

Page 1

USERS MANUAL
No. 861
PLEASE READ THESE INSTRUCTIONS FULLY BEFORE USING THIS JIG
FOR MORE INFORMATION AND VIDEO INSTRUCTIONS VISIT
WWW.GENERALTOOLS.COM/DOVETAILER2
THE
DOVETAIL JIG
861 Dovetailer II Manual 11P-081711_Layout 1 8/17/11 5:12 PM Page 1
Page 2

CONTENTS
Introduction . . . . . . . . . . . . . . . . . . . . . . . . . . . . . . . . . . . . . . . . . . 3
Capacity and Specifications . . . . . . . . . . . . . . . . . . . . . . . . . . . . 4
What’s in the Jig Kit . . . . . . . . . . . . . . . . . . . . . . . . . . . . . . . . . . . 4
Anatomy of the DOVETAILER
II Jig . . . . . . . . . . . . . . . . . . . . 5 –6
Dovetail Router Bit and Bearings . . . . . . . . . . . . . . . . . . . . . . 5
Using the Built-In Depth Gauge . . . . . . . . . . . . . . . . . . . . . . . 6
Preparing the Router . . . . . . . . . . . . . . . . . . . . . . . . . . . . . . . 6 –7
Safety Overview . . . . . . . . . . . . . . . . . . . . . . . . . . . . . . . . . . . . 6
Router Set-Up . . . . . . . . . . . . . . . . . . . . . . . . . . . . . . . . . . 6 –7
Cutting Joints . . . . . . . . . . . . . . . . . . . . . . . . . . . . . . . . . . . . 7 – 13
Cutting a Half Blind Dovetail Joint . . . . . . . . . . . . . . . . . 7 –9
Cutting Joints Longer Than the Jig Opening . . . . . . . . . . . 10
Cutting a Full Through Dovetail Joint . . . . . . . . . . . . . . . . . 10
Edge to Edge Jointing . . . . . . . . . . . . . . . . . . . . . . . . . . . . . 11
Cutting a Box Joint . . . . . . . . . . . . . . . . . . . . . . . . . . . . 12 – 13
Customer Support . . . . . . . . . . . . . . . . . . . . . . . . . . . . . . . . . . . 14
Warranty Information . . . . . . . . . . . . . . . . . . . . . . . . . . . . . . . . . 14
Return for Repair Policy . . . . . . . . . . . . . . . . . . . . . . . . . . . . . . . 14
2
861 Dovetailer II Manual 11P-081711_Layout 1 8/17/11 5:12 PM Page 2
Page 3
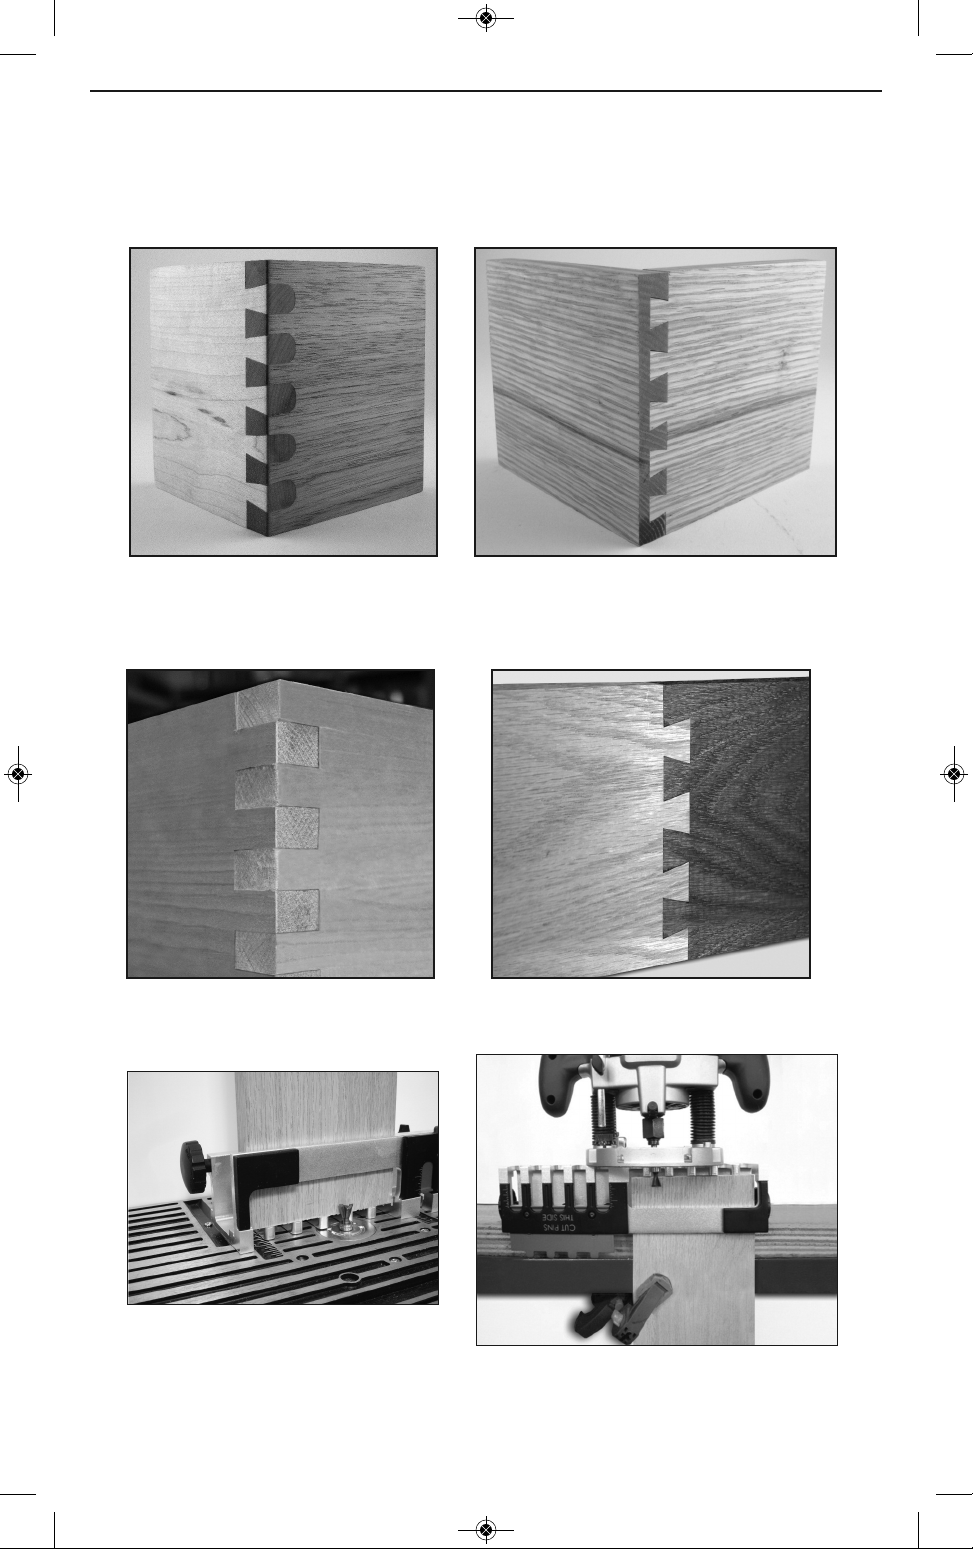
INTRODUCTION
Thank you for purchasing General Tools & Instruments’ DOVETAILERII Dovetail Jig. A simple and
easy way to make professional dovetail joints, the DOVETAILERII enables you to cut half blind,
full through and box joints as well as edge to edge joining. The DOVETAILERII can be used on a
router table (Fig. 1 or free hand with a handheld router (Fig. 2).
3
FULL THROUGH
HALF BLIND
BOX JOINT
EDGE JOINT
FIG. 2
FIG. 1
861 Dovetailer II Manual 11P-081711_Layout 1 8/17/11 5:12 PM Page 3
Page 4
CAPACITY AND SPECIFICATIONS:
Accommodates stock from 1/2 in. to 1 in. thick.
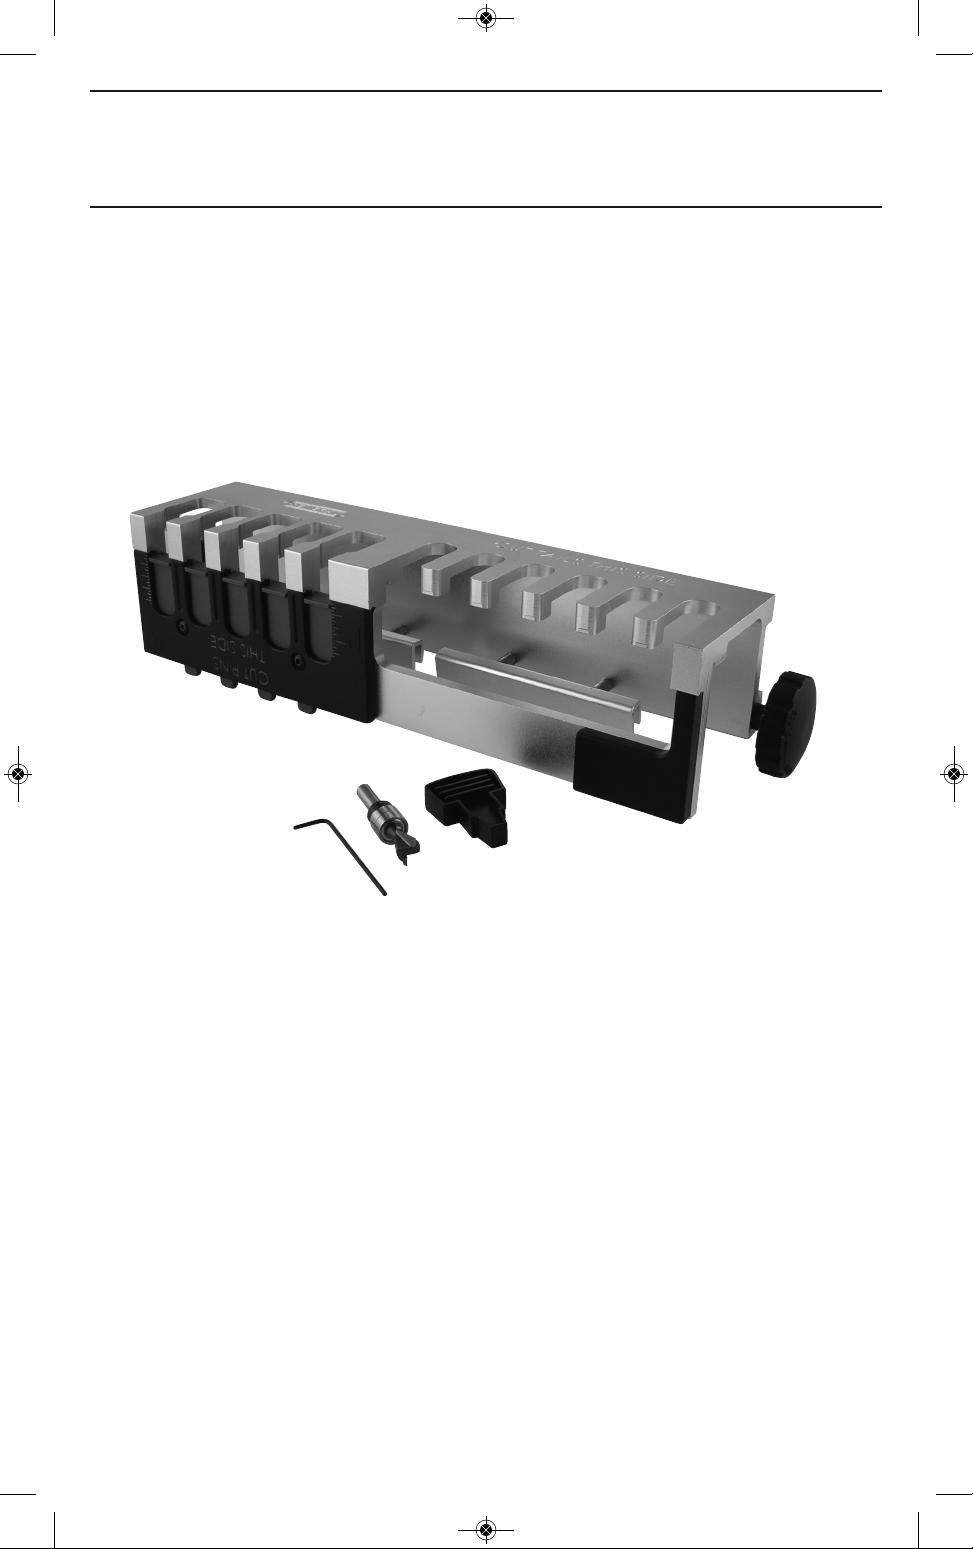
WHAT’S IN THE JIG KIT
The fully assembled jig
Two router table guide knobs
One 14° x 1/2 in. dovetail router bit with guide bearings
(1/4 in. shank)
One alignment tool
One allen wrench
It is highly recommended that you familiarize yourself with the nomenclature in Fig. 3 before
proceeding.
4
FIG. 3
861 Dovetailer II Manual 11P-081711_Layout 1 8/17/11 5:12 PM Page 4
Page 5

ANATOMY OF THE DOVETAILER II JIG
DOVETAIL JIG ASSEMBLY
NOTE: Your jig comes fully assembled for use. The addition of the router control knobs aids in the
use of this jig on router tables.
1. For use on a router table, securely screw in the two Router Table Guide Knobs [6] into the holes
provided on the ends of the jig. Always use the Router Table Guide Knobs when using the jig on
a router table.(FIG. 4)
DOVETAIL ROUTER BIT AND BEARINGS
Included bearings are 1/2 in. outside diameter (OD) and 1/4 in. inner diameter (ID). Router sleeves
or bushings can be used in place of the guide bearings as long as they are also 1/2 in. OD.
Included router bit is 14˚ x 1/2 in. Other bits can be substituted provided they have a 1/4 in.
diameter shank have no greater diameter than 17/32 in.
Caution: Keep fingers on control knobs only when using the jig on a router table.
5
FIG.4
– Jig Assembly
– Depth Plate
– Template Position Rule
–
Depth Adjuster Plate
– Depth Measuring Working Surface
– Edge Alignment Teeth
– Template Lock Screws
– Two Router Table Guide Knobs
– Face Clamp
– Face Clamp Thumb Screws
2A
3A
3B
861 Dovetailer II Manual 11P-081711_Layout 1 8/17/11 5:12 PM Page 5
Page 6

U
SING THE BUILT-IN DEPTH GAUGE
The built-in Depth Gauge is used to set both the depth of the Dovetail Cutter during router setup
as well as to control the length of the pins during cutting. (FIG. 5).
1. Loosen the Template Lock Screws
on the face of the Depth Plate .
2. Align the Depth Measuring Working Surface with the desired measurement on the
Template Position Rule Make sure both sides are at the same measurement.
3. Tighten the Template Lock Screws
to lock the Depth Adjuster Plate in position .
PREPARING THE ROUTER
SAFETY OVERVIEW
1. KNOW YOUR ROUTER. Read the owner’s manual that came with your router before
you use it. Understand the machine’s applications and limitations, as well as the
specific potential hazards inherent in its use. Before using the router, check that none
of its moving parts are broken, loose or misaligned.
NOTE: General Tools & Instruments is not responsible for router misuse or the disregard of
standard safety precautions associated with using a router.
ROUTER SETUP
1. Insert the dovetail cutter with
its guide bearings fully into the
router.
2. Set the height of the Dovetail
Cutter Bit using the Depth
Measureing Working Surface
. (FIG.6)
For instructions on setting the
depth gauge see USING THE
DEPTH GAUGE above.
3A
2A
3A
6
FIG. 5
FIG. 6
861 Dovetailer II Manual 11P-081711_Layout 1 8/17/11 5:12 PM Page 6
Page 7

7
3
. FIG.7 shows the dimension of the
dovetail joint affected by the cutter
height.
NOTE: Setting this height affects the
length of the Tails and the depth of
the Pins.
4. Now that the router is setup,
you need to reset the Depth
Adjuster Plate
for the length
of the pins. (FIG. 8) Set the
depth gauge for the length of
the “PINS”. This should be
equal to the thickness of the
wood used for the “TAILS”
board. (FIG. 9)
CUTTING JOINTS
Note: Always cut the “TAILS” side of the joint first.
CUTTING A HALF BLIND DOVETAIL JOINT
1. When cutting a half-blind dovetail joint, using the included dovetail cutter, start with a bit
height setting equal to the depth of the joint you desire. (FIG. 7)
2. Cut a test joint with scrap wood to confirm the fit of the
joint. If the boards do not fit together easily, the joint
may be too tight. The joint can be made looser or
tighter by setting the cutter depth shallower or deeper
as shown in FIG. 8.
3. Mark the center of your board, then center the mark
on any one of the guide teeth in the “TAILS” portion
of the jig.
4. Make sure the outside face of the board faces inwards
towards the clamp.
5. Tighten the clamps securely.
FIG. 9
OUTSIDE FACE
PINS
TAILS
FIG. 8
FIG. 7
861 Dovetailer II Manual 11P-081711_Layout 1 8/17/11 5:12 PM Page 7
Page 8

6. Clamp the board to a workbench or
secure it in a vice as shown (FIG. 10)
or if using a router table, make sure
the face saying “cut tails this side” is
faced to the router table (FIG. 11).
7. Cut the “TAILS” portion of the joint
always keeping the guide bearings
against the template edges. When
finished, remove “TAILS” board from
the jig.
8. Then to cut the “PINS”. Loosely
clamp the “PINS” board into
the jig with the outside face
pointing inward.
9. To align the edges, insert the
tails of the “TAILS” board
into the Edge Alignment
Teeth teeth on the top of
the Adjuster plate
with
the rounded side in (inside
face), and slide the loosely
clamped “PINS” board to
align its edges with the
edges of the “TAILS” board.
Now securely tighten the
clamps and remove the
“TAILS” board
(FIG. 12).
8
FIG. 10
FIG. 11
FIG. 12
3
B
861 Dovetailer II Manual 11P-081711_Layout 1 8/17/11 5:12 PM Page 8
Page 9

1
0. Make all cuts to the pins board. For those cuts, the router should ride on the surface
marked “cut pins this side” shown in FIG. 13 & 14. Be sure to follow the jig profile.
11. Dry fit the two sections together. If problems arise, file or trim the joint as needed.
9
FIG. 13
FIG. 14
861 Dovetailer II Manual 11P-081711_Layout 1 8/17/11 5:12 PM Page 9
Page 10

CUTTING JOINTS LONGER THAN THE JIG OPENING
Joints longer than the opening must be cut in multiple continuous segments. To align the jig with
the previous cut, the aligning tool provided must be used.
1. Move the previously cut wood in the jig and position the last slot from the previous cut in
the last channel of the jig either going to the right or to the left.
2. Loosely clamp the wood in the jig.
3. Insert the aligning tool into the slot to properly align the wood with the jig. (FIG. 15)
4. Tighten the clamps securely, and continue cutting.
5. Repeat as necessary.
CUTTING A FULL THROUGH DOVETAIL JOINT
* This requires a dovetail cutter bit with a depth equal to or
greater than the wood thickness you are cutting.
Note: Do not use router bit with a maximum diameter
greater than 17/32 in.
The steps required to cut a full through joint (FIG. 16) are the
same as to those described in the previous section CUTTING A
HALF BLIND DOVETAIL JOINT. With the following exceptions:
When cutting the “PINS” portion of the joint, set the depth
gauge equal to the thickness of the “TAILS” board.
10
TAILS
PINS
FIG. 15
FIG. 16
FIG. 15
861 Dovetailer II Manual 11P-081711_Layout 1 8/17/11 5:12 PM Page 10
Page 11

E
DGE TO EDGE JOINTING
1
. When cutting an edge joint, the round-over
created by the dovetail jig must be eliminated in
order to join the two pieces of wood using a
Dovetail-Joint. (FIG.17)
2. Insert the first board into the “TAILS” section of
the Dovetail Jig along with 1/4 in. thick shim to
offset the board away from the rounded postion
of the template in the jig. (FIG. 18)
3. Align one edge of the board to be cut with the
outside edge of the jig. (FIG. 18)
4. Tighten the clamps securely, and make all cuts.
5. Insert the second board into the jig along with the same shim and offset one edge of the
board 1/2 in. in from the outside edge of the jig. FIG. 19. This spacing will offset the
“TAILS” of the second board so that they align with the slots cut into the first board.
11
FIG. 17
FIG. 18
FIG. 19
861 Dovetailer II Manual 11P-081711_Layout 1 8/17/11 5:12 PM Page 11
Page 12

CUTTING A BOX JOINT
• When cutting a box joint, only use the “TAILS” portion of the jig for all cuts.
• For box jointing, use a 1/2 in. diameter straight bit with a 1/4 in. shank with either a 1/2 in.
O.D. guide bearing or a 1/2 in. O.D. guide sleeve insert in your router. Set the depth of the
cutter to equal, or slightly greater than the thickness of the wood you are joining.
Tip: Always make sure that the guide bearing or the guide sleeve tracks in the guide slot.
• To avoid the “round-over” part of the jig’s guide finger, use a 1/4 in. thick shim between
the wood and the inner surface of the jig to offset the board from the “round-over”.
Tip: If you’re doing more than one joint, you can use a piece of double-face tape to hold
the shim in place.
12
861 Dovetailer II Manual 11P-081711_Layout 1 8/17/11 5:12 PM Page 12
Page 13

•
Cut the slots in the first board with the board edge set flush with the right hand edge of the
jig. (FIG. 20). Make the entry and exit cuts using the left side of the guide slot only
(FIG. 20)
• For the joining board, clamp it in the jig with its edge offset 3/8 in. in from the right hand
edge of the jig. Make entry and exit cuts using the right side of the guide slot only
(FIG. 21).
• Dry fit the joint before gluing to be sure it is tight. If necessary, use a wood mallet to bring
the two parts together.
13
FIG. 20
FIG. 21
861 Dovetailer II Manual 11P-081711_Layout 1 8/17/11 5:12 PM Page 13
Page 14

CUSTOMER SUPPORT
Please visit our website at www.generaltools.com/dovetailer2 to obtain additional woodworking
information, instructional videos and product manual.
WARRANTY INFORMATION
The No. 861 DovetailerII Dovetail Jig Kit from General Tools & Instruments is warranted to the
original purchaser to be free from defects in material and workmanship for a period of one year.
Subject to certain restrictions, General will repair or replace this product, if, after examination,
it is determined by General to be defective in material or workmanship.
RETURN FOR REPAIR POLICY
Every effort has been made to provide you with a reliable product of superior quality. However, in
the event your instrument requires repair, please contact our Customer Service to obtain an RGA
(Return Goods Authorization) number before forwarding the unit via prepaid freight to the
attention of our Service Center at this address:
General Tools & Instruments
80 White Street
New York, NY 10013
212-431-6100
Remember to include a copy of your proof of purchase, your return address, and your phone
number and/or e-mail address.
14
861 Dovetailer II Manual 11P-081711_Layout 1 8/17/11 5:12 PM Page 14
Page 15

NOTES
________________________________________________________
________________________________________________________
________________________________________________________
________________________________________________________
________________________________________________________
________________________________________________________
________________________________________________________
________________________________________________________
________________________________________________________
________________________________________________________
________________________________________________________
________________________________________________________
________________________________________________________
________________________________________________________
________________________________________________________
________________________________________________________
________________________________________________________
________________________________________________________
15
861 Dovetailer II Manual 11P-081711_Layout 1 8/17/11 5:12 PM Page 15
Page 16

GENERAL TOOLS & INSTRUMENTS
80 White Street, New York,NY10013-3567
PHONE (212) 431-6100
FAX (212) 431-6499
TOLL FREE (800) 697-8665
e-mail: sales@generaltools.com
www.generaltools.com
861 User’s Manual
Specifications subject to change without notice
©2011 GENERAL TOOLS & INSTRUMENTS
NOTICE - WE ARE NOT RESPONSIBLE FOR TYPOGRAPHICAL ERRORS.
MAN#861 8/17/11
861 Dovetailer II Manual 11P-081711_Layout 1 8/17/11 5:12 PM Page 16
 Loading...