

Page 1
MedSense
™
®
Base M5N001
Page 2
3
How MedSense Works 4
Setting Up the MedSense Base 6
Using Up the MedSense Base 6
Legal Statements 8
Contents
Welcome to MedSense
Dear MedSense user,
We would like to thank you for using our product and welcome
you to the MedSense community. We share your goal of achieving
the highest possible level of hygiene in your hospital, and we hope
using our product makes your life simpler.
Sincerely,
The General Sensing Team
Page 3
4 5
How MedSense Works
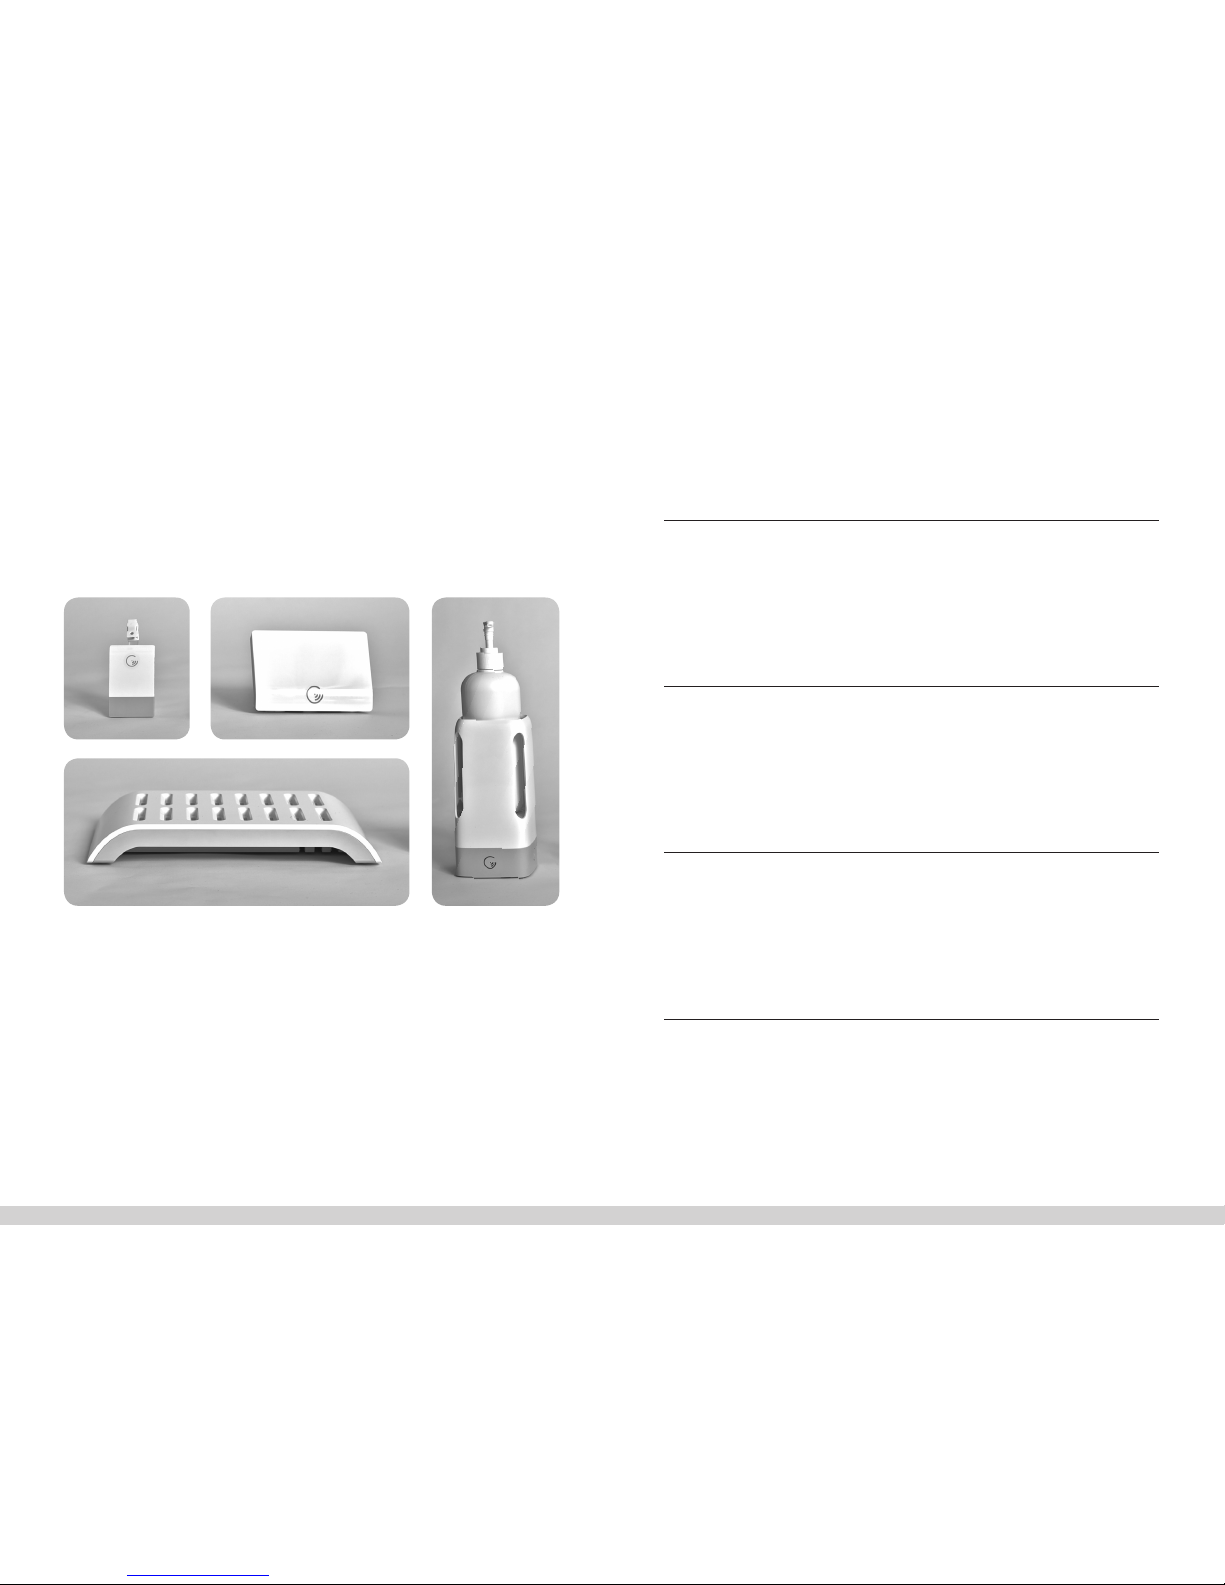
MedSense is a combination of four easy-to-use wireless devices that
monitor and record compliance performance at point-of-care areas.
These devices take advantage of low-power wireless communication
and the latest web technologies to offer you a simple, powerful, and
accurate hand hygiene compliance monitoring solution.
1. 2. 3.
4.
1. The MedSense Badge
The MedSense Badge, worn like an identity card, collects hand hygiene
compliance data as the healthcare worker delivers care around the
hospital.
2. The MedSense Beacon
The MedSense Beacon is a low-prole, battery-powered device that
is placed above a patient bed or other point of care with a semipermanent adhesive backing. The Beacon establishes a wireless patient
zone that allows the Badge to identify hand hygiene opportunities.
3. The MedSense Dispenser Monitor
The MedSense Dispenser Monitor acts as a holster for sanitizer
bottles. When a healthcare worker uses a sanitizer bottle, the
Dispenser Monitor signals the user’s Badge, which in turn records a
hand hygiene action.
4. The MedSense Base
The MedSense Base functions as a wireless base station through
which Badges upload compliance data to MedSense HQ. The Base also
functions as a battery charger for the Badge, capable of charging up to
sixteen Badge batteries to full capacity in two hours.
The MedSense HQ
MedSense HQ, General Sensing’s cloud-based web application, is what
ties all four devices together.
Page 4
6 7
Setting Up the MedSense Base
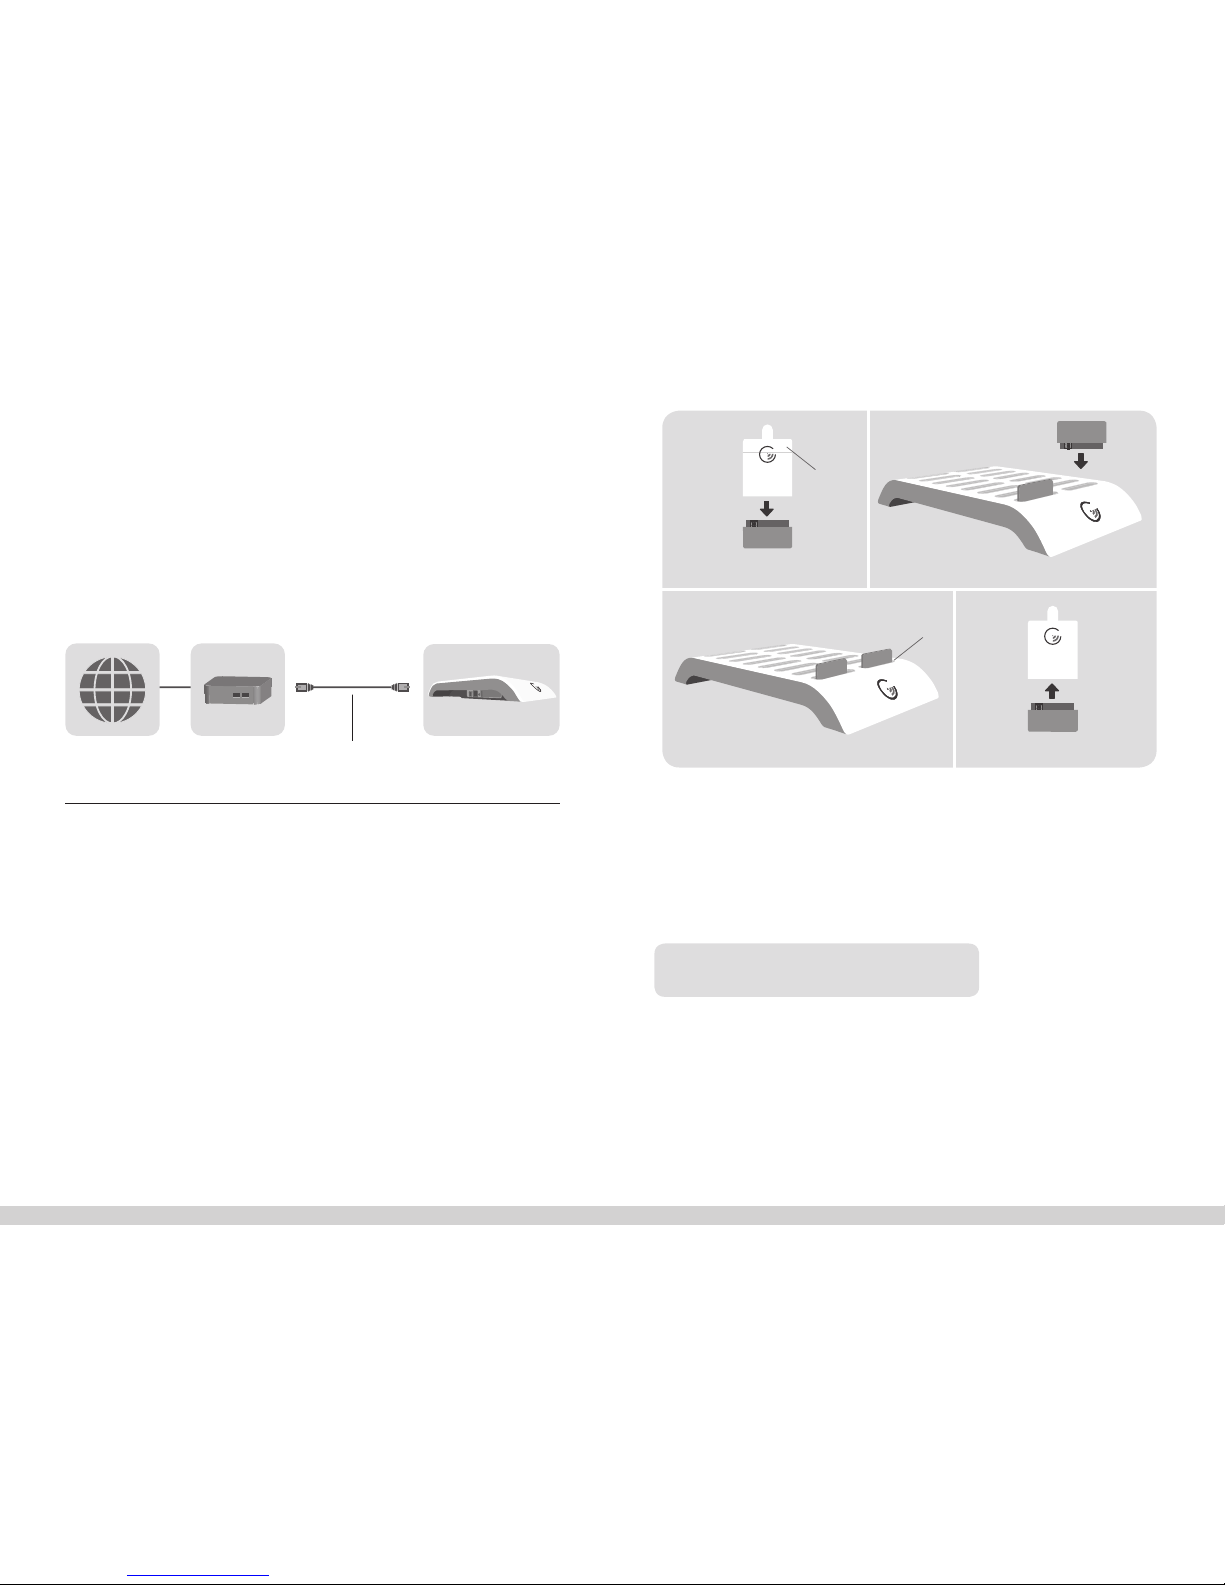
• Locate the Base centrally, such as on a nursing station. Keep the Base
away from metal structures, as this may cause connection problems.
• The Base can be mounted on either a tabletop or on the wall, using
the screws provided.
• Connect the Base to the Ethernet port using the Ethernet cable
provided.
• The Base is connected once the light turns green.
MedSense Base
Router
Internet
Ethernet Cable
Using the MedSense Base
CHARGING BATTERIES
The Base can charge up to sixteen Badge batteries to full capacity
in two hours. Individual indicator lights on each battery slot indicate
charging status. A pulsing blue light means a battery is charging, with a
solid blue light indicating a fully charged battery.
BASE CONNECTION STATUS
Refer to the status LED connected next to the Ethernet port on
the side of the Base.
1.
2.
Insert battery into base.
4.
BLINKING
RED
Remove battery from badge.
BLUE
Solid blue light indicates a fully charged battery. Insert charged battery into badge.
3.
Base Online .......................................................................................Green, Solid
Base Attempting to Connect .......................................................Amber, Solid
User Attention Required ..........................................................Green, Blinking
Base Station Internal Error .....................................................Amber, Blinking
TROUBLESHOOTING
LED State: Solid Amber
Status: Base Station Attempting to Connect
Explanation: Your Base is trying to connect to MedSense HQ. The
Base will go through this step during normal operation, but it should
transition to Online (solid green) after about 8 seconds.
If the solid amber state persists, then there is a problem.
Page 5

8 9
Steps to correct:
1. Check to make sure that the router is properly connected to
the network. You can do this by checking the status lights on
your router or by trying to bring up a web page on a computer
connected to the network through the same router.
2. If your router IS NOT properly connected to the Internet, contact
the MedSense support team.
3. If your router IS properly connected to the Internet, make sure that
your Base is connected as specied in the typical network diagram
on p. 7.
If you are still experiencing this error after executing the
troubleshooting steps above, contact the MedSense support team.
LED State: Blinking Green*
Status: User Attention Required
Explanation: Ethernet cable is plugged in, but Base cannot get an IP
address.
Steps to correct:
1. Check that router is functioning normally. If your router is
functioning normally, reset the Base by disconnecting the power
source for 10 seconds and then reconnecting.
2. The Base may need advanced Ethernet conguration to run on your
network. Contact the MedSense support team to congure your Base.
If you are still experiencing this error after executing the
troubleshooting steps above, contact the MedSense support team.
LED State: Blinking Amber*
Status: Internal error
Explanation: An internal error has occurred.
Step to correct:
1. Reset your Base by disconnecting the power source. Wait 5
seconds, and then reconnect the power source.
If you are still experiencing this error after executing the
troubleshooting steps above, contact the MedSense support team.
*Your Base will attempt to restart itself after 10 seconds in this state.
CARE INSTRUCTIONS
Wipe down in place with a damp cloth.
POWER
The Base should only be used with the included power supply. Please
contact the MedSense support team for further information.
Page 6

1110
Legal Statements
FCC Statement
This equipment has been tested and found to comply with the limits
for a Class B digital device, pursuant to part 15 of the FCC rules. These
limits are designed to provide reasonable protection against harmful
interference in a residential installation. This equipment generates, uses,
and can radiate radio frequency energy and, if not installed and used in
accordance with the instructions, may cause harmful interference to
radio communications. However, there is no guarantee that interference
will not occur in a particular installation.
If this equipment does cause harmful interference to radio or television
reception, which can be determined by turning the equipment off and
on, the user is encouraged to try to correct the interference by one or
more of the following measures:
• Reorient or relocate the receiving antenna.
• Increase the separation between the equipment and receiver.
• Connect the equipment into an outlet on a circuit different from that
to which the receiver is connected.
• Consult the dealer or an experienced radio/TV technician for help.
To assure continued compliance, any changes or modications not
expressly approved by the party responsible for compliance could void
the user’s authority to operate this equipment.
Radiation Exposure Statement
This equipment complies with FCC radiation exposure limits set forth
for an uncontrolled environment and it also complies with Part 15 of
FCC RF Rules. Operation is subject to the following two conditions:
• This device may not cause interference
• This device must accept any interference, including interference that
may cause undesired operation of the device.
Caution!
The manufacturer is not responsible for any radio or TV interference
caused by unauthorized modications to this equipment. Such
modications could void the user authority to operate the equipment.
Canada Statement
• This device complies with Industry Canada RSS-210. Operation is
subject to the following two conditions: (1) this device may not cause
interference, and (2) this device must accept any interference, including
interference that may cause undesired operation of the device.
• Le présent appareil est conforme aux CNR d’Industrie Canada
applicables aux appareils radio RSS-210. L’exploitation est autorisée
aux deux conditions suivantes : (1) l’appareil ne doit pas produire de
brouillage, et (2) l’utilisateur de l’appareil doit accepter tout brouillage
radioélectrique subi, même si le brouillage est susceptible d’en
compromettre le fonctionnement.
• The device meets the exemption from the routine evaluation
limits in section 2.5 of RSS 102 and compliance with RSS-102 RF
exposure, users can obtain Canadian information on RF exposure and
compliance.
• Le dispositif rencontre l’exemption des limites courantes d’évaluation
dans la section 2.5 de RSS 102 et la conformité à l’exposition de
RSS-102 rf, utilisateurs peut obtenir l’information canadienne sur
l’exposition et la conformité de rf.
Page 7

• This transmitter must not be co-located or operating in conjunction
with any other antenna or transmitter. This equipment should be
installed and operated with a minimum distance of 20 centimeters
between the radiator and your body.
• Cet émetteur ne doit pas être Co-placé ou ne fonctionnant en
même temps qu’aucune autre antenne ou émetteur. Cet équipement
devrait être installé et actionné avec une distance minimum de 20
centimètres entre le radiateur et votre corps.
• CAN ICES-3 (B)/NMB-3(B)
12
 Loading...