

General Music WX2, WX400 Owner's Manual

OWNER'S MANUAL

INSTRUCTION PERTAINING TO A RISK OF FIRE, ELECTRIC SHOCK, OR INJURY TO PERSONS.
WARNING - When using electric products, basic precautions should always be followed, including the following:
1. Read all the Safety and Installation instructions and explanations of Graphic Symbols before using the product .
2. This product must be earthed. If it should malfunction or breakdown, grounding provides a path of least resistance for
electric current to reduce the risk of electric shock. This product is equipped with a cord having an equipment-grounding
conductor and a grounding plug. The plug must be plugged into an appropriate outlet that is properly installed and earthed in
accordance with all local codes and ordinances.
DANGER - Improper connection of the equipment-grounding conductor can result in a risk of electric shock. Check
with a qualified electrician or serviceman if you are in doubt as to whether the product is properly grounded. Do not modify
the plug provided with the product - if it will not fit the outlet, have a proper outlet installed by a qualified electrician.
3. To reduce the risk of injury, close supervision is necessary when this product is used near children.
4. Do not use this product near water - for example, near a bathtub, washbowl, kitchen sink, in a wet basement, or near a
swimming pool or the like.
5. This product should only be used by a stand or cart that is recommended by the manufacturer.
6. This product, either alone or in combination with an amplifier and headphones or speakers, may be capable of producing
sound levels that could cause permanent hearing loss. Do not operate for a long period of time at a high volume level or at a
level that is uncomfortable. If you experience any hearing loss or ringing in the ears, you should consult an audiologist.
7. This product should be located so that its location or position does not interfere with its proper ventilation.
8. This product should be located away from heat sources such as radiators, heat registers, or other products that produce
heat.
9. The product should be connected to a power supply only of the type described in the operating instructions or as marked
on the product.
10. This product may be equipped with a polarized line plug (one blade wider than the other). This is a safety feature. If you
are unable to insert the plug into the outlet, contact an electrician to replace your obsolete outlet. Do not defeat the safety
purpose of the plug.
11. The power-supply cord of the product should be unplugged from the outlet when left unused for a long period of time.
When unplugging the power supply cord, do not pull on the cord, but grasp it by the plug.
12. Care should be taken so that objects do not fall and liquids are not spilled into the enclosure through openings.
13. The product should be serviced by qualified service personnel when:
A. The power-supply cord or the plug has been damaged; or
B. Objects have fallen, or liquid has been spilled into the product; or
C. The products has been exposed to rain; or
D. The product does not appear to be operating normally or exhibits a marked change in performance; or
E. The product has been dropped, or the enclosure damaged.
14. Do not attempt to service the product beyond that described in the user-maintenance instructions. All other servicing
should be referred to qualified service personnel.
15.
WARNING - Do not place objects on product power cord or place it in a position where anyone could trip
over, walk on or roll anything over it. Do not allow the product, or its bench, or its pedal board to rest on or to be installed
over power cords of any type. Improper installations of this type create the possibility of fire hazard and/or personal injury.
16. Electromagnetic interference (RFI). This electronic product utilizes digital sampled wave processing technology (S.W.P.) that
may adversely affect radio/tv reception. Read FCC information inside back cover for additional information.
SAVE THESE INSTRUCTIONS
IMPORTANT SAFETY AND INSTALLATION INSTRUCTIONS
CAUTION
RISK OF ELECTRIC SHOCK
DO NOT OPEN
CAUTION: TO REDUCE THE RISK OF
ELECTRIC SHOCK, DO NOT REMOVE COVER
(OR BACK). NO USER-SERVICEABLE PARTS
INSIDE. REFER SERVICING TO QUALIFIED
SERVICE PERSONNEL.
EXPLANATION OF GRAPHIC SYMBOLS:
The lightning flash with arrowhead symbol,
within an equilateral triangle, is intended to
alert the user to the presence of uninsulated
“dangerous voltage” within the product’s
enclosure that may be of sufficient magnitude
to constitute a risk of electric shock to persons.
The exclamation mark within an equilateral
triangle is intended to alert the user to the
presence of important operating and
maintenance (servicing) instructions in the
literature accompanying the product.

Owner’s Manual

The information in this publication has been carefully prepared and
checked. The manufacturers however decline all liability for eventual
errors. All rights are reserved. This publication may not be copied,
photocopied or reproduced in part or in whole without prior written
consent from Generalmusic S.p.A. Generalmusic reserves the right to
apply any aesthetic, design or function modifications it considers necessary to any of its products without prior notice. Generalmusic declines
all liability for damage to property or persons resulting from improper
use of the instrument.
© 1993 Generalmusic S.p.A. All rights reserved.

Owner's Manual
A
CONTENTS
CHAPTER 1
INTRODUCTION............................................................................................1. 1 - 1. 14
Perhaps the best advice we can give you..... ................................................................................................1. 1
WX2 and WX400 - what’s the difference? ...................................................................................................1. 1
Welcome to all WS users who don’t want to throw their WS Songs disks away..........................................1. 1
We haven’t forgotten the S-Series users.......................................................................................................1. 1
GETTING STARTED ......................................................................................................... 1. 2
Quick installation .........................................................................................................................................1. 2
WX DEMO SONG ........................................................................................................................................1. 2
Play some ROM Sounds ...............................................................................................................................1. 3
Drum family .................................................................................................................................................1. 3
Samples ........................................................................................................................................................1. 3
Zoom in and see your Sound in large type ...................................................................................................1. 3
Select some Real Time Performances ..........................................................................................................1. 3
Layer two Sounds (tracks)............................................................................................................................1. 3
Multi-track situations ...................................................................................................................................1. 4
Deactivate tracks (Sounds) with the Toggle.................................................................................................1. 4
Select and play Internal Styles .....................................................................................................................1. 4
Sing along with a Song using SCORE..........................................................................................................1. 5
Load a Song from the supplied WX Demo Disk ...........................................................................................1. 5
Preload .........................................................................................................................................................1. 6
Load a Song Stylew from WS Songs Disks...................................................................................................1. 6
How to record a Song ..................................................................................................................................1. 7
DETAILED START-UP ................................................................................................................................1. 8
BEFORE STARTING…… ............................................................................................................................1. 8
THE REAR PANEL ......................................................................................................................................1. 8
Connecting the Power cable ........................................................................................................................1. 8
Power Switch................................................................................................................................................1. 9
Using the Internal Amplifier ........................................................................................................................1. 9
Audio Out (Left-Right/M) outputs ................................................................................................................1. 9
The Ext (send/return) Jacks..........................................................................................................................1. 9
Audio In (Left-Right/M) inputs.....................................................................................................................1. 9
Control Pedals - Connecting the Footpedals...............................................................................................1. 9
Pedalboard .................................................................................................................................................1. 10
MIDI Connections ......................................................................................................................................1. 10
Headphones................................................................................................................................................1. 10
Video Jacks - TV and RGB.........................................................................................................................1. 10
POWERING UP .........................................................................................................................................1. 12
Contrast......................................................................................................................................................1. 12
The Keyboard .............................................................................................................................................1. 12
Master Volume Slider.................................................................................................................................1. 12
Track Ball...................................................................................................................................................1. 12
Before getting to grips with your unit, set the Internal clock and calendar.... ..........................................1. 13
Procedure ...................................................................................................................................................1. 13
USE ONLY GENERALMUSIC SOFTWARE .............................................................................................1. 14

B
Owner's Manual
CHAPTER 2
INTERFACE BASICS ....................................................................................2. 1 - 2. 12
NAVIGATION AND DATA ENTRY .............................................................................................................2. 1
The display ...................................................................................................................................................2. 1
The Cursor Diamond....................................................................................................................................2. 2
The “TOGGLE” - the central Cursor diamond button................................................................................2. 2
Zoom in - zoom out.......................................................................................................................................2. 2
The Function buttons (F1…F8) ...................................................................................................................2. 2
The PAGE+ and PAGE- buttons of the Edit section....................................................................................2. 2
DATA ENTRY...............................................................................................................................................2. 2
The Data Entry Wheel ..................................................................................................................................2. 2
The Keyboard ...............................................................................................................................................2. 3
The Ent and Esc buttons...............................................................................................................................2. 3
MASTER VOLUME......................................................................................................................................2. 3
THE EDIT MODES......................................................................................................................................2. 4
THE SOUND BANKS...................................................................................................................................2. 4
THE SEQUENCER & USERS CONTROLS ................................................................................................2. 4
THE PERFORMANCE AND STYLE BANKS ..............................................................................................2. 5
THE SEQUENCER EDIT SECTION ...........................................................................................................2. 5
THE 4 OPERATING MODES ......................................................................................................................2. 6
Real Time Performance mode ......................................................................................................................2. 6
Internal Style mode ......................................................................................................................................2. 6
Programmable Style mode ...........................................................................................................................2. 7
Song and Song Style mode ...........................................................................................................................2. 7
SELECTION - using the modes....................................................................................................................2. 9
To select a Sound .........................................................................................................................................2. 9
Second and third banks ..............................................................................................................................2. 10
To select a Real Time Performance ...........................................................................................................2. 10
To select an Internal Style..........................................................................................................................2. 11
To select a Programmable Style ................................................................................................................2. 11
To select a Song .........................................................................................................................................2. 12
Conclusion..................................................................................................................................................2. 12
CHAPTER 3
PERFORMANCES, TRACKS & ROM SOUNDS ..........................................3. 1 - 3. 10
THE PERFORMANCES..................................................................................................... 3. 1
SAVE PERFORMANCE - how to memorise a modification ........................................................................3. 1
What parameters do the Performances memorise? .....................................................................................3. 2
How the Performances of the playing modes differ .....................................................................................3. 2
The Style and Song commands .....................................................................................................................3. 3
The Start/Stop button ................................................................................................................................... 3. 3
The Fill/Tap button ......................................................................................................................................3. 3
Add Modulation or Pitch changes to your playing with the Track-ball.......................................................3. 3
The Fill Var/Cont button ..............................................................................................................................3. 3
The Intro/End button ....................................................................................................................................3. 3
A rapid tour of the main display ..................................................................................................................3. 4
Some simple operations to perform with the Toggle....................................................................................3. 5
Mute or activate a Track ..............................................................................................................................3. 5

Owner's Manual
C
Select tracks and create multi-track situations ............................................................................................3. 5
View a Sound in large type...........................................................................................................................3. 5
Split Sound Tracks........................................................................................................................................3. 6
Mixing the Sound volumes of a multi-timbral situation ...............................................................................3. 6
THE TRACKS AND THE TRACK CONFIGURATION ...............................................................................3. 7
Tracks and the Real Time Performance.......................................................................................................3. 7
Tracks and the WX Sequencer......................................................................................................................3. 7
The Track Configuration..............................................................................................................................3. 7
The SCORE function ....................................................................................................................................3. 8
THE ROM SOUNDS ....................................................................................................................................3. 9
Double and Single Oscillator Sounds ..........................................................................................................3. 9
Drumkits and Sound Patches .......................................................................................................................3. 9
How the Sounds are organised ..................................................................................................................3. 10
CHAPTER 4
THE EDIT SECTION......................................................................................4. 1 - 4. 85
General overview of the Edit Section...........................................................................................................4. 1
The Edit section displays: ............................................................................................................................4. 1
The Edit Section provides the following edit modes: ...................................................................................4. 2
DISK AND STATIC RAM ..........................................................................................4. 3
General information.....................................................................................................................................4. 3
Precautions to take when handling Disks ....................................................................................................4. 3
How to load a floppy disk into the Disk Drive .............................................................................................4. 4
DISK OPERATING MODES........................................................................................................................4. 5
How to toggle between DISK and SRam......................................................................................................4. 5
Loading data into SRAM ..............................................................................................................................4. 5
LOAD OPERATIONS......................................................................................................... 4. 6
LOAD ALL DISK (or all SRAM) ..................................................................................................................4. 6
Automatic loading ........................................................................................................................................4. 7
LOAD ALL SONGS ......................................................................................................................................4. 7
LOAD ALL STYLES .....................................................................................................................................4. 7
LOAD ALL PERFORMANCES....................................................................................................................4. 7
LOAD ALL SAMPLES..................................................................................................................................4. 8
LOADING SAMPLES FROM THE S-SERIES DISKS:................................................................................4. 8
LOAD BANK MODE ......................................................................................................... 4. 8
LOAD A SINGLE BANK OF STYLES (Programmable)..............................................................................4. 8
LOAD A SINGLE BANK OF REAL TIME PERFORMANCES ...................................................................4. 9
LOAD SINGLE MODE .................................................................................................... 4. 10
LOAD SINGLE SONG ...............................................................................................................................4. 10
LOAD SINGLE PROGRAMMABLE STYLE .............................................................................................. 4. 10
LOAD SINGLE PERFORMANCE .............................................................................................................4. 10
LOAD SINGLE SAMPLE ...........................................................................................................................4. 11
LOAD SINGLE MIDI FILE .......................................................................................................................4. 11
PRELOAD......................................................................................................................... 4. 13
SAVE OPERATIONS........................................................................................................ 4. 14
SAVE ALL MODE ......................................................................................................................................4. 14
SAVE ALL TO DISK (or to SRAM) ............................................................................................................4. 14

D
Owner's Manual
SAVE ALL SONGS .....................................................................................................................................4. 14
SAVE ALL STYLES ....................................................................................................................................4. 15
SAVE ALL PERFORMANCES ...................................................................................................................4. 15
SAVE ALL SAMPLES.................................................................................................................................4. 15
SAVE BANK MODE ........................................................................................................ 4. 15
SAVE A SINGLE BANK OF PROGRAMMABLE STYLES ........................................................................4. 15
SAVE A SINGLE BANK OF REAL TIME PERFORMANCES ..................................................................4. 16
SAVE SINGLE MODE ..................................................................................................... 4. 16
Save Single MIDI File ................................................................................................................................4. 16
ERASE OPERATIONS ..................................................................................................... 4. 19
UTILITY OPERATIONS .................................................................................................. 4. 21
FORMAT = allows a disk to be formatted. ................................................................................................4. 21
DIRECTORY = allows the contents of a disk to be examined. ..................................................................4. 21
FREE SPACE = Displays the free space available. ..................................................................................4. 22
DISK (SRam) NAME = Allows a name to be given to a disk or to the SRam............................................4. 22
LOAD USER PROGRAM...........................................................................................................................4. 23
LOAD WS SONG........................................................................................................................................4. 24
EDIT MIXER............................................................................................................4. 25
The VOLUME Page .......................................................................................................... 4. 25
The PANPOT Page ............................................................................................................ 4. 26
The MASTER Page ........................................................................................................... 4. 26
The AUDIO IN Page.......................................................................................................... 4. 27
EDIT STATUS ......................................................................................................... 4. 28
The GENERAL page......................................................................................................... 4. 28
The following functions are available: ......................................................................................................4. 28
Functions assignable to the Pedals: ..........................................................................................................4. 29
The MICROTUNING Page ............................................................................................... 4. 31
How to programme an Intonation Scale ....................................................................................................4. 32
The VIDEO MONITOR Page ........................................................................................... 4. 33
EDIT PERFORMANCE...........................................................................................4. 35
Navigation ..................................................................................................................................................4. 35
CONFIGURATION........................................................................................................... 4. 35
Connect/Disconnect Local (Keyboard)......................................................................................................4. 35
Connect/Disconnect MIDI IN events..........................................................................................................4. 36
Connect/Disconnect the internal Sound generator ....................................................................................4. 36
Connect/Disconnect MIDI OUT.................................................................................................................4. 37
MODE: .......................................................................................................................................................4. 37
DETUNE: .......................................................................................................................... 4. 38
TRANSPOSE: ................................................................................................................... 4. 38
AFTER TOUCH................................................................................................................ 4. 39
RANDOM PAN................................................................................................................. 4. 39
TRACKBALL ................................................................................................................... 4. 39

Owner's Manual
E
EFFECTS........................................................................................................................... 4. 40
DAMPER....................................................................................................................................................4. 40
VOLUME PEDAL ......................................................................................................................................4. 40
PEDALS .....................................................................................................................................................4. 41
PRIORITY ..................................................................................................................................................4. 41
COPY..........................................................................................................................................................4. 42
PERFNAME ...............................................................................................................................................4. 42
RESTORE ...................................................................................................................................................4. 43
EDIT EFFECTS.......................................................................................................4. 44
The Effect types available: .........................................................................................................................4. 44
EDIT EFFECTS .........................................................................................................................................4. 45
How to Edit the Effects...............................................................................................................................4. 45
EFFECT 1 - REVERB....................................................................................................... 4. 46
EFFECT 2 - DELAY, MODULATIONS ........................................................................... 4. 47
The RESTORE, STORE and COMPARE functions....................................................................................4. 50
Compare .....................................................................................................................................................4. 50
Restore........................................................................................................................................................4. 50
How to Store an edited Effect.....................................................................................................................4. 51
EDIT SPLITS .......................................................................................................... 4. 53
How to modify the keyboard extension of a track ......................................................................................4. 53
CHORD SPLIT.................................................................................................................. 4. 55
FREE ..........................................................................................................................................................4. 55
LOCK .........................................................................................................................................................4. 56
Transfer a Sound to the Pedalboard ..........................................................................................................4. 56
EDIT SOUNDS........................................................................................................4. 57
General Edit Procedure .............................................................................................................................4. 58
Navigation ..................................................................................................................................................4. 58
The Display Commands .............................................................................................................................4. 58
THE SOUND EDIT PARAMETERS ..........................................................................................................4. 59
“Single” and “Double” Oscillator editing................................................................................................4. 59
The Edit Menu:...........................................................................................................................................4. 59
Store the modified Sound ...........................................................................................................................4. 60
Drumkits (and Sound Patch) ......................................................................................................................4. 61
The Drumkit Edit Menu..............................................................................................................................4. 61
The Drumkit Menu .....................................................................................................................................4. 62
The Drumkit Commands ............................................................................................................................4. 64
The Commands common to both Edit Displays .........................................................................................4. 66
EFFECTS ...................................................................................................................................................4. 66
COMPARE .................................................................................................................................................4. 66
LIBRARY ....................................................................................................................................................4. 67
Substitution of the sound in edit with another from the Library ................................................................4. 68
STORE........................................................................................................................................................4. 70
Preload and Edit Sound .............................................................................................................................4. 72
EDIT MIDI ............................................................................................................... 4. 73
Navigation ..................................................................................................................................................4. 73
Master and Slave........................................................................................................................................4. 74
Assigning the MIDI Channels and Out port...................................................................... 4. 74
Procedure:..................................................................................................................................................4. 74

F
Owner's Manual
Memorising the setting ...............................................................................................................................4. 74
What does WX transmit and receive ? .......................................................................................................4. 75
MIDI Filters....................................................................................................................... 4. 77
The Filter parameters ................................................................................................................................4. 77
MIDI CONTROLLERS...............................................................................................................................4. 78
MIDI Other ........................................................................................................................ 4. 80
CLOCK: selects INT(ernal) or EXT(ernal) Clock. ....................................................................................4. 80
COMMON CHANNEL: assigns a channel (1-16 or Off)...........................................................................4. 80
MERGE: Activates (On) or deactivates (Off) the function. .......................................................................4. 81
SYSTEM EXCLUSIVE: enables the instrument for System Exclusive operations (On). ...........................4. 82
MIDI CHANNEL LOCK: locks a MIDI channel configuration for the instrument as a whole.................4. 82
GENERAL MIDI: Affects GS and GM MIDI Standard Files.....................................................................4. 82
EDIT ARRANGE ..................................................................................................... 4. 84
CHAPTER 5
STYLES, SONGS & SEQUENCER...............................................................5. 1 - 5. 48
1. INTERNAL STYLES...................................................................................................... 5. 1
General information.....................................................................................................................................5. 1
What is a Style? ............................................................................................................................................5. 1
Chord recognition and the Riff ....................................................................................................................5. 2
How to select an Internal Style ....................................................................................................................5. 3
The Style Commands ....................................................................................................................................5. 3
The Style Tempo ...........................................................................................................................................5. 4
The Tempo-fix, M. Perf. and Sync functions ................................................................................................5. 4
Chord Split ...................................................................................................................................................5. 5
Free and Lock ..............................................................................................................................................5. 5
Deactivating the tracks engaged by the Sequencer (SEQ)...........................................................................5. 6
How to Mute a Sequencer track ...................................................................................................................5. 6
How to disengage a track and play it in real time .......................................................................................5. 6
Save a modified Internal Style Performance................................................................................................5. 7
Save to SRam or Disk ...................................................................................................................................5. 7
Restore Internal Style Performance .............................................................................................................5. 7
The ARRANGER options and how the Styles are affected ...........................................................................5. 8
2. PROGRAMMABLE STYLES...................................................................................... 5. 10
Riffs ............................................................................................................................................................5. 10
Styles can be programmed in three ways:..................................................................................................5. 10
The Prog. Style Performance .....................................................................................................................5. 10
How to record a Style (Real Time).................................................................................... 5. 11
A detailed explanation of each step............................................................................................................5. 12
Name your Prog. Style ...............................................................................................................................5. 19
Save your new Prog. Style to SRam or to Disk ..........................................................................................5. 19
Programming Styles using STEP recording ...................................................................... 5. 20
Procedure ...................................................................................................................................................5. 20
Use COPY to copy a recorded Riff to another ...........................................................................................5. 23
Other operations available in Prog Style mode .........................................................................................5. 23
Programmable Styles compared with Internal Styles ................................................................................5. 24
3. SONG STYLES............................................................................................................. 5. 25

Owner's Manual
G
Real Time Recording..................................................................................................................................5. 25
Step recording ............................................................................................................................................5. 25
Copying from an existing Song Style .........................................................................................................5. 25
How to record a Song Style (real time) ............................................................................. 5. 26
How to see the Chord track events.............................................................................................................5. 28
Recording a Medley ...................................................................................................................................5. 28
Give your Song Style a name......................................................................................................................5. 29
Muting or disengaging recorded tracks .....................................................................................................5. 29
Song Style Performances............................................................................................................................5. 29
How to create up to 8 Song Style Performances........................................................................................5. 29
Editing Song Styles.....................................................................................................................................5. 31
Save your Song Style to SRam or Disk.......................................................................................................5. 31
Load Song Styles from WS Songs Disks .....................................................................................................5. 31
4. SONGS & THE SEQUENCER..................................................................................... 5. 32
About the Sequencer...................................................................................................................................5. 32
The Sequencer controls ..............................................................................................................................5. 32
The Sequencer operating modes ................................................................................................................5. 33
SONGS .............................................................................................................................. 5. 34
Something about the Songs and their structure .........................................................................................5. 34
Where are the Songs stored?......................................................................................................................5. 35
The Song Performances .............................................................................................................................5. 35
Exploiting the Real Time Performances.....................................................................................................5. 35
Loading Songs from disk ............................................................................................................................5. 36
Preload .......................................................................................................................................................5. 36
Song Playback Mode..................................................................................................................................5. 37
Start a Song from any point .......................................................................................................................5. 37
Playing along with a Song in playback......................................................................................................5. 38
The SCORE function - sing along with your Songs ...................................................................................5. 38
The GET function .......................................................................................................................................5. 39
Connecting to a domestic TV or colour computer monitor........................................................................5. 39
SONG RECORD mode ..................................................................................................... 5. 40
Songs can be recorded in two ways: ..........................................................................................................5. 40
Before entering Record mode, prepare your Performance........................................................................5. 40
How to Realtime Record a Song ....................................................................................... 5. 40
Realtime Record options ............................................................................................................................5. 42
The Mask option .........................................................................................................................................5. 43
How to Step Record a Song............................................................................................... 5. 43
Recording Pitch Bend, After Touch and Controller data...........................................................................5. 44
Multi-track recording.................................................................................................................................5. 44
Recording MIDI IN events simultaneously with Track events. ..................................................................5. 45
Synchronization with external MIDI devices .............................................................................................5. 45
Create a Performance to communicate with Computers/Sequencers........................................................5. 45
The GET function - create a Score of your recording ....................................................... 5. 46
GENERAL INSTRUCTIONS TO FOLLOW WHEN PROGRAMMING THE LYRICS AND CHORDS TRACKS
USING A COMPUTER ..............................................................................................................................5. 47
LYRICS TRACK .........................................................................................................................................5. 47
CHORDS TRACK.......................................................................................................................................5. 47
Working with Standard MIDI Files ................................................................................... 5. 48

H
Owner's Manual
Create Standard MIDI Files ......................................................................................................................5. 48
Load Standard MIDI Files .........................................................................................................................5. 48
General MIDI and Standard MIDI Files ...................................................................................................5. 48
CHAPTER 6
SEQUENCER EDIT MODE ...........................................................................6. 1 - 6. 22
MASTER TRACK............................................................................................................... 6. 1
The Master Track parameters - First page ..................................................................................................6. 1
For Song Styles only: ...................................................................................................................................6. 3
For Songs only: ............................................................................................................................................6. 3
For Songs and Song Styles:..........................................................................................................................6. 4
Master Track Event Edit ..............................................................................................................................6. 4
How to edit Master Track events..................................................................................................................6. 5
Create an event with INSERT ......................................................................................................................6. 5
DELETE EVENTS.............................................................................................................. 6. 6
The Master Track MASK function................................................................................................................6. 7
COPY................................................................................................................................... 6. 8
To effect the Copy, press ENT......................................................................................................................6. 9
MOVE................................................................................................................................ 6. 10
ERASE............................................................................................................................... 6. 11
INSERT/DELETE ............................................................................................................. 6. 12
INSERT.......................................................................................................................................................6. 12
DELETE .....................................................................................................................................................6. 12
TRANSP............................................................................................................................ 6. 13
DYNAMIC ........................................................................................................................ 6. 14
QUANTIZE ....................................................................................................................... 6. 15
Quantize Procedure in Record mode .........................................................................................................6. 15
MICROSCOPE (Event Edit) ............................................................................................. 6. 16
The Microscope functions ..........................................................................................................................6. 19
NAME................................................................................................................................ 6. 20
How to use the keyboard ............................................................................................................................6. 20
UNDO................................................................................................................................ 6. 21
UNDO and FREE MEMORY .....................................................................................................................6. 21
OPTION............................................................................................................................. 6. 22
APPENDIX
WX Rom Sound Map ........................................................................................................................................ i
WX Rom Drumkits...........................................................................................................................................iv
Percussion Samples........................................................................................................................................ xii
MIDI Implementation chart ......................................................................................................................... xiii
MIDI Controllers .......................................................................................................................................... xiv
WX Specifications........................................................................................................................................... xv
Glossary ........................................................................................................................................................ xvi

Owner's Manual
1 - 1
Getting Started
Introduction
CHAPTER 1 - INTRODUCTION
Congratulations! and thanks for purchasing the WX2/WX400 Multimedia Workstation.
Considering the high level of technology and innumerable features offered, WX2/
WX400 is a very easy instrument to operate. Its user-friendly interface is one of the main
attractions - in next to no time, whether expert or novice, you will be able to discard the
initial sense of panic normally felt when you look at the control panel of a new instrument
for the first time.
Perhaps the best advice we can give you.....
Read this manual
It’s a well known fact of life that simple things can become very complicated if some time
is not dedicated to browsing through the relative documentation.
You are strongly recommended to read at least the introductory part of this manual
(Introduction, Getting Started, Interface Basics) which takes you through a guided tour
of all the functions without going into details. It’s then up to you.
WX2 and WX400 - what’s the difference?
The keyboard and the aesthetics - WX2 has 61 notes and has the classic “keyboard”
appearance; WX400 has an 88 note keyboard with weighted keys (Hammer Action) and
has the typical “digital piano” look. In all other respects, both instruments are identical
- therefore, this manual refers to both models by using the term “WX”.
Welcome to all WS users who don’t want to throw their WS
Songs disks away.....
That’s right, WX is compatible with WS software - at least as far as Songs go!
You can load WS Songs (WS1, WS2, WS3, WS400, GWS400) through the specific
function (Load WS Song) found in the Disk Utility page.
W e haven’t for gotten the S-Series users.....
WX, if fitted with the optional 2 Megabyte Sample RAM DISP, can load samples from
S-Series disks. So, if you’ve got a friend whose got an S2 or S3, better if he’s also got
the Sample Translator, you can share some great sounds.
1 - 2
Owner's Manual
Getting Started
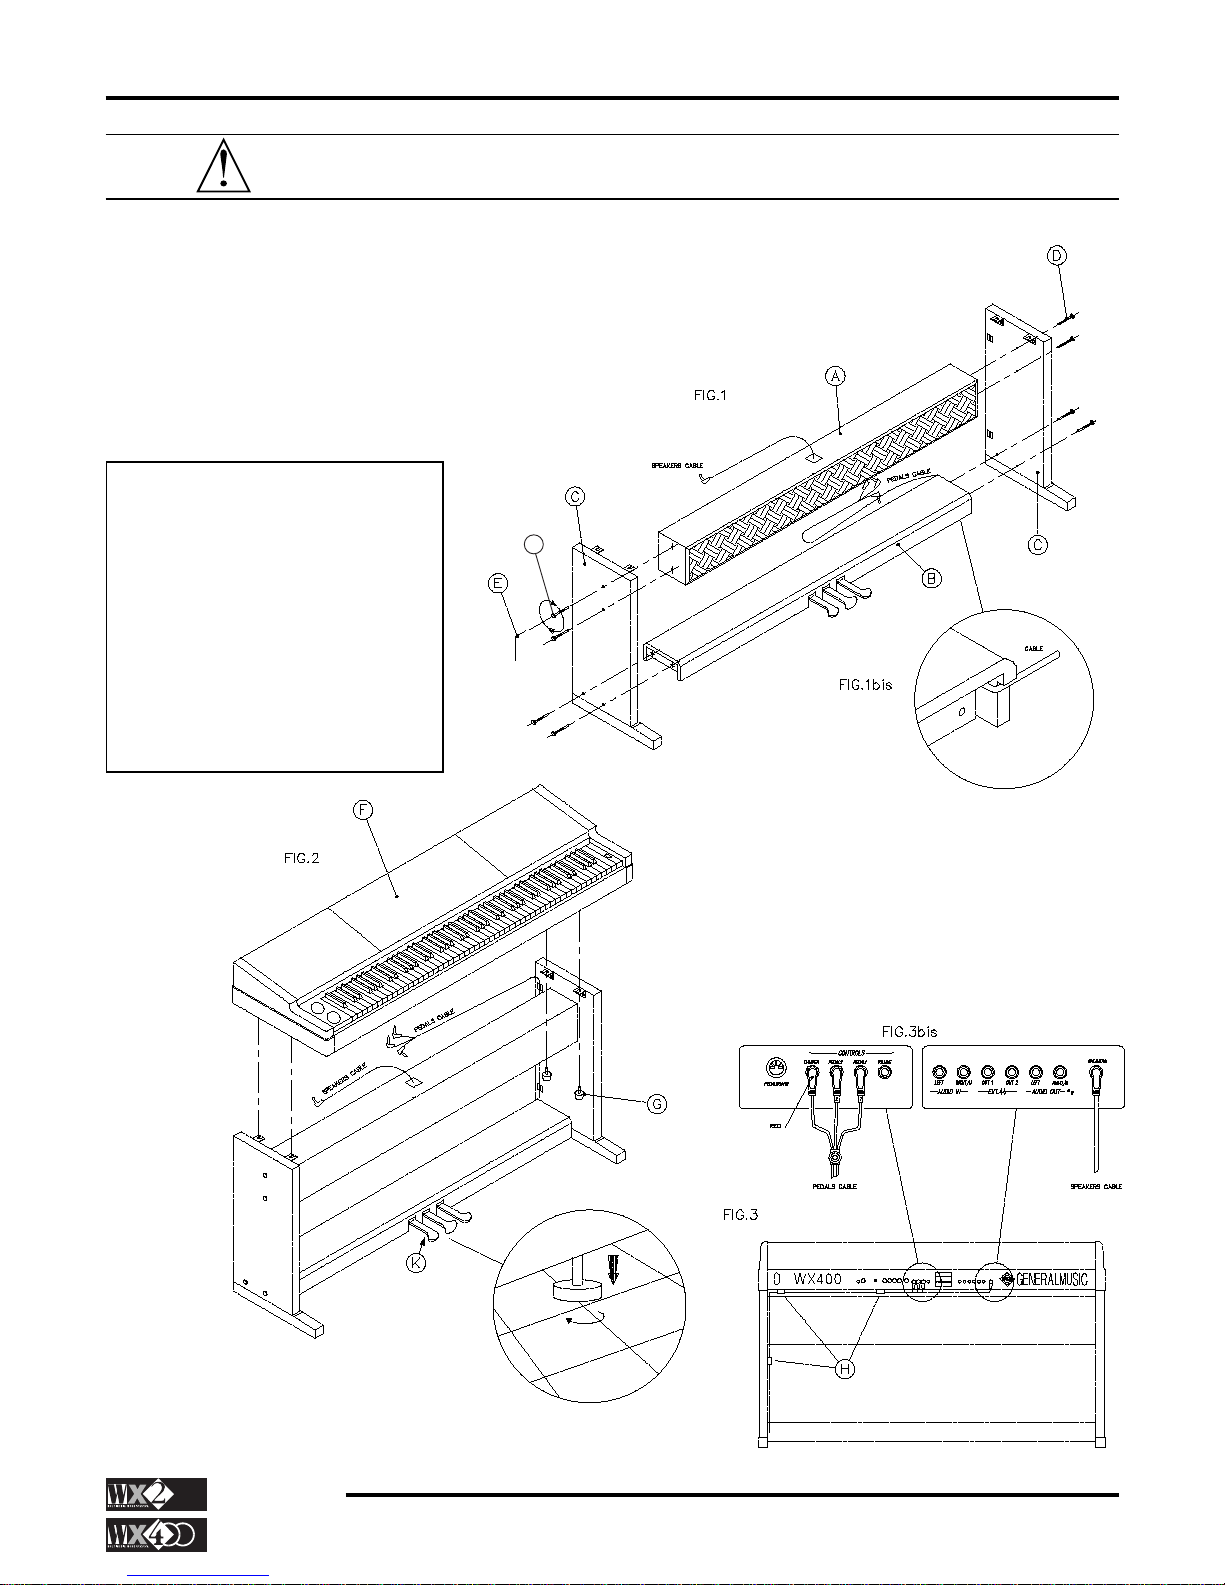
WX400 ASSEMBLY INSTRUCTIONS
HOW TO ASSEMBLE YOUR WX400 PIANO WORKSTATION
1. Remove parts A, B, C, F from the packing and accessories D, E, G, H from the plastic
bag.
2. Fix the pedal cross-bar B to the flanks C with the bolts D, using the hexagonal rod
spanner E, as shown in Fig. 1. The pedals cable must be passed through the rear
loophole, as shown in Fig 1 bis.
3. Fix the bass reflex box A to the flanks C with the bolts D,
using the hexagonal rod spanner E, as shown in Fig. 1.
7. Place the instrument in its definite location and adjust the adjustable leg K
under the pedals cross-bar until it rests
firmly on the floor.
4. Place the cabinet F on top of the assembled base,
fixing it into position with the thumb screws G, as
shown in Fig. 2.
5. Attach the 4 adhesive clamps H (two at the back of
the inner right flank and two under the cabinet), and
clamp the pedals cable as shown in Fig. 3.
6. Insert the pedals and speakers jacks into their
respective rear panel sockets as shown in Fig. 3.
D
ASSEMBLY LIST:
A. BASS REFLEX BOX.
B PEDALS CROSS BAR.
C. RIGHT/LEFT FLANKS WITH BASS.
D. 8 HEXAGONAL RECESSED
BOLTS.
E. HEXAGONAL ROD SPANNER.
F. CABINET.
G. 4 THUMB SCREWS.
H. 4 ADHESIVE CLAMPS.
Owner's Manual
1 - 3
Getting Started
GETTING STARTED
If you’re familiar with hooking up gear, here’s a non-illustrated list of fundamental
things that need to be done to play right away.
You can use the supplied WX2/WX400 Demo disk or WS Songs Disks and listen to the
way the WX plays them.
The chapters which follow discuss each function of the keyboard in greater detail.
Quick installation
◆ Be absolutely sure that your WX voltage matches with your main supply voltage.
◆ Place WX2 on a stable keyboard stand, or on a hard, flat surface. Make sure that
the WX400 is correctly assembled by following the instructions carefully.
◆ Check the level of the Master Volume control or, if you are connected to an amp/
speaker system, make sure the volume is at a save level.
◆ If you want to use an amp/speaker system, connect the rear panel Stereo output
jacks (Left and Right/M) to the system using a pair of standard (1/4 inch) audio
cables. Use Right/M stereo jack for Mono reproduction.
◆ If you prefer, plug in a set of headphones using the appropriate jack located on the
left front end of the panel below the Pitch/Mod Track Ball.
◆ Plug the optional Pedal(s), the multi-switch or the Volume pedal into the appro-
priate pedal sockets.
◆ Connect the instrument’s power cable.
◆ Power up and start playing. The instrument powers up in Real Time Performance
mode showing 8 Sounds belonging to Bank 1 of the Piano family.
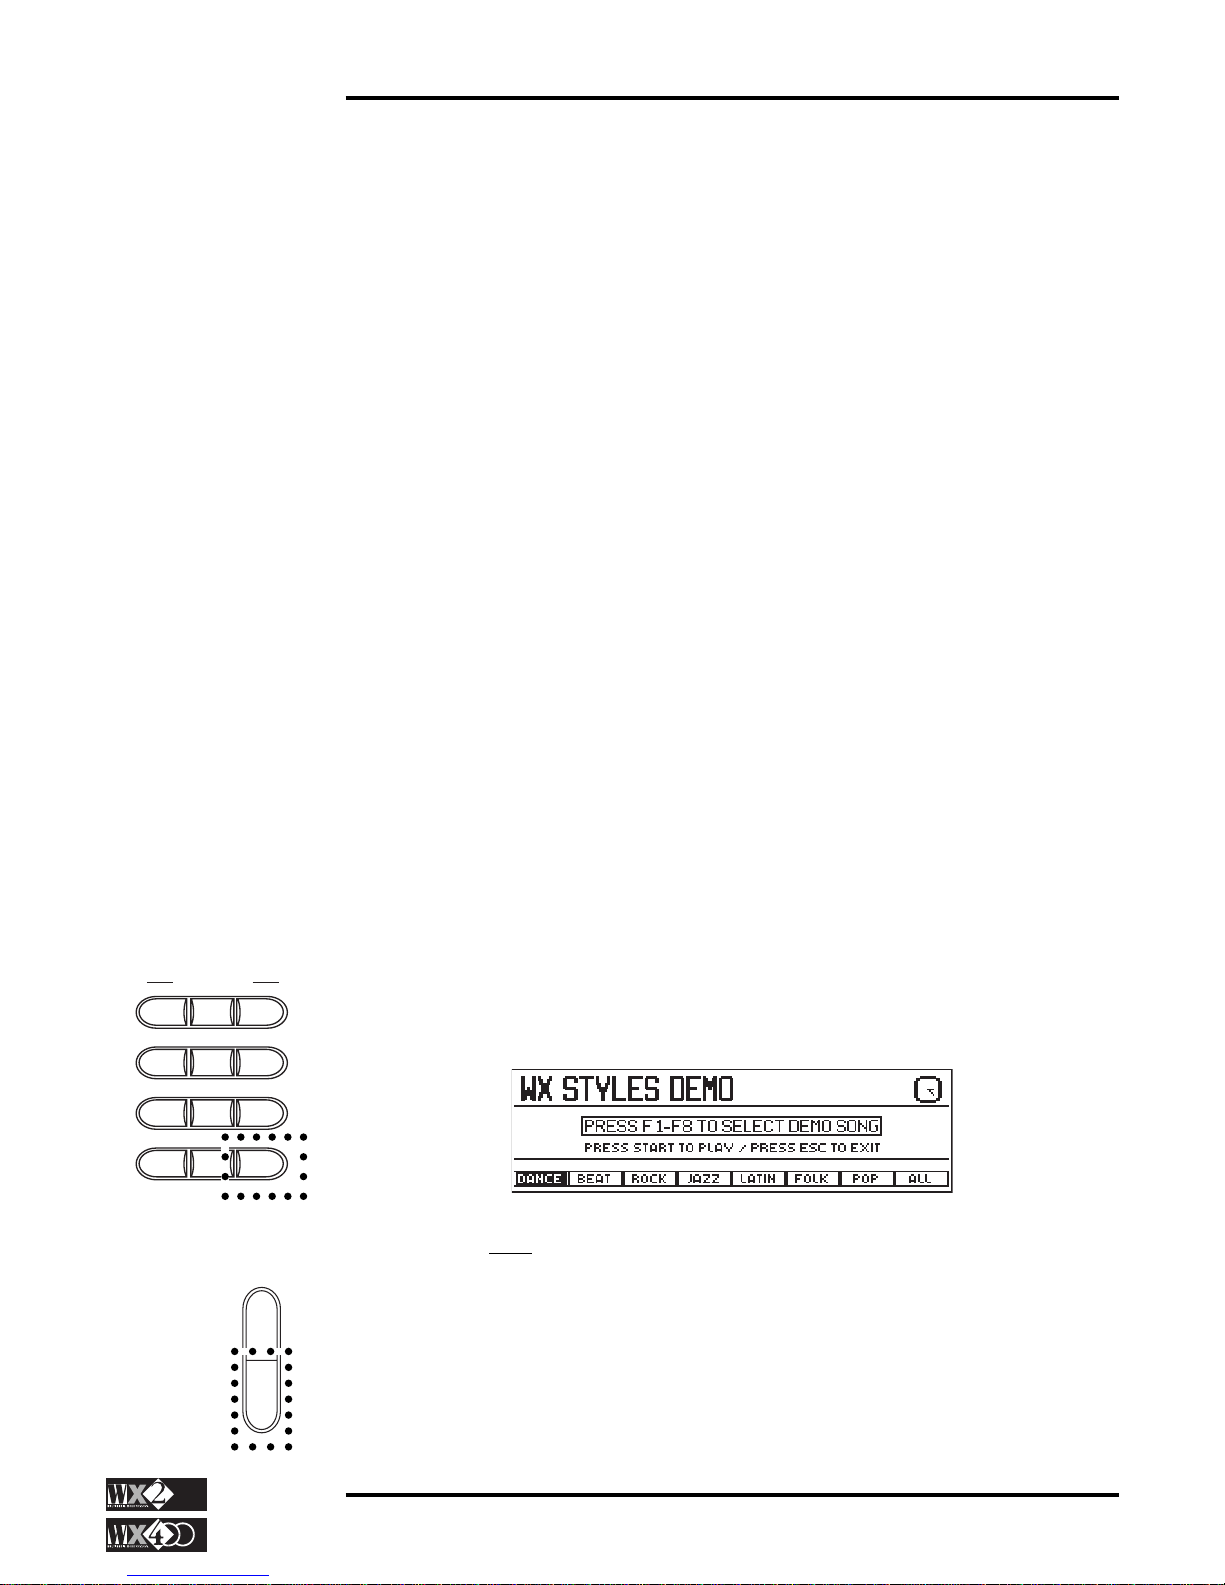
WX DEMONSTRATION STYLES
WX incorporates 7 Demonstration Styles.
◆ Press the DEMO button in the SEQ EDIT section.
◆ Select one of the demo Styles with the corresponding Function button (F1…F7)
and press Start/Stop to start it.
You can play along with the Style in playback mode; when it reaches the end, it
stops automatically.
◆ Press “All” (button F8) to start a medley from the selected style; the medley stops
when it reaches the end of the last style.
◆ Press ESC to escape from the Demo display.
SEQ. EDIT
MASTER COPY MOVE
ERASE
INS/DEL
TRANSP
QUANT MICRO NAME
OPTION UNDO DEMO
E
N
T
E
S
C

1 - 4
Owner's Manual
Getting Started
Play some ROM Sounds
◆ Select the displayed Sounds of the current Real Time Performance by means of the
row of Function buttons marked F1 … F8. The sounds are shown in two rows
across the lower display area.
◆ Press the PAGE+ button in the Edit section once then again to access Banks 2 and
3 of 8 Sounds each, some of which are variations of those in Bank 1. The small
number to the extreme left shows which Bank of the currently select Family you
are in.
◆ Return to the Bank 1 Sounds with PAGE-.
◆ Select a different Sound Family from the family groups on the extreme left of the
control panel (Piano, Bass, Guitar...) and continue selecting other sounds.
Drum family
◆ If you select the “Drums” family, you can choose Percussion sounds and Drumkits
from 16 different Banks. The Drumkits are in Banks 2 and 3.
◆ Use PAGE+ button to access the other Banks and return with PAGE–.
Samples
◆ The “Samples” family provides 8 banks, the first two with 8 sounds, the remaining
6 with 8 “empty” slots ready to receive Samples loaded1 from disk.
◆ Use PAGE+ button to access the other Banks and return with PAGE–
Zoom in and see your Sound in large type
◆ Press the “right” arrow of the cursor diamond to zoom in on the active track in the
left box of the display and view the Sound in large type.
◆ Press the “left” arrow to return to the normal display.
Select some Real Time Performances
◆ Press one of the first three Performance bank buttons of the top row of the
Performances and Style Banks - for example, PERF 1. 8 Performance names will
be displayed across the bottom part.
◆ Select each Performances using the selection buttons F1…F8. Note that most of
the displayed Performances activate multi-track situations. In some cases, you will
hear that some sounds are active across different keyboard extensions with respect
to others.
◆ Select another Performance bank and continue experimenting with the selections.
Layer two Sounds (tracks)
◆ If you start from a single track situation, press the “down” or “up” arrows of the
cursor diamond to move the reverse-highlighted cursor in the display one step
lower or higher to the next track.
◆ Activate the selected track by striking the central button of the cursor diamond,
NOTE 1:
WX can load samples
from Disk only if the
instrument is equipped
with the optional
Sample RAM (2 Mega-
bytes).

Owner's Manual
1 - 5
Getting Started
called the “Toggle”. Now you can play layered tracks (the tracks do not necessarily
have to be consecutive to be layered - you can layer tracks 1 and 4, tracks 3 and 11
and so on...).
◆ Zoom in on both tracks with the “right” arrow of the cursor diamond and zoom out
with the “left” (you cannot zoom in on more than two tracks).
Multi-track situations
◆ Use the “up” and “down” cursor arrow to select tracks and the Toggle to activate
any number of selected tracks up to a maximum of 16.
◆ Different sounds can be assigned to the reverse-highlighted track by selecting a
different Sound family. Use the Function buttons (F1…F8) to select the Sounds.
◆ Each track can be programmed to play across a preset keyboard range by accessing
the SPLIT function in the Edit section. See the relevant chapter for more details.
If you enter Split mode, don’t forget to press SPLIT again, or ESC to escape.
Deactivate tracks (Sounds) with the Toggle
◆ An active Track displays its number, the sound currently assigned to it and the
“track status” showing “ON” in the extreme left column.
◆ If you select an active Track with the “Up” or “Down” cursor arrows, you can
temporarily deactivate it by pressing the Toggle. The track status column will
show “OFF”, the sound assigned to it will not be displayed not will it play. This
status is called the “mute” condition. Press the Toggle once more to re-activate the
track.
Select and play Internal Styles
◆ Access an Internal Style Bank by pressing one of the 8 buttons from the lower row
of the Performance & Style Banks on the extreme right of the control panel (Dance,
Beat, etc.).
◆ Select one of the displayed Styles by pressing the relative F function button. Note
that 4 tracks are engaged by the Sequencer (the track status shows “SEQ”), while
the remaining 2 are either “OFF” or “ON”.
◆ Press Start/Stop to start the Style and play a note or chord on the lower part of the
keyboard. Play a tune on the right part; the melody line will be accompanied by an
automatic Rhythm and Arrangement (called a Style).
◆ Press the Fill button for a Fill In and the Var button for a Fill Variation. This last
function triggers a variation of the basic style after the Fill Var terminates.
◆ Select other Styles within the same bank by means of the function buttons
(F1…F8) and note how the Sounds assigned to the tracks change according to the
Style selected.
◆ Press the M. PERF button (below button F7) and select some Styles. Note how
tracks 5 and 6 rest unchanged while those engaged by the Sequencer vary
according to the Style selected.

1 - 6
Owner's Manual
Getting Started
NOTE 1:
The instrument cannot
be played during the
automatic loading
procedure.
SRAM
Static RAM - a battery
backed memory that
can store user pro-
grammed data that is to
be used regularly.
◆ Deactivate the M. PERF button to restore the normal status.
◆ Access another Internal Style Bank by pressing one of the 8 Style buttons (Ethnic,
Pop, etc.).
◆ Stop the Style by pressing Start/Stop.
Sing along with a Song using SCORE
Your instrument is supplied with two Songs loaded into the SRam. When you power up,
both Songs will be loaded into the instrument’s memory (RAM) automatically.
◆ Press SONGS in the “Sequencer & Users” group.
◆ Select the Song “My way” with the relative Function button (F2).
◆ Press Start/Stop to start the Song.
◆ Press the SCORE button in the "Sequencer & Users" group.
◆ While the Song is in playback, select each option available on the lower part of the
display (All, Lyrics, Zoom, Chord) and observe the difference between each
function.
◆ Press SCORE or ESC to escape SCORE mode.
◆ The Song stops automatically, or you can stop it at any time with Start/Stop.
Load a Song from the supplied WX Demo Disk
1. Automatic loading
1
◆ With the WX switched off, insert the WX Demo Disk into the driver.
◆ Turn WX on - all the Songs present in the Demo disk will load automatically.
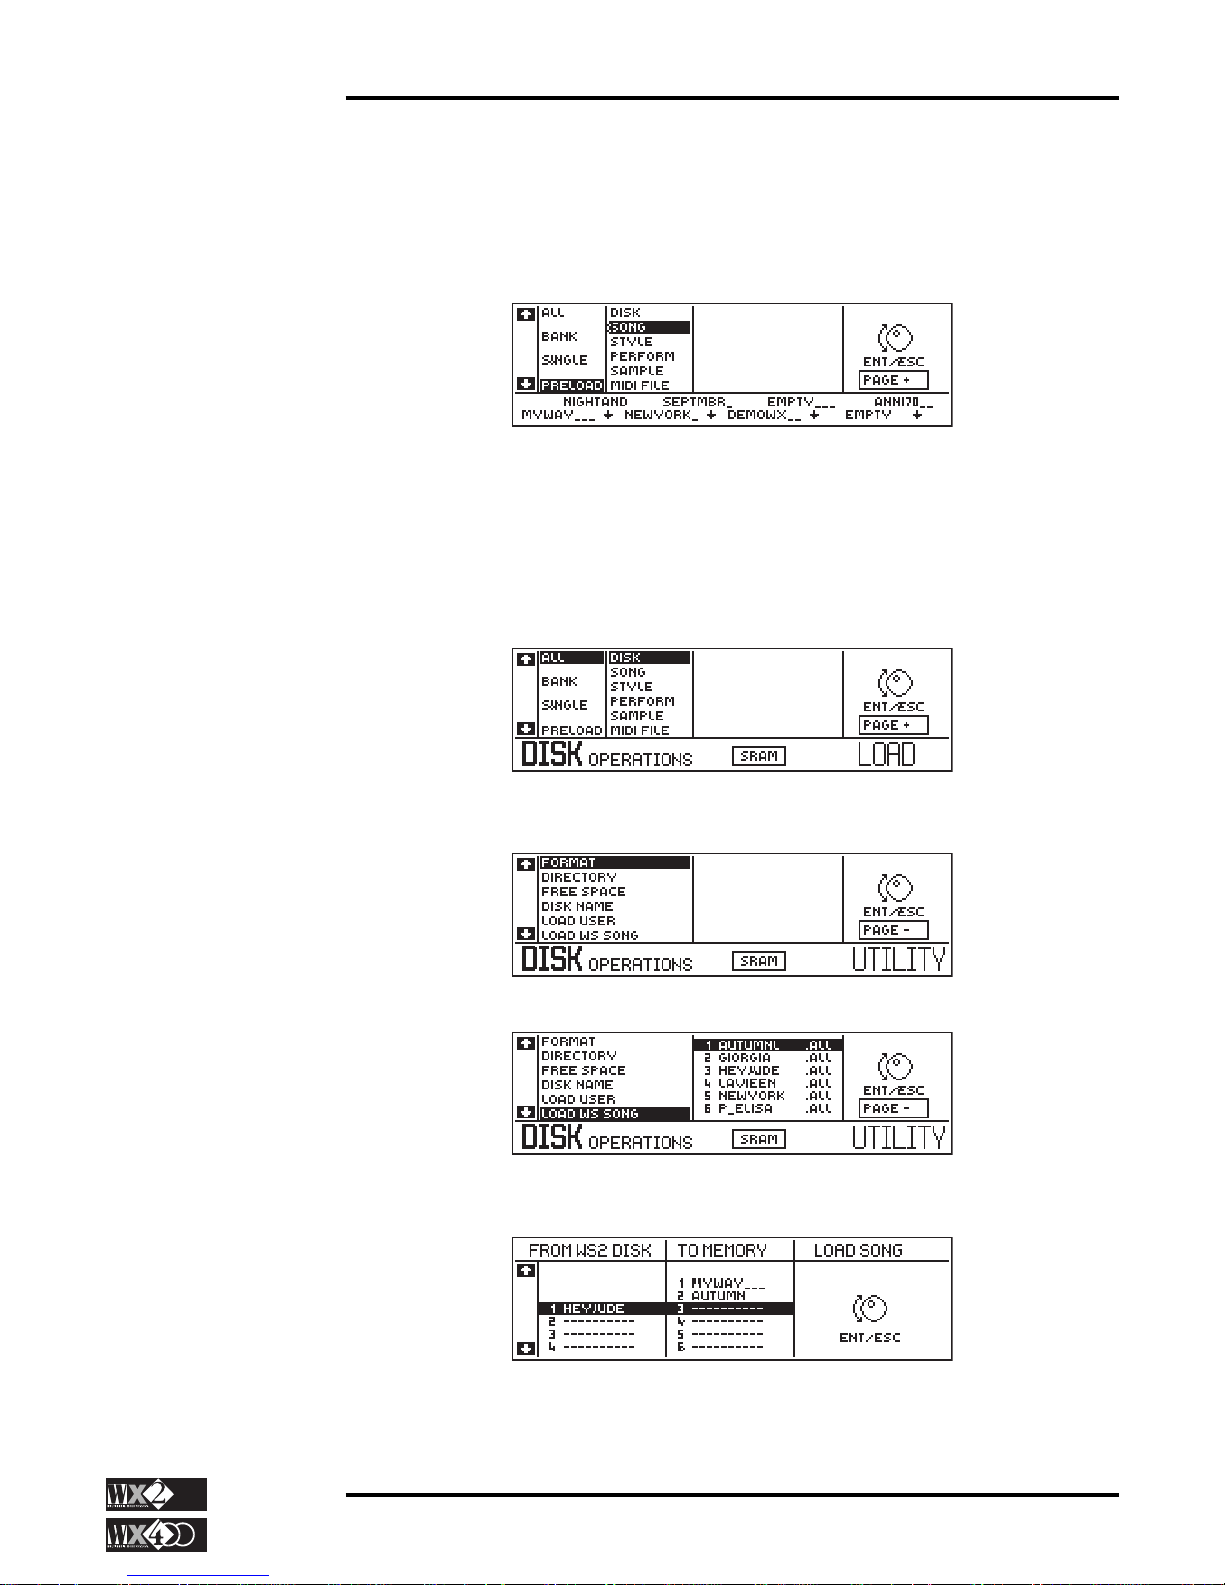
2. Loading after turning the instrument on
◆ Press DISK in the EDIT section and check that you are in DISK mode. If you are
in “SRam operations”, press the F5 button corresponding to “Disk” .
◆ Scroll down to “Single”.
◆ Rotate the Dial to select “Song”.
◆ Press ENT.
◆ Scroll to the Song to load and press “ENT” twice.
◆ Press “DISK” to escape from Disk mode.
◆ Press SONGS from the SEQUENCER & USERS buttons.
◆ Select a Song with the appropriate F function button.
◆ Start the Song with Start/Stop.
◆ Play along with the song using tracks not engaged by the Sequencer (those identified
by the "KYB" symbol).
Owner's Manual
1 - 7
Getting Started
Pr eload
◆ An alternative and faster Song loading procedure is the PRELOAD function,
which can also be performed while the Sequencer is in Song playback mode. In
practice, this feature displays the Bank of available Songs in correspondence with
the 8 Function buttons (F1…F8).
◆ You can then choose the song to load by pressing the relative Function button.
This function is only valid for WX Songs and is discussed in a later chapter.
Load a Song Style from WS Songs Disks
Use this operation to load Song Styles from WS disks (WS1, WS2, WS400, GWS400):
◆ Press DISK to access DISK mode (check that SRam operations are not selected):
◆ Press PAGE + three times to access the UTILITY page and scroll down to “Load
WS song” with the Down cursor arrow.
◆ Press ENT and the WS disk directory will be displayed:
◆ Rotate the Dial to select the required Song (.All file) and press ENT to start the
conversion.
◆ Rotate the Dial to select the destination in Memory and press ENT twice.
◆ Escape Disk mode by pressing ESC or DISK.
NB
Preload operates in
Song Mode only.

1 - 8
Owner's Manual
Getting Started
◆ Press the SONG button and select the song with the relative Function button.
◆ Start the Song with Start/Stop and play.
How to record a Song
You can create a multi-track Song by using the following real time recording method.
It is also possible to record patterns (Programmable Styles) and Song Styles which
exploit existing patterns. These are discussed in the relative chapters further ahead.
◆ Select SONGS in the “Sequencer & Users” group.
◆ Select an “empty” position.
◆ Confirm SONG REC MODE.
◆ Select a Track to record with the Up/Down Cursor arrows and activate it for
recording with the Toggle.
◆ Press Start to start the recording and, after a one bar count down, start playing.
◆ When you finish playing, press Start/Stop to stop recording.
◆ Listen to the playback by pressing Start/Stop again. You can record additional
events at this stage.
◆ When you have finished recording the first track, press Stop to end recording and
confirm the recorded track with the Toggle.
◆ Select another track and Repeat the operations for other tracks to create your Song.
◆ When you have finished recording all the tracks of your Song, press ESC and press
Start/Stop to start the playback.
Owner's Manual
1 - 9
Getting Started
DETAILED START-UP
This section explains some of the most important “Getting started” steps in greater detail
and takes you through a tour of the rear panel, describing the various cable connections,
as well as the Clock/Calendar which you can set right away.
BEFORE STARTING……
Before connecting anything, it is important that you rest your WX2 securely on a stable
keyboard stand. Otherwise, it should rest on a hard, flat surface.
The WX400 is supplied with an appropriate support and speakers box. It should not be
substituted with any other kind of support.
WX2/WX400 does not have any user-serviceable parts therefore, under no circumstances should you attempt to remove any panels or try to open the unit by removing the
screws from under the instrument. If you attempt to open WX, you’ll risk electric shock.
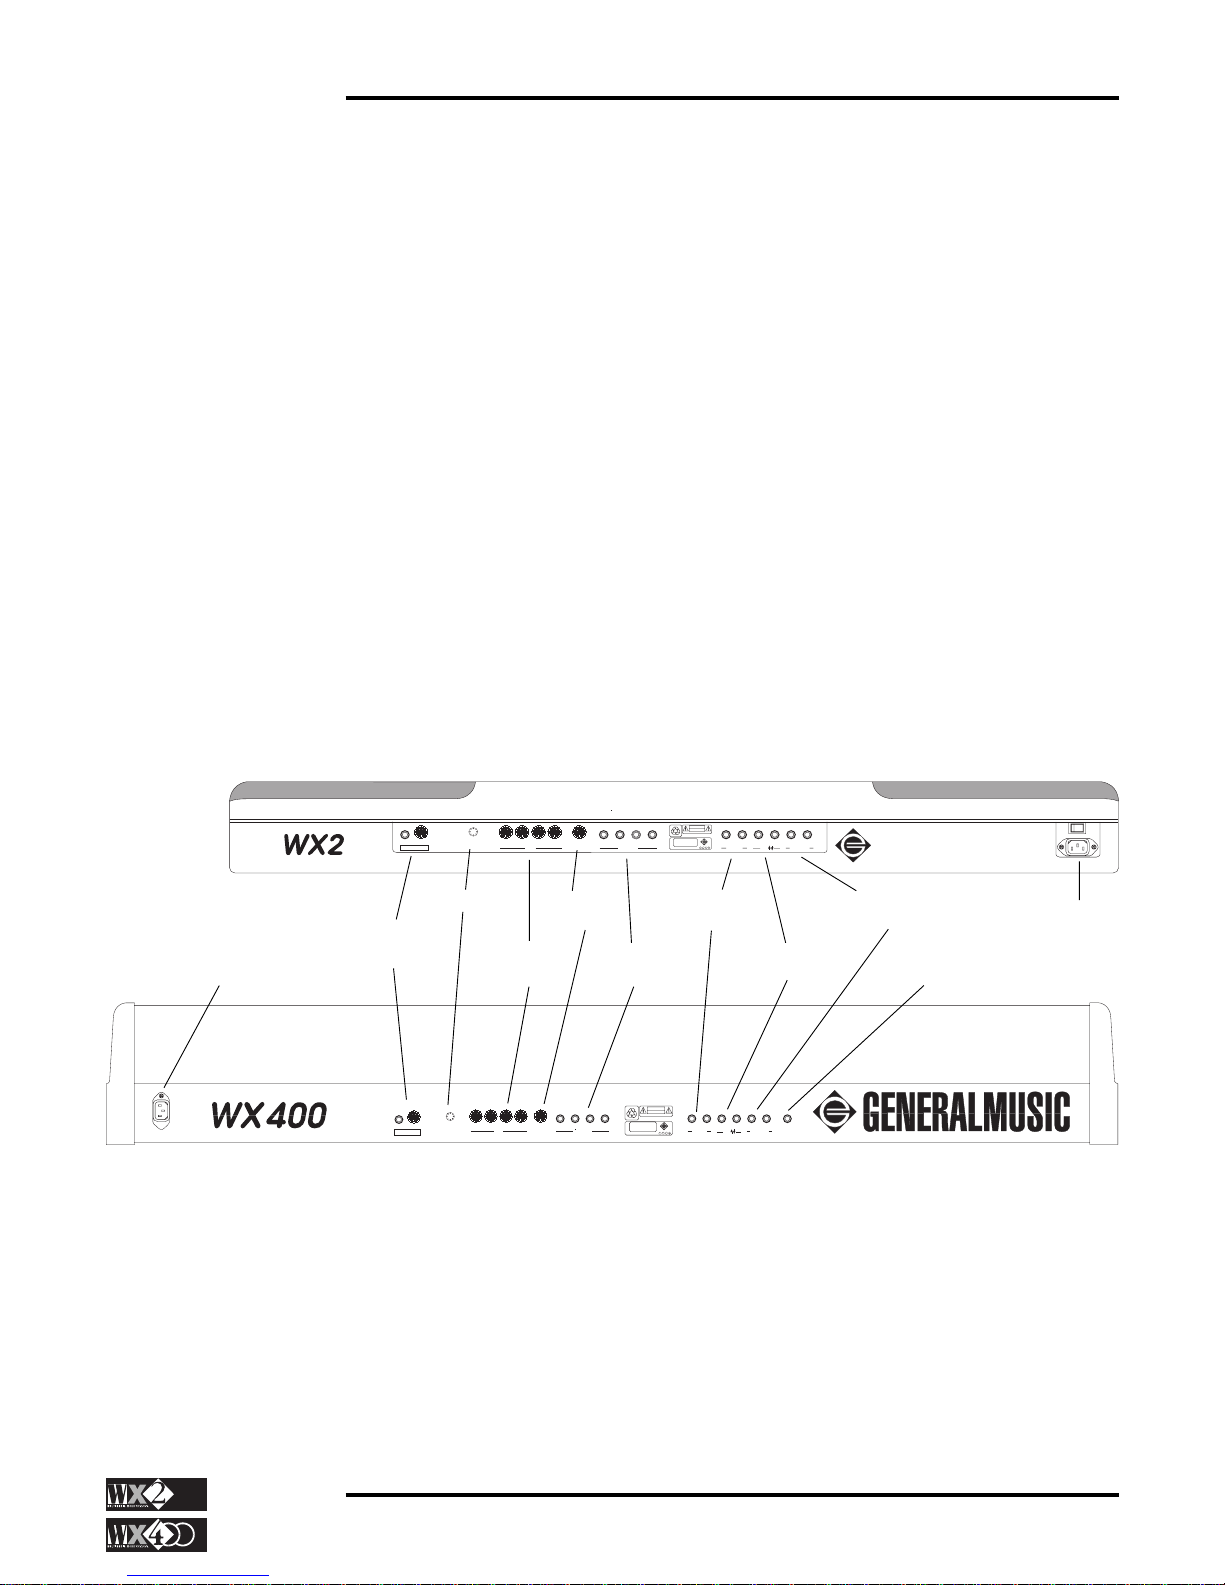
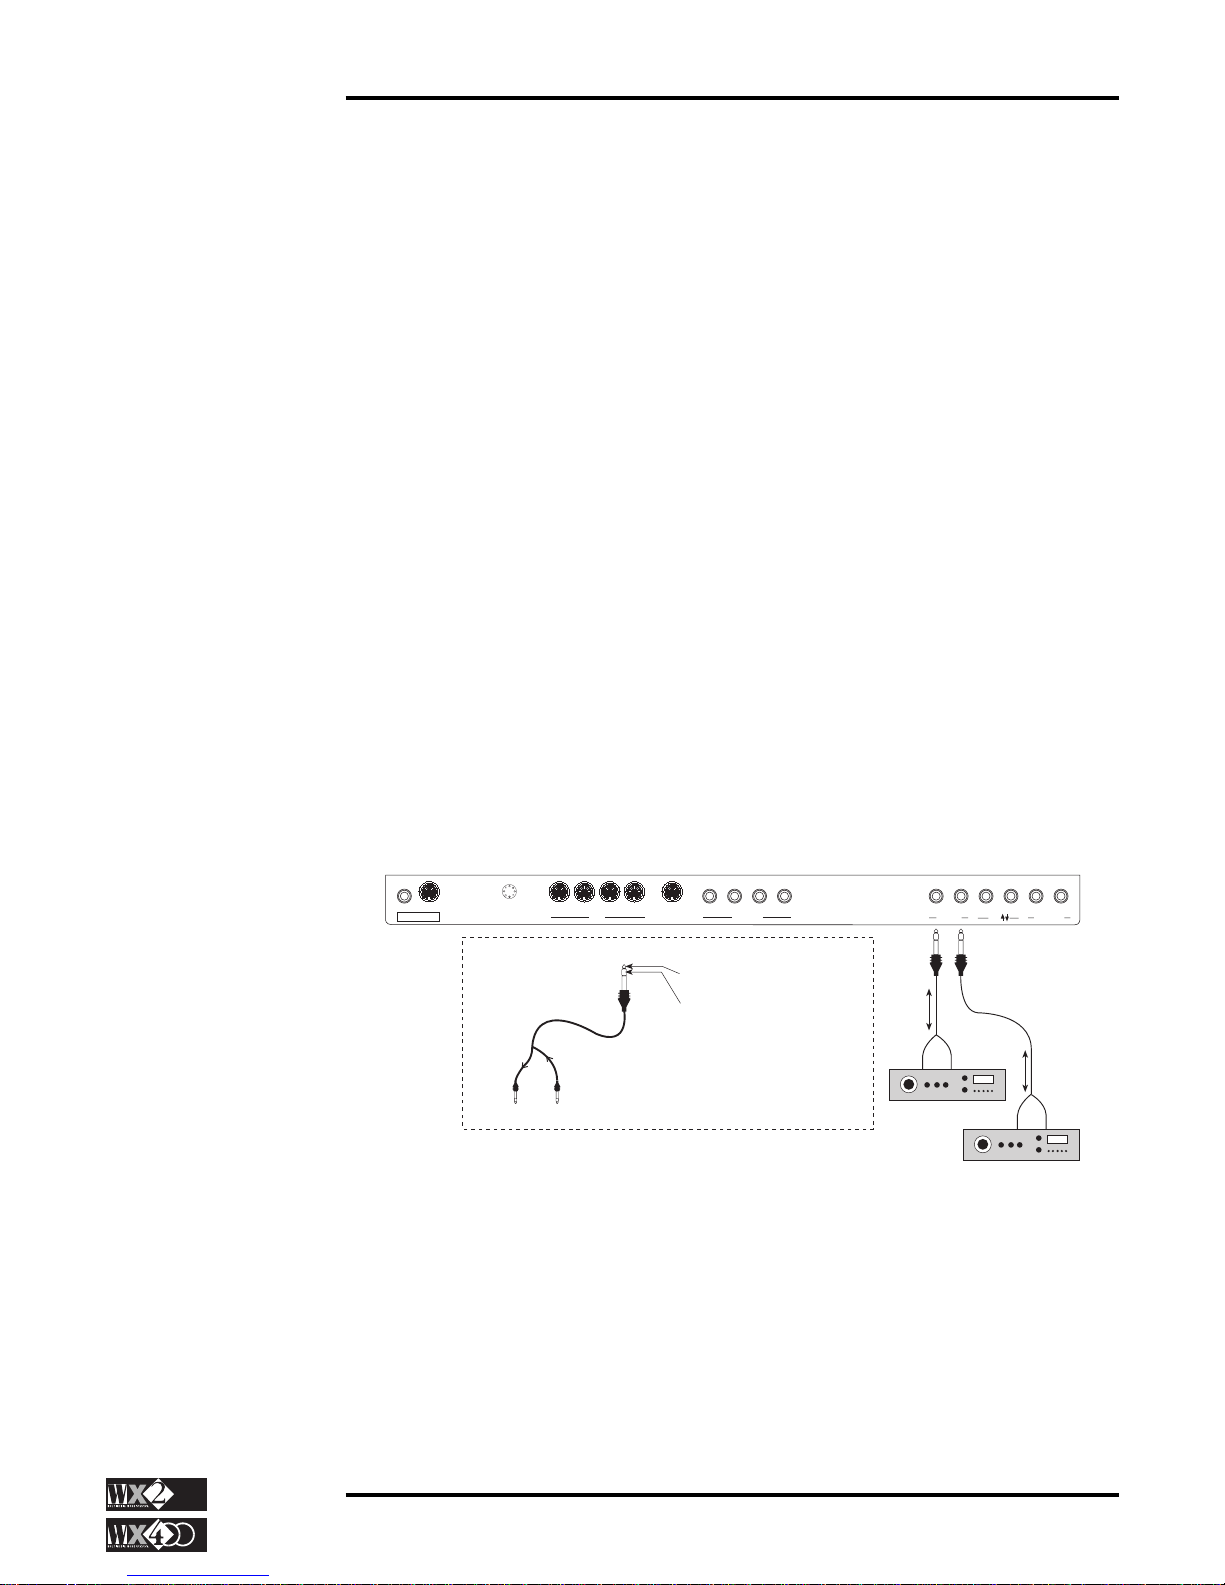
THE REAR PANEL
CONNECTING THE POWER CABLE
Your WX runs on a voltage that matches with the voltage in your area. If you face the
rear panel of WX2, the power connector is on the right hand side, while on WX400, it
is on the left hand side.
After connecting the power cable to the WX end, plug the other end into an earthed
(grounded) outlet. If your power source does not have an outlet that matches the plug on
the power cable, do not defeat the safety feature by changing plug on the power cable but
install the correct grounded outlet. This will reduce the risk of a shock hazard and avoid
problems with audio hum.
GENERALMUSIC
MOD.
SER.
AC~
MADE IN ITALY by GENERALMUSIC
D
Fl
N
“
COMPLIES WITH THE LIMITS FOR A ”CLASS B“ COMPUTING
DEVICE PURSUANT TO SUBPART J OF PART 15 OF FCC RULES”
CAUTION
AVIS
: RISQUE DE CHOC ELECTRIQUE-NE PAS OUVRIR
GENERALMUSIC
RISK OF ELECTRIC SHOCK
DO NOT OPEN
LEFT RIGHT/M OUT 1 OUT 2 LEFT RIGHT/M
AUDIO IN AUDIO OUT
EXT.
CONTROLS
DAMPER PEDAL 1 PEDAL 2 VOLUME
PEDALBOARDTHRUINOUT 1OUT 2CONTRAST
MIDI
VIDEO OUT
RGBTV
GENERALMUSIC
GENERALMUSIC
MOD.
SER.
AC~
MADE IN ITALY by GENERALMUSIC
D
Fl
N
“
COMPLIES WITH THE LIMITS FOR A ”CLASS B“ COMPUTING
DEVICE PURSUANT TO SUBPART J OF PART 15 OF FCC RULES”
CAUTION
AVIS
: RISQUE DE CHOC ELECTRIQUE-NE PAS OUVRIR
GENERALMUSIC
RISK OF ELECTRIC SHOCK
DO NOT OPEN
LEFT RIGHT/M OUT 1 OUT 2 LEFT RIGHT/M
AUDIO IN AUDIO OUT
EXT.
CONTROLS
DAMPER PEDAL 1 PEDAL 2 VOLUME
PEDALBOARDTHRUINOUT 1OUT 2
CONTRAST
MIDI
VIDEO OUT
RGBTV
SPEAKERS
CONTRAST
VIDEO
TV - RGB
MIDI
INTERFACE
PEDAL
BOARD
AUDIO IN
LEFT - RIGHT(M)
AUDIO OUT
LEFT - RIGHT(M)
CONTROL
PEDALS
EXT (Send/Return)
OUT 1 - OUT 2
SPEAKERS
POWER
SWITCH
(WX2)
POWER
SWITCH
(WX400)
1 - 10
Owner's Manual
Getting Started
POWER SWITCH
The power switch on the WX2 is located on the rear panel - on the WX400, it is positioned
on the extreme right hand side of the keyboard.
THE INTERNAL AMPLIFIER
WX Sounds are enhanced by 20+20 Watt Stereo Amplification in the WX2 and 40+40
W Stereo Amplification in the WX400.
SPEAKERS SOCKET (WX400)
The WX400 includes a sound box containing the instrument’s speakers. The box is
connected to the “SPEAKERS” socket on the rear panel by means of the cable (with a
stereo jack) attached to the box. Read the WX400 assembly instructions.
The Master potentiometer on the WX control panel controls the instrument’s overall
volume.
AUDIO OUT LEFT-RIGHT/M OUTPUTS
If you want to unleash more audio power in stereo, you can connect a mono audio cable
to each of the “Audio Out” jacks marked Left, Right/M. Connect the other end of each
cable to your mixing board or PA system inputs.
If only one input is available, use the WX’s Right/M output to get the full signal in mono.
THE EFFECTS SEND/RETURN JACKS (Ext ’‘ Out 1 - Out 2)
Sound sources which connect to the WX Audio In (L/R) cannot be processed by the WX
Effects Processor. The Effects Send/Return outputs can be used to process instruments
connected to the Audio In inputs and then return them to the main WX mix.
LEFT RIGHT/M
AUDIO IN
OUT 1 OUT 2
EXT.
LEFT RIGHT/M
AUDIO OUTCONTROLS
DAMPER PEDAL 1 PEDAL 2 VOLUME
PEDALBOARDTHRUINOUT 1OUT 2
MIDI
CONTRAST
VIDEO OUT
RGBTV
Send/Return
Output (from instrument connected
to Audio In)
Return (to internal amplification
and/or Audio Out )
To Effect
From Effect
SEND/RETURN CABLES
RingTip
Effects Device
Send/Return
Effects Device
Each EXT ‘’ jack (Out 1 - Out 2) on the WX rear panel is a stereo jack. If you connect
a Send/Return cable to one of these jacks, the Tip connects to the output and the Ring
serves as the signal Return. Therefore, you can process the sound with an external effect
(reverb, chorus, distortion, etc.) and return it to the WX internal amplifier and/or Audio
Outputs (L/R).
AUDIO IN LEFT-RIGHT/M INPUTS
To exploit the WX internal amplifier, you can connect audio cables from an external
sound source (a microphone, a musical instrument or a cassette recorder) to the input

Owner's Manual
1 - 11
Getting Started
[Left, Right/M] jacks. There is also a facility available in the Mixer function to control
the Treble, Bass and Volume of the incoming audio signal.
CONTROL PEDALS - CONNECTION OF THE FOOTPEDALS
WX has two jacks (Pedal 1 - Pedal 2) which can be programmed to accept Switch
Control pedals (logic) or Continuous Control pedals (analog), a third jack for a Switch
Control pedal (logic) marked Damper and a Continuous control jack marked Volume,
preset to control the standard MIDI Foot command - MIDI O4.
The default status of the programmable jacks varies according to the instrument.
In WX2 (all optional): Pedal 1 = Volume - Pedal 2 = Start/Stop - Damper = Damper
In WX400:Pedal 1 = Soft - Pedal 2 = Sostenuto - Damper = Damper.
The pedals in model WX400 are enclosed in the pedal cross-bar of the instrument. To
connect the Pedals, follow the assembly instructions at the begining of the owner’s
manual. The jacks are marked 1, 2 and 3 where jack 3 refers to the Damper.
The three Pedal jacks Pedal 1, Pedal 2 and Damper are all function assignable and have
reversible polarity options, allowing the connection of pedals of different brands.
PEDALBOARD
You can connect a Pedalboard to this jack.
MIDI CONNECTIONS
The MIDI implementations are one of the attractions of WX, which makes it an excellent
MIDI controller. Both models are fitted with a MIDI IN, a MIDI THRU and two MIDI
OUT ports (Out 1 - Out 2).
The WX2/WX400 Keyboard will respond to Note messages transmitted to MIDI IN for
all notes C-1 – G9 (note numbers 0 - 127). In some cases, the higher notes will not sound.
HEADPHONES
Both WX models have a headphone jack on the left front edge of the instrument, below
the Track-ball.
Connect a pair of headphones for private listening without disturbing others in the same
room. The headphone Volume is controlled by the Master Volume slider. Inserting the
headphone jack disconnects the internal speakers but does not affect external amplification if used.
THE VIDEO INTERFACE - VIDEO OUT JACKS (TV and RGB)
These two rear-panel outputs provide various possibilities of interfacing with a monitor.
If you possess an “ATARI” type colour monitor, the 13 pin DIN connector marked RGB
sends a signal which is compatible (100%) with the standard adopted by the said monitor.
For high quality images therefore, it is sufficient to connect the monitor directly to the
WX RGB connector using the cable supplied with the monitor.
To connect your WX to a domestic TV screen, the latter must be equipped with a SCART
connector, or a COMPOSITE VIDEO jack. In the first case, you can connect the RGB
output directly to the SCART connector by means of the supplied video cable. In the
IMPORTANT:
The VIDEO outputs
are operative only if
the instrument is fitted
with the optional
VIDEO INTERFACE
(a small printed
circuit).
Models not equipped
with the V.I. are
identified by a remov-
able label applied near
the rear panel Video
Out sockets.
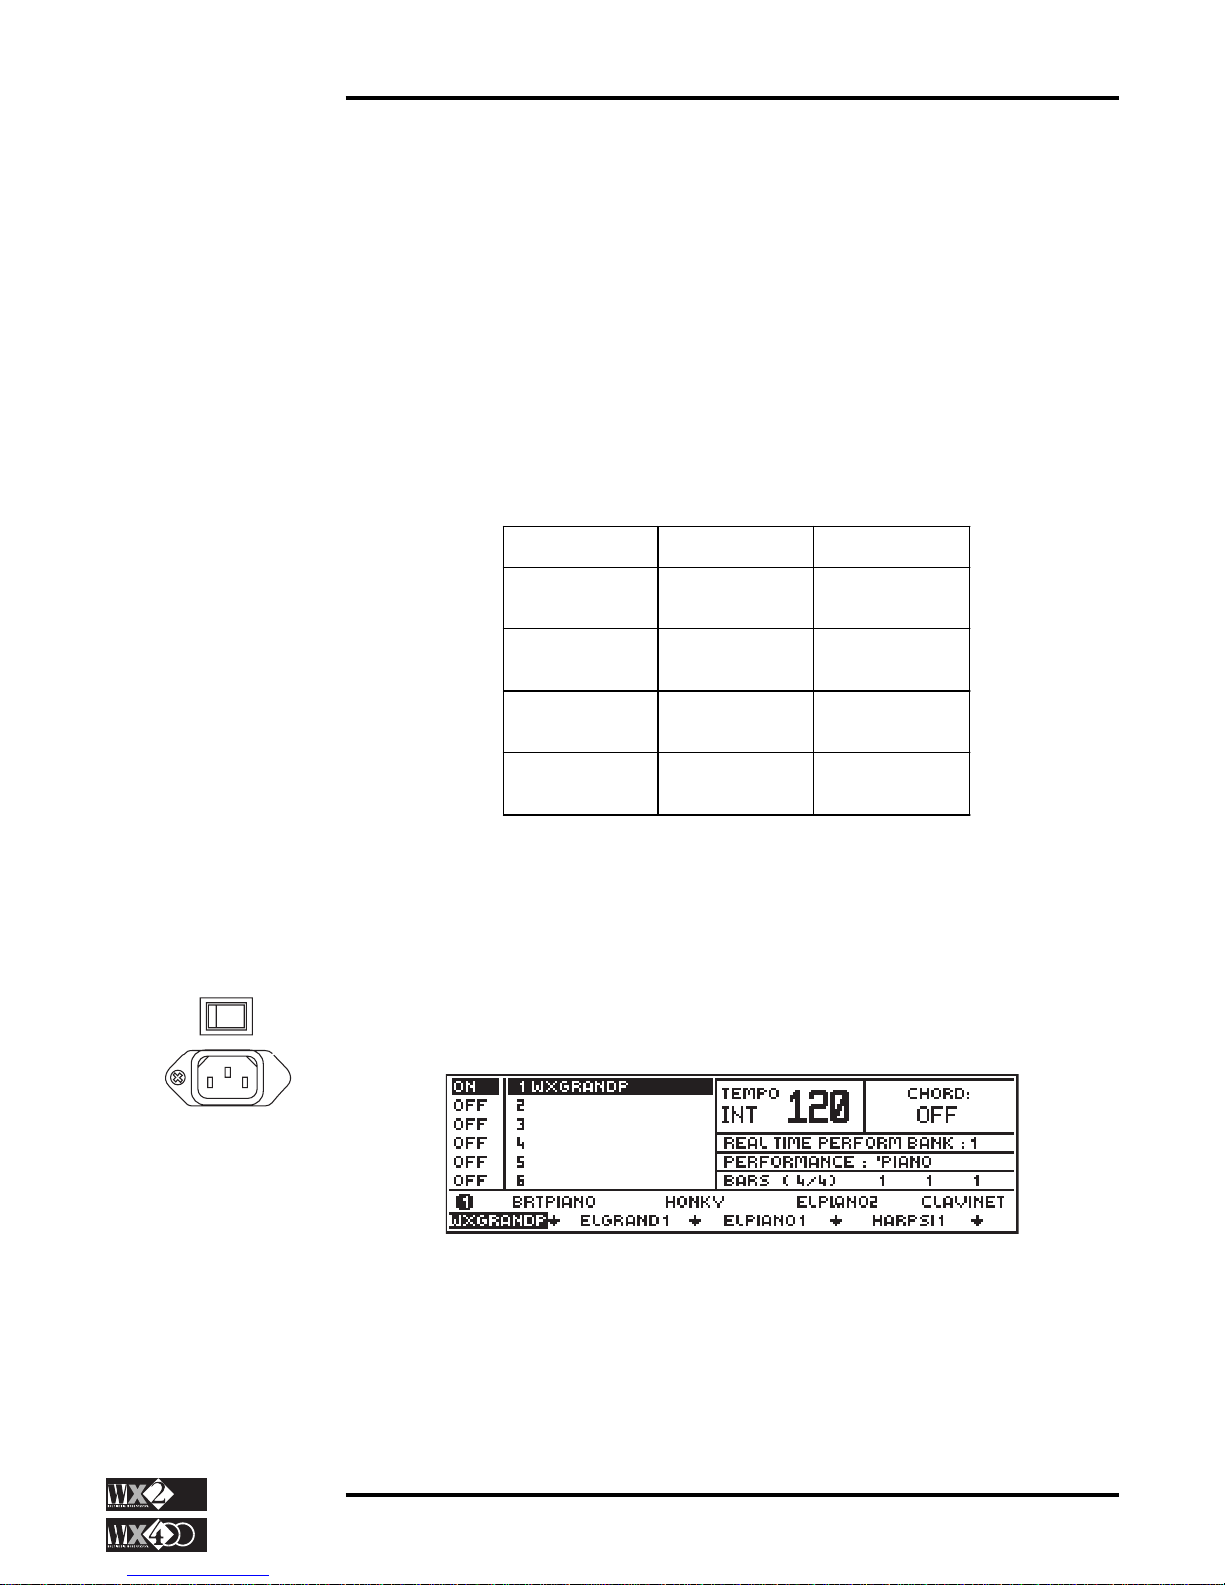
1 - 12
Owner's Manual
Getting Started
second case, use is made of the RCA jack marked “TV” which sends a “composite video”
signal. Attention! This is not a modulated signal and should not be connected to the TV
aerial socket!! This signal is analogous to the one used by domestic video recordings,
therefore, it is sufficient to use a normal RCA cable normally supplied with video
recorders. In this case, however, the quality of the image is inferior to that obtained from
the first two cases.
As a last resort not foreseen by the specifications, you can connect to a video recorder
that is already connected to a TV, exploiting the rear-panel TV RCA jack. This is the only
case where you can project the images generated by WX on a TV screen not equipped
with a SCART connector or a composite video input. The quality of the images, however,
is greatly reduced owing to the exploitation of the modulator incorporated in the video
recorder.
The following table summarises all the possibilities:
MONITOR VIDEO OUT ACCESSORIES
ATARI
(Colour)
RGB (Standard Atari
cable)
TV or Computer
Scart
RGB WX VIDEO
CABLE
TV
Video input
TV RCA VIDEO
CABLE
TV TV Video Recorder
RCA Video cable
POWERING UP
The power switch on model WX2 is located next to the power cable connector on the rear
panel. Model WX400 has the power switch located on the extreme right of the keyboard
facia.
When you power up, the display shows the WX2 or WX400 logo for a few seconds, then
the “Real Time Performance” display will appear.
The Graphic Liquid Crystal backlit display is your principal means of communication
with the instrument. A glance at the display shows you where you are at all times and
pressing a button on the control panel corresponds to a display change almost every time.
The display’s contents are discussed in a later chapter.
Note:
You can connect to a
colour computer
monitor provided it is
fitted with a SCART
socket.
IMPORTANT:
The VIDEO outputs
are operative only if
the instrument is fitted
with the optional
VIDEO INTERFACE
(a small printed
circuit).
Models not equipped
with the V.I. are
identified by a remov-
able label applied near
the rear panel Video
Out sockets.
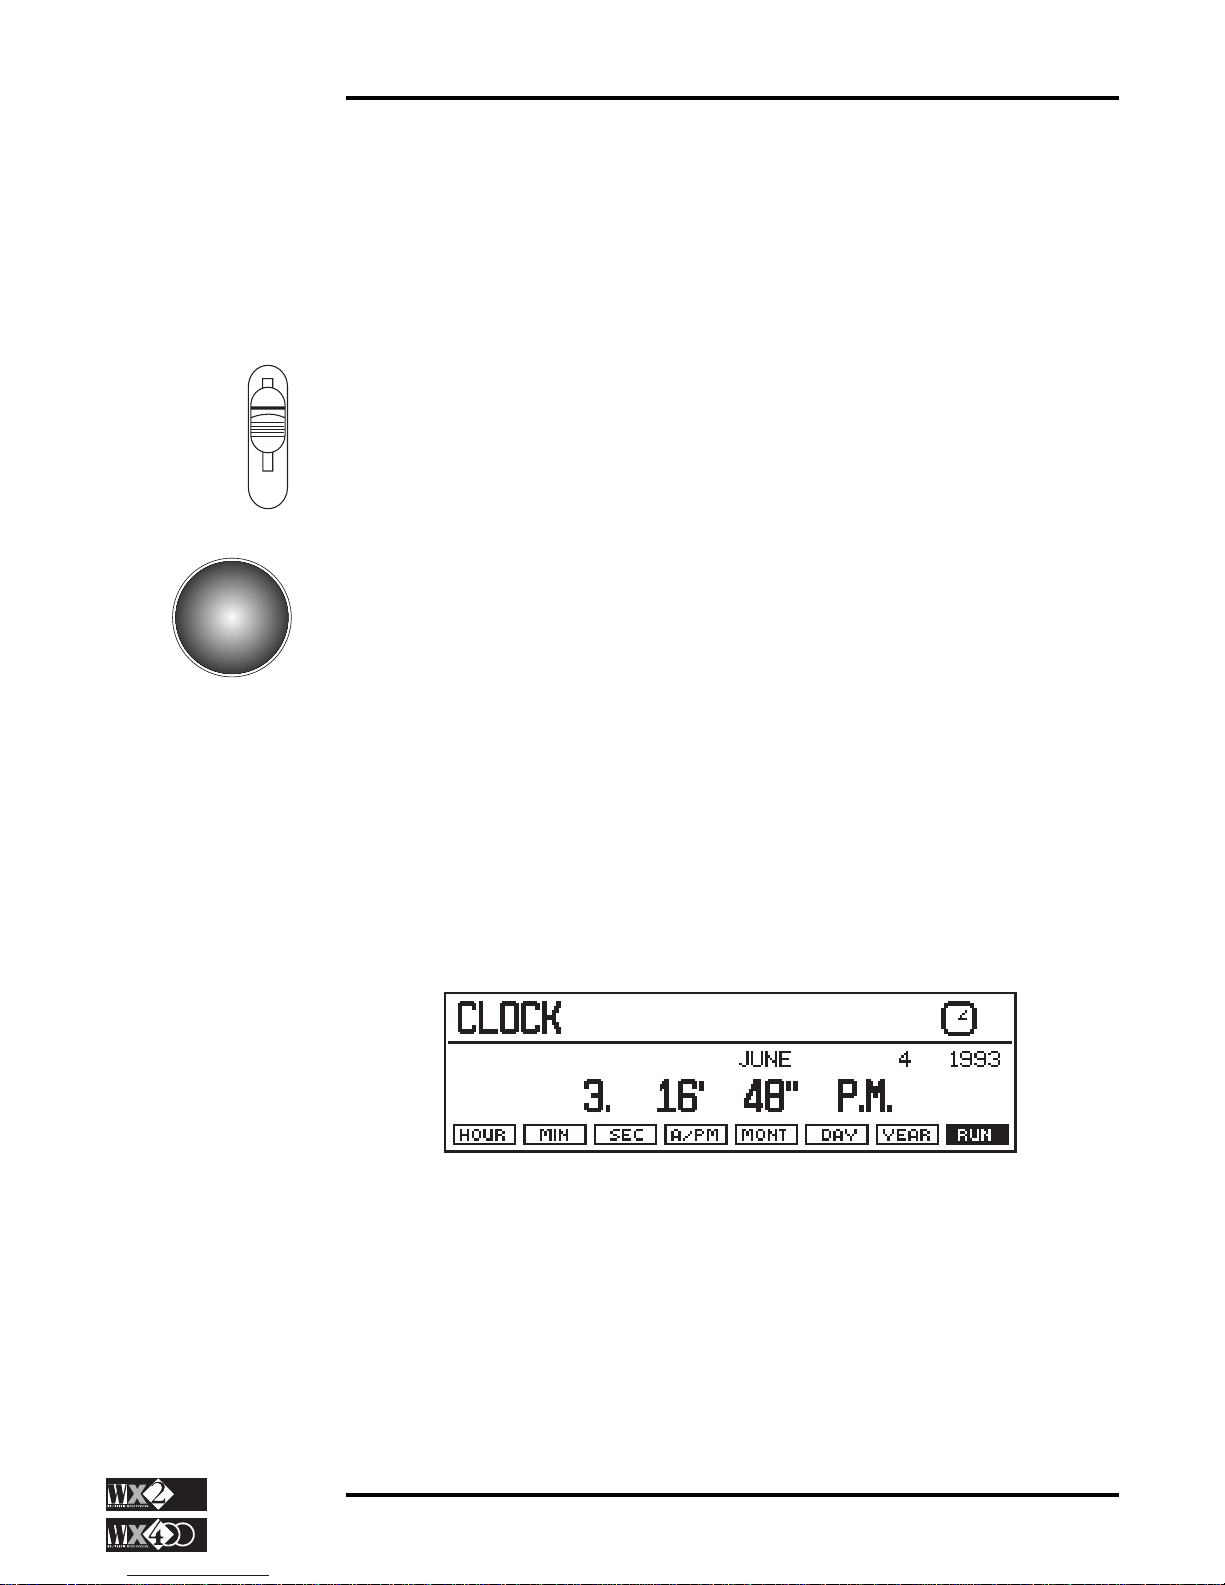
Owner's Manual
1 - 13
Getting Started
CONTRAST
If the display appears too dark or too light, you can adjust the contrast by means of the
small rear-panel control. It may require adjustment for different viewing angles.
The Keyboard
The WX Keyboard sends and receives Attack and Release velocity, sends mono
(channel) Aftertouch messages and receives mono and poly Aftertouch messages.
Master Volume Slider
This slider controls the volume of the Stereo Audio Output pair and the headphone jack.
The Ext Out 1 and Out 2 outputs and MIDI Volume are not affected by the Master
Volume slider.
Track Ball
This control provides the Pitch and Modulation functions, the first obtained by left/right
movements, the second by up/down movements. Intermediate levels are also possible
with diagonal movements, obtaining both effects simultaneously.
Both controls are fixed and cannot be programmed. However, both controls can be
enabled or disabled for each Track of any Performance.
Before getting to grips with your unit, set the Internal
clock and calendar....
Your WX has a digital clock and calendar which is backed by a re-chargeable NickelCadmium battery. When the unit is switched off, the clock/calendar continues to operate.
Every time the instrument is powered up, the battery is re-charged.
Procedure
◆ Press CLOCK in the Edit section to access Clock mode:
◆ Press the Function button (F1…F8) corresponding to “HOUR” and rotate the Dial
to set the correct hour.
◆ Repeat the procedure for the Minutes and Seconds.
◆ Pass to the Calendar by selecting “DAY” and rotate the Dial to select the correct
day.
◆ Repeat the procedure for the “MONTH” and “YEAR”.
◆ Press “RUN” to start the Clock/Calendar.
◆ Press “CLOCK” or “ESC” to escape from the display.
MASTER

1 - 14
Owner's Manual
Getting Started
USE ONLY GENERALMUSIC SOFTWARE
It is important that you use only Generalmusic software! Whether you are an amateur or
a professional, you should know that:
a) any software that you use must comply with the laws currently in force, with the
SIAE (Italian Authors and Editors Society), with copyright laws and with
publishers who reserve all the rights for public viewing and synchronisation of
texts (WX);
b) Generalmusic disks comply in all respects with the laws currently in force;
c) our software is original, unedited, programmed by highly expert technicians/
musicians who are perfectly acquainted with all Generalmusic equipment;
d) the quality of our library, in continuous expansion with the latest titles from the
recording industry as well as the classics for all musical tastes, is unanimously
recognised and at your complete disposal from the best musical instrument stores.
All original Generalmusic disks have the Generalmusic logo printed on the metal
protection plate and on all our covers.
GENERALMUSIC
®
For your keyboard or expander, ask your dealer only for original Generalmusic software.
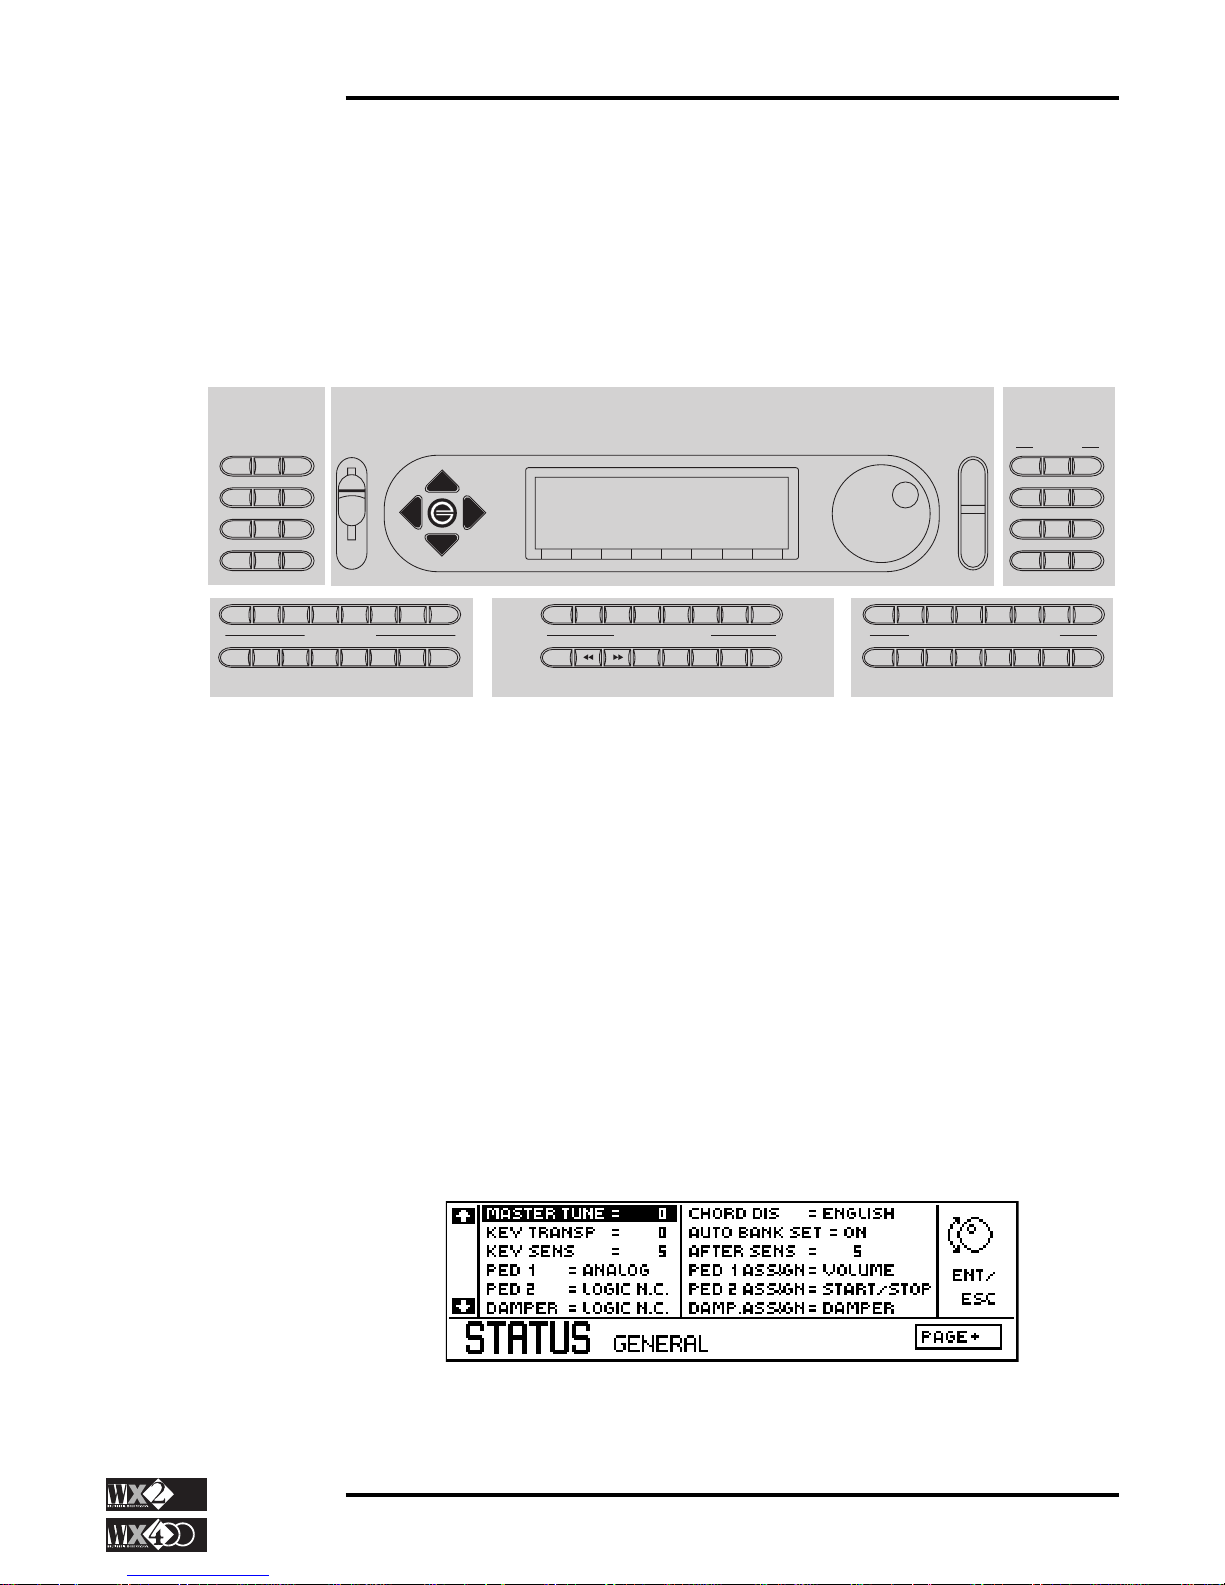
Owner's Manual
2 - 1
Interface Basics
CHAPTER 2 - INTERFACE BASICS
In this chapter, you can learn how to move around the control panel and start to get
acquainted with the principal playing modes as well as the selection procedures. The
illustration below shows how the instrument’s control panel is divided into various
zones, each providing a primary operation: edit mode, navigation and data entry,
sequencer edit, performance & style bank selection, sequencer and user controls and
sound bank selection.
NAVIGATION AND DATA ENTRY
Navigation and Data Entry tasks are performed within the Display area and include the
Cursor Diamond, the Data Entry Wheel, the Ent/Esc buttons and the Function buttons
F1…F8. The PAGE+ and PAGE- buttons of the Edit section also contribute to the
navigating operations in the display area.
The display
The backlit LCD graphic display is certainly the most important interface between you
and the WX. A great deal of information is constantly available due to the display’s 240
x 64 pixel dimensions and each button pressed reflects a command or editing change.
Each mode displays functions and parameters organised into smaller, related groups and
the entire “picture” is called a Page. Accessing a mode for the first time opens an “entry
level page” and in many cases, the current mode will have one or more additional pages,
selected with the PAGE+/- navigation buttons.
Below we examine the entry level display for the Status mode.
The lower display area shows the current mode (the mode identifier) and to the right,
PAGE+ reminds you that other pages follow.
MASTEREDIT
DISK PERF
SOUNDS
MIXER EFF1/2 MIDI
STATUS SPLITS ARRAN
CLOCK PAGE+PAGE-
F1 F2 F3 F4 F5 F6 F7 F8
SEQ. EDIT
MASTER COPY MOVE
ERASE
INS/DEL
TRANSP
QUANT MICRO NAME
OPTION UNDO DEMO
PERFORMANCES & STYLES BANKS
PERF 1 PERF 2 PERF 3 P.SONG STYLE 1 STYLE 2 STYLE 3 STYLE 4
DANCE BEAT ROCK'n JAZZ LATIN FOLK ETHNIC POP
SEQUENCER & USERS
REC SCORE TEMPO SYNC M.PERF SONGS
F1 F2 F3 F4 F5 F6 F7 F8
PIANO CHROM ORGAN GUITAR BASS STRING ENSEM BRASS
REED PIPE SYNLD SYNPAD SYNEFF ETHNIC DRUMS
SAMPLES
SOUND BANKS
E
N
T
E
S
C
NAVIGATION AND DATA ENTRY SEQUENCER
EDIT
EDIT
MODES
SOUND BANKS SEQUENCER CONTROLS AND USERS PERFORMANCE/ STYLE BANKS
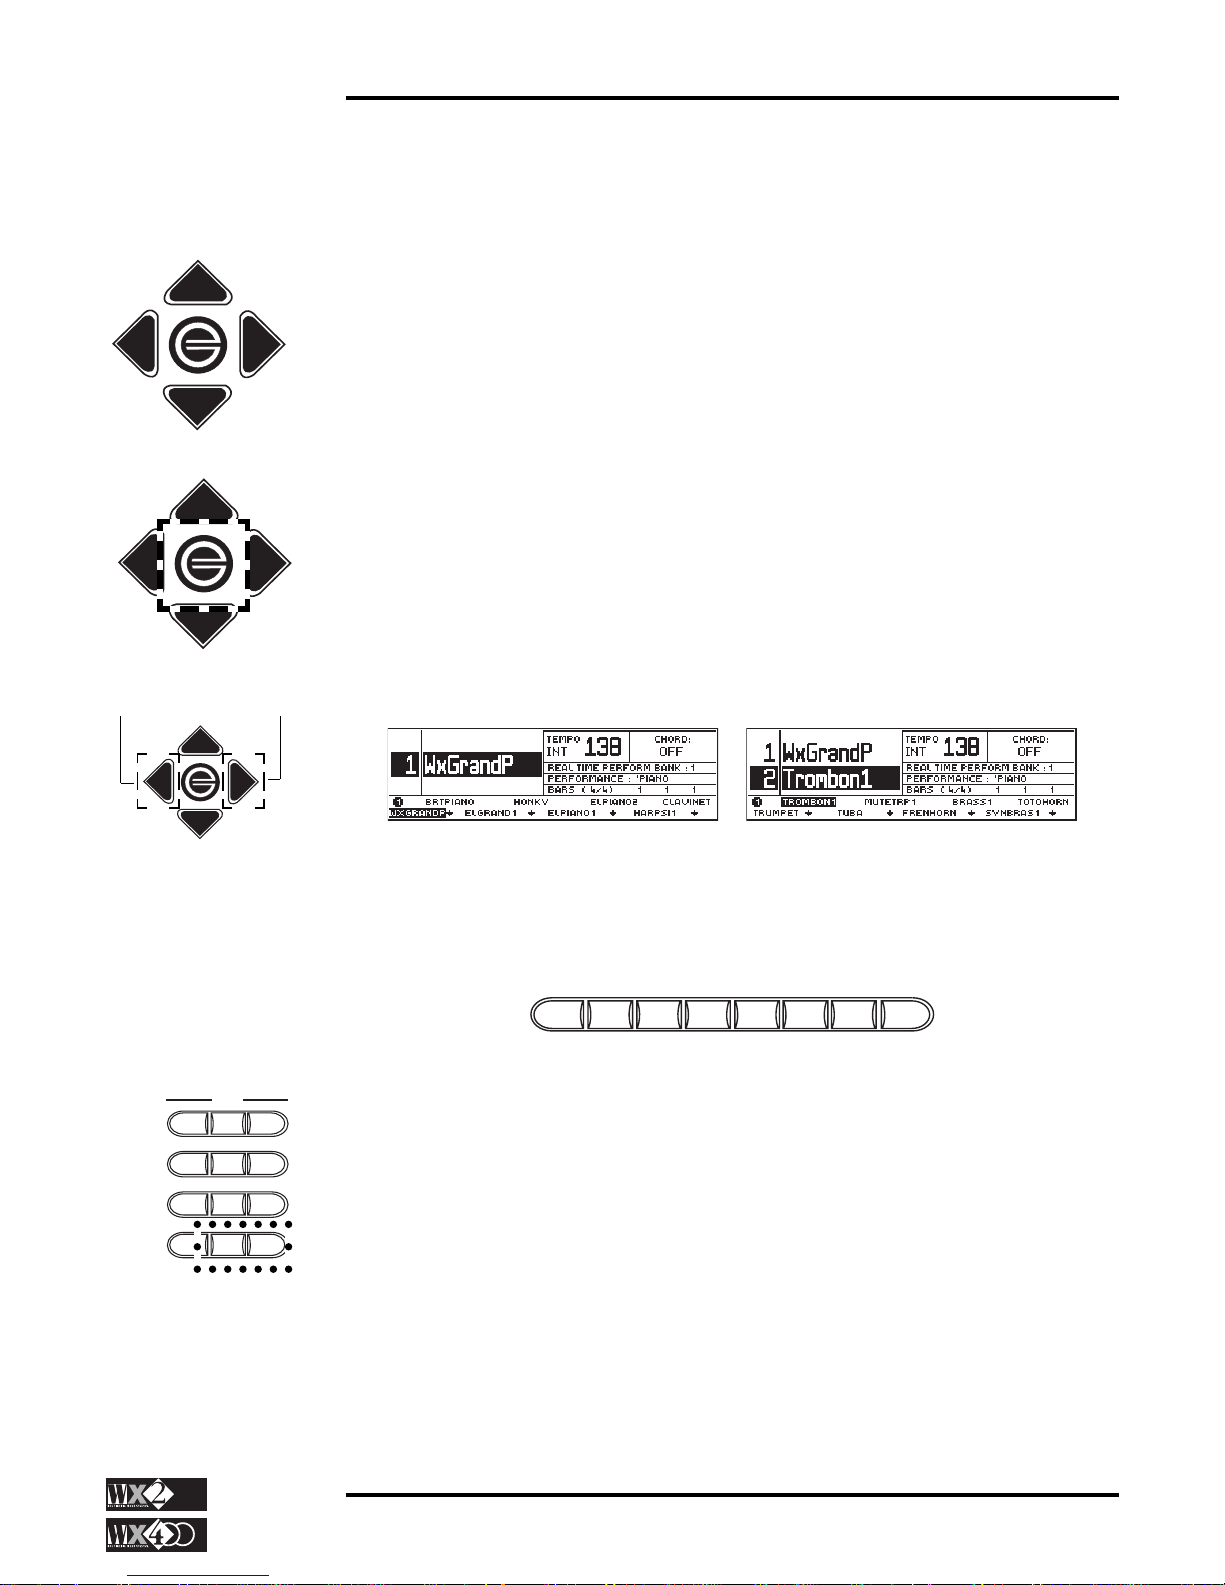
2 - 2
Owner's Manual
Interface Basics
The left and right display areas above the identifier show various functions. The currently
selected function is shown in reverse-highlight.
THE CURSOR DIAMOND
Your principal navigating tool is the Cursor Diamond, arranged in four arrows in a
diamond fashion and a central “On/Off” switch, called the “Toggle”.
This control moves the display’s cursor around the currently selected page, in the
directions indicated by the “arrows”. The display cursor is a reverse-highlighted
rectangle which marks the value of the currently selected parameter.
Selecting Tracks or performing Editing tasks involves selecting various elements in the
display and changing their values. The Tracks or Parameters are selected by highlighting
them and their status is changed with Data Entry Dial or Toggle, as shown below.
The “TOGGLE” - the central Cursor diamond button
The central button of the Cursor Diamond is used as a Data Entry control but, its use is
limited to toggling between “On” and “Off” situations.
Zoom in - zoom out
In Bank situations where Tracks are displayed, the right cursor diamond zooms in on a
single Track or two layered Tracks, so that you can view them in larger type.
Normal size is restored with the left cursor diamond.
The Function buttons (F1…F8)
In many edit situations, the Function buttons F1…F8 are used to navigate from one
function to another.
F1 F2 F3 F4 F5 F6 F7 F8
The function of these buttons change depending on the currently selected mode.
The PAGE+ and PAGE- buttons of the Edit section
The two buttons are exclusively used to change page. Edit modes which consist of more
than one page will show PAGE+ on the entry level page. Depending on how many pages
follow, you will see “Page+/Page-” or “Page-” on subsequent pages PAGE + advances
to the next page, PAGE - returns to the previous one.
Zoom out Zoom in
EDIT
DISK PERF
SOUNDS
MIXER EFF1/2 MIDI
STATUS SPLITS ARRAN
CLOCK PAGE+PAGE-
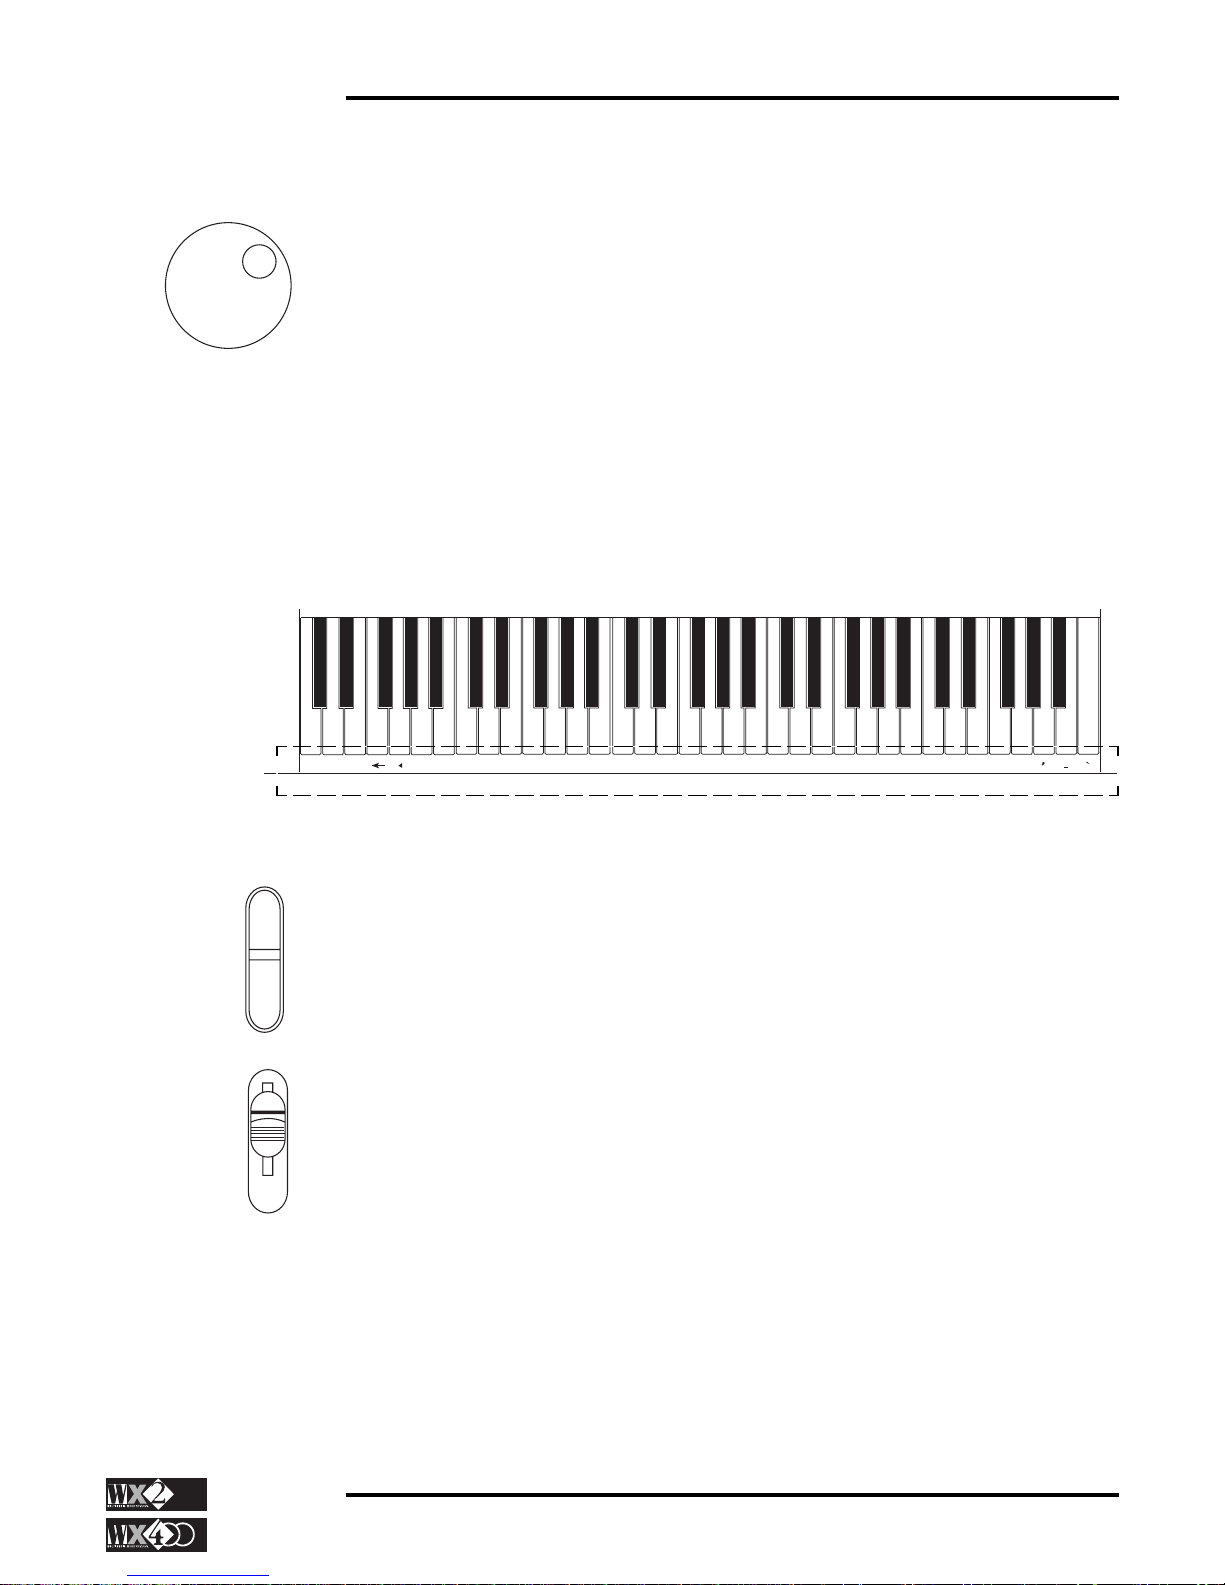
Owner's Manual
2 - 3
Interface Basics
DATA ENTR Y
All Data Entry tasks are performed within the display area.
The Data Entry Wheel
Data Entry is performed mainly using the Data Entry Wheel (or Dial) to the right of the
display. This control is particularly useful owing to the possibility of providing
continuous entry of data - you can enter large or small changes very quickly.
Rotating in a Clockwise direction increases a value while an anticlockwise direction
decreases it.
Turning slowly increases/decreases by one increment. Turning rapidly jumps increments in large steps.
The Keyboard
The Keyboard is a source of alphanumeric entries when you are in situations which
require a name to be written to identify a Performance, a Song, a Disk or other.
Numbers and letters are entered one character at a time by pressing the relative key. After
the entry, the flashing cursor moves to the next position automatically. If you make a
mistake, there is a Return key (<––) to cancel the last entry, a Delete key to cancel the
entry at the cursor position, a Space key to create a space between two entries, a back
space key ( § ) to move the cursor backwards one step at a time and a Shift key to toggle
between uppercase and lowercase letters. The Dial moves the cursor left or right.
Up to 8 characters can be inserted (11 for Disk or SRam) and, when you have entered the
name, confirmation is required by pressing Enter.
The Ent and Esc buttons
The Ent button accesses the SAVE PERFORMANCE command and confirms all
situations which show the message “Press Ent to confirm” or “Yes”.
The Esc (escape) button confirms a “No” situation, leaves the current editor and returns
to the main display.
MASTER
E
N
T
E
S
C
SHIFT SPACE DELETE
ABCDEF GH I J K LMNO PQRS T UVWXYZ
,.
0987654321
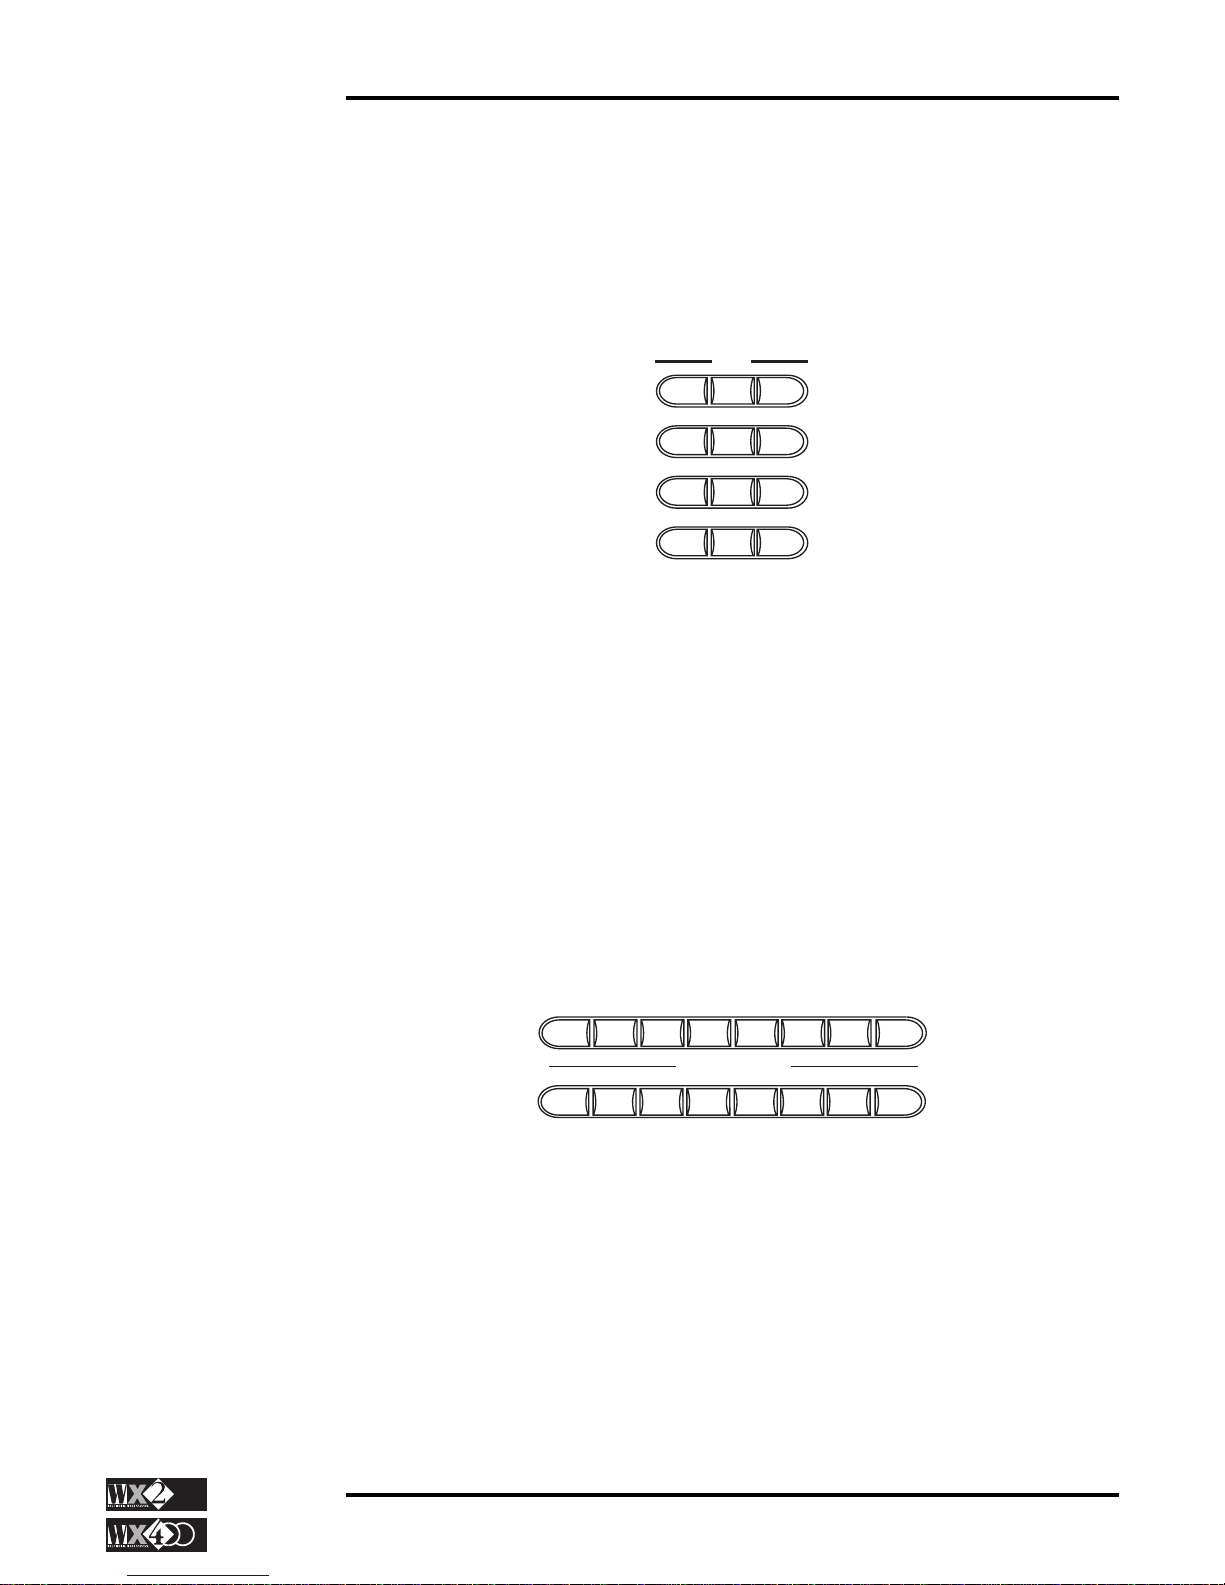
2 - 4
Owner's Manual
Interface Basics
MASTER VOLUME
This slider regulates the overall Volume of the instrument.
THE EDIT MODES
The very heart and control centre of the entire WX system, the Edit section consists of
10 programming modes which render WX2/WX400 operative.
EDIT
DISK PERF
SOUNDS
MIXER EFF1/2 MIDI
STATUS SPLITS ARRAN
CLOCK PAGE+PAGE-
Each Edit mode is identified for the kind of operations that are performed in that mode.
In some cases, there is a sub-editor which provides a set of parameters necessary to edit
the function found in the current mode.
All the modes consist of an entry-level page and most have one or more pages which are
selected with the PAGE+ and PAGE- buttons.
You can pass from one accessed edit mode to another without having to leave the
currently selected mode.
The WX keyboard will always be active, regardless of the mode you are in. In fact, the
only time you can’t play it is when you are in the middle of a “Load All” disk operation
or while the unit is powering up.
THE SOUND BANKS
These contain all the Sounds available in WX, arranged in Family groups according to
General MIDI (Piano, Bass, Guitar, etc.).
PIANO CHROM ORGAN GUITAR BASS STRING ENSEM BRASS
REED PIPE SYNLD SYNPAD SYNEFF ETHNIC DRUMS
SAMPLES
SOUND BANKS
Each Family consists of three banks of eight related Sounds, except the Samples family
with eight banks of eight, and the Drum family with 16 banks of 8 (2 Banks are
exclusively Drumkits). All totals to over 500 Sounds1, instantly available in all playing
modes.
NOTE: 1
Only if all the Samples
slots are occupied. In
default conditions, the
total number of sounds
instantly available are
472.
 Loading...