

Generalmusic WK3 World Keyboard Owner's Manual


CAUTION
RISK OF ELECTRIC SHOCK
DO NOT OPEN
The lightning flash with arrowhead symbol,
within an equilateral triangle, is intended to alert
the user to the presence of uninsulated “dangerous voltage” within the product’s enclosure
that may be of sufficient magnitude to constitute a risk of electric shock to persons.
The exclamation point within an equilateral triangle is intended to alert the user to the presence of important operating and maintenance
(servicing) instructions in the literature accompanying the product.
IMPORTANT SAFETY INSTRUCTIONS
INSTRUCTIONS PERT AINING T O A RISK OF FIRE, ELECTRIC SHOCK OR INJURY TO PERSONS
1. Read all the instructions (Safety, Installation and FCC if applicable) before using the product.
2. Do not use this product near water (example, near a swimming pool, spa, tub, sink or wet basement) and do not expose
to rain.
3. This product should be used only with a cart or stand that is recommended by the manufacturer, or should be used with
the components supplied. If this product requires assembly before being played, take special care to follow the assembly
instructions found at the back of the manual.
4. This product, whether alone or in combination with an amplifier and headphones or speakers, may be capable of produc-
ing sound levels that could cause permanent hearing loss. Do not operate for long periods of time at a high volume level
or at a level that is uncomfortable. If you experience any hearing loss or ringing in the ears, you should consult an
audiologist.
5. WARNING: Do not place this product or any other objects on the power cord, or place it in a position where one could
walk on, trip over or roll anything over power or connecting cords of any kind.
6. This product should be located so that its location does not interfere with its proper ventilation.
7. This product should be located away from heat sources such as radiators, heat registers, or other products that produce
heat.
8. This product should be connected to a power supply only of the type described in the operating instructions or as marked
on the product.
9. This product may be equipped with a polarised line plug (one blade wider than the other). This is a safety feature. If you
are unable to insert the plug into the wall outlet, contact an electrician to replace your obsolete outlet. Do not defeat the
safety purpose of the plug.
10. The power supply cord of the product should be unplugged from the outlet when left unused for long periods of time.
11. Care should be taken so that objects do not fall and liquids are not spilled into the enclosure through openings.
12. This product should be serviced by qualified service personnel when:
a) the power supply cord or the plug has been damaged; or
b) objects have fallen, or liquid has been spilled into the product; or
c) the product has been exposed to rain; or
d) the product does not appear to operate normally or exhibits marked changes in performance; or
e) the product has been dropped, or the enclosure damaged.
13. Do not attempt to service the product beyond that described in the user-maintenance instructions. All servicing should
be referred to qualified service personnel.
14. Some Generalmusic products may have benches and/or accessory mounting fixtures that are either supplied as part of
the product or as optional accessories. Please ensure that benches are correctly assembled and stable and any optional
fixtures (where applicable) are well secured before use.
15. Electromagnetic Interference (RFI) This electronic product utilises digital sample wave processing technology (S.W.P.)
that may adversely affect radio/TV reception. Read the FCC note on the inside back cover of the owner’s manual for
additional information.
SAVE THESE INSTRUCTIONS
GROUNDING INSTRUCTIONS
This product may be grounded. If it should malfunction or breakdown, grounding provides a path of least resistance for
electric current to reduce the risk of electric shock. This product is equipped with a cord having an equipment-grounding
conductor and a grounding plug. The plug must be connected to an appropriate outlet that is properly installed and grounded
in accordance with all local codes and ordinances.
DANGER - Improper connection of the equipment-grounding conductor can result in a risk of electric shock. Check with a
qualified electrician or serviceman if you are in doubt as to whether the product is properly grounded. Do not modify the plug
provided with the product - if it will not fit the outlet, have a proper outlet installed by a qualified electrician.
CAUTION: TO REDUCE THE RISK OF
ELECTRIC SHOCK, DO NOT REMOVE COVER
(OR BACK). NO USER-SERVICEABLE PARTS
INSIDE. REFER SERVICING TO QUALIFIED
SERVICE PERSONNEL.
INSTRUCTIONS PERT AINING T O A RISK OF FIRE, ELECTRIC SHOCK OR INJUR Y TO PERSONS
1. Read all the instructions (Safety, Installation and FCC if applicable) before using the product.
2. Do not use this product near water (example, near a swimming pool, spa, tub, sink or wet basement) and do not expose
3. This product should be used only with a cart or stand that is recommended by the manufacturer, or should be used with
4. This product, whether alone or in combination with an amplifier and headphones or speakers, may be capab le of produc-
5. WARNING: Do not place this product or any other objects on the power cord, or place it in a position where one could
6. This product should be located so that its location does not interfere with its proper ventilation.
7. This product should be located away from heat sources such as radiators, heat registers, or other products that produce
8. This product should be connected to a power supply only of the type described in the operating instructions or as marked
9. This product may be equipped with a polarised line plug (one blade wider than the other). This is a safety feature. If you
10. The power supply cord of the product should be unplugged from the outlet when left unused for long periods of time.
11. Care should be taken so that objects do not fall and liquids are not spilled into the enclosure through openings.
12. This product should be serviced by qualified service personnel when:
13. Do not attempt to service the product beyond that described in the user-maintenance instructions. All servicing should
14. Some Generalmusic products may have benches and/or accessory mounting f ixtures that are either supplied as part of the
15. Electromagnetic Interference (RFI) This electronic product utilises digital sample wave processing technology (S.W.P.)
GROUNDING INSTRUCTIONS
This product may be grounded. If it should malfunction or breakdown, grounding provides a path of least resistance for
electric current to reduce the risk of electric shock. This product is equipped with a cord having an equipment-grounding
conductor and a grounding plug. The plug must be connected to an appropriate outlet that is properly installed and grounded
in accordance with all local codes and ordinances.
DANGER - Improper connection of the equipment-grounding conductor can result in a risk of electric shock. Check with a
qualified electrician or serviceman if you are in doubt as to whether the product is properly grounded. Do not modify the plug
provided with the product - if it will not fit the outlet, have a proper outlet installed by a qualified electrician.


○○○○○○○○○○○
ii Contents
ii Contents
The Utility section 5. 14
The Style Tempo 5. 16
Examples of how to use the Styles 5. 18
• 6 Disk 6. 1
Load operations - Play a Song or MidiFile direct from disk 6. 5
Loading WS and CD compatible files 6. 11
Save Operations 6. 14
Utility functions 6. 21
General disk handling information 6. 26
Precautions to observe when using WK3 disks with a computer 6. 28
• 7 Songs 7. 1
Selecting and playing back Songs 7. 2
Song Playback 7. 3
Displaying lyrics 7. 8
• 8 Song/Styles 8. 1
Selecting and playing back Song/Styles 8. 2
Song/Style Playback 8. 3
• 9 Digital Signal Processor 9. 1
Selecting the effect types 9. 2
Bypassing the effects 9. 4
Regulating the Send levels 9. 5
• 10 MIDI 10. 1
Principal MIDI applications 10. 6
Piloting WK3 with a master keyboard 10. 9
Additional MIDI parameters 10. 12
• 11 New Release (OS update) 11. 1
How to set the new functions 11. 2
Auto Arrange 11. 2
Fingered 1 11. 3
Fingered 2 11. 3
Auto Name 11. 5
REFERENCE GUIDE
• 12 Selection 12. 1
Selecting Performances 12. 1
Selecting Styles 12. 2
Selecting Sounds 12. 4
Selecting Samples 12. 6
Selecting Songs & Song/Styles 12. 7
• 6 Disk 6. 1
• 7 Songs 7. 1
• 8 Song/Styles 8. 1
• 9 Digital Signal Processor 9. 1
• 10 MIDI 10. 1
• 11 New Release (OS update) 11. 1
REFERENCE GUIDE
• 12 Selection 12. 1


○○○○○○○○○○○
iv Contents
iv Contents
• 15 Edit DSP effects 15. 1
How to edit an effect 15. 1
The Reverb parameters 15. 4
The Effects parameters 15. 4
Reverb/Effects tables 15. 6
• 16 User Style recording 16. 1
Recording User Styles 16. 3
Programming the User Style Performance 16. 7
• 17 Song/Style Recording 17. 1
Recording Song/Styles 17. 2
Programming the Song/Style Performance 17. 6
• 18 Song Recording 18. 1
Recording Songs 18. 2
Programming the Song Performance 18. 6
• 19 Sequencer Edit 19. 1
Quantize function 19. 2
Clear function 19. 4
Master Track function 19. 9
Copy function 19. 13
• 20 REC / EDIT 20. 1
Regulating the Mic/Line signal 20. 3
Preparing to sample - select the Splits 20. 4
Programmable Pads Assign 20. 12
APPENDIX
Tables A. i
Midi Implementation chart A xii
Audio/Video Interface
Installation instructions A. xiv
Specifications A. xvi
Index A. 17
• 15 Edit DSP effects 15. 1
• 16 User Style recording 16. 1
• 17 Song/Style Recording 17. 1
• 18 Song Recording 18. 1
• 19 Sequencer Edit 19. 1
• 20 REC / EDIT 20. 1
APPENDIX


○○○○○○○○○○○○○○○○○○○○○○
ii Introduction
ii Introduction
SPECIFICATIONS
• Polyphony & multitimbricity
Maximum polyphony: 64 voices . Multitimbric-
ity: 16 parts (Song mode) or 8 parts (Style
mode). Each part is assigned to a track. In
Style mode, 5 tracks are assigned to the autoaccompaniment section and 3 tracks to the
keyboard.
• Sound Generation
Sounds are based on sampled waveforms
(PCM, Wavetables and Subtractive Synthesis technology) and modified by a series of
macro functions. The instrument’s 32 oscillators generate “single” Sounds (32-note polyphonic) or “layered” Sounds (16 note polyphonic), depending on the number of oscillators used to elaborate the Sound (1 or 2).
• ROM Sounds
ROM (permanent memory) contains 4 Mega-
bytes of samples, which are the source of almost 400 ROM-Sounds.
• Sound Edit
WK3’s Sound Edit function permits quick mod-
ification of Sound and Drumkits, producing ESounds (“Performance-Sounds”) which are
stored in the Performances. The modifications
are stored in Performance tracks to allows
Songs, Styles or Performances to load the correct sounds.
• Sample-RAM
WK3
is fitted with a battery-backed SampleRAM dedicated to the storage of Samples.
Disk-based Samples can be loaded into Sample-RAM, or can be recorded with the
WK3
sampler, a feature made available by installing the optional Audio/Video Interface.
• Digital Signal Processor
WK3
features an on-board T wo Digital Effects
Processors, controlled in real time, enrich the
sound with effects (reverbs and modulations).
Each Performance can store its own effects
configuration and an editor is available to create user-effects which are stored in the Performances.
• Sequencer
The 16-track Sequencer includes a series of
functions that allow Style, Song/Style and
Song recording (real time system), playback
and editing. Also featured is a Lyrics function
(Text) which displays Song lyrics during playback. The Quick Rec function allows the rapid recording of a Song/Style by using existing
Styles. The standard System-RAM allows you
to store up to 7 Song/Styles and 7 Songs.
• Chain, Preload, Play Direct from Disk
The Chain function allows you to chain the
Song/Styles and Songs in memory and play
them one after the other with a single command. The Preload function allows you to
load new data into memory (Songs: WK format and Midi files) while the sequencer is in
play or while you play in real time. The Di-
rect-from-Disk function allows you to play a
Song or MIDI File directly from disk without
loading the data into memory.
• Automatic Accompaniments
Styles provide automatic musical accompa-
niments, consisting of 5 tracks. Every Style
has 4 Variations. Up to 16 disk-based Styles
(User programmable) can be loaded and automatically stored in memory.
• Disk Drive
Data can be stored on 3.5” HD floppy disks in
WK3 format (1.44 megabyte) or standard MSDOS (1.44 megabyte). The Atari ST/Falcon
SPECIFICATIONS
• Polyphony & multitimbricity
• Sound Generation
• ROM Sounds
• Sound Edit
• Sample-RAM

○○○○○○○○○○○○○○○○○○○○○○
iv Introduction
iv Introduction
Generalmusic on Internet: http://www.generalmusic.com
The information in this publication has been carefully prepared and checked. The manufacturers however decline
all liability for eventual errors. All rights are reserved. This publication may not be copied, photocopied or
reproduced in part or in whole without prior written consent from Generalmusic S.p.A. Generalmusic reserves
the right to apply any aesthetic, design or function modifications it considers necessary to any of its products
without prior notice. Generalmusic declines all liability for damage to property or persons resulting from
improper use of the instrument.
Make sure that all internal electronic options are installed by an authorised Generalmusic service technician.
Check with an authorised Generalmusic dealer for information on the closest service center.
Gem by Generalmusic © 1996. All rights reserved.
Apple, IBM, Macintosh, Microsoft, MS-DOS, Windows, Atari, are registered trademarks of the respective
companies.
IMPORTANT INFORMATION
1. The WK3 should contain the following items from the factory:
a) Instrument;
b) 3 Floppy disks (2 Operating System (OS) -Disks, 1 Demo);
c) Owner’s manual.
2. When contacting your retailer or authorized Generalmusic technical assistance centre, always provide the model name and serial number of your instrument (found on the identification plate).
The information in this publication has been carefully prepared and checked. The manufacturers however decline
all liability for eventual errors. All rights are reserved. This publication may not be copied, photocopied or
reproduced in part or in whole without prior written consent from Generalmusic S.p.A. Generalmusic reserves
the right to apply any aesthetic, design or function modifications it considers necessary to any of its products
without prior notice. Generalmusic declines all liability for damage to property or persons resulting from
improper use of the instrument.
Make sure that all internal electronic options are installed by an authorised Generalmusic service technician.
Check with an authorised Generalmusic dealer for information on the closest service center.
Apple, IBM, Macintosh, Microsoft, MS-DOS, Windows, Atari, are registered trademarks of the respective
companies.
IMPORTANT INFORMATION
1. The WK3 should contain the following items from the factory:
2. When contacting your retailer or authorized Generalmusic technical assistance centre, always pro-


○○○○○○○○○○○○○○○○○○○○○○
vi Introduction
vi Introduction

○○○○○○○○○○○○○○○○○○○○○○
User Guide
User Guide
GENERAL SAFETY INSTRUCTIONS
Power source
• Be sure that your local AC mains voltage matches the voltage specified on the name plate before
connecting to the mains.
• DC power cannot be used to power this instrument.
• If the instrument is to remain unused for long periods of time, remove the power cord from its wall
outlet. For safety purposes, remove the power cord in cases of storms with lightning.
Handling the power cord
• Never touch the power cord or its plug with wet hands.
• Never pull on the cord to remove it from the wall socket, always pull the plug.
• Never forcibly bend the power cord.
• If the power cord is scarred, cut or broken, or has a bad contact, it will be a potential fire hazard or
source of serious electric shock. NEVER use a damaged power cord; have it replaced by a qualified
technician.
If water (or other liquid) gets into the instrument
• Do not allow liquids to penetrate the instrument. Do not place containers of liquids on the instrument. If water or liquids penetrate the instrument, remove the power cord from the wall socket at
once, and contact the store where the unit was purchased.
• As a general precaution, never open the unit and touch or tamper with the internal circuitry.
If the instrument plays in an abnormal way
• T urn off the power immediately , remove the power cord from the mains outlet and contact the store
where it was purchased.
• Discontinue using the unit at once. Failure to do so may result in additional damage or other
unexpected damage or accident.
Important notes
• Place the keyboard on an appropriate stand or on a hard, flat surface.
• Do not place heavy objects on the keyboard and avoid leaning on it.
• Before turning on the instrument, be sure to set the volume to a reasonable level (master volume
slider at about two thirds of the course).
• Before connecting your instrument to other devices, always remember to turn off the power to all
units; this will help to prevent damage or malfunction.
General user maintenance
• Clean the external casing and keys of your WK3 Keyboard using a soft, clean, slightly damp cloth
and polish with a soft, dry cloth.
• Never use industrial cleaners, detergents, abrasive cleansers, waxes, solvents or polishes as they
may damage the instrument finish.
• Always turn off the power supply after use and never turn the unit on and off repeatedly in quick
succession as this places an undue load on the electronic components.
GENERAL SAFETY INSTRUCTIONS
Power source
Handling the power cord
If water (or other liquid) gets into the instrument
If the instrument plays in an abnormal way
Important notes
General user maintenance
• Clean the external casing and keys of your WK3 Keyboard using a soft, clean, slightly damp cloth

○○○○○○○○○○○○○○○○○○○○○○
1•2 User Guide
1•2 User Guide
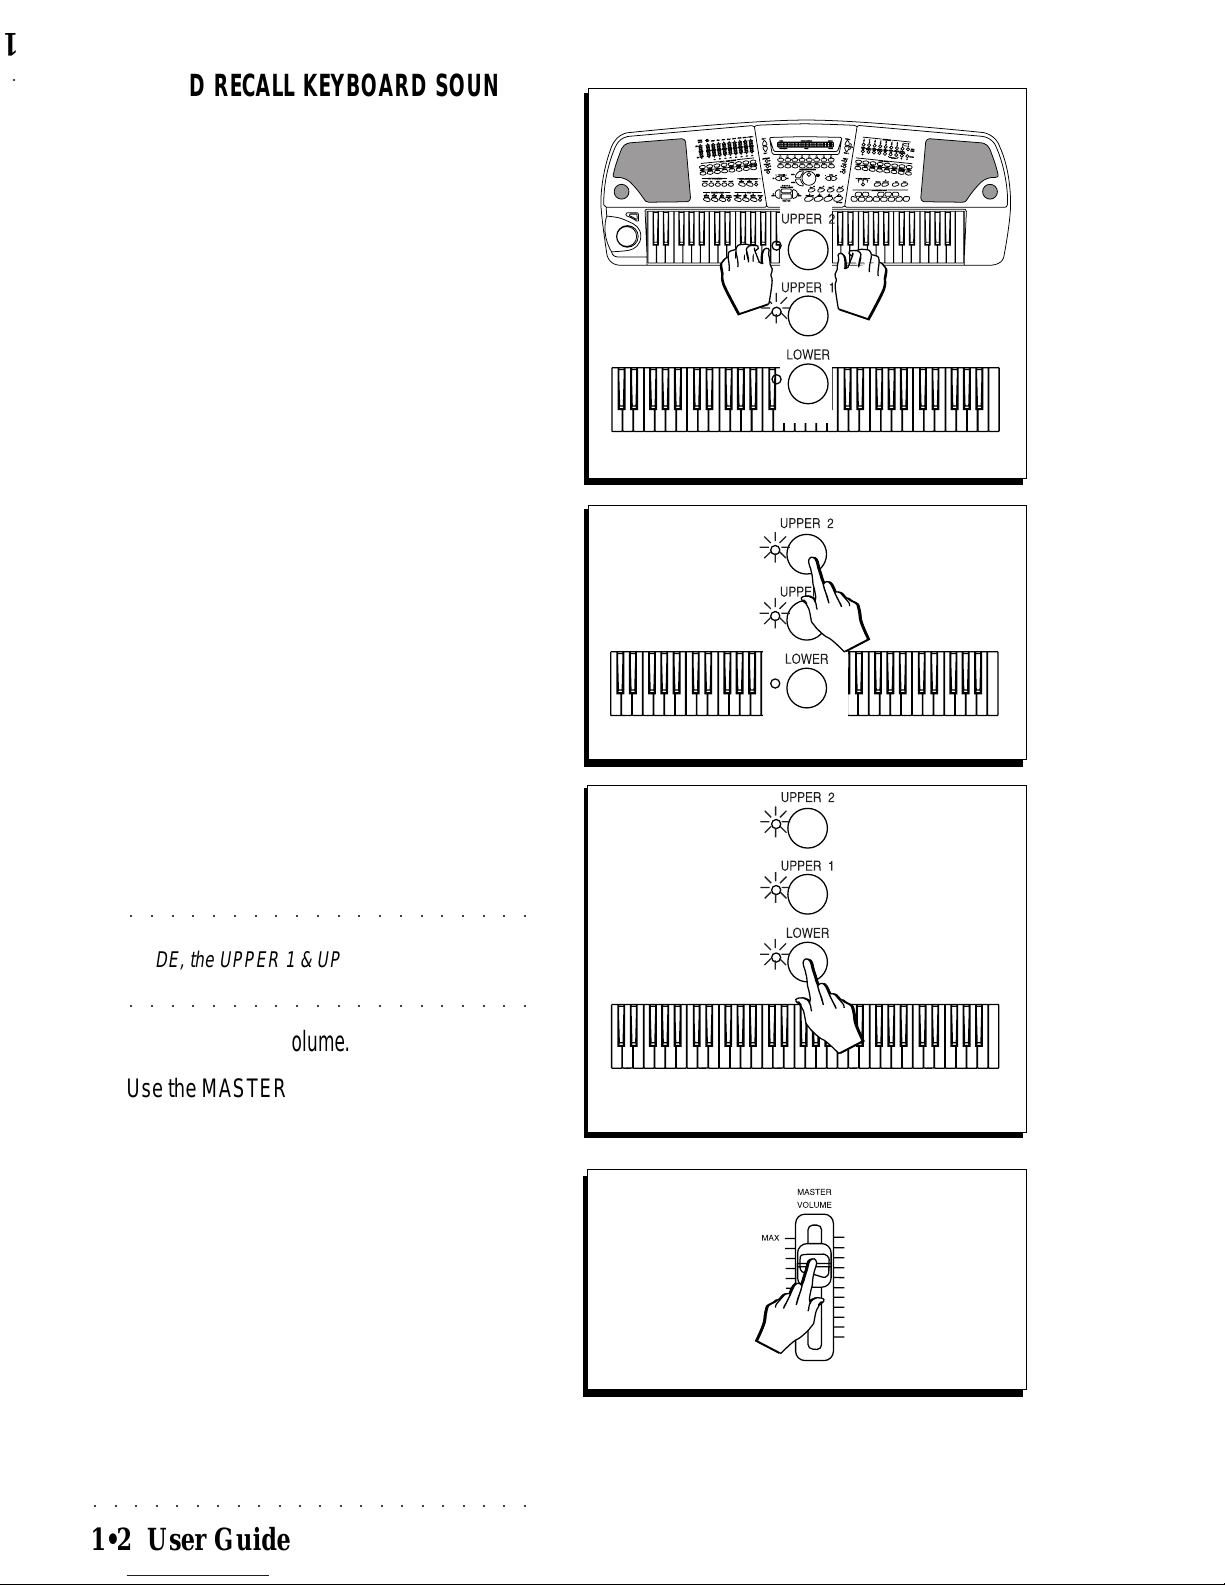
PLAY AND RECALL KEYBOARD SOUNDS
IN REAL TIME
1. Play on the keyboard.
You will hear the “Piano” sound play across
the full keyboard extension.
The group of
Keyboard Activators
(Upper 2,
Upper 1, Lower) shows Upper 1 selected (led
on), indicating that the UPPER 1 keyboard
section is active to play.
The current keyboard mode is set to SPLIT
MODE and the Upper 2 and Lower keyboard
sections are enabled for activation.
2. Press UPPER 2.
A second sound is introduced, layered with
the first. Pressing a single note on the keyboard plays two sounds simultaneously.
3. Press LOWER and play with both hands.
A third sound is introduced and the keyboard
is now divided with a Split Point at note B3.
The LOWER keyboard plays over the range
C2 - B3. The UPPER 1 and UPPER 2 sections are assigned to the range C4 - C7.
○○○○○○○○○○○○○○○○○○○○
©
Note: If you deactivate LOWER in SPLIT
MODE, the UPPER 1 & UPPER 2 sections are
○○○○○○○○○○○○○○○○○○○○
reassigned to the full keyboard extension.
4. Adjust the overall volume.
Use the MASTER VOLUME control to adjust
the general volume of the instrument.
A comfortable level is about two thirds of the
maximum course of the slider.
1
< --------- SINGLE SOUND (Upper 1 or Upper 2) --------- >
2
< --------LAYERED SOUNDS (Upper 1 & Upper 2)-------->
SPLIT Keyboard
< -------Lower------- >< ----- Upp 1 &/or Upp 2------- >
3
4
PLAY AND RECALL KEYBOARD SOUNDS
IN REAL TIME
1. Play on the keyboard.
2. Press UPPER 2.
3. Press LOWER and play with both hands.
4. Adjust the overall volume.

○○○○○○○○○○○○○○○○○○○○○○
1•4 User Guide
1•4 User Guide
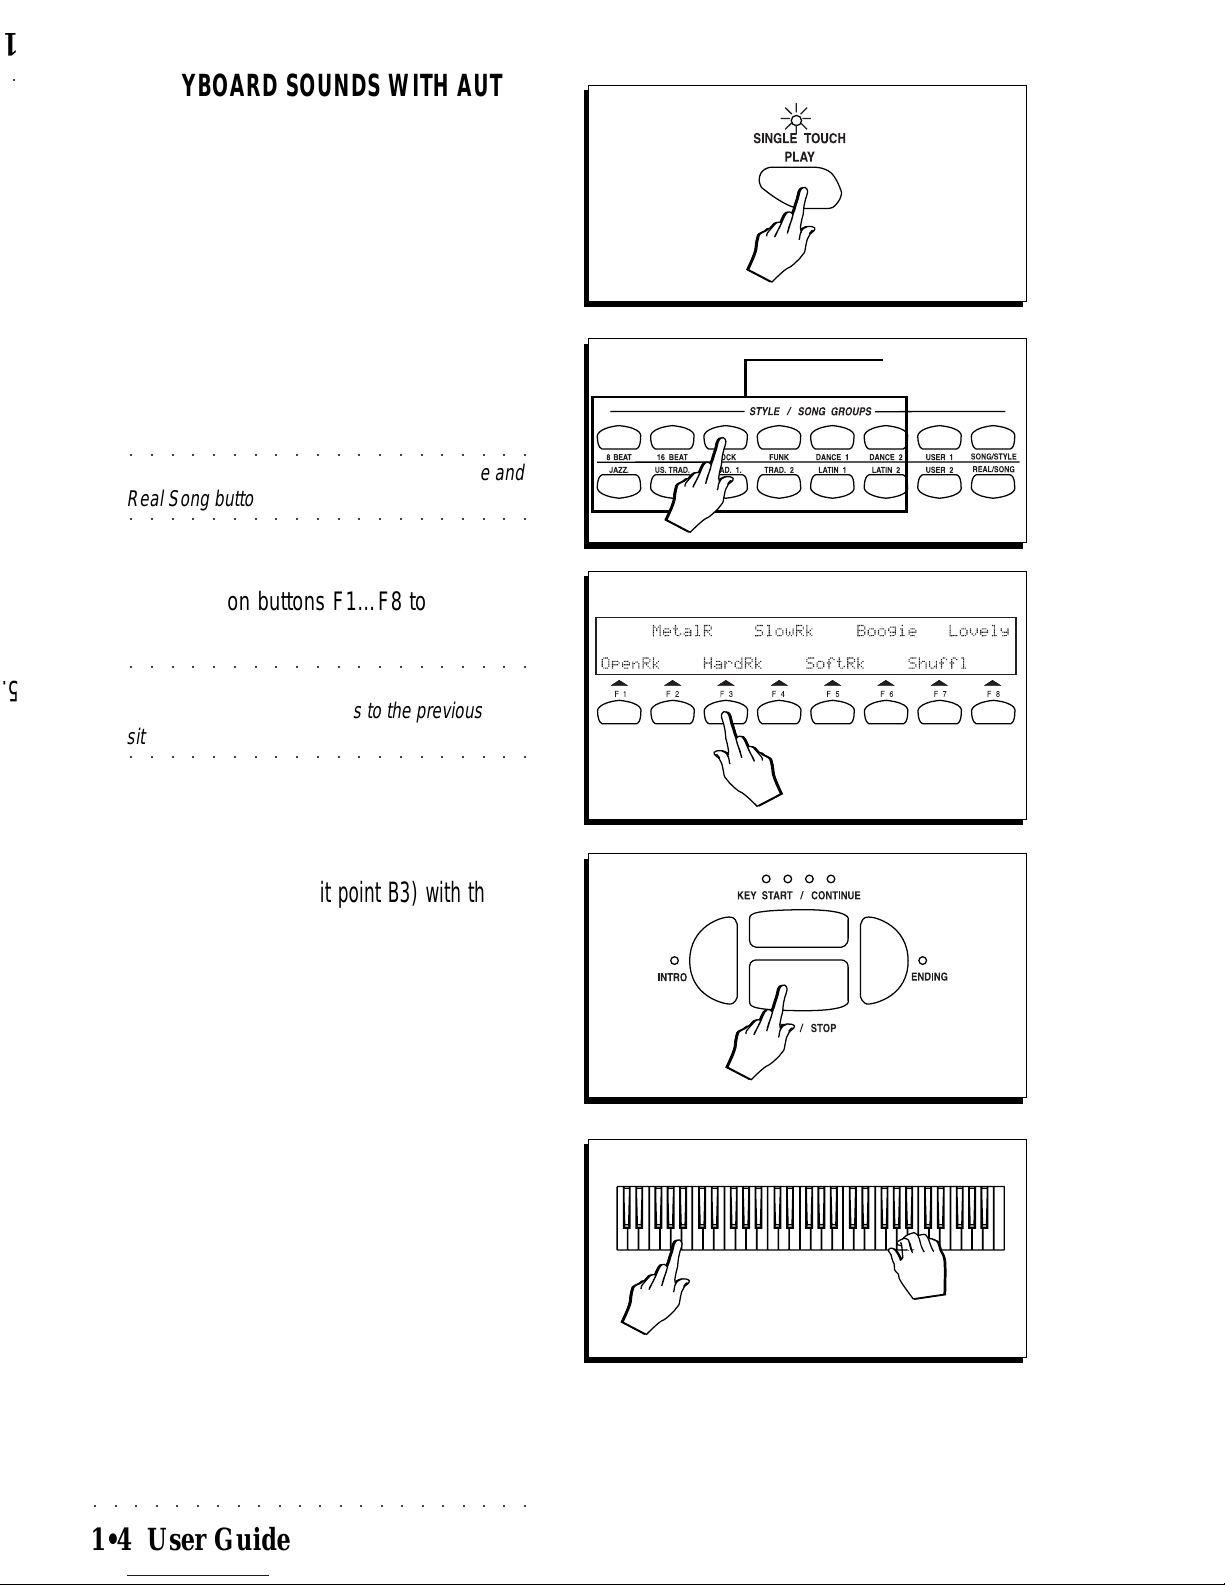
PLAY KEYBOARD SOUNDS WITH AUTOMATIC ACCOMPANIMENTS (STYLES)
A Style will already be selected but you can select another Style in the following manner:
1. Press SINGLE TOUCH PLAY.
The ARRANGE ON/OFF and ARRANGE
MEMORYbuttons will activate.
2. Press a Style Group button in the SONG/STYLE
GROUPS (8 Beat, 16 Beat, etc.).
○○○○○○○○○○○○○○○○○○○○
©
Note: Avoid pressing the User, Song/Style and
○○○○○○○○○○○○○○○○○○○○
Real Song buttons for the time being.
3. Select a Style.
Use Function buttons F1…F8 to select one
of the 8 displayed Styles.
○○○○○○○○○○○○○○○○○○○○
©
Note: If a Style is not selected within the first 2/
3 seconds, the display returns to the previous
○○○○○○○○○○○○○○○○○○○○
situation automatically.
4. Press START/STOP
The Drum accompaniment starts to play.
5. Play a note (below split point B3) with the left
hand and a melody with the right.
You’ll hear a fully orchestrated arrangement
accompanying the keyboard sound.
The combination of sounds that play and the
keyboard mode will depend on the Style selected.
Y ou can change the combination of keyboard
sounds by intervening on the keyboard activators (Upper 2, Upper 1 and Lower).
Styles are discussed in detail in the relative
chapter afterwards.
3
4
5
1
Style Groups
2
PLAY KEYBOARD SOUNDS WITH AUTO-
MATIC ACCOMPANIMENTS (STYLES)
A Style will already be selected but you can se-
lect another Style in the following manner:
1. Press SINGLE TOUCH PLAY.
2. Press a Style Group button in the SONG/STYLE
3. Select a Style.
4. Press START/STOP
5. Play a note (below split point B3) with the left

○○○○○○○○○○○○○○○○○○○○○○
1•6 User Guide
1•6 User Guide
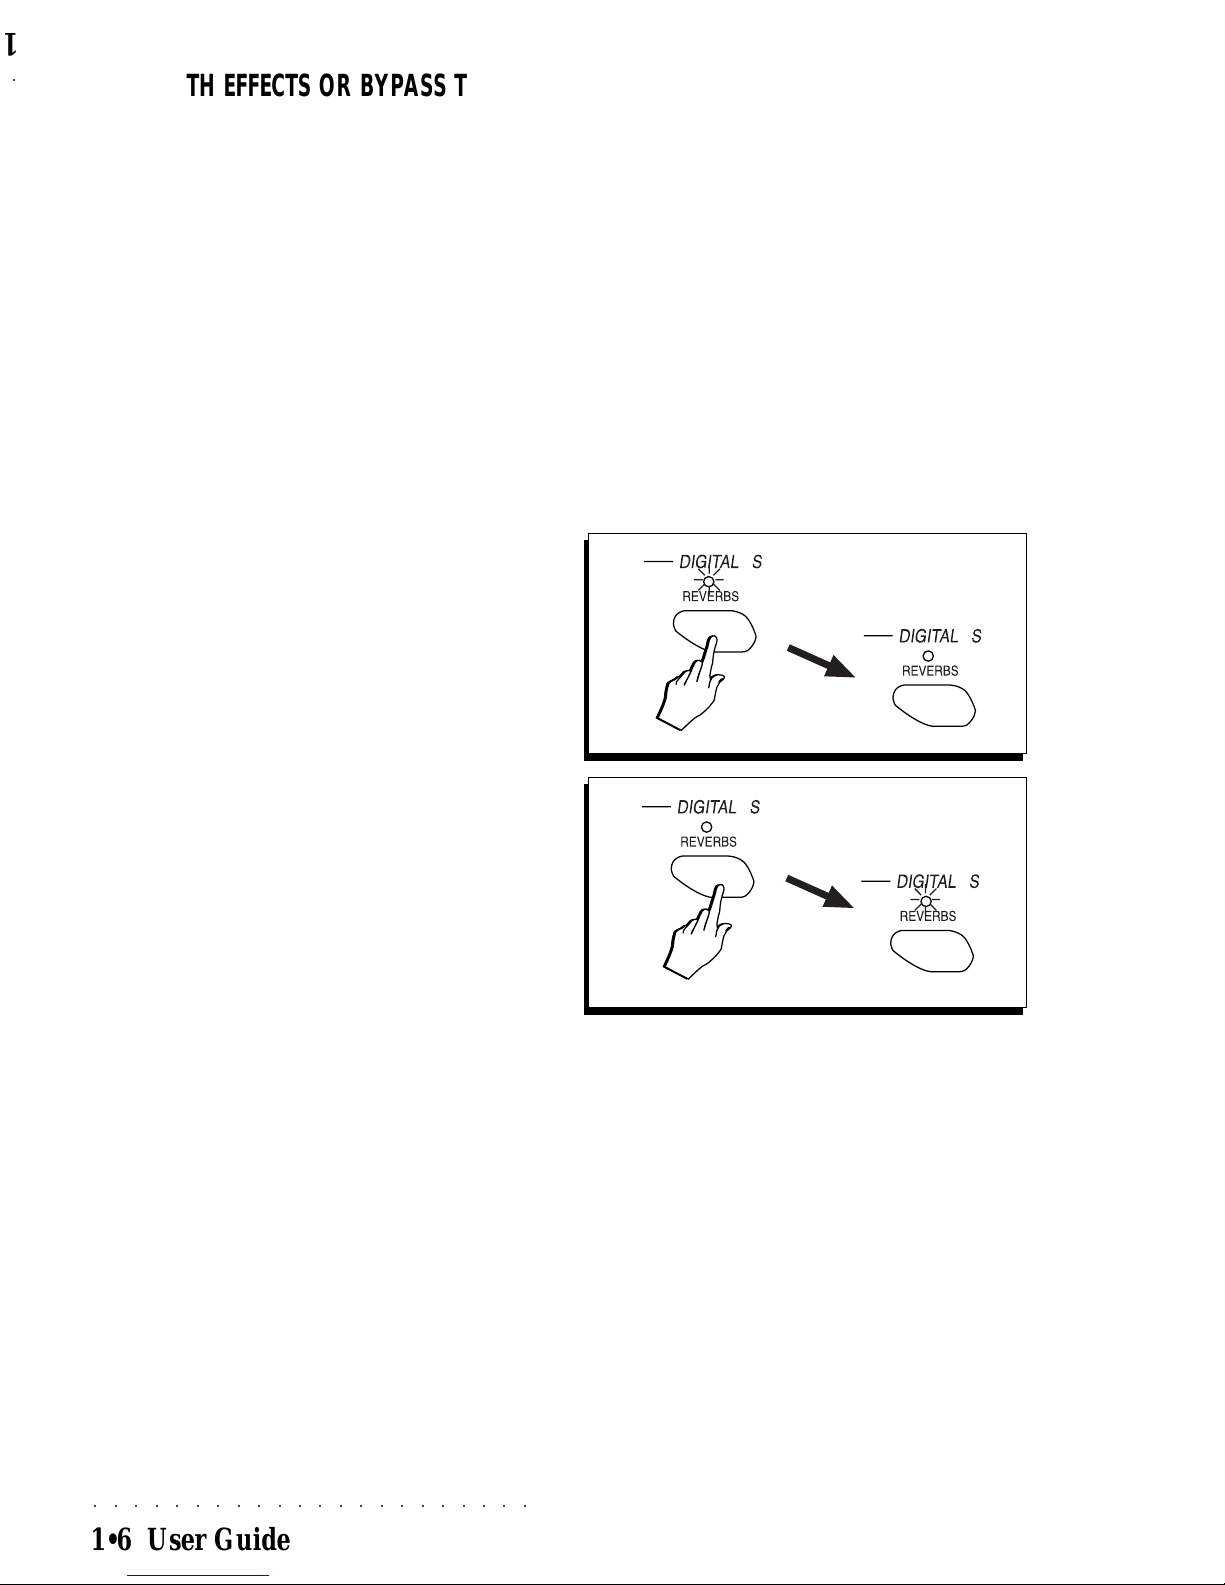
PLAY WITH EFFECTS OR BYPASS THEM
One or both effects buttons in the Digital Signal
Processor will be active (led on), showing that
the current Performance is being processed by
one or both effect types (Reverb and/or Mod/
Delay Effect).
You can temporarily modify the way in which a
Performance or Style is processed by changing
the On/Off configuration of the Reverbs and Ef-
fects buttons.
When the leds are on, the current Performance
is being processed by the effects; when off, the
respective effect is bypassed.
Bypass
1. To bypass an effect, press an active button.
The led of the button goes off, indicating that
the current Performance is no longer being
processed by the relative DSP.
To activate an effect
2. Press a deactivated button.
The led of the button turns on to indicate that
the current Performance is being processed
by the relative DSP.
22 Reverb and 22 Mod/Delays are available
and both signal processors are user-programmable (See chapter 15, «Edit Effects»). How
to select the effects is discussed in chapter
9, «Digital Signal Processor».
1
2
PLAY WITH EFFECTS OR BYPASS THEM
One or both effects buttons in the Digital Signal
Processor will be active (led on), showing that
the current Performance is being processed by
one or both effect types (Reverb and/or Mod/
Delay Effect).
You can temporarily modify the way in which a
Performance or Style is processed by changing
the On/Off configuration of the Reverbs and Ef-
fects buttons.
When the leds are on, the current Performance
is being processed by the effects; when off, the
respective effect is bypassed.
Bypass
1. To bypass an effect, press an active button.
To activate an effect
2. Press a deactivated button.

○○○○○○○○○○○○○○○○○○○○○○
1•8 User Guide
1•8 User Guide
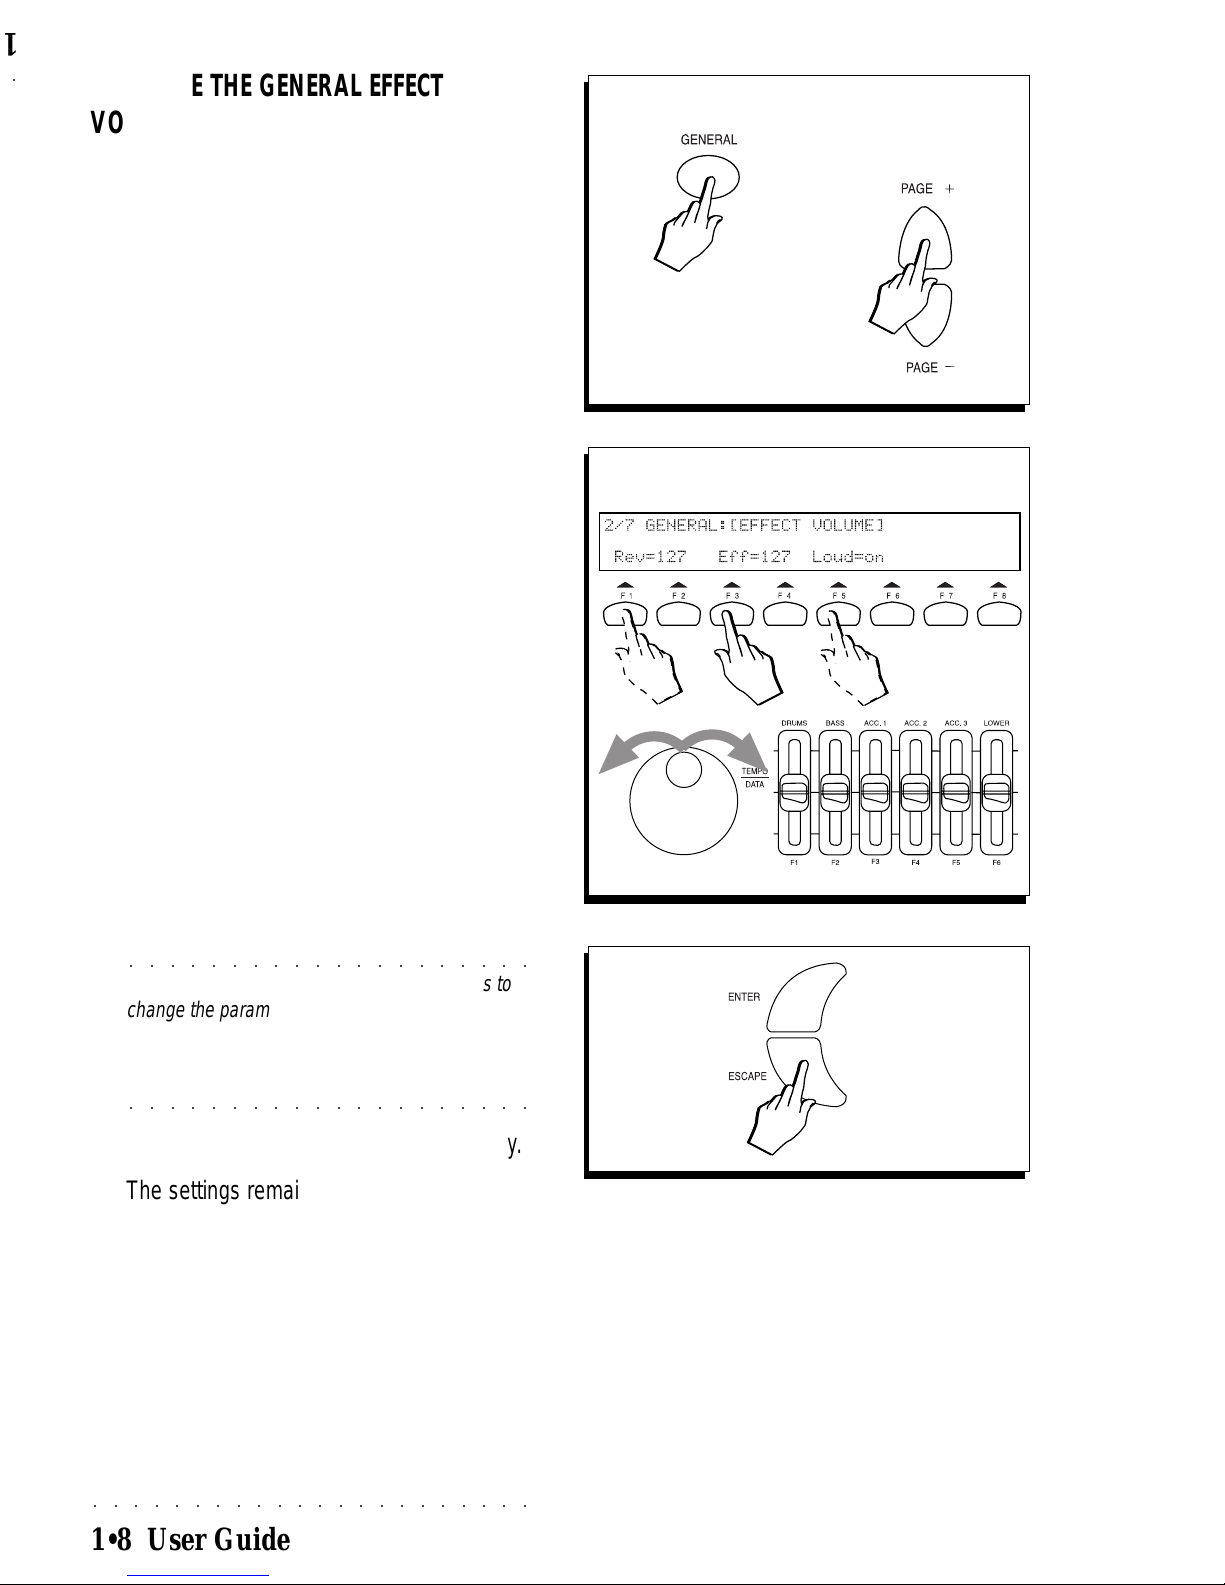
REGULATE THE GENERAL EFFECT
VOLUMES AND ACTIVATE LOUDNESS
It is possible to regulate the general effect volumes to suit the surroundings and activate the
Loudness function.
Although each Performance recalls appropriate
effect volume settings and mixer settings for each
track, a general setting can be applied to render
the effects more or less intense with a single command.
The Loudness control introduces a particular
equalisation (a simultaneous control of the Bass
and T reble tones - similar to that found on home
stereo units). When Loudness is ON, it favours
certain frequencies at low volume.
1. Press the GENERAL button (close to the EDIT PERFORMANCE section).
The first page of Edit General is opened.
2. Press the PAGE+ button once.
3. Select the parameters with the Function buttons:
Rev=Reverb (F1/F2), Eff=Effect (F3/F4),
Loud=Loudness (F5/F6).
4. Modify the selected parameter with the Dial.
○○○○○○○○○○○○○○○○○○○○
©
Hint: You can use the F1-F2, F3-F4 sliders to
change the parameter values directly without
selecting them. The Loudness control can be
switched ON and OFF by toggling with the F5 or F6
○○○○○○○○○○○○○○○○○○○○
Function buttons.
5. Press ESCAPE per return to the default display.
The settings remain in memory (RAM) after
turning off the instrument.
1/2
3/4
5
REGULATE THE GENERAL EFFECT
VOLUMES AND ACTIVATE LOUDNESS
It is possible to regulate the general effect vol-
umes to suit the surroundings and activate the
Loudness function.
Although each Performance recalls appropriate
effect volume settings and mixer settings for each
track, a general setting can be applied to render
the effects more or less intense with a single com-
mand.
The Loudness control introduces a particular
equalisation (a simultaneous control of the Bass
and T reble tones - similar to that found on home
stereo units). When Loudness is ON, it favours
certain frequencies at low volume.
1. Press the GENERAL button (close to the EDIT PER-
2. Press the PAGE+ button once.
3. Select the parameters with the Function buttons:
4. Modify the selected parameter with the Dial.
5. Press ESCAPE per return to the default display.

○○○○○○○○○○○○○○○○○○○○○○
1•10 User Guide
1•10 User Guide
Demo
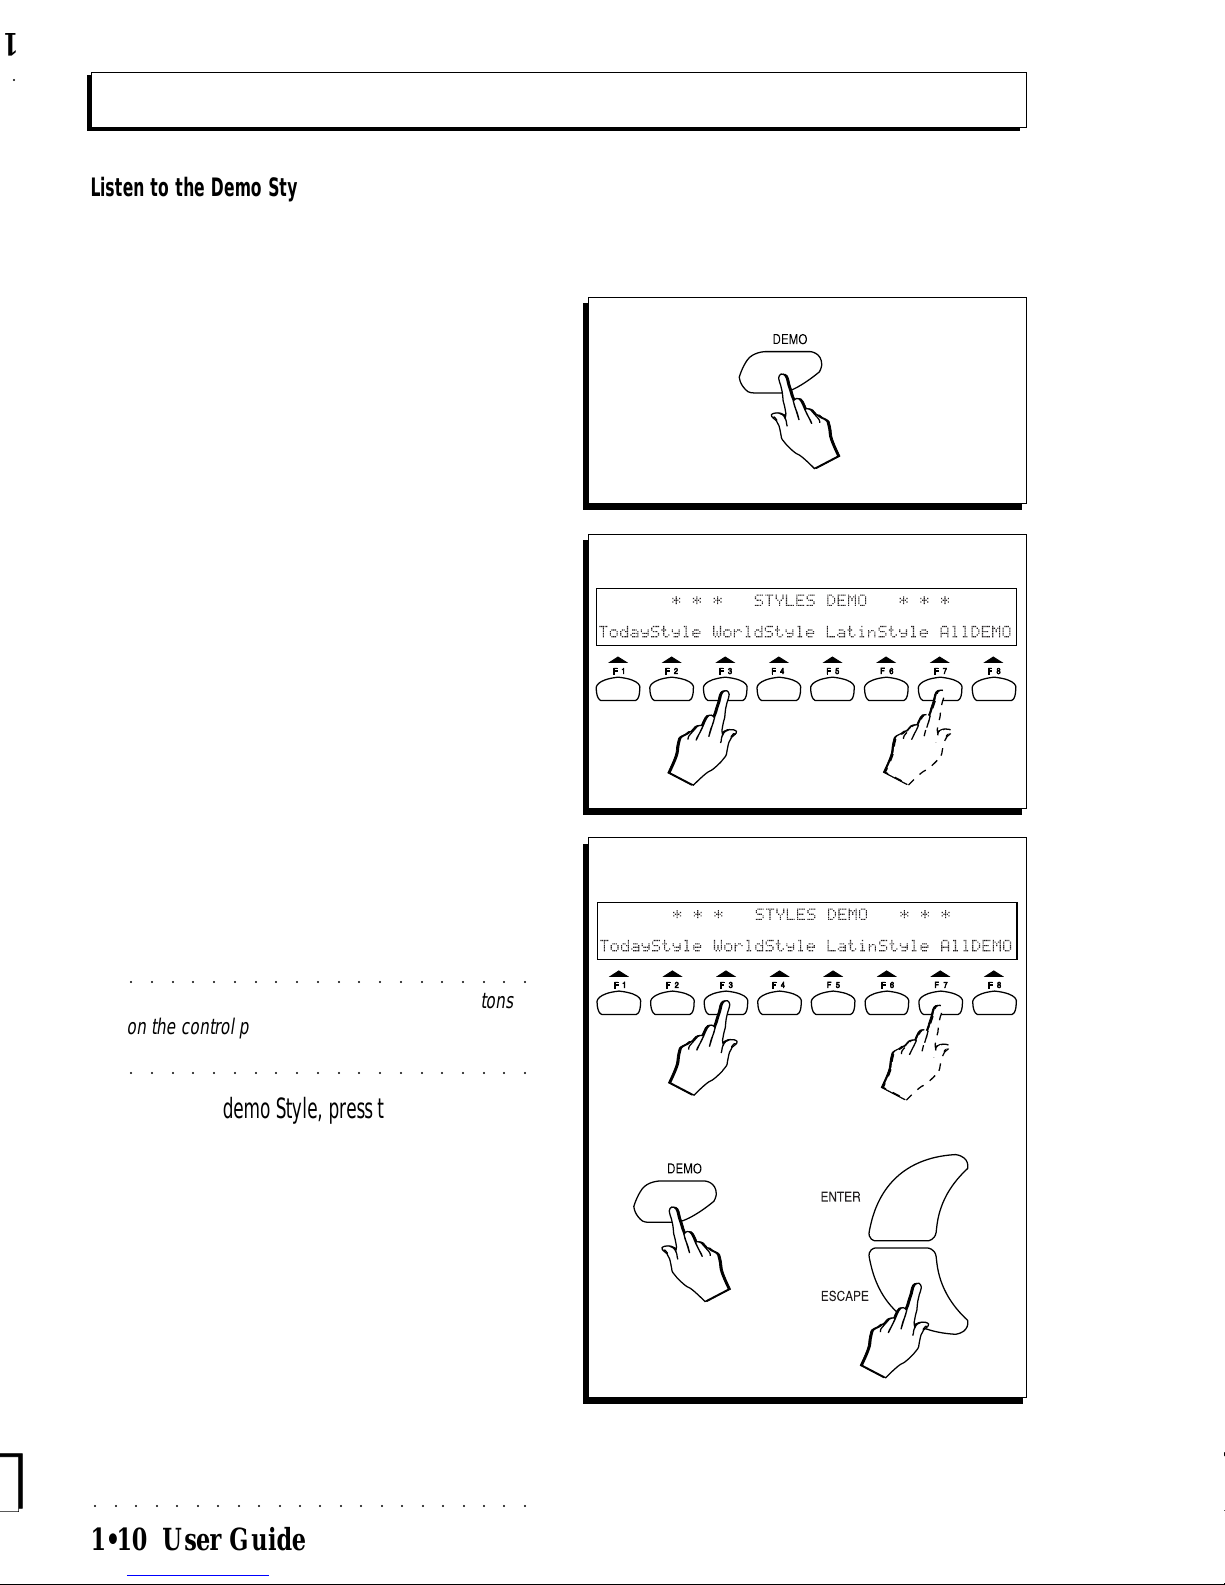
Listen to the Demo Styles
You can listen to the automatic playback of your
WK3 to get an idea of what the instrument is capable of doing. The Demo Styles can be played
back in any operating mode. Initially, set the instrument’s Master Volume control to about the
half way mark.
1. Press the DEMO button.
The 2x40 backlit Liquid Crystal Display (LCD)
shows three Styles to choose from and the
“ALL” option.
2. Select a Style or the “ALL” option.
Use the corresponding Function buttons.
If you select one of the 3 demo Styles, the
selected Style starts to play instantly. When
it reaches the end it stops automatically.
If you select «ALLDEMO», the Styles play
as a chained “medley”. When the end of the
last Style is reached, it loops back to the beginning of the first demo Style and starts to
repeat the entire sequence. Playback continues to repeat until stopped.
○○○○○○○○○○○○○○○○○○○○
©
Note: During the demo playbacak, all buttons
on the control panel are temporarily disabled. The
○○○○○○○○○○○○○○○○○○○○
only operative control is the Master Volume slider.
3. T o stop the demo Style, press the corresponding
Function button, or ESCAPE, or DEMO.
The demo Style (single Style or «ALL») stops
instantly and WK3 is restored to normal operation. Using the Function buttons does not
escape from the Demo display.
Using ESCAPE or DEMO stops the Demo
Style and closes the DEMO display.
3
OR
OR
1
2
Demo
Listen to the Demo Styles
You can listen to the automatic playback of your
WK3 to get an idea of what the instrument is ca-
pable of doing. The Demo Styles can be played
back in any operating mode. Initially, set the in-
strument’s Master Volume control to about the
half way mark.
1. Press the DEMO button.
2. Select a Style or the “ALL” option.
3. T o stop the demo Style, press the corresponding

○○○○○○○○○○○○○○○○○○○○○○
1•12 User Guide
1•12 User Guide
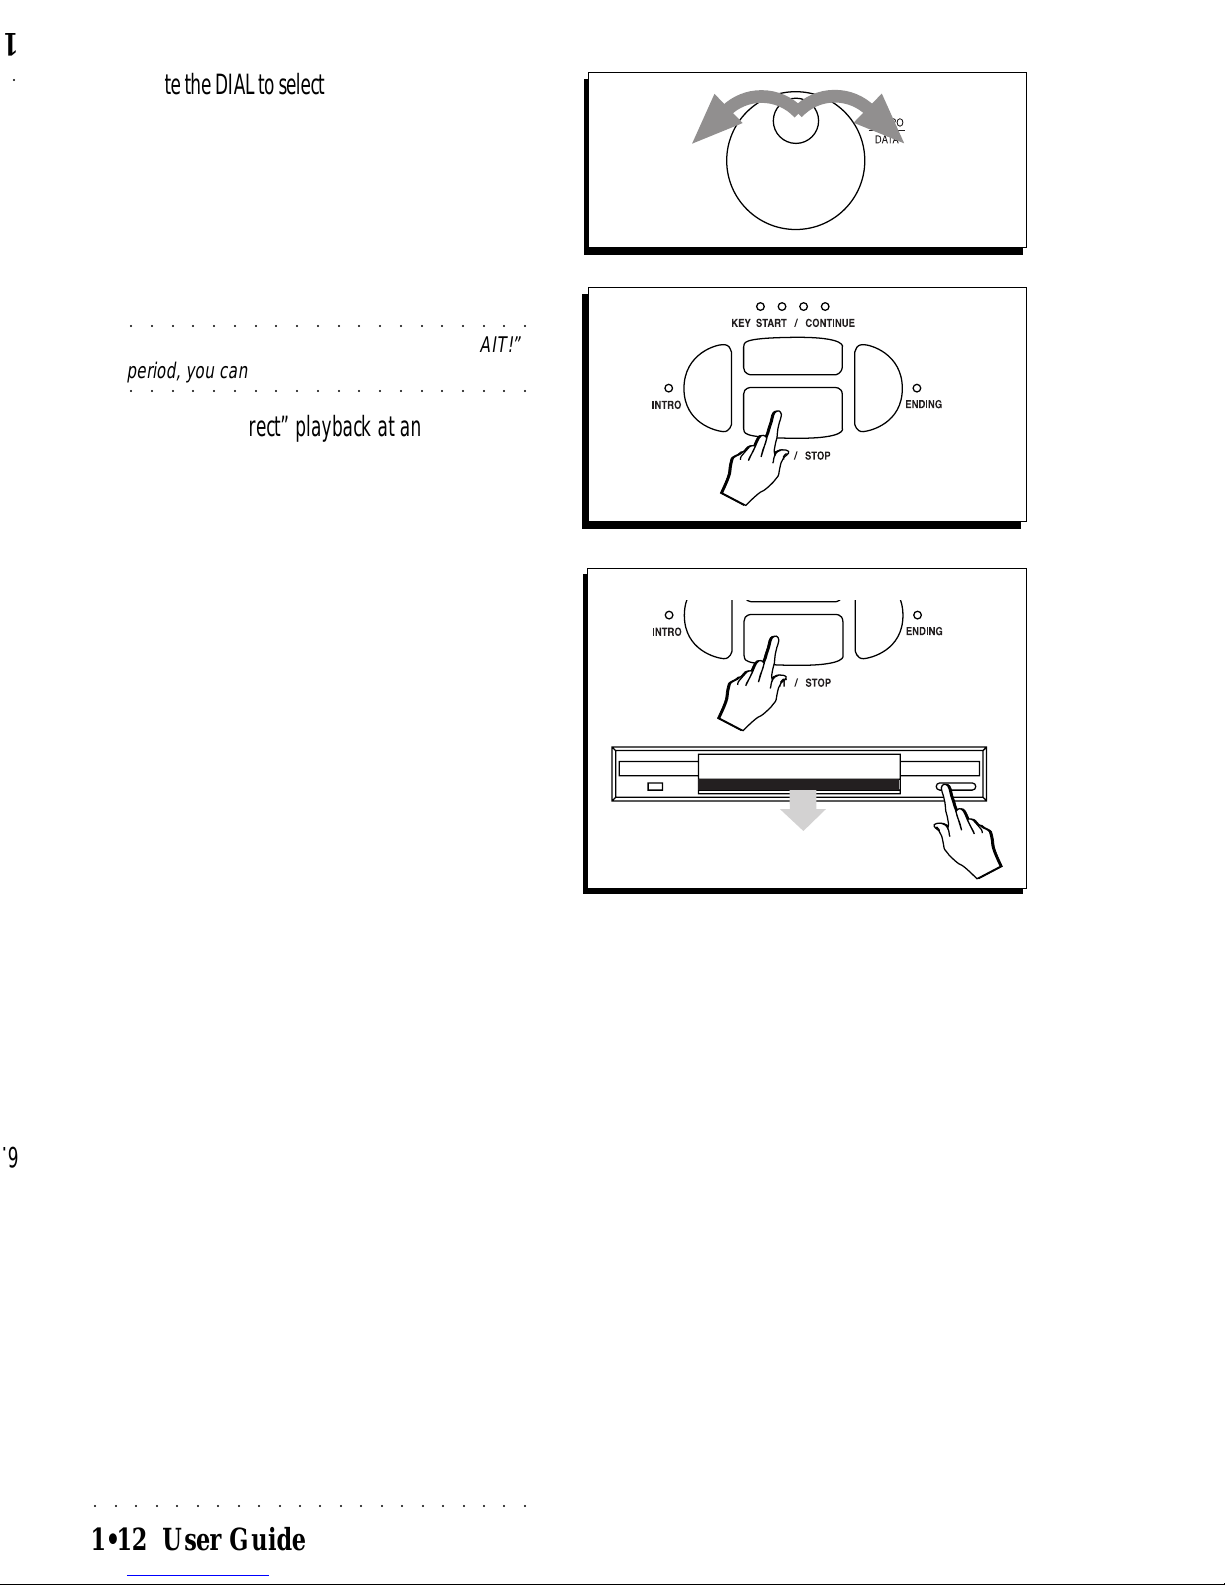
4. Rotate the DIAL to select a WK3 Song or Midifile.
Scroll through the files and select a Song or
Midifile.
5. Press START/STOP to start the playback.
The message “Wait!!” appears for a few seconds then playback begins.
○○○○○○○○○○○○○○○○○○○○
©
Note: If you press Escape during the “WAIT!”
○○○○○○○○○○○○○○○○○○○○
period, you can abort the Direct play function.
6. T o stop the “direct” playback at any time, pr ess
START/STOP.
When the Song or Midifile stops, WK3 remains in Song mode.
Don’t forget to remove the Floppy disk from
the drive.
5
6
4
4. Rotate the DIAL to select a WK3 Song or Midifile.
5. Press START/STOP to start the playback.
6. T o stop the “direct” playback at any time, pr ess

○○○○○○○○○○○○○○○○○○○○○○
1•14 User Guide
1•14 User Guide
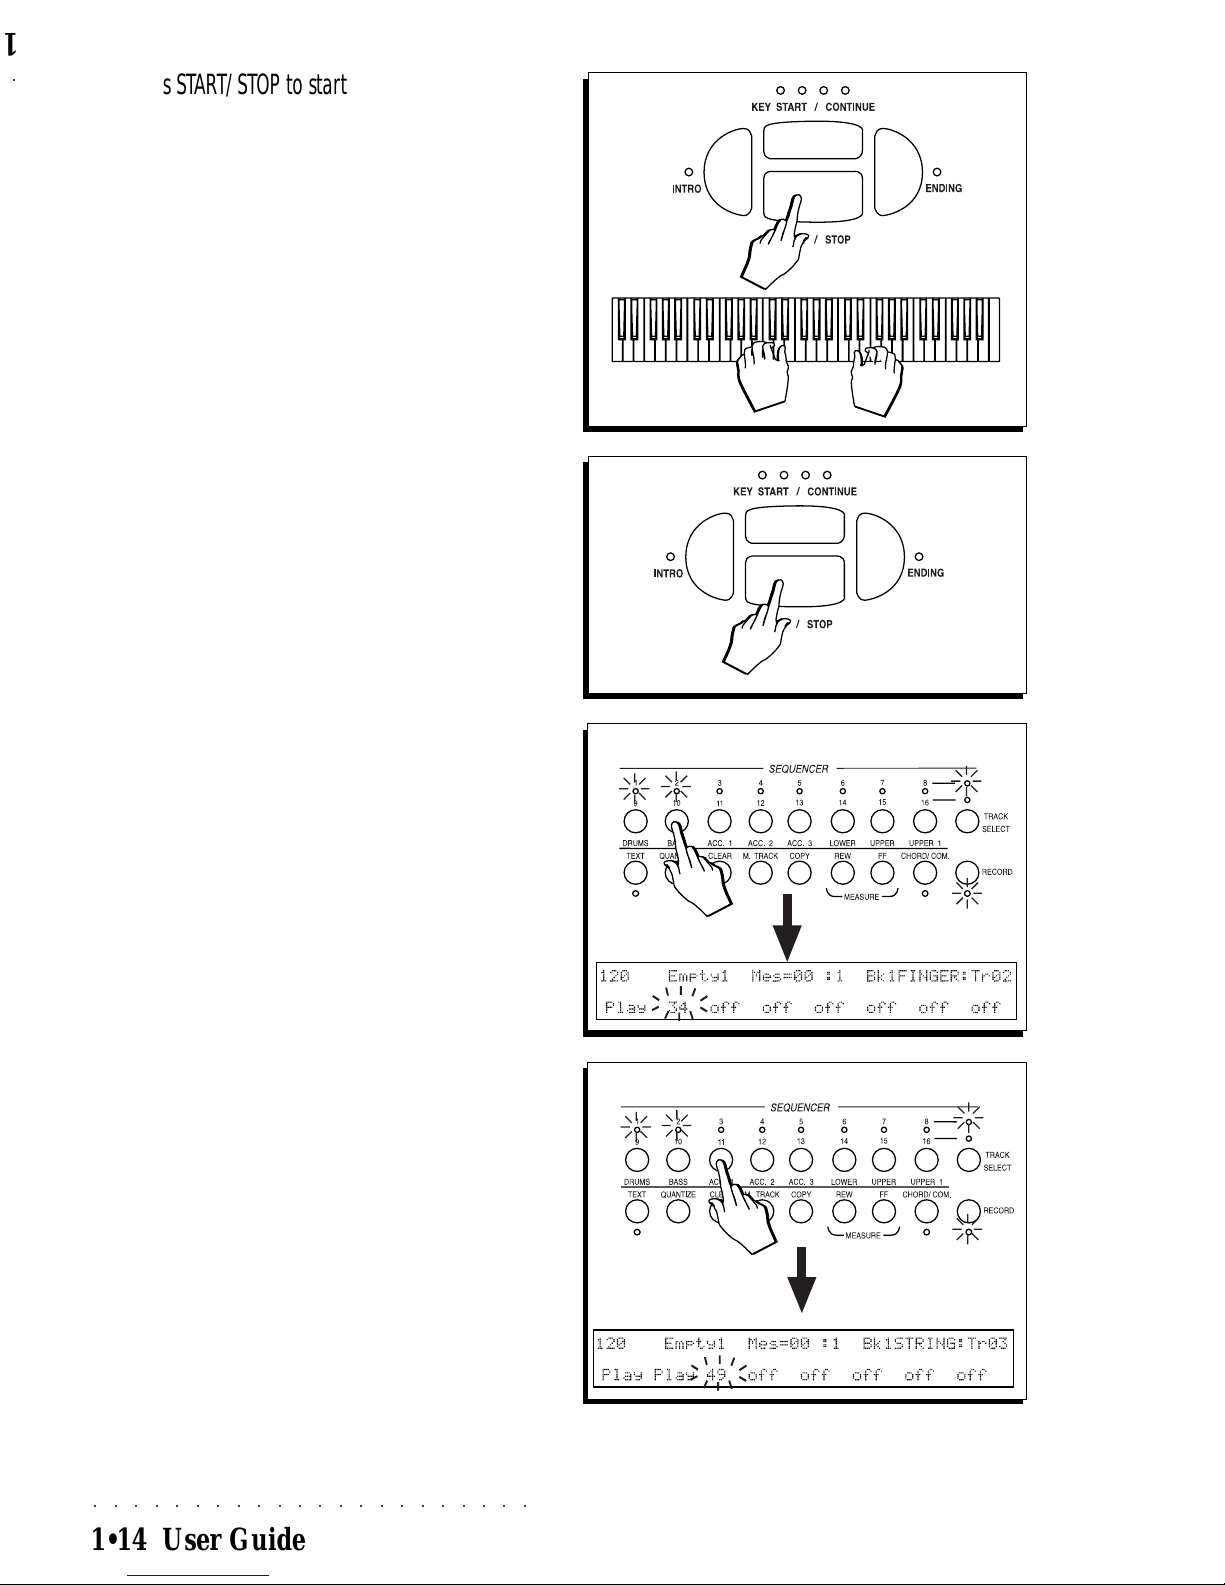
4. Press START/STOP to start the recording.
A metronome will beat time (drum sticks). Y ou
will have a one measure (bar) lead into the
recording to get ready.
5. Start playing after the one bar lead.
Any notes you play during the lead-in will not
be recorded.
6. When you have finished recording the Drum
track, stop the recording with START/STOP.
The metronome continues to beat time and
the led of the recorded track in the sequencer
continues to flash. This allows you to start
the sequencer again and record other events,
adding them to those already recorded
(overdubbing) - this is essential for the drum
track. More about this in the Song chapter.
7. Select another track to record in the Sequencer.
The previous track is confirmed (led on) and
the next track enters record mode (led flashing). The recorded track is shown in “play”
mode.
8. When you have finished recording the track, select another one to record in the Sequencer, this
time without pressing Start/Stop.
The sequencer stops recording, the previous
track is confirmed (led on) and the next track
enters record mode (led flashing). The recorded tracks are shown in “play” mode.
Repeat points 7 and 8 as many times as required until you have recorded your multitrack Song. While you record another track,
the track(s) in “play” will playback exactly as
you recorded them.
At this point, it is also possible to intervene
on the recorded data to correct or cancel the
events. More about event editing in the
Sequencer Edit chapter 19.
4/5
7
8
6
4. Press START/STOP to start the recording.
5. Start playing after the one bar lead.
6. When you have finished recording the Drum
7. Select another track to record in the Sequencer.
8. When you have finished recording the track, se-
 Loading...