

Page 1

ENGLISHENGLISH
ENGLISHENGLISH
ENGLISH
Owner’s manual
English
Page 2
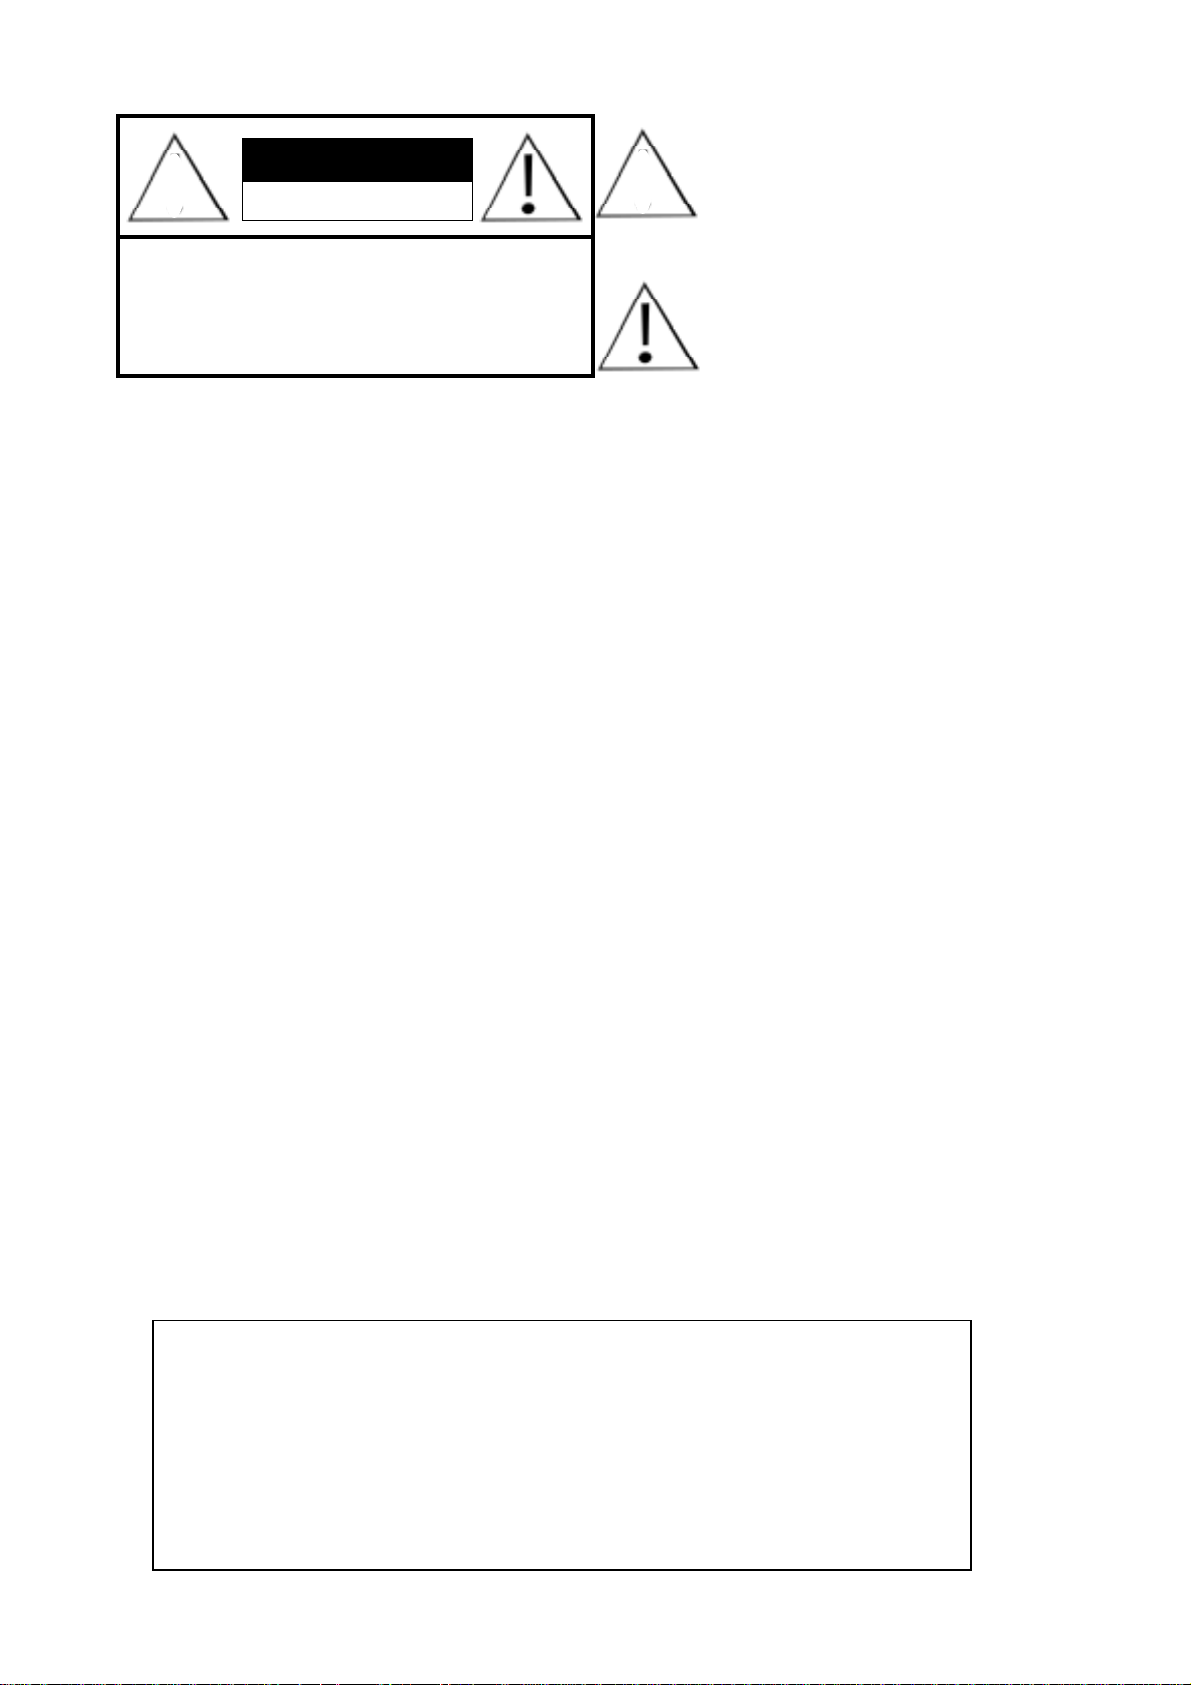
The lightning flash with arrowhead symbol,
CAUTION
7
CAUTION: TO REDUCE THE RISK OF
ELECTRIC SHOCK, DO NOT REMOVE COVER
(OR BACK). NO USER-SERVICEABLE PARTS
INSIDE. REFER SERVICING TO QUALIFIED
RISK OF ELECTRIC SHOCK
DO NOT OPEN
SERVICE PERSONNEL.
7
within an equilateral triangle, is intended to
alert the user to the presence of uninsulated
“dangerous voltage” within the product’s
enclosure that may be of sufficient magnitude
to constitute a risk of electric shock to persons.
The exclamation point within an equilateral
triangle is intended to alert the user to the
presence of important operating and maintenance (servicing) instructions in the literature
accompanying the product.
Power
◆ This keyboard is powered through the included external power supply (AC/DC Adapter) connected to a 230V
mains (wall) output.
Power Supply (AC/DC Adapter)
◆ Use solely with GENERALMUSIC AC/DC adapter included with the instrument. Using a different adapter than
the one recommended may seriously damage the keyboard electronic circuits and be dangerous for the user. We
recommend to always disconnect the adapter from the mains outlet if the keyboard is not used for an extended period
of time.
◆ Make sure that the POWER ON/OFF switch is set to OFF position before connecting and before disconnecting
the AC/DC Adadpter, in order to prevent damage to the internal components of the instrument.
◆ Always use the power supply included with the instruments, whose technical output specifications are: 12/16V
DC (direct supply) 2,2 Ac, center positive.
Have liquids been spilled over or have objects been dropped into the
instrument?
◆ Switch the keyboard off and unplug it immediately, disconnecting the AC/DC adapter from the wall output.
Contact your dealer immediately.
◆ NEVER place containers with liquid substances upon the instrument.
Does the instrument not sound properly?
◆ Switch the keyboard off and unplug it immediately, disconnecting the AC/DC adapter from the wall output.
Contact your dealer immediately.
◆ Stop playing immediately, or the damage could aggravate.
Ordinary handling and care
◆ To clean the instrument, use a soft, clean, slightly dampened duster. Wipe dry with a soft and dry cloth.
◆ Do not use solvents, cleansers or aggressive detergents. Those substances might damage the finish.
◆ Always remember to switch the instrument off after use. Do not switch on and off continuously: the internal
electronic components might be overcharged and block the instrument operations.
Internet Generalmusic: http://www.generalmusic.com
All the information contained in this booklet was accurately edited and tested. The company
howev er declines any responsibility f or possible o v ersights. All rights reserved. This booklet,
or part of it, cannot be copied, photocopied or reproduced without the prior consent of
Generalmusic S.p.A. Generalmusic reserves the right to modify or change the aesthetic or
functional features or the design of each product. Generalmusic is not liable for damage to
commodities or persons derived from misusing the product.
© 2001 Generalmusic S.p.A. All rights reser ved.
Page 3

Contents
The Owner’s Manual .............................................................. 1
Specifications ......................................................................... 1
Important warning .................................................................. 2
Important preliminary notes ................................................... 3
How to update your instrument .............................................. 3
General Reset ........................................................................ 3
Front Panel WK1Or ................................................................ 4
Rear Panel WK1 Or (Connections) ....................................... 6
• 1 Get Started...................................................................................... 8
Power On/Off ........................................................................... 8
Play on the keyboard and change the sounds ....................... 8
Select Performances and listen to the sounds........................ 9
Select Styles and play with automatic accompaniments........ 10
Using Pitch Bend and Modulation Wheel............................... 10
Use the Effects....................................................................... 11
Use the headphones .............................................................. 11
Use the pedals ....................................................................... 11
Adjust the overall effect volume level ..................................... 11
Transpose the instrument (in semitones) ............................... 12
Demo...................................................................................... 13
How to listen to the Demo Songs........................................... 13
Play a Song direct from disk ................................................. 13
• 2 Basic Concepts ............................................................................14
Styles, Song Styles and Songs.............................................. 14
Style Lock and Single Touch Play ......................................... 15
Song Style mode.................................................................... 15
Song mode ............................................................................. 15
Performances ......................................................................... 16
Tracks ..................................................................................... 17
Sounds ................................................................................... 17
ROM-Sound ........................................................................... 17
Drumkits ................................................................................. 17
Samples ................................................................................. 17
Connections ........................................................................... 18
Power ..................................................................................... 18
AUX Outputs ......................................................................... 18
MIDI........................................................................................ 18
Pedals..................................................................................... 19
Computer................................................................................ 19
Video interface....................................................................... 19
Headphones ........................................................................... 19
Musi c Stand........................................................................... 19
The Display ........................................................................... 20
Data Entry .............................................................................. 21
Entering alphanumeric data ................................................... 21
Enter / Escape........................................................................ 21
○○○○○○○○○○○○○○○○○○○
Index i
Page 4

• 3 Sounds and Performances ....................................................22
Sound s and Tracks ............................................................... 22
The real time keyboard sections ........................................... 22
Sounds and keyboard modes ................................................ 22
Full Mode................................................................................ 22
Split Mode .............................................................................. 22
Selecting a Sound ................................................................ 24
Sounds can be selected as follows: ....................................... 24
Keyboard Sounds.................................................................. 24
Selecting a Performance ....................................................... 25
How to programme a Performance ........................................ 25
Performance values............................................................... 26
Store Performance ................................................................. 28
How to name a Performance.................................................. 29
How to restore the original Performance Settings.................. 29
• 4 Arabic Scale...................................................................................30
What is the Arabic Scale ? ..................................................... 30
Where is the Arabic Scale ?................................................... 30
How to recall a preset Arabic Scale ....................................... 30
How to set a new Arabic Scale in real time............................ 31
How to Store a user-programmed Arabic Scale .................... 32
Arabic Tuning and Micro Tuning ............................................. 32
• 5 Styles...............................................................................................33
WK1 Or Styles....................................................................... 33
Selecting a Style .................................................................... 33
Recalling a Style from a Performance................................... 34
Total Clear of the User Style .................................................. 34
The Style controls .................................................................. 35
Start / Stop ............................................................................. 35
Key Start................................................................................. 35
Intro ........................................................................................ 35
Ending .................................................................................... 35
Var 1, Var 2, Var 3, Var 4 ........................................................ 36
FILL, Fill B .............................................................................. 36
The Arranger Section ............................................................ 36
Lower Memory ....................................................................... 36
Arrange On/Off ....................................................................... 36
Tap tempo (FILL B second feature)........................................ 36
The Style Tempo ................................................................... 37
Direct Style Memory buttons .................................................. 37
Tempo lock ............................................................................. 37
Saving Tempo to a performance ........................................... 37
Arrange Mode......................................................................... 38
Fingered 1 .............................................................................. 38
Fingered 2 .............................................................................. 38
One Finger ............................................................................. 38
FreeStyle ................................................................................ 38
The Split point ........................................................................ 39
How to set a new Split point................................................... 39
Arrange Memory ................................................................... 39
Bass to Lowest....................................................................... 39
Auto arrange........................................................................... 40
Auto bass ............................................................................... 40
○○○○○○○○○○○○○○○○○○○○○○○○○○○○○○○○○○○○○○○○○○○
ii Index
Page 5

Single Touch Play, Store Performance/Performance Recall,
Style/Tempo Lock ................................................................... 41
Single Touch Play................................................................... 41
Store Performance / Performance Recall............................... 41
Style / Tempo Lock ................................................................. 41
Metronome ............................................................................. 41
Sustain ................................................................................... 41
Harmony................................................................................. 41
Reverb e Chorus .................................................................... 41
• 6 Disk...................................................................................................44
The Disk ................................................................................ 44
File types and extensions...................................................... 44
Access to disk. ....................................................................... 44
What is a MIDI File................................................................. 45
General MIDI (GM)................................................................. 45
GMX Format.......................................................................... 45
Loading Songs and MidiFiles ............................................... 45
Loading Styles........................................................................ 46
Loading Performance ............................................................. 46
Loading Sample ..................................................................... 46
Loading Song Style ............................................................... 46
Load Operations.................................................................... 47
How to LOAD ......................................................................... 47
Recognizing File from its extension ....................................... 47
Save Operations.................................................................... 48
the save procedure................................................................. 48
Saving MIDI File.................................................................... 49
Saving Song Styles ............................................................... 49
Delete Operations ................................................................. 49
Formatting a Floppy disk........................................................ 50
Format 720 Kb........................................................................ 50
Format 1,44 Mb ...................................................................... 50
The Formatting procedure...................................................... 50
General disk-handling information ....................................... 51
Inserting a Floppy Disk into the drive .................................... 51
Ejecting a Floppy Disk........................................................... 51
Disk protection........................................................................ 51
Handling Floppy Disks........................................................... 51
Back-up copies...................................................................... 52
Cleaning the disk drive head.................................................. 52
Precautions to observe when using WK1 Or disks with a PC ... 52
• 7 Songs................................................................................................53
What is a Song....................................................................... 53
The Song Performance ......................................................... 53
Selecting a Song ................................................................... 53
How to select a Song ............................................................. 53
Song playback........................................................................ 53
Cancelling a Song (Clear Function) ...................................... 54
Melody off............................................................................... 54
Play all Songs......................................................................... 54
Play a Song with a track in Real Time.................................... 54
Displaying Lyrics .................................................................... 56
○○○○○○○○○○○○○○○○○○○
Index iii
Page 6

• 8 Song Styles....................................................................................57
Song Style Performance ........................................................ 57
Selecting a Song Style .......................................................... 57
How to select a Song Style .................................................... 57
Play a Song Style in Real Time .............................................. 58
Recording a Song Style ......................................................... 58
Enter Song Style recording mode .......................................... 58
Listen to the Song Style playback .......................................... 59
Clear Song Style (User Song Style)....................................... 60
How to assigna aname to a Song Style ................................. 60
• 9 Programmable Styles (User) .................................... 61
Recording a User Style .......................................................... 62
The basic structure of a Style Riff .......................................... 62
Selecting a Variation............................................................... 62
Modifying the recording Tempo ............................................... 62
Selecting a different recording track....................................... 63
Selecting a different Riff ......................................................... 63
Setting the Time Signature, the Pitch and the Beat number . 63
Recording a User Style .......................................................... 64
User Style playback................................................................ 65
Modifying a User Style ........................................................... 65
Adding new elements Overdub .............................................. 65
Quantize ................................................................................. 66
Clear Note .............................................................................. 66
Clear Track, Clear Riff , Clear T empo , Clear All............................ 67
Saving your User Style to a Floppy Disk................................ 67
Style Copy .............................................................................. 67
The User Style Perfor mance .................................................. 68
Default setting of a User Style Performance .......................... 68
How to program a User Style Performance ........................... 68
Assigning a name to a User Style.......................................... 68
Recording a Program Change ............................................... 69
Recording Commands ........................................................... 69
• 10 Digital Signal Processor .......................................................70
Rev/Cho ................................................................................. 70
Assigning the effects .............................................................. 70
How to select the type of effec ............................................... 70
Disabling the effects ............................................................... 71
Controlling the effect send level ............................................. 71
Revsend ................................................................................. 71
Chosend ................................................................................. 71
• 11 MIDI/GENERAL ....................................................................... 72
Damper Pedal ........................................................................ 72
Volume Pedal ......................................................................... 72
Arabic tuning .......................................................................... 72
Microtune................................................................................ 73
Mixer Lock .............................................................................. 73
Dsp lock.................................................................................. 73
Dynamic ................................................................................. 73
MIDI Channel/local/internal/G.MIDI ....................................... 74
Chn.lock/MIDI Dump .............................................................. 75
Serial/TV/TV text .................................................................... 75
INIT (memory reset) / Release date....................................... 76
○○○○○○○○○○○○○○○○○○○○○○○○○○○○○○○○○○○○○○○○○○○
iv Index
Page 7

• MIDI and the MIDI function........................................................77
What is MIDI........................................................................... 77
The computer port.................................................................. 77
Tracks and MIDI channels...................................................... 77
The rules for MIDI connection ................................................ 78
Assigning MIDI channels........................................................ 78
MIDI Lock ............................................................................... 78
Common and Chord Channel ................................................ 78
Common Channel .................................................................. 78
Chord Channel ....................................................................... 79
MIDI numeration..................................................................... 79
The main MIDI applications.................................................... 79
Controlling and expander or other keyboards with WK1 Or... 79
Controlling WK1 Or from a MIDI accordion............................ 80
Using WK1 Or in Song con un computer or external sequencer ..... 81
Sistema Esclusivo (Generalmusic System Exclusive) ........... 84
• Reference Section
Technical Specifications of WK1 ................................... Ref. 2
• Appendix
Table of Sounds................................................................. A. 1
Table of Styles, Songs, Performances ................................ A. 3
Table of Reverb ................................................................... A. 4
Table of Chorus ................................................................... A. 4
Table of Drumkit .................................................................. A. 5
Recognized chords - example in (“C”) ................................ A. 8
MIDI Implementation chart .................................................. A. 9
Recognized Control Change messages (MIDI Controller) .... A. 10
Track Control Changes....................................................... A. 10
○○○○○○○○○○○○○○○○○○○
Index v
Page 8

Introduction
Congratulations, and thank you for purchasing WK1 oriental Multimedia Workstation. The instrument in your hand is the
successful result of the combination of extraordinary sound quality , automatic accompaniment and a surprisingly easy-tooperate user interface.
MUL TIMEDIA WORKSTA TION
WK1 oriental is an Arranger Keyboard with multimedia f eatures that render making music real fun. With WK1 oriental you
can sing following the lyrics both on the display and on a TV monitor (TV Karaoke).
THE OWNER’S MANUAL
Our best advice: read the Owner’s Manual carefully: it is the best way to learn how WK1 oriental operates.
The Manual is divided into separate User Guides. An Appendix with tables and MIDI specifications is given at the end.
Specifications
Poliphony and multitimbrality
WK1 oriental is 32-note polyphonic (maximum), 16-part multi-timbral in Song mode and 8-part multi-timbral in Style
mode. Each part is assigned to a track. In Real Time mode, 3 tracks (maximum) are assigned to the k e yboard.
• Sound Generation
WK1 oriental Sound Generation uses PCM e Wavetable technology. Sounds are based on processed sampled
wavef orms. The keyboard’ s 32 obscillators generate “single oscillator” (32-note maximum polyphony) and “dual oscillator”
(16-note maximum polyphony) sounds.
• ROM Sound
WK1 oriental’s ROM (Read Only Memory) contains 464 Sounds including 16 Drumkits + 1 arabic kit.
• Sample-RAM
The back-up memory can hold Samples that can be loaded from Floppy Disk.
• Arabic Scale
A special section consisting of twelve buttons arranged in keyboardoctave style and a set of buttons which provide
seve ral associated functions. Each Arabic Scale button lowers the corresponding note of the k eyboard by 1/4 of a tone
in real time. The Arabic Scale Memory section provides 4 locations f or preset Arabic Scales , a general Cancel b utton
and a Store command.
• Digital Signal Processor
WK1 oriental features a double Digital Signal Processor that can be controlled in Real Time. Tw o different effects (1
Reverb and 1 Modulation/Delay) can be assigned and stored to each Performance.
• Sequencer
The on-board Sequencer allows you to record Song Styles (Real-Time recording method), to pla y Songs back and to
play with Styles. Data saved in the sequencer is stored to the System-RAM (battery backed-up).
• Play Direct from Disk
Playing Direct from Disk means playing a Song in WK, PK, or SMF format directly from the Floppy Disk without ha ving
to load all data to memory . This feature becomes useful when you wish to play a Song or a Midi File that exceeds the
available Sequencer mermory.
• Automatic Accompaniments
WK1 oriental features 96 ROM Styles that add automatic accompaniments to the 3 Real Time keyboard sections
(Upper 1, Upper 2, Lower). Each Style features 4 Variations that contain Basic, Intro, Ending and Fill patterns, totalling
40 different patterns. Up to 7 User Styles (Styles loaded from disk) can be stored to WK1 oriental memory.
· The Disk Drive is a device used to transfer data from and to Floppy Disks. Floppy Disks can be stored to create an
external library of Songs, Styles, Perf ormances and Samples. A disk drive reads from and sa ves to 3,5” Floppy Disks
that can respectively store up to 720 kb (2DD disks) and 1,44 Mb (2HD disks). (1,44 Mb) and Atari ST/Falcon (720 kb)
are recognized formats to exchange Midi Files.
○○○○○○○○○○○○○○○○○○○○○○○
Introduction 1
Page 9

• ROM Styles and Programmable Styles
The WK1 Or f eatures 96 ROM Styles (including 4 groups of Oriental Styles) which provide automatic accompaniments
for the three real time keyboard sections (Upper 1, Upper 2, Lower). Each Style has 4 Variations consisting of Basic,
Intro, Fill and Ending patterns, totalling 40 different patterns. It is also possible to record your own Styles (Programmable
Styles). Up to 8 User Styles can be recorded and stored to memory (96 – 103).
• Direct Style Memory
The WK1 Or allows you to select and memorize 16 Styles combinations in the direct access memory locations for
quick access during play, useful for live perf o rmances.
• Karaoke
The lyrics of a song can be read on the WK1 oriental display (two lines , 24 characters each). Alternatively, an optional
video interface availab le by Generalmusic makes it possib le to use WK1 oriental in Karoke mode with an external TV
monitor. The interface can be adapted to the diff erent video standards used in Europe or in the U.S. In order to read the
lyrics, the “TV text” function in the MIDI/GENERAL page must be turned on, and the RGB/SCART cable supplied with
the optional video interface must be connected to the TV set.
• Updatable Operating System
The Operating System, that is, the software that runs WK1 Oriental operations, is stored in a Flash ROM. It can be
updated loading more powerful releases that offer more functions.
• MIDI
Thanks to its fully implemented MIDI features, WK1 oriental can become a master keyboard. Moreov er WK1 oriental
can be controlled by another master instrument and operate like a 16-part multi-timbral expander.
• Direct Connection to a computer
WK1 oriental can connect directly to a computer (Mac, PC o Atari) by a single serial cable. This kind of connection can
be alternative to a normal MIDI connection and needs no optional MIDI interface for the computer. The speed of the
information exchange can be adapted to the specific computer used. Serial cables can be purchased at any computer
shop.
IMPORT ANT W ARNING
1. Make sure that the package is flawless and contains:
a) WK1 oriental Multimedia W o rkstation (the instrument);
b) one floppy disk containing the operating system;
c) one demonstration floppy disk;
d) one music stand;
e) one Owner’s Manual;
f) one Ac/Dc Pow er Supply adapter;
g) the Guarantee Certificate;
h) the list of Generalmusic distributors.
○○○○○○○○○○○○○○○○○○○○○○○○○○○○○○○○○○○○○○○
2 Introduction
Page 10
Important preliminary notes
Read the following notes carefully before switching your keyboard on:
DO NOT PLACE FLOPPY DISKS ON TOP OF THE LOUDSPEAKERS
- avoid placing floppy disk on top of loudspeak ers, telephones, electric home devices or other sources of electromagnetic
fields: the disk content could be erased or damaged.
HOW TO UPDA TE Y OUR INSTRUMENT
To implement new functions in your keyboard, f ollo w the steps belo w:
1. Before turning the WK1 oriental on, insert the floppy disk containing the latest release of Generalmusic Operating
System.
2. Turn on the WK1 oriental . The message “Load Operating System?” appears on the display.
3. Press ENTER to confirm (pressing ESCAPE cancels the operation).
4. After pressing ENTER, the message “O .S. Disk loading...” appears on the display.
5. When the operation is complete, WK1oriental is ready to play.
N.B. To check the date of the Operating System, scroll to the last page of the MIDI/GENERAL functions.
GENERAL RESET
In order to restore WK1 oriental to its default conditions set by the f actory, proceed as follows:
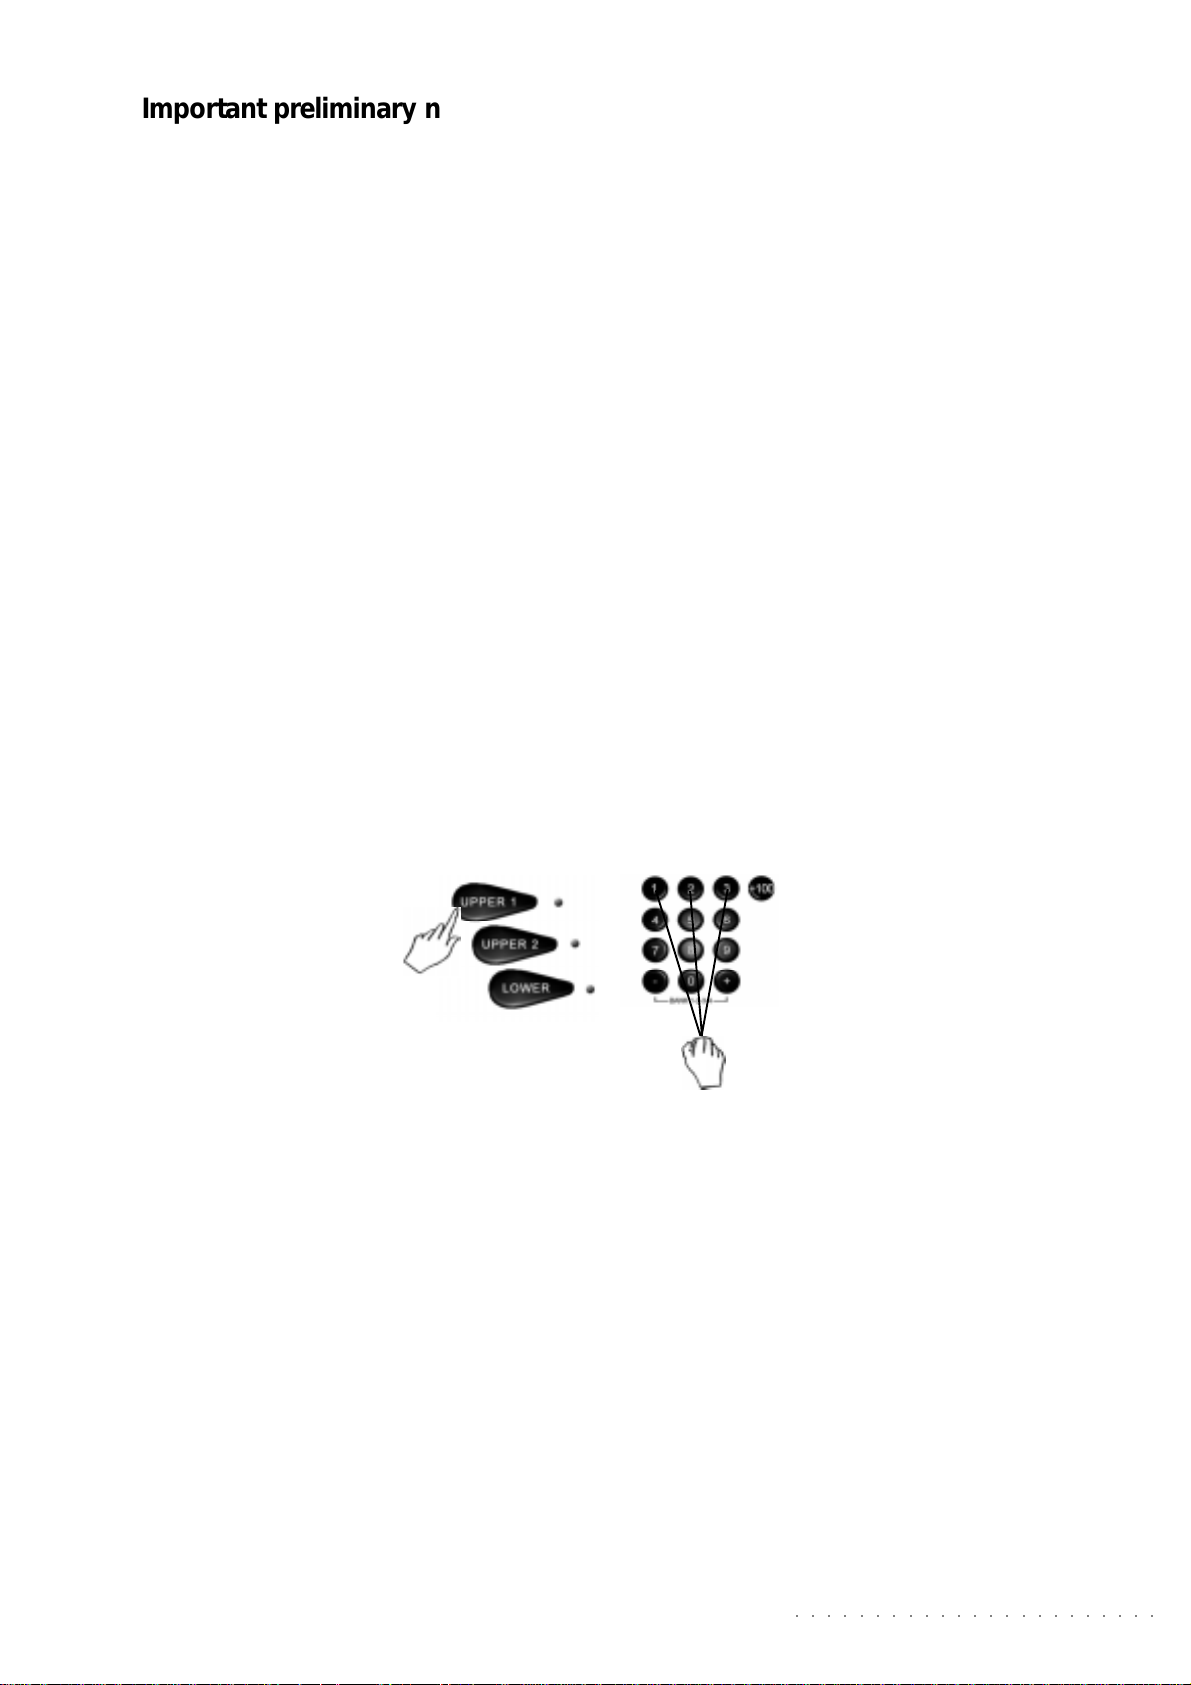
Press and hold the UPPER 1 (located on the right of the display), and the number keys 1, 2 and 3 at the same time . The
message SYSTEM RESET ! appears on the display for a few seconds.
WARNING !
This operation definitevely erases all the user-programmed data contained in the internal RAM of the instrument.
REACHARGEABLE, BACK-UP BATTERY
WK1 oriental is equipped with a Ni-Cad reachargeable batter y, to retain data when the instrument is off. When the
instrument is turned off, the data is retained in the memory for approximately 30 days.
If you have not used WK1 oriental for a long period of time, you are advised to leave the instrument on for at least 8/10
hours in order to fully recharge the battery .
○○○○○○○○○○○○○○○○○○○○○○○
Introduction 3
Page 11
o
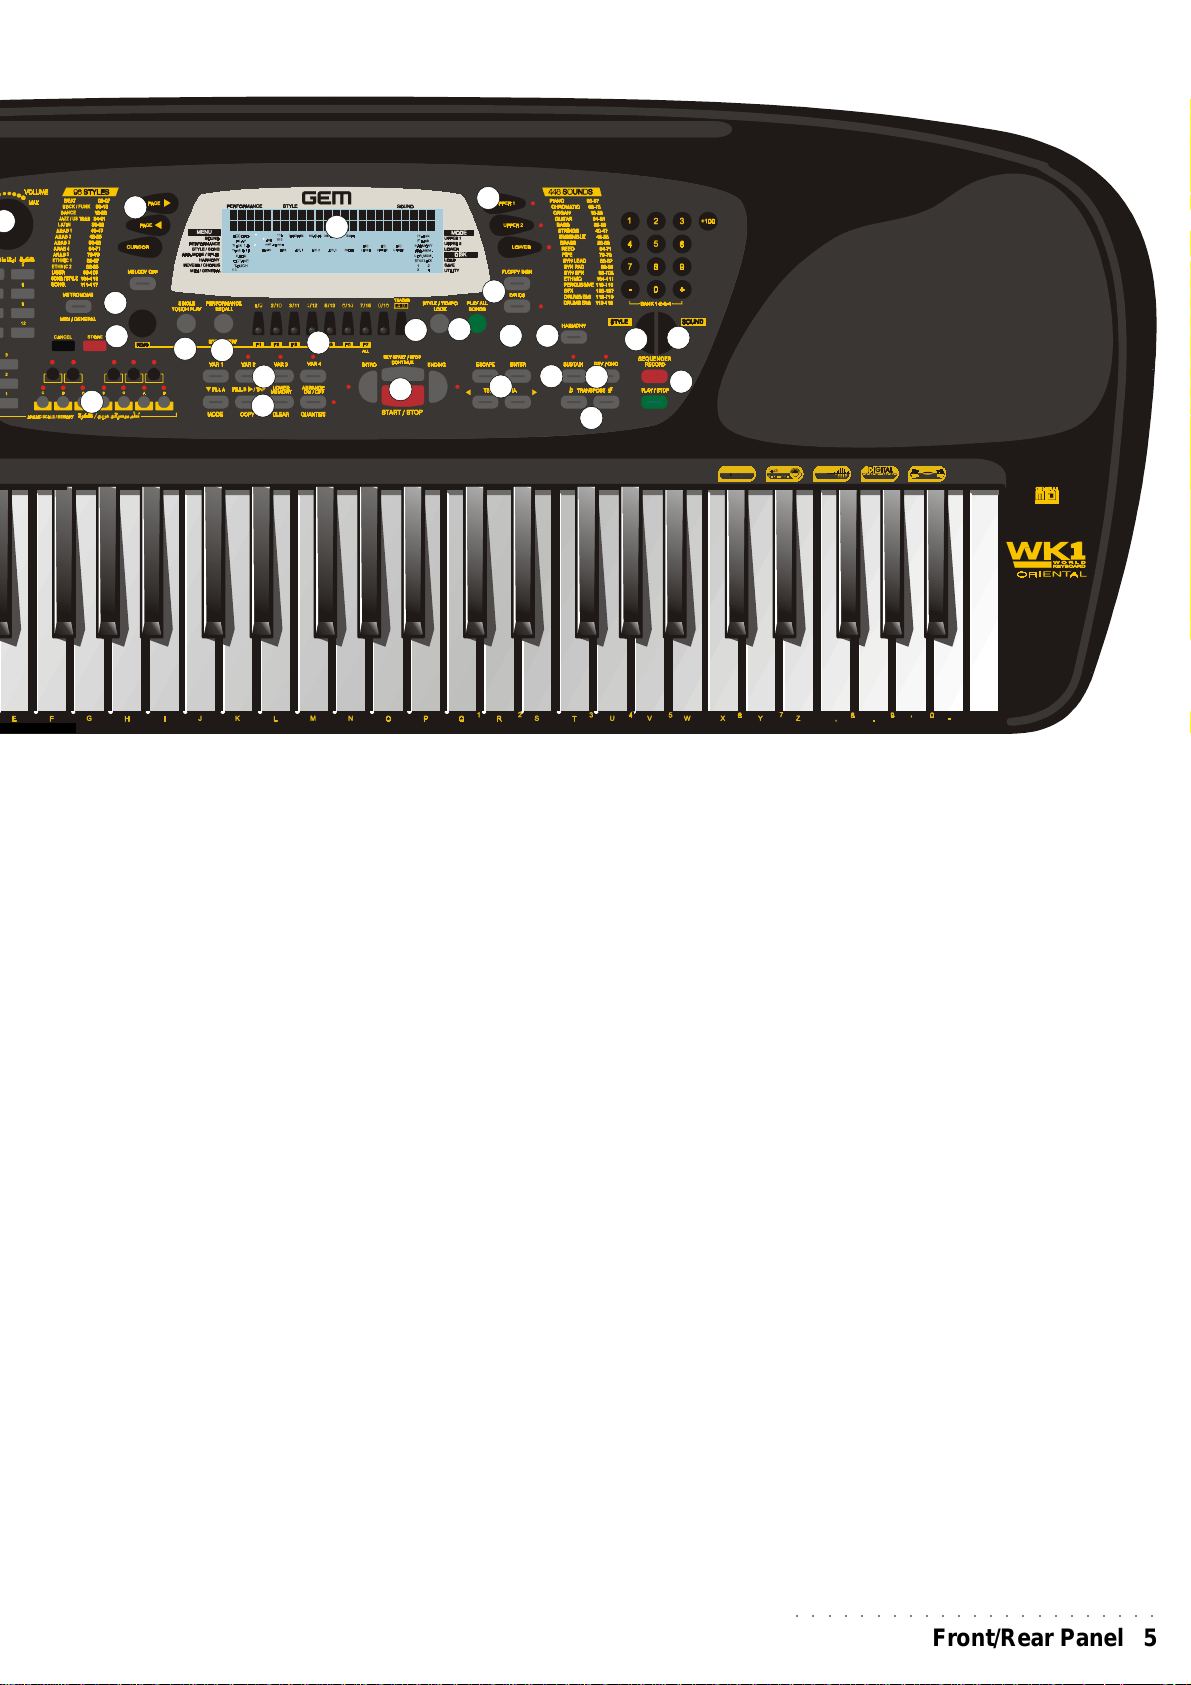
WK1Oriental Front P anel
1. POWER. Switch to turn the instrument ON and OFF.
2. V OLUME. Slider to control the instrument overall Volume.
3. CURSOR / P A GE. Navigation keys. The PAGE and PAGE keys select
the edit function pages. The CURSOR key is used to move among the
various sections of the page. The selected function is shown by a pointing
arrowhead in the display.
4. ARABIC SCALE. The control centre of all the Arabic Scale functions:
ARABIC SCALE: 12 buttons, arranged in keyboard octave style which lower
the corresponding notes of the keyboard by 1/4 of a tone in real time .
5. ARABIC SCALE MEMOR Y. This section contains 4 memory slots (1, 2, 3)
to select user-programmed Arabic scales, the ST ORE button which memorizes
user-programmed Arabic notes and a general CANCEL button to cancel the
current Arabic Scale selection.
6. MELODY OFF. This keys turns off the melody in the play ed back Song.
It is a useful feature when singing over the backing, or to play the melody
live on the keyboard.
7. DEMO. This k ey starts the Demo songs. The F1...F8 function keys select
the 8 Songs that demonstrate the instruments potential. F9 key plays the
Songs back in a sequence.
2929
29
2929
3030
30
3030
22
2
11
1
11
2727
27
2727
CDEFGABCD
22
55
5
55
8. SINGLE TOUCH PLAY. When this function is active (the displa y indicates
it as ON), the sounds of a Style-Perfor mance are assigned to the Style
tracks. The ARRANGE ON/OFF and A RRANGE MEMORY functions are
autmatically activated. In this mode, the 9 Function keys (F1 … F9)
recall 9 Single Touch Play settings that v ary according to the selected Style.
When the display indicator is OFF when a Style is selected, only the sounds
from the Drum, Bass, Acc1,2,3 will change.
9. RECALL/STORE PERFORMANCE. Pressing this key puts you in Performance mode, and the cursor arrowhead in the display moves down to
indicate PERF in the menu). The PAGE keys select the 7 groups that
contain the 63 Perfor mances (each group features 9); (F1...F9) Function
keys recall the P erformance. It is possible to modify the P erformance settings
and save them. If the key is pressed and held for about 2 seconds, the
STORE PERFORMANCE is activated, where the control panel settings may be
saved to the current Performance and even renamed it with a new Performance name.
10. (F1 … F9) FUNCTION KEYS (S.T.PLAY/PERFORMANCE). These
keys select Demo Songs, P erformances, Single Touch Play settings, Style,
Song Style or current Song tracks, depending on the selected mode of
WK1 Or. When in Song mode, the two rows of n umbers under the function
keys correspond to the 16 Song Tracks (F1 … F8). F9 toggles between
tracks 01-08 and 09-16.
11. VARIATION 1, 2, 3, 4: These keys change the Style va riation patterns
(the display indicator is ON). The selected v ariation is shown by the relative
led which turns on.
12. FILL A, FILL B/TAP,LOWER MEMORY; ARRANGE ON/OFF
FILL A (Fills to previous Variation): this key plays a Fill pattern (display indicator
ON) and then goes back to the previous Variation.
FILL B(Fills to next Var iation): when this key is pressed while a Style is
played (the display indicator tur ns ON), the Fill pattern is recalled and it
passes on to the successive Variation.
TAP - Tapping on this key 3 or f our times automatically sets the beat speed
and starts the Style in the desired Tempo.
Please insert the same drum kit i nstruments of the gk350 fr
3131
31
3131
LOWER MEMORY: notes in the Lower section of the keyboard
continue to sound (display indicator ON) or stop (indicator
OFF) after releasing the keys play ed in the Low er section of
the keyboard.
ARRANGE ON/OFF: enables (led ON) or disables (led OFF)
the automatic accompaniment of the Styles.
13. ST ART/ST OP , INTRO , ENDING, KEY ST ART/CONTINUE.
START/STOP Star ts and stops a Style. INTRO places the
introduction of a Style on stand-by before the Style starts.
ENDING adds an Ending pattern to a Style before stopping it.
KEY START synchronizes the start of a Style with a note or
chord played in the low er keyboard area. CONTINUE resumes
the current Song Style or Song from the point where it had
been stopped.
14. TEMPO/DATA, ENTER, ESCAPE. T EMPO/DATA Keys
modify the Tempo in Styles, Song Styles or Songs. When a
mode is selected where values may be edited, the – and +
keys modify the value of the selected parameter. ENTER
confirms selections or changes made. ESCAPE cancels the
input data or exits the edit page.
15. SUSTAIN: adds a sustain effect to the three keyboard
sections (Upper 1, 2 e Lower) independently by the
Damper Pedal.
16. REV/CHO. Enables (led ON) or disables (led OFF) THE
Digital Signal Processori.
17. HARMONY : enables or disables the melody harmonizer .
○○○○○○○○○○○○○○○○○○○○○○○○○○○○○○○○○○○○○○○
4 Front/Rear Panel
Page 12
33
3
33
66
6
66
77
7
77
44
4
44
88
8
88
MELODY OFF
99
9
99
1111
11
1111
1212
12
1212
1010
10
1010
2121
21
2121
1313
13
1313
1919
19
1919
2020
20
2020
2222
22
2222
2323
23
2323
1414
14
1414
2424
24
2424
1717
17
1717
1515
15
1515
1818
18
1818
1616
16
1616
2626
26
2626
2525
25
2525
2828
28
2828
EFF#
m c2 to D #6
18. TRANSPOSE b / #. Raises (#) or lowers (b) the overall
pitch of the instrument by a semitone every time that it is
pressed, up to a maximum of ± 12 semitones (1 octave).
When both keys are pressed at the same time the transposer
is set back to 0.
19. STYLE/TEMPO LOCK. STYLE LOCK: When this function
is ON (the display indicates the status), when a Perf ormance is selected only the keyboard sounds (Low er, Upper 1 e
2) change, while the accompaniment tracks remain
unchanged. When it is OFF, recalling Performances
changes all panel value, including Styles and keyboard
sounds. TEMPO LOCK: when active (display indicator ON),
the current Tempo setting is locked for all Style changes.
When OFF , each Style recalls the stored T empo data. When
T empo Loc k function is ON, the display will show a flashing
“ Tempo” indication that alternates the current value with
the “Lock” indication.
20. PLAY ALL SONGS. If a Song or MIDI File disk is
inserted in the disk drive, pressing this key will play all the
Songs or MIDIFiles available on disk in a sequence.
21. DISPLAY . A colored, backlit, LCD multi-function displa y
simultaneousely displays and provides access to the v arious
parameters. The user interf ace shows the currrent status of
the machine at all times. The ON or OFF status of the panel
keys is shown by corresponding indicators or icons that
turn on or off accordingly. When a MIDIFile is pla yed, WK1
display will show the lyrics of the song in the first two lines
(for a maximum of 24 characters). The surrounding
silkscreened indications to the left and to the right, belong
to the display area and will be described in detail in Chapter
2 ( “Basic Concepts”), in the “Display ” section.
Floppy
is
Disk
Drive
Multi
Effects
Stereo
Filter
Stereo
22. UPPER 1, UPPER 2, LOWER. These keys enable
(led ON) or disable (led OFF) the corresponding keyboard
sections.
23. FLOPPY DISK. Enters the disk drive operating
functions (Load, Save, Delete , F o rmat) when transferring
data to disk (SAVE), or from disk (LOAD).
24. LYRICS. When a MIDIFile is played back, this key
enables (led ON ) or disables (led OFF) the song lyrics in
the display.
25. SOUND . Enables (led ON) or disables (led OFF) the
numeric keypad to recall Sounds (00-127) including the
Drumkits located in banks 2, 3 and 4), referred to the
silkscreened values written above in the panel. Three-digit
numbers are selected by first pressing the +100 key,
followed b y the remaining two digits. The sound banks 1,
2, 3 and 4) are selected in cyclic order by pressing the +
and – keys simultaneously.
26. STYLE. Enables (led ON) or disables (led OFF) the
numeric keypad to recall Styles (00-95), USER Styles (96-
103),Song/Styles (104-110) and Songs (111-117).
27. DIRECT STYLE MEMORY. Each of the 16 memory
buttons of this section memorize a preferred Style selected
from the ROM or User banks (the User Style must be in
memory) for a rapid recall. The overall configuration of
both direct memory sections (Style and Sound) can be
stored to floppy disk or hard disk for future loading.
○○○○○○○○○○○○○○○○○○○○○○○
Front/Rear Panel 5
Page 13

28. SEQUENCER. These 2 keys are dedicated to the recording
and playback of the Song Styles, and to the playback of the
Songs. The RECORD key automatically enables the instrument to
recording Song Styles. If the key is pressed and held for a fe
seconds gives access to CLEAR function, that allows you to
cancel recording errors and unwanted parts (all, chord, etc.).
PLAY /STOP star ts and stops the playback of the Songs and the
recording and playback of the Song Styles.
29. PITCH/BEND. The Pitch Bend wheel directly controls the
pitch of the sounds generated by WK1; moving it hor izontally
gives a “gliding” effect that adds realistically to the sound of some
acoustic instruments such as a saxophone, a guitar, a violin
etc..
30. MODULATION. The Modulation key enables modulation of
the sound.
31. Il DISK DRIVE. The disk dr ive is located to the left of the
instrument, under the keyboard. It works with 3.5” disks of the
(2DD) or (2HD) type.
○○○○○○○○○○○○○○○○○○○○○○○○○○○○○○○○○○○○○○○
6 Front/Rear Panel
Page 14

Rear P annel WK1oriental (Connection)
MIDI-OUT
RGB S-VHS COMPUTER
11
1
11
MIDI-OUT
MIDI-IN VOLUMEDAMPER PHONESAUX
MIDI-IN VOLUMEDAMPER PHONESAUX
22
2
22
33
3
33
DC-12VRGB S-VHS COMPUTER
DC-12V
OUT
OUT
44
4
44
66
6
66
88
8
88
77
55
7
5
77
55
1. VIDEO INTERF ACE. An (optional) interface with RGB
and S-VHS ports to connect WK1 Or to a TV set or
monitor to display the Lyrics of a Song.
2. COMPUTER. Serial port to directly connect WK1 Or
to a computer (Apple Macintosh, or IBM, or compatibile). The data exchange between WK1 Or and a computer requires appropriate setting, as explained in detail in
the MIDI/General chapter.
3. MIDI. MIDI interface equipped with MIDI IN and MIDI
OUT sockets to connect WK1 Or to other MIDI devices
(keyboard, computer etc.). MIDI cables are not supplied
with the instrument.
When using WK1 Or alone, it is not necessary to connect
the MIDI ports to any external device.
4. DAMPER. When the DAMPER pedal (optional) is
connected to this socket, the notes play ed on the keyboard
are sustained if the pedal is pressed.
5. VOLUME. When a V OLUME pedal (optional) is connected
to this socket, the ov e rall v olume of the k eyboard or of the
selected sections is controlled by this pedal.
6. A UX/OUT Audio output to connect WK1 Or to an external
system (mixer, external amplifier , DAT recorder, etc.).
7. PHONES. Headphone socket.
8. DC-12v. Adapter sock et, to connect WK1 Or to a 220V
mains source through the AC/DC power supply adapter
provided with the instrument.
○○○○○○○○○○○○○○○○○○○○○○○
Front/Rear Panel 7
Page 15
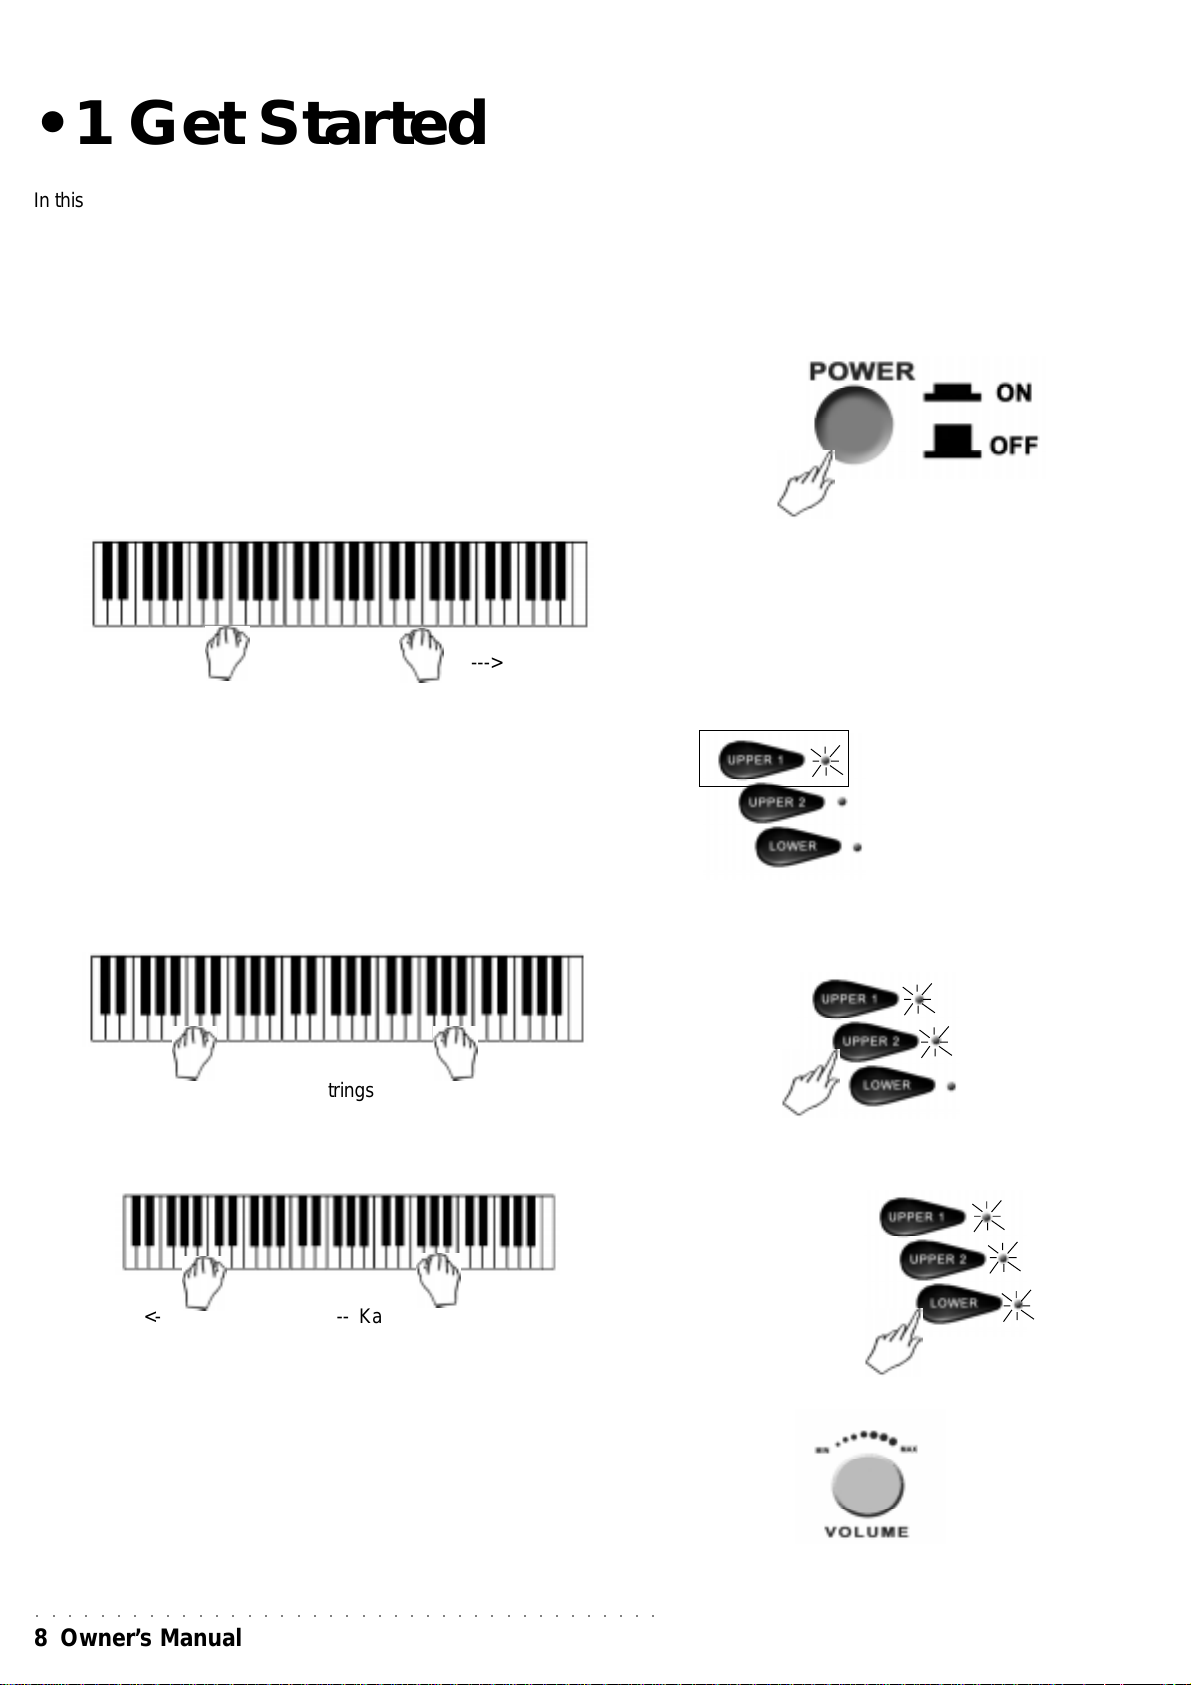
• 1 Get Started
In this chapter you will find step by step instructions on the basic functions
that will help you understand and get to know your instrument straightawa y .
Powering up and preliminary operations
Power On/Off
The switch to turn the keyboard on and off is located on the left lateral panel.
To power WK1 oriental up insert the power supply cable in the rear-
panel mains socket, and plug the cable into a 220V wall socket.
Play on the keyboard and change the sounds
1. Play on the keyboard.
<--------------------- Kanoun --------------------->
The “Kanoun” sound is heard over the whole keyboard extension.
The group of Keyboard activ ator keys (Upper 2, Upper 1, Lower) shows
that UPPER 1 is active: the led is ON. The UPPER 1 section of the
keyboard is now playing.
You can also enable the Upper 2 e Lower sections of the keyboard.
2. Press UPPER 2 and play on the keyboard.
A second sound is now heard, layered with the first.
<--------------------- Kanoun --------------------->
<--------------------- Strings2 -------------------->
Each note played on the keyboard plays two sounds simultaneously.
3. Press LOWER and play on the keyboard with both hands.
<- HaloPad -><------------ Kanoun ------------>
<------------ Strings2 ----------->
A third sound is introduced. The keyboard is now divided in two parts,
with a Split point on B3 note The LOWER keyboard section plays in the
C2 - B3 area. UPPER 1 and UPPER 2 sections pla y in the C4 - C7 area.
4. Adjust the overall volume.
Use the VOLUME dial to adjust the overall volume of the instrument.
Two thirds of the maximum range of the dial is recommended.
○○○○○○○○○○○○○○○○○○○○○○○○○○○○○○○○○○○○○○○
8 Owner’ s Manual
Page 16
PLAY MANUAL BASS
In Real Time Mode, WK1 Or adds a fourth Sound to the keyboard, allowing you to play bass manually.
5. Press Function button F2 twice and play again with both hands.
The display shows the activation of the Bas section with the BAS symbol
above the BASS track.
A fourth sound (PickBass) is now added to the other three. You will hear
a layered combination of two sounds on the right and a layered
combination of two sounds on the left (below note F#3).
6. Deactivate LOWER (if on) and play on the keyboard.
The LED of the Lower button goes off and the Upper 1 and 2 sounds
will play together with the Bass Sound. If you now deactivate both
Upper 1 and Upper 2 section, the Bass sound will play across the
entire keyboard.
It is also possible to set WK1 Or to power up with the Manual Bass
active by memorizing the corresponding panel situation in the powerup Perfor mance. Manual Bass is governed by the AU TO MANUAL
BASS option under the ARRANGE MODE function (see the Styles
chapter). The default setting of AUTO MANUAL BASS is ON.
<- HaloPad -><------------ Kanoun ------------>
<- PickBass -><----------- Strings2 ----------->
PLAY WITH A PRESET ARABIC SCALE
The Arabic Scale Memory section contains 3 preset (ROM) Arabic Scales
(factory-set which cannot be permanently erased from memory).
1. Press one of the 3 Arabic Scale Memory buttons (1, 2, 3) to select a
preset Arabic Scale.
The corresponding LED turns on. At the same time, one or more buttons
of the ARABIC SCALE section activate (shown by the corresponding LED)
to identify the Arabic notes.
The pitch of the Arabic notes will be lowered by 1/4 of a tone. Recalling an
Arabic Scale affects the keyboard on a global basis, regardless of th
ecurrent mode.
2.To r e c al l a d if ferent preset Arabic scale, simply press one of the other
Memory buttons .
The previous button will cancel and the Arabic Scale will change configuration according to which Memory button is pressed.
3. To cancel the selected Arabic Scale, press the Cancel button.
The preset Arabic Scale cancels and restores the instrument to the normal
(equal) playing scale.
Refer to the Arabic Scale chapter for more information regarding the selection and programming of Arabic Scales.
○○○○○○○○○○○○○○○○○○○○○○○
Get Started 9
Page 17
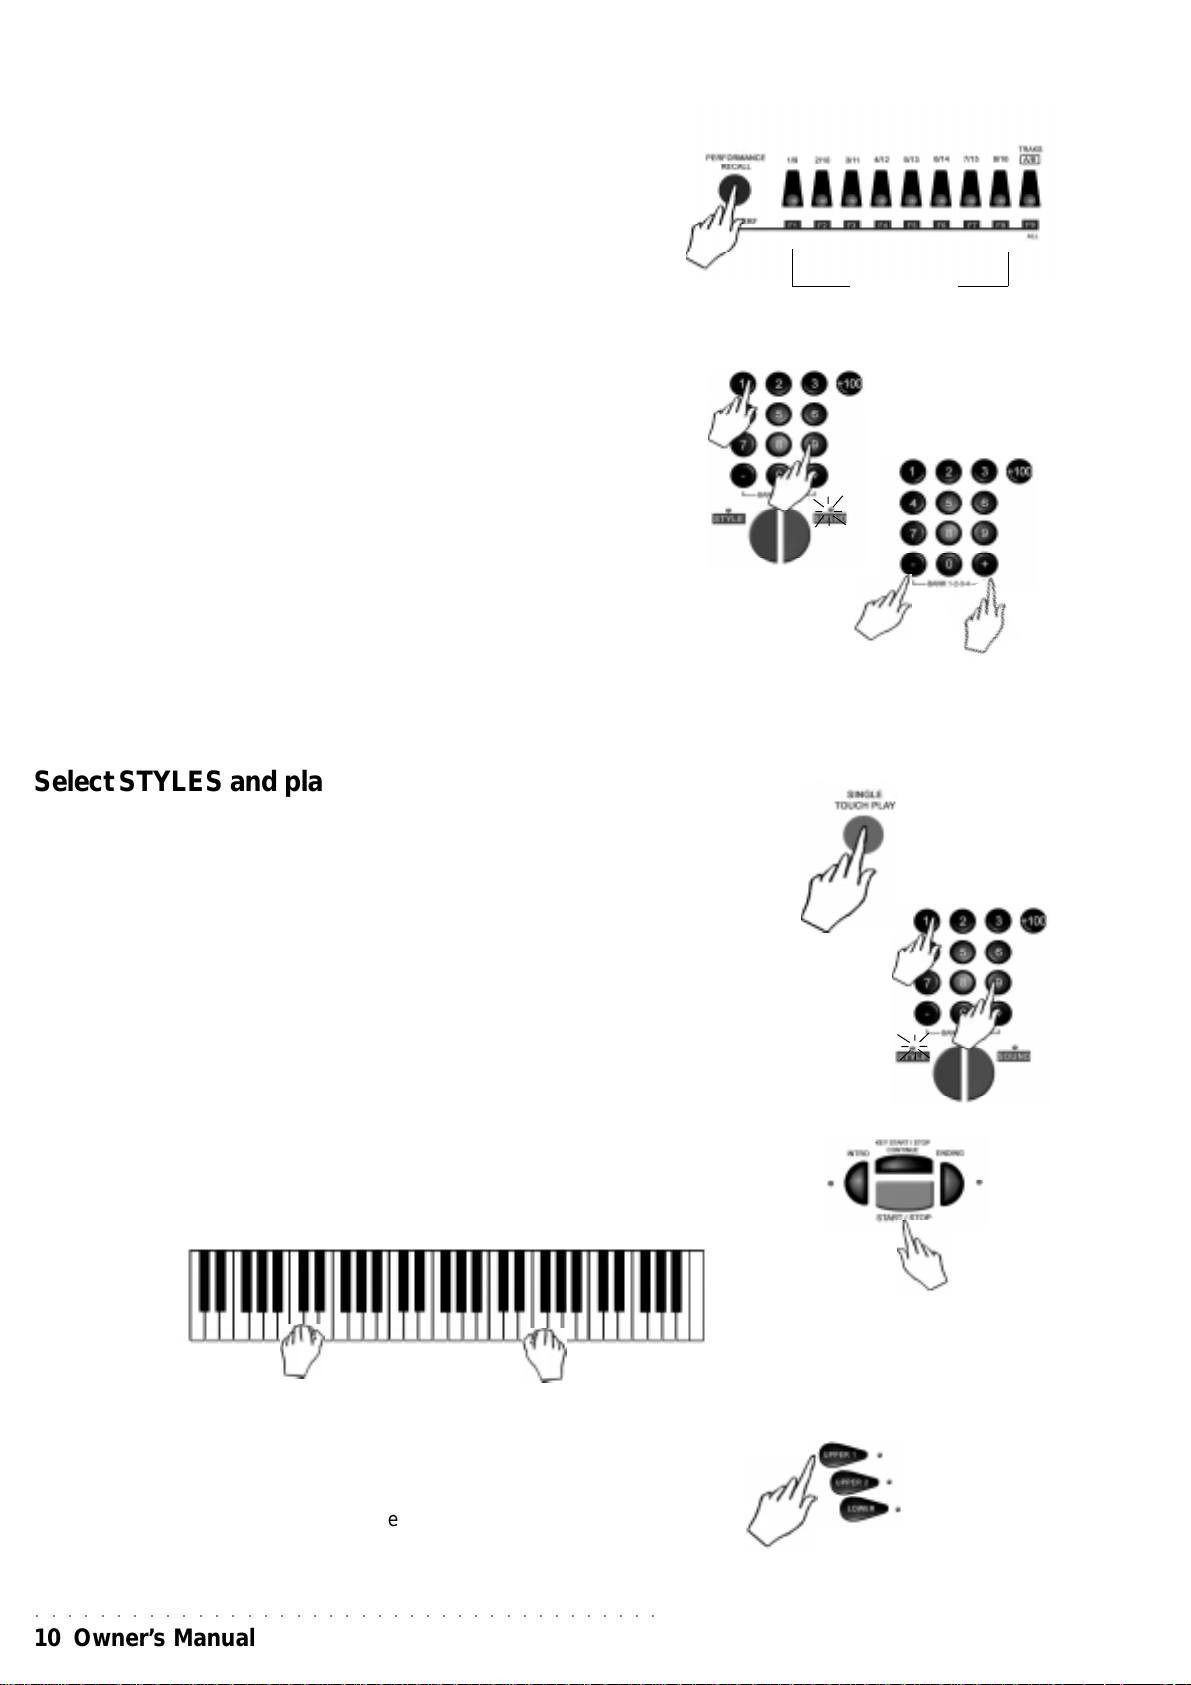
SELECT PERFORMANCES AND LISTEN TO THE SOUNDS
1. Press the Perfor mance Recall key.
2. Select a Perfor mance.
Use the Function keys (F1...F9) to select one of the 9 P erfo rmances in the
first bank
3. Play on the keyboard
The selected Performance recalls a different combination of sounds. The
keyboard setting may also change (Split or Full mode). Sounds and
keyboard mode depend on the selected Performance. The Split point is
the same for all Perfor mances.
Perfor mances may:
• recall combinations of up to 3 keyboard sounds;
• recall different settings of the control panel;
• recall Styles.
More details on the Performances are available in the “Performance”
section of the Owner’s Manual.
4. Change the sounds.
F1............F9
Use the Sound key (the led is ON) and the numeric keypad to select a
sound. You can also press the + and – keys to select sounds step b y step.
Select STYLES and play with automatic accompaniments
One Style will already be selected, but you can select another in the following way:
1. Press SINGLE TOUCH PLAY.
The corresponding box on the display is highlighted and the ARRANGE ON/OFF
LED on the control panel turns on.
2. Select a Style (the LED turns on) by pressing the corresponding number
on the numeric keypad.
3. Press START/STOP.
The drum accompaniment (Drum track) starts playing.
4. Play a chord with the left hand (keeping belo w split point B3) and a melody
with the right hand.
A full instrumental accompaniment to your melody star ts playing automatically.
The combination of the sounds playing in the accompaniment depends from the
selected Style.
You can modify the preset combination of the sounds in real time by operating on
the keyboard activators controls (Upper 2, Upper 1 e Lower).
More details can be found in the “Styles” chapter of this manual.
○○○○○○○○○○○○○○○○○○○○○○○○○○○○○○○○○○○○○○○
10 Owner’s Manual
Page 18
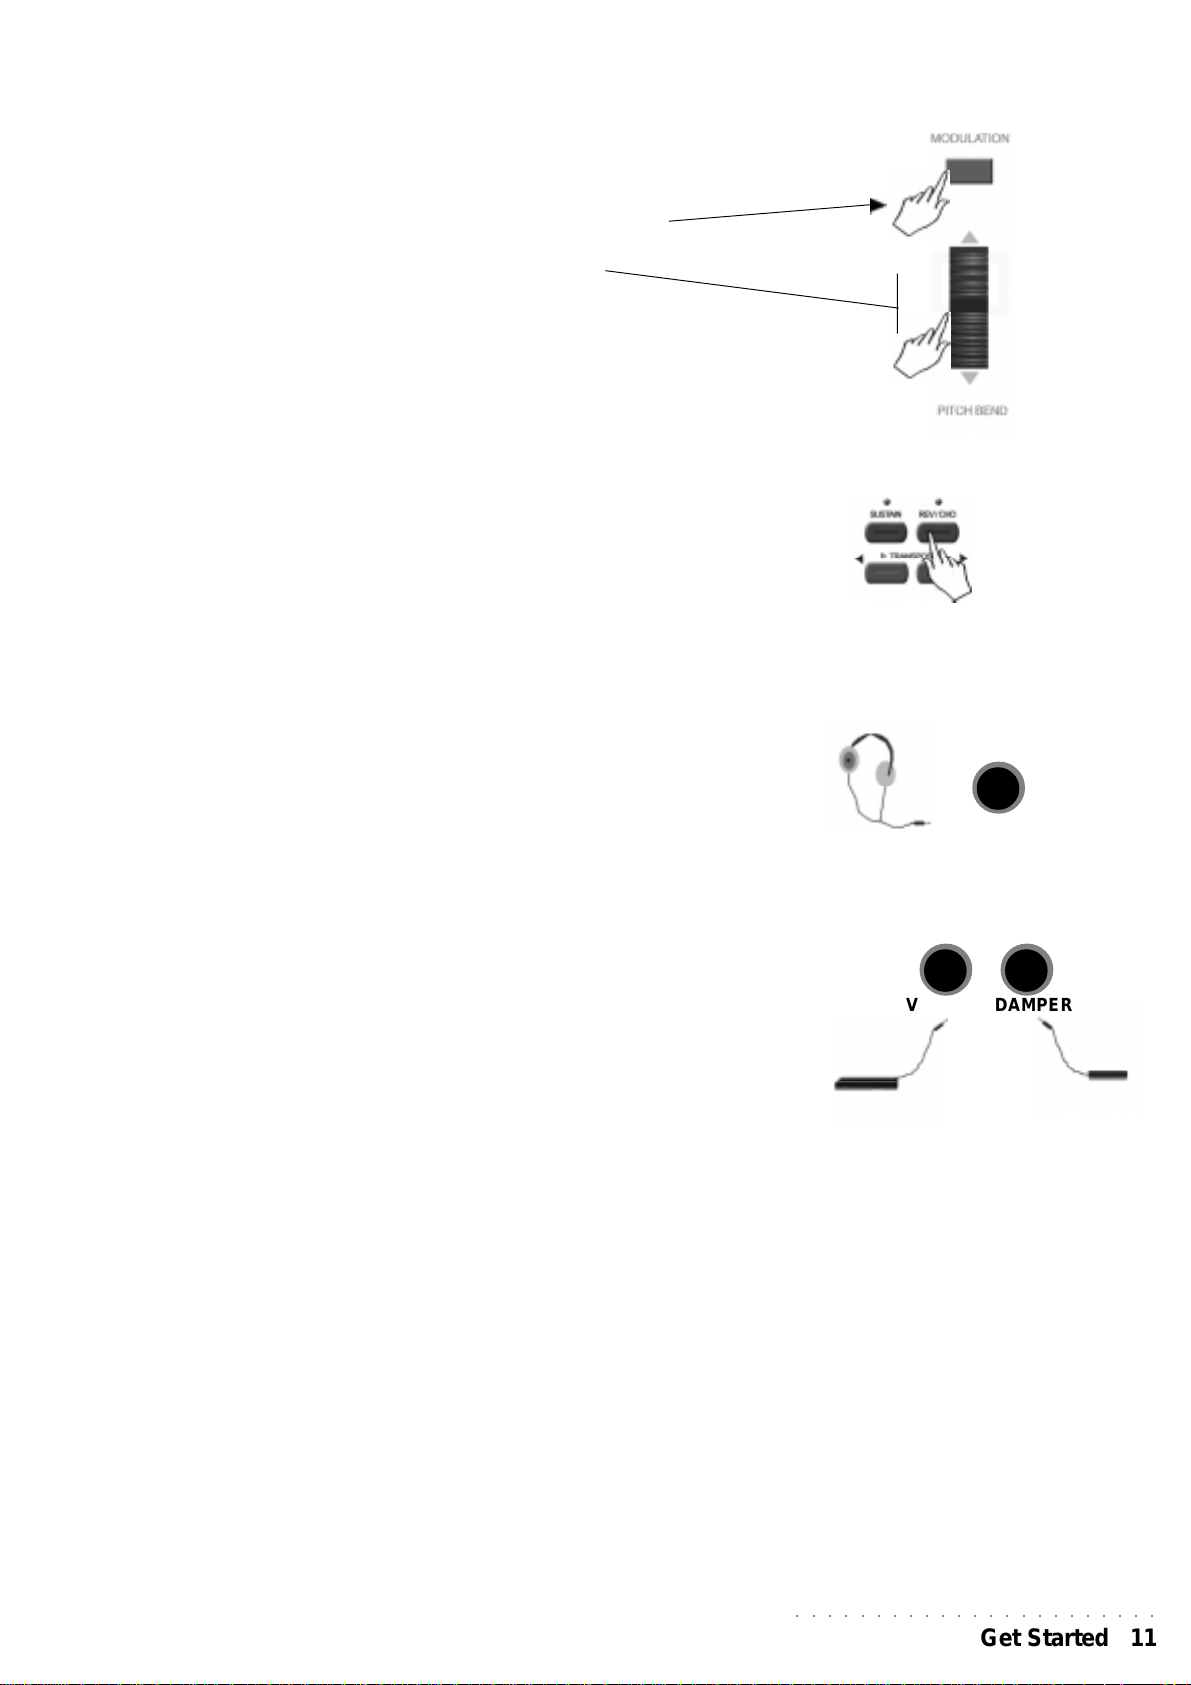
Using Pitch Bend and Modulation wheel
You can modify the pitch of the keyboard sound while you are playing, using
the Pitch Bend wheel located to the left of the keyboard.
To obtain a Modulation, press the Modulation key.
To obtain a Pitch Bend, move the wheel vertically (upwards or
downwards).
UP
Pitch Bend and Modulation are variation of the pitch that imitate the
vibrato or other typical effects of some instruments (trombone, guitar , violin,
etc.).
Use the Effects
The REV/CHO key can be active (led ON) or non active (led OFF).
You can temporarily modify the active effects in a P erformance or a Style, by
holding the REV/CHO key down.
WK1 oriental features 22 types of Reverb and 22 types of Modulation/
Delay (Chorus) effect.
Use the Headphones
• Plug your headphones in the headphone socket located on the rear panel
of WK1 oriental . The loudspeakers are turned off automatically.
DOWN
PHONES
Use the Pedals
If you have purchased the optonal Generalmusic pedals (volume and
footswitch pedals), connect them to the relative Volume and Damper pedal
on the rear panel.
Pedals will add the following controls:
• Damper = Damper (sustain)
• Volume = Master Volume
DAMPERVOLUME
○○○○○○○○○○○○○○○○○○○○○○○
Get Started 11
Page 19
Adjust the overall effect volume level
You can adjust the general volume of the effects as it is more suitable to the
environment where you are playing.
Although Perfor mance recalls appropriate effect volume and mixer settings
for each track, you can adjust the overall level by a single operation, to give
more or less intensity to the Effect General Level.
1. Press and hold the REV/CHO key, the current effect selection and
the relative general level will be shown in the display.
Use the CURSOR key to move over the page, and the TEMPO/DATA keys
to select among the 22 types of Reverb and the 22 types of Modulations
available.
The general level of each effect is shown at the side: this can be modified
using the Tempo/Data keys.
If you store the new settings with the Store P erf ormance function, they will
remain in the machine RAM memory even if the instrument is turned off.
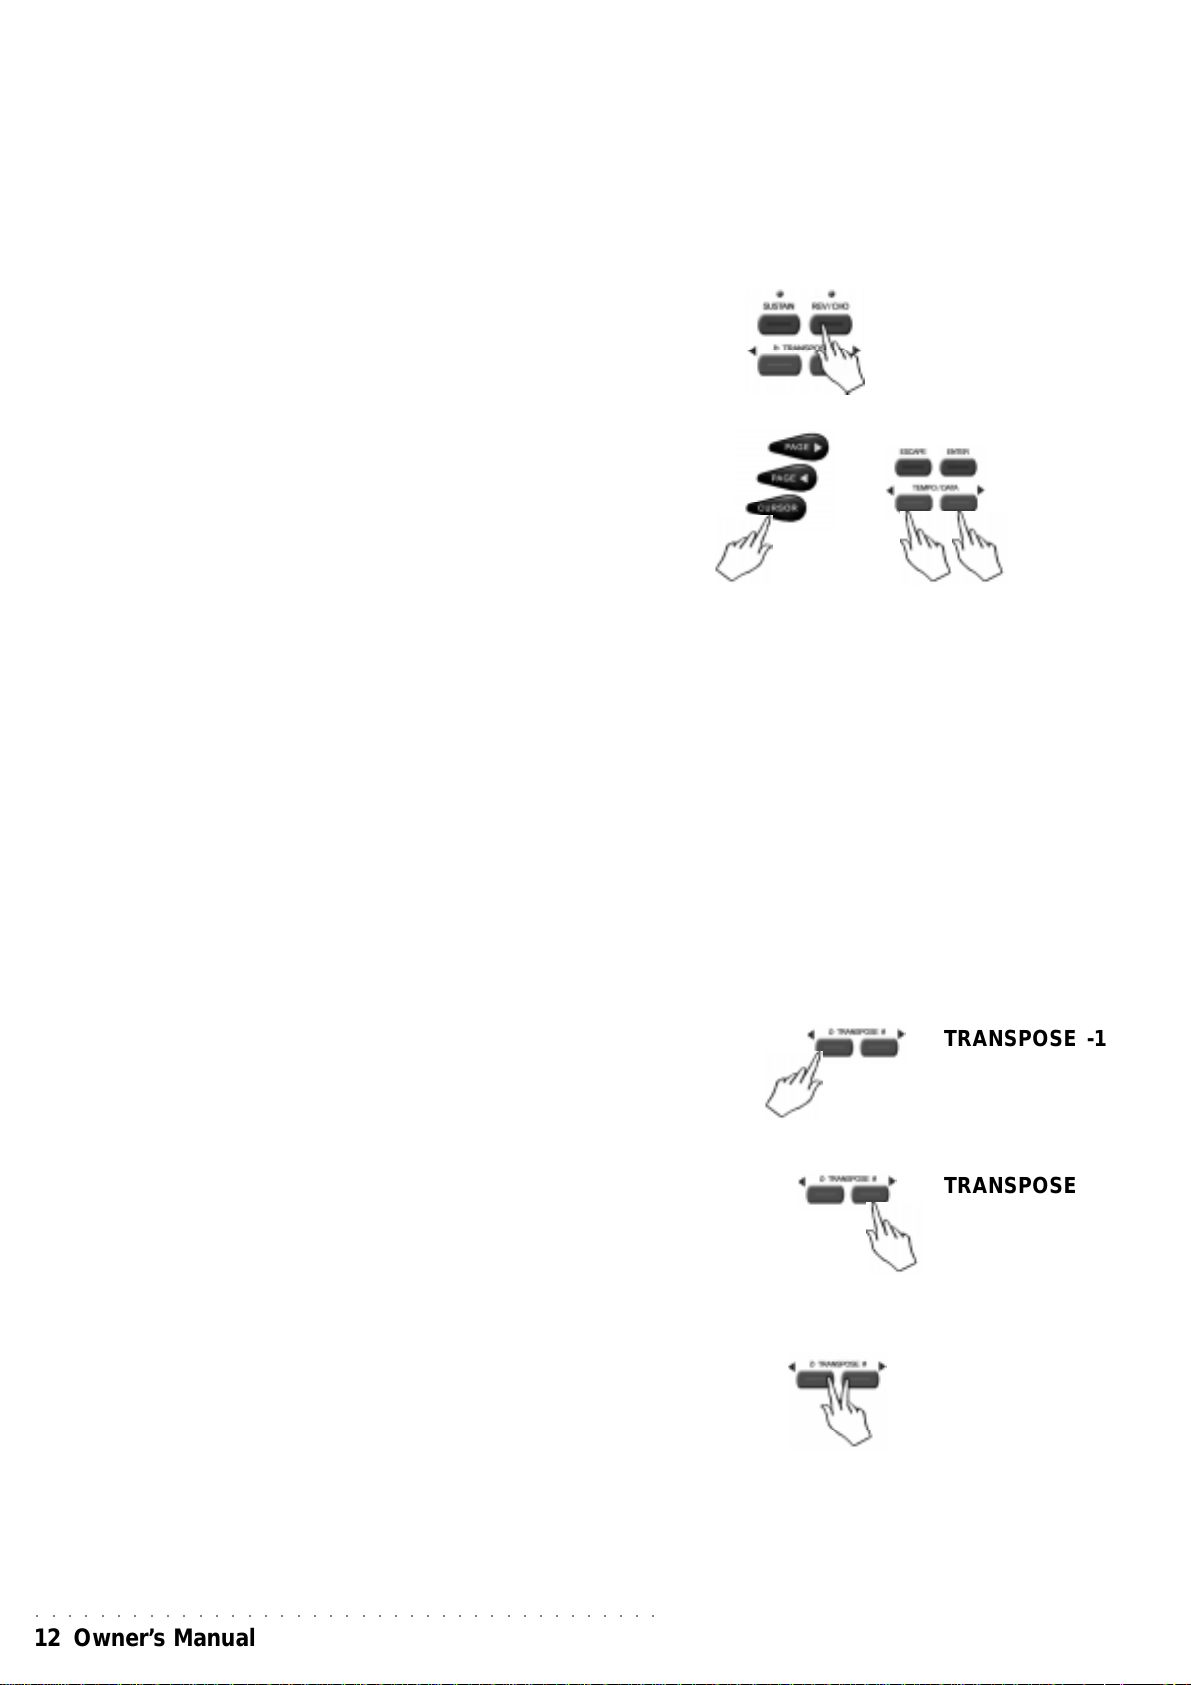
Transpose the instrument (in semitones)
If you play a difficult tune that implies the use of many black keys, or if the
tune you are playing is not in key with the Singer’s voice or with another
instrument , you can transpose WK1 Or to play in a different key.
TRANSPOSE b/# keys allow to transpose the instrument by ±12
semitones (12 semitones = 1 octave).
1. Press the TRANSPOSE b or TRANSPOSE # keys.
In the central part of the display keyboard current tune status is shown
(00 = default tuning).
2. Press TRANSPOSE b to lower the pitch, or TRANSPOSE # to raise
the pitch.
Each time the TRANSPOSE b key is pressed, the display will show a
decrease of one semitone.
Each time the TRANSPOSE # key is pressed, the display will show an
increase of one semitone.
If either key is pressed and held for some time, the transposer value
changes continuosly to reach the maximum value (-12 o +12)is reached.
TRANSPOSE -1
TRANSPOSE +1
Clear the Transposer setting
3 If you press both TRANSPOSE keys at the same time, the transpose
settings will be cleared and the keyboard will be restored to the original
neutral (00) status.
○○○○○○○○○○○○○○○○○○○○○○○○○○○○○○○○○○○○○○○
12 Owner’s Manual
TRANSPOSE 0
Page 20
Demo
How to listen to the Demo Songs
Demo Songs of WK1oriental can be started at any time to get an idea of
the real sound potential of this instrument.
1. Press the DEMO key.
2. Select one of the first 6 tasti function keys (F1…F6) below the display.
Each function key corresponds to a Song. By pressing the F7 key you
can listen to all of the 6 Demo songs chained in a medley.
The Demo Song starts.
3. To stop the Demo Song press the function key again, or press the
DEMO key to exit.
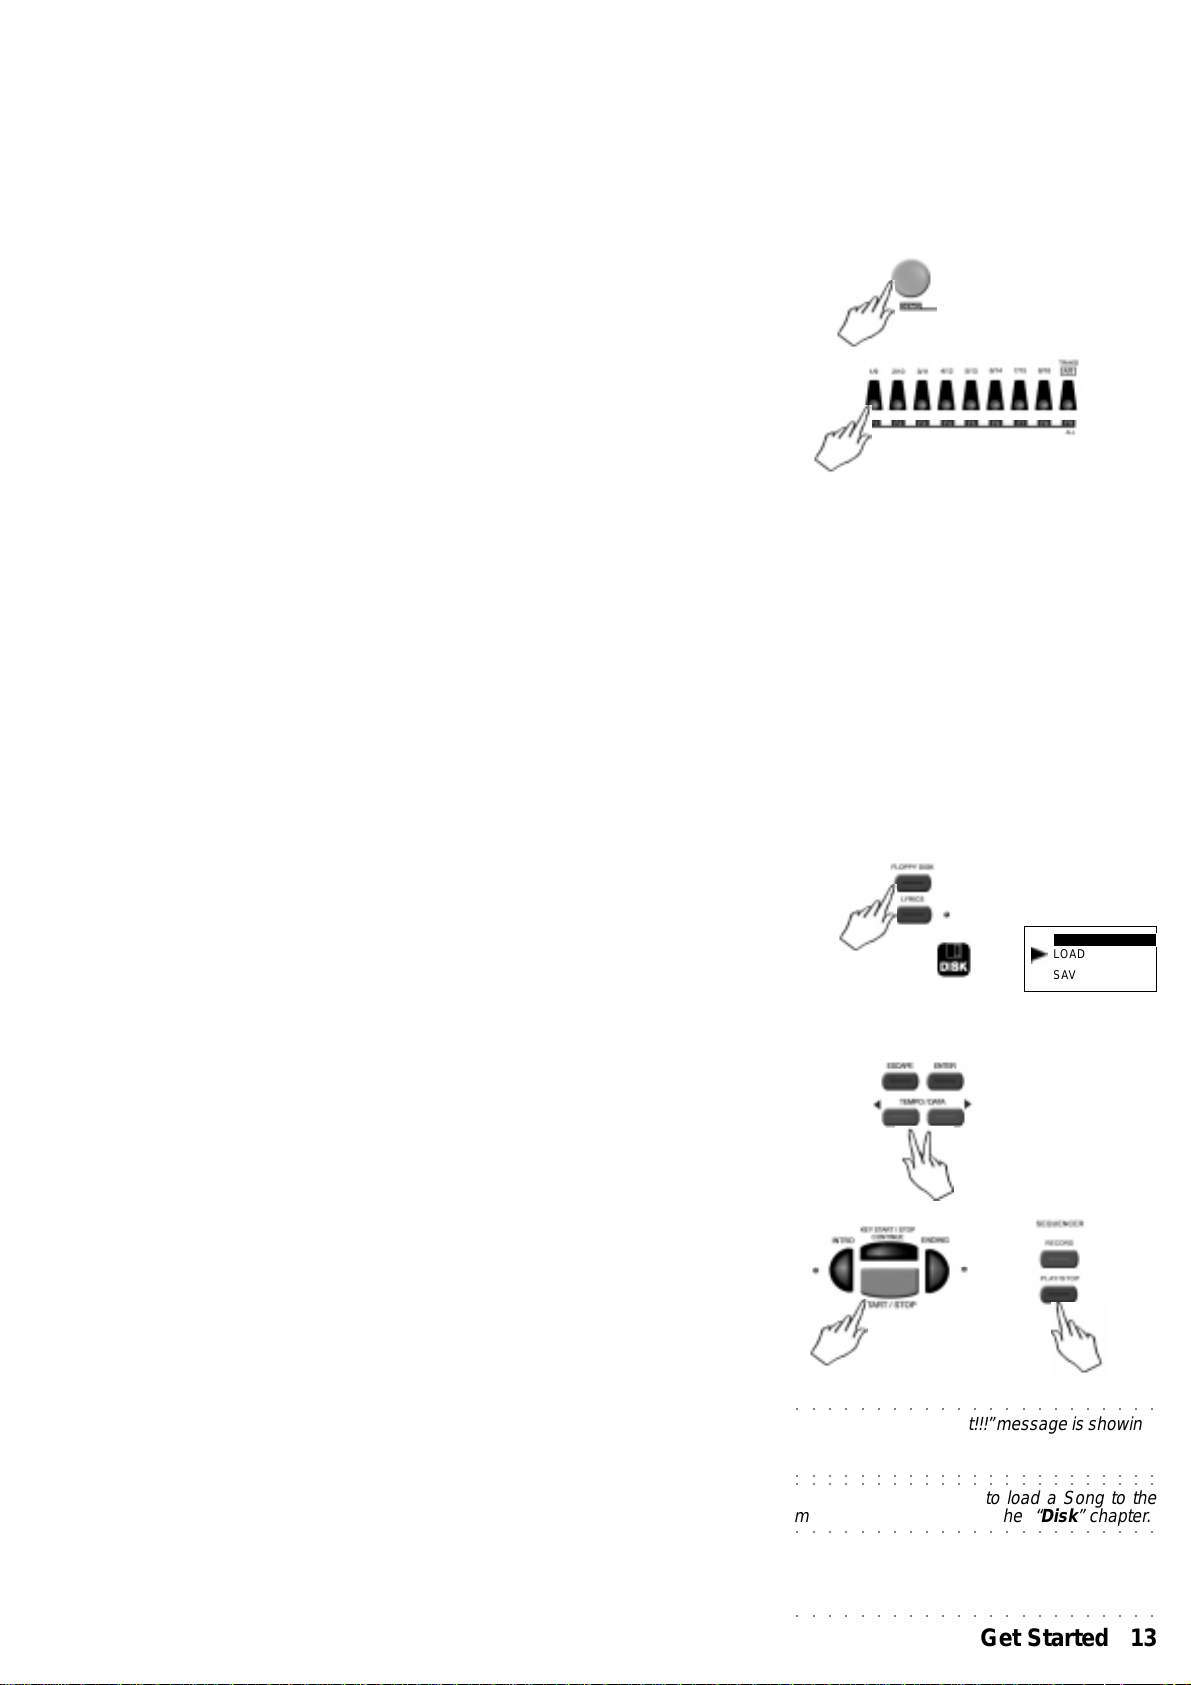
PLAY A SONG DIRECT FROM DISK
WK1 oriental can play back a Song (in GMX, WK2, PK7, WK3 or Standard
Midi File [SMF] format) directly from disk, without having to load them to
the memory.
Get a floppy disk containing WK2, PK7, WK3, songs, or Standard MidiFiles.
1. Insert the floppy disk into the disk drive.
General rules about how to handle floppy disks with the due care are
given in the “General Disk handling infor mation” in the “Disk” section
of the Owner’s Manual.
2. Press the FLOPPY DISK key.
The Disk icon lights up and the cursor arrowhead moves to the LOAD
indication in the disk menu.
The display shows the first available file type complete with the relati-
ve extension.
3. Use the Tempo/Data keys to scroll over the disk file directory until the
name of the desired file appears.
4. Press PLAY/STOP or START/STOP to start the song direct from disk.
The “Wait!!!” message is shown for a few seconds, then the selected
song starts playing.
LOAD
SAVE
DISK
5. Press the PLAY/STOP o START/STOP key at any time to stop the
song playback.
○○○○○○○○○○○○○○○○○○○○○○○
Note 1: While the “W ait!!!” message is showing,
it is possible to stop the disk drive operation by
pressing the ESCAPE key.
○○○○○○○○○○○○○○○○○○○○○○○
○○○○○○○○○○○○○○○○○○○○○○○
Nota 2: Details on how to load a Song to the
memory are described in the “Disk” chapter.
○○○○○○○○○○○○○○○○○○○○○○○
○○○○○○○○○○○○○○○○○○○○○○○
Get Started 13
Page 21
• 2 Basic Concepts
In this chaper you will find the basic concepts to make WK1 oriental wo rk,
along with general information that will help youunderstand the various
parts of the instrument.
T o gain access to the keyboard functions, as w ell as following the instructions
in the Owner’s Manual chapter , you can follo w a friendly shortcut: by holding
down the key relative of the function y ou wish to modify, WK1 oriental will
automatically set into the desired function edit mode..
Styles, Song Styles and Songs
WK1 oriental operating modes are:
Style/RealTime mode: to pla y with the accompaniments or use WK1 as
a normal keyboard. To enable this mode, select one amoung the 63
PERFORMANCES or a STYLE from the Style selection keypad. This
is the default mode when WK1 is pow ered up.
Song Style mode: to record the ke yboard sounds with accompaniments
and create 8-track Songs. To enable this mode, press the STYLE key
(led ON), select the desired number (104-110) on the numerif keypad
and press the RECORD key.
Song mode: to playback Songs from a disk or from the memor y. To
enable this mode select the Song number (111-117) on the numeric
keypad.
Style and Real Time modes (Style accompaniments OFF)
Style and Real Time mode have a Performance in common.
In Style mode up to 8 (5+3) tracks can play sim ultaneously , while only up to
3 can play in Real Time mode. P erformances are edited in the same way in
both modes.
Style/Real Time Performances are always divided into two parts:
• the first 5 tracks are dedicated to the automatic accompaniment;
• the other 3 tracks are dedicated to the keyboard sections
(Upper 1, Upper 2, Lower) to play in Real Time.
Sounds and accompaniments can be recalled by selecting:
a Style (press the STYLE key, then select a number on the numeric
keypad )
or
a Perfor mance (press the PERFORMANCE key, then select a Performance using the function keys located below the displa y).
○○○○○○○○○○○○○○○○○○○○○○○○○○○○○○○○○○○○○○○
14 Owner’s Manual
Page 22
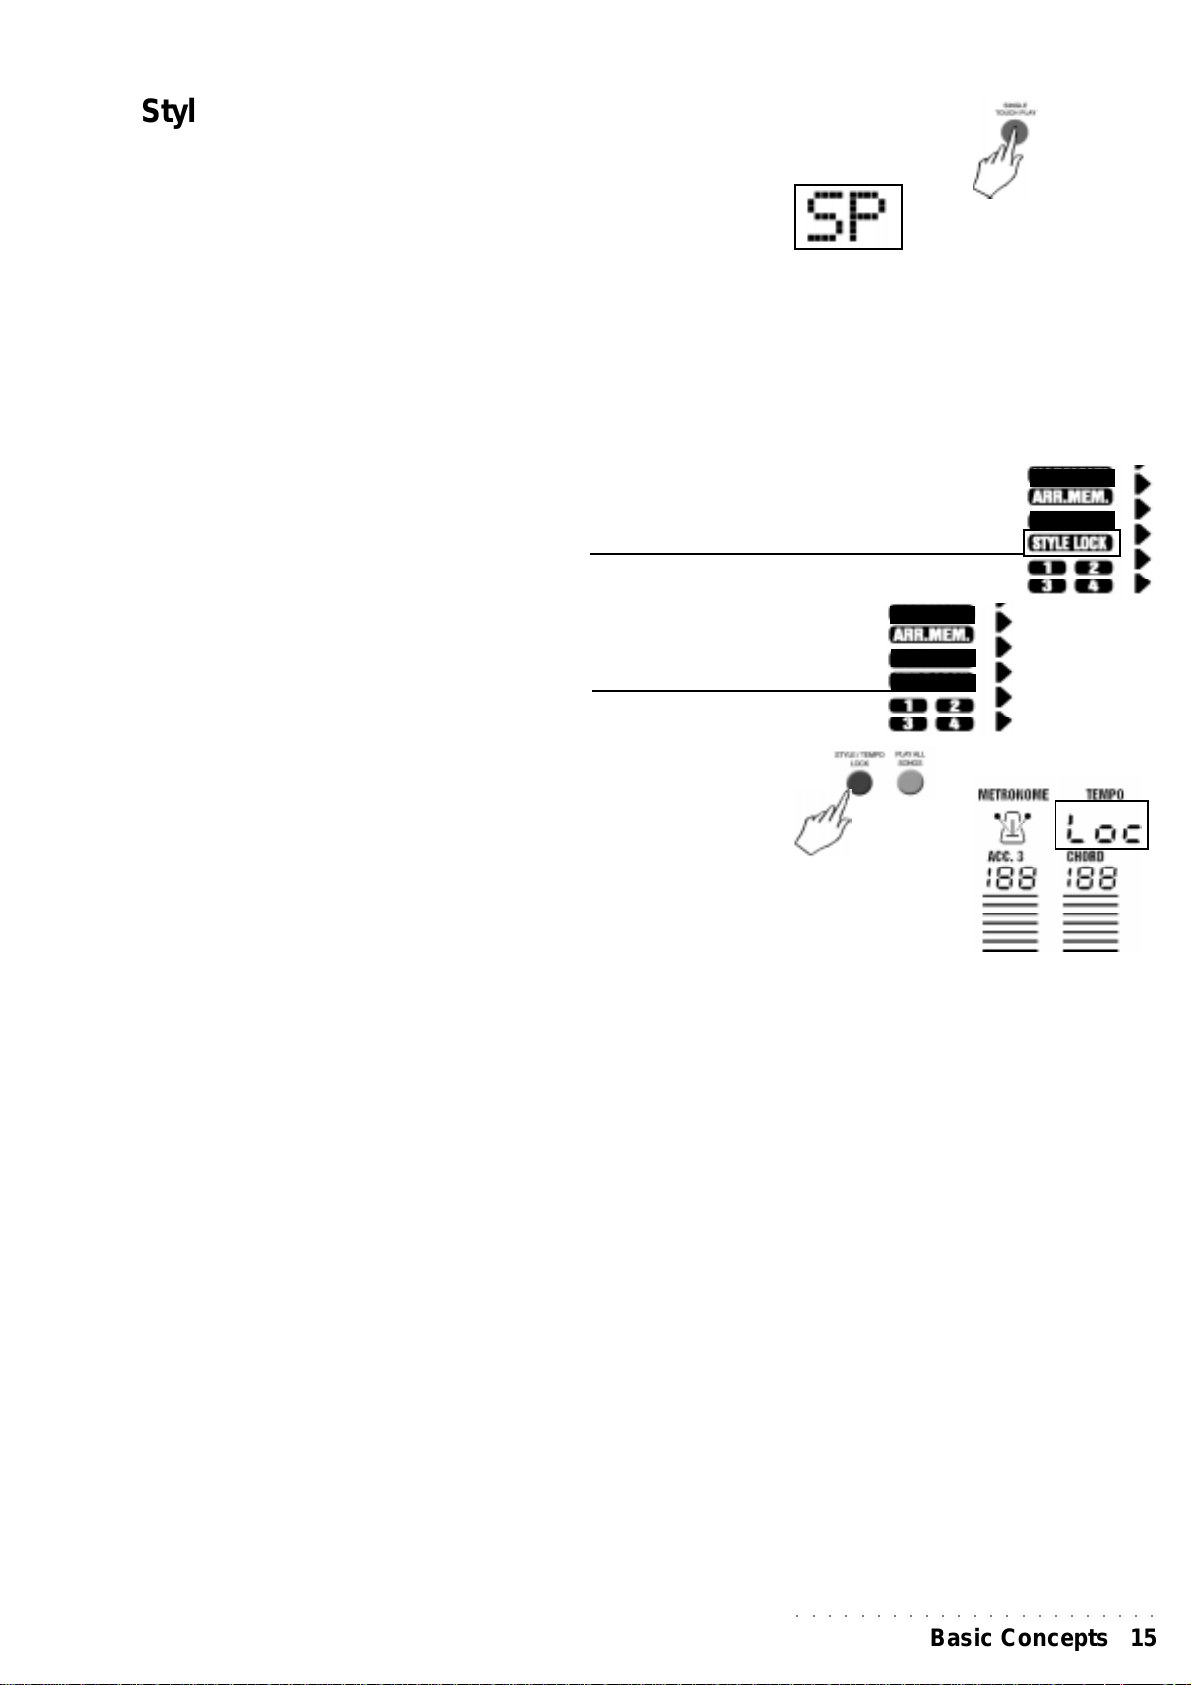
Style Lock and Single T ouch Play
The sounds recalled by selecting P erf ormance and Style are controlled by
the status of the SINGLE TOUCH PLAY and STYLE LOCK functions.
SINGLE TOUCH PLAY ON (SP appears above left in the display):
When a Style is selected on the left hand numeric
keypad, the following parameters are recalled: the
automatic accompaniment patterns, the more
appropriate keyboard sounds for the Style and f or the
Keyboard and, if the Tempo Lock function is off, the
memorized T empo .
SINGLE TOUCH PLAY OFF (no SP message is shown in the display):
Selecting a Style recalls the accompaniment patterns,
the Tempo and the Style sounds, while the keyboard
selection sounds remain unchanged.
STYLE LOCK ON (indicated in the display):
When a Performance is selected, the Style does not
change. Only the keyboard sounds are changed, while
the Style sounds remain unchanged.
STYLE LOCK OFF (indicated in the display):
When a Performance is selected, the Style, the
Variation, the Tempo and Effects memorized are
recalled. Moreover, the sounds both in the keyboard
section and in the accompaniment are changed.
TEMPO LOCK
It is enabled by pressing and holding down the STYLE/
TEMPO LOCK for a few seconds. The 3dgit tempo
display will show the LOC message blinking. Now the
style can be changed and the tempo will not be
affected..
To disable the function press and hold the STYLE/
TEMPO LOCK once again.
SONG STYLE MODE
Song Styles are 8-track songs created by recording the keyboard sounds
played on the 3 ke yboard trac ks with the automatic accompaniment of the
Styles (5 tracks). The Style chords are recorded in the CHORD track. Song
Styles are a quick method to create backing tracks for singers or solo
instruments.
Up to 7 Song Styles can be loaded to the WK1 oriental memory.
SONG MODE
A Song is a multi-timbral 16-track performance, in which each track
represents an instrument of the orchestra or of the band. WK1 oriental
can load and playback songs in the follo wing formats: GMX, PK7, WK3 or
MidiFile (Standard Midi File) created on other sequencers.
Up to 7 Songs can be loaded to the memory , if the locations are av ailable.
WK1oriental can be used as a MIDI 16-part sound generator.
○○○○○○○○○○○○○○○○○○○○○○○
Basic Concepts 15
Page 23

Performances
A Perfo rmance is a combination of sounds and settings. P erf ormances can store the current status
of the panel buttons and information pertaining to the parts that make up a Performance to play in
real time and with Styles. P erformances memorise effect settings, the status of the controllers (pedals,
Pitch/Modulation ball), the pads configuration, the MIDI channel configuration, the status of the
tracks (On/Off), the Tempo setting and more. By selecting a Perf ormance, all the settings memorised
to the Perfo rmance are recalled in a single step.
There are 63 programmable Performances available to choose from, giving you a vari-
ety of possibilities of setting the WK1 oriental to your liking with the least number of
operations. In addition, in ROM (non-programmable) there are as many Style-Performances
as there are ROM Styles, which you can recall at the touch of a button using the SINGLE
TOUCH PLAY function.
Real Time Performance
63 user-programmable P erformances are arranged in 7 PERFORMANCE GROUPS. Perf ormances
recall combinations of the keyboard sounds, panel settings, Style, Variation and Tempo. Press the
PERFORMANCE RECALL button to quickly access the Perf ormances (select them with the F1…F9
buttons). Hold down the same button to activate the STORE PERFORMANCE command, which
allows you to sav e the panel situation to the current Performance.
Style Performance
96 default non-programmable P erformances are associated to the ROM Styles which are permanently
stored in the instrument’s Read Only Memory. The default Style Performances are recalled when
Styles are selected with the SINGLE TOUCH PLAY function selected (display indicator on). Style
Perf o rmances recall sounds for the accompaniments and keyboard sections.
Single T ouch Play
Single Touch Play settings are additional Performances which are recalled by using the function
buttons F1…F9 when the SINGLE TOUCH PLAY function is active (display indicator selected). In
this condition, as well as being able to select the ROM Styles using the Style / Song selection
keypad, you can also recall up to 9 preset real time k eyboard settings (combinations of the Upper 1,
Upper 2 and Lower sounds) which depend on the current Style. The possibilities are, therefore,
endless when you consider that there are 96 ROM Styles, each with 10* Single Touch Play settings
(for a total of 960 preset settings!).
Song Style Performance
Song Style Perf ormances (non-programmable) are associated to the Song Styles which are stored
in appropriate memory locations as indicated in the Song / Style lists at the top of the instrument’s
control panel. The Song Style P erformances recall sounds associated to the accompaniment tracks
and keyboard tracks used in the recording.
Song Performance
Every Song loaded or played from disk is associated to a specific Song Performance which is
automatically recalled by selecting the Song (111-117).
Can Performances be used via MIDI?
Every Song loaded or played from disk is associated to a specific Song Performance which is
automatically recalled by selecting the Song (111-117).
Perf ormances are a source of 16 Sounds via MIDI, regardless of the status of the instrument.
It is possible to modify the 16 Perf ormance tracks using the Page b uttons to the left of the display , but
only when the arrowhead does not show the Perf function selected. If y ou are playing in real time or
with the Styles, the configuration of tracks 10-16 does not influence either pla ying mode (track 9 is
used by the Pads). On the other hand, if you are programming WK1oriental to use it as a multitimbral slave device, all 16 tr acks are considered.
○○○○○○○○○○○○○○○○○○○○○○○○○○○○○○○○○○○○○○○
16 Owner’s Manual
Page 24

Tracks
A Trac k is the smallest part of a Perfo rmance and each type of Perf ormance contains a number of tracks that correspond to the playing mode to
which the Perf o rmance is associated.
A sound can be assigned to each track; the displa y always shows the sounds
assigned to the keyboard sections (Upper 1, Upper 2, Lower). It is also
possible to see the sounds assigned to all the tracks of the current P erformance. The Tracks are divided into two groups: 01-08 and 09-16. If the
display arrowhead shows the Song function selected, the function button
F9 allows you to switch from the trac k set 01-08 to 09-16.
The Sounds assigned to the tracks are displayed as Program Change
numbers. The bar graphs shown directly under the Program Change
numbers represent the track Volume le vels.
The status (ON or OFF) of the Upper 1, Upper 2 and Lower tracks can be
changed by intervening directly on the corresponding section activators
(Upper 1, Upper 2, Lower). The ON/OFF status of all the other tra cks of the
Perfor mance (except the real time tracks) is changed by pressing the
corresponding function buttons repeatedly (provided that the PERF function
is not shown selected with the arrowhead). The ON/OFF status of the
tracks is shown by the track name (e.g. ‘Drum’) which is displayed
when ON or cancels when OFF.
Sounds
WK1 Oriental can be:
• ROM sounds
• Drum kit sounds
• Samples
• ROM Sounds
WK1 oriental contains 464 sample-based ROM Sounds (inc luding 17
Drumkits).
The Sample Ram allows you to load one or more samples in memory, to
increase the sound potential of the instrument.
DRUM KITS
Drumkits assign a different percussive sound to each note of the keyboard.
Banks 2 and 3 of the PERCUSSIVE Sound Group contain 16 Drumkits +
an Arabic Kit (Percussive)
SAMPLES
WK1 oriental can load samples in WK2, PK7, WK3 and CD formats. They can be
loaded to the memory using the “Load All Disk” function.
○○○○○○○○○○○○○○○○○○○○○○○
Basic Concepts 17
Page 25
Connections
This section gives a brief explaination of the rear panel sock ets and of the
the types of connection possible for your WK1 oriental.
POWER
Connects WK1 Oriental to a mains socket through the provided AC/DC
power supply adapter.
AUX/OUTPUTS
The rear-panel Stereo output jacks allows the WK1 oriental to be connected
to an external amplification system (keyboard amplifier, domestic stereo
system, mixing console, etc.). The signal is processed by the instrument’s
internal digital effects processor.
For stereo reproduction, connect two jack cables to the A UXOUT . T o exclude
the instrument’s internal amplification and use the audio outputs only , insert
a jack into the headphones socket. Connecting the AUXOUTjacks to e xternal
amplification equipment does not exclude the internal speakers.
MIDI
WK1 Or is fitted with a standard MIDI interface consisting of a MIDI IN and
a MIDI OUT port for MIDI connections. Detailed infor mation regarding
MIDI applications are found in the dedicated chapter further ahead.
Below follow brief instructions on the principal MIDI connections possible.
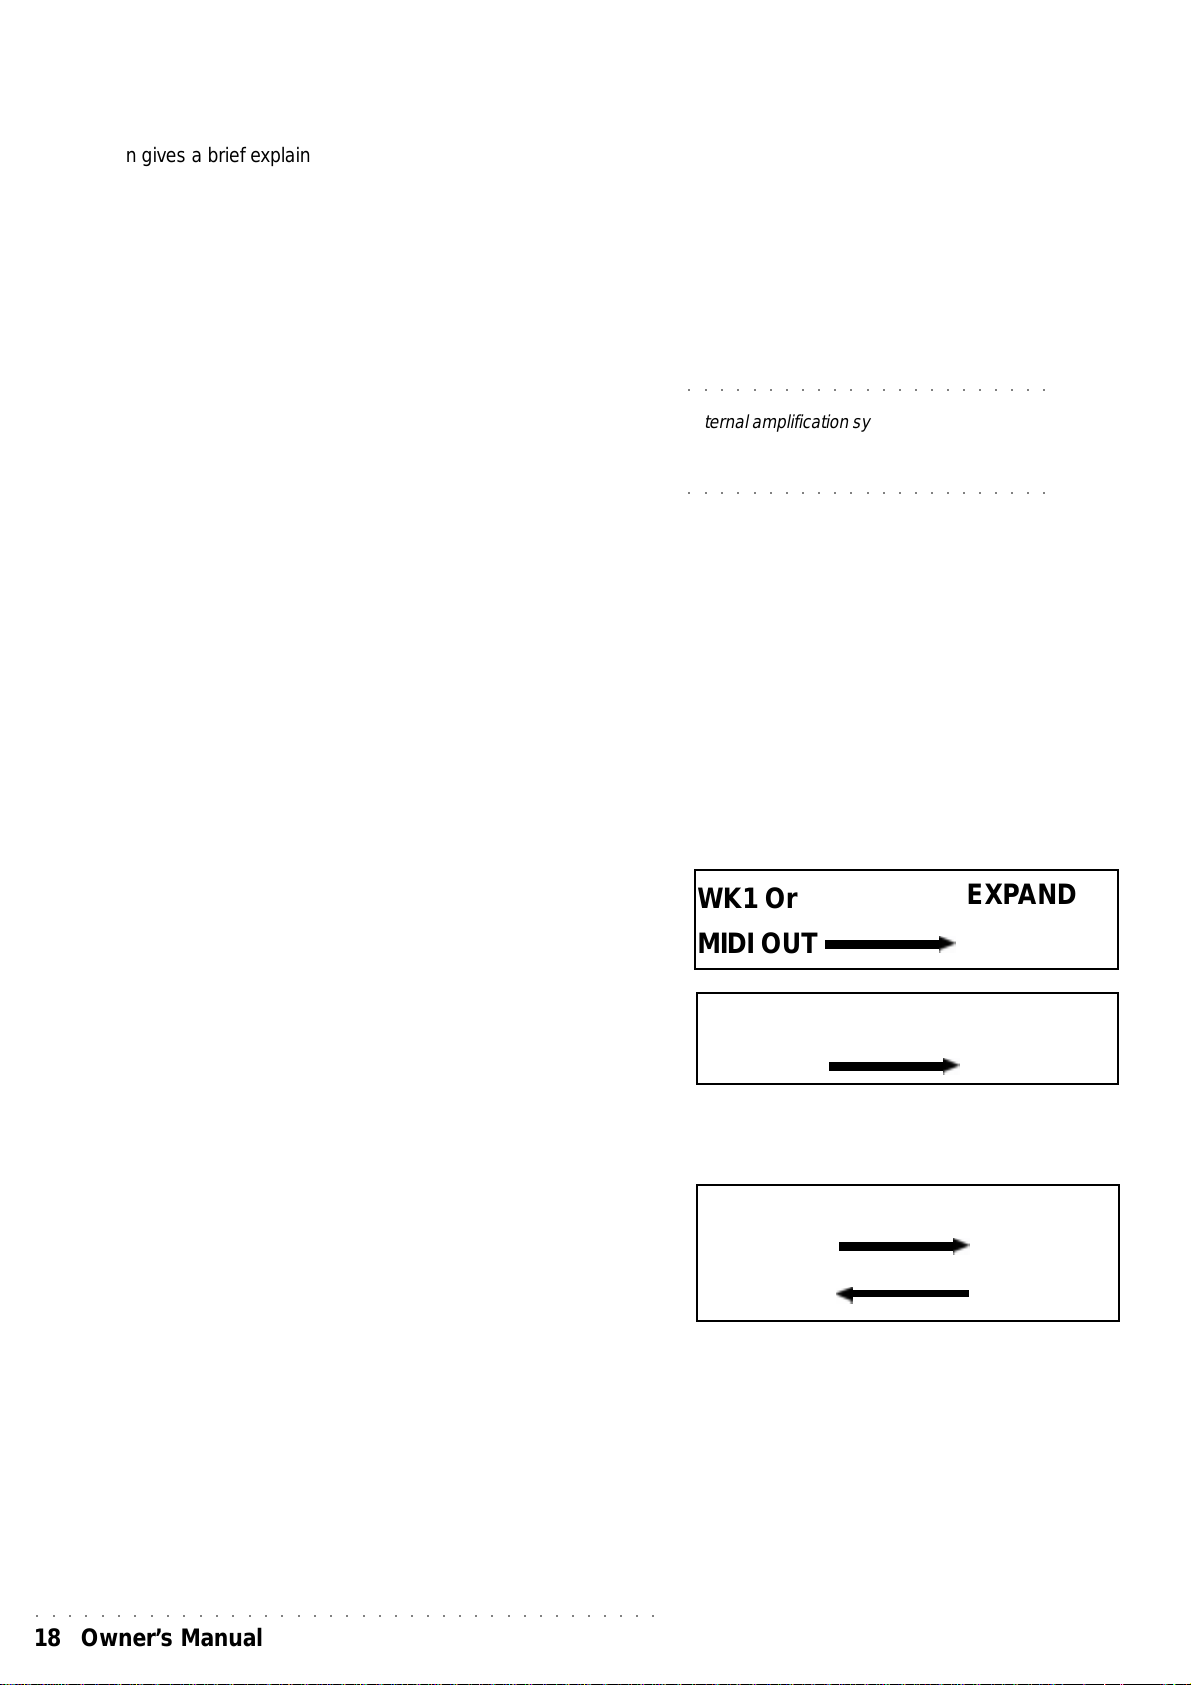
• WK1 Or controlling another instrument.
Connect the WK1 Or MIDI OUT to the MIDI IN of the other instrument.
• WK1 Or controlled by a master keyboard.
Connect the WK1 Or MIDI IN to the MIDI OUT of the master keyboard.
If you wish the master keyboard to simulate WK1 Or fully , set it to transmit
on the same channel as the WK1 Or Common Channel, setting all
other channels to off.
○○○○○○○○○○○○○○○○○○○○○○○
WARNING - Turn down the volume of the
external amplification system before connecting
audio cables. Inserting jacks into the connectors
can cause unpleasant noise which may damage
the speakers of the amplification system
○○○○○○○○○○○○○○○○○○○○○○○
WK1 Or
MIDI OUT
MK
EXPANDER
MIDI IN
WK1Or
• Recording Songs on a computer or external sequencer.
Connect the WK1 Or MIDI IN to the MIDI OUT of the external device,
the WK1 Or MIDI OUT to the MIDI IN of the external device. In MIDI/
GENERAL mode scroll with the PAGE keys to the page where LOCAL
is shown. Enable “Local OFF” function in the UPPER 1 k eyboard section,
but do not disable the track . In this way the keyboard is separated from
the sound generation and WK1 Or sends keyboard data to its own
internal sound engine via the computer/sequencer.
○○○○○○○○○○○○○○○○○○○○○○○○○○○○○○○○○○○○○○○
18 Owner’s Manual
MIDI OUT
MK
MIDI OUT
MIDI IN
MIDI IN
WK1 Or
MIDI IN
MIDI OUT
Page 26

PEDALS
Connect the optional Volume and Damper pedal to the relative sockets.
The default Control Change (CC) messages appear as follows:
DAMPER: Damper (generates CC64)
VOLUME: Master V olume (generates CC07 on Common Channel)
COMPUTER
WK1 oriental can be connected to a computer through the COMPUTER
connector
Computer connection is alternative to MIDI connection. The two types of
connection cannot be used at the same time.
Types of computer connection
Macintosh and compatibles. Connect to the MAC Modem port through a
standard serial cable. Programme the sequencer to communicate with WK1
oriental.
PC IBM and compatibles. Use standard serial cables of the DB8-DB9,
DB8-DB25 type to connect to the serial port. Select the WK1 oriental
appropriate speed to communicate with the PC (refer to the “MIDI/
GENERAL” chapter).
VIDEO INTERFACE
The Video RGB and S-VHS sock ets connect the instrument to a TV set or
monitor to display Song lyrics in Karaoke Style.
WK1 oriental is configured to operate with the European Video Standard
(P AL). In the U.S.A. the instrument must be configured in the NTSC standard.
Refer to the “MIDI/GENERAL” chapter for more details.
Connect a RGB monitor, a TV set or a short-circuit video set to this socket.
For domestic TV sets, set the AV mode.
HEADPHONES
WK1 oriental features a headphones socket.
Plugging the heaphones jacks into the headphones socket excludes the
internal speakers and allows private listening.
MUSIC STAND
A music stand is supplied in the WK1 oriental package. Fix it to the
instrument holes in the rear panel to hold music scores.
○○○○○○○○○○○○○○○○○○○○○○○
Basic Concepts 19
Page 27
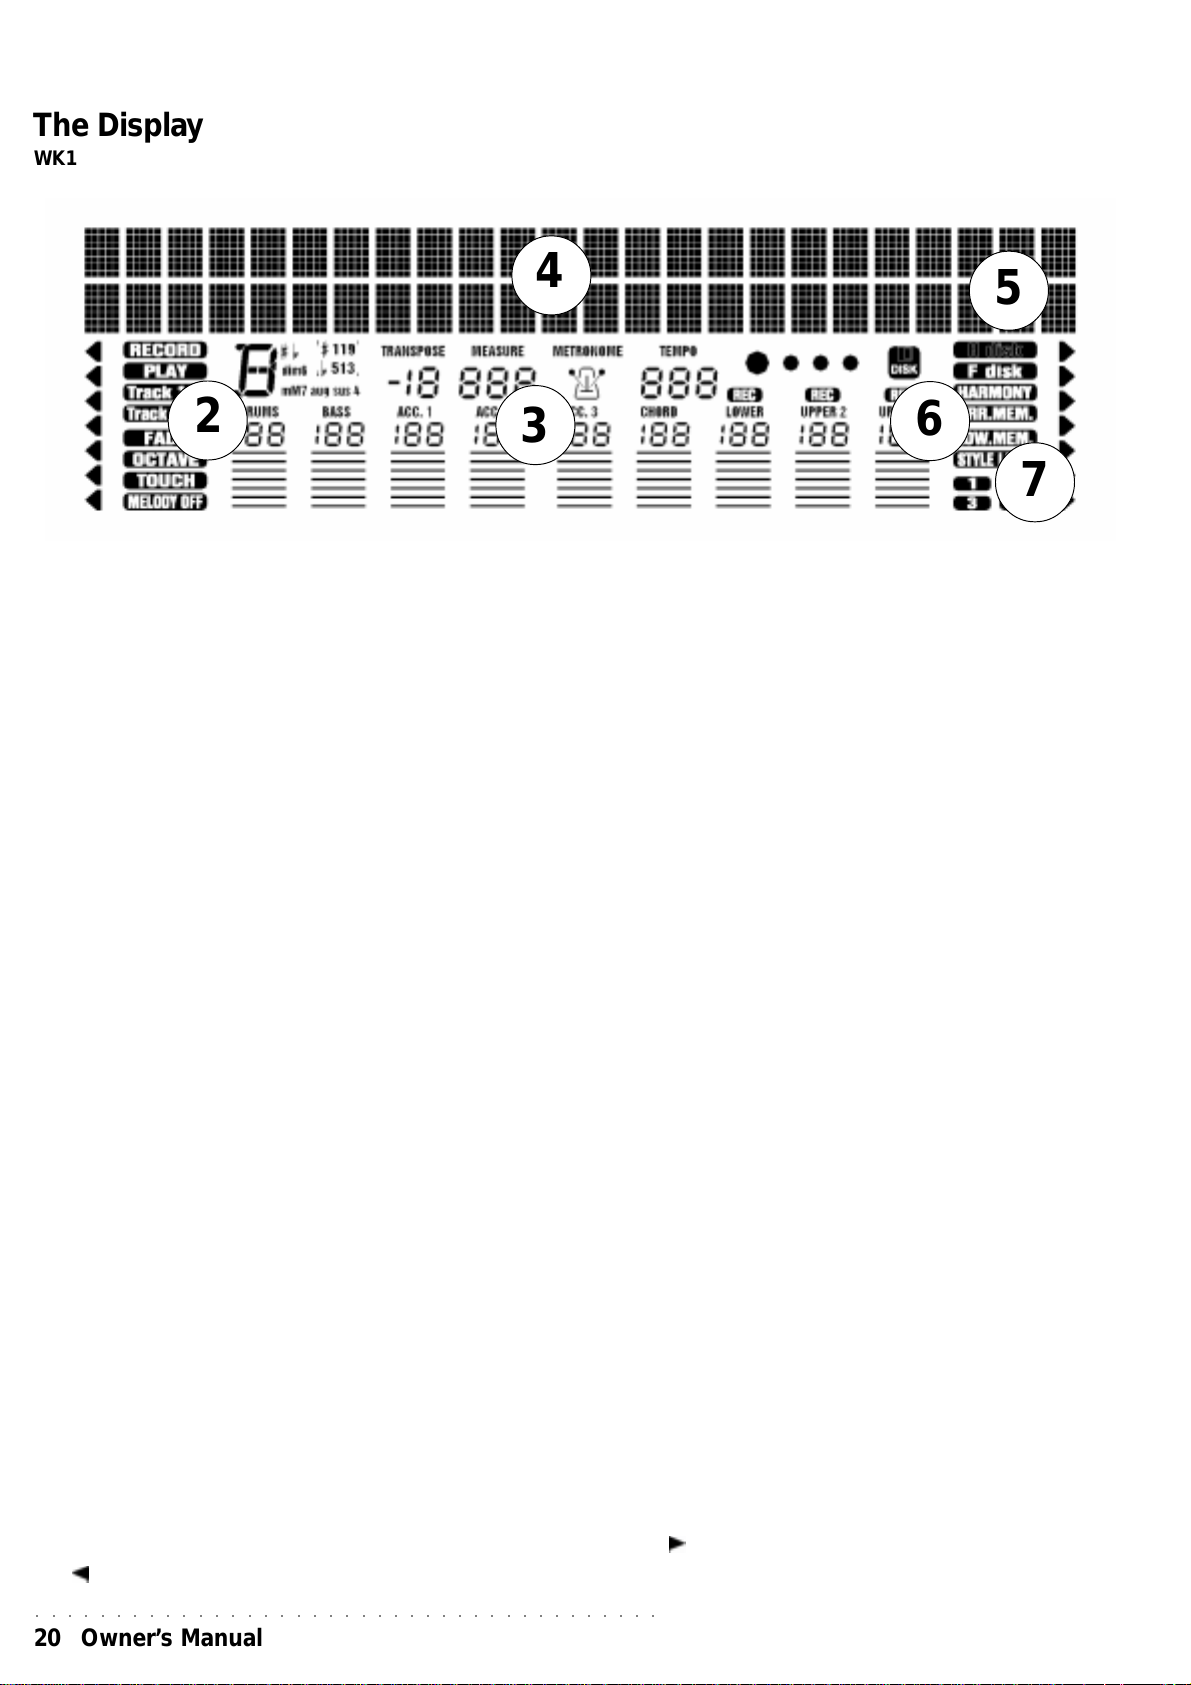
The Display
WK1 oriental features a large, back-lit multifunction liquid crystal display that will simplify all operations performed
on the instrument. The user interface is divided into 7 areas:
4
2
1) MENU (left)
It lists all functions that are accessed by the reference ke y s.
2) INDICATORS (left)
Indicators show the ON or OFF status of the relative functions.
3) READING AREA (two lines, up to 24 c haracters)
When LYRICS function is active, the Song lyrics are displayed in this area.
Alternatively, it shows the names of the events associated to Style, Upper1,
Upper2, and Lower sections.
3
5
6
7
4) CENTRAL AREA
The following e vents are visualized in this area:
- the volume of the accompaniment tracks and of the Real Time sections;
- the left hand accompaniment chord;
- the Metronome ON/OFF status;
- the Tempo setting and relative metronome beat;
- the disk drive functions Floppy Disk);
- the overall Transpose setting;
- the Sequencer measure counter;
- the values relating to functions;
- the names of the Sounds, Styles, Perf ormances, Song Styles, Songs, and
functions.
5) INDICATORS (right)
Show the ON/OFF status of the corresponding functions.
6) MODE
Names of the 3 real time keyboard sections selected with the corresponding
buttons to the right (Upper 1, Upper 2, Lower). A LED indicator near the button
shows which section is selected. The on/off status of the keyboard sections
determine how the keyboard sounds are combined and set the keyboard modes
(Full or Split).
7) DISK
Lists the available functions after selecting FLOPPY DISK with the PAGE
and . keys
○○○○○○○○○○○○○○○○○○○○○○○○○○○○○○○○○○○○○○○
20 Owner’s Manual
Page 28
Data Entry
Modes, pages and values are selected as follo ws:
After selecting a function with the corresponding arrowhead, it is possible
to:
- change Page (where two or more pages are given) using the PAGE
keys,
- enter data (change parameter values) using the TEMPO/DAT A keys.
For example: to assign a different Sound to a tra ck, first select the track with
the corresponding function key (F1 … F9). The selected trac k starts blinkng
in the display track area, indicating that it is ready to accept modifications
(in this case, the PERF function must not be selected and the SINGLE
TOUCH PLAY function must be off).
Some panel keys, when held do wn for about 2 seconds, giv e direct access
to the edit panel of the selected function. These keys are:
STORE PERFORMANCE, STYLE/TEMPO LOCK, ARRANGE ON/OFF,
HARMONY, REV/CHO, RECORD (Sequencer mode).
Entering alphanumeric data
When you need to enter the name of a Performance, of a Song Style, or
during SAVE operations in Disk mode, WK1oriental keyboard operates
like a alphanumeric input peripheral. Each k e yboard note corresponds to
a letter,a number or a symbol.
1 2 3 4 5 6 7 8 9 0
A B C D E F G H I J K L M N O P Q R S T U V W X Y Z , . ‘ -
I/O
CAPS
SPA CE
DELETE
Up to 7 character names can be entered through the keyboard k eys . ( up
to 8 characters when working in FLOPPYDISK mode).
The table illustrates the position of the characters on the keyboard.
The leftmost notes are control keys:
• D2: CAPS - Toggles between Caps On / Caps Off (Capital
and small letters).
• D#2:INS/OVER - Insert / Overwrite. Insert adds a character
between two others, Overwrite, replaces existing characters. Overwrite is the default setting of the keyboard.
• E2: SPACE - a space is added
• F2: DELETE - deletes the selection or the successive cha-
racters.
• G2: <— (BACKSPACE) - deletes previous characters.
Move to the right or to the left using the + and – keys of the numeric
keypad respectively..
Press ESCAPE to exit.
Press and hold the STORE PERF key to record the new Performance
name. Press ENTER to confirm.
ENTER / ESCAPE
ENTER confirms an operation and the values assigned to the modified
parameter. In some function pages , Enter confirms a value and executes
an operation (e.g.: Load operation in Disk mode). Moreover, Enter can
also provide access to Disk and Midi modes.
ESCAPE cancels an operation or the values assigned to the
parameters.
○○○○○○○○○○○○○○○○○○○○○○○
Basic Concepts 21
Page 29

• 3 Sounds and P erformances
SOUNDS AND TRACKS
A Sound is assigned to each Perf ormance track.
THE REAL TIME KEYBOARD SECTIONS (UPPER 1,
UPPER2, LOWER)
The display constantly shows which tracks are assigned to the
accompaniment and which ones are assigned to the keyboard section (this
does not happen only when a special mode is selected, where the
deactivation of the tracks is required).
The sections that can be played in Real Time are : Upper 1, Upper 2 e
Lower; they correspond respectiv ely to trac ks 7, 8 e 9.
SOUNDS AND KEYBOARD MODES
The keyboard sounds can be combined in different configur ations, by using
the LOWER, UPPER 1 e UPPER 2 (keyboard section) k eys, located to the
right of the display.
A LED placed next to each of them shows their ON or OFF status.
It is possible to set the keyboard to FULL or SPLIT modes. By selecting
one of them, the keyboard will work in two different w ays.
FULL MODE
When in FULL Mode, you can play ov er the entire extension of the keyboard
, either using a single Sound or two Sounds layered.
If you wish to play in Full mode, just turn off the LO WER section b y hitting
the LOWER key (the led will go out) as well as the ARRANGE ON/OFF
key.
By doing this, the UPPER 1 e UPPER 2 sections, whether single or layered,
will be assigned to the entire range of the keyboard (make sure that
ARRANGE ON/OFF is turned off).
In this mode, when you play with Styles (and the ARRANGE ON/OFF led
is ON), the automatic accompaniment will recognize the current SPLIT
point and will assign the part of the keyboard to the left of the Split to the
LOWER section.
If the LOWER section is turned off, the part of the keyboard to the left of the
Split point will be silent.
The UPPER 1 e UPPER 2 sections can be activated or deactivated,
according to your requirements.
SPLIT MODE
The SPLIT mode gives the opportunity to divide the keyboard into two
separate sections, so that two different Sounds can be used at the same
time: one Sound will be assigned to the section of the ke yboard on the left
of the Split point (LOWER) and the other one to the section on the right
(UPPER 1 e/o UPPER 2).
--------------- (Upper 1, Upper 2) ----------------------
When playing in Real Time y ou can s witch to Split mode b y simply turning
the LOWER section on (the LED is on): to do this, press the LOWER key
located to the right of the display.
○○○○○○○○○○○○○○○○○○○○○○○○○○○○○○○○○○○○○○○
22 Owner’s Manual
--------- Lower -------- ------------------ Upper 1, Upper 2 -------------------
Page 30

In this way the ke yboard will be divided into two sections, one to the left and
one to the right of the Split point, as standard mode for the instrument.
To recap, the possible situations are as follows:
when ARRANGE ON/OFF is off (the accompaniment is off)
a) only UPPER 1 on: Sound from tr ack 9 over the entire keyboard r ange;
b) only UPPER 2 on: Sound from trac k 8 over the entire keyboard r ange.;
c) UPPER 1 and 2 both on: Sound 8 and 9 are layered over the entire
keyboard;
d) UPPER 1 and LOWER both on: Sound from track 7 left of the split
and Sound from track 9 on the right;
e) UPPER 2 and LOWER both on: Sound from track 7 left of the split
and Sound from track 8 on the right;
f) All on: Sound from track 7 left of the split, and Sounds from tracks 8
and 9 layered on the right.
T urning ARRANGE ON/OFF to on (the accompaniment is on) automatically
sets to Slit Mode and divides the keyboard at the Split point. In this case if
LOWER section is not active , the left part of the keyboard will not pla y. On
the contrary, the Sound from track 7 is associated to this section.
The function of the other two sections is identical.
○○○○○○○○○○○○○○○○○○○○○○○
Sound and Performances 23
Page 31

Selecting a Sound
SOUNDS CAN BE SELECTED AS FOLLOWS:
a) By recalling the desired Sound to the Real Time keyboard section: first
press the SOUND key (led ON) and digit the corresponding Sound
number on the numeric keypad;
b) by recalling a Performance that contains the sound combinations as
well as other performance parameters;
c) by recalling a SINGLE T OUCH PLA Y setting using one of the 9 Function
keys (F1...F9).
KEYBOARD SOUNDS
To assign a Sound to a keyboard section (Upper 1, Upper 2 e Lower), you
must first select the section: use the UPPER 1, UPPER 2, LO WER keys, or
the relative function key s.
Only one section at a time can be enabled.
1. Press one of the section selectors to the right of the display .
The arrowhead moves immediately to the selected section, while the
Sound it contains blinks in the display.
2. Enter the Sound number on the numeric keypad.
To select a Sound whose number is greater than 99, first press the
100+ key, then enter the two remaining digits. (For example, taking the
Sound table on the top right of the control panel as a reference, select
Sound No. 100 BRIGHTNESS: first press the +100 key, then enter 0
twice in the SOUND keypad).
a
b
c
1
2
3. Play on the keyboard and listen to the sound recalled.
Repeat the operation to change the sound of another section.
The Sound shown in the display is alwa ys the one assigned to the section
indicated by the right arrowhead.
BANKS 1, 2, 3 AND 4
WK1 oriental are arranged in SOUND BANKS. They can be selected
pressing the + e - on the numeric keypad, at one time.
Banks 1,2 each 3 contain 128 sounds (Sounds from Bank 1 are General
MIDI compatible); Bank 4 features 60 more Sounds that can be played
back by selection Bank 4 and using either the + or - key from the right
numeric keypad to scroll over its contents. Banks 1, 2 and 3 are GMX
compatible (GMX is an extended General Midi standard created by
Generalmusic).
WK1 oriental Drumkits are contained in Banks 2, 3 and 4 (112-119). You
can choose among the 17 Drumkits are available. The relative drum maps
are provided in the Appendix to the Owner’s Manual. Bank 4 offers an
arabic Drumkit . T o assign a Drumkit to one of the keyboard sections, proceed
as explained to select a Sound. Make sure that BANK 2 or BANK 3 are
selected, then enter the Drumkit number (112-119). The current Bank
number is shown by the numbered indicators, in the bottom right hand
corner in the display.
○○○○○○○○○○○○○○○○○○○○○○○○○○○○○○○○○○○○○○○
24 Owner’s Manual
Page 32

Selecting a Performance
If you are not satisfied by recalling a single Sound and wish to change the
entire keyboard sound combinaton (including a Style, as described in detail in
the “STYLE” chapter), you can select a Performance.
To recall a Performance, proceed as follo ws:
1. Press the PERFORMANCE RECALL key to have access to Performance
mode, the arrowhead moves to Performance.
2. Use the function keys (F1…F9) located below the display to recall one of
the 9 Perf ormances of the first group (WK1 default setting is group 1);
3. Use the PAGE keys or the + and - keys in the numeric keypad to have
access to the 7 groups of 9 Pe r formances each.
The letter “P” and the relative group number appears in the display, along
with the name of the single Perf ormance selected. TEMPO/D ATA keys can
be used to control Tempo in Performance mode.
STYLE LOCK
Since a Style is associated to a Perf ormance, by recalling a P erf ormance you
will also recall the Style assigned to it.
If you prefer not to recall Styles automatically, you can enable STYLE LOCK
function: the accompaniment will remain unchanged with all Performances.
How to programme a Performance
WK1 oriental contains 63 user-programmable Performances that you can
modify according to your needs.
Perfor mance programming operations are quite simple. By programming a
performance you will always recall y our f av ourite Sound combinations, Styles
and panel settings.
Follow the steps given below to modify a Perfor mance. It is important to
remember that the instrument MUST NOT be set to PERF mode - the left
arrowhead of the display MUST NOT indicate the PERF menu function.
a) Assign Sounds to the tracks.
Select a track with the corresponding function button (F1…F9) under the
display , and recall a Sound using the procedure already described. Use the
TEMPO/DATA keys to control the trac k volume.
b) Change the ON/OFF status in Real Time keyboard tracks.
Turn the UPPER 1,UPPER 2, e LOWER on or off.
c) Change the ON/OFF status of the accompaniment tracks (Drum,
Bass, Acc1, Acc2, Acc3).
Press the corresponding function button repeatedly to obtain the OFF status.
It is not possible to change the ON/OFF status of the Real Time k e yboard
tracks with the corresponding function buttons (F7…F9) - see point 2 abov e.
The ON/OFF status of a track can be seen at a glance by the corresponding
name (for example ‘Drum’) which appears if ON or cancels if OFF.
○○○○○○○○○○○○○○○○○○○○○○○
Sound and Performances 25
Page 33

d) Modify the volume of the tracks.
Use the Function keys (F1…F9) to enter the desired track. The first
page will be shown in the display. Press the CURSOR key once: the
volume value will start blinking. Use the TEMPO/DATA key to modify
the volume.
e) Transpose the tracks.
Use the Function keys (F1…F9) to enter the desired track. Press the
CURSOR twice: the transpose value will star t blinking in the dsiplay.
Use the TEMPO/DATA keys to raise or lower the pitch by a semitone.
f) Modify the effects.
The ON/OFF status of the REVERB and CHORUS functions, the
corresponding effect types and the relative ov erall effect v olume can be
saved to the current Performance..
g) When the track is blinking, it is possib le to modify each value in the
single section.
Use Page[ ]and[ ] keys to control the values.
PERFORMANCE V ALUES
- VOLUME : (00/127) displays the track Volume.
- REVSEND: (00/15) the value indicates the amount of Reverb effect
in the track.
- CHOSEND: (00/15) the value indicates the amount of Chorus
(Modulation/Delay effect) in the track.
- TRANSP: (-24/+24). indicates the transpose setting.
- DETUNE: (-63/+63) influences the overall fine tuning: it moves by
1/64th of a semitone.
- PAN : (00/31 right 00/-31 left) moves the sound of the tra ck to the left
or to the right.
By setting this value to the minimum with the TEMPO/DATA, k eys, the
P AN mute message appears in the display; the sound is no longer heard
but the effects are still active in the tra ck. In this case, you will only hear
the effect processed sound.
If the track is engaged by a Drumkit which already features a pan setting
the message PAN lock appears: in this case PAN is not active.
- V OLPED: (ON/OFF) enab les or disables the Volume Pedal control on
the track (the Volume Pedal is optional and must be connected to the
rear panel jack socket).
- DAMPER: (ON/OFF) enables or disables the Damper Pedal control
on the track (the Damper Pedal is optional and must be connected to
therear panel jack socket).
○○○○○○○○○○○○○○○○○○○○○○○○○○○○○○○○○○○○○○○
26 Owner’s Manual
Page 34

- PITCH/M: (ON/OFF) enab les or dsables the track for the action of the
Pitch/Modulation control.
- PITCHRG: (00/12) indicates the Bender range: if the value is 00, the
Pitch Bender wheel will have no eff ect on the track. A v alue higher than
00 indicates the wheel action in semitones (e.g.: 12=1 octa ve)
- EDITSND: (ON/OFF) If a Song in WK1 oriental is loaded,which can
possibly contain edited sounds, they can be listened to if the function is
ON. If you wish to listen to the or iginal, unmodified sounds, set this
function to OFF. ON is the default setting.
Use the TEMPO/DA TA keys to modify the values.
You can exit any edit page at any time without losing your temporary
modifications.
Save your modifications if you decide to change to a new Performance.
Selecting a new Perf ormance, or selecting the current one again, will imply
losing your data unless you sav e them.
○○○○○○○○○○○○○○○○○○○○○○○
Sound and Performances 27
Page 35

Store P erformance
The STORE PERFORMANCE function key allows you to to save the panel
configuration setting to a Perfor mance. Use the STORE PERFORMANCE
function whenever you ha ve accomplished one of the actions described in the
previous paragraph. In this way you will photograph the desired panel setting
and you will be able to recall it at all times.
Press ENTER or ESCAPE to save or exit from the Store Performance
operations.
Use the PERFORMANCE RECALL / STORE PERFORMANCE key to enter
Performance mode: the arrowhead moves automatically to the PERF menu
function.
The original Performances set by the factory cannot be cancelled definitively,
but can be restored at all times by using the REST ORE function. IMPORTANT:
When using this function the factory-set Performances will be restored to the
original memory locations, clearing the location contents. Make sure that your
programmed performances will be saved to a Floppy Disk before resetting
with RESTORE.
To save P erf o rmances to disk, refer to the Disk chapter.
If you modify the first of the 63 availab le Performances, this will appear whenev er
WK1 oriental is turned on.
You may choose not to store your programmed P erfo rmances to disk but keep
them in the machine RAM memory taking advantage of the battery back-up.
Keep in mind that in case the battery runs down all your data will be irretriev ably
lost.
To recap, a Perf o rmance is stored as follows:
a) Press and hold the STORE PERFORMANCE key;
b) Press ENTER to confirm the display request ( ?).
When you select a Style and SINGLE TOUCH PLAY function is ON, the
original Performance (set by Generalmusic) is recalled. You can modify
and store it to one of the 63 programmable Perf ormance locations available.
SAVE CHANGES TO A DIFFERENT PERFORMANCE (OR
CREATE A NEW ONE)
If you wish to save the P erformance to a new location, follo w these instructions:
1. Pre ss and hold the STORE PERFORMANCE key for a second;
2. Use the TEMPO/DA T A key to move to the location that will contain
the Performance.
The Perf ormance number will be shown in the displa y (e .g.: P 11).
3. Press ENTER.
The Perf o rmance will be saved to the new location.
○○○○○○○○○○○○○○○○○○○○○○○○○○○○○○○○○○○○○○○
28 Owner’s Manual
Page 36

PERFORMANCE NAME
To change the Performance name, proceed as follo ws:
1. Keep the ST ORE PERF. key pressed f or a fe w seconds
2. Use the symbol located below the keyboard to write the new
name.
1
2
A B C D E F G H I J K L M N O P Q R S A B C D E F G H I J K L M N O P Q R S
A B C D E F G H I J K L M N O P Q R S
A B C D E F G H I J K L M N O P Q R S A B C D E F G H I J K L M N O P Q R S
I/OI/O
I/O
I/OI/O
CAPSCAPS
CAPS
CAPSCAPS
DELETEDELETE
DELETE
DELETEDELETE
SPSP
AA
CECE
SP
A
CE
SPSP
AA
CECE
3. Confirm with ENTER to save the Performance.
HOW TO RESTORE THE ORIGINAL PERFORMANCE
SETTINGS
The INIT (refer to the “MIDI/GENERAL”) function cancels all modifications
applied to the Performances and recalls the original settings from the
machine ROM memory.
1. Press and hold the MIDI/GENERAL key for a few seconds.
2. Scroll to the INIT page with the Page keys.
3. Use the TEMPO/DATA keys to select the par ts you wish to
restore.
1 2 3 4 5 6 7 8 9 0
T U T U
V V
W X W X
Y Z ,Y Z ,
. .
T U
T U T U
V
V V
W X
W X W X
Y Z ,
Y Z ,Y Z ,
‘ -‘ -
.
‘ -
. .
‘ -‘ -
3
1
2
ALL Memory...............................(cancels data from the RAM memory)
Sequencer........................................(cancels data from the Sequencer)
Performance......................(cancels all 63 Performance from the RAM)
Sample............................................................(cancels samples, if any)
4. Press ENTER to confirm cancellation.
3
4
○○○○○○○○○○○○○○○○○○○○○○○
Sound and Performances 29
Page 37

• 4 The Arabic Scale
This chapter tells you most of what you need to know about the Arabic
Scale. Some Arabic Scale editing tasks can also be performed in the
General section (see the MIDI/GENERAL chapter for more details).
To simplify the explanations, you can reset your WK1 Oriental so that the
instrument is restored to its default status (use the “System Reset” operation
explained at the end of the Intro chapter , page 1.3).
WHAT IS THE ARABIC SCALE ?
While so-called “Western” music is based on the use of a single intonation
scale (Equal scale), Oriental music boasts the use of several diff erent “Arabic
Scales”, all, howev er , based on the lowe ring of the pitch by 1/4 of a tone of
one or more notes of the standard chromatic scale.
The name “Arabic Scale” is a general term which describes all the possible
configurations which can be obtained by lowering the pitch (alwa ys b y 1/4
of a tone) of one or more notes within a standard octave .
WHERE IS THE ARABIC SCALE ?
The control centre of the Arabic Scale consists of two distinct sections,
both located on the left part of the WK1Or’s control panel: the ARABIC
SCALE and the MEMORY .
○○○○○○○○○○○○○○○○○○○○○○○
Note: Arabic Scale editing tasks include a
general Arabic Tuning function (which tunes all
the current Arabic notes), and a Microtune
function (which tunes individual Arabic notes).
○○○○○○○○○○○○○○○○○○○○○○○
The ARABIC SCALE section is easily identified by the 12 circular buttons
laid out in the same manner as an octave of black and white notes.
The Arabic Scale MEMORY is located abo ve the Arabic Scale, adjacent to
the Style/Song selection keypad. This section groups together several different functions. Here’s a breakdown of each function:
Memory 1, 2, 3, : memory slots for preset or user-programmed
Arabic Scales;
Cancel : cancels the selected Arabic Scale;
Store : memorizes user-programmed Arabic Scales.
HOW TO RECALL A PRESET ARABIC SCALE
The Arabic Scale Memory section contains 4 preset (ROM) Arabic Scales
(1, 2, 3 and 4). The Arabic Scale configurations memorized in these four
presets are factory-set and cannot be permanently erased from memory.
They can, however, be temporarily replaced by user-programmed scales
for as long as you wish. They are restored to their default settings using the
System Reset operation. The default configurations are those shown in
the margin opposite.
1. Press one of the 4 Memory buttons (1, 2, 3 or 4) to select a preset
Arabic Scale.
The button pressed is identified by a LED which lights up. Each
○○○○○○○○○○○○○○○○○○○○○○○
Note: The following table shows the default settings of the Preset Arabic Scales.
○○○○○○○○○○○○○○○○○○○○○○○
Memory Arabic Notes
1 E B
2 E A
3 F# B
○○○○○○○○○○○○○○○○○○○○○○○○○○○○○○○○○○○○○○○
30 Owner’s Manual
Page 38

button activates a diff erent Ar abic Scale.
At the same time, one or more buttons of the ARABIC SCALE activate
(a LED lights up above the active b utton).
2. Play on the k eyboard.
You will here one or more notes of every scale play 1/4 tone lower than
usual.
Each active button of the ARABIC SCALE section identifies the note affected on the keyboard. The pitch of the affected notes will be lowered b y 1/
4 of a tone.
Recalling an Arabic Scale affects the keyboard regardless of how it is currently set to play; in Split or La yer mode.
3. Recall a different preset Arabic Scale by pressing one of the other
Memory buttons.
The currently selected Memory button will cancel and the Arabic Scale will
change configuration according to which button is pressed.
To cancel the current Arabic Scale
• Simply press the Cancel button in the MEMORY section.
The current Arabic Scale is deactivated (all LEDs of the Arabic Scale section go off) and the instrument returns to the normal (Equal) scale.
HOW TO SET A NEW ARABIC SCALE IN REAL TIME
You can configure your own Arabic Scale at any time while you play.
1. Set the Arabic Scale of your choice by pressing one or more b uttons
of the ARABIC SCALE section.
The LED of the buttons pressed lights up to indicate which notes of the
scale are affected.
2. Play on the keyboard and, while playing, activate or deactivate the
Arabic Scale buttons at will.
If you press an active button (LED on), it will be cancelled (the LED indicator
goes off).
You can also modify an active preset Arabic Scale by adding one or more
Arabic notes to the currently selected scale.
If, after modifying a preset Arabic Scale, you press a Memory button (1, 2,
3 or 4), you will cancel the current scale and recall a preset scale.
○○○○○○○○○○○○○○○○○○○○○○○
The Arabic Scale
31
Page 39

HOW TO STORE A USER-PR OGRAMMED ARABIC SCALE
The four default Arabic Scales presets memorized in the Memory buttons can be
temporarily replaced with user-programmed scales. They will remain in memory ev en
after turning the instrument off.
1. Set a preferred Arabic Scale using the methods already described.
2. Hold down the STORE b utton.
The LEDs of the Memory buttons start to flash.
3. With the STORE button held, press the Memory button corresponding to the location
where you want to store the user-programmed scale and release both buttons.
The LED on the Memory button pressed will remain on and the previous Arabic
Scale occupying the button selected will be replaced with the new one .
Storing user-programmed Arabic Scales does not destroy the default preset scales
occupying the Memory slots, they are simply temporarily cancelled and replaced
with the new ones.
You can restore the original scales by carrying out the “System Reset” operation.
ARABIC TUNING AND MICRO TUNING
The Arabic Notes can be fine tuned according to specific requirements using the
Arabic Tuning and Mircotuning functions found under the Midi/General menu. For
more information about these two functions, refer to the Midi/General chapter.
○○○○○○○○○○○○○○○○○○○○○○○○○○○○○○○○○○○○○○○
32 Owner’s Manual
Page 40

• 5 Styles
You can enjoy playing the keyboard sounds in real time while WK1 Or
automatically adds the accompaniment, as if you were playing with a band of
musicians. The automatic arrangements are provided by the WK1 Or Styles.
This chapter describes the automatic arrangements of the Styles, how to
slect them and how to store them to the Performances.
The tracks contain se veral programmable par ameters: sound, volume , pan,
transpose, detune rev erb, chorus, pitch bend, pedal volume and damper.
The arrangement patterns cannot be changed in the ROM Styles; in the
USER Style locations (96-103), it is possible to load disk-based Styles in
the following fo rmats: WK2, PK7, WK3 and CD.
IMPORTANT: If the disk-based User Style contains less than 4 Variations
(e.g. only 2), after loading the Styles, be sure that the Variation indicator in
the display indicates either Variation 1 or 2. This is to prevent total silence
at Style Start.
WK1 Oriental Styles
Styles are a collection of musical patterns typical of various forms of making
music, ranging from rock and pop to traditional and Latin music.
Each WK1 Or Style features 4 Variations, 4 Intros, 2 Fills and 4 Endings.
A Style, therefore, provides a complete range of musical str uctures with
which you can play whatever type of music you prefer.
Styles provide automatic accompaniments that are based on the chord
played on the keyboard: the accompaniment patterns change to suit the
current chord.
Each Style consists of 8 tracks: the first 5 are engaged b y the sequencer
for the auto accompaniments, and the remaining 3 belong to the real
time keyboard sections. The 5 accompaniment tracks are divided as
follows: track 1 Drums (dr um sets), track 2 BASS, tracks 3, 4 and 5
correspond to ACC1, ACC2, ACC3 respectively (accompaniments 1, 2
and 3).
contains 96 permanent ROM Styles in the machine memory and can
store additional 8 USER Styles to load from disk in the RAM memory.
The Styles are arranged in groups of 8, as shown in the Style table on
the top of the instrument panel (STYLE/SONG).
Selecting a Style
1. Press the SINGLE TOUCH PLAY button (the corresponding display
indicator turns on).
With the S.T.PLAY function on, the Style you select will always be
recalled from the machine ROM version (fixed) and any operation
carried out on the panel will not be stored.
The S.T.PLAY key also automatically activates the ARRANGE ON/
OFF and ARRANGE MEMORY functions (in the ARRANGER panel
section - the ARR. MEM display indicator also turns on).
2. Specify the number corresponding to the desired STYLE on the
left hand selection keypad.
WK1 Or sets automatically to Style mode.
○○○○○○○○○○○○○○○○○○○○○○○
Styles 33
Page 41

3. If you wish to change the Sound assigned to one or more tracks, first
check that the PERF menu funcion IS NOT selected and that the S. T.
PLA Y function is OFF , then press the corresponding function ke y (F1...F9)
to enable the track, that will start blinking in the display.
You can now change the Sound by digiting the corresponding number
on the right hand selection keypad.
If you wish to modify the track volume level, use the TEMPO/DATA
keys.
4. Press START / STOP to start the Style.
This operation may be also performed while a Style is playing. In this
case the new Style selected will start on the successive beat.
Recalling a Style from a Performance
Each Perf ormance contains a Style that can be recalled at any time. Press
and hold down the STORE PERFORMANCE k ey for a f ew seconds. When
the (“?”) message appears in the display confirm with ENTER. The current
panel configuration, including the active V ariation and Tempo will be stored
to the Perfo rmance.
Therefore it is possible to recall a Style (and the relative Variation/Tempo)
by selecting a P erformance, provided that the STYLE LOCK function is not
active.
1. Disable STYLE LOCK if this is ON (the display indicator to must be
OFF).
2. Press the PERFORMANCE RECALL key i f you are not yet in P erformance mode.
The name of the first Perf ormance in the first group and the name of the
current group (es. P11: Kanoun) will appear in the display.
Each function key selects one of the 9 Performances of the selected
group.
3. If you wish to change group (7 groups are av ailable) use the PAGE e
PAGE key , or the + e – keys in the numeric keypad. Use the TEMPO/DA T A keys to control Tempo.
Recalling a Perfor mance automatically disables the SINGLE TOUCH
PLA Y function and restores WK1 to the default status of the P erformance. If the TEMPO LOCK function is disabled, the T empo is also updated.
4. Press START / STOP to run the Style.
Total clear of the User Style
Kanoun
1
In User Style mode, only total cancellation of the Style location (96 - 103) is
permitted.
Make sure that one or more Styles are loaded to the machine internal
memory. Select the USER STYLE mode using the numeric keypad with
the STYLE led ON, then proceed to CLEAR.
1. Press and hold the RECORD key in the Sequencer for a few
seconds.
2. Press the CLEAR button.
3. Use the TEMPO/DA TA keys to select ALL function.
4. Press ENTER twice
○○○○○○○○○○○○○○○○○○○○○○○○○○○○○○○○○○○○○○○
34 Owner’s Manual
LOWER
2
6
FILLB /TAP4
FILL A
MEMORY
ARRANGE
ON/OFF
3
4
Page 42

The Style controls
The keys and controls of the Style functions are explained in the next few
paragraphs.
START/STOP
Starts or Stops the automatic accompaniments (Styles). When recording a
Song Style, this key will be used to start the Style: the Song Style will be
recorded by the Sequencer area with the PLAY/STOP key.
While the Style or Song is playing, the display shows 4 tempo monitoring
indicators next to the metronome icon.
Before pressing START/STOP you can preset one of either INTRO, FILL or
ENDING play as an introduction to the Style.
KEY START
This function synchronises the start of the automatic accompaniments with a
note pressed on the lower split keyboard without having to use START/STOP
(if you are not playing in Free Style mode, you can start the accompaniment
playing in the lower ke yboard section).
Key Start can be disabled by:
• pressing ENDING: the Style runs freely to the end;
• pressing Key Start once again: the Style terminates.
Key Start is not disabled when:
• pressing START/STOP to interrupt the Style;
• pressing INTRO, ENDING, or FILL before starting the Style.
Key Start function can be enabled or disabled also when a Style is playing.
INTRO
Plays an introductory sequence of one or two measures. After pressing INTRO
(the corresponding display indicator turns on), press ST AR T/STOP to start the
Style with the Intro.
INTRO can also play as a Fill In if pressed during Style play.
ENDING
Stops a Style accompaniment with an ending (“coda”). The corresponding
display indicator turns on when ending is selected.
If you preset ENDING before Style start, it plays as an Introduction
○○○○○○○○○○○○○○○○○○○○○○○
Styles 35
Page 43

V AR 1, V AR 2, V AR 3, V AR 4
These keys control 4 different va riations of the same Style.
Before starting the accompaniment, you can decide in which Variation you wish to play. While y o u
are playing, you can s witch from a V ariation to another by simply pressing the desired V ariation key.
An appropriate INTRO , a FILL and an ENDING are associated to each Va riation.
6
FILLB /TAP4
FILL A
FILLA, FILL B
These keys add Fill patterns to a Style.
FILL A adds the pattern and does not change the current Variation.
FILL B adds the pattern and recalls the V a riation following the current one .
Fills are normally one or two measures long. If you press and hold down the Fill k ey y ou will listen
to the entire Fill pattern playing continuously.
You can preset a Fill pattern before starting a Style. In this case Fill will be used as an INTRO.
○○○○○○○○○○○○○○○○○○○○○○○
Important: “Continue” function does not work
LOWER MEMORY
When LOWER MEMOR Y is on (the display led is ON), the notes played in
on the Styles. See the “SONG STYLES” chapter
for details.
○○○○○○○○○○○○○○○○○○○○○○○
the right hand section of the keyoard will keep on playing even if the left
hand is raised.
6
FILLB /TAP
FILL A
LOWER
ARRANGE
MEMORY
ON/OFF
LOWER
ARRANGE
MEMORY
4
ON/OFF
When the function is OFF, the sound in the Lower ke yboard section will end
as the left hand is raised.
The Lower memory function is useful to hold “pad” sounds without using a
Damper Pedal, which may be of more use for the right-hand section of the
keyboard.
ARRANGE ON/OFF
When ARRANGE ON/OFF is on (LED on), all the accompaniment tracks
are enabled for pla y. If this button is off, only the Drum track will pla y after
the start.
TAP TEMPO (FILL B second feature)
Tap a beat on this pad when the accompaniment is off.
You will set the Tempo speed and the Style will be playing with that Tem-
po. The display will show the new setting.
To mark the tempo, you should tap on the pad as many times as the Time
Signature number is: that is , tap 4 times to mark 4/4 or three times to mark
3/4.
A sound of drumsticks will click to mark the Tempo beat.
FILLB /TAP4
6
FILL A
LOWER
MEMORY
FILLB /TAP4
FILLB /TAP4
FILLB /TAP4
ARRANGE
ON/OFF
LOWER
MEMORY
LOWER
MEMORY
LOWER
MEMORY
ARRANGE
FILLB /TAP4
ARRANGE
ON/OFF
ARRANGE
ON/OFF
ON/OFF
.
LOWER
MEMORY
ARRANGE
ON/OFF
○○○○○○○○○○○○○○○○○○○○○○○○○○○○○○○○○○○○○○○
36 Owner’s Manual
1 2 3
Page 44

The Style Tempo
The Tempo of a Style can be changed using the TEMPO/DATA keys either
before starting or during a Style, regardless of the TEMPO LOCK status.
(IMPORTANT: In some situations the same functions control other parameter .
For example, TEMPO/DATA key control the volume of a blinking track.
The current Tempo can be stored to a Perfor mance, and be ready for new
settings. To recap, it is possible to:
a) select a Style with Single Touch Play active and recall the original Style
tempo from the ROM;
b) recall a Performance where a user programmed Tempo was stored;
c) Establish a Tempo that will not be subject to changes by using the Tempo
Lock function.
DIRECT STYLE MEMORY BUTTONS
With The 12 Direct Style Memory buttons, you can quickly recall as
many Styles as there are buttons. The overall configuration can be
changed and stored to Disk or Hard Disk partition.
With The 12 Direct Style Memory buttons can:
+-
recall as many sound combination relating to the keyboard section (up
to 3 section) as there are buttons;
recall as many different panel setting as there are buttons;
TEMPO LOCK
The TEMPO LOCK function loc ks the current Style T empo allowing y ou to
recall Styles without changing the Tempo, regardless of the status of the
Single T ouch Play button.
Nevertheless, it is alwa ys possib le to change the T empo in real time using
the TEMPO/DATA key .
The activation of TEMPO LOCK is shown in the display with the alternate
flashing of the Tempo setting and the word “LOC”.
When TEMPO LOCK is ON, the Tempo setting remains fixed for all
subsequent Style and Perf ormance selections.
When TEMPO LOCK is OFF, the selection of a Style or a Performance
recalls the memorised Tempo setting.
SAVING TEMPO TO A PERFORMANCE
○○○○○○○○○○○○○○○○○○○○○○○
Note: The 12 Style Memory buttons also memorize the T empo and V ariation parameters.
○○○○○○○○○○○○○○○○○○○○○○○
a
To save the Tempo to a Performance, follow these instructions:
a) select the Performance where you wish to sa ve the new Tempo setting;
b) use the TEMPO/DAT A key to set the new Tempo
c) Press and hold the STORE PERFORMANCE button for a f ew seconds
d) Press ENTER to confirm the request shown in the display (“?”).
The save operation can also be carried out while the Style is playing.
b
c
d
○○○○○○○○○○○○○○○○○○○○○○○
Styles 37
Page 45

Arrange Mode
The Arrange Mode menu offers sev eral useful f eatures which simplify Style playing e ven further. The
features offered are: Auto Arrange, Auto Bass and four Chord recognition modes: FINGERED 1,
FINGERED 2, ONE FINGER and FREESTYLE.
FINGERED 1
At least three notes are needed for the chords to be recognised.
FINGERED 2
The chord will play according to the actual notes pressed. A three note
chord will trigger the full accompaniment. With one or two notes, the chord
will be recognised but the notes played of the accompaniment will be limited
to those actually played.
ONE FINGER
It is only necessary to play a single note played below the Split Point is
recognised as the root of a major chord.
• To obtain a minor chord play
the root and the minor third (e.g.
C and Eb).
• For a diminished, play the root
and the diminished fifth (C + Gb
above or below C).
• For a seventh chord play the
root and the seventh (C + Bb
above or below C).
• For a major 7th, play the root
and the augmented seventh (C
+ B above or below C).
C (maj)
C min
C dim
C 7
C maj7
FREESTYLE
When you are in this mode, the chord is recognized from any part of the
keyboard, e ven if it is played by the right hand, or played with both hands.
The chord will not change unless at least three notes are played at the
same time. If one or two notes are play ed, the new chord is not recogniz ed
and the accompaniment will not change.
This feature makes it possible to play on the entire extension of the
keyboard with the sounds from UPPER 1 e 2. Selecting Freestyle
mode automatically disables the LOWER section
○○○○○○○○○○○○○○○○○○○○○○○○○○○○○○○○○○○○○○○
38 Owner’s Manual
○○○○○○○○○○○○○○○○○○○○○○○
NOTA: The ARRANGE ON/OFF key, pressed
and held for a few seconds, is a shortcut to the
4 Arranger mode pages: FINGERED1,
FINGERED2, ONE FINGER e FREE STYLE.
The new setting will be stored to the Perf ormance and will be retained in WK1 memory even
when the keyboard is turned off.
○○○○○○○○○○○○○○○○○○○○○○○
Page 46

The Split point
The Split corresponds to the point which divides the keyboard into two
parts, left (lower) and right (upper). The Split point can be set to any
note of the keyboard, allowing you to modify the keyboard extension
dedicated to the recognition of the chords that trigger the auto accompaniments.
By changing the Split point, you automatically modify the extensions of the
LOWER and UPPER keyboard sections.
HOW TO SET A NEW SPLIT POINT
1. Press the ARRANGE ON/OFF key for a few seconds.
The display will show the default split setting with a message: B3/C4
2. Press the CURSOR key to move to the split point selection
3. Press the keyboard note you wish to set as the new Split point.
4. Press ESCAPE to exit.
The new Split point is now set to all the instrument. It will remain in
WK1 Or memory even if this is turned off.
Arrange Memory and Bass to lowest.
To have access to this function press and hold for a one second the
ARRANGE ON/OFF key, then the PAGE+ key: the two functions Arrange
Memory e Bass to lowest will be shown in the display-
Use the CURSOR key to toggle between the two modes:
LOWER
6
1
FILL A
FILLB /TAP4
MEMORY
ARRANGE
ON/OFF
.
2
3
4
Arrange Memory
When Arrange Memory is ON, the automatic accompaniment will continue playing even if the hand playing the arrange chord is raised from
the keyboard.
When OFF, if the hand is raised from the keyboard, the
accompaniment is interrupted and only Drum track will continue
playing.
Bass to lowest
When ON, the bass of the automatic accompaniment will play around
the lowest note in the chord.
When OFF, the bass follows the original Style pattern
Bass to Lowest permits real time changes to the otherwise fixed bass
pattern of a Style, by playing different chord inversions.
○○○○○○○○○○○○○○○○○○○○○○○
Styles 39
Page 47

AUTO ARRANGE
This option, when set to ON, allows the ARRANGE ON/OFF button to be
automatically activated by pressing START/ST OP. This feature guar antees
that the Style auto accompaniments are available every time you press
Start/Stop. WK1 Or is factor y-programmed to power up with the AUTO
ARRANGE function enabled.
How to change the status of the Auto Arrange function
1. Select the Arrange Mode menu by holding down the Arrange On/Off
button for an instant.
Press the PAGE button to select the Auto Arrange option.
2. Press TEMPO/DATA buttons to change the On/Off status of the Auto
Arrange option.
When Auto Arrange is OFF, pressing Star t/Stop will not activate the
Arrange On/Off button automatically.
The new Arrange Mode setting remains in memory even after power
down.
AUTO BASS
Auto Bass controls the activation of the Manual Bass tr ack which in def ault
conditions is set for manual play when the sequncer is not playing.
When the sequencer is off, the following possibilities are permitted when
AUTO BASS is set to ON:
• If ARRANGE ON/OFF is disabled (LED off) and the LOWER keyboard
is off (LED off), the Manual Bass track plays across the full keyboard.
• If ARRANGE ON/OFF is enabled (LED on), the Manual Bass track plays
on the lower part of the split keyboard.
• If MANUAL BASS is currently assigned to the keyboard (shown by the
“BAS” display indicator), pressing START/STOP automatically
deactivates MANUAL BASS and re-assigns the Bass track to the auto
accompaniments of the Style.
When AUT O BASS is set to OFF, the Bass track of the Style accompaniment
cannot be assigned to the keyboard for Manual Bass playing.
The setting of AUTO BASS is ON by default.
How to change the status of the Auto Bass function
1. Select the Arrange Mode menu by holding down the Arrange On/Off
button for an instant, or by moving the left display arrowhead to the
Arrange Mode menu with the Cursor buttons.
2. Press the PAGE button to select the Auto Bass option.
3. Press TEMPO/DATA b uttons to change the On/Off status of the option.
6
FILL A FILLB /TAP
6
FILL A FILLB /TAP
LOWER
ARRANGE
MEMORY
LOWER
MEMORY
ON/OFF
ARRANGE
ON/OFF
.
.
4
4
When Auto Bass is OFF, the Bass track of the Styles cannot be activated
for manual play.
The new Arrange Mode setting remains in memory even after power
down.
○○○○○○○○○○○○○○○○○○○○○○○○○○○○○○○○○○○○○○○
40 Owner’s Manual
Page 48

SINGLE TOUCH PLAY, STORE PERFORMANCE/PERFORMANCE
RECALL, STYLE/TEMPO LOCK
SINGLE TOUCH PLA Y
The SINGLE TOUCH PLAY button assigns the factory set sounds
stored in ROM to all the tracks (accompaniment and keyboard tracks)
for each Style/ In addition, this button activates the ARRANGE ON/
OFF button (LED on) and the ARRANGE MEMORY function (corresponding display indicator on).
When SINGLE TOUCH PLAY is off, selecting Styles recalls only the
Style accompaniment sections without changing the keyboard sounds.
The ON/OFF status of the SINGLE T OUCH PLA Y function is shown on the
top left area in the display.
With SINGLE T OUCH PLAY on, the function buttons (F1 … F9) also recall
9 “Single Touch Play” panel settings for the Real Time k eyboard sections.
Each ROM Style is associated to 9 different patterns, for a total of 864
situations, in addition to the 96 basic configurations (one for each Style).
STORE PERFORMANCE / PERFORMANCE RECALL
Changes made to the selected Performance can be saved through this
function key.
As explained in the previous chapter, Performances contains various
parameters which can be changed by the user .
If you hold down the STORE PERFORMANCE for a few seconds then
reply to the Performance store confirmation request (“?”) with ENTER, all
the changes made are saved to the P erf o rmance.
If you do not wish to cancel the previous P erf ormance, do not confirm with
ENTER, but move to the free location where y ou wish the new P erformance to be stored using the TEMPO/D A T A ke y . Only now , confirm with ENTER.
The Performance number appears in the 3 digit display area only after
activating the STORE PERFORMANCE function.
The PERFORMANCE RECALL / STORE PERFORMANCE ke y can also
be used as a shortcut to get to Performance mode more quickly:
if you press the PERFORMANCE RECALL / STORE PERFORMANCE
key, the cursor arrowhead will immediately move to the “PERFORMANCE” mode in the display.
Single To uch Play
○○○○○○○○○○○○○○○○○○○○○○○
Styles 41
Page 49

STYLE / TEMPO LOCK
The STYLE LOCK function allows you to select Performances without
changing the current Style.
When STYLE LOCK is active (the display indicator is ON), you can move
from one Perfo rmance to another without changing the Style..
If you hold down this button f or about 2 seconds, the TEMPO LOCK function
activates (as already explained).
The status of the TEMPO LOCK function is displayed by the alternate
flashing of the Tempo setting with the word ‘LOC’. This function maintains
the current Tempo setting for all Style and Performance changes. When
OFF , selecting a Style or P erformance also recalls the original tempo setting.
TEMPO LOCK and STYLE LOCK can both be active at the same time.
METRONOME
This function key starts the Metronome in Play and Record modes.
When active, the Metronome icon is shown in the displa y.
SUSTAIN
Active (led ON), non active (led OFF)
This is a general control which activates the sustain effect on all three Real
Time keyboard sections, independent of the Damper pedal.
If you want to sustain the Sounds of the UPPER 1, UPPER 2 and LOWER
sections, activate this function.
HARMONY
Enables or disables the HARMONY function, a feature which can orchestrate your playing, making simple one-note melodies sound as if they are
being played by a full orchestr a. The corresponding displa y indicator turns
on when HARMONY is active.
The structure of the automatic harmony is based on the current Harmony
Type setting and only operates when the keyboard is split.
By holding down the HARMONY button for about 2 seconds, the display
shows the currently selected Harmony Type.
With the PAGE buttons, you can select the Harmony type that best suits
the kind of music that you are playing.
The types of Harmony available are divided into two categories, according
to whether the Harmony depends on the notes played with the left hand or
not.
Harmony types that depend on the notes played below the split point
Closed: The notes played by the left hand are added to the melo-
dy note exactly as play ed. The harmonising chord is a
closed (or tight) position (notes fall within the same octave).
Open 1: same as above, close but with an open chord (notes
spread over 2 octaves).
○○○○○○○○○○○○○○○○○○○○○○○○○○○○○○○○○○○○○○○
42 Owner’s Manual
Page 50

Open 2: similar to Open 1 but with the notes played on the left
hand randomly assigned to the right
Block: transforms the melody note into a full four or five note
chord, each note in perfect harmony
Harmony types that do not depend on the notes played below the split
point:
Octave: doubles the note of the right hand by playing an octave hi-
gher. No left hand chord required.
Oscar: doubles the note of the right hand with a note two octaves
below . No left hand chord required. This structure is based on the harmony typically used by the jazz musician
Oscar Peterson.
Jazz: adds tw o notes above the note played by the right hand,
at intervals of a fourth and a minor seventh. No left hand
chord required.
Rock: creates a three note chord consisting of the melody note,
a fifth interval and an octave interval (e.g. C-G-C’). No left
hand chord required.
REV/CHO
WK1 Or can process the signals it generates, thanks to two built-in multieff ect
devices that affect the sections independently.
Rev:Hall 2 Vol=100
Cho:Chorus 2 Vol=100
It is possible to set the effect processor to active (Led ON) or non active
(Led OFF) mode. .
To modify Reverb o il Chorus and their Send, keep the REV/CHO key
pressed for at least one second. The Multieffect page will appear on the
LCD display. The parameter that can be modified star ts blinking. Use the
TEMPO/DATA. Keys to modify the effects.
Use the CURSOR key to move among the various parameters.
When each effect is display ed, the relative general volume is indicated.
○○○○○○○○○○○○○○○○○○○○○○○
Styles 43
Page 51

• 6 The Disk
Working with a hard disk and floppy disks provides y ou with the possibility
to create an extensive library of Sounds, Samples, Performances, Styles,
Songs e Song Styles, that can be loaded to WK1 Or RAM at any time.
This chapter is an introduction to the concepts of File, Floppy Disks and
RAM memory. You will learn about the main access functions to a Disk
and how to load and save Songs, Styles, Perfor mances, Samples, MIDI
Files and all the other formats that are compatible with WK1 Or.
Floppy Disk accepted formats
WK1 Or accepts 3,5” HD and DD floppy disks. These are the most
commonly used types and can be purchased at any computer shops,
stationeries, office commodity shops and supermarkets.
WK1 Or can read files in GMX, WK, PK, MIDI FILE, MS-DOS, Atari ST/
Falcon and Generalmusic CD series for mats.
WK1 Or cannot read Songs, Styles and Samples in formats of nonGeneralmusic instruments. The exclusive for mat of musical instruments
adopted by a manufacturer is proprietary and not compatible with the format
of instruments of other makes. To exchange Songs with other instruments
it is necessary to save the Song as a MidiFile to a MS-DOS formatted
disk.
Files
Data are stored on disks in the form of files. Files identify Songs, Song
Styles, Perfor mances, Styles or Samples.
File types and extensions
The types of file used when working with a disk are identified by a name
(which appears in the 8- digit display area) and an extension (shown in
the 3-digit display area) which specifies the type of file.
In file types that include SONGS in PK, WK, STYLES and ALL for mats,
the extension is not displayed. The extensions of all other recognized file
types are listed in the paragraph explaining the LOAD functions.
ACCESS T O DISK
Any operation involving files can be effected using the functions given in
the Disk mode pages, through the FLOPPY DISK function key.
The main functions are divided into 5 groups:
1. LOAD...........Load data to RAM from a Floppy Disk
2. SAVE...........Saves RAM data to a Floppy Disk
3. DELETE......Cancels single Files from a Floppy Disk
4. FORMAT....Formatting procedure and cancellation of the contents
of a Floppy Disk.
The display shows when Floppy Disk mode is active: if a Floppy Disk
containing MidiFiles or Songs is inserted and the FLOPPY DISK key is
pressed, DIRECT page is shown. Use the PAGE and keys, and the
CURSOR to move around a page.
Press ESCAPE to exit DISK mode.
○○○○○○○○○○○○○○○○○○○○○○○○○○○○○○○○○○○○○○○○○○○○○○○○○○
44 Owner’ s Manual
Page 52

N.B. Once the DISK has been pressed to execute a LOAD or SAVE
command, as soon as the Disk Drive completes the operation the
display is automatically restored to DIRECT mode, that is the first page
of the Disk page. Press ESCAPE to exit.
WHA T IS A MIDI FILE?
MIDI means Musical Instruments Digital Interface. A Standard MIDI File
(SMF) is a format created to maintain data compatibility among different
devices complying to the SMF format. This format allows Songs to be
exchanged between different instruments and computers. If a Song is
saved as a Midifile on a MS-DOS disk, most computers or musical
instruments will be able to load and read that Song.
WK1 Or reads format 0 e 1 MIDIFiles, and saves MIDI file in 0 format.
GENERAL MIDI (GM)
T o further improve the compatibility between instruments of different makes,
the MIDI file should conform to the General MIDI standard.
The General MIDI standard establishes common standards for the sound
listing, the Program Change numbers for sound selection, the configur ation
in the Drumkits, the assignment of MIDI channel 10 to the drumkit track, a
minimum polyphony (24) and a maximum number of tracks (16).
○○○○○○○○○○○○○○○○○○○○○○○
NOTE
A led turns ON while the Disk Drive
operation is in progress. Do not extract
the Floppy Disk during this time
otherwise the data could be damaged or
lost
○○○○○○○○○○○○○○○○○○○○○○○
○○○○○○○○○○○○○○○○○○○○○○○
NOTE
0 FORMAT: all tracks are mixed to a single
track.
1 FORMAT: all tracks are kept separate
(Multi-track).
○○○○○○○○○○○○○○○○○○○○○○○
In WK1 Or, the Sound Bank 1 and the Drumkit Bank 2, are fully compatible
to the General MIDI standard. WK1Or recognizes a MIDI file in General
MIDI standard by the messages it contains (General MIDI ON). In case
this message is not detected, sounds different from Drumkit could be
assigned to MIDI 10 channel. T o ensure correct loading of GM compatib le
MIDI files that do not contain the “General MIDI ON” flag, the General MIDI
parameter is set by defoult to ON under the “MIDI” button.
GMX FORMAT
GMX format is an extension of the General MIDI specifically by
Generalmusic that makes the first three sound banks of all WK Or
instruments compatible with each other.
LOADING SONGS AND MIDIFILES
Up to 7 locations (111-117) are available in the RAM to load Songs and
MidiFiles. To select a location, move the left cursor arrowhead to the SONG
menu function and digit the corresponding number in the left numeric
keypad.
NOTE: Songs can also be selected by direct digiting of the corresponding
number (111-117), on the keypad.
WK1 Or can load songs in the CD, WK3 e PK7 formats.
○○○○○○○○○○○○○
Disk 45
Page 53

LOADING STYLES
Up to 8 locations (96-103) are available in the WK1 RAM memory to load
Styles.
WK1 Or can load Styles in the CD, WK3 e PK7 formats.
LOADING PERFORMANCES
Up to 63 RAM locations are available to load Performances. Locations are
divided in7 groups, each featuring 9 Perfor mances. Use the PAGE or the
+ e – in the numeric keypad and make sure that the arrowhead is pointing
to the PERF menu function. The contents of the two direct access memories
(Direct Style Memory e Direct Sound Memory) is automatically loaded
and saved together with the Performances.
WK1 Or can also load Performances from WK3 and PK7.
LOADING SAMPLES
Samples are loaded directly to the battery-backed Sample RAM, using
the load All Disk function.
WK1 Or can also load Samples from WK3 and PK7 ser ies.
LOADING SONG STYLES
WK1 Or Song Styles can only be loaded to the memory using the “ Load
All Disk” procedure, since this format contains files of different types.
WK1 Or only loads WK1 Or, Song Styles.
○○○○○○○○○○○○○○○○○○○○○○○○○○○○○○○○○○○○○○○○○○○○○○○○○○
46 Owner’ s Manual
Page 54

Load Operations
Data from disk or partitions can be loaded into WK1 Or RAM memory in
different ways:
1. as single elements (Load Song, Load Style, Load MidiFile);
2. as a set of files from a Group (Load Styles , Load Performance
[Performance Gr oups], Load Samples);
3. as “All Disk”, that is, all the data contained in the disk previously
saved in ALL Disk mode.
WK and PK songs, as well as MidiFiles, can be executed directly
from the floppy disk.
How to LO AD
1. Insert a Floppy Disk into the disk drive, and press the FLOPPY DISK
key. The DISK icon and the name of the first file contained in the
Floppy Disk will appear in the display.
2. Press PAGE to go to LOAD page.
3. Select the desired file using the TEMPO/DATA, keys. Press ENTER to
confirm.
WK starts loading the file in the first location available.
N.B. If you press the FLOPPY DISK key, select the Song and then
press START/STOP or PLAY/STOP, the Song will play in Direct from
Disk mode. (See also the relative notes in the “Getting Started” chapter .
Recognizing a File from its extension
Apart from the Songs in WK and PK formats, and from STYLES and ALL
files, all other files are recognized by their extensions.
MIDIFILES and single STYLES will respectively appear as Mid e U01U08 in the display.
The extension for SAMPLES and PERFORMANCES, will be shown in
the display.
No extension is shown for Songs in WK and PK format. WK1 is not
compatible with the files of WK3 and PK7 series made in SONG STYLE
mode.
The following files are available in the disk: SONG, MIDIFILE, STYLE,
PERFORMANCE and SAMPLE.
• If you wish to load all Style as a Group, mak e sure that you have pressed
the DISK key, and then press the CURSOR key. The “AllStyles”
indication starts blinking in the display. Press ENTER to start loading.
• If you wish to load all files together, press the CURSOR key once
again. The “ALL.Disk” indication will blink in the display. Press ENTER
to start loading.
• To listen to the Songs loaded in the memory, digit the number
corresponding to the selected Song (111-117) in the numeric keypad.
Then press PLAY/STOP to start the execution.
Mid: Ne wYork
U01: Ne wYork
SamplSWK
Perf oPWK
Cd: NwYrkSNG
Cd: 8BeatSTY
Cd: PianoSMP
• To play a User Style from the machine memory, press the STYLE key
(the LED must be ON) and select the desired Style (96-103), by entering
the relative number in the numeric keypad. Press Single Touch Play
and start the Style as you would do with a normal ROM Style.
○○○○○○○○○○○○○
Disk 47
Page 55

Save Operations
Although data are retained in the machine RAM memory even when the
instrument is turned off, it is advisable to save a copy of your data to a
Floppy Disk. RAM is best used as a dynamic w o rk area and not as a data
storage device.
WK1 Or can be saved to a Floppy Disk:
1. as single elements (Song, Style, MidiFile);
2. as set of files from a Group (AllStyles , Perfor mances, SMP)
3. as an “ ALL” operation, that is, saving all the data kept in the RAM
memory.
To save a file as a single element, you can either use the same name, or
rename the file. No name is requested to save a Performance, a Style or
an ALL format file.
The Save Procedure
1. Get a formatted disk and insert it in the drive.
○○○○○○○○○○○○○○○○○○○○○○○
NOTE: To ensure that ALL loads exactly the
desired combination of files, load them to the
RAM as single elements, save them using the
SAVE ALL function.
○○○○○○○○○○○○○○○○○○○○○○○
1
If the disk is write-protected, remove the protection
.
2. Press the FLOPPY DISK key and move to SAVE page using
the PAGE + button.
The first page of the SONG mode is shown in the display.
3. Press the CURSOR key to select the format of the file you
wish to save (Song, SMF, Perform, STY, AllSty, SMP, AllDisk).
4. Once you have selected the desired mode (e.g.: SONG),
PRESS ENTER.
The name of the first Song contained in the RAM memory appears in
the display.
5. Select the Song you wish to save with the TEMPO/DATA
keys.
6. Press ENTER to confirm the selected Song.
The following message appears in the display “SAVE: (+ filename) “ .
Use Keys to write [ENT] “ . The file is ready to be saved to disk.
7. If you wish to rename the Song, use the keyboard note to
write the new name. If you wish to maintain the same
filename, follow the next steps to save .
2
3
4
5
6
7
8. Press ENTER.
The following message appears in the display “OK, ready to save [ENT]?
-” In case the Floppy Disk already contains a file by the same name,
the message will read : ”OverWrt?”.
9. Press ENTER once again. The file is now saved.
WARNING! If the disk drive contains an unfor matted Floppy Disk,
pressing SAVE prompts the message : UNFORMAT.
If the disk is write-protected the message is: DISK PROTECTED.
If the disk is damaged, the message is: DISK CORRUPTED.
○○○○○○○○○○○○○○○○○○○○○○○○○○○○○○○○○○○○○○○○○○○○○○○○○○
48 Owner’ s Manual
89
Page 56

SA VING MIDI FILES
If you wish that your Songs to be read by other instruments or by a computer, you have to save them as MIDI File to a MS-DOS or Atari format
(MidiFile format 0).
To save a General MIDI (GM) compatible MIDI File set the General MIDI
parameter to ON (refer to the “MIDI/GENERAL” section of the Owner’s
Manual). The Performance parameters in all tracsk will be converted into
the correspondent MIDI controls (Bank select MSB e LSB, Program
Change, Volume, Pan, Control change 91 and 93 for the Effects).
If the Song contains Lyrics, it will be conver ted into a Lyric format event
and the generated file will be a MidiFile with text (Karaoke).
All WK1 Or Songs saved as a MidiFile are always compatible with the
GMX format. Consequently the y are compatib le with all instruments of the
WK series which feature a Disk Drive.
SAVING SONG STYLES
Song Styles can be saved to a Floppy Disk using the “ Save All ” procedure. In fact this type of file involves different sections of the
instrument.
Song Styles cannot be saved as a Midi File.
Delete Operation
The Delete function is used to delete a file from the Floppy Disk.
1. Insert the Floppy Disk in the drive
2. Press the FLOPPY DISK key and use the PAGE keys to move to
DELETE page.
3. Select the file you wish to delete using the TEMPO/DATA keys.
4. Press ENTER twice.
(remove the protection)
.
1
2
The file has been deleted and is no longer in the Floppy Disk.
3
○○○○○○○○○○○○○
4
Disk 49
Page 57

Formatting a Floppy Disk
WK1 Or will not read from a Floppy Disk which is not in a recognized
format. Using a disk in a non-compatible format will prompt a message
that requests to abandon the current Floppy Disk and try with a new one.
Two formatting procedures are possible.
FORMAT 720 KB
This procedure formats a 3.5” DD Floppy Disk in MS-DOS/Atari ST f ormats
(capacity:720 kilobytes).
FORMAT 1,44 MB
This procedure formats a 3.5” HD Floppy Disk for WK1 use with 1,44
Megabytes capacity. Such for mat is fully compatible with MS-DOS and
allows the exchange of files between instruments of the WK and PK
series and computers (MS-DOS, Window s, OS/2, Macintosh, some Atari
models and Amiga).
THE FORMATTING PROCEDURE
This function is available in the third page of DISK mode. If you are reformatting a used disk, remember that all data stored in the disk will be
cancelled.
1. P r ess the FLOPPY DISK key and move with the PAGE key to the
third page (FORMA T).
2. Use the CURSOR key to choose between 1.44Mb and
720kb format.
3. Press ENTER twice to format the Floppy Disk as desired.
1
2
3
○○○○○○○○○○○○○○○○○○○○○○○○○○○○○○○○○○○○○○○○○○○○○○○○○○
50 Owner’ s Manual
Page 58

General disk-handling tips
If this is the first time you use a Floppy Disk and do not feel comfor table
about handling such delicate magnetic aids, read this section very carefully.
INSERTING A FLOPPY DISK INT O THE DRIVE
Floppy Disks are inserted in the disk drive with the lablel side up, and the
metallic shutter first in. Push the disk smoothly and firmly until it clicks into
place.
Hold the disk straight and avoid forcing it in while inserting.
EJECTING A FLOPPY DISK
Before ejecting a Floppy Disk, mak e sure that the operation led in the drive is
OFF, and that WK1 Or display shows no disk operation being in progress.
To extract the Disk, press the eject button and remove the disk.
DISK PROTECTION
Floppy disks feature a protection tab that saf eguard valuable data and prev ent
accidental cancellation.
To remove the protection and be able to write on the disk, slide the plastic
tab upwards, closing the hole.
To protect the Floppy Disk so that it is not possible to erase or overwrite the
contents, slide the plastic tab downwards, opening the hole.
You can use a pen or a pointed object to slide the tab.
HANDLING FLOPPY DISKS
Floppy Disks should be handled with great care, to prevent damage or loss
of data.
1. Never open the metal protection shutter or touch the soft surface of the
Floppy Disk.
PUSH
Protected not protected
2. Never lea ve a Floppy Disk inside WK1 Or disk drive when you carry the
keyboard around. Vibrations may cause the drive head to scratch the
disk and make it useless.
3. Never place Floppy Disks in proximity of TV sets, computer monitors,
amplifier, loudspeakers, power transformers or other device which is a
potential source of magnetic field. The disk contents could be seriously
damaged or lost.
4. Never leave the disks in extremely warm or cold places. Do not expose
them to direct sunlight. Protect them from dust or dirt.
5. Do not place objects on top of a Floppy Disk.
6. Always return a Floppy Disk in a protective case after use.
○○○○○○○○○○○○○
Disk 51
Page 59

Back-up copies
It is advisable to keep a back-up copy of the more valuable Floppy Disks.
The back-up copies should be stored in safe places, as they are of e xtreme
importance in case the data contained either in the instrument or in other
Floppy Disks get lost or damaged.
T o transfer data from a Floppy Disk to another it is necessary to go through
the instrument RAM memory. The contents of the source Floppy Disk (the
one containing the data you want to back-up) should be first loaded to
WK1 Or RAM memory, then saved to the destination Floppy Disk (the one
you will keep as a back-up copy).
CLEANING THE DISK DRIVE HEAD
After the instrument has been used for a long period of time, the disk drive
head may become dirty , and cause frequent disk load and disk save errors .
To proceed to head cleaning, make sure you will use a good-quality fluidtype head cleaning kit for 3.5” double-sided disk drive. Do not use a cleaning
kit intended for old single-sided disk drives.
1. Moisten the cleaning disk with the fluid product.
2. Insert the cleaning disk into the drive.
3. Execute a loading procedure. An error message will appear. It must
appear, as this is perfectly nor mal.
4. After about 10 seconds, extract the disk.
WARNING!: Wait at least 5 minutes before using the dr ive again.
PRECAUTIONS T O OBSERVE WHEN USING WK1 DISKS
WITH A COMPUTER
As occurs with MS-DOS operating system, WK1 Or uses up to 8-character
filenames, and a 3-character extension.
Macintosh, OS/2 and Windows 95 operating systems may use longer
names. When a file is named, or renamed on these computers, the follo wing
rules should be followed:
1. Never change the file extension, since it identifies the type of file and
the relative structure.
2. Never use names longer than 8 characters.
Furthermore, owing to some limitations of MS-DOS and Atari systems, it
is extremely important to observe the following precautions:
1. Do not insert spaces within a file name (e.g.: “MY FILE”). MS-DOS
does not recognize file names containing spaces. To keep a file name
divided into two distincted parts, you can separate the two parts with
an “underscore” symbol (e.g.: “MY_FILE”).
3. Do not assign the same name to two different files, e v en though one is
written all in Capitals and the other with small letters (e.g. “MYFILE”
and “myfile”). MS-DOS and Atari do not distinguish between capital
and small (or uppercase and lowercase) letters.
○○○○○○○○○○○○○○○○○○○○○○○○○○○○○○○○○○○○○○○○○○○○○○○○○○
52 Owner’ s Manual
Page 60

• 7 Songs
WHAT IS A SONG?
A Song is a multitrack recording of several instrumental parts, each of
them corresponding to a track.
Songs can be loaded from disk in the following for mats:GMX, WK, PK,
CD and Standard MIDI File (SMF 0 and 1).
Tracks contain “MIDI events” that correspond to as many MIDI messages.
The MIDI messages can be Note, Pitch Bend, Program Change messages,
and a series of Control Change messages to control the change of Sound
Bank for the Sounds, the Sustain or Volume pedals, the Pan and several
other values. The MIDI e vents recorded in the trac ks are not actual sounds,
but messages exchanged with WK1 Or internal sound generators or with
and external expander that WK1 Or , controls. A song is a series of MIDI
events distributed over each track.
THE SONG PERFORMANCE
Each WK1 Or Song is associated to a single Song P erformance. When
a Song is loaded or saved in MIDI File format, all values that the Song
Performance contains are converted, into the corresponding MIDI
messages (Program Change, Pan, Volume, Effects) within each track.
○○○○○○○○○○○○○○○○○○○○○○○
Note: When a Song is loaded to the internal
memory , it will engage a location. The next song
loaded will occupy the subsequent location and
so on, with a cyclic course. For e xample, in case
location 111 is already engaged, the next song
loaded will engage location 112 etc. When the
7 locations available have all been engaged,
the cycle will start again and the next song
loaded will engage location 111, replacing the
previousle loaded Song.
○○○○○○○○○○○○○○○○○○○○○○○
Selecting a Song
WK1 Or can save up to 7 Songs in the SONG group of the USER
section (from 111 to 117, if the memory locations are not all in use).
HOW TO SELECT A SONG
Refer to the “DISK ” chapter for instructions about how lo load a Song
or MIDI Files from a Floppy Disk.
• Digit the number corresponding to the desired song (111-117)
in the left numeric keypad.
E.g.: to select the Song from location 111, Press the “ +100 ” key and
then digit 1 and 7.
The left cursor arrowhead will automatically move to the STYLE/SONG
menu function.
SONG PLAYBACK
If you select a Song from the memory, proceed as follows to listen to it:
1. After selecting the Song, press the PLAY/STOP key to start the
playback.
3
PERFORMANCE
1
2
1
MENU
SOUND
STYLE/SONG
While the song is being played, the display indicator will show the
Tempo and the measure counter in the display will show the current
Song position.
2. Use t he TEMPO/DATA ke ys to change the TEMPO.
3. Press the PLAY/STOP or START/STOP keys to stop the playbac k.
The Song stops at a precise point (shown in the display counter).
2
3
○○○○○○○○○○○○○○○○○○○○○○○
Songs 53
Page 61

4. Press KEY START/CONTINUE to resume the playback from the
point where it has been stopped.
5. Press the STOP and then the PLAY key to restart the playback from
the beginning.
4
If you wish to playback your Song direcly without loading it to WK1
internal memory, seek for it in the Floppy Disk and play START/STOP
to start it. Refer to the “DISK” chapter for more detailed instructions.
CANCELLING A SONG (CLEAR FUNCTION)
If you are not satisfied with a Song or MIDI File track, you can delete
the track by selecting the Song (111 - 117) and f ollowing the instructions
about the CLEAR function given in the “Song Style” chapter. You can
choose whether to cancel the entire file (ALL), the tempo (TEMPO),
the Common track (COMMON), any of the 16 tracks selectable with
the TEMPO/D A TA keys. To perform this application, move to the desired
mode, then proceed to CLEAR by pressing the RECORD key in the
Sequencer and confirming with ENTER.
MELOD Y OFF
The MELODY OFF keys is plays the Song back excluding the melody.
This is particular ly useful if you wish to sing along with the backing or
to play the melody in real time on the keyboard.
The status of this function is shown in the leftmost indicator in the
display.
5
PLAY ALL SONGS
Use this function to listen to all songs contained in the Floppy Disk
without loading them to the machine memory. Once you have inserted
a Floppy Disk into the Disk Drive, press PLAY ALL SONGS to start the
playback
PLAY A SONG WITH A TRACK IN REAL TIME
Most of the Songs loaded from a Floppy Disk will have all tracks
engaged by the Sequencer. You can check about this immediately by
observing the display: if all tracks are active, including tracks 9...6 (use
the F9 function key to toggle between the two group of tracks), you will
see that no track is free to play along with the Song in Real Time.
If one or more tracks are off, it means that the y are not engaged by the
Sequencer.
If you wish to play along with the Song in Real Time, you can either:
• A) disengage one of the tracks used by the Sequencer ;
or
• B) enable of the tracks not used by the Song.
○○○○○○○○○○○○○○○○○○○○○○○○○○○○○○○○○○○○○○○
54 Owner’ s Manual
Page 62

A) How to deactivate one of the tracks engaged in the Sequencer
1. Select a Song and press PLAY/STOP to star t playing.
Check how many tracks are engaged in the sequencer.
2. Press one of the Function keys that correspond to a track
currently working.
The volume bargraphs will start blinking, indicating that the track is
now active.
NOTE: When the volume of a track is set to MIN, the display will
always show one Volume bar.
3. Press again the Function key corresponding to the active
track.
The number relative to the sound of the selected track is turned off.
The track stops playing.
4. Press the same key once again.
The track indication starts blinking. The relative track is no longer
engaged by the sequencer: it is now active to play in Real Time
during the Song.
5. Play on the keyboard.
The sound that was assigned to the sequencer track comes now
directly from the keyboard. Now you can play in Real Time during
the Song.
6. Press the same key once again.
The track indication is turned on steadily: it has no w been reassigned
to the Sequencer and can play the notes recorded in the Song.
B) How to activate one of the tracks not engaged by the Song.
1. Press twice one of the function keys relative to a non active
track.
The track starts blinking.
2. Play on the keyboard.
The sound currently assigned to the active track is now playing.
3. Press the same key once again.
The track is turned off and is no longer active.
○○○○○○○○○○○○○○○○○○○○○○○
Songs 55
Page 63

Displaying L yrics
If your Song or MIDI File contain the Lyrics track (the text of the song),
you can have them displayed both to on an external monitor, and to
WK1 Or display. In this way you will be ready to sing in Karoke style.
If you wish to do so on the display, proceed as follows:
- Select the MIDI file and press the START/STOP key to start the
playback;
- Press the LYRICS key to enable Karaoke function (led ON);
The display will show the lyrics in the first two rows.
If you wish the Lyrics to be displayed by o an external monitor, or by a
domestic TV set, follow the instr uctions below very carefully:
1. Connect the RGB or S-VHS cable (optional), to the TV set or to
the monitor.
WK1 Or is default set to communicate with video devices which
comply with the European PAL Standard. To communicate with
American NTSC standard, it is necessary to set the “ Video Select
Mode ” in the MIDI/GENERAL mode to NTSC . If your TV -set features
a S-VHS connection, it is best to use the S-VHS connector provided
with WK1 Or . Refer to the “MIDI/GENERAL” chapter, or to the
“Connections” paragraph in Chapter 2 for better details.
2. Scroll to page 3 in the MIDI/GENERAL section and set the “TEXT
LYRICS” function to ON using the TEMPO/DATA keys.
3. Tur n the TV to the AV channel.
Refer to the instruction booklet of your TV set to select AV channel.
If you are using an external monitor, it should normally be set to AV
channel.
4. Select the desired Song (da 111 a 117).
5. Press the PLAY/STOP key to start the selected Song.
○○○○○○○○○○○○○○○○○○○○○○○○○○○○○○○○○○○○○○○
56 Owner’ s Manual
Page 64

• 8 Song Styles
A Song Style is an 8-track Song created by recording a Style (Rom or
User) with the keyboard tracks (Upper 1, Upper 2, Lower). Song Styles
capture the chords that trigger the Style accompaniment patterns on a
“Chords track” and you can choose to record one or more keyboard
tracks according to your requirements. During the recording, you can
exploit the Intro, Fill and Ending patterns and change Style at will. In
practice, what you normally do in real time with a Style is captured by
the sequencer in Song Style Record mode to create a Song Style.
Up to 8 tracks are engaged by the Sequencer to record a Song Style: 5
associated to the accompaniment patterns (Drum, Bass, Acc3, Acc2,
Acc1) and 3 to the keyboard tracks (Upper 1, Upper 2, Lower).
Only Song Styles in WK1 Oriental format only can be loaded to the
RAM using the “Load All Disk”.
Song Styles are similar to Songs in several of their aspects, except
that they do not contain a Lyrics track.
SONG STYLE PERFORMANCE
Each Song Style is associated to a single Song Style Perfor mance
which contains all the parameters and settings for a Song Style. This
simplifies Song Style recording, because all the information necessary
to record and playback are housed in the Song Style Performance
without having to set parameters while recording. When you record a
Song Style, it is best to programme the associated Song Style Performance beforehand.
A Song Style cannot be saved as a MIDI file, only as an “ALL” data
package.
Song Style selection
WK1 Or can store up to 7 Song Styles in the locations numbered from
104 to 110 in the USER section.
SELECTING A SONG STYLE
Refer to the DISK chapter for e xplanations regarding ho w to load Song
Styles to WK1 Or memory from disk, then proceed as follows:
1. Make sure that one or more Song Styles are loaded. Then digit the
number corresponding to the desired Song Style on the left hand
selection keypad
The left display arrowhead moves automatically next to the SONG
menu function.
2. Use the PLAY/STOP key to start the Song Style.
3. Press the STOP key to arrest the Song Style at any time.
1
MENU
SOUND
PERFORMANCE
STYLE/SONG
2
N.B. Pressing the START/STOP button starts the last selected Style,
while the PLAY/STOP button starts the last selected Song, or has no
effect is the relative location is empty
3
○○○○○○○○○○○○○○○○○○○○○○○
Song Style 57
Page 65

Play a Song Style in Real Time
In almost all cases, the Song Styles will have all tracks engaged by the sequencer. You can
check this at a glance by looking at the status of the tracks in the display. If they are all on,
this means that they are all used by the sequencer.
If one or more tracks are off, this indicates that they are not engaged by the sequencer. If
you want to play along with the Song Style during playback with one of the keyboard tracks,
you can either:
• A) deactivate one of the Real Time tracks used by the Sequencer.
• B) engage one of the Real Time tracks not used by the Song Style.
N.B. The accompaniment tracks can only be deactivated.
Refer to the “SONG” chapter for the instructions referred to the above operations.
When a Song Style is in Play mode, access is possible to UPPER1, UPPER2 and LOWER
sections with the relative keys and with the F7, F8, F9 function keys.
Recording a Song Style
Styles offer an excellent means of preparing backings for a soloist. For example, you can record
two keyboard tracks (Upper 2 & Lower) with accompaniments, then use Upper 1 to play the
melody in real time with the Song Style in playback
Song Styles record all panel interventions made while recording: changes of Style, use of the
Intro, Fills, Endings, Fade In/Out, activation/deactivation of the effects, Harmony On/Off and
more. The events generated by the panel interventions are recorded in the COMMON track.
COMMON and CHORDS tracks activate automatically when you enter Song Style Record mode.
Before recording a Song Style, it is advisable to completely clear the sequencer memory in
order to use the total RAM capacity and avoid undesired parts when saving a Song Style. In
fact, the Song Style is saved as an ALL data set, therefore, whatever is contained in RAM will
also form part of the Song Style.
To clear all data from the Sequencer, move with the CURSOR key to MIDI/GENERAL mode.
Use the PAGE keys until the message “InitALL” appears in the display. You can now rotate the
dial to choose whether to clear all the instrument (ALL), the Sequencer (SEQ), the Sample
memory (SMP) or the Performances (PFM); select the “InitSEQ” option (if you select “InitALL”
Performances and Samples will be erased), then press ENTER twice: WK1 Or is now ready to
record Song Styles.
ENTER THE SONG STYLE RECORDING MODE
Press the RECORD key: the first free location is made available.
Press PLAY/STOP, to star t the recording.
While you play, WK1 Or records the panel status and all the operations that you carry
out.
The CHORD track is automatically activated only if empty. The keyboard tracks are
recorded only if their relative indicators are shown on in the display.
You can decide whether to start with a free Intro, with no Style, or with an automatic
accompaniment straightaway.
1. Press INTRO (if you wish to start with an INTRO).
You alternatively use, Intro, Fills or Ending.
2. Press START/STOP to start the accompaniment.
○○○○○○○○○○○○○○○○○○○○○○○○○○○○○○○○○○○○○○○
58 Owner’ s Manual
Page 66

3. Star t playing.
4. Continue as if you were using a normal Style.
• Use Fills
• Change the Variation
• Change the Style
• Adjust the Volume
• Use the optional Volume and Damper
• Change the sounds etc.....
5. When you wish to end your Song Style, you can:
• Stop the Sequencer pressing PLAY/STOP
or;
• Stop the il Sequencer with an ENDING
LISTEN TO THE SONG STYLE PLAYBACK
1. When you have finished recording the Song Style press RECORD
or ESCAPE to exit the recording mode.
2. Press PLAY/STOP to star t the Song Style.
3. If a keyboard track is not engaged by the sequencer, you can use it
to play along with the Song Style.
1
2
3
○○○○○○○○○○○○○○○○○○○○○○○
Song Style 59
Page 67

Clear Song Style (User Song Style)
If you are not satisfied with a Song Style, it is possible to delete some
values through the CLEAR function in Record mode.
Press and hold the Record key for a f ew seconds to go to CLEAR function.
Use the PAGE key to select the section you wish to delete:
1. ALL: Clears all the recorded events of the current SONG STYLE but
not the last Performance programmed. In pratice, only the recorded
sequences are cancelled from the last recorded Song Style.
2. CHORD: The CHORD indication in the display starts blinking to signal
that the track is empty and ready for a new recording. CHORD can be
used only the first time. If you wish to record the Chord track again to
cancel recording errors you must clear the entire track with Clear
CHORD.
3. LOWER: Clears track 7.
4 UPPER 2: Clears track 8.
5. UPPER 1: Clears track 9.
7. TEMPO: Cancels changes made to Tempo track.
8. COMMON: The Common track contains all the recorded panel e vents
(change of Var., Intro, Fill, Ending etc.). Common Clear deletes all
recording events.
Use the Page keys to move to the section you wish to clear and press
ENTER. Press ENTER again to confirm the display message.
Song Styles are retained in WK1 memory also when the instrument is
turned off. It is advisable to save a copy of the favour ite recordings as an
ALL format file on a Floppy Disk. to avoid unwanted lost of data.
It is possible to clear data from USER SONGS and USER STYLES.
If you do not like a track of a Song or a MidiFile, you can cancel it by
selecting the Song (111 - 117) and referring to the Song Style Clear
instructions. You can choose to cancel: the entire file (ALL), the Tempo
(TEMPO), the Common track (COMMON), each of the 16 dial-selectable
tracks. To perform this operation, press and hold down the RECORD key
for a few seconds, using the CURSOR e PAGE key to reach the desired
section, and proceed to CLEAR.
When in User Style mode only the total clear of the current Style location
is permitted (8 locations from 96 to 103).
How to assign a name to a Song Style
To assign a new name to your Song Style, press and hold down the
STORE PERF ke y f or a f e w seconds, then follow the instructions given in
the “Performance Name” chapter.
Important: to listen to Songs or Song Styles, the left arrowhead must be
pointing to Song mode. S ONG is automatically selected ever y time the
PLAY/STOP key is pressed.
○○○○○○○○○○○○○○○○○○○○○○○○○○○○○○○○○○○○○○○
60 Owner’ s Manual
Page 68

9 • Programmable Styles (User)
WK1 Or sequencer memor y can store up to 7 programmable User Styles
(96 - 103) which can either be loaded from disk or programmed by the
user. An extensive User Style library, available on Generalmusic Floppy
Disks, offers a large selection of User Styles to choose from. Styles can
be created according to two methods. The easier of the two consists in
modifying existing Styles. The second method, which may be more comple x
but is sure more interesting, is programming Styles from scratch, creating
every single part of the Style (Drums, Bass, Acc.1, Acc.2, Acc.3, V ariation,
Intro, Fill e Ending).
Use the MODE, COPY, CLEAR, and QUANTIZE to program a Style (these
keys are more frequently used in Style Playbac k mode, as Fills, Tap Tempo
and Fade functions).
Follow the steps below to program your own Style.
Recording a User Style
A. Setting the User Style parameters
The available options to record a new Style are descr ibed in the
following example.
Selecting an empty User Style location
1. Make sure that the STYLE led in the numer ic keypad is ON.
2. Digit the number of one of the User Style locations (96-103).
Location 96 is selected in this example. The display will show the selected
location number (“User01”). The number changes with each Style selected
(01=96, 02=97, etc.).
LOVER
MEMORY
ARRANGE
ON/OFF
3. Press and hold the REC key in the Sequencer section for at least 2
seconds to switch to Record mode.
WK1 Or directly sets to User Style recording mode. The Drums track
(U01:DRM:Maj>) is ready to record the “Major” Riff. The relative Program
Change number in the Drums track starts blinking in the display.
If you play on the connected keyboard, you will hear a drum sound with
each note you play.
○○○○○○○○○○○○○○○○○○○○○○○
User Styles 61
Page 69

THE BASIC STRUCTURE OF A STYLE RIFF
It is important to be familiar with the basic structure of a Style. Styles
provide automatic accompaniments based on the chords.
Major, minor and 7th chords generate three very different types of
accompaniment.
Each accompaniment generated by Major, minor or 7th chords, is
divided into four Variations. Each Variation is divided into various
parts: Basic, Intro, Fill, Ending, which compose the basic structure of
each Style, in 40 short patterns, or the “Riff”.
A Riff is a music pattern that plays cyclically. When you play with
Styles you will hear brief patterns that repeat themselves. A “basic”
Riff is the main part of a Style, repeatedly played until it is stopped, or
until it is interrupted by Fill, a Intro or an Ending. The length of a Riff is
variable between 1 measure (MIN) and 16 measures (MAX).
Selecting a Variation - [Optional]
Style Riffs
Var1 Var2 Var3 Var4
Major1 basic Major2 basic Major3 basic Major4 basic
minor1 basic minor2 basic minor3 basic minor4 basic
7th1 basic 7th2 basic 7th3 basic 7th 4 basic
IntroMajor1 IntroMajor2 IntroMajor3 IntroMajor4
Introminor1 Introminor2 Introminor3 Introminor4
Intro7th1 Intro7th2 Intro7th3 Intro7th4
EndMajor1 EndMajor2 EndMajor3 EndMajor4
Endminor1 Endminor2 Endminor3 Endminor4
End7th1 End7th2 End7th3 End7th4
Fill1 Fill2 Fill3 Fill4
4. The Variation currently being recorded in shown on the top left
display area. You can change the Variation by pressing the relative
key.
Variation No. 1 is recorded in this example
.
Modifing the recording Tempo - [Optional]
5. Use the TEMPO/D ATA keys if you wish to select a different
Tempo for your Style.
The default setting value of Tempo is 120.
The Variations to the Tempo effected while programming are not
recorded. If the 120 default setting for your Tempo is too slow, use the
TEMPO/DATA keys to select the desired speed.
LOVER
MEMORY
ARRANGE
ON/OFF
○○○○○○○○○○○○○○○○○○○○○○○○○○○○○○○○○○○○○○○
62 Owner’ s Manual
Page 70

Selecting a different recording track [Optional]
6. You may wish to start recording your Style from a different track
that is not default set one (Drums). Use the (F1 - F5) Function keys to
select the desired track among the following ones:
F1 = Drums, F2 = Bass, F3 = Acc.1, F4 = Acc.2, F5 = Acc.3.
In this example, recording start from Drums track.
Note: Recording from the Drums track first will set the TEMPO that
will be applied to the other tracks recorded successively.
Selecting a different Riff - [Optional]
7. If you prefer to record a different Riff, use the +and- in the numerif
keypad to select the desired Riff.
In this example the Riff recorded is basic Major in the Drums track.
Note: If some User Style have already been loaded to the machine
memory, select the first available (empty) location. Alternatively, you
can disengage a location, erasing the contents with the Clear Style
function, explained in detail in the relative paragraph.
Setting the Time Signature , the Pitch
( key-transposing) and the Beat number [ Op tional]
8. To change the basic parameters, press the MODE function key.
As soon as the User Style recording mode is enables, the default
settings of the automatically selected Riff are:
- the Tempo is set to 4/4
- the Key is set to “C”.
- the length is two (2) measures.
Changing the Tempo
The Tempo counter blinks in the display.
Press the CURSOR key to move the flashing cursor and the TEMPO/
DATA key to enter the desired value.
The Time Signature available values are the following ones:
1/2; 1/4; 1/8 - 2/2; 2/4; 2/8 - 3/2; 3/4; 3/8 - 4/2; 4/4; 4/8 - 5/4; 5/8 - 6/4; 6/8
-7/4; 7/8 - 8/4; 8/8 - 9/8 - 10/8 - 11/8 - 12/8 - 13/8 - 14/8 - 15/8 - 16/8.
Changing the Pitch.
Press the CURSOR key to move the flashing cursor and the TEMPO/
DATA keys to select the desired pitch.
The indication of the current key note (“C” in our case) will start
blinking in the display.
Use the TEMPO/DATA keys to enter the desired value.
Setting the Pitch keeps your Style always in tune as it automatically
transposes the chords to the selected key even when the Style is
changed during playback.
The recommended pitch is “C” for Major chord Riffs, “D” for minor
chord Riffs and “G” for 7th chord Riffs.
LOVER
MEMORY
ARRANGE
ON/OFF
○○○○○○○○○○○○○○○○○○○○○○○
User Styles 63
Page 71

To set the number of beats to a Riff, press the CURSOR key to move
the flashing cursor, and use the TEMPO/DATA to select the number
of beats. You can record up to 16 measures for each Riff.
9. Press the ESCAPE key to exit and return to User Style recording
mode.
Recording a User Style
After setting the parameters, follow the instructions to record a new
Style.
1. Press the START/STOP key to start recording. One empty beat is
executed. The notes played dur ing the empty beat will not be saved to
the Sequencer. The measure counter is active in the display and the
events occurring are shown. “00” measure indicates the empty beat.
2. Star t playing after the empty beat. The Sequencer will record each
note played. When you get to the end of the Riff, recording starts
again from the first measure and the notes played until this time are
played back. This feature is particularly useful when recording the
Drums track, since it is possible to add a new instrument every time
the loop restarts.
3. When you have finished recording the first track, press the Start/
Stop key to stop the recording. The numer correspondent to the Drums
track is still blinking.
1
2
3
4. Press the Function key correspondent to the recorded track twice.
In our example, press the F1 (Drums) function key twice to disengage
the Drums sound from the keyboard.
5. Select the next track you wish to record by pressing the
corresponding Function key. In our example, the next track to be
recorded is the Bass t rac k, corresponding to F2 function key. The
Drums track will be indicated in “play” mode in the display, while the
Bass track starts blinking.
6. Press the START/STOP to star t recording the Bass track. Dr ums
track will start playing while the Bass track is being recorded.
7. Start recording the Bass tracks notes.
8. When you are finished, press the Star t/Stop key to stop recording.
9. Press the Function key corresponding to the newly recorded track
twice. In our example, press F2 (Bass - F2).
10. You can now record other tracks following the same procedure.
When you finish recording the tracks of the first Variation, you can
either:
• select a new Riff (BasicMin, Basic7th, IntroMaj, IntroMin. Intro7th,
Fill, etc).
Use the + and – keys in the numeric keypad to select the Riff; or :
4
5
6
8
9
10
• select a new Variation. In this case press one of the Var. keys (led
ON).
○○○○○○○○○○○○○○○○○○○○○○○○○○○○○○○○○○○○○○○
64 Owner’ s Manual
Page 72

Always remember that simple Variations lead to the best results. A
simple Variation can be enhanced and enriched by adding new
tracks. For example, you can record Major Variation 1 on three tracks
only (Drums, Bass, Acc1) and with simple patterns.
Record Variation 2 setting Major e Minor in the same tracks (Drums,
Bass, Acc1), but adding small differences. Variation 4 can be
recorded on 4 tracks (Drums, Bass, Acc1, Acc2) and further changes
to its patterns. Variation 4 could feature Major, Minor and 7th chords
on all of the five tracks (Drums, Bass, Acc1, Acc2, Acc3) and more
complex Riffs.
NOTE: Each Variation may only contain a Fll pattern.
11. When you finish recording, press ESCAPE to exit the Sequencer
mode.
User Style playback
1.Press the Start/Stop key to start the User Style.
Nota: If you have recorded less then 4 Var iations, make sure that the
leds corresponding to the Variations are ON. If they are not, no sound
will be heard.
2. Play with your User Style as if you were using a normal ROM Style.
Modifying a User Style
Overdub, Quantize, Clear Note, Clear Riff,
Clear Tempo, Clear All Style
Various options are available to modify your User Style.
You can apply changes as soon as you have finished recording a Riff
or a Style.
1. If you have finished recording a Riff, do not exit the Record mode.
2. If you are not in Record mode, press the RECORD key to enable
the mode, then use the + and - to select the Riff you wish to modify.
Select the desired track by pressing the corresponding Function (F1 F5) key.
Your style can now be modified. The following modification options
are possible:
Adding new elements (Overdub)
You can add new elements to a recorded Riff.
1. Set the Riff to Record mode.
2. Play the notes you wish to add to the pattern. The new elements
will be added (overdub) the existing ones.
3. Stop the recording and repeat the procedure for each track you
wish to modify.
○○○○○○○○○○○○○○○○○○○○○○○
User Styles 65
Page 73

Quantize
Quantize function self-corrects errors in the recording Tempo. In other
words, small possible imperfections are trimmed and corrected, and
the beats are made homogeneous within a bar, according to the
established Quantize value.
1. Select and playback the Riff you wish to correct, then press the
QUANTIZE key
The playback stops and the Riff, t rack and current quantize value are
shown in the display.
2. Use the CURSOR key to move to the Quantize parameter, and the
TEMPO/DATA keys to select a new value.
3. Press the Start/Stop key to listen to the corrected Riff.
LOWER
ARRANGE
MEMORY
FILL A
FILLB /TAP4
ON/OFF
1
2
4. If you are satisfied with the corrections, press the ENTER key twice
to confirm.
If you wish to further improve the pattern, stop the execution by pressing
the Start/Stop key. Select a new quantize value and listen to the newly
modified riff agin. You can continue until the patterns sounds perfect.
Clear Note
If you detect that a Riff contains wrong notes, you can clear them. Up to
5 notes can be cleared at the same time from the recorded Riff.
1. Select the Riff you wish to correct, then press the CLEAR key.
2. Select the track you wish to modify by pressing the relative Function key.
In our example, the Drum track will be corrected by cancelling a few
notes.
3. While the Riff is playng, check the beat counter and identify at what
point and which notes you wish to clear.
3
4
LOWER
ARRANGE
MEMORY
4
FILLB /TAP
1
FILL A
ON/OFF
4. Press the keyboard note you wish to cancel just a little below the
established point.
5. Stop the pattern by pressing the Start/Stop key.
6. To exit CLEAR mode, press the ESCAPE key twice.
Apply this procedure to any Riff you wish to improve.
○○○○○○○○○○○○○○○○○○○○○○○○○○○○○○○○○○○○○○○
66 Owner’ s Manual
2
4
5
6
Page 74

Clear T rack, Clear Riff, Clear Tempo, Clear All
Clear Track function is used to clear a single track of the Riff, all the tracks
of a Riff, the Tempo track in a Style or the entire Style. Clear Track and Clear
Riff functions modify the current Variation. Clear Tempo and Clear All modify
the entire Style.
1. When the Style is in Record mode, press the CLEAR key.
2. Select the Riff you wish to cancel using the + and – in the numeric
keypad.
You can choose among the following Riffs::
BasicMaj, BasicMin, Basic7th, IntMajor, IntMinor, In7_th, EndMajor,
EndMinor, End7_th, Fill, TempoTrk, ALL.
3. Select the Variation by pressing the relative key.
4. Select the track you wish to cancel by pressing the corresponding
Function (F1- F5) key.
FILL A
FILL A
FILLB /TAP4
FILLB /TAP4
4
1
LOWER
ARRANGE
MEMORY
LOWER
MEMORY
ON/OFF
ARRANGE
ON/OFF
2
3
5. Select the Clear TempoTrk fu n c t i o n u s i n g t h e TEMPO/DATA key s i f yo u
with to cancel the recorded Tempo and bring it back to its original default
status.
6. Select the Clear All function using the TEMPO/D A TA to completely cancel
the Style.
7. After selecting the desired section desiderata (Track, Riff, T empo, All),
press ENTER twice to confirm.
Press ESCAPE to exit and return to Record mode.
A recorded track is identified by the name appearing above the Program
Change number.
Saving your User Style to a Floppy Disk
User Styles are stored to the machine memory even when WK1 is turned
off. To prevent unwanted loss of data, you are recommended to save your
User Styles to a Floppy Disk. Information about Save Style procedure are
given the “DISK” chapter of the Owner’s Manual.
Note: Pressing ENTER twice will cancel the Riff completely.
Style Copy
COPY Function is used to copy an existing Style (either ROM or User) to one of
the 8 Style User locations (96-103) available in the memory. For example, you
can use the COPY function to copy a ROM Style and successively modify the
copy by adding or cancelling elements from the Style tracks.
5
7
LOWER
ARRANGE
MEMORY
FILLB /TAP4
FILL A
1
ON/OFF
1. When in Record mode, press the COPY function key.
The number blinking to the left corresponds to the source Style. The number
to the right is the destination, automatically selected. For example, the User
Style in location 96 will have location 97 as destination.
2. Use the TEMPO/DATA keys to select the Style you wish to copy (00- 103).
3. Press ENTER twice to confirm copy.
Press ESCAPE to exit the function and return to Record mode.
2
3
○○○○○○○○○○○○○○○○○○○○○○○
User Styles 67
Page 75

The User Style Performance
All emply User Styles contain a default Performance default made of the
following sounds, assigned to the accompaniment tracks:
Default setting of a User Style Performance
Traccia Sound Pr. Change
Drums Stand1 112
Bass Finger 33
Acc1 Piano1 00
Acc2 SteelGtr 25
Acc3 Strings 48
How to program a User Style P erformance
It is NOT possible to recall a Style User Performance with the
Perfor mance Recall key, as it happens with Performances in RealTime,
Song/Style and Song modes. Each User Style is associated with a
single User Style Perfor mance which is only stored in the current Style
User location and not in other locations.
You can program a User Style Perfor mance only in Style User Record
mode. Follow the instructions given in the Performance chapter to modify
the sounds and the values of the tracks. Make sure that the track name
appears above the Program change number (press the corresponding
Function key twice).
Once you have programmed the User Style Performance, press and hold
the PERF STORE key for one second. Press ENTER to confir m.
The modifications are directly stored in the User Style location. Follow
the recording procedure as described.
Assigning a name to a User Style
You can assign a name to your User Style according to the instructions
described in the Performance chapter.
IMPORTANT: Make sure that you are in Record mode when you wish to
assign a name to a Style. Press the Page key to select the Performance
Name page.
1. Select a User Style and press the REC key to switch to Record mode.
2. Press the PAGE key to go to the Performance Name page.
3. The keyboard sets to alpha-numeric function automatically. You can
now enter the User Style name.
4. Press and hold the PERF STORE key. Press ENTER to confirm.
The name of the User Style is now saved.
1
2
3
4
○○○○○○○○○○○○○○○○○○○○○○○○○○○○○○○○○○○○○○○
68 Owner’ s Manual
4
Page 76

Recording a Program Change
You may decide to change a Sound during the recording. In that case
the Sequencer will record the corresponding Program Change number
to the relative track.
When playing the Style back , the track (or the tracks) containing the
Sound that has been changed, will play the first cycle of the Riff with
the original Sound and will change to the second Sound exactly as
recorded, that is, the second Sound will be included from the second
cycle and all the subsequent ones. It will not be possible therefore to
listen to the original sound, unless the Style is stopped and restarted.
To avoid this condition, it is advisable to record a Program Change to
the original Sound again, just before the end of the first cycle of the Riff.
In this way, all the successive cycles of the Riff will start with the first
Sound selected.
The best results are obtained when modifying Riffs that are 4 bars long
or more.
Recording Commands
All controls generated by hardware devices (Pedali, Pitch bend, Modulation), or by the pedals connected to WK1 Or rear-panel sockets will
be recorded to the relative track. Attivate solo la traccia su cui desiderate
registrare i controlli.
To record Volume section messages, use the optional Volume Pedal,
that can be programmed in the Volume section in the General Menu.
○○○○○○○○○○○○○○○○○○○○○○○
User Styles 69
Page 77

• 10 Digital Signal Processor
WK1 Or allows you to process Performances (Style/RealTime, Song Style e
Song Performance) through the on-board m ulti-eff ect processor and to make
the overall sound more realistic.
T h e Digital Signal Processor i s made by two units that process the
Performances with Reverb and Modulation / Delay effects.
Each section has independent effects Send control to regulate the effect
volume level in the current Performance.
The DSP control buttons are located in the UTILITY area.
REV/CHO
When it is active (the LED indicator is ON), the current Performance is
processed from the type of effect assigned both to the Reverb and to
the Chorus unit of the DSP. The overall processed sounds can be heard
over the internal speakers and from the LEFT e RIGHT outputs.
When it is not active (the LED is OFF) , the sound is not processed by
the DSP and no effect is given.
Assigning the effects
The way to assign effects to the current Performance is identicaI, no
matter what the selected mode is (Style/Real Time, Song Style , Song).
HOW T O SELECT THE TYPE OF EFFECT
1. Press and the REV/CHO for a few seconds.
The effect currently assigned to the Performance is indicated in the
display.
2. Use CURSOR to move and the TEMPO/D AT A ke ys to assign a
different effect to the unit.
You can scroll over the 22 diff erent types of eff ect av ailable f or each
DSP unit.
The same effect can be selected from both the DSP units.
To control the general effect volume, mo v e with the CURSOR ke y to
the volume and modify it using the TEMPO/DATA, keys.
3. To exit the effect function, use the arrow keys or press ESCAPE.
The selected effects have now been assigned to the current Perfor-
mance.
○○○○○○○○○○○○○○○○○○○○○○○
Note: Use ENTER or ESCAPE keys to switch
Rotary effect from Slow to Fast.
○○○○○○○○○○○○○○○○○○○○○○○
1
2
3
4. Press and hold STORE PERFORMANCE for a few seconds. Press
ENTER to save the changes in the current Performance.
If a different P erf ormance is selected, or if the same Performance is
selected again before saving the changes, the new effect settings
will be lost and the Performance will be restored to the previous
setting.
○○○○○○○○○○○○○○○○○○○○○○○○○○○○○○○○○○○○○○○
70 Owner’s Manual
4
Page 78

DISABLING THE EFFECTS
You can disable the effects assigned to the current Performance at
any time.
• By pressing the REV/CHO key you will either enable (led ON) or
disable (led OFF) the DSP.
Controlling the Effect Send Level
The appropriate effect (Reverb or Chorus) eff ect can be set to each Perf ormance track independently.
REVSEND
Controls the REVERB level in each Performance track.
CHOSEND
Controls the CHORUS level in each Perforrmance track.
1. Select the track you wish to modify, using one of the two function
keys.
(Note: you must not be in Performance mode. Besides, Single Touch
Play must not be active).
1
2. The selected track will blink in the displa y , and the assigned Sound
will be shown in the 8-digit area. Press the P age ke y to enter the
track edit page.
3. Press the Page key repeatedly until you get to the RevSend o r
ChoSend page.
The value shown, between 00 and 15; indicates the amount of effect
assigned to the track.
4. Modify the value using the TEMPO/DATA keys.
5. Press ESCAPE to exit.
6. Press the STORE PERFORMANCE key for a few seconds and
confirm with ENTER to save the changes to the current Performance.
2
3
4
5
Note
:
If you select another P erformance, or recall the current one
before saving the changes, the Performance will be restored to the
previously changed settings.
○○○○○○○○○○○○○○○○○○○○○○○
Digital Signal Processor 71
Page 79

• 11 MIDI/General
To have access to MIDI/GENERAL mode, press the relativeMIDI/
GENERAL key, and hold it down for a few seconds.
Use the Page keys to scroll through the various pages. Move to the
various sections of a page with the CURSOR key.
Damper Pedal: The function of the Damper Pedal is controlled by
this section. The pedal must be connected to the Damper socket
located on the rear panel of the instrument.
Use the TEMPO/DATA key to have access to the following
pedal-controlled functions:
• Sw Up1/2: Sets the Real Upper1 e Upper2 to ON or to OFF. This
function is useful when you wish to use two sounds
alternatively but do not wish to interrupt the execution.
• St/Stp: Starts or stops the the drum pattern.
• Fill A: executes Fill IN A.
• Fill IN: executes Fill IN.
• Fill B: executes Fill IN B.
• Intro: adds the intro to the selected Variation.
• Ending: adds the ending to the selected Variation.
• FreezeC: ‘Locks’ the current chord (pedalheld), allowing you to
play freely withboth hands across the entire key-boardwithout
triggering changes inthe Style auto-accompaniment. Thefunction
deactivates at pedal release.
1
2
3
• VocMute: (only if the A.V.P. accessor y is installed) Activates/
Mutes the Vocal track when using the Audio Vocal Processor.
•TrkMute:Activates/Mutes track
Volume PEDAL: The volume pedal, connected to the rear of the
instrument, can either control the overall volume (ALL) or the single
sections (SEC). Use the TEMPO/DATA key To switch from ALL to
SEC.
If th e PAGE+ is pressed, the display will show the following
functions: Arabic tuning, Microtune , Mixer lock, Dsp lock,
Tuning, Dynamic, Serial Computer.
Use the CURSOR key to select the desired function, and the
TEMPO/DATA key to modify the values.
port, make sure that OFF (default setting) is restore, otherwise the
MIDI interface will be disabled.
ARABIC TUNING
00:ArT une: (–31 … 0 … +31) This parameter tunes all the Arabic notes
of the currently selected Arabic Scale setting in steps of 1/32nd of a
quarter tone.
Change the Microtuning value with the Dial or the +/– buttons of the
Sound keypad.
○○○○○○○○○○○○○○○○○○○○○○○○○○○○○○○○○○○○○○○
72 Owner’ s Manual
Page 80

MICROTUNE
00:MicroX: (01 … 127) This parameter fine tunes an individual note of the
Arabic Scale in steps of 1/127th of a tone. The note “X” has the range: C,
C#, D, Db, E, F, F#, G, Ab, A, Bb, B.
Play the Arabic note of the current Arabic Scale that needs tuning on the
keyboard.
Use the TEMPO/DATA buttons to fine tune the selected Arabic note. The
value of 32 corresponds to the standard Arab tuning.
MIXER LOCK
MixLock: (On/Off) This parameter, when set to ON, locks the volume set-
tings of the track for all performances, allowing you to change Performances and Styles without altering the current volume balance of all the
tracks. Whate ver changes are made to the V olume settings when ON remain
memorized even after turning off the instrument.
Use the TEMPO/DATA buttons to toggle between On and Off.
DSPLock: (On/Off) This parameter, when set to ON, locks the effects
settings (Reverb and Chorus) for all Performances and Styles, allowing
you to change Styles and Perfor mances without altering the current effect
settings.
Use the TEMPO/DATA buttons to toggle between On and Off.
TUNING: (-63/63) This function indicates the o verall tuning of WK1Or, and
can be modified using the TEMPO/D ATA key. The 00 v alue corrresponds
to standard tuning of the “A” note in 440 Hz.
DYNAMIC: Using the TEMPO/DATA key in this section helps you obtain a
harder or softer keyboard to react to your touch. 3 options to modify the
dynamic response are available: soft, normal and hard.
Note: the “OFF” indication shows that the keyboard is no longer dynamic.
Serial Computer: in case WK1Or is connected to a PC through a serial
port, it is necessar y to select the type of connection according to the
computer used (PC1, PC2, MAC).
Video type=PAL (Europe): Enables video standard type
according to the TV system used. You can select between PAL
and NTSC.
Text Lyrics: shows the lyrics of the Song both on an external monitor or TV set and on the display.
Important: If you are not going to make any connection to the serial
○○○○○○○○○○○○○○○○○○○○○○○
Midi/General 73
Page 81

Modifications to CHANNEL and LOCAL can be saved to the Performance.
Channel: use this individual track function to assign to each track the desired
MIDI channel. To enable this function, press ENTER.
The 3-digit display indicates the number of the MIDI channel assigned
to the track (e.g.: C01= channel 1), while the 8-digit display indicates
the track number. Use the + and – keys to select the track .
The TEMPO/DATA keys control the MIDI channel number to assign to
the track (1-16) as well as the track OFF status. To select each track
quickly, use the relative Function (F1 … F8) key.
After selecting all the 16 tracks with the PAGE + key, the display
shows Common and Chord tracks and the respective MIDI channel
numbers. Select the MIDI channel you wish to assign to COMMON
and to CHORD channels (if you are using a MIDI accordion, refer to
the “MIDi” chapter of the Owner’s Manual).
Press ESCAPE to exit the CHANNEL mode and return to the MIDI
selection page. Continue your selection using the TEMPO/DATA key.
MIDI Local: Use LOCAL (ON/OFF) Function to decide whether WK1Or
keyboard should control the sound generation of each section.It is
possible to separate each track from the sound generation. Press
ENTER to enable this individual track function.
The number of the track appears in the display. Usa F9
Function key to toggle between Group A tracks (01-08) to
Group B tracks (09-16). Use the TEMPO/DATA keys to
establish the ON/OFF status of the track, and the CURSOR key
to select the track.
Press ESCAPE to exit LOCAL mode and return to the MIDI
selection MIDI page. Continue your selection using the TEMPO/DATA key.
Internal: when WK1 Or is activ e , it is controlled b y the internal CLOCK;
this device sets and maintains the established Tempo.
If you wish to exclude the internal CLOCK, the Tempo followed
by WK1 Or will be set by the computer or external sequencer
(CLOCK EXT), connected to WK1Or MIDI IN port; in this case,
use the TEMPO/DATA keys to select “External” mode.
G.Midi: if WK1Or is set to General MIDI ON, the instrument becomes
compatible with all MIDI Files that are loaded to the memory.
If you wish to communicate via MIDI with instruments that are not
General MIDI compatible, it is advisable to set WK1Or to General
MIDI OFF position. To enable Generalmusic standard (GMX) it is
necessary to set General MIDI to OFF. In this way all the Sound
banks and all the 44 effects provided by WK1Or will be at your
disposal when programming your music backings.
○○○○○○○○○○○○○○○○○○○○○○○
Note: To select the other 8 tracks (from 9 to 16),
use the F9 Function key.
○○○○○○○○○○○○○○○○○○○○○○○
Start/Stop: If the START/STOP function is active, WK1Or will start as
soon as the START command will be sent by the external device
(computer, sequencer) connected via MIDI. Use the TEMPO/DATA
key to toggle between ON and OFF.
MIDI T raspose In: ON/OFF
○○○○○○○○○○○○○○○○○○○○○○○○○○○○○○○○○○○○○○○
74 Owner’ s Manual
Page 82

ChnLock: (ON/OFF) The CHANNEL LOCK function locks the current
Performance setting to the entire instrument. Before using this
function you should set ChnLock to ON status, then modify the setting
of the MIDI channels. This is the only way to apply the MIDI channel
setting to the entire instrument. Use the TEMPO/DATA to set this
function to ON or to OFF.
The last setting saved will be maintained in the machine memory even
when WK1Or is turned off, provided that the first Perf ormance, which is
the one on which WK1Or sets by default upon turning on, has been
saved to Store Performance.
Dump: DUMP function transmits all data from WK1Or internal memory
via MIDI: this is a further possibility to safeguard valuable data.
WK1 Or Computer
MIDIMIDI
MIDI
MIDIMIDI
MIDI
MIDIMIDI
MIDIMIDI
To dump data to any data filer (computer, sequencer, etc), proceed
as follows:
1) Connect WK1 Or MIDI OUT por t to the MIDI IN of the external
device.
2) Use the PAGE and PAGE keys to select DUMP page. Now
select the type of data you wish to transfer (ALL, SEQ, PERF)
with the TEMPO/DATA keys.
3) Recording procedure starts in the external device.
4) When finished, press ENTER twice.
SERIAL
Serial (Off, PC1, PC2, Mac): This function allows you to set the function
of the computer port on the instrument’s back panel. This is a direct
interface with your computer’s serial port and can be used as a reliable
alternative to MIDI without the need for a MIDI interface card. Normally
set to OFF, the port can be set to operate in any of the following modes:
PC1: Slower setting for Windows P.C. Only use this mode if you
have problems with PC2.
PC2: F astest setting f or Windows P.C. Use this mode when possible.
MIDI IN MIDI OUTMIDI IN MIDI OUT
MIDI IN MIDI OUT
MIDI IN MIDI OUTMIDI IN MIDI OUT
IN IN
IN
IN IN
TRHU OUTTRHU OUT
TRHU OUT
TRHU OUTTRHU OUT
MAC: Appropr iate setting for Apple Macintosh computers.
Use the TEMPO/DATAbuttons to toggle between On and Off.
TV
TV=PAL/NTSC: This function enables the video standard according to
the television you connect to when using the WK2 Or Karaok e function.
You can choose between PAL (Europe) or NTSC (U.S.A.)
Use the TEMPO/DATA buttons choose the desired setting.
TV Te xt
TV text: (On/Off) This function anables/disables the WK1 Or for the
projection of Song lyrics onto an external monitor or domestic TV set
connected to the rear panel RGB or S-VHS port.
Use the TEMPO/DATAbuttons to toggle between On and Off.
○○○○○○○○○○○○○○○○○○○○○○○
Midi/General 75
Page 83

MIDI
MidiENT: Contains 9 MIDI related parameters which can be accessed by
pressing ENTER. How to select and modify the relative parameters is
explained on page 2.XX.
INIT (memory reset)
InitALL: (All, Seq, Pfm) This function allows you to reset (initialize) the
RAM memory of your WK2 Or and restore the default (factory-set)
conditions.
ALL: the entire memory which returns the instrument to its factory status
and cancels all programmed data.
SEQ: the sequencer data.
PFM: the user programmed Performances.
Use the TEMPO/DATAbuttons to toggle to select the element that requires
resetting.
RELEASE DATE
rEL XX_XX_XX (Date): This function allows you to check the release date
of the last loaded WK2 Or operating system.
Press ESCAPE to exit the General menu.
○○○○○○○○○○○○○○○○○○○○○○○○○○○○○○○○○○○○○○○
76 Owner’ s Manual
Page 84

MIDI and the MIDI functions
WHAT IS MIDI?
MIDI, abbreviation for Musical Instrument Digital Interface , is a standard interface
used for communication between electronic musical instruments and computers.
This chapter illustrates some of the more common MIDI applications for WK1 Or .
WK1Or is equipped with a standard MIDI interface, consisting of a MIDI IN
and a MIDI OUT port .
WK1Or used as a stand alone instrument does not need any MIDI connection.
With MIDI it is possible to:
• use WK1Or as a master keyboard to control another m usical instrument;
• connect WK1Or to an external sequencer (computer) to programme Songs
and Styles;
• control WK1 Oras a slave instrument from a master keyboard, or from
another control device (guitar controller, wind controller, drum pads, etc.).
THE COMPUTER PORT
The COMPUTER port acts as a MIDI IN and MIDI OUT por t together for
communication between WK1Or to a computer using a single serial cable.
Using the computer port disables the MIDI ports.
If your computer can direct MIDI data to the serial port (identified as RS232 in
IBM computers and compatibles, or as MODEM in Apple Macintosh computers),
the two MIDI cables can be replaced by a single serial cable.
Connecting WK1Or through its COMPUTER port enables control of the 16
MIDI channels (as occurs in a standard MIDI interface).
Tracks and MIDI channels
WK1 Or always receives MIDI data on the 16 channels simultaneously. In
transmission, WK1 Or sends MIDI data on 16 channels only in Song mode.
You can assign any MIDI channel (from 1 to 16) to each track. A track can also
be excluded from MIDI, if you turn it to OFF.
In Song mode, the default MIDI setting of the ROM P er f ormance is the following:
Song track MIDI Channel
1...16 1...16
In Style and Song Style mode, the default MIDI setting of the ROM P er formance is the following:
Style T rack No. MIDI Channel
Drum F1 10
Bass F2 2
Acc1 F3 3
Acc2 F4 4
Acc3 F5 5
Lower F7 6
Upper2 F8 7
Upper1 F9 8
○○○○○○○○○○○○○○○○○○○○○○○
Nota: WK1 Or can alw ays receive on 16 MIDI
channels simultaneously, regardless of the
mode set.
○○○○○○○○○○○○○○○○○○○○○○○
○○○○○○○○○○○○○○○○○○○○○○○
Midi 77
Page 85

RULES FOR MIDI CONNECTION
• In MIDI connections, the instruments that controls another is conventionally
defined as “master”, while the controlled instrument is defined “sla ve”.
• The MIDI OUT of the master instrument is connected to the MIDI IN of the slave
instrument.
• T o programme Songs in an external sequencer , WK1 Or MIDI OUT is connected
to the MIDI IN of the sequencer; the MIDI OUT of the sequencer is connected to
the WK1Or MIDI IN.
• Do not connect the two MIDI ports of the same instrument. Do not connect the
same MIDI ports (both IN or both OUT) between two instruments.
• In the connections with external MIDI devices, the tracks of the external device
and WK1 Ormust be tuned to the same MIDI channels.
ASSIGNING MIDI CHANNELS
The MIDI channel setting of each Perf ormance can be freely programmed and can
be stored with the STORE PERFORMANCE function.
The procedure to follow when assigning MIDI channels is explained in detail in the
“MIDI/GENERAL” chapter of the Owner’s Manual.
MIDI channels can be independently programmed for each tr a ck .
MIDI LOCK
If you enable the MIDI LOCK function setting it to ON (see “MIDI/GENERAL”) the
current setting of a Performance will be maintained for all other Performances. All
other settings assigned to the other Perfo rmances will be ignored.
To keep the last programmed setting stored to the instrument memory even when
WK1 Or is tur ned off, it is necessary to save the first Performance with the Store
Perf ormance function. WK1 Orwill automatically set to that P erf ormance this upon
powering up.
COMMON AND CHORD CHANNELS
The main uses of the Common and the Chord Channel are:
• simulating the entire WK1Or keyboard with a Master keyboard. The master
keyboard must transmit on the same channel as WK1 OrCommon or Chord
Channels.
• reserving a special track either in the sequencer or in another instrument for the
selection and control of Styles, Perf ormances, Songs, panel functions etc. In the
external sequencer, a track is reserved for the control data transmitted on the
same MIDI channel assigned to WK1 Or common or chord channel.
To have access to COMMON and CHORD channels, refer to the “PRELIMINARY
OPERATIONS” chapter.
COMMON CHANNEL
Use this function to assign the MIDI channel to Common. The channel
assigned to Common is no longer available to receive notes from an external
device. Program and Control Change received on Common select Styles,
Songs, Song Styles, Effects and other functions described in the “Appendix” at
the end of the Owner’s Manual. The MIDI channel assigned to Common can
only receive data, as transmission on Common is disabled. Press and hold the
STORE PERFORMANCE key, then press ENTER to store the current MIDI
setting to the Performance.
○○○○○○○○○○○○○○○○○○○○○○○○○○○○○○○○○○○○○○○
78 Owner’s Manual
Page 86

CHORD CHANNEL
Use this function to connect a MIDI accordion. Chord channel can only receive data
from the MIDI accordion and control WK1 Or automatic accompaniment. Follow the
standard procedure to assign a MIDI channel. Press ESCAPE to return to the main
Menu. Press and hold down STORE PERFORMANCE and then press ENTER to
save the current MIDI setting to the Performance.
Note: a correct setting of the Common and Chord functions is the ke y condition to
ensure full compatibility with a MIDI accordion. (For details refer to the chaper
“CONTROLLING WK1Or FROM A MIDI ACCORDION”).
MIDI NUMERATION
MIDI data are numbered from 0 to 127. Some instruments may adopt 1 to 128
numeration. When using external devices that adopt a different numeration, the
appropriate conversation should be applied between one system and the other .
The main MIDI applications
MIDI IN MIDI OUTMIDI IN MIDI OUT
MIDI IN MIDI OUT
MIDI IN MIDI OUTMIDI IN MIDI OUT
CONTROLLING AN EXP ANDER OR OTHER KEYBO ARDS WITH WK1 Or
MIDIMIDI
MIDI
MIDIMIDI
MIDIMIDI
MIDI
MIDIMIDI
MIDI IN MIDI OUTMIDI IN MIDI OUT
MIDI IN MIDI OUT
MIDI IN MIDI OUTMIDI IN MIDI OUT
If you wish to control an expander or other MIDI instruments using WK1Or as a master
keyboard, read the follo wing instructions carefully.
• Connect the WK1 Or MIDI OUT port with the expander MIDI IN.
Set WK1 O r to operate in Real Time mode and play at least three sounds
at the same time (Upper 1, Upper 2 and Lower keyboard sections). In
Song Mode only one track is made available f or Real Time operation.
In the Real Time mode setup, the MIDI messages generated by WK1Or keyboard,
travel from WK1 MIDI OUT port to the expander MIDI IN. If you have set both instruments
to the same MIDI channels, when you pla y on WK1 keyboard, y ou will hear the sound
coming from both the keyboard and the expander.
If you wish to exclude the sounds generated by WK1 Orand only hear those coming
from the expander, y ou can either set WK1 Ortrack volume v alues to Zero, or set WK1
Or tracks to “Local Off” (as explained in the “MIDI/GENERAL” chapter ).
If you save a Performance with zero volume on the tracks you can listen to the
expander only.
Using the “ Local On/Off ” parameters and setting the tracks corresponding to the
keyboard sections (F7...F9) to “Off” , you can disconnect the keyboard from WK1 Or
internal sound generator. The data transmitted from the keyboard will only be sent to
MIDI OUT, and you will only hear the expander sound.
Preliminary Operations
1. Connect WK1 Or MIDI OUT to the expander MIDI IN .
MIDI IN MIDI OUTMIDI IN MIDI OUT
MIDI IN MIDI OUT
2. Select a Perf ormance
MIDI IN MIDI OUTMIDI IN MIDI OUT
MIDIMIDI
MIDI
MIDIMIDI
1
MIDI IN MIDI OUTMIDI IN MIDI OUT
MIDI IN MIDI OUT
MIDI IN MIDI OUTMIDI IN MIDI OUT
MIDIMIDI
MIDI
MIDIMIDI
NOTE: Programme the track as you wish, setting sounds, volumes, pan,
effects etc.
3. Press and hold the MIDI/GENERAL key f or a few seconds.
Then press the Page key until the “MIDI Channels”appears in the display.
2
○○○○○○○○○○○○○○○○○○○○○○○
3
Midi 79
Page 87

The MIDI channels in WK1 Or keyboard sections, must correspond to the
channels in the expander sections, (alternatively, set the expander
sections so that they correspond to WK1 Or sections).
4. Press the PAGE key to switch to MIDI CHANNEL mode and to the
relative tracks.
5. Press the PAGE again. The display will show this
The TEMPO/DA TA ke ys control the Midi channel number .
4
MIDI Common Channel : off
MIDI Chord Channel : off
5
6. Press ESCAPE key to exit “MIDI/GENERAL” mode.
To save changes made to the Performance, press and hold the STORE
PERFORMANCE key for a few seconds. Press ENTER to confirm and
save the changes.
If the changes are not saved, they will be lost as soon as a ne w Perf ormance is recalled.
7. Play on WK1 Or keyboard to send MIDI data to the external expander.
The sounds coming from both WK1 Or and the expander can be heard
together.
CONTROLLING WK1 ORIENTAL FROM A MIDI ACCORDION
Connect the accordion MIDI OUT port to WK1 Or MIDI IN socket with a standard
Midi cable. T o driv e WK1 Or from your accordion, proceed as follows:
1. Set MIDI LOCK to ON (as explained in the MIDI/GENERAL chapter).
2. Set WK1 CHORD channel (as explained in the MIDI/GENERAL chapter)
to the accordion CHORD channel, or to the channel engaged by your
accordion to transmit chords ( midi accordions usually engage Ch.2).
3. Set WK1 Or tracks to the midi channels, using the table shown below.
6
7
4. Set COMMON channel to OFF.
5. Make sure that WK1 Or is set to ONE FINGER mode (refer to the
ARRANGE MODE instructions).
6. Extend the SPLIT point to the maximum setting allowed for the chords
(refer to the SPLIT chapter).
Note: If you wish to listen to WK1 Or sounds together with the melody
coming from your accordion, set the UPPER 1 sections (or UPPER1 and
UPPER 2 together) to the same midi channel that the accordion engages
for the right hand, or melody section (midi Accordions usually engage Ch.1
and/or Ch. 4).
You can store the setting you have obtained to one or more of the 63
Performances available. The entire set of Performances can be saved to the
Floppy Disk.
Schema per Fisarmonica MIDI
DRUM= Ch 10
BASS= Ch 3
ACC1= Ch 5
Acc2= Ch 6
Acc3= Ch 7
LOWER= Ch 2
UPPER2= Ch 1
UPPER1= Ch 1
COMMON= OFF
CHORD= 2
○○○○○○○○○○○○○○○○○○○○○○○○○○○○○○○○○○○○○○○
80 Owner’s Manual
Page 88

USING WK1 IN SONG MODE WITH A COMPUTER OR EXTERNAL SE Q UENCER
If you prefer using a computer to record your Songs, in order to fully e xploit the advanced
features av ailab le, read carefully the following instructions.
The aim is to have WK1Or keyboard to generate MIDI messages to transmit to the
computer sequencer:
• Connect the WK1Or MIDI OUT to the sequencer MIDI IN.
• Connect the WK1Or MIDI IN to the sequencer MIDI OUT.
In this setup (Song mode), with the correctly assigned MIDI channels, the MIDI
messages generated by WK1Or keyboard are transmitted by WK1Or MIDI OUT,
received by the sequencer MIDI IN and recorded by the sequencer software. By pressing
PLA Y in the computer sequencer, the MIDI messages are transmitted b y the sequencer
MIDI OUT and received by WK1Or MIDI IN.
Via MIDI, you can send messages from the sequencer and make all the modifications
and setting as you would normally do on WK1Or control panel. You can set sounds,
volumes, pan, select and modify effects etc.
When you send messages to WK1Or to select Sounds, the messages must be
transmitted on the MIDI channel assigned to the track containing the Sound you wish
to modify . T o select WK1 Orsounds, y ou must first send a Control Change 00 command
(Bank Select) followed by a Program Change command. The Sound table (with the
corresponding MIDI messages for selection) can be found in the Appendix.
To use the described setting, it is advisable to set the track used to send data to the
computer sequencer to “Local Off” .
Set the computer sequencer to retransmit all the MIDI messages received to WK1Or.
Depending on the software used, this retransmitting function is identified by different
designations: “echo”, “echo on”, “echo back”, “patch thru”, “soft thru”, “midi thru”, etc.
By setting the track used to send data to the computer sequencer to “Local Off” ,
playing on the keyboard will produce no sound. Nevertheless, data are transmitted to
the sequencer via MIDI. The sequener echoing function retransits the same MIDI
received data directly to WK1 Or sound generator. Consequently, you can hear the
sounds coming again from WK1 Or keyboard.
If you do not set the track to “Local Off”, when the “echo” function is active on the
computer, you will hear a double note sound with each note played: the first note is
generated by the internal (Local) connection between the keyboard and the sound
generator, the second is generated by the e xternal MIDI connection from the keyboard
to the sequencer, bac k to the sound gener ator.
MIDIMIDI
MIDI
MIDIMIDI
MIDI IN MIDI OUTMIDI IN MIDI OUT
MIDI IN MIDI OUT
MIDI IN MIDI OUTMIDI IN MIDI OUT
MIDIMIDI
MIDI
MIDIMIDI
MIDI IN MIDI OUTMIDI IN MIDI OUT
MIDI IN MIDI OUT
MIDI IN MIDI OUTMIDI IN MIDI OUT
The Computer Port
As an alternative to the MIDI connections just described, you can use the COMPUTER port and a single serial cable. The COMPUTER port disables the MIDI port.
Apple Macintosh
Macintosh (o compatibles) communicate at the speed of 1 MHz. Read the computer
Software manual for reference.
Use a standard serial cable of the DB8 type to connect WK1Or to the MacIntosh
MODEM port.
Set the COMPUTER parameters to MAC in “MIDI/GENERAL” .
IBM PC
IBM PC (or compatibles) may communicate at the speed of 31250 baud (PC1) or
38400 baud (PC2).
Use standard serial cables of the DB8-DB9, DB8-DB25 types connect WK1 Or to the
PC serial port.
Set the COMPUTER parameters to PC1 or PC2 in “MIDI/GENERAL”.
○○○○○○○○○○○○○○○○○○○○○○○
Midi 81
Page 89

PLAYING WK1 ORIENTAL WITH A MASTER KEYBOARD
Master keyboard are usually mute instruments which do not feature a sound
generator. They require an external sound source to produce sounds. WK1
Or internal sound generator may operate as an external sound source
(Slave).
The Master keyboard must transmit on the MIDI channel that is assigned
to Common in WK1Or.
All Bank Select (CC00) and Program Change (PC) messages which are
normally used to select WK1Or, if transmitted on the Common Channel
are now interpreted as messages to exchange Perf ormances, Styles, Song
Styles or Songs.
Selecting Styles via MIDI COMMON
To select a Style from a master keyboard or computer, y ou must send two
Control Change messages relating to BankSelect (CC 0 - 32) and (CC 32
- 0) followed by a Program Change (PC), with the values shown in the
following table:
Internal Style ( ROM Location 00 - 95)
CC 0 - 32 00-07 (8 BEAT)
CC 32 - 0 08-15 (16 BEAT)
PC 00 - 95 16-23 (ROCK)
24-31 (FUNK)
32-39 (DANCE 1)
40-47 (DANCE 2)
48-55 (JAZZ)
56-63 (US TRAD)
64-71 (TRAD 1)
72-79 (TRAD 2)
80-87 (LATIN 1)
88-95 (LATIN 2)
User Style (RAM Location RAM 96 - 103 )
CC 0 - 44 96 - 103 (USER STYLE)
CC 32 - 0
PC 1- 8
Controlling Styles via MIDI COMMON
The Style controls can be simulated by sending ControlChange 80 and 81
messages to WK1 Or with the values shown in the f ollo wing table .
If the master keyboard features progr ammable ke ys, some of the f ollowing
messages can be assigned to the keys to control Styles directly from the
master.
Style Control Value of CC80 (ONE SHOT - single function keys)
Fill >< 00
Fill < 01
Fill > 02
Intro 08
Ending 16
○○○○○○○○○○○○○○○○○○○○○○○○○○○○○○○○○○○○○○○
82 Owner’s Manual
Page 90

V ar 1+2+3+4 24-27
Key Start 40
Fade In/Out 59
Rotary 61
Tempo increment 66
Tempo decrement 67
Next Performance 68
Previous Perfo r mance 69
Style Control Value of CC81 / 0 - 63=OFF / 64 - 127=ON
(ON/OFF - double function keys or buttons)
Fill >< 00 64
Fill < 01 65
Fill > 02 66
Intro 08 72
Ending 16 80
Harmony ON/OFF 32 96
Arrange ON/OFF 33 97
Arrange Memory ON/OFF 37 101
Lower Memory ON/OFF 38 102
Key Start ON/OFF 40 104
Single Touch Play ON/OFF 48 112
Style Lock ON/OFF 49 113
Tempo Lock ON/OFF 51 115
Fade In ON/OFF 59 123
Fade Out ON/OFF 60 124
Rotary ON/OFF 61 125
Selecting the Effetti via MIDI COMMON
To select the Effects from a Master keyboard or computer via Common
channel, you must send two Control Change messages relative to the Eff ects
change CC 16 - 0 / 64, CC 48 - nn (number of the effect), with the values
shown in the tables listed in the Appendix.
Nota: Control Change 16 with v alue 0 selects the REVERB mode, with
value 64 the CHOR US mode.
Control Change 48 must always be followed by the number of the Effect
required (see the deve essere seguito sempre dal numero dell’eff etto desiderato (see the tables listed in the Appendix).
Selecting Songs and Song Styles via MIDI COMMON
To select a Song from a Master keyboard or a computer , y ou must send a
Control Change message relative to BankSelect (CC00) followed by a
Program Change (PC) message with the values listed in the tab le belo w:
SONG (RAM location 111 - 117 )
CC 32 00 111 - 117 (Songs)
CC 00 56
PC 1 - 7
SONG STYLE ( RAM location 104 - 110 )
CC 32 00 104 - 110 (Song Styles)
CC 00 62
PC 1 - 7
PERFORMANCE ( RAM location 0 - 63 )
CC 32 00 0 - 63 RealTime Performances
CC 00 48
PC 1 - 63
○○○○○○○○○○○○○○○○○○○○○○○
Midi 83
Page 91

Selecting Sound banks via MIDI ( Bk 1, 2, 3, 5, 6 )
CC 00 - vv (vv=value of the bank)
PC 1 -128
The WK1Or banks that can be selected via MIDI (Bank Select - CC 00 + value of the bank) to
command a Sound change are the following ones: Bk 1, 2, 3, relative to GMX (standard Generalmusic)
sound map, Bk 5, used to recall SAMPLES (1-a 8) and Bk 6, e xtension of WK1 O rsound map ( 00-
59 + 1 Effects Kit: location 112). Furthermore, there are other sound banks that are not available to
the user for selection, but necessary to WK1Or internal structure to guarantee compatibility with
other Generalmusic instruments.
Additional MIDI parameters
WK1 Or offers additionale MIDI paramters which add versatility to the instrument. The parameters
can be recalled from MIDI/GENERAL mode:
• General MIDI ON/OFF
• Channel Lock
More details are explained in the “MIDI/GENERAL” chapter of the Owner’s Manual.
Generalmusic System Exclusive
Via MIDI, WK1Or recognizes Generalmusic System Exclusiv e messages that control the v alues of
various features, such as: effects, master tune, master transpose. The system exclusive strings for
each requested parameters are listed below:
REVERB CHANGE
F0,2F,30,01,00,00,00,13,00,vv,F7 (vv= effect number 00h-15h)
REVERB LEVEL
F0,2F,30,01,00,00,00,13,01,vv,F7 (vv= reverb volume 00h-7Fh)
Note: The re v erb v olume selected by the instrument panel must be set to its maximum r ange (1 2 7)
REVERB TIME
F0,2F,30,01,00,00,00,13,02,vv,F7 (vv= reverb time 00h-7Fh)
CHORUS CHANGE
F0,2F,30,01,00,00,00,13,05,vv,F7 (vv= effect number 00h-15h)
CHORUS LEVEL
F0,2F,30,01,00,00,00,13,06,vv,F7 (vv= effect volume 00h-7Fh)
CHORUS RATE
F0,2F,30,01,00,00,00,13,07,vv,F7 (vv= value effect rate 00h-7Fh)
CHORUS DEPTH
F0,2F,30,01,00,00,00,13,08,vv,F7 (vv= value effect depth 00h-7Fh)
MASTER TUNE
F0,2F,30,01,00,00,00,07,00,vv,F7 (vv= central value 40h + / - 40h )
MASTER TRANSPOSE
F0,2F,30,01,00,00,00,09,02,vv,F7 (vv= central value 18h + / - 18 h semitones)
WARNING: All the numbers within the SysEx strings must be expresed as “HEXADECIMAL”
codes. SysEx messages do not require a specific MIDI channel.
○○○○○○○○○○○○○○○○○○○○○○○○○○○○○○○○○○○○○○○
84 Owner’s Manual
Page 92

Reference
section
• T echnical Specification
• Appendix
Page 93

Technical Specifications WK1 Oriental
Keyboard : 61 keys (C2 - C7), velocity sensitive, aftertouch via MIDI.
Display : Large multi-function coloured backlit LCD display.
Control buttons : 1 cursor buttons, enter, escape, tempo/data keys,
1 numeric keypads 16 direct access programmable buttons (Direct Style Memry)
Arabic Scale : 12 buttons (direct access), 4 memory buttons, Cancel, Store.
Modes : 4 real time sections (lower, upper 2, upper 1, bass).
Sounds : 464 PCM sounds - 17 drumkits (including 1 Arabkit).
Polyphony : up to 32 notes.
Split : programmable split.
Edit : track edit (up to 16 tracks), on/off, volume, reverb send, chorus send, transpose,
detune, pan,
volume pedal, damper, pitch bend/modulation, pitch bend range.
Digital Effects : 22 reverb types + 22 chorus types (modulation/delay/echo).
Harmony : 8 harmony types.
Sustain : general sustain (lower, upper 2, upper 1).
Demo : automatic demonstration (6 demo songs).
Automatic Styles : 96 styles x 4 variations (drum, bass, acc 1, acc 2, acc 3).
Arranger : arrange on/off, arrange memory, lower memory, bass to lowest,
4 chord recognition modes (one finger, fingered 1, fingered 2, free style).
Sequencer controls : start/stop, intro, ending, key start/continue, fill <, fill in, fill >/tap tempo, fade, play/stop,
record, clear, tempo.
General controls : volume slider, transpose, tuning, style/tempo lock, touch sensitivity.
Single Touch Play : 10 settings of lower, upper 2, upper 1 combinations for 96 Styles (960 settings).
Perfor mance : 63 performances of programmable panel settings (RAM),
Performance Recall, Store Performance.
Pads : 4 programmable pads.
Sequencer : 7 song style, 7 user song (16 track player), 8 programmable user style (5 tracks),
5 recordable tracks (lower, upper 2, upper 1, chord) for song style.
Disk : load, save, delete, format, direct from disk, play all songs, compatibility with GMX,
WK3, WK2, PK7, MIDI FILE+Lyr ic formats.
Karaoke : Karaoke function on the LCD display and,with the optional video interface, external
monitor (pal/ntsc).
Computer : computer serial por t (pc1, pc2, mac).
Midi : 16 MIDI channels (programmable), common, chord, 16 tracks local on/off, external
clock,
general midi on/off, midi start/stop, channel lock, transposer In, midi set, dump.
Auxiliary Jacks : headphones, damper, pedale volume, computer,
midi in/out/ , aux/out,
Loudspeakers : 15 W + 15 W; 2 way; 4 loudpeakers.
Dimensions : 98X40X16.
Weight: 9,5 Kg.
Accessories included : owner’s manual, 1 operating system on floppy disk, power supply adapter, music stand,
power cord, mains cable, guarantee certificate, list of Generalmusic distributors.
Optional Accessories : Video interface, volume pedal, single foot switch, multi foot switch, metal stand, carrying
bag.
Note: the specifications are subject to change without prior notice.
○○○○○○○○○○○○○○○○○○○○○○○○○○○○○○○○○○○○○○○
Rif. 2
 Loading...