

DIGITAL KEY BOARDS
owners manual
•English
wk1000
SPECIAL MESSAGES
ALARM SYMBOLS:
Generalmusic electronics prod ucts
could present la bels sim i lar to that
dis played in this section. Please follow
ac cu rate ly the pre cau tions descripted
in the safety instructions.
The exclamation mark within an equi lat er al triangle is
intended to alert.
The lightning fl ash with arrowhead symbol, within an equilateral triangle, is intended to alert the user to the presence of
uninsulated “dangerous voltage” within the product’s enclosure that may be of suffi cient magnitude to constitute a risk of
electric shock to persons.
IMPORTANT NOTE: To reduce the risk related to the correct and normal use of the instrument, all Generalmusic products are accuralety tested
in a safety laboratory. DO NOT modify the present unit, the safety standard and the correct instrument operativity could be com pro mised, and as
a further con se quence the warranty will be invalidated.
IMPORTANT SAFETY AND INSTALLATION INSTRUCTIONS
INSTRUCTION PERTAINING TO A RISK OF FIRE, ELECTRIC SHOCK, OR INJURY TO PERSONS.
WARNING!
When using electric products, basic precautions should always be followed, including the following:
1. Read all the Safety and Installation instructions and explanations of Graphic Symbols before using the product.
2. This product must be earthed. If it should malfunction or breakdown, grounding provides a path of least resistance for electric
current to reduce the risk of electric shock. This product is equipped with a cord having an equipment-grounding conductor and a
grounding plug. The plug must be plugged into an appropriate outlet that is properly installed and earthed in accordance with all
local codes and ordinances.
DANGER:Improper connection of the equipment grounding conductor can result in a risk of electric shock. Check with a qualifi ed electrician or serviceman if you are
in doubt as to whether the product is properly grounded. Do not modify the plug provided with the product, if it will not fi t the outlet, have a proper outlet installed by a
qualifi ed electrician.
3. To reduce the risk of injury, close supervision is necessary when this product is used near children.
4. Do not use this product near water for example, near a bathtub, washbowl, kitchen sink, in a wet basement, or near a swimming
pool or the like.
5. This product should only be used by a stand or cart that is recommended by the manufacturer.
6. This product, either alone or in combination with an amplifi er and headphones or speakers, may be capable of producing sound levels that could
cause permanent hearing loss. Do not operate for a long period of time at a high volume level or at a level that is uncomfortable. If you experience
any hearing loss or ringing in the ears, you should consult an audiologist.
7. This product should be located so that its location or position does not interfere with its proper ventilation.
8. This product should be located away from heat sources such as radiators, heat registers, or other products that produce heat.
9. The product should be connected to a power supply only of the type described in the operating instructions or as marked on the product.
10. This product may be equipped with a polarized line plug (one blade wider than the other). This is a safety feature. If you are unable to insert the plug
into the outlet, contact an electrician to replace your obsolete outlet. Do not defeat the safety purpose of the plug.
11. The power-supply cord of the product should be unplugged from the outlet when left unused for a long period of time. When unplugging the power
supply cord, do not pull on the cord but grasp it by the plug.
12. Care should be taken so that objects do not fall and liquids are not spilled into the enclosure through openings.
13. The product should be serviced by qualifi ed service personnel when:
A. The power-supply cord or the plug has been damaged
B. Objects have fallen, or liquid has been spilled into the product;or
C. The products has been exposed to rain or moisture
D. The product does not appear to be operating normally or exhibits a marked change in performance
E. The product has been dropped, or the enclosure damaged.
14. Do not attempt to service the product beyond that described in the user-maintenance instructions. All other servicing should be referred to qualifi ed
service personnel.
15. WARNING - Do not place objects on product power cord or place it in a position where anyone could trip over, walk on or roll anything over it. Do
not allow the product, or its bench, or its pedal board to rest on or to be installed over power cords of any type. Improper installations of this type
create the possibility of fi re hazard and/or personal injury.
16. Electromagnetic interference (RFI). This electronic product utilizes digital sampled wave processing technology (S.W.P.) that may adversely affect
radio/tv reception. Read FCC information inside back cover for additional information.
Generalmusic cannot be held responsible for damage caused by improper use or mod i fi ca tions to the
instrument, or data lost or destroyed
Technical specifi cations are subject to change
The information contained in this manual are considered correct at the moment of printing. Generalmusic reserves the
right to change or modify any technical spec i fi ca tion with out prior notice or obbligation to upgrade existing units.
The illustrations and the screens of this manual are for instructional purposes only and may appear dif-
ferent from those on your instrument.
SAVE THESE INSTRUCTIONS

Introduction page1
Multimedia functions page1
The owners manual page1
Specifi cations page1
wk1000 front panel page3
wk1000 rear panel connections page4
Getting started page5
Powering up and preliminary operations page5
Power on/off page5
Play the keyboard and change the sounds page5
Select performances and listen to the sounds page6
Select styles and play with automatic accompaniments page6
Using pitch bend and modulation wheel page7
Use the effects page7
Use the headphones page7
Use the pedals page7
Adjust the overall effect volume page7
Basic concepts page10
Styles, song styles and songs page10
Style and real time modes (style accompaniments off) page10
Style lock and single touch play page11
Song style mode page11
Song mode page11
Performances page12
Realtime performances page12
Style performances page12
Single touch play setting page12
Song style performance page12
Song performance page12
Tracks page13
Sounds page13
Connections page14
Power page14
Pedals page15
Computer page15
Video interface page15
Headphones page15
Music stand page15
The display page16
Data entry page16
Example: to assign a different sound to a track page16
MANUAL INDEX
Entering alphanumeric data page17
Enter / escape page17
Sounds and performances page18
The real time keyboard sections (upper 1, upper2, lower) page18
Sounds and keyboard modes page18
Full mode page18
Split mode page19
Sounds selection page20
Mode to recall sounds page20
Performances selection page21
Style lock page21
How to programme a performance page21
Performance values page22
Store performance page22
Recap to store a performance page23
Save edit to a different performance (or create a new one) page23
Performance name page23
How to restore the factory performance settings page23
The Styles page24
wk1000 styles page24
Selecting a style page24
Recalling a style from a performance page25
The style controls page26
Start/stop page26
Key start page26
Intro page26
Ending page26
Variations var 1, var 2, var 3, var 4 page26
Fade in/out - fi ll a - fi ll - fi ll b fade in/out page27
Fill a - fi ll - fi ll b page27
Tap tempo (fi ll b second feature) page27
MANUAL INDEX

The arranger section page28
Arranger on/off page28
Lower memory page28
Balance page28
The tempo speed page28
The tempo lock page28
The split point page29
How to set a new split point page29
Arrange mode page29
Arrange memory and bass to lowest page30
Store performance/performance recall page30
Arrange memory page30
Bass to lowest page30
Style/tempo lock page31
Rev/cho page32
Disk page33
Floppy disk recognized formats page33
File types and extensions page33
Access to disk page33
What is a midi fi le? Page34
Loading songs and midifi les page34
Loading styles page34
Loading performances page34
Loading samples page34
Loading song styles page34
Load operations page35
How to load page35
Recognizing a fi le from its extension page35
Save operations page36
The save procedure page36
Saving midi fi les page37
Saving song styles page37
Delete fi le page37
Formatting a fl oppy disk page37
The formatting procedure page37
General disk-handling tips page38
Inserting a fl oppy disk into the drive page38
Ejecting a fl oppy disk page38
Disk protection page38
Handling fl oppy disks page38
Back-up copies page38
MANUAL INDEX
Cleaning the disk drive head page38
Precautions to observe using the wk1000 disks with a computer page38
The songs page39
What is a song? Page39
The song performance page39
Selecting a song page39
How to select a song page39
Song playback page39
Cancelling a song (the clear function) page40
Melody off page40
Play all songs page40
To play a song track in realtime page40
ssign any of the sequencer tracks to the realtime control page40
Displaying lyrics page41
Song styles page42
Song style performance page42
Song style selection page42
Selecting a song style page42
Play a song style in real time page42
Recording a song style page43
Enter the song style recording mode page43
Listen to the song style playback page43
Clear song style (user song style) page44
How to assign a name to a song style page44
The user styles page45
Recording a user style page45
The basic structure of a style riff page45
Setting the user style parameters page45
Select an empty user style location page45
MANUAL INDEX
wk1000 manual index

MANUAL INDEX
Selecting a variation [optional step] page46
Modifying the recording tempo [optional step] page46
Selecting a different recording track [optional step] page46
Selecting a different riff - [optional] page46
Setting the time signature, the pitch (key transposing) and the beat number - [optional] page46
Changing the tempo signature page46
Changing the riff key pitch page46
To set the number of beats in a riff page46
Recording a user style page47
User style playback page48
Modifying a user style: overdub, quantize, clear note, clear riff, clear tempo, clear all style page48
Clear note page48
Adding new elements (overdub) page48
Quantize page48
Clear track, clear riff, clear tempo, clear all page49
Saving your user style to a fl oppy disk page49
Style copy page49
The user style performance page50
How to program a user style performance page50
To assign a name to a user style page50
To record program change page50
Recording commands page50
The digital signal processor page51
Rev/cho page51
To assign the effects page51
How to select the type of effect page51
Disabling the effects page51
Controlling the effect send level page52
The midi page53
Chord channel page54
Midi numeration page54
The main applications of midi page54
Preliminary operations page54
Controlling an expander or other keyboards with wk1000 page54
Controlling the keyboard from a midi accordion page55
Using a computer (or external sequencer) page55
The computer port page55
Controlling the keyboard with a master keyboard page56
Selecting styles via midi common page56
Controlling the styles via midi common page56
Selecting the effects via midi common channel page56
Selecting songs and song styles via midi common page57
Selecting sound banks via midi ( bk 1, 2, 3, 5, 6 ) page57
Additional midi parameters page57
Generalmusic system exclusive page57
Midi/general page58
Volume pedal page58
Chnlock (on/off) page58
Pedal page58
Midi page59
Channel: local/internal/G.Midi/start/stop/chn.Lock/dump page59
Channel page59
Midi local page59
Internal page59
G.Midi page59
Start/stop page59
Midi transpose page59
Chnlock (on/off) page60
•Midi dump page60
Midi dump saved data reception page60
Inizialize all page60
Operating system release date page60
APPENDIX Page61
wk1000 sound database Page62
wk1000 STYLES LIST Page64
Technical specifi cations Page64
Reverb table Page64
Chorus table Page64
wk1000 midi implementation chart Page65
MANUAL INDEX
wk1000 manual index
UPPER 2
UPPER 1
LOWER
+100
IMPORTANT WARNING
Make sure that the package is complete and contains:
The wk1000 arranger keyboard (the instrument);
A
One Operating System Floppy Disk
B
One music stand;
C
One Owners Manual;
D
One Ac/Dc Power Supply adapter;
E
One RGB/SCART video cable to display song lyrics on a screen
F
The Guarantee Certifi cate;
G
The Generalmusic distributors list.
H
IMPORTANT PRELIMINARY NOTES
Read the following notes carefully before switching your keyboard on: DO NOT PLACE FLOPPY DISKS ON
TOP OF THE LOUDSPEAKERS - avoid placing fl oppy disk on top of loudspeakers, telephones, electric home
devices or other sources of electromagnetic fi elds: the disk content could be erased or damaged.
HOW TO UPDATE YOUR INSTRUMENT
To implement new functions in your keyboard, follow the steps below:
1. Before turning the wk1000 on, insert the fl oppy disk containing the latest release of General
music Operating System.
2. Turn on the wk1000. The message “Load Operating System?” appears on the display.
3. Press ENTER to confi rm (pressing ESCAPE cancels the operation).
4. After pressing ENTER, the message “O.S. Disk loading...” appears on the display.
5. When the operation is complete, wk1000 is ready to play.
N.B. To check the date of the Operating System, scroll to the last page of the MIDI/GENERAL functions.
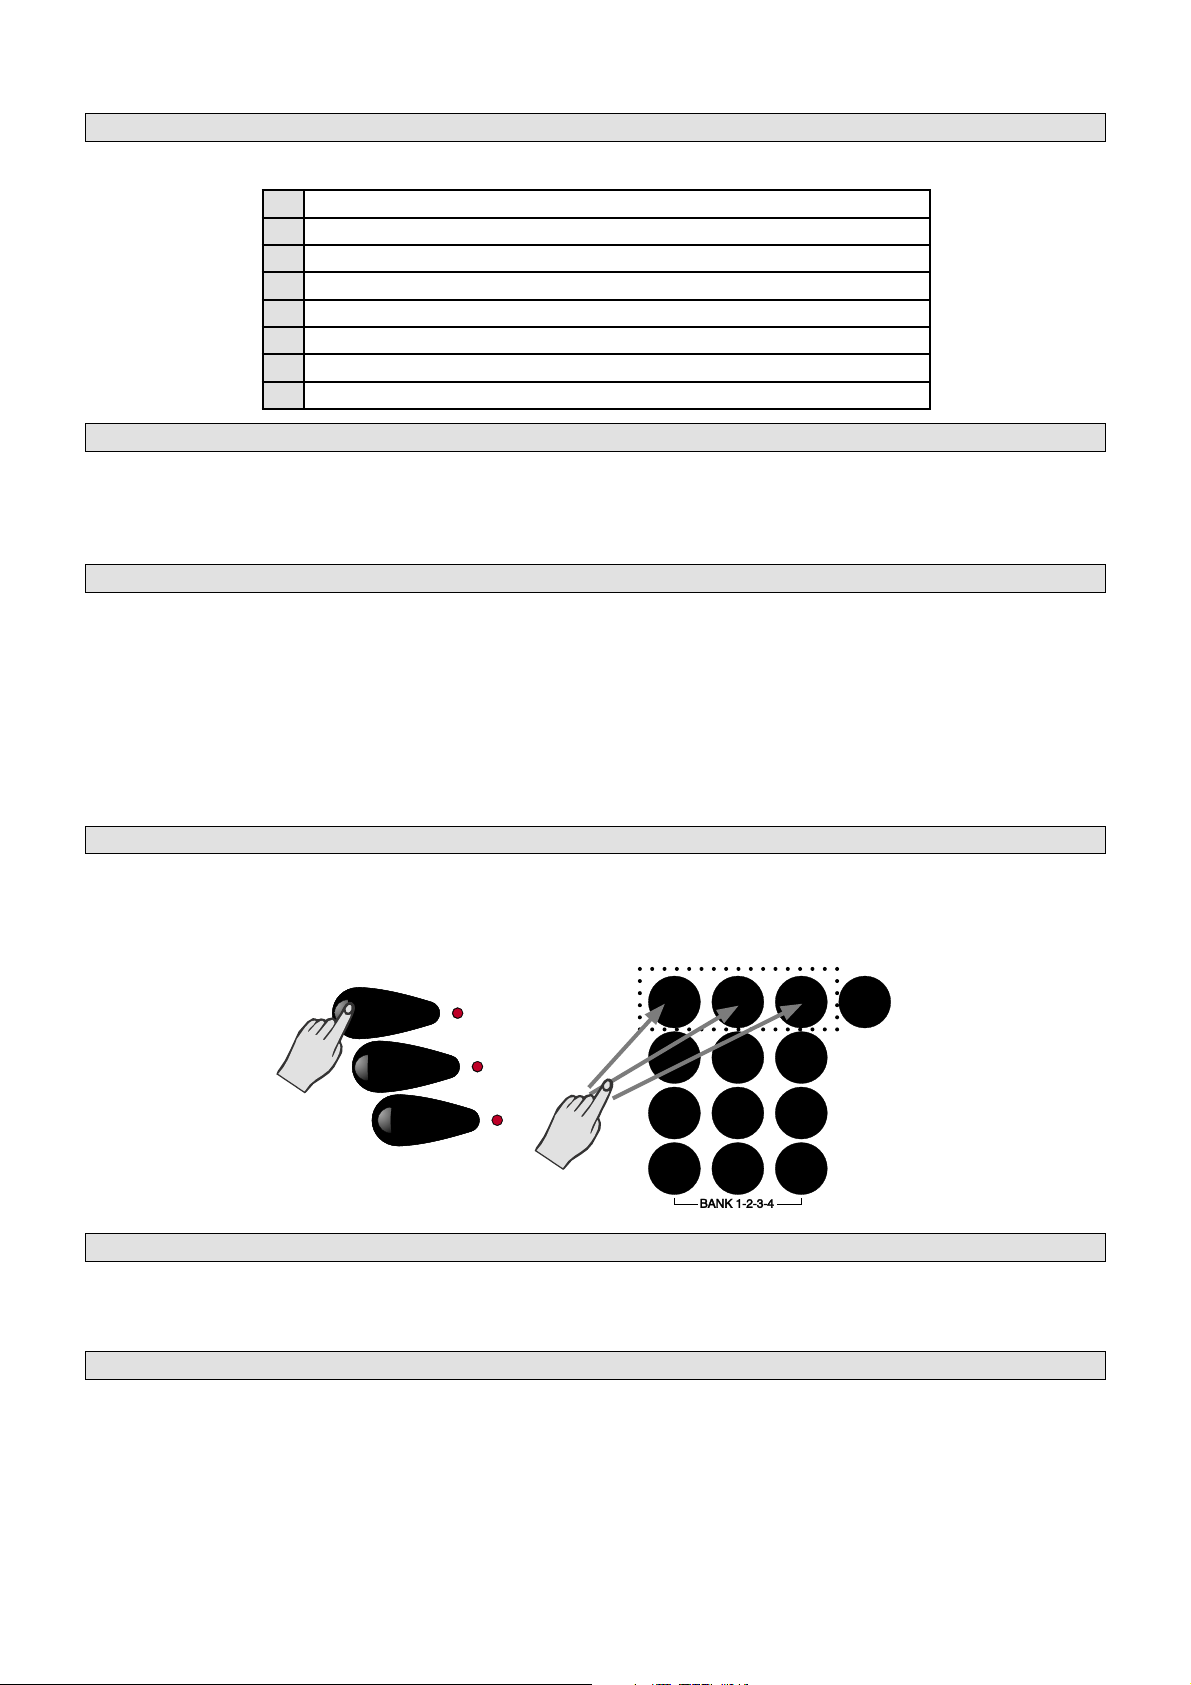
GENERAL RESET
In order to restore wk1000 to its default conditions set by the factory, proceed as follows:
Press and hold the UPPER 1 (located on the right of the display), and the number keys 1, 2 and 3 at the
same time. The message SYSTEM RESET ! appears on the display for a few seconds.
UPPER 1
UPPER 2
LOWER
1
4
7
-
2
5
8
0
+100
3
6
9
+
WARNING !
This operation defi nitevely erases all the user-programmed data contained in the internal RAM of the instrument.
REACHARGEABLE, BACK-UP BATTERY
the wk1000 is equipped with a Ni-Cad reachargeable battery, to retain data when the instrument is off.
When the instrument is turned off, the data is retained in the memory for approximately 30 days. If you
have not used wk1000 for a long period of time, you are advised to leave the instrument on for at least
8/10 hours in order to fully recharge the battery.

owners manual
Congratulations, and thank you for purchasing wk1000 arranger keyboard. The instrument in your
hand is the successful result of the combination of extraordinary sound quality, automatic accompaniment and a surprisingly easy-to-operate user interface.
wk1000 is an Arranger Keyboard with multimedia features that render making music real fun. With
wk1000 you can sing following the lyrics both on the display and on a TV monitor (TV Karaoke).
Our best advice: read the owners Manual carefully: it is the best way to learn how wk1000 operates.
The Manual is divided into separate User Guides. An Appendix with tables and MIDI specifi cations
is given at the end.
Poliphony and multitimbrality
wk1000 is 32-note polyphonic (maximum), 16-part multi-timbral in Song mode and 8-part multi-timbral in Style
mode. Each part is assigned to a track. In Real Time mode, 3 tracks (maximum) are assigned to the keyboard.
Sound Generation
wk1000 Sound Generation uses PCM e Wavetable technology. Sounds are based on processed sampled waveforms. The keyboard’s 32 obscillators generate “single oscillator” (32-note maximum polyphony) and “dual
oscillator” (16-note maximum polyphony) sounds.
ROM Sound
wk1000 ROM memory (Read Only Memory) contains 471 Sounds including 20 Drumkits.
Sample-RAM
The back-up memory can hold Samples that can be loaded from Floppy Disk.
Digital Signal Processor
wk1000 features a double Digital Signal Processor that can be controlled in Real Time. Two different effects (1
Reverb and 1 Modulation/Delay) can be assigned and stored to each Performance
Sequencer
The on-board Sequencer allows you to record Song Styles (Real-Time recording method), to play Songs back and
to play with Styles. Data saved in the sequencer is stored to the System-RAM (battery backed-up).
Play Direct from Disk
Playing Direct from Disk means playing a Song in WK, PK, or SMF format directly from the Floppy Disk without
having to load all data to memory. This feature becomes useful when you wish to play a Song or a Midi File that
exceeds the available Sequencer mermory
Automatic Accompaniments
wk1000 features 96 ROM Styles that add automatic accompaniments to the 3 Real Time keyboard sections (Upper
1, Upper 2, Lower). Each Style features 4 Variations that contain Basic, Intro, Ending and Fill patterns, totalling
40 different patterns. Up to 7 User Styles (Styles loaded from disk) can be stored to wk1000 memory.
The disk drive
The Disk Drive is a device used to transfer data from and to Floppy Disks. Floppy Disks can be stored to create
an external library of Songs, Styles, Performances and Samples. A disk drive reads from and saves to 3,5” Floppy
Disks that can respectively store up to 720 kb (2DD disks) and 1,44 Mb (2HD disks). (1,44 Mb) and (720 kb) are
recognized formats to exchange Midi Files.
Karaoke
The lyrics of a song can be read on the wk1000 display (two lines, 24 characters each). Alternatively, the on-board
video interface makes it possible to use wk1000 in Karoke mode with an external TV monitor. The interface can
be adapted to the different video standards used in Europe or in the U.S. In order to read the lyrics, the “TV text”
function in the MIDI/GENERAL page must be turned on, and the RGB/SCART cable supplied with the keyboard
must be connected to the TV set.
Updatable Operating System
The Operating System, that is, the software that controls wk1000, is stored in a Flash ROM. It can be updated
by loading more powerful releases that offer more functions.
MIDI
Thanks to its fully implemented MIDI features, wk1000 can become a master keyboard. Moreover wk1000 can
be controlled by another master instrument and operate like a 16-part multi-timbral expander.
Direct Connection to a computer
wk1000 can connect directly to a computer (Mac, PC o Atari) by a single serial cable. This kind of connection can
be alternative to a normal MIDI connection and needs no optional MIDI interface for the computer. The speed
of the information exchange can be adapted to the specifi c computer used. Serial cables can be purchased at
any computer shop.
wk1000
INTRODUCTION
MULTIMEDIA FUNCTIONS
THE OWNERS MANUAL
SPECIFICATIONS
Page1Introduction
owners manual
wk1000
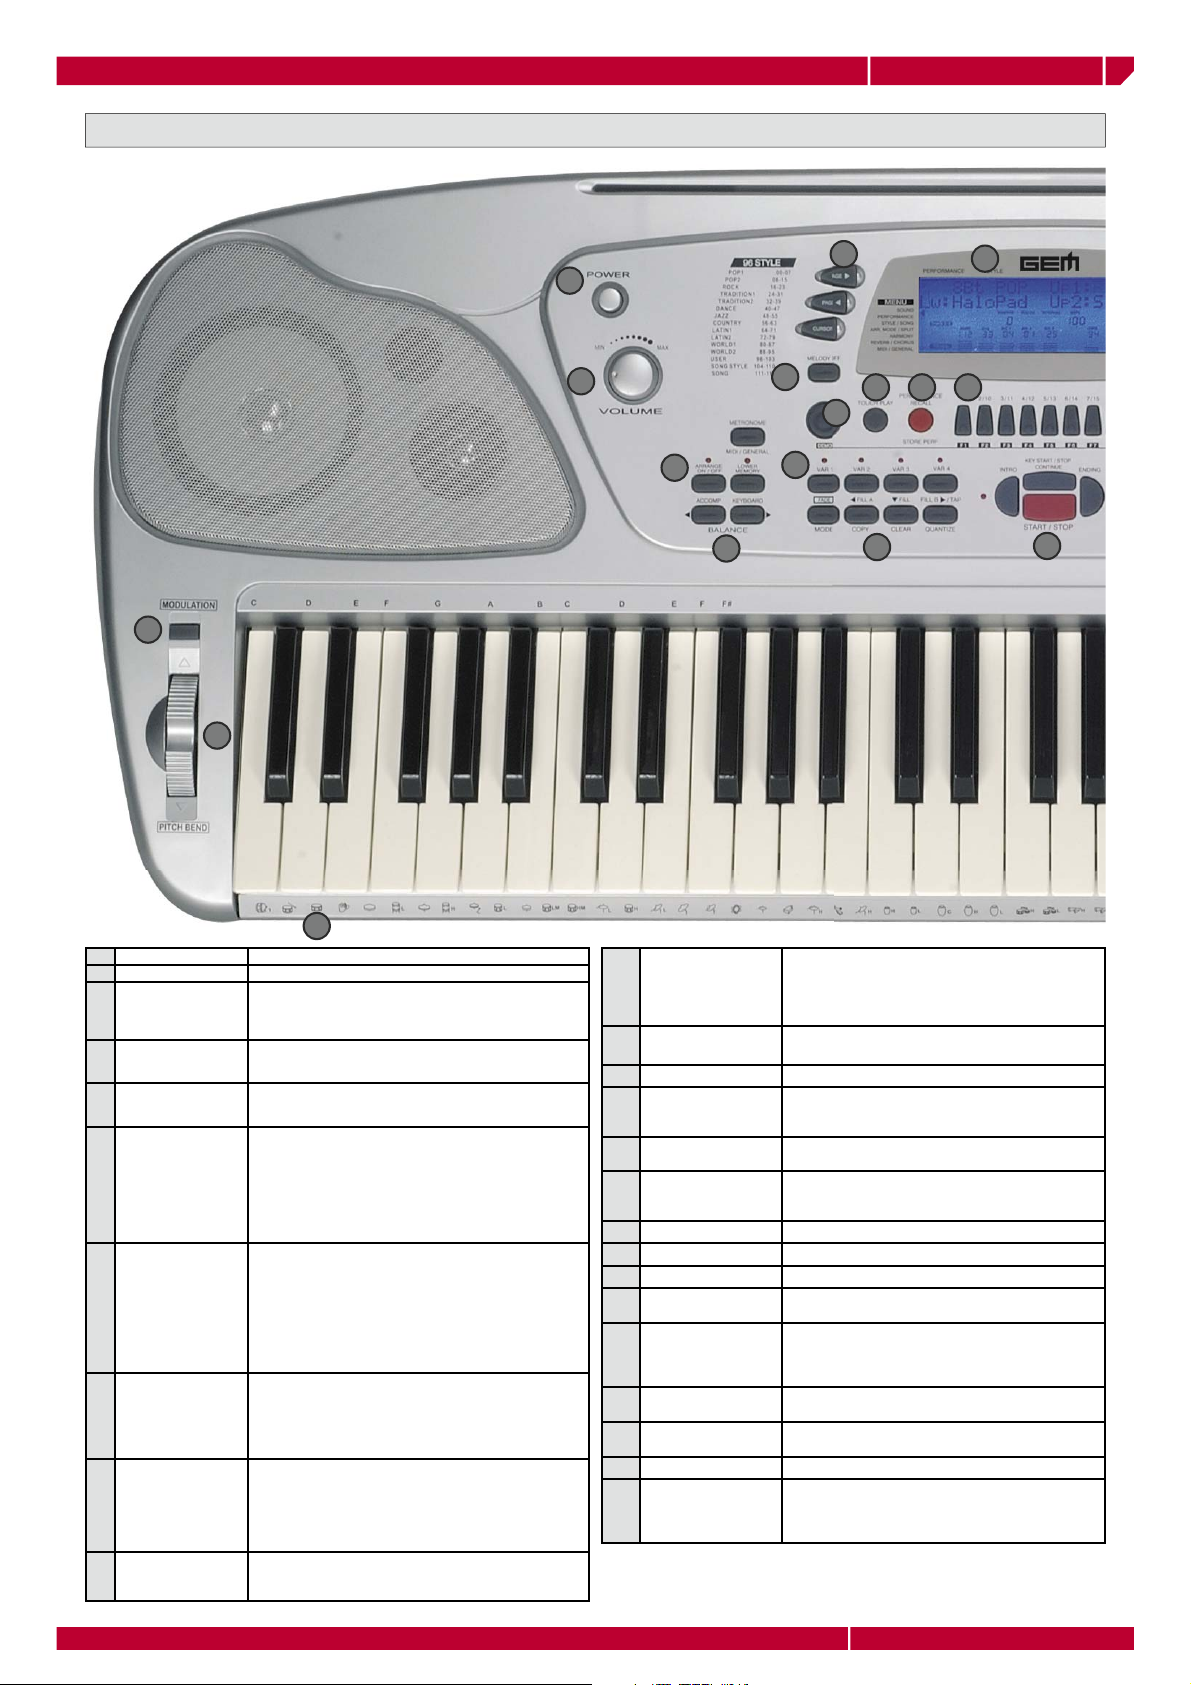
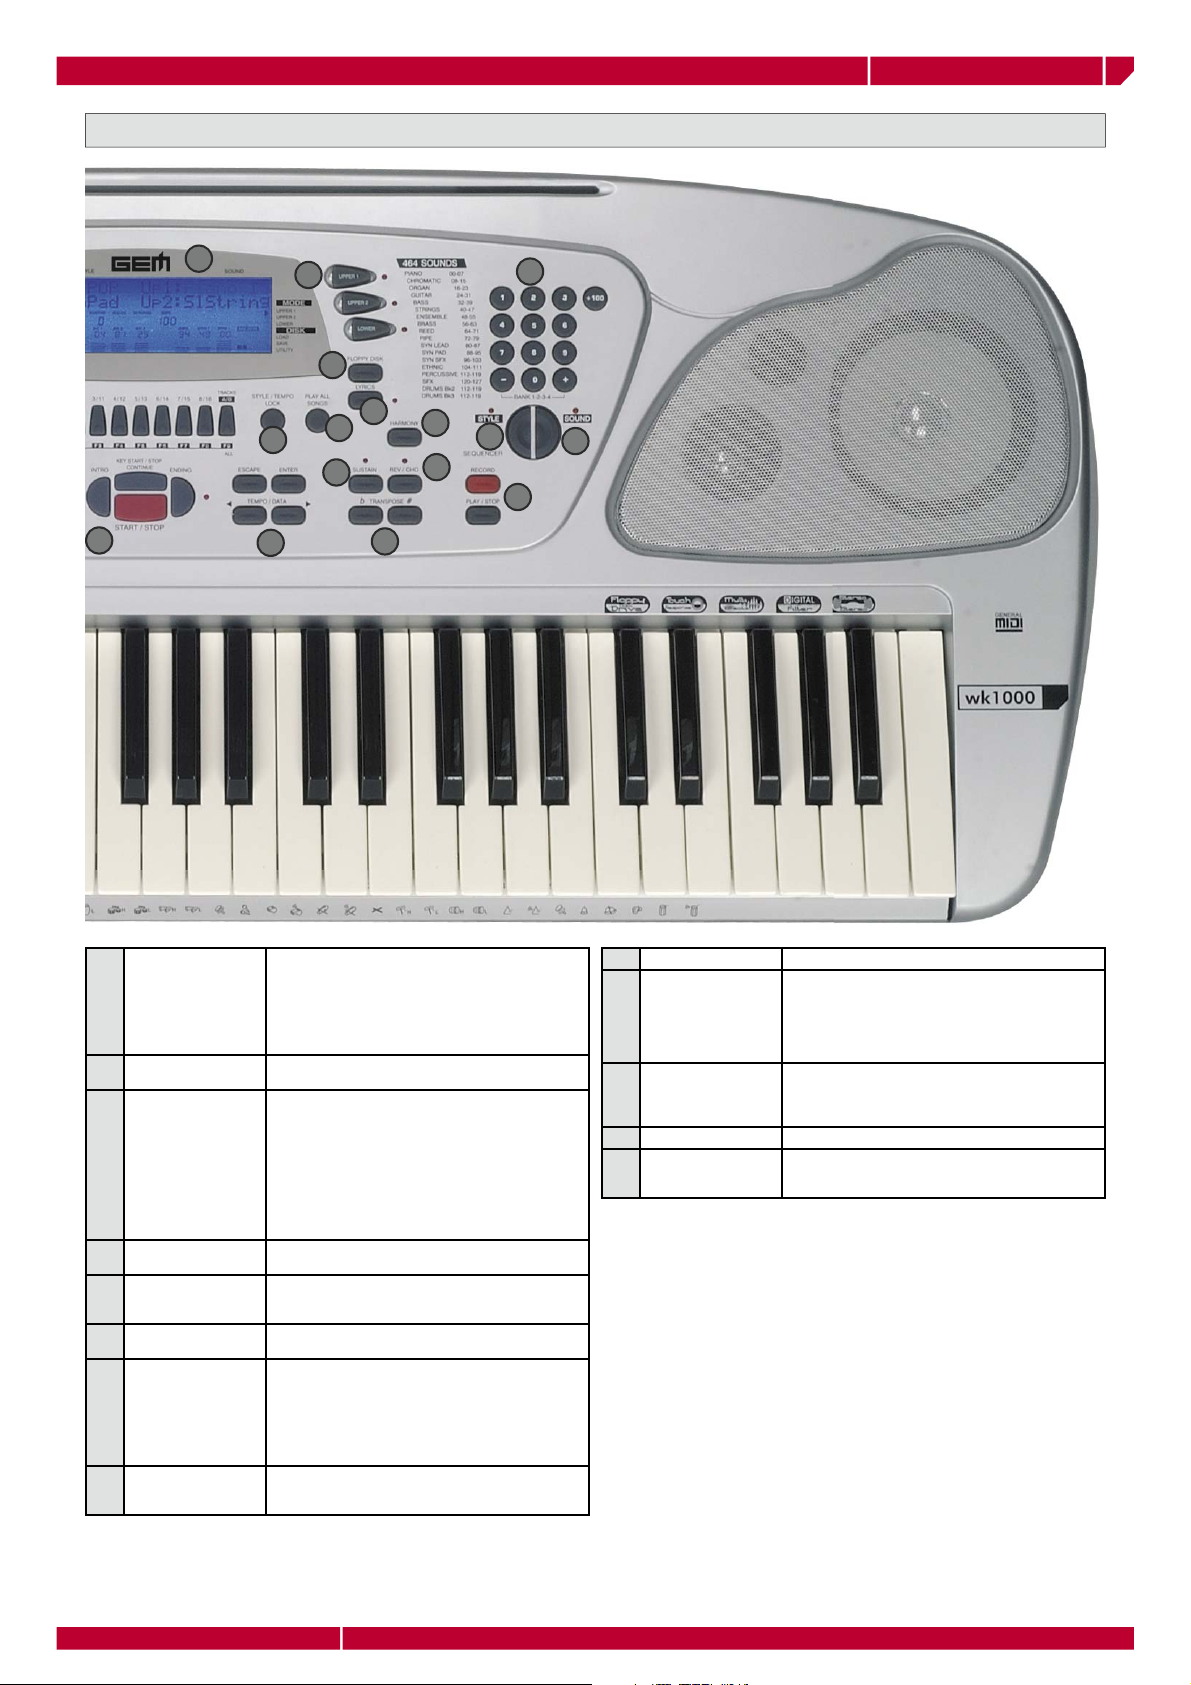
wk1000 Front Panel
30
29
3
21
1
2
4
6 7 8
5
9
13
10
11
12
POWER
1
VOLUME
2
CURSOR / PAGE
3
MELODY OFF
4
DEMO
5
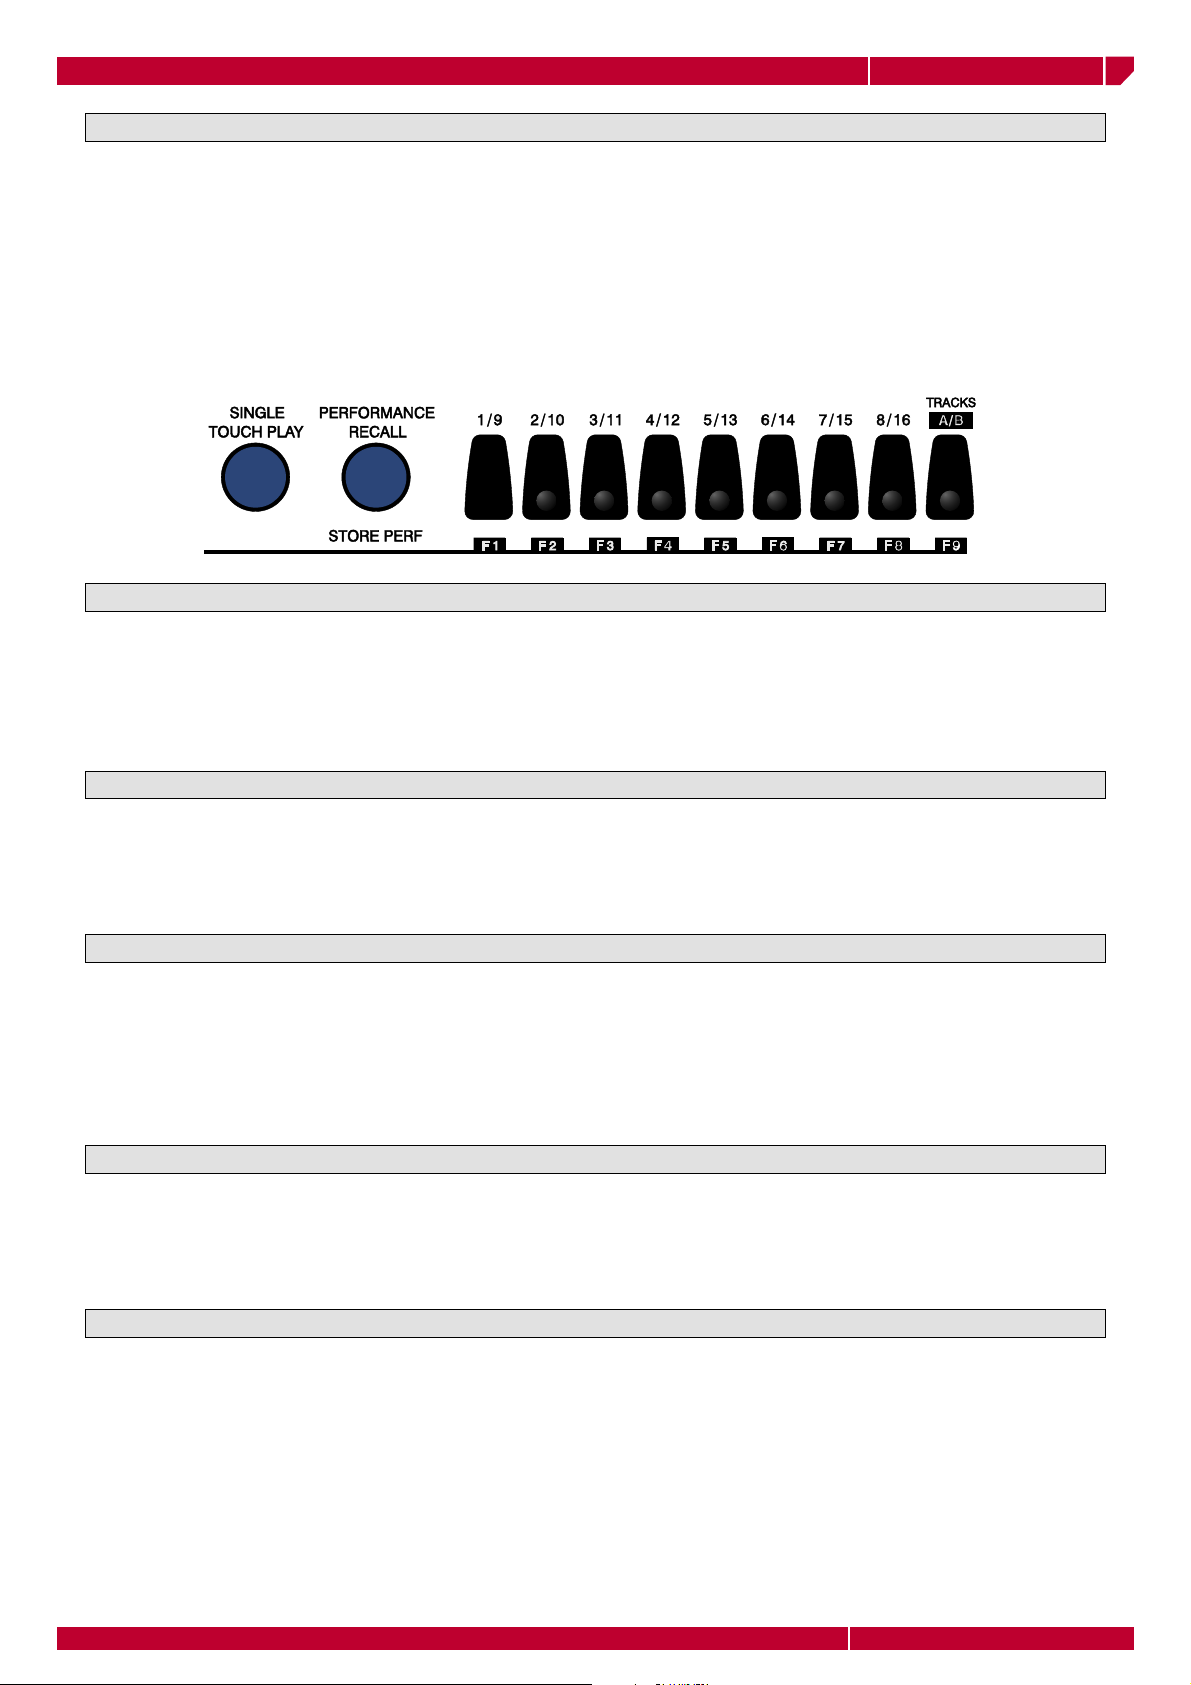
SINGLE TOUCH
6
PLAY
RECALL/STORE PER-
7
FORMANCE
(F1/F9) FUNCTION
8
KEYS (S.T. PLAY/
PERFORMANCE)
ARRANGER.
9
VARIATION 1,
10
2,3,4
31
Switch the instrument ON and OFF.
Control the instrument overall Volume.
Navigation keys. The PAGE and PAGE keys select the edit
function pages. The CURSOR key is used to move among the
various sections of the page. The selected function is shown
by a pointing arrowhead in the display.
This keys turns off the melody in the played back Song. It is a
useful feature when singing over the backing, or to play the
melody live on the keyboard.
This key starts the Demo songs. The F1/F8 function keys select
the 8 Songs that demonstrate the instruments potential. F9 key
plays the Songs back in a sequence.
When this function is active (the display indicates it as ON), the
sounds of a Style-Performance are assigned to the Style tracks.
The ARRANGE ON/OFF and ARRANGE MEMORY functions
are autmatically activated. In this mode, the 9 Function keys
(F1/F9) recall 9 Single Touch Play settings that vary according
to the selected Style. When the display indicator is OFF when
a Style is selected, only the sounds from the Drum, Bass,
Acc1,2,3 will change.
This button enter the performance mode, and the cursor arrowhead in the display moves down to indicate PERF in the
menu). The PAGE keys select the 7 groups that contain the 63
Performances (each group features 9); (F1/F9) Function keys
recall the Performance. It is possible to modify the Performance
settings and save them. If the key is pressed and held for about
2 seconds, the STORE PERFORMANCE is activated, where the
control panel settings may be saved to the current erformance
and even renamed it with a new Performance name.
These keys select Demo Songs, Performances, Single Touch Play
settings, Style, Song Style or current Song tracks, depending
on the selected mode of wk1000 . When in Song mode, the
two rows of numbers under the function keys correspond to
the 16 Song Tracks (F1/F8). F9 toggles between tracks 01- 08
and 09-16
Functions control the Styles. ARRANGE ON/OFF enables (led
ON) or disables (led OFF) the automatic accompaniment of
the Styles. LOWER MEMORY: notes in the Lower section of the
keyboard continue to sound (display indicator ON) or stop
(indicator OFF) after releasing the keys played in the Lower
section of the keyboard.
These keys change the Style variation patterns (the display
indicator is ON). The selected variation is shown by the relative led which turns on.
FADE
11
FILL A (Fills to previous Variation)
FILL (Fills to current Variation)
FILL B (Fills to next
Variation)
TAP Tapping on this key 3 or four times automatically sets the beat
KEY START/STOP/ CON-
12
TINUE
START/STOP
INTRO
ENDING
BALANCE Balance the level between the Arranger and the Real Time
13
TEMPO/DATA, ENTER,
14
ESCAPE
SUSTAIN adds a sustain effect to the three keyboard sections (Upper
15
REV/CHO Enables (led ON) or disables (led OFF) the Digital Signal
16
HARMONY enables or disables the melody harmonizer.
17
TRANSPOSE b / # Raises (#) or lowers ( b) the overall pitch of the instrument
18
Starts and stops a Style with a gradual increase and decrease of volume. The fi rst effect is obtained by pressing
the Start key fi rst and the FADE key together, the second
by pressing the FADE while playing. FADE action is shown
by the display indicator which turns on.
This key plays a Fill pattern (display indicator ON) and then
goes back to the previous Variation.
It plays a Fill pattern and sticks to the current Variation.
When this key is pressed while a Style is played (the display
indicator turns ON), the Fill pattern is recalled and it passes
on to the successive Variation.
speed and starts the Style in the desired Tempo.
Synchronizes the start of a Style with a note or chord played
in the lower keyboard area. Resumes the current Song Style
or Song from the point where it had been stopped
Play or stop the selected style
Start the selected style with a music introduction
Stops the selected style with a music Coda (ending)
sections (Upper1, Upper2, Lower)
Modify the Tempo speed in Styles, Song Styles or Songs.
Once a mode is selected the +/- button modify the value of
the selected parameter. ENTER confi rms selections or edit.
ESCAPE cancels the data input data exits the edit page.
1, 2 e Lower) independently by the Damper Pedal
Processor.
by a semitone every time that it is pressed, up to a maximum of ± 12 semitones (1 octave). When both keys are
pressed at the same time the transposer is set back to 0.
Introduction Page2
owners manual
wk1000
wk1000 Front Panel
12
21
19
14
22
23
20
15
24
18
17
16
26
27
25
28
STYLE/TEMPO LOCK.
19
STYLE LOCK
PLAY ALL SONGS Pressing this key will play all the Songs or MIDIFiles avail-
20
DISPLAY This device displays and provides access to the various
21
UPPER 1, UPPER 2,
22
LOWER
FLOPPY DISK Enters the disk drive operating functions (Load, Save,
23
LYRICS Enables (led ON ) or disables (led OFF) the song lyrics in
24
SOUND Enables (led ON) or disables (led OFF) the numeric keypad
25
STYLE Enables (led ON) or disables (led OFF) the numeric keypad
26
Once a Performance is selected only the realtime sections
(Lower, Upper 1 e 2) change, while the accompaniment
tracks remain unchanged. TEMPO LOCK: when active
(display indicator ON), the current Tempo setting is locked
for all Style changes. When Tempo Lock function is ON,
the display will fl ash “ Tempo” indication that alternates
the current value with the “Lock” indication.
able on disk in a sequence.
parameters. The user interface shows the currrent status of
the machine at all times. The ON or OFF status of the panel
keys is shown by corresponding indicators or icons that turn
on or off accordingly. When a MIDIFile is played, wk1000
display will show the lyrics of the song in the fi rst two lines
(for a maximum of 24 characters). The surrounding silkscreened indications to the left and to the right, belong to
the display area and will be described in detail in Chapter
2 ( “Basic Concepts”), in the “Display” section.
These keys enable (led ON) or disable (led OFF) the corresponding keyboard sections.
Delete, Format) when transferring data to disk (SAVE), or
from disk (LOAD).
the display playing a Midifi le.
to recall Sounds (00-127), including the Drumkits located in
banks 2, 3 and 4, referred to the silkscreened values written
above in the panel. Three-digit numbers are selected by
fi rst pressing the +100 key, followed by the remaining two
digits. The sound banks 1, 2, 3 and 4 are selected in cyclic
order by pressing the +/– buttons simultaneously.
to recall Styles (00-95), USER Styles (96-103),Song/ Styles
(104-110) and Songs (111-117).
KEYPAD
27
SEQUENCER The RECORD button automatically enables the instrument
28
PITCH/BEND The Pitch Bend wheel directly controls the pitch of the
29
MODULATION The modulation button enables the sound modulation
30
DISK DRIVE The disk drive is located to the left of the instrument,
31
Numeric pad to recall sound, sound bank or styles.
to recording Song Styles. If the button is pressed and held
for a fe seconds enter to the CLEAR function, that allows
you to cancel recording errors and unwanted parts (all,
chord,etc.). PLAY/STOP starts and stops the Songs and
record and play the Song Styles.
sounds generated by the wk1000. Moving it horizontally
gives a “gliding” effect that adds reality to some acoustic
instruments such as saxophone, guitars, violins etc.
under the keyboard. It works with 3.5” disks of the (2DD)
or (2HD) type.
Page3Introduction
owners manual
wk1000
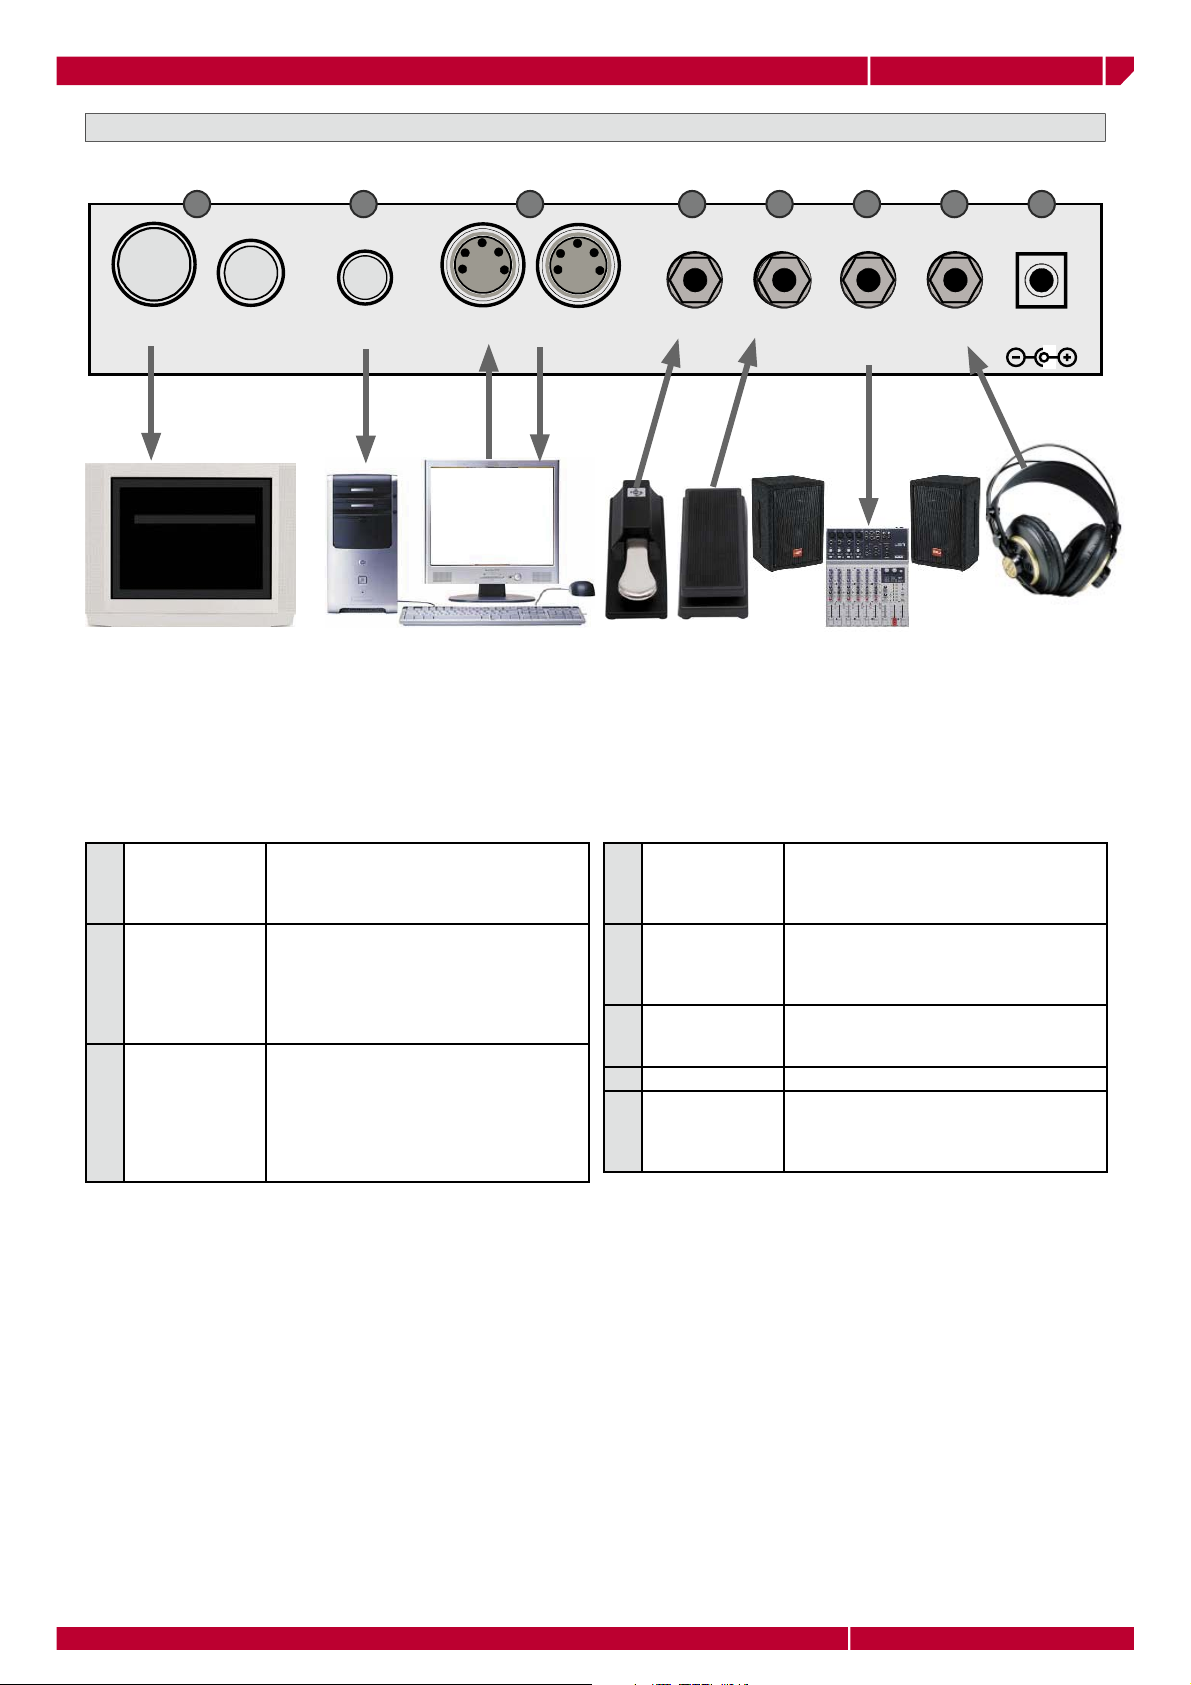
wk1000 REAR PANEL CONNECTIONS
1
RGB S-VHS COMPUTER
MUSIC FILES
LYRYCS ON
SCREEN KARAOKE
PERFORMANCE
2 3 4 5 6 6 7
MIDI-IN VOLUMEDAMPER PHONESAUX
MIDI-OUT
DC-12V
OUT
1
VIDEO INTERFACE
2
COMPUTER Serial port to directly connect wk1000 to
3
MIDI MIDI interface equipped with MIDI IN and
An interface with RGB and SVHS ports to
connect wk1000 to aTV set or monitor to
display the Lyrics of a Song. A Video cable
is supplied with the instrument.
a computer (Apple Macintosh, or IBM, or
compatibile). The data exchange between
wk1000 and a computer requires appropriate setting, as explained in detail in the
MIDI/ General chapter.
MIDI OUT sockets to connect wk1000 to
other MIDI devices (keyboard, computer
etc.). MIDI cables are not supplied with the
instrument. When using wk1000 alone, it is
not necessary to connect the MIDI ports to
any external device.
4
DAMPER (*) When the DAMPER pedal (optional) is con-
5
VOLUME (*) When a VOLUME pedal (optional) is con-
6
AUX/OUT Audio output to connect wk1000 to an
7
PHONES Headphone socket.
8
DC-12V Adapter socket, to connect wk1000 to a
nected to this socket, the notes played on
the keyboard are sustained if the pedal is
pressed.
nected to this socket, the overall volume of
the keyboard or of the selected sections is
controlled by this pedal.
external system (mixer, external amplifi er,
DAT recorder, etc.).
220V mains source through the AC/DC
power supply adapter provided with the
instrument.
(*) Damper Pedal product code 970134/970116
(*) Volume Pedal product code 970013
Introduction Page4
owners manual
UPPER 2
UPPER 1
LOWER
UPPER 2
UPPER 1
UPPER 2
UPPER 1
LOWER
UPPER 2
UPPER 1
LOWER
wk1000
GETTING STARTED
In this chapter you will fi nd step by step instructions on the basic functions that will help you understand
and get to know your instrument straightaway.
POWERING UP AND PRELIMINARY OPERATIONS
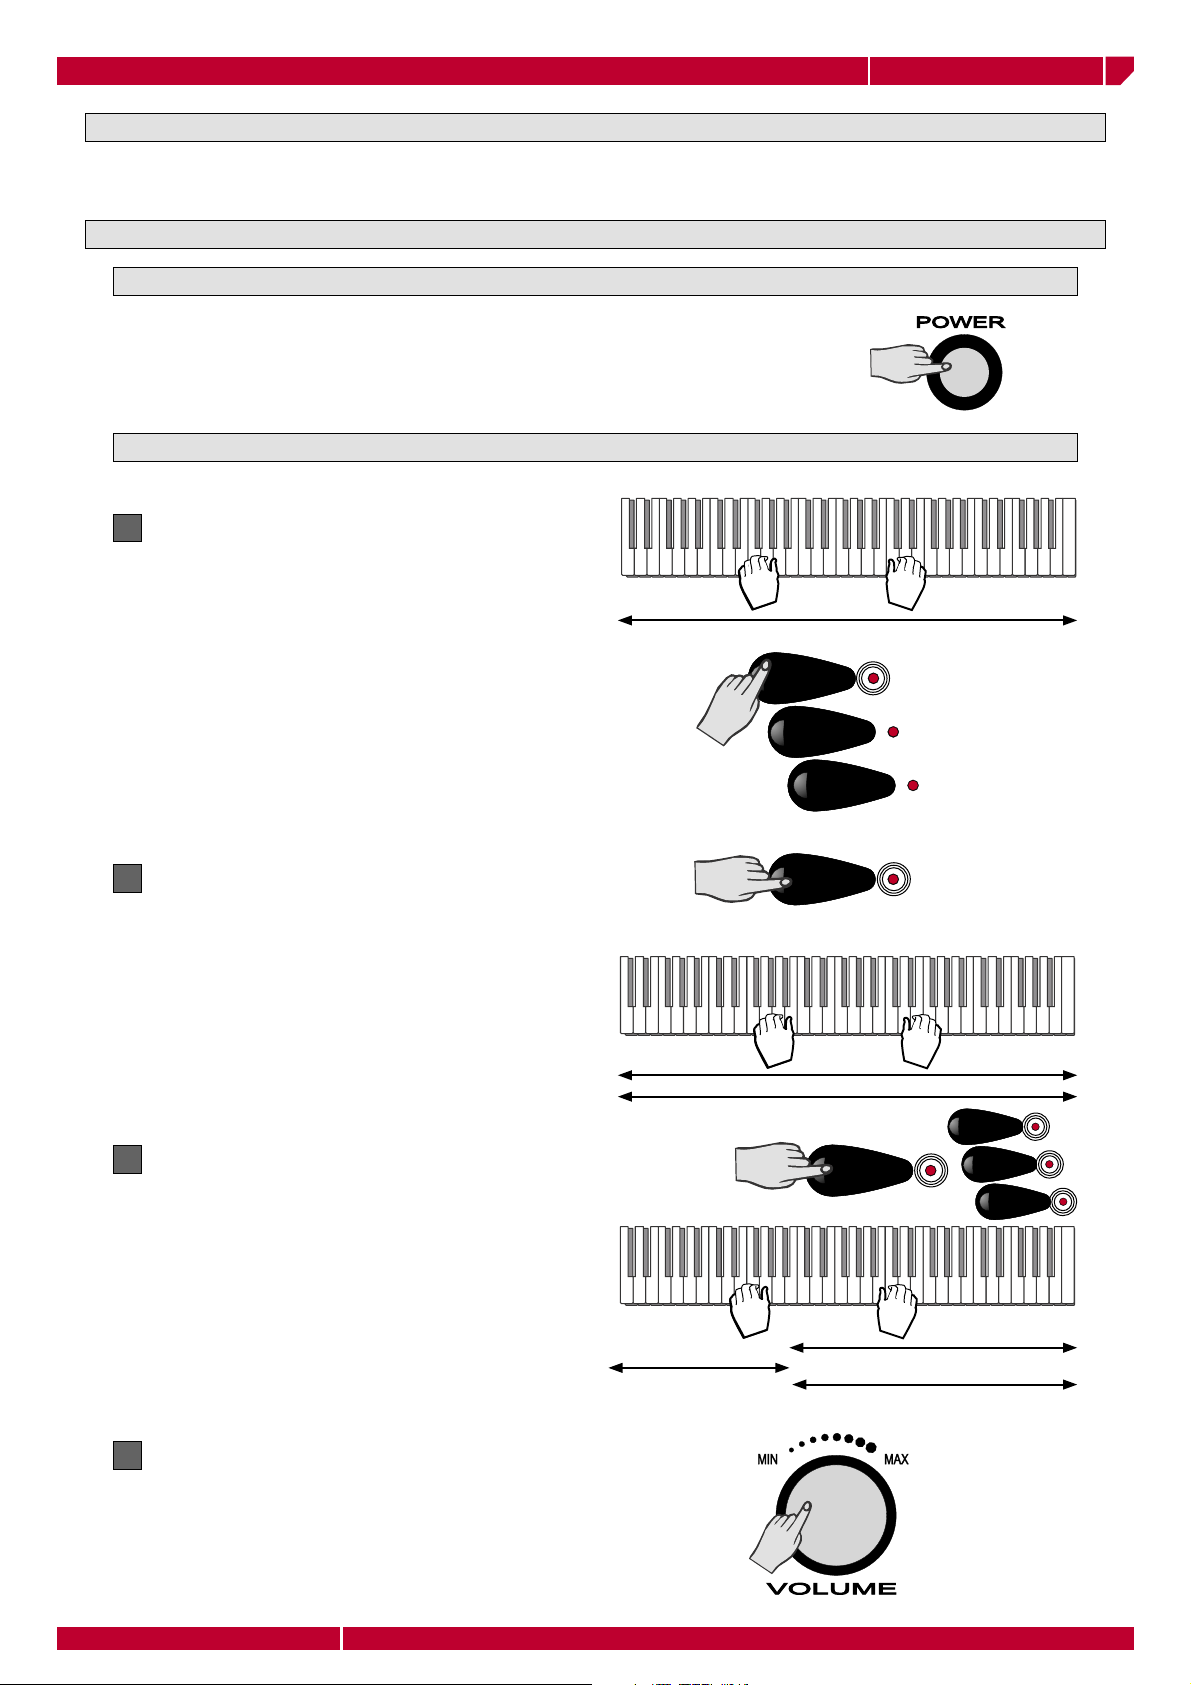
POWER ON/OFF
The switch to turn the keyboard on and off is located on the left lateral panel.
To power wk1000 up insert the power supply cable in the rear-panel mains
socket, and plug the cable into a 220V wall socket.
PLAY THE KEYBOARD AND CHANGE THE SOUNDS
Play on the keyboard.
1
The PIANO sound plays over the whole keyboard
extension.
PIANO
The group of Keyboard activator keys (Upper 2,
Upper 1, Lower) shows that UPPER 1 is active: the
led is ON. The UPPER 1 section of the keyboard is
now playing.
You can also enable the Upper 2 e Lower sections
of the keyboard.
Press the button UPPER 2 and play
2
A second sound is enabled layered with the fi rst,
Each note played on the keyboard plays two sounds
simultaneously.
Press the button LOWER and play on the keyboard
3
using with both hands.
A third sound is now enabled. The keyboard is now
divided in two parts, with a Split point on B3 note
The LOWER keyboard section plays in the C2 - B3
area. UPPER 1 and UPPER 2 sections play in the
C4 - C7 area.
UPPER 1
UPPER 2
LOWER
UPPER 2
PIANO
POLYSYNTH
LOWER
PIANO
UPPER 1
UPPER 2
LOWER
Adjust the overall volume.
4
Use the VOLUME dial to adjust the overall volume
of the instrument. Two thirds of the maximum range
of the knob is recommended.
Getting Started
Page5
HALOPAD
POLYSYNTH
owners manual
+100
+100
UPPER 2
UPPER 1
LOWER
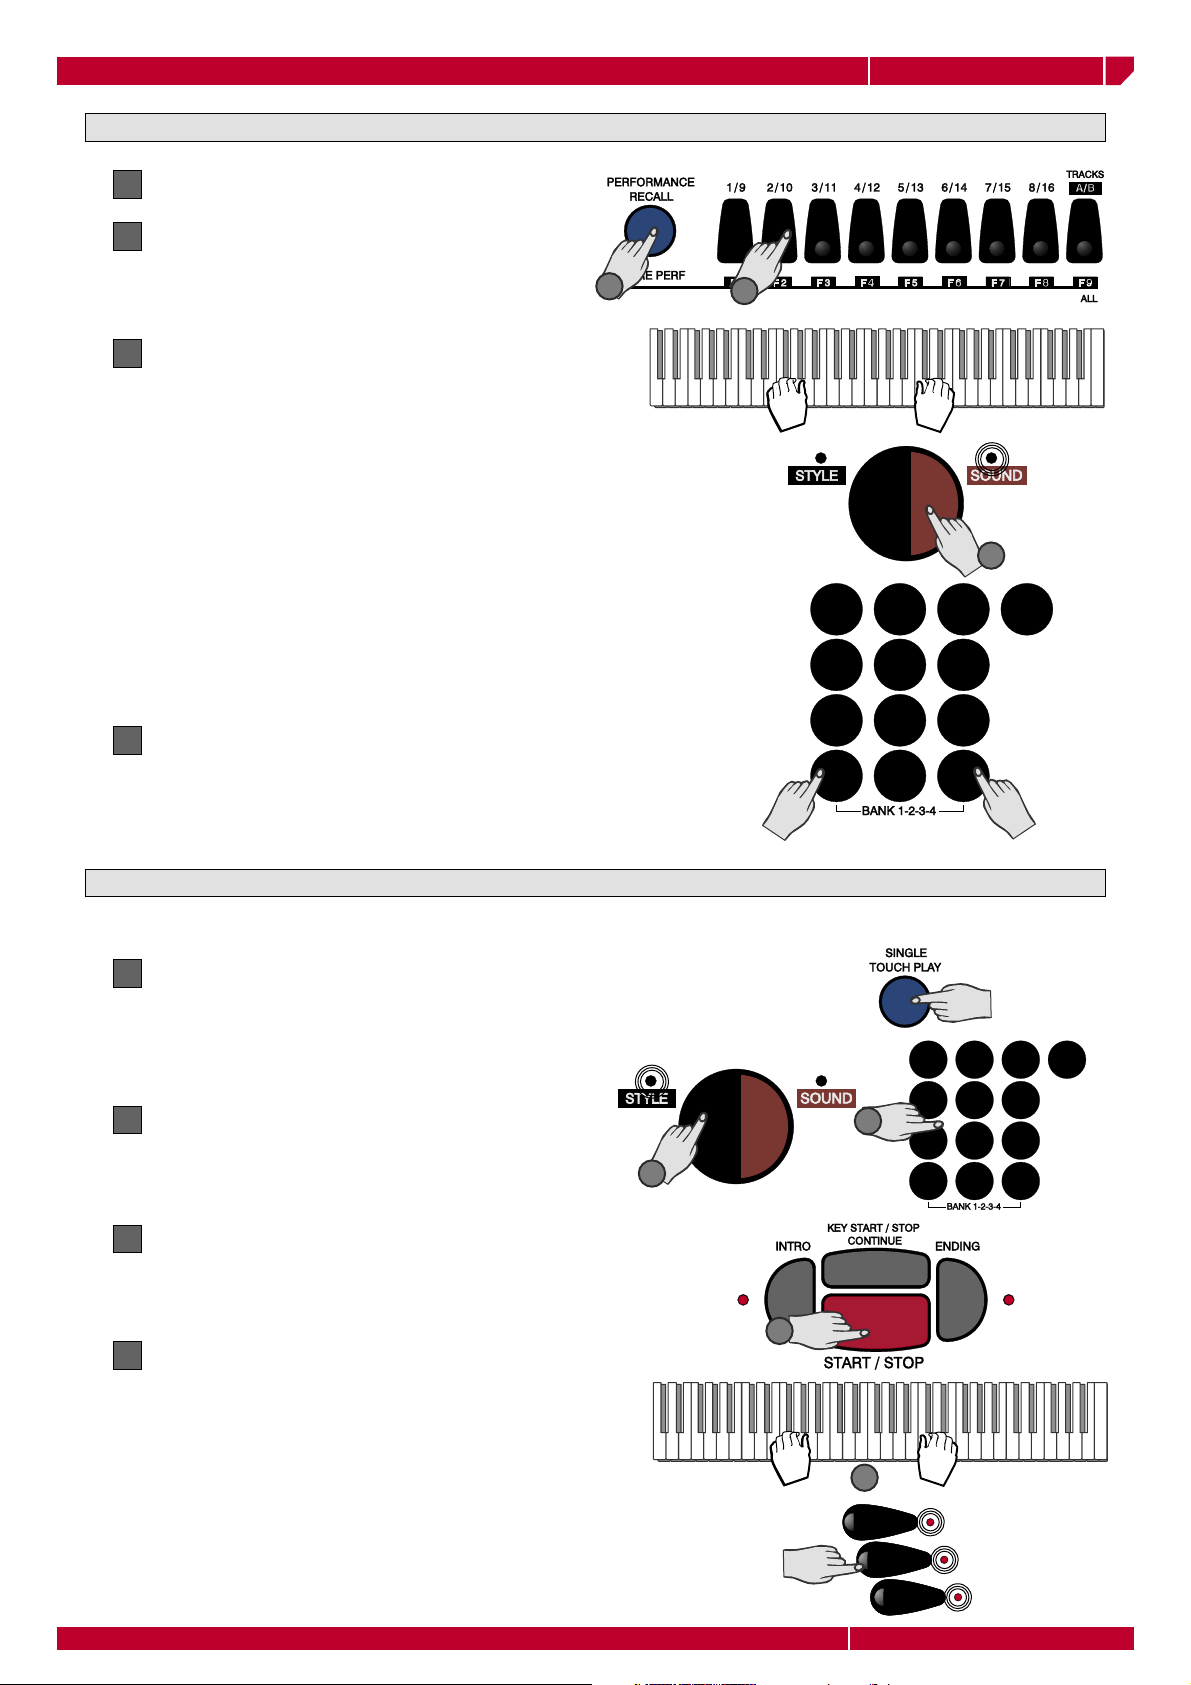
SELECT PERFORMANCES AND LISTEN TO THE SOUNDS
Press the PERFORMANCE RECALL button
1
Select a PERFORMANCE
2
wk1000
Use the Function keys (F1/F9) to select one of the
9 Performances in the fi rst bank
Play on the keyboard.
3
The selected Performance recalls a different combination of sounds. The keyboard setting may also
change (Split or Full mode). Sounds and keyboard
mode depend on the selected Performance. The Split
point is the same for all Performances.
A Performances may recall:
• Combinations of up to 3 keyboard sounds;
• Different settings of the control panel;
• Styles.
More details on the Performances are available
in the “Performance” section of the Owner’s
Manual.
Change the sounds
4
Use the SOUND button (the led is ON) and the numeric keypad to select a sound. You can also press
the +/-buttons to select sounds step by step.
1
2
4
1
4
7
-
2
5
8
0
+100
3
6
9
+
SELECT STYLES AND PLAY WITH AUTOMATIC ACCOMPANIMENTS
The default set up always recall the style #1, but you can select any style in the following way:
Press the SINGLE TOUCH PLAY button
1
The corresponding box on the display is highlighted
and the ARRANGE ON/OFF LED on the control
panel turns on.
Press the STYLE button (the LED turns on) and dial-
2
ing the corresponding number on the keypad.
Press START/STOP.
3
The drum accompaniment (Drum track) starts
playing.
Play a chord with the left hand (keeping below
4
split point B3) and a melody with the right hand.
A full instrumental accompaniment to your melody
starts playing automatically.
2
3
1
4
2
7
-
+100
3
2
5
6
9
8
0
+
Page6
The combination of the sounds playing in the accompaniment depends from the selected Style.
You can modify the preset combination of the
sounds in real time by the button Upper 2, Upper
1 and Lower.
More details can be found in the “Styles” chapter of this manual.
4
UPPER 1
UPPER 2
LOWER
Getting Started
owners manual
PAGE
PAGE
CURSOR
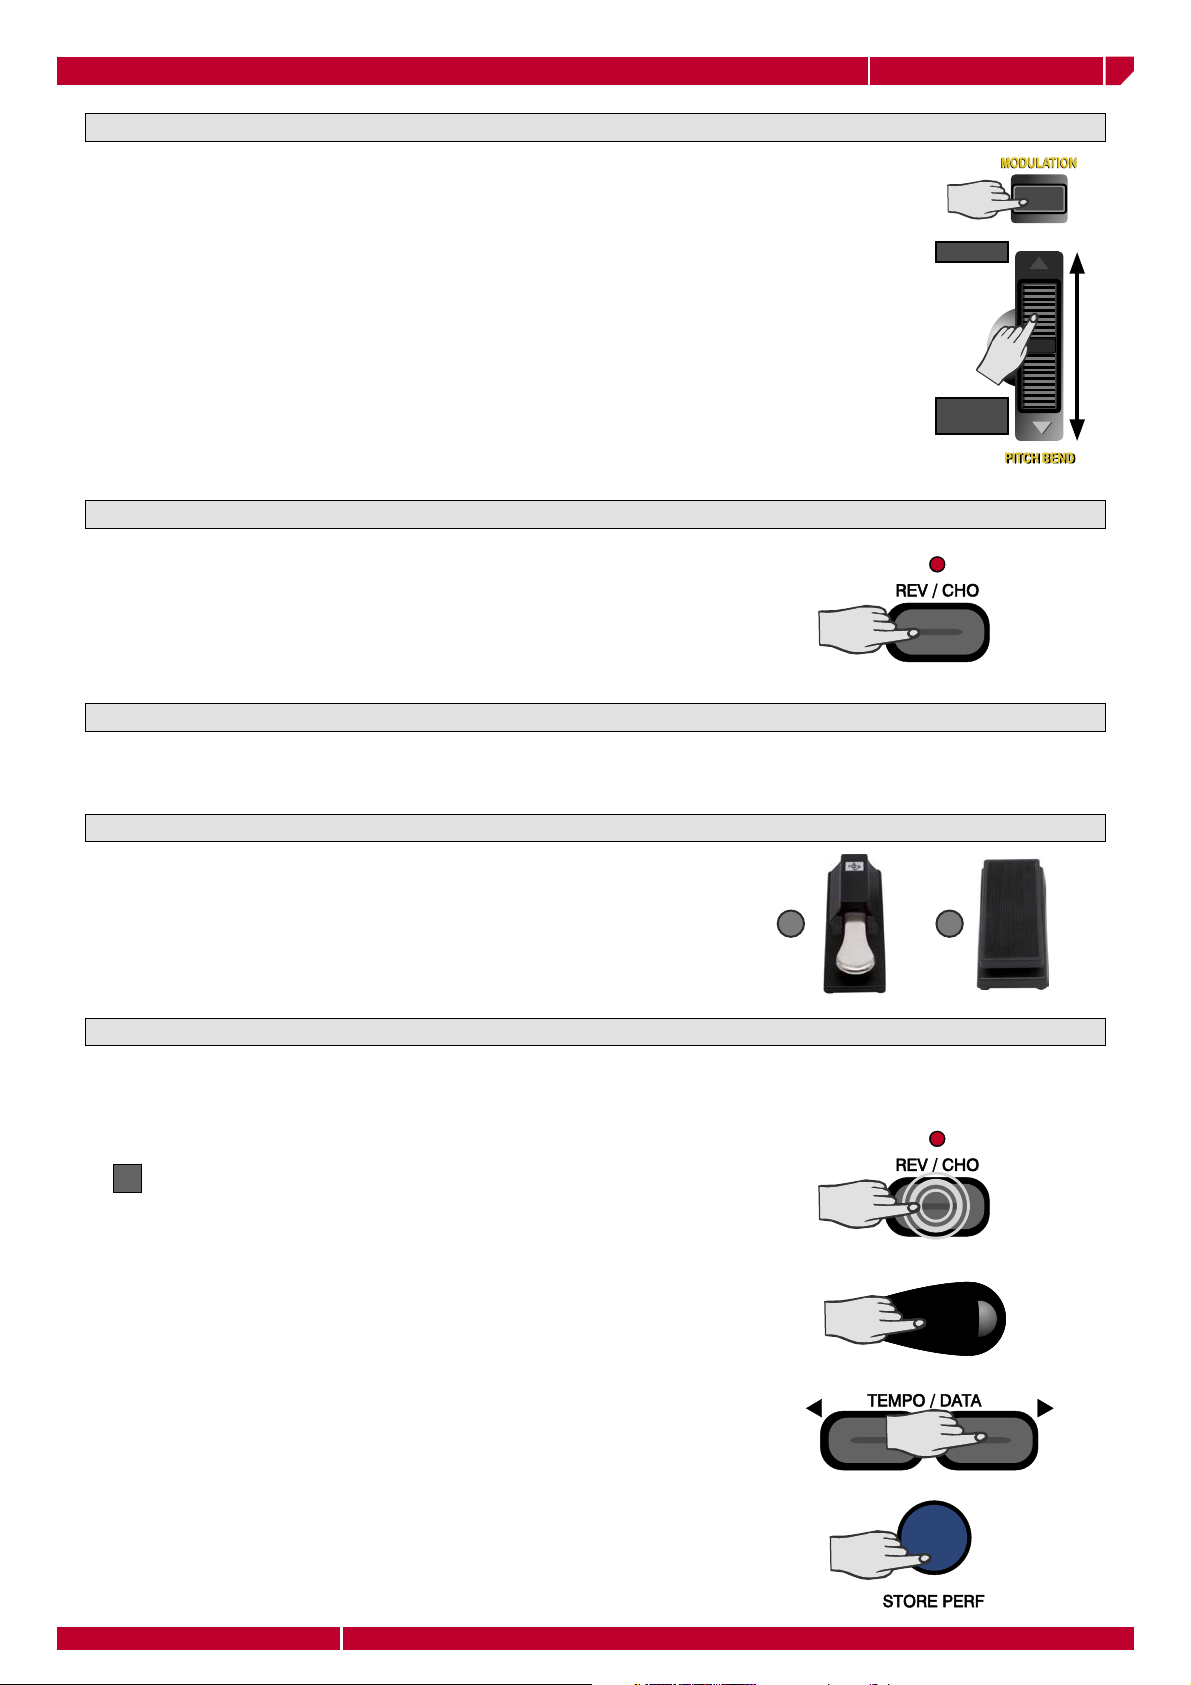
USING PITCH BEND AND MODULATION WHEEL
You can modify the pitch of the keyboard sound while you are playing, using the Pitch Bend
wheel located to the left of the keyboard.
wk1000
To get Modulation press the Modulation button
Pitch UP
To get Bend Bend, move the wheel vertically (upwards or downwards)
Pitch Bend and Modulation are variation of the pitch that imitate
the vibrato or other typical effects of some instruments (trombone,
Pitch
DOWN
guitar, violin, etc.).
USE THE EFFECTS
The REV/CHO key can be enabled (led ON) or disabled (led OFF).
You can temporarily modify the active effects in a Performance or a
Style, by holding the REV/CHO key down. wk1000 features 22 types
of Reverb and 22 types of Modulation/Delay (Chorus) effect.
USE THE HEADPHONES
Plug your headphones in the headphone socket located on the rear panel of wk1000. The keyboard loudspeakers are turned off automatically. (see detail on Page 4 "CONNECTIONS").
USE THE PEDALS
If you have purchased the optonal Generalmusic pedals (volume and
footswitch pedals), connect them to the relative Volume and Damper
pedal on the rear panel. Pedals will add the following controls:
1 2
1 Damper = Damper (sustain)
2 Volume = Master Volume
ADJUST THE OVERALL EFFECT VOLUME
You can adjust the effects general volume as it is more suitable to the environment where you are playing.
Although Performance recalls appropriate effect volume and mixer settings for each track, you can adjust
the overall level by a single operation, to give more or less intensity to the Effect General Level.
Press and hold the REV/CHO key, the current ef-
1
fect selection and the relative general level will
be shown in the display.
Use the CURSOR key to move over the page, and the
TEMPO/ DATA keys to select among the 22 types of
Reverb and the 22 types of Modulations available.
The general level of each effect is shown at the side:
this can be modifi ed using the Tempo/empo/Data
keys.
CURSOR
If you store the new settings with the STORE
PERFORMANCE function, they will remain in the
machine RAM memory even if the instrument is
turned off.
Getting Started
Page7
owners manual
wk1000
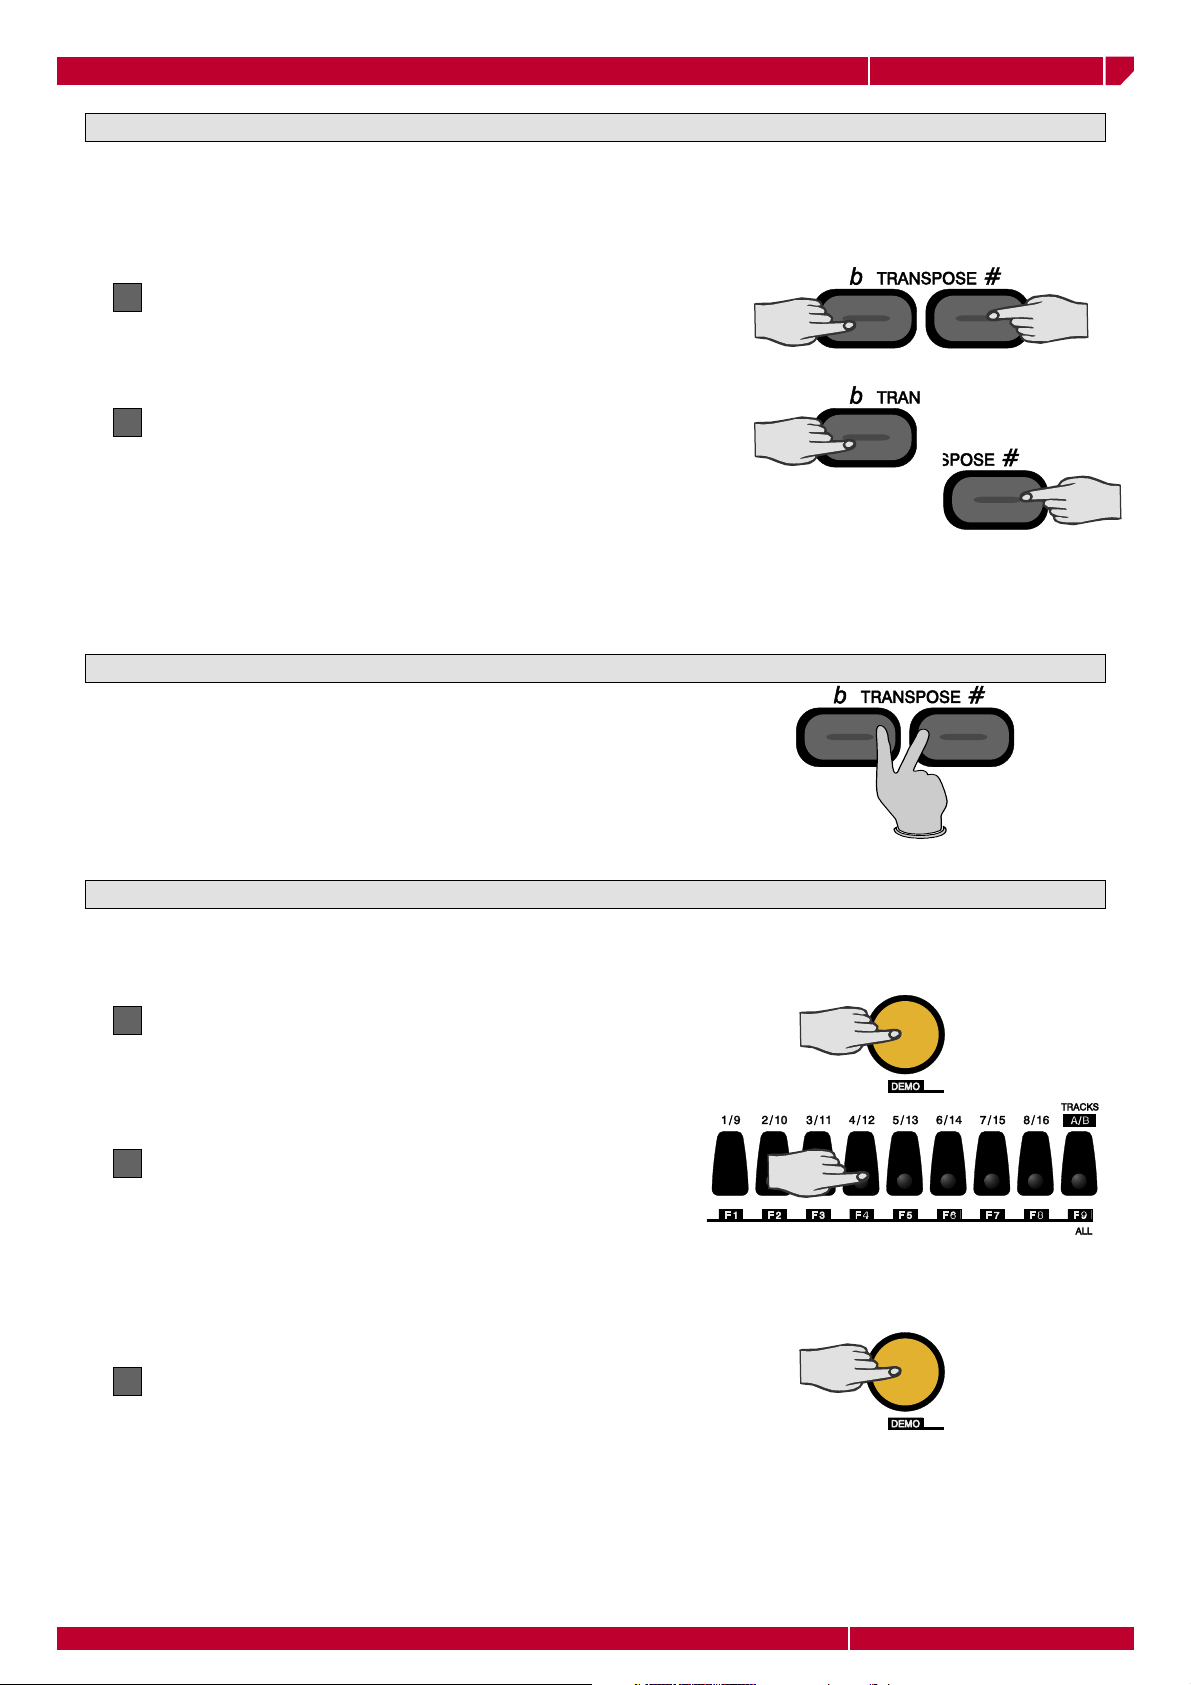
TRANSPOSE THE INSTRUMENT (IN SEMITONES)
If you play a diffi cult tune that implies the use of many black keys, or if the tune you are playing is not in key
with the Singer’s voice or with another instrument , you can transpose wk000 to play in a different key.
The TRANSPOSE b/# buttons allow to transpose the instrument by ±12 semitones (12 semitones = 1
octave).
Press the TRANSPOSE b or TRANSPOSE # key
1
In the central part of the display keyboard current
tune status is shown (00 = default tuning).
Press TRANSPOSE b to lower the pitch, or TRANS-
2
POSE # to raise the pitch
Each time the TRANSPOSE b key is pressed, the
display will show a decrease of one semitone.
Each time the TRANSPOSE # key is pressed, the
display will show an increase of one semitone.
If either key is pressed and held for some time, the transposer value changes continuosly to reach the
maximum value (-12 o +12) is reached.
CLEAR THE TRANSPOSE SETTING
If you press both TRANSPOSE keys at the same time,
the transpose settings will be cleared and the keyboard
will be restored to the original neutral (00) status.
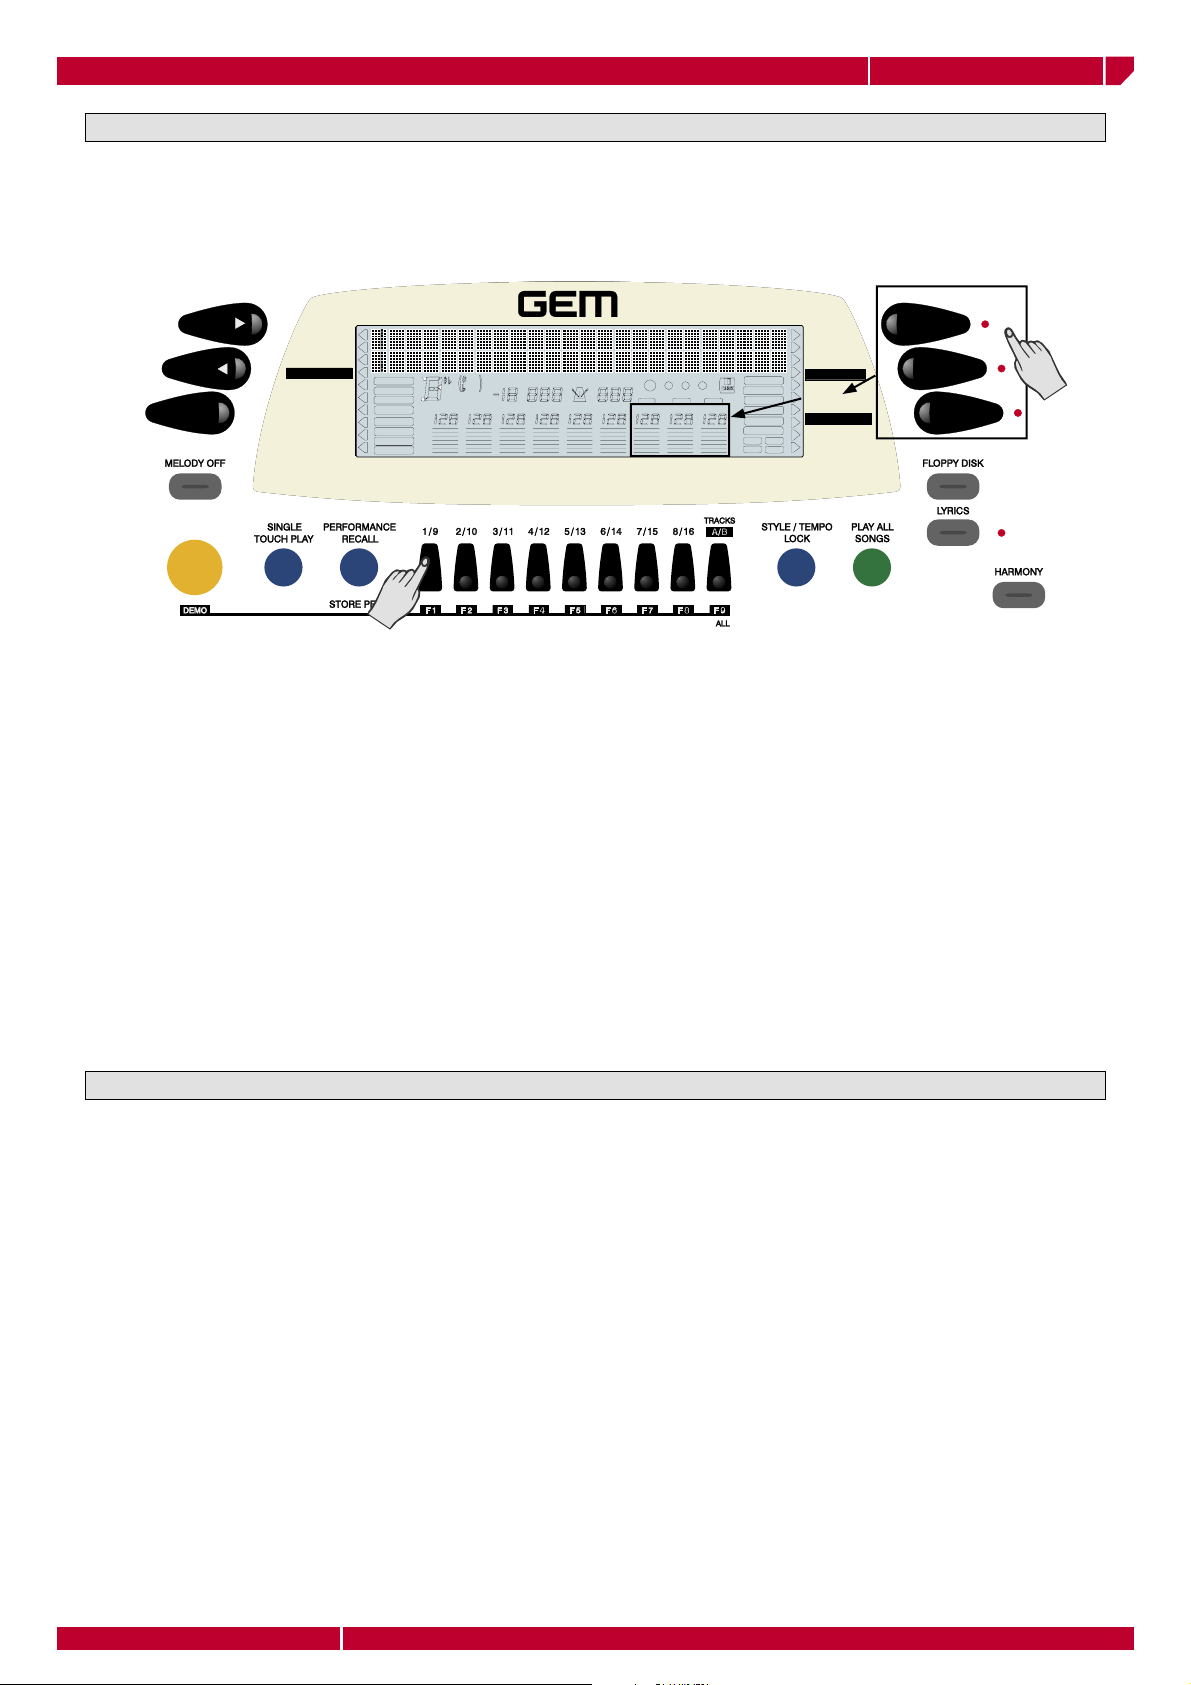
DEMO: HOW TO PLAY THE DEMO SONGS
The Demo Songs of wk1000 can be started at any time to get an idea of the real sound potential of this
instrument.
Press the DEMO key
1
Select one of the fi rst 8 function buttons (F1/F8)
2
below the display
Each function key corresponds to a Song. By pressing
the F9 (ALL) key you can listen to all of the 8 Demo
songs chained in a medley.
The Demo Song starts.
To stop the Demo Song press the function key
3
again, or press the DEMO key to exit.
Page8
Getting Started

owners manual
-"1
*,",
-/9ÊÉÊ-"
,,°Ê"ÊÉÊ-*/
," 9
,6,ÊÉÊ",1-
ÊÉÊ ,
"7,
1//9
1**,ÊÓ
1**,Ê£
"
-6
-
"
1
*,",
-/9
-"1
wk1000
PLAY A SONG DIRECT FROM DISK
The wk1000 can play Song in: GMX, WK2, PK7, WK3 or Standard Midi File [SMF] format, directly from disk,
without having to load them to the memory. Insert a disk containing compatible music fi les in the driver.
Insert the fl oppy disk into the disk drive
1
Press the FLOPPY DISK key
2
The DISK icon lights up and the cursor arrowhead
moves to the LOAD indication in the disk menu. The
display shows the fi rst available fi le type complete
with the relative extension.
Use the Tempo/Data keys to scroll over the disk
3
fi le directory until the name of the desired fi le
appears
Press PLAY/STOP or START/STOP to start the song
4
direct from disk
The message “Wait!!!” appears for a few seconds, on
the display then the selected song starts playing.
1
-"1
*,",
-/9ÊÉÊ-"
,,°Ê"ÊÉÊ-*/
," 9
,6,ÊÉÊ",1-
ÊÉÊ ,
*,",
,",
*9
/À>V Ê£n
/À>V Ê£È
"/6
/"1
"9Ê"
-/9
££
/, -*"- -1, /*"/," "
x£Î
`È
Ç>Õ }ÃÕÃÊ{Ê
°Ê£ °ÊÓ,1- -- "7, 1**,ÊÓ°ÊÎ ", 1** ,Ê£
-"1
"
Ê`Ã
1**,Ê£
Ê`Ã
1**,ÊÓ
, ,
," 9
,,°°
"7°°
-/9Ê"
£
Î
"7,
-
"
-6
Ó
{
1//9
,
Press again the PLAY/STOP o START/STOP buttons
5
at any time to stop the song playback
Getting Started
Page9
+100
owners manual
wk1000
BASIC CONCEPTS
In this chaper you will fi nd the basic concepts to make wk1000 work, along with general information that
will help you understand the various parts of the instrument. To gain access to the keyboard functions, as
well as following the instructions in the Owner’s Manual chapter, you can follow a friendly shortcut: by
holding down the key relative of the function you wish to modify, wk1000 will automatically set into the
desired function edit mode.
STYLES, SONG STYLES AND SONGS
wk1000 operating modes are: Style/RealTime mode: to play with the accompaniments or use wk1000 as
a normal keyboard. To enable this mode, select one amoung the 63 PERFORMANCES or a STYLE from the
Style selection keypad. This is the default mode when wk1000 is powered up. Song Style mode: to record
the keyboard sounds with accompaniments and create 8-track Songs. To enable this mode, press the
STYLE key (led ON), select the desired number (104-110) on the numerif keypad and press the RECORD
key. Song mode: to playback Songs from a disk or from the memory. To enable this mode select the Song
number (111-117) on the numeric keypad.
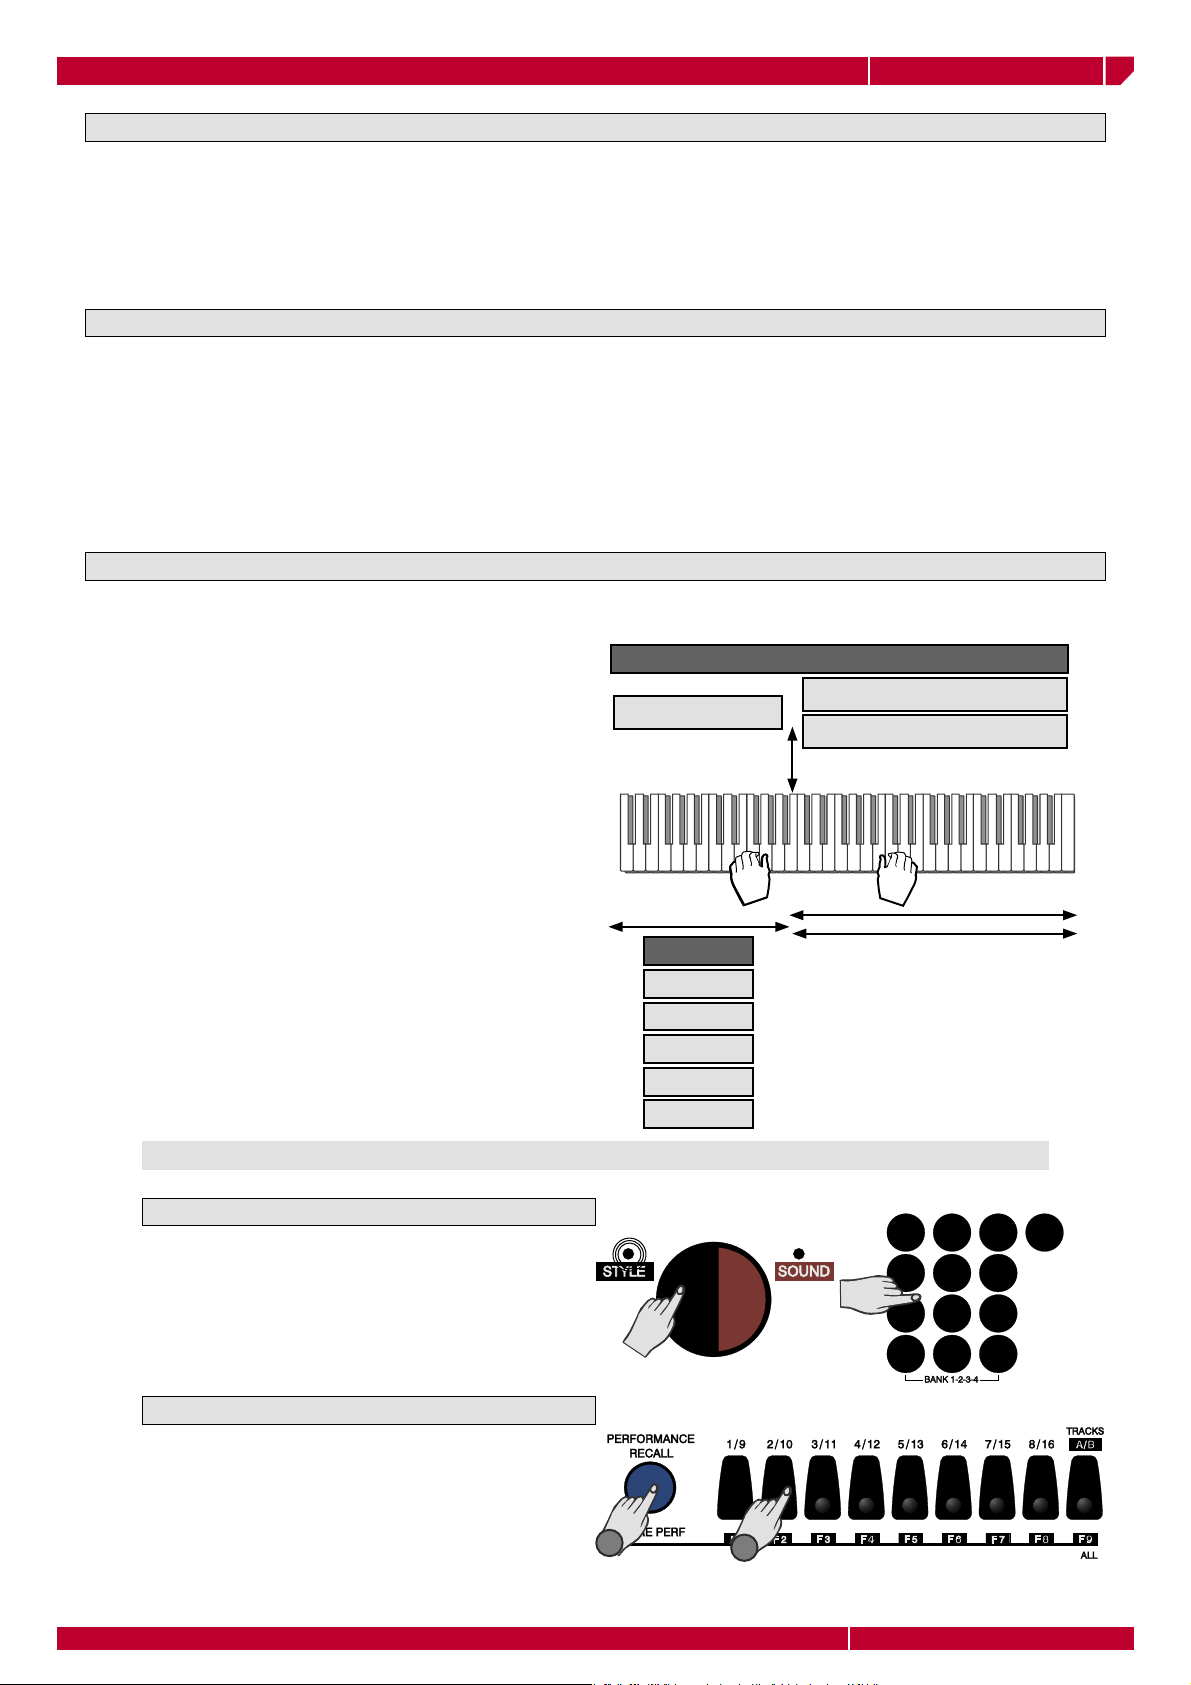
STYLE AND REAL TIME MODES (STYLE ACCOMPANIMENTS OFF)
Style and Real Time mode have a Performance in common.
In Style mode up to 8 tracks (5 accompaniment +
3 realtime) can play simultaneously, while only up
to 3 tracks can play in Real Time mode. Performances are edited in the same way in both modes.
Style/Real Time Performances are always divided
into two parts:
• the fi rst 5 tracks are dedicated to the automatic
accompaniment;
• the other 3 tracks are dedicated to the keyboard
sections (Upper 1, Upper 2, Lower) to play in Real
Time.
Sounds and accompaniments can be recalled by:
Selecting a Style
Press the STYLE key, then select a number on the
numeric keypad.
Lower
Style tracks
BASS
DRUM
ACC1
ACC2
ACC3
REALTIME SECTIONS
Upper 1
Upper 2
Split Point
1
4
7
+100
3
2
5
6
9
8
Press the PERFORMANCE RECALL button, then
select a Performance using the function buttons
located below the display.
Page10
Selecting a Performance
-
0
+
1
2
Getting Started
SOUND
PERFORMANCE
STYLE / SONG
ARR. MODE / SPLIT
HARMONY
REVERB / CHORUS
MIDI / GENERAL
LOWER
UTILITY
UPPER 2
UPPER 1
LOAD
SAVE
DISK
MODE
MENU
PERFORMANCE
STYLE
SOUND
owners manual
wk1000
STYLE LOCK AND SINGLE TOUCH PLAY
The sounds recalled by selecting Performance and Style are controlled by the status of the SINGLE TOUCH
PLAY and STYLE LOCK functions.
PERFORMANCE
STYLE
SP
MENU
SOUND
PERFORMANCE
STYLE / SONG
ARR. MODE / SPLIT
HARMONY
REVERB / CHORUS
MIDI / GENERAL
RECORD
PLAY
Tra ck 1 -8
Tra ck 9 -16
FADE
OCTAVE
TOUCH
MELODY OFF
SINGLE TOUCH PLAY ON
Enabling the function the “SP” message appears above left in the display. Selecting any
Style are recalled the following parameters:
accompaniment patterns, a proper set of
sounds for the Style and for the Keyboard
and, if the Tempo Lock function is off, the
memorized Tempo.
SINGLE TOUCH PLAY OFF
No “SP” message is shown in the display.
The Style selection recalls the accompaniment patterns, the Style sounds, the tempo
data. The realtime sections sounds remain
unchanged.
119
513
dim6
mM7 aug su s 4
TRAN SPOSE MEA SURE TEMPOMETRON OME
REC
ACC. 1 ACC. 2DRUMS BASS LOWER UPPER 2ACC. 3 CHORD UPPER 1
LOC
FLASH
REC REC
STYLE LOCK ON (indicated in the display)
Selecting a Performance the Style does
not change. Only the keyboard sounds
are changed, the Style data remain unchanged.
STYLE LOCK OFF (indicated in the display)
Selecting a Performance all the programmed
parameters are recalled: the Style, the Variation, the Tempo speed, the effects and the
realtime section souns.
It is enabled by pressing and holding down
the STYLE/TEMPO LOCK for a few seconds.
The tempo area in the display will show the
“LOC” message blinking. Now the style can be
changed and the tempo will not be affected.
To disable the function press and hold the
STYLE/TEMPO LOCK once again.
SOUND
H disk
F disk
HARMON Y
ARR.MEM.
LOW.M EM.
STYLE LOCK
2
1
3
4
TEMPO LOCK
MODE
UPPER 1
UPPER 2
LOWER
DISK
LOAD
SAVE
UTILITY
Song Styles are 8-track songs created by recording the 3 keyboard sections and the automatic accompaniment of the Styles (5 tracks). The Style chords are recorded in the CHORD track. Song Styles are a quick
method to create backing tracks for singers or solo instruments. Up to 7 Song Styles can be loaded to the
wk1000 memory.
A Song is a multi-timbral 16-track performance, in which each track represents an instrument of the orchestra or of the band. wk1000 can load and playback songs in the following formats: GMX, PK7, WK3 or
MidiFile (Standard Midi File) created on external sequencers. Up to 7 Songs can be loaded to the memory,
if the locations are available. wk1000 can be used as a MIDI 16-part sound generator.
Getting Started
SONG MODE
Page11
SONG STYLE MODE
owners manual
wk1000
PERFORMANCES
A Performance is a combination of sounds and settings. Performances can store the current status of the
panel buttons and information pertaining to the parts that make up a Performance to play in real time and
with Styles. Performances memorise effect settings, the status of the controllers (pedals, Pitch/Modulation
ball), the pads confi guration, the MIDI channel confi guration, the status of the tracks (On/Off), the Tempo
setting and more. By selecting a Performance, all the settings memorised to the Performance are recalled
in a single step. There are 63 programmable Performances available to choose from, giving you a variety
of possibilities of setting the wk1000 to your liking with the least number of operations. In addition, in ROM
(non-programmable) there are as many Style-Performances as there are ROM Styles, which you can recall
at the touch of a button using the SINGLE TOUCH PLAY function.
REALTIME PERFORMANCES
63 user-programmable Performances are arranged in 7 PERFORMANCE GROUPS. Performances recall
combinations of the keyboard sounds, panel settings, Style, Variation and Tempo. Press the PERFORMANCE
RECALL button to quickly access the Performances (select them with the F1/F9 buttons). Hold down the
same button to activate the STORE PERFORMANCE command, which allows you to save the panel situation
to the current Performance.
STYLE PERFORMANCES
96 default non-programmable Performances are associated to the ROM Styles which are permanently
stored in the instrument’s Read Only Memory. The default Style Performances are recalled when Styles are
selected with the SINGLE TOUCH PLAY function selected (display indicator on). Style Performances recall
sounds for the accompaniments and keyboard sections.
SINGLE TOUCH PLAY SETTING
SINGLE TOUCH PLAY SETTINGS are additional Performances which are recalled by using the function buttons F1/F9 when the SINGLE TOUCH PLAY function is active (display indicator selected). In this condition,
as well as being able to select the ROM Styles using the Style / Song selection keypad, you can also recall
up to 9 preset real time keyboard settings (combinations of the Upper 1, Upper 2 and Lower sounds) which
depend on the current Style. The possibilities are, therefore, endless when you consider that there are 96
ROM Styles, each with 10* Single Touch Play settings (for a total of 960 preset settings!).
SONG STYLE PERFORMANCE
Song Style Performances (non-programmable) are associated to the Song Styles which are stored in appropriate memory locations as indicated in the Song/Style lists at the top of the instrument’s control panel.
The Song Style Performances recall sounds associated to the accompaniment tracks and keyboard tracks
used in the recording.
SONG PERFORMANCE
Every Song loaded or played from disk is associated to a specifi c Song Performance which is automatically
recalled by selecting the Song (111-117).
Page12
Getting Started
SOUND
PERFORMANCE
STYLE / SONG
ARR. MODE / SPLIT
HARMONY
REVERB / CHORUS
MIDI / GENERAL
LOWER
UTILITY
UPPER 2
UPPER 1
LOAD
SAVE
DISK
MODE
MENU
PERFORMANCE
STYLE
SOUND
UPPER 2
PAGE
UPPER 1
PAGE
LOWER
CURSOR
owners manual
wk1000
TRACKS
The Track is the smallest part of a Performance and each type of Performance contains a number of tracks
that correspond to the playing mode to which the Performance is associated. A sound can be assigned to
each track; the display always shows the sounds assigned to the realtime keyboard sections (Upper 1, Upper 2, Lower).
CURSOR
PAGE
PAGE
MENU
SOUND
PERFORMANCE
STYLE / SONG
ARR. MODE / SPLIT
HARMONY
REVERB / CHORUS
MIDI / GENERAL
PERFORMANCE
RECORD
PLAY
Trac k 1-8
Tra ck 9-1 6
FADE
OCTAVE
TOUCH
MELODY OFF
STYLE
119
TRANS POSE MEASUR E TEMPOMETRONOME
513
dim6
mM7 aug sus 4
ACC. 1 ACC. 2DRUMS BASS LOWER UPP ER 2ACC. 3 CHORD UPPER 1
SOUND
H disk
F disk
REC
REC REC
HARMONY
ARR.MEM.
LOW.MEM .
STYLE LOCK
1
3
MODE
UPPER 1
UPPER 2
LOWER
DISK
LOAD
SAVE
2
4
UTILITY
UPPER 1
UPPER 2
LOWER
It is also possible to see the sounds assigned to all the tracks of the current Performance. The Tracks are
divided into two groups: 01-08 and 09-16. If the display arrowhead shows the Song function selected,
the function button F9 allows you to switch from the track set 01-08 to 09-16. The Sounds assigned to
the tracks are displayed as Program Change numbers. The bar graphs shown directly under the Program
Change numbers represent the track Volume levels. The status (ON or OFF) of the Upper 1, Upper 2 and
Lower tracks can be changed by intervening directly on the corresponding section activators (Upper 1, Upper 2, Lower). The ON/OFF status of all the other tracks of the Performance (except the real time tracks)
is changed by pressing the corresponding function buttons repeatedly (provided that the PERF function is
not shown selected with the arrowhead). The ON/OFF status of the tracks is shown by the track name (e.g.
‘Drum’) which is displayed when ON or cancels when OFF.
SOUNDS
wk1000 sounds can be: ROM sounds, Drum kit sounds, Samples.
ROM Sounds
wk1000 contains 471 sample-based ROM Sounds (including 20 Drumkits). The Sample Ram allows you to
load one or more samples in memory, to increase the sound potential of the instrument.
DRUM KITS
Drumkits assign a different percussive sound to each note of the keyboard. Banks 2 and 3 of the PERCUSSIVE Sound Group contain 20 Drumkits. Bank 4 contains a special drumkit (location 112) confi gured with
some extra special sounds (DrumSFX) to tickle your immagination.
SAMPLES
wk1000 can load samples in WK2, PK7, WK3 and CD formats. They can be loaded to the memory using
the “ Load All Disk” function.
Getting Started
Page13
owners manual
wk1000
CONNECTIONS
This section gives a brief explaination of the rear panel sockets and of the the types of connection possible
for your wk1000.
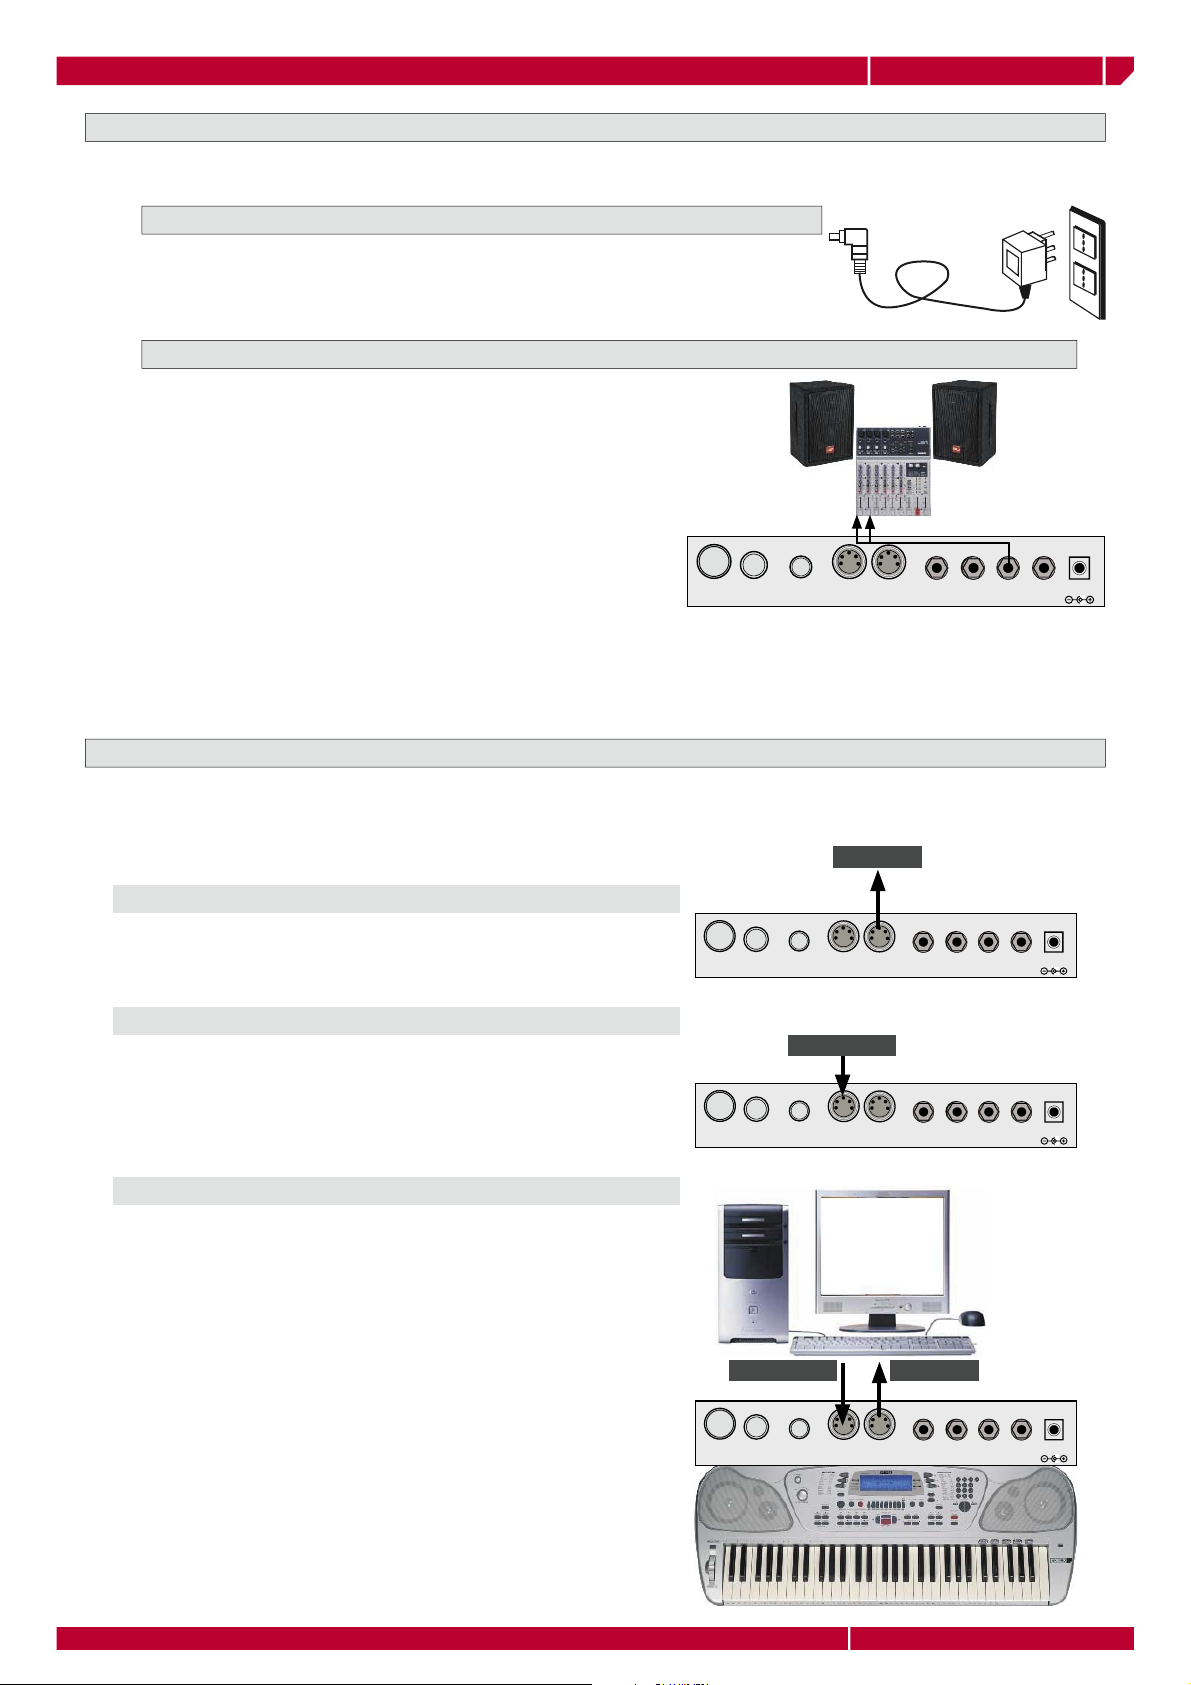
POWER
Connects wk1000 to a mains socket through the provided AC/DC power
supply adapter
AUX/OUTPUTS
The rear-panel Stereo output jacks allows the wk1000 to
be connected to an external amplifi cation system (keyboard amplifi er, domestic stereo system, mixing console,
etc.). The signal is processed by the instrument’s internal
digital effects processor. For stereo reproduction, connect
two jack cables to the AUXOUT. To exclude the instrument’s internal amplifi cation and use the audio outputs
only, insert a jack into the headphones socket. Connecting
the AUXOUT jacks only to external amplifi cation equipment, does not exclude the internal speakers.
RGB S-VHS COMPUTER
MIDI-OUT
MIDI-IN VOLUMEDAMPER PHONESAUX
OUT
DC-12V
MIDI
wk1000 has MIDI IN/OUT port for standard MIDI connections. Detailed information regarding MIDI applications are found in the dedicated chapter further ahead. Below follow brief instructions on the principal
MIDI connections
MIDI IN
wk1000 CONTROLLING A MIDI INSTRUMENT (MASTER)
Connect the wk1000 MIDI OUT to the MIDI IN of the external instrument
wk1000 CONTROLLED BY A MIDI MASTER KEYBOARD (SLAVE)
Connect the wk1000 MIDI IN to the MIDI OUT of the master keyboard. If you wish the master keyboard to simulate
wk1000 fully, set it to transmit on the same channel as the
wk1000 Common Channel, setting all other channels to off.
USE wk1000 TO RECORD ON AN EXTERNAL MIDI SEQUENCER
Connect the wk1000 MIDI IN to the MIDI OUT of the external device, the wk1000 MIDI OUT to the MIDI IN of the
external device. In MIDI/GENERAL select with the PAGE
button the LOCAL control. Enable “Local OFF” function in
the UPPER 1 keyboard section, but do not disable the track.
In this way the keyboard is separated from the sound generation and wk1000 sends midi data to its own internal
sound engine via the computer/sequencer.
RGB S-VHS COMPUTER
MIDI OUT
RGB S-VHS COMPUTER
MIDI-OUT
MIDI-IN VOLUMEDAMPER PHONESAUX
MIDI-OUT
MIDI-IN VOLUMEDAMPER PHONESAUX
MIDI INMIDI OUT
DC-12V
OUT
OUT
DC-12V
Page14
RGB S-VHS COMPUTER
MIDI-OUT
MIDI-IN VOLUMEDAMPER PHONESAUX
Getting Started
OUT
DC-12V
owners manual
wk1000
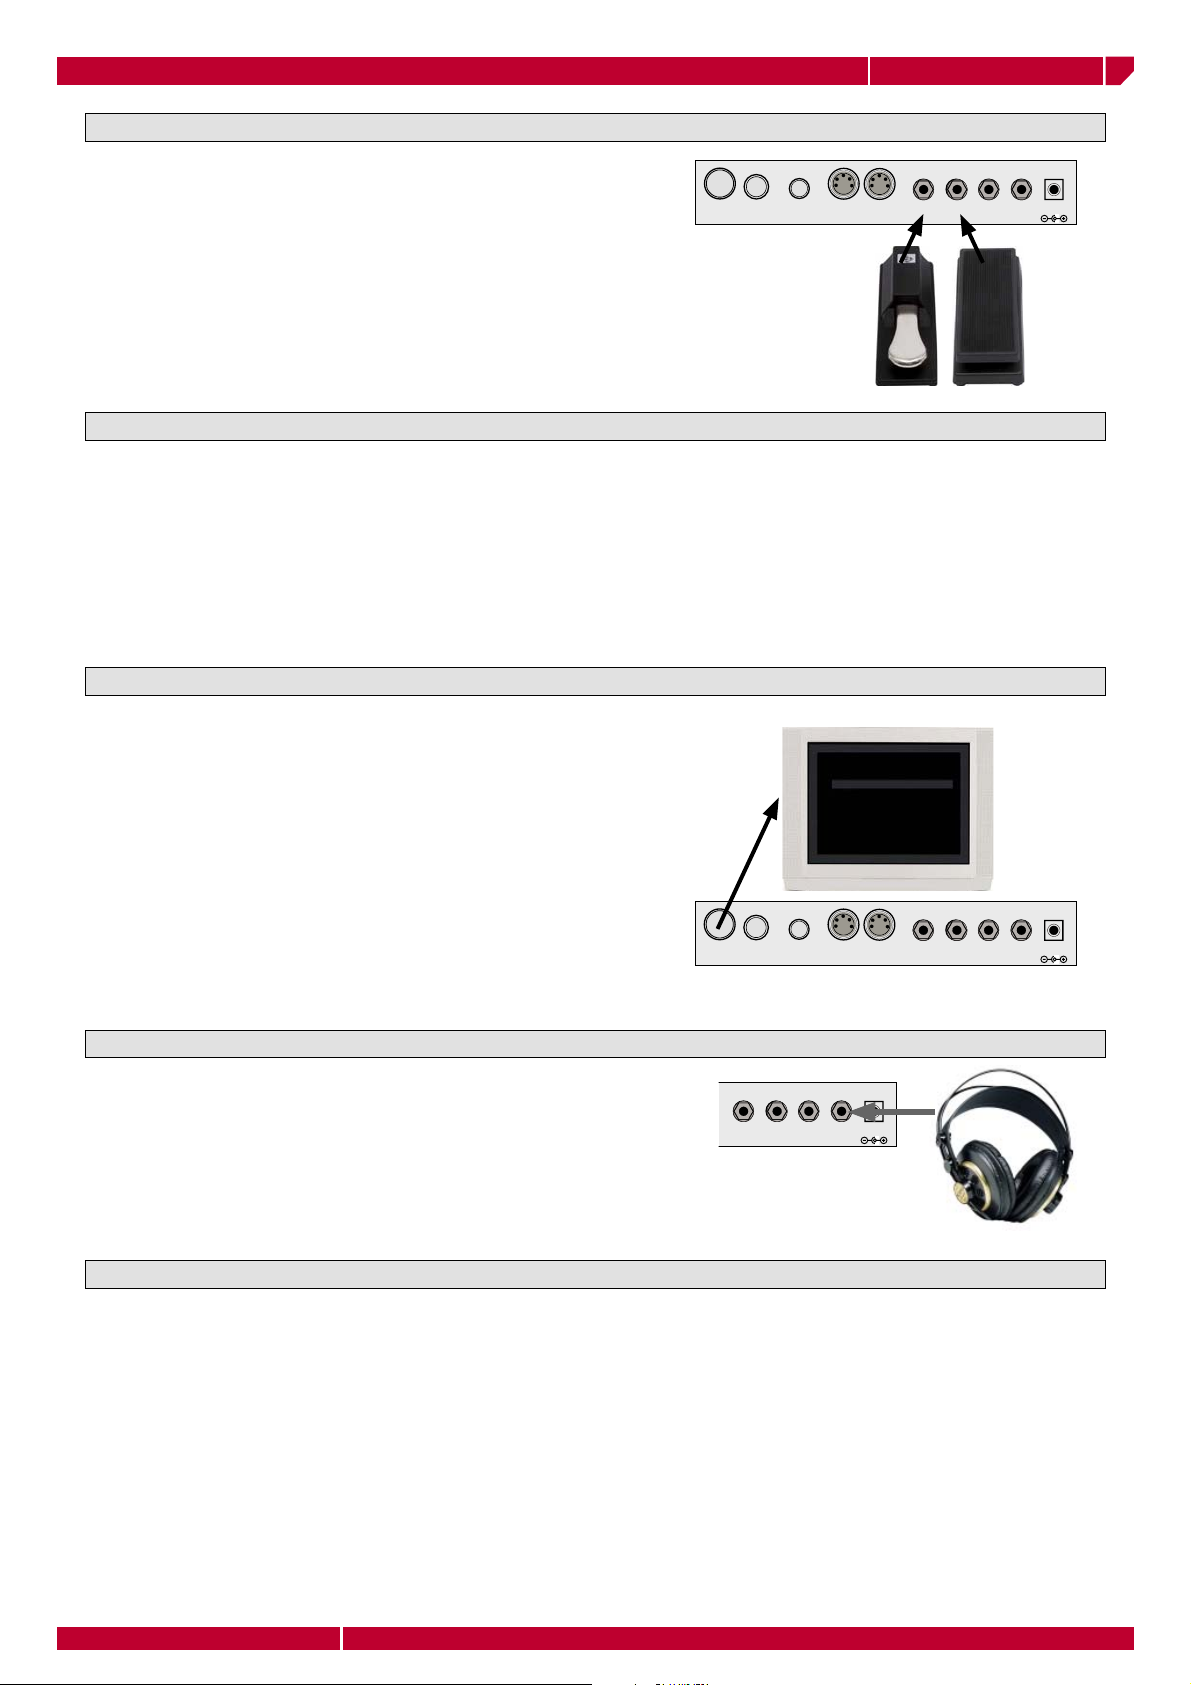
PEDALS
Connect the optional Volume and Damper pedal to the relative
sockets. The default Control Change (CC) messages appear as
follows:
RGB S-VHS COMPUTER
MIDI-OUT
MIDI-IN VOLUMEDAMPER PHONESAUX
DAMPER: Damper (generates CC64)
VOLUME: Master Volume (generates CC07 on Common Channel)
COMPUTER
wk1000 can be connected to a computer through the COMPUTER (serial) connector. Computer connection
is alternative to MIDI connection. The two types of connection cannot be used at the same time.
MAC. Connect to the MAC Modem port through a standard serial cable. Properly set the sequencer
on your Mac to communicate with wk1000.
PC IBM and compatibles. Use standard serial cables of the DB8-DB9, DB8-DB25 type to connect
to the serial port. Select the wk1000 appropriate speed to communicate with the PC (refer to the
“MIDI/GENERAL” chapter).
OUT
DC-12V
VIDEO INTERFACE
The Video RGB and S-VHS sockets connect the instrument to
a TV set or monitor to display Song lyrics in Karaoke Style.
wk1000 is confi gured to operate with the European Video
Standard (PAL). In the U.S.A. the instrument must be confi gured in the NTSC standard. Refer to the “MIDI/GENERAL”
chapter for more details. Connect a RGB monitor, a TV set or
a short-circuit video set to this socket. For domestic TV sets, set
the AV mode.
HEADPHONES
wk1000 features a headphones socket. Plugging the heaphones jacks into the headphones socket excludes the internal
speakers and allows private listening.
RGB S-VHS COMPUTER
VOLUMEDAMPER PHONESAUX
OUT
MUSIC FILES
LYRYCS ON
SCREEN KARAOKE
PERFORMANCE
MIDI-OUT
MIDI-IN VOLUMEDAMPER PHONESAUX
DC-12V
DC-12V
OUT
MUSIC STAND
A music stand is supplied in the wk1000 package. Fix it to the instrument holes in the rear panel to hold
music scores.
Getting Started
Page15
-"1
*,",
-/9ÊÉÊ-"
,,°Ê"ÊÉÊ-*/
," 9
,6,ÊÉÊ",1-
ÊÉÊ ,
"7,
1//9
1**,ÊÓ
1**,Ê£
"
-6
-
"
1
*,",
-/9
-"1
PAGE
PAGE
owners manual
wk1000
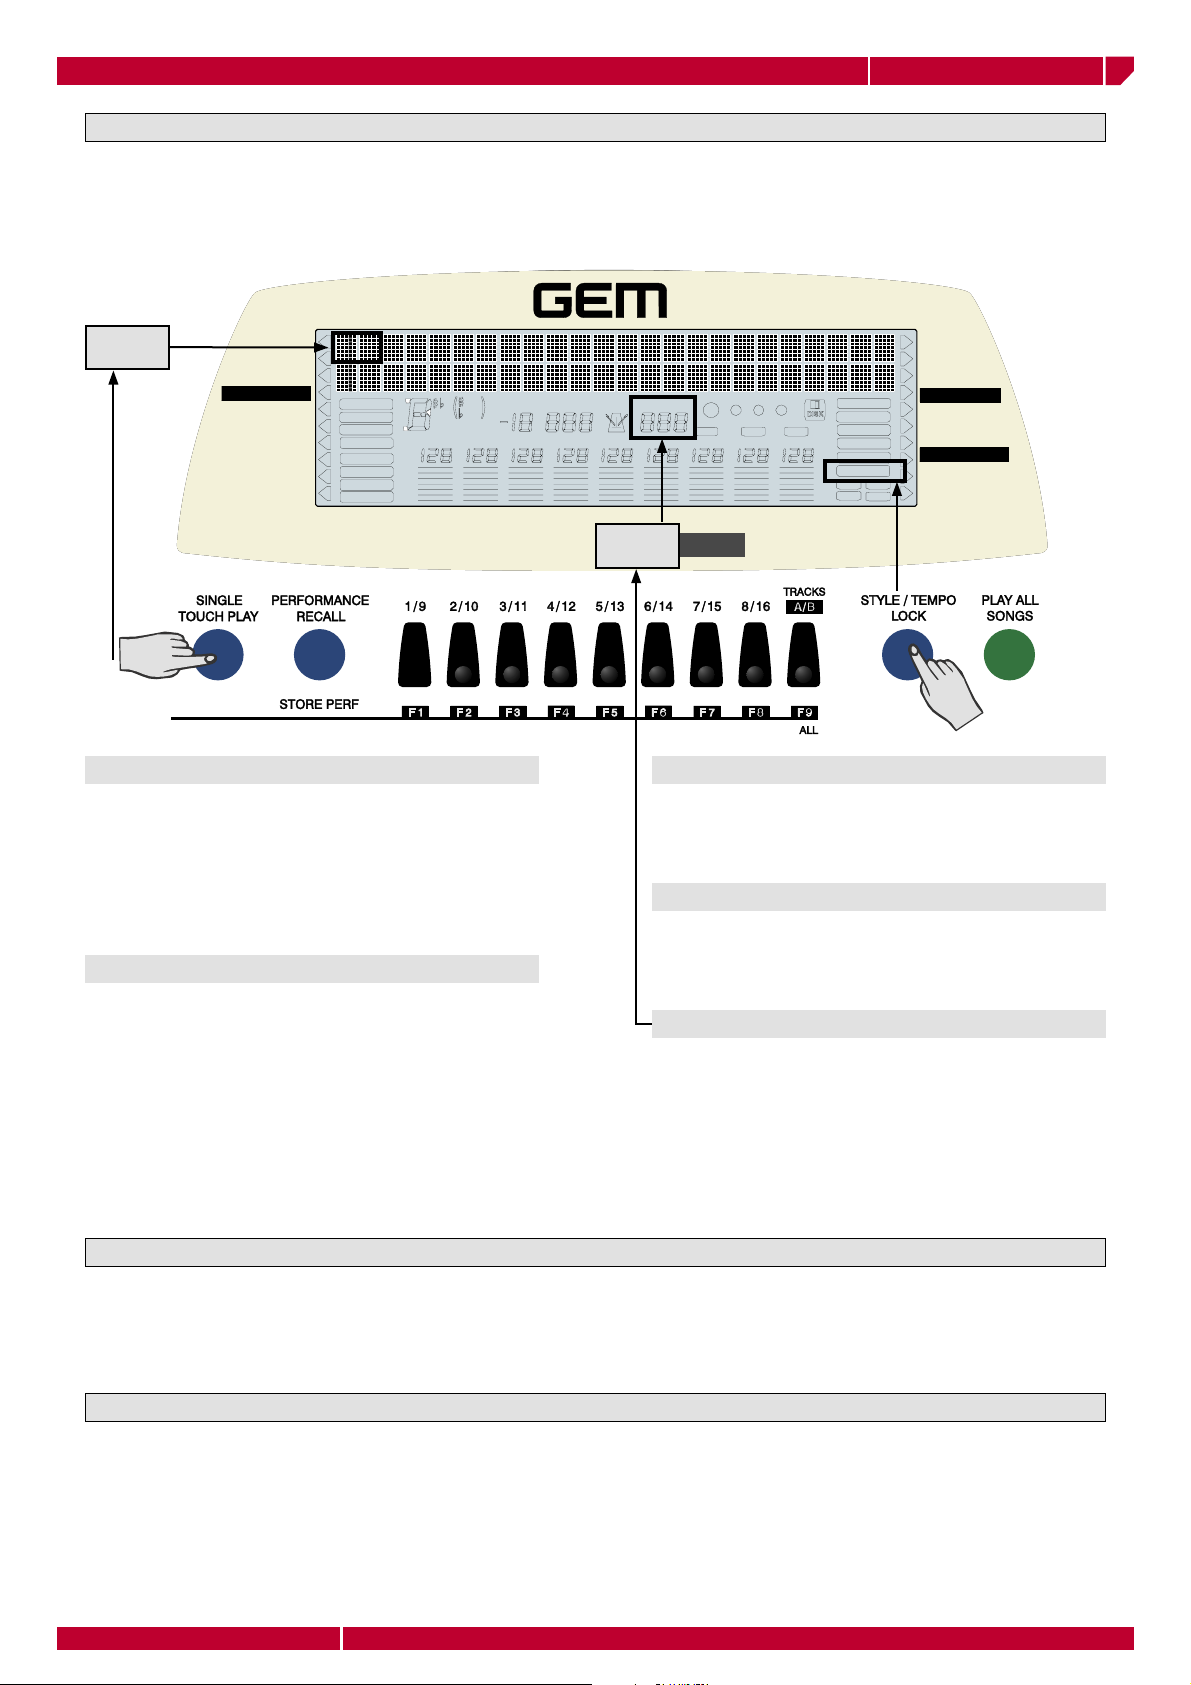
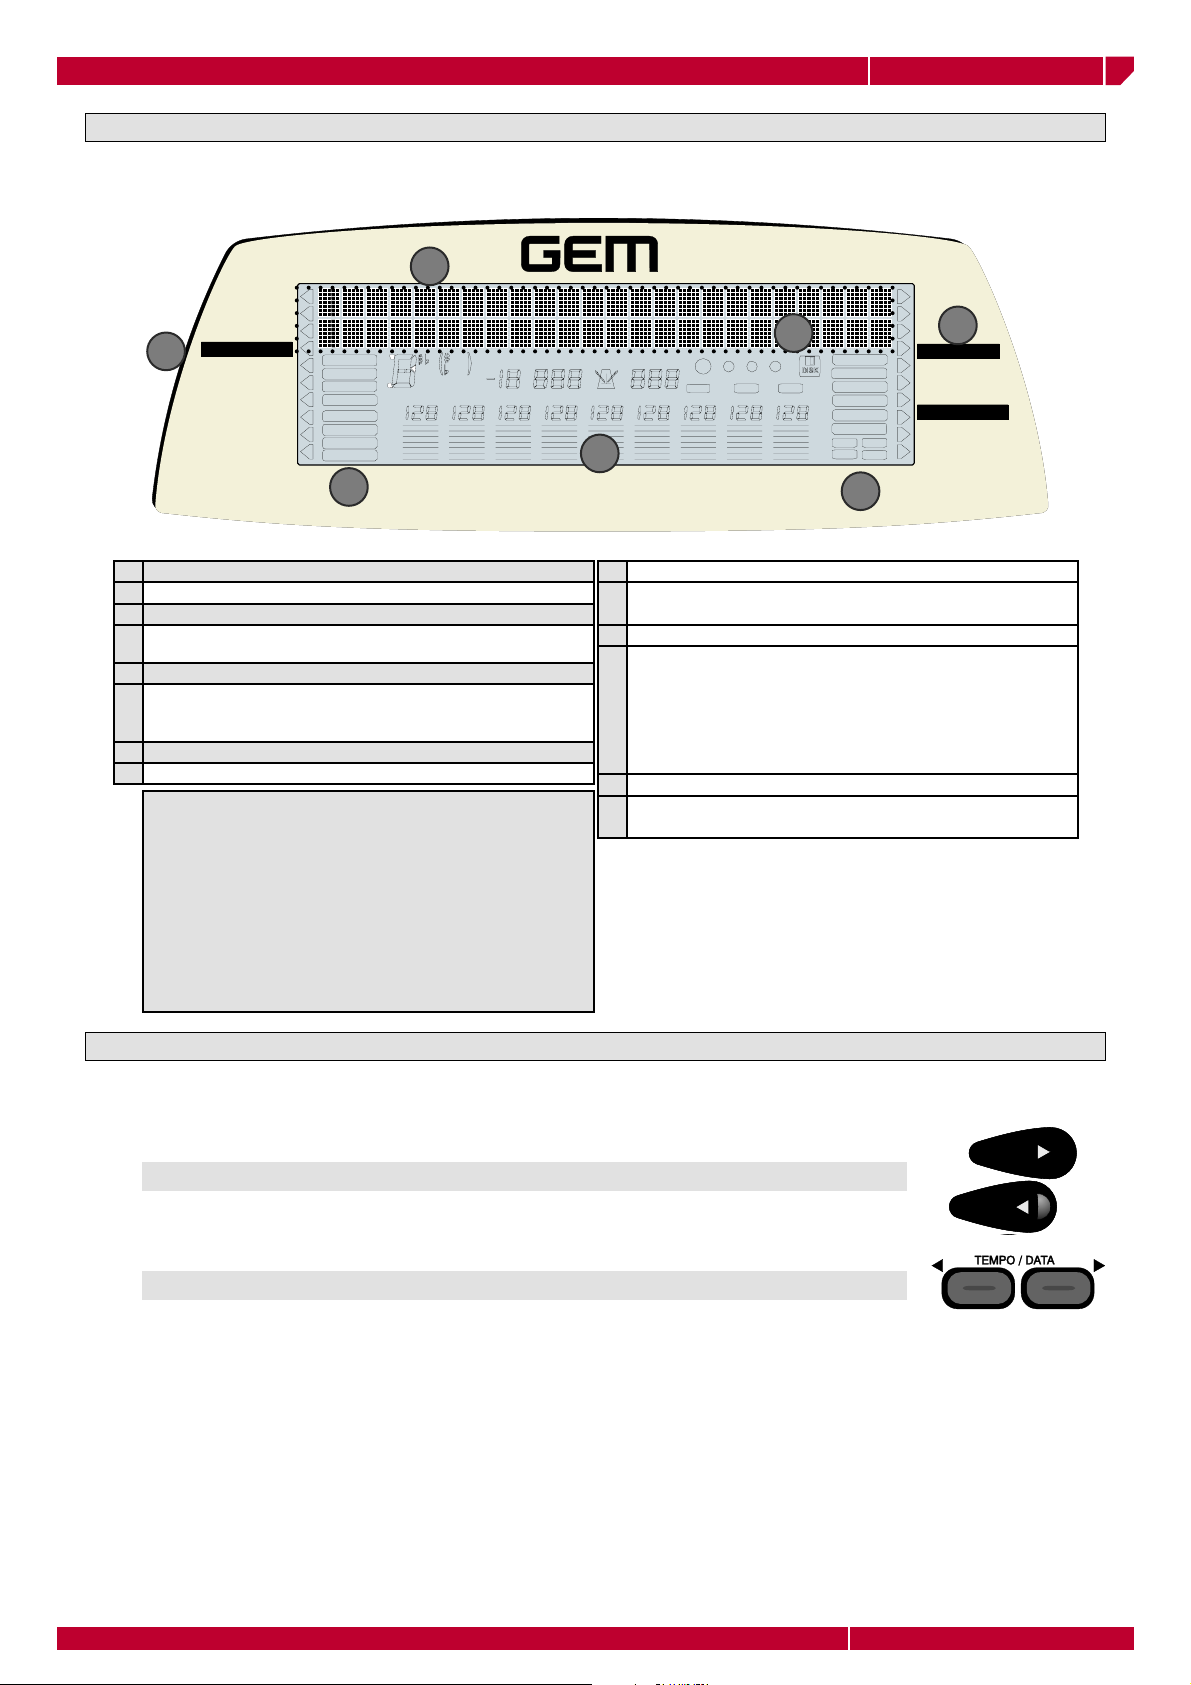
THE DISPLAY
wk1000 features a large, back-lit multifunction liquid crystal display that will simplify all operations performed on the instrument. The user interface is divided into 7 areas:
3
££
x£Î
`È
Ç >Õ } ÃÕÃÊ{Ê
-/9
/, -*"- -1, /*"/," "
°Ê£ °ÊÓ,1- -- "7, 1**,ÊÓ°ÊÎ ", 1**,Ê£
1
*,",
,,°Ê"ÊÉÊ-*/
,6,ÊÉÊ",1-
ÊÉÊ ,
1
-"1
-/9ÊÉÊ-"
," 9
*,",
,",
*9
/À> V Ê£n
/À> V Ê£ È
"/6
/"1
"9Ê"
2
MENU (left)
1
It lists all functions that are accessed by the reference keys
INDICATORS (left)
2
Indicators show the ON or OFF status of the relative functions.
READING AREA (two lines, up to 24 characters)
3
When LYRICS function is active, the Song lyrics are displayed
in this area. Alternatively, it shows the names of the events
associated to Style, Upper1, Upper2, and Lower sections.
CENTRAL AREA
4
The following events are visualized in this area:
• The Accompaniment and realtime tracks volume
• The left hand accompaniment chord;
• The Metronome ON/OFF status;
• The Tempo setting and metronome beat;
• The disk drive functions
• The overall Transpose setting;
• The Sequencer measure counter;
• The values relating to functions;
• The names of the : Sounds, Styles, Performances,
Song Styles, Songs, and functions.
-"1
7
Ê`Ã
Ê`Ã
,
, ,
4
," 9
,,°°
"7°°
-/9Ê"
£
Î
Ó
{
"
1**,Ê£
1**,ÊÓ
"7,
-
"
-6
1//9
6
5
INDICATORS (right)
5
Show the ON/OFF status of the corresponding functions.
MODE
6
The names of the 3 real time sections selected with the
corresponding buttons to the right (Upper 1, Upper 2,
Lower). A LED indicator near the button shows which
section is selected. The on/off status of the keyboard sections determine how the keyboard sounds are combined
and set the keyboard modes (Full or Split).
DISK
7
Indicate the FLOPPY DISK activity once the relative button on the panel is pressed.
Modes, pages and values are selected as follows: After selecting a function with the corresponding arrowhead, it is possible to:
Page16
DATA ENTRY
• Change Page (where two or more pages are given) using the PAGE buttons
• Enter data (change parameter values) using the TEMPO/DATA buttons
PAGE
PAGE
Getting Started
 Loading...