

Generalmusic RealPiano RP150 Owner's Manual
OWNER’S MANUAL
English

The information in this publication has been carefully prepared and checked. The
manufacturers however decline all liability for eventual errors. All rights are reserved.
This publication may not be copied, photocopied or reproduced in part or in whole without
prior written consent from Generalmusic S.p.A. Generalmusic reserves the right to apply
any aesthetic, design or function modifications it considers necessary to any of its products
without prior notice. Generalmusic declines all liability for damage to property or
persons resulting from improper use of the instrument.
© 1999 Generalmusic S.p.A. All rights reserved.
General safety instructions
Power source
• Be sure that your local AC main voltage matches the voltage specified on the name plate before connecting to the mains.
• DC power cannot be used to power this instrument.
Handling the power cord
• Never touch the power cord or its plug with wet hands.
• Never pull on the cord to remove it from the wall socket, always pull the plug.
• Never forcibly bend the power cord.
• If the power cord is scarred, cut or broken, or has a bad contact, it will be a potential fire hazard or source of serious
electric shock. NEVER use a damaged power cord; have it replaced by a qualified technician.
If water gets into the instrument
• Remove the power cord from the wall socket at once, and contact the store where the unit was purchased.
• The top surface of your instrument should never be used as a shelf for flower vases and other containers which hold
liquids.
Metal items etc. inside the unit
• Do not permit metal items or other materials to fall inside the unit.
Metal items may result in electric shock or damage.
• Be especially careful with regards to this point when children are near the unit. They should be warned never to try to put
anything inside, and never to slide a hand into the unit while you or other persons are playing.
• If articles do fall inside, remove the power cord from the wall socket at once and, if necessary, contact the store where the
unit was purchased.
• As a general precaution, never open the unit and touch or tamper with the internal circuitry.
If the instrument plays in an abnormal way
• Turn off the power immediately, remove the power cord from the main outlet and contact the store where it was purchased.
• Discontinue using the unit at once. Failure to do so may result in additional damage or other unexpected damage or
accident.
General user maintenance
• Clean the cabinet and keys of your instrument using a soft, clean, slightly damp cloth and polish with a soft, dry cloth.
• Never use industrial cleaners, detergents, abrasive cleansers, waxes, solvents or polishes as they may damage the instrument finish.
• Always turn off the power supply after use and never turn the unit on and off repeatedly in quick succession as this places
an undue load on the electronic components.

a
Section 1: Instrument Layout
Front Panel ................................................. 2
Rear Panel .................................................. 4
Power switch and Headphones................... 5
Turn the instrument on ............................... 5
Headphone Jacks........................................ 5
Pedal connection ........................................ 6
Section 2: Quick Study Guide
Realtime operations.................................... 8
Selecting the RP150 Presets......................11
The Selection buttons................................11
The Preset................................................. 13
Listen to the Demo Songs ........................ 14
Recording a Song ..................................... 16
Section 3: Basic Functions
Brilliance .................................................. 18
Transpose ................................................. 18
Touch........................................................ 19
Section 4: Perf Edit - The Presets and how
to edit them
The concept of the RP150 Preset ............. 22
The structure of a Preset........................... 22
The Effects ............................................... 23
The Perf Edit menu .................................. 24
1. Sound Program .................................... 25
2. Sound Volume ..................................... 27
3. Section Transpose................................ 28
4. Reverb Send (Rev. Send)..................... 29
5. Reverb Decay Time (Rev Time).......... 30
6. Effect Send Level (EFX Send)............ 31
7 & 8. Effect parameter Editing .............. 32
9. Damper Pedal Assign (Damp. Assign) 33
10. Auto Wha Wha .................................. 34
11. Microtuning....................................... 35
User Microtuning .............................. 35
12. Detune ............................................... 37
13. Delay ................................................. 38
14. The Store command .......................... 39
How to store your modifications.............. 39
Store the modified Preset to the
same location......................................... 39
Table of contents
Store the modified Preset to a
different location .................................... 40
Change the name of the Preset ................. 40
Section 5: General Edit
1. Tune Control....................................... 43
2. MIDI Channel..................................... 44
3. MIDI Mode......................................... 45
4. MIDI Transpose.................................. 46
5. MIDI In Filters ................................... 47
6. MIDI Out Filter .................................. 48
7. MIDI Local......................................... 49
8. MIDI Clock ........................................ 50
9. MIDI Dump........................................ 51
10. Computer............................................ 52
11. Restore Preset..................................... 53
12. Restore Microtune.............................. 54
13. Piano Frame Level ............................. 55
14. Display Contrast................................. 56
Section 6: Recording Studio/Sequencer
Recording Studio Controls....................... 58
Rec Control .............................................. 58
Time Signature ......................................... 58
Metronome (click).................................... 58
Countdown ............................................... 59
Section 7: Reference
RP150 T echnical Specifications............... 62
T echnology............................................... 63
Natural String Resonance......................... 63
Damper Physical Model........................... 63
Advanced Release Technology ................ 63
Appendix
Preset/User Preset list.............................A. 2
MIDI Implementation chart ...................A. 3
Special Control Change messages .........A. 4

b

Instrument layout
Section 1

2
Front panel
1. Demo : Activates the factory programmed demonstration of the internal sounds.
2. General : This button provides access to the functions which affect the instrument as a whole:
Tune, Midi, Piano Frame Level, Display Control, Restore Preset.
3. Volume Slider : Controls the main volume of the instrument.
4. Brilliance +\– : Use these buttons to adjust the overall tone of the instrument.
5. Transpose #/b : Increases (#) or decreases (b) the overall pitch of the instrument in half-step
(semitone) increments.
6. Selection : Use these buttons to select Presets and User Presets (single, layer or split sound
combinations).
7. Preset\ This button switches between Preset selection mode and User Preset selection
mode.
8. GrandPiano : Press this button to select the Grandpiano Preset which instantly recalls the
GrandPiano sound across the entire keyboard.
9. Page Use these buttons to step through the various functions in the Perf Edit and General
menus.
10. Display : 2 x 16 LCD display, backlit.
11. Data +/– : These buttons adjust values shown in the display when using programmable
functions.
12. Balance / : These buttons regulate the volume balance between two sounds in either Layer or
Split modes.
13. Touch : This button adjusts the touch of the keyboard according to your playing style.
14. Store : Press this button when you are ready to store the changes you have made.
VOLUME
BRILLIANCE
TRANSPOSE
USER PRESET
PAGE
DATA
RECORDING STUDIO
CONTROL
SELECTION
INTERNAL PRESET
GRANDPIANO
4
2
176 9 10 11 16
853
2324
12
131415
212019
18
22
17
User Preset :
Up/Down / :

3
15. Rec.Control : Use this button to set the recording options of the on-board sequencer.
16. Play\Stop : Press this button to playback what you have recorded, to stop the playback or stop
the recording.
17. Rec. : Press this button to record what you play.
18. Perf. Edit : Use this button to edit a variety of Preset performance features.
19. Effect : Use this button to select an effect type. When the LED is off, the current effect type
is cancelled.
20. Reverb : Use this button to select a reverb type. When the LED is off, the current reverb type
is cancelled.
21. Layer : Press this button to instantly activate two layered sounds which play at the same
time across the entire keyboard.
22. Split : Turning this button on will split the keyboard into separate left and right parts and
automatically recall the sound for the left hand.
23. Power : Situated on the right key block, press this button to turn the instrument on and off.
24. Headphones : The Headphones jack panel is located on the left side of the instrument, under the
keyboard.
4
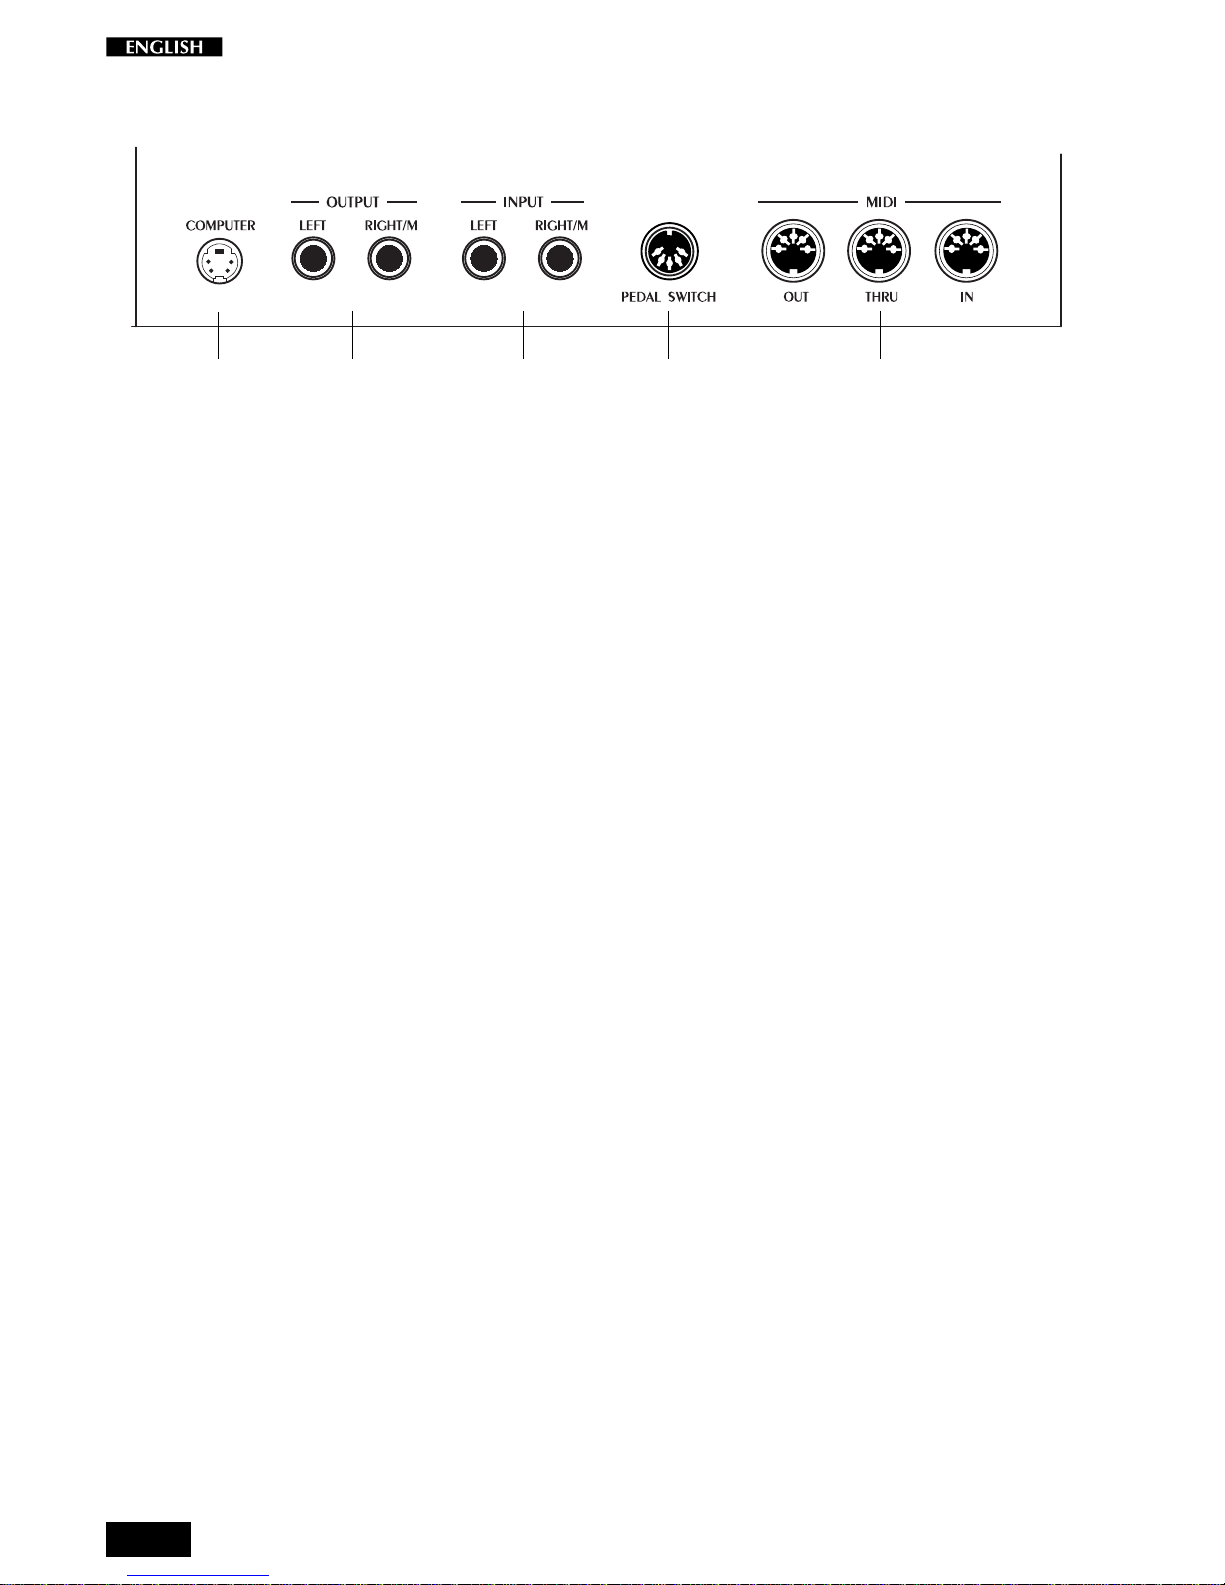
Rear panel
1. Computer : Allows direct connection of the instrument to a PC or Macintosh computer (or
relative compatibles) without the need to use a MIDI interface.
2. Output These two outputs are used to connect the instrument to another amplifier, mixer or
recording device in stereo. If you are connecting to mono equipment (e.g. a guitar
amplifier) then you should use only the Right/Mono jack.
3. Input You can use these two inputs to connect another instrument or sound module to the
piano. The output of the other instrument will be mixed with the main signal of the
RP150 and sent to the Output, Speaker and Headphone jacks. If you are connecting
a mono signal (e.g. a microphone) then you should use only the Right/Mono jack.
4. Pedal Switch : The pedal group consisting of three pedals (Damper, Sostenuto and Soft) should be
connected to this connector.
5. MIDI interface : These ports allow the instrument to be connected to other MIDI devices. MIDI In
allows the sounds of the RP150 to be played by an external device, e.g. a controller
keyboard or sequencer. MIDI Out sends MIDI information from the RP150 to other
equipment so that the instrument can be used as a controller. MIDI Thru provides
a copy of the information being received by the MIDI In. Use MIDI Thru when
connecting a number of different instruments together.
32451
Left - Right/M :
Left - Right/M :
5
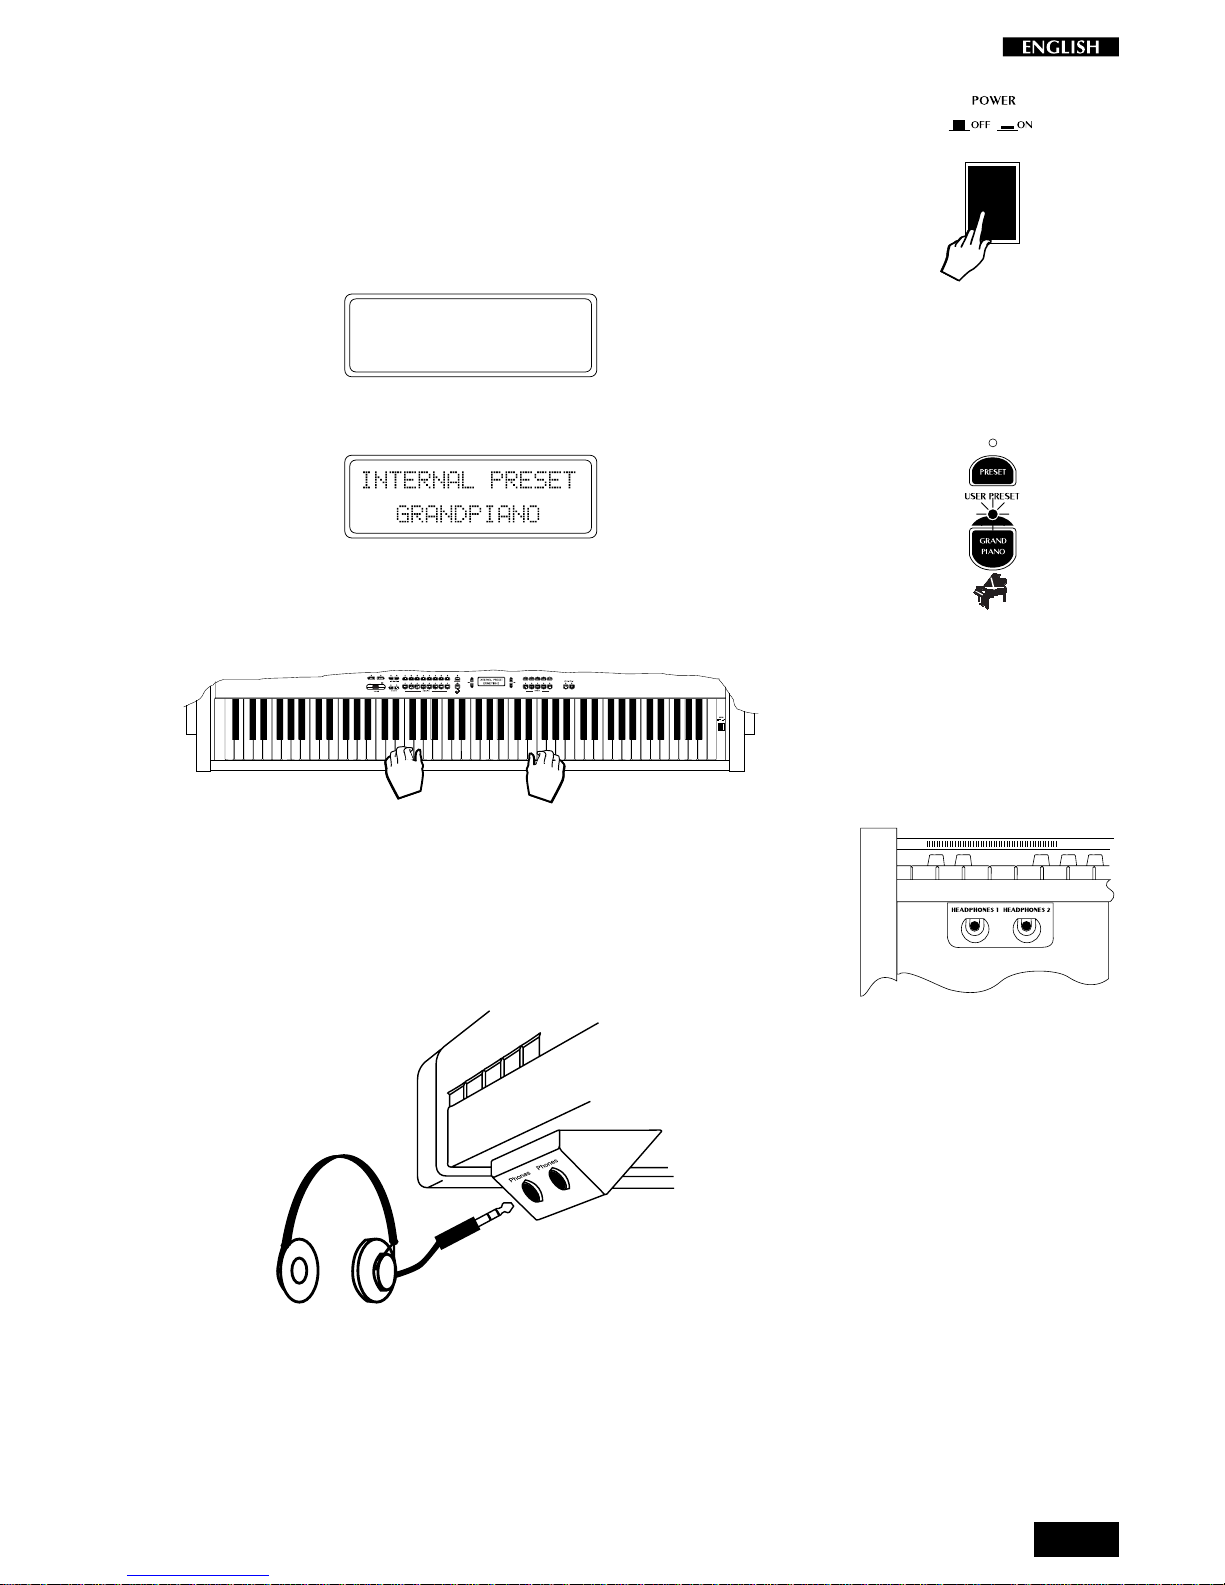
Power switch and Headphones
Turn the instrument on
To turn the instrument on, press the Power switch located on the right key
block. After turning on, the name of the instrument appears in the display
for an instant.
* G E M *
REALPIANO RP150
Shortly after, the instrument sets for play showing a default display.
In this power up condition, you will be able to play a piano sound
(GrandPiano) across the entire keyboard without carrying out other
operations.
<--------------------- GrandPiano ---------------------->
Headphone jacks
The headphone jacks are located at the extreme left side of the rail which
runs beneath the keyboard.
Plugging a set of headphones into the left jack excludes the internal
speakers to allow you to play in total silence without disturbing others in
the same room. Plugging into the right jack does not exclude the internal
speakers.
Use the Volume slider to adjust the Headphones volume.

6
Pedal Connection
The RP150 is supplied with a triple pedal assembly, consisting of the Soft,
Sostenuto and Damper pedals.
Connect the cable from the pedal assembly to the Pedal Switch connector
on the rear panel.
Soft : The Soft pedal (left) is a switch control pedal (On/
Off) and affects the timbre of the instrument such
that it plays softer, allowing you to continue using
the same playing style at a lower volume.
Sostenuto : The Sostenuto pedal (center) is a switch control
pedal (On/Off) which sustains the notes of the
keys currently depressed. All new notes played
after having depressed the pedal are not affected.
Damper : The Damper pedal (right) applies the Sustain ef-
fect to all notes released. If you release a note
after depressing the Damper, the note will proceed
towards its natural decay according to the type of
sound played.
The Damper is particularly effective with Piano
type sounds.
The Damper is controlled by a Physical Model.
See “Technology” in the Reference section.
Note: for all piano type sounds, the notes of the
uppermost keys (from E6 to C8) are automatically
sustained, such as in an acoustic piano.

Quick Study Guide
Section 2
For those of you who don't like to read manuals or wish to read the
manual in detail later, here is everything you need to get started. This
section will explain how to approach the instrument for the first time in
a simple fashion. It will help you to get quickly acquainted with the most
important features of the instrument.
8
Realtime operations
The RP150 operating system has been conceived to permit several
simple and quick real time operations.
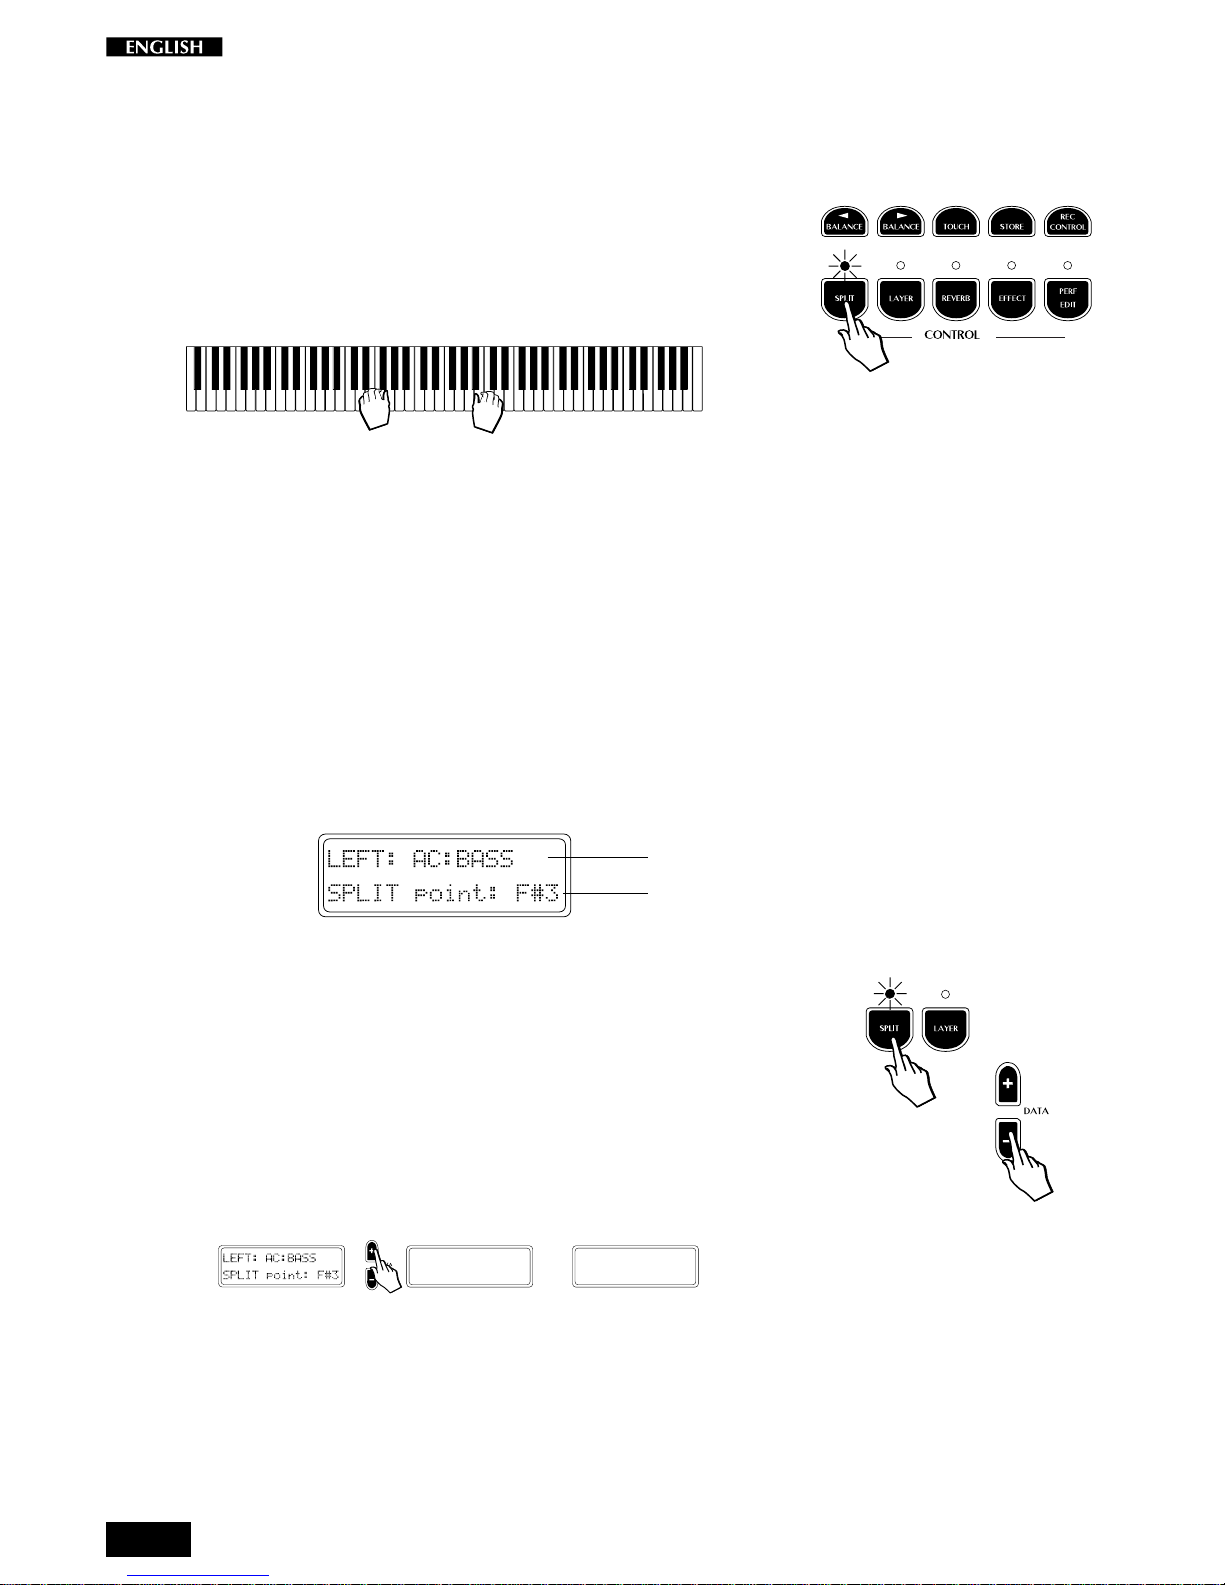
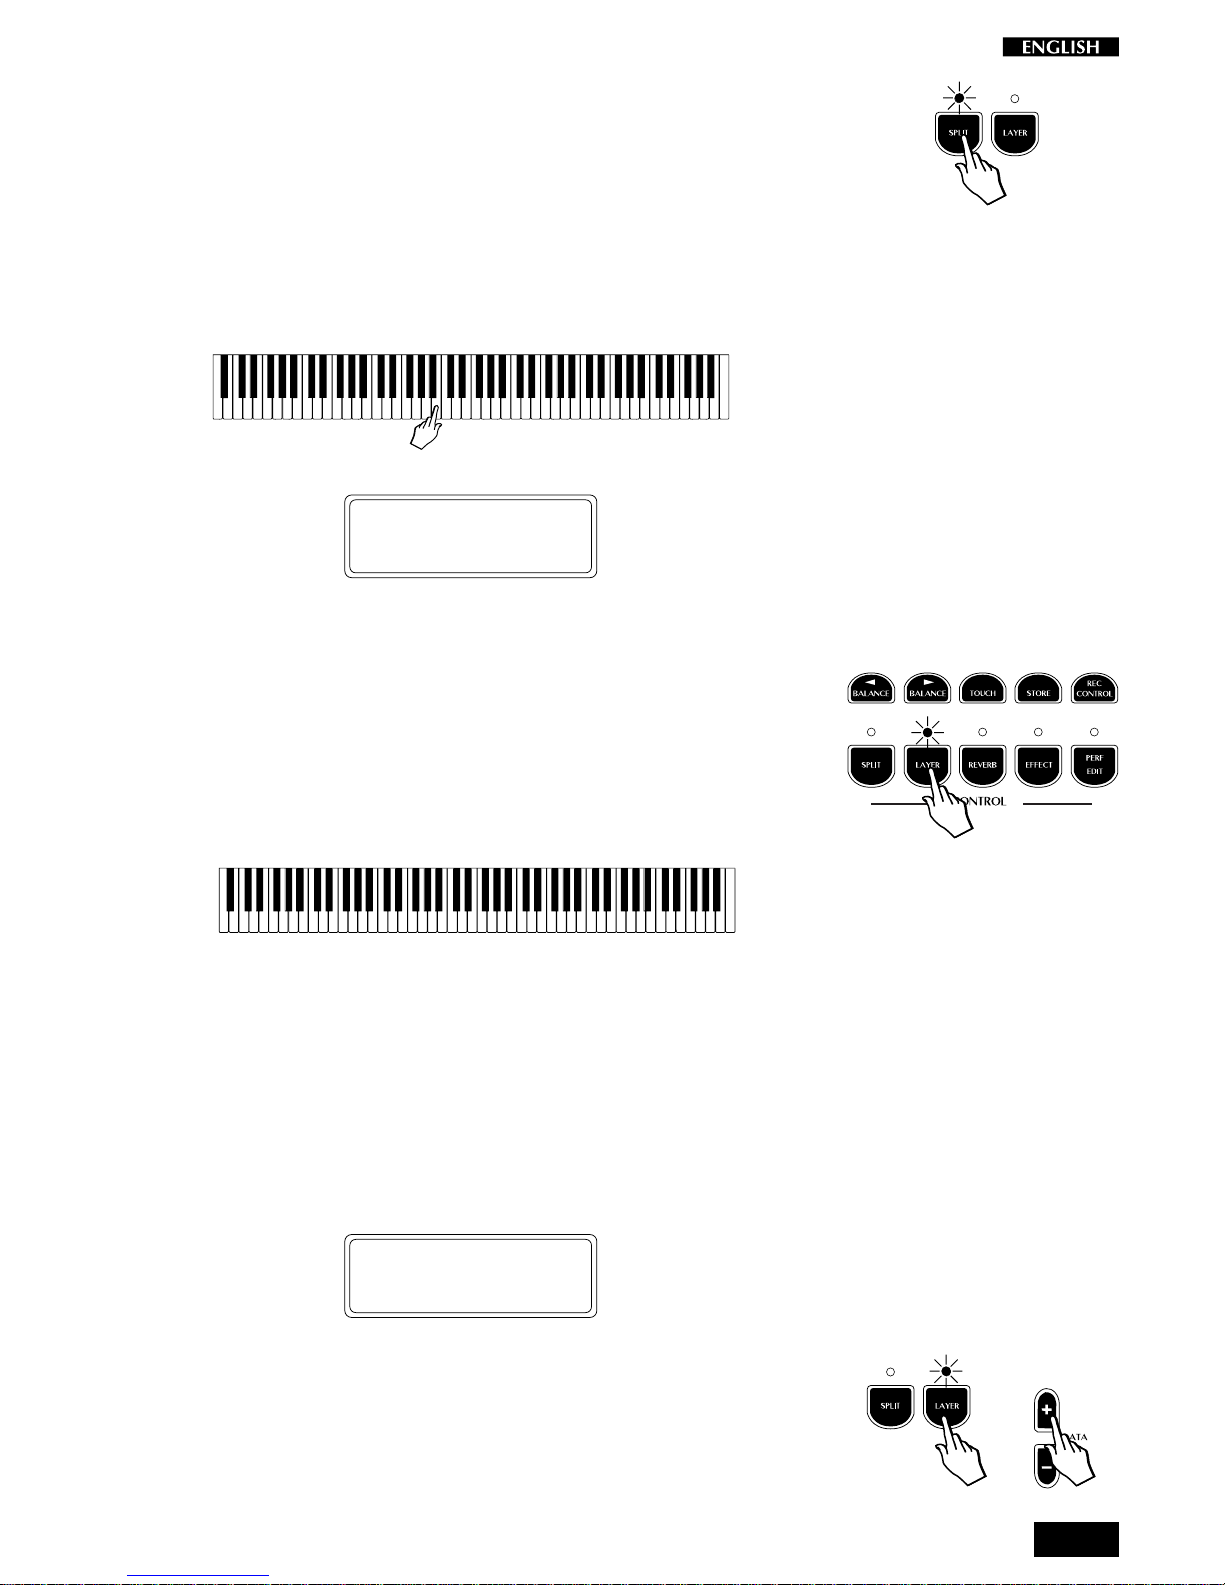
• Activate Split mode
Starting from the Single Preset “GrandPiano”, you can easily split the
keyboard by pressing the SPLIT button. This will divide the keyboard into
separate left and right sections.
<------- Ac. Bass ------><--------- GrandPiano ---------->
After pressing the SPLIT button (the LED turns on), the GrandPiano
sound remains active on the right side of the split. An Acoustic Bass
sound is automatically assigned on the left side of the split.
If you press the SPLIT button again, the LED will turn off and the keyboard
returns to the previous mode with the GrandPiano sound active to play
across the entire keyboard.
• Change the sound assigned to a Split
When you press the SPLIT button, for an instant (about 5 seconds) the
display shows the sound assigned to the left split together with the current
split point setting:
After the temporary period, the display returns to normal showing the
starting situation (in this case the GrandPiano display).
1. Press the SPLIT button.
2. While the temporary display is shown, press the DATA +/– buttons
to scroll the various sounds.
In this case, pressing the DATA + button will change the sound
assigned to the left keyboard section from Ac.Bass to RideBass,
then to El.Bass and so on, cyclically through the entire Sound data
base (see the Sound Program table on page 26 of this manual).
LEFT: Ridebass
SPLIT Point :F#3
...
LEFT: El.Bass
SPLIT Point :F#3
...
Clearly, if you use the DATA – button, you can scroll the sounds in
reverse order.
Left Split sound
Split Point note
9
• Change the Split point setting
The default setting of the Split point corresponds to F#3. You can quickly
modify the setting to suit your requirements.
1. Press and hold down the SPLIT button.
The temporary display appears showing the current split point
setting.
2. Press the note on the keyboard corresponding to the new split
point required.
In the example, the new split point is shown in the display as B3.
LEFT: Ridebass
SPLIT Point :B3
The setting remains memorized until you select a different Preset.
It is possible to assign a different Split point setting to each Preset.
• Activate Layer mode
To mix or “layer” two sounds together, simply press the LAYER button.
1. After pressing the LAYER button (the LED turns on), a second
sound is activated layered with the first (in this case, Strings is
added to the GrandPiano sound).
<------------------------ GrandPiano ---------------------->
<----------------------- Strings ---------------------->
2. If you press the LAYER button again, the LED turns off and the
keyboard returns to the previous mode with the GrandPiano sound
active to play across the entire keyboard.
• Change the sound assigned to a Layer
When you press the LAYER button, for an instant (about 5 seconds) the
display shows the sound assigned to the layer:
LAYER: Strings
After the temporary period, the display returns to normal showing the
starting situation (in this case the GrandPiano display).
1. Press the LAYER button.
2. While the temporary display is shown, press the DATA +/– buttons
to scroll the various sounds.
10
In this case, pressing the DATA + button will change the sound
assigned to the layer section from Strings to Slow Strings, then to
Mellow Strings and so on, cyclically through the entire Sound data
base (see the Sound Program table on page 26 of this manual).
LAYER: Strings
LAYER: Slow Str
...
LAYER: Mellow St
...
Clearly, if you use the DATA – button, you can scroll the sounds in
reverse order.
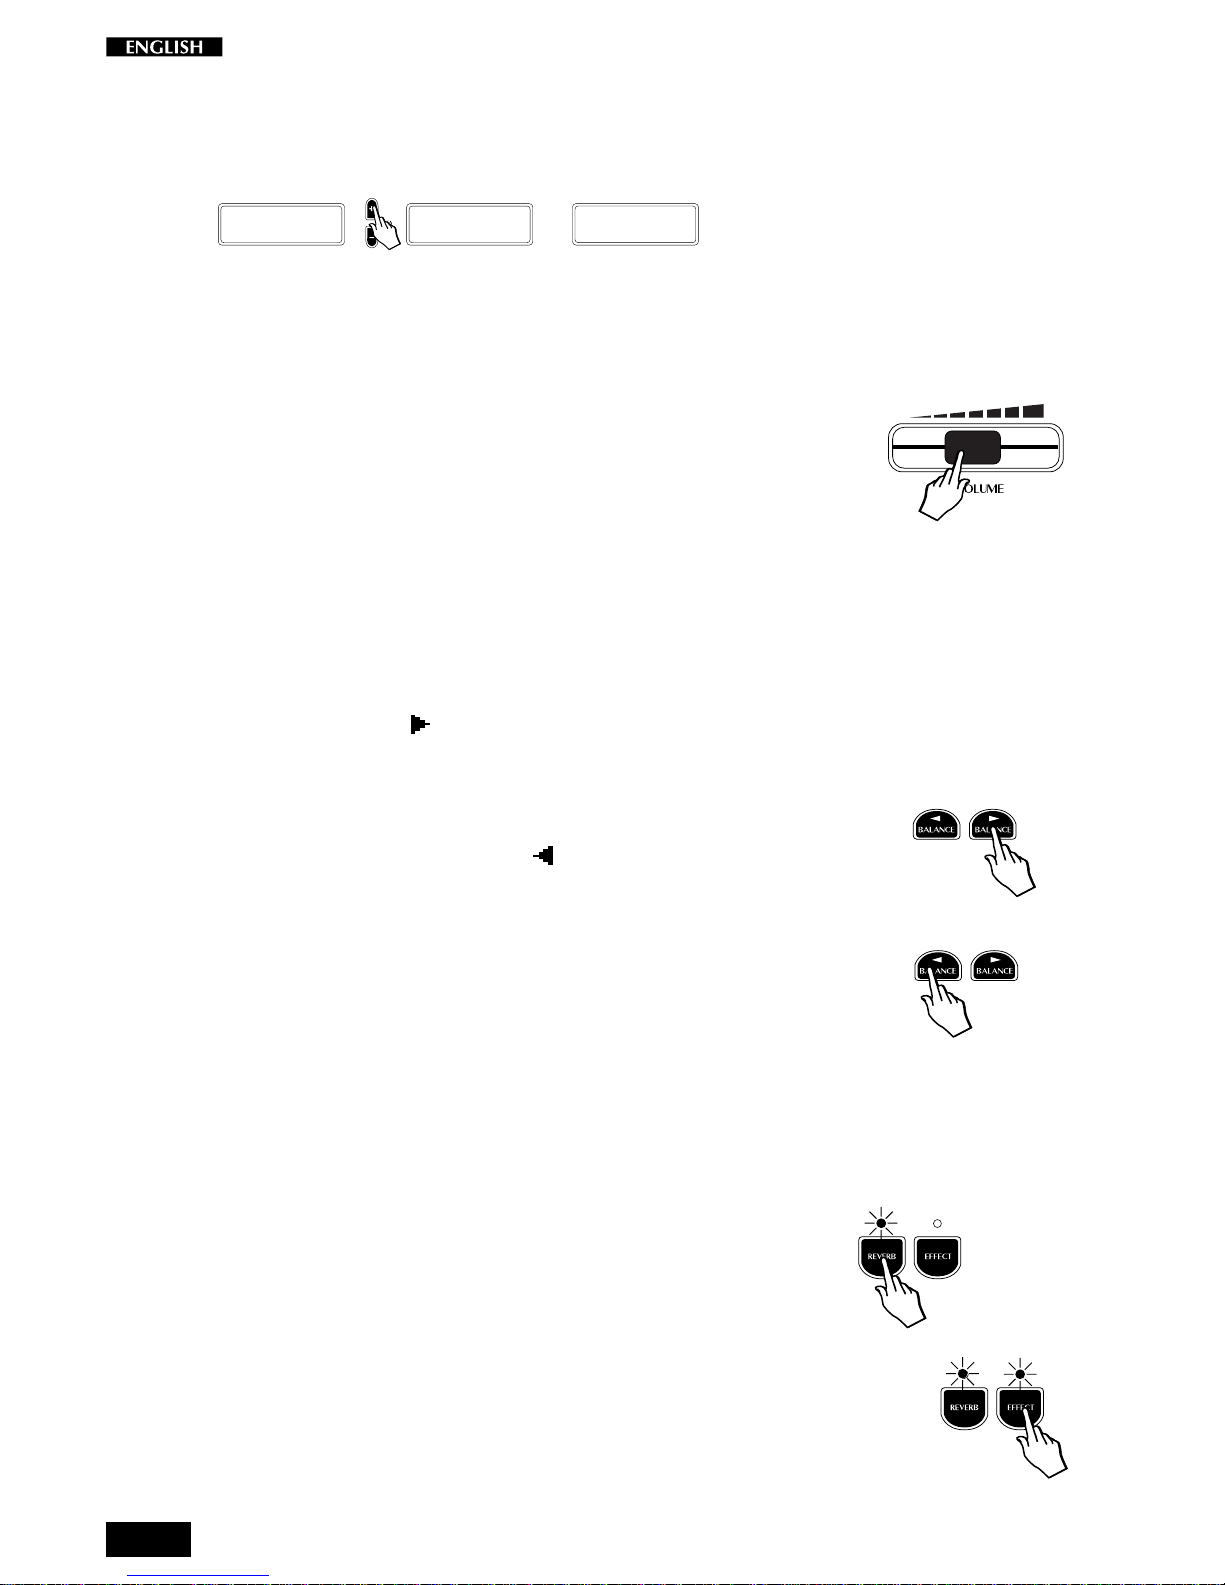
• Adjust the Volume of the instrument
You can regulate the volume of the instrument as a whole by using the
Volume slider.
This control increases or decreases the volume of the internal speakers,
the Headphones and the Output Left - Right/M jacks.
• Change the Volume Balance between two sounds
If you are playing either in Layer or Split mode, you can regulate the
volume of the two sections in real time using the BALANCE buttons (in the
CONTROL section). These buttons regulate the volume of one section
with respect to the other, creating a perfect balance between the two
sections according to your requirements.
1. Press the right BALANCE button to increase the volume of the
main sound.
The volume of the second sound (split or layer) will decrease
automatically in proportion to the main one.
2. Conversely, press the left BALANCE button to increase the
volume of the second sound.
The volume of the main sound will decrease automatically in
proportion to the second one.
If you select a Single Preset (or deactivate the SPLIT or LAYER
button), the BALANCE buttons operate as normal Volume controls
for the main section.
• Add effects to the selected sound
You can easily add effects to the selected sound by using the REVERB
and EFFECTS buttons in the CONTROL section.
To add Reverb:
• Press the REVERB button (the LED turns on).
In this case, the Hall Reverb effect is added to the Grandpiano
sound.
To add Effect (chorus/delay/modulation):
• Press the EFFECT button (the LED turns on).
In this case, the Chorus effect is added to the GrandPiano sound.
Note. It is possible to add either Reverb, or Effect, or both effects
to a single sound, to a Split or Layer Preset and the settings can be
memorized.
11
Selecting the RP150 Presets
The RP150 contains 64 Internal Presets, consisting of single, split and
layered sound combinations which incorporate appropriately memorized
volume, balance, effect settings and more. An additional 64 User Preset
locations are available with as many sound variations and combinations,
where you can store your preferred programmed sound settings. The
Presets and User Presets are organized in the Selection section.
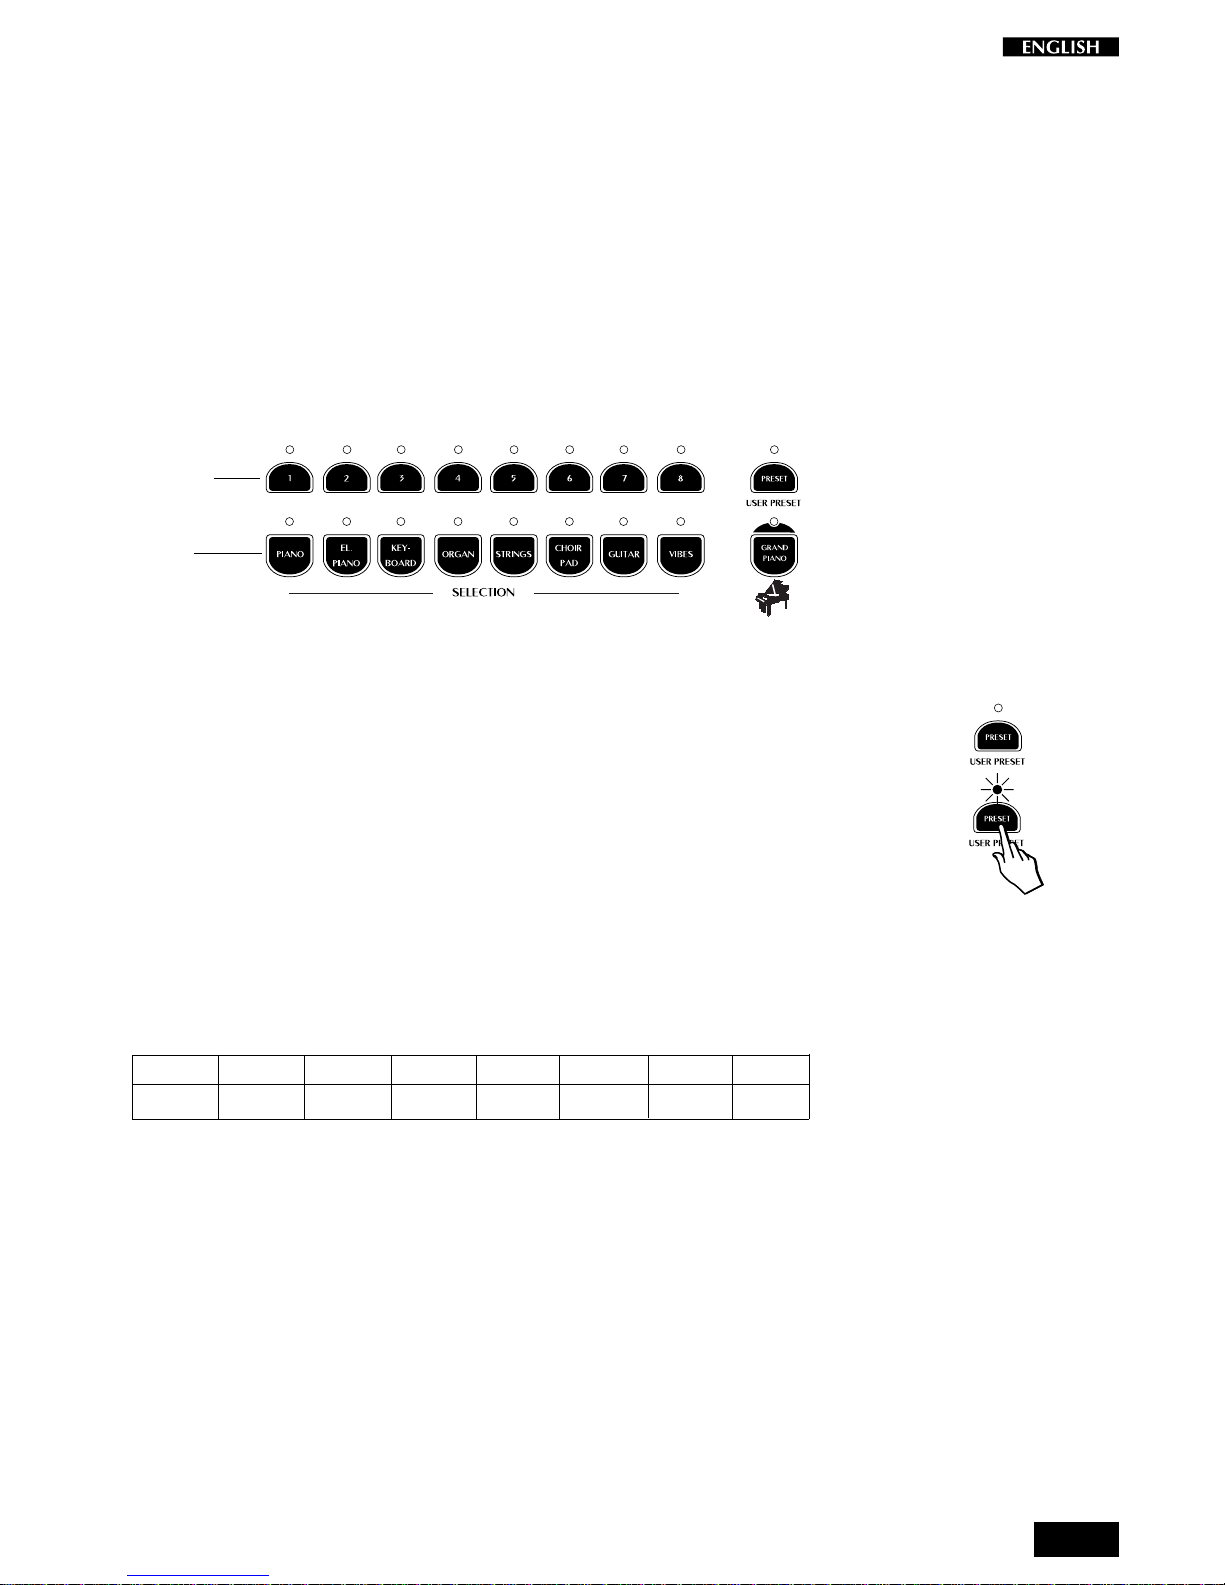
The Selection buttons
This section consists of a lower row of 8 Preset “family” Groups and an
upper row of 8 Presets of the selected Preset Group.
On the right are the Preset/User Preset button and the GrandPiano
button. The latter sets the instrument to play the default GrandPiano
sound instantly, returning the instrument to Single Preset mode from any
situation.
When the LED of the Preset button is off, the sounds recalled relate to the
internal Presets.
When the User Preset LED is on, the sounds recalled are user memorized
Presets.
The 8 Preset Group buttons are marked as follows: Acoustic Piano,
Electric Piano, Keyboard, Organ, Strings, Choir\Pad, Guitar, Vibes.
The 8 buttons of the upper row select 8 different Presets of the currently
selected Preset Group and are factory-set to recall Presets in the
following manner:
12 345678
Single Single Single Single Layer Layer Split Split
Each Preset of the current Group contains a memorized Layer and Split
sound combination which you can recall in real time by activating the
appropriate buttons.
Similarly, a Layer or Split Preset is easily converted to one of the other
modes by activating/deactivating the Split or Layer buttons accordingly.
For example, if you have selected the Layer Preset 5 of a Preset Group,
simply press SPLIT to recall the memorized Split combination, or deactivate LAYER to recall the memorized Single sound.
When you select a Preset Group from the lower row for the first time after
turning on, Preset n. 1 of the upper row is automatically selected by
default.
Preset
Groups
Presets
12
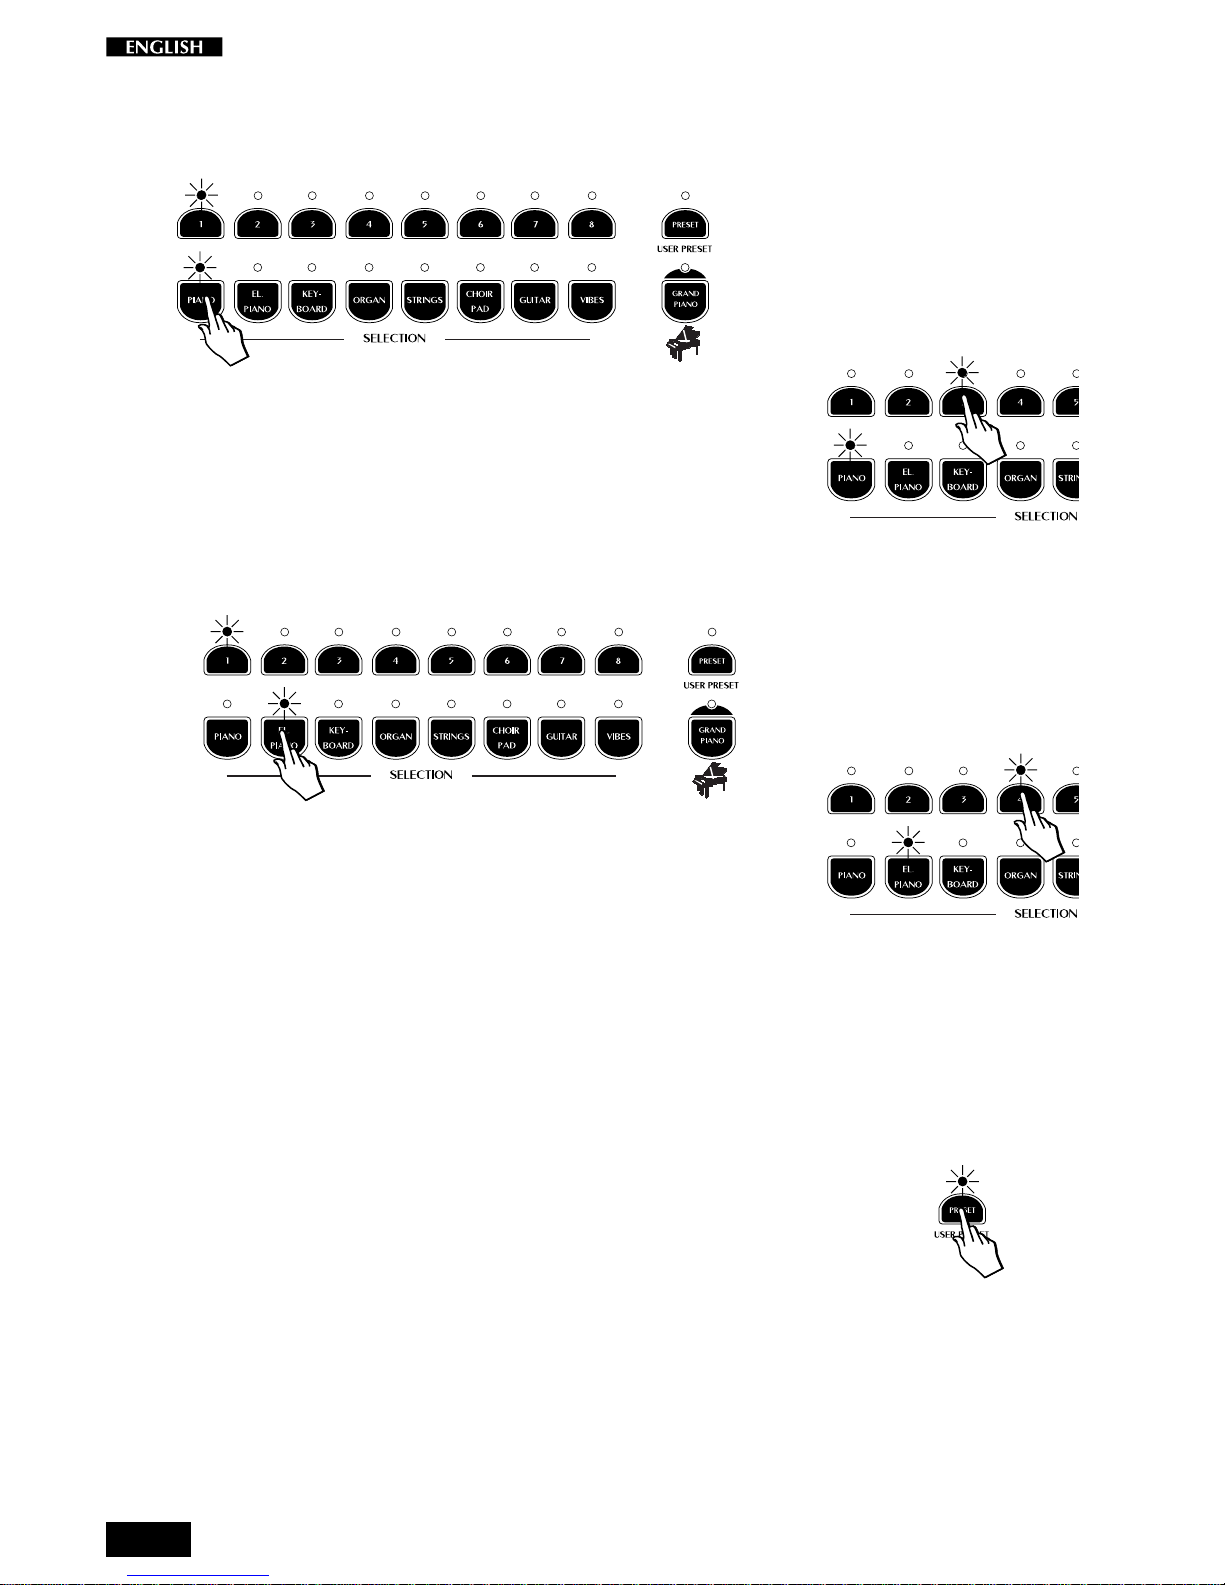
Example 1
1. If you select the Piano Group button, Preset 1 (GrandPiano) is
recalled automatically.
2. Now select button n. 3 of the top row.
This will recall the single Preset Upright Piano across the entire
keyboard.
Example 2
3. If you select the El. Piano Group button, Preset n. 1 of the top row
activates automatically, recallingthe Preset Rhodex.
4. Now press button 4 and you recall the Preset FM Piano.
Repeat the operations to select the other Presets.
The last Preset button selected for the current Preset Group remains
memorized. For example, if you select the Piano Group button (as in the
example explained above), Preset 3 (Upright Piano) will be recalled. If
you now select the El Piano Group button, you will recall the FM Piano
Preset (button 4).
This system of memorizing the last selection made will help you recall
your preferred Presets quickly.
User Presets
The same logic also applies to the User Presets. Simply press the Preset
button to activate the User Presets (the LED turns on). Here you will find
an additional 64 User Presets belonging to the same Preset Groups which
recall different sound combinations with respect to the Presets.
For example, you can select the Preset n. 3 of the Piano Group to recall
Upright Piano, select User Preset n. 7 to recall Jazz Piano 2, then switch
from Preset to User Preset by pressing the Preset/User Preset button
repeatedly.
The User Presets are also programmable. You can memorize any
preferred sound setting to the User locations without permanently losing
the factory User Presets. These can be restored to their original status
using the Restore Preset function (see the General chapter).
Note: For a list of Presets and factory
User Presets, refer to the tables in the
Appendix.

13
The Preset
The changes that you make to your sounds and sound combinations (add
effects, select Split or Layer, adjust the volumes, change the effect sends,
etc., can be memorized to the User Preset locations.
In simple terms, a User Preset (sometimes also called a “Performance”)
is just the end result of some tweaking and editing where the instrument
now sounds the way you want it to. At this stage, your User Preset can
be saved in memory so that you can instantly recall it the next time you
need to use it.
Although the procedure for saving and naming a User Preset is described
in detail elsewhere in this manual, the basic steps are very simple.
• After creating a User Preset which you want to store, press the
STORE button.
• Next, choose one of the lower Selection buttons followed by one of
the 8 buttons of the upper row. Your User Preset is now stored to
memory.

14
Listen to the Demo songs
The RP150 contains a set of demonstration recordings of the internal
sounds.
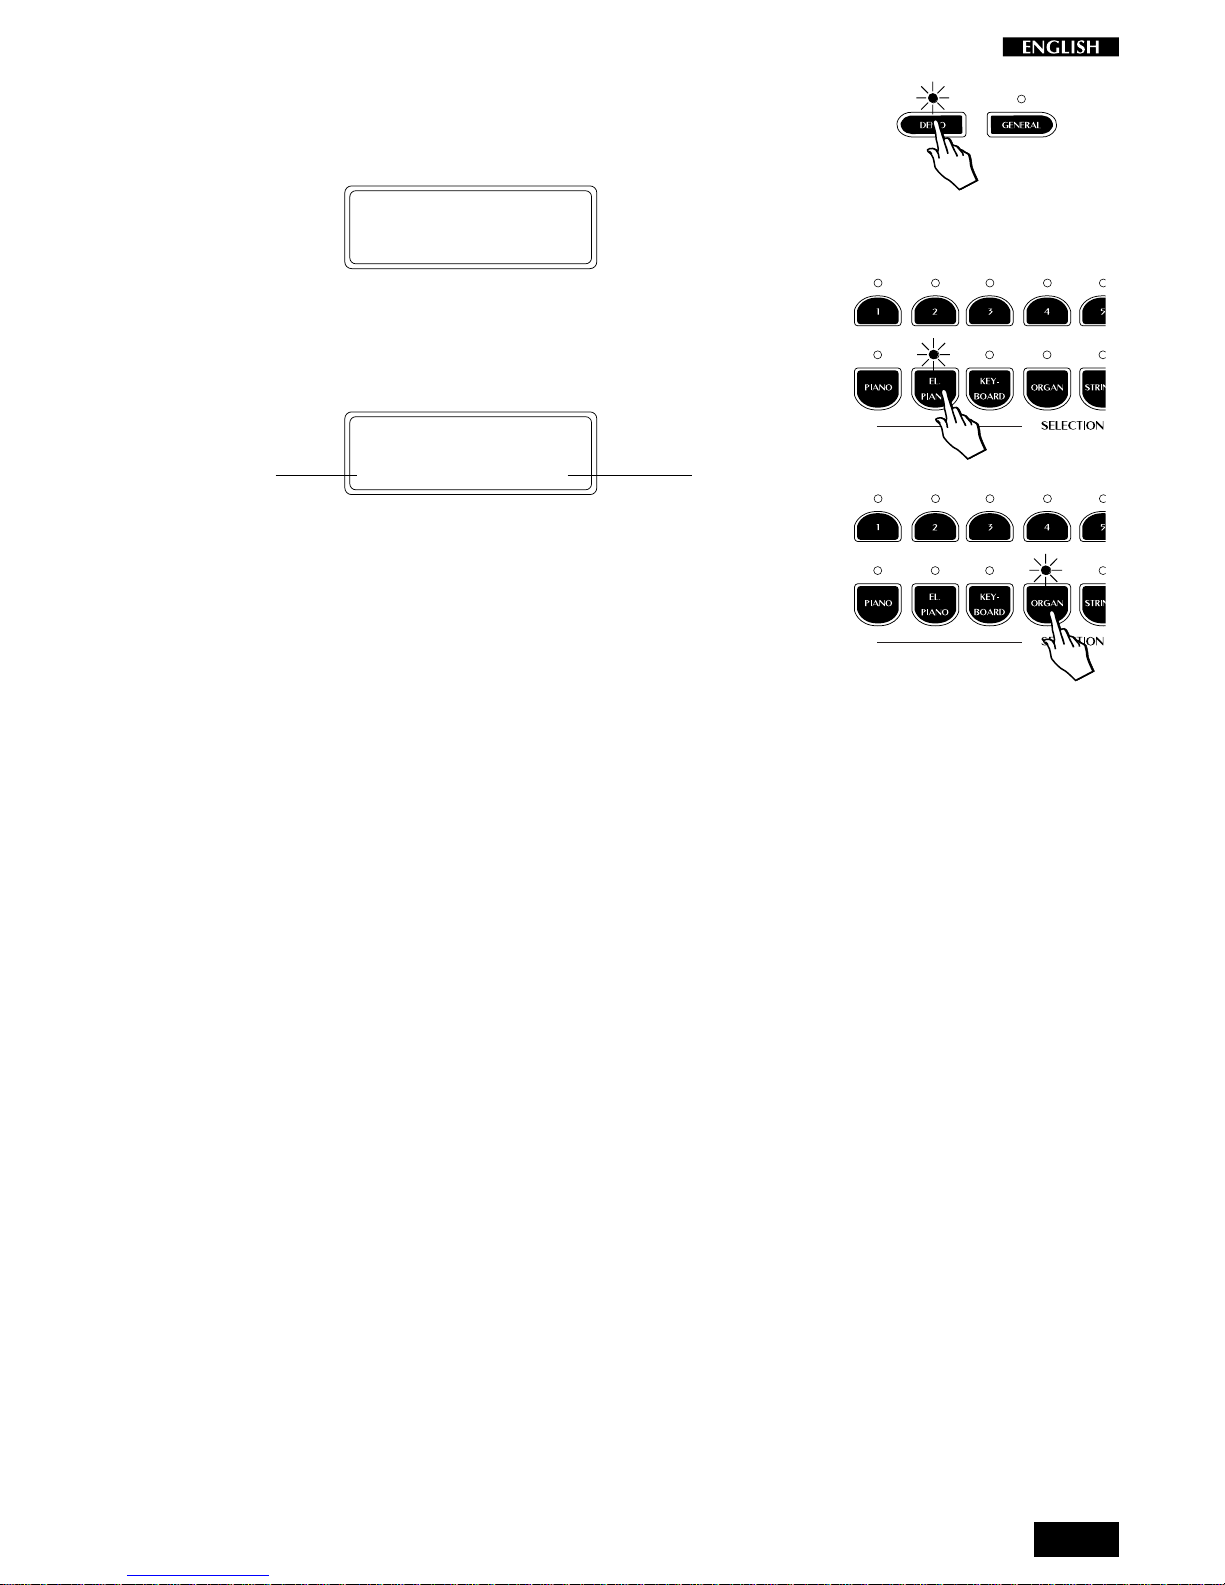
• Press the DEMO button to trigger the playback of the demo songs.
The LEDS of the Selection section start to flash.
Shortly after, the first recording of a piano sound starts to play.
When it reaches the end, the second recording starts automatically
and so on....
• To stop the playback at any point, press the DEMO button again.
The demonstration sequence consists of 16 recordings, chained to play
as a medley automatically. Each recording corresponds to a demonstration of theselected Preset of the Selection section.
Select a single demonstration
It is possible select a single demonstration recording without activating
the chain playback.
1. Press the DEMO button then, while the LEDs of the Selection
buttons are flashing, press one of the Selection buttons to trigger
the playback of the single recording.
The titles of the recordings are listed below:
Demo song list
12 345678
Beethoven Latin Tchaikovsky Walkin’ Bach Clouds Karma Combo
Romance Electric NutRock Jazz Organ Concerto Pad+Fretless Strato Vibes
Piano+String Grand+Bass Celesta + Bass Harpsi+String Bass + Pad + Bass
Chopin Nuances Bach v. Bach Vivaldi Bach 6 string Toccata
Prelude Rhodex Goldberg Fugue Concerto in A– Air Guitar Vibes
Piano solo solo
Harpsichord ChurchOrgan
Strings Choir Alborada solo
Ac.Piano El.Piano Keyboard Organ String Choir/Pad Guitar Vibes
The buttons of the lower row recall single Preset recordings: piano, organ,
etc.. The upper row of buttons recall recordings of the Presets containing
two sections: piano and strings, piano and bass, etc.
When you press a button, the corresponding LED remains on and the
corresponding demonstration recording starts to play.
15
Example:
1. Press the DEMO button. The display shows a message confirming
entry into the Demo mode:
RP150 DEMO
2. Press, for example, the El.Piano button.
The demo starts to play. At the same time, the display shows the
number and name of the Demo song currently playing:
RP150 DEMO
2 Nuances
3. It is possible to pass instantly from one Demo song to another by
pressing another button (in this case Organ).
4. To stop the Demo song press the relative button again.
Note: In DEMO mode, all the instrument’s panel commands, the
keyboard and the MIDI interface will be temporarily disabled.
Song titleSong number
16
Recording a song
The RP150 sequencer (Recording Studio) allows you to record a simple
song just as you play it.
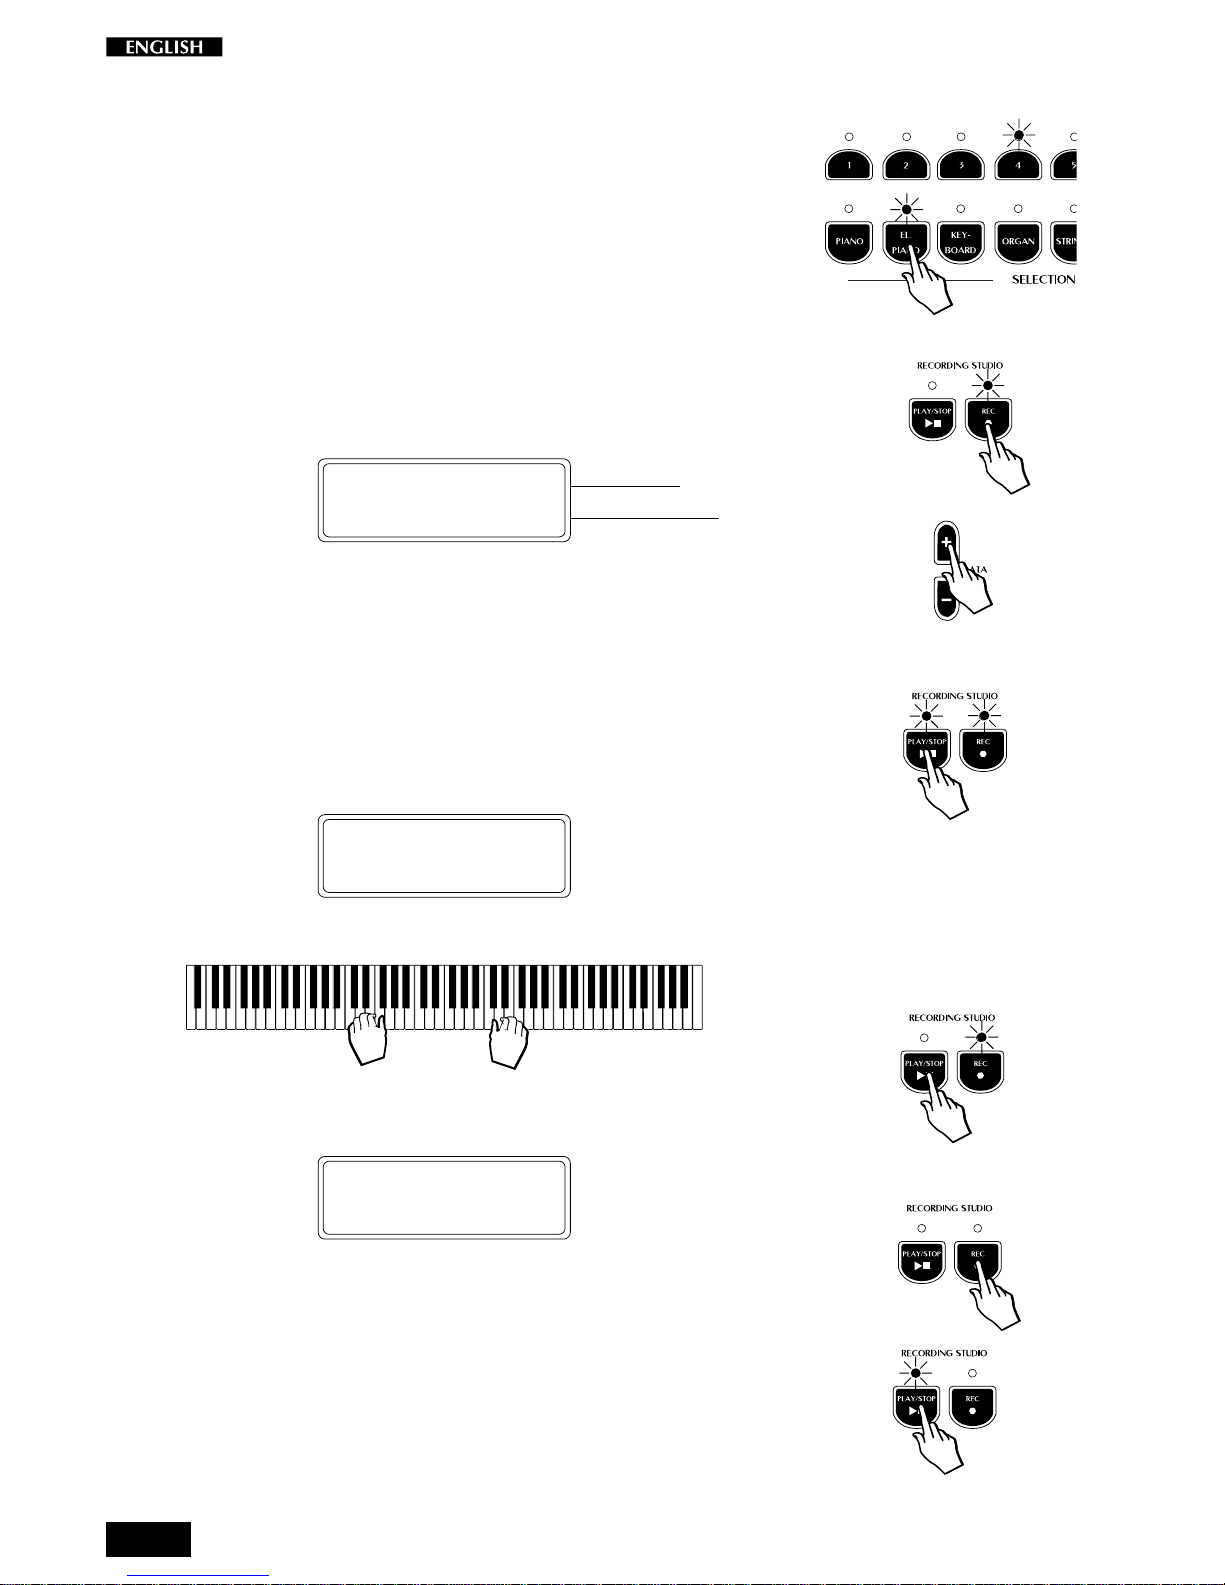
1. Select the Preset that you want to record.
2. Press the REC button.
The display shows the starting measure of the song pointer and the
current Tempo setting.
*REC.STUDIO 00/1
TEMPO = 120
3. Using the DATA +/– buttons to the right of the display, you can
change the Tempo setting (the recording and playback speed).
4. Press the PLAY/STOP button.
A one measure countdown into the recording starts and the display
shows the message “Recording” to indicate that the sequencer is
ready to capture all that you play:
*REC.STUDIO 0/2
* RECORDING !*
5. Start to play after the one measure countdown.
6. When you have finished playing, press PLAY/STOP.
The display shows the “record end” message.
*REC.STUDIO 32/1
* RECORD END!*
7. Press the REC button to exit Record mode.
8. To playback your recording, press PLAY/STOP.
Song pointer
Tempo

Basic Functions
Section 3
This section will explain some basic real time panel functions which
affect the instrument as a whole.
18
BRILLIANCE –\+
The BRILLIANCE controls in the Control section allow you to adjust the
brightness of the instrument’s tone. Brilliance affects the instrument as
a whole and cannot be applied independently to individual sounds.
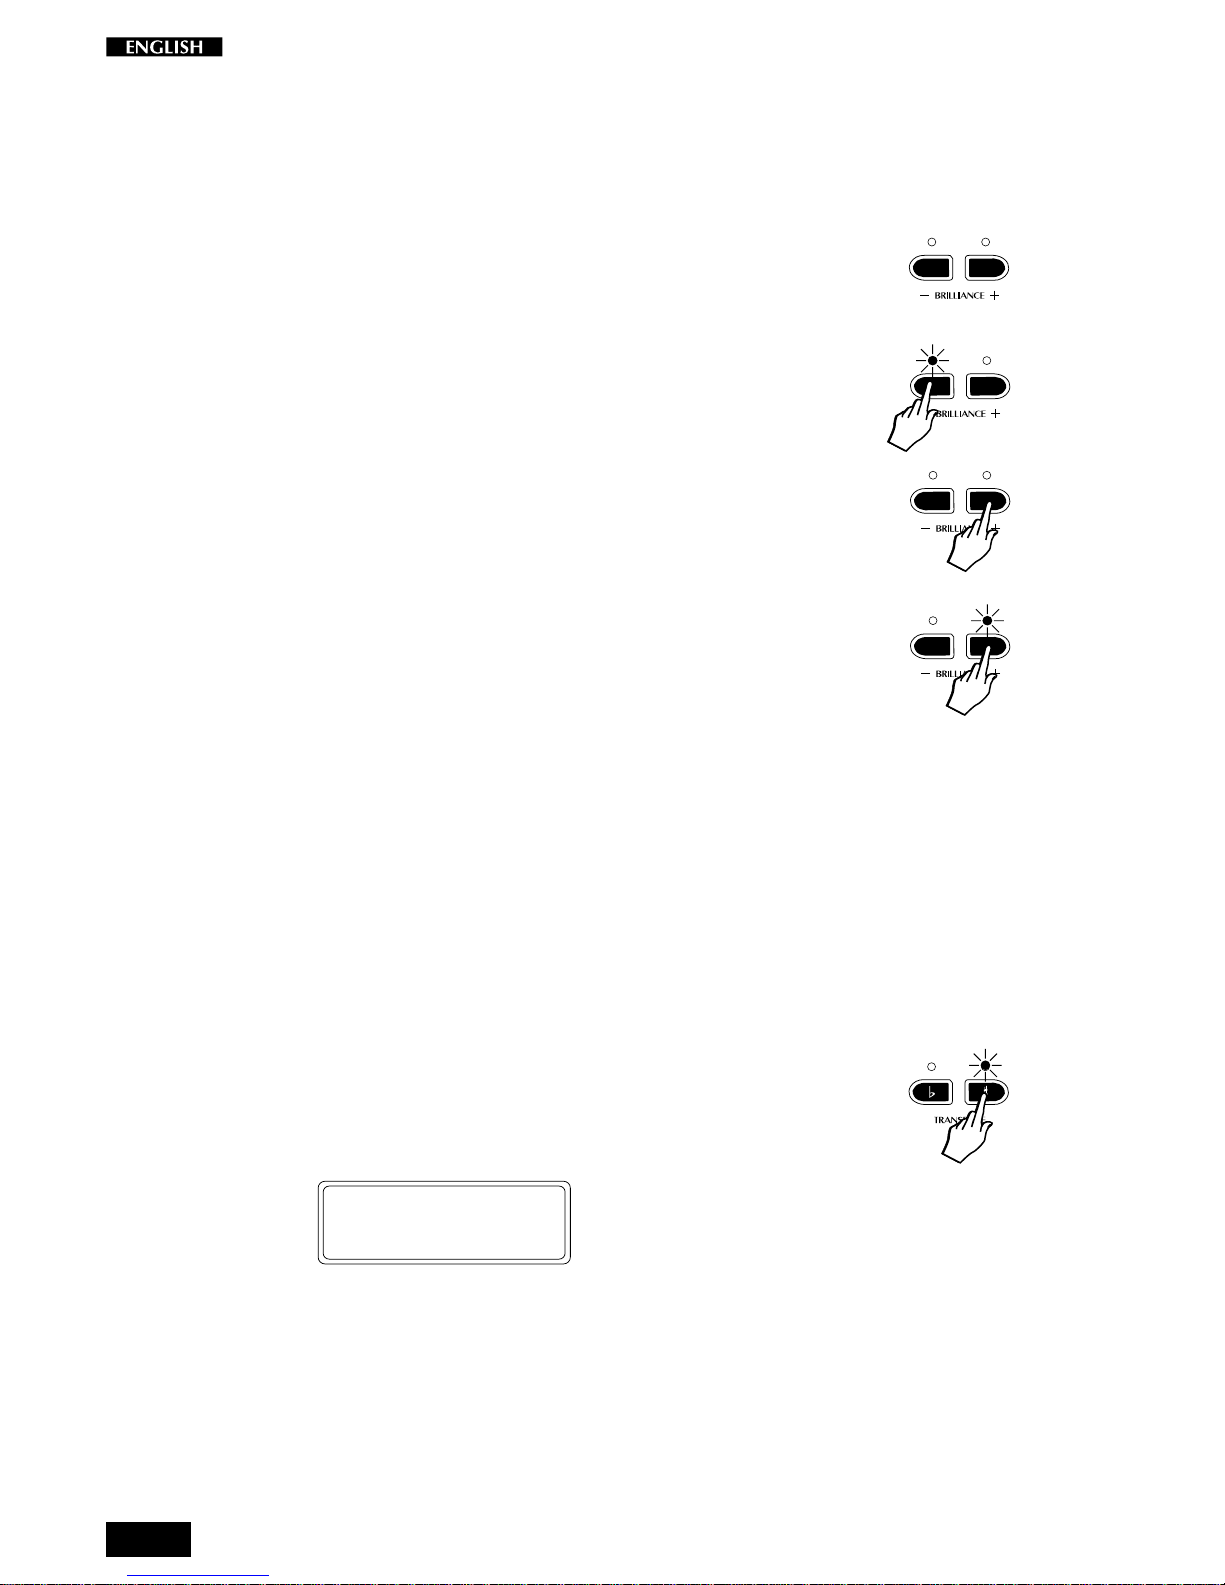
When both LEDs are off, the tone of the instrument is normal.
To change the Brilliance setting:
• Press BRILLIANCE – to activate the Loudness setting:
The Brilliance – button gives a softer tone (enhancement of the bass
frequencies).
• Press the currently deactivated BRILLIANCE button to activate the
Normal setting (in this case Brilliance +). The LED of the active
button will cancel.
• Press BRILLIANCE + to activate the Bright setting.
The Brilliance + button gives a brighter tone (enhancement of the
high frequencies).
TRANSPOSE
Pressing either TRANSPOSE button will adjust the pitch of the instrument
in half-step (semitone) increments or decrements, through the overall
range of –/+ 12 semitones.
When both LEDs are off, the pitch of the instrument is set to normal
(Equal: C = C).
To Transpose the instrument
1. Press TRANSPOSE #.
The pitch of the instrument is raised one semitone and the amount
of transposition is displayed as a relative value for a short period.
* TRANSPOSE *
+1 C = C#
After about 5 seconds, if you don’t press either Transpose button,
the display returns to the previous situation and the instrument
remains at the last set pitch.
Every time you press the TRANSPOSE # button, the pitch is raised
by one semitone.
19
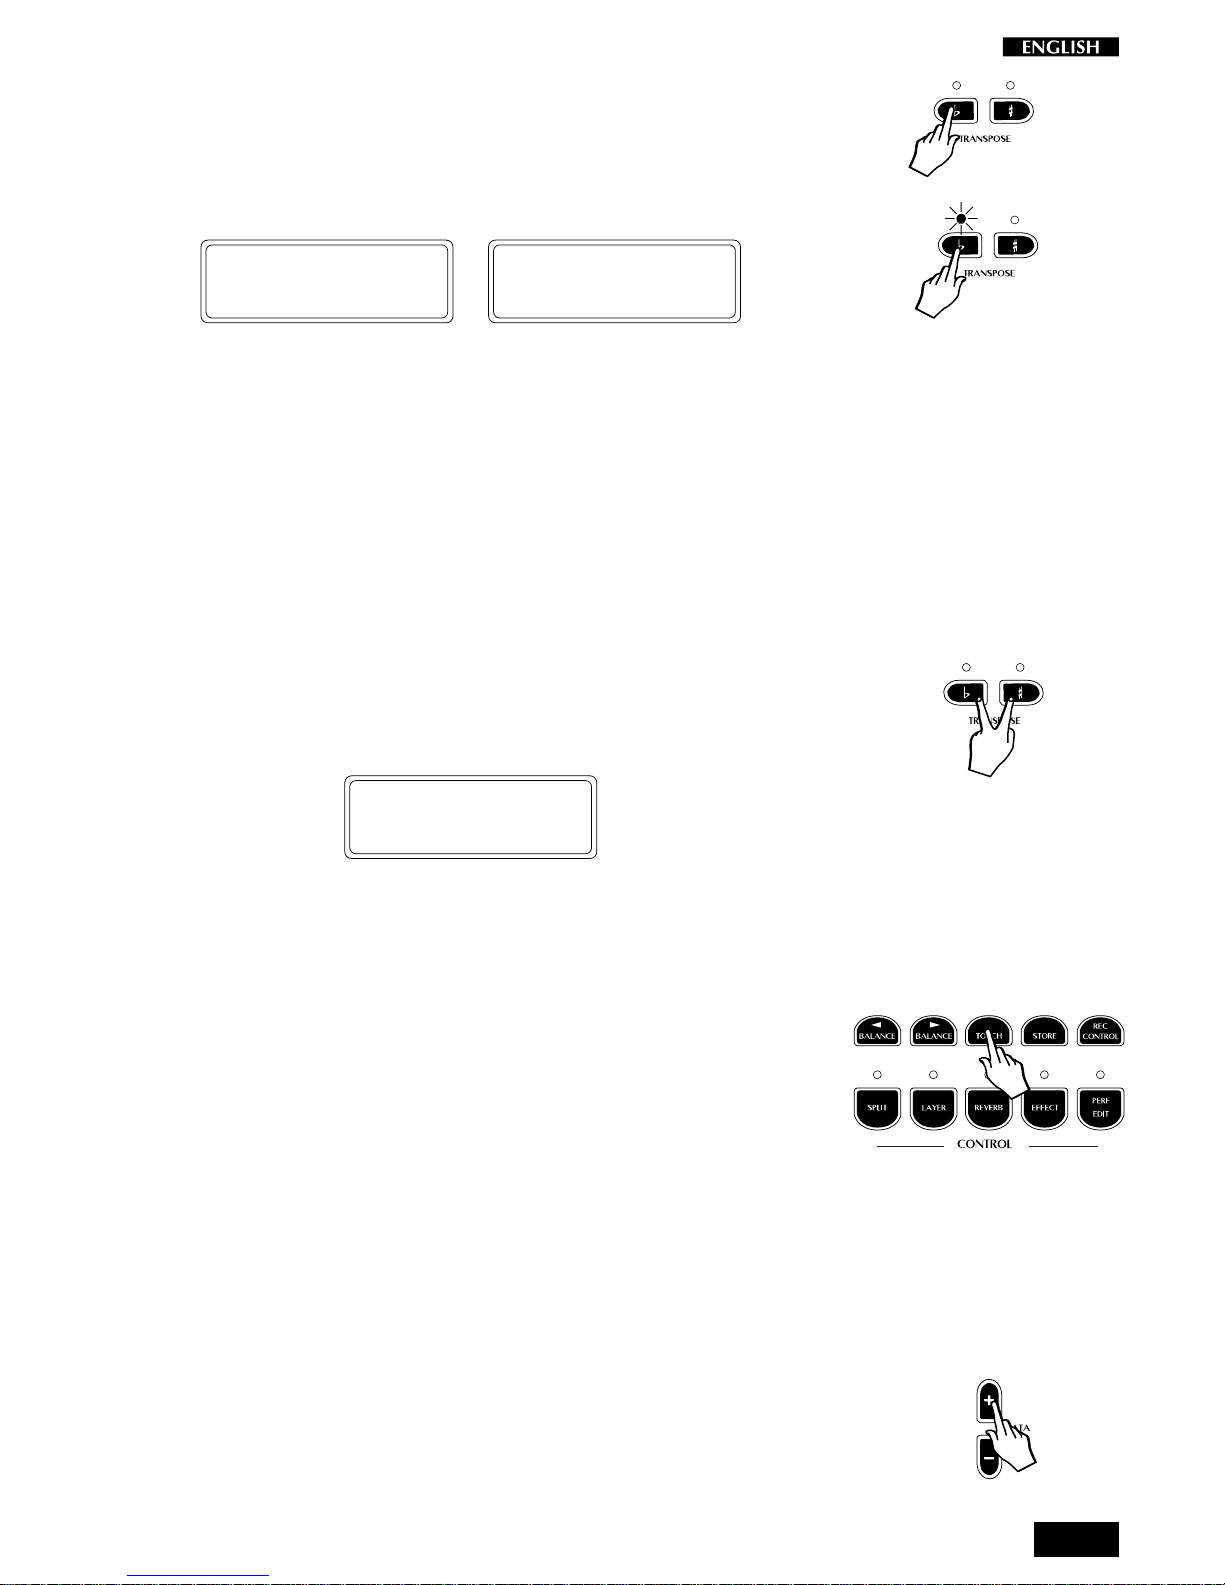
2. Press TRANSPOSE b.
The pitch of the instrument is lowered one semitone and the amount
of transposition is displayed as a relative value for a short period.
(An eventual raised transpose setting will be lowered by one halfstep by pressing Transpose b).
* TRANSPOSE *
0 C = C
* TRANSPOSE *
-1 C = B
After about 5 seconds, if you don’t press either Transpose button,
the display returns to the previous situation and the instrument
remains at the last set pitch.
Every time you press the TRANSPOSE b button, the pitch is
lowered by one semitone.
The current Transpose setting remains memorized even after turning the
instrument off. When you turn the instrument on again, the LED of the
Transpose b or # buttons shown on indicate the lowered or raised status
of the pitch.
Reset
The current pitch setting can be cancelled instantly by pressing both
buttons together.
* TRANSPOSE *
0 C = C
This restores normal pitch to the instrument.
TOUCH
The RP100 offers three different keyboard responses, or “velocity curves”,
which affect the instrument as a whole. Every time you turn on the
instrument, the “NORMAL” curve is set automatically.
Two other curves are available: Soft and Hard.
Soft : this is useful for a player with a lighter touch or some-
body more accustomed to a synth action keyboard. It
requires only a relatively soft touch to achieve maximum
volume.
Normal : This setting most accurately represents the touch re-
sponse of a piano.
Hard : This setting is for “stronger” players. It requires a fairly
powerful touch to achieve maximum volume.
The various curves can be selected by repeatedly pressing either the
DATA + or – button after pressing the TOUCH button.
 Loading...