

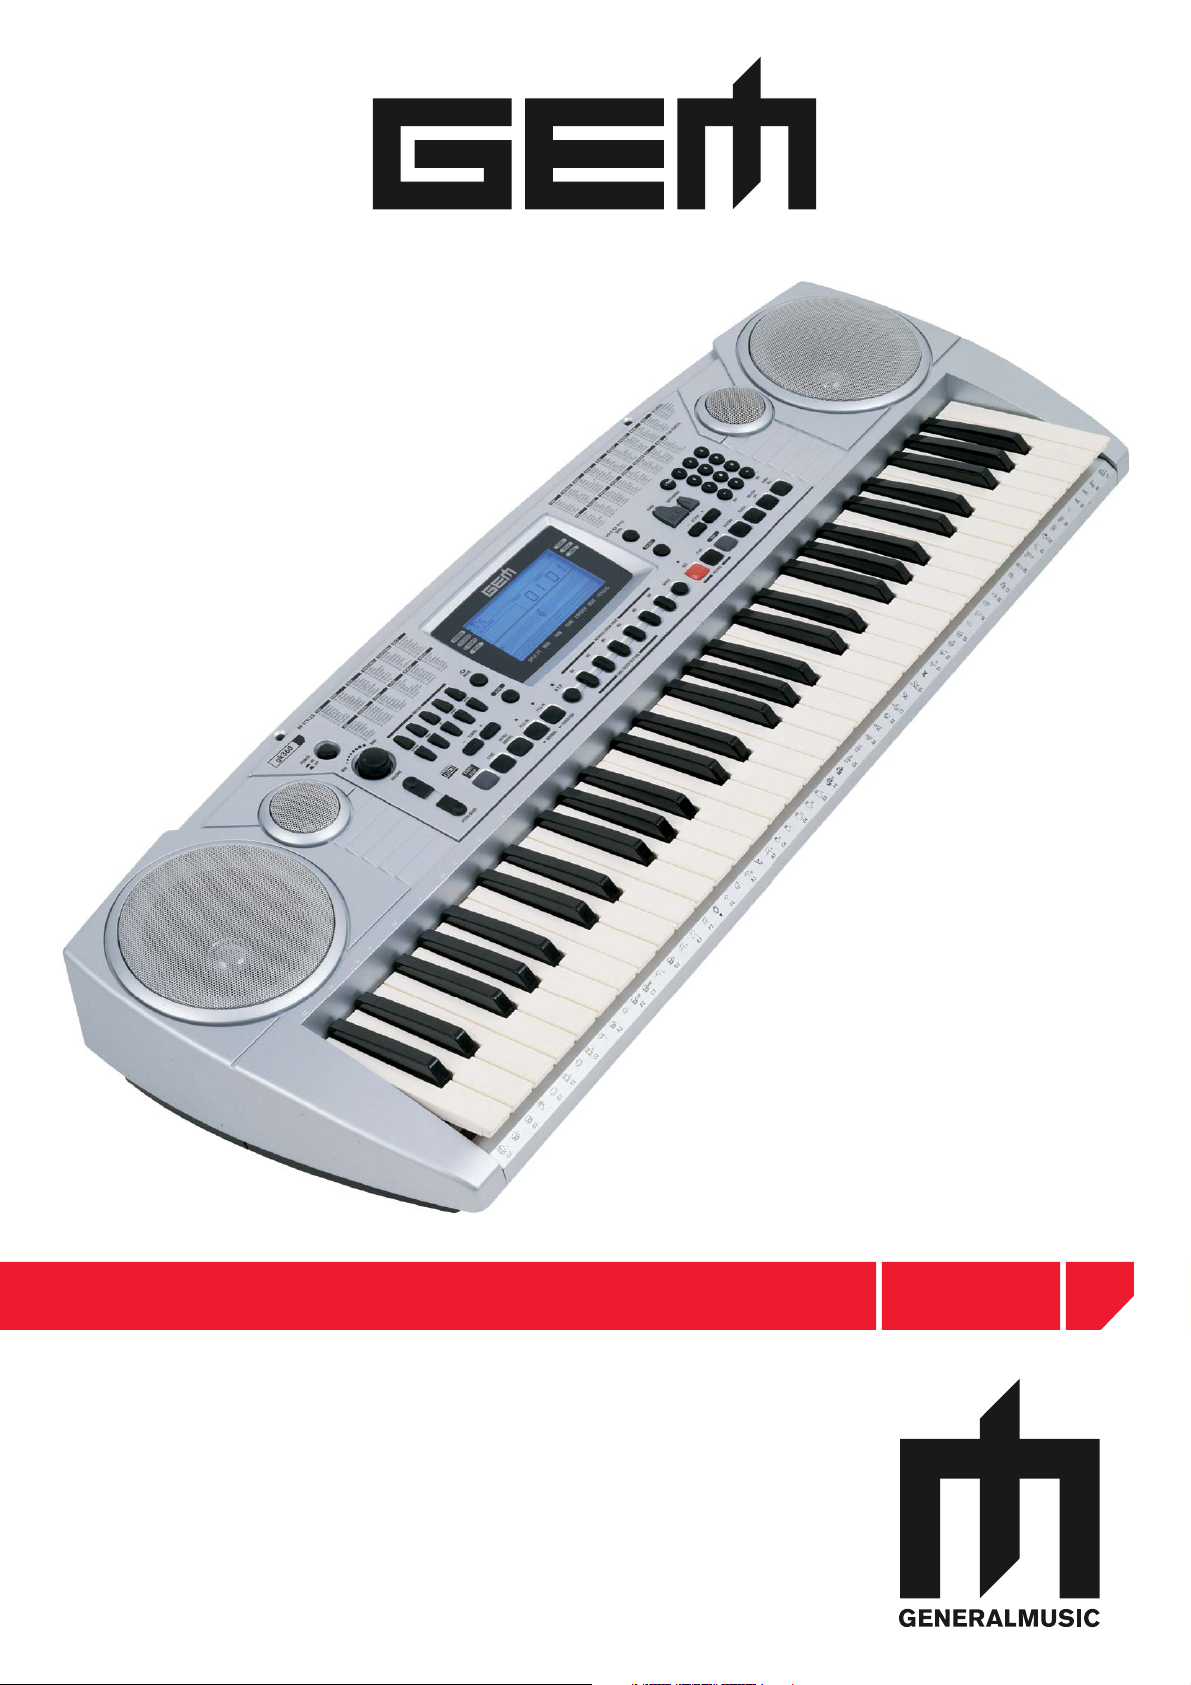
DIGITAL KEY BOARDS
owners manual
•English
gk360
SPECIAL MESSAGES
ALARM SYMBOLS:
Generalmusic electronics prod ucts
could present la bels sim i lar to that
dis played in this section. Please follow
ac cu rate ly the pre cau tions descripted
in the safety instructions.
The exclamation mark within an equi lat er al triangle is
intended to alert.
The lightning fl ash with arrowhead symbol, within an equilateral triangle, is intended to alert the user to the presence of
uninsulated “dangerous voltage” within the product’s enclosure that may be of suffi cient magnitude to constitute a risk of
electric shock to persons.
IMPORTANT NOTE: To reduce the risk related to the correct and normal use of the instrument, all Generalmusic products are accuralety tested
in a safety laboratory. DO NOT modify the present unit, the safety standard and the correct instrument operativity could be com pro mised, and as
a further con se quence the warranty will be invalidated.
IMPORTANT SAFETY AND INSTALLATION INSTRUCTIONS
INSTRUCTION PERTAINING TO A RISK OF FIRE, ELECTRIC SHOCK, OR INJURY TO PERSONS.
WARNING!
When using electric products, basic precautions should always be followed, including the following:
1. Read all the Safety and Installation instructions and explanations of Graphic Symbols before using the product.
2. This product must be earthed. If it should malfunction or breakdown, grounding provides a path of least resistance for electric
current to reduce the risk of electric shock. This product is equipped with a cord having an equipment-grounding conductor and a
grounding plug. The plug must be plugged into an appropriate outlet that is properly installed and earthed in accordance with all
local codes and ordinances.
DANGER:Improper connection of the equipment grounding conductor can result in a risk of electric shock. Check with a qualifi ed electrician or serviceman if you are
in doubt as to whether the product is properly grounded. Do not modify the plug provided with the product, if it will not fi t the outlet, have a proper outlet installed by a
qualifi ed electrician.
3. To reduce the risk of injury, close supervision is necessary when this product is used near children.
4. Do not use this product near water for example, near a bathtub, washbowl, kitchen sink, in a wet basement, or near a swimming
pool or the like.
5. This product should only be used by a stand or cart that is recommended by the manufacturer.
6. This product, either alone or in combination with an amplifi er and headphones or speakers, may be capable of producing sound levels that could
cause permanent hearing loss. Do not operate for a long period of time at a high volume level or at a level that is uncomfortable. If you experience
any hearing loss or ringing in the ears, you should consult an audiologist.
7. This product should be located so that its location or position does not interfere with its proper ventilation.
8. This product should be located away from heat sources such as radiators, heat registers, or other products that produce heat.
9. The product should be connected to a power supply only of the type described in the operating instructions or as marked on the product.
10. This product may be equipped with a polarized line plug (one blade wider than the other). This is a safety feature. If you are unable to insert the plug
into the outlet, contact an electrician to replace your obsolete outlet. Do not defeat the safety purpose of the plug.
11. The power-supply cord of the product should be unplugged from the outlet when left unused for a long period of time. When unplugging the power
supply cord, do not pull on the cord but grasp it by the plug.
12. Care should be taken so that objects do not fall and liquids are not spilled into the enclosure through openings.
13. The product should be serviced by qualifi ed service personnel when:
A. The power-supply cord or the plug has been damaged
B. Objects have fallen, or liquid has been spilled into the product;or
C. The products has been exposed to rain or moisture
D. The product does not appear to be operating normally or exhibits a marked change in performance
E. The product has been dropped, or the enclosure damaged.
14. Do not attempt to service the product beyond that described in the user-maintenance instructions. All other servicing should be referred to qualifi ed
service personnel.
15. WARNING - Do not place objects on product power cord or place it in a position where anyone could trip over, walk on or roll anything over it. Do
not allow the product, or its bench, or its pedal board to rest on or to be installed over power cords of any type. Improper installations of this type
create the possibility of fi re hazard and/or personal injury.
16. Electromagnetic interference (RFI). This electronic product utilizes digital sampled wave processing technology (S.W.P.) that may adversely affect
radio/tv reception. Read FCC information inside back cover for additional information.
Generalmusic cannot be held responsible for damage caused by improper use or mod i fi ca tions to the
instrument, or data lost or destroyed
Technical specifi cations are subject to change
The information contained in this manual are considered correct at the moment of printing. Generalmusic reserves the
right to change or modify any technical spec i fi ca tion with out prior notice or obbligation to upgrade existing units.
The illustrations and the screens of this manual are for instructional purposes only and may
appear different from those on your instrument.
SAVE THESE INSTRUCTIONS

MANUAL INDEX
Introduction ................................................................................................................................................................. 1
Power supply ................................................................................................................................................................ 1
Using the AC adaptor ................................................................................................................................................... 1
Using batteries .............................................................................................................................................................1
Connections ................................................................................................................................................................. 2
The Phones jack ........................................................................................................................................................... 2
The Sustain jack ........................................................................................................................................................... 2
The Aux. Out jack ......................................................................................................................................................... 2
The MIDI IN, MIDI OUT and MIDI THRU ports ............................................................................................................... 2
Listen to the Demo Song ..............................................................................................................................................3
Basic Operation ...........................................................................................................................................................3
Selecting & playing Voices ............................................................................................................................................ 3
Play a single Voice ........................................................................................................................................................ 3
Select a Voice with the [–] and [+] buttons .................................................................................................................... 3
Select a Voice with the numeric keypad ........................................................................................................................4
Dual voice (play two layered voices) .............................................................................................................................. 4
Keyboard percussion .................................................................................................................................................... 4
The MEMORY ...............................................................................................................................................................5
Selecting the Memory ...................................................................................................................................................5
Split keyboard .............................................................................................................................................................. 5
Play in Split mode with a Dual option on the Upper keyboard .......................................................................................5
To cancel Split mode .....................................................................................................................................................5
Muting the sections ...................................................................................................................................................... 6
Instant Piano Voice ....................................................................................................................................................... 6
Balancing the Lower and Upper sections .......................................................................................................................6
Add Pitch Bend to your playing ..................................................................................................................................... 7
Play with Effects or bypass them .................................................................................................................................... 7
Touch Response ............................................................................................................................................................7
The Octave – transposer ...............................................................................................................................................8
Cancelling the Octave Transpose setting ....................................................................................................................... 8
Styles - Auto-Accompaniment .......................................................................................................................................8
What are the Styles? ....................................................................................................................................................8
Selecting Style Mode .................................................................................................................................................... 8
Use the [-] and [+] buttons to select a Style .................................................................................................................. 9
Use the numeric keypad to select a Style ......................................................................................................................9
Selecting the Styles by recalling the Memory ................................................................................................................. 9
Changing the Style Tempo .......................................................................................................................................... 10
Restoring the memorized Tempo ................................................................................................................................. 10
About the Chord Recognition Modes ........................................................................................................................... 10
Using the Style Auto functions ....................................................................................................................................11
Select the Fill In and change Style Variation ................................................................................................................11
Start the Style accompaniments with Key Start ............................................................................................................11
Start the Style with an Intro pattern ............................................................................................................................. 11
Stop the Style with an Ending phrase .......................................................................................................................... 11
Balancing the Style accompaniment tracks with the Mixer ............................................................................................ 12
Muting the Style tracks ...............................................................................................................................................12
Using the Single Touch Play settings in Style mode ......................................................................................................12
Selecting the S.T. Play settings ..................................................................................................................................... 13
Changing the accompaniment Split Point .................................................................................................................... 13
Digital Effects ............................................................................................................................................................. 14
The Reverb and Chorus indicators ............................................................................................................................... 14
The Memory buttons and Store Memory ...................................................................................................................... 14
How to Store a Memory .............................................................................................................................................. 14
The Sequencer ........................................................................................................................................................... 15
Listen to the playback of a recorded Song ...................................................................................................................15
Record a new song .....................................................................................................................................................15
The Metronome .......................................................................................................................................................... 16
The GK360 Utility functions ........................................................................................................................................ 16
Transpose .................................................................................................................................................................. 16
Tune .......................................................................................................................................................................... 16
Pan ............................................................................................................................................................................16
MIDI .......................................................................................................................................................................... 17
Midi channel selection ................................................................................................................................................17
Control Change fi lter ................................................................................................................................................. 17
The Beat function ....................................................................................................................................................... 17
PERCUS function ........................................................................................................................................................17
TECHNICAL SPECIFICATIONS ..................................................................................................................................... 18
APPENDIX .................................................................................................................................................................. 19
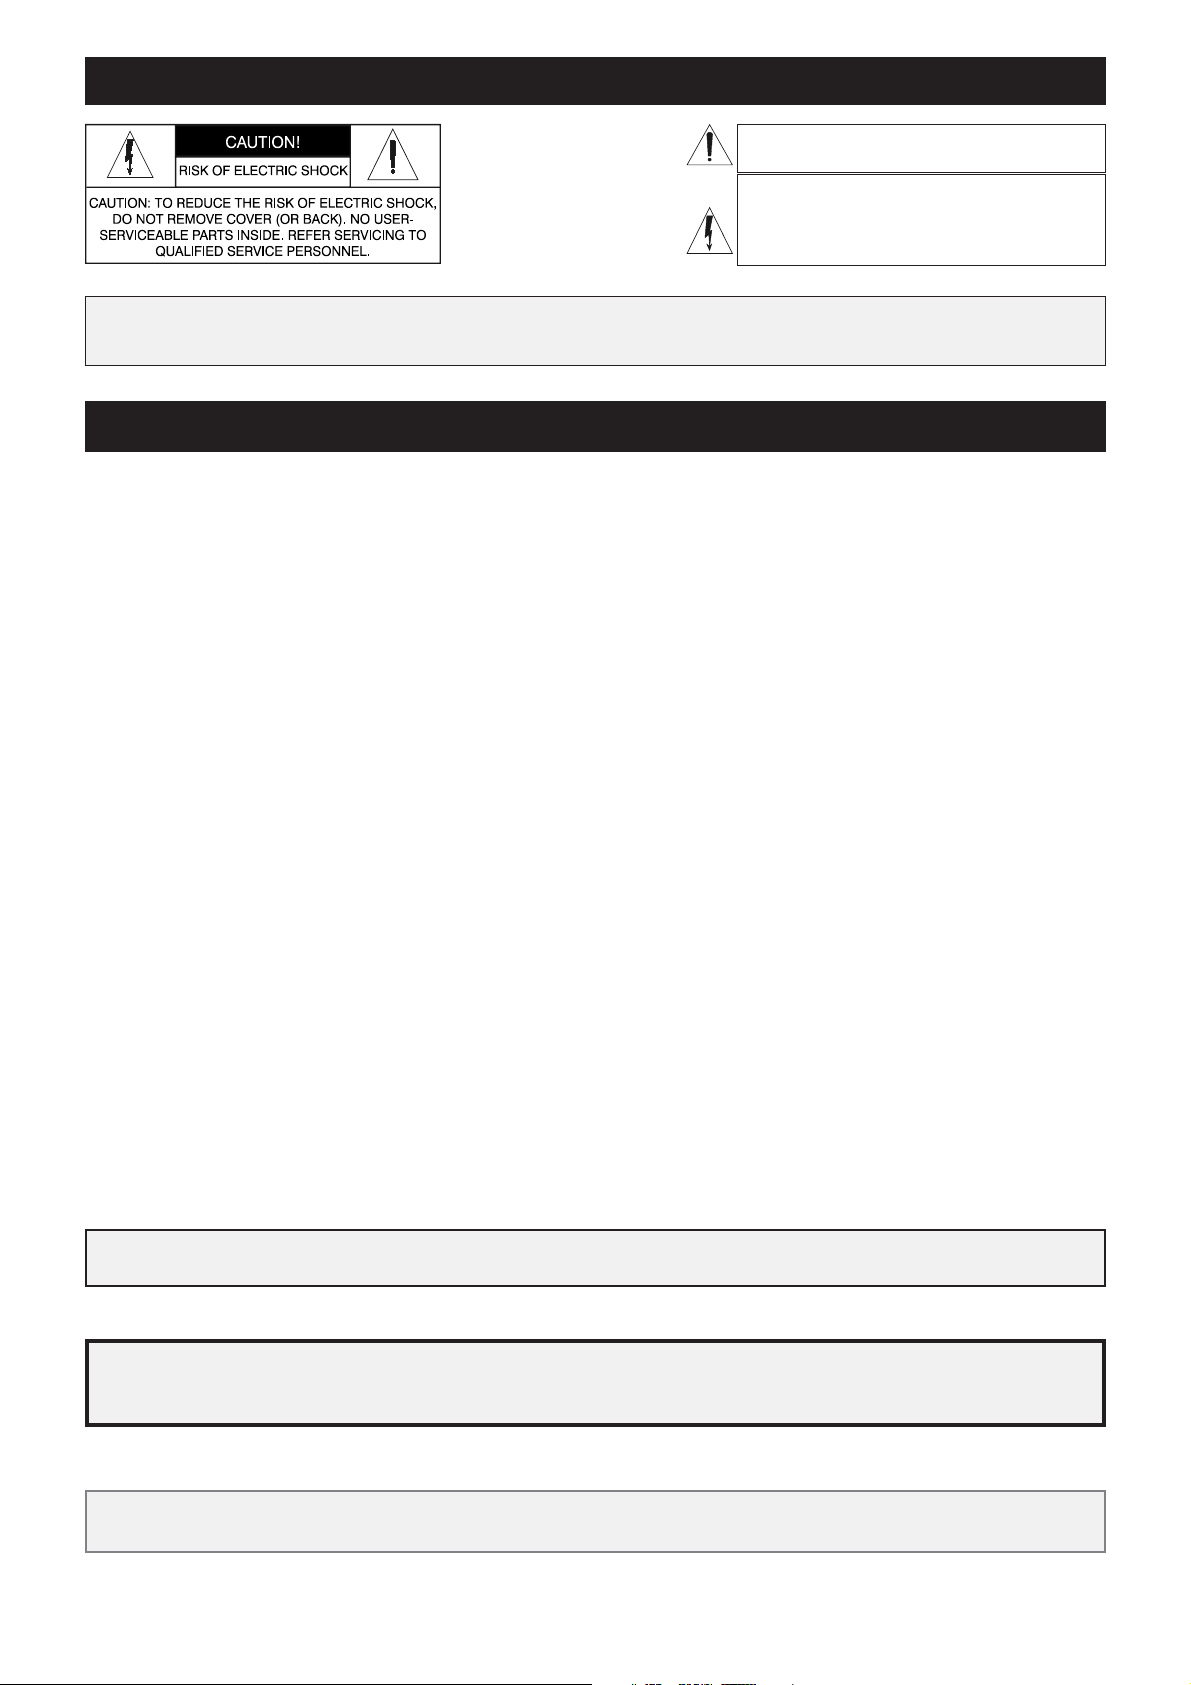
GK360
GK360 CONTROL PANEL LAYOUT
Care of your keyboard
Your keyboard will give you years of playing pleasure if you follow the simple rules outlined below:
• Do not expose the keyboard to high temperature, direct sunlight and excessively dusty
places.
• Avoid physical shocks caused by dropping, bumping, or placing heavy objects on the
keyboard.
• Never use cleaners such as alcohol or solvents to clean the keyboard.
• Always turn the power off when making any connections.
The keyboard is provided with a replaceable NON- RECHARGEABLE LITHIUM BATTERY (CR2032 3 Volts), to maintain
user programmed data intact while the instrument is off. The battery is internally mounted and has an approximate
life-span of 1 year. When data is no longer retained, contact your authorized technical assistance centre to have the
lithium battery replaced with the same or equivalent type reccommended by the manufacturer.
NB Danger of explosion or damage of the battery if it is incorrectly replaced (reversed polarities, +,–).
owners manual
gk360
Introduction
Thank you for purchasing the new GEM gk360 electronic keyboard. The gk360 offers the
following features:
• 61 note keyboard with Touch Response;
• 178 PCM voices GeneralMidi Compatible
• On-board Digital multi-effects processor with 8 Reverb and 8 Chorus effects.
• 96 Styles (automatic accompaniments) with 2 Variations;
• Two chord recognition modes for the Styles: Fingered and One Finger;
• 384 Single Touch Play settings;
• 50 Demo songs;
• On-board Sequencer with Record, Play/Stop.
• MIDI compatibility.
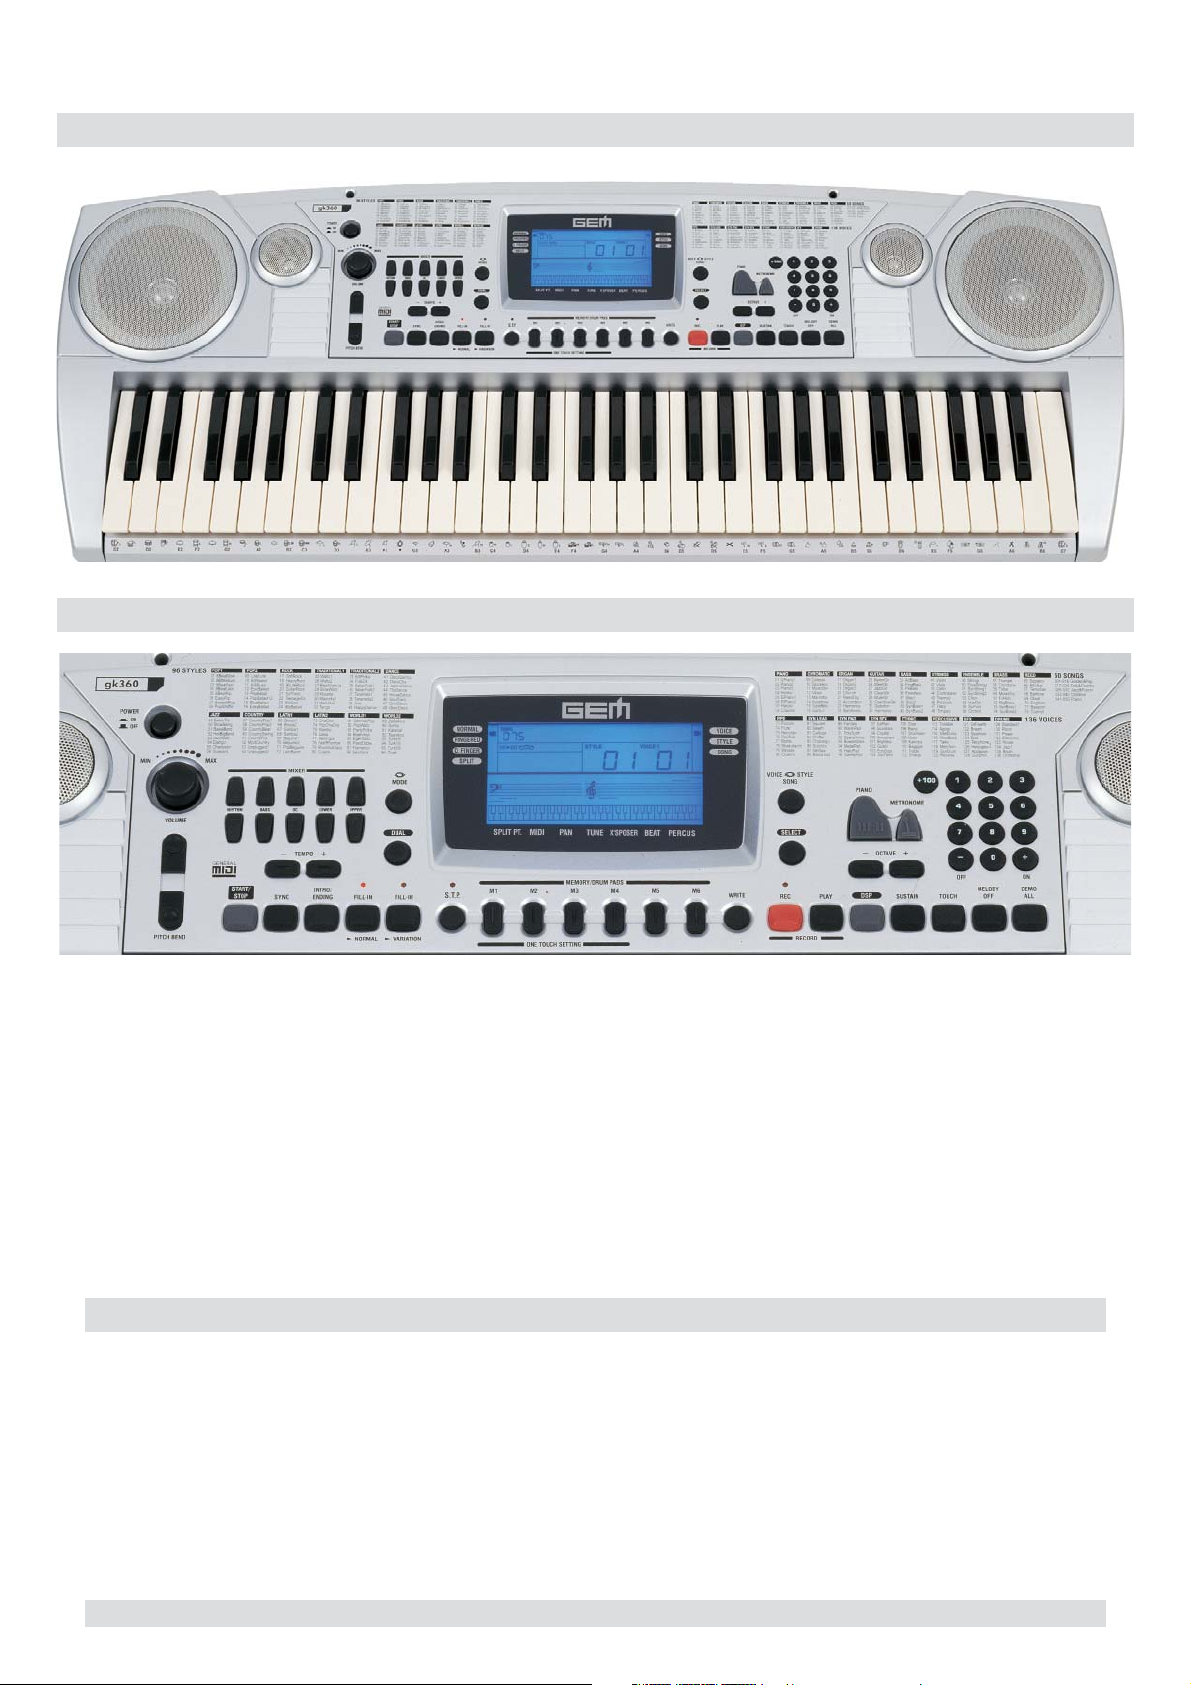
Power supply
This keyboard can be powered by current from a standard household wall outlet (using the
specifi ed AC adaptor) or by batteries.
Using the AC adaptor
Always ensure that the instrument is turned OFF when connecting or
disconnecting the power adaptor. Applying power while the power
switch in depressed may damage the components inside the unit. Do
not use adapters other than the one specifi ed for this keyboard. The technical specifi cations of the adapter must be: 12V DC output, 1800mA,
centre positive type.
CAUTIONS:
Use only the specifi ed AC adaptor. Use of another type of adaptor creates the danger of fi re and electric shock. For safety
sake, be sure to unplug the AC adaptor from the wall outlet whenever leaving the keyboard unattended for a long time.
Using batteries
Always make sure you turn the keyboard off before inserting new batteries or replacing old
ones.
To insert the batteries
1. Carefully turn the instrument upside-down and remove the battery
compartment cover.
2. Insert six D size (SUM-1 or R-20) batteries into the battery com
part ment, being careful to follow the polarity markings on the cabinet.
3. Replace the compartment cover, making sure that it locks fi rmly in pla
ce, then turn the instrument the right way up.
Important battery information
Any of the following symptoms indicate low battery power. Replace the batteries
as soon as possible whenever any of the following occurs.
• A dim and diffi cult-to-read LCD display.
• Abnormally low speaker/headphone volume.
• Distortion of the sound output.
• Sudden power failure when playing at high volume.
• Abnormal playing of the rhythms or demo songs.
• Dimming of the display when playing at high volume.
CAUTIONS:
Improper handling of the batteries can cause them to burst and leak, creating the danger of personal injury or damage of the keyboard. Be sure to take the following important precautions when using batteries:
• Never use batteries of different types.
• Never mix old batteries with new ones.
• Replace the batteries as soon as possible after any sign of discharge.
• Always make sure to remove the batteries from the keyboard’s battery compartment when the keyboard is not expected to be
used for a long period of time.
Page1
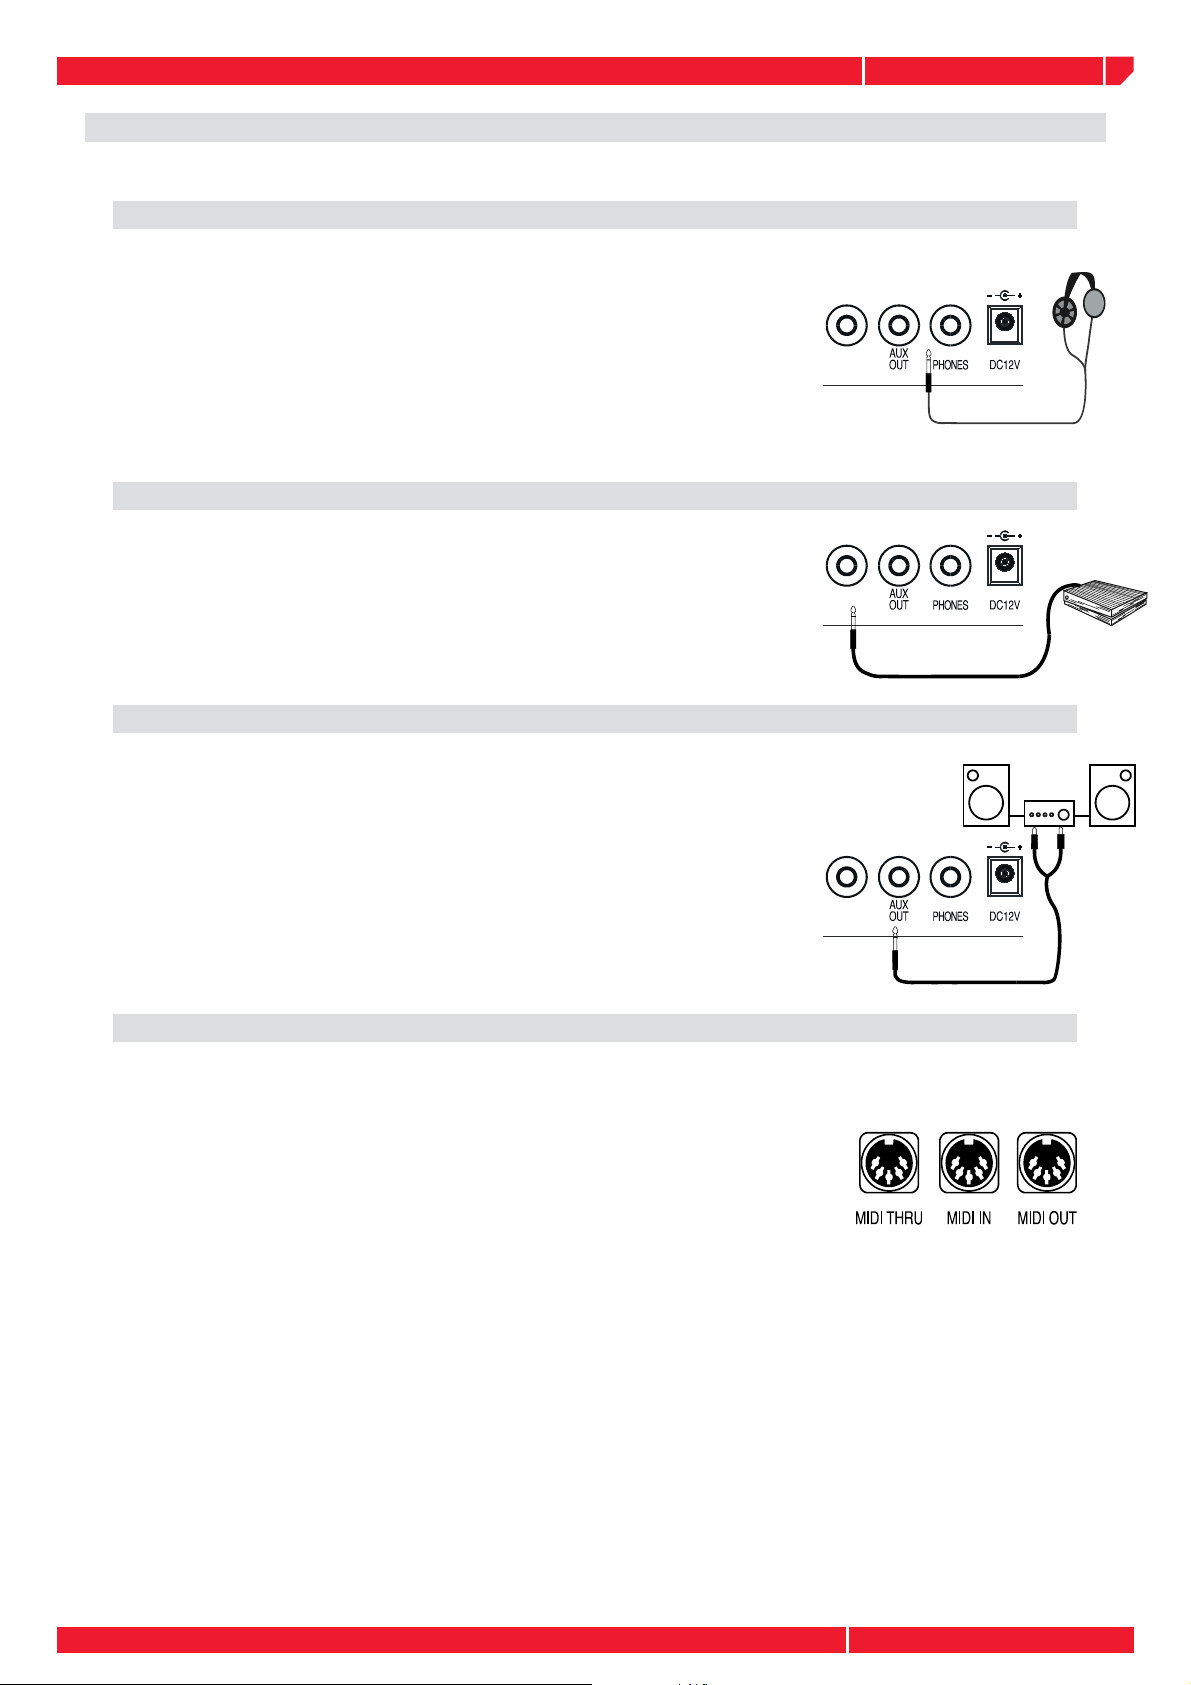
owners manual
Connections
The Phones jack
If you prefer to play with headphones for high quality personal
monitoring, plug a standard stereo headphone set into the rear
panel PHONES jack. The internal speakers are automatically
disconnected. Use the VOLUME slider to adjust the headphone
volume
The Sustain jack
An optional footswitch can be plugged into the Sustain jack for
sustain control. The footswitch operates like the Sustain pedal of
an acoustic piano. Press for sustain, release for normal sound.
gk360
SUSTAIN
SUSTAIN
The Aux. Out jack
Connect the rear-panel AUX. OUT jack to amplifi ed speakers,
amplifi ers or domestic hi-fi units for external amplifi cation. Use
audio cables with standard 1/4” jacks and plug into the LINE
IN or AUX. IN of the external amp. system. To use the external
amp. system only and exclude the internal speakers of the gk360,
plug a jack into the PHONES jack.
The MIDI IN OUT and THRU ports
The gk360 is fi tted with a standard MIDI interface consisting of
In, Out and Thru ports for MIDI connections. The MIDI IN port
receives MIDI data from an external MIDI device. The MIDI OUT
port transmits MIDI data to an external MIDI device. The MIDI
THRU port retransmits the same MIDI data received at the MIDI
IN port to another external MIDI device.
SUSTAIN
Page2
owners manual
gk360
Listen to the Demo Songs
You can listen to the automatic playback of your gk360 to get an idea of what the instrument
is capable of doing.
Turn the power ON by pressing the [POWER] switch. After
1
a short period, the display will appear showing the NORMAL playing mode with a piano sound (Piano1) ready to
play across the full keyboard
Turn the power ON by pressing the [POWER] switch. After
2
a short period, the display will appear showing the NORMAL playing mode with a piano sound (Piano1) ready to
play across the full keyboard
Press the [DEMO] button to stop the Song at any point
3
of the playback. It is also possible stop the Demo with the
[START/STOP] button.
The playback starts automatically; when the Song reaches the end, it
goes to the next Song until you stop the playback; the 50 Demo songs
can also be selected with the numeric keypad. During the playback, it
is also possible to exclude the melodic line [MELODY OFF] and learn
to play the melody by following the notes shown on the display.
}ÊÎÈä
Note:
panel will be temporarily deactivated and it will not be possible
to play along with the song.
While the Demo song is playing, the buttons of the control
Basic Operation
This section explains all the basic operations that you can carry out when the instrument is in
NORMAL mode. Every time you turn on your instrument, it sets to NORMAL mode.
To return the instrument to NORMAL mode, press the
[MODE] button to the left of the display.
Selecting & playing Voices
The gk360 has 178 PCM voices including 1 percussion kits that you can select and play on the
keyboard. After turning on, the gk360 sets to NORMAL/VOICE mode with the display showing
a black arrow pointing to the NORMAL mode in the top left hand corner of the display and
the VOICE 1 message at the center. In VOICE mode, you can select and play voices.
Play a single Voice
If you play on the keyboard after turning the instrument on,
you will hear a piano sound (in this example, Voice 01, “Piano
<-------------- PIANO 1 -------------->
1”) play across the entire keyboard. Select a Voice with the [–]
and [+] buttons In VOICE mode, the [–] and [+] buttons of
the numeric keypad allow you to step through the individual
Voices one by one. The [+] button selects in increasing numerical order while the [–] button selects in reverse order. Holding
either button down scrolls rapidly forwards or backwards
through all the voices. The selected voice number is shown
in the bottom right hand corner of the display.
Page3

owners manual
Select a Voice with the numeric keypad
Using the numeric keypad is the quickest way to go directly
to the Voice you need, but you must know the exact number
of the voice. The name and corresponding number of all
the Voices in memory are silkscreened above the display on
the right. You’ll see that they start from number 01 through
to number 178. Two-digit voice numbers are selected by
entering the two digits in sequence. For example, to select
Voice number 17 (Organ 1), press button [1] then button
[7]. Three digit voice numbers are entered by fi rst pressing
the [VOICE]/[+100] button to specify the “hundreds”, then
pressing the remaining two digits in sequence.
Dual voice (play two layered voices)
To play with the DUAL option (with two layered sounds), press
the [DUAL] button. The message “VOICE 2” appears in the
display as well as the voice number assigned to the layered
section. If you play on the keyboard, you will hear two sounds
for every note played. In our example, you will hear the
Piano voice (01) together with Strings (49). In DUAL mode,
whatever voice selection you make will always be assigned
to the second voice. To return to NORMAL single voice play,
press the [DUAL] button again.
gk360
1
2
<----------- PIANO 1 ------------>
<------- SLOW STRINGS -------->
2
Keyboard percussion
To play percussive instruments on the keyboard, select the
DrumKit from the DRUMKIT group. The DrumKit is recalled
using exactly the same method used to recall a Voice; by
inserting the corresponding number on the numeric keypad
when the instrument is in NORMAL mode (not DUAL or
SPLIT). To recall the STANDARD Drum Kit, simply input voice
number 129.
Press the [VOICE]/[+100] button to select the “hun-
1
dreds”
Insert the two remaining digits; “2” then “9”. With the
2
DRUMKIT selected, the keyboard transform into a device
which plays all the percussive sounds of a real drum kit.
You can see what kind of percussive instrument each note
plays by referring to the silkscreened markings on the rail
under the keyboard
To return to normal playing, simply recall a Voice from any
group except the Drum Kit group.
2
1
1
3
<------PERCUSSION Sound ----->
Note: To play all the sounds of a Drum Kit, it is important to remember that the keyboard must not be in
Split or Dual mode. Be sure, therefore, that the left display arrow is pointing to the NORMAL function.
Page4
owners manual
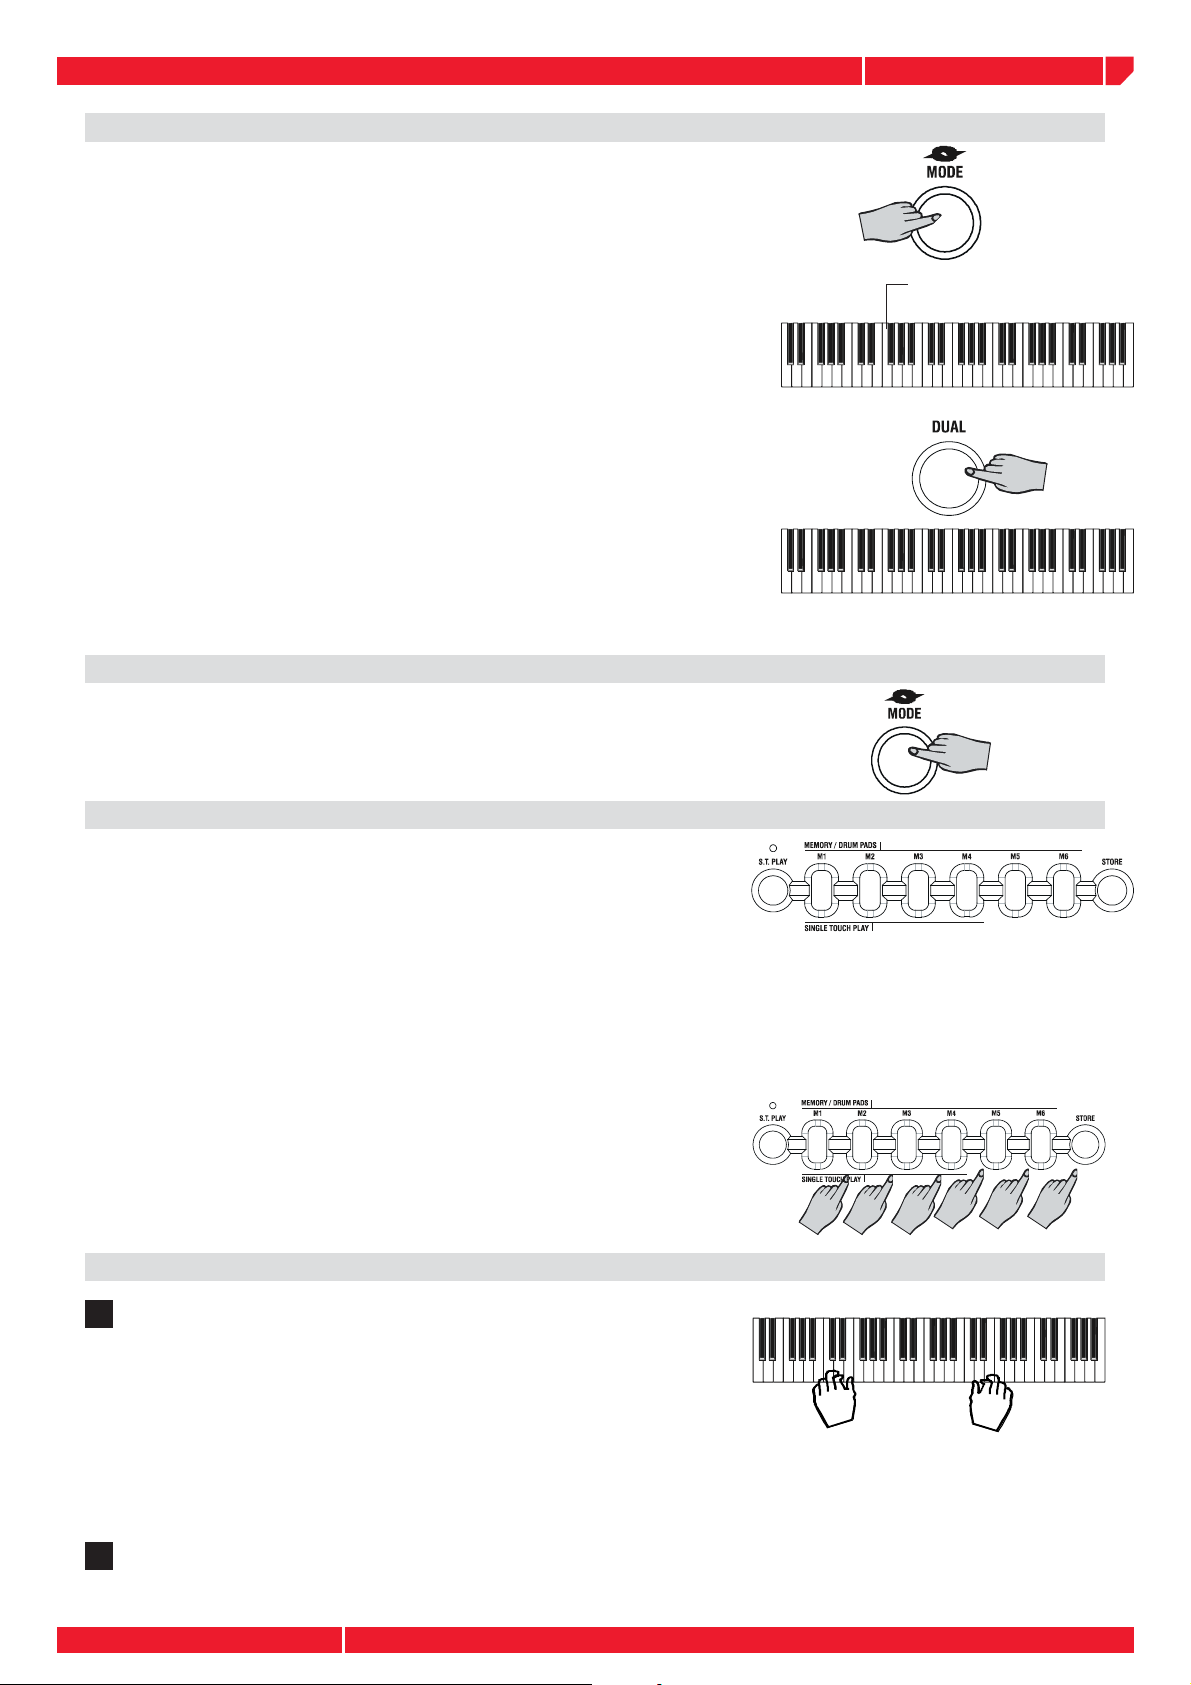
Split keyboard
To play on a split keyboard with one or two voices on the
right hand side (UPPER keyboard) and one voice on the left
(LOWER keyboard), press the [MODE] button as many times
as necessary until the left display arrowhead points to the
SPLIT function. The keyboard will be split into a Lower section
and an Upper section. If you play on the keyboard, you will
hear one sound (01: Piano 1) on the right hand side of the
keyboard and another sound (49: Strings) on the left. You can
check the sound assigned to the lower section . Play in Split
mode with a Dual option on the Upper keyboard To play with
two layered sounds on the Upper keyboard and one on the
Lower, simply press the [DUAL] button while you are in SPLIT
mode. If you want to change the voices on the Upper keyboard, proceed as already described on the previous pages
for Single and Dual voice selection. To change the Voice of
the Lower section, hold down the [MODE] button and proceed
as already described to change the voice number.
<-STRINGS->
<-STRINGS->
gk360
Split point (Fa#3)
<----- PIANO 1----->
<-SLOW STRINGS-->
<------PIANO 1 ----->
To cancel Split mode
To escape Split mode and return to a full NORMAL keyboard,
press the [MODE] button once.
The MEMORY
So far, you have learn how to select single and combined
Voices in Normal, Dual and Split modes using a number of
panel operations. If, every time you want to create a preferred
sound combination, you have to take several steps to arrive at
your goal, you would ask yourself if there wasn’t a quicker way
of selecting what you want. The answer lies in the MEMORYwhich offers a quick and simple method of recalling a panel
situation at the touch of a single button. A MEMORYis simply
a combination of voices and other panel settings (Voices,
Track Volumes, Effect type and level, Style, Variation, Chord
Recognition mode, Split Point, etc.). The gk360 contains six
Memory which recall factory-set panel confi gurations, but you
can also memorize your own combinations using the STORE
MEMORY feature.
Selecting the Memory
Take a quick look at the display, then press one of MEMORY but-
1
tons (M1 - M6); for example, press the [M1] button. The display
shows the situation recalled by the MEMORY. If you were playing
in NORMAL mode, after selecting the Performance you will fi nd
that the keyboard will be split and the mode will have changed
to either Fingered, or One Finger, to enable the Styles. You will
also see a change of Style number. For more information about
how to recall Styles by selecting the MEMORY, refer to the section
entitled “The Styles” on page 8)
Repeat the selections for all the other Performance buttons, observe
2
the changes in the display and play on the keyboard to listen to
the change of voices.
Page5

owners manual
Balancing the Lower and Upper sections
gk360
If you are playing in Normal mode with Voices on a Split
keyboard, you may at some stage want to adjust the volume
of one section with respect to the other. Using the
[MIXER]
Volume controls, you will be able to balance your Upper and
Lower voices to the levels required very easily. The MIXER
consists of 5 twin buttons organized in two rows. The top row
of buttons are [INCREASE VOLUME] controls while the bottom row are [DECREASE VOLUME] controls. When you are
playing with voices only, voice balancing tasks require the use
of the [UPPER] and [LOWER] controls only. The other three
controls, (Drums, Bass and Accomp), are explained under
Styles on page 12.
To increase the volume of, the Upper section, for example,
press the top [INCREASE VOLUME] button and hold it down
until you reach the Volume required. The display shows the
Volume level of the Upper section.
To decrease the volume, press the bottom [DECREASE VOLUME] control. If the Upper section is playing with the DUAL
effect, the [UPPER MIXER] controls adjust both voices at the
same time.
INCREASE VOLUME
DECREASE VOLUME
Muting the sections
If you want to exclude a section (mute, or turn off), you can
use the MIXER control buttons. Simply press both [INCREASE
VOLUME] and [DECREASE VOLUME] buttons at the same time
to mute the section required. For example, if you press both
the top and bottom buttons of the [UPPER MIXER], the display
will show UPPER OFF. To restore the volume to normal, press
both the [INCREASE] and [DECREASE VOLUME] buttons again
at the same time.
Instant Piano Voice
Regardless of the current situation, you can recall the Piano Voice instantly by pressing the [ PIANO] button. Pressing this button returns the
keyboard to NORMAL single voice play with the PIANO voice active
across the entire keyboard. Press the [PIANO] button again to return to
the previously selected situation.
MUTE SECTION
The [PIANO] button always returns you to a single piano voice playing across the full keyboard. You may use
the PIANO button as a “return to start” button whenever you wish to have only one sound active across all 61
keys.
Page6

owners manual
Add Pitch Bend to your playing
While you play, you can add Pitch Bend to your keyboard
sounds by using the [PITCH BEND] buttons located to the
left of the control panel. You can bend the pitch 2 semitones
above or below normal using these controls. Hold down the
top [PITCH BEND] button to bend the notes up. Hold down
the bottom [PITCH BEND] button to bend the notes down. The
pitch returns to normal when you release the button. Pitch
Bend is a “glide” (or glissato) effect which simulates the effect
heard in certain instruments (trombone, guitar, violin, etc.).
Play with Effects or bypass them
While you play, one or both effects (Reverb and/or Chorus)
will be shown active by the small black indicator arrow at the
top of the display. This means that the current Performance is
being processed by one or both effect types. By means of the
[REVERB] and [CHORUS] buttons on the extreme right hand
side of the control panel, you can turn the effect on or off at
will. When the small black display arrow is shown pointing
to the REVERB and/or CHORUS indicator, the current voices
are playing with the effects. When one or both indicators
are off, the respective effect is bypassed and the sounds play
with no effect.
gk360
PITCH UP
PITCH DOWN
To restore the effect, press the same button again. 8
Reverbs and 8 Chorus (Modulation effects) are available to
choose from and both effects units have an independent effect
level control. For further details refer to the section entitled
“The Digital Effects” on page 14.
Touch Response
The [TOUCH] button is a general function which affects the
keyboard globally. The gk360 keyboard is Velocity Sensitive;
in other words, the harder you play on the keys, the louder
the sound becomes, as occurs in an acoustic piano. If you
prefer to play on the keyboard without TOUCH RESPONSE,
you can disable the function by pressing the [TOUCH] button.
The small black arrow pointing to the Touch indicator will
turn off. Press the [TOUCH] button again to restore TOUCH
RESPONSE to the keyboard.
Page7

owners manual
The Octave – transposer
Whether you are playing with Styles or just Voices in single,
dual or split mode, you can octave-shift the current Voice
down one octave (maximum) in real time. The current Voice
is shown in the display by the message VOICE 1, VOICE 2 or
LOWER (when the [SPLIT/LOWER] button is held down).
Press the [OCTAVE–] button
1
A small black display arrow points to the OCTAVE –
function on the right to show that the current voice is set to
play one octave lower than normal. In the example, Voice
1 is shown set to play an octave lower
To cancel the octave transposition, press the [OCTAVE–
2
and +] button again. The small black OCTAVE – display
indicator turns off
gk360
}ÊÎÈä
oCT-12
oCT 00
Styles - Auto-Accompaniment
What are the Styles?
Styles are a collection of musical patterns representing many types of music, ranging from rock and
pop to traditional and ethnic music. The gk360 contains 96 different auto-accompaniment Styles
that can be used to provide fully-orchestrated arrangements. The sophisticated Auto Accompaniment
system can provide automated bass and chord backing that is perfectly matched to the selected
accompaniment Style. The Styles a formed by 5 sections, or tracks, that generate the automatic
arrangements: Drums, Bass and 3 Accomp, and an additional two tracks, Upper and Lower, for
the keyboard sounds. The automatic arrangements are triggered by playing chords (fi ngered or
one-fi nger) on the lower part of the keyboard below the split point.
Selecting Style Mode
To select the Styles, you must set the gk360 to STYLE mode
Press the [STYLE] button
1
At the center of the display, the message STYLE is shown
to show that the instrument is ready to accept a STYLE
selection
To enable the Style auto-accompaniments, you must select
one of the two chord recognition modes (ONE FINGER or
FINGERED).
2
Page8
Press the [ SINGLE TOUCH PLAY] button
Pressing this button activates the KEY START function
automatically and enables the Style auto-accompaniments
by recalling one of the two chord recognition modes (ONE
FINGER or FINGERED). The left display arrowhead points
to FINGERED or ONE FINGER. The display example shows
FINGERED selected. The FINGERED and ONE FINGER chord
recognition modes are explained in detail further ahead.
Note: When SINGLE TOUCH PLAY is on, the
sounds memorized in the Style Performance are
assigned to all the tracks. Selecting a Style changes
the sounds of the accompaniment sections (Drums,
Bass, Accomp) as well as the keyboard sections
(Upper 1, Upper 2, Lower). When SINGLE TOUCH
PLAY is off, selecting a Style changes the sounds of
the accompaniment sections only.

owners manual
You can select a Style in three different ways: Use the [-] and [+] buttons to
select a Style In STYLE mode, the [–] and [+] buttons of the numeric keypad step
through the individual Styles one by one.
Press the [+] button to select the Styles in increasing
3
numerical order
Press the [–] button to select the Styles in reverse order. Holding
4
the button down scrolls rapidly forwards or backwards through
all the Styles. The selected Style number is shown at the center of
the display
Use the numeric keypad to select a Style
Using the numeric keypad is the quickest way to go directly to the
Style you need, but fi rst, you must know the exact number of the
Style. The name and corresponding number of all the Styles in
memory are silkscreened above the display on the left. You’ll see
that they are organized in Groups (8 BEAT, 16 BEAT, ROCK, etc.)
and numbered from 01 through to 96. Select the Style you want by
entering the corresponding two digits in sequence. For example, to
select Style number 17 (SoftRock), press button [1] then [7].
gk360
Selecting the Styles by recalling the Memory
Another quick way of selecting the Styles is by selecting the Performances, but this means that you have to
remember which Style is memorized in the Memory. If you use the Performances to select Styles, remember
to turn off the S.T. PLAY button. You can also memorize your preferred Styles to these buttons with Store
Memory. This argument is explained in detail further ahead on page 14.
Playing the Styles
Once you have selected a Style, press the [START/STOP]
1
button. You’ll hear the Drums accompaniment track start
to play.
Play a note or chord on the left part of the keyboard below
2
note F#3 to trigger the automatic accompaniments
An automatic accompaniment will start to play, generated by the Style
sections: Drums, Bass and Accomp. As you change chord from Major
to minor or seventh, etc., you will notice a change of style pattern.
Each time you change key, for example, from C to F, the Style pattern
will transpose automatically. The names of the recognized chords are
displayed in the left hand corner of the display. For example, if you
play the chord of C, the display will show the large letter “C”. If you
play a chord not recognized by the instrument’s chord recognition
system, the current pattern will not change until you play a recognized
chord. Also shown in the display are 4 round Beat pattern indicators
which show the current beat of the bar as you play your style. The
fi rst bar of every two-bar cycle shows all 4 indicators, while every
other beat shown one small indicator. The fi rst beat of the second bar
is shown with the larger beat indicator. To play your Style using the
automatic functions (Var, Key Start, Intro, Fill, Ending), see the section
entitled “Using the Style Auto functions” further ahead.
Press the [START/STOP] button if you want to stop the
3
Style.
NOTE: If you hear a Drum pattern only without automatic accompaniment when you play a note or chord on the Lower
keyboard, check that you are not in NORMAL or SPLIT mode. The arrowhead must point to either FINGERED or ONE
FINGER for the Style accompaniment to play.
Page9

owners manual
Changing the Style Tempo
gk360
Every time you select a Style, you also recall a memorized
playing speed, (TEMPO), shown in the top left hand corner
of the display. You can speed up or slow down the tempo,
before or after starting the Style, by pressing the [TEMPO /+]
button.
• Press the [TEMPO+] button to increase the Tempo
value, or the [TEMPO–] button to decrease the value.
Holding down either [+] or [–] end of the button
changes the Tempo value at high speed continually until
released.
Restoring the memorized Tempo
To restore the Style’s memorized Tempo, press both the
[TEMPO–/+] buttons at the same time
About the Chord Recognition Modes
The gk360 allows you to choose between two different Chord
recognition modes: FINGERED and ONE FINGER. The chords
that you play (Fingered or One Finger type) must be played
on the lower part of the keyboard dedicated to the Auto Bass
Chords (from note C2 up to and including note F#3).
DECREASE
TEMPO
INCREASE
TEMPO
FINGERED mode requires that you press at least 3 notes
for a chord to be recognized.
ONE FINGER mode requires that you press only one note
for a Major chord to be recognized. Other chords require
more notes
If a Chord recognition mode isn’t selected, press the
1
[MODE] button as many times as necessary until the left
display arrowhead points to either FINGERED or ONE
FINGER
Press the [START/STOP] button to start the current Style
2
If you select FINGERED, play a chord of at least 3 notes
3
on the Auto Bass Chord section of the keyboard to trigger
the auto-accompaniments
If you select ONE FINGER, play one note on the Auto Bass
Chord section of the keyboard to trigger the Major chord
of the auto-accompaniments Other chords using the “One
fi nger” method involves the use of two or three fi ngers. In the
Appendix you’ll fi nd useful reference charts for Fingered and
One Finger chords.
FINGERED
ONE FINGER
Note: If you change Style while the rhythms are playing, the current Tempo rests unchanged. The memorized Style
Tempo is recalled only when the Style is not playing.
Page10

owners manual
gk360
Using the Style Auto functions
The Styles provide a wide variety of automatic functions that make the gk360 very easy to
play. The functions are found in the ACCOMPANIMENT CONTROL section.
Select the Fill In and change Style Variation
Each Style has two accompaniment patterns, NORMAL and
VARIATION, which you can select at any time before or after
starting to play the Styles by pressing the corresponding
button. The LED status on the FILL 1 or FILL 2 buttons tells you
which Style pattern is active for play, Normal or Variation.
When you press the [FILL 1/NORMAL] or the [FILL 2/VAR]
button during playback, the current pattern will be interrupted
by an appropriate Fill In, or “break”, then proceed with the
same pattern or variation, depending on which button you
press. The LED of the button pressed will turn on while the
LED of the other button will turn off.
Start the Style accompaniments with Key Start
The KEY START function allows you to synchronize the start
of your Style with a note or chord pressed on the keyboard
without using the Start/Stop button. When you press the
[SYNCRO] button, the display shows 4 fl ashing black dots
(beat pattern indicators) after the word TEMPO to indicate
the synchro start stand-by. Now, if you play a note or chord
on the lower part of the keyboard, the Style pattern starts
automatically.
Start the Style with an Intro pattern
Before starting the Style, press the [INTRO] button to put
the instrument into intro-stand-by mode. The LED of the
current Style pattern (Fill1/Normal or Fill2/Var) starts to
fl ash to indicate that the INTRO has been preset. Now
press the [START/STOP] button and play a note or chord
on the lower part of the keyboard. The Style starts with an
introductory pattern then proceeds with the selected autoaccompaniment (Normal or Variation). Stop the Style with
an Ending phrase You can stop your Style automatically with
a professionally-programmed ending pattern without using
the Start/Stop button. While the Style is playing, simply press
the [ENDING] button. The Style auto-accompaniment will
stop automatically with an Ending phrase.
Page11

owners manual
Balancing the Style accompaniment tracks with the Mixer
gk360
Playing with Styles, you can adjust the volume of one section
with respect to the others using the [MIXER] Volume controls.
INCREASE VOLUME
You will be able to balance all the Style sections; Drums, Bass,
Accomp as well as the Lower and Upper keyboard sections.
How the MIXER controls are organized is explained on page
6. In Style mode, to increase the volume of the Bass track,
for example, press the top [INCREASE VOLUME] button and
hold it down until you reach the Volume required. The display
shows the Volume level of the section being controlled, in
this case the Bass section. To decrease the volume, press the
bottom [DECREASE VOLUME] control.
Note: The volumes of the three Accompaniment tracks are controlled simultaneously by the [ACCOMP]
Volume buttons.
DECREASE VOLUME
Muting the Style tracks
If you want to exclude a section (mute, or turn off), simply
press both [INCREASE VOLUME] and [DECREASE VOLUME]
buttons at the same time to mute the section required. For
example, to play your Upper and Lower voices with the
BASS accompaniment only, mute the DRUMS and ACCOMP
tracks. The display will show OFF for the respective section.
To restore the volume to normal, press both the [INCREASE]
and [DECREASE VOLUME] buttons again at the same time.
MUTE TRACKS
Using the Single Touch Play settings in Style mode
The SINGLE TOUCH PLAY settings are a quick and easy way of reconfi guring the voices of
the UPPER and LOWER sections of a Style by pressing only one button while you are playing,
without having to stop to change voices manually. Playing the Styles with the [SINGLE TOUCH
PLAY] button on, each Style you select recalls a panel confi guration (voices and volume settings)
for the accompaniment sections (Drums, Bass, Accomp) as well as for the Upper and Lower
sections.The S.T. PLAY settings are recalled using the fi rst four buttons of the MEMORY section
[M1-M4]. The gk360 provides a total of 96 x 4 = 384 different panel confi gurations.
Page12

owners manual
Selecting the S.T. Play settings
Select a Style using the methods already described.
1
Press the [S.T. PLAY] button. The display will show a small
2
black arrowhead pointing to the S.T. PLAY indicator in
the bottom left hand corner
Make sure that one of the two chord recognition modes
is selected.
Start the Style using the methods already described (Key
3
Start, Intro, etc.)
While you are playing the Style, press one of the SINGLE
4
TOUCH PLAY buttons ([M1], [M2], [M3] or [M4]). The
display will show the current Single Touch Play setting.
You’ll hear a change of voice confi guration and the Style
Variation may also change
gk360
Note: The S.T. PLAY settings change
the confi guration of the UPPER and
LOWER sections only.
Repeat the selection procedure of the SINGLE TOUCH
5
PLAY settings after changing other Styles
On the following page there are instructions on how to
store your preferred settings into the 6 memories.
Note: When the [S.T. PLAY] button
is on (display indicator on), the
two MEMORY buttons [M5] and
[M6] are disabled for Performance
selection.
Page13

owners manual
Digital Effects
The gk360 contains a Digital multi-effects processor which adds realism
to your playing. The Digital Signal Processor (DSP) consists of one
unit which process the Performances with Reverb and Chorus effects.
The buttons which control the Digital Effect are DSP button. The DSP
indicators When the DSP display indicators are on, all the voices of the
current Performance will play with their programmed effects. When one
or both the corresponding display indicators are off, the sounds will
play “dry” (without effects).
The Memory buttons and Store Memory
You have seen that the Single Touch Play settings recall factoryset confi gurations for the current Style when the [S.T. PLAY]
button is on. You have also seen that, when S.T.PLAY is off,
(display indicator off), the 6 buttons of the PERFORMANCE
section recall factory-set panel confi gurations (see page 5),
including Voices, Volumes, Style, Variation, Split Point, etc..
How to Store a Memory
gk360
If you don’t want to use the factory Performance settings, you can memorize your own panel
confi gurations to the PERFORMANCE buttons. This very useful feature allows you to store up
to 6 preferred panel confi gurations, including Style, Variation and other selections, which you
can then recall at the touch of a single button. To memorize a Performance, the fi rst thing to
do is to modify one of the factory set situations. For example, if you select STYLE number 45
(Swing) with Single Touch Play on, the voices recalled for the Upper and Lower sections will be
Organ 2 and Strings respectively. You only need to change one aspect of any factory setting
to be able to save the new setting as a new Performance. In our example, let’s change the
voice assigned to the Voice 1 section.
Press the [VOICE/SONG/STYLE] button, press the
1
[S.T.PLAY] button, then select Style n. 49 (BasicTrio)
1
Press the [VOICE/SONG/STYLE] button and select a
2
different Voice by using either the [+] and [–] buttons,
or the numeric keypad (voice 27, Jazz Guitar, for this
example).
2
Disable the Single Touch Play function (press the
3
[S.T.PLAY])
Hold down the [STORE] button and simultaneously press
4
one of the PERFORMANCE buttons [M1] - [M6].
5
Page14
For example, if you press [M5]. The small black arrowhead
at the bottom of the display will show the current
Performance. Whatever information was previously stored
in the selected button will be erased by the new data
At this point, you can check if your new Performance has
been stored. Changing the panel situation (for example,
select a Voice or Style), then press the MEMORY button
that you used to store your Performance in point 4
above.
3
4
5

owners manual
gk360
The Sequencer
Your gk360 contains a very simple and easy to use sequencer which records whatever you
play and plays back the recorded sequence just as you played it. You can record in Voice
mode or Style mode with one or two melody tracks. In playback, you can play along with the
recorded sequence using different voices to those used in the Melody tracks. The following
example explains how to record a sequence using the Accompaniments.
Set the instrument for Style play and select a Style. (Follow the
1
instructions explained on page 9
Press the [REC] button.
2
the four Beat indicators in the display will fl ash
If you want to start the recording of the Style with an introduction,
3
press the [INTRO] button to preset the Intro
The sequencer Start to record the notes you play
4
The Key Start function triggers the Style accompaniment patterns
when you play a chord on the keyboard below the split point.
If you play a note or chord on the upper part of the keyboard,
only the drum track will be triggered.
While playing, use the Fills, change the Variation, change
5
Voices for the Upper and Lower sections, activate/deactivate
Dual mode, etc.. Whatever you do will be captured by the
sequencer
Stop the recording with the [REC] button. You can also stop
6
the recording with an ending by press the [ENDING] button.
Listen to the playback of a recorded Song
ress the [PLAY] button to listen to the playback of your
1
recording
While the recorded sequence is playing, you can play along
using any voice. Simply select the one you want and play
Record a new song
To record a new Song and overwrite the old one, simply press the [REC] button and the buttons
you want to record. Proceed to record your new song using the method already described.
The old song will be overwritten (cancelled). If you press [PLAY] when the sequencer contains
no recorded notes, the display will show an EMPTY message.
Page15

owners manual
gk360
The Metronome
At any time, you can activate the METRONOME for practising purposes. To play with the
Metronome, press the STYLE button and insert the value 00 on the numeric keypad (press the
“0” button twice).
Press the [START/STOP] button to start the Metronome. The Metronome
starts beating time with a ‘tick’. If you select the Metronome while you
are playing a Style, the auto accompaniment will stop and the Metronome will take over as the provider of the beat. The Metronome is useful
to practice keeping time or when you have to practice a study piece.
To stop the Metronome tick, press the [START/STOP] button.
THE GK360 UTILITY FUNCTIONS
The gk360 features several utility functions which affect the keyboard globally. The functions
are: SPLIT PT., TRANSPOSE, TUNE, PAN, BEAT, PERCUSS and MIDI.
SPLIT POINT
This function allows to increase or decrease the keyboard area dedicated to the Style chords,
you can change the Split Point setting to any note of the keyboard and memorize the setting
to a Performance. The default setting corresponds to the note F#3.
SPLIT POINT EDITING
Press the [SELECT] button to select SPLIT PT. in the
1
display
The display will show the current Split Point setting. The
default Split Point is F#3.
Press the key corresponding to the new Split point
2
The new Split Point note is shown in the display. For example,
if you press note C4, the display will show the letter C on
the extreme left and the number 4 at the center.
The gk360 FUNCTION menu is temporized, then after some
second you fi nish to use it the system escape from the menu
automatically.
Note: The Split Point can be different for each
Performance, and the settings remain memorized
even after turning the instrument off.
The new Split Point can be memorized to a Memory using the Store memory procedure, as already
explained on the previous page.
The MIDI function
The MIDI function allows you to set the Transmission/Reception channel for the keyboard as a whole. You can set any
MIDI channel from 1 -16. If you select the MIDI function, the
display shows the factory-set MIDI channel assignment.
Use the [+/ON] button to increase the channel number value, or the [–/OFF] button to decrease the channel number
value.
Note: It is not possible to assign separate and independent MIDI
channels to the voices and accompaniment sections.
Page16

owners manual
gk360
Pan
The PAN function allows you to change the stereo pan position of the
overall sound, moving the sound at the speakers either to the left or to
the right. If you press either the [+] or [-] PAN buttons once only, the
display will show the normal setting corresponding to Pan at the centre (00). Press the [+] or [-] PAN buttons repeatedly to pan the overall
sound to the left (max: 07) or to the right (max: 07). The cancel the Pan
setting and restore the normal Pan position (centre), press both [+] and
[-] PAN buttons at the same time.
Note: The programmed PAN setting will remain memorized until you turn the instrument off. When you turn gk360
on again, the instrument will set to the normal Pan setting (00)
Tune
The TUNE function allows you to fi ne tune the instrument in steps on one
cent at a time (cent = one hundredth of a tone). If you press either the
[+] or [-] TUNE buttons once only, the display shows the normal tuning
setting (00) corresponding to the standard A = 440 Hz. Press the [+] or
[-] TUNE buttons repeatedly to raise (max: 50) or lower (max: 50) the
tuning until you reach the value required. The cancel the Tuning setting
and restore normal pitch, press both [+] and [-] TUNE buttons at the
same time
Note: The programmed TUNE setting will remain memorized until you turn the instrument off.
When you turn gk360 on again, the instrument will set to the normal Tune setting (00).
The Transpose
The TRANSPOSE function allows you to change the pitch of the instrument in semitone steps, up to a maximum setting of 12 semitones above
or below standard pitch. If you press either the [+] or [-] TRANSPOSE
buttons once only, the display shows the normal pitch setting (00).
Press the [+] or [-] TRANSPOSE buttons repeatedly to raise or lower the
pitch in semitone steps until you reach the value required. The cancel
the Transpose setting and restore normal pitch, press both [+] and [-]
TRANSPOSE buttons at the same time.
Note: The programmed TRANSPOSE setting will remain memorized until you turn the instrument off. When you
turn gk360 on again, the instrument will set to the normal Transpose setting (00).
The Beat function
The BEAT function allows you to set a time signature (number
of beats in a measure) for the Metronome. The factory set-
ting corresponds to 4 beats for every measure. If you press
either the [+] or [-] button, the display will show the factory
setting (for example, “4”).
Press either the [+] or [-] button repeatedly to scroll to the
required Beat number.
The PERCUS function
The percussion function allows to program as PAD the Memory keys. Through the [+] and [-] keys you can turn the PERCUSS function ON so that you can play 6 different drum pad
kits in real time.
Page17

owners manual
gk360
GK360 TECHNICAL SPECIFICATIONS
Keyboard
Polyphony
Sounds
Performances
One Touch Setting
Operating Mode
Digital Effects
Controls
Display
Styles
Styles Controls
Sequencer
Song Library
MIDI
Connections
Extra Info
Amplifi cation
Dimensions (lxhxd)
Weight
61 keys with dynamics
64 notes max.
178, GM compatibles
6 memories, 92 albums
384 (4 x style)
layer/split
reverb/chorus
Power on/off, volume, pitch buttons +/-, mixer (drum, bass,
acc., lower, upper), tempo, +/-, mode, dual, voice/style/song,
select, piano, metronome, octave +/, key pad, single touch
play, memory/drum pads, store, dsp, sustain, touch, melody
off, demo, M1/M6, transpose
multifunction LCD display (neon backlit), with music notation &
keyboard guide
96
start/stop, sync, intro/ending, fi ll in normal, fi ll in variation,
O.T.S. (one touch settings)
realtime recorder, rec, play/stop
50 Songs + 5 Demo
MIDI In/Out/Thru
MIDI In/Out/Thru, sustain, aux out, phones, DC 12V In
Adapter included, music stand included, battery supply (6 D
size batteries, not included)
5W + 5W
950 x 145 x 350 mm/37’’ x 5’’ x 13’’
7 Kg/15 lbs (without batteries)
Page18
Technical specifi cation and design are subject to change without notice
Music Stand
The keyboard is supplied with a music stand that can be mounted on the instrument by
inserting the two lower pegs of the music stand into the two holes located on the top
panel of the gk360. To remove the music stand, lift it upwards.

owners manual
gk360
APPENDIX
One fi nger chords chart
fi ngered chords chart
Page19

owners manual
APPENDIX 1-VOICE LIST
Dis-
SoundName
play
Num.
1 Piano1 0-0 Instrument 61 Fr.Horn 60-0 Instrument 121 FretNois 120-0 Instrument
2 Piano2 1-0 Instrument 62 Brass 61-0 Instrument 122 Breath 121-0 Instrument
3 Piano3 2-0 Instrument 63 SynBras1 62-0 Instrument 123 SeaShore 122-0 Instrument
4 HonkyPF 3-0 Instrument 64 SynBras2 63-0 Instrument 124 Birds 123-0 Instrument
5 RhodesPF 4-0 Instrument 65 Sopr.Sax 64-0 Instrument 125 Phone 1 124-0 Instrument
6 FMPiano 5-0 Instrument 66 Alto Sax 65-0 Instrument 126 Helicopt 125-0 Instrument
7 Harpsich 6-0 Instrument 67 TenorSax 66-0 Instrument 127 Applause 126-0 Instrument
8 Clavinet 7-0 Instrument 68 Bari.Sax 67-0 Instrument 128 Gun Shot 127-0 Instrument
9 Celesta 8-0 Instrument 69 Oboe 68-0 Instrument 129 STDdrum 0 DrumKit (ch.10)
10 Glocken 9-0 Instrument 70 Eng.Horn 69-0 Instrument 130 ROOMdrum 8 DrumKit (ch.10)
11 MusicBox 10-0 Instrument 71 Bassoon 70-0 Instrument 131 POWdrum 16 DrumKit (ch.10)
12 Vibes 11-0 Instrument 72 Clarinet 71-0 Instrument 132 ELECdrum 24 DrumKit (ch.10)
13 Marimba 12-0 Instrument 73 Piccolo 72-0 Instrument 133 ANLGdrum 25 DrumKit (ch.10)
14 Xilo 13-0 Instrument 74 Flute 73-0 Instrument 134 JAZZdrum 32 DrumKit (ch.10)
15 TubBell 14-0 Instrument 75 Recorder 74-0 Instrument 135 BRSHdrum 40 DrumKit (ch.10)
16 Santur 15-0 Instrument 76 PanFlute 75-0 Instrument 136 ORCdrum 48 DrumKit (ch.10)
17 Organ1 16-0 Instrument 77 Bottle 76-0 Instrument 137 SFXdrum 56 DrumKit (ch.10)
18 Organ2 17-0 Instrument 78 Shakuha. 77-0 Instrument 138 HarpsOct 6-8 Instrument
19 Organ3 18-0 Instrument 79 Whistle 78-0 Instrument 139 12strnGt 25-8 Instrument
20 Church 19-0 Instrument 80 Ocarina 79-0 Instrument 140 Hawai Gt 26-8 Instrument
21 ReedOrg 20-0 Instrument 81 SquareLd 80-0 Instrument 141 PhatSyn1 82-1 Instrument
22 Musette 21-0 Instrument 82 SawLead 81-0 Instrument 142 PhatSyn2 84-1 Instrument
23 Harmonic 22-0 Instrument 83 Calliope 82-0 Instrument 143 Sinus 126-15 Instrument
24 Bandoneo 23-0 Instrument 84 ChifLead 83-0 Instrument 144 Castanet 115-8 Instrument
25 NylonGt 24-0 Instrument 85 Charang 84-0 Instrument 145 Orch.BD 116-8 Instrument
26 HybridGt 25-0 Instrument 86 SoloVox 85-0 Instrument 146 GtCutNoi 120-1 Instrument
27 JazzGt 26-0 Instrument 87 Saw5th 86-0 Instrument 147 StrnSlap 120-2 Instrument
28 CleanGt 27-0 Instrument 88 BassLead 87-0 Instrument 148 KeyClick 121-1 Instrument
29 MutedGt 28-0 Instrument 89 Fantasy 88-0 Instrument 149 Rain 122-1 Instrument
30 OverdrGt 29-0 Instrument 90 WarmPad 89-0 Instrument 150 Thunder 122-2 Instrument
31 DistorGt 30-0 Instrument 91 PolySynt 90-0 Instrument 151 Wind 122-3 Instrument
32 HarmonGt 31-0 Instrument 92 SpaceVox 91-0 Instrument 152 Stream 122-4 Instrument
33 AcouBass 32-0 Instrument 93 BowGlass 92-0 Instrument 153 Bubbles 122-5 Instrument
34 FingBass 33-0 Instrument 94 MetalPad 93-0 Instrument 154 Dog 123-1 Instrument
35 PickBass 34-0 Instrument 95 HaloPad 94-0 Instrument 155 Gallop 123-2 Instrument
36 FretlBas 35-0 Instrument 96 SweepPad 95-0 Instrument 156 Bird 123-3 Instrument
37 SlapBas1 36-0 Instrument 97 IceRain 96-0 Instrument 157 Phone 2 124-1 Instrument
38 SlapBas2 37-0 Instrument 98 SoundTrk 97-0 Instrument 158 DoorCreak 124-2 Instrument
39 SyntBas1 38-0 Instrument 99 Crystal 98-0 Instrument 159 DoorSlam 124-3 Instrument
40 SyntBas2 39-0 Instrument 100 Atmosph. 99-0 Instrument 160 Scratch 124-4 Instrument
41 Violin 40-0 Instrument 101 Brightn. 100-0 Instrument 161 Windchim 124-5 Instrument
42 Viola 41-0 Instrument 102 Goblin 101-0 Instrument 162 CarEngin 125-1 Instrument
43 Cello 42-0 Instrument 103 EchoDrop 102-0 Instrument 163 Car Stop 125-2 Instrument
44 Contrabs 43-0 Instrument 104 StarThem 103-0 Instrument 164 Car Pass 125-3 Instrument
45 Tremolo 44-0 Instrument 105 Sitar 104-0 Instrument 165 CarCrash 125-4 Instrument
46 Pizzicat 45-0 Instrument 106 Banjo 105-0 Instrument 166 Soren 125-5 Instrument
47 Harp 46-0 Instrument 107 Shamisen 106-0 Instrument 167 Train 125-6 Instrument
48 Timpani 47-0 Instrument 108 Koto 107-0 Instrument 168 JetPlane 125-7 Instrument
49 Strings 48-0 Instrument 109 Kalimba 108-0 Instrument 169 Starship 125-8 Instrument
50 SlowStrn 49-0 Instrument 110 BagPipe 109-0 Instrument 170 BurstNoi 125-9 Instrument
51 SynStrn1 50-0 Instrument 111 Fiddle 110-0 Instrument 171 Laughing 126-1 Instrument
52 SynStrn2 51-0 Instrument 112 Shanai 111-0 Instrument 172 Scream 126-2 Instrument
53 Choir 52-0 Instrument 113 Tinkle 112-0 Instrument 173 Punch 126-3 Instrument
54 DooVox 53-0 Instrument 114 Agogo 113-0 Instrument 174 Heart Bt 126-4 Instrument
55 SyntVox 54-0 Instrument 115 SteelDrm 114-0 Instrument 175 Step 126-5 Instrument
56 Orch.Hit 55-0 Instrument 116 Woodblok 115-0 Instrument 176 Mach.Gun 127-1 Instrument
57 Trumpet 56-0 Instrument 117 Taiko 116-0 Instrument 177 LaserGun 127-2 Instrument
58 Trombone 57-0 Instrument 118 Melo.Tom 117-0 Instrument 178 Explosn. 127-3 Instrument
59 TubaBass 58-0 Instrument 119 Syn.Drum 118-0 Instrument
60 MuteTrum 59-0 Instrument 120 Rev.Cymb 119-0 Instrument
Patch
(ProgBank-
MSB)
Instr. / Drum-
Kit
Display
Num.
SoundName
Patch
(ProgBank-
MSB)
Instr. / Drum-
Kit
Display
Num.
SoundName
Patch
(Prog-
BankMSB)
gk360
Instr. / DrumKit
Page20

owners manual
gk360
APPENDIX 2-STYLE LIST
POP1 POP2 ROCK
01 8BeatSlow 09 LiteFunk 17 SoftRock 25 Waltz1 33 6/8Polka 41 DiscoSamba
02 8BtMedium 10 6/8Sweet 18 HeavyRock 26 Waltz2 34 Folk2/4 42 DiscoCha
03 8BeatFast 11 6/8Blues 19 80LiteRock 27 Real Vienna 35 ItalianFolk1 43 JamiroDance
04 8BeatLatin 12 EpicBallad 20 GuitarRock 28 SlowWaltz 36 ItalianFolk2 44 70sDance
05 8BeatPop 13 PopBallad 21 SurfTwist 29 Musette 37 Tarantella1 45 HouseDance
06 EasyPop 14 PopBallad12 22 Teenage50s 30 Mazurka1 38 Tarantella2 46 SoulTown
07 SmoothPop 15 BlueBallad 23 60sSoul 31 Mazurka2 39 Jive 47 OrchDisco
08 PopShuffl e 16 EasyBallad 24 80sBallad 32 Tango 40 HappyDance 48 GloryDisco
JAZZ COUNTRY LATIN1 LATIN2 WORLD1 WORLD2
49 BasicTrio 57 CountryPop1 65 Bossa1 73 ChaCha 81 GermanPop 89 Zeibekico
50 SlowSwing 58 CountryPop2 66 Bossa2 74 PopChaCha 82 PopWaltz 90 Syrtos
51 BasieBand 59 CountryBeat 67 Samba1 75 Mambo 83 PartyPolka 91 Kalamat
52 HotBigBand 60 CountrySwing 68 Samba2 76 Salsa 84 Boehmish 92 Tsamikos
53 JazzWaltz 61 CountryFox 69 Beguine1 77 Merengue 85 EgerWaltz 93 Turk9/8
54 Django 62 ModCountry 70 Beguine2 78 FastRhumba 86 PasoDoble 94 Turk7/8
55 Charleston 63 Unplugged1 71 PopBeguine 79 RhumbaClass 87 Flamenco 95 Turk5/8
56 Dixieland 64 Unplugged2 72 LatinBand 80 Guajira 88 Sevillana 96 Duek
TRADITIONAL1 TRADITIONAL2
DANCE
SONG LIST
1 The Entertainer
S. Joplin
26 The Sideway
2 The Old Gray Mare 27 Ave Maria
3 Brahms Lullaby
4 Carmen
J. Brahms
G. Bizet
28 Der Deitcher’s Dog
29 Joy To The World
5 The Stage Coach 30 Santa Claus Is Coming To Town
6 Nocturne
7 Back Arioso
8 Symphony No.45 in F#
F. Chopin
J. S. Bach
F. J. Haydn
31 Silent Night
32 Amazing Grace
33 Sippin Cider Through A Straw
Farewell mov.1
9 Heidenröslein
10 German Dance no.6 in E
11 Canon
12 Sonata
13 Flute Sonata No 7 in A
Franz Schubert
F. J. Haydn
Pachelbel
W. A. Mozart
G. F. Haendel
34 Battle Hymne Of The Republic
35 Carry Me Back To Old Virginny
36 Oh! Susanna
37 Old Floks At Home
38 Mazurka for Piano Op.6 No.1
minor mov.4
14 Concerto in F Op.4 No.5
G. F. Haendel
39 Rondo # 1
mov.3
15 Turkey In The Straw 40 O’ Sole Mio
16 Old Black Joe
17 Rondo
S. C. Foster
W. A. Mozart
41 Nocturnes Op.32 No.2 in Ab
42 mov.2 Adagio Cello Concerto in D
Op.101
18 Londonderry Air 43 Chant San Sparoles Op.40 No.6
19 My Bonnie 44 German Dance no.5 in D
20 Nocturne Op.15No.2 in F#
21 German Dance no.1 in D
F. Chopin
F. J. Haydn
45 Impromptu
46 Nocturne
22 Red River Valley 47 Minuet
23 Etudes Op.10 No.3 in E
F. Chopin
48 Invention A 2 Voix
Major
24 Troika 49 Gavotte
25 Nocturnes Op.62 No.2 in E
F. Chopin
50 Spring
Folk song
F. Schubert
S. Winner
F. Gruber
F. Chopin
W. A. Mozart
F. Chopin
F. J. Haydn
P. I.Tschaikowsky
F. J. Haydn
F. Chopin
J. S. Bach
F. J. Gossec
F. Mendelssohn
Page21

owners manual
gk360
APPENDIX
MIDI Implementation chart
ÕVÌ
/
À>Ã
>ÃV iv>ÕÌ
>i >}i`
iv>ÕÌ
`i iÃÃ>}iÃ
ÌiÀi`
Ìi
ÕLiÀ\ /ÀÕi ÛVi
6iVÌÞ \ Ìi
Ìi vv
IIIIIIIIIII
ä£ÓÇ ä£ÓÇ
IIIIIIIIIII
"
]6r££ÓÇ
8 ]6rä
v Ì iÀ iÞ¿ Ã
/ÕV ¿ Ã
*ÌV i`
ÌÀ ä
>}i £
x
È
Ç
£ä
££
È{
Èx
"
ÈÈ
ÈÇ
nä
n£
£
Î
£Óä
£Ó£
£ÓÎ
*À}À>
>}i \ ÌÀÕi
IIIIIIIIIII
-ÞÃÌi ÝVÕÃÛi 8
-ÞÃÌi \ -}*ÃÌ
\-} -iiVÌ
\ / Õi
-ÞÃÌi \V
,i> / i \>`Ã
ÕÝ \" " É"
\ Ìià "v v
iÃÃ>}ià \VÌÛi ÃiÃi
\,iÃiÌ
ÌiÃ\ I£
7i Ìi >VV«>iÌà ÃÌ>ÀÌi`] > iÃÃ>}i à ÌÀ>ÃÌÌi`°7i
>VV«>iÌà ÃÌ«i`] > iÃÃ>}i à ÌÀ>ÃÌÌi`°7i >
iÃÃ>}i à ÀiViÛ
à ÀiViÛi`] >VV«>iÌà ÃÌ«i`°
ÌÌi`
£V
££ÈV
8
8
8
8
"
"
"
"
"
8
8
"
8
"
"
"
"
"
8
8
"
"
8
8
8
8
8I£
8
8
8
8
,iV}âi` ,i>ÀÃ
££ÈV
Î
Î
8
ä£ÓÇ
]6r££ÓÇ
8 ]6räÆn]6rä£ÓÇ®
8
8
"
"
"
"
"
"
"
"
"
"
"
"
"
"
"
"
"
"
"
> -iiVÌ
`Õ>Ì
*ÀÌ>iÌ /i
>Ì> ÌÀÞ
6Õi
*>
Ý«ÀiÃÃ
-ÕÃÌ>*i`>
*ÀÌ>iÌ" É"
-ÃÌiÕÌ *i`>
-vÌ *i`>
,iÛiÀL *À}À>
ÀÕÃ*À}À>
,iÛiÀL iÛi
ÀÕÃ iÛi
-Õ`"vv
,iÃiÌ ÌÀiÀÃ
ÌiÃ"vv
ä£ÓÇ
"
8
8
8
8
8I£
8
i`] >VV«>iÌÃ ÃÌ>ÀÌi`° 7i > iÃÃ>}i
Page22
`i £\ " " ] *"9 `i Ó \ " " ] " " \ 9-
"
`i Î\ " " ] *"9 `i { \ " " ] " " 8 \ "

FEDERAL COMMUNICATIONS COMMISSION
Note : This equipment has been tested and found to comply with the limits for a Class B digital device, pur-
suant to Part 15 of FCC Rules. These limits are designed to provide reasonable protection against harmful
interference in a residential installation. This equipment generates, uses, and can radiate radio frequency
energy and, if not installed and used in accordance with the instructions, may cause harmful interference to
radio communications.
However, there is no guarantee that interference will not occur in a particular installation. If this instrument
does cause harmful interference to radio or television reception, which can be determined by turning the
instrument off and on, the user is encouraged to try to correct the interference by one or more of the following measures:
• Reorient or relocate the receiving antenna.
• Increase the separation between the equipment and the receiver.
• Connect the equipment into an outlet on a circuit different from that
to which the receiver is connected.
• Consult the dealer or an experienced radio/TV technician for help.
CAUTION : Changes or modifi cations to this product not expressly approved by the manufacturer could
void the user’s authority to operate this product.

STOCK CODE 271466
Specifi cations are subject to change without prior notice.
PRINTED IN CHINA
Generalmusic S.p.A. Via delle Rose, 12
47842 S.Giovanni in Marignano (RN) - Italy
Tel. +39 0541 959511Fax +39 0541 957404 www.generalmusic.com
 Loading...