

IMPOR TANT
Read Befor e U sing Keyboard!
Congratulations on your purchase of the new Equinox Synthesizer Workstation from
Generalmusic. This instrument is equipped with cutting edge Flash ROM memory, so that your
new keyboard can be permanently updated by disk with the latest operational advantages and
new features. It is important that you f ollow the procedur e below before using your instrument
for the first time to ensure that the instrument functions properly. Check with your au thorised
Generalmusic dealer for exciting new features to load in your Flash ROM in the future.
STEP 1
STEP 2
FINAL STEP
With the instrument turned OFF, insert the Generalmusic Equinox
Operating System Disk included in your materials packet into the disk
drive. After you have inserted the disk, turn the instrument ON.
You will see a message in the instrument display screen that says:
Loading OS-DISK clears ALL MEMORY!! <Enter to Load/Escape to
abort>
Press ENTER and wait about 3 minutes for the new Operating System
to load. When the new system has finished loading, you will see the
following message in the instrument display screen:
Loading Successful!! <Enter to continue>
At this time, Press ENTER again and the instrument will proceed
through the normal operating display screens. You can now Turn
OFF the instrument in preparation for the final step listed below.
IMPORTANT: REMOVE THE OPERATING SYSTEM DISK BEFORE PROCEEDING TO THE FINAL STEP!
As you turn the instrument ON, KEEP ROTATING THE DIAL until
the following message appears in your display screen:
!!WARNING!! Dial on Power-Up Requests Memory Clear!!
<Enter to clear/Escape to abort>
Press ENTER. You have now completed the
update process, and your Generalmusic Equinox
has been permanently upgraded.
Note: There may be a Battery Warning message when you initially turn on the instrument.
This message will not appear after the instrument has been plugged in and turned ON for a
few hours. During this time, the internal battery that holds new information in memory
will recharge. For now, just press ENTER or ESCAPE to continue on if the message appears
when you power-up the instrument.
271221


Owner’s manual
Cod. 271221 English
The lightning flash with arrowhead symbol, within an
CAUTION
RISK OF ELECTRIC SHOCK
DO NOT OPEN
CAUTION: TO REDUCE THE RISK OF ELECTRIC
SHOCK, DO NOT REMOVE COVER (OR BACK). NO
USER-SERVICEABLE PARTS INSIDE. REFER
SERVICING TO QUALIFIED SERVICE PERSONNEL.
equilateral triangle, is intended to alert the user to the
presence of uninsulated “dangerous voltage” within the
product’s enclosure that may be of sufficient magnitude
to constitute a risk of electric shock to persons.
The exclamation mark within an equilateral triangle is
intended to alert the user to the presence of important
operating and maintenance (servicing) instructions in the
literature accompanying the product.
IMPORTANT SAFETY INSTRUCTIONS
INSTRUCTIONS PERTAINING T O A RISK OF FIRE, ELECTRIC SHOCK OR INJUR Y T O PERSONS
1. Read all the instructions (Safety, Installation and FCC if applicable) before using the product.
2. Do not use this product near water (example, near a swimming pool, spa, tub, sink or wet basement) and do not expose to
rain.
3. This product should be used only with a cart or stand that is recommended by the manufacturer, or should be used with the
components supplied. If this product requires assembly before being played, take special care to follow the assembly
instructions found at the back of the manual.
4. This product, whether alone or in combination with an amplifier and headphones or speakers, may be capable of producing
sound levels that could cause permanent hearing loss. Do not operate for long periods of time at a high volume level or at a
level that is uncomfortable. If you experience any hearing loss or ringing in the ears, you should consult an audiologist.
5. WARNING: Do not place this product or any other objects on the power cord, or place it in a position where one could walk
on, trip over or roll anything over power or connecting cords of any kind.
6. This product should be located so that its location does not interfere with its proper ventilation.
7. This product should be located away from heat sources such as radiators, heat registers, or other products that produce heat.
8. This product should be connected to a power supply only of the type described in the operating instructions or as marked on
the product.
9. This product may be equipped with a polarised line plug (one blade wider than the other). This is a safety feature. If you are
unable to insert the plug into the wall outlet, contact an electrician to replace your obsolete outlet. Do not defeat the safety
purpose of the plug.
10. The power supply cord of the product should be unplugged from the outlet when left unused for long periods of time.
11. Care should be taken so that objects do not fall and liquids are not spilled into the enclosure through openings.
12. This product should be serviced by qualified service personnel when:
a) the power supply cord or the plug has been damaged; or
b) objects have fallen, or liquid has been spilled into the product; or
c) the product has been exposed to rain; or
d) the product does not appear to operate normally or exhibits marked changes in performance; or
e) the product has been dropped, or the enclosure damaged.
13. Do not attempt to service the product beyond that described in the user-maintenance instructions. All servicing should be
referred to qualified service personnel.
14. Some products may have benches and/or accessory mounting fixtures that are either supplied as part of the product or as
optional accessories. Please ensure that benches are correctly assembled and stable and any optional fixtures (where
applicable) are well secured before use.
15. Electromagnetic Interference (RFI) This electronic product utilises digital sample wave processing technology (S.W.P.) that
may adversely affect radio/TV reception. Read the FCC note on the inside back cover of the owner’s manual for additional
information.
SAVE THESE INSTRUCTIONS
The information in this publication has been carefully prepared and checked. The manufacturers however decline all liability for
eventual errors. All rights are reserved. This publication may not be copied, photocopied or reproduced in part or in whole without prior
written consent from Generalmusic S.p.A. Generalmusic reserves the right to apply any aesthetic, design or function modifications
it considers necessary to any of its products without prior notice. Generalmusic declines all liability for damage to property or persons
resulting from improper use of the instrument.
Make sure that all internal electronic options are installed by an authorized Generalmusic service technician. Check with an authorized
Generalmusic dealer for information on the closest service center.
Copyright Generalmusic © 1998. All rights reserved.
Products and brand names that are referred to in this publication (Akai, Apple, Ensoniq,Emu, IBM,Jaz, Kurzweil, Macintosh, Microsoft,
MS-DOS, Roland, Sample Vision, Windows, Zip) may either be trademarks and/or registered trademarks of their respective owners.
The Publisher/s and Author/s make no claim to these trademarks.

Contents
QUICK GUIDE
USER GUIDE
Introduction i
The Owner’s Manual ii
Front Panel layout 2
Rear Panel (Connections) 5
Setting up and getting to know the instrument 6
Connecting a set of headphones 6
Connecting to an amplification system 6
Turn on the power 7
Adjust the volume 7
Connect the pedals 7
Using the wheels 8
Using Aftertouch 8
Playing with or without the effects 9
Transposing the instrument up or down 9
Using the Solo button 10
The basics of Equinox 11
1 • SOUND MODE 1. 2
Sound Families 1. 2
Drum Kits and Drum Sounds 1. 3
Selecting Sounds 1. 4
Moving Between Families 1. 6
Editing and changing Sounds 1. 6
Quick Edit - (using the Sliders) 1. 8
Storing Sounds 1. 11
User sound locations 1. 11
Mirror locations 1. 12
Advanced Edit - (using the Menus) 1. 13
Wave Menu 1. 14
Layers 1. 14
Layer 1. 15
Waveform 1. 16
Volume 1. 16
Amp. Envelope 1. 16
Filter 1. 17
Pitch Envelope 1. 18
L.F.O 1. 19
Pan 1. 20
Control Menu 1. 22
○○○○○○○○○○○○○○○○○○○○○○○○○○○○○○○○○○○
Contents a

Effects Menu 1. 24
Effects functions 1. 25
Other Menu 1. 27
2 • PERFORMANCE MODE
Parts List 2. 2
Parts Menu 2. 2
The Parts List functions 2. 4
Part selection 2. 6
Mixer Menu 2. 7
Effects Menu 2. 8
Other Menu 2. 9
3 • DRUM MODE
Editing a Drum Kit 3. 2
Bank / Prog 3. 2
Volume 3. 2
Pan 3. 2
Transpose / Tuning 3. 3
Filter 3. 3
Exclude 3. 3
Reverb / Profx Send 3. 3
Audio Out 3. 3
Dynamic Switch 3. 4
Copy button 3. 5
Expand button 3. 5
Compare button 3. 5
Restore button 3. 6
Control, Effect and Other 3. 6
Storing your new Drumkit 3. 6
○○○○○○○○○○
b Contents
4 • SAMPLE MODE
Sample Mode -Playback/Edit 4. 2
Sample Translator 4. 3
Assigning Samples 4. 5
Other assign functions 4. 7
Editing Samples 4. 8
5 • DRAWBAR MODE
Function buttons 5. 2
Type Menu 5. 2
Setup Menu 5. 3
Effects Menu 5. 4
Split Menu 5. 5
Storing Drawbar settings 5. 6
Copying Drawbars to Performances 5. 6

6 • ARPEGGIATOR
Edit Menu 6. 2
7 • GROOVES
Groove Library 7. 1
Groove Patches 7. 3
Creating a Groove Patch 7. 4
Storing your Groove Patch 7. 7
Transposing a Groove in real time 7. 8
Shuffle 7. 9
Editing single Grooves 7. 11
Groove Lab 7. 13
8 • DISK
Understanding the RAMFILE 8. 2
Save 8. 2
Load 8. 6
Utilities 8. 8
9 • SYSTEM 1
Controls 9. 2
Tune 9. 4
Master 9. 6
Other 9. 8
10 • MIDI
Stnth Menu 10. 2
Seq. Menu 10. 3
Master Menu 10. 4
Dump Menu 10. 7
11 • SEQUENCER
Recording a sequence - the basics 11. 2
Changing sounds and volume levels 11. 4
Navigating around your song 11. 5
Exiting and re-entering RECORD MODE 11. 5
Recording another song 11. 6
Record Mode functions 11. 7
Playback/Edit Mode functions 11. 10
The “UNDO” button 11. 11
Edit Menu 11. 12
Creating a groove from a song 11. 23
Events 11. 24
Using the Event list 11. 30
Editing Events in the list 11. 32
Master Menu 11. 41
Option Menu 11. 41
○○○○○○○○○○○○○○○○○○○○○○○○○○○○○○○○○○○
Contents c

APPENDIX
Clear Menu 11. 41
Undo Menu 11. 42
Effect Menu 11. 43
Track Menu 11. 44
Mixer Menu 11. 44
12 • USER PANEL
Creating a new Panel configuration 12. 2
Slider settings 12. 4
Button settings 12. 5
13 • NOTEPAD
14 • Credits
ROM-Sounds A. 2
Grooves list A. 13
Performances list A. 16
Drawbars list A. 16
Arpeggio list A. 16
Effects list - 3 Effect Configuration A. 17
Effects list - 2 + 2 Effect Configuration A. 17
PROFX Block diagrams A. 18
MIDI Implementation chart A. 28/29
Index A. 31
○○○○○○○○○○
d Contents
Introduction
Thank you for purchasing the new Equinox Synthesizer Workstation from Generalmusic.
The Equinox, available in 61 key and 76 key versions, contains
enormous technological potential to give professional musicians
the essential tools for just about any situation - whether it’s for
composition, live or studio work.
• An immense database (16 Mb samples) with over 1000 preset Sounds and user memory locations to store more than
2000 new sounds. 1 12 Performance memories and a Groove
machine featuring over 1000 user-programmable Grooves.
• Unique Drawbar mode for instant access to vintage electronic organ sounds using the 8 panel sliders as drawbars with
key-click, percussion, overdrive, etc..
• 250.000 event, 16 track sequencer with advanced song editing facilities.
• Advanced Sound editing facilities with 64 note polyphony,
128 digital filters with resonance, up to 6 oscillators per voice,
3 Lfos and up to 21 independent Envelopes with 10 segment
resolution.
• Sample Translator to create user-samples and load new samples of the most popular formats (Wav (PC), Aiff (Mac), Akai™,
Kurzwail™, Smp, Snd. Future os versions will allow loading
of Roland™, Ensoniq™ and Emu™ samples.
• Full MIDI implementation - The Equinox is the perfect Master Controller for advanced MIDI set-ups (32 MIDI Channel
control, 16 programmable Midi Zones, 8 programmable Sliders, 2 programmable Wheels, 3 assignable Pedals).
• Flash-ROM memory which allows the instrument’s memory
to be instantly upgraded by simply inserting a special floppy
disk in the drive.
• The Equinox can be fitted with optional memory (8 Mb backed
Sample RAM and up to 32 Mb SIMMs), an internal Hard Disk
(2 Gigabytes) and a SCSI port (compatible with CD-ROM,
Zip™, Jaz™ external hard drives).
○○○○○○○○○○○○○○○○○○○○○○○○○○○○○○
Introduction i

The Owner’ s Manual
To ensure long, trouble-free operation, please read this manual
carefully. The Owner’s Manual is supplied in a 3-ring binder which
can easily be updated as new features are added. The Quick
Guide introduces you to the functions of each button on the control panel and shows how to move around the display . Graphical
illustrations are included for better understanding of these examples. Once you are acquainted with the instrument’s basic functions, use the User Guide to discover the full potential of your
Equinox.
At the end of the manual is the Appendix containing various
tables, MIDI information and an index.
○○○○○○○○○○○○○○
ii Introduction
Quick Guide
This Quick Guide explains briefly what each button and control
does on the Front panel and explains more about the jacks and
connectors of the Rear panel.
Following this you’ll find information about setting the instrument
up and some basic operating instructions.
I/O
CAPS
DELETE A
SPACE
BCDEFGHIJKLMNOPQR12STU
345
VWX6Y7Z ,
890
.
'
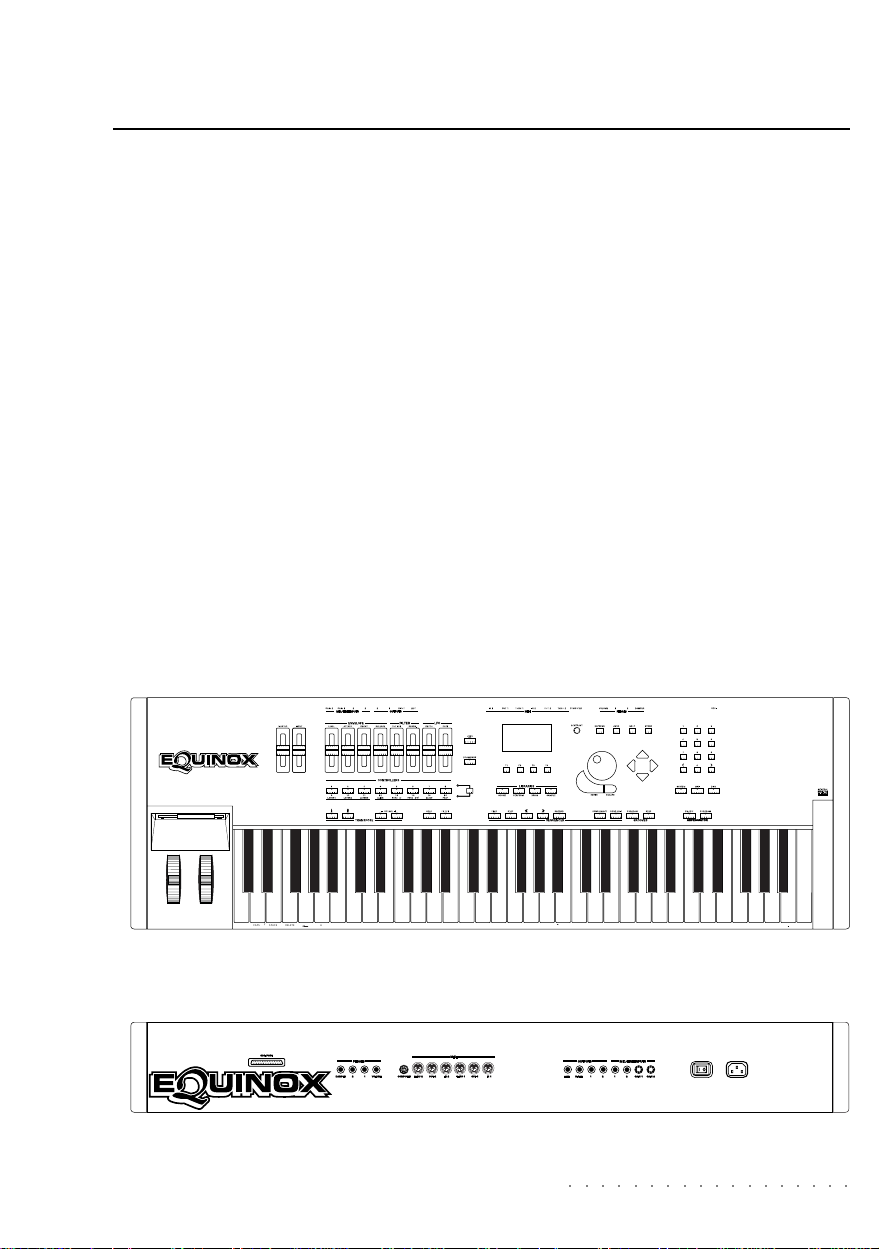
Front panel
Rear panel
○○○○○○○○○○○○○○○○○○
Front & Rear Panel 1
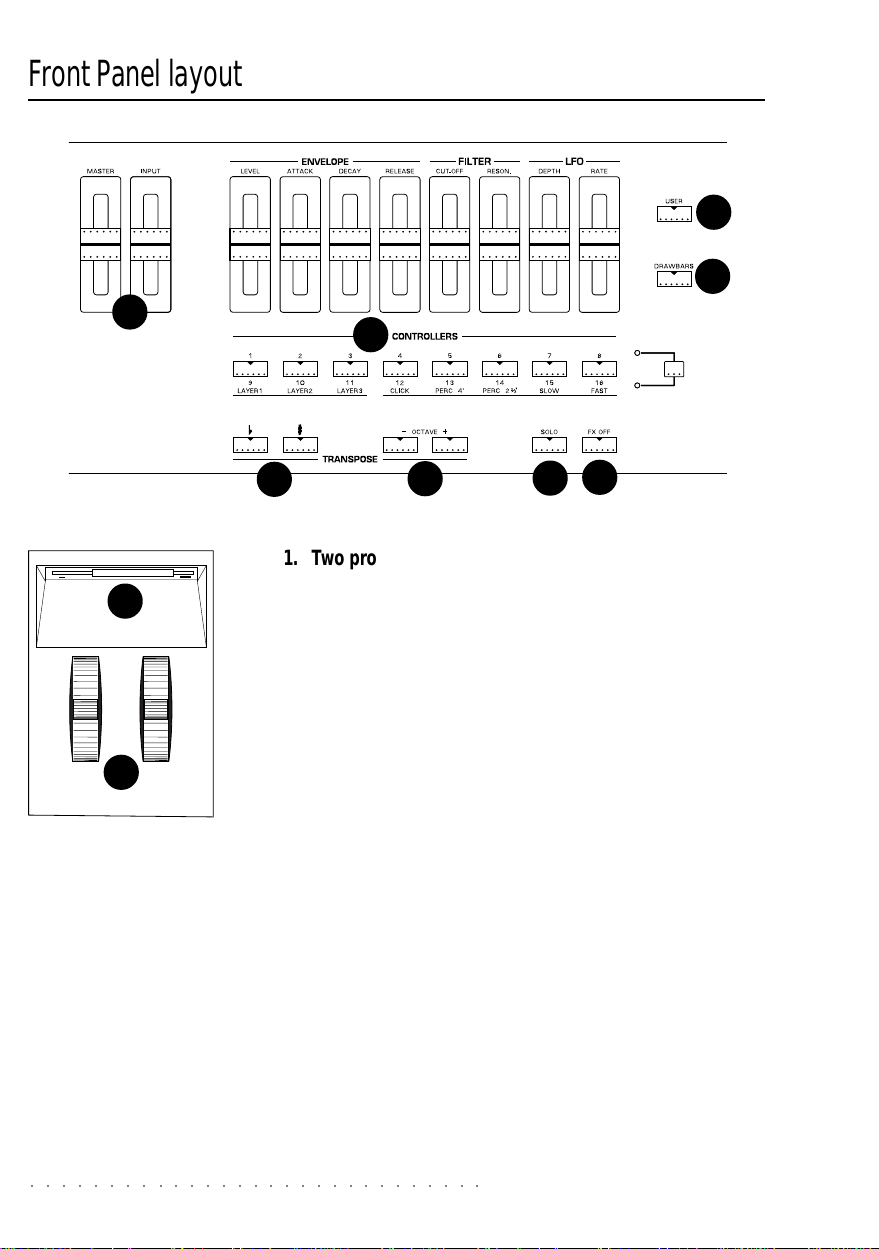
Front Panel layout
3
2
5
6
4
10
7
1. T wo programmable Wheels: The left wheel is spring load-
ed and normally used for Pitch Bend. The right wheel is freemoving and normally used for Modulation.
2. Disk Drive: Handles 3.5” double density (2DD) or high density (2HD) floppy disks.
8
9
3. Master and Input sliders: The Master slider controls the
overall volume of the instrument. The Input slider controls
1
○○○○○○○○○○○○○○○○○○○○○○○○○○○○○
the level of the Line/Mic signals fed into the Input jacks.
4. Controllers section: Totally programmable slider and button panel. In Sound mode, the sliders are used for real time
sound editing (Envelope, Filter and LFO). In Drawbar mode,
the sliders operate as drawbars and the buttons 5-8 activate
typ-ical electronic organ functions (Click, Perc, Slow/Fast
Rotary). In Performance and Song modes, the sliders control the volumes of the 16 parts and the buttons select the
parts (Tracks).
5. User: Allows you to specify your own functions for the 8
sliders and buttons.
6. Drawbar: Activates Drawbar mode.
7. Transpose
+/– 24 semitones).
b
/#: Master transposer in semitone steps (range
2 Quick Guide
12
11
12
14 15 16
13
17
18
19
20
21
22
23
24
25
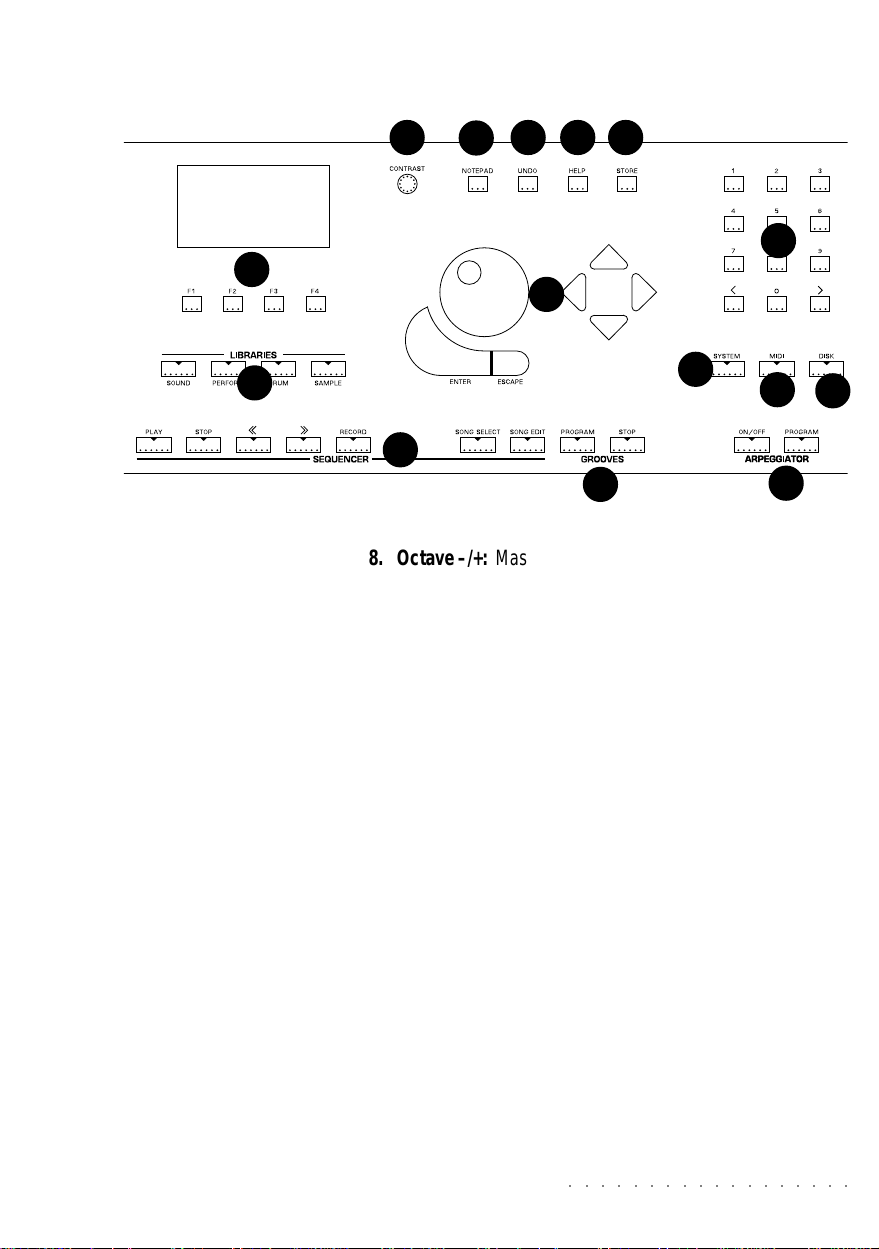
8. Octave –/+: Master and section octave transposer (range +/
– 5 octaves).
9. Solo: Isolates a single sound from the rest in multi-track
situations.
10. FX OFF: when on (LED on), the effects processors are bypassed and the sounds are emitted dry.
11. Display and selection buttons (F1 … F4): A 128 x 64
pixel, backlit graphic LCD display . The four buttons below F1
… F4 select functions shown in the display which change
according to the current mode.
12. Contrast: A small knob to control the display contrast.
13. Notepad: Utility to view text files, (song lists, lyrics etc.).
14. Undo: Cancels the last performed task in edit situations.
15. Help: Shows the on-line help menu in several different lan-
guages.
16. Store: Saves your modifications to memory (Performances,
Sounds, etc.).
17. Keypad: A numeric keypad used for entering specific values
(data selection, parameter editing, etc.).
○○○○○○○○○○○○○○○○○○
Front & Rear Panel 3

18. Data Entry Dial, Navigational cursors and Enter/Escape
buttons: A data entry Dial for the continuous selection of
data. 4 directional buttons (cursors) which move the display’s
negative highlight cursor in the direction of the arrow (up/
down/left/right). The Enter button is used in different situations either to delve deeper into a function or to confirm a
decision. The Escape button cancels operations and can
also be used to exit from certain edit menus.
19. Libraries: 4 buttons, used to recall the different types of
internal sounds (Sound, Performance, Drum, Sample).
20. System: Contains a number of different functions which affect the instrument as a whole (pedals, tuning, keyboard velocity, etc.).
21. Midi: Allows you to modify the functions which affect the
instrument’s Midi and Computer ports.
22. Disk: Contains all the necessary functions to load, save and
organize data on Floppy disks, the internal Hard Disk or any
external SCSI devices.
23. Sequencer: 5 buttons which control the sequencer functions (Play, Stop, Rew [<<], FF [>>], Record) and 2 buttons
for Song Selection and Song Edit.
24. Grooves: Allows you to listen to the on-board groove libraries as well as edit and create your own groove patches.
25. Arpeggiator: Activates the on-board Arpeggiator and allows
you to create your own custom arpeggio patterns.
○○○○○○○○○○○○○○○○○○○○○○○○○○○○○
4 Quick Guide
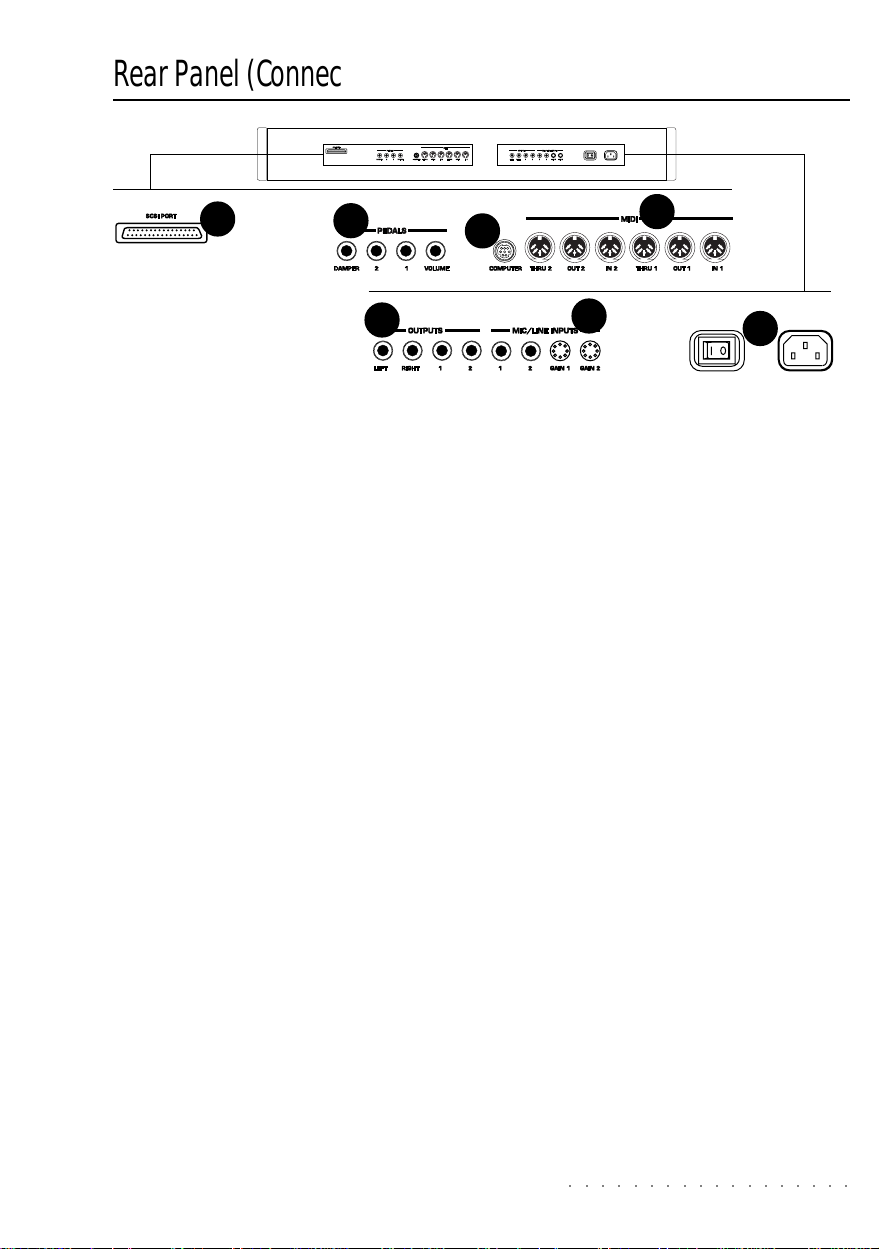
Rear Panel (Connections)
1
2
5
1. SCSI port (optional). Allows external storage media to be
connected to the unit (CD-ROM, Jaz™, Zip™ etc.).
2. Pedals: Damper, 1, 2, Volume. Three programmable pedal
jacks (Damper, 1, 2) for continuous control pedals and switch
action pedals (with reversible polarity) and a Volume jack for
a volume pedal.
3. Computer port: Serial connector for direct computer connection (Apple Macintosh or IBM PC and compatibles).
4. MIDI: Twin set of independent ports for MIDI connections.
MIDI IN 1/2, MIDI THRU 1/2, MIDI OUT 1/2).
5. Outputs: (Left, Right, 1, 2). Stereo Left/Right jacks and auxiliary 1, 2 jacks to monitor the Equinox through an external
amplification system. For Mono reproduction, use either the
Left or Right jack. Outputs 1 & 2 emit “dry” sounds (no effects).
6. Mic/Line Inputs: (1, 2, Gain 1, Gain 2). Audio inputs for
Microphone or Line signals (musical instrument, cassette recorder, CD player or microphone). For Mono connections,
use the In 1 jack. The volume of the Mic/Line signal fed into
the In 1 & 2 jacks is controlled by the Input panel slider. The
two Gain controls 1 & 2 control the impedance of the signal
fed into the respective In jacks. Fully anti-clockwise = Line
level. Fully clockwise = Mic level.
7. Power On/Off Switch and mains socket: The switch turns
the instrument on and off. Insert the supplied power cord
into the mains socket and the other end into a suitable wall
outlet.
3
6
4
7
○○○○○○○○○○○○○○○○○○
Front & Rear Panel 5
Setting up and getting to know the instrument
The Equinox does not have it ‘s own built in amplification so
either headphones or an external amplifier/speaker system are
required.
For external amplification, a high quality stereo keyboard amplifier system is recommended.
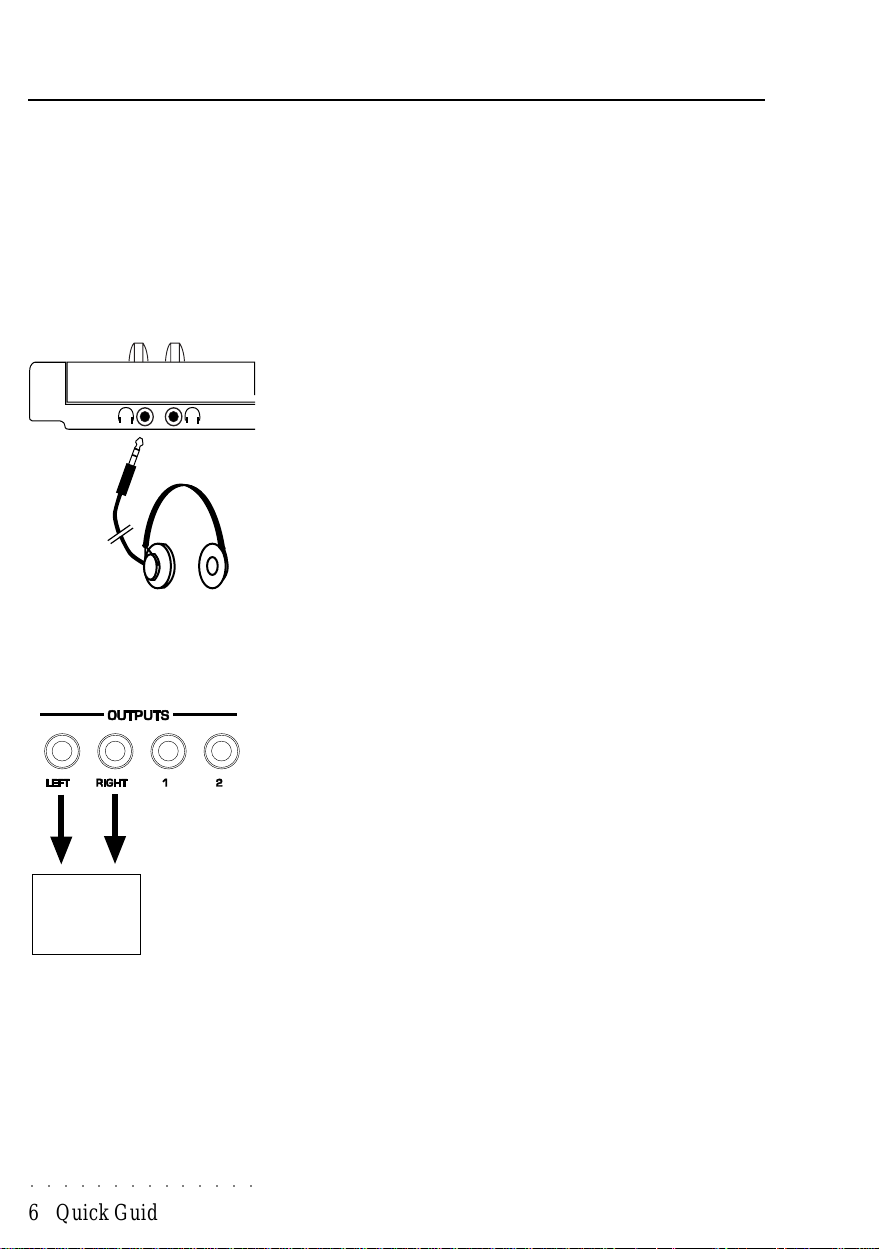
Connecting a set of headphones
If you prefer to play with headphones for high quality personal
monitoring, plug a standard stereo headphone set (8
of the two headphones jacks located on the left side of the instrument, under the Wheels panel.
Use the Master volume slider to adjust the headphone volume.
Ω
) into one
Stereo
amplification
system
○○○○○○○○○○○○○○
6 Quick Guide
Connecting to an amplification system
Before connecting audio cables, be sure that the power switch
on the rear panel is off and the master volume is at minimum.
Connect the power cord to the rear panel mains socket and insert the other end of the power cord into a suitable grounded wall
outlet.
Connect the audio cables to the stereo audio outputs (Left, Right)
and the other ends to your amplifier system. Use audio cables
with standard 1/4” jacks. To connect to domestic stereo units,
use RCA jacks. For mono reproduction, connect to either the
Left or Right output jack. The auxiliary outputs 1 and 2 emit “dry”
signals (i.e. no effects).
Note: better results are obtained
by adjusting the volume of the
mixer or amplifier controls rather
than lowering the volume of the
instrument.
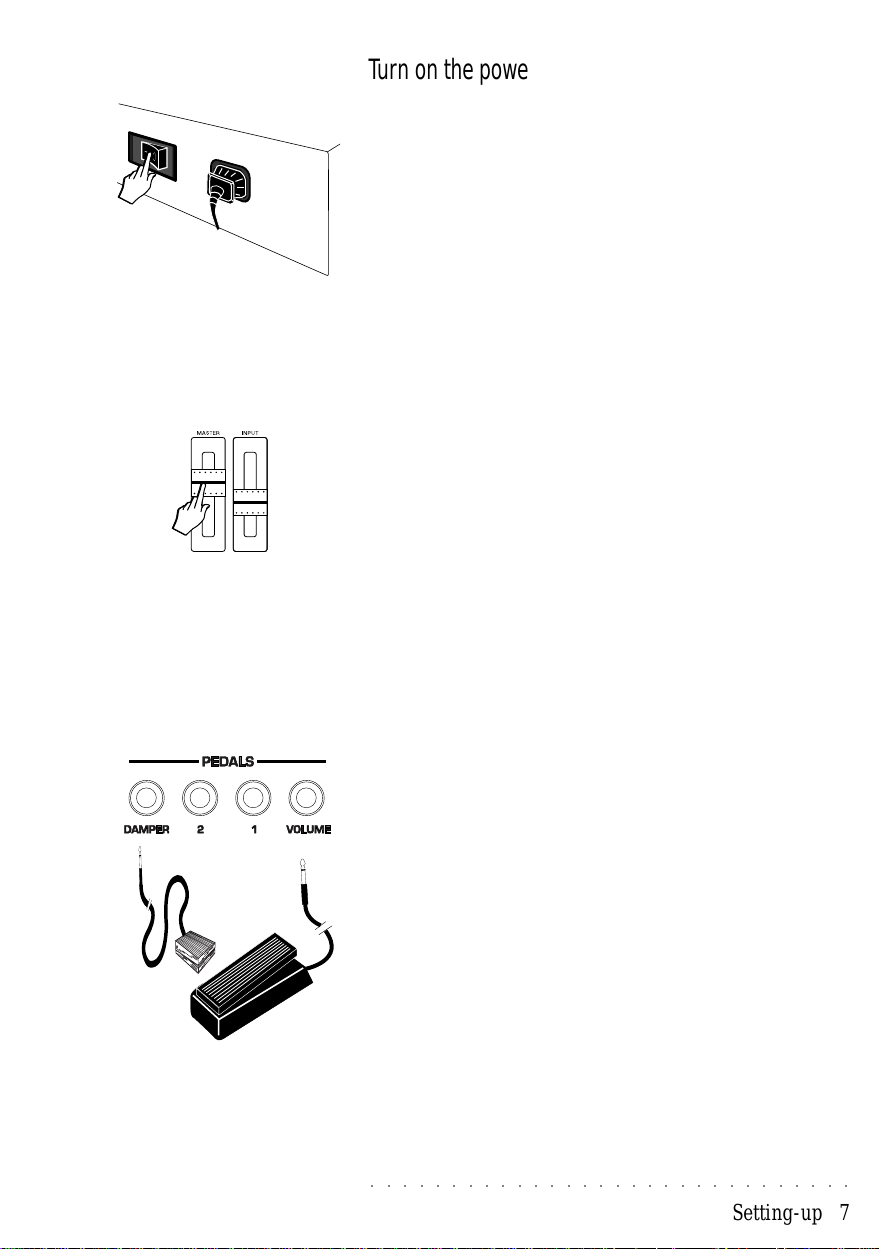
Turn on the power
The power switch is located on left side of the rear panel (when
sitting in front of the keyboard).
Turn the power on only after all the connections to other equipment (amplifiers, Midi devices, etc.) have been made.
After a short scanning period, the display will appear showing
the last used mode (Sound, Performance, Drawbar, etc.).
The various modes available are explained afterwards.
Adjust the volume
Adjust the general volume of the instrument with the Master panel slider.
If you are using headphones, you should find that about three
quarter volume is a comfortable listening level.
(All Generalmusic control pedals
are optional accessories).
Connect the pedals
There are four rear panel PEDALS jacks marked Volume, 1, 2
and Damper which accept control pedals.
The Volume jack is a non-programmable port for a standard Volume Pedal. The remaining three jacks (Damper, 1, 2) are fully
editable although their functions have been pre-set at the factory.
The default configuration of the pedals is as follows:
Ped1 = Expression
Ped2 = Start/Stop
Damper = Damper (sustain)
Volume = Volume
Y our pedals settings can either be stored with each performance
or they can be “locked” so that their functions are global.
○○○○○○○○○○○○○○○○○○○○○○○○○○○○○○
Setting-up 7
The pedal jacks 1, 2 and Damper are function assignable and
can be independently enabled or disabled for each of the 16 parts
in a Performance.
All three pedals (1, 2, Damper) can be programmed to accept
Switch action (on/off) or Continuous (graduated levels) control
pedals (Volume type). It is also possible to reverse the polarity of
the Switch action pedals.
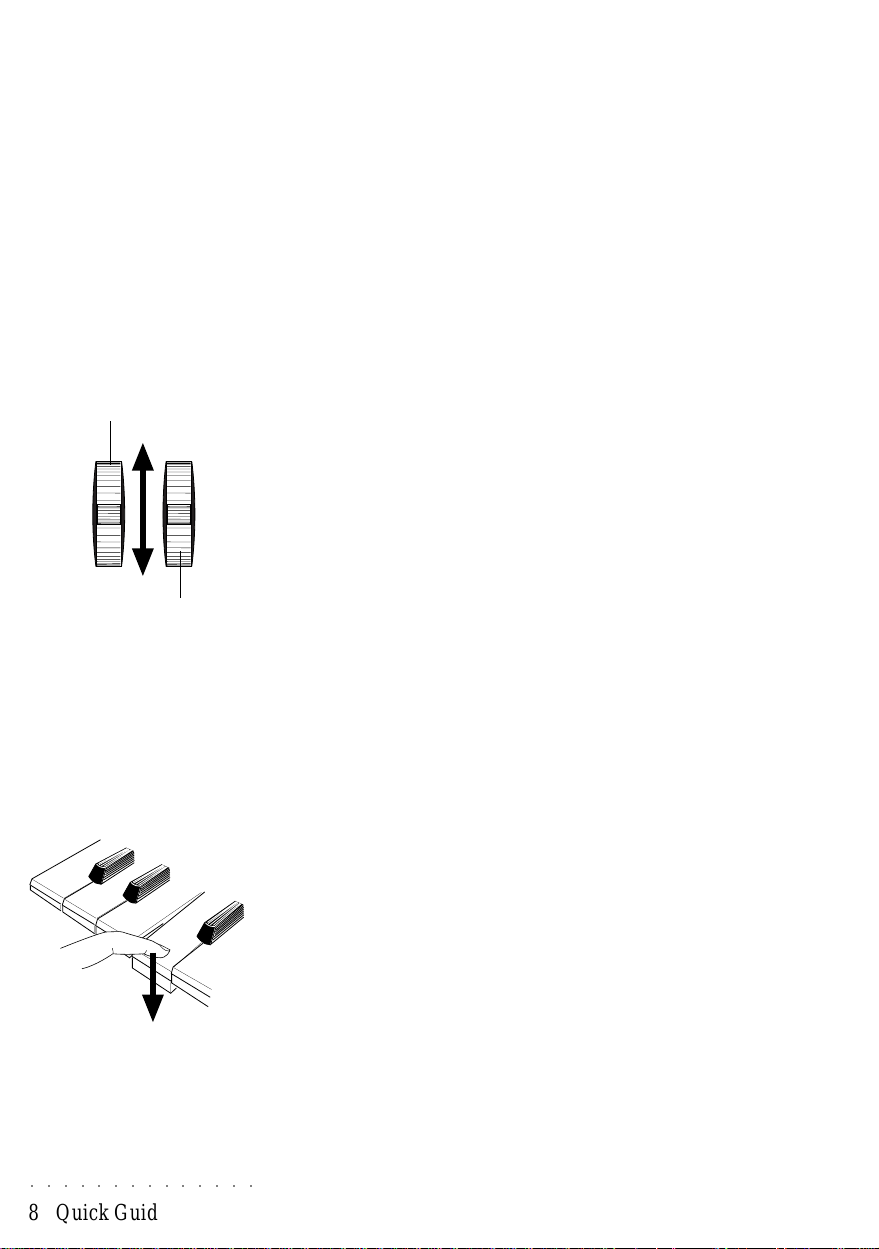
Pitch Bend wheel
Modulation wheel
Using the wheels
The on-board controlling devices include two wheels on the left
key block.
The default configuration of the wheels is as follows:
Wheel 1 (left) = Pitch Bend
Wheel 2 (right) = Modulation
Wheel 1 is spring loaded to return to the central position.
Wheel 2 is free-moving and remains at the last set position.
The programmed Wheel configuration is a general setting which
applies to the instrument as a whole.
The Wheels can be independently enabled or disabled for each
of the 16 parts in a Performance.
Using Aftertouch
This feature makes is possible to vary the degree of modulation
by varying the pressure applied to the keys. No effect is produced with normal key pressure, but the effect can be introduced
by applying pressure to the keys after playing them.
Press harder after playing
the keys
○○○○○○○○○○○○○○
8 Quick Guide
The Aftertouch effect can be independently enabled or disabled
for each of the 16 parts in a Performance.
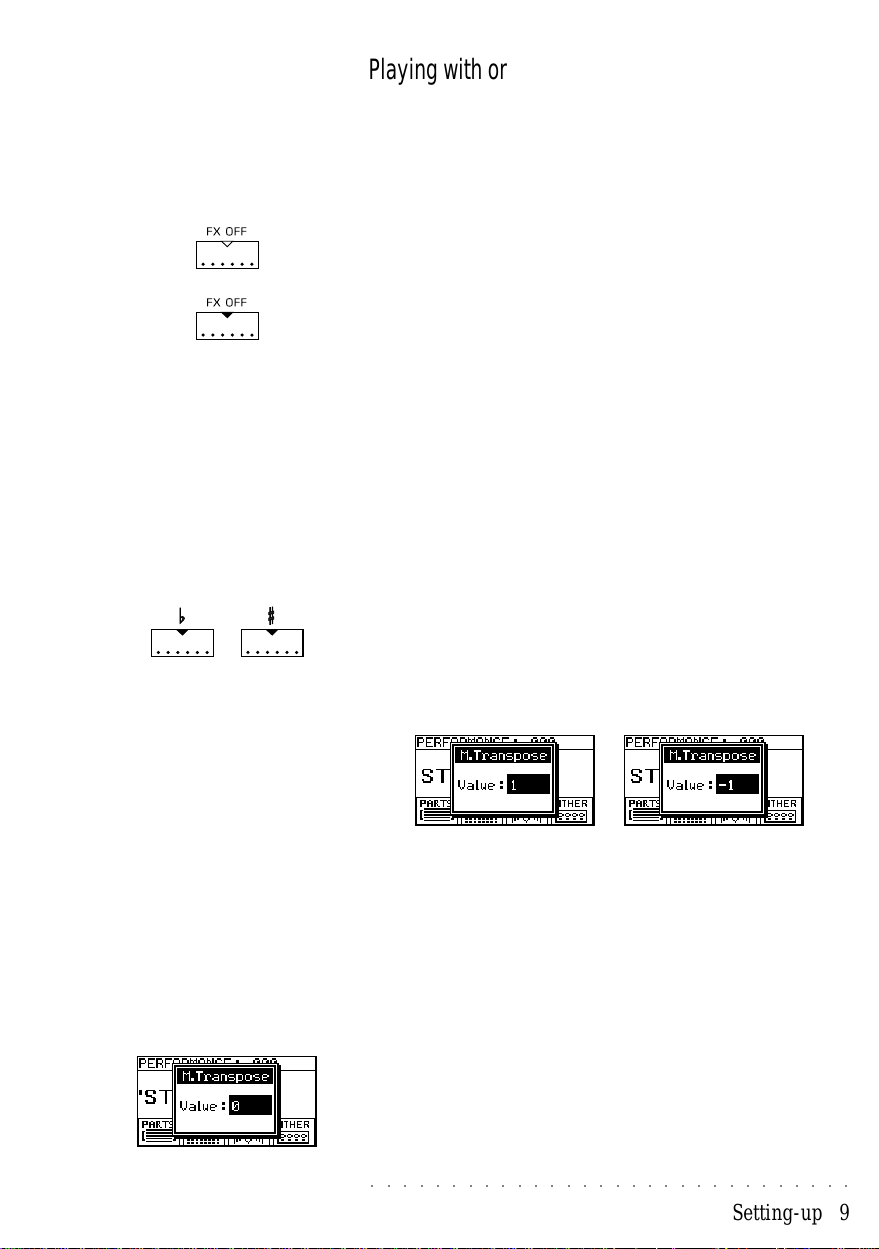
Playing with or without the effects
Whether you are playing single Sounds, Performances, Drawbars, etc., you’ll find that in all cases one or more effects will be
applied to the sounds you are playing. If you prefer to play without effects, you can instantly bypass the internal digital effects
processors by pressing the FX OFF button.
When the LED is off, the sound(s) will play with their programmed
effects.
When the LED is ON, the sound(s) will play “dry” (without effects).
The on/off status of the FX OFF button cannot be memorised.
Transposing the instrument up or down
Master Transpose
The TRANSPOSE b/# buttons allow real time pitch adjustments
(transpositions) in steps of one semitone (range
= 2 octaves).
• Press the TRANSPOSE # or TRANSPOSE b buttons to raise
(#) or lower (
b
) the pitch.
±
24 semitones
Note: Transposing with the #/
buttons affects the instrument as a
whole. If, for example, you switch
from Sounds mode to Performance
mode, the Performances will also
play at the new pitch. If you turn
the instrument off, turning on again
will restore normal pitch.
b
To clear the keyboard transpose setting
• Press both TRANSPOSE buttons at the same time.
○○○○○○○○○○○○○○○○○○○○○○○○○○○○○○
Transp #: Transp
b:
…
The pitch of the instrument is instantly raised (#) or lowered
(b) one step and a window will appear showing the current
Transpose value (0 = standard pitch).
Press the Transpose # or
b
button as many times as necessary until you reach the desired pitch. The display returns to
normal after a few seconds. The LED of the Transpose # or
b
button remians on to show that the instrument has been
transposed up or down.
Setting-up 9
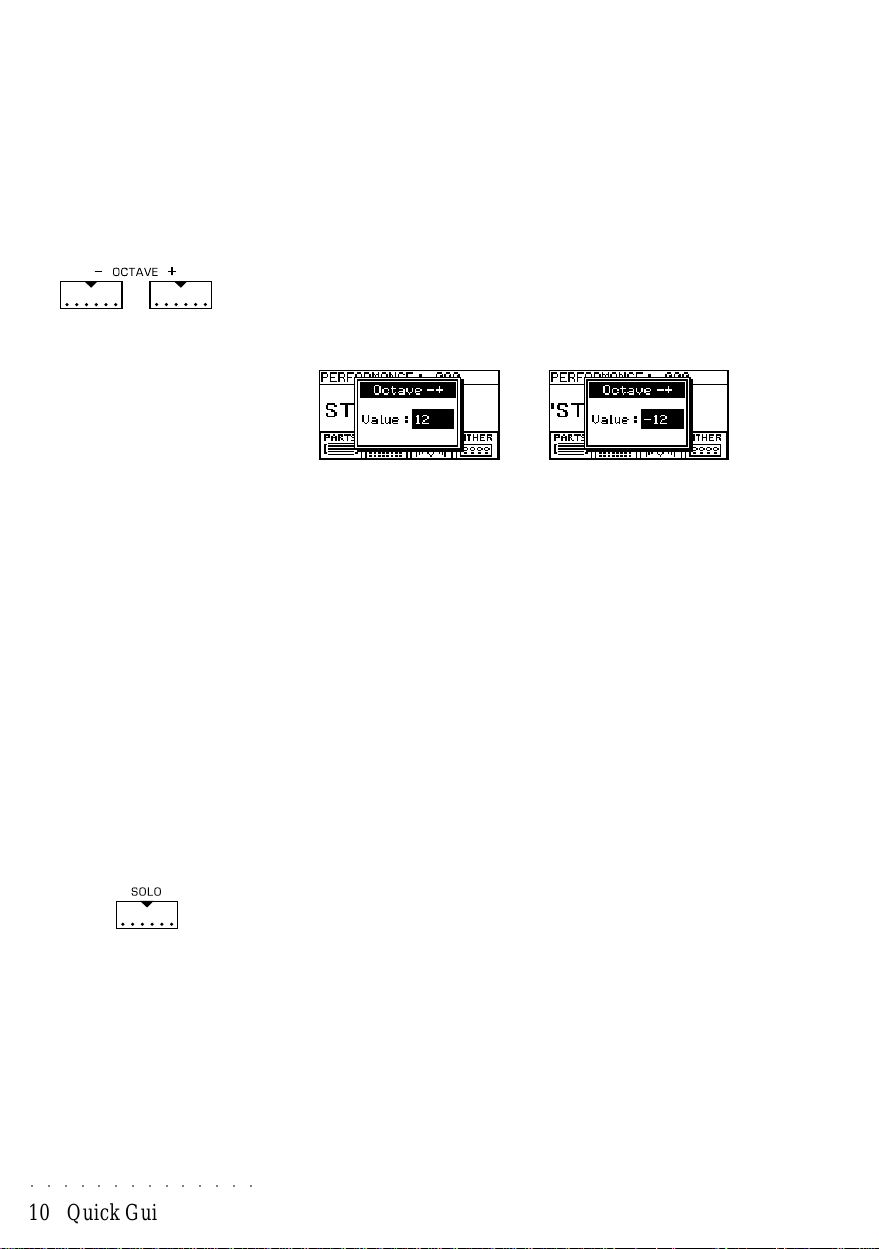
Section transposer (Octaves)
If you are playing a single Sound (in Sounds mode), you can
transpose in octave steps within the range +/– 5 octaves (60
semitones) by means of the Octave +/– buttons.
If you are playing in Performance mode, the Octave +/– buttons
affect the currently selected part (shown in negative highlight in
the parts list).
• Press the OCTAVE + or OCTA VE – button as many times as
desired until you reach the correct octave..
Octave +: Octave –:
Note: Unlike the Master transposer, Octave transpositions only affect the current Sound or Performance part. If, for example, you are
playing in Sounds mode and you
change Sound or switch to Perform
mode, the octave transposition will
be cancelled.
Using the Solo button
In multi-part situations (Performance, Drawbars, Song), the Solo
button isolates a sound from the rest in order that you may make
some changes and listen to the result without listening to all the
other sounds. Once you have obtained the sound you want, you
can select another part to solo or deactivate Solo to restore the
multi-part situation to normal.
• Simply press the SOLO button to activate the function (LED
…
The setting is shown in a temporary window and the LED on
the octave button turns on to show the raised or lowered status of the sound (or part). The display returns to normal after
a few seconds.
on).
In Performance and Song modes, the current Sound is shown
in the Parts list. To select another sound, simply press the
corresponding Part select button.
○○○○○○○○○○○○○○
10 Quick Guide
In Drawbar mode, the sound heard will correspond to the
selected Drawbar, shown in the Drawbar Setup display. To
listen to another Drawbar, simply move the corresponding
Slider.

The basics of Equinox
The more you work with the Equinox, the more you will appreciate the user-friendly and logical panel layout.
The panel layout allows simple and direct access to all the functions and the backlit 128 x 64 pixel LCD graphic display tells you
where you are at all times, using simple, concise terminology
combined with easy to understand graphics.
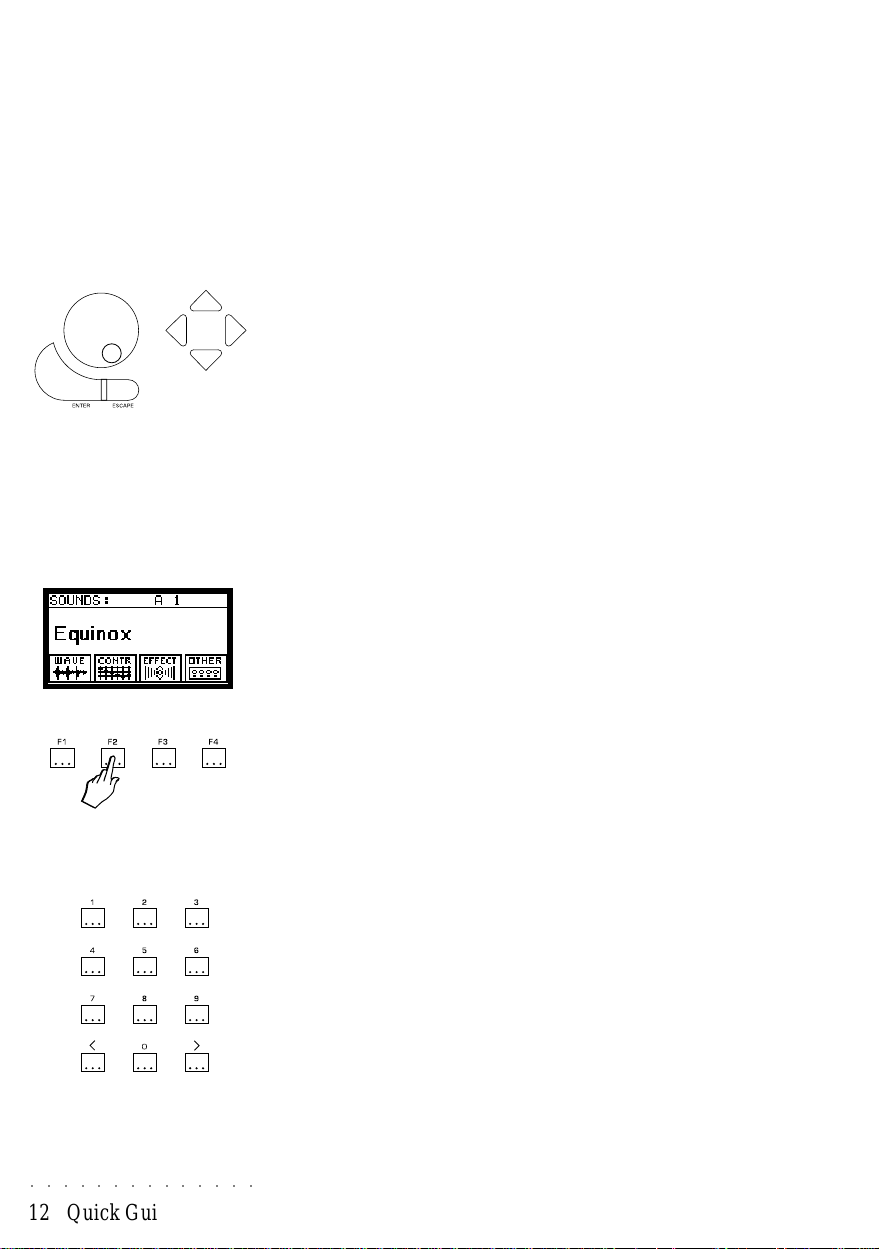
The graphic LCD display
The Equinox display is the principal user interface which tells
you the status of the instrument at all times.
Each time you turn the instrument on, the display will be in the
same basic mode that you left it in before you switched it off,
(Sound, Performance, Drawbars etc.)
Current
mode
Current
Sound
Bank and
Sound number
Menu of
Sound functions
The last selected playing mode is memorized when you turn the
instrument off.
The display tells you where you are at all times by showing the
name of the current mode at the top and a menu of associated
functions at the bottom.
For example (opposite), the Sound mode display shows the name
of the current Sound, the Bank and Sound number and a menu
of four associated functions.
Other displays will be explained further on in this manual.
○○○○○○○○○○○○○○○○○○○○○○○○○○○○○○
The basics of Equinox 11
Selection, Navigation and Data Entry
In Play modes, the Dial and the Cursor buttons operate as the
principal selection tools. In other modes (Sequencer, Function,
Edit, Store), these controls transform into navigating and data
entry devices.
Selection - the Dial and the Cursors
In Play mode, the Dial is the principal selection device (Sounds,
Performances, etc.). Clockwise rotation selects continually in increasing numerical order, counter-clockwise rotation selects in
reverse order.
The Cursor Up/down buttons select items (Sounds, Perfs, etc.)
sequentially in single steps; the Up button in ascending numerical order, the Down button in descending order.
The Cursor Left/Right buttons activate a temporary window which
allows you to switch between banks (factory and user).
The Function buttons F1 - F4
The 4 buttons under the display select the functions that appear
at the bottom of many screens. Selecting one of these functions
will take you to a new edit environment.
○○○○○○○○○○○○○○
12 Quick Guide
Getting back to the main menu in a single step can be achieved
by pressing the MENU button, (F4), where applicable.
The Numeric Keypad
A secondary data entry tool is the numeric keypad (to the right of
the cursor buttons) which enters specific values.
Pressing any of these buttons activates an entry window where
you can type in the number required. Sometimes you may need
to enter two numbers separated by a dash (e.g. 55 - 2). In this
case, use the cursor right button to move to the right side of the
separator dash. When you’ve finished, confirm by pressing ENTER.
Also, for stepping through options in single steps, you can use
the Increase (>) and Decrease (<) buttons of the keypad.
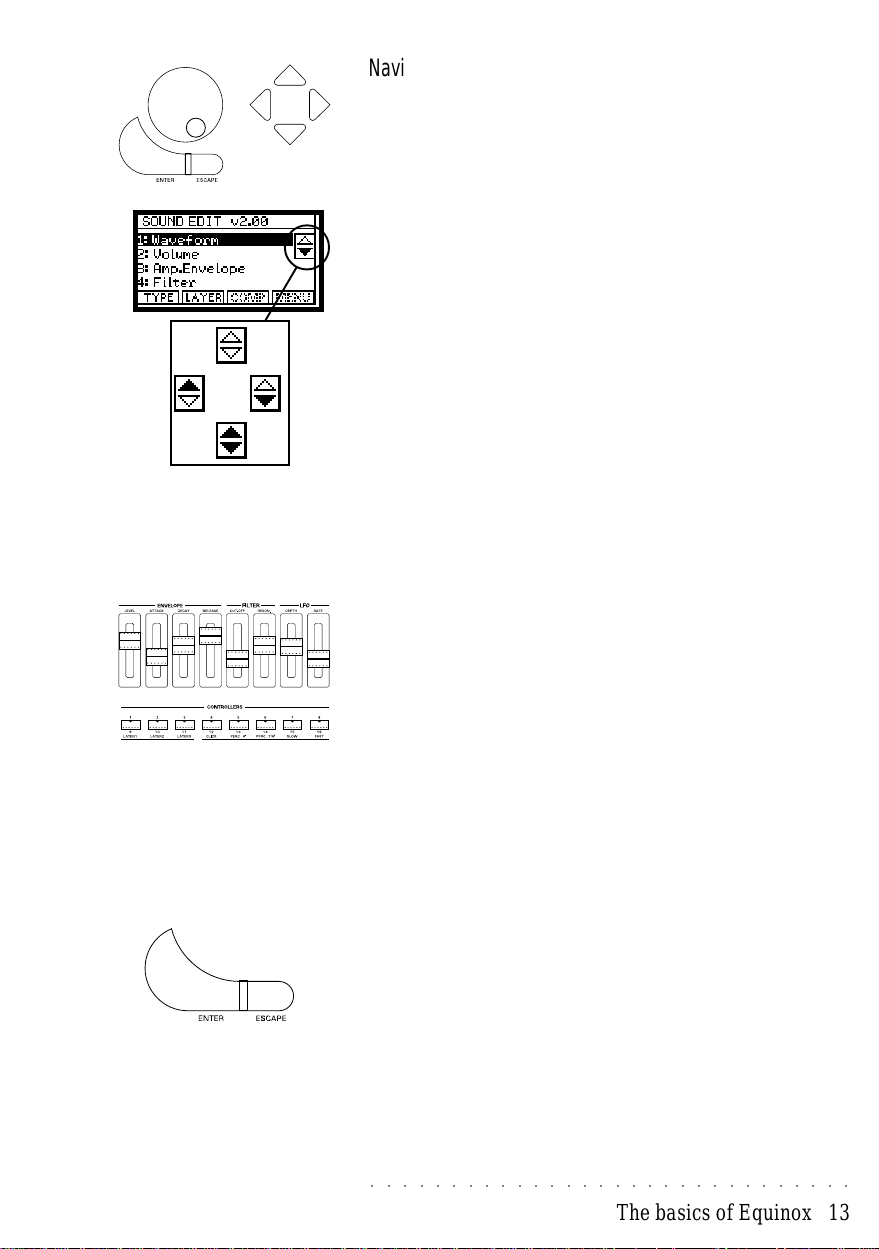
Navigating and entering data
In all modes other than Play mode, the Cursors are the principal
navigating tools and the Dial the data entry device. The display
cursor is a negative highlight zone which is moved up or down
with the cursor up/down buttons. In all displays that show a menu,
two small up/down arrows representing the cursors tell you at a
glance whether or not additional features are out of view.
Two white arrows means that no other features are available,
one black arrow means that other features are available if you
scroll in the direction of the black arrow , two black arrows means
that other features are available in either direction.
The value of the selected parameter is changed with the Dial (or
keypad). Clockwise rotation of the Dial enters data in increasing
order, counter-clockwise rotation in decreasing order.
Sliders and control buttons
The 8 Sliders and the 8 buttons underneath are used for selecting and controlling pre-defined functions or they can be re-programmed to control the functions that you choose.
In SOUND, DRUM and SAMPLE mode, the sliders operate as
real time editors, modifying the characteristics of the current
Sound according to the function assigned to the slider (Envelope, Filter, Lfo). When you edit a sound, the first three buttons
operate as switches for the three layers in the sound.
In PERFORMANCE and SONG mode, the sliders operate as
volume controls for the 16 parts or tracks while the buttons beneath the sliders are used as on/off switches for the corresponding part or track.
Enter/Escape
Generally, Enter confirms operations and, in some cases, also
executes a function, such as note copy or quantization in Song
Edit. Often you use the ENTER button to go a little deeper into a
particular edit menu. Sometimes an edit task may require stepping through various “levels” of edit pages using the ENTER button.
The ESCAPE button generally cancels operations and returns to
the previous display page. In editing situations, Escape steps
back through the various levels that you have been working on.
○○○○○○○○○○○○○○○○○○○○○○○○○○○○○○
The basics of Equinox 13
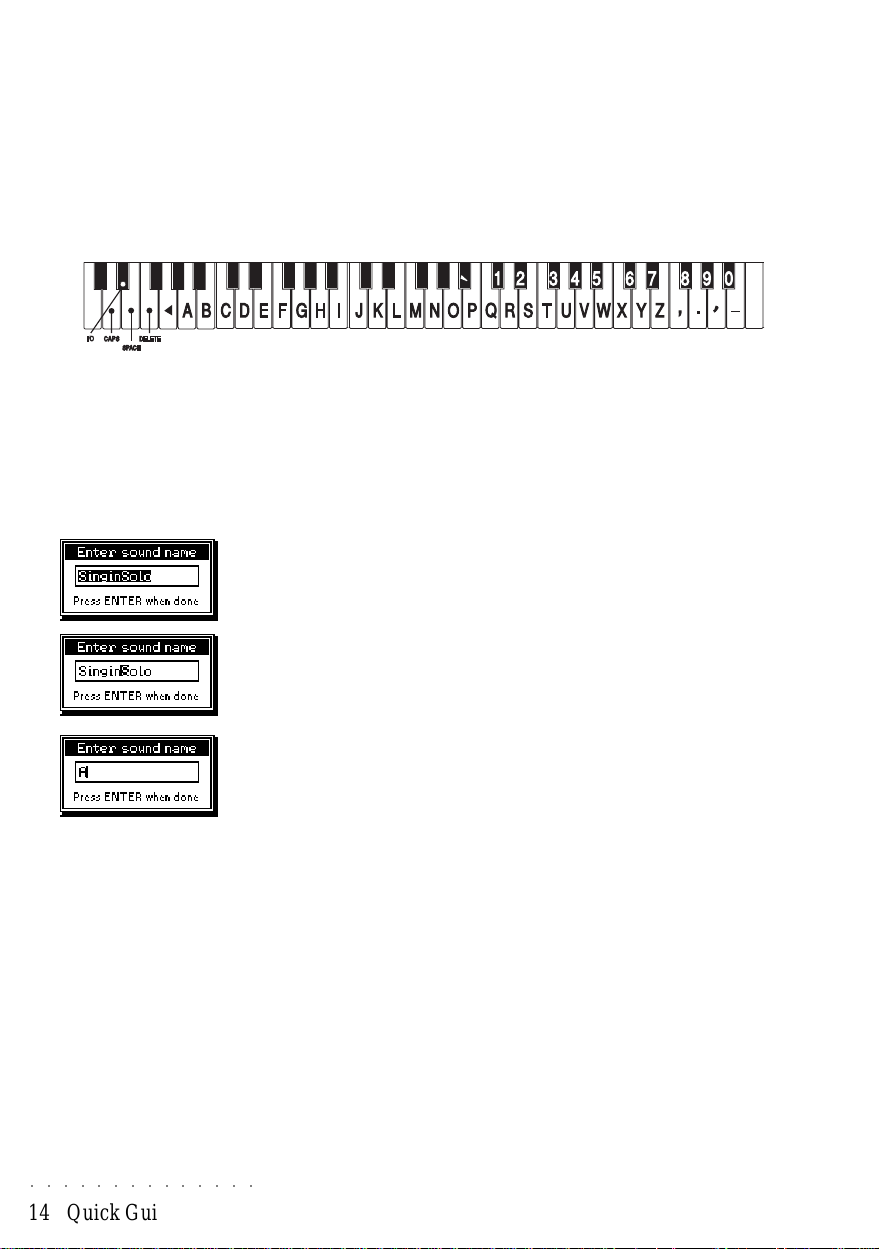
Text entry
When entering names (Sound name, Performance name, Song
name, etc.), the keys of the keyboard become a kind of typewriter where most of the keys are assigned to a particular letter,
symbol or number. The alphanumeric configuration of the keyboard is shown in the following illustration::
The white keys (A2 - B6) insert letters (A-Z) and various punctuation marks. The black keys (C#5 - A#6) insert the numbers 1-9
and 0. The keys D2, D#2, E2, F2 and G2 provide various word
processing functions. The letters and numbers are printed on
the metal rail which runs beneath the keyboard.
You enter the new name by pressing the corresponding keys of
the keyboard. Numbers can also be inserted using the key-pad.
The lower notes of the keyboard provide the following word
processing functions:
○○○○○○○○○○○○○○
14 Quick Guide
D2:CAPS - Caps On / Caps Off. Caps on inserts uppercase
letters. Caps off inserts lowercase letters.
D#2: INS/OVER - toggles between Insert and Overwrite
mode. Insert mode inserts a character at the flashing cursor
position and all characters to the right of the cursor move
one space to the right. Overwrite mode replaces the selected character (flashing) with the new one.
E2:SPACE - inserts a space between two entries.
F2: DELETE - cancels the character to the right of the flash-
ing cursor.
G2:<— (BACKSPACE) - cancels the previous character and
moves the cursor one step backwards.
Once you have entered the name, press ENTER to confirm and
close the name window, or press ESCAPE if you realize that you
don’t want to enter a name at this time.

User Guide
The chapters of the User Guide explain all you need to know
about the Equinox.
The subjects discussed here are:
1. Sound mode, Quick Edit & Advanced Edit.
2. Performance mode.
3. Drum mode.
4. Sample mode.
5. Drawbar mode.
6. Arpeggiator.
7. Grooves.
8. Disk.
9. System.
10. Midi.
11. Sequencer.
12. User panel.
13. Notepad.
○○○○○○○○○○○○○○○○○○○○○○○○○○○○○○
Sound mode 1•1
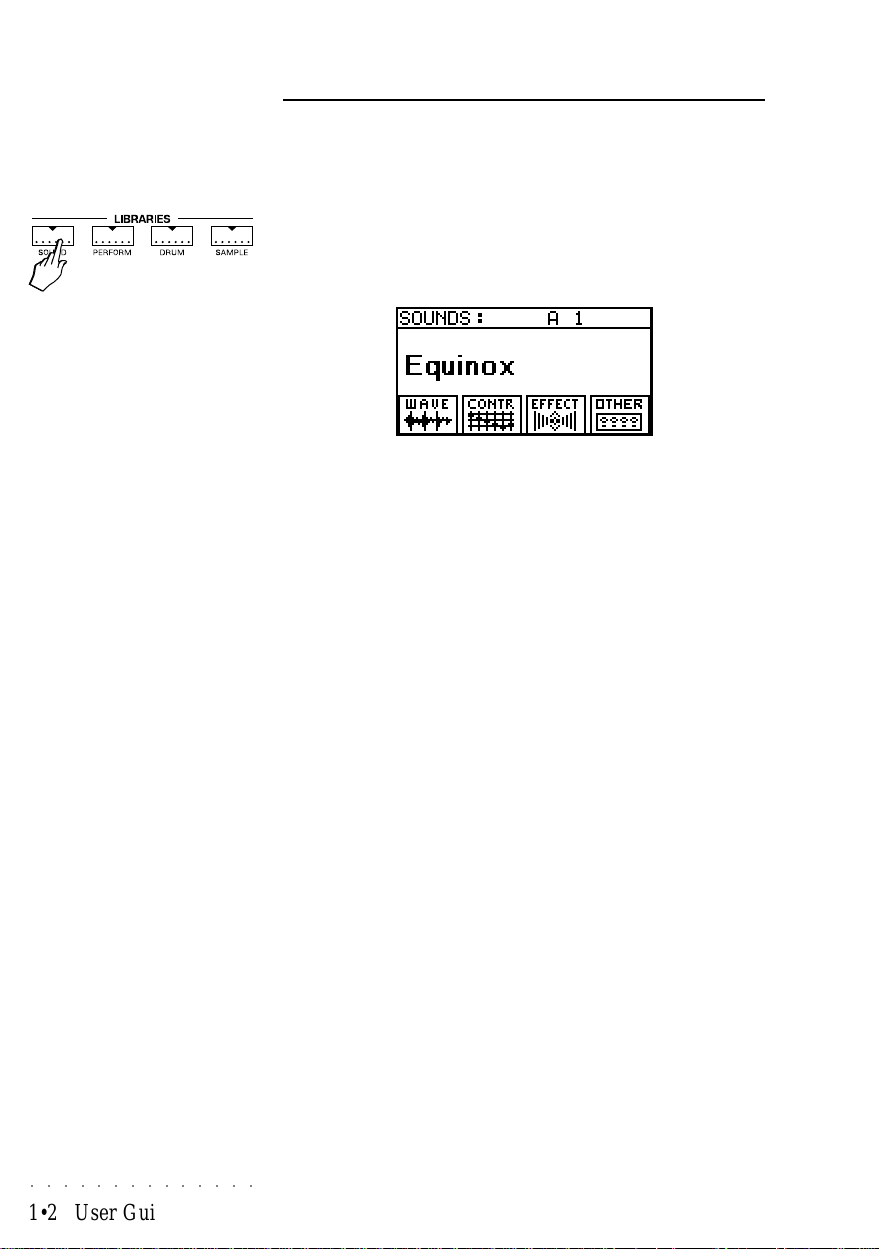
1 • SOUND MODE
Note: All examples in this section require that the Equinox is in
SOUND MODE.
If you are uncertain how to return to the instrument to SOUND
MODE, simply turn the unit on from scratch and press the SOUND
button beneath the screen.
Sound Families
Because the Equinox has well over 1000 factory sounds as
standard, these sounds have been divided into 1 1 families, making it easier to find the right type of sounds quickly and easily.
Each family , (also called “Banks”), can contain up to 128 sounds.
○○○○○○○○○○○○○○
1•2 User Guide
Let’s take a closer look at these families;
1. SYNTH A
2. SYNTH B
3. SYNTH C
4. SYNTH D
5. ORCHESTRA
6. GMX 1
7. GMX 2
8. GMX 3
14. DRUM KITS
15. DRUM SOUNDS 1
16. DRUM SOUNDS 2

SYNTH A, B, C, D
These are the “core” sounds of the Equinox. Many of these
sounds have been specially created by some of the most prominent programmers and musicians in the world. The sounds in
these families will also give you some insight of the creative possibilities of the Equinox as a synthesizer.
ORCHESTRA
In this family you will find authentic reproductions of traditional
orchestral instruments. Many of these sounds are further enhanced by appropriate effects, typical of the instrument’s playing
style, being assigned to either velocity or aftertouch.
GMX 1, 2 and 3
GMX is Generalmusic’s own standard set of sounds which are
included in every Generalmusic product. The first bank, GMX1,
contains the industry standard General MIDI sound library. This
family is designed to be used when the Equinox is required to
play General MIDI song disks or when the instrument is being
controlled by a computer program or some other device which
requires a General MIDI sound library . The second and third GMX
banks contain 256 sounds taken from Generalmusic’s own extensive sound library. These sounds, along with the 128 sounds
in the GMX1 bank, ensure compatibility with Generalmusic’s own
GMX song library , (not available in the U.S.A), and also with song
disks created on other Generalmusic instruments.
Drum Kits and Drum Sounds
The Drum Kits family includes just about every type of drum kit
you could imagine - from jazz to rock, orchestra to techno and
beyond. However, unlike many other keyboards, on the Equi-
nox you can not only create your own drum kits but you can edit
each and every individual drum sound. For this reason, two families are provided in which you can find every single individual
drum sound. These sounds can be freely edited just like any
other sound. They can then be stored as new sounds, either for
individual use or for incorporating into the drum kits.
○○○○○○○○○○○○○○○○○○○○○○○○○○○○○○
Sound mode 1•3
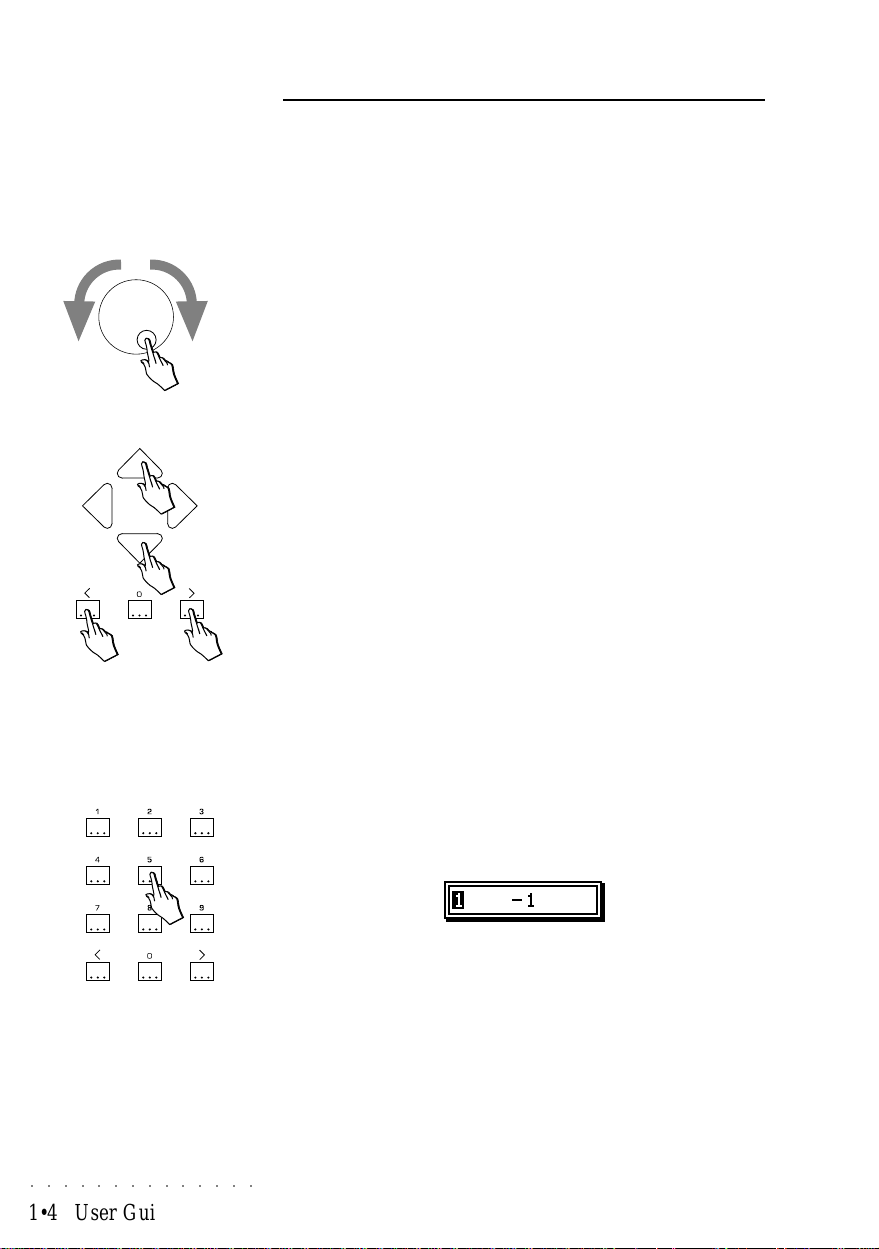
Selecting Sounds
Sounds can be selected in three different ways.
1. Scrolling with the dial
Moving the dial in either direction will scroll sequentially through
all the sounds in the instrument’s memory. When you reach the
last sound of a particular family you automatically pass into the
next family until you have reached the end of all sounds in the
instrument’s memory.
2. Single steps
Using either the Cursor Up/Down buttons or the INC / DEC buttons of the numeric keypad you can step through individual sounds
one by one.
○○○○○○○○○○○○○○
1•4 User Guide
3. Directly entering a number
This method is the quickest way to go directly to the sound you
need but, first, you must know the exact number and location of
this sound. Pressing any of the buttons in the numeric keypad
will open up a small window as shown below:
You need to enter two numbers separated by a dash, (which is
inserted automatically for you). The first is a number between 1
and 128. This is the location of the desired sound within it’s family. After you’ve entered this first number, use the cursor right
button to move the display cursor to the right of the separator
dash. The next number you enter will indicate which family the
sound is in, (you can use the family numbers in the list on the
previous page as a guide).
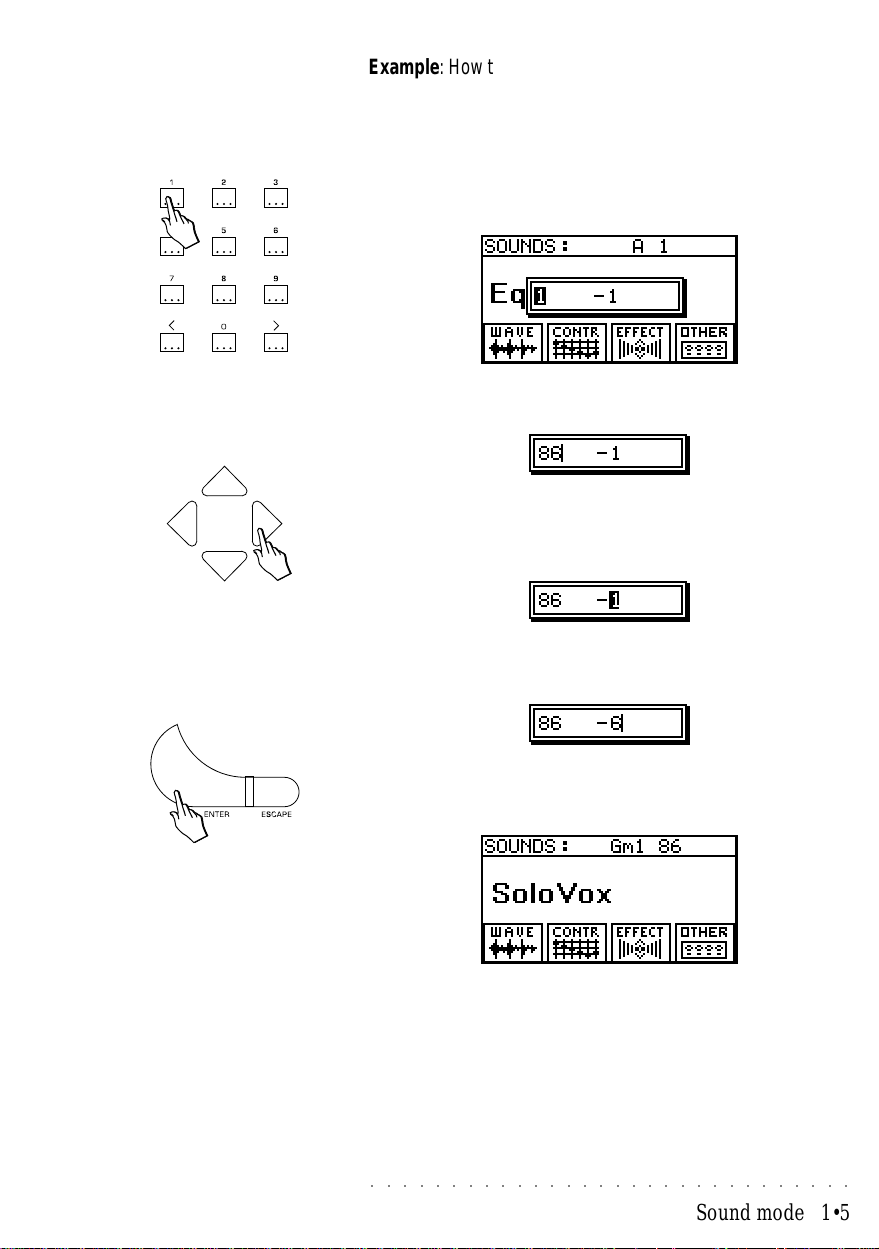
Example: How to directly select the sound SOLO VOX from the
keypad. SOLO VOX is sound number 86 in family number 6
(GMX 1).
Step 1. Press any numbered key on the numeric keypad.
Step 2. Type the number 86.
Step 3. Press the cursor right button to move the cursor to the
right side of the separator dash.
Step 4. Type the number 6.
Step 5. Press ENTER.
○○○○○○○○○○○○○○○○○○○○○○○○○○○○○○
Sound mode 1•5

Moving Between Families
Sometimes you might want to jump directly from one sound family to another when looking for a particular sound. Pressing either the Cursor Left button or the Cursor Right button will open
the BANK SELECT window.
The current family is highlighted and you can select any other
family by moving up or down in the families list using the cursor
controls. When the family you want is highlighted press ENTER.
You will now return to sound selection as before but you’ll be
working within the newly selected family.
Editing and changing Sounds
○○○○○○○○○○○○○○
1•6 User Guide
Immediately following the factory sound banks you will find the
USER sound banks, (called USER 1, 2, 3 etc.). There are 16 of
these USER banks and any new sounds which you create on the
instrument can be stored in any of these 2048, (16 x 128) locations.
Any sound on the Equinox can be edited to your taste. This
editing can consist of anything from the simplest adjustment of
the sound’s tone or volume level to a complete reconstruction of
the sound, resulting in a totally original and personal sound.
Editing always begins by selecting one of the sounds currently in
the instrument’s memory as a starting point for the sound you’re
going to create. When you edit a sound, you can decide, at any

point, to either save the new sound you’ve made or to just quit
editing and go back to using the instrument as before. This procedure is explained in detail under
STORING SOUNDS
.
There are two different ways to edit a sound.
The first method is
Quick Edit
which lets you modify the sound
quickly and easily using the eight sliders on the left side of the
instrument.
The second method is
Advanced Edit
which uses the four buttons beneath the sound’s name as a starting point for complex
editing.
○○○○○○○○○○○○○○○○○○○○○○○○○○○○○○
Sound mode 1•7

Quick Edit - (using the Sliders)
The eight sliders on the left side of the instrument’s control panel
allow you to instantly edit the most essential characteristics of
any sound.
LEVEL: The overall volume of the sound. The level increases as
the slider is moved upwards. Most factory sounds are programmed with optimum volume level set. Sometimes, especially
if you use the filters for special effects, the overall volume of the
sound may rise sharply and will need to be decreased so that it
better matches the level of other sounds.
ATTACK: This slider adjusts the time taken for a sound to reach
it’s maximum volume level after a key has been pressed. The
attack time increases as the slider is moved upwards. Setting a
very fast attack time, (with the slider all the way to the bottom),
will make a sound more percussive. Setting a slower attack time
will cause the sound to fade in slowly when a key is pressed.
○○○○○○○○○○○○○○
1•8 User Guide
Since this slider can be used to either increase or decrease the
amount of attack that the sound originally had, the original attack
time of the sound can be restored by setting the slider to its centre position.
DECAY: This slider will only affect those sounds which feature
“decay”. Decay is the effect of something fading away as you
hold a key on the keyboard. A piano sound is a good example of
a sound which has decay . As you hold down the key, the sounds
fades away or “decays”. Eventually you will hear no sound at all.
An organ sound, on the other hand, has no decay. The level of
the sound remains the same as long as you hold down a key.
The decay slider is used to adjust the amount of time it takes a

sound to decay , (in the case of our piano sound that would be the
amount of time it took between when the sound is at maximum
level and the point at which we no longer hear anything).
Since this slider can be used to either increase or decrease the
decay time of the original sound, the original decay time of the
sound can be restored by setting the slider to its centre position.
RELEASE: The release slider is used to adjust the amount of
time a sound continues to play after the key has been released.
This “release time: increases as the slider is moved upwards.
Maximum release times can last for more than twenty thirty seconds after a key has been released.
Since this slider can be used to either increase or decrease the
release time of the original sound, the original release time of the
sound can be restored by setting the slider to its centre position.
CUT OFF: In it’s simplest form, this is the sound’s most important tone control. Cut-Off is one half of the main filter controls,
(the other being “Resonance”). Usually these two are used in
combination for powerful manipulation of a sound’s tonal character. As the slider is moved downwards the filter closes allowing
less of the original sound to pass through. This generally has the
effect of making the sound warmer and less “fizzy”. Moving the
slider upwards opens the filter, increasing the brilliance of the
sound.
Since this slider can be used to either increase or decrease the
filter cut-off point of the original sound, the original cut-off point of
the sound can be restored by setting the slider to its centre position.
RESONANCE: This slider , the second essential element of filter
control, introduces complex harmonic overtones which are added to the final sound. Sometimes these overtones can only be
produced when the Filter Cut-Off setting is low enough. T ry setting the Resonance slider fairly high and then moving the Cut-Off
slider while you play. The distinctive sound of a resonating filter
is one of the key elements in many classic synthesizer sounds.
Since this slider can be used to either increase or decrease the
amount of resonance in the original sound, the original amount
of resonance can be restored by setting the slider to its centre
position.
○○○○○○○○○○○○○○○○○○○○○○○○○○○○○○
Sound mode 1•9

LFO DEPTH: This control is used to set the amount of “vibrato”
or modulation applied to a sound. If the current sound includes
some type of modulation or vibrato, you can use this slider to
either increase, decrease or completely remove the effect, (by
setting the slider to minimum).
Since this slider can be used to either increase or decrease the
LFO depth in the original sound, the original LFO depth can be
restored by setting the slider to its centre position.
LFO RATE: This slider can be used to adjust the speed of the
“vibrato” or modulation in a sound. It is designed to be used in
conjunction with the LFO DEPTH slider.
Since this slider can be used to either increase or decrease the
LFO rate in the original sound, the original LFO rate can be restored by setting the slider to its centre position.
○○○○○○○○○○○○○○
1•10 User Guide

Storing Sounds
Whenever you edit a sound you will, at some point, decide that
you either want to save your new sound or simply forget it and
return to using the instrument as before.
A modified Sound that has not been stored to memory shows a
small mark at the top left hand corner before the name.
To cancel an edit, simply use the dial or the cursor controls to
choose a different sound and everything will be instantly forgotten. If you’re using one of the advanced edit menus, (WAVE,
CONTROL, EFFECT or OTHER), or one of their related functions, simply press the ESCAPE button until you return the main
sound selection page. Then scroll to the next sound and your
previous edit is cancelled as before.
If you decide you want to store your sound into the instrument’s
memory, the next step will be to press the STORE button.
During the storing process, you will first be asked to select a
destination for your new sound and then given the opportunity to
name it.
User sound locations
Any sound that you create yourself is referred to as a “User
Sound”. Just like the factory sounds, User Sounds are also stored
in families, (or “Banks”). In addition to the 11 factory sound families that we’ve already looked at, the Equinox also contains 16
user banks and each bank has space for 128 sounds. This means
you can store up to 2048 of your own sounds in the Equinox.
When you press the STORE button to save a sound that you’ve
been working on, you are asked to select where, in these 16
User Banks, you would like to store your new sound.
Although you can choose any destination for your sound, the
○○○○○○○○○○○○○○○○○○○○○○○○○○○○○○
Sound mode 1•11

instrument starts out by suggesting a location which might make
your sound easy to find in the future. We call this the “mirror
location”.
Mirror locations
We know that the Equinox’s factory sounds are stored in 1 1 families containing up to 128 sounds each. We also know that there
are 16 User families available which are also capable of storing
up to 128 sounds each. This means that we are able to store at
least as many user sounds as there are factory sounds. It is from
here that we get the idea of “mirror locations”.
Each factory sound has an associated “mirror location”, where a
modified version of that sound can be stored. This mirror location is simply a slot in one of the User Banks. It is the slot with the
same number as the original sound and resides in the same User
Bank number as the original sound’s Factory Bank number.
For example, let’s say we edited the sound MOON WIND, which
is sound number 98 in factory family number 7, (GMX 2). When
we press the STORE button to save this new creation, the suggested slot for saving this sound is going to be Position #98 in
User Bank #7.
○○○○○○○○○○○○○○
1•12 User Guide
Of course, you don’t have to store your sound in this mirror location. You can store it anywhere you want. However, using the
mirror location eliminates a certain amount of extra work when
saving a sound you’ve created. If you accept the mirror location
then storing your sound is simply a case of pressing ENTER a
few times. You can safely ignore all the prompts to change the
location and to change the name. When you need to find your
sound in the future, you know exactly where it will be.

Advanced Edit - (using the Menus)
If you’re serious about creating and editing sounds then it won’t
be too long before you yearn for a little more flexibility than is
offered by the sliders in Quick Edit mode. The advanced editing
controls are always visible in the screen when you’re in SOUND
mode. Here you will find the real key to the synthesizer power of
the Equinox
The advanced edit controls are divided into four categories:
WAVE: This is the heart and soul of the Equinox synthesizer
engine and the starting point for creating new sounds. Here you
can select the waveforms on which your sound will be based,
design complex envelopes, set dynamic filters, panning controls
and many other fundamental elements of your sound
CONTROL: Here a number of live expression controls can be
set up for your sound including assignment of the performance
wheels, portamento control, velocity and aftertouch
EFFECT: Up to four digital signal processors are available to be
assigned to your sound. These offer a wide range of popular
effects ranging from reverbs to a variety of choruses, phasers
and flangers, delay, distortion, pitch shifting, ring modulation,
compression, 3D and EQ.
OTHER: Some additional controls for final tweaking.
○○○○○○○○○○○○○○○○○○○○○○○○○○○○○○
Sound mode 1•13

Wave Menu
Layers
The first thing you need to know, when you enter the W A VE menu
to create or edit a sound, is that all Equinox sounds are created
using either 1, 2 or 3 layers. After pressing the WA VE button, as
soon as the WA VE menu is visible, look over at the first 3 buttons
below the slider panel.
These are the layer select buttons when you’re in WAVE edit.
Either 1, 2 or all 3 of these buttons will be lit, (don’t worry that one
of them is flashing). This tells you how many layers the current
sound is made from.
The flashing layer is the one which is currently available for editing. We will refer to this as the
any of the settings in any of the menus currently in the screen,
you would be changing only the settings of the active layer. To
make a different layer active, simply press it’s button once. The
new layer button begins to flash and the previously active layer
now stops flashing. To mute a layer, (which can be useful when
you want to hear only the layer which you’re currently editing and
mute the others), simply press it’s associated button until the
light turns off.
active layer. If you were to adjust
○○○○○○○○○○○○○○
1•14 User Guide
So what actually is a layer ? In simple terms, a layer is a sound.
In fact, many of the Equinox sounds are created using only one
layer. When more complex sounds are needed, up to three layers can be combined together to form a single sound. Since the
process required to edit one layer is exactly the same as for another, we are going to concentrate our examples in this section
only on editing a single layer. Creating multi-layer sounds is a
relatively simple process once you know how to edit a single
layer.
Layers can also be of different types - single waveform or dual
waveform. For the explanation of edit features on the following
pages, we will assume that only the simplest type of layer is being used - a single waveform layer.

For advanced users wishing to know more about the various dual
layer types here’s a quick guide;
Dual 1: Separate Volume, Amp Envelope, Filter and
Pitch Envelope for each waveform.
Dual 2: As above but the two filters are in series and
common to both waveforms.
Dual 3: Volume and Amp. Envelope are common while
filters are separate for each waveform.
Dual 4: Everything is common to both waveforms.
Layer
The
LAYER
button allows you to add new layers to a sound, (by
using
CREA TE
already in memory, (by using
the velocity and key ranges for each layer allowing you to create
splits and velocity switching between layers.
), either of your own creation or from other sounds
IMPORT
). Here you can also set
Now let’s take a quick look at the main features of the WAVE
menu:
○○○○○○○○○○○○○○○○○○○○○○○○○○○○○○
Sound mode 1•15

WAVEFORM
Here you can select the waveform which this layer is going to
use. The other controls in this menu allow you to adjust the tuning and the way in which the waveform is affected by velocity
and aftertouch.
VOLUME
This menu allows you to control the overall volume level of this
layer and also to set by how much the volume level will change
when either velocity or aftertouch is applied.
○○○○○○○○○○○○○○
1•16 User Guide
AMP. ENVELOPE
The principal function of this menu is to allow you to “draw” two
envelopes, called the KEY ON and KEY OFF envelopes respectively . In each of these envelope screens, you draw a shape which
represents the way the volume level of the sound changes over
time.
In the KEY ON envelope screen, the shape you draw will describe the way the volume of the sound will change while the key
is held down.

In the KEY OFF envelope screen, the shape you draw will describe the way the volume changes after the key is released.
Under the CONTROLS sub-menu, you will find a number of functions which control the way the sound responds to the envelopes
which you have drawn. These functions allow you create changes in the effectiveness of the envelopes when velocity and aftertouch effects are applied to the keyboard.
FILTER
Five different types of filter are available. For each filter, under
the CONTROLS menu, you can choose the Filter type, set it’s
Cut-off and Resonance and also assign Cut-Off and Resonance
values to be controlled by velocity and/or aftertouch.
The last three parameters of the FILTER/CONTROLS menu allow you to set the effectiveness of the two filter envelopes which
are available. These envelopes are called the KEY ON and KEY
OFF envelopes respectively . In each of these envelope screens,
you draw a shape which represents the way the Cut-off point of
the filter changes over time.
○○○○○○○○○○○○○○○○○○○○○○○○○○○○○○
Sound mode 1•17

NOTE: In order to hear the effect
of these two envelopes, you must
first set the ENV. DEPTH, (in the
CONTROLS menu), to some value greater than zero:
In the KEY ON envelope screen, the shape you draw will describe the way the Cut-off point will change while the key is held
down.
In the KEY OFF envelope screen, the shape you draw will describe the way the Cut-off point changes after the key is released.
○○○○○○○○○○○○○○
1•18 User Guide
PITCH ENVELOPE
This feature allows you to “draw” two envelopes, called the KEY
ON and KEY OFF envelopes respectively. In each of these envelope screens, you draw a shape which represents the way the
pitch changes over time.
In the KEY ON envelope screen, the shape you draw will describe the way the pitch changes while the key is held down.

NOTE: In order to hear the effect
of these two envelopes, you must
first set the ENV. DEPTH, (in the
CONTROLS menu), to some value greater than zero.
In the KEY OFF envelope screen, the shape you draw will describe the way the pitch changes after the key is released.
In the CONTROLS menu, you will also find some parameters
which allow you to modify the speed and depth of these envelopes according to velocity and aftertouch.
…
L.F.O
The L.F.O section is used to add modulation, (which, in it’s simplest form can be thought of as vibrato or tremolo), to the current
layer. There are five different types of modulation which be applied. The type of modulation, it’s related speed and other features can be set under CONTROLS.
This modulation can then be applied to one of three sources -
PITCH,
○○○○○○○○○○○○○○○○○○○○○○○○○○○○○○
Sound mode 1•19

AMPLITUDE
or
FILTER
.
Each of these three menus contain identical features. In each
case you choose how much modulation to apply in general, (
CILLATOR 1
aftertouch is applied, (
) and how much extra modulation to apply when
A/T OSCILLATOR1
).
OS-
PAN
○○○○○○○○○○○○○○
1•20 User Guide
The PAN menu offers two different methods of varying the pan
position of this layer.
The first method allows you to change the pan position according to the keyboard velocity of aftertouch amount. This can be
set from the VELOCITY and AFTERTOUCH parameters in the
CONTROLS
menu.
The second method of varying the pan position is by drawing two
envelopes.

In a similar fashion to
and
AMP ENVELOPE,
PITCH ENVELOPE, FILTER ENVELOPE
you can draw both a KEY ON;
and a KEY OFF envelope for the pan position.
As with the other envelope functions on the Equinox, you’ll need
to set the
ENV. AMOUNT
, (in the
CONTROLS
menu), before
these envelopes will have any effect.
○○○○○○○○○○○○○○○○○○○○○○○○○○○○○○
Sound mode 1•21

Control Menu
PITCH BENDER
Here you can set the amount of pitch shift available from the
pitch bend wheel.
You can independently set the amount of pitch bend when the
wheel is moved up and the amount of pitch bend when it is moved
down. This menu also contains the modulation wheel control.
PORTAMENTO
○○○○○○○○○○○○○○
1•22 User Guide
MODE:
new note is played.
NORMAL
portamento creates a pitch slide whenever a
LEGA TO
portamento activates the pitch slide,
(portamento), effect only when a note is played while another
note is still being held.
TYPE: This feature only applies when, during the course of sliding from one note to another, you play an new note somewhere
in between the two, (which begins a separate portamento, [pitch
slide] of it’s own). The TYPE setting controls where this new slide
will commence from;
Floating: The new portamento will commence from the pitch
which the previous portamento had reached when
the new key was pressed.
Re-Start: The new portamento will commence from the ulti-
mate destination of the previous portamento.

SPEED: The time taken for the pitch slide to occur.
TIME/RATE: This control affects the way that the
is interpreted. When this parameter is set to TIME, the
SPEED
SPEED
setting
value controls the actual amount of time it takes to slide from any
note to any other note regardless of the “distance” in pitch between the two. This means that the time taken to slide between
any two notes will always be the same.
When this parameter is set to RATE, the
SPEED
value controls
the amount of pitch change per second. This means that the
time it takes to slide from one note to another depends entirely
on the “distance” it has to travel between the two. This means
that the time taken to slide between any two notes will be different depending on which notes were played.
AFTERTOUCH
Here you can enable or disable the aftertouch effect.
VELOCITY
Y ou can choose from eight different velocity curves. A small graphic is displayed to represent each curve. There are four normal
curves - 0, 1, 2 and 3, (where a lighter touch produces a quieter
sound), and four inverse curves - 4, 5, 6 and 7, (where a lighter
touch produces a louder sound).
This menu also allows you to set velocity limits to your sound by
using the
○○○○○○○○○○○○○○○○○○○○○○○○○○○○○○
VELOCITY RANGE
parameter.
Sound mode 1•23

Effects Menu
Three effects processors, (DSPs) are provided. They can be used
individually or in any combination - series or parallel.
REVERB
This section contains a library of different reverbs presets. Choose
a reverb preset from the library by selecting
Below the selected type, you will see all of the available parameters for editing the current reverb. The output of the Reverb
section is “100% wet”, (meaning that it does not mix any of the
original “dry” signal with it’s output)
TYPE
.
○○○○○○○○○○○○○○
1•24 User Guide
MULTIFX
This section contains a number of popular effects ranging from
Mono and Stereo Delays to Chorus, Distortion and Pitch Shift.
Choose the effect you want to use by selecting
Below the selected type, you will see all of the available parameters for editing the current effect. The parameters offered will be
different depending on the type of effect currently selected.
TYPE.

PROEFX
This section is the most important and powerful of all three effects sections.
In addition to containing a variety of high quality stereo effects,
(Flanger, Chorus, Overdrive etc.), it also contains a number of
popular studio post processing functions, (3D, EQ, Loudness
Maximizer, Audio Exciter etc.).
It is also the only section which offers a WET/DRY mix parameter in those effects where it is appropriate. It also has the ability
to be completely disabled and used as a direct stereo dry signal
control, (see
The ProEFX section also contains two “post send” controls which
allow you to send the sound, after it has been processed by the
ProEFX section, to the Reverb, (
(
TO MULTIFX
SEND
).
).
TO REVERB
) or to the MultiFX,
Effects functions
SEND (button F2): This function allows you to assign the amount
of each effect that you want to apply to the sound. For REVERB
and MULTIFX, simply select the amount of each effect that you
want - from 0 - 127.
The ProEFX section of the SEND menu operates slightly differently from the other two. Because both the Reverb and MultiFX
outputs are “100% wet”, the amount of dry signal in the sound is
controlled by the ProEFX send level.
If you are using an effect from the ProEFX section then, in many
○○○○○○○○○○○○○○○○○○○○○○○○○○○○○○
Sound mode 1•25

cases, it will have a WET/DRY parameter, (for example, STEREO WAH has this parameter). This is a value which can be set
from 0 to 100 where value 0 represents 100% dry, (no effect),
value 100 represents 100% wet and value 50 represents a 50/50
wet dry mix.
NOTE: Some of the effects in ProEFX do not offer a WET/DRY
parameter, (for example, 3D, EQ, Loudness Maximizer, Audio
Exciter etc.) because they are intended for attenuation and enhancement rather that for special effects.
If you don’t wish to use any effects from the ProEFX section then
you can switch it off and turn the ProEFX send into a simple DRY
LEVEL control. To do this, simply place the cursor over the word
ProEFX and turn the dial anti-clockwise.
Now the send level will control the amount of dry signal in the
mix.
MODE (button F3): When available, this function allows you to
select the effects mode. The normal mode is called “3 Effects”
and it offers the 3 effects processors as described above.
○○○○○○○○○○○○○○
1•26 User Guide
This should be used wherever possible to allow maximum flexibility in programming sounds.
The second mode, (2xSynth + 2xSeq) is designed only for situations where you wish to use the Equinox’s internal sequencer
while playing sounds or performances at the same time.
In this mode, only Reverb and MultiFX are available for sounds
and performances. However, the sounds used by the song are
given their own independent Reverb and MultiFX sections which
can be assigned separately, (under
SONG EDIT / EFFECTS
).

Other Menu
MODE
Here you can set the polyphonic or monophonic mode of this
sound as follows;
POLY :
MONO L :
MONO R :
MONO T :
MONO L+R:
Normal polyphonic mode;
Left note priority;
Right note priority;
Last note priority without retrigger;
Last note priority with retrigger.
LEGATO
Setting this feature to ON will cause the initial attack portion of
the sound to be bypassed when the keys are played “legato”.
RANDOM PAN
This function will automatically shift the pan position of the sound
by a random amount whenever a new note is played. The amount
of shift is limited by the value you select. At maximum level, (7),
the pan position may shift completely to the left or right channel.
MASTER TRANSP.
Usually you will want to leave this set to ON. It confirms that this
sound will be affected by the TRANSPOSE buttons on the front
panel. In some situations, for example, when creating drum
sounds, you may not want the track to be shifted. In this case,
set this function to OFF.
RANDOM PITCH
This function automatically applies a little detuning to the sound
each time a new note is played. The amount by which it detunes
the note is limited by the value you select. At maximum value,
(7), this automatic detuning may be as much as a half step sharp
or flat.
○○○○○○○○○○○○○○○○○○○○○○○○○○○○○○
Sound mode 1•27

○○○○○○○○○○○○○○
1•28 User Guide

2 • PERFORMANCE MODE
A
PERFORMANCE
layered together or split across the keyboard in any configuration. Pressing the PERFORM button will put the Equinox in
Performance play mode.
In this way you can scroll through all performances which already exist in memory. There are 1 12 performances preset from
the factory and an additional 112 memories into which you can
store your own creations.
is a combination of up to 16 sounds either
To construct a Performance you start by selecting a number of
sounds or
is called a
Part
how many
able to view 16
are arranged in what we call the
sounds from this
use is entirely your choice. If you only decide, for example, that
you want to layer three sounds together then you only need to be
concerned with the first three parts in the
○○○○○○○○○○○○○○○○○○○○○○○○○○○○○○
Parts
, (in Performance mode, each constituent sound
Part)
. A Performance can contain as little as only one
or as many as 16
Parts
Parts
Parts
you actually decide to use, you will always be
within your Performance. These 16 parts
Parts List
layered together. Regardless of
Parts List
you actually decide to switch on and
. How many of the
Parts List
.
Performance mode 2•1

Parts List
The Parts List can be viewed by pressing the P ARTS button (F1).
You can move from one part to another with the cursor up/down
keys. The part shown selected (negative highlight) is the active
zone of the display, therefore, sound selection is made either
from the dial or numeric keypad as in Sound mode. The cursor
Left and Right keys can be used to select different sound banks
in exactly the same way as Sound mode.
Y ou can select the number of parts that you want to be active by
using the buttons beneath the 8 sliders in conjunction with the 18, 9-16 selector button.
1-8 / 9-16 Selector button
○○○○○○○○○○○○○○
2•2 User Guide
Each button is simply an on/off switch for the part with the corresponding number. If all these buttons are switched off you will
hear no sound. The slider above each button functions as a
volume control for that part.
Parts Menu
To adjust other values for the current part, (the one which the
cursor currently highlights), simply press ENTER. This will call
up the PARTS EDIT screen for the selected part.
Y ou can return to the Parts List at any time by pressing ESCAPE.
Let’s take a look at some of the functions here;

TRANSPOSE: Here you can change the pitch of the sound in
half tone steps, within a maximum range of 60 steps up or down.
To shift the sound up or down by an octave you can use the
OCTAVE +/- buttons on the front panel.
DETUNE: This allows you to adjust the fine pitch of the sound in
64ths of a half step.
RANDOM PITCH: As it’ s name suggests, this function automatically applies a little detuning to the sound each time a new note
is played. The amount by which it detunes the note is limited by
the value you select. At maximum value, (7), this automatic detuning may be as much as a half step sharp or flat.
MASTER TRANSP. Usually you will want to leave this set to
ON. It confirms that this sound will be affected by the TRANS-
POSE buttons on the front panel. In some situations, for example, when using drum kits, you may not want the track to be shifted. In this case, set this function to OFF.
PORTAMENTO MODE:
P. TYPE:
P: SPEED:
P. TIME / RATE:
These functions allow Portamento, (pitch slide) to be applied to
this sound. These features work the same way as in
MODE
.
See the Portamento section of
SOUND MODE
for a description
SOUND
of these functions.
○○○○○○○○○○○○○○○○○○○○○○○○○○○○○○
Performance mode 2•3

DELAY TIME: Selecting a value here will cause the sound to be
delayed for a brief period of time after a key is pressed. This
allows you to create a number of special effects using real time
delays. The delay time value is shown in “Ticks”. These ticks
are subdivisions of the beat based on the current “Clock Speed”,
(the tempo of the internal sequencer - this can be changed by
pressing SONG EDIT and using the dial). Each tick represents
1/192nd of a beat. Therefore if you set a delay time of 192, you
will hear a delay of exactly one beat between when you press
the key and when the sound is heard.
POLY PRIORITY: Setting this function to ON gives the current
sound “priority of polyphony”. This signifies that this particular
sound will never have notes “stolen” by other parts or tracks of
the sequencer. If you subsequently try to play this sound while
all of the available polyphony is being used, it will “steal” the notes
it needs from other parts.
Press MENU (button F4) or ESCAPE to return to the Parts List.
○○○○○○○○○○○○○○
2•4 User Guide
The Parts List functions
SPLIT (button F2): The SPLIT button allows you to select a
single split point, (called a
can then be assigned to either the left or right side of the assigned split point.
Under the SPLIT button, simply set the “Basic Split” to ON and
choose where you want the keyboard to be split.
Then return to the parts list with ENTER or ESCAPE.
Basic Split
), on the keyboard. Parts

As you select each part in the list, you can assign it’s position,
either to the left or to the right of the split point, by pressing the
INCREASE or DECREASE buttons of the keypad.
NOTE: The RANGE function is
not available if the Basic Split is
on.
For each part in the
Parts List
, you will see a small arrow icon
indicating which side of the split the sound is assigned to.
RANGE (button F3): The RANGE button (F3) is used to specify, for each part, exactly how and when it will be activated from
the keyboard. You can select a range of notes and a range of
velocities, outside of which, this part will not be activated. This
allows the RANGE function to be used when you want to create
a
Multi-Split
or a
Velocity Switch
between a group of different
sounds.
NOTE: The complete span of an
88 note keyboard has A0 as it’s
lowest note and C8 as it’s highest.
Multi-Split
For example, to make a five part split, switch on parts 1, 2, 3, 4
and 5. Then assign the NOTES range as follows, (remember to
use the part buttons to switch between current parts);
PART 1: A0 to B2
PART 2: C3 to B3
PART 3: C4 to B4
PART 4: C5 to B5
PART 5: C6 to A8
This will give you a five part split where you have a different
sound in each octave, (for the 61 note model).
○○○○○○○○○○○○○○○○○○○○○○○○○○○○○○
Performance mode 2•5

NOTE: On any velocity sensitive
keyboard, the lightest possible
key velocity is 0 and the hardest
velocity is 127.
Velocity Switch
For example, to make a three part velocity switch, switch on parts
1, 2 and 3. Then assign the VELOCITY range as follows;
PART 1: 0 to 40
PART 2: 40 - 80
PART 3: 80 - 127
This will give you one sound across the whole keyboard. Depending on how hard you play, you will switch between three
different sounds.
Part selection
It is possible to stay in the PARTS edit screen and choose a
different part to edit without first having to escape and return to
the
Parts List
ton
, (the buttons beneath the sliders), and the selected part will
become the object of the current edit screen, (this works the same
way in MIXER, EFFECT and OTHER too).
. Simply press the corresponding
part select but-
○○○○○○○○○○○○○○
2•6 User Guide
Throughout this section these buttons will be referred to as the
part select buttons
.

Mixer Menu
The mixer controls the final output of the sounds in this performance.
Essentially it lets you select volume, pan position, and output
jack selection for each part. As with the PARTS edit menu, you
can stay in the MIXER screen while using the part select buttons
to select which part you want to adjust. While most of these
functions are easy to understand, there are a couple of noteworthy features;
RANDOM P AN: This function will automatically shift the pan position of the current part by a random amount whenever a new
note is played. The amount of shift limited by the value you select. At maximum level, (7), the pan position may shift complete-
ly to the left or right channel.
AUDIO OUT : The Equinox has 4 output jacks - Left, Right, Out1
and Out2. This function is used to select which of these the
current part will use. You can use these as two stereo pairs or,
instead, Out 1 and Out 2 can be used as mono outs.
The VOL button is provided to give you an overview of the relative levels of all 16 parts.
○○○○○○○○○○○○○○○○○○○○○○○○○○○○○○
Performance mode 2•7

Effects Menu
For instructions on using the effects, see the EFFECTS section
of SOUND MODE.
In Performance mode, the procedure for assigning effects to the
parts is fairly simple. First you choose the effects mode and set
up the actual effects you would like to use. Then, for each part,
you assign the amount of SEND to each effect.
○○○○○○○○○○○○○○
2•8 User Guide
After selecting the
Effects Mode
and choosing the actual effects,
pressing the SEND button will allow you to assign the effects to
the various parts. Use the part select buttons to choose the part
you want to assign, then set the send levels appropriate for that
part only.

Other Menu
A few extra features are available under this menu which allow
you to activate or deactivate the various controllers on the instrument.
This includes the three pedals (whose actual functions can be
selected under
ulation wheels and the keyboard velocity and aftertouch controls.
SYSTEM/CONTROL
), the pitch bend and mod-
○○○○○○○○○○○○○○○○○○○○○○○○○○○○○○
Performance mode 2•9

○○○○○○○○○○○○○○
2•10 User Guide

3 • DRUM MODE
There are two different ways to get to
method is to simply press the DRUM button in the LIBRARIES
section.
The second method is, from within
BANK SELECT
scroll down to one of the three drum banks.
When the Equinox is in
either complete DRUM KITS or individual DRUM SOUNDS
pending on the bank selected. The Equinox is unique among
synth workstations in allowing you to freely use and edit every
individual drum sound in the instrument.
For editing individual DRUM SOUNDS, the procedure is exactly
the same as in
ever, the edit environment is quite different. In
the
WAVE
together to make a single multi-layered sound. This is also true
in
DRUM MODE
ever, when editing DRUM KITS, the
entirely new editing environment.
window, (with the cursor left or right button), and
DRUM MODE
SOUND MODE
menu is always used to combine up to 6 waveforms
when editing individual DRUM SOUNDS. How-
. When editing DRUM KITS how-
DRUM MODE.
SOUND MODE
you are able to select
The first
, call up
SOUND MODE
WAVE
menu becomes an
the
de-
Technically speaking, a DRUM KIT is not really a sound in its
own right. It is simply a collection of other sounds which have
been assigned to be triggered by specific keys of the keyboard.
For each key we can specify which sound to assign, (it doesn’t
have to be a drum sound. It can be any sound currently in the
instrument - even an imported sample). Once the sound has
been assigned to that key, we can set the Volume level, Pitch,
Panning, Effect Sends, Audio Out and many other assignments
specific to that one key.
○○○○○○○○○○○○○○○○○○○○○○○○○○○○○○
Drum mode 3•1

Editing a Drum Kit
Select any DRUM KIT, (DK1 - 1 through DK1 - 128) and press
the WAVE button, (F1).
Y ou should now see the DRUM PATCH EDITOR as shown here.
In the top right corner of the display you will see the name of a
key . Press any key on the keyboard and this will instantly update
to show the key which you just pressed. You are now ready to
edit this key . Let’ s examine the individual parameters which are
available for each key:
BANK / PROG
These two are used in combination to allow any sound to be
assigned to the current key.
○○○○○○○○○○○○○○
3•2 User Guide
VOLUME
This volume setting applies only to the current key. Use this to
balance the volume level of your selected sound with the rest of
the kit.
PAN
The stereo pan position of the current key.

TRANSPOSE / TUNING
Coarse and fine pitch adjustments which allow any note in audible range to be triggered regardless of the current key’s location
on the keyboard.
FILTER
A simple lowpass filter which allows you to make fine adjustments to the timbre of the sound assigned to the current key.
Setting this to 0 indicates that the filter is off. Setting positive
values will increase the brightness of the sound while negative
values will make it “warmer”.
EXCLUDE
3 “exclude numbers” are available. Keys which are assigned the
same “exclude number” are not permitted to sound at the same
time. This is useful for creating authentic “canceling” effects.
For example an open hi-hat and closed hi-hat could not possibly
sound at the same time in a real drumkit so, for authenticity you
would assign them the same exclude number. The same might
be true for an open and closed triangle sound. However, there
would be no reason why the triangle and hi-hat couldn’t sound
simultaneously . This means that the triangle sounds would need
to be assigned to their own unique exclude numbers. Setting
EXCLUDE to 0 turns this effect off.
REVERB / PROFX SEND
These parameters set the amount of effect send from the current
key to the on board DSPs.
AUDIO OUT
Here you can specify which of the four available audio outs this
key will use. You may either use L+R or 1+2 as stereo pairs or
instead assign Out1 or Out2 as separate monophonic outs.
○○○○○○○○○○○○○○○○○○○○○○○○○○○○○○
Drum mode 3•3

DYNAMIC SWITCH
Each key can actually have two sounds assigned to it. Only one
of the sounds can be triggered at a time depending on the velocity of the keystrike. If you look over to the first two buttons beneath the slider panel, you see that there are two layers available for editing .
Currently we’ve only been working on LA YER1. If you now press
the LA YER2 button it should start to flash. Now you’ll see a new
screen containing the same choices of parameters we’ve just
used. This LAYER2 sound is ready to be triggered when the
current key is struck above a specified velocity. The velocity is
set by the value of the DYNAMIC SWITCH parameter.
Make some changes to the settings of LAYER2 so that it is distinctly from LA YER1. Then set the DYNAMIC SWITCH parameter to 100.
○○○○○○○○○○○○○○
3•4 User Guide
Now, when you play the key softly, (below velocity = 100), you
will hear the layer 1 sound. When you play harder, (above velocity=100), you will switch to the LAYER2 sound.

COPY BUTTON, (F1)
Pressing the
the current layer to the other. This function is a utility for creating
multi layered sounds. If you are editing a key, you might make
extensive changes to LAYER1 before you’ve changed anything
in LA YER2. In many cases, you might want LA YER2 to contain a
similar if not identical sound to LAYER1, (a good use of the
NAMIC SWITCH
ducing the same sound as the first with a few parameter changes - volume levels, effect sends, tuning etc.).
COPY
button will copy all the parameter settings of
DY-
function is simply to have the second layer pro-
EXPAND BUTTON, (F2)
This function is used to duplicate the settings of a single key
across a range of adjacent keys on the keyboard. Pressing the
EXPAND
upper and lower limits of the group of keys across which you
want to spread the settings of the current key.
button will call up a window which allows you to set the
This function will automatically tune each key in the group chromatically one half step above or below its neighbor making it
ideal for tuned percussion and other instrumental sound to be
used within a DRUM KIT.
COMPARE BUTTON, (F3)
This function applies to the key currently being edited. Pressing
COMP ARE will temporarily allow you to hear the settings of that
key as they were before you changed anything.
○○○○○○○○○○○○○○○○○○○○○○○○○○○○○○
Drum mode 3•5

RESTORE BUTTON, (F4)
Pressing this button will undo all editing and restore the current
DRUM KIT to its original settings.
CONTROL, EFFECT and OTHER
The
CONTROL, EFFECT
are identical to those in
of their operation are not described here as these functions have
already been covered in the
ual.
and
OTHER
menus in
SOUND MODE.
For this reason, details
SOUND MODE
DRUM MODE
section of this man-
STORING YOUR NEW DRUM KIT
Just like ordinary sounds, DRUM KITS, once edited to your liking, can be stored into any empty location by simply pressing the
STORE button.
○○○○○○○○○○○○○○
3•6 User Guide
During the storing process, you will first be asked to select a
destination for your new sound and then given the opportunity to
name it.
You may store as many edited DRUM KITS as you like.

4 • SAMPLE MODE
The Equinox can load new sound samples into memory which
can then be edited and saved as new Equinox sounds. Before
new samples can be loaded, you must be sure that sufficient
memory has been installed to accommodate the samples you
wish to load. This can either be in the form of Generalmusic’s
own battery backed DRAM modules or SIMMs chips which can
be obtained from most computer suppliers. You can check the
amount of sample memory that has been installed by looking
under
SYSTEM / OTHER / INFO,
(F1 button).
When you press the
SAMPLES
button, one of two different things
will happen depending on whether or not you already have any
samples loaded into the instrument. If there are no samples loaded in, you will go directly to the
If samples are present then you will go instead to the
MODE - PLAYBACK/EDIT
SAMPLE TRANSLA TOR
screen.
screen.
SAMPLE
○○○○○○○○○○○○○○○○○○○○○○○○○○○○○○
Sample Mode 4•1

SAMPLE MODE - PLA YBACK/EDIT
If the Equinox already contains some samples then pressing
the
SAMPLE
BACK/EDIT
This screen allows you to select both the original samples which
you’ve loaded plus any edited sounds you’ve subsequently created which incorporate your new sample waveforms.
This mode is offered as a convenient way to recall your samples
without first having to search for them among the other sounds in
the instrument. The edit functions available in this mode are exactly the same as those offered in
tions for
the
SOUND MODE
New sounds which you create in this mode can be saved to any
available location in any of the 16 user sound families.
button will bring up the
SAMPLE MODE - PLAY-
screen.
SOUND MODE.
WA VE, CONTR., EFFECT
and
section of this manual.
OTHER
All instruc-
can be found in
○○○○○○○○○○○○○○
4•2 User Guide
From this mode, you can go into the SAMPLE TRANSLATOR
environment, simply by pressing the SAMPLE button a second
time. Y ou will be of fered a choice to either “Re-Edit” the currently
selected sample or load a completely new one.
Press ENTER to “Re-Edit” the last selected sample or ESCAPE
to prepare for loading new samples.

SAMPLE TRANSLATOR
The Equinox is capable of loading many different samples types
from a number of different companies’ formats. Because the list
of compatible sample types is constantly being updated, check
with your Generalmusic dealer or distributor to see which formats are compatible with the operating system version you are
currently using.
Samples can be loaded from floppy disks, from SCSI devices,
(CD-ROM, Removable drives etc. ) or via MIDI using the Sample
Dump Standard protocol. In these examples we are going to
work with a floppy disk which contains an MS-DOS format .WAV
sound file.
To start SAMPLE TRANSLATOR, press the SAMPLE button.
If the SAMPLE button is already pressed but you don’t see SMP.
TRANSLATOR in the title bar of the screen then press it one
more time and then press ESCAPE to bypass the “Re-Edit” option.
Now you are ready to load a sample.
To load a sample from a floppy disk or SCSI device:
1. Insert the sample disk in the floppy drive.
2. Press LOAD, (F1).
○○○○○○○○○○○○○○○○○○○○○○○○○○○○○○
Sample Mode 4•3

3. Select the device from the options list and press ENTER.
4. Use the cursor controls to locate and highlight the sample file
you wish to load.
5. Press ENTER.
To load a sample via MIDI using Sample Dump Standard:
1. Connect two MIDI cables between the sending device and
the Equinox, (MIDI OUT to MIDI IN and MIDI IN to MIDI
OUT).
2. Prepare the sending device to send the sample, (but don’t
start it yet).
3. Press LOAD, (F1).
4. Select MIDI SAMPLE REQ from the options list and press
ENTER.
○○○○○○○○○○○○○○
4•4 User Guide
5. Choose the number of the sample you want to load, (if you’re
not sure, try 0 or 1).
6. Press ENTER.
Now you’ve loaded a single sample and you can see it at the top
of the
SAMPLE LIST.
This list can contain up to 16 samples at

the same time. These 16 samples can be mapped to different
regions of the keyboard and then saved as a single Equinox
waveform when you’ve finished.
If you want to load another sample at this time, move the cursor
down to the second line of the SAMPLE LIST, press LOAD, (F1)
and proceed as before.
ASSIGNING SAMPLES
Once you’ve loaded in the samples that you need, the only essential step you need to take before you can save them is to
ASSIGN, (or “map”), your samples to a specific range of keys.
Press the ASSIGN button, (F3) to open the ASSIGN MENU.
Assigning a single sample
If you’ve only loaded a single sample then you’ll probably just
want to assign it to the full range of keys. When you enter the
ASSIGN MENU, you will see the lowest and highest note range
displayed to the right of the sound name.
The default values are A0 to C8 - the full length of the keyboard.
To accept and confirm these settings, simply press the ENTER
button, then ESCAPE to return to the main SAMPLE TRANSLATOR screen.
○○○○○○○○○○○○○○○○○○○○○○○○○○○○○○
Sample Mode 4•5

You will now see a small check mark at the extreme right of the
sample name indicating that this sample has been assigned and
is now ready to be saved.
Now you can press STORE and select a destination and a name
for your new sound.
As mentioned before, you may save this sound into any available location in the user sound families. Press ENTER to complete the operation.
Assigning multiple samples
If you have loaded a number of different samples into SAMPLE
TRANSLATOR then you will need to use the ASSIGN MENU to
map your samples to specific areas of the keyboard.
○○○○○○○○○○○○○○
4•6 User Guide
Place the cursor over each sample and press the INCLUDE button, (F3). Now you will see an upper and lower note limit of A0 to
C8 for the selected sample. Place the cursor over the A0.
Y ou can change this value either with the dial or, if you press the
MIDI button, (F2), you can change it by pressing a key on the
keyboard. Once you’ve assigned the lower note limit, move the
cursor to the upper note and assign this in the same way. This
process should be repeated for every sample in the list.

You must assign unique and specific regions of the keyboard to
each sample in the list before you will be able to save your multisample. When you’ve finished assigning all samples in the list,
press ESCAPE to return the main SAMPLE TRANSLATOR
screen.
If you assigned every sample correctly then you should see a
small check mark at the extreme right of each sample name in
the list. If this is the case, you can press STORE and select a
name and destination for your new sound.
Other assign functions
If you wish to temporarily remove a sample from the assigned
group, press the EXCLUDE button, (F4).
This sample will either need to be re-assigned later or it must be
erased from the group, (using the ERASE button, (F2) from the
main SAMPLE TRANSLATOR screen), before you will be able
to save your multi-sample.
Another very useful function in the assign menu is the AUTO
button, (F1). This will prepare a “rough key map” for you by automatically assigning each of the samples in the list to it’s own
separate range of keys. It arranges the samples in order according to the source note of each sample, (the key on the keyboard
which plays back the sample at it’s original pitch) or , if the source
pitches are the same, the order of the samples in the list. To use
this function, simply go to the assign menu after loading your
samples and press the AUTO button.
○○○○○○○○○○○○○○○○○○○○○○○○○○○○○○
Sample Mode 4•7

EDITING SAMPLES
Some simple tools have been provided which allow you to edit
individual samples after they have been loaded. To edit a single
sample, highlight it from the main SAMPLE TRANSLATOR list
and press the EDIT button, (F4).
The functions available are as follows;
PITCH
The pitch reference shown here is the name of a key on the
keyboard. This allows you to change the source note - the key
on the keyboard which plays back the sample at it’s original pitch.
RATE
○○○○○○○○○○○○○○
4•8 User Guide
This function operates as a fine tuning control for the sample
allowing you to accurately adjust the playback speed of the source
sample.
LOOP START
Here you can set the start point of the sample loop. The number
displayed represents the byte number in the sample file. If the
sample had already been assigned a loop then this information
will be automatically copied to the loop start parameter . If no loop
point was found in the sample the LOOP START value will default to zero.
SAMPLE END
Here you can see the byte number at which the sample ends
and, consequently, the size of the sample in bytes. You can
change the end point, (without actually reducing the size of the
sample), by simply selecting a different value. When you play

the keyboard, you will hear that the sample now finishes at an
earlier point.
At this stage you can also choose to “trim off” the surplus data
which still remains after the newly set end point. To do this, press
the CUT button, (F3).
LOOP ON / OFF
Setting this feature to on will activate a continuous loop between
the LOOP ST ART and SAMPLE END points when a key is played.
TUNING BUTTON, (F1)
Pressing the TUNING button will assign an ordinary sound to the
keyboard. This sound is designed to be used as a reference pitch
when setting the PITCH and RATE parameters.
GAIN BUTTON, (F2)
This function will rewrite the sample data to increase or decrease
the overall gain. Pressing the gain button will display a window
where you can view an image of the sample.
Use the dial to select which level you want the gain to be changed
to, then press ENTER to start the rewriting process. Because
the gain function has to re-write all of the data in the sample file,
it can take quite a long time when working with larger samples.
○○○○○○○○○○○○○○○○○○○○○○○○○○○○○○
Sample Mode 4•9

CUT BUTTON, (F3)
See SAMPLE END for information about how to use this feature.
EXPORT BUTTON, (F4)
After editing, your sample can be saved back to a disk or sent to
a MIDI sample dump source with it’s new values.
T o use this function, press EXPORT, choose the device you want
to send the sample to and press ENTER.
Now you can enter a name for your new sample and select the
format in which you want it to be exported. Press ENTER to complete the operation.
○○○○○○○○○○○○○○
4•10 User Guide

5 • DRAWBAR MODE
Pressing the DRAWBARS button allows you to use the sliders
like a set of Hammond Organ
®
drawbars.
In DRAWBAR mode, you work in a separate environment with
special features and controls that are dedicated to coloring and
controlling organ sounds.
16 preset configurations have been provided to let you explore
some of the different possibilities of the Drawbar section. You
can scroll through these by turning the dial while in DRAWBARS
mode.
The eight sliders operate as eight of the drawbars on an organ.
Although you can change the pitch of each drawbar to make any
“footage” you like, the default settings are as follows.
1 2 3 4 5 6 7 8
SLIDER 1 - 16'
SLIDER 2 - 5 1/3'
SLIDER 3 - 8'
SLIDER 4 - 4'
SLIDER 5 - 2 2/3'
SLIDER 6 - 2'
SLIDER 7 - 1 3/5'
SLIDER 8 - 1'
○○○○○○○○○○○○○○○○○○○○○○○○○○○○○○
Drawbar mode 5•1

Function buttons
The last 5 buttons of the slider and button panel, (beneath sliders 4-8), operate as switches for traditional organ effects in DRA WBARS mode.
KEY CLICK: A typical effect of early drawbar organs, Key Click
is an important part of the classic rock or jazz organ sound. Switching off Key Click will give you a sound more reminiscent of later
drawbar organs.
PERC 4', PERC 2 2/3': For Jazz and Pop organ sounds, these
percussive effects can be added to the main drawbar sound.
SLOW / FAST CONTROL: This is the speed switch for the rotary loudspeaker emulator. Finer adjustments in the speed settings
can be made under “Effect”.
○○○○○○○○○○○○○○
5•2 User Guide
Type Menu
The TYPE setting controls the voicing of the drawbars allow you
to emulate different types of drawbar organs. The following types
are available:
SMOOTH: This gives each drawbar a very pure sinewave sound
typical of some of the transistorized organs of the 60’s and 70’s
HARD: This gives each drawbar the classic voicing of a vintage
Hammond organ.

JAZZ: Similar in nature to the HARD setting but with a more percussive attack.
ROCK: This version of the classic drawbar organ sound is a little
thinner than the HARD setting and is perfect for “screaming Hammond” effects, (especially when used with the Overdrive effect).
Setup Menu
The SETUP menu allows you to change the attributes of each
Drawbar. Before you change one of the options in this menu,
you should first move the slider who’s values you wish to edit.
You will see the name of the slider in the title bar of the display.
The slider then becomes the “selected drawbar”.
The menu options are as follows;
TRANSPOSE: Allows coarse tuning of the selected drawbar in
half tone steps.
DETUNE: Allows fine tuning of the selected drawbar’s pitch.
P AN: Adjusts the stereo pan position of the selected drawbar.
Under the Utilities button:
PERC 4 VOL: This is a general setting for the volume of the
percussion effect assigned to button #5.
○○○○○○○○○○○○○○○○○○○○○○○○○○○○○○
Drawbar mode 5•3

PERC 2 VOL: This is a general setting for the volume of the
percussion effect assigned to button #6.
CLICK VOL: This is a general setting for the volume of the Key
Click effect assigned to button #4.
Effects Menu
In DRAWBARS mode there are three different effects available,
REVERB, ROTARY and OVERDRIVE.
These effects have been optimized at the factory so, although
you can edit every parameter of each effect if you wish, in most
cases it will be enough to simply adjust the amount of each effect. These levels can be adjusted under the
SEND
button.
○○○○○○○○○○○○○○
5•4 User Guide
If you wish to edit the parameters of each effect or choose a
different type of REVERB or ROTARY, simply place the cursor
over the section you want to edit and press ENTER. This will
open the parameter display for the selected effect.

Split Menu
In DRAWBARS mode, it is possible to split the keyboard and
assign one additional sound to the left side of the keyboard split
point. Press the SPLIT button to turn the split function on and set
the split point.
The remaining features in the split display allow you to select the
sound for the left side of the split and also to adjust it’s relative
volume, pitch and effect send levels.
○○○○○○○○○○○○○○○○○○○○○○○○○○○○○○
Drawbar mode 5•5

Storing Drawbar settings
Once you have made a drawbar setting that you like, everything
can be memorized into a “Drawbar performance”. Simply press
the STORE button and select one of the 16 Drawbar performance locations (from 113-128) as a destination.
You can enter a name for your Drawbar performance during the
store procedure. These user Drawbar performances can be selected with the dial in the same way as the factory presets. The
first user performance appears after the last factory preset.
Copying Drawbars to Performances
For increased flexibility, you can also save any Drawbar setting
to one of the 1 12 user performance memories. This allows you to
layer up to 8 additional parts with the 8 Drawbars. The drawback
of using performances to store Drawbar settings, however, is that
the Rotary speed, click and percussion buttons will not function
as they do in DRAWBARS mode. Also, keep in mind that the
sliders will only operate as Drawbars if, after editing, you re-save
the performance with tracks 1-8 at the “top”.
○○○○○○○○○○○○○○
5•6 User Guide
To save a Drawbar setting as a Performance, press the
button and select the
of the
Drawbar
Performance
locations (from 1-1 12) instead
locations (from 1 13-128) as the destination bank.
STORE
When you save your Drawbar setting as a Performance you can
continue editing it just like any other performance.

The parts of Drawbar performance are configured in the following way;
Parts 1 - 8 : Drawbar voices.
Parts: 12 - 13 : Click and Percussions.
This means that, in order to retain the original Drawbar sound,
you should not change anything in these parts. You can use
parts 9-11 and 14-16 exactly as you wish.
○○○○○○○○○○○○○○○○○○○○○○○○○○○○○○
Drawbar mode 5•7

○○○○○○○○○○○○○○
5•8 User Guide

6 • ARPEGGIA TOR
The Arpeggiator works in both SOUND and PERFORM modes.
In PERFORM mode the Arpeggiator will control the part which is
specified under the ARP setting, (in the
PERFORM
screen).
16 factory patterns have been provided to let you explore some
of the different possibilities of the Arpeggiator. After switching
the Arpeggiator ON, you can scroll through these preset patterns
by first pressing the PROGRAM button and then using the dial to
select the different presets.
OTHER
menu of the
Once an arpeggio is playing, you can lock it by pressing HOLD,
(in the PROGRAM menu). The pattern will continue to play until
you turn the HOLD function off.
○○○○○○○○○○○○○○○○○○○○○○○○○○○○○○
Arpeggiator 6•1

Edit Menu
Y ou can create and store your own arpeggio patterns. Press EDIT ,
(button F1), to see the menu;
BEAT: Here you choose the speed and style of the arpeggio.
The first options are simple subdivisions of the beat, 8th notes,
16th notes and so on.
Following these you will find a number of “groove quantized”
options. These are called 1/8B, 1/8C, 1/16B, 1/16C etc., each
offering a slightly different feel.
The last two options are “Glissandi”. These, instead of stepping
through the actual notes played like a real Arpeggio, play up or
down in half step increments, starting and finishing at the lowest
and highest notes played. When using one of these Glissando
settings, only the highest and lowest notes held will affect the
nature of the glissando. All other notes in between these two can
be omitted.
○○○○○○○○○○○○○○
6•2 User Guide
DIRECTION: Here you can choose whether the arpeggio steps
up, from lower notes to higher notes, down, or alternately up/
down or down/up. The last two settings are a little different;
Random:
This will trigger, at random, the notes which are
being held. The pattern is completely nonrepetitive and will continue to “randomize” for as
long as the notes are held.
Input:
In this mode, the arpeggio will play the notes in
the order which they were pressed. Careful use
of this mode allows you to control the exact
nature and style of the arpeggio pattern.
OCTAVE: This function controls the “width” of the arpeggio in
octaves.

VELOCITY: Although it is ef fectively a volume control, the velocity parameter actually controls “how hard the arpeggiator hits the
keys”. Depending on the sound selected, reducing the velocity
will reduce the volume of the arpeggio but it also reduces any
other parameters which have been assigned to velocity in that
sound, (e.g. Filter, Envelope speed etc. ). If you turn the dial past
the maximum setting, 127, you will find the setting for
INPUT
velocity. When set, this means that the velocity of the arpeggio
pattern will be identical to the velocity with which the keys were
struck.
LENGTH: Here you can set the length of the individual notes
which make up the arpeggio. The longest notes are 1/4 notes.
As you increase the fractional amount, the length becomes shorter, (with the shortest possible setting being 1/192).
CRESCENDO: This causes the volume of the arpeggio to fluctuate as the pattern is repeated. This gives the interesting effect of
the arpeggio either going away from you or coming towards you.
The effect is repeated each time the arpeggio loops around. If
you set a positive value, (by turning the dial clockwise), this will
create the effect that the arpeggio is starting somewhere in the
distance and then coming towards you. If you set a negative value, the reverse effect will happen.
DELAY: This parameter allows you to adjust the amount of time
which elapses between the time you press the keys and the
moment at which the arpeggio starts. Each step represents 1/
192nd of a beat. Therefore, if you set it to 192, there will be a
delay of exactly 1 beat. A setting of 96 will delay it by exactly half
a beat and so on.
REPEAT: If this is set to OFF the arpeggio will only play through
once and then stop. If you set it to ON, the arpeggio will continue
until the keys are released, (or until HOLD is turned off)
TRANSPOSE: This allows you to create some interesting effects by having the arpeggio play in a different key from the notes
which were originally played. The amount of pitch shift can be
set in half step increment either up, (positive values - clockwise)
or down, (negative values - anti clockwise).
○○○○○○○○○○○○○○○○○○○○○○○○○○○○○○
Arpeggiator 6•3

HOLD: This setting allows you to choose what happens to this
pattern when the
HOLD
button is pressed.
There are two modes;
Build: When HOLD is pressed, the current arpeggio will
continue to play. If new notes are subsequently
pressed they will be incorporated into the current
arpeggio pattern. This means that, as new notes
are added, the pattern continues to “build”.
Freeze: When HOLD is pressed, the current arpeggio will
continue to play. If new notes are subsequently
pressed, the old pattern will be cancelled and a
new pattern, based solely on the newly played
notes will be created.
SYNC BUTTON, (F3)
Press this button to synchronize the arpeggio with the sequencer's clock.
○○○○○○○○○○○○○○
6•4 User Guide

7 • GROOVES
The Grooves section of the Equinox contains over 1000 MIDI
grooves. These provide a valuable resource of inspiring drum,
bass and keyboard “riffs” which can be used either for real time
playing or can be incorporated into sequences and edited to your
taste.
Each groove is actually a small looping MIDI sequence. This
means that you have complete freedom to change any aspect of
these grooves - the sounds, the effects, the tempo, the key, the
pitch and so on.
When you press the
tion, the screen will show you the name of the current
Patch,
and you can immediately start to play it from the keyboard. Use the dial to scroll through some of the factory preset
Groove Patches.
PROGRAM
button in the
GROOVES
sec-
Groove
Groove Library
The factory grooves have been arranged into 16 families with
each family containing 64 grooves. These families have been
organized into specific categories making it easier to quickly find
any particular groove quickly . There are also 8 user families into
which you can either copy the factory grooves or store your own
creations.
The factory groove families are listed below.
DRUM 1
DRUM 2
DRUM 3
PERCUSSION
BASS 1
○○○○○○○○○○○○○○○○○○○○○○○○○○○○○○
Grooves 7•1

BASS 2
BASS 3
KEYS 1
KEYS 2
KEYS 3
KEYS 4
KEYS 5
GUITAR
COMBI 1
COMBI 2
COMBI 3
With so many grooves available, the
LIBRARY
function has been
provided to give you a quick and easy way to audition all of the
grooves. To use it, turn on the
GROOVES
section and select
PROGRAM
LIBRARY
button in the
, (F3).
The screen is divided into two parts. On the left side, you can
see the currently selected family. On the right side you can see
a list of the individual grooves contained in this family. A quick
and easy way to listen to any groove is to simply press a key on
the keyboard. Since each family contains 64 grooves, the 64
keys from C2 to D#7 can be used to audition every groove in a
family.
On the
Equinox
61, since you don’t physically have these last
three keys for auditioning grooves 62-64, after pressing the last
key on the keyboard (C7), take the cursor to the right of the display and press the cursor down button. Y ou will be able to listen
to these grooves simply by selecting them.
○○○○○○○○○○○○○○
7•2 User Guide

Groove Patches
Once you find some grooves that you like, you can incorporate
them into a “Groove Patch”. A Groove Patch is a set of grooves
which can be recalled any time you need it. Within a Groove
Patch, you can define which grooves you want to assign to which
keys, how each groove will behave when triggered and also, if
you wish, modify the voicing, effect sends, transposition of each
groove independently.
In addition to containing 64 individual grooves, each family also
has space to store 64 Groove Patches. In the factory preset families, you will find a small number of patches which have been
created for you. You can audition these by pressing the
button under
LIBRARY
.
When you create your own patches, however, you must store
them in the USER groove families. Since there are 8 USER families available, you can store up to 512 of your own patches, (64
patches in each of the 8 families).
PATCH
A groove patch can use any of the grooves from the 16 factory
families plus any groove from the current USER family. If you
wish to use a groove from a different USER family , you must first
copy it into the current USER family.
○○○○○○○○○○○○○○○○○○○○○○○○○○○○○○
Grooves 7•3

Creating a Groove Patch
Creating you own groove patch is easy . To make a Groove Patch
from scratch, press the
The first step is choose a groove template. You can assign as
many keys as you want to play grooves. Those keys which you
do not assign to the grooves can be played normally in PERFORM mode. To make this task a little quicker, a number of popular configurations are offered as templates.
CREATE
button.
Choose
LOWEST OCTAVE
and press ENTER.
Next you select which user family you will want to store this patch
into. This choice only matters when you are using grooves of
your own which you have stored into one of the USER families.
If you just want to create a patch from factory grooves then it
makes no difference which user group you choose.
For this example, we’ll select PATCH IN USER1. Press ENTER
to confirm. The last step asks you to choose a GROOVE Group.
○○○○○○○○○○○○○○
7•4 User Guide

For this example, go up and select the COMBI1 Group and press
ENTER.
If you try to play the keyboard you will see that only the lowest
octave is assigned to triggering grooves while the rest of the keyboard is assigned to whichever performance was last selected.
Now you can explore the
EDIT
environment. Press the EDIT
button, (F1) and confirm that you want to edit this patch by pressing ENTER.
Pressing any key on the keyboard will instantly update the information you see in the screen. The system automatically “catches” the key that you pressed allowing you to instantly edit it’s
settings. Press one of the “active” groove keys and try experimenting by assigning some different grooves to that key.
○○○○○○○○○○○○○○○○○○○○○○○○○○○○○○
Grooves 7•5

Here are some of the main features of the edit menu;
TRIGGER
This controls how long the groove will continue playing after this
key is released. There are three choices;
MANUAL: The groove will start when you press the key and
stop when you release it.
LATCH: The groove will continue playing after you release
the key . You can stop the groove by either pressing the same key again or by pressing the
button in the
GROOVES
section.
STOP
ONE-SHOT: The groove will play through once completely re-
gardless of when the key is released.
START SYNC
Here you can select how soon the groove starts playing after you
press the key. There are three options;
REAL: The groove will start the moment the key is
pressed
○○○○○○○○○○○○○○
7•6 User Guide
BEAT: After you press the key, the groove will wait until
the beginning of the next beat before starting.
BAR: After you press the key, the groove will wait until
the beginning of the next bar before starting.
STOP SYNC
Here you can select how soon the groove stops playing after you
release the key. There are three options;
REAL: The groove will stop the moment the key is re-
leased
BEAT: After you release the key, the groove will wait un-
til the beginning of the next beat before stopping.
BAR: After you release the key , the groove will wait un-
til the beginning of the next bar before stopping.

VELOCITY
This allows you to select whether or not the volume of the groove
is affected by the velocity of the keystrike.
EXCLUDE GROUP
This feature is designed to make it impossible for certain grooves
to be played together. When two or more grooves are assigned
the same exclude group number, it will no longer be possible to
play them both at the same time. There are 16 “exclude groups”
to choose from.
PLAY MODE
This feature allows the Groove to be played either forwards or
backwards, for a unique and intersting effect.
See also SHUFFLE mode, where you can change the Groove
play direction with the left and right cursor arrows.
Storing your Groove Patch
When you are satisfied with the groove patch you’ve created,
press STORE.
Y ou can the choose a name and a final destination for your groove
patch. When you need to recall this groove patch in the future,
simply turn on the
and use the dial or numeric keypad to select your patch. User
groove patches are listed after the factory presets.
○○○○○○○○○○○○○○○○○○○○○○○○○○○○○○
PROGRAM
button in the
GROOVES
section
Grooves 7•7

Transposing a Groove in real time
While a groove is playing, either from a GROOVE PATCH or
from the SHUFFLE function, you may transpose its pitch from
the original to any other key.
In Groove Patch
At any time while using a GROOVE P A TCH, press the EDIT button, (F1). You will now see the GROOVE TRANSPOSE function
on button F4.
In Shuffle mode
The GROOVE TRANSPOSE function can be found on button F4.
○○○○○○○○○○○○○○
7•8 User Guide
To transpose the current groove, press TRANSP , (F4) and press
any key on the keyboard.
The pitch of the current groove will instantly change The original
pitch of the groove relates to the key of C. To restore the original
pitch, repeat the transpose function and press any C key on the
keyboard.

Shuffle
In simplest terms, the SHUFFLE function is a automated “idea
generator”. Drawing from the 16 factory groove families and the
8 user families, the SHUFFLE function can instantly create a multi
track groove, (up to 8 tracks), by randomly selecting a drum
groove, a bass line, a guitar riff and more, and letting you hear
how they sound together . The results from this simple but pow-
Changing the Groove Play
direction
In Shuffle mode, the small arrow to
the left of each track name indicates the play direction. You can
change the direction for each track
by pressing the left or right cursor.
erful feature can be quite astonishing.
Up to 8 tracks can be “shuffled together”, but sometimes the best
results come from just using two or three tracks.
For each track listed there are three options:
SHUFFLE: The track will randomly select a new groove from
the libraries each time the
MAKE
button is pressed
OK: The current groove is locked into this track. It will
not change when the MAKE button is pressed.
OFF: The track is muted.
Try this example. Set Drum 1, Bass 1 and Synth 1 to SHUFFLE.
Then press
MAKE.
You will instantly hear a three track groove created by three randomly selected tracks. To re-randomize everything, simply press
MAKE
again.
If you hear something you like, for example, maybe you like the
drum track but the bass line doesn’t seem right, set the Drum 1
track to OK. The next time you press
MAKE
, the drum track will
not be changed.
○○○○○○○○○○○○○○○○○○○○○○○○○○○○○○
Grooves 7•9

If you want to assign a specific groove to a particular track, first
place the cursor over the track and then press
GET
.
Now you can select the groove you want from any of the available groove families.
After you confirm by pressing ENTER, your selected groove will
be locked into that track.
Any time you hear a pattern that you like, it can be saved as a
new groove by pressing the STORE button. Follow the prompts
to chose a name and location for this new groove.
○○○○○○○○○○○○○○
7•10 User Guide
Sometimes, when creating a groove shuffle pattern, you may
find that there are certain families whose grooves you don’t like
or which simply don’t seem to fit in well with the other patterns
you’re using. Pressing the WHA T button, (F2) allows you to specify which groove families the shuffle system will choose from.
Use the cursor keys to highlight any family and use the ENTER
button to either include or exclude that family from the shuffle
group. You can choose any or all of the 16 preset families and
the 8 user families. A negative highlight, (white on black), indicates a family that will be used in the next shuffle. Press ESCAPE when you’ve finished your selection.
 Loading...