

Page 1
INSIDE YOUR VEHICLE
Instrument Panel . . . . . . . . . . . . . . . . . . . . . . . . . .2
Instrument Panel Cluster . . . . . . . . . . . . . . . . . . .3
Heated Front Seats . . . . . . . . . . . . . . . . . . . . . . . .4
Power Lumbar Front Seats . . . . . . . . . . . . . . . . .4
Passenger Automatic Locking Restraint (ALR) .4
Driver and Front Passenger
Safety Belt Reminder . . . . . . . . . . . . . . . . . . . . . .4
Automatic Dimming Rearview Mirror with
®
, Compass and Temperature Display . . .4
OnStar
Automatic Climate Control System . . . . . . . . . . .5
Manual Climate Control System . . . . . . . . . . . . .6
Entertainment Systems — Radio/CD . . . . . . . . .6
Rear Seat Entertainment System . . . . . . . . . . . . .8
Universal Home Remote . . . . . . . . . . . . . . . . . . . .9
Sunroof . . . . . . . . . . . . . . . . . . . . . . . . . . . . . . . . . .9
Steering Wheel Controls (OnStar
Congratulations on your purchase of a GMC Sierra or Sierra Denali. Please read this information and your
Owner Manual to ensure an outstanding ownership experience. Note that your vehicle may not include all the
features described in this booklet. Keep this booklet with your Owner Manual for easy reference.
®
/Radio) . . . . .10
Cruise Control . . . . . . . . . . . . . . . . . . . . . . . . . . .10
UTSIDE YOUR VEHICLE
O
Power Folding Mirrors . . . . . . . . . . . . . . . . . . . .11
Automatic Headlamp Controls . . . . . . . . . . . . . .11
Daytime Running Lamps (DRL) . . . . . . . . . . . . .11
Content Theft-Deterrent System . . . . . . . . . . . .12
Voltmeter Operation . . . . . . . . . . . . . . . . . . . . . .12
ERSONALIZING YOUR VEHICLE
P
Memory Positions for Driver’s Seat and
Mirror Settings . . . . . . . . . . . . . . . . . . . . . . . . . . .12
Memory Settings for Your Vehicle . . . . . . . . . . .13
Odometer/Trip Settings . . . . . . . . . . . . . . . . . . . .14
Fuel Information . . . . . . . . . . . . . . . . . . . . . . . . .15
EHICLE SYMBOLS GLOSSARY . . . . . . . . . . . . . . . .16
V
OADSIDE ASSISTANCE . . . . . . . . . . . . . . . . . . . . . .20
R
Y GMLINK . . . . . . . . . . . . . . . . . . . . . . . . . . . . . . .20
M
Page 2
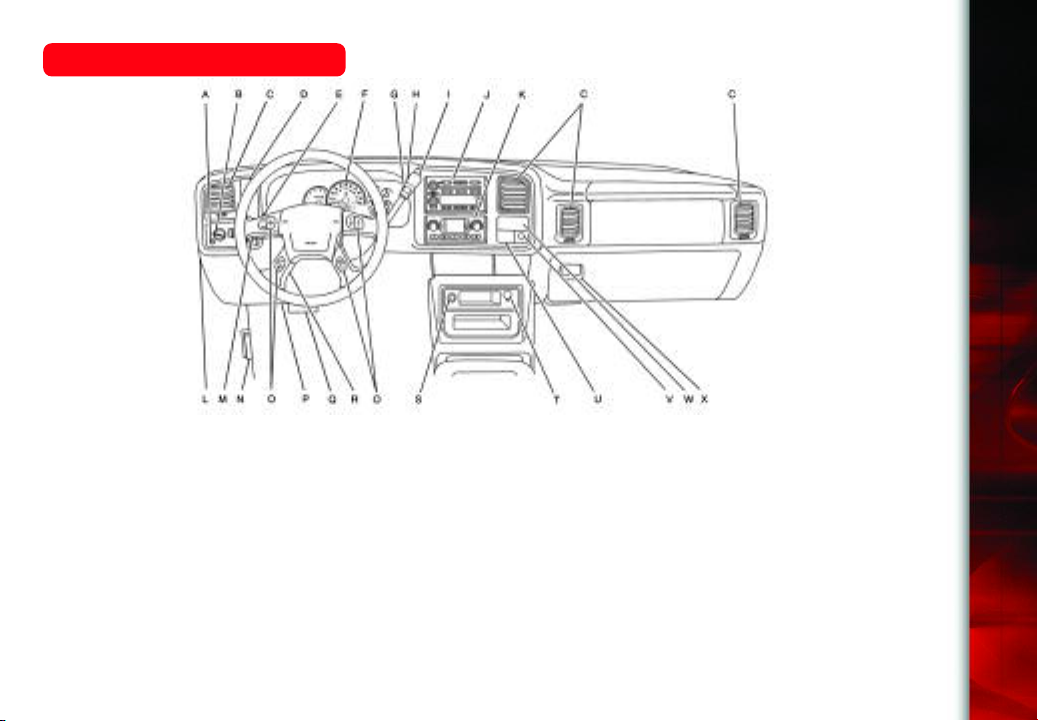
Instrument Panel
2
Getting to Know Your Sierra/Sierra Denali
A. Dome Lamp Override Button
B. Headlamp Controls
C. Air Outlets
D. Automatic Transfer Case/
Electronic Transfer Case/Traction
Assist System (TAS)
E. Turn Signal/Multifunction Lever
F. Instrument Panel Cluster
G. Range Selection Mode Button
H. Gearshift Lever
(automatic transmission)
I. Tow/Haul Selector Button
(if equipped)
J. Audio System
K. Climate Control System
L. Instrument Panel Fuse Block
M.Cargo Lamp Button
N. Hood Release
O. Steering Wheel Control Buttons
(if equipped)
P. Center Instrument Panel
Fuse Block
Q. Parking Brake Release
See Section 3 of your Owner Manual.
R. Tilt Wheel Lever
S. Cigarette Lighter
T. Accessory Power Outlet
U. Manual Selectable Ride Control
(if equipped)
V. Auxiliary Roof Mounted Lamp
Button
W.Passenger Air Bag Off Switch
(if equipped)
X. Glove Box
Page 3
Instrument Panel Cluster
A
B
C
H
D
E
F
G
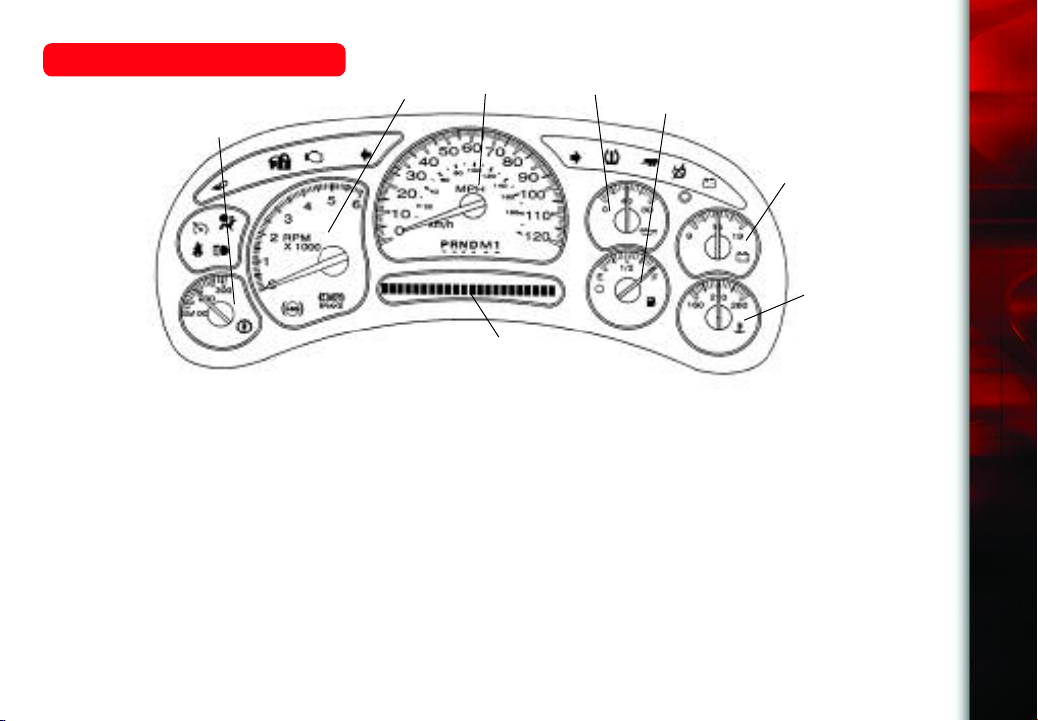
Your vehicle’s instrument panel is
equipped with this cluster or one very
similar to it. The U.S. Heavy-Duty
(Allison) Transmission version is
shown here.
The instrument panel cluster includes
these key features:
A. Transmission Temperature Gauge
(if equipped)
B. Tachometer
C. Speedometer and Transmission
Gear Selector
D. Oil Pressure Gauge
E. Fuel Gauge
F. Voltmeter
G. Engine Coolant Temperature
Gauge
H. Driver Information Center (DIC)
and Odometer
See Section 3 of your Owner Manual.
NOTE: See Section 3 of your Owner
Manual for more information about
what the lights, gauges and indicators on your vehicle’s instrument
panel tell you about your vehicle’s
operation.
3
Page 4
4
Getting to Know Your Sierra/Sierra Denali
Heated Front Seats (if equipped)
B
A
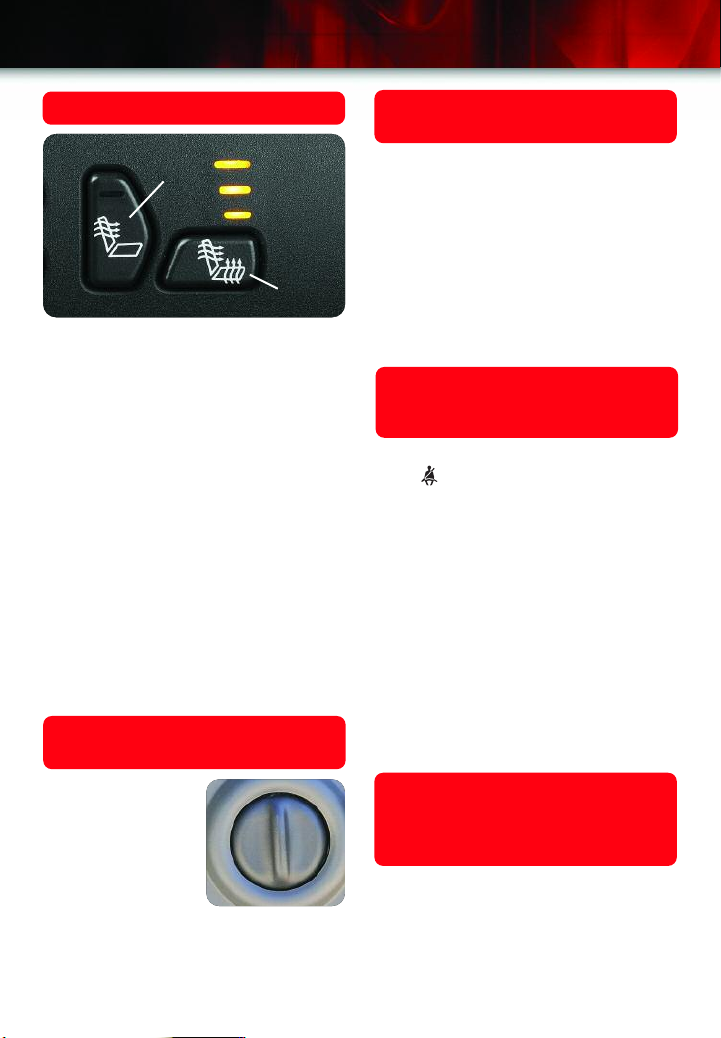
This feature allows you to heat the front
seatbacks and seat cushions simultaneously or just the seatbacks. The controls
are located on the driver and front passenger door panels.
Select a heat setting for both the
seatback and seat cushion
• Press and release the horizontal
button (“A” above) until the indicator
light shows the desired setting.
Select a heat setting for the seatback
only
• Press and release the vertical button
(“B” above) until the indicator light
shows the desired setting.
See Section 1 of your Owner Manual.
Power Lumbar Front Seats
(if equipped)
Passenger Automatic Locking
Restraint (ALR)
The safety belt is designed to lock during an accident, but it will also lock if it is
pulled out all the way during initial buckling, and you may be unaware that this
has happened. If the safety belt does
lock, unbuckle it and allow it to retract
fully; then pull it out and rebuckle the
belt.
See Section 1 of your Owner Manual.
Driver and Front Passenger
Safety Belt Reminder
(if equipped)
A chime will sound and the safety belt
light ( ) will be illuminated and flash
for several seconds when the ignition
key is turned to Run or Start, or at
any time the vehicle is running, and the
driver’s safety belt is not buckled.
If your vehicle is equipped with the
Passenger Sensing System, the chime
will sound and a message will be displayed on the Driver Information Center
for several seconds if the passenger’s
safety belt is not buckled under the
same conditions.
See Section 3 of your Owner Manual.
Adjust lumbar
support
• Press the front
or rear of the
two-way lumbar
control located
on the side of
the seat cushion near the door.
Release at the preferred setting.
See Section 1 of your Owner Manual.
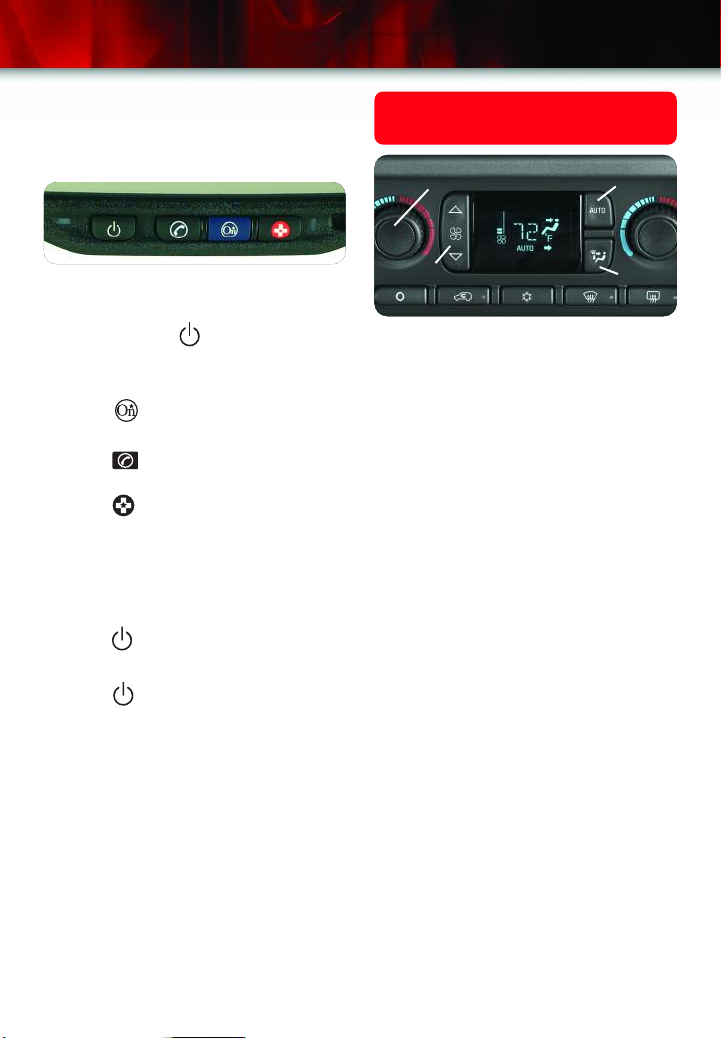
Automatic Dimming Rearview
Mirror with OnStar®, Compass
and Temperature Display
(if equipped)
Controls for the dimming feature, as well
as OnStar®(if equipped) and the compass and temperature displays, are
located on the bottom of the mirror.
Page 5
5
When on, the automatic interior dimming
rearview mirror dims to the proper level
to minimize glare from lights behind you
when it’s dark outside.
Turn the self-dimming function
on or off
• Press and hold for approximately
eight seconds.
Use the OnStar system
• Press to connect to an OnStar
®
Advisor.
• Press to answer or end a call
from the OnStar®Center.
• Press in an emergency to connect
to an OnStar®Advisor who can contact the nearest emergency services
provider.
Turn the outside temperature displays
and compass readings on or off
• Press .
Display temperature
• Press and hold for four seconds
(until the display blinks) to toggle
between °C and °F. Once the desired
°C or °F is displayed, release the
button. Wait four seconds and the
temperature will be displayed.
See Section 2 of your Owner Manual.
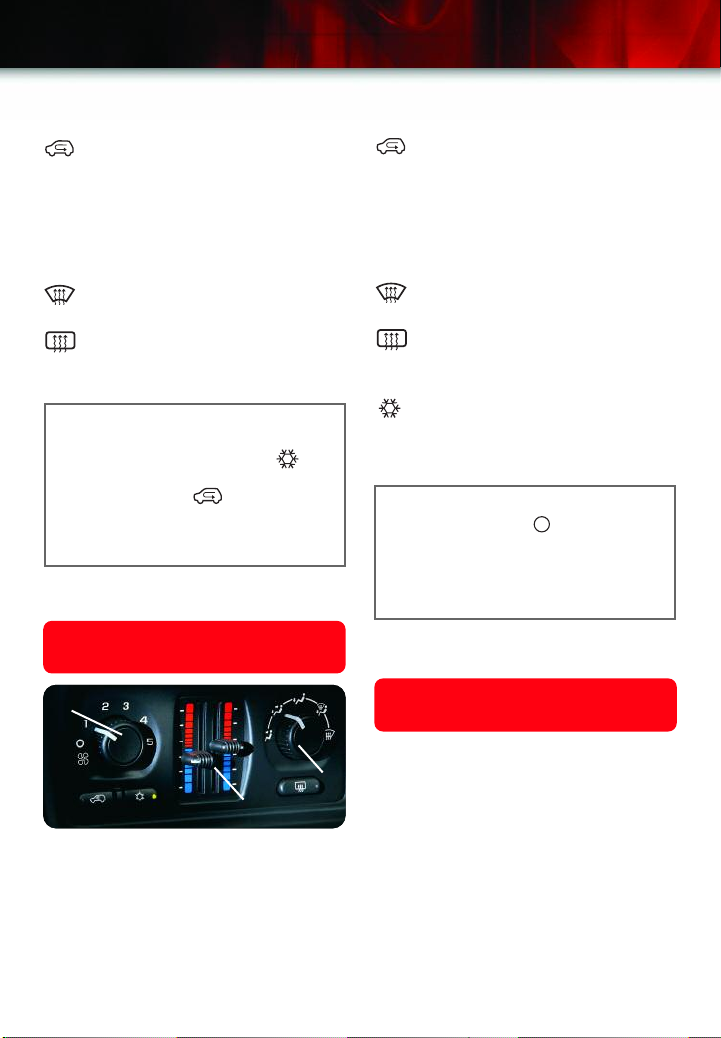
Automatic Climate Control
System (if equipped)
B
D
A
C
Adjust settings for automatic
operation
• Push the AUTO button (“A” above)
and adjust the temperature knob (“B”
above) to the desired temperature.
When automatic operation is active, the
system will control the inside temperature, air delivery, air inlet and fan speed.
Set same temperature for driver and
front passenger
• Press and hold the AUTO button for
four seconds.
• Turn the passenger-side temperature
knob to select a different temperature
for the passenger.
Select air distribution manually
• Press and release the Mode
button (“C” above) until the desired
source of air is indicated on the display.
The Mode feature allows you to select
air delivery to the floor, the instrument
panel outlets, or the windshield outlets.
Manually raise or lower fan speed
•
Press the upper or lower portion of the
Fan control button (“D” above).
Page 6
6
Getting to Know Your Sierra/Sierra Denali
Additional Climate Control System
Functions (Automatic)
Recirculates interior air while in
:
Vent or Bi-Level position. Use this setting to get maximum cooling from the air
conditioning system. To prevent
window fogging, Recirculation will not
operate in the Defog, Defrost or Floor
mode.
: Clears windshield and front side
windows of fog/frost.
: Clears rear glass of fog/frost and
activates heated outside rearview mirrors (if equipped).
Note: To avoid window fogging on rainy
and humid days at temperatures above
freezing, run the air conditioner ( ).
Also, it is best to avoid the use of the
recirculation mode ( ) except for
short times to avoid exterior odors or
when maximum air conditioning performance is needed.
See Section 3 of your Owner Manual.
Manual Climate Control System
(if equipped)
Additional Climate Control System
Functions (Manual)
: Recirculates interior air while in
Vent or Bi-Level position. Use this setting to get maximum cooling from the air
conditioning system. To prevent
window fogging, Recirculation will not
operate in the Defog, Defrost or Floor
mode.
: Clears windshield and front side
windows of fog/frost.
: Clears rear glass of fog/frost and
activates heated outside rearview mirrors (if equipped).
: Turns the air conditioning system
on and off. The button’s LED will
illuminate when the air conditioning
system is on.
Note: When the climate control system
is in the Off position ( ), outside air
will continue to enter the vehicle and will
be directed according to the mode
position selected. This is normal climate
control operation.
See Section 3 of your Owner Manual.
C
A
B
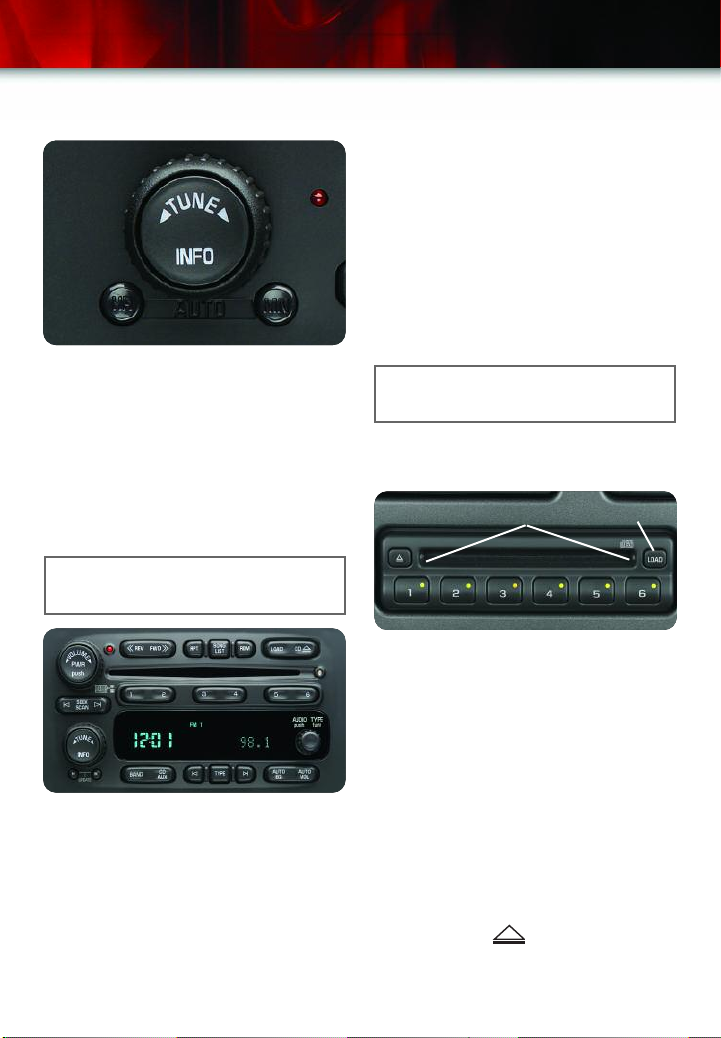
Adjust settings for operation
• Adjust air delivery location with mode
control knob (“A” above).
• Adjust driver/passenger temperatures
with levers (“B” above).
• Set fan speed to desired setting
(“C” above).
Entertainment Systems —
Radio/CD
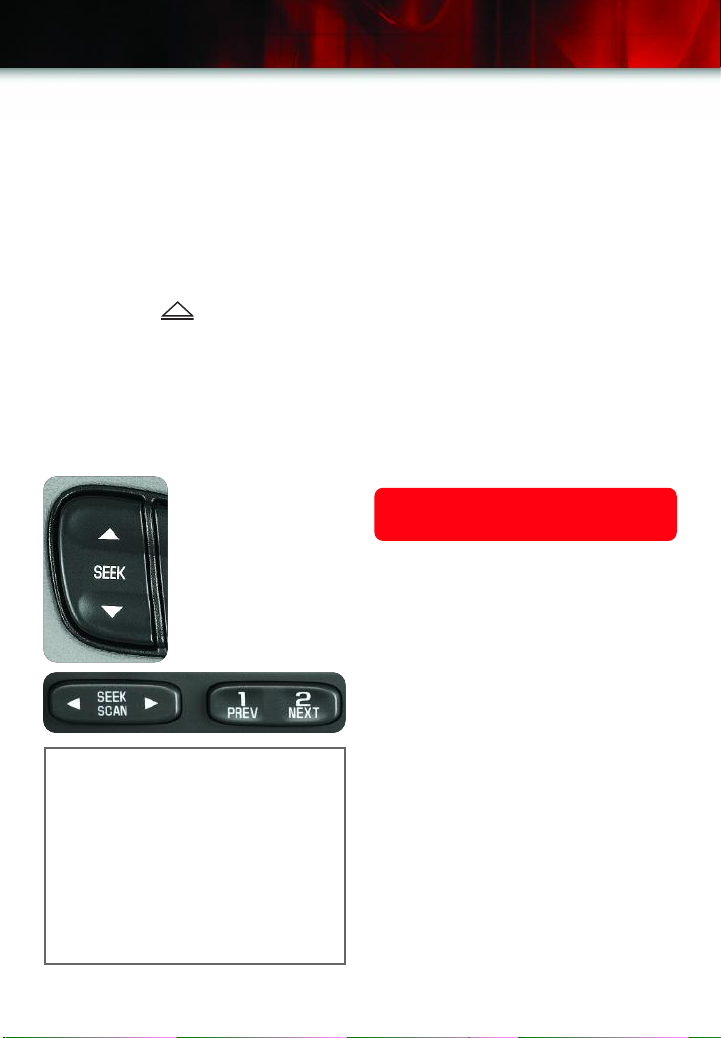
Set the time on radios without a
Radio Data System (RDS)
• Press and hold the HR or MIN arrow
for two seconds.
• Press the HR (down) arrow until the
correct hour appears on the display.
• Press and hold the MIN (up) arrow
until the correct minute appears on
the display.
Page 7
7
Set the time on radios with a Radio
Data System (RDS)
Your radio may have a button marked
“H” or “HR” to represent hours and an
“M” or “MIN” to represent minutes.
• Press and hold the hour button until
the correct hour appears on the
display.
• Press and hold the minute button
until the correct minute appears on
the display.
Note: The time may be set with the
ignition on or off.
Program radio station presets
• Turn the radio on.
• Press BAND to select the band
(AM/FM1/FM2/XM1/XM2).
• Use the seek button or tune knob to
tune in the desired station.
• Press AUTO EQ or AUTO TONE
(as applicable to your radio) to select
the equalization that best suits the
type of station selected.
• Press and hold one of the six numbered buttons until a beep sounds;
release the button.
• Repeat these steps for each station
preset, using a different numbered
button for each station.
Access one of the two available XM
Satellite Radio bands (if equipped)
• Press the BAND button until XM1 or
XM2 appears on the display.
Note: Requires subscription to XM
Radio.
Six-Disc CD Changer
(Denali models only)
B
A
Quick Load
• Press LOAD (“A” above) for approximately three seconds. The lowest
available number will flash.
• Wait for amber lights to flash on sides
of slot (“B” above) before inserting
CD. The next available number will
flash and accept another CD until all
are occupied.
• To exit Quick Load, press either a
number with a CD in it or LOAD.
Quick Unload
• Press Eject ( ) for approximately
three seconds; all CDs will eject from
highest number to lowest.
Page 8
8
Getting to Know Your Sierra/Sierra Denali
Load 1 CD
• Press LOAD; all available numbers
will flash amber.
• Select the number desired.
• Wait for amber lights to flash on sides
of slot before inserting CD.
• Insert CD.
• Repeat to load more CDs.
Unload 1 CD
• Press Eject ( ).
• Press number for CD desired.
Play a CD
• Option 1: Select the number for the
CD desired (wait eight seconds).
• Option 2: Press 5/SIDE button on
radio face to scroll through CDs.
Select CD Track
• Option 1:
PREV/NEXT on
radio.
• Option 2: SEEK
arrows on radio.
• Option 3: SEEK
arrows on steering
wheel.
Note: CDs with any labels may jam
in the CD player. Label a CD using a
permanent marker. If more than one CD
is inserted into the slot at one time, or if
scratched or damaged CDs are played,
the CD player could be damaged. When
using the CD player, use only CDs in
good condition without labels; load one
CD at a time; and keep the CD player
and the loading slot free of foreign
materials, liquids and debris.
Chime Level Adjustment
You can use the radio to adjust the
volume level of the vehicle chime.
To change the volume level:
1. Turn the ignition On and the radio
power Off.
2. Press and hold the pushbutton numbered 6 on the radio. The chime volume level will change and LOUD or
NORMAL, depending on the setting,
will appear on the radio display.
3. To change the setting back, press
and hold pushbutton 6 again.
Each time the chime volume is changed,
three chimes will sound at the new volume level.
See Section 3 of your Owner Manual.
Rear Seat Entertainment System
(if equipped)
The DVD Rear Seat Entertainment
(RSE) system includes a DVD player
and a video display screen, located in
the overhead console, two sets of wireless headphones and a remote control.
To play a DVD:
• The ignition must be in the Run or
Accessory position, or RAP (Retained
Accessory Power, available after the
ignition is turned off) must be active.
• Push forward on the release latch to
fold down the video screen.
• Insert a DVD into the loading slot;
it will automatically start.
• If a DVD is already loaded, press the
Play/Pause button.
• Press the CD/AUX button on the
radio until RSE appears on the radio
display to listen to the DVD through
your vehicle speakers.
Page 9
9
• When using the wireless headphones, turn the headphones on and
adjust the volume using the volume
knob.
To stop or eject a DVD:
• To stop playing a DVD, press the
Stop button. Press the Play button to
resume viewing. If the Stop button is
pressed twice, the DVD will resume
viewing at the beginning.
• To eject a DVD, press the eject button on the DVD player.
See Section 3 of your Owner Manual.
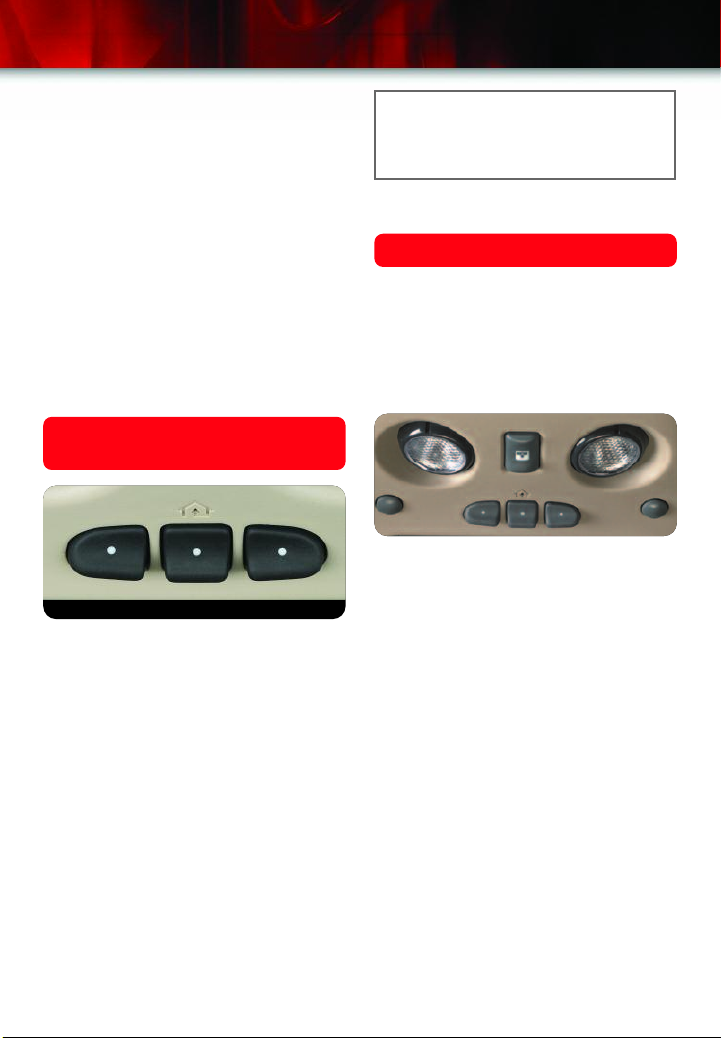
Universal Home Remote
(if equipped)
Program the Universal Home Remote
1. Determine which of the three channels (buttons) you want to program
for functions such as garage door
opener, gate opener or entry door
locks.
2. Press and hold the desired remote
button through step 3.
3. When the remote light blinks slowly
(within 30 seconds), hold your transmitter/opener 1" to 3" from the remote
buttons. Then hold your transmitter
button on until the remote light flashes rapidly (up to 90 seconds). The
process is now complete.
Note: If your transmitter has a “rolling
code” feature, this process may not
work. Please refer to your Owner
Manual.
See Section 2 of your Owner Manual.
Sunroof (if equipped)
To open and close the power sliding
sunroof, the ignition must be on or
Retained Accessory Power (RAP) must
be active. The sunroof button used to
operate the sunroof is located in the
front overhead console.
Express Vent:
• Press and release the rear side of the
Sunroof button to express vent the
glass panel.
Express Open:
• Once the sunroof is in the vent
position, press and release the rear
side of the Sunroof button to express
open the glass panel. Push up on the
sunshade and allow it to roll rearward. This can be done before or
after the glass panel is opened.
Close:
• Press and hold the front side of the
Sunroof button to close the glass
panel. The sunshade must be pulled
forward manually.
See Section 2 of your Owner Manual.
Page 10
10
Getting to Know Your Sierra/Sierra Denali
Steering Wheel Controls
(OnStar
®
/Radio) (if equipped)
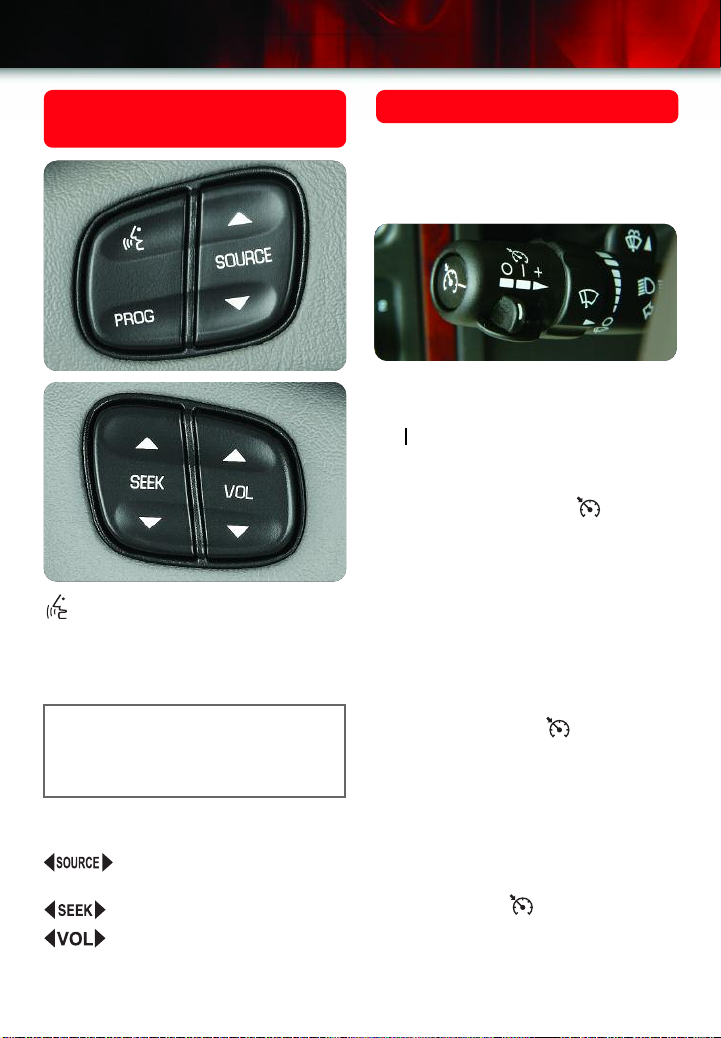
(OnStar/Voice Recognition)
(if equipped): This button will activate
OnStar®for use. If your vehicle is not
equipped with the OnStar®system,
pressing this button will mute the radio.
Note: For additional OnStar®features
information, including Personal Calling
and Virtual Advisor, see the OnStar
section of your Owner Manual.
®
PROG : This button will cycle through
the radio presets.
: Selects AM, FM, XM Satellite
Radio (if equipped), cassette or CD
: Seeks radio stations
: Adjusts radio volume
See Section 3 of your Owner Manual.
Cruise Control (if equipped)
Cruise control allows you to maintain a
constant speed of 25 mph or more without keeping your foot on the accelerator
pedal.
Setting Cruise Control:
1. Move the cruise control switch to On
( ).
2. Attain the speed you want to
cruise at.
3. Press in the Set button ( ) at the
end of the multifunction lever on
the left side of the steering column.
4. Take your foot off the accelerator
pedal.
5. The cruise symbol on the instrument
cluster will illuminate.
There are two ways to increase speed
while cruising:
• Use the accelerator pedal to get to a
higher speed. Press at the end of
the multifunction lever to set the
cruising speed. Release the accelerator pedal.
• Press the resume/accelerate switch
(+) to increase speed, and then
release the switch.
To reduce speed while cruising:
• Press and hold at the end of the
multifunction lever until you reach the
desired lower speed, and then
release it.
See Section 3 of your Owner Manual.
Page 11
11
Power Folding Mirrors
(if equipped)
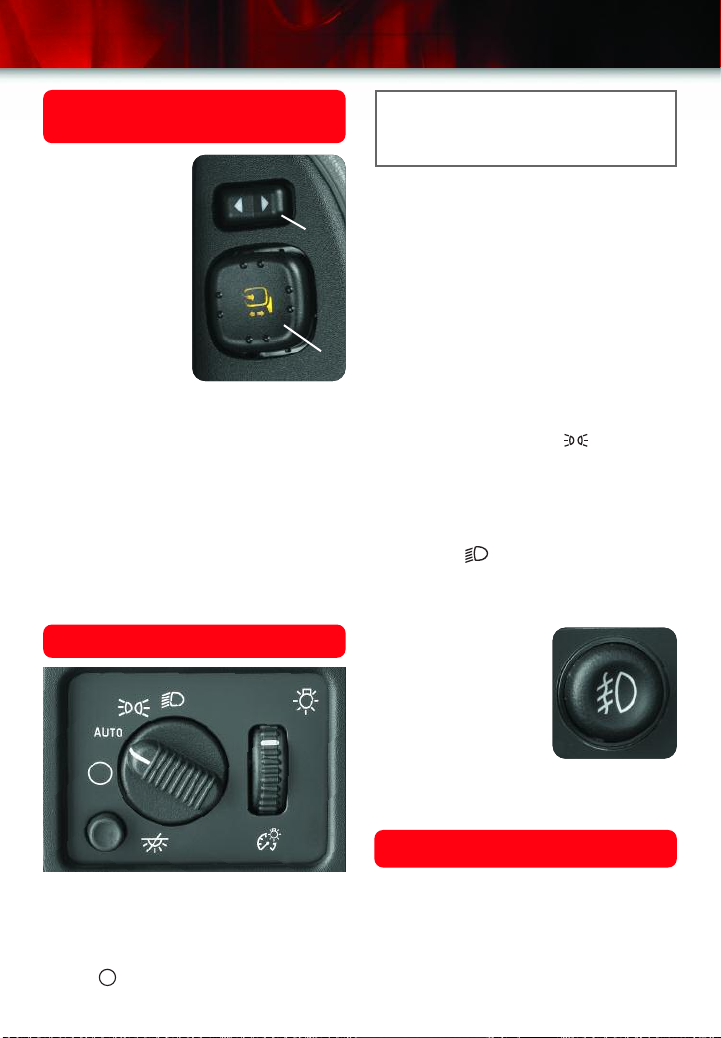
Fold mirrors
• Move the
selector switch
located above
A
the mirror control (“A” right)
to the center
position.
• Press the right
side of the
four-way
control pad (“B” above) to fold in the
mirrors.
• Press the left side of the four-way
control pad to fold out the mirrors.
If the mirrors have been folded manually, they must be moved through the
power folding cycle three times to reset
them in their tracks.
See Section 2 of your Owner Manual.
Automatic Headlamp Controls
Note: Your DRLs or automatic head-
lamps will re-engage at the next key
cycle.
Activate the automatic headlamp
system
• Turn the exterior lamps knob to
AUTO. The automatic headlamp system will turn on the front and rear
lamps.
Manually illuminate the parking
lamps, side-marker lamps, taillamps,
B
instrument panel/radio lights, license
plate lamps and roof marker lamps (if
equipped)
• Turn the exterior lamps knob to the
parking lamp position ( ).
Manually activate the headlamps, all
exterior tail/side-marker lamps and
the instrument panel/radio lights
• Turn the exterior lamps knob to this
position ( ).
Turn the fog lamps (if equipped)
on or off
• Press the fog lamp
button located on
the left side of the
instrument panel.
An indicator lamp
will illuminate when
the fog lamps
are on.
See Section 3 of your Owner Manual.
Turn off Daytime Running Lamps
(DRL) and automatic headlamps
• Turn the exterior lamps knob (located
to the left of the steering wheel) to
Off ( ) and release.
Daytime Running Lamps (DRL)
Disable the DRL when idling
• Shift the vehicle into Park, or
• Set the parking brake (manual
transmission only)
See Section 3 of your Owner Manual.
Page 12
12
Getting to Know Your Sierra/Sierra Denali
Voltmeter OperationContent Theft-Deterrent System
(if equipped)
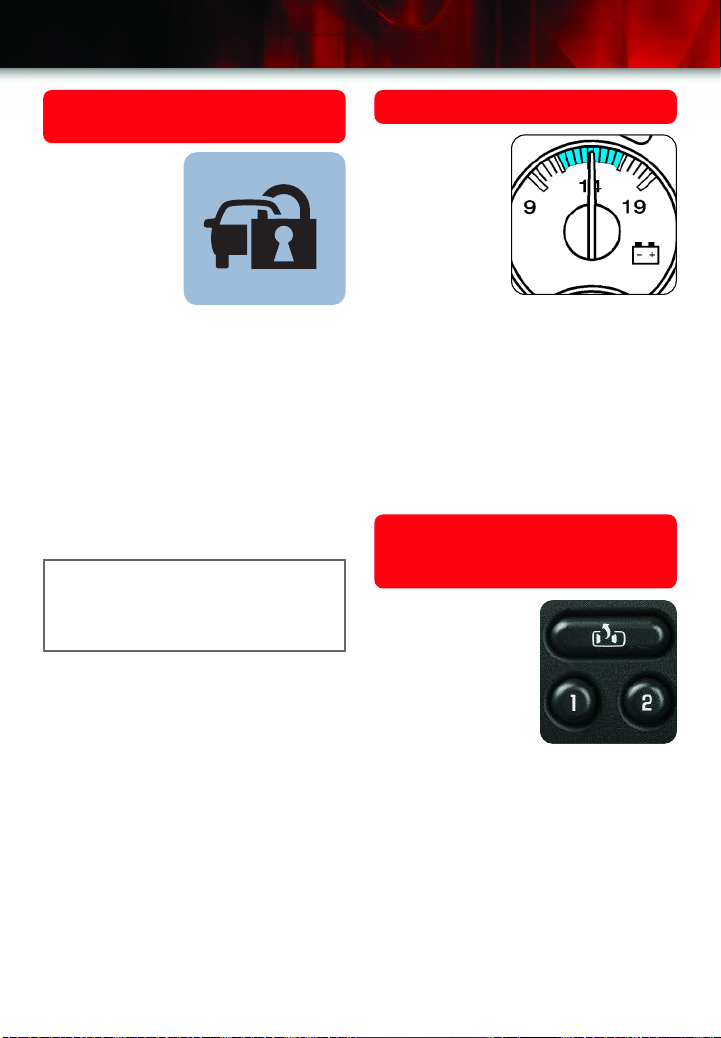
Arm the
System
• Lock the
doors using
the Remote
Keyless Entry
transmitter.
The alarm is
activated
when the symbol shown above
illuminates in the instrument panel
(approximately 30 seconds).
If your vehicle is equipped with a Driver
Information Center, you can program the
alarm to the following:
• Both Horn/Headlamps
The voltmeter
shows the
condition of the
vehicle’s charging system. The
system is
designed to regulate voltage
output to help
improve fuel economy and extend
battery life. Normal system operation
readings may fluctuate (as indicated by
the blue area in the illustration above)
based on vehicle operation, including
the number of electrical accessories
being operated and engine speed.
See Section 3 of your Owner Manual.
• Horn only
• Lamps only
•Off
Note: Your vehicle’s factory default
setting is Horn and Lamps. See the
Memory Settings for Your Vehicle section of this booklet for more information.
Memory Positions for Driver’s
Seat and Mirror Settings
(if equipped)
Use the driver’s
door mounted
controls to:
See Section 2 of your Owner Manual.
• Adjust driver
seat, including
lumbar
adjustment.
• Adjust the outside rearview mirrors.
• With the vehicle in Park, press and
hold Memory 1 or 2 until two chimes
sound (about four seconds).
To set up for another driver:
• Repeat the process with the other
memory button.
See Section 2 of your Owner Manual.
Page 13

13
Memory Settings for Your Vehicle
(Driver Information Center)
(if equipped)
To scroll though the features that can be
customized using the Driver Information
Center:
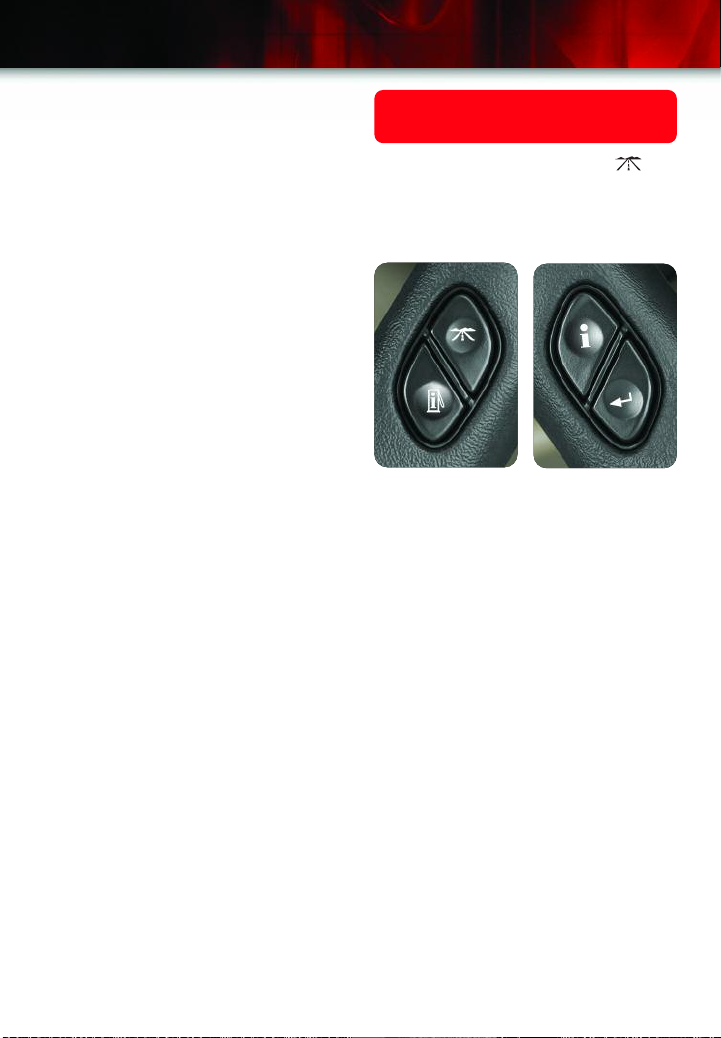
1. Press the (Personalization) button
located on the steering wheel.
2. Press the (Select) button to
choose your desired setting. The first
setting is the default setting from the
factory.
3. Press the Personalization button to
move to the next feature.
Lock Doors
(Automatically locks the doors.)
• Lock Doors: In Gear
• Lock Doors: With Speed
Unlock Doors
(Automatically unlocks the doors.)
• Unlock Doors: In Park
• Unlock Driver: In Park
• Unlock Doors: Key Out
• Unlock Doors: Manually
Door Lock Delay
(Delays locking the doors and tailgate
until five seconds after the last door is
closed.)
• Door Lock Delay: Off
• Door Lock Delay: On
Lock Feedback
(The feedback received when locking
the vehicle with the Remote Keyless
Entry transmitter.)
• Lock Feedback: Both
• Lock Feedback: Lamps
• Lock Feedback: Horn
• Lock Feedback: Off
Unlock Feedback
(The feedback received when unlocking
the vehicle with the Remote Keyless
Entry transmitter.)
• Unlock Feedback: Lamps
• Unlock Feedback: Horn
• Unlock Feedback: Both
• Unlock Feedback: Off
Headlamp Delay
(The amount of time the headlamps will
stay on after the vehicle is turned off.)
• Headlamp Delay: 10 Sec
• Headlamp Delay: 20 Sec
• Headlamp Delay: 40 Sec
• Headlamp Delay: 1 Min
• Headlamp Delay: 2 Min
• Headlamp Delay: 3 Min
• Headlamp Delay: Off
Perimeter Lights
(The headlamps and back-up lamps will
come on for 40 seconds, if it is dark
enough, when unlocking the vehicle with
the Remote Keyless Entry transmitter.)
• Perimeter Lights: On
• Perimeter Lights: Off
Easy Exit Seat
(The driver’s seat moves to the exit
position when the key is removed from
the ignition.)
• Easy Exit Seat: Off
• Easy Exit Seat: On
Page 14
14
Getting to Know Your Sierra/Sierra Denali
Curb View
(The outside rearview mirror(s) tilt down
when the vehicle is shifted into
Reverse.)
• Curb View: Off
• Curb View: Passenger
• Curb View: Driver
• Curb View: Both
Alarm Warning
(The feedback received when the alarm
is active.)
• Alarm Warning: Both
• Alarm Warning: Off
• Alarm Warning: Horn
• Alarm Warning: Lamps
Elevated Idle
(On diesel engines only. Activates the
idle/exhaust restrictor feature.)
• Elevated Idle: Off
• Elevated Idle: On
Language
(The Driver Information Center display
language.)
• Language: English
• Language: Français (French)
• Language: Español (Spanish)
Display Units
(The units in which all information will be
displayed.)
• Display Units: English
• Display Units: Metric
See Section 3 of your Owner Manual.
Odometer/Trip Settings
(if equipped)
Press the trip information button
to scroll through the Odometer, Trip A,
Trip B, Tire Pressures, Timer and
Engine Hours choices on the Driver
Information Center.
Odometer
This mode shows the total distance the
vehicle has been driven in either miles
or kilometers. Pressing the reset stem
located on the instrument cluster with
the vehicle off will also display the
odometer.
Trip A
This mode shows the current distance
traveled since the last reset for TRIP A
in either miles or kilometers.
Trip B
This mode shows the current distance
traveled since the last reset for TRIP B
in either miles or kilometers.
Page 15
15
Reset Trip Information
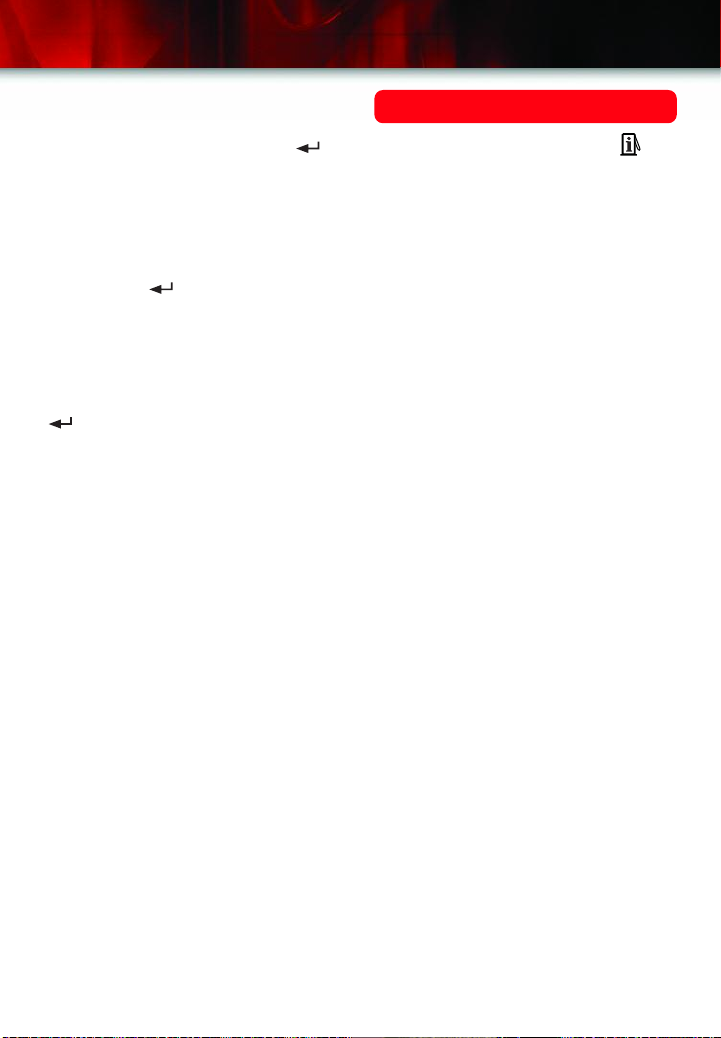
To reset TRIP A or TRIP B information,
press and hold the Select button ( )
for one second while in one of the trip
modes. This will reset the information for
TRIP A or TRIP B. You can also reset
TRIP A or TRIP B while they are displayed by pressing the reset stem on
the cluster. If you press and hold the
reset stem or for four seconds, the
display will show the distance traveled
since the last ignition cycle for TRIP A or
TRIP B.
Timer
The DIC can be used as a timer. Press
while TIMER is displayed to start
the timer. The display will show the
amount of time that has passed since
the timer was last reset, not including
time the ignition is off, up to 99 hours,
59 minutes and 59 seconds (99:59:59).
Engine Hours
This mode shows the total number of
hours the engine has run. Pressing and
holding the reset stem located on the
instrument cluster for about four seconds will also display the engine hours
after the odometer is displayed when the
vehicle is off.
See Section 2 of your Owner Manual.
Fuel Information (if equipped)
Press the fuel information button
to scroll through the Fuel Range, Fuel
Used, Average Economy and Engine Oil
Life selections on the Driver Information
Center.
Fuel Range
This mode shows the range in miles that
the vehicle can travel with the current
amount of fuel.
Fuel Used
This mode shows the current amount of
fuel used in gallons since the last reset
for Fuel Used. This mode should be
reset after every fuel tank fill-up.
Average Economy
This mode shows the average fuel economy in miles per gallon since the last
reset for Average Economy.
Engine Oil Life
This mode shows the percentage of oil
life left until it is recommended to
change the engine oil. An oil and filter
change should be performed within 600
miles of the Change Oil message being
displayed.
See Section 3 of your Owner Manual.
Page 16
16
Getting to Know Your Sierra/Sierra Denali
Vehicle Symbols Glossary
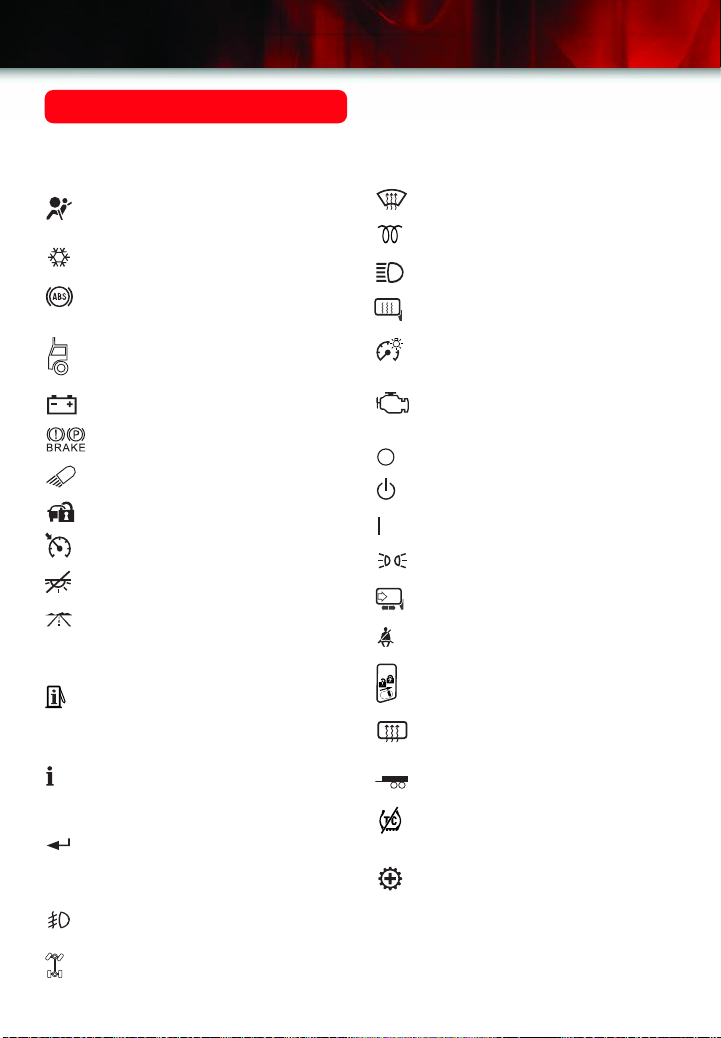
Following are examples of symbols you may find on your vehicle. It is important to
become familiar with them, as they alert you to various vehicle operating conditions.
Air Bag Readiness and Warning
Light (if equipped)
Air Conditioning (A/C)
Antilock Brake System
Warning Light
Auxiliary Roof-Mounted Lamp
Switch (if equipped)
Battery Warning Light
Brake System Warning Light
Cargo Lamp Button
Content Theft Deterrent
Cruise Control Set
Dome Lamps Override Button
Driver Information Center Trip
Information Button (on steering
wheel) (if equipped)
Driver Information Center Fuel
Information Button (on steering
wheel) (if equipped)
Driver Information Center
Personalization/Menu Button
(on steering wheel) (if equipped)
Driver Information Center Select
Button (on steering wheel)
(if equipped)
Fog Lamps (if equipped)
Front and Side Window Defrost
Glow Plug (if equipped)
Headlamps
Heated Side Mirrors
Instrument Panel Brightness
Control
Malfunction Indicator Lamp
(Check Engine Light)
Off
Off/On
On
Parking Lamps
Power Folding Mirrors
Safety Belt Reminder Light
Rear Door Security Locks
(if equipped)
Rear Window Defogger
(if equipped)
Tow/Haul Mode Light
Traction Control Off Light
(if equipped)
Up-Shift Light
(vehicles with manual transmission)
(if equipped)
Four-Wheel Drive Light
(if equipped)
Page 17
Notes
17
Page 18
18
Getting to Know Your Sierra/Sierra Denali
Notes
Page 19
Notes
19
Page 20

20
Getting to Know Your Sierra/Sierra Denali
Roadside Assistance
1-800-GMC-8782
TTY: 1-888-889-2438
As the proud owner of a GMC Sierra or
Sierra Denali, you are automatically
enrolled in the GMC Roadside
Assistance program. This value-added
service is intended to provide you with
peace of mind as you drive in the city
or travel the open road.
GMC’s Roadside Assistance toll-free
number is staffed by a team of technically trained advisors, who are available
24 hours a day, 365 days a year. We
take the anxiety out of uncertain situations by providing minor repair information over the phone or making arrangements to tow your vehicle to the nearest
GMC dealer.
We will provide the following services for
3 years/36,000 miles (60,000 km), at no
expense to you:
• Fuel delivery
• Lockout service
(identification required)
• Tow to nearest dealership for
warranty service
• Flat tire assistance
• Jump starts
For prompt and efficient assistance
when calling, please provide the following information to the advisor:
• Location of the vehicle
• Telephone number and your location
• Vehicle model, year and color
• Vehicle mileage
• Vehicle Identification Number (VIN)
• Vehicle license plate number
GMC reserves the right to limit services
or reimbursement to an owner or driver
when, in GMC’s judgment, the claims
become excessive in frequency or type
of occurrence.
Roadside Assistance and OnStar
(if equipped)
If your vehicle is OnStar-equipped,
press the blue OnStar button and the
vehicle will send your current GPS location to an OnStar Advisor who will speak
to you, assess your condition, contact
Roadside Assistance and relay your
exact location so you will get the help
you need.
My GMLink
The GMC Owner Center at My GMLink
is a complimentary service for GMC
owners, a one-stop resource to enhance
your GMC ownership experience.
Exclusive member benefits include
online service reminders, vehicle maintenance tips, online owner manual,
special privileges and more. Sign up
today at www.mygmlink.com
Certain restrictions, precautions and safety procedures apply to your vehicle. Please read your Owner Manual
for complete instructions. All information contained herein is based on information available at the time of
printing and is subject to change without notice. Copyright 2005 by GM Corp. All rights reserved.
!06SDENALIGTK=A!
06SDENALIGTK A
 Loading...