

Page 1

1 / 10
Bluetooth Headset
User Manual
HA-C300
Welcome
Thank you for choosing our products. The company Bluetooth headsethas a fashionable design, powerful
functions, and high compatibility, providing you with hands-free convenience in making calls and
listening to music. It is your best choice in office and during traveling and driving.
Bluetooth Wireless Technology
With the Bluetooth wireless technology, you can connect the headset to its compatible communication
devices without using cables. The Bluetooth wireless connection allows you to use a cell phone without
holding it against the headset, but the maximum distance between them cannot exceed 10 meters
(about30 feet). The Bluetooth wireless connection may be interfered by obstacles (such as walls) or other
electronic devices.
In some areas, use of the Bluetooth wireless technology may be subject to some constraints. Please
consult your local authority or service provider for details.
Page 2
2 / 10
Quick Start
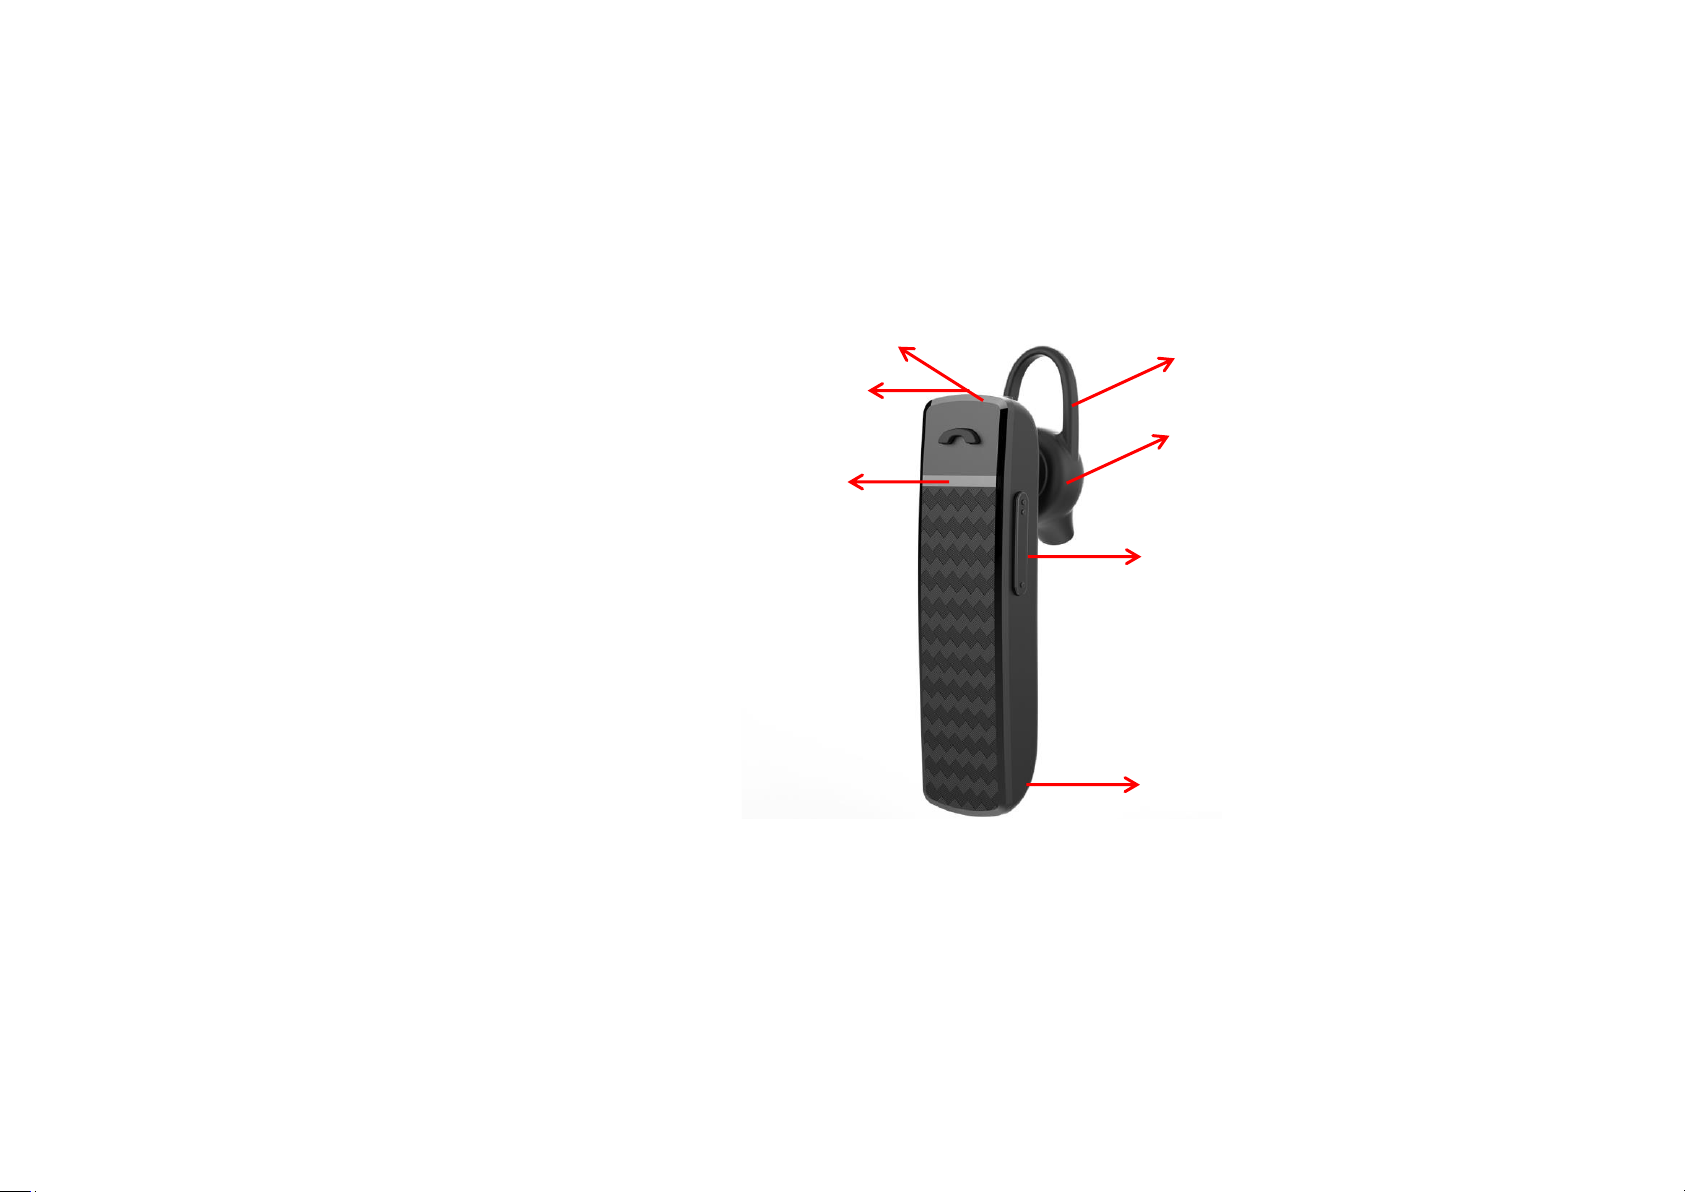
The headset consists of the following components:
1.MFB (Multi Function Button)
2.LEDindicator
3.Volume +/-
4.Receiver
5.Ear hook
6.Micro USB charging port
7.Microphone
⑥
④
②
③
⑤
⑦
Page 3

3 / 10
Fully charge the headset before using. For details about how to charge the headset, see "Charger and
Battery" in this manual. Meanwhile, choose the cell phone that is compatible with the headset or
other Bluetooth devices to pair with the headset. For details about pairing, see "Basic Operations".
Tip: Keep the headset away from your credit card or other magnetic storage media; otherwise, the
stored information may be lost due to demagnetization.
The product features and functions as follows:
●Extremely large battery capacity, supporting long-time use
●Stable calling and smooth music playing
●Super-clear voice call design
●Comfortable and firm wearing
How to connect with the Bluetooth headset (Note: Use iPhone for example)
1. At power off status, hold down MFB for about 2 seconds until the headsetenter into a paring mode withred & blue light
flash alternately.
Page 4

4 / 10
2.Open the Bluetooth software of your phone, searching the headset.
3.Find the Bluetooth headset, pairing it to finish the connected.
Basic Operations
○ Power on: At power off status, hold down MFB for about 2 seconds until the red & blue light flash alternately, together
with a voice of "Power On".
○ Connection: After successful pairing, you will hear a voice of “Connected”.
○ Hang up calls: When you are on a call, press MFB with a beep to end the call.
○ Reject incoming calls: When a call is coming, double click MFB button to reject the incoming call.
○ Call transfer: During call communication, hold down MFB for 1 second then release to transferthe call. Repeat the step
to switch back to the cell phone.
○ Call answer: When a call is incoming, press MFB with a beep to answer the call.
○ Re-dial the last called number: Double-click MFB with a beep to re-dial the last called phone number.
○ Music play/pause: When you are listening to music, press MFB once to pause music. Press it again to play music.
○ Volume up: Click Volume+ each time, the volume will be increased for one level. You will hear a beep when the
volume is increased to maximum.
○ Volume down: Click Volume- each time, the volume will be reduced for one level. You will hear a beep when the
volume is reduced to minimum.
Page 5

5 / 10
○ Previous song: When you are listening to music, hold down Volume – for 1 second to switch to the previous song.
○ Next song: When you are listening to music, hold down Volume + for 1 second to switch to the next song.
○ iOS Battery Indicator: After the headset is successfully connected to an Apple device, the Apple device displays the
current battery status of the Bluetooth headset.
○ Power off: At any status, long press MFB about 5 seconds,until the red indicator remains on for 1 second then turns
off, you will hear a voice of "Power Off".
○ Start / shut the voice control: At connection status, hold down MFB for about 1 second with a beep. Repeat the step to
shut voice control.
○ Multi-point function: At power off status, hold down MFB until red and blue indicators blink alternatively to power on
and enter into the pairing mode. Connect the Bluetooth headset to cell phone A,after successful connection,power off
the headset.Open the headset again to enter into paring mode, and connect it to cell phone B.After successful
connection, power off the headset. Open the headset until the blue indicator blinks 3 times then to release, it needn’t
enter into the pairing mode this time ,and will auto connect the previous connected cell phone A and B. Now you can
use the headset to answer the coming call from any cell phone A or B.
○ Chinese/English Switch: When the headset is being charged, long press MFB button、 Volume+ and Volume-
simultaneously about 1second to switch language.
○Clear connection record: Press the MFB button for about 5 seconds when the headset is being charged. The indicator
blinks red for three times and the factory settings are restored.
Page 6

6 / 10
Charger and Battery
Before using any charger to charge this headset, check whether the specifications of the charger meet
requirements. The recommended output voltage of the charger is DC5V+/-0.25V, and the recommended
output current is 100 mA to 500 mA. An over-high charging voltage may damage the headset.
Warning: Only use the recommended charger if possible. Other chargers may violate the warranty terms
of the equipment and results in danger. If the charging cable is delivered with the headset, connect the
cable to a CCC-certified charger or computer to charge the headset.
Charging the Battery
The headset is embedded with non-removable charging battery. Do not attempt to remove the battery
from the headset; otherwise, the headset may be damaged. If the headset is not used in a long time, keep
it in a dry and well-ventilated place, and charge the headset once every two months.
1. If the red indicator blinks with a voice prompt " Battery Low", the headset battery is low. If the
headset continues to work, it may be automatically powered off. At this time, you need to charge
the headset by connecting the cable of the charger to the charging port on the headset.
2. Connect the charger to an AC power socket.
3. The red indicator is on when the headset is being charged. If the charging is not started yet,
Page 7

7 / 10
disconnect the headset from the power socket, and reconnect the headset again. It takes about 2
hours to fully charge the headset. After battery charging is completed, the red indicator is off, and
the blue indicator is on. At this time, you can disconnect the charger from the power socket and
headset.
4. A fully charged battery can provide about 12hours of talk time, or 400hours of standby time. The
actual talk time and standby time may vary with different cell phones, settings, use methods, and
environment.
Troubleshooting
Problem Description
Cause
Solution
Power on function is failed.
The battery is exhausted.
Use the charger to fully charge the
battery.
Time of holding down MFB
button is too short.
Press the MFB button again.
Charging function is failed.
The charging port is not
properly connected.
Reconnect the charging port.
Power off function is failed.
The headset program is in error
due to an incorrect operation.
Use the charger to charge and reset
the headset.
The headset cannot be
searched or pairing fails.
The headset does not enter into
the pairing state.
Enable the headset to enter into the
pairing state.
Page 8

8 / 10
The Bluetooth application of the
cell phone is in error.
Close the cell phone and start again
to pair the cell phone with the
headset.
Tips
1. To extend the service life of the battery, you are advised to charge the headset at least once a
month.
2. Please use the charger provided by company to charge the headset. Use of other low-quality
chargers may bring about dangers.
3. Adjust the volume to an appropriate degree when using the headset.
4. DO NOT wear the headset when sleeping; otherwise, the headset may be damaged or cause injuries
to you.
5. When driving, you are advised to use the company Bluetooth headset to ensure your driving safety.
It is dangerous to directly use cell phones when driving.
6. Keep the headset away from kids. Small components of the headset may cause suffocation or other
injuries to kids.
Page 9

9 / 10
FCC Statement
This device complies with Part 15 of the FCC rules. Operation is subject to the following two conditions: 1)
this device may not cause harmful interference, and 2) this device must accept any interference received,
including interference that may cause undesired operation.
Note: This equipment has been tested and found to comply with the limits for a Class B digital device,
pursuant to part 15 of the FCC Rules. These limits are designed to provide reasonable protection against
harmful interference in a residential installation.
This equipment generates uses and can radiate radio frequency energy and, if not installed and used in
accordance with the instructions, may cause harmful interference to radio communications. However,
there is no guarantee that interference will not occur in particular installation. If this equipment does
cause harmful interference to radio or television reception, which can be determined by turning the
equipment off and on, the user is encouraged to try to correct the interference by one or more of the
following measures:
--Reorient or relocate the receiving antenna.
--Increase the separation between the equipment and receiver.
--Connect the equipment into an outlet on a circuit different from that to which the receiver is
connected.
--Consult the dealer or an experienced radio/TV technician for help.
Changes or modifications not expressly approved by the party responsible for compliance could void the
user’s authority to operate the equipment.
Page 10

10 / 10
IC Note:
This device complies with Industry Canada's licence-exempt RSSs. Operation is subject to the following
two conditions:
(1) This device may not cause interference; and
(2) This device must accept any interference, including interference that may cause undesired operation
of the device.
Cet appareil est conforme aux CNR exemptes de licence d'Industrie Canada . Son fonctionnement est
soumis aux deux conditions suivantes :
(1) Ce dispositif ne peut causer d'interférences ; et
(2) Ce dispositif doit accepter toute interférence , y compris les interférences qui peuvent causer un
mauvais fonctionnement de l'appareil.
Radiation Exposure Statement
The device has been evaluated to meet general RF exposure requirement. The device can be usedin
portable exposure condition without restriction.
L'appareil a été évalué pour répondre aux exigences générales d'exposition aux radiofréquences.
L'appareil peut être utilisé en condition d'exposition portable sans restriction.
 Loading...