

General Electric MUSE NX Devices and Interfaces Manual_SM_2102027-010_A MUSE NX Cardiology Information System Devices and Interfaces Manual 2102027-010A
Page 1

GE Healthcare
MUSE™ NX
Cardiology Information System
Devices and Interfaces Manual
2102027-010A
MUSE™ NX
Cardiology Information System
English
©
2018 General Electric Company
All Rights Reserved.
Page 2

Publication Information
The information in this manual applies only to the MUSE™ NX Cardiology Information System. It does not apply to earlier product versions.
Due to continuing product innovation, specifications in this manual are subject to change without notice.
12SL, CASE, CardioSoft, InSite ExC, MAC, MACCRA, MARS, MUSE, Marquette, MobileLink, and MULTI-LINK are trademarks owned by GE
Medical Systems Information Technologies, Inc., a General Electric Company going to market as GE Healthcare. All other trademarks
contained herein are the property of their respective owners.
This product complies with the requirements concerning medical devices from the following regulatory bodies.
For more information about compliance, refer to the Regulatory and Safety Guide for this product.
The document part number and revision are on each page of the document. The revision identifies the document’s update level. The
revision history of this document is summarized in the following table.
Revision Date Comment
A 30 October 2018 Customer release.
To access other GE Healthcare Diagnostic Cardiology documents, go to the Common Documentation Library (CDL), located at
https://www.gehealthcare.com/support/support-documentation-library, and select Cardiology.
To access Original Equipment Manufacturer (OEM) documents, go to the device manufacturer's website.
This document describes the MUSE™ NX Cardiology Information System, also referred to as the ”product”, “system,” or “device.” This
document is intended to be used by an operator of the MUSE system.
The MUSE™ NX Cardiology Information System is intended to be used under the direct supervision of a licensed healthcare practitioner, by
trained operators in a hospital or facility providing patient care.
This document provides information required for the proper use of the system. Familiarize yourself with this information and read and
understand all instructions before attempting to use this system. Keep this document with the Regulatory and Safety manual, and with the
equipment at all times, and periodically review it.
Illustrations in this document are provided as examples only. Depending on system configuration, screens in the document may differ from
the screens on your system. Patient names and data are fictitious. Any similarity to actual persons is coincidental.
Support
GE Healthcare maintains a trained staff of application and technical experts to answer questions and to respond to issues and problems
that may arise during the installation, maintenance, and use of this product.
If you require additional assistance, contact your GE Healthcare representative, or GE Healthcare support at one of the following numbers:
• North America: 1-800-558-7044
• Europe: +49 761 45 43 -0
• Asia: +86 21 3877 7888
Training
This document is intended as a supplement to, not a substitute for, thorough product training. If you have not received training on the use
of the product, you should request training assistance from GE Healthcare.
To see available training, go to the GE Healthcare training website www.gehealthcare.com/training.
For more self-paced course offerings, tools, and reference guides you may find useful, visit the GE Healthcare Education Store at
www.gehealthcare.com/educationstore.
2 MUSE™ NX 2102027-010A
Page 3

Service Manual Language Information
WARNING
(EN)
ПРЕДУПРЕЖДЕНИЕ
(BG)
警告
ZH-CN
This service manual is available in English only.
• If a customer's service provider requires a language other than English, it is the
customer's responsibility to provide translation services.
• Do not attempt to service the equipment unless this service manual has been
consulted and is understood.
• Failure to heed this warning may result in injury to the service provider, operator, or
patient, from electric shock, mechanical or other hazards.
Това упътване за работа е налично само на английски език.
• Ако доставчикът на услугата на клиента изиска друг език, задължение на клиента
е да осигури превод.
• Не използвайте оборудването, преди да сте се консултирали и разбрали
упътването за работа.
• Неспазването на това предупреждение може да доведе до нараняване на
доставчика на услугата, оператора или пациент в резултат на токов удар или
механична или друга опасност.
本维修手册仅提供英文版本。
•
如果维修服务提供商需要非英文版本,客户需自行提供翻译服务。
•
未详细阅读和完全理解本维修手册之前,不得进行维修。
•
忽略本警告可能对维修人员,操作员或患者造成触电、机械伤害或其他形式的伤
害。
警告
(ZH-TW)
UPOZORENJE
(HR)
本維修手冊只提供英文版。
•
如果客戶的維修人員有英語以外的其他語言版本需求,則由該客戶負責 提供翻譯服
務。
•
除非您已詳閱本維修手冊並了解其內容,否則切勿嘗試對本設備進行維 修。
•
不
重視本警告可能導致維修人員、操作人員或病患因電擊、機械因素或 其他因素而
受到傷害。
Ove upute za servisiranje dostupne su samo na engleskom jeziku.
• Ukoliko korisnički servis zahtijeva neki drugi jezik, korisnikova je odgovornost osigurati
odgovarajući prijevod.
• Nemojte pokušavati servisirati opremu ukoliko niste konzultirali i razumjeli ove upute.
• Nepoštivanje ovog upozorenja može rezultirati ozljedama servisnog osoblja, korisnika
ili pacijenta prouzročenim električnim udarom te mehaničkim ili nekim drugim
opasnostima.
2102027-010A MUSE™ NX 3
Page 4

VAROVÁNÍ
(CS)
Tento provozní návod existuje pouze vanglickém jazyce.
• Vpřípadě, že externí služba zákazníkům potřebuje návod vjiném jazyce, je zajištění
překladu doodpovídajícího jazyka úkolem zákazníka.
• Nesnažte se oúdržbu tohoto zařízení, aniž byste si přečetli tento provozní návod a
pochopili jeho obsah.
• Vpřípadě nedodržování této varování může dojít kporanění pracovníka prodejního
servisu, obslužného personálu nebo pacientů vlivem elektrického proudu, respektive
vlivem mechanických či jiných rizik.
ADVARSEL
(DA)
WAARSCHUWING
(NL)
HOIATUS
(ET)
Denne servicemanual findes kun på engelsk.
• Hvis en kundes tekniker har brug for et andet sprog end engelsk, er det kundens
ansvar at sørge for oversættelse.
• Forsøg ikke at servicere udstyret medmindre denne servicemanual har været
konsulteret og er forstået.
• Manglende overholdelse af denne advarsel kan medføre skade på grund af elektrisk,
mekanisk eller anden fare for teknikeren, operatøren eller patienten.
Deze service manual is alleen in het Engels verkrijgbaar.
• Indien het onderhoudspersoneel een andere taal nodig heeft, dan is de klant
verantwoordelijk voor de vertaling ervan.
• Probeer de apparatuur niet te onderhouden voordat deze service manual
geraadpleegd en begrepen is.
• Indien deze waarschuwing niet wordt opgevolgd, zou het onderhoudspersoneel, de
gebruiker of een patiënt gewond kunnen raken als gevolg van een elektrische schok,
mechanische of andere gevaren.
Käesolev teenindusjuhend on saadaval ainult inglise keeles.
• Kui klienditeeninduse osutaja nõuab juhendit inglise keelest erinevas keeles, vastutab
klient tõlketeenuse osutamise eest.
• Ärge üritage seadmeid teenindada enne eelnevalt käesoleva teenindusjuhendiga
tutvumist ja sellest aru saamist.
• Käesoleva hoiatuse eiramine võib põhjustada teenuseosutaja, operaatori või patsiendi
vigastamist elektrilöögi, mehaanilise või muu ohu tagajärjel.
VAROITUS
(FI)
4 MUSE™ NX 2102027-010A
Tämä huolto-ohje on saatavilla vain englanniksi.
• Jos asiakkaan huoltohenkilöstö vaatii muuta kuin englanninkielistä materiaalia,
tarvittavan käännöksen hankkiminen on asiakkaan vastuulla.
• Älä yritä korjata laitteistoa ennen kuin olet varmasti lukenut ja ymmärtänyt tämän
huolto-ohjeen.
• Mikäli tätä varoitusta ei noudateta, seurauksena voi olla huoltohenkilöstön, laitteiston
käyttäjän tai potilaan vahingoittuminen sähköiskun, mekaanisen vian tai muun
vaaratilanteen vuoksi.
Page 5

ATTENTION
(FR)
Ce manuel technique n'est disponible qu'en anglais.
• Si un service technique client souhaite obtenir ce manuel dans une autre langue que
l'anglais, il devra prendre en charge la traduction et la responsabilité du contenu.
• Ne pas tenter d'intervenir sur les équipements tant que le manuel technique n'a pas
été consulté et compris.
• Le non-respect de cet avertissement peut entraîner chez le technicien, l'opérateur ou
le patient des blessures dues à des dangers électriques, mécaniques ou autres.
WARNUNG
(DE)
FIGYELMEZTETÉS
(HU)
AÐVÖRUN
(IS)
Diese Serviceanleitung ist nur in englischer Sprache verfügbar.
• Falls der Kundendienst eine andere Sprache benötigt, muss er für eine entsprechende
Übersetzung sorgen.
• Keine Wartung durchführen, ohne diese Serviceanleitung gelesen und verstanden zu
haben.
• Bei Zuwiderhandlung kann es zu Verletzungen des Kundendiensttechnikers, des
Anwenders oder des Patienten durch Stromschläge, mechanische oder sonstige
Gefahren kommen.
Ez a szerviz kézikönyv kizárólag angol nyelven érhető el.
• Ha a vevő szerviz ellátója angoltól eltérő nyelvre tart igényt, akkor a vevő felelőssége a
fordítás elkészíttetése.
• Ne próbálja elkezdeni használni a berendezést, amíg a szerviz kézikönyvben leírtakat
nem értelmezték és értették meg.
• Ezen figyelmeztetés figyelmen kívül hagyása a szerviz ellátó, a működtető vagy
a páciens áramütés, mechanikai vagy egyéb veszélyhelyzet miatti sérülését
eredményezheti.
Þessi þjónustuhandbók er eingöngu fáanleg á ensku.
• Ef að þjónustuveitandi viðskiptamanns þarfnast annars tungumáls en ensku, er það
skylda viðskiptamanns að skaffa tungumálaþjónustu.
• Reynið ekki að afgreiða tækið nema þessi þjónustuhandbók hefur verið skoðuð og
skilin.
• Brot á að sinna þessari aðvörun getur leitt til meiðsla á þjónustuveitanda, stjórnanda
eða sjúklingi frá raflosti, vélrænum eða öðrum áhættum.
PERINGATAN
(ID)
2102027-010A MUSE™ NX 5
Manual servis ini hanya tersedia dalam bahasa Inggris.
• Jika penyedia jasa servis pelanggan memerlukan bahasa lain selain dari Bahasa
Inggris, merupakan tanggung jawab dari penyedia jasa servis tersebut untuk
menyediakan terjemahannya.
• Jangan mencoba melakukan servis terhadap perlengkapan kecuali telah membaca
dan memahami manual servis ini.
• Mengabaikan peringatan ini bisa mengakibatkan cedera pada penyedia servis,
operator, atau pasien, karena terkena kejut listrik, bahaya mekanis atau bahaya
lainnya.
Page 6

AVVERTENZA
(IT)
Il presente manuale di manutenzione è disponibile soltanto in Inglese.
• Se un addetto alla manutenzione richiede il manuale in una lingua diversa, il cliente è
tenuto a provvedere direttamente alla traduzione.
• Si proceda alla manutenzione dell'apparecchiatura solo dopo aver consultato il
presente manuale ed averne compreso il contenuto.
• Il non rispetto della presente avvertenza potrebbe far compiere operazioni da cui
derivino lesioni all'addetto, alla manutenzione, all'utilizzatore ed al paziente per
folgorazione elettrica, per urti meccanici od altri rischi.
警告
(JA)
경고
(KO)
ЕСКЕРТУ
(KK)
このサービスマニュアルは英語版しかありません。
•
サービスを担当される業者が英語以外の言語を要求される場合、翻訳作業はその
業者の責任で行うものとさせていただきます。
•
このサービスマニュアルを熟読し、十分に理解をした上で装置のサービスを行っ
てください。
•
この警告に従わない場合、サービスを担当される方、操作員あるいは患者が、感
電や機械的又はその他の危険により負傷する可能性があります。
본 서비스 지침서는 영어로만 이용하실 수 있습니다.
•
고객의 서비스 제공자가 영어 이외의 언어를 요구할 경우, 번역 서비스를 제공하는
것은 고객의 책임입니다.
•본
서비스 지침서를 참고했고 이해하지 않는 한은 해당 장비를 수리하려고 시도하지
마십시오.
•이
경고에 유의하지 않으면 전기 쇼크, 기계상의 혹은 다른 위험으로부터 서비스 제
공자, 운영자 혹은 환자에게 위해를 가할 수 있습니다.
Бұл қызмет көрсету
Тұтынушының қызмет
•
етсе, аудару бойынша
болуы тиіс.
Бұл қызмет көрсету
•
қызмет көрсетуден
Бұл
•
ескертуді елемеу
шогынан,
мүмкін.
механикалық
бойынша
бас
нұсқаулығы
провайдері
қызметтерімен қамтамасыз
бойынша
қызмет
нұсқаулығын назарға
тартыңыз.
провайдері, оператор немесе
немесе
тек
ағылшын
басқа қауіптер нəтижесінде жарақат
ағылшын
тілінен
қолжетімді.
тілінде
басқа
тілдегі
тұтынушы
ету
түсінбегенше, жабдыққа
алып,
емделушінің
нұсқаны
жауапкершілігінде
талап
электр
алуына
əкелуі
BRĪDINĀJUMS
(LV)
6 MUSE™ NX 2102027-010A
Šī apkalpotāju rokasgrāmata ir pieejama tikai angļu valodā.
• Ja apkalpošanas sniedzējam nepieciešama informācija citā, nevis angļu, valodā,
klienta pienākums ir nodrošināt tās tulkošanu.
• Neveiciet aprīkojuma apkopi, neizlasot un nesaprotot apkalpotāju rokasgrāmatu.
• Šī brīdinājuma neievērošana var radīt elektriskās strāvas trieciena, mehānisku vai citu
risku izraisītu traumu apkopes sniedzējam, operatoram vai pacientam.
Page 7

ĮSPĖJIMAS
(LT)
Šis eksploatavimo vadovas yra prieinamas tik anglų kalba.
• Jei kliento paslaugų tiekėjas reikalauja vadovo kita kalba - ne anglų, numatyti vertimo
paslaugas yra kliento atsakomybė.
• Nemėginkite atlikti įrangos techninės priežiūros, nebent atsižvelgėte į šį eksploatavimo
vadovą ir jį supratote.
• Jei neatkreipsite dėmesio į šį perspėjimą, galimi sužalojimai dėl elektros šoko,
mechaninių ar kitų paslaugų tiekėjui, operatoriui ar pacientui.
ADVARSEL
(NO)
OSTRZEŻENIE
(PL)
AVISO
(PT-BR)
Denne servicehåndboken finnes bare på engelsk.
• Hvis kundens serviceleverandør trenger et annet språk, er det kundens ansvar å sørge
for oversettelse.
• Ikke forsøk å reparere utstyret uten at denne servicehåndboken er lest og forstått.
• Manglende hensyn til denne advarselen kan føre til at serviceleverandøren,
operatøren eller pasienten skades på grunn av elektrisk støt, mekaniske eller andre
farer.
Niniejszy podręcznik serwisowy dostępny jest jedynie w języku angielskim.
• Jeśli dostawca usług klienta wymaga języka innego niż angielski, zapewnienie usługi
tłumaczenia jest obowiązkiem klienta.
• Nie należy serwisować wyposażenia bez zapoznania się i zrozumienia niniejszego
podręcznika serwisowego.
• Niezastosowanie się do tego ostrzeżenia może spowodować urazy dostawcy usług,
operatora lub pacjenta w wyniku porażenia elektrycznego, zagrożenia mechanicznego
bądź innego.
Este manual de assistência técnica só se encontra disponível em inglês.
• Se o serviço de assistência técnica do cliente não for GE, e precisar de outro idioma,
será da responsabilidade do cliente fornecer os serviços de tradução.
• Não tente reparar o equipamento sem ter consultado e compreendido este manual de
assistência técnica.
• O não cumprimento deste aviso pode por em perigo a segurança do técnico, operador
ou paciente devido a choques elétricos, mecânicos ou outros.
AVISO
(PT-PT)
2102027-010A MUSE™ NX 7
Este manual técnico só se encontra disponível em inglês.
• Se a assistência técnica do cliente solicitar estes manuais noutro idioma, é da
responsabilidade do cliente fornecer os serviços de tradução.
• Não tente reparar o equipamento sem ter consultado e compreendido este manual
técnico.
• O não cumprimento deste aviso pode provocar lesões ao técnico, ao utilizador ou ao
paciente devido a choques eléctricos, mecânicos ou outros.
Page 8

AVERTISMENT
(RO)
Acest manual de service este disponibil numai în limba engleză.
• Dacă un furnizor de servicii pentru clienţi necesită o altă limbă decât cea engleză, este
de datoria clientului să furnizeze o traducere.
• Nu încercaţi să reparaţi echipamentul decât ulterior consultării şi înţelegerii acestui
manual de service.
• Ignorarea acestui avertisment ar putea duce la rănirea depanatorului, operatorului
sau pacientului în urma pericolelor de electrocutare, mecanice sau de altă natură.
ПРЕДУПРЕЖДЕНИЕ
(RU)
UPOZORENJE
(SR)
VAROVANIE
(SK)
Настоящее руководство по обслуживанию предлагается только на английском языке.
• Если сервисному персоналу клиента необходимо руководство не на английском, а
на каком-то другом языке, клиенту следует обеспечить перевод самостоятельно.
• Прежде чем приступать к обслуживанию оборудования, обязательно обратитесь к
настоящему руководству и внимательно изучите изложенные в нем сведения.
• Несоблюдение требований данного предупреждения может привести к тому,
что специалисты по обслуживанию, операторы или пациенты получат удар
электрическим током, механическую травму или другое повреждение.
Ovo servisno uputstvo je dostupno samo na engleskom jeziku.
• Ako klijentov serviser zahteva neki drugi jezik, klijent je dužan da obezbedi
prevodilačke usluge.
• Ne pokušavajte da opravite uređaj ako niste pročitali i razumeli ovo servisno uputstvo.
• Zanemarivanje ovog upozorenja može dovesti do povređivanja servisera, rukovaoca ili
pacijenta usled strujnog udara, ili mehaničkih i drugih opasnosti.
Tento návod na obsluhu je k dispozícii len v angličtine.
• Ak zákazníkov poskytovateľ služieb vyžaduje iný jazyk ako angličtinu, poskytnutie
prekladateľských služieb je zodpovednosťou zákazníka.
• Nepokúšajte sa o obsluhu zariadenia skôr, ako si neprečítate návod na obsluhu a
neporozumiete mu.
• Zanedbanie tohto varovania môže vyústiť do zranenia poskytovateľa služieb,
obsluhujúcej osoby alebo pacienta elektrickým prúdom, mechanickým alebo iným
nebezpečenstvom.
OPOZORILO
(SL)
8 MUSE™ NX 2102027-010A
Ta servisni priročnik je na voljo samo v angleškem jeziku.
• Če ponudnik storitve stranke potrebuje priročnik v drugem jeziku, mora stranka
zagotoviti prevod.
• Ne poskušajte servisirati opreme, če tega priročnika niste v celoti prebrali in razumeli.
• Če tega opozorila ne upoštevate, se lahko zaradi električnega udara, mehanskih ali
drugih nevarnosti poškoduje ponudnik storitev, operater ali bolnik.
Page 9

ADVERTENCIA
(ES)
Este manual de servicio sólo existe en inglés.
• Si el encargado de mantenimiento de un cliente necesita un idioma que no sea el
inglés, el cliente deberá encargarse de la traducción del manual.
• No se deberá dar servicio técnico al equipo, sin haber consultado y comprendido este
manual de servicio.
• La no observancia del presente aviso puede dar lugar a que el proveedor de servicios,
el operador o el paciente sufran lesiones provocadas por causas eléctricas, mecánicas
o de otra naturaleza.
VARNING
(SV)
UYARI
(TR)
ЗАСТЕРЕЖЕННЯ
(UK)
Den här servicehandboken finns bara tillgänglig på engelska.
• Om en kunds servicetekniker har behov av ett annat språk än engelska ansvarar
kunden för att tillhandahålla översättningstjänster.
• Försök inte utföra service på utrustningen om du inte har läst och förstår den här
servicehandboken.
• Om du inte tar hänsyn till den här varningen kan det resultera i skador på
serviceteknikern, operatören eller patienten till följd av elektriska stötar, mekaniska
faror eller andra faror.
Bu servis klavuzunun sadece İngilizcesi mevcuttur.
• Eğer müşteri teknisyeni bu klavuzu İngilizce dşnda bir başka lisandan talep ederse,
bunu tercüme ettirmek müşteriye düşer.
• Servis klavuzunu okuyup anlamadan ekipmanlara müdahale etmeyiniz.
• Bu uyarya uyulmamas, elektrik, mekanik veya diğer tehlikelerden dolay teknisyen,
operatör veya hastann yaralanmasna yol açabilir.
Дане керівництво з сервісного обслуговування постачається виключно англійською
мовою.
• Якщо сервісний інженер потребує керівництво іншою мовою, користувач
зобов'язаний забезпечити послуги перекладача.
• Не намагайтеся здійснювати технічне обслуговування даного обладнання, якщо
ви не читали, або не зрозуміли інформацію, надану в керівництві з сервісного
обслуговування.
• Недотримання цього застереження може призвести до травмування сервісного
інженера, користувача даного обладнання або пацієнта внаслідок електричного
шоку, механічного ушкодження або з інших причин невірного обслуговування
обладнання.
CẢNH
BÁO
(VI)
2102027-010A MUSE™ NX 9
Liệu Hướng Dẫn Sửa Chữa chỉ
Tài
Nếu
•
Anh, thì khách hàng sẽ có trách
• Không
• Không tuân
sửa chữa, người vận
khác
đơn vị
các
được sửa chữa thiết bị trừ
thủ những cảnh
cung
hành hay
cấp dịch vụ
bản tiếng
có
cho khách hàng yêu
nhiệm
khi đã tham
báo này có
bệnh
Anh.
cung
thể dẫn đến
nhân, do
cấp
các
khảo
và
các
sốc điện,
cầu một
dịch vụ dịch thuật.
hiểu
Tài
tổn thương
rủi
các
ngữ
ngôn
liệu Hướng dẫn Sửa chữa.
cho
ro về cơ khí hay các
nào khác
người thực hiện
tiếng
rủi
ro
Page 10

Table of Contents
1:Introduction......................................................................................................... 12
MUSE System Network Diagram................................................................................................................. 13
2:Ambulatory (Holter)........................................................................................... 14
CardioDay................................................................................................................................................................14
Data Transmission..................................................................................................................................15
Customer Requirements......................................................................................................................16
Determine MUSE eDoc Connect Parameters............................................................................ 16
Optional CardioDay System Prerequisites.................................................................................. 17
Configure CardioDay and MUSE Interface Settings............................................................... 18
System Checkout.....................................................................................................................................27
Troubleshooting........................................................................................................................................28
MARS..........................................................................................................................................................................28
Data Transmission..................................................................................................................................29
Customer Requirements......................................................................................................................30
Configure MARS with the MUSE System...................................................................................... 30
System Checkout.....................................................................................................................................39
Troubleshooting........................................................................................................................................41
SEER 1000 iOS/Mobile App.............................................................................................................................42
SEER 1000 iOS/Mobile App Option for MUSE Orders............................................................. 42
Troubleshooting........................................................................................................................................45
3:CASE/CardioSoft..................................................................................................47
Data Transmission..............................................................................................................................................47
CASE and MUSE System Compatibility Matrix.......................................................................................48
Customer Requirements.................................................................................................................................. 48
Considerations for Multiple CASE Systems.............................................................................................48
Communication Levels..................................................................................................................................... 49
Configure CASE/CardioSoft with the MUSE System............................................................................49
Schedule a System Shutdown.......................................................................................................... 50
Verify or Add the Stress Exercise Option to the MUSE System..........................................51
Cancel the System Shutdown...........................................................................................................52
Set Up the CASE8000 User Account..............................................................................................53
Configure the CASE/CardioSoft System Network Settings.................................................. 58
Configure the MUSE System Settings on the CASE/CardioSoft System v6.x
without DCP (Older Version)............................................................................................................... 58
Configure the MUSE System Settings on the CASE/CardioSoft System v7.x............... 61
Import the Server CA Certificate..................................................................................................... 65
Configure CASE/CardioSoft Reports on the MUSE File Server........................................... 69
System Checkout.................................................................................................................................................71
Troubleshooting....................................................................................................................................................72
4:DICOM Communication.....................................................................................74
Data Transmission..............................................................................................................................................75
MUSE Services.......................................................................................................................................... 76
Customer Requirements.................................................................................................................................. 76
Configure DICOM with the MUSE System................................................................................................76
Page 11

Schedule a System Shutdown.......................................................................................................... 77
Verify or Add the DICOM Service(s) and Option to the MUSE System.............................77
Cancel the System Shutdown...........................................................................................................79
Configure MUSE Services to Receive and Send DICOM Tests............................................ 80
Configure Inbound DICOM Device(s)..............................................................................................82
Configure Outbound DICOM Devices in the MUSE System................................................. 83
Configure the DICOM Modality Worklist Client Service on the MUSE System............. 85
System Checkout.................................................................................................................................................89
Troubleshooting....................................................................................................................................................89
5:MAC ECG Systems.............................................................................................. 90
Data Transmission..............................................................................................................................................90
Customer Requirements.................................................................................................................................. 91
Wireless/LAN Communication Requirements........................................................................................91
Configure MAC ECG Systems with the MUSE System........................................................................93
Set Up the MUSE Modem Feature..................................................................................................93
Set Up the MUSE Server for DCP Communication..................................................................99
MobileLink Configuration..................................................................................................................104
Import the Server CA Certificate for MAC Systems..............................................................106
Disable the eDoc Connect Option................................................................................................110
System Checkout..............................................................................................................................................111
Troubleshooting.................................................................................................................................................112
6:VA VistA Imaging.............................................................................................. 113
Data Transmission........................................................................................................................................... 113
Customer Requirements................................................................................................................................114
Create the VA VistA User in the MUSE System...................................................................................114
Verfiy the VA VistA Imaging Formats for MUSE Test Types..........................................................115
System Checkout..............................................................................................................................................116
Troubleshooting.................................................................................................................................................116
A:Related Documents......................................................................................... 117
Page 12

Introduction
Introduction
This manual has information to install and configure the MUSE system with the
following devices:
• Ambulatory (Holter)
• "CardioDay"
1
• "MARS"
• "SEER 1000"
• "CASE/CardioSoft"
• "DICOM Communication"
• "MAC ECG systems"
• "VA VistA Imaging"
12 MUSE™ NX 2102027-010A
Page 13

MUSE System Network Diagram
Introduction
2102027-010A MUSE™ NX 13
Page 14

Ambulatory (Holter)
Ambulatory (Holter)
CardioDay
The CardioDay to MUSE interface feature allows the user to exchange Holter order
and patient demographics with the MUSE system and export Holter reports from the
CardioDay system (v2.5 or later) to the MUSE system for viewing, editing, printing, and
storage. Both features are intended to improve user workflow in facilities which share
CardioDay v2.5 and MUSE systems.
2
For additional information, see the CardioDay v2.5 Pre-Installation Manual for system
prerequisites or see the CardioDay v2.5 Installation and Field Service Manual for
configuration instructions.
NOTE:
CardioDay v2.5 SP2 is not compatible with the MUSE Order feature for the latest
MUSE system. Customers with CardioDay v2.5 SP2 or earlier must update to
CardioDay v2.5 SP3 to enable the MUSE Order feature with the MUSE system.
14 MUSE™ NX 2102027-010A
Page 15

Data Transmission
Ambulatory (Holter)
There are two interface features that enhance the user workflow for CardioDay:
• CardioDay to MUSE Order Interface: CardioDay gets orders and patient
demographics from the Holter device through the MUSE system.
• CardioDay Export to the MUSE System: CardioDay exports Holter reports to the
MUSE system to view, edit, print, or store patient tests.
CardioDay to MUSE Order Interface
The CardioDay v2.5 MUSE Orders feature retrieves open Holter orders from the MUSE
system and transfers patient demographic and order information to the SEER 1000
and other Holter recorder devices.
If the CardioDay system is configured to query and retrieve order and patient
demographic data from MUSE, the MUSE Orders option button is enabled in the
Transfer Patient Data and in the Recorder Hookup Preview windows. Select Query
Orders to open the MUSE Holter/Order list.
When the data imports and the Holter recorder starts, the MUSE order Status
changes from Open to Pending.
NOTE:
Only MUSE orders for Holter test types with an Open status show in the
CardioDay Orders list.
The following customer environment configurations must be known for the use of this
interface:
2102027-010A MUSE™ NX 15
Page 16

Ambulatory (Holter)
• MUSE system network hostname or IP address
• MUSE system user account and password
• MUSE system network port for MUSE Web API service endpoint
CardioDay Export to the MUSE System
When the user completes a report on the CardioDay system, they can export
the Holter PDF report and metadata to the MUSE system for review. The Holter
reports from CardioDay export to a shared folder as a pair of files: the Holter PDF
report (*.pdf) and the report metadata (*.txt). The MUSE Generacq service gets the
CardioDay tests from the share folder and searches for the report metadata (*.txt
files). The MUSE Normal service processes the report data when detected and stores
the reports in the MUSE database.
It is suggested that a dedicated MUSE user be created for communication to the
MUSE orders interface. For additional details, see "Create a Dedicated MUSE User
Account for CardioDay Holter Orders Query" on page 24.
When the report and metadata import to the MUSE system, the order Status
changes from Pending to Unconfirmed. The order is linked to report.
NOTE:
The CardioDay system can be set to automatically archive a recording after it has
been exported to the MUSE system.
Customer Requirements
The customer is responsible for the following requirements:
• Network connectivity
This includes name resolution, access rights, unrestricted TCP port communication,
and file share authentication.
• CardioDay software version v2.5 SP3 or higher.
To verify the CardioDay version, in the CardioDay application, go to Help> Version.
Determine MUSE eDoc Connect Parameters
Gather the following information prior to beginning the CardioDay to MUSE interface
setup.
Information Needed Description
Is the eDoc Connect option on the MUSE system
enabled?
Determine if the eDoc Connect option is enabled.
If it is not, it will need to be temporarily enabled
and then must be disabled (if not purchased/
in use by customer for other data/report
type imports) after the CardioDay to MUSE
communication configuration is complete.
The eDoc Connect option can be enabled by
modifying the installed MUSE configuration.
MUSE site number CardioDay data imports data to this MUSE site
number.
16 MUSE™ NX 2102027-010A
Page 17

Information Needed Description
MUSE site location CardioDay data imports data to this MUSE site
MUSE share folder location The folder location that MUSE Generacq
Optional CardioDay System Prerequisites
To enable optional features for the CardioDay-to-MUSE interface, the following
requirements must be met.
Ambulatory (Holter)
location.
monitors for CardioDay data.
To be able to transfer CardioDay tests to MUSE,
a share folder must be created. Ideally, the share
is a local folder on the MUSE application server
that is shared to the CardioDay system. The user
account configured to start the MUSE Generacq
service must have both read and delete file and/
or share permission access to the location.
Feature System Prerequisite
Orders Interface/Report Export
Orders Interface
CardioDay
MUSE Cardiology Information
System
CardioDay and the MUSE
Cardiology Information System
MUSE Cardiology Information
System
CardioDay and the MUSE
Cardiology Information System
License and activate the
CardioDay MUSE Connection
option.
Identify the MUSE site number
used to query Holter Orders
and to import data from
CardioDay Holter Report.
Install the latest version of the
MUSE system.
Enable the MUSE system Holter
Data Storage.
Install and configure the MUSE
Web API interface.
Activate the ADT/ORM Holter
Orders interface for CardioDay/
MUSE Holter Orders.
Active the standard MUSE Web
API HTTPS network connection
between the CardioDay
and MUSE systems on the
configured TCP port (default
443).
Identify the MUSE user account
and password.
2102027-010A MUSE™ NX 17
Page 18

Ambulatory (Holter)
Feature System Prerequisite
Report Export
MUSE Cardiology Information
System
CardioDay and the MUSE
Cardiology Information System
Configure CardioDay and MUSE Interface Settings
To configure the setting for the CardioDay and MUSE interface, perform the following
procedures in the order that they are listed.
1. "Schedule a System Shutdown" on page 18
2. "Verify or Add the HIS Orders Interface and HL7 ADT Query Interface Options" on
page 19
3. "Cancel the System Shutdown" on page 20
4. "Enable the Holter Test Type for Each MUSE Site" on page 21
5. "Enable the HIS Interface Settings" on page 22
Enable the MUSE eDoc Connect
option to configure the
CardioDay acquisition profile.
(This can be disabled after
configuration.)
Permit Full Control (read, write,
delete) access to the shared
MUSE import folder using
Windows user authentication
and the SMB protocol.
6. "Create a CardioDay Acquisition Profile" on page 22
7. "Create a CardioDay Share Folder in the MUSE System" on page 24
8. "Create a Dedicated MUSE User Account for CardioDay Holter Orders Query" on
page 24
9. "Configure the CardioDay System with the MUSE System" on page 26
10. "Disable the eDoc Connect Option" on page 26
Schedule a System Shutdown
1. Log on to the MUSE application server as an administrator.
2. In the MUSE application, go to System> Setup.
3. In the Setup window, select System.
4. Right-click on the Product name and select Shutdown System.
The Shutdown System window opens.
18 MUSE™ NX 2102027-010A
Page 19

Ambulatory (Holter)
5. Select the Shutdown Type.
• Select Full to close the MUSE client application and stop MUSE services.
• Select Partial to disconnect all remote connections to the MUSE clients. The
MUSE clients and the MUSE services continue to run.
NOTE:
If the MUSE application stays open on a remote client workstation, the
application disconnects from the MUSE server.
6. Select the time for the Shutdown Delay.
7. Select Activate Shutdown.
The top of the MUSE client application shows when the shutdown occurs.
Verify or Add the HIS Orders Interface and HL7 ADT Query Interface Options
1. Go to Control Panel> Programs> Programs and Features.
2. Right-click on MUSE and select Change.
3. On the Welcome to the MUSE Setup Wizard window, select Next >.
4. Select Next > until you reach the Select Options screen.
5. On Select Options screen, view the HIS Orders Interface and HL7 ADT Query
Interface options.
• If the option is enabled (checked), select Cancel to exit the installation wizard.
2102027-010A MUSE™ NX 19
Page 20

Ambulatory (Holter)
6. Select Next > to bypass the Select Features screen. No changes to features
7. On the MUSE Services Configuration screen, enter the Background User
8. Select Next >.
9. Enter the Options Configuration Password. The Serial Number should be pre-
• If the option is disabled (unchecked), check the box for the option and
complete the modification to the installed MUSE system configuration.
Password.
populated. If you need to manually enter the serial number, refer to your Product
Activation Sheet. Then, select Next >.
NOTE:
Only a qualified GE Healthcare service representative has access to the
Options Configuration Password. This password cannot be provided to
customers.
10. Select Next >.
11. Select Next > to confirm installation with the modified settings. The Modifying
MUSE screen displays installation progress.
12. On the Modify Complete screen, select Close.
Cancel the System Shutdown
1. Go to Services.
20 MUSE™ NX 2102027-010A
Page 21

2. Right-click on the MUSE service and select Start.
This starts the MUSE MT host service and allows you to log on.
3. Log on to the MUSE application on the MUSE application server.
The application displays the current shutdown status at the top of the window.
4. In the MUSE application, go to System> Setup.
5. Select System.
6. Right-click on the Product name and select Shutdown System.
7. In the Shutdown System window, select Cancel Shutdown.
If the MUSE services were stopped, they are now restarted and remote
connectivity is restored.
Ambulatory (Holter)
The system does not automatically notify users that the MUSE system is
available.
Enable the Holter Test Type for Each MUSE Site
Enable a MUSE Holter Test Type for each site that will be using the CardioDay/MUSE
Holter orders or reports.
1. From within the MUSE application, go to System> Setup.
2. Under the Advanced section, select Test Types.
3. Right-click the Holter Test Type and select Properties.
4. In the Test Type Properties window, go to Enabled for Sites and select each site
that will use the Holter orders or report data interfaces.
2102027-010A MUSE™ NX 21
Page 22

Ambulatory (Holter)
5. Select OK.
Enable the HIS Interface Settings
1. From within the MUSE application, go to System> Setup> Sites.
2. Right-click on the site and select Properties.
3. Go to HIS Settings> General.
4. In Interface Settings, make sure that the following settings are enabled:
• Site Has ADT Interface
• Site Has Orders Interface
NOTE:
If these settings are not enabled, contact your GE Healthcare HL7 Integrator.
5. Select OK.
Create a CardioDay Acquisition Profile
1. From within the MUSE application, go to System> Setup.
2. In the Advanced section, select Acquisition Profile.
22 MUSE™ NX 2102027-010A
Page 23

The list of the existing acquisition profiles display. If this is the first acquisition
profile, the list is empty.
3. Right-click on the right side of the screen and choose New.
4. On the Acquisition Profile Properties, enter the profile properties.
Ambulatory (Holter)
Field Description
Name Type a descriptive name, such as Site0001--
Loc 12--CardioDay Holter.
Test Type Select Holter from the drop-down list.
Site Select the MUSE site to receive CardioDay
data.
Location Select the MUSE share location-CardioDay
data will import data to this MUSE site
number.
NOTE:
DEFAULT may be the only selection
available.
Profile 1. Select Import. The file window opens to
the MUSE program folder.
2. Browse to AcquisitionProfiles|
CardioDay Acquisition Profile.xml.
3. Select Open.
5. Select OK.
2102027-010A MUSE™ NX 23
Page 24

Ambulatory (Holter)
Create a CardioDay Share Folder in the MUSE System
The folder can exist on the CardioDay system, the MUSE system, or an external
system. It is recommended that the share folder exists with the MUSE installation
directory. The share folder must grant full access to both the CardioDay and MUSE
systems.
1. From within the MUSE application, go to System> Setup> Share Folder.
A list of existing share folders display.
2. Right-click on the right side of the screen and select New.
3. In the Share Folder Properties window, enter the share folder properties.
Field Description
Entry Enter the MUSE share folder name for the
location that the MUSE Generacq service will
monitor for CardioDay data.
File Name Filter Enter *.txt.
Profile Name Select the name of the CardioDay acquisition
profile.
4. Select OK.
Create a Dedicated MUSE User Account for CardioDay Holter Orders Query
Create a new user and password for CardioDay to query the MUSE Orders interface
through the MUSE Web API. Enable this user for all sites which will use the Holter
orders query.
1. From within the MUSE application, go to System> Setup.
2. Select Users.
3. Right-click on the right side and select New.
4. In the User Properties window, enter CardioDay user account details for the
identified fields.
24 MUSE™ NX 2102027-010A
Page 25

Ambulatory (Holter)
Field Description
Last Name Type an appropriate user name, such as
CardioDay.
First Name Type an appropriate user name, such as
OrdersAccount.
MUSE User Name Type the appropriate MUSE user name to
allow access to the system when logging
in with MUSE authentication such as
CardioDayOrders.
Account is Enabled Check this box to enable this user account for
CardioDay Holter Orders query.
MUSE Password Type a password with a maximum of 15
characters.
Characters can be alpha or numeric.
Re-enter MUSE Password Retype the same password as you entered in
the MUSE Password field.
Account is Enabled Check this box to enable sites to use the
CardioDay Holter Orders Query.
User cannot change password Check this box to block users from changing
the MUSE password.
Password never expires Check this box so that the password for this
user never expires and does not have to be
changed.
5. In Active Sites panel, select all the sites that will be using the Holter Orders
Query.
6. From the left pane, select Advanced.
7. Enter the System details.
Field Description
User ID Type a unique ID for the CardioDay Orders
account.
Role Select MUSE Service.
Profile Select None.
2102027-010A MUSE™ NX 25
Page 26

Ambulatory (Holter)
Field Description
Display Password Prompt when Saving Do not check.
Display User in Personnel Lists Uncheck. This option is checked by default.
8. Select OK.
Configure the CardioDay System with the MUSE System
Go to the CardioDay v2.5 Installation and Field Service Manual for instructions to:
• Query Holter orders from the MUSE system.
• Export data to the MUSE system in a compatible format to the CardioDay share
folder.
Disable the eDoc Connect Option
Disable the eDoc Connect option if the customer has not purchased eDoc Connect.
1. "Schedule a system shutdown."
2. Go to Control Panel> Programs> Programs and Features.
3. Right-click on MUSE and select Change.
4. On the Welcome to the MUSE Setup Wizard window, select Next >.
5. Select Next > until you reach the Select Options screen.
6. On Select Options screen, uncheck the eDoc Connect option.
7. Select Next > to bypass the Select Features screen. No changes to features
8. On the MUSE Services Configuration screen, enter the Background User
Password.
9. Select Next >.
10. Select Next > to confirm installation with the modified settings. The Modifying
MUSE screen displays installation progress.
26 MUSE™ NX 2102027-010A
Page 27

Ambulatory (Holter)
11. On the Modify Complete screen, select Close.
12. "Cancel the system shutdown."
System Checkout
1. Make sure that the Holter reports export correctly to the MUSE system.
a) Export a CardioDay Holter report to the CardioDay share folder defined in
b) Log on to the MUSE application.
c) Make sure the CardioDay Holter report displays in the MUSE system Edit List
d) Open the CardioDay Holter report.
NOTE:
2. Go to the CardioDay Installation and Field Service Manual to make sure the MUSE
system can import MUSE orders.
the MUSE system.
for the appropriate site.
For more information about the usage and checkout of CardioDay report
export to the MUSE system, see the CardioDay Installation and Field Service
Manual.
2102027-010A MUSE™ NX 27
Page 28

Ambulatory (Holter)
Troubleshooting
Symptom Cause Recommendation
Cannot export Holter report to
the MUSE system.
MUSE Connection Test failure
during setup.
Query Orders button missing
from Add Patient tab.
There is an issue with the eDoc
Connect configuration.
Wrong hostname or IP address. Confirm proper hostname
Hostname to IP address lookup
(DNS) not functioning.
Wrong IP port used for MUSE
Web API.
MUSE web client or app pool
are not running in the MUSE
web server (IIS).
User name or password is not a
valid MUSE user.
See MUSE Cardiology
Information System eDoc
Connect Manual for a
resolution.
and/or IP address of the MUSE
System.
Confirm hostname resolution/
lookup is working on iOS device.
Try entering the IP address of
the MUSE system in the URL.
The proper listening IP port
number of the MUSE Web API
(default 443) must be included
as part of URL configuration.
Confirm with MUSE
administrator or GE Healthcare
service representative that the
MUSE web client and app pool
are configured properly and
running without errors on the
MUSE web server (IIS).
Confirm that the configured
User Name and Password
match that of a valid MUSE
user.
No MUSE patient/exam orders
displayed in Order List.
Other network communication
fault or port blocking.
Improper Site Number in
configuration.
No Holter orders with Open
order status.
Check for other network
communication faults,
restrictions, and firewalls.
Confirm the presence of MUSE
orders with the proper Site
Number.
Confirm the presence of MUSE
order using:
Test Type=Holter
Status=OPEN
MARS
The Multi-function Ambulatory Review System (MARS) is software that provides the
tools to analyze, review, and generate reports for ECG data acquired from Holter
recorders and bedside monitors.
28 MUSE™ NX 2102027-010A
Page 29

MARS system to MUSE system communication allows you to transfer stored MARS
reports from the MARS system to the MUSE system for viewing, editing, printing,
and storage. At the MUSE system, you can view the strip pages and edit patient
demographics, diagnosis statements, and findings.
Data Transmission
Ambulatory (Holter)
The MARS system transfers the complete Holter report. The Holter test is stored in
the reports folder on the MARS system with a .mrs extension. The MUSE Generacq
service searches that folder for *.mrs files. Tests are then normalized on the MUSE
system and stored in the database. MARS stored reports do not contain full disclosure
information.
Tests are also processed through the MARS Formatter during acquisition to generate
a PDF that can be viewed in the MUSE Editor.
NOTE:
While tests are being processed by the MARS Formatter during acquisition, you
cannot view or edit them in the test editor. The following message is displayed
while the Holter report is being formatted after normalization:
The Holter record acquired for patient is currently checked out by Admin.
MUSE Services
MARS system to MUSE system communication uses the following two MUSE services:
MUSE Generacq and MUSE Format.
2102027-010A MUSE™ NX 29
Page 30

Ambulatory (Holter)
Service Description
MUSE Generacq The MUSE Generacq service handles acquisitions from
other systems or devices. In MARS system to MUSE system
communication, it searches the reports share on the MARS system
for stored reports (files with the *.mrs file extension) and pulls the
reports to the MUSE system for processing.
MUSE Format The MUSE Format service(s) launch the MARS Formatter program.
The MARS Formatter program formats the output to match the
format from the MARS system.
Customer Requirements
The customer is responsible for supplying appropriate network connectivity, including
name resolution, between the MARS systems and the MUSE application server.
Configure MARS with the MUSE System
To configure the settings for MARS and the MUSE system interface, perform the
following procedures in the recommended order that they are listed:
1. "Configure the MARS System Network Settings" on page 30
2. "Verify the MARS Software Version" on page 30
3. "Record the IP Address or Host Name of the MARS System" on page 31
4. "Verify the MARS Reports Share" on page 31
5. "Activate the MARS to MUSE Option on the MARS System" on page 31
6. "Set Up the Site Information on the MARS System(s)" on page 31
7. "Add the MARS System to the MUSE Generacq Configuration" on page 35
8. "MARS Print Formatter" on page 36
9. "Create the site.ini File for the MARS Print Formatter" on page 37
10. "Copy the rusty.ini Configuration File from the MARS System" on page 38
Configure the MARS System Network Settings
For the MARS and MUSE systems to communicate, the MARS system must conform
to the network settings in effect at the installation site. Contact the site’s system
administrator to obtain required information or to assist in configuring the system.
Make sure that networking is enabled on all MARS systems that need to communicate
with the MUSE system. Additionally, confirm that Windows network settings on
the MARS systems are appropriately configured to communicate with the MUSE
application server.
Verify the MARS Software Version
To determine your MARS software version:
1. From the MARS system menu bar, select Help> About.
30 MUSE™ NX 2102027-010A
Page 31

The About window opens.
2. Record the software version listed on the About window.
Record the IP Address or Host Name of the MARS System
Record the computer name or IP address of each MARS system that will interface
with the MUSE system.
If you want to use the IP address, it must be static.
Verify the MARS Reports Share
Make sure that the MARS reports folder (default is c:\gemsit\reports) is shared and
has a share name of Reports. You must establish and give file and share permissions
of Full Control to the user account that is configured to start the MUSE Generacq
service on the MUSE application server.
Activate the MARS to MUSE Option on the MARS System
Ambulatory (Holter)
1. Locate the MARS software activator sheet.
2. From the MARS application menu bar, select System> System Setup> Software
Activators.
A list of task names opens along with their corresponding modes and statuses.
3. If the MARS to MUSE task name is disabled, click MARS to MUSE.
A list of available modes is displayed in the Change Mode To list box.
4. Click Activate.
5. Type the access code from the activator sheet into the Enter Activator Code
Here text box.
6. Click Save Changes.
If the code is incorrect or incomplete, an error message is displayed.
7. Select OK.
8. Click Quit to close the window.
9. Repeat steps "2" through "8" on all systems requiring MARS system to MUSE
system communication.
Set Up the Site Information on the MARS System(s)
Site setup is necessary to transfer Holter data to a MUSE system. The sites and
locations entered in each MARS system must match the sites and locations used on
the MUSE system.
NOTE:
Contact the MUSE system owner for the site and location information you
need to use for the MARS system.
Repeat the following steps for each MARS system that is communicating with the
MUSE system.
2102027-010A MUSE™ NX 31
Page 32

Ambulatory (Holter)
1. From the MARS main window, select System> System Setup> Site.
The System: Site and Locations Setup window opens.
2. Select the appropriate Site #.
3. Enter the corresponding Site Name.
4. Select the appropriate Location #.
5. Enter the corresponding Location Name.
6. Click Add.
7. Repeat steps "2" through "6" as necessary.
8. Click OK.
9. At the Changes made. Save them? prompt, click Yes to save your changes.
Schedule a System Shutdown
1. Log on to the MUSE application server as an administrator.
2. In the MUSE application, go to System> Setup.
3. In the Setup window, select System.
4. Right-click on the Product name and select Shutdown System.
The Shutdown System window opens.
5. Select the Shutdown Type.
• Select Full to close the MUSE client application and stop MUSE services.
32 MUSE™ NX 2102027-010A
Page 33

• Select Partial to disconnect all remote connections to the MUSE clients. The
MUSE clients and the MUSE services continue to run.
NOTE:
If the MUSE application stays open on a remote client workstation, the
application disconnects from the MUSE server.
6. Select the time for the Shutdown Delay.
7. Select Activate Shutdown.
The top of the MUSE client application shows when the shutdown occurs.
Verify or Add the Holter Data Storage and eDoc Connect Options
1. Go to Control Panel> Programs> Programs and Features.
Ambulatory (Holter)
2. Right-click on MUSE and select Change.
3. On the Welcome to the MUSE Setup Wizard window, select Next >.
4. Select Next > until you reach the Select Options screen.
5. On Select Options screen, view the eDoc Connect and Holter Data Storage
options.
• If the option is enabled (checked), select Cancel to exit the installation wizard.
• If the option is disabled (unchecked), check the box for the eDoc Connect
and/or the Holter Data Storage option and complete the modification to the
installed MUSE system configuration.
NOTE:
If the customer has not purchased the eDoc Connect option, it must only be
temporarily enabled for the setup of the CardioDay v2.5. This option should
be disabled once the CardioDay v2.5 has been setup.
6. Select Next > to bypass the Select Features screen. No changes to features
7. On the MUSE Services Configuration screen, enter the Background User
Password.
8. Select Next >.
9. Enter the Options Configuration Password. The Serial Number should be prepopulated. If you need to manually enter the serial number, refer to your Product
Activation Sheet. Then, select Next >.
NOTE:
Only a qualified GE Healthcare service representative has access to the
Options Configuration Password. This password cannot be provided to
customers.
2102027-010A MUSE™ NX 33
Page 34

Ambulatory (Holter)
10. Select Next >.
11. Select Next > to confirm installation with the modified settings. The Modifying
MUSE screen displays installation progress.
12. On the Modify Complete screen, select Close.
Cancel the System Shutdown
1. Go to Services.
2. Right-click on the MUSE service and select Start.
This starts the MUSE MT host service and allows you to log on.
3. Log on to the MUSE application on the MUSE application server.
The application displays the current shutdown status at the top of the window.
4. In the MUSE application, go to System> Setup.
5. Select System.
6. Right-click on the Product name and select Shutdown System.
7. In the Shutdown System window, select Cancel Shutdown.
34 MUSE™ NX 2102027-010A
Page 35

If the MUSE services were stopped, they are now restarted and remote
connectivity is restored.
The system does not automatically notify users that the MUSE system is
available.
Add the MARS System to the MUSE Generacq Configuration
To ensure the MUSE system can locate and communicate with the MARS system(s),
use the following procedures to add, modify, or remove paths to the MARS system(s)
as needed.
Add the Path of Each MARS System to the MUSE Database
Complete the following procedure to add the path of each MARS system to the MUSE
database.
1. From within the MUSE application, go to Setup.
2. Select Share Folder.
Ambulatory (Holter)
The list of existing Share Folders is displayed.
The Share Folder option within MUSE is where MUSE Generacq folders and file
name filters are configured.
3. Select Action> New.
The Share Folder Properties dialog opens.
4. Complete the fields as described in the following table:
Field Task
Entry Enter the UNC path of the MARS reports share on the MARS system,
for example \\servername\reports.
File Name Filter Enter *.MRS.
Profile Name Select None.
5. Select OK.
Modify an Existing Share Folder Entry
The following procedure can be used to modify an existing Share Folder entry.
1. From within the MUSE application, go to Setup.
2. Select Share Folder.
The list of existing share folders is displayed.
3. Right-click on the Share Folder you want to modify and choose Properties.
The Share Folder Properties window opens.
4. Complete the fields as described in the following table:
2102027-010A MUSE™ NX 35
Page 36

Ambulatory (Holter)
5. Select OK.
Remove an Existing Share Folder Entry
The following procedure can be used to delete an existing Share Folder entry if
necessary.
1. From within the MUSE application, go to Setup.
2. Select Share Folder.
Field Value
Entry Enter the UNC path of the MARS reports share on the MARS system,
for example \\servername\reports.
File Name Filter Enter *.MRS.
Profile Name Select None.
The list of existing share folders is displayed
3. Right-click on the share folder you want to remove and choose Delete.
MARS Print Formatter
The MARS Print Formatter allows Holter reports that are viewed and printed from
the MUSE system to look the same as when they are printed from the MARS system.
Starting with the MUSE system, the MARS Print Formatter is automatically installed
when the MUSE application is installed on the MUSE application server.
The version of the MARS Print Formatter installed with the MUSE system is MARS v8.0
SP7. The print formatter is backward compatible with previous versions of MARS,
however it may not be forward compatible. If the MARS Print Formatter version is
later than v8.0 SP7, you may need to install it to ensure compatibility with MARS
Holter reports from MARS versions newer than MARS v8.0 SP7.
Uninstall an Older Version of the MARS Print Formatter
An updated version of the MARS Print Formatter is automatically installed during the
MUSE system installation process. These steps tell you how to uninstall the MARS Print
Formatter version older than v8.0 SP7.
1. Log on to the MUSE application server as an administrator.
2. Go to Windows Control Panel> Programs> Programs and Features.
3. Select MUSE-MARS and choose Uninstall.
The MARS InstallShield Wizard is displayed and prompts you to confirm the
uninstall.
4. Select OK.
5. At the InstallShield Wizard Complete screen, click Finish.
36 MUSE™ NX 2102027-010A
Page 37

6. Confirm that the <drive>:\gemsit folder no longer exists, where <drive>is
the is the letter of the drive on which the MARS Print Formatter software was
previously installed.
If the <drive>:\gemsit folder still exists, rename or delete it.
Create the site.ini File for the MARS Print Formatter
Use the following instructions to create the site.ini file on the MUSE Application
server. The site.ini file is used by the MARS Print Formatter for outputting the MUSE
site and location name on MARS formatted reports. If these steps are not performed,
the MARS formatted reports viewed and printed from the MUSE system will show
Unknown for site names and locations.
NOTE:
This process will need to be repeated each time a MUSE site or location that is
used by a MARS formatted Holter report is added to MUSE system.
1. Log on to the MUSE application server as the MUSE Administrator user.
Ambulatory (Holter)
2. Insert the MUSE installation media into the optical drive of the system.
If any Autorun or AutoPlay screens appear, close or cancel them.
3. Browse the optical drive in Windows Explorer and perform one of the following:
• If the MUSE Application and Support DVD is inserted, navigate to the \MUSE
Support\MARS Site INI Update folder.
• If the MUSE Support ISO is being used, navigate to the \MARS Site INI Update
folder.
4. Copy SiteIniUpdate.exe from the MUSE support media to the location where the
MUSE application is installed. The default location of the MUSE application is: C:
\Program Files (x86)\MUSE.
5. Run Siteiniupdate.exe from the MUSE installation folder using Run as
Administrator.
When Siteiniupdate.exe runs, a command prompt window will open and close.
There will be no on-screen messages if it completes successfully.
6. Verify the C:\gemsit\var\MarsNT\system\site.ini is created or updated.
The contents of the file will reflect the MUSE site and location configuration of the
MUSE system. See the following site.ini file basics.
site.ini File Basics
The site.ini file is made up of at least three sections.
• The [Site List] section lists all of the site numbers.
• Each site will have a [Site] section that lists the location numbers and the site
name. If there are multiple sites, there will be multiple [Site] sections.
2102027-010A MUSE™ NX 37
Page 38

Ambulatory (Holter)
• Each site and location combination will have its own [Site Location] section
containing the location name. If there are multiple locations for each site,
there will be multiple [Site Location] sections.
Following is an example of a site.ini file:
[Site List]
Site Numbers= 1 2
[Site 1]
Location Numbers= 1 2
Site Name= "Memorial Hospital"
[Site 1 Location 1]
Location Name= "Holter Scanning"
[Site 1 Location 2]
Location Name= "ECG Department"
[Site 2]
Location Numbers= 1 2
Site Name= "General Hospital"
[Site 2 Location 1]
Location Name= "Mary’s Office"
[Site 2 Location 2]
Location Name= "John’s Office"
Copy the rusty.ini Configuration File from the MARS System
To maintain proper MARS Holter report formatting on the MUSE system, copy the
Rusty.ini configuration file from the primary MARS Server (or standalone workstation)
to the MUSE system.
This file is located in the default installation folder on the MARS system: C:\gemsit\var
\MarsNT\system.
This task should be completed any time there are changes to the MARS system
configuration.
Disable the eDoc Connect Option
Disable the eDoc Connect option if the customer has not purchased eDoc Connect.
1. "Schedule a system shutdown."
2. Go to Control Panel> Programs> Programs and Features.
3. Right-click on MUSE and select Change.
4. On the Welcome to the MUSE Setup Wizard window, select Next >.
5. Select Next > until you reach the Select Options screen.
6. On Select Options screen, uncheck the eDoc Connect option.
7. Select Next > to bypass the Select Features screen. No changes to features
38 MUSE™ NX 2102027-010A
Page 39

Ambulatory (Holter)
8. On the MUSE Services Configuration screen, enter the Background User
Password.
9. Select Next >.
10. Select Next > to confirm installation with the modified settings. The Modifying
MUSE screen displays installation progress.
11. On the Modify Complete screen, select Close.
12. "Cancel the system shutdown."
System Checkout
To ensure that the MARS system to MUSE system communication is functioning
properly, you need to save a report on each MARS workstation, send those reports to
the MUSE application server, and then retrieve and print those reports on the MUSE
application server.
Save a Report on the MARS System
Complete the following steps to save a report on the MARS system. These steps are
performed on the MARS system.
1. Click the Patient Select icon.
2. In the Patient Select window, select Holter from the Data Type list.
3. Select a patient in the list.
4. Click the Patient Information icon.
2102027-010A MUSE™ NX 39
Page 40

Ambulatory (Holter)
5. Verify that the Site and Location information is filled in for this patient.
6. Click the Report Review icon.
7. Click Save Report.
The following message is displayed: Report successfully stored.
8. Click OK.
9. Click Close.
The Report Review tool closes.
Send a MARS Holter Report to the MUSE System
Complete the following steps to send a MARS report to the MUSE system. These steps
are performed on the MARS system.
1. Click the Patient Select icon.
2. In the Patient Select window, select Stored Reports from the Data Type list.
3. Select the stored report you saved using the steps in "Save a Report on the MARS
System" on page 39.
4. Click Tools.
5. Click Store to MUSE.
The following message is displayed: You have selected 1 file(s) for MUSE
storage. Are you sure you want to store the selected file(s) to MUSE?
6. Click Yes.
The following message is displayed: 1 report(s) queued for storage to MUSE.
7. Click OK.
8. After a brief delay, verify that the report is listed as Stored to MUSE.
NOTE:
If the Delete Reports After Transfer to MUSE option is enabled on the MARS
system, the patient report will automatically be removed from the Stored
Reports list.
9. Click Close.
View a MARS Holter Report in the MUSE Editor
With the MUSE system there is a Report Preview tab available within the MUSE Editor.
This Report Preview displays the Holter Report as it would look if printed from the
MARS system.
1. Open the Holter report stored to the MUSE system using the steps in "Send a
MARS Holter Report to the MUSE System" on page 40.
2. Verify the Report Preview tab displays the MARS Holter report.
40 MUSE™ NX 2102027-010A
Page 41

NOTE:
Be aware of the following when viewing Holter reports on the MUSE system:
• Created reports are not displayed in the Report Preview tab until the
associated electronic document data is manually imported.
• Holter reports acquired by earlier versions of the MUSE system cannot be
previewed until they have been opened in the MUSE Editor at least once.
The following message displays the first time you open a Holter report in
the MUSE system that does not have a Report Preview: The Full Report
is currently not present for this test, but will be available the next time
the study is opened in the editor.
Print the MARS Holter Reports from the MUSE System
1. Select the Holter report from the MUSE Edit List.
2. On the tool bar, click Print Test.
Ambulatory (Holter)
3. From the Available Printers list, select a Laser printer or PDF Folder device.
4. Click OK.
5. Verify that the report was generated, then confirm that it is formatted properly
Troubleshooting
Symptom Possible Cause Recommendations
Unable to store tests from the
MARS system to the MUSE
system.
based on the configuration:
• If the MARS Format Holter specific format setting is enabled, the report should
look like a MARS report.
• If the MARS Format Holter specific format setting is not enabled, the report
should look like a MUSE report.
The Holter Data Storage
option is not enabled on the
MUSE system.
The MARS to MUSE option is
not activated on the MARS
system.
Enable the Holter Data
Storage option on the MUSE
system.
Activate the MARS to MUSE
option on the MARS system. The
MARS to MUSE option must be
activated on each MARS system
that needs to store data to the
MUSE system.
The user account configured
to start the MUSE Generacq
service on the MUSE
application server does not
have access to the reports
share on the MARS system.
The reports share on the MARS
system is not defined correctly.
2102027-010A MUSE™ NX 41
Ensure the user account
configured to start the MUSE
Generacq service on the MUSE
application server has access
to the reports share on the
MARS system.
Ensure the reports share on the
MARS system is set up correctly.
Page 42

Ambulatory (Holter)
Symptom Possible Cause Recommendations
The Site and/or Location
on MARS reports display as
Unknown when viewed on the
MUSE system.
The following message appears
when attempting to view a
recently acquired Holter report
in the MUSE application: The
Holter record acquired for
patient is currently checked
out by Admin.
The following message appears
when attempting to view a
Holter report that was acquired
before the MUSE system was
upgraded: The Full Report is
currently not present for this
test, but will be available the
next time the study is opened
in the editor.
The Share Folder is not set up
correctly for the MARS system
in the MUSE System Setup.
The site.ini has not been
correctly configured on the
MUSE system for the MARS
Print Formatter.
The Holter report is being
processed by the MARS Print
Formatter.
The Holter report has not been
processed by the MARS Print
Formatter yet.
Ensure the Share Folder setup
in MUSE System Setup is
correctly defined.
Ensure the site.ini exists and is
correctly defined on the MUSE
system.
Wait for the test to be
processed by the MUSE system
and MARS Print Formatter and
then open the test in the MUSE
application.
Wait for the test to be
processed by the MARS Print
Formatter and then open it
again in the MUSE application.
SEER 1000 iOS/Mobile App
For additional information on the SEER 1000 Recorder, see SEER™ 1000 ECG Recorder
and Mobile Application Operating Manual.
SEER 1000 iOS/Mobile App Option for MUSE Orders
42 MUSE™ NX 2102027-010A
Page 43

Prerequisites
Ambulatory (Holter)
The SEER 1000 Holter iOS/Mobile App retrieves open Holter orders from the MUSE
system, allowing the transfer of patient demographic and order information to the
SEER 1000 recorder.
If your SEER 1000 iOS/Mobile App is configured to query and retrieve patient
demographic and order data from the MUSE system, the Query Orders option is
displayed in the Add Patient window. Select Query Orders to view the Order List.
NOTE:
Only MUSE orders for Holter test types with an OPEN status are displayed. If no
MUSE orders meet this criteria, the list will be empty.
The SEER 1000 iOS/Mobile App MUSE Order option requires the MUSE Web API to
communicate with the MUSE system.
The MUSE systems must be configured with the required components:
• HIS Order Interface (This is an Enterprise Configuration option.)
• MUSE Web API
• MUSE system network hostname
• MUSE system network port for HTTPS service endpoint (default is 443)
• MUSE system user account and password
NOTE:
It is recommended that a dedicated MUSE system user is created for
communication to the MUSE orders interface.
Consult your local GE Healthcare service representative for proper MUSE system
configuration settings.
Configure the MUSE Orders for the SEER 1000 iOS/Mobile App
1. Log in to the SEER 1000 application as an administrator. Select Administration in
the upper right corner and enter the administrator password.
2. Select Order Settings from the menu bar at the bottom of the window.
2102027-010A MUSE™ NX 43
Page 44

Ambulatory (Holter)
3. Enter the MUSE SERVER DETAILS to connect to the MUSE Web API interface.
a) For the URL, enter the base URL for the MUSE Web API HTTPS service
endpoint followed by the port number (default is 443). This URL has to
match the URL created on the MUSE Web Server certificate.
Only URLs with a hostname are support, not IP addresses. For example,
the URL address https://MUSEComputer.domain.com:443 is permitted,
whereas https://192.168.0.20:443 is not.
b) For User name and Password, enter the MUSE service account login
information.
c) For Site number, enter the site number.
d) Enable the Update order status option.
The Update order status button in the MUSE configuration settings controls
if the order status is changed when the order is downloaded to a recorder
and the recording is started.
• If this setting is switched OFF, the order state remains OPEN and will not
change when a recording is started from this MUSE order. Orders with an
OPEN state remain in the results of subsequent MUSE queries. Additional
recordings may be started from this order in this workflow mode.
• If this setting is switched ON when a recording is started from a MUSE
order, the MUSE order changes from an OPEN state to a PENDING state.
Only MUSE orders that are flagged in an OPEN state are included in
MUSE query operations. Orders with the PENDING state do not display
44 MUSE™ NX 2102027-010A
Page 45

Ambulatory (Holter)
in subsequent MUSE queries. The MUSE order status must be manually
updated after sending a report to MUSE.
e) For Timeout in Sec., adjust the value.
The MUSE orders timeout setting by default is set to 30 seconds. This is the
configured timeout for the open MUSE Holter orders to be received from the
configured MUSE system.
This value can be adjusted for system environments with a large number
of Holter test types with an OPEN status or if network performance is
inadequate.
4. Select Test Connection to test the configured MUSE orders connection through
the MUSE Web API interface.
The test returns a MUSE connection successful or MUSE connection failed
message.
5. Select Save.
Troubleshooting
Issue Cause Recommendation
MUSE Connection Test failure
during setup.
The Query Orders button
missing from the Add Patient
tab.
NOTE:
Typically, the CA certificate automatically installs on the SEER 1000
device. If the CA certificate does not automatically install, see https://
support.apple.com/en-us/HT204477 for additional details.
Improper URL. The URL to be entered needs to
be the base URL for the MUSE
Web API followed by the port
number. For example, http://
MUSEComputer.domain.com:443.
Wrong hostname Confirm the proper hostname
of the MUSE system.
Hostname to IP address lookup
(DNS) not functioning.
Wrong hostname port used for
MUSE Web API.
Confirm hostname resolution/
lookup is working on the iOS
device.
The proper listening hostname
port number of the MUSE Web
API service (default 443) must
be included as part of URL
configuration.
2102027-010A MUSE™ NX 45
Page 46

Ambulatory (Holter)
Issue Cause Recommendation
No MUSE patient/exam orders
displayed in the Order List.
The MUSE web site or
application pool are not
running in IIS.
User name or password is not a
valid MUSE user.
Other network communication
fault or port blocking.
Improper Site Number in the
configuration.
No Holter orders with the OPEN
order status.
Confirm with the MUSE
administrator or GE Healthcare
service representative that the
MUSE Web API and application
pool services are configured
properly and running on in IIS
on the MUSE web server.
Confirm that the configured
user and password match that
of a valid MUSE User.
Check for other network
communication faults,
restrictions, and firewalls.
Confirm the presence of MUSE
orders with proper site number.
Confirm the presence of MUSE
orders with:
Test Type=Holter
Status=OPEN
46 MUSE™ NX 2102027-010A
Page 47

CASE/CardioSoft
The CASE System (Cardiac Assessment System for Exercise) runs on GE Healthcare
hardware and analyzes cardiac functions for Exercise/Stress tests and Resting
ECGs. CardioSoft performs the same tests, but runs on customer-provided personal
computers.
CASE/CardioSoft
3
Patient list and orders can be downloaded from the MUSE system. The final report
and ECG reports can be transferred to the MUSE system.
The information provided applies to both CASE and CardioSoft systems.
Data Transmission
The CASE/CardioSoft system sends tests to a shared folder on the MUSE application
server. The MUSE Generacq service monitors this shared folder for files and pulls
2102027-010A MUSE™ NX 47
Page 48

CASE/CardioSoft
them to the MUSE system. Tests are formatted for the MUSE system and stored in the
database.
The CASE/CardioSoft system can get patient tests or order information from the MUSE
system with the MUSE Web API.
CASE and MUSE System Compatibility Matrix
CASE
Software
Version
6.x Bimini (1) Windows NT
6.x Radisys (2) Windows NT
6.x Radisys (3) Windows XP
6.x-7.x Kontron (4) Windows XP
6.x-7.x Kontron (5) Windows 7
7.x Advantech (6) Windows 8.1
7.x Advantech (7) Windows 10 2018 Full MUSE operability
CASE Platform
(ID)
Operating
System
32-bit
32-bit
32-bit
32-bit
Enterprise 64bit
Professional
64-bit
Years
Produced
2001-2003 None
2003-2004 eDOC only
2005-2010 eDOC only
2011-2015 eDOC only
2011-2015 Full MUSE operability
2016-2018 Full MUSE operability
Interoperability with MUSE
Purchasable upgrade to
Windows 7 Enterprise 64-bit or
to Advantech Windows 10 CASE
v7.x
Customer Requirements
The customer must have the applicable network connectivity and name resolution
between the CASE/CardioSoft system and the MUSE application server.
Considerations for Multiple CASE Systems
With multiple CASE/CardioSoft systems, use the same Windows CASE8000 user name
and password.
If you add a new CASE/CardioSoft system to an existing MUSE system with multiple
CASE/CardioSoft systems, some of the steps in this section may have already been
completed.
48 MUSE™ NX 2102027-010A
Page 49

Communication Levels
Configure the CASE/CardioSoft to MUSE system interface with one of the three
communication levels to share data for CASE/CardioSoft reports (Level 1), MUSE
reports and patient data (Level 2), or patient orders (Level 3).
Each level builds on the features and requirements of the previous level. For example,
for MUSE reports and patient data (Level 2), the CASE/CardioSoft to MUSE interface
must have a shared folder and a network connection (MUSE Web API) with the MUSE
Exercise Testing Data Storage option enabled.
Table 1: CASE/CardioSoft Communication Levels with the MUSE System
CASE/CardioSoft
Communication Level
Details
Data Direction CASE/CardioSoft
Transfer Method Shared folder Network Network
Required Components MUSE Exercise Testing
1
For confirmed MUSE reports and patient data, you must install the MUSE web client. See the MUSE
Cardiology Information System Installation and Upgrade Manual for instructions.
2
For patient order data, you must install and configure the HIS Orders Interface option. The HIS
Orders Interface is configured by a trained HL7 implementation person. Contact a GE Healthcare
HL7 service representative for more information.
Level 1:
CASE/CardioSoft
Reports
MUSE
→
Data Storage option
Level 2:
MUSE Reports,
Patient Data
MUSE/CardioSoft
CASE
→
MUSE Web API
MUSE → CASE/
1
Interface option
Configure CASE/CardioSoft with the MUSE System
To configure the settings for the CASE/CardioSoft and MUSE system interface,
perform the following procedures in the recommended order that they are listed:
1. "Schedule a System Shutdown" on page 50
Level 3:
Order Data
CardioSoft
HIS Orders
2
2. "Verify or Add the Stress Exercise Option to the MUSE System" on page 51
3. "Cancel the System Shutdown" on page 52
4. "Set Up the CASE8000 User Account" on page 53
a. "Create the CASE8000 User in Windows" on page 53
b. "Create the MUSE Acq Users Local Windows Group" on page 54
c. "Create the CASE8000 Windows Share" on page 56
d. "Create the CASE8000 User in the MUSE System" on page 57
5. "Configure the CASE/CardioSoft System Network Settings" on page 58
2102027-010A MUSE™ NX 49
Page 50

CASE/CardioSoft
6. "Configure the MUSE System Settings on the CASE/CardioSoft System v6.x without
DCP (Older Version)" on page 58
7. "Configure the MUSE System Settings on the CASE/CardioSoft System v7.x" on
page 61
8. "Import the Server CA Certificate" on page 65
9. "Configure CASE/CardioSoft Reports on the MUSE File Server" on page 69
Schedule a System Shutdown
1. Log on to the MUSE application server as an administrator.
2. In the MUSE application, go to System> Setup.
3. In the Setup window, select System.
4. Right-click on the Product name and select Shutdown System.
The Shutdown System window opens.
5. Select the Shutdown Type.
• Select Full to close the MUSE client application and stop MUSE services.
• Select Partial to disconnect all remote connections to the MUSE clients. The
MUSE clients and the MUSE services continue to run.
NOTE:
If the MUSE application stays open on a remote client workstation, the
application disconnects from the MUSE server.
6. Select the time for the Shutdown Delay.
7. Select Activate Shutdown.
50 MUSE™ NX 2102027-010A
Page 51

The top of the MUSE client application shows when the shutdown occurs.
Verify or Add the Stress Exercise Option to the MUSE System
Only a qualified GE Healthcare service representative can do this procedure.
1. Go to Control Panel> Programs> Programs and Features.
2. Right-click on MUSE and select Change.
3. On the Welcome to the MUSE Setup Wizard window, select Next >.
4. Select Next > until you reach the Select Options screen.
5. On Select Options screen, view the Exercise Testing Data Storage option.
• If the option is enabled (checked), select Cancel to exit the installation wizard.
CASE/CardioSoft
• If the option is disabled (unchecked), check the box for the Exercise Testing
Data Storage option and complete the modification to the installed MUSE
system configuration.
6. Select Next > to bypass the Select Features screen. No changes to features
7. On the MUSE Services Configuration screen, enter the Background User
Password.
8. Select Next >.
9. Enter the Options Configuration Password. The Serial Number should be prepopulated. If you need to manually enter the serial number, refer to your Product
Activation Sheet. Then, select Next >.
NOTE:
Only a qualified GE Healthcare service representative has access to the
Options Configuration Password. This password cannot be provided to
customers.
10. Select Next >.
11. Select Next > to confirm installation with the modified settings. The Modifying
MUSE screen displays installation progress.
2102027-010A MUSE™ NX 51
Page 52

CASE/CardioSoft
12. On the Modify Complete screen, select Close.
Cancel the System Shutdown
1. Go to Services.
2. Right-click on the MUSE service and select Start.
This starts the MUSE MT host service and allows you to log on.
3. Log on to the MUSE application on the MUSE application server.
The application displays the current shutdown status at the top of the window.
4. In the MUSE application, go to System> Setup.
5. Select System.
6. Right-click on the Product name and select Shutdown System.
7. In the Shutdown System window, select Cancel Shutdown.
If the MUSE services were stopped, they are now restarted and remote
connectivity is restored.
The system does not automatically notify users that the MUSE system is
available.
52 MUSE™ NX 2102027-010A
Page 53

Set Up the CASE8000 User Account
If the CASE8000 user does not already exist, create the CASE8000 user account in
Windows and the MUSE system, then add the CASE8000 user to the MUSE Acq Users
group.
A CASE8000 user account is requried in the MUSE application if you want to transfer
exercise/stress or resting ECG tests. The CASE8000 user account must be part of the
MUSE Acq Users group to access the MUSE system to transfer MUSE reports from a
CASE/CardioSoft system to the MUSE system.
A CASE8000 user account is not necessary for orders transferred via DCP.
Create the CASE8000 User in Windows
If a CASE8000 user does not already exist on the MUSE system, create a local user
named CASE8000 on the MUSE application.
1. In Windows, go to Computer Management.
CASE/CardioSoft
2. From the left pane, select Local Users and Groups> Users.
3. Right-click in an open area and select New User.
4. In the New User window, enter the user details.
Field Description
User name Enter CASE8000.
2102027-010A MUSE™ NX 53
Page 54

CASE/CardioSoft
Field Description
Full name Enter CASE8000.
Description Enter the description: User for the CASE
system.
Password Enter case!8000.
NOTE:
The password can be modified, but
cannot exceed 15 characters. If the
password changes, share the modified
password with GE Healthcare Service for
support.
Confirm Password Enter the password again to confirm correct
entry.
User must change password at next logon Not selected.
User cannot change password Check
Password never expires Check
Account is disabled Not selected.
5. Select Create.
6. Close the Computer Management window.
Create the MUSE Acq Users Local Windows Group
To transfer MUSE reports from a CASE/CardioSoft system to the MUSE system, you
need to give CASE/CardioSoft users access to the MUSE system. The first part of this
access is the creation of the MUSE Acq Users local Windows group.
If one does not already exist, create a local group on the MUSE application server
named MUSE Acq Users.
1. In Windows, go to Computer Management.
2. From the left pane, select Local Users and Groups> Groups.
3. Look for the MUSE Acq Users in the display list.
• If the MUSE Acq Users group displays, double-click to view the properties.
Verify that CASE800 is a member of this group.
• If the MUSE Acq Users does not display in the list, right-click in the open area
and select New Group.
4. In the New Group window, enter the group details.
54 MUSE™ NX 2102027-010A
Page 55

CASE/CardioSoft
Field Description
Group name Enter MUSE Acq Users.
Description Enter the description: Users can access the
MUSE acquisition share folder.
2102027-010A MUSE™ NX 55
Page 56

CASE/CardioSoft
Field Description
Members 1. Select Add.
2. In the Select Users, Computer, Service
Accounts, or Groups window, complete
the following fields:
• For the Select this object type field,
leave the default selection.
• For From this location, select the
MUSE application server.
• For Enter the object names to
select, enter CASE8000.
3. Select OK.
5. Select Create.
6. Close the Computer Management window.
Create the CASE8000 Windows Share
Create a user share for CASE8000 to transfer MUSE reports from a CASE/CardioSoft
system to the MUSE system.
By default, the MUSE Generacq service on the MUSE application server is configured
to check the acq$ folder (default location is <drive>:\Muse\acq$) for incoming files to
process. In order to transfer records from the CASE system to the MUSE system, this
location must be shared.
NOTE:
The C: drive is the default for the SQL database server. If the MUSE system is
on a single server, the D: drive is the default.
1. Go to <drive>:\Muse\acq.
2. Right-click on the folder and select Properties.
3. From the acq Properties window, select Sharing> Advanced Sharing...
4. Select Share this folder.
5. In the Share name field, enter ACQ$ or CASE8000.
6. Select Permissions and add the CASE8000 user and the MUSE Acq Users group.
a) Type CASE8000 or select the CASE user from the drop-down list. Select Add.
b) Type MUSE Acq Users or select the user group from the drop-down list.
Select Add.
7. For Permission Level, select Read/Write or Change (depending on the OS) for
each added user/group.
8. If the Everyone group is listed with share permissions, remove it.
9. When complete, select Share.
56 MUSE™ NX 2102027-010A
Page 57

10. The File Sharing window displays a confirmation message that the folder has
been shared. Select Done.
11. This folder should be shared with two user groups: ACQ$ and CASE8000. Repeat
steps "5"-"10" to ensure that both user groups have access and permissions with
the acq folder.
12. Select Close to exit acq Properties.
Create the CASE8000 User in the MUSE System
If a CASE8000 user does not already exist on the MUSE system, create a user named
CASE8000 on the MUSE application.
1. Go to System> Setup.
2. Under System, select Users.
3. Select Action> New.
CASE/CardioSoft
4. Enter the following information:
NOTE:
You may use a different password if desired, however, the password specified
on the CASE system must match the password used here.
Category Field Value
General
Last Name 8000
First Name CASE
MUSE User Name CASE8000
Windows User Name <servername_or_domain>
Account is Enabled Check
MUSE Password case!8000
\CASE8000
For local accounts, use the
name of the MUSE file server
for server name or domain.
NOTE:
The password can be
modified, but cannot
exceed 15 characters. If
the password changes,
share the modified
password with GE
Healthcare Service for
support.
User cannot change
password
2102027-010A MUSE™ NX 57
Check
Page 58

CASE/CardioSoft
Category Field Value
Password never expires Check
Active Sites Select sites to grant user
access.
Advanced
User ID Enter an available numerical
identifier for a system user.
Role View Only
Job Titles Deselect all boxes.
Display User in Personnel
Lists
Leave as is. Default is
checked.
5. Select OK.
Configure the CASE/CardioSoft System Network Settings
For the CASE/CardioSoft systems and MUSE system to communicate, the CASE/
CardioSoft systems must conform to the facility's network settings. Contact the
site’s system administrator to obtain required information and assist in system
configuration.
Make sure the network is enabled on all CASE/CardioSoft systems that communicate
with the MUSE system. Windows network settings on the CASE/CardioSoft systems
must be appropriately configured to communicate with the MUSE application and the
MUSE website via TCP/IP.
Configure the MUSE System Settings on the CASE/CardioSoft System v6.x without DCP (Older Version)
The MUSE system configuration on the CASE/CardioSoft system must be complete
before you can fully integrate CASE/CardioSoft systems with the MUSE system.
1. Start the CASE/CardioSoft application.
2. Select System Configuration.
3. In the System Configuration window, select the MUSE tab.
58 MUSE™ NX 2102027-010A
Page 59

CASE/CardioSoft
4. Complete the Setup for MUSE section by performing the tasks in the table
following the screen capture.
Section Field Task
Setup for MUSE
Request MUSE Data Check
MUSE Web Server Enter the name or IP address of the MUSE
application server.
MUSE User Name Enter CASE8000.
NOTE:
If the MUSE website is configured with
a default domain, and a local case8000
user is being used, you may need
to specify the MUSE User Name as
<muse_server_name>\case8000 where
<muse_server_name> is the computer
name of the MUSE application server.
MUSE Password Enter the password case!8000.
NOTE:
The password can be modified, but
cannot exceed 15 characters. If the
password changes, share the modified
password with GE Healthcare Service for
support.
2102027-010A MUSE™ NX 59
Page 60

CASE/CardioSoft
Section Field Task
Port number Enter the port for the website on the MUSE
system. This is typically 80.
Store procedure for
MUSE
Port number and SSL
Connection
Internet Browser Use the browse button to find the executable
Data transfer to
MUSE via Shared
Directory
Shared Directory Enter the UNC path of the shared folder on
Directory User Name Enter CASE8000.
Check the SSL Connection box and enter the
SSL port number for the MUSE web server. The
SSL port is typically 443.
for Internet Explorer (IE). IE is typically located
in the following path: C:\Program Files
\Internet Explorer\Iexplore.exe. Adjust the
path accordingly for non-English operating
systems.
NOTE:
While multiple browsers are supported
for the MUSE web client, the current
release of the CASE/CardioSoft system
only supports the use of IE.
Select this radio button.
the MUSE application server. This is typically
\\<muse_server_name>\case8000 where
<muse_server_name> is the computer name
of the MUSE application server.
Directory Password Enter the password case!8000.
NOTE:
The password can be modified, but
cannot exceed 15 characters. If the
password changes, share the modified
password with GE Healthcare Service for
support.
Additional system
information (right
pane)
Location Number Enter or select the desired MUSE location for
the CASE/CardioSoft system. This location
should match the appropriate location defined
in the MUSE system.
Cart/Device Number Choose a unique device number for this
CASE/CardioSoft system (and all future CASE/
CardioSoft systems), to ensure that all records
sent to the MUSE system have unique file
names.
MUSE Software
Version
Select 7.2 and above from the drop-down list.
5. Select OK.
60 MUSE™ NX 2102027-010A
Page 61

NOTE:
For information regarding all other options on the MUSE tab of the System
Configuration window, see CASE/CardioSoft system documentation.
Configure the MUSE System Settings on the CASE/CardioSoft System v7.x
The MUSE system configuration on the CASE/CardioSoft system must be complete
before you can fully integrate CASE/CardioSoft systems with the MUSE system.
1. Start the CASE/CardioSoft application.
2. Select System Configuration.
3. In the System Configuration window, select the MUSE tab.
4. Enter the configuration details to interface with the MUSE system.
Figure 1: CASE/CardioSoft System Configuration for the MUSE System
CASE/CardioSoft
The configuration details how the system will interface with MUSE, how to store
data, location information, and additional configuration options.
2102027-010A MUSE™ NX 61
Page 62

CASE/CardioSoft
Section Field Task
Setup for MUSE
Enter how you will
be connecting to
the MUSE system.
No This must be unchecked to interface
with the MUSE system.
DCP Check this option if you want to connect
to the MUSE system with DCP.
Web API Check this option if you want to connect
to the MUSE system with the MUSE Web
API.
MUSE Web Server Enter the name or IP address of the
MUSE application server.
MUSE User Name Enter CASE8000.
NOTE:
For systems with the DCP
option that will be transferring
patient tests, you may need to
specify the MUSE User Name as
<muse_server_name>\case8000
where <muse_server_name> is
the computer name of the MUSE
application server.
MUSE Password Enter the password. The default value is
case!8000.
NOTE:
The password should match
the password of the CASE8000
Windows user. Make sure to
use the correct password if it is
was modified from the default
suggested value. Password cannot
exceed 15 characters and must be
shared with GE Healthcare Service
for support.
Port number Enter the port for the website on the
MUSE system. This is typically 80.
SSL Connection Check the SSL Connection box and
enter the SSL port number for the MUSE
web server. The SSL port is typically 443.
62 MUSE™ NX 2102027-010A
Page 63

Section Field Task
Internet Browser Use the browse button to find the
executable for Internet Explorer (IE).
IE is typically located in the following
path: C:\Program Files\Internet
Explorer\Iexplore.exe. Adjust the path
accordingly for non-English operating
systems.
NOTE:
CASE/CardioSoft
While multiple browsers are
supported for the MUSE web client,
the current release of the CASE/
CardioSoft system only supports the
use of IE.
Store procedure
for MUSE
Enter how to
save and store
data from CASE/
CardioSoft.
Location
information (right
pane)
No Data transfer to MUSE Uncheck to send patient data to the
MUSE system.
Save MUSE data to medium Select this button to save data to a CD/
DVD or USB. This external medium is
then connected to a MUSE workstation.
DCP Select this button to send data to the
MUSE system with DCP.
Data transfer to MUSE
directory
Shared Directory Enter the UNC path of the shared folder
Directory User Name Enter CASE8000.
Directory Password Enter the password case!8000.
MUSE Site Enter the MUSE site number for the
Location Number Enter or select the desired MUSE
Select this button to send data to a
shared folder connected to a MUSE
system
on the MUSE application server. This is
typically \\<muse_server_name>\acq
$ where <muse_server_name> is the
computer name of the MUSE application
server.
facility.
location for the CASE/CardioSoft
system. This location should match
the appropriate location defined in the
MUSE system.
Cart/Device Number Choose a unique device number for this
CASE/CardioSoft system (and all future
CASE/CardioSoft systems), to ensure
that all records sent to the MUSE system
have unique file names.
MUSE Software Version For CASE v7.x, select 8.0 and above
from the drop-down list.
2102027-010A MUSE™ NX 63
Page 64

CASE/CardioSoft
Section Field Task
Timeout in sec Select the timeout duration in seconds
for the amount of time before another
attempt is made to connect with the
MUSE system.
Additional options
(bottom pane)
Tests are "View Only" after
transfer to MUSE
Select this option to have patient tests
read-only on the CASE/CardioSoft
application and to use the MUSE system
to edit patient tests.
NOTE:
For information on the other options, see the CASE/CardioSoft system
documentation.
5. If you are connecting to the MUSE system by DCP, select the DCP tab. If you are
connecting with the MUSE Web API, continue to step "6".
Figure 2: CASE/CardioSoft System Configuration for DCP
a) Select Discover DCP Devices or enter the Server Address for the MUSE
system. The format is <MuseServerAddress:ServerPort/SendTest.
You can select Test Device Connection to verify that the CASE/CardioSoft
system is connected to the MUSE system.
64 MUSE™ NX 2102027-010A
Page 65

b) Select Restricted (MUSE) DCP Server.
6. Select OK to save your changes.
Import the Server CA Certificate
All MUSE Web interfaces now require HTTPS with certificates.
Import a copy of the CA cerificate file to each device communicating with MUSE.
Depending on configuration, web clients not on the same domain as the web server
may also require certificate importation.
NOTE:
Third party interfaces to the MUSE Web API will require similar certificate
importation, but are beyond the scope of this documentation and should be
discussed with the third-party vendor.
If the MUSE web client is on the same domain as the web server, you do not need to
import a certificate.
NOTE:
If the certificate is being modified, the binding may need to be updated.
For additional details, see the Update the Certificate Binding (Not for New
Installations) topic in the Troubleshooting chapter of the MUSE Cardiology
Information System Installation and Upgrade Manual.
CASE/CardioSoft
1. Start Microsoft Management Console (MMC) Tool by selecting Start> Run.
Enter MMC and select OK.
2. Select File> Add/Remove Snap-in...
a) From the Available snap-ins (left-side panel), select Certificates. Then,
select Add >.
2102027-010A MUSE™ NX 65
Page 66

CASE/CardioSoft
The Certificates snap-in option displays in the Select snap-ins (right-side
panel).
b) The Certificates snap-in window displays. Select Computer account and
select Next > .
c) Select Local computer: (the computer this console is running on).
66 MUSE™ NX 2102027-010A
Page 67

CASE/CardioSoft
d) Select Finish.
e) Select OK.
3. From the left panel, expand Certificates (Local Computer). Right-click on
Trusted Root Certification Authorities and select All Tasks> Import.
4. The Certificate Import Wizard opens. On the Welcome page, select Next.
5. Select Browse and navigate to the downloaded CA certificate file. Select Next >.
2102027-010A MUSE™ NX 67
Page 68

CASE/CardioSoft
6. Select Next >.
The Place all certificates in the following store option should be selected with
the identified Certificate store as Trusted Root Certifcation Authorities.
7. Select Finish.
8. A import confirmation message window displays. Select OK.
68 MUSE™ NX 2102027-010A
Page 69

Configure CASE/CardioSoft Reports on the MUSE File Server
To correctly format CASE/CardioSoft reports sent to the MUSE share folder, the MUSE
system must use the same report templates. CASE/CardioSoft report templates are
created on the CASE/CardioSoft systems and then copied to the MUSE system.
Refer to your CASE/CardioSoft system documentation for instructions on creating the
report templates.
CASE/CardioSoft
NOTE:
If the certificate is being modified, the binding may need to be updated.
For additional details, see the Update the Certificate Binding (Not for New
Installations) topic in the Troubleshooting chapter of the MUSE Cardiology
Information System Installation and Upgrade Manual.
1. After creating the templates on the CASE/CardioSoft system, copy the NARRATIV
folder from the CASE/CardioSoft system to removable media or a network share.
The default location is D:\CASE\NARRATIV or C:\CARDIO\NARRATIV.
2. Log on to the MUSE application server as MuseAdmin.
3. On the MUSE system, copy the NARRATIV folder from the removable media or
network share to a temporary location on the MUSE application server such as C:
\CASE1\NARRATIV.
NOTE:
If you are copying report templates from multiple CASE/CardioSoft
systems, create a separate temporary location for each system, such as C:
\CASE1\NARRATIV, C:\CASE2\NARRATIV, and so on.
4. On the MUSE system, open a command prompt.
5. Change to the location of the MUSE application files (default is C:\Program Files
(x86)\Muse).
6. Type this command with your defined parameters: loadtemplate -path:"<path
to narrativ folder>" -test:4 -lang:<language> -db:<dbname>. Use the table
below.
2102027-010A MUSE™ NX 69
Page 70

CASE/CardioSoft
Table 2: Command Options
Command Option Description
-path Required.
The path to the CASE/CardioSoft report templates.
For example: C:\CASE1\NARRATIV.
-lang Optional.
This is the report language.
If you do not include this switch, the language defaults to en (English).
The language you enter should match the language of the CASE
system.
See the following table for other language codes.
-db Optional.
Database name and prefix (for example Server\Instance.Prefix).
The default is \.MUSE.
Table 3: Language Codes
Code Language
da Danish
de German
en English
es Spanish
fi Finnish
fr French
it Italian
ja Japanese
nl Dutch
no Norwegian
ru Russian
sv Swedish
zh-chs Simplified Chinese
zh-cht Traditional Chinese
Examples:
• For an English language CASE system with a local MUSE database:
loadtemplate -path:"C:\CASE1\NARRATIV" -test:4
70 MUSE™ NX 2102027-010A
Page 71

CASE/CardioSoft
NOTE:
Notice that in this example neither the language nor the database name
was specified. Because the default language is English and the database
is local with a default prefix of MUSE, it was not necessary to specify either
of these in the command.
• For a Spanish language CASE system, a remote MUSE database named
SQLSERVER1, and a default prefix of MUSE: loadtemplate -path:"C:
\CASE1\NARRATIV" -test:4 -lang:es -db:SQLSERVER1\.MUSE
• For a Swedish language CASE system, a remote MUSE database, an instance
name of SQLSERVER1\MUSE, and a default prefix of MUSE: loadtemplate -
path:"C:\CASE1\NARRATIV" -test:4 -lang:sv -db:SQLSERVER1\MUSE.MUSE
7. Press Enter.
The templates are loaded into the MUSE database.
8. Repeat this procedure to load templates from each CASE/CardioSoft system as
desired.
NOTE:
If more than one CASE/CardioSoft system has the same Report Template
name, the last Report Template with that name loaded into the MUSE
database will be the Report Template used in the MUSE database. Use
unique Report Template names at the CASE/CardioSoft systems to avoid
overwriting report templates already loaded into the MUSE database.
9. Verify the report templates are loaded into the MUSE database.
a) Open a stress exercise test in the MUSE Editor.
b) Go to the Clerical tab and select the down arrow in the Report Template
drop-down list.
c) Verify the report templates loaded from the CASE/CardioSoft systems are
listed there.
System Checkout
After system setup, make sure the CASE/CardioSoft system to MUSE system
communication is set up correctly.
1. Verify that the CASE/CardioSoft system can transfer reports to the MUSE share
folder and that the MUSE system can import CASE/CardioSoft reports.
a) In CASE/CardioSoft application, select Local Database.
b) Highlight a patient name and select Examinations.
c) In the Select Test window, select a test record. Select Transfer to MUSE.
d) Select Save.
2102027-010A MUSE™ NX 71
Page 72

CASE/CardioSoft
e) Log on to MUSE and verify the test record displays in the MUSE system's Edit
List.
2. Test the web connection between the CASE/CardioSoft system and MUSE
system.
a) In the CASE/CardioSoft application, select MUSE Browser.
The CASE system launches with the specified web browser defined in the
System Configuration settings. The browser connects to the MUSE web
client home page.
b) Sign in to the MUSE web client with the CASE/CardioSoft username and
password.
c) Submit a request query and view the results to make sure the web
connection responds.
3. Verify that the CASE/CardioSoft system can view the patient list from the MUSE
system.
a) In the CASE/CardioSoft application, select New Test.
b) Review the patient list. Make sure the patient list is from the MUSE system
and not only the local CASE system.
4. Verify that the CASE/CardioSoft system can view open orders from the MUSE
system.
a) In the CASE/CardioSoft application, select New Test.
b) Select Order List.
c) Make sure that the open orders from the MUSE system display.
Troubleshooting
Symptom Cause Recommendation
Unable to view patients or
orders on the MUSE system
from the CASE/CardioSoft
system.
The MUSE User Name and/
or MUSE Password specified
in the Setup for MUSE on the
CASE/CardioSoft system is
incorrect.
The MUSE Web API stopped on
the MUSE application server.
Ensure the MUSE User Name
and/or MUSE Password are
entered correctly in the CASE
System Configuration.
Ensure the MUSE Web API
service is running.
The MUSE system currently
shutdown.
Unable to transfer tests from a
CASE/CardioSoft system to the
MUSE system.
72 MUSE™ NX 2102027-010A
The Exercise Testing Data
Storage option is not enabled
on the MUSE system.
Cancel the system shutdown.
Enable the Exercise Testing
Data Storage option on the
MUSE system.
Page 73

Symptom Cause Recommendation
CASE/CardioSoft
The Directory User Name and/
or Directory Password defined
in the Store procedure for
MUSE on the CASE/CardioSoft
system is incorrect.
The Shared Directory defined
in the Store procedure for
MUSE on the CASE/CardioSoft
system is incorrect.
The Directory User Name
defined in the Store procedure
for MUSE on the CASE/
CardioSoft system does not
have access to the MUSE share.
The share on the MUSE
application server is not defined
correctly.
Ensure the Directory User
Name and/or Directory
Password are entered
correctly in the CASE System
Configuration.
Ensure the Shared Directory is
entered correctly in the CASE
System Configuration.
Ensure the Directory User
Name defined on the CASE/
CardioSoft system is a member
of the MUSE Acq Users group
on the MUSE application server.
Ensure the acq$ folder (default
is <drive>:\Muse\acqS) is
correctly shared on the MUSE
application server.
2102027-010A MUSE™ NX 73
Page 74

DICOM Communication
DICOM Communication
The MUSE system supports DICOM functionality with three different features: Storage
Service Class Provider (SCP), Storage Service Class User (SCU), and Modality Worklist
(MWL) SCU.
4
Feature Description
DICOM Storage SCP Allows DICOM ECG tests to be received by the MUSE system.
Storage Commitment is supported. The MUSE system acts as
a DICOM Storage Service Class Provider.
NOTE:
Inbound DICOM tests can only be acquired into MUSE
Site 1 and will be acquired without any MUSE location
information. This means that tests acquired via DICOM
and intended for a MUSE Site other than 1 must be
discarded and recovered to the correct site. Furthermore,
non-default report distribution locations cannot be used
for routing the test when it is acquired. The location of the
test, however, can be changed in the MUSE Editor.
DICOM Storage SCU Allows tests to be sent from the MUSE system to DICOM
devices. Storage Commitment is supported. The system acts
as a DICOM Storage Service Class User.
DICOM MWL SCU Allows the system to receive orders from DICOM Modality
Worklist Service Class Providers. The system queries Modality
Worklist Service Class Provider (SCP) for Modality Worklist
orders and updates the system orders database. The system
acts as a DICOM Modality Worklist Service Class User.
For detailed information on DICOM conformance, see the MUSE Cardiology
Information System DICOM Conformance Statement.
74 MUSE™ NX 2102027-010A
Page 75

Data Transmission
DICOM Communication
The DICOM system shares data with the MUSE system one of three transmission
routes:
• The DICOM SCU sends data to the MUSE DICOM SCP
• The MUSE DICOM SCU sends data to the DICOM SCP
• MUSE MWL SCU exchanges data with the DICOM MWL SCP
DICOM SCU to MUSE DICOM SCP
The DICOM device Storage Service Class User transmits a DICOM test across the
network to the MUSE DICOM Storage Service Class Provider service. The test is then
normalized on the MUSE system and stored in the database. If storage commitment is
enabled, a DICOM SCU sends a storage commitment request to the MUSE system and
the MUSE system returns a storage commitment response to the DICOM SCU.
MUSE DICOM SCU TO DICOM SCP
The MUSE DICOM device Storage Service Class User transmits a DICOM test
across the network to a receiving DICOM Storage Service Class Provider. If storage
commitment is enabled, the MUSE system sends a storage commitment request to
the DICOM SCP, and the DICOM SCP returns a storage commitment response to the
system.
2102027-010A MUSE™ NX 75
Page 76

DICOM Communication
MUSE MWL SCU and DICOM MWL SCU
The DICOM Modality Worklist Service Class User service queries the DICOM Modality
Worklist Service Class Provider for orders. Orders that are returned are created/
updated in the system orders database. These orders behave the same as orders
received via the MUSE HL7 Parser.
MUSE Services
Each system DICOM function has its own MUSE service on the system application
server, as described in the following table.
MUSE Service Name DICOM Function
MUSE DICOM Modality Worklist Client DICOM Modality Worklist (MWL) Service Class
MUSE DICOM Storage Provider DICOM Storage Service Class Provider (SCP)
User (SCU)
MUSE DICOM Storage User DICOM Storage Service Class User (SCU)
In addition to these services, the MUSE Normal service is used to normalize all
inbound test data, including DICOM, and the MUSE Format service is used to format
all outbound data, including DICOM IOD and DICOM Encapsulated PDF.
Customer Requirements
The customer is responsible for supplying the following:
• Network connectivity between the system and the non-system DICOM services
and devices.
• AE titles, IP addresses, and ports for all non-system DICOM services and devices.
Configure DICOM with the MUSE System
To configure the settings for DICOM and the MUSE system interface, perform the
following procedures in the recommended order that they are listed:
1. "Schedule a System Shutdown" on page 77
2. "Verify or Add the DICOM Service(s) and Option to the MUSE System" on page
77
3. "Cancel the System Shutdown" on page 79
4. "Configure MUSE Services to Receive and Send DICOM Tests" on page 80
5. "Configure Inbound DICOM Device(s)" on page 82
6. "Configure Outbound DICOM Devices in the MUSE System" on page 83
7. "Configure the DICOM Modality Worklist Client Service on the MUSE System" on
page 85
76 MUSE™ NX 2102027-010A
Page 77

Schedule a System Shutdown
1. Log on to the MUSE application server as an administrator.
2. In the MUSE application, go to System> Setup.
3. In the Setup window, select System.
4. Right-click on the Product name and select Shutdown System.
The Shutdown System window opens.
DICOM Communication
5. Select the Shutdown Type.
• Select Full to close the MUSE client application and stop MUSE services.
• Select Partial to disconnect all remote connections to the MUSE clients. The
MUSE clients and the MUSE services continue to run.
NOTE:
If the MUSE application stays open on a remote client workstation, the
application disconnects from the MUSE server.
6. Select the time for the Shutdown Delay.
7. Select Activate Shutdown.
The top of the MUSE client application shows when the shutdown occurs.
Verify or Add the DICOM Service(s) and Option to the MUSE System
Use the following procedure to add the DICOM option and service to the MUSE
system.
2102027-010A MUSE™ NX 77
Page 78

DICOM Communication
1. Go to Control Panel> Programs> Programs and Features.
2. Right-click on MUSE and select Change.
3. On the Welcome to the MUSE Setup Wizard window, select Next >. Continue to
4. On the Select Options screen, view the DICOM option.
5. Select Next > to view the Select Features screen.
NOTE:
This procedure can only be performed by a qualified GE Healthcare service
representative.
select Next > until you reach the Select Options screen.
• If the option is enabled (checked), select Cancel to exit the installation wizard.
• If the option is disabled (unchecked), check the box for the DICOM option.
Selecting DICOM automatically selects all DICOM services.
6. On Select Features screen, under Server> Services, view the DICOM feature.
• If the feature is enabled (checked), select Cancel to exit the installation wizard.
• If the feature is disabled (unchecked), select < Back and make sure the DICOM
option is selected.
7. On the MUSE Services Configuration screen, enter the Background User
Password.
8. Select Next >.
9. Select Next > to confirm installation with the modified settings. The Modifying
MUSE screen displays installation progress.
78 MUSE™ NX 2102027-010A
Page 79
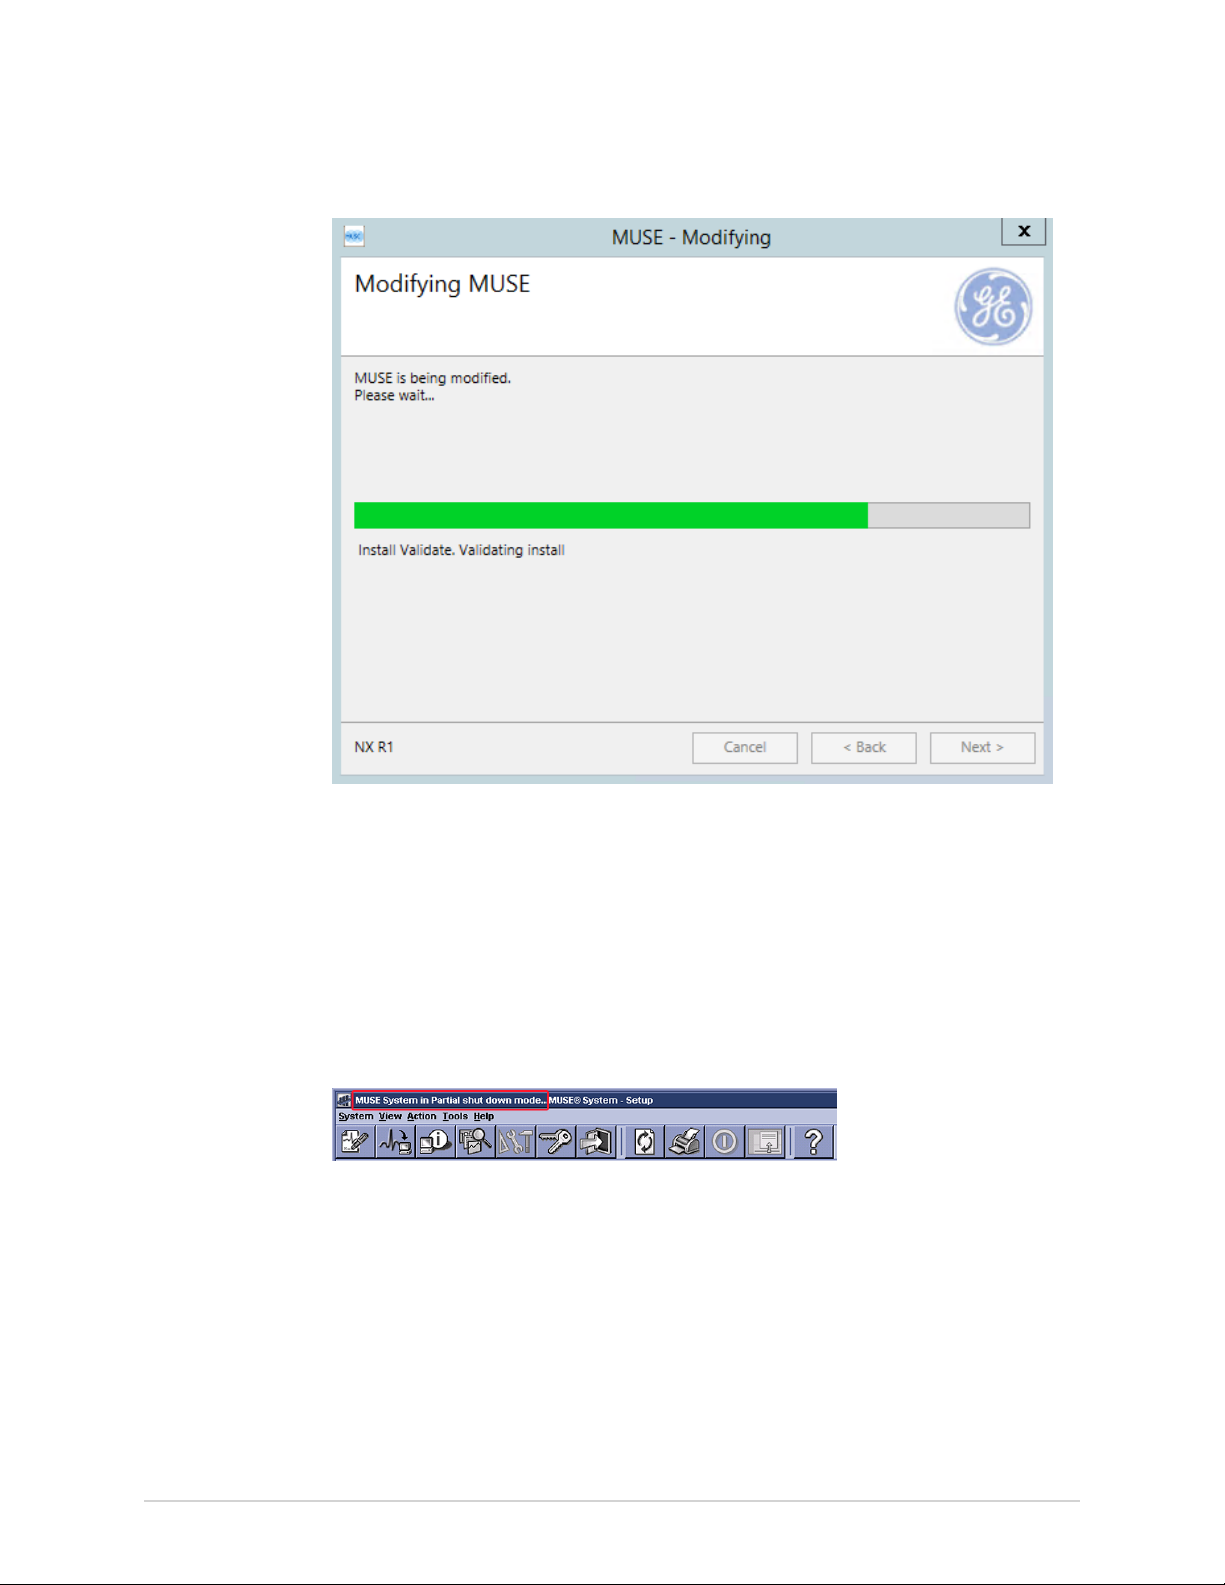
DICOM Communication
10. On the Modify Complete screen, select Close.
Cancel the System Shutdown
1. Go to Services.
2. Right-click on the MUSE service and select Start.
This starts the MUSE MT host service and allows you to log on.
3. Log on to the MUSE application on the MUSE application server.
The application displays the current shutdown status at the top of the window.
4. In the MUSE application, go to System> Setup.
5. Select System.
6. Right-click on the Product name and select Shutdown System.
7. In the Shutdown System window, select Cancel Shutdown.
If the MUSE services were stopped, they are now restarted and remote
connectivity is restored.
The system does not automatically notify users that the MUSE system is
available.
2102027-010A MUSE™ NX 79
Page 80

DICOM Communication
Configure MUSE Services to Receive and Send DICOM Tests
Configure MUSE system services for DICOM.
• DICOM STORE SCP is the MUSE service for the DICOM Storage SCP. This service
receives DICOM tests from the DICOM Storage SCU.
• DICOM STORE SCU is the MUSE service for the DICOM Storage SCU. This service
sends DICOM tests to DICOM Storage SCP.
MUSE services for DICOM communication are configured with a default AE title and
port.
1. Log on to the MUSE application.
2. Go to System> Setup.
3. From the Advanced section, select DICOM Services.
4. Review and set the properties to receive DICOM tests from the DICOM Storage
SCU.
a) Right-click on DICOM STORE SCP and select Properties.
b) From the left pane, select General. Review and modify the DICOM SCP
Configuration fields.
Field Description
IP Address Enter the name or IP address of the MUSE application
server.
The default is localhost.
This should not need to be changed.
AE Title Enter the DICOM Application Entity (AE) title of the MUSE
Storage SCP.
The default is MuseStoreSCP.
Port Enter the port that the MUSE Storage Provider service
will listen on.
The default port is 104.
Enable Storage
Commitment
Check this box to provide storage commitment responses
from the MUSE system.
The MUSE Storage Provider service listens for storage
commitment messages on the same IP address and port
as DICOM tests.
Retry Interval for sending
N-Report (in seconds)
80 MUSE™ NX 2102027-010A
NOTE:
This field can only be modified if the Enable Storage
Commitment is checked.
Enter the time between attempts to send a storage
commitment status to the DICOM Storage SCU.
The default is 60.
Page 81

Field Description
DICOM Communication
Maximum wait time before
failure
NOTE:
This field can only be modified if the Enable Storage
Commitment is checked.
Enter the maximum time the MUSE Storage Provider
service should wait for a storage commitment response.
The default is 180.
c) From the left pane, select DICOM Association Settings to verify the default
settings.
Field Default Setting
Maximum Length of PDU 28672
Association Open Timeout (in seconds) 120
Association Idle Timeout (in seconds) 30
Maximum No. of Concurrent Associations 5
d) Select OK to save your changes.
To ignore any changes made, select Close.
5. Review and set the properties to send tests to the DICOM Storage SCP.
a) Right-click on DICOM STORE SCU and select Properties.
b) From the left pane, select General. Review and modify the DICOM SCU
Configuration fields.
Field Description
AE Title Enter the DICOM AE title of the System Storage SCU.
The default is MuseStoreSCU.
Storage commitment port
(for receiving responses)
Maximum Wait Time Enter the maximum time in seconds that the system waits
Maximum retries Enter the maximum number of storage commitment
Enter the port that the system DICOM STORE SCU service
listens on for storage commitment responses.
The default port is 105.
for storage commitment responses.
Default is 60.
requests that the system makes if previous requests fail.
Default is 3.
c) From the left pane, select DICOM Association Settings to verify the default
settings.
2102027-010A MUSE™ NX 81
Page 82

DICOM Communication
Field Default Setting
Maximum Length of PDU 28672
Association Open Timeout (in seconds) 120
Association Idle Timeout (in seconds) 30
Maximum No. of Concurrent Associations 5
d) Select OK to save your changes.
To ignore any changes made, select Close.
6. If any changes were made, these services will need to be restarted on the
system application server.
Configure Inbound DICOM Device(s)
Each inbound DICOM Storage SCU Device needs to be configured in the MUSE system
prior to the device being able to associate with and send DICOM tests to it.
Use the following steps to configure an inbound DICOM device in the MUSE system.
Repeat these steps for each inbound DICOM device that needs to send tests to the
MUSE system.
1. Log on to the MUSE application.
2. Go to System> Setup.
3. Select DICOM Devices.
4. Configure an existing device or add a new device.
• To view the properties of an existing DICOM device, right-click on the entry for
the device and select Properties.
• To add a new device, right-click in an open area, and select New.
5. Select General and complete the following fields as appropriate.
Field Description Actions
AE Title The DICOM Application Entity
Title of the MUSE Storage
Service Class User device.
IP Address The name or IP address of the
DICOM device.
Type the AE Title of the
DICOM Device that sends
tests to the MUSE system.
Type the IP address of the
DICOM Device that sends
tests to the MUSE system.
Description This field can be used to
describe the device.
82 MUSE™ NX 2102027-010A
Type a description of the
device into this field.
Page 83

Field Description Actions
DICOM Communication
Storage Commitment If storage commitment is
enabled, the MUSE system
sends storage commitment
responses to the DICOM
device storage commitment
service using information
configured here.
AE Title The DICOM Application
Entity Title of the storage
commitment service on the
DICOM device.
IP Address The IP Address of the storage
commitment service on the
DICOM device.
Port The port number of the
storage commitment service
on the DICOM device.
If the DICOM device supports
storage commitment, select
this box to enable it.
Type the AE Title of the
storage commitment service
on the DICOM Device.
Type the IP Address of the
storage commitment service
on the DICOM Device.
Type the port number of the
storage commitment service
on the DICOM Device.
NOTE:
To send DICOM tests to the MUSE system, configure the DICOM Storage SCU
device to use the MUSE DICOM Storage SCP AE Title, IP Address, and Port as
defined in the Setup> DICOM Services> DICOM STORE SCP.
Use this same information for storage commitment, if that option is enabled
for the MUSE Storage Provider service.
6. Select OK to save your change.
To ignore any changes made, select Close.
Configure Outbound DICOM Devices in the MUSE System
All DICOM devices must be configured in the MUSE system before you can send or
receive DICOM tests in the MUSE system.
1. Log on to the MUSE application.
2. Go to System> Setup.
3. From the System section, select Devices.
4. Configure an existing DICOM device or add a new device.
• To view the properties of an existing DICOM device, right-click on the entry for
the device and select Properties.
• To add a new device, right-click in an open area, and select New.
• Select DICOM IOD (Information Object Definition) for ECG test types sent to
DICOM IOD devices.
• Select DICOM PDF to add the DICOM encapsulated PDF device.
2102027-010A MUSE™ NX 83
Page 84

DICOM Communication
5. From the left pane, select General. Review and modify the device properties.
Field Action
Device Name Enter the name of the system device.
Device AE Title Enter the DICOM AE Title of the DICOM storage SCP that
receives tests from the system.
IP Address Enter the IP address of the receiving DICOM storage
SCP that receives tests from the system.
Port Enter the port number of the receiving DICOM storage
SCP. This is the DICOM storage service class provider
that receives tests from the system.
Send Original IOD if available
NOTE:
This option is only available for
DICOM IOD device types.
Supports Storage Commitment Check this box to provide storage commitment
Storage Commitment AE Title Enter the DICOM Application Entity Title of the storage
Storage Commitment IP Address Enter the IP address of the storage commitment
Storage Commitment Port Enter the port number of the storage commitment
To export the original unedited DICOM test data, check
this option.
To export the edited DICOM test, uncheck this option.
responses from the MUSE system. The system sends
storage commitment requests to the DICOM device
storage commitment service using information
configured here.
Uncheck this option to disable this function or if the
device does not support storage commitment.
commitment service on the DICOM device.
service on the DICOM device.
service on the DICOM device.
NOTE:
To receive DICOM tests from the MUSE system, the receiving DICOM Storage
SCP might need to be configured with the DICOM Storage SCU AE title and IP
address defined in Setup> DICOM Services> DICOM STORE SCU
If storage commitment is enabled, specify the MUSE system's DICOM STORE
SCU storage commitment port on the receiving DICOM Storage SCP.
6. Select DICOM Echo to make sure that the system can associate with the DICOM
Storage SCP.
• If the association is successful, the system displays: DICOM Echo Successful.
• If the association fails, the system displays: DICOM Echo Failed. Check the
settings and try again.
7. From the left pane, select Hours of Operation to configure time range by week
day to receive DICOM tests from the added device.
84 MUSE™ NX 2102027-010A
Page 85

DICOM Communication
8. From the left pane, select Advanced apply the DICOM device configuration
settings for either all sites or specific individual sites.
For a new DICOM PDF device, the Advanced section has format options for the
PDF based on test type.
9. Select OK to save your changes.
To ignore any changes made, select Close.
Configure the DICOM Modality Worklist Client Service on the MUSE System
The system DICOM modality worklist client service queries a DICOM modality worklist
service class provider for DICOM orders.
Use the following steps to configure the system DICOM modality worklist client
service to query for DICOM orders. Repeat these steps for each system site that needs
to query for DICOM orders.
1. Log on to the system application.
2. Go to System> Setup.
3. From the Advanced section, select DICOM Services.
4. Perform one of the following steps:
• To create a new DICOM MWL SCU service, go to Action> New> MWL Server.
• To modify an existing DICOM MWL SCU service, right-click on the entry and
select Properties.
5. From the left pane, select MWL Config and set up the following fields as
appropriate:
2102027-010A MUSE™ NX 85
Page 86

DICOM Communication
Field Description
Modality Worklist User Service
AE Title Enter the DICOM AE Title of the system MWL SCU.
Default Site Enter the system site number.
Orders received via DMWL with a value in the DICOM
Institution Name (0008,0080) that matches a configured
MUSE Site name are stored under that site.
If the DICOM Institution Name is either blank, or does not
match a configured MUSE Site name, the Order is stored in
this Default Site.
Query Default Site Only Check this box to enable queries to be only for orders that
have a DICOM Institution Name that matched the name of
the Default MUSE Site.
Modality Worklist Provider Configuration
AE Title Enter the DICOM AE Title of the DICOM MWL SCP that the
system queries for orders.
IP Address Enter the IP address of the DICOM MWL SCP that the system
queries for orders.
86 MUSE™ NX 2102027-010A
Page 87

DICOM Communication
Field Description
Port Enter the port of the DICOM MWL SCP that the system queries
for orders.
Default Query
Query Interval (In Minutes) Enter the number (in minutes) to specify the frequency the
system queries for orders.
Days in the Future Enter the number of days in the future (from the current time)
to query for Scheduled Procedure Start Date/Time.
The default is five.
Days in the Past Enter the number of days in the past (from current time) to
query for Scheduled Procedure Start Date/Time.
The default is five.
Location Parsing
Scheduled Station AE Title This option can only be enabled if the Current Patient
Location is not checked.
This is one of two fields from the orders received through
DICOM MWL used to match a configured MUSE HIS Location
Full Name. The matched orders will be stored under that
location.
2102027-010A MUSE™ NX 87
Page 88

DICOM Communication
Field Description
Current Patient Location This option can only be enabled if the Scheduled Station AE
Title is not checked.
This is one of two fields from the orders received through
DICOM MWL used to match a configured MUSE HIS Location
Full Name. The matched orders will be stored under that
location.
In the Separator and Location Section fields,
enter the parsing multi-segment values for the
Current_Patient_Location stings.
When parsing location from the Current Patient Location
field, orders received through the DICOM MWL with a value
in the DICOM Current Patient Location (0038,0300) that
match a configured MUSE HIS Location Full Name, the order
is stored under that location.
If both a Location Separator and Location Segment# are
configured, the Current Patient Location is parsed prior to
matching the MUSE HIS Location Full Name. For example,
if the Current Patient Location value contains the string
'General Hospital-Cardiac ICU-Room 204-Bed 1' and the
Location Separator is configured as '-' and the Location
Segment is configured as '2', the parsed result of 'Cardiac
ICU' is used for matching to the MUSE HIS Location Full
Name.
If a match is not made to a MUSE HIS Location Full Name,
the order is not associated with any MUSE Location.
The Room Section and Bed Section fields are similarly used
for parsing out the room number and bed number from the
Current Patient Location value. In the above example, the
room number would be parsed as "204" and the bed number
would be parsed as "1".
NOTE:
To receive DICOM modality worklist queries from the system, the DICOM
modality worklist service class provider might need to be configured with
the system modality worklist service class user AE title defined in the DICOM
MWL SCU entry in DICOM services in the system setup.
6. Select DICOM Echo to make sure that the system can associate with the DICOM
device.
• If the association is successful, the system displays: DICOM Echo Successful.
• If the association fails, the system displays: DICOM Echo Failed. Check the
settings and try again.
7. From the left pane, select DICOM Association Settings to verify the default
settings.
8. Select OK to save your changes.
To ignore any changes made, select Cancel.
88 MUSE™ NX 2102027-010A
Page 89

9. Restart the MUSE DICOM Modality Worklist Client service on the system
application server.
System Checkout
1. Verify that the MUSE system is receiving DICOM tests.
a) From the DICOM Storage Service Class User device, send a DICOM ECG test
to the MUSE system.
b) On the MUSE system, verify the test is visible in the MUSE Edit List.
2. Verify that the MUSE system can send DICOM tests.
a) From the MUSE system, print an ECG to a DICOM IOD or PDF device.
b) On the DICOM device, verify the test is transmitted successfully.
3. Verify that orders from the DICOM MWL SCP are visible in the MUSE system.
DICOM Communication
Troubleshooting
Symptom Condition Action
Unable to send
tests from a
DICOM device
to the MUSE
system.
Unable to send
tests from the
MUSE system
to a DICOM
Device.
Unable to
receive DICOM
MWL orders
in the MUSE
system.
The sending DICOM device has not been
defined as a DICOM Device in the MUSE
system.
The MUSE DICOM Storage Provider
service is not started.
The test is a non-ECG test. Only ECG tests can be sent to a DICOM
The MUSE DICOM Storage User service
is not started.
The MUSE DICOM Modality Worklist
Client service is not started.
Confirm that the DICOM device has
been defined in the MUSE system.
Each DICOM device that sends DICOM
tests to the MUSE system must be
defined in MUSE Setup> DICOM
Devices with a valid configuration.
Start the MUSE DICOM Storage Provider
service.
IOD device. ECG and non-ECG tests may
be sent to a DICOM PDF device.
Start the MUSE DICOM Storage User
service.
Start the MUSE DICOM Modality Worklist
Client service.
2102027-010A MUSE™ NX 89
Page 90

MAC ECG Systems
MAC ECG Systems
The Microprocessor Augmented Cardiograph (MAC) ECG systems provide diagnostic
care with the Marquette™ 12SL™ ECG Analysis Program. When the MAC ECGs
communicate with the MUSE system, the MAC ECG systems transfer tests to the
MUSE system for viewing, editing, printing, and storage. The MAC ECG systems also
receive orders and/or patient demographics information from the MUSE system.
Additionally, remote query allows a MAC ECG system to query for and receive tests
from the MUSE system, while reverse transmission allows MUSE to send data to a
MAC ECG system.
5
Data Transmission
MAC ECG devices can communicate with the MUSE system via direct serial cable,
modem, wireless network, or local area network.
90 MUSE™ NX 2102027-010A
Page 91

MAC ECG Systems
The following table provides the methods available for transferring data from the
acquiring ECG device to the system. Many of the methods listed require a premium
feature (the purchase and activation of an option) on the acquiring ECG device. Refer
to your GE Healthcare sales representative for more information.
Table 4: Acquiring ECG Device Interface Features
CSI NetworkMAC Devices CSI
Modem
Wireless LAN
MAC 600
MAC 800
MAC 1200
MAC 1600
MAC 2000
MAC 3500
MAC 5500
MAC VU360
1
MAC 800 v2 required for DCP.
2
Remote Query is a premium feature that enables an acquisition device to retrieve a patient
record directly from the MUSE system. This feature has advanced security controls to enable/
disable Remote Query by site within the MUSE system.
✓ ✓ ✓
✓ ✓ ✓ ✓ ✓
✓ ✓
✓ ✓ ✓ ✓
✓ ✓ ✓ ✓ ✓ ✓ ✓ ✓
✓ ✓ ✓ ✓ ✓ ✓
✓ ✓ ✓ ✓ ✓ ✓ ✓
CSI
Direct
DCP USB/
USB
Flash
Drive
1
✓ ✓ ✓
SD
Remote
Card
Query
✓ ✓
2
ADT
Query
1
Customer Requirements
The customer is responsible for appropriate serial, telephony, or network connectivity
between the MAC ECG systems and the MUSE systems that have been configured for
MAC system to MUSE system communication.
Wireless/LAN Communication Requirements
The Wireless and LAN options are automatically installed and enabled with the latest
MUSE system.
Communication Protocols
Two different communication protocols can be used to support LAN communication
between a MAC system and a MUSE system: CSI and DCP.
2102027-010A MUSE™ NX 91
Page 92

MAC ECG Systems
Protocol Requirements
CSI • Static IP address or hostname for the MAC system
• A modem is defined in MUSE for each MAC system
• Wireless/LAN communication option enabled in
MUSE
DCP • Static or dynamic IP address for the MAC system
• DCP communication option enabled in MUSE
Supported MAC Systems
Only the following MAC systems are supported with the latest version of the MUSE
system:
System Software Version
MAC 800
1.0 or higher
MAC 1600
MAC 2000 1.1 or higher
MAC 3500
v009A or higher
MAC 5500
MAC VU360 See MAC VU360
compatibility
documentation.
MAC System Communication Option
Make sure that the communication option is enabled for the MAC system.
System Communication Option
MAC 800
LANM
MAC 1600
MAC 2000 LANM
WIFM
MAC 3500
MAC 5500
MAC VU360 WRLS
92 MUSE™ NX 2102027-010A
ELAN
WIFI
Page 93

Configure MAC ECG Systems with the MUSE System
To configure the settings for MAC ECG systems and the MUSE system interface,
perform the following procedures in the recommended order that they are listed:
1. "Set Up the MUSE Modem Feature" on page 93
2. "Set Up the MUSE Server for DCP Communication" on page 99
3. "MobileLink Configuration"
4. "Import the Server CA Certificate for MAC Systems" on page 106
5. "Disable the eDoc Connect Option" on page 26
Set Up the MUSE Modem Feature
The MUSE system uses the following modem types to send and receive data:
MAC ECG Systems
Table 5: MUSE Modem Types
Modem Type Description
FAX Modem Supports outgoing fax transmission. Requires physical
modem.
CSI Modem Supports Plain Old Telephone Service (POTS) modem
communication to compatible MAC systems. Requires
physical modem.
CSI Direct Supports direct serial cable communication with compatible
MAC systems. Requires physical serial cable.
CSI Network Supports wireless and/or LAN cart connections with
compatible MAC systems.
To support any of the available modem types on MUSE, the MUSE Modem feature
must be installed and the MUSE Modem service must be running.
NOTE:
During an upgrade from MUSE v7.x, all CSI Wireless modems are converted to
CSI Network modems. If you see a CSI Wireless entry in the Modem Setup list, the
modem server for that modem was not upgraded or is missing. Refer to the MUSE
Cardiology System Installation and Upgrade Manual for information on performing
a wireless modem migration during a MUSE v7 upgrade.
Schedule a System Shutdown
1. Log on to the MUSE application server as an administrator.
2. In the MUSE application, go to System> Setup.
3. In the Setup window, select System.
4. Right-click on the Product name and select Shutdown System.
2102027-010A MUSE™ NX 93
Page 94

MAC ECG Systems
The Shutdown System window opens.
5. Select the Shutdown Type.
• Select Full to close the MUSE client application and stop MUSE services.
• Select Partial to disconnect all remote connections to the MUSE clients. The
MUSE clients and the MUSE services continue to run.
NOTE:
If the MUSE application stays open on a remote client workstation, the
application disconnects from the MUSE server.
6. Select the time for the Shutdown Delay.
7. Select Activate Shutdown.
The top of the MUSE client application shows when the shutdown occurs.
Verify or Add the MUSE Modem Service
The MUSE Modem feature and service are typically installed during the initial
installation of the MUSE client. Use the following instructions to verify whether the
MUSE Modem feature and service are installed on the MUSE system and to install
them if they are not. These steps can be performed on the MUSE application server or
MUSE workstation.
1. Log on to the MUSE system you want to configure as the MUSE Administrator
user.
2. Go to Control Panel> Programs> Programs and Features.
94 MUSE™ NX 2102027-010A
Page 95

3. Right-click on MUSE and select Change.
4. On the Welcome to the MUSE Setup Wizard window, select Next >.
5. On Select Options screen, view the eDoc Connect.
• If the option is enabled (checked), select Cancel to exit the installation wizard.
• If the option is disabled (unchecked), check the box for the eDoc Connect.
NOTE:
If the customer has not purchased the eDoc Connect option, it must only be
temporarily enabled for this setup procedure. This option should be disabled
once the setup is complete.
6. Select Next > until you reach the Select Features screen.
7. Expand Server> Services and do one of the following:
• If the check box next to Modem is already checked, select Cancel. The
Modem feature is already installed. Proceed to "Setup a Modem Device" on
page 97.
MAC ECG Systems
• If the check box next to Modem is not checked, check the box and select
Next.
8. On the MUSE Services Configuration screen, enter the Background User
Password.
9. Select Next >.
2102027-010A MUSE™ NX 95
Page 96

MAC ECG Systems
10. Select Next > to confirm installation with the modified settings. The Modifying
MUSE screen displays installation progress.
11. On the Modify Complete screen, select Close.
Cancel the System Shutdown
1. Go to Services.
2. Right-click on the MUSE service and select Start.
This starts the MUSE MT host service and allows you to log on.
3. Log on to the MUSE application on the MUSE application server.
The application displays the current shutdown status at the top of the window.
4. In the MUSE application, go to System> Setup.
5. Select System.
6. Right-click on the Product name and select Shutdown System.
7. In the Shutdown System window, select Cancel Shutdown.
If the MUSE services were stopped, they are now restarted and remote
connectivity is restored.
96 MUSE™ NX 2102027-010A
Page 97

The system does not automatically notify users that the MUSE system is
available.
Verify MUSE Services
Verify that the MUSE and MUSE Modem services are started.
Setup a Modem Device
1. Log on to the MUSE system as a user with privileges to modify settings in MUSE
Setup.
2. Go to System> Setup.
3. In the Navigation pane, select Modems.
4. Perform one of the following:
a) To create a new modem, go to Action> New and select one of the
MAC ECG Systems
following:
Modem Description
Fax Modem Used for physical FAX modems
CSI Modem Used for physical CSI modems
CSI Direct Used for direct serial cable at a MUSE
client
CSI Network Used for CSI LAN or Wireless Carts
The appropriate Modem Properties window opens.
b) To modify an existing modem, right-click on an existing entry and choose
Properties.
The appropriate Modem Properties window opens.
5. Enter the appropriate values described in the following tables.
Table 6: FAX, CSI, or CSI Direct Modem Properties
Field Description
Computer Name Name of the computer where the modem is
physically installed.
Port For FAX modems and CSI modems, this is
the port where the modem is physically
connected. For CSI Direct, this is the
port where the serial cable is physically
connected.
Baud Rate 115.2K (CSI Direct), 9600 (CSI, FAX)
1
If the FAX modem encounters problems at 9600 baud, use 4800 baud.
2102027-010A MUSE™ NX 97
1
Page 98

MAC ECG Systems
Table 7: CSI Network Modem Properties
Field Description
Computer Name The name of the computer where the modem
service is installed. This is normally the MUSE
application server, but could be a MUSE client
if the number of cart connections exceeds the
number of connections the MUSE server can
handle. See the MUSE Cardiology Information
System Pre-installation Manual.
IP Address or Hostname For static IP and reserved DHCP addressing
schemes, type the IP address of the cart.
For the hostname addressing scheme, type
the system name of the cart.
Port The port configured at the cart for data
transmission.
Retry Interval in Seconds Defines the upper limit of the time delay
between the cart’s attempts to communicate
with the MUSE system. The default is 30
seconds. The recommended retry interval is 5
seconds.
NOTE:
6. Select OK to save your changes or Close/Cancel to ignore your changes.
NOTE:
Restart the Modems
The individual threads running to support each connection are designed to
automatically restart if they stop for any reason. Use the following procedure if you
need to restart them manually.
1. Log on to the MUSE application.
2. Select Setup> Modems.
Refer to the appropriate document referenced below for detailed installation
and configuration information for the CSI Network modem types when used
with compatible MAC ECG systems:
• MobileLink Wireless Communication Installation Manual
• LAN Option for MAC Resting ECG Systems Installation and Troubleshooting
Guide
When a new modem is set up, the MUSE Modem service is notified and
automatically starts a new thread to support the connection. You do not
need to restart the MUSE Modem service after defining a new modem.
3. Select the modem(s) that you want to restart, right-click on it/them, and select
Restart Modem.
98 MUSE™ NX 2102027-010A
Page 99

NOTE:
There is also a Restart Modem icon on the toolbar that can be used to
restart a modem.
A message displays that the modems were successfully restarted.
NOTE:
If you do not receive this message, the MUSE MT Host service was not
able to communicate to the MUSE Modem services. There are two possible
causes for this:
MAC ECG Systems
• The MUSE Modem service is not running.
• The firewall settings on the MUSE Modem service's host system are not
configured correctly.
For more information about the modems, including when they start or restart,
refer to the MUSE Application log.
If the connection to a cart fails, the MUSE Modem service immediately attempts
to restart it. The failure and restart are logged in the Application Log.
If the restart fails within one minute, the service does not wait until the one
minute interval is up before trying again.
If there are three consecutive failures within one minute, a message is logged
indicating that error message logging for this modem has been stopped
until the modem is working again. Halting error message logging prevents
the Application Log from filling up with repetitive error messages. While no
messages are being logged, the service continues to restart the modem in the
background. Once the modem is restarted and continues running for at least
one minute, logging resumes for this modem. Manually restarting the modem
from the user interface also resumes logging.
Set Up the MUSE Server for DCP Communication
Use the following procedures to set up a MUSE server for DCP communication.
Schedule a System Shutdown
1. Log on to the MUSE application server as an administrator.
2. In the MUSE application, go to System> Setup.
2102027-010A MUSE™ NX 99
Page 100

MAC ECG Systems
3. In the Setup window, select System.
4. Right-click on the Product name and select Shutdown System.
The Shutdown System window opens.
5. Select the Shutdown Type.
• Select Full to close the MUSE client application and stop MUSE services.
• Select Partial to disconnect all remote connections to the MUSE clients. The
MUSE clients and the MUSE services continue to run.
NOTE:
If the MUSE application stays open on a remote client workstation, the
application disconnects from the MUSE server.
6. Select the time for the Shutdown Delay.
7. Select Activate Shutdown.
The top of the MUSE client application shows when the shutdown occurs.
Verify or Add the DCP Feature to the MUSE System
Use the following procedure to verify, and if necessary, add the MUSE DCP services
and DCP communication option to the MUSE system.
1. Log on to the MUSE application server as an administrator.
2. Go to Control Panel> Programs> Programs and Features.
3. Right-click on MUSE and select Change.
100 MUSE™ NX 2102027-010A
 Loading...