

General Electric ML-CL TO GE X-RAY INTERFACE OPERATION OVERVIEW_SM_2014451-518_A CardioLab to GE X-Ray Interface Operation Overview and System Configuration

Mac-Lab/CardioLab to GE X-Ray Interface
Operation Overview and System Configuration
Introduction
Revision History
Instructions
PN 2014451-518
Mac-Lab/CardioLab
(5.1D, 5.2, 6.0 Mac-Lab/CardioLab Versions )
Revision Date Comments
A 01 January 2005 Initial release of document.
Overview of Modality Worklist and Exam Data Export Interface
The bi-directional interface between the Mac-Lab®/CardioLab® acquisition
system and the Innova/Advantx X-Ray system uses the Modality Worklist
(MWL) and Exam Data Export interface fun ctions. Demographic info rmation
is queried from the Mac-Lab/C ardioLab system to the X-Ray system prior to
the examination using Modality Worklist, while X-Ray information is sent to
the Mac-Lab/CardioLab system once the examination is completed using
Exam Data Export.
Benefits
The customer benefits of a bi-directional interface are:
Eliminate duplicate entry of patient demographics to reduce the
likelihood of manual data entry errors and increasing staff efficiency.
Allows the Mac-Lab/CardioLab and X-Ray system to share a unique
patient identifier to avoid patient mismatches.
Provides comprehensive X-Ray documentation within the Mac-Lab/
CardioLab system automatically. X-Ray information is saved as part of
the patient record and can be printed as part of the case report on the
Mac-Lab/CardioLab system.
Configurations
Network configuration
The X-Ray system must be connected to the Mac-Lab/C ardioLab system
through the network via 100BaseT Ethernet (TCP/IP).
2014451-518A Mac-Lab/CardioLab 1
01 January 2005

Product configurations
Innova
The X-Ray system must have the MWL and Exam Data Export options to
communicate bi-directionally with the Mac-Lab/CardioLab system.
Innova System Required Components
4100 Modality Worklist: All new systems ship with Modality Worklist
Exam Data Export:·Innova 4100 M4 release (for installed base and new
systems)
3100 Modality Worklist: All new systems ship with Modality Worklist
Exam Data Export: Innova 3100 M3 release (for installed base and new
systems)
2000 Modality Worklist:
·Heroic2 M3 FMI 11491 (for installed base up to Q1 2003)
Modality Worklist Option part number S18721AW (for new
systems)
Exam Data Export:
Advantx
Mac-Lab/CardioLab
Heroic Service Pack FMI 11495 release (for installed base through
2003)
Heroic VCP M3 release (for new systems)
Advantx System Required Components
2000 Advantx DLX Software version C21 or greater.
Modality Worklist: Advantx DLX HIS/RIS Option P/N S18411HS
Exam Data Export: Advantx DLX MPPS Option P/N S18411PP
Mac-Lab/CardioLab System Required Components
IT Software Version 6.0 with GE X-Ray Interface Software Option
7000/4000/2000 Software Version 5.1D/5.2
X-Ray interface option part number LK-XRAY-A (2015798-001) for 5.2
X-Ray interface option part number LK-XRAY1-A (2008182-001) for 5.1D
2 Mac-Lab/CardioLab 2014451-518A

Interface Operation
Patient
Information
ADT
Interface
(Optional)
Mac-Lab/
CardioLab
System
Manual
Entry
X-Ray
System
Worklist
(Patient
Information)
Exam Data
Export
(X-Ray Info)
1
3
2
The block diagram below shows the flow of information between the Mac-Lab/
CardioLab and X-Ray systems.
001
Patient dem ograph ic informa tion is entered directly into the Mac-Lab/CardioLab
system either manually or imported via an optional ADT interface (1). On the
Mac-Lab/CardioLab system, patient information is entered on the screen below.
002
When the exam is ready to begin, the patient is confirmed into Mac-Lab/
CardioLab system. At this moment, Mac-Lab/CardioLab system becomes a
"Modality Worklist provider" and is ready to send the information of the active
patient upon a Worklist Query from the X-Ray system.
2014451-518A Mac-Lab/CardioLab 3
On the X-Ray system, a "Worklist Query" to Mac-La b/CardioLab system is
performed to obtain the information of the active patient. The demographic

information is automatically exported to X-Ray system via the network
connection.
The patient information from the Mac-Lab/CardioLab system is automatically
populated in a new patient and exam on the X-Ray system (2).
The following patient and exam information is transferred from Mac-Lab/
CardioLab system to the X-Ray system:
Innova Field Advantx Field Mac-Lab/CardioLab Field
Mac-Lab/
CardioLab 6.0
Mac-Lab/
CardioLab 5.2
Patient ID# Patient ID# MRN (Medical Record Number) X X
Patient First Name Patient First Name First Name X X
Patient Last Name Patient Last Name Last Name X X
Patient Birthdate Patient Birthdate Date of Birth X X
Patient Gender Patient Gender Gender X X
Patient Height* Height X
Patient Weight* Weight X
Accession Number* Accession Number** Accession Number X X
Physician Name* Admitting Physician** Admitting Physician X X
Exam Type* Procedure Type
Study ID Number* Study Number
Phone Number X X
City X X
State X X
Country X X
* Fields manually editable at the Innova system.
** Fields sent from the Orders dialogue on the Mac-Lab/CardioLab system
The exam on X-Ray system is started manually by selecting the exam previously
retrieved from Mac-Lab/CardioLab system and pressing the Start Exam button.
The exam started on the X-Ray system must always be the same exam that is
active on Mac-Lab/CardioLab system. If you start a different exam, the exam
data export will fail.
The patient remains active on Mac-Lab/CardioLab throughout the examination.
Any changes made to the Mac-Lab/CardioLab patient demographics during the
examination will not update the X-Ray patient information.
The fluoro ti me and the dose informati on of th e X -R ay a cquisitions performed o n
the X-Ray system are stored in the X-Ray database along with the exam
information. The dose information is characterized by the Total Dose and the
Total/Fluoro/Record Dose Area Product (DAP).
4 Mac-Lab/CardioLab 2014451-518A

This information is displa yed on th e Exam Br owser at t he end of t he exam. After
each record acquisition (Cine run) performed on the X-Ray system, the run
information is stored in the X-Ray database along with the exam information,
and displayed on the X-Ray S equence Browser.
After closing the X-Ray exam by pressing the "End Exam" button, the
information of the exam is sent automatically to the Mac-Lab/CardioLab system
(3). It is displayed on the Radiology Dialog Window, in the Study menu.
The X-Ray information passed from the X-Ray system to Mac-La b/CardioLab
includes the following fields. Abbreviations used in the Radiology dialog window
are shown in brackets.
X-Ray Parameter
Run time [TIME] X X
Run number [RUN] X X
Plane [PL] or [Plane] X X
Angulation [ANG] or [RAO/LAO] X X
Rotation [ROT] or [CRA/CAU] X X
Number of frames [FRAMES] X X
Frames per second [FPS] X X
Kilo-volts [KV] X X
Milliamps [MA] X X
Milliseconds [MS] X X
Focal Distance [SID (cm)] X X
Image Intensifier mode [FOV (cm)] X X
Exam Fluoro DAP* (cGycm2)
Exam Total DAP* (cGycm2)
Mac-Lab/
CardioLab 6.0
X
X
Mac-Lab/
CardioLab 5.2
Exam Cine DAP* (cGycm2)
Total Runs X X
Total Fluoro Time (minutes) X X
*DAP = Dose Area Product
X
Worklist Limitations
The Admitting Physician field in the Mac-Lab/CardioLab system is mapped
to the Innova Physician Name field. The Reading Physician, Referring
Physician and Operator Name fields are not filled by Mac-Lab/CardioLab
system.
2014451-518A Mac-Lab/CardioLab 5

When retrieving the workl ist from the Mac-Lab /CardioLab system, t he Exam
Type is systematically filled with "Mac-Lab procedure" by the Mac-Lab/
CardioLab system. This string is hardcoded in the Mac-Lab/CardioLab
worklist interface at this time but it is editable on the Innova side.
Study ID in Mac-Lab/CardioLab system is returned to Innova as "1000". This
is editable on the Innova side.
The X-Ray system to Mac-Lab/CardioLab Worklist Query must contain at
least one of the following: MRN, Patient Name, or Study Date.
The Mac-Lab/CardioLab system does no t sen d pa tie n t da ta if the wo r kl ist
from DL filters by Any Modality or Any AETitle (i.e. wild character in the
query).
The Mac-Lab/CardioLab system does no t sen d pa tie n t da ta if the wo r kl ist
from DL filters by Any Date (i.e. wild character in the query for the study
date)
Exam Data Export Limitations
The Cine Frames field in the Radiology Window of Ma c-Lab/CardioLab
system does not get auto-populated from the Innova. It displays as a blank
but is editable.
The Milliamps (MA) field may not be populated by Innova in some of the
Innova2000 versions, and shows up as "0" on the Mac-Lab/CardioLab system
Radiology Window.
The dose information sent from Innova is estimated from the X-Ray
acquisition parameters. The estimation model is accurate at ±30%.
The angles are displayed as signed in the Mac-Lab/CardioLab system, while
in Innova they are always positive and followed by the indication of LAO,
RAO or CRA, CAU. In the Mac-Lab/CardioLab system, LAO and CRA angles
are displayed as positive values, while RAO and CAU angles are displayed as
negative values (e.g., if the primary angle in Innova is 30 RAO, in the MacLab/CardioLab system is -30).
If there is a Dose Measurement Device connected to Innova, the display and
storage of the estimated dose may be disabled and the dose data will not be
sent to the Mac-Lab/CardioLab system.
If some sequences are deleted on the Innova system before the end of the
examination (i.e., before pressing the End Exam button), the information
related to the deleted sequences will not be transferred to Mac-Lab/
CardioLab system. However:
The number of Total Runs will contain all the runs ac quir ed during the
The Cine Dose and Total Dose information will contain the dose
examination, including the deleted runs.
delivered during the examinat ion, including the dose of the deleted
sequences.
6 Mac-Lab/CardioLab 2014451-518A

Procedures
Configure Mac-Lab/CardioLab 6.0 system
1. Log in to the Acquisition system as an Administrator.
a. Press Ctrl + Action + Del and click Log Off.
b. Click OK at the log off message and immediately hold down the Shift
key to stop the auto-login sequence.
c. Log in to the Windows XP OS locally as mlcltechuser.
To log in locally, select the computer name in the Domain field.
d. Log in to the Mac-Lab/CardioLab Custom shell locally as mlcltechuser.
2. Verify S o ftware Option is enabled:
a. Double-click on the Service Console icon on the desk to p .
b. Browse to the Software Options Manager > Software Options.
Verify that the GE X-Ray Interface option has a valid key and is enabled.
If this option is not enable, contact GE Technical Support to have this
option enabled.
3. Double-click the GE icon on the desktop to launch the Mac-Lab/CardioLab
application.
4. Select System Settings from the Administration menu.
5. Click Connectivity in the System Settings window. The following window is
displayed:
2014451-518A Mac-Lab/CardioLab 7

6. Enter the following settings:
Local System Settings: These settings are for this Mac-Lab/CardioLab
system.
AE Title: The DICOM name for the Mac-Lab/CardioLab system. An AE
Title may only contain letters, numbers and the underscore character,
and must be 16 characters or less.
NOTE
AE Titles are case sensitive.
Listen Port: this is the port number that the Mac-Lab/CardioLab system
listens for connections from the X-Ray system. The default is 1225, and
should not be changed.
X-Ray System Settings: These settings apply to the GE X-Ray system.
AE Title: The DICOM name for the X-Ray system. This is found in the X-
Ray system's configuration settings (default is "dlx_root" for DLX
systems and "TERRA" for the Innova systems)
Modality: This is the imaging system's modality. The default is XA, and
should not be changed.
Text Encoding: This is how text sent to the X-Ray system is coded. The
default is Latin-1, and should not be changed.
003
8 Mac-Lab/CardioLab 2014451-518A

NOTE
Modality Worklist Host and MPPS Host settings refer to the CVIS se rver
and do not need to be modified for the GE X-Ray interface configuration
7. Res ta rt t he Mac-L ab/ Ca rdioLa b syst em t o in it ia li ze the s yst em with t he new
configuration.
8. Allow the system to auto login to the Windows XP OS. At the Mac-Lab/
CardioLab custom shell, login as the local mlcluser.
9. Go to the appropriate Configure the X-Ray system section.
2014451-518A Mac-Lab/CardioLab 9

Configure Mac-Lab/CardioLab 5.1D/5.2 system
1. Log in to the Acquisition system as an Administrator.
For a 5.2 system, login to the system as mlcltechuser (password:
mlcl!techuser).
For a 5.1D system, login to the system as administrator (password:
cardiolab!)
2. Verify if the X-Ray interface software is already installed on the acquisition
system:
a. Right-click the My Computer icon on the desktop and select Explore.
b. Navigate to D:\Gemms\Prucka.
If a sub-directory named Config under the Prucka directory, then the
interface is already installed. Close Windows Explorer.
If the directory does not exist, skip to step 3.
c. Select Start > Settings > Control Panel > Services.
Browse through the list for a service named MWL MPPS Service. Verify
that the service has an automatic startup type and that the service is
started. If not restart the service by either manually starting the service
or rebooting the acquisition system. Skip to step 4.
3. Install the X-Ray Interface :
a. Insert the GE X-Ray Interface Installation CD into the CD-ROM
drive (for version 5.1D systems, use P/N 2008182-001; for version 5.2
systems, use P/N 2015798- 001) .
b. Right-click My Computer on the desktop and select Explore.
c. Navigate to the CD-ROM drive and double-click setup.exe.
d. At Choose Setup Language, choose the appropriate language for the
installation program and click OK.
e. At the Welcome window, click Next.
10 Mac-Lab/CardioLab 2014451-518A

f. Click Yes at the Software License Agreement window.
g. Click OK at the warning messa ge .
h. Click Next at the Microsoft XML Parser Setup Wizard window.
i. Select the I accept the terms… radio button at the E nd User License
Agreement window, and click Next.
j. Enter the appropriate user information at the Customer Information
window and click Next.
k. Click Install at the Ready to Install window.
l. Click Finish at the Complete window.
m. Click Finish at the Completing the Microsoft XML Parser Setup Wizard
window.
n. Restart the Mac-Lab/CardioLab system in order to initialize the system
with the new configuration.
o. Log into the Acquisition system as an Administrator.
For a 5.2 system, login to the system as mlcltechuser (password:
mlcl!techuser).
For a 5.1D system, login to the system as administrator (password:
cardiolab!)
4. Launch the Mac-Lab/CardioLab application.
5. Select System Settings from the Administration menu.
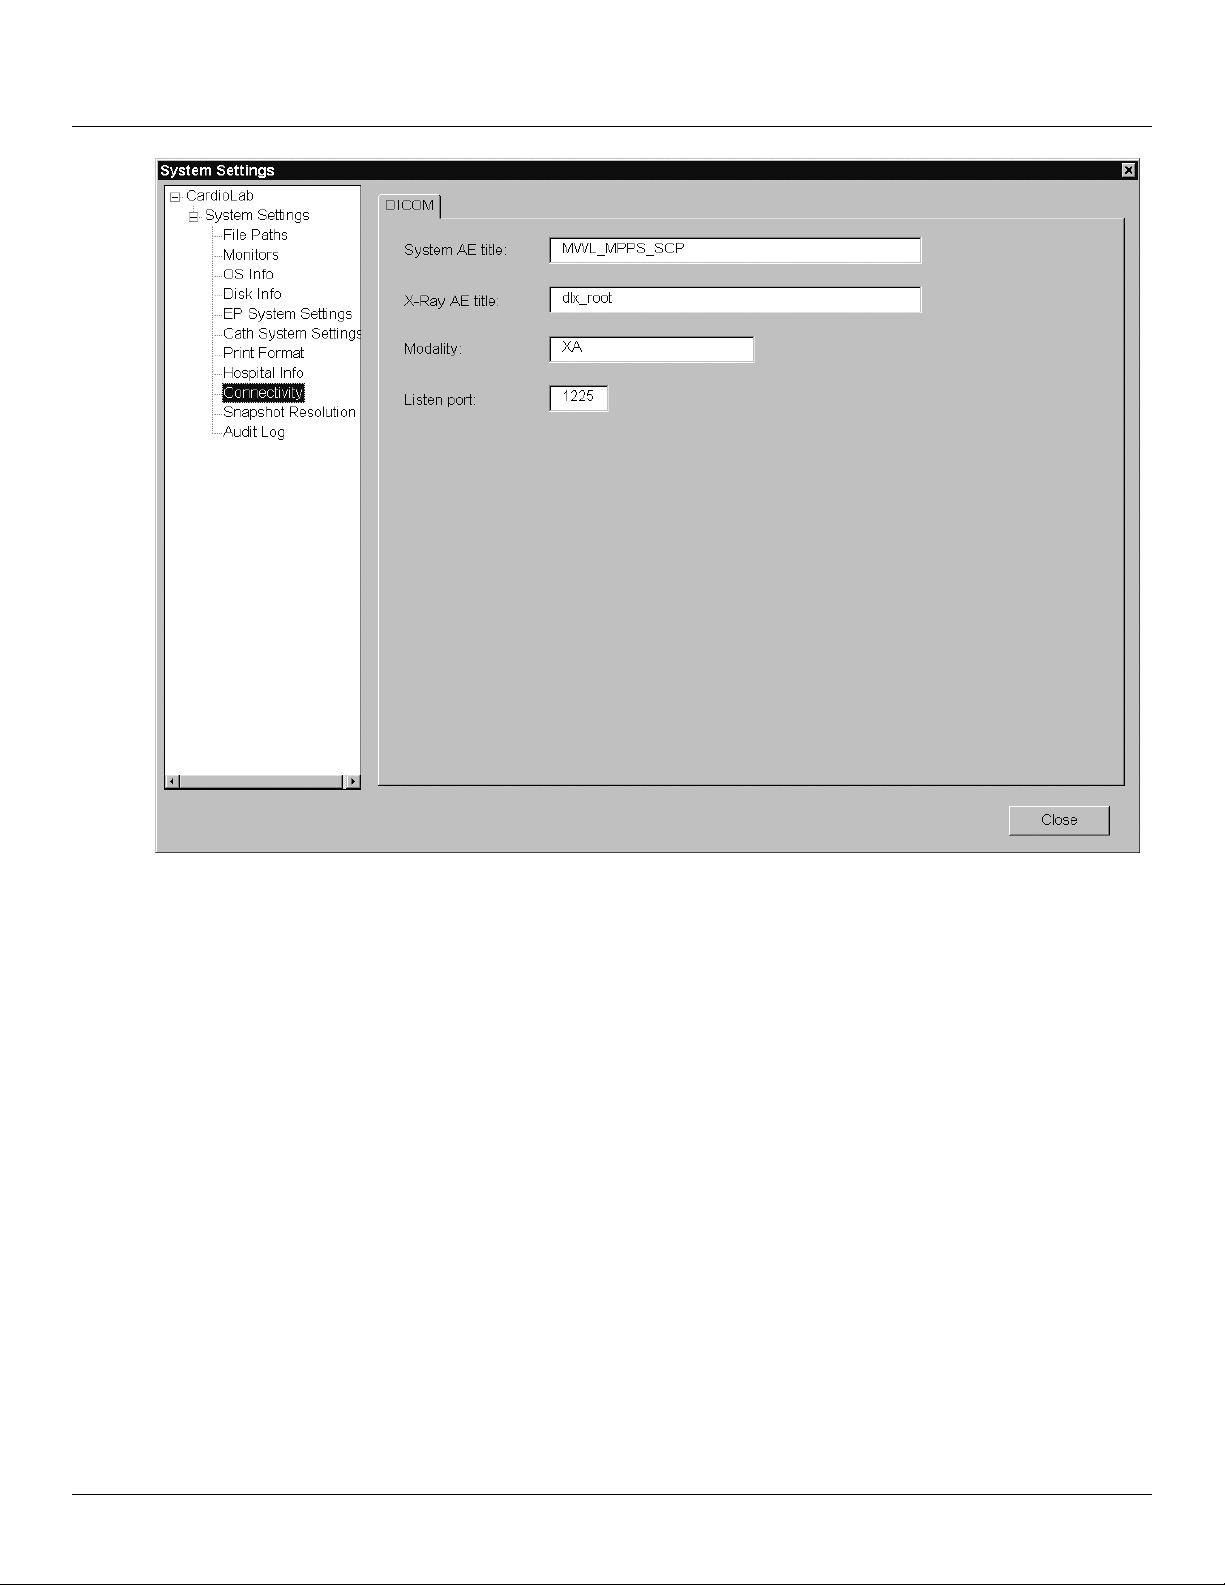
6. Click Connectivity in the System Settings window. The following window is
displayed
2014451-518A Mac-Lab/CardioLab 11
005
7. Enter the following settings:
System AE Title: This is the Application Entity title for the Mac-Lab/
CardioLab acquisition system. By default, this is set to
MWL_MPPS_SCP, but should be changed to something unique. An AE
Title can be up to 16 characters, containing upper and lower case letters,
numbers and the underscore “_” character. For example, enter
MLCL_Lab1 for the local AE title.
NOTE
AE Title is case-sensitive.
X-Ray AE Title: This is the Application Entity title for the GE X-Ray
system. By default, this is set to dlx_root for DLX systems and TERRA
for Innova systems. This should be unique if there are multiple X-Ray
systems at the facility. The AE Title information for the X-Ray system
can be obtained from the X-Ray System Application.
Modality: This is the imaging system's modality. Leave as the default of
XA.
Listen port: This is the port number on which the Mac-Lab/CardioLab
system listens for conne ctions fr om the X-Ray syst em. This shou ld be left
as the default value of 1225.
8. Restart the Mac-L ab/ Ca rdioLa b s yst em t o ini t ial iz e the s ystem wi th t he new
configuration.
12 Mac-Lab/CardioLab 2014451-518A

9. Log in to the Acquisition system as a user (local mlcluser).
10. Go to the appropriate Configure the X-Ray system section.
2014451-518A Mac-Lab/CardioLab 13

Configure the Innova X-Ray System
This setup procedure applies to the Innova 2000/3100/4100 DL.
1. Log in to the DL box using Dlservice account. If necessary:
a. Select Start > Shutdown.
b. Select the Close all programs and log on as a different user radio button
and click Yes.
c. Hold down the Shift key to stop the auto login process.
d. Login as Dlservice (password HEROIC), at the windows login screen.
2. Right click Network Neighborhood and select Properties.
3. Record the computer name at the Identification tab.
4. Highlight TCP/IP and select Properties from the Protocols tab.
5. Select adapter #2 in the adapter drop-down box.
6. Record the X-Ray system IP information.
7. Click OK to the Microsoft TCP/IP Properties window.
8. Click OK to the Network Properties window.
9. Log off and log into Windows as DL (password innova).
Wait until the application has full y loa ded .
10. Click on the Service icon and select Service from the list in the main
application screen.
14 Mac-Lab/CardioLab 2014451-518A
Service icon
006
2014451-518A Mac-Lab/CardioLab 15

11. Click the Configuration button in the Service User Interface (SUIF)
007
16 Mac-Lab/CardioLab 2014451-518A

12. If the system is an Innova 2000, click System > Options from the left pane
NOTE:
SUIF Entry Screen / Option
Must have Proprietary Service Key
in place to make changes.
and check the Worklist Option checkbox from the list.
2014451-518A Mac-Lab/CardioLab 17

13. Select DICOM Configuration from the list on the left.
NOTE:
SUIF Configuration Screen / DICOM
New settings for Worklist Server.
Auto-archive On/Off default.
NOTE
If the system is an Innova 2000 Pre SVC Pack, the following screen will
be displayed: Exam Data Export not enabled (below).
008
009
18 Mac-Lab/CardioLab 2014451-518A

NOTE
All other systems will display a screen similar to the Exam Data Export
enabled screen (below).
010
14. Record the system's AE title and port number as listed under Local DL
Identification
15. Record the following under the Worklist server:
Select TRUE from the list in the Enable worklist field.
Enter the Mac-Lab/CardioL ab sys t em IP add ress in th e Worklist SCP IP
address field
Enter the Mac-Lab/CardioLab system AE Title in the Worklist SCP AE
Title field
Enter the Mac-Lab/CardioLab listening port (1225) in the Worklist SCP
port number field
Select YES from the list in the Automatic retrieve of Worklist at boot.
16. Enter the following in the Exam Data Export section:
Select TRUE from the list in the Enable Exam Data Export field.
Enter the Mac-Lab/CardioLab system IP address in the Exam Data
Export SCP IP address field
Enter the Mac-Lab/CardioLab system AE Title in the Exam Data Export
SCP AE Title field
2014451-518A Mac-Lab/CardioLab 19

Enter the Mac-Lab/CardioLab listening port (1225) in the Exam Data
Export SCP port number field
17. Click Set Configuration when complete.
18. Click the Exit button.
19. Restart the Innova system.
The system will reboot, auto-login, and begin loading the application. Wait
until the application is fully loaded
20 Mac-Lab/CardioLab 2014451-518A

Configure the AdvantxE DLX X-Ray system
Place Cursor in this area
1. If the application is not started at the DLX console:
If a dlx login: prompt is displayed, type dlx and press Return.
If an ok: prompt is displayed, t ype boot and press Return. This will bring
the system to the dlx l ogin: prompt. At this prompt, type dlx and press
Return.
Wait for the DLX application to fully load.
2. Check the software version and IP configuration:
a. Move the mouse into the black area at the bottom of the screen (see
diagram below) and press Control + Shift + + ~ to open an xterm
console.
011
b. At the prompt, ty pe tail -100 errlog and press Return.
The DLX Application Version is displayed (e.g., C25.60).
c. At the prompt, type ifconfig -a and press Return.
The information after hme1: are the details for the gateway NIC:
flags=863 <UP, BROADCAST, NOTRAILERS, RUNNING,
MULTICAST> mtu inet 3.231.48.171 netmask ff000000 broadcast
3.255.255.255)
2014451-518A Mac-Lab/CardioLab 21

d. Type exit and press Return to close the console.
3. Verify that the MWL and MPPS options are enabled
a. Move the mouse into the black area at the bo ttom of the scr een. Left cli ck
(and hold) and select DLX Others > DLX INSTAL.
Wait until the DLX INSTAL application finishes loading.
b. At the Enter Command Number: prompt, type 5 (for Other Options) and
press Return.
c. At the Enter Command: prompt, type 5 (for Network Configuration
Menu) and press Return.
If 4: Patient Worklist Management Option = YES, the MWL option is
installed.
If 5: Modality Performed Procedure Step Option = YES, the MPPS
option is installed
d. Type 99 (to go back to the upper menu) at the Enter Command: prompt,
and press Return.
e. Type 99 at the Enter Command: prompt, and press Return.
f. Left click on the black screen and select DLX Application.
Wait for the Application to finish loading.
4. Configure the MWL and MPPS options:
NOTE
You must be running the application in Service mode (rather than
application mode).
a. Click the Door icon in the lower right corner of the screen and click Exit
b. Type service at the dlx login: prompt press Return.
c. Type proprietary at the password prompt and press Return.
d. Left-Cl ick i nto t he bl ack are a at the bott om o f the s cre en, and se lec t DLX
Application.
e. Configure the MPPS service:
i. Left-click into the black area on the bottom of the screen and select
DLX Others > Settings > MPPS.
ii. When prompted for Remote IP Address, type the IP address of the
MacLab/Ca r di oL ab syst em an d pres s Return.
iii. When prompted for Application Title, type the AE Title of the
MacLab/Car di oL ab sy st em an d pres s Return.
iv. When prompted for Application Port, type 1225 and press Return.
v. Type Y to confirm the values entered.
f. Configure the Worklist service:
i. Left click into the black area on the bottom of the screen and select
DLX Others > Settings > Worklist.
22 Mac-Lab/CardioLab 2014451-518A

ii. When prompted for Remote IP Address, type the IP address of the
Mac-Lab/CardioLab system and press Return.
iii. When prompted for Application Title, type the AE Title of the Mac-
Lab/CardioLab system and press Return.
iv. When prompted for Application Port, type 1225 and press Return.
v. Type Y to confirm the values entered.
g. To find and set the AE title for the DLX, click in the black space at the
bottom of the screen and select DLX Others > Settings > DLX AE-Title.
The DLX AE Title is displayed. If it needs to be changed, enter a new AE
Title and click Apply.
5. Restart the DLX application to reflect any changes to the configuration.
a. Click the door icon in the lower right corner of the screen and select Exit.
b. At the dlx login: prompt, type restart and press Return
c. At the dlx login: prompt, type dlx and press Return.
2014451-518A Mac-Lab/CardioLab 23

Interface Testing
Enter Patient Information on the Mac-Lab/CardioLab system
1. At the Mac-Lab/Cardio La b syste m, dou ble- click th e GE icon to launch the
application.
2. Click on New-Study icon to open a Mac-Lab or CardioLab study (either may
be selected).
3. Enter the appropriate patient demographic information.
If you also want to transfer the Admitting Phys ician and Accession Number
data, enter this data into the Orders dialog (under the Study menu).
24 Mac-Lab/CardioLab 2014451-518A

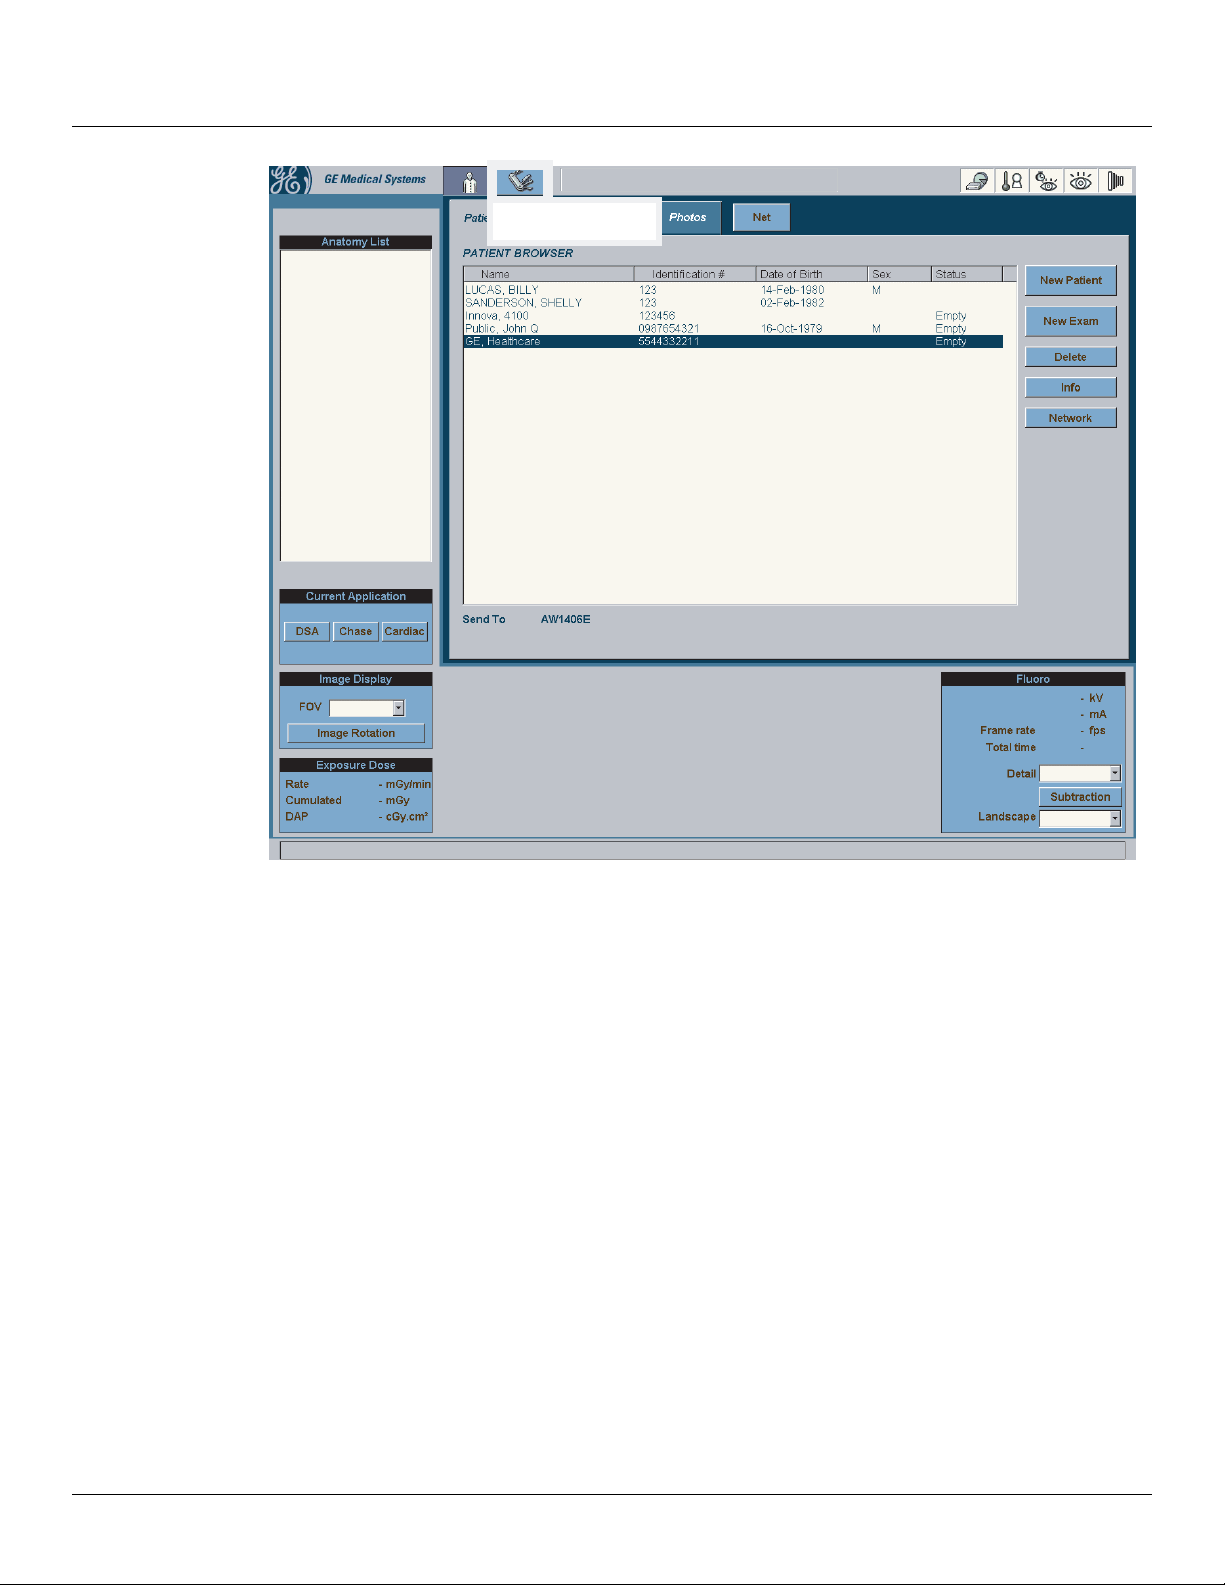
Test with the Appropriate X-Ray System
1. Innova DL:
a. The main window displays a Patient Browser window and a Worklist
browser window.
012
b. Click the Settings/Search button.
2014451-518A Mac-Lab/CardioLab 25

c. In the Modality Worklist section, verify both the This room and This
modality checkboxes are checked.
d. Verify the Today radio button is selected in the Date field.
e. Click the Refresh Now button. The patient will be listed in the Worklist
Browser.
f. With the patient selected, click the Add to Database button.
g. Click Start Exam at the Patient Informa tion wind o w.
h. Acquire X-Ray images (create a fluoro sequence).
i. Click the End Exam button.
NOTE
Always close the study on the X-Ray system before closing the study
on the Mac-Lab/CardioLa b syste m so the run information can be
transferred.
MPPS information should now be populated into the Mac-Lab/CardioLab
study. At the Mac-Lab/CardioLab system, you can verify that the data
from the X-Ray system is transferred by opening the Radiology dialog
under the Study menu and clicking the Refresh button.
This information can also be included in the Mac-Lab/CardioLab report
by adding the "X-Ray Run Information" section to your report format.
013
26 Mac-Lab/CardioLab 2014451-518A
Refer to the Mac-Lab/CardioLab Operator's Manual for additional
information on Report Formats.
j. Close the study on the Mac-Lab/CardioLab system.
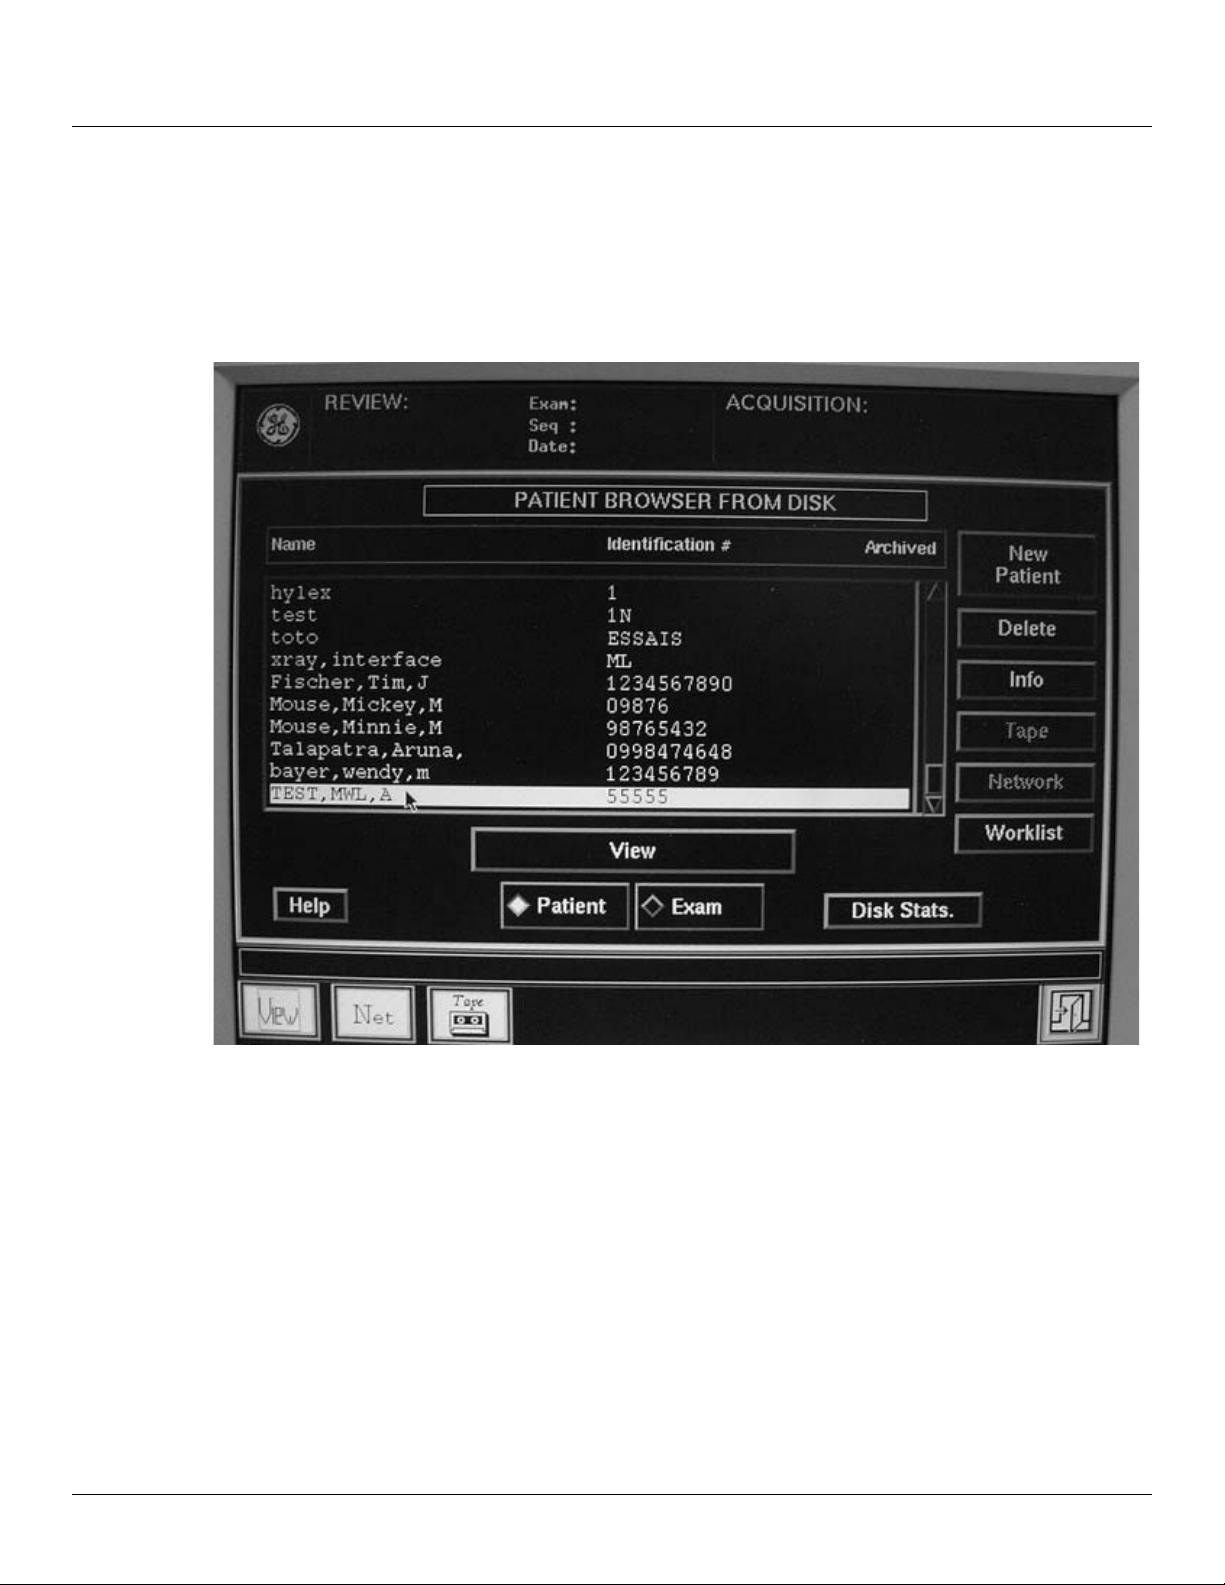
2. DLX system
a. From the DLX Application, click the Worklist button on the right side of
the screen.
014
b. Click on the Query button at the Patient Worklist Browser window.
2014451-518A Mac-Lab/CardioLab 27
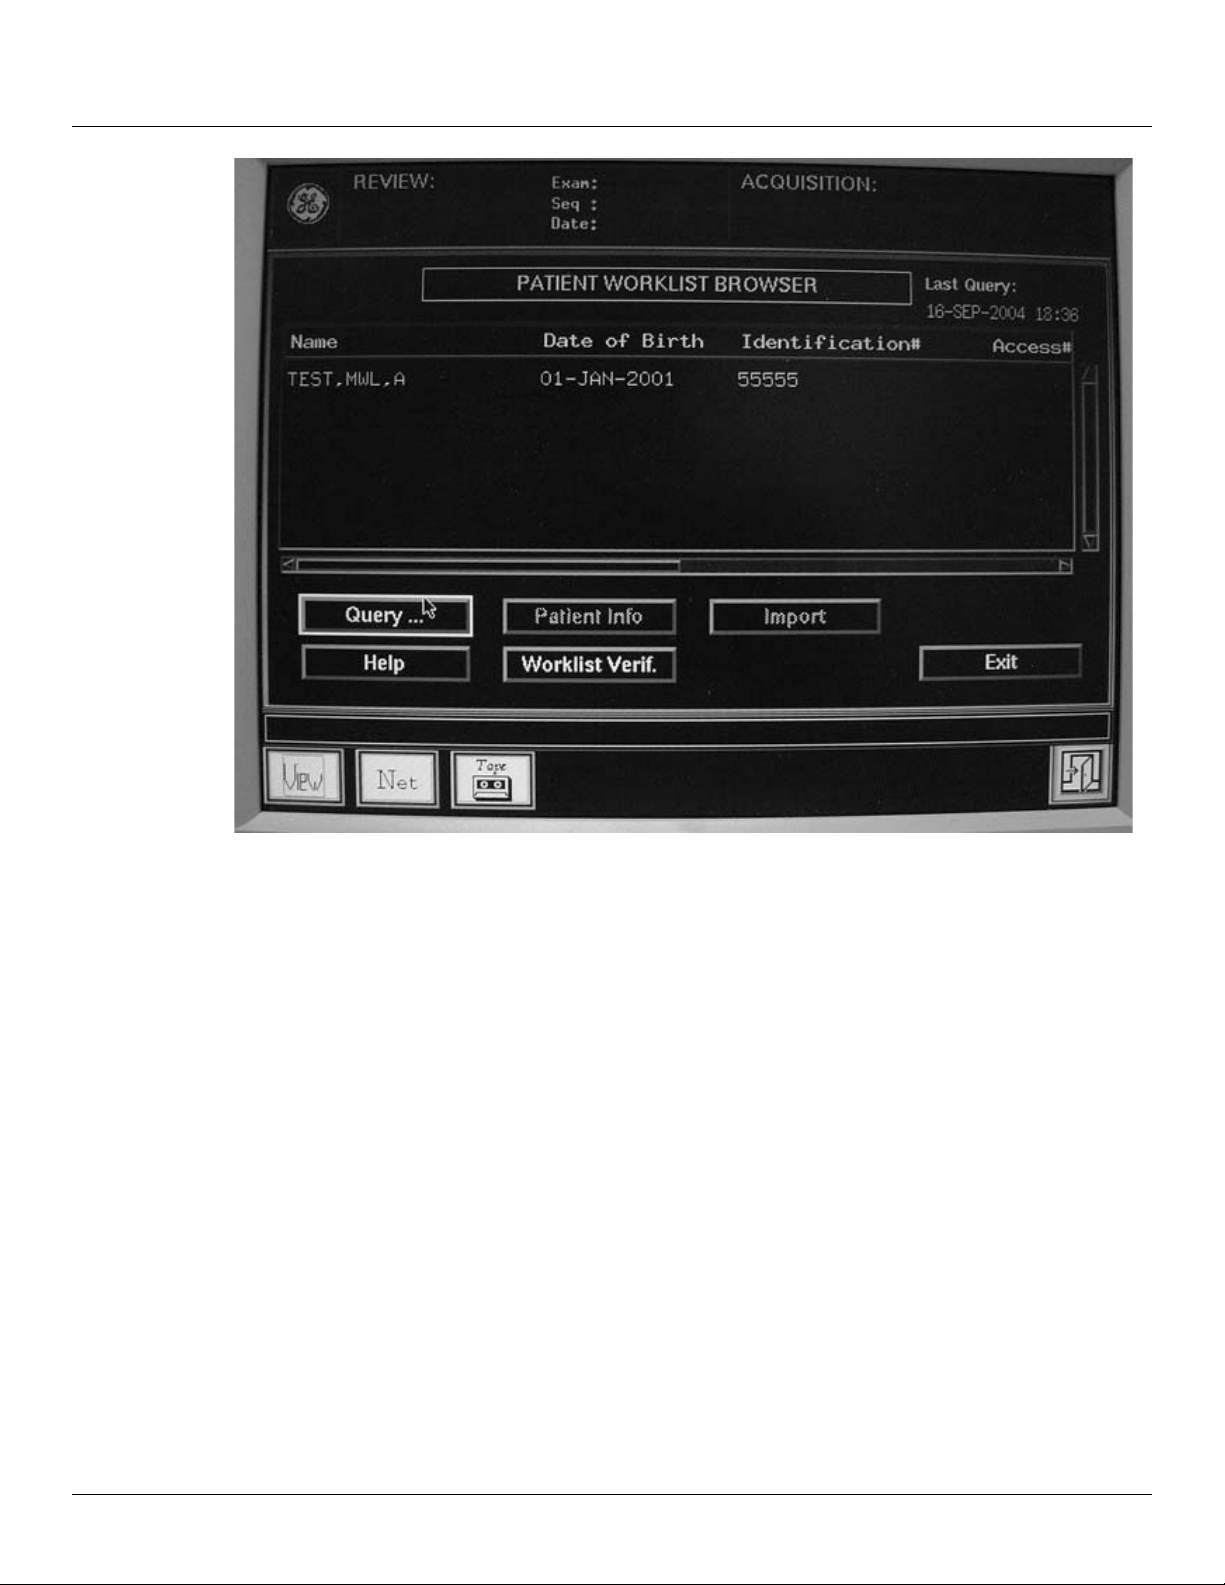
015
28 Mac-Lab/CardioLab 2014451-518A

c. Verify the Today radio butto n is sele cted and click Start.
If no patient is returned, enter the first letter of the patient's last name
and verify the Today radio button is selected and click Start.
d. Highlight the patient and click the Import button.
e. Click Close at the Worklist Import Request Status message box.
f. Click Exit.
g. Find the patient in the Patient Browser window and click the Exam
button
h. Click the New Exam button.
i. Click the Start Exam button.
j. Acquire X-Ray images (create a fluoro sequence).
k. Click the End Exam button.
NOTE
It is important to close the study on the X-Ray system prior to closing
the study on the Mac-Lab/CardioLab system in order for the run
information to be transferred.
016
MPPS information should be now populated into the Mac-Lab/CardioLab
study. At the Mac-Lab/CardioLab system, you can verify that the data
2014451-518A Mac-Lab/CardioLab 29

GE Medical Systems Information Technologies. • 8200 W. Tower Ave.
Milwaukee, WI 53223 U.S.A.
© 2004 GE Medical Systems Information Technologies. All rights reserved.
from the X-Ray system is transferred by opening the Radiology dialog
under the Study menu and clicking the Refresh button.
This information can also be included in the Mac-Lab/CardioLab report
by adding the "X-Ray Run Information" section to your report format.
Refer to the Mac-Lab/CardioLab Operator's Manual for additional
information on Report Formats.
l. Close the study on the Mac-Lab/CardioLab system.
30 Mac-Lab/CardioLab 2014451-518A
 Loading...