

Page 1

Convection/Microwave Oven
GE Profile
350A4502P473 49-40452 06-05 JR
JVM1790
Owner’s
Manual
www.GEAppliances.ca
Write the model and serial numbers here:
Model # __________________________
Serial # __________________________
You can find them on a label when the
door is open.
Safety Instructions . . . . . . . . . . . . . .2–6
Operating Instructions
Bake Features . . . . . . . . . . . . . 10, 18, 20
Best Method of Cooking Chart . . . .21
Changing Power Level . . . . . . . . . . . 14
Cooking Options . . . . . . . . . . . . . . . .10
Cookware Tips . . . . . . . . . . . . . . . . . . .20
Fast Bake Feature . . . . . . . . . .10, 19, 20
Features of Your Oven . . . . . . . . . . 8, 9
Microwave Terms . . . . . . . . . . . . . . . . 14
Other Features . . . . . . . . . . . . . . .23–25
Auto Recipe
™
Conversion . . . .18, 24
Automatic Fan . . . . . . . . . . . . . . . . .25
Auto Nite Light . . . . . . . . . . . . . . . .24
Bake Temp. Adjust . . . . . . . . . . . . .24
Beeper Volume . . . . . . . . . . . . . . . .24
Child Lock-Out . . . . . . . . . . . . . . . .23
Clear/Off . . . . . . . . . . . . . . . . . . . . .23
Clock . . . . . . . . . . . . . . . . . . . . . . . . .23
Cooking Complete Reminder . . . .23
Display Language . . . . . . . . . . . . . . .24
Display ON/OFF . . . . . . . . . . . . . . .24
Display Speed . . . . . . . . . . . . . . . . . .24
Help . . . . . . . . . . . . . . . . . . . . . . . . . .23
Measures . . . . . . . . . . . . . . . . . . . . . .25
More Time Message . . . . . . . . . . . .25
Resume . . . . . . . . . . . . . . . . . . . . . . .23
Start/Pause . . . . . . . . . . . . . . . . . . . .23
Surface Light . . . . . . . . . . . . . . . . . .25
Timer . . . . . . . . . . . . . . . . . . . . . . . . .25
Turntable On/Off . . . . . . . . . . . . . .25
Vent Fan . . . . . . . . . . . . . . . . . . . . . .25
Roast Features
. . . . . . . . . . . . 10, 18, 20
Sensor Features
. . . . . . . . . . . . . . . 15–17
Time and Auto Features . . . . 9, 11–13
Warm Feature . . . . . . . . . . . . . . . . . . . 22
Care and Cleaning
Charcoal Filters . . . . . . . . . . . . . . . . . . .29
Inside . . . . . . . . . . . . . . . . . . . . . . . . . . .26
Outside . . . . . . . . . . . . . . . . . . . . . . . . .26
Replacing the Light Bulbs . . . . . . . . .27
Stainless Steel . . . . . . . . . . . . . . . . . . . .27
Vent Filters . . . . . . . . . . . . . . . . . . .28, 29
Troubleshooting Tips . . . . . . . . 30, 31
Things That Are Normal
With Your Microwave Oven . . . . . . . 32
Consumer Support
Consumer Support . . . . . . Back Cover
Optional Kits . . . . . . . . . . . . . . . . . . . . .7
Product Registration . . . . . . . . . . .33-34
Warranty . . . . . . . . . . . . . . . . . . . . . . . .
35
Français
For a French version of this
manual, visit our Website at
www.GEAppliances.ca.
Pour une version française de ce
manuel, consultez notre site Web
www.electromenagersge.ca.
P/No.:3828W5A4641
Page 2

IMPORTANT SAFETY INSTRUCTIONS.
READ ALL INSTRUCTIONS BEFORE USING.
IMPORTANT SAFETY INSTRUCTIONS.
When using electrical appliances basic safety precautions should be followed, including the following:
■ Read and follow the specific precautions in the
PRECAUTIONS TO AVOID POSSIBLE EXPOSURE TO
EXCESSIVE MICROWAVE ENERGY section above.
■ This appliance must be grounded. Connect only
to a properly grounded outlet. See the GROUNDING
INSTRUCTIONS section on page 6.
■ Install or locate this appliance only in accordance with
the provided Installation Instructions.
■ This microwave oven is CSA listed for installation over
electric and gas ranges.
■ This microwave oven is not approved or tested for
marine use.
■ This over-the-range oven is designed for use over ranges
no wider than 36” (91.4 cm). It may be installed over
both gas and electric cooking equipment.
■ Do not operate this appliance if it has a damaged power
cord or plug, if it is not working properly, or if it has
been damaged or dropped. If the power cord is
damaged, it must be replaced by General Electric
Service or an authorized service agent using a power
cord available from General Electric.
■ Do not cover or block any openings on the appliance.
■ Use this appliance only for its intended use as described
in this manual. Do not use corrosive chemicals or vapors
in this appliance. This microwave oven is specifically
designed to heat, dry or cook food, and is not intended
for laboratory or industrial use.
■ To reduce the risk of fire in the oven cavity:
— Do not overcook food. Carefully attend appliance when
paper, plastic or other combustible materials are placed
inside the oven while cooking.
— Remove wire twist-ties and metal handles from paper or
plastic containers before placing them in the oven.
— Do not use the oven for storage purposes. Do not leave
paper products, cooking utensils or food in the oven
when not in use.
— Do not pop popcorn in your microwave oven unless in
a special microwave popcorn accessory or unless you use
popcorn labeled for use in microwave ovens.
— If materials inside the oven ignite, keep the oven door
closed, turn the oven off and disconnect the power cord,
or shut off power at the fuse or circuit breaker panel.
If the door is opened, the fire may spread.
— Do not use the Sensor Features twice in succession on
the same food portion. If food is undercooked after
the first countdown, use Time Cook for additional
cooking time.
SAVE THESE INSTRUCTIONS
WARNING!
For your safety, the information in this manual must be followed to minimize the risk of fire, explosion, electric shock,
exposure to excessive microwave energy, or to prevent property damage, personal injury, or loss of life.
(a) Do Not Attempt to operate this oven with the door
open since open-door operation can result in harmful
exposure to microwave energy. It is important not to
defeat or tamper with the safety interlocks.
( b) Do Not Place any object between the oven front face
and the door or allow soil or cleaner residue to
accumulate on sealing surfaces.
(c) Do Not Operate the oven if it is damaged. It is
particularly important that the oven door close
properly and that there is no damage to the:
(1) door (bent),
(2) hinges and latches (broken or loosened),
(3) door seals and sealing surfaces.
(d) The Oven Should Not be adjusted or repaired by
anyone except properly qualified service personnel.
PRECAUTIONS TO AVOID POSSIBLE EXPOSURE
TO EXCESSIVE MICROWAVE ENERGY
2
Consumer Support
Troubleshooting Tips Care and Cleaning
Operating Instructions
Safety Instructions
Page 3
3
www.GEAppliances.ca
IMPORTANT SAFETY INSTRUCTIONS.
■ When using the Bake, Roast or Fast Bake functions,
both the outside and inside of the oven will become
hot. Always use hot pads to remove containers of food
and accessories such as the oven shelf.
■ Thermometer—Do not use regular cooking or oven
thermometers when cooking by microwave or using
the Fast Bake mode. The metal and mercury in these
thermometers could cause arcing and possible damage
to the oven. Do not use a thermometer in food you are
microwaving unless the thermometer is designed or
recommended for use in the microwave oven.
■ Do not clean with metal scouring pads. Pieces can burn
off the pad and touch electrical parts involving risk of
electric shock.
■ Do not store any materials, other than our
recommended accessories, in this oven when not in use.
■ Do not store this appliance outdoors. Do not use this
product near water—for example, in a wet basement,
near a swimming pool, near a sink or in similar locations.
■ Keep power cord away from heated surfaces.
■ Do not immerse power cord or plug in water.
■ Do not mount this appliance over a sink.
■ See door surface cleaning instructions in the Care and
cleaning of the microwave oven section of this manual.
■ This appliance must only be serviced by qualified service
personnel. Contact nearest authorized service facility for
examination, repair or adjustment.
■ As with any appliance, close supervision is necessary
when used by children.
■ Do not store anything directly on top of the microwave
oven surface when the microwave oven is in operation.
SAVE THESE INSTRUCTIONS
ARCING
If you see arcing, press the CLEAR/OFF button and correct the problem.
Arcing is the microwave term for sparks in the oven.
Arcing is caused by:
■ The metal shelf not installed correctly so it
touches the microwave wall.
■ Metal or foil touching the side of the oven.
■ Turntable ring support not installed correctly.
■ Foil not molded to food (upturned edges act
like antennas).
■ Metal, such as twist-ties, poultry pins, or gold-
rimmed dishes, in the microwave.
■ Recycled paper towels containing small metal
pieces being used in the microwave.
WARNING!
Safety Instructions Operating Instructions
Care and Cleaning
Troubleshooting Tips Consumer Support
Page 4
4
IMPORTANT SAFETY INSTRUCTIONS.
READ ALL INSTRUCTIONS BEFORE USING.
FOODS
■ Do not pop popcorn in your microwave oven
unless in a special microwave popcorn accessory
or unless you use popcorn labeled for use in
microwave ovens.
■ Do not boil eggs in a microwave oven. Pressure
will build up inside egg yolk and will cause it to
burst, possibly resulting in injury.
■ Operating the microwave with no food inside for
more than a minute or two may cause damage
to the oven and could start a fire. It increases the
heat around the magnetron and can shorten
the life of the oven.
■ Foods with unbroken outer “skin” such as
potatoes, hot dogs, sausages, tomatoes, apples,
chicken livers and other giblets, and egg yolks
should be pierced to allow steam to escape
during cooking.
■ Some products such as whole eggs and sealed
containers—for example, closed jars—are able
to explode and should not be heated in this
microwave oven. Such use of the microwave
oven could result in injury.
■ SUPERHEATED WATER
Liquids, such as water, coffee, or tea, are able to
be overheated beyond the boiling point without
appearing to be boiling. Visible bubbling or boiling
when the container is removed from the microwave
oven is not always present. THIS COULD RESULT IN
VERY HOT LIQUIDS SUDDENLY BOILING OVER WHEN
THE CONTAINER IS DISTURBED OR A SPOON OR
OTHER UTENSIL IS INSERTED INTO THE LIQUID.
To reduce the risk of injury to persons:
— Do not overheat the liquid.
— Stir the liquid both before and halfway through
heating it.
— Do not use straight-sided containers with narrow
necks.
— After heating, allow the container to stand in the
microwave oven for a short time before removing
the container.
— Use extreme care when inserting a spoon or
other utensil into the container.
■ Foods cooked in liquids (such as pasta) may
tend to boil more rapidly than foods containing
less moisture. Should this occur, refer to the
Care and cleaning of the microwave oven section
for instructions on how to clean the inside of
the oven.
■ Avoid heating baby food in glass jars, even with
the lid off. Make sure all infant food is thoroughly
cooked. Stir food to distribute the heat evenly.
Be careful to prevent scalding when warming
formula. The container may feel cooler than the
formula really is. Always test the formula before
feeding the baby.
■ Don’t defrost frozen beverages in narrow-necked
bottles (especially carbonated beverages). Even if
the container is opened, pressure can build up.
This can cause the container to burst, possibly
resulting in injury.
■ Hot foods and steam can cause burns. Be careful
when opening any containers of hot food,
including popcorn bags, cooking pouches and
boxes. To prevent possible injury, direct steam
away from hands and face.
■ Do not overcook potatoes. They could dehydrate
and catch fire, causing damage to your oven.
■ Cook meat and poultry thoroughly—meat to at
least an INTERNAL temperature of 160°F (70°C)
and poultry to at least an INTERNAL
temperature of 180°F (82°C). Cooking to these
temperatures usually protects against foodborne
illness.
WARNING!
Consumer Support
Troubleshooting Tips
Care and Cleaning
Operating Instructions Safety Instructions
Page 5
5
www.GEAppliances.ca
MICROWAVE-SAFE COOKWARE
Do not operate the oven in the microwave mode without the turntable and the turntable support seated
and in place. The turntable must be unrestricted so it can rotate.
Make sure all cookware used in your microwave oven is suitable for microwaving. Most glass casseroles,
cooking dishes, measuring cups, custard cups, pottery or china dinnerware which does not have metallic
trim or glaze with a metallic sheen can be used. Some cookware is labeled “suitable for microwaving.”
■ If you are not sure if a dish is microwave-safe,
use this test: Place in the oven both the dish you
are testing and a glass measuring cup filled with
1 cup of water—set the measuring cup either in
or next to the dish. Microwave 30–45 seconds at
high. If the dish heats, it should not be used for
microwaving.
If the dish remains cool and only the water in
the cup heats, then the dish is microwave-safe.
■
Oversized food or oversized metal cookware
should not be used in a microwave/convection
oven because they increase the risk of electric
shock and could cause a fire.
■
Sometimes the oven floor, turntable and walls
can become too hot to touch. Be careful touching
the floor, turntable and walls during and after
cooking.
■ If you use a meat thermometer while
microwaving or using the FAST BAKE
mode
,
make sure it is safe for use in microwave ovens.
■ Do not use recycled paper products. Recycled
paper towels, napkins and waxed paper can
contain metal flecks which may cause arcing
or ignite. Paper products containing nylon or
nylon filaments should be avoided, as they
may also ignite.
■ Some styrofoam trays (like those that meat
is packaged on) have a thin strip of metal
embedded in the bottom. When microwaved,
the metal can burn the floor of the oven or
ignite a paper towel.
■ Use of the shelf accessory:
— Remove the shelf from the oven when
not in use.
— Use pot holders when handling the shelf and
cookware. They may be hot.
— Be sure that the shelf is positioned properly
inside the oven to prevent product damage.
— Do not cover the shelf or any part of the oven
with metal foil. This will cause overheating of
the microwave/convection oven.
■ Do not use your microwave/convection oven
to dry newspapers.
■
Not all plastic wrap is suitable for use in
microwave ovens. Check the package for
proper use.
■ Paper towels, waxed paper and plastic wrap can
be used to cover dishes in order to retain moisture
and prevent spattering while microwaving. Be
sure to vent plastic wrap so steam can escape.
■
Do not use paper products when the microwave/
convection oven is operated in the
BAKE
, ROAST
or
FAST BAKE
mode.
■ Cookware may become hot because of heat
transferred from the heated food. Pot holders
may be needed to handle the cookware.
■ When microwaving “boilable” cooking pouches
and tightly closed plastic bags, they should be slit,
pierced or vented as directed by package. If they
are not, plastic could burst during or immediately
after cooking, possibly resulting in injury. Also,
plastic storage containers should be at least
partially uncovered because they form a tight seal.
When cooking with containers tightly covered
with plastic wrap, remove covering carefully and
direct steam away from hands and face.
■ Use foil only as directed in this manual. TV
dinners may be microwaved in foil trays less than
3/4” (2 cm) high; remove the top foil cover and
return the tray to the box. When using foil in the
microwave oven, keep the foil at least 1” (2.5 cm)
away from the sides of the oven.
■ Plastic cookware—Plastic cookware designed for
microwave cooking is very useful, but should be
used carefully. Even microwave-safe plastic may
not be as tolerant of overcooking conditions as
are glass or ceramic materials and may soften or
char if subjected to short periods of overcooking.
In longer exposures to overcooking, the food and
cookware could ignite.
Follow these guidelines:
Use microwave-safe plastics only and use
them in strict compliance with the cookware
manufacturer’s recommendations.
Do not microwave empty containers.
Do not permit children to use plastic
cookware without complete supervision.
3
2
1
Safety Instructions Operating Instructions Care and Cleaning
Troubleshooting Tips
Consumer Support
Page 6
6
READ AND FOLLOW THIS SAFETY INFORMATION CAREFULLY.
SAVE THESE INSTRUCTIONS
IMPORTANT SAFETY INFORMATION.
READ ALL INSTRUCTIONS BEFORE USING.
GROUNDING INSTRUCTIONS
This appliance must be grounded. In the event of
an electrical short circuit, grounding reduces the
risk of electric shock by providing an escape wire
for the electric current.
This appliance is equipped with a power cord
having a grounding wire with a grounding plug.
The plug must be plugged into an outlet that is
properly installed and grounded.
Consult a qualified electrician or service technician
if the grounding instructions are not completely
understood, or if doubt exists as to whether the
appliance is properly grounded.
If the outlet is a standard 2-prong wall outlet,
it is your personal responsibility and obligation
to have it replaced with a properly grounded
3-prong wall outlet.
Do not under any circumstances cut or remove the
third (ground) prong from the power cord.
Do not use an adapter plug with this appliance.
Do not use an extension cord with this appliance.
If the power cord is too short, have a qualified
electrician or service technician install an outlet
near the appliance.
For best operation, plug this appliance into its
own electrical outlet to prevent flickering of lights,
blowing of fuse or tripping of circuit breaker.
WARNING!
WARNING: Improper use of the grounding plug can result in a risk of electric shock.
THE VENT FAN
The fan will operate automatically under certain
conditions (see Automatic Fan feature). Take care
to prevent the starting and spreading of accidental
cooking fires while the vent fan is in use.
■ Clean the underside of the microwave often.
Do not allow grease to build up on the microwave
or the fan filters.
■ In the event of a grease fire on the surface units
below the microwave oven, smother a flaming
pan on the surface unit by covering the pan
completely with a lid, a cookie sheet or a flat tray.
■ Use care when cleaning the vent fan filters.
Corrosive cleaning agents, such as lye-based
oven cleaners, may damage the filters.
■ When preparing flaming foods under the
microwave, turn the fan on.
■ Never leave surface units beneath your microwave
oven unattended at high heat settings. Boilovers
cause smoking and greasy spillovers that may
ignite and spread if the microwave vent fan is
operating. To minimize automatic fan operation,
use adequate sized cookware and use high heat
on surface units only when necessary.
Consumer Support
Troubleshooting Tips
Care and Cleaning
Operating Instructions Safety Instructions
Page 7

7
Optional kits www.GEAppliances.ca
Filler Panel Kits
■ JX40WH—White
■ JX41—Black
When replacing a 36” (91.4 cm) range hood, filler
panel kits fill in the additional width to provide a
custom built-in appearance.
For installation between cabinets only; not for
end-of-cabinet installation. Each kit contains
two 3″ wide filler panels.
Filter Kits
■ JX81D—Recirculating Charcoal Filter Kit
Filter kits are used when the oven cannot be vented
to the outside.
Available at extra cost from your GE supplier.
Safety Instructions
Operating Instructions
Care and Cleaning
Troubleshooting Tips
Consumer Support
Page 8
8
About the features of your oven.
Throughout this manual, features and appearance may vary from your model.
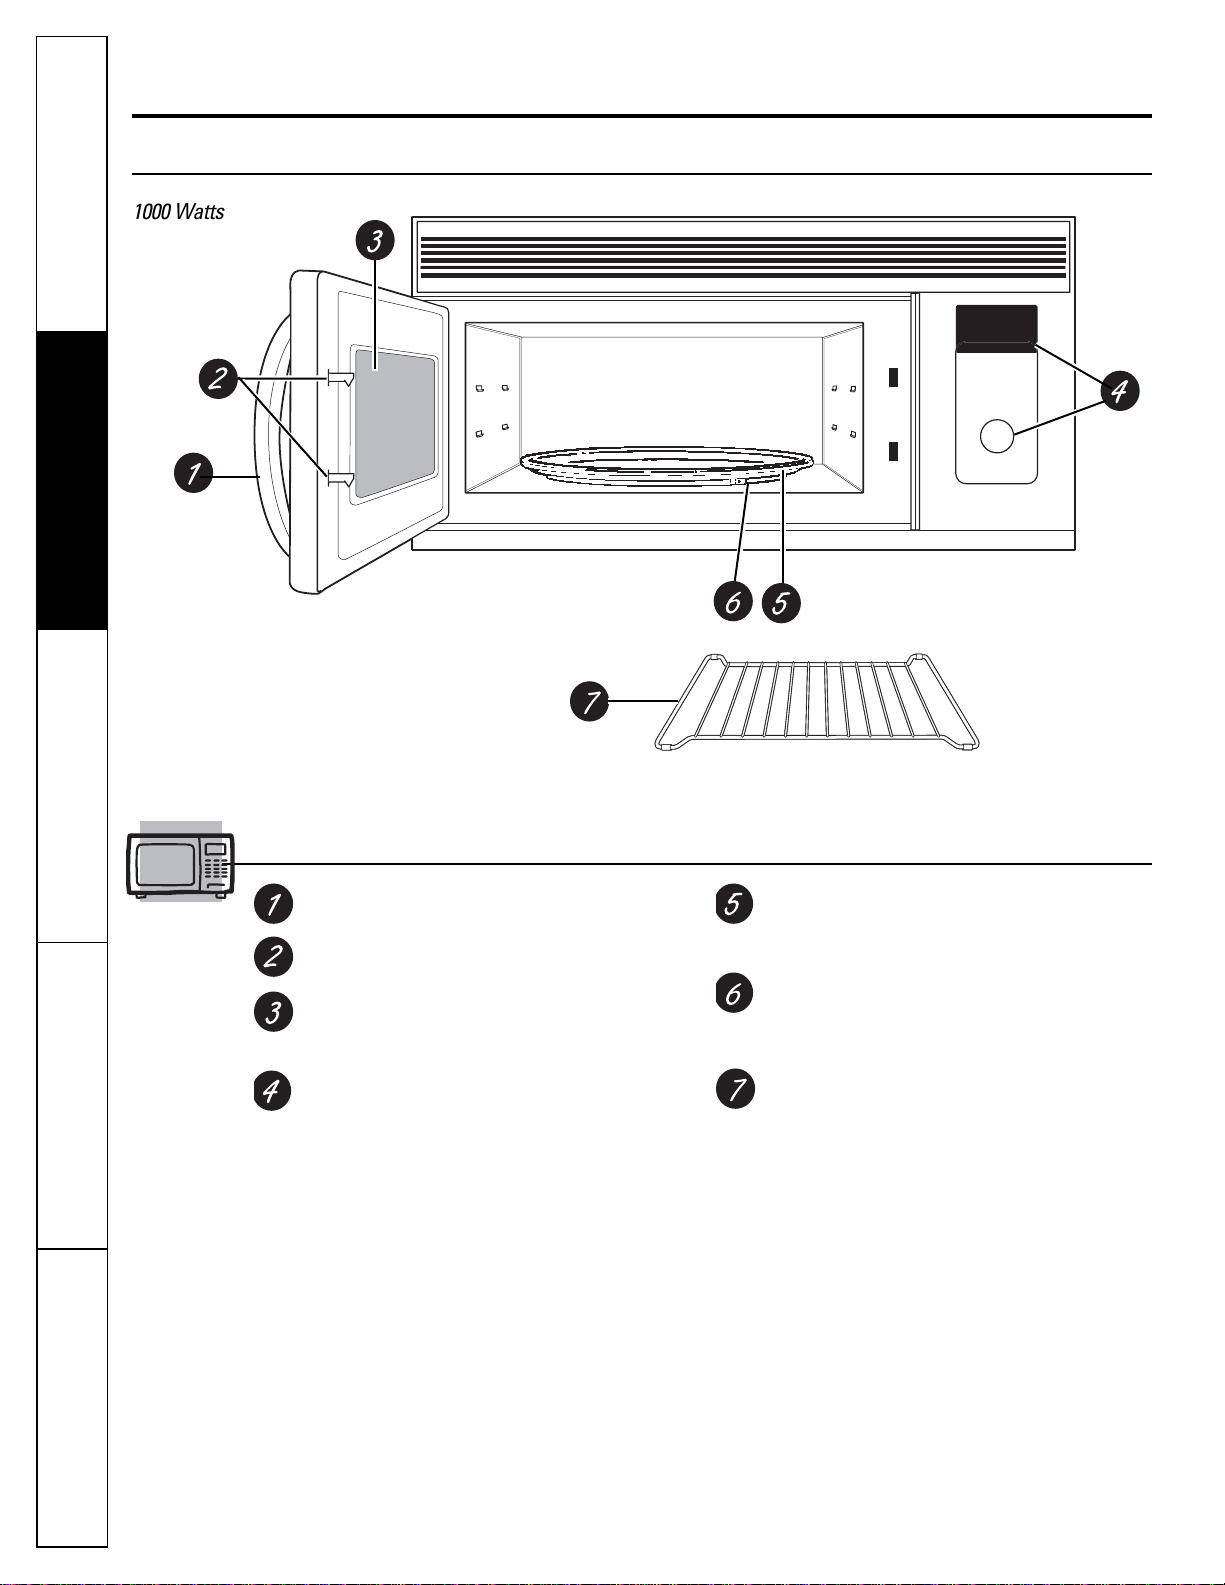
1000 Watts
Features of the Oven
Door Latch Release Handle.
Door Latches.
Window with Metal Shield. Screen allows
cooking to be viewed while keeping
microwaves confined in the oven.
Control Panel and Selector Dial.
Removable Turntable. Do not operate the oven
in the microwave mode without the turntable
and turntable support seated and in place.
Removable Turntable Support. Do not operate
the oven in the microwave mode without the
turntable and turntable support seated and in
place.
Shelves. Use with CONVECTION BAKE,
CONVECTION ROAST or COMBINATION FAST
BAKE. (Do not use when microwave cooking.)
For best results, use one shelf in the lower
position and leave at least a 1-inch gap
between the cooking dish and the sides of the
oven. For two-level Baking or Fast Baking use
both shelves.
Consumer Support Troubleshooting Tips
Care and Cleaning
Operating Instructions
Safety Instructions
850 Watts
Page 9
Microwave Cooking Time and Auto Features
Press Turn and push dial to enter
TIME COOK Amount of cooking time
Press once (Time Cook I) to microwave
any time between 15 seconds and 95 minutes.
Press twice (Time Cook II) to change power
levels automatically during cooking.
MICRO EXPRESS cook/Add 30 sec. Starts immediately!
DEFROST
Press once (Fast) Food weight up to one pound (454 g)
Press twice (Auto) Food weight up to six pounds (2.7 kg)
Press three times (Time) Amount of defrosting time
BEVERAGE Starts immediately!
Press once (6-7 oz./185-220 mL)
Press twice (8-9 oz./240-280 mL)
Press three times (10-12 oz./310-375 mL)
POWER level Power level 1–10
Sensor Features
Press Turn and push dial to enter Option
POPCORN Starts immediately! more/less time
REHEAT Starts immediately! more/less time
Press once (plate)
Press twice (pasta)
Press three times (1⁄2 to 1 cup/120 to 240 mL)
Press four times (1 to 2 cups/240 to 480 mL)
AUTO COOK Food type more/less time
Convection Baking or Convection Roasting
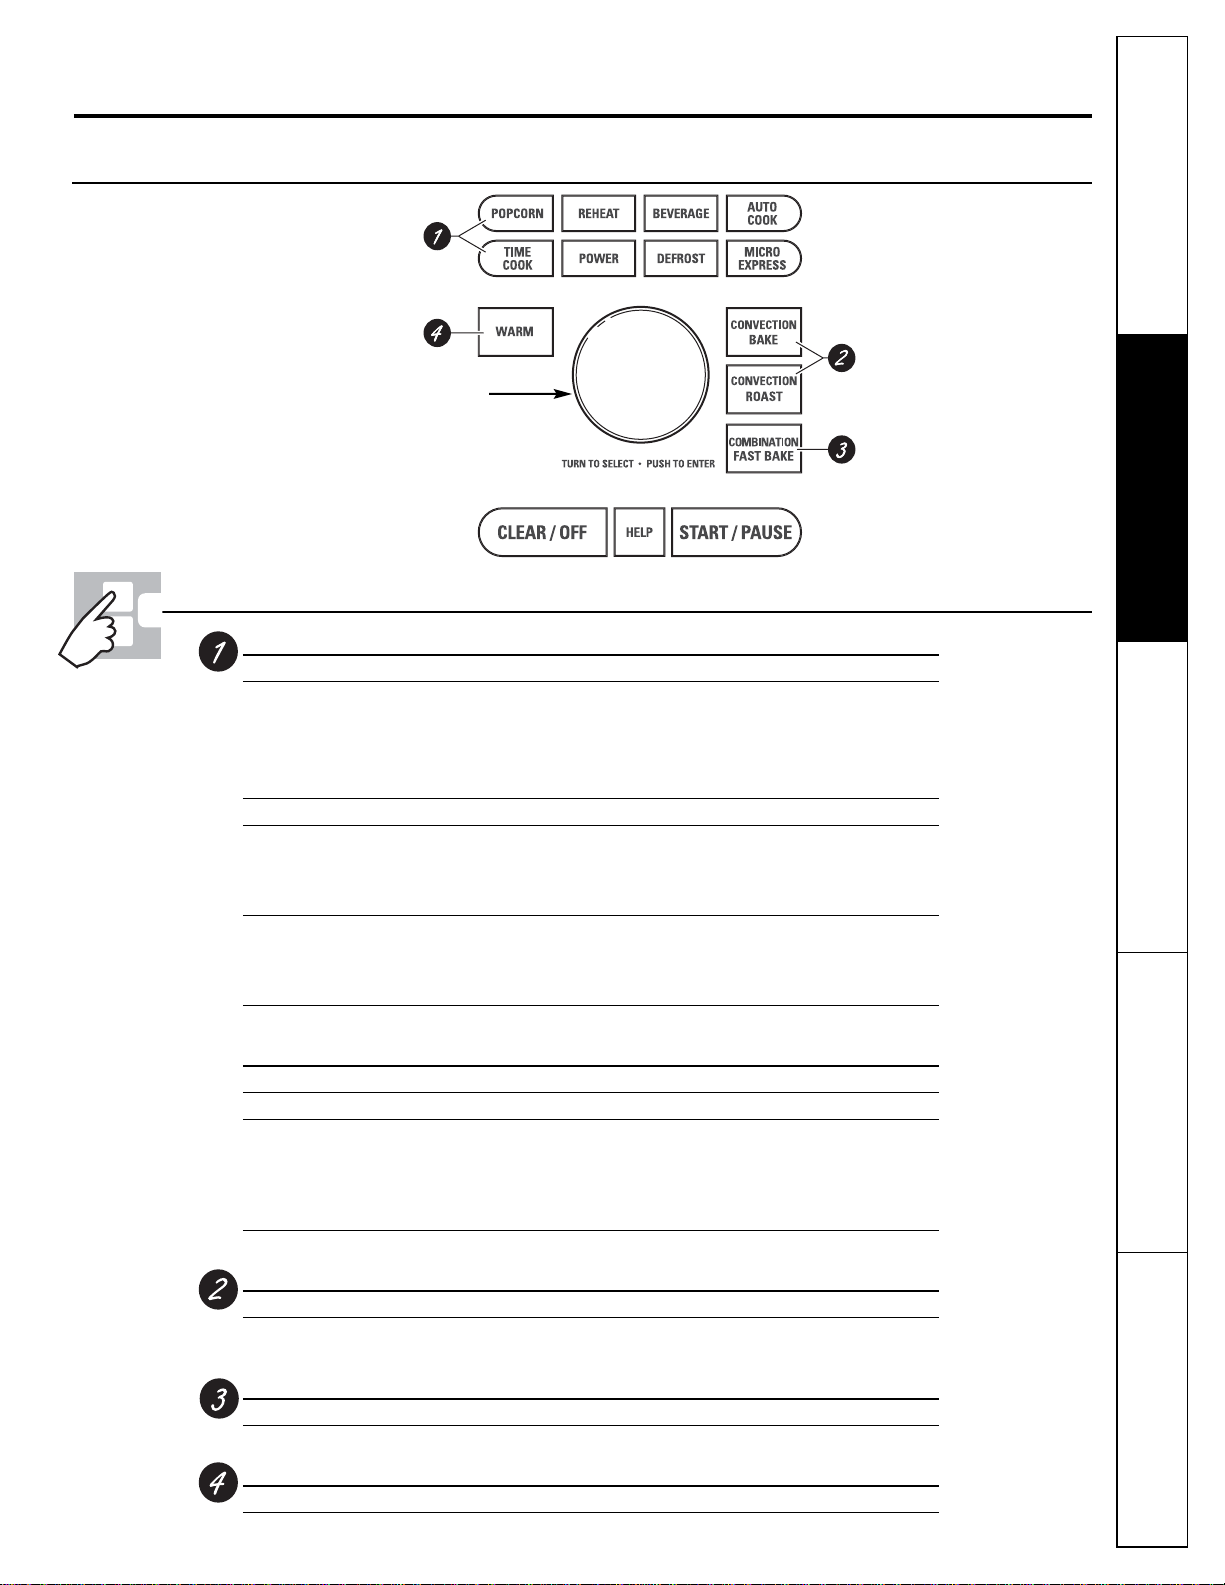
Press Turn and push dial to enter
CONVECTION BAKE or Oven temperature and cook time
CONVECTION ROAST
Combination Fast Baking
Press Turn and push dial to enter
COMBINATION FAST BAKE Oven temperature and cook time
Warming
Press Turn and push dial to enter
WARM Oven temperature and warm time
9
You can cook by Microwave, Convection Bake, Convection Roast or Combination Fast Bake. Keep hot, cooked foods at
serving temperature with the Warm feature.
About the cooking and warming features of your
microwave/convection oven.
www.GEAppliances.ca
Cooking Controls
Dial Selector
Safety Instructions
Operating Instructions
Care and Cleaning
Troubleshooting Tips
Consumer Support
Page 10
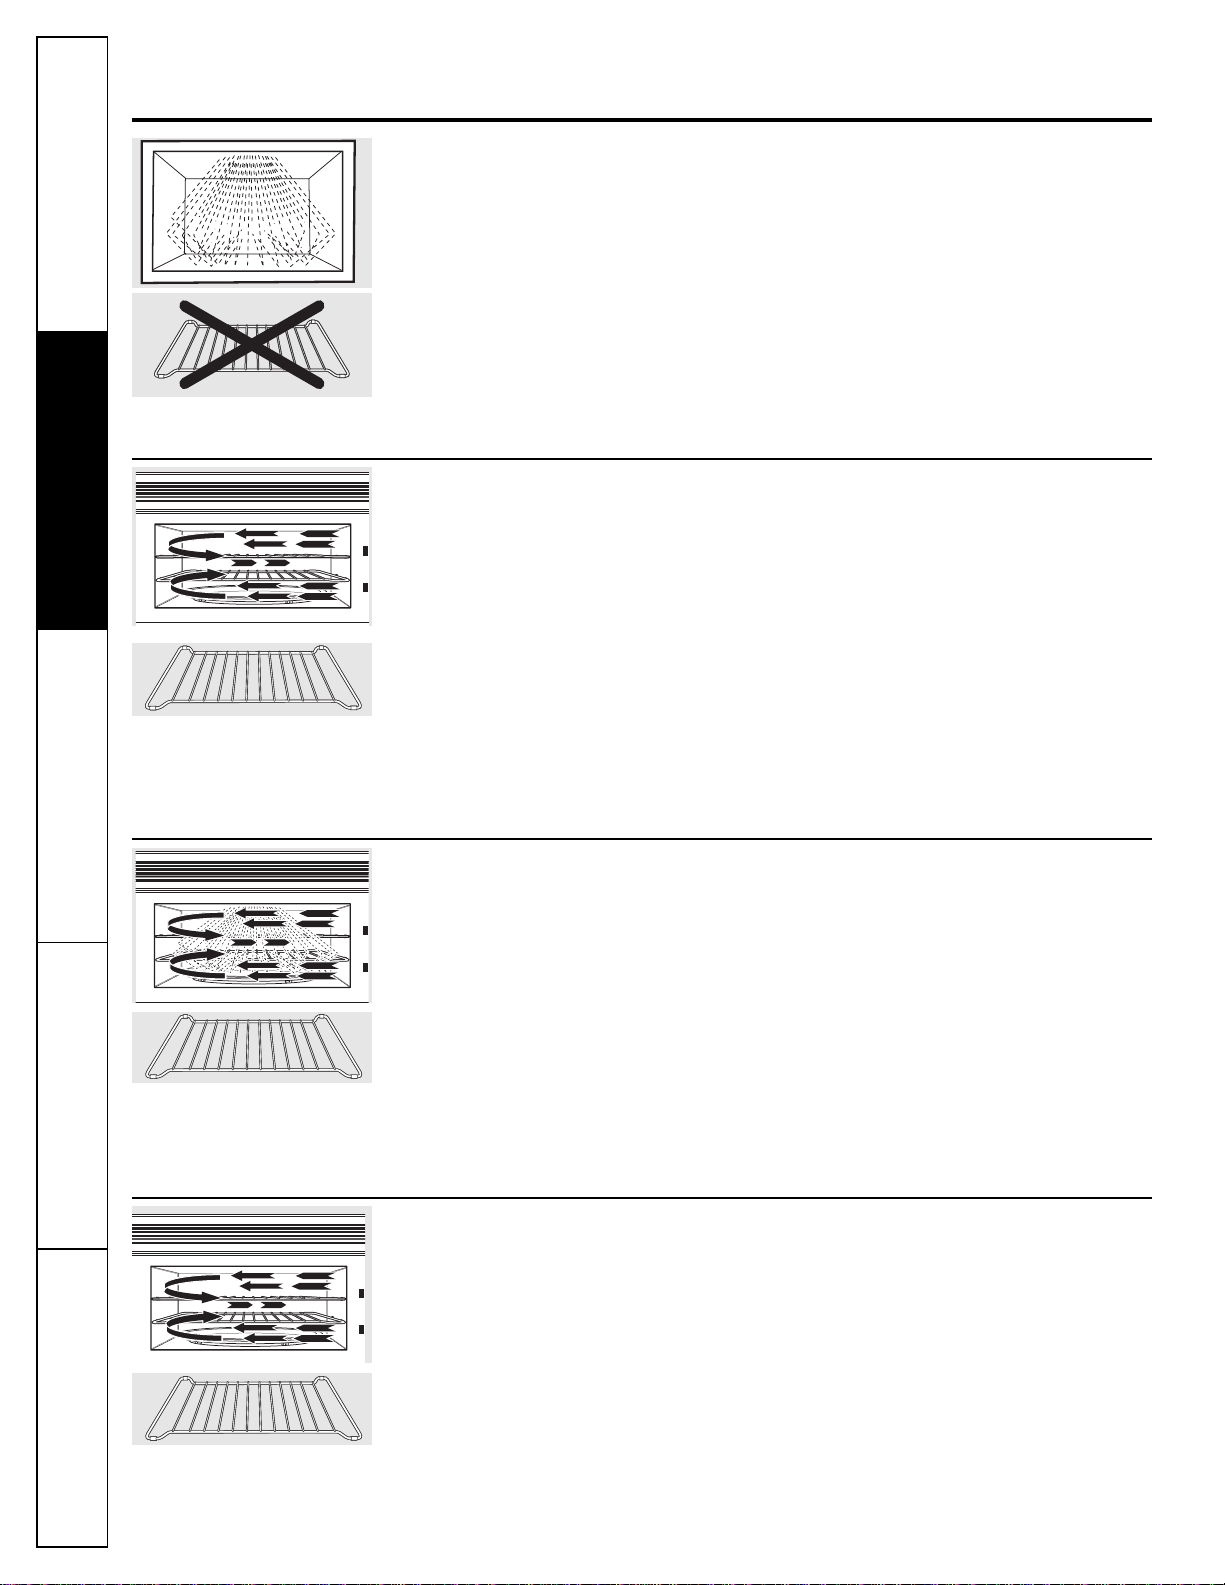
10
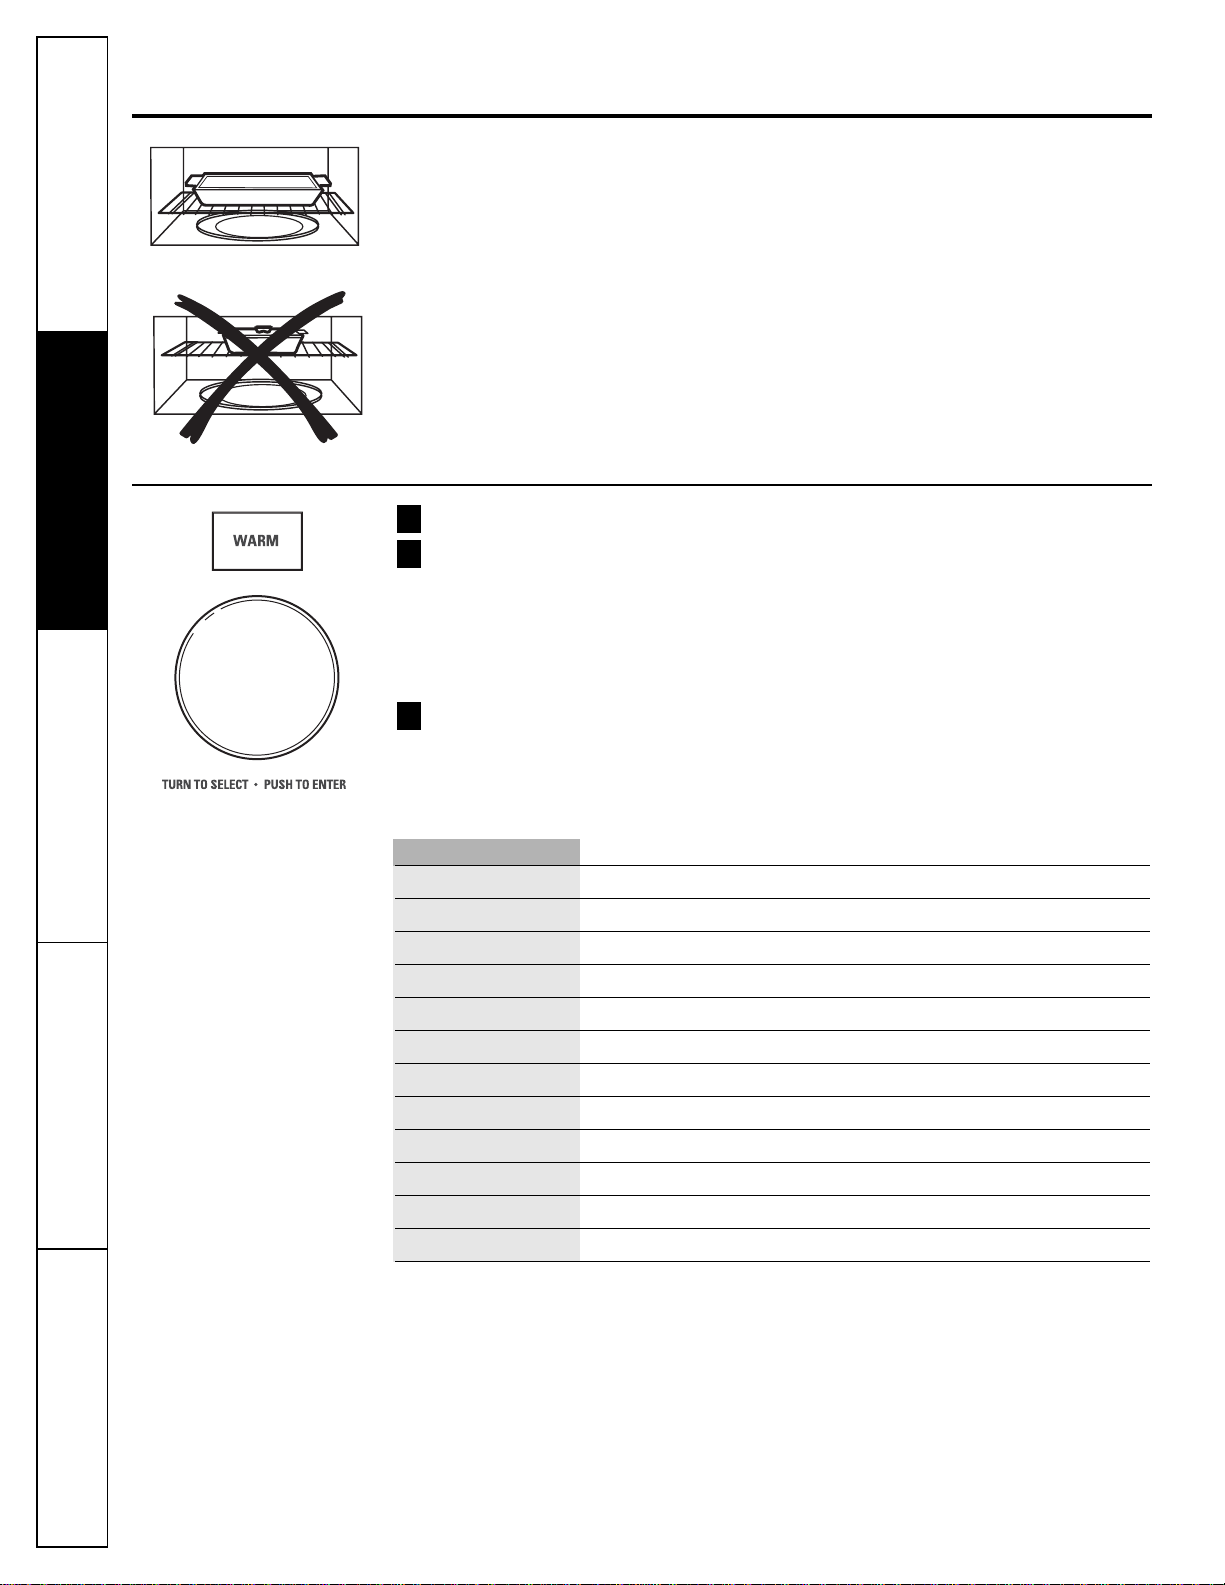
Do not use the shelves when
microwave cooking.
Always use the shelf when baking.
For best results, use one shelf in the
lower position. For two-level cooking
only, use both shelves.
Cooking Method
Microwave energy
is distributed evenly
throughout the oven
for thorough, fast
cooking of food.
Heat Source
Microwave energy.
Heat Conduction
Heat produced
within food by
instant energy
penetration.
Benefits
Fast, high efficiency
cooking. Oven and
surroundings do
not get hot.
Easy clean-up.
Cooking Method
Hot air circulates
around food to
produce browned
exteriors and seal
in juices.
Heat Source
Circulating
heated air
(Convection).
Heat Conduction
Heat conducted
from outside of food
to inside.
Benefits
Aids in browning
and seals in flavor.
Cooks some foods
faster than regular
ovens.
Cooking Method
Warm air circulates
around food to keep
previously cooked
food warm.
Heat Source
Circulating heated
air (Convection).
Heat Conduction
Warmth conducted
from outside of food
to inside.
Benefits
Keeps hot, cooked
foods at serving
temperature.
Always use the shelf when warming.
Available cooking options.
Microwave Cooking
Convection Baking and Convection Roasting
Warming
The warming feature will keep hot, cooked foods at serving temperature. Always start with
hot food. Use cookware and utensils that can withstand temperatures up to 230°F.
During baking or roasting, a heating element is used to raise the temperature of the air
inside the oven. Any oven temperature from 225°F to 450°F (107°C to 230°C) may be
programmed. A fan gently circulates this heated air throughout the oven, over and around
the food, producing golden brown exteriors and rich moist interiors. This circulation of
heated air is called convection.
Because the heated air is kept constantly moving, not permitting a layer of cooler air to
develop around the food, some foods cook faster than in regular oven cooking.
Your oven uses microwave energy to cook by a set time or weight, or automatically
by sensor.
Sensor microwave works by detecting the increasing humidity released during cooking.
The oven automatically adjusts the cooking time to various types and amounts of food.
Cooking Method
Microwave energy
and convection heat
combine to cook
foods up to 25%
faster than regular
ovens, while
browning and
sealing in juices.
Heat Source
Microwave energy
and circulating
heated air.
Heat Conduction
Food heats from
instant energy from
penetration and heat
conducted from
outside of food.
Benefits
Shortened
cooking time from
microwave energy,
plus browning and
crisping from
convection heat.
Always use the shelf with Fast Bake.
For best results, use one shelf in the
lower position. For two-level cooking
only, use both shelves.
Combination Fast Baking
Your oven also offers the option of Combination Fast Bake, using microwave energy along
with convection cooking. You cook with speed and accuracy, while browning and crisping
to perfection.
Consumer Support
Troubleshooting Tips
Care and Cleaning
Operating Instructions Safety Instructions
Page 11
11
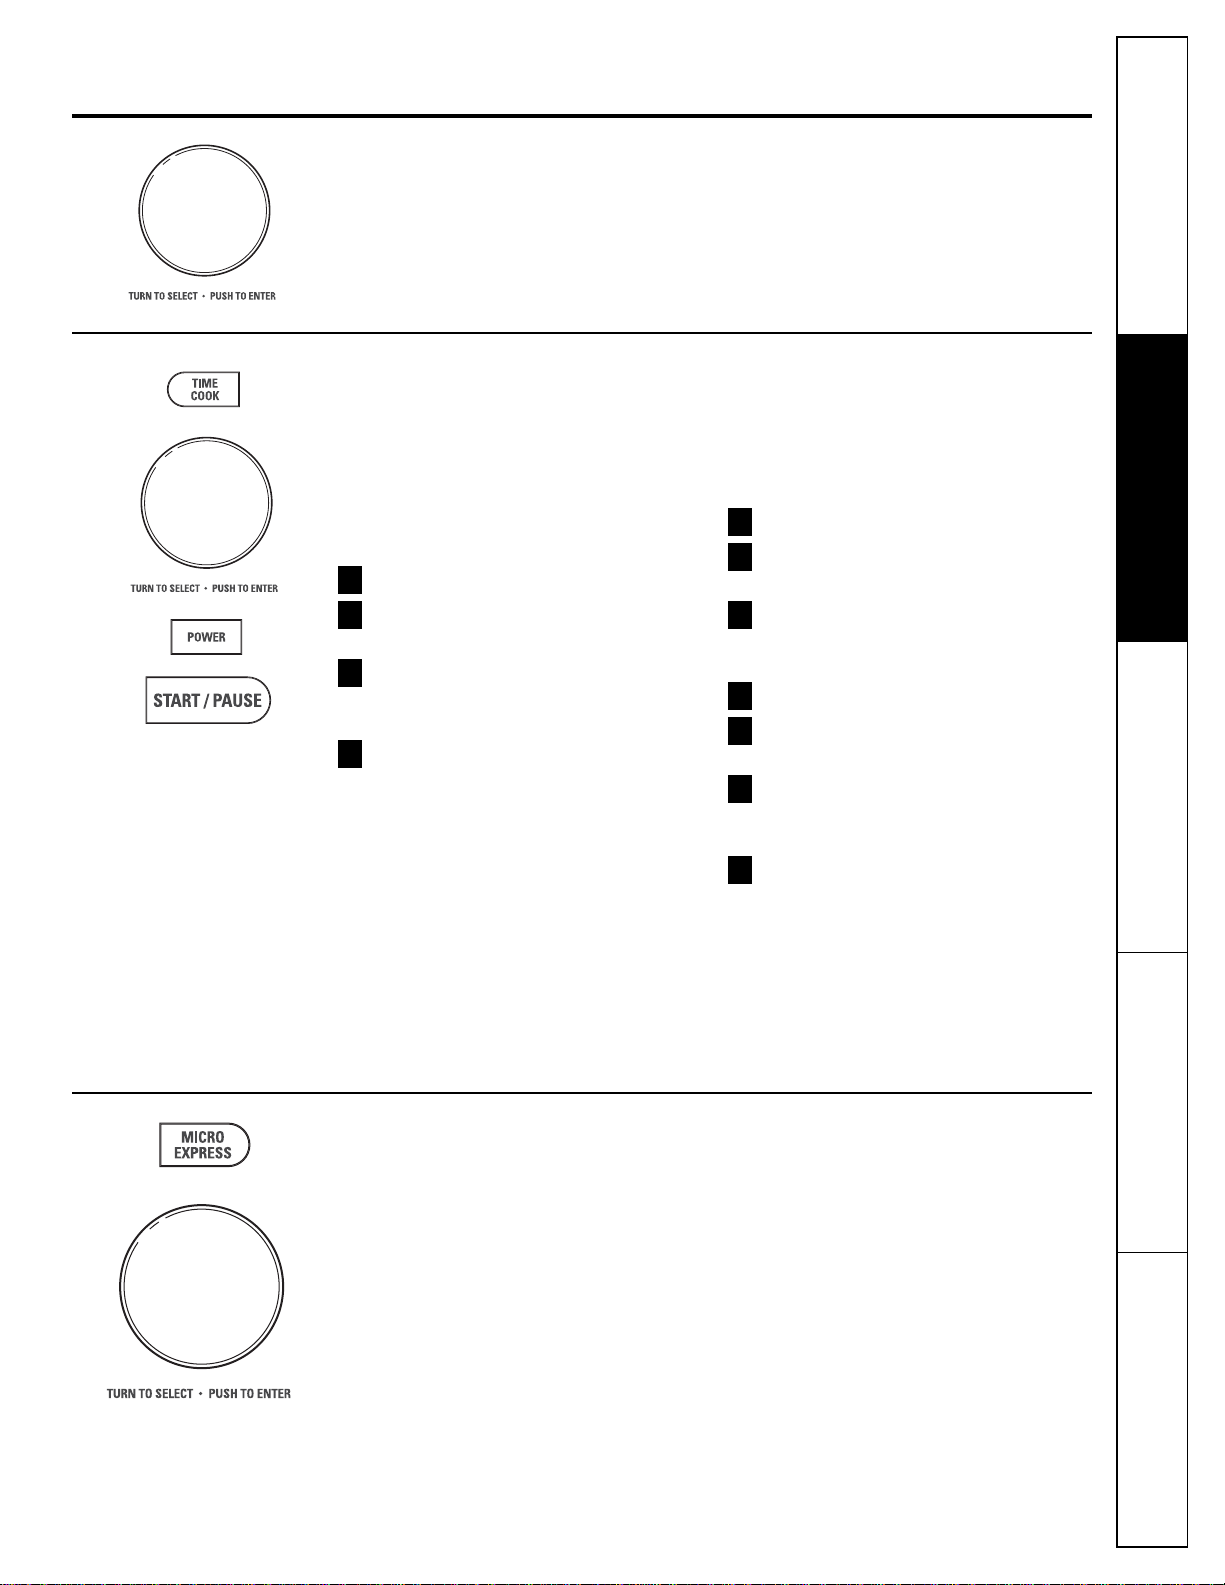
Time Cook
(Do not use the shelves when
microwave cooking.)
Time Cook I
Allows you to microwave for any time
between 15 seconds and 95 minutes.
Power level 10 (High) is automatically set,
but you may change it for more flexibility.
Press the TIME COOK button.
Turn the dial to set the cook time and
press the dial to enter.
Change power level if you don’t want
full power. (Press POWER. Turn the dial
to select. Press the dial to enter.)
Press the dial or the START/PAUSE
button to start cooking.
You may open the door during Time Cook
to check the food. Close the door and press
the dial or START/PAUSE to resume cooking.
NOTE: You may change the cook time at any
time during cooking by turning the dial. You
may also change the power level by pressing
the POWER button.
Time Cook II
Lets you change power levels automatically
during cooking. Here’s how to do it:
Press the TIME COOK button.
Turn the dial to set the first cook time
and press the dial to enter.
Change the power level if you don’t
want full power. (Press POWER. Turn the
dial to select. Press the dial to enter.)
Press the TIME COOK button again.
Turn the dial to set the second cook
time and press the dial to enter.
Change the power level if you don’t
want full power. (Press POWER. Turn the
dial to select. Press the dial to enter.)
Press the dial or the START/PAUSE
button to start cooking.
At the end of Time Cook I, Time Cook II
counts down.
NOTE: You may change the cook time at any
time during cooking by turning the dial. You
may also change the power level by pressing
the POWER button.
7
6
5
4
3
2
1
4
3
2
1
Micro Express Cook (Do not use the
shelves when microwave cooking.)
This is a quick way to set and start cooking
in 30 second blocks each time the MICRO
EXPRESS button is pressed. The cook time
may be changed by turning the dial at any
time during cooking.
The power level will automatically be set
at 10 and the oven will start immediately.
The power level can be changed as time is
counting down. Press the POWER button,
turn the dial and press to enter.
About the time and auto microwave features. www.GEAppliances.ca
Using the Dial
You can make selections on the oven by
turning the dial and pressing it to enter
the selection.
Pressing the dial can also be used in place
of the START/PAUSE button for quicker
programming of the oven.
Safety Instructions
Operating Instructions
Care and Cleaning
Troubleshooting Tips
Consumer Support
Page 12

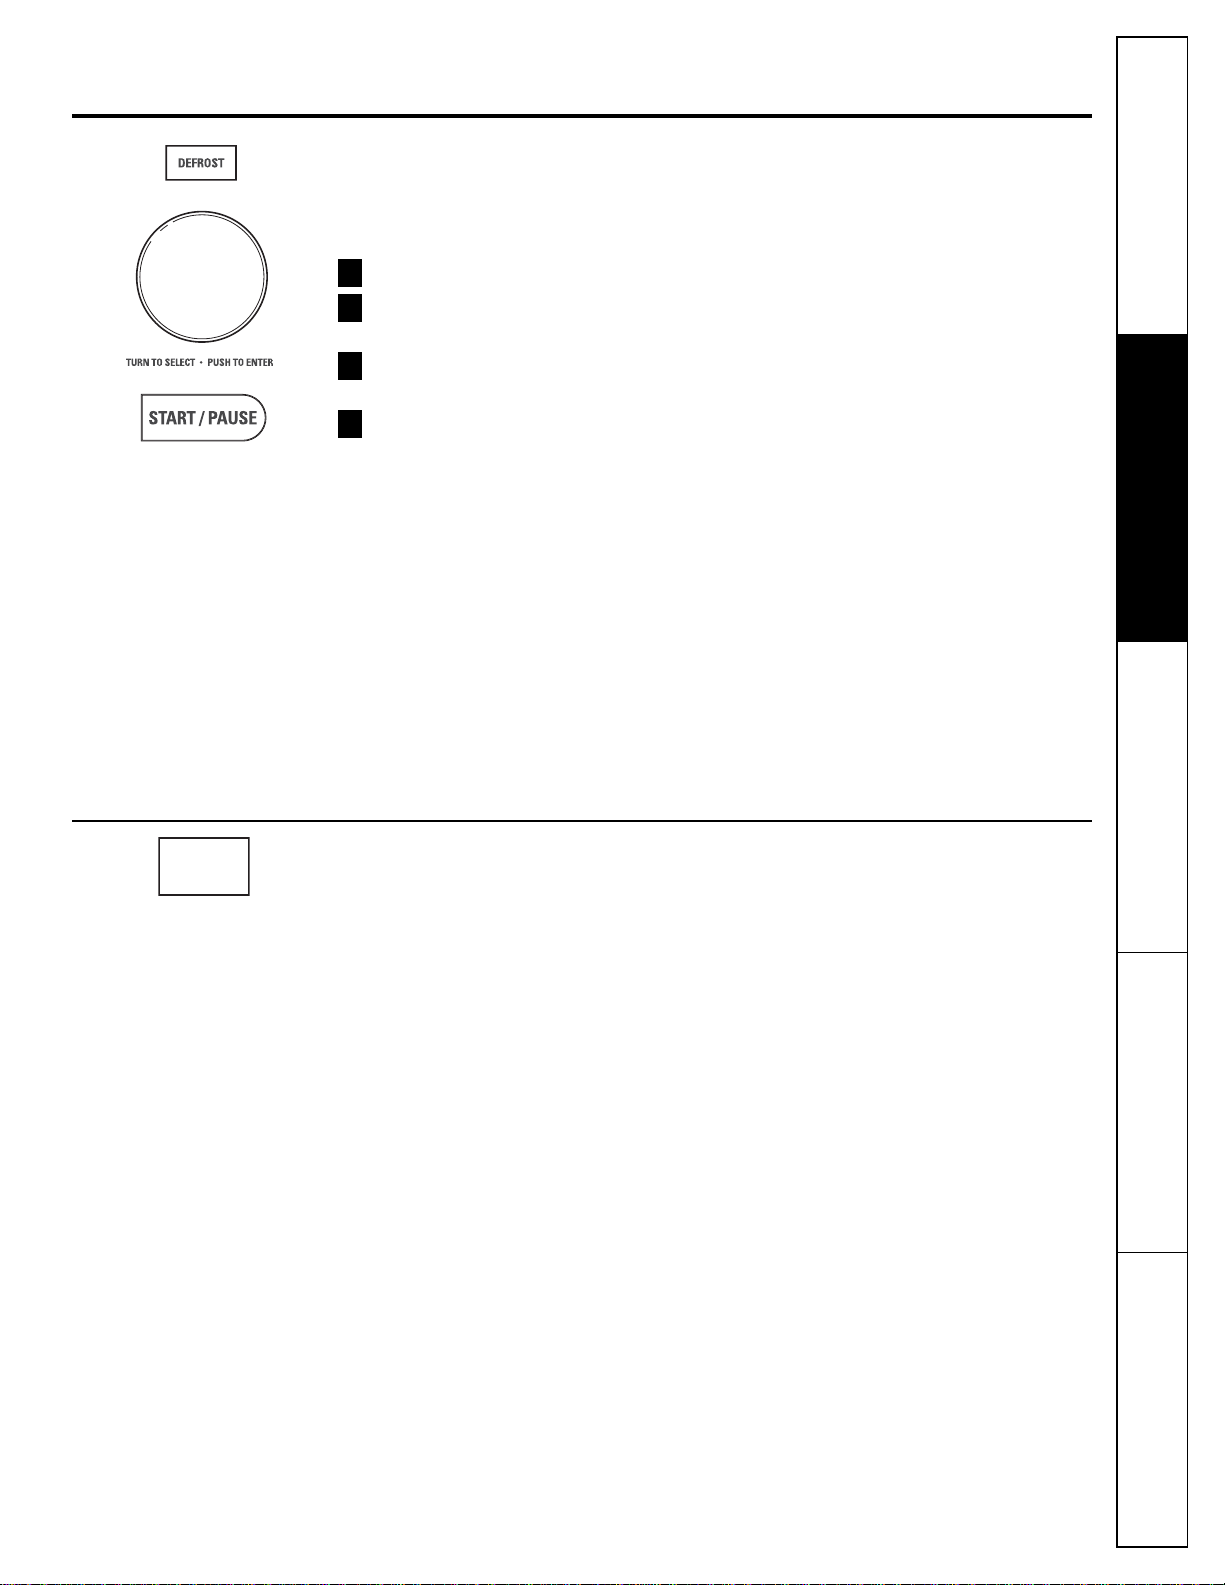
Fast Defrost (Do not use the shelves when
microwave cooking.)
Fast Defrost automatically sets the
defrosting times and power levels to give
even defrosting results for meats, poultry
and fish weighing up to one pound.
■ Remove meat from package and place on
microwave-safe dish.
Press the DEFROST button once.
Turn the dial to the food weight,
using the Conversion Guide at right.
For example, dial .5 for .5 pounds
(8 oz./227 g) Press the dial to enter.
Press the START/PAUSE button to start
defrosting.
Turn the food over if the oven signals
TURN FOOD OVER.
■ Remove defrosted meat or shield warm
areas with small pieces of foil.
■ After defrosting, most meats need to
stand 5 minutes to complete defrosting.
Conversion Guide
If the weight of food is stated in pounds and
ounces, the ounces must be converted to tenths
(.1) of a pound.
Weight of Food Enter Food Weight
in Ounces (Grams) (tenths of a pound)
1-2 (28-57) .1
3 (85) .2
4-5 (113-142) .3
6-7 (170-198) .4
8 (227) .5
9-10 (255-284) .6
11 (312) .7
12-13 (340-369) .8
14-15 (397-425) .9
4
3
2
1
12
About the time and auto microwave features.
Auto Defrost (Do not use the shelves when
microwave cooking.)
Use Auto Defrost for meat, poultry and fish
weighing up to six pounds.
Use Time Defrost
for most other frozen foods.
Auto Defrost automatically sets the
defrosting times and power levels to give
even defrosting results for meats, poultry
and fish.
■ Remove meat from package and place
on microwave-safe dish.
Press the DEFROST button twice.
Turn the dial to the food weight,
using the Conversion Guide at right.
For example, dial 1.2 for 1.2 pounds
(1 pound, 3 oz./535 g) Press the dial to
enter.
Press the START/PAUSE button to start
defrosting.
Turn the food over if the oven signals
TURN FOOD OVER.
■ Remove defrosted meat or shield warm
areas with small pieces of foil.
■ After defrosting, most meats need to
stand 5 minutes to complete defrosting.
Large roasts should stand for about
30 minutes.
Conversion Guide
If the weight of food is stated in pounds and
ounces, the ounces must be converted to tenths
(.1) of a pound.
Weight of Food Enter Food Weight
in Ounces (Grams) (tenths of a pound)
1-2 (28-57) .1
3 (85) .2
4-5 (113-142) .3
6-7 (170-198) .4
8 (227) .5
9-10 (255-284) .6
11 (312) .7
12-13 (340-369) .8
14-15 (397-425) .9
4
3
2
1
Consumer Support
Troubleshooting Tips
Care and Cleaning
Operating Instructions Safety Instructions
Page 13
13
www.GEAppliances.ca
Time Defrost (Do not use the shelves when
microwave cooking.)
Use Time Defrost to defrost for a selected
length of time.
Press the DEFROST button three times.
Turn the dial to select the time you
want. Press the dial to enter.
Press the START/PAUSE button to start
defrosting.
Turn the food over if the oven signals
TURN FOOD OVER.
You may change the defrost time at any
time during defrosting by turning the dial.
Power level is automatically set at 3, but can
be changed. You can defrost small items
quickly by raising the power level after
entering the time. Power level 7 cuts the
total defrosting time in about half; power
level 10 cuts the total time to approximately
1/3. However, food will need more
frequent attention than usual.
A dull thumping noise may be heard
during defrosting. This is normal when
oven is not operating at High power.
Defrosting Tips
■
Foods frozen in paper or plastic can be
defrosted in the package. Closed packages
should be slit, pierced or vented AFTER
food has partially defrosted. Plastic storage
containers should be partially uncovered.
■ Family-size, prepackaged frozen dinners
can be defrosted and microwaved. If the
food is in a foil container, transfer it to
a microwave-safe dish.
■ Foods that spoil easily should not be
allowed to sit out for more than one hour
after defrosting. Room temperature
promotes the growth of harmful bacteria.
■ For more even defrosting of larger foods,
such as roasts, use Auto Defrost. Be sure
large meats are completely defrosted
before cooking.
■ When defrosted, food should be cool
but softened in all areas. If still slightly icy,
return to the microwave very briefly, or
let it stand a few minutes.
4
3
2
1
Safety Instructions
Operating Instructions
Care and Cleaning
Troubleshooting Tips
Consumer Support
Beverage (Do not use the shelves when
microwave cooking.)
The BEVERAGE feature heats beverages
from 6 to 12 ounces (185 to 375 mL).
Press once for 6-7 oz. (185-220 mL).
Press twice for 8-9 oz. (240-280 mL).
Press three times for 10-12 oz. (310-375 mL).
Drinks heated with the Beverage feature may be
very hot. Remove the container with care.
BEVERAGE
Page 14
14
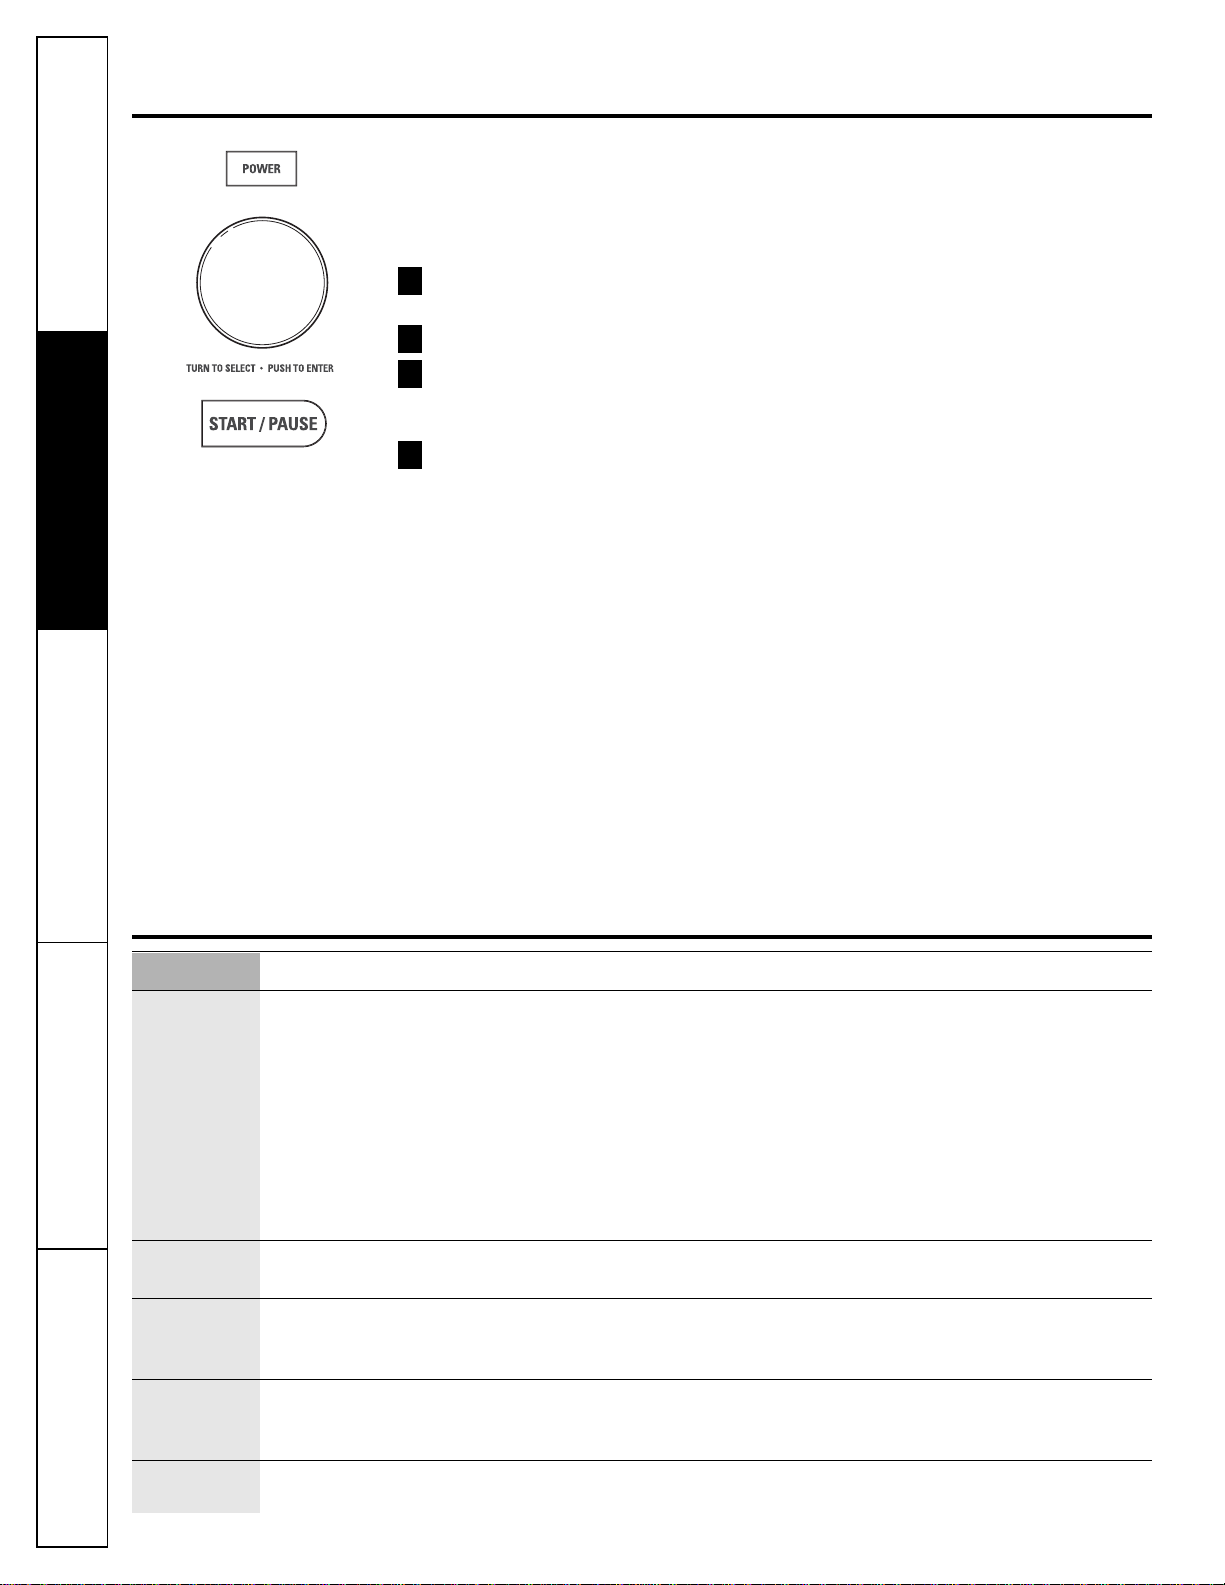
About changing the power level.
The power level may be entered or
changed immediately after entering the
time for Time Cook, Time Defrost or Express
Cook. The power level may also be changed
during time countdown.
First, follow directions for Time Cook,
Time Defrost or Express Cook.
Press the POWER button.
Turn the dial clockwise to increase and
counterclockwise to decrease the power
level. Press the dial to enter.
Press the START/PAUSE button to start
cooking.
Variable power levels add flexibility to
microwave cooking. The power levels on
the microwave oven can be compared to
the surface units on a range. Each power
level gives you microwave energy a certain
percent of the time. Power level 7 is
microwave energy 70% of the time. Power
level 3 is energy 30% of the time. Most
cooking will be done on High (power level
10) which gives you 100% power. Power level
10 will cook faster but food may need more
frequent stirring, rotating or turning over.
A lower setting will cook more evenly and
need less stirring or rotating of the food.
Some foods may have better flavor, texture
or appearance if one of the lower settings is
used. Use a lower power level when cooking
foods that have a tendency to boil over,
such as scalloped potatoes.
Rest periods (when the microwave
energy cycles off) give time for the food
to “equalize” or transfer heat to the inside
of the food. An example of this is shown
with power level 3—the defrost cycle. If
microwave energy did not cycle off, the
outside of the food would cook before
the inside was defrosted.
Here are some examples of uses for various
power levels:
High 10: Fish, bacon, vegetables, heating
liquids.
Med-High 7: Gentle cooking of meat and
poultry; baking casseroles and reheating.
Medium 5: Slow cooking and tenderizing
for stews and less tender cuts of meat.
Low 2 or 3: Defrosting; simmering; delicate
sauces.
Warm 1: Keeping food warm; softening
butter.
4
3
2
1
Arcing Arcing is the microwave term for sparks in the oven. Arcing is caused by:
■ the metal shelf being installed incorrectly and touching the microwave walls.
■ metal or foil touching the side of the oven.
■ foil that is not molded to food (upturned edges act like antennas).
■ metal such as twist-ties, poultry pins, gold-rimmed dishes.
■ recycled paper towels containing small metal pieces.
■ the turntable ring support being installed incorrectly.
Covering Covers hold in moisture, allow for more even heating and reduce cooking time. Venting plastic wrap or
covering with wax paper allows excess steam to escape.
Shielding In a regular oven, you shield chicken breasts or baked foods to prevent over-browning. When microwaving,
you use small strips of foil to shield thin parts, such as the tips of wings and legs on poultry, which would
cook before larger parts.
Standing Time When you cook with regular ovens, foods such as roasts or cakes are allowed to stand to finish cooking or
to set. Standing time is especially important in microwave cooking. Note that a microwaved cake is not
placed on a cooling rack.
Venting After covering a dish with plastic wrap, you vent the plastic wrap by turning back one corner so excess
steam can escape.
Microwave terms.
Term Definition
Consumer Support
Troubleshooting Tips
Care and Cleaning
Operating Instructions Safety Instructions
Page 15
15
About the sensor microwave features. www.GEAppliances.ca
Humidity Sensor
What happens when using the Sensor Features:
The Sensor Features detect the increasing humidity released during cooking. The oven
automatically adjusts the cooking time to various types and amounts of food.
Do not use the Sensor Features twice in succession on the same food portion—it may
result in severely overcooked or burnt food. If food is undercooked after the countdown,
use Time Cook for additional cooking time.
NOTE: Sensor features will not operate when the oven is hot. If one of the sensor cooking buttons is
pressed when the temperature inside the oven is greater than 200°F (93°C), “OVEN TOO HOT FOR SENSOR
COOKING---USING ALTERNATE METHOD” will be displayed. The oven will automatically change to cook by
time (follow the directions in the display) or once the oven is cool enough, the sensor features will function
normally.
■ The proper containers and covers are essential for best sensor cooking.
■ Always use microwave-safe containers and cover them with lids or vented plastic wrap.
Never use tight sealing plastic containers—they can prevent steam from escaping and
cause food to overcook.
■ Be sure the outside of the cooking containers and the inside of the microwave oven are
dry before placing food in the oven. Beads of moisture turning into steam can mislead
the sensor.
Dry off dishes so they don’t mislead
the sensor.
Vented
Covered
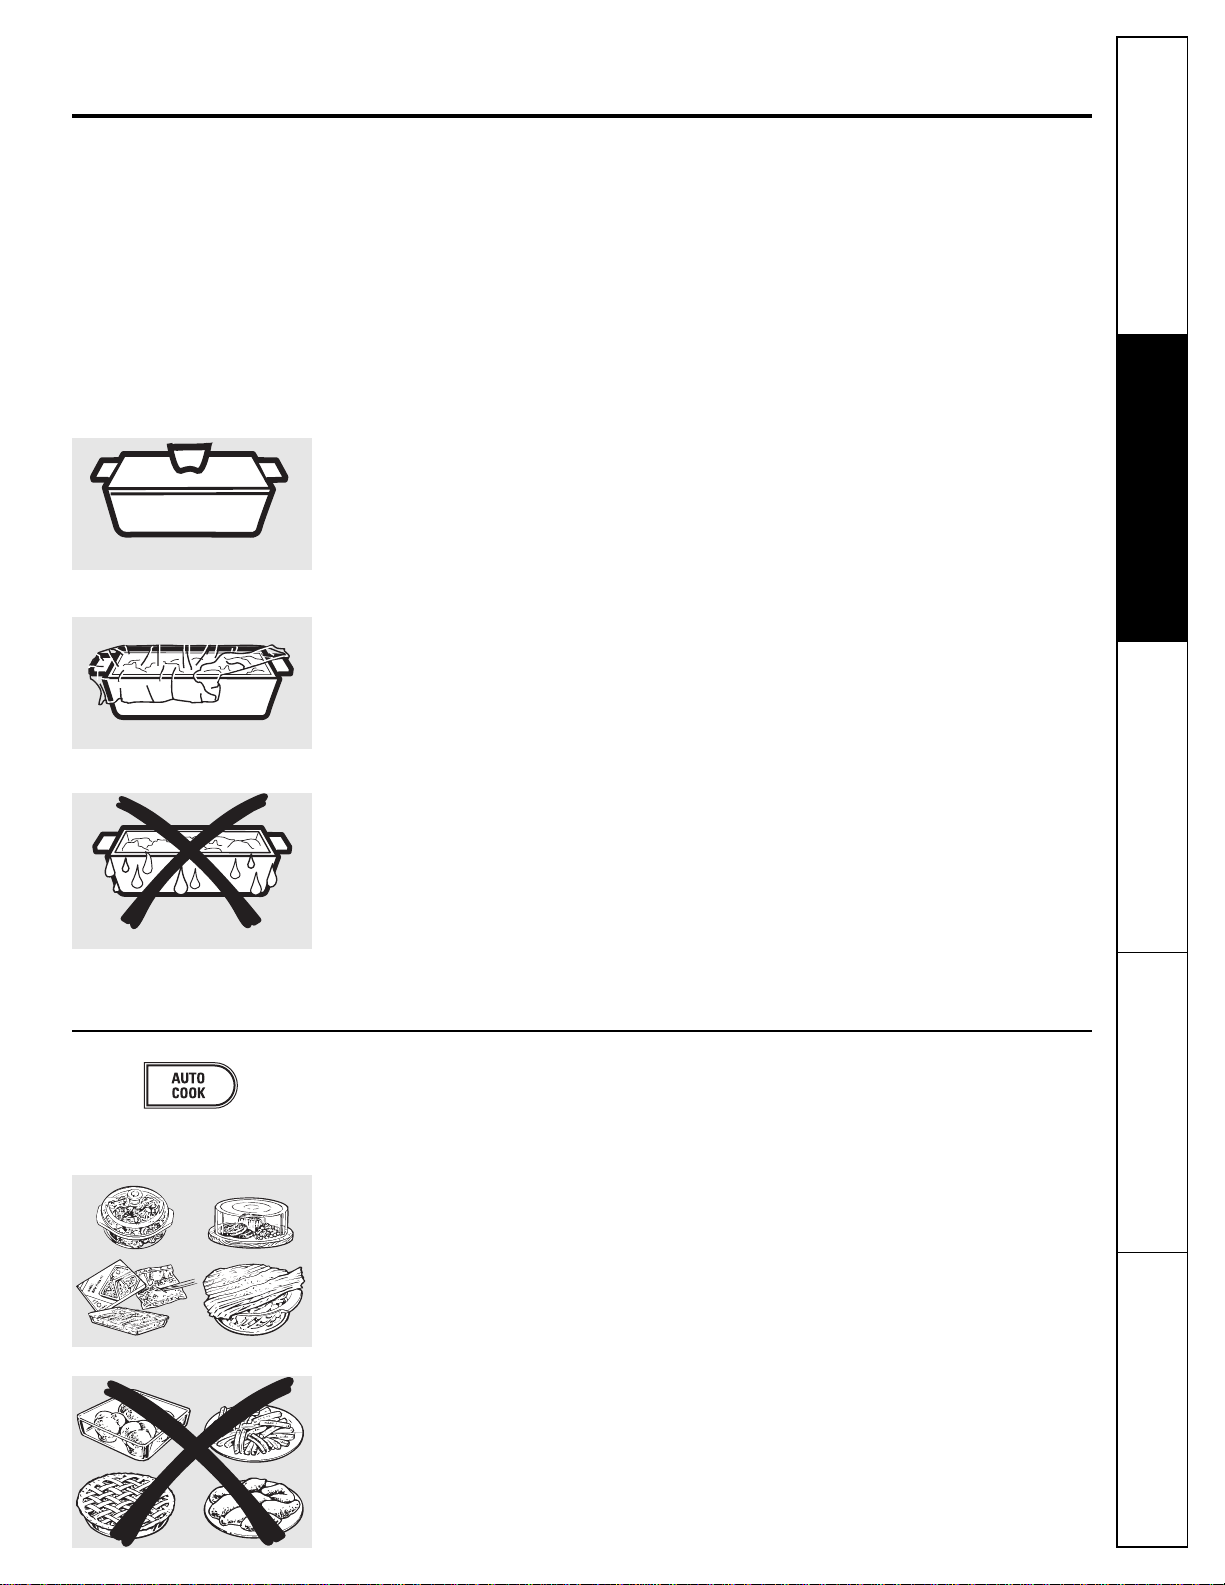
Auto Cook (Do not use the shelves when microwave cooking.)
Because most cooking containers must be covered during Auto Cook, this feature is best
with foods that you want to steam or retain moisture.
NOTE: Use of the metal shelf with Auto Cook is not recommended.
Recommended Foods
A wide variety of foods including meats, fish and vegetables can be cooked
using this feature.
Foods not recommended
Foods that must be cooked uncovered, foods that require constant attention, foods that
require addition of ingredients during cooking and foods calling for a dry look or crisp
surface after cooking should not be cooked using this feature. It is best to Time Cook them.
Safety Instructions
Operating Instructions
Care and Cleaning
Troubleshooting Tips
Consumer Support
Page 16
16
Sensor Food Type Guide
Food Type Servings Serving Size Comments
Chicken Pieces
1 to 4 2 to 8 Use oblong, square or round dish.
pieces Cover with vented plastic wrap.
Fish 1 to 4 4 to 16 oz. Use oblong, square or round dish.
(114 to 456 g) Cover with vented plastic wrap.
Ground Meat — 8 to 32 oz. Use round casserole dish. Crumble meat
(Beef, Pork, Turkey) (227 to 908 g) into dish. Cover with vented plastic wrap.
Potatoes 1 to 4 8 to 32 oz. Pierce skin with fork. Arrange in a
(227 to 908 g) star pattern in center of turntable.
Canned Vegetables 1 to 4 4 to 16 oz. Use microwave-safe casserole or bowl.
(114 to 456 g) Cover with lid or vented plastic wrap.
Fresh Vegetables 1 to 4 4 to 16 oz. Use microwave-safe casserole or bowl.
(114 to 456 g) Add 2 tablespoons water for each serving.
Cover with lid or vented plastic wrap.
Frozen Vegetables 1 to 4 4 to 16 oz. Use microwave-safe casserole or bowl.
(114 to 456 g) Follow package instructions for adding
water. Cover with lid or vented plastic wrap.
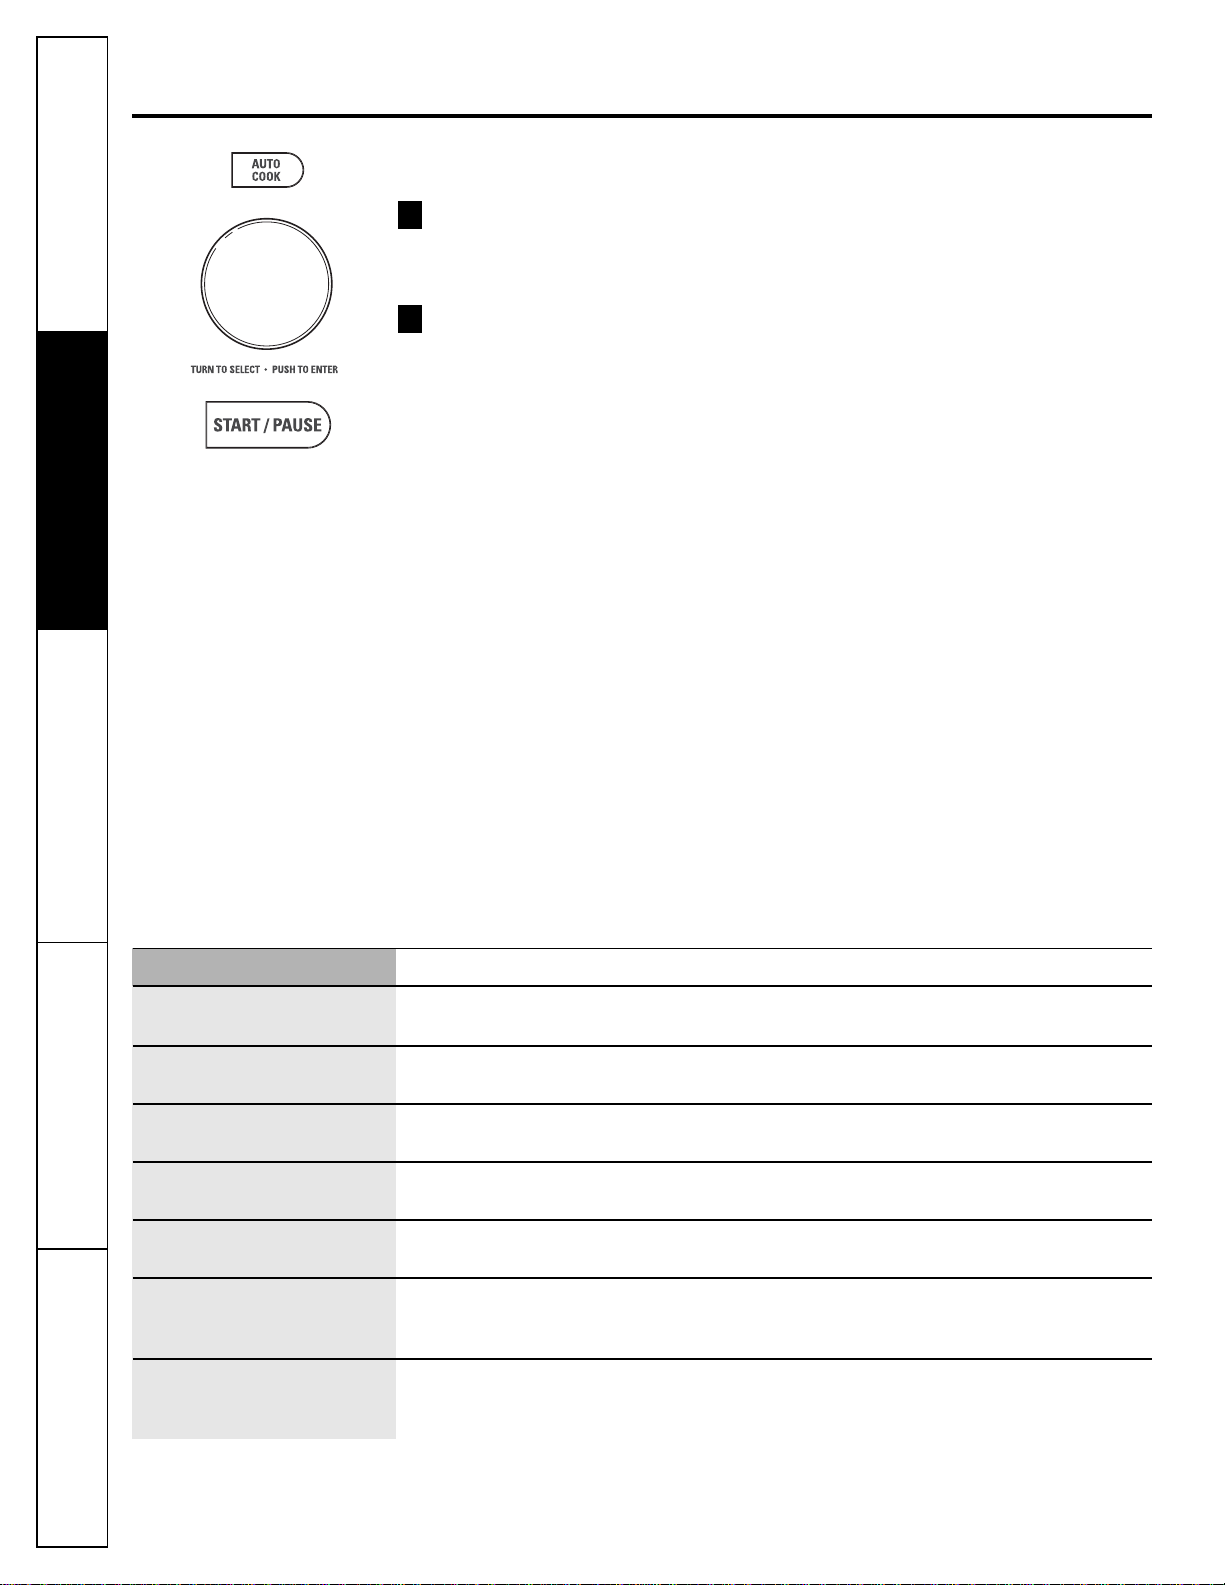
Auto Cook (Do not use the shelves when
microwave cooking.)
Place covered food in the oven and
close the door. Press the AUTO COOK
button. ENTER FOOD TYPE appears in
the display.
Turn the dial to the desired food type.
Press to enter.
See the Sensor Food Type Guide below for
specific foods and instructions.
The oven starts immediately.
NOTE: If the door was open while the
control was being set, close the door and
press the START/PAUSE button to begin
cooking.
If food is undercooked after the
countdown, use Time Cook for additional
cooking time.
Do not open the oven door before the countdown
time is displayed—steam escaping from the oven
can affect cooking performance. If the door is
opened, close the door and press START/PAUSE
immediately.
If ground meat was selected, the oven may
signal you to drain and stir the meat. Open
the door, drain the meat and close the door.
Press the START/PAUSE button if necessary
to resume cooking.
Cooking Tips
■ When oven signals and countdown time
is displayed, the door may be opened
for stirring, turning or rotating food.
To resume cooking, close the door and
press START/PAUSE.
■ Match the amount of food to the size of
container. Fill containers at least 1/2 full.
■ Be sure outside of container and inside
of oven are dry.
■ After completion of Cook cycle, if food
needs additional cooking, return food to
oven and use Time Cook to finish cooking.
How to Adjust the Oven’s Automatic
Settings for a Shorter or Longer Cook Time
(Not available for all food types)
To subtract 10% from the automatic
cooking time:
Within the first 30 seconds after the oven
starts, turn the dial counterclockwise, until
a minus (“–”) sign appears, and press to
enter.
To add 10% to the automatic cooking time:
Within the first 30 seconds after the oven
starts, turn the dial clockwise, until a plus
(“+”) sign appears, and press to enter.
2
1
About the sensor microwave features.
NOTE: Do not use this feature
twice in succession on the
same food portion—it may
result in severely overcooked
or burnt food.
Consumer Support
Troubleshooting Tips
Care and Cleaning
Operating Instructions Safety Instructions
Page 17
www.GEAppliances.ca
Popcorn (Do not use the shelves when microwave
cooking.)
To use the Popcorn feature:
Follow package instructions, using Time
Cook if the package is less than 1.5 ounces
(43 g) or larger than 3.5 ounces (100 g).
Place the package of popcorn in the center
of the turntable.
Press the POPCORN button. The oven starts
immediately.
If you open the door while POPCORN SENSOR
is displayed, an error message will appear. Close
the door, press CLEAR/OFF and begin again.
If food is undercooked after the countdown, use
Time Cook for additional cooking time.
How to Adjust the Automatic Popcorn Setting to
Provide a Shorter or Longer Cook Time
If you find that the brand of popcorn you use
underpops or overpops consistently, you can add
or subtract 20–30 seconds to the automatic
popping time.
To subtract time:
Within the first 30 seconds after the oven starts,
turn the dial counterclockwise, until a minus
(“–”) sign appears, for 20 seconds less cooking
time. Press to enter. Turn again, until two minus
(“– –”) signs appear, to reduce cooking time
another 10 seconds for a total of 30 seconds
less time. Press to enter.
To add time:
Within the first 30 seconds after the oven starts,
turn the dial clockwise, until a plus (“+”) sign
appears, for an extra 20 seconds cooking time.
Press to enter. Turn again, until two plus (“++”)
signs appear, to add another 10 seconds for a
total of 30 seconds additional time. Press to
enter.
2
1
Use only with prepackaged
microwave popcorn weighing
1.5 to 3.5 ounces (43 to 100 g).
NOTE: Do not use this feature
twice in succession on the
same food portion—it may
result in severely overcooked
or burnt food.
NOTE: Do not use this feature
twice in succession on the
same food portion—it may
result in severely overcooked
or burnt food.
Reheat (Do not use the shelves when microwave
cooking.)
The Reheat feature reheats servings of previously
cooked foods or a plate of leftovers.
Place the cup of liquid or covered
food in the oven. Press REHEAT once, twice,
three times or four times. The oven starts
immediately.
Press once for a plate of leftovers.
Press twice for a pasta.
Press three times for 1/2 to 1 full cup
(120 to 240 mL).
Press four times for 1 to 2 full cups (240 to
480 mL).
The oven signals when steam is
sensed and the time remaining begins
counting down.
Do not open the oven door until time is
counting down. If the door is opened,
close it and press START immediately.
After removing food from the oven, stir, if possible,
to even out the temperature. Reheated foods may have
wide variations in temperature. Some areas of food may
be extremely hot.
If food is not hot enough after the countdown
use Time Cook for additional reheating time.
Some Foods Not Recommended for Use
With Reheat
It is best to use Time Cook for these foods:
■ Bread products.
■ Foods that must be reheated uncovered.
■ Foods that need to be stirred or rotated.
■ Foods calling for a dry look or crisp surface
after reheating.
How to Adjust the Oven’s Automatic
Settings for a Shorter or Longer Time
To subtract 10% from the automatic
cooking time:
Within the first 30 seconds after the oven starts,
turn the dial counterclockwise, until a minus
(“–”) sign appears, and press to enter.
To add 10% to the automatic cooking time:
Within the first 30 seconds after the oven starts,
turn the dial clockwise, until a plus (“+”) sign
appears, and press to enter.
2
1
17
Safety Instructions
Operating Instructions Care and Cleaning
Troubleshooting Tips Consumer Support
REHEAT
Page 18
18
Baking or roasting uses a heating element to raise the temperature of the air inside the
oven. Any oven temperature from 225°F to 450°F (107°C to 230°C) may be set. A fan gently
circulates this heated air throughout the oven, over and around the food, producing golden
brown exteriors and rich, moist interiors. This circulation of heated air is called convection.
Because the heated air is kept constantly moving, not permitting a layer of cooler air to
develop around the food, some foods cook faster than in regular oven cooking.
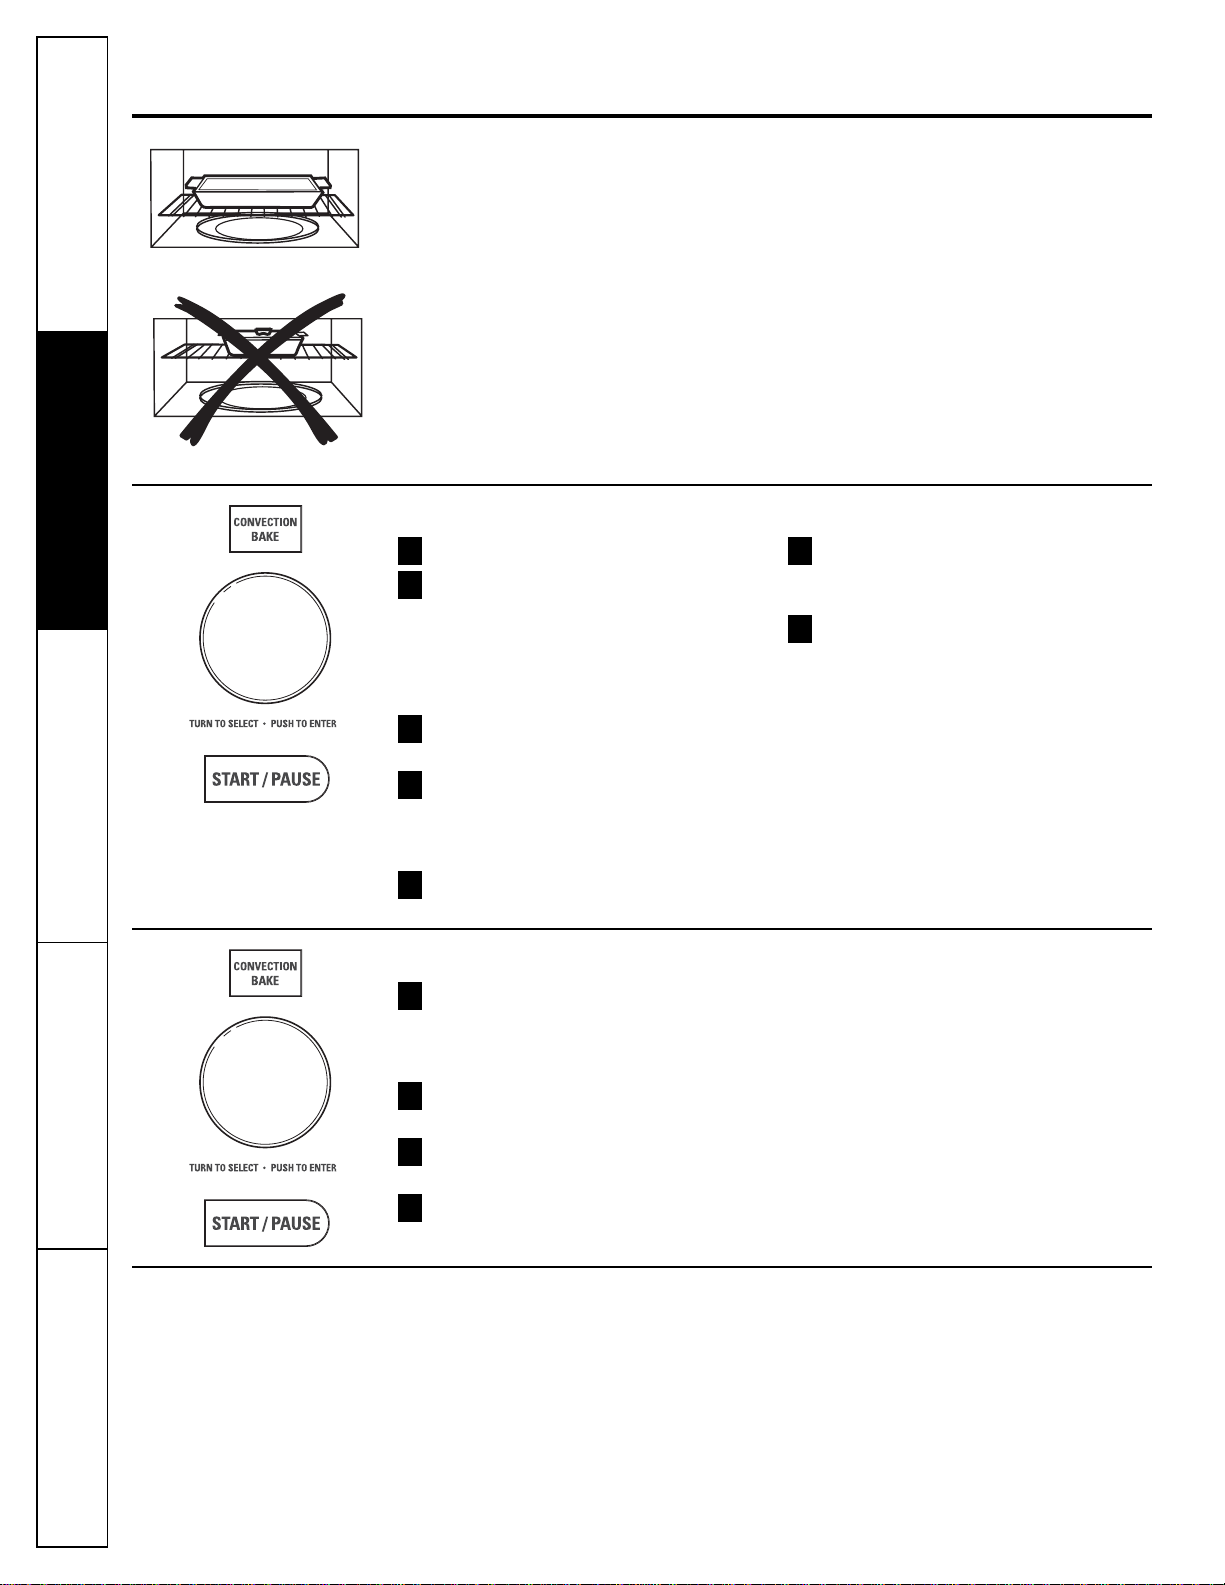
For Best Results…
Use one shelf in the lower position and leave at least a 1-inch (2.5 cm) gap between the cooking dish and the
sides of the oven. For two-level cooking only, use both shelves.
The shelf is required for good air circulation and even browning.
See the Cookware Tips section for information on suggested cookware.
Bake or Roast with Preheat
Press the BAKE or ROAST button.
Turn the dial to set the oven
temperature and press dial to enter.
Do not enter bake time now. (The cook
time will be entered later, after the oven
is preheated.) See the Auto Recipe™
Conversion section below.
Press the dial or the START/PAUSE
button to start preheating.
When the oven is preheated, it will
signal. If you do not open the door
within 1 hour, the oven will turn off
automatically.
Open the oven door and, using
caution, place the food in the oven.
Close the oven door. Turn the dial
to set the cook time and press the dial
or START/PAUSE to start cooking.
When cooking is complete, the oven
will signal and turn off.
NOTE: You may change the cook time at any time
during cooking by turning the dial.
You may change the oven temperature at any time
during cooking by pressing the POWER button. Turn
the dial to set the oven temperature and press the
dial to enter.
To view the cook time and oven temperature during
cooking, press the BAKE button.
7
6
5
4
3
2
1
Bake or Roast without Preheating
If your recipe does not require
preheating, press the BAKE or
ROAST button. See the Auto Recipe™
Conversion section below.
Turn the dial to set the oven
temperature and press to enter.
Turn the dial to set the cook time and
press to enter.
Press the dial or the START/PAUSE
button to start the oven.
NOTE: You may change the cook time at any time
during cooking by turning the dial.
You may change the oven temperature at any time
during cooking by pressing the POWER button. Turn
the dial to set the oven temperature and press the
dial to enter.
To view the cook time and oven temperature during
cooking, press the BAKE button.
4
3
2
1
About the baking and roasting features.
Correct shelf position
Incorrect shelf position
Consumer Support
Troubleshooting Tips
Care and Cleaning
Operating Instructions Safety Instructions
Auto Recipe™Conversion
When using CONVECTION BAKE, the Auto Recipe™ Conversion feature will automatically
convert entered regular baking temperatures to convection baking temperatures.
This feature is activated so that the display will show OFFSET ON and the actual converted
(reduced) temperature. For example, if you enter a regular recipe temperature of 350°F
(177°C) and press the START button, the display will show the converted temperature of
325°F (163°C).
This feature can be turned off in the OPTIONS menu. See the Auto Recipe™ Conversion
Selection in the About the other features section.
NOTE: If convection baking and the Auto Recipe™ Conversion feature is turned off, reduce the oven
temperature 25°F (14°C) from the recipe to prevent overbrowning on the top of baked goods
Page 19
Fast Bake without Preheat
If your recipe does not require
preheating, press the FAST BAKE
button.
Turn the dial to set the oven
temperature and press to enter.
Turn the dial to set the cook time and
press to enter.
Press the dial or the START/PAUSE
button to start the oven.
NOTE: You may change the cook time at any time
during cooking by turning the dial.
You may change the oven temperature and
microwave power level at any time during
cooking by pressing the POWER button. Turn the
dial to set the oven temperature and press the
dial to enter. Then, turn the dial to set microwave
power level 1 through 4 and press the dial to
enter. The default power level is 4.
To view the cook time and oven temperature
during cooking, press the FAST BAKE button.
NOTE:
■ Some recipes call for preheating.
■ Check the Cookware Tips section for
correct cookware when using Fast Bake.
■ Do not use metal cookware with
Fast Bake.
■ See the Best Method of Cooking section
to determine the which foods are
appropriate to cook using Fast Bake.
■ Reduce the recipe cook time by 25%.
3
2
1
4
19
Fast Bake offers the best features of microwave energy and convection cooking. Microwaves
cook food fast and convection circulation of heated air browns foods beautifully. Any oven
temperature from 225°F to 450°F (107°C to 230°C) may be set.
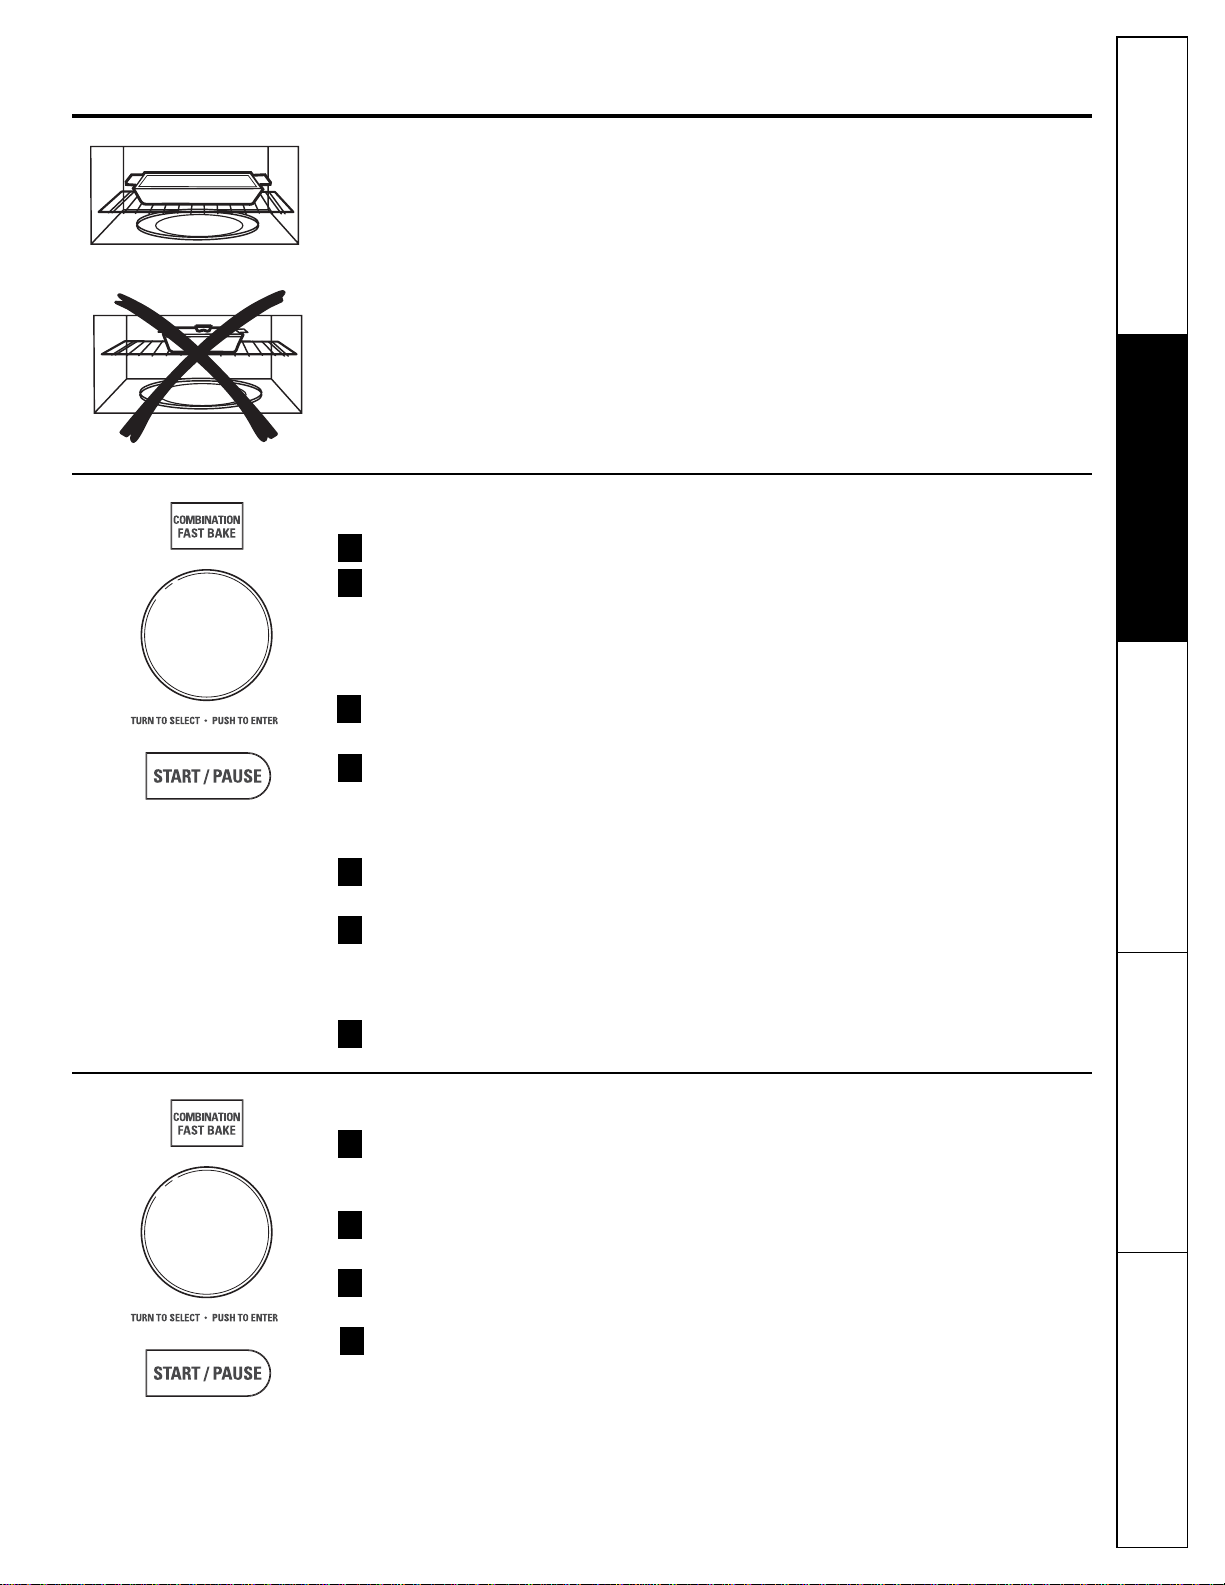
For Best Results…
Use one shelf in the lower position and leave at least a 1-inch (2.5 cm) gap between the cooking dish and the
sides of the oven. For two-level cooking only, use both shelves.
The shelf is required for good air circulation and even browning.
See the Cookware Tips section for information on suggested cookware.
See the Best Method of Cooking section to determine the which foods are appropriate to cook
using Fast Bake.
Fast Bake with Preheat
Press the FAST BAKE button.
Turn the dial to set the oven
temperature and press dial to enter.
Do not enter FAST BAKE cook time
now. (The cook time will be entered
later, after the oven is preheated.)
Press the dial or the START/PAUSE
button to start preheating.
When the oven is preheated, it will
signal. If you do not open the door
within 1 hour, the oven will turn off
automatically.
Open the oven door and, using
caution, place the food in the oven.
Close the oven door. Turn the dial to
set the cook time and press to enter.
Press the dial or the START/PAUSE
button to start cooking.
When cooking is complete, the oven
will signal and turn off.
NOTE: You may change the cook time at any time
during cooking by turning the dial.
You may change the oven temperature and
microwave power level at any time during
cooking by pressing the POWER button. Turn the
dial to set the oven temperature and press the
dial to enter. Then, turn the dial to set microwave
power level 1 through 4 and press the dial to
enter. The default power level is 4.
To view the cook time and oven temperature
during cooking, press the FAST BAKE button.
■ Check the Cookware Tips section for
correct cookware when using Fast Bake.
■ Do not use metal cookware with
Fast Bake.
■ Reduce the recipe cook time by 25%.
■ See the Best Method of Cooking section
to determine the which foods are
appropriate to cook using Fast Bake.
7
6
5
4
2
1
3
About the Fast Bake feature. www.GEAppliances.ca
Correct shelf position
Incorrect shelf position
Safety Instructions
Operating Instructions Care and Cleaning
Troubleshooting Tips Consumer Support
Page 20
20
Cookware tips.
Convection Bake or Roast
Metal Pans are recommended for all types of baked products, but especially where
browning is important.
Dark or dull finish metal pans are best for breads and pies because they absorb heat and
produce crisper crust.
Shiny aluminum pans are better for cakes, cookies or muffins because they reflect heat
and help produce a light tender crust.
Glass or Glass-Ceramic casserole or baking dishes are best suited for egg and cheese
recipes due to the cleanability of glass.
Combination Fast Bake
Glass or Glass-Ceramic baking containers are recommended. Be sure not to use items with
metal trim as it may cause arcing (sparking) with oven wall or oven shelf. This can damage
the cookware, the shelf or the oven.
Heat-Resistant Plastic microwave cookware (safe to 450°F/230°C) may be used, but it is not
recommended for foods requiring all-around browning, because the plastic is a poor
conductor of heat.
Convection Bake Combination
Cookware Microwave or Roast Fast Bake
Heat-Resistant Glass, Glass-Ceramic Yes Yes Yes
(Pyrex®, Fire King®, Corning Ware®, etc.)
Metal No Yes No
Non Heat-Resistant Glass No No No
Microwave-Safe Plastics Yes No Yes*
Plastic Films and Wraps Yes No No
Paper Products Yes No No
Straw, Wicker and Wood Yes No No
* Use only microwave cookware that is safe to 450°F (230°C).
Consumer Support
Troubleshooting Tips
Care and Cleaning
Operating Instructions Safety Instructions
Page 21
21
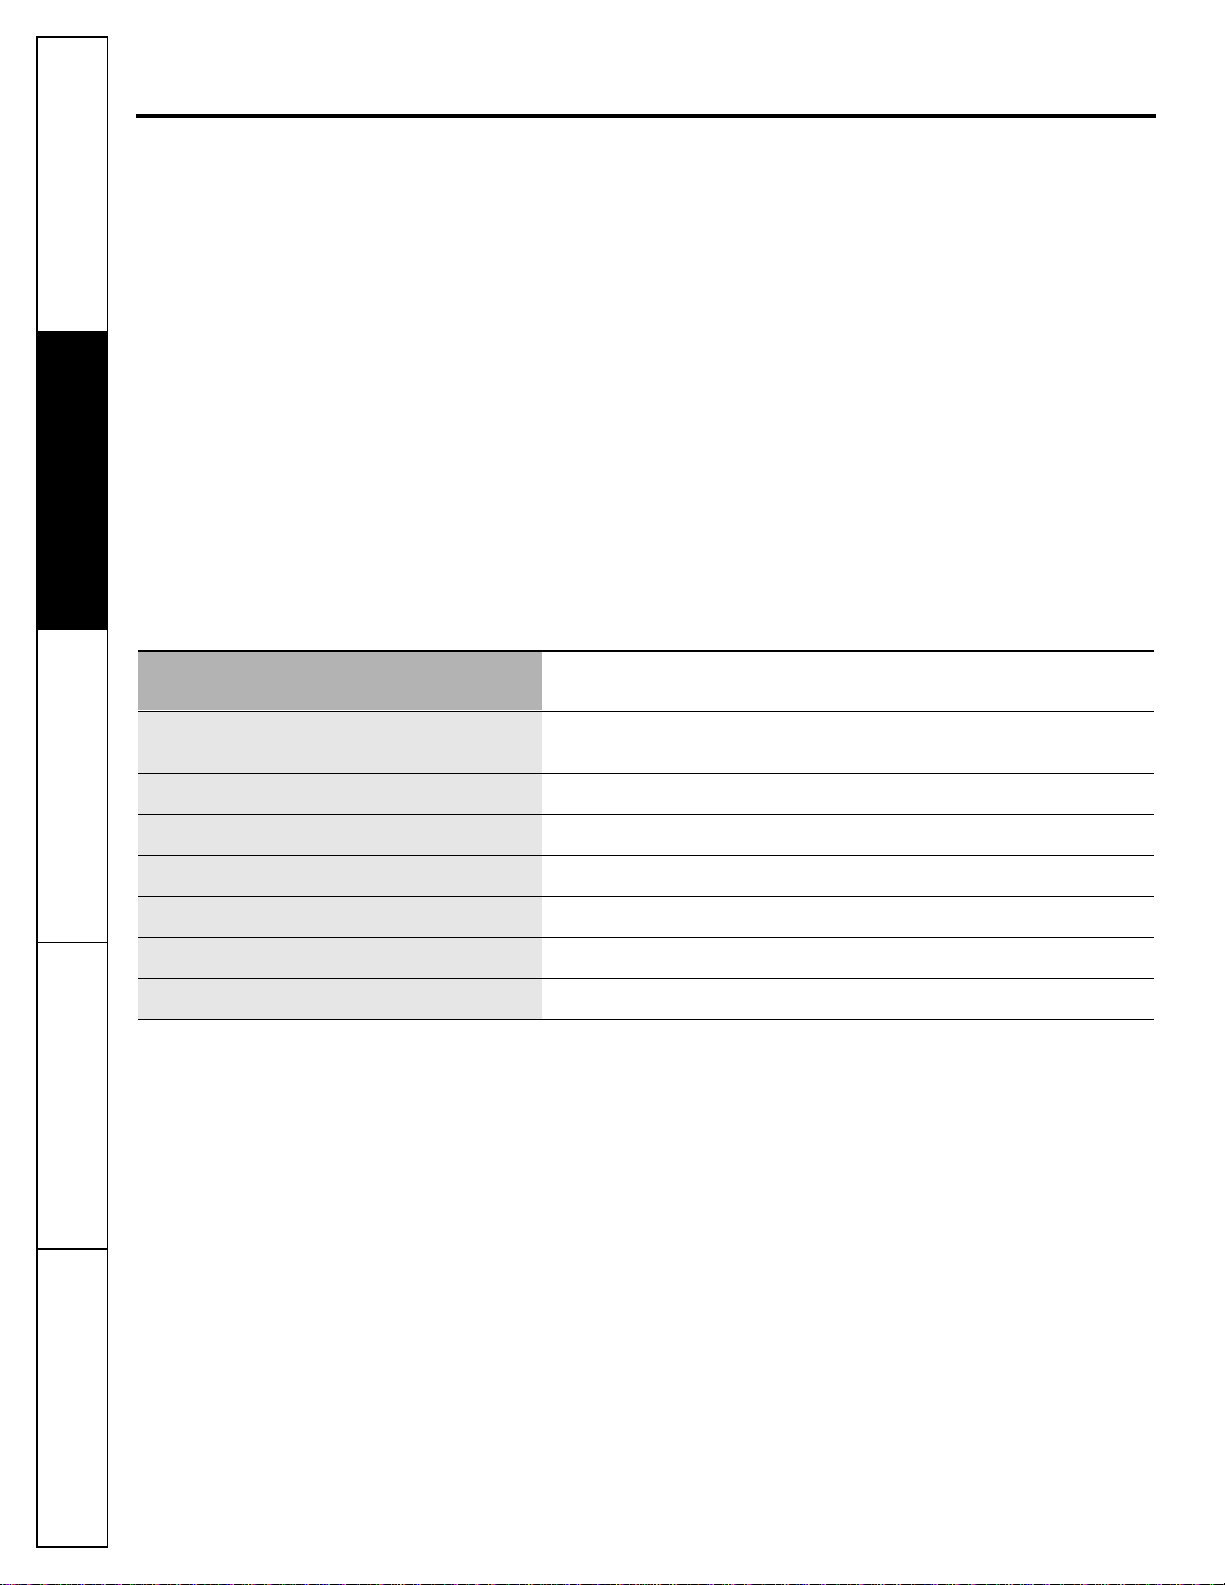
Use the following guide to select the best method of cooking. Recipes can be adapted using the guidelines below to
determine the appropriate cooking mode.
Foods Microwave Bake Roast Fast Bake
Appetizers
Dips and Spreads ✓
Pastry Snacks ✓✓ ✓
Beverages ✓
Sauces and Toppings ✓
Soups and Stews ✓
Meats
Defrosting ✓
Roasting ✓✓
Poultry
Defrosting ✓
Roasting ✓✓✓
Fish and Seafood
Defrosting ✓
Cooking ✓✓ ✓
Casseroles ✓✓ ✓
Eggs and Cheese
Scrambled, Omelets ✓✓
Quiche, Souffle ✓✓
Vegetables, (fresh) ✓
Breads
Muffins, Coffee Cake ✓✓
Quick ✓
Yeast ✓
Desserts
Cakes, Layer and Bundt ✓
Angel Food and Chiffon ✓
Custard and Pudding ✓
Bar Cookies ✓✓
Fruit ✓
Pies and Pastry ✓
Candy ✓
Blanching Vegetables ✓
Frozen Convenience Foods ✓✓ ✓
Select the best method of cooking. www.GEAppliances.ca
Combination Fast Bake
When using COMBINATION FAST BAKE, reduce recipe cook time by 25%.
For Example: A recipe states to cook a roast for 60 minutes at 400°F (230°C).
60 minutes x 0.25 = 15 minutes saved
So the new cook time in FAST BAKE mode will be:
60 minutes – 15 minutes = 45 minutes.
Recipe conversions.
Safety Instructions
Operating Instructions Care and Cleaning
Troubleshooting Tips Consumer Support
Page 22
22
About the warming feature.
The WARM feature will keep hot, cooked foods at serving temperature. Always start with
hot food. Use cookware and utensils that can withstand temperatures up to 230°F (110°C).
For Best Results…
Always use the shelf in its “low” position when warming. The shelf is required for good air circulation and
even warming.
See the Cookware Tips section for information on suggested cookware.
Press the WARM button.
Turn the dial to select the oven
temperature. See the chart and tips
below. Press the dial to enter.
LOW 150°F (65°C)
MEDIUM 170°F (77°C)
HIGH 210°F (100°C)
Press the dial or the START/PAUSE
button to start warming.
If the oven door is opened during warming,
PAUSE will appear in the display. Close the
door and press START/PAUSE.
To Crisp Stale Items:
■ Place food or dishes directly on the shelf
in the low position.
■ Use LOW setting.
■ Check crispness after 45 minutes.
Add time as needed.
3
2
1
Temperature Selection Chart
Tips for Crisp Foods:
■ Leave food uncovered.
■ Do not use plastic containers or
plastic wrap.
Tips for Moist Foods:
■ Cover food with lid or aluminum foil.
■ Do not use plastic containers or
plastic wrap.
Food Type Control Setting Moist/Crisp
Bread, Hard Rolls Medium Crisp
Bread, Soft Rolls Medium Moist
Casseroles Medium Moist
Fried Foods High Crisp
Meats* and Fish Medium Crisp
Pancakes, Waffles High Crisp
Pizza High Crisp
Potatoes, Baked High Crisp
Potatoes, Mashed Medium Moist
Poultry High Moist
Tortilla Chips Low Crisp
Vegetables Medium Moist
* USDA/FSIS recommends an internal temperature of 145°F (63°C) as the minimum doneness for beef.
Use a portable meat thermometer to check internal temperatures.
Correct shelf position
Incorrect shelf position
Consumer Support
Troubleshooting Tips
Care and Cleaning
Operating Instructions Safety Instructions
Page 23

23
About the other features. www.GEAppliances.ca
Clock
Press to enter the time of day or to check
the time of day while cooking.
Press the CLOCK button.
Turn the dial to set hours. Press the dial
to enter.
Turn the dial to set minutes. Press the
dial to enter.
Turn the dial to select AM or PM.
Press the dial to enter.
4
3
2
1
Cooking Complete Reminder
To remind you that you have food in the
oven, the oven will display YOUR FOOD IS
READY and beep once a minute until you
either open the oven door or press the
CLEAR/OFF button.
Start/Pause
In addition to starting many functions,
START/PAUSE allows you to stop cooking
without opening the door or clearing the
display.
Clear/Off
Press the CLEAR/OFF button to stop and
cancel cooking at any time.
Child Lock-Out
You may lock the control panel to prevent
the oven from being accidentally started or
used by children.
To lock or unlock the controls, press and
hold the CLEAR/OFF button for about three
seconds. When the control panel is locked,
CONTROL LOCKED will be displayed briefly
anytime a button or dial is pressed.
Help
The HELP button displays feature
information and helpful hints.
Press HELP, then turn the dial to select
a feature and press the dial to enter.
Resume
The cooking program just used stays in
memory for 5 minutes. After that you will
need to begin the program again. To turn
this option off, see the More Time Message
section.
If your food needs to cook a bit longer,
you can restart the oven by pressing
theSTART/PAUSE button or selector dial.
RESUME COOKING will be displayed and
the oven will restart immediately at 10%
of the original time.
2
1
Safety Instructions
Operating Instructions Care and Cleaning
Troubleshooting Tips Consumer Support
START / PAUSE
CLEAR / OFF
CLEAR / OFF
Page 24

24
About the other features.
Display ON/OFF
Use to turn your clock display on or off.
Press the OPTIONS button and turn the
dial to select DISPLAY ON/ OFF. Press the
dial to enter.
Turn the dial to select ON or OFF. Press
the dial to enter.
Display Speed
The scroll speed of the display can be
changed.
Press the OPTIONS button and turn the
dial to select DISPLAY SPEED. Press the
dial to enter.
Turn the dial to select slowest to fastest.
Press the dial to enter.
2
1
2
1
Auto Nite Light
The Auto Nite Light can be set to come on
and go off at desired times.
Press the OPTIONS button and turn the
dial to select AUTO NITE LIGHT. Press the
dial to enter.
Turn the dial to select SET TIMES. Press
the dial to enter.
Enter the time of day for the light to
come on by turning the dial to select
the hour, minutes and AM or PM. Press
the dial to enter after each selection.
Enter the time of day for the light to
go off by turning the dial to select the
hour, minutes and AM or PM. Press the
dial to enter after each selection.
NOTE: The NITE indicator will be lit whenever the
nite light is set to operate.
To review the nite light settings, turn
the dial to select REVIEW SETTINGS after
selecting the Auto Nite Light option. Press
the dial to enter.
To clear the nite light settings, turn the
dial to select CLEAR SETTINGS after selecting
the Auto Nite Light option. Press the dial
to enter.
4
3
2
1
Bake Temp. Adjust
Use to set the oven to automatically adjust
set temperatures by 5, 10, 15, 20 or 25°F
(3, 6, 8, 11 or 13°C).
Press the OPTIONS button and turn the
dial to select BAKE TEMP ADJUST. Press
the dial to enter.
Turn the dial to select NO CHANGE, 5,
10, 15, 20 or 25°F (3, 6, 8, 11 or 13°C)
and press to enter.
Beeper Volume
The beeper sound level can be adjusted.
Press the OPTIONS button and turn the
dial to select BEEPER VOLUME. Press the
dial to enter.
Turn the dial to select mute to loud.
Press the dial to enter.
NOTE: The MUTE indicator will be lit whenever the
beeper volume is set to mute.
2
1
2
1
Auto Recipe™Conversion Selection
When ON the oven will automatically
convert entered regular baking
temperatures to convection baking
temperatures. See Auto Recipe™Conversion
in the About the baking and roasting features
section.
Press the OPTIONS button and turn
the dial to select OFFSET. Press the dial
to enter.
Turn the dial to select CONVECTION
BAKE TEMP OFFSET-ON/OFF and press
to enter.
Display Language
The language for the scrolling display can
be set to either English or Spanish.
Press the OPTIONS button and turn the
dial to select DISPLAY LANGUAGE. Press
the dial to enter.
Turn the dial to select ENGLISH or
FRENCH. Press the dial to enter.
2
1
2
1
Consumer Support
Troubleshooting Tips
Care and Cleaning
Operating Instructions Safety Instructions
Page 25

Vent Fan
The vent fan removes steam and other
vapors from surface cooking.
Press VENT FAN once for high fan speed,
twice for medium fan speed, three times for
low fan speed or a fourth time to turn the
fan off.
NOTE: The FAN indicator will be lit while
the fan is operating.
Automatic Fan
An automatic fan feature protects the
microwave from too much heat rising from
the cooktop below it. It automatically turns
on if it senses too much heat.
If you have turned the fan on you may find
that you cannot turn it off. The fan will
automatically turn off when the internal
parts are cool. It may stay on for 30 minutes
or more after the cooktop and microwave
controls are turned off.
Surface Light
Press SURFACE LIGHT once for bright light,
twice for the night light or a third time to
turn the light off.
Tim er
The Timer operates as a minute timer and
can be used at any time, even when the
oven is operating.
Press the TIMER button.
Turn the dial to select the minutes.
Press the dial to enter.
Turn the dial to select the seconds.
Press the dial to enter
Press the dial or TIMER to start.
To cancel, press the TIMER button.
When time is up, the oven will signal.
To turn off the timer signal, press TIMER.
NOTE: The TIMER indicator will be lit while the
timer is operating.
4
3
2
1
Measures
Measurements can be set to display in
Default (English) or metric.
Press the OPTIONS button and turn the
dial to select MEASURES. Press the dial
to enter.
Turn the dial to select DEFAULT or
METRIC and press to enter.
More Time Message
After cooking is complete, a message can be
displayed giving you the option to cook the
food longer at the same settings. See the
Resume section.
Press the OPTIONS button and turn the
dial to select MORE TIME MESSAGE.
Press the dial to enter.
Turn the dial to select MESSAGE ON or
OFF and press to enter.
2
1
2
1
www.GEAppliances.ca
Turntable On/Off
For best cooking results, leave the turntable
on. It can be turned off for large dishes.
Press the TURNTABLE ON/OFF button.
Turn the dial to select ON or OFF.
Press the dial to enter.
Sometimes the turntable can become too
hot to touch.
Be careful touching the turntable during
and after cooking.
2
1
25
Safety Instructions
Operating Instructions Care and Cleaning
Troubleshooting Tips Consumer Support
Page 26

26
Care and cleaning of the oven.
Helpful Hints
An occasional thorough wiping with a solution of baking soda
and water keeps the inside fresh.
Be sure the power is off before cleaning any part of this oven.
How to Clean the Inside
Walls, Floor, Inside Window, Metal and Plastic Parts on the Door
Some spatters can be removed with a paper towel; others may require a damp cloth.
Remove greasy spatters with a sudsy cloth, then rinse with a damp cloth. Do not use
abrasive cleaners or sharp utensils on oven walls.
Never use a commercial oven cleaner on any part of your microwave.
Removable Turntable and Turntable Support
To prevent breakage, do not place the turntable into water just after cooking. Wash it
carefully in warm, sudsy water or in the dishwasher. The turntable and support can be
broken if dropped. Remember, do not operate the oven in the microwave mode without
the turntable and support seated and in place.
Shelves
Clean with mild soap and water or in the dishwasher.
Do not clean in a self-cleaning oven.
How to Clean the Outside
We recommend against using cleaners with ammonia or alcohol, as they can damage
the appearance of the microwave oven. If you choose to use a common household
cleaner, first apply the cleaner directly to a clean cloth, then wipe the soiled area.
Bottom
Clean off the grease and dust on the bottom often. Use a solution of warm water
and detergent.
Case
Clean the outside of the microwave with a sudsy cloth. Rinse with a damp cloth and then
dry. Wipe the window clean with a damp cloth.
Control Panel and Door
Wipe with a damp cloth. Dry thoroughly. Do not use cleaning sprays, large amounts of
soap and water, abrasives or sharp objects on the panel—they can damage it. Some paper
towels can also scratch the control panel.
Door Surface
It is important to keep the area clean where the door seals against the microwave. Use only
mild, non-abrasive detergents applied with a clean sponge or soft cloth. Rinse well.
Consumer Support Troubleshooting Tips
Care and Cleaning
Operating Instructions Safety Instructions
Page 27

27
Stainless Steel
Do not use a steel-wool pad; it will scratch the
surface.
Shake bottle well.
Place a small amount of CERAMA
BRYTE®Stainless Steel Appliance
Cleaner on a damp cloth or damp
paper towel.
Clean a small area (approximately
8” x 8”/20.3 x 20.3 cm), rubbing with
the grain of the stainless steel if
applicable.
Dry and buff with a clean, dry paper
towel or soft cloth.
Repeat as necessary.
NOTE: If a mineral oil-based stainless steel
appliance cleaner has been used before to
clean the appliance, wash the surface with
dishwashing liquid and water prior to using
the CERAMA BRYTE
®
Stainless Steel
Appliance Cleaner. After washing the
surface with dishwashing liquid
and water, use a generous amount
of CERAMA BRYTE®Stainless Steel
Appliance Cleaner to clean the appliance.
To Order
To order CERAMA BRYTE®Stainless Steel
Appliance Cleaner, please call our toll-free
number:
Parts Department 1-800-263-0686
www.GEAppliances.ca
CERAMA BRYTE
®
Stainless Steel Appliance
Cleaner . . . . . . . . . . . . . . . . . . . . . . . . . .# 40616EF
www.GEAppliances.ca
Replacing the light bulb.
Cooktop Light/Nite Light
Replace with a 120 volt, 40 watt (max.) halogen
bulb. Order WB08X10051 from your GE supplier.
To replace the cooktop light/nite light,
first disconnect the power at the main
fuse or circuit breaker panel, or pull
the plug.
Remove the screw from the side of the
light compartment cover and lower the
cover until it stops.
Be sure the bulb is cool before
removing. Break the adhesive seal
by gently unscrewing the bulb.
Screw in the new bulb, then raise the
light cover and replace the screw.
Connect electrical power to the oven.
4
3
2
1
Remove screw.
Safety Instructions
Operating Instructions Care and Cleaning
Troubleshooting Tips
Consumer Support
Page 28

28
About the exhaust feature.
Vent Fan
The vent fan has two metal reusable
vent filters.
Models that recirculate air back into the
room also use a charcoal filter.
Reusable Vent Filters
The metal filters trap grease released by
foods on the cooktop. They also prevent
flames from foods on the cooktop from
damaging the inside of the oven.
For this reason, the filters must always be
in place when the hood is used. The vent
filters should be cleaned once a month,
or as needed.
Removing and Cleaning the Filters
To remove, slide them to the rear using the
tabs. Pull down and out.
To clean the vent filters, soak them and
then swish around in hot water and
detergent. Don’t use ammonia or ammonia
products because they will darken the
metal. Light brushing can be used to
remove embedded dirt.
Rinse, shake and let dry before replacing.
To replace, slide the filters into the frame
slots on the back of each opening. Press up
and to the front to lock into place.
Reusable vent filters
(on all models).
Charcoal filter (on some models).
Consumer Support
Troubleshooting Tips
Care and Cleaning
Operating Instructions Safety Instructions
Page 29

29
www.GEAppliances.ca
Charcoal Filter
The charcoal filter cannot be cleaned. It must
be replaced. Order Part No. WB02X10943 from
your GE supplier.
If the model is not vented to the outside,
the air will be recirculated through a
disposable charcoal filter that helps
remove smoke and odors.
The charcoal filter should be replaced
when it is noticeably dirty or discolored
(usually after 6 to 12 months, depending on
usage).
To Remove the Charcoal Filter
To remove the charcoal filter, first disconnect
power at the main fuse or circuit breaker,
or pull the plug. Remove the top grille
by removing the two screws that hold it
in place.
You may need to open the cabinet doors to
remove the screws.
Lift the filter at the bottom until it
comes free of the tabs. Slide the filter
down and out.
To Install the Charcoal Filter
To install a new charcoal filter, remove
plastic and other outer wrapping from the
new filter.
Insert the top of the filter up and into the
grooves on the inside of the top opening.
Push the bottom of the filter in until it rests
in place behind the tabs.
Remove 2 grille screws to remove
the grille.
Safety Instructions
Operating Instructions
Care and Cleaning
Troubleshooting Tips
Consumer Support
Page 30

30
Troubleshooting Tips
Save time and money! Review the charts on the following
pages first and you may not need to call for service.
Problem Possible Causes What To Do
Oven will not start A fuse in your home may be • Replace fuse or reset circuit breaker.
blown or the circuit breaker
tripped.
Power surge. • Unplug the microwave oven, then plug it back in.
Plug not fully inserted into wall • Make sure the 3-prong plug on the oven is fully inserted
outlet. into wall outlet.
Door not securely closed. • Open the door and close securely.
Control panel lighted, Door not securely closed. • Open the door and close securely.
yet oven will not start
START/PAUSE button not pressed • Press START/PAUSE.
after entering cooking selection.
Another selection entered • Press CLEAR/OFF.
already in oven and CLEAR/OFF
button not pressed to cancel it.
Cooking time not entered after • Make sure you have entered cooking time after pressing
pressing TIME COOK. TIME COOK.
CLEAR/OFF was pressed • Reset cooking program and press START/PAUSE.
accidentally.
Food weight not entered after • Make sure you have entered food weight after selecting
selecting AUTO DEFROST or AUTO DEFROST or FAST DEFROST.
FAST DEFROST.
Food type not entered after • Make sure you have entered a food type.
pressing AUTO COOK.
CONTROL LOCKED The control has been locked. •Press and hold CLEAR/OFF for about 3 seconds
appears on display to unlock the control.
OVEN TOO HOT FOR One of the sensor cooking •These features will not operate when the oven is hot.
SENSOR COOKING--- buttons was pressed when the The oven will automatically change to cook by time
USING ALTERNATE temperature inside the oven (follow the directions in the display) or once the oven is
METHOD appears was greater than 200°F (93°C). cool enough, the sensor features will function normally.
on display
Floor of the oven is warm The cooktop light is located • This is normal.
even when the oven has below the oven floor. When
not been used light is on, the heat it produces
may make the oven floor get warm.
You hear an unusual You have tried to change •Many of the oven’s features are preset and
low-tone beep the power level when it is cannot be changed.
not allowed.
Oven emits a smoky odor Oils on the stainless steel cavity •This is normal.
and gray smoke after are burning off after using the
using the Bake feature Bake feature the first few times.
Before you call for service…
Consumer Support Troubleshooting Tips
Care and Cleaning
Operating Instructions
Safety Instructions
Page 31

31
Problem Possible Causes What To Do
Food browns on top much Rack has been placed in the • Always use the rack in its “low” position.
faster than on the bottom “high” position.
Oven temperature The cooking element cycles • This is normal.
fluctuates during cooking on and off to maintain the
oven temperature at the
desired setting.
Vent fan comes on The vent fan automatically turns •This is normal.
automatically on to protect the microwave if it
senses too much heat rising from
the cooktop below.
During Bake, Roast or Fast Bake •This is normal.
(after preheating), the vent fan
will automatically come on to
cool the oven components.
SENSOR ERROR appears When using a Sensor feature, •Do not open door until steam is sensed and time
on the display the door was opened before is shown counting down on the display.
steam could be detected.
Steam was not detected in a •Use Time Cook to heat for more time.
maximum amount of time.
www.GEAppliances.ca
Safety Instructions
Operating Instructions
Care and Cleaning
Troubleshooting Tips
Consumer Support
Page 32

32
Before you call for service…
Things That Are Normal With Your Microwave Oven
■ Steam or vapor escaping from around
the door.
■ Light reflection around door or outer case.
■ Dimming oven light and change in
the blower sound at power levels other
than high.
■ Dull thumping sound while oven is
operating.
■ TV/radio interference might be noticed
while using the microwave. Similar to
the interference caused by other small
appliances, it does not indicate a
problem with the microwave. Plug the
microwave into a different electrical
circuit, move the radio or TV as far away
from the microwave as possible, or check
the position and signal of the TV/radio
antenna.
Consumer Support
Troubleshooting Tips
Care and Cleaning
Operating Instructions Safety Instructions
Page 33

33
Troubleshooting TipsOperating Instructions
Safety Instructions
Customer Service
OWNERSHIP REGISTRATION
P.O. BOX 1780
MISSISSAUGA, ONTARIO
L4Y 4G1
(FOR CANADIAN CONSUMERS ONLY POUR RÉSIDENTS CANADIENS SEULEMENT)
Please place in envelope and mail to:
Veuillez mettre dans une enveloppe et envoyez à :
Page 34

34
Safety InstructionsTroubleshooting Tips
Customer Service
Operating Instructions
CUT ALONG THIS LINE AND RETURN CARD – THANKS
DÉCOUPEZ ICI ET ENVOYEZ LA FICHE – MERCI
For Canadian
Customers
Pour les
consommateurs
canadiens
Veuillez enregistrer votre produit afin de nous permettre de
communiquer avec vous si jamais un avis de sécurité concernant
ce produit était émis et de communiquer facilement avec vous en
vertu de votre garantie, si le besoin s’en fait sentir.
OWNERSHIP REGISTRATION CERTIFICATE – FICHE D’INSCRIPTION DU PROPRIÉTAIRE
Please register your product to enable us to contact you in
the remote event a safety notice is issued for this product
and to allow for efficient communication under the terms of
our warranty, should the need arise.
REGISTER ON-LINE:
ENREGISTREMENT SUR INTERNET À :
MR. / M MRS. / MME.
MISS/MLLE. MS.
STREET NO / NO RUE STREET NAME / RUE
CITY / VILLE
IND. RÉG.
AREA CODE/
DID YOU PURCHASE A SERVICE CONTRACT FOR THIS APPLIANCE?
AVEZ-VOUS ACHETÉ UN CONTRAT DE SERVICE POUR CET APPAREIL ?
NAME OF SELLING DEA LER / NOM DU MARCHAND
INSTALLATI ON DATE / D ATE D’INSTAL LATION
Y/A M D/J
I do not wish to receive any promotional offers regarding this product.
TELEPHONE
FIRST NAME / PRÉNOM
Je ne désire pas recevoir d’offres promotionnelles concernant ce produit
www.geappliances.ca
www.electromenagersge.ca
CORRESPONDENCE
CORRESPONDANCE
E-MAIL/COURRIEL
ENGLISH
FRANÇAIS
LAST NAME / NOM
YES/OUI
NO/NON
MAIL TO:
POSTEZ À :
MODEL / MODÈLE
SERIAL / SÉRIE
P.O. BOX 1780, MISSISSAUGA
ONTARIO, L4Y 4G1
PROVINCE POSTAL CODE POSTAL
IF YES/SI OUI : EXPIRATION
Y/A M
.
APT.NO/APP./RR#
D/J
Page 35

35
GE Microwave Oven Warranty.
Troubleshooting TipsOperating Instructions
Safety Instructions
Customer Service
All warranty service provided by our Factory Service
Centers, or an authorized Customer Care® technician.
For service, call 1-800-361-3400.
This warranty is extended to the original purchaser and any succeeding owner for products purchased for use in
Canada.
Some provinces do not allow the exclusion or limitation of consequential damages, so the above limitation or
exclusion may not apply to you. This warranty gives you specific legal rights, and you may also have other rights
which vary from province to province. To know what your legal rights are in your province, consult your local or
provincial consumer affairs office.
Warrantor: Camco Inc.
If further help is needed concerning this warranty, write;
Consumer Relations Manager - Camco Inc.
1 Factory Lane, Suite 310, Moncton NB E1C 9M3
Staple your receipt here.
Proof of the original purchase
date is needed to obtain service
under the warranty.
For the Period Of:
Two Years
From the date of the
original purchase
LIMITED ADDITIONAL
THREE YEARS
WARRANTY
Camco Will Replace
Any part of the microwave which fails due to a defect in materials or workmanship.
During this full two-year warranty, Camco will also provide, free of charge, all labour
and service to replace the defective part.
The magnetron tube, if the magnetron tube fails due to a defect in materials or
workmanship. During this three-year limited warranty, you will be responsible for any
labour or in-home service costs.
For each of the above warranties. To avoid trip charges, take your microwave to a Camco Factory Service Center. For in-home
service you will be charged for the technician’s travel cost to your home.
■ Service trips to your home to teach you how to use the
product.
■ Improper installation.
■ Failure of the product if it is abused, misused, or used
for other than the intended purpose or used
commercially.
■ Replacement of house fuses or resetting of circuit
breakers
■ Damage to the product caused by accident, fire, floods
or acts of God.
■ Incidental or consequential damage to personal property
caused by possible defects with this appliance.
■ Damage caused after delivery.
Read your Use & Care Material:
If you then have any questions about operating the
product, please contact your dealer or our Consumer
Affairs office at the address below, or call toll free:
Camco Inc.
1-800-361-3400
Consumer Information Service
What Camco Will Not Cover:
Page 36

36
Service Telephone Numbers
Operating Instructions Safety InstructionsTroubleshooting Tips
Customer Service
Problem Solver 1-800-361-3400
For answers call Camco Inc.
In-Home Repair Service 1-800-361-3400
Expert Camco repair service is only a phone call away.
Service Contracts 1-800-461-3636
Now you can have trouble-free and suprise-free service for as long as you own your
appliance. While your warranty is still in effect, you can purchase a CAMCO SERVICE
CONTRACT. For one low fee...just pennies a day...Camco Customer Service will take
care of the repairs your appliance needs - both parts and labour.
Parts and Accessories 1-800-263-0686
Individuals qualified to service their own appliances can have parts or accessories sent
directly to their homes.
Instructions contained in this manual cover procedures to be performed by any user. Other
servicing generally should be referred to qualified service personnel. Caution must be
exercised, since improper servicing may cause unsafe operation.
Service Satisfaction
If you are not satisfied with the service you receive from Camco, follow these steps.
First, contact the people who serviced your appliance. Next, if you are still not pleased,
write all the details–including your phone number–to: Manager, Consumer Relations,
Camco Inc., Suite 310,
1 Factory Lane,
Moncton, NB E1C 9M3.
Page 37

Four à micro-ondes/convection
GE Profile
350A4502P473 49-40452 06-05 JR
JVM1790
Manuel de
l’utilisateur
www.electromenagersge.ca
Inscrivez ici les numéros de modèle et de série :
N° de modèle __________________________
N° de série ____________________________
Vous trouverez ces numéros sur une étiquette,
lorsque la porte est ouverte.
Instructions de sécurité . . . . . . . . . . . . 2–6
Mode d’emploi
Autres caractéristiques . . . . . . . . . . . .23–25
Affichage MARCHE/ARRÊT . . . . . . . .24
Aide . . . . . . . . . . . . . . . . . . . . . . . . . . . . . .23
Arrêt/Effacer . . . . . . . . . . . . . . . . . . . . . .23
Conversion automatique
Auto RecipeMCpour convection . .18, 24
Départ/Pause . . . . . . . . . . . . . . . . . . . . . .23
Horloge . . . . . . . . . . . . . . . . . . . . . . . . . . .23
Lampe d’éclairage de la surface
de cuisson . . . . . . . . . . . . . . . . . . . . . . . .25
Langue d’affichage . . . . . . . . . . . . . . . . .24
Message de durée supplémentaire . . . .25
Mesures . . . . . . . . . . . . . . . . . . . . . . . . . . .25
Minuterie . . . . . . . . . . . . . . . . . . . . . . . . .25
Plateau tournant Marche/Arrêt . . . . .25
Rappel de fin de cuisson . . . . . . . . . . . .23
Réglage de la température de cuisson . .24
Reprendre . . . . . . . . . . . . . . . . . . . . . . . .23
Veilleuse automatique . . . . . . . . . . . . . . .24
Ventilateur automatique . . . . . . . . . . . . .25
Ventilateur d’extraction . . . . . . . . . . . . .25
Verrouillage pour enfants . . . . . . . . . . .23
Vitesse de défilement de l’affichage . . .24
Volume du signal sonore . . . . . . . . . . . .24
Caractéristiques de cuisson . . . . . 10, 18, 20
Caractéristiques de
cuisson rapide . . . . . . . . . . . . . . .10, 19, 20
Caractéristiques de rôtissage
. . . . 10, 18, 20
Caractéristiques des fonctions à durée
programmée et automatiques . . 9, 11–13
Caractéristiques des fonctions
avec capteur
. . . . . . . . . . . . . . . . . . . . 15–17
Caractéristiques du four . . . . . . . . . . . . 8, 9
Caractéristiques du maintien
au chaud . . . . . . . . . . . . . . . . . . . . . . . . . 22
Changement du niveau de puissance . . 14
Conseils sur les ustensiles de cuisine . . .20
Options de cuisson . . . . . . . . . . . . . . . . . .10
Tableau des meilleures méthodes
de cuisson . . . . . . . . . . . . . . . . . . . . . . . . .21
Terminologie de la cuisson
aux micro-ondes . . . . . . . . . . . . . . . . . . . 14
Entretien et nettoyage
Acier inoxydable . . . . . . . . . . . . . . . . . . . .27
Extérieur . . . . . . . . . . . . . . . . . . . . . . . . . . .26
Filtres à charbon . . . . . . . . . . . . . . . . . . . . .29
Filtres du ventilateur . . . . . . . . . . . . . .28, 29
Intérieur . . . . . . . . . . . . . . . . . . . . . . . . . . . .26
Remplacement de l’ampoule . . . . . . . . .27
Conseils de dépannage . . . . . . . . . .30, 31
Situations courantes pendant la
cuisson au four à micro-ondes . . . . . . . . 32
Service à la clientèle
Enregistrement du produit . . . . . . . . 33, 34
Garantie . . . . . . . . . . . . . . . . . . . . . . . . . . . .
35
Nécessaires en option . . . . . . . . . . . . . . . . .7
Service à la clientèle . . . . . . . . Dernière de
couverture
Piéce n°:3828W5A4641
Page 38

MESURES DE SÉCURITÉ IMPORTANTES.
LISEZ TOUTES LES INSTRUCTIONS AVANT D’UTILISER VOTRE APPAREIL.
MESURES DE SÉCURITÉ IMPORTANTES.
Lors de l’utilisation d’appareils électriques, suivez les mesures de sécurité de base :
■ Lisez et respectez les mesures de sécurité énoncées dans la
section PRÉCAUTIONS À OBSERVER POUR ÉVITER UNE
ÉVENTUELLE EXPOSITION EXCESSIVE AUX MICRO-ONDES.
■ Cet électroménager doit être mis à la terre. Ne le branchez
qu’à une prise de courant convenablement mise à la terre.
Reportez-vous à la section INSTRUCTIONS DE MISE À LA TERRE,
page 6.
■ Veillez à respecter les directives fournies dans les Instructions
d’installation pour le choix de l’emplacement et l’installation
de l’appareil.
■ Ce four à micro-ondes est homologué CSA pour une
installation au-dessus d’une cuisinière électrique ou à gaz.
■ Ce four à micro-ondes n’est pas approuvé ou testé pour
l’utilisation en mer.
■ Ce four à micro-ondes avec hotte intégrée est conçu pour être
utilisé au-dessus de cuisinières dont la largeur n’excède pas
91,4 cm (36 po). Il peut être installé au-dessus d’appareils de
cuisson électriques ou à gaz.
■ Ne faites pas fonctionner cet appareil si le cordon
d’alimentation ou la fiche de branchement sont endommagés,
s’il ne fonctionne pas correctement, s’il a été endommagé ou
s’il est tombé. Si le cordon d’alimentation est endommagé, il
doit être remplacé par le service après-vente de General
Electric ou un agent autorisé qui utilisera un cordon
d’alimentation de General Electric.
■ Ne recouvrez ni n’obstruez aucune des ouvertures de
l’appareil.
■ Cet appareil doit uniquement être utilisé aux fins prévues et
décrites dans ce manuel. N’utilisez aucun produit chimique ou
vapeur corrosifs dans cet appareil. Ce four à micro-ondes a été
spécialement conçu pour réchauffer et cuire les aliments, et
non pour être utilisé en laboratoire ou à des fins industrielles.
■ Pour réduire le risque d’incendie à l’intérieur du four :
— Ne faites pas trop cuire les aliments. Surveillez attentivement
votre four, si vous utilisez du papier, du plastique ou d’autres
matières inflammables pour la cuisson.
— Retirez les attaches et les autres accessoires métalliques des
emballages en papier ou en plastique avant de les placer dans
le four.
— Ne rangez rien à l’intérieur du four. Ne laissez pas d’articles
en papier, d’ustensiles de cuisine ou d’aliments dans le four,
lorsqu’il n’est pas utilisé.
— Ne faites pas de maïs soufflé dans le four à micro-ondes à
moins d’utiliser un accessoire pour micro-ondes ou des grains
de maïs prévus à cet effet.
— Si un feu se déclare dans votre four, laissez la porte fermée,
éteignez le four et débranchez le cordon d’alimentation ou
coupez le courant en enlevant le fusible ou en déclenchant le
disjoncteur. Si vous ouvrez la porte, les flammes risquent de se
propager.
— N’utilisez pas les fonctions avec capteur deux fois de suite pour
un même aliment. Si l’aliment n’est pas assez cuit après le
décompte, utilisez Cuisson minutée pour augmenter la durée
de cuisson.
CONSERVEZ CES INSTRUCTIONS
AVERTISSEMENT!
Pour votre sécurité et pour réduire les risques d’incendie, d’explosion, de choc électrique, d’exposition excessive aux micro-ondes, de
dommages matériels, de blessures ou même d’accident mortel, vous devez vous conformer aux instructions contenues dans ce manuel.
2
Service à la clientèle
Dépannage Entretien et nettoyage
Mode d’emploi
Instructions de sécurité
PRÉCAUTIONS À OBSERVER POUR ÉVITER UNE ÉVENTUELLE
EXPOSITION EXCESSIVE AUX MICRO-ONDES
a) Ne tentez pas de faire fonctionner cet appareil lorsque la
porte est ouverte. Cela vous exposerait aux effets nocifs des
micro-ondes. Il est important de ne jamais forcer ou
modifier le système de verrouillage de sécurité.
b) Ne placez pas d’objets entre la surface avant du four et la
porte. Ne laissez pas de saleté ou de résidus de produits de
nettoyage s’accumuler sur les surfaces étanches.
c) Ne faites pas fonctionner le four s’il a été endommagé. Il est
très important que la porte du four ferme bien et que les
pièces suivantes ne soient pas endommagées :
1) la porte (tordue),
2) les charnières et loquets (cassés ou desserrés),
3) les joints et surfaces étanches.
d) Seul un technicien qualifié est habilité à ajuster ou à réparer
cet appareil.
Page 39

3
www.electromenagersge.ca
MESURES DE SÉCURITÉ IMPORTANTES
■ Pendant l’utilisation des fonctions Cuisson, Rôtissage ou
Cuisson rapide, l’intérieur et l’extérieur du four seront très
chauds. Utilisez toujours des mitaines pour sortir les plats du
four et des accessoires tels que la grille du four.
■ Thermomètre – N’utilisez pas de thermomètres à cuisson ou à
four normaux, lorsque vous utilisez les fonctions de cuisson ou
le mode Cuisson rapide. Le métal et le mercure contenus dans
ces thermomètres pourraient produire des étincelles et
endommager le four. N’utilisez pas de thermomètre pour les
aliments que vous mettez au micro-ondes, à moins que ce
thermomètre n’ait été spécialement conçu pour le micro-ondes.
■ Ne nettoyez pas ce four avec des tampons à récurer
métalliques. Des bouts de métal pourraient se détacher et
toucher des pièces électriques, présentant ainsi un risque de
choc électrique.
■ Lorsque ce four ne fonctionne pas, n’y rangez rien d’autre que
les accessoires recommandés.
■ Ne laissez pas cet appareil à l’extérieur. N’utilisez pas cet
appareil à proximité de l’eau : par exemple dans un sous-sol
humide, près d’une piscine ou d’un évier.
■ Éloignez le cordon d’alimentation de toute surface chaude.
■ N’immergez pas la fiche de branchement ou le cordon
d’alimentation dans l’eau.
■ N’installez pas cet appareil au-dessus d’un évier.
■ Pour le nettoyage de la surface de la porte, consultez les
instructions de la section Entretien et nettoyage du four à
micro-ondes du présent manuel.
■ Seul un technicien qualifié peut réparer cet appareil. Si une
inspection, une réparation ou un ajustement s’avère nécessaire,
communiquez avec le bureau de service après-vente autorisé le
plus proche.
■ Comme pour tout autre appareil, l’utilisation du four par des
enfants doit faire l’objet d’une étroite supervision.
■ Ne rangez rien sur le four à micro-ondes lorsque celui-ci
fonctionne.
CONSERVEZ CES INSTRUCTIONS
ÉTINCELLES
Si vous constatez la présence d’étincelles, appuyez sur la touche ARRÊT/EFFACER et éliminez la cause du problème.
La formation d’étincelles dans le four à micro-ondes est
provoquée par :
■ La grille en métal qui n’est pas correctement installée
et entre en contact avec les parois du four à microondes.
■ Une feuille d’aluminium ou un autre article métallique
qui entre en contact avec une paroi du four.
■ Le support du plateau tournant qui n’est pas
correctement installé.
■ Du papier d’aluminium qui n’épouse pas bien la forme
d’un aliment (les bords relevés agissent comme des
antennes).
■ La présence d’articles métalliques (attaches, broches
à volaille, dorures sur un ustensile) dans le four à
micro-ondes.
■ Des essuie-tout en papier recyclé contenant des
particules métalliques.
AVERTISSEMENT!
Instructions de sécurité Mode d’emploi
Entretien et nettoyage
Dépannage Service à la clientèle
Page 40

4
MESURES DE SÉCURITÉ IMPORTANTES.
LISEZ TOUTES LES INSTRUCTIONS AVANT D’UTILISER VOTRE APPAREIL.
ALIMENTS
■ Ne faites pas de maïs soufflé dans le four à micro-ondes
à moins d’utiliser un accessoire pour micro-ondes ou
des grains de maïs prévus à cet effet.
■ Ne faites pas cuire d’œuf dans le four à micro-ondes. La
pression s’accumulerait à l’intérieur du jaune et ferait
éclater l’œuf, ce qui pourrait provoquer des blessures.
■ Faire fonctionner le four à micro-ondes pendant plus
d’une minute ou deux sans placer d’aliment à
l’intérieur peut endommager le four et provoquer un
incendie. La température autour du magnétron
augmente et cela peut affecter la durée de vie du four.
■ Percez les jaunes d’œuf et la « peau » d’aliments
comme les pommes de terre, les saucisses, les tomates,
les pommes, le foie de volaille et d’autres abats pour
permettre à la vapeur de s’échapper pendant la
cuisson.
■ Certains produits comme les œufs entiers ou les
aliments contenus dans des récipients fermés – un pot
en verre par exemple – peuvent éclater. Vous ne devez
pas les faire chauffer dans le four à micro-ondes. Une
telle utilisation du four à micro-ondes peut provoquer
des blessures.
■ EAU SURCHAUFFÉE
Les liquides comme l’eau, le café ou le thé peuvent être
surchauffés, c.-à-d. passer leur point d’ébullition, sans avoir
l’air de bouillir. L’ébullition peut ne pas être visible lorsque
vous sortez le récipient du four à micro-ondes. AINSI, CES
LIQUIDES BRÛLANTS PEUVENT SOUDAINEMENT SE
METTRE À BOUILLIR ET DÉBORDER DU RÉCIPIENT
LORSQUE CE DERNIER EST DÉPLACÉ OU QU’ON Y PLONGE
UN USTENSILE COMME UNE CUILLÈRE.
Pour réduire le risque de blessures :
– Ne surchauffez pas le liquide.
– Remuez le liquide avant la période de chauffage et au
mileu de celle-ci.
– N’utilisez pas de récipient à parois verticales dont le
goulot est étroit.
– Une fois le récipient chauffé, laissez-le reposer dans le
four à micro-ondes pendant un court moment avant de
le retirer.
– Faites très attention lorsque vous introduisez une
cuillère ou un autre ustensile dans le récipient.
■ Les aliments cuits dans un liquide (comme les pâtes)
ont tendance à bouillir plus rapidement que les
aliments à plus faible teneur en eau. Si cela se produit,
consultez la section Entretien et nettoyage du four à micro-
ondes pour les instructions concernant le nettoyage de
l’intérieur du four.
■ Ne faites pas chauffer d’aliments pour bébé dans des
pots en verre, même si le couvercle a été enlevé.
Assurez-vous que les aliments pour bébé sont bien cuits.
Remuez pour répartir la chaleur uniformément.
Lorsque vous réchauffez du lait maternisé (formule),
faites attention à ne pas vous ébouillanter. La
température du lait peut être plus élevée que celle du
récipient. Vérifiez toujours la température du lait avant
de le donner au bébé.
■ Ne faites pas décongeler des bouteilles de boisson
surgelée dont le goulot est étroit (surtout en ce qui
concerne les boissons gazeuses). De la pression peut
s’accumuler, même si le bouchon a été enlevé. Le
récipient pourrait éclater et causer des blessures.
■ La vapeur et les aliments chauds peuvent causer des
brûlures. Soyez prudent lorsque vous ouvrez des
récipients d’aliments chauds comme les sacs de maïs
soufflé, les sachets et boîtes de cuisson. Pour éviter
toute blessure, tenez votre visage et vos mains à l’écart
de la vapeur.
■ Ne faites pas trop cuire les pommes de terre. Elles
pourraient se déshydrater et prendre feu, ce qui
endommagerait votre four.
■ Faites bien cuire la viande et la volaille : la température
INTERNE de la viande doit atteindre au moins 70 °C
(160 °F) et celle de la volaille, au moins 82 °C (180 °F).
La cuisson à ces températures protège habituellement
contre les intoxications alimentaires.
Service à la clientèle
Dépannage
Entretien et nettoyage
Mode d’emploi Instructions de sécurité
AVERTISSEMENT!
Page 41

5
www.electromenagersge.ca
USTENSILES DE CUISINE CONVENANT AUX MICRO-ONDES
N’utilisez pas ce four en mode micro-ondes si le plateau tournant et son support ne sont pas en place. Aucun
obstacle ne doit empêcher le plateau de tourner.
Assurez-vous que tous les ustensiles que vous utilisez dans votre four sont compatibles avec la cuisson aux microondes. La plupart des cocottes en verre, des plats, des récipients gradués et des coupes à crème en verre, ainsi que
la vaisselle en porcelaine ou en terre cuite qui ne comporte pas de motifs métalliques, peuvent être utilisés. Certains
ustensiles portent la mention « résiste au four à micro-ondes ».
■ Si vous n’êtes pas certain qu’un ustensile de cuisine
convienne aux four à micro-ondes, faites l’essai suivant :
versez 240 mL (une tasse) d’eau dans une tasse
graduée en verre. Placez-la dans le four, à l’intérieur ou
à côté de l’ustensile que vous désirez tester. Chauffez
aux micro-ondes pendant 30 à 45 secondes à la
puissance maximale. Si l’ustensile est chaud, vous ne
devriez pas l’utiliser dans le four à micro-ondes.
Si l’ustensile ne chauffe pas et que seule l’eau dans la
tasse est chaude, il peut aller au four à micro-ondes.
■
Les aliments ou ustensiles en métal de grand format ne
doivent pas être utilisés dans un four à microondes/convection, car ils augmentent les risques de
choc électrique et d’incendie.
■
Parfois, la sole du four, le plateau tournant et les parois
peuvent devenir trop chauds au toucher. Faites
attention de ne pas y toucher pendant ou après la
cuisson.
■ Si vous utilisez un thermomètre à viande pendant le
réchauffage ou la CUISSON RAPIDE, assurez-vous qu’il
est compatible avec les fours à micro-ondes.
■ N’utilisez aucun produit en papier recyclé. Les papiers
paraffinés, les serviettes de table et les essuie-tout en
papier recyclé peuvent contenir des particules
métalliques susceptibles de prendre feu ou de produire
des étincelles. Évitez d’utiliser des produits en papier
qui contiennent du nylon ou des fibres de nylon, car ils
peuvent aussi s’enflammer.
■ Certains contenants en polystyrène (comme ceux
utilisés pour l’emballage de la viande) possèdent un
fond incrusté d’une mince bande métallique. Lors du
réchauffage aux micro-ondes, cette bande métallique
peut brûler la sole du four ou mettre le feu à un essuietout en papier.
■ Utilisation de la grille en accessoire :
— Retirez la grille du four lorsque vous ne l’utilisez pas.
— Utilisez des gants isolants lorsque vous manipulez la
grille ou des ustensiles. Ils peuvent être chauds.
— Assurez-vous que la grille est bien placée à l’intérieur
du four afin de prévenir tout dommage.
— Ne couvrez pas la grille ou une partie quelconque
du four avec du papier d’aluminium. Cela pourrait
causer une surchauffe du four à microondes/convection.
■ N’utilisez pas votre four à micro-ondes/convection
pour sécher des journaux.
■
Tous les types de pellicule plastique ne conviennent pas
aux micro-ondes. Consultez les instructions fournies
avec chaque produit d’emballage.
■ Pour qu’un aliment ne s’assèche pas et pour éviter les
projections, vous pouvez utiliser une pellicule plastique,
du papier paraffiné ou des essuie-tout en papier.
Cependant, disposez la pellicule plastique de façon à ce
que la vapeur puisse s’échapper.
■
N’utilisez pas de produits en papier lorsque le four à
micro-ondes/convection fonctionne en mode
CUISSON
, RÔTISSAGE ou
CUISSON RAPIDE
.
■ Les ustensiles de cuisine peuvent devenir chauds sous
l’effet de la chaleur transmise par les aliments chauffés.
Vous devrez peut-être utiliser des gants isolants pour
manipuler ces ustensiles.
■ Les sachets de cuisson que l’on peut faire « bouillir » et
les sachets en plastique étanches doivent être entaillés
ou percés selon les instructions fournies sur leur
emballage. Leur enveloppe en plastique pourrait en
effet éclater pendant la cuisson, ou juste après, et être à
l’origine de blessures. De même, les contenants en
plastique doivent être entrouverts, puisque le couvercle
constitue une fermeture étanche. Après avoir utilisé un
récipient recouvert d’une pellicule en plastique pour la
cuisson, enlevez la pellicule avec prudence. Pour éviter
toute blessure, tenez votre visage et vos mains à l’écart
de la vapeur.
■ Utilisez le papier d’aluminium selon les instructions
fournies dans le présent manuel. Les repas préparés
contenus dans des barquettes en aluminium de moins
de 2 cm (3/4 po) de hauteur peuvent être réchauffés
aux micro-ondes. Ôtez la feuille d’aluminium du dessus
et remettez la barquette dans la boîte. Lorsque vous
utilisez du papier d’aluminium dans le four à microondes, éloignez-le d’au moins 2,5 cm (1 po) des parois
du four.
■ Ustensiles de cuisine en plastique – Les ustensiles de
cuisine en plastique conçus pour les fours à microondes sont très utiles, mais ils doivent être utilisés avec
prudence. Même le plastique conçu pour la cuisson aux
micro-ondes peut ne pas être aussi résistant à la chaleur
qu’un ustensile en verre ou en céramique. Il peut
s’amollir ou se carboniser rapidement, s’il est soumis à
une cuisson excessive. S’ils sont longtemps exposés à
une cuisson excessive, l’aliment et l’ustensile peuvent
prendre feu.
Observez les règles suivantes :
N’utilisez que des plastiques conçus pour la cuisson
aux micro-ondes et suivez à la lettre les
recommandations du fabricant.
Ne faites pas chauffer de contenants vides dans le
four à micro-ondes.
Ne permettez pas aux enfants de mettre des ustensiles
en plastique dans le four, lorsqu’ils sont seuls.
Instructions de sécurité Mode d’emploi Entretien et nettoyage
Dépannage
Service à la clientèle
1
2
3
Page 42

6
LISEZ ET SUIVEZ ATTENTIVEMENT CES CONSEILS DE SÉCURITÉ.
CONSERVEZ CES INSTRUCTIONS
MESURES DE SÉCURITÉ IMPORTANTES.
LISEZ TOUTES LES INSTRUCTIONS AVANT D’UTILISER VOTRE APPAREIL.
INSTRUCTIONS DE MISE À LA TERRE
Cet appareil doit être mis à la terre. En cas de courtcircuit, le conducteur de mise à la terre permet au courant
électrique de s’échapper, ce qui réduit le risque de choc
électrique.
Cet appareil est doté d’un cordon d’alimentation
comportant un fil et une fiche de mise à la terre. La fiche
doit être branchée sur une prise de courant correctement
installée et mise à la terre.
Si vous ne comprenez pas bien les instructions de mise à la
terre ou en cas d’incertitude quant à la mise à la terre de
l’appareil, consultez un électricien qualifié ou un
technicien du service après-vente.
Si la prise de courant est une prise murale standard à
2 alvéoles, c’est à l’utilisateur qu’incombent la
responsabilité et l’obligation de la faire remplacer par une
prise à 3 alvéoles correctement mise à la terre.
Vous ne devez en aucun cas arracher la troisième broche
(mise à la terre) de la fiche de branchement.
N’utilisez pas de fiche d’adaptation avec cet appareil.
N’utilisez pas de cordon prolongateur avec cet appareil.
Si le cordon d’alimentation est trop court, demandez à un
électricien qualifié ou à un technicien du service aprèsvente d’installer une prise près de l’appareil.
Pour un fonctionnement optimal, branchez cet appareil
dans sa propre prise électrique, pour éviter que les lampes
ne clignotent, les fusibles ne sautent ou le disjoncteur ne
se déclenche.
AVERTISSEMENT : Si l’appareil n’est pas correctement mis à la terre, l’utilisateur s’expose à des
chocs électriques.
VENTILATEUR D’EXTRACTION
Le ventilateur fonctionne automatiquement dans certaines
conditions (consultez la section Ventilateur automatique).
Évitez que ne débutent et ne se propagent des feux
déclenchés accidentellement par la cuisson, lorsque le
ventilateur est en cours d’utilisation.
■ Nettoyez souvent le dessous du four à micro-ondes. Ne
laissez pas la graisse s’accumuler sur le micro-ondes ou
les filtres du ventilateur.
■ Dans le cas d’un feu de graisse sur les éléments de
surface situés en-dessous du four à micro-ondes,
étouffez les flammes en recouvrant l’ustensile d’un
couvercle, d’une plaque à gâteaux ou d’un plateau.
■ Nettoyez les filtres du ventilateur avec soin. Les produits
de nettoyage corrosifs, comme ceux utilisés pour le
four et à base de soude, peuvent endommager les
filtres.
■ Pour faire flamber des aliments sous le four à micro-
ondes, vous devez mettre le ventilateur en marche.
■ Ne laissez jamais les éléments de surface sous le four à
micro-ondes à des réglages élevés sans surveillance. Les
débordements peuvent produire de la fumée et des
projections de graisse qui pourraient s’enflammer et se
propager si le ventilateur du four à micro-ondes est en
cours d’utilisation. Pour réduire le fonctionnement du
ventilateur automatique, choisissez des ustensiles de
taille appropriée et n’utilisez les éléments de surface à
réglage élevé que lorsque cela est vraiment nécessaire.
Service à la clientèle
Dépannage
Entretien et nettoyage
Mode d’emploi Instructions de sécurité
AVERTISSEMENT!
Page 43

7
Nécessaires en option www.electromenagersge.ca
Nécessaires de panneaux complémentaires
■ JX40WH—Blanc
■ JX41—Noir
Lors du remplacement d’une hotte de cuisinière de
91,4 cm (36 po), les nécessaires de panneaux
complémentaires permettent de combler la largeur
supplémentaire afin de donner un aspect encastré.
Pour une installation entre des armoires seulement et non
en bout de comptoir. Chaque nécessaire contient deux
panneaux complémentaires de 7,6 cm (3 po) de largeur.
Nécessaires de filtre
■ JX81D—Nécessaire de filtre à charbon pour le
recyclage d’air
Des nécessaires de filtre sont utilisés lorsque le four ne
peut évacuer les vapeurs à l’extérieur.
Disponible à raison d’un coût supplémentaire chez votre fournisseur GE.
Instructions de sécurité
Mode d’emploi
Entretien et nettoyage
Dépannage
Service à la clientèle
Page 44

8
Caractéristiques du four à micro-ondes
Dans ce manuel, les caractéristiques et l’aspect de l’appareil peuvent varier selon le modèle.
1 000 watts
Caractéristiques du four
Poignée d’ouverture de la porte.
Loquets de la porte.
Hublot avec écran métallique. La protection
métallique permet l’observation du mets durant la
cuisson et emprisonne les micro-ondes à l’intérieur
du four.
Tableau de commande et bouton de sélection.
Plateau tournant amovible. N’utilisez pas ce four en
mode micro-ondes si le plateau tournant et son
support ne sont pas en place.
Support amovible. N’utilisez pas ce four en mode
micro-ondes si le plateau tournant et son support
ne sont pas en place.
Grilles. Utilisez-les avec les modes de CUISSON À
CONVECTION, RÔTISSAGE À CONVECTION ou
CUISSON RAPIDE COMBINÉE. (Ne l’utilisez pas pour
la cuisson aux micro-ondes.)
Pour de meilleurs résultats, utilisez une grille en
position basse et laissez au moins 2,5 cm (1 po)
entre le plat et les parois du four. Utilisez les
deux grilles pour une Cuisson, ou Cuisson rapide,
sur deux niveaux.
Service à la clientèle Dépannage
Entretien et nettoyage
Mode d’emploi
Instructions de sécurité
850 Watts
850 watts
Page 45

Cuisson minutée aux micro-ondes et fonctions automatiques
Appuyez sur Tournez le bouton de sélection et appuyez pour valider
CUISSON MINUTÉE Durée de cuisson
Appuyez une fois (Cuisson minutée I) pour
cuire aux micro-ondes de 15 sec. à 95 min.
Appuyez deux fois (Cuisson minutée II) pour
changer automatiquement le niveau de
puissance pendant la cuisson.
MICRO EXPRESS/Ajout de 30 secondes
Mise en marche immédiate!
DÉCONG. (DÉCONGÉLATION)
Appuyez une fois (Rapide) Aliments jusqu’à 454 g (1 lb)
Appuyez deux fois (Automatique) Aliments jusqu’à 2,7 kg (6 lb)
Appuyez trois fois (Minutée) Durée de la décongélation
BOISSON Mise en marche immédiate!
Appuyez une fois (185-220 mL/6-7 oz)
Appuyez deux fois (240-280 mL/8-9 oz)
Appuyez trois fois (310-375 mL/10-12 oz)
PUISSANCE Niveau de puissance de 1 à 10
Caractéristiques des fonctions avec capteur
Appuyez sur Tournez le bouton de sélection et appuyez pour valider Option
MAÏS SOUFFLÉ Mise en marche immédiate! Durée plus/moins
RÉCHAUFFAGE Mise en marche immédiate! Durée plus/moins
Appuyez une fois (assiette)
Appuyez deux fois (pâtes)
Appuyez trois fois (120 à 240 mL/
1
⁄2 à 1 tasse)
Appuyez quatre fois (240 à 480 mL/1 à 2 tasses)
CUISSON AUTOMATIQUE Type d’aliment Durée plus/moins
Cuisson ou rôtissage à convection
Appuyez sur Tournez le bouton de sélection et appuyez pour valider
CUISSON CONVECTION ou Température du four et durée de cuisson
RÔTISSAGE CONVECTION
Cuisson rapide combinée
Appuyez sur Tournez le bouton de sélection et appuyez pour valider
CUISSON RAPIDE COMBINÉE Température du four et durée de cuisson
Maintien au chaud
Appuyez sur Tournez le bouton de sélection et appuyez pour valider
MAINTIEN AU CHAUD Température du four et durée de maintien au chaud
9
Vous pouvez cuisiner aux micro-ondes ou en mode Cuisson à convection, Rôtissage à convection ou Cuisson rapide combinée.
Maintenez les aliments cuits au chaud pour les servir plus tard, grâce à la fonction de maintien au chaud.
Caractéristiques de cuisson et de réchauffage
du four à micro-ondes/convection
www.electromenagersge.ca
Commandes de cuisson
S
SSON
CUISSO
O
CHAU
GE
UT
CE
CUISSO
CONVECTION
ÔTISSAG
CO
ON
CUISSO
CO
N
R
R
E
Bouton de sélection
Instructions de sécurité
Mode d’emploi
Entretien et nettoyage
Dépannage
Service à la clientèle
AUT
NVECTI
MBI
N
N
E
N
MIN
AU CHAUD
ARRÊT/EFFACE
PUISSAN
TOURNER POUR SLECTIONNER
FFA
BOI
DÉCONGELER
APPUYER POUR ENTRE
PART/PAUS
Page 46

10
N’utilisez pas de grille pour la cuisson
aux micro-ondes.
Utilisez toujours une grille lorsque vous
cuisinez. Pour de meilleurs résultats,
utilisez une grille en position basse.
N’utilisez les deux grilles que pour une
cuisson sur deux niveaux.
Méthode de
cuisson
L’énergie des microondes est distribuée
uniformément dans le
four pour une cuisson
à cœur et rapide des
aliments.
Source de chaleur
Énergie des microondes.
Conduction
thermique
L’énergie des microondes produit de la
chaleur dans les
aliments par
pénétration instantanée.
Avantages
Cuisson rapide, très
efficace. Le four et ce
qui l’entoure ne
chauffent pas.
Nettoyage facile.
Méthode de
cuisson
L’air chaud circule
autour des aliments
pour qu’ils dorent à
l’extérieur et restent
bien tendres à
l’intérieur.
Source de chaleur
Circulation d’air chaud
(convection).
Conduction
thermique
Conduction de la
chaleur de l’extérieur
vers l’intérieur des
aliments.
Avantages
Permet de faire dorer
les aliments et de
garder toute leur
saveur. Certains
aliments cuisent plus
vite qu’avec des fours
traditionnels.
Méthode de
cuisson
L’air chaud circule
autour des aliments
déjà cuits pour les
garder au chaud.
Source de chaleur
Circulation d’air chaud
(convection).
Conduction
thermique
Conduction de la
chaleur de l’extérieur
vers l’intérieur des
aliments.
Avantages
Garde les plats déjà
cuits à la température
à laquelle vous
souhaitez les servir.
Utilisez toujours une grille lorsque vous
gardez des aliments au chaud.
Options de cuisson disponibles
Cuisson aux micro-ondes
Cuisson et rôtissage à convection
Maintien au chaud
La fonction de maintien au chaud conserve les aliments cuits à la température à laquelle vous
souhaitez les servir. Utilisez-la toujours avec des aliments déjà chauds. Utilisez des ustensiles qui
peuvent résister à des températures allant jusqu’à 110 °C (230 °F).
Pendant la cuisson ou le rôtissage, un élément chauffant augmente la température de l’air à
l’intérieur du four. Une température de 107 à 230 °C (225 à 450 °F) peut être programmée. Un
ventilateur fait circuler l’air ainsi chauffé au-dessus et autour de l’aliment, pour que celui-ci soit doré
à souhait et reste tendre. La circulation d’air chaud est connue sous le nom de convection.
Étant donné que l’air chaud circule constamment, empêchant une couche d’air plus frais de se
former autour de l’aliment, certains aliments cuisent plus rapidement que dans un four traditionnel.
Votre four utilise l’énergie des micro-ondes pour cuire selon une durée ou un poids déterminé.
Il peut également cuire de façon automatique par capteur.
Le capteur détecte le niveau d’humidité tout au long de la cuisson.
Le four ajuste automatiquement la durée de cuisson selon les types d’aliments et les quantités.
Méthode de
cuisson
L’énergie des microondes et la convection
sont combinées pour
cuisiner jusqu’à 25 %
plus vite que les fours
traditionnels et obtenir
des aliments tendres et
croustillants.
Source de chaleur
Énergie des microondes et circulation
d’air chaud.
Conduction
thermique
Les aliments chauffent
grâce à une pénétration
instantanée de l’énergie
des micro-ondes et à
une conduction de la
chaleur de l’extérieur
vers l’intérieur.
Avantages
Réduction de la durée
de cuisson grâce à
l’énergie des microondes. Aliments dorés
et croustillants grâce à
la convection.
Utilisez toujours une grille lorsque vous
utilisez la Cuisson rapide. Pour de
meilleurs résultats, utilisez une grille en
position basse. N’utilisez les deux grilles
que pour une cuisson sur deux niveaux.
Cuisson rapide combinée
Votre four vous permet également d’utiliser la Cuisson rapide combinée, qui allie l’énergie des microondes et la cuisson à convection. Vous cuisinez vite et bien pour des plats dorés et croustillants à souhait.
Service à la clientèle
Dépannage
Entretien et nettoyage
Mode d’emploi Instructions de sécurité
Page 47

11
Cuisson minutée (N’utilisez pas de grille pour
la cuisson aux micro-ondes.)
Cuisson minutée I
Cette fonction permet de programmer une
durée de cuisson allant de 15 secondes à
95 minutes.
Le niveau de puissance élevé (10) est
automatiquement sélectionné, mais vous pouvez
choisir un autre niveau de puissance.
Appuyez sur CUISSON MINUTÉE.
Tournez le bouton de sélection pour régler
la durée de cuisson et appuyez pour valider.
Choisissez le niveau de puissance approprié,
si vous ne souhaitez pas utiliser la puissance
maximale. (Appuyez sur PUISSANCE.
Tournez le bouton de sélection pour faire
votre choix. Appuyez dessus pour valider.)
Appuyez sur le bouton de sélection ou sur
DÉPART/PAUSE pour commencer la cuisson.
Vous pouvez ouvrir la porte du four durant la
cuisson minutée pour vérifier l’aliment. Pour
reprendre la cuisson, fermez la porte et appuyez
sur le bouton de sélection ou DÉPART/PAUSE.
REMARQUE : Pendant la cuisson, vous pouvez
changer la durée de cuisson quand vous le souhaitez
en tournant le bouton de sélection. Vous pouvez
également changer le niveau de puissance en appuyant
sur le bouton PUISSANCE.
Cuisson minutée II
Cette fonction permet un changement
automatique du niveau de puissance durant la
cuisson. Pour utiliser cette fonction :
Appuyez sur CUISSON MINUTÉE.
Tournez le bouton de sélection pour régler
la première durée de cuisson et appuyez
pour valider.
Choisissez le niveau de puissance approprié,
si vous ne souhaitez pas utiliser la puissance
maximale. (Appuyez sur PUISSANCE.
Tournez le bouton de sélection pour faire
votre choix. Appuyez dessus pour valider.)
Appuyez de nouveau sur CUISSON MINUTÉE.
Tournez le bouton de sélection pour régler
la deuxième durée de cuisson et appuyez
pour valider.
Choisissez le niveau de puissance approprié,
si vous ne souhaitez pas utiliser la puissance
maximale. (Appuyez sur PUISSANCE.
Tournez le bouton de sélection pour faire
votre choix. Appuyez dessus pour valider.)
Appuyez sur le bouton de sélection ou sur
DÉPART/PAUSE pour commencer la cuisson.
À la fin de Cuisson minutée I, le décompte de
Cuisson minutée II débute.
REMARQUE : Pendant la cuisson, vous pouvez
changer la durée de cuisson quand vous le souhaitez
en tournant le bouton de sélection. Vous pouvez
également changer le niveau de puissance en appuyant
sur le bouton PUISSANCE.
Cuisson Micro Express (N’utilisez pas de grille
pour la cuisson aux micro-ondes.)
Voici une façon rapide de commencer la cuisson en
la réglant par blocs de 30 secondes chaque fois que
vous appuyez sur le bouton MICRO EXPRESS.
Pendant la cuisson, vous pouvez changer la durée
de cuisson quand vous le souhaitez en tournant le
bouton de sélection.
Le niveau de puissance élevé (10) est
automatiquement sélectionné et le four se met
immédiatement en marche.
Il est possible de modifier le niveau de puissance
durant le décompte. Appuyez sur le bouton
PUISSANCE , tournez le bouton de sélection et
appuyez pour valider.
Fonctions minutées et fonctions automatiques
du four à micro-ondes
www.electromenagersge.ca
CUISSO
E
CE
R
E
Utilisation du bouton de sélection
Vous pouvez sélectionner les options du four en
tournant le bouton de sélection et en appuyant
dessus pour valider votre choix.
Vous pouvez également appuyer sur le bouton
de sélection en lieu et place du bouton
DÉPART/PAUSE pour programmer le four plus
rapidement.
Instructions de sécurité
Mode d’emploi
Entretien et nettoyage
Dépannage
Service à la clientèle
1
2
3
4
1
2
3
4
5
6
7
TOURNER POUR SÉLECTIONNER •
APPUYER POUR ENTRER
N
MINUTÉ
TOURNER POUR SLECTIONNER
APPUYER POUR ENTRE
PUISSAN
D
PART/PAUS
TOURNER POUR SÉLECTIONNER •
APPUYER POUR ENTRER
Page 48

Décongélation rapide (N’utilisez pas de grille
pour la cuisson aux micro-ondes.)
Décongélation rapide Le four sélectionne
automatiquement la durée de décongélation et
le niveau de puissance qui fourniront les
meilleurs résultats pour la viande, la volaille ou le
poisson jusqu’à 454 g (1 livre).
■ Retirez la viande de son emballage et placez-la
sur un plat allant au four à micro-ondes.
Appuyez une fois sur DÉCONGELER.
Entrez le poids de l’aliment en tournant le
bouton de sélection et en utilisant le guide
de conversion à droite. Par exemple,
tournez le bouton jusqu’à .5 pour 0,5 lb
(8 oz/225 g). Appuyez sur le bouton de
sélection pour valider.
Appuyez sur DÉPART/PAUSE pour
commencer la décongélation.
Retournez l’aliment lorsque le four affiche
RETOURNEZ ALIMENT.
■ Retirez du four la viande décongelée ou
couvrez les zones chaudes avec de petits
morceaux de feuille d’aluminium.
■ Vous devez laisser reposer la plupart des
viandes pendant 5 minutes pour que la
décongélation se termine.
Guide de conversion
Si le poids des aliments est en livres et en onces ou en
kilogrammes et en grammes, vous devez le convertir en
livres et en dixièmes de livres (0,1).
12
E
R
Fonctions minutées et fonctions automatiques du four à micro-ondes
Décongélation automatique (N’utilisez pas de
grille pour la cuisson aux micro-ondes.)
Utilisez la Décongélation automatique pour les
viandes, la volaille et le poisson de moins de
2,7 kg (6 lb).
Utilisez la fonction Décongélation
minutée pour la plupart des autres produits
alimentaires surgelés.
La
décongélation automatique programme
automatiquement le niveau de puissance et la
durée de décongélation pour une décongélation
uniforme des viandes, volailles et poissons.
■ Retirez la viande de son emballage et placez-la
sur un plat allant au four à micro-ondes.
Appuyez deux fois sur DÉCONGELER.
Entrez le poids de l’aliment en tournant le
bouton de sélection et en utilisant le guide
de conversion à droite. Par exemple, appuyez
sur 1.2 pour 1,2 lb (1 livre, 3 oz/535 g).
Appuyez sur le bouton de sélection pour
valider.
Appuyez sur DÉPART/PAUSE pour
commencer la décongélation.
Retournez l’aliment lorsque le four affiche
RETOURNEZ ALIMENT.
■ Retirez du four la viande décongelée ou
couvrez les zones chaudes avec de petits
morceaux de feuille d’aluminium.
■ Vous devez laisser reposer la plupart des
viandes pendant 5 minutes pour que la
décongélation se termine. Pour un gros rôti,
la période d’attente est d’environ 30 minutes.
Guide de conversion
Si le poids des aliments est en livres et en onces ou en
kilogrammes et en grammes, vous devez le convertir en
livres et en dixièmes de livres (0,1).
E
R
Service à la clientèle
Dépannage
Entretien et nettoyage
Mode d’emploi Instructions de sécurité
1
2
3
4
Poids de l’aliment Entrez le poids
en g (oz) (en dixièmes de livre)
28–57 g (1–2 oz) 0,1
85 g (3 oz) 0,2
113–142 g (4–5 oz) 0,3
170–198 g (6–7 oz) 0,4
227 g (8 oz) 0,5
255–284 g (9–10 oz) 0,6
312 g (11 oz) 0,7
340–369 g (12–13 oz) 0,8
397–425 g (14–15 oz) 0,9
1
2
3
4
Poids de l’aliment Entrez le poids
en g (oz) (en dixièmes de livre)
28–57 g (1–2 oz) 0,1
85 g (3 oz) 0,2
113–142 g (4–5 oz) 0,3
170–198 g (6–7 oz) 0,4
227 g (8 oz) 0,5
255–284 g (9–10 oz) 0,6
312 g (11 oz) 0,7
340–369 g (12–13 oz) 0,8
397–425 g (14–15 oz) 0,9
TOURNER POUR SLECTIONNER
APPUYER POUR ENTRE
PART/PAUS
TOURNER POUR SLECTIONNER
APPUYER POUR ENTRE
PART/PAUS
Page 49

13
E
TOURNER POUR SLECTIONNER
R
www.electromenagersge.ca
Décongélation minutée (N’utilisez pas de
grille pour la cuisson aux micro-ondes.)
La fonction Décongélation minutée permet
d’effectuer une décongélation pendant une
durée déterminée.
Appuyez trois fois sur DÉCONGELER.
Tournez le bouton de sélection jusqu’à la
durée désirée. Appuyez sur le bouton de
sélection pour valider.
Appuyez sur DÉPART/PAUSE pour
commencer la décongélation.
Retournez l’aliment lorsque le four affiche
RETOURNEZ ALIMENT.
Pendant la décongélation, vous pouvez changer
la durée de décongélation quand vous le
souhaitez en tournant le bouton de sélection.
Le niveau de puissance est automatiquement
réglé à 3, mais vous pouvez le changer si vous le
désirez. Vous pouvez décongeler rapidement de
petites quantités de nourriture en augmentant le
niveau de puissance après avoir programmé la
durée. Au niveau de puissance 7, la durée de
décongélation est réduite de moitié. Au niveau
de puissance 10, la décongélation prend trois fois
moins de temps. Cependant, vous devrez
surveiller les aliments plus fréquemment.
Il se peut que vous entendiez un bruit sourd
pendant la décongélation. Ce bruit est normal
lorsque le four ne fonctionne pas au niveau de
puissance élevé.
Conseils pour la décongélation
■
Les aliments surgelés dans un emballage en
papier ou en plastique peuvent être décongelés
dans leur emballage. Taillez ou percez des
ouvertures dans les emballages étanches
APRÈS le début de la décongélation.
Entrouvrez les récipients en plastique.
■ Les repas surgelés de format familial peuvent
être décongelés ou cuits aux micro-ondes. Si
le produit est fourni dans un récipient en
aluminium, mettez-le dans un plat allant au
four à micro-ondes.
■ Les aliments rapidement périssables ne
doivent pas être laissés à température
ambiante pendant plus d’une heure après la
décongélation. Les bactéries dangereuses
prolifèrent rapidement à température
ambiante.
■ Pour une décongélation plus uniforme des
aliments volumineux, comme les rôtis, utilisez
la Décongélation automatique. Assurez-vous que
les grosses pièces de viande sont
complètement décongelées avant de les cuire.
■ Un aliment décongelé doit être froid, mais
uniformément tendre. Si l’aliment comporte
encore des zones congelées, remettez-le
brièvement dans le four à micro-ondes ou
attendez quelques minutes.
Instructions de sécurité
Mode d’emploi
Entretien et nettoyage
Dépannage
Service à la clientèle
Boisson (N’utilisez pas de grille pour la cuisson
aux micro-ondes.)
La fonction BOISSON réchauffe les boissons
de 185 à 375 mL (6 à 12 oz).
Appuyez une fois pour 185 à 220 mL (6-7 oz).
Appuyez deux fois pour 250 à 280 mL (8–9 oz).
Apuyez trois fois pour 310 à 375 mL (10-12 oz).
En utilisant la fonction Boisson, le liquide peut devenir
très chaud. Vous devez manipuler le récipient très
prudemment.
1
2
3
4
APPUYER POUR ENTRE
PART/PAUS
BOISSON
Page 50

14
Changement du niveau de puissance
Vous pouvez entrer ou changer le niveau de
puissance immédiatement après avoir réglé la
durée de cuisson minutée, décongélation minutée
ou cuisson express. Le niveau de puissance peut
aussi être changé lors du décompte.
D’abord, vous devez suivre les instructions
de cuisson minutée, décongélation minutée
ou cuisson express.
Appuyez sur PUISSANCE .
Tournez le bouton de sélection vers la
droite pour diminuer le niveau de
puissance. Appuyez sur le bouton de
sélection pour valider.
Appuyez sur DÉPART/PAUSE pour
commencer la cuisson.
Les différents niveaux de puissance donnent une
plus grande souplesse à la cuisson aux microondes. Les niveaux de puissance du four à microondes sont comparables à ceux des éléments
chauffants d’une cuisinière. Chaque niveau de
puissance utilise l’énergie des micro-ondes
durant un certain pourcentage du temps de
cuisson. Le niveau de puissance 7 utilise l’énergie
des micro-ondes 70 % du temps. Le niveau de
puissance 3 émet des micro-ondes pendant 30 %
du temps. Le niveau de puissance élevé (10), qui
utilise l’énergie des micro-ondes durant toute la
durée de la cuisson, est le plus fréquemment
utilisé. Au niveau de puissance 10, les aliments
cuisent plus vite, mais il faut les remuer ou les
retourner plus souvent.
L’emploi d’un niveau de puissance inférieur
permet une cuisson plus uniforme et vous n’avez
pas à remuer ou retourner l’aliment aussi
souvent. Avec certains aliments, vous obtiendrez
une meilleure saveur, texture ou apparence, en
réduisant la puissance de chauffage. Il est
également utile d’employer un niveau de
puissance inférieur pour la cuisson d’un aliment
qui pourrait déborder, comme les pommes de
terre au gratin.
Une période d’attente, après la période de
cuisson aux micro-ondes, favorise une
distribution uniforme de la chaleur au sein de
l’aliment. Prenez par exemple le niveau de
puissance 3 pour la décongélation : Si l’énergie
des micro-ondes ne s’arrêtait pas, l’extérieur de
la nourriture cuirait avant que l’intérieur ne soit
décongelé.
Exemples d’utilisation des divers niveaux de
puissance :
Élevé 10 : Poisson, bacon, légumes, réchauffage
des liquides.
Moy.- max. 7 : Cuisson douce pour viande ou
volaille, mets en sauce et réchauffage.
Moyen 5 : Cuisson lente pour attendrir la viande
comme les ragoûts et les coupes de viande moins
tendres.
Bas 2 ou 3 : Décongélation; cuisson lente; sauces
délicates.
Réchauffage 1 : Pour garder les aliments chauds
sans les cuire de façon excessive; amollissement
du beurre.
E
R
CE
Étincelles Formation d’étincelles dans le four à micro-ondes. Elle est provoquée par :
■ la grille en métal qui n’est pas correctement installée et entre en contact avec les parois du four à micro-ondes.
■ un article en métal ou du papier d’aluminium qui touche les parois du four.
■ du papier d’aluminium qui n’épouse pas bien la forme d’un aliment (les coins relevés agissent comme des
antennes).
■ des articles en métal, comme les attaches, les broches à volaille, la garniture dorée de la vaisselle.
■ des essuie-tout en papier recyclé, contenant des particules métalliques.
■ le support du plateau tournant qui n’est pas correctement installé.
Recouvrement
Les couvercles retiennent l’humidité, assurent une cuisson plus uniforme et réduisent la durée de cuisson. Une
pellicule en plastique légèrement soulevée ou un morceau de papier ciré permettent à l’excès de vapeur de s’échapper.
Protéger Dans un four traditionnel, vous recouvrez la poitrine d’un poulet ou des aliments déjà cuits pour éviter qu’ils ne
brunissent trop. Lorsque vous faites cuire des aliments aux micro-ondes, vous devez recouvrir les parties minces des
aliments, comme le bout des ailes et les pilons d’une volaille avec de petites bandes de papier d’aluminium pour éviter
qu’elles soient cuites avant les parties plus charnues.
Période d’attente
Lors de la cuisson dans un four traditionnel, certains aliments comme les rôtis ou les gâteaux sont laissés afin qu’ils
finissent de cuire ou qu’ils prennent. Cette période d’attente est particulièrement importante après la cuisson aux
micro-ondes. Notez qu’un gâteau cuit aux micro-ondes ne doit pas refroidir sur une grille.
Aération Après avoir recouvert un récipient avec une pellicule plastique, vous pouvez laisser une ouverture en soulevant un des
coins pour permettre à la vapeur de s’échapper.
Terminologie de la cuisson aux micro-ondes
Terme Définition
Service à la clientèle
Dépannage
Entretien et nettoyage
Mode d’emploi Instructions de sécurité
1
2
3
4
PUISSAN
TOURNER POUR SLECTIONNER
APPUYER POUR ENTRE
PART/PAUS
Page 51

15
Caractéristiques des fonctions avec capteur www.electromenagersge.ca
Capteur d’humidité
Ce qui se produit lorsque vous utilisez les fonctions avec capteur :
Le capteur détecte le niveau d’humidité tout au long de la cuisson. Le four ajuste automatiquement
la durée de cuisson selon les types d’aliments et les quantités.
N’utilisez pas les fonctions avec capteur deux fois de suite pour un même aliment – vous pourriez
trop le cuire ou le faire brûler. Si l’aliment n’est pas assez cuit après le décompte, utilisez Cuisson
minutée pour augmenter la durée de cuisson.
REMARQUE : Vous ne pourrez pas utiliser les fonctions avec capteur si le four est chaud. Si vous appuyez sur un des
boutons de cuisson avec capteur lorsque la température du four dépasse 93 °C (200 °F), « FOUR TROP CHAUD POUR
CUISSON A/CAPTEUR – UTILISEZ AUTRE METHODE » sera affiché. Le four passera automatiquement en cuisson
minutée (suivez les instructions qui s’affichent) ou les fonctions avec capteur reprendront un fonctionnement normal une
fois que le four aura assez refroidi.
■ Il est essentiel d’utiliser les bons contenants et couvercles pour la meilleure cuisson avec capteur.
■ Utilisez toujours des contenants pour cuisson au four à micro-ondes et recouvrez-les d’une
pellicule plastique en laissant une ouverture ou d’un couvercle. N’utilisez jamais de couvercle en
plastique trop étanche – qui empêcherait la vapeur de s’échapper et ferait trop cuire l’aliment.
■ Assurez-vous que l’extérieur des contenants et l’intérieur du four à micro-ondes sont secs avant de
mettre la nourriture dans le four. Des gouttelettes d’humidité se transformant en vapeur peuvent
tromper le capteur.
Séchez les contenants pour qu’ils ne
trompent pas le capteur.
Avec ouverture
Avec couvercle
Cuisson automatique (N’utilisez pas de grille pour la cuisson aux micro-ondes.)
Étant donné que la plupart des contenants doivent être couverts pendant la Cuisson automatique,
cette fonction correspond mieux aux aliments que vous souhaitez cuire à la vapeur ou qui doivent
rester bien tendres.
REMARQUE : L’utilisation d’une grille métallique avec la fonction Cuisson automatique est déconseillée.
Aliments recommendés
Une large varitété d’aliments, dont la viande, le poisson et les légumes, peuvent être cuits grâce à
cette fonction.
Aliments déconseillés
Il est déconseillé d’utiliser cette fonction avec les aliments qui doivent être cuits sans être couverts,
qui nécessitent une attention constante ou l’ajout d’ingrédients en cours de cuisson, et avec les
aliments dont la surface doit être croustillante. Il est recommendé d’utiliser la Cuisson minutée pour
les cuisiner.
CUISSO
O
Instructions de sécurité
Mode d’emploi
Entretien et nettoyage
Dépannage
Service à la clientèle
N
AUT
Page 52

16
E
R
CUISSO
O
Guide des types d’aliment pour la cuisson avec capteur
Type d’aliment Portions Taille de la portion Remarques
Poulet en morceaux 1 à 4 2 à 8 Utilisez un plat ovale, carré ou rond. Recouvrez
morceaux d’une pellicule plastique en laissant une ouverture.
Poisson 1 à 4 114 à 456 g (4 à 16 oz) Utilisez un plat ovale, carré ou rond. Recouvrez
d’une pellicule plastique en laissant une ouverture.
Viande hachée — 227 à 908 g (8 to 32 oz) Utilisez une cocotte ronde. Émiettez la viande
(bœuf, porc, dinde) dans le plat. Recouvrez d’une pellicule plastique
en laissant une ouverture.
Pommes de terre 1 à 4 227 à 908 g (8 à 32 oz) Percez la peau avec une fourchette. Positionnez
les pommes de terre en forme d’étoile au centre
du plateau tournant.
Légumes en conserve 1 à 4 114 à 456 g (4 à 16 oz) Utilisez une cocotte ou un bol convenant à la
cuisson aux micro-ondes. Recouvrez d’une
pellicule plastique, en laissant une ouverture,
ou d’un couvercle.
Légumes frais 1 à 4 114 à 456 g (4 à 16 oz) Utilisez une cocotte ou un bol convenant à la
cuisson aux micro-ondes. Ajoutez 2 cuillères à
soupe d’eau pour chaque portion. Recouvrez
d’une pellicule plastique, en laissant une
ouverture, ou d’un couvercle.
Légumes surgelés 1 à 4 114 à 456 g (4 à 16 oz) Utilisez une cocotte ou un bol convenant à la
cuisson aux micro-ondes. Suivez les instructions sur
l’emballage concernant l’addition d’eau. Recouvrez
d’une pellicule plastique, en laissant une ouverture,
ou d’un couvercle.
Cuisson automatique (N’utilisez pas de grille
pour la cuisson aux micro-ondes.)
Placez les aliments couverts dans le four et
fermez la porte. Appuyez sur CUISSON
AUTO. « ENTREZ TYPE ALIMENT » s’affiche
alors.
Tournez le bouton de sélection jusqu’au type
d’aliment désiré. Apuyez pour valider.
Consultez le Guide des types d’aliment pour la
cuisson avec capteur ci-dessous pour les aliments
particuliers et les instructions.
Le four se met en marche immédiatement.
REMARQUE : Si la porte était ouverte lorsque vous
avez entré votre réglage, fermez-la et appuyez sur
DÉPART/PAUSE pour commencer la cuisson.
Si l’aliment n’est pas assez cuit après le
décompte, utilisez Cuisson minutée pour
augmenter la durée de cuisson.
N’ouvrez pas la porte avant que le décompte ne soit
affiché – de la vapeur s’échappant du four pourrait
affecter les performances de cuisson. Si la porte est
ouverte, fermez-la et appuyez immédiatement sur
DÉPART/PAUSE.
Si la sélection était réglée sur viande hachée, le
four peut émettre un signal sonore pour
égoutter la viande hachée et la remuer. Ouvrez
la porte, égouttez la viande et refermez la porte.
Appuyez sur DÉPART/PAUSE s’il s’avère
nécessaire de continuer la cuisson.
Conseils de cuisson
■ Lorsque le four émet un signal sonore et que
le décompte s’affiche, vous pouvez ouvrir la
porte pour remuer ou retourner les aliments.
Pour continuer la cuisson, fermez la porte et
appuyez sur DÉPART/PAUSE.
■ Faites correspondre la quantité de nourriture
avec la taille du contenant. Remplissez au
moins la moitié du contenant.
■ Veillez à ce que l’extérieur du contenant et
l’intérieur du four soient secs.
■ Si, à la fin de la cuisson, les aliments
nécessitent une cuisson supplémentaire,
remettez-les dans le four et utilisez la Cuisson
minutée pour finir la cuisson.
Modification des réglages automatiques du four
pour augmenter ou réduire la durée de cuisson
(selon le type d’aliment)
Pour réduire la durée de cuisson de 10 % :
Pendant les 30 premières secondes de cuisson,
tournez le bouton de sélection vers la gauche,
jusqu’à ce que le symbole moins ( – ) apparaisse
et appuyez pour valider.
Pour augmenter la durée de cuisson de 10 % :
Pendant les 30 premières secondes de cuisson,
tournez le bouton de sélection vers la droite,
jusqu’à ce que le symbole moins ( + ) apparaisse
et appuyez pour valider.
Caractéristiques de la cuisson avec capteur
REMARQUE : N’utilisez pas
cette fonction deux fois de
suite pour un même aliment,
vous pourriez trop le cuire ou
le faire brûler.
Service à la clientèle
Dépannage
Entretien et nettoyage
Mode d’emploi Instructions de sécurité
1
2
N
AUT
TOURNER POUR SLECTIONNER
APPUYER POUR ENTRE
PART/PAUS
Page 53

www.electromenagersge.ca
Maïs soufflé (N’utilisez pas de grille pour la cuisson aux
micro-ondes.)
Comment utiliser la fonction Maïs soufflé :
Suivez les instructions sur l’emballage. Servezvous de la fonction Cuisson minutée si le sac pèse
moins de 43 g (1,5 oz) ou plus de 100 g (3,5 oz).
Placez le sac de maïs soufflé au centre du plateau
tournant.
Appuyez sur MAÏS SOUFFLÉ. Le four se met en
marche immédiatement.
Si vous ouvrez la porte lorsque « CAPTEUR MAÏS
SOUFFLÉ » est affiché, un message d’erreur apparaît.
Fermez la porte, appuyez sur ARRÊT/EFFACER et
recommencez.
Si l’aliment n’est pas assez cuit après le décompte,
utilisez Cuisson minutée pour augmenter la durée de
cuisson.
Modification du réglage Maïs soufflé pour augmenter ou
réduire la durée de cuisson
Si vous trouvez que la marque de maïs que vous
utilisez ne cuit pas assez ou cuit trop, vous pouvez
augmenter ou diminuer de 20 à 30 secondes la durée
automatique de cuisson.
Pour réduire la durée de cuisson :
Pendant les 30 premières secondes de cuisson,
tournez le bouton de sélection vers la gauche, jusqu’à
ce que le symbole moins ( – ) apparaisse pour enlever
20 secondes. Apuyez pour valider. Tournez le bouton à
nouveau jusqu’à ce que deux moins ( – – )
apparaissent afin de réduire le temps de 10 secondes
supplémentaires, pour un total de 30 secondes en
moins. Apuyez pour valider.
Pour augmenter la durée de cuisson :
Pendant les 30 premières secondes de cuisson,
tournez le bouton de sélection vers la droite, jusqu’à
ce que le symbole moins ( + ) apparaisse pour ajouter
20 secondes. Apuyez pour valider. Tournez le bouton à
nouveau jusqu’à ce que deux plus ( ++ ) apparaissent
afin de rajouter 10 secondes, pour un total de
30 secondes en plus. Apuyez pour valider.
MAÏ
S
SOU
É
Utilisez uniquement avec des
emballages de maïs soufflé pour
four à micro-ondes pesant de
43 à 100 g (1,5 à 3,5 oz).
REMARQUE : N’utilisez pas cette
fonction deux fois de suite pour
un même aliment, vous pourriez
trop le cuire ou le faire brûler.
REMARQUE : N’utilisez pas
cette fonction deux fois de
suite pour un même aliment,
vous pourriez trop le cuire ou
le faire brûler.
Réchauffage (N’utilisez pas de grille pour la cuisson aux
micro-ondes.)
La fonction Réchauffage permet de réchauffer des
portions d’aliments déjà cuits ou une assiette de restes.
Placez la tasse de liquide ou les aliments couverts
dans le four. Appuyez sur RÉCHAUFFAGE une,
deux, trois ou quatre fois. Le four se met en
marche immédiatement.
Appuyez une fois pour une assiette de restes.
Appuyez deux fois pour des pâtes.
Appuyez trois fois pour 120 à 240 mL (1/2 à
1 tasse).
Appuyez quatre fois pour 240 à 480 mL (1 à
2 tasses).
Le four signale l’apparition de vapeur et le
décompte de la durée restante débute.
N’ouvrez pas la porte avant le début du décompte. Si
la porte est ouverte, fermez-la et appuyez
immédiatement sur DÉPART.
Après avoir retiré l’aliment du four, si possible remuez-le pour
rendre la température uniforme. Les aliments réchauffés peuvent
présenter de larges variations de température. Certaines parties
peuvent être extrêmement chaudes.
Si l’aliment n’est pas assez chaud après le décompte,
utilisez Cuisson minutée pour augmenter la durée de
cuisson.
Il n’est pas recommandé d’utiliser la fonction
Réchauffage pour certains aliments.
Il est préférable de recourir à la Cuisson minutée pour
les aliments suivants :
■ Produits de boulangerie.
■ Aliments qui doivent être réchauffés sans être
couverts.
■ Aliments qui doivent être remués ou retournés.
■ Aliments qui, après réchauffage, doivent avoir une
surface croustillante.
Modification des réglages automatiques du four
pour augmenter ou diminuer la durée de cuisson
Pour réduire la durée de cuisson de 10 % :
Pendant les 30 premières secondes de cuisson,
tournez le bouton de sélection vers la gauche, jusqu’à
ce que le symbole moins ( – ) apparaisse et appuyez
pour valider.
Pour augmenter la durée de cuisson de 10 % :
Pendant les 30 premières secondes de cuisson,
tournez le bouton de sélection vers la droite, jusqu’à
ce que le symbole moins ( + ) apparaisse et appuyez
pour valider.
17
Instructions de sécurité
Mode d’emploi Entretien et nettoyage
Dépannage Service à la clientèle
1
2
1
2
FFL
RÉCHAUFFAGE
Page 54

18
La cuisson ou le rôtissage à convection utilisent un élément chauffant pour augmenter la
température de l’air à l’intérieur du four. Une température de 107 à 230 °C (225 à 450 °F) peut être
programmée. Un ventilateur fait circuler l’air ainsi chauffé au-dessus et autour de l’aliment, pour que
celui-ci soit doré à souhait et reste tendre. La circulation d’air chaud est connue sous le nom de
convection.
Étant donné que l’air chaud circule constamment, empêchant une couche d’air plus frais de se
former autour de l’aliment, certains aliments cuisent plus rapidement que dans un four traditionnel.
Pour de meilleurs résultats...
Utilisez une grille en position basse et laissez au moins 2,5 cm (1 po) entre le plat et les parois du four. N’utilisez les
deux grilles que pour une cuisson sur deux niveaux.
La grille est nécessaire pour une bonne circulation de l’air et un aliment doré uniformément.
Consultez la section Conseils sur les ustensiles de cuisine.
Cuisson ou rôtissage avec préchauffage
Appuyez sur CUISSON ou RÔTISSAGE.
Tournez le bouton de sélection pour régler
la température du four et appuyez pour
valider. N’entrez pas la durée de cuisson
pour l’instant. (Vous l’entrerez plus tard,
lorsque le four sera préchauffé.) Consultez
la section Conversion automatique Auto
Recipe
MC
ci-dessous.
Appuyez sur le bouton de sélection ou sur
DÉPART/PAUSE pour commencer le
préchauffage.
Lorsque le four est préchauffé, il émettra un
signal sonore. Si vous n’ouvrez pas la porte
dans l’heure qui suit, le four s’éteindra
automatiquement.
Ouvrez la porte du four et, avec précaution,
placez le plat dans le four.
Fermez la porte. Tournez le bouton de
sélection pour régler la durée de cuisson et
appuyez dessus ou sur DÉPART/PAUSE pour
commencer la cuisson.
Lorsque la durée de cuisson sera écoulée, le
four émettra un signal sonore et s’éteindra.
REMARQUE : Pendant la cuisson, vous pouvez changer la
durée de cuisson quand vous le souhaitez en tournant le
bouton de sélection.
Pendant la cuisson, vous pouvez changer la température
du four quand vous le souhaitez en appuyant sur
PUISSANCE. Tournez le bouton de sélection pour régler
la température du four et appuyez pour valider.
Pour visualiser la durée de cuisson et la température du
four pendant la cuisson, appuyez sur CUISSON.
E
R
CUISSO
CO
ON
Cuisson ou rôtissage sans préchauffage
Si votre recette ne requiert pas de
préchauffage, appuyez sur CUISSON ou
RÔTISSAGE. Consultez la section Conversion
automatique Auto Recipe
MC
ci-dessous.
Tournez le bouton de sélection pour régler
la température du four et appuyez pour
valider.
Tournez le bouton de sélection pour régler
la durée de cuisson et appuyez pour valider.
Appuyez sur le bouton de sélection ou sur
DÉPART/PAUSE pour commencer la cuisson.
REMARQUE : Pendant la cuisson, vous pouvez changer la
durée de cuisson quand vous le souhaitez en tournant le
bouton de sélection.
Pendant la cuisson, vous pouvez changer la température
du four quand vous le souhaitez en appuyant sur
PUISSANCE. Tournez le bouton de sélection pour régler
la température du four et appuyez pour valider.
Pour visualiser la durée de cuisson et la température du
four pendant la cuisson, appuyez sur CUISSON.
E
R
CUISSO
CO
ON
Caractéristiques de cuisson et de rôtissage
Position de grille correcte
Position de grille incorrecte
Service à la clientèle
Dépannage
Entretien et nettoyage
Mode d’emploi Instructions de sécurité
Conversion automatique Auto RecipeMCpour convection
Lorsque vous utilisez CUISSON CONVECTION, la fonction de Conversion automatique Auto Recipe
MC
convertira automatiquement les températures de cuisson normale entrées en températures de
cuisson à convection.
Cette fonction est activée de façon à ce que « CONV MARC » (Convection marche) et que la
température convertie réelle (réduite) soient affichés. Par exemple, si vous entrez une température
normale de 177 °C (350 °F) et appuyez sur DÉPART, l’affichage montrera la température convertie de
163 °C (325 °F).
Cette fonction peut être désactivée dans le menu OPTIONS. Référez-vous à la Sélection de conversion
automatique Auto Recipe
MC
dans la section Autres caractéristiques.
REMARQUE : Si vous utilisez la cuisson à convection et que la fonction de Conversion automatique
Auto Recipe
MC
est désactivée, réduisez la température du four de 14 °C (25 °F) pour éviter que le
dessus des aliments ne cuise trop.
2
3
4
5
6
7
1
1
2
3
4
N
NVECTI
TOURNER POUR SLECTIONNER
APPUYER POUR ENTRE
PART/PAUS
N
NVECTI
TOURNER POUR SLECTIONNER
APPUYER POUR ENTRE
PART/PAUS
Page 55

Cuisson rapide sans préchauffage
Si votre recette ne requiert pas de
préchauffage, appuyez sur CUISSON RAPIDE.
Tournez le bouton de sélection pour régler
la température du four et appuyez pour
valider.
Tournez le bouton de sélection pour régler
la durée de cuisson et appuyez pour valider.
Appuyez sur le bouton de sélection ou sur
DÉPART/PAUSE pour commencer la cuisson.
REMARQUE : Pendant la cuisson, vous pouvez
changer la durée de cuisson quand vous le souhaitez
en tournant le bouton de sélection.
Pendant la cuisson, vous pouvez changer la température et
le niveau de puissance du four quand vous le souhaitez en
appuyant sur PUISSANCE. Tournez le bouton de sélection
pour régler la température du four et appuyez pour valider.
Ensuite, tournez le bouton de sélection pour régler le
niveau de puissance (1 à 4) et appuyez pour valider. Le
niveau de puissance par défaut est 4.
Pour visualiser la durée de cuisson et la température
du four pendant la cuisson, appuyez sur CUISSON
RAPIDE.
REMARQUE :
■ Certaines recettes requièrent le préchauffage
du four.
■ Consultez la sectionConseils sur les ustensiles
de cuisine pour connaître les ustensiles
appropriés à la Cuisson rapide.
■ N’utilisez pas d’ustensiles en métal avec la
Cuisson rapide.
■ Consultez la section Meilleures méthodes de
cuisson pour déterminer quels aliments cuire
avec la Cuisson rapide.
■ Réduisez le temps de cuisson de 25 %.
E
R
CUISSO
RAPIDE
CO
E
19
La Cuisson rapide comporte les meilleures caractéristiques de la cuisson aux micro-ondes et à
convection. Les micro-ondes cuisent les aliments plus rapidement et la circulation d’air chaud par
convection dore parfaitement les aliments. Une température de 107 à 230 °C (225 à 450 °F) peut
être programmée.
Pour de meilleurs résultats...
Utilisez une grille en position basse et laissez au moins 2,5 cm (1 po) entre le plat et les parois du four. N’utilisez les
deux grilles que pour une cuisson sur deux niveaux.
La grille est nécessaire pour une bonne circulation de l’air et un aliment doré uniformément.
Consultez la section Conseils sur les ustensiles de cuisine.
Consultez la section Meilleures méthodes de cuisson pour déterminer quels aliments cuire avec la Cuisson rapide.
Cuisson rapide avec préchauffage
Appuyez sur CUISSON RAPIDE.
Tournez le bouton de sélection pour régler
la température du four et appuyez pour
valider. N’entrez pas la durée de CUISSON
RAPIDE pour l’instant. (Vous l’entrerez plus
tard, lorsque le four sera préchauffé.)
Appuyez sur le bouton de sélection ou
sur DÉPART/PAUSE pour commencer le
préchauffage.
Lorsque le four est préchauffé, il émettra un
signal sonore. Si vous n’ouvrez pas la porte
dans l’heure qui suit, le four s’éteindra
automatiquement.
Ouvrez la porte du four et, avec précaution,
placez l’aliment dans le four.
Fermez la porte du four. Tournez le bouton
de sélection pour régler la durée de cuisson
et appuyez pour valider. Appuyez sur le
bouton de sélection ou sur DÉPART/PAUSE
pour commencer la cuisson.
Lorsque la durée de cuisson sera écoulée, le
four émettra un signal sonore et s’éteindra.
REMARQUE : Pendant la cuisson, vous pouvez
changer la durée de cuisson quand vous le souhaitez
en tournant le bouton de sélection.
Pendant la cuisson, vous pouvez changer la
température et le niveau de puissance du four quand
vous le souhaitez en appuyant sur PUISSANCE.
Tournez le bouton de sélection pour régler la
température du four et appuyez pour valider. Ensuite,
tournez le bouton de sélection pour régler le niveau de
puissance (1 à 4) et appuyez pour valider. Le niveau de
puissance par défaut est 4.
Pour visualiser la durée de cuisson et la température
du four pendant la cuisson, appuyez sur CUISSON
RAPIDE.
■ Consultez la sectionConseils sur les ustensiles
de cuisine pour connaître les ustensiles
appropriés à la Cuisson rapide.
■ N’utilisez pas d’ustensiles en métal avec la
Cuisson rapide.
■ Réduisez le temps de cuisson de 25 %.
■ Consultez la section Meilleures méthodes de
cuisson pour déterminer quels aliments cuire
avec la Cuisson rapide.
E
R
CUISSO
RAPIDE
CO
E
Caractéristiques de cuisson rapide www.electromenagersge.ca
Position de grille correcte
Position de grille incorrecte
Instructions de sécurité
Mode d’emploi Entretien et nettoyage
Dépannage Service à la clientèle
1
3
2
4
5
6
7
1
4
2
3
N
MBINÉ
TOURNER POUR SLECTIONNER
APPUYER POUR ENTRE
PART/PAUS
N
MBINÉ
TOURNER POUR SLECTIONNER
APPUYER POUR ENTRE
PART/PAUS
Page 56

20
Conseils sur les ustensiles de cuisine
Cuisson ou rôtissage à convection
Des moules en métal sont recommandés pour divers produits de boulangerie et les pâtisseries, mais
surtout pour faire brunir les aliments.
Les moules en métal foncé ou au fini mat conviennent mieux pour les pains et les tartes, car ils
absorbent la chaleur et donnent une croûte plus croustillante.
Les moules en aluminium au fini brillant conviennent mieux pour les gâteaux, les biscuits ou les
muffins, car ils réfléchissent la chaleur et donnent une croûte tendre et légère.
Les cocottes ou les plats de cuisson en verre ou en vitrocéramique conviennent mieux pour les
recettes contenants des œufs et du fromage, car le verre est plus facile à nettoyer.
Cuisson rapide combinée
On recommande l’utilisation de contenants en verre ou en vitrocéramique. N’utilisez pas d’articles
ayant une bordure métallique, car ils peuvent provoquer la formation d’étincelles en touchant les
parois ou la grille du four. Cela peut endommager l’ustensile, la grille ou le four.
Vous pouvez utiliser des ustensiles en plastique résistant à la chaleur (jusqu’à 230 °C/450 °F) et
allant au four à micro-ondes, mais ils ne sont pas recommandés pour les aliments nécessitant un
brunissage complet, car le plastique est un mauvais conducteur de chaleur.
Cuisson ou rôtissage Cuisson rapide
Ustensile de cuisine Micro-ondes à convection combinée
Verre et vitrocéramique résistant à la chaleur Oui Oui Oui
(Pyrex®, Fire King®, Corning Ware®, etc.)
Métal Non Oui Non
Verre non résistant à la chaleur Non Non Non
Ustensiles en plastique allant au four à micro-ondes Oui Non Oui*
Pellicule plastique Oui Non Non
Produits en papier Oui Non Non
Paille, osier et bois Oui Non Non
* N’utilisez que des ustensiles de cuisine allant au four à micro-ondes qui résistent à une température de 230 °C (450 °F).
Service à la clientèle
Dépannage
Entretien et nettoyage
Mode d’emploi Instructions de sécurité
Page 57

21
Utilisez ce guide pour sélectionner la meilleure méthode de cuisson. Les recettes peuvent être adaptées en suivant les instructions
ci-dessous pour déterminer le mode de cuisson approprié.
Aliments Micro-ondes Cuisson Rôtissage Cuisson
rapide
Hors d’œuvre
Trempettes et produits à tartiner
✓
Collations à base de pâte
✓✓ ✓
Boissons
✓
Sauces et nappages
✓
Soupes et ragoûts
✓
Viande
Décongélation
✓
Rôtissage
✓✓
Volaille
Décongélation
✓
Rôtissage
✓✓✓
Poisson et fruits de mer
Décongélation
✓
Cuisson
✓✓ ✓
Cocottes
✓✓ ✓
Oeufs et fromage
Oeufs brouillés, omelettes
✓✓
Quiche, soufflé
✓✓
Légumes, (frais)
✓
Pain
Muffins, brioches
✓✓
Pain éclair
✓
Pain à la levure
✓
Desserts
Gâteaux (à étages et Bundt)
✓
Gâteau des anges et tarte mousseline
✓
Flan et crème-dessert
✓
Barres, biscuits
✓✓
Fruits
✓
Tartes et pâtes à tarte
✓
Bonbons
✓
Ébouillantage de légumes
✓
Aliments préparés surgelés
✓✓ ✓
Meilleures méthodes de cuisson www.electromenagersge.ca
Cuisson rapide combinée
Lorsque vous utilisez la CUISSON RAPIDE COMBINÉE, réduisez la durée de cuisson de la recette de 25 %.
Par exemple : Une recette demande de cuire un rôti pendant 60 minutes à 205 °C (400 °F).
60 minutes x 0,25 = 15 minutes économisées
Donc, la nouvelle durée de CUISSON RAPIDE sera de :
60 minutes – 15 minutes = 45 minutes.
Conversion de durée de cuisson
Instructions de sécurité
Mode d’emploi Entretien et nettoyage
Dépannage Service à la clientèle
Page 58

22
Caractéristiques du maintien au chaud
La fonction de MAINTIEN AU CHAUD conserve les aliments cuits à la température à laquelle vous
souhaitez les servir. Utilisez-le toujours avec des aliments déjà chauds. Utilisez des ustensiles qui
peuvent résister à des températures allant jusqu’à 110 °C (230 °F).
Pour de meilleurs résultats...
Utilisez toujours la grille en position basse lorsque vous maintenez des aliments au chaud. La grille est nécessaire pour
une bonne circulation de l’air et un maintien au chaud uniforme.
Consultez la section Conseils sur les ustensiles de cuisine.
Appuyez sur MAINTIEN AU CHAUD
(GARD CHAU).
Tournez le bouton de sélection pour régler
la température du four. Consultez le tableau
et les conseils ci-dessous. Appuyez sur le
bouton de sélection pour valider.
BAS 65 °C (150 °F)
MOYEN 77 °C (170 °F)
ÉLEVÉ 100 °C (210 °F)
Appuyez sur le bouton de sélection ou sur
DÉPART/PAUSE pour commencer.
Si la porte du four est ouverte durant le
maintien au chaud, « PAUSE » s’affichera.
Fermez la porte et appuyez sur DÉPART/PAUSE.
Pour faire dorer des aliments rassis ou desséchés :
■ Placez les aliments ou plats directement sur la
grille en position basse.
■ Utilisez le réglage BAS.
■ Vérifier si l’aliment est croustillant après
45 minutes. Ajoutez du temps si nécessaire.
Tableau de sélection des températures
Conseils pour des aliments croustillants :
■ Ne couvrez pas les aliments.
■ N’utilisez pas de contenants en plastique ou
de pellicule plastique.
Conseils pour des aliments tendres :
■ Couvrez les aliments avec un couvercle ou du
papier d’aluminium.
■ N’utilisez pas de contenants en plastique ou
de pellicule plastique.
Type d’aliment Réglage des commandes Tendre/croustillant
Pain, petits pains durs Moyen Croustillant
Pain, petits pains mœlleux Moyen Tendre
Cocottes Moyen Tendre
Aliments frits Élevé Croustillant
Viande* et poisson Moyen Croustillant
Crêpes, gaufres Élevé Croustillant
Pizza Élevé Croustillant
Pommes de terre au four Élevé Croustillant
Purée Moyen Tendre
Volaille Élevé Tendre
Chips tortilla Bas Croustillant
Légumes Moyen Tendre
* Le département de l’Agriculture des États-Unis et le FSIS recommendent une température interne
minimum de 63 °C (145 °F) pour la cuisson du bœuf.
Utilisez un thermomètre à viande pour vérifier la température interne.
Position de grille correcte
Position de grille incorrecte
Service à la clientèle
Dépannage
Entretien et nettoyage
Mode d’emploi Instructions de sécurité
1
2
3
AU CHAUD
TOURNER POUR SÉLECTIONNER •
APPUYER POUR ENTRER
Page 59

23
Autres caractéristiques www.electromenagersge.ca
Horloge
Appuyez dessus pour entrer l’heure ou la
consulter pendant la cuisson.
Appuyez sur HORLOGE.
Tournez le bouton de sélection pour régler
l’heure. Appuyez sur le bouton de sélection
pour valider.
Tournez le bouton de sélection pour régler
les minutes. Appuyez sur le bouton de
sélection pour valider.
Tournez le bouton de sélection pour choisir
AM ou PM. Appuyez sur le bouton de
sélection pour valider.
R
M
Rappel de fin de cuisson
Pour vous rappeler que des aliments sont
toujours dans le four, l’appareil affiche
« ALIMENT PRÊT » et émet un signal sonore
toutes les minutes jusqu’à ce que vous ouvriez la
porte ou que vous appuyiez sur ARRÊT/EFFACER.
ARRÊT/EFFACER
Départ/Pause
En plus d’actionner plusieurs fonctions, la
touche DÉPART/PAUSE vous permet d’arrêter la
cuisson sans ouvrir la porte ni effacer l’affichage.
Arrêt/Effacer
Appuyez sur le bouton ARRÊT/EFFACER pour
arrêter et annuler la cuisson en tout temps.
Verrouillage pour enfants
Il est possible de désactiver les fonctions du
tableau de commande pour empêcher la mise
en marche accidentelle ou l’utilisation du four
par des enfants.
Pour désactiver ou réactiver les commandes,
appuyez et maintenez la pression pendant
environ trois secondes sur ARRÊT/EFFACER.
Lorsque le tableau de commande est verrouillé,
« COMMANDE VERROUILL » s’affichera
brièvement à chaque fois que vous appuierez sur
un bouton (y compris le bouton de sélection).
ARRÊT/EFFACER
Aide
La touche AIDE affiche des renseignements et
des conseils utiles concernant les fonctions.
Appuyez sur AIDE, puis tournez le bouton de
sélection pour choisir une fonction et appuyez
dessus pour valider.
Reprendre
Le programme de cuisson utilisé précédemment
reste en mémoire pendant 5 minutes. Après
cela, vous devrez recommencer le programme.
Pour désactiver cette fonction, consultez la
section Message de durée supplémentaire.
Si vos aliments nécessitent une cuisson plus
longue, vous pouvez reprendre la cuisson en
appuyant sur DÉPART/PAUSE ou sur le
bouton de sélection.
« CONTINUEZ CUISSON » sera affiché et le
four se remettra en marche immédiatement
à 10 % de la durée initiale.
Instructions de sécurité
Mode d’emploi Entretien et nettoyage
Dépannage Service à la clientèle
1
2
1
2
3
4
TOURNER POUR SÉLECTIONNER •
APPUYER POUR ENTRER
HORLOGE
AM/P
TOURNER POUR SLECTIONNER
APPUYER POUR ENTRE
DÉPART/PAUSE
Page 60

24
Autres caractéristiques
Affichage MARCHE/ARRÊT
Utilisez cette fonction pour activer ou désactiver
l’affichage de l’horloge.
Appuyez sur OPTIONS et tournez le bouton
de sélection pour choisir « AFFICHAGE
HORLOGE MAR/ARRÊT ». Appuyez sur le
bouton de sélection pour valider.
Tournez le bouton de sélection jusqu’à
« MARCHE » ou « ARRÊT ». Appuyez sur le
bouton de sélection pour valider.
Vitesse de défilement de l’affichage
Vous pouvez modifier la vitesse de défilement de
l’affichage.
Appuyez sur OPTIONS et tournez le bouton
de sélection pour choisir « VITESSE
AFFICHAGE ». Appuyez sur le bouton de
sélection pour valider.
Tournez le bouton de sélection pour régler
de très basse à très élevée. Appuyez sur le
bouton de sélection pour valider.
Veilleuse automatique
La Veilleuse automatique peut-être programmée
pour s’allumer ou s’éteindre à des heures
voulues.
Appuyez sur OPTIONS et tournez le bouton
de sélection pour choisir « VEILLEUSE
AUTOMATIQUE ». Appuyez sur le bouton de
sélection pour valider.
Tournez le bouton de sélection jusqu’à
« RÉGL HEUR ». Appuyez sur le bouton de
sélection pour valider.
Entrez l’heure où la veilleuse s’allumera en
tournant le bouton de sélection pour choisir
l’heure, les minutes et AM ou PM. Appuyez
sur le bouton de sélection après chaque
sélection.
Entrez l’heure où la veilleuse s’éteindra en
tournant le bouton de sélection pour choisir
l’heure, les minutes et AM ou PM. Appuyez
sur le bouton de sélection après chaque
sélection.
REMARQUE : L’indicateur de la veilleuse automatique
s’allumera à chaque fois que celle-ci est programmée.
Pour visualiser les réglages de la veilleuse
automatique, tournez le bouton de sélection
jusqu’à « REVOIR LES RÉGLAGES » après avoir
sélectionné l’option « Veilleuse automatique ».
Appuyez sur le bouton de sélection pour valider.
Pour effacer les réglages de la veilleuse
automatique, tournez le bouton de sélection
jusqu’à « EFFACER LES RÉGLAGES » après avoir
sélectionné l’option « Veilleuse automatique ».
Appuyez sur le bouton de sélection pour valider.
Réglage de la température de cuisson
Utilisez cette fonction pour que le four ajuste
automatiquement la température par tranche de
3, 6, 8, 11 ou 13 °C (5, 10, 15, 20 ou 25 °F).
Appuyez sur OPTIONS et tournez le bouton
de sélection pour choisir « AJUSTEZ TEMP
CUISSON ». Appuyez sur le bouton de
sélection pour valider.
Tournez le bouton de sélection jusqu’à
« AUC CHANG », 3, 6, 8, 11 ou 13 °C (5, 10,
15, 20 ou 25 °F) et appuyez dessus pour
valider.
Volume du signal sonore
Vous pouvez régler le volume du signal sonore.
Appuyez sur OPTIONS et tournez le bouton
de sélection pour choisir « VOLUME DU BIP ».
Appuyez sur le bouton de sélection pour
valider.
Tournez le bouton de sélection pour régler
de muet à fort. Appuyez sur le bouton de
sélection pour valider.
REMARQUE : L’indicateur MUET s’allumera dès que le
volume sera réglé sur muet.
Sélection de conversion automatique
Auto Recipe
MC
pour convection
Lorsque cette fonction est activée, le four
convertira automatiquement les températures de
cuisson entrées en températures de cuisson à
convection. Référez-vous à la Conversion
automatique Auto Recipe
MC
dans la section
Caractéristiques de cuisson et de rôtissage.
Appuyez sur OPTIONS et tournez le bouton
de sélection pour choisir « CUIS CONV »
(cuisson à convection). Appuyez sur le
bouton de sélection pour valider.
Tournez le bouton de slection jusqu’à
« TEMP DE CUISSON A/CONV – MAR/ARRET »
(température de cuisson avec convection marche/arrêt) et appuyez dessus pour valider.
Langue d’affichage
La langue de l’affichage à défilement peut être
réglée sur anglais ou français.
Appuyez sur OPTIONS et tournez le bouton
de sélection pour choisir « LANGUE
AFFICHAGE ». Appuyez sur le bouton de
sélection pour valider.
Tournez le bouton de sélection jusqu’à
« ANGLAIS » ou « FRANÇAIS ». Appuyez sur
le bouton de sélection pour valider.
Service à la clientèle
Dépannage
Entretien et nettoyage
Mode d’emploi Instructions de sécurité
1
2
3
4
1
2
1
2
1
2
1
2
1
2
1
2
TOURNER POUR SÉLECTIONNER •
APPUYER POUR ENTRER
TOURNER POUR SÉLECTIONNER •
APPUYER POUR ENTRER
TOURNER POUR SÉLECTIONNER •
APPUYER POUR ENTRER
TOURNER POUR SÉLECTIONNER •
APPUYER POUR ENTRER
Page 61

Ventilateur d’extraction
Le ventilateur d’extraction évacue la vapeur
d’eau et les autres vapeurs provenant de la
surface de cuisson.
Appuyez une fois sur VENTILATEUR (VENT_EVAC)
pour sélectionner la vitesse élevée, deux fois
pour la vitesse moyenne, trois fois pour la vitesse
basse ou quatre fois pour commander l’arrêt du
ventilateur.
REMARQUE : Le témoin du ventilateur est allumé
lorsque celui-ci fonctionne.
Ventilateur automatique
Un ventilateur automatique protège le four à
micro-ondes contre un excès de chaleur provenant
de la surface de cuisson placée sous le four. Le
ventilateur se met en marche automatiquement s’il
détecte une chaleur excessive.
Il se peut que vous ne puissiez pas arrêter le
ventilateur après l’avoir mis en marche. Le
ventilateur cessera de fonctionner
automatiquement lorsque les composants
internes auront suffisamment refroidi. Le
ventilateur peut continuer à fonctionner
pendant 30 minutes ou plus après que vous ayez
arrêté les commandes de la surface de cuisson et
du four à micro-ondes.
UR
Lampe d’éclairage de la surface de cuisson
Appuyez une fois sur « LAMPE DE SURFACE »
pour la lumière de haute intensité, deux fois
pour la basse intensité ou trois fois pour
commander l’extinction.
SU
CE
Minuterie
La touche Minuterie commande la minuterie.
Vous pouvez l’utiliser à tout moment, même
durant le fonctionnement de l’appareil.
Appuyez sur MINUTERIE.
Tournez le bouton de sélection pour régler
les minutes. Appuyez sur le bouton de
sélection pour valider.
Tournez le bouton de sélection pour régler
les secondes. Appuyez sur le bouton de
sélection pour valider.
Appuyez sur le bouton de sélection ou sur
MINUTERIE pour commencer la cuisson.
Pour annuler, appuyez sur MINUTERIE.
Le four émet un signal sonore à la fin du
décompte. Pour supprimer le signal, appuyez sur
MINUTERIE.
REMARQUE : Le témoin de la MINUTERIE est allumé
durant le décompte.
E
Mesures
Les mesures sont en impérial (anglais) par
défaut. Elles peuvent être affichées en métrique.
Appuyez sur OPTIONS et tournez le bouton
de sélection pour choisir « MESURES ».
Appuyez sur le bouton de sélection pour
valider.
Tournez le bouton de sélection jusqu’à
« PAR DÉFAU » ou « MÉTRIQUE » et appuyez
dessus pour valider.
Message de durée supplémentaire
Une fois la cuisson terminée, un message peut
s’afficher pour vous proposer de cuire les
aliments plus longtemps au même réglage.
Consultez la section Reprendre.
Appuyez sur OPTIONS et tournez le bouton
de sélection pour choisir « MESSAGE +
DURÉE ». Appuyez sur le bouton de sélection
pour valider.
Tournez le bouton de sélection jusqu’à
« MESSAGE MARCHE » ou « MESSAGE ARRÊT »
et appuyez dessus pour valider.
www.electromenagersge.ca
Plateau tournant Marche/Arrêt
Pour obtenir une meilleure cuisson, laissez le
plateau tournant en position de marche. Il peut
être désactivé pour les grand plats.
Appuyez sur PLATEAU TOURNANT
MARCHE/ARRÊT.
Tournez le bouton de sélection jusqu’à
« MARCHE » ou « ARRÊT ». Appuyez sur le
bouton de sélection pour valider.
Le plateau tournant peut parfois devenir trop
chaud au toucher.
Faites attention avant d’y toucher, durant et
après la cuisson.
U
T
25
Instructions de sécurité
Mode d’emploi Entretien et nettoyage
Dépannage Service à la clientèle
1
2
3
4
1
2
1
2
1
2
TOURNER POUR SÉLECTIONNER •
APPUYER POUR ENTRER
RFA
MINUTERI
TOURNER POUR SÉLECTIONNER •
APPUYER POUR ENTRER
PLATEA
TOURNANT
MARCHE/ARRÊ
TOURNER POUR SÉLECTIONNER •
APPUYER POUR ENTRER
VENTILATE
Page 62

26
Entretien et nettoyage du four à micro-ondes
Conseils pratiques
De temps à autre, vous pouvez essuyer l’intérieur du four avec un linge imbibé d’une solution d’eau
et de bicarbonate de soude pour plus de fraîcheur.
Assurez-vous que le four est arrêté avant de le nettoyer.
Nettoyage de l’intérieur du four
Parois verticales, sole, hublot interne, composants métalliques et plastiques de la porte
Certaines éclaboussures peuvent être enlevées avec un essuie-tout, d’autres doivent être essuyées avec
un linge humide. Pour éliminer les taches graisseuses, utilisez un chiffon imbibé d’eau et de savon,
puis rincez avec un chiffon humide. N’utilisez jamais un produit de nettoyage abrasif ou un ustensile
pointu sur les parois du four.
N’utilisez jamais de nettoyant commercial pour four sur une partie quelconque de votre four à micro-ondes.
Plateau tournant et support amovibles
Pour éviter de le briser, ne trempez pas le plateau tournant dans l’eau immédiatement après la
cuisson. Lavez-le avec soin dans de l’eau savonneuse tiède ou au lave-vaisselle. Une chute peut briser
le plateau tournant et son support. N’oubliez pas qu’il ne faut pas utiliser ce four en mode microondes si le plateau tournant et son support ne sont pas en place.
Grilles
Nettoyez-les avec un savon doux et de l’eau ou au lave-vaisselle.
Ne les nettoyez pas dans un four autonettoyant.
Nettoyage des surfaces externes
N’utilisez pas de produits contenant de l’ammoniaque ou de l’alcool pour nettoyer le four à micro-ondes.
L’ammoniaque ou l’alcool peuvent endommager l’apparence de votre four à micro-ondes. Si vous utilisez un
nettoyant ménager courant, appliquez-le d’abord directement sur un chiffon propre, puis essuyez la surface sale.
Dessous
Enlevez régulièrement la graisse et la poussière du dessous du four. Utilisez une solution à base de
détergent et d’eau tiède.
Caisse
Nettoyez les surfaces externes avec un chiffon imbibé d’eau savonneuse. Rincez avec un linge humide
et séchez. Essuyez le hublot avec un chiffon humide.
Tableau de commande et porte
Nettoyez-les avec un chiffon humide. Séchez bien. Ne vaporisez pas de produits nettoyants et
n’utilisez pas une grande quantité d’eau et de savon, ni de produits abrasifs ou d’objets pointus sur le
tableau de commande. Ces produits et articles peuvent l’endommager. Certains essuie-tout en papier
peuvent également rayer le tableau de commande.
Surface de la porte
Il est important que la surface de la porte qui entre en contact avec le four à micro-ondes reste
propre. Utilisez uniquement un détergent doux non abrasif avec une éponge propre ou un chiffon
doux. Rincez bien.
Service à la clientèle Dépannage
Entretien et nettoyage
Mode d’emploi Instructions de sécurité
Page 63

27
Acier inoxydable
N’utilisez pas de tampon en laine d’acier, il raierait
la surface.
Secouez bien la bouteille.
Placez une petite quantité de CERAMA
BRYTE
®
, produit de nettoyage pour les
appareils en acier inoxydable, sur un
chiffon humide ou un essuie-tout humide.
Nettoyez une petite surface (environ
20,3 x 20,3 cm/8 x 8 po), en frottant l’acier
inoxydable dans le sens du grain si
nécessaire.
Séchez et polissez avec un essuie-tout ou un
linge doux, sec et propre.
Répétez au besoin.
REMARQUE : Si vous avez déjà utilisé un nettoyant
à base d’huile minérale pour appareil en acier
inoxydable, lavez la surface avec du détergent à
vaisselle et de l’eau avant d’utiliser le CERAMA
BRYTE
®
, produit de nettoyage pour les appareils
en acier inoxydable. Après avoir lavé la surface à
l’aide de détergent à vaisselle et d’eau, utilisez
une quantité conséquente de CERAMA BRYTE
®
,
produit de nettoyage pour les appareils en acier
inoxydable, pour nettoyer l’appareil.
Pour commander
Pour commander du CERAMA BRYTE®, produit
de nettoyage pour les appareils en acier
inoxydable, veuillez appeler notre numéro sans
frais :
Département des pièces
de rechange 1-800-263-0686
www.electromenagersge.ca
CERAMA BRYTE
®
produit de nettoyage pour les
appareils en acier inoxydable . . . . . . . .N° 40616EF
www.electromenagersge.ca
Remplacement de l’ampoule
Lampe d’éclairage de la surface de
cuisson/veilleuse
Remplacez l’ampoule par une ampoule halogène
120 V, 40 W (max.). Commandez l’ampoule
n° WB08X10051 auprès de votre fournisseur GE.
Pour remplacer l’ampoule de la lampe
d’éclairage de la surface de cuisson/de la
veilleuse, débranchez l’appareil ou
interrompez l’alimentation du circuit au
niveau du tableau de distribution
(disjoncteurs ou fusibles).
Retirez la vis sur le côté du couvercle du
boîtier de l’ampoule et abaissez le couvercle
jusqu’à ce qu’il s’arrête.
Assurez-vous que l’ampoule est froide avant
de la retirer. Cassez le joint adhésif en
dévissant doucement l’ampoule.
Vissez la nouvelle ampoule, poussez le
couvercle vers le haut et remettez la vis en
place. Rétablissez l’alimentation électrique
du four.
Ôtez la vis.
Instructions de sécurité
Mode d’emploi Entretien et nettoyage
Dépannage
Service à la clientèle
1
2
3
4
Page 64

28
Caractéristiques d’extraction
Ventilateur d’extraction
Le ventilateur d’extraction comporte deux filtres
en métal réutilisables.
Pour les modèles avec recyclage d’air, il y a
également un filtre à charbon.
Filtres réutilisables
Les filtres en métal retiennent la graisse émise
par les aliments lors de l’utilisation de la surface
de cuisson. Ces filtres empêchent également les
flammes provenant des aliments cuits sur la
surface de cuisson d’endommager l’intérieur du
four à micro-ondes.
Pour cette raison, il faut toujours que les filtres
soient en place lors de l’utilisation de la hotte
d’extraction. Il faut nettoyer les filtres à graisse
chaque mois, ou lorsque cela devient nécessaire.
Dépose et nettoyage des filtres
Pour retirer les filtres, faites-les glisser vers l’arrière
en utilisant les languettes. Tirez-les vers le bas et
sortez-les.
Faites tremper les filtres pour les nettoyer. Vous
devez ensuite les agiter dans une solution d’eau
chaude et de détergent. N’utilisez pas un produit
contenant de l’ammoniaque, car il noircirait le
métal. On peut effectuer un brossage léger pour
éliminer la saleté incrustée.
Rincez, secouez et laissez sécher les filtres avant
de les réinstaller.
Pour la réinstallation, faites glisser les filtres dans
les châssis par l’arrière. Poussez vers le haut et
vers l’avant pour bloquer le filtre en place.
Filtres réutilisables
(sur tous les modèles).
Filtre à charbon (certains modèles).
Service à la clientèle
Dépannage
Entretien et nettoyage
Mode d’emploi Instructions de sécurité
Page 65

29
www.electromenagersge.ca
Filtre à charbon
Le filtre à charbon ne peut pas être nettoyé. Il doit
être remplacé. Commandez le filtre n° WB02X10943
auprès de votre fournisseur GE.
Si l’appareil n’est pas relié à l’extérieur, l’air est
recyclé à travers un filtre à charbon jetable qui
retient la fumée et les odeurs.
Le filtre à charbon doit être emplacé, lorsqu’il
est visiblement sale ou qu’il a changé de couleur
(après environ 6 à 12 mois, selon la fréquence
d’utilisation du ventilateur).
Dépose du filtre à charbon
Avant de retirer le filtre à charbon, débranchez
l’appareil ou coupez l’alimentation du circuit au
niveau du tableau de distribution (disjoncteurs
ou fusibles). Retirez la grille supérieure en
enlevant les deux vis de fixation.
Vous devrez peut-être ouvrir des portes d’armoire
pour enlever les vis.
Tirez le filtre par le bas jusqu’à ce qu’il se dégage
des languettes. Faites glisser le filtre vers le bas et
retirez-le.
Installation du filtre à charbon
Avant d’installer le nouveau filtre à charbon,
enlevez l’emballage (plastique ou autre) du
nouveau filtre.
Insérez le haut du filtre dans les rainures de
l’ouverture supérieure. Poussez le filtre par le bas
jusqu’à ce qu’il soit en place, derrière les
languettes.
Retirez les deux vis de fixation de la
grille pour enlever celle-ci.
Instructions de sécurité
Mode d’emploi
Entretien et nettoyage
Dépannage
Service à la clientèle
Page 66
30
Conseils de dépannage
Économisez du temps et de l’argent! Consultez le tableau
ci-dessous et celui de la page suivante pour éviter tout appel de
service qui ne serait pas nécessaire.
Problème Causes possibles Solutions
Le four ne fonctionne pas Un fusible de votre résidence peut • Remplacez le fusible ou réenclenchez le disjoncteur.
être grillé ou le disjoncteur peut s’être
déclenché.
Surtension. • Débranchez puis rebranchez le cordon d’alimentation du four.
La fiche est mal branchée dans la • Assurez-vous que la fiche à trois broches est bien insérée dans
prise de courant. la prise de courant.
La porte n’est pas bien fermée. • Ouvrez la porte, puis refermez-la bien.
Le tableau de commande est La porte n’est pas bien fermée. • Ouvrez la porte, puis refermez-la bien.
allumé mais le four ne se
met pas en marche.
Vous n’avez pas appuyé sur le bouton • Appuyez sur DÉPART/PAUSE.
DÉPART/PAUSE après avoir entré votre
sélection de cuisson.
Une autre option a été sélectionnée • Appuyez sur ARRÊT/EFFACER
et vous n’avez pas appuyé sur
ARRÊT/EFFACER pour l’annuler.
Vous n’avez pas entré la durée de • Veillez à entrer la durée de cuisson après avoir appuyé sur
cuisson après avoir appuyé sur CUISSON MINUTÉE.
CUISSON MINUTÉE.
Vous avez appuyé sur ARRÊT/EFFACER • Reprogrammez la cuisson et appuyez sur DÉPART/PAUSE.
par accident.
Vous n’avez pas entré le poids de • Veillez à entrer le poids de l’aliment après avoir sélectionné
l’aliment après avoir sélectionné DÉCONGÉLATION AUTOMATIQUE ou DÉCONGÉLATION RAPIDE.
DÉCONGÉLATION AUTOMATIQUE ou
DÉCONGÉLATION RAPIDE.
Vous n’avez pas entré le type • Veillez à entrer le type d’aliment.
d’aliment après avoir appuyé sur
CUISSON AUTO.
CONTROL VERROUILL La commande a été verrouillée. •Appuyez pendant 3 secondes sur la touche ARRÊT/EFFACER
s’affiche pour déverrouiller les commandes.
FOUR TROP CHAUD POUR Vous avez appuyé sur l’un des • Ces fonctions ne peuvent pas être utilisées lorsque le four est
CUISSON AVEC CAPTEUR --- boutons de cuisson avec capteur, chaud.
« UTILISEZ AUTRE lorsque la température du four Le four passera automatiquement en cuisson minutée (suivez
MÉTHODE » s’ affiche dépassait 93 °C (200 °F). les instructions qui s’affichent) ou, une fois que le four aura
refroidi, les fonctions avec capteur reprendront un
fonctionnement normal.
La sole du four est chaude, La lampe déclairage de la surface de • Cela est normal.
même si le four n’a pas été cuisson est située sous la sole du
utilisé four. Lorsque la lampe est allumée,
la chaleur qu’elle génère chauffe la
sole du four.
Bip inhabituel à tonalité grave Vous avez essayé de changer le niveau • De nombreuses caractéristiques du four sont préréglées et
de puissance, alors que ce n’était pas ne peuvent être changées.
autorisé.
Le four sent la fumée et de la
Des huiles sur les parois en acier • Cela est normal
f
umée grise apparaît après
inoxydable brûlent après avoir utilisé
avoir utilisé la fonction Cuisson
la fonction Cuisson les premières fois.
Avant de contacter un service de dépannage…
Service à la clientèle Dépannage
Entretien et nettoyage
Mode d’emploi
Instructions de sécurité
Page 67

31
Problème Causes possibles Solutions
Le dessus des aliments brunit La grille a été placée en position • Utilisez toujours la grille en position basse.
plus vite que le dessous haute.
La température du four L’élément de cuisson se met en • Cela est normal.
varie pendant la cuisson marche et s’arrête pour maintenir la
température du four au réglage
désiré.
Le ventilateur se met en Le ventilateur d’extraction se met • Cela est normal.
marche automatiquement automatiquement en marche pour
protéger le four à micro-ondes s’il
détecte un excès de chaleur provenant
de la surface de cuisson placée sous
le four.
Pendant la cuisson, le rôtissage ou la • Cela est normal.
cuisson rapide combinée (après
préchauffage), le ventilateur
d’extraction se mettra automatiquement
en marche pour refroidir le four.
« ERREUR CAPTEUR » s’affiche
Lorsque vous utilisez une fonction • N’ouvrez pas la porte tant que la vapeur n’a pas été détectée et
avec capteur, la porte a été ouverte que le décompte n’est pas affiché.
avant que la vapeur ne puisse être
détectée.
La capteur n’a pas détecté la vapeur • Utilisez la Cuisson minutée pour augmenter la durée de cuisson.
en un temps déterminé.
www.electromenagersge.ca
Instructions de sécurité
Mode d’emploi
Entretien et nettoyage
Dépannage
Service à la clientèle
Page 68

32
Avant de contacter un service de dépannage…
Situations courantes pendant la cuisson au four à micro-ondes
■ De la vapeur s’échappe de la porte.
■ Un reflet de lumière autour de la porte ou du
boîtier.
■ Une baisse d’intensité de la lampe du four ou
un changement dans le bruit du ventilateur
lorsque le four fonctionne à un niveau de
puissance autre que le niveau maximum.
■ Un cognement sourd pendant que le four
fonctionne.
■ Vous pouvez observer des interférences
perturbant la réception des ondes de radio et
télévision lorsque le four à micro-ondes
fonctionne. Ces interférences sont semblables
à celles des autres petits électroménagers et
n’indiquent pas un mauvais fonctionnement
de votre four. Branchez-le sur un circuit
électrique différent, éloignez la radio ou la
télévision le plus possible du four ou vérifiez la
position et le signal de l’antenne de réception
de la radio ou de la télévision.
Service à la clientèle
Dépannage
Entretien et nettoyage
Mode d’emploi Instructions de sécurité
Page 69

33
OWNERSHIP REGISTRATION
P.O. BOX 1780
MISSISSAUGA, ONTARIO
L4Y 4G1
(FOR CANADIAN CONSUMERS ONLY POUR RÉSIDENTS CANADIENS SEULEMENT)
Please place in envelope and mail to:
Veuillez mettre dans une enveloppe et envoyez à :
Instructions de sécurité
Mode d’emploi
Entretien et nettoyage
Dépannage
Service à la clientèle
Page 70

34
CUT ALONG THIS LINE AND RETURN CARD – THANKS
DÉCOUPEZ ICI ET ENVOYEZ LA FICHE – MERCI
For Canadian
Customers
Pour les
consommateurs
canadiens
Veuillez enregistrer votre produit afin de nous permettre de
communiquer avec vous si jamais un avis de sécurité concernant
ce produit était émis et de communiquer facilement avec vous en
vertu de votre garantie, si le besoin s’en fait sentir.
Entretien et nettoyage
Mode d’emploi Instructions de sécuritéDépannage
Service à la clientèle
OWNERSHIP REGISTRATION CERTIFICATE – FICHE D’INSCRIPTION DU PROPRIÉTAIRE
Please register your product to enable us to contact you in
the remote event a safety notice is issued for this product
and to allow for efficient communication under the terms of
our warranty, should the need arise.
REGISTER ON-LINE:
ENREGISTREMENT SUR INTERNET À :
MR. / M MRS. / MME.
MISS/MLLE.
STREET NO / NO RUE STREET NAME / RUE
CITY / VILLE
AREA CODE/
DID YOU PURCHASE A SERVICE CONTRACT FOR THIS APPLIANCE?
AVEZ-VOUS ACHETÉ UN CONTRAT DE SERVICE POUR CET APPAREIL ?
NAME OF SELLING DEA LER / NOM DU MARCHAND
INSTALLATI ON DATE / D ATE D’INSTAL LATION
Y/A M D/J
I do not wish to receive any promotional offers regarding this product.
Je ne désire pas recevoir d’offres promotionnelles concernant ce produit
IND. RÉG.
MS.
TELEPHONE
www.geappliances.ca
www.electromenagersge.ca
FIRST NAME / PRÉNOM
CORRESPONDENCE
CORRESPONDANCE
E-MAIL/COURRIEL
ENGLISH
FRANÇAIS
LAST NAME / NOM
YES/OUI
NO/NON
MAIL TO:
POSTEZ À :
MODEL / MODÈLE
SERIAL / SÉRIE
P.O. BOX 1780, MISSISSAUGA
ONTARIO, L4Y 4G1
PROVINCE POSTAL CODE POSTAL
IF YES/SI OUI : EXPIRATION
.
Y/A M
APT.NO/APP./RR#
D/J
Page 71

35
Garantie du four à micro-ondes GE
Instructions de sécurité
Mode d’emploi Entretien et nettoyage
Dépannage
Service à la clientèle
Toutes les réparations sous garantie sont effectuées par nos Centres
de réparation ou par nos réparateurs Customer Care® autorisés.
Pour appeler le service de réparation, composez le 1-800-361-3400.
Pour la période de : Camco remplacera :
Deux ans
Toute pièce du four à micro-ondes qui se révèle défectueuse en raison d’un vice de matières ou de
À compter de la date
fabrication. Au cours de cette garantie complète de deux ans, Camco fournira également, sans frais,
d’achat d’origine toutes les pièces et la main-d’œuvre pour la réparation, ou pour remplacer la pièce défectueuse.
GARANTIE LIMITÉE Le magnétron, s’il se révèle défectueux en raison d’un vice de matières ou de fabrication. Au
SUPPLÉMENTAIRE cours de cette garantie limitée supplémentaire de trois ans, vous devrez assumer les frais de main-
DE TROIS ANS d’œuvre ou de réparation à domicile.
■ Toute visite à votre domicile pour vous expliquer le
fonctionnement de l’appareil.
■ Une installation inadéquate.
■ Toute défectuosité du produit lorsqu’il a été utilisé de
façon abusive ou inadéquate, ou employé à toute autre
fin que celle pour laquelle il a été conçu, ou utilisé à des
fins commerciales.
■ Le remplacement des fusibles ou le réenclenchement des
disjoncteurs du panneau de distribution de votre
résidence.
■ Tout dommage au produit attribuable à un accident, un
incendie, une inondation ou un cas de force majeure.
■ Tout dommage direct ou indirect causé à vos biens
personnels par une défectuosité possible de cet appareil.
■ Tout dommage causé après la livraison.
Veuillez lire votre Guide d’utilisation.
Pour toute question concernant le fonctionnement de
l’appareil, communiquez avec votre détaillant ou notre
bureau des Relations avec les consommateurs à l’adresse
indiquée ci-dessous, ou appelez sans frais :
Camco Inc.
1-800-361-3400
Service des renseignements aux consommateurs
Ce que Camco ne couvre pas :
Cette garantie est offerte à l’acheteur initial, ainsi qu’à tout propriétaire subséquent d’un produit acheté en vue d’une
utilisation domestique au Canada.
Dans certaines provinces, il est interdit d’exclure ou de limiter les dommages directs ou indirects. Il est alors possible que
les limitations ou exclusions ci-dessus ne s’appliquent pas dans votre cas. La présente garantie vous confère des droits
juridiques spécifiques. Vous pouvez bénéficier d’autres droits, qui varient d’une province à l’autre. Pour connaître les
droits dont vous bénéficiez dans votre province, communiquez avec le bureau des Relations avec les consommateurs de
votre région ou de votre province.
Garant : Camco Inc.
Si vous avez des questions concernant la présente garantie, écrivez au :
Directeur, Relations avec les consommateurs - Camco Inc.
1, Factory Lane, bureau 310, Moncton (N.-B.) E1C 9M3
Agrafez votre facture ici.
Une preuve de la date d’achat
d’origine est requise pour
obtenir le service sous garantie.
Pour chacune des garanties ci-dessus : Pour éviter les frais de déplacement, apportez le four micro-ondes à un centre de
réparation Camco. Les frais de déplacement du technicien seront facturés pour le dépannage à domicile.
Page 72

Imprimé en Corée
Numéros de téléphone du service après-vente
Pour tout problème 1-800-361-3400
Pour obtenir des réponses, appelez Camco Inc.
Service de réparation à domicile 1-800-361-3400
Pour bénéficier du service de réparation expert de Camco, il suffit de téléphoner.
Contrats d’entretien 1-800-461-3636
Vous pouvez désormais bénéficier d’un service de réparation sans surprises ni tracas tant que vous
possédez votre appareil. Pendant que votre garantie est encore en vigueur, vous pouvez acheter un
CONTRAT D’ENTRETIEN DE CAMCO. Pour un coût modique, seulement quelques sous par jour,
le Service après-vente de Camco s’occupera des réparations – pièces et main-d’œuvre – dont votre
appareil peut avoir besoin.
Pièces et accessoires 1-800-263-0686
Les personnes ayant les compétences requises pour réparer elles-mêmes leurs appareils peuvent
recevoir directement à la maison des pièces ou accessoires.
Les directives stipulées dans le présent manuel comportent des procédures que n’importe quel utilisateur
peut effectuer. Les autres types de réparation doivent généralement être confiés à un technicien qualifié. Il
faut faire preuve de prudence, puisqu’une réparation inadéquate peut affecter le fonctionnement
sécuritaire de l’appareil.
Satisfaction du service après-vente
Si vous n’êtes pas satisfait du service après-vente dont vous avez bénéficié de Camco, voici la marche
à suivre. Premièrement, communiquez avec les gens qui ont réparé votre appareil. Ensuite, si vous
n’êtes toujours pas satisfait, écrivez en donnant tous les détails, y compris votre numéro de
téléphone, au :
Directeur, Relations avec les consommateurs,
Camco Inc.,
1, Factory Lane, Bureau 310,
Moncton (N.-B.) E1C 9M3
Entretien et nettoyage
Mode d’emploi
Instructions de sécuritéDépannageService à la clientèle
 Loading...