

General Electric Invenia ABUS Viewer Basic Service Manual_SM_4700-0049-00_3 ActiveCare+S.F.T. and ActiveCare+DTx Operation and Service Manual

Technical Publication
Invenia™ ABUS Viewer
System Setup and Basic Service Manual
Direction 4700-0049-00
Rev. 3
All Material Copyright © 2018, 2019 by General Electric Company Inc.
All Rights Reserved.


Revision history
Revision History
Date
Revision
Rev. 1 2018/07/24 Initial Release
Rev. 2 2018/07/25 Added reviewer comments
Rev. 3 2019/05/08 Incorporated updates from SN75200
(YYYY/MM/DD)
List of Effected Pages (LOEP)
Chapters Revision Chapters Revision
Front Rev. 3 Chapter 4 Rev. 3
Front matter Rev. 3 Chapter 5 Rev. 3
Table of Contents Rev. 3 Chapter 6 Rev. 3
Chapter 1 Rev. 3 Chapter 7 Rev. 3
Chapter 2 Rev. 3 Chapter 8 Rev. 3
Reason for change
Chapter 3 Rev. 3 Rear Cover Rev. 3
Please verify that you are using the latest revision of this document. Information
pertaining to this document is maintained on MyW orkshop /ePDM (GE electronic Product
Data Management). If you need to know the latest re vision, contact your distributor , local
GE Sales Representative or in the USA call the GE Ultrasound Clinical Answer Center at
1 800 682 5327 or 1 262 524 5698.
Invenia ABUS Viewer – System Setup and Basic Service Manual i-1
Direction 4700-0049-00 Rev. 3

Important Precautions
Translation policy
i-2 Invenia ABUS Viewer – System Setup and Basic Service Manual
Direction 4700-0049-00
Rev. 3

Invenia ABUS Viewer – System Setup and Basic Service Manual i-3
Direction 4700-0049-00 Rev. 3

i-4 Invenia ABUS Viewer – System Setup and Basic Service Manual
Direction 4700-0049-00
Rev. 3

Invenia ABUS Viewer – System Setup and Basic Service Manual i-5
Direction 4700-0049-00 Rev. 3

i-6 Invenia ABUS Viewer – System Setup and Basic Service Manual
Direction 4700-0049-00
Rev. 3

Invenia ABUS Viewer – System Setup and Basic Service Manual i-7
Direction 4700-0049-00 Rev. 3

i-8 Invenia ABUS Viewer – System Setup and Basic Service Manual
Direction 4700-0049-00
Rev. 3

Invenia ABUS Viewer – System Setup and Basic Service Manual i-9
Direction 4700-0049-00 Rev. 3

i-10 Invenia ABUS Viewer – System Setup and Basic Service Manual
Direction 4700-0049-00
Rev. 3

Invenia ABUS Viewer – System Setup and Basic Service Manual i-11
Direction 4700-0049-00 Rev. 3

i-12 Invenia ABUS Viewer – System Setup and Basic Service Manual
Direction 4700-0049-00
Rev. 3

Invenia ABUS Viewer – System Setup and Basic Service Manual i-13
Direction 4700-0049-00 Rev. 3

i-14 Invenia ABUS Viewer – System Setup and Basic Service Manual
Direction 4700-0049-00
Rev. 3

Damage in transportation
All packages should be closely examined at time of delivery. If
damage is apparent, write “Damage In Shipment” on ALL copies
of the freight or express bill BEFORE delivery is accepted or
“signed for” by a GE representative or hospital receiving agent.
Whether noted or concealed, damage MUST be reported to the
carrier immediately upon discovery, or in any event, within 14
days after receipt, and the contents and containers held for
inspection by the carrier. A transport ation company will not pay a
claim for damage if an inspection is not requested within this 14
day period.
Certified electrical contractor statement - For USA Only
All electrical Installations that are preliminary to positioning of
the equipment at the site prepared for the equipment shall be
performed by licensed electrical contractors. Other connections
between pieces of electrical equipment, calibrations and testing
shall be performed by qualified GE personnel. In per for m ing all
electrical work on these products, GE will use its own specially
trained field engineers. All of GE’s electrical work on these
products will comply with the requirements of the applicable
electrical codes.
The purchaser of GE equipment shall only utilize qualified
personnel (i.e., GE’s field engineers, personnel of third-party
service companies with equivalent training, or licensed
electricians) to perform electrical servicing on the equipment.
Invenia ABUS Viewer – System Setup and Basic Service Manual i-15
Direction 4700-0049-00 Rev. 3

Omission and errors
If there are any omissions, errors or suggest ion s for imp ro vin g
this documentation, contact the GE Global Documentation
Group with specific information listing the system typ e, man ua l
title, part number, revision number, page number and
suggestion details.
Mail the
information to:
Service Documentation
GE Medical Systems Ultrasound and Primary Care Diagnostics,
LLC
9900 Innovation Drive (RP-2156)Wauwatosa, WI 53226 USA
GE employees should use Post-market Qu a lity Ma na gem e nt
(PQM) to report service documentation issues.
These issues will then be in the internal problem reporting tool
and communicated to the writer.
i-16 Invenia ABUS Viewer – System Setup and Basic Service Manual
Direction 4700-0049-00
Rev. 3

Legal notes
Proprietary to GE
The contents of this publication may not be copied or duplicated
in any form, in whole or in part, without prior written permission
of GE.
GE may revise this publication from time to time without written
notice.
Permission to use Advanced Service Software and related
documentation (herein called the material) by pers ons other
than GE employees is provided only under an Advanced
Service Package License relating specifically to such
Proprietary Material. This is a different agreement from the one
under which operating and basic service software is licensed. A
license to use operating or basic service software does not
extend to or cover such software or related docu mentation.
If you are a GE employee or a customer who has entered into
such a license agreement with GE to use proprietary software,
you are authorized to use the Material according to the
conditions stated in your license agreement.
However, you do not have the permission of GE to alter,
decompose or reverse-assemble the software, and unle ss you
are a GE employee, you may not copy the Material. The
Material is protected by Copyright and Trade Secret laws; the
violation of which can result in civil damages and criminal
prosecution.
If you are not party to such a license agreement or a GE
Employee, you must exit this Material now.
Trademarks
All products and their name brands are trademarks of their
respective holders.
Copyrights
All Material Copyright © 2018, 2019 by
General Electric Company Inc. All Rights Reserved.
Invenia ABUS Viewer – System Setup and Basic Service Manual i-17
Direction 4700-0049-00 Rev. 3

i-18 Invenia ABUS Viewer – System Setup and Basic Service Manual
Direction 4700-0049-00
Rev. 3

Table of Contents
Translation policy - - - - - - - - - - - - - - - - - - - - - - - - - - - - - - - - - - - - - - - - i-2
Damage in transportation - - - - - - - - - - - - - - - - - - - - - - - - - - - - - - - - - i-15
Certified electrical contractor statement - For USA Only - - - - - - - - - - - - i-15
Omission and errors - - - - - - - - - - - - - - - - - - - - - - - - - - - - - - - - - - - - - i-16
Legal notes - - - - - - - - - - - - - - - - - - - - - - - - - - - - - - - - - - - - - - - - - - - i-17
Proprietary to GE - - - - - - - - - - - - - - - - - - - - - - - - - - - - - - - - - - - - - - - i-17
Trademarks - - - - - - - - - - - - - - - - - - - - - - - - - - - - - - - - - - - - - - - - - - - i-17
Copyrights - - - - - - - - - - - - - - - - - - - - - - - - - - - - - - - - - - - - - - - - - - - - i-17
Table of Contents
Chapter 1 — Invenia ABUS Viewer Introduction
Service Manual Overview
Content in this Manual - - - - - - - - - - - - - - - - - - - - - - - - - - - - - - - - - - - 1-2
Typical users of the Service Manual - - - - - - - - - - - - - - - - - - - - - - - - - - 1-4
Invenia ABUS models covered by this manual- - - - - - - - - - - - - - - - - - - 1-4
Invenia ABUS Viewer - - - - - - - - - - - - - - - - - - - - - - - - - - - - - - - - - - - - 1-5
Network Dataflow Configuration - - - - - - - - - - - - - - - - - - - - - - - - - - - - - 1-6
Data Storage and Archive - - - - - - - - - - - - - - - - - - - - - - - - - - - - - - - - - 1-7
Label Locations - - - - - - - - - - - - - - - - - - - - - - - - - - - - - - - - - - - - - - - - 1-8
Invenia ABUS Viewer Software Commercial Strategy- - - - - - - - - - - - - - 1-9
Chapter 2 — Site Preparation/Pre-Installation Requirements
Installation
Installation Checklist - - - - - - - - - - - - - - - - - - - - - - - - - - - - - - - - - - - - - 2-2
Import Patient Exams into the Workstation - - - - - - - - - - - - - - - - - - - - - 2-4
Workstation PC Requirements - - - - - - - - - - - - - - - - - - - - - - - - - - - - - - 2-5
Workstation PC Hardware Compatibility
Workstation Hardware Compatibility Check- - - - - - - - - - - - - - - - - - - - - 2-8
System Requirements Check Report
Examples- - - - - - - - - - - - - - - - - - - - - - - - - - - - - - - - - - - - - - - - - - - - 2-11
Setting up the Workstation PC (Optional)
Workstation PC Setup- - - - - - - - - - - - - - - - - - - - - - - - - - - - - - - - - - - 2-12
Requirements for the Installer
Windows Operating System Administrator Rights - - - - - - - - - - - - - - - 2-16
Antivirus
Antivirus Software- - - - - - - - - - - - - - - - - - - - - - - - - - - - - - - - - - - - - - 2-17
Antivirus Exclusion List for the Invenia ABUS Viewer - - - - - - - - - - - - 2-18
Customer Assistance
Contact Information- - - - - - - - - - - - - - - - - - - - - - - - - - - - - - - - - - - - - 2-19
Invenia ABUS Viewer – System Setup and Basic Service Manual i-19
Direction 4700-0049-00 Rev. 3

Chapter 3 — Invenia ABUS Viewer Software Installation
Preparing for Installation
Overview - - - - - - - - - - - - - - - - - - - - - - - - - - - - - - - - - - - - - - - - - - - - - 3-2
Invenia ABUS Viewer Delivery Package Contents - - - - - - - - - - - - - - - - 3-2
Invenia ABUS Viewer Software Installation Procedure
Before installing software: - - - - - - - - - - - - - - - - - - - - - - - - - - - - - - - - - 3-4
Invenia ABUS Viewer Software Load Procedure - - - - - - - - - - - - - - - - - 3-5
Invenia ABUS Viewer Upgrade Required Pre-Steps- - - - - - - - - - - - - - - 3-6
Invenia ABUS Viewer Software Installation (New Software Installation) 3-14
Creating a GEService Windows User - - - - - - - - - - - - - - - - - - - - - - - - 3-21
License Request Process - - - - - - - - - - - - - - - - - - - - - - - - - - - - - - - - 3-24
License Check - - - - - - - - - - - - - - - - - - - - - - - - - - - - - - - - - - - - - - - - 3-25
License Update Process - - - - - - - - - - - - - - - - - - - - - - - - - - - - - - - - - 3-26
Chapter 4 — Configuring Invenia ABUS Viewer Service Parameters
Service Parameters
Date and Time Setup - - - - - - - - - - - - - - - - - - - - - - - - - - - - - - - - - - - - 4-2
Local Network Setup - - - - - - - - - - - - - - - - - - - - - - - - - - - - - - - - - - - - 4-4
Invenia ABUS Viewer Application in a Multi-monitor review environment 4-7
Admin Account - - - - - - - - - - - - - - - - - - - - - - - - - - - - - - - - - - - - - - - - 4-9
Institution Name Setup - - - - - - - - - - - - - - - - - - - - - - - - - - - - - - - - - - 4-10
Invenia ABUS Viewer AE Title and Port Number Network- - - - - - - - - - 4-11
Invenia ABUS Viewer Image Folder - - - - - - - - - - - - - - - - - - - - - - - - - 4-12
Invenia ABUS Viewer Software DICOM Configuration (Outputs) - - - - - 4-17
ABUS Viewer Software DICOM Configuration (Output Mapping)- - - - - 4-18
Sample DICOM Configuration (Outputs and Output Maps) - - - - - - - - - 4-19
Invenia ABUS Viewer Common Workflow Configurations - - - - - - - - - - 4-23
Invenia ABUS 2.0 Workflows - - - - - - - - - - - - - - - - - - - - - - - - - - - - - - 4-27
Minimum Free Space (Auto-Delete) - - - - - - - - - - - - - - - - - - - - - - - - - 4-34
InSite Agent Configuration- - - - - - - - - - - - - - - - - - - - - - - - - - - - - - - - 4-36
Functional Checks - - - - - - - - - - - - - - - - - - - - - - - - - - - - - - - - - - - - - 4-38
Chapter 5 — Configuring Invenia ABUS Viewer Application
Parameters
Customizing the Invenia ABUS Viewer
Overview - - - - - - - - - - - - - - - - - - - - - - - - - - - - - - - - - - - - - - - - - - - - - 5-2
System Configuration Hanging Protocol - - - - - - - - - - - - - - - - - - - - - - - 5-3
System Configuration Viewing Protocol - - - - - - - - - - - - - - - - - - - - - - - 5-4
System Configuration Worksheet - - - - - - - - - - - - - - - - - - - - - - - - - - - 5-5
System Configuration Setup - - - - - - - - - - - - - - - - - - - - - - - - - - - - - - - 5-8
System Configuration DICOM - - - - - - - - - - - - - - - - - - - - - - - - - - - - - 5-10
System Configuration Export - - - - - - - - - - - - - - - - - - - - - - - - - - - - - - 5-11
System Configuration Print - - - - - - - - - - - - - - - - - - - - - - - - - - - - - - - 5-12
System Configuration Service - - - - - - - - - - - - - - - - - - - - - - - - - - - - - 5-13
System Configuration About - - - - - - - - - - - - - - - - - - - - - - - - - - - - - - 5-14
Chapter 6 — Service Desktop
Common Service Desktop (CSD)
Introduction - - - - - - - - - - - - - - - - - - - - - - - - - - - - - - - - - - - - - - - - - - - 6-2
Service Desktop — Class A- - - - - - - - - - - - - - - - - - - - - - - - - - - - - - - - 6-3
i-20 Invenia ABUS Viewer – System Setup and Basic Service Manual
Direction 4700-0049-00
Rev. 3

System Information- - - - - - - - - - - - - - - - - - - - - - - - - - - - - - - - - - - - - - 6-4
Accessing the Service Desktop - - - - - - - - - - - - - - - - - - - - - - - - - - - - - 6-6
Chapter 7 — InSite and Remote Connectivity
InSite
Overview - - - - - - - - - - - - - - - - - - - - - - - - - - - - - - - - - - - - - - - - - - - - - 7-2
InSite Setup - - - - - - - - - - - - - - - - - - - - - - - - - - - - - - - - - - - - - - - - - - - 7-2
Chapter 8 — Troubleshooting
Troubleshooting Issues
Resetting the Invenia ABUS Viewer System Configuration File - - - - - - - 8-2
Images not sending to PACS - - - - - - - - - - - - - - - - - - - - - - - - - - - - - - - 8-4
Invenia ABUS Viewer – System Setup and Basic Service Manual i-21
Direction 4700-0049-00 Rev. 3

i-22 Invenia ABUS Viewer – System Setup and Basic Service Manual
Direction 4700-0049-00
Rev. 3

Chapter 1
Invenia ABUS Viewer
Introduction
The Invenia ABUS Viewer is the updated version of the
Invenia ABUS Review Software. The Invenia ABUS
Viewer is backwards compatible and can be used to
display images from any prior Invenia ABUS system.
Invenia ABUS Viewer – System Setup and Basic Service Manual 1-1
Direction 4700-0049-00 Rev. 3

Invenia ABUS Viewer Introduction
Service Manual Overview
Content in this Manual
This manual provides installation and service in formation fo r the
Invenia ABUS Viewer (Invenia ABUS Workstation Review
Software).
The manual is divided into eight chapters.
In the beginning of the manual, before Chapter 1, you will find
the Revision overview, the Important Precautions including the
T ranslation Policy, Dama ge in T ransportation, Certified Electrical
Contractor Statement, Omissions and Errors, Service Safety
Considerations and Legal Notes, and the Table of Contents.
NOTE: This document covers only service documentation related to the
Invenia ABUS Viewer software application. For service
documentation for the Invenia ABUS 2.0 please refer to the
Invenia ABUS 2.0 Proprietary Service Manual.
1-2 Invenia ABUS Viewer – System Setup and Basic Service Manual
Direction 4700-0049-00
Rev. 3

Service Manual Overview
Content in this Manual (continued)
Table 1-1: Manual Content
Chapter
number Chapter title Description
1. Introduction Contains a content summary and warnings.
2. Invenia ABUS Viewer Site
Preparation/Pre-Installation
3. Invenia ABUS Viewer Software
Installation
4. Configuring Invenia ABUS Viewer
Service Parameters
5. Configuring Invenia ABUS Viewer
Application Parameters
6. Service Desktop Information on the Service Desktop setup.
7. InSite Covers setup and use for InSite, the GE service that
8. Troubleshooting Contains updates to settings, configurations or
Contains pre-setup requirements for the Invenia ABUS
Viewer.
Contains setup procedure with procedure checklist.
Contains basic setup procedures that the service
engineer should perform during the installation of the
Invenia ABUS Viewer software product.
Contains setup procedures for customer-specific areas
of the Invenia ABUS Viewer software product.
provides customer ability to connect to a GE Service
Engineer.
procedures to facilitate implementing solutions.
Invenia ABUS Viewer – System Setup and Basic Service Manual 1-3
Direction 4700-0049-00 Rev. 3

Invenia ABUS Viewer Introduction
Typical users of the Service Manual
• System administrators
• Licensed Hospital’s Service Providers
Invenia ABUS models covered by this manual
Model Numbers and System Catalog Numbers
Table 1-2: Model and Catalog numbers
Description CAT# Console Number
Invenia ABUS Viewer H5098SW N/A YES
Workstation PC H5098HW N/A NO
NOTE: These are the basic catalog numbers. There are functional
catalog numbers that combine different configurations. Consult
your Marketing teams for more information.
GIB INSTAL LATION
REQUIRED
1-4 Invenia ABUS Viewer – System Setup and Basic Service Manual
Direction 4700-0049-00
Rev. 3

Invenia ABUS Viewer
The Invenia ABUS Viewer software will typically be installed at a
Workstation PC located in a mammography reading room
environment, normally with low ambient light levels next to a
mammography reading station and a DICOM workstation. The
Workstation PC is designed to accept, transfer, display, store
and process medical images and data. The Workstation PC
enables the user to optimize, measure and annotate the images.
The Invenia ABUS Viewer provides images to enable
Physicians to differentiate normal and abnormal breast tissue.
The Invenia ABUS Viewer is intended for use by Health Care
Professionals only.
The Invenia ABUS Viewer software displays three-dimensional
data sets for viewing in three orthogonal planes and standard
ultrasound images, permitting Interpreting Physicians to quickly
review, locate, and mark regions of interest. The Workstation
includes the following components:
1. Workstation PC Tower with minimal hardwar e requirements
2. Monitor
3. Keyboard
4. Mouse
Service Manual Overview
NOTE: The Invenia ABUS Viewer software does not require planned
maintenance.
For hardware specific maintenance requirements, check
Workstation OEM manuals.
Invenia ABUS Viewer – System Setup and Basic Service Manual 1-5
Direction 4700-0049-00 Rev. 3

Invenia ABUS Viewer Introduction
Network Dataflow Configuration
Exam studies are sent from the Invenia ABUS 2.0 (scan station)
to the Invenia ABUS Viewer and sent either directly or indirectly
(via PACS/Enterprise Archive) to be reviewed by the Interpreting
Physician before they are archived.
Basic Image Dataflow Samples
NOTE: Customer backs up the ABUS 3D, Reports, Captured Images,
and ABUS SR Objects on the USB/NAS drive.
NOTE: Chapter 4 covers complex dataflows, Invenia ABUS Viewer
DICOM Setup. Chapter 9 covers Troubleshooting.
1-6 Invenia ABUS Viewer – System Setup and Basic Service Manual
Direction 4700-0049-00
Rev. 3

Data Storage and Archive
The workstation that the Invenia ABUS Viewer operates on, is
intended to provide temporary storage. A Workst ation PC with 1
TB disk space will hold approximately 200 patient studies. The
Invenia ABUS Viewer can be configured to maintain 10, 20, 30,
40, or 50 percent of the available disk space free to ensure good
workstation performance.
If free space reaches a percentage under the configured limit
specified by the user, old reviewed studies are then deleted
(oldest first) overnight or when the workstation is powered up
the next time. Transfers from the Invenia ABUS Viewer are
rejected by the Workstation PC if free disk space falls below 5%.
Suspended or un-reviewed studies are never automatically
deleted in this manner. Deleted studies can only be r e-displayed
if the whole study was stored to PACS or external storage, and
re-imported.
NOTE: Chapter 4 covers the auto-delete functionality . Chapter 9 covers
troubleshooting.
Service Manual Overview
Invenia ABUS Viewer – System Setup and Basic Service Manual 1-7
Direction 4700-0049-00 Rev. 3

Invenia ABUS Viewer Introduction
Label Locations
NOTE: It is important to refer to the current revision of the Invenia ABUS
Viewer Basic User Manual for a full list of product labels prior to
servicing the system.
The Invenia ABUS Viewer software DVD ships with a GE
CARES label.
Figure 1-1. Invenia ABUS Viewer Software and GE CARES
Label Package Sample
Qualified personnel should apply the Invenia ABUS Viewer
Software System ID (GE CARES label) on the Workstation PC
Tower. The following figure shows the recommended location to
install the GE CARES label on a HP Z440 Workstation PC.
Figure 1-2. Label Installation on HP Z440 Workstation PC
1-8 Invenia ABUS Viewer – System Setup and Basic Service Manual
Direction 4700-0049-00
Rev. 3

Service Manual Overview
Invenia ABUS Viewer Software Commercial Strategy
The customer may purchase the Invenia ABUS Viewer software
as follows:
This process describes installing the following items on the
computer system:
Option 1. Invenia ABUS Viewer Software Only
Option 2. Invenia ABUS Viewer Software and Workstation PC
NOTE: Both options require qualified personnel to load the Invenia
ABUS Viewer software and apply the Invenia ABUS Viewer
license during installation.
Figure 1-3. Invenia ABUS Viewer Commercial Strategy
Option 1. Invenia ABUS Viewer Software Only Installation
Overview
The field engineer will load the Invenia ABUS Viewer Software
to a customer-owned Workstation PC (minimum hardware
requirements must be met). The field engineer will also
configure the Invenia ABUS Viewer DICOM network settings
(per site survey), and complete the Invenia ABUS Viewer
license procedure. The GE CARES sticker should be applied to
the Workstation PC Tower and the Invenia ABUS Viewer
software should be stored at the customer site.
NOTE: The Invenia ABUS Viewer software is a medical device.
Customers should store the disk or USB drive at a safe location.
Invenia ABUS Viewer – System Setup and Basic Service Manual 1-9
Direction 4700-0049-00 Rev. 3

Invenia ABUS Viewer Introduction
Invenia ABUS Viewer So ftware Commercial Strategy (continued)
Option 2. Invenia ABUS Viewer Software and Workstation
PC Installation Overview
The field engineer will unpack and set up the Workstation PC
Tower, Monitor, Mouse and Keyboard. The field engineer will
then load the Invenia ABUS Viewer software, configure the
Invenia ABUS software DICOM network settings (per site
survey), and complete the Invenia ABUS Viewer license
procedure. The GE CARES sticker should be applied to the
Workstation PC Tower and the Invenia ABUS Viewer software
should be stored at the customer site.
1-10 Invenia ABUS Viewer – System Setup and Basic Service Manual
Direction 4700-0049-00
Rev. 3

Chapter 2
Site Preparation/
Pre-Installation
Requirements
This chapter covers topics and tasks in preparation for
installation.
Invenia ABUS Viewer – System Setup and Basic Service Manual 2-1
Direction 4700-0049-00 Rev. 3

Site Preparation/Pre-Installation Requirements
Installation Checklist
Please follow this checklist when setting up the Invenia ABUS
Viewer:
Table 2-1: Installation Checklist
Step Page
Installation
1. Pre-installation preparation steps:
a. Site survey with all defined Dataflows and all DICOM services
destinations (IP Address, AE Title, Port Number).
b. Workstation PC(s) have minimum hardware configuration,
c. Customer IT and PACs administrators available at the time of
install
2. Workstation PC Basic setup (if needed):
a. Plug in, power on, and boot up the Workstation
b. Apply the system ID sticker to the Workstation PC tower
c. Check/Configure the Workstation PC local date and time.
d. Check/Configure the local area network (LAN) addresses.
IF UPGRADING, ensure patient data is properly backed up, and manually back up
user and system configuration settings. Perform the backup found on the page
listed here.
3. Invenia ABUS Viewer Software Installation:
a. Perform the software installation procedure
b. Perform the HASP license .C2V file procedure - see Chapter 3
c. Install V2Cfile (received from GE after request) to enable HASP
license procedure - See Chapter 3 step 4. This step may not be
completable at the immediate time of Viewer installation, as it
requires interaction with GE then a response. Therefore this action
must be noted for future action.
d. Verify the license is set to “perpetual”.
4. Invenia ABUS Viewer configuration setup:
a. Configure the Invenia ABUS Viewer AE Title and Port Number
b. Configure the Image Data folder (required for Seno Iris integration)
c. Configure DICOM services and destinations (per Customer
Request or Site Survey)
d. Configure the DICOM Output Mapping (per Customer Request or
Site Survey)
e. Configure InSite Agent Configuration on Service Desktop
‘Site Preparation/
Pre-Installation
Requirements’ on
page 2-1
‘Setting up the
Workstation PC
(Optional)’ on
page 2-12
‘Import Patient
Exams into the
Workstation’ on
page 2-4
‘Invenia ABUS
Viewer Software
Installation’ on
page 3-1
‘Invenia ABUS
Viewer AE Title and
Port Number
Network’ on
page 4-11
2-2 Invenia ABUS Viewer – System Setup and Basic Service Manual
Direction 4700-0049-00
Rev. 3

Table 2-1: Installation Checklist (Continued)
Step Page
Installation
5. Invenia ABUS Viewer testing:
Perform a complete validation of customer’s dataflow. For example:
a. Start a new test exam on the Invenia ABUS 2.0 (using a Worklist
and Manual Mode)
b. Perform a test scan of the six (6) sets of images (LAP, RAP, LMED,
etc.)
c. Transfer test study to destination device (per Customer Request or
Site Survey)
d. Note the transfer time (address any problems with long transfer
time with site IT admin)Verify test study on Invenia ABUS Viewer
(verify all images arrived)
e. Review test study (add markers, calipers and secondary captures)
f. Sign report (studies will transfer per Auto-export configuration)
g. Verify test study status changed from NEW to REVIEWED on all
workstations. (see Export tab in DICOM config and check the SR
box for each workstation)
h. Verify test study arrived at all appropriate destinations (PACS,
NAS, etc.)
i. Verify PACS viewers can open and view Screen captures and
report (worksheet)
j. Verify Query/Retrieve (if applicable - per Site Survey)
k. Verify Pre-fetching works (if applicable - per Site Survey)
6. Back up configuration of both Invenia ABUS 2.0 and Invenia ABUS
Viewer to a USB portable drive.
7. T est InSite connections by logging into both the Invenia ABUS 2.0 and all
workstations.
8. If the site has multiple workstations, you will need to test all the
workstations for the ability to push a study to each workstation.
Invenia ABUS Viewer
Basic User Manual
Invenia ABUS Viewer
Basic User Manual
Invenia ABUS Viewer
Basic User Manual
Invenia ABUS Viewer
Basic User Manual
9. Setup configuration for the workstation, Worklist server, PACS server , and
MPPS server (if applicable). Confirm / Set the AE Title.
Invenia ABUS Viewer
Basic User Manual
Invenia ABUS Viewer – System Setup and Basic Service Manual 2-3
Direction 4700-0049-00 Rev. 3

Site Preparation/Pre-Installation Requirements
Import Patient Exams into the Workstation
1. At the Invenia ABUS Workstation, connect the USB drive.
Wait for it to be detected.
2. Run the Invenia ABUS Workstation application and login
with your service account.
3. Click the Study Browser button .
4. In the top right corner of the Study Browser screen click
From then click on the Browse button.
5. Browse to the USB drive then click OK. If the patient exam
folders are in a particular folder then select that folder
otherwise just select the USB drive itself.
6. A list of patient exams identified on the USB drive will be
displayed. The list may take a few seconds to display.
7. Click the check boxes of the patient exams to be imported.
Figure 2-1. Patient exams to transfer
8. Click the Import button. A progress bar will show the import
progress and completion.
9. Once the import has completed delete the patient exam
folder(s) on the USB drive.
WARNING
The patient exam data copied to the USB drive in this
procedure must not leave the site in compliance with HIPAA.
Ensure that the copied folders are deleted from the USB drive
before leaving the facility.
10. Remove the USB drive from the Workstation.
2-4 Invenia ABUS Viewer – System Setup and Basic Service Manual
Direction 4700-0049-00
Rev. 3

Workstation PC Requirements
Requirements
The Invenia ABUS Viewer must be installed on a PC
Workstation that support s hi gh resolution g raphics and provides
10 GB for the application and sufficient storage to support the
user's exam volume.
For the latest information on the Invenia Viewer
requirements:
Installation
Figure 2-2. GE Support Documentation Library
Invenia ABUS Viewer – System Setup and Basic Service Manual 2-5
Direction 4700-0049-00 Rev. 3

Site Preparation/Pre-Installation Requirements
Requirements (continued)
1. Go to this link in a web browser:
https://www.gehealthcare.com/en/support/
support-documentation-library
2. From the Support Documentation Library page, select to
"Enter Customer Documentation Portal."
3. Select the following Search Criteria: Modality (Ultrasound),
Product (Invenia ABUS), Manual Type (User and Operator
Manual), Language [select preferred language], an d Current
Revisions (Current Revisions), then press Search.
4. Select and download the Basic User Manual by pressing the
Actions' Download icon.
2-6 Invenia ABUS Viewer – System Setup and Basic Service Manual
Direction 4700-0049-00
Rev. 3

Installation
Hardware Requirements
Table 2-2: Invenia ABUS Viewer Hardware Requirements
Hardware Description
Video Card Support for OpenGL 3.3 or Higher
2 GB GDDR5 Dedicated Video Memory or more
Memory Bandwidth 100GB/s or higher
Support Resolution of at least 1920 x 1200 at 60Hz
Monitor Minimum Requirements:
Dedicated 24” Color Monitor
Minimum resolution 1920 x 1200
Recommended Monitor Specs: or greater diagonal size
1920 x 1200 resolution or higher
LED backlit, Color Panel
Brightness 250 cd/m or greater
Contrast Ratio 1000:1 or higher
Database The Invenia ABUS Viewer software uses PostgreSQL database. The database is
installed and configured automatically during the isntallation process.
No other instances of PostgreSQL database are supported on the same computer.
Processor,
Memory
Available Disk
Space
I/O and Media One or more USB 2.0 port/s, DVD Player
Video Card Support for OpenGL 3.3 or Higher
Xeon E5-1620 3.6GHz or better
8.0 GB RAM or better
Minimum requirements at installation:
8.0 GB RAM
Hard Drive with 400MB reserved for the application and separate Hard Drive/disk space
for Exames (1GB per exam, recommend 300 exams cache)
Minimum requirements at installation:
300 GB of available space
2 GB GDDR5 Dedicated Video Memory or more
Memory Bandwidth 100GB/s or higher
Support Resolution of at least 1920 x 1200 at 60Hz
IMPORTANT OPERATING SYSTEM REQUIREMENTS:
Review Software:
Windows 7 x 64 (ONLY)
This software does not support Windows 10
Invenia ABUS Viewer:
Windows 7 x 64 and Windows 10
Invenia ABUS Viewer – System Setup and Basic Service Manual 2-7
Direction 4700-0049-00 Rev. 3

Site Preparation/Pre-Installation Requirements
Workstation PC Hardware
Workstation Hardware Compatibility Check
Performing the workstation hardware compatibility check:
Table 2-3: Workstation PC Hardware Compatibility
Step Corresponding Graphic
1. Open a Web browser and type:
https://www.abusclub.net/us/service
Compatibility
2-8 Invenia ABUS Viewer – System Setup and Basic Service Manual
Direction 4700-0049-00
Rev. 3

Table 2-3: Workstation PC Hardware Compatibility (Continued)
Step Corresponding Graphic
2. Download the SystemCheck-ABUSViewer
file (zip file 6.6 MB)
3. Unzip it and copy it to the desktop of the
computer where the compatibility needs to
be tested.
Workstation PC Hardware Compatibility
4. Double-click on "Run.bat", then press any
key to continue.
Invenia ABUS Viewer – System Setup and Basic Service Manual 2-9
Direction 4700-0049-00 Rev. 3

Site Preparation/Pre-Installation Requirements
Table 2-3: Workstation PC Hardware Compatibility (Continued)
Step Corresponding Graphic
5. A "ReqCheckResults.txt" file is created
containing the system requirements report.
2-10 Invenia ABUS Viewer – System Setup and Basic Service Manual
Direction 4700-0049-00
Rev. 3

System Requirements Check Report
System Requirements Check Report
Examples
The workstation must pass the overall results in order for the
Invenia ABUS Viewer software to be installed on a customer
workstation.
Table 2-4: System Requirements Check Report
Description Corresponding Graphic
Sample of a system that failed the overall
system requirements check.
Sample of a system that passed the overall
system requirements check.
Invenia ABUS Viewer – System Setup and Basic Service Manual 2-11
Direction 4700-0049-00 Rev. 3

Site Preparation/Pre-Installation Requirements
Setting up the Workstation PC
Workstation PC Setup
The Invenia ABUS Viewer can be installed on a customer PC
that meets hardware requirements, or on an e xisting or ne w GE
Workstation PC. For sales orders that include a W orkstation
PC, the field engineer must unpack and set up the Workstation
hardware.
1. Carefully unpack the Workstation package: W orkst ation PC,
Monitor, Keyboard, Mouse, Power and Network Cords:
(Optional)
Table 2-5: Setting up the Workstation PC
Step Corresponding Graphic
1. Cut the box straps using a pair of scissors.
2-12 Invenia ABUS Viewer – System Setup and Basic Service Manual
Direction 4700-0049-00
Rev. 3

Setting up the Workstation PC (Optional)
Table 2-5: Setting up the Workstation PC (Continued)
Step Corresponding Graphic
2. Cut the tape to open the box.
3. Carefully remove the Workstation PC Tower.
Invenia ABUS Viewer – System Setup and Basic Service Manual 2-13
Direction 4700-0049-00 Rev. 3

Site Preparation/Pre-Installation Requirements
Table 2-5: Setting up the Workstation PC (Continued)
Step Corresponding Graphic
4. Carefully remove the Monitor and Stand.
2. Set up the Workstation by assembling the Monitor to the
stand. Connect the power and monitor video cables.
3. Connect the Monitor video cable to the Video Output
(Display Port) on the rear of the Workstation PC.
4. Connect the wired keyboard to any USB connector on the
rear of the Workstation.
5. Connect the mouse to any open USB connector on the rear
of the Workstation.
6. Plug in the Power and Network cables, then power on to
boot up the Workstation.
2-14 Invenia ABUS Viewer – System Setup and Basic Service Manual
Direction 4700-0049-00
Rev. 3

Setting up the Workstation PC (Optional)
Workstation PC Setup (continued)
7. Perform the Time Zone, Date and Time set up procedure
(Chapter 4).
8. Unpack the Invenia ABUS Viewer Software package and
apply the GE CARES Label (system ID sticker) to the
Workstation PC Tower.
NOTE: Apply the sticker on the removal panel which is located on
the left side of the PC as shown:
9. Continue to the Invenia ABUS Viewer installation pro cedure.
NOTE: Service Note SN75037 HP PC Workstation provides specific
details on the Workstation and Base Load Software procedure.
Invenia ABUS Viewer – System Setup and Basic Service Manual 2-15
Direction 4700-0049-00 Rev. 3

Site Preparation/Pre-Installation Requirements
Requirements for the Inst aller
Windows Operating System Administrator Rights
Windows level administrative rights are required to install
the Invenia ABUS Viewer Software. Ensure that you are
logged into the viewing workstation as an administrator.
2-16 Invenia ABUS Viewer – System Setup and Basic Service Manual
Direction 4700-0049-00
Rev. 3

Antivirus Software
Antivirus
Antivirus
Anti-virus software may impact or prevent the installation of the
Invenia ABUS Viewer software or key components of the
software: database, license, archive, service desktop.
Therefore, it may be necessary to disable or to create an
antivirus exclusion list for the Invenia ABUS Viewer software
and its supporting applications such as Sentinal HASP.
Invenia ABUS Viewer – System Setup and Basic Service Manual 2-17
Direction 4700-0049-00 Rev. 3

Site Preparation/Pre-Installation Requirements
Antivirus Exclusion List for the Invenia ABUS Viewer
In case an Antivirus software needs to be installed on the
system running the Invenia ABUS Viewer sof tware, the following
programs/locations should be excluded from any antivirus
monitoring: Default Invenia ABUS Viewer image archive folder:
C:\Image-Data folder.
NOTE: The folder location can be modified during software installation
or at the system configuration menu.
Default installation folder is C:\Program
Files\U-Systems\Invenia ABUS Workst ation\
NOTE: The folder location can be cha nged only during the actual
installation process of the Invenia ABUS Viewer software.
Exclude the following services/applications/processes:
Table 2-6: Antivirus Exclusion List for the Invenia ABUS Viewer
Applications • Haspdinst.exe
Services • PostGreSQL
• Hasprus.exe
• Invenia ABUS Workstation.exe
• UsysContextSyncApp.exe
• UsysDcmReceiveApp.exe
• UsysDicomExportService.exe
• UsysDiskClean.exe
• UsysMonitorService.exe
• UsysOfflineDataManager.exe
• UsysDataCaptureService
• UsysDicomSendService
• UsysMonitorService
NOTE: The list could vary based on the system and configuration. While
these are the most common applications and services utilized
by the Invenia ABUS Application, other programs and locations
specific to this application or the system in general, might need
to be excluded from antivirus monitoring to improve
performance.
2-18 Invenia ABUS Viewer – System Setup and Basic Service Manual
Direction 4700-0049-00
Rev. 3

Contact Information
Customer Assistance
Customer Assistance
If this equipment does not work as indicated in this service
manual or in the user manual, or if you require additional
assistance, please contact GE Service or appropriate support
resource. Note the following:
1. System ID serial number.
2. Software version.
3. Date and time of occurrence.
4. Sequence of events leading to issue.
5. Is the issue repeatable?
Invenia ABUS Viewer – System Setup and Basic Service Manual 2-19
Direction 4700-0049-00 Rev. 3

Site Preparation/Pre-Installation Requirements
Contact Information (continued)
Table 2-7: Phone Numbers for Customer Assistance
2-20 Invenia ABUS Viewer – System Setup and Basic Service Manual
Direction 4700-0049-00
Rev. 3

Customer Assistance
Manufacturer
Table 2-8: Manufacturer
GE Healthcare - GE Medical Systems Ultrasound and Primary Care Diagnostics, LLC
9900 Innovation Drive
Wauwatosa, WI 53226
USA
Invenia ABUS Viewer – System Setup and Basic Service Manual 2-21
Direction 4700-0049-00 Rev. 3

Site Preparation/Pre-Installation Requirements
2-22 Invenia ABUS Viewer – System Setup and Basic Service Manual
Direction 4700-0049-00
Rev. 3

Chapter 3
Invenia ABUS Viewer
Software Installation
This chapter describes how to install the Invenia ABUS
Viewer software for a workstation.
Invenia ABUS Viewer – System Setup and Basic Service Manual 3-1
Direction 4700-0049-00 Rev. 3

Invenia ABUS Viewer Software Installation
Preparing for Installation
Overview
This process describes installing the following items on the
computer system:
1. Invenia ABUS Viewer software
2. Sentinal HASP license handling software
3. GE Service Desktop software
Additionally , the installation allows users with Seno Ir is hardware
and software to integrate that functionality with the Invenia
ABUS Viewer. This configuration must be done by a GE
authorized representative.
Invenia ABUS Viewer Delivery Package Contents
The Invenia ABUS Viewer software is delivered in a p ackage
containing these items:
1. Invenia ABUS Viewer installation software on a Software
media DVD or USB flash drive
2. GE CARES label
Figure 3-1. Invenia ABUS Viewer and GE CARES Label Package Sample
NOTE: It is important to refer to the current revision of the Invenia ABUS
Viewer Basic User Manual for a full list of product labels prior to
servicing the system.
3-2 Invenia ABUS Viewer – System Setup and Basic Service Manual
Direction 4700-0049-00
Rev. 3

Preparing for Installation
Invenia ABUS Viewer Delivery Package Contents (continued)
The GE authorized representative installing the Invenia ABUS
Viewer software should apply the Invenia ABUS Vie wer software
system ID (GE CARES label) on the Workstation PC Tower.
The following figure shows the recommended location to install
the GE CARES label on a HP Z440 Workstation PC Tower.
Figure 3-2. Label Installation on the HP Z440 Workstation PC
Tower
Invenia ABUS Viewer – System Setup and Basic Service Manual 3-3
Direction 4700-0049-00 Rev. 3

Invenia ABUS Viewer Software Installation
Invenia ABUS Viewer Sof tware
Installation Procedure
Before installing software:
NOTE: READ the ENTIRE procedure before startin g the Sof twa re Load
Procedure.
As a precautionary step, GE Healthcare recommends that system and user
configurations are backed up before installing software.
NOTE: To install this software, Windows level administrative rights are
required. Ensure that you are logged into the Viewer as an
administrator.
NOTE: For application reinstall, ensure that ALL patient data on the
Viewer has been archived to a separate media before installing
the new application software.
NOTE: Ensure that there is 300 GB of free space on the hard drive
before installing the application software. Delete Patients using
the Study Browser if required.
NOTE: Ensure that the system meets the minimum hardware
requirements. (See Hardware Requirements). The Invenia
ABUS Viewer Software will load on Windows 7 (64x) and
Windows 10.
3-4 Invenia ABUS Viewer – System Setup and Basic Service Manual
Direction 4700-0049-00
Rev. 3

Invenia ABUS Viewer Software Installation Procedure
Invenia ABUS Viewer Software Load Procedure
Table 3-1: Invenia ABUS Viewer Database Flowchart
Invenia ABUS Viewer – System Setup and Basic Service Manual 3-5
Direction 4700-0049-00 Rev. 3

Invenia ABUS Viewer Software Installation
Invenia ABUS Viewer Upgrade Required Pre-Steps
(Software Installation on a System Running Invenia Review
Software 2.3.0 and earlier)
NOTE: The procedure below is for upgrading a Workstation from
Invenia Review Software (2.3.0 and earlier) to Invenia ABUS
Viewer (2.5.1).
IMPORTANT: The field engineer MUST complete the following
steps before loading the Invenia ABUS Vi ewer Software.
NOTE: The goal is to remove ALL traces of the old software to allow a
complete installation of the new software. If this step is not
completed, refer to the Troubleshooting chapter to find the step s
required to redo the installation.
NOTE: For new installations, refer to ‘Invenia ABUS Viewer Software
Installation (New Software Installation)’ on page 3-14.
Remove Invenia ABUS Review Software (2.3.0 and earlier)
Table 3-2: Remove Invenia ABUS Review Software (2.3.0 and earlier)
Step Corresponding Graphic
Before Performing this Procedure:
1. Log in to Invenia ABUS Viewer as Service.
2. Manually backup (write down or take pictures) of all of the system configuration settings.
3. Manually backup the user accounts (user passwords will be lost after the upgrade).
4. Ensure that ALL patient data is backed up, including image data to “C:\image-data_backup” (if needed).
(Transfer images to PACS, NAS, etc.).
5. Log out.
This step is necessary only if
upgrading from Invenia ABUS
Review Software (2.3.0 and earlier)
Uninstall the Invenia ABUS
Workstation software:
Click on the Windows "Start" icon;
then click on the "Control Panel".
Under "Programs", click on
"Uninstall a program". Select the
"Invenia ABUS Workstation"
program. At the top of the program
list, click "Uninstall".
NOTE: If a Program and Features
message window appears, press
"Yes".
3-6 Invenia ABUS Viewer – System Setup and Basic Service Manual
Direction 4700-0049-00
Rev. 3

Invenia ABUS Viewer Software Installation Procedure
Remove Database
Table 3-3: Remove Database
Step Corresponding Graphic
1. Find the database folder (it is usually located on the C:\ drive) to check which database is installed in
your Workstation, the folder name is either “mysql” or “PostgreSQL”. Perform the next 6 steps of this
procedure based on the database installed on the Workstation.
Invenia ABUS Viewer – System Setup and Basic Service Manual 3-7
Direction 4700-0049-00 Rev. 3
Invenia ABUS Viewer Software Installation
Table 3-3: Remove Database (Continued)
Step Corresponding Graphic
2. Run cmd.exe (command prompt) as administrator, do so by clicking on the Windows button (lower left
corner). Type “cmd” in the Search programs and files area. Press and hold simultaneously the
Ctrl+Shift+Enter keys.
3. A pop-up may appear that says “Do you want to allow the following program to make changes to
this computer?” Click “Yes”.
4. Use the appropriate command line
based on the database type.
Stop MySQL database service:
Once in the command screen type
in “net stop mysql” and press enter
to stop the database service.
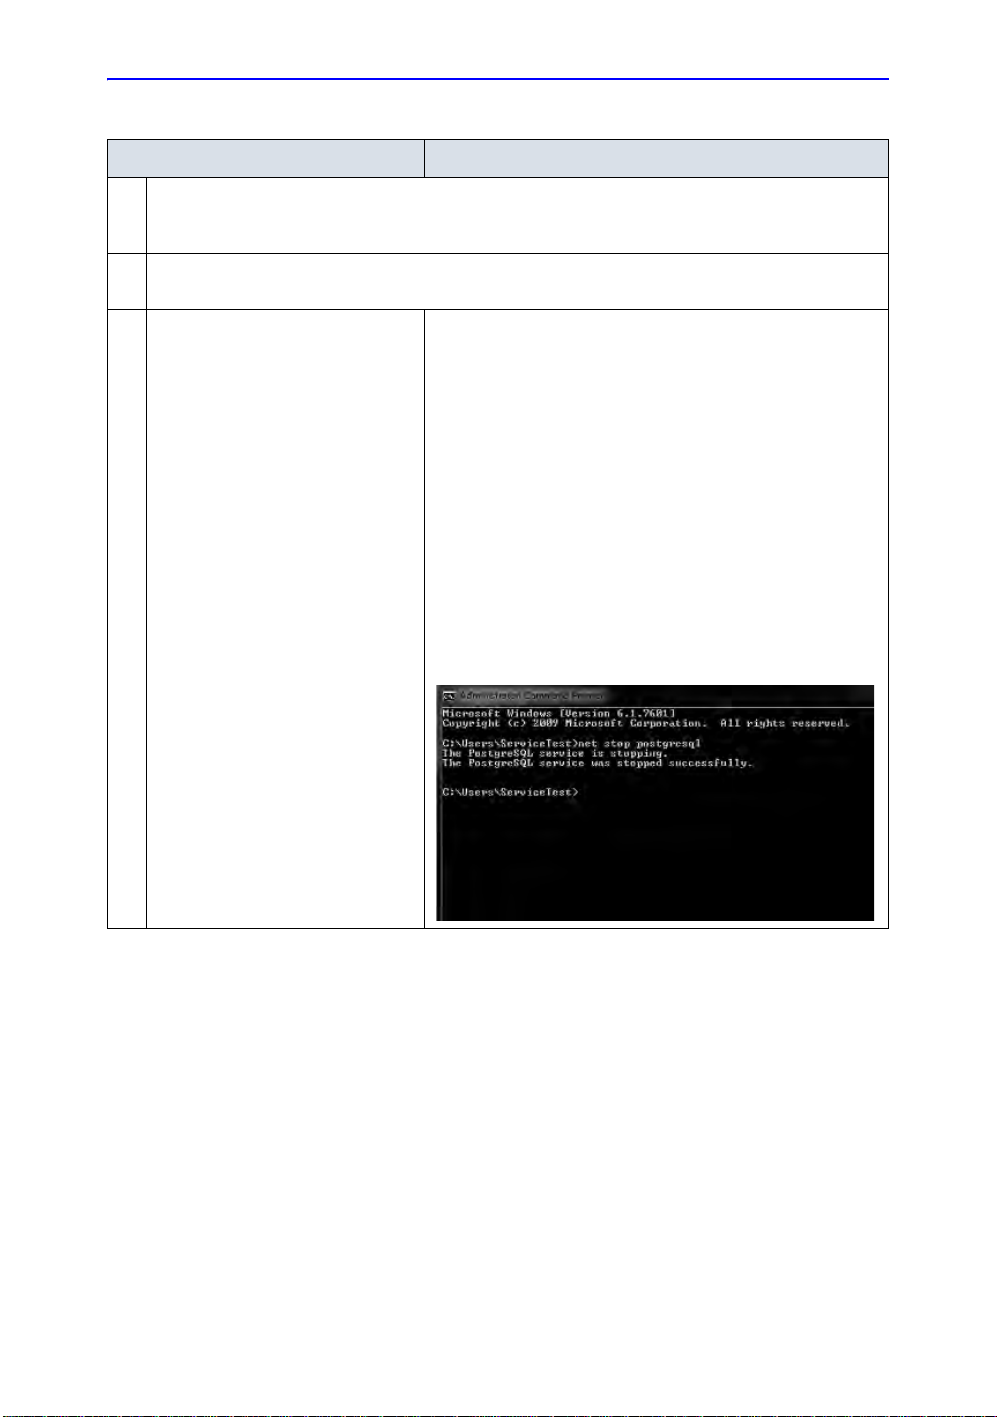
Stop PostgreSQL database service:
Once in the command screen type
in “net stop postgresql” and press
enter to stop the database service.
3-8 Invenia ABUS Viewer – System Setup and Basic Service Manual
Direction 4700-0049-00
Rev. 3
Invenia ABUS Viewer Software Installation Procedure
Table 3-3: Remove Database (Continued)
Step Corresponding Graphic
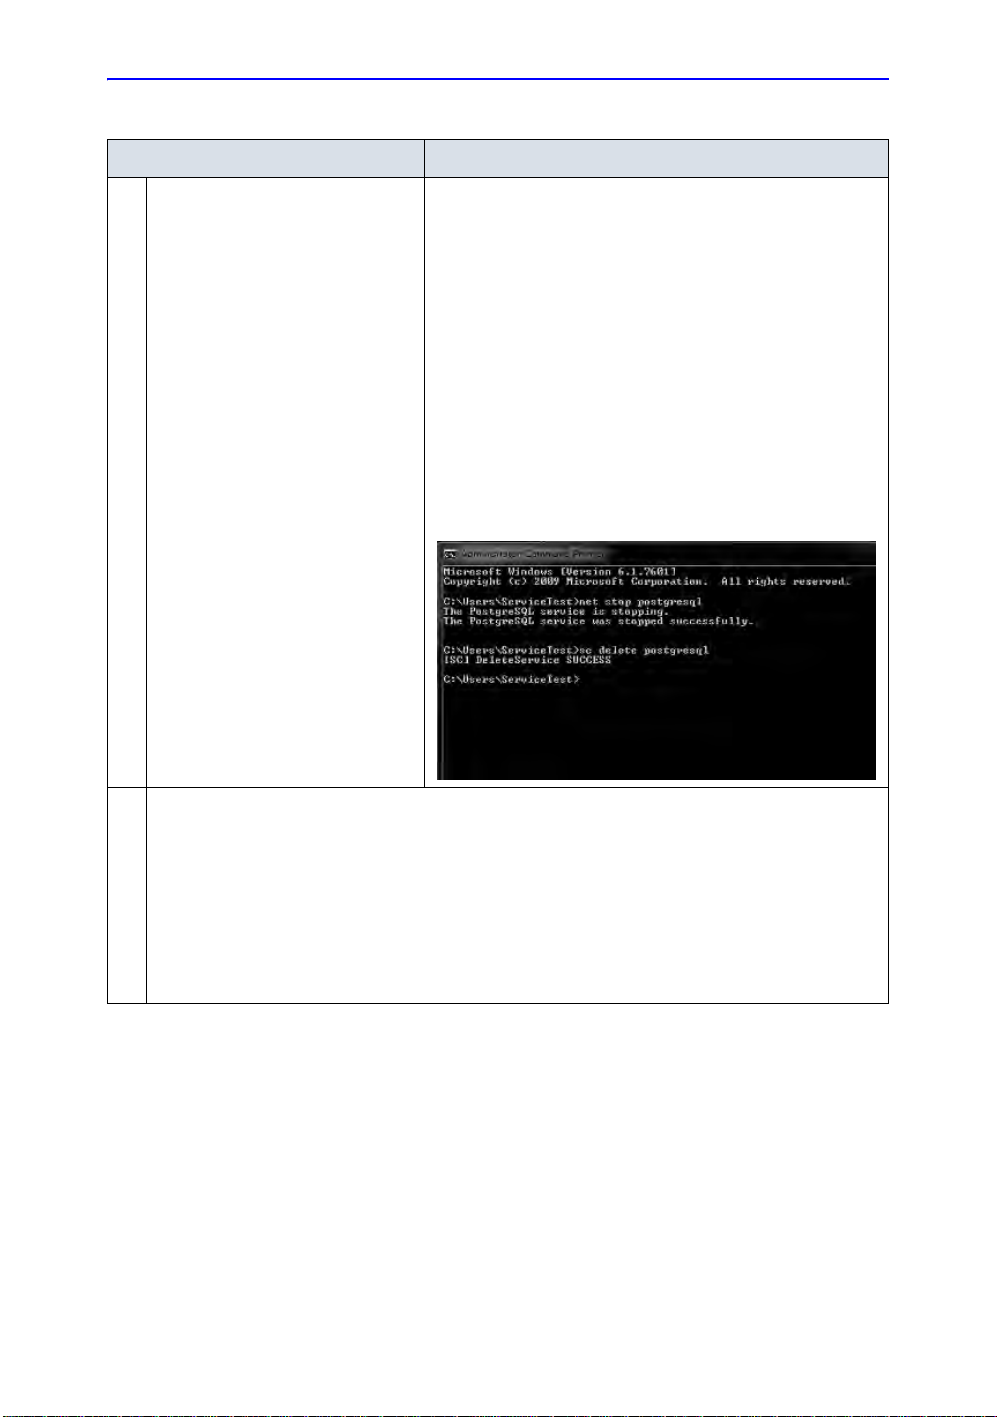
5. Use the appropriate command line
based on the database type.
Delete MySQL database service:
Type the common “sc delete
mysql” and press enter to remove
the MySQL entry from the services.
Delete PostgreSQL database
service:
Type the common “sc delete
postgresql” and press enter to
remove the PostgreSQL entry from
the services.
6. Delete the appropriate database folder.
Find the database folder in C:\ drive:
Delete the MySQL database folder:
Right-click on the MySQL folder to highlight it, and then select “Delete”.
Delete the PostgreSQL database folder:
Right-click on the PostgreSQL folder to highlight it, and then select “Delete”.
Invenia ABUS Viewer – System Setup and Basic Service Manual 3-9
Direction 4700-0049-00 Rev. 3

Invenia ABUS Viewer Software Installation
Remove InveniaWS Registry Entry
Table 3-4: Remove InveniaWS Registry Entry
Step Corresponding Graphic
1. Click on the Windows button (lower left corner). Type “regedit” in the Search programs and files area.
2. A pop-up may appear that says “Do you want to allow the following program to make changes to this
computer?” Click “Yes”.
3. Locate the following folder on the left hand side of the screen.
HKEY_LOCAL_MACHINE\SOFTWARE\U-Systems\Invenia WS
4. Click on the InveniaWS line to
highlight it.
5. Delete the InveniaWS folder by
right-clicking on it and selecting the
Delete option. Then, click “Yes” to
proceed.
3-10 Invenia ABUS Viewer – System Setup and Basic Service Manual
Direction 4700-0049-00
Rev. 3

Invenia ABUS Viewer Software Installation Procedure
Rename the Image-Data Folder and Remove System Configuration Files
(Presets)
Table 3-5: Rename Image-Data Folder and Remove System Configuration Files
Step Corresponding Graphic
1. Configure the Windows OS to Show
hidden Files and Folders:
Press on the Windows “Start” icon;
then press on “Computer”. Select
the C:\ drive.
Click Organize, then Select Folder
Options, then select the View tab.
Under Advanced settings, select
Show hidden files, folders, and
drives, and then select OK.
2. Rename the “C:\image-data” folder
to “C:\image-data_backup”
NOTE: This step is only required if
intending to restore the patient data
after the upgrade.
This step will require available disk
space, otherwise copy
“C:\image-data_backup” to an
external drive.
Depending on the amount of data,
this step may take a long time.
Thus, if ALL image data is backed
up (PACs, NAS, etc.), and the
customer agrees that the data is no
longer needed on the workstation,
delete the image folder.
Invenia ABUS Viewer – System Setup and Basic Service Manual 3-11
Direction 4700-0049-00 Rev. 3

Invenia ABUS Viewer Software Installation
Table 3-5: Rename Image-Data Folder and Remove System Configuration Files
Step Corresponding Graphic
3. Delete the serialNo.txt file.
4. Double-click the Program Data
folder.
5. Double-click the U-System folder.
3-12 Invenia ABUS Viewer – System Setup and Basic Service Manual
Direction 4700-0049-00
Rev. 3

Invenia ABUS Viewer Software Installation Procedure
Table 3-5: Rename Image-Data Folder and Remove System Configuration Files
Step Corresponding Graphic
6. Delete the system.config file.
7. The Invenia Workstation Review Software has been completely removed from the customer’s
Workstation PC, and is ready for the Invenia ABUS Viewer to be loaded.
Perform the ‘Invenia ABUS Viewer Software Installation Procedure’ on page 3-4.
IMPORTANT: Once the Invenia ABUS Viewer software load is finished:
1. Manually enter the user account names (set passwords to Invenia1 and inform all users that the
passwords were set to default and that they should modify the default password on the first login).
2. Manually enter the customer’s settings (some of the settings are new to the Invenia ABUS Viewer
- leave those as default).
3. Re-import the image data from “C:\image-data_backup” (if needed), and delete this backup folder
before leaving the customer site.
4. The license update procedure is not needed for upgrades.
Invenia ABUS Viewer – System Setup and Basic Service Manual 3-13
Direction 4700-0049-00 Rev. 3

Invenia ABUS Viewer Software Installation
Invenia ABUS Viewer Software Installation (New Software
Installation)
Table 3-6: Estimated Procedure Time
Manpower / Time / Training Level Tools
One person / 60 minutes / Invenia ABUS Instructions Lead Class Invenia ABUS Viewer Software DVD
Table 3-7: Invenia ABUS Viewer Software Load Procedure
Step Corresponding Graphic
NOTE: Check the Workstation date and time before proceeding with the Invenia ABUS Viewer Software
Load Procedure. If the date and time is incorrect, perform "date and time" setup in the PSM Chapter 4.
1. The Invenia ABUS Viewer software is on a DVD; insert the disc into the Workstation PC DVD Drive.
After a slight delay, Windows will auto-play the disc and start installation.
NOTE: Depending on the Windows configuration, the auto-run feature might be deactivated. If
auto-run is disabled, manually start the software installation procedure from the CD/DVD drive.
Click on the Windows "Start" icon,
select "Computer",
click on "DVD Drive",
and then right-click on the Invenia ABUS Viewer installation file executable name:
"d:\Invenia ABUS Viewer-global-2.5.1.xxx.exe".
In the right-click popup, select ’Run as administrator’.
The installation process will now start.
2. If this dialog box appears, click "Yes"
to proceed.
If this screen does not appear, the
software will automatically start to
install. (See Step 3.)
3. The software installation setup
process will start.
3-14 Invenia ABUS Viewer – System Setup and Basic Service Manual
Direction 4700-0049-00
Rev. 3

Invenia ABUS Viewer Software Installation Procedure
Table 3-7: Invenia ABUS Viewer Software Load Procedure (Continued)
Step Corresponding Graphic
4. The dialog window for the Setup
phase will be displayed.Click
"Install" to begin this phase.
5. The installation software will begin
unpacking the files.
6. Once the Setup extraction phase is
complete, this dialog box is
displayed.
NOTE: A reboot is required in order
to continue the installation steps
after the next installation phase is
completed. IF YOU HAVE ANY
OPEN APPLICATIONS WITH DATA
THAT YOU DO NOT WANT TO
LOSE, SAVE THE DATA NOW; then
close the applications before
proceeding.
When ready, click "Next" to proceed.
Invenia ABUS Viewer – System Setup and Basic Service Manual 3-15
Direction 4700-0049-00 Rev. 3

Invenia ABUS Viewer Software Installation
Table 3-7: Invenia ABUS Viewer Software Load Procedure (Continued)
Step Corresponding Graphic
7. The final dialog window for the Setup
phase opens.
Click ’Finish’ to trigger a machine
restart. This will close the Windows
application and reboot the machine.
NOTE: Depending on the IT policy at
your location and the machine
settings, the workstation might
perform a Windows update (if one is
pending) before fully rebooting. This
may impact the availability of the
machine during that period.
8. The corresponding screen is
displayed briefly.
9. Click on "Next" again on the Invenia
ABUS Viewer Installation window.
3-16 Invenia ABUS Viewer – System Setup and Basic Service Manual
Direction 4700-0049-00
Rev. 3

Invenia ABUS Viewer Software Installation Procedure
Table 3-7: Invenia ABUS Viewer Software Load Procedure (Continued)
Step Corresponding Graphic
10. The Invenia ABUS Viewer checks the
minimum hardware requirements.
Click "Next" to proceed.
NOTE: If the system check fails,
consider the following:
Case 1: Seno Iris Integration.
Perform the Environmental V ariables
described on the Invenia ABUS
Viewer PSM.
Case 2: Not a Seno Iris Integration;
however, the customer is using an
approved hardware configuration.
Perform the Environmental V ariables
described in the Invenia ABUS
Viewer PSM.
Case 3: Workstation does not have
the minimum hardware required.
Customer will need to provide a
Workstation PC that meets the
Invenia ABUS Viewer specifications.
11. The installer will request confirmation
of a destination folder for the Invenia
ABUS Viewer software. Unless the
customer requests a different
location, the default location does not
need to be modified. Press "Next" to
proceed.
Invenia ABUS Viewer – System Setup and Basic Service Manual 3-17
Direction 4700-0049-00 Rev. 3

Invenia ABUS Viewer Software Installation
Table 3-7: Invenia ABUS Viewer Software Load Procedure (Continued)
Step Corresponding Graphic
12. Click "Install" to start the installation
process.
13. Once the Invenia ABUS Viewer
software is successfully installed, the
"Installation Completed" dialog will
be displayed.
Click "Continue" to proceed with the
installation of the Service Desktop
software.
3-18 Invenia ABUS Viewer – System Setup and Basic Service Manual
Direction 4700-0049-00
Rev. 3

Invenia ABUS Viewer Software Installation Procedure
Table 3-7: Invenia ABUS Viewer Software Load Procedure (Continued)
Step Corresponding Graphic
14. The corresponding screens will be
displayed and the Service Desktop
installation begins.
NOTE: This step may take 5-7
minutes.
15. The Invenia ABUS Viewer serial
number information is shipped with
the software media.
Type in the serial number using the
following format: "INVVxxxxxxx"
(where xxxxxxx are the serial number
digits).
16. This step confirms that all
components are installed
successfully.
Click "Restart" to close the dialog
window and to restart the
Workstation.
NOTE: The software is ready for use
after the system has completed
rebooting.
After the reboot, the user should
remove the installation DVD and
store it safely.
Invenia ABUS Viewer – System Setup and Basic Service Manual 3-19
Direction 4700-0049-00 Rev. 3

Invenia ABUS Viewer Software Installation
Table 3-7: Invenia ABUS Viewer Software Load Procedure (Continued)
Step Corresponding Graphic
17. Double-click the Invenia ABUS Viewer icon on the Desktop, and login to the Invenia ABUS Viewer
using the Service User Name and Password.
Then, follow the installation checklist to ensure that the Invenia ABUS Viewer is fully configured and
functional for customer use or applications testing.
1. Add the GE Service Windows user account.
2. Configure the InSite agent and verify that the system is connected to the InSite connection. A
DNS may be needed to be able to complete this step.
3. Verify that the license is perpetual, if not, then perform the license update procedure.
3-20 Invenia ABUS Viewer – System Setup and Basic Service Manual
Direction 4700-0049-00
Rev. 3

Invenia ABUS Viewer Software Installation Procedure
Creating a GEService Windows User
A software bug with the Service Desktop package was identified
with the Invenia ABUS Viewer (2.5.1) and Invenia 2.0 (2.0.3): a
required GEService user is not created, thus SSH and Data File
transfer will not work unless this GEService user is manually
created in Windows.
Instructions on creating the GEService Windows user on the
Invenia ABUS Viewer
Table 3-8: Creating the GEService Windows User
Step Corresponding Graphic
1. Click on Windows “Start” icon and
then click “Control Panel”. Under
“User Accounts and Family
Safety” click on “Add or remove
user accounts.”
2. Click on “Create a new account”.
Invenia ABUS Viewer – System Setup and Basic Service Manual 3-21
Direction 4700-0049-00 Rev. 3

Invenia ABUS Viewer Software Installation
Table 3-8: Creating the GEService Windows User (Continued)
Step Corresponding Graphic
3. Type GEService for the account
name, checkmark Administrator,
and then click on the “Create
Account” button.
4. Click on the GEService account
icon.
5. Select “Create a password.”
3-22 Invenia ABUS Viewer – System Setup and Basic Service Manual
Direction 4700-0049-00
Rev. 3

Invenia ABUS Viewer Software Installation Procedure
Table 3-8: Creating the GEService Windows User (Continued)
Step Corresponding Graphic
6. Type SvcForward123$ for the
password (on both fields), then
click on the “Create Password”
button.
The Windows user name and
password is now configured. The
GE user should be able to use the
SSH and Data File features.
Invenia ABUS Viewer – System Setup and Basic Service Manual 3-23
Direction 4700-0049-00 Rev. 3

Invenia ABUS Viewer Software Installation
License Request Process
Table 3-9: License Request Process
Step Corresponding Graphic
1. Go to Start->Computer-> (C :)
Drive->Program
Files->USystems->Invenia ABUS
Workstation (or the location specified
during the installation process), and
then double click on the hasprus.exe
application.
2. At the pop up screen (Sentinel HASP
RUS), select Collect Information
button on the Collect Key Status
Information tab.
3. At the Save Key Status As screen, enter the serial number of the Invenia ABUS Viewer Software
from the ‘GE CARES’ label as the File name (sample: INVW1500010) and select Save. The serial
number information from the product label on the Workstation must be used for this. We recommend
that you also save this file to a USB thumb drive, clearly label-identify the drive and store it in a secure
place in case it is needed in the future.
4. E-mail the file generated in Step 3 ( <serial number>.c2v ) to the following email address:
Licensing.ABUS@ge.com
The serial number, site name and SID (ID from the GE CARES label) must be included in the
e-mail for the request to be processed.
In the GE address book, the e-mail address is listed as: “~Health ABUS Licensing”
3-24 Invenia ABUS Viewer – System Setup and Basic Service Manual
Direction 4700-0049-00
Rev. 3

Invenia ABUS Viewer Software Installation Procedure
License Check
Table 3-10: License Check
Step Corresponding Graphic
1. Open Internet Explorer and in the address bar type (http://localhost:1947) and select Enter.
2. Select Features in the list at the left side of
the screen.
3. The Sentinal Admin Control Center will
open. Verify that the Workstation PC on the
product column is flagged as “Perpetual” in
the Restrictions column.
Invenia ABUS Viewer – System Setup and Basic Service Manual 3-25
Direction 4700-0049-00 Rev. 3

Invenia ABUS Viewer Software Installation
License Update Process
The Invenia ABUS Viewer PSM procedure demon strates how to
update the V2C license file using the HASPRUS.exe program.
The following error message may be displayed when trying to
apply the V2C license using the HASPRUS.exe program.
Table 3-11: Error Message when trying to apply V2C license
Message Corresponding Graphic
“Update failed: Internal API Error” message
when using the HASPRUS.exe program to
load the V2C license file.
The following procedure demonstrates how to properly update
the V2C license file using the web browser:
Table 3-12: License Update Process
Step Corresponding Graphic
1. You will get a response from “~Health ABUS Licensing” with an attached <serial number> V2C file.
Copy this file to the workstation (with network transfer, InSite or USB drive), as it will be used in S tep 4
below.
2. Open Internet Explorer.
In the address bar, type: “http://
localhost:1947" and press the Enter
key.
3-26 Invenia ABUS Viewer – System Setup and Basic Service Manual
Direction 4700-0049-00
Rev. 3

Invenia ABUS Viewer Software Installation Procedure
Table 3-12: License Update Process (Continued)
Step Corresponding Graphic
3. Under the Options menu, click on
“Update/Attach”.
4. Click on the “Browse...” button then
navigate to the location where the
V2C license file is stored. Select the
file and then click the “Open” button.
5. Click on the “Apply File” button.
6. “Your update was applied
successfully” message displays on
your screen. This indicates that the
Invenia ABUS Viewer license
update process is complete.
License Check:
Click on “Features” and then
confirm that the Invenia ABUS
Viewer product key is listed as
“Perpetual”.
Invenia ABUS Viewer – System Setup and Basic Service Manual 3-27
Direction 4700-0049-00 Rev. 3

Invenia ABUS Viewer Software Installation
3-28 Invenia ABUS Viewer – System Setup and Basic Service Manual
Direction 4700-0049-00
Rev. 3

Chapter 4
Configuring Invenia ABUS
Viewer Service Parameters
The GE authorized representative installing the Invenia
ABUS Viewer should set up the most common
administration operating parameters as described in
this chapter.
Invenia ABUS Viewer – System Setup and Basic Service Manual 4-1
Direction 4700-0049-00 Rev. 3

Configuring Invenia ABUS Viewer Service Parameters
Service Parameters
Date and Time Setup
Table 4-1: Date and Time Setup
Step Corresponding Graphic
1. Select the Windows "Start" icon, select
"Control Panel", select "Clock, Language,
and Region", then select "Date and Time".
2. Select the “Change time zone...” button.
4-2 Invenia ABUS Viewer – System Setup and Basic Service Manual
Direction 4700-0049-00
Rev. 3

Table 4-1: Date and Time Setup (Continued)
Step Corresponding Graphic
3. Select the appropriate time zone location.
Select “OK” to close the Time Zone
Settings.
4. If necessary, select the "change date and
time..." Select "OK" to retain changes.
Service Parameters
Invenia ABUS Viewer – System Setup and Basic Service Manual 4-3
Direction 4700-0049-00 Rev. 3

Configuring Invenia ABUS Viewer Service Parameters
Local Network Setup
Configure the Local Area Connection per data in the
Pre-Installation Site Survey Worksheet.
Table 4-2: Local Network Setup
Step Corresponding Graphic
1. Click on the Windows "Start" icon, select
"Control Panel", select " Network and
Internet ", then select "Network and
Sharing Center".
2. Select Change Adapter Settings (on the
left side of the display).
3. Double click on the Local Area Connection.
NOTE: Some Workstation PCs may have
multiple Local Area Connections. Configure
the Local Area Connection per
Pre-Installation Site Survey Worksheet.
4-4 Invenia ABUS Viewer – System Setup and Basic Service Manual
Direction 4700-0049-00
Rev. 3

Step Corresponding Graphic
4. Select Properties.
Service Parameters
Table 4-2: Local Network Setup (Continued)
5. Select Internet Protocol 4 IPv4, then select
the Properties button.
Invenia ABUS Viewer – System Setup and Basic Service Manual 4-5
Direction 4700-0049-00 Rev. 3

Configuring Invenia ABUS Viewer Service Parameters
Table 4-2: Local Network Setup (Continued)
Step Corresponding Graphic
6. Set up the IP Address, and DNS (if needed)
per the Pre-Installation Site Survey
Worksheet. Then click on “OK” to retain
changes.
7. Select Close and Close again.
4-6 Invenia ABUS Viewer – System Setup and Basic Service Manual
Direction 4700-0049-00
Rev. 3

Service Parameters
Invenia ABUS Viewer Application in a Multi-monitor review
environment
The display monitor for the Invenia ABUS Viewer should always
be running as the “Main Display” in Windows.
Table 4-3: Multi-Monitor Review Environment
Step Correspondin g Graphic
1. Right click on an empty space on the
desktop and click on Screen Resolution.
NOTE: This step can also be
accomplished:
Click on the Windows “Start” icon, select
“Control Panel”, select “Appearance and
Personalization”, select “Display” and
then click on “Adjust resolution”.
2. Identifying the Invenia ABUS Viewer
Display Monitor:
Select the “Identity” button, then select the
monitor icon number that corresponds to
the number displayed on the Invenia ABUS
Viewer monitor screen.
Invenia ABUS Viewer – System Setup and Basic Service Manual 4-7
Direction 4700-0049-00 Rev. 3

Configuring Invenia ABUS Viewer Service Parameters
Table 4-3: Multi-Monitor Review Environment (Continued)
Step Correspondin g Graphic
3. Once the display device is selected, place
a check mark on the “Make this my main
display” option. Then click on OK to apply
the settings change.
NOTE: The Start Menu will now be in that
numbered display. You can manually move
the Start Menu and Icons to any of the
monitors (just drag and drop).
Troubleshooting cursor issue with multiple Workstation monitors
If the following issue occurs, see the Note below: In the
Multi-monitor setup, a user encounters a problem with the
cursor moving always to the main display when trying to place a
marker or interact with the Invenia ABUS Viewer.
NOTE: The Invenia ABUS Viewer software needs to run on the primary
monitor, otherwise the mouse will always move to the “main”
windows display after the right click menu is used or a marker is
placed. That is, Windows must be set to use the primary monitor
as the main Windows display as previously described.
4-8 Invenia ABUS Viewer – System Setup and Basic Service Manual
Direction 4700-0049-00
Rev. 3

Admin Account
Table 4-4: Admin Account
Step Corresponding Graphic
1. The default admin account:
User Name: admin
Password: inveniaws
2. The Invenia ABUS Viewer User Accounts
window will ask the admin user to modify
the default password at the first login. The
new password will need to satisfy all the
security rule settings: A green check
means the rule is satisfied. A red dash
means the value must be adjusted until the
parameter rule is satisfied.
Service Parameters
Invenia ABUS Viewer – System Setup and Basic Service Manual 4-9
Direction 4700-0049-00 Rev. 3

Configuring Invenia ABUS Viewer Service Parameters
Institution Name Setup
Table 4-5: Institution Name Setup
Step Corresponding Graphic
1. Click on the Configuration Gears icon
2. Select Setup.
3. Configure the customer name (Hospital
Name) information under the General Tab
Institution Name field.
NOTE: The information entered in this field
will also populate the Service Desktop
header.
4-10 Invenia ABUS Viewer – System Setup and Basic Service Manual
Direction 4700-0049-00
Rev. 3

Service Parameters
Invenia ABUS Viewer AE Title and Port Number Network
Table 4-6: AE Title and Port Number Network
Step Corresponding Graphic
1. Click on the Configurat ion Gears icon
2. Select DICOM and then select the “Edit”
button under the “Local Settings” section.
3. Select the button and navigate to the drive
location where the customer wants to store
the image data, then select “Select Folder”.
For example: from “c:\image-data” to
“x:\image-data” (x should be the drive letter
assigned for the dedicated Invenia ABUS
hard drive). Select the “OK” button to save
changes.
Default Settings:
AE Title: INVENIAWS
Port: 104
Invenia ABUS Viewer – System Setup and Basic Service Manual 4-11
Direction 4700-0049-00 Rev. 3

Configuring Invenia ABUS Viewer Service Parameters
Invenia ABUS Viewer Image Folder
Changing Image Folder location to a different drive location
The default location of the Image Folder (or image-data) is
C:\image-data; however, customers may want to set up the
Image Folder on a different (larger) disk drive. The following
procedure describes the necessary steps to change the Image
Folder location to a different drive location. This procedure also
includes the workaround needed to fix the drive path: Invenia
ABUS Viewer software 2.5.1.546 software bug.
Table 4-7: Image Folder
Step Corresponding Graphic
1. Click on the Configuration Gears icon
2. Select DICOM and then click on the
“Edit” button to configure the “Local
Settings” section.
4-12 Invenia ABUS Viewer – System Setup and Basic Service Manual
Direction 4700-0049-00
Rev. 3

Table 4-7: Image Folder (Continued)
Step Corresponding Graphic
3. Click the "..." button and navigate to the
drive location where the customer will
store the image data.Select “Select
Folder”.
For example, from “c:\image-data" to
“x:\image-data” (x should be the drive
letter assigned for the dedicated
Invenia ABUS Viewer hard drive).
Press “OK” to save the changes.
Service Parameters
Invenia ABUS Viewer – System Setup and Basic Service Manual 4-13
Direction 4700-0049-00 Rev. 3

Configuring Invenia ABUS Viewer Service Parameters
Workaround needed to fix the drive path
Invenia ABUS Viewer software 2.5.1.546 drive path software
bug: The Invenia ABUS software 2.5.1.546 places a "/" slash
instead of "\" when modifying the Image Folder drive path
location. The wrong slash creates a problem when the Invenia
ABUS Viewer software, which tries to save the imag es, since it
does not properly recognize the drive path.
Table 4-8: Fix Drive Path Workaround
Step Corresponding Graphic
1. The following steps are only necessary
if changing the Image Folder location
on the Invenia ABUS Viewer 2.5.1.546.
Once the Image Folder location is
configured, click on the “OK” button.
2. Select Service and then click on the
“Export System Settings” button.
4-14 Invenia ABUS Viewer – System Setup and Basic Service Manual
Direction 4700-0049-00
Rev. 3

Table 4-8: Fix Drive Path Workaround (Continued)
Step Corresponding Graphic
3. Navigate to the Windows Desktop and
then type a file name (i.e.
system_settings).
Click on the Save button.
4. Navigate to the Windows Desktop and
right-click on the system setting file
created in Step 3.
Select “Open with” and then click on
the “Notepad” icon.
Service Parameters
5. Find the “<localScpSettings” html code
line, and then edit the “rootDir=” by
replacing the “/” with “\”.
Once the file path has been corrected,
Save and then close the file.
For example:
<localScpSettings
aetitle=”INVENIAWS port=”104”
rootDir=”D:/image-data”/>
Replace the “/” with “\”.;
<localScpSettings
aetitle=”INVENIAWS port=”104”
rootDir=”D:\image-data”/>
Invenia ABUS Viewer – System Setup and Basic Service Manual 4-15
Direction 4700-0049-00 Rev. 3

Configuring Invenia ABUS Viewer Service Parameters
Table 4-8: Fix Drive Path Workaround (Continued)
Step Corresponding Graphic
6. Return to the Invenia ABUS Viewer
Service configuration screen. Click on
the “Import System Settings” button.
7. Navigate to the Windows
Desktop.Select the system settings file
saved in Step 5.
Press on the “Open” button.
8. A “System Configuration Imported”
message window will display on your
screen.Press “OK”, then log out of the
Invenia ABUS Viewer.
Login to the Invenia ABUS Viewer and verify that the file path to the Image Folder is correct.
4-16 Invenia ABUS Viewer – System Setup and Basic Service Manual
Direction 4700-0049-00
Rev. 3
 Loading...