

Page 1

geappliances.ca
Safety Instructions . . . . . . . . . 2, 3
Operating Instructions
Care and Cleaning of
the refrigerator . . . . . . . . . . . . . . . .5, 6
Control Settings . . . . . . . . . . . . . . . . . .4
Installation Instructions
Preparing to Install
the Refrigerator . . . . . . . . . . . . . . . . . . 7
Reversing the Door Swing . . . . . 8-11
Troubleshooting Tips . . . 12-14
Top-Freezer
Normal Operating Sounds . . . . . . 12
Consumer Support
Consumer Support . . . . . . . . . . . . . . 18
Product Registration . . . . . . . . 15, 16
Warranty . . . . . . . . . . . . . . . . . . . . . . 17
Owner’s Manual and
Installation Instructions
Model GTR12
La section française
commence à la page 19.
Write the model and serial
numbers here:
Model__________________
Serial __________________
You can find them on a label inside
the refrigerator on the upper left
side wall.
Refrigerators
350A4502P656
Page 2
IMPORTANT SAFETY INFORMATION.
READ ALL INSTRUCTIONS BEFORE USING.
WARNING!
Use this appliance only for its intended purpose as described in this Owner’s Manual.
SAFETY PRECAUTIONS
Safety InstructionsOperating InstructionsTroubleshooting Tips
Safety InstructionsOperating Instructions
Installation
Installation
Installation
Instructions
Instructions
Instructions
When using electrical appliances, basic safety precautions should be followed, including the following:
■ This refrigerator must be properly installed
■
and located in accordance with the Installation
Instructions before it is used.
■ Do not allow children to climb, stand or hang
■
on the shelves in the refrigerator. They could
damage the refrigerator and seriously injure
themselves.
■ Do not touch the cold surfaces in the freezer
■
compartment, particularly when hands are
damp or wet. Skin may stick to these extremely
cold surfaces.
■ Do not store or use gasoline or other flammable
■
vapors and liquids in the vicinity of this or any
other appliance.
■ In refrigerators with automatic icemakers,
■
avoid contact with the moving parts of the
ejector mechanism, or with the heating element
that releases the cubes. Do not place fingers or
hands on the automatic icemaking mechanism
while the refrigerator is plugged in.
■ Keep fingers out of the “pinch point” areas;
■
clearances between the doors and between
the doors and cabinet are necessarily small.
Be careful closing doors when children are
in the area.
■ Unplug the refrigerator before cleaning and making
■
repairs.
NOTE: We strongly recommend that any servicing
be performed by a qualif ied individual.
■ Turning the control to the OFF position does
■
not remove power to the light circuit.
■ Do not refreeze frozen foods which have
■
thawed completely.
■ Before replacing a burned-out light bulb, the
■
refrigerator should be unplugged in order to avoid
contact with a live wire filament. (A burned-out
light bulb may break when being replaced.)
DANGER! RISK OF CHILD ENTRAPMENT
PROPER DISPOSAL OF THE REFRIGERATOR
Child entrapment and suffocation are not problems of
the past. Junked or abandoned refrigerators are still
dangerous…even if they will sit for “just a few days.”
If you are getting rid of your old refrigerator, please
follow the instructions below to help prevent
accidents.
Before You Throw Away Your Old
Refrigerator or Freezer:
Troubleshooting Tips
Consumer Support Troubleshooting Tips Operating Instructions Safety Instructions
2
■ Take off the doors.
■ Leave the shelves in place so that children may not
easily climb inside.
USE OF EXTENSION CORDS
Because of potential safety hazards under certain conditions, we strongly recommend against the
use of an extension cord.
However, if you must use an extension cord, it is absolutely necessary that it be a UL-listed (in the United States)
or a CSA-listed (in Canada), 3-wire grounding type appliance extension cord having a grounding type plug and
outlet and that the electrical rating of the cord be 15 amperes (minimum) and 120 volts.
Refrigerants
All refrigeration products contain refrigerants, which
must be removed prior to product disposal. If you are
getting rid of an old refrigeration product, check with
the company handling the disposal about what to do.
Page 3
geappliances.ca
WARNING!
HOW TO CONNECT ELECTRICITY
Do not, under any circumstances, cut or remove the third (ground) prong from the power cord. For
personal safety, this appliance must be properly grounded.
The power cord of this appliance is equipped with
a 3-prong (grounding) plug which mates with a
standard 3-prong (grounding) wall outlet to minimize
the possibility of electric shock hazard from this
appliance.
Have the wall outlet and circuit checked by a
qualified electrician to make sure the outlet is
properly grounded.
Where a standard 2-prong wall outlet is encountered,
it is your personal responsibility and obligation to
have it replaced with a properly grounded 3-prong
wall outlet.
The refrigerator should always be plugged into its
own individual electrical outlet which has a voltage
rating that matches the rating plate.
This provides the best performance and also prevents
overloading house wiring circuits which could cause a
fire hazard from overheated wires.
Never unplug your refrigerator by pulling on the
power cord. Always grip plug firmly and pull straight
out from the outlet.
Repair or replace immediately all power cords that
have become frayed or otherwise damaged. Do not
use a cord that shows cracks or abrasion damage
along its length or at either end.
When moving the refrigerator away from the
wall, be careful not to roll over or damage the
power cord.
USE OF ADAPTER PLUGS
Adapter plugs are not permitted in Canada.
Instructions
Installation
READ AND FOLLOW THIS SAFETY INFORMATION CAREFULLY.
SAVE THESE INSTRUCTIONS
Troubleshooting TipsOperating InstructionsSafety Instructions
Consumer Support
3
Page 4
About the control on the refrigerator.
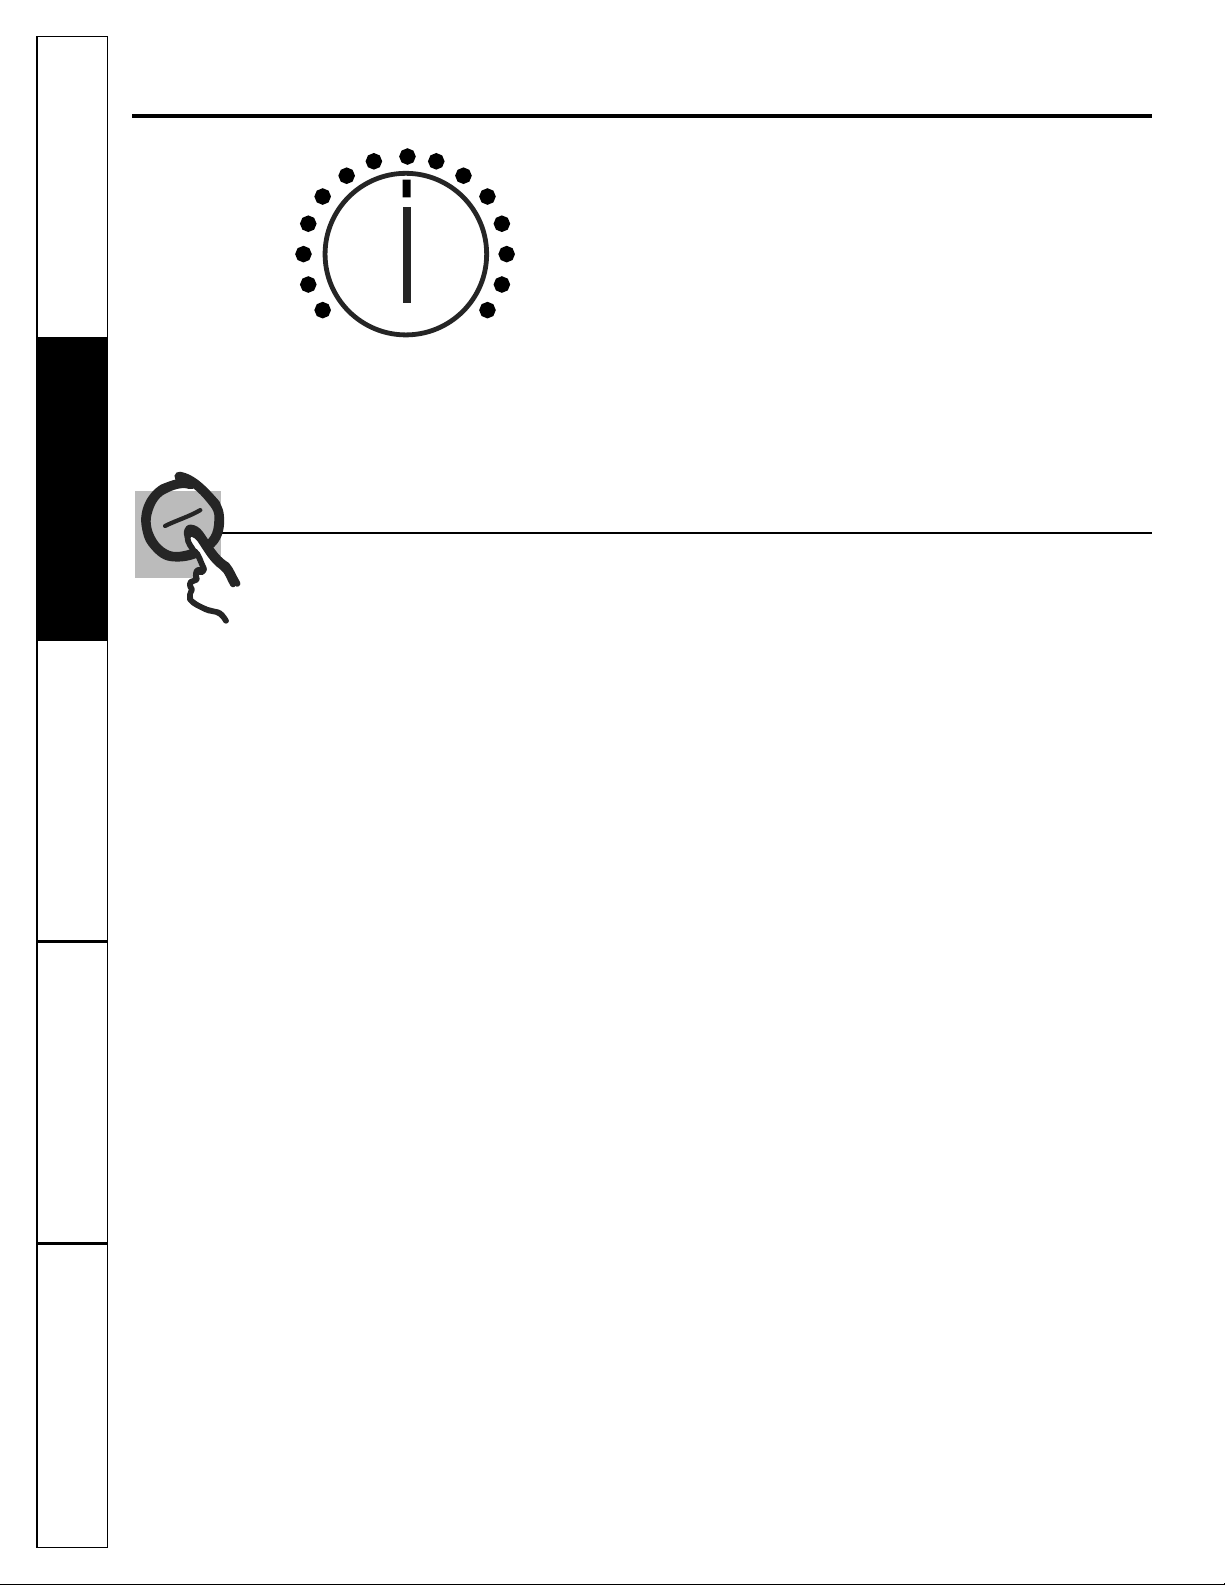
The temperature control on your refrigerator regulates the
temperature in the fresh food and freezer compartments.
Initially set the control to the mid-setting as shown.
Adjust the control one increment at a time, and allow 12 hours
Safety InstructionsOperating InstructionsTroubleshooting Tips
Safety InstructionsOperating Instructions
MAXMIN
after each adjustment for the refrigerator to reach the
temperature you set.
Control Settings
Installation
Installation
Installation
Instructions
Instructions
Instructions
The temperature control maintains the temperature
in both the fresh food and freezer compartments.
Setting the control at MIN is the warmest setting.
Setting the control at MAX is the coldest setting.
After changing the control, allow 12 hours for the
refrigerator to reach the temperature you have set.
Control settings will vary based on personal
preferences, usage and operating conditions,
and may require more than one adjustment.
Troubleshooting Tips
Consumer Support Troubleshooting Tips Operating Instructions Safety Instructions
4
Page 5

Care and cleaning of the refrigerator.
Cleaning the Outside
geappliances.ca
Keep the outside clean. Wipe with a clean
cloth lightly dampened with mild liquid dish
detergent. Dry with a clean, soft cloth.
Do not wipe the refrigerator with a soiled dish
cloth or wet towel. These may leave a residue
that can erode the paint. Do not use scouring
pads, powdered cleaners, bleach or cleaners
containing bleach because these products can
scratch and weaken the paint f inish.
Cleaning the Inside
To help prevent odors, leave an open box
of baking soda in the fresh food and freezer
compartments.
Unplug the refrigerator before cleaning.
If this is not practical, wring excess moisture
out of sponge or cloth when cleaning around
switches, lights or controls.
Use warm water and baking soda solution—
about a tablespoon (15 ml) of baking soda to
a quart (1 liter) of water. This both cleans and
neutralizes odors. Rinse and wipe dry.
Other parts of the refrigerator—including door
gaskets, fruit and vegetable drawers, and all
plastic parts—can be cleaned the same way.
Protect the paint finish. The finish on the
outside of the refrigerator is a high quality,
baked-on paint finish. With proper care, it will
stay new-looking and rust free for years.
Apply a coat of kitchen/appliance wax when
the refrigerator is new, and then at least twice
a year.
Defrost water pan. The non-removable pan
is located under the compressor at the rear
of the refrigerator. It should be cleaned at
least once a year. Move the refrigerator out
from the wall as far as necessary, and unplug
the power cord from the wall outlet. Let the
compressor cool before cleaning the pan.
Use a clean cloth or sponge dampened in
warm water and baking soda solution—one
tablespoon (15 ml) of baking soda to a quart
(1 liter) of water. Do not use cleansing
powders, abrasive cleaners, bleach or
cleaners containing chlorides.
Do not wash any plastic refrigerator parts
in the dishwasher.
Instructions
Installation
After cleaning the door gaskets, apply a thin
layer of petroleum jelly to the door gaskets
at the hinge side. This helps keep the gaskets
from sticking and bending out of shape. Do
not use cleansing powders or other abrasive
cleaners.
Behind the Refrigerator
Once a year, move the refrigerator out
and vacuum the back coils. Be careful when
moving the refrigerator away from the wall.
All types of floor coverings can be damaged,
particularly cushioned coverings and those
with embossed surfaces.
Troubleshooting TipsOperating InstructionsSafety Instructions
Pull the refrigerator straight out and return it
to position by pushing it straight in. Moving
the refrigerator in a side direction may
result in damage to the floor covering or
refrigerator.
When pushing the refrigerator back, make
sure you don’t roll over the power cord.
Consumer Support
5
Page 6
Care and cleaning of the refrigerator.
Replacing the Light Bulb
Safety InstructionsOperating InstructionsTroubleshooting Tips
Safety InstructionsOperating Instructions
Moving the control beyond the MIN position
does not remove power to the light circuit.
The bulb is located behind the shield in the
back wall.
Unplug the refrigerator.
Remove shelves.
Remove the screw.
Gently remove the light shield by inserting
a flat blade screwdriver into the slot at the
top of the shield and pop it off.
Preparing for Vacation
For long vacations or absences, remove
food and unplug the refrigerator. Move the
control beyond the MIN position, and clean
the interior with a baking soda solution of one
tablespoon (15 ml) of baking soda to one
quart (1 liter) of water. Leave the doors open.
Replace the bulb with an appliance
bulb of the same or lower wattage
(15 Watt maximum).
Insert the tab at the bottom of the light
shield into the light bulb housing and
snap it into place.
Replace the screw.
Installation
Installation
Installation
Instructions
Instructions
Instructions
Troubleshooting Tips
Preparing to Move
Secure all loose items such as shelves and
drawers by taping them securely in place
to prevent damage.
Be sure the refrigerator stays in an upright
position during moving.
Consumer Support Troubleshooting Tips Operating Instructions Safety Instructions
6
Page 7
Installation
Refrigerator
Instructions
Model GTR12
If you have questions, call 1.800.561.3344 or visit our Website at: geappliances.ca.
BEFORE YOU BEGIN
Read these instructions completely and carefully.
•
IMPORTANT – Save these instructions for
local inspector’s use.
•
IMPORTANT – Observe all governing codes
and ordinances.
• Note to Installer – Be sure to leave these
instructions with the Consumer.
• Note to Consumer – Keep these instructions for
future reference.
• Skill level – Installation of this appliance requires basic
mechanical skills.
• Completion time – Refrigerator Installation
15 minutes
Reversing the Door Swing
1 hour
• Proper installation is the responsibility of the installer.
• Product failure due to improper installation is not covered
under the Warranty.
CLEARANCES
Allow the following clearances for ease of installation,
proper air circulation and plumbing and electrical
connections.
• Sides 1” (2.5 cm)
• Top 4” (10.2 cm)
• Back 2” (5 cm) from the coiling on the back to the wall
To help with proper spacing and ventilation, make sure the
metal spacer or twist-on rubber bumper (at the back of
some models) is in place.
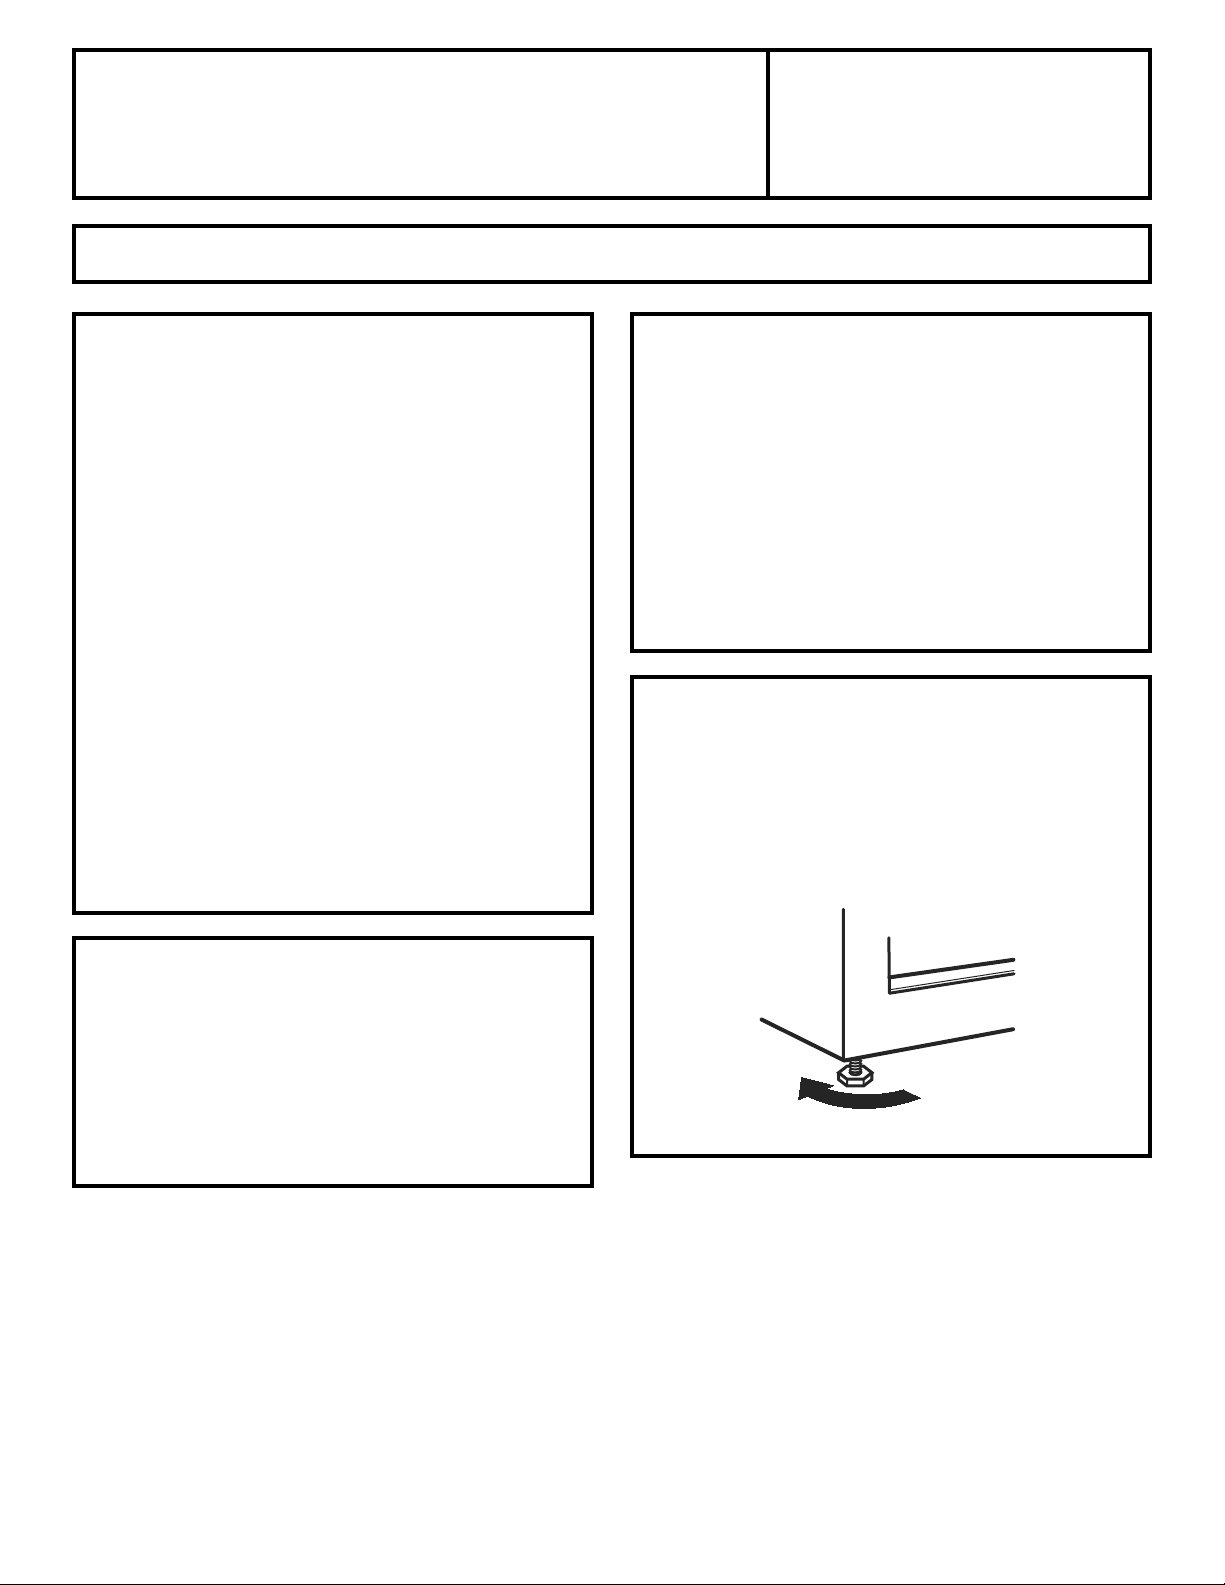
LEVELING LEGS
Adjustable legs at the front corners of the refrigerator
should be set so the refrigerator is firmly positioned on
the floor, and the front is raised just enough that the door
closes easily when opened about halfway.
To adjust the leveling legs, turn the legs clockwise to
raise the refrigerator, counterclockwise to lower it.
REFRIGERATOR LOCATION
• Do not install the refrigerator where the temperature will
go below 55°F (13°C) because it will not run often enough
to maintain proper temperatures.
• Install it on a floor strong enough to support it
fully loaded.
• Do not install it closer than 5” (13 cm) next to a range.
To raise the refrigerator
7
Page 8
Installation Instructions
REVERSING THE DOOR SWING
IMPORTANT NOTES
1
REMOVE THE FREEZER DOOR
When reversing the door swing:
• Read the instructions all the way through before starting.
• Handle parts carefully to avoid scratching paint.
• Set screws down by their related parts to avoid using
them in the wrong places.
• Provide a non-scratching work surface for the doors.
IMPORTANT: Once you begin, do not move the cabinet
until door-swing reversal is completed.
These instructions are for changing the hinges from the
right side to the left side—if you ever want to change the
hinges back to the right side, follow these same
instructions and reverse all references to left and right.
Unplug the refrigerator from its electrical outlet.
Empty all door shelves.
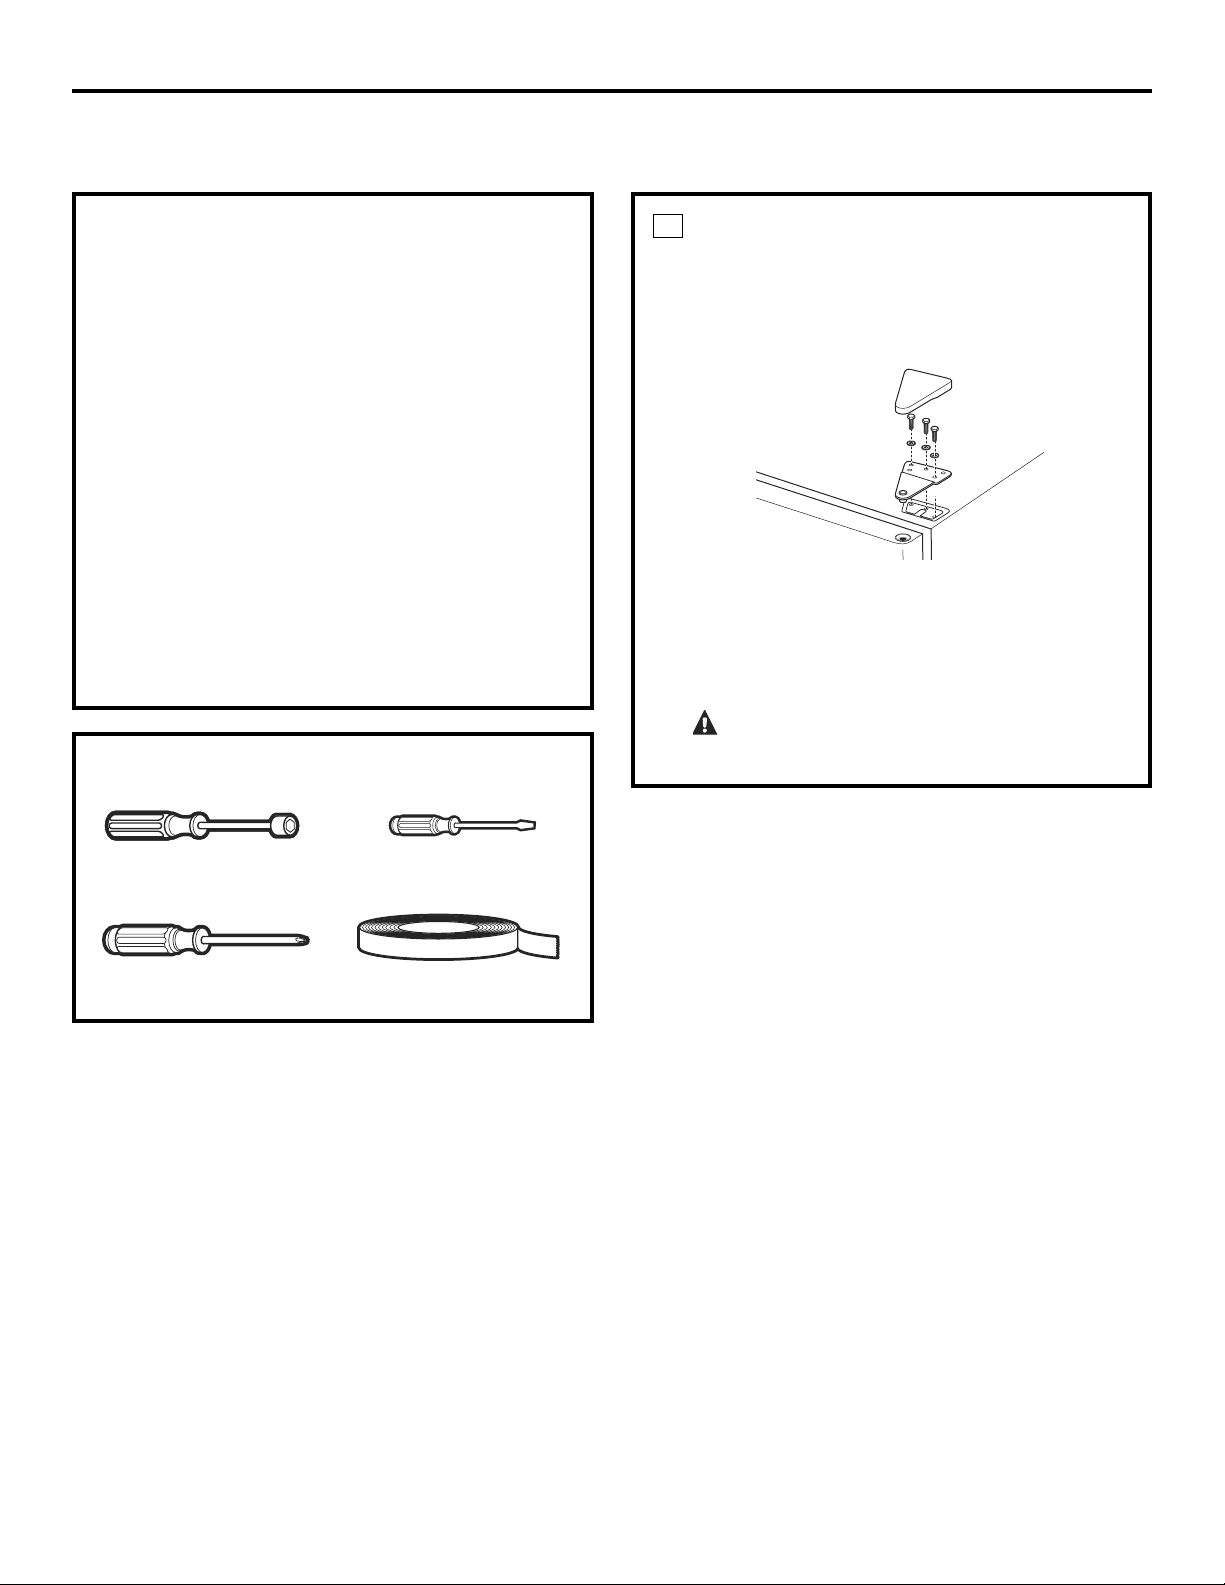
TOOLS YOU WILL NEED
Remove the hinge cover, screws (some models have
lock washers with each screw), top hinge and shim (if
included).
Set the door on a non-scratching surface with the
outside up.
NOTE: On some models, when removing the door,
watch for washer(s) between the center hinge and the
bottom of the freezer door that may stick to the door.
Do not lose.
CAUTION:Do not let door drop
to the floor. To do so could damage the door stop.
5/16” Socket driver
Phillips screwdriver
Thin-blade screwdriver
Masking tape
8
Page 9
Installation Instructions
REVERSING THE DOOR SWING
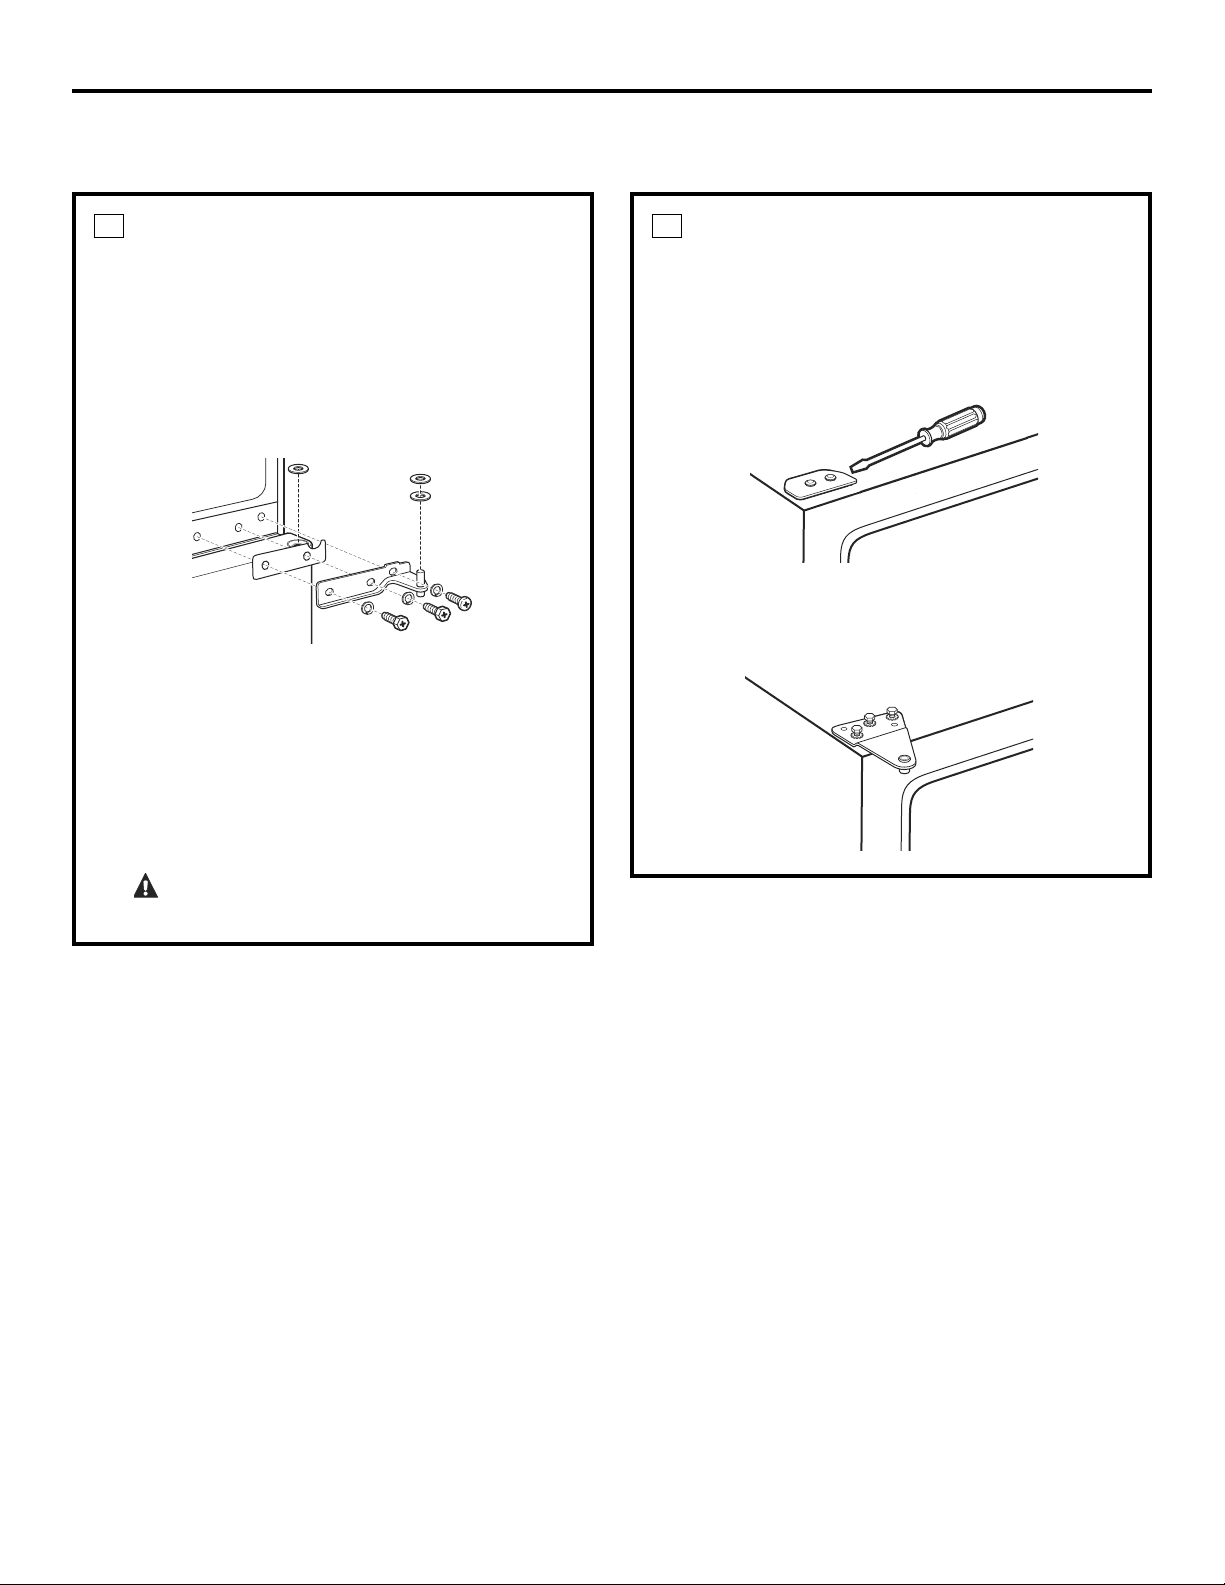
2
REMOVE THE FRESH FOOD DOOR
Tape the door shut with masking tape.
Remove the center hinge and shim by removing
the screws (some models have lock washers with
each screw). Lift up the hinge to remove it.
NOTE: Some models have a washer between the
center hinge and the top of the fresh food door.
Do not lose.
Remove the tape holding the door shut.
Lift the fresh food door up and off the bottom hinge.
(CONT.)
3
TRANSFER TOP HINGE TO THE LEFT
Using a flat blade screwdriver, remove the plug button
and hinge hole cover. Be careful of the paint finish.
Reinstall the hinge hole cover and the plug button on
the right side by inserting it into the holes vacated by
the top hinge screws.
Reassemble the top hinge (and shim) on the left side,
turning the screws just enough to hold the hinge
in place.
Set the door outside-up on a non-scratching surface.
NOTE: On some models, when removing the door,
watch for washer(s) between the bottom hinge and
the bottom of the fresh food door that may stick to
the door. Do not lose.
CAUTION:Do not let door drop
to the floor. To do so could damage the door stop.
9
Page 10
Installation Instructions
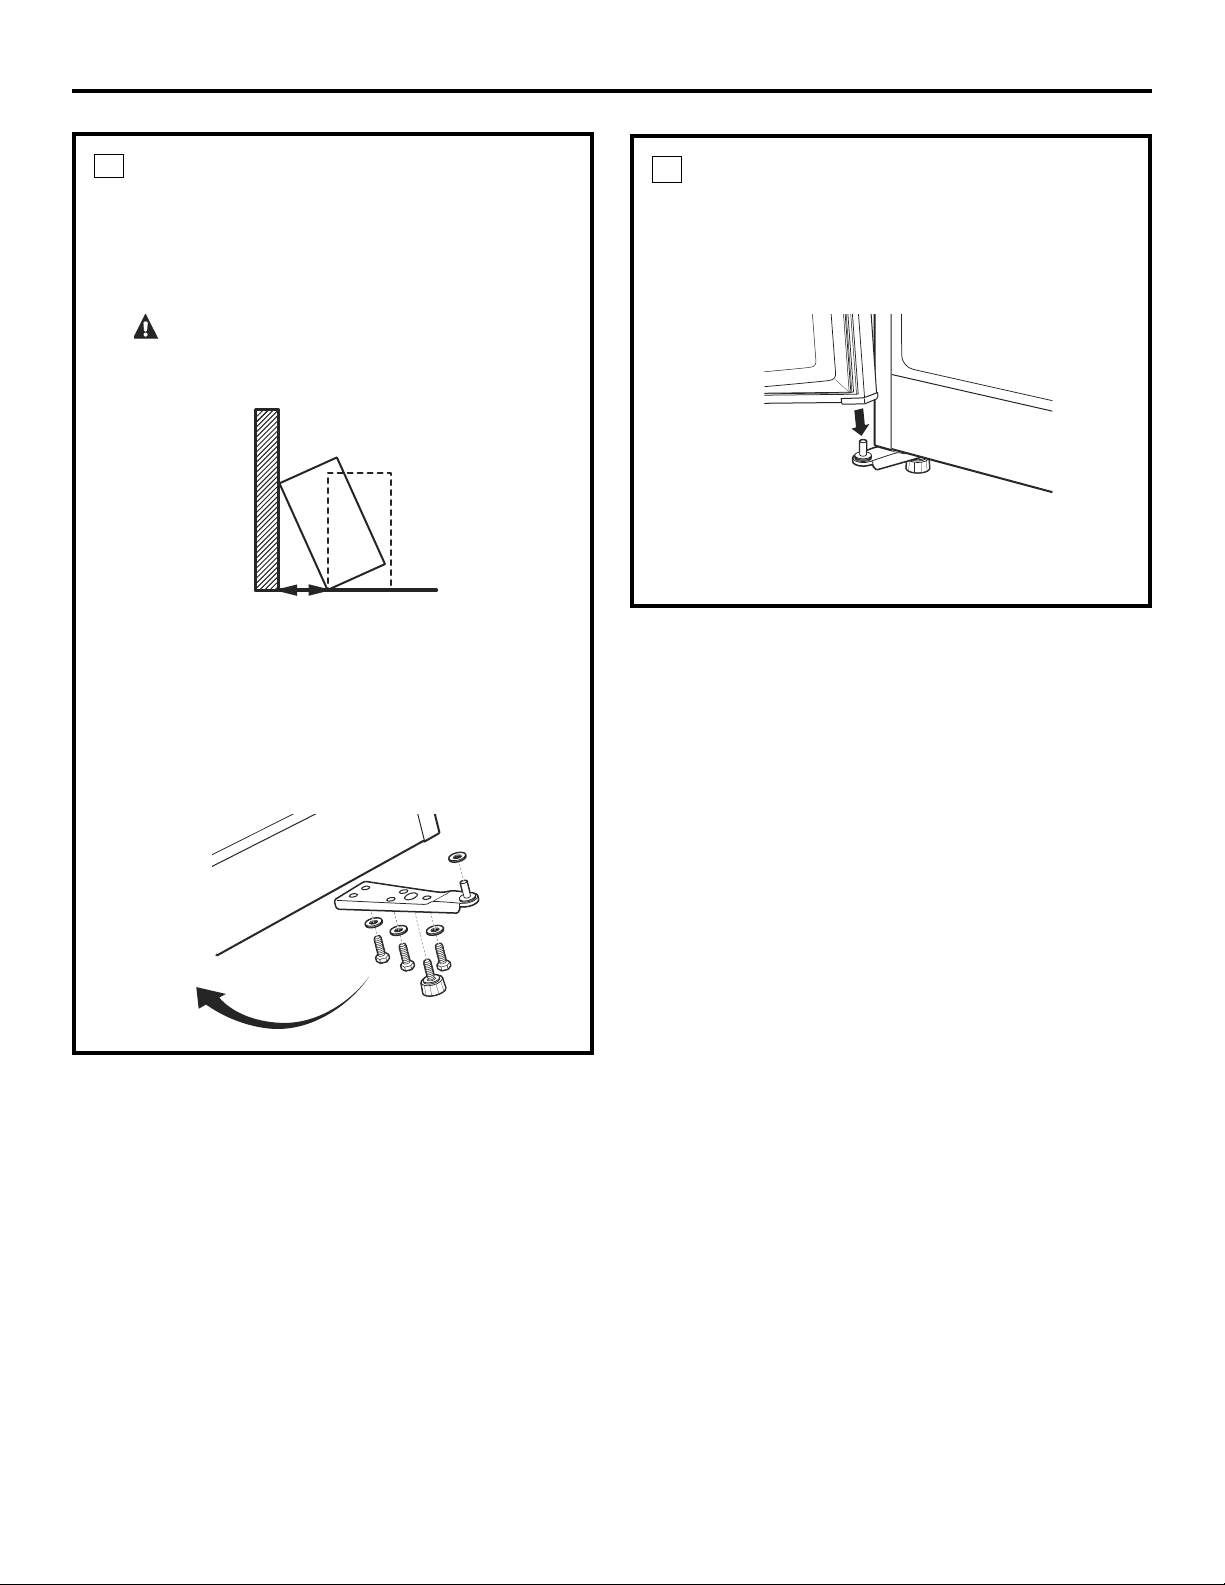
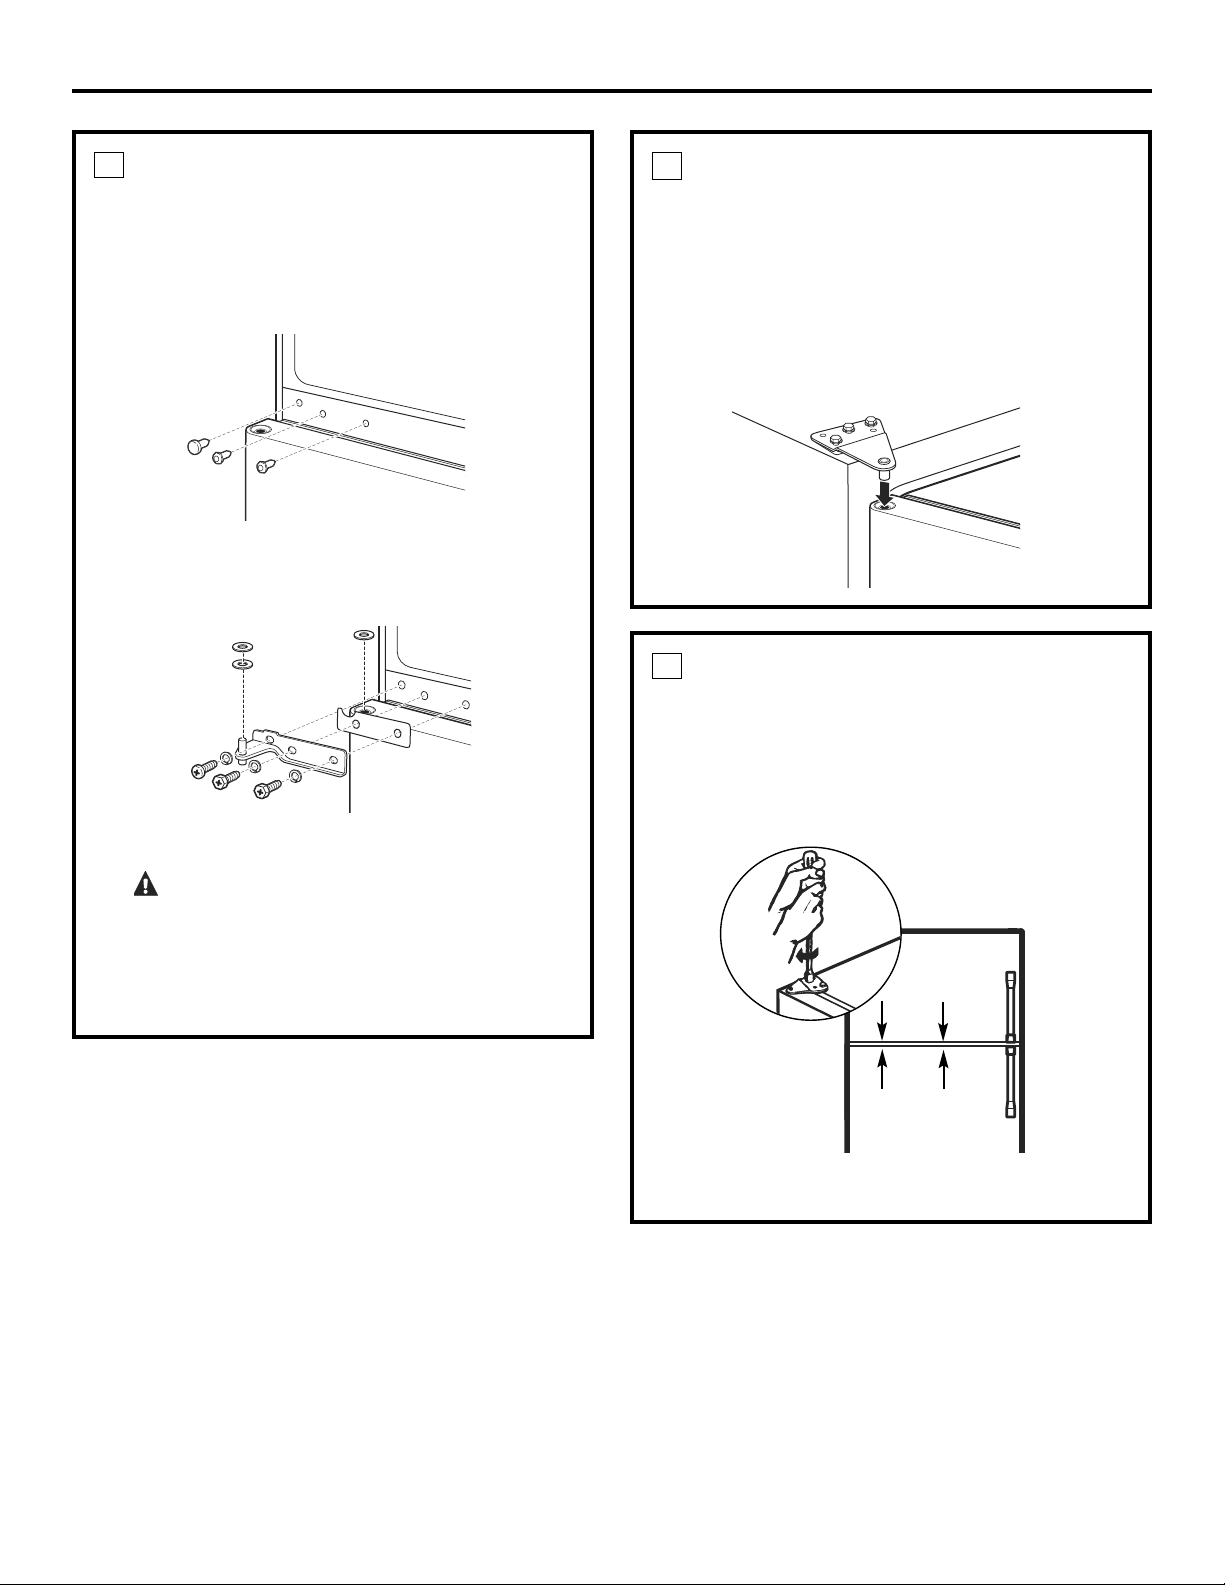
4
TRANSFER BOTTOM HINGE
TO THE LEFT
To access the bottom hinge, move the refrigerator
so it is 30” from a wall. Then carefully tip the
refrigerator back until it rests against the wall.
CAUTION:Be sure that the coils
on the back of the refrigerator do not rest against
the wall. Doing so could damage the coils.
30”
Remove the screws (some models have washers
with each screw), leveling leg and bottom hinge from
the right side. Remove the leveling leg from the left side
of the cabinet and install it in the right side.
5
REHANG THE FRESH FOOD DOOR
If washers were used with hinges, make sure they are
in place on the bottom hinge. Place the fresh food door
on the bottom hinge, close the door and tape it in
place with masking tape.
With a flat blade screwdriver, remove the plug
button from the left side (top of door) and install on
the right.
Reassemble the bottom hinge on the left side.
NOTE: The leveling legs are not interchangeable.
10
Page 11
Installation Instructions
6
INSTALL CENTER HINGE
ON THE LEFT
Remove the three plug buttons on the left side and
install them on the right. Remove the mullion screw on
the left side with a Phillips screwdriver and install on
the right.
Install the center hinge on the left side with the screws,
spacer and washer(s) (on some models) that you
removed in Step 2.
7
REHANG THE FREEZER DOOR
With a flat blade screwdriver, remove the plug button
from the left side (top of door) and install on the right.
Place the freezer door on the center hinge over
the pin.
Raise the top hinge by hand and insert the top
hinge pin into the hole in the door. Then swing
the door shut.
Remove the tape holding the door shut.
CAUTION:When assembled correctly,
the hinge is tight against the cabinet.
ATTENTION: The screws must be properly tightened.
Turn the screws until snug. Then tighten the screws a
minimum of 1/2 turn using both hands.
8
ALIGN THE DOORS
Align the freezer door with the fresh food door so that
the gap between the doors is even.
Tighten the top hinge screws by turning them until
snug. Then turn the screws a minimum of 1/2 turn
using both hands.
Install the hinge cover over the top hinge.
11
Page 12

Normal operating sounds.
Newer refrigerators sound different from older refrigerators. Modern refrigerators
have more features and use newer technology.
Do you hear what I hear? These sounds are normal.
HUMMM...
WHOOSH...
■
The new high efficiency compressor may run faster
and longer than your old refrigerator and you may
hear a high-pitched hum or pulsating sound while
it is operating.
■
You may hear a whooshing sound when the doors close.
This is due to pressure equalizing within the refrigerator.
■
You may hear the fans spinning at high speeds.
This happens when the refrigerator is first plugged in,
when the doors are opened frequently or when a large
amount of food is added to the refrigerator or freezer
compartments. The fans are helping to maintain the
correct temperatures.
■
You may hear cracking or popping sounds when the
refrigerator is first plugged in. This happens as the
refrigerator cools to the correct temperature.
■
The compressor may cause a clicking or chirping
sound when attempting to restart (this could take
Installation
Instructions
up to 5 minutes).
■
Expansion and contraction of cooling coils during and
after defrost can cause a cracking or popping sound.
■
On models with an icemaker, after an icemaking cycle,
you may hear the ice cubes dropping into the ice
bucket.
CLICKS, POPS,
CRACKS and CHIRPS
WATER SOUNDS
■
The flow of refrigerant through the freezer cooling coils
may make a gurgling noise like boiling water.
■
Water dropping on the defrost heater can cause a
sizzling, popping or buzzing sound during the defrost
cycle.
■
A water dripping noise may occur during the defrost
cycle as ice melts from the evaporator and flows into
the drain pan.
■
Closing the door may cause a gurgling sound due to
pressure equalization.
Consumer Support Troubleshooting Tips Operating Instructions Safety Instructions
12
Page 13

Before you call for service…
geappliances.ca
Troubleshooting Tips
Save time and money! Review the charts on the following
pages f irst and you may not need to call for service.
Problem Possible Causes What To Do
Refrigerator does not Refrigerator in defrost cycle. • Wait about 30 minutes for defrost cycle to end.
operate
Vibration or rattling Front leveling legs need • See Leveling Legs.
(slight vibration adjusting.
is normal)
Motor operates for Normal when refrigerator • Wait 24 hours for the refrigerator to completely
long periods or
cycles on and off
frequently. (Modern
refrigerators with
more storage space
and a larger freezer
require more
operating time. They
start and stop often
to maintain even
temperatures.)
Control in OFF position. • Move the control to a temperature setting.
Refrigerator is unplugged. • Push the plug completely into the outlet.
The fuse is blown/circuit • Replace fuse or reset the breaker.
breaker is tripped.
is first plugged in. cool down.
Often occurs when large • This is normal.
amounts of food are
placed in refrigerator.
Door left open. • Check to see if package is holding door open.
Hot weather or frequent • This is normal.
door openings.
Temperature control • See About the control.
set at the coldest setting.
Instructions
Installation
Fresh food or freezer Temperature control not • See About the control.
compartment too warm set cold enough.
Warm weather or frequent • Set the temperature control one step colder.
door openings. See About the control.
Door left open. • Check to see if package is holding door open.
Frost or ice crystals Door left open. • Check to see if package is holding door open.
on frozen food
(frost within package
is normal)
Ice cubes have Food transmitting odor/taste • Wrap foods well.
odor/taste to ice cubes.
Slow ice cube freezing Door left open. • Check to see if package is holding door open.
Too frequent or too long
door openings.
Interior of refrigerator • See Care and cleaning.
needs cleaning.
Temperature control not • See About the control.
set cold enough.
Troubleshooting TipsOperating InstructionsSafety Instructions
Consumer Support
13
Page 14

Before you call for service…
Troubleshooting Tips
Problem Possible Causes What To Do
Refrigerator has odor Foods transmitting odor • Foods with strong odors should be tightly wrapped.
to refrigerator.
Interior needs cleaning. • See Care and cleaning.
• Keep an open box of baking soda in the refrigerator;
replace every three months.
Moisture forms on Not unusual during periods • Wipe surface dry.
outside of refrigerator of high humidity.
Moisture collects inside Too frequent or too long
(in humid weather, air door openings.
carries moisture into
refrigerator when doors
are opened)
Interior light does No power at outlet. • Replace fuse or reset the breaker.
not work
Installation
Instructions
Defrost water pan needs
cleaning.
Light bulb burned out. • See Replacing the light bulb.
• See Care and cleaning.
Consumer Support Troubleshooting Tips Operating Instructions Safety Instructions
14
Page 15

Please place in envelope and mail to:
Veuillez mettre dans une enveloppe et envoyez à :
OWNERSHIP REGISTRATION
P.O. BOX 1780
MISSISSAUGA, ONTARIO
L4Y 4G1
(FOR CANADIAN CONSUMERS ONLY POUR RÉSIDENTS CANADIENS SEULEMENT)
15
Page 16

For Canadian
Customers
OWNERSHIP REGISTRATION CERTIFICATE – FICHE D’INSCRIPTION DU PROPRIÉTAIRE
Please register your product to enable us to contact you in
the remote event a safety notice is issued for this product
and to allow for efficient communication under the terms of
our warranty, should the need arise.
REGISTER ON-LINE:
ENREGISTREMENT SUR INTERNET À :
MR. / M. MRS. / MME
MISS/MLLE
STREET NO / NO RUE STREET NAME / RUE APT.NO/APP./RR#
CITY / VILLE
AREA CODE/
MS.
IND. RÉG.
TELEPHONE/TÉLÉPHONE E-MAIL/COURRIEL
www.geappliances.ca
www.electromenagersge.ca
FIRST NAME / PRÉNOM LAST NAME / NOM
Veuillez enregistrer votre produit afin de nous permettre de
communiquer avec vous si jamais un avis de sécurité concernant
ce produit était émis et de communiquer facilement avec vous en
vertu de votre garantie, si le besoin s’en fait sentir.
MAIL TO:
POSTEZ À :
P.O. BOX 1780, MISSISSAUGA
ONTARIO, L4Y 4G1
PROVINCE
POSTAL CODE/CODE POSTAL
Pour les
consommateurs
canadiens
DID YOU PURCHASE A SERVICE CONTRACT FOR THIS APPLIANCE?
AVEZ-VOUS ACHETÉ UN CONTRAT DE SERVICE POUR CET APPAREIL ?
NAME OF SELLING DEA LER / NOM DU MARCHAND
INSTALLAT ION DATE / D ATE D’INSTA LLATION
Y/A M D/J
DÉCOUPEZ ICI ET ENVOYEZ LA FICHE – MERCI
CUT ALONG THIS LINE AND RETURN CARD – THANKS
I do not wish to receive any promotional offers regarding this product.
CORRESPONDENCE
CORRESPONDANCE
ENGLISH
FRANÇAIS
Je ne désire pas recevoir d’offres promotionnelles concernant ce produit
YES/OUI
NO/NON
MODEL / MODÈLE
SERIAL / SÉRIE
.
IF YES/SI OUI : EXPIRATION
Y/A M D/ J
16
Page 17

Refrigerator Warranty.
All warranty service provided by our Factory Service Centers, or an
authorized Customer Care®technician. To schedule service, on-line,
visit us at geappliances.ca, or call 1.800.561.3344. Please have
serial number and model number available when calling for service.
Staple your receipt here.
Proof of the original purchase
date is needed to obtain service
under the warranty.
For The Period Of: Mabe Will Replace:
One Year Any part of the refrigerator which fails due to a defect in materials or workmanship.
From the date of the During this limited one-year warranty, Mabe will also provide, free of charge, all labor and
original purchase related service to replace the defective part.
What Mabe Will Not Cover:
■ Service trips to your home to teach you how to use
the product.
■ Improper installation, delivery or maintenance.
■ Failure of the product if it is abused, misused, or used for
other than the intended purpose or used commercially.
■ Loss of food due to spoilage.
■ Replacement of house fuses or resetting of circuit
breakers.
■ Damage caused after delivery.
■ Replacement of the water filter cartridge, if included, due
to water pressure that is outside the specified operating
range or due to excessive sediment in the water supply.
■ Replacement of the light bulbs, if included, or water filter
cartridge, if included, other than as noted above.
■ Damage to the product caused by accident, fire, floods
or acts of God.
■ Incidental or consequential damage caused by possible
defects with this appliance.
■ Product not accessible to provide required service.
Instructions
Installation
EXCLUSION OF IMPLIED WARRANTIES—Your sole and exclusive remedy is product repair as provided in
this Limited Warranty. Any implied warranties, including the implied warranties of merchantability or
fitness for a particular purpose, are limited to one year or the shortest period allowed by law.
This warranty is extended to the original purchaser and any succeeding owner for products purchased for
home use within Canada.
In home warranty service will be provided in areas where it is available and deemed reasonable to provide.
Warrantor: Mabe Canada Inc., Burlington, ON L7R 5B6
Troubleshooting TipsOperating InstructionsSafety Instructions
Consumer Support
17
Page 18

Consumer Support.
GE Appliances Website
Have a question or need assistance with your appliance? Try the GE Appliances Website 24 hours a day,
any day of the year! For greater convenience and faster service, you can now download Owner’s Manuals,
order parts or even schedule service on-line.
geappliances.ca
Schedule Service 1.800.561.3344 or geappliances.ca
Expert GE repair service is only one step away from your door. Get on-line and schedule your service at
your convenience any day of the year! Or call 1.800.561.3344 during normal business hours.
Real Life Design Studio geappliances.ca
GE supports the Universal Design concept—products, services and environments that can be used by
people of all ages, sizes and capabilities. We recognize the need to design for a wide range of physical and
mental abilities and impairments. For details of GE’s Universal Design applications, including kitchen design ideas
for people with disabilities, check out our Website today.
Extended Warranties 1.888.261.2133 or geappliances.ca
Purchase a GE extended warranty and learn about special discounts that are available while your warranty
is still in effect. You can purchase it on-line anytime, or call 1.888.261.2133 during normal business hours.
GE Consumer Home Services will still be there after your warranty expires.
Parts and Accessories 1.800.661.1616 or geappliances.ca
Individuals qualified to service their own appliances can have parts or accessories sent directly to their homes
(VISA, MasterCard and Discover cards are accepted). Order on-line today, 24 hours every day or by phone at
1.800.661.1616 during normal business hours.
Instructions contained in this manual cover procedures to be performed by any user. Other servicing
generally should be referred to qualified service personnel. Caution must be exercised, since improper
servicing may cause unsafe operation.
Contact Us geappliances.ca
If you are not satisfied with the service you receive from GE, contact us on our Website with all the details
including your phone number, or write to: Director, Consumer Relations
Mabe Canada Inc.
Suite 310, 1 Factory Lane
Moncton, NB, E1C 9M3
Register Your Appliance geappliances.ca
18
Register your new appliance on-line—at your convenience! Timely product registration will allow for
enhanced communication and prompt service under the terms of your warranty, should the need arise.
You may also mail in the pre-printed registration card included in the packing material.
Printed in China
Page 19

www.electromenagersge.ca
Sécurité . . . . . . . . . . . . . . . . . .20 et 21
Utilisation
Entretien et nettoyage
du réfrigérateur . . . . . . . . . . .23 et 24
Réglage du bouton
de commande . . . . . . . . . . . . . . . . . .22
Installation
Préparation avant l’installation
du réfrigérateur . . . . . . . . . . . . . . . . .25
Inversion de la porte . . . . . . . .26 à 29
Dépannage . . . . . . . . . . . . . .30 à 32
Bruits de fonctionnement
normaux . . . . . . . . . . . . . . . . . . . . . . . .30
Service à la clientèle
Service à la clientèle . . . . . . . . . . . .36
Enregistrement
du produit . . . . . . . . . . . . . . . . .33 et 34
Garantie . . . . . . . . . . . . . . . . . . . . . . . .35
Manuel de l’utilisateur
et instructions
d’installation
Modèle GTR12
à congélateur en haut
Inscrivez ici les numéros
de modèle et de série :
Modèle ________________
Série __________________
Vous trouverez ces numéros sur une
Réfrigérateurs
étiquette située sur la paroi latérale
supérieure gauche du réfrigérateur.
350A4502P656
Page 20

CONSIGNES DE SÉCURITÉ IMPORTANTES.
LISEZ TOUTES LES INSTRUCTIONS AVANT D’UTILISER VOTRE APPAREIL.
AVERTISSEMENT!
Cet appareil doit être utilisé uniquement aux fins prévues et décrites dans ce manuel.
CONSIGNES DE SÉCURITÉ
Lorsque vous utilisez des appareils électriques, observez les consignes de sécurité élémentaires suivantes :
■ Ce réfrigérateur doit être installé conformément aux
■
instructions d’installation avant d’être utilisé.
■ Ne laissez pas les enfants grimper, s’asseoir, se tenir
■
debout ni se pendre aux clayettes de cet appareil. Ils
pourraient l’endommager et gravement se blesser.
■ Ne touchez pas les surfaces froides du congélateur, plus
■
particulièrement lorsque vos mains sont humides. Votre
peau peut coller à ces surfaces extrêmement froides.
■ Ne rangez pas et n’utilisez pas d’essence ni d’autres
■
vapeurs et liquides inflammables à proximité de cet
appareil ni près de tout autre appareil électroménager.
■ Si vous possédez un réfrigérateur doté d’une machine à
■
glaçons automatique, évitez tout contact avec les pièces
mobiles du mécanisme d’éjection ou avec l’élément
chauffant qui libère les glaçons. Ne mettez pas vos mains
ni vos doigts sur le mécanisme de production
automatique des glaçons lorsque le réfrigérateur est
branché.
■ Éloignez vos doigts des zones où vous pouvez facilement
■
vous faire pincer : les espaces entre les portes, et entre
les portes et les armoires, sont toujours étroits. Soyez
prudent lorsque vous fermez les portes de l’appareil en
présence d’enfants.
■ Débranchez l’appareil avant de le nettoyer et de le
■
réparer.
REMARQUE : Nous vous recommandons vivement de
confier les réparations à un technicien qualif ié.
■ Tourner le bouton de commande sur la position OFF
■
(Arrêt) ne coupe pas l’alimentation de l’éclairage.
■ Ne recongelez pas d’aliments qui ont complètement
■
décongelé.
■ Avant de remplacer une ampoule grillée, débranchez le
■
réfrigérateur pour éviter tout contact avec un filament
sous tension. (Une ampoule grillée peut se briser
lorsqu’on la remplace.)
DANGER! RISQUE D’ENFERMEMENT
POUR LES ENFANTS
MISE AU REBUT APPROPRIÉE DU RÉFRIGÉRATEUR
Les enfants pris au piège ou morts d’asphyxie sont un
problème courant. Les réfrigérateurs abandonnés ou mis
au rebut sont toujours dangereux... même si ce n’est que
pour « quelques jours ». Si vous vous débarrassez de votre
vieux réfrigérateur, veuillez suivre les instructions ci-dessous
pour éviter tout accident.
Avant de mettre au rebut votre ancien appareil
de réfrigération :
■ Démontez les portes.
■ Laissez les clayettes en place afin d’empêcher les
enfants de grimper facilement à l’intérieur.
Frigorigènes
Tout appareil de réfrigération contient des frigorigènes qui
doivent être retirés avant la mise au rebut de l’appareil. Si
vous vous débarrassez d’un ancien appareil, adressez-vous
à l’entreprise d’élimination des déchets pour savoir
comment procéder.
UTILISATION DE CORDONS PROLONGATEURS
En raison de risques de sécurité dans certaines situations, nous vous déconseillons fortement l’utilisation d’un
cordon prolongateur.
Toutefois, si vous devez utiliser un cordon prolongateur, celui-ci doit absolument être homologué UL (aux États-Unis) ou CSA
(au Canada), doit être de type trifilaire avec mise à la terre, doit être muni d’une fiche et d’une prise mises à la terre, et doit
être prévu pour une alimentation nominale de 15 A (minimum) et de 120 V.
Service à la clientèle Dépannage Mode d’emploi Consignes de sécuritéInstallation Consignes de sécuritéSécurité
20
Page 21

www.electromenagersge.ca
AVERTISSEMENT!
RACCORDEMENT ÉLECTRIQUE
Ne coupez et ne retirez en aucun cas la troisième broche (mise à la terre) de la fiche du cordon d’alimentation.
Pour votre sécurité, cet appareil doit être correctement mis à la terre.
Pour diminuer les risques de choc électrique, le cordon
d’alimentation de cet appareil est muni d’une fiche à
3 broches (mise à la terre) qui correspond à une prise
murale à 3 alvéoles (prise mise à la terre).
Faites vérifier la prise murale et le circuit par un électricien
qualifié pour vous assurer que la prise est correctement
mise à la terre.
Si la prise murale comporte 2 alvéoles, il vous incombe de la
faire remplacer par une prise à 3 alvéoles correctement
mise à la terre.
Le réfrigérateur doit toujours être le seul appareil branché
sur une prise de courant dont la tension nominale
correspond à celle indiquée sur la plaque signalétique.
Cela assure de meilleures performances et évite toute
surcharge, et donc surchauffe, des circuits du domicile qui
pourrait être à l’origine d’un incendie.
Ne débranchez jamais le réfrigérateur en tirant sur son
cordon d’alimentation. Saisissez fermement la fiche et
sortez-la de la prise en tirant bien droit.
Réparez ou remplacez immédiatement tous les cordons
électriques effilochés ou endommagés. N’utilisez pas de
cordon qui présente des signes d’usure ou de fissure.
Lorsque vous éloignez l’appareil du mur, faites attention à
ne pas le faire rouler sur le cordon d’alimentation et à ne
pas endommager ce dernier.
UTILISATION DE FICHES D’ADAPTATION
L’utilisation de fiches d’adaptation est interdite au Canada.
LISEZ ET SUIVEZ ATTENTIVEMENT CES CONSIGNES DE SÉCURITÉ
CONSERVEZ CES INSTRUCTIONS
DépannageUtilisationSécurité Installation
Service à la clientèle
21
Page 22

À propos du bouton de commande du réfrigérateur
Le bouton de commande de température situé sur la façade de votre
réfrigérateur régule la température dans les compartiments
réfrigérateur et congélateur. Ajustez d’abord le bouton de commande
au réglage moyen, comme indiqué sur l’illustration.
Réglez le bouton de commande par paliers et attendez 12 heures entre
les réglages pour que la température du réfrigérateur atteigne celle que
MAXMIN
vous avez sélectionnée.
Réglage du bouton de commande
Le bouton de commande de la température permet de
maintenir la température dans le congélateur et le
réfrigérateur. MIN (Minimum) est le réglage le plus chaud.
MAX (Maximum) est le réglage le plus froid.
Après avoir changé le réglage du bouton de commande,
attendez 12 heures pour que la température du réfrigérateur
atteigne celle que vous avez sélectionnée.
Le réglage du bouton de commande dépend de vos
préférences ainsi que des conditions d’utilisation et de
fonctionnement du réfrigérateur. Par ailleurs, il se peut
que vous deviez effectuer plusieurs ajustements avant de
trouver le bon réglage.
Service à la clientèle Dépannage Mode d’emploi SécuritéInstallation Mode d’emploiUtilisation
22
Page 23

Entretien et nettoyage du réfrigérateur www.electromenagersge.ca
Nettoyage de l’extérieur
L’extérieur doit rester propre. Nettoyez au moyen
d’un chiffon propre légèrement imbibé de savon à
vaisselle liquide doux. Séchez à l’aide d’un linge
doux et propre.
N’essuyez pas le réfrigérateur avec un torchon sale
ou une serviette humide. Ceux-ci peuvent laisser un
résidu qui pourrait endommager la peinture.
N’utilisez pas de tampon à récurer, de poudre
nettoyante, d’agent de blanchiment (ou de produit
qui en contienne) car ils peuvent rayer ou fragiliser
la peinture.
Nettoyage de l’intérieur
Pour éviter toute odeur désagréable, laissez une
boîte de bicarbonate de soude ouverte dans le
réfrigérateur et le congélateur.
Débranchez le réfrigérateur avant de le nettoyer.
Si cela n’est pas pratique, essorez bien l’éponge ou
le chiffon utilisé lorsque vous nettoyez autour des
interrupteurs, des lampes ou des boutons de
commande.
Utilisez une solution d’eau chaude et de
bicarbonate de soude — environ une cuillère à
soupe (15 mL) de bicarbonate de soude pour 1 litre
d’eau. Cela sert à nettoyer et à neutraliser les
odeurs. Rincez et essuyez.
Protégez la peinture. L’extérieur du réfrigérateur
est recouvert d’une peinture cuite au four de haute
qualité. S’il est bien entretenu, le revêtement garde
son aspect neuf et ne rouille pas pendant de
nombreuses années. Appliquez une couche de cire
pour électroménagers de cuisine lorsque le
réfrigérateur est encore neuf, puis répétez
l’application au moins deux fois par an.
Plateau de dégivrage Le plateau non amovible est
situé sous le compresseur, à l’arrière du
réfrigérateur. Il doit être nettoyé au moins une fois
par an. Éloignez autant que possible le
réfrigérateur du mur et débranchez le cordon
d’alimentation de la prise murale. Laissez le
compresseur refroidir avant de nettoyer le plateau.
Utilisez un chiffon ou une éponge propre et imbibé
d’une solution d’eau chaude et de bicarbonate de
soude — une cuillère à soupe (15 mL) de
bicarbonate de soude pour 1 pinte (1 litre) d’eau.
N’utilisez pas de poudre nettoyante, de nettoyant
abrasif, d’agent de blanchiment ou de nettoyant
contenant du chlorure.
Les autres pièces du réfrigérateur — dont les joints
de porte, les bacs à fruits et légumes, et les pièces
en plastique — peuvent être nettoyées de la même
manière.
Une fois les joints de porte nettoyés, appliquez une
fine couche de pétrolatum sur ceux-ci, au niveau
des charnières. Cela évite aux joints de coller et de
se tordre. N’utilisez pas de poudre nettoyante ou
d’autre type de nettoyant abrasif.
Derrière le réfrigérateur
Une fois par an, déplacez le réfrigérateur et passez
l’aspirateur sur les serpentins. Faites attention
lorsque vous éloignez le réfrigérateur du mur. Tous
les types de revêtement de sol peuvent être
endommagés, particulièrement ceux qui sont
coussinés ou en relief.
Ne nettoyez aucune des pièces en plastique du
réfrigérateur au lave-vaisselle.
Sortez le réfrigérateur en le tirant bien droit et
remettez-le en place en le repoussant de la même
façon. Déplacer le réfrigérateur de façon latérale
peut endommager le revêtement de sol ou le
réfrigérateur.
Lorsque vous repoussez le réfrigérateur pour le
remettre en place, assurez-vous qu’il ne roule pas
sur le cordon d’alimentation.
DépannageUtilisationSécurité Installation
Service à la clientèle
23
Page 24

Entretien et nettoyage du réfrigérateur
Remplacement de l’ampoule
Tourner le bouton de commande plus loin que le
réglage MIN (Minimum) ne coupe pas l’alimentation
du circuit d’éclairage.
L’ampoule est située derrière le couvre-ampoule
qui se trouve dans la paroi arrière du réfrigérateur.
Débranchez le réfrigérateur.
Retirez les clayettes.
Retirez la vis.
Retirez doucement le couvre-ampoule en
insérant un tournevis plat dans la fente qui
se trouve au-dessus du couvre-ampoule
puis en soulevant ce dernier.
Avant de partir en vacances
En cas de vacances ou d’absences prolongées,
retirez les aliments du réfrigérateur et débranchezle. Tournez le bouton plus loin que le réglage MIN
(Minimum) et nettoyez l’intérieur du réfrigérateur à
l’aide d’une solution composée d’une cuillère à
soupe (15 mL) de bicarbonate de soude et d’une
pinte (un litre) d’eau. Laissez les portes ouvertes.
Remplacez l’ampoule par une ampoule
pour électroménagers d’une puissance
égale ou inférieure (15 W maximum).
Insérez dans le logement de l’ampoule la
languette qui se trouve au bas du couvreampoule, puis enclenchez ce dernier en
place.
Réinstallez la vis.
Avant un déménagement
Afin d’éviter d’endommager les pièces mobiles
comme les clayettes et les bacs, immobilisez-les
au moyen de ruban adhésif.
Assurez-vous que le réfrigérateur reste en position
verticale durant le déménagement.
Service à la clientèle Dépannage Mode d’emploi SécuritéInstallation Mode d’emploiUtilisation
24
Page 25

Instructions
Réfrigérateur
d’installation
Modèle GTR12
Si vous avez des questions, composez le 1-800-561-3344 ou consultez notre site Web à
l’adresse suivante :
AVANT DE COMMENCER
Lisez attentivement toutes ces instructions.
•
IMPORTANT
l’inspecteur local.
•
IMPORTANT
règlements en vigueur.
Remarque destinée à l’installateur
•
ces instructions au consommateur.
Remarque destinée au consommateur
•
ces instructions pour vous y reporter ultérieurement.
• Niveau de compétence – L’installation de cet appareil nécessite
des compétences de base en mécanique.
• Durée de l’installation – Installation du réfrigérateur
• L’installateur est responsable de la qualité de l’installation.
• Une panne du produit due à une mauvaise installation n’est pas
couverte par la garantie.
electromenagersge.ca.
– Conservez ces instructions pour
– Observez tous les codes et
– Veillez à laisser
– Conservez
15 minutes
Inversion de la porte
1 heure
DÉGAGEMENTS
Prévoyez les dégagements suivants pour faciliter l’installation, la
circulation d’air, les raccordements de tuyauterie et les
raccordements électriques :
• Côtés : 1 po (2,5 cm)
• Haut : 4 po (10,2 cm)
• Arrière : 2 po (5 cm) entre les serpentins au dos du réfrigérateur
et le mur
Pour un dégagement et une ventilation appropriés, assurez-vous
que l’entretoise métallique ou le butoir à visser en caoutchouc (au
dos de certains modèles) est en place.
PIEDS DE MISE À NIVEAU
Les pieds réglables à l’avant du réfrigérateur doivent être ajustés
de manière à ce que l’appareil repose bien sur le sol et que l’avant
soit légèrement surélevé pour permettre de fermer facilement la
porte lorsque celle-ci est ouverte de moitié.
Pour régler les pieds de mise à niveau : tournez-les vers la
droite pour lever le réfrigérateur, vers la gauche pour l’abaisser.
EMPLACEMENT DU RÉFRIGÉRATEUR
• N’installez pas le réfrigérateur dans un endroit où la
température peut descendre en dessous de 55 °F (13 °C), car il
ne fonctionnera pas assez souvent pour maintenir une bonne
température intérieure.
• Installez-le sur un sol assez solide pour le supporter une fois
plein.
• Ne l’installez pas à moins de 5 po (13 cm) d’une cuisinière.
Pour surélever le réfrigérateur
25
Page 26

Instructions d’installation
INVERSION DE LA PORTE
REMARQUES IMPORTANTES
Pour inverser la porte :
• Lisez bien toutes les instructions avant de commencer.
• Manipulez les pièces avec précaution pour éviter de rayer la
peinture.
• Posez les vis à côté des pièces auxquelles elles correspondent
pour éviter de les utiliser au mauvais endroit.
• Aménagez un espace qui ne présente aucun risque de rayure
pour les portes.
IMPORTANT : Une fois l’inversion commencée, ne déplacez pas la
caisse jusqu’à ce que l’inversion soit terminée.
Ces instructions indiquent comment changer les charnières de
côté (de la droite vers la gauche) — si vous souhaitez remettre les
charnières du côté droit, suivez les mêmes instructions en
inversant toutes les références faites aux côtés droit et gauche.
Débranchez le réfrigérateur de la prise murale.
Videz tous les balconnets.
OUTILS NÉCESSAIRES
1
DÉPOSE DE LA PORTE DU
COMPARTIMENT CONGÉLATEUR
Retirez le couvre-charnière, les vis (certains modèles
disposent de rondelles de blocage), la charnière supérieure
et la cale (le cas échéant).
Posez la porte, face extérieure vers le haut, sur une surface
qui ne risque pas de la rayer.
REMARQUE : Lorsque vous retirez la porte de certains
modèles, faites attention aux rondelles qui se trouvent entre
la charnière centrale et le bas de la porte du congélateur, car
celles-ci pourraient coller à la porte. Ne les perdez pas.
ATTENTION :Ne laissez pas la porte
tomber sur le sol. Cela pourrait endommager la butée
de porte.
Tournevis à douille de 5/16 po
Tournevis Phillips
Tournevis fin
Ruban-cache
26
Page 27

Instructions d’installation
INVERSION DE LA PORTE
2
DÉPOSE DE LA PORTE DU
COMPARTIMENT RÉFRIGÉRATEUR
Immobilisez la porte en position fermée au moyen de rubancache.
Retirez la charnière centrale et la cale en enlevant les vis
(certains modèles possèdent des rondelles de blocage à
chaque vis). Soulevez la charnière pour la retirer.
REMARQUE : Certains modèles possèdent une rondelle entre
la charnière centrale et le haut de la porte du compartiment
réfrigérateur. Ne la perdez pas.
Ôtez le ruban adhésif qui maintient la porte en position
fermée.
(SUITE)
3
DÉPLACEMENT DE LA CHARNIÈRE
SUPÉRIEURE VERS LA GAUCHE
À l’aide d’un tournevis plat, retirez le capuchon de finition et
le cache des trous de charnière. Faites attention à ne pas
endommager la peinture.
Réinstallez le cache des trous de charnière et le capuchon de
finition sur le côté droit en les insérant dans les trous libérés
par les vis de la charnière supérieure.
Réinstallez la charnière supérieure (et la cale) du côté gauche
en tournant les vis juste assez pour qu’elles retiennent la
charnière en place.
Soulevez la porte du compartiment réfrigérateur et dégagezla de la charnière inférieure.
Posez la porte, face extérieure vers le haut, sur une surface
qui ne risque pas de la rayer.
REMARQUE : Lorsque vous retirez la porte de certains
modèles, faites attention aux rondelles qui se trouvent entre
la charnière inférieure et le bas de la porte du réfrigérateur,
car celles-ci pourraient coller à la porte. Ne les perdez pas.
ATTENTION : Ne laissez pas la porte
tomber sur le sol. Cela pourrait endommager la butée
de porte.
27
Page 28

Instructions d’installation
4
DÉPLACEMENT DE LA CHARNIÈRE
INFÉRIEURE VERS LA GAUCHE
5
RÉINSTALLATION DE LA PORTE DU
COMPARTIMENT RÉFRIGÉRATEUR
Pour accéder à la charnière inférieure, éloignez le
réfrigérateur du mur de 30 po (76,2 cm). Puis, faites
doucement basculer l’arrière du réfrigérateur jusqu’à
ce qu’il repose contre le mur.
ATTENTION : Assurez-vous que les
serpentins situés à l’arrière du réfrigérateur ne sont pas
appuyés contre le mur. Cela pourrait les endommager.
30 po (76,2 cm)
Retirez les vis (certains modèles possèdent des rondelles à
chaque vis), le pied de mise à niveau et la charnière inférieure
situés du côté droit. Retirez le pied de mise à niveau situé à
gauche de la caisse et installez-le à droite.
Réinstallez la charnière inférieure du côté gauche.
REMARQUE : Les pieds de mise à niveau ne sont pas
interchangeables.
Si les charnières sont munies de rondelles, assurez-vous que
ces dernières sont en place sur la charnière inférieure. Posez
la porte du compartiment réfrigérateur sur la charnière
inférieure et immobilisez-la avec du ruban-cache.
À l’aide d’un tournevis plat, enlevez le capuchon de
finition qui se trouve du côté gauche (sur le dessus de la
porte) et installez-le du côté droit.
28
Page 29

Instructions d’installation
6
INSTALLATION DE LA CHARNIÈRE
CENTRALE À GAUCHE
Retirez les trois capuchons de finition situés à gauche et
mettez-les à droite. Retirez les vis-meneaux qui se trouvent
à gauche à l’aide d’un tournevis Phillips, puis installez-les
à droite.
Installez la charnière centrale à gauche à l’aide des vis,
des entretoises et des rondelles (certains modèles) que
vous avez enlevées à la deuxième étape.
7
RÉINSTALLATION DE LA PORTE DU
COMPARTIMENT CONGÉLATEUR
À l’aide d’un tournevis plat, enlevez le capuchon de finition
qui se trouve du côté gauche (sur le dessus de la porte) et
installez-le du côté droit.
Posez la porte du compartiment congélateur sur l’axe de la
charnière centrale.
Avec votre main, soulevez la charnière supérieure et insérez
son axe dans le trou de la porte. Puis, refermez la porte.
8
ALIGNEMENT DES PORTES
Ôtez le ruban adhésif qui maintient la porte en position
fermée.
ATTENTION : Lorsque la charnière est
bien installée, celle-ci repose parfaitement contre la caisse.
ATTENTION : Les vis doivent être bien serrées. Tournez les
vis jusqu’à ce qu’elles soient bien ajustées. Puis, resserrez-les
d’au moins 1/2 tour en utilisant vos deux mains.
Alignez la porte du compartiment congélateur avec celle du
compartiment réfrigérateur de manière à ce que l’espace
entre les portes soit uniforme d’un bout à l’autre.
Serrez les vis de la charnière supérieure jusqu’à ce qu’elles
soient bien ajustées. Puis, resserrez-les d’au moins 1/2 tour
en utilisant vos deux mains.
Installez le couvre-charnière sur la charnière supérieure.
29
Page 30

T
Bruits de fonctionnement normaux
Les nouveaux réfrigérateurs produisent des bruits différents de ceux des anciens réfrigérateurs. Les
réfrigérateurs modernes disposent de plus de fonctions et utilisent une technologie plus récente.
Entendez-vous ce que j’entends? Ces bruits sont tout à fait normaux.
BOURDONNEMENTS...
APPELS D’AIR...
■ Le nouveau compresseur à haute efficacité peut fonctionner
plus rapidement et plus longtemps que celui de votre ancien
réfrigérateur. Il se peut que vous entendiez un
bourdonnement aigu ou un son modulé lors de son
fonctionnement.
■ Il se peut que vous entendiez un bruit d’appel d’air lorsque
vous fermez les portes. Cela est dû à la stabilisation de la
pression à l’intérieur du réfrigérateur.
CLIQUETIS, CLAQUEMENTS,
CRAQUEMENTS et SIFFLEMENTS
■
Il se peut que vous entendiez des craquements ou des
claquements lorsque vous branchez le réfrigérateur pour
la première fois. Cela se produit quand le réfrigérateur
refroidit pour atteindre la température adéquate.
■
Le compresseur peut être à l’origine de cliquetis ou de
sifflements lorsque qu’il essaie de redémarrer (cela peut
prendre jusqu’à 5 minutes).
■
L’expansion et la contraction des serpentins de
refroidissement pendant et après le dégivrage peuvent
engendrer des craquements ou des claquements.
■
Sur les modèles dotés d’une machine à glaçons, il se peut
qu’après un cycle de production, vous entendiez le bruit
des glaçons tombant dans le bac à glaçons.
VROMBISSEMEN
■ Il se peut que vous entendiez les ventilateurs tourner très
rapidement. Cela se produit lorsque le réfrigérateur est
branché pour la première fois, que les portes sont
fréquemment ouvertes ou qu’une grande quantité d’aliments
est ajoutée dans le réfrigérateur ou le congélateur. Les
ventilateurs aident au bon maintien des températures.
BRUITS D’EAU
■
Le flux du frigorigène à travers les serpentins de
refroidissement peut produire un bruit de glouglou qui
ressemble à de l’eau qui bout.
■
De l’eau qui tombe sur l’élément chauffant de dégivrage
peut être à l’origine de grésillements ou de bourdonnements
durant le dégivrage.
■
Il se peut que vous entendiez un bruit de goutte à goutte
pendant le dégivrage, lorsque la glace sur l’évaporateur fond
et s’écoule dans le plateau de dégivrage.
■
La fermeture de la porte peut causer un bruit de glouglou dû
à la stabilisation de la pression.
Service à la clientèle Dépannage Utilisation SécuritéInstallation
30
Page 31

Avant de contacter un service de dépannage…
www.electromenagersge.ca
Conseils de dépannage
Économisez temps et argent! Consultez le tableau suivant
pour éviter tout appel de service qui ne serait pas nécessaire.
Problème Causes possibles Solutions
Le réfrigérateur ne Le réfrigérateur est en cours de • Attendez environ 30 minutes pour que le dégivrage se termine.
fonctionne pas dégivrage.
Le bouton de commande est à OFF • Positionnez le bouton de commande à un réglage de
(Arrêt). température.
Le réfrigérateur est débranché. • Insérez complètement la fiche dans la prise.
Le fusible est grillé/le disjoncteur • Remplacez le fusible ou réenclenchez le disjoncteur.
s’est déclenché.
Vibration ou cliquetis Les pieds de mise à niveau avant • Reportez-vous à la section sur les pieds de mise à niveau.
(il est normal d’entendre doivent être ajustés.
une légère vibration)
Le moteur fonctionne
pendant de longues périodes
de temps ou se déclenche
souvent. (Les réfrigérateurs
modernes avec plus d’espace
de rangement et un congélateur plus grand nécessitent
un fonctionnement plus long.
Ils se mettent en marche et
s’arrêtent régulièrement pour
maintenir des températures
uniformes.)
Le compartiment La commande de la température n’est • Consultez la section À propos du bouton de commande du
réfrigérateur ou pas réglée à une température assez réfrigérateur.
congélateur est trop chaud basse.
Présence de givre ou de
cristaux de glace sur les
aliments congelés (la
présence de givre à l’intérieur
des emballages est normale)
Ceci est normal lorsque le réfrigérateur • Attendez 24 heures pour que le réfrigérateur refroidisse
est branché pour la première fois. complètement.
Ceci est fréquent lorsqu’une • Ceci est normal.
grande quantité d’aliments est
placée dans le réfrigérateur.
La porte est restée ouverte. • Vérifiez si un emballage empêche la fermeture de la porte.
Temps très chaud ou • Ceci est normal.
ouvertures fréquentes de la porte.
La commande de la température • Consultez la section À propos du bouton de commande du
se trouve au réglage le plus froid. réfrigérateur.
Temps chaud ou ouvertures • Ajustez la commande de la température à un réglage plus froid.
fréquentes de la porte. Consultez la section À propos du bouton de commande du
réfrigérateur.
La porte est restée ouverte. • Vérifiez si un emballage empêche la fermeture de la porte.
La porte est restée ouverte. • Vérifiez si un emballage empêche la fermeture de la porte.
La porte est trop souvent ouverte
ou reste ouverte trop longtemps.
DépannageUtilisationSécurité Installation
Les glaçons ont une L’odeur/le goût provient d’aliments • Emballez bien les aliments.
odeur/un goût désagréable qui ont une forte odeur.
L’intérieur du réfrigérateur • Consultez la section Entretien et nettoyage du réfrigérateur.
doit être nettoyé.
Les glaçons gèlent La porte est restée ouverte. • Vérifiez si un emballage empêche la fermeture de la porte.
lentement
La commande de la température • Consultez la section À propos du bouton de commande du
n’est pas réglée à une température réfrigérateur.
assez basse.
Service à la clientèle
31
Page 32

Avant de contacter un service de dépannage…
Dépannage
Problème Causes possibles Solutions
Le réfrigérateur sent L’odeur provient d’aliments qui ont • Les aliments qui dégagent une forte odeur doivent être bien
mauvais une forte odeur. emballés.
• Gardez une boîte de bicarbonate de soude ouverte dans le
réfrigérateur et remplacez-la tous les trois mois.
L’intérieur doit être nettoyé. • Consultez la section Entretien et nettoyage du réfrigérateur.
Le plateau de dégivrage doit être • Consultez la section Entretien et nettoyage du réfrigérateur.
nettoyé.
L’extérieur de l’appareil Ceci n’est pas rare lorsque le temps • Essuyez la surface du réfrigérateur.
est humide est humide.
L’intérieur de l’appareil est La porte est trop souvent ouverte ou
humide (l’humidité contenue reste ouverte trop longtemps.
dans l’air peut pénétrer à
l’intérieur de l’appareil
lorsque les portes sont
ouvertes)
L’éclairage intérieur ne
fonctionne pas
Absence de courant à la prise. • Remplacez le fusible ou réenclenchez le disjoncteur.
L’ampoule est grillée. • Consultez la section Remplacement de l’ampoule.
Service à la clientèle Dépannage Utilisation SécuritéInstallation
32
Page 33

Please place in envelope and mail to:
Veuillez mettre dans une enveloppe et envoyez à :
OWNERSHIP REGISTRATION
P.O. BOX 1780
MISSISSAUGA, ONTARIO
L4Y 4G1
(FOR CANADIAN CONSUMERS ONLY POUR RÉSIDENTS CANADIENS SEULEMENT)
33
Page 34

For Canadian
Customers
OWNERSHIP REGISTRATION CERTIFICATE – FICHE D’INSCRIPTION DU PROPRIÉTAIRE
Please register your product to enable us to contact you in
the remote event a safety notice is issued for this product
and to allow for efficient communication under the terms of
our warranty, should the need arise.
REGISTER ON-LINE:
ENREGISTREMENT SUR INTERNET À :
MR. / M. MRS. / MME
MISS/MLLE MS.
STREET NO / NO RUE STREET NAME / RUE APT.NO/APP./RR#
CITY / VILLE
IND. RÉG.
AREA CODE/
TELEPHONE/TÉLÉPHONE E-MAIL/COURRIEL
www.geappliances.ca
www.electromenagersge.ca
FIRST NAME / PRÉNOM LAST NAME / NOM
Veuillez enregistrer votre produit afin de nous permettre de
communiquer avec vous si jamais un avis de sécurité concernant
ce produit était émis et de communiquer facilement avec vous en
vertu de votre garantie, si le besoin s’en fait sentir.
MAIL TO:
POSTEZ À :
P.O. BOX 1780, MISSISSAUGA
ONTARIO, L4Y 4G1
PROVINCE
POSTAL CODE/CODE POSTAL
Pour les
consommateurs
canadiens
DID YOU PURCHASE A SERVICE CONTRACT FOR THIS APPLIANCE?
AVEZ-VOUS ACHETÉ UN CONTRAT DE SERVICE POUR CET APPAREIL ?
NAME OF SELLING DEA LER / NOM DU MARCHAND
INSTALLAT ION DATE / D ATE D’INSTA LLATION
Y/A M D/J
DÉCOUPEZ ICI ET ENVOYEZ LA FICHE – MERCI
CUT ALONG THIS LINE AND RETURN CARD – THANKS
I do not wish to receive any promotional offers regarding this product.
CORRESPONDENCE
CORRESPONDANCE
ENGLISH
FRANÇAIS
Je ne désire pas recevoir d’offres promotionnelles concernant ce produit
YES/OUI
NO/NON
MODEL / MODÈLE
SERIAL / SÉRIE
.
IF YES/SI OUI : EXPIRATION
Y/A M D/ J
34
Page 35

Garantie
Toutes les réparations sous garantie sont effectuées par nos Centres
®
de réparation ou par nos réparateurs agréés Customer Care
. Pour
faire la demande d’une réparation en ligne, visitez notre site à
l’adresse www.electromenagersge.ca ou appelez au 1-800-561-3344.
Agrafez votre facture ici.
Une preuve de la date d’achat d’origine
est requise pour bénéficier du service
de réparation sous garantie.
Veuillez avoir les numéros de série et de modèle de votre appareil à
portée de main lorsque vous appelez pour obtenir du service.
Période de garantie : Mabe remplacera :
Un an Toute pièce du réfrigérateur qui se révèle défectueuse en raison d’un vice de matériau ou de fabrication.
à compter de la date Au cours de cette garantie limitée d’un an, Mabe fournira également, sans frais, toute la main-d’œuvre
d’achat d’origine pour le remplacement de la pièce défectueuse à domicile.
Ce que Mabe ne couvre pas :
■ Toute visite à votre domicile pour vous expliquer le
fonctionnement de l’appareil.
■ L’installation, la livraison ou l’entretien inadéquat de l’appareil.
■ Toute défectuosité du produit attribuable à une utilisation
abusive ou inadéquate, s’il a été utilisé à toute autre fin que
celle pour laquelle il a été conçu, ou s’il a été utilisé à des fins
commerciales.
■ Les aliments avariés.
■ Le remplacement des fusibles ou le réenclenchement du
disjoncteur de votre domicile.
■ Tout dommage causé après la livraison.
■ Le remplacement de la cartouche du filtre à eau (le cas
échéant) causé par une pression d’eau qui dépasse les
limites spécifiées ou un remplacement causé par un excès
de sédiments dans l’alimentation en eau.
■ Le remplacement des ampoules (le cas échéant) ou de la
cartouche du filtre à eau (le cas échéant) pour une autre
raison que celles citées ci-dessus.
■ Tout dommage au produit attribuable à un accident, un
incendie, une inondation ou une catastrophe naturelle.
■ Tout dommage accessoire ou indirect causé par des
défaillances possibles de l’appareil.
■ Tout produit auquel il n’est pas possible d’accéder pour
effectuer les réparations nécessaires.
EXCLUSION DES GARANTIES IMPLICITES — Votre seul et unique recours est de faire réparer le produit dans
le cadre de cette garantie limitée. Toute garantie implicite, incluant la garantie de qualité marchande ou
d’adaptabilité du produit à un usage particulier, est limitée à un an ou à la période la plus courte autorisée
par la loi.
Cette garantie est offerte à l’acheteur initial, ainsi qu’à tout propriétaire subséquent d’un produit acheté en vue d’une
utilisation domestique au Canada.
Le service à domicile en vertu de cette garantie sera fourni dans les régions où ce service est offert et où il est raisonnable
de le fournir.
Garant : Mabe Canada Inc., Burlington, ON L7R 5B6
35
DépannageUtilisationSécurité Installation
Service à la clientèle
Page 36

Service à la clientèle
Site Web des électroménagers GE www.electromenagersge.ca
Vous avez des questions ou vous avez besoin d’aide concernant votre appareil? Consultez le site Web des électroménagers GE
accessible 24 heures sur 24, tous les jours de l’année! Pour un service pratique encore plus rapide, vous pouvez maintenant
télécharger des manuels, commander des pièces ou même faire une demande de réparation en ligne.
Demande de réparation 1-800-561-3344 ou www.electromenagersge.ca
Le service expert de réparation GE n’est qu’à un pas de chez vous. Demandez une réparation en ligne, peu importe la journée!
C’est pratique! Vous pouvez également téléphoner au 1-800-561-3344 durant les heures normales de bureau.
Centre de conception universelle www.electromenagersge.ca
GE soutient la conception universelle : des produits, des services et des milieux de vie à la portée de tous, quels que soient leur
âge, leur taille ou leurs capacités mentales et physiques. Nous avons conscience qu’il est nécessaire d’adapter la conception de
nos produits à toute la variété de capacités et d’handicaps physiques et mentaux existants. Pour plus de détails sur les
applications de conception universelle de GE, dont la conception de cuisines pour les personnes atteintes d’un handicap,
consultez notre site Web dès aujourd’hui.
Garanties prolongées 1-888-261-2133 ou www.electromenagersge.ca
Procurez-vous une garantie prolongée GE et informez-vous au sujet des rabais spéciaux offerts tout au long de la durée de
votre garantie. Vous pouvez vous la procurer en ligne en tout temps ou en téléphonant au 1-888-261-2133 durant les heures
normales de bureau. Les services à domicile GE seront toujours disponibles après expiration de votre garantie.
Pièces et accessoires 1-800-661-1616 ou www.electromenagersge.ca
Les personnes ayant les compétences requises pour réparer elles-mêmes leurs appareils peuvent directement recevoir des
pièces ou des accessoires à domicile (les cartes VISA, MasterCard et Discover sont acceptées). Commandez en ligne dès
aujourd’hui, 24 heures sur 24, ou en téléphonant au 1-800-661-1616 durant les heures normales de bureau.
Les instructions contenues dans le présent manuel comportent des procédures que tout utilisateur peut effectuer.
Les autres types de réparation doivent généralement être confiés à un technicien qualifié. Usez de prudence, car une
réparation ou un entretien mal effectué peut rendre l’utilisation de l’appareil dangereuse.
Contactez-nous www.electromenagersge.ca
Si vous n’êtes pas satisfait du service après-vente de GE, communiquez avec nous sur notre site Web en fournissant tous les
détails et votre numéro de téléphone, ou écrivez à : Director, Consumer Relations
Mabe Canada Inc.
Suite 310, 1 Factory Lane
Moncton, NB E1C 9M3
36
Enregistrez votre appareil www.electromenagersge.ca
Enregistrez votre nouvel appareil en ligne — au moment qui vous convient le mieux! L’enregistrement de votre produit
dans les délais prescrits permet une meilleure communication et un service rapide, selon les modalités de votre garantie, si
besoin est. Vous pouvez également envoyer par courrier la carte d’enregistrement préimprimée qui se trouve dans l’emballage
de votre appareil.
Imprimé en Chine
 Loading...