

Page 1

Safety Information
Connect Electricity . . . . . . . . . . . . . . .4
Proper Disposal . . . . . . . . . . . . . . . . .3
Safety Precautions . . . . . . . . . . . . . . .2
Operating Instructions
Automatic Icemaker . . . . . . . . . . . .10
Controls . . . . . . . . . . . . . . . . . . . . . . .5
Ice and Water Dispenser . . . . . . . . .11
Shelves, Bins and Racks . . . . . . . .6–8
Storage Drawers . . . . . . . . . . . . . . .8, 9
Care and Cleaning . . . . . . . .12, 13
Replacing the Light Bulbs . . . . . . .13
Installation Instructions . . . .14, 15
Troubleshooting Tips
Before You Call For Service . . .17–19
Normal Operating Sounds . . . . . . .16
EXPORT 197D3352P001 49-60100 12-00 JR
Write your model and serial numbers here:
Model # _____________________
Serial # _____________________
Find these numbers on a label inside
the refrigerator compartment at the top
on the right side behind the controls.
Réfrigérateurs
Côte à côte
Manuel d’utilisation
et d’installation
La section française commence à la page 21
Frigoríficos
Lado a lado
Models 20, 22 and 25
Owner’s Manual and
Installation Instructions
Manual del propietario
e instalación
La sección en español empieza en la página 41
Refrigerators
Side by Side
Page 2

2
IMPORTANT SAFETY INFORMATION.
READ ALL INSTRUCTIONS BEFORE USING.
WARNING!
Use this appliance only for its intended purpose as described in this Owner’s Manual.
SAFETY PRECAUTIONS
When using electrical appliances, basic safety precautions should be followed, including the following:
■
■This refrigerator must be properly installed
and located in accordance with the Installation
Instructions before it is used. Also see the
How to
Connect Electricity
section.
■
■Do not attempt to stand on top of the refrigerator.
Doing so may result in bodily injury or damage to
the refrigerator.
■
■Do not allow children to play with the refrigerator
or tamper with the controls.
■
■Do not allow children to climb, stand or hang on
the shelves in the refrigerator. They could damage
the refrigerator and seriously injure themselves.
■
■Do not touch the cold surfaces in the freezer
compartment when hands are damp or wet.
Skin may stick to these extremely cold surfaces.
■
■Do not store or use gasoline or other flammable
vapors and liquids in the vicinity of this or any
other appliance.
■
■In refrigerators with automatic icemakers, avoid
contact with the moving parts of the ejector
mechanism, or with the heating element that
releases the cubes. Do not place fingers or hands
on the automatic icemaking mechanism while
the refrigerator is plugged in.
■
■Installation of the icemaker must be done by
a qualified service technician.
■
■Keep fingers out of the “pinch point” areas;
clearances between the doors and between the
doors and cabinet are necessarily small. Be careful
closing doors when children are in the area.
■
■Unplug the refrigerator before cleaning and
making repairs.
NOTE: We strongly recommend that any servicing be
performed by a qualified individual.
■
■
Before replacing a burned-out light bulb, the
refrigerator should be unplugged
in order to avoid
contact with a live wire filament. (A burned-out
light bulb may break when being replaced.)
NOTE: Turning the freezer control to the 0 position does not
remove power to the light circuit.
■
■Do not refreeze frozen foods which have thawed
completely.
Page 3
3
DANGER! RISK OF CHILD ENTRAPMENT
PROPER DISPOSAL OF THE REFRIGERATOR
Child entrapment and suffocation are not problems
of the past. Junked or abandoned refrigerators are
still dangerous…even if they will sit for “just a few
days.” If you are getting rid of your old refrigerator,
please follow the instructions below to help prevent
accidents.
Before You Throw Away Your Old Refrigerator
or Freezer:
■Take off the doors and discard separately.
■Leave the shelves in place so that children may not
easily climb inside.
■If the refrigerator has a lock, make it unusable.
CFC Disposal
Your old refrigerator may have a cooling system
that used CFCs (chlorofluorocarbons). CFCs are
believed to harm stratospheric ozone.
If you are throwing away your old refrigerator,
make sure the CFC refrigerant is removed for
proper disposal by a qualified servicer. If you
intentionally release this CFC refrigerant you
can be subject to fines and imprisonment under
provisions of environmental legislation.
Page 4
4
IMPORTANT SAFETY INFORMATION.
READ ALL INSTRUCTIONS BEFORE USING.
WARNING!
HOW TO CONNECT ELECTRICITY
The power cord of this appliance is equipped with
an earthing plug which mates with a standard
earthed wall outlet to minimize the possibility of
electric shock hazard from this appliance.
Have the wall outlet and circuit checked by a
qualified electrician to make sure the outlet is
properly earthed.
Where an unearthed wall outlet is encountered,
it is your personal responsibility and obligation to
have it replaced with a properly earthed wall outlet.
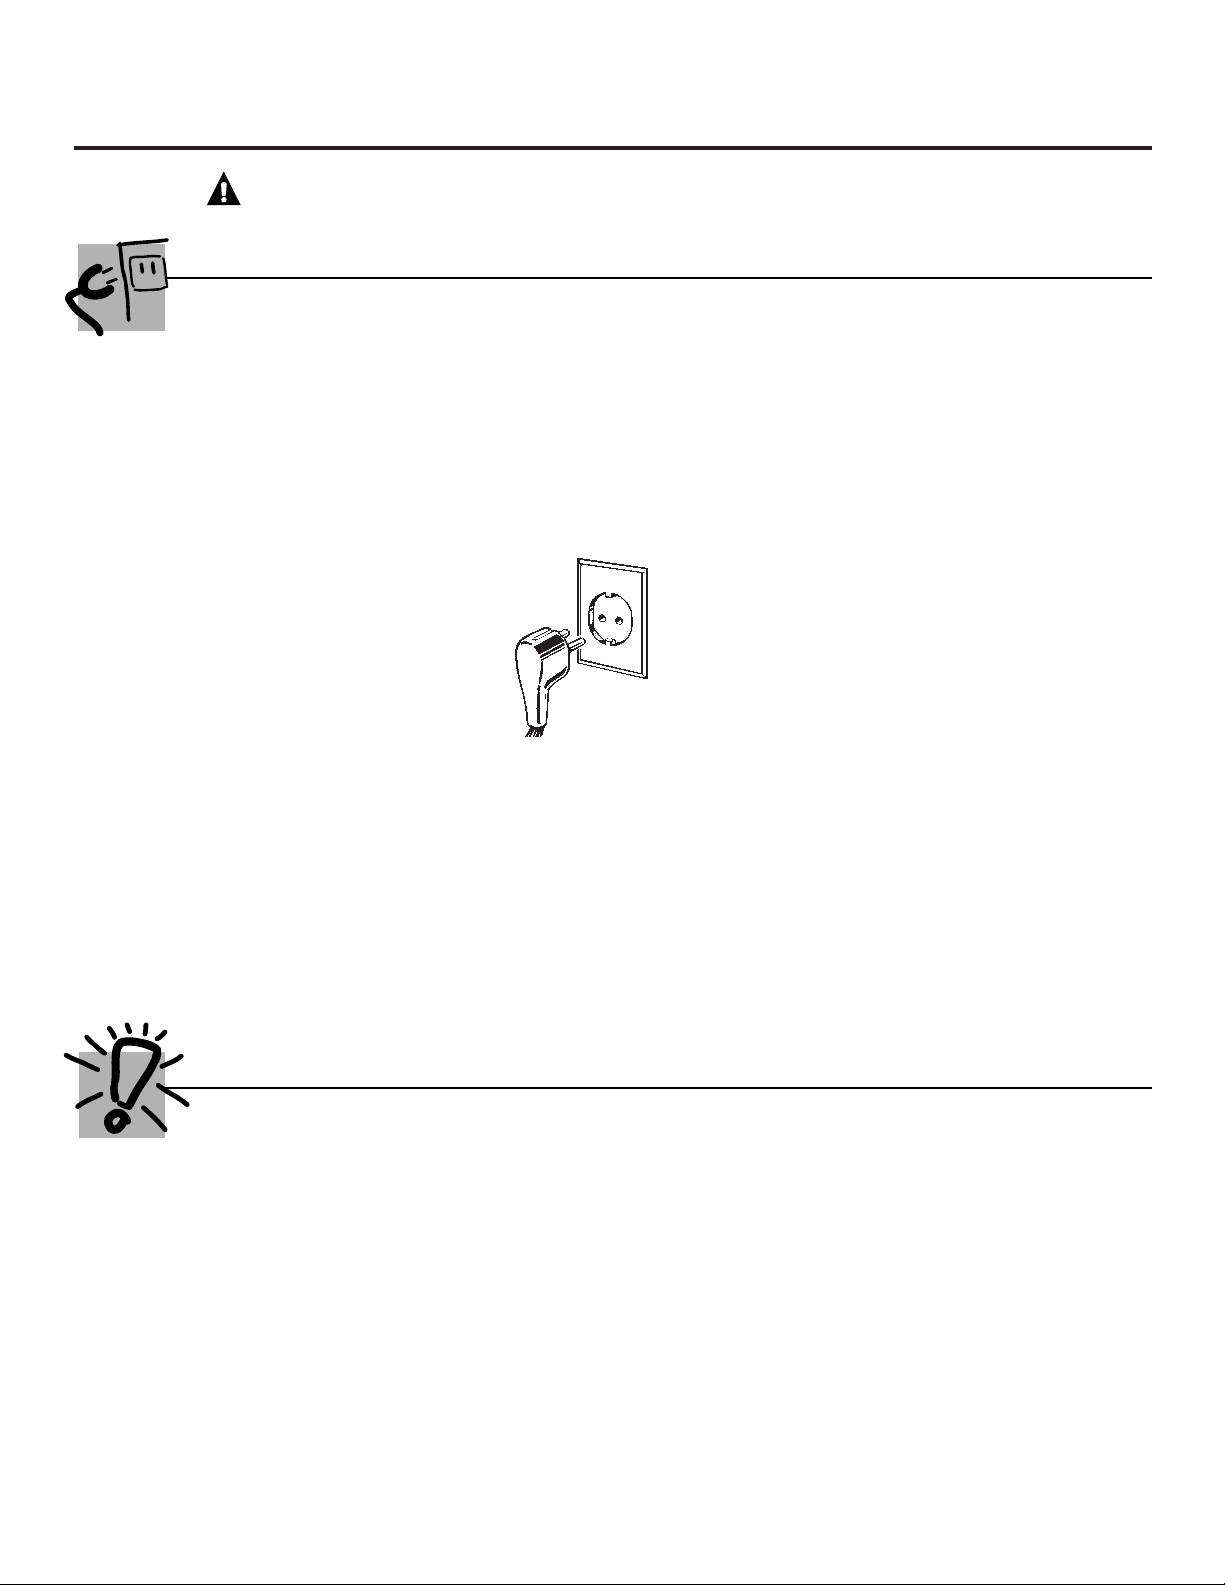
The refrigerator should
always be plugged into
its own individual
electrical outlet.
This provides the
best performance
and also prevents
overloading house
wiring circuits which could cause a fire hazard from
overheated wires. Please refer to the rating plate on
the refrigerator for the correct voltage, wattage and
frequency. If the product plug does not fit your
outlet, the product should be fitted with a new plug.
IMPORTANT: The refitting of electric plugs and cables should
be done by a qualified technician or service agent. In some
countries the refitting of electric plugs and cables is only
permitted when the work is completed by a qualified technician.
If the power supply cord becomes damaged, it must
be replaced by a qualified service agent in order to
avoid a safety hazard.
Never unplug your refrigerator by pulling on the
power cord. Always grip plug firmly and pull straight
out from the outlet.
Repair or replace immediately all power cords that
have become frayed or otherwise damaged. Do not
use a cord that shows cracks or abrasion damage
along its length or at either end.
When moving the refrigerator away from the wall,
be careful not to roll over or damage the power cord.
Mains lead replacement
If the mains lead on your refrigerator needs
replacing at any time, it must be replaced by a
special lead which is obtainable from your local
dealer. A charge will be made for the replacement
of the mains lead if you have damaged the lead.
The refrigerator must be positioned so that the plug
is accessible.
READ AND FOLLOW THIS SAFETY INFORMATION CAREFULLY.
SAVE THESE INSTRUCTIONS
Insure proper earthing
exists before using.
Earthing plug
Page 5
5
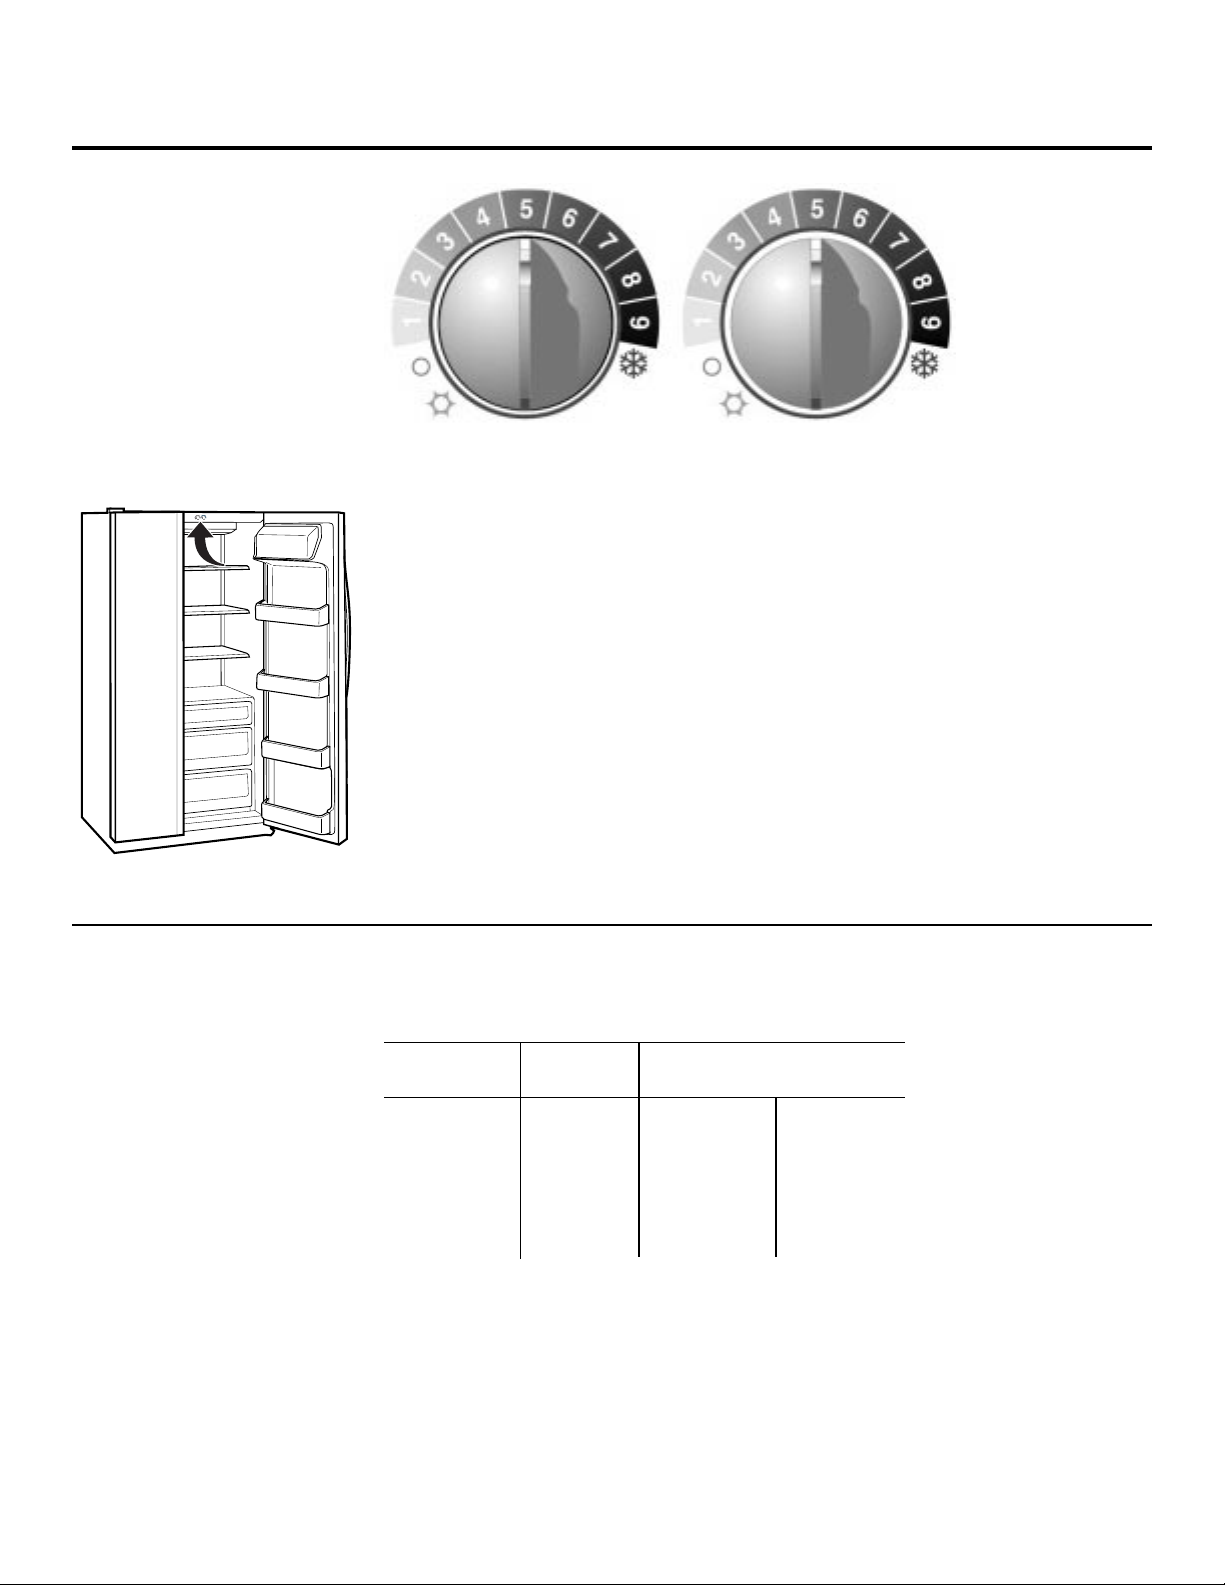
Initially, set the fresh food control at 5 and the freezer control at 5 and allow
12 hours for the temperature to stabilize.
Several adjustments may be required. Adjust the controls one increment at a
time, and allow 12 hours after each adjustment for the refrigerator to reach
the temperature you have set.
Setting the freezer control to 0 stops cooling in both the fresh food and freezer
compartments but does not shut off electrical power to the refrigerator.
Control settings will vary based on personal preferences, usage, and
operating conditions and may require more than one adjustment.
About the controls on the refrigerator.
Ambient Room Temperature Limits
This refrigerator is designed to operate in ambient temperatures specified by
its Temperature Class which is marked on the rating plate.
Temperature Symbol Ambient Temperature
Class Maximum Minimum
ExtendedTemperate SN 32°C 10°C
Temperate N 32°C 16°C
Subtropical ST 38°C 18°C
Tropical T 43°C 18°C
NOTE: Internal temperature may be affected by such factors as the location of the refrigerator,
ambient temperature and frequency of door openings. Adjust temperature controls as required
to compensate for these
factors.
9 IS COLDEST
0 IS OFF
5
5
6
6
4
4
7
7
3
3
8
8
2
2
9 IS COLDEST
9
9
1
1
0 IS OFF
0
FREEZER FRESH FOOD
Page 6
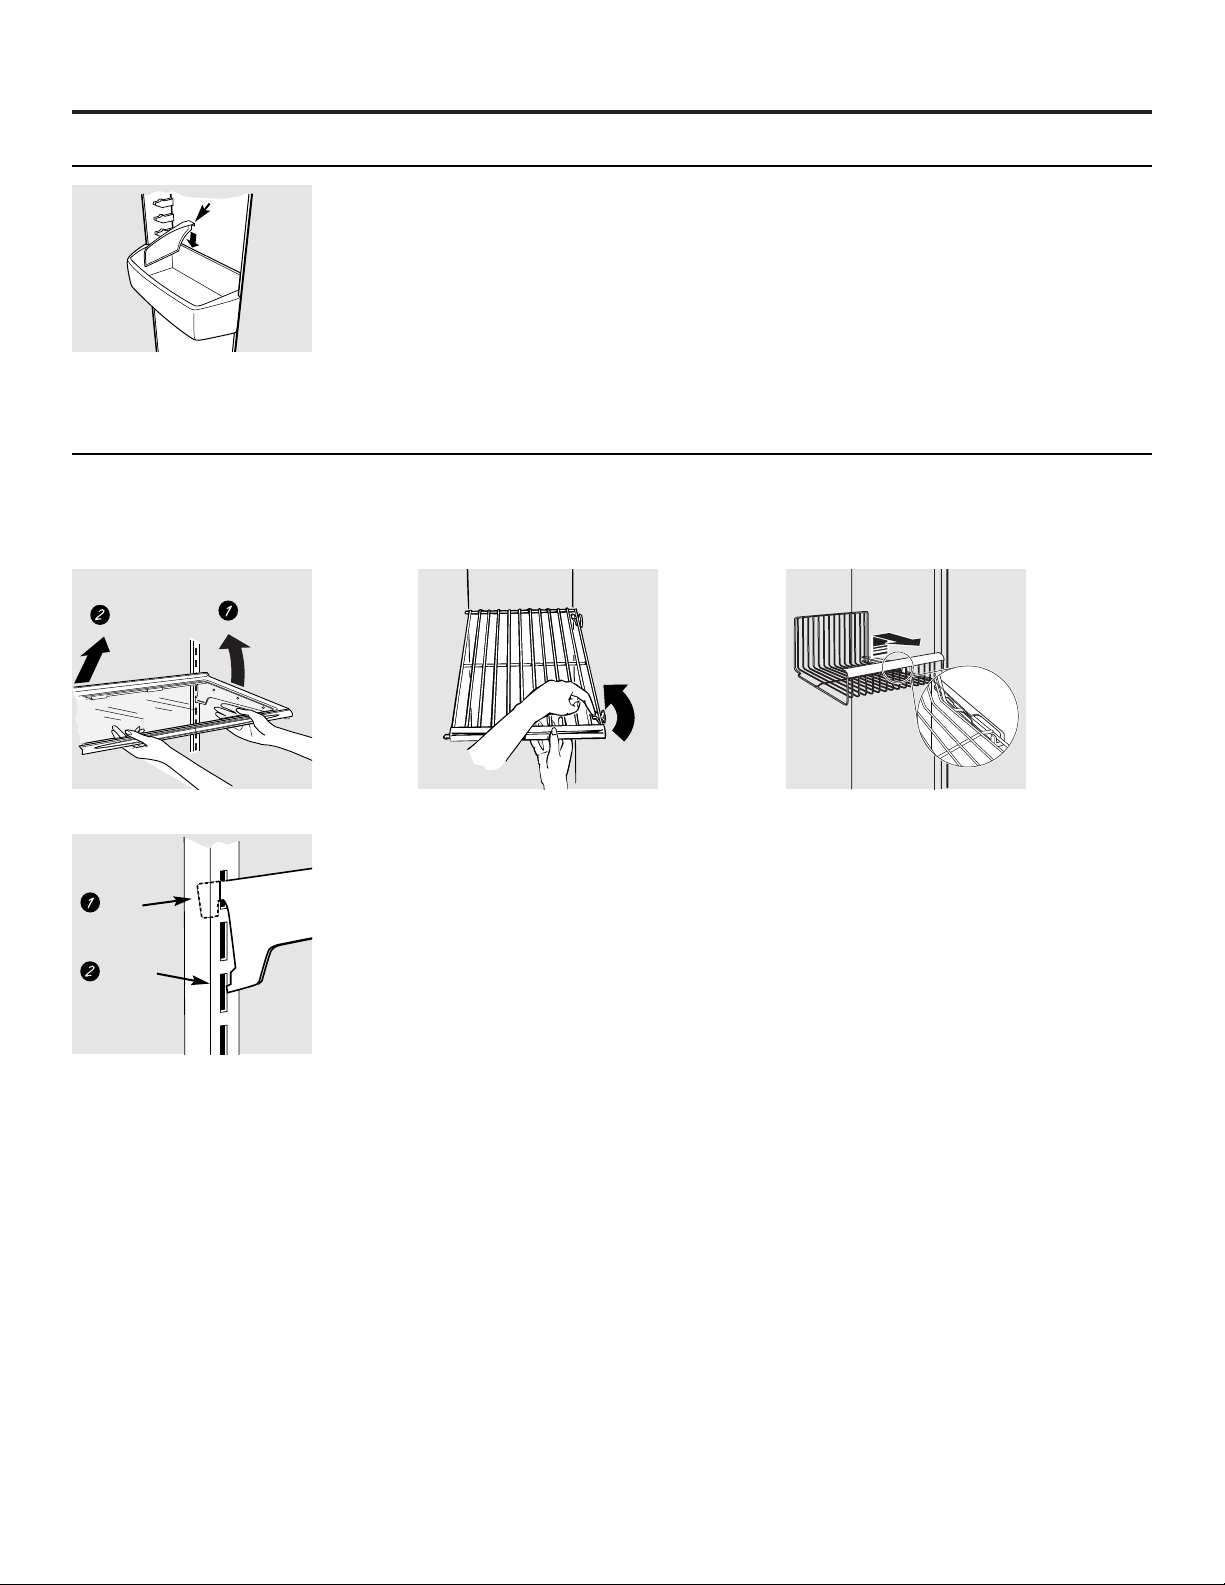
Rearranging the Shelves
To Remove
To Replace
6
About the refrigerator shelves and bins.
Bins on the Fresh Food Compartment Door
Adjustable bins can easily be carried from
refrigerator to work area.
To remove:
Lift the front of the bin up, then
pull out.
To replace or relocate:
Engage the bin in the
molded supports of the door, and push in.
Bin will lock in place.
The snugger
helps prevent tipping, spilling or
sliding of small items stored on the door shelf.
Place a finger on either side of the divider
near the rear and move it back and forth to
fit your needs.
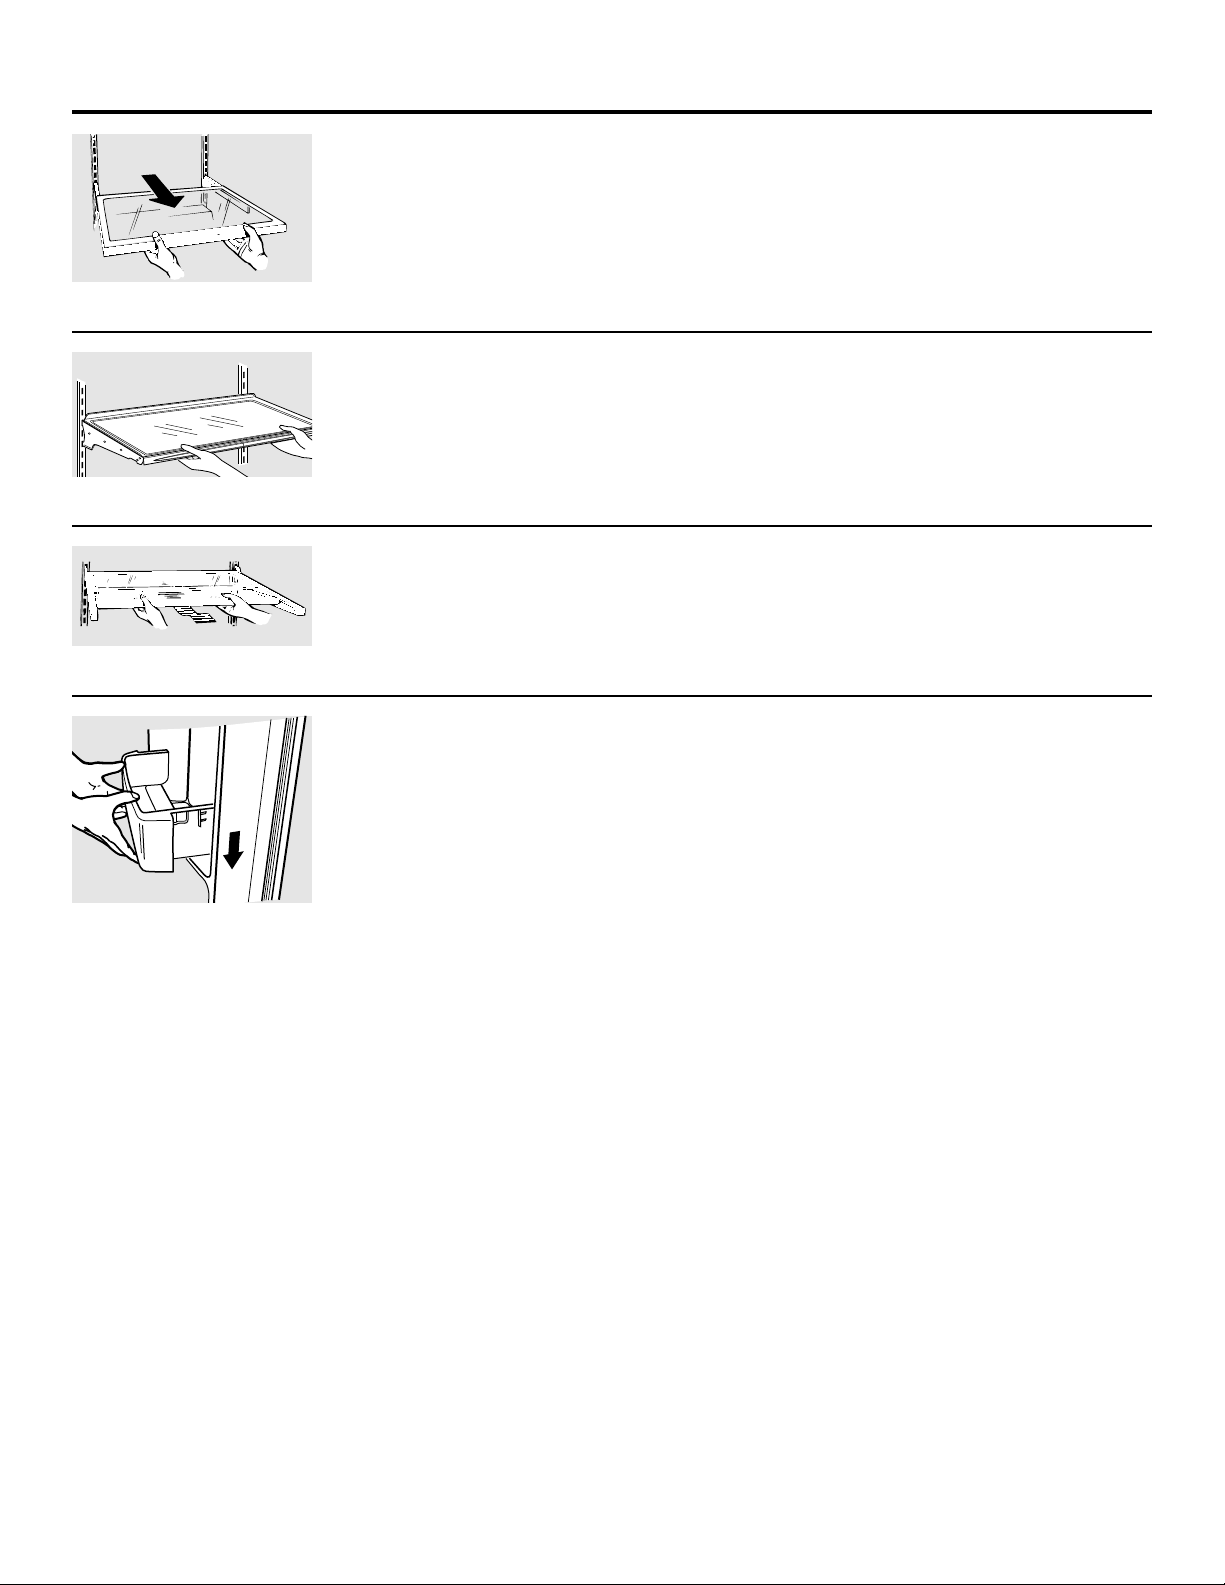
Refrigerator Shelves:
Lift up and out
Tilt up
Insert
top hook
Lower to
lock in place
To Remove
Freezer Shelves:
Not all features are on all models.
Snugger
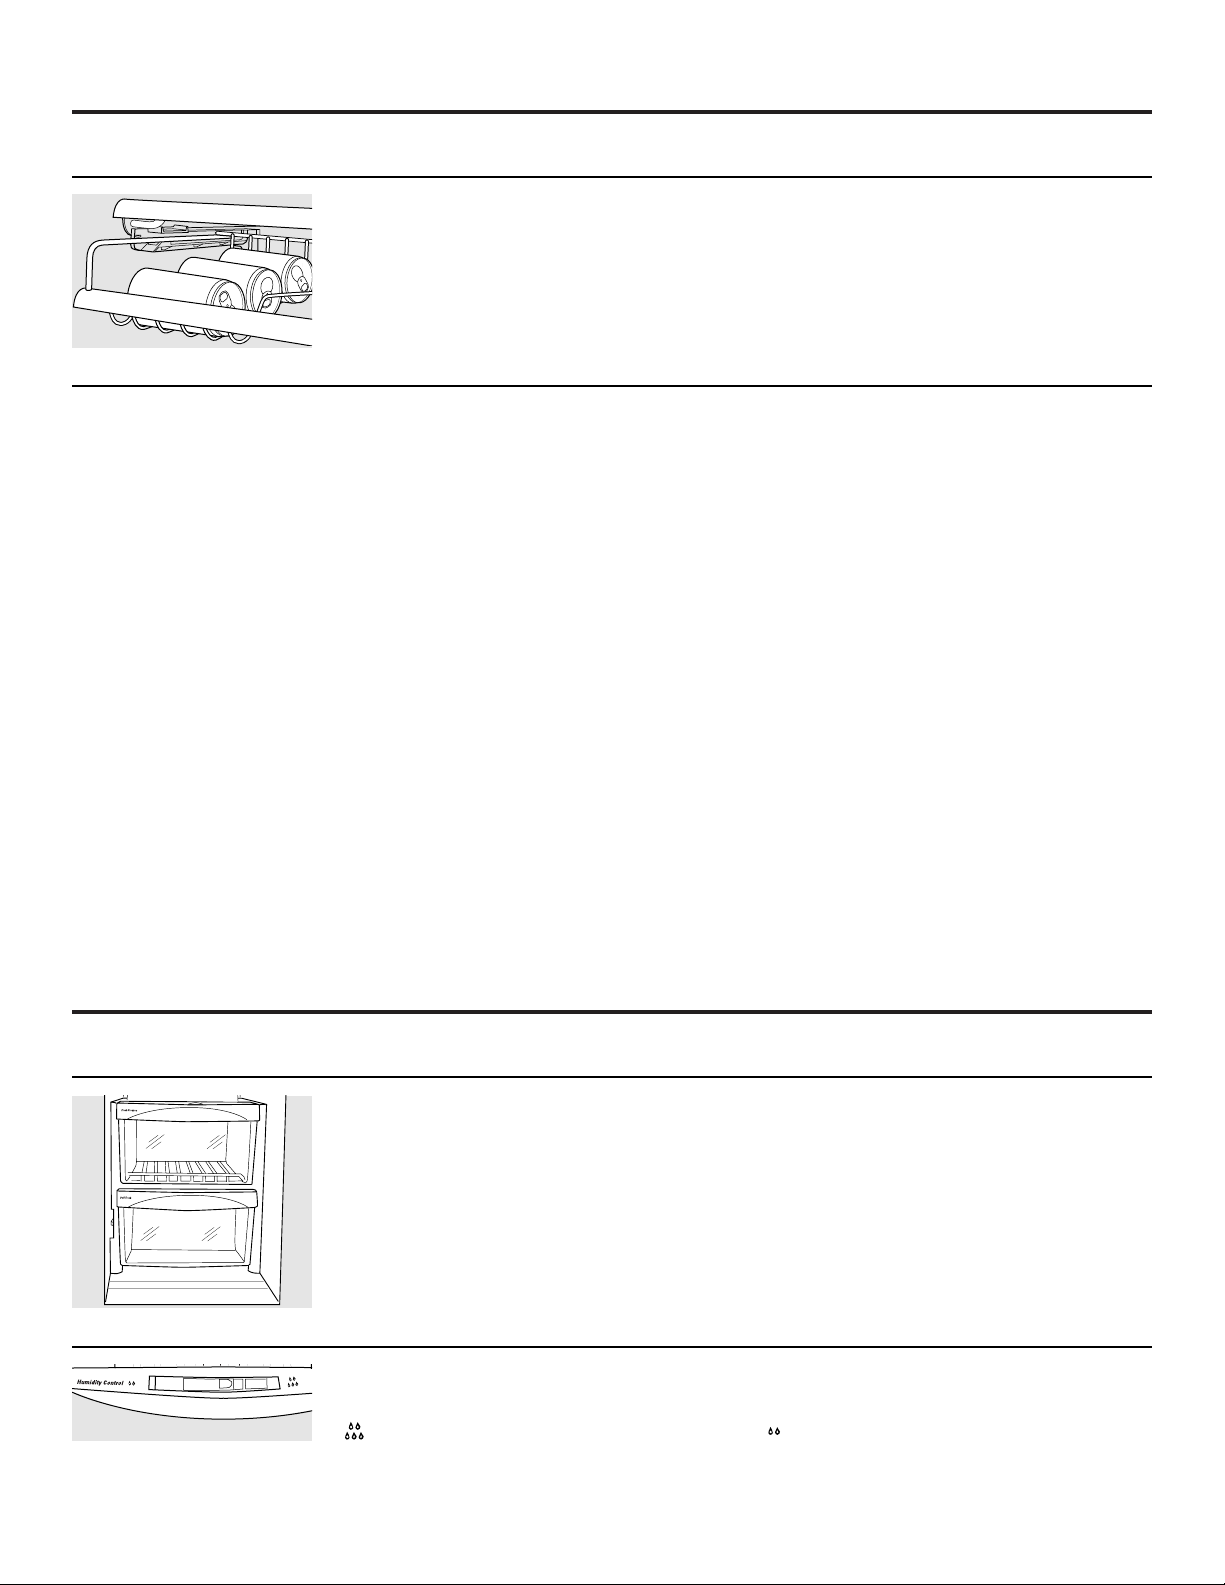
To Remove
Freezer Baskets:
Remove the basket by pulling it forward,
lifting up the front, and sliding it past the
stop
location.
WARNING: Poor performance may occur if
freezer baskets are not used. Storage of items in
the freezer without using baskets may result in
poor temperature performance due to restrictions
of air flow within the freezer compartment.
Page 7
Deep Door Shelves
Detachable shelf extenders deepen and
enclose fixed door shelves, providing more
storage room and greater storage flexibility.
To remove:
Lift the shelf extender straight up
then pull out.
To replace:
Engage the shelf extender in the
molded supports on the door and push in.
It will lock in place.
Quick Space Shelf
(on some models)
This shelf splits in half and slides under itself for
storage of tall items on the shelf below.
Slide-Out Spillproof Shelf
(on some models)
The slide-out spillproof shelf allows you to
reach items stored behind others. The special
edges are designed to help prevent spills from
dripping to lower shelves.
Make sure you push the shelves all the way back in
before you close the door.
Spillproof Shelves
(on some models)
Spillproof shelves have special edges to help
prevent spills from dripping to lower shelves.
7
Page 8
8
About the storage drawers.
Not all features are on all models.
About the additional features.
Not all features are on all models.
Storage Drawers
Excess water that may accumulate in the
bottom of the drawers should be wiped dry.
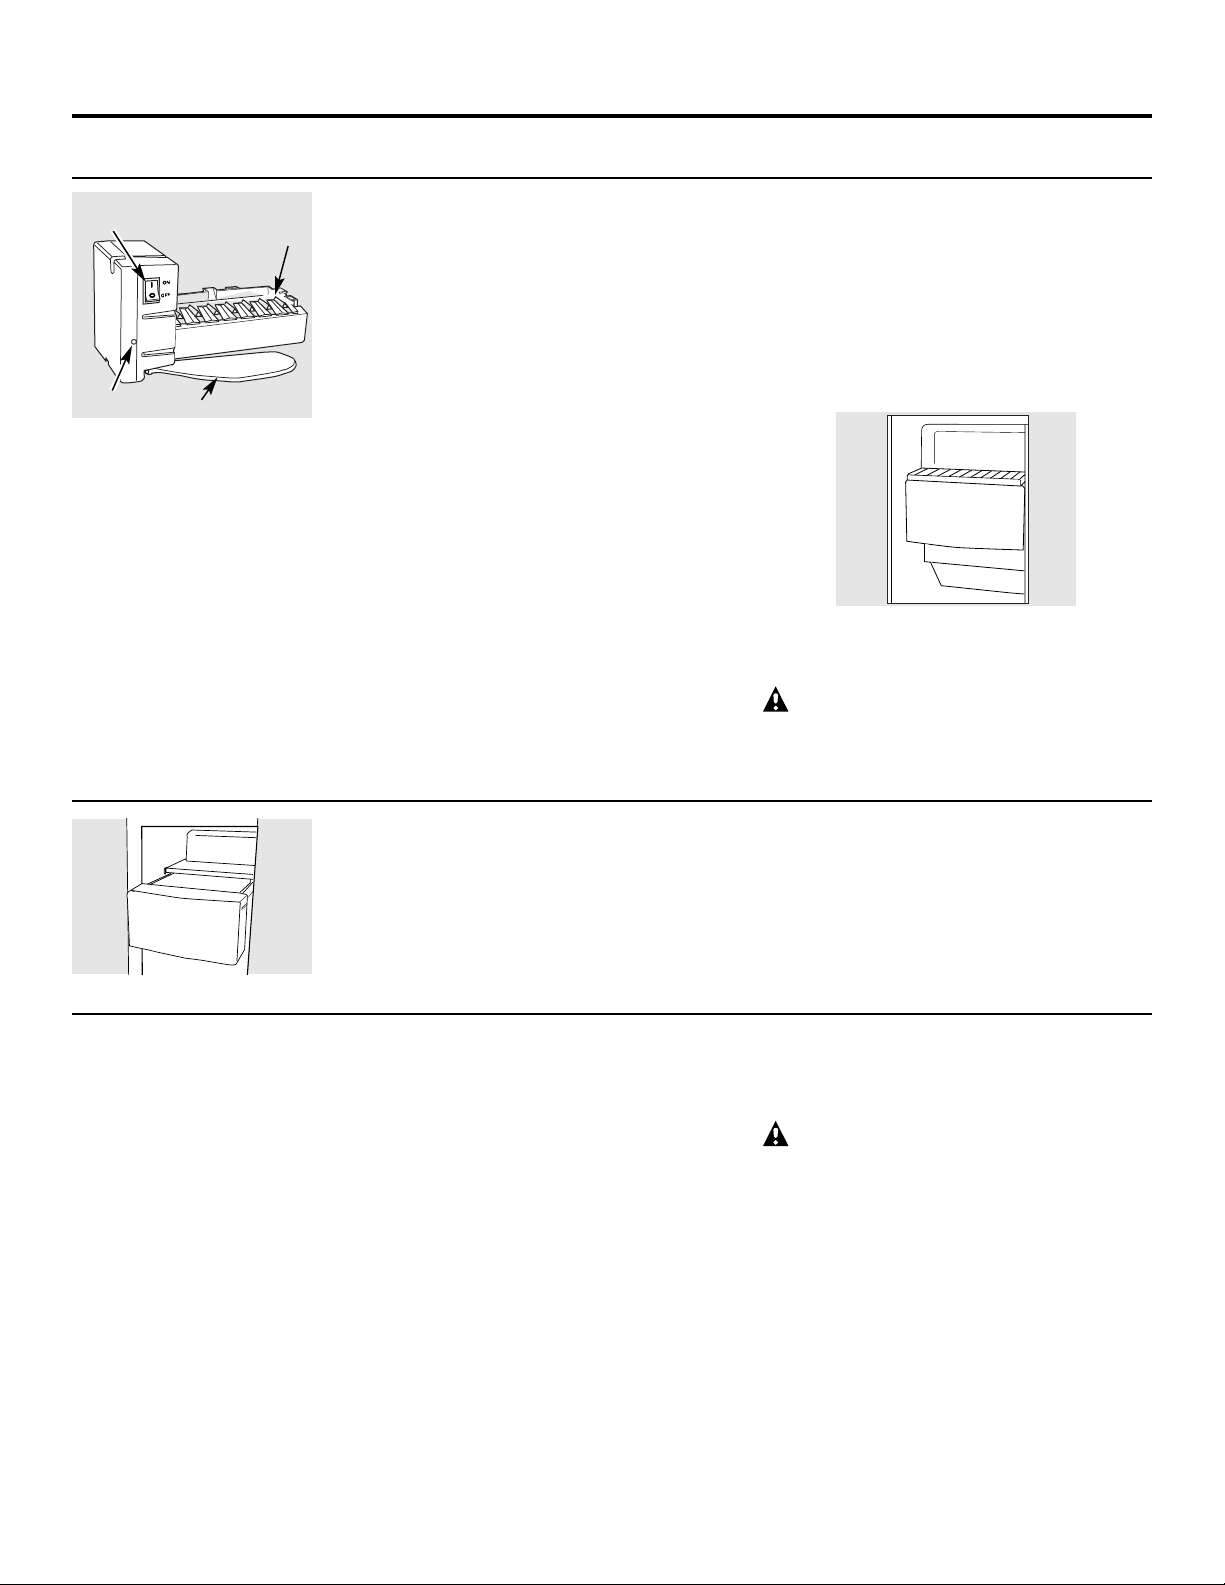
Adjustable Humidity Drawers
Slide the control all the way to the
High
or
setting to provide high humidity
recommended for most vegetables.
Slide the control all the way to the
Low
or
setting to provide lower humidity levels
recommended for most fruits.
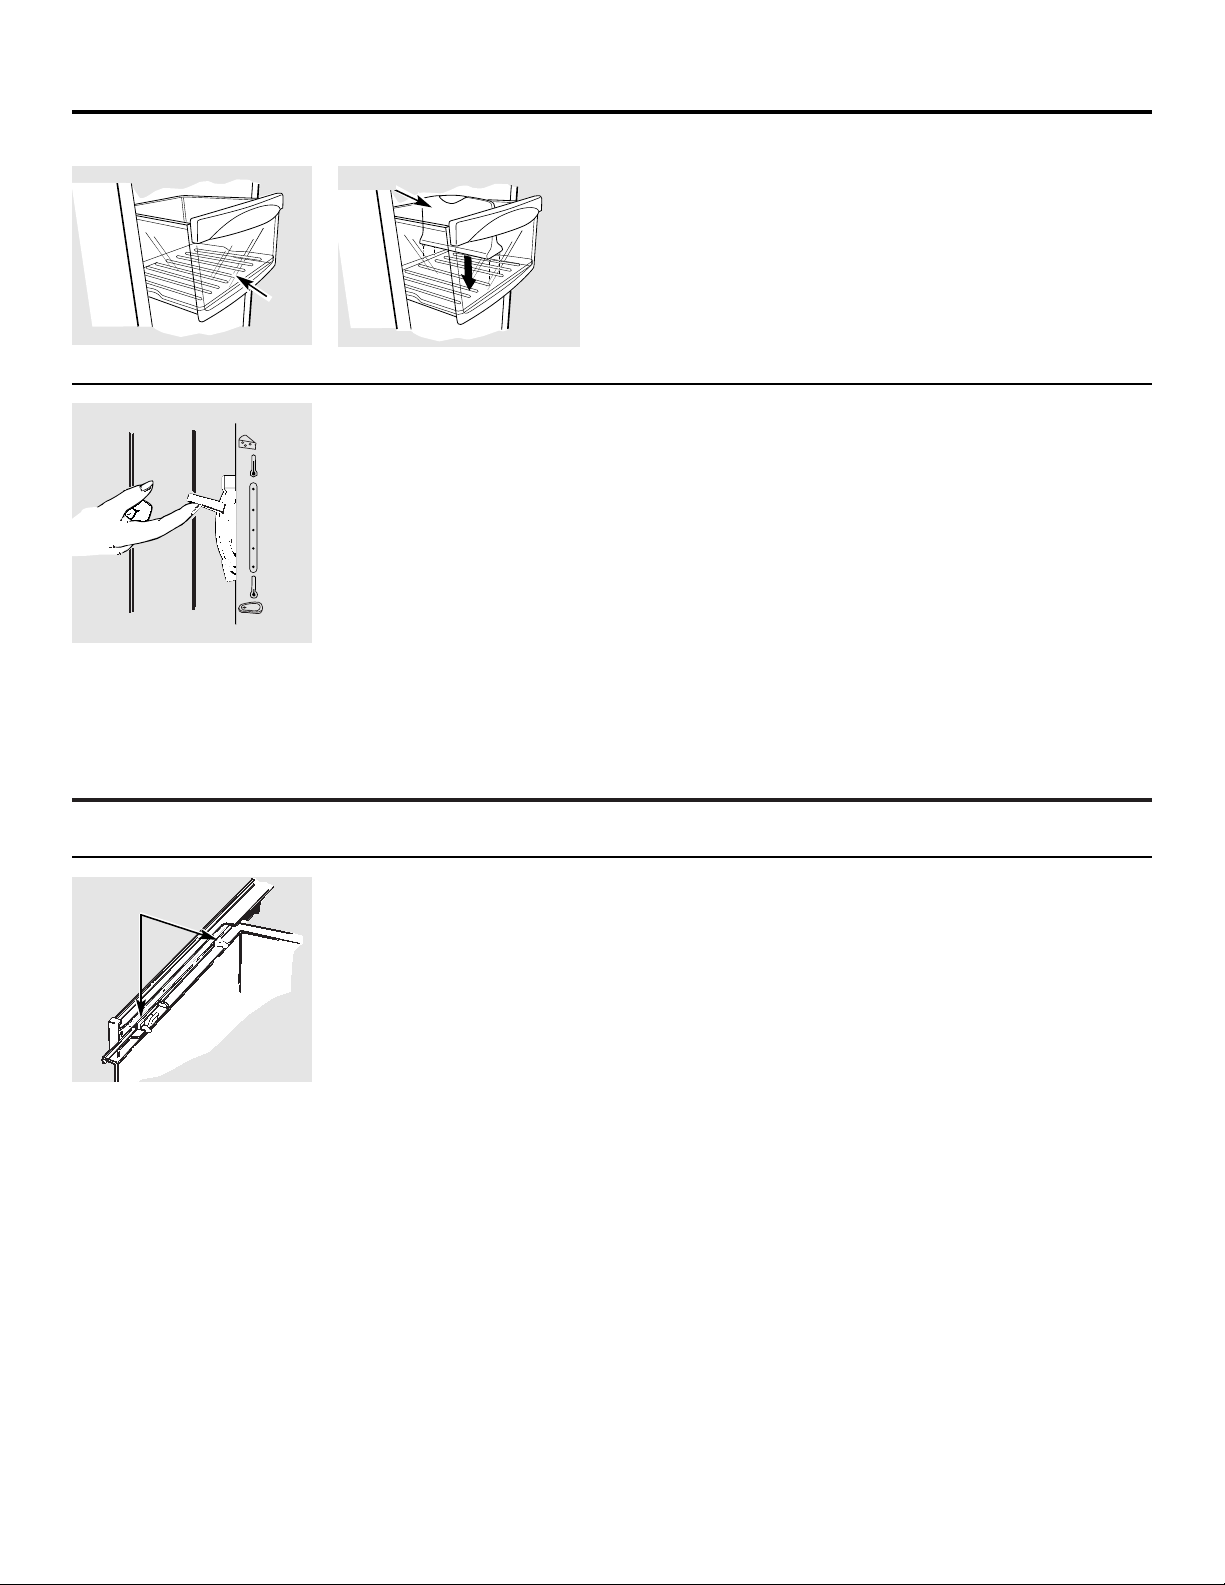
ShelfSaver™Rack
Use this rack to store beverage cans for
easy access.
It can also hold a 9″ x 13″ baking dish.
Loading the Freezer Compartment
Load so that at least 15 mm of space remains
clear between stacks of packages and 15 mm
to 25 mm of space between the top of any
stack and any shelf or basket above it.
Packages may hang over the front of shelves
but must remain 15 mm from doors.
■Food to be frozen must not be placed
in direct contact with food in storage.
If food is to be frozen every day, it may
be necessary to reduce the quantity to
be frozen.
■If a quantity of food needs to be frozen,
set the freezer control to its coldest setting.
After the food is frozen, reset the freezer
control to its initial position.
■Food is most quickly frozen on the middle
three shelves of the freezer compartment
and most slowly in the freezer door shelves.
■Do not store commercially quick-frozen
food longer than the time recommended
by the food manufacturers.
■If the power to the appliance is shut off for
an extended time or if the refrigerating
system fails, do not open the doors unless
absolutely necessary. When it is necessary,
close them as quickly as possible so the
frozen food will stay frozen as long as
possible.
■The freezer door storage shelves marked
with a two-star label are only appropriate
for the storage of previously frozen food.
Effervescent drinks should not be stored in the
freezer compartment.
Page 9
About storage drawer removal.
Not all features are on all models.
Drawer Removal
Drawers can easily be removed by tilting up
slightly and pulling past
stop
location.
If the door prevents you from taking out
the drawers, the refrigerator will need to
be rolled forward until the door opens
enough to slide the drawers out. In some
cases, when you roll the refrigerator out,
you will need to move the refrigerator to
the left as you roll it out.
When replacing the drawers, make
sure you slide them through the
drawer guides.
Drawer
Guides
9
Convertible Meat Drawer
The convertible meat drawer has its own
cold air duct to allow a stream of cold air
from the freezer compartment to flow
around the drawer.
The variable temperature control
regulates
the air flow from the freezer compartment.
Set control lever
up
to convert the drawer
to normal refrigerator temperature and
provide extra vegetable storage space. Cold
air duct is turned off. Variable settings
between these extremes can be selected.
Set control lever
down
to the coldest setting
to store fresh meats. If lever is left in meat
position for a long period of time, some frost
may form on the inside of the drawer.
Normal
Coldest
Divider
Trivet
Trivet and Divider
(on some models)
The trivet is designed to keep your fruits and vegetables off
the floor of the drawer and away from any moisture that
might form. The divider will keep the larger fruits and
vegetables from falling or rolling onto the more delicate
ones. By lifting straight up on the divider, you can detach it
from the trivet and adjust it from side to side, then push
down and into position.
Page 10
10
Automatic Icemaker
(on some models)
The icemaker will produce seven cubes
per cycle—approximately 100–130 cubes
in a 24-hour period, depending on freezer
compartment temperature, room
temperature, number of door openings
and other use conditions.
If the refrigerator is operated before the
water connection is made to the icemaker,
set the power switch in the O position.
When the refrigerator has been connected
to the water supply, set the power switch to
the Iposition.
The icemaker will fill with water when it cools
to freezing. A newly-installed refrigerator
may take 12 to 24 hours to begin making
ice cubes.
Throw away the first few batches of ice to
allow the water line to clear.
Be sure nothing interferes with the sweep of
the feeler arm.
It is normal for several cubes to be joined
together.
If ice is not used frequently, old ice cubes will
become cloudy, taste stale, and shrink. If the
ice cubes become stuck in the icemaker, turn
off the icemaker, remove cubes and turn
icemaker back on.
WARNING: Connect to potable water supply
only. Installation of the icemaker must be
done by a qualified service technician.
There is an upper freezer shelf
above the icemaker that can be
used for storage.
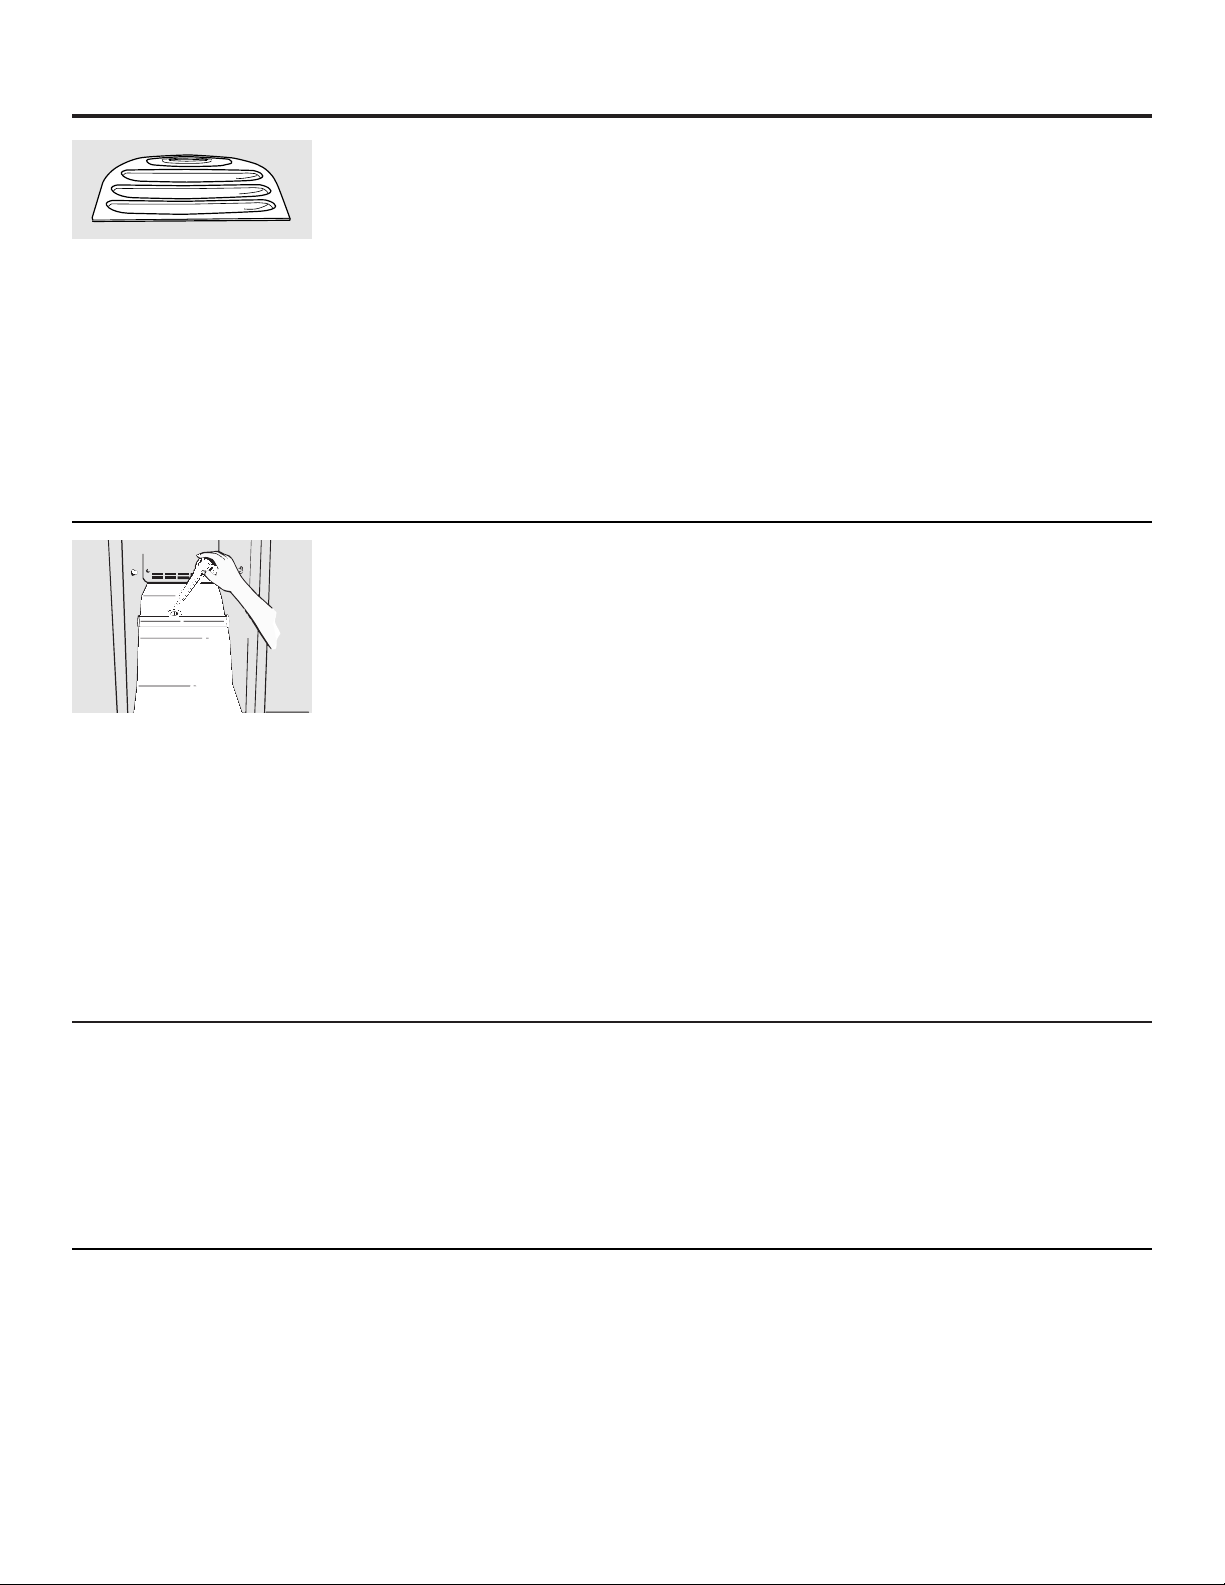
Ice Storage Drawer
Icemaker Accessory Kit
To access ice,
pull the drawer out.
To remove the drawer,
pull it straight out and
lift it past the
stop
location.
If your refrigerator did not come already
equipped with an automatic icemaker,
an icemaker accessory kit is available at
extra cost.
Check the back of the refrigerator for the
specific icemaker kit needed for your model.
WARNING: Connect to potable water supply
only. Installation of the icemaker must be
done by a qualified service technician.
Icemaker
Feeler Arm
Power
Switch
Green
Power Light
About the automatic icemaker.
A newly-installed refrigerator may take 12–24 hours to begin making ice.
Page 11
11
About the ice and water dispenser.
On some models
Ice Storage Drawer on Dispenser
Models
To remove:
Set the icemaker power switch to the
O
position. Pull the drawer straight out
and then lift past the
stop
position.
To replace:
When replacing the drawer, make sure to
push it firmly into place. If it does not go all
the way back, remove it and rotate the drive
mechanism 1/4 turn. Then push the drawer
back again.
Rotate
Drive
Mechanism
Important Facts About Your Dispenser
■Do not add ice from trays or bags to
the storage bin. It may not crush or
dispense well.
■Avoid overfilling glass with ice and use
of narrow glasses. Backed-up ice can jam
the chute or cause the door in the chute
to freeze shut. If ice is blocking the chute,
poke it through with a wooden spoon.
■Beverages and foods should not be quick-
chilled in the ice storage bin. Cans, bottles
or food packages in the storage bin may
cause the icemaker or auger to jam.
■Some crushed ice may be dispensed even
though you selected
CUBED ICE.
This
happens occasionally when a few cubes
have been left in the crusher.
■After crushed ice is dispensed, some water
may drip from the chute.
■Sometimes a small mound of snow will
form on the door in the ice chute. This
condition is normal and usually occurs
when you have dispensed crushed ice
repeatedly. The snow will eventually
evaporate.
CAUTION: Some products such as water ices should
not be consumed too cold.
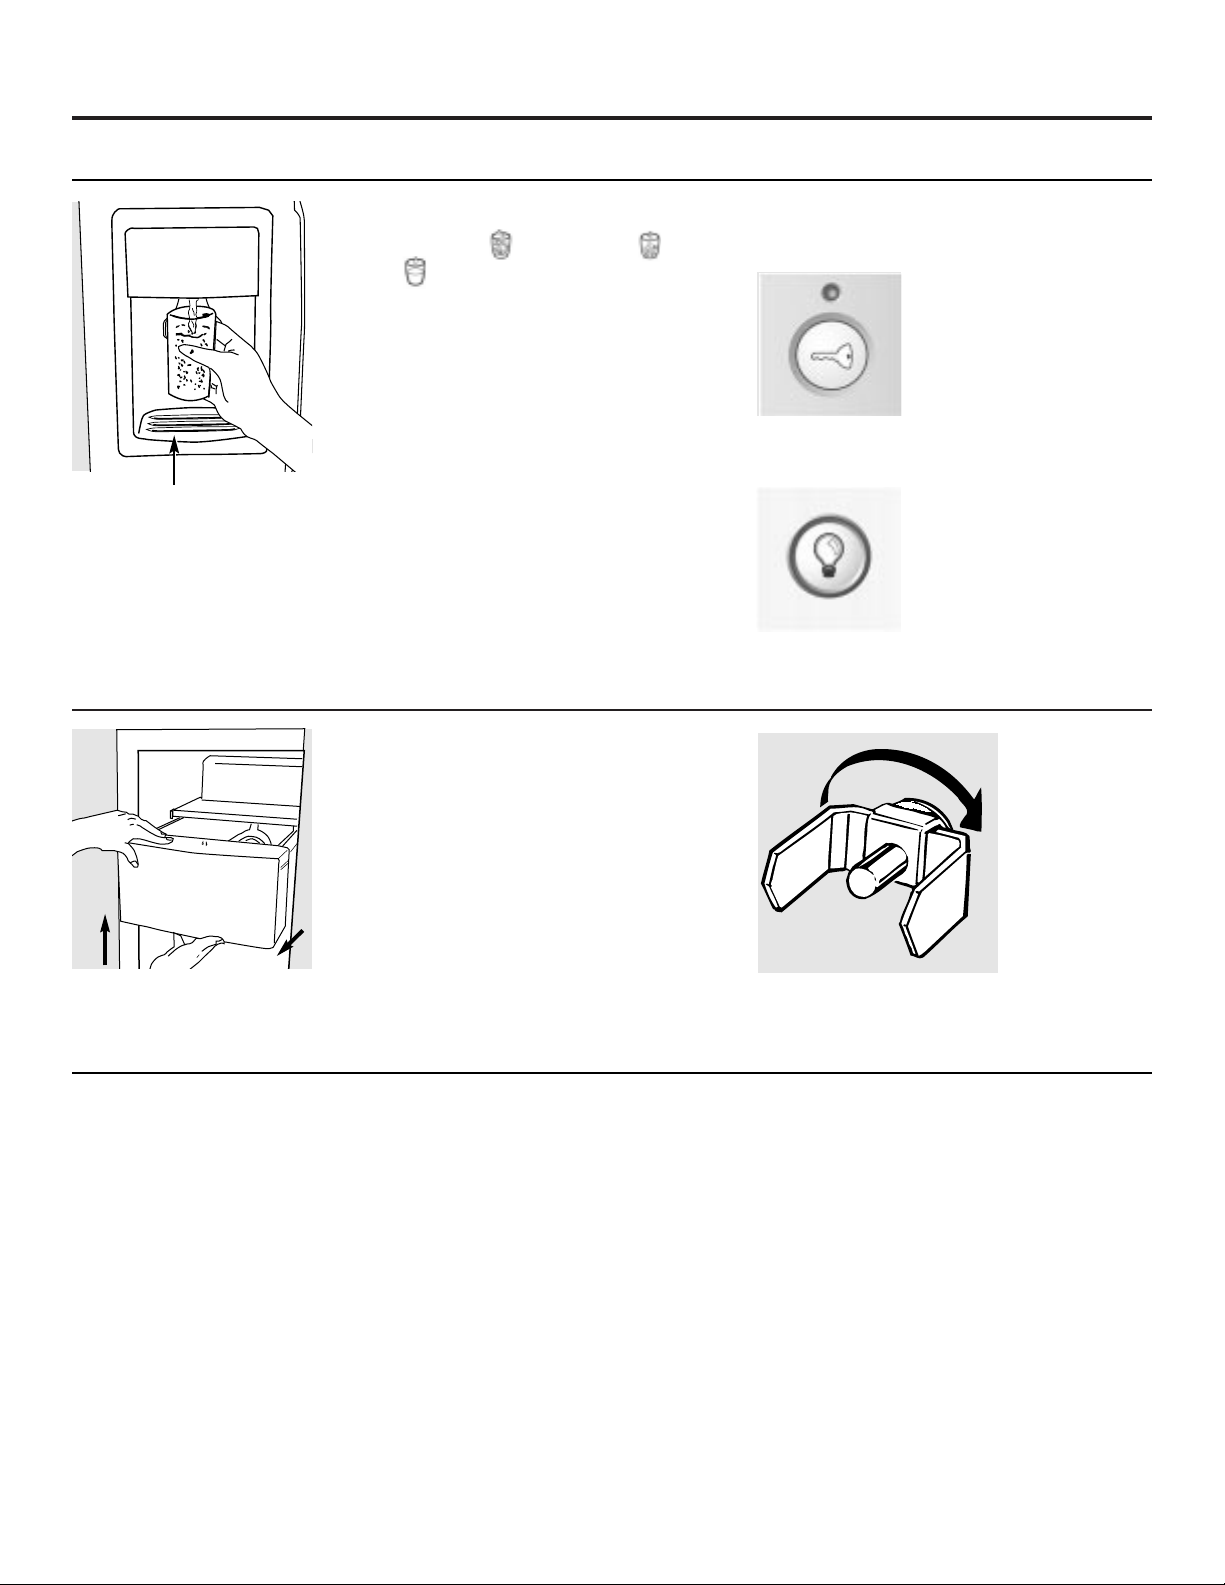
To Use the Dispenser
Select
CUBED ICE , CRUSHED ICE
or
WATER .
Press the glass gently against the top of the
dispenser cradle.
The spill shelf is not self-draining. To reduce
water spotting, the shelf and its grille should
be cleaned regularly.
If no water is dispensed when the refrigerator is first
installed, there may be air in the water line system.
Press the dispenser arm for at least two minutes to
remove trapped air from the water line and to fill the
water system. To flush out impurities in the water
line, throw away the first six glassfuls of water.
CAUTION: Never put fingers or any other
objects into the ice crusher discharge opening.
Locking the Dispenser (on some models)
Press the
LOCK CONTROL
pad for 3 seconds to lock
the dispenser and control
panel. To unlock, press
and hold the pad again
for 3 seconds.
Dispenser Light
This pad turns the
night
light
in the dispenser on and
off. The light also comes on
when the dispenser cradle is
pressed. If this light burns
out, it should be replaced
with a 6 watt maximum,
12 volt DC bulb.
Spill Shelf
Page 12
12
Condenser
There is no need for routine condenser
cleaning in normal home operating
environments. However, in environments
that may be particularly dusty or greasy, the
condenser should be cleaned periodically
for efficient refrigerator operation.
Cleaning the condenser:
The condenser is located inside the back
of the refrigerator. To access it, first unplug
the refrigerator. Then remove the access
cover. The condenser is on the right side.
Care and cleaning of the refrigerator.
Cleaning the Outside
The dispenser drip area,
(on some models)
beneath the grille, should be wiped dry. Water
left in this area may leave deposits. Remove
the deposits by adding undiluted vinegar to
the well. Soak until the deposits disappear or
become loose enough to rinse away.
The dispenser cradle
(on some models).
Before cleaning, lock the dispenser by
pressing and holding the
LOCK CONTROL
pad
for 3 seconds. Clean with warm water and
baking soda solution—about a tablespoon
(15 ml) of baking soda to a quart (1 liter)
of water. Rinse thoroughly and wipe dry.
The door handles and trim.
Clean with a
cloth dampened with soapy water. Dry
with a soft cloth.
Keep the outside clean.
Wipe with a clean
cloth lightly dampened with kitchen
appliance wax or mild liquid dish detergent.
Dry and polish with a clean, soft cloth.
Do not wipe the refrigerator with a soiled dish cloth
or wet towel. These may leave a residue that can
erode the paint. Do not use scouring pads, powdered
cleaners, bleach or cleaners containing bleach
because these products can scratch and weaken
the paint finish.
Cleaning the Inside
To help prevent odors,
leave an open box of
baking soda in the fresh food and freezer
compartments.
Unplug the refrigerator before cleaning.
If this
is not practical, wring excess moisture out
of sponge or cloth when cleaning around
switches, lights or controls.
Use warm water and baking soda solution—
about a tablespoon (15 ml) of baking soda
to a quart (1 liter) of water. This both cleans
and neutralizes odors. Rinse and wipe dry.
After cleaning the door gaskets, apply a thin
layer of petroleum jelly to the door gaskets at
the hinge side. This helps keep the gaskets
from sticking and bending out of shape.
Drain opening in freezer compartment.
During
yearly cleaning, remove bottom freezer
basket and flush a solution of baking soda—
1 teaspoon (5 ml) and 2 cups (500 ml) of
hot (not boiling) water— through the drain
line with the help of a meat baster. This
will help eliminate odor and reduce the
likelihood of a clogged drain line. If drain
becomes clogged, use a meat baster and
baking soda solution to force the clog
through the drain line.
Avoid cleaning cold glass shelves with hot water
because the extreme temperature difference may
cause them to break. Handle glass shelves carefully.
Bumping tempered glass can cause it to shatter.
Do not wash any plastic refrigerator parts in
the dishwasher.
Dispenser drip area.
Be careful when moving the refrigerator away
from the wall. All types of floor coverings
can be damaged, particularly cushioned
coverings and those with embossed surfaces.
Pull the refrigerator straight out and return
it to position by pushing it straight in.
Moving the refrigerator in a side direction
may result in damage to the floor covering
or refrigerator.
When pushing the refrigerator back, make sure you
don’t roll over the power cord or icemaker supply line
(on some models).
Behind the Refrigerator
Page 13
For long vacations or absences, remove food
and unplug the refrigerator. Move the freezer
control to the O position, and clean the
interior with a baking soda solution of one
tablespoon (15 ml) of baking soda to one
quart (1 liter) of water. Leave the doors open.
Set the icemaker power switch to the
O
position and shut off the water supply
to the refrigerator.
If the temperature can drop below freezing,
have a qualified servicer drain the water
supply system (on some models) to prevent
serious property damage due to flooding.
Replacing the light bulbs.
Turning the control to the O position does not remove power to the light circuit.
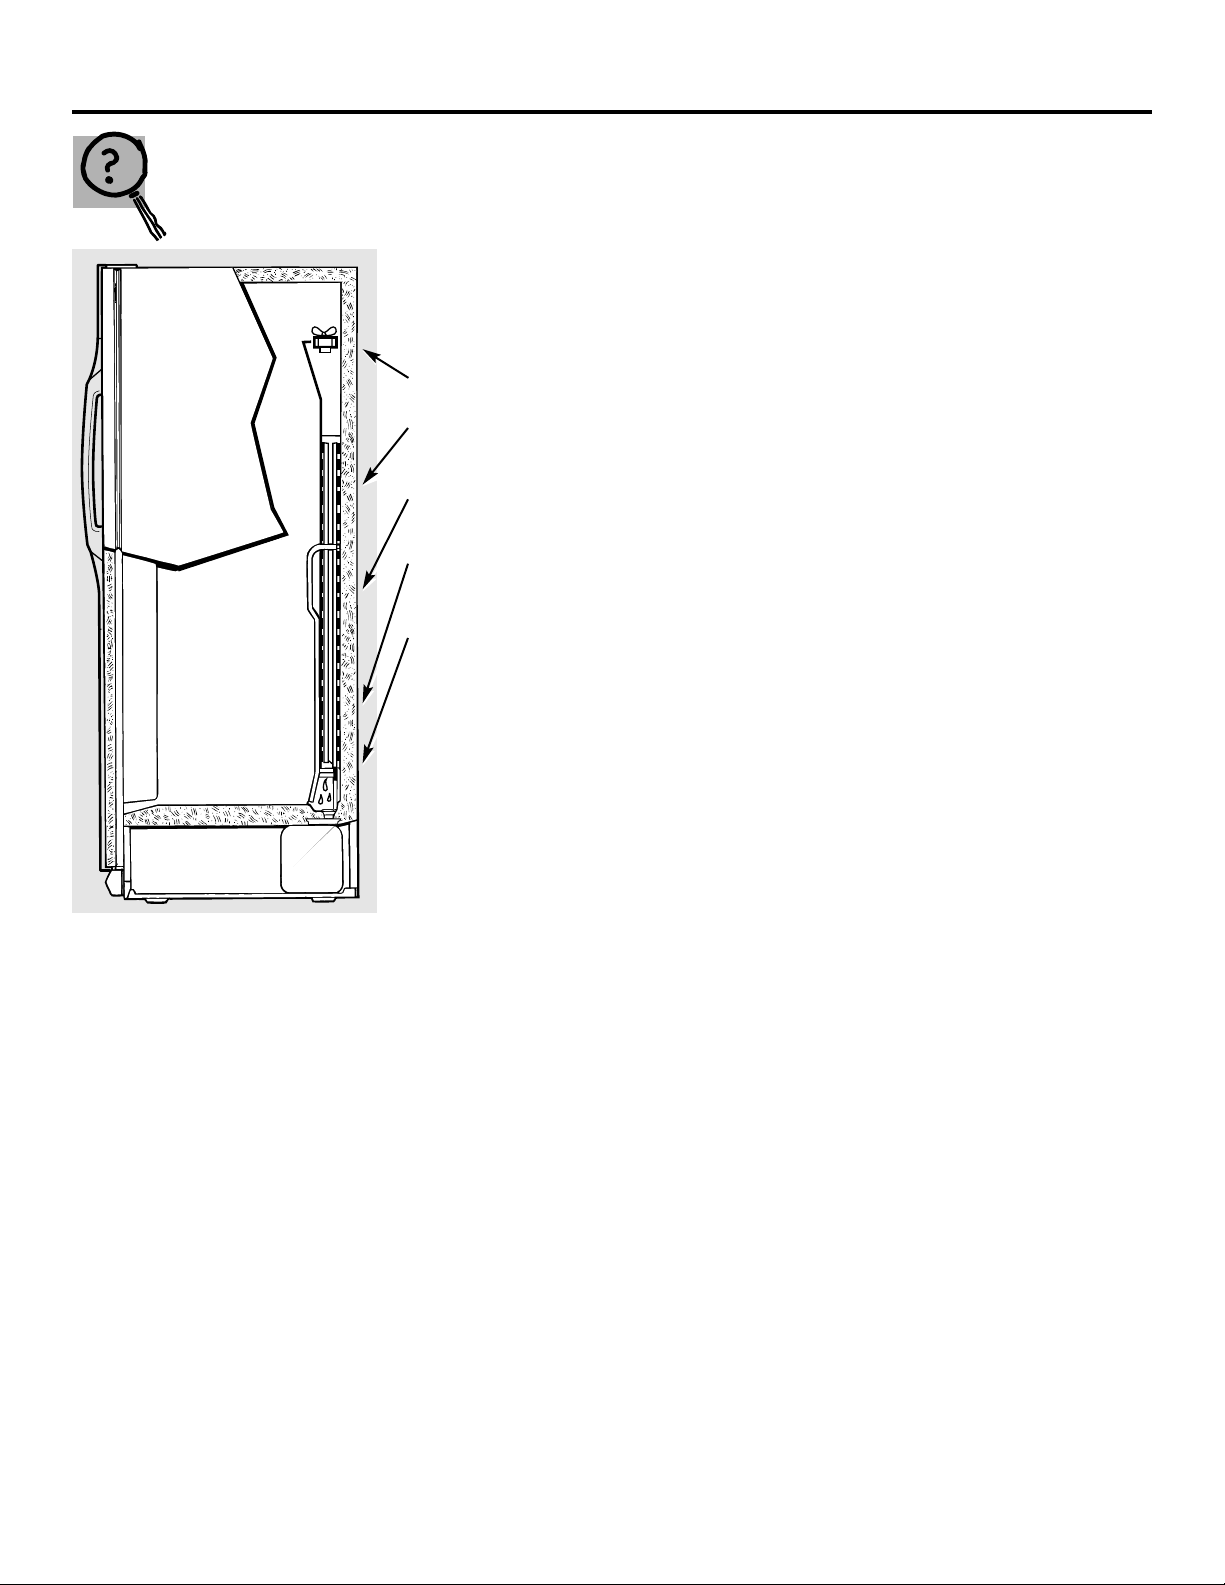
Fresh Food Compartment—Upper Light
Unplug the refrigerator.
The bulb is located behind the controls.
Replace with an appliance bulb of the
same or lower wattage.
Plug the refrigerator back in.
Fresh Food Compartment—Lower Light
(on some models)
This light is located above the top drawer.
Unplug the refrigerator.
Grasp the lip at the bottom of the light
shield and pull it up and forward.
After replacing with an appliance bulb
of the same or lower wattage, replace
the shield.
Plug the refrigerator back in.
Freezer Compartment
Unplug the refrigerator.
Remove the shelf just below light shield.
(The shelf will be easier to remove if it is
emptied first.)
Lift up on the light shield to remove.
After replacing with an appliance bulb of
the same or lower wattage, reinstall the
shield by hanging it from the three tabs.
Reinstall the shelf and plug the
refrigerator back in.
13
Preparing for Vacation
Preparing to Move
Secure all loose items such as grille, shelves
and drawers by taping them securely in place
to prevent damage.
Be sure the refrigerator stays in an upright position
during moving.
Dispenser
Unplug the refrigerator.
The bulb is located on the dispenser
under the control panel. Remove the
light bulb by turning it counterclockwise.
Replace the bulb with a bulb of the same
size and wattage.
Plug the refrigerator back in.
Page 14
14
BEFORE YOU BEGIN
Read these instructions completely and carefully.
•
IMPORTANT
–
Save these
instructions for local inspector’s use.
•
IMPORTANT
–
Observe all
governing codes and ordinances.
• Note to Installer –Be sure to leave these
instructions with the Consumer.
• Note to Consumer –Keep these instructions
for future reference.
• Skill level – Installation of this appliance requires
basic mechanical skills.
• Completion time – Refrigerator Installation
15 minutes
• Proper installation is the responsibility of the
installer.
• Product failure due to improper installation is not
covered under the Warranty.
• Do not install the refrigerator where the temperature
will go below 16°C because it will not run often enough
to maintain proper temperatures.
• Install it on a floor strong enough to support it fully
loaded.
REFRIGERATOR LOCATION
Installation
Refrigerator
Instructions
Models 20, 22, 25
Allow the following clearances for ease of installation,
proper air circulation and plumbing and electrical
connections.
• Sides 4 mm
• Top 25 mm
• Back 25 mm
A door clearance of 19 mm is needed for a 90° door
opening which provides better access to the food
storage area.
CLEARANCES
If the refrigerator has an icemaker, it will have to be
connected to a cold drinking water line. An approved
water supply kit (containing tubing, shutoff valve,
fittings and instructions) is available at extra cost
from your local distributor.
Installation of the icemaker must be done by a
qualified service technician.
WATER SUPPLY TO THE ICEMAKER
(on some models)
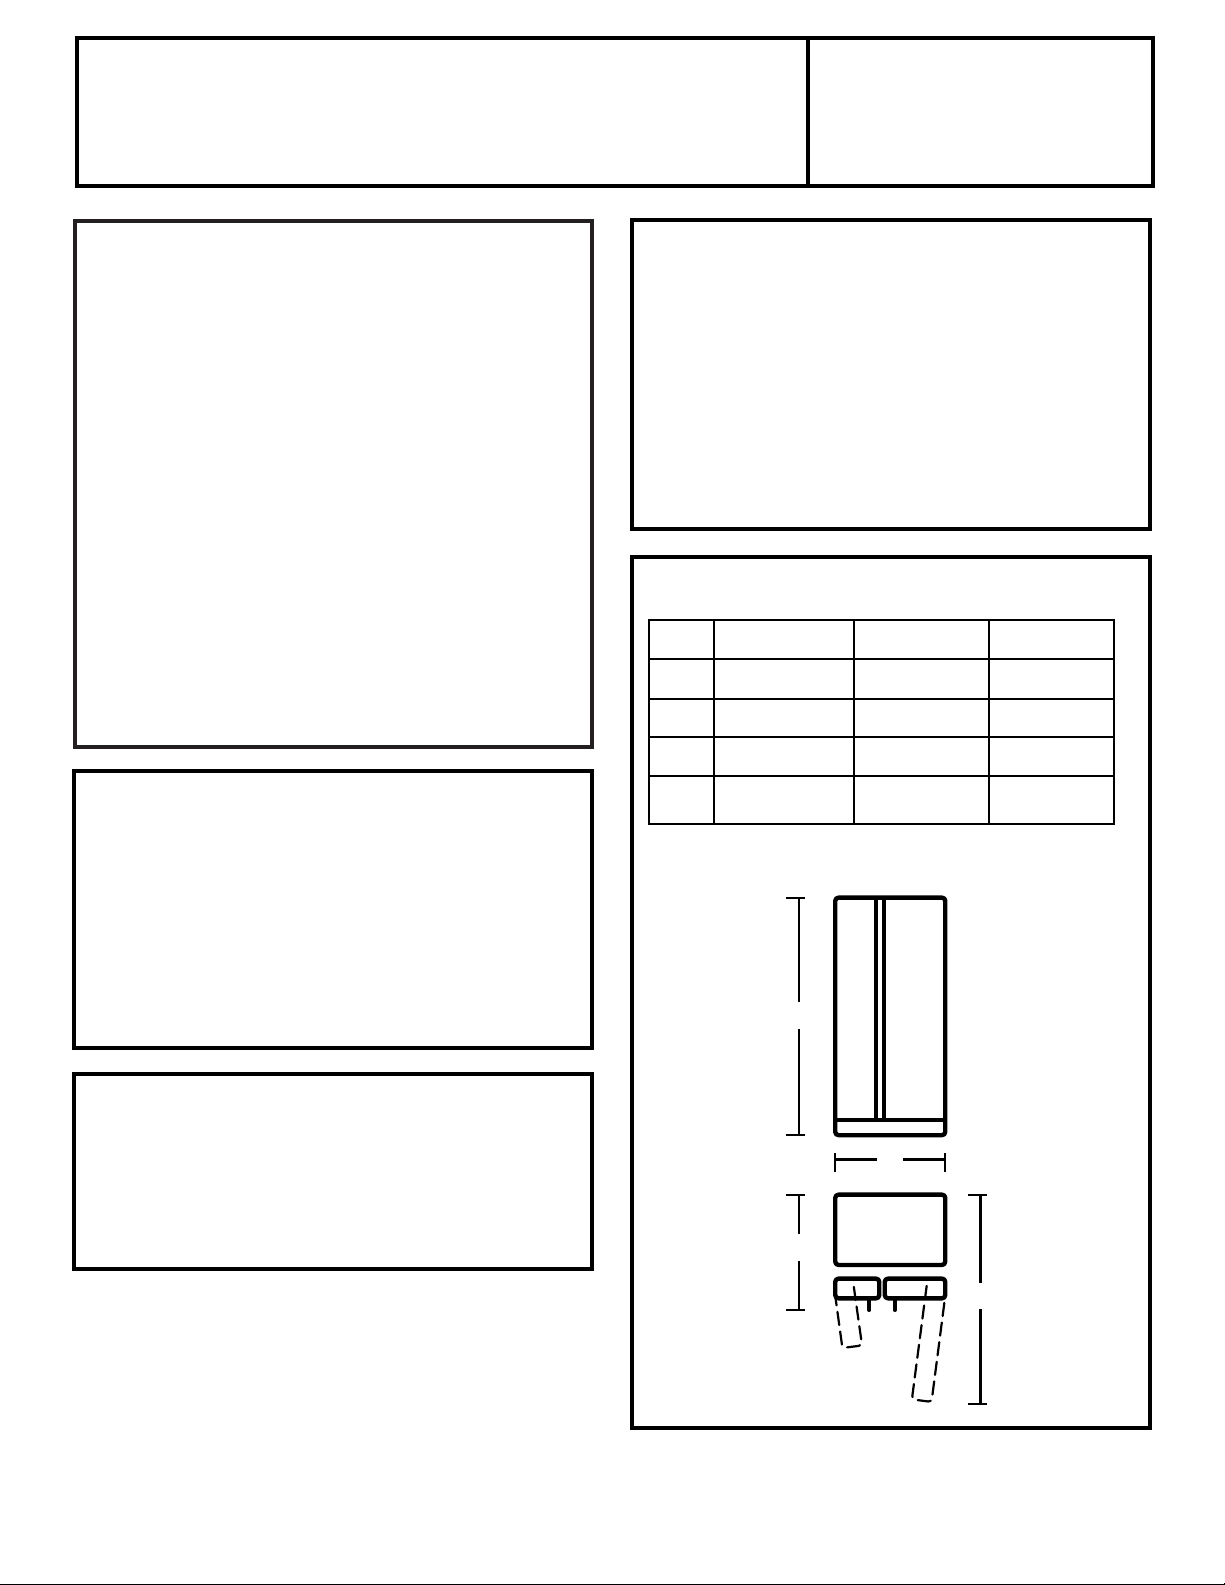
*Height does not include hinge.
**Depth includes handle.
DIMENSIONS
20 22 25
A* 1689 mm 1689 mm 1746 mm
B 800 mm 851 mm 908 mm
C** 838 mm 838 mm 838 mm
D 1182 mm 1240 mm 1240 mm
A
B
C
D
Page 15
15
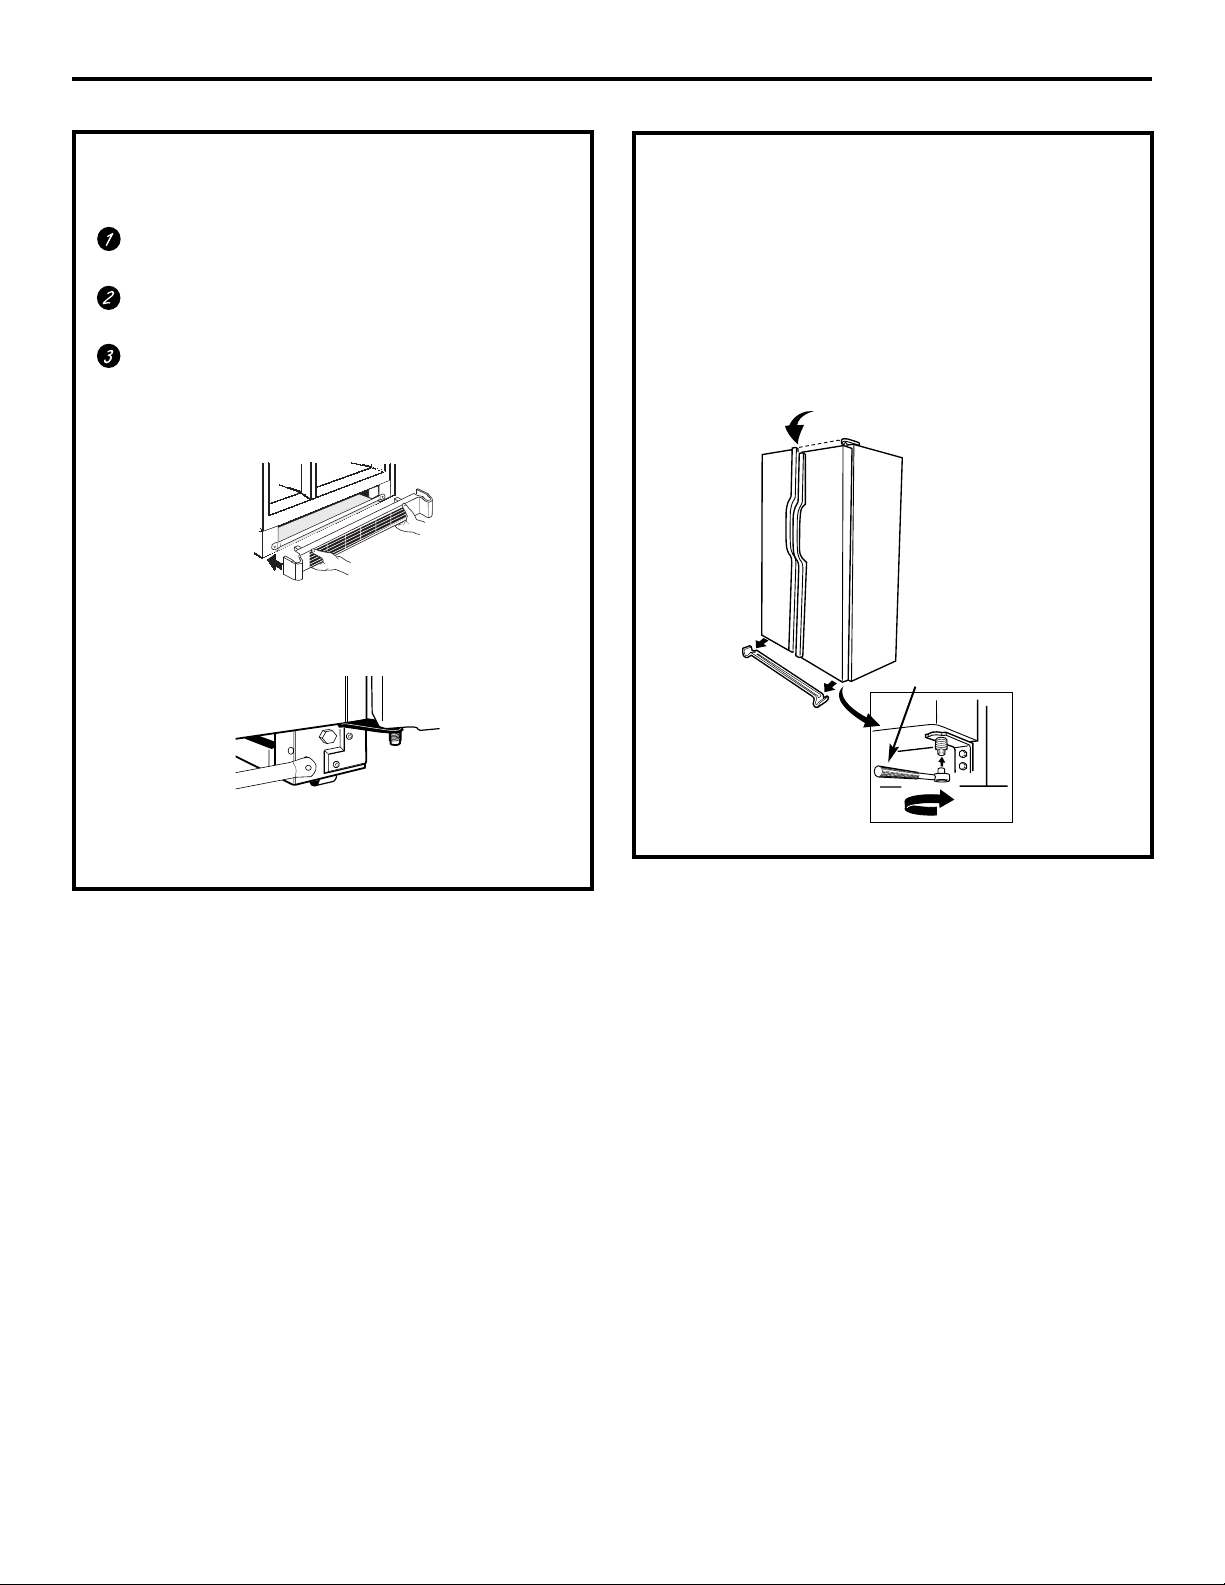
To remove the base
grille, open the doors
and then pull the
grille straight out.
5/16″Socket
Wrench
Raise
The rollers have 3 purposes:
Rollers adjust so the door closes easily when opened
about halfway.
Rollers adjust so the refrigerator is firmly positioned
on the floor and does not wobble.
Rollers allow you to move the refrigerator away from
the wall for cleaning.
To adjust the rollers, remove the base grille by pulling it
out at the bottom.
Turn the roller adjusting screws clockwise to raise the
refrigerator, counterclockwise to lower it. Use an
adjustable wrench (3/8″hex head bolt) or pliers.
To replace base grille, line up the clips on back of grille
between the bar and the bottom of the cabinet. Push
forward until grille snaps into place.
ROLLERS DOOR ALIGNMENT
After leveling, make sure that doors are even at the top.
To make the doors even, adjust the fresh food door. Using
a 5/16″socket wrench, turn the door adjusting screw to
the right to raise the door, to the left to lower it. (A nylon
plug, embedded in the threads of the pin, prevents the pin
from turning unless a wrench is used.) After one or two
turns of the wrench, open and close the fresh food door
and check the alignment at the top of the doors.
Installation Instructions
Page 16
The new high efficiency compressor runs faster and will have a higher pitch hum or
pulsating sound while operating.
The fan circulating air inside the freezer which keeps the temperatures throughout.
Water dropping on the defrost heater causing a sizzling, hissing or popping sound
during the defrost cycle.
The flow of refrigerant through the freezer cooling coils sounds like boiling water
or a gurgling noise.
Cracking or popping of cooling coils caused by expansion and contraction during
defrost and refrigeration following defrost.
Water dripping as it melts from the evaporator and flows to the drain pan during
the defrost cycle.
Icemaker
(on some models)
The icemaker water valve will buzz when the icemaker fills with water. If the power
switch is in the Iposition it will buzz even if it has not yet been hooked up to water.
Keeping the power switch in the Iposition before it is hooked up to water can
damage the icemaker. To prevent this, set the power switch to the O position.
This will stop the buzzing.
The sound of cubes dropping into the bin and water running in pipes as
icemaker refills.
These sounds are normal
and are due mostly to highly
efficient operation.
16
Normal operating sounds.
Page 17
17
Problem Possible Causes What To Do
Refrigerator does not
Refrigerator in defrost cycle. • Wait about 30 minutes for defrost cycle to end.
operate
Freezer control inO position. •Move the freezer control to a temperature setting.
Refrigerator is unplugged. • Push the plug completely into the outlet.
The fuse is blown/circuit •Replace fuse or reset the breaker.
breaker is tripped.
Vibration or rattling
Front rollers need adjusting. • See
Rollers.
(slight vibration
is normal)
Motor operates for
Normal when refrigerator • Wait 24 hours for the refrigerator to completely
long periods or cycles
is first plugged in. cool down.
on and off frequently.
Often occurs when large •This is normal.
(Modern refrigerators
amounts of food are
with more storage
placed in refrigerator.
space and a larger
Door left open. • Check to see if package is holding door open.
freezer require more
Hot weather or frequent • This is normal.
operating time. They
door openings.
start and stop often
Temperature controls •See
About the controls.
to maintain even
set at the coldest
temperatures.)
setting.
Fresh food or freezer
Temperature control not set • See
About the controls.
compartment too warm
cold enough.
Warm weather or frequent •Set the temperature control one step colder.
door openings. See
About the controls.
Door left open. • Check to see if package is holding door open.
Frost or ice crystals
Door left open. • Check to see if package is holding door open.
on frozen food
Too frequent or too long
(frost within package
door openings.
is normal)
Divider between fresh
Automatic energy saver •This helps prevent condensation on the outside.
food and freezer
system circulates warm
compartments
liquid around front edge
feels warm
of freezer compartment.
Automatic icemaker
Icemaker power switch • Set the power switch to the Iposition.
does not work
is in the Oposition.
(on some models)
Water supply turned off or • See
Installing the water line.
not connected.
Freezer compartment •Wait 24 hours for the refrigerator to completely cool down.
too warm.
Piled up cubes in the storage • Level cubes by hand.
bin cause the icemaker
to shut off.
Ice cubes stuck in icemaker. • Turn off the icemaker, remove cubes, and turn the
(Green power light on icemaker back on.
icemaker blinking).
Troubleshooting Tips
Save time and money! Review the charts on the following pages first
and you may not need to call for service.
Before you call for service…
Page 18
18
Problem Possible Causes What To Do
Ice cubes have
Ice storage bin needs cleaning. • Empty and wash bin. Discard old cubes.
odor/taste
Food transmitting odor/taste • Wrap foods well.
to ice cubes.
Interior of refrigerator •See
Care and cleaning.
needs cleaning.
Slow ice cube freezing
Door left open. • Check to see if package is holding door open.
Temperature control not set •See
About the controls.
cold enough.
Door not closing
Door gasket on hinge side •Apply petroleum jelly on face of gasket.
properly
sticking or folding over.
Orange glow in
Defrost heater is on. • This is normal.
the freezer
Cube dispenser does not
Icemaker turned off or •Turn on icemaker or water supply.
work (on some models)
water supply turned off.
Ice cubes are frozen to • Remove cubes.
icemaker feeler arm.
Irregular ice clumps in • Break up with fingertip pressure and discard remaining clumps.
storage container.
• Freezer may be too warm. Adjust the freezer control to a colder
setting, one position at a time, until clumps do not form.
Dispenser is
LOCKED
. •Press and hold the
LOCK CONTROL
pad for 3 seconds.
Water has poor taste/odor
Water dispenser has not been •Dispense water until all water in system is replenished.
(on some models)
used for a long time.
Water in first glass is
Normal when refrigerator • Wait 24 hours for the refrigerator to completely cool down.
warm (on some models)
is first installed.
Water dispenser has not been • Dispense water until all water in system is replenished.
used for a long time.
Water system has been drained. •Allow several hours for replenished supply to chill.
Water dispenser does
Water supply line turned • See
Installing the water line.
not work (on some models)
off or not connected.
Air may be trapped in the •Press the dispenser arm for at least two minutes.
water system.
Dispenser is
LOCKED
. •Press and hold the
LOCK CONTROL
pad for 3 seconds.
Water is not dispensed
Water in reservoir is •Call for service.
but icemaker is working
frozen.
Troubleshooting Tips
Before you call for service…
Page 19

19
Problem Possible Causes What To Do
No water or ice cube
Supply line or shutoff •Call a plumber.
production
valve is clogged.
Dispenser is
LOCKED
. •Press and hold the
LOCK CONTROL
pad for 3 seconds.
Refrigerator has odor
Foods transmitting • Foods with strong odors should be tightly wrapped.
odor to refrigerator.
• Keep an open box of baking soda in the refrigerator; replace
every three months.
Interior needs cleaning. • See
Care and cleaning.
Defrost water drainage • See
Care and cleaning.
system needs cleaning.
Moisture forms on
Not unusual during •Wipe surface dry.
outside of refrigerator
periods of high humidity.
Moisture collects inside
Too frequent or too
(in humid weather, air
long door openings.
carries moisture into
refrigerator when doors
are opened)
Interior light does
No power at outlet. • Replace fuse or reset the breaker.
not work
Light bulb burned out. •See
Replacing the light bulbs.
Water on kitchen floor or
Drain in the bottom of • See
Care and cleaning.
on bottom of freezer
the freezer clogged.
Cubes jammed in chute. •Poke ice through with a wooden spoon.
Hot air from bottom
Normal air flow cooling
of refrigerator
motor. In the refrigeration
process, it is normal that
heat be expelled in the
area under the refrigerator.
Some floor coverings are
sensitive and will discolor at
these normal and safe temperatures.
CUBED ICE was selected
Last setting was
CRUSHED ICE
. • A few cubes were left in the crusher from the previous setting.
but CRUSHED ICE
This is normal.
was dispensed
(
on some models)
Page 20

Notes.
20
Page 21

Mesures de sécurité
Bonne mise au rebut . . . . . . . . . . . . . . 24
Branchement électrique . . . . . . . . . . 23
Mesures de sécurité . . . . . . . . . . . . . . . 22
Instructions de fonctionnement
Bacs de rangement . . . . . . . . . . . . 28, 29
Clayettes, bacs et paniers . . . . . . 26–27
Distributeur de glaçons
et d’eau . . . . . . . . . . . . . . . . . . . . . . 30–31
Machine à glaçons
automatique . . . . . . . . . . . . . . . . . 29–30
Réglages . . . . . . . . . . . . . . . . . . . . . . . . 25
Soins et nettoyage . . . . . . . . . . . 31–33
Remplacement des
ampoules électriques . . . . . . . . . . . . . 33
Instructions d’installation . . . 34, 35
Liste de vérifications préventives
Avant d’appeler
un réparateur . . . . . . . . . . . . . . . . 37–40
Bruits normaux de
fonctionnement . . . . . . . . . . . . . . . . . 36
21
Inscrivez le numéro de modèle et le
numéro de série ci-dessous :
Numéro de modèle : _____________________
Numéro de série : ______________________
Vous les trouverez sur une étiquette située en
haut à droite du compartiment réfrigération,
derrière les réglages.
Page 22

22
MESURES DE SÉCURITÉ IMPORTANTES.
LISEZ TOUTES LES INSTRUCTIONS AVANT
D’UTILISER VOTRE RÉFRIGÉRATEUR.
AVERTISSEMENT!
N’utilisez cet appareil qu’aux fins prévues dans le présent Manuel du propriétaire.
MESURES DE SÉCURITÉ
Pour utiliser un appareil électroménager électrique, vous devez prendre des mesures de sécurité, en particulier :
■
■Vous devez bien installer et placer votre
réfrigérateur, conformément aux Instructions de
montage avant de l’utiliser. Consultez également
la section
Comment raccorder au réseau électrique.
■
■N’essayez jamais de monter sur votre
réfrigérateur. Cela peut occasionner des blessures
corporelles et des dommages au réfrigérateur.
■
■Ne permettez jamais aux enfants de jouer avec
votre réfrigérateur ou de modifier ses réglages.
■
■Ne permettez jamais aux enfants de grimper, de
monter, de se tenir ou de se pendre aux clayettes
de votre réfrigérateur. Ils peuvent endommager le
réfrigérateur et se blesser sérieusement.
■
■Ne touchez jamais les surfaces froides dans le
compartiment congélation quand vos mains sont
humides ou mouillées. Votre peau peut coller à
ces surfaces extrêmement froides.
■
■Ne conservez jamais ou n’utilisez jamais d’essence
ou d’autres liquides ou gaz inflammables à
proximité de votre réfrigérateur ou de tout autre
appareil électroménager.
■
■Dans les réfrigérateurs qui ont des machines à
glaçons, évitez tout contact avec les éléments
mobiles du mécanisme d’éjection, ou avec les
éléments de chauffage qui libèrent les glaçons.
Ne mettez jamais vos doigts ou vos mains sur le
mécanisme de fabrication automatique de glaçons
quand le réfrigérateur est branché.
■
■Un technicien de service qualifié doit installer la
machine à glaçons.
■
■Ne laissez jamais vos doigts dans des endroits où ils
risquent d’être pincés. L’écartement entre les
portes et l’armoire est nécessairement petit.
■
■Débranchez votre réfrigérateur avant de le
nettoyer et de le réparer.
NOTE : Nous vous recommandons fortement de faire
accomplir tout service par un technicien qualifié.
■
■
Avant de remplacer une ampoule brûlée, vous devez
débrancher votre réfrigérateur
pour vous éviter
d’entrer en contact avec un filament porteur
d’électricité (vous pouvez briser une lampe brûlée
en essayant de la changer).
NOTE: Vous n’enlèverez pas le courant électrique du circuit
de la lumière en tournant le réglage en position 0.
■
■Ne recongelez jamais des aliments congelés qui
ont complètement dégelé.
Page 23

23
DANGER! RISQUE DE PRISE AU PIÈGE
BONNE MISE AU REBUT DE VOTRE RÉFRIGÉRATEUR
L’enfermement et l’asphyxie des enfants ne sont pas
des histoires du passé. Les réfrigérateurs jetés ou
abandonnés sont toujours dangereux... même s’ils
ne doivent rester là que «quelques jours». Si vous
vous débarrassez de votre vieux réfrigérateur, suivez
les instructions suivantes pour prévenir tout
accident.
Avant de jeter votre vieux réfrigérateur ou
congélateur :
■Enlevez les portes et jetez-les séparément.
■Laissez les étagères montées, pour éviter que des
enfants puissent facilement tenir dans votre
réfrigérateur.
■Si votre réfrigérateur a une serrure, cassez-la.
Disposition des chlorofluorocarbures
Votre vieux réfrigérateur peut avoir un système de
refroidissement utilisant des chlorofluorocarbures.
On pense que ceux-ci peuvent causer des dommages
environnementaux.
Si vous jetez votre vieux réfrigérateur, assurez-vous
de faire enlever tout le réfrigérant aux
chlorofluorocarbures par un service qualifié qui les
jettera convenablement. Si vous relâchez
intentionnellement ce réfrigérant aux
chlorofluorocarbures, vous pouvez être condamné à
des amendes et à de l’emprisonnement
conformément aux lois sur la protection de
l’environnement.
Page 24

24
MESURES DE SÉCURITÉ IMPORTANTES.
LISEZ TOUTES LES INSTRUCTIONS AVANT
D’UTILISER VOTRE RÉFRIGÉRATEUR.
AVERTISSEMENT!
BRANCHEMENT ÉLECTRIQUE
Le cordon d’alimentation de cet appareil est muni
d’une fiche à trois broches (bipolaire avec terre) qui
se met dans une prise murale à trois trous (bipolaire
avec terre), pour réduire le risque de secousse
électrique occasionné par cet appareil.
Faites vérifier la prise murale et le circuit électrique
par un électricien qualifié pour vous assurer que la
prise murale est bien mise à la terre.
Si vous avez une prise murale à deux broches
seulement (sans terre), vous êtes personnellement
responsable et obligé de la faire remplacer par une
bonne prise murale avec terre, bien mise à la terre.
Vous devez toujours
brancher votre
réfrigérateur à sa
propre prise électrique.
Le rendement de votre
réfrigérateur sera meilleur
et vous éviterez ainsi de
surcharger les circuits
électriques et de surchauffer le câblage de votre
maison, avec tous les risques d’incendie connexes.
Veuillez consulter la plaque signalétique de votre
réfrigérateur pour trouver le bon voltage, wattage
et fréquence. Si la fiche de votre appareil ne
correspond pas à votre prise murale, vous devez
monter une nouvelle fiche sur votre appareil.
IMPORTANT: Vous devez faire effectuer la pose des fiches et
des cordons d’alimentation électrique par un électricien qualifié
ou un agent de service. Dans certains pays, la repose de fiches
et de cordons d’alimentation électrique n’est autorisée que si
elle a été effectuée par un électricien qualifié.
Si le cordon d’alimentation est endommagé, vous
devez le faire remplacer par un agent de service
qualifié pour éviter tout risque en matière de
sécurité.
Ne débranchez jamais votre réfrigérateur en tirant
sur le cordon d’alimentation. Tenez toujours la
fiche fermement et enlevez-la de la prise en tirant
droit.
Réparez ou remplacez immédiatement tout cordon
d’alimentation usé ou endommagé. N’utilisez jamais
de cordon fissuré ou usé sur sa longueur ou à l’une
de ses extrémités.
Pour écarter votre réfrigérateur du mur, faites
attention de ne pas écraser ou d’endommager le
cordon d’alimentation.
Remplacement du cordon d’alimentation
Pour remplacer n’importe quand le cordon
d’alimentation de votre réfrigérateur, vous devez le
remplacer par un cordon spécial qui n’est
disponible que chez votre revendeur local. Vous
devrez payer les frais de remplacement du cordon
d’alimentation si vous l’avez endommagé.
Vous devez placer le réfrigérateur dans un endroit où
vous avez accès à la prise.
LISEZ ET SUIVEZ SOIGNEUSEMENT CES MESURES DE SÉCURITÉ.
CONSERVEZ CES INSTRUCTIONS
Assurez-vous qu’une
bonne mise à la terre
existe avant d’utiliser
Fiche avec mise
à la terre
Page 25

25
Mettez initialement le bouton de réglage de température du compartiment
réfrigération en position 5 et celui du compartiment congélation en position 5
et attendez 12 heures que la température se stabilise.
Vous aurez peut-être besoin d’ajuster plusieurs fois. Ajustez le réglage d’une
unité à la fois et attendez 12 heures après chaque ajustement que le
réfrigérateur atteigne la température désirée.
En mettant le bouton de réglage de température du compartiment congélation
en position 0, vous arrêtez de refroidir le compartiment réfrigération aussi bien
que le compartiment congélation, mais vous ne coupez pas l’alimentation
électrique de votre réfrigérateur.
Le réglage de la température varie selon vos préférences personnelles, votre
usage et vos conditions de fonctionnement et peut nécessiter plus d’un
ajustement.
Limites de température ambiante dans la pièce
Votre réfrigérateur est conçu pour fonctionner dans les températures ambiantes
indiquées par sa Classe de température qui est marquée sur sa plaque signalétique.
Classe de Symbole Température ambiante
température Maximale Minimale
Tempérée–
Étendue SN 32 °C 10 °C
Tempérée N 32 °C 16 °C
Subtropicale ST 38 °C 18 °C
Tropicale T 43 °C 18 °C
NOTE : La température interne peut être influencée par des facteurs tels que l’emplacement du réfrigérateur,
la température ambiante et la fréquence des ouvertures de porte. Ajustez les boutons de réglage de
température de manière à compenser l’action de ces facteurs.
9 IS COLDEST
0 IS OFF
Réglage de votre réfrigérateur.
5
5
6
6
4
4
7
7
3
3
8
8
2
2
9 IS COLDEST
9
9
1
1
0 IS OFF
0
FREEZER FRESH FOOD
Page 26

Changement d’emplacement des clayettes
Enlèvement
Remise en place
26
Clayettes et bacs de votre réfrigérateur.
Bacs dans la porte du compartiment réfrigération
Vous pouvez facilement transporter les bacs
ajustables du réfrigérateur jusqu’à votre surface
de travail.
Enlèvement :
Soulevez l’avant du bac, puis tirez.
Remise en place ou changement d’emplacement :
Engagez le bac dans le support moulé de la
porte et poussez vers l’intérieur. Il se bloquera
en place.
La partition ajustable
empêche les petits articles
placés sur le balconnet de la porte de couler, de
se renverser ou de glisser. Mettez un doigt de
chaque côté de la partition près de l’arrière et
bougez-la dans un sens ou dans l’autre selon vos
besoins.
Clayettes du compartiment réfrigération :
Soulevez et
enlevez
Faites
basculer
Insérez le
crochet
supérieur
Abaissez
pour mettre
en place
Enlèvement
Clayettes du compartiment congélation :
Clayette coulissante anti-déversement
(sur certains modèles)
La clayette coulissante anti-déversement vous
permet d’atteindre des articles posés derrière
d’autres articles. Ses rebords spéciaux sont
conçus pour empêcher les liquides de couler
sur les clayettes inférieures.
Assurez-vous de bien pousser la clayette jusqu’au
fond avant de fermer la porte.
Clayettes anti-déversement
(sur certains modèles)
Les clayettes anti-déversement ont un rebord
spécial pour empêcher les liquides de couler
sur les clayettes inférieures.
Tous les modèles n’ont pas toutes ces caractéristiques.
Partition ajustable
Enlèvement
Paniers du compartiment congélation :
Enlevez le panier en le tirant vers l’avant,
en soulevant l’avant et en lui faisant
dépasser sa position
d’arrêt
en glissant.
AVERTISSEMENT : Si vous n’utilisez pas les
panier du compartiment congélation, le
rendement sera mauvais. Vous obtiendrez un
mauvais rendement de température si vous
rangez des articles dans le compartiment
congélation sans utiliser les paniers, car vous
réduisez la circulation d’air dans ce
compartiment.
Page 27

Clayettes profondes de porte
Des rallonges détachables approfondissent
et enclosent les clayettes fixes de portes, en
fournissant plus de place et plus de souplesse
de rangement.
Enlèvement :
Soulevez la rallonge droit vers le
haut, puis tirez-la.
Remise en place :
Engagez la rallonge dans les
supports moulés de la porte et poussez vers
l’intérieur. Elle se fixera en place.
Clayette repliables
(sur certains modèles)
Cette clayette se replie en deux et sa moitié
extérieure glisse sous sa moitié intérieure pour
permettre le rangement d’articles de haute
taille sur la clayette inférieure.
27
Caractéristiques supplémentaires.
Tous les modèles n’ont pas toutes ces caractéristiques.
Panier ShelfSaver
™
Utilisez ce panier pour avoir un accès facile
aux boîtes de boissons.
Il peut également contenir un plat de
cuisson de 23 cm x 33 cm (9″ x 13″).
Chargement du compartiment congélation
Rangez vos aliment de manière à laisser au
moins 15 mm d’espace libre entre les
paquets de nourriture et de 15 mm à 25 mm
d’espace libre entre le haut de vos paquets et
toute clayette ou panier situé au dessus
d’eux. Vous pouvez laisser avancer les
paquets de nourriture à l’avant des clayettes,
mais vous devez les écarter à 15 mm des
portes.
■Vous ne devez pas placer vos aliments à
congeler en contact direct avec les
aliments frais. Si vous devez congeler des
aliments chaque jour, vous devez peut-être
réduire la quantité d’aliments à congeler.
■Si vous devez congeler une grande quantité
d’aliments, réglez le compartiment
congélation à sa température la plus basse.
Une fois les aliments congelés, réglez à
nouveau le compartiment congélation à sa
température normale.
■Vous congèlerez plus facilement les
aliments en les mettant sur les trois
clayettes du milieu du compartiment
congélation et plus difficilement en les
mettant dans les balconnets de porte du
compartiment congélation.
■Ne conservez jamais d’aliments à
congélation rapide plus longtemps que
le temps recommandé par le producteur
d’aliments.
■Si vous coupez l’alimentation électrique
de votre réfrigérateur pendant une longue
durée, ou si le système de réfrigération
tombe en panne, n’ouvrez les portes qu’en
cas de nécessité absolue. Si vous devez le
faire, refermez-les le plus rapidement
possible de manière à conserver congelés
vos aliments le plus longtemps possible.
■Les balconnets de porte du compartiment
congélation portant une étiquette avec
deux étoiles ne conviennent qu’au
rangement d’aliments déjà congelés.
Vous ne devez jamais ranger de boissons
gazeuses dans le compartiment congélation.
Page 28

28
Bacs de rangement.
Tous les modèles n’ont pas toutes ces caractéristiques.
Bacs de rangement
Vous devez essuyer toute eau qui s’accumule
au fond des bacs.
Bacs à humidité réglable
Bac à viande convertible
Le bac à viande convertible a sa propre
conduite d’air, qui amène du compartiment
congélation un courant d’air froid qui
circule dans le bac.
Le réglage de température variable
ajuste
le courant d’air en provenance du
compartiment congélation.
Réglez le levier en position up(haut) pour
mettre le bac à la température normale du
compartiment réfrigération et avoir
davantage d’espace pour les légumes. Cela
coupe le courant d’air froid. Vous pouvez
choisir des températures intermédiaires
entre ces deux extrêmes.
Réglez le levier en position
down
(bas) pour
mettre le bac à la température la plus froide
et conserver la viande fraîche. Si le levier
reste en position
down
(bas) pendant
longtemps, il peut se créer un peu de givre
à l’intérieur du bac.
Normal
Le plus froid
Séparation
Sousplat
Sous-plat et séparation
(sur certains modèles)
Le sous-plat est conçu pour écarter vos fruits et vos légumes
du bas du bac et les protéger de toute humidité qui pourrait
se former. La séparation empêche les plus grands fruits et
légumes de tomber ou de rouler sur les autres plus délicats.
En levant tout droit la séparation, vous pouvez la séparer du
sous-plat et la régler d’un côté à l’autre, puis la repousser
en position.
Faites glisser le mécanisme de réglage en
position
High
(haut) ou pour obtenir un
degré d’humidité élevé, recommandé pour
la plupart des légumes.
Faites glisser le mécanisme de réglage en
position
Low
(bas) ou pour obtenir un
degré d’humidité bas, recommandé pour
la plupart des fruits.
Page 29

Enlèvement du bac à rangement.
Tous les modèles n’ont pas toutes ces caractéristiques.
Enlèvement du bac
Vous pouvez facilement enlever les bacs en
les soulevant légèrement et en les tirant au
delà de leur position
d’arrêt.
Si la porte vous empêche de tirer les bacs
complètement, vous devez tirer le
réfrigérateur vers l’extérieur en le roulant
jusqu’à ce que sa porte s’ouvre suffisamment
pour laisser sortir les bacs. Dans certains cas,
vous devez également tirer le réfrigérateur
vers la gauche en le faisant sortir de son
emplacement.
En remettant en place les bacs,
assurez-vous de bien les glisser
dans leurs guides.
Guides de
bac
29
Machine à glaçons automatique
(sur certains modèles)
La machine à glaçons produit sept glaçons
par cycle, soit environ 100 à 130 glaçons par
24 heures, selon la température du
compartiment congélation, la température
de la pièce, le nombre de fois que la porte est
ouverte et les autres conditions d’utilisation.
Si vous faites fonctionner le réfrigérateur
avant de raccorder l’eau à la machine à
glaçons, mettez le commutateur de marche
en position
O.
Après avoir raccordé le réfrigérateur à
l’alimentation d’eau, mettez le commutateur
de marche en position I.
La machine à glaçons se remplit d’eau
quand elle atteint le point de congélation.
Un réfrigérateur nouvellement installé
prend de 12 à 24 heures pour commencer
à fabriquer des glaçons.
Jetez les premiers lots de glaçons pour
permettre à la conduite d’eau de se purger.
Assurez-vous que rien ne gène la course du
bras palpeur.
Il est normal de trouver des glaçons qui
soient soudés ensemble.
Si vous n’utilisez pas souvent vos glaçons, les
vieux glaçons deviennent opaques, prennent
un mauvais goût et rétrécissent. Si des
glaçons se coincent dans la machine à
glaçons, mettez le commutateur de marche
en position OFF (arrêt) et enlevez les
glaçons. Ensuite, remettez le commutateur
de marche en position ON (marche) pour
remettre en marche la machine à glaçons.
AVERTISSEMENT : Branchez uniquement à une
alimentation d’eau potable. Un technicien de
service qualifié doit installer la machine à
glaçons.
Il y a une clayette supérieure de
compartiment congélation audessus de la machine à glaçons,
que vous pouvez utiliser pour ranger
des aliments.
Machine
à glaçons
Bras palpeur
Commutateur
de marche
Lumière verte
indiquant la
marche
Machine à glaçons automatique.
Un réfrigérateur juste branché peut prendre de 12 à 24 heures pour commencer à faire des glaçons.
Page 30

Choisissez
CUBED ICE
(glaçons) ,
CRUSHED ICE
(glace concassée)
ou
WATER
(eau) .
Appuyez le verre doucement contre le bras
de distribution.
Le bac de trop-plein n’est pas muni d’un
système d’écoulement. Pour enlever les
taches dues à l’eau, vous devez le nettoyer
régulièrement, ainsi que sa grille.
Si vous n’avez pas distribué d’eau après avoir installé
le réfrigérateur, il peut y avoir de l’air dans la
conduite d’eau. Appuyez sur le bras de distribution
pendant au moins deux minutes pour expulser l’air de
la conduite d’eau et remplir le système de distribution
d’eau. Pour éliminer toute impureté en provenance de
la conduite d’eau, jetez les six premiers verres d’eau.
ATTENTION : Ne mettez jamais vos doigts ou
d’autres objets dans l’ouverture du distributeur.
Verrouillage du distributeur (sur certains modèles)
Appuyez sur la touche
LOCK CONTROL
(verrouillage) pendant
3 secondes pour
verrouiller le distributeur
et son panneau de réglage.
Pour déverrouiller,
appuyez sur la touche
pendant 3 secondes.
Lumière du distributeur
Cette touche allume et
éteint la lumière
du
distributeur. Cette lumière
s’allume également quand
on appuie sur le bras de
distribution. Si l’ampoule
brûle, vous devez la
remplacer par une
ampoule de 6 watts,
12 volts DC.
30
Distributeur de glaçons et d’eau.
Sur certains modèles
Utilisation du distributeur
Bac de trop-plein
Bac à glaçons
Ensemble accessoire de machine à glaçons
Pour avoir accès aux glaçons,
tirez le bac
vers l’extérieur.
Pour enlever le bac,
tirez-le doit vers
l’extérieur et soulevez-le pour lui faire
dépasser sa position
d’arrêt.
Si votre réfrigérateur n’est pas déjà équipé
d’une machine à glaçons, vous pouvez
acheter un ensemble accessoire de machine
à glaçon.
Vous trouverez derrière votre réfrigérateur
le modèle d’ensemble de machine à glaçons
qui convient à votre modèle de réfrigérateur.
AVERTISSEMENT : Branchez uniquement à
une alimentation d’eau potable. Un technicien
de service qualifié doit installer la
machine à glaçons.
Machine à glaçons automatique.
Page 31

31
Bac de glaçons sur les modèles à
distributeur
Enlèvement :
Réglez le commutateur de la machine à
glaçons en position 0.Tirez le bac droit vers
vous et soulevez-le pour dépasser sa position
d’arrêt.
Remise en place :
Pour remettre en place le bac, assurez-vous
de bien le pousser en place. S’il n’entre pas
complètement, enlevez-le et tournez le
mécanisme de fonctionnement d’un quart
de tour. Remettez en place le bac.
Faites tourner
Mécanisme de
fonctionnement
Renseignements importants sur votre distributeur
■N’ajoutez jamais dans votre bac à glaçons
des glaçons en provenance de sacs ou de
plateaux. Ils risquent d’être difficiles à
concasser ou à distribuer.
■Évitez de trop remplir les verres de glaçons
et d’utiliser des verres étroits. Des glaçons
peuvent bloquer le conduit ou empêcher
le volet de fermeture de se fermer en
gelant. Si des glaçons bloquent le conduit,
faites-les passer à l’aide d’une cuillère en
bois.
■Ne placez jamais de boissons ou
d’aliments dans le bac à glaçons pour les
rafraîchir rapidement. Les boîtes, les
bouteilles ou les paquets d’aliments placés
dans le bac à glaçon peuvent coincer la
machine à glaçons ou la vis sans fin.
■Si vous choisissez
CUBED ICE
(glaçons), il
peut se produire que de la glace concassée
tombe dans votre verre. Cela se produit de
temps à autre quand il reste des glaçons
dans le concasseur.
■Après distribution de glace concassée, de
l’eau peut s’écouler du conduit.
■Du givre se forme parfois sur le volet du
conduit à glaçons. C’est normal et cela se
produit généralement après des
distributions répétées de glace concassée.
Ce givre s’évapore de lui-même.
ATTENTION : Vous ne devez pas consommer trop
froids certains produits comme les glaces à l’eau.
Soins et nettoyage de votre réfrigérateur.
Nettoyage de l’extérieur
Bac de trop-plein du distributeur
(sur certains
modèles). Vous devez essuyer complètement
jusqu’à ce qu’il soit bien sec le bac de tropplein du distributeur situé sous la grille.
L’eau laissée dans ce bac peut laisser des
dépôts. Enlevez tous ces dépôts en versant du
vinaigre non dilué dans le bac. Laissez
reposer jusqu’à ce que tous les dépôts
disparaissent ou deviennent suffisamment
mous pour être enlevés.
Berceau du distributeur
(sur certains
modèles). Avant de le nettoyer, verrouillez le
distributeur en appuyant sur la touche
LOCK
CONTROL
(verrouillage) pendant 3 secondes.
Nettoyez avec une solution d’eau chaude et
de bicarbonate de soude (environ 15 ml, ou
une c. à soupe, de bicarbonate de soude
pour 1 litre d’eau). Rincez soigneusement
et séchez complètement en essuyant.
Les poignées de porte et les garnitures.
Nettoyez avec un linge trempé dans l’eau
savonneuse. Séchez avec un linge doux.
Conservez l’extérieur propre.
Essuyez avec un
linge propre légèrement humecté de cire à
appareil électroménager ou de détersif
liquide à vaisselle doux. Séchez et polissez
avec un linge doux, propre.
N’essuyez jamais votre réfrigérateur avec un torchon
sale ou une serviette mouillée. Cela peut laisser un
résidu qui risque d’endommager la peinture. N’utilisez
jamais de tampon à récurer, de nettoyant en poudre,
d’eau de javel ou de produit nettoyant contenant un
agent de blanchiment, car ces produits peuvent rayer
et endommager la peinture.
Bac de trop-plein du distributeur.
Page 32

Pour de longues vacances ou absences,
enlevez tous vos aliments et débranchez votre
réfrigérateur. Mettez le freezer control en
position 0(arrêt) et nettoyez l’intérieur avec
une solution de bicarbonate de soude, d’une
cuillère à soupe (15 ml) de bicarbonate de
soude pour une pinte (1 litre) d’eau. Laissez
les portes ouvertes.
Mettez le commutateur de marche de la
machine à glaçons en position Oet fermez
l’alimentation d’eau du réfrigérateur.
Si la température risque de descendre en
dessous du point de congélation, demandez
à un technicien qualifié de purger votre
système d’alimentation d’eau (sur certains
modèles) pour empêcher des inondations
pouvant occasionner des dégâts sérieux.
32
Préparation de départ en vacances
Le condenseur
Vous n’avez pas besoin de nettoyer
routinièrement le condenseur en milieu
domestique normal. Cependant, en milieu
particulièrement gras ou poussiéreux,
vous devez nettoyer périodiquement le
condenseur pour obtenir un fonctionnement
efficace de votre réfrigérateur.
Nettoyage du condenseur :
Le condenseur est situé à l’intérieur de
l’arrière du réfrigérateur. Pour y avoir accès,
débranchez le réfrigérateur. Enlevez ensuite
le couvercle d’accès. Le condenseur se
trouve du côté droit.
Faites attention quand vous écartez votre
réfrigérateur du mur. Vous pouvez
endommager votre revêtement de plancher,
en particulier s’il est matelassé ou s’il a une
surface en relief.
Déplacez le réfrigérateur en le tirant droit et
remettez-le en place en le poussant droit.
Si vous bougez le réfrigérateur de côté, vous
pouvez endommager le revêtement de
plancher ou le réfrigérateur.
Lorsque vous remettez en place votre réfrigérateur,
assurez-vous de ne pas le rouler sur le cordon
d’alimentation ou la conduite d’eau de la machine à
glaçons (sur certains modèles).
Derrière votre réfrigérateur
Nettoyage de l’intérieur
Pour aider à empêcher les odeurs,
laissez une
boîte ouverte de bicarbonate de soude dans
les compartiments réfrigération et
congélation.
Débranchez votre réfrigérateur avant de le
nettoyer.
Si ce n’est pas pratique, enlevez
toute humidité au moyen d’une éponge ou
d’un chiffon pour nettoyer autour des
commutateurs, des lumières ou des réglages.
Utilisez une solution d’eau chaude et de
bicarbonate de soude (une cuillère à soupe
environ, soit 15 ml, de bicarbonate de soude
dans une pinte, soit 1 litre, d’eau). Cette
solution nettoie tout en neutralisant les
odeurs. Rincez et séchez en essuyant.
Après avoir nettoyé les joints de portes,
mettez une couche mince de pétrolatum sur
les joints de portes du côté de la charnière.
Cela aide à empêcher les joints de coller et
de se déformer.
Orifice d’écoulement dans le compartiment
congélation.
Au début du nettoyage, enlevez
la corbeille du bas du compartiment
congélateur et faites écouler une solution
de 5 ml (une cuillère à thé) de bicarbonate
de soude pour 500 ml d’eau chaude (pas
bouillante) par l’orifice d’écoulement à
l’aide d’une poire à jus. Cela aidera à
éliminer l’odeur et à réduire la possibilité
d’obstruction de l’écoulement. Si
l’écoulement est bloqué, utilisez une poire à
jus et une solution de bicarbonate de soude
pour pousser le bouchon dans la conduite
d’écoulement.
Évitez de nettoyer les clayettes froides en verre (sur
certains modèles) à l’eau chaude, parce qu’elles
risquent de se casser à cause de la grande différence
de températures. Manipulez avec soins le verre. Vous
pouvez briser en éclats le verre trempé en le heurtant.
Ne lavez aucune pièce en matière plastique de votre
réfrigérateur dans votre machine à laver la vaisselle.
Soins et nettoyage de votre réfrigérateur.
Page 33

Remplacement des ampoules électriques.
Vous ne débranchez pas votre réfrigérateur du circuit d’alimentation électrique en mettant le bouton de réglage en
position 0 (arrêt).
Compartiment réfrigération—Ampoule supérieure
Débranchez le réfrigérateur.
L’ampoule est située derrière les
réglages. Remplacez-la par une ampoule
d’appareil électroménager de même
voltage.
Rebranchez le réfrigérateur.
Compartiment réfrigération—Ampoule inférieure
(sur certains modèles)
L’ampoule est située au dessus du bac supérieur.
Débranchez la réfrigérateur.
Saisissez la patte située en bas de l’écran
pare-lumière et tirez-le vers le haut et
l’avant.
Après avoir remplacé par une ampoule
d’appareil électroménager de même
voltage ou de voltage inférieur, remettez
l’écran pare-lumière en place.
Rebranchez le réfrigérateur.
Compartiment congélation
Débranchez la réfrigérateur.
Enlevez la clayette située juste en dessous
de l’écran pare-lumière (Vous pourrez
l’enlever plus facilement en la vidant
d’abord).
Enlevez l’écran pare-lumière en le tirant
vers le haut.
Après avoir remplacé par une ampoule
d’appareil électroménager de même
voltage ou de voltage inférieur, remettez
l’écran pare-lumière en place en le
pendant à ses trois taquets.
Remettez la clayette en place et
rebranchez le réfrigérateur.
33
Préparation de déménagement
Fixez en place toutes les pièces mobiles,
comme la grille, les clayettes et les tiroirs, à
l’aide de ruban adhésif, pour empêcher tout
dommage.
Assurez-vous que votre réfrigérateur soit en position
droite pendant le déménagement.
Distributeur
Débranchez la réfrigérateur.
L’ampoule est située sur le distributeur,
sous le panneau de réglage. Enlevez
l’ampoule en la tournant dans le sens
opposé aux aiguilles d’une montre.
Remplacez l’ampoule par une ampoule
d’appareil électroménager de même
taille et voltage.
Rebranchez le réfrigérateur.
Page 34

34
AVANT DE COMMENCER
Lisez les instructions complètement et attentivement.
•
IMPORTANT
–
Conservez ces
instructions pour votre inspecteur local.
•
IMPORTANT
–
Observez tous les
codes et les ordonnances en vigueur.
• Note à l’installateur –Assurez-vous de laisser
ces instructions au consommateur.
• Note au consommateur –Conservez ces
instructions pour références futures.
• Niveau de compétence – L’installation de cet
appareil électroménager nécessite des compétences
mécaniques de base.
• Durée requise pour l’installation – Installation du
réfrigérateur : 15 minutes
• L’installateur est responsable d’une bonne
installation.
• Toute panne de l’appareil due à une mauvaise
installation est exclue de la garantie.
• N’installez jamais votre réfrigérateur dans une pièce
où la température ambiance risque d’être inférieure
à 16 °C, parce qu’il ne se mettra pas en marche
suffisamment souvent pour maintenir de bonnes
températures.
• Installez votre réfrigérateur sur un plancher
suffisamment solide pour le supporter quand il est
plein.
EMPLACEMENT DU
RÉFRIGÉRATEUR
Instructions
Réfrigérateur
d’installation
Modèles 20, 22, 25
Prévoyez les dégagements suivants pour faciliter votre
installation, permettre une bonne circulation d’air et les
raccordements d’électricité et de plomberie.
• Côtés 4 mm
• Haut 25 mm
• Arrière 25 mm
Prévoyez un dégagement de 19 mm pour pouvoir ouvrir
la porte à 90° et avoir un meilleur accès aux aliments
contenus dans votre réfrigérateur.
DÉGAGEMENTS
Si votre réfrigérateur a une machine à glaçons, il
faudra le brancher à une conduite d’eau froide. Vous
trouverez une trousse d’alimentation d’eau approuvée
(contenant un tuyau, un robinet d’arrêt, les joints et les
instructions) chez votre revendeur.
La machine à glaçons doit être installée par un
technicien de service qualifié.
ALIMENTATION D’EAU DE LA
MACHINE À GLAÇONS
(sur certains modèles)
*La hauteur ne comprend pas la charnière.
**La largeur comprend la poignée.
DIMENSIONS
20 22 25
A* 1689 mm 1689 mm 1746 mm
B 800 mm 851 mm 908 mm
C** 838 mm 838 mm 838 mm
D 1182 mm 1240 mm 1240 mm
A
B
C
D
Page 35

35
Pour ouvrir la grille de
base, ouvrez les
portes, puis tirez la
grille droit vers
l’extérieur.
Clé à douille de
5/16″
Pour soulever
Les roulettes servent à trois fins :
Les roulettes servent à vous permettre, une fois bien
réglées, de fermer facilement la porte quand elle est
ouverte à moitié.
Les roulettes servent à vous permettre, une fois bien
réglées, de bien poser votre réfrigérateur sur le
plancher pour lui éviter d’osciller.
Les roulettes servent à vous permettre d’écarter
votre réfrigérateur du mur pour nettoyer.
Pour régler les roulettes, enlevez la grille de base en la
tirant par le bas.
Tournez les vis de nivellement des roulettes dans le sens
des aiguilles d’une montre pour monter votre
réfrigérateur, dans le sens opposé à celui des aiguilles
d’une montre pour l’abaisser. Utilisez une clé anglaise
(boulon à tête hexagonale de 3/8″) ou des pinces.
Pour remettre en place la grille, alignez les pinces se
trouvant derrière la grille entre la barre et le bas du
compartiment réfrigération. Poussez en avant jusqu’à ce
que la grille soit fixée en place.
ROULETTES ALIGNEMENT DES PORTES
Après avoir mis à niveau votre réfrigérateur, assurez-vous
que les portes soient bien parallèles au sommet.
Pour égaliser les portes, réglez la porte du compartiment
réfrigération. À l’aide d’une clé à douille de 5/16″,
tournez la vis de réglage de la porte vers la droite pour
monter la porte, vers la gauche pour la descendre. Un
bouchon de nylon, intégré au filetage de la vis, l’empêche
de tourner si une clé n’est pas utilisée. Après un ou deux
tours de clé, ouvrez et fermez la porte du compartiment
réfrigération et vérifiez l’alignement au sommet de la
porte.
Instructions d’installation
Page 36

Votre nouveau compresseur à haut rendement tourne plus vite et a un ton de
ronronnement ou de pulsation plus aigu quand il fonctionne.
Le ventilateur fait circuler de l’air dans le compartiment congélation pour
maintenir une température uniforme.
L’eau coule goutte à goutte sur le chauffage du dégivreur, ce qui occasionne des
sifflements, des crépitements ou des craquements.
Le réfrigérant circule dans les bobines de refroidissement du compartiment
congélation, ce qui occasionne un bruit d’eau en train de bouillir ou en train de
gargouiller.
Les bobines de refroidissement se contractent ou s’élargissent pendant le cycle de
dégivrage et de réfrigération après le dégivrage, ce qui occasionne des craquements
ou des crépitements.
De l’eau s’égoutte quand elle se condense dans l’évaporateur et s’écoule dans le
plateau de dégivrage pendant le cycle de dégivrage.
Machine à glaçons
(sur certains modèles)
Le robinet d’alimentation d’eau de la machine à glaçons émet un bourdonnement
quand la machine à glaçons se remplit d’eau. Si le commutateur est en position I,
un bourdonnement se fait entendre même si la machine n’a pas encore été
branchée à l’alimentation d’eau. Si vous conservez le commutateur en position
I
avant de brancher la machine à l’alimentation d’eau, vous risquez d’endommager
votre machine. Pour éviter tous dégâts, mettez le commutateur en position O. Le
bourdonnement s’arrêtera.
Les glaçons font du bruit lorsqu’ils tombent dans le bac et lorsque l’eau circule dans les
tuyaux pour remplir la machine à glaçons.
Ces bruits sont normaux et sont
principalement occasionnés par
un fonctionnement hautement
efficace.
36
Bruits normaux de fonctionnement.
Page 37

37
Liste de vérifications préventives
Économisez votre temps et votre argent! Consultez les tableaux des
pages suivantes, vous éviterez peut-être d’appeler un réparateur.
Avant d’appeler un réparateur.. .
Votre réfrigérateur se
trouve dans son cycle de
dégivrage.
Réglage du compartiment
congélateur en position
0
(arrêt)
.
Le réfrigérateur est
débranché.
Le fusible a sauté ou le
disjoncteur a sauté.
Vous devez régler les
roulettes de devant.
C’est normal quand on met
en marche le réfrigérateur
pour la première fois.
Cela arrive souvent quand
on met beaucoup d’aliments
dans le réfrigérateur.
La porte est restée ouverte.
Il fait chaud ou vous ouvrez
souvent la porte.
La température est réglée
dans sa position la plus froide.
Le bouton de réglage de
température est mis à une
température trop basse.
Il fait chaud ou vous ouvrez
souvent la porte.
La porte est restée ouverte.
La porte est restée ouverte.
Vous ouvrez la porte trop
souvent ou trop longtemps.
• Attendez environ 30 minutes la fin du dégivrage.
• Changez le réglage du compartiment congélateur en position
de refroidissement.
• Poussez la fiche complètement dans la prise murale.
• Changez le fusible ou rebranchez le disjoncteur.
• Consultez
Roulettes.
• Attendez 24 heures que le réfrigérateur se refroidisse
complètement.
• C’est normal.
• Vérifiez qu’un paquet de nourriture n’empêche pas la porte de
se fermer.
• C’est normal.
• Consultez
Réglages.
• Consultez
Réglages.
• Mettez le bouton de réglage de température un numéro plus
froid. Consultez
Réglages.
• Vérifiez qu’un paquet de nourriture n’empêche pas la porte de
se fermer.
• Vérifiez qu’un paquet de nourriture n’empêche pas la porte de
se fermer.
Votre réfrigérateur ne
fonctionne pas
Vibrations ou bruits de
casse (il est normal
d’avoir de petites
vibrations)
Le moteur fonctionne
pendant de longues
périodes ou se met en
marche et s’arrête
fréquemment (les
réfrigérateurs modernes,
qui ont davantage
d’espace de rangement
et un compartiment
congélation plus grand,
nécessitent plus de
temps de
fonctionnement. Ils se
mettent en marche et
s’arrêtent souvent pour
maintenir des
températures
constantes).
Le compartiment
réfrigération ou
congélation est trop
chaud.
Du givre ou des cristaux
de glace se forment sur
les aliments congelés
(du givre à l’intérieur
des paquets d’aliments
est normal)
Votre problème Causes possibles Solutions
Page 38

38
Liste de vérifications préventives
Avant d’appeler un réparateur.. .
Votre problème Causes possibles Solutions
La séparation entre le
Le système automatique •Cela aide à empêcher la condensation à l’extérieur.
compartiment réfrigération
d’économie d’énergie fait
et le compartiment
circuler un liquide chaud
congélation demeure
autour des arêtes de devant
chaude.
du compartiment congélation.
La machine à glaçons
Le commutateur de marche •Mettez le commutateur en position I.
automatique ne
est en position
OFF
(arrêt).
fonctionne pas
L’alimentation d’eau est
(sur certains modèles)
arrêtée ou n’est pas branchée.
L’alimentation en eau est coupée •Consultez
Installation de la conduite d’eau.
ou n’est pas raccordée.
Le compartiment congélateur •Attendez 24 heures que le réfrigérateur soit complètement froid.
est trop chaud.
Une accumulation de glaçons •Nivelez les glaçons à la main.
dans le tiroir à glaçons
peut causer un arrêt de la
machine à glaçons.
Des glaçons sont coincés • Arrêtez la machine à glaçons, enlevez les glaçons et remettez en
dans la machine à glaçons marche la machine à glaçons.
(la lumière verte de la
machine à glaçons scintille).
Les glaçons ont une
Le bac à glaçons doit être nettoyé. •Videz et lavez le bac à glaçons. Jetez les vieux glaçons.
odeur ou un goût
Les aliments donnent de • Emballez bien les aliments.
l’odeur ou du goût aux glaçons.
L’intérieur du réfrigérateur •Consultez
Soins et nettoyage de votre réfrigérateur.
a besoin d’être nettoyé.
La formation des
La porte est restée ouverte • Vérifiez qu’un paquet de nourriture n’empêche pas la
glaçons est lente
porte de se fermer.
Le bouton de réglage de •Consultez
Réglages.
température est mis à une
température trop basse.
La porte ne se
Le joint de porte du côté de la •Mettez du pétrolatum sur le joint.
ferme pas bien
charnière colle ou se replie.
Il y a une lueur orangée
Le dégivreur du •C’est normal.
dans le compartiment
compartiment congélation
congélation
fonctionne.
Page 39

39
Votre problème Causes possibles Solutions
Le distributeur de glaçons
La machine à glaçons •Mettez en marche la machine à glaçons ou ouvrez
ne fonctionne pas
est arrêtée, ou l’alimentation l’alimentation d’eau.
(sur certains modèles)
d’eau est arrêtée.
Des glaçons sont collés • Enlevez les glaçons.
au bras de distribution.
Il y a des flocons de glace • Cassez-les entre les doigts et jetez les autres morceaux irréguliers.
irréguliers dans le compartiment
•Il est possible que le compartiment congélation soit trop chaud.
de rangement.
Réglez la température du compartiment congélation en position
plus froide, un numéro à la fois, jusqu’à ce qu’il ne se forme plus
de flocons.
Le distributeur est verrouillé. •Appuyez sur la touche
LOCK CONTROL
(verrouillage)
pendant 3 secondes.
L’eau a mauvais goût ou
Vous n’avez pas utilisé le •Alimentez en eau jusqu’à ce que le réservoir du
mauvaise odeur
distributeur d’eau depuis distributeur soit rempli.
(sur certains modèles)
longtemps.
L’eau versée dans le
C’est normal quand le •Attendez 24 heures que le réfrigérateur se
premier verre est chaude
réfrigérateur vient d’être installé. refroidisse complètement.
(sur certains modèles)
Le distributeur d’eau n’a pas • Alimentez en eau jusqu’à ce que le réservoir du distributeur
été utilisé depuis longtemps. soit rempli.
Le système d’eau n’a pas été purgé. •Attendez quelques heures que le nouvel
approvisionnement refroidisse.
Le distributeur d’eau
La conduite d’alimentation •Consultez
Installation de la conduite d’eau.
ne fonctionne pas
d’eau est coupée ou débranchée.
(sur certains modèles)
Il peut y avoir de l’air •Appuyez sur le bras de distribution pendant au moins
dans le système d’eau. deux minutes.
Le distributeur est verrouillé. •Appuyez sur la touche
LOCK CONTROL
(verrouillage)
pendant 3 secondes.
Il n’y a pas de distribution
L’eau est gelée dans le réservoir. •Appelez le service de réparation.
d’eau mais la machine à
glaçons fonctionne.
Il n’y a pas de distribution
La conduite ou le robinet •Appelez un plombier.
d’eau ou de glaçons.
d’approvisionnement d’eau
est bloqué.
Le distributeur est verrouillé. •Appuyez sur la touche
LOCK CONTROL
(verrouillage)
pendant 3 secondes.
Le réfrigérateur sent
Les aliments donnent • Vous devez bien empaqueter les aliments qui sentent fort.
une odeur au réfrigérateur.
•Conservez une boîte ouverte de bicarbonate de soude dans
votre réfrigérateur; remplacez-la tous les trois mois.
L’intérieur a besoin d’un nettoyage. • Consultez
Soins et nettoyage de votre réfrigérateur.
Le système d’évacuation d’eau •Consultez
Soins et nettoyage de votre réfrigérateur.
de dégel a besoin d’un nettoyage.
Page 40

Liste de vérifications préventives
Avant d’appeler un réparateur.. .
Votre problème Causes possibles Solutions
Il se forme de l’humidité
Ce n’est pas inhabituel •Essuyez la surface jusqu’à ce qu’elle soit bien sèche.
à l’extérieur du
quand il fait très humide.
réfrigérateur
II se forme de l’humidité
Vous ouvrez les portes trop
à l’intérieur (quand il fait
souvent ou trop longtemps.
humide, l’air transporte
de l’humidité à l’intérieur
du réfrigérateur quand
vous ouvrez les portes)
La lumière intérieure
Le courant n’arrive pas à la prise. •Remplacez le fusible ou rebranchez le disjoncteur.
ne fonctionne pas
L’ampoule est brûlée. •Consultez
Remplacement des ampoules.
ll y a de l’eau sur le
La conduite d’élimination •Consultez
Soins et nettoyage.
plancher de la cuisine ou
de l’eau en bas du compartiment
en bas du département
congélation est bouchée.
congélation
Des glaçons sont coincés •Enlevez la glace avec une cuillère en bois.
dans l’orifice de distribution.
Le bas du réfrigérateur
C’est normal, le moteur
émet de l’air chaud
est refroidi par air.
Dans le processus de réfrigération,
il est normal que de la chaleur
soit émise en dessous du
réfrigérateur. Certains
revêtements de planchers
sont sensibles et se décolorent
à ces températures normales
et pas dangereuses.
Vous avez choisi CUBE ICE
Votre réglage précédent • Il restait quelques glaçons dans le mécanisme de distribution,
(glaçons), mais c’est
était en position
CRUSHED ICE
de votre réglage précédent. C’est normal.
de la glace concassée
(glace concassée).
qui sort (sur certains
modèles)
40
Page 41

Información de seguridad
Conecte a la Red . . . . . . . . . . . . . . .44
Forma apropiada
de eliminación . . . . . . . . . . . . . . . . .43
Normas de seguridad . . . . . . . . . . .42
Instrucciones
de funcionamiento
Cajones de Almacenamiento . .48, 49
Controles . . . . . . . . . . . . . . . . . . . . .45
Dispensador de agua y de hielo . . .51
Dispositivo automático
para fabricar hielo . . . . . . . . . . . . . .50
Estantes, Recipientes y
Rejillas . . . . . . . . . . . . . . . . . . . . .46–48
Cuidado y limpieza . . . . . . . .52, 53
Cambio de bombillas . . . . . . . . . . .53
Instrucciones
de instalación . . . . . . . . . . . . .54, 55
Consejos de Solución de Problemas
Antes de llamar
al servicio técnico . . . . . . . . . . . .57–59
Sonidos normales durante
la operación . . . . . . . . . . . . . . . . . . .56
Anote aquí el modelo y número de serie:
Modelo: ________________________
Número de serie: ________________
Podrá encontrar estos datos en la
etiqueta, dentro del compartimiento
del frigorífico, en la parte superior
derecha, bajo los controles.
41
Page 42

42
INFORMACIÓN IMPORTANTE DE SEGURIDAD.
PRIMERO LEA COMPLETAMENTE LAS INSTRUCCIONES.
¡PRECAUCIÓN!
Use este aparato sólo para los fines que se describen en este Manual del usuario.
NORMAS DE SEGURIDAD
Cuando use electrodomésticos, siga las normas básicas de seguridad, incluyendo las siguientes:
■
■Antes de usarse, este frigorífico deberá estar
instalado y ubicado de acuerdo con las
instrucciones de instalación. Ver también la
sección
Cómo Conectar a la Red
.
■
■No intente ponerse de pie sobre el refrigerador.
Eso podría resultar en daños personales o del
refrigerador.
■
■Evite que los niños jueguen con el refrigerador o
que manipulen indebidamente los controles.
■
■Impida que los niños se suban, se pongan de pie
en los estantes del refrigerador o se cuelguen de
los mismos. Podría dañarse el refrigerador y
además causarles serias lesiones.
■
■No toque las superficies frías del congelador con
las manos húmedas o mojadas. La piel se podría
adherir a las superficies extremadamente frías.
■
■No almacene ni use gasolina ni otros vapores o
líquidos inflamables cerca de éste o de cualquier
otro aparato.
■
■Si su frigorífico tiene un dispositivo automático
para fabricar hielo, evite el contacto con las partes
móviles del mecanismo de expulsión, o con el
resistencia térmica que desprende los cubos.
No ponga los dedos ni las manos en el mecanismo
automático para hacer hielo mientras el
refrigerador esté conectado.
■
■La instalación del dispositivo automático de hielo
debe realizarse únicamente por un técnico
cualificado.
■
■No toque las partes punzanartes con los dedos.
Los espacios entre las puertas y entre las puertas
y los armarios de cocina son estrechos por
necesidad. Cierre las puertas con cuidado
cuando hayan niños cerca.
■
■Desconecte el frigorífico antes de limpiarlo o de
efectuar reparaciones.
OBSERVACIÓN: Recomendamos enfáticamente encargar
cualquier reparación servicio de asistencia técnica.
■
■
Antes de reemplazar una bombilla fundida, el
frigorífico deberá ser desconectado
para evitar el
contacto con un cable con corriente. (La bombilla
podría romperse al reemplazarla.)
OBSERVACIÓN: Colocar el control del congelador en
posición 0 no desconecta el circuito de la luz.
■
■No vuelva a congelar los alimentos una vez que se
hayan descongelado.
Page 43

43
CÓMO ELIMINAR SU FRIGORÍFICO DE FORMA APROPIADA
El riesgo de que los niños queden atrapados
y se asfixien no es un problema del pasado.
Los frigoríficos abandonados o tirados …aunque
sea sólo por unos pocos días siguen siendo un
peligro. Si se deshace de su viejo aparato, por favor
siga las instrucciones que le damos a continuación,
para ayudar a prevenir accidentes.
Antes de deshacerse de su viejo frigorífico
o congelador:
■Quite todas las puertas y tírelas por separado.
■Deje los estantes en su sitio para que los niños
no se suban encima.
■Si su viejo refrigerador tiene un candado,
inutilícelo
Eliminación de CFC
Puede ser que su antiguo frigorífico tenga
un sistema de refrigeración que use CFC
(clorofluorocarbonos). Se cree que los CFC
son nocivos para el ozono de la estratosfera.
Si se deshace del antiguo frigorífico, asegúrese
de que se extraiga el refrigerante con CFC para
que un técnico cualificado lo deposite en el lugar
apropiado. Si libera a propósito el refrigerante con
CFC usted podrá sufrir multas y encarcelamiento
según la normativa vigente de la legislación medioambiental.
¡PELIGRO! RIESGO DE QUE UN NIÑO PUEDA
QUEDAR ATRAPADO
Page 44

44
INFORMACIÓN IMPORTANTE DE SEGURIDAD.
PRIMERO LEA COMPLETAMENTE LAS INSTRUCCIONES.
¡PRECAUCIÓN!
CÓMO CONECTAR A LA RED ELÉCTRICA
El cable eléctrico de este aparato está equipado con
un enchufe de tres clavijas (tierra) que encaja en
una toma de corriente estándar de pared de tres
entradas (tierra) a fin de reducir al máximo la
posibilidad de daños por descarga eléctrica al usar
este aparato.
Haga que un electricista cualificado revise la toma
de corriente de la pared y el la instalación para
asegurarse de que la salida esté conectada
debidamente a tierra.
Cuando sólo se
disponga de una
salida de corriente sin
toma de tierra, es su
responsabilidad
reemplazarla por una
salida adecuado para
tres clavijas con toma de
tierra. El refrigerador debe estar siempre
enchufado a una toma de electricidad propia.
Esto le proporcionará el mejor rendimiento y
además evitará la sobrecarga de los circuitos
eléctricos de la vivienda, lo cual podría causar un
incendio si los cables se sobrecalentaran. En la placa
indicadora de potencia del refrigerador encontrará
el voltaje, potencia y frecuencia adecuados. Si el
enchufe del producto no encaja en su salida de
corriente, debería cambiarse el enchufe del aparato
por uno nuevo.
IMPORTANTE: Los cambios de enchufes y cables debería
realizarse por un técnico cualificado o un agente de servicio.
En algunos países, sólo está permitido cambiar enchufes y
cables a técnicos cualificados.
Si el cable de corriente viene dañado de fábrica,
debe ser reemplazado por el servicio de asistencia
técnicopara evitar cualquier riesgo.
Nunca desconecte el frigorífico tirando del cable.
Tome siempre firmemente el enchufe y sáquelo del
contacto directamente hacia fuera.
Repare o reemplace inmediatamente cualquier
cable que se haya desgastado o dañado por
cualquier razón. No utilice cables que muestren
roturas o daños por abrasión a lo largo de éste
ni en alguno de sus extremos.
Al alejar su refrigerador de la pared, evite pisar el
cable o dañarlo.
Cómo cambiar el cable de corriente
Si el cable de corriente de su frigorífico necesita
cambiarse en algún momento, deberá sustituirlo por
un cable especial que podrá comprar en su tienda
de repuestos. Si usted ha dañado el cable, los gastos
correrán a su cargo.
Debe situarse el refrigerador de forma que el enchufe
sea accesible.
LEA Y SIGA CUIDADOSAMENTE LA INFORMACIÓN DE SEGURIDAD.
CONSERVE ESTAS INSTRUCCIONES
Antes de usarlo
asegúrese que hay una
buena conexión a tierra.
Enchufe con
toma de tierra
Page 45

45
Para empezar, ponga el control para alimentos frescos en 5 y el control del
congelador en 5 y deje pasar 12 horas para que la temperatura se estabilice.
Puede ser necesario realizar varios ajustes. Ajuste los controles de incremento
en incremento, y espere 12 horas tras realizar cada ajuste para que el
refrigerador alcance la temperatura que ha seleccionado.
Cuando ajusta el control del congelador a 0 dejan de enfriar el compartimiento
de alimentos frescos y el congelador pero el frigorífico no se apaga.
La graduación de los controles es un asunto de gustos personales, uso y
condiciones de operación y puede requerir más de un ajuste.
Los controles en el frigorífico.
Límites de temperatura ambiente en la habitación
Este frigorífico está diseñado para funcionar en temperaturas ambientales especificadas
por Clase de Temperatura que está marcada en la placa indicadora de potencia.
Temperatura Símbolo Temperatura Ambiente
Clase de Máximo Mínimo
Extendido
Templado SN 32°C 10°C
Templado N 32°C 16°C
Subtropical ST 38°C 18°C
Tropical T 43°C 18°C
OBSERVACIÓN: La temperatura interna puede verse afectada por factores como la ubicación del aparato,
la temperatura ambiente y la frecuencia con que se abren las puertas. Ajuste los controles de temperatura
según lo requiera a fin de compensar estos
factores.
9 ES EL NIVEL
MÁXIMO DE FRÍO
0 ES APAGADO
5
5
6
6
4
4
7
7
3
3
8
8
2
2
9 IS COLDEST
9
9
1
1
0 IS OFF
0
FREEZER FRESH FOOD
Page 46

Reorganización de los estantes
Para extraerlos
Para cambiarlos
46
Los estantes y recipientes del frigorífico.
Los recipientes en la puerta del compartimiento de alimentos frescos
Los recipientes ajustables se pueden llevar
fácilmente del frigorífico al área de trabajo.
Para sacarlo:
Levante la parte frontal del
recipiente hacia arriba, luego sáquelo.
Para reemplazarlos o reubicarlos:
Ajuste el
recipiente en los soportes moldeados de la
puerta y empuje hacia dentro El recipiente
se ajustará en su lugar.
La tapa deslizante
ayuda a prevenir que un
golpecito haga derramarse algo o que las cosas
pequeñas guardadas en el interior del estante
de la puerta se caigan o resbalen. Ponga un
dedo en cada lado del divisor hacia la parte
trasera y muévalo hacia delante y hacia atrás
hasta que se ajuste a sus necesidades.
Estantes del frigorífico:
Tire hacia arriba
y hacia fuera
Levántelo
Introduzca
el gancho
superior
Bájelo para
que se ajuste
en su lugar
Para extraerlos
Estantes de congelador:
No todos los modelos tienen todas las características.
Tapa deslizante
Para extraerlas
Cestas de congelador:
Extraiga la cesta tirando de la misma
hacia delante y levantando la parte
delantera hasta sobrepasar el punto
donde se para.
ADVERTENCIA: Si no se usan las cestas del
congelador es posible que el rendimiento sea
pobre. Si se almacenan alimentos en el
congelador sin usarlas el rendimiento de la
temperatura podría ser bajo por falta de
circulación del aire en el congelador.
Page 47

Estantes profunds de la puerta
Los extensores de estante desmontables dan
profundidad y encierran las estanterías fijas
de las puertas, ofreciendo mayor espacio y
flexibilidad de almacenamiento.
Para sacarlo:
Levante el extensor directamente
hacia arriba y luego hacia fuera.
Para cambiarlo:
Coloque el extensor del estante
en los soportes moldeados en la puerta y
empuje hacia dentro. Se ajustará en su lugar.
Estante ajustable
(en algunos modelos)
Este estante se divide en dos y la mitad se
desliza debajo de sí mismo para guardar
artículos muy altos ubicados en el estante
se encuentra más abajo.
Estante deslizante a prueba de derrames
(en algunos modelos)
El estante deslizante a prueba de derrames
permite alcanzar artículos situados detrás de
otros. Los bordes especiales están diseñados
para ayudar a prevenir derramamientos
o goteos a los estantes que se encuentran
más abajo.
Asegúrese de haber empujado los estantes hasta el
fondo antes de cerrar la puerta.
Estantes a prueba de derrames
(en algunos modelos)
Los bordes especiales están diseñados para
ayudar a prevenir derramamientos o goteos a
los estantes que se encuentran más abajo.
47
Page 48

48
Los Cajones de Almacenamiento.
No todos los modelos tienen todas las características.
Características adicionales.
No todos los modelos tienen todas las características.
Cajones de almacenamiento
El exceso de agua que pueda acumularse
en el fondo de los compartimientos debe
secarse.
Cajones con humedad regulable
Deslice el control hasta llegar a la posición
High
(alto) o para proporcionar el
máximo nivel de humedad, recomendado
para la mayoría de los vegetales.
Deslice el control hasta llegar a la posición
Low
(bajo) o para obtener el nivel
mínimo de humedad, recomendado para
la mayoría de las frutas.
Rejilla ShelfSaver
™
Use este dispensador de latas para guardar latas
de bebidas y alcanzarlas con mayor facilidad.
También puede sostener un plato de cocinar
de 9″ x 13″.
Cómo llenar el congelador
Llene el frigorífico de forma que quede un
espacio libre de, al menos, 15 mm entre los
paquetes y 25 mm de espacio entre la parte
superior de cualquier paquete y el estante o
la cesta por encima del mismo. Los paquetes
pueden colgar por fuera de la parte frontal de
los estantes, pero deberán mantener una
distancia de unos 15 mm con las puertas.
■Los alimentos a congelar no debe situarse en
contacto directo con la comida almacenada.
Si necesita congelar productos cada día,
puede que sea necesario reducir la cantidad
a congelar.
■Si necesita congelar una cantidad elevada de
alimentos, ajuste el control del congelador a
su posición máxima. Una vez que el producto
haya sido congelado vuelva a ajustar el
control del congelador a su posición inicial.
■La comida se congela más rápidamente en las
tres estantes del centro del compartimiento
del congelador y más lentamente en las
estantes de la puerta del congelador.
■No almacene comida rápida congelada por
más tiempo del recomendado por sus
fabricantes.
■Si el electrodoméstico se desconectara por
un período extenso de tiempo o si fallase el
sistema frigorífico, no abra las puertas a
menos que sea absolutamente necesario.
En ese, ciérrelas tan pronto como pueda
para que la comida congelada permanezca
en dicho estado el mayor tiempo posible.
■Las estantes de las puertas del congelador
marcadas con una etiqueta de dos estrellas
sólo deben almacenar alimentos previamente
congelados.
Las bebidas carbónicas no deben guardarse en el
congelador.
Page 49

Cómo sacar el cajón de almacenamiento.
No todos los modelos tienen todas las características.
Cómo sacar los cajones
Pueden extraerse fácilmente levantándolos
ligeramente y tirando de ellos hasta pasar
el punto de
tope
.
Si la puerta no le permite sacar los cajones,
necesitará empujar el frigorífico hacia
delante hasta que la puerta se abra lo
suficiente para poder sacarlos. En algunos
casos, cuando se hace rodar el aparato hacia
fuera, será necesario moverlo a la vez hacia
la izquierda.
Al cambiar los cajones, asegúrese de
deslizarlos por sus guías.
Guías del
cajón
49
Cajón convertible para carnes
Este cajón convertible para carnes tiene su
propio conducto de refrigeración, que permite
la circulación de aire frío proveniente del
congelador.
El control de temperatura variable
regula el flujo
de aire desde el congelador.
Deslice la palanca de control
hacia arriba
para
obtener en el cajón la temperatura normal
del frigorífico y proveer espacio extra para
almacenar verduras. El conducto de
refrigeración queda apagado. Se pueden
seleccionar posiciones variables entre estos
extremos. Deslice la palanca de control
hacia
abajo
, en la posición más fría, para conservar
carne fresca. Si la palanca permanece mucho
tiempo en esta posición, se podrá formar
escarcha en el interior del cajón.
Normal
Lo más frío
Divisor
Soporte
Soporte y divisor
(en algunos modelos)
El soporte está diseñado para que sus frutas y verduras no
toquen el suelo del cajón y no entren en contacto con la
escarcha que pudiera formarse en él. El divisor evitará que las
frutas y verduras de mayor tamaño caigan o rueden encima
de las más delicadas. Al levantar el divisor puede separarlo
del soporte y ajustarlo de un lado a otro, luego vuelva a
apretarlo hacia abajo y hasta que entre en su posición.
Page 50

50
Dispositivo automático para fabricar hielo
(en algunos modelos)
El dispositivo para hacer hielo dispensará
siete cubitos por ciclo— aproximadamente
100-130 cubitos en un período de 24 horas,
dependiendo de la temperatura del
congelador, de la temperatura ambiente,
del número de veces que se abra la puerta y
de otras condiciones de uso.
Si el frigorífico se pone en marcha antes
de que se instale la toma de agua en el
dispositivo para fabricar hielo, ponga el
interruptor de funcionamiento del mismo
en la posiciónO(DESACTIVADO).
Cuando el refrigerador se haya conectado
al suministro de agua, ponga el interruptor
en la posición I(ACTIVADO).
El dispositivo para hacer hielo se llenará
de agua cuando la temperatura alcance
el punto de congelación. Un frigorífico
recién instalado puede tardar entre
12 y 24 horas en empezar a fabricar hielo.
Tire las primeras cargas de cubitos de hielo
para permitir que el circuito de agua se
limpie.
Asegúrese que nada impida el movimiento
del brazo detector.
Es normal que algunos cubitos salgan
pegados.
Si no se usa hielo con frecuencia, los cubitos
de hielo viejos se opacan, disminuyen de
tamaño y adquieren un sabor desagradable.
Si los cubitos de hielo se pegasen al
dispositivo, apáguelo, saque los cubitos y
vuelva a conectarlo.
ADVERTENCIA: Solo conecte al suministro de
agua potable. La instalación del dispositivo
automático de hielo debe realizarse
únicamente por un técnico cualificado.
Hay un estante en la parte superior del
congelador por encima del dispositivo
para hacer hielo que puede usarse para
almacenamiento.
Cajoncillo para almacenaje del hielo
Accesorios del dispositivo automático para hacer hielo
Para acceder al hielo,
tire del cajoncillo hacia
fuera.
Para extraer el cajoncillo,
tire del mismo hacia
fuera y levántelo hasta sobrepasar el punto
donde se
para
.
Si su frigorífico no estaba equipado de serie
con un dispositivo automático para hacer
hielo, puede adquirir un dispositivo para
hacer hielo, por un precio adicional.
Vea la parte trasera de su aparato para saber
el juego de accesorios de dispositivo para
hacer hielo que su modelo necesita
específicamente.
ADVERTENCIA: Solo conecte al suministro de
agua potable. La instalación del dispositivo
automático de hielo debe realizarse
únicamente por un técnico cualificado.
Dispositivo para
fabricar hielo
Brazo Detector
Interruptor
de Corriente
Luz Verde de
Corriente
El dispositivo automático para fabricar hielo.
Un frigorífico recién instalado puede tardar de 12 a 24 horas antes de empezar a fabricar hielo.
Page 51

51
El dispensador de agua y hielo.
En algunos modelos
Cajón de almacenamiento de hielo en
modelos con dispensador
Para sacarla:
Ponga el interruptor de marcha del dispositivo
de hielo en la posición O. Tire del cajón
directamente hacia fuera y luego levántela
hasta pasar el punto
en que se detiene.
Para cambiarla:
Al cambiar el cajón asegúrese de presionarla
firmemente en su sitio. Si no llega hasta el
final, vuelva a sacarla y gire el mecanismo de
manejo 1/4 de vuelta. Luego empújelo de
nuevo.
Girar
Instrucciones
de uso
Datos importantes sobre su dispensador
■No agregue hielo de bandejas o de bolsas
en el recipiente de almacenamiento.
Podría provocar que no salga bien o que
no se triture adecuadamente.
■No llene demasiado los vasos de hielo ni
use vasos estrechos. El hielo amontonado
podría obstruir el orificio o hacer que se
congele la puerta de la salida de manera
que no se pueda abrir. Si hubiera hielo
bloqueándolo, empújelo con una cuchara
de madera.
■No debería usarse el recipiente de hielo
para enfriar rápidamente bebidas ni
alimentos. Las latas, botellas o paquetes de
comida podrían hacer que el dispositivo
de hielo se agujereara o obturase.
■Puede que salga algo de hielo triturado
aunque haya seleccionado la opción
CUBED ICE
(Hielo en Cubitos). Esto sucede
en ocasiones cuando algunos cubos se
cuelan por el triturador.
■Después de dispensar hielo triturado,
puede gotear un poco de agua de la salida.
■A veces, se formará un pequeño montón
de nieve en la salida del hielo de la puerta.
Esto es normal y, por regla general, sucede
cuando ha dispensado hielo picado
repetidamente. La nieve se evaporará por
sí misma.
PRECAUCIÓN: Algunos productos como el agua
helada no deberían consumirse demasiado fríos.
Para usar el dispensador
Seleccione
CUBED ICE
(Hielo en cubitos) ,
CRUSHED ICE
(Picado) o
WATER
(Agua)
.
Presione el vaso suavemente contra el brazo
del dispensador. El recipiente recogedor
no se vacía solo. Para evitar las manchas de
agua, el recogedor y la parrilla se deberán
limpiar regularmente.
Si no hay agua corriente cuando se acaba de instalar
el frigorífico, puede que entre aire en el circuito del
agua. Presione el brazo del dispensador durante al
menos dos minutos para eliminar el aire acumulado y
llenar el sistema de agua. Para eliminar las impurezas
de la línea de agua, deseche los primeros seis vasos
de agua.
PRECAUCIÓN: Nunca introduzca los dedos ni
cualquier otro objeto en la apertura de salida del
triturador de hielo.
Para bloquear el dispensador (en algunos modelos)
Presione la tecla
LOCK
CONTROL
(control de
bloqueo) durante tres
segundos para cerrar el
dispensador y el panel de
control. Para desbloquearlo,
presione la misma tecla
durante tres segundos
nuevamente.
Luz del dispensador
Esta tecla enciende y apaga
la luz nocturna del
dispensador. La luz también
se enciende al presionar
el brazo del dispensador.
Si esta luz se funde debería
reemplazarse con una
bombilla de un máximo
de 6 vatios y 12 voltios DC.
Recipiente Recogedor
Page 52

52
Condensador
Para uso doméstico normal, la limpieza rutinaria
del condensador no es necesaria. Sin embargo,
en ambientes que puedan ser particularmente
grasos o con mucho polvo, el condensador deberá
limpiarse de forma periódica para el buen
funcionamiento del aparato.
Limpieza del condensador:
El condensador está
situado en la parte trasera del frigorífico. Para
acceder al mismo, primero desenchufe el
frigorífico. Luego quite la cubierta de acceso.
El condensador está situado al lado derecho.
Cuidado y limpieza del frigorífico.
Limpieza del exterior
El receptor del dispensador
(en algunos modelos),
por debajo de la parrilla, debe mantenerse limpio
y seco. El agua que se queda en esta área puede
dejar depósitos. Quite los depósitos agregando
vinagre sin diluir al fondo. Remoje hasta que
desaparezcan los depósitos o hasta que se
desprendan lo suficiente para quitarlos.
El botón del dispensador
(en algunos modelos).
Antes de limpiarlo, cierre el dispensador
presionando y manteniendo apretada la tecla
LOCK CONTROL
durante 3 segundos. Use agua
caliente y una solución de bicarbonato de sodio—
aproximadamente una cucharada (15 ml) de
bicarbonato de sodio por cada cuarto (1 litro) de
agua. Aclare completamente con agua y seque.
Las manijas de la puerta y los ornamentos.
Se limpian
con un paño húmedo y jabón neutro. Seque con
un paño suave.
Mantenga limpio el exterior.
Límpielo con un paño
limpio ligeramente humedecido con cera para
aparatos de cocina o con un detergente neutro y
agua. Seque y abrillante con un paño limpio y suave.
No limpie el frigorífico con un paño sucio ni húmedo.
Estos podrían dejar residuos que dañen la pintura. No use
estropajos, detergentes en polvo, lejía ni limpiadores que
contengan lejía, ya que estos productos podrían rayar y
desprender el acabado de pintura.
Limpieza del Interior
Para evitar olores,
deje una recipiente de
bicarbonato de sodio destapado en los
compartimientos de alimentos frescos y del
congelador.
Desconecte el frigorífico antes de limpiarlo.
Si no
fuera posible, escurra el exceso de humedad de
la esponja o del paño cuando limpie alrededor
de botones, bombillas o controles.
Use agua caliente y una solución de bicarbonato
de sodio—aproximadamente una cucharada
(15 ml) de bicarbonato de sodio por cada litro
de agua. Esta solución limpia y neutraliza olores.
Enjuague y séquelo.
Después de limpiar las juntas de las puertas,
aplique una capa delgada de vaselina al lado de
la bisagra. Esto ayuda a evitar que las juntas se
doblen o se peguen.
Destape la apertura del congelador.
En la limpieza
anual, retire la canasta inferior del congelador e
introduzca, con ayuda de una jeringa para carne,
una solución de bicarbonato de sodio—una
cucharadita (5 ml) y 2 tazas (500 ml) de agua
caliente (no hirviendo)— en la tubería de desagüe.
Esto ayudará a eliminar los olores y a reducir la
probabilidad de que se obstruya. Si la salida del
desagüe se obturara, use una jeringa de carne y
una solución de bicarbonato de sodio para forzar
que la materia pase a través de la línea de desagüe.
Evite limpiar los estantes de cristal con agua caliente dado
que el cambio extremo de temperatura podría hacer que se
rompan. Maneje los estantes de vidrio con cuidado. Golpear
un vidrio templado puede hacer que se rompa en pedazos.
No lave ninguna parte plástica del frigorífico en el
lavavajillas.
Área de goteo del dispensador
Se deberá tener cuidado al retirar el frigorífico de
la pared. Todos los suelos se pueden dañar, sobre
todo parquet y moquetas y los que tienen relieves.
Tire del frigorífico en forma recta y empuje
nuevamente para devolverlo a su posición. Mover
el frigorífico en dirección lateral puede causar
daños al recubrimiento del piso o al frigorífico.
Cuando empuje el frigorífico hacia atrás, debe asegurarse
de que no esté pasando por encima del cable de corriente o
de la línea de agua del dispositivo automático de hielo (en
algunos modelos).
Detrás del frigorífico
Page 53

En el caso de vacaciones o ausencias prolongadas,
retire los alimentos y desenchufe el frigorífico.
Coloque el control del congelador en la posición
O
(apagado) y limpie el interior con una solución
de bicarbonato de una cucharada (15 ml) de
bicarbonato por un litro de agua. Deje las
puertas abiertas.
Ponga el interruptor del dispositivo de hielo en la
posición
O
y cierre el paso del agua al frigorífico.
Si la temperatura ambiente pudiera llegar a estar
por debajo del punto de congelación, haga que
una persona cualificada desagüe el sistema de
suministro de agua (en algunos modelos) para
evitar daños a la propiedad causados por
inundación.
Cómo cambiar las bombillas.
Colocar el control en posición 0 no desconecta el circuito de la luz.
Luz superior del—compartimiento de Alimentos frescos
Desenchufe el frigorífico.
La bombilla está situada detrás de los
controles. Sustituya la bombilla por
otra del mismo voltaje o inferior.
Vuelva a enchufar el frigorífico.
Compartimiento de alimentos frescos—luz inferior
(en algunos modelos)
Esta luz está situada por encima de la gaveta
superior.
Desenchufe el frigorífico.
Tome la lengüeta de la parte inferior de
la cubierta de la luz y tire de esta hacia
delante.
Después de reemplazar la bombilla por
otra del mismo voltaje o inferior, vuelva
a colocarla cubierta.
Vuelva a enchufar el
frigorífico a la
corriente.
Compartimiento del congelador
Desenchufe el frigorífico.
Saque el estante que está justo debajo de
la cubierta de la luz. (Será más fácil de
quitarlo si se vacía primero.)
Levante la cubierta de la luz para
extraer.
Después de colocar una bombilla nueva
de igual o menos potencia, vuelva a
instalar la cubierta colgándola de las tres
pestañas.
Vuelva a instalar el estante y enchufe el
frigorífico de nuevo.
53
Preparación para vacaciones
Preparación para mudanzas
Asegure todos los elementos sueltos como
parrillas, estantes y cajones pegándolos con
cinta adhesiva en su lugar para evitar daños.
Asegúrese que el frigorífico se coloque en posición vertical
durante la mudanza.
Dispensador
Desenchufe el frigorífico.
La bombilla está situada en el dispensador
bajo el panel de control. Quite la bombilla
girándola en el sentido contrario al de las
agujas del reloj.
Cambie la bombilla por otra del mismo
tamaño y voltaje.
Vuelva a enchufar el frigorífico a la red
eléctrica.
Page 54

54
ANTES DE QUE EMPIECE
Lea todo este manual cuidadosamente.
•
IMPORTANTE
–
Guarde este
manual para que lo pueda usar el inspector local.
•
IMPORTANTE
–
Siga todos los
códigos y leyes relacionados.
• Nota para el Instalador –Asegúrese de
devolver el manual de instrucciones al Consumidor.
• Nota al Consumidor –Guarde este manual
para revisarlo en el futuro.
• Nivel de Conocimientos – La instalación de este
electrodoméstico requiere conocimientos
mecánicos básicos.
• Tiempo de montaje – Instalación del Refrigerador
15 minutos
• El instalador es el responsable de que la instalación
se efectúe de forma adecuada.
• Los fallos del producto fruto de una instalación
incorrecta no están cubiertos por la garantía.
• No instale el frigorífico en un lugar donde la
temperatura ambiente bajará de los 16°C ya que no se
pondrá en marcha lo suficiente para mantener una
temperatura apropiada.
• Instálelo sobre una superficie suficientemente fuerte
para aguantar su peso cuando esté lleno.
UBICACIÓN DEL FRIGORÍFICO
Instrucciones de
Frigorífico
Instalación
Modelos 20, 22, 25
Deje suficiente espacio para facilitar la instalación,
la circulación adecuada de aire y las conexiones de
fontanería y electicidad.
• Por los lados 4 mm
• Por arriba 25 mm
• Por detrás 25 mm
Se necesita un espacio para la puerta de 19 mm para su
apertura en 90°. Esto facilita el acceso al espacio de
almacenamiento de alimentos.
ESPACIOS DE SEGURIDAD
Si el frigorífico tiene un dispositivo de hielo, deberá
estar conectado a la tubería de agua potable fría.
Puede adquirirse, con un costo adicional un juego de
suministro de agua (contiene tuberías, llave de paso,
adaptadores e instrucciones) en su servicio de
asistencia técnica.
La instalación del dispositivo automático de hielo debe
realizarse únicamente por un técnico cualificado.
SUMINISTRO DE AGUA AL
DISPOSITIVO DE HIELO
(en algunos modelos)
*Altura no incluye bisagra.
**Profundidad incluye manija.
DIMENSIONES
20 22 25
A* 1689 mm 1689 mm 1746 mm
B 800 mm 851 mm 908 mm
C** 838 mm 838 mm 838 mm
D 1182 mm 1240 mm 1240 mm
A
B
C
D
Page 55

55
Para extraer la parrilla
de la base, abra las
puertas y tire de la
parrilla hacia fuera.
5/16″Llave
hexagonal
Para levantarla
Los rodillos tienen 3 propósitos:
Los rodillos se ajustan de forma que la puerta se
cierre fácilmente cuando esté medio abierta.
Los rodillos se ajustan para que el frigorífico esté
firmemente apoyado en el suelo y no se tambalee.
Los rodillos permiten mover el frigorífico para
retirarlo de la pared para su limpieza.
Para ajustar los rodillos, quite la parrilla de la base, tirando
hacia fuera por debajo.
Gire los tornillos que ajustan el rodillo en el sentido de las
agujas del reloj para elevar el frigorífico y en el sentido
contrario para bajarlo. Use una llave ajustable (de 3/8″
hexagonal) o tenazas.
Para volver a colocar la parrilla de la base, alinee los
ganchos de la parte trasera de la parrilla entre la barra y la
parte inferior del armario. Presiónela hacia delante hasta
que los ganchos queden fijos en su lugar.
RODILLOS ALINEADO DE LAS PUERTAS
Una vez nivelado, asegúrese que las puertas estén alineadas
en la parte superior.
Para nivelar las puertas, ajuste la puerta del
compartimiento de alimentos frescos. Use una llave
Allen de 5/16″para girar el tornillo de ajuste de la
puerta: Hacia la derecha para levantar la puerta y hacia
la izquierda para bajarla. (Un tapón de nylon intercalado
en la fibra de la clavija evita el que se gire la misma a
menos que se use dicha llave.) Después de una o dos
vueltas de llave, abra y cierre la puerta de los alimentos
frescos y revise el correcto alineado de la parte superior
de las puertas.
Instrucciones de instalación
Page 56

El nuevo compresor altamente efectivo funciona más rápido y tendrá un zumbido
o ruido pulsante más alto durante su funcionamiento.
El ventilador, haciendo circular aire dentro del congelador, mantiene una
temperatura uniforme.
El goteo de agua que cae en el calentador de descongelación causa un ruido
silbante durante el ciclo de descongelación.
El flujo de refrigerante a través de la espiral de refrigeración del congelador causa
sonidos similares al agua hirviendo o un gorgoteo.
Las espirales de refrigeración crujen o truenan a causa de la expansión y
contracción durante la descongelación y la refrigeración después del deshielo.
El goteo de agua al derretirse desde el vaporizador y fluir a la bandeja de desagüe
en el ciclo de descongelación.
Dispositivo automático para hacer hielo
(en algunos modelos)
La válvula de agua del dispositivo para hacer hielo zumba cuando se llena de agua.
Si el interruptor está en posición I(ACTIVADA hacia abajo) zumbará aun sin estar
conectada al agua. Tener el interruptor en la posición I(ACTIVADA hacia abajo)
antes de que esté conectado al agua puede dañar el dispositivo. Para evitar esto,
ponga el interruptor de marcha en la posición O. Esto evitará el ruido.
El sonido de los cubitos de hielo al caer al recipiente y el flujo del agua en las
tuberías cuando el dispositivo se está rellenando.
Estos sonidos son normales y
se deben a su elevada eficacia
operativa.
56
Sonidos normales de operación.
Page 57

57
Problema Posibles Causas Qué hacer
El frigorífico no
El frigorífico está en ciclo • Espere unos 30 minutos a que termine el ciclo de descongelación.
funciona
de descongelación.
El control del congelador está • Ponga el control en una posición de temperatura.
en posición O.
El frigorífico está • Apriete el enchufe hasta el fondo de la toma de corriente.
desenchufado.
Se ha fundido un fusible/ • Cambie el fusible o reconecte el diferencial.
ha saltado el diferencial.
Vibraciones o sacudidas
Los rodillos frontales • Ver
Rodillos
.
(es normal que vibre
necesitan ajustarse.
ligeramente)
Es normal cuando • Espere 24 horas a que el refrigerador se enfríe por completo.
se enchufa al principio.
Sucede a menudo cuando se • Es normal.
guardan cantidades grandes
de comida.
Puerta quedó abierta. • Revise que no haya un paquete que impida cerrar la puerta.
Hace calor o la puerta • Es normal.
se abre frecuentemente.
Seleccionado el nivel más bajo • Ver
Controles
.
del control de temperatura.
Nevera o congelador
Control de temperatura en • Ver
Controles
.
demasiado templado
posición poco fría.
Hace calor o la puerta • Ajuste el control de temperatura a un nivel más bajo.
se abre frecuentemente. Ver
Controles
.
Puerta quedó abierta. • Revise que no haya un paquete que no permite cerrar la puerta.
Se ha acumulado hielo en
Puerta quedó abierta. • Revise que no haya un paquete que impida cerrar la puerta.
los alimentos congelados
La puerta se abre con
(es normal que haya hielo
demasiada frecuencia.
dentro del paquete)
El divisor entre el
El sistema de ahorro energético • Esto ayuda a que no se forme condensación en el exterior.
congelador y la nevera
hace circular líquido templado
parece caliente
por el borde del congelador.
El dispositivo de hielo
El interruptor del dispositivo • Ponga el interruptor en posición
I
.
no funciona
está en posición O.
(en algunos modelos)
Suministro de agua apagado • Ver
Instalación de la línea de agua.
o no conectado.
Congelador demasiado caliente. • Espere 24 horas para que el aparato se enfríe por completo.
Hay cubitos amontonados en • Nivele los cubitos con la mano.
el recipiente que hacen que
el dispositivo se apague.
Hay cubitos pegados al • Apague el dispositivo, saque los cubitos y vuelva a
dispositivo. (La luz verde ponerlo en marcha.
del dispositivo parpadea).
Solución de problemas
¡Ahorre tiempo y dinero! Revise las tablas en las páginas
siguientes y tal vez no necesite llamar al servicio técnico.
Antes de llamar al servicio técnico…
El motor está en marcha
por mucho tiempo o se
enciende y apaga con
frecuencia. (Los
frigoríficos modernos con
más espacio y mayores
congeladores necesitan
más tiempo de
funcionamiento. Se ponen
en marcha y se apagan
para mantener su
temperatura.)
Page 58

58
Problema Posibles Causas Qué hacer
Los cubitos tienen
Hay que limpiar el recipiente. • Vacíe y limpie el recipiente. Tire los cubitos viejos.
olor/sabor
La comida está dando mal • Envuelva bien los alimentos.
olor/sabor a los cubitos.
El interior del frigorífico • Ver
Cuidado y Limpieza
.
necesita limpiarse.
Congelación de
Puerta quedó abierta. • Revise que no haya un paquete impidiendo que se cierre
cubitos lenta
la puerta.
Control de temperatura • Ver
Controles
.
ajustado demasiado alto.
Puerta no se cierra bien
La junta selladora de la puerta en • Ponga vaselina en la parte delantera de la junta.
lado de bisagras se pega o se dobla.
Luz naranja en
Calentador de descongelación • Es normal.
el congelador
en marcha.
El dispositivo de cubitos
Dispositivo apagado o paso • Encienda dispositivo o abra paso de agua.
no funciona
de agua cerrado.
(en algunos modelos)
Hay cubitos pegados al brazo • Quite los cubitos.
detector del dispositivo.
Bloques de hielo irregulares en • Rómpalos con la presión de sus dedos (no más) y tire
el recipiente de almacenamiento. los restantes.
• Congelador puede estar demasiado caliente. Vaya ajustando el
control del congelador a una posición más fría, de una posición
a la otra, hasta que no se formen bloques.
El dispensador está LOCKED • Presione la tecla
LOCK CONTROL
manteniéndola apretada
(bloqueado). por 3 segundos.
El agua tiene mal
No se ha usado el dispensador • Saque agua del dispensador hasta que se renueve toda el agua
olor/sabor
en mucho tiempo. del sistema.
(en algunos modelos)
El agua del primer vaso
Es normal cuando el frigorífico • Espere 24 horas a que el frigorífico se enfríe por completo.
está templada
está recién instalado.
(en algunos modelos)
No se ha usado el dispensador • Saque agua del dispensador hasta que se renueve toda el agua
en mucho tiempo. del sistema.
El sistema del agua se ha vaciado. • Deje pasar varias horas hasta que el Nuevo depósito se enfríe.
El dispensador de agua
Suministro de agua apagado • Ver
Instalación de la línea de agua
.
no funciona
o no está conectado.
(en algunos modelos)
Puede haber aire atrapado • Mantenga presionado el brazo del dispensador un mínimo
en el circuito del agua. de dos minutos.
El dispensador está LOCKED • Presione la tecla
LOCK CONTROL
manteniéndola apretada
(bloqueado). por 3 segundos.
No sale agua
El agua en la reserva está • Llame al servicio de reparaciones.
pero el dispositivo
congelada.
de hielo sí
Solucionar problemas
Antes de llamar al servicio técnico…
Page 59

59
Problema Posibles Causas Qué hacer
No sale agua ni
La línea de agua o la • Llame a un fontanero.
cubitos de hielo
válvula están obturadas.
El dispensador está LOCKED • Presione la tecla
LOCK CONTROL
manteniéndola apretada
(bloqueado). por 3 segundos.
El frigorífico huele mal
Alguna comida está • Las comidas que desprendan fuertes olores deben envolverse
desprendiendo olores muy bien.
en el frigorífico.
• Deje una caja de bicarbonáto sódico abierta en el frigorífico,
cámbiela cada tres meses.
El interior del frigorífico • Ver
Cuidado y Limpieza
.
necesita limpiarse.
Descongele el desagüe • Ver
Cuidado y Limpieza
.
el sistema necesita limpiarse.
Se forma humedad
No es inusual en períodos • Seque la superficie.
fuera del frigorífico
de mucha humedad.
Se acumula humedad
Las puertas se abren demasiado
(en el interior cuando
veces o por mucho rato.
hace humedad, el aire
introduce humedad
en el frigorífico cuando
las puertas se abren)
No funciona la luz
No hay corriente en la toma. • Cambie el fusible o reconecte el diferencial.
interior
La bombilla se ha fundido. • Ver
Cómo cambiar las bombillas
.
Hay agua en el suelo
El desagüe del fondo • Ver
Cuidado y limpieza
.
de la cocina o en
del congelador está obturado.
el fondo del congelador
Cubitos atascados en la salida. • Empuje el hielo hacia fuera con una cuchara de madera.
Aire caliente de parte
Circulación de aire normal que
inferior del aparato
enfría el motor. En el proceso de
refrigeración, es normal que salga
calor en el área bajo el frigorífico.
Algunos suelos son sensibles y
pueden perder color a estas
temperaturas normales y seguras.
Se seleccionó CUBED ICE
La última selección fué • Habían quedado unos cuantos cubitos en la trituradora
pero salió CRUSHED ICE
CRUSHED ICE. de la selección anterior. Esto es normal.
(hielo picado)
(
en algunos modelos)
Page 60

Printed in the United States
Imprimé aux États-Unis
Impreso en los Estados Unidos
This appliance conforms to the following EEC Directives:
Cet appareil ménager est conforme aux directives CEE suivantes :
Este electrodoméstico se adecúa a los requisitos de la CEE:
Low Voltage Equipment
Appareils ménagers à bas voltage
Para electrodomésticos de bajo voltaje
73/23/EEC
93/68/EEC
Electromagnetic Compatibility
Compatabilité électromagnétique
Compatibilidad electromagnética
89/336/EEC
92/31/EEC
93/68/EEC
 Loading...