

Page 1

SAFETY INFORMATION ............2
OPERATING INSTRUCTIONS
Control Settings .......................4
Refrigerator Features ..................4
Care and Cleaning ...................5-6
Replacing the Light Bulb ...............5
INSTALLATION INSTRUCTIONS ...7
TROUBLESHOOTING TIPS ........10
WARRANTY ....................... 11
CONSUMER SUPPORT ............12
ATTENTION:
Defrosting—Do not use sharp, pointed
objects to remove frost or ice from
surfaces of the freezer compartment.
Doing so could puncture the cooling
coil, causing the unit to lose its ability
to maintain cold temperatures and
voiding the warranty. See the Care and
Cleaning section for instructions on
defrosting the freezer compartment.
OWNER’S MANUAL
& INSTALLATION
INSTRUCTIONS
3 Cubic Foot Models
4 Cubic Foot Models
ENGLISH/FRANÇAIS/
ESPAÑOL
Write the model and serial
numbers here:
Model # _________________
Serial # _________________
REFRIGERATORS
GE is a trademark of the General Electric Company. Manufactured under trademark license.
Find these numbers on a
label inside the refrigerator
compartment at the
top on the right side.
245D2031P001 49-60750-1 07-16 GEA
Page 2
IMPORTANT SAFETY INFORMATION.
READ ALL INSTRUCTIONS BEFORE USING.
SAFETY
IMPORTANT SAFETY INFORMATION READ ALL INSTRUCTIONS BEFORE USING
GE Appliances website
For more information on your refrigerator’s operation, visit www.GEAppliances.com or
call 800.GECARES (800.432.2737). In Canada visit GEAppliances.ca or call 800.561.3344.
This is the safety alert symbol. This symbol alerts you to potential hazards that can kill or hurt you and others. All
safety messages will follow the safety alert symbol and the word “DANGER”, “WARNING”, or “CAUTION”. These words are
defined as:
DANGER
WARNING
CAUTION
Indicates a hazardous situation which, if not avoided, will result in death or serious injury.
Indicates a hazardous situation which, if not avoided, could result in death or serious injury.
Indicates a hazardous situation which, if not avoided, could result in minor or moderate injury.
IMPORTANT SAFETY INSTRUCTIONS
WARNING
This refrigerator must be properly installed and located in accordance
with the Installation Instructions before it is used.
Unplug the refrigerator before making repairs, replacing a light bulb,
or cleaning.
Note: Power to the refrigerator cannot be disconnected by any setting
on the control panel.
Note: Repairs must be performed by a qualified service professional.
Replace all parts and panels before operating.
Do not store or use gasoline or other flammable vapors and liquids in
the vicinity of this or any other appliance.
To reduce the risk of fire, explosion, electric shock, or injury when using your
refrigerator follow these basic safety precautions:
Because of potential safety hazards under certain conditions, we strongly
recommend against the use of an extension cord. However, if you must
use an extension cord, it is absolutely necessary that it be a UL-listed (in
the United States) or a CSA certified (in Canada), 3-wire grounding type
appliance extension cord having a grounding type plug and outlet and that
the electrical rating of the cord be 15 amperes (minimum) and 120 volts.
To prevent suffocation and entrapment hazards to children, remove
the fresh food and freezer doors from any refrigerator before
disposing of it or discontinuing its use.
Do not allow children to climb, stand or hang on the door handles or
the shelves in the refrigerator. They could seriously injure themselves.
CAUTION
Do not clean glass shelves or covers with warm water when they
are cold. Glass shelves and covers may break if exposed to sudden
temperature changes or impact, such as bumping or dropping.
Tempered glass is designed to shatter into many small pieces if it
breaks.
Keep fingers out of the “pinch point” areas; clearances between
the doors and between the doors and cabinet are necessarily
small. Be careful closing doors when children are in the area.
To reduce the risk of injury when using your refrigerator, follow these basic
safety precautions.
2
Do not refreeze frozen foods which have thawed completely.
In refrigerators with automatic icemakers, avoid contact with the
moving parts of the ejector mechanism, or with the heating element
that releases the cubes. Do not place fingers or hands on the
automatic ice making mechanism while the refrigerator is plugged
in.
Page 3
GEAppliances.com
SAFETY (CONT.)
INSTALLATION
WARNING
Explosion Hazard.
Keep flammable materials and vapors, such as gasoline, away from refrigerator. Failure to do so can
result in fire, explosion, or death.
CONNECTING ELECTRICITY
WARNING
Plug into a grounded 3-prong outlet
Do not remove the ground prong
Do not use an adapter
Do not, under any circumstances, cut or remove the third (ground) prong from the power cord.
For personal safety, this appliance must be properly grounded.
The power cord of this appliance is equipped with a 3-prong (grounding)
plug which mates with a standard 3-prong (grounding) wall outlet to
minimize the possibility of electric shock hazard from this appliance.
Have the wall outlet and circuit checked by a qualified electrician to
make sure the outlet is properly grounded.
Where a standard 2-prong wall outlet is encountered, it is your personal
responsibility and obligation to have it replaced with a properly
grounded 3-prong wall outlet. Do not use an adapter.
The refrigerator should always be plugged into its own individual
electrical outlet which has a voltage rating that matches the rating
plate.
Electrical Shock Hazard.
Failure to follow these instructions can result in
death, fire, or electrical shock.
A 115 Volt AC, 60 Hz, 15- or 20-amp fused, grounded electrical supply
is required. This provides the best performance and also prevents
overloading house wiring circuits which could cause a fire hazard from
overheated wires.
Never unplug your refrigerator by pulling on the power cord. Always grip
plug firmly and pull straight out from the outlet.
Repair or replace immediately all power cords that have become frayed
or otherwise damaged. Do not use a cord that shows cracks or abrasion
damage along its length or at either end.
When moving the refrigerator away from the wall, be careful not to roll
over or damage the power cord.
PROPER DISPOSAL OF YOUR OLD REFRIGERATOR
WARNING
Remove fresh-food and freezer doors from the refrigerator, prior to disposal. Failure to do so can
result in child entrapment which can lead to death or brain damage.
IMPORTANT:
Child entrapment and suffocation are not problems of the past. Junked
or abandoned refrigerators are still dangerous even if they will sit for
“just a few days.” If you are getting rid of your old refrigerator, please
follow the instructions below to help prevent accidents.
Before You Throw Away Your Old Refrigerator or Freezer:
Take off the fresh food and freezer doors.
Leave the shelves in place so that children may not easily climb
inside.
Refrigerants
All refrigeration products contain refrigerants, which under federal
law must be removed prior to product disposal. If you are getting
rid of an old refrigeration product, check with the company
handling the disposal about what to do.
Suffocation and child entrapment hazard.
WARNING
This appliance contains isobutane refrigerant, R600a, a natural
gas with high environmental compatibility. However it is also
combustible. Please adhere to the warnings below:
1) When handling, installing and operating the appliance, care should
be taken to avoid damage to the refrigerant tubing.
2) Servicing shall be performed by factory-authorized service personnel
and component parts shall be replaced with manufacturerauthorized replacement components.
3) Refrigeration products contain refrigerants, which under federal
law must be removed prior to product disposal.
4) Keep ventilation openings in the appliance enclosures or in the built-
in structure clear of obstruction.
5) Do not use mechanical devices or other means to accelerate the
defrosting process.
6) Do not damage refrigerant circuit.
7) Do not use electrical appliances inside the food storage
compartment of the appliance.
R600a Refrigerant
READ AND FOLLOW THIS SAFETY INFORMATION CAREFULLY.
SAVE THESE INSTRUCTIONS
3
Page 4
About the refrigerator controls and features.
MIN
OFF
MED
MAX
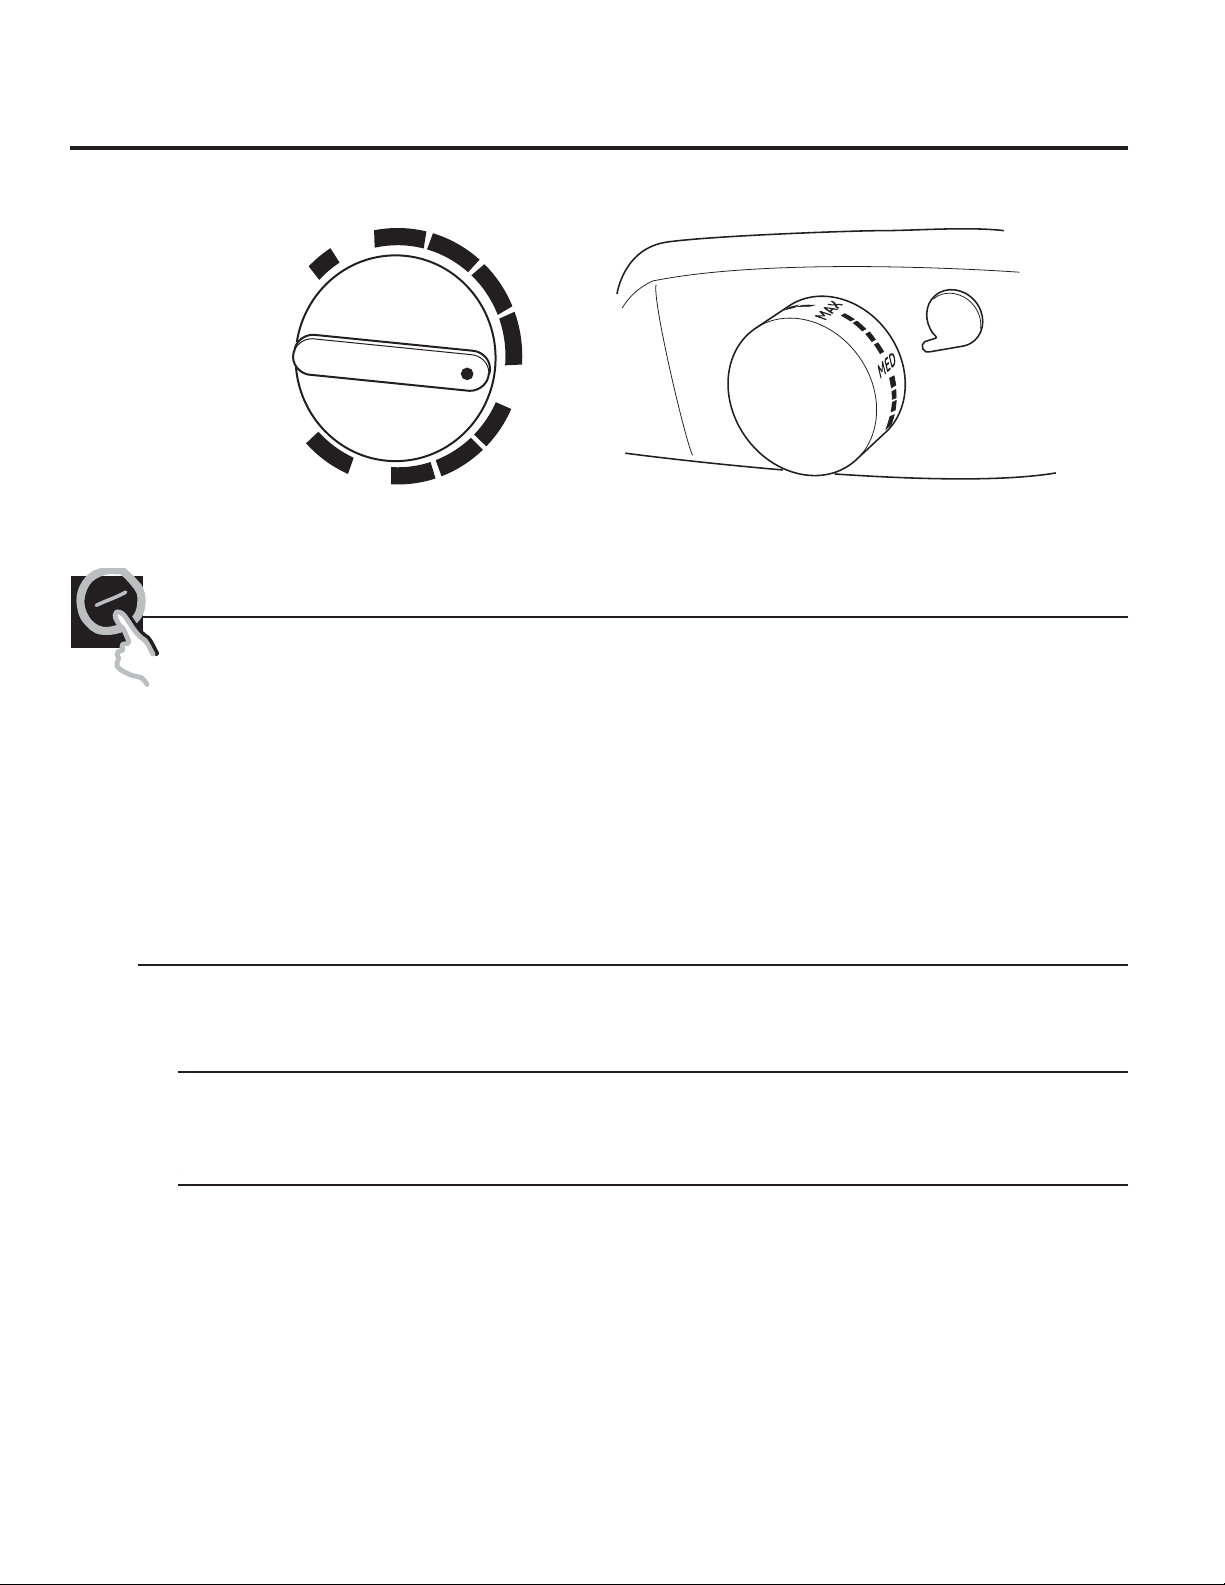
The control will look like one of the above.
Control Settings
The temperature control maintains the temperature in
the refrigerator. Setting the control to MIN is the warmest
setting. Setting the control to MAX is the coldest setting.
Set the control to MED.
Allow 24 hours for the refrigerator to reach the
MED temperature. If you want a colder or warmer
temperature, move the dial one setting at a time. Moving
the control to OFF stops cooling but does not turn off the
power to the refrigerator. Setting the control too high may
cause freezing in the refrigerator depending on the room
temperature.
How To Test Temperatures
Use the milk test. Place a container of milk on a shelf and
check it a day later. If the milk is too warm or too cold,
adjust the temperature control.
After changing the control, allow 24 hours for the
refrigerator to reach the temperature you have set.
Features
Shelves
To remove a shelf, lift up the back slightly and pull forward. Some models have multi-position shelves that can be moved to
different levels.
Ice Tray Compartment
This compartment is designed for production of ice cubes and short-term storage (a few days at most) of some commercially-frozen
foods when in contact with the evaporator (cold surface in compartment.)
Door Shelves
Shelves on the door provide convenient storage for frequently used items. Some models have doors that are deep enough to store
large bottles.
4
Page 5
Care and cleaning of the refrigerator. GEAppliances.com
Cleaning the Outside
Keep the outside clean. Wipe with a clean cloth
lightly dampened with kitchen appliance wax or
mild liquid dish detergent. Dry and polish with a
clean, soft cloth.
Do not wipe the refrigerator with a soiled dish
cloth or wet towel. These may leave a residue
that can erode the paint. Do not use scouring
pads, powdered cleaners, bleach or cleaners
containing bleach because these products can
scratch and weaken the paint finish.
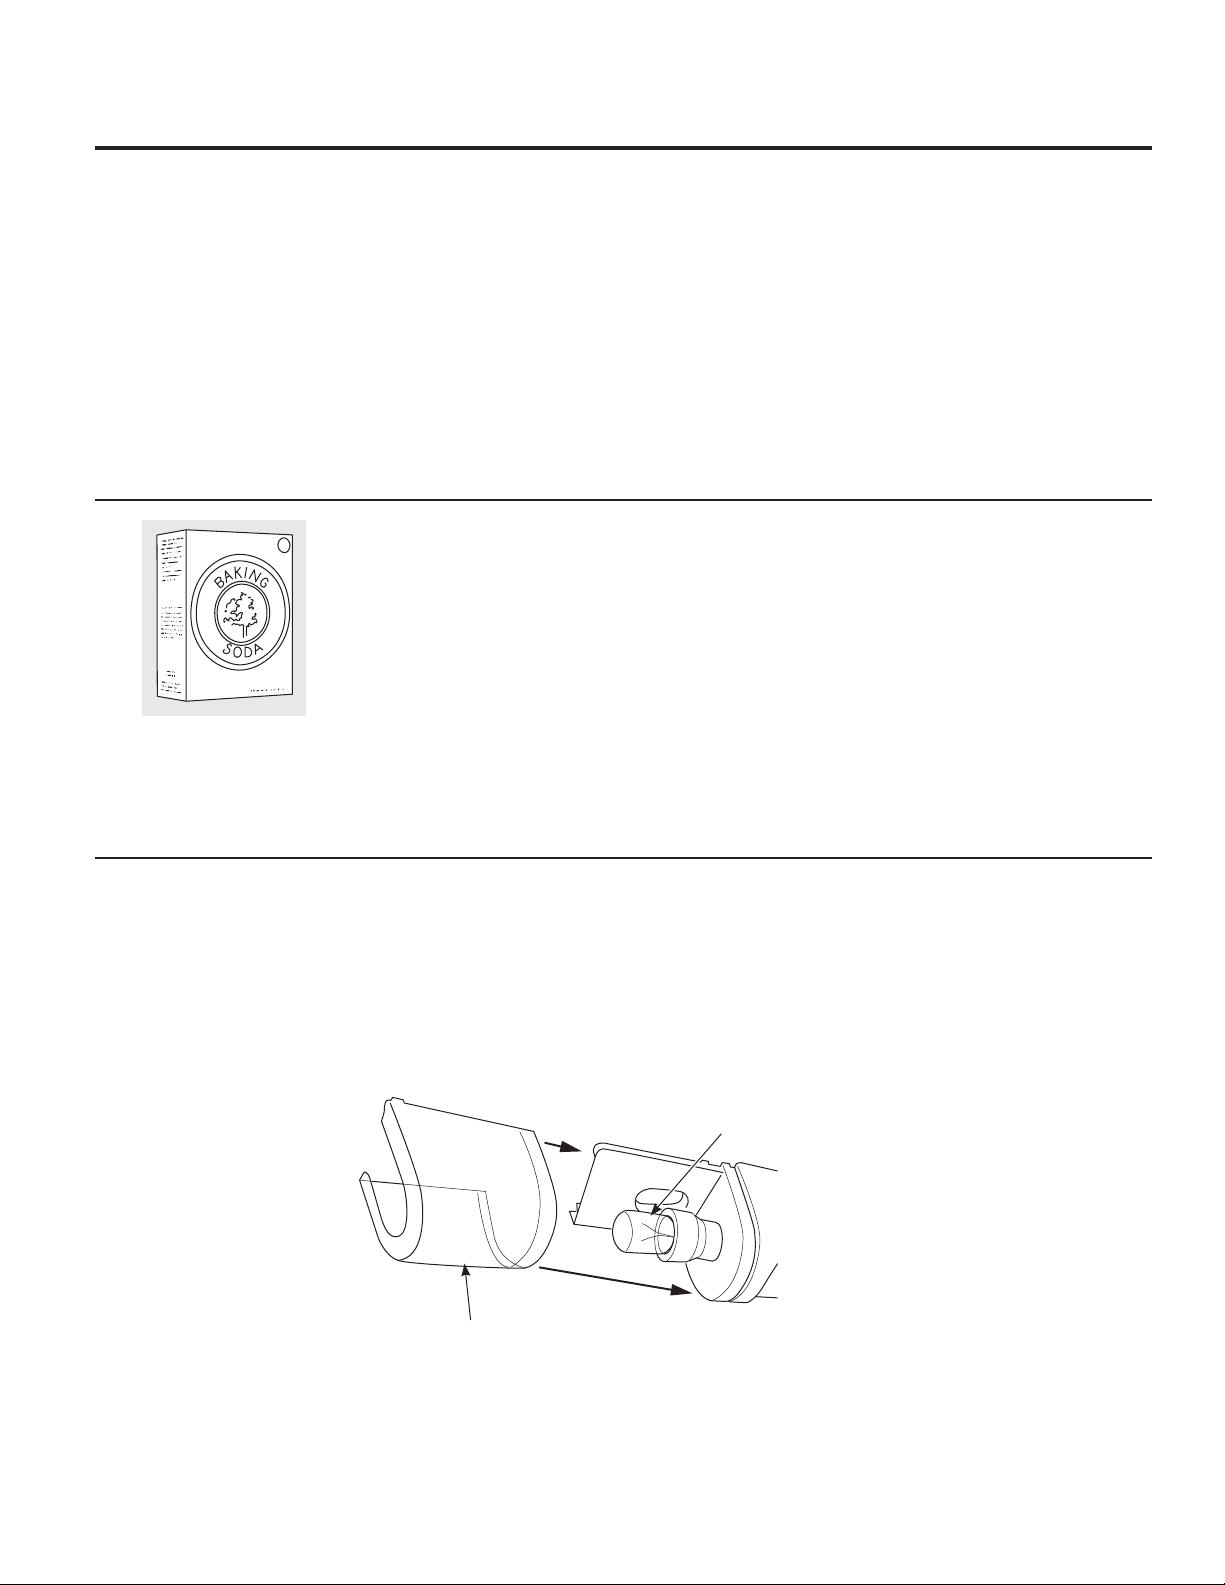
Cleaning the Inside
To help prevent odors, leave an open box of
baking soda in the refrigerator.
Unplug the refrigerator before cleaning. If this
is not practical, wring excess moisture out of
sponge or cloth when cleaning around the
control.
Protect the paint finish. The finish on the outside
of the refrigerator is a high quality, baked-on
paint finish. With proper care, it will stay newlooking and rust-free for years. Apply a coat of
kitchen/ appliance wax when the refrigerator is
new, and then at least
twice a year.
Other parts of the refrigerator–including door
gaskets, fruit and vegetable drawers, and all
plastic parts–can be cleaned the same way.
Do not wash any plastic refrigerator parts in the
dishwasher.
Use warm water and baking soda solution –
about a tablespoon (15 ml) of baking soda to
a quart (1 liter) of water. This both cleans and
neutralizes odors. Rinse and wipe dry.
Replacing the Light Bulb (on some models)
Unplug the refrigerator before replacing a
burned-out bulb. Setting the controls to OFF
does not remove power to the light circuit.
The light bulb is located behind the temperature
control housing and is visible through the light
shield.
Remove the light shield by snapping it from the
bottom of the housing. Gently unscrew the light
bulb. Replace with a bulb of the same or lower
wattage.
Bulb
Light Shield
5
Page 6

Care and cleaning of the refrigerator.
Defrosting
Defrost whenever frost on the wall of the
ice tray compartment becomes 1/4” thick.
Never use a sharp or metallic instrument to
remove frost as it may damage the cooling
coils. (A punctured cooling coil will cause
serious problems and void the warranty.) We
recommend using a plastic scraper. Do not
use any electrical device in defrosting your
refrigerator.
To defrost:
Remove foods and ice trays from the ice tray
compartment.
Set the temperature control dial at OFF
position.
On models without a drip tray, place a pan
beneath the ice tray compartment to collect
water.
Defrosting usually takes a few hours. To defrost
faster, keep the door open. Also, pouring warm
(not hot) water on the frosted part may speed
defrosting. Do not use boiling water³LWPD\
damage plastic parts.
(on manual defrost models only)
After defrosting:
Empty water from the drip tray or from
the pan placed beneath the ice tray
compartment. Wash the tray or pan with
warm water.
Wipe the ice tray compartment with a damp
cloth.
Turn the temperature control to the desired
setting and return food and ice trays to the
refrigerator.
NOTE: If ice buildup is very thick, it may keep
the ice tray compartment door from opening
or closing completely. Don’t try to force it open;
after defrosting, the door will open and close
easily.
Preparing for Vacation
For long vacations or absences, remove food and
unplug the refrigerator. Move the control to the OFF
position, and clean the interior with a baking soda
solution of one tablespoon (15 ml) of baking soda to
one quart (1 liter) of water. Leave the door open.
Preparing to Move
Secure all loose items such as shelves and
ice trays by taping them securely in place to
prevent damage.
Be sure the refrigerator stays in an upright
position during moving.
6
Page 7
Installation
Instructions
Refrigerator
3 Cubic Foot Models
4 Cubic Foot Models
If you have questions, call GE Appliances at 1.800.GE.CARES or visit our Website at:
GEAppliances.com.
In Canada, call 1.800.561.3344 or Visit our Website at: www.geappliances.ca
BEFORE YOU BEGIN
Read these instructions completely and carefully.
•
IMPORTANT – Save these instructions for local
inspector’s use.
•
IMPORTANT – Observe all governing codes
and ordinances.
• Note to Installer – Be sure to leave these instructions
with the Consumer.
• Note to Consumer – Keep these instructions
for future reference.
LOCATION REQUIREMENTS
• Do not install the refrigerator where the temperature will go
below 50°F (10°C) because it will not run often enough to
maintain proper temperatures.
•
Install it on a floor strong enough to support it fully loaded.
• Do not install it in a recessed area.
• Do not build in the refrigerator.
UNPACKING YOUR REFRIGERATOR
• Remove tape and any labels (except for the rating label)
from your refrigerator. Tape or glue residue can also be
removed by rubbing a small amount of liquid dish soap
over the adhesive with your fingers. Wipe with warm
water and dry.
• Do not use sharp instruments, rubbing alcohol,
flammable fluids, or abrasive cleaners to remove tape
or glue. These products can damage the surface of your
refrigerator.
• When moving the refrigerator, do not tilt the refrigerator
beyond 45° from upright position.
LEVELING LEGS
Adjustable legs at the front corners of the refrigerator
should be set so the refrigerator is firmly positioned
on the floor, and the front is raised just enough that
the door closes easily when opened about halfway.
To adjust the leveling legs, turn the legs counterclockwise to
raise the refrigerator, clockwise to lower it.
CLEARANCES
Allow the following clearances for ease of installation and
proper air circulation.
3 and 4
Cubic Foot Models
Sides 1/2” (13 mm)
Top 2” (51 mm)
Back 2” (51 mm)**
**From the rear cabinet surface to the wall
Turn counterclockwise to
raise, clockwise to lower.
7
Page 8
Installation Instructions
WARNING
Explosion Hazard.
Keep flammable materials and vapors, such as gasoline, away from refrigerator. Failure to do so can
result in fire, explosion, or death.
CONNECTING ELECTRICITY
WARNING
Plug into a grounded 3-prong outlet
Do not remove the ground prong
Do not use an adapter
Failure to follow these instructions can result in death, fire, or electrical shock.
Electrical Shock Hazard.
POWER CORD
• Plug the refrigerator power cord into its own properly grounded wall outlet with a voltage rating matching that on the
refrigerator rating plate.
• Do not use an extension cord.
• Read all safety precautions on pages 2 and 3.
Plug buttons
or screws
Plug
button
Spacer
Hinge
cover
Leveling legs
Hinge
Bottom
hinge
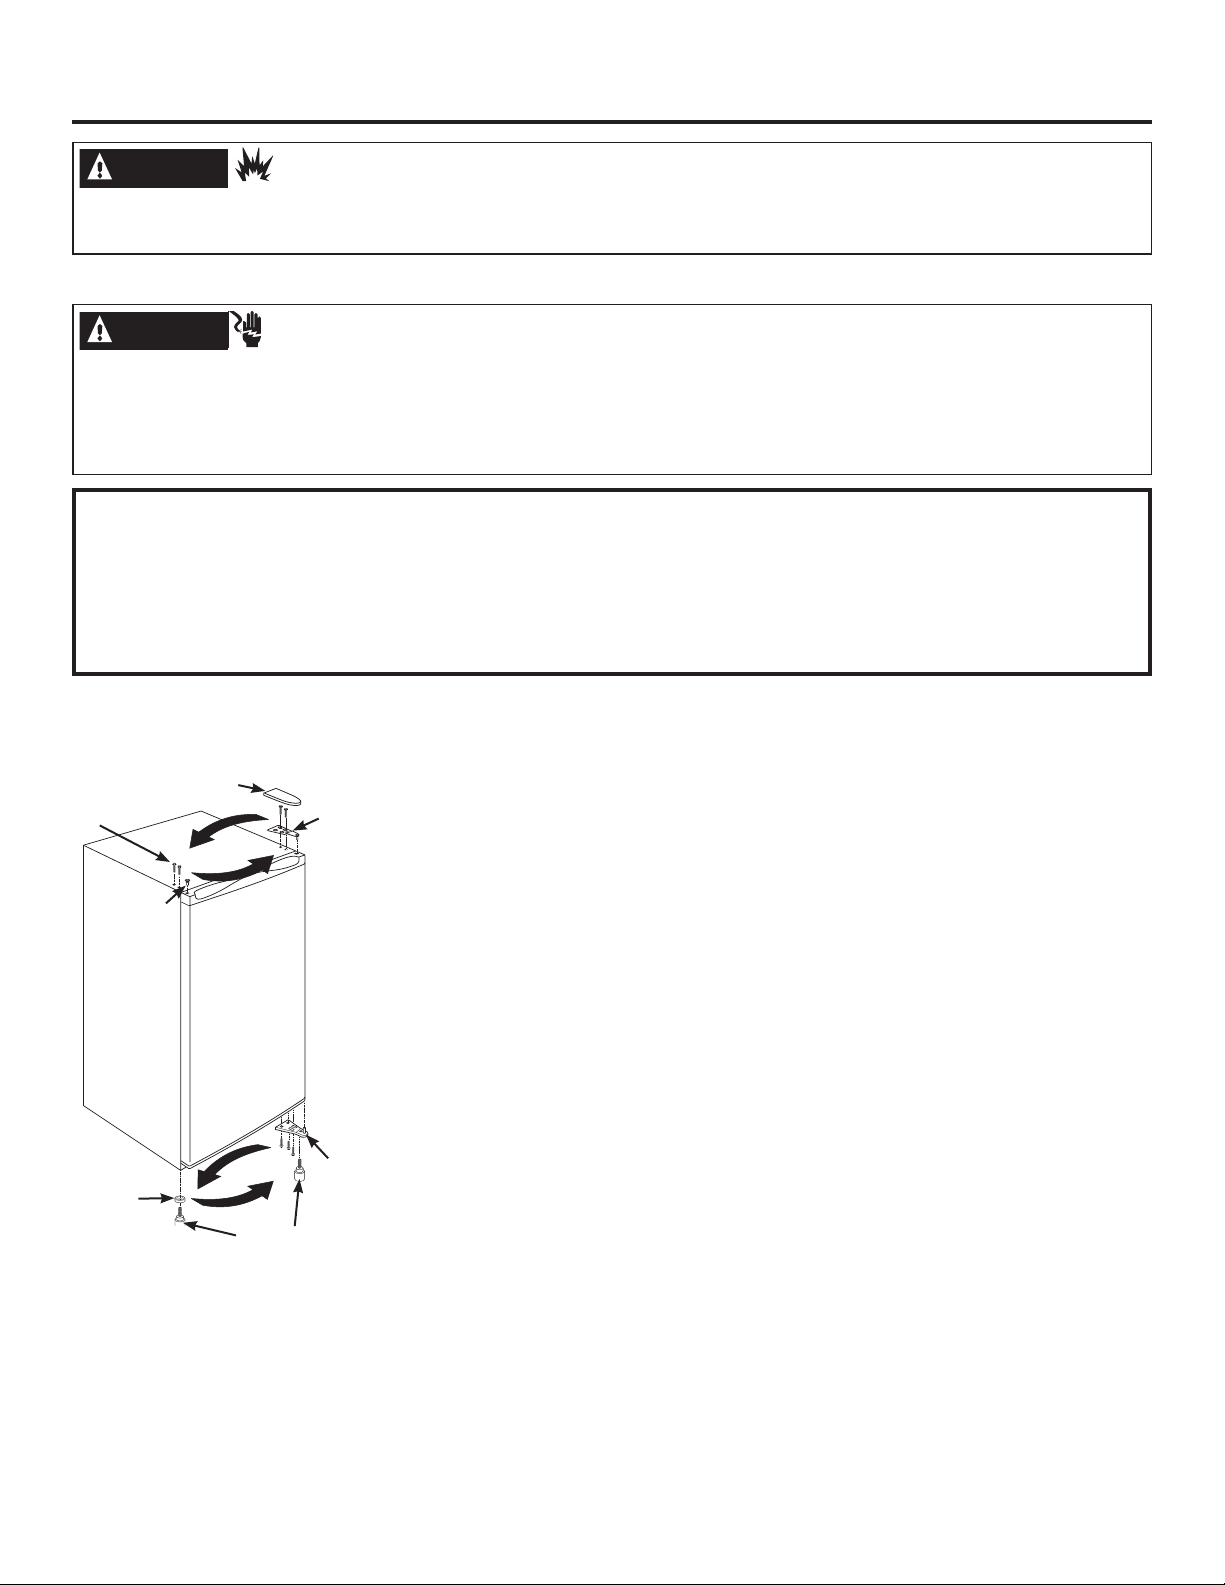
Door Reversal
1. Remove the small plug button on the left
side of the door top cap.
2. Remove the 2 plug buttons or screws on
the left side on top of the cabinet.
3. Remove the plastic hinge cover by lifting
it up by the front edge.
4. Remove the 2 screws from the top hinge.
5. Lift the door up and off the bottom hinge
(right side).
6. Tilt the refrigerator cabinet back to
remove the left leveling leg.
7. Remove the screws on the bottom hinge
(right side) and remove the leveling leg.
Move the bottom hinge to the left side
and secure it with screws. Re-install the
leveling legs.
IMPORTANT: The left leg has a spacer or
spacer feature that must be moved to the
right side leveling leg when the door swing
is reversed.
8. Screw the right leveling leg, with the
spacer, back in place on the right side.
(on some models)
9. Position the door on the left bottom
hinge. With the magnetic gasket holding
the door in place, secure the top hinge
with screws.
10. Make sure the door is aligned with the
refrigerator cabinet before continuing.
11. Replace the hinge cover on top of the
hinge.
12. Put the plug button in the hole on the
right side of the door cap.
13. Put the 2 plug buttons on the right side
on top of the cabinet
8
Page 9
Installation Instructions
Plug buttons
or screws
Plug
buttons
Plug
button
Hinge cover
Center
hinge
Screws
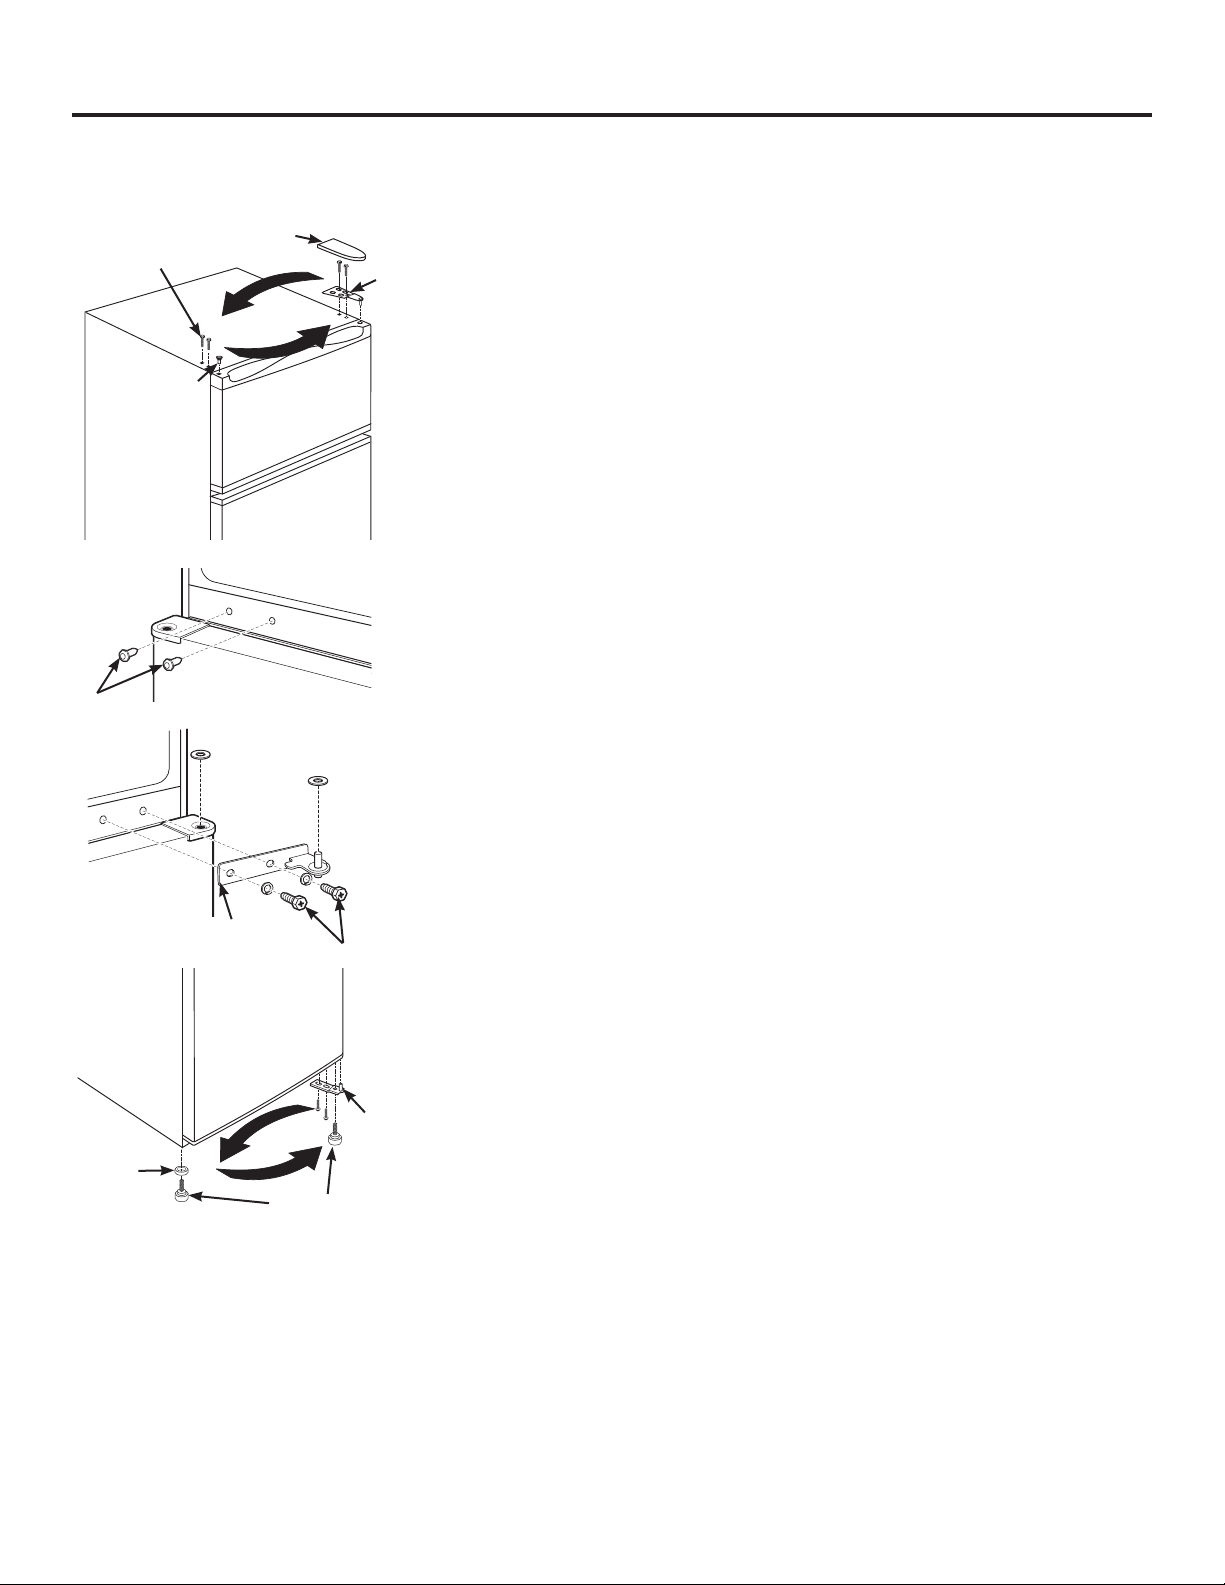
2-Door Reversal
1. Remove the small plug button on the left
Hinge
side of the door top cap.
(on some models)
2. Remove the 2 plug buttons or screws on
the left side on top of the cabinet.
3. Remove the plastic hinge cover by lifting
it up by the front edge.
4. Remove the 2 screws from the top hinge.
5. Lift the freezer door up and off the middle
hinge (right side). Set the door on a nonscratching surface with the outside up.
6. Remove the center hinge by removing
the 2 screws. Lift the hinge to remove.
7. Lift the fresh food door off of the bottom
hinge. Set the door on a non-scratching
surface with the outside up.
8. Tilt the refrigerator cabinet back to
remove the left leveling leg.
9. Remove the screws on the bottom hinge
(right side) and remove the leveling leg.
Move the bottom hinge to the left side
and secure it with screws. Re-install the
leveling legs.
IMPORTANT: The left leg has a spacer or
spacer feature that must be moved to the
right side leveling leg when the door swing
is reversed.
10. Screw the right leveling leg, with the
spacer, back in place on the right side.
11. Remove the two plug buttons on the left
side at the center and install them on the
right.
12. Position the door on the left bottom
hinge. With the magnetic gasket holding
the door in place, make sure the door is
aligned with the refrigerator, and secure
the center hinge on the left with screws.
13.
Place the freezer door on the center hinge
over the pin. Assure the door is aligned
horizontally and vertically, and that the
gasket seals on all sides.
14.
Replace the top hinge on the left side with
screws.
15. Replace the hinge cover on top of the
hinge.
16. Put the plug button in the hole on the
right side of the door cap.
17. Put the 2 plug buttons on the right side
on top of the cabinet
Spacer
Bottom
hinge
Leveling legs
9
Page 10
Before you call for service…
Troubleshooting Tips
Save time and money! Review the chart below first and you
may not need to call for service.
Problem Possible Causes What To Do
Refrigerator does not operate Control in OFF position. Move the control to a temperature
setting.
Refrigerator is unplugged. Push the plug completely into the
outlet.
The fuse is blown/circuit breaker is
tripped.
Vibration or rattling (slight vibration is
normal)
Motor operates for long periods or cycles Normal when refrigerator is first
Refrigerator too warm Temperature control not set cold
Refrigerator has odor Foods transmitting odor to
Moisture forms on outside of refrigerator Not unusual during periods of high
Moisture collects inside (in humid weather,
air carries moisture into refrigerator when
door is opened)
Refrigerator too cold Temperature control set too cold. See About the control.
Front leveling legs need adjusting. See Leveling Legs.
Refrigerator is on an uneven surface. Use shims to level the refrigerator.
plugged in.
Often occurs when large
food are placed in refrigerator.
Door left open. Check to see if package is holding
Hot weather or frequent door
openings.
Temperature control set at the
coldest setting.
Not enough clearance from the wall. See Clearances in Preparing to install
enough.
Warm weather or frequent door
openings.
Door left open. Check to see if package is holding
Cabinet sides are warm This is normal for a hot wall type
refrigerator.
humidity.
Too frequent or too long door
openings.
amounts of
Replace fuse or reset the breaker.
Wait 24 hours for the refrigerator to
completely cool down.
This is normal.
door open.
This is normal.
See About the control.
the refrigerator.
See About the control.
Set the temperature control one step
colder. See About the control.
door open.
condenser.
Foods with strong odors should be
tightly wrapped.
Keep an open box of baking soda in
the refrigerator; replace every three
months.
Wipe surface dry.
10
Page 11
Refrigerator Warranty.
For US Customers, all warranty service provided by our Factory Service
®
Centers, or an authorized Customer Care
technician. To schedule service,
on-line, 24 hours a day, visit us at GEAppliances.com, or call GE Appliances
at 800.GE.CARES (800.432.2737). Please have serial number and model
number available when calling for service.
In Canada, call 800.561.3344.
For the Period of: GE Appliances Will Replace
One Year
From the date of the original
purchase
What is Not Covered:
Service trips to your home to teach you how to use the
product.
Improper installation, delivery or maintenance.
Failure of the product if it is abused, misused, or used for
other than the intended purpose or used commercially.
Loss of food due to spoilage.
Damage caused after delivery.
Replacement of house fuses or resetting of circuit breakers.
Any part of the refrigerator which fails due to a defect in materials or workmanship.
During this period of One Year from the date of original purchase, GE Appliances will choose, at its
optioin, to replace or service the defective unit. During this limited one-year warranty, should GE
Appliances choose to service the unit, GE Appliances will provide any part of the freezer which fails
due to a defect in materials or workmanship and free of charge, all labor and related service costs
to replace the defective part. During this limited one-year warranty, should GE Appliances choose
to replace the unit, it may do so by providing you with a certificate redeemable at a retailer for a
replacement product.
Staple your receipt here.
Proof of the original purchase
date is needed to obtain service
under the warranty.
Replacement of the light bulbs.
Damage to the product caused by accident, fire, floods or
acts of God.
Incidental or consequential damage caused by possible
defects with this appliance.
Product not accessible to provide required service.
Associated costs when GE Appliances chooses to issue the
consumer a certificate as a form of product replacement.
(;&/86,212),03/,(':$55$17,(6³<RXUVROHDQGH[FOXVLYHUHPHG\LVSURGXFWUHSDLUDVSURYLGHGLQWKLV
Limited Warranty. Any implied warranties, including the implied warranties of merchantability or fitness for
a particular purpose, are limited to one year or the shortest period allowed by law.
For US Customers: This warranty is extended to the original purchaser and any succeeding owner for products purchased
for home use within the USA. If the product is located in an area where service by a GE Appliances Authorized Servicer is
not available, you may be responsible for a trip charge or you may be required to bring the product to an Authorized GE
Appliances Service location for service. In Alaska, the warranty excludes the cost of shipping or service calls to your home.
Some states do not allow the exclusion or limitation of incidental or consequential damages. This warranty gives you
specific legal rights, and you may also have other rights which vary from state to state. To know what your legal rights are,
consult your local or state consumer affairs office or your state’s Attorney General.
Warrantor US: GE Appliances
For Customers in Canada: This warranty is extended to the original purchaser and any succeeding owner for products
purchased in Canada for home use within Canada. In-home warrant service will be provided in areas where it is available
and deemed reasonable by Mabe to provide.
Warrantor Canada: MC Commercial, Burlington, Ontario, L7R 5B6
11
Page 12

Consumer Support
GE Appliances Website
Have a question or need assistance with your appliance? Try the GE Appliances Website 24 hours a day, any day of the year!
You can also shop for more great GE Appliances products and take advantage of all our on-line support services designed for
your convenience. In the US: GEAppliances.com In Canada: GEAppliances.ca
Register Your Appliance
Register your new appliance on-line at your convenience! Timely product registration will allow for enhanced communication and
prompt service under the terms of your warranty, should the need arise. You may also mail in the pre-printed registration card
included in the packing material.
In the US: GEAppliances.com/register
In Canada: Prodsupport.mabe.ca/crm/Products/ProductRegistration.aspx
Schedule Service
Expert GE Appliances repair service is only one step away from your door. Get on-line and schedule your service at your
convenience any day of the year. In the US: GEAppliances.com/ge/service-and-support/service.htm
or call 800.432.2737 during normal business hours.
In Canada: GEAppliances.ca/en/support/service-request or call 800.561.3344
Extended Warranties
Purchase a GE Appliances extended warranty and learn about special discounts that are available while your warranty is still
in effect. You can purchase it on-line anytime. GE Appliances Services will still be there after your warranty expires. In the US:
GEAppliances.com/ge/service-and-support/shop-for-extended-service-plans.htm
or call 800.626.2224 during normal business hours.
In Canada: GEAppliances.ca/en/support/purchase-extended-warranty or call 800.290.9029
Remote Connectivity
For assistance with wireless network connectivity (for models with remote enable),
visit our website at GEAppliances.com/ge/connected-appliances/ or call 800.220.6899 in the US only.
Parts and Accessories
Individuals qualified to service their own appliances can have parts or accessories sent directly to their homes
(VISA, MasterCard and Discover cards are accepted). Order on-line today 24 hours every day.
In the US: GEApplianceparts.com or by phone at 877.959.8688 during normal business hours.
Instructions contained in this manual cover procedures to be performed by any user. Other servicing generally should
be referred to qualified service personnel. Caution must be exercised, since improper servicing may cause unsafe
operation.
Customers in Canada should consult the yellow pages for the nearest Mabe service center, visit our website at GEAppliances.
ca/en/products/parts-filters-accessories or call 800.661.1616.
Contact Us
If you are not satisfied with the service you receive from GE Appliances, contact us on our Website with all the details including
your phone number, or write to:
In the US: General Manager, Customer Relations | GE Appliances, Appliance Park | Louisville, KY 40225
GEAppliances.com/ge/service-and-support/contact.htm
In Canada: Director, Consumer Relations, Mabe Canada Inc. | Suite 310, 1 Factory Lane | Moncton, N.B. E1C 9M3
GEAppliances.ca/en/contact-us
12
Printed in China
Page 13

MESURES DE SÉCURITÉ ...........2
FONCTIONNEMENT
Réglage des Commandes
Composants du réfrigérateur ...........16
Entretien et nettoyage. ...............5-6
Remplacement de l’ampoule ............5
INSTALLATION .....................7
CONSEILS DE DÉPANNAGE ......10
...............4
Manuel d’utilisation
et d’installation
3 Modèles de pieds cubes
4 Modèles de pieds cubes
GARANTIE ......................... 11
SOUTIEN AU CONSOMMATEUR . . 12
ATTENTION:
Dégivrage — N’utilisez pas d’objets
coupants ou pointus pour enlever
le givre ou la glace des surfaces du
compartiment congélateur. Sinon,
vous risquez de percer le serpentin
de refroidissement et l’appareil
sera incapable de maintenir des
températures froides. Cette négligence
annulera la garantie. Consultez la
section Entretien et nettoyage pour
des instructions sur le dégivrage du
compartiment congélateur
FRANÇAIS
Transcrivez les numéros de modèle
et de série ici :
# de modèle _____________
# de série _______________
Ils figurent sur l’étiquette
qui se trouve à l’interieur du
compartiment réfrigérateur en
haute à droite.
RÉFRIGÉRATEURS
GE est une marque déposée de General Electric Company. Fabriqué sous licence de marque.
245D2031P001 49-60750-1 07-16 GEA
245D2031P001 49-60750-1 07-16 GEA
Page 14

INSTRUCTIONS IMPORTANTES DE SÉCURITÉ.
LISEZ TOUTES LES INSTRUCTIONS AVANT
D’UTILISER VOTRE RÉFRIGÉRATEUR.
SÉCURITÉ
IMPORTANTES CONSIGNES DE SÉCURITÉ VEUILLEZ LIRE TOUTES LES CONSIGNES AVANT UTILISATION
Site Internet GE Appliances
Pour de plus amples informations sur le fonctionnement de votre réfrigérateur, consultez
le site www.electromenagersge.ca ou composez le 800.561.3344.
Ce symbole représente une alerte de sécurité. Ce symbole vous avise de dangers possibles pouvant causer
la mort, des blessures ou autres. Tous les messages de sécurité seront précédés du symbole d’ alerte de sécurité
ainsi que des mots « DANGER », « AVER TISSEMENT » ou « MISE EN GARDE ». Ces messages sont les suivants :
DANGER
AVERTISSEMENT
ATTENTION
Signale une situation qui présente un danger imminent et qui, si elle n’est pas évitée, entraînera des blessures
graves, voire la mort.
Signale une situation qui présente un danger imminent et qui, si elle n’est pas évitée, peut entraîner des
blessures graves, voire la mort.
Signale une situation qui présente un danger imminent et qui, si elle n’est pas évitée, peut entraîner des
blessures mineures ou graves.
.
IMPORTANTES CONSIGNES DE SÉCURITÉ
AVERTISSEMENT
Ce réfrigérateur doit être correctement installé conformément aux
Consignes d’Installation avant toute utilisation.
Débranchez le réfrigérateur avant d’effectuer une réparation, de
remplacer une ampoule ou de le nettoyer.
Remarque : L’alimentation du réfrigérateur ne peut être déconnectée
par aucune des fonctions sur le panneau de commande.
Remarque : Les réparations doivent être effectuées par un
professionnel qualifié.
Remettez toutes les pièces et panneaux en place avant d’utiliser
l’appareil.
Ne stockez pas ou n’utilisez pas d’essence ou d’autres vapeurs et
liquides inflammables à proximité de cet appareil ou de tout autre
appareil électroménager.
Nous déconseillons fortement l’utilisation d’une rallonge à cause
des risques potentiels dans certaines conditions. Cependant, si
ATTENTION
Ne nettoyez pas les clayettes ou les couvercles en verre avec de
l’eau tiède quand ceux-ci sont froids. Les clayettes et couvercles
en verre peuvent se casser s’ils sont exposés à des changements
soudains de température ou si vous les cognez ou les faites tomber.
Le verre trempé est conçu pour se briser en petits morceaux en cas
de casse
Éloignez les doigts des parties du congélateur où l’on peut
facilement se pincer : les espaces entre les portes, et entre les portes
et les placards sont toujours étroits. Soyez prudent lorsque vous
fermez les portes en présence d’enfants.
Pour réduire le risque d’incendie, d’explosion, de choc électrique ou de blessures lorsque
vous utilisez votre réfrigérateurde , veuillez suivre ces consignes de sécurité :
Pour réduire le risque de blessures lorsque vous utilisez votre réfrigérateurde , veuillez
suivre ces consignes de sécurité.
l’utilisation d’un cordon prolongateur est nécessaire, ce dernier doit
obligatoirement être homologué UL (aux USA) ou CSA (au Canada),
à trois brins avec mise à la terre pour appareil électroménager et
doit être équipé d’une fiche et d’une prise femelle avec terre. Les
caractéristiques électriques du cordon prolongateur doivent être de
15 ampères (minimum) et de 120 volts.
Pour éviter les risques d’asphyxie et d’enfermement pour les
enfants. Démontez les portes du congélateur et du compartiment
de réfrigération avant de le mettre au rebut ou d’interrompre son
utilisation.
Ne laissez pas les enfants grimper, se mettre debout ou se
suspendre aux poignées de portes dans le réfrigérateur ou aux
clayettes du réfrigérateur. Ils pourraient se blesser gravement.
Ne recongelez pas les aliments surgelés qui ont complètement
dégelé.
Si votre réfrigérateur est doté d’une machine à glaçons automatique,
évitez le contact avec les pièces mobiles du mécanisme éjecteur,
ou avec l’élément chauffant qui libère les glaçons. Ne posez pas
les doigts ou les mains sur le mécanisme de la machine à glaçons
automatique pendant que le réfrigérateur est branché.
2
Page 15

electromenagersge.ca
SÉCURITÉ (CONT.)
INSTALLATION
AVERTISSEMENT
Risque d’explosion.
Conservez les matériaux et vapeurs inflammables tels que l’essence à l’écart de votre réfrigérateur.
Une explosion, un incendie voire la mort pourrait en résulter.
BRANCHEMENTS ÉLECTRIQUES
AVERTISSEMENT
Branchez l’appareil dans une prise triple avec terre.
Ne retirez pas la broche de terre.
N’utilisez pas d’adaptateur.
Ne coupez pas ou n’enlevez pas, sous aucun prétexte, la troisième broche de mise à la terre du cordon
d’alimentation. Pour des raisons de sécurité, cet appareil doit être correctement mis à la terre.
Le cordon d’alimentation de cet appareil est équipé d’une fiche à trois
broches (pour une mise à la terre) qui s’adapte à la prise de courant
standard à 3 broches (pour une mise à la terre) pour minimiser les risques
de chocs électriques par cet appareil.
Faites vérifier la prise murale et le circuit électrique par un électricien
qualifié pour s’assurer que le système est correctement mis à la terre.
Dans le cas d’une prise biphasée, l’installateur a la responsabilité et
l’obligation de la remplacer par une prise triphasée correctement mise à la
terre. N’utilisez pas d’adaptateur.
Le réfrigérateur doit toujours être branché à sa propre prise électrique
d’une tension nominale correspondant à celle indiquée sur sa plaque
signalétique.
Risque de choc électrique.
Le non-respect de ces instructions peut entraîner des
risques d’incendies, des chocs électriques ou la mort.
Une alimentation électrique à 115 volts CA, 60 Hz, avec un fusible de 15
ou 20 ampères et une mise à la terre est nécessaire. Ceci permet d’obtenir
un meilleur rendement et évite de surcharger les circuits électriques du
domicile qui risque d’occasionner un incendie en surchauffant.
Ne débranchez jamais le réfrigérateur en tirant sur le cordon
d’alimentation. Prenez toujours fermement la fiche en main et tirez pour la
sortir de la prise.
Réparez ou remplacez immédiatement tout cordon électrique usé
ou endommagé. N’utilisez pas un cordon fissuré ou présentant des
dommages dus aux frottements soit sur sa longueur ou aux extrémités.
Lorsque vous éloignez votre réfrigérateur du mur, faites attention à ne pas
le faire rouler sur le cordon d’alimentation afin de ne pas l’endommager.
MISE AU REBUT APPROPRIÉE DE VOTRE ANCIEN RÉFRIGÉRATEUR
AVERTISSEMENT
Démontez les portes du compartiment de réfrigération et du compartiment de congélation du
réfrigérateur, avant mettre celui-ci au rebut. Le non-respect de cette recommandation peut entraîner
l’enfermement d’un enfant qui peut entraîner la mort ou des lésions cérébrales.
IMPORTANT:
Les enfants pris au piège ou morts d’asphyxie sont toujours d’actualité.
Les réfrigérateurs jetés ou abandonnés restent dangereux même si
vous ne les laissez au rebut que pour « quelques jours ». Si vous voulez
jeter votre ancien réfrigérateur, suivez les instructions suivantes pour
empêcher les accidents.
Avant de jeter votre ancien réfrigérateur ou congélateur:
Démontez les portes du compartiment de réfrigération et du
compartiment de congélation.
Laissez les clayettes en place, pour éviter que des enfants puissent
facilement grimper dans votre réfrigérateur.
Fluides frigorigènes
Les appareils réfrigérants contiennent des fluides frigorigènes
qui conformément à la législation fédérale doivent être retirés
avant la mise au rebut de l’appareil. Si vous mettez au rebut un
ancien réfrigérateur contenant des fluides frigorigènes, vérifiez
la procédure à suivre auprès de la compagnie responsable de
l’élimination.
Un enfant risque de suffoquer ou d’y être emprisonné.
AVERTISSEMENT
Avertissement: Cet appareil contient un fluide frigorigène isobutane,
R600a, un gaz naturel d’une grande compatibilité environnementale.
Il s’agit toutefois d’un combustible. Veuillez respecter les
avertissements suivants :
1) Lors de la manipulation, de l’installation et de l’utilisation de cet
appareil, prenez soin de ne pas endommager les tubes de circulation
du fluide frigorigène.
2) L’entretien doit être effectué par un technicien de service autorisé
par le fabricant. Les pièces seront remplacées par des pièces
recommandées par le fabricant.
3) Les appareils réfrigérants contiennent des fluides frigorigènes qui
conformément à la législation fédérale doivent être retirés avant la
mise au rebut de l’appareil.
4) N’obstruez pas les évents dans l’enceinte prévue pour l’appareil.
5) N’utilisez pas d’appareils ou autres moyens mécaniques pour
accélérer le processus de dégivrage.
6) N’endommagez pas le circuit du fluide frigorigène.
7) N’utilisez pas d’appareils électriques dans le compartiment
réfrigérateur de cet appareil.
Liquide frigorigène R600a
LISEZ ET SUIVEZ SOIGNEUSEMENT CES MESURES DE SÉCURITÉ.
CONSERVEZ CES INSTRUCTIONS
3
Page 16

À propos des commandes et des composants du réfrigérateur.
MIN
OFF
MED
MAX
La commande ressemblera à l’une de celles illustrées ci-dessus.
Réglage des commandes
La commande de température maintient la température
dans le réfrigérateur. Un réglage sur MIN correspond à
la température la plus chaude et sur MAX, la plus froide.
Réglez la commande sur MED (moyenne).
Allouez 24 heures pour atteindre la température MED
(moyenne). Si vous souhaitez une température plus
froide ou plus chaude, tournez le cadran un réglage
à la fois. Mettre la commande à OFF (arrêt) met fin
au refroidissement mais ne coupe pas l’alimentation
électrique au réfrigérateur. Un réglage à une température
trop froide peut causer la formation de givre dans le
réfrigérateur selon la température de la pièce.
Comment faire un essai de température
Faites l’essai du lait. Placez un contenant de lait sur une
clayette et inspectez-la plus tard. Si le lait est trop chaud
ou trop froid, ajustez la température.
Après un nouveau réglage, allouez 24 heures pour
atteindre la température choisie.
Composants
Clayettes
Pour retirer une clayette, soulevez l’arrière légèrement puis tirez vers l’avant. Certains modèles sont dotés de clayettes
multipositions qui peuvent être placées à différents niveaux.
Compartiment des plateaux à glaçons
Ce compartiment est destiné à la production de cubes de glace et au rangement à court terme (quelques jours au maximum) de
certains aliments précongelés lorsqu’en contact avec l’évaporateur (surface froide dans le compartiment.)
Balconnets de porte
Les balconnets de porte procurent un rangement pratique pour les articles fréquemment utilisés. Certains modèles sont dotés de
portes suffisamment profondes pour y ranger de grosses bouteilles.
4
Page 17

Entretien et nettoyage.
Nettoyage de l’extérieur
Conservez l’extérieur propre. Essuyez avec un linge
propre légèrement humecté de cire à appareil
électroménager ou de détersif liquide à vaisselle
doux. Séchez et polissez avec un linge doux, propre.
N’essuyez jamais votre réfrigérateur avec un torchon
sale ou une serviette mouillée. Cela peut laisser un
résidu qui risque d’endommager la peinture. N’utilisez
jamais de tampon à récurer, de nettoyant en poudre,
d’eau de javel ou de produit nettoyant contenant
un agent de blanchiment ou d’ammoniac, car ces
produits peuvent rayer et endommager la peinture.
Nettoyage de l’intérieur
Pour aider à empêcher les odeurs, laissez une
boîte ouverte de bicarbonate de soude dans les
compartiments réfrigération et congélation.
Débranchez le réfrigérateur avant de le
nettoyer. Si cela n’est pas pratique, essorez le
surplus d’humidité de l’éponge ou du linge lors
du nettoyage à proximité de la commande.
Utilisez une solution d’eau tiède et de
bicarbonate de soude – environ une cuillerée à
table (15 ml) de bicarbonate de soude dans un
litre d’eau. Cela aura pour effet de nettoyer et
electromenagersge.ca
Protégez le fini. Le réfrigérateur est doté d’une
peinture extérieure cuite au four de haute
qualité. Un entretien adéquat conservera
son aspect neuf et ses propriétés antirouille
pendant des années. Appliquez une couche de
cire pour électroménagers sur le réfrigérateur à
l’état neuf, puis deux fois l’an par la suite.
de neutraliser les odeurs. Rincez puis essuyez
pour assécher.
Les autres composants du réfrigérateur –
incluant les joints d’étanchéité de porte, les
tiroirs des fruits et légumes et toutes les pièces
en plastique – peuvent être nettoyés de la
même façon.
Ne lavez pas les pièces en plastique du
réfrigérateur au lave-vaisselle.
Remplacement de l’ampoule (certains modèles)
Débranchez le réfrigérateur avant de remplacer
une ampoule grillée. Placer la commande à OFF
(arrêt) ne coupe pas l’alimentation électrique au
circuit de la lampe.
L’ampoule est située derrière le boîtier de la
commande de température et elle est visible à
Ampoule
Écran protecteur de la lampe
travers l’écran protecteur de la lampe.
Enlevez l’écran protecteur en le dégageant
du bas du boîtier. Dévissez l’ampoule avec
précaution. Remplacez-la par une ampoule
d’une tension (watts) égale ou inférieure.
5
Page 18

Entretien et nettoyage.
Dégivrage (modèles à dégivrage manuel seulement)
Procédez au dégivrage dès qu’une épaisseur
de givre de 1/4 po (6 mm) se forme sur la paroi
du compartiment des plateaux à glaçons.
N’utilisez jamais un instrument coupant ou
métallique pour dégager le givre car cela
pourrait endommager les serpentins de
refroidissement. (Un serpentin percé causera
des problèmes importants et annulera la
garantie.) Nous recommandons d’utiliser un
grattoir en plastique. N’utilisez aucun appareil
électrique pour dégivrer votre réfrigérateur.
Pour dégivrer :
Retirez les aliments et les plateaux du
compartiment des plateaux à glaçons.
Tournez le cadran de la commande de
température à la position OFF (arrêt).
Sur les modèles sans plateau de dégivrage,
placez un récipient sous le compartiment des
plateaux à glaçons pour recueillir l’eau.
En général, le dégivrage prend quelques heures.
Pour procéder plus rapidement, gardez la
porte ouverte. Vous pouvez aussi verser de
l’eau modérément chaude (non bouillante) sur
la zone givrée pour accélérer le processus.
N’utilisez pas d’eau bouillante car elle peut
endommager les pièces en plastique.
Après le dégivrage :
Videz l’eau du plateau de dégivrage ou du
récipient placé sous le compartiment des
plateaux à glaçons. Lavez le plateau ou le
récipient à l’eau modérément chaude.
Essuyez le compartiment des plateaux à
glaçons avec un linge humide.
Tournez la commande de température sur le
réglage désiré et remettez les aliments et les
plateaux dans le réfrigérateur.
NOTE : ISi l’accumulation de givre est très
épaisse, l’ouverture ou la fermeture de la porte
du compartiment peut être entravée. Ne forcez
pas le mouvement; après le dégivrage, la porte
se maniera facilement.
Préparation de départ en vacances
Pendant les vacances ou des absences
prolongées, retirez les aliments et débranchez
le réfrigérateur. Tournez la commande à la
position OFF (arrêt) et nettoyez l’intérieur avec
une solution d’une cuillerée à table (15 ml) de
bicarbonate de soude et de 1 litre d’eau.
Préparation de déménagement
Fixez en place toutes les pièces mobiles,
comme la grille, les clayettes et les tiroirs, à
l’aide de ruban adhésif, pour empêcher tout
dommage.
Assurez-vous que votre réfrigérateur soit en
position droite pendant le déménagement.
Laissez la porte ouverte.
6
Page 19

Instructions
Réfrigérateur
d’installation
Modèles 3 pieds cubes
Modèles 3 pieds cubes
Si vous avez des questions, appelez le 1.800.561.3344 ou visitez notre site Web à l’adresse:
www.electromenagersge.ca
AVANT DE COMMENCER
Veuillez lire toutes les directives attentivement.
•
IMPORTANT – Conservez ces instructions
pour l’inspecteur local.
•
IMPORTANT – Respectez toutes les
ordonnances et les codes locaux.
• Note à l’installateur – Assurez-vous de laisser
ces instructions au consommateur.
• Note au consommateur – Conservez ces
instructions pour référence future.
DÉBALLAGE DU RÉFRIGÉRATEUR
• Retirez le ruban adhésif et toute étiquette (sauf l’étiquette
des spécifications) du réfrigérateur. Les résidus de ruban
ou de colle peuvent se dégager en frottant une petite
quantité de savon à vaisselle liquide sur l’adhésif avec les
doigts. Essuyez avec un chiffon imbibé d’eau chaude puis
asséchez.
• N’utilisez pas d’instruments coupants, d’alcool à friction,
de liquides inflammables ni de nettoyants abrasifs
pour enlever le ruban ou la colle. Ces produits peuvent
endommager la surface de votre réfrigérateur.
• Lors de son déplacement, ne penchez pas le réfrigérateur
de plus de 45° par rapport à sa position droite.
SPÉCIFICATIONS D’EMPLACEMENT
• N’installez jamais votre réfrigérateur dans un emplacement
où la température ambiante sera inférieure à 12.7°C (55°F).
Il ne se mettra pas en marche suffisamment souvent pour
maintenir des températures convenables.
• Installez votre réfrigérateur sur un plancher suffisamment
solide pour le porter lorsqu’il est plein.
• Ne placez pas l’appareil dans un renfoncement.
• N’encastrez pas le réfrigérateur.
PIEDS DE NIVELLEMENT
Les pieds ajustables dans les coins avant du réfrigérateur
doivent être ajustés de façon que le réfrigérateur repose
solidement contre le plancher; il faut aussi que l’avant
soit légèrement plus haut afin que les portes se ferment
aisément lorsqu’elles sont ouvertes à mi-course.
Pour ajuster les pieds, tournez-les dans le sens des aiguilles
d’une montre pour abaisser le réfrigérateur, et dans le sens
inverse pour le soulever.
DÉGAGEMENTS
Prévoyez les dégagements suivants pour faciliter
l’installation, la bonne circulation d’air et les raccordements
de plomberie et d’électricité.
Côtés : 13 mm (1/2”)
Dessus : 51 mm (2”)
Arrière : 51 mm (2”) **
**Depuis la face arrière de la carrosserie jusqu’au mur
Tournez dans le sens des aiguilles
pour abaisser, dans le sens inverse
pour soulever.
7
Page 20

Instructions d’installation
AVERTISSEMENT
Risque d’explosion.
Conservez les matériaux et vapeurs inflammables tels que l’essence à l’écart de votre réfrigérateur.
Une explosion, un incendie voire la mort pourrait en résulter.
BRANCHEMENTS ÉLECTRIQUES
AVERTISSEMENT
Branchez l’appareil dans une prise triple avec terre.
Ne retirez pas la broche de terre.
N’utilisez pas d’adaptateur.
Le non-respect de ces instructions peut entraîner des risques d’incendies, des chocs électriques ou la mort.
Risque de choc électrique.
CORDON D’ALIMENTATION
• Branchez le cordon d’alimentation du réfrigérateur dans sa propre prise murale correctement mise à la terre; la spécification de
tension de la prise doit correspondre à celle figurant sur la fiche signalétique du réfrigérateur.
• N’utilisez pas une rallonge.
• Lisez les consignes de sécurité des pages 2 et 3.
Permutation des portes (certains modèles)
Bouchons
ou vis
Bouchon
Espaceur
Couvercle
de charnière
Pieds de
nivellement
Charnière
Charnière
inférieure
1. Enlevez le petit bouchon du côté gauche
de la moulure de porte supérieure.
2. Enlevez les 2 bouchons ou vis du côté
gauche du dessus de la carrosserie.
3. Enlevez le couvercle de charnière en
plastique en le soulevant par son bord
avant.
4. Enlevez 2 vis de la charnière supérieure.
5. Soulevez la porte puis dégagez-la de la
charnière inférieure (côté droit).
6. Penchez la carrosserie du réfrigérateur
vers l’arrière pour enlever le pied de
nivellement gauche.
7. Enlevez les vis de la charnière inférieure
(côté droit) et enlevez le pied de
nivellement. Déplacez la charnière
inférieure du côté gauche et fixez-la avec
des vis. Reposer les pieds de nivellement.
IMPORTANT : Le pied gauche est muni
d’un espaceur ou l’équivalent qui doit
être déplacé du côté droit du pied de
nivellement lorsque l’ouverture de la porte
est inversée.
8. Vissez le pied de nivellement droit (avec
l’espaceur) à sa position du côté droit.
9. Placez la porte sur la charnière inférieure
gauche. En vous assurant que le joint
d’étanchéité magnétique maintient
la porte en place, fixez la charnière
supérieure avec les vis.
10. Assurez-vous que la porte est alignée
sur la carrosserie du réfrigérateur avant
de poursuivre.
11. Replacez le couvercle de charnière sur le
dessus de la charnière.
12. Insérez le bouchon dans le trou du côté
droit de la moulure de porte.
13. Insérez les 2 bouchons du côté droit du
dessus de la carrosserie.
8
Page 21

Instructions d’installation
Bouchons
ou vis
Bouchons
Bouchon
Couvercle
de charnière
Charnière
Charnière
centrale
Vis
2-Permutation des portes (certains modèles)
1. Enlevez le petit bouchon du côté gauche
de la moulure de porte supérieure.
2. Enlevez les 2 bouchons ou vis du côté
gauche du dessus de la carrosserie.
3. Enlevez le couvercle de charnière en
plastique en le soulevant par son bord
avant.
4. Enlevez les 2 vis de la charnière
supérieure.
5. Soulevez la porte du congélateur puis
dégagez-la de la charnière centrale (côté
droit). Placez la porte sur une surface non
abrasive avec l’extérieur orienté vers le
haut.
6. Enlevez les 2 vis qui fixent la charnière
centrale. Soulevez la charnière pour la
dégager.
7. Soulevez la porte du compartiment
réfrigérateur pour la dégager de la
charnière inférieure. Placez la porte sur
une surface non abrasive avec l’extérieur
orienté vers le haut.
8. . Penchez la carrosserie du réfrigérateur
vers l’arrière pour enlever le pied de
nivellement gauche.
9. Enlevez les vis de la charnière
inférieure (côté droit) ainsi que le pied
de nivellement. Déplacez la charnière
inférieure du côté gauche et fixez-la avec
les vis. Reposez les pieds de nivellement.
IMPORTANT : Le pied gauche est muni
d’un espaceur ou l’équivalent qui doit
être déplacé du côté droit du pied de
nivellement lorsque l’ouverture de la porte
est inversée.
10. Vissez le pied de nivellement droit (avec
l’espaceur) à sa position du côté droit.
11. Enlevez les deux bouchons du côté
gauche au centre et posez-les à droite.
12. Placez la porte sur la charnière inférieure
gauche. En vous assurant que le joint
d’étanchéité magnétique maintient la
porte en place, assurez-vous que la porte
est alignée sur le réfrigérateur, et fixez la
charnière centrale sur la gauche avec les
vis.
13.
Placez la porte du congélateur sur la
charnière centrale sur son axe. Assurezvous que la porte est alignée sur les
plans horizontal et vertical, et que le joint
d’étanchéité est bien appuyé sur tous les
côtés.
14.
Replacez la charnière supérieure du côté
gauche à l’aide de vis.
15. Replacez le couvercle de charnière sur le
dessus de la charnière.
16. Insérez le bouchon dans le trou du côté
droit de la moulure de porte.
17. Insérez les 2 bouchons du côté droit du
dessus de la carrosserie.
Espaceur
Charnière
inférieure
Pieds de
nivellement
9
Page 22

Avant d’appeler un réparateur…
Conseils de dépannage–Économisez du temps et de l’argent! Consultez d’abord les
tableaux qui suivent et vous pourrez peut-être éviter de faire appel à un réparateur.
Problème Causes possibles Correctifs
Le réfrigérateur ne fonctionne pas Commande à la position OFF (arrêt). Déplacez la commande sur un
réglage de température.
Le réfrigérateur est débranché. Enfoncez la fiche de l’appareil dans la
prise murale.
Le fusible est grillé/le disjoncteur est
déclenché.
Vibration ou bruit métallique (une légère
vibration est normale)
Le moteur fonctionne pendant de longues
périodes
Température trop élevée dans le
réfrigérateur
Odeur dans le réfrigérateur Des aliments ont transmis leur odeur
De la condensation s’accumule à l’extérieur Cela n’est pas inhabituel pendant les
De la condensation s’accumule à l’intérieur
(par temps humide, l’ouverture des
porteslaisse entrer de l’humidité)
Le réfrigérateur est trop froid La commande est réglée à une
Il faut ajuster les pieds de
nivellement avant.
Le réfrigérateur repose sur une
surface non uniforme.
Ceci est normal lorsque le
réfrigérateur vient d’être branché.
Une grande quantité d’aliments a
été mise au réfrigérateur.
Porte laissée ouverte. Vérifiez qu’il n’y a pas un paquet qui
Temps chaud ou ouverture
fréquente des portes.
Les commandes de température ont
été réglées à la température la plus
froide.
Dégagement insuffisant jusqu’au
mur.
La commande de température n’a
pas été réglée à une température
assez basse.
Temps chaud ou ouverture
fréquente des portes.
Porte laissée ouverte. Vérifiez qu’il n’y a pas un paquet qui
Les côtés de la carrosserie sont
chauds
au réfrigérateur.
périodes de forte humidité.
Les portes sont ouvertes trop
fréquemment ou pendant trop
longtemps.
température trop froide.
10
Remplacez le fusible ou réarmez le
disjoncteur.
Voir la section Pieds de nivellement.
Use shims to level the refrigerator.
Attendez 24 heures pour que
le réfrigérateur refroidisse
complètement.
C’est normal.
empêche la porte de fermer.
C’est normal.
Consultez Les commandes.
Voir la rubrique Dégagements dans la
section Avant de commencer.
Consultez Les commandes.
Abaissez la commande de
température d’une position Consultez
Les commandes.
empêche la porte de fermer.
Cela est normal pour un condensateur
de type à parois chaudes.
Les aliments à odeur forte doivent être
emballés hermétiquement.
Gardez une boîte ouverte de
bicarbonate de soude dans le
réfrigérateur.
Essuyez bien la surface extérieure.
Voir la section À propos des
commandes et des composants du
réfrigérateur.
Page 23

Garantie du réfrigérateur.
Pour les clients des États-Unis, toutes les réparations en vertu de
la garantie sont fournis par nos Centre de Service d’Usine ou par un
technicien autorisé Customer Care®. Pour prévoir une réparation,
consultez notre site GEAppliances.com ou appelez GE Appliances le 800.
GE.CARE5 (800.432.2737). Veuillez avoir votre numéro de série et votre
numéro de modèle à portée de main lorsque vous appelez pour obtenir un
service.
Au Canada, appelez le 800.561.3344.
Pendant la période de
GE Appliances remplacera :
garantie de :
Un An
A compter de la date d’achat
initial
Ce qui n’est pas couvert par GE :
■ Les déplacements à votre domicile pour vous expliquer
l’utilisation de ce produit
■ Une installation, livraison ou maintenance défectueuse.
■ Une panne du produit par abus d’utilisation, par mauvaise
utilisation, par modification ou s’il a été utilisé dans un but
autre que celui pour lequel il a été fabriqué.
■ Détérioration des aliments.
■ Le remplacement des fusibles ou le réenclenchement du
disjoncteur du domicile.
■ Les dommages causés après la livraison.
■ Le remplacement de la cartouche filtrante, si incluse, à
cause d’une pression d’eau en dehors de la gamme de
fonctionnement recommandée ou à cause d’une concentration
excessive de sédiments dans l’eau d’alimentation.
Toute pièce du réfrigérateur qui s’ avère défectueuse en raison d’un défaut de matériau ou de
fabrication. Durant cette période de Un (1) an à partir de la date d’achat d’origine, GE Appliances
décidera, à sa discrétion, de remplacer ou de réparer l’ appareil défectueux. Dans l’éventualité où GE
Appliances déciderait de réparer l’appareil durant cette période de garantie limitée de un (1) an, GE
Appliances fournira toute pièce du congélateur qui s’avère défectueuse suite à un vice de matière ou
de fabrication et assumera tous les coûts de main-d’œuvre et de service associés au remplacement
de la pièce défectueuse. Dans l’éventualité où GE Appliances déciderait de remplacer l’appareil durant
cette période de garantie limitée de un (1) an, elle pourra procéder en vous remettant un certificat
échangeable contre un produit de remplacement chez un détaillant.
Agrafez votre facture ici.
Pour bénéficier du service de
réparation sous garantie, une
preuve de la date d’achat initial
est nécessaire.
■ Le remplacement des ampoules.
■ Tout dommage causé par accident, incendie, inondation ou
une catastrophe naturelle.
■ Tout dommage fortuit ou indirect causé par des défauts
éventuels de cet appareil.
■ Le service s’il est impossible d’avoir accès au produit.
Les coûts associés lorsque GE décide de remettre au
consommateur un certificat échangeable contre un produit de
remplacement.
EXCLUSION DES GARANTIES TACITES - Votre recours exclusif est l’échange du produit suivant les modalités de
la Garantie Limitée. Toutes garanties tacites, y compris les garanties de valeurs marchandes ou d’adéquation
à des fins particulières, sont limitées à une durée d’un an ou à la durée la plus courte autorisée par la loi.
Pour les clients des États-Unis : Cette garantie est étendue à l’acheteur d’origine et aux propriétaires suivants pour tout
produit acheté pour une utilisation domestique aux États-Unis. Si le produit est installé dans une région où ne se trouve
aucun réparateur autorisé GE Appliances, vous devrez peut-être assumer les frais de transport ou apporter l’appareil
à un centre de service autorisé GE Appliances. En Alaska, cette garantie exclut le coût d’expédition ou de dépannage à
votre domicile.
Certains états n’acceptent pas d’exclusion ou de limites aux dommages indirects consécutifs. Certains droits particuliers
vous sont dévolus en vertu de la présente garantie et peuvent s’accompagner d’autres droits qui varient selon votre lieu
de résidence. Pour connaître vos droits juridiques, veuillez consulter le bureau local ou le bureau d’état des affaires aux
consommateurs ou le Procureur Général de votre état.
Garant :
États-Unis :
GE Appliances
Pour les clients au Canada : Cette garantie est étendue à l’acheteur d’origine et aux propriétaires suivants pour tout
produit acheté aux Canada pour une utilisation domestique aux Canada.Le service à domicile en vertu de la garantie
sera fourni dans les régions où il est disponible et où Mabe estime raisonnable de le fournir.
Garant Canada: MC Commercial, Burlington, Ontario, L7R 5B6
11
Page 24

Soutien au consommateur
Site Web de GE Appliances
Vous avez une question ou vous avez besoin d’aide pour votre appareil électroménager? Visitez le site Web de GE Appliances 24
heures par jour, tous les jours de l’année! Vous pouvez aussi y trouver d’autres formidables produits GE Appliances et tirer avantage
de tous nos services d’assistance en ligne. Aux États-Unis : GEAppliances.com Au Canada : GEAppliances.ca
Enregistrez votre électroménager
Enregistrez votre nouvel appareil en ligne au moment qui vous convient le mieux! L’enregistrement de votre produit dans les délais
prescrits permet une meilleure communication et un service rapide, selon les modalités de votre garantie, si besoin est. Vous pouvez
également envoyer par courrier la carte d’enregistrement pré-imprimée qui se trouve dans l’emballage de votre appareil.
Aux États-Unis : GEAppliances.com/register
Au Canada : Prodsupport.mabe.ca/crm/Products/ProductRegistration.aspx
Service de réparation
Un service de réparation expert GE Appliances se trouve à quelques pas de chez vous. Rendez-vous sur notre site et programmez,
à votre convenance, une visite de réparation à n’importe quel jour de l’année.
Aux États-Unis : GEAppliances.com/ge/service-and-support/service.htm ou composez le 800.432.2737 durant les heures
normales de bureau.
Au Canada : GEAppliances.ca/en/support/service-request ou composez le 800.561.3344
Prolongation de garantie
Procurez-vous une prolongation de garantie GE Appliances et informez-vous des rabais spéciaux en vigueur pendant la durée de
votre garantie. Vous pouvez vous la procurer en ligne en tout temps. Les services GE Appliances seront toujours disponibles après
l’expiration de la garantie. Aux États-Unis :
GEAppliances.com/ge/service-and-support/shop-for-extended-service-plans.htm ou composez le 800.626.2224 durant les
heures normales de bureau.
Au Canada : GEAppliances.ca/en/support/purchase-extended-warranty ou composez le 800.290.9029
Connectivité à distance
Pour de l’assistance concernant la connectivité au réseau sans fil (pour les modèles équipés de cette fonction), visitez notre site Web
au GEAppliances.com/ge/connected-appliances/ ou composez le 800.220.6899 aux États-Unis seulement.
Pièces et accessoires
Les personnes ayant les compétences requises pour réparer elles-mêmes leurs appareils peuvent recevoir directement à la maison
des pièces ou accessoires (les cartes VISA, MasterCard et Discover sont acceptées). Commandez en ligne 24 heures par jour.
Aux États-Unis : GEApplianceparts.com ou par téléphone au 877.959.8688 durant les heures normales de bureau.
Les instructions contenues dans le présent manuel comportent des procédures que tout utilisateur peut effectuer. Les
autres types de réparation doivent généralement être confiés à un technicien qualifié. Usez de prudence : une réparation ou
un entretien mal effectués peuvent rendre l’utilisation de l’appareil dangereuse.
Les consommateurs au Canada doivent consulter les pages jaunes pour connaître le centre de service Mabe le plus proche, visiter
notre site Web au GEAppliances.ca/en/products/parts-filters-accessories ou composer le 1.800.661.1616.
Communiquez avec nous
Si vous n’êtes pas satisfait du service après-vente de GE Appliances, communiquez avec nous depuis notre site Web en fournissant tous
les détails dont votre numéro de téléphone, ou écrivez à :
Aux États-Unis : General Manager, Customer Relations | GE Appliances, Appliance Park | Louisville, KY 40225
GEAppliances.com/ge/service-and-support/contact.htm
Au Canada : Director, Consumer Relations, Mabe Canada Inc. | Suite 310, 1 Factory Lane | Moncton, N.B. E1C 9M3
GEAppliances.ca/en/contact-us
12
Imprimé à la Chine
Page 25

INFORMACIÓN DE SEGURIDAD ...2
INSTRUCCIONES DE
FUNCIONAMIENTO
Configuraciones de los Controles ........4
Funciones del Refrigerador .............4
Cuidado y Limpieza ..................5-6
Reemplazo de la Lámpara ..............5
INSTRUCCIONES
DE INSTALACIÓN ................7
CONSEJOS PARA LA SOLUCIÓN
DE PROBLEMAS .................10
GARANTÍA ........................ 11
SOPORTE AL CLIENTE ............12
ATENCIÓN:
Descongelación – No use objetos
filosos ni punteagudos para retirar
escarcha o hielo de las superficies
del compartimiento del freezer.
Hacer esto podría perforar la bobina
de refrigeración, haciendo que
la unidad pierda la capacidad de
mantener las temperaturas frías y
anulando la garantía. Para acceder a
instrucciones sobre cómo descongelar
el compartimiento del freezer, consulte
la sección de Cuidado y Limpieza.
Manual del Propietario
e Instrucciones de
Instalación
Modelos de 3 Pies Cúbicos
Modelos de 4 Pies Cúbicos
ESPAÑOL
Escriba los números de modelo y
de serie aquí:
Nº de Modelo ____________
Nº de Serie ______________
Busque estos números en una
etiqueta del lado izquierdo,
REFRIGERADORE
GE es una marca registrada de General Electric Company. Fabricado bajo licencia de marca.
cerca de la parte intermedia del
compartimiento del refrigerador.
245D2031P001 49-60750-1 07-16 GEA
Page 26

INFORMACIÓN IMPORTANTE DE SEGURIDAD.
LEA TODAS LAS INSTRUCCIONES ANTES DE USAR.
SEGURIDAD
INFORMACIÓN IMPORTANTE DE SEGURIDAD LEA TODAS LAS INSTRUCCIONES ANTES DE USAR
Sitio Web de Electrodomésticos de GE
Para más información sobre el funcionamiento de su refrigerador, visite
www.GEAppliances.com
Éste es el símbolo de alerta de seguridad. El mismo alerta sobre potenciales riesgos de muerte o lesiones tanto para
usted con para otras personas. Todos los mensajes de seguridad estarán a continuación del símbolo de alerta de seguridad y con la palabra “PELIGRO”, “ADVERTENCIA” o “PRECAUCIÓN”. Estas palabras se definen como:
Indica una situación de riesgo que, si no se evita, podría resultar en la muerte o en lesiones graves.
PELIGRO
Indica una situación de riesgo que, si no se evita, podría resultar en la muerte o en lesiones graves.
ADVERTENCIA
Indica una situación de riesgo que, si no se evita, podría resultar en lesiones menores o moderadas.
PRECAUCIÓN
INSTRUCCIONES IMPORTANTES DE SEGURIDAD
ADVERTENCIA
A fin de reducir el riesgo de incendio, explosión, descargas eléctricas o lesiones al usar
su refrigerador, siga estas precauciones básicas de seguridad:
Este refrigerador se deberá instalar y ubicar adecuadamente de
acuerdo con las Instrucciones de Instalación antes de ser usado.
Desenchufe el refrigerador antes de hacer reparaciones,
reemplazar una lámpara de luz o hacer una limpieza.
Nota: La corriente que va al refrigerador no puede ser
desconectada por ninguna configuración del panel de control.
Nota: Las reparaciones deberán ser realizadas por un Profesional
del Servicio Técnico calificado.
Reemplace todas las piezas y paneles antes del uso.
No guarde ni use gasolina u otros vapores inflamables y líquidos
cerca de este u otros electrodomésticos.
Debido a los posibles riesgos sobre la seguridad bajo
ciertas condiciones, recomendamos enfáticamente no usar
prolongadores. Sin embargo, si se debe usar un prolongador,
es absolutamente necesario que sea un prolongador para
PRECAUCIÓN
$¿QGHUHGXFLUHOULHVJRGHOHVLRQHVDOXVDUHOUHIULJHUDGRUVLJDHVWDVSUHFDXFLRQHV
básicas.
No limpie estantes de vidrio ni tapas con agua caliente cuando
estén fríos. Los estantes de vidrio y las tapas se pueden romper si
son expuestos a cambios de temperatura repentinos o impactos,
tales como sacudones o caídas. El vidrio templado está diseñado
para destruirse en pequeñas piezas en caso de rotura.
Mantenga los dedos fuera de los espacios de “riesgo de
lastimaduras”; los despejes entre las puertas y entre las puertas y
el gabinete son necesariamente pequeños. Tenga el cuidado de
cerrar las puertas cuando los niños se encuentren en el área.
electrodoméstico de la lista UL (en Estados Unidos) o uno
certificado por CSA (en Canadá), de 3 cables con conexión a tierra,
que cuente con un enchufe con conexión a tierra y un toma
corriente con una graduación eléctrica del cable de 15 amperes
(mínimo) y 120 volts.
A fin de evitar riesgos de que los niños sufran asfixia o queden
atrapados, retire las puertas de comidas frescas y del freezer de
cualquier refrigerador antes de deshacerse o dejar de usar el mismo.
No permita que los niños se trepen, paren o cuelguen de las
manijas de la puerta o de los estantes del refrigerador. Podrían
sufrir lesiones graves.
No vuelva a congelar comidas que hayan estado totalmente
congeladas en forma previa.
En refrigeradores con máquinas de hacer hielo automáticas,
evite el contacto con las partes móviles del mecanismo eyector o
con el elemento de calefacción que libera los cubos. No coloque
los dedos ni las manos en el mecanismo de la máquina de hielo
automática mientras el refrigerador esté enchufado.
2
Page 27

INFORMACIÓN IMPORTANTE DE SEGURIDAD.
LEA TODAS LAS INSTRUCCIONES ANTES DE USAR. GEAppliances.com
SEGURIDAD (CONT)
INSTALACIÓN
ADVERTENCIA
Riesgo de Explosión.
Mantenga cualquier material y vapores inflamables, tales como gasolina, alejados del refrigerador. Si
no se cumple con esto se podrá producir una explosión, incendio o la muerte.
CONEXIÓN DE LA ELECTRICIDAD
ADVERTENCIA
Enchufe en un tomacorriente con conexión a
tierra de 3 cables.
No elimine el cable de conexión a tierra.
No use un adaptador.
Nunca, bajo ninguna circunstancia, corte o elimine el tercer cable (tierra) del cable de corriente.
Para su seguridad personal, este electrodoméstico debe estar adecuadamente conectado a tierra.
El cable de corriente de este electrodoméstico contiene un enchufe de
3 cables (conexión a tierra) que se conecta a un tomacorriente de pared
estándar de 3 cables (conexión a tierra) para minimizar la posibilidad de
riesgos de descargas eléctricas por parte del mismo.
Contrate a un electricista calificado para que controle el tomacorriente y
el circuito eléctrico, a fin de asegurar que el enchufe esté correctamente
conectado a tierra.
En caso de contar con un tomacorriente de pared de 2 cables, es su
responsabilidad y obligación reemplazarlo por un tomacorriente de pared
de 3 cables correctamente conectado a tierra. No use un adaptador.
El refrigerador debería estar siempre conectado a un enchufe específico
con un índice de voltaje equivalente al que figura en su etiqueta de
características técnicas.
Riesgo de Descarga Eléctrica.
Si no se siguen estas instrucciones se podrá
producir a muerte, incendios o descargas
eléctricas.
Se requiere un suministro eléctrico con fusible y conexión a tierra de
115 voltios de CA, 60 Hz, 15 o 20 amperes. Esto garantiza el mejor
funcionamiento y además previene la sobrecarga de los circuitos
del hogar, lo cual podría ocasionar riesgos de incendio debido al
recalentamiento de cables.
Nunca desenchufe el refrigerador tirando del cable de corriente. Siempre
tome su enchufe firmemente y empuje el mismo hacia afuera para
retirarlo.
Repare o reemplace de inmediato todos los cables de corriente pelados
o con cualquier tipo de daño. No use un cable con cortaduras o abrasión
sobre su extensión o extremos.
Al alejar el refrigerador de la pared, se deberá tener cuidado de que no
ruede sobre ni dañe el cable de corriente.
FORMA ADECUADA DE DESCARTAR SU ANTIGUO REFRIGERADOR
ADVERTENCIA
Retire del refrigerador las puertas de comidas frescas y del freezer, antes de descartar el refrigerador.
Si esto no se realiza, los niños podrán quedar atrapados y ocasionar la muerte o daño cerebral.
IMPORTANTE:
Que un niño quede atrapado o que sufra una asfixia no son problemas
del pasado. Los refrigeradores antiguos o abandonados aún son
peligrosos, incluso aunque se conserven por “sólo unos pocos días”. Si
se deshará de su antiguo refrigerador, siga las siguientes instrucciones
a fin de evitar accidentes.
Antes de Descartar su Antiguo Refrigerador o Freezer:
Retire las puertas de comidas frescas y del freezer.
Deje los estantes en su lugar de modo que los niños no puedan
trepar dentro con facilidad.
Refrigerantes
Todos los productos de refrigeración cuentan con refrigerantes,
que de acuerdo con la ley federal deberán ser eliminados antes
de descartar el producto. Si se deshará de un producto de
refrigeración antiguo, consulte a la compañía a cargo sobre cómo
deshacerse del mismo.
: Riesgo de que los niños sufran asfixia o y queden atrapados.
ADVERTENCIA
ADVERTENCIA: Este electrodoméstico cuenta con refrigerante
isobutano, R600a, un gas natural con alto nivel de compatibilidad
medioambiental. Sin embargo, también es inflamable. Se solicita el
cumplimiento de las siguientes advertencias:
1) Al mover, instalar y operar el electrodoméstico, se deberá tener cuidado
de no dañar la tubería del refrigerante.
2) El servicio técnico deberá ser realizado por personal autorizado del
servicio de la fábrica, y los componentes podrán ser reemplazados por
componentes de reemplazo autorizados por el fabricante.
3) Los productos de refrigeración cuentan con refrigerantes, que de acuerdo
con la ley federal deberán ser eliminados antes de descartar el producto.
4) Mantenga las aberturas de ventilación en el espacio de protección del
electrodoméstico o en la estructura incorporada libres de obstrucción.
5) No use dispositivos mecánicos u otros medios para acelerar el proceso de
descongelamiento.
6) No dañe el circuito del refrigerante.
7) No use dispositivos eléctricos dentro del compartimiento de
almacenamiento de comida del electrodoméstico.
Refrigerante R600a
LEA Y SIGA ESTA INFORMACIÓN DE SEGURIDAD CUIDADOSAMENTE.
GUARDE ESTAS INSTRUCCIONES
3
Page 28

Acerca de los controles y las funciones del refrigerador
MIN
OFF
MED
MAX
El control se verá con un aspecto similar a uno de los anteriores.
Configuraciones de los Controles
El control de temperatura mantiene la temperatura del
refrigerador. Al ubicar el control en MIN (Mínimo) se ajusta
la configuración más caliente. Al ubicar el control en MAX
(Máximo) se ajusta la configuración más fría. Configure el
control en MED (Media).
Espere 24 horas hasta que el refrigerador alcance la
temperatura MEDIA. Si desea una temperatura más fría
o más caliente, mueva el dial de a una configuración
por vez. Mover el control a OFF (Apagado) detiene
el enfriamiento, pero no apaga el encendido del
refrigerador. Configurar el control demasiado alto podría
hacer que el refrigerador se congele, dependiendo de la
temperatura del ambiente.
Cómo Evaluar las Temperaturas
Use la prueba de la leche. Ubique un envase de leche
en un estante y controle el mismo un día después. Si la
leche está demasiado caliente o demasiado fría, ajuste el
control de temperatura.
Use la prueba de la leche. Ubique un envase de leche
en un estante y controle el mismo un día después. Si la
leche está demasiado caliente o demasiado fría, ajuste el
control de temperatura.
Funciones
Estantes
Para retirar un estante, levante la parte trasera suavemente y empuje hacia usted. Algunos modelos cuentan con estantes
con posiciones múltiples, los cuales se pueden ubicar en diferentes niveles.
Compartimiento de la Bandeja de Hielo
Este compartimiento está diseñado para la producción de cubos de hielo y almacenamientos a corto plazo (unos pocos días
como máximo) de algunas comidas comercialmente congeladas cuando tengan contacto con el evaporador (superficie fría en el
compartimiento).
Estantes de la Puerta
Los estantes de la puerta brindan un nivel de almacenamiento conveniente para productos de uso frecuente. Algunos modelos
cuentan con puertas con la profundidad suficiente como para guardar botellas grandes.
4
Page 29

Cuidado y limpieza del refrigerador. GEAppliances.com
Limpieza de la Parte Exterior
Mantenga la parte exterior limpia. Use una tela
limpia que esté ligeramente humedecida con
cera para utensilios de cocina o detergente
líquido suave. Seque y pula con una tela limpia
y suave.
No limpie el refrigerador con una tela sucia
para platos o una toalla mojada. Estos podrán
dejar residuos que ocasionen corrosión sobre
la pintura. No use estropajos, limpiadores
en polvo, blanqueadores o limpiadores
que contengan blanqueador, ya que estos
Limpieza de la Parte Interior
Para evitar olores, deje abierta una caja de
bicarbonato de sodio en el refrigerador.
Desenchufe el refrigerador antes de limpiar. Si
esto no resulta práctico, estruje el exceso de
humedad para eliminarlo de la esponja o tela al
limpiar alrededor del control.
productos pueden rayar y debilitar la
terminación de la pintura.
Proteja el acabado de la pintura. El acabado
en la parte exterior del refrigerador posee
una pintura horneada de alta calidad. Con el
cuidado debido, conservará un aspecto nuevo
y sin óxido por años. Aplique una capa de cera
de cocina/ para electrodomésticos cuando el
refrigerador sea nuevo, y luego por lo menos
una vez por año.
2WUDVSDUWHVGHOUHIULJHUDGRU³LQFOX\HQGRMXQWDV
de la puerta, cajones de frutas y verduras, y
todas las piezas de plástico – se pueden limpiar
de la misma forma.
No lave ninguna parte plástica del refrigerador
en el lavavajillas.
Use agua caliente y solución de bicarbonato
GHVRGLR³DSUR[LPDGDPHQWHXQDFXFKDUD
sopera (15 ml) de bicarbonato de sodio para un
cuarto de galón (1 litro) de agua. Esto limpia y
neutraliza los olores. Enjuague y seque.
Cómo Reemplazar la Lámpara (en algunos modelos)
Desenchufe el refrigerador antes de reemplazar
una lámpara quemada. La configuración de
los controles en OFF (Apagado) no elimina la
corriente del circuito de luz.
La lámpara está ubicada detrás de la carcasa
del control de temperatura y se puede ver a
través de la tapa de la luz.
Lámpara
Retire la tapa de la luz, empujando desde la
parte inferior de la carcasa. De forma suave,
destornille la lámpara. Reemplace por una
lámpara con la misma cantidad o menos watts
Carcasa de la Luz
5
Page 30

Carcasa de la Luz.
Cómo Descongelar (sólo en modelos con descongelación manual)
Realice la descongelación cuando la escarcha
en la pared del compartimiento de la bandeja
de hielo llegue a tener 1/4” de grosor. Nunca
use un instrumento punteagudo o metálico
para retirar la escarcha, ya que podrá dañar
las bobinas de enfriamiento. (Si una bobina
de enfriamiento es perforada, esto ocasionará
graves problemas y anulará la garantía).
Recomendamos el uso de una espátula de
plástico. No use ningún dispositivo eléctrico
para descongelar su refrigerador.
Para descongelar:
Retire las comidas y las bandejas de hielo del
compartimiento de la bandeja de hielo.
Configure el dial del control de temperatura
en la posición OFF (Apagado).
En los modelos con bandeja de goteo, ubique
una olla debajo del compartimiento de la
bandeja de hielo para recolectar agua
La descongelación lleva normalmente algunas
horas. Para descongelar con mayor rapidez,
mantenga la puerta abierta. Además, verter
agua tibia (no caliente) en la parte con escarcha
podrá acelerar la descongelación. No use
agua hirviendo - esto podrá dañar las partes
plásticas.
Luego de descongelar:
Vacíe el agua de la bandeja de goteo o de la
olla ubicada debajo del compartimiento de
la bandeja de hielo. Lave la bandeja o la olla
con agua tibia.
Limpie el compartimiento de la bandeja de
hielo con una tela húmeda
Gire el control de temperatura a la
configuración deseada y regrese la comida y
las bandejas de hielo al refrigerador.
NOTA: Si la acumulación de hielo es muy
gruesa, esto podrá impedir que la puerta del
compartimiento de la bandeja de hielo se cierre
o abra completamente. No intente forzar su
apertura; luego de descongelar, la puerta se
abrirá y cerrará con facilidad.
Preparación para las Vacaciones
Si estará de vacaciones o ausente por tiempo
prolongado, retire la comida y desenchufe el
refrigerador. Mueva el control a la posición OFF
(Apagado), y limpie el interior con una solución de
bicarbonato de sodio de una cuchara sopera (15 ml)
de bicarbonato de sodio para un cuarto de galón (1
litro) de agua. Deje la puerta abierta.
Preparación para una Mudanza
Asegure todos los ítems tales como estantes
y bandejas de hielo, pegando los mismos de
forma segura en sus respectivos lugares a fin
de evitar daños.
Asegúrese de que el refrigerador permanezca
en una posición erguida durante el movimiento.
6
Page 31

Instrucciones
de Instalación
Refrigerador
Modelos de 3 Pies Cúbicos
Modelos de 4 Pies Cúbicos
Ante cualquier duda, llame al 1.800-GE-CARES o visite nuestro sitio web en: GEAppliances.com
ANTES DE COMENZAR
Lea estas instrucciones en su totalidad y atentamente.
•
IMPORTANTE – Conserve estas instrucciones
para uso del inspector local.
•
IMPORTANTE – Cumpla con todos los
códigos y ordenanzas gubernamentales.
• Nota para el Instalador – Asegúrese de que el
Comprador conserve estas instrucciones.
• Nota para el Comprador – Conserve estas
instrucciones para referencia futura.
REQUISITOS DE UBICACIÓN
• No instale el refrigerador donde la temperatura llegue a
ser inferior a los 50ºF (10ºC), ya que no se activará con la
frecuencia necesaria para mantener las temperaturas
apropiadas.
•
Instale el mismo en un piso lo suficientemente fuerte como
para soportarlo cargado en su totalidad.
• No lo instale en un área cerrada.
• No empotre el refrigerador.
ESPACIO NECESARIO
Deje el siguiente espacio para una fácil instalación y una
adecuada circulación de aire.
Modelos de 3 y 4 Pies Cúbicos
Costados 1/2” (13 mm)
Parte superior 2” (51 mm))
Parte trasera 2” (51 mm)**
**Desde la superficie trasera del gabinete hasta la pared
CÓMO DESEMBALAR SU REFRIGERADOR
• Retire la cinta y cualquier etiqueta (excepto la etiqueta
de calificación) de su refrigerador. Los residuos de cinta o
pegamento se pueden retirar fácilmente frontando con
los dedos una cantidad pequeña de jabón líquido para
lavar platos sobre el adhesivo. Limpie con agua caliente
y seque.
• No use instrumentos puntiagudos, no frote alcohol, no
use líquidos inflamables, ni limpiadores abrasivos para
retirar cinta o pegamento. Estos productos pueden dañar
la superficie del refrigerador
• Al mover el refrigerador, no lo incline más de 45º desde
su posición vertical.
PATAS NIVELADORAS
Las patas niveladoras en las esquinas frontales del
refrigerador se deberían configurar de modo que éste
quede posicionado de manera firme sobre el suelo, y
que el frente quede elevado lo suficiente como para
que la puerta se cierre con facilidad cuando se abra
aproximadamente hasta la mitad.
Para ajustar las patas niveladoras, gire las mismas en
dirección contraria a las agujas del reloj para levantar el
refrigerador, y en dirección de las agujas del reloj para
bajarlas.
Gire en dirección de las agujas del reloj
para subir, y en dirección contraria a
las agujas del reloj para bajar.
7
Page 32

Instrucciones de Instalación
ADVERTENCIA
Riesgo de Explosión.
Mantenga cualquier material y vapores inflamables, tales como gasolina, alejados del refrigerador. Si no
se cumple con esto, se podrá producir una explosión, incendio o la muerte.
CONEXIÓN DE LA ELECTRICIDAD
ADVERTENCIA
Enchufe en un tomacorriente con conexión a tierra de 3 cables.
No elimine el cable de conexión a tierra.
No use un adaptador.
Si no se siguen estas instrucciones se podrá producir a muerte, incendios o descargas eléctricas.
Riesgo de Descarga Eléctrica.
CABLE DE CORRIENTE
• Enchufe el cable de corriente del refrigerador en su propio tomacorriente correctamente conectado a tierra, con un índice de
voltaje que coincida con la placa de calificación del refrigerador.
• No use un prolongador.
• Lea todas las precauciones de seguridad en las páginas 2 y 3.
Inversión de la Puerta (en algunos modelos)
Botones
o tornillos
obturadores
Botón
obturador
Espaciador
Tapa
de la
Bisagra
Patas
niveladoras
Hinge
Bisagra
inferior
1. Retire el botón obturador pequeño sobre
el lado izquierdo de la tapa superior de la
puerta.
2. Retire los 2 botones o tornillos obturadores
sobre el lado izquierdo en la parte superior
del gabinete.
3. Retire la tapa de la bisagra plástica
levantando la misma desde el extremo
frontal.
4. Retire los 2 tornillos desde la bisagra
superior.
5. Levante la puerta hacia arriba y afuera
de la bisagra inferior (lado derecho).
6. Incline el gabinete del refrigerador hacia
atrás para retirar la pata niveladora
izquierda.
7. Retire los tornillos de la bisagra
inferior (lado derecho) y retire la pata
niveladora. Mueva la bisagra inferior
hacia la izquierda y asegure la misma
con tornillos. Vuelva a instalar las patas
niveladoras.
IMPORTANTE: La pata izquierda cuenta
con un espaciador o con un dispositivo
espaciador que deberá ser movido hacia
la pata niveladora del lado derecho
cuando el giro de la puerta sea invertido.
8. Vuelva a atornillar la pata niveladora
derecha, con un espaciador, del lado
derecho.
9. Posicione la puerta sobre la bisagra
inferior izquierda. Con una junta
imantada que sostenga la puerta en su
posición, asegure la bisagra superior con
tornillos.
10. Asegúrese de que la puerta quede
alineada con el gabinete del
refrigerador antes de continuar.
11. Reemplace la tapa de la bisagra sobre la
parte superior de la bisagra.
12. Coloque el botón obturador en el agujero
sobre el lado derecho de la tapa de la
puerta.
13. Coloque los 2 botones obturadores sobre
el lado derecho en la parte superior del
gabinete.
8
Page 33

Instrucciones de Instalación
Botones
o tornillos
obturadores
Botón
obturador
Botón
obturadores
Espaciador
Tapa de la
bisagra
Bisagra
central
Bisagra
Tornillos
Patas
niveladoras
2-Inversión de la Puerta (en algunos modelos)
1. Retire el botón obturador pequeño
sobre el lado izquierdo de la tapa
superior de la puerta.
2. Retire los 2 botones o tornillos
obturadores sobre el lado izquierdo en
la parte superior del gabinete.
3. Retire la tapa de la bisagra plástica
levantando la misma desde el extremo
frontal.
4. Retire los 2 tornillos desde la bisagra
superior.
5. Levante la puerta del freezer
hacia arriba y afuera de la bisagra
intermedia (lado derecho). Coloque
la puerta en una superficie que no
produzca rayaduras con la parte
exterior hacia arriba.
6. Retire la bisagra central quitando los
2 tornillos. Levante la bisagra para
retirarla.
7. Retire la puerta de comidas frezcas de
la bisagra inferior. Coloque la puerta
en una superficie que no produzca
rayaduras con la parte exterior hacia
arriba.
8. Incline el gabinete del refrigerador
hacia atrás para retirar la pata
niveladora izquierda.
9. Retire los tornillos de la bisagra
inferior (lado derecho) y retire la pata
niveladora. Mueva la bisagra inferior
hacia la izquierda y asegure la misma
con tornillos. Vuelva a instalar las patas
niveladoras.
IMPORTANTE: La pata izquierda cuenta
con un espaciador o con un dispositivo
espaciador que deberá ser movido
hacia la pata niveladora del lado
derecho cuando el giro de la puerta sea
invertido.
10. Vuelva a atornillar la pata niveladora
derecha, con un espaciador, del lado
derecho.
11. Retire los dos botones obturadores
del lado izquierdo de la parte central e
instale los mismos sobre la derecha.
12. Posicione la puerta sobre la bisagra
inferior izquierda. Con una junta
imantada que sostenga la puerta en
su lugar, asegúrese de que la puerta
esté alineada con el refrigerador, y
asegure la bisagra central sobre la
parte izquierda con tornillos.
13. Coloque la puerta del freezer en
la bisagra central sobre la clavija.
Asegúrese de que la puerta esté
alineada de forma horizontal y vertical,
y que la junta quede sellada sobre
todos los lados.
14. Reemplace la bisagra superior del lado
izquierdo con tornillos.
15. Reemplace la tapa de la bisagra sobre
la parte superior de la bisagra.
16. Coloque el botón obturador en el
agujero sobre el lado derecho de la
tapa de la puerta.
17. Coloque los 2 botones obturadores
sobre el lado derecho en la parte
superior del gabinete.
Patas
niveladoras
9
Page 34

Antes de Solicitar el Servicio Técnico…
Consejos para la Solución de Problemas
¡Ahorre tiempo y dinero! Primero revise los cuadros que aparecen en las siguientes
páginas y es posible que no necesite solicitar reparaciones.
Problema Causas Posibles Qué Hacer
El refrigerador no funciona El control está en la posición OFF
(Apagado).
El refrigerador está desenchufado. Presione el enchufe completamente
Se quemó el fusible/ el disyuntor
está activado
Vibración normal o ruidosa (una vibración
leve es normal)
El motor funciona durante períodos o ciclos
largos
El refrigerador está demasiado caliente El control de temperatura no
El refrigerador tiene olor Comidas que transmiten olor al
Se forma humedad en la parte exterior del
refrigerador
Se acumula humedad dentro (en climas
húmedos, el aire lleva humedad al
refrigerador cuando la puerta es abierta)
El refrigerador está demasiado frío El control de temperatura fue
Las patas niveladoras frontales
necesitan ajuste.
El refrigerador se encuentra en una
superficie despareja.
Normal when refrigerator is first
plugged in.
Sucede con frecuencia cuando se
colocan grandes cantidades de
comida en el refrigerador.
Se dejó la puerta abierta. Controle que no haya paquetes que
Clima cálido o apertura frecuente de
la puerta.
El control de temperatura está
configurado en la posición más fría.
No hay suficiente espacio desde la
pared. .
se configuró en un nivel lo
suficientemente frío.
Clima cálido o se abre la puerta con
frecuencia.
Se dejó la puerta abierta. Controle que no haya paquetes que
Los costados del gabinete están
tibios
refrigerador.
No es atípico durante períodos con
altos niveles de humedad.
Se abre la puerta de forma muy
frecuente o por períodos demasiado
largos.
configurado en un nivel muy frío.
Move the control to a temperature
setting.
dentro del tomacorriente.
Reemplace el fusible o reinicie el
disyuntor.
Consulte la sección de Patas
Niveladoras.
Use cuñas para nivelar el refrigerador.
Espere 24 horas hasta que el
refrigerador se enfríe completamente.
Esto es normal.
impidan que la puerta se cierre.
Esto es normal.
Consulte la sección Acerca del Control.
Consulte la sección de Despejes al
Preparar la instalación del refrigerador.
Consulte la sección Acerca del control
Configure el control de temperatura
un paso más frío. Consulte la sección
Acerca del control
impidan que la puerta se cierre.
Esto es normal cuando haya un
condensador de pared caliente.
Las comidas con olores fuertes se
deberán cubrir de forma hermética.
Keep an open box of baking soda in
the refrigerator; replace every three
months.
Seque la superficie.
Consulte la sección Acerca del control.
10
Page 35

Garantía del Refrigerador. (Para clientes en Estados Unidos)
Todos los servicios de garantía los proporcionan nuestros Centros de
Reparación de Fábrica o nuestros técnicos Customer Care® autorizados.
Para concertar una cita de reparación, en línea, 24 horas al día, visíte nos al
GEAppliances.com, o llame al 800.GE.CARES (800.432.2737). Cuando llame para
solicitar servicio, por favor tenga a mano el número de serie y el número de
modelo.
Por el período de: GE reemplazará:
Un año
A partir de la fecha de la
compra original.
Cualquier parte del refrigerador que falle debido a defectos en los materiales o en la fabricación.
Durante este período de Un Año desde la fecha de compra original, GE elegirá, de acuerdo a
su decisión, reemplazar o realizar el servicio técnico sobre la unidad defectuosa. Durante esta
garantía limitada de un año, si GE decide realizar el servicio técnico sobre la unidad, GE brindará
cualquier pieza del freezer que falle debido a un defecto en los materiales o la fabricación y, sin
costo, todos los servicios relacionados con el reemplazo de la pieza defectuosa. Durante esta
garantía limitada de un año, si GE decide reemplazar la unidad, puede hacer esto brindándole un
certificado reembolsable en una tienda minorista por un producto de reemplazo.
Lo que GE no cubrirá:
■ Viajes del técnico del servicio a su hogar para enseñarle
sobre cómo usar el producto.
■ Instalación, entrega o mantenimiento inadecuados.
■ Fallas del producto en caso de abuso, mal uso, o uso para
propósitos diferentes al original o uso comercial.
■ Pérdida de alimentos por mal estado.
■ Reemplazo de fusibles de la casa o reinicio de disyuntores.
■ Daño causado después de la entrega.
■ Reemplazo de bombillas de luz.
Grape aquí su recibo. Se
requiere facilitar prueba de
la fecha de compra original
para obtener un servicio bajo
la garantía.
■ Daños ocasionados sobre el producto por accidente,
incendio, inundaciones o catástrofes naturales.
■ Daños consecuentes o incidentales causados por posibles
defectos de este producto.
■ Producto no accesible para brindar el servicio requerido.
Costos asociados cuando GE decide entregar al
consumidor un certificado como forma de reemplazo del
producto.
(;&/86,Ï1'(*$5$17Ë$6,03/Ë&,7$6³6X~QLFR\H[FOXVLYRGHUHFKRHVODUHSDUDFLyQGHOSURGXFWR
tal y como se indica en esta Garantía limitada. Cualquier garantía implícita, incluyendo las garantías
implícitas de comerciabilidad o adecuación para un fin determinado, están limitadas a un año o el
período de tiempo más breve permitido por la ley.
Para los clientes de EE.UU. Esta garantía se extiende al comprador original y a cualquier dueño subsiguiente de
productos comprados para uso hogareño dentro de EE.UU. Si el producto está en un área donde no se encuentra
disponible un Proveedor Autorizado del Servicio Técnico de GE, usted será responsable por el costo de un viaje o se
podrá requerir que traiga el producto a una ubicación del Servicio Técnico de GE Autorizado para recibir el servicio.
En Alaska, la garantía excluye el costo de envío o llamadas del servicio a su hogar.
Algunos estados no permiten la exclusión o limitación de daños fortuitos o consecuentes. Esta garantía le da derechos
legales específicos y es posible que tenga otros derechos legales que varían entre un estado y otro. Para conocer cuáles
son sus derechos legales, consulte a la oficina de asuntos del consumidor local o estatal o al Fiscal de su estado.
Garante: General Electric Company. Louisville, KY 40225
Para los clientes de Canadá : Esta garantía se extiende al comprador original y cualquier comprador posterior
de productos comprados en Canadá para uso residencial dentro de Canadá. El servicio a domicilio warrant será
proporcionado en las áreas donde está disponible y que se considere razonable por Mabe para ofrecer.
Mabe Canada Inc., Burlington, ON, L7R 5B6
11
Page 36

Soporte para el Consumidor
Sitio Web de GE Appliances
¿Desea realizar una consulta o necesita ayuda con su electrodoméstico? ¡Intente a través del Sitio Web de GE Appliances las
24 horas del día, cualquier día del año! Usted también puede comprar más electrodomésticos maravillosos de GE Appliances y
aprovechar todos nuestros servicios de soporte a través de Internet, diseñados para su conveniencia.
En EE.UU.: GEAppliances.com
Registre su Electrodoméstico
¡Registre su electrodoméstico nuevo a través de Internet, según su conveniencia! Un registro puntual de su producto permitirá
una mejor comunicación y un servicio más puntual de acuerdo con los términos de su garantía, en caso de surgir la necesidad.
También puede enviar una carta en la tarjeta de inscripción preimpresa que se incluye con el material embalado.
En EE.UU.: GEAppliances.com/register
Servicio Programado
El servicio de reparación de expertos de GE Appliances está a sólo un paso de su puerta. Conéctese a través de Internet y programe
su servicio a su conveniencia cualquier día del año. En EE.UU.: GEAppliances.com/ge/service-and-support/service.htm
o comuníquese al 800.432.2737 durante el horario de atención comercial.
Garantías Extendidas
Adquiera una garantía extendida de GE Appliances y conozca los descuentos especiales que están disponibles mientras su
garantía aún está vigente. La puede adquirir en cualquier momento a través de Internet. Los servicios de GE Appliances aún
estarán allí cuando su garantía caduque.
En EE.UU.: GEAppliances.com/ge/service-and-support/shop-for-extended-service-plans.htm
o comuníquese al 800.626.2224 durante el horario de atención comercial.
Conectividad Remota
Para solicitar asistencia para la conectividad de red inalámbrica (para modelos con acceso remoto),
visite nuestro sitio web en GEAppliances.com/ge/connected-appliances/ o comuníquese al 800.220.6899 en EE.UU.
Piezas y Accesorios
Aquellos individuos calificados para realizar el servicio técnico de sus propios electrodomésticos podrán solicitar el envío de
piezas o accesorios directamente a sus hogares (se aceptan las tarjetas VISA, MasterCard y Discover). Ordene hoy a través de
Internet durante las 24 horas, todos los días. En EE.UU.: GEApplianceparts.com o de forma telefónica al 877.959.8688 durante
el horario de atención comercial.
Las instrucciones que figuran en este manual cubren los procedimientos que serán realizados por cualquier usuario.
Otros servicios técnicos generalmente deben ser derivados a personal calificado del servicio. Se deberá tener cuidado,
ya que una reparación indebida podrá hacer que el funcionamiento no sea seguro.
Contáctenos
Si no se encuentra satisfecho con el servicio que recibió de GE Appliances, comuníquese con nosotros a través de nuestro sitio
Web con todos los detalles, incluyendo su número telefónico, o escriba a:
En EE.UU.: General Manager, Customer Relations | GE Appliances, Appliance Park | Louisville, KY 40225
GEAppliances.com/ge/service-and-support/contact.htm
12
Impreso en China
 Loading...