

Page 1

X-C 6250 Pro
User’s Manual
Page 2

X-C 6250 Pro Users Manual
Identification
X-C 6250 Pro Users Manual
October 1999 · Revision 003
Copyright Notice
© Copyright 1999 Itronix Corporation. All rights reserved. No part of this
document may be reproduced, transmitted, transcribed, stored in a retrieval
system, or translated into any other language or computer language in whole or
in part, in any form or by any means, whether it be electronic, mechanical,
magnetic, optical, manual, or otherwise, without the prior written consent of
Itronix Corporation, South 801 Stevens Street, Spokane, Washington 99204.
Disclaimer
This document is printed in the U.S.A. Itronix Corporation reserves the right to
revise the manual and make periodic changes to the content without a direct or
inferred obligation to Itronix to notify any person of such revision or changes.
Itronix Corporation does not assume responsibility for the use of this manual,
nor for any patent infringements or other rights or third parties who may use the
manual.
This document contains valuable trade secrets and proprietary information of
Itronix Corporation.
This product is available for purchase under the terms of the Itronix Hardware
Purchase and Software License Agreement. Itronix hardware products may be
reconditioned, or be manufactured from parts and components that may be
new, used, rebuilt, or recycled and in some cases, the hardware product may
not be new and may have been previously installed. In any event, Itronix
warranty terms apply.
Trademark Notice
Itronix is a registered trademark of Itronix Corporation.
Microsoft, MS, Windows, and MS-DOS are registered trademarks of Microsoft
Corporation.
IBM is a trademark of International Business Machines Corporation.
ii
79-0003-003 22 October 1999
Page 3

Compliance Statements
The X-C 6250 Pro computer has been tested and found to comply with the
limits for a Class B digital device, pursuant to Part 15 of the FCC Rules. These
limits are designed to provide reasonable protection against harmful interference
in a residential installation. This equipment generates, uses, and can radiate
radio frequency energy and, if not installed and used in accordance with the
instructions, may cause harmful interference to radio communications.
However, there is no guarantee that interference will not occur in a particular
installation.
If this equipment does cause harmful interference to radio or television
reception, which can be determined by turning the equipment off and on, the
user is encouraged to try to correct the interference by one or more of the
following measures:
• Reorient or relocate the receiving antenna.
• Increase the separation between the equipment and receiver.
• Connect the equipment into an outlet on a circuit different from that to
which the receiver is connected.
• Consult the dealer or an experienced radio/TV technician for help.
The X-C 6250 Pro computer complies with Part 68 of the FCC Rules. On the
bottom of this equipment is a label that contains, among other information, the
FCC registration number and ringer equivalence number (REN) for this
equipment. If requested, this information must be provided to the telephone
company.
The REN is used to determine the quantity of devices which may be connected
to the telephone line. Excessive RENs on the telephone line may result in the
devices not ringing in response to an incoming call. In most, but not all areas,
the sum of the RENs should not exceed five (5.0). To be certain of the number
of devices that may be connected to the line, as determined by the total RENs,
contact the telephone company to determine the maximum REN for the calling
area.
The X-C 6250 Pro computer may be connected to the telephone network using
the RJ-11 jack provided.
If this equipment causes harm to the telephone network, the telephone
company will notify you in advance that temporary discontinuance of service
may be required. If advance notice isnt practical, the telephone company will
notify the customer as soon as possible. Also, you will be advised of your right
to file a complaint with the FCC if you believe it is necessary.
The telephone company may make changes in its facilities, equipment,
operations, or procedures that could affect the operation of the equipment. If
79-0003-003 22 October 1999
iii
Page 4

X-C 6250 Pro Users Manual
this happens, the telephone company will provide advance notice in order for
you to make the necessary modifications in order to maintain uninterrupted
service.
If trouble is experienced with this equipment, please contact the equipment
manufacturer for repair and/or warranty information. Do not attempt repairs of
this equipment yourself without obtaining manufacturer authorized parts and
documentation. If the trouble is causing harm to the telephone network, the
telephone company may request you remove the equipment from the network
until the problem is resolved.
Compliance Statement for Canada
NOTICE: The Industry Canada label identifies certified equipment. This
certification means that the equipment meets certain telecommunications
network protective, operational and safety requirements as prescribed in the
appropriate Terminal Equipment Technical Requirements document(s). The
Department does not guarantee the equipment will operate to the users
satisfaction.
Before installing this equipment, users should ensure that it is permissible to be
connected to the facilities of the local telecommunications company. The
equipment must also be installed using an acceptable method of connection.
The customer should be aware that compliance with the above conditions may
not prevent degradation of service in some situations.
Repairs to certified equipment should be made by a representative designated
by the supplier. Any repairs or alterations made by the user to this equipment,
or equipment malfunctions, may give the telecommunications company cause
to request the user to disconnect the equipment.
Users should ensure for their own protection that the electrical ground
connections of the power utility, telephone lines, and internal metallic water
pipe system, if present, are connected together. This precaution may be
particularly important in rural areas.
CAUTION! Users should not attempt to make such connections themselves,
but should contact the appropriate electric inspection authority, or electrician,
as appropriate.
The Ringer Equivalence Numbers (REN) are:
X-C 6250 Pro non-radio: 0.5B
X-C 6250 Pro ARDIS: 0.5B
X-C 6250 Pro RAM: 0.5B
X-C 6250 Pro CDPD: 1.3B
NOTICE: The Ringer Equivalence Number (REN) assigned to each terminal
iv
79-0003-003 22 October 1999
Page 5

device provides an indication of the maximum number of terminals allowed to
be connected to a telephone interface. The termination on an interface may
consist of any combination of devices subject only to the requirement that the
sum of the Ringer Equivalence Numbers of all the devices does not exceed 5.
The X-C 6250 Pro computer may be connected to the telephone network using
the RJ-11 jack provided.
Fax Branding
The Telephone Consumer Protection Act of 1991 makes it unlawful for any
person to use a computer or other electronic device to send any message via a
telephone fax machine unless such message clearly contains in a margin at the
top or bottom of each transmitted page or on the first page of the transmission,
the date and time it is sent and an identification of the business or other entity,
or other individual sending the message and the telephone number of the
sending machine or such business, other entity, or individual.
In order to program this information into your fax machine, you should
complete the following:
This information is entered through the FAX application software
you have installed. Consult your FAX software documentation for
instructions about entering this information.
Warnings and Cautions
WARNING It is important that only authorized Itronix personnel attempt
repairs on Itronix equipment as this might void any maintenance contract with
your company. Unauthorized service personnel might be subject to shock
hazard on some Itronix equipment if removal of protective covers is attempted.
The product you have purchased is powered by a rechargeable battery. The
battery is recyclable and, under various state and local laws, it may be illegal to
dispose of this battery into the municipal waste stream. Do not crush the
battery or place it in a fire. Check with your local solid-waste officials for details
on recycling options or proper disposal.
CAUTION Internal components of the X-C 6250 Pro computer will be
damaged if exposed to contaminants. When dust covers, the PC card door, or
the battery door are open on the computer, shield the unit from all
contaminants such as liquids, rain, snow, and dust.
Federal Communication Commission (FCC) Regulations for the Stand Alone
Charger
This equipment has been tested and found to comply with the limits for a Class
B digital device, pursuant to part 15 of the FCC Rules. These limits are
designed to provide reasonable protection against harmful interference in a
79-0003-003 22 October 1999
v
Page 6

X-C 6250 Pro Users Manual
residential installation. This equipment generates, uses and can radiate radio
frequency energy and, if not installed and used in accordance with the
instructions, may cause harmful interference to radio communications.
However, there is no guarantee that interference will not occur in a particular
installation. If this equipment does cause harmful interference to radio or
television reception, which can be determined by turning the equipment off and
on, the user is encouraged to try to correct the interference by one or more of
the following measures:
• Reorient or relocate the receiving antenna.
• Increase the separation between the equipment and receiver.
• Connect the equipment into an outlet on a circuit different from that to
which the receiver is connected.
• Consult the dealer or an experienced radio/TV technician for help.
The equipment has been approved to [Commission Decision CTR21] for
pan-European single terminal connection to the Public Switched Telephone
Network (PSTN). However, due to differences between individual PSTNs
provided in different countries the approval does not, of itself, give an unconditional assurance of successful operation on every PSTN network termination
point.
In the event of problems, you should contact your equipment supplier in the
first instance.
Safety Information
The following safety symbols are used in this manual to indicate potentially
dangerous situations. Do not proceed beyond a WARNING or CAUTION symbol
until the indicated conditions are fully understood and met.
CAUTION This caution statement denotes a hazard. It calls attention to a
procedure or practice that could result in damage to or destruction of part
or all of the product if not performed correctly.
WARNING This warning denotes a hazard. It calls attention to a procedure or practice that could result in personal injury if not performed
correctly.
vi
79-0003-003 22 October 1999
Page 7

About This Manual
The X-C 6250 Pro Users Manual provides information about using the
X-C 6250 Pro computer and some of its peripherals.
If youve never used this computer (or any computer) before, the first
three sections contain important information to get you started successfully. To help you become a proficient user or just to make your daily
tasks easier, try using the tools that reside on your system listed on
page viii.
If youre an experienced computer user already familiar with Windows, Section 3, Getting Started, provides important setup proce-
dures for the computer. Section 5 shows you how to customize system
settings.
If you dont read anything else in this manual, turn to Section 7 and
read about batteries and power. Following the tips outlined in this
section can significantly increase the life of your batteries.
Inside
To Do This... Turn to This Section
See where we put the parts Features of the Computer, Page 17
Use the keyboard Using the Keyboard and Mouse, Page 26
Use the mouse Using the Keyboard and Mouse, Page 34
Set up your computer correctly Getting Started, Page 38
Register your radio modem If You Have a Radio Modem, Page 48
Customize settings Customizing Settings, Page 58
Copy files Transferring Files, Page 64
Charge and maintain batteries Managing Batteries and Power, Page 74
Use PC Cards Using PC Cards, Page 88
Connect printers or external drives Optional Equipment and Accessories,
Find out about your modem Modems, Page 112
Maintain your computer Maintenance and Storage, Page 116
Correct errors Error Messages, Page 126
Solve problems Troubleshooting, Page 136
79-0003-003 22 October 1999
Page 92
vii
Page 8

X-C 6250 Pro Users Manual
For More Help
If you need help, or if you want to learn more about your computer, use
the following resources already installed on your system.
• If you need help using an application, refer to the applications online
Help. Start the application, select Help from the menu bar, and then
choose the item you want.
• To learn about using Windows 95, a ten-minute tutorial is accessible
from the Start Menu by selecting Help, Contents, Tour: Ten Minutes
to Using Windows.
• For help using Windows 95, refer to the online Help on your system.
To access this information, select Help from the Start Menu.
viii
79-0003-003 22 October 1999
Page 9

Contents
About This Manual.............................................................. vii
Inside.................................................................................. vii
For More Help ....................................................................viii
Section 1 Features of the Computer........................ 15
Introduction .......................................................................16
Individual Parts ..................................................................17
Indicator Lights ................................................................... 19
Standard Hardware .............................................................. 20
Optional Hardware............................................................... 20
Standard Software ............................................................... 21
Optional Software ................................................................ 22
MS-DOS Utilities ................................................................. 22
If You Have a Touch Screen ................................................. 23
Section 2 Using the Keyboard and Mouse ...............25
Keyboard Basics .................................................................26
Restarting the Computer ....................................................... 26
Primary Keys....................................................................... 26
Arrow Keys ......................................................................... 29
Numeric Keypad.................................................................. 30
FN Keys ............................................................................. 31
Function Keys ..................................................................... 32
Other Keys .......................................................................... 33
Using the Mouse................................................................. 34
General Guidelines ............................................................... 35
Changing the Speed of the Mouse .................................... 35
Section 3 Getting Started ......................................37
Introduction .......................................................................38
PRECAUTIONS.................................................................... 38
79-0003-003 22 October 1999
ix
Page 10

X-C 6250 Pro Users Manual
The First Time... .................................................................39
Connecting the AC Adapter ................................................... 39
Installing and Charging the Battery ........................................ 40
Turning the Computer On and Off .......................................... 42
Startup Problems? ............................................................... 43
If You Have a Touch Screen................................................... 43
Password Security ..............................................................44
Setting or Changing Your Password ........................................ 45
If You Cannot Remember Your Password ................................ 45
Section 4 If You Have a Radio Modem ....................47
Introduction .......................................................................48
Before You Start: Register! ...................................................48
ARDIS or RAM .................................................................... 48
Cellular Data or Voice ........................................................... 48
Cellular CDPD ..................................................................... 49
What Can I Do with My Radio Modem?.................................49
Using the Integrated Radio Modem....................................... 50
Antenna Positioning ............................................................. 50
Serial Port Settings .............................................................. 51
Radio Indicator Light............................................................ 51
Enabling the Radio Modem................................................... 51
For MS-DOS Users............................................................... 53
Factory Installed Radio Software ..........................................53
User Installable Cellular/CDPD Radio Software ......................54
Additional Documentation....................................................55
Section 5 Customizing Settings .............................. 57
Introduction .......................................................................58
Using the System Configuration Utility ..................................58
Accessing the SCU............................................................... 59
Setting the COM3 and COM4 IRQs....................................... 60
x
79-0003-003 22 October 1999
Page 11

Section 6 Transferring Files ...................................63
Introduction .......................................................................64
Using Direct Cable Connection ............................................. 65
Direct Cable Connection Requirements................................... 65
Computers Connected to a Network ....................................... 66
Direct Cable Connection Tips ................................................ 66
Wiring Specifications for Cables ...........................................71
Parallel Cables..................................................................... 71
Serial Cables ....................................................................... 72
Section 7 Managing Batteries and Power ................ 73
Introduction .......................................................................74
Practical Battery Tips..........................................................74
Conserving Power and Extending Battery Life ........................79
Low Battery Warnings .........................................................80
Power-saving Features.........................................................80
Suspend ............................................................................. 80
Hard Disk Standby............................................................... 80
Display ............................................................................... 81
Backlight ....................................................................... 81
MaxBright...................................................................... 82
Getting Battery Information..................................................82
Battery Status ..................................................................... 82
Battery Maintenance ............................................................ 82
Removing and Replacing Batteries........................................83
Charging Batteries ..............................................................84
Deep Cycle Discharging .......................................................85
Battery Storage and Care..................................................... 86
Disposing of Batteries ......................................................... 86
79-0003-003 22 October 1999
xi
Page 12

X-C 6250 Pro Users Manual
Section 8 Using PC Cards .....................................87
Introduction .......................................................................88
Inserting and Removing a PC Card .......................................88
Transferring Files Using PC Cards ......................................... 89
Using Bootable PC Cards.....................................................90
Section 9 Optional Equipment and Accessories .......91
Connecting a Printer ...........................................................92
Connecting an External Monitor............................................93
Connecting an External Mouse .............................................93
PC Card External Floppy Disk Drive ......................................95
PRECAUTIONS.................................................................... 95
Booting from a PC Card External Floppy ................................. 96
Using an External CD-ROM ..................................................97
Stand Alone Charger ...........................................................98
Indicator Lights ................................................................... 99
xii
Vehicle Adapter ..................................................................99
Vehicle Cradle ..................................................................102
PRECAUTIONS.................................................................. 103
Charging Batteries ............................................................. 103
Communicating with Other Devices ..................................... 104
External Antennas ......................................................... 104
RF Antenna Placement .................................................. 105
Using the CD-ROM ............................................................ 106
Cleaning or Replacing Cradle Contact Pins............................ 107
Surge Protection ...............................................................108
Selecting the Right Surge Protection .................................... 108
Surge Environment ....................................................... 108
Type of Equipment to be Protected.................................. 108
Quality of Electrical Wiring and Service ........................... 109
Selecting the Right Equipment ............................................ 109
79-0003-003 22 October 1999
Page 13

Section 10 Modems ............................................111
Introduction .....................................................................112
Which Modem Do I Have? .................................................. 112
Using the Internal Landline Modem ....................................113
Transferring Files ..............................................................114
Section 11 Maintenance and Storage ...................115
Introduction .....................................................................116
If You Have a Touch Screen ............................................... 116
Hard Drive Care and Handling............................................ 116
Internal Hard Drives ........................................................... 117
External PC Card Hard Drives.............................................. 118
Battery Maintenance and Storage .......................................119
Maintaining Batteries ......................................................... 119
Storing Batteries ................................................................ 119
Computer Maintenance and Storage ...................................120
Maintaining Your Computer................................................. 120
Care and Cleaning ........................................................ 120
Storing Your Computer ....................................................... 123
Appendix A Error Messages .................................125
Introduction .....................................................................126
POST Messages................................................................126
MS-DOS Messages ...........................................................132
Windows Messages........................................................... 133
Application Messages ........................................................133
79-0003-003 22 October 1999
xiii
Page 14

X-C 6250 Pro Users Manual
Appendix B Troubleshooting ................................135
What to Try First............................................................... 136
For More Help ................................................................... 136
Common Solutions to Common Problems ............................137
Applications ...................................................................... 138
Batteries ........................................................................... 140
Cellular Modem ................................................................. 143
Display ............................................................................. 143
Hard Disk ......................................................................... 145
I/O Ports ........................................................................... 145
Keyboard .......................................................................... 147
Landline Modems .............................................................. 148
Miscellaneous ................................................................... 151
Mouse .............................................................................. 155
PC Cards .......................................................................... 155
Pen/Touch Screen .............................................................. 157
Peripherals........................................................................ 157
Radio Modems .................................................................. 157
xiv
Appendix C Glossary ...........................................161
Index..................................................................167
79-0003-003 22 October 1999
Page 15

SECTION 1
Features of the
Computer
○○○○○○○○○○○○○○○○○○○○○○○○○○○
Introduction 16
Individual Parts 17
Indicator Lights 19
Standard Hardware 20
Optional Hardware 20
Standard Software 21
Optional Software 22
MS-DOS Utilities 22
If You Have a Touch Screen 23
WE KNOW THE ROAD
TM
Page 16

X-C 6250 Pro Users Manual
Introduction
The X-C 6250 Pro mobile computer is a ruggedized, weather-sealed
computer system built for the demanding environment of the mobile
worker. Designed for use by large mobile workforces, this computer is
one of the most practical work tools for collecting, managing, and
communicating information in the field.
The following pages describe the external and internal features of your
X-C 6250 Pro computer.
16
79-0003-003 22 October 1999
Page 17
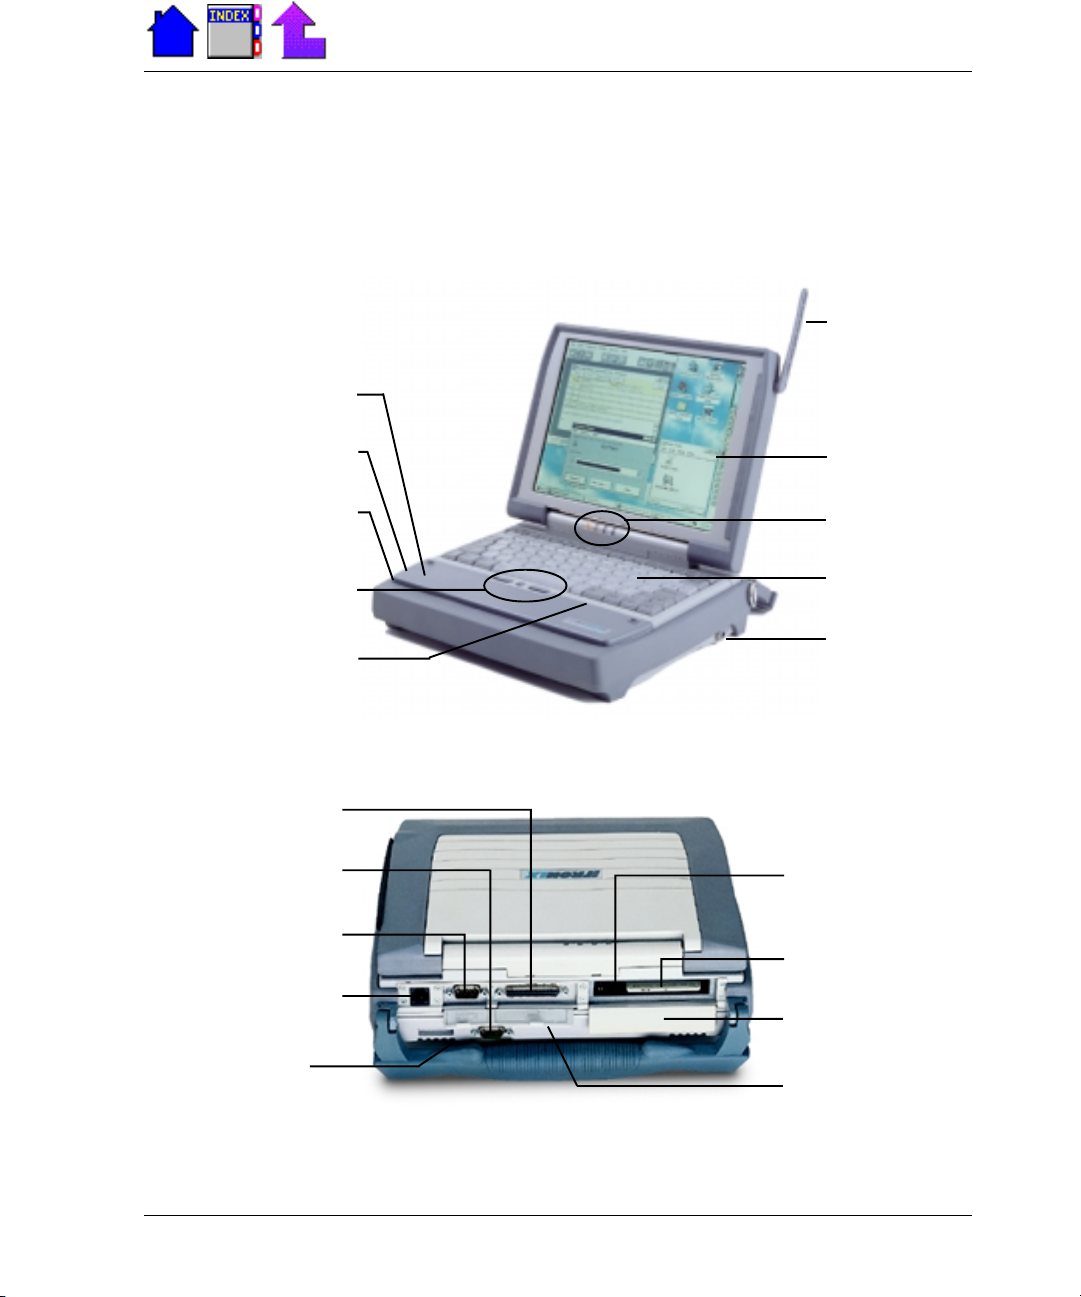
Individual Parts
These diagrams and descriptions provide an overview of the computer.
Battery Door
Section 1. Features of the Computer
Antenna
USB Port
Audio Port
Mouse Pointer
and Buttons
Microphone
Parallel Port
Video Port
Serial Port
RJ-11 Connector
Display
Indicator Lights
Keyboard
Power Port
PC Card Ejector
Buttons
PC Card Sockets
PC Card Door (open)
Speaker
(on the bottom of
the computer)
79-0003-003 22 October 1999
Dust Cover (open)
17
Page 18

X-C 6250 Pro Users Manual
The labeled components are described below.
• 9-Pin Serial Port This port can be used for serial communications,
bar code input, connection to a printer, or other purposes.
• 15-Pin Video Port This port can be used to connect an external
monitor (see Section 9 of this manual for more information).
• 25-Pin Parallel Port This port can be used to connect optional
devices such as a printer.
• Antenna If you have a radio modem installed in your computer, the
antenna sends and receives radio waves for this modem.
• Audio Port A custom port designed to connect to an adapter such
as a telco or multimedia adapter.
• Battery Door and Latches This door covers the Nickel Metal-
Hydride (NiMH) battery. If you unlatch the battery door before
turning off the computer first, the system automatically powers off
the unit to protect data on the hard disk.
• Display Display options include monochrome, color, or touch
screen. The screen can be illuminated in low-light conditions by
turning on the backlight or MaxBright (
FN+F1).
18
• Dust Covers These covers provide added protection for the serial,
parallel, and video ports when they are not being used.
• Keyboard The keyboard is environmentally sealed and designed
with 93 percent standard key spacing.
• Microphone The microphone allows a user to talk to another
person using the internal modem and the Speaker Phone application.
• Mouse Pointer and Buttons The integrated mouse pointer is
located directly below the spacebar on the keyboard. The left and
right mouse buttons are located on either side of the mouse.
• PC Card Door This door covers the PC card sockets. When this
door is open, shield the unit from all contaminants such as liquids,
rain, snow, and dust.
• PC Card Sockets PC cards are inserted into these sockets. To
remove a card, press the ejector button located to the left of the
each socket.
79-0003-003 22 October 1999
Page 19

Section 1. Features of the Computer
• Power Port This port is used to connect the external power supply
to the computer.
• RJ-11 Connector This port is used by the internal modem to
communicate over standard voice grade telephone lines.
• Speaker Located on the bottom of the computer, the speaker
provides sound for the unit. Use the
adjust speaker volume.
FN+F6 and FN+F7 keys to
• USB Port The Universal Serial Bus port is a series Type A USB
connector.
Indicator Lights
Located below the display, these lights blink or remain on or off to
indicate activity on the system.
The On/Off light illuminates when you power on the computer; it blinks
to indicate a low battery.
The External Power light illuminates when external power is connected
to the computer. It blinks while the external power supply is charging
the battery and remains on when the battery is fully charged.
The Disk Activity light comes on when the hard disk is spinning or
processing data.
The Radio On/Off light illuminates when the radio modem is powered
on (if your computer is equipped with a radio modem). If the computer
is off and you receive a message, the light blinks to indicate a message
is waiting.
POWER ON / LOW BATT RADIO ON / MESSAGE
79-0003-003 22 October 1999
EXTERNAL POWER / CHRG HARD DRIVE ACTIVE
19
Page 20

X-C 6250 Pro Users Manual
Standard Hardware
• National Instruments
®
266 megahertz (MHz) GXm® processor
• 32, 64, 96, or 128 Megabytes (MB) of Random Access Memory
(RAM)
• 1 MB of internal video RAM
• Monochrome, color, or touch screen display that opens to 180
degrees
• Internal hard disk
• Weather sealed keyboard with 93 percent standard key spacing
• Video port with a standard 15-pin D connector
• USB port that is a series Type A USB connector
• 2 PC card sockets supporting two Type I or II cards, or one Type III
card
• Nickel Metal Hydride (NiMH) battery
• Display contrast and speaker volume adjustment keys
• Backlight toggle key and adjustment keys (monochrome display)
• Backlight adjustment keys (color display)
• MaxBright toggle key (10.4-inch color display only)
20
• Automatic temperature compensation of display contrast
• Integrated mouse pointer
• AC adapter
Optional Hardware
• Stand Alone Charger
• Vehicle Adapter
• Vehicle Cradle
• RF modem
• Bar code wand
• Bar code laser scanner
79-0003-003 22 October 1999
Page 21

• Hand-held laser scanner
• External 3.5-inch floppy drive
• External CD-ROM drive
• Internal modem
Standard Software
Section 1. Features of the Computer
• Microsoft
National Instrumentss Virtual System Architecture (VSA)
Allows XpressGRAPHICS and XpressAUDIO as well as generic
16-bit emulation capabilities (SoundBlaster®16).
®
Windows® 95, 98 and NT
• Speaker Phone
Allows you to dial a number and talk with someone, just like a
telephone.
• Battery Maintenance
Allows you to deep cycle discharge batteries.
• Battery Status
Provides current information about the battery including voltage,
temperature, and remaining capacity.
• Documentation in PDF format
A Users Manual resides on the computers desktop as a PDF file.
• Practical Battery Tips
Lists important information about battery use and proper
maintenance.
• Keyboard Status
Shows the status of the Num Lock and Caps Lock keys. Icons appear
on the Windows 95 Taskbar when Num Lock or Caps Lock are
activated.
• HyperTerminal
Enables you to connect your computer to other computers and
exchange information.
79-0003-003 22 October 1999
21
Page 22

X-C 6250 Pro Users Manual
Optional Software
• Battery History
Tracks all major power and battery events in the system and
generates a timeline of power events and usage.
• Password Security
Prevents unauthorized users from gaining access to information on
the computer.
MS-DOS Utilities
• MODEM
Allows you to turn on the internal modem before running an MS-
®
DOS
application.
• XCPRF
Installs the radio modem power management TSR.
• RADIO
Reports the status of the radio modem; turns the radio modem on
and off.
22
• BATTMON
Logs battery and power usage statistics for later viewing and
diagnostic purposes.
79-0003-003 22 October 1999
Page 23

If You Have a Touch Screen
If you have a touch screen, follow the guidelines below.
CAUTION
• Always use an approved stylus.
• Never use sharp, hard, or abrasive implements on the touch
screen such as ball point pens, pencils, or keys. They could
damage the screen.
• To clean the touch screen panel, apply a household glass cleaner
to a soft, clean, dry cloth and wipe the screen.
To use the stylus
• Slide the stylus out of its holder.
If you have a shoulder strap, you may have a slot on the strap to
hold the stylus.
Section 1. Features of the Computer
• To replace it, slide it into the appropriate slot point first.
If you cannot select objects accurately with the stylus, you may need to
recalibrate the touch screen.
To calibrate the touch screen
1 From the Start Menu, select Programs, Touch, and then choose
Touchscreen Controls.
2 Select the Calibration button.
3 Follow the instructions on the screen to calibrate the touch screen.
79-0003-003 22 October 1999
23
Page 24

X-C 6250 Pro Users Manual
24
79-0003-003 22 October 1999
Page 25

SECTION 2
Using the
Keyboard and
Mouse
○○○○○○○○○○○○○○○○○○○○○○○○○○○
Keyboard Basics 26
Restarting the Computer 26
Primary Keys 26
Arrow Keys 29
Numeric Keypad 30
FN Keys 31
Function Keys 32
Other Keys 33
Using the Mouse 34
General Guidelines 35
Changing the Speed of the Mouse 35
WE KNOW THE ROAD
TM
Page 26

X-C 6250 Pro Users Manual
Keyboard Basics
The keyboard on the mobile computer looks much like the keyboard of a
typewriter and operates in almost the same way. While typewriter keys
put characters on paper, the keys on the laptop enter characters in the
computer and perform certain functions, depending on the application
or program. Typing skills are helpful but are not essential because
typing short commands or responses is easy.
The mobile computer features:
• A typewriter-style keyboard
• Twelve function keys, F1-F12
• Embedded numeric keypad
• Mouse keys
Special Function Keys (85-Key Keyboard Only)
CAUTION You can restart the mobile computer using the following
keys; however, restarting your computer while you are running
applications or working in Windows may corrupt files or data.
26
Restarting the Computer
Press To do this
CTRL+ALT+DEL Reboot the computer.
Press and hold both mouse Reset the computer.
buttons for about ten seconds
and then release the buttons.
Primary Keys
Key Description
ALT The ALT (alternate) key is used with other keys to
perform special tasks. Pressing CTRL+ALT+DEL resets
the computer. Processing stops and the computer
attempts to restart the operating system.
79-0003-003 22 October 1999
Page 27
Section 2. Using the Keyboard and Mouse
y
)
(
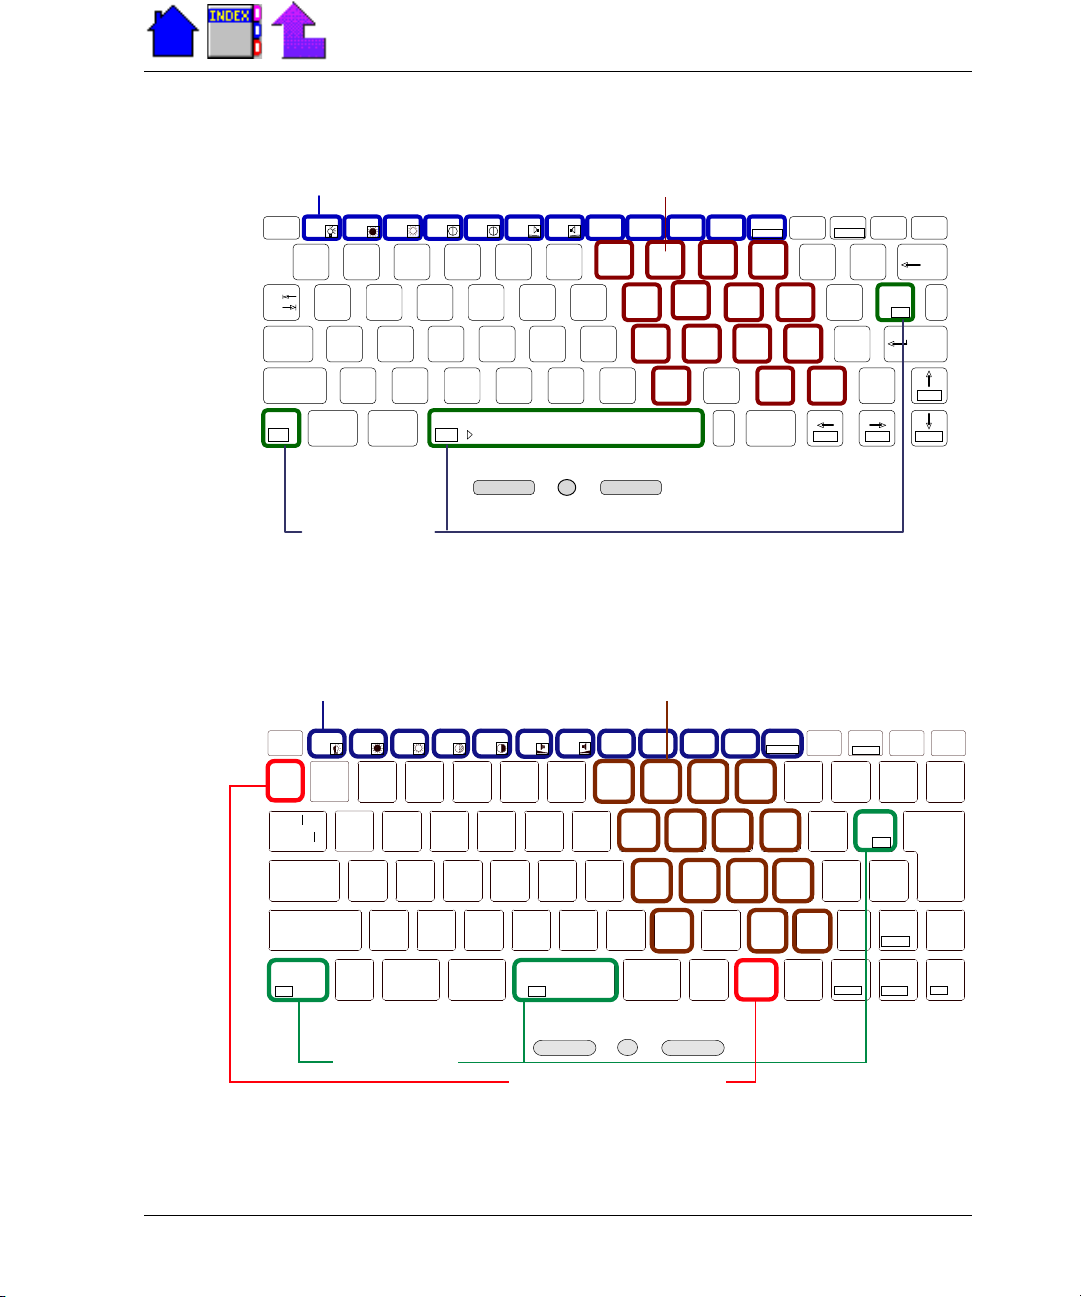
Function Keys
F1 F2 F3 F4 F5 F6 F7 F8 F9 F10 F11 F12
Esc
^
%
$
6
5
4
/
Tab
Caps
Lock
ñ
Fn
!
1
Shift
@
2
Ctrl Alt
#
3
ON
Embedded Numeric Keypad
&7
7
HGFDSA
8
*
8
1
J
MNBVCXZ
Mouse Keys
On/Off Keys
79-Key USA Keyboard
Function Keys
F1 F2 F3 F4 F5 F6 F7 F8 F9 F10 F11 F12
Esc
$
!
ù
¦
`
1
Tab
ç
è
Caps Lock
“
£
2
3
QWER
AS DFGH
%5^
4
6
TY
Embedded Numeric Keypad
& 77* 88( 99^ *
U 4 I 5
1 K 2
J
Prt Sc
Num Lk
9
9
546
OIUYTREWQ
2
K
<
0
,
~
`
O 6
L 3
S
*
0
P
:
3
L
;
.
>
.
Alt
Num Lk
_
-
0
P -
: +
;
sRq
_
-
_
+
Prt Sc
Sys Rq
{
[
?
/
Scr Lk Pause
Inse rt
+
=
{
[
"
'
/
ñ
Scr Lk
Insert
+
=
}
]
@,~
Delete
Break
Backspace
}
]
OFF
Enter
Shift
Pg Up
EndHome Pg Dn
Pause
Break
Back
Space
Off
#
¦
\
Delete
Back
Space
Enter
¿
? /
0 <
Shift
ñ
FN
ZXCVBN
Ctrl Alt
|
\
ON /
M
> .
/
.
,
Alt Gr
Ctrl
è
Home Pg Dn End
é
Pg Up
ê
ñ
Shift
è
Mouse Keys
On/Off Keys
Special Function Keys
85-Key International
(UK Layout) Keyboard (Optional)
79-0003-003 22 October 1999
27
Page 28

X-C 6250 Pro Users Manual
ALT GR The ALT GR key, a special function key found on the 85-
BACKSPACE The BACKSPACE key, sometimes represented on the
CAPS LOCK Pressing the CAPS LOCK key one time locks keys A
key keyboard, when pressed and held, allows you to use
characters in the bottom right of a three character key.
keyboard as a left arrow, moves the cursor one position
to the left. The character to the left of the cursor is
erased.
On the 85-key International Keyboard the key to the
right of the
BACKSPACE key is also designed to move the
cursor one position to the left. The character to the left
of the cursor is erased. If other functions are designed
for this key, the key will be printed with the appropriate
legend.
through Z in the UPPER CASE position. Pressing the
CAPS LOCK key again returns the letters to lower case.
While in the upper case mode, pressing the SHIFT key
results in lowercase characters when entered. You still
have to use the SHIFT key to display characters located
on the upper portion of the keyboard. For example, press
SHIFT+8 to type an asterisk (*), even when the CAPS
LOCK key is activated.
28
This icon appears on the Taskbar when Caps Lock
is activated.
Key Description
CTRL The CTRL (control) key works with other keys to perform
a variety of functions.
ENTER The ENTER key signals the computer that you have
completed your entry. This is your way of telling the
computer to process the information that you have
entered.
ESC The ESC (escape) key cancels the current line if you are
working in DOS. In some DOS applications, pressing the
ESC key backs you out of your last menu selection. In
Windows, the ESC key allows you to exit a pop-up
window or message box.
79-0003-003 22 October 1999
Page 29

Section 2. Using the Keyboard and Mouse
PRT SC In Windows, pressing the PRT SC (print screen) key
copies the current screen or window to the clipboard so
you can paste it into documents. Pressing
ALT+PRT SC
key copies the active window to the clipboard.
SHIFT The SHIFT key changes the keys A through Z to the
UPPER CASE position. When you press an alphabetic
key, the character appears as a capital letter. When you
press
SHIFT with other keys, the characters on the upper
part of the keys appear. For example, pressing SHIFT+7
displays an ampersand (&).
FN Function. Some special keys have been established to
perform important tasks when pressed and held with the
FN key. These keys are described later in this document.
SPACEBAR Use the SPACEBAR to enter a space and move the cursor
one character to the right. If you press FN and the
SPACEBAR at the same time, your computer turns on.
On the 85-key International Keyboard the two keys to
the right of the
SPACEBAR are also designed to enter a
space and move the cursor one character to the right. If
other functions are designed for these keys, the keys will
be printed with the appropriate legends.
TAB The TAB key moves the cursor to the next tab stop or
Arrow Keys
The arrow keys are defined by the software application.
The
UP ARROW key usually moves the cursor up one line. In some
cases, you can use the up arrow to make selections from menus and
scrollable list boxes.
The
DOWN ARROW key usually moves the cursor down one line. In
Windows, you can use the down arrow to make selections from menus
and scrollable list boxes.
The
RIGHT ARROW key usually moves the cursor one character position
to the right.
79-0003-003 22 October 1999
field. Tab stops are defined by your operating system or
application program. Press the TAB key to move from one
field or text box to another.
29
Page 30

X-C 6250 Pro Users Manual
The LEFT ARROW key usually moves the cursor one character position to
the left.
In Windows, you can use the arrow keys instead of the mouse.
Key Description
FN+END Pressing FN+END (FN+RIGHT ARROW) activates the End
FN+HOME Pressing FN+HOME (FN+LEFT ARROW) activates the
FN+PGDN Pressing FN+PGDN (FN+DOWN ARROW) activates the
FN+PGUP Pressing FN+PGUP (FN+UP ARROW) activates the page
key. The function of the End key is defined by the
application being used.
Home key. The function of the Home key is defined by
the application with which you are working.
page down key. The Page Down key is defined by the
application being used. It usually causes the next screen
or window to appear.
up key. The Page Up key is defined by the application
you use. It usually causes the previous screen or window
to appear.
30
Numeric Keypad
The numeric keypad is embedded in the keyboard area. The embedded
keypad emulates the numeric keypad typically found on a full-size
keyboard. It is arranged like a calculator for applications that require
you to key many numbers or for use with the Calculator in the standard
Windows Accessories.
This icon appears on the Windows 95 Taskbar when Num Lock is
enabled:
Num Lock icon
79-0003-003 22 October 1999
Page 31

Section 2. Using the Keyboard and Mouse
Below are descriptions of the keys when NUM LK is pressed.
Key Description
NUM LK (FN+F12) Numeric Lock. Pressing the FN+NUM LK keys places
the embedded numeric keypad in the numeric state.
Pressing 0 through 9 generates numbers. Pressing
FN+NUM LK again returns keys back to their original
state. For example, when NUM LOCK is on, the u
key generates a 4 when pressed. When NUM LOCK
is off, the keys return to their alphabetic setting.
Minus (-) The Minus key is used to subtract numbers.
Plus (+) The Plus key is used to add numbers.
Asterisk (*) The Asterisk key is used to multiply numbers.
Forward Slash (/) The Forward Slash key is used to divide numbers.
Period (.) The period key inserts a decimal point.
ENTER The ENTER key generates a total for calculations you
have entered.
FN Keys
On the mobile computer, you must press the FN key in combination
with other keys to perform various tasks. These keys are labeled with a
small box around the command. For example:
FN+PGDN
Press To do this
FN+ON Turn on the computer
(
FN+SPACEBAR)
FN+OFF Turn off the computer
FN+F1 Toggle the backlight on and off (monochrome
FN+F1 Toggle MaxBright on and off (10.4-inch color
FN+F2 Dim the display backlight
FN+F3 Brighten the display backlight
79-0003-003 22 October 1999
Fn
display)
display only)
PgDn
31
Page 32

X-C 6250 Pro Users Manual
FN+F4 Lighten the display contrast (not available on the
FN+F5 Darken the display contrast (not available on the
FN+F6 Decrease the volume
FN+F7 Increase the volume
FN+NUM LK (FN+F12) Toggle NUM LOCK on and off (In NUM
FN+INSERT Toggle Insert mode on and off
FN+END Activate the End key. The function of the End key
FN+HOME Activate the Home key. The function of the home
Press To do this
10.4-inch color display)
10.4-inch color display)
LOCK mode, the blue keys on the keyboard
emulate a numeric keypad.)
is defined by the application being used.
key is defined by the application with which you
are working.
32
FN+PGDN Activate the Page Down key. This key is defined by
the application being used. It usually causes the
next screen or window to appear.
FN+PGUP Activate the Page Up key. This key is defined by
the application you use. It usually causes the
previous screen or window to appear.
Function Keys
Key Description
F1 - F12 The Function keys are located at the top row of the
keyboard. How you use function keys F1 through F12
depends upon the application that is running.
79-0003-003 22 October 1999
Page 33

Section 2. Using the Keyboard and Mouse
Other Keys
Key Description
DEL Delete. In DOS, the DEL key deletes one character to the
left of the cursors position. In Windows, the
deletes highlighted text, selected objects or graphics,
and single characters of text located one position to the
right of the cursor.
FN+INSERT The Insert key is activated by pressing FN+INSERT
(FN+SCR LK). The Insert key may vary with the software
being used.
PAUSE Momentarily pauses or stops the display.
SCROLL LOCK The function of the SCROLL LOCK key depends on the
software being used. It is often used to keep the cursor
in one position while the text moves.
DEL key
79-0003-003 22 October 1999
33
Page 34

X-C 6250 Pro Users Manual
y
)
(
Using the Mouse
The mouse (pointer device) and its buttons (controls) are located at the
bottom of the keyboard just below the space bar. The mouse, which
looks like a gray eraser head, is positioned between the left and right
mouse buttons at the bottom of the keyboard.
Apply light pressure to the mouse in the direction you want to move the
pointer around the screen. You can move the pointer to the icon or
menu you want, and click with the left, primary mouse button for most
operations. Or, double-click the left, primary mouse button twice rather
quickly for certain operations. Use the left, primary mouse button to
either click or double-click, which is based on the task you are
performing.
F1 F2 F3 F4 F5 F6 F7 F8 F9 F10 F11 F12
Esc
&7
^
%
$
6
5
4
HGFDSA
*
8
7
1
J
MNBVCXZ
/
Tab
Caps
Lock
ñ
Fn
!
1
Shift
@
2
Ctrl Alt
#
3
ON
9
8
9
546
OIUYTREWQ
2
K
<
0
,
~
`
Prt Sc
Scr Lk Pause
Num Lk
0
3
L
>
.
Alt
Inse rt
S
sRq
_
*
-
_
P
:
+
;
.
?
/
{
[
"
'
/
Break
+
=
Shift
ñ
EndHome Pg Dn
Mouse Keys
The following table describes the meaning of terms used with the
mouse.
Term Meaning
Point To move the mouse until the mouse pointer on the
screen points to the item of choice.
Click To quickly press and release the left, primary mouse
button. To select an icon, you must point and click on
that icon. Usually, you point and click on buttons, menu
bars, menu options, and drop-down list boxes.
}
]
Backspace
OFF
Delete
¦
\
Enter
Pg Up
34
79-0003-003 22 October 1999
Page 35

Section 2. Using the Keyboard and Mouse
Term Meaning
Double-click To click the left, primary mouse button twice in rapid
succession.
Pointing and double-clicking on an application icon
opens or launches the program associated with the icon.
Drag To point, click, and press and hold down the left,
primary mouse button while you move the mouse. You
use drag to move icons from one window or directory to
another. To select text in a data entry field, you place the
cursor at the beginning of the text, click on the left,
primary mouse button, and drag the cursor over text.
You can then delete or type over the text.
General Guidelines
The mobile computer uses a Liquid Crystal Display (LCD), which is the
type of screen used on many notebook and sub-notebook computers.
One problem experienced on computers with an LCD display, especially
in cold environments, is that the cursor seems to disappear whenever
the mouse is moved quickly. To improve the visibility of the mouse
cursor, you should:
• Enable the Pointer Trails feature to add trailing cursors.
• Use a slow or medium speed/sensitivity level.
You can combine a higher level of acceleration with a slow or medium
speed/sensitivity level. This will allow you to move the mouse cursor
quickly by increasing your finger pressure, while still providing a finer
degree of control when you apply minimum pressure.
Changing the Speed of the Mouse
To change the speed of the mouse, from the Start Menu select Settings,
Control Panel, and then choose Mouse to make adjustments.
79-0003-003 22 October 1999
35
Page 36

X-C 6250 Pro Users Manual
36
79-0003-003 22 October 1999
Page 37

SECTION 3
Getting Started
○○○○○○○○○○○○○○○○○○○○○○○○○○○
Introduction 38
PRECAUTIONS 38
The First Time... 39
Connecting the AC Adapter 39
Installing and Charging the Battery 40
Turning the Computer On and Off 42
Startup Problems? 43
If You Have a Touch Screen 43
Password Security 44
Setting or Changing Your Password 45
If You Cannot Remember Your Password 45
WE KNOW THE ROAD
TM
Page 38

X-C 6250 Pro Users Manual
Introduction
This section includes procedures for setting up and using your
computer for the first time.
PRECAUTIONS
Please be aware of the following important information before you
begin operating your computer.
Data stored on floppy disks may be corrupted if the disks come in
close contact with the magnetic components of the computer. Do
not lay a floppy disk on top of or under the computer.
The internal components of the computer will be damaged if
exposed to contaminants. When dust covers, the PC card door, or
the battery door on the computer are open, shield the unit from all
contaminants such as liquids, rain, snow, and dust.
You can lose data if you remove the battery while the computer is
operating on battery power. Turn off the unit by pressing
before you remove the battery. You can also lose data if the battery
is removed for more than 10 minutes.
FN+OFF
38
CAUTION If you have a touch screen:
-Always use an approved stylus.
-Never use sharp, hard, or abrasive implements on the touch screen
such as ball point pens, pencils, or keys. They could damage the
screen.
• WARNING The computer is powered by a rechargeable Nickel
Metal Hydride (NiMH) battery. Disposing of this battery improperly
can cause serious personal injury. Do not crush the battery or place
it in a fire. The battery is recyclable and, under various state and
local laws, it may be illegal to dispose of the battery into the
municipal waste stream. Check with your local solid-waste officials
for details on recycling options or proper disposal.
79-0003-003 22 October 1999
Page 39

The First Time...
Using your computer for the first time involves:
• Connecting the AC adapter to the computer
• Installing and charging the battery
Connecting the AC Adapter
To connect the AC adapter
1 Attach the power cord to the AC adapter, and then connect the
appropriate end of the cord to an AC wall outlet.
2 Insert the other end of the AC adapter cable into the computers
power port on the side of the unit.
Section 3. Getting Started
Computer
79-0003-003 22 October 1999
Power Port
AC Adapter
39
Page 40

X-C 6250 Pro Users Manual
Installing and Charging the Battery
The Nickel Metal Hydride (NiMH) battery supplied with your computer
should be fully charged before you operate the unit on battery power. To
increase battery capacity, follow the recommendations about deep cycle
discharging later in this manual.
To install the battery
1 Lift up the display and locate the battery door in front of the
keyboard.
2 Open the battery door by pushing the two latches down and then
sliding it away from the unit.
40
A
B
Velc ro
Pad
Battery
Door
Latches
Battery
79-0003-003 22 October 1999
Page 41

Section 3. Getting Started
3 Align the battery connectors as shown in the diagram below, and
then place the battery in the computer.
4 Replace the battery door by sliding it toward the keyboard and
latching it into place.
The battery starts charging automatically.
The computers external power light on the indicator panel blinks while
the battery is charging; it stops blinking and remains on when the
battery has completed charging. At moderate temperatures,
approximately 21°C (70°F), the battery will be fully charged in three to
four hours. In extremely hot or cold temperatures, it may take up to 16
hours to charge the battery.
Note Keep the display tilted open while the battery is charging to
help prevent the battery from overheating.
79-0003-003 22 October 1999
Connectors
41
Page 42

X-C 6250 Pro Users Manual
Turning the Computer On and Off
You can operate the computer while the battery is charging.
To turn on the computer
1 Press FN+ON (FN+SPACEBAR).
Note: If the computer does not power on, restart it by holding down
both mouse buttons for at least 10 seconds, and then releasing the
buttons.
2 Adjust the display contrast control for a sharp, clear display.
• FN+F4 lightens the display
• FN+F5 darkens the display
Note: If you have a 10.4-inch color display, these keys are not
active.
3 Adjust the backlight if necessary.
• On a monochrome display, pressing FN+F1 toggles the backlight
on and off.
42
• On a color display, the backlight is on whenever the computer is
running. Pressing
4 Make sure the date and time are correct by choosing the Date/Time
icon from Control Panel and making any needed changes.
FN+F1 toggles the MaxBright feature on and off.
To turn off the computer
• Press FN+OFF.
When you power the computer back on, the system resumes from
where you left off. To conserve battery power, turn off the computer
whenever you are not using it.
Note The system automatically turns off (suspends) the unit after
a period of continuous idle time. You can resume where you left off
by pressing FN+ON.
79-0003-003 22 October 1999
Page 43

Section 3. Getting Started
Startup Problems?
If your computer does not operate, try these solutions.
• Connect the AC adapter to charge the battery if it is not charged.
• If the AC adapter is connected, make sure the electrical outlet you
are using works.
• Check to make sure the battery is installed and charged properly.
• Check the battery door latches to make sure the door is closed and
secured.
• If the computer does not turn on, restart the system by holding down
both mouse buttons for at least 10 seconds and then releasing the
buttons.
• If the battery doesnt begin charging, remove the battery, connect the
AC adapter, and turn on the computer by pressing
the battery. The indicator light blinks while the battery is charging.
Appendix B, Troubleshooting, lists additional solutions you can try.
FN+ON. Reinstall
If You Have a Touch Screen
CAUTION
• Always use an approved stylus.
• Never use sharp, hard, or abrasive implements on the touch
screen such as ball point pens, pencils, screw drivers or keys.
They could damage the screen.
• To clean the touch screen panel, apply a household glass cleaner
to a soft, clean, dry cloth and wipe the screen. A soft, dry cotton
cloth may be used to eliminate fingerprints on the screen if
household cleaner is unavailable.
79-0003-003 22 October 1999
43
Page 44

X-C 6250 Pro Users Manual
To use the stylus
• Slide the stylus out of its holder.
If you have a shoulder strap, you may have a slot on the strap to
hold the stylus.
• To replace it, slide it into the appropriate slot point first.
If you cannot select objects accurately with the stylus, you may need to
recalibrate the touch screen.
To calibrate the touch screen
1 From the Start Menu, select Programs, Touch, and then choose
Touchscreen Controls.
2 Select the Calibration button.
3 Follow the instructions on the screen to calibrate the touch screen.
Password Security
If your computer is equipped with security software configured
appropriately, you can activate or deactivate password security. To learn
more about the security software, refer to its online help.
To activate or deactivate security
1 Select the Password Security icon in the Mobile Computer Tools
folder.
2 Enter your current password and check the box to be able to get into
the Change Password screen.
If you are using the computer for the first time, enter the default
password provided by your company.
3 If the Activate Security field is available to change, toggle the field to
the desired setting (contact your supervisor or help desk if you dont
have access to this field and need it).
If you set the Activate Security field, this activates password security
and you are prompted for a password whenever keyboard or mouse
inactivity exceeds the time specified in the Inactivity Delay field. If
you clear the Activate Security field, you are not prompted for a
password.
44
79-0003-003 22 October 1999
Page 45

Section 3. Getting Started
Setting or Changing Your Password
Setting or changing your password is a way to make sure unauthorized
users do not gain access to the information stored on your computer. If
your computer is equipped with security software, follow these
instructions to set or change your password.
To set or change your password
1 Select the Password Security icon in the Mobile Computer Tools
folder.
2 Enter your current password.
If you are using the computer for the first time, enter the default
password provided by your company.
3 Enter your new password twiceonce in the Enter New Password
field and again in the Re-Enter New Password field.
4 Choose OK to save your new password.
If You Cannot Remember Your Password
If your computer is equipped with security software and you forget your
password, contact your supervisor or the help desk at your organization
for instructions about regaining access to your system.
79-0003-003 22 October 1999
45
Page 46

X-C 6250 Pro Users Manual
46
79-0003-003 22 October 1999
Page 47

SECTION 4
If You Have a
Radio Modem
○○○○○○○○○○○○○○○○○○○○○○○○○○○
Introduction 48
Before You Start: Register! 48
ARDIS or RAM 48
Cellular Data or Voice 48
Cellular CDPD 49
What Can I Do with My Radio Modem? 49
Using the Integrated Radio Modem 50
Antenna Positioning 50
Serial Port Settings 51
Radio Indicator Light 51
Enabling the Radio Modem 51
For MS-DOS Users 53
Factory Installed Radio Software 53
User Installable Cellular/CDPD Radio Software 54
Additional Documentation 55
WE KNOW THE ROAD
TM
Page 48

X-C 6250 Pro Users Manual
S/N: 999001
RID: 1234ABCD
S/N: 999001
ESN: 1234ABCD
Introduction
If your computer is equipped with a radio modem, you must register it
with the appropriate network provider. There are also a few things to
remember when using your radio.
Before You Start: Register!
Before using your radio modem you must sign up for service with a
wireless network provider. When you register, you will need to furnish
the network provider with your modem ID and the computers serial
number. This information is printed on the bottom of the computer.
ARDIS or RAM
If you are registering with the ARDIS wireless network or the RAM
Mobile Data MOBITEX network, your Radio Modem ID (RID) will be
printed on a label as shown below.
48
Computer serial number
Radio ID
Cellular Data or Voice
If you are registering with a Cellular provider for data or voice service,
your modems Electronic Serial Number (ESN) will be printed on a label
as shown below.
Computer serial number
Cellular modem
Electronic Serial Number
79-0003-003 22 October 1999
Page 49

Section 4. If You Have a Radio Modem
ESN Hex: CE001BC0
ESN Dec: 206-00007104
EID: 00-A0-D5-00-1B-C0
Cellular CDPD
If you are registering with a Cellular provider for CDPD service, your
modems Equipment Identifier (EID) will be printed on a label as shown
below.
Electronic serial number
(Hexadecimal, decimal)
Radio ID
CAUTION Your modem generates radio frequency (RF) signals. Do
not operate the radio modem before you have registered it with a
network provider. The network will not accept a signal from an
unregistered device. Unauthorized use of your radio modem may
interfere with local business or government communications,
resulting in fines or other legal action.
What Can I Do with My Radio Modem?
The radio modem in your mobile computer gives you the freedom to
send and receive data without connecting to the wired telephone
system or traditional wired networks. Common uses of radio
communications include dispatching, personal messaging, and
accessing remote host computer systems.
Cellular radio modems offer an additional capability to use your
computer as a cellular phone. When you are not sending or receiving
data, you can switch the modem into voice mode using your mobile
computers Speaker Phone program.
The exact capabilities of your radio modem are determined by the
communications software you are using, and the services provided by
your wireless network provider. Refer to the documentation provided
79-0003-003 22 October 1999
49
Page 50

Section 4. If You Have a Radio Modem
with your communications software for information on using the
program with a radio network. Your network provider can answer
questions regarding specific network features, host connectivity,
registration options, billing, and geographic coverage areas. In some
cases, your network provider can also assist you with selecting
modem setup options for your communications software.
Using the Integrated Radio Modem
This section provides basic information on operating your mobile
computer’s integrated radio modem.
Antenna Positioning
The mobile computer radio antenna has maximum sensitivity in the
full vertical upright position. For best radio reception, position the
antenna as shown below. You can fold the antenna down while the
radio is not being used.
While the display is open
CAUTION For RIM 901 Radios: While
the radio is operating, its antenna must be at
least 5 cm from all persons in order to comply
with the FCC RF exposure limit. Radio
operators must make sure their radio unit is in
compliance with these FCC regulations. See
Section 9 for important information about
vehicle-mounted antennas.
CAUTION For RIM 801 Radios: To
comply with FCC RF exposure requirements
this device must be operated with a minimum
separation distance of 3 cm (1.2 inches)
between the user/nearby person and the
antenna, with the antenna in the vertical
upright position. This is the intended position
of the antenna when using the RIM 801D
radio modem installed in the unit.
50 79-0003-003 22 October 1999
Page 51

Section 4. If You Have a Radio Modem
Serial Port Settings
The mobile computers integrated radio modem is accessed through the
COM4 serial port. When installing your communications software, make
sure to configure the software to use COM4 with Hardware Flow Control
(RTS/CTS) enabled.
Radio Indicator Light
Indicator lights located below the computer display report current
mobile computer activities. The indicator light at the far right shows
radio power status and message wake up activity.
Radio on/off and
message waiting
There are three modes reported by the radio indicator light:
Off On Blinking
Radio power Radio power Indicates a message wake up has
is off is on occurred. If a radio message is
If you are using the Sierra Wireless SB300 Series (CDPD/Cellular) radio
modem, the radio indicator light will blink while a Speaker Phone
cellular voice call is in progress.
Enabling the Radio Modem
The integrated radio modem powers on automatically when your
communications program requests use of the COM4 serial port. When
you close the program, the radio automatically powers off.
You can use the Radio Status utility to manually disable the radio when
you want to conserve battery power or store the computer. The Radio
79-0003-003 22 October 1999
received while the computer is
suspended (computer off/radio on),
the computer automatically powers on
to allow your radio application to store
the message.
51
Page 52

X-C 6250 Pro Users Manual
Status utility appears as a minimized icon on the Windows desktop. You
can also run Radio Status by opening the Radio Tools folder. Doubleclick on the icon to activate Radio Status.
Clicking on the Radio Status Power button toggles power to the
integrated radio modem.
Radio enabled
Modem Type
CDPD/Cellular
52
Radio disbled
Modem type
CDPD/Cellular
79-0003-003 22 October 1999
Page 53

Section 4. If You Have a Radio Modem
TIP If the computers battery becomes low, the system
automatically disables the radio and extinguishes the radio indicator
light. The system will automatically restore the radio hardware and
indicator light after the low battery condition is corrected.
For MS-DOS Users
If you exit Windows and return to the MS-DOS prompt, use the RADIO
command to enable or disable the radio modem.
Command Action
RADIO ON Enables the radio
RADIO OFF Disables the radio
RADIO Reports the current radio status
You can also enable or disable the radio using the DOS Radio Status
resident utility. While running your radio application software, press
CTRL+ALT+R to pop up the DOS Radio Status screen.
Factory Installed Radio Software
The mobile computer includes factory installed software that makes it
easy to verify the operation of your integrated radio modem. These
programs are located in the Radio Tools folder.
79-0003-003 22 October 1999
53
Page 54

X-C 6250 Pro Users Manual
User Installable Cellular/CDPD Radio Software
If you are using the Sierra Wireless SB300 (CDPD/Cellular) radio
modem, you will need to install the Sierra Wireless Watcher program.
To install Sierra Wireless Watcher software
1 Ensure that Dialup Networking and TCP/IP are installed on your
system.
Refer to Windows 95 online Help for information about installing
these components.
2 Select Run from the Start menu and enter the following:
c:\sierra\watcher\setup.exe
3 When prompted to select a modem, choose the SB300 Series option.
4 When prompted for a communications port select COM4.
5 Select defaults for all other settings.
54
79-0003-003 22 October 1999
Page 55

Additional Documentation
If you are developing a custom radio application for the mobile
computer, you may need to order additional documentation describing
the programming interface to your radio modem. The following is a list
of documents available for purchase from Technical Publications, Itronix
Corporation, P.O. Box 179, Spokane, WA 99210.
Motorola RPM Native Mode Interface R1.1
Itronix Part No. 98-0008-001
Native Control Language (NCL) interface specification for developing
communication applications using the ARDIS networks.
Motorola Mobile Asynchronous Communications (MASC) Interface R1.0
Itronix Part No. 98-0009-001
MASC serial interface specification for developing communication
applications using the Bell South Wireless network).
Sierra Wireless SB300 Series Modem User Guide
Itronix Part No. 98-0013-001 & 98-0012-001
AT command set and SLIP interface specification for use with the Sierra
Wireless SB300 Series modem (CDPD/Cellular/PSTN networks).
Section 4. If You Have a Radio Modem
Sierra Wireless PocketPlus Developers Toolkit
Itronix Part No. 98-0005-001
Programming information for designing and developing TCP/IP, UDP, and
Winsock applications on the CDPD network using the Sierra Wireless
SB300 Series modem.
79-0003-003 22 October 1999
55
Page 56

X-C 6250 Pro Users Manual
56
79-0003-003 22 October 1999
Page 57

SECTION 5
Customizing
Settings
○○○○○○○○○○○○○○○○○○○○○○○○○○○
Introduction 58
Using the System Configuration Utility 58
Accessing the SCU 59
Setting the COM3 and COM4 IRQs 60
WE KNOW THE ROAD
TM
Page 58

X-C 6250 Pro Users Manual
Introduction
This section shows you how to access the System Configuration Utility
(SCU) in order to customize settings for your own personal preference.
It also covers viewing and changing IRQ settings.
CAUTION Changing settings may cause the mobile computer to
operate incorrectly. Change default settings only if you are
instructed to do so.
Using the System Configuration Utility
The System Configuration Utility (SCU) allows you to change default
settings for your hardware options and power management. The default
settings should not be changed unless you are installing new hardware
or adding memory. Otherwise, your existing hardware may not operate
properly.
58
You can change the power management options based on personal
preference. For example, the computer enters suspend mode after 2
minutes if it does not detect any keyboard or mouse activity. If you want
to change this time-out setting, use SCU to make this change. Other
power management options you may want to change include:
• When the system turns off the backlight (or MaxBright)
• When the hard disk is placed in standby mode
• How power is managed for the COM ports
• Whether the computer resumes when the radio modem detects a
ring signal
• Whether or not power management is enabled
Important Changing or disabling power management options can
decrease battery life. Set these options at levels that will use the
least amount of battery power.
79-0003-003 22 October 1999
Page 59

Section 5. Customizing Settings
Accessing the SCU
To access the System Configuration Utility
1 From the Start Menu, select Shut Down and then choose Restart
the computer.
2 Read the text on the screen while the computer is restarting and
press
CTRL+ALT+S as soon as the following line appears:
<CTRL+ALT+S> to enter System Configuration Utility.
3 Follow the instructions at the bottom of the screen to move around in
this utility and change the items you want to customize.
4 To exit the utility, press
ALT+E (or select Exit from the menu), and
then choose the appropriate option.
This utility provides additional options in the Exit menu:
Default Settings loads default settings defined by the system.
Factory Defaults loads the settings defined at the time of
manufacture.
Note You may want to reset these parameters to their factory
defaults and then customize the settings. First write down the
existing settings in case you need to refer to them.
79-0003-003 22 October 1999
59
Page 60

X-C 6250 Pro Users Manual
Setting the COM3 and COM4 IRQs
Some modem software will not work with standard communication
(COM) port and Interrupt Request (IRQ) settings. Follow these
guidelines for the mobile computer:
COM Port IRQ Setting Change to
COM3 IRQ 11 IRQ 4
COM4 IRQ 10 IRQ 3
The IRQ must be set the same in Windows 95 (Windows 98 and NT)
and in the SCU. Follow the procedures below.
To view or change the IRQ settings in the SCU
1 From the Start Menu, select Shut Down and then choose Restart
the computer.
2 Read the text on the screen while the computer is restarting, and
press
CTRL+ALT+S as soon as the following line appears:
<CTRL+ALT+S> to enter System Configuration Utility.
3 Select Components by pressing
4 Select COM Ports.
5 Press
6Use the
7 Choose OK to save the settings.
TAB to move to COM3 or COM4 settings.
UP and DOWN ARROW keys to switch between IRQ values,
and then press the SPACEBAR on the desired setting.
ALT+C.
To view or change the Windows 95 IRQ settings
1 From the Start Menu, select Settings, Control Panel, and then choose
System.
2 Select the Device Manager tab, and then choose the plus sign next
to Ports.
3 Choose COM3 or COM4.
4 Select the Resources tab to view the current Interrupt Request
setting.
5 Make sure the Use Automatic Settings box is not checked.
60
79-0003-003 22 October 1999
Page 61

Section 5. Customizing Settings
6 Select Interrupt Request listed under Resource type.
7 Choose the Change Setting button.
If a message appears indicating that this resource cannot be
changed, select a different configuration type in the Setting based
on box and go back to Step 6.
8 In the Value field, use the
UP or DOWN ARROW to display valid
values.
If the desired value does not appear, select a different configuration
type in the Setting based on box and go back to Step 6.
79-0003-003 22 October 1999
61
Page 62

X-C 6250 Pro Users Manual
62
79-0003-003 22 October 1999
Page 63

SECTION 6
Transferring Files
○○○○○○○○○○○○○○○○○○○○○○○○○○○
Introduction 64
Using Direct Cable Connection 65
Direct Cable Connection Requirements 65
Computers Connected to a Network 66
Direct Cable Connection Tips 66
Wiring Specifications for Cables 71
Parallel Cables 71
Serial Cables 72
WE KNOW THE ROAD
TM
Page 64

X-C 6250 Pro Users Manual
Introduction
You may need to transfer files to the mobile computers hard drive such
as copying a new program file to the computer so you can use a new
version. There are several different ways you can transfer files to your
computer:
• Using Direct Cable Connection between computers loaded with
Windows 95 (see the instructions in this section).
• Using PC cards (see Section 8, Using PC Cards).
• Using an external floppy or a CD-ROM (see Section 9, Optional
Equipment and Accessories).
• Using the internal landline modem (see Section 10, Modems).
CAUTION In addition to the above methods, your company may
have other ways of copying files to your computer. Contact your
supervisor or your organizations help desk for information about the
best way to do this.
64
79-0003-003 22 October 1999
Page 65

Using Direct Cable Connection
Direct Cable Connection is a Microsoft product that comes with
Windows 95. It allows you to establish a connection between two
computers loaded with Windows 95 to gain access to the host
computers resources.
Windows 95 online Help provides detailed instructions about installing
and using this software, as well as troubleshooting information for this
process. Look up Direct Cable Connection and Direct Cable
Connection, Troubleshooting in the Help index. The information on the
following pages provides additional tips and guidelines to help make
this process successful.
For additional information, check your local bookstore for books on
Windows 95. Also, a large amount of information about Direct Cable
Connection can be found on the Internet (search for Direct Cable
Connection).
Direct Cable Connection Requirements
Section 6. Transferring Files
Make sure the following requirements are met before installing and
using Direct Cable Connection.
• Windows 95 must be installed on the host and the guest computer.
• A parallel or serial cable must be connected to both computers. See
Direct Cable Connection Tips for information about obtaining a
cable. If you need to make a cable, see Wiring Specifications for
Cables later in this section.
• File sharing must be enabled on the host computer. For information
about how to enable sharing, look up enabling, file and printer
sharing in the Windows 95 online Help index.
• To share files, you share the folder they are in. A folder must be set
up as shared. For information about establishing shared folders,
look up shared folders, setting up in the online Help index.
79-0003-003 22 October 1999
65
Page 66

X-C 6250 Pro Users Manual
Computers Connected to a Network
If you are using Direct Cable Connection to share resources with a
computer on a network, follow these guidelines.
• Give your guest computer a unique name to avoid problems
connecting to the host computer.
1 From the Start Menu, select Settings, Control Panel, and then
choose Network.
2 Select the Identification tab, and then enter the appropriate
information.
3 Choose OK, and then restart your computer if you are prompted to
do so.
• If you are prompted to enter a network password, enter it correctly or
you may not be able to see the shared resources on the host
computer.
Direct Cable Connection Tips
66
Where do I find basic information about Direct Cable
Connection?
• Windows 95 online Help provides several help topics about Direct
Cable Connection. From the Start menu, select Help, and then use
the index to search for Direct Cable Connection.
I dont know how to start Direct Cable Connection
• To start Direct Cable Connection, select the Start button, Programs,
Accessories, and then choose Direct Cable Connection. If you dont
see Direct Cable Connection on the Accessories menu, see the
procedure below. Note that Direct Cable Connection will only work if
both machines are running Windows 95.
79-0003-003 22 October 1999
Page 67

Section 6. Transferring Files
Direct Cable Connection is not on the Accessories menu
If Direct Cable Connection is not on your Accessories menu, follow
•
this procedure to add it:
1 From the Start button, select Settings, and then choose Control
Panel.
2 Choose Add/Remove Programs, and then select the Window Setup
tab.
3 Highlight Communications in the component list, and then choose
Details.
Make sure that Dial-Up Networking and Direct Cable Connection
are checked.
4 Choose OK. Choose OK again.
You may be prompted to insert the Windows 95 CD-ROM or
disk(s).
When I try to start Direct Cable Connection, I get the error
Cannot find file C:\WINDOWS\DIRECTCC.EXE (or one of its
components)
• This indicates that Direct Cable Connection was not initially installed
completely. First, uninstall both Dial-Up Networking and Direct Cable
Connection as follows:
1 From Control Panel, choose Add/Remove Programs.
2 Select the Window Setup tab.
3 Highlight Communications in the component list, and then choose
Details.
Make sure that Dial-Up Networking and Direct Cable Connection
are NOT checked.
4 Choose OK; choose OK again.
5 Follow the instructions previously under Direct Cable Connection
is not on the Accessories menu.
79-0003-003 22 October 1999
67
Page 68

X-C 6250 Pro Users Manual
Where do I get a Direct Parallel Cable?
Direct Parallel Cables are available at computer stores. They are
•
often referred to as one of the following:
Parallel Laplink Cable
PC File Transfer Cable
Direct Cable Connection Cable
Direct Parallel Cable
Interlink Cable
Interlnk/Intersvr Cable
For information about obtaining a Direct Parallel Cable, contact your
organizations help desk.
I am having trouble making a connection
• Use the Windows 95 Direct Cable Connection Troubleshooting as the
first step in resolving a problem. From the Start menu, choose Help,
and then use the index to search for Direct Cable Connection,
Troubleshooting.
• Make sure that Windows 95 is installed on the host and the guest
computer.
68
• Make sure that both computers are securely connected by a Direct
Parallel Cable. A Direct Parallel Cable is not the same as a standard
parallel cable.
• When starting Direct Cable Connection for the first time, you are
prompted to select Host or Guest for the operating mode. Make sure
that one PC is the Host (PC Workstation) and one is the Guest
(mobile computer). If one of the computers is attached to a Local
Area Network (LAN) and you want both computers to have access to
LAN resources, set the computer attached to the LAN as the Host,
and the other computer as the Guest.
• Make sure that the Host and Guest computers have unique computer
names. On both computers, from the Start menu, select Settings,
Control Panel, and then choose Network. Select the Identification
tab, and then verify that the computer name is different for each
computer. If necessary, change the computer name of the Guest
computer to a name that is unique for the entire workgroup. The
name is case sensitive.
79-0003-003 22 October 1999
Page 69

Section 6. Transferring Files
• Verify that the Host and Guest computers have the same workgroup
name. On both computers, from the Start menu, select Settings,
Control Panel, and then choose Network. Select the Identification
tab, and then verify that the workgroup name is the same for both
computers. If not, set the Guest computer to have the same
workgroup name as the Host computer. The name is case sensitive.
For example, the name WORKGROUP is not the same as
Workgroup.
• Make sure that you start Direct Cable Connection on the Host
computer first, and then the Guest computer. After starting Direct
Cable Connection on the Host, make sure that you choose the Listen
button. After starting Direct Cable Connection on the Guest, make
sure that you choose the Connect button.
• Check to make sure your printer/parallel port is configured for Direct
Cable Connection communication. Both computers must have the
same printer port configuration. In your BIOS setup, check the
section regarding ports setup, usually in the chipset setup for newer
motherboards. There will be a section that configures the printer/
parallel port. There are two printer sections: one is IRQ and the other
is type of communication. In the type, make sure it is in the ECP
mode or EPP + ECP mode. Save and exit. The IRQs do not have to
match.
• Make sure that you are able to see the Verifying... message when
connecting. If you see this message, the Host and Guest computers
are able to communicate over the cable. This means that your port
and cable configurations are working.
• If you see this message but still cannot make a connection, make
sure that both computers have the same protocols. On both
computers, from the Start menu, select Settings, Control Panel, and
then choose Network. Select the Configuration tab, and verify that
both computers have the same network components installed.
NetBEUI protocol needs to be installed for the Host gateway function
to operate. If the protocols are not the same, select Help from the
Start menu, and then use the index to search for installing a
network protocol and follow the instructions.
• If you do not see the Verifying... message, this means the Host and
Guest are not able to communicate over the cable. Something may
be wrong with your cable. Verify that the cable is securely connected
at each computer.
79-0003-003 22 October 1999
69
Page 70

X-C 6250 Pro Users Manual
• Make sure that both computers have the Dial-Up Adapter installed.
From the Start menu, select Settings, Control Panel, and then choose
Add/Remove Programs. Select the Window Setup tab. Highlight
Communications in the component list, and then choose Details.
Make sure that Dial-Up Networking is checked. If not, check it, and
then choose OK. Choose OK again. You may be prompted to insert
the Windows 95 CD-ROM or disk(s).
• Verify that another application is not using Dial-up Adapter. You
cannot use the Dial-up Adapter for a dial-up connection (such as
Internet, FAX, modem) at the same time as a Direct Cable
Connection. Disconnect from any dial-up connections before starting
Direct Cable Connection.
I cannot access information on the Host computer or LAN
• Make sure Network Neighborhood is on the desktop of both
computers. If it isnt, you can re-install it from your Windows 95 CDROM or disk(s).
• Make sure that resources on the Host computer are shared. Choose
Network Neighborhood on the Host computer. Right click on the
resource you want to share, and then select Sharing... from the popup menu. Select Shared As, and then choose OK. If Sharing... is not
on the pop-up menu, that resource cannot be shared. You wont be
able to access LAN resources unless they are shared (talk to your
Network Administrator about this).
70
The shared folder doesnt have a drive letter assigned to it
• To map a drive letter to a shared folder, choose Network
Neighborhood on the Guest computer. Right click on the folder you
want to assign a drive letter to, and then select Map Network Drive
from the pop-up menu. Enter the drive letter you want to assign.
79-0003-003 22 October 1999
Page 71

Wiring Specifications for Cables
You can use a parallel or serial cable to transfer information; however, a
parallel connection transfers data at a much higher rate than a serial
connection.
Parallel Cables
To make a Direct Parallel Cable, make a cable with male DB-25
connectors at both ends and wire the cable as follows:
25 pin 25-pin Description
pin 2 <> pin 15 N/A
pin 3 <> pin 13 N/A
pin 4 <> pin 12 N/A
pin 5 <> pin 10 N/A
pin 6 <> pin 11 N/A
pin 15 <> pin 2 N/A
Section 6. Transferring Files
pin 13 <> pin 3 N/A
pin 12 <> pin 4 N/A
pin 10 <> pin 5 N/A
pin 11 <> pin 6 N/A
pin 25 <> pin 25 Ground-Ground
79-0003-003 22 October 1999
71
Page 72

X-C 6250 Pro Users Manual
Serial Cables
To make a Direct Serial Cable, make a cable with either a 9-pin or 25pin female connector on both ends, and wire the cable as follows:
9 pin 25 pin 25 pin 9-pin Description
pin 5 pin 7 <> pin 7 pin 5 Ground-Ground
pin 3 pin 2 <> pin 3 pin 2 Transmit-Receive
pin 7 pin 4 <> pin 5 pin 8 RTS-CTS
pin 6 pin 6 <> pin 20 pin 4 DSR-DTR
pin 2 pin 3 <> pin 2 pin 3 Receive-Transmit
pin 8 pin 5 <> pin 4 pin 7 CTS-RTS
pin 4 pin 20 <> pin 6 pin 6 DTR-DSR
72
79-0003-003 22 October 1999
Page 73

SECTION 7
Managing
Batteries and
Power
○○○○○○○○○○○○○○○○○○○○○○○○○○○
Introduction 74
Practical Battery Tips 74
Conserving Power and Extending Battery Life 79
Low Battery Warnings 80
Power-saving Features 80
Getting Battery Information 82
Removing and Replacing Batteries 83
Charging Batteries 84
Deep Cycle Discharging 85
Battery Storage and Care 86
Disposing of Batteries 86
WE KNOW THE ROAD
TM
Page 74

X-C 6250 Pro Users Manual
Introduction
The mobile computer uses a Nickel Metal Hydride (NiMH) battery. This
section provides some important information about these types of
batteries and ways to extend their life.
Practical Battery Tips
Tip 1. Getting the most from your battery
• Your battery will last longer during the day if it is used and charged
between 10°C and 30°C (50°F and 86°F).
• Charge the battery nightly where the temperature will remain around
20°C (68°F).
• Set up your system to automatically suspend (turn off) while the
battery is charging.
This can be done by enabling the Suspend on AC Power option
under the Power, Suspend/Resume Control menu in the System
Configuration Utility (SCU). This allows the system to automatically
suspend while it is connected to external power.
74
• Use the Battery Maintenance application (located in the computer
tools folder) to deep cycle discharge your battery. Deep cycling your
battery reconditions it and eliminates memory effect. Follow these
guidelines when deep cycling:
- Deep cycle your battery when requested, which may be as often
as 3 months, depending on usage.
- For the best conditioning, deep cycle the battery where the
temperature will remain around 20°C (68°F).
- Leave the display tilted open and allow unrestricted airflow so
excess heat can escape from the battery compartment and
prevent the battery from overheating.
- Consider running the deep cycle process over a weekend because
it can take up to 40 hours to complete.
79-0003-003 22 October 1999
Page 75

Section 7. Managing Batteries and Power
• The indicator light may read fully charged, but this does not
necessarily guarantee sufficient capacity. Use the Battery Status
application periodically to check your batterys capacity, and then
recondition it as needed.
• Even the best maintained batteries eventually need to be retired.
They simply degrade from continuous use. Consider replacing your
battery if you are not getting the usage you need from it after
performing a deep cycle discharge.
Tip 2. Conserving power and extending battery life
• Turn off your computer by pressing FN+OFF whenever you are not
using it.
• Make sure your system suspends automatically. PC Cards, custom
applications, or modified system settings can affect this.
• Unplug peripherals and remove peripheral and network PC Cards
when you are not using them.
• If you have a monochrome display, turn off the backlight when you
do not need it.
• If you have a 10.4-inch color display, turn off MaxBright when you
do not need it.
• Use the SCU to set power management options at levels that will
consume the least amount of battery power (see Section 5,
Customizing Settings, for more information).
• Use the AC adapter or vehicle adapter whenever possible.
• Avoid exposing batteries to extremely hot or cold temperatures for
long periods.
• The mobile computer display does not require a screen saver. Using
screen savers consumes valuable battery power and is discouraged
unless the unit is connected to external power and an external
monitor.
• Deep cycle discharge your battery when requested, which may be as
often as 3 months, depending on usage by using the Battery
Maintenance application.
• Store the battery within the recommended temperature range: 10°C
to 30°C (50°F to 86°F).
79-0003-003 22 October 1999
75
Page 76

X-C 6250 Pro Users Manual
Tip 3. If your battery is new or has not been used for
several weeks
Follow these guidelines to deep cycle discharge the battery and
condition it.
• Deep cycling the battery up to four times in succession may increase
its capacity. You may want to do this over consecutive weekends
since each deep cycle process can take up to 40 hours. After this
initial conditioning, maintain battery capacity by deep cycling when
requested, which may be as often as 3 months, depending on usage.
• For the best conditioning, deep cycle the battery where the
temperature will remain around 20°C (68°F).
Tip 4. Determining when your battery has finished
charging
• Under normal circumstances, your battery is finished charging when
the external power indicator light stops blinking and remains solid.
To prevent possible damage to the battery, the system will not allow
a charge if the battery temperature is above 50°C (122°F) or below
5°C (41°F), such as in a closed, unattended vehicle. In this case,
your battery may not be fully charged.
• If you charge your battery every night, it is finished charging when
the Battery Status application shows a full gas gauge even though
the external power indicator light may still be blinking.
If your battery is new, or if you have not used it for a week or more,
the gas gauge may be inaccurate because the battery naturally
discharges over time. In this case, wait until the external power
indicator light stops blinking and remains solid.
76
79-0003-003 22 October 1999
Page 77

Section 7. Managing Batteries and Power
Tip 5. How your battery behaves in warm and cold
conditions
In warm conditions
• When using a battery in warm conditions, the battery capacity will
drain faster. In general, as the temperature rises, it is possible for the
battery to drain 20 percent faster at 40°C (104°F) and 50 percent
faster at 45°C (113°F).
• To prevent possible damage to the battery, the system will not allow
a charge if the battery temperature is above 45°C (113°F), such as
in a closed, unattended vehicle during the summer.
• If possible, charge the battery in a location with a moderate
temperature of around 20°C (68°F). The battery wont last as long
during the day if charged at higher temperatures because heat slows
down the batterys chemical reactions. Also, if the battery becomes
too hot while charging, the charge mode automatically switches from
Fast Charge to Slow Charge. Slow Charge takes much longer to finish
charging the battery.
• When charging the battery, leave the display tilted open and allow
unrestricted airflow so excess heat can escape from the battery
compartment and prevent the battery from overheating.
In cold conditions
• When using a battery in cold conditions, the battery capacity can
drain 30 percent faster at 4°C (39°F) and 70 percent faster at -11°C
(19°F).
• To prevent possible damage to the battery, the system will not allow
a charge if the battery temperature is below 5°C (41°F), such as in a
closed, unattended vehicle during the winter.
• If possible, charge the battery in a location with a moderate
temperature of around 20°C (68°F). The battery wont last as long
during the day if charged at lower temperatures because cold slows
down the batterys chemical reactions.
79-0003-003 22 October 1999
77
Page 78

X-C 6250 Pro Users Manual
Tip 6. Preventing data loss
How to prevent data loss when removing the battery or storing
your computer
• You can lose data if you remove the battery while the computer is
operating on battery power. To prevent this, turn off the unit by
pressing
• The computer is equipped with enough internal backup power to
maintain memory contents for about 5 minutes each time you
exchange batteries. Be careful not to exceed this 5 minute limit
when you replace the battery.
• If you plan to store your computer for more than 30 days, exit
Windows to save data to the hard disk, and then press
turn off the computer. Remove the battery before storing the
computer.
Tip 7. Returning batteries for service
FN+OFF before you remove the battery.
FN+OFF to
• When shipping batteries, use non-static packing material to reduce
the possibility of static discharge. Placing the battery in a non-static
bag is ideal; however, wrapping the battery in paper or newspaper is
also acceptable.
• Contact your supervisor or your organizations help desk for correct
shipping procedures and information.
Tip 8. For more information
• The Battery Status and Battery Maintenance applications provide
battery troubleshooting information. From the Help menu for each
application, choose Contents (or Help Topics), and then choose
Troubleshooting, followed by Common Solutions to Common
Problems.
78
79-0003-003 22 October 1999
Page 79

Section 7. Managing Batteries and Power
Conserving Power and Extending Battery Life
Follow these guidelines to get the most use from your batteries and
extend their life.
• Turn off your computer by pressing FN+OFF whenever you are not
using it.
• Make sure your system suspends automatically. PC Cards, custom
applications, or modified system settings can affect this.
• Unplug peripherals and remove peripheral and network PC Cards
when you are not using them.
• If you have a monochrome display, turn off the backlight when you
do not need it.
• If you have a 10.4-inch color display, turn off MaxBright when you
do not need it.
• Use the SCU to set power management options at levels that will
consume the least amount of battery power (see Section 5,
Customizing Settings, for more information).
• Use the AC adapter or vehicle adapter whenever possible.
• Avoid exposing batteries to extremely hot or cold temperatures for
long periods.
• The mobile computer display does not require a screen saver. Using
screen savers consumes valuable battery power and is discouraged
unless the unit is connected to external power and an external
monitor.
• Deep cycle discharge your battery when requested, which may be as
often as 3 months, depending on usage by using the Battery
Maintenance application.
• If you plan to store the computer for more than 30 days, remove the
battery.
• Store the battery within the recommended temperature range: 10°C
to 30°C (50°F to 86°F).
79-0003-003 22 October 1999
79
Page 80

X-C 6250 Pro Users Manual
Low Battery Warnings
When the battery becomes low, the mobile computer beeps and the
battery indicator light blinks. If you are running Windows, a warning
message also appears on the screen periodically. Unless you connect
external power or replace the battery within a reasonable time, the
system turns off the computer automatically. If the battery voltage
becomes very low, the computer shuts off and you cannot turn it back
on until you correct the low battery condition.
Power-saving Features
Suspend
Suspend mode turns off the system if there is no activity for a period of
time. The computer also enters suspend mode if the battery capacity
becomes critically low and external power is not connected or the
battery is not replaced.
80
Note Some systems do not automatically enter suspend mode
when they are connected to external power. Systems that can
suspend on external power have a user-defined option in the System
Configuration Utility (SCU) that enables or disables this feature. See
Section 5 for information about accessing the SCU.
By default, the computer enters suspend mode after two minutes of
inactivity. This time-out setting can be changed in the System
Configuration Utility (see Section 5, Customizing Settings). You can
place the computer in suspend mode manually by pressing
Files and data are retained and you can resume where you left off by
pressing FN+ON.
FN+OFF.
Hard Disk Standby
To conserve power, the hard disk switches to standby mode after a
period of inactivity and resumes when it detects activity.
79-0003-003 22 October 1999
Page 81

Section 7. Managing Batteries and Power
Display
To conserve power, the system turns off the display when the computer
enters suspend mode. It automatically turns on when the computer is
turned back on.
Backlight
The display backlight can be turned on to make information on the
screen easier to read in low-light situations. To conserve power on the
monochrome displays only the system automatically turns off the
backlight after a period of inactivity. You must manually turn the
backlight on by pressing FN+F1 when you resume. You can change the
time-out setting for the backlight in the System Configuration Utility
(SCU). See Section 5, Customizing Settings, for more information.
On a color display, the backlight is always on whenever the computer is
running. See About the Display Backlight below.
About the Display Backlight
10.4-inch color
• Backlight is always on when the computer is runnning
• FN+F1 toggles MaxBright on/off
• FN+F2 dims
• FN+F3 brightens
• FN+F2 and FN+F3 are active only when MaxBright is off
10-inch monochrome
• FN+F1 toggles the backlight on/off
• FN+F2 dims
• FN+F3 brightens
79-0003-003 22 October 1999
81
Page 82

X-C 6250 Pro Users Manual
MaxBright
MaxBright is a feature available on 10.4-inch color display that
intensifies the backlight to its maximum brightness. Pressing
toggles MaxBright on and off. The system automatically turns off
MaxBright after a period of inactivity, and this time-out setting can be
changed in the System Configuration Utility (SCU). See Section 5,
Customizing Settings, for information about accessing the SCU.
Getting Battery Information
Battery Status
The Battery Status application provided with your system monitors the
condition of the battery installed in the computer. This application
allows you to check information such as the current capacity and
temperature of the battery. Battery Status runs automatically when you
run Windows. To learn more about this program, refer to its online help.
FN+F1
82
To open this program, choose the Battery Status icon from the Taskbar.
Battery Maintenance
The Battery Maintenance application allows you to perform a deep
cycle discharge of the battery and obtain information about the last
time this activity was completed. For additional information, see Deep
Cycle Discharging later in this section.
To learn more about this program, refer to its online help.
79-0003-003 22 October 1999
Page 83

Section 7. Managing Batteries and Power
Removing and Replacing Batteries
Replace the battery in your computer with a new one if your existing
battery does not hold a charge. If your battery is drained, replace it with
a charged one. When operating on battery power, the computer is
equipped with enough internal backup power to maintain memory
contents for about 5 minutes each time you exchange batteries.
CAUTION You can lose data if you remove the battery while the
mobile computer is operating on battery power. Turn off the
computer by pressing FN+OFF before you remove the battery. You
can also lose data if the battery is removed from the unit for more
than 5 minutes.
To remove and replace the battery
1 Turn off the computer by pressing FN+OFF, and then locate the
battery door in front of the keyboard.
2 Push the two battery door latches down to unlatch the door and slide
it away from the unit (C).
3 Grasp the ribbon and pull up on the battery to remove it.
4 Align the battery connectors and place a new battery in the
computer (D).
5 Replace the battery door and make sure it is securely latched.
C D
A
B
Velcro
Pad
79-0003-003 22 October 1999
Connectors
83
Page 84

X-C 6250 Pro Users Manual
Charging Batteries
To maintain power and prevent data loss from a low battery, charge the
battery daily. You can use several external power or charging devices
approved for use with the mobile computer. The AC adapter comes with
your computer, but you also can use other optional devices such as the
vehicle adapter, the stand alone charger, or the vehicle cradle. See
Section 9, Optional Equipment and Accessories, for more information
about this equipment.
To charge the battery using the AC adapter
1 Connect the appropriate end of the AC adapter to an AC wall outlet.
2 Connect the other end to the computers power port on the side of
the unit.
3 Install the battery in your computer and make sure the battery door
is latched and secured.
84
Velcro
Pad
79-0003-003 22 October 1999
Page 85

Leave the display tilted open and allow unrestricted airflow while the
battery is charging. This allows excess heat to escape from the battery
compartment and helps prevent the battery from overheating.
The battery starts fast charging automatically, and the external power
indicator light blinks while the battery is charging. At moderate
temperatures, around 70 degrees Fahrenheit, the battery will complete
charging in 3 to 4 hours. Under extremely cold or hot temperatures,
however, the battery can take up to 16 hours to fully charge.
Deep Cycle Discharging
Use the mobile computers Battery Maintenance application to perform
a deep cycle discharge. To run this application, double-click the Battery
Maintenance icon in the Mobile Computer Tools folder. To learn more
about this program, refer to its online help.
Nickel Metal Hydride (NiMH) batteries can develop memory effect
when they are partially discharged and recharged repetitively without a
full discharge. Repeatedly charging the batteries this way will eventually
decrease battery capacity and performance. To recondition the batteries
and eliminate battery charge memory effect, you should deep cycle
discharge batteries when requested, which may be as often as 3
months, depending on usage.
Section 7. Managing Batteries and Power
If your battery is new or has not been used for several weeks, deep
cycling it up to four times in succession may increase its capacity. You
may want to do this over consecutive weekends since each deep cycle
process can take up to 40 hours. After this initial conditioning, maintain
battery capacity by deep cycling at the recommended frequency.
79-0003-003 22 October 1999
85
Page 86

X-C 6250 Pro Users Manual
Battery Storage and Care
Follow these guidelines to maintain performance of NiMH batteries.
• Avoid exposing batteries to extremely hot or cold temperatures for
long periods. To prevent possible damage to the battery, the mobile
computer does not allow the battery to charge if the internal
temperature of the battery gets too low (<5°C or < 41°F) or too
high (> 50°C or > 122°F).
• Charge the batteries nightly where the temperature will remain
around 20°C (68°F).
• Deep cycle discharge your battery when requested, which may be as
often as 3 months, depending on usage.
• Store the batteries within the recommended temperature range:
10°C to 30°C (50°F to 86°F).
• After storage, or periods during which the battery has not been used,
deep cycling it up to four times in succession may increase its
capacity. You may want to do this over consecutive weekends since
each deep cycle process can take up to 40 hours. After this initial
conditioning, maintain battery capacity by deep cycling at the
recommended frequency.
Disposing of Batteries
WARNING The mobile computer is powered by a rechargeable
Nickel Metal Hydride (NiMH) battery. Disposing of the battery
improperly can cause serious personal injury. Do not crush the
battery or place it in a fire. The battery is recyclable and, under
various state and local laws, it may be illegal to dispose of it into
the municipal waste stream. Check with your local solid-waste
officials for details on recycling options or proper disposal.
86
79-0003-003 22 October 1999
Page 87

SECTION 8
Using PC Cards
○○○○○○○○○○○○○○○○○○○○○○○○○○○
Introduction 88
Inserting and Removing a PC Card 88
Transferring Files Using PC Cards 89
Using Bootable PC Cards 90
WE KNOW THE ROAD
TM
Page 88

X-C 6250 Pro Users Manual
Introduction
A PC card is a self-contained, credit card-sized device that can be used
to store programs, data, or to expand the capabilities of your computer.
The mobile computer accepts Type I, Type II, and Type III PC cards.
Inserting and Removing a PC Card
The PC card sockets are located on the back of the computer.
CAUTION The internal components of the mobile computer will
be damaged if exposed to contaminants. When the PC card door is
open, shield the unit from all contaminants such as liquids, rain,
snow, and dust.
To insert a PC card
1 Provide a suitable environment for the computer, and then open the
PC card door by pushing in on the door and sliding the latch down.
Push in on the door and slide the latch down
Door
Ejector Buttons PC Card
88
79-0003-003 22 October 1999
Page 89

Section 8. Using PC Cards
Important Make sure the card is positioned correctly when you
insert it. Attempting to insert the card upside down can damage
the ejector button, and this may cause the button to malfunction
when you remove the card.
2 Position the card and carefully slide it into the card socket until it is
firmly seated.
3 Close the PC card door and push the latch up to secure it.
To remove a PC card
1 Before you remove the card, select the PC card icon in the system
tray area of the screen (near the clock in the lower right corner),
and choose Stop [card name] card.
2 Provide a suitable environment for the computer, and then open the
PC card door by pushing in on the door and sliding the latch down.
3 Press the ejector button.
4 Carefully slide the card out of the socket.
Tip Use one finger to press down lightly on top of the card, and
then slide it out. If the ejector button malfunctions when you press
it, release the button and press it again.
Transferring Files Using PC Cards
To transfer files using PC cards
This method of transferring files requires that the computer you are
exchanging files with is also equipped with a PC card socket.
1 Insert a PC memory or ATA card into the PC card socket of the
source computer.
2 Copy the file(s) you want to transfer from the hard disk to the PC
card.
The drive letter assigned to the card depends on the hardware
configuration of the computer.
79-0003-003 22 October 1999
89
Page 90

X-C 6250 Pro Users Manual
3 Remove the card and insert it into the card socket of the destination
computer.
4 Copy the file(s) from the PC card to the hard disk of the destination
computer.
Using Bootable PC Cards
The mobile computer normally boots from the internal hard disk (drive
C); however, it might be necessary to boot from an alternate boot device
if the computers hard disk becomes corrupted or fails, or if you want to
boot another operating system.
You can boot from an approved external floppy disk drive (see Section 9
for more information), or you can use an SRAM PC Card. Boot
precedence is first from the SRAM PC card (drive C), then the external
floppy (drive A, removable), and then the internal hard drive.
Important Do not use FN+OFF to suspend the computer if you
have booted from a PC Card rather than the computers internal
hard disk. When you have finished using the card, remove it from
the computer and then press CTRL+ALT+DEL to restart the system.
90
79-0003-003 22 October 1999
Page 91

SECTION 9
Optional
Equipment and
Accessories
○○○○○○○○○○○○○○○○○○○○○○○○○○○
Connecting a Printer 92
Connecting an External Monitor 93
Connecting an External Mouse 93
PC Card External Floppy Disk Drive 95
Using an External CD-ROM 97
Stand Alone Charger 98
Vehicle Adapter 99
Vehicle Cradle 102
Surge Protection 108
WE KNOW THE ROAD
TM
Page 92

X-C 6250 Pro Users Manual
Connecting a Printer
You can connect a printer to the mobile computer with the parallel or
serial cable supplied with your printer. This allows you to print
documents that are stored in the computer. See your printers users
manual for more information.
To connect a printer to the parallel port
1 Open the I/O dust cover on the back of the computer and connect
the male end of the parallel cable to the 25-pin connector (the larger
of the two connectors).
This connector is referred to as LPT1.
2 Connect the other end of the cable to your printer.
3 Follow the instructions for your application to use the printer.
To connect a printer to the serial port
1 Open the I/O dust cover on the back of the computer and connect
the male end of the parallel cable to the 9-pin connector (the smaller
of the two connectors).
92
This connector is referred to as COM1.
2 Connect the other end of the cable to your printer.
3 Follow the instructions for your application to use the printer.
BACK VIEW
9-pin
Serial Port
Parallel Port
Dust Cover
(open)
25-pin
79-0003-003 22 October 1999
Page 93

Section 9. Optional Equipment and Accessories
Connecting an External Monitor
The computer has a Display Selection feature that allows you to
switch between the computer display, an external monitor, or both as
the active display.
To use an external monitor, first connect the monitor cable to the 15-pin
video port on the back of the computer and then follow the procedure
below.
To select a display
1 From the Desktop, double click the Display Select icon.
2 Select one of these options:
• LCD Panel to use the computer display
• Monitor / LCD to use both displays
3 Choose OK.
Connecting an External Mouse
You can connect an external mouse to the serial port of the computer.
First select the appropriate mouse manufacturer and model as
described below, and then enable the communication port by making
changes in the System Configuration Utility (SCU).
To connect an external mouse
1 Connect the mouse to the 9-pin serial port on the back of the
computer.
2 From the Start Menu, select Control Panel, Settings, and then choose
Mouse.
3 Select the General tab, and then choose Change.
4 Make sure Show all devices is enabled.
79-0003-003 22 October 1999
93
Page 94

X-C 6250 Pro Users Manual
5 Under Manufacturers, select the appropriate mouse you intend to
use.
6 Under Model, select the appropriate model.
7 Choose OK.
8 Close all windows and enable the communication port.
94
79-0003-003 22 October 1999
Page 95

Section 9. Optional Equipment and Accessories
PC Card External Floppy Disk Drive
An external floppy drive can be connected to the computer using the PC
Card socket. You can use the external floppy to transfer files to the
mobile computer; use the drive letters that correspond to your hardware
configuration.
Follow the procedures in this section to connect the floppy drive to the
computer.
PRECAUTIONS
• Using an unapproved bootable external floppy disk drive may cause
errors or may damage the computer. Use only external floppy disk
drives approved for use with the mobile computer.
• Do not open the computers battery door when you are using an
external floppy disk drive.
79-0003-003 22 October 1999
95
Page 96

X-C 6250 Pro Users Manual
To connect an external floppy disk drive
1 Open the PC Card door on the back of the computer and insert the
PC Card connector into the socket.
2 Connect the other end of the cable to your external floppy drive.
3 Turn on the floppy disk drive.
Booting from a PC Card External Floppy
PC Card
Connector
The mobile computer normally boots from the internal hard disk;
however, it might be necessary to boot from an alternate boot device if
the computers hard disk becomes corrupted or fails, or if you want to
boot another operating system. One option is to use a bootable external
floppy disk drive.
To boot from an external floppy disk drive
1 If you are running Windows, Exit Windows (from the Start Menu
select Shut Down, and then choose Shut down the computer).
2 Separate the PC Card connector from the cable by gently squeezing
the two small clips on each side of the connector.
3 Insert the PC Card (disconnected from the cable) into the socket.
4 Restart the computer by pressing
5 Follow the instructions on the screen to reconnect the cable to the
PC Card, insert a diskette, and boot the computer.
FN+ON.
96
79-0003-003 22 October 1999
Page 97

Section 9. Optional Equipment and Accessories
Using an External CD-ROM
You can use an external CD-ROM drive to copy files to the mobile
computer or access information from a CD. Before you connect an
external CD-ROM to the computer, check these things:
• Make sure you are using an external CD-ROM that is approved for
use with the mobile computer.
• If necessary, follow the instructions provided with the CD-ROM to
install the correct device drivers on the computer.
After following the appropriate setup procedures, you can access the
external CD-ROM by using Windows Explorer or My Computer. Use the
drive letter that corresponds to your hardware configuration.
To connect an external CD-ROM
1 Connect the CD-ROM cable to your CD-ROM drive.
2 Open the PC Card door on the back of the computer and insert the
PC Card connector into the socket.
3 Turn on the CD-ROM drive.
PC Card
Connector
79-0003-003 22 October 1999
97
Page 98

X-C 6250 Pro Users Manual
Stand Alone Charger
The stand alone charger is an optional charging device used to charge a
Nickel Metal Hydride (NiMH) battery. This charger allows you to charge
an additional battery for the mobile computer.
CAUTION There are no user-replaceable parts within the stand
alone charger, so do not open the charger case. The stand alone
charger is internally protected. It resets automatically if there is a
power fault.
The operating temperature for this device is +10ºC to +40ºC (+50ºF
to +104ºF). Operating the stand alone charger outside of this
temperature range may damage the battery.
To charge a battery
1 Insert the appropriate end of the power cord into the power port on
the stand alone charger; insert the other end of the power cord into
an electrical wall outlet.
98
2 Align the connectors and place the battery onto the charger.
The charger automatically begins fast charging the battery. At
moderate temperatures, around 21°C (70ºF), the battery will be fully
charged in approximately three to four hours. Under extremely cold
or hot temperatures, however, the battery can take up to 16 hours to
charge.
Red “Fault” Light
Green Indicator
Light
Power Port
79-0003-003 22 October 1999
Page 99

Indicator Lights
Green Red Description
On On Power up. No battery installed.
Blinking Off Charging battery.
On Off Charging complete.
On Blinking Battery problem. Use Battery Status
Blinking Blinking Charger problem.
Vehicle Adapter
The Vehicle Adapter is an optional device that supplies power from the
vehicle battery to operate the computer and charge the battery installed
in the unit. It typically connects to the vehicle battery using the
cigarette lighter socket.
Section 9. Optional Equipment and Accessories
to check the condition of the battery.
CAUTION
There are no user-replaceable parts within the vehicle adapter, so
do not open the adapter case. The adapter is internally protected. It
resets automatically if there is a power fault.
The operating temperature for this device is -20°C to +60°C (-4°F
to +140°F). Operating the vehicle adapter outside of this
temperature range may damage the battery.
To prevent possible damage to the battery, the system will not allow the
battery to charge at extreme temperatures. Be aware of the following
charging characteristics, especially if the computer is left unattended in
a closed vehicle.
Temperature Charging Activity
<5°C (<41°F) Battery will not charge
>45°C (>113°F) Slow charge mode
>50°C (>122°F) Maintenance charge
79-0003-003 22 October 1999
99
Page 100

X-C 6250 Pro Users Manual
To connect the vehicle adapter
1 Insert the vehicle adapters power cord into the power port on the
side of the computer.
2 Insert the cigarette lighter adapter into the vehicles cigarette lighter
socket, turning it slightly to make a good connection.
The power light illuminates to indicate that current is reaching the
vehicle adapter. When you connect the vehicle adapter, it
automatically begins fast charging the computers battery. At
moderate temperatures, around 21°C (70ºF), the battery will be fully
charged in approximately three hours. Under extremely cold or hot
temperatures, however, it will take longer to charge the battery (up
to 16 hours).
100
Power Light
Power Cord
Cigarette
Lighter Adapter
79-0003-003 22 October 1999
 Loading...