

Page 1

T5200
User’s Manual
Page 2

T5200 Users Manual
Identification
T5200 Computer User’s Manual
June 1999 · Revision 002
Copyright Notice
© Copyright 1999 Itronix Corporation. All rights reserved. No part of this
document may be reproduced, transmitted, transcribed, stored in a retrieval system,
or translated into any other language or computer language in whole or in part, in
any form or by any means, whether it be electronic, mechanical, magnetic, optical,
manual, or otherwise, without the prior written consent of Itronix Corporation,
South 801 Stevens Street, Spokane, Washington 99204.
Disclaimer
Itronix Corporation reserves the right to revise the manual and make periodic
changes to the content without a direct or inferred obligation to Itronix to notify
any person of such revision or changes. Itronix Corporation does not assume
responsibility for the use of this manual, nor for any patent infringements or other
rights or third parties who may use the manual.
This document contains valuable trade secrets and proprietary information of
Itronix Corporation.
This product is available for purchase under the terms of the Itronix Hardware
Purchase and Software License Agreement. Itronix hardware products may be
reconditioned, or be manufactured from parts and components that may be new,
used, rebuilt or recycled, and in some cases, the hardware product may not be new
and may have been previously installed. In any event, Itronix warranty terms apply.
Philips Semiconductors, AltoCom, and their suppliers retain title to and ownership
of the V.34 modem software, regardless of the form or media in or on which the
original and other copies may exist.
Trademark Notice
Itronix is a registered trademark of Itronix Corporation.
Microsoft, MS, Windows, and MS-DOS are registered trademarks of Microsoft
Corporation.
AltoCom is a trademark of AltoCom, Inc.
Other company and product names mentioned herein may be the trademarks of
their respective owners.
ii 77-0001-002 06/99
Page 3

Important Before using this manual and the product it
describes, read the Microsoft’s Certificate of Authenticity and
the safety information in Appendix D.
iii77-0001-002 06/99
Page 4

T5200 Users Manual
Contents
Section 1 Getting Started 1
Precautions 2
Introduction 3
Unpacking Y our System 3
The First Time. . . 4
Installing the Battery 4
Connecting the AC Adapter 5
Turning the T5200 Computer On and Off 6
Things You Need to Do at Start-up 7
Start-up Problems? 9
Password Security 10
If You Have a Radio 11
Section 2 A Closer Look at the T5200 Computer 13
Introduction 14
Standard Hardware 15
Standard Software 16
T5200 Computer Keyboard 16
Basic Keys 17
Using the Stylus 19
iv 77-0001-002 06/99
Page 5

Section 3 Customizing Settings 21
Introduction 22
Control Panel 22
Communications 23
Display 2425
Keyboard 26
Network 26
Owner 26
Password 27
Power 28
Regional Settings 29
Remove Programs 30
Stylus 30
System 31
T5200 Information 32
Volume and Sounds 32
Section 4 Operating Your T5200 Computer 35
Introduction 36
Connecting to a Desktop Computer 36
Installing Windows CE Services on Your Desktop 36
Establishing a Connection 37
Copying and Converting Files 38
Printing Files from the T5200 Computer 39
PC Cards 39
Section 5 Power Management 41
Introduction 42
Practical Battery Tips 42
Low Battery Indicators 43
Checking Battery Power 43
Replacing Batteries 45
v77-0001-002 06/99
Page 6

T5200 Users Manual
Charging Batteries 46
Battery Storage and Care 47
Disposing of Batteries 47
Section 6 Maintenance and Storage 49
Introduction 50
Care and Cleaning 50
Storing Your T5200 Computer 51
Section 7 Troubleshooting 53
Introduction 54
What to Try First 54
Operational Problems 55
Battery Problems 56
Display Problems 57
Keyboard Problems 58
Touch Screen Problems 58
Radio Problems 59
Desktop Communication Problems 60
Appendix A Expanding Your T5200 Computer 63
Introduction 64
Options 64
PC Card Socket 64
Expansion DRAM 64
Expansion Flash (Compact Flash) 64
Radio Modem 65
Peripherals 65
Vehicle Cradle 65
Vehicle Adapter 67
vi 77-0001-002 06/99
Page 7

AC Adapter 68
Stand Alone Battery Charger 69
Appendix B Hardware Specifications 71
Physical Features 72
Display 72
Processor and Memory 72
Input/Output 73
Power 73
Communications 74
Modems 74
T elephone Line Connector 74
Appendix C Keyboard Functions 75
Introduction 76
Power On/Off 77
Function Keys 78
Primary Keys 78
Numeric Keys 79
Customizing Keyboard Settings 80
Adjusting the Key Repeat Rate 80
Adjusting Audio Feedback 81
Appendix D Statements and Notices 83
Compliance Statements 83
W arnings and Cautions 86
Index 89
vii77-0001-002 06/99
Page 8

T5200 Users Manual
viii 77-0001-002 06/99
Page 9

SECTION 1
Getting Started
○○○○○○○○○○○○○○○○○○○○○○○○○
Precautions 2
Introduction 3
Unpacking Y our System 3
The First Time. . . 4
Installing the Battery 4
Connecting the AC Adapter 5
Turning the T5200 Computer On and Off 6
Things You Need to Do at Start-up 7
Start-up Problems? 9
Password Security 10
If You Have a Radio 11
WE KNOW THE ROAD
TM
1
Page 10

T5200 Users Manual
Precautions
Please be aware of the following important information before you
begin operating your T5200 computer.
• Data stored on PC Cards may be corrupted if the cards come in
close contact with the magnetic components of the computer.
Do not lay a PC Card on top of or under the computer.
• The internal components of the T5200 computer will be
damaged if exposed to contaminants. When the battery is
removed or when the PC card door is open, shield the unit from
all contaminants such as liquids, rain, snow , and dust.
• You can lose data if you remove the battery while the computer
is operating. Turn off the unit before you remove the battery.
You can also lose data if the battery is removed for more than
10 minutes.
• Use the stylus that comes with your T5200 computer . Don’t use
sharp implements such as keys, pens or mechanical pencils to
touch the screen because they can damage the screen.
• WARNING The T5200 computer is powered by a Lithium Ion
(Li-ion) battery. Disposing of these batteries improperly can
cause serious personal injury. Do not crush the batteries or
place them in a fire. The battery is recyclable and, under various
state and local laws, it may be illegal to dispose of these
batteries into the municipal waste stream. Check with your local
solid-waste officials for details on recycling options or proper
disposal.
2 77-0001-002 06/99
Page 11

Introduction
The T5200 computer is a rugged handheld computer that uses the
Windows CE operating system. The T5200 computer is smaller
than a ruggedized laptop, but has many of the same features. It is
weather-sealed, resists bumps and drops, can connect with a variety
of peripherals and host computers, and is capable of
communicating over landline and wireless networks.
This section shows you the basics you need to do when you first
receive your computer and how to get started.
Unpacking Your System
Inside your packaging you will find:
• T5200 computer
• Power cord
• AC Adapter
• Lithium Ion battery
• T5200 User’s Manual
Section 1. Getting Started
You may have additional components or peripherals if you ordered
these items separately. Check your packing slip for a complete list
of items included in your package.
377-0001-002 06/99
Page 12
T5200 Users Manual
The First Time. . .
Using your T5200 computer for the first time involves:
• Installing the battery
• Connecting the AC Adapter to the computer to charge the
battery
Installing the Battery
Make sure the T5200 computer is sheltered (away from liquids,
dirt, etc..) when you install the Lithium Ion battery; the computer is
not weather sealed until the battery is properly installed. The
battery should be fully charged before you operate the unit on
battery power. To get the most from your battery, follow the
guidelines in Section 5, “Power Management.”
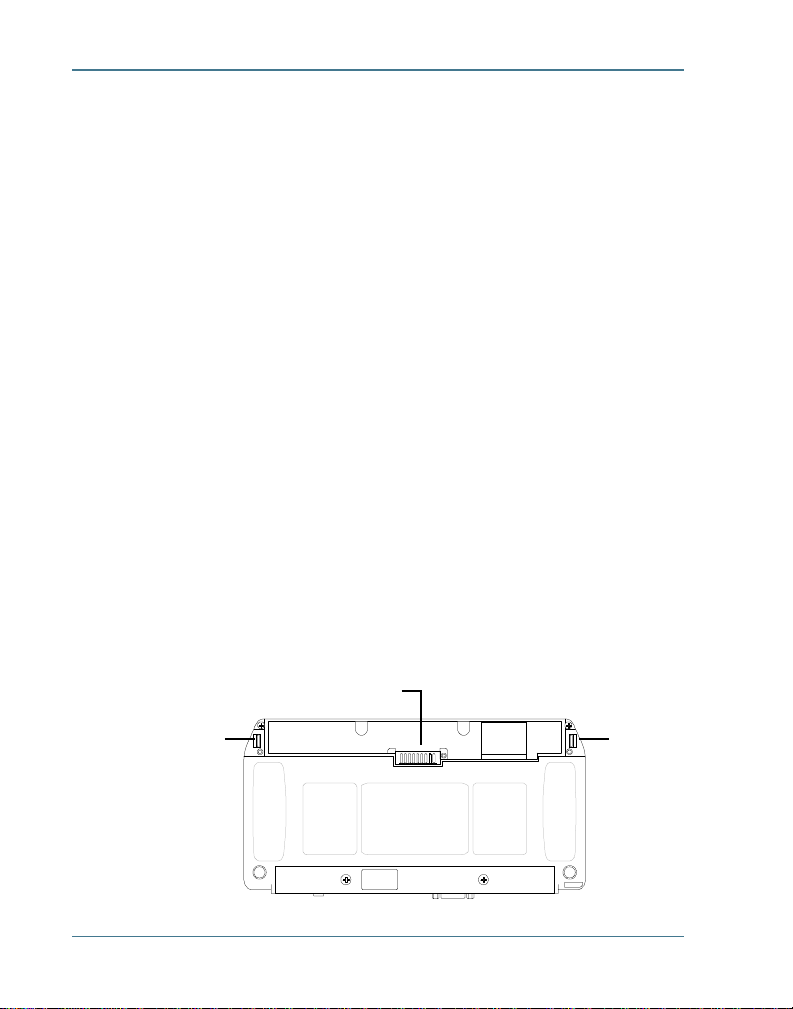
To install the battery
1 Align the battery connectors and place the battery in the
computer.
2 Press down on the battery and slide the latches into place to
secure the battery .
Battery
connectors
LatchLatch
BOTTOM VIEW
4 77-0001-002 06/99
Page 13

Section 1. Getting Started
Connecting the AC Adapter
To connect the AC Adapter
1 Attach the power cord to the AC Adapter and connect the
appropriate end of the cord to an AC wall outlet.
2 Insert the appropriate end of the AC Adapter cable into the
power port on the back of the computer.
3 The T5200 computer will power on and start charging the
battery automatically. The battery char ging icon appears on the
taskbar until the battery is fully charged, then the fully charged
icon appears.
Battery charging icon. Battery fully charged icon.
At moderate temperatures, approximately 70°F (21°C), the
battery should be fully charged in three to four hours. In warmer
or cooler temperatures, the battery may take longer to fully charge.
Power Port
577-0001-002 06/99
Page 14
T5200 Users Manual
Turning the T5200 Computer On and Off
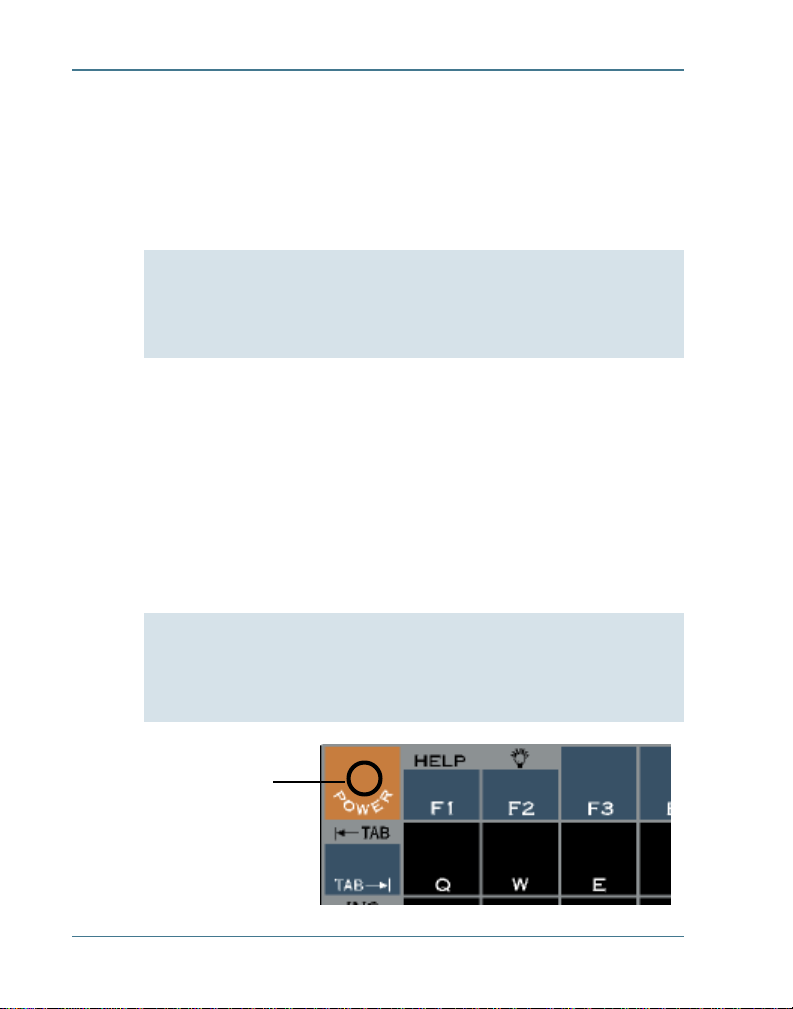
To turn on the computer
• Press the POWER button once, and then give the system time to
respond
Note If the computer does not power on, press and hold the
POWER button for at least ten seconds and then release the
button to restart the computer.
To turn off the computer
• Press the POWER button once
When you power the computer back on, the system resumes from
where you left off.
If you need to leave the system for a short time and want to
conserve battery power, you can turn off the computer even if you
are running applications. You can resume where you left off by
pressing POWER.
Note The computer automatically powers on when it is
connected to external power. Also, the computer does not
power off when it is connected to external power.
Press the POWER button
once to switch the
computer on or off
6 77-0001-002 06/99
Page 15

Section 1. Getting Started
Things You Need to Do at Start-up
When you turn on your T5200 computer for the first time, you need
to perform these simple tasks:
• Calibrate the touch screen
• Adjust the screen to your own personal viewing preference
• Set the date and time
• Enter User Information
CAUTION Use the stylus that comes with your T5200
computer. Using sharp implements such as keys, pens or
mechanical pencils to touch the screen can cause damage to
the screen.
Calibrating the Touch Screen
Calibrating the touch screen involves touching the screen with the
stylus in specific locations to align the background image with the
screen. The calibration screen is typically the first screen that
appears when you turn on the computer for the first time.
Simply position and briefly hold the stylus at the center of each
crosshair as it appears on the screen.
After this initial calibration, if you cannot select objects accurately
with the stylus, or if you notice later that the stylus is not accurate,
you may need to recalibrate the touch screen. T o open the calibration screen, simultaneously press CTRL, ALT, EQUAL SIGN (=).
777-0001-002 06/99
Page 16
T5200 Users Manual
Adjusting the Screen
You can toggle the backlight on if you need additional light to view
the screen more easily. To conserve battery power, the backlight
switches off automatically after one minute of continuous idle time.
You can also adjust the display contrast for better viewing.
Use the following keys to make adjustments:
To Do This... Press
T oggle the backlight on and of f SHIFT+F2
Lighten the display SHIFT+F5
Darken the display SHIFT+F6
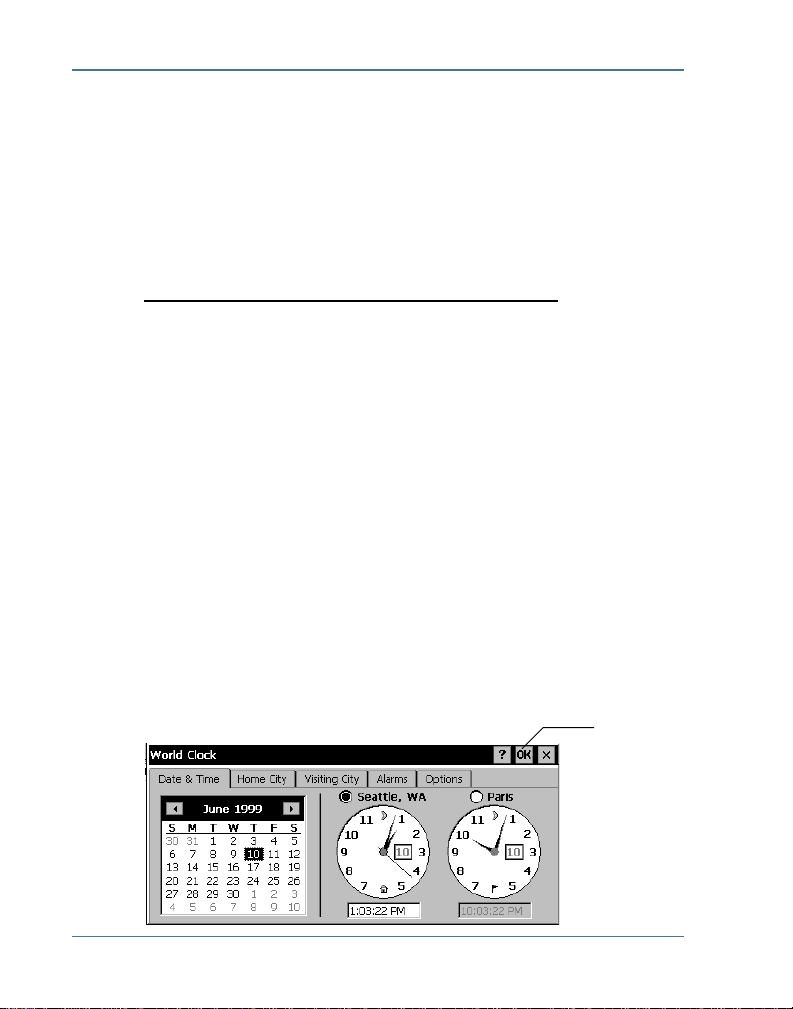
Setting the Date and Time
To set the date and time
1 T ap the Start button, tap Settings, and then double-tap Control
Panel (or simply double-tap the time on the task bar and skip
Step 2).
2 Double-tap the “World Clock” icon.
3 From the Time menu, make changes to the Time and Date, and
then close this screen by tapping OK in the upper right-hand
corner of the World Clock window
OK
8 77-0001-002 06/99
Page 17

Section 1. Getting Started
Start-up Problems?
If your T5200 computer does not operate, try these solutions.
• Check to make sure the battery is installed and charged properly
• Connect the AC adapter to charge the battery if it is not char ged
• If the AC adapter is connected, make sure the electrical outlet
you are using works
• If the computer does not turn on, press and hold the POWER
button for at least 10 seconds, and then release the button
• If the battery doesn’t begin char ging, remove the battery,
connect the AC adapter, turn on the computer by pressing
POWER, then reinstall the battery
Section 7, “Troubleshooting,” lists additional solutions you can try.
977-0001-002 06/99
Page 18
T5200 Users Manual
Password Security
If you are using the T5200 computer for the first time, enter the
default password provided by your company.
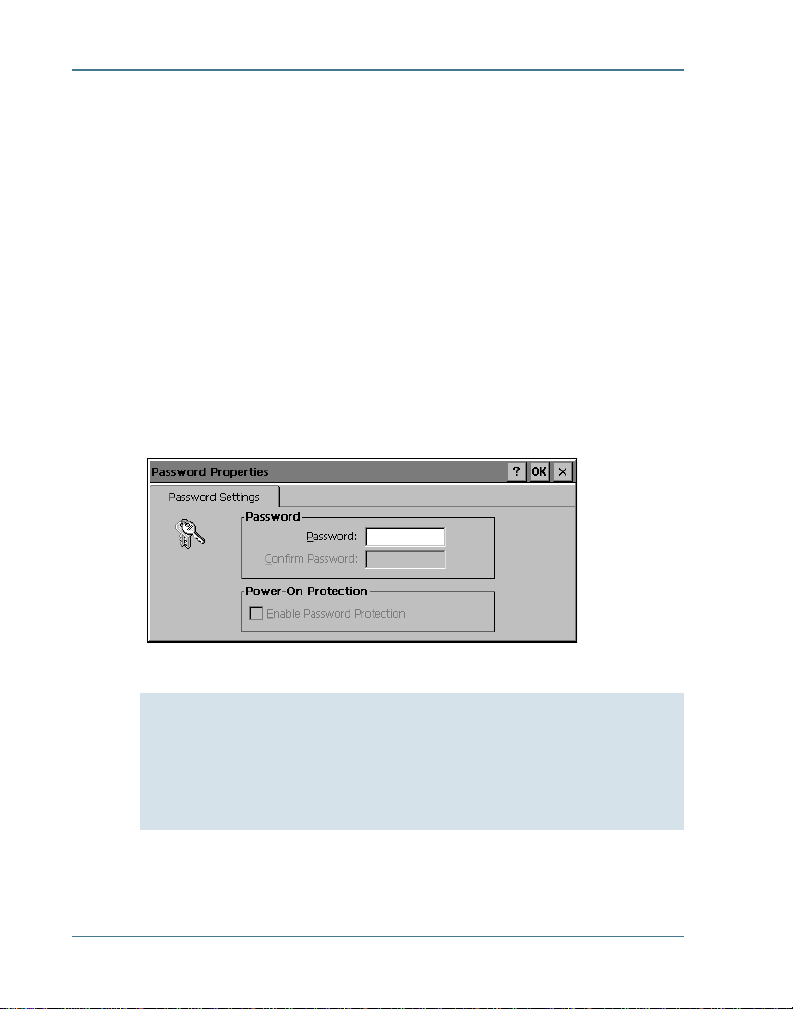
To set or change your password
1 T ap the Start Menu, select Settings, Control Panel, and then
double-tap the Password icon.
2 Set or change your password by entering a word of up to eight
characters—once in the Password box and again in the Confirm
Password box.
3 Check “Enable Password Protection.”
CAUTION If you for get your password, you won’t be able to
access information on your computer. You must reset (cold
boot) the system, which will erase any data that was not saved
to Compact Flash or PC Card..
10 77-0001-002 06/99
Page 19
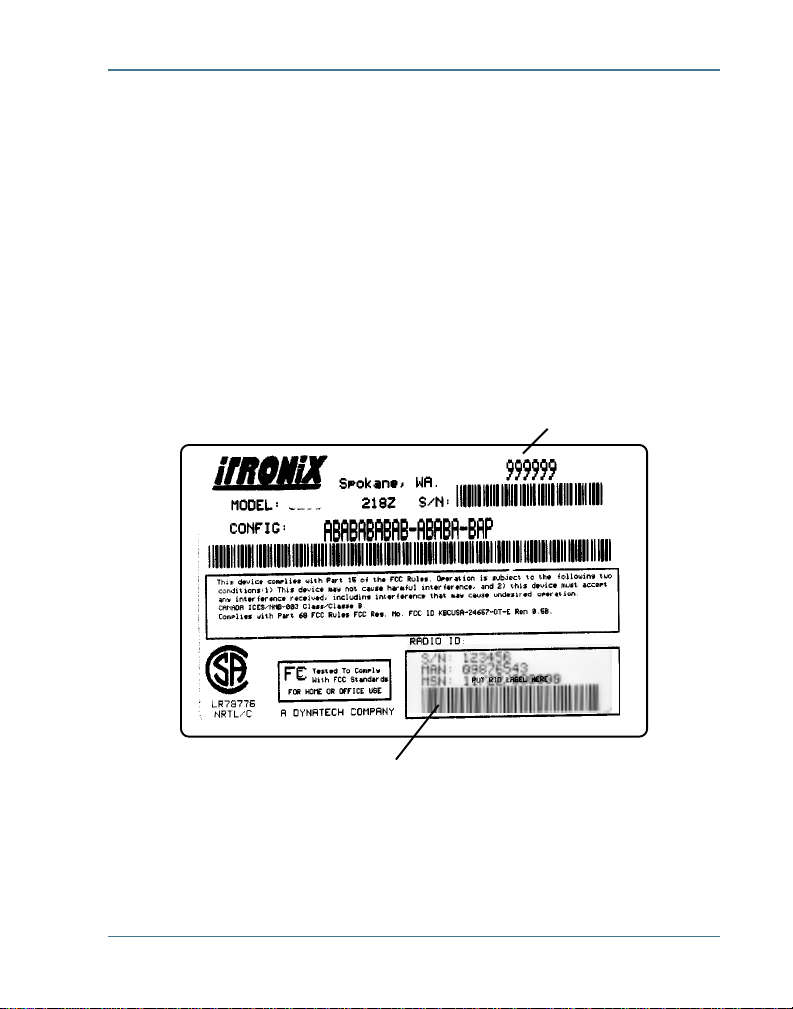
If You Have a Radio
If your computer is equipped with a radio modem, you must
register it with the appropriate network provider. When you
register, you need to furnish the network provider with your radio
modem ID and the computer’s serial number . This information is
printed on the bottom of the T5200 computer.
If you are registering with the ARDIS wireless network or the
BellSouth Wireless Data MOBITEX network, your Radio Modem
ID (RID) will be printed on a label as shown below .
Section 1. Getting Started
Computer Serial Number
Radio Modem ID (RID) Label
1177-0001-002 06/99
Page 20
T5200 Users Manual
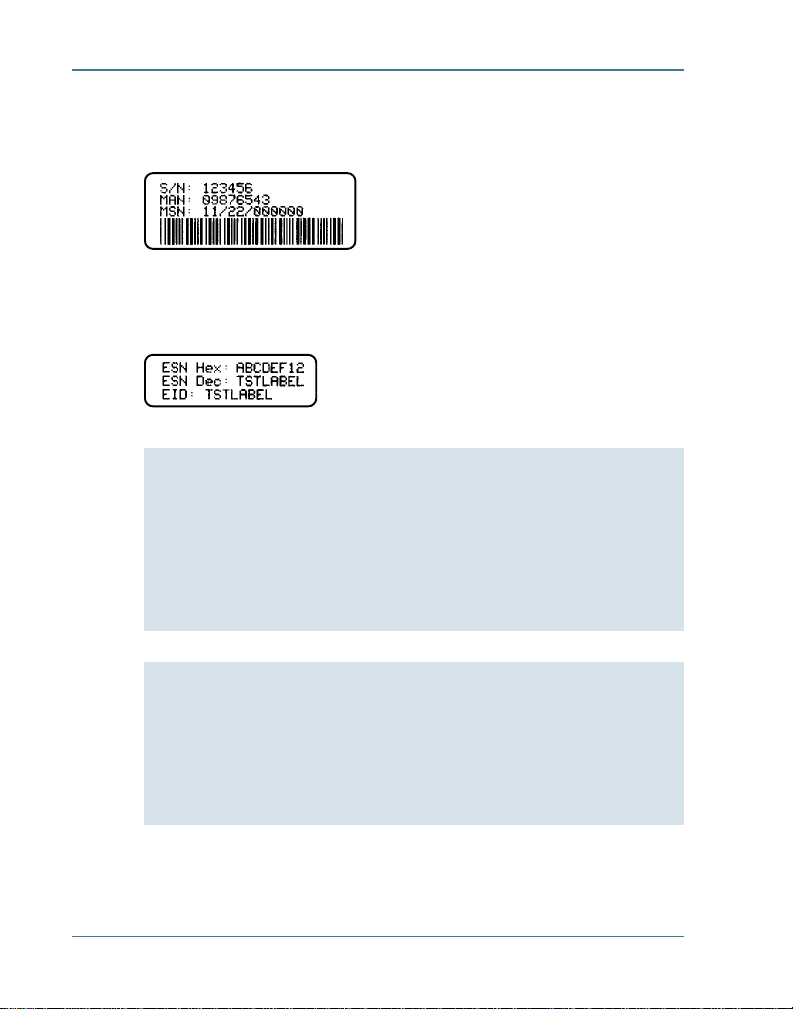
If you are registering with a Cellular provider for data service, your
modem’s Electronic Serial Number (ESN) will be printed on a
label as shown below.
If you are registering with a Cellular provider for CDPD service,
your modem’s Equipment Identifier (EID) will be printed on a
label as shown below.
CAUTION Your modem generates radio frequency (RF) signals.
Do not operate the radio modem before you have registered it
with a network provider. The network will not accept a signal
from an unregistered device. Unauthorized use of your radio
modem may interfere with local business or government
communications, resulting in fines or other legal action.
CAUTION While the radio is operating, its antenna must be at
least 29mm (1.25 inches) from all persons in order to comply
with the FCC RF exposure limit. Radio operators must make
sure their radio unit is in compliance with these FCC regulations.
12 77-0001-002 06/99
Page 21
SECTION 2
A Closer Look at the
T5200 Computer
○ ○○○○○○○○○○○○○○○○○○○○○○○○
Introduction 14
Standard Hardware 15
Standard Software 16
T5200 Computer Keyboard 16
Basic Keys 17
Using the Stylus 19
W E K N O W T H E R O A D
T M
13
Page 22
T5200 Users Manual
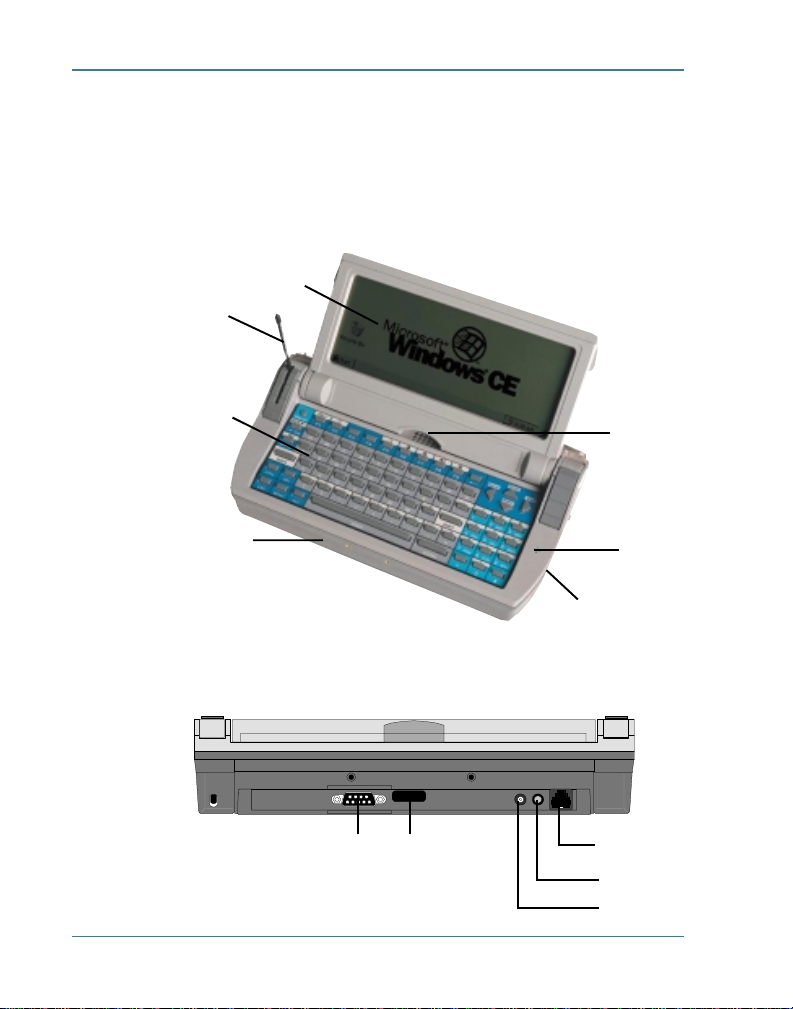
Introduction
The following diagrams and descriptions provide an overview of
the T5200 computer.
Display
Antenna
Keyboard
Speaker
Battery
9-Pin Serial Port IR Port RJ-11 Port
14 77-0001-002 06/99
Microphone
Optional PC Card
Door and Socket
Headset Port
Power Port
Page 23

Section 2. A Closer Look at the T5200
Standard Hardware
The labeled components are described below.
9-Pin Serial Port This port can be used for serial communications,
connection to a printer, or connecting to a desktop PC.
Battery The Lithium Ion (Li-ion) battery is located on the bottom
of the computer.
Display The standard display is a 7.3-inch monochrome touch
screen with 640x240 resolution.
Headset Port This port is located on the back of the computer and
allows you to connect a headset instead of using the speaker and
microphone.
Keyboard The keyboard is environmentally sealed and each key
can provide audio feedback when pressed.
PC Card Door and Socket If your T5200 computer is equipped
with an optional PC Card socket, the PC Card is inserted here.
When this door is open, shield the area from all contaminants such
as liquids, rain, snow, and dust.
Power Port This port is used to connect the external power supply
to the computer.
RJ-11 Port This port is used by the internal modem to communicate over standard voice grade telephone lines.
Speaker Located on the top of the computer above the keyboard,
the speaker provides sound for the unit.
Microphone The microphone is located to the right of the
keyboard below the thumbgrip.
Cradle Contacts Located on the bottom of the unit, the cradle
contacts allow connection to the optional vehicle cradle (not
shown).
1577-0001-002 06/99
Page 24
T5200 Users Manual
Standard Software
The Speaker Phone Application comes with the T5200 computer.
This application allows you to dial a number and talk with another
person over telephone lines. Other standard applications that come
with the computer are discussed in more detail in Section 3,
“Customizing Settings.”
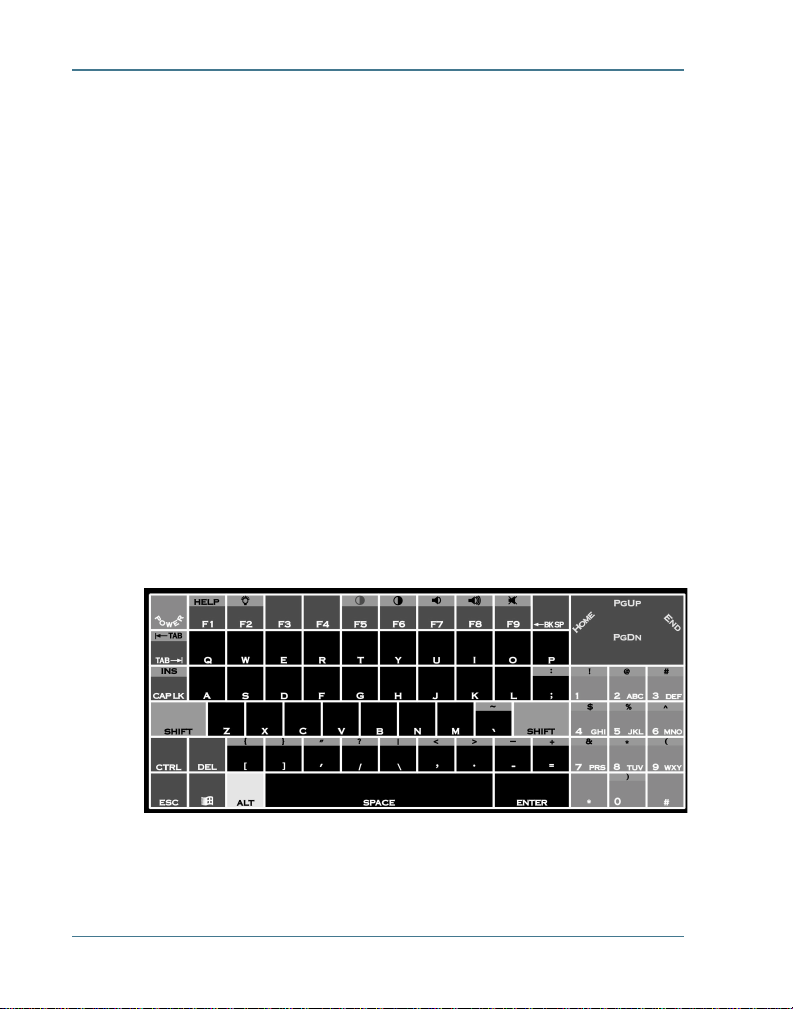
T5200 Computer Keyboard
The standard keyboard for the T5200 computer contains 75 keys
that are sealed to protect them from harsh environments. It includes
a telephone-type numeric keypad for entering or dialing numbers.
Pressing the SHIFT key allows you to enter characters located above
each key with the same background color as the SHIFT key. Also, the
ALT key works with the PGUP, PGDN, HOME and END keys. When a key
is pressed, a click provides audio feedback (if desired).
16 77-0001-002 06/99
Page 25

Section 2. A Closer Look at the T5200
CAUTION You can restart the T5200 computer by pressing
the POWER button for at least ten seconds and then releasing
it; however, restarting your computer while you are running
applications or working in Windows CE may cause data loss
or corrupt files.
Basic Keys
The following table shows the keys for basic operations. Appendix
C contains a complete description of key functions.
To do this... Press
Turn on the computer POWER
Turn off the computer POWER
T oggle the backlight on and off SHIFT+F2
Lighten the display contrast SHIFT+F5
Darken the display contrast SHIFT+F6
Decrease the volume SHIFT+F7
Increase the volume SHIFT+F8
T oggle the speaker on and off SHIFT+F9
Restart the computer POWER for
at least 10 sec.
1777-0001-002 06/99
Page 26
T5200 Users Manual
The SHIFT key is used in combination with other keys on the
keyboard to perform special functions. This key has been
designed as a “sticky” key for convenient one-handed
operation. Pressing the key once is the same as holding it
down until a second key is pressed.
For example, pressing SHIFT+F5 dims the display. W ith one
hand you can press SHIFT, release it, and then press F5. The
SHIFT key remains pressed until the second key is pressed.
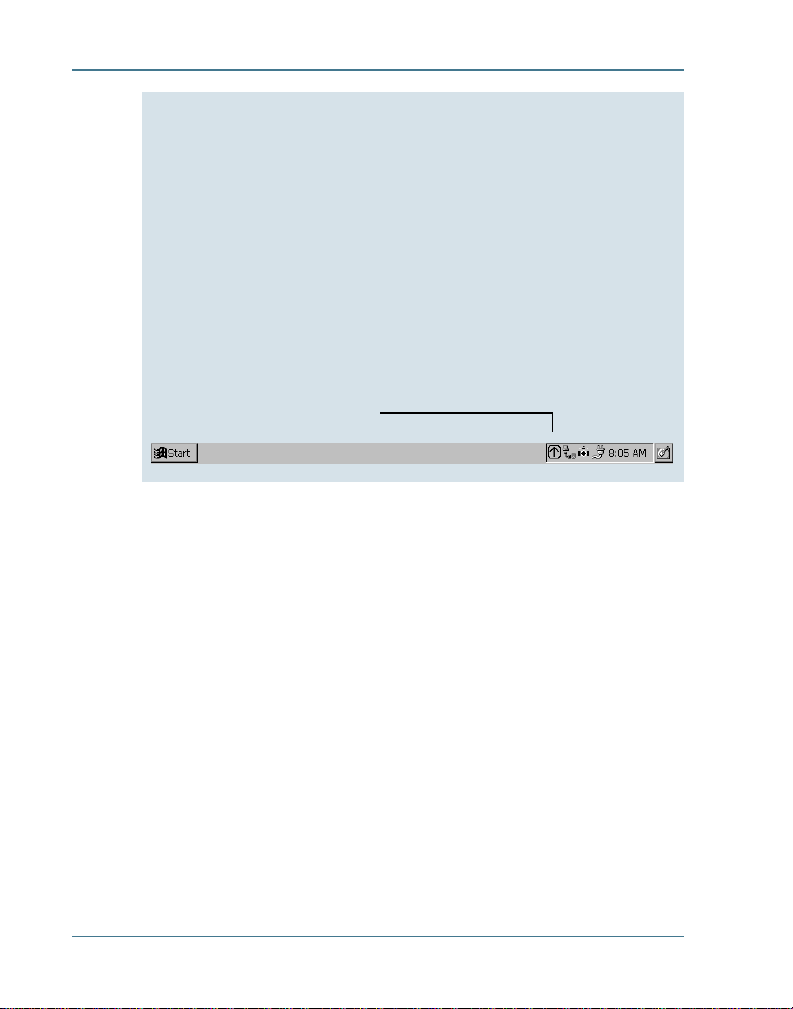
When the sticky shift key is enabled, the icon appears in the
taskbar area of the screen.
Keyboard Tips
18 77-0001-002 06/99
Page 27

Using the Stylus
CAUTION Use the stylus that comes with your T5200
computer. Don’t use sharp implements such as keys, pens or
mechanical pencils to touch the screen because they can
damage the screen.
To use the stylus
• Slide the stylus out of the slot on the hard handle or from the
clip below the display
If you have a shoulder strap, you may also have a slot or pocket
on the strap to hold the stylus
• To replace it, slide it into the appropriate slot or pocket point
first
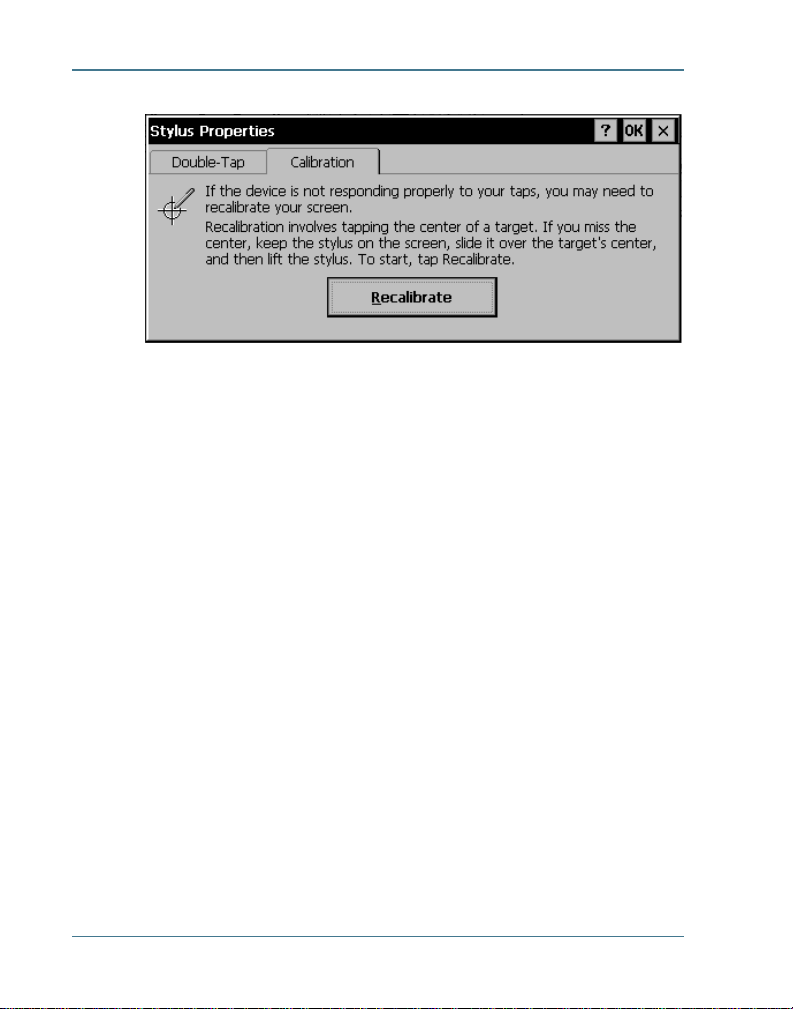
To recalibrate the touch screen
If you cannot select objects accurately with the stylus, you may
need to recalibrate the touch screen.
Section 2. A Closer Look at the T5200
1 T o open the calibration screen, simultaneously press CTRL, ALT,
EQUAL SIGN (=) or tap the Start Menu, select Control Panel and
double-tap the Stylus icon on the screen.
2 Select the Calibration T ab in the Stylus Properties box and tap
the Recalibrate button to bring up the target screen.
1977-0001-002 06/99
Page 28
T5200 Users Manual
3 Position and briefly hold the stylus at the center of each
crosshair or “target” as it appears on the screen.
4 After you have finished, press ENTER to accept the new settings
and OK in the Stylus Properties box to accept all changes.
20 77-0001-002 06/99
Page 29

SECTION 3
Customizing
Settings
○○○○○○○○○○○○○○○○○○○○○○○○○
Introduction 22
Control Panel 22
Communications 23
Display 24, 25
Keyboard 26
Network 26
Owner 26
Password 27
Power 28
Regional Settings 29
Remove Programs 30
Stylus 30
System 31
T5200 Information 32
Volume and Sounds 32, 33
TM
WE KNOW THE ROAD
21
Page 30

T5200 Users Manual
Introduction
You can customize several settings on the T5200 computer to suit
your own personal preference. These settings can be modified by
using the utilities under Control Panel. This section tells you about
these utilities and how to make changes.
Control Panel
T o access these utilities, tap the Start Menu, choose Settings,
choose Control Panel, and then double-tap the appropriate icon.
Important After making changes to settings in Control Panel,
you must tap OK to save them. Tapping the X closes the
window without saving any changes on any of the tabs.
22 77-0001-002 06/99
Page 31

Section 3. Customizing Settings
Communications
• Tap the Start Menu, select Settings, Control Panel, and then
double-tap the Communications icon.
This utility allows you to establish a name for your T5200 computer, which is important when connecting to a desktop computer.
You can also use this utility to set automatic dialing patterns and
make adjustments for communicating between computers.
Device Name
2377-0001-002 06/99
Page 32

T5200 Users Manual
PC Connection
Open this dialog box to make any necessary changes when you are
connecting to a desktop computer.
Display
• Tap the Start Menu, select Settings, Control Panel, and then
double-tap the Display icon
This utility allows you to change the background that appears on
your screen, or the backlight idle time/power saving settings.
To change your background
1 T ap Browse to locate an image you want to use. If you want
the image to cover the entire background, check “Tile image
on background.”
24 77-0001-002 06/99
Page 33

Section 3. Customizing Settings
2 T ap OK to close the window and save any new settings.
To change your backlight
1 T ap the Backlight tab to view the view the current backlight
defaults.
2 T ap the box to select or deselect the power saving options.
3 Change the idle time settings by typing in a new time or by
tapping the down arrow and selecting a new time from the
menu.
Note The Advanced button in the bottom right corner of the
Backlight window is grayed-out and does not function.
2577-0001-002 06/99
Page 34

T5200 Users Manual
Keyboard
• Tap the Start Menu, select Settings, Control Panel, and then
double-tap the Keyboard icon.
Move the sliders to adjust the key repeat rate. Refer to Appendix C
Keyboard Functions for additional information.
Network
The Network Configuration box lists the installed hardware devices
that enable your computer to connect to the network and the
identification process by which you may access data.
Owner
• Tap the Start Menu, select Settings, Control Panel, and then
double-tap the Owner icon.
Record owner information here, including your name, address, and
phone number(s). If you want this information to appear on the
screen each time you start your computer, check “Display Owner
26 77-0001-002 06/99
Page 35

Section 3. Customizing Settings
Identification” in the At Power On area. You can also add more
information in the Notes tab.
Password
• Tap the Start Menu, select Settings, Control Panel, and then
double-tap the Password icon.
To set or change your password
1 Set or change your password by entering a word of up to eight
characters—once in the Password box and again in the Confirm
Password box.
2 Check “Enable Password Protection.”
2777-0001-002 06/99
Page 36

T5200 Users Manual
Power
• Tap the Start Menu, select Settings, Control Panel, and then
double-tap the Power icon.
The Battery window provides information about the status of your
battery. The T5200 computer uses a Lithium Ion battery as the
main battery .
The T5200 computer uses a super capacitor as the backup battery.
CAUTION If you for get your password, you won’t be able to
access information on your computer. You must reset (cold
boot) the system, which will erase any data that was not saved
to Compact Flash or PC Card.
The super capacitor is automatically recharged from the main
battery and it never needs to be replaced.
T o conserve battery power , the computer automatically suspends
operation after two minutes of continuous idle time. You can
change this time by selecting the Power Off tab and then selecting a
different time from the list. The system will not suspend while
connected to external power, and if suspended will automatically
28 77-0001-002 06/99
Page 37

Section 3. Customizing Settings
turn on when connected to external power.
For important information about batteries and power, see Section 5,
“Power Management.”
Regional Settings
• Tap the Start Menu, select Settings, Control Panel, and then
double-tap the Regional Settings icon.
If the programs you are using support international settings, this
utility allows you to set the way these programs manage numbers,
currencies, times, and dates.
2977-0001-002 06/99
Page 38

T5200 Users Manual
Remove Programs
• Tap the Start Menu, select Settings, Control Panel, and then
double-tap the Remove Programs icon.
This utility enables you to remove programs you no longer need on
your computer. Check with your company’s help desk before
removing any programs from your system.
Stylus
• Tap the Start Menu, select Settings, Control Panel, and then
double-tap the Stylus icon.
Use this utility to calibrate your touch screen or to adjust the
double-tap rate of the stylus.
30 77-0001-002 06/99
Page 39

Section 3. Customizing Settings
System
• Tap the Start Menu, select Settings, Control Panel, and then
double-tap the System icon.
This utility provides general information about your Windows CE
system and also allows you to adjust unused internal memory on
your T5200 computer. The system is preset with the recommended
Program Memory and Storage Memory defaults. In general, an
increase in Program Memory allows your T5200 computer to run
more programs simultaneously , while an increase toward Storage
Memory allows for additional data storage.
3177-0001-002 06/99
Page 40

T5200 Users Manual
T5200 Information
• Tap the Start Menu, select Settings, Control Panel, and then
double-tap the T5200 Information icon.
From this utility , under the Version Tab, you can identify your
computers software version, build name, build date and boot
version. Under the Configuration T ab you can identify the Serial
Number and Configuration String of your software.
Volume and Sounds
• Tap the Start Menu, select Settings, Control Panel, and then
double-tap the Volume and Sounds icon.
From this utility, you can adjust the volume of sounds, or you can
turn sounds on or off. On the Volume tab, move the slider to adjust
volume; select or clear check boxes to turn sound on or off for
items.
32 77-0001-002 06/99
Page 41

Section 3. Customizing Settings
On the Sound tab, select the events on the Event Name list for
sounds that you want to hear. Choose None from the Event Sound
list to turn sound off for that event. Select Browse to locate a
different sound to use. Different schemes can be saved by selecting
Save As... and then naming the sound scheme.
3377-0001-002 06/99
Page 42

T5200 Users Manual
34 77-0001-002 06/99
Page 43

SECTION 4
Operating Your
T5200 Computer
○○○○○○○○○○○○○○○○○○○○○○○○○
Introduction 36
Connecting to a Desktop Computer 36
Installing Windows CE Services on Your Desktop 36
Establishing a Connection 37
Copying and Converting Files 38
Printing Files from the T5200 Computer 39
PC Cards 39
TM
WE KNOW THE ROAD
35
Page 44

T5200 Users Manual
Introduction
This section shows you how to connect your T5200 computer to a
desktop computer and how to transfer and print files.
Connecting to a Desktop Computer
Windows CE Services is a program that resides on your desktop
computer with Windows 95/98/NT installed. It allows you to
browse folders, files and install programs on the T5200 computer.
Setting up this program involves two steps: installing it on your
desktop, and then establishing a connection between computers.
You will need a 9-pin null modem serial cable for this connection,
and you can use any available serial port on your desktop. See
Section 7 Troubleshooting for the null modem serial cable connection specifications.
Installing Windows CE Services on
Your Desktop
There are several ways to install Windows CE Services onto your
desktop computer. Contact your company’s help desk for the
procedure established by your organization.
To install Windows CE Services
1 Use your company’s established procedure to run the Windows
CE Services setup program that installs this program onto your
36 77-0001-002 06/99
Page 45

Section 4. Operating Your Computer
desktop.
2 Follow the instructions on the screen.
3 After you choose Finish from the setup program, you will be
prompted to select a communications port.
After selecting this port, follow the next procedure to establish a
connection between your desktop computer and your T5200
computer.
Establishing a Connection
To establish a connection
1 Start Windows CE Services on your desktop computer if it is
not already running.
2 Turn on your T5200 computer by pressing the POWER button
once (if it is on battery power).
3 Insert the 9-pin null modem serial connector into the communi-
cations port on your desktop computer, which you selected
previously in the setup procedure.
4 Insert the other end of the null modem serial cable into the
serial port on the T5200 computer.
The connection process starts automatically.
Once your T5200 computer is connected to your desktop computer,
it displays files and folders on your T5200 computer. You cannot
run programs that are stored on your T5200 computer from
Windows CE Services.
3777-0001-002 06/99
Page 46

T5200 Users Manual
This connection icon is displayed in the taskbar on both the PC and
CE device when the connection is established and services are
enabled.
The following pop-up window is displayed when the initial
connection is made and services are established. T ap Hide to clear
the window , or Disconnect to disconnect from CE Services.
Copying and Converting Files
Windows CE uses the same method to copy files as Windows 95.
You can copy a file by dragging it to a destination or by using the
Cut, Copy , and Paste commands. Files are automatically converted
when they are copied between these systems. You can also specify
how files are converted by selecting File Conversion from the
T ools menu of Windows CE Services on your desktop.
38 77-0001-002 06/99
Page 47

Printing Files from the T5200
Computer
You can print files that reside on the T5200 computer using
Windows CE Services on your desktop computer.
To print a file
1 Connect the T5200 computer to your desktop computer and
start Windows CE Services.
2 In Windows CE Services, select the file you want to print.
3 Select File, and then choose Print.
PC Cards
If your T5200 computer is equipped with the optional PC Card
socket, you can use a PC Card, such as SRAM and Flash Memory
PC Cards, to transfer files.
Section 4. Operating Your Computer
3977-0001-002 06/99
Page 48

T5200 Users Manual
40 77-0001-002 06/99
Page 49

SECTION 5
Power
Management
○○○○○○○○○○○○○○○○○○○○○○○○○
Introduction 42
Practical Battery Tips 42
Low Battery Indicators 43
Checking Battery Power 43
Replacing Batteries 45
Charging Batteries 46
Battery Storage and Care 47
Disposing of Batteries 47
WE KNOW THE ROAD
TM
41
Page 50

T5200 Users Manual
Introduction
The T5200 computer uses a Lithium Ion (Li-ion) battery as the
main battery. This section provides some important information
about this battery and ways to extend its life.
The T5200 computer can be operated on battery power or external
power. If a battery is installed, the system automatically starts
charging the battery when external power is connected.
Practical Battery Tips
• Your battery will last longer during the day if it is used and
charged between 50o F and 86o F (10o C and 30o C)
• Charge the battery nightly where the temperature will remain
around 70o F (22° C)
• T urn off the computer manually whenever you are not using it
• Make sure your system suspends automatically. PC Cards,
custom applications, or modified system settings can affect this
• T urn of f the backlight when you do not need it
• T urn of f volume and sounds for events you do not need
• Avoid exposing batteries to extremely hot or cold temperatures
for long periods
• If you plan to store the computer for more than 30 days, backup
files and data, remove the battery, and store the battery in a dry
place
42 77-0001-002 06/99
Page 51

Section 5. Power Management
Low Battery Indicators
When the battery becomes low, the computer beeps and the low
battery icon appears in the taskbar. Double-tapping this icon opens
the Power Properties window so you can view the level of battery
power. If the battery becomes very low, the computer beeps and a
low battery message appears on the screen periodically. Unless you
replace the battery or connect external power, the computer shuts
off automatically .
Checking Battery Power
You can check the level of battery power by opening the Power
utility from Control Panel or by double-tapping the battery icon in
the taskbar. The Battery window provides information about the
status of your battery .
4377-0001-002 06/99
Page 52

T5200 Users Manual
T o conserve battery power , the computer automatically suspends
operation after two minutes of continuous idle time. You can
change this time by selecting the Power Off tab and then selecting a
different time from the list. The system will not suspend while
connected to external power even if the box is checked here.
44 77-0001-002 06/99
Page 53

Replacing Batteries
When operating on battery power, the T5200 computer is equipped
with enough internal backup power to maintain memory contents
for about ten minutes each time you exchange batteries.
CAUTION
You can lose data if you remove the existing battery while the
computer is operating on battery power. Before you remove
the battery , turn of f the computer by pressing the POW ER
button. You can also lose data if the battery is removed for
more than ten minutes.
Removing the battery exposes the internal components of the
computer to the environment. Whenever you remove the
battery, always shield the unit from contaminants such as
liquids, rain, snow , and dust.
To replace the battery
Section 5. Power Management
1 Press down on the battery near the latches, slide the battery
latches out and remove the battery.
2 Align the battery connectors and install a new battery .
3 Press down on the battery near the latches and slide the latches
into place to secure it.
4577-0001-002 06/99
Page 54

T5200 Users Manual
Charging Batteries
T o maintain power and prevent data loss from a low battery, charge
the battery daily. Use the AC Adapter that comes with your T5200
computer.
You can operate the T5200 computer while the battery is charging.
To charge the battery
1 Make sure the battery is installed properly in the T5200
computer.
2 Connect the appropriate end of the AC Adapter to an AC wall
outlet.
3 Connect the other end to the computer’s power port on the back
of the unit.
The battery starts charging automatically . A fully dischar ged
battery is fully charged in approximately three to four hours at
moderate temperatures, around 70o F (22° C). In warmer or
cooler temperatures, the fully discharged battery can take much
longer to fully charge.
Battery charging icon. Battery fully charged icon.
Note If the computer does not power on, press and hold the
POWER button for at least ten seconds and then release the
button to restart the computer.
46 77-0001-002 06/99
Page 55

Section 5. Power Management
Battery Storage and Care
Follow these guidelines to maintain performance of the Lithium Ion
battery.
• Avoid exposing batteries to extremely hot or cold temperatures
for long periods.
• Charge the battery nightly where the temperature will remain
around 70o F (22o C).
• Store the batteries within this temperature range: 50
(10o C to 30o C).
Disposing of Batteries
WARNING Disposing of the Lithium Ion battery improperly
can cause serious personal injury . Do not crush the battery or
place it in a fire. The battery is recyclable and, under various
state and local laws, it may be illegal to dispose of it into the
municipal waste stream. Check with your local solid-waste
officials for details on recycling options or proper disposal.
o
F to 86o F
4777-0001-002 06/99
Page 56

T5200 Users Manual
48 77-0001-002 06/99
Page 57

SECTION 6
Maintenance
and Storage
○○○○○○○○○○○○○○○○○○○○○○○○○
Introduction 50
Care and Cleaning 50
Storing Your T5200 Computer 51
TM
WE KNOW THE ROAD
49
Page 58

T5200 Users Manual
Introduction
The T5200 computer was designed to withstand rugged and harsh
environments. Following the guidelines in this section will help you
maintain the condition and performance of your computer.
Care and Cleaning
Physical Inspection Periodically inspect the computer and accessories for wear, damage, or loose or missing parts. Identifying and
correcting potential problems early can help reduce the need to
return the unit for service.
Outside Case Like all tools, the outside of the computer will get
dirty with use. The case can be cleaned with a solution of mild
detergent in water applied to a clean, soft cloth. Always wipe off
the computer with a soft cloth after cleaning.
Display Periodically inspect the display to make sure the contrast
and brightness functions are operating properly . To clean the
display, apply a household glass cleaner to a clean, dry, soft cloth
and then wipe the screen. Do not use paper products because they
can scratch the screen.
External Power Connector The external power connector may
sometimes be exposed to moisture and/or contamination causing an
unreliable connection to the external power source. Clean this
connector using a cotton swab dipped in isopropyl alcohol.
RJ-11 Connector Make sure this connector is operating properly .
During normal use, the connector pins can get dirty or become
broken, bent, or pushed out of place. Clean the connector with a
cotton swab dipped in isopropyl alcohol.
50 77-0001-002 06/99
Page 59

Section 6. Maintenance and Storage
Keyboard Check all keys to make sure they are working properly.
T o clean the keyboard, use a solution of mild detergent in water
applied to a clean, soft cloth.
I/O Ports Make sure the ports are working correctly. Periodically
inspect the ports for damage and contamination.
PC Card Connector If your computer is equipped with a PC Card
connector, make sure it is operating correctly by reading from or
writing to a PC Card.
Battery If moisture condenses on the battery and battery connec-
tors, remove it using a clean, dry cloth. The connectors may
corrode if they are exposed to moisture for extended periods.
Corrosion can be removed with a cotton swab dipped in isopropyl
alcohol.
Storing Your T5200 Computer
With a fully char ged battery, you can store the computer for
approximately 30 days without losing data in DRAM. If you plan
to store the computer for more than 30 days, follow these guidelines.
To store the T5200 computer
1 Use a reliable backup process to store files or data.
2 Exit all applications and turn off the computer.
3 Remove the battery from the unit and store it in a dry place.
4 Once the battery is removed, the computer is no longer weather
sealed, so you need to protect the computer’s internal components. Placing the computer inside a sealed, antistatic bag is
ideal for long-term storage.
5177-0001-002 06/99
Page 60

T5200 Users Manual
5 Store the unit within the recommended temperature ranges of
-40o F to +167o F (-40o C to +75o C).
If you use PC Cards, refer to the manufacturer’s instructions you
received with the card for storage and care information.
Note When you turn the computer on after it has been stored
for a long time, you may need to restart the system by
holding down the POWER button for about ten seconds and
then releasing it. You will also need to recalibrate the touch
screen. See the Getting Started section of this manual for
more information.
52 77-0001-002 06/99
Page 61

SECTION 7
Troubleshooting
○○○○○○○○○○○○○○○○○○○○○○○○○
Introduction 54
What to Try First 54
Operational Problems 55
Battery Problems 56
Display Problems 57
Keyboard Problems 58
Touch Screen Problems 58
Radio Problems 59
Desktop Communication Problems 60
TM
WE KNOW THE ROAD
53
Page 62

T5200 Users Manual
Introduction
This section provides some basic solutions to problems you might
have while using the T5200 computer or connecting to your
desktop computer. If you can’t find a solution here, contact your
company’s help desk.
What to Try First
If the T5200 computer stops functioning, try this first:
• Restart the system by pressing the POWER button for at least
10 seconds and then releasing the button.
If the computer still does not work, contact your company’s help
desk.
54 77-0001-002 06/99
Page 63

Operational Problems
The computer shuts off unexpectedly
• The computer has suspended automatically. Press the POWER
button to turn it back on.
• The battery may be critically low. Connect external power to
charge the battery, or replace the battery with a charged one.
The computer wont turn on
• The battery may not be installed properly, or it may not be fully
charged. Make sure a fully charged battery is properly installed.
• Connect external power to charge the battery if it is not charged.
• If you are using the AC Adapter, check the electrical outlet you
are using to make sure it is working properly.
• Try restarting the system by pressing the POWER button for at
least ten seconds and then releasing it.
The computer suspends too quickly
Section 7. Troubleshooting
• You can extend the auto-suspend time. From the Start Menu, tap
Settings, Control Panel, and then double-tap the Power icon.
Select the Power Off tab and enter a different time from the list.
The computer doesnt automatically suspend
• The computer will not suspend when it is connected to external
power.
5577-0001-002 06/99
Page 64

T5200 Users Manual
The computer has stopped working and restarting the system
doesnt work
• If the computer stops responding even after you’ve tried
restarting the system, you may need to do a full reset.
CAUTION Performing a full reset erases all data and files in
DRAM since the last time you backed up files to a desktop
computer, Compact Flash or PC Card.
• To reset the system, remove the battery, disconnect external
power, and then press the POWER button for at least 20
seconds. Reinstall the battery and connect external power. The
T5200 computer turns on automatically once external power is
applied.
Battery Problems
The battery does not charge
• Move the computer to a location with a moderate temperature
of around 70o F (22o C) to charge the battery
• Make sure the AC Adapter cables are connected properly.
When connected and charging, the battery charging icon
displays in the taskbar
Taskbar
Battery charging icon
56 77-0001-002 06/99
Page 65

The battery doesnt last very long
• Turn off the computer whenever you’re not using it
• Shorten the time the backlight automatically shuts off
• Turn off sound and volume to events you do not need
• Charge the battery nightly where the temperature will remain
around 70o F (22o C)
Display Problems
The display is too dark or too light to read
• The system may have suspended operation automatically. Turn
the computer on by pressing the POWER button once.
• Adjust the contrast by pressing SHIFT+F5 or SHIFT+F6
• Toggle the backlight on by pressing SHIFT+F2
The display performance is slow
Section 7. Troubleshooting
• The temperature may be too cold. Move the computer to a
warmer operating environment.
5777-0001-002 06/99
Page 66

T5200 Users Manual
Keyboard Problems
PGUP, PGDN, HOME, and END keys dont work
• Press and hold ALT and then the appropriate key
I cant tell if the computer recognizes keys when I press them
• Enable key clicks and/or adjust the volume
T o enable key clicks from the Start Menu, tap Settings, Control
Panel, and then double-tap the Volume and Sounds icon. To
hear audio feedback when you press a key, make sure the “Key
Clicks” box is checked on the Volume tab. Move the slider to
adjust the loudness.
Touch Screen Problems
When I tap the screen with the stylus, nothing happens
• T ry recalibrating the touch screen
T o recalibrate the screen simultaneously press CTRL, ALT, EQUAL
(=), and follow the directions on the screen.
SIGN
58 77-0001-002 06/99
Page 67

Radio Problems
How can I tell if my radio is working?
• Enable a RIM Radio communications session
T o enable a RIM Radio communication session from the Start
Menu, tap Programs, Communication, and T erminal. Doubletap the “Make a New Session” icon to bring up the Session
Properties dialogue box. On the Communications Tab name
your session, select modem “RIM Radio on COM4” then tap
the Configure button. Under the Device Properties Port
Settings tab, check Manual Dial and configure the Connection
Properties as follows:
Baud Rate 9600
Data Bits 8
Parity None
Stop Bits 1
Flow Control Hardware
T ap OK to save these settings and return to Session Properties.
Enter any digit in the T elephone Number block and tap OK.
This will bring up the Connection Dialing status window for
your session . T ype in “menu” at the command line to view
options for this session. Select an option from the menu for
your session. When finished tap OK.
• Enable a CDPD communications session
T o open a terminal session to your CDPD modem from the Start
Menu, tap Programs, Communication, and T erminal. Doubletap the “Make a New Session” icon to bring up the Session
Properties dialogue box. On the Communications Tab name
your session, select modem “CDPD on COM4” then tap the
Section 7. Troubleshooting
5977-0001-002 06/99
Page 68

T5200 Users Manual
Configure button. Under the Device Properties Port Settings
tab, check Manual Dial and configure the Connection Properties
as follows:
Baud Rate 19200
Data Bits 8
Parity None
Stop Bits 1
Flow Control Hardware
T ap OK to save these settings and return to Session Properties.
Enter any digit in the T elephone Number block and tap OK.
This will bring up the Connection Dialing status window for
your session. T ype AT and wait for an OK. This creates a
terminal connection to the internal CDPD modem. Refer to
your CDPD modem User’s Manual for information on commands available for your modem.
Desktop Communication Problems
I have installed Windows CE Services on my desktop, but I still
cannot see files and folders that reside on my T5200 computer.
• Make sure the null modem serial cable from the T5200 com-
puter is connected to an appropriate serial port on your desktop
• Make sure the null modem serial cable is inserted correctly
• Verify both are communicating at the same speed
• Check the communications settings on the T5200 computer and
your desktop:
60 77-0001-002 06/99
Page 69

Section 7. Troubleshooting
To check communications settings on the T5200 computer
1 From the Start Menu, select Settings, Control Panel, and
then double-tap the Communications icon.
2 Select the PC Connection tab and make sure the “Allow
connection with desktop computer when H/PC is attached”
box is checked.
To check communications settings on your Windows 95/98/
NT desktop computer
1 From the Start Menu, select Settings, Control Panel, and
then choose System.
2 Select the Device Manager tab, select Modem, and then
choose the communications port you are using.
3 Select the Modem tab and make sure the port you are using
matches the one that appears in the list.
Null modem Serial Cable Pin Assignments:
1 234 56789
N/C
4 326&1 54879
5
9
1
6
Null modem Cable
6177-0001-002 06/99
Page 70

T5200 Users Manual
62 77-0001-002 06/99
Page 71

APPENDIX A
Expanding Your
T5200 Computer
○○○○○○○○○○○○○○○○○○○○○○○○○
Introduction 64
Options 64
PC Card Socket 64
Expansion DRAM 64
Expansion Flash (Compact Flash) 64
Radio Modem 65
Peripherals 65
Vehicle Cradle 65
Vehicle Adapter 67
AC Adapter 68
Stand Alone Battery Charger 69
TM
WE KNOW THE ROAD
63
Page 72

T5200 Users Manual
Introduction
The T5200 computer comes with many built-in features. You can
also add options and order many peripherals to expand the capabilities of your system. Several accessories are also available for
your T5200 computer.
This section shows you the options available for your T5200
computer and the peripherals and accessories you can order.
Contact your company’s help desk for a current list of equipment.
Options
PC Card Socket
• Type III socket
• Accepts both Storage and I/O Cards
• PCMCIA version 2.1
Expansion DRAM
• 16 MB (Total 32 MB)
Expansion Flash (Compact Flash)
• 8 and 15 MB
64 77-0001-002 06/99
Page 73

Radio Modem
The T5200 computer has several radio options for networks.
These include Bell South Wireless Data (Mobitex), American
Mobile/Ardis (DATATAC) and CDPD. Contact your company’s
help desk for a current list of the various modem options.
Peripherals
Vehicle Cradle
The Vehicle Cradle is a vehicle-based docking station designed to
safely secure the computer in the vehicle. A standard key lock
located in the front of the cradle locks the computer onto the cradle
for security purposes. You can use the vehicle cradle to:
• Charge batteries
• Communicate with other devices (serial communications)
• Radio connection for external antennas (option)
Appendix A. Expanding Your T5200 Computer
Charging Batteries
The Vehicle Cradle is designed to charge the computer’s battery
with voltage from the vehicle battery while you are traveling.
Follow the procedure below to charge a Lithium Ion (Li-ion)
battery.
6577-0001-002 06/99
Page 74

T5200 Users Manual
Important
• A temperature of 0º to +50º Celsius (32º to +122º Fahrenheit) is
recommended when charging batteries with the Vehicle Cradle.
Batteries may not charge successfully outside this temperature
range.
To charge a battery installed in the T5200 computer
1. Place the computer onto the Vehicle Cradle, making sure it is
securely latched.
2. The vehicle cradle automatically begins fast charging the
battery.
CAUTION
• There are no user-replaceable parts within the Vehicle
Cradle, so do not open the Cradle case. The Vehicle
Cradle is internally protected. It resets automatically if
there is a power fault.
• Do not use the Vehicle Cradle to charge the computer
battery overnight. Turn off the Vehicle Cradle at the end
of each work day to prevent draining the voltage in your
vehicle’s battery below starting levels.
Communicating with Other Devices
The Vehicle Cradle is designed with a standard serial port so you
can connect external devices such as a printer or modem. Specify
COM1 when you select the communications port in your application. Connect the external device to the serial port on the back of
the cradle, and then place the mobile computer onto the vehicle
cradle. You can install or remove the computer from the vehicle
66 77-0001-002 06/99
Page 75

Appendix A. Expanding Your T5200 Computer
cradle without connecting or disconnecting a printer or modem
cable from the cradle.
As an option, an external RF antenna also can be connected to the
cradle using the TNC RF connector on the back. Contact your
supervisor or your organization’s help desk for information about
using an external antenna.
CAUTION
• Turn off the Vehicle Cradle at the end of each work day to
prevent draining the voltage in your vehicle’s battery
below starting levels.
Vehicle Adapter
The Vehicle Adapter is an optional device that supplies power from
the vehicle battery to operate the computer and charge the battery
installed in the unit. It typically connects to the vehicle battery
using the cigarette lighter socket.
CAUTION
• There are no user-replaceable parts within the Vehicle
Adapter, so do not open the Adapter case. The Vehicle
Adapter is internally protected. It resets automatically if
there is a power fault.
• Do not use the Vehicle Adapter to charge the computer
battery overnight. Turn off the Vehicle Adapter at the end
of each work day to prevent draining the voltage in your
vehicle’s battery below starting levels.
6777-0001-002 06/99
Page 76

T5200 Users Manual
T o prevent possible damage to the battery, the system will not
allow the battery to charge at extreme temperatures. Be aware of
the following charging characteristics, especially if the computer is
left unattended in a closed vehicle.
Temperature Charging Activity
<0°C (<32°F) Battery will not charge
>50°C (>122°F) Battery will not charge
To connect the Vehicle Adapter
1. Insert the Vehicle Adapter’s power cord into the power port on
the side of the T5200 computer.
2. Insert the cigarette lighter adapter into the vehicle’s cigarette
lighter socket, turning it slightly to make a good connection.
The power light illuminates to indicate that current is reaching
the Vehicle Adapter. When you connect the Vehicle Adapter, it
automatically begins fast charging the computer’s battery. At
moderate temperatures, around 70º Fahrenheit (22° C), the
battery will be fully charged within about three hours (charging
times will vary depending on the power level remaining in the
battery prior to starting the charge). Under extremely cold or
hot temperatures, however, the battery will not charge.
AC Adapter
The AC Adapter is an optional charging device used to charge a
Lithium Ion battery and externally power the T5200 computer. This
charger allows you to charge the battery while operating the
computer on AC input power. The operating temperature for this
device is 0º to +50º Celsius (+32º to +122º Fahrenheit). Operating
the AC Adapter outside of this temperature range may damage the
battery.
68 77-0001-002 06/99
Page 77

Appendix A. Expanding Your T5200 Computer
To connect to external power
1. Insert the appropriate end of the AC Adapter power cord into
the power port on the T5200 computer; insert the other end of
the power cord into an electrical wall outlet.
The AC Adapter automatically begins fast charging the battery .
At moderate temperatures, around 70º Fahrenheit, the battery
will complete charging in approximately three hours. The AC
Adapter is intended for in-house use and should not be used in
extreme conditions.
CAUTION
• There are no user-replaceable parts within the AC
Adapter, so do not open the Adapter case. The AC
Adapter is internally protected. It resets automatically if
there is a power fault.
Stand Alone Battery Charger
The Stand Alone Battery Charger is an optional charging device
used to charge a Lithium Ion battery. This charger allows you to
charge an additional T5200 battery for the mobile computer . The
operating temperature for this device is 0º to +50º Celsius (+32º to
+122º Fahrenheit). Operating the Stand Alone Battery Charger
outside of this temperature range may damage the battery.
To charge a battery
1. Insert the appropriate end of the power cord into the power port
on the Stand Alone Battery Charger; insert the other end of the
power cord into an electrical wall outlet, the AC Adapter or the
Vehicle Adapter.
6977-0001-002 06/99
Page 78

T5200 Users Manual
2. Align the connectors and place the battery onto the charger.
The charger automatically begins fast charging the battery. At
moderate temperatures, around 70º Fahrenheit (22° C), the
battery will complete charging in approximately three hours.
Under extremely cold or hot temperatures, however, the battery
will not charge.
CAUTION
• There are no user-replaceable parts within the Stand
Alone Battery Charger, so do not open the Charger case.
The Stand Alone Battery Charger is internally protected. It
resets automatically if there is a power fault.
70 77-0001-002 06/99
Page 79

APPENDIX B
Hardware
Specifications
○○○○○○○○○○○○○○○○○○○○○○○○○
Physical Features 72
Display 72
Processor and Memory 72
Input/Output 73
Power 73
Communications 74
Modems 74
T elephone Line Connector 74
WE KNOW THE ROAD
TM
71
Page 80

T5200 Users Manual
Physical Features
• Length: 9.8 inches
• W idth: 5.0 inches
• Height: 2.25 inches
Display
• 7.3-inch, 640x240 pixel resolution
• T ransflective monochrome; 16-shades of gray
• Passive touch screen, pressure sensitive for finger or stylus
• Backlight and contrast controls
Processor and Memory
• Philips PR31700 CPU, 32-bit 73.7 MHz MIPS-based RISC
processor
• 16 MB DRAM (maximum 32 MB)
• 16 MB system flash memory (nonvolatile)
• Internal compact flash connector for optional expansion
memory (various capacities)
72 77-0001-002 06/99
Page 81

Input/Output
• Fully-sealed, 75-key QWERTY keyboard
• Passive pen or finger touch screen
• Full duplex RS-232, 9-pin “D” serial port
• IrDA Level 1 serial port
• Sealed headset jack
• Built-in RJ-11 phone jack
• External power
• 5VDC power supply from serial port to power peripherals
• Vehicle cradle contacts and serial out of contacts
Power
• 3 cell Lithium Ion battery at 10.8V
• High efficiency SMPS 3.3V, 5V, and 12V
• External 18V power supply (AC and Vehicle)
• Cradle contacts for vehicle-based power supply
• Stand Alone Battery Charger
Appendix B. Hardware Specifications
7377-0001-002 06/99
Page 82

T5200 Users Manual
Communications
Modems
• 33.6 Kbps V.34 fax/data wireless modem
• ARDIS network (DAT ATAC)
• Bell South W ireless Data network (Mobitex)
• CDPD
Telephone Line Connector
• Built-in RJ-11 jack
74 77-0001-002 06/99
Page 83

APPENDIX C
Keyboard
Functions
○○○○○○○○○○○○○○○○○○○○○○○○○
Introduction 76
Power On/Off 77
Function Keys 78
Primary Keys 78
Numeric Keys 79
Customizing Keyboard Settings 80
Adjusting the Key Repeat Rate 80
Adjusting Audio Feedback 81
WE KNOW THE ROAD
TM
75
Page 84

T5200 Users Manual
Introduction
This section provides a detailed description of key functions for the
standard keyboard. Special features and custom keyboard overlays
also can be developed. Contact your company’s help desk for a
description of key functions if you have a custom keyboard.
The keyboard for the T5200 computer is a fully sealed, 75-key
QWER TY keyboard. It includes a numeric keypad for entering or
dialing numbers. When a key is pressed, a click provides audio
feedback. See “Customizing Keyboard Settings” later in this
section to change this setting.
76 77-0001-002 06/99
Page 85

The SHIFT key is used in combination with other keys on the
keyboard to perform special functions. The shift key has been
designed as “sticky” key for convenient one-handed operation. Pressing the key once is the same as holding it down
until a second key is pressed.
For example, pressing SHIFT+F5 dims the display. With one
hand you can press SHIFT, release it, and then press F5. The
SHIFT key remains pressed until the second key is pressed.
When the sticky key is enabled, the icon appears in the tray
area of the screen.
Power On/Off
Press To do this...
POWER Turn on the computer
POWER Turn off the computer
POWER for at least 10 sec. Restart the computer
POWER for at least 20 sec. Reset the computer
(with battery removed)
Appendix C. Keyboard Functions
Keyboard Tips
CAUTION You can restart the computer by pressing the
POWER button for at least ten seconds and then releasing it;
however, restarting your computer while you are running
applications or working in Windows CE may cause data loss
or corrupt files.
7777-0001-002 06/99
Page 86

T5200 Users Manual
Function Keys
Key(s) Description
SHIFT+F2 Toggles the backlight on and of f
SHIFT+F5 Lightens the display
SHIFT+F6 Darkens the display
SHIFT+F7 Decreases the volume
SHIFT+F8 Increases the volume
SHIFT+F9 Turns off the speaker
Primary Keys
Pressing the SHIFT key produces upper case alphabetic characters
and the symbols and functions (such as |¬TAB) shown above the
keys. You also can press CAP LK to enter upper case alphabetic
characters; however, even when CAP LK is pressed SHIFT must also be
pressed to enter the characters located above each key.
Key(s) Description
BK SP Deletes one character to the left
TAB Moves the cursor to the next tab stop
SHIFT|¬TAB Used for backtab
SHIFT+INS Inserts a character within a line (may vary
depending on the software used)
CAP LK Locks alphabetic characters in the upper case
position
CTRL Works with other keys to perform various
functions
DEL Deletes highlighted text or object
78 77-0001-002 06/99
Page 87

Key(s) Description
ESC Cancels the current operation
Displays the Windows CE Start menu
ALT W orks with other keys to perform various
functions
SPACE Enters one space
ENTER T ells the computer to process the information you
have typed or selected
ALT+PGUP Moves information on the screen up one page
ALT+PGDN Moves information on the screen down one page
ALT+HOME Moves the cursor to the top, left corner of the
screen
ALT+END Moves the cursor to the bottom, right corner of
the screen
Numeric Keys
The keypad emulates the numeric keypad typically found on a fullsize keyboard. It is arranged like a telephone touch pad. It also
contains alphabetic characters you can use when dialing telephone
numbers. Press SHIFT to enter the characters shown above each key.
Appendix C. Keyboard Functions
7977-0001-002 06/99
Page 88

T5200 Users Manual
Customizing Keyboard Settings
You can adjust the rate at which keys repeat when you hold them
down, and you can adjust the sound of key presses.
Adjusting the Key Repeat Rate
1 T ap the Start Menu, select Settings, Control Panel, and then
double-tap the Keyboard icon.
2 Move the sliders to adjust the key repeat rate, and then tap OK
to save the new settings.
80 77-0001-002 06/99
Page 89

Appendix C. Keyboard Functions
Adjusting Audio Feedback
• Tap the Start Menu, select Settings, Control Panel, and then
double-tap the Volume and Sounds icon.
Under “Enable clicks & taps for:” you can turn off the audio
feedback by clearing the Key Clicks box, or you can adjust the
sound of clicks by selecting Loud or Soft.
8177-0001-002 06/99
Page 90

T5200 Users Manual
82 77-0001-002 06/99
Page 91

APPENDIX D
Statements and
Notices
○○○○○○○○○○○○○○○○○○○○○○○○○
Compliance Statements
The T5200 computer has been tested and found to comply with the limits for
a Class B digital device, pursuant to Part 15 of the FCC Rules. These limits
are designed to provide reasonable protection against harmful interference in a
residential installation. This equipment generates, uses, and can radiate radio
frequency energy and, if not installed and used in accordance with the
instructions, may cause harmful interference to radio communications.
However, there is no guarantee that interference will not occur in a particular
installation.
CAUTION While the radio is operating, its antenna must be at
least 29mm (1.25 inches) from all persons in order to comply
with the FCC RF exposure limit. Radio operators must make
sure their radio unit is in compliance with these FCC regulations.
If this equipment does cause harmful interference to radio or television
reception, which can be determined by turning the equipment off and on, the
user is encouraged to try to correct the interference by one or more of the
following measures:
TM
WE KNOW THE ROAD
83
Page 92

T5200 Users Manual
• Reorient or relocate the receiving antenna.
• Increase the separation between the equipment and receiver.
• Connect the equipment into an outlet on a circuit different from that to
which the receiver is connected.
• Consult the dealer or an experienced radio/TV technician for help.
The T5200 computer complies with Part 68 of the FCC Rules. On the bottom
of this equipment is a label that contains, among other information, the FCC
registration number and ringer equivalence number (REN) for this equipment.
If requested, this information must be provided to the telephone company.
The REN is used to determine the quantity of devices which may be connected
to the telephone line. Excessive RENs on the telephone line may result in the
devices not ringing in response to an incoming call. In most, but not all areas,
the sum of the RENs should not exceed five (5.0). To be certain of the number
of devices that may be connected to the line, as determined by the total RENs,
contact the telephone company to determine the maximum REN for the calling
area.
The T5200 computer may be connected to the telephone network using the
RJ-11 jack provided.
If this equipment causes harm to the telephone network, the telephone
company will notify you in advance that temporary discontinuance of service
may be required. If advance notice isnt practical, the telephone company will
notify the customer as soon as possible. Also, you will be advised of your right
to file a complaint with the FCC if you believe it is necessary.
The telephone company may make changes in its facilities, equipment,
operations, or procedures that could affect the operation of the equipment. If
this happens, the telephone company will provide advance notice in order for
you to make the necessary modifications in order to maintain uninterrupted
service.
If trouble is experienced with this equipment, please contact the equipment
manufacturer for repair and/or warranty information. Do not attempt repairs of
this equipment yourself without obtaining manufacturer authorized parts and
documentation. If the trouble is causing harm to the telephone network, the
telephone company may request you remove the equipment from the network
until the problem is resolved.
84 77-0001-002 06/99
Page 93

Appendix D. Agreements and Notices
Compliance Statement for Canada
NOTICE: The Industry Canada label identifies certified equipment. This
certification means that the equipment meets certain telecommunications
network protective, operational and safety requirements as prescribed in the
appropriate Terminal Equipment Technical Requirements document(s). The
Department does not guarantee the equipment will operate to the users
satisfaction.
Before installing this equipment, users should ensure that it is permissible to
be connected to the facilities of the local telecommunications company. The
equipment must also be installed using an acceptable method of connection.
The customer should be aware that compliance with the above conditions may
not prevent degradation of service in some situations.
Repairs to certified equipment should be made by a representative designated
by the supplier. Any repairs or alterations made by the user to this equipment,
or equipment malfunctions, may give the telecommunications company cause
to request the user to disconnect the equipment.
Users should ensure for their own protection that the electrical ground
connections of the power utility, telephone lines, and internal metallic water
pipe system, if present, are connected together. This precaution may be
particularly important in rural areas.
CAUTION! Users should not attempt to make such connections themselves,
but should contact the appropriate electric inspection authority, or electrician,
as appropriate.
The Ringer Equivalence Number (REN) for this device is located on the
Equipment Identification Label affixed to the bottom of the computer.
NOTICE: The Ringer Equivalence Number (REN) assigned to each terminal
device provides an indication of the maximum number of terminals allowed to
be connected to a telephone interface. The termination on an interface may
consist of any combination of devices subject only to the requirement that the
sum of the Ringer Equivalence Numbers of all the devices does not exceed 5.
The T5200 computer may be connected to the telephone network using the
RJ-11 jack provided.
Fax Branding
The Telephone Consumer Protection Act of 1991 makes it unlawful for any
person to use a computer or other electronic device to send any message via a
telephone fax machine unless such message clearly contains in a margin at
the top or bottom of each transmitted page or on the first page of the
8577-0001-002 06/99
Page 94

T5200 Users Manual
transmission, the date and time it is sent and an identification of the business
or other entity, or other individual sending the message and the telephone
number of the sending machine or such business, other entity, or individual.
In order to program this information into your fax machine, you should
complete the following:
This information is entered through the FAX application
software you have installed. Consult your FAX software
documentation for instructions about entering this information.
Warnings and Cautions
Warning It is important that only authorized Itronix personnel attempt repairs
on Itronix equipment as this might void any maintenance contract with your
company. Unauthorized service personnel might be subject to shock hazard
on some Itronix equipment if removal of protective covers is attempted.
The product you have purchased is powered by a rechargeable battery. The
battery is recyclable and, under various state and local laws, it may be illegal
to dispose of this battery into the municipal waste stream. Do not crush the
battery or place it in a fire. Check with your local solid-waste officials for
details on recycling options or proper disposal.
Caution Internal components of the T5200 computer will be damaged if
exposed to contaminants. When the PC card door is open or the battery is
removed, shield the unit from all contaminants such as liquids, rain, snow,
and dust.
Federal Communication Commission (FCC) Regulations for the
Intellicharger
The T5200 computer Intellicharger has been tested and found to comply with
the limits for a Class B digital device, pursuant to Part 15 of the FCC Rules.
These limits are designed to provide reasonable protection against harmful
interference in a residential installation. This equipment generates, uses, and
can radiate radio frequency energy and, if not installed and used in accordance
with the instructions, may cause harmful interference to radio communications. However, there is no guarantee that interference will not occur in a
particular installation.
86 77-0001-002 06/99
Page 95

Appendix D. Agreements and Notices
If this equipment does cause harmful interference to radio or television
reception, which can be determined by turning the equipment off and on, the
user is encouraged to try to correct the interference by one or more of the
following measures:
• Reorient or relocate the receiving antenna.
• Increase the separation between the equipment and receiver.
• Connect the equipment into an outlet on a circuit different from that to
which the receiver is connected.
• Consult the dealer or an experienced radio/TV technician for help.
Warning It is important that only authorized Itronix personnel attempt repairs
on Itronix equipment as this might void any maintenance contract with your
company. Unauthorized service personnel might be subject to shock hazard
on some Itronix equipment if removal of protective covers is attempted.
Safety Information
The following safety symbols are used in this manual to indicate potential
dangerous situations. Do not proceed beyond a WARNING or CAUTION
symbol until the indicated conditions are met.
CAUTION This caution statement denotes a hazard. It calls attention to
a procedure or practice that could result in damage to or destruction of
part or all of the product if not performed correctly.
WARNING This warning statement denotes a hazard. It calls attention
to a procedure or practice that could result in personal injury if not
performed correctly.
8777-0001-002 06/99
Page 96

T5200 Users Manual
88 77-0001-002 06/99
Page 97

Index
○○○○○○○○○○○○○○○○○○○○○○○○○
A
AC Adapter 5, 46
address, entering personal 26
adjusting the double-tap rate 30
adjusting the key repeat rate 26, 80
adjusting the screen 8
ARDIS wireless network 11
audio feedback, adjusting 32, 81
auto-suspend 28, 44
B
background for display 24
backup power 45
basic keys 17
battery
charging 5, 46
checking power 28, 43
cleaning connectors 51
disposing of 47
installing 4
low indicators 43
recycling 47
WE KNOW THE ROAD
replacing 45
storage and care 47
temperatures 42
tips 42
troubleshooting 56
C
calibrating the touch screen 7, 19
CDPD service 12
cellular network 12
changing default settings 22
changing your password 27
chargers
stand alone 68, 69
vehicle cradle 65
charging batteries 5, 46
checking battery power 28, 43
cleaning your computer 50
clock, setting 8
TM
89
Page 98

T5200 Users Manual
communications
connecting to a desktop 24
radio 11
compliance statements 83
connecting to a desktop computer
24, 36
conserving battery power 42
Control Panel 22
converting files 38
copying files 38–39
customizing
audio feedback 32, 81
communications 23
display background 24
double-tap rate 30
international settings 29
key repeat rate 80
owner information 26
volume and sounds 32
your computer name 23
D
data, transferring 38, 39
date, setting 8
deleting programs 30
desktop computer
connecting 36
troubleshooting 60
display
adjusting 8
background 24
cleaning 50
troubleshooting 57
disposing of batteries 47
double-tap rate, adjusting 30
E
entering your name and address 26
equipment, standard 3
expanding your T5200 computer 64
external power 5, 42, 46
vehicle cradle 65
F
FCC statements 83
features, T5200 computer 14, 72
files, copying and converting 38–39
function keys 78
G
getting started 3
H
hardware specifications 72
hardware, standard 15
I
identification 26
if you forget your password 10
if you have a radio 11
installing software 36
installing the battery 4
international settings 29
K
key repeat rate, adjusting 26, 80
90 77-0001-002 06/99
Page 99

Index
keyboard 16–17, 76
adjusting audio feedback 32, 81
adjusting the key repeat rate 26, 80
basic keys 17
cleaning 51
key descriptions 78
sticky keys 18, 77
tips 18, 77
troubleshooting 58
L
Lithium Ion battery 42
M
maintaining your computer 50
MOBITEX network 11
N
name, entering personal 26
naming your computer 23
numeric keys 79
O
options 64
overview of the T5200 computer 14
owner information 26
peripherals 65
personal information, entering 26
phone number, entering 26
power
backup 45
battery 43
checking battery 28
conserving 28
external 5, 42, 46
power port, cleaning 50
precautions 2
primary keys 78
printing 39
R
radio
registering 11
RF signals 12
troubleshooting 59
RAM network 11
recalibrating the touch screen 7, 19
recycling batteries 47
regulatory information 83
removing and replacing the battery 45
removing programs 30
restarting the computer 17, 56, 77
resuming 6
RJ-11 connector, cleaning 50
P
password 10, 27
PC Cards 2, 39
pen/touch screen
calibrating 19
troubleshooting 58
S
safety symbols 87
screen
adjusting 8
background 24
cleaning 50
troubleshooting 58
9177-0001-002 06/99
Page 100

T5200 Users Manual
setting or changing your password
10, 27
setting the date and time 8
settings, changing default 22
software
installing 36
removing 30
standard 16
sounds, turning on or off 32
specifications 72
stand alone charger 68, 69
standard equipment 3
standard hardware 15
standard software 16
startup instructions 4
startup problems, solutions to 9
startup tasks 7
sticky keys 18, 77
storing batteries 47
storing your computer 51–52
stylus 19, 30
system information 31
T
T5200 computer
cleaning 50
connecting to a desktop computer 36
expanding with options 64
features 14, 72
full restart 56
hardware specifications 72
keyboard 16, 76
maintaining 50
naming 23
overview 14
peripherals 65
restarting 17, 77
T5200 computer (continued)
storing 51
stylus 19, 30
troubleshooting 55
turning on and off 77
using the first time 4
temperatures 42, 47, 57
things you need to do at startup 7
time, setting 8
tips
battery 42
keyboard 18, 77
touch screen
calibrating 7, 19
troubleshooting 58
transferring files 38, 39
troubleshooting 54
U
unpacking your system 3
V
vehicle cradle 65
volume, adjusting 32
W
Windows CE 31
Windows CE Services 36–39
troubleshooting 60
wireless network 11–12
World Clock, setting 8
92 77-0001-002 06/99
 Loading...