

Page 1
GoBook Pro Help Page 1 of 74
Getting Started
Congratulations on your purchase of the Itronix GoBook Pro computer! Your new GoBook Pro
features the most innovative advances in portable computing technology. It combines state-of-the-art
ergonomics with a rugged, durable architecture to provide you with a notebook computer that is
compact, powerful, rugged and easy to use. Designed for a wide range of business and personal
productivity applications, the GoBook Pro is an ideal choice for use in applications that require the
ultimate in ruggedness, durability, performance and intrinsic safety.
For maximum expandability without compromising portability, the GoBook Pro accommodates a
number of modules, including USB interfaces and one PC card slot. The high capacity hard disk drive
provides you with plenty of storage space for multimedia files and applications.
The GoBook Pro features a standard 81-key Nitevue® keyboard (82-key international). The highresolution 10.4-inch touch screen LCD panel provides clear and crisp viewing with touch screen
convenience.
This User’s Guide contains all the information you need to set up and use your new GoBook Pro. It
describes all the features of the GoBook Pro in an easy-to-read yet thorough manner.
1. Getting Started Topics
GoBook Pro Help
file://C:\WINDOWS\TEMP\~hh6357.htm 5/23/01
Page 2

GoBook Pro Help Page 2 of 74
Unpacking Your System
Inside your packaging you will find:
l Itronix GoBook Pro computer
l Power cord
l AC adapter
l Battery
l 2 Styluses
l GoBook Pro Quick Start Guide
You may have additional components or peripherals if you ordered these items separately. Check your
packing slip for a complete list of items included in your package.
79_0100_001
© 2001 Itronix Corporation. All rights reserved.
1. Getting Started Topics
GoBook Pro Help
Precautions
You can use your computer under a wide range of environmental conditions. However, to ensure long
use and continued high performance, consider the following factors when setting up your computer:
l Follow all warnings and instructions noted in this documentation and in the Windows Help
program.
l The first time you use your computer, we recommend that you carefully read Power Management
to familiarize yourself with some battery basics to ensure optimum battery performance
l Unplug the computer from the power outlet before cleaning. Use a damp cloth for cleaning. Do
file://C:\WINDOWS\TEMP\~hh6357.htm 5/23/01
Page 3

GoBook Pro Help Page 3 of 74
not use aerosols, solvents, or strong detergents
l Slots and openings in the computer case are for ventilation purposes. Do not block or cover these
openings or the system could overheat
l On the bottom of the GoBook Pro, there is a label with information on the power requirements of
this system. These requirements must be followed. If you are unsure of your local power supply,
consult your dealer or local Power Company
l Do not step on or place anything on the power cord
l If you use the computer with an extension cord, ensure that the total ampere ratings of all the
devices sharing the extension do not exceed the rating of the extension cord or the rating of the
wall outlet
l Never push foreign objects into the computer through any of the slots or openings. Dangerous
voltages are present, which could cause electric shock or fire, or damage sensitive components
l For best results, use a power strip with a built-in surge protector. Do not use inferior extension
cords as this may result in damage to your computer
79_0100_001
© 2001 Itronix Corporation. All rights reserved.
1. Getting Started Topics
GoBook Pro Help
Checklists
After opening the package, carefully inspect the contents. Contact your dealer if any items are missing
or appear damaged. The shipping carton should contain the following:
STANDARD
l A GoBook Pro computer
l A battery
l An AC adapter with power cord
file://C:\WINDOWS\TEMP\~hh6357.htm 5/23/01
Page 4

GoBook Pro Help Page 4 of 74
l 2 Styluses
l Quick Start Guide
OPTIONS
The following items are normally optional, but some vendors may include them in the standard package.
Some items may not be available in some countries, or some vendors may choose not to carry all the
items.
l Additional battery pack
l Shoulder Strap
l Audio adapter cable
CAUTION When purchasing any of the accessories listed above, purchase only those accessories that
are approved for use with your computer. The above accessories are proprietary items. Your system
vendor can obtain these approved accessories. If you use items that are not approved for use with this
computer, you may cause your computer to malfunction, or to emit or receive electromagnetic radiation
in excess of local regulations. For non-proprietary accessories such as PC Cards or printers, ensure that
the accessory functions properly in your computer before making the purchase. Your system vendor
may be able to recommend reliable brands and models.
Features
High Capacity Hard Disk Drive
The computer has a high capacity hard disk drive, enabling you to install your favorite programs and
store large multimedia files.
Full Array of Ports and Connectors
Your computer includes standard ports for connecting to peripherals such as USB devices and
monitors. USB ports allow you to add many other peripherals.
Bright SVGA LCD
Your computer has a bright, easy to view SVGA LCD panel with integrated touch screen.
Built-in Speaker and Microphone
The speaker and internal microphone enable you to run a variety of multimedia applications. An
optional audio adapter cable is available for connecting external speakers (headphones) and
microphone.
Function Keys
file://C:\WINDOWS\TEMP\~hh6357.htm 5/23/01
Page 5

GoBook Pro Help Page 5 of 74
Function keys allow you to suspend your computer, shut the LCDs off, and give you easy control of
audio and your monitor.
Where to Look For Information
About Your Computer
This User’s Manual describes the key elements of your computer. New users can find a simple step-bystep orientation in this chapter.
About Windows
The Windows Online Help, found on the Start menu, offers extensive Windows assistance. Welcome
to Windows offers an online orientation for new Windows users. You can find it in:
Start/Programs/Accessories/System Tools.
79_0100_001
© 2001 Itronix Corporation. All rights reserved.
GoBook Pro Help
The First Time. . .
Using your computer for the first time involves:
l Installing the battery
l Connecting the AC adapter to the computer
l Calibrating and charging the battery
Installing the Battery
1. Getting Started Topics
Make sure the computer is sheltered when you install the battery; the computer is not weather sealed
until the battery is properly installed. The battery should be fully charged before you operate the unit on
battery power. To get the most from your battery, follow the guidelines in Power Management.
To install the battery
file://C:\WINDOWS\TEMP\~hh6357.htm 5/23/01
Page 6

GoBook Pro Help Page 6 of 74
1. Align the battery connectors and place the battery in the computer.
2. Slide the battery latch to the locked position.
3. Make certain that the battery latch engages properly.
NOTE When the battery is installed and the computer is connected to AC power, see Connecting the
AC Adapter below, it starts charging automatically. At moderate temperatures, approximately 70°
Fahrenheit (21°C), the battery will be fully charged in four to six hours. In warmer or cooler
temperatures, the battery can take much longer to fully charge. Refer to Power Management for
additional information.
Connecting the AC Adapter
To connect the AC adapter
1. Connect the AC adapter power cord to the AC adapter.
2. Connect the AC adapter to the power jack at the right side of your computer.
3. Connect the AC adapter power cord to an AC outlet.
4. Lift the display to open the LCD.
5. Open the LCD panel to a comfortable viewing angle.
6. Press FN On (FN+spacebar) to turn ON the power.
Turning the Computer On and Off
You can operate the computer while the battery is charging, while on external power , or on battery
power only.
To turn on the computer
l Press the FN On (spacebar) once, and then give the system time to respond.
To turn off the computer
1. Press FN Off (Q key) to enter Off Mode
2. From the Start menu, click Shut Down. Then, from the Shut Down Windows screen select Shut
Down and click OK.
3. Press FN+F10 to Suspend to Disk
4. Close the lid (monitor) of the computer. To enable this option go to Start, Settings, Control
Panel, and Power Management. Choose the Advanced tab and select Standby or Shutdown from
file://C:\WINDOWS\TEMP\~hh6357.htm 5/23/01
Page 7
GoBook Pro Help Page 7 of 74
the Display lid suspend/resume drop down box.
Computer Off In Off Mode, the contents of your computer’s memory are held intact, while
practically all the rest of the components in your computer either turn off completely, or reduce power
consumption to a minimum. In Off Mode, your computer remains active, but with a minimum possible
power consumption. Return the computer to full power by pressing FN On (spacebar). A fully-charged
battery can maintain in Off Mode for many hours.
Suspend to Disk (Hibernate) FN+F10 enters Suspend to DiskMode. This is similar to turning off the
computer, except that the current state of the computer is copied to the hard disk as a special file. In a
Suspend to Disk there is no power consumption. When the computer returns from suspend mode , the
desktop appears with the same files and programs open as when the computer was suspended. Suspend
to Disk is very useful when you don’t want to take the time to shut down all open programs one by one
to shut off the computer. This mode is also called hibernation mode.
CAUTION Shutting down the computer improperly could result in lost or corrupted data.
Adjusting the Volume
Volume for the computer is adjusted by using function key combinations.
l FN + F6 decreases the volume
l FN + F7 increases the volume
l FN + F5 toggles the volume mute on or off
You can also adjust the volume with the Windows volume control applet, which is located on the
taskbar and looks like this .
NOTE Adjusting the volume using the function keys produces only a slight change with each press. It
may take several presses to increase or decrease the volume to a level that you desire.
79_0100_001
© 2001 Itronix Corporation. All rights reserved.
1. Getting Started Topics
GoBook Pro Help
Calibrating the Touch Screen
file://C:\WINDOWS\TEMP\~hh6357.htm 5/23/01
Page 8

GoBook Pro Help Page 8 of 74
Your GoBook Pro computer has a touch screen display. Follow the guidelines below to calibrate the
touch screen for optimum use.
CAUTION
l Always use an approved stylus or your finger.
l Never use sharp, hard, or abrasive implements on the
touch screen such as ball point pens, pencils, or keys.
They could damage the screen.
l To clean the touch screen panel, apply a household glass
cleaner to a soft, clean, dry cloth and wipe the screen.
Calibrating the touch screen
To calibrate the touch screen click the Start menu, select Programs, UPDD or Touch screen, and then
select “Calibrate. This opens the touch screen calibration program.
Calibrating the touch screen involves touching and releasing on the X with the stylus on your screen.
This action aligns the background image with the screen.
NOTE If you cannot select objects accurately with the stylus you may need to re-calibrate the touch
screen. This can be accomplished by revisiting the procedure above.
Adjusting the Screen
You can adjust the display brightness for better viewing.
Use the following keys to make adjustments:
To Do This... Press
Brighten the display FN+F3
Darken the display FN+F2
Setting the Date and Time
To set the date and time
1. Click the Start button, select Settings, select Control Panel, and double-click the Date / Time
icon.
2. From the Date / Time Properties menu, make changes to the Time and Date, and then close this
file://C:\WINDOWS\TEMP\~hh6357.htm 5/23/01
Page 9
GoBook Pro Help Page 9 of 74
screen by clicking OK.
79_0100_001
© 2001 Itronix Corporation. All rights reserved.
1. Getting Started Topics
GoBook Pro Help
Startup Problems?
If your computer does not operate, try these solutions.
l Connect the AC adapter to charge the battery if it is not charged.
NOTE The Power LED on the AC adapter should be lit as well as the external power LED
activity indicator on the GoBook Pro if the AC adapter is connected and functioning properly.
Additionally, one of the following power icons should appear in the task tray.
l If the AC adapter is connected, make sure the electrical outlet you are using works.
l Check to make sure the battery is installed and charged properly.
l If the battery doesn’t begin charging, remove the battery, connect the AC adapter, and turn on
the computer by pressing FN On. Reinstall the battery. The 2nd indicator light blinks while the
battery is charging.
The Troubleshooting section of this manual lists additional solutions you can try.
79_0100_001
© 2001 Itronix Corporation. All rights reserved.
Getting Familiar with Your Computer
The GoBook Pro computer is a ruggedized , weather-sealed, intrinsically safe laptop computer system
file://C:\WINDOWS\TEMP\~hh6357.htm 5/23/01
Page 10
GoBook Pro Help Page 10 of 74
built for the demanding environment of the mobile worker. Designed for use by mobile workforces, this
computer is a superior work tool for collecting, managing, and communicating information in the field.
The following pages describe the external and internal features of your GoBook Pro computer.
2. Getting Familiar with Your Computer Topics
GoBook Pro Help
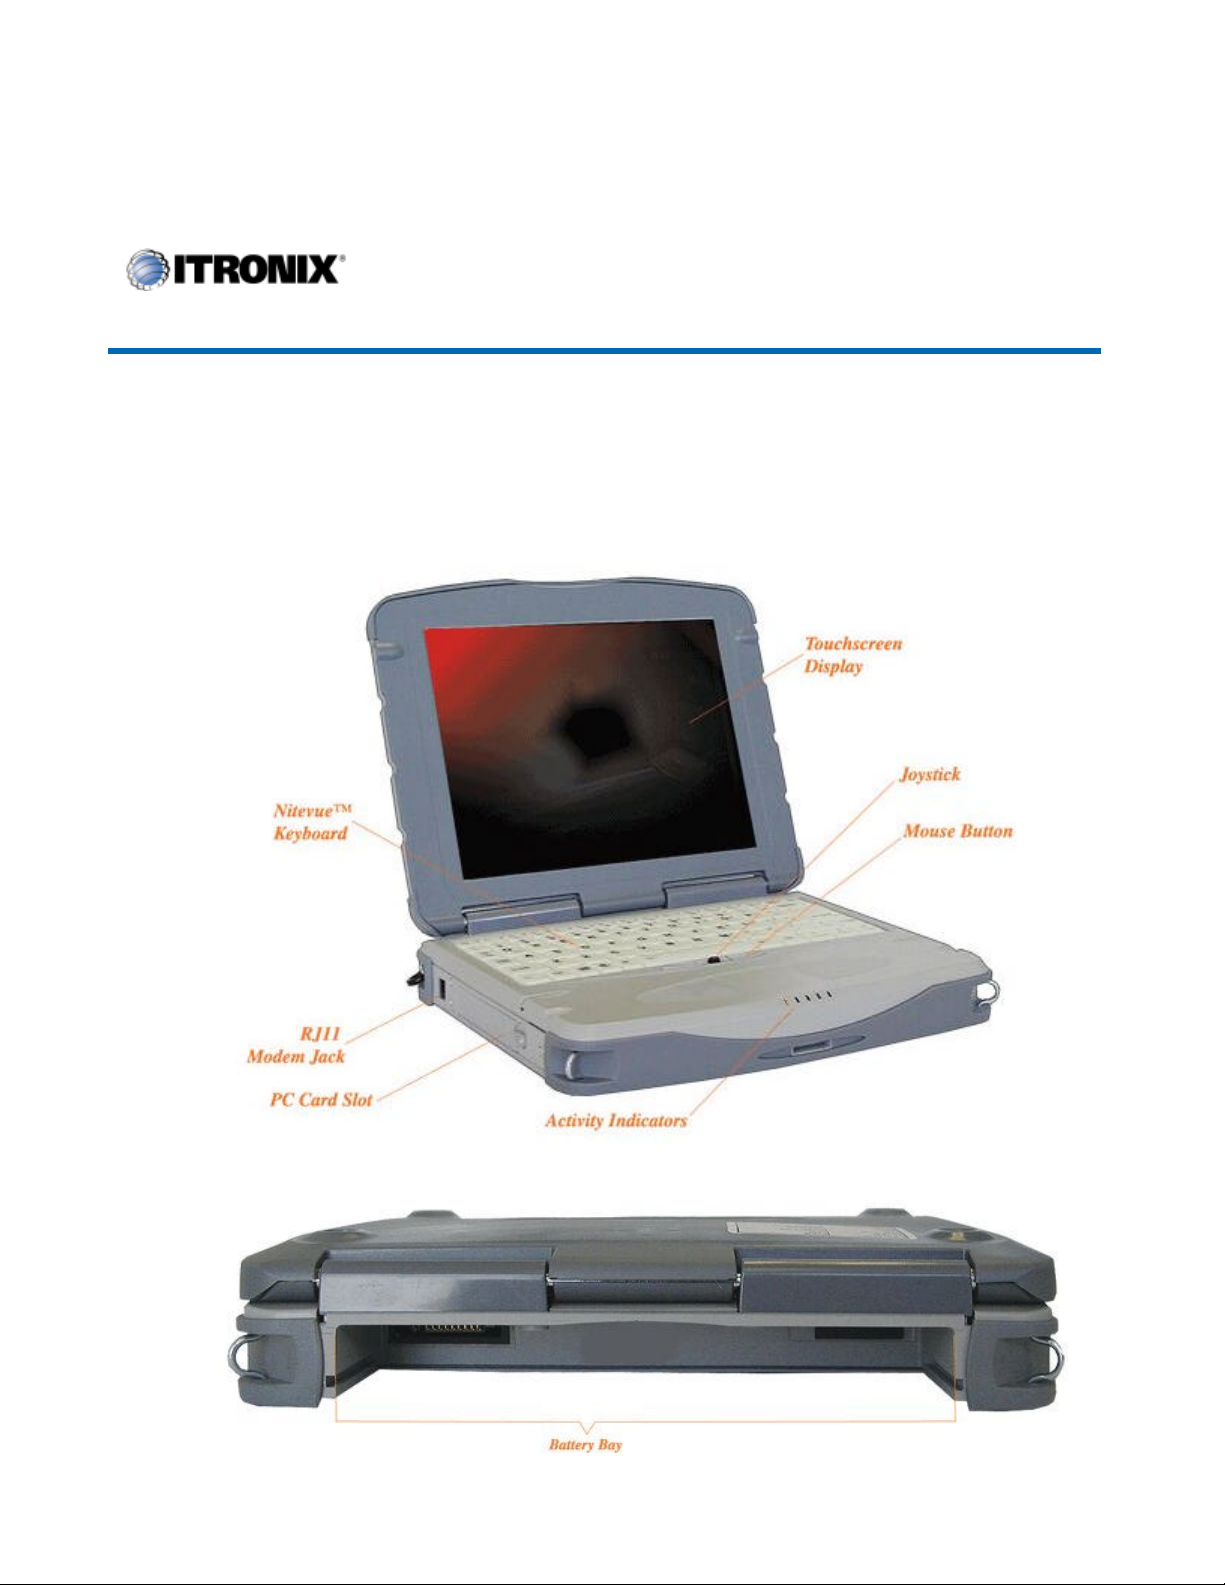
Individual Parts
The following diagrams and descriptions provide an overview of your GoBook Pro computer.
Front View
Back View
file://C:\WINDOWS\TEMP\~hh6357.htm 5/23/01
Page 11
GoBook Pro Help Page 11 of 74
Left Side View
Right Side View
Bottom View
LED Activity Indicators
The activity indicators, located between the keyboard and the touch screen, light up when a particular
function of the computer is active. Each indicator is marked with a corresponding symbol and is visible
when the lid is open or closed. LED numbers are from left to right
file://C:\WINDOWS\TEMP\~hh6357.htm 5/23/01
Page 12

GoBook Pro Help Page 12 of 74
Icon & LED #Function LED Description
LED #1
LED #2
LED #3
LED #4
LED #5
Power Status Amber
Blinking
Amber
Not lit The computer is suspended or off
Charge Status Amber The computer is attached to AC power and the
Blinking
Amber
Not lit The computer is not attached to AC power
Disk Status (HW) Amber The hard disk drive is being accessed
Not lit The hard disk drive is not being accessed
Radio Status Green RF modem is on and in range
Amber RF modem is on and out of range
Blinking
Green
Blinking
Amber
Not lit RF modem is off
BlueTooth Status
(HW)
Amber The BlueTooth radio is powered on
Not lit The BlueTooth radio is not powered on
The computer is powered and operating
The battery is low
battery is fully charged
The computer is attached to AC and the battery
is charging
A message is waiting
RF is transmitting
79_0100_001
© 2001 Itronix Corporation. All rights reserved.
2. Getting Familiar with Your Computer Topics
GoBook Pro Help
Keyboard Basics
The keyboard on the GoBook Pro computer looks much like the keyboard of a typewriter and operates
in almost the same way. While typewriter keys put characters on paper, the keys on the laptop enter
characters in the computer and perform certain functions, depending on the application or program.
The GoBook Pro computer features:
file://C:\WINDOWS\TEMP\~hh6357.htm 5/23/01
Page 13

GoBook Pro Help Page 13 of 74
l 81-key US keyboard; 82-key international keyboard
l Twelve function keys, F1-F12
l Embedded numeric keypad
l Mouse keys and cursor control keys
Restarting the Computer
Press… To do this
CTRL+ALT+DEL twice Soft reboot the computer.
CAUTION All open and unsaved data will be lost.
Press and hold both mouse
buttons for about ten seconds
and then release the buttons.
Reset the computer
Primary Keys
Key Description
ALT The alt (alternate) key is used with other keys to perform special tasks.
Pressing CTRL+ALT+DEL twice resets the computer, processing stops and
the computer attempts to restart the operating system .
ALT GR The ALT GR key, a special function key found on the 82-key international
keyboard, when pressed and held, allows you to use characters in the bottom
right of a three character key.
BACKSPACE The BACKSPACE key, sometimes represented on the keyboard as a left
arrow, moves the cursor one position to the left. The character to the left of the
cursor is erased.
CAPS LOCK Pressing the CAPS LOCK key one time locks keys A through Z in the UPPER
CASE position. Pressing the CAPS LOCK key again returns the letters to
lower case. While in the upper case mode, pressing the SHIFT key results in
lowercase characters when entered. You still have to use the SHIFT key to
display characters located on the upper portion of the keyboard. For example,
press SHIFT+8 to type an asterisk (*), even when the CAPS LOCK key is
activated.
The CAPS LOCK activity indicator is on when the keyboard is in CAPS
LOCK mode. This indicator can be found in the windows tray at the lower
right corner of the screen.
file://C:\WINDOWS\TEMP\~hh6357.htm 5/23/01
Page 14

GoBook Pro Help Page 14 of 74
(print screen) key copies the current screen or
ALT+PRT SC
key changes the keys A through Z to the UPPER CASE position. When
you press an alphabetic key, the character appears as a capital letter. When you press
Function. Some special keys have been established to perform important tasks when
Key Description
CTRL The CTRL (control) key works with other keys to perform a variety of functions.
ENTER The ENTER key signals the computer that you have completed your entry. This is
your way of telling the computer to process the information that you have entered.
ESC The ESC (escape) key cancels the current line if you are working in DOS. In some
DOS applications, pressing the ESC key backs you out of your last menu selection.
In Windows, the ESC key allows you to exit a pop-up window or message box.
PRTSC In Windows, pressing the FN+PRTSC
window to the clipboard so you can paste it into documents. Pressing
key copies the active window to the clipboard.
SHIFT The SHIFT
SHIFT with other keys, the characters on the upper part of the keys appear. For
example, pressing SHIFT+7 displays an ampersand (&).
FN
pressed and held with the FN key. These keys are described later in this document.
The FN key legend is color keyed to other special keys on the keyboard
SPACEBAR Use the SPACEBAR to enter a space and move the cursor one character to the
right.
TAB The TAB key moves the cursor to the next tab stop or field. Tab stops are defined
by your operating system or application program. Press the TAB key to move from
one field or text box to another.
Arrow Keys
The arrow keys are defined by the software application.
The UP ARROW key usually moves the cursor up one line. In some cases, you can use the up arrow to
make selections from menus and scrollable list boxes.
The DOWN ARROW key usually moves the cursor down one line. In Windows, you can use the down
arrow to make selections from menus and scrollable list boxes.
The RIGHT ARROW key usually moves the cursor one character position to the right.
The LEFT ARROW key usually moves the cursor one character position to the left.
Function Keys
Hold the FN key while pressing the numbered function key.
file://C:\WINDOWS\TEMP\~hh6357.htm 5/23/01
Page 15

GoBook Pro Help Page 15 of 74
Function key Description
FN+F2 Decreases LCD brightness
FN+F3 Increases LCD brightness
FN+F5 Toggles the audio between mute and on
FN+F6 Decrease volume
FN+F7 Increase volume
FN+F8 Toggles between LCD/CRT displays
FN+F10 Suspend to Disk
FN+SPACEBAR Turns on computer
FN+Q Turn off computer
Numeric Keypad
The numeric keypad is embedded in the keyboard area. The embedded keypad emulates the numeric
keypad typically found on a full-size keyboard. It is arranged like a calculator for applications that
require you to key many numbers or for use. For example, with the Calculator in the standard
Windows Accessories.
Pointing Stick
The pointing stick is a pressure sensitive pointing device that provides all the features of a two-button
mouse. Its primary function is to move the cursor around the screen.
Using Your Pointing Stick
Clicking
1. First, place your fingers on the pointing stick.
2. Gently move your finger in the direction you want the cursor to move. The stick detects the
change in pressure and moves the cursor in the corresponding direction.
3. The left and right buttons located directly below the pointing stick are the same in function as
those on a two-buttoned mouse. Clicking these buttons makes selections, drags objects, or
performs a variety of other functions depending on the software. To select an object, first move
the pointer over the object you want to select, and then press the left button one time. The
functions of these buttons are software specific.
NOTE The pointing stick also has the ability to do a left button click if it is tapped.
Double-clicking
l Double-clicking is a common technique for selecting objects or launching programs from icons.
Once you have moved the pointer over the object you wish to select, rapidly press the left button
two times. This action is commonly referred to as “double-clicking” an object.
NOTE Double-clicking can also be accomplished by double-tapping with the pointing stick.
file://C:\WINDOWS\TEMP\~hh6357.htm 5/23/01
Page 16

GoBook Pro Help Page 16 of 74
Dragging
l Move the pointer to the desired location then press down the left button. While still holding down
the left button, move the pointer to the desired location. Release the button.
l Move the pointer to the desired location. Tap the pointing stick twice quickly as if you were
double-clicking, however do not remove your finger after the second tap. Move the cursor to the
desired location. Lift your finger to finish dragging.
Adjust the pointing stick settings by selecting Settings/Control Panel/Mouse/Buttons. These settings
allow you to change the orientation of the pointing stick from right-handed to left-handed, and fine-tune
the pointer movement and timing of clicks.
General Guidelines
The mobile computer uses a Liquid Crystal Display (LCD), which is the type of screen used on many
notebook and sub-notebook computers. One problem experienced on computers with an LCD display,
especially in cold environments, is that the cursor seems to “disappear” whenever the mouse is moved
quickly. To improve the visibility of the mouse cursor, you should:
l Enable the “Pointer Trails” feature to add trailing cursors.
l Use a slow or medium speed/sensitivity level.
You can combine a higher level of acceleration with a slow or medium speed/sensitivity level. This will
allow you to move the mouse cursor quickly by increasing your finger pressure, while still providing a
finer degree of control when you apply minimum pressure.
NOTE To change the speed of the mouse, from the Start Menu select Settings, Control Panel, and
then choose Mouse to make adjustments.
Connecting an External Keyboard or Mouse
You can use your GoBook Pro computer with an optional external keyboard, numeric keypad, or
mouse. The devices are “hot swap” capable, which means you do not have to power down the GoBook
Pro to connect these devices to the USB connection located on the right side of the unit.
79_0100_001
© 2001 Itronix Corporation. All rights reserved.
2. Getting Familiar with Your Computer Topics
GoBook Pro Help
file://C:\WINDOWS\TEMP\~hh6357.htm 5/23/01
Page 17

GoBook Pro Help Page 17 of 74
Disk Drives
The Hard Disk Drive
The hard disk provides high-capacity storage and fast access. Windows and most programs are stored
here. Your GoBook Pro identifies the hard disk drive as drive C.
79_0100_001
© 2001 Itronix Corporation. All rights reserved.
2. Getting Familiar with Your Computer Topics
GoBook Pro Help
The PC Card Slot
The PC card slot can be used as an interface between your computer and a variety of communications
devices, such as network adapters, SCSI adapters, fax/modems, or they can be used to provide
additional data storage capacity. Your computer’s PC Card slot supports Type I, or II PC Cards, 32-bit
CardBus cards, and Zoomed Video cards. Type III PC Cards require an optional extender card.
Installing a Card
1. The top side of a PC Card is usually identified with a label. Insert the card into the slot with the
top up and the edge with pinhole contacts going in first. You will feel some resistance as the card
slides into the back of the slot.
2. PC Cards require drivers, or a program that allows the operating system to use a specific device.
Many drivers are included with Windows, but if not, you will be prompted to install the driver
included with your card.
3. In Windows 98, the computer will beep twice to indicate successful installation. A single beep
means that there was a problem recognizing the card. There is no beep with other versions of
Windows software .
NOTE Please read the instructions included with individual PC Cards. Some cards may be inserted
with power on, while others require that the computer be turned off.
file://C:\WINDOWS\TEMP\~hh6357.htm 5/23/01
Page 18

GoBook Pro Help Page 18 of 74
Removing a PC Card
1. If a PC Card is in use, you must shut down the PC Card before removing it.
2. Click the PC Card icon on the right side of the Windows tray taskbar , then click Stop.
3. When the Windows message appears, telling you that it is safe to remove the card, click OK.
4. Press the eject button on the PC Card slot to release the eject button (it is spring loaded and
remains hidden until it is pressed).
5. Press the eject button again to release the PC Card.
79_0100_001
© 2001 Itronix Corporation. All rights reserved.
2. Getting Familiar with Your Computer Topics
GoBook Pro Help
Connecting to an External Monitor
The GoBook Pro has a 15-Pin VGA monitor port to connect your computer to an external monitor.
Using the VGA monitor port for dual display
You may use an external monitor simultaneously with your GoBook Pro’s LCD.
1. Use the FN+F8 hot keys to cycle through the CRT/LCD settings or do the following:
2. Locate the 15-pin VGA monitor port on the right side panel of your GoBook Pro and connect the
video signal cable from the external monitor to the monitor port.
3. Connect the monitor’s power cable to a power outlet and turn on the monitor.
4. If the new monitor has not automatically been detected and is not displaying what appears on
your GoBook Pro’s LCD screen, open the Control Panel.
5. Double-click Display. The Display Properties window opens.
file://C:\WINDOWS\TEMP\~hh6357.htm 5/23/01
Page 19

GoBook Pro Help Page 19 of 74
6. Click the Settings tab.
7. Click the Advanced button.
8. Click the S3DuoVue tab. The screen shown at the right appears.
9. Select the CRT box to enable display on an external monitor.
10. You can also use the FN+F8 hot keys to cycle through the CRT/LCD settings.
79_0100_001
© 2001 Itronix Corporation. All rights reserved.
Making Connections
Your computer is equipped with a full array of ports and connectors, including standard input/output
(I/O) ports for quickly and easily adding peripheral devices such as printers and monitors. Refer to
documentation included with individual devices for details on connecting these devices to your
computer. Your computer may also include modem and LAN (optional) ports, offering advanced
communications technology.
3. Making Connections Topics
GoBook Pro Help
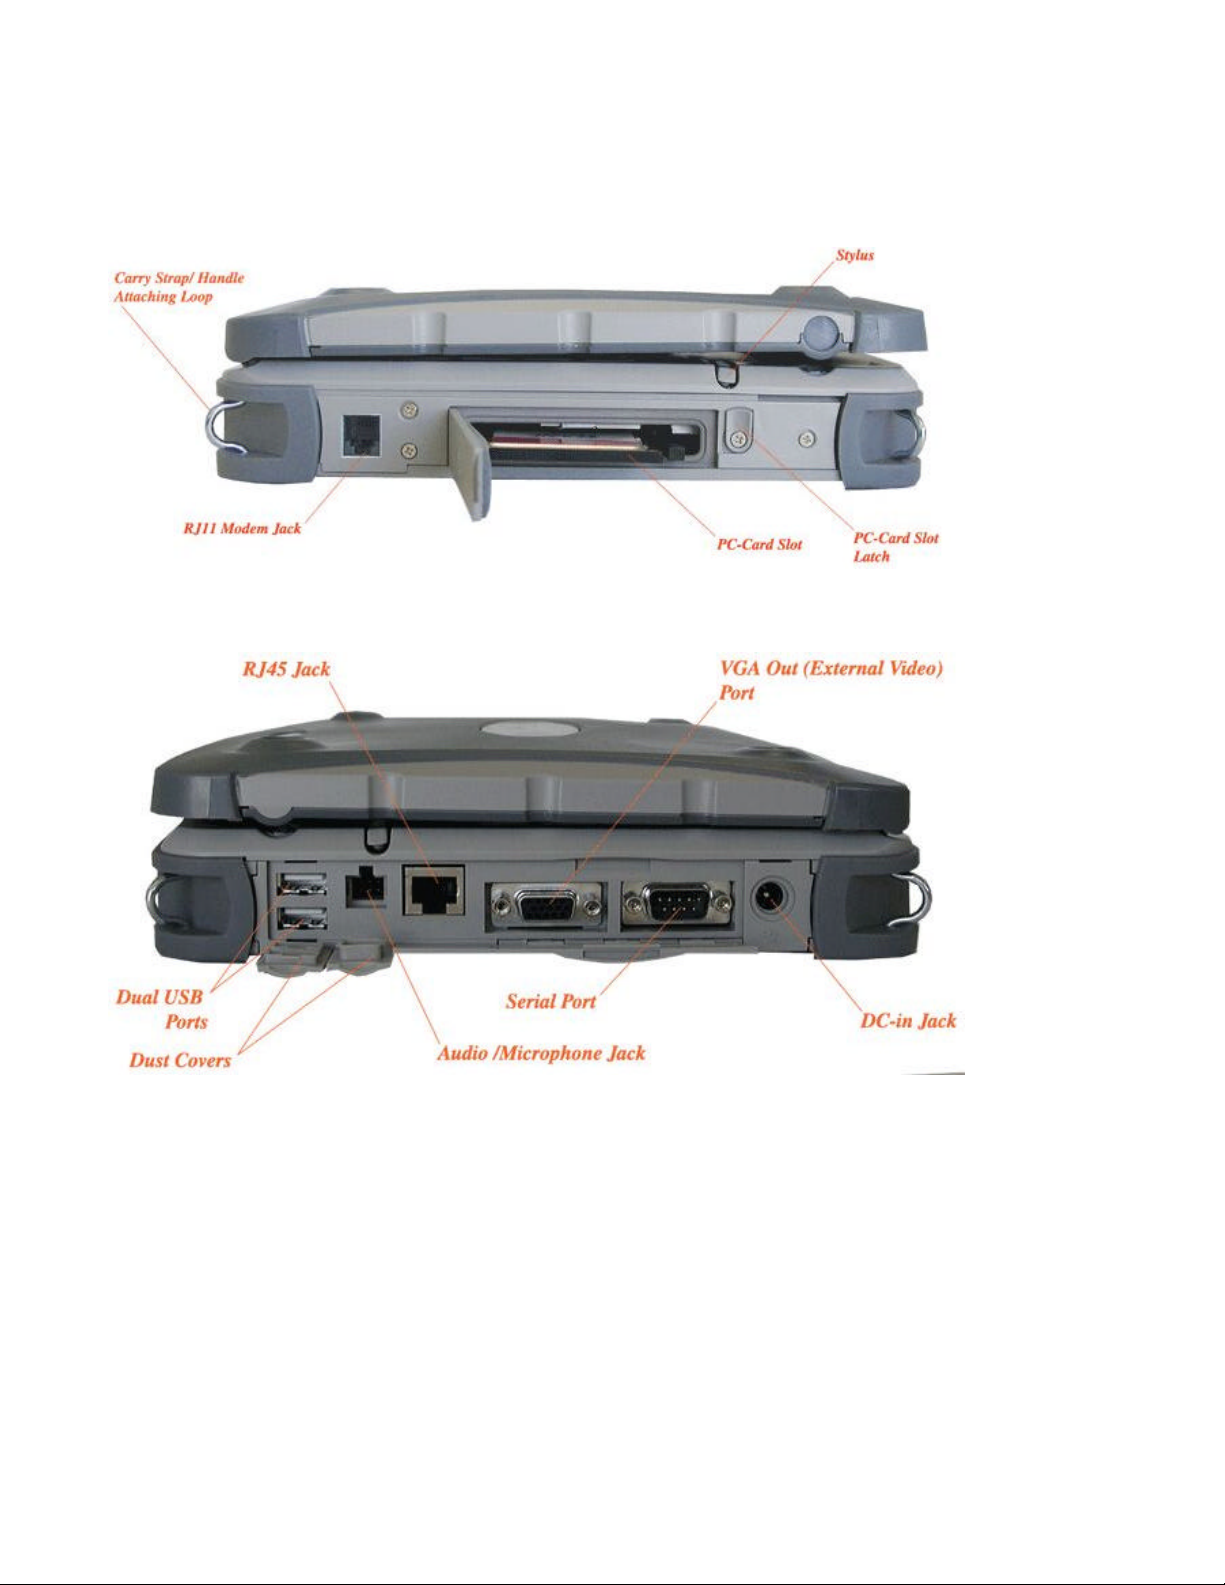
Right Side Connectors
1 Serial Port
The 9-pin serial port can be used to connect your computer to serial devices such as fax/modem or
serial mouse. This port is identified as COM1 and is 16550A compatible.
2 LAN RJ-45 Jack (optional)
With the built-in Ethernet LAN combo, you can make LAN connections without installing PC cards.
Connection speed is 10/100 Mbps.
3 USB (Universal Serial Bus) Ports (2 Connectors)
The Universal Serial Bus (USB) is the latest standard for attaching input devices, scanners, and other
devices to a PC. USB devices can be chained together on a single cable. USB is 1.1 compliant.
file://C:\WINDOWS\TEMP\~hh6357.htm 5/23/01
Page 20

GoBook Pro Help Page 20 of 74
4 Microphone/Audio Connector
Connect a microphone to this port to record audio. Connect external speakers or a stereo headset to
listen to multimedia.
5 External Monitor Connector
Connect an external monitor to this port.
79_0100_001
© 2001 Itronix Corporation. All rights reserved.
3. Making Connections Topics
GoBook Pro Help
Left Side Connectors
1 PC-Card Slot
Use this slot to connect PCMCIA-card devices.
2 Fax/modem RJ-11 Jack
The fax/modem can transmit data using the 56 Kbps V.90 protocol, and send and receive faxes at 14.4
Kbps. In some countries, local regulations may not permit the use of the fax/modem designed for this
system. In this case, you may use a PCMCIA modem.
CAUTION Plug your modem into an analog telephone jack only. Most homes use analog lines. Do not
use digital lines, such as the PBX and ISDN systems found in many offices. Digital lines may damage
your modem.
79_0100_001
© 2001 Itronix Corporation. All rights reserved.
If You Have a Wireless Modem
If your GoBook Pro computer is equipped with a wireless modem, you must first register it with the
file://C:\WINDOWS\TEMP\~hh6357.htm 5/23/01
Page 21

GoBook Pro Help Page 21 of 74
appropriate network provider.
Before using your wireless modem you must sign up for service with a wireless network provider.
When you register, you will need to furnish the network provider with your modem ID and the
computer’s serial number. This information is printed on a label located on the bottom of your GoBook
Pro computer.
4. Wireless Modem Topics
GoBook Pro Help
Registering Your Wireless Modem
Air Card 300 (CDPD)
When the computer is booting, you may be asked if you want to make the Sierra Wireless AirCard 300
your primary network interface card. For this procedure, click Yes and run Wireless Expert.
NOTE Wireless Expert should start automatically.
Call your preferred cellular data provider and tell them the AirCard EID displayed on the first screen.
Then follow the on-screen procedures.
Air Card 350 (CDPD)
When the computer is booting, you may be asked if you want to make the Sierra Wireless AirCard 350
your primary network interface card. For this procedure, click Yes and run Wireless Expert.
NOTE Wireless Expert should start automatically.
Call your preferred cellular data provider and tell them the AirCard EID displayed on the first screen.
Then follow the on-screen procedures.
RIM 902M (Mobitex) for Cingular
Record the radio ID and the GoBook Pro Serial number as labeled on the bottom of the GoBook Pro or
shipping box. With your company registration account information, call Cingular at 1-800-662-4839
and request registration. Run a reliable radio application to verify registration was successful.
Cisco Aironet Wireless LAN
Contact your local area network administrator to setup your computer for your network.
CAUTION Your modem generates radio frequency (RF) signals. Do not operate the radio modem
before you have registered it with a network provider. The network will not accept a signal from an
file://C:\WINDOWS\TEMP\~hh6357.htm 5/23/01
Page 22

GoBook Pro Help Page 22 of 74
unregistered device. Unauthorized use of your radio modem may interfere with local business or
government communications, resulting in fines or other legal action.
79_0100_001
© 2001 Itronix Corporation. All rights reserved.
4. Wireless Modem Topics
GoBook Pro Help
Wireless Modem LED Status
Air Card 300 (CDPD)
The wireless modem is powered ON after reboot, or resume, as indicated by the wireless modem LED
activity indicator being a steady green. It can be turned off by right clicking on the PC Card icon in the
system task tray, and selecting “Stop Sierra Wireless AirCard 300 CDPD”. It can then be repowered by
doing a suspend/resume or a reboot.
Air Card 350 (CDPD)
The wireless modem is powered on after reboot or resume as indicated by the wireless modem LED
activity indicator being a steady green. It can be turned off by right clicking on the PC-Card icon in the
system task tray, and selecting “ Stop Sierra Wireless AirCard 350 CDPD “. It can then be repowered
by doing a suspend/resume or a reboot.
RIM 902M (Mobitex) for Cingular
The wireless modem LED activity indicator has three states when a DataTac wireless modem is
installed. They are:
l Solid Green LED – Wireless modem is ON and in range, regardless of the state of the computer
l Flashing Green LED – Wireless modem is ON, and has a Message Waiting from the network
l LED Off – Wireless Modem is OFF. No power is supplied to the wireless modem
l Solid Yellow LED - Wireless modem is ON and out of range
l Flashing Yellow LED - Wireless modem is on and transmitting
file://C:\WINDOWS\TEMP\~hh6357.htm 5/23/01
Page 23

GoBook Pro Help Page 23 of 74
Cisco Wireless LAN
The wireless modem is powered ON after initial boot, reboot, or resume as indicated by the wireless
modem LED activity indicator being solid green. It can be turned off by right clicking the PC Card icon
in the system task tray, then selecting “Stop Cisco Systems 340 Series Wireless LAN Adapter”. It can
be repowered by doing a suspend/resume, or by rebooting the computer.
79_0100_001
© 2001 Itronix Corporation. All rights reserved.
4. Wireless Modem Topics
GoBook Pro Help
Installing Your Wireless Modem Software
Installing the Software for Your Wireless Modem
Following are the installation procedures for installing the software for your wireless modem.
Air Card 300 (CDPD)
l Software comes pre-installed
Air Card 350 (CDPD)
l Software comes pre-installed
RIM 902M (Mobitex) for Cingular
The RIM 902M radio is automatically installed through the Plug and Play feature of the Windows
operating system. Once installed the radio can be accessed as COM4.
1. To verify the radio is installed and functioning correctly, a hyperterminal session can be used to
access RIM’s built in diagnostic program.
2. To access this diagnostic program, create a hyterterminal session direct to COM4 with 8 data
bits, no parity, 1 stop bit, and hardware handshaking.
3. Once a connection has been established, type “menu” (lower case, without the quotes) and press
file://C:\WINDOWS\TEMP\~hh6357.htm 5/23/01
Page 24

GoBook Pro Help Page 24 of 74
enter. The RIM Diagnostic screen should appear.
This diagnostic program allows the user to send a short message either to yourself or another device on
the network. For more information on how use the built-in diagnostics, visit the RIM website at
www.rim.net.
Cisco Wireless LAN
l Driver comes pre-installed
79_0100_001
© 2001 Itronix Corporation. All rights reserved.
4. Wireless Modem Topics
GoBook Pro Help
Using Your Wireless Modem
Following are the procedures for using your wireless modem.
Air Card 300 (CDPD)
l Run Watcher from the desktop , or from the Start, Programs, SierraWireless, Aircard3xx menu.
l Verify signal strength is green and radio LED in ON.
Air Card 350 (CDPD)
l Run Watcher from the desktop, or from the Start, Programs, SierraWireless, Aircard3xx menu.
l Verify signal strength is green and radio LED activity indicator is ON.
RIM 902D (Mobitex) for Cingular
l With the exception of the built-in diagnostic program of the RIM radio, there are no standard
applications shipped that allow the RIM 902M radio to be used for communication.
The RIM 902M radio understands two protocols: MASC, and; RIM access protocol (RAP). To use the
file://C:\WINDOWS\TEMP\~hh6357.htm 5/23/01
Page 25

GoBook Pro Help Page 25 of 74
RIM 902M radio, an application that uses one of these protocols must be installed on the computer and
configured to communicate on COM4.
Cisco Wireless LAN
l Go to your preferred LAN application and run normally
CAUTION While the RIM 802 radio is operating, the antenna must be at least 2.0 cm from all
persons in order to comply with the FCC RF exposure limit. Radio (wireless modem) operators
must make sure their radio unit is in compliance with these FCC regulations. See Optional
Equipment and Accessories for important information about vehicle-mounted antennas.
79_0100_001
© 2001 Itronix Corporation. All rights reserved.
Power Management
5. Power Mangement Topics
GoBook Pro Help
Using the Battery
Monitoring Battery Power
There are two ways to monitor how much power the battery has left.
1. Click Start, Settings, Control Panel, Power Management (Power Options); then click the Power
Meter tab.
2. Moving the cursor to the battery icon on the taskbar , without selecting anything, is the simplest
way to check on battery power status. The status will show as a pop-up when you mouse-over
the icon.
NOTE If you do not see the battery icon on the taskbar, enable it in Start, Settings, Control Panel,
Power Management. Choose the Advanced tab and select “Always show icon on the taskbar.”
Low Battery Alarms
file://C:\WINDOWS\TEMP\~hh6357.htm 5/23/01
Page 26

GoBook Pro Help Page 26 of 74
How your computer responds to a low battery condition can be set by going to Start, Settings, Control
Panel, Power Management, Alarms.
Two different power alarms can be enabled or disabled: the Low Battery Alarm, and the Critical Battery
Alarm. Use the slidebar to set the power level at which the alarms are activated. Click on the Action
button to choose whether the alarm sounds, displays a message, or both.
CAUTION When battery power is low, the battery LED activity indicator will flash, and the alarm will
beep or display a warning on your screen. Take immediate action, such as saving files or connecting to
the AC adapter , or data may be lost.
When the computer alerts you that the battery is low, immediately do one of the following:
l Connect the AC power adapter
l Save your work, and suspend to disk (Hibernate) by pressing FN+F10
l Save your work, then select Shut Down from the Start menu
l Press FN+Q to turn off the computer (or suspend to disk) and replace the discharged battery with
a charged battery (See Changing the Battery later in this section).
NOTE Do not restart the computer until you have connected to an AC adapter, or replaced the
discharged battery with a charged battery.
79_0100_001
© 2001 Itronix Corporation. All rights reserved.
5. Power Mangement Topics
GoBook Pro Help
Battery Charging
When you use the AC adapter to connect your GoBook Pro to a power outlet, the internal battery will
automatically begin to recharge. While the battery is charging, the External Power Battery Charge LED
activity indicator on the indicator panel will be flashing. When the battery is fully charged, the
External Power Battery Charge LED activity indicator will turn solid.
If your computer is turned off, or suspended to RAM, a fully discharged battery will take about 4 hours
file://C:\WINDOWS\TEMP\~hh6357.htm 5/23/01
Page 27

GoBook Pro Help Page 27 of 74
to recharge. If your computer is turned on and is not in suspend mode , it will take about 6 hours to
recharge the battery. Refer to the following table:
System On 6 - 7 hours 3-4 hours
System Off (suspend to
RAM)
Charging Discharging
4 hours —
Power Saving Modes
Adjust the default power management settings in the Power Management (Power Options) dialog box
in the Control Panel. The Power Management (Power Options) dialog box allows you to set different
actions to take when the computer is left idle for a certain amount of time.
Suspend Mode
There are several possible settings for suspend mode, which can be selected in the Power Management
(Power Options) dialog box: You may suspend to RAM, suspend to disk (Hibernate), or disable
suspend altogether, which is not recommended.
Suspend to RAM
In a suspend to RAM, the contents of your computer’s memory are held intact, while practically all the
rest of the components in your computer either turn off completely, or reduce power consumption to a
minimum. In a Suspend to RAM, your computer remains active but with the minimum possible power
consumption. Return the computer to full power by pressing any key. When the computer returns from
suspend mode, the desktop appears with the same files and programs open as when the computer was
suspended. A fully-charged battery can maintain a Suspend to RAM for many hours.
Suspend to Disk (Hibernate)
Suspend to Disk (Hibernate) is similar to turning off the computer, except that the current state of the
computer is copied to the hard disk as a special file. When the computer returns from suspend mode,
the desktop appears with the same files and programs open as when the computer was suspended.
Suspend to Disk (Hibernate) is very useful when you don’t want to take the time to shut down all open
programs one by one to shut off the computer, only to have to open the same programs and files the
next time you use the computer. This mode is also called hibernation mode.
Suspend-to-Disk Partition
In order to Suspend to Disk, you must have a special suspend-to-disk partition on your hard disk drive.
This partition is pre-installed on your computer. The pre-installed partition is large enough to store all
system memory.
Initiating Suspend Mode
file://C:\WINDOWS\TEMP\~hh6357.htm 5/23/01
Page 28

GoBook Pro Help Page 28 of 74
There are four ways to initiate suspend mode. The settings can be adjusted in the Power Management
dialog box:
l The computer will automatically enter suspend mode when not used for a set period of time
l Selecting the Stand by button in the Shut Down Windows dialog box
l Pressing the suspend/system off function key (FN + Q)
l Closing the lid (display) if enabled in power settings.
Power Saving Tips
l Avoid operating the fax/modem, or audio and video applications when using battery power.
Operating a fax modem, video, or audio equipment increases the computer’s power requirements.
l Decreasing monitor brightness can also save power. Decrease brightness by pushing FN + F2.
Increase it by pushing FN + F3.
When to Replace the Battery
Over time, the battery’s capacity gradually decreases. We recommend that you replace your battery
when you notice that it begins to store significantly less charge.
Changing the Battery
Change the main battery pack as follows:
1. Turn off the computer.
2. Disconnect external power .
3. Close the display and turn the computer over.
4. slide the latch to the un-locked position and slide the battery out of the compartment.
5. Make sure the replacement battery is properly orientated. Insert the battery into the battery
compartment. Check that the latch locks back into position. Slide the latch to the locked position.
Heat Considerations
The computer’s processor has been specially designed to consume little power, and generates very little
heat. However, working in a hot environment, or working for long periods may raise the temperature.
Your computer takes the following steps to lower temperature:
1. The cooling fan is turned on. You may hear the fan and feel air coming from a vent near the left
front of the computer when this happens.
file://C:\WINDOWS\TEMP\~hh6357.htm 5/23/01
Page 29

GoBook Pro Help Page 29 of 74
If the temperature continues to rise:
2. Processor activity is reduced. You may notice a slight loss of performance when this happens.
If the computer overheats:
3. The processor will stop functioning and the computer will shutdown.
79_0100_001
© 2001 Itronix Corporation. All rights reserved.
Customizing Your BIOS Settings
This chapter explains how to use the Setup Utility to modify the BIOS settings. The Setup Utility
displays and allows modification of the GoBook Pro components and the configuration of devices that
are connected to it. This information is used to test and initialize components at start-up time and to
make sure everything runs properly when the system is operating.
The BIOS is installed with a set of default values. You may be able to increase system performance by
changing some of the timing values in the Setup Utility, but this can be limited by the kind of hardware
you are using. In certain circumstances, the system may generate an error message that asks you to
make changes to the CMOS settings using the Setup Utility. This happens when the system finds an
error during the POST (Power On Self Test) that it carries out at startup.
If you are not sure how to configure the BIOS settings we suggest that you select Auto
Configuration with Optimal Settings on the Main Menu screen, then exit saving changes. This loads
optimized default settings for normal use.
6. Customizing Your BIOS Topics
GoBook Pro Help
Using the BIOS Setup Utility
The BIOS Setup Utility allows you to configure your computer’s basic settings. When you turn your
computer on, the system reads this information to initialize the hardware so that it can operate correctly.
Use the BIOS Setup Utility to change your computer’s start-up configuration. For example, you can
change the security and power management routines of your system.
Starting the BIOS Setup Utility
You can only start the Setup Utility shortly after the computer has been turned on. A prompt appears
file://C:\WINDOWS\TEMP\~hh6357.htm 5/23/01
Page 30

GoBook Pro Help Page 30 of 74
on the computer display that says “Press F2 to run Setup.” When you see this prompt, press the F2 key
and the system will start the Setup Utility and display the main menu of the utility.
Navigation and Help
The Menu Bar
The Setup Utility has these six menu options in the Menu Bar at the top of the window:
Main Use for basic system configuration
Advanced Use to set the advanced features
Security Use to set user and supervisor passwords and the backup and virus-check
reminders
Power Use to configure power management features
Boot Use to select the sequence boot devices that are searched to load an operating
system
Exit Use to exit the current Setup session
The Legend Bar
You can use the keys in the legend bar at the bottom of the Setup Window to make selections or exit
the current menu.
Key Function
F1 or ALT+H General Help Window
ESC Exit this menu
Left/Right Arrow Keys Select a different menu
Up/Down Arrow Keys Move the cursor up or down between fields
TAB or SHIFT+TAB Cycle the cursor up and down
HOME or END Move the cursor to the top or bottom of the window
PgUp or PgDn Move the cursor to the next or previous page
F5 or - Select the Previous Value for the field
F6 or + or Space Select the Next Value for the field
F9 Load the Default Configuration values for this menu
F10 Save and exit
Enter Execute command or Select Submenu
ALT+R Refresh the screen
The Field and General Help Windows
The Field Help Window is on the right side of each menu. It displays the help text for the currently
selected field. This text updates as you move the cursor from field to field.
The General Help Window describes the legend keys and their alternates. You can display it by
pressing F1 or ALT+H on any menu.
file://C:\WINDOWS\TEMP\~hh6357.htm 5/23/01
Page 31

GoBook Pro Help Page 31 of 74
79_0100_001
© 2001 Itronix Corporation. All rights reserved.
6. Customizing Your BIOS Topics
GoBook Pro Help
The Main Menu
You can change the system date and time on the main menu and view system and extended memory.
Field Setting Function
System Time HH:MM:SS Set the system time
System Date MM/DD/YYYY Set the system date
Legacy Diskette ADisabled Selects floppy type
Legacy Diskette BN/A Selects floppy type
Primary Master sub-menu Set drive settings
Primary Slave sub-menu Set drive settings
Boot Options sub-menu Set boot options
Memory Cache Enabled Sets the state of the memory cache
file://C:\WINDOWS\TEMP\~hh6357.htm 5/23/01
Page 32

GoBook Pro Help Page 32 of 74
System Memory N/A Displays amount of conventional memory detected
during boot up
Extended
Memory
N/A Displays the amount of extended memory detected
during boot up
Primary Master
The drive type is automatically detected by the BIOS. You can use this menu to view the hard disk
configuration.
Field Setting Function
Type User
None
Auto
1-39
CD-ROM
ATAPI
Removable
Total Sectors N/A
Maximum Capacity N/A
Sectors 1 to 63 Number of sectors per track
User=User enters parameters of
hard-disk drive
None=Autotyping is not able to
supply the drive type or end user
has selected None, disabling any
drive that may be installed.
Auto=Autotyping, the drive itself
supplies the correct drive
information.
1-39=User selects pre-determined
type of hard-disk drive
CD-ROM=CD-ROM drive is
installed
ATAPI Removable=removable
disk drive is installed
file://C:\WINDOWS\TEMP\~hh6357.htm 5/23/01
Page 33

GoBook Pro Help Page 33 of 74
Multi-Sector Transfers Disabled
Standard
2 sectors
4 sectors
8 sectors
16 sectors
LBA Mode Control Enabled
Disabled
32-Bit I/O Enabled
Disabled
Transfer Mode Standard
Fast PIO 1
Fast PIO 2
Fast PIO 3
Fast PIO 4
SMART Monitoring Enabled
Disabled
Ultra DMA Mode: Mode 0
Mode 1
Mode 2
Disabled
Any selection except Disabled
determines the number of sectors
transferred per block. Standard is
1 sector per block
Enabling LBA causes Logical
block Addressing to be used in
place of Cylinders, Heads, &
Sectors
Enables 32-bit communication
between CPU and IDE card.
Requires PCI or local bus.
Selects the method for
transferring the data between the
hard disk and system memory.
The Setup menu only lists those
options supported by the drive
and platform.
Turn on Self-Monitoring
Analysis-Reporting Technology,
which monitors condition of the
hard drive and reports when a
catastrophic IDE failure is about
to happen
Primary Slave
file://C:\WINDOWS\TEMP\~hh6357.htm 5/23/01
Page 34

GoBook Pro Help Page 34 of 74
Field Setting Function
Type Auto
None
CD-ROM
User
Multi-Sector Transfers N/A Specify the number of sectors per
LBA Mode Control N/A Enabling LBA causes Logical
32 Bit I/O Disabled
Enabled
Transfer Mode Standard
Fast PIO 1
Fast PIO 2
Fast PIO 3
Fast PIO 4
FPIO 3 / DMA
1
FPIO 4 / DMA
2
SMART Monitoring N/A
Ultra DMA Mode Disabled
Mode 0
Mode 1
Mode 2
Auto=Autotyping, the drive itself
supplies the correct drive
information.
None=Autotyping is not able to
supply the drive type or end user
has selected None, disabling any
drive that may be installed.
CD-ROM=CD-ROM drive is
installed
User=User enters parameters of
hard-disk drive
block for multiple sector transfers.
Block Addressing to be used in
place of Cylinders, Heads &
Sectors.
Enables or disables 32 bit IDE
data transfers
Select method for moving data
to/from the drive.
Selects the Ultra DMA mode used
for moving data to/from the drive
Boot Options
file://C:\WINDOWS\TEMP\~hh6357.htm 5/23/01
Page 35

GoBook Pro Help Page 35 of 74
Field Setting Function
QuickBoot
Mode
Summary
Screen
SETUP
Prompt
Enabled
Disabled
Enabled
Disabled
Enabled
Disabled
Enabled allows the system to skip certain tests while booting,
decreasing the time needed to boot.
Displays system configuration summary screen during boot up.
Displays "Press <F2> for Setup" during boot up." Disabling this
option does not disable <F2>, only the display of the message.
79_0100_001
© 2001 Itronix Corporation. All rights reserved.
6. Customizing Your BIOS Topics
GoBook Pro Help
The Advanced Menu
file://C:\WINDOWS\TEMP\~hh6357.htm 5/23/01
 Loading...