

Page 1
architecture to provide you with a notebook computer that is compact, powerful, rugged and easy to use. Designed for a
Checklists
Page
1
of 74GoBook II Help
7/31/2003
file://C:\Documents%20and%20Settings\harwoodm.ITRXNT1\Local%20Settings\Temp\~hh9A72.htm
Getting Started
Congratulations on your purchase of the Itronix GoBook II computer! Your new GoBook II features the most
innovative advances in portable computing technology. It combines state-of-the-art ergonomics with a rugged, durable
wide range of business and personal productivity applications, the GoBook II is an ideal choice for use in applications
that require durability and performance.
For maximum expandability without compromising portability, the GoBook II has a USB interface and a PC card slot.
The high capacity hard disk drive provides you with plenty of storage space for multimedia files and applications.
The GoBook II features a standard 87-key Nitevue® keyboard (89-key international). The high-resolution 12.1-inch
touch screen LCD panel provides clear and crisp viewing with the convenience of a touch screen.
This online document, GoBook II Help, contains all the information you need to set up and use your new GoBook II. It
describes all the features of the GoBook II in an easy-to-read yet thorough manner. For information on printing,
navigating or otherwise using GoBook II Help see How to Use This Help System.
GoBook II™ Help
Page 2

After opening the package, carefully inspect the contents. Contact your dealer if any items are missing or appear
the purchase. Your system vendor may be able to recommend reliable brands and models.
Page
2
of 74GoBook II Help
7/31/2003
file://C:\Documents%20and%20Settings\harwoodm.ITRXNT1\Local%20Settings\Temp\~hh9A72.htm
damaged. The shipping carton should contain the following:
STANDARD
The Itronix GoBook II computer
Battery
ADP-90AB or ADP-75FB AC adapter with power cord
12.1 inch XGA display
Stylus
Shoulder Strap
GoBook II Quick Start Guide
OPTIONS
The following items are normally optional, but some vendors may include them in the standard package. Some items
may not be available in some countries, or some vendors may choose not to carry all the items.
Floppy disk drive
CD-ROM drive
CD-RW Drive
DVD-ROM drive
SVGA display
Soft Handle
Media Bay Li-Ion battery pack (3000 mAhr)
Hard Disk Drive Heater
LCD Heater
CAUTION
When purchasing any of the accessories listed above, purchase only those accessories that are approved
for use with your computer. The above accessories are proprietary items. Your system vendor can obtain these
approved accessories. If you use items that are not approved for use with this computer, you may cause your computer
to malfunction, or to emit or receive electromagnetic radiation in excess of local regulations. For non-proprietary
accessories such as PC Cards or printers, ensure that the accessory functions properly in your computer before making
Page 3

Features
step orientation in
Page
3
of 74GoBook II Help
7/31/2003
file://C:\Documents%20and%20Settings\harwoodm.ITRXNT1\Local%20Settings\Temp\~hh9A72.htm
High Capacity Hard Disk Drive
The computer has a high capacity hard disk drive, enabling you to install your favorite programs and store large
multimedia files.
Full Array of Ports and Connectors
Your computer includes standard ports for connecting to peripherals such as USB devices and monitors. USB ports
allow you to add many types of peripherals.
Large SVGA or XGA LCD
Your computer has a large, easy to view SVGA or XGA LCD panel.
Built-in Microphone and Stereo Speakers
The stereo speakers and internal microphone enable you to run a variety of multimedia applications.
Function Keys
Function keys allow you to suspend your computer, shut the LCDs off, and give you easy control of audio and your
monitor.
Where to Look For Information
About Your Computer
This Help System describes the key elements of your computer. New users can find a simple step-bythis chapter.
About Windows
For more extensive information and help about Windows go to Help and Support, found on the Start Menu. Go to
Start, Programs, Accessories to open , an online orientation of Windows XP.
72_0103_003
10 December 2002
© 2002 Itronix Corporation. All rights reserved.
GoBook II™ Help
Page 4

Precautions
Slots and openings in the computer case are for ventilation purposes. Do not block or cover these openings or the
Page
4
of 74GoBook II Help
7/31/2003
file://C:\Documents%20and%20Settings\harwoodm.ITRXNT1\Local%20Settings\Temp\~hh9A72.htm
You can use your computer under a wide range of environmental conditions. However, to ensure long use and
continued high performance, consider the following factors when setting up your computer:
Follow all warnings and instructions noted in this documentation and in the WindowsHelp and Support, found
on the Start Menu.
The first time you use your computer, we recommend that you carefully read the section on Power Management
to familiarize yourself with some basic battery information and to ensure optimum performance
There is danger of explosion if the battery is incorrectly replaced. Replace only with the same or equivalent type
recommended by the manufacturer. Dispose of used batteries according to the manufacturer's instructions.
Do not open the RAM door by yourself.
Unplug the computer from the power outlet before cleaning. Use a damp cloth for cleaning. Do not use aerosols,
solvents, or strong detergents
system could overheat
On the bottom of the GoBook II, there is a label with information on the power requirements of this system.
These requirements must be followed. If you are unsure of your local power supply, consult your dealer or local
Power Company
Do not step on or place anything on the power cord
If you use the computer with an extension cord, ensure that the total ampere ratings of all the devices sharing the
extension do not exceed the rating of the extension cord or the rating of the wall outlet
Unless instructed, never push foreign objects into the computer through any of the slots or openings. Dangerous
voltages are present, which could cause electric shock, fire, or damage sensitive components
For best results, use a power strip with a built-in surge protector. Do not use inferior extension cords as this may
result in damage to your computer
72_0103_003
10 December 2002
© 2002 Itronix Corporation. All rights reserved.
GoBook II™ Help
Page 5

The First Time. . .
Turning the Computer On and Off
Page
5
of 74GoBook II Help
7/31/2003
file://C:\Documents%20and%20Settings\harwoodm.ITRXNT1\Local%20Settings\Temp\~hh9A72.htm
Using your computer for the first time involves:
Installing the battery
Connecting the AC adapter to the computer
Turning the Computer On and Off
Adjusting the Volume
Installing the Battery
Make sure the computer is sheltered when you install the Lithium Ion battery; the computer is not weather sealed until
the battery is properly installed. The battery should be fully charged before you operate the unit on battery power. To
get the most from your battery, follow the guidelines in the Power Management section.
To install the battery
1. Remove the battery door.
2. Align the battery connectors and place the battery in the computer.
3. Replace the battery door and rotate the door latches to secure the door.
NOTE
When the battery is installed and the computer is connected to AC power, see Connecting the AC Adapter
below, it starts charging automatically. At moderate temperatures, approximately 70° Fahrenheit (21°C), the battery
will be fully charged in four to six hours. In warmer or cooler temperatures, the battery can take much longer to fully
charge. Refer to the Power Management section for additional information.
Connecting the AC Adapter
To connect the ADP-90AB or ADP-75FB AC adapter
1. Connect the AC adapter power cord to the AC adapter.
2. Connect the AC adapter to the power jack at the rear of your computer.
3. Connect the AC adapter power cord to an AC outlet.
4. Lift the display to open the LCD.
5. Open the LCD panel to a comfortable viewing angle.
6. Press the
Power Button
to turn ON the power.
Page 6

You can operate the computer while the battery is charging, while on external power , or on battery power only.
In a Suspend to Disk there is no power consumption. When the
You can also adjust the volume with the Windows volume control applet, which is located on the taskbar and looks like
Page
6
of 74GoBook II Help
7/31/2003
file://C:\Documents%20and%20Settings\harwoodm.ITRXNT1\Local%20Settings\Temp\~hh9A72.htm
To turn on the computer
Press the
Power Button
button once, and then give the system time to respond.
To turn off the computer
1. From the Start menu, tap Shut Down.
2. Then, from the Shut Down Windows screen select Shut Down and tap OK.
If you need to leave the system for a short time, or if you want to conserve battery power, you can suspend the
computer by pressing FN+F3. See Power Management for additional information.
Suspend to RAM
In a suspend to RAM, the contents of your computer's memory are held intact, while almost all the
components in your computer either turn off completely, or reduce power consumption to a minimum. In a suspend to
RAM, your computer remains active, but with a minimum possible power consumption. Return the computer to full
power by pressing any key. A fully-charged battery can maintain a Suspend to RAM for many hours.
Suspend to Disk (Hibernate)
Suspend to Disk is similar to turning off the computer, except that the current state of
the computer is copied to the hard disk as a special file.
computer returns from suspend mode , the desktop appears with the same files and programs open as when the
computer was suspended. Suspend to Disk is very useful when you don’t want to take the time to shut down all open
programs one by one to shut off the computer. This mode is also called hibernation mode.
CAUTION
Shutting down the computer improperly could result in lost or corrupted data.
Adjusting the Volume
Volume for the computer is adjusted by using function key combinations.
FN + F8 decreases the volume
FN + F9 increases the volume
FN +
toggles the volume mute on or off
F10
this .
NOTE
Adjusting the volume using the function keys produces only a slight change with each press. It may take
several presses to increase or decrease the volume to a level that you desire.
Page 7

72_0103_001
To calibrate the touch screen, open the Calibration Applet by selecting Start, Programs, Mobile Computer Tools, Touch
Touch Screen
have the new settings
take effect.
Page
7
of 74GoBook II Help
7/31/2003
file://C:\Documents%20and%20Settings\harwoodm.ITRXNT1\Local%20Settings\Temp\~hh9A72.htm
10 December 2002
© 2002 Itronix Corporation. All rights reserved.
GoBook II™ Help
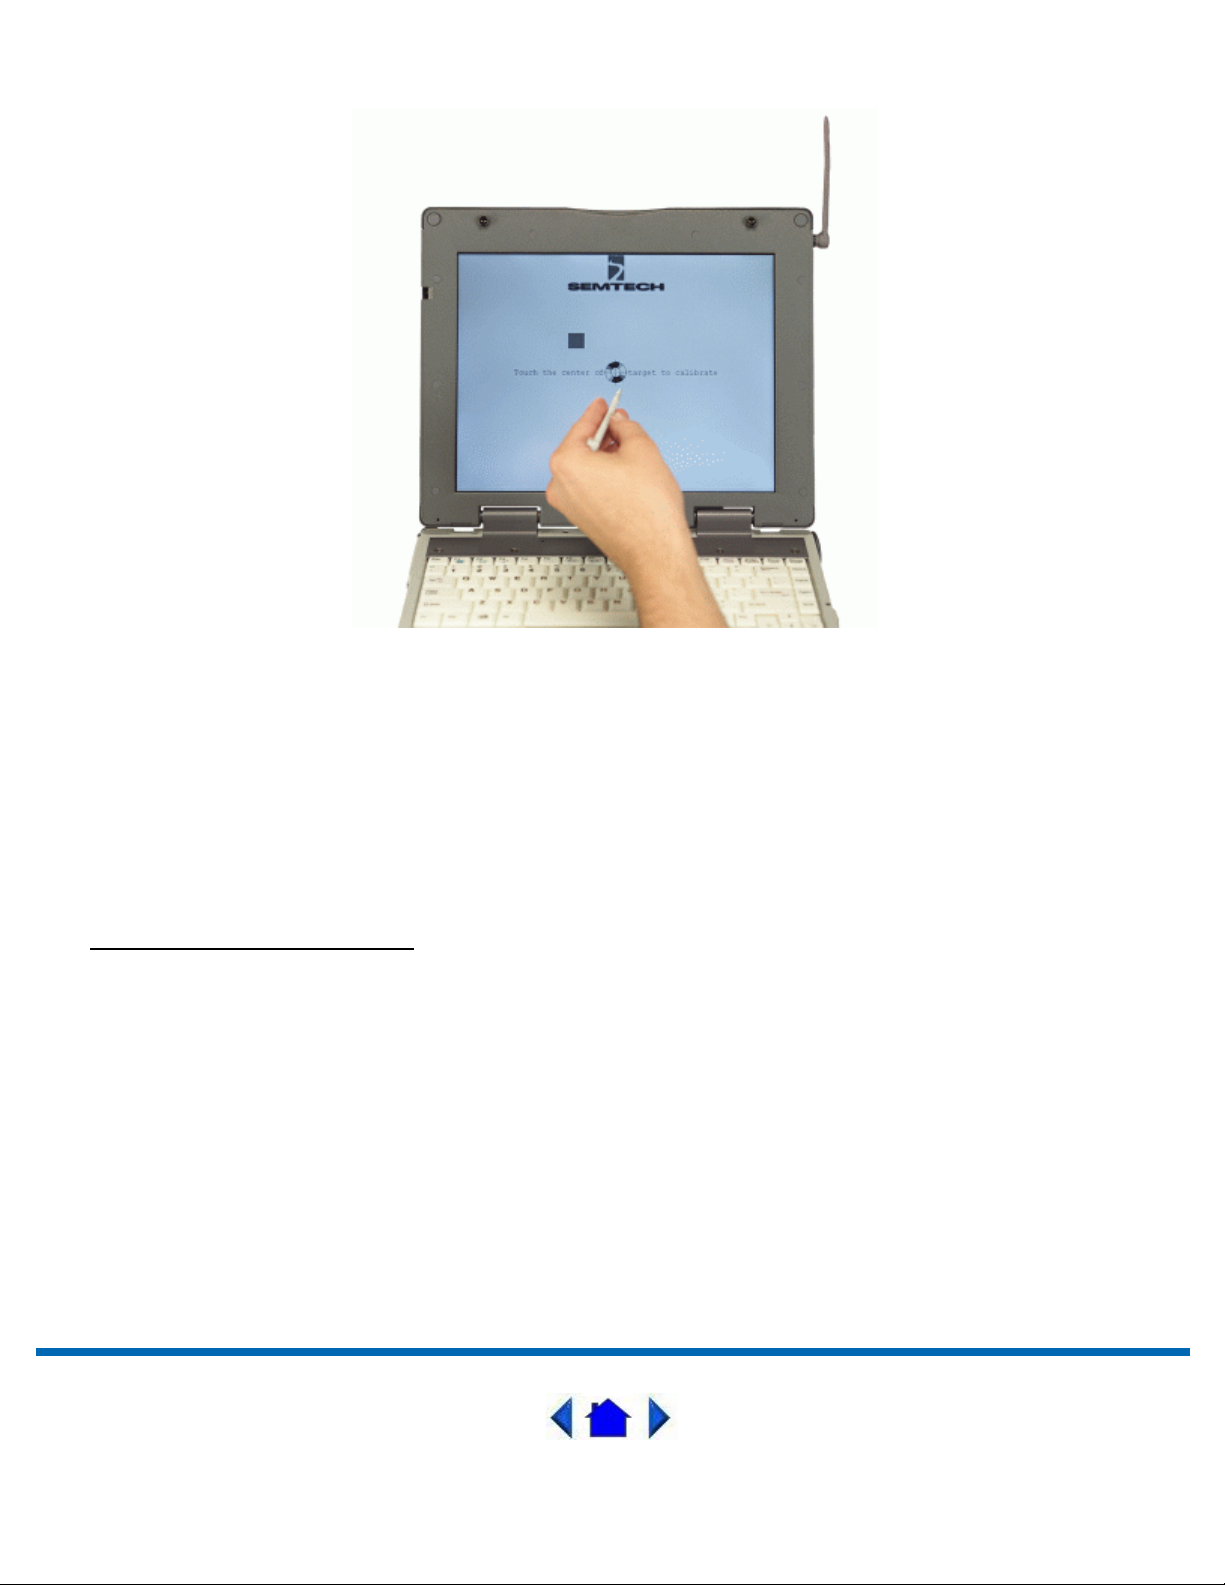
Calibrating the Touch Screen
Your GoBook II computer has a touch screen display. Follow the guidelines below to calibrate the touch screen for
optimum use.
CAUTION
Always use an approved stylus or your finger.
Never use sharp, hard, or abrasive implements on the touch screen such as ball point pens, pencils, or keys.
They could damage the screen.
To clean the touch screen panel, apply a household glass cleaner to a soft, clean, dry cloth and wipe the
screen.
Calibrating the touch screen
Screen Calibrator. You can also open the Calibration Applet by selecting Start, Settings, Control Panel,
Calibrator.
After the Calibration Applet starts, click on the Calibrate button
After you have completed calibration by touching the four highlighted points with an approved stylus, select OK to
Page 8
Page
8
of 74GoBook II Help
7/31/2003
file://C:\Documents%20and%20Settings\harwoodm.ITRXNT1\Local%20Settings\Temp\~hh9A72.htm
NOTE
be accomplished by revisiting the procedure above.
Adjusting the Screen
You can adjust the display brightness for better viewing.
Use the following keys to make adjustments:
Setting the Date and Time
To set the date and time
If you cannot select objects accurately with the stylus you may need to re-calibrate the touch screen. This can
To Do This... Press
Lighten the display
Darken the display
1. Tap the Start button, Settings, Control Panel, and double-tap the Date / Time icon.
FN+F7
FN+F6
2. From the Date / Time Properties menu, make changes to the Time and Date, and then close this screen by
selecting OK.
Page 9
72_0103_003
sealed laptop computer system built for the demanding environment
GoBook II
™ Help
Page
9
of 74GoBook II Help
7/31/2003
file://C:\Documents%20and%20Settings\harwoodm.ITRXNT1\Local%20Settings\Temp\~hh9A72.htm
10 December 2002
© 2002 Itronix Corporation. All rights reserved.
GoBook II™ Help
Startup Problems?
If your computer does not operate, try these solutions.
Connect the AC adapter to charge the battery if it is not charged.
NOTE
The Power LED on the AC adapter should be lit as well as the External Power Indicator on the
GoBook II if the AC adapter is connected and functioning properly. Additionally, one of the power icons should
appear in the task tray.
If the AC adapter is connected, make sure the electrical outlet you are using works.
Check to make sure the battery is installed and charged properly.
If the battery doesn’t begin charging, remove the battery, connect the AC adapter, and turn on the computer by
pressing On. Reinstall the battery. The Battery Power Indicator LED is solid while the battery is charging.
The
Troubleshooting
section lists additional solutions you can try.
72_0103_003
10 December 2002
© 2002 Itronix Corporation. All rights reserved.
Getting Familiar with Your Computer
The GoBook II computer is a ruggedized , weatherof the mobile worker. Designed for use by mobile workforces, this computer is a superior work tool for collecting,
managing, and communicating information in the field.
The following pages describe the external and internal features of your GoBook II computer.
Page 10

Individual Parts
5.
Power Button
Page
10
of 74GoBook II Help
7/31/2003
file://C:\Documents%20and%20Settings\harwoodm.ITRXNT1\Local%20Settings\Temp\~hh9A72.htm
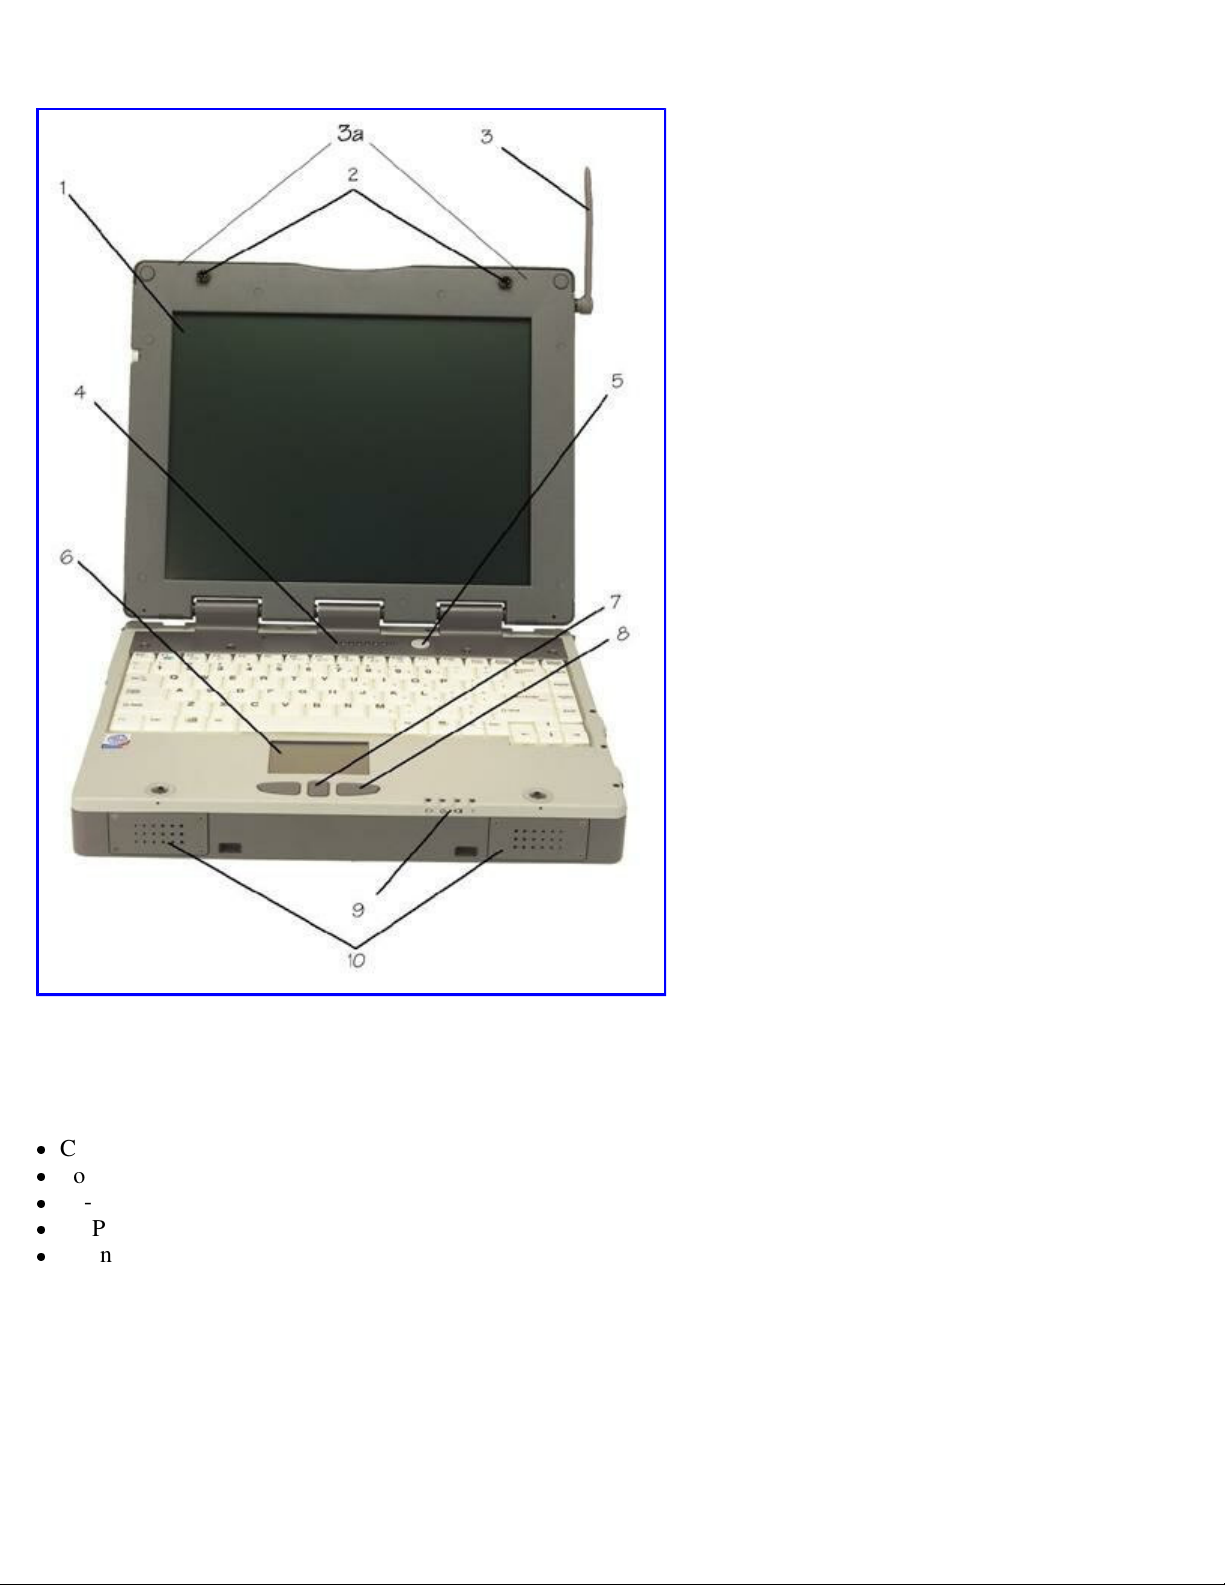
The following diagrams and descriptions provide an overview of your GoBook II computer.
Hover the mouse over each number on the picture to see a description.
Front View
1. Touch Screen Display
2. Display Latches
3. Antenna
3a. Antenna’s (internal mini-WLAN & BlueTooth)
4. Activity Indicators
6. Touchpad
7. Scrolling Button
8. Touchpad Buttons
9. Power / Wireless Modem Indicators
10. Speakers
Page 11
9-Pin Serial Port
Page
11
of 74GoBook II Help
7/31/2003
file://C:\Documents%20and%20Settings\harwoodm.ITRXNT1\Local%20Settings\Temp\~hh9A72.htm
Back View
Cooling Fan
Power Jack
15-Pin VGA Port
60-Pin Multi-IO Port
6. PS2 Port
7. RJ-11 Modem Jack
8. RJ-45 Network Jack
9. USB Port
10. D-Rings
Page 12
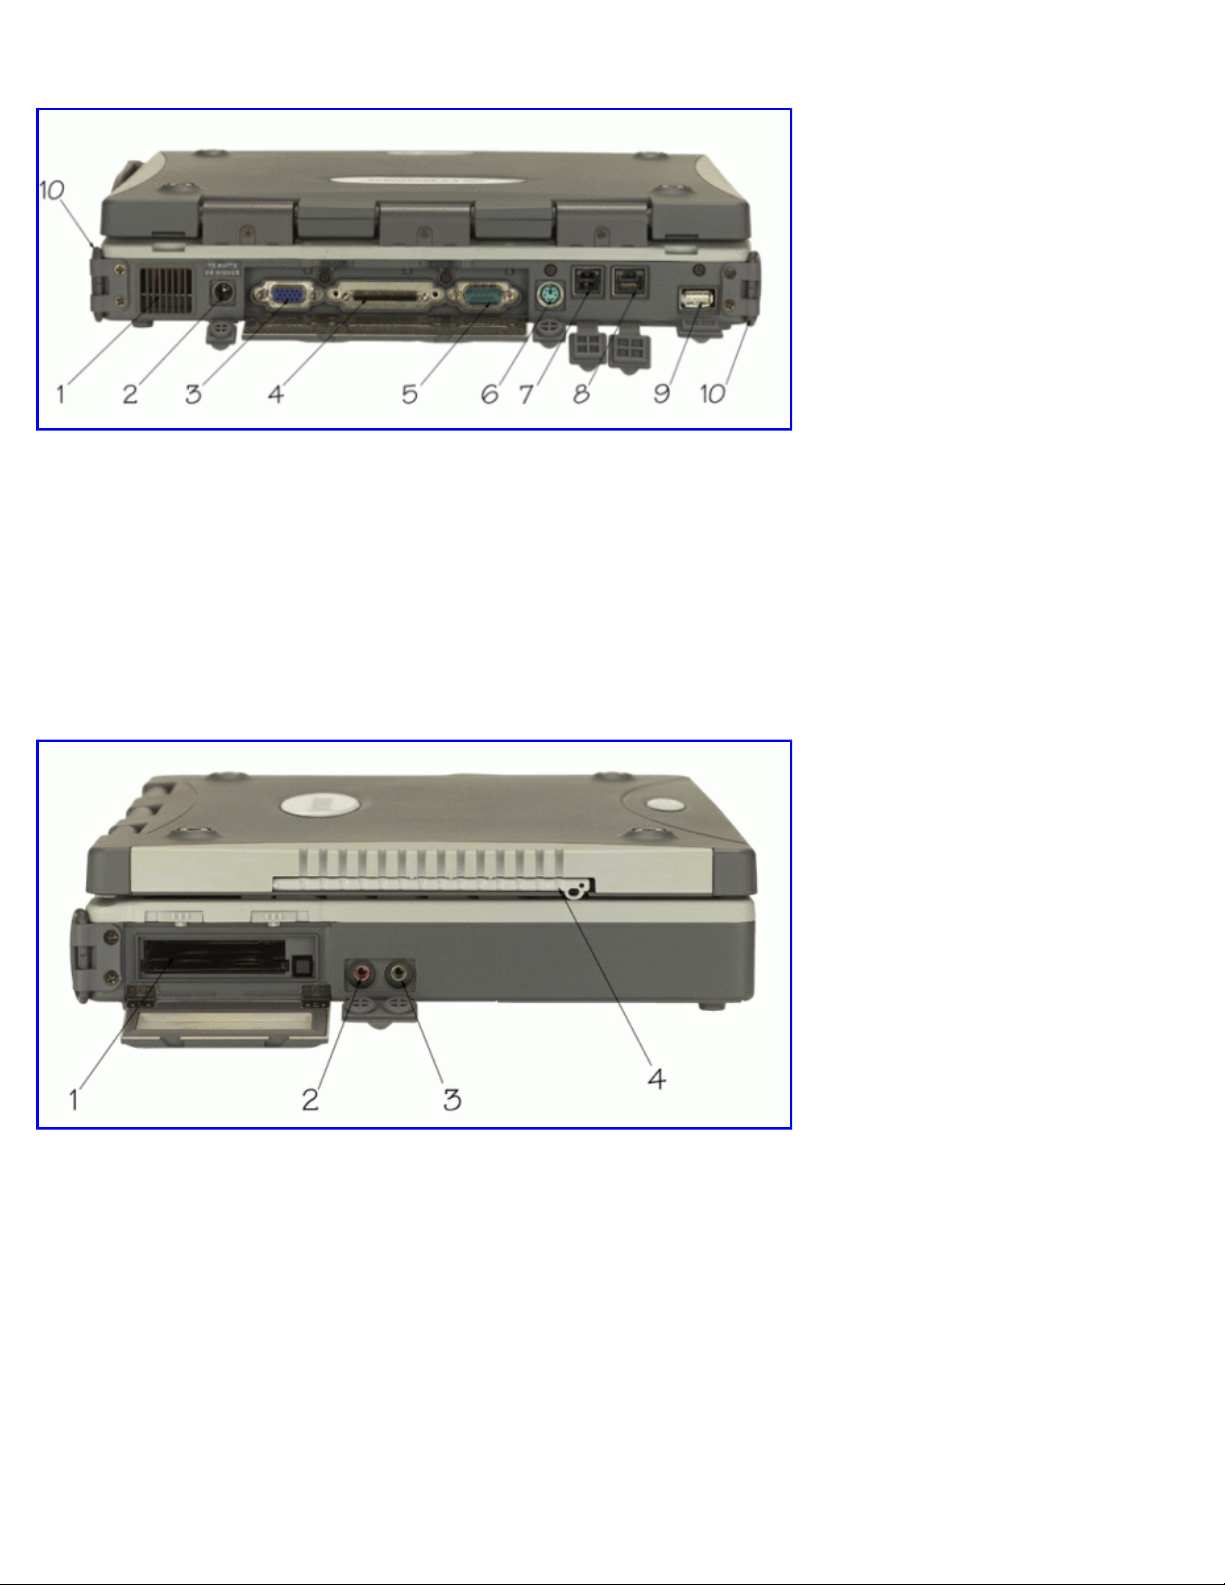
Left Side View
5.
Security Slot
Page
12
of 74GoBook II Help
7/31/2003
file://C:\Documents%20and%20Settings\harwoodm.ITRXNT1\Local%20Settings\Temp\~hh9A72.htm
1. PC Card Slot
2. Microphone Jack
3. Audio Jack
4. Stylus
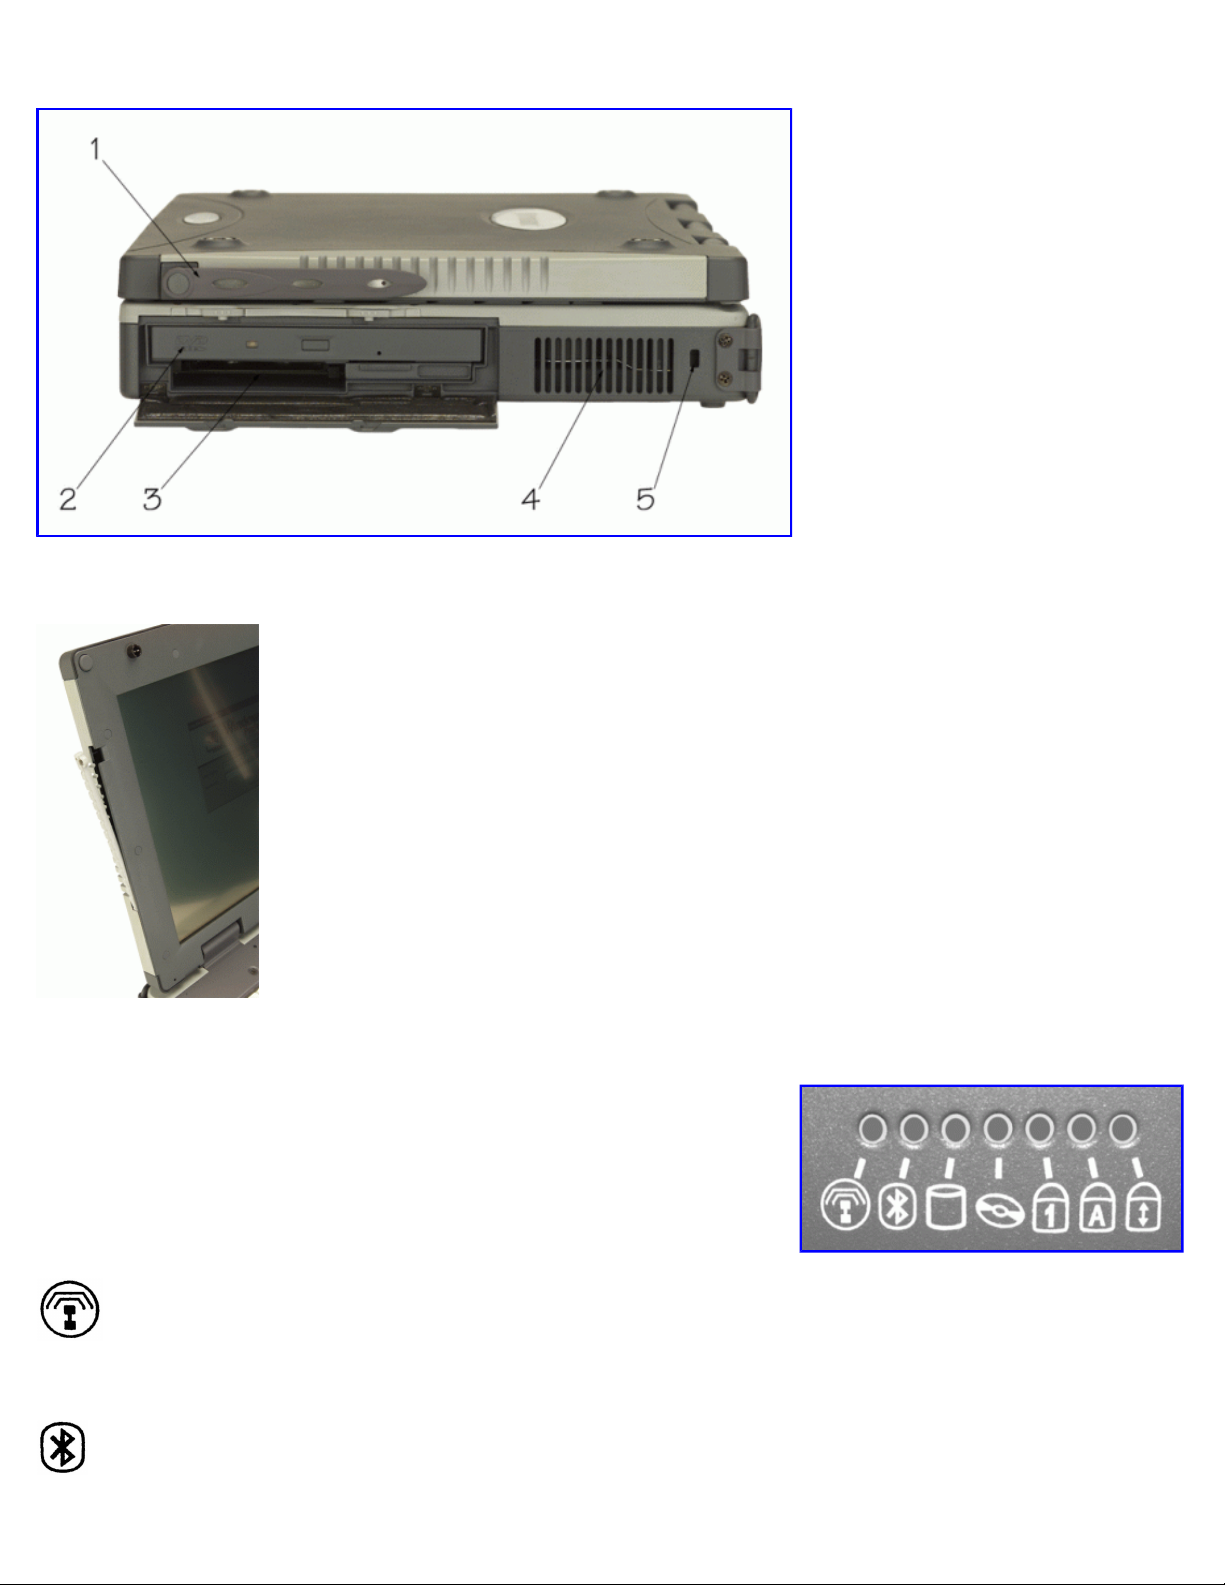
Right Side View
1.Antenna
2. Media Bay - CDROM, DVD, Floppy Disk, CDRW, or Media Bay Battery
3. Radio Bay
4. Cooling Fan
Page 13
Display with Stylus
Icon & LED #
Page
13
of 74GoBook II Help
7/31/2003
file://C:\Documents%20and%20Settings\harwoodm.ITRXNT1\Local%20Settings\Temp\~hh9A72.htm
LED Activity Indicators
The activity indicators, located above the keyboard, light up when a particular
function of the computer is active. Each indicator is marked with a
corresponding symbol and is visible when the lid is open or closed. LED
numbers are from left to right.
Function
LED #1
Mini PCI
Not Used
Page 14
10 December 2002
LED #2
Icon
Page
14
of 74GoBook II Help
7/31/2003
file://C:\Documents%20and%20Settings\harwoodm.ITRXNT1\Local%20Settings\Temp\~hh9A72.htm
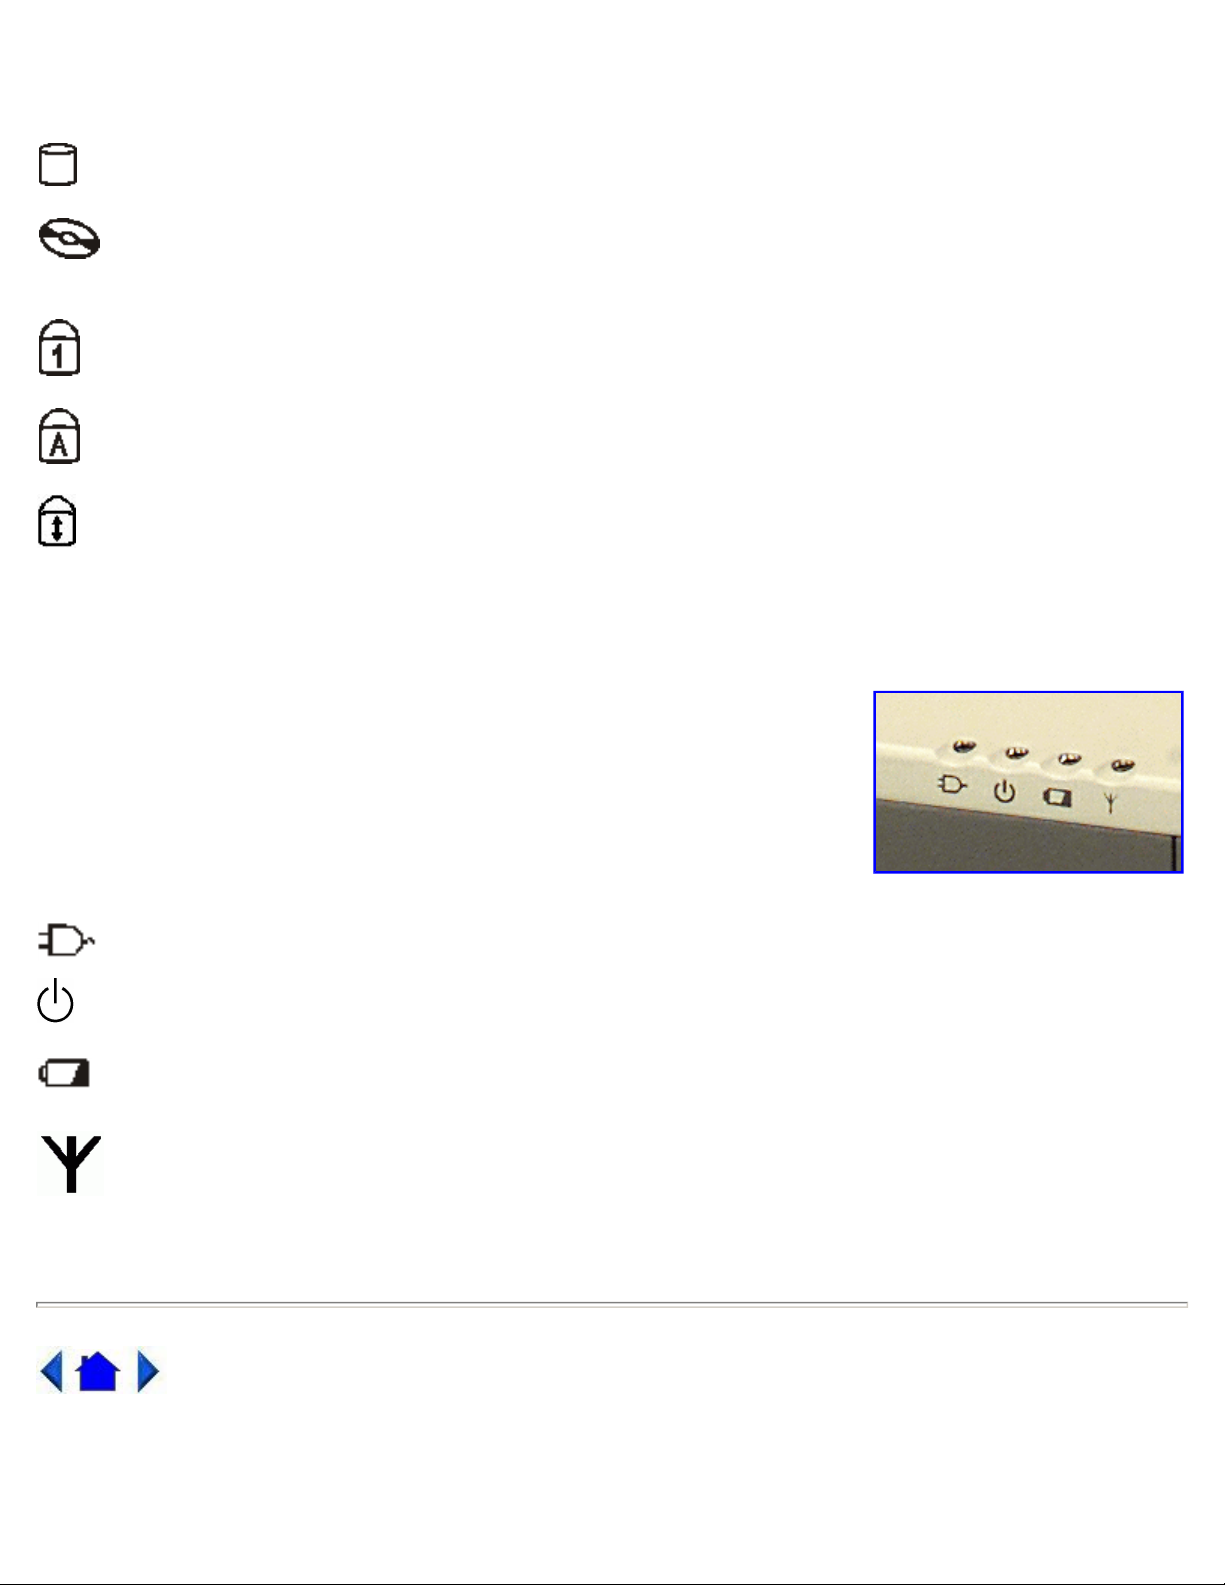
LED #3
LED #4
LED #5
LED #6
LED #7
Disk Status
(HW)
Media Drive
Bay
Number Lock
Caps Lock
Scroll Lock
LED Power / Wireless Modem Indicators
The case front LED’s indicate external power, unit ON/OFF, battery status, and
wireless modem ON/OFF. The indicators remain active and viewable even when the
LCD panel is closed.
Function LED
External
Power
Power
Battery
Wireless
Modem
Green
LED off
Green
Flashing Green
Green
Flashing Green
LED off
Green
Flashing Green
LED off
72_0103_003
Page 15

© 2002 Itronix Corporation. All rights reserved.
Arrow Keys
GoBook II
™ Help
Press
…
Page
15
of 74GoBook II Help
7/31/2003
file://C:\Documents%20and%20Settings\harwoodm.ITRXNT1\Local%20Settings\Temp\~hh9A72.htm
Keyboard Basics
The keyboard on the GoBook II computer looks much like the keyboard of a typewriter and operates in almost the
same way. While typewriter keys put characters on paper, the keys on the laptop enter characters in the computer and
perform certain functions, depending on the application or program.
The GoBook II computer features:
87-key US keyboard; 89-key international keyboard
Twelve function keys, F1-
Embedded numeric keypad
Mouse keys and cursor control keys
F12
Restarting the Computer
CTRL+ALT+DEL
Primary Keys
.
.
.
Page 16
The arrow keys are defined by the software application.
change in pressure and moves the cursor in the corresponding direction.
Page
16
of 74GoBook II Help
7/31/2003
file://C:\Documents%20and%20Settings\harwoodm.ITRXNT1\Local%20Settings\Temp\~hh9A72.htm
The
UP ARROW
selections from menus and scrollable list boxes.
The
DOWN ARROW
selections from menus and scrollable list boxes.
The
RIGHT ARROW
The
LEFT ARROW
key usually moves the cursor up one line. In some cases, you can use the up arrow to make
key usually moves the cursor down one line. In Windows, you can use the down arrow to make
key usually moves the cursor one character position to the right.
key usually moves the cursor one character position to the left.
Function Keys
Hold the FN key while pressing the numbered function key.
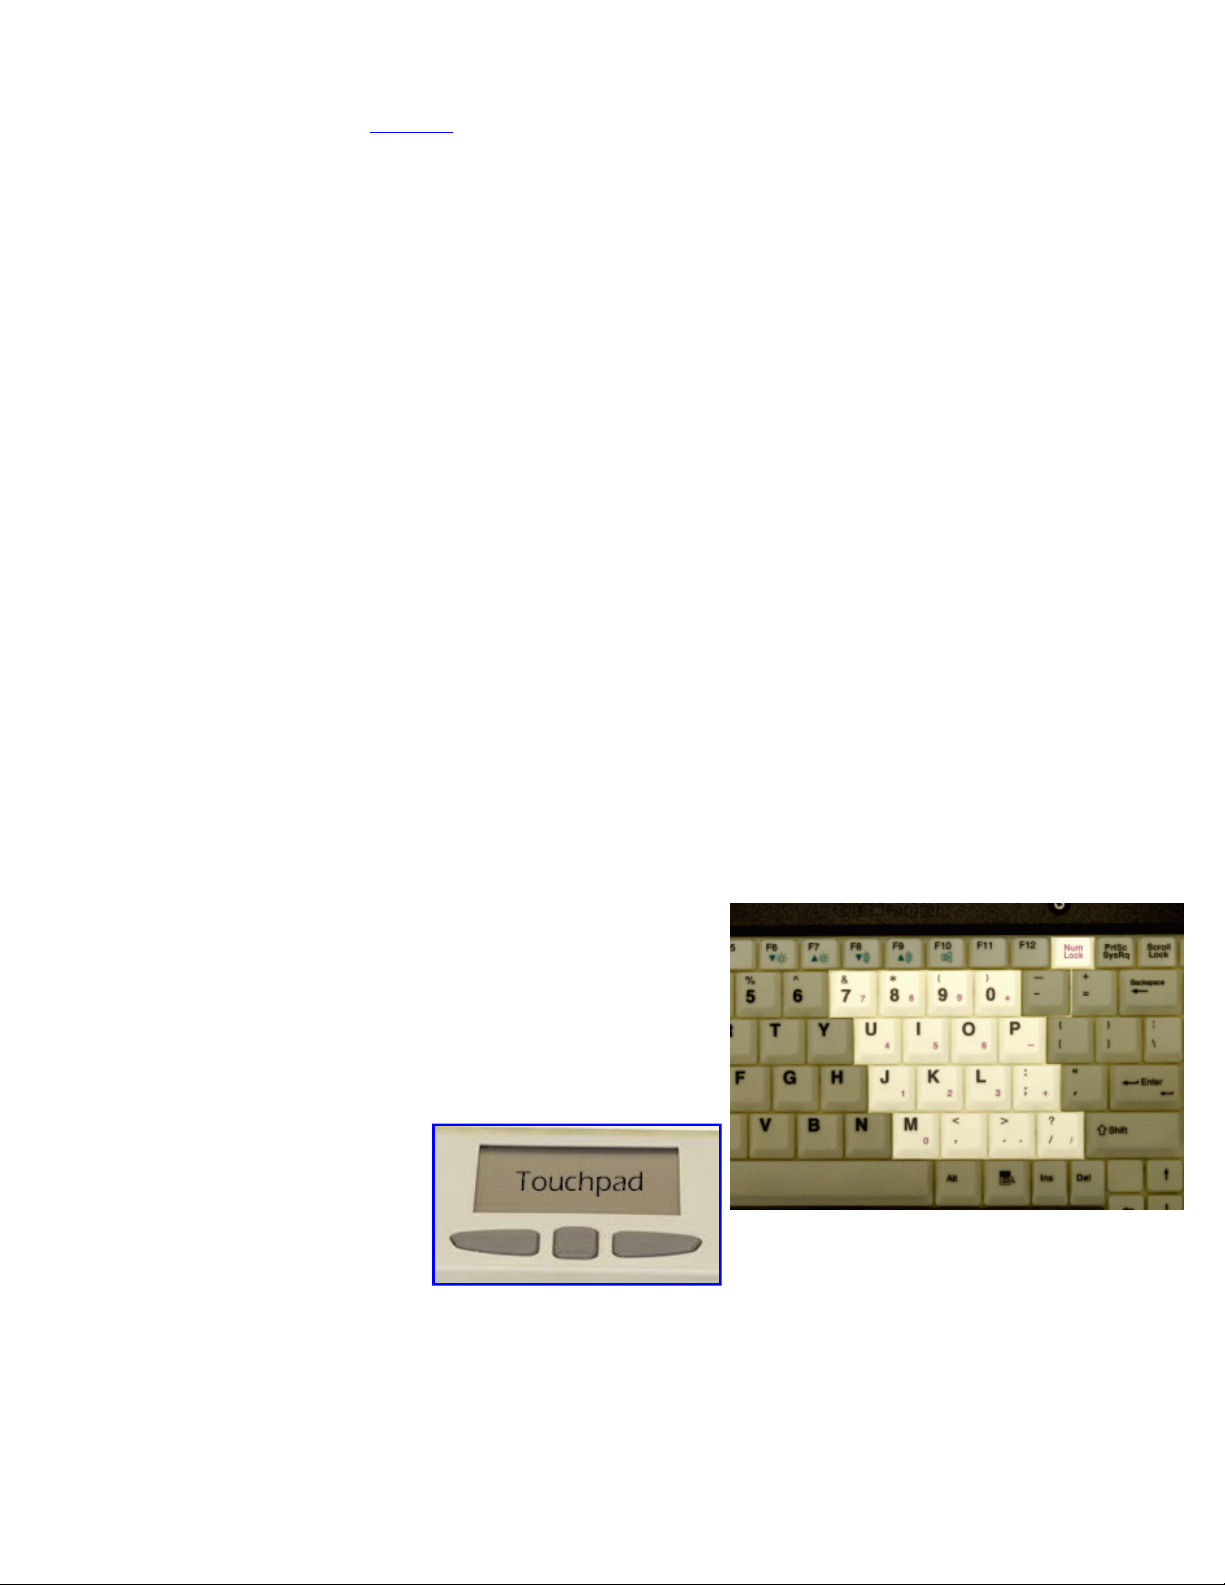
Numeric Keypad
The numeric keypad is embedded in the keyboard area. The
embedded keypad emulates the numeric keypad typically found on a
full-size keyboard. It is arranged like a calculator for applications that
require you to key many numbers or for use with the Calculator in the
standard Windows Accessories.
Touchpad
The touchpad is a pointing device that
provides all the features of a two-button
mouse. Its primary function is to move
the cursor around the screen.
Using Your Touchpad
Clicking
1. First, place your fingers on the keyboard in the normal typing position. The touchpad is easily accessible by
moving either your left or right thumb off the space bar and on to the touchpad.
2. Gently move your thumb across the touchpad in the direction you want the cursor to move. The pad detects the
Page 17

tapping. This
depending on the software. To select an object, first move the pointer over the object you want to select, and then
clicking, however
to make adjustments.
Page
17
of 74GoBook II Help
7/31/2003
file://C:\Documents%20and%20Settings\harwoodm.ITRXNT1\Local%20Settings\Temp\~hh9A72.htm
NOTE
The touchpad on your GoBook II computer is electrically sensitive to finger touch. It will not respond if
touched by anything other than your fingers, such as a stylus or pencil.
3. The touchpad offers another method of making selections in a software program. It is called doublefunction corresponds to double-clicking with a mouse. Once the cursor has been moved to the object you want to
select, lightly double-tap the pressure sensitive touchpad. This double-tapping on the touchpad will select the
desired item and prompt the software to perform the related operation.
4. The left and right buttons located directly below the touchpad are the same in function as those on a twobuttoned mouse. Clicking these buttons makes selections, drags objects, or performs a variety of other functions
press the left button one time. The functions of these buttons are software specific.
Double-clicking
Double-clicking is a common technique for selecting objects or launching programs from icons. Once you have
moved the pointer over the object you wish to select, rapidly press the left button two times. This action is
commonly referred to as "double-clicking" an object.
Dragging
Move the pointer to the desired location then press down the left button. While still holding down the left button,
move the pointer to the desired location. Release the button.
Move the pointer to the desired location. Tap the touchpad twice quickly as if you were doubledo not remove your finger after the second tap. Move the cursor to the desired location. Lift your finger to finish
dragging.
Adjust the touchpad settings by selecting Settings/Control Panel/Mouse/Buttons. These settings allow you to change
the orientation of the touchpad from right-handed to left-handed, and fine-tune the pointer movement and timing of
clicks.
Touchpad Precautions
If not properly cared for the touchpad can be easily damaged. Please take note of the following precautions.
Do not rest heavy objects on the touchpad or the touchpad buttons.
General Guidelines
The mobile computer uses a Liquid Crystal Display (LCD), which is the type of screen used on many notebook and
sub-notebook computers. One problem experienced on computers with an LCD display, especially in cold
environments, is that the cursor seems to "disappear" whenever the mouse is moved quickly. To improve the visibility
of the mouse cursor, you should use a slow or medium speed/sensitivity level.
You can combine a higher level of acceleration with a slow or medium speed/sensitivity level. This will allow you to
move the mouse cursor quickly by increasing your finger pressure, while still providing a finer degree of control when
you apply minimum pressure.
NOTE
To change the speed of the mouse, from the Start Menu select Settings, Control Panel, and then choose Mouse
Page 18

Scrolling Buttons
LCD and use the external monitor exclusively.
Page
18
of 74GoBook II Help
7/31/2003
file://C:\Documents%20and%20Settings\harwoodm.ITRXNT1\Local%20Settings\Temp\~hh9A72.htm
If you are scrolling through a document, you may it find the scrolling button more restful to your hand than holding
down a mouse button. The scrolling button is located between the touchpad buttons. Push the top of the button to
scroll up in a document or Web page; press the bottom of the button to scroll down.
Connecting an External Keyboard or Mouse
You can use your GoBook II computer with an optional external keyboard, numeric keypad, or IBM PS/2 compatible
mouse. These devices are "hot swap" capable, which means you do not have to power down the GoBook II to connect
them to the PS/2 connection located on the back of the unit.
72_0103_003
10 December 2002
© 2002 Itronix Corporation. All rights reserved.
GoBook II™ Help
Display Basics
XGA vs. SVGA Display
Your GoBook II computer has either an XGA (standard) or SVGA (optional) display.
XGA Display:
light from the backlight so it has excellent readability in indirect light. The XGA display is the most popular display
because it is easy to read indoors and in vehicles.
SVGA Display:
superior readability in direct sunlight. It also includes a backlight to improve visibility in low light conditions such as
shade, in a vehicle or indoors.
Connecting to an External Monitor
The GoBook II has a 15-Pin VGA monitor port to connect your computer to an external monitor.
The XGA display is a transmissive color display designed to minimize glare and maximize transmitted
The optional SVGA display is a transflective color display designed for frequent outdoor use with
Using the VGA monitor port for dual display
You may use an external monitor simultaneously with your GoBook II’s LCD. You may also disable the GoBook II's
Page 19

1. Locate the 15-pin VGA monitor port on the back of the unit behind the IO door. Then connect the video signal
inch floppy disks and is read and
ROM
drive will be D.
The media bay is located on the right side of your computer, as you are facing the display, and is
Page
19
of 74GoBook II Help
7/31/2003
file://C:\Documents%20and%20Settings\harwoodm.ITRXNT1\Local%20Settings\Temp\~hh9A72.htm
cable from the external monitor to the monitor port.
2. Connect the monitor’s power cable to a power outlet and turn on the monitor.
3. If the new monitor has not automatically been detected and is not displaying what appears on your GoBook II’s
LCD screen, open the Control Panel.
4. Double-tap
5. Tap the
6. Tap the
7. You can also use the FN+F2 hot keys to cycle through the CRT, LCD, and CRT//LCD settings.
72_0103_003
10 December 2002
© 2002 Itronix Corporation. All rights reserved.
GoBook II™ Help
Display
Settings
S3DuoVue
. The Display Properties window opens.
tab. Then select the
tab and select the CRT box the enable display on an external monitor.
Advanced
button.
Disk Drives
Your computer comes with several components for reading and writing (recording) information.
The Hard Disk Drive
The hard disk provides high-capacity storage and fast access. Windows and most programs are stored here. Your
GoBook II identifies the hard disk drive as drive C. For information about removing or installing the hard drive see
Hard Drive Care and Handling.
The Floppy Disk, CD-ROM, or DVD-ROM Drive
Your computer may come with a floppy disk drive. The floppy disk drive accepts 3.5write capable.
The CD-ROM drive is a read only drive. It cannot be used to write data to a recordable compact disk. The CD-ROM
drive can read data from CDs, including audio or video CDs. The DVD drive can read both DVD and CD disks. Your
GoBook II identifies the drive with the letter following the hard drive letter. If you hard drive is C, then the CD0-
Page 20
accessible by sliding the two bay door latches, which release and open the door.
Keep these precautions in mind when handling CD
-
ROM/DVD
-
ROM discs.
Page
20
of 74GoBook II Help
7/31/2003
file://C:\Documents%20and%20Settings\harwoodm.ITRXNT1\Local%20Settings\Temp\~hh9A72.htm
Inserting a CD-ROM or DVD-ROM Disk
1. Press the button on the front of the drive to open the disk tray and pull the tray open.
2. Place the disk on the tray, label side up.
3. Place the disk on the central spindle and press gently until the disk clicks into place.
4. Slide back the tray until it clicks shut.
Removing a CD-ROM or DVD-ROM Disk
1. Make sure the computer is not accessing the CD-ROM/DVD-ROM drive.
2. Press the button on the front of the drive and pull the tray all the way out.
3. Pick up the CD-DVD by the edges and remove the CD-ROM/DVD-ROM from the tray. Push the tray into the
computer until it closes fully.
CAUTION
the drive will flash. Do not attempt to remove a disk while this light is active.
Changing your 'swappable' media bay device
1. Make sure the computer is not accessing the media bay
2. Slide the door latches to release the media bay door.
3. Left click the "unplug or eject" media bay icon on the
4. Select the media bay device and left click to stop the
5. Wait for the "safe to remove hardware" message.
6. Grasp the media bay device by the removal tab and pull straight out until it is clear from the slot.
7. Click OK
When the computer is reading from a CD-ROM/DVD-ROM or Floppy disk drive, the indicator light for
drive.
right side of the taskbar.
device.
8. Re-insert the next media bay device by firmly pushing it back into the slot until it clicks into place.
Precautions for Handling CD-ROM/DVD-ROM Disks
Page 21

Your computer
’
s PC Card slot supports Type I, II or III
PC Cards, 32
-
bit CardBus cards, and Zoomed Video cards.
Page
21
of 74GoBook II Help
7/31/2003
file://C:\Documents%20and%20Settings\harwoodm.ITRXNT1\Local%20Settings\Temp\~hh9A72.htm
Always hold the disc by the edges; avoid touching the surface of the disc.
Use a clean, dry, cloth to remove dust, smudges, or fingerprints. wipe from the center outward.
Do not write on the surface of the disc.
Extremes in temperature may damage discs. Store discs in a cool dry place.
Do not use benzene, thinners, or cleaners with detergent. Only use CD0-ROM/DVD-ROM cleaning kits.
Do not bend or drop the discs.
Do not place objects on top of discs.
CAUTION
do not insert any foreign objects into the disc tray. Do not force the tray to open or close manually. When
not in use, keep the tray closed to prevent dust or dirt from entering the drive unit. If you experience difficulty when
removing a CD/DVD disc, stretch a paper clip (or use a pin or a thin metal rod) and insert it into the emergency eject
hole located on the front panel.
The CD/DVD disk tray should eject immediately. This procedure can also be used to remove a CD-DVD from the
drive when the GoBook II is powered off.
72_0103_003
10 December 2002
© 2002 Itronix Corporation. All rights reserved.
GoBook II™ Help
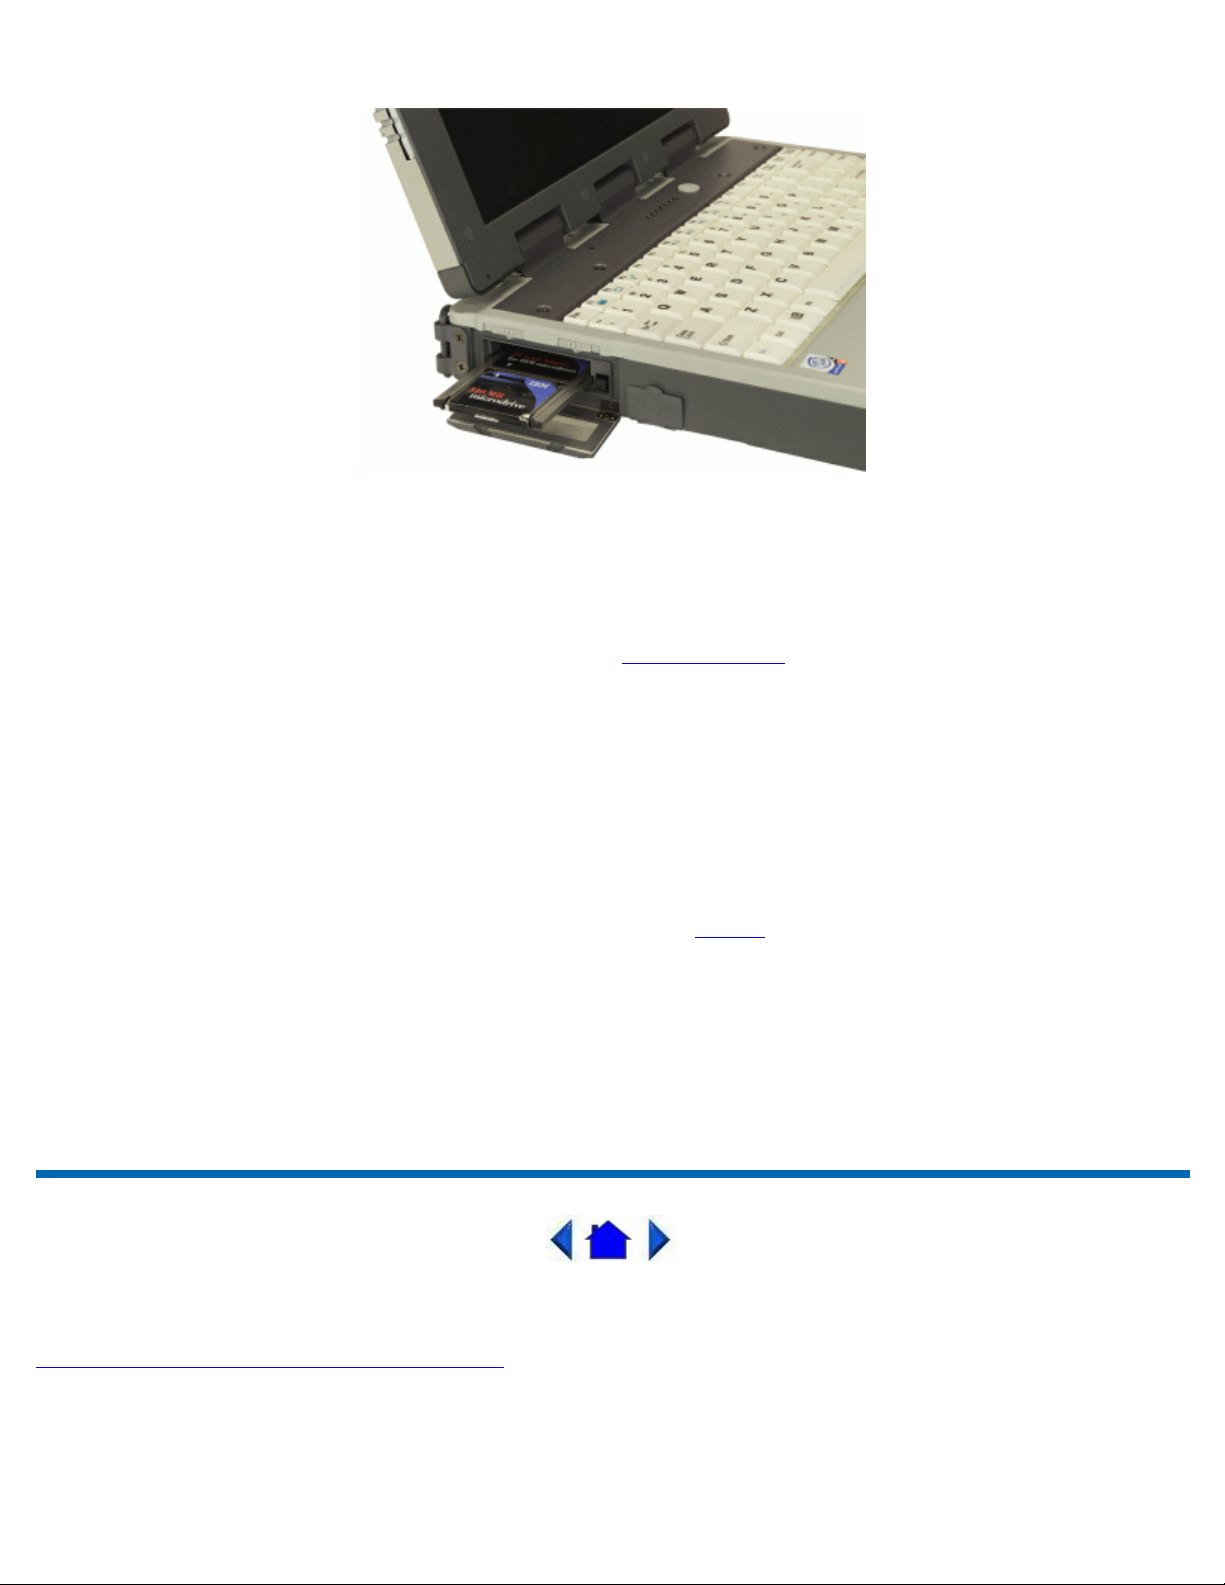
The PC Card Slot
The PC card slot can be used as an interface between your computer and a variety of communications devices, such as
network adapters, SCSI adapters, and fax/modems. They can also be used to provide additional data storage capacity.
Page 22
Making Connections
Page
22
of 74GoBook II Help
7/31/2003
file://C:\Documents%20and%20Settings\harwoodm.ITRXNT1\Local%20Settings\Temp\~hh9A72.htm
Installing a Card
1. The top side of a PC Card is usually identified with a label. Insert the card into the slot with the top up and the
edge with pinhole contacts going in first. You will feel some resistance as the card slides into the back of the slot.
2. PC Cards require drivers, or a program that allows the operating system to use a specific device. Many drivers
are included with Windows, but if not, you will be prompted to install the driver included with your card.
NOTE
while others require that the computer be turned off.
Removing a PC Card
72_0103_003
10 December 2002
© 2002 Itronix Corporation. All rights reserved.
Please read the instructions included with individual PC Cards. Some cards may be inserted with power on,
1. If a PC Card is in use, you must shut down the PC Card before removing it.
2. Select the PC Card icon on the right side of the Windows tray taskbar , then tap Stop.
3. When the Windows message appears, telling you that it is safe to remove the card, tap OK.
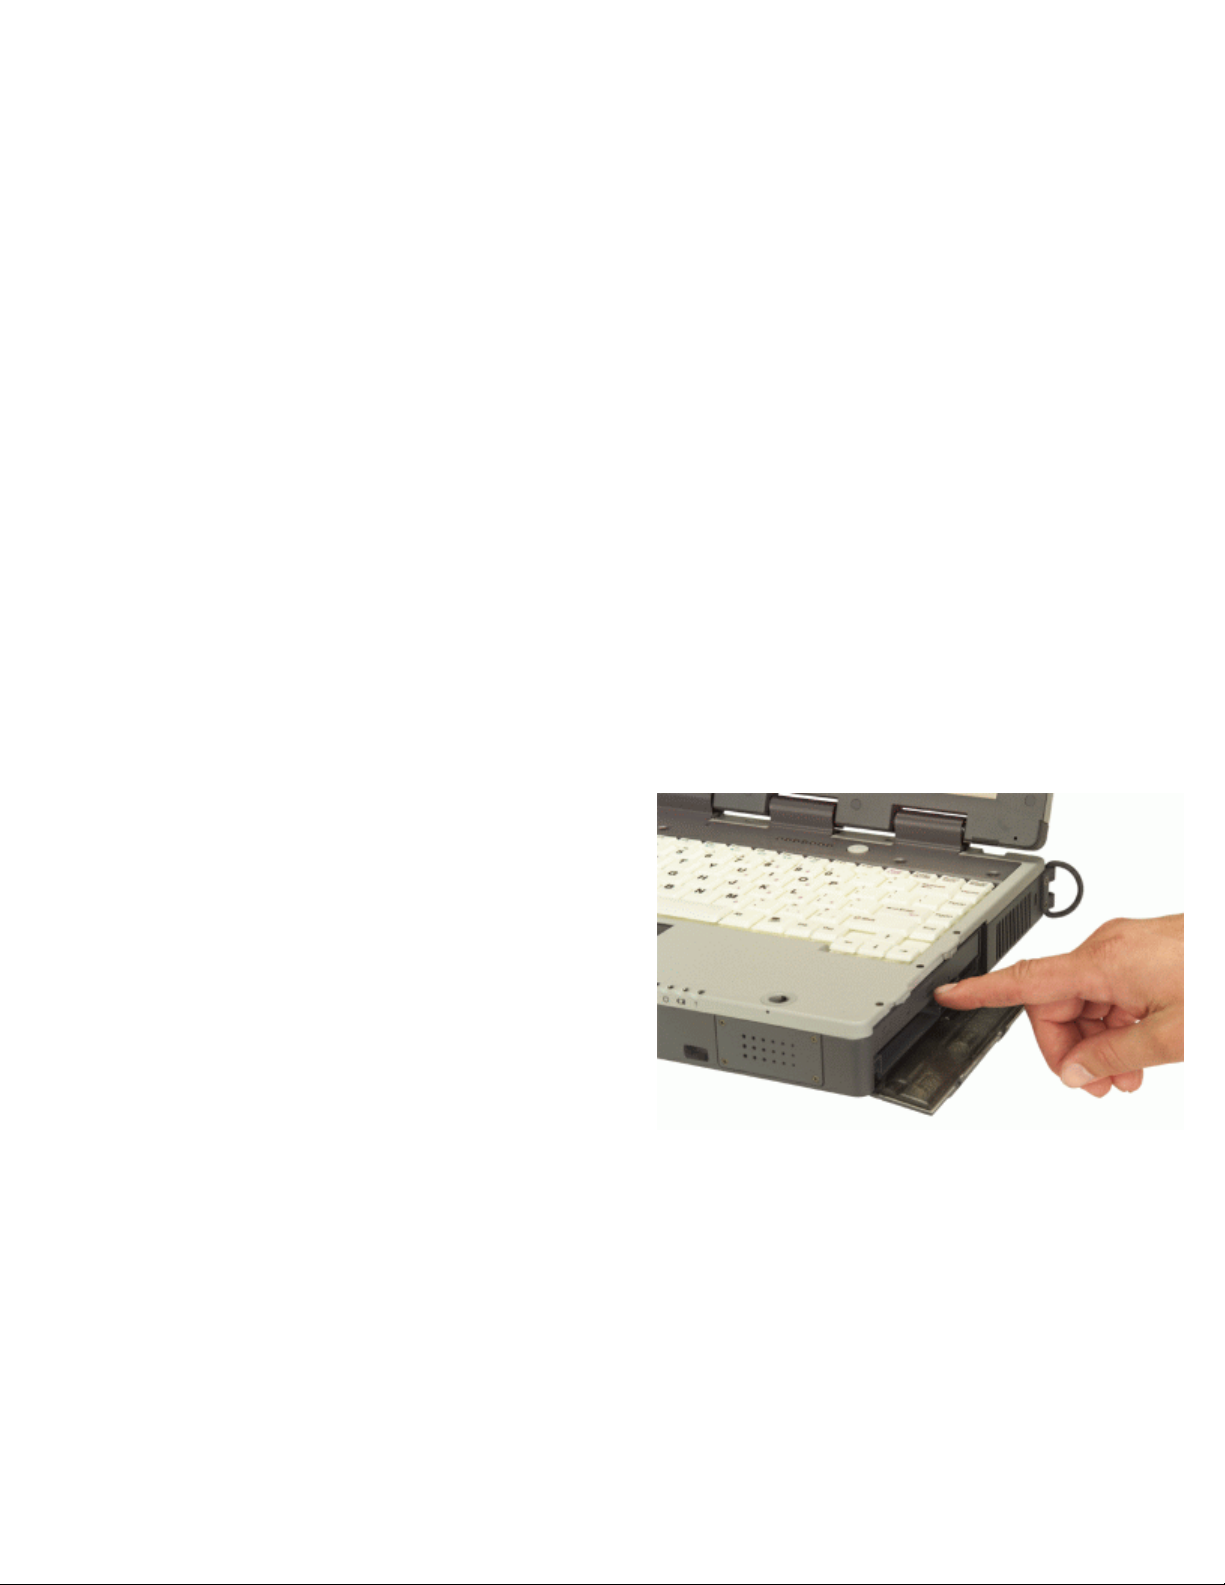
4. Press the eject button on the PC Card slot to release the eject button (it is spring loaded and remains hidden until
it is pressed).
5. Press the eject button again to release the PC Card.
Page 23
Your computer is equipped with a full array of ports and connectors, including standard input/output (I/O) ports for
This port is identified as COM1 and is 16550A compatible.
Page
23
of 74GoBook II Help
7/31/2003
file://C:\Documents%20and%20Settings\harwoodm.ITRXNT1\Local%20Settings\Temp\~hh9A72.htm
quickly and easily adding peripheral devices such as printers and monitors. Refer to documentation included with
individual devices for details on connecting these devices to your computer. Along with the standard ports found on
most computers, your computer may also include optional modem and LAN ports for advanced communications
technology.
GoBook II™ Help
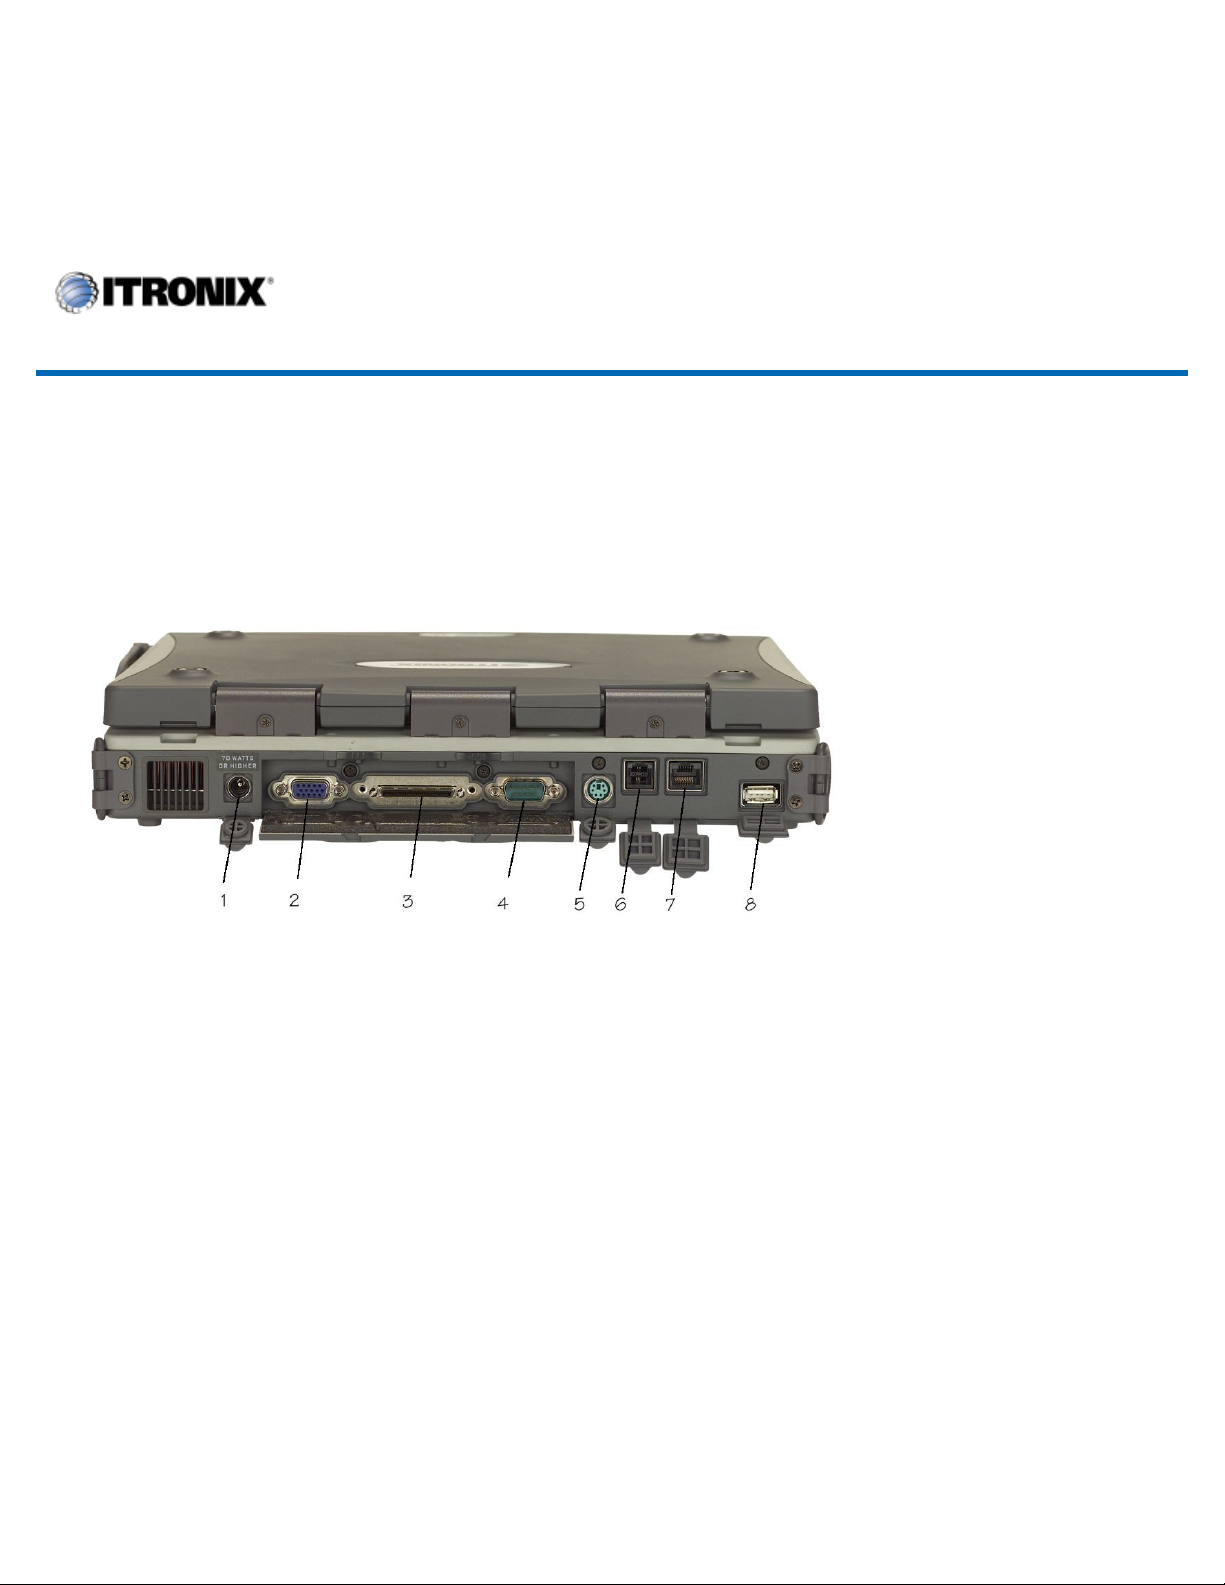
Rear Connectors
Hover the mouse over each number on the picture to see a description.
1 DC-in Jack
Connect the DC power cable from the AC adapter to this jack.
2 VGA Out (External Video) Port
The 15-pin monitor can connect your computer to an external monitor.
3 Multi-I/O Port
The 60-pin Multi-IO port is provided so you can connect the GoBook II to an optional cradle or office dock.
4 Serial Port
The 9-pin serial port can be used to connect your computer to serial devices such a a fax/modem or a serial mouse.
Page 24

5 PS/2 Port
Hover the mouse over each number on the picture to see a description
Page
24
of 74GoBook II Help
7/31/2003
file://C:\Documents%20and%20Settings\harwoodm.ITRXNT1\Local%20Settings\Temp\~hh9A72.htm
You can use the mini-DIN PS/2 port to connect your computer to a PS/2 device such as a PS/2 keyboard or mouse.
6 Fax/modem RJ-11 Jack
The fax/modem can transmit data using the 56 Kbps V.90 or V.92 protocol, and send and receive faxes at 14.4 Kbps.
In some countries, local regulations may not permit the use of the fax/modem designed for this system. In this case,
you may use a PCMCIA modem.
CAUTION
lines, such as PBX and ISDN systems found in many offices. Digital lines may damage your modem. If you are
unsure as to the type of port you have to plug into, simple detection and protection devices are available at your local
computer store.
7 LAN RJ-45 Jack (optional)
With an Ethernet LAN you can make LAN connections without installing PC cards. Connection speed is 10/100
Mbps.
8 USB (Universal Serial Bus) Port
The USB is latest standard for attaching input devices, scanners, and other devices to a PC. USB devices can be
chained together on a single cable. USB is 1.1 compliant.
72_0103_003
10 December 2002
© 2002 Itronix Corporation. All rights reserved.
Plug your modem into an analog telephone jack only. Most homes use analog lines. Do not use digital
GoBook II™ Help
Left Side Connectors
Page 25

Hover the mouse over the number on the picture to see a description.
Page
25
of 74GoBook II Help
7/31/2003
file://C:\Documents%20and%20Settings\harwoodm.ITRXNT1\Local%20Settings\Temp\~hh9A72.htm
1 PC-Card Slot
Use this slot to connect PCMCIA-card devices.
2 Microphone Jack
Connect a microphone to this jack to record audio.
3 Audio-Out Jack
Connect external speakers or a stereo headset to this jack to listen to multimedia.
72_0103_003
10 December 2002
© 2002 Itronix Corporation. All rights reserved.
GoBook II™ Help
Right Side Connector
Page 26

This device contains a Cisco MPI
-
350 WLAN radio transmitter, a Sierra Wireless AC750 WAN radio transmitter
Page
26
of 74GoBook II Help
7/31/2003
file://C:\Documents%20and%20Settings\harwoodm.ITRXNT1\Local%20Settings\Temp\~hh9A72.htm
1 Security Slot
Your computer has a Security Slot that can be used with a standard laptop locking device, such as a Kennsington Lock.
You can connect the GoBook II to a large object with the lock to prevent theft of your GoBook. See the
documentation that comes with your lock for more information.
72_0103_003
10 December 2002
© 2002 Itronix Corporation. All rights reserved.
Wireless Communications
The GoBook II includes three antennas for wireless communication. The WLAN antenna and Blue Tooth antenna are
embedded in the upper display housing and requires no user action. Another antenna is located on the upper right
corner of the display for the Sierra Wireless AC750 WAN radio. Simply raise this antenna when using your Sierra
Wireless AC750 WAN radio.
Use only the supplied or an approved antenna(s). Unauthorized antennas, modifications, or attachments could impair
call quality, damage the phone, or result in violation of FCC regulations.
The GoBook II (IX260) contains the radio transmitters listed below. The following statements are relevant when using
these radios:
Page 27

and a Blue Tooth radio Transmitter. To comply with FCC RF exposure requirements when using the Sierra
distance of 20 cm must be maintained between the back of the LCD display and all users/bystanders. When using
etwork) and
Bluetooth
GoBook II
™ Help
Page
27
of 74GoBook II Help
7/31/2003
file://C:\Documents%20and%20Settings\harwoodm.ITRXNT1\Local%20Settings\Temp\~hh9A72.htm
Wireless AC750 WAN radio transmitter, a minimum separation distance of 20 cm must be maintained between
the external dipole antenna and all users/bystanders. When using the WLAN transmitter, a minimum separation
the Blue Tooth transmitter, a minimum separation distance of 20 cm must be maintained between the back of the
LCD display and all users/bystanders. The Sierra Wireless AC750 WAN radio, WLAN transmitter, and the Blue
Tooth should be turned off before carrying the Laptop PC order to comply with FCC RF exposure requirements.
Since each customer's radio configuration is unique please refer to the manufacturer documentation to setup and use
your radio's.
WAN and WLAN
The GoBook II supports many different wireless radio configuration options including LAN (Local Area
WAN (Wide Area Network) wireless communication.
LAN radios are local and therefore span a small area such as a building or small group of buildings. The GoBook II's
LAN radios include the Cisco Mini-PCI slot WLAN (Wireless Local Area Network) .
WAN radios cover a wider geographical area so they can be used anyplace the carrier has digital coverage. For
example, our cell phone system. WAN radios are usually connected via a communications infrastructure such as a
telephone system and connect at 14.4K to 153K depending on the carrier, technology, and coverage. The GoBook II's
WAN radios include GPRS.
72_0103_003
10 December 2002
© 2002 Itronix Corporation. All rights reserved.
N
GoBook II™ Help
Page 28
capable devices come within range of one another, an electronic conversation takes place to determine
Page
28
of 74GoBook II Help
7/31/2003
file://C:\Documents%20and%20Settings\harwoodm.ITRXNT1\Local%20Settings\Temp\~hh9A72.htm
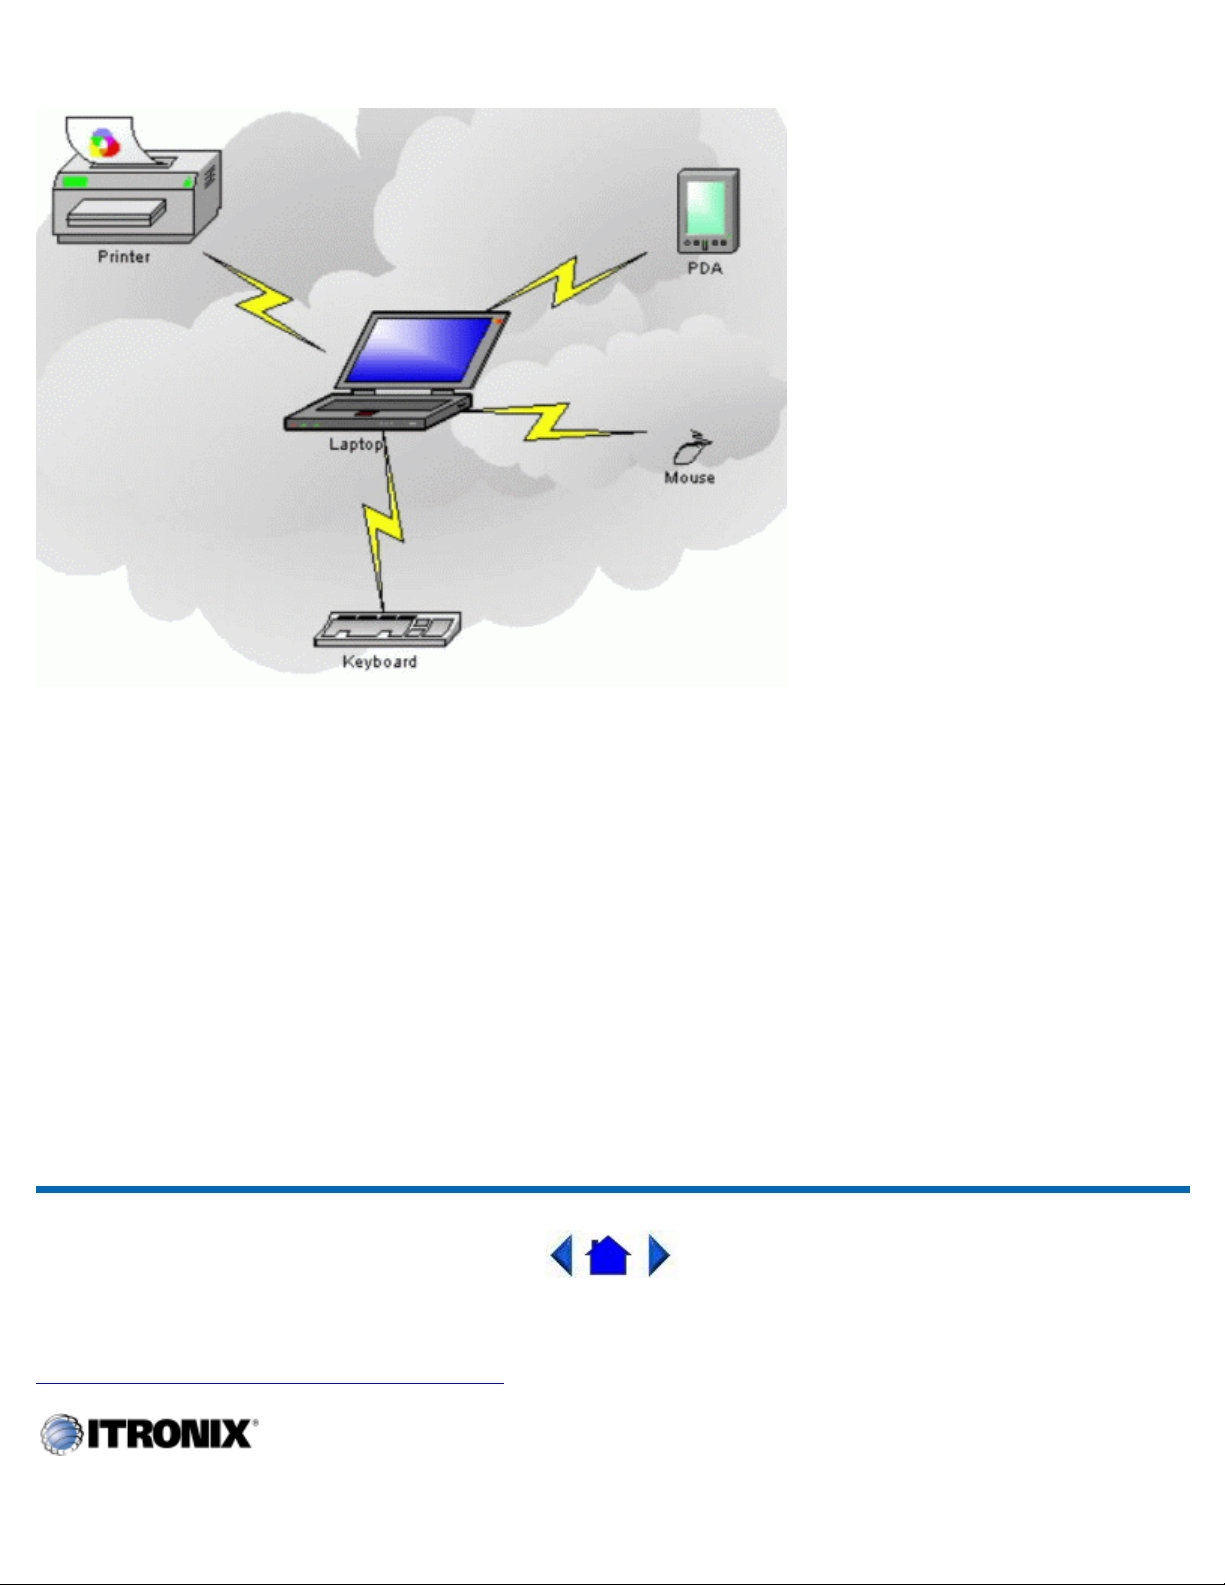
Bluetooth systems create a personal-area network (PAN), or piconet, that may fill a room or may encompass no more
distance than that between the cell phone on a belt-clip and the headset on your head.
When Bluetoothwhether they have data to share or whether one needs to control the other. The user doesn’t have to press a button or
give a command -- the electronic conversation happens automatically. Once the conversation has occurred, the devices
-- whether they’re part of a computer system or a stereo -- form a network.
Once a piconet is established, the members randomly hop frequencies in unison so they stay in touch with one another
and avoid other piconets that may be operating in the same room.
One of the ways Bluetooth devices avoid interfering with other systems is by sending out very weak signals of 1
milliwatt. By comparison, the most powerful cell phones can transmit a signal of 3 watts. The low power limits the
range of a Bluetooth device to about 10 meters, cutting the chances of interference between your computer system and
your portable telephone or television. Even with the low power, the walls in your house won’t stop a Bluetooth signal,
making the standard useful for controlling several devices in different rooms.
72_0103_003
10 December 2002
© 2002 Itronix Corporation. All rights reserved.
Page 29

GoBook II
™ Help
GoBook II
™ Help
Page
29
of 74GoBook II Help
7/31/2003
file://C:\Documents%20and%20Settings\harwoodm.ITRXNT1\Local%20Settings\Temp\~hh9A72.htm
GPRS
For specific information about your GPRS radio please refer to the manufacturer’s documentation.
72_0103_003
10 December 2002
© 2002 Itronix Corporation. All rights reserved.
Cisco Wireless LAN
The GoBook II computer includes a high powered WLAN radio:
1. The
72_0103_003
10 December 2002
© 2002 Itronix Corporation. All rights reserved.
Power Management
The GoBook II has power management capability so you can reduce the amount of energy used, especially during
periods of inactivity. Effective use of power management options can greatly conserve and extend your battery life.
Cisco MPI350 MiniPCI slot
may already be installed on your GoBook II computer. Refer to it for more information.
with one antennas in the display. The Cisco MiniPCI Card User’s Manual
GoBook II™ Help
Page 30

Battery Calibration
terminate immediately.
Page
30
of 74GoBook II Help
7/31/2003
file://C:\Documents%20and%20Settings\harwoodm.ITRXNT1\Local%20Settings\Temp\~hh9A72.htm
BIOS Level Battery Calibration
The first time you use a battery, you should calibrate it. The calibration process empties and charges the battery. This
allows the Windows battery gauge to accurately monitor battery status. To calibrate a battery, follow these steps:
1. Plug in the AC adapter.
2. Restart the computer. When the startup screen appears, just prior to the Windows logo screen, press the Del key
to enter the BIOS Setup Utility.
3. At the "Choose the setup function" screen, select "Battery Calibration" and hit enter.
NOTE
4. Choose Primary or secondary battery and hit enter. Battery Calibration will take from 10 to 16 hours, depending
on how much power the battery may already contain.
Make sure the AC adapter and battery are present.
Windows Battery Calibration
Over time, as the battery is repeatedly drained and recharged, battery performance will decrease. Occasionally, the
battery needs to be recalibrated for maximum performance. This is the purpose of the Battery Calibration application,
to restore the battery to maximum performance levels.
To run the Battery Calibration program tap Start, Programs, and Mobile Computer Tools.
After starting calibration, the Battery Calibration application requires no further input from the user. The calibration
consists of four steps:
1. Partial Discharge - the battery is drained to a level below 60 %.
2. Charge - the battery is fully charged to 100 %.
3. Discharge and calibrate:
First, the battery is discharged all the way down to zero. Now the battery is 'calibrated' but not charged. You
may stop the process after this point and let the battery charge outside of the Battery Calibration application.
4. Charge - if the Battery Calibration continues running, the battery will fully charged to 100%.
NOTE
CAUTION
than two minutes, the application will terminate.
CAUTION
The unit will not go into suspend mode while Battery Calibration is running.
Do not disconnect AC power while Battery Calibration is running. If AC remains disconnected for more
Do not remove the battery while Battery Calibration is running. Doing so will cause the application to
Page 31

72_0103_003
Save your work and then select Shut Down from the Start menu
Page
31
of 74GoBook II Help
7/31/2003
file://C:\Documents%20and%20Settings\harwoodm.ITRXNT1\Local%20Settings\Temp\~hh9A72.htm
10 December 2002
© 2002 Itronix Corporation. All rights reserved.
GoBook II™ Help
Using the Battery
Monitoring Battery Power
There are two ways to monitor how much power the battery has left:
1. Click Start, Settings, Control Panel, Power Management (Power Options); then tap the Power Meter tab.
2. Moving the cursor to the battery icon on the taskbar, without selecting anything, is the simplest way to check on
battery power status. The status will show as a pop-up when you mouse-over the icon.
NOTE
Options). Choose the Advanced tab and select "Always show icon on the taskbar."
Low Battery Alarms
How your computer responds to a low battery condition can be set by going to Start, Settings, Control Panel, Power
Management, Alarms.
If you do not see the battery icon, enable it in Start, Settings, Control Panel, Power Management (Power
Two different power alarms can be enabled or disabled: the Low Battery Alarm, and the Critical Battery Alarm. Use
the slidebar to set the power level at which the alarms are activated. Click on the Action button to choose whether the
alarm sounds, displays a message, or both.
CAUTION
When battery power is low, the Battery Power Indicator will flash and the alarm will beep or display a
warning on your screen. Take immediate action, such as saving files or connecting to the AC adapter , or data may be
lost.
When the computer alerts you that the battery is low, immediately do one of the following:
Connect the AC power adapter
Save your work and suspend to disk (Hibernate) by pressing the
Power Button
Page 32

disable suspend altogether, which is not recommended.
Page
32
of 74GoBook II Help
7/31/2003
file://C:\Documents%20and%20Settings\harwoodm.ITRXNT1\Local%20Settings\Temp\~hh9A72.htm
Turn off the computer (or suspend to disk) and replace the discharged battery with a charged battery (See
Changing the Battery)
NOTE
Do not restart the computer until you have connected to an AC adapter, or replaced the discharged battery with
a charged battery.
72_0103_003
10 December 2002
© 2002 Itronix Corporation. All rights reserved.
GoBook II™ Help
Battery Charging
When you use the AC adapter to connect your GoBook II to a power outlet, the internal battery will begin to recharge
automatically. While the battery is charging, the Battery Power Indicator will be flashing green. When the battery
is fully charged, it will turn off.
If your computer is turned off, or suspended to RAM, a fully discharged battery will take about 4 hours to recharge. If
you computer is turned on and is not in suspend mode, it will take 4- 6 hours to recharge the battery. Refer to the
following table:
Charging Discharging
System On 4-6 hours 3-4 hours
System Off (suspend to RAM) 4 hours —
NOTE
a fully charged Li-Ion battery can run the GoBook II for approximately 3 hours or more.
Power Saving Modes
Adjust the default power management settings in the Power Management (Power Options) dialog box in the Control
Panel. The Power Management (Power Options) dialog box allows you to set different actions to take when the
computer is left idle for a certain amount of time.
Suspend Mode
There are several possible settings for suspend mode. You may Suspend to RAM, Suspend to Disk (Hibernate), or
Page 33

Suspend to RAM
instructions.
Page
33
of 74GoBook II Help
7/31/2003
file://C:\Documents%20and%20Settings\harwoodm.ITRXNT1\Local%20Settings\Temp\~hh9A72.htm
In a suspend to RAM, the contents of your computer’ s memory are held intact, while most of the components in your
computer either turn off completely, or reduce power consumption to a minimum. In a Suspend to RAM, your
computer remains active but with the minimum possible power consumption. Return the computer to full power by
pressing any key. A fully-charged battery can maintain a Suspend to RAM for many hours.
Suspend to Disk (Hibernate)
Suspend to Disk (Hibernate) is similar to turning off the computer, except that the current state of the computer is
copied to the hard disk as a special file. When the computer returns from suspend mode, the desktop appears with the
same files and programs open as when the computer was suspended. Suspend to Disk (Hibernate) is very useful when
you don’t want to take the time to shut down all open programs one by one to shut off the computer, only to have to
open the same programs and files the next time you use the computer. This mode is also called hibernation mode.
Initiating Suspend Mode
There are four ways to initiate suspend mode. The settings can be adjusted in the Power Management dialog box:
The computer will automatically enter suspend mode when not used for a set period of time
Selecting the Standby button in the Shut Down Windows dialog box
Pressing the power button (if enabled in power settings)
Pressing the suspend function key (FN+F3)
Power Button Settings
The function of the
However, holding the
Power Button
Power Button
any situation, resulting in the loss of any unsaved information.
Power Saving Tips
Avoid operating the fax/modem, or audio and video applications when using battery power. Operating a fax
modem, video, or audio equipment increases the computer’ s power requirements.
Decreasing monitor brightness can also save power. Decrease brightness by pushing FN + F6. Increase it by
pushing FN + F7.
can be set to Shut down, Stand by or Hibernate in the Windows Control Panel.
down for more than four seconds will force a power off while operating under
When to Replace the Battery
Over time, the battery’ s capacity gradually decreases. We recommend that you replace your battery when you notice
that it begins to store significantly less charge.
WARNING
There is danger of explosion if the battery is incorrectly replaced. Replace only with the same or
equivalent type recommended by the manufacturer. Dispose of used batteries according to the manufacturer's
Page 34

Changing the Battery
modification of the GoBook II components and the configuration of devices that are connected to it. This information is
The GoBook II is configured with a set of default values. You may be able to increase system performance by changing
Page
34
of 74GoBook II Help
7/31/2003
file://C:\Documents%20and%20Settings\harwoodm.ITRXNT1\Local%20Settings\Temp\~hh9A72.htm
Change the main battery pack as follows:
1. Turn off the computer.
2. Disconnect external power .
3. Close the display and turn the computer over.
4. Rotate the latches on the battery door to the open position and
remove the door. Remove the battery.
5. Make sure the replacement battery is properly orientated. Insert
the battery into the battery compartment. Check that the latches
lock back into position.
6. Charge the new battery by plugging the computer into AC power.
Heat Considerations
The computer’ s processor has been specially designed to consume little power and generates very little heat. However,
working in a hot environment, or working for long periods may raise the temperature. Your computer takes the
following steps to lower temperature:
1. The cooling fan turns on. You may hear the fan and feel air coming from a vent near the right rear of the
computer when this happens.
2. If the temperature continues to rise, Processor activity is reduced. You may notice a slight loss of performance
when this happens.
3. If the computer overheats, the processor will stop functioning and the computer will shutdown.
72_0103_003
10 December 2002
© 2002 Itronix Corporation. All rights reserved.
Customizing Your CMOS Settings
This chapter explains how to use the Setup Utility to modify the CMOS settings. The Setup Utility displays and allows
used to test and initialize components at start-up time and to make sure everything runs properly when the system is
operating.
Page 35

some of the timing values in the Setup Utility, but this can be limited by the kind of hardware you are using. In certain
the Setup Utility. This happens when the system finds an error during the POST (Power On Self Test) that it carries out
Page
35
of 74GoBook II Help
7/31/2003
file://C:\Documents%20and%20Settings\harwoodm.ITRXNT1\Local%20Settings\Temp\~hh9A72.htm
circumstances, the system may generate an error message that asks you to make changes to the CMOS settings using
at startup.
CAUTION
If you are not sure how to configure the CMOS settings
Settings on the Main Menu screen, then exit saving changes. This loads optimized default settings for normal use.
GoBook II™ Help
It is not recommended that you change any settings since this may cause the unit to not function properly.
we suggest that you select Auto configuration with Optimal
Using the Setup Utility
The Setup Utility allows you to configure your computer’ s basic settings. When you turn your computer on, the system
reads this information to initialize the hardware so that it can operate correctly. You can use the Setup Utility to change
your computer’s start-up configuration. For example, you can change your system's security routine.
Starting the Setup Utility
You can only start the Setup Utility shortly after the computer has been turned on or rebooted. To execute a controlled
reboot select Start, shutdown, Restart. Shortly after the computer restarts the following prompt appears on the
computer display, “
"and the system will start the Setup Utility with the following screen displayed.
Setup
DEL:Setup
” Press the
key when you see the prompt. The prompt will change to "
DEL
GO >
Page 36

72_0103_003
Navigating and Entering Information in the BIOS
Page
36
of 74GoBook II Help
7/31/2003
file://C:\Documents%20and%20Settings\harwoodm.ITRXNT1\Local%20Settings\Temp\~hh9A72.htm
10 December 2002
© 2002 Itronix Corporation. All rights reserved.
GoBook II™ Help
The Main Menu
The Setup Utility main menu has seven main submenu options:
Standard CMOS Setup
Advanced CMOS Setup
Power Management Setup
Peripheral Setup
Stealth Mode Setup
Auto-Detect Hard Disks
Change User Password
Change Supervisor Password
Save Settings and Exit, and Exit Without Saving are used to exit the Setup Utility.
Page 37

Use the following keys to move between fields and to enter information
computer.
CMOS is simply a type of Non
-
Volatile Memory used to store the basic configuration of the computer.
Page
37
of 74GoBook II Help
7/31/2003
file://C:\Documents%20and%20Settings\harwoodm.ITRXNT1\Local%20Settings\Temp\~hh9A72.htm
Key Function
DEL
ESC
,
Up
down
arrow
keys /
Tab
PgUp
PgDn
Enter
or
F2
F3
F10
Starts the Setup utility after turning on the computer.
Exits any submenu. If you wish to exit the Setup Utility without
saving changes, go to the main menu, then press
Moves among selections.
Use the
increase a value, such as a date or number, and
it. For other types of choices, such as "enabled," or "disabled,"
use either key to move between choices.
Makes a selection.
Changes the color of the graphic display.
Saves changes, then exits
PgUp, PgDn
keys to modify a field. Use
Esc
PgUp
PgDn
.
to
to decrease
72_0103_003
10 December 2002
© 2002 Itronix Corporation. All rights reserved.
GoBook II™ Help
Standard CMOS Setup
The Standard CMOS Setup page of the Setup Utility has a list of fields that describe the basic configuration of your
Page 38

Standard Feature Description
Primary / Secondary Master and Slave Settings
Page
38
of 74GoBook II Help
7/31/2003
file://C:\Documents%20and%20Settings\harwoodm.ITRXNT1\Local%20Settings\Temp\~hh9A72.htm
Field Setting Function
System
Time
Floppy
Drive A
Type Shows type of system installed including the following options:
Pri. Master Auto
Sec. Master Auto
System
Memory;
Extended
Memory
Use these fields to set the time and date. The time is displayed in 24 hour
Not
Installed
1.44 MB (3
1/2")
User
Not
Installed
ATAPI
CD-ROM
Not
Installed
These fields display the amount of conventional memory and extended memory
format. The date can be set from January 1, 1980 to December 31, 2099. The
values set in these two fields take effect immediately.
Indicates if a floppy disk drive is installed. Default is 1.44 MB (3 1/2"). If this
field is set to "Not Installed" the system will not detect a floppy inserted in the
media bay.
- (Pri. Master) Auto, user, Not Installed
- (sec. Master) auto, ATAPI CD-ROM, Not Installed
The default setting is Auto. Auto lets the system automatically read setup
information from the device.
The default setting is Auto. Auto lets the system automatically read setup
information from the device. When set to Auto, the BIOS will automatically
detect hard disk capacity.
detected by the system during boot up. They are display only fields.
CAUTION
exited the Setup Utility.
Incorrect settings can cause your system to malfunction. To correct mistakes, press
Esc
until you have
Page 39

Advanced CMOS Setup
Size Displays the hard disk capacity.
Page
39
of 74GoBook II Help
7/31/2003
file://C:\Documents%20and%20Settings\harwoodm.ITRXNT1\Local%20Settings\Temp\~hh9A72.htm
Cylinders Display the number of cylinders on the hard disk drive.
WPCOM Precomp Cylinder
Sec Number of sectors per cylinder
Heads Displays the number of heads per cylinder on the hard disk drive.
LBA
Mode
Blk Mode Multi-sector transfers enabled
PIO
Mode
32Bit
Mode
LBA (Logical Block Addressing) mode is used to support IDE hard disks larger than 504 MB.
LBA support is required for compatibility with the FAT32 system. Only some hard disk drives
support LBA mode. The default setting depends on the hard disk drive type.
PIO (Programmed Input/Output) mode refers to data transfer method used by IDE drives. These
modes use the CPU's registers for data transfer in contrast with DMA (Direct Memory Access),
which transfers directly between main memory and the peripheral device. The default value
Auto lets the system automatically read setup information it needs for setup from the hard disk
drive. Five explicit values, 0 to 4, are also possible.
Enables hard drive 32-bit data transfer. Only some hard disk controllers support 32Bit mode.
CAUTION
supplied by the manufacturer of your hard drive. Incorrect settings can result in your system not recognizing the
installed hard disk.
72_0103_003
10 December 2002
© 2002 Itronix Corporation. All rights reserved.
GoBook II™ Help
Before attempting to configure a hard disk drive, make sure you have the configuration information
Page 40

10 December 2002
Field Setting Function
Page
40
of 74GoBook II Help
7/31/2003
file://C:\Documents%20and%20Settings\harwoodm.ITRXNT1\Local%20Settings\Temp\~hh9A72.htm
Bootup
Sequence
S.M.A.R.T.
for Hard
Bootup NumLock
Display
Expansion
Mode
Password
Check
C; A;
CDROM
A; C;
CDROM
CDROM;
A; C;
Disabled
Enabled
Off
On
Enabled
Disabled
Setup The default value is Setup, which specifies that a password is only required to enter
Always If Always is selected, the password is required when the system is booted up or
Use this field to set the devices from which the system should boot in order of
priority. The default value is C; A; CDROM,. This means the computer will
attempt to boot from the hard disk drive (HDD), then the floppy disk drive (FDD),
then the CD-ROM.
the computer will boot from the FDD, then the HDD, then the CD-ROM. The
BIOS will auto detect a floppy disk in boot device A:
The computer will boot from the CD-ROM, then the FDD, then the HDD.
The S.M.A.R.T. (Self-Monitoring, Analysis, and Disks Reporting Technology)
system is a diagnostics technology that monitors and predicts device performance.
The disk drive software monitors the internal performance of the motors, media,
heads, and electronics of the drive. Only S.M.A.R.T. Hard Disks are supported.
The default is Enabled.
Use this field to initially disable the Num-Lock feature of the internal keyboard
when the GoBook II starts The default is Off.
If you are using DOS or a 640 x 480 resolution to run windows, the display will not
fill the entire screen. Enable this mode to expand the display to the entire screen.
the Setup Utility.
resuming from a suspend-to-disk.
72_0103_003
Page 41

© 2002 Itronix Corporation. All rights reserved.
Page
41
of 74GoBook II Help
7/31/2003
file://C:\Documents%20and%20Settings\harwoodm.ITRXNT1\Local%20Settings\Temp\~hh9A72.htm
GoBook II™ Help
Power Management Setup
This section of the Setup Utility manages power settings. To save power, you may select the time the computer may
idle before going into standby, or a low power state, then into suspend mode. See Power Management for an
introduction to suspend modes.
Field Setting Function
Intel ® SpeedStep
Technology
Battery Low
Warning Beep
Radio Wake-Up Enabled The internal radio is allowed to resume the unit.
Recommended Enables the system to reduce the CPU speed when the battery is in
use to conserve power. This is the default setting.
Battery The computer will utilize Intel ® SpeedStep Technology when the
battery is in use. This technology lowers the CPU clock speed to
save power.
Performance The computer always uses optimal CPU clock speed and does not
utilize Intel ® SpeedStep Technology
Reverse When the battery is in use, the computer will utilize Intel ®
SpeedStep Technology. When the computer is running on AC power
it will run in Performance mode.
Disabled Disables Intel ® SpeedStep Technology feature.
Disabled Battery low warning beep disabled.
Enabled Battery low warning beep enabled (beeps at 7% remaining).
Disabled The internal radio is not allowed to resume the unit.
Page 42

72_0103_003
Page
42
of 74GoBook II Help
7/31/2003
file://C:\Documents%20and%20Settings\harwoodm.ITRXNT1\Local%20Settings\Temp\~hh9A72.htm
10 December 2002
© 2002 Itronix Corporation. All rights reserved.
GoBook II™ Help
Peripheral Setup
Settings on this page allow you to change port configurations.
Field Setting Function
Internal
MDC
Modem
Onboard
Serial
Port A &
B
Auto
Disabled
Auto COM 1 is assigned to the serial port
Disabled Disables COM 1. You may need to
3F8/COM1 Default address and COM port
Default is disabled.
located at the rear of your GoBook
II. Set this field to Auto to enable
the system to automatically assign an
I/O address and interrupt to the port.
remove this port in Windows to
release the IRQ resource for use by
other devices.
setting.
Page 43

display brightness operate normally.
2F8/COM2 Optional address setting.
Page
43
of 74GoBook II Help
7/31/2003
file://C:\Documents%20and%20Settings\harwoodm.ITRXNT1\Local%20Settings\Temp\~hh9A72.htm
3E8/COM3 Optional address setting.
2E8/COM4 Optional address setting.
Onboard
Parallel
Port
Parallel
Port IRQ 5 7
Parallel
Port
DMA
Parallel
Port
Mode
Auto Set this field to Auto, so that the
system automatically assigns an I/O
address and interrupt. You can also
choose a specific I/O address.
Disabled Disables the LPT port.
378 This is the default address setting.
278 Optional address setting.
3BC Optional address setting.
Only available with addresses 378,
278 and 3BC
0
1
3
Normal Normal
Bi-dir Bi-directional
EPP 1.9 Enhanced Parallel Port
EPP 1.7 Enhanced Parallel Port
ECP Extended Capabilities Port
Only available in ECP mode
72_0103_003
10 December 2002
© 2002 Itronix Corporation. All rights reserved.
GoBook II™ Help
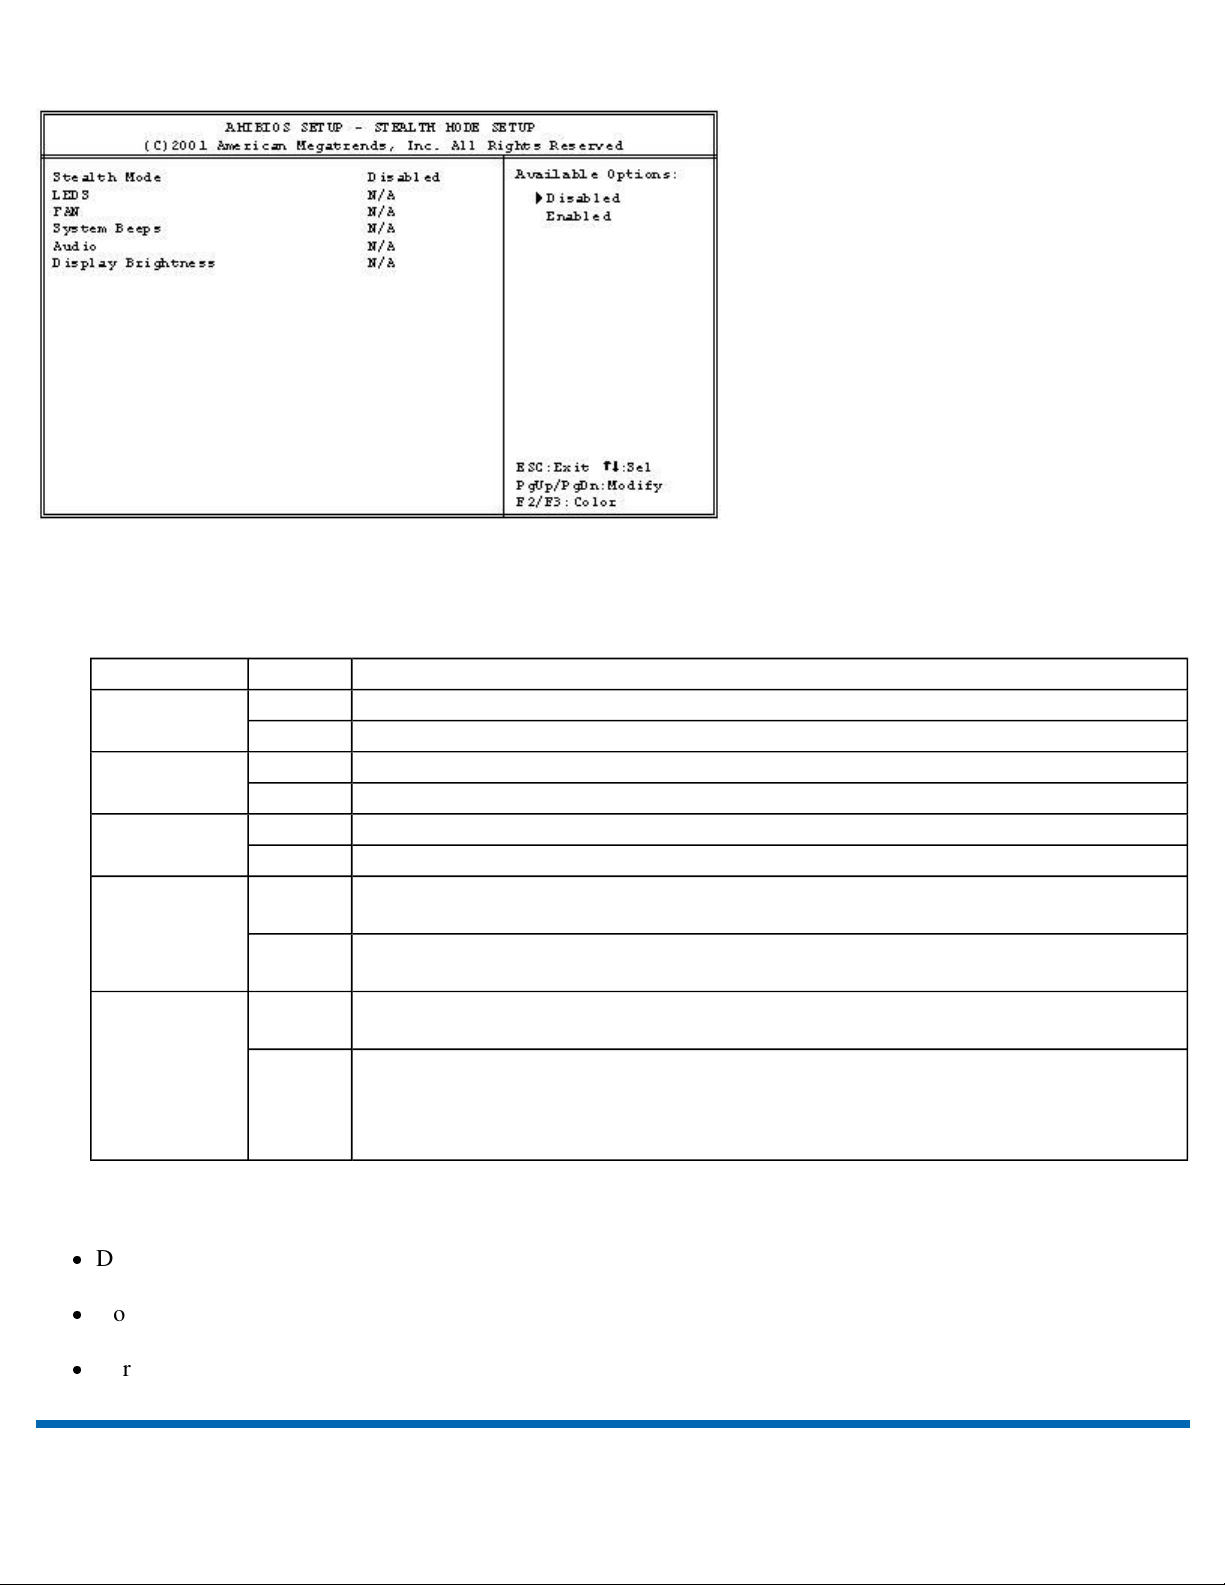
Stealth Mode Setup
Stealth mode is a feature that allows the GoBook II to be used in an environment where sound and light could be
dangerous to the users, such as a military user. If Stealth mode is disabled the LEDs, Fan, system beeps, audio, and
Page 44
Page
44
of 74GoBook II Help
7/31/2003
file://C:\Documents%20and%20Settings\harwoodm.ITRXNT1\Local%20Settings\Temp\~hh9A72.htm
When Stealth mode is enabled the various options have the following effect.
NOTE
The off setting means that option is in Stealth Mode.
Field Setting Function
LEDs On LEDs function normally
Off LEDs are disabled
Fan On The fan functions normally
Off The Fan is disabled. Heat management is then controlled solely through throttling.
System
Beeps
On Beeps are heard during POST
Off The system beeper is disabled during the boot up or resume process.
Audio On Audio is preserved across suspend/resume and boot. The default volume level is
set to mid range.
Off Volume is set to 0 across suspend/resume and boot. Use the existing audio
function keys to restore volume.
Display
Brightness
On Display brightness is preserved across suspend/resume and boot. It is restored to
default when the brightness level is set at 0. The default level is mid range.
Off Brightness is set to 0 across suspend/resume and boot. FN+F1 restores brightness
to the value it was set to before suspend. Additionally, FN+F7 can be used to
increase display brightness gradually. FN+F6 can be used to decrease brightness
gradually.
The keyboard backlight does the following whether stealth mode is enabled or disabled:
Does not illuminate when the system is off or suspended
Does not illuminate on resume or boot
Turns off when FN+F1 is pressed to turn off the display.
Page 45

72_0103_003
With a User password, you can enter the Setup Utility and change or remove the User password, but you cannot enter
Page
45
of 74GoBook II Help
7/31/2003
file://C:\Documents%20and%20Settings\harwoodm.ITRXNT1\Local%20Settings\Temp\~hh9A72.htm
10 December 2002
© 2002 Itronix Corporation. All rights reserved.
GoBook II™ Help
Auto-Detect Hard Disks
When the Auto-Detect Hard Disks option is selected, the BIOS will automatically detect Primary Master and
Secondary Slave settings.
NOTE
Secondary Master to
72_0103_003
10 December 2002
© 2002 Itronix Corporation. All rights reserved.
If you Auto-Detect your Hard Disk Drive while your media bay drive is empty, you will need to reset the
Auto On
before you can use the CD-ROM (or other media devices).
GoBook II™ Help
Change Password
Change Supervisor Password
A supervisor password must be set before a lower-level password can be set. After selecting Change Supervisor
Password, press
keystrokes. If you make an error, press
Change User Password
. You will be prompted for the new password, and then again to verify it. Type in six or fewer
Enter
to start over.
Esc
Page 46

the Setup Utility and change or remove the Supervisor password. You also cannot enable diskette access if it has been
choose y to reset
values.
Page
46
of 74GoBook II Help
7/31/2003
file://C:\Documents%20and%20Settings\harwoodm.ITRXNT1\Local%20Settings\Temp\~hh9A72.htm
disabled.
72_0103_003
10 December 2002
© 2002 Itronix Corporation. All rights reserved.
GoBook II™ Help
Auto Configuration with Optimal Settings
The Auto Configuration menu resets the computer to default values. The Auto Detect Hard Disks likewise helps users
to configure their systems quickly. When you see the prompt, "Load high performance settings
the computer to default values.
72_0103_003
10 December 2002
© 2002 Itronix Corporation. All rights reserved.
(y/n)
"
GoBook II™ Help
Exit and Saving
Save Settings and Exit
Select this option to save changes to the field values and restart the computer using the new values. Pressing
any of the menu screens also allows you to save settings and exit.
Exit Without Saving
Select this option to discard any changes you have made to the field values and restart the computer using the old
F10
from
Page 47

A large number of computer and high technology equipment damage is directly related to AC power and telephone line
is flooded with hundreds of AC power line surge suppressors advertising high performance surge protection; only a few
Type of Equipment to be Protected
Page
47
of 74GoBook II Help
7/31/2003
file://C:\Documents%20and%20Settings\harwoodm.ITRXNT1\Local%20Settings\Temp\~hh9A72.htm
72_0103_003
10 December 2002
© 2002 Itronix Corporation. All rights reserved.
Optional Equipment and Accessories
The GoBook II computer has several equipment and accessory options to further enhance your mobile computing
experience.
CAUTION
with your computer. Some accessories are proprietary items and can be obtained through your system vendor. If you
use items that are not approved for use with this computer, you may cause your computer to malfunction, or to emit or
receive electromagnetic radiation in excess of local regulations. For non-proprietary accessories such as PC Cards or
printers, ensure that the accessory functions properly in your computer before making the purchase. Your system
vendor may be able to recommend reliable brands and models.
GoBook II™ Help
When purchasing any additional accessories, purchase only those accessories that are approved for use
Surge Protection
problems. These problems can include surges, spikes, noise, interference, and weather-related problems, which in turn
can cause glitches, hang-ups, crashes, performance slow downs, and down time with computer equipment. The market
of them actually provide adequate protection.
This section provides guidelines for selecting a quality surge suppressor to be used with your GoBook II, and it helps
identify a few sources for products with acceptable performance.
Selecting the Right Surge Protection
Consider the level of quality you need when selecting a surge suppressor. This depends on factors such as surge
environment, the type of equipment to be protected, and the quality of the electrical wiring and service.
Surge Environment
Surge environment refers to the damage potential from electrical surges in a particular geographical area. A high
quality suppressor should be used if there is frequent lightning activity in the area and the location service is fed by
overhead utility poles.
Page 48

If the computer is equipped with a modem, the modem should also be surge protected. Protecting the power line
There are a number of companies that sell quality surge suppressors such as Sutton Designs, APC, and Panamax. When
Page
48
of 74GoBook II Help
7/31/2003
file://C:\Documents%20and%20Settings\harwoodm.ITRXNT1\Local%20Settings\Temp\~hh9A72.htm
without protecting the modem line provides only partial protection.
Quality of Electrical Wiring and Service
Wiring should be up to current NEC standards and have verified good AC grounds. It is important that your computer
system be plugged into a grounded AC outlet when charging and that all peripherals connected to your system
reference the same AC ground.
Selecting the Right Equipment
you are looking for a surge suppressor, consider these things.
Expect to pay at least $50 for a good quality surge suppressor.
The surge suppressor should be a UL 1449, 497, and 1283 listed for surge suppression, modem surge protection,
and RFI/EMI noise filtering respectively.
The surge suppressor should have diagnostic LEDs that verify good AC ground, proper wiring, and proper surge
operation. On/off switches that light are not recommended since they can produce electrical noise.
The Joule ratings should be a minimum of 480 Joules for the AC surge circuit.
The Joule ratings should be a minimum of 240 Joules for the modem.
The modem surge circuit should present low capacitance to the modem line or it will slow the transmission rate.
Capacitance should be specified at less than 50 picofarads.
Quality surge suppressor manufacturers generally offer a lifetime warranty.
Consider obtaining a protected equipment coverage policy which insures the equipment in the event of surge
damage.
The devices that will be attached to the computer also need to be surge protected.
72_0103_003
10 December 2002
© 2002 Itronix Corporation. All rights reserved.
GoBook II™ Help
Page 49

Vehicle Adapter
The power light illuminates to indicate that current is reaching the vehicle adapter. When you connect the vehicle
Automatically connect to an external RF
antenna
GoBook II
™ Help
Page
49
of 74GoBook II Help
7/31/2003
file://C:\Documents%20and%20Settings\harwoodm.ITRXNT1\Local%20Settings\Temp\~hh9A72.htm
The Vehicle Adapter is an optional device that supplies power from the vehicle battery to operate the computer and
charge the battery installed in the unit. It typically connects to the vehicle battery using the cigarette lighter socket.
To prevent possible damage to the battery, the system will not allow the battery to charge at extreme temperatures. Be
aware of the following charging characteristics, especially if the computer is left unattended in a closed vehicle.
Temperature Charging Activity
<5°C (<41°F) Battery will not charge
>50°C (<122°F) Battery will not charge
To connect the vehicle adapter
1. Insert the vehicle adapter’s power cord into the power port on the back of the computer.
2. Insert the cigarette lighter adapter into the vehicle’ s cigarette lighter socket, turning it slightly to make a good
connection.
adapter, it automatically begins charging the computer’ s battery. At moderate temperatures, around 21°C (70ºF),
the battery will be fully charged in approximately four to five hours. However, under extremely cold or hot
temperatures, or if the system is on, it will take longer to charge the battery (up to 16 hours).
72_0103_003
10 December 2002
© 2002 Itronix Corporation. All rights reserved.
Vehicle Cradle
The vehicle cradle is a vehicle-based docking station designed to safely secure the computer in the vehicle. A standard
key lock located on the front of the cradle locks the computer onto the cradle for security purposes. You can use the
vehicle cradle to:
Charge batteries
Communicate with other devices
Page 50

more capacity into the battery.
External power can be removed at this time since the
Page
50
of 74GoBook II Help
7/31/2003
file://C:\Documents%20and%20Settings\harwoodm.ITRXNT1\Local%20Settings\Temp\~hh9A72.htm
PRECAUTIONS
There are no user-replaceable parts within the vehicle cradle, so do not open the cradle case. The vehicle
cradle is internally protected; it resets automatically if there is a power fault.
Do not use the vehicle cradle to charge the computer battery overnight. Turn off the vehicle cradle at the
end of each work day to prevent draining the voltage in your vehicle’ s battery below starting levels.
Charging Batteries
The vehicle cradle is designed to charge the computer’s battery with voltage from the vehicle battery while you
are traveling between jobs. Follow the procedure below to charge a battery.
To charge a battery installed in the computer
1. Place the computer onto the vehicle cradle, making sure it is securely latched.
2. If charging is required it begins automatically. The Battery Power Indicator flashes.
3. When the battery is fully charged, the Battery Power Indicator remains steady.
Important
A temperature of 5°C to 50°C (41°F to 22°F) is required when charging batteries with the
vehicle cradle. Batteries will not charge successfully outside this temperature range.
If you charge your battery daily, rely on the gas gauge reading to determine battery
capacity. The gas gauge displayed by the Power Meter may show that the battery is full,
but charging continues. This happens because the charging process is trying to put a little
Page 51

The contact pins on the vehicle cradle are exposed to contamination and stress when the computer is installed and
1.
Hold down the protective plastic cover.
battery is virtually full.
may read 100%, when the actual capacity is only 10%.
Page
51
of 74GoBook II Help
7/31/2003
file://C:\Documents%20and%20Settings\harwoodm.ITRXNT1\Local%20Settings\Temp\~hh9A72.htm
If your battery is new or has not been used for several weeks, rely on the indicator light to
determine when the battery is fully charged. The gas gauge is unreliable in these cases; it
Communicating with Other Devices
Connect the external device to either of the USB ports on the back of the cradle, and then place the GoBook II
onto the vehicle cradle. You can install or remove the computer from the vehicle cradle without connecting or
disconnecting the cables.
Vehicle Mount Antennas
You can also connect an external RF antenna to the cradle using the SMA RF connector on the back of the
vehicle cradle. FCC regulations require that users of vehicle-mounted antennas must use only antennas
authorized for use with the GoBook II in order to meet FCC RF exposure limits. Please contact your
organization’ s help desk for a list of approved vehicle-mounted antennas. For mounting installation and/or
mounting instructions for these types of antennas, see the instructions that accompany each antenna.
RF Antenna Placement
WARNING
Improper installation and/or operating configurations of permanent and magnetic vehicle-mounted
antennas may cause FCC RF exposure limits to be exceeded. Vehicle-mounted antennas must be placed at least
20 cm from operators and bystanders.
Placement of a vehicle-mounted antenna
1. Measure and identify an area 20 cm (8 inches) in from the edges of the vehicle roof (see diagram below).
2. Place the antenna within that area.
To maximize RF performance, position the antenna in the center of the vehicle roof.
Cleaning or Replacing Cradle Contact Pins
removed from the cradle during normal daily operation. If the pins become dirty, they can be removed and
cleaned as necessary using electrical contact cleaner. Or they can be replaced. The power and ground pins are
pins 3 and 8 respectively. When charging problems are encountered and replacement pins are not available,
other pins in the contact assembly can be used to field fix the unit until replacement parts are available.
To clean or replace the cradle contact pins
Page 52

2. Grasp a pin and pull straight up, being careful not to bend it.
Your GoBook II has a hard disk drive (HDD) heater option to warm the HDD before spinning up in temperatures
72_0103_003
Page
52
of 74GoBook II Help
7/31/2003
file://C:\Documents%20and%20Settings\harwoodm.ITRXNT1\Local%20Settings\Temp\~hh9A72.htm
3. Clean the pin with electrical contact cleaner and reinstall it into the cradle contact assembly.
If a pin is bent or cannot be cleaned, contact your support desk to obtain a replacement pin.
NOTE
connector.
CAUTION
the contact connector. Doing so may cause an electrical short and subsequent damage to the cradle.
72_0103_003
10 December 2002
© 2002 Itronix Corporation. All rights reserved.
Pin 8 is not user replaceable. Contact your support desk for information about replacing this RF
Do not place any metal objects on top of the cradle that might make contact with the metal pins of
GoBook II™ Help
Heaters
Hard Disk Drive Heater
below 5°C,the minimum safe operating temperature of the HDD. The heater is built into the removable HDD
module and operates as needed when the computer is turned on or is in an operational state. If the temperature is
below 5°C when booting or resuming you will see the message "Warming internal hard drive. Please wait...".
The unit will continue booting when it detects the HDD is warm enough to operate safely.
NOTE
heater to operate, you will see the error message "Battery too low to warm the hard drive. Shutting down..." and
the computer will shut down. Apply external power and reboot.
If you are using the computer in a cold temperature environment and the battery level is too low for the
LCD Heater
The GoBook II also has an optional CCFL heater to improve display brightness in a cold environment. The
heater consists of a film and heater strip that is bonded over the CCFL area of the display. It is designed to turn
on when the temperature is cold enough to impact display brightness.
Page 53

10 December 2002
10 December 2002
Page
53
of 74GoBook II Help
7/31/2003
file://C:\Documents%20and%20Settings\harwoodm.ITRXNT1\Local%20Settings\Temp\~hh9A72.htm
© 2002 Itronix Corporation. All rights reserved.
Maintenance and Storage
The GoBook II is ruggedized and weather resistant. Handle it with the normal care required by any sophisticated
electronic equipment, and the computer will provide reliable service even under harsh field conditions.
Follow the guidelines in this section to care for your unit.
GoBook II™ Help
Battery Maintenance and Storage
Maintaining Batteries
Follow these guidelines to maintain performance of Lithium-Ion (Li-on) batteries.
Avoid exposing batteries to extremely hot or cold temperatures for long periods. To prevent possible
damage to the battery, the GoBook II does not allow the battery to charge if the internal temperature of the
battery gets too low (< 5°C or < 41°F) or too high (> 50°C or > 122°F).
Charge the battery nightly where the temperature will remain around 20°C (68°F).
Re-calibrate your battery when your battery performance degrades.
Storing Batteries
Store the battery within the recommended temperature range: 10°C to 30°C (50°F to 86°F).
Unused or stored batteries can lose power over time. When you install a battery that has not been used for
awhile, connect external power to the computer and charge the battery.
After storage, battery calibration may increase its capacity.
72_0103_003
Page 54

© 2002 Itronix Corporation. All rights reserved.
Using a soft, dry cloth (do not use paper products because they can scratch the surface, add a small amount
clean cloth to clean the display. Do not use paper products because they can scratch the screen.
Page
54
of 74GoBook II Help
7/31/2003
file://C:\Documents%20and%20Settings\harwoodm.ITRXNT1\Local%20Settings\Temp\~hh9A72.htm
GoBook II™ Help
Computer Maintenance and Storage
Maintaining Your Computer
Follow these guidelines to help maintain the condition and performance of your computer.
Turn off the computer when you are not using it.
Charge the batteries daily or whenever their capacity is low.
Operate the computer within the recommended temperature ranges of -23°C to +60°C (32°F to +140°F).
Care and Cleaning
Physical Inspection
parts. Identifying and correcting potential problems early can help reduce the need to return the unit for service.
Periodically inspect the computer and accessories for wear, damage, loose or missing
Outside Case
Like all tools, the outside of the computer will get dirty with use. The case is made of painted
Magnesium and polycarbonate blend (plastic) doors and covers. These areas can be cleaned with a solution of
one part Formula 409™ and one part water. Follow the procedure below.
To clean the outside case
1. Disconnect external power and turn off the computer.
2. Remove the battery.
3.
of cleaning solution to the cloth and clean the computer case.
4. Wipe off any excess liquid with a soft cloth.
5. Reinstall the battery.
Display
Periodically inspect the display to make sure the brightness function is operating properly and that all
pixels are operational.
To clean your touch screen
To clean the display assembly, use the same cleaning solution and procedure described earlier for the outside
case. In some cases, you can use a small amount of isopropyl alcohol to remove streaks or smears. Use a soft,
Page 55

External Power Connector
s instructions you received with the card for storage and care
information.
Page
55
of 74GoBook II Help
7/31/2003
file://C:\Documents%20and%20Settings\harwoodm.ITRXNT1\Local%20Settings\Temp\~hh9A72.htm
contamination causing an unreliable connection to the external power source.
Clean the connector using a cotton swab dipped in isopropyl alcohol.
The external power connector may sometimes be exposed to moisture and/or
RJ-11/ RJ-45 / USB Connectors
connector pins can get dirty or become broken, bent, or pushed out of place. Clean the connector with a cotton
swab dipped in isopropyl alcohol.
Keyboard
cleaning solution and procedure described above for the outside case.
If keyboard problems persist, the keyboard might need to be replaced. This can be done without returning the
unit for service. Contact your local support person for more information.
I/O Ports
damage or contamination, and make sure the cover is attached to the computer. The I/O cover can be replaced
without returning the unit for service. Contact your local support person for more information.
PC Card Door and Connector
the PC Card door is closed, it provides a watertight seal for the PC Card socket. Shield the area from all
contaminants such as liquids, rain, snow, and dust when the door is open.
Make sure the PC Card connector is operating properly by reading from or writing to a PC Card.
Cradle Contacts
cleaned with a cotton swab dipped in isopropyl alcohol. See Cleaning or Replacing Cradle Contact Pins for
more information.
Check all keys to make sure they are working properly. To clean the keyboard, use the same
Make sure the video, serial, and audio ports are operating properly. Periodically inspect the ports for
The cradle contacts on the bottom of the computer may get dirty with daily use. Pins can be
Make sure these connectors are operating properly. During normal use, the
Whenever possible, make sure this door is closed and latched properly. When
Storing Your Computer
If you plan to store the computer, follow these storage guidelines.
To store the computer
1. Files and data should be saved before storing the computer.
Contact your organization’ s help desk about the procedure for backing up files or data.
2. Exit all applications and use the appropriate procedure to exit from your operating system.
3. Turn off the computer by going to the Start menu and selecting Shutdown.
4. Remove the battery from the unit and store it in a dry place.
5. Store the computer within the recommended temperature ranges of -40°C to +75°C (-40°F to +167°F).
If you use PC cards, refer to the manufacturer’
Page 56

72_0103_003
A shock can cause the read/write head to contact the spinning disk, resulting in immediate loss of stored data and
can be seen in the battery well just under the RTC hatch.
Page
56
of 74GoBook II Help
7/31/2003
file://C:\Documents%20and%20Settings\harwoodm.ITRXNT1\Local%20Settings\Temp\~hh9A72.htm
10 December 2002
© 2002 Itronix Corporation. All rights reserved.
GoBook II™ Help
Hard Drive Care and Handling
There is one hard drive option for the GoBook II: a removable shock-mounted 2.5-inch hard drive. All hard
drives contain media for data storage in the form of a rotating disk, read/write head(s), a motor, and electronics
for interfacing and control. Drives can be susceptible to damage from severe shock and other stressful
environmental impacts. The degree of susceptibility to damage is directly related to the individual hard drive and
the mounting system employed.
When reading or writing to the hard disk , the head is “flying” on a thin layer of air, micro-inches above the disk.
possible physical damage to the disk. It could also create loose debris in the drive enclosure that may cause
progressive damage over time.
To reduce exposure to high operating shocks, the GoBook II uses power modes for the hard drive that prevent
the read/write heads from being positioned over the disk when it is not being used: idle mode and standby mode.
You can reduce the risk of damage to the hard drive and increase the reliability of the hard drive and data
integrity by following the recommendations below.
Installing and Removing the Hard Drive
To remove the hard drive:
1. Shut down the unit and remove external power.
2. Open the battery door and remove the battery using the extraction tape. The hard drive is in a cassette that
Page 57

This will unload the read/write heads and spin down the disk.
Page
57
of 74GoBook II Help
7/31/2003
file://C:\Documents%20and%20Settings\harwoodm.ITRXNT1\Local%20Settings\Temp\~hh9A72.htm
3. On the left side of the hard drive cassette you will see a small black release lever. Pull the lever towards
you (away from the direction of the RTC hatch) and slide the cassette out into the battery storage area.
4. Lift the hard drive cassette from the battery storage area.
To install the hard drive:
1. Make sure the unit is shut down and external power is removed.
2. The battery door should be off the unit and the battery removed.
3. Make sure the small black release lever is rotated towards you (in its released position).
4. Slide the hard drive cassette into its storage location.
5. Replace the battery and then replace the battery door.
Internal Hard Drives
Do not intentionally drop the computer. The unit is designed to withstand the day to day rigors of the
mobile environment and provide years of reliable service. The useful life of the product can be enhanced
by not intentionally abusing it.
Whenever possible suspend the unit by pressing FN+F3 before moving it from one location to another.
Page 58

Page
58
of 74GoBook II Help
7/31/2003
file://C:\Documents%20and%20Settings\harwoodm.ITRXNT1\Local%20Settings\Temp\~hh9A72.htm
Maintain the environmental seal of the computer by keeping all external access doors closed and latched.
Also avoid exposing the unit to extreme temperatures or moisture when the doors are open.
Periodically backup or archive important files and data.
External PC Card Hard Drives
Each PC Card hard drive manufacturer provides specific guidelines for the care and handling of the product. In
addition, follow these recommendations:
When the PC Card hard drive is not inserted in a PC Card socket, store the hard drive in a protective
carrying case. This will help protect it from inadvertent shocks.
Always use care when handling the hard drive. Do not drop, bend, flex, or crush it.
Avoid exposing the PC Card hard drive to extreme moisture, heat, or sunlight.
Keep all debris out of the connector to ensure good electrical connections.
There are no user repairable parts in the PC Card hard drive. Do not attempt to disassemble any part of the
hard drive. The warranty will be voided if drive seals are broken or screws have been removed.
Periodically backup or archive important files and data.
If you encounter or suspect hard drive problems, you can run SCANDISK, which provides a description of file
usage and syntax on selected drives. SCANDISK will identify any failures on the hard drive and prompt you for
corrective action based on selected options. If problems are found, it may be necessary to run SCANDISK
several times to determine the extent and severity of the problem. SCANDISK may discover multiple bad
clusters. Up to ten bad clusters can be allowed before returning the computer for service. After you have run
SCANDISK and the problem persists or becomes more severe, or if SCANDISK finds more than ten bad
clusters, return the unit for service.
To run SCANDISK in WIN2K and WINXP right click on the drive letter, go to properties, and select the tools
tab, Error-checking and click check now. In other Windows operating systems you can run SCANDISK by
going to Start, Programs, Accessories, System Tools. Then select SCANDISK.
72_0103_003
10 December 2002
© 2002 Itronix Corporation. All rights reserved.
GoBook II™ Help
Page 59

When the GoBook II computer restarts, it tests its
hardware
components. This test is called the
Power On Self
Page
59
of 74GoBook II Help
7/31/2003
file://C:\Documents%20and%20Settings\harwoodm.ITRXNT1\Local%20Settings\Temp\~hh9A72.htm
Touch Screen Care
CAUTION
Always use an approved stylus or your finger.
Never use sharp, hard, or abrasive implements on the touch screen such as ball point pens, pencils,
or keys. They could damage the screen.
To clean the touch screen panel, apply a household glass cleaner to a soft, clean, dry cloth and wipe
the screen.
72_0103_003
10 December 2002
© 2002 Itronix Corporation. All rights reserved.
Error Messages
The following are possible error and warning messages you may encounter while operating the GoBook II
computer. The messages described in this section are listed below.
Error and warning messages are generated by several different sources including:
Power On Self Test (POST)
MS-DOS
Windows
Applications
GoBook II™ Help
POST Messages
Page 60

Test (POST) . If the system finds an error during this test, it displays an error message.
your supervisor or your organization's help desk.
Page
60
of 74GoBook II Help
7/31/2003
file://C:\Documents%20and%20Settings\harwoodm.ITRXNT1\Local%20Settings\Temp\~hh9A72.htm
Some POST errors can occur before anything can be displayed on the screen. In this case, the computer issues a
series of beeps, then stops working. This type of error indicates a serious hardware problem, and you should
contact your supervisor or your organization’ s help desk.
The most common POST error messages are listed next along with solutions you can try.
Disk not found
Restart the computer by pressing the power button for at least eight seconds. If the problem persists, contact
your supervisor or your organization's help desk.
Fixed disk controller failure
Disk controller is not responding. Report this error to your supervisor or your organization's help desk.
Fixed disk failure
Report this error to your supervisor or your organization's help desk.
GA20 Error
Hardware failure. Report this error to your supervisor or your organization's help desk.
Hard disk boot sector invalid
Hard disk failed
Restart the computer by pressing the power button for at least eight seconds. If the problem persists, contact
your supervisor or your organization's help desk.
Insert boot-disk and press any key
Restart the computer by pressing the
your supervisor or your organization's help desk.
KB / Interface Error
Reboot the computer by pressing
report this error to your supervisor or your organization's help desk.
Keyboard Error
Unlock Keyboard
Power Button
CTRL+ALT+DEL
for at least eight seconds. If the problem persists, contact
. If the message persists, and the keyboard is not usable,
Restart the computer by pressing the
Power Button
for at least eight seconds. If the problem persists, contact
Page 61

No boot device available
The unit will continue booting when the HDD
Page
61
of 74GoBook II Help
7/31/2003
file://C:\Documents%20and%20Settings\harwoodm.ITRXNT1\Local%20Settings\Temp\~hh9A72.htm
Reboot the computer by pressing
replaced. Report this error to your supervisor or your organization's help desk.
No boot sector on hard disk
Data corrupted on hard disk. Restore hard disk data by rebooting from CD-ROM.
Non-system disk or disk error - Replace and press any key to continue
Remove the non-bootable PC memory card or floppy disk and press any key to reboot.
Non-system disk - insert boot disk and press any key
Restart the computer by pressing the
your supervisor or your organization's help desk.
Press the F1 key to resume
This message indicates that an error was found during POST. Pressing the F1 key allows the system to attempt
to boot.
CPU Fan Error
CTRL+ALT+DEL
Power Button
. If the message persists, the hard disk may need to be
for at least eight seconds. If the problem persists, contact
Report the error to your supervisor or your organization's help desk.
Battery too low to warm the hard drive. Shutting down...
There is not enough battery power to operate the Hard Disk Drive (HDD) heater and the temperature is too cold
to safely turn on the HDD. Apply external power and/or move the unit to a location that is at least 5°C.
Warming internal hard drive. Please wait...
The temperature is less than 5°C and the HDD heater is operating.
temperature is warm enough for safe operation.
72_0103_003
10 December 2002
© 2002 Itronix Corporation. All rights reserved.
GoBook II™ Help
Page 62

MS-DOS Messages
Page
62
of 74GoBook II Help
7/31/2003
file://C:\Documents%20and%20Settings\harwoodm.ITRXNT1\Local%20Settings\Temp\~hh9A72.htm
The MS-DOS operating system may display a warning or error message if it encounters a problem with a
command in the CONFIG.SYS or AUTOEXEC.BAT file, or a command that you entered at the DOS prompt.
Following are a few of the most common MS-DOS messages.
Bad command or file name
A command was entered that is spelled incorrectly or does not exist on the computer.
Invalid media type reading drive X (where X is any drive letter)
Abort, Retry, Fail?
The media may not be formatted. Press a to abort, then format the card using the MS-DOS Format command, or
from Windows using the Format Disk command.
Invalid drive specification
You tried to access a drive that does not exist. This can happen if you try to access drive D, but the media is not
loaded. Report this error to your supervisor or help desk.
Non-System disk or disk error
Replace and press any key when ready
This can occur if media is in the card socket and you restart the computer. Remove the media, and then press any
key.
Not ready reading drive X (where X is any drive letter)
Abort, Retry, Fail?
Make sure that the media is inserted fully into the card socket, then press r to retry.
72_0103_003
10 December 2002
© 2002 Itronix Corporation. All rights reserved.
GoBook II™ Help
Page 63

Windows Messages
My
application
locks up, acts strangely, or produces a General Protection Fault (GPF) error
Page
63
of 74GoBook II Help
7/31/2003
file://C:\Documents%20and%20Settings\harwoodm.ITRXNT1\Local%20Settings\Temp\~hh9A72.htm
Windows messages are typically self-explanatory. (See Troubleshooting, for more information).
Application Messages
Both MS-DOS and Windows applications may display messages if a warning or error condition occurs. Refer to
the online Help or other documentation for the application that generated the message.
72_0103_003
10 December 2002
© 2002 Itronix Corporation. All rights reserved.
Troubleshooting
This section is designed to help you determine and fix problems you might encounter while operating the
GoBook II computer. Try the following things in order:
First look through the categories in this section for a solution.
If you don’ t find a solution for your situation here, try one of the resources listed below.
If you are having a problem with a computer application , use the online Help that comes with the
application to find a solution.
If you still cannot resolve your problem, contact the help desk at your organization.
For More Help
Windows Help is already installed on your system. To access this information, select
Support
Third-party Windows manuals are available from your local bookstore.
from the Start Menu.
GoBook II™ Help
Windows Help and
Applications
Page 64

When you first try to use HyperTerminal or similar application, the system responds with a message asking
2.
Open the battery door and remove the battery.
Page
64
of 74GoBook II Help
7/31/2003
file://C:\Documents%20and%20Settings\harwoodm.ITRXNT1\Local%20Settings\Temp\~hh9A72.htm
If you’ ve tried to resolve the problem and your application still doesn’ t respond, you may need to restart
your computer as described below.
To reboot your computer, select Start, Shut Down, Restart. If that does not work, try pressing
CTRL+ALT+DEL
twice.
If the computer does not restart, the keyboard may be locked up. Perform a hardware reset by holding
down the
Power Button
for at least five seconds and then release the button.
CAUTION
The data on the hard disk could be corrupted. Run SCANDISK.
Windows is out of memory/resources. Exit Windows and restart Windows.
This will result in a loss of all unsaved data.
Communications programs such as HyperTerminal don’ t seem to work or they lock Windows
if you want to install the modem. Answer “Yes” to this question and follow the instructions on the screen
to install it.
72_0103_003
10 December 2002
© 2002 Itronix Corporation. All rights reserved.
GoBook II™ Help
Batteries
The battery does not charge
To prevent possible damage to the battery, the system will not allow a charge if the battery temperature is
extremely hot or cold (such as in a closed, unattended vehicle). If possible, charge the battery in a location
with a moderate temperature of around 20°C (68°F).
If possible, turn off the computer while the battery is charging.
If the battery is new or has been stored for a week or more, follow this procedure:
1. Make sure the computer is turned off.
Page 65

3. Connect the AC adapter to the computer and an AC wall outlet, and then turn on the computer by pressing
Page
65
of 74GoBook II Help
7/31/2003
file://C:\Documents%20and%20Settings\harwoodm.ITRXNT1\Local%20Settings\Temp\~hh9A72.htm
the
Power Button
.
4. Let the computer complete the boot process. Then reinstall the battery and replace the battery door..
5. Allow the system to remain idle for one hour with the AC adapter connected to the computer.
The Battery Power Indicator blinks when the battery starts charging.
6. If the battery still fails to charge after an hour, remove the battery, wait several seconds, and then install it
again.
If the battery does not begin charging within several minutes, return the unit for service.
The batteries take much longer than seven hours to charge
Under moderate temperatures, about 21°C (70ºF), the computer’ s battery takes approximately 4 to 5 hours
to completely charge. Under extremely cold or hot temperatures, however, the battery can take up to 16
hours to fully charge.
The batteries don’ t last very long
Calibrate the battery using the Battery Calibration selection in Mobile Computer Tools. If your battery is
new or has not been used for several weeks, calibrating the battery over a weekend may substantially
increase its capacity.
As your battery ages, the maximum capacity that it can hold naturally decreases, and even the best
maintained batteries eventually need to be retired. Consider replacing the battery if you are not getting the
usage you need from it.
The gas gauge isn’ t full after charging the battery
This may indicate that the charging process terminated prematurely.
The gas gauge reads “full,” but the charging indicator light is still blinking
If you charge your battery daily, rely on the gas gauge reading to determine battery capacity. The charging
process may continue even if the gas gauge reads full. External power can be removed because the battery
is virtually full.
My battery seems to have less and less capacity
If your battery is new, or if your are using it for the first time, you will need to calibrate it prior to using it.
As your battery ages, the maximum capacity that it can hold naturally decreases, and even the best
maintained batteries eventually need to be retired. Consider replacing the battery if you are not getting the
usage you need from it.
Page 66

72_0103_003
Change the color scheme. From the Start Menu select Settings, Control Panel, choose Display, and then tap
Page
66
of 74GoBook II Help
7/31/2003
file://C:\Documents%20and%20Settings\harwoodm.ITRXNT1\Local%20Settings\Temp\~hh9A72.htm
10 December 2002
© 2002 Itronix Corporation. All rights reserved.
GoBook II™ Help
Display
The display performance is slow
The temperature may be too cold. Move the computer to a warmer operating environment.
I can’t read the display
Adjust the brightness level using FN+F6 and FN+F7.
The automatic power-saving mode may have shut off (suspended) the computer. Press any key to resume.
If the display brightness is unreadable after a resume or reboot but is easily adjusted with FN+F6 and
FN+F7
backlight will operate normally.
The underlined, inverse, and hypertext characters are difficult to read on the screen
you may have set Stealth mode in the Setup Utility. If you disable Stealth mode the display and
the Appearance tab to make changes to the color scheme.
I can’t see the cursor while using the DOS editor
Press FN+
INSERT
to change from insert mode to overwrite mode to enable a block cursor. When it
defaults to insert mode, the DOS editor uses an underline cursor which is less visible than the block cursor
for overwrite mode.
The display appears to have random pixels darkened after scrolling
Contact your supervisor or your organization’ s help desk for information about correcting this problem.
I changed my display resolution, but I see no difference on the screen
Try restarting your computer for the changes to take effect.
Page 67

72_0103_003
Any card in the PC card socket except for a properly formatted memory card will cause this error since it is
There is not enough battery power to operate the Hard Disk Drive (HDD) heater and the temperature is too
Page
67
of 74GoBook II Help
7/31/2003
file://C:\Documents%20and%20Settings\harwoodm.ITRXNT1\Local%20Settings\Temp\~hh9A72.htm
10 December 2002
© 2002 Itronix Corporation. All rights reserved.
GoBook II™ Help
Hard Disk
The hard disk will not spin up so the computer can’ t boot up
This occurs if the unit is exposed to extreme low temperatures. This is not a hardware failure associated
with the hard disk . Allow the computer to warm to room temperature. The minimum cold or soft boot
temperature is 0°C (32°F)
I can’t save files because the disk is full
Report this situation to your supervisor or your organization’ s help desk.
Diskette Read Error
trying to read the PC card.
Any media in the installed media bay, except for properly formatted media, will cause this error since it is
trying to read the media.
I get the message "Battery too low to warm the hard drive. Shutting down..."
cold to safely turn on the HDD. Apply external power and/or move the unit to a location that is at least 5°
C.
72_0103_003
10 December 2002
© 2002 Itronix Corporation. All rights reserved.
Page 68

GoBook II™ Help
Page
68
of 74GoBook II Help
7/31/2003
file://C:\Documents%20and%20Settings\harwoodm.ITRXNT1\Local%20Settings\Temp\~hh9A72.htm
I/O Ports
I can’t access a serial port
Make sure another application is not using the same port .
Make sure the correct COM port is selected in your application. Refer to the online Help for your
application.
72_0103_003
10 December 2002
© 2002 Itronix Corporation. All rights reserved.
GoBook II™ Help
Keyboard
Something unexpected happens when I press a key
You may have pressed a key combination that performs a Windows function. Make sure you are pressing
the correct keys for the application you are running.
Incorrect characters appear on the screen when I press certain keys
You may be in NUM LOCK mode. Press
72_0103_003
10 December 2002
© 2002 Itronix Corporation. All rights reserved.
NUM LOCK
to toggle NUM LOCK mode off.
GoBook II™ Help
Page 69

Landline Modems
When you first try to use HyperTerminal or similar application, the system responds with a message asking
Page
69
of 74GoBook II Help
7/31/2003
file://C:\Documents%20and%20Settings\harwoodm.ITRXNT1\Local%20Settings\Temp\~hh9A72.htm
The modem doesn’ t work
When you first try to use HyperTerminal or similar application , the system responds with a message
asking if you want to install the modem. Answer “Yes” to this question and follow the instructions on the
screen to install it.
Make sure the communication settings are correct in your application. Refer to the online Help for your
application.
The modem doesn’ t dial a number
Check these things:
If you are using an external modem, make sure the cables are attached correctly.
Make sure your communications parameters are correct in your application. Refer to the online Help for
your application.
The modem dials and receives an answer but does not establish a connection
You may have incorrect parameters selected for your application to talk with the remote modem. Refer to
the online Help for your application.
You may need to adjust your modem’ s baud rate or protocol selection.
Communications programs such as HyperTerminal don’ t seem to work or they lock Windows
If you are using the internal modem, be sure to specify the proper communications port .
if you want to install the modem. Answer “Yes” to this question and follow the instructions on the screen
to install it.
The modem dials and the answering modem generates tone, but our modem does not begin the training sequence
to establish a connection
Although the problem may appear to originate from the computer, the source of the problem is the answering
modem.
Try setting up the answering modem to generate the correct V.22 tone, which can usually be done by
sending an AT command to the modem.
Page 70

72_0103_003
The battery may not be installed properly, or it may not be fully charged. Make sure a fully charged battery
for at
Check to make sure the COM ports are off. For example, exit any
application
that uses COM ports.
Page
70
of 74GoBook II Help
7/31/2003
file://C:\Documents%20and%20Settings\harwoodm.ITRXNT1\Local%20Settings\Temp\~hh9A72.htm
10 December 2002
© 2002 Itronix Corporation. All rights reserved.
GoBook II™ Help
Miscellaneous
The computer shuts off unexpectedly
The computer has entered suspend mode . Press any key to turn it back on.
The battery capacity may be low. Connect external power to charge the battery, or replace the battery with
a fully charged one.
The battery contacts may be dirty. Turn off the computer, remove the battery, and clean the contacts.
The speaker volume is too high or too low
Increase the volume by pressing FN+F9; decrease the volume by pressing FN+F8.
The computer won’ t turn on
is properly installed.
Connect external power to charge the battery if it is not charged.
If you are using the AC adapter , check the electrical outlet you are using to make sure it is working
properly.
If the GoBook II computer does not turn on, restart the computer by holding down the
Power Button
least 10 seconds and then release it.
The computer won’ t turn off
Press and hold the
Power Button
for at least eight seconds.
The computer enters suspend mode too quickly
When there is no activity for a period of time, the computer turns off or enters suspend mode. To extend
this time, use the Power Management program and increase the non-activity time to enter suspend.
The computer doesn’ t automatically suspend
Page 71

to toggle between full
©
2002 Itronix Corporation. All rights reserved.
Page
71
of 74GoBook II Help
7/31/2003
file://C:\Documents%20and%20Settings\harwoodm.ITRXNT1\Local%20Settings\Temp\~hh9A72.htm
Make sure external power is not connected. Depending on power settings, some systems will not suspend
automatically when they are connected to external power.
Make sure the standby time is set properly in the Power Management program.
The system date and time are incorrect
Reset the correct date and time by choosing the Date/Time icon from Control Panel and making the
appropriate changes.
I receive an “ out of memory” error message
Too many applications may be running at the same time. Close applications you don’ t need.
Run MS-DOS applications in full screen rather than a window. Press
ALT+ENTER
screen and window mode.
If you’ re using desktop wallpaper, set wallpaper to None. To do this, choose Display from Control Panel
and make the appropriate change.
Make sure you have enough space on your hard disk . Contact your supervisor or your organization’ s help
desk for assistance.
Set up a permanent swap file. Contact your supervisor or your organization’ s help desk for assistance.
Holding down the Power button to reset the computer doesn’ t always work
Try resetting the computer again. If this doesn’ t work, remove all power, including the battery pack, and
allow the unit to remain idle for ten minutes. After ten minutes, connect external power and retry.
The LED's, backlight, and/or keyboard backlight don't illuminate.
You may have enabled Stealth mode in the Setup Utility. Go to CMOS Setup and disable Stealth mode.
The computer doesn't make any sounds, even during boot-up.
You may have enabled Stealth mode in the Setup Utility. Go to CMOS Setup and disable Stealth mode.
The fan stopped running.
You may have enabled Stealth mode in the Setup Utility. Go to CMOS Setup and disable Stealth mode.
72_0103_003
10 December 2002
Page 72

The system does not recognize the PC Card CD
-
ROM when it is inserted into the PC Card socket
Page
72
of 74GoBook II Help
7/31/2003
file://C:\Documents%20and%20Settings\harwoodm.ITRXNT1\Local%20Settings\Temp\~hh9A72.htm
GoBook II™ Help
Mouse
I have difficulty double-clicking the mouse fast enough
From the Start Menu, select Settings, Control Panel, and then choose Mouse. The Buttons tab contains the
setting for the double-click speed.
I can’t see the mouse pointer
The mouse pointer may be off the screen. Move the mouse until it reappears on the screen.
From the Start Menu, select Settings, Control Panel, and then choose Mouse. The Motion tab contains
settings for the mouse speed and mouse trails.
72_0103_003
10 December 2002
© 2002 Itronix Corporation. All rights reserved.
GoBook II™ Help
PC Cards
I can’t remove the PC card
Press the ejector button located inside the PC card door on the side of the computer. The button will pop
out. Press the ejector button again to eject the PC card. Slide the card out.
If the ejector button malfunctions when you press it, release the button and then press it again.
Diskette Read Error
Any card in the PC Card socket except for a properly formatted memory card will cause this error since it
is trying to read the PC Card.
Page 73

allow the display to recover.
Page
73
of 74GoBook II Help
7/31/2003
file://C:\Documents%20and%20Settings\harwoodm.ITRXNT1\Local%20Settings\Temp\~hh9A72.htm
There is a delay of 10 to 15 seconds before the CD-ROM drive is recognized.
Drivers may not be installed. Contact your organization’ s help desk for assistance.
The computer locks up when I remove the PC card
Before you remove the card, select the PC card icon on the taskbar (in the tray area near the clock in the
lower right corner), and choose “ Stop [card name] card.”
The computer locks up when inserting a PC card
Because of the combination media bay configuration on the GoBook II, the computer may not be locked
up. Instead, it may be taking a couple of minutes before the system recognizes the PC card slot.
72_0103_003
10 December 2002
© 2002 Itronix Corporation. All rights reserved.
GoBook II™ Help
Pen/Touch Screen
When I try to use the stylus on my touch screen, nothing happens
If you cannot select objects accurately with the stylus, you may need to recalibrate the touch screen.
To calibrate the touch screen
1. From the Start Menu, select Programs, Mobile Computer Tools and then choose Touch Screen Calibrator.
This opens the Calibration Applet.
2. Click on the Calibrate button.
3. After you have completed calibration by touching the highlighted points using an approved stylus, select
OK to have the new settings take effect.
The touch screen display warps or pillows in high humidity
The computer remains functional; however, moving the computer to a more suitable environment will
Page 74

The touch screen doesn’t respond after a suspend
©
2002 Itronix Corporation. All rights reserved.
Page
74
of 74GoBook II Help
7/31/2003
file://C:\Documents%20and%20Settings\harwoodm.ITRXNT1\Local%20Settings\Temp\~hh9A72.htm
The touch screen needs a few seconds to work after a suspend. Wait a moment and try again.
72_0103_003
10 December 2002
 Loading...