

Page 1

Mobile Air Conditioner
Instruction Manual
Model TC9000R (Cooling / Dehumidifying)
Model TC12000RH (Cooling / Heating / Dehumidifying)
Please read and retain these
instructions for future reference
Page 2
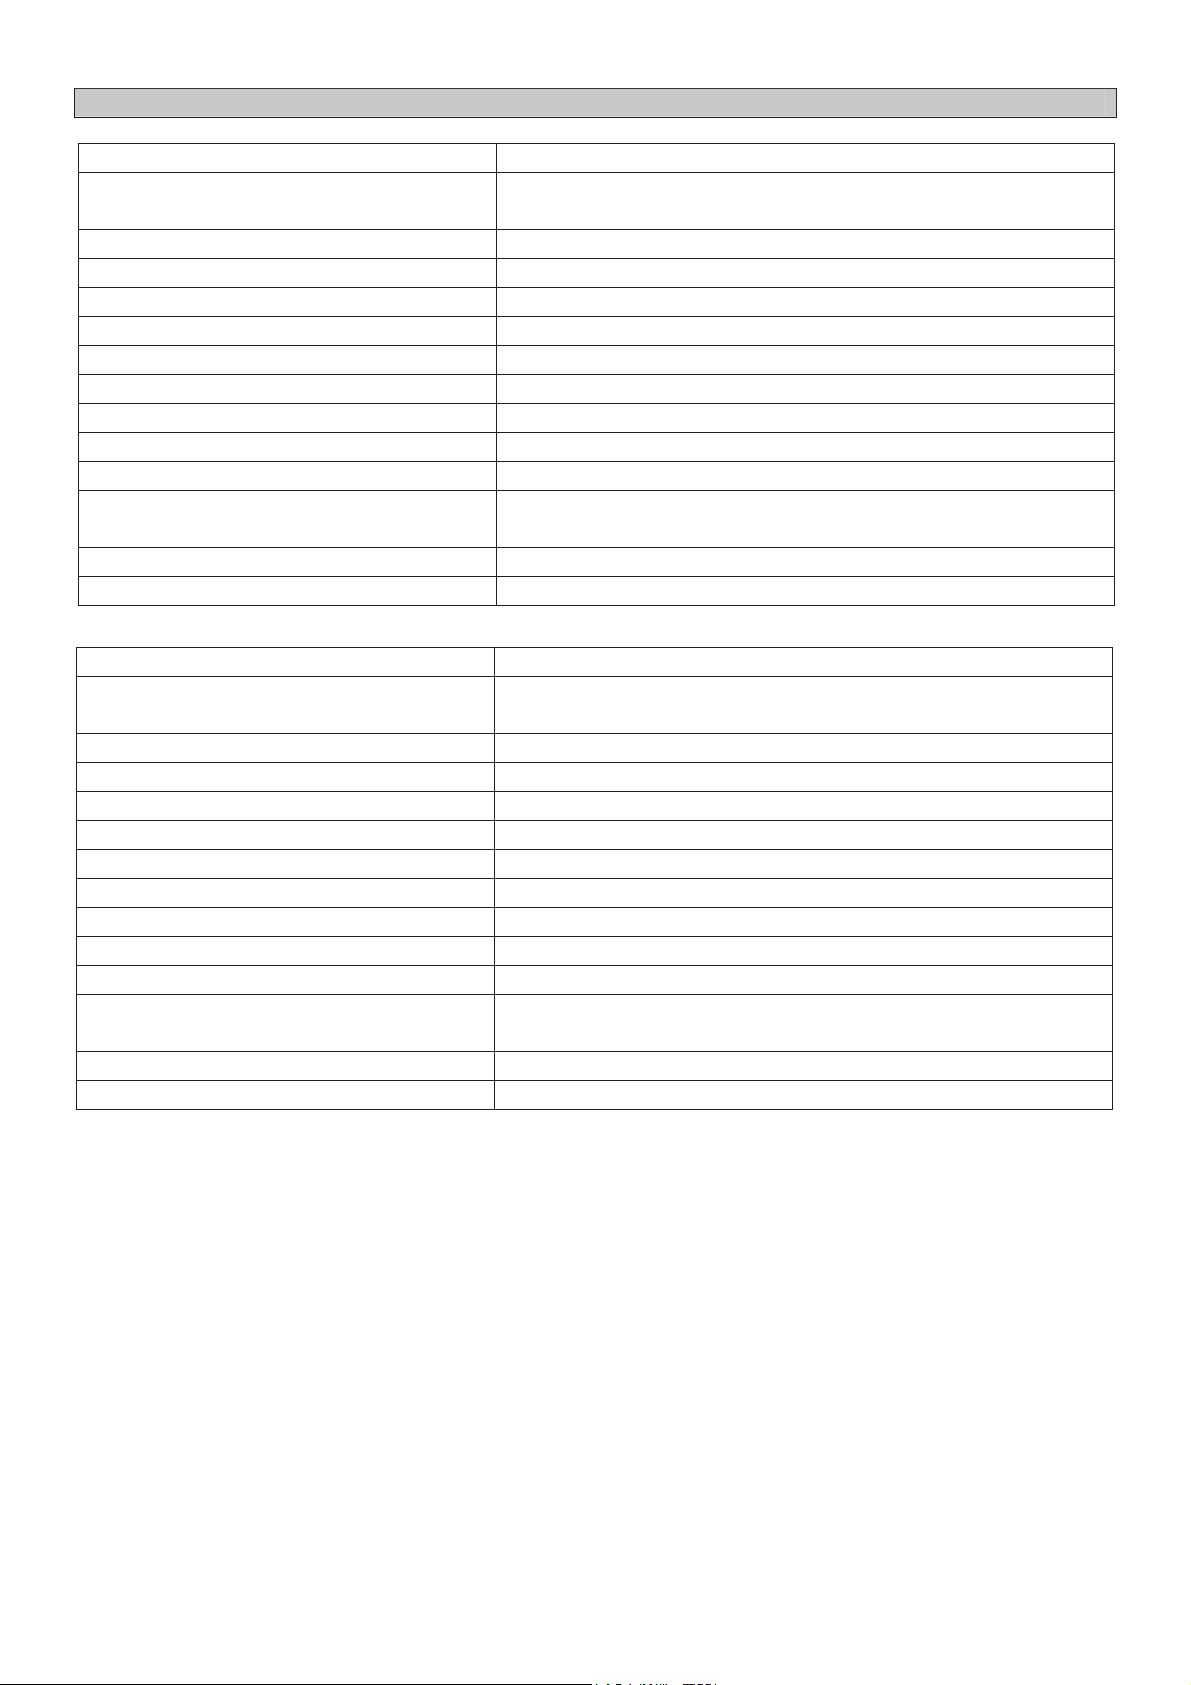
SPECIFICATION
Model no. TC9000R
Cooling capacity 8500 BTU
W
2490
Heating capacity N/A
Power/Ampere consumption for cooling* 830W/ 3.7A
Air volume (max. speed) 350 m³/h
Humidity removal capacity 1.2 L/hr
Power supply
Compressor Rotary
Refrigerant R410a
Fan speed 2
Timer Electronic switch 1 – 12 hours
Working temperature Cooling: 18 - 32°C
Net Weight 30 kg
Dimension 400 x 377 x 750 mm (WxDxH)
no. TC12000RH
Model
Cooling capacity 10000 BTU
Heating capacity (Heat Pump) 10000 BTU (2930W)
Power/Ampere consumption Cooling 830W (3.7A) / Heating 1180W (5.2A)
Air volume (max. speed) 350 m³/h
Humidity removal capacity 1.5 L/hr
Power supply
Compressor Rotary
Refrigerant R410a
Fan speed 2
Timer Electronic switch 1 – 12 hours
Working temperature Cooling: 18 - 32
Net Weight 32 kg
Dimension 400 x 377 x 750 mm (WxDxH)
220-240V~,
2930
220-240V~, 50Hz
Heating: 5 - 27 C
50Hz
W
°
°C
PLEASE NOTE:
data marked with '*' may vary for technical reasons: for actual data, please refer to the rating label
The
placed
at the back of the unit.
Page 3
BEFORE USE
Important Safety Instructions
1. Transport & store the unit in an upright position only. Leave it in an upright position for at least 3 hours before
first use.
2. Always place the unit on an even, level surface.
3. An opening in a window or wall is required to accommodate the exhaust hose to expel the hot air.
4. Make sure the unit is connected to an earthed power supply of the correct rating. (Refer to the rating label
located at the back of the unit).
5. The unit will cool when the room temperature is between 18°C~32°C depending on the thermostat setting.
6. DO NOT use this unit for functions other than those described in this instruction manual.
7. DO NOT tilt the unit.
8. DO NOT cover or obstruct the appliance’s inlet and outlet grilles.
9. Your air conditioner has been designed to be used only in the home, office and similar conditions and should
not be used for any other purpose.
10. This unit is for indoor use only.
11. Never unplug the air conditioner while it is working, this could damage the electronic circuits.
12. DO NOT use the appliance in a wet room, such as a bathroom or laundry room to avoid the risk of electrical
shocks.
13. Do not bend or crush the warm air exhaust hose.
14. DO NOT sit or place articles on the appliance.
15. DO NOT use the appliance with wet or damp hands.
16. DO NOT let chemical substances come into contact with the appliance.
17. DO NOT use the appliance in the presence of flammable substances or vapours such as alcohol, insecticides,
petrol, etc.
18. DO NOT use the plug to start and stop the appliance. ALWAYS use the intended control panel to start and stop
the unit.
19. ALWAYS turn off the appliance when it is not in use and remove the mains plug from the socket outlet.
20. ALWAYS turn the unit off and remove the mains plug before cleaning, carrying out maintenance or moving
location.
21. Avoid the use of adapter plugs, multiple sockets and /or extension leads. If their use is necessary, ensure they
conform to current safety standards.
22. Do not pull the electrical cable or place it near a source of heat: always unroll it completely to avoid dangerous
overheating. If the power cord becomes damaged, the service agent or a similarly qualified person must
replace it, in order to avoid a hazard.
23. The filter must be used with the product at all times, when removing it for clearing always turn the unit off and
unplug the mains plug from the socket.
24. Do not operate the unit with a damaged power cord or plug, after it malfunctions, has been dropped or
damaged. If the power cord is damaged it must be replaced by the manufacturer or a qualified service engineer
to avoid a hazard.
25. Closely supervise any children and pets when unit is in use
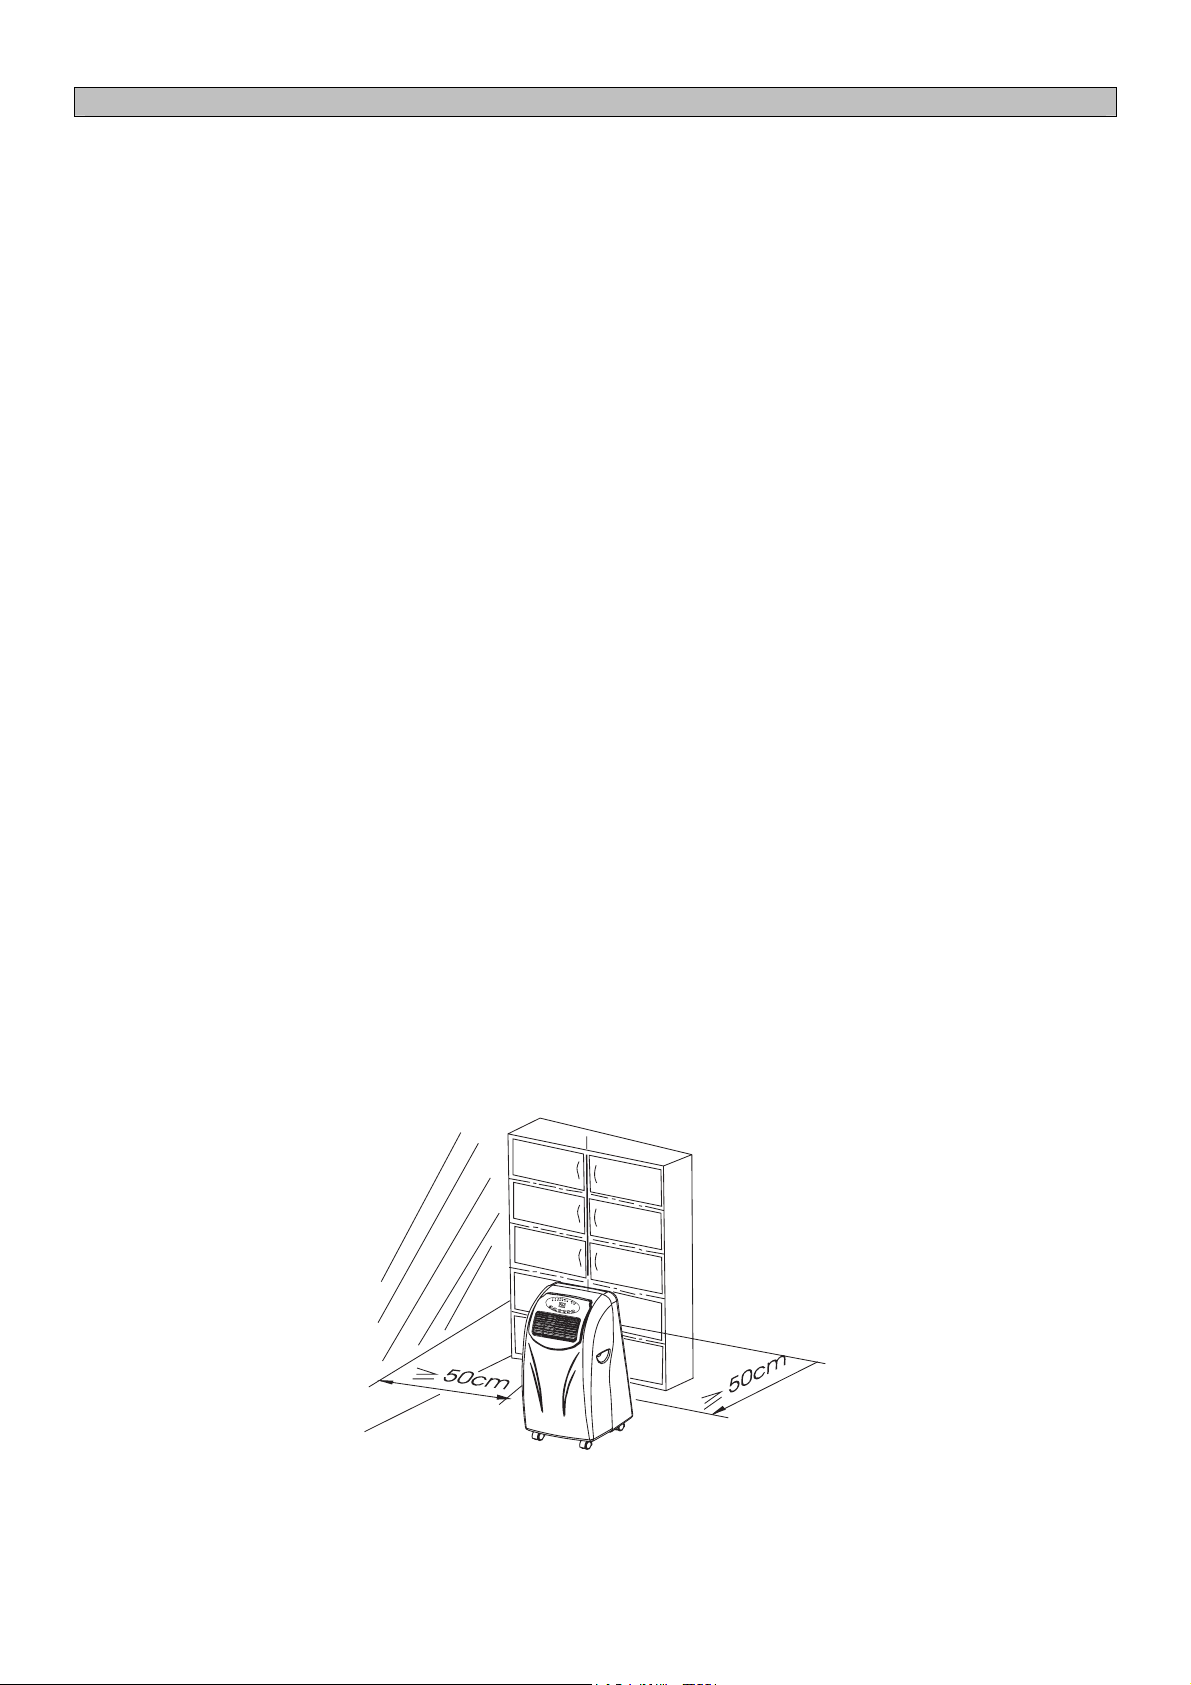
26. Only use in the upright position on a flat level surface, at least 50cm from any objects.
WALL
Page 4
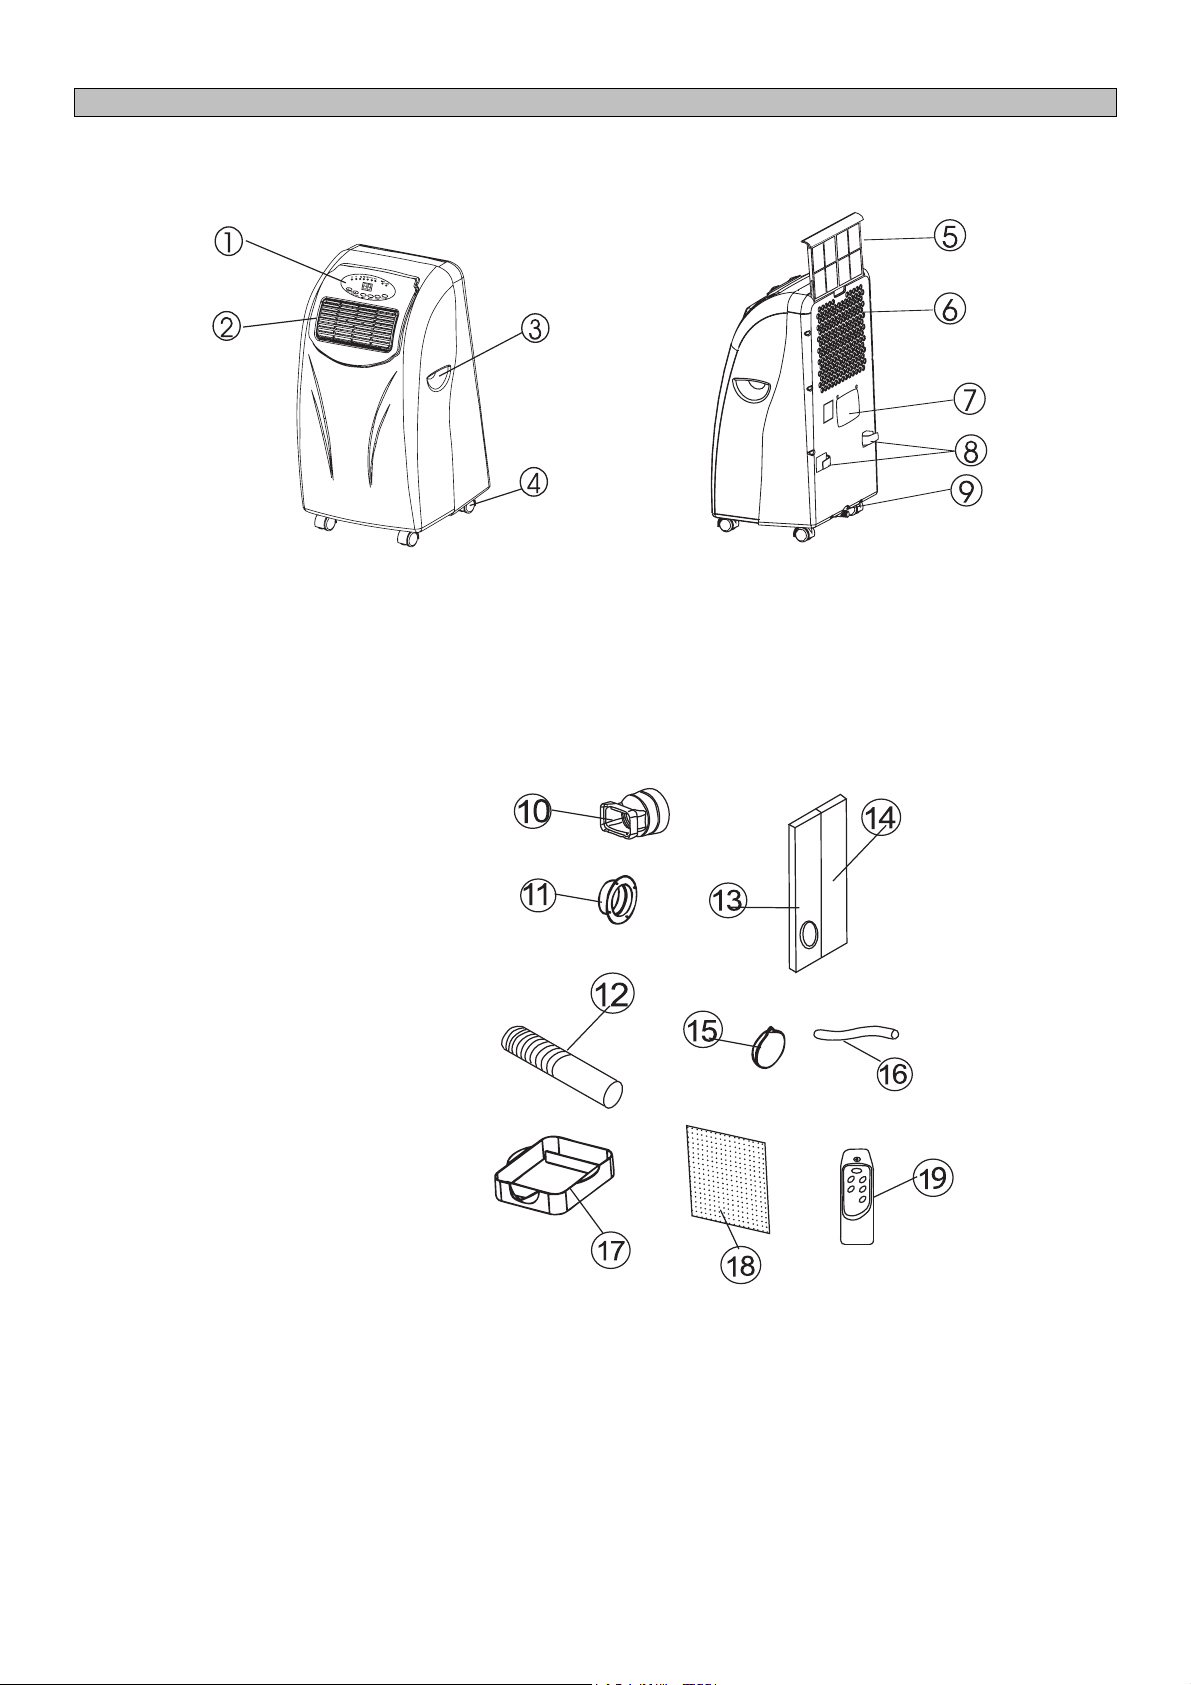
over hose and into back of the air
Front Back
1. Control Panel
2. Air outlet
3. Carry handle
4. Caster
Accessories
10. Indoor adaptor - for insertion
PARTS
5. Air filter
6. Air inlet
7. Exhaust air outlet
8. Cord storage
9. Water stopper / drainage point
conditioner
11. Outdoor adaptor - for insertion
over hose and into foam strip (or
into hole in the wall/window)
12. Exhaust hose
13. Foam strip - for filling the open
window space and with hole for
connection to exhaust hose
14. Foam strip - for filling the open
window space
15. Round cap for filling the hole in
wall/window
16. Drain tube for continuous
drainage
17. Water tray
18. Active carbon filter
19. Remote control (for electronic
model only)
Page 5
INSTALLATION
Installing the exhaust pipe
This unit is a portable air conditioner, which can be moved from room to room.
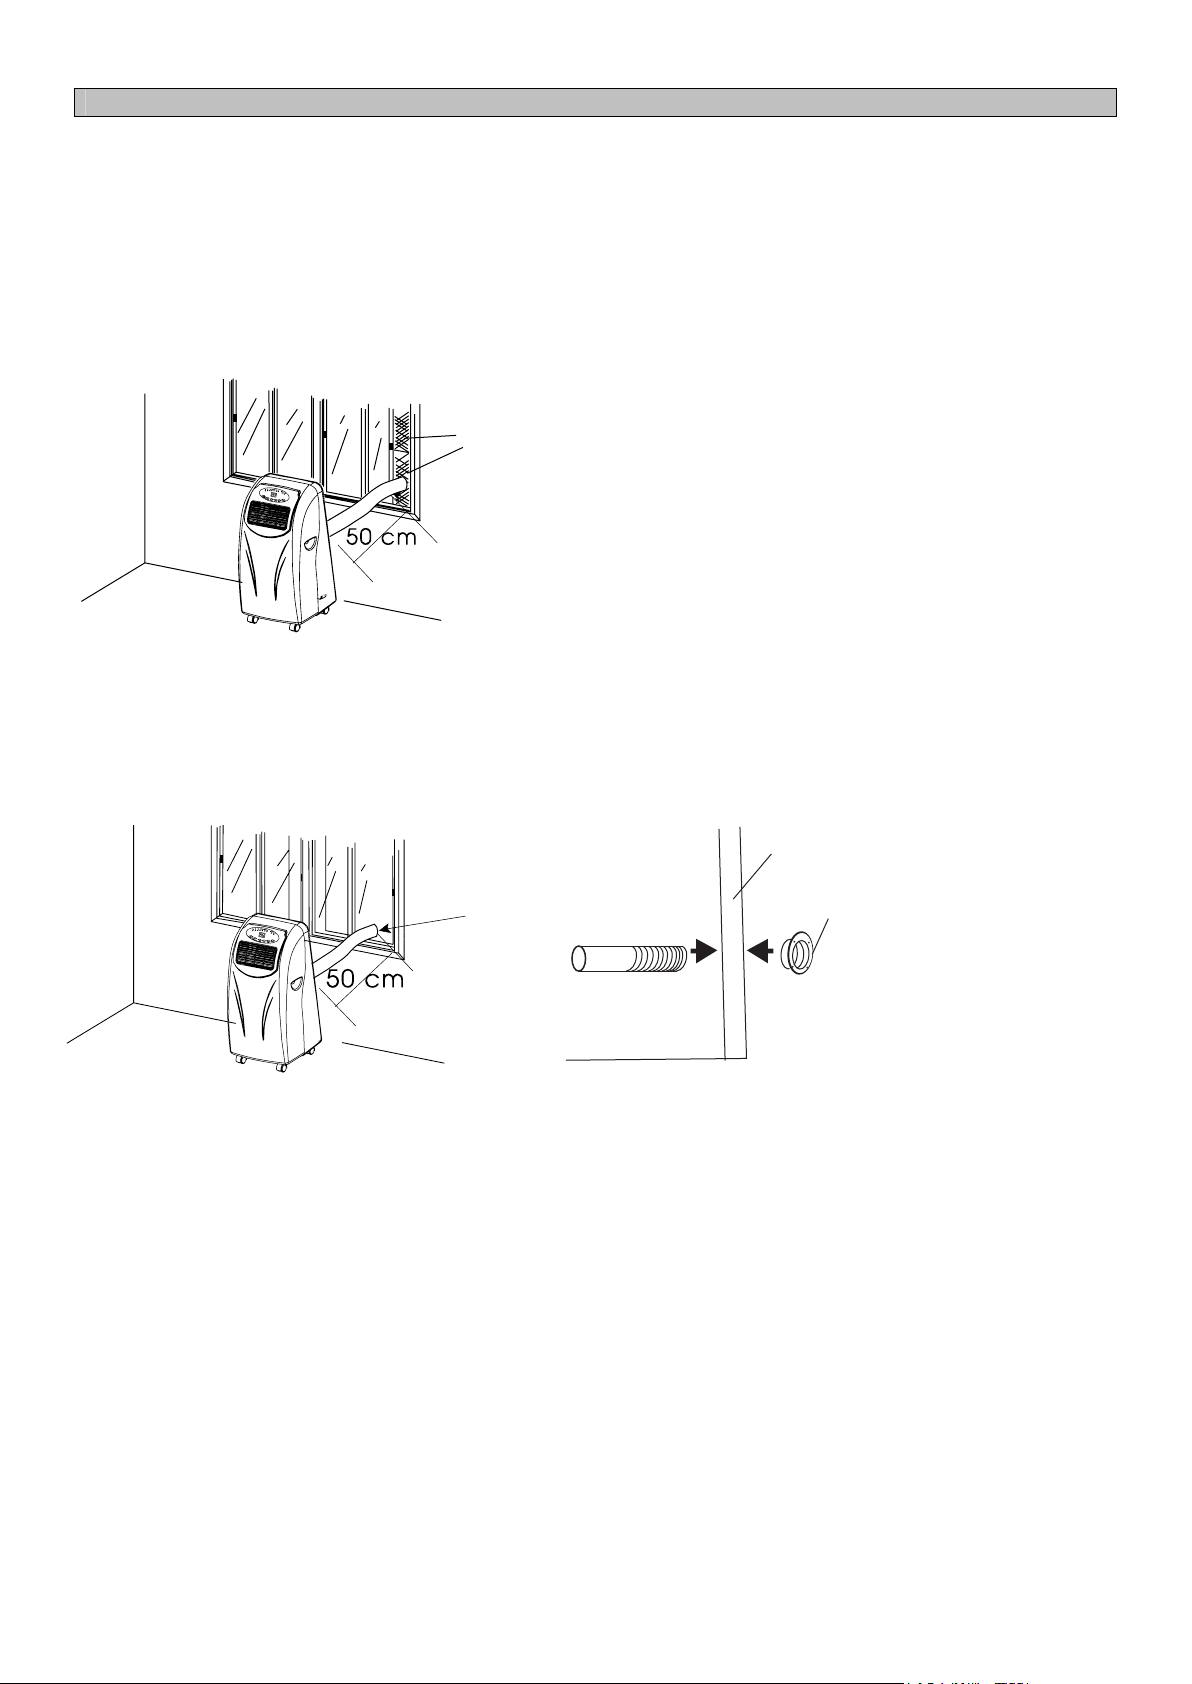
1. Using the foam strips
• These are not suitable for hinged window systems
Foam strips
• Place the foam window strips against the window. Mark and cut them to size if necessary.
• Feed exhaust hose through the foam strip and insert strip into window gaps as shown. Slide window across
so that foam is held securely. This technique may also be used for sash windows.
• Note: Please take care to maintain protection against intruders.
2
. Using the adaptor
Wall or window
outdoor adapter
• Cut a 130mm diameter hole in the wall or window, using the appropriate tools and safety equipment.
• Feed exhaust hose through the window or wall and attach the outdoor adaptor from the outside as shown.
• When not in use, cover the hole with the cap (15. on accessories list) provided.
Page 6

Installing the exhaust hose
• Use only the hose provided and clip exhaust hose and unit adaptor to the back of the air
conditioner.
• Avoid kinks and bends in the exhaust hose as this will cause expelled moist air to build up
causing the unit to overheat and shut down.
• The hose may be extended from 300mm to 1500mm, but for maximum efficiency use the shortest
length possible.
WARNING!
Do not replace or extend the hose as this could cause the unit to malfunction.
Installing the carbon filter
1. Remove the filter frame from the unit.
2. Separate the filter fixer from the filter frame.
3. Remove the active carbon filter from its plastic bag.
4. Insert the active carbon filter into the filter frame.
5. Fix the filter by reassembling the fixer onto the filter frame.
6. Re-fit the filter frame inside the unit.
.
6.
1
Page 7
OPERATING INSTRUCTIONS
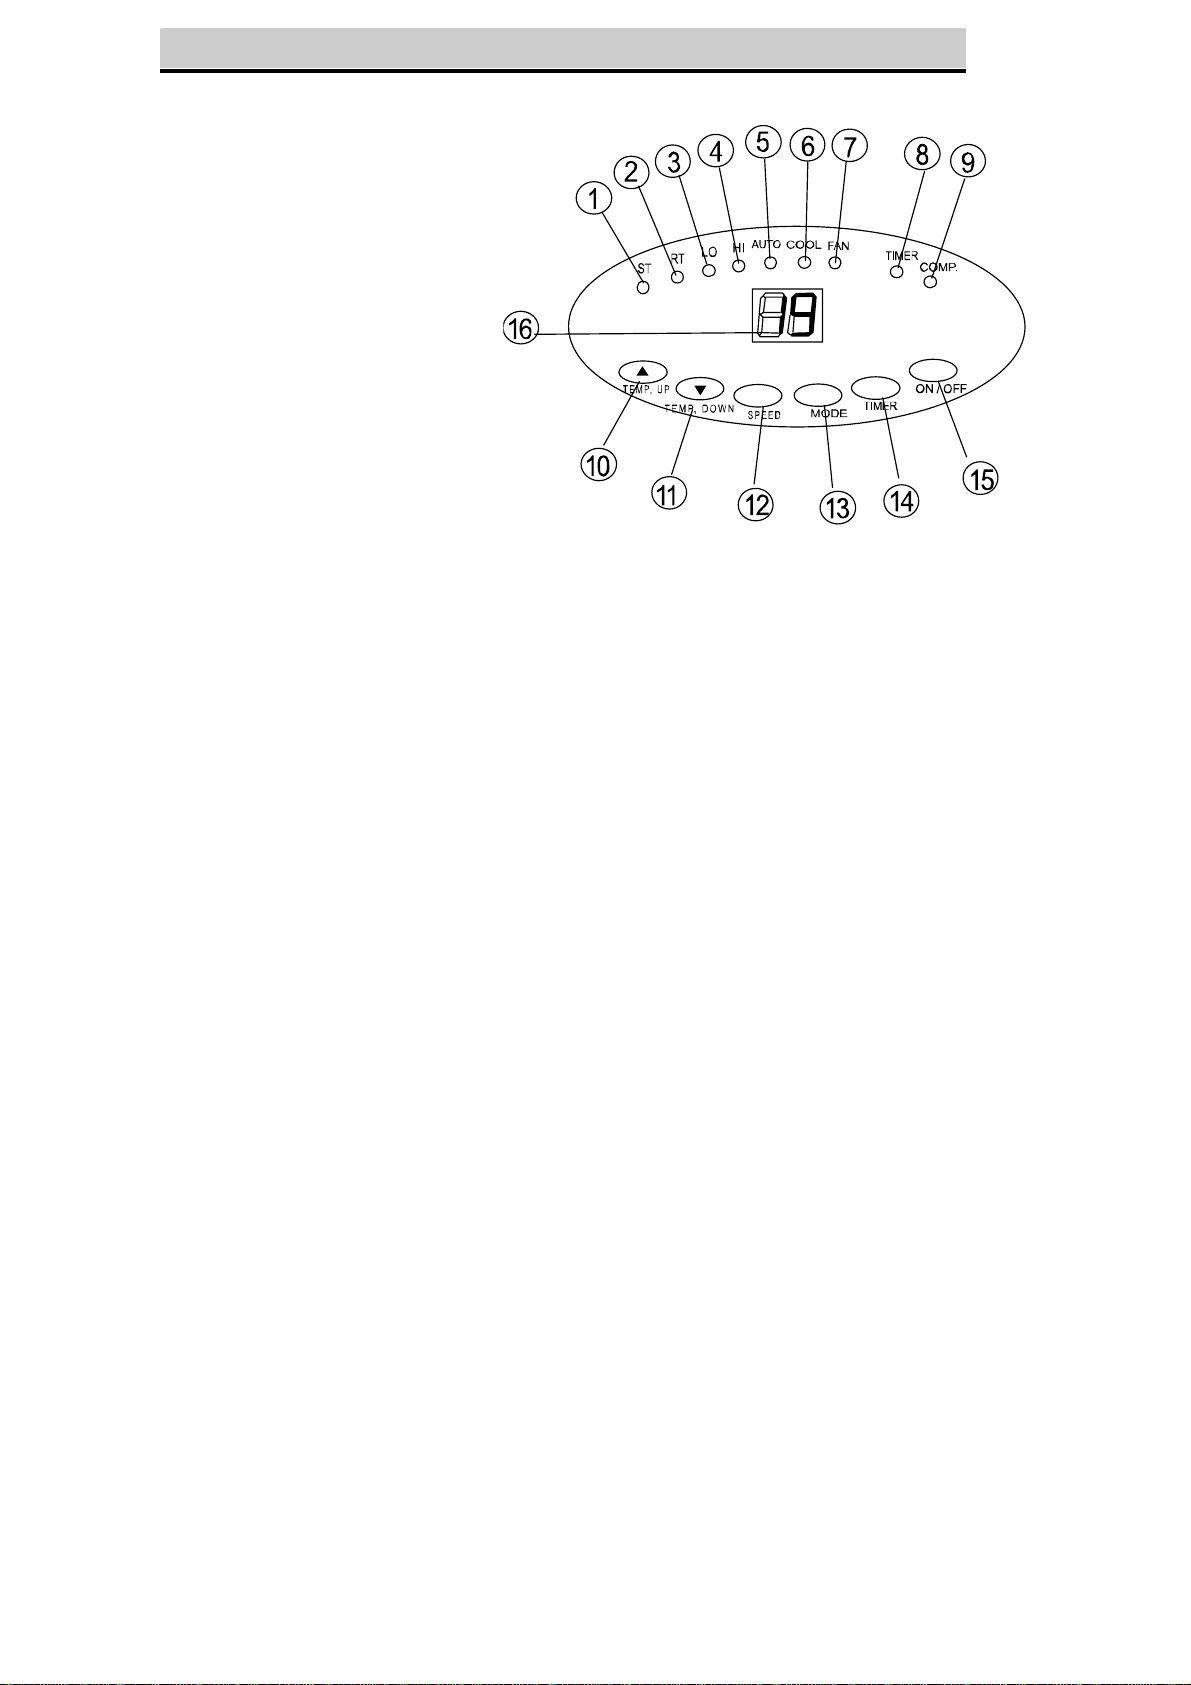
Control panel
1. 'Set temperature' indicator
2. 'Room temperature' indicator
3. Low ventilation indicator
4. High ventilation indicator
5. Automatic mode indicator
6. Cooling mode indicator
7. Fan mode indicator
8. Heating mode indicator (For
cool & heat models only.)
9. Timer operation indicator
10. Compressor operation
indicator
11. 'Temperature up' button
12. 'Temperature down' button
13. Speed (ventilation)button
14. Mode (function) option
button
15. Timer button
16. ON/OFF (power) button
17. Display window
Turning ON/OFF
Press ON/OFF button, the unit will start automatically. If the ambient temperature is
- higher than 23
- higher than 20
- below 20
o
C, the unit will work in cooling model.
o
o
C but below or equal to 23 oC , the unit will work in ventilation model.
C , the unit will work in heating function (for cool & heat models only).
Indicators of the functions in progress come on at the same time. *NOTE! The
COMPRESSOR indicator will only light up as the compressor is in operation.
The display window shows the ambient room temperature.
To turn the unit off, press ON/OFF button again.
Setting mode/function
Press MODE button to select required working mode: automatic, cooling, fan or heating,
(Heating is for cool & heat models only.)
The indicator of your selected mode comes on.
Setting temperature
Press 'Temperature up' or 'Temperature down' bu tton to regulate the temperature you
desired.
The display window will show the temperature you set as you press 'Temperature up' or
'Temperature down' button. Otherwise, it will always show the ambient temperature.
o
The pre-setting temperature of this machine is: 24
C for cooling, 20 oC for heating.
Page 8
Setting ventilation speed
1. Press SPEED button to choose vent speed (high or low). The speed indicator light will indicate which speed
setting is in use.
2. If the unit is in AUTO mode, it will choose the ventilation speed automatically according to the ambient
temperature (the related indicator light will illuminate), at this time.
Setting timer
1. Press TIMER button to set the operating hours you desired (1 to 12 hours, the timer light will illuminate). When
the set time has been reached, the machine will turn off automatically. The display window will show the hour(s)
you set as you press TIMER button. If the timer button is not pressed, the unit will work continuously.
2. By pressing the timer but without turning on the other functions, you can PRE-SET the time for the machine to
work. For example, if you press the timer to '2', the unit will work automatically after 2 hours.
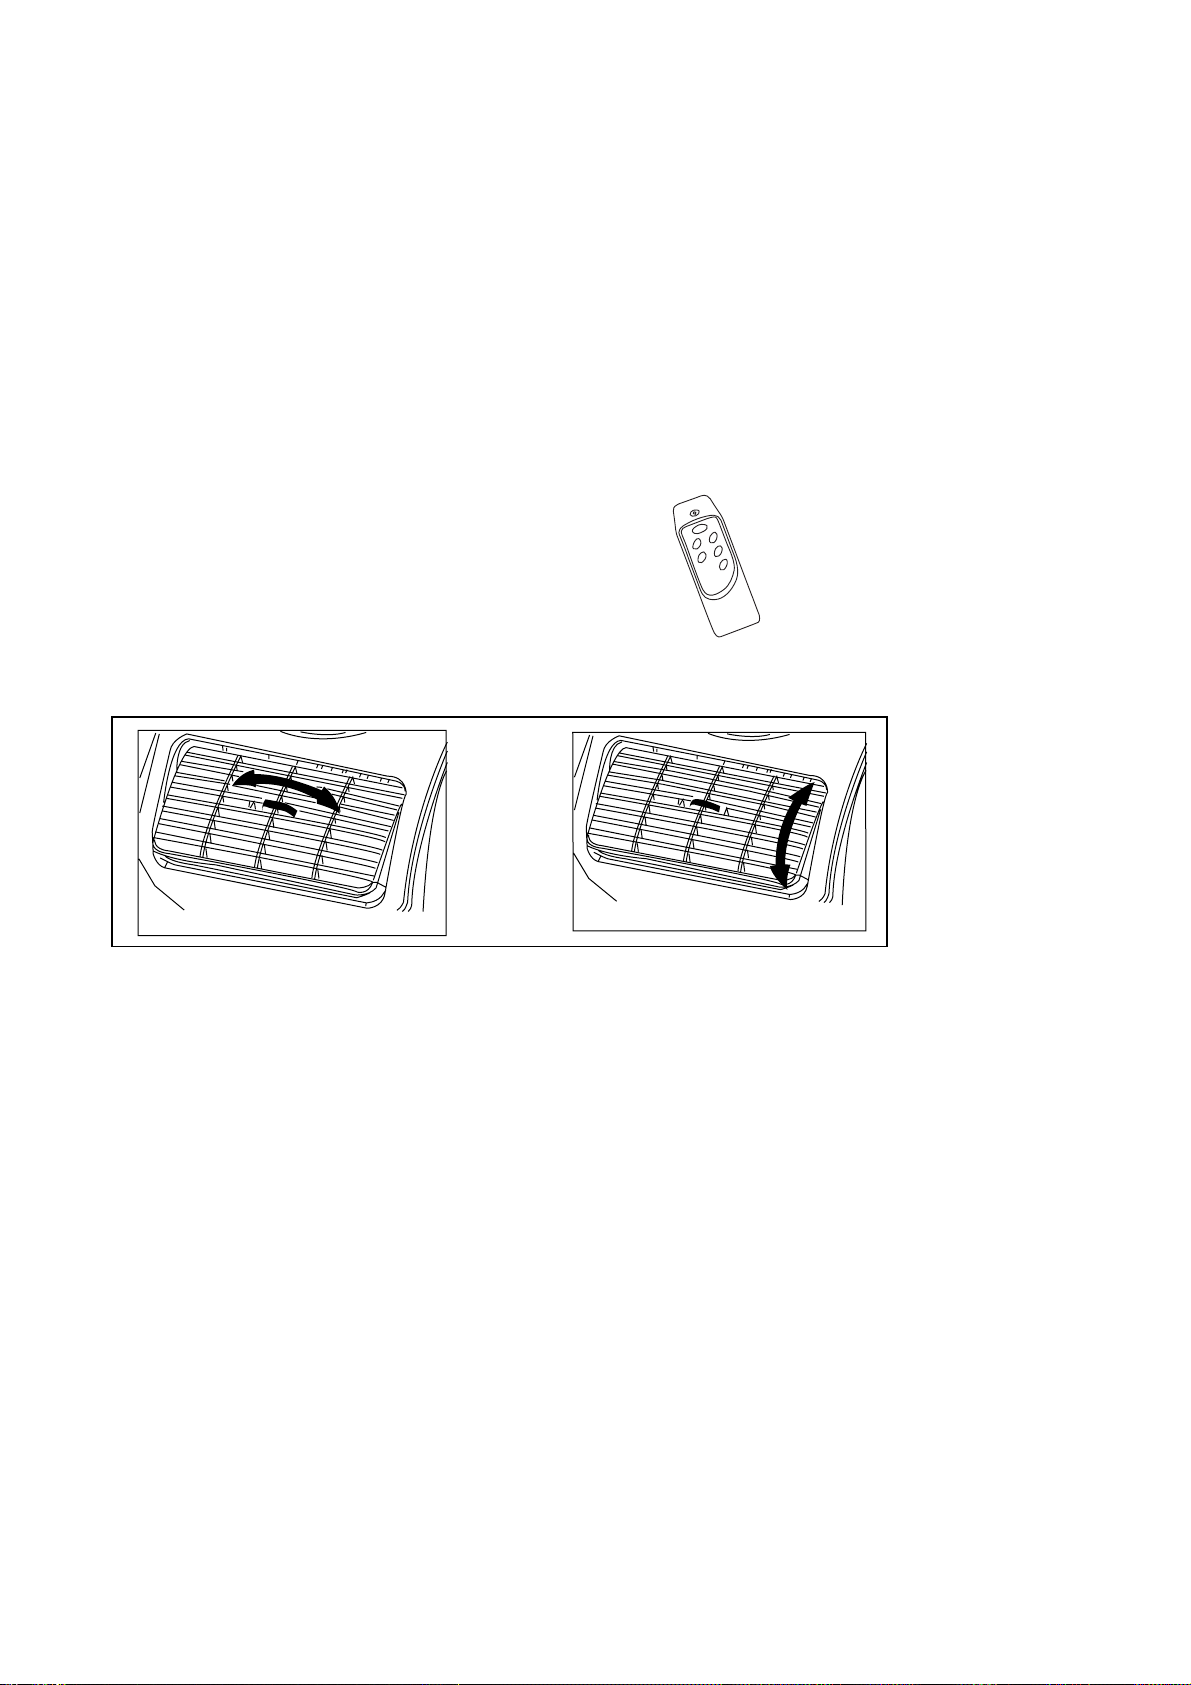
All the above functions can also be performed with the
supplied remote control.
This remote control requires 2 pcs AAA batteries to
operate
Regulating air flow direction
Turn the roller on the air vent to control the
air flow direction of the vertical louvres.
Move the air vent directly to adjust the air flow
direction of the horizontal louvres.
NOTE
1. To prolong the life of the unit please wait at least 3 minutes before restarting the unit after it has been
switched off.
2. The cooling system will switch off if the ambient temperature is lower than the set temperature. As the
ambient temperature rises above the set temperature the cooling function will re-start.
Page 9

DRAINAGE
During the process of cooling, some water will be extracted from the air into the unit. If the reservoir is full:
On the electronic model both the compressor and motor will stop. The COMP. Indicator will flash to show you.
To re-start the unit empty the collected water in one the following ways:
1. Turn off the air conditioner and avoid
moving it when full.
2. Position the water tray underneath the drain
hole.
3.
Remove the with drain cap & rubber plug from
the drain hole and allow the water to drain
out.
4. When the water tray is almost full, replace
the rubber plug in the drain hole and empty
the water tray.
5. Repeat until the unit is emptied.
6. Replace the rubber plug and tighten the
with drain cap firmly.
7. Switch on the unit - the comp light should
not be flashing.
with drain cap
If you wish to operate the unit without the need to empty the water tank, please:
Remove the with drain cap and rubber plug
•
and retain for future use.
• Connect the drain tube supplied to the
water outlet as shown and locate the other
end into a drain.
• The drain tube may be extended by adding
an extension tube and using a suitable
connector, (not supplied by the
manufacturer).
with drain cap
Please note
1. The drain must be at or below the
outlet level.
2. Flashing comp / ‘full water’ indicator
will not function in this mode of
drainage.
3. If you want to extend the water tube,
you can connect it with another tube
(OD: 18mm)
Page 10

Always switch off and unplug the air conditioner from the mains before cleaning.
To maximize the efficiency of the air conditioner clean regularly.
Cleaning the housing
Use a soft, damp cloth to wipe the body clean.
Never use aggressive chemicals, gasoline, detergents, chemically treated cloths, or other cleansing solutions.
These could all damage the unit casing.
Cleaning the filter
Use a vacuum cleaner or tap the filter lightly to remove loose dust and dirt from the filters and then rinse thoroughly
under running water (no hotter than 40°C). Dry thoroughly before replacing. Never operate the unit without the
filters.
End of season storage
• Drain any water in the unit before completely
operating the unit on ventilation only mode for
a few hours, to thoroughly dry the inside.
• Clean or change the filter
• Unplug and store the power cord as shown
• Replace in the original carton or cover for
storage.
MAINTENANCE
The air conditioner does not run.
The machine seems to have little
cooling effect.
The machine is not cooling.
Too noisy
The compressor doesn’t run.
Trouble Shooting
Is the air conditioner plugged in?
Is there a power failure?
Is the ‘COMP’ indicator flashing?
Is the room temperature below the set
temperature?
Is there direct sunshine? (Please close the curtains
or blinds.)
Are too many windows or doors open?
Are there too many people in the room?
Is there something in the room producing lots of
heat?
Is the filter dusty, contaminated?
Is the air intake or output blocked up?
Is the room temperature below your selected
temperature?
Is the machine positioned unevenly, thus creating
vibration?
Is the floor underneath the machine uneven?
It is possible the overheat protector for the
compressor is in operation. Wait for the
compressor to cool down.
* Never try to repair or dismantle the unit yourself
Page 11
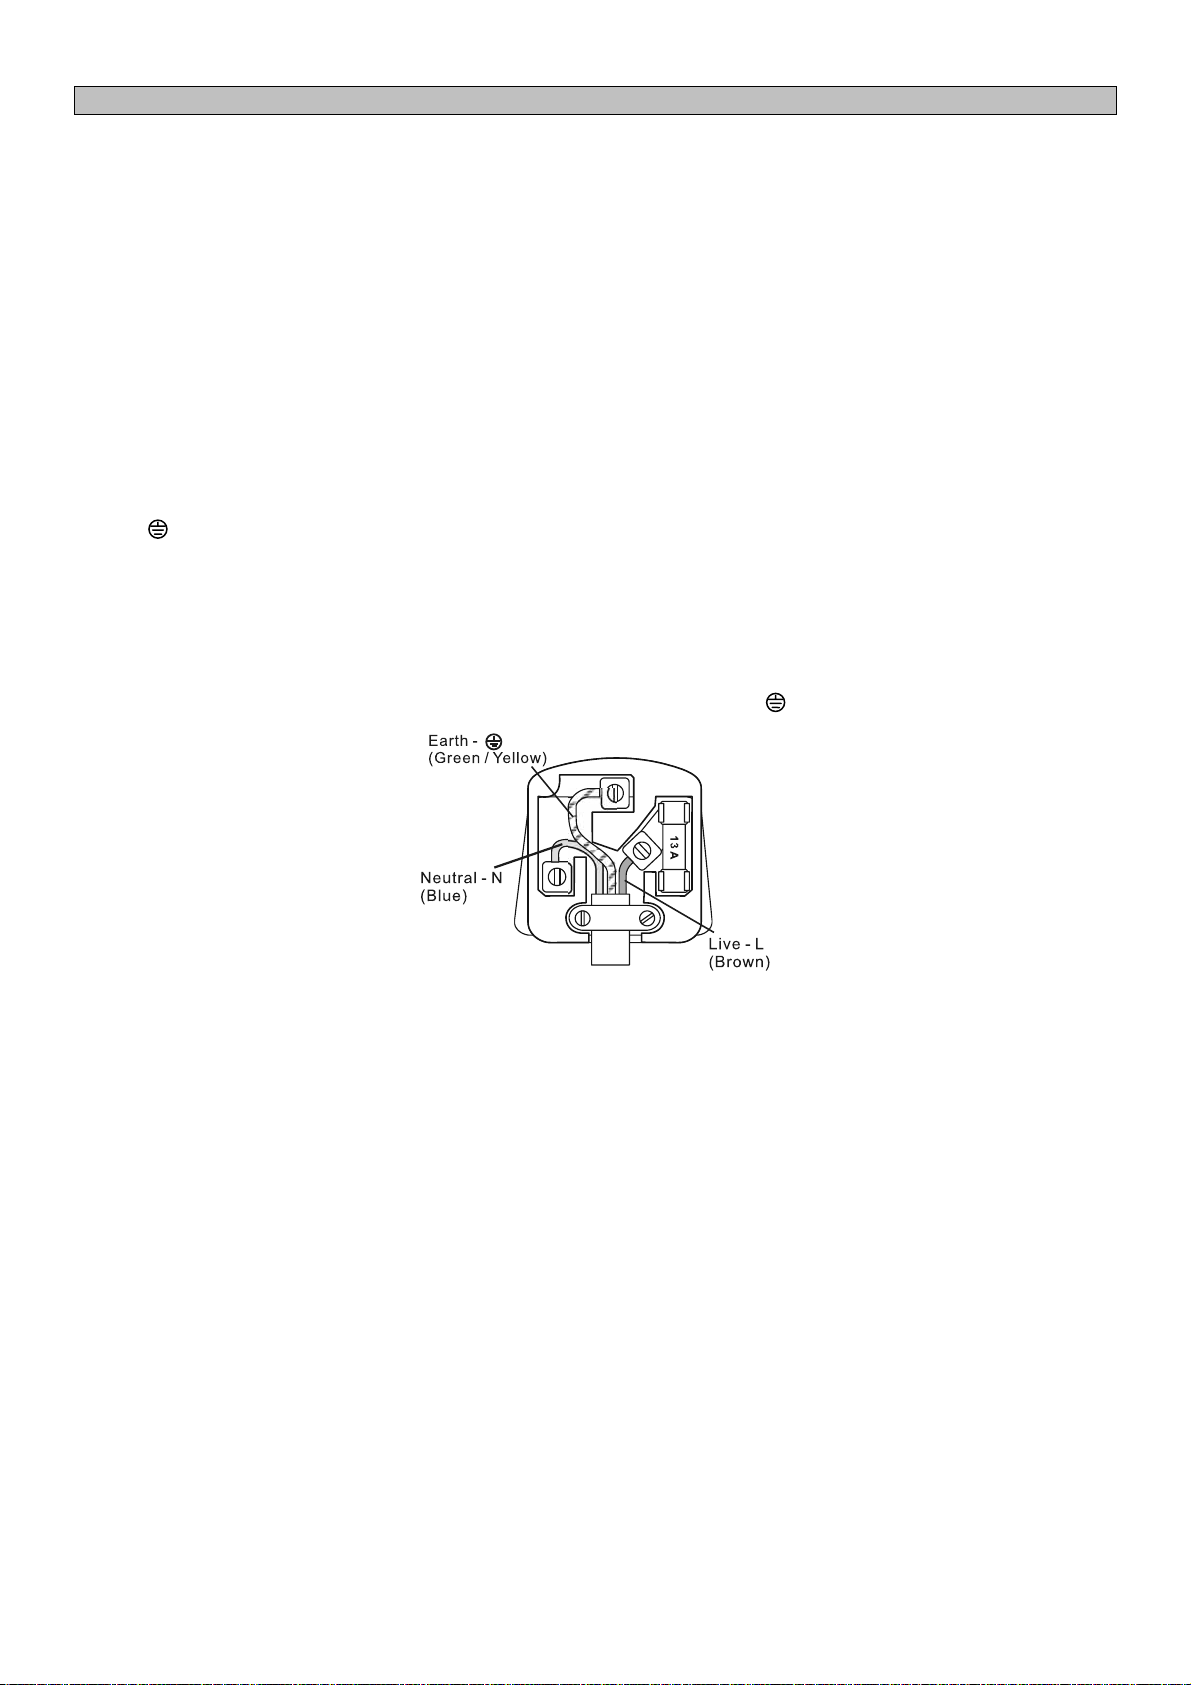
BS PLUG WIRING
Wiring Instructions: Should it be necessary to change the plug please note the wires in the mains lead are
coloured in accordance with the following code :
BLUE - NEUTRAL
BROWN - LIVE
GREEN AND YELLOW - EARTH
As the colours of the wires in the mains lead of this appliance may not correspond with the coloured markings
identifying the terminals in your plug, proceed as follows:
1. The BLUE wire is the NEUTRAL and must be connected to the terminal which is marked with the letter N or
coloured BLACK.
2. The BROWN wire is the LIVE and must be connected to the terminal which is marked with the letter L or
coloured RED.
3. The GREEN/YELLOW is the EARTH and must be connected to the terminal which is marked with the letter E
or or coloured GREEN OR GREEN/YELLOW.
4. Always ensure that the cord grip is positioned and fastened correctly.
If a 13A (BS 1363) fused plug is used it must be fitted with a 13A (BS 1362) fuse. If in doubt consult a qualified
electrician.
Wiring for a 13 Amp Plug (BS 1363)
Please note. The Earth Terminal is marked with the letter E or Earth Symbol .
Page 12

uarantees this product free from defects in materials and workmanship for a period of
voltage
.
This warranty is in addition to, and does not
SERVICE & WARRANTY
• Do not operate the unit with a damaged cord or plug, after the unit malfunctions, has been
dropped or damaged.
• For your convenience, record the complete model number and product name
(located on the Product Identification Plate), the date you purchased the product, and attach
your purchase receipt as proof of purchase.
• To ensure your product is covered by warranty, the complete
receipt should be returned to your retailer
EHS (International) Ltd. G
one (1) year.
Should this unit be operated under conditions other than those recommended, at voltages other than the
indicated on the unit, or any attempts made to service or modify the unit, will render this WARRANTY VOID
The product you buy may sometimes differ slightly from illustration.
affect, your statutory rights.
Should you have a problem with this product, please call our Help Desk on: (0870) 742 5021
ONE (1) YEAR LIMITED WARRANTY
Save This Warranty Information
.
faulty product together with your purchase
This product has been manufactured to comply with EEC Directives 73/23/EEC and 89/336/EEC
Waste electrical products should not be disposed of with
household waste. Please recycle where facilities exist.
Check with your Local Authority or retailer for recycling advice.
EHS, Manchester, M17 1RN
EHS 02/06
 Loading...