

Page 1
Canada: GF-WSAVOR
Canada: GF-WSAVOR
Water Savor™ Controller
USA: GFI #7081
Installation Instructions
Read and Save These Instructions
I. Safety
WARNING! Improper electrical wiring can result in fi re, failure, or loss of humidity control.
!
Disconnect electrical power before installing or servicing. Failure to disconnect electrical
power may result in injury or death. All local building and electrical codes must be followed.
Congratulations! You have decided to save money and the environment by installing the Water
Savor™ Controller. The Water Savor™ Controller is an electronic device that controls the amount of
water used by a ow-through by-pass humidi er; part of which would normally be wasted down the
drain.
The Water Savor™ Controller should be installed by a licensed technician. Failure to properly install
or operate the Water Savor™ may result in property damage, personal injury or humidity levels that are less than desired. Read instructions
carefully to safely achieve maximum humidity and water savings.
Safety questions regarding the Water Savor™ Controller may be directed to General Filters, Inc.
CANADIAN CUSTOMERS: (888) 216-9184; USA CUSTOMERS: (866) 476-5101.
II. Application:
When there is a call for humidity, the Water Savor™ Controller cycles 24vac of power to the humidi ers solenoid valve. Settings can be adjusted
1-6 (See Figure 3) to ensure that the humidi er will work at full capacity while also saving the maximum amount of water as possible.
III. Installation Instructions:
Precautions:
WARNING: Disconnect electrical power before beginning installation. After installation is complete and before leaving, check to ensure the
!
humidi er is functioning as intended.
Mounting:
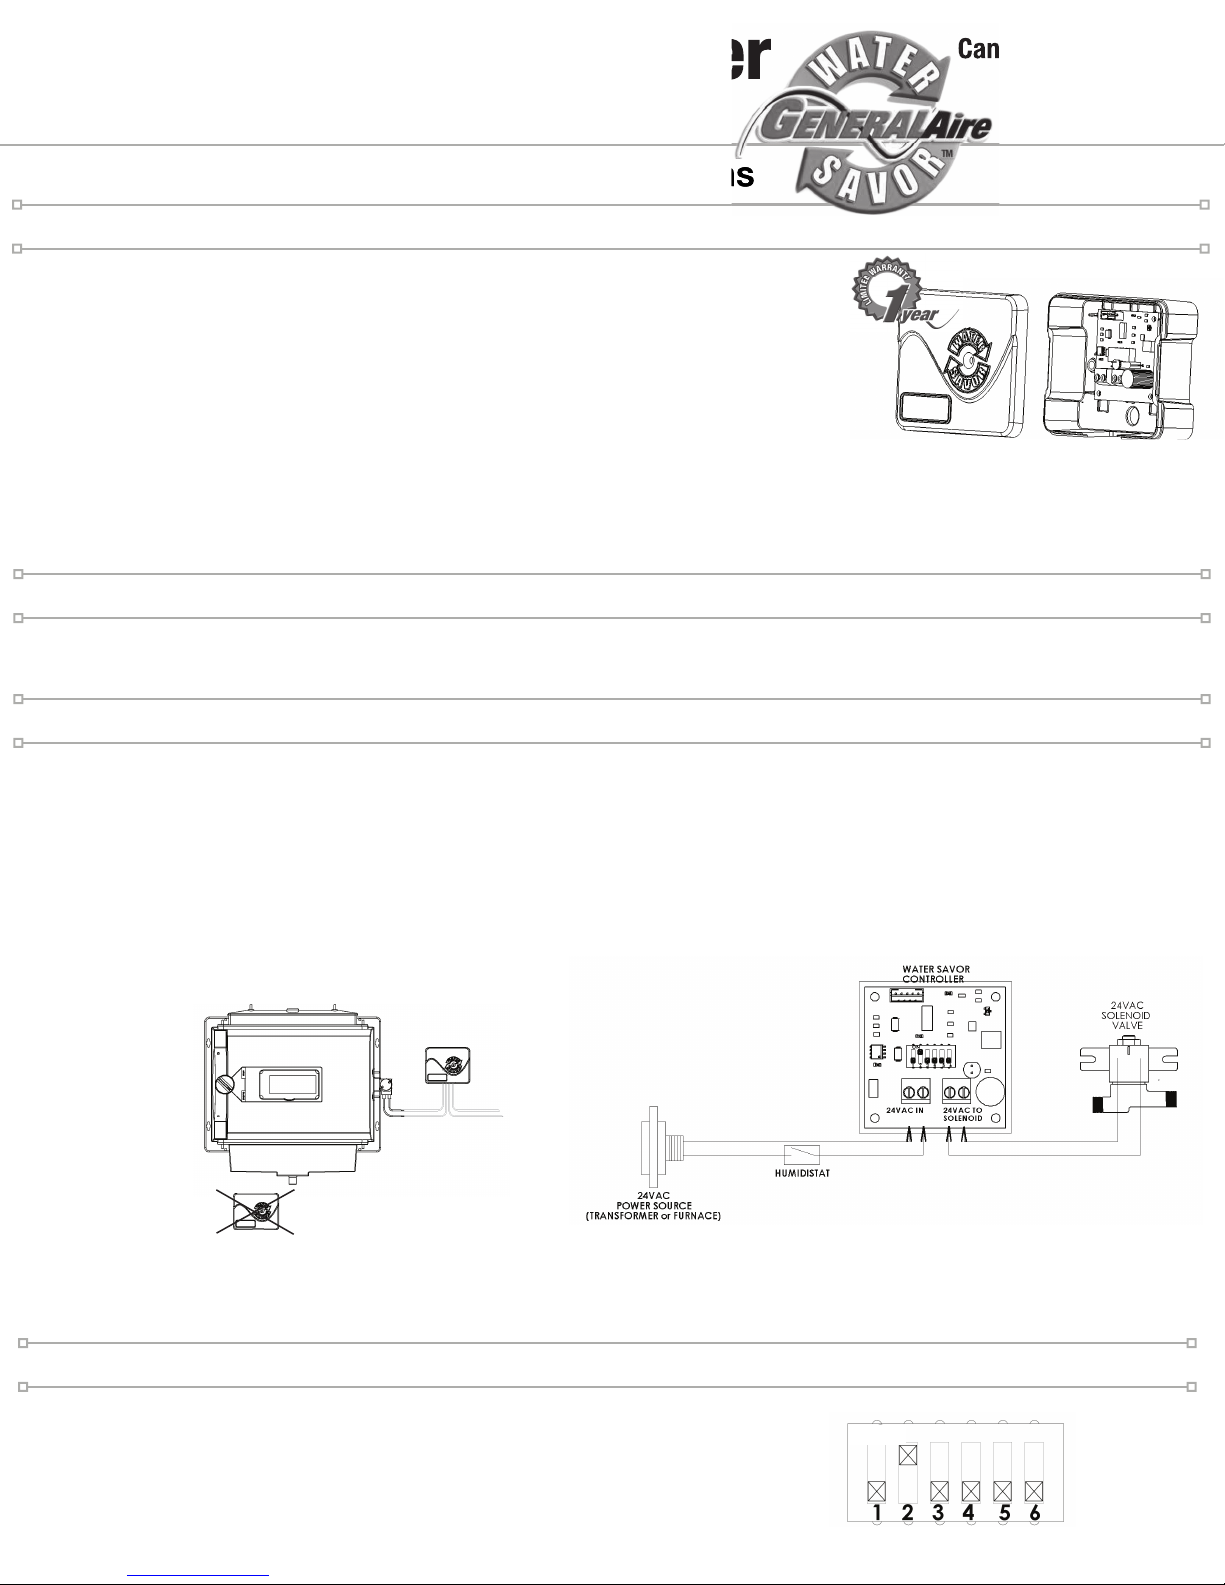
1. Chose a location for the Water Savor™. To prevent water damage, mount to the side or above the humidi er (See Figure 1). Never install
below the humidifi er. Some solenoid valve wires are long enough to connect directly to the Water Savor™. If not, additional wire may be
required.
2. Mount the Water Savor™ on the duct using the (2) #8 X 3/4 PHILLIPS HEX screws provided.
Figure 1 Figure 2
NEVER install below the humidifi er.
Mount to the side or above the unit.
Wiring Instructions (Wire is not included. 18 gage wire is recommended.):
3. Connect the two humidi er solenoid wires to the screw terminals labeled: “24VAC TO SOLENOID” (See Figure 2).
4. Connect the 24VAC power source wires (1 from humidistat & 1 from transformer) to the screw terminals labeled “24VAC IN” (See Figure 2).
IV. Recommended Water Savor™ Dip Switch Settings
1. Refer to the Recommended Dip Switch Settings Chart (Table; next page) to nd the Water
Savor™ setting that matches the applicable humidi er model.
2. Use a small at head screw driver to adjust the Water Savor™ to the applicalble setting
(See Figure 3).
1-6 settings (1 = maximum water savings; 6 = minimum water savings).
3. Only one setting should be ON at a time. (See Figure 3).
Figure 3
ON POSITION
OFF POSITION
Page 2

WSC WaterSavor Controller Installation Manual
V. Customized Water Savor™ Settings (to ensure maximum water savings):
1. Start by using the recommended setting for your humidi er. If your humidi er is not on a Table below, start at setting #6 (minimum savings).
2. Maintain the recommended setting for 3 days. This allows time for humidity to migrate and stabilize throughout the home.
3. After 3 days at the recommended setting, record humidity levels by using a humidity gage, or simply determine how the humidity feels in
the home. If humidity has not dropped, move on to step 4 to save even more water.
4. Switch the setting on the dip switch to one number less than the current setting. For example; if your current
setting is at #3, turn #3 setting to OFF and turn setting #2 ON (see Figure 4, to right).
5. Maintain the new setting for 3 days, again to allow humidity time to absorb and migrate throughout the home.
6. After 3 days at the new setting, again record what the humidity is in your home by using a humidity gage or
judging how the humidity feels in the home.
7. If the humidity dropped, change back to the previous setting. This would indicate your humidi er’s optimum water saving capabilities.
8. If the humidity did not drop, repeat steps 3 & 4, until you nd the optimum setting.
RECOMMENDED DIP SWITCH SETTINGS
Model
Hot Cold
Setting
GeneralAire
SL16 5 3
1042 / 1042WSC 5 3
1099LHS 5 4
570 / 570WSC 5 3
900 / 900WSC 5 3
Model
Hot Cold
Setting
Honeywell
HE220 5 4
HE240 5 4
HE260 5 4
HE265 5 4
HE280 5 4
Model
Hot Cold
Setting
Skuttle
Lennox
SK 2000 5 4
SK 2001 5 4
SK 2002 5 4
HCWB3-12 5 4
HCWB3-17 5 4
Model
Goodman
Desert Springs
HE12A / HE12M 5 3
HE17A / HE17M 5 3
HE12MB 5 3
HE17MB 5 3
DS-PFT 6 5
Hot Cold
Setting
Figure 4
ON
OFF
OFF OFF OFF OFF
Model
Hot Cold
Setting
Aprilaire
White Rogers
AA 500 5 4
AA 600 5 4
AA 700 5 4
HFT2100 5 4
HFT2700 5 4
VI. Warranty
Your WaterSavor™ Controller is warranted to the consumer against defects in materials and workmanship for a period of one year from date of
installation. Defective units will be replaced without charge except for removal, reinstallation and transportation costs. To obtain a replacement
unit under this limited warranty, the consumer must send the defective unit to the manufacturer. The manufacturer assumes no liability in
connection with the installation or use of this product, except as stated in this limited warranty. The manufacturer will in no event be liable for
incidental or consequential damages.
Warranty Registration - Keep a Copy For Your Records
Cut Out to Mail
Warranty Registration
Canada: GF-WSAVOR
USA: GFI #7081
Product Information
Serial Number: __________________________________________________
Model:__________________________________________________________
Installation Date Month: ___________Day: _________Year: __________
Owner Information
Name: _________________________________________________________
Address: _______________________________________________________
Address 2: _____________________________________________________
City: _______________________State: _________Zip Code: __________
Phone: ________________________________________________________
Email: _________________________________________________________
Contractor Information
Contractor Name: ________________________________________________
Address: ________________________________________________________
Address 2: ______________________________________________________
City: ______________________State: _________Zip Code: ____________
Contractor Phone: _______________________________________________
Contractor Email: ________________________________________________
Register Online
www.GeneralAire.com / Support Center
www.cgfproducts.com/Warranty Registration
Or Mail
USA CUSTOMERS, MAIL TO:
General Filters, Inc
Attn: Warranty Dept.
43800 Grand River Ave.
Novi, MI 48375
www.general lters.com
CANADIAN CUSTOMERS, MAIL TO:
Canadian General Filters, Ltd.
Attn: Warranty Dept.
400 Midwest Rd.
Toronto, ON M1P3A9 Canada
www.cgfproducts.com
Keep a copy for your records!
FORM NO. WSC_06_REV_B - Engineering / Files / Released / Manuals
2
(10-2015; JPF) H: Indesign Work / Installation Manual / WaterSavor
Manufacturers of Whole House Residential Indoor Air Quality Products.
Humidifi ers - Dehumidifi ers - Air Cleaners - UV Air Purifi ers - Heat/Energy Recovery Ventilators
Page 3

Directives d’installation
du contrôle Water Savor
I. SÉCURITÉ:
AVERTISSEMENT! Un raccordement électrique inadéquat peut causer un incendie, une panne ou la perte
de le contrôle l’humidité. Débrancher l’alimentation électrique avant d’installer le dispositif ou de procéder
à son entretien ou à sa réparation. A défaut de débrancher le courant électrique, cela peut causer des
blessures très graves causant la mort. Il convient d’observer tout code du bâtiment et code électrique
applicable.
MC
Canada: GF-WSAVOR
USA: GFI #7081
Félicitations! Vous avez choisi d’économiser et de préserver l’environnement en installant Le contrôle
Water Savor
l’humidi cateur avec une circulation directe ou avec le ‘’by-pass’’ empêchant le gaspillage, dont une partie
serait autrement normalement gaspillée.
Le contrôle Water Savor
des blessures, des dommages matériels ou un taux d’humidité non souhaité pourraient s’ensuivre. Lire les instructions attentivement a n d’obtenir un
niveau d’humidité maximum tout en optimisant l’économie d’eau.
Les questions relatives à la sécurité au sujet de du contrôle Water Savor
CONSOMMATEURS CANADIANS: (888) 216-9184; CONSOMMATEURS AMERICANS: (866) 476-5101.
MC
. Le contrôle Water SavorMC est un dispositif électronique qui contrôle la quantité d’eau de
MC
devrait être installée par un technicien agréé. À défaut d’installer ou de faire fonctionner correctement le contrôle Wator Savor,
MC
peuvent être adressées à General Filters au numéro sans frais:
II. APPLICATION:
Lorsque l’appel d’humidité est activé, Le contrôle Water SavorMC met sous tension la valve électromagnétique de 24 VCA de l’humidi cateur. Les réglages
peuvent être ajustés entre 1 et 6 (voir la Figure 3) pour s’assurer que l’humidi cateur fonctionne à plein rendement tout en permettant d’économiser l’eau
le plus possible.
III. INSTRUCTIONS D’INSTALLATION:
PRÉCAUTIONS:
Débrancher l’alimentation électrique avant de commencer l’installation. Une fois l’installation terminée, s’assurer que l’humidi cateur fonctionne de la
façon prévue.
MONTAGE:
1. Déterminer l’endroit convenable pour installer Le contrôle la Water SavorMC. Pour prévenir les dégâts causés par l’eau, installer Le contrôle sur
le côté de l’humidi cateur ou au-dessus de celui-ci (voir la Figure 1). Ne jamais installer la commande sous l’humidi cateur. Les ls de valve
électromagnétique sont parfois suf samment longs pour être branchés directement au contrôle Water Savor
supplémentaires seront nécessaires.
2. Installer Le contrôle Water Savor
MC
sur la conduite à l’aide des deux vis à tête hexagonale cruciforme nº 8 X 3/4 comprises.
MC
. Si ce n’est pas le cas, des ls
Figure 1
Ne jamais l’installer au bas de l’unité,
seulement à côté où au-dessus.
SOURCE D’ ALIMEUTATION
(TRANSFORMATUER OU FOURNAISE)
Figure 2
ELECTROMAGNETIQUE
INSTRUCTIONS DE CÂBLAGE (Fil est pas inclus. Câble de calibre 18 est recommandé.):
3. Brancher les deux ls de la valve électromagnétique de l’humidi cateur aux bornes vissées identi ées par « 24VAC TO SOLENOID »
(ALIMENTATION 24 VCA VERS LA VALVE ÉLECTROMAGNÉTIQUE). Voir la Figure 2.
4. Brancher les deux ls de l’alimentation électrique 24 VAC (un venant de l’humidostat et l’autre venant du transformateur) aux bornes vissées
identi ées par « 24VAC IN » (ENTRÉE DE L’ALIMENTATION 24 VCA). Voir la Figure 2.
IV. RÉGLAGE RECOMMANDÉ DU COMMUTATEUR DIP DU CONTRÔLE WATER SAVOR™:
5. Consulter le tableau des réglages recommandés du commutateur DIP (voir le Tableau
A à la page suivante) pour identi er le réglage du contrôle Water Savor
au bon modèle d’humidi cateur. Utiliser un petit tournevis à tête plate pour xer adéquatement le
réglage du contrôle Water Savor
male; 6 = économie d’eau minimale).
6. Un seul des réglages doit être activé à la fois (voir la Figure 3).
CONSULTER LA PAGE SUIVANTE POUR CONNAÎTRE LES RÉGLAGES PERSONNALISÉS
DU CONTRÔLE WATER SAVOR
MC
(voir la Figure 3). Réglage de 1 à 6 (1 = économie d’eau maxi-
MC
(a n d’optimiser l’économie d’eau).
MC
qui correspond
Figure 3
24 VAC
VALVE
ON POSITION
OFF POSITION
Page 4

V. RÉGLAGES PERSONNALISÉS DU CONTRÔLE WATER SAVOR™ (afi n de minimiser la consommation d’eau):
1. Choisir d’abord le réglage recommandé pour l’humidi cateur. Si l’humidi cateur ne gure pas dans le Tableau A ci-dessous, utiliser d’abord le
réglage nº 6 (économie minimum).
2. Utiliser le réglage recommandé pendant 3 jours. Ce délai permet la stabilisation du taux d’humidité partout dans la résidence.
3. Après l’emploi du réglage recommandé sur 3 jours, mesurer le taux d’humidité à l’aide d’un hygromètre ou évaluer le niveau de confort dans la
résidence en lien avec le taux humidité. Si le taux d’humidité n’a pas diminué, passer à l’étape 4 pour économiser encore plus d’eau.
4. Réduire d’un chiffre le réglage du commutateur DIP. Par exemple; si le réglage actuel est 3, positionner ce réglage à l’arrêt et activer le réglage nº 2
(voir la Figure 4 à droite).
5. Conserver le nouveau réglage pendant 3 jours a n de permettre à nouveau au taux d’humidité de s’uniformiser
partout dans la résidence.
6. Une fois les 3 jours écoulés en utilisant le nouveau réglage, mesurer de nouveau le taux d’humidité à l’aide d’un
hygromètre ou évaluer le niveau de confort associé au taux d’humidité dans la résidence.
7. Si l’humidité est plus basse, revenir au réglage précédent. Ce réglage correspond probablement à la capacité
maximale de
8. Si le taux d’humidité n’a pas diminué, reprendre les étapes 3 et 4 jusqu’à l’obtention du réglage optimal.
l’humidi cateur pour ce qui est de l’économie d’eau.
Figure 4
OFF
ON
OFF OFF OFF OFF
TABLE A RÉGLAGES RECOMMANDÉS DU COMMUTATEUR DIP
Modèle
CHAUDE FROIDE
Réglage
GeneralAire
SL16 5 3
1042 / 1042WSC 5 3
1099LHS 5 4
570 / 570WSC 5 3
900 / 900WSC 5 3
Modèle
Honeywell
HE220 5 4
HE240 5 4
HE260 5 4
HE265 5 4
HE280 5 4
CHAUDE FROIDE
Réglage
Modèle
CHAUDE FROIDE
Réglage
Skuttlle
Lennox
SK 2000 5 4
SK 2001 5 4
SK 2002 5 4
HCWB3-12 5 4
HCWB3-17 5 4
Modèle
CHAUDE FROIDE
Réglage
Goodman
Desert Springs
HE12A / 12M 5 3
HE17A / 17M 5 3
HE12MB 5 3
HE17MB 5 3
DS-PFT 6 5
Modèle
CHAUDE FROIDE
Aprilaire
White Rogers
AA 500 5 4
AA 600 5 4
AA 700 5 4
HFT2100 5 4
HFT2700 5 4
VI. Garantie Limitée
Votre WaterSavor
compter de la date d’installation. Article défectueux est remplacés sans frais à l’exception des frais de déménagement, de réinstallation et de
transport. Pour obtenir un de remplacement en vertu de la présente garantie limitée, le consommateur doit envoyer l’appareil défectueux au
fabricant. Le fabricant n’assume aucune responsabilité dans le cadre de l’installation ou l’utilisation de ce produit, sauf comme indiqué dans
la présente garantie limitée. Le fabricant en aucun cas sera responsable des dommages accessoires ou indirects.
Pour le Support technique
Il est possible d’enregistrer votre produit en ligne à l’adresse www.cgfproducts.com or ou de remplir le formulaire
RENSEIGNEMENTS SUR LE PRODUIT:
N° de série: ______________________________________________________________
Modèle: _________________________________________________________________
Date d’installation : Mois _______________ Jour ______________ Année _____________
RENSEIGNEMENTS SUR LE PROPRIÉTAIRE:
Nom: ____________________________________________________________________
Adresse : __________________________________________________________________
Adresse 2 : ________________________________________________________________
Ville : ______________________ Province/État : ___________ Code postal : ____________
Téléphone : ________________________________________________________________
Courriel : __________________________________________________________________
BON DE GARANTIE
Renseignements sur l’entrepreneur :
Nom de l’entrepreneur : _______________________________________________________
Adresse : __________________________________________________________________
Adresse 2 : _________________________________________________________________
Ville : ____________________ Province/état : __________ Code postal :________________
Téléphone de l’entrepreneur : __________________________________________________
Courriel de l’entrepreneur : _____________________________________________________
FORM NO. WSC_06_REV_B - Engineering / Files / Released / Manuals
2
(3-2015; JPF; InDesign)
MC
Controller est garanti au consommateur contre tout vice de matériau ou de fabrication pendant une période d’un an à
ci-dessous et de nous faire parvenir la section à découper par courrier à une des adresses mentionnées.
Découper le long du pointillé. Veuillez fournir tous les renseignements demandés.
Canada: GF-WSAVOR
USA: GFI #7081
Manufacturers of Whole House Residential Indoor Air Quality Products.
Humidifi ers - Dehumidifi ers - Air Cleaners - UV Air Purifi ers - Heat/Energy Recovery Ventilators
Register Online:
www.cgfproducts.com/Warranty Registration
Expédier le formulaire à l’adresse:
CONSOMMATEURS CANADIANS:
Canadian General Filters ltée
Au soin de : Warranty Department
400, chemin Midwest
Toronto (Ontario) M1P 3A9
www.CGFProducts.com
Saus Frais (888) 216-9184
CONSOMMATEURS AMERICANS:
General Filters, Inc
Attn: Warranty Dept.
43800 Grand River Ave.
Novi, MI 48375
www.GeneralAire.com
Saus Frais (866) 476-5101
Réglage
 Loading...