

Page 1

AUDIBLE/VISUAL
NON-CONTACT
VOLTAGE TESTER
WITH ADJUSTABLE
SENSITIVITY
USER’S MANUAL
VS4000
Please read this manual carefully and thoroughly before using this product.
Page 2

TABLE OF CONTENTS
Introduction . . . . . . . . . . . . . . . . . . . . . . . . . . 3 –4
Key Features . . . . . . . . . . . . . . . . . . . . . . . . . . . . . 5
Safety Instructions . . . . . . . . . . . . . . . . . . . . . 5 –6
Product Overview . . . . . . . . . . . . . . . . . . . . . . . . . 7
Setup Instructions . . . . . . . . . . . . . . . . . . . . . . . . 8
Install Batteries . . . . . . . . . . . . . . . . . . . . . . . . 8
Operating Instructions . . . . . . . . . . . . . . . . . . 8 –9
Specifications . . . . . . . . . . . . . . . . . . . . . . . . . . . . 9
Warranty Information . . . . . . . . . . . . . . . . . . . . . 10
Return for Repair Policy . . . . . . . . . . . . . . . . . . . 11
Guide de L'Utilisateur . . . . . . . . . . . . . . . . 13 – 24
2
Page 3

INTRODUCTION
Thank you for purchasing General Tools & Instruments’
(General’s) VS4000 Audible/Visual Non-contact Voltage
Detector with Adjustable Sensitivity. Please read this manual
carefully and thoroughly before using the product.
The VS4000 provides a safe (non-contact) way to check
whether an electric line or cable or AC outlet is “hot”
(energized). It does so by sensing from a short distance the
electromagnetic field created by AC voltage.
Even unloaded AC circuits generate electromagnetic fields.
Although these fields are extremely weak, their constantly
changing nature means that they generate some current.
A sensitive non-contact voltage detector can sense this
current via induction, in much the same way that a sensitive
radio receiver can sense weak radio waves.
Non-contact voltage (NCV) detectors, including the VS4000,
cannot detect DC voltages, such as those found in automotive
electrical systems. Like other NCV units, the VS4000 also
cannot detect AC voltage through a wall or metal conduit.
3
Page 4

Unlike the typical NCV detector, the VS4000 has adjustable
sensitivity—a feature that makes it possible to determine
which wire in a bundle is the “hot” wire. This application calls
for turning down the sensitivity in stages after the VS4000
senses voltage. As you reduce sensitivity, at some stage only
the energized wire will produce a field strong enough to
activate the audible and visual alarms from a short distance.
In this way, the VS4000’s adjustable sensitivity takes the
guesswork out of identifying the “hot” wire of a bundle.
The VS4000 also has a wider detection range (5 to 1000VAC)
than the typical NCV unit. The ability to detect the presence of
12VAC in non-contact fashion is particularly useful during
troubleshooting of hardwired process plant and industrial
automation systems and equipment such as gas and water
valves, fans, lights, relays, inverters, solenoids and horns.
12VAC is also commonly used to power hardwired
commercial and residential building doorbells/buzzers and
thermostats. Separately, the VS4000’s ability to detect 480V
using its lowest sensitivity setting makes troubleshooting and
installing generators and fluorescent lighting ballasts easier,
faster and safer.
4
Page 5

KEY FEATURES
• Redundant indications (beeper sounds and red LED
flashes rapidly) when voltage is detected
• Adjustable sensitivity
• 5 to 1000VAC detection range
• Safe for CAT IV 1000V use
• Pocket clip
• ETL approved
• Powered by (2) “AAA” batteries
SAFETY INSTRUCTIONS
•
WARNING
•
• You must confirm that the batteries powering the VS4000
are not weak or dead before you use the unit to test for the
presence of AC voltage. It is essential that you do this
each time you use the instrument.
The usual way to check the batteries is to insert the blade
tip (Fig. 1, Callout 1) into both slots of a 110VAC outlet
known to be energized with the VS4000’s sensitivity set to
maximum. If the beeper does not sound and the LED does
not light for either slot, replace both “AAA” batteries before
proceeding. Another simple way to check for live batteries
is to briskly rub the tip of the unit through your hair with
sensitivity maximized; static electricity has more than
enough voltage to activate the beeper and LED.
• Remember to move the power switch of the VS4000 to the
OFF position after you have finished using the unit. This is a
safety instruction because leaving the instrument powered
5
Page 6

on (in standby) will drain the batteries over time. The same
red LED used to indicate detected voltage will flash slowly
and continuously in standby mode to remind you to turn off
the VS4000. If you still forget to power off the unit, and fail
to confirm that the batteries are charged the next time you
use it, you risk your safety on the results of a test that the
VS4000 may be unable to perform.
• To avoid electric shock, do not operate the unit without the
battery compartment cover in place.
• Physically separate the multiple lines of 2-phase and
3-phase circuits before testing them.
• Do not use the VS4000 if it appears to be damaged or
malfunctioning.
• Do not expose the tester to temperatures above 104°F
(40°C), relative humidity greater than 85%, or voltages
higher than 1000V.
• Do not use the VS4000 to test for the presence of DC
voltage.
• Do not use the unit to test for the presence of AC voltage on
a shielded conductor, behind a wall or conduit, or under
soil.
• Keep your hand behind the finger guard (Fig. 1, Callout 3)
when performing a test. Never touch any conductor with
your hand or skin until you have confirmed that it is not
“hot”. Whenever you have reason to believe that a line or
outlet is “hot”, measure its voltage with a multimeter or
clamp meter.
6
Page 7
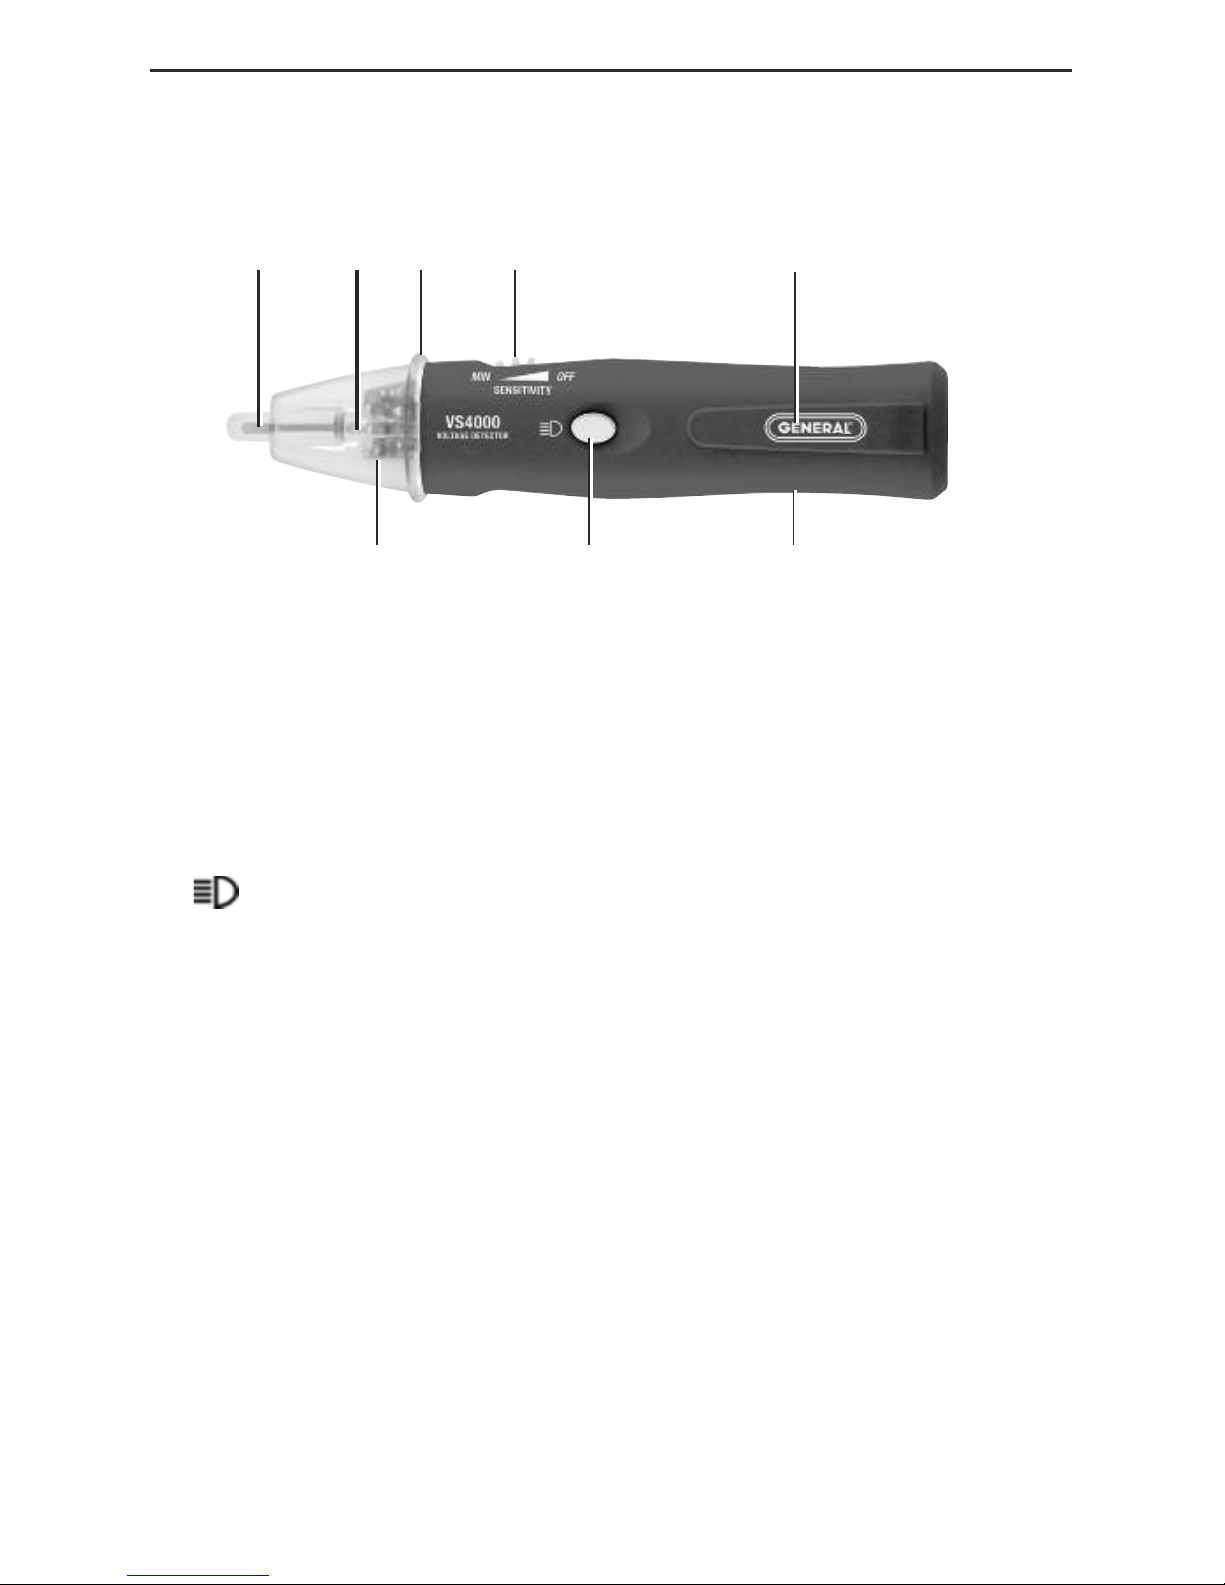
PRODUCT OVERVIEW
Fig. 1 below shows the controls, indicators and key
components of the VS4000.
Fig. 1
1. Blade tip
2. White LED work light
3. Finger guard
4. Power switch/sensitivity control thumbwheel
5. Pocket clip
6. Work light on button
7. Red LED. Flashes twice every 2-1/2 seconds to indicate
unit remains powered on. Flashes multiple times per
second when AC voltage is detected.
8. Battery compartment (on back)
7
5
4
3
7
6 8
1 2
Page 8

SETUP INSTRUCTIONS
INSTALL BATTERIES
1. Prepare to open the battery compartment (Fig. 1, Callout 8)
by rotating the unit 180° so its back is facing you.
2. Place your right thumb on the raised III왘 icon near the
center of the back and move it to the right to slide the
battery compartment cover away from the unit.
3. Install two “AAA” batteries in series in the battery
compartment by observing the polarity marks stenciled
inside it.
4. Close the battery compartment by sliding the cover back
into its original position until the flange snaps it shut.
OPERATING INSTRUCTIONS
To check the charge of the batteries, power on the VS4000
by slowly rotating the power switch forward out of the OFF
position until it just clicks. As the SENSITIVITY label below
the switch indicates, in this position the NCV detector is
operating at its highest sensitivity. Rotating the thumbwheel
further forward decreases sensitivity. When the thumbwheel
cannot be moved further forward, the detector’s sensitivity is
at its lowest level (as indicated by the MIN label).
With the sensitivity set to maximum, insert the blade tip
(Fig. 1, Callout 1) into both slots of an AC outlet known to be
energized (left figure above). If the batteries are adequately
charged, the beeper will sound and the red LED near the
blade tip (Fig. 1, Callout 7) will flash rapidly when the tip is in
one of the slots.
8
Page 9

To detect the presence of AC voltage on a line or cable,
turn on the VS4000, set its sensitivity to maximum, and
position its tip close to or touching the line or cable. If the
beeper sounds and the red LED flashes rapidly, the line or
cable is “hot” (energized). If you do not get both positive
indications, touch the tip to the line or cable (right figure
above). If the beeper sounds and the red LED flashes, the line
or cable is “hot” (energized). If you still do not get positive
indications, the line or cable is de-energized.
To turn on the white LED work light (Fig. 1, Callout 2), press
and hold the button (Fig. 1, Callout 6). To extinguish the
light, release the button.
SPECIFICATIONS
Voltage Detection Range 5 to 1000VAC @ 50 to 400Hz
Operating Temperature 32° to 104°F (0° to 40°C) @ <85% RH
Dimensions 6.1 x 1.3 x 1.1 in. (154 x 32 x 28mm)
Weight (with batteries) 1.8 oz. (55g), including batteries
Power Source 2 “AAA” batteries (included)
9
Page 10

WARRANTY INFORMATION
General Tools & Instruments’ (General’s) VS4000
Audible/Visual Non-contact Voltage Tester with Adjustable
Sensitivity is warranted to the original purchaser to be free
from defects in material and workmanship for a period of one
year. Subject to certain restrictions, General will repair or
replace this instrument if, after examination, the company
determines it to be defective in material or workmanship.
The warranty period begins on the date of purchase. You are
encouraged to register your product online. General will
extend your warranty an additional 60 days if you register
at www.generaltools.com/ProductRegistry.
This warranty does not apply to damages that General
determines to be from an attempted repair by non-authorized
personnel or misuse, alterations, normal wear and tear, or
accidental damage. The defective unit must be returned to
General Tools & Instruments or to a General-authorized
service center, freight prepaid and insured.
Acceptance of the exclusive repair and replacement remedies
described herein is a condition of the contract for purchase of
this product. In no event shall General be liable for any
incidental, special, consequential or punitive damages, or for
any cost, attorneys’ fees, expenses, or losses alleged to be a
consequence of any damage due to failure of, or defect in any
product including, but not limited to, any claims for loss of
profits.
Register now at www.generaltools.com/ProductRegistry to
receive a 60-day extension to your warranty.
10
Page 11

RETURN FOR REPAIR POLICY
Every effort has been made to provide you with a reliable
product of superior quality. However, in the event your
instrument requires repair, please contact our Customer
Service to obtain an RGA (Return Goods Authorization)
number before forwarding the unit via prepaid freight to the
attention of our Service Center at this address:
General Tools & Instruments
75 Seaview Drive
Secaucus, NJ 07094
212-431-6100
Remember to include a copy of your proof of purchase, your
return address, and your phone number and/or e-mail
address.
11
Page 12

GENERAL TOOLS & INSTRUMENTS
75 Seaview Drive
Secaucus, NJ 07094-1806
PHONE (212) 431-6100
FAX (212) 431-6499
TOLL FREE (800) 697-8665
e-mail: sales@generaltools.com
www.generaltools.com
VS4000 User’s Manual
Specifications subject to change without notice
NOTICE - NOT RESPONSIBLE FOR TYPOGRAPHICAL ERRORS.
©2015 GENERAL TOOLS & INSTRUMENTS
MAN# VS4000
5/27/15
General Tools & Instruments
GeneralToolsNYC
Page 13

13
TESTEUR DE TENSION
SANS CONTACT
AUDIBLE/VISUEL AVEC
SENSIBILITÉ RÉGLABLE
MANUEL DE L'UTILISATEUR
VS4000
Veuillez lire ce manuel soigneusement et à fond avant d'utiliser ce produit.
Page 14

TABLE DES MATIÈRES
Introduction . . . . . . . . . . . . . . . . . . . . . . . . 14 – 15
Caractéristiques clés . . . . . . . . . . . . . . . . . . . . . 16
Instructions de sécurité . . . . . . . . . . . . . . 16 – 17
Aperçu du produit . . . . . . . . . . . . . . . . . . . . . . . 18
Instructions de configuration . . . . . . . . . . . . . . 19
Installer les piles . . . . . . . . . . . . . . . . . . . . . 19
Instructions de fonctionnement . . . . . . . . 19 – 20
Spécifications . . . . . . . . . . . . . . . . . . . . . . . . . . 21
Information sur la garantie . . . . . . . . . . . . 21 – 22
Retour pour la politique de réparation . . . . . . . 22
INTRODUCTION
Merci de votre achat du VS4000 Testeur de tension sans
contact audible/visuel avec sensibilité réglable de General
Tools & Instruments. Veuillez lire ce manuel soigneusement
et à fond avant d'utiliser le produit.
Le VS4000 offre une façon sécuritaire (sans contact) de
vérifier si une ligne ou un câble électrique ou une prise c.a.
est « chaude » (sous tension). Il effectue cela en détectant
d'une courte distance le champ électromagnétique créé par
la tension c.a.
Même les circuits c.a. déchargés génèrent des champs
électromagnétiques. Bien que ces champs soient
extrêmement faibles, leur nature changeante constante
signifient qu'ils génèrent un certain courant. Un détecteur de
tension sans contact sensible peut détecter ce courant via
14
Page 15

induction, de la même façon qu'un récepteur radio sensible
peut détecter des ondes radio faibles.
Les détecteurs de tension sans contact (NCV), incluant le
VS4000, ne peuvent détecter les tensions CC, comme ceux
trouvés dans les systèmes électriques automobiles. Comme
les autres unités NCV, le VS4000 n'est également pas en
mesure de détecter la tension c.a. à travers un mur ou un
conduit métallique.
Au contraire du détecteur NVC typique, le VS4000 possède
une sensibilité réglable : une option qui rend possible de
déterminer quel fil dans un faisceau de fils est le fil
« alimenté ». Cette application demande d'abaisser la
sensibilité en étapes après que le VS4000 détecte la tension.
Alors que vous réduisez la sensibilité, à seulement un certain
point, le fil alimenté produira un champ assez fort pour activer
les alarmes audibles et visuels d'une courte distance. De cette
façon, la sensibilité réglable du VS4000 enlève le besoin
d'identifier le fil « alimenté » d'un faisceau de fils.
Le VS4000 a une portée de détection plus grande (5 à
1 000 VCA) que l'unité typique NCV. La capacité de détecter
la présence de 12 VCA de manière sans contact est
particulièrement utile lors du dépannage d'usines de
traitement câblés et de systèmes automobiles industriels et
de l'équipement comme les valves de gaz et d'eau, les
ventilateurs, l'éclairage, les relais, les inverseurs, les
solénoïdes et les klaxons. Le 12 VCA est habituellement
utilisé pour alimenté les thermostats et les
sonnettes/avertisseurs de bâtiments commerciaux et
résidentiels câblés. De manière séparée, la capacité du
VS4000 de détecter le 480 V grâce à sa plus faible
configuration de sensibilité rend le dépannage et l'installation
de générateurs et de ballasts d'éclairage fluorescents plus
facile, plus rapide et plus sécuritaire.
15
Page 16

CARACTÉRISTIQUES CLÉS
• Indications redondantes (le signal sonore se fait entendre et
la DEL rouge clignote rapidement) lorsque la tension est
détectée
• Sensibilité réglable • Plage de détection de 5 à 1 000 VCA
• Sécuritaire pour utilisation à 1 000 V CAT IV
• Attache pour la poche • Approuvé ETL
• Alimenté par deux (2) piles « AAA »
INSTRUCTIONS DE SÉCURITÉ
•
AVERTISSEMENT
•
• Vous devez confirmer que les piles alimentant le VS4000 ne
sont pas faibles ou mortes avant que vous utilisiez l'unité pour
tester la présence de la tension c.a. Il est essentiel que vous
faites cela chaque fois que vous utilisez l'instrument.
La façon habituelle de vérifier les piles est d'insérer la
pointe de la lame (Fig. 1, Référence 1) dans les deux fentes
d'une prise 110 VCA connue pour être alimentée avec la
sensibilité du VS4000 configurée au maximum. Si
l'avertisseur n'émet pas de signal sonore et que la DEL ne
s'allume pas pour une fente ou l'autre, remplacez les deux
piles « AAA » avant de poursuivre. Une autre façon simple
de vérifier des batteries sous tension est de frotter vivement
la pointe de l'unité dans vos cheveux avec la sensibilité au
maximum; l'électricité statique a plus qu'assez de tension
pour activer la sonnerie et la DEL.
• Souvenez-vous de déplacer le commutateur de
l'alimentation du VS4000 à la position OFF (éteindre) une
fois que vous avez terminé d'utiliser l'unité. C'est une
16
Page 17

instruction de sécurité car laisser l'instrument sous tension
(en mode attente) videra les piles au fil du temps.
La même DEL rouge utilisée pour indiquer la tension
détectée clignotera lentement et de manière continue en
mode attente pour vous rappeler d'éteindre le VS4000. Si,
malgré cela, vous oubliez d'éteindre l'appareil, et ne
confirmez pas que les piles sont rechargées la prochaine
fois que vous utilisez l'appareil, vous mettez en risque votre
sécurité sur les résultats d'un test que le VS4000 pourrait
être incapable d'effectuer.
• Pour éviter un choc électrique, n'utilisez pas l'appareil sans
que le couvercle du compartiment de la pile ne soit en place.
• Séparez physiquement les lignes multiples des circuits
2 phases et 3 phases avant de les tester.
• N'utilisez pas le VS4000 s'il semble endommagé ou en
mauvais fonctionnement.
• N'exposez pas le testeur à des températures supérieures à
40 °C, à une humidité relative supérieure à 85 %, ou à des
tensions supérieures à 1 000 V.
• N'utilisez pas le VS4000 pour tester la présence d'une
tension CC.
• N'utilisez pas l'appareil pour tester la présence d'une
tension c.a. sur un conducteur blindé, derrière un mur ou
une conduite, ou sous le sol.
• Conservez votre main derrière le protège-doigts (Fig. 1,
Référence 3) lorsque vous effectuez un test. Ne touchez
jamais tout conducteur avec votre main ou la peau nue à
moins que vous n'ayez confirmé que le conducteur ne soit
pas « sous tension ». Si vous avez raison de croire qu'une
ligne ou une sortie est « sous tension », mesurez sa tension
avec un multimètre ou une pince multimètre.
17
Page 18

APERÇU DU PRODUIT
La Fig.1 ci-dessous montre les commandes, les indicateurs et
les composants clés du VS4000.
Fig. 1
1. Pointe de la lame
2. Témoin de travail DEL blanche
3. Protège-doigts
4.
Molette de contrôle du commutateur d'alimentation/sensibilité
5. Attache pour la poche
6. Témoin de travail sur le bouton
7. DEL rouge. Clignote deux fois chaque 2,5 secondes pour
indiquer que l'appareil demeure en marche. Clignote
plusieurs fois par seconde lorsque la tension c.a. est
détectée.
8. Compartiment de la pile (à l'endos)
18
5
4
3
7
6 8
1 2
Page 19

INSTRUCTIONS DE CONFIGURATION
INSTALLER LES PILES
1. Préparez l'ouverture du compartiment de la pile (Fig. 1,
Référence 8) en tournant l'unité de 180° de façon à ce que
son endos vous fait face.
2. Mettez votre pouce droit sur le III왘 icon levé près du
centre de l'endos et déplacez-le vers la droite pour glisser
le couvercle du compartiment des piles loin de l'unité.
3. Installez deux piles « AAA » en série dans le compartiment
des piles en observant les marques de polarité indiquées à
l'intérieur.
4. Fermez le compartiment des piles en glissant le couvercle
en sa position originale jusqu'à ce que le rebord
s'encliquete de manière fermée.
INSTRUCTIONS DE
FONCTIONNEMENT
Pour vérifier la charge des piles, mettez en marche le VS4000
en tournant lentement le commutateur de l'alimentation vers
l'avant et en vous éloignant de la position OFF (éteindre)
jusqu'à ce qu'il produise un déclic. Comme l'étiquette de
SENSITIVITY (sensibilité) dessous le commutateur indique,
dans cette position, le détecteur NCV fonctionne à sa
sensibilité la plus élevée. Tourner davantage la molette vers
l'avant diminue la sensibilité. Lorsque la molette ne peut plus
être déplacée vers l'avant, la sensibilité du détecteur est à
son niveau le plus bas (comme indiquée par l'étiquette MIN).
Avec la sensibilité configurée au maximum, insérez la pointe
de la lame (Fig. 1, Référence 1) dans les deux fentes d'une
prise c.a. connue pour être sous tension (figure gauche
19
Page 20

ci-dessus). Si les piles sont chargées de manière adéquate,
l'indicateur sonore émettra un bruit et la DEL rouge près de la
pointe de la lame (Fig. 1, Référence 7) clignotera rapidement
lorsque la pointe est dans l'une des fentes.
Pour détecter la présence d'une tension c.a. sur une ligne
ou un câble, allumez le VS4000, configurez sa sensibilité à
maximale, et positionnez sa pointe près de ou touchant la
ligne ou le câble. Si l'indicateur sonore émet un bruit et que
la DEL rouge clignote rapidement, la ligne ou le câble est «
sous tension » (alimenté). Si vous n'obtenez pas les deux
indications positives, touchez la pointe à la ligne ou au câble
(figure à droite ci-dessus.) Si l'indicateur sonore émet un
bruit et que la DEL rouge clignote, la ligne ou le câble est «
sous tension » (alimenté). Si vous n'obtenez toujours pas
d'indications positives, la ligne ou le câble est hors-tension
(non alimenté).
Pour allumer le témoin de travail de DEL blanche (Fig. 1,
Référence 2), appuyez et maintenez le bouton (Fig. 1,
Référence 6). Pour éteindre le témoin lumineux, relâchez le
bouton.
20
Page 21

SPECIFICATIONS
Plage de détection de la tension 5 à 1 000 VCA @ 50 à 400 Hz
Température de fonctionnement 0 ° à 40 °C @ <85 % H.R.
Dimensions 154 x 32 x 28 mm
Poids 55 g, incluant les piles
Source électrique 2 piles « AAA » (incluses)
INFORMATION SUR LA GARANTIE
Le VS4000 Testeur de tension sans contact audible/visuel
avec sensibilité réglable de General Tools & Instruments
(General) est garanti à l'acheteur original être libre de défauts
dans le matériel et la main-d'oeuvre pour une période d'un
an. Sujet à certaines restrictions, General réparera ou
remplacera cet instrument si, après examen, la société
détermine que l'appareil est défectueux dans le matériel
ou la main-d'oeuvre.
La période de garantie débute à la date d'achat. Vous
êtes encouragé à enregistrer votre produit en ligne.
General prolongera votre garantie pour 60 jours
supplémentaires si vous vous enregistrez au :
www.generaltools.com/ProductRegistry.
Cette garantie ne s'applique pas aux dommages que General
détermine être d'un essai de réparations par du personnel
non autorisé ou une mauvaise utilisation, des modifications,
l'usure normale ou des dommages accidentels. L'unité
défectueuse doit être retournée à General Tools & Instruments
ou à un centre de service autorisé de General, port prépayé et
assuré.
21
Page 22

L'acceptation de la réparation exclusive et des recours de
remplacement décrits dans les présentes est une condition
du contrat pour l'achat de ce produit. En aucun cas General
ne sera tenu pour responsable pour les dommages
accidentels, spéciaux, indirects ou punitifs, ou pour tout frais,
honoraire d'avocats, dépense ou pertes présumées être une
conséquence de tout dommage provoqué par une défaillance
de, ou un défaut dans tout produit incluant, mais non limité à,
toute réclamation pour perte de profits.
Enregistrez-vous maintenant à
www.generaltools.com/ProductRegistry pour recevoir un
prolongement de 60 jours à votre garantie.
RETOUR POUR LA POLITIQUE
DE RÉPARATION
Tous les efforts ont été effectués pour vous offrir un produit
fiable d'une qualité supérieure. Cependant, dans le cas où
votre instrument demande une réparation, veuillez contacter
notre Service à la clientèle pour obtenir un numéro ARM
(Autorisation de retour de marchandise) avant d'envoyer
l'unité frais prépayé à l'attention de notre Centre de service
à cette adresse :
General Tools & Instruments
75 Seaview Drive
Secaucus, NJ 07094, États-Unis
212-431-6100
N’oubliez pas d'inclure une copie de votre preuve d'achat,
votre adresse de retour et votre numéro de téléphone et/ou
courriel.
22
Page 23

NOTES
____________________________________________
____________________________________________
____________________________________________
____________________________________________
____________________________________________
____________________________________________
____________________________________________
____________________________________________
____________________________________________
____________________________________________
____________________________________________
____________________________________________
____________________________________________
____________________________________________
____________________________________________
____________________________________________
____________________________________________
23
Page 24

GENERAL TOOLS & INSTRUMENTS
75 Seaview Drive
Secaucus, NJ 07094-1806
, États-Unis
Téléphone : 212 431-6100
Télécopie : (212) 431-6499
SANS FRAIS : (800) 697-8665
courriel : sales@generaltools.com
www.generaltools.com
Manuel de l'utilisateur du VS4000
Les spécifications sont sujettes à changement sans préavis
AVIS - NOUS NE SOMMES PAS RESPONSBLES DES ERREURS TYPOGRAPHIQUES.
©2015 GENERAL TOOLS & INSTRUMENTS
MAN NoVS4000
27/5/2015
General Tools & Instruments
GeneralToolsNYC
 Loading...