

Page 1

OWNER'S MANUAL FOR
MODEL "SM 12"
USE AND CARE OF YOUR
ELECTRIC FOOD SLICER
General Slicing/Red Goat Disposers
1152 Park Avenue P.O. Box 428
Murfreesboro, Tennessee 37133-0428 • (615)893-4820
Page 2
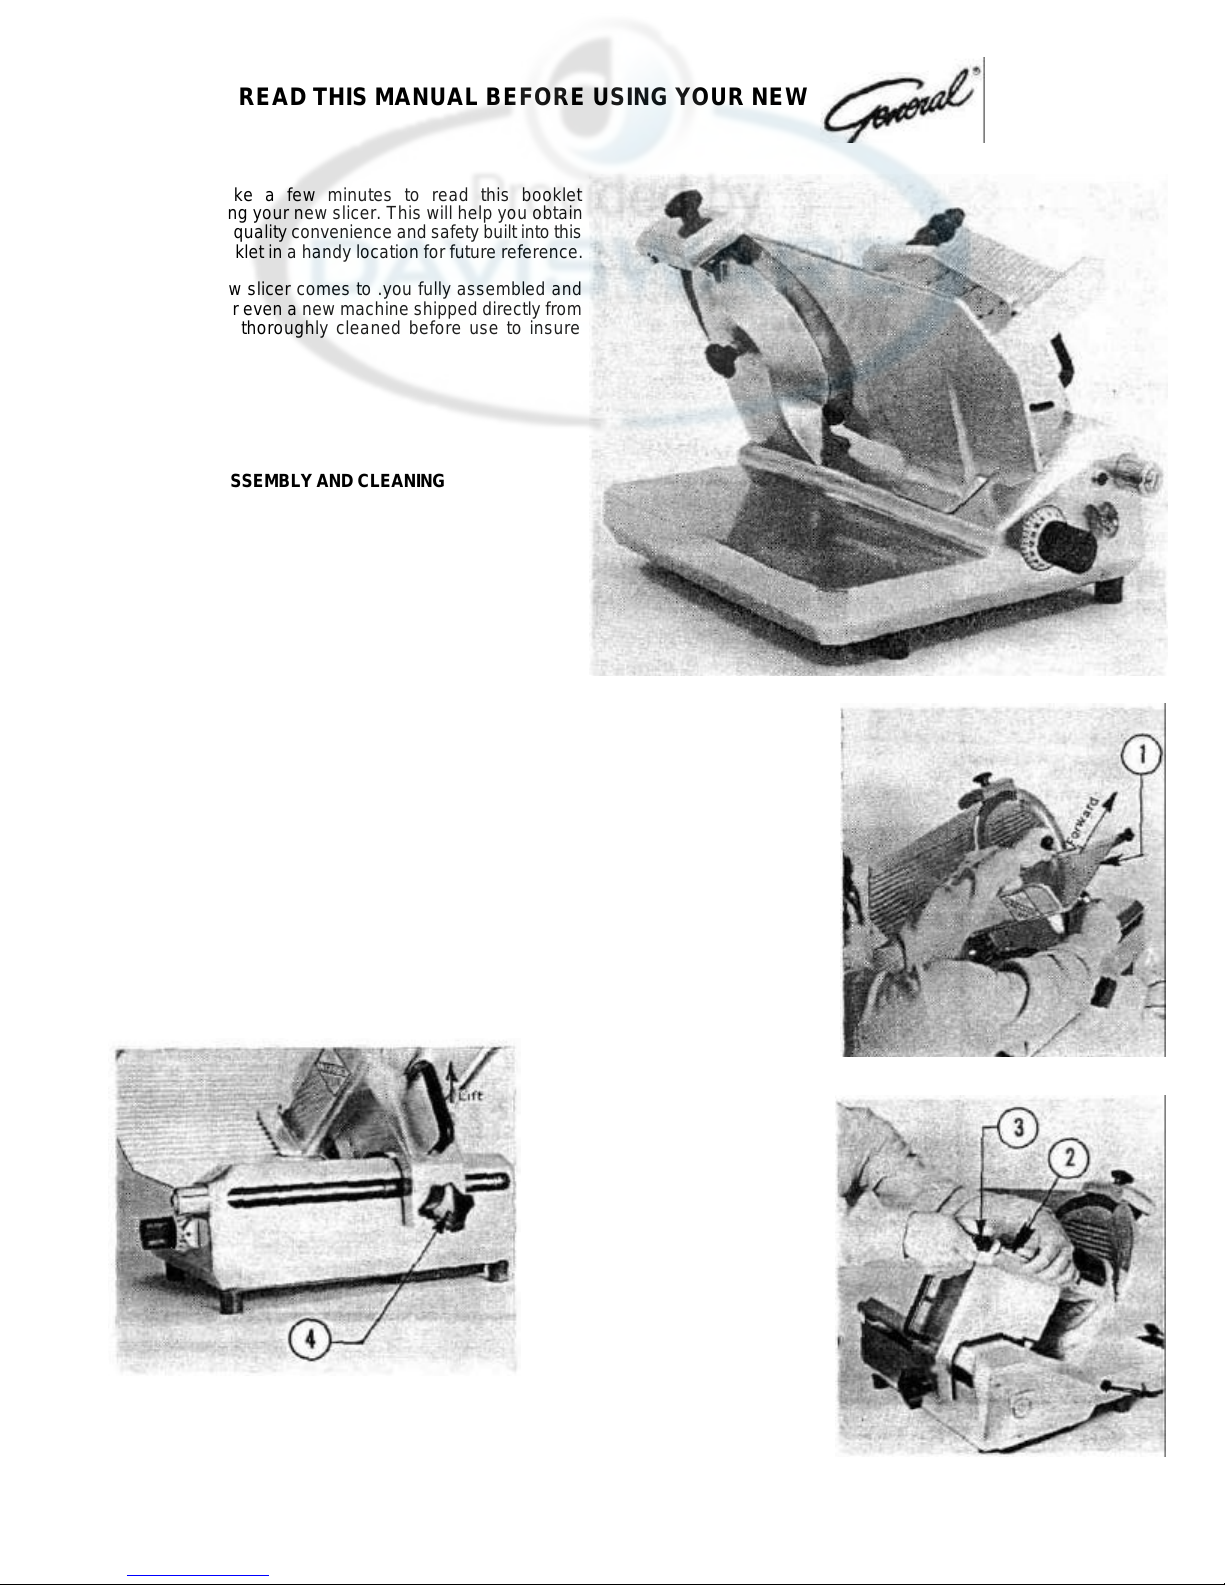
FIG. 1 FIG. 2
FIG. 3
IMPORTANT! READ THIS MANUAL BEFORE USING YOUR NEW SLICER
It is important to take a few minutes to read this booklet
thoroughly before using your new slicer. This will help you obtain
the full benefits of the quality convenience and safety built into this
product. Keep this booklet in a handy location for future reference.
ASSEMBLY: Your new slicer comes to .you fully assembled and
ready for use, however even a new machine shipped directly from
the factory should be thoroughly cleaned before use to insure
sanitary conditions.
DISASSEMBLY AND CLEANING
CAUTION: BE SURE THE SLICER IS UNPLUGGED AND THE
REGULATOR KNOB IS SET AT "0" BEFORE CLEANING OR
HANDLING.
REMOVING FOOD PUSHER
1. Set thickness regulator knob to "0" position.
2. Slide platform ( 1) to extreme forward position (fig. 1 )
3. While holding food pusher shaft (2) turn lock knob (3)
counterclockwise and remove, (fig. 2)
PLATFORM REMOVAL
1. Loosen knob (4) counterclockwise about one turn. (removal
of knob not necessary), (fig. 3)
2. Grasp platform and pull straight up. (fig. 3)
Page 3

FIG. 4
FIG. 5
FIG. 6
FIG. 7
REMOVING KNIFE SHARPENER
CAUTION: EXTREME CARE SHOULD BE USED
WHEN REMOVING SHARPENER AS THIS WILL
LEAVE A PORTION OF THE BLADE EXPOSED.
1. Grasp knife sharpener (5) by knob (fig. 4).
2. Pull straight up as far as possible. DO NOT LOOSEN
KNOB FROM SHARPENER. Turn clock wise one
quarter of a turn and pull sharpener up and away from
sheer (fig. 5).
REMOVAL OF KNIFE COVER
1. If platform is mounted on slicer slide it to the
extreme rear position away from knife.
2. While holding cover ( 6 ) loosen and remove lock ing
knob (7) by turning it counterclockwise (fig. 6-7).
3. Push threaded stud in and remove cover.
Page 4

REMOVAL OF KNIFE
IMPORTANT: Extreme caution must be used when
FIG.
8
USING YOUR NEW SLICER
FIG. 9
FIG.
10
removing blade. Your SM-12 knife comes to
you razor sharp and thus may cause severe
injury unless proper care is exercised.
1. Knife cannot be removed unless sharpener is removed
first. (See removal of blade sharpener.)
2. Remove cover as described above.
3. Using a standard screwdriver, loosen and remove three
mounting screws. (fig. 8).
4. Carefully, remove knife.
This "Warning" label
is affixed to your
unit. Do Not Remove.
Your slicer motor is designed to be used on 110-120
volts, 60 cycle as indicated on the nameplate.
Be sure the voltage is the same before plugging into
outlet.
1. Place food on platform (1) (fig. 10).
2. Set regulator knob for desired slice thickness and start
slicer. (If your slicer is equipped with the regulator knob
"shut-off" option, the motor can be turned "on" or "off" with
the use of the regulator knob while toggle switch is in "on"
position. Always turn toggle switch to "OFF" position when
slicer is not in use.)
3. Using platform reciprocating handle (8) move platform (1)
back and forth for every slice. NOTE:
push platform far enough forward to complete the slice,
then pull back until the food being cut clears the cutting
edge of the knife (fig. 10).
Your electric slicer is gravity fed and, therefore, it does not
require use of the Food Pusher. However, use of the food
pusher is important to prevent personal injury, particularly
when slicing small pieces of food. As a rule —
ALWAYS USE FOOD PUSHER. (9) NEVER
FEED FOOD BY HAND (fig. 6.).
Page 5

FIG.
12 FIG.
13
LUBRICATION AND MAINTENANCE
Your new slicer will offer years of maintenance free operation
with proper care and use. Your motor needs no lubrication. To
insure continued smooth operation, the platform guide rod
should be lubricated about every two months by applying about
ten drops of lightweight oil Item (12) fig. 13.
CLEANING
Do not immerse assembled slicer or base assembly in water. Keep
spray cleaners and running water away from switch area, pully/belt
cover and motor mounting/housing area. Do not use abrasive
cleaners.
1. Wash base with hot soapy water and dry thoroughly.
2. Clean all remaining parts with hot soapy water and dry.
3. When cleaning sharpener be sure stone and deburrer plate is free
of grease and dry thoroughly.
FIG. 11
Page 6

General Slicing / Red Goat Disposers
from original position) and push
In this position, Cap sharpener down slightly until pink stone makes firm contact with knife at the
seconds. Be sure pink stone is rotating. If not,
off" burr
on front edge of knife. Be sure that blue/gray stone is rotating. If not, shut off slicer, remove
down on shaft and
SHARPENING THE KNIFE (SUPPLEMENT)
FOR
MODEL SM-12A SLICER
1. SHUT OFF and unplug slicer.
2. Turn regulator knob to Zero ("O").
3. Clean knife with hot soapy water. (See disassembly instructions, Page 2)
4. PULL UP (DO NOT TURN) sharpener using black knob. (Fig.11).
5. Rotate sharpener clockwise ¼ turn and remove (lift straight up) from shaft.
6. Inspect sharpener stones to be:
a. Free of cracks or chips; if cracked or broken replace stones.
b. Clean; no grease or food.
c. Both stones rotate and move back and forth freely against springs.
7. If sharpener stones need cleaning, use provided brass brush, wash in hot soapy water and dry.
Set sharpener back on shaft and rotate further clockwise (180°
8.
down until stones touch knife. (Fig.12)
9.
pre-set angle. (Fig. 12)
10. Plug-in and turn on slicer, KEEPING HANDS AND FINGERS AWAY FROM KNIFE.
Let pink stone grind knife for approximately 5
11.
shut off slicer, remove sharpener and lubricate stone shaft with provided oil.
Push-in on deburring (blue/gray) stone knob (No. 11, Fig. 12) for 2-3 seconds to "knock-
12.
13. When sharpening is complete, shut off slicer while stones are in sharpening position.
14. Remove sharpener by pulling up on black knob and rotating it ¼ turn counter-clockwise.
15. ALWAYS SHUT-OFF slicer when inspecting knife cutting edge.
16. CAUTION: NEVER TOUCH rotating knife; will cause severe cuts to fingers and hands.
17. Clean off filings from knife, sharpener and slicer surfaces.
18. Replace sharpener to its storage position by:
a. Hold in position as shown in Fig. 5, page 3.
b. Set sharpener on to shaft and rotate counterclockwise until sharpener slides-
into storage position.
Page 7

SLICER MAINTENANCE: Model SM-12A
CLEANING:
Unplug slicer before disassembling
*
* Read owner's manual for "how to" disassemble for cleaning
CAUTION: DO NOT immerse assembled slicer or base assembly in water
*
* Do not wash slicer or any component parts in dishwasher
* Do not use abrasive cleaners
* Do not spray water or cleaners into or near slicer base openings, switch or running light
Wash all parts. . . base, knife, covers, cheese scraper, food platform carriage, food pusher,
*
including total sharpener assembly with hot soapy water NOT in dishwasher and dry
thoroughly
Clean off grease from sharpener stones under hot running water using supplied brass
*
bristle brush, dry thoroughly
LUBRICATION: Add daily after thorough cleaning, supplied mineral oil
Do Not use vegetable oil!!
* (1) one drop to each stone shaft (near spring) and sharpener mounting shaft
(1) one drop to food pusher shaft
*
(1) one drop behind numbers on front thickness control knob
*
(2) two drops to main bottom round shaft
*
* (1) one drop to threads on back of knife cover at center and to end of shaft
KNIFE SHARPENING: Read owner’s manual
Shut off slicer and clean knife
*
Pull up sharpener, rotate clockwise 180 degrees and then push down until pink stone
*
touches knife.
* KEEP HANDS AND FINGERS AWAY FROM KNIFE, turn on slicer
* Let pink stone grind for 5 to 10 seconds
* While pink stone is grinding, push in blue/gray stone hold for 2 to 3 seconds to deburr
* Shut off slicer, remove sharpener & clean off filings
* Clean sharpener and set back in stored position
Any questions?? Or for service, parts and accessories call . . .
1-800-251-4232, FAX: 1-800-221-5291
1-800-251-4232, FAX: 1-800-221-5291
General Slicing/Red Goat Disposers 1152 Park Ave • P.O. Box 428 • Murfreesboro, Tennessee 37133-0428 •(615)893-4820
Page 8

REPLACEMENT PARTS
LIST
MODEL: SM-12A
KEY
QTY
NO PART NO NAME: DESCRIPTION MACH
1 09-SM-1722 BUTTON: DEBURRING STONE 1
2 08-SM-6050 NUT: STONE MTG 1
3 06-SM-6051 FIBER WASHER 1
4 09-SM-1327 DEBURRING STONE (GRAY) 1
5 09-SM-1317 SHAFT: DEBURRING STONE 1
6 08-SM-1323 SPRING: DEBURRING STONE 1
7 08-SM-6050 NUT: STONE MTG 1
8 06-SM-6051 FIBER WASHER 1
9 09-SM-1203 STONE: SHARPENING 1
10 09-SM-1318 SHAFT: SHARPENING STONE 1
11 08-SM-1322 SPRING: SHARPENING STONE 1
12 08-SM-1102 WASHER: FLAT 6 MM 1
13 09-SM-1208 KNOB: SHARPENING HSG/KNIFE COVER 1
14 23-SM-1320 SHARPENER HOUSING 1
30-SM-1320 SHARPENER ASSY COMPLETE 1
15 08-SM-1210 SCREW: CSK HD 6MA X 12 1
16 08-SM-1211 NUT: TUBE SHAFT 1
17 08-SM-1336 RETAINING RING: STONE SHAFT 2
18 30-SM-1202 SHARPENER FRAME ASSY 1
(INC: 1-12, 16-18, 21 &22)
19 08-SM-1204 WASHER: FLAT 4MM 2
20 08-SM-1012 SCREW: PN HD 4MA X 10 2
21 23-SM-1202 TUBE SHAFT, NUT & FRAME 1
(INC: 16, 18,21 &22)
22 30-SM-1207 MTG POST ASSY: SHARPENER 1
22A 08-SM-1035 SCREW: SET 8MAX 8 1
23 23-SM-1319 REGULATOR PLATE 1
24 09-SM-1208 KNOB: SHARPENER HSG/KNIFE COVER 1
24A 09-SM-1223 ROD: KNIFE COVER 1
25 08-SM-1216 NUT: HEX 14MA X 6 1
26 08-SM-1217 WASHER: FLAT 14MM X 1 1
27 23-SM-1212 KNIFE HOUSING 1
28 08-SM-1218 SPACER: KNIFE PULLEY, 23MM 1
08-SM-1340 SPACER: KNIFE PULLEY SHAFT 1
29 30-SM-1220 KNIFE PULLEY ASSY 1
(INC: 28, 29, BRG & SHAFT)
• 09-SM-1222 PULLEY SHAFT 1
* 09-SM-1219 BEARING (CALL FACTORY) 2
30 06-SM-1221 BELT: TB2-34-660 (THRU S/N 110598BD012) 1
06-SM-1370 BELT: TB2-630 (S/N 110598BD013 FWD)
31 09-SM-1224 KNIFE: 12" 1
09-SM-1307 KNIFE: 12" SS 1
32 08-SM-1220 SCREW PN HD 5MAX 10 3
33 23-SM-1299 KNIFE COVER 1
34 08-SM-1427 THUMBSCREW: KNIFE COVER 1
35 08-SM-1441 THUMBSCREW: KNIFE WIPER 2
36 09-SM-1284 KNIFE WIPER 1
37 08-SM-1514 WASHER: STAR 8MM 2
38 08-SM-1214 SCREW: HXHD 8MAX 30 2
39 23-SM-1345 BASE 1
40 09-SM-1253 PLATFORM RAIL 1
41 08-SM-1073 SCREW: HXHD 5MAX 10 2
42 09-SM-1231 REGULATOR KNOB 1
43 08-SM-1232 BUSHING: REGULATOR KNOB 1
44 09-SM-1301 REGULATOR CAM: 30MM 1
45 08-SM-1091 USE P/N 08-SM-479 2
46 30-SM-1228 RATCHET PIN ASSY 1
47 05-6-1503 RUNNING LIGHT: 115V 1
48 05-6-4581 GUARD: TOGGLE SWITCH 1
49 05-6-1501 SWITCH: TOGGLE, 120V 1
05-6-1507 SWITCH: TOGGLE, 230V 1
49A 12-6-1779 LABEL: ON/OFF 1
49B 06-6-2192 BOOT: TOGGLE SWITCH 1
50 30-SM-1233 BRACKET: REGULATOR SPRING 1
51 08-SM-1333 SCREW: SKHD 6MA X 16 1
52 08-SM-1234 SPRING: REGULATOR 1
53 08-SM-1235 SCREW: PN HD 6MA X 10 1
55 08-SM-1267 NUT: CAM FOLLOWER 1
56 06-SM-1267 CAM FOLLOWER PIN 1
57 01-SM-1237 REGULATOR SLIDE 1
58 08-SM-1236 SLIDE BUSHING 2
59 09-SM-1363 BRACKET: REGULATOR SLIDE 2
60 08-SM-1063 NUT: JAM HEX 6MM 2
KEY
QTY
NO PART NO NAME: DESCRIPTION MACH
61 08-SM-1054 SCREW: HXHD 6MA X 20 1
62 08-SM-1333 SCREW: SKHD 6MA X 16 4
63 08-SM-1226 WASHER: FLAT 8MM X 26 2
64 08-SM-1302 WASHER: LOCK SPLIT 8MM 2
65 08-SM-1227 SCREW: HXHD 8MAX 30 2
66 08-SM-1334 BUMPER: MOTOR ADJUSTMENT SCREW
67 08-SM-1515 NUT: HEX 8MA 1
68 08-SM-1515 NUT: HEX 8MA 1
69 08-SM-1247 SCREW: BELT TENSION ADJ 1
70 30-SM-1246 MOTOR: 115V/60HZ (THRU S/N 110598BD012) 1
30-SM-1371 MOTOR: 115V/60HZ; SM12A NS 1
(S/N 110598BD013 FWD)
30-SM-1230 MOTOR: 220V/50HZ 1
09-MM-9541 BEARING: #6201 2
05-SM-1367 WIRE: MOTOR GROUND 1
08-SM-1235 SCREW: PN HD 6MAX 10 3
05-SM-6125 GROUND TAG 3
08-SM-6127 WASHER: STAR 5MM 3
08-SM-6126 SCREW: PN HD 5MA X 8 1
71 09-SM-1364 RETAINING RING: MOTOR MTG 2
72 09-SM-1347 BRKT, MTG: MOTOR SM-12A 1
73 08-SM-1333 SCREW: SKHD 6MA X 16 2
74 08-SM-1365 POST: MOTOR MTG 1
75 05-SM-1245 CAPACITOR: 10MF, 450V 1
(THRU S/N 110598BD012)
05-SM-2032 CAPACITOR: 20MF, 450V 1
(S/N 110598BD013 FWD)
76 08-SM-1224 CLAMP: CAPACITOR 1
77 08-SM-1117 SCREW: ST PN HD 39 X 10 1
78 05-SM-1506 STRAIN RELIEF 1
79 05-GSM-756 CORDSET 1
80 08-SM-1117 SCREW: ST PN HD 39 X 10 4
81 08-SM-1240 WIRE CLAMP 4
82 09-SM-1329 BOTTOM COVER: SM-12A 1
83 06-SM-1463 FOOT: 45MM H W/6MA STUD 4
84 30-SM-1359 SPIKE PLATE ASSY (INC: 84,90 & 91) 1
85 30-SM-1289 FOODPUSHER ASSY (INC 84-91) 1
86 08-SM-1362 SCREW: FOODPUSHER STORAGE 1
87 08-SM-1016 NUT: JAM HEX 6MA 1
88 08-SM-1264 SCREW: SET 10MAX 30 1
89 30-SM-1265 HANDLE ASSY W/STUD 1
90 06-SM-1360 NYLON WASHER: FOODPUSHER 1
91 09-SM-1490 KNOB: SM W/6 MM FEMALE THREAD 1
92 09-SM-1269 SHAFT: FOODPUSHER 1
93 09-SM-1283 LOCK KNOB: SHAFT 1
94 23-SM-1270 PLATFORM 1
95 23-SM-1273 PLATFORM BRKT 1
96 09-SM-1272 HANDLE: PLATFORM 1
97 09-SM-1274 KNOB: PLATFORM 1
98 08-SM-1271 SCREW: HXHD 5MAX 15 1
99 08-SM-1102 WASHER: FLAT 6MM 2
100 08-SM-1080 NUT: HEX 6MM 1
101 08-SM-1282 SCREW: HXHD 6MA X 25 1
102 06-SM-1540 ROLLER: PLATFORM 1
103 08-SM-1102 WASHER: FLAT 6MM 1
104 09-SM-1275 ROLLER BRKT 1
105 08-SM-1278 SCREW: RND HD (RLR BRKT) SS 2
106 08-SM-1226 WASHER: FLAT 8MM X 26 2
107 08-SM-1514 WASHER: STAR 8MM 2
108 08-SM-1261 SCRDW:SCKHD 8MAX 15 2
109 08-SM-1260 WASHER: SHAFT 2
110 09-SM-1252 SHAFT EXTENSION 1
111 06-SM-1259 WASHER: RUBBER 2
112 08-SM-1337 WASHER: PLATFORM SHAFT 2
113 08-SM-1258 BUMPER: SPRING SHAFT 2
114 09-SM-1254 PLATFORM SHAFT 1
115 01-SM-1255 PLATFORM CARRIAGE 1
116 08-SM-1251 STUD: PLATFORM BRKT 10MM X 38 1
117 08-SM-1256 SCREW: HXHD 6MA X 20 NYLON 1
118 08-SM-1257 SCREW: SET (CARRIAGE) 1
119 06-SM-1346 WASHER: RUBBER 1
120 08-SM-1303 SCREW: PLATFORM BRKT 1
• Not Pictured.
General Slicing/Red Goat Disposers • 1152 Park Avenue • P.O. Box 428 • Murfreesboro, TN 37133-0428 • (615) 893-4820
Effective: April 1, 1999
Page 9

REPLACEMENT PARTS LIST MODEL: SM-12A
General Slicing/Red Goat Disposers • 1152 Park Ave • P.O. Box 428 • Murfreesboro, Tennessee 37133-0428 • (615) 893-4820
Page 10

 Loading...