

Page 1

SOUND LEVEL
CALIBRATOR
USER’S MANUAL
SCAL1356
99 Washington Street
Melrose, MA 02176
Phone 781-665-1400
Toll Free 1-800-517-8431
Visit us at www.TestEquipmentDepot.com
Please read this manual carefully and thoroughly
before using this product.
Page 2

TABLE OF CONTENTS
Key Features . . . . . . . . . . . . . . . . . . . . . 2
What’s in the Package . . . . . . . . . . . 2 –3
Product Overview . . . . . . . . . . . . . . . . . 3
Setup Instructions . . . . . . . . . . . . . . . . . 4
Install Battery . . . . . . . . . . . . . . . . . . 4
Operating Instructions . . . . . . . . . . . 5 –7
Specifications . . . . . . . . . . . . . . . . . . . . 7
Warranty Information . . . . . . . . . . . 8 –9
Return for Repair Policy . . . . . . . . . . . 10
KEY FEATURES
• Conforms to ANSI S1.4-1984 and IEC
60942:2003 Class 2
• Two output levels: 94dB and 114dB
• Fits 1 in. and 1/2 in. microphones
• Low battery indication
• CE and RoHS approved
WHAT’S IN THE PACKAGE
The SCAL1356 comes in a soft pouch inside
a white box. Also inside the pouch are a
1/2 in. microphone adapter, a certificate of
2
Page 3
traceable calibration, a “9V” battery and this
user’s manual.
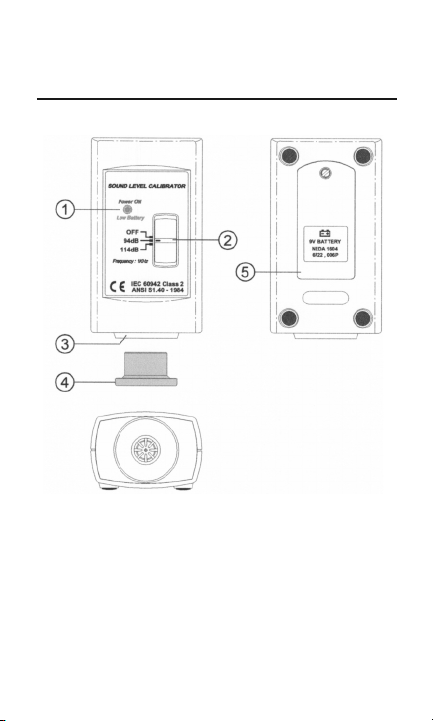
PRODUCT OVERVIEW
햲 Power ON/Low Battery LED
햳 Power OFF/Output level selector switch
햴 Port sized for 1-in. microphone
햵 1/2-inch microphone adapter
햶 Battery compartment
3
Page 4

SETUP INSTRUCTIONS
INSTALL BATTERY
1. Turn the calibrator over and open the
battery compartment by using a small
flat-head screwdriver to remove the
single screw securing the battery
compartment cover. Take care not to lose
the small screw.
2. Plug the included “9V” battery into the
wired socket inside the compartment.
The terminals of the battery and the
socket mate in only one way, with the
smaller male terminal plugging into the
larger female terminal.
3. Close the battery compartment by
replacing its cover and reinstalling and
tightening the small screw.
4
Page 5

OPERATING
INSTRUCTIONS
1a. To calibrate a sound level
meter with a 1/2-in. diameter
microphone, insert the
microphone into the 1/2-in.
microphone adapter, which is
supplied inserted into the
bottom of the calibrator
(see figure at right and Callout
4 of figure on page 3).
1b. To calibrate a sound level
meter with a 1-in. diameter
microphone, first remove the
1/2-in adapter and then insert the
microphone into the 1-in. microphone
port.
2. Select a range of the sound level meter
to be calibrated that includes 94dB
(0 to 100dB, for example). It makes no
difference whether the meter is set for
fast or slow time weighting, or for “A” or
“C” frequency weighting.
5
Page 6

3. Move the Power OFF/Output level
selector switch on the SCAL1356 to the
94dB position. If the installed battery is
adequately charged, the front panel
Power ON/Low Battery LED will glow
green. If the installed battery is weak, the
LED will glow red. If the installed battery
is dead, the LED will not illuminate at all.
Replace a weak or dead battery
immediately by following the procedure
in the Setup Instructions section.
4. Turn the meter's calibration (sensitivity)
adjustment screw or potentiometer until
the meter reads exactly 94dB.
5. Choose a range of the meter that
includes 114 dB (0 to 120dB, for
example).
6. Move the Power OFF/Output level
selector switch on the SCAL1356 to the
114dB position.
7. Turn the meter's calibration (sensitivity)
adjustment screw or potentiometer until
the meter reads exactly 114dB.
6
Page 7

After calibrating the sound level meter,
move the Power OFF/Output level selector
switch on the SCAL1356 back to the OFF
position, to avoid unnecessarily draining the
battery.
SPECIFICATIONS
Output Sound Pressure Levels: 94dB and
114dB at reference conditions (74°F/23°C,
50%RH, 1013hpa atmospheric pressure)
Output sound pressure accuracy: ±0.5dB
Output Frequency: 1000Hz ±2%
Total Harmonic Distortion(THD): <3%
Operating Temperature: 32° to 140°F
(0° to 40°C) @ 10 to 90%RH
Storage Temperature: 14° to 122°F
(-10° to 50°C) @ 0 to 70%RH
Dimensions: 4.4 x 2.4 x 1.7 in.
(113 x 63 x 43mm)
Weight: 6 oz. (170g), without battery
Power Source: (1) “9V” batttery (included)
7
Page 8

WARRANTY
INFORMATION
General Tools & Instruments’ (General’s)
SCAL1356 Sound Level Calibrator is
warranted to the original purchaser to be
free from defects in material and
workmanship for a period of one year.
Subject to certain restrictions, General will
repair or replace this instrument if, after
examination, the company determines it to
be defective in material or workmanship.
The warranty period begins on the date of
purchase. You are encouraged to register
your product online. General will
extend your warranty an additional
60 days if you register at
www.generaltools.com/ProductRegistry.
This warranty does not apply to damages
that General determines to be from an
attempted repair by non-authorized
personnel or misuse, alterations, normal
wear and tear, or accidental damage. The
defective unit must be returned to General
Tools & Instruments or to a Generalauthorized service center, freight prepaid
and insured.
8
Page 9

Acceptance of the exclusive repair and
replacement remedies described herein is a
condition of the contract for purchase of this
product. In no event shall General be liable
for any incidental, special, consequential or
punitive damages, or for any cost, attorneys’
fees, expenses, or losses alleged to be a
consequence of damage due to failure of,
or defect in any product including, but not
limited to, any claims for loss of profits.
Register now at
www.generaltools.com/ProductRegistry to
receive a 60-day extension to your warranty.
9
Page 10

RETURN FOR REPAIR
POLICY
Every effort has been made to provide you
with a reliable product of superior quality.
However, in the event your instrument
requires repair, please contact our Customer
Service to obtain an RGA (Return Goods
Authorization) number before forwarding
the unit via prepaid freight to the attention
of our Service Center at this address:
Remember to include a copy of your proof
of purchase, your return address, and your
phone number and/or e-mail address.
10
Page 11

NOTES
__________________________________
__________________________________
__________________________________
__________________________________
__________________________________
__________________________________
__________________________________
__________________________________
__________________________________
__________________________________
__________________________________
__________________________________
__________________________________
__________________________________
__________________________________
11
Page 12
General Tools & Instruments
GeneralToolsNYC
99 Washington Street
Melrose, MA 02176
Phone 781-665-1400
Toll Free 1-800-517-8431
Visit us at www.TestEquipmentDepot.com
©2014 GENERAL TOOLS & INSTRUMENTS
NOTICE - WE ARE NOT RESPONSIBLE FOR TYPOGRAPHICAL ERRORS.
MAN# SCAL1356
6/30/14
 Loading...