

Page 1
COMBUSTIBLE
GAS LEAK
DETECTOR PEN
USER’S MANUAL
PNG1
Test Equipment Depot - 800.517.8431 - 99 Washington Street Melrose, MA 02176
TestEquipmentDepot.com
Please read this manual carefully and thoroughly
before using this product.
Page 2

KEY FEATURES
• Detects leaks of natural gas (methane), propane
or butane from plumbing and appliances
• Sensitive, reliable and easy to use
• Fast response time
• Redundant visual and audible alarms
• Different alarms for leaks, sensor fault and low
battery
• Automatically sets zero measurement baseline
upon startup in fresh air
• CE and RoHS approved
SAFETY INSTRUCTION
NEVER use an open flame (from a cigarette lighter
or candle, for example) to help search for gas leaks
in dark areas.
WHAT’S IN THE PACKAGE
The PNG1 comes in a blister pack along with
(2) “AA” Alkaline batteries and a wrist strap. A hard
copy of this user’s manual is inside the fold-over
blister card.
2
Page 3
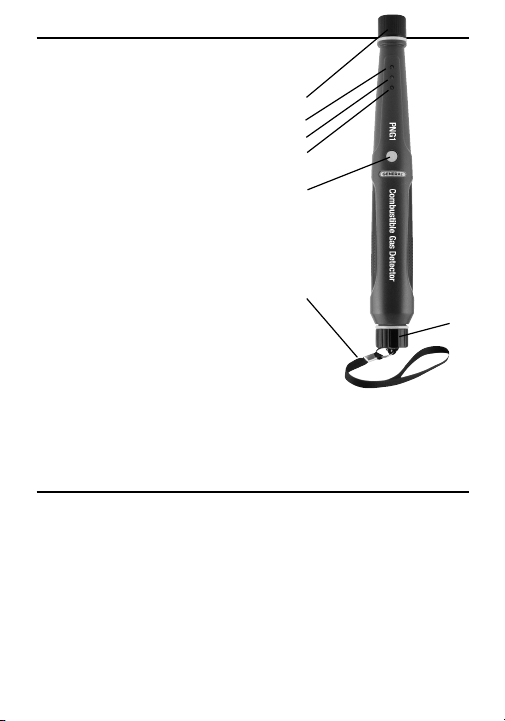
PRODUCT
OVERVIEW
Fig. 1 shows the controls,
indicators and physical
features of the PNG1.
Familiarize yourself with
their locations before
moving on to the Setup
Instructions and
Operating Instructions.
1. Sensor
2. Red high alarm LED
3. Yellow low alarm LED
4. Green power on LED
5. Power button
6. Wrist strap
7. Battery compartment cover
1.
2.
3.
4.
5.
6.
Fig. 1
SETUP INSTRUCTIONS
INSTALL BATTERIES
1. Open the PNG1’s battery compartment by
unscrewing the black cap at the base of the
instrument (Fig. 1, Callout 7).
7.
3
Page 4

2. Insert the two supplied “AA” batteries into the
compartment anode (+ side) first.
3. Close the compartment by reinstalling and
tightening the black cap.
OPERATING INSTRUCTIONS
Before turning on the detector, move to an area
where the air is clear of all combustible gases,
smoke, perfume, alcohol and volatile organic
compounds (VOCs). If you activate the unit where
any of these substances is present, the instrument
will automatically calibrate to a non-zero gas
concentration baseline. This will produce inaccurate
(and potentially dangerous) readings and foster a
false sense of security.
To activate the PNG1, press and hold the button
(Fig. 1, Callout 5) for at least 3 seconds. The
instrument will immediately sound a brief, rapid
sequence of five tones and begin a 15-second
warmup period. During this period, the three frontpanel LEDs will flash rapidly and repeatedly in order
from bottom to top.
The warmup period ends when the detector sounds
two loud descending tones. To signal that the
instrument is ready to detect gas, the green LED
flashes about once every 7 seconds, accompanied
by two muted ascending tones.
4
Page 5

The following table explains the meaning of all
possible combinations of visual and audible
indications.
Detected Visual Audible
condition indication indication
Ready to sense gas Green LED Two ascending
flashes every tones every
2 seconds 7 seconds
High gas concentration: Red and yellow Five ascending
above (50±10)% LEL LEDs on tones
twice/second
Low gas concentration: Yellow LED on Two tones at
between (20±5)% LEL same pitch
and (50±10)% LEL twice/second
Low battery charge: None Three descending
<2.7VDC tones every
30 to 75 seconds;
interval depends
on charge level
Sensor fault Yellow LED on One tone every
1.5 seconds
Change the batteries immediately upon hearing the
audible indication for Low Battery Charge shown in
the table. To avoid draining the batteries, press and
hold the button for at least three seconds to
power off the PNG1 following each use.
5
Page 6

SPECIFICATIONS
Gases Detected: Methane (CH4) Propane (C3H8),
Butane (C4H10)
Detection Range: 0 to 100%LEL
(Lower Explosive Limit)
High Alarm Level: >(50±10)% LEL
Low Alarm Level: Between (20±5)% LEL
and (50±10)% LEL
Response Time: < 5 seconds
High and Low Audible Alarm Levels: >65dB
Sampling Technique: Natural diffusion
Operating Temperature:
-4° to 131°F (-20° to 55°C) @ <95%RH
Dimensions: 9.1 (L) x 1.2 (Dia.) in. (229 x 30mm)
Weight (including batteries): 5 oz. (142g)
Power Source: 2 “AA” batteries (included)
WARRANTY INFORMATION
General Tools & Instruments’ (General’s) PNG1
Combustible Gas Leak Detector Pen is warranted to
the original purchaser to be free from defects in
material and workmanship for a period of one year.
Subject to certain restrictions, General will repair or
6
Page 7

replace this instrument if, after examination, the
company determines it to be defective in material or
workmanship. The warranty period begins on the
date of purchase. You are encouraged to register
your product online. General will extend your
warranty an additional 60 days if you register at
www.generaltools.com/ProductRegistry.
This warranty does not apply to damages that
General determines to be from an attempted repair
by nonauthorized personnel or misuse, alterations,
normal wear and tear, or accidental damage. The
defective unit must be returned to General Tools &
Instruments or to a General-authorized service
center, freight prepaid and insured.
Acceptance of the exclusive repair and replacement
remedies described herein is a condition of the
contract for purchase of this product. In no event
shall General be liable for any incidental, special,
consequential or punitive damages, or for any cost,
attorneys’ fees, expenses, or losses alleged to be a
consequence of damage due to failure of, or defect
in any product including, but not limited to, any
claims for loss of profits.
Register now at
www.generaltools.com/ProductRegistry to receive a
60-day extension to your warranty.
7
Page 8

RETURN FOR REPAIR POLICY
Every effort has been made to provide you with a
reliable product of superior quality. However, in the
event your instrument requires repair, please contact
our Customer Service to obtain an RGA (Return Goods
Authorization) number before forwarding the unit via
prepaid freight to the attention of our Service Center at
this address:
Remember to include a copy of your proof of purchase,
your return address, and your phone number and/or
e-mail address.
8
Page 9

General Tools & Instruments
GeneralToolsNYC
99 Washington Street
Melrose, MA 02176
Phone 781-665-1400
Toll Free 1-800-517-8431
Visit us at www.TestEquipmentDepot.com
©2014 GENERAL TOOLS & INSTRUMENTS
NOTICE - WE ARE NOT RESPONSIBLE FOR TYPOGRAPHICAL ERRORS.
MAN# PNG1
10/21/14
9
 Loading...