

Page 1
GENERAC
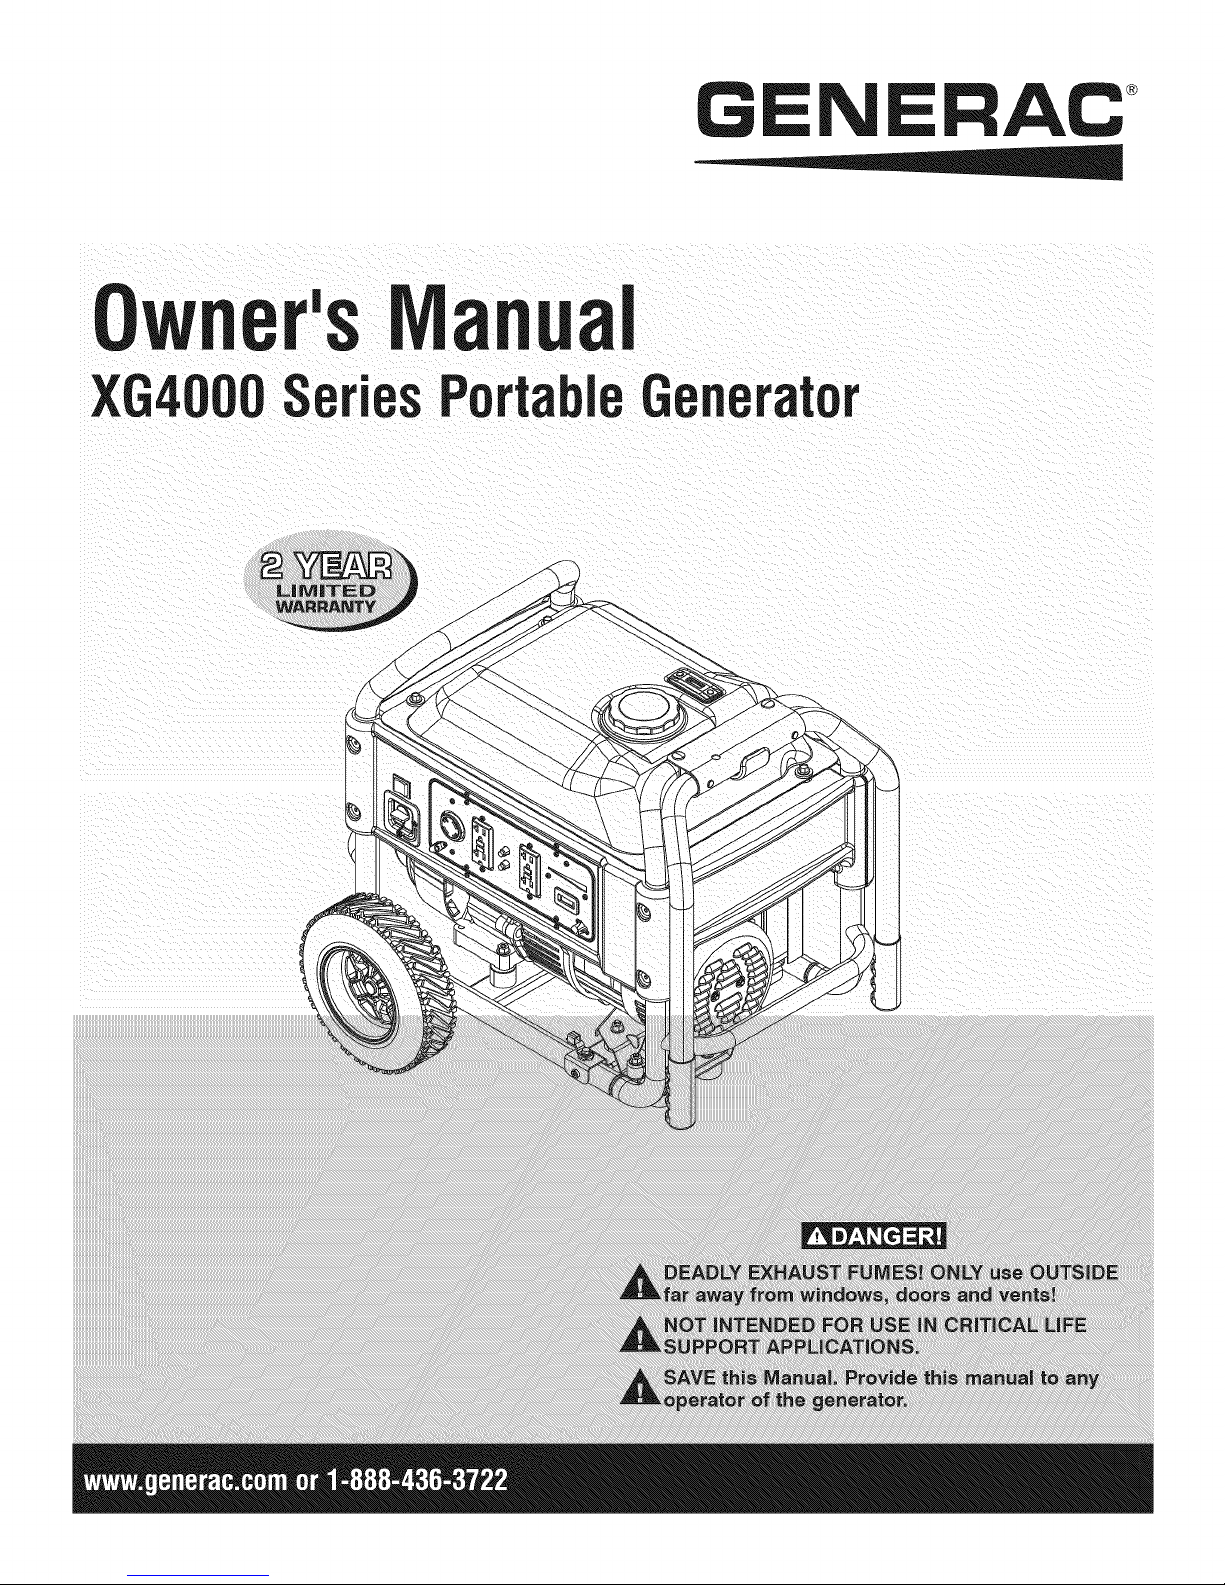
Owner'sIVlanual
SeriesPortabJeGenerator
Page 2
introduction..............................................................................1
Readthis IVlanualThoroughly..................................................1
Safety Rules ............................................................................1
StandardsIndex.......................................................................3
Generalinformation.................................................................4
1.1 Unpacking................................................................................4
1.1.1 AccessoryBox............................................................4
1.2 Assembly.................................................................................4
1.2.1 AssemblingtheWheelKitandFrameFoot...................4
Operation................................................................................. 5
2.1 Knowthe Generator................................................................. 5
2.2 Hourmeter- No Reset.............................................................. 6
2.3 Hourmeter- With Reset............................................................6
2.4 CordSets andConnectionPlugs..............................................6
2.4.1 120VAC,20Amp, GFCIDuplexReceptacle..................6
2.4.2 120/240 VAC,20 Amp Receptacle..............................7
2.5 Howto Usethe Generator........................................................7
2.5.1 Groundingthe GeneratorWhenUsedas a Portable......7
2.5.2 Connecting the Generatorto a Building's
ElectricalSystem......................................................... 8
2.5.3 Neutralto FrameGrounding.........................................8
2.5.4 ConnectingElectrical loads.......................................... 8
2.6 Don'tOverloadthe Generator...................................................8
2.7 WattageReferenceGuide......................................................... 9
2.8 BeforeStarting the Generator................................................... 9
2.8.1 Adding EngineOil........................................................9
2.8.2 Adding Gasoline........................................................ 10
2.9 ToStartthe Engine................................................................. 10
2.10 Stoppingthe Engine............................................................... 11
2.11 Low Oil PressureShutdownSystem....................................... 11
2.11.1 Restarting.................................................................. 11
Maintenance.......................................................................... 11
3.1 Performing ScheduledMaintenance....................................... 11
3.2 MaintenanceSchedule........................................................... 11
3.3 ProductSpecifications........................................................... 11
3.3.1 GeneratorSpecifications.............................................11
3.3.2 EngineSpecifications ................................................. 11
3.3.3 EmissionsInformation................................................ 12
3.4 GeneralRecommendations.................................................... 12
3.4.1 GeneratorMaintenance............................................... 12
3.4.2 ToCleanthe Generator............................................... 12
3.4.3 EngineMaintenance................................................... 12
3.4.4 CheckingOil Level...................................................... 12
3.4.5 Changingthe Oiland OilFilter.....................................12
3.4.6 ReplacingtheSparkPlug............................................ 13
3.5 ServiceAir Filter..................................................................... 13
3.6 CleanSparkArrestor Screen.................................................. 13
3.7 General.................................................................................. 14
3.8 Long TermStorage................................................................. 14
3.9 OtherStorageTips................................................................. 14
Troubleshooting.....................................................................1,5
4.1 TroubleshootingGuide............................................................15
Notes.....................................................................................16
Warranty................................................................................18
MANUALDELUSUARIO....................................23
MANUELDEL'UTILISATEUR.............................45
Page 3
iNTRODUCTiON
Thankyou for purchasingthis model by GeneracPowerSystems,
Inc. This model is a compact, high performance, air-cooled,
engine driven generatordesigned to supply electrical power to
operateelectrical loads where no utility power is availableor in
placeof utility dueto a poweroutage.
READTHiSMANUALTHOROUGHLY
If any portion of this manual is not understood, contact the
nearest Authorized Dealerfor starting, operating and servicing
procedures.
The operator is responsiblefor proper and safe use of the
equipment.We strongly recommend that the operator read this
manualandthoroughlyunderstandallinstructions beforeusingthe
equipment.Wealsostronglyrecommendinstructingother usersto
properlystart andoperatethe unit.This preparesthemifthey need
to operatethe equipmentin an emergency.
Thegeneratorcan operatesafely,efficiently andreliably only if it
is properlylocated, operatedandmaintained.Beforeoperatingor
servicingthe generator:
• Becomefamiliar with and strictly adhereto all local, stateand
nationalcodes and regulations.
• Study all safety warnings in this manual and on the product
carefully.
• Becomefamiliarwith this manualandthe unit beforeuse.
Themanufacturercannot anticipateevery possible circumstance
that might involvea hazard.The warnings inthis manual,and on
tags and decals affixedto the unit are, therefore,not all inclusive.
If using a procedure,work method or operatingtechniquethat the
manufacturerdoes not specifically recommend,ensurethat it is
safe for others. Also make sure the procedure,work method or
operatingtechniqueutilizeddoes not renderthe generatorunsafe.
THE INFORMATIONCONTAINEDHEREIN WAS BASED ON
MACHINESIN PRODUCTIONAT THE TIME OF PUBLICATION.
GENERACRESERVESTHERIGHTTO MODIFYTHISMANUALAT
ANYTIME.
SAFETYRULES
Throughoutthis publication,and on tags and decals affixedto the
generator,DANGER,WARNING,CAUTIONand NOTEblocks are
usedto alert personnelto special instructionsabout a particular
operation that may be hazardous if performed incorrectly or
carelessly. Observe them carefully. Their definitions are as
follows:
iNDICATESA HAZARDOUSSiTUATiONORACTIONWHICH,IF
NOTAVOIDED,WiLLRESULTiN DEATHORSERIOUSiNJURY.
Indicatesa hazardoussituationor actionwhich,if not
avoided, couldresultin deathor seriousinjury.
,ACAUTION!
Indicatesa hazardoussituationor action which,if not
avoided, couldresultin minoror moderateinjury.
NOTE:
Notescontainadditionalinformationimportantto a procedure
and will be foundwithin the regulartextbodyof thismanual.
These safety warnings cannot eliminate the hazardsthat they
indicate. Common sense and strict compliancewith the special
instructionswhile performing the action or service areessentialto
preventingaccidents.
Four commonly used safety symbols accompany the DANGER,
WARNINGand CAUTIONblocks. The type of information each
indicatesis as follows:
,_This symbol points out important safety
information that, if not followed, could
endanger personal safety and/or property of
others.
This symbol points out potential explosion
hazard.
i/_This symbol points out potential fire hazard.
i/_This symbol points out potential electrical
shock hazard.
GENERAL HAZARDS
• NEVERoperatein an enclosed area, in a vehicle, or indoors
EVENIFdoors and windows areopen.
• For safety reasons, the manufacturer recommendsthat the
maintenanceof this equipmentis carried out by anAuthorized
Dealer.Inspectthe generatorregularly,and contactthe nearest
AuthorizedDealerfor parts needingrepairor replacement.
• Operategeneratoronly on levelsurfacesandwhereit will notbe
exposedto excessivemoisture,dirt, dust or corrosivevapors.
• Keephands, feet, clothing, etc., awayfrom drive belts, fans,
and othermoving parts. Neverremoveany fan guardor shield
whilethe unit is operating.
• Certain parts of the generator get extremely hot during
operation. Keep clear of the generator until it has cooled to
avoidsevereburns.
• Do NOToperategeneratorinthe rain.
• Do not alter the construction of the generator or change
controlswhich might createan unsafeoperatingcondition.
• Neverstart or stop the unit with electrical loads connected
to receptaclesAND with connected devicesturned ON. Start
the engine and let it stabilize before connecting electrical
loads. Disconnectall electricalloads beforeshutting downthe
generator.
• Do not insert objectsthrough unit's cooling slots.
• When working on this equipment, remain alert at all times.
Never work on the equipment when physically or mentally
fatigued.
Page 4

* Neverusethe generatoror anyof its parts as a step. Stepping
on the unit can stress and break parts, and may result in
dangerousoperating conditions from leaking exhaust gases,
fuel leakage,oil leakage,etc.
NOTE:
This generatoris equipped with a spark arrestormuffler. The
spark arrestor must bemaintained in effective working order
by the owner/operator. In the State of California, a spark
arrestor is requiredby law (Section4442 ofthe California
PublicResourcesCode).Otherstates may havesimilarlaws.
Federal lawsapply on federallands.
EXHAUST & LOCATIONHAZARDS
• Never operate in an enclosed area or indoors!NEVERuse
in the home,in a vehicle,or in partlyenclosedareas such
as garages, even if doors and windowsare open! ONLYuse
outdoors and far from openwindows,doors,vents,andinan
areathat will notaccumulatedeadly exhaust.
Using a generator indoors CAN KiLL YOU JN MINUTES.
Generator exhaust contains carbon monoxide. This is
a poison you cannot see or smell.
NEVER use insidea home
or garage, EVEN JFdoors
and windows are open.
* The engine exhaustfumes contain carbon monoxide, which
you cannot see or smell. This poisonous gas, if breathedin
sufficientconcentrations,can causeunconsciousnessor even
death.
* Adequate, unobstructed flow of cooling and ventilating air
is critical to correct generator operation. Do not alter the
installation or permit even partial blockage of ventilation
provisions, as this can seriously affect safe operationof the
generator.ThegeneratorMUSTbeoperatedoutdoors.
* This exhaustsystemmust be properly maintained.Do nothing
that mightrendertheexhaustsystemunsafeorinnoncompliance
with any localcodes and/orstandards.
* Always usea batteryoperatedcarbonmonoxidealarmindoors,
installedaccordingto themanufacturer'sinstructions.
* If you start to feet sick, dizzy,or weak after the generatorhas
beenrunning,moveto fresh air IMMEDIATELYSeea doctor,as
you couldhave carbonmonoxidepoisoning.
Only use OUTSIDE and
far away from windows,
doors, and vents.
ELECTRICALHAZARDS
* The generator produces dangerously high voltage when in
operation.Avoidcontactwith barewires,terminals,connections,
etc., while the unit is running,even on equipmentconnected
to the generator. Ensureall appropriate covers, guards and
barriersarein placebeforeoperatingthe generator.
* Never handle any kind of electrical cord or device while
standinginwater,while barefootorwhile handsor feet arewet.
DANGEROUSELECTRICALSHOCKMAYRESULT.
* TheNationalElectricCode(NEC)requirestheframe andexternal
electrically conductive parts of the generator be properly
connectedto an approvedearth ground.Local electricalcodes
may also require proper grounding of the generator.Consult
with a localelectricianfor groundingrequirementsin thearea.
* Use a ground fault circuit interrupter in any damp or highly
conductivearea(such as metaldecking or steelwork).
* Do not useworn, bare,frayed or otherwise damagedelectrical
cord setswith the generator.
* Beforeperforminganymaintenanceonthegenerator,disconnect
the enginestarting battery (if equipped)to preventaccidental
start up. Disconnectthe cablefrom the batterypost indicated
by a NEGATIVE,NEGor (-) first. Reconnectthatcable last.
* In caseof accident causedby electricshock, immediatelyshut
down the source of electrical power.If this is not possible,
attempt to free the victim from the live conductor. AVOID
DIRECTCONTACTWITH THEVICTIM, Use a non-conducting
implement,such asa rope or board,to freethevictim fromthe
live conductor.If the victim is unconscious, applyfirst aidand
getimmediatemedical help.
FiREHAZARDS
• GasolineishighlyFLAMMABLEand itsvaporsare EXPLOSIVE.
Do not permitsmoking,open flames, sparksor heat in the
vicinitywhilehandlinggasoline.
• Never add fuel while unit is runningor hot.Allow engineto
cool completelybeforeaddingfuel.
• Never fill fuel tankindoors, Comply with all laws regulating
storageand handlingof gasoline.
• Do not overfill the fuel tank. Always allow roomfor fuel
expansion. If tank is over=filled,fuel can overflow onto a hot
engineandcauseFIREor an EXPLOSION.Neverstoregenerator
with fuel in tankwhere gasolinevapors might reach an open
flame, spark or pilot light (as on a furnace, water heateror
clothes dryer). FIREor EXPLOSIONmay result. Allow unit to
cool entirelybeforestorage.
• Wipe up any fuel or oil spills immediately. Ensure that no
combustiblematerialsareleft on or nearthe generator.Keepthe
areasurroundingthe generatorcleanandfree from debrisand
keepa clearanceof five (5) feet on all side to allow for proper
ventilationof the generator.
• Do not insert objectsthrough unit's cooling slots.
• Do not operatethe generator if connected electrical devices
overheat,if electricaloutputislost,if engineor generatorsparks
or if flames or smoke are observedwhile unit is running.
• Keepafire extinguishernearthe generatoratall times.
Page 5

STANDARDS/#DEX
Inthe absenceof pertinentstandards,codes,regulationsandtaws,
the publishedinformation listedbelowmay be usedas a guideline
foroperationofthis equipment.Alwaysreferencethelatestrevision
availablefor the standardslisted.
1. NationalFireProtectionAssociation(NFPA)70:TheNATIONAL
ELECTRICCODE(NEC)availablefrom www.nfpa.org
2. NationalFire ProtectionAssociation(NFPA)5000: BUILDING
CONSTRUCTIONAND SAFETYCODEavailablefrom www.
nfpa.org
3. InternationalBuildingCodeavailablefrom www.iccsafe.org
4. Agricultural Wiring Handbookavailablefrom www.rerc.org ,
Rural ElectricityResourceCouncil P.O.Box 309 Wilmington,
OH45177-0309
5. ASAEEP-364.2InstallationandMaintenanceof FarmStandby
Electric Power available from www.asabe.org, American
Society of Agricultural & Biological Engineers2950 Niles
Road,St. Joseph,MI 49085
This list is not all inclusive.Checkwith theAuthority HavingLocal
Jurisdiction (AHJ)for any localcodes or standardswhich maybe
applicableto your jurisdiction.
MODELNO:
SERIALNO:
CALIFORNIAPROPOSITION55 WARNING
Engineexhaustandsomeof its constituentsareknown
to theStateof Californiato causecancer,birth defects
and otherreproductiveharm.
CALIFORNIAPROPOSITION55 WARNING
This productcontainsor emitschemicalsknown tothe
Stateof Californiato causecancer,birth defects and
otherreproductiveharm.
UnitID
Locations
Page 6

1.1 UNPACKING
• Removeall packagingmaterial.
• Removeseparateaccessorybox.
• Removecarton off the generator.
1.1.1 ACCESSORYBOX
Checkall contents(Figure1). If anyparts aremissingor damaged
locatean authorizeddealerat1-888-436-3722.
Contentsinclude:
• 2-Axle Pins • OilFilter
• 2- WheelSpacers • Air Filter
• 2- HairPins • SparkPlug
• 2- Wheels • SparkPlugWrench
• 1- FrameFoot • ShopTowel
• 1- FrameBolt • 1 QuartSAE30Oil Bottle
• 1- FrameFlatWasher • OilFunnel
• 3- FlangeNuts • 2 - VibrationMounts
Figure 1 - Accessory Box
Referto Figure2andinstallthe wheelkit andframefoot asfollows:
1. Slidethe AxlePinthroughthe Wheel,WheelSpacer(Washer)
andthe Frame.
2. Installthe Hair Pintothe AxlePinto securethewheel. Repeat
for the oppositeside.
3. Secure the Vibration Mounts to the Frame Foot with the
includedlocking nuts.
4. To install the Frame Foot, remove the lock nut from the
VibrationMount stud.
5. Place the Frame Foot on the Vibration Mount stud and
re-installthelock nut.Tightenthe nutcompletely.
6. Installthe FrameBolt through the FrameWasher,Frameand
Framefoot. Securewith a flangenut.
Figure 2 - Wheel and Foot Assembly
ASSEMBLE
FRAME
FOOT
SECUREWHEEL
ANDAXLEWITH
HAIRPIN
1.2 ASSEMBLY
Readentire Owner's Manual beforeattemptingto assemble or
operatethe generator. The generatorrequires some assembly
priorto usingit. If problems arise whenassemblingthegenerator,
pleasecall the GeneratorHelplineat 1-888-436-3722.
1.2.1 ASSEMBLINGTHEWHEELKITANBFRAMEFOOT
Thewheel kit is designedto greatly improvethe portability of the
generator.Youwilt needthe following tools to installthewheel kit:
• Pliers
• 1/2" (13mm)Wrench
• SocketWrenchwith a1/2" (13mm)socket.
NOTE:
The wheelsare notintendedfor over-the-roaduse.
RE-USETHIS
NUTFROM
VIBRATION--_
MOUNT
t
WHEELSPACER
FRAME
BOLT
FRAME
WASHER
FLANGE
NUT
SLIDEAXLE
THROUGHWHEEL
ANDWHEEL
SPACER
INSTALLFRAMEFOOT
Page 7
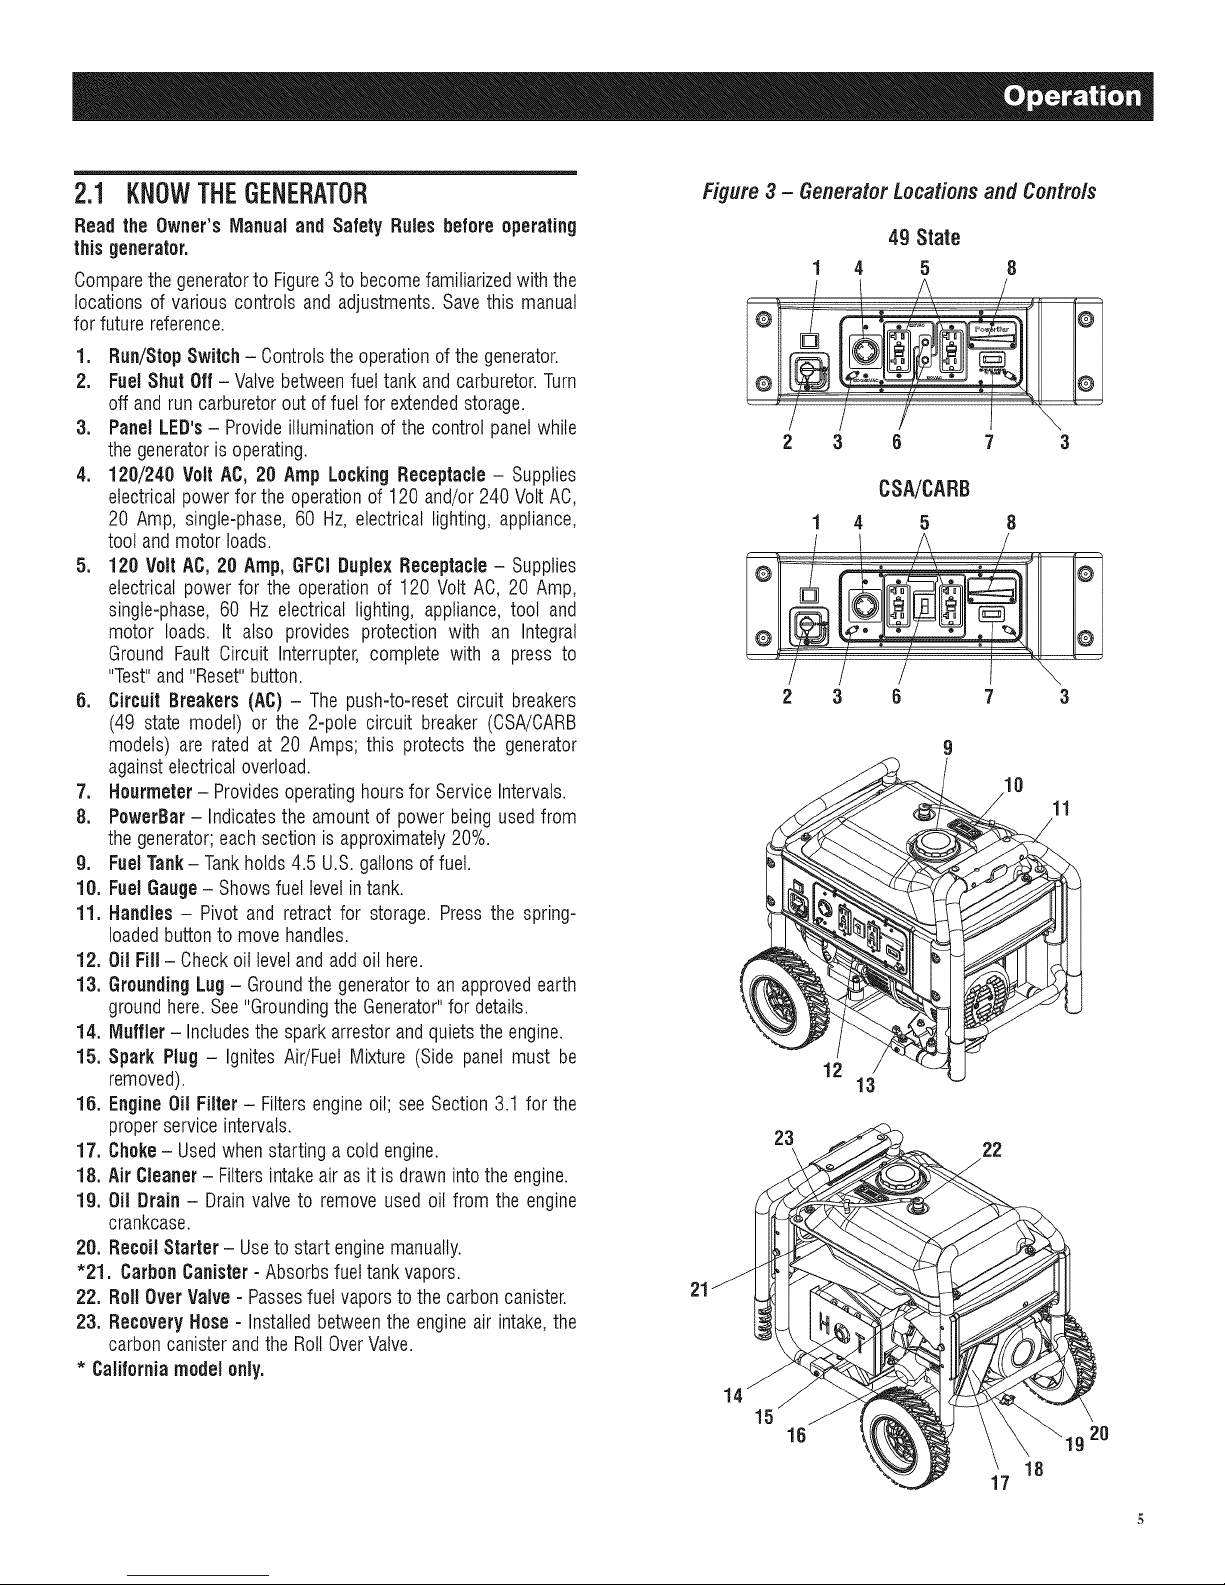
2.1 KNOWTHEGENERATOR
Read the Owner'sIVlanualand Safety Rules before operating
thisgenerator.
Comparethegeneratorto Figure3to becomefamiliarizedwith the
locations of various controls and adjustments.Savethis manual
for future reference.
1. Run/StopSwitch - Controlsthe operationof the generator.
2. FuelShut Off - Valvebetweenfueltank andcarburetor.Turn
off and run carburetoroutof fuelfor extendedstorage.
3. Panel LED's- Provideilluminationof the control panelwhile
thegeneratoris operating.
4. 120/240 Volt AC, 20 Amp LockingReceptacle- Supplies
electricalpower for the operationof 120 and/or 240 VoltAC,
20 Amp, single-phase,60 Hz, electrical lighting, appliance,
tool andmotor loads.
5. 120 Volt AC,20 Amp, GFCiDuplexReceptacle - Supplies
electrical power for the operationof 120 Volt AC, 20 Amp,
single-phase, 60 Hz electrical lighting, appliance,tool and
motor loads. It also provides protection with an Integral
Ground Fault Circuit Interrupter, complete with a press to
"Test"and "Reset"button.
6. CircuitBreakers(AC) - The push-to-reset circuit breakers
(49 state model) or the 2-pole circuit breaker (CSA/CARB
models) are rated at 20 Amps; this protects the generator
againstelectricaloverload.
7. Hourmeter- Providesoperatinghours for Service Intervals.
8. PowerBar- Indicatesthe amountof power being used from
thegenerator;each section is approximately20%.
g. FuelTank- Tankholds4.5 U.S.gallonsof fuel.
10. FuelGauge- Showsfuel levelin tank.
11. Handles - Pivot and retractfor storage. Press the spring-
loadedbuttonto move handles.
12. Oil Fill- Checkoil level andadd oil here.
13. Grounding Lug- Groundthe generatorto an approvedearth
groundhere.See"GroundingtheGenerator"for details.
14. Muffler - Includesthe sparkarrestor andquietsthe engine.
15. Spark Plug- Ignites Air/Fuel Mixture (Side panel must be
removed).
15. EngineOil Filter- Filtersengineoil; seeSection 3.1 for the
properservice intervals.
17. Choke- Usedwhenstarting a cold engine.
18, AirCleaner- Filtersintakeair as it is drawn intothe engine.
19. Oil Drain- Drain valveto remove used oil from the engine
crankcase.
20. RecoilStarter - Useto start enginemanually.
"21. CarbonCanister- Absorbs fuel tank vapors.
22. Roll OverValve - Passesfuel vaporsto the carboncanister.
23. Recovery Hose- Installedbetweenthe engineair intake,the
carboncanister andthe RollOverValve.
* Californiamodelonly,
Figure 3 - Generator Locations and Controls
49 State
1 4 5 8
@ @
2 3 6 7 3
CSA/CARB
1 4 5 8
2 3 6 7 3
12
13
23
21
22
11
15
16 20
18
17
Page 8
2.2 HOURMETER=NORESET
The Hourmeter tracks hours of operation
maintenance:
Therewill be a onetime breakin "CHGOIL"messagethat flashes
with the elapsedtime in hours and tenths after thefirst 30 hours
of operation.
This messagewill actuallybeginflashing at 29 hoursand disable
itself at 31 hours providing a two hour window to perform the
service.
Therewill be a subsequent"CHGOIL"messageevery 100 hours.
Themessage wilt flash one hour before and onehour after each
100 hour interval,again providinga two hour window to perform
service.
Every200 hours the "SVC"icon on the lower left hand corner of
the display will flash. Themessagewill flash one hourbefore and
onehourafter each200 hourintervalprovidingatwo hourwindow
to perform service.
Whenthe hour meter is inthe FlashAlert mode, the maintenance
message will always alternate with elapsedtime in hours and
tenths. The hours wilt flash four times, then alternate with the
maintenancemessagefour times untilthe meter resets itself.
,, 100 hours - CHGOIL-- Oil ChangeInterval(Every100 hrs)
* 200 hours- SVC-- Air FilterInterval(Every200 hrs)
for scheduled
Fora newgeneratorfor instance,the messagewill say "CHGOIL"
thenflash "in30". This meansthat in 30 hours, the oil wilt needto
be changed. Pressingthe button a few more times will bring the
meter backto the screenthat shows the total hoursrun.
Reset: Toggleto the alert that you wish to reset then hold the
buttondownfor 9 seconds.Themaintenancehoursareresetwhen
thedisplay shows "0000.0".
NOTE:
Thehourglass graphic willflashon and off whenthe engine
is running.Thissignifiesthatthe meter is trackinghours of
operation.
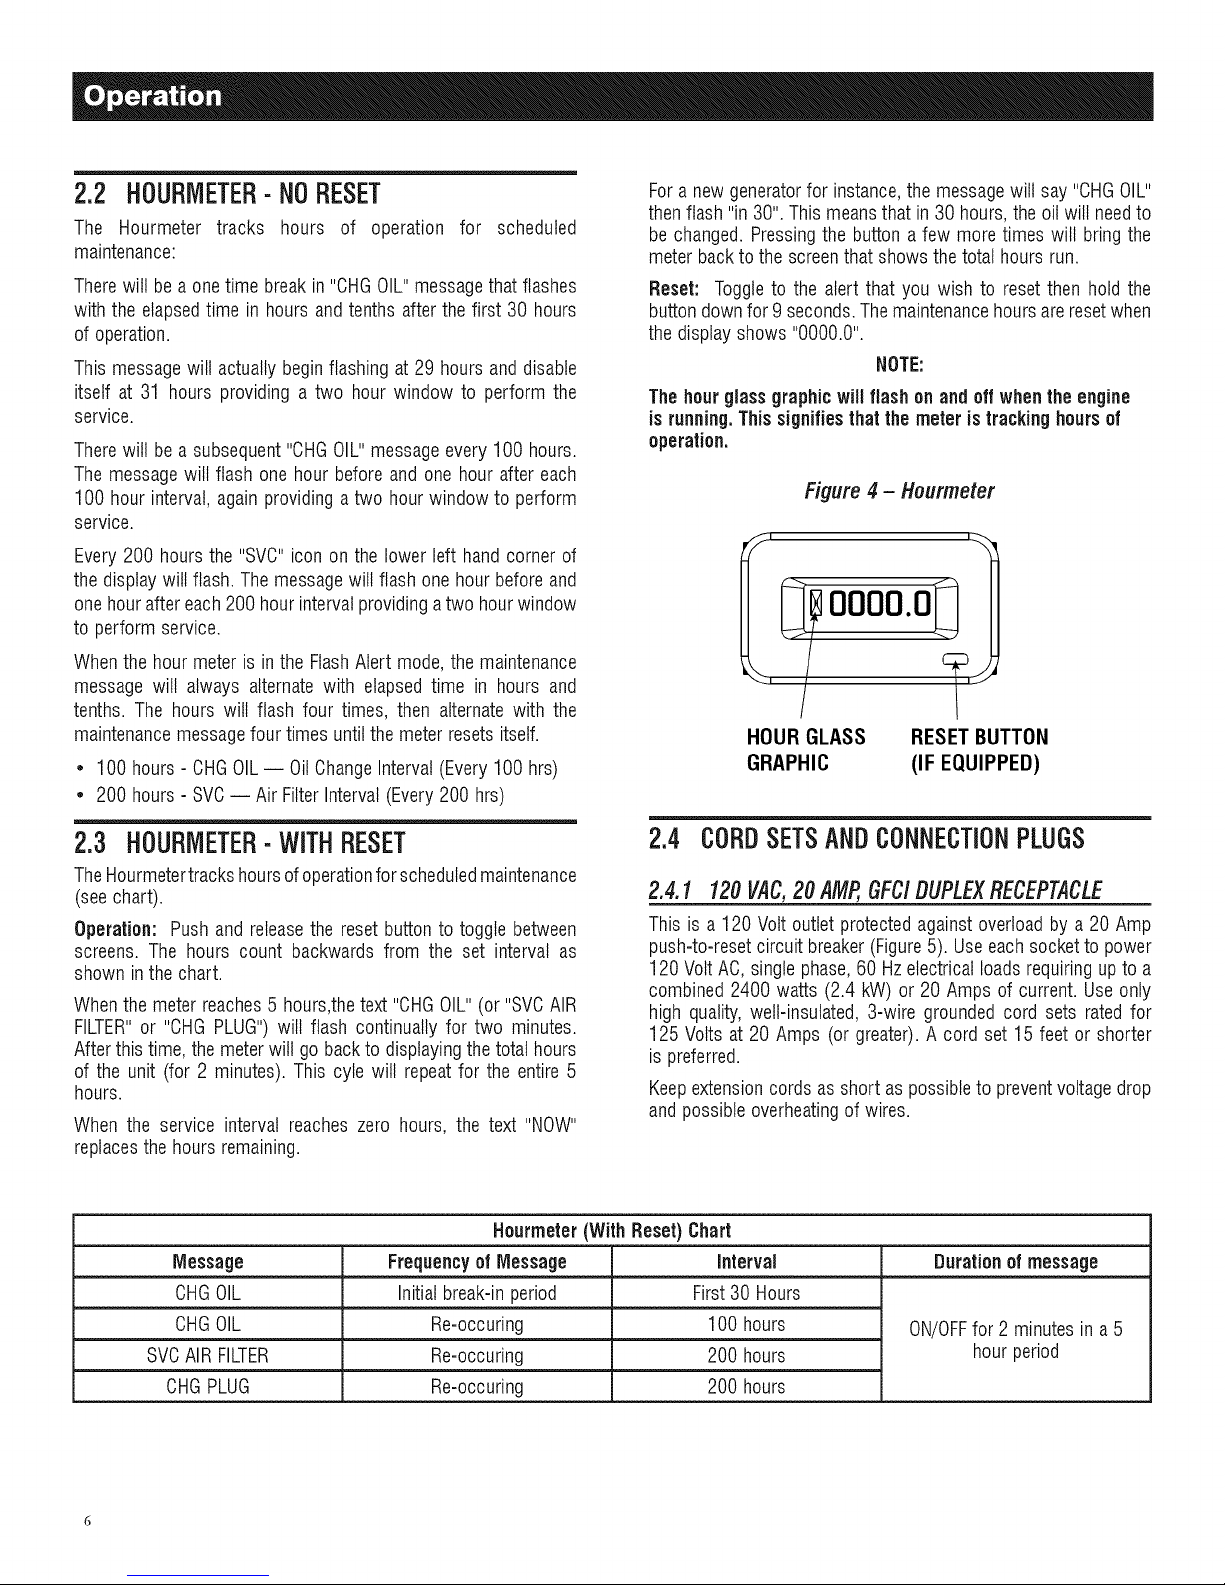
Figure 4 - Hourmeter
OOOO'O
HOUR GLASS RESETBUTTON
GRAPHIC (IF EQUIPPED)
2.3 HOURMETEB=WITHRESET
TheHourmetertrackshoursof operationforscheduledmaintenance
(seechart).
Operation: Pushand releasethe reset button to toggle between
screens. The hours count backwards from the set interval as
shown in the chart.
Whenthe meter reaches5 hours,thetext"CHGOIL"(or"SVCAIR
FILTER"or "CHG PLUG")will flash continually for two minutes.
Afterthis time, the meterwill go backto displayingthe total hours
of the unit (for 2 minutes). This cyle will repeatfor the entire 5
hours.
When the service interval reacheszero hours, the text "NOW"
replacesthe hours remaining.
Nourmeter(With Reset) Chart
Message Frequencyof Message Interval Duration of message
CHGOIL Initialbreak-inperiod First30 Hours
CHGOIL Re-occuring 100 hours ON/OFFfor 2 minutes in a 5
SVCAIR FILTER Re-occuring 200 hours hour period
CHGPLUG Re-occuring 200 hours
2.4 CORDSETSANDCONNECTIONPLUGS
2.4.1 120VAC,20AMP,GFC/DUPLEXRECEPTACLE
This is a 120 Volt outlet protectedagainst overloadby a 20 Amp
push-to-resetcircuitbreaker (Figure5). Useeach socketto power
120 VoltAC, singlephase,60 Hzelectrical loadsrequiringupto a
combined 2400 watts (2.4 kW) or 20 Amps of current.Use only
high quality, welt-insulated,3-wire groundedcord sets ratedfor
125 Volts at 20 Amps (or greater).A cord set15 feet or shorter
is preferred.
Keepextensioncords as short as possibleto preventvoltagedrop
and possibleoverheatingof wires.
Page 9
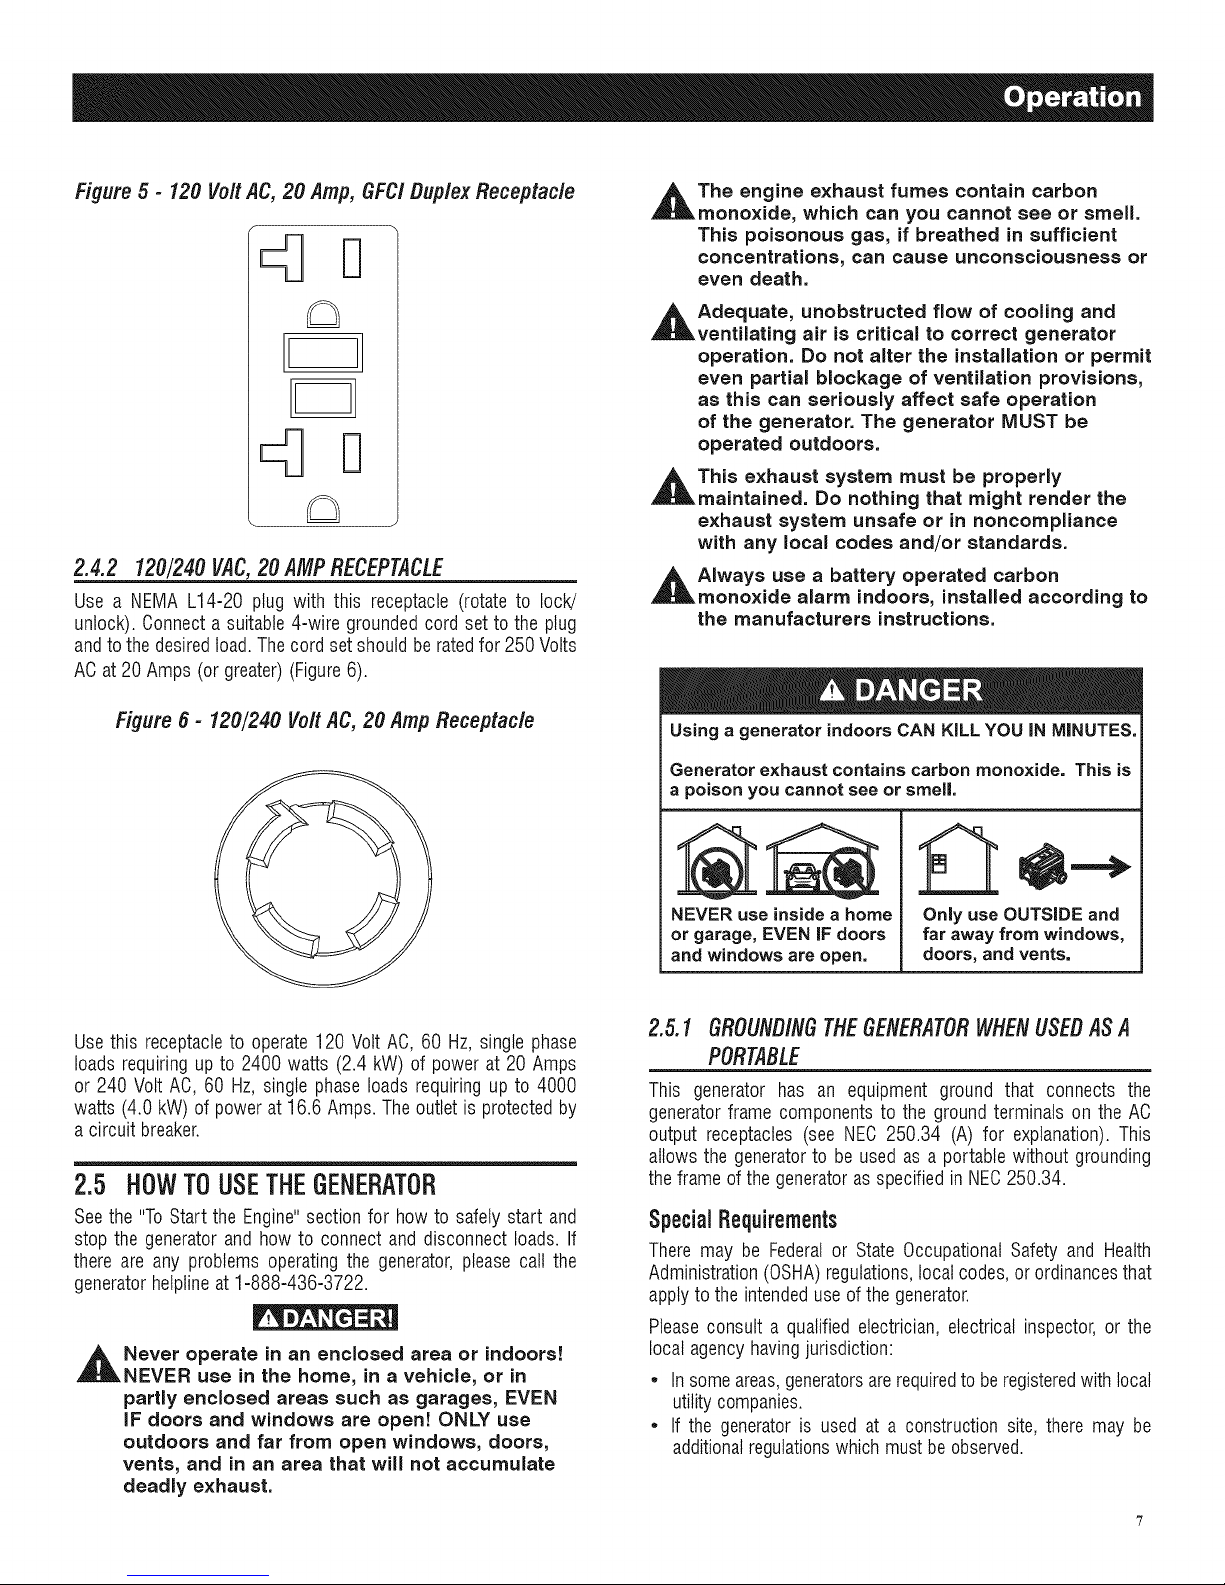
Figure 5 - 120 Vo/t AC, 20 Amp, GFC/ Duplex Receptac/e
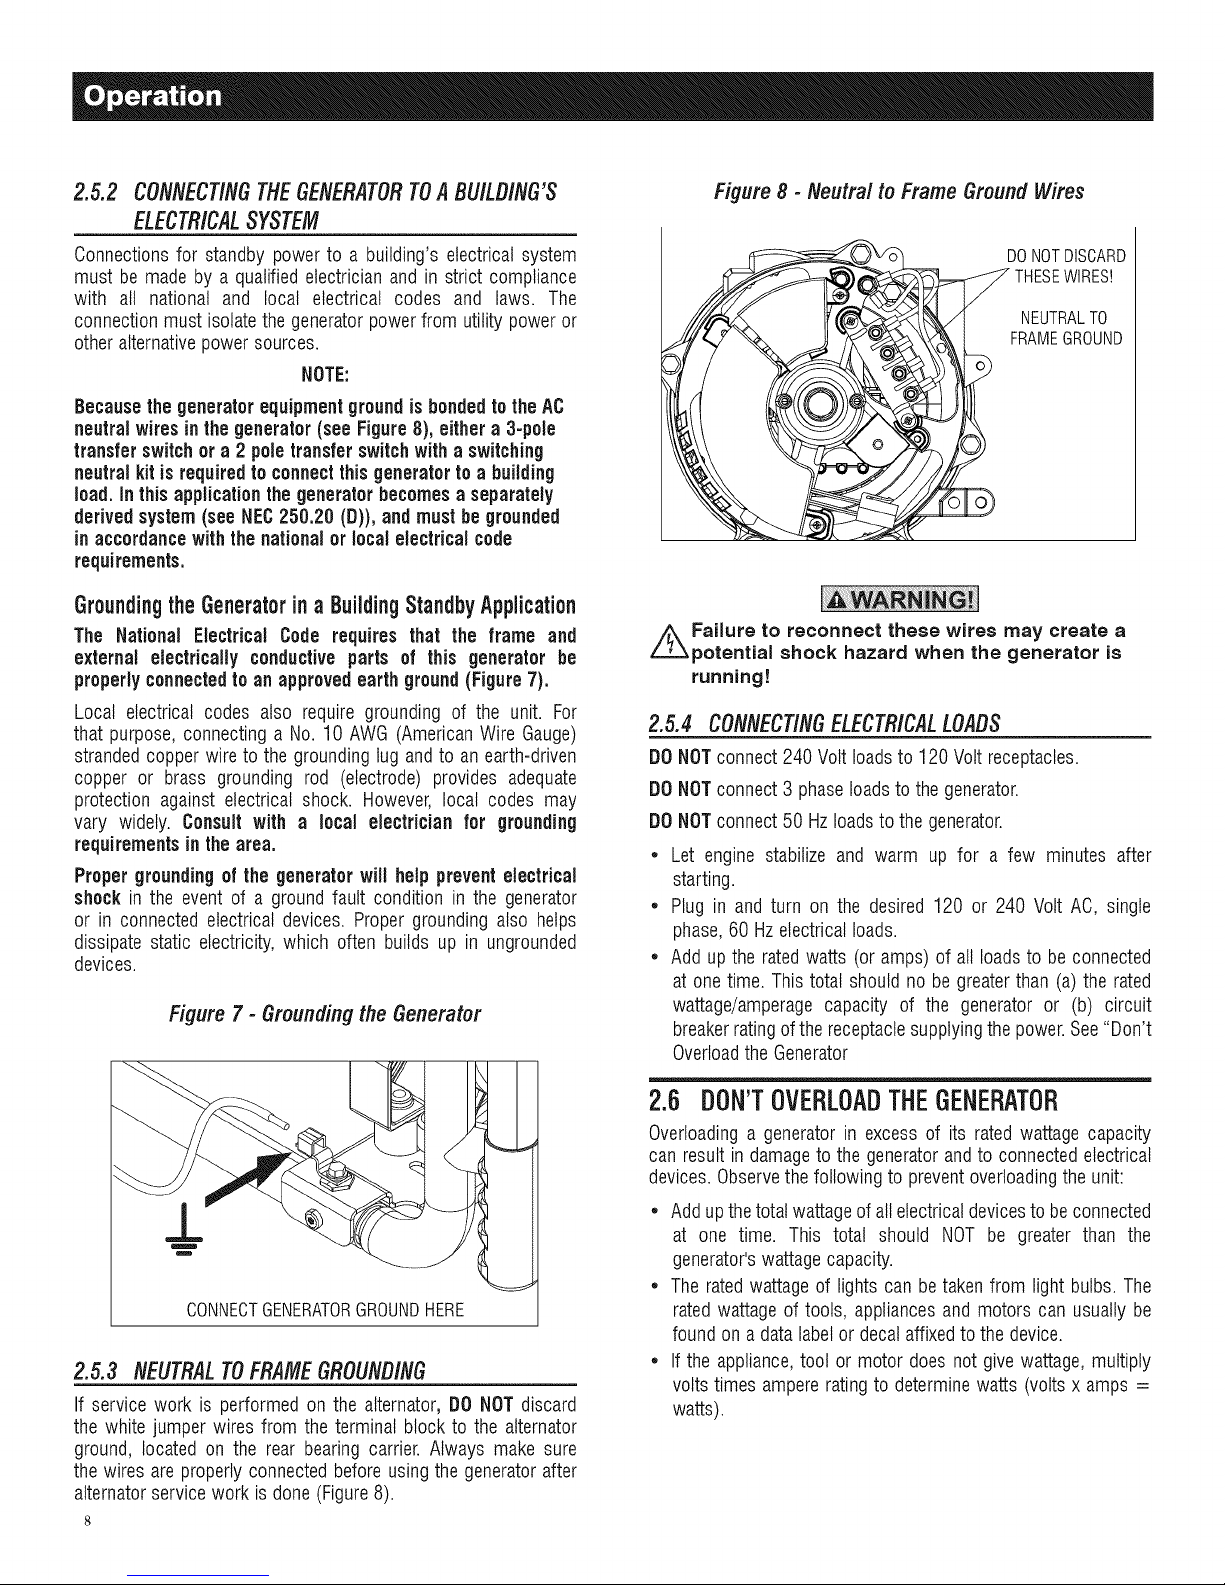
2.4.2 120/240 VAC,20 AMPRECEPTACLE
Use a NEMA L14-20 plug with this receptacle (rotate to lock!
unlock). Connecta suitable4-wire groundedcord set to the plug
andto thedesiredtoad.Thecordset should be ratedfor 250 Volts
ACat 20 Amps (or greater)(Figure6).
_t he engine exhaust fumes contain carbon
monoxide, which can you cannot see or smell.
This poisonous gas, if breathed in sufficient
concentrations, can cause unconsciousness or
even death.
_t Adequate, unobstructed flow of cooling and
ventilating air is critical to correct generator
operation. Do not alter the installation or permit
even partial blockage of ventilation provisions,
as this can seriously affect safe operation
of the generator. The generator MUST be
operated outdoors.
_t This exhaust system must be properly
maintained. Do nothing that might render the
exhaust system unsafe or in noncompliance
with any local codes and/or standards.
AIways use a battery operated carbon
monoxide alarm indoors, installed according to
the manufacturers instructions.
Figure 6 - 120/240 VoRAC, 20 Amp Receptac/e
Use this receptacleto operate120 Volt AC, 60 Hz, singlephase
loads requiringup to 2400 watts (2.4 kW) of power at 20 Amps
or 240 Volt AC, 60 Hz,single phase loads requiring up to 4000
watts (4.0 kW) of powerat 16.6 Amps. The outletis protectedby
a circuit breaker.
2,5 HOWTOUSETHEGENERATOR
Seethe "ToStart the Engine"sectionfor howto safelystart and
stop the generator and how to connect and disconnect loads. If
there are any problems operatingthe generator,pleasecall the
generatorhelplineat 1-888-436-3722.
Never operate in an encJosed area or indoors!
NEVER use in the home, in a vehicJe, or in
partly encJosed areas such as garages, EVEN
iF doors and windows are open! ONLY use
outdoors and far from open windows, doors,
vents, and in an area that will not accumulate
deadly exhaust.
Using a generator indoors CAN KiLL YOU iN MINUTES.
Generator exhaust contains carbon monoxide. This is
a poison you cannot see or smell.
NEVER use inside a home
or garage, EVEN iF doors
and windows are open.
Only use OUTSIDE and
far away from windows,
doors, and vents.
2.5.1 GROUNDINGTHEGENERATORWHENUSEDASA
PORTABLE
This generator has an equipment ground that connects the
generatorframe componentsto the groundterminals on the AC
output receptacles (see NEC 250.34 (A) for explanation).This
allows the generatorto be used as a portable without grounding
theframe ofthe generatoras specifiedin NEC250.34.
SpecialRequirements
There may be Federalor State Occupational Safety and Health
Administration(OSHA)regulations,localcodes, or ordinancesthat
applyto the intendeduse ofthe generator.
Pleaseconsult a qualified electrician, electrical inspector, or the
local agencyhavingjurisdiction:
* In someareas,generatorsarerequiredtoberegisteredwith local
utilitycompanies.
* If the generatoris used at a construction site, there may be
additionalregulationswhich mustbe observed.
Page 10
2.5.2 CONNECTINGTHEGENERATORTOA BU/LD/NG'S
ELECTRICALSYSTEM
Connectionsfor standby power to a building's electrical system
must be made by a qualifiedelectricianand in strict compliance
with all national and local electrical codes and laws. The
connectionmust isolatethe generatorpowerfrom utility power or
otheralternativepowersources.
NOTE:
Becausethe generatorequipment groundis bondedto the AC
neutral wires in thegenerator(see Figure8), either a 3-pole
transferswitchor a 2 pole transferswitchwith a switching
neutralkit is requiredto connectthisgenerator to a building
load. Inthis application the generator becomes a separately
derived system(seeNEC250.20 (D)), and mustbegrounded
in accordancewith thenationalorlocalelectrical code
requirements.
GroundingtheGeneratorina BuildingStandbyApplication
The National Electrical Code requires that the frame and
external electrically conductiveparts of this generator be
properlyconnectedto an approvedearth ground (Figure 7).
Local electrical codes also require grounding of the unit. For
that purpose,connecting a No.10 AWG (AmericanWire Gauge)
strandedcopperwire to the groundinglug and to an earth-driven
copper or brass grounding rod (electrode) provides adequate
protection against electrical shock. However, local codes may
vary widely. Consultwith a local electrician for grounding
requirementsin the area.
Proper grounding of the generator will help preventelectrical
shockin the event of a ground fault condition in the generator
or in connectedelectrical devices. Proper grounding also helps
dissipate static electricity, which often builds up in ungrounded
devices.
Figure7 - Groundingthe Generator
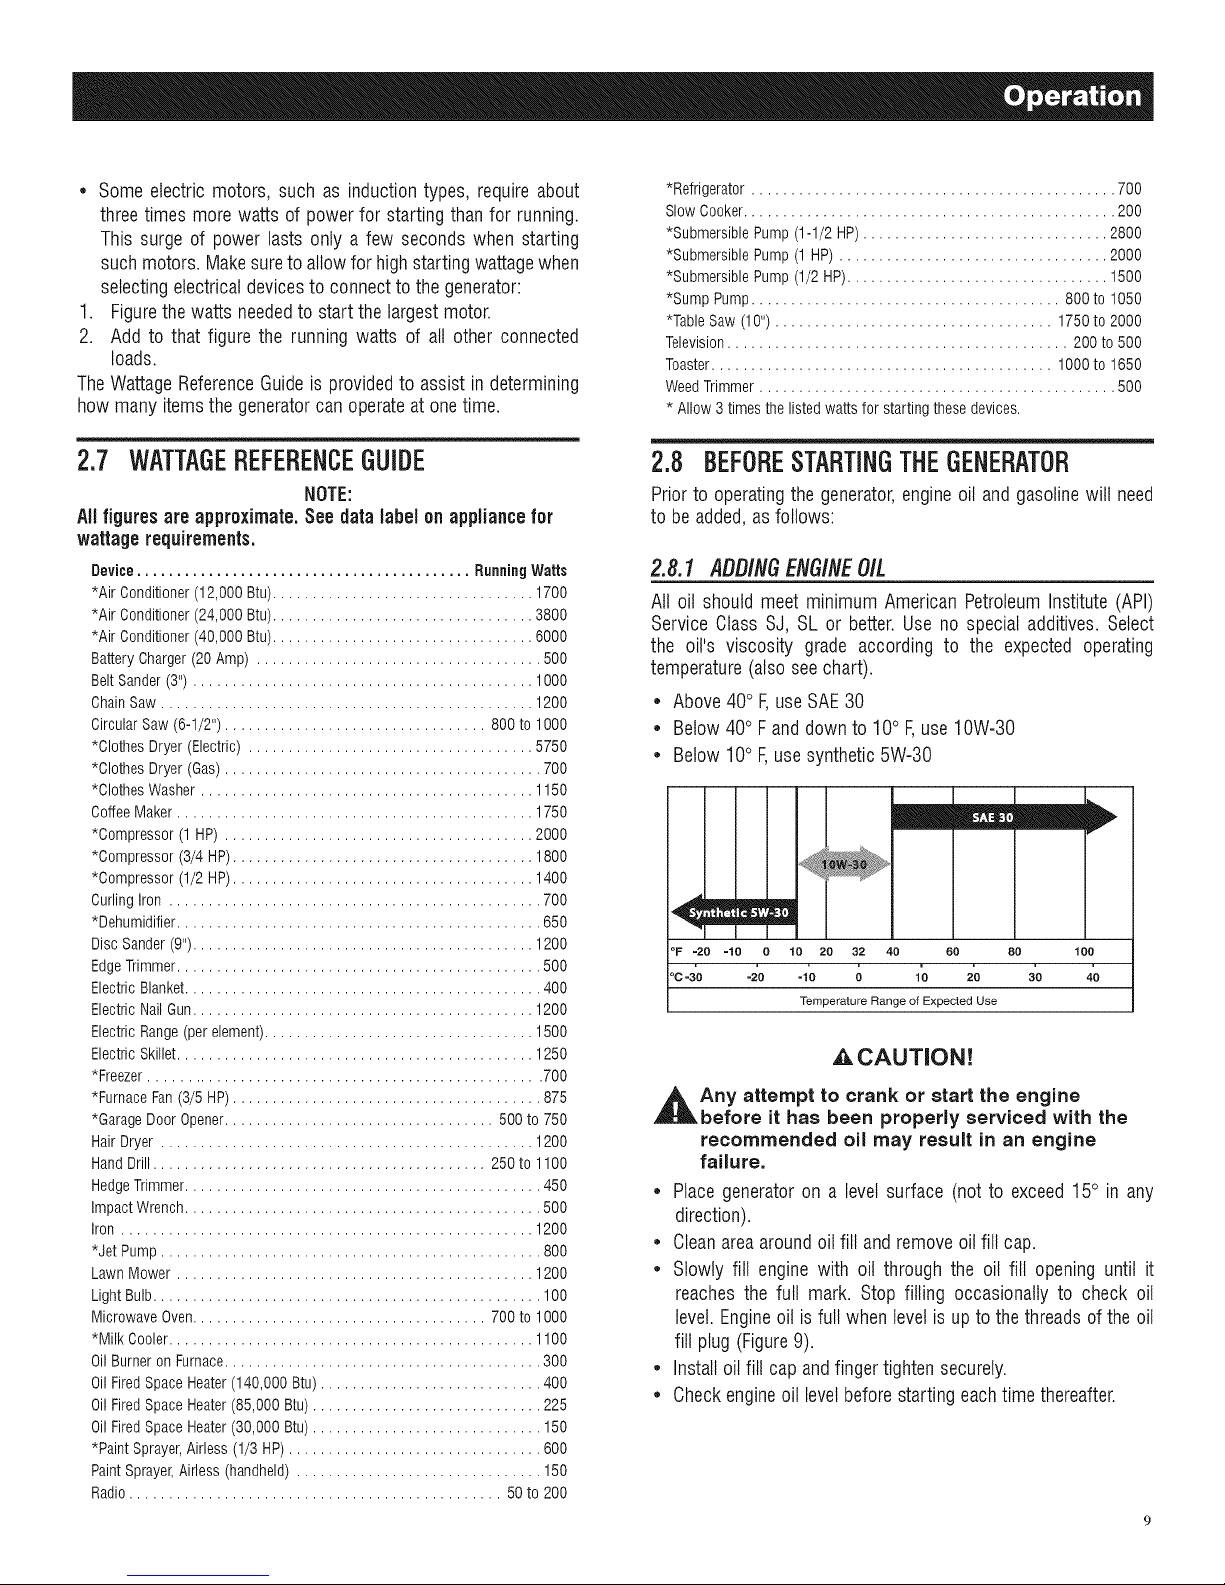
Figure8 - Neutral to FrameGroundWires
DONOTDISCARD
THESEWIRES!
NEUTRALTO
FRAMEGROUND
//_Failure to reconnect these wires may create a
potential shock hazard when the generator is
running!
2.5.4 CONNECtiNGELECTR/CALLOADS
DONOTconnect 240 Volt loadsto 120 Voltreceptacles.
DONOTconnect 3 phaseloadsto the generator.
DONOTconnect 50 Hzloadsto the generator.
* Let engine stabilize and warm up for a few minutes after
starting.
* Plug in and turn on the desired 120 or 240 Volt AC, single
phase,60 Hzelectrical loads.
* Add up the ratedwatts (or amps)of all loadsto be connected
at one time. This total should no be greaterthan (a)the rated
wattage/amperagecapacity of the generator or (b) circuit
breakerratingofthe receptaclesupplyingthepower.See"Don't
OverloadtheGenerator
CONNECTGENERATORGROUNDHERE
2.5.3 NEUTRALTOFRAMEGROUNDING
If service work is performed on the alternator,DO NOTdiscard
the white jumper wires from the terminal blockto the alternator
ground, located on the rear bearing carrier. Always make sure
the wires are properlyconnected beforeusingthe generatorafter
alternatorservicework is done (Figure8).
2.6 DON'TOVERLOADTHEGENERATOR
Overloadinga generatorin excess of its ratedwattage capacity
can result in damageto the generatorandto connectedelectrical
devices.Observethefollowing to preventoverloadingthe unit:
* Addupthetotal wattageofallelectricaldevicesto be connected
at one time. This total should NOT be greater than the
generator'swattagecapacity.
* The ratedwattageof lights can betaken from light bulbs. The
ratedwattage of tools, appliancesand motors can usually be
foundon a data labelor decal affixedto the device.
* If the appliance,tool or motor does not give wattage,multiply
voltstimes ampereratingto determinewatts (voltsx amps =
watts).
Page 11
• Some electric motors, such as inductiontypes, requireabout
threetimes more watts of powerfor starting than for running.
This surge of power lasts only a few seconds when starting
such motors. Makesureto allowfor highstarting wattagewhen
selectingelectricaldevicesto connectto the generator:
1. Figurethewatts neededto start thelargest motor.
2. Add to that figure the running watts of all other connected
loads.
TheWattageReferenceGuideis providedto assist in determining
howmany itemsthe generatorcan operateat onetime.
*Refrigerator .............................................. 700
Slow Cooker............................................... 200
*Submersible Pump (1-1/2 HP)............................... 2800
*Submersible Pump (1 HP) .................................. 2000
*Submersible Pump (1/2 HP)................................. 1500
*Sump Pump....................................... 800to 1050
*Table Saw (10") ................................... 1750 to 2000
Television........................................... 200 to 500
Toaster........................................... 1000 to 1650
WeedTrimmer ............................................. 500
* Allow 3 times the listed watts for starting these devices.
2.7 WATTAGEREFERENCEGUIDE
NOTE:
Allfigures are approximate. Seedata labelon appliancefor
wattage requirements.
Device.......................................... RunningWatts
*Air Conditioner(12,000 Btu)................................. 1700
*Air Conditioner(24,000 Btu)................................. 3800
*Air Conditioner(40,000 Btu)................................. 6000
Battery Charger(20 Amp) .................................... 500
Belt Sander (3") ........................................... 1000
Chain Saw............................................... 1200
Circular Saw (6-1/2") ................................. 800 to 1000
*Clothes Dryer (Electric) .................................... 5750
*Clothes Dryer (Gas) ........................................ 700
*Clothes Washer .......................................... 1150
CoffeeMaker ............................................. 1750
*Compressor (1HP) ....................................... 2000
*Compressor (3/4 HP)...................................... 1800
*Compressor (1/2 HP)...................................... 1400
OurlingIron ............................................... 700
*Dehumidifier.............................................. 650
Disc Sander (9")........................................... 1200
EdgeTrimmer.............................................. 500
Electric Blanket............................................. 400
Electric NailGun........................................... 1200
Electric Range(per element).................................. 1500
Electric Skillet............................................. 1250
*Freezer.................................................. 700
*Furnace Fan(3/5 HP)....................................... 875
*Garage Door Opener.................................. 500 to 750
Hair Dryer ............................................... 1200
HandDrill .......................................... 250to 1100
HedgeTrimmer............................................. 450
Impact Wrench............................................. 500
Iron .................................................... 1200
*Jet Pump ................................................ 800
Lawn Mower ............................................. 1200
Light Bulb................................................. 100
Microwave Oven..................................... 700 to 1000
*Milk Cooler.............................................. 1100
OilBurner on Furnace........................................ 300
OilFired Space Heater(140,000 Btu)............................ 400
OilFired Space Heater(85,000 Btu)............................. 225
OilFired Space Heater(30,000 Btu)............................. 150
*Paint Sprayer,Airless (1/3 HP)................................ 600
PaintSprayer,Airless (handheld) ............................... 150
Radio ............................................... 50 to 200
2.8 BEFORESTARTINGTHEGENERATOR
Prior to operatingthe generator,engineoil and gasolinewill need
to beadded,as follows:
2.8.1 ADD/NGENG/NEO/L
All oil should meet minimum American PetroleumInstitute (API)
Service Class SJ, SL or better.Useno special additives. Select
the oil's viscosity grade according to the expected operating
temperature(also seechart).
• Above40° F,useSAE30
• Below40° Fand downto 10° F,use10W-30
• Below 10° F,usesynthetic5W-30
mEm
7I
°F -20 -!0 O 10 20 32 40 60 80 leo
oc-3'o -_o -;o ; 1'0 2'0 3'o 4?
Temperature Range of Expected Use
,&,CAUTION!
_t ny attempt to crank or start the engine
before it has been properly serviced with the
recommended oil may result in an engine
failure.
• Place generatoron a level surface (not to exceed15° in any
direction).
• Cleanareaaroundoil fill and removeoil fill cap.
• Slowly fill engine with oil through the oil fill opening until it
reaches the full mark. Stop filling occasionally to check oil
level. Engineoil isfull when levelis up to thethreadsof the oil
fill plug (Figure9).
• Installoil fill cap andfinger tightensecurely.
• Checkengineoil levelbeforestarting eachtime thereafter.
Page 12
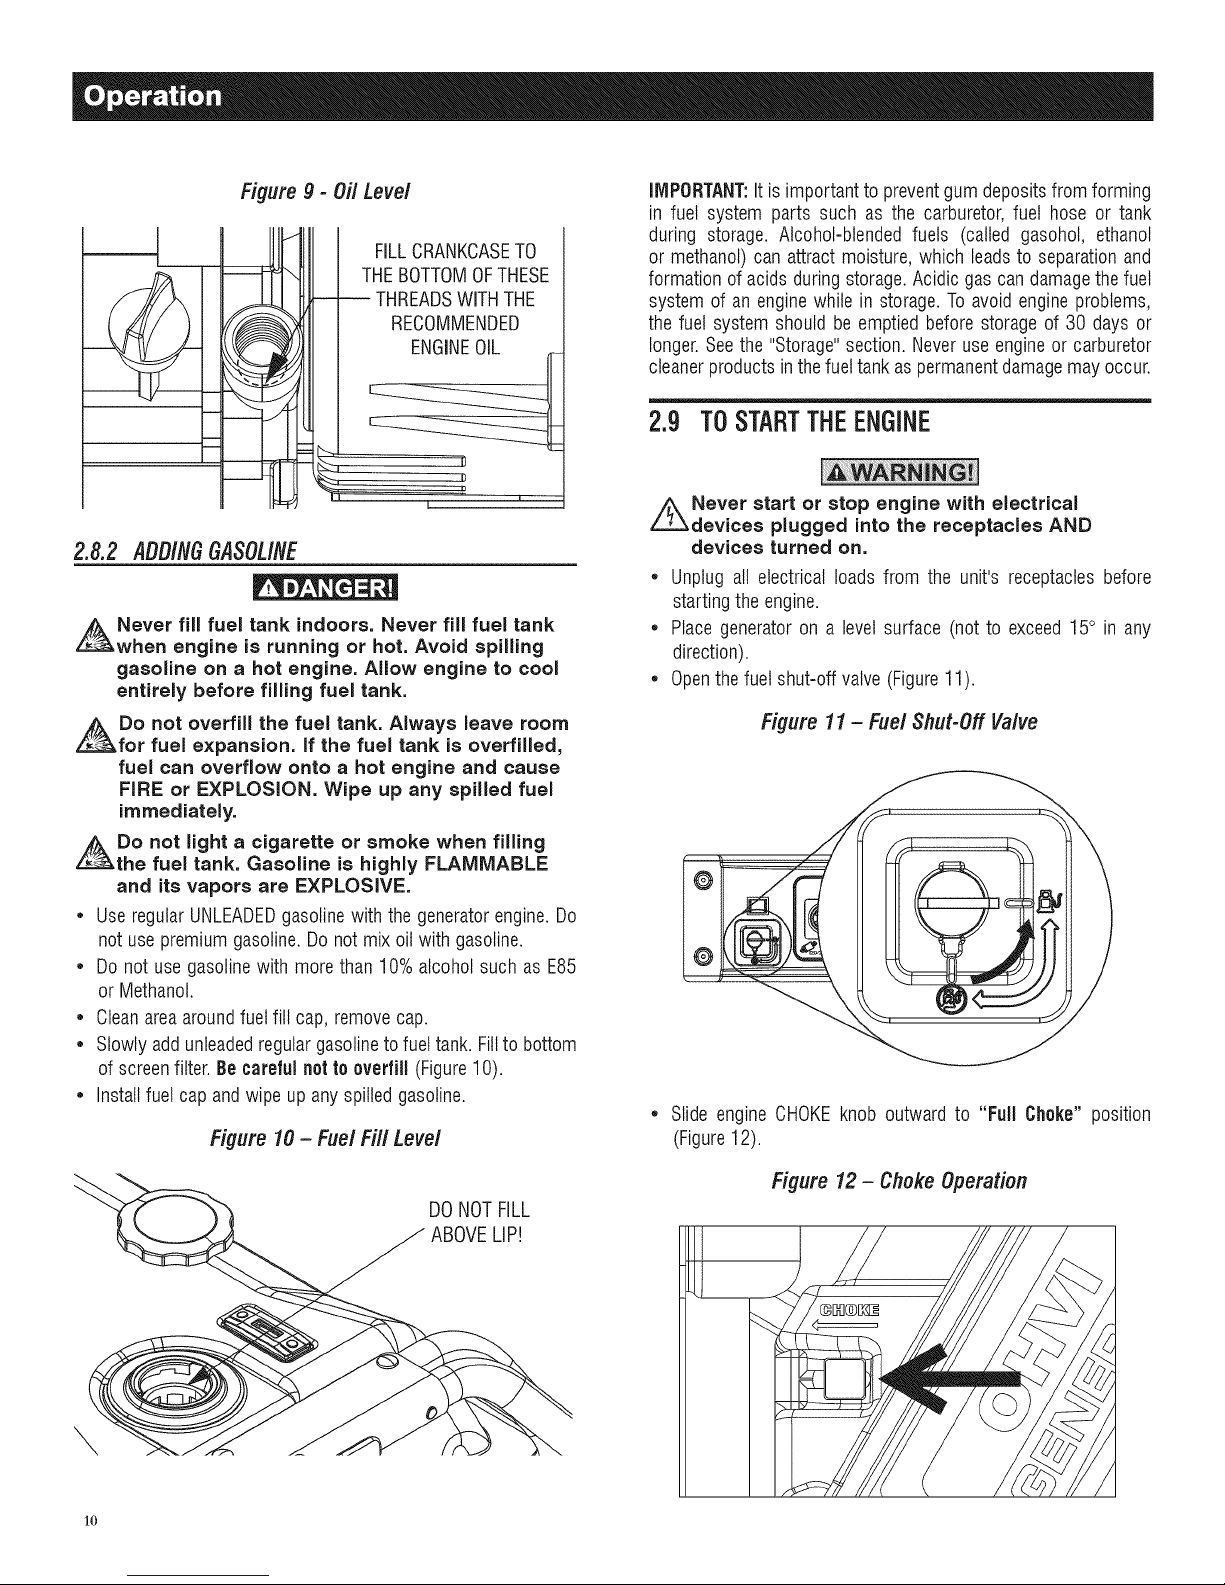
Figure g - Oil Level
m
THEBOTTOMOFTHESE
- -- THREADSWITHTHE
FILLCRANKCASETO
RECOMMENDED
ENGINEOIL
IMPORTANT:Itis important to preventgum depositsfromforming
in fuel system parts such as the carburetor,fuel hose or tank
during storage. Alcohol-blendedfuels (called gasohol, ethanol
or methanol)can attract moisture, which leadsto separationand
formationof acids duringstorage.Acidic gascandamagethefuel
system of an enginewhile in storage.Toavoid engineproblems,
the fuel system should be emptiedbefore storage of 30 days or
longer.Seethe "Storage"section. Neveruseengineor carburetor
cleanerproducts inthefueltank aspermanentdamagemay occur.
m
m
V ,
2.8,2 ADD/fiGGASOLINE
Never fill fuel tank indoors. Never fill fuel tank
when engine is running or hot. Avoid spilling
gasoline on a hot engine. Allow engine to cool
entirely before filling fuel tank.
z_Do not overfill the fuel tank. Always leave room
for fuel expansion. If the fuel tank is overfilled,
fuel can overflow onto a hot engine and cause
FiRE or EXPLOSION. Wipe up any spilled fuel
immediately.
Do not light a cigarette or smoke when filling
the fuel tank. Gasoline is highly FLAMMABLE
and its vapors are EXPLOSIVE.
• UseregularUNLEADEDgasofinewith the generatorengine.Do
not usepremiumgasoline.Do not mix oilwith gasoline.
• Do not use gasolinewith more than 10% alcohol such as E85
or Methanol.
• Cleanareaaroundfuel fill cap, removecap.
• Slowlyaddunleadedregulargasolineto fueltank. Fillto bottom
of screenfilter.Be carefulnotto overfill (Figure10).
• Installfuel cap andwipe up any spilled gasoline.
Figure 10 - Fuel Fill Level
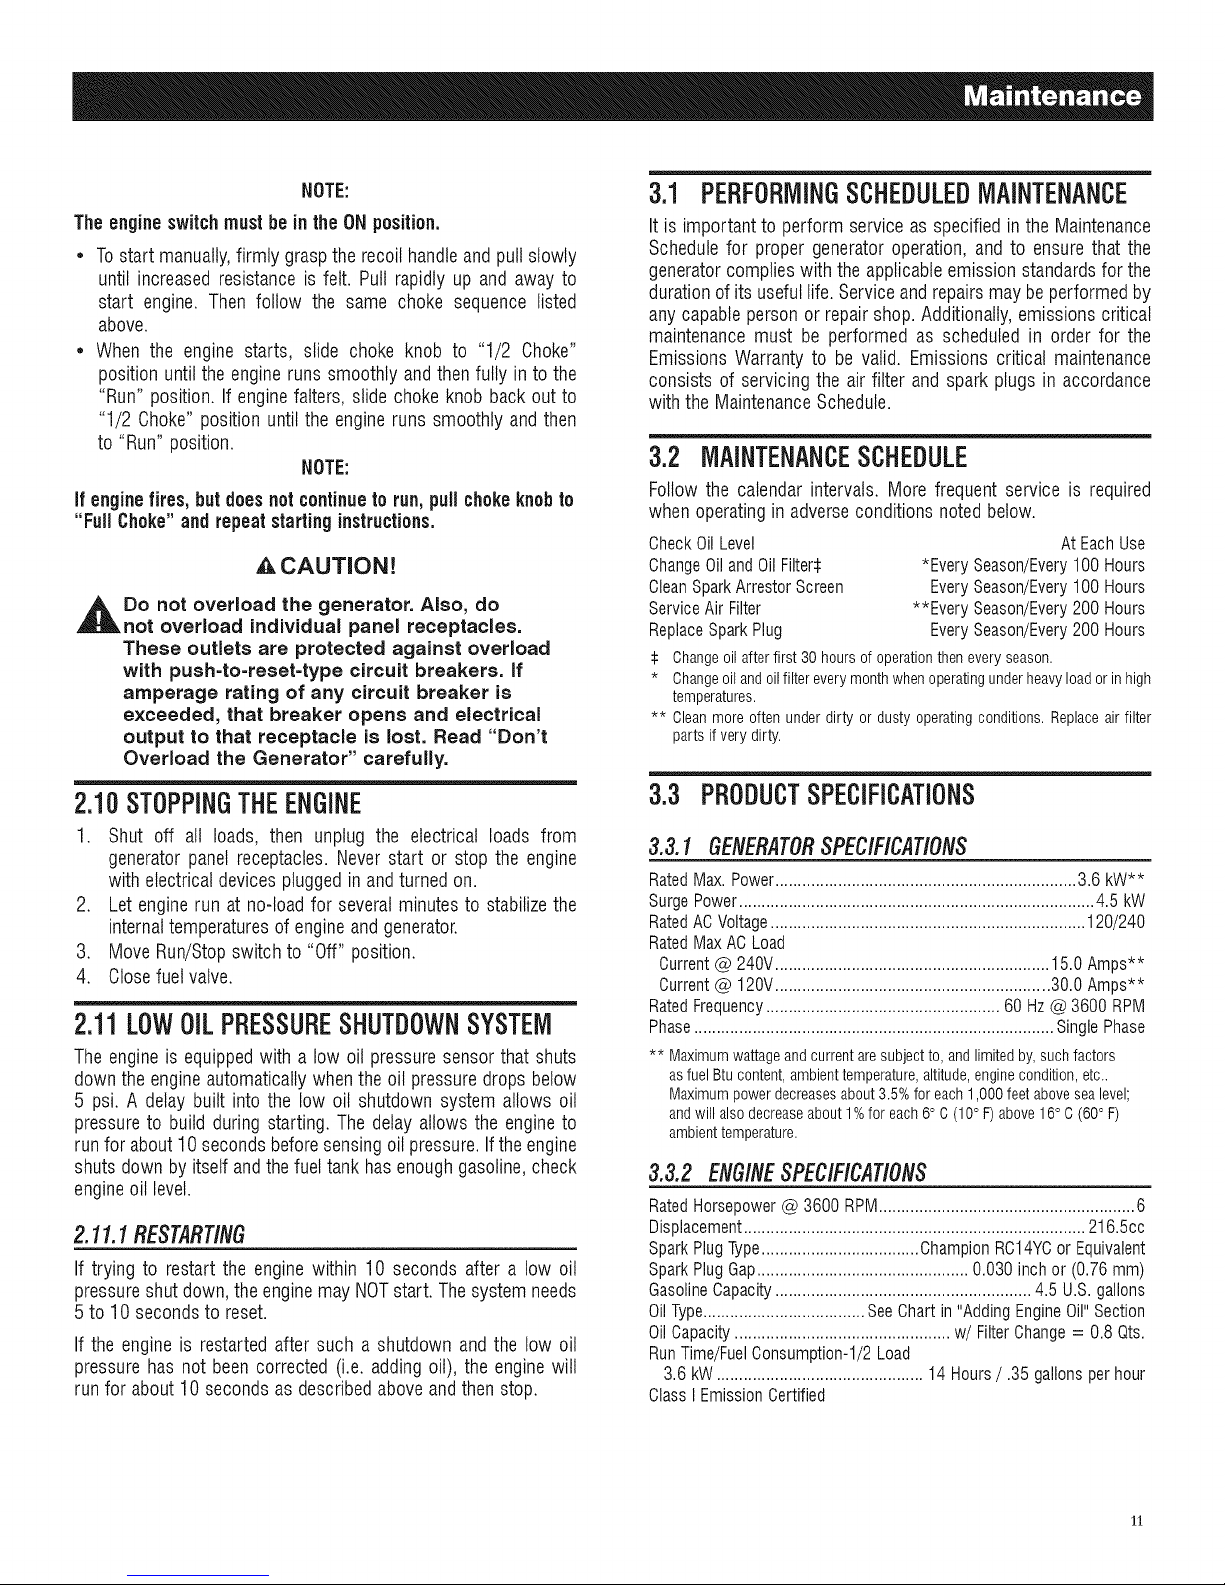
2.9 TOSTARTTHEENGINE
//_Never start or stop engine with electrical
devices plugged into the receptacles AND
devices turned on.
• Unplug all electrical loads from the unit's receptaclesbefore
startingthe engine.
• Place generatoron a levelsurface (not to exceed15° in any
direction).
• Openthefuel shut-off valve (Figure11).
Figure 11 - Fuel Shut-Off Valve
Slide engine CHOKEknob outward to "FullChoke"position
(Figure12).
\
1o
Figure 12- Choke Operation
DONOTFILL
ABOVELIP!
Page 13
NOTE:
The engine switchmustbe in the ONposition.
* Tostart manually,firmly grasp therecoil handleand pull slowly
until increasedresistance is felt. Pull rapidly up and away to
start engine. Then follow the same choke sequence listed
above.
* When the engine starts, slide choke knob to "1/2 Choke"
position untilthe engine runssmoothly andthenfully in to the
"Run" position. If enginefalters, slide chokeknob backout to
"1/2 Choke"position until the engine runs smoothly and then
to "Run" position.
NOTE:
If engine fires,but doesnot continuetorun,pull chokeknobto
"Full Choke"and repeatstartinginstructions.
A, CAUTION!
,_Do not overload the generator. Also, do
not overload individual panel receptacles.
These outlets are protected against overload
with push=to=reset=type circuit breakers, if
amperage rating of any circuit breaker is
exceeded, that breaker opens and electrical
output to that receptacle is lost. Read "Don't
Overload the Generator" carefully.
3.1 PEBFOBIVlINGSCHEDULEDMAINTENANCE
It is importantto performserviceas specified in the Maintenance
Schedulefor proper generatoroperation, and to ensure that the
generatorcomplieswith the applicableemissionstandardsfor the
durationof its usefullife. Serviceand repairsmaybe performedby
anycapable personor repairshop. Additionally,emissionscritical
maintenancemust be performed as scheduled in order for the
Emissions Warrantyto be valid. Emissions critical maintenance
consists of servicingthe air filter and spark plugs in accordance
with the MaintenanceSchedule.
3.2 MAINTENANCESCHEDULE
Follow the calendar intervals. More frequent service is required
whenoperatingin adverseconditions notedbelow.
CheckOilLevel AtEachUse
ChangeOilandOilFilters *EverySeason/Every100Hours
CleanSparkArrestorScreen EverySeason/Every100Hours
ServiceAirFilter **EverySeason/Every200Hours
ReplaceSparkPlug EverySeason/Every200Hours
:i: Changeoil after first 30 hours of operationthen every season.
* Changeoil and oilfilter every monthwhen operatingunderheavyload or in high
temperatures.
** Clean more often under dirty or dusty operating conditions. Replace air filter
parts if verydirty.
2.10STOPPINGTHEENGINE
1. Shut off all loads, then unplug the electrical loads from
generatorpanel receptacles.Never start or stop the engine
with electricaldevicespluggedin andturnedon.
2. Let enginerun at no-load for severalminutesto stabilizethe
internaltemperaturesof engineand generator.
3. Move Run/Stopswitch to "Off" position.
4. Closefuelvalve.
2.11LOW01LPRESSURESHUTDOWNSYSTEM
Theengineis equippedwith a low oil pressuresensorthat shuts
downthe engineautomaticallywhenthe oil pressuredropsbelow
5 psi. A delay built into the low oil shutdown system allows oil
pressureto build during starting. The delay allows the engineto
run for about10 secondsbeforesensingoil pressure.If theengine
shutsdown by itself andthe fueltank hasenoughgasoline,check
engineoil level.
2.1I.IRESTARTING
If trying to restart the engine within 10 seconds after a low oil
pressureshut down, theenginemay NOTstart. Thesystemneeds
5 to 10 secondsto reset.
If the engine is restarted after such a shutdown and the low oil
pressure has not been corrected (i.e. adding oil), the enginewill
run for about10secondsas describedabove andthen stop.
3.3 PBODUCTSPECIFICATIONS
3.3.1GENERATOR SPEC/F/CAT/ON$
RatedMax. Power................................................................... 3.6 kW**
SurgePower............................................................................... 4.5 kW
RatedACVoltage...................................................................... 120/240
RatedMax ACLoad
Current@ 240V............................................................. 15.0 Amps**
Current@ 120V............................................................. 30.0 Amps**
RatedFrequency.................................................... 60 Hz@ 3600 RPM
Phase................................................................................ SinglePhase
** Maximumwattageandcurrentaresubjectto,andlimitedby,suchfactors
asfuelBtucontent,ambienttemperature,altitude,enginecondition,etc..
Maximumpowerdecreasesabout3.5%foreach1,000feetabovesealevel;
andwillalsodecreaseabout1%foreach6° C(10° F)above16° C(60°F)
ambienttemperature.
3.3.2 ENG/NESPECIFICATIONS
RatedHorsepower@ 3600 RPIVl......................................................... 6
Displacement............................................................................ 216.5cc
SparkPlugType...................................ChampionRC14YCor Equivalent
SparkPlug Gap............................................... 0.030 inch or (0.76 ram)
GasolineCapacity......................................................... 4.5 U.S. gallons
OilType.................................... SeeChart in "Adding EngineOil"Section
OilCapacity................................................ w/Filter Change= 0.8 Qts.
RunTime/FuelConsumption-l/2 Load
3.6 kW .............................................. 14 Hours/ .35 gallons per hour
ClassI Emission Certified
11
Page 14
3.3.3 EMISSIONSINFORMATION
TheEnvironmentalProtectionAgency(and CaliforniaAir Resource
Board for generators certified to CA standards) require(s) that
this generator comply with exhaust and evaporative emission
standards.Locate the emissions compliance decalon the engine
to determinewhat standards the generatormeets. This generator
is certified to operateon gasoline.The emission control system
consists ofthe following:
* Air InductionSystem
- IntakePipe/Manifold
- AirCleaner
, FuelSystem
- Carburetor
- FuelTanWCap
- FuelLines
- EvaporativeVentLines
- CarbonCanister(forCAenginesonly)
, IgnitionSystem
- SparkPlug
- IgnitionModule
, ExhaustSystem
- ExhaustManifold/Muffler
3.4 GENERALRECOMMENDATIONS
Thewarranty of thegeneratordoesnotcoveritemsthat havebeen
subjectedto operator abuseor negligence.To receivefull value
from the warranty, the operator must maintain the generatoras
instructed inthis manual.
Some adjustmentswilt need to be made periodically to properly
maintainthegenerator.
All adjustmentsin the Maintenancesectionof this manual should
be madeat leastonce eachseason.Followthe requirementsinthe
"MaintenanceSchedule".
NOTE:
Oncea year replacethe spark plugand replace the air filter.
A new sparkplugand cleanair filter assure properfuel-air
mixture andhelpthe engine run better andlast longer.
NOTE:
DONOTuse a garden hose to cleangenerator.Water can
enter the engine fuel system and cause problems.In addition,
if water entersthe generator through coolingair slots,some
waterwill be retained in voidsand crevicesof the rotor
and stator windinginsulation.Water anddirt buildup on the
generatorinternalwindingswill eventually decreasethe
insulationresistanceof these windings.
3.4.2 TOCLEANTHEGENERATOR
* Usea dampcloth to wipe exteriorsurfaces clean.
* A soft, bristlebrushmaybe usedto loosencakedon dirt, oil, etc.
* A vacuumcleanermay be usedto pick up loose dirt anddebris.
* Low pressure air (not to exceed 25 psi) may be used to
blow away dirt. Inspect cooling air slots and openingson the
generator.Theseopeningsmustbekeptcleanandunobstructed.
3.4.3 ENGINEMAINTENANCE
When working on the generator, always
disconnect spark plug wire from spark plug and
keep the wire away from the spark plug.
3.4.4 CHECKINGOILLEVEL
See the "BEFORESTARTINGTHE GENERATOR"section for
information on checking the oil level. The oil level should be
checkedbeforeeachuse,or at leasteveryeighthoursof operation.
Keepthe oil levelmaintained.
3.4.5 CHANGINGTHEOILANDOILFILTER
Changethe oil and filter after the first 30 hours of operation.
Changethe oil every 100 hours or every season thereafter. If
running this unit under dirty or dusty conditions, or in extremely
hotweather,changethe oil moreoften.
ACAUTION!
3.4.1 GENERATORMAINTENANCE
Operateandstorethe unit in a cleandry environmentwhereit will
not be exposedto excessivedust,dirt, moistureor any corrosive
vapors.Coolingair slotsin thegeneratormustnot becomeclogged
with snow, leaves,or anyotherforeign material.
Checkthe cleanlinessof the generatorfrequentlyand cleanwhen
dust, dirt, oil, moisture or otherforeign substancesarevisible on
its exteriorsurface.
,_ CAUTION!
,l_ Never insert any object or tool through the air
cooling slots, even if the engine is not running.
12
,_ Hot oil may cause burns. Allow engine to
cool before draining oil. Avoid prolonged
or repeated skin exposure with used oil.
Thoroughly wash exposed areas with soap.
Usethe followinginstructionsto changethe oil afterthe engine
coolsdown:
1. Cleanareaaroundoil drainplug.
2. Removeoil drain plugfrom engineand oil fill plug to drainoil
completelyinto a suitablecontainer.
3. When oil has completely drained, install oil drain plug and
tightensecurely.
4. Placea suitable containerbeneaththe oil filter and turn filter
counterclockwise to remove. Discard according to local
regulations.
5. Coat gasket of new filter with clean engine oil. Turn filter
clockwise untilgasketcontacts lightlywith filter adapter.Then
tightenan additional3/4 turn.
Page 15
6. Fill engine with recommendedoil. (See "Before Starting the
Generator"for oil recommendations).
7. Wipeup anyspilledoil.
8. Disposeof usedoil at a propercollectioncenter.
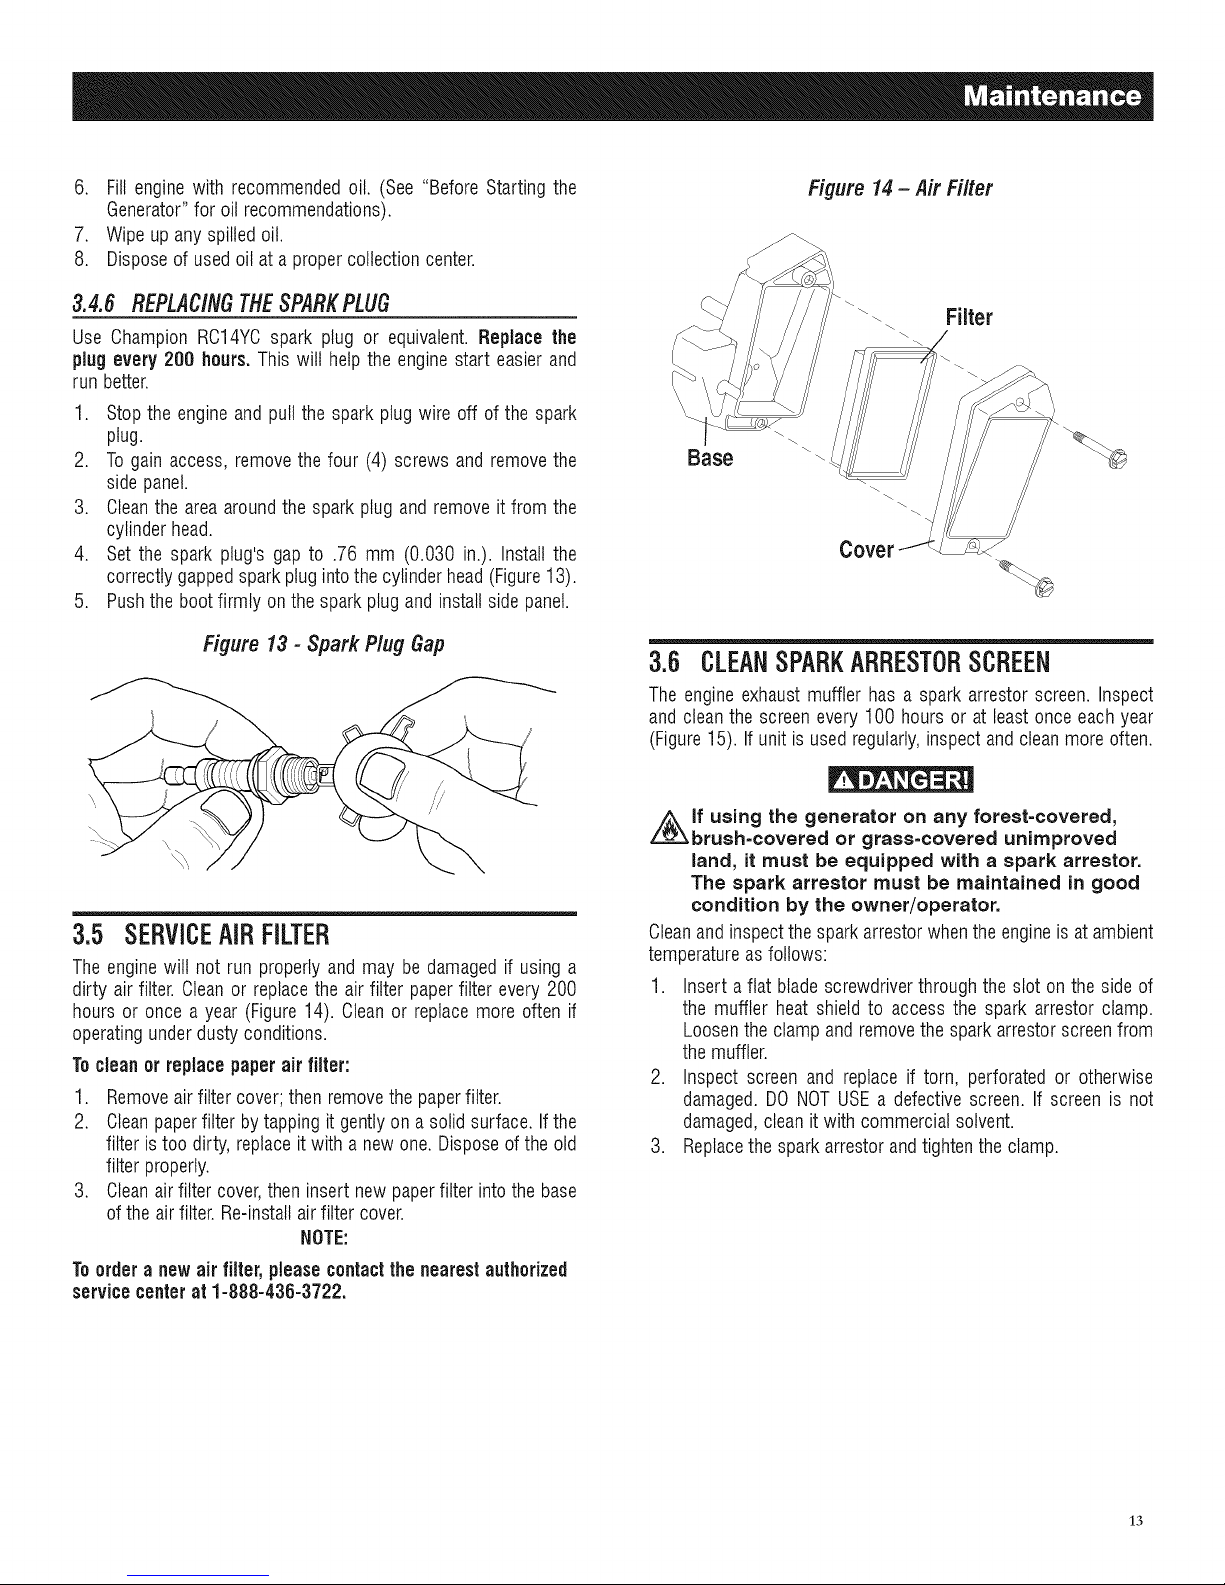
Figure 14- Air Filter
3.4.6 REPLACINGTHESPARKPLUG
Use Champion RC14YCspark plug or equivalent. Replace the
plugevery 200 hours.This wilt help the engine start easierand
run better.
1. Stopthe engineand pull the spark plug wire off of the spark
plug.
2. Togain access, removethe four (4) screws and removethe
side panel.
3. Cleanthe area aroundthe spark plug and remove it from the
cylinder head.
4. Set the spark plug's gap to .76 mm (0.030 in.). Install the
correctly gappedsparkplug intothe cylinderhead(Figure13).
5. Pushthe bootfirmly on the sparkplug and install side panel.
Figure 13 - Spark Plug Gap
3.5 SERVICEAIRFILTER
Theenginewilt not run properlyand may be damaged if usinga
dirty air filter. Cleanor replacethe air filter paperfilter every 200
hours or once a year (Figure14). Cleanor replace more often if
operatingunderdusty conditions.
Tocleanor replacepaperair filter:
1. Removeairfilter cover;then removethe paperfilter.
2. Cleanpaperfilter bytappingit gentlyon a solid surface. If the
filter is too dirty, replaceit with a newone. Disposeof theold
filter properly.
3. Cleanairfilter cover,then insert new paperfilter into the base
of the airfilter.Re-installair filter cover.
NOTE:
Filter
Base
Covel
3.6 CLEANSPARKARRESTORSCREEN
The engineexhaustmuffler has a spark arrestor screen. Inspect
and cleanthe screen every 100 hours or at least onceeachyear
(Figure15). If unit is usedregularly,inspectand cleanmore often.
i_lf using the generator on any forest=covered,
brush=covered or grass=covered unimproved
land, it must be equipped with a spark arrestor.
The spark arrestor must be maintained in good
condition by the owner/operator.
Cleanandinspectthe sparkarrestorwhentheengineis at ambient
temperatureasfollows:
1. Insert a flat blade screwdriverthrough the slot on the side of
the muffler heat shield to access the spark arrestor clamp.
Loosenthe clamp and removethe spark arrestorscreenfrom
themuffler.
2. Inspect screen and replace if torn, perforated or otherwise
damaged. DONOT USEa defective screen. If screen is not
damaged,cleanit with commercialsolvent.
3. Replacethe spark arrestorandtightenthe clamp.
Toorder a new air filter, pleasecontactthe nearestauthorized
servicecenterat 1-888-436-3722.
13
Page 16

Figure 15 -- Spark Arrestor Screen
Drain fuel into approved container outdoors,
away from open flame. Be sure engine is cool.
Do not smoke in the vicinity or light a cigarette.
2. Start and run engineuntilenginestopsfrom lack of fuel
3. Allow the engineto cool to the touch and then drain the oil
from the crankcase.Refillwith the recommendedgrade.
4. Removespark plug and pour about 1/2 ounce (15 mt) of
engineoil intothecylinder.Coversparkplug holewith rag. Putt
the recoil starter acouple times to lubricatethe piston rings
and cylinderbore.
CAUTION!
ARRESTOR
SCREENCLAMP
SPARK
ARRESTOR
SCREEN
INSERTSCREWDRIVER
THROUGHSLOTINHEAT
SHIELDTO ACCESS
ARRESTORSCREENCLAMP
3.7 GENERAL
Thegeneratorshould be started at leastonce every 30 days and
be allowedto run at least30 minutes.If this cannot be done and
the unit must be stored for morethan 30 days, use thefollowing
informationas a guideto prepareit for storage.
NEVER store engine with fuel in tank indoors
or in enclosed, poorly ventilated areas where
fumes may reach an open flame, spark or pilot
light as on a furnace, water heater, clothes
dryer or other gas appliance.
_t Allow unit to cool entirely before storage.
3.8 LONGTERMSTORAGE
It is importantto preventgum deposits from forming in essential
fuel systemparts such asthe carburetor,fuel hoseortank during
storage. Also, experience indicates that alcohol-blendedfuels
(calledgasohol,ethanol or methanol)can attract moisture,which
leadsto separationand formation of acids during storage.Acidic
gas candamagethefuel system of an enginewhile in storage.
To avoid engineproblems, the fuel system should be emptied
beforestorageof 30 days or longer,asfollows:
1. Removeallgasolinefrom thefuel tank.
_t void spray from the spark plug hole when
cranking engine.
5. Install and tighten the spark plug. Do not connect the spark
plug wire.
6. Cleanthe generatorouter surfaces. Check that cooling air
slots andopeningson generatorareopen andunobstructed.
7. Storethe unit in a clean, dry place.
3.9 OTHERSTORAGETiPS
* Do not store gasolinefrom oneseasonto another.
* Replacethe gasolinecan if it starts to rust. Rustand/or dirt in
the gasolinewill cause problems with the carburetorand fuel
system.
* If possible, store the unit indoors, in a garage or shed, and
cover it to give protectionfrom dust and dirt. BESURETO
EMPTYTHEFUELTANK.
* If it is not practical to emptythe fuel tank andthe unit is to
be stored for some time, use a commercially availablefuel
stabilizer added to the gasoline to increase the life of the
gasoline.
* Coverthe unit with a suitable protective cover that does not
retainmoisture.
i_NEVER cover the generator while engine and
exhaust area are warm. Allow unit to cool
entirely.
14
Page 17

4.1 TBOUBLESHOOTINGGUIDE
Engineis running,but noAC output
is available.
1. Circuit breakeris open.
2. Poor connectionor defectivecord set.
3. Connecteddevice is bad.
4. Faultin generator.
5. GFCItrips the 20 Amp outlets.
! I
1. Resetcircuit breaker.
2. Checkand repair.
3. Connectanotherdevicethat is in good condition.
4. ContactAuthorizedService Facility.
5. Repairthe"short" and reset the GFCI.
Engine runs good but bogs down 1. Short circuit in a connectedload. 1. Disconnectshorted electricalload.
when loadsare connected. 2. Generatoris overloaded. 2. See"Don'tOverloadthe Generator".
3. Enginespeedis too slow. 3. ContactAuthorizedServiceFacility.
4. Shorted generatorcircuit. 4. ContactAuthorizedService Facility.
Enginewill not start; or starts and 1. Fuelshut-off is OFF. 1. TurnFuelshut-off ON.
runsrough. 2. Dirtyair filter. 2. Cleanor replaceairfilter.
3. Out of gasoline. 3. Fillfuel tank.
4. Stale gasoline. 4. Drainfuel tank andfill with fresh fuel.
5. Sparkplug wire not connectedto spark plug. 5. Connectwire to spark plug.
6. Badsparkplug.
7. Waterin gasoline.
8. Over-choking.
9. Low oil level.
10. Excessiverich fuel mixture.
11. Intakevalvestuck open or closed.
12. Enginehas lost compression.
6. Replacesparkplug.
7. Drainfuel tank; fill with fresh fuel.
8. Put choke knobto NoChokeposition.
9. Fill crankcaseto proper level.
10. Contact AuthorizedServiceFacility.
11. Contact AuthorizedServiceFacility.
12. Contact AuthorizedServiceFacility.
Engineshuts downduring 1. Out of gasoline. 1. Fillfuel tank.
operation. 2. Low oil level. 2. Fill crankcaseto proper level.
3. Faultin engine. 3. ContactAuthorizedService Facility.
Engine lacks power. 1. Load is too high. 1. See"Don'tOverloadthe Generator".
2. Dirty air filter. 2. Replaceairfilter.
3. Engineneedsto beserviced. 3. ContactAuthorizedServiceFacility.
.
=
Engine "hunts" or falters. 1. Chokeis openedtoo soon. 1. Move choke to halfway position until engineruns
2. Carburetoris runningtoo rich or too lean. smoothly.
2. ContactAuthorizedService Facility.
15
Page 18

16
Page 19

17
Page 20

EM/$$/ONWARRANTYFOREPACERTIFIEDEQUIPMENT
U,S, EPA EMiSSiON CONTROL WARRANTY STATEMENT
YOUR WARRANTY RIGHTS AND OBLiGATiONS
TheUnited StatesEnvironmentalProtectionAgency (EPA)and GeneracPowerSystems,Inc. (Generac)are pleasedto explainthe Emission Control
SystemWarranty (ECSWarranty) on your new 2011 and laterequipment.New equipmentthat use small spark-ignitedenginesmust bedesigned,built,
andequipped to meet stringentanti-smog standardsfor the federal government.Generacwill warrantthe emission control system on your equipment
for the period of time listed belowprovidedthere has beenno abuse, neglect,unapprovedmodificationor improper maintenanceof your equipment.
Theemission control system on this equipmentincludes all components whose failurewould increasethe emissionsof anyregulatedpollutant.These
componentsare listed in the EmissionsInformation section ofthis manual.
MANUFACTURER'S WARRANTY COVERAGE:
This ECSWarranty is validfor two years,or for the same period as specifiedin the GeneracLimited Warranty,whicheveris longer.Forequipmentwith
hourmeters,the warranty period is anumber of hours equalto halfthe UsefulLifeto whichthe equipmentis certified, or the warrantyperiod specified
abovein years, whicheveris less.TheUseful Life can befound on the EmissionControlLabel on the engine.If, during suchwarranty period,any
emission-relatedpart on your equipmentisfound to be defectivein materialsor workmanship, repairs or replacementwill be performed by aGenerac
AuthorizedWarrantyServiceDealer.
OWNER'S WARRANTY RESPONSiBiLiTiES:
Asthe equipmentowner,you are responsiblefor the completion of all requiredmaintenanceas listed in your factory suppliedOwner'sManual.For
warranty purposes,Generacrecommendsthat you retainall receiptscovering maintenanceon your generator,butGeneraccannotdenywarranty
solelydueto the lack of receipts.
Youshould beaware that Generacmay denyanyand/or all warrantycoverageor responsibility if your equipment,or apart!component thereof,has
failed due to abuse,neglect, impropermaintenance,or unapprovedmodifications.
Youare responsible for contactingaGeoeracAuthorized Warranty Dealer as soonas a problemoccurs.Thewarranty repairsshouldbe
completed in a reasonableamount oftime, not to exceed 30 days.
Warrantyservice can bearrangedby contacting eitheryour sellingdealeror aGeneracAuthorizedWarranty ServiceDealer.Tolocate the Generac
AuthorizedWarrantyServiceDealernearestyou, call ourtoll free numberbelow, or email emissions@generac.com.
1-800-333-1322
IMPORTANTNOTE:This warranty statementexplainsyour rights and obligationsunderthe Emission ControlSystem Warranty,which is providedto
you by Generacpursuantto federal law. Seealsothe "GeneracLimitedWarrantiesfor GeneracPowerSystems,Inc.," which is enclosedherewith on a
separatesheet,also providedto you byGenerac.Notethat this warranty shall not apply to any incidental,consequentialor indirect damagescaused
bydefects in materials or workmanship or any delayin repairor replacementof the defectivepart(s). This warranty is in place of all other warranties,
expressedor implied.Specifically,Generacmakesno other warrantiesas to the merchantabilityor fitness for a particular purpose.Any implied
warrantieswhich areallowed by law, shallbe limited in durationto the terms of the expresswarranty providedherein.Somestates do not allow
limitationson how long an implied warrantylasts, so the abovelimitation may not applyto you.
TheECSWarrantyappliesonly to the emissioncontrol system of your newequipment. Boththe ECSWarrantyandthe GeneracWarrantydescribe
importantrights and obligationswith respectto your new engine.
Warrantyservice can beperformed onlyby a GeneracAuthorizedWarrantyServiceFacility.When requestingwarranty service, evidencemust be
presentedshowingthe date ofthe saleto the originalpurchaser/owner.
Ifyou have any questionsregardingyour warranty rights andresponsibilities,you should contact Generacatthe following address:
PartI of 2
18
ATTENTION WARRANTY DEPARTMENT
GENERAC POWER SYSTEMS, INC.
P.O. BOX 297 * WHITEWATER, Wi 53190
PartNo. 0J3335A Rev.A 11/11
Page 21
EM/SS/ONWARRANTYFOREPACERTIFIEDEQUIPMENT
EMiSSiON CONTROL SYSTEM WARRANTY
EmissionControl SystemWarranty (ECSWarranty)for equipmentusing small spark-ignited engines:
(a) Applicability:This warranty shall applyto equipmentthat usessmall off-road engines.The ECSWarrantyperiodshall beginon the datethe new
equipmentis purchasedby/deliveredto itsoriginal, end-usepurchaser/ownerandshall continue for the lesserof:
(1) Theperiodof time specified in the GeneracLimited Warrantyenclosedherewith,but notless than 24 months,or
(2) Forenginesequippedwith hour meters,a numberof operating hoursequal to half of the engine'suseful life. The usefullifeis specified on the
EmissionsControl Labelon the engine.
(b) GeneralEmissionsWarranty Coverage:Generacwarrantsto the original,end-usepurchaser/ownerof the new engineor equipment andto each
subsequentpurchaser/ownerthat the ECSwhen installedwas:
(1) Designed,built andequippedsoas to conform with all applicableregulations;and
(2) Freefrom defectsin materialsand workmanship which causethe failure of a warrantedpart at anytime duringthe ECSWarrantyPeriod.
(c) Thewarranty on emissions-relatedparts will be interpretedasfollows:
(1) Anywarranted part that is not scheduledfor replacementas requiredmaintenancein the Owner'sManual shall bewarranted forthe ECS
WarrantyPeriod.If any such partfails duringthe ECSWarranty Period,it shall be repairedor replacedby Generacaccordingto Subsection
(4) below.Any such part repairedor replacedunderthe ECSWarrantyshall bewarranted for the remainderofthe ECSWarranty Period.
(2) Anywarranted part that is scheduled onlyfor regularinspection asspecifiedin the Owner'sManualshall be warrantedfor the ECSWarranty
Period.A statementin the Owner's Manualto the effect of "repairor replace asnecessary"shall not reducethe ECSWarrantyPeriod.Any
such part repairedorreplacedunderthe ECSWarrantyshall be warrantedfor the remainderofthe ECSWarrantyPeriod.
(3) Anywarranted part that is scheduledfor replacementasrequired maintenancein the Owner'sManualshall be warrantedfor the period of time
priorto first scheduled replacementpointfor thatpart. Ifthe part fails prior to the first scheduled replacement,the part shall be repairedor
replacedby Generacaccordingto Subsection(4) below.Any such emissions-relatedpart repairedor replacedunderthe ECSwarranty shall
bewarrantedfor the remainderof the period prior to the first scheduledreplacementpoint for that part.
(4) Repairor replacementof any warranted,emissions-relatedpart underthis ECSWarranty shall beperformed atno charge to the owner ata
GeneracAuthorizedWarrantyServiceFacility.
(5) Notwithstandingthe provisions of subsection (4) above,warranty services or repairsmust be providedat GeneracAuthorizedService
Facilities.
(6) Whenthe engineis inspectedby a GeneracAuthorizedWarrantyServiceFacility,the purchaser/ownershall notbe heldresponsiblefor
diagnosticcosts if the repairis deemedwarrantable.
(7) Throughoutthe ECSWarrantyPeriod,Generacshall maintaina supply of warranted emission-relatedparts sufficient to meetthe expected
demandfor such parts.
(8) AnyGeneracauthorizedand approvedemission-relatedreplacementparts may beused in the performanceof any ECSWarrantymaintenance
or repairsandwill beprovidedwithout chargeto the purchaser/owner.Such useshall not reduceGenerac'sECSWarrantyobligations.
(9) No modifications,other than those explicitlyapproved by Generac,may be madeto the generator.Unapprovedmodificationsvoid this ECS
Warrantyand shall be sufficient groundfor disallowingan ECSWarrantyclaim.
(10) Generacshall not be heldliablehereunderforfailures of any non-authorizedreplacementparts, or failures of anyauthorizedparts caused by
the useof non-authorizedreplacementparts.
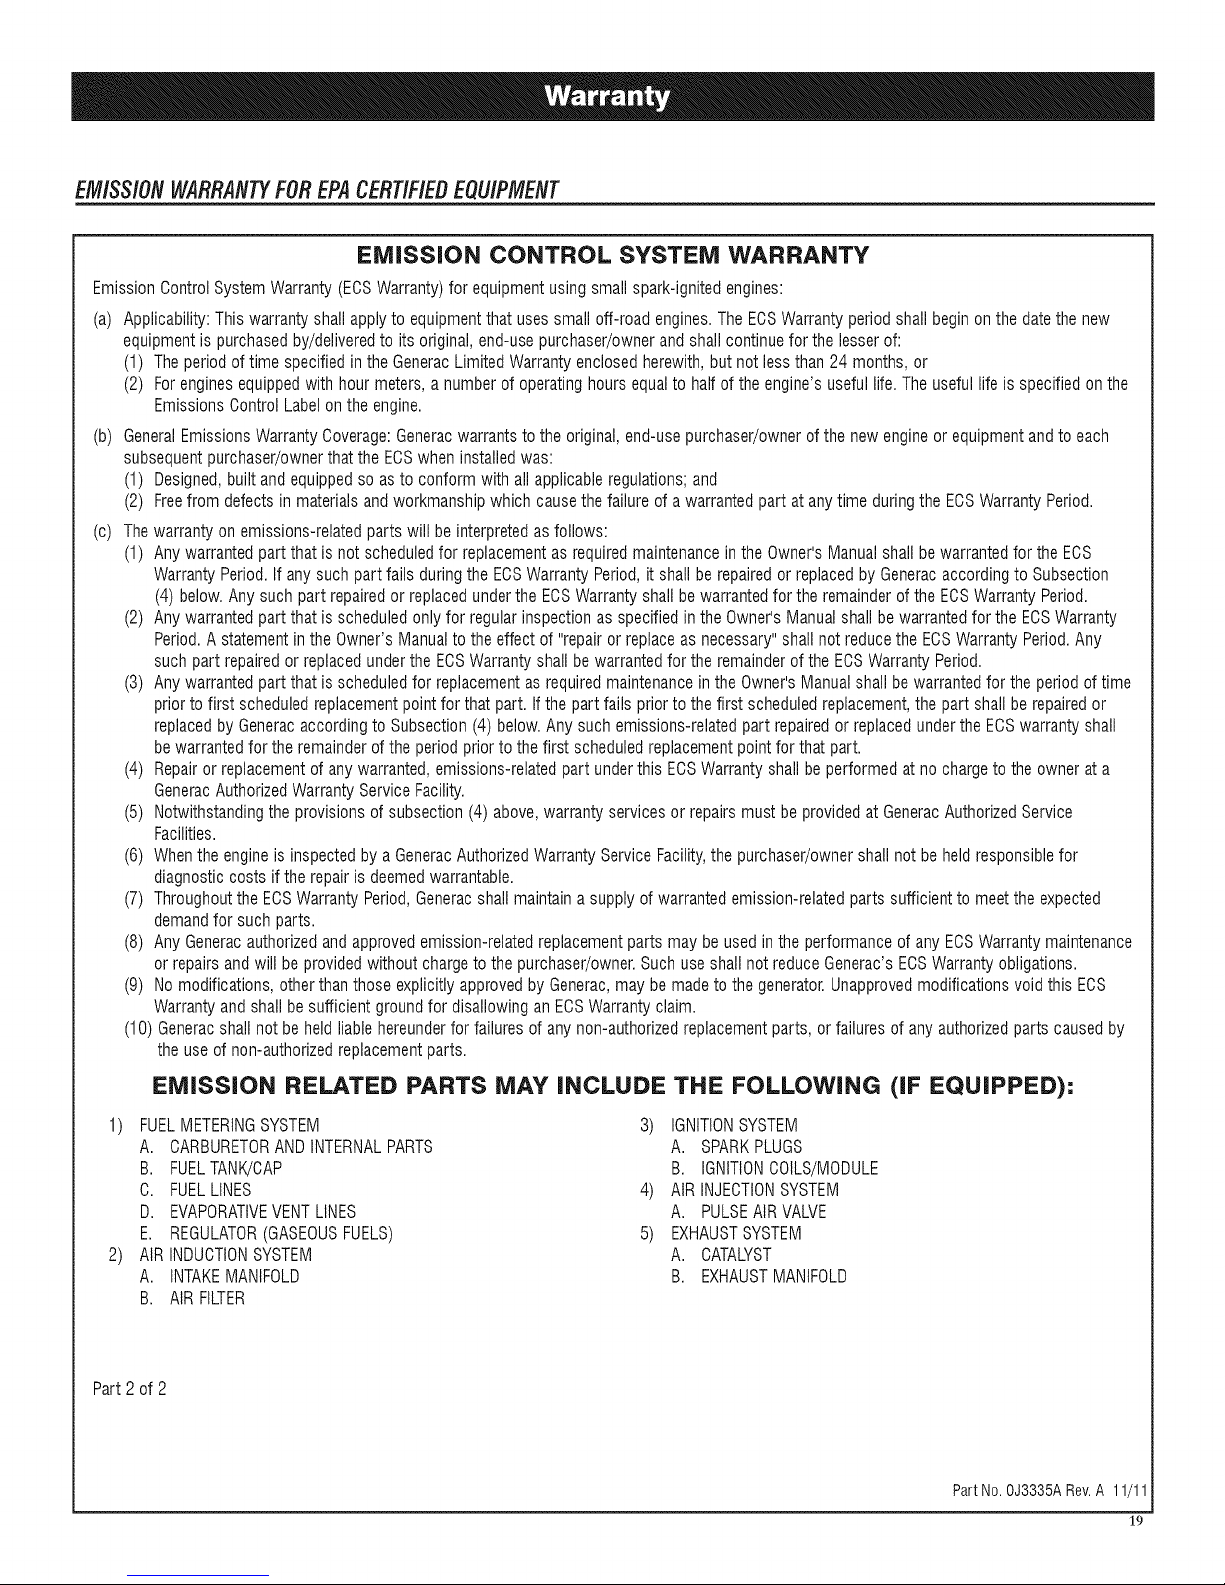
EMISSION RELATED PARTS MAY iNCLUDE THE FOLLOWING (IF EQUIPPED):
1) FUELMETERINGSYSTEM 3) IGNITIONSYSTEM
A. CARBURETORANDINTERNALPARTS A. SPARKPLUGS
B. FUELTANK!CAP B. IGNITtONCOILS/MODULE
C. FUELLINES 4) AIRINJECTIONSYSTEM
D. EVAPORATIVEVENTLINES A. PULSEAIRVALVE
E. REGULATOR(GASEOUSFUELS) 5) EXHAUSTSYSTEM
2) AIRINDUCTIONSYSTEM A. CATALYST
A. INTAKEMANIFOLD B. EXHAUSTMANIFOLD
B. AIRFILTER
Part 2 of 2
PartNo. OJ3335ARev.A 11/11
19
Page 22

EM/$$/ONWARRANTYFORCARBCERT/F/EDEOU/PMENT
CALiFORNiA AND U.S, EPA EMiSSiON CONTROL WARRANTY STATEMENT
YOUR WARRANTY RIGHTS AND OBLiGATiONS
The CaliforniaAir Resource Board (CARB)and the UnitedStates EnvironmentalProtectionAgency (EPA),together with GeneracPower Systems, Inc.
(Generac)arepleasedto explainthe EmissionControlSystemWarranty (ECSWarranty)onyour new2012 equipment.Newequipmentthat usesmall spark-
ignitedenginesmust be designed,built, and equippedto meetstringentanti-smogstandardsfor the state of Californiaandthe federal government.Generac
will warrant the emission control system on your equipment for the periodof time listed below providedthere has been no abuse, neglect, unapproved
modificationor impropermaintenanceof your equipment.
The emission control system on this equipment includes all components whose failure would increasethe emissions of any regulated pollutant. These
componentsare listedin the EmissionsInformation section of this manual.
MANUFACTURER'S WARRANTY COVERAGE:
This ECSWarrantyis valid for two years, orfor the same period asspecified inthe GeneracLimitedWarranty,whicheveris longer.Forequipmentwith hour
meters,the warranty periodis anumberof hoursequalto halfthe Useful Lifeto which the equipmentis certified,or the warrantyperiod specified abovein
years,whicheveris less.The Useful Life canbe found on the EmissionControl Labelon the engine. If, during such warranty period,any emission-related
part on your equipmentis found to be defectivein materialsor workmanship,repairsor replacementwill be performedby a GeneracAuthorizedWarranty
ServiceDealer.
OWNER'S WARRANTY RESPONSiBiLiTiES:
Asthe equipmentowner,you areresponsibleforthe completionofall requiredmaintenanceas listedin your factory suppliedOwner'sManual.Forwarranty
purposes,Generacrecommendsthat you retain all receipts covering maintenanceon your generator,butGeneraccannot deny warranty solely due to the
lack of receipts.
You shouldbe awarethat Generacmay denyany and/or all warranty coverageor responsibilityif your equipment,or a part!componentthereof, hasfailed
dueto abuse,neglect,improper maintenance,or unapprovedmodifications.
Youare responsiblefor contacting a Genera¢Authorized Warranty Dealeras soon as a problemoccurs.Thewarranty repairs should be completed
in a reasonable amount oftime, not to exceed30 days.
Warrantyservicecan be arrangedbycontacting eitheryour sellingdealeror a GeneracAuthorizedWarrantyServiceDealer.Tolocate theGeneracAuthorized
WarrantyService Dealernearestyou, call our toll free numberbelow, or email emissions@generac.com.
1-800-333-1322
IMPORTANTNOTE: This warranty statement explainsyour rights and obligations underthe Emission ControlSystem Warranty,which is providedto you
by Generacpursuantto federallaw.Seealso the "GeneracLimitedWarrantiesfor GeneracPowerSystems, Inc.,"which is enclosedherewithon a separate
sheet,also providedto you by Generac.Notethat this warranty shallnot apply to any incidental,consequentialor indirect damagescaused by defects in
materialsor workmanshipor anydelayin repairor replacementofthe defectivepart(s). This warranty isin placeof allotherwarranties,expressedor implied.
Specifically,Generacmakesno other warrantiesas to the merchantabilityor fitness for a particular purpose.Any implied warranties allowed by law shall
be limited in durationto theterms ofthe expresswarranty providedherein.Somestates do not allow limitations on how long an impliedwarranty lasts, so
the abovelimitation may not apply to you.
TheECSWarrantyappliesonlyto the emissioncontrol system ofyour newequipment.Boththe ECSWarrantyand the GeneracWarrantydescribeimportant
rightsand obligations with respectto your new engine.
Warrantyservice canbe performed onlyby a GeneracAuthorizedWarranty ServiceFacility.Whenrequestingwarrantyservice, evidencemust bepresented
showingthe dateof the sale to the original purchaser/owner.
Ifyou haveany questionsregardingyour warranty rights andresponsibilities,you shouldcontact Generacatthe following address:
ATTENTION WARRANTY DEPARTMENT
GENERAC POWER SYSTEMS, INC.
P.O. BOX 297 * WHITEWATER, WI 53190
Part 1 of 2
PartNo. 0J8147C Rev.A 01/12
2O
Page 23

EMISSIONWARRANTYFORCARBCERTIFIEDEQUIPMENT
EMiSSiON CONTROL SYSTEM WARRANTY
EmissionControl SystemWarranty (ECSWarranty)for equipmentusing small spark-ignited engines:
(a) Applicability:This warranty shall applyto equipmentthat uses smalloff-road engines.The ECSWarrantyperiod shall beginonthe datethe new
equipmentis purchasedby/deliveredto its original,end-usepurchaser/ownerandshall continuefor the lesserof:
(1) The periodof time specified inthe GeneracLimitedWarrantyenclosedherewith,but not lessthan 24 months, or
(2) Forenginesequippedwith hour meters,anumber of operatinghours equalto half ofthe engine'suseful life.Theuseful life is specifiedon the
EmissionsControl Labelonthe engine.
(b) GeneralEmissionsWarrantyCoverage:Generacwarrantsto the original,end-usepurchaser/ownerof the new engineor equipmentandto each
subsequentpurchaser/ownerthat the ECSwhen installedwas:
(1) Designed,built and equippedso as to conform with allapplicableregulations;and
(2) Freefrom defectsin materialsand workmanshipwhich cause thefailure of a warranted part at anytime during the ECSWarranty Period.
(c) The warrantyon emissions-relatedparts will be interpretedasfollows:
(1) Any warrantedpart that is not scheduledfor replacementasrequired maintenanceinthe Owner'sManualshallbe warrantedfor the ECS
WarrantyPeriod.If anysuch part fails duringthe ECSWarrantyPeriod,it shall be repairedor replacedby Generacaccordingto Subsection(4)
below. Anysuch part repairedor replacedunderthe ECSWarrantyshallbewarranted for the remainderof the ECSWarranty Period.
(2) Any warrantedpart that is scheduledonly for regularinspection asspecified in the Owner'sManual shall bewarrantedfor the ECSWarranty
Period.A statementin the Owner's Manualto the effect of "repair or replaceas necessary"shall not reducethe ECSWarrantyPeriod.Any
such part repairedor replacedunderthe ECSWarrantyshall bewarranted for the remainderof the ECSWarrantyPeriod.
(3) Any warrantedpart that is scheduledfor replacementas requiredmaintenancein the Owner'sManualshall be warrantedfor the period of time
prior to first scheduledreplacementpointfor that part. Ifthe part fails priorto the first scheduledreplacement,the part shall be repairedor
replacedby Generacaccordingto Subsection(4) below.Any such emissions-relatedpart repairedor replacedunderthe ECSwarrantyshall be
warrantedfor the remainderof the period prior to the first scheduledreplacementpoint for that part.
(4) Repairor replacementof anywarranted,emissions-relatedpart under this ECSWarrantyshall be performed at no chargeto the ownerat a
GeneracAuthorizedWarrantyServiceFacility.
(5) Notwithstandingtheprovisions of subsection (4) above,warranty services or repairs mustbe providedat GeneracAuthorizedService
Facilities.
(6) Whenthe engineis inspectedby a GeneracAuthorizedWarranty ServiceFacility,the purchaser/ownershallnot beheld responsiblefor
diagnostic costs if the repairis deemedwarrantable.
(7) Throughoutthe ECSWarrantyPeriod,Generacshallmaintain a supply of warranted emission-relatedparts sufficientto meetthe expected
demandfor such parts.
(8) Any Generacauthorizedand approvedemission-relatedreplacementparts may be used in the performance of any ECSWarrantymaintenance
or repairs andwill be provided without chargeto the purchaser/owner.Suchuseshall not reduceGeneracECSWarrantyobligations.
(9) Nomodifications, otherthan those explicitly approvedby Generac,may be madeto the generator.Unapprovedmodificationsvoid this ECS
Warrantyand shall be sufficient groundfor disallowing an ECSWarrantyclaim.
(10) Generacshall not be heldliable hereunderfor failures of any non-authorizedreplacementparts, or failures of any authorizedparts causedby
the use of non-authorizedreplacementparts.
EMISSION RELATED PARTS MAY iNCLUDE THE FOLLOWING (IF EQUIPPED):
1) FUELMETERINGSYSTEM 3) IGNITIONSYSTEM
A. CARBURETORANDINTERNALPARTS A. SPARKPLUGS
B. FUELTANK/CAP B. IGNITIONCOILS/MODULE
C. FUELLINES 4) AIR INJECTIONSYSTEM
D. EVAPORATIVEVENTLINES A. PULSEAIRVALVE
E. REGULATOR(GASEOUSFUELS) 5) EXHAUSTSYSTEM
E CARBONCANISTER A. CATALYST
2) AIRINDUCTIONSYSTEM B. EXHAUSTMANIFOLD
A. INTAKEMANIFOLD
B. AIR FILTER
Part2 of 2
Part No. 0J8147CRev.A 01/12
21"
Page 24

GENERAC POWER SYSTEMS "TWO YEAR" LiMiTED WARRANTY FOR
XG SERIES PORTABLE GENERATORS
Fora period of two (2) yearsfrom thedate of original sale,GeneracPower Systems, Inc. (Generac)warrants its XGSeries generatorswill befreefrom defects in materials
and workmanshipfor the itemsand period set forth below. Generacwill, at its discretion,repair or replaceany part that, upon examination,inspection and testing by
Generacor a GeneracAuthorizedWarranty Service Dealer,isfound to be defective. Repair or replacementpursuant to this limited warranty shall not renew or extendthe
originalwarranty period.Any repairedproduct shallbe warranted for the remaining original warranty period only. Any equipment that the purchaser/owner claimsto be
defectivemust be returnedto and examined by the nearestGeneracAuthorizedWarranty Service Dealer.All transportation costs underthewarranty, including return to
the factory, areto be borneand prepaid by the purchaser/owneKThis warranty applies only to GeneracXGSeries portable generatorsand is not transferablefrom original
purchaseESaveyour proof-of-purchase receipt.If you do not provide proof of the initialpurchase date,the manufacturer's shipping date of the product will be usedto
determinethe warranty period.
WARRANTY SCHEDULE
Consumerapplicationsare warrantedfor two (2)years. Commercial and Rentalapplications arewarranted for one (1) year or 1000 hours maximum, whichever comes first.
CONSUMER APPLICATION
YEARONE- 100% Limited comprehensive coverage onLabor and Part(s) (proofof purchaseand maintenanceis required):
• All Components
YEARTWO- 100%Limited comprehensivecoverage on Part(s) (proof of purchase and maintenanceis required):
All Components
COMMERCIAL/RENTAL APPLICATION
YEARONE- 100%Limited comprehensive coverage on Labor and Part(s) (proof of purchase andmaintenanceis required):
All Components
NOTE: Forthe purposeof this warranty "consumer use" means personalresidentialhousehold or recreationaluse by originalpurchaser.This warranty does not apply to
unitsused for PrimePower in placeof utility whereutility power service is present or where utility power service does not normally exist. Oncea generatorhas
experiencedcommercial or rental use, it shall thereafterbe considereda non-consumer use generatorfor the purposeof this warranty.
Guidelines:
1. All warranty repairs, must be performed and/or addressedby an Authorized/CertifiedGeneracDealer,or branchthereof.
2. Unitsthat havebeen resold arenot covered underthe GeneracWarranty,as this Warrantyis not transferable.
3. Useof Non-Generac replacementpart(s) will void the warranty in its entirety.
4. Generacmay choose to Repair,Replaceor Refund a piece of equipment.
5. Warranty Labor Ratesare basedon normal working hours. Additionalcosts for overtime, holiday or emergencylabor costs for repairsoutside of normal business hours
will bethe responsibility of the customer.
6. Warranty Parts shipment costs are reimbursedat ground shipment rates. Costsrelatedto requests for expeditedshippingwill bethe responsibility ofthe customeK
7. Verification of required maintenancemay be requiredfor warranty coverage.
THiS WARRANTY SHALL NOT APPLY TO THE FOLLOWING:
1. Costs of normal maintenanceand adjustments.
2. Failurescaused by any contaminatedfuels, oils or lack of proper oil levels.
3. Repairs or diagnostics performed by individuals otherthan Generacauthorizeddealersnot authorized inwriting byGenerac.
4. Failuresdue, but not limited, to normal wear and tear,accident, misuse, abuse, negligenceor improperuse.
5. As with all mechanical devices, the Generacengines need periodicpart(s) service and replacementto perform as designed.This warranty will not cover repairwhen
normal use has exhaustedthelife of a part(s) or engine.
6. Failurescaused by any externalcause or act of God,such as collision, theft, vandalism, riot or wars, nuclearevent,fire, freezing,lightning, earth-quake,windstorm, hail,
volcanic eruption, water or flood, tornado or hurricane.
7. Damage relatedto rodentand/or insect infestation.
8. Products that are modified or altered in a manner notauthorized by Generac in writing.
9. Any incidental, consequential or indirectdamages caused by defects in materials or workmanship, or any delay in repair or replacementof the defectivepart(s).
10. Failuredue to misapplication.
11. Expensesrelatedto "customer instruction" ortroubleshooting where no manufacturing defect is found.
12. Rentalequipment usedwhile warranty repairs are beingperformed.
13. Starting batteries,fuses, light bulbs and enginefluids.
THISWARRANTYIS IN PLACEOFALL OTHERWARRANTIES,EXPRESSEDOR IMPLIED,SPECIFICALLY,GENERACMAKESNO OTHERWARRANTIESASTO THE
MERCHANTABILITYORFITNESSFORA PARTICULARPURPOSE.Any impliedwarranties which areallowed by law, shall be limited indurationto the terms of the express
warranty provided herein.Some states do not allow limitations on how long an implied warranty lasts, so the above limitationmay notapplyto purchaser/owner.
GENERAC'SONLYLIABILITYSHALLBETHEREPAIRORREPLACEMENTOFPART(S)AS STATEDABOVE.IN NOEVENTSHALLGENERACBE LIABLEFORANYINCIDENTAL,
ORCONSEQUENTIALDAMAGES,EVENIFSUCHDAMAGESAREA DIRECTRESULTOF GENERAC'SNEGLIGENCE.Some states do not allow the exclusion or limitation of
incidentalor consequentialdamages, so the abovelimitations may not apply to purchaser/owner.Purchaser/owneragreesto make no claims against Generacbased on
negligence.This warranty gives purchaser/ownerspecific legal rights. Purchaser/owneralso may haveother rightsthat vary from stateto state.
GENERAC POWER SYSTEMS, INC.
P.O. BOX 8 • Waukesha, WI 53187 • Ph: (888) GENERAC (438=3722) • Fax: (282) 544-4851
PartNo. 0H5472 RevisionE (03/12)
To locate the nearest Authorized Dealer visit our website www.generac.com
Manual PartNo. 0J3092 RevisionC (05/24/12) Printedin U.S.A.
Page 25

G ®
® _ ® • _ _ ®
aidelUsuario
Generadorpomt_ se =eXG40
r'"i" r"
23
Page 26

introducci6n...........................................................................25
Leaeste manual ensu totalidad............................................25
Reglasde Seguridad .............................................................25
[ndicedenormas................................................................... 27
informaci6ngeneral...............................................................28
1.1 Desempaque..........................................................................28
1.1.1 Oajadeaccesorios....................................................28
1.2 Ensamble...............................................................................28
1.2.1 Ensambledelkitderuedasy patadelmarco.............28
Operaci6n.............................................................................. 29
2.1 Gonozcael generador............................................................29
2.2 Hor6metro- no reajuste.........................................................30
2.3 Hor6metro- con reajuste.......................................................30
2.4 Gablesy enchufes de conexbn ..............................................30
2.4.1 ReceptaculodobleGFCt,120 VAC,20 amperios........30
2.4.2 Receptaculode120/240 VAC,20 amperios...............31
2.5 C6mousar el generador.........................................................31
2.5.1 C6moponera tierra el generadorcuando
se usa como portD.til..................................................31
2.5.2 C6moconectar el generadora un sistema
electrico deedificio....................................................32
2.5.3 Puestaatierrade neutrala marco .............................32
2.5.4 Conexbn de cargas electricas...................................32
2.6 Nosobrecargueel generador.................................................32
2.7 Guiade referenciade potencia...............................................33
2.8 Antesde arrancarel generador..............................................33
2.8.1 Agregadodeaceite de motor.....................................33
2.8.2 Agregadodecombustible ..........................................34
2.9 Paraarrancarel motor ...........................................................34
2.10 Paradodelmotor ................................................................... 35
2.11 Sistemade apagadopot baja presi6n de aceite......................35
2.11.1 Reanudarla marcha..................................................35
IVlantenimiento.......................................................................35
3.1 G6morealizarmantenimientoprogramado..............................35
3.2 Programademantenimiento...................................................35
3.3 Especificacionesdelproducto................................................35
3.3.1 Especificacionesdelgenerador...................................35
3.3.2 Especificacionesdelmotor.........................................35
3.3.3 Informacbndeemisiones..........................................36
3.4 Recomendacionesgenerales..................................................36
3.4.1 Mantenimientodelgenerador......................................36
3.4.2 Paralimpiarelgenerador............................................36
3.4.3 Mantenimientodelmotor............................................36
3.4.4 Verificaci6ndelniveldeaceite....................................36
3.4.5 Cambiodelaceiteydelfiltrodeaceite........................36
3.4.6 Reemplazodelabujia.................................................37
3.5 Serviciodelfiltrodeaire.........................................................37
3.6 Limpieelfiltrodelsupresordechispas..................................37
3.7 Generales...............................................................................38
3.8 AImacenamientoalargoplazo................................................38
3.9 Otrosconsejosdealmacenamiento........................................38
Localizaci6ny correcci6ndefallas .......................................39
4.1 GuiadedeteccbndeIocalizacbny correccbndefallas.........39
Garantia.................................................................................40
24
Page 27

INTRODUCCION
Graciaspor comprar estegeneradorportatil deGeneracPowerSystems,
Inc. Este modelo es un generador compacto, de alto rendimiento,
enfriado por aire y accionado por un motor que esta disefiado para
suministrar corriente electrica para impulsar cargas electricasdondeno
estedisponibleel servicio publico electricoo en lugar delservicio publico
electricopor un apagon.
LEAESTEMANUALENSUTOTALIDAD
Si cualquier parte de este manual no se entiende, contacte al
DistribuidorAutorizadomas cercanopara obtenerinformacion sobre los
procedimientosde arranque,operaciony mantenimiento.
El operador es responsable del uso apropiado y seguro del equipo.
Recomendamos encarecidamenteque el operador lea este manual y
comprenda a fondo todas las instrucciones antes de usar el equipo.
Tambien recomendamos encarecidamente darle instrucciones a otros
usuarios sobrecomo arrancary operarcorrectamentela unidad. Estolos
prepararaen caso deque necesitenoperarel equipoen unaemergencia.
El generador puede operar de forma segura, eficiente y confiable
solamentesi se situa, operay mantienecorrectamente.Antesde operaro
darmantenimientoal generador:
* Familiaricesecon todos los codigos y regulacioneslocales, estatales
y nacionales,y sigalasal piede la letra.
. Estudiecuidadosamentetodas las advertencias de seguridaden este
manualyen el producto.
* Familiaricesecon estemanual y con launidadantesde usarla.
El fabricante no puede anticipar cada circunstancia posible que pueda
implicar un riesgo. Las advertencias en este manual,yen lasetiquetas
y calcomanias en la unidadson, por Io tanto, no exhaustivas.Si usa un
procedimiento,metodo detrabajo otecnica de operacionqueelfabricante
no recomiendeespecificamente,cercioresedeque es seguroparaotros.
Tambienaseguresedequeel procedimiento,metodode trabajootecnica
de operacionutilizadano hagaque el generadorseainseguro.
LA INFORMACIONINCLUIDA EN EL PRESENTESE BASA EN LAS
MAQUINAS EN PRODUCCIONA LA HORA DE LA PUBLICACION.
GENERACSERESERVAEL DERECHODEMODtFICARESTEMANUALEN
CUALQUIERMOMENTO.
REGLASDESEGURIDAD
En esta publicaci6n,y en las etiquetasy calcomanias en el generador,
los recuadros de PELIGRO,ADVERTENCIA,PRECAUCIONy NOTAse
utilizan para alertar al personal de instrucciones especialessobre una
operacion en particular que pueda ser peligrosa si se realizaincorrecta
o negligentemente.Observeloscuidadosamente. Sus definiciones son
como sigue:
INDICAUNASITUACIONPELIGROSA0 ACCIONQUE,SINOSEEVITA,
TRAERACOMORESULTADOLAMUERTE0 UNDANOSERIO.
Indicaunasituaci6noacci6npeligrosaque,si noseevita,podria
ocasionarlamuerteounalesi6ngrave.
,A CUIDADO
Indicaunasituaci6n o acci6n peligrosaque, si no se evita, podria
ocasionarunalesi6nmenor o moderada.
NOTA:
LasNotascontieneninformacibnadicional importantepara un
proeedimientoy seincluyendentrode/cuerpodel texto de este manual.
Estas advertencias de seguridad no pueden eliminar los peligros que
indican.Elsentidocomuny el estrictocumplimiento conlas instrucciones
especialesmientrasrealizala accion o el servicio son esencialesparala
prevencionde accidentes.
Cuatrosimbolos de seguridadde uso frecuente acompahanlos cuadros
de PELIGRO,ADVERTENCIAy PRECAUClON.Eltipo de informacion que
cadaunoindica es como sigue:
,_ Este simbolo se_ala informaci6ndeseguridad importanteque,
si no se sigue, podriaporteren peligrola seguridad personal
y/o las propiedadesde terceros.
Estesimbolo indicael riesgode posibleexplosi6n.
i/_'k_kEstesimbolo indicael riesgodeposibleincendio.
i/¢kEste simbolo indicael riesgode posibledescargaelectrica.
PELIGROSGENERALES
• NUNCA opere en un area cerrada o en interiores, en un vehiculo,
incluso si las puertas y ventanasestanabiertas.
• Porrazonesdeseguridad,elfabricanterecomiendaqueelmantenimiento
de este equipose realice por un Distribuidor Autorizado. Examineel
generadorregularmente, y contacte al Distribuidor Autorizadomas
cercanoparalas piezasquenecesitanrepararseo reemplazarse.
• Solo opere el generador en superficies niveladas y donde no este
expuesto a humedad, suciedad, polvo o vapores corrosivos, en
exceso.
• Mantenga las manos, pies, ropa, etc., alejados de las bandas de
impulsion, de los ventiladoresy de otras piezasmoviles.Nuncaquite
algunaguarda o blindaje de los ventiladoresmientras la unidadestD.
en operacion.
• Ciertas piezas del generador se calientan demasiado durante la
operacion. Mantengase alejado del generador hasta que se haya
enfriadoparaevitarquemadurasgraves.
• NOopere el generadorenlaIluvia.
• No modifique la estructura del generador ni cambie los controles
puestoquepodriacrearunacondicion defuncionamientoinsegura.
• Nuncaarranqueo parela unidadcon las cargas electricasconectadas
alos tomacorrientesYcon los dispositivos conectadosENCENDIDOS.
Arranqueel motor y dejeloestabilizarseantesde conectar las cargas
electricas. Desconectetodas las cargas electricasantes deapagarel
generador.
• No inserteobjetosa travesdelasranurasde enfriamientodela unidad.
• AItrabajar en este equipo, permanezcaalerta todo el tiempo. Nunca
realice trabajos en el equipo cuando este cansado fisicamente o
mentalmente.
Page 28

Nuncautiliceelgeneradoroningunadesuspiezascomeescalon.Si
separasobrelaunidadpuedeejercerprestonyromperpiezas,yesto
puedegenerarcondicionesdefuncionamientopeligrosascomefugas
degasesdeescape,fugasdecombustible,fugasdeaceite,etc.
NOTA:
Estegeneradoresta equipadocon nn silenciador snpresor de chispas.
El supresor de chispasdebe set mantenidoen condiciones de trabajo
efectivasper elpropietario/operador. Enel Estadode California, un
snpresor de chispas es reqneridoper la ley (Seeeibn4442 del Codigo
de ReeursosPublieosde California).Otros estadospuedentener leyes
similares. Los leyesfederalesapliean en tierras federales.
PELIGROSDELESCAPEY DELAUBICACiON
iNunca opere en ;ireas cerradaso interiores!iNUNGAopereen un
;irea cerrada, en un vehiculo;o en el interiorAUNQUElas puertas
y ventanas estan abiertas! Uselo SOLO en exteriores y lejos de
ventanasabiertas, poertas, ductos de ventilaci6ny en ;ireasque
noacumularan el mortal escape.
El use del generador en ambientes cerrados PUEDE
MATARLO EN MINUTES.
El los gases de escape del generador contienen mono×ido
de carbono. Este es un venenos que no se puede vet ni clef.
NUNCAIo utilice dentro de una
casa o garaje, INCLUSOSllas
puertasy lasventanasestan
abiertas.
Utilfcelo SOLAMENTEalaire
librey lejosde ventanas,
puertas, respiraderos.
PELIGROSELi°CTRICOS
• El generador produce un voltaje peligrosamentealto cuandoesta en
funcionamiento. Evite tocar alambres pelados, los terminales, las
conexiones,etc. mientras la unidadesta en funcionamiento, incluso
en el equipo conectado al generador. Asegurese de que todas las
cubiertas, guardasy barrerasadecuadasesten colocadas en su sitio
antesdehacerfuncionar el generador.
• Nunca manipule ninguntipo de cable o dispositivo electrico mientras
este parade en agua, mientras este descalzo, o mientras tenga
las manes o los pies mojados. PUEDESUFRIR UNA DESCARGA
ELF:CTRICAPEUGROSA.
• El Codigo ElectricoNacional (NEC)requiereque el marco y las partes
conductorasdelexteriordelgeneradorestenconectadascorrectamente
auna tierraaprobada.Los codigoselectricos localespuedentambien
requerirque el generadorse ponga atierra adecuadamente.Consulte
con un electricistalocal sobre los requerimientosde puesta a tierra
en su a_rea.
• Utilice un interrupter de circuito per falla a tierra en a_reashumedas
o altamenteconductivas (come los trabajos en pisos metaJicosoen
herreria).
• No use cables electricos gastados,pelados, quemadoso dahadosde
algunaotraforma con el generador.
• Antesde realizarmantenimientoalgenerador,desconectelabateriadel
motor de arranque(de teneflo) para impedir un arranqueaccidental.
Desconecteprimero el cable del borne de la bateria indicado come
NEGATtVO,NEGo (-). Esecabledebe reconectarseper ultimo.
• En case de un accidente ocasionado per descarga electrica, corte
inmediatamentela fuente de corrienteelectrica. Si esto no es posible,
intente liberar a la victima del conductor vivo. EVlTE EL CONTACTO
DIRECTOCONLAV[OTIMA. Utiliceun instrumentono conductor,tal
come una cuerda ouna tabla, para liberar a la victima delconductor
vivo. Sila victima esta_inconsciente, apliquelos primeros auxilios y
consigaayudamedicainmediatamente.
RIESGOSDEINCENDiOS
• Los gases de escape del motor contiene monoxide de carbono,
que no se puedever ni oler. Este gas venenoso, si es inhaladoen
concentracionesaltas,puedecausarinconscienciao aunla muerte.
• El flujo adecuadoy sin obstrucciones del aire de enfriamientoy de
ventilaciones esencialpara el correctofuncionamiento delgenerador.
No modifique la instalaci6n ni permitaalgun bloqueo, incluso parcial,
de los componentes de la ventilacion, come esto puede afectar
seriamentela operacionsegura del generador.ElgeneradorSEDEBE
poneren funcionamientoalairelibre.
• Este sistema de escape debe recibir el mantenimientocorrecto. No
haganadaque puedahacerque el dispositivo de escapeseainseguro
o que no cumplacon los codigos o normaslocales.
Utilice siempre una alarma a pilas para deteccion del monoxide de
carbonoen interiores,siguiendo las instrucciones delfabricante.
• Si comienza a sentirse enfermo, mareado o debil despuesde que
el generador este en funcionamiento, trasladese aun lugar con aire
fresco INMEDtATAMENTE.Visite aun doctor, pues podria sufrir de
intoxicacionper monoxidede carbono.
• La gasolina es altamente INFLAMABLE y sos vapores son
EXPLOSIVOS.No permitafumar, llamas abiertas, chispaso taler a
su alrededor mientras manipola la gasolina.
• Nuncaafiadacombustiblemientras launidadesta enfuncionamiente
o caliente. Permitaque el motor se enfrietotalmente antes de ahadir
combustible.
• Nunca Ilene el deposite de combustibleen interiores.Cumpla con
todas las leyes que regulan el almacenamientoy el manejo de la
gasolina.
• No sobrellene el deposito de combustible.Siempre deje espacio
para la dilatation del combustible.Si se sobrellena el deposito, el
combustible puede desbordarse sobre el motor caliente y causar
un INCENDtOouna EXPLOSION.Nunca almaceneel generadorcon
combustible en el deposito donde los vapores de gasolina pueden
Ilegar auna llama abierta, una chispa o un piloto (come en un
homo, calentador de aguaoun secadorade ropa). Puede suceder
un INCENDIOouna EXPLOSION.Permita que la unidad se enfrie
totalmenteantes de almacenafla.
• Limpie los derrames de combustible o aceite inmediatamente.
Aseguresede que no se dejenmaterialescombustiblessobreo cerca
delgenerador.Mantengael areaalrededordel generadorlimpia y libre
de desechos y deje un espacio de cinco (5) pies a cada lade para
permitir la adecuadaventilaciondelgenerador.
Page 29

* Noinserteobjetosatravesdelasranurasdeenfriamientodelaunidad.
* Noopereelgeneradorsilosdispositivoselectricosconectados
serecalientan,sisepierdelacorrientedesalida,sielmotoroel
generadorgeneranchispasosiseobservanllamasohumomientras
launidadestaenfuncionamiento.
* Tengaunextintorcercadelgeneradorentodomomento.
JND/CEDEflORMttS
1. Asociacion nacional de proteccion contra incendios (NFPA)70: El
CODIGOELI_CTRICONACIONAL(NEC)disponibleenwww.nfpa.org
2. Asociacicn nacional de proteccion contra incendios (NFPA)5000:
CODtGODEEDIFICACIONY SEGURIDADdisponibleenwww.nfpa.org
3. El Codigo internacional de la construccion disponible en www.
iccsafe.org
4. Manual de OableadoAgricola disponible enwww.rerc.org, Oonsejo
de Recursos de Electricidad Rural RO. Box 309 Wilmington, OH
45177-0309
5. ASAE EP-364.2 Instalacion y mantenimiento de energia electrica
de respaldo en granjas disponible en www.asabe.org, Sociedad
AmericanadeIngenierosAgricolas y Biologicos2950 NilesRoad,St.
Joseph, MI49085
Estalista no es inclusiva..Verifiquecon laAutoridad conjurisdiccicn local
(AHJ) cualesquieracodigos locales o normas quepuedanser aplicables
asu jurisdiccicn.
N.° DEMODELO:
N.° DESERIE:
ADVERTENCiADE LAPROPOSICiON65 DECALIFORNIA
Elestadode Californiaha identificadoquelos gasesde escape
del motory algunosdesus compuestospuedencausarcancer,
defectosde nacimientoy otros dafios reproductivos.
EtestadodeCaliforniaha identificadoqueesteproductocontiene
o emitesustanciasquimicasque puedencausarcancer,defectos
ADVERTENCiADE LAPROPOSiCiON65 DECALIFORNIA
de nacimientoy otros dafios reproductivos.
2'7
Page 30

1.1 DESEIVIPAQUE
• Retiretodo elmaterialde empaque.
• Retirela caja deaccesorios.
• Retirela caja decarton del generador.
1.1.1 CAJADEACCESORiOS
Compruebetodo el contenido(Figura1). Si algunaspiezasfaltan o estan
dahadas, Iocalice a un distribuidor autorizado Ilamando al 1-888-436-
3722.
Elpaqueteincluye:
• 2- Clavijasde eje • Filtrode aceite
• 2- Espaciadoresde rueda • Filtrode aire
• 2-Horquillas • Bujia
• 2-Ruedas • Llavede bujia
• 1 -Patadelmarco • Toalla
• 1 - Pernodelmarco • Bote deaceite de 1 cuarto de
galonSAE30
• 1 -Arandelaplanade marco • Embudode aceite
• 3- Tuercasdebrida • 2- Monturasde vibracion
Figura 1 - Caja de accesorios
NOTA:
Las ruedas no estan disefiadas para usoen carretera.
Refieraseala Figura2 einstaleel kit deruedas y la patadelmarco como
sigue:
1. Deslicelaclavijade ejeatraves dela Ilanta,elespaciadordela rueda
(arandela)y el marco.
2. Instalela horquilla a la clavijade eje para asegurarla rueda. Repita
parael lado opuesto.
3. Asegure las monturas de vibracion a la pata del marco con las
tuercas de cierre incluidas.
4. Parainstalarla pata del marco, retire la tuerca de cierre del taco de
la monturadevibracion.
5. Coloquela patadel marco en el taco de la montura de vibracion y
vuelvaainstalar la tuerca de cierre. Aprietepor completola tuerca.
6. Instaleel perno delmarcoatravesde la arandelademarco, el marco
y la patadel marco. Asegurecon una tuerca debrida.
Figura 2 - Ensamble de rueda ypata.
DEPATADE
_ NSAMBLE
6
MARCO
ASEGURELA
RUEDAY EL EJE
CONHORQUILLA
1.2 ENSAlVlBLE
Lea compietamenteel Manual de Propietario antes de realizar el
ensamble u operar el generador. El generador requiere de ciertos
procedimientosde ensambleprevio al uso. Si surgen problemas durante
el ensambledel generador,Namea la Lineade Ayuda del Generadoral
1-888-436-3722.
1.2.1 ENSAMBLEDELKITDERUEDASYPATADEL
MARCO
El kit de rueda esta disehado para mejorar grandementela portabilidad
delgenerador.Ustednecesitaralas siguientesherramientaspara instalar
apropiadamenteel kit de ruedas:
• Licates
• Lavede 1/2" (13mm)
• Llavede dado con un dadode 1/2" (13mm)
28
USEDENUEVO
ESTATUERCADE--¢
LAMONTURA
DEVIBRACION
INSTALELAPATADELMARCO
DE
-. RUEDA(ARANDELA)
'ERNODE
_MARCO
DEMARCO
ARANDELA__
TUERCADEBRIDA /
/
DESLICEELEJE
ATRAVESDELA
RUEDAYDEL
ESPACIADORDE
LARUEDA
Page 31

2.1 CONOZCAELGENERADOR
Lea el IVlanualdel Propietarioy las Reglas de Seguridad antes de
porterel generaduren funciunamiento.
Compare el generadorcon la Figura 3 para familiarizarse con las
ubicaciones de los diferentescontroles y ajustes.Conserveeste manual
parafuturasreferencias.
1. interrupter de arranque/parada - Controla la operacion del
generador.
2. Corte de combustible- Va_lvulaentre eltanque de combustible y
el carburador.Apague y agote el combustible del generador para
almacenamientoprolongado.
3. Laces LEDdel panel- Proprocionaniluminacbn delpaneldecontrol
mientraselgenerdorestafuncionando.
4. Receptaculo de cierre de 120/240 voltios AC, 20 amperios -
Suministra la energia electrica para la operacbn de iluminacbn
electrica,herramientas,aparatosy cargas del motor de 120 y/o 240
voltiosAC, 20 amperiosy 60 Hzmonofa,sicos.
5. Receptaculo duplex GFCI de 120 voltios AC, 20 amperius -
Suministra la energia electrica para la operacbn de iluminacbn
electrica, herramientas, aparatos y cargas del motor de
120 voltios AC, 20 amperios y 60 Hz monofasicos. Tambien
proporciona proteccbn con un interrupter de circuito de falla con
conexion a tierra integral, complete con un boton de preston para
"Prueba"y "Reinicio".
6. Interruptoresde circuito(AC)- Losinterruptoresde circuitodeltipo
presionarparareajustar.(modelo49 state) o el interrupterde circuito
de 2 polos (modelos CSA/CARB) estan ajustados a 20 amperios;
esto protegeel generadorcontra sobrecargaelectrica.
7. Horometro- Brindahoras deoperacbn paraintervalosde servicio..
8. Barra de energia -Indica la cantidad de energiaque esta siendo
usada desde el generador; cada seccion es aproximadamenteel
20%.
g. Tanquede combustible- Eltanquetiene unacapacidadde 4.5 U.S.
galonesde combustible.
10. Indicadorde combustible-Indica el nivel de combustible en el
tanque.
11. IVlanijas- Pivoteany se retraenpara el almacenamiento. Pulseel
boton de resorte paramover las manijas.
12. Llenado de aoeite - Compruebeel nivel de aceite y agregueaceite
aqui.
13. Oreja de conexiona tierra - Conecteaqui el generadora unatierra
aprobada.Consulte"Come poner a tierra el generador"paraobtener
detalles.
14. 8ilenciador - Incluye el supresorde chispasy silencia el motor.
15. Bujia- Enciendelamezclaaire/combustible(elpanel lateraldebeser
retirado).
16. Filtro de aceite del motor- Filtrael aceite del motor, consulte la
Seccion3.1 paralos intervalos de servicio apropiados.
17. Ahogador - Se usa cuando se arrancael motorfrio.
18. Limpiador de aire - Filtrael aire de entradamientrasse Io dirige al
motor.
lg. Drenaje de aceite - Drenalava,lvula para retirar aceiteusado del
ca_fretdel motor.
20. Arrancador de retroceso - Se usa para arrancar manualmenteel
motor.
*21.Cartucho decarbon-Absorvelosvaporesdeltanquede combustible.
22. Valvula de inversion - Pasalos vapores decombustibleal cartucho
de carbon.
23. IVlanguerade recuperation - Instalado entre la toma de aire del
motor,el filtro decarbon active y el rollo de lava,lvula.
* Solo modelo California.
Figura 3 - Ubicaciones y controles de/generador
Estado 49
1 4 5 8
@ @
J / / "/ \
2 3 B 7 3
CSA/CARB
1 4 5 8
2 3 6 7 3
11
12
13
23
21
15
1B 20
22
17
18
29
Page 32

2.2 HOR6METRO-NOREAJUSTE
Elhorometrole siguela pistaalas horasdeoperacionparamantenimiento
programado:
Habrauntiempo de pausaenel mensaje"CHGOIL"("CAMBIARACEITE")
quecentelleacon el tiempotranscurrido enhoras y decimos despues de
las primeras 30 horas de operacion.
Este mensaje realmente comienza a centellear alas 29 horas y se
deshabilitaen 31 horas proporcionandounaventana de dos horas para
realizarelservicio.
Habra un mensaje subsiguiente "OHGOIL" ("CAMBIARACEITE")cada
100 horas. El mensajecentelleara,una hora antes y una hora despues
cada intervalo de 100 horas, proporcionandode nuevo una ventana de
dos horas pararealizarel servicio.
Cada 200 horas, el icono "SVC" en la esquina inferior izquierdade la
pantalla centellear& El mensaje centelleara,una hora antes y una hora
despuescadaintervalode200 horas,proporcionandounaventanadedos
horas pararealizarel servicio.
Cuandoel horometroesta en el modo Alerta de centelleo,el mensajede
mantenimientse alternarasiempre con el tiempo transcurrido en horas
y decimas. Las horas centellearancuatro veces, alternandoseentonces
con el mensaje de mantenimientocuatroveces hasta que el medidor se
reiniciaasi mismo.
• 100 horas - CHGOIL (CAMBtODEAOEITE)-- Intervalode cambio de
aceite(Cada100 horas)
• 200 horas - SVC-- Intervalode filtro deaceite(Cada 200 horas)
Reajustar: Cambiea la alertaque usted deseareajustary luego presione
haciaabajoel boron durante9 segundos.Lashoras demantenimientose
reajustancuandola pantallamuestra "0000.0".
NOTA:
La gr;Uicade relojde arena cenlellear;iintermiienlementecuando
el motoreste funcionando. Estosignificaque el medidor le esta
siguiendola pistaalas horas de operation.
Figura 4 - Hordmetre
GRAFICODE
RELOJ DE ARENA
BOTONDEREAJUSTE
(SI EST.&.INSTALADO)
2.4 CABLESYENCHUFESDECONEXION
2.3 HOBOIVIETBO-CON REAJUSTE
Elhorometrole siguela pistaalas horasdeoperacionparamantenimiento
programado(ver cuadro) (Figura4).
Operaci6n: Presioney libere el boton de reajuste para alternar entre
pantallas. Las horas se cuentan hacia atra.sdesde el intervalo de ajuste
como se muestra enel cuadro.
Cuando el medidor alcanza5 horas, el texto "CHG OIL:' (o "SVO AIR
FILTER"o "CHGPLUG")centellearacontinuamentedurantedos minutos.
Despuesde este tiempo, el medidor regresarapara mostrar las horas
totales de la unidad (durante 2 minutos). Es ciclo se repetira,durante
todas las 5 horas.
Cuando el intervalo de servicio alcance cero horas, el texto "NOW"
reemplazalashoras restantes.
Paraun generadornuevo por ejemplo, el mensajedira "CHG011"luego
centelleara"in 30". Estosignifica queen 30 horas,el aceitenecesitaraser
cambiado.Presionandoel boton unaspocas vecesmas traeraal medidor
de nuevoa la pantallaque muestralas horastotales defuncionamiento.
Cuadro del Horometro (con reajoste)
Frecuencia del mensaje
CHGOIL(cambiar aceite)
CHGOIL(cambiar aceite)
SVCAIR FILTER(filtro de aire svc)
CHGPLUG(cambiarbujia)
Periodode entradaforzadainicial
Reocurrencia
Reocurrencia
Reocurrencia
2.4.1 RECEPTACULODOBLEGFCl, 120VAC,20
AMPERIOS
Este es un tomacorriente de 120 voltios protegido contra sobrecargas
por un disyuntor de circuito tipo presionarpara reajustarde 20 amperios
(Figura 5). Utilice cada conector para alimentar de 120 voltios de
AC, monofasica de 60Hz Ins cargas que se requieren hasta un total
combinado de 2.400 vatios (2.4 kW) o 20 amperios de corriente. Use
solojuegos decablesde3 hilos atierradealtacalidad,bienaislados, con
capacidadde 125 voltios a 20 amperios (o mas). Un cable de 15 pies
o menores preferido.
Mantenga los cables de extension tan cortos como sea posible para
prevenircaidade voltajey posiblerecalentemientode los cables.
Intervalo
Primeras30 horas
100 horas
200 horas
200 horas
Duration del mensajeMensaje
ON/OFF(encendido/apagado)
durante2 minutos en un periodode
5 horas
3O
Page 33

Figura 5 - Receptacu/o dob/e GFC/ de 120 Volt AC,
20 amperios
2.4.2 RECEPTACULODE120/240VAC,20AMPER/OS
Use un tomacorriente NEMA L14-20 con este receptaculo (rotar para
bloquear/desbloquear).Conecteunacablede 4 hilos atierra adecuadoal
tomacorrientey a la cargadeseada.Elcabledebeteneruna capacidadde
250 voltios A0 a 20 amperios (o mayor) (Figura6).
Los humos del escape del motor contienen
mon6xido de carbono, que no se puede oler
ni ver. Este gas venenoso, si se aspira en
concentraciones suficientes, puede hacerle
pettier la conciencia y causarle la muerte.
,_EI flujo adecuado y sin obstrucciones de aire
para ventilaci6n y refrJgeraci6n es critico para
la correcta operaci6n del generador. No altere
la instalaci6n ni permita que haya siquiera un
bloqueo parcial de la provisi6n de ventilaci6n, ya
que esto puede afectar seriamente la operaci6n
segura del generador. El generador DEBE set
operado en exteriores.
_ ste sistema de escape debe tenet un apropiado
mantenimiento. No haga nada que pueda porter
en peligro la segurJdad del escape o que no
cumpla con algun c6digo local o estandar.
Siempre use una alarma de mon6xido de carbono
operada con baterfas en los interJores, instalada
de acuerdo a las instrucciones del fabricante.
Figura 6 - Receptacu/o de 120/240 AC, 20 amperios
Use este receptaculoparaoperar cargas de 120 voltios AC monofasicas
de 60 Hz, que requieran hasta 2400 vatios (2.4 kW) de potencia a
20 amperios, o cargas de 240 voltios A0 monofasicas de 60 Hz, que
requieranhasta4000 vatios (4.0 kW) de potencia a 16.6 amperios. La
salidaesta protegidapor un interruptor de circuito.
2.5 COMOUSABELGENEBADOB
Oonsultela seccion "Paraarrancar el motor" para ver como arrancar y
pararel generadorconseguridady como conectary desconectarcargas.
Si surgen problemas con la operaciondel generador,Namea la linea de
ayudadelgenerador1-888-436-3722.
JNunca opere en areas cerradas o interiores!
iNUNCA opere en un area cerrada, en un
vehiculo, o en el interior AU,NQUE I,as puertas
y ventanas estan abiertas! Uselo SOLO en
exterJores y lejos de ventanas abiertas, puertas,
ductos de ventilaci6n yen areas que no
acumularan el mortal escape.
El uso del generador on ambientes cerrados PUEDE
MATARLO EN MINUTOS.
El mosgases de escape del generador contienen monoxido
de carbono. Esto es un venenos que no so puede ver ni oler.
NUNCAIo utilice dentro de una
casa o garaje, INCLUSO SJlas
puertasy lasventanasostan
abiertas.
Utilicelo SOLAMENTEal aire
librey lejosde ventanas,
puertas,respiraderos.
2.5.1 COMOPONERATIERRAELGENERADORClJANBO
SEUSACOMOPORTATIL
Estegeneradortiene una tierra de equipoque conecta los componentes
delmarco delgeneradoralas terminales de tierra en los receptaculosde
salidadeCA (verNEC250.34 (A)para unaexplicaci6n). Estopermiteque
el generadorsea usadocomo un portatil sin ponera tierra elmarco del
generadorcomo se especifica en NEC250.34.
Requerimient0sespeciales
Puedehaberregulacionesfederaleso estatalesde la Administracionde
salud y seguridadocupacional (OSHA),codigos locales, u ordenanzas
queapliquenal uso previsto del generador.
Por favor, consulte a un electricista calificado, inspector electrico o
agencialocalque tengajurisdicci6n:
• En algunasa_reas,se requiere que los generadoresesten registrados
con compa_iasde servicio publico locales.
• Si el generadorva a ser usado en un sitio de construcci6n, puede
haberregulacionesadicionalesque debenser observadas.
31
Page 34

2.5.2 COMOCONECTARELGENERABORA UNSlSTEMA
ELECTRiCODEEOIF/C/O
Lasconexionesparaenergiaderespaldoa un sistemaelectricode edificio
debenser hechasporun electricistacalificadoy enestricto cumplimiento
detodos los codigos y leyes electricasnacionalesy locales.Laconexion
debeaislar la energiadel generadorde la energiapublicau otras fuentes
alternativasde energia.
NOTA:
Debidoa que latierra del equipo del generadoresta conectadaa los
canes neutralesde CAen el generador(vet Figura 8), se requiere
uninterruptordetransferenciade3 poloso de 2 polosconunkit
neutralde interrupcionparaconectareste generador a unacarga
de edificio. Enesta aplicacion, el generador se vuelveun sistema
derivadoseparadamente (vet NEC250.20 (D)), y debe set puestoa
tierra de acuerdo conlos requisitos delcodigoelectrico local.
C6moponeratierrael generadorenunaaplicaci6nde
respaldodeedificio
El Codigo National de Electricidad exige que el marco y las partes
externas conductorasde electricidad del generadorse conectena una
tierra aprobada (Figura 7).
Los codigos electricos localespuedentambien requerir quelaunidad se
pongaatierraadecuadamente.Paraeso,la conexiondeuncablede cobre
trenzado No.10 AWG (AmericanWire Gauge) a latierra y a unatierra de
cobre o una varilla de bronce conectada a tierra (electrodo), brinda la
proteccion adecuada contra choques electricos. De todas formas, los
codigoslocales puedenvariarmucho. Consulteconunelectricista local
sobre los requerimientos de puestaa tierra en su ;irea.
Porter a tierra adecuadamente el generador evitar;i descargas
electricas en caso defallas atierra del generadoro de los dispositivos
electricos conectados. Una tierra adecuadatambien ayuda a disipar la
electricidadesta.tica,que a menudo se acumula en los dispositivos sin
conexionatierra.
Figura 7 - Cbmo porter a tierra el generador
Figura8 - Cables de tierra neutrala marco
iNODESCARTE
_ _ESTOS CABLES!
TIERRADE
k'i%\ NEUTRAL
_, _ AMARCO
//_iLa falla en la reconexion de estos cablespuedecrear un
riesgo de posibledescarga electrica cuandoel generador
este funcionando!
2.5.4 CONEX/ONDECARGASELE-CTRICAS
NOconectecargasde 240 voltiosa receptaculos de 120 voltios.
NOconectecargasirif;isicas al generador.
NOconectecargasde 50 Hzal generador.
• Deje queelmotor se estabilicey calientepor unos minutos luego del
arranque.
• Conectey encienda las cargas electricas de 120 o 240 voltios AC
monofasicasde 60 Hzdeseadas.
• Sume la potencia nominal (o amperios) de todas las cargas que
se van a conectar al mismo tiempo. Estetotal no debe ser mayor
que (a) la capacidadnominal vataje/amperajedel generador o (b) la
clasificacion delinterruptor de circuito delreceptaculoquesuministra
la electricidad.Consultelaseccion "No sobrecargueel generador"
OONECTELATIERRADEL GENERADORAQUi
2.5.3 PUESTAA TIERRADENEUTRALA MARCO
Si se realizatrabajo de servicio en el generador,NOdescarte los cables
del puente blancodel bloque terminal a la tierradel alternador,ubicado
en la parte posterior del portador del cojinete.Siempreaseguresede que
los cables esten apropiadamenteconectados antes de usar el generador
despuesde que sehaya hecho deltrabajo deservicio delalternador.
32
2.6 NO SOBREOARGUEELGENERADOR
Lasobrecargadeungenerador por encimadesu potencianominalpuede
ocasionar dahos al generador y los dispositivos electricos conectados.
TengaencuentaIo siguienteparaimpedir que la unidad se sobrecargue:
• Sume la potencia de todos los dispositivos que se conectaran al
mismo tiempo. Estetotal NO debe ser mayor que la capacidad de
vatajedel generador.
• La potencianominal de las luces seindica en los bulbos. La potencia
nominal de herramientas,dispositivosy motores se puede encontrar
en la etiquetao calcomaniade datosadheridaal dispositivo.
• Si el dispositivo, herramientao motor no da potencia,multiplique los
voltiospor los amperiosparadeterminarlos vatios (voltiosx amperios
= vatios).
• Algunos motores electricos, como los de induccion, requierencerca
de tres veces mas potencia para arrancar que durante la marcha.
Esteaumentodepotencia solo duraunossegundos enel arranquede
estos motores. Aseguresede disponer de esta potencia alta cuando
seleccionelos dispositivos electricos que conectaraal generador:
1. Calculela potenciaque necesitael motor mas grandeparaarrancar.
2. Ahadaa esta cifra los vatios de funcionamiento detodas las otras
cargasconectadas.
La Guia de Referencia de Potencia se proporciona para ayudar a
determinarcua.ntosaparatospuedeoperarel generadoralmismotiempo.
Page 35

2.7 GUIADEREFERENCIADEPOTENCIA
NOTA:
Todasinscifrassonaproximadas.Consuitelaetiquetadedatesdel
dispositivoparasaberacercadelosrequisitesdepotencia.
Dispositivo................................... Vatios de operacien
*Aire aeondicionado (12.000 BTU)............................. 1700
*Aire acondicionado (24.000 BTU)............................. 3800
*Aire acondicionado (40.000 BTU)............................. 6000
Cargadorde bateria (20 Amperios).............................. 500
Lijadora de banda (3") ...................................... 1000
Mote sierra............................................... 1200
Cierra circular (6-1/2") ................................. 800 a 1000
*Secadora de ropa (electrica) ................................ 5750
*Secadora de ropa (gas) ..................................... 700
*Lavadora de ropa......................................... 1150
Cafetera................................................. 1750
*Compresor (1 HP) ........................................ 2000
*Compresor (3/4 HP)....................................... 1800
*Oompresor (1/2 HP)....................................... 1400
Plancha paracabello ........................................ 700
*Deshumedecedor.......................................... 650
Lijadora de banda (9") ...................................... 1200
Desbrozadora.............................................. 500
Manta Electrica............................................. 400
Clavadoraelectrica......................................... 1200
Parrillaelectrica (per elemento) ............................... 1500
Sartenelectrica ........................................... 1250
*Freezer.................................................. 700
*Ventilador de homo (3/5 HP) ................................. 875
*Dispositivo deapertura de puertade garaje ................. 500 a 750
Secadorapara cabello ...................................... 1200
Taladrode mane...................................... 250 a 1100
Cortadora desetos.......................................... 450
Llavede impacto ........................................... 500
Plancha ................................................. 1200
*Bomba de chorro a presion .................................. 800
Podadora ................................................ 1200
Bombilla electrica........................................... 100
Homo de microondas.................................. 700 a 1000
*Enfriador de leche ........................................ 1100
Quemadordeaceite en horno.................................. 300
Calentadorde espacios deaceite (140.000 BTU)................... 400
Calentadorde espacios deaceite (85.000 BTU).................... 225
Calentadorde espacios deaceite (30.000 BTU).................... 150
*Pistola pulverizadora,sin aire (1/3 HP).......................... 600
Pistola pulverizadora,sin aire (portatil) ........................... 150
Radio ................................................ 50 a 200
*Refrigerador.............................................. 700
Olla electrica de coccion lenta ................................. 200
*Bomba sumergible (1-1/2 HP) ............................... 2800
*Bomba sumergible (1 HP) .................................. 2000
*Bomba sumergible (1/2 HP)................................. 1500
*Bomba de sumidero.................................. 800 a 1050
*Sierra de mesa (10") ............................... 1750 to 2000
Television............................................ 200 a 500
Tostadora.......................................... 1000 a 1650
Desmalezadora............................................. 500
* Serequiere 3 veces la potenciaindicada paraencenderestos dispositivos.
2.8 ANTESDEARRANCARELGENERADOR
Antes de poner el generador en funcionamiento, debe agregar aceite y
combustible al motor, de la manera siguiente:
2.8.1 AGREGADODEACEITEDEMOTOR
Todo el aceite debe cumplir per Io menos con la Clasede Servicio SJ,
SL o meier del Institute del Petroleo Norteamericano. No use aditivos
especiales. Seleccione el grade de viscosidad del aceite de acuerdo a
la temperaturadefuncionamiento prevista(consultetambien elcuadro).
• Sobre 40° E utiliceSAE30
• Debajode 40° Fa 10° F,utilice 10W-30
• Debajode 10° F,utilice5W-30 sintetico
j°F =20 =10 O 10 20 32 40 60 80
_cie -_o -1.0 _ lo 2'0
Range de temperaturas de use esperado
A CUIDADO
,_ Cualquier intento de el motor antes de le
{lade servicio apropiado coo el aceite recomendado puede
traer come resultado una falla del motor.
• Coloque el generador en una superficie nivelada (no exceda los 15 ° en
ninguna direccion).
• Limpie el a.rea alrededor de la boca de Ilenado de aceite y retire el
tapon.
• Lentamente Ilene el motor con aceite a traves de la abertura de
Ilenado de aceite hasta que alcance la marca full.. Detenga el vertido
ocasionalmente para verificar el nivel. El aceite del motor esta
completo cuando el nivel esta. arriba de la rosca del tapon de Ilenado
de aceite (Figura 9).
• Instale el tapon de la boca de Ilenado de aceite y ajustelo bien.
• Oompruebe el nivel de aceite en el motor siempre antes del arranque.
arraocar
Figura 9 - Nivel del aceite
!
m m
LLENE EL CARTER HASTA LA
PARTE INFERIORDE ESTAS
- - ROSCAS CON EL ACEITE DE
MOTOR RECOMENDADO
que
se
haya
33
Page 36

2.8.2 AGREGADODECOMBUStiBLE
2.9 PARAARRANCARELMOTOR
z_Nunca Ilene el dep6sito de combustibleeu interieres.Nunca
Ilene el dep6sito de combustiblecuafldoel motoreste en
marcha ocaliente.Evitederramargasolinaen unmotor
caliente.Permita que el motor se enfrie tetalmenteantes de
llenar el dep6sitode combustible.
z_No sobrellene el dep6sitode combustible. Siempre deje espaeio
para la dilataci6ndel combustible.Si se sobrellena el taflque,
el combustiblepuedederramarse sobre el motor caiiente y
causar un INCENDIOo unaEXPLOSION.Limpieinmediatamente
el combustiblederramado.
No enciefldaun cigarrilloni fumeal lienar el dep6sito de
gasolina.La gasolinaes altamente INFLAIVlABLEy sus vapores
son EXPLOSIVOS.
* Usegasolina regular SIN PLOMOen el motor del generador.No use
gasolinapremium. No mezcleaceiteenla gasolina.
* Nousegasolinacon mas de110%dealcoholtal come E85o Metanol.
* Limpieel areaalrededordel tapon de combustible, retireeltapon.
* Vierta lentamente gasolina regular sin plomo en el tanque de
combustible. Llene hasta el fondo del filtro. Tenga cuidade de no
sebreilenar eltanque (Figura10).
* Coloqueel tapon de combustible y limpiela gasolinaderramada.
Figure10 - Nivel deflenado del combustible
iNOLLENAR
ENCIMA
DELBORDE!
/_Nunca arranque o apagueun motorcondispositivos electricos
conectadesa losreceptaculesY eucendidos.
* Desconectetodas las cargas electricas de los recepta.culosde la
unidadantesde arrancarel motor.
* Coloqueel generadoren unasuperficienivelada (noexcedalos 15° en
ningunadireccion).
* Abrala va.lvuladecorte decombustible (Figura11).
Figura11 - Valvu/ade corte decombustib/e
* Mueva la palanca del ESTRANGULADORhacia afuera a la posicbn
"Full Choke"("Estrangulacionma.xima")(Figura12).
Figura12 - Operation de/estrangu/ador
\
IMPORTANTE:Es importanteevitar queseformen depositosdegoma en
laspiezasesencialesdelsistema decombustibletalescome elcarburador,
la manguerade combustibleo el depositoduranteel almacenamientoper
periodos largos. Los combustibles mezclados con alcohol (llamados
gasohol, etanol o metanol) puedenatraer la humedad, Io que conduce
a la separacion y formacion de acidos durante el almacenamiento. El
combustible a.cidopuededahar el sistema de combustible de un motor
mientrasestaguardado.Paraevitar problemasenel motor,se debevaciar
el sistema de combustible antes de su almacenamiento per 30 dias o
mas. Consultela seccion "Almacenamiento". Nunca use productos de
limpiezapara motor o carburadoren el tanque de combustible, ya que
puedecausar dafiospermanentes.
34
NOTA:
El interrupter del motor debe estar en la posiciou ON.
Para el arranque manual, sujete firmemente la manija de retroceso
firmemente y tire lentamentehasta que sienta un aumento en la
resistencia.Tire rapidamente hacia arriba y afuerapara arrancar el
motor.Luegosigala misma secuenciadeestrangulacionlistadaarriba.
Duranteel arranque,muevala palancadel estranguladora la posicion
"1/2 Choke" ("1/2 estrangulaci6n") hasta que el motor arranque
suavementey luego per complete a la posicbn "Run" ("Arranque").
Si el motor falla, mueva la palanca del estranguladornuevamentea
la posicion "1/2 Choke" ("1/2 estrangulaci6n") hasta que arranque
suavemente,y luegootra vez a la posicion "Run" ("Arranque").
Page 37

NOTA:
Si el motor enciende, per0 no quedaen marcha, mueva la palanca
delestrangulad0r a la p0sici6n"Full Ch0ke"("Estrangulaci6n
m;ixima") y repita las instru¢ci0nesdearranque.
,A CUIDADO
No sobrecargue el generador. Tarnpoco sobrecargue
los paneies individuaies de los recept_cuios.
Estas saiidas est_n protegidas contra sobrecargas
con interruptores de circuito tipo presionar para
reajustar. Si el amperaje nominal de un interruptor
de circuito se excede, dicho interruptor se abre y
se pierde la saiida el_ctrica a ese recept_culo. Lea
cuidadosamente la secci6n "No sobrecargue el
generador".
2.10PABADODELMOTOB
1. Apaguetodas las cargas, luego desconectelas cargas electricas de
los receptaculos delpanel del generador.Nuncaarranqueo pareel
motor con dispositivos electricosconectadosy encendidos.
2. Dejequeel motorfuncione sin cargadurantealgunos minutos para
estabilizarlas temperaturasinternasdel motor y el generador.
3. Muevael interruptor deArranque/Paradaala posicbn "Off".
4. Cierrela va.lvuladecombustible.
2.11SISTEMADEAPAGADOPOBBAJAPBESION
DEACEITE
Elmotorestaequipadocon unsensordepresbn bajadel aceitequeapaga
automaticamenteelmotor cuandola presbn delaceitecae por debajode
5 PSI.Una construccbn de retardo dentro del sistemade apagadobajo
permiteque la presbn del aceite aumenteduranteelarranque.El retardo
permiteque el motor funcione cercade 10 segundosantesde detectarla
presion del aceite. Si el motor se apagasolo y el tanque de combustible
tiene suficientegasolina,verifiqueel nivel de aceite.
2.1I.1REANUDAR LA MARCHA
Si trata de volver a arrancar el motor en 10 segundos despues de un
apagado por baja presbn del aceite, el motor puede NO arrancar. El
sistemanecesita de 5 a 10 segundos para restablecerse.
Si el motor se havuelto aarrancar despuesdelapagadoy la presion baja
delaceite no ha sido corregida (por ejemplo,agregandoaceite), el motor
funcionara durante cerca de 10 segundos segun se describio antes y
luegose para.
&1 {30MOBEALIZABMANTENIIV]IENTO
PBOGBAMADO
Es importante realizar el servicio especificado en el Programa de
mantenimientopara un funcionamiento apropiadoy asegurarse que el
generadorcumple con las normas deemisbn aplicablesparaladuracbn
desu vidautil. Elservicio y las reparacionesdebenser realizadospor una
personacapazo por el taller de reparaciones.Ademas,el mantenimiento
critico de las emisionesdebe ser realizadosegunel programa con el fin
de que la Garantiade las Emisionessea valida. El mantenimientocritico
de las emisionesconsiste de darle servicio al filtro de airey las bujias de
acuerdoal Programade mantenimiento.
&2 PBOGBAMADEMANTENIMIENTO
Sigalos intervalos enel calendario.Serequiereun servicio masfrecuente
si se opera en las condiciones adversas como las que se describen
debajo.
Verificacbndelniveldeaceite
Cambieelaceitey elfiltro deaceite$
Limpieelfiltro del supresordechispas
Servicioalfiltro deaire
Reemplazodela bujia
:i: Cambie el aceite luego de las primeras 30 horas de operacion, luego carla
estacion.
* Cambie el aceite y el filtro de aceite cada mes cuando se opera bajo cargas
pesadas o enaltas temperaturas.
** Realize la limpieza mas a menudo si se opera bajo condiciones de mucha
suciedad o polvo. Reemplacelas piezasdel filtro deaire si esta muy sucio.
*Cadaestacion/Cada100Horas.
Cadaestacion/Cada100 Horas.
**Cada estacion/Cada200 Horas.
Encadauso
Cadaestacbn
3.3 ESPECIFICAOIONESDELPBODUCT0
3.3.1 ESPEC/F/CAC/OflESDELGEflERADOR
M_ima nominal Potencia ...................................................... 3.6 kW**
Potenciadesalida....................................................................... 4.5 kW
VoltajeACnominal.................................................................... 120/240
CargamaximaACnominal
Corrientea 240V........................................................15.0 amperios**
Oorrientea 120V........................................................30.0 amperios**
Frecuencianominal.................................................. 60 Hza 3600 RPIVl
Fase..................................................................................... Monofa.sico
** La potenciay corrientesmaximasestansujetasa, y limitadas por,factorescomo
el contenido calorico del combustible, la temperaturaambiente, la altura, las
condiciones del motor,etc. La potencia maxima disminuye cerca de3,5% por
cada 1.000 piespor encima del nivel del mar;tambien disminuiracerca de 1%
por cada 6° C (10° F) por encima de16° C (60°F) detemperatura ambiente.
3.3.2 ESPECiFICACiONESDELMOTOR
Caballosdefuerza nominalesa 3600 RPM.......................................... 6
Desplazamiento......................................................................... 216.5cc
Tipode bujia....................................... OhampionRO14YOo equivalente
Espaciamientodelabujia.......................... 0.030 pulgadaso (0.76 ram)
Capacidadde combustible................................ 4.5 galonesamericanos
Tipode aceite......................................Oonsulteel cuadro dela seccion
"Agregadodeaceite al motor"
Oapacidadde aceite.........................con cambio defiltro = 0.8 cuartos
Tiempode operacion/Oonsumode combustible-l/2 carga
3.6 kW ............................................14 Horas/ 0.35 galonespor hora
Certificado emisionclase I
35
Page 38

3.3.3 INFORIVIACiONBEEMiSlONES
La Agenciade ProteccionAmbiental (y la Junta de RecursosAereosde
California para generadorescertificados para normas de CA standards)
requiere(n) que este generador cumpla con las normas de emision
para gases de escape. Ubique la calcomania de cumplimiento para las
emisionesen el motor para determinarque normas cumple el generador.
Estemotorestacertificado paraoperarcon gasolina.Elsistema decontrol
de emisionesconsiste de Io siguiente:
* Sistemade induccionde aire
- Tuberidmultiplede admision
- Limpiador deaire
* Sistemade combustible
- Carburador
- Tanque/taponde combustible
- Lineasde combustible
-Lineas deventeo evaporativo
- Cartuchode Carbon(solo para motores deCA)
* Sistemade ignicion
- Bujia
- M6dulo de ignicion
, Sistemade escape
- Multiplede escape/Silenciador
NOTA:
NOutiliceuna manguera de jardin para limpiar el generador. El agua
puedeentrar en el sistema de combustibledel motor y ocasionar
problemas.Adem;is, si el agua entra en el generador a traves de
Ins ranuras delaire de enfriamiento,un pocode agua permanecera
en huecos y hendidurasdel aislamiento deldevanado del rotor y
delestator.La acumulacion de agua y suciedad en los devanados
internosdel generador disminuira eventualmente la resistencia del
aislamiento de estos devanados.
3.4.2 PARALIIVIPIARELGENERABOR
* Utiliceun patio humedoparalimpiar Ins superficies exteriores.
* Un cepillo de cerda suavesse puede utilizar para aflojar la suciedad
apelmazada,el aceite,etc.
, Una aspiradora se puede utilizar para recoger suciedad y desechos
sueltos.
* Puede usarse aire de baja presion (sin exceder25 PSI) para soplar
la suciedad. Reviselas ranuras y aberturas del aire de enfriamiento
del generador. Estas aberturas se deben mantener limpias y sin
obstrucciones.
3.4.3 MANTEN/IVI/ENTODE/.MOTOR
3.4 BECOMENDACIONESGENEBALES
La garantiadel generadorno cubre los articulos quehansido sometidos
a abusoo negligenciapor parte delusuario. Pararecibir el valortotal de
la garantia, el operadordebe mantener el generadorcomo se indica en
este manual.
Sonnecesariosalgunosajustesperiodicosparamanteneradecuadamente
sugenerador.
Todoslos ajustesenla seccionMantenimientode estemanualdeben
realizarse,almenos,unavezporestacion.Sigalosrequisitosenelcuadro
"Programademantenimiento".
NOTA:
Unavezal afio,reemplacela bujia y el filtro de aire. Una bujia
nuevay un filtro de aire limpioaseguran la mezcla adecuada
decombustibley aire y ayudana quesu motor funcione mejor
y {lure mastiempo.
3.4.1 MANTEN/iVI/ENTODELGENERADOR
Operey almacenela unidaden un ambienteseco y limpio donde no este
expuestaa mucho polvo, suciedad, humedadoa ningunvaporcorrosivo.
Las ranuras del aire de enfriamiento del generador no deben quedar
bloqueadascon nieve,hojas o algunotro material extrafio.
Oompruebela limpieza del generadorcon frecuencia y limpielo cuando
haya polvo, suciedad, aceite, humedad u otras sustancias extrafias
visibles en la superficie exterior.
,A CUIDADO
_lk unca inserte ning_n objeto o herramienta a trav_s
de Ins ranuras de enfriamiento pot aire, incluso si el
motor no est_ en funcionamiento.
//_kkCuando se este trabajando en el generador,siempre desconecte
el cable de la bujia dela bujia ymantenga el cablelejos de
la bnjia.
3.4.4 VERIHCACiONDELN/VELDEACEITE
Consulte la seccion "ANTESDE ARRANCAREL GENERADOR"para
obtener informacion acerca de como verificar el nivelde aceite.El nivel
de aceitesedebe verificarantesde cada usoo al menos cada 8 horas de
operacion.Mantengael nivel deaceite.
3.4.5 CAMBiODELACEITEYDELFILTRODEACEITE
Cambieel aceitedel motor despuesde las primerastreinta (30) horas de
operacion.A partir de esemomento, cambie el aceite cada 100 horaso
cadaestacion. Si opera esta unidad en condiciones sucias o de mucho
polvo,en climas extremadamenteca.lidos,cambieel aceitema.sseguido.
,A CUIDADO
,_EI aceite calientepuede ocasionarquemaduras. Permita que el
motorse enfrie antes de drenar el aceite. Evite la exposicion
prolongadaorepetidade la pielconel aceite usado.Lavea
rondo Ins ;ireasexpnestas conjabon.
Siga Ins siguientes instruccionespara cambiarel aceite luego de que
el motorse hayaenfriado:
1. Limpieel areaalrededor deltapon de drenajede aceite.
2. Retireeltapon de drenajede aceitey el tapon de Ilenadodeaceite y
dreneel aceitecompletamenteen un recipienteadecuado.
3. Cuandoel aceite se haya vaciado completamente,coloque el tapon
de drenajey asegurelo.
4. Coloqueun recipienteadecuadobajo el filtro de aceitey gire el filtro
a la izquierdapararetirarlo.Descarte de acuerdoalas regulaciones
locales.
5. Recubrala junta delnuevofiltro con aceite de motor limpio. Gireel
filtro a la izquierda hastaque lajunta haga contacto ligeramentecon
el adaptadordelfiltro. Luego apriete3/4 devueltaadicional.
36
Page 39

6. Llene el motor con el aceite recomendado. (Consulte la seccion
"Antes dearrancarel generador"para conocer las recomendaciones
acercadel aceite).
7. Limpieel aceite derramado.
8. Dispongadel aceiteusado en un centro derecoleccion apropiado.
3.4.6 REEMPLAZOBE LABUJJA
Use bujiasChampion RC14YOo equivalentes.Reemplace la bujia carla
200 horas. Estoayudaraalmotor a arrancary funcionarmejor.
1. Detengaelmotor y retireel cablede la bujia.
2. Para ganar acceso, retire los cuatro (4) tornillos y retire el panel
lateral.
3. Limpieel areaalrededor de la bujiay retireladel cabezaldelcilindro.
4. Fije el espaciamientode la bujia en .76 mm (0.030 pig.). Coloque
la bujia con el espaciamiento correcto en el cabezal del cilindro
(Figure13).
5. Presionela bota firmemente enla bujiae instaleel panellateral.
Figura 13 - Espaciamiento de la bujia
I
NOTA:
Para pedir unnuevofiltro de aire, contacteal centre de servicio
autorizado re;is cercanoal 1-888-436-3722.
3.6 LllMIPIEELFILTRODELSUPRESORDE
CHISPAS
El silenciadordelescapedel motor tiene unfiltro de supresor dechispas.
Inspeccioney limpie el filtro cada 100 horas o al menos una vez al a_o
(Figura15). Si la unidad se usa regularmente,inspeccione y limpie con
ma.sfrecuencia.
Si usa el generador en cualquierarea cubiertade bosques,
matorrales o hierba,debeestar equipade conunsupresorde
chispas. El supresorde chispas debeset mantenido en buenas
condicienes per el propietario/operador.
Limpiee inspeccioneel supresordechispas cuandoelmotor seencuentre
atemperaturaambientecomosigue:
1. Inserte un destornillador de punta plana a traves de la ranura en el
lado delblindajedecalor delsilenciadorparaacceder ala abrazadera
del supresor de chispas. Afloje la abrazaderay retire el filtro del
supresorde chispas del silenciador.
2. Inspeccioneel filtro y reemplacelosiesta rasgado, perforado o de
otra manera da_ado. NO use un filtro defectuoso. Si la pantallano
esta dahada,limpiela con un solventecomercial.
3. Reemplaceel supresorde chispas y aprietela abrazadera.
3.5 SERVICIODELFILTRODEAIRE
Si se usa un filtro de aire sucio, el motor puede operar incorrectamente
o da_arse. Limpieo reemplaceel papel del filtro de aire cada200 horas
ouna vez al a_o (Figura 14). Realizarla limpiezao el reemplazoma.sa
menudosi se opera bajo condicionesde mucho polvo.
Para limpiar o reemplazarel filtro de aire:
1. Retirelacubierta delfiltro de aireluegoretire el filtro depapel.
2. Para limpiar el papel de filtro, golpeelo suavemente sobre una
superficie dura. Si el filtro esta muy sucio, reempla.celocon uric
nuevo.Dispongael filtro usadoadecuadamente.
3. Limpiela cubierta del filtro, luegocoloqueun nuevopapeldefiltro en
la base.Vuelvaa instalarla cubierta delfiltro.
Figura 14 - Fi/tro de aire
Filtro
Base
Figura 15 -- Filtro del supresor de chispas
ABRAZADERA DEL FILTRO
DELSUPRESOR DECHISPAS INSERTEEL DESTORNILLADORA
FILTRODEL BLINDAJEDECALOR PARAACCEDER
SUPRESORDE A LA ABRAZADERADEL FILTRO
CHISPAS DEL SUPRESORDECHISPAS
TRAVESDELA RANURA EN EL
Cubierta
3"7
Page 40

3.7 GENERAL
El generador debera arrancarse al menos una vez cada 30 dias y
permitirselefuncionar al menos 30 minutos. Si esto no se puede hacery
la unidaddebeguardarsepormas de30 dias,use la siguienteinformacion
como guiapara prepararloparasu almacenamiento.
z_NUNCA almacene el motor con combustibleen el tanqueen
interioreso en areas cerradaso con pocaventilaci{ondonde
losgases puedenalcanzar una llama abierta, chispao luz
pilotoco[noen unhorno,calentadorde agua,secador de ropa
uotro dispositivodegas.
,_l Perrnita la unidad enfrie totalmente antes de
almacenarla.
que
se
3.8 ALIVIACENAMIENTOALARGOPLAZO
Es importante evitar que se formen depositos de goma en las piezas
esenciales del sistema de combustible tales como el carburador, la
manguera de combustible o el deposito durante el almacenamientopot
periodos largos. Los combustibles mezclados con alcohol (llamados
gasohol, etanol o metanol) pueden atraer la humedad,Io queconduce
a la separacbn y formacbn de a.cidosdurante el almacenamiento.El
combustible acido puededaharel sistema de combustible de un motor
mientrasesta.guardado.
Para evitar problemas en el motor, se debe vaciar el sistema de
combustible antesde su almacenamiento por 30 dias o ma.scomo se
indica a continuacion:
1. Quitetoda la gasolinadeldeposito de combustible.
,& CUIDADO
,_ Eviteel rociadodel orificiode la ¢uando el
motor.
5. Instaley aprietela bujia.Noconecte el cable de la bujia.
6. Limpie las superficies externas del generador.Compruebeque las
ranuras y aberturas del aire de enfriamientoen el generadoresten
abiertasy sin obstaculos.
7. Almacenela unidad enun lugar limpioy seco.
bujia arrallqge
3.90TROS CONSEJOSDEALMACENAMIENTO
• No almacenela gasolina de una estaciona otra.
• Reemplacelagasolinasi comienzaaoxidarse.Eloxidoy/o la suciedad
en el combustible puedencausar problemasen el carburadoryen el
sistemade combustible.
• Si es posible, almacene la unidad en interiores, en un garaje o
cobertizoy cubralo paraprotejerlo delpolvo y suciedad.ASEGURESE
DEVACIARELTANQUEDECOMBUSTIBLE.
• Si no es practico vaciar eltanque de combustible y la unidad se va
a guardar pot algun tiempo, utilice un estabilizadorde combustible
comercialmente disponible ahadido a la gasolina para extendersu
vidautil.
• Cubrala unidadcon una cubiertaprotectoraadecuadaque no retenga
humedad.
z_NUNCA cubrael generadormientraselmotoryla zonade
escapeestancalientes.Permitaquelaunidadse enfriepot
completo.
z_Drene el combustibleenun recipienteadecuado y al aire fibre,
lejosde cuaiquierfuente de ignition.Asegurese de que el
motor eshi frio. No fume a su alrededor ytampocoencienda
uncigarillo.
2. Arranquey pongaenmarcha el motor hastaque se detengapor falta
de combustible.
3. Permitaque el motor se enfrie al tacto y luegodrene el aceitedel
carter. Reemplacecon el grado recomendado.
4. Quitelas bujiasy vierta cercade 1/2 onza(15 ml) deaceitede motor
en los cilindros. Oubrael agujero de la bujia con un trapo. Tire del
arrancadorderetrocesoun par de vecesparalubricar los anillosy el
interiordel piston.
38
Page 41

4.1 GUIADELOCALiZACI6NYCORECCI6NDEFALLAS
Elmotorest_ien marcha,
perono hay unasalida de
ACdisponible.
1. El interruptor decircuito esta abierto.
2. Conexiondeficienteo cables defectuosos.
3. El dispositivo conectadonofunciona correctamente.
4. Fallaenel generador.
5. El GFCIactiva las salidas de 20 amperios.
= =
1. Reconfigureel interruptor del circuito.
2. Verificary reparar.
3. Conecteotto dispositivoquefuncionecorrectamente.
4. Oontactea un centro deservicios autorizado.
5. Repareel "corto" y reconfigureel GFCI.
El motor arranca bienperose 1. Cortocircuito en unacarga conectada. 1. Desconectela carga electrica en corto.
enlentece cuandosele conectan 2. El generadoresta.sobrecargado 2. Consultela seccbn "No sobrecargueel generador".
cargas. 3. La velocidad delmotor es muy baja. 3. Contactea un centro deservicios autorizado.
4. Circuito del generadoren corto. 4. Contactea un centro deservicios autorizado.
=
El motor no arranca, o arranca y 1. La va.lvuladecorte decombustible esta.en OFF. 1. Coloquela va_lvulade corte de combustible en
funciona real. posicion ON.
2. Filtrode aire sucio.
3. Sin combustible.
4. Oombustibleen mal estado.
2. Limpie o reemplaceelfiltro de aire.
3. Lleneeltanque decombustible.
4. Vacieel tanque decombustibley Ilenelocon
combustible nuevo.
5. Cabledela bujiano conectado.
6. Bujiaen real estado.
7. Aguaen el combustible.
5. Conecteel cable a la bujia.
6. Remplacela bujia.
7. Vacieel tanquedecombustibley Ilenelocon
combustible nuevo.
8. Sobreestrangulacbn.
8. Coloquela palancadel estranguladorenla posicion
Sin estrangular.
9. Bajo nivel deaceite.
10. IVlezclade combustiblemuy rica.
9. Lleneel carter hasta el nivel adecuado.
10. Oontactea un centro de servicios autorizado.
11. Va.lvulade entradaatascadaen posicion abierta 11. Oontactea un centro de servicios autorizado.
o cerrada.
12. Elmotor perdio compresion. 12. Oontactea un centro de servicios autorizado.
=
,
El motor se apaga mientras 1. Sincombustible. 1. Lleneel tanquede combustible.
esta funcionaado. 2. Bajo nivel deaceite. 2. Lleneelcarter hasta el nivel adecuado.
3. Motor defectuoso. 3. Oontactea un centro deservicios autorizado.
AI motor le falta potencia. 1. La cargaes muy alta. 1. Consulte la seccbn "No sobrecargueelgenerador"
2. Filtrode aire sucio. 2. Reemplaceelfiltro de aire.
3. El motor necesitaservicio. 3. Oontactea un centro deservicios autorizado.
. =
El motor se apaga o fall& 1. El estranguladorseabremuy ra.pido. 1. Muevael estranguladora la posicbn intermedia
2. El carburadoresta.funcionando muy rico o muy 2. Contactea un centro deservicios autorizado.
pobre.
m
hastaque el motor funcione suavemente.
39
Page 42

EM/$10NDEGARANT/APARAELEQU/POCERT/F/CADOPORLAEPA
DECLARACION DE GARANTiA DE CONTROL DE EMISIONES DE LA EPA EE,UU,
SUS DERECHOS DE GARANTiA Y OBLIGACIONES
LaAgenciadeProteccionAmbientai(EPA)de los EE.UU.y GeneracPowerSystems,Inc.(Generac)se complacenenexplicarla garantiadelSistemadeControl
deEmisionesensu nuevoequipode2011 y posteriores.Losequiposnuevosqueutilizanpeque_osmotoresencendidoscon chispase debendise_ar,construir,
y equipardetaiforma quecumplancon lasestrictasnormascontraelsmogdel gobiernofederal.Generacgarantizaelsistemadecontroldeemisionesensu
equipoporelperiodoquese enumeraa continuacionsiemprequeno hayahabidoabuso,negligencia,modificacionnoaprobadaomantenimientoincorrectode
suequipo.Elsistemadecontroldeemisionesde esteequipoincluyetodos los componentescuyafailaaumentariala emisiondetodocontaminanteregulado.
EstoscomponentesseenumeranenlaseccionInformacionsobreEmisionesdeestemanual.
COBERTURA DE LA GARANTiA DEL FABRICANTE:
EstaGarantiaECSesv_tlidapor dos a_os,opor el mismoperiodoquese especifiqueenla GarantiaLimitadaGenerac,elqueseam_tslargo.Paralosequipos
quetienenmedidordehoras,elperiododegarantiaesunnumerodehorasiguala la mitadde lavidautil parala queestercertificadoelequipo,o elperiodode
garantiaespecificadoen a_os,elqueseamenor.Lavida util sepuedeencontrarenlaetiquetadeControldeEmisionesdelmotor.Si durantedichoperiodode
garantiaseidentificaque cuaiquierpartede suequiporelacionadaconlas emisionesesterdefectuosaen cuantoa susmateriaiesofabricacion,unCentrode
ServiciodeGarantiaAutorizadodeGeneracreaiizar_tlasreparacioneso remplazos.
RESPONSABILIDADES DEL DUENO EN LA GARANTiA:
Comodue[3odelequipo,ustedesresponsabledelareaiizaciondetodoelmantenimientorequeridocomose indicaensu ManualdelUsuariosuministradode
fa.brica.Paralospropositosdelagarantia,Generacrecomiendaqueguardetodoslos recibosdemantenimientodesugenerador,peroGeneracno puedeinvaiidar
lagarantiasolamentedebidoalafaita derecibos.
Usteddebesaberque Generacpuedenegarcuaiquiery/o toda garantiadecoberturao responsabilidadsisu equipo,o unaparteo componentedel mismo,ha
failadodebidoai abuso,mantenimientoinapropiado,omodificacionesno autorizadas.
UstedesresponsabJedepanerseencontactoconunCentrade GarantiaAutorizadodeGeneractanprontocomaocurraunprabJerna.Lasreparacianespar
garantiadebenterrninarseen unperiadode tiernparazonabie,qua noexcedade30 dias.
Elservicioporgarantiapuedesercoordinadoponiendoseencontactoconsu distribuidorautorizadoo conun CentrodeServiciodeGarantiaAutorizadode
Generac.ParaubicaraiDistribuidordeServiciodeGarantiaAutorizadodeGeneracm_tscercano,flameainumerogratuitoqueaparecedebajo,o cont_tctenosa
travesdelcorreoelectronico:emissions@generac.com.
1-800-333-1322
NOTAllVIPORTANTE:Estadeclaraciondegarantiaexplicasusderechosy obligacionessegunla GarantiadelSistemadeControldeEmisiones(GarantiaECS),
quelees proporcionadapor Generacconformea laleyfederal.Veatambienlas "GarantiasLimitadasde GeneracparaGeneracPowerSystems,Inc.",que se
incluyenenotrahojaenestedocumento,y quetambienlesonproporcionadaspor Generac.Observequeestagarantianoseaplicar_ta los da_osincidentales,
consecuenteso indirectosocasionadospordefectosenmateriaiesofabricaciono a aigunretrasoenla reparaciono el reemplazodelas partesdefectuosas.
Estagarantiaremplazaalas otrasgarantias,expresadaso implicitas.Especificamente,Generacno ofreceningunaotragarantiaen cuantoala comerciabilidad
oidoneidadparaalgunpropositoenparticular.Cuaiquiergarantiaimplicitapermitidaporley,sera.limitadaen su duracionalosterminosdela garantiaexpresa
proporcionadaenel presente.AIgunosestadosno permitenlimitacionesencuantoaladuracionde unagarantiaimplicita,asiquela limitacionanteriorpuedeno
aplicarseausted.
LaGarantiadel ECSseaplicasolamenteaisistemade controldeemisionesde su nuevoequipo.LaGarantiadel ECSy laGarantiade Generacdescriben
derechosy obligacionesimportantesrelacionadasconsunuevomotor.
Elserviciodegarantiapuedereaiizarsesolamentepor unCentrodeServiciodeGarantiaAutorizadodeGenerac.AI pedirel serviciode garantia,sedeben
presentarpruebasenlasqueseindiquelafechadela ventaaicomprador/due[_ooriginal.
Sitieneaigunapreguntasobresusderechosyresponsabilidadesdela garantia,debecontactarseconGenerac,en la direccionsiguiente:
A LA ATENCJC)N DEL DEPARTAMENTO DE GARANTiAS
RO. BOX 297 * WHITEWATER, W| 53190
Parte1 de2
4O
GENERAC POWER SYSTEMS, |NC.
NOde parteOJ3335ARev.A 11/11
Page 43

EMI$/ONDEGARANT/APARAELEQU/POCERT/F/CADOPORLAEPA
GARANTiA DEL SISTEMA DE CONTROL DE EMISIONES
GarantiadelSistemadeControldeEmJsiones[ECS,porsussJglaseningles](garantJadelECS)paraequiposqueusanpeque_osmotoresencendJdoscon
chJspa:
(a) AplicacJ6n:EstagarantiaseaplJcar_talos equiposqueutJlJzanpeque_osmotoresnoparavehiculos.Elperiodode garantiadelECScomenzar_tenlafechaen
queelequiponuevoescompradooentregadoasucomprador/due_ooriginaly usuariofinal,y continuar_tpor 24 mesesconsecutivosdespuesdeesafecha.
(1) ElperJodoespecifJcadoenlapresenteGarantiaLimJtadadeGenerac,perono menosde24 meses,o
(2) Paramotoresequipadosconmedidordehoras,unnumerodehorasdeoperacioniguaialamJtaddelavida util demotor.Lavidautil se puedeencontrar
enla etiquetadeControldeEmJsJonesdel motor.
(b) CoberturaGeneraldela GarantiadeEmisJones:Generacgarantizaai comprador/due[_ooriginaly usuariofinaldelnuevomotoro equipoy acadacomprador/
due_osubsJguientequeel ECScuandose instaio:
(1) EstabadJse_ado,construJdoy equipadoparacumplJrcontodas las normas@Babies; y
(2) Estabalibrededefectosenlosmateriaiesyfabricacionquepudieranocasionarfailasde unapiezacon garantiaencuaiquJermomentoduranteel Periodo
deGarantJadel ECS.
(c) LagarantiaparalaspiezasrelacJonadascon emJsionessera.interpretadacomosigue:
(1) Cualquierpiezacon garantiaquenoesteprogramadaparareemplazocomo partedelmantenimientonecesarioin@ado enelManualdelUsuariosera.
garantizadaporel PeriododeGarantiadelECS.Si cuaiquierade estaspiezasfailaduranteelPeriododeGarantiadelECS,sera.reparadaoreemplazada
porGeneracsegunla subseccion(4) siguiente.Dichapartereparadao reemplazadabajola Garantiadel ECSsera.garantizadaporel resto delPeriodode
GarantiadelECS.
(2) Cualquierpartegarantizadaque esteprogramadasolamenteparalasinspeccionesregularessegunseespecifiqueen elManualdelUsuariosera.
garantizadaporel PeriododeGarantiadelECS.Unenunciadoenel ManualdelUsuarioqueindique"repareo reemplacecuantoseanecesario"no
reducira,elPeriododeGarantiadel ECS.Dichaparte reparadaoreemplazadabajolaGarantiadel ECSsera.garantizadaporel restodel Periodode
GarantiadelECS.
(3) Cualquierpiezacon garantiaqueesteprogramadaparareemplazocomopartedelmantenimientonecesarioenelManualdelUsuariosera.garantizada
porelperiodode tiempoprevioal primerreemplazoprogramadoparadichapieza.Sila piezafailaantesdelprimerreemplazoprogramado,la pieza
sera.reparadao reemplazadaporGeneracsegunla subseccion(4) siguiente.Dichapiezarelacionadaconlas emisionesquehayasidoreparadao
reemplazadabajola garantiadelECSsera.garantizadaporelrestodel periodoprevioalprimerreemplazoprogramadoparaesapieza.
(4) Lareparaciono elreemplazodecualquierpiezagarantizadarelacionadaconlas emisionesbajoestaGarantiadel ECSsera.sin cargoparaeldue_oenun
CentrodeServiciodeGarantiaAutorizadodeGenerac.
(5) Apesarde las disposicionesdela subseccion(4)anterior,los serviciosdegarantiao dereparacionessedebenproporcionarenunCentrodeServicio
Autorizadode Generac.
(6) Cuandoel motores examinadoporun CentrodeServiciode GarantiaAutorizadodeGenerac,elcomprador/due_ono sera.responsabledelcostode
diagnosticosi la reparacionesta.cubiertaporlagarantia.
(7) Duranteel PeriododeGarantiadel ECS,Generactendra,el inventariode piezasrelacionadascon lasemisionesbajogarantiasuficienteparacubrirla
demandaprevistaparatalespiezas.
(8) Laspiezasde recambiorelacionadasconlas emisionesquehayansidoautorizadasy aprobadaspor Generacse puedenutilizardurantecualquier
mantenimientoo reparaciondeGarantiadelECSy sera.nproporcionadassincargoai comprador/due_o.Dichousono reducira,lasobligacionesdela
GarantiadelECSdeGenerac.
(9) Nosepuedenrealizarotrasmodificacionesal generador,exceptoaquellasexplicitamenteaprobadasporGenerac.Lasmodificacionesnoaprobadas
anulanla GarantiaECSy sonmotivosuficienteparainvaiidarun reclamoa esta.
(10) Generacnosera.responsableporfallas de repuestosno autorizados,o fallasdepiezasautorizadascausadasporelusoderepuestosno autorizados.
LAS PIEZAS RELACIONADAS CON EiVlISIONES PUEDEN INCLU|R LAS SIGUIENTES
(SI ESTAN INSTALADAS):
1) SISTEMADEDOSIFICACIONDELCOMBUSTIBLE 3) SISTEMADEIGNICION
A. CARBURADORYPLEASINTERNAS A. BUJJAS
B. TANQUE/TAPONDECOMBUSTIBLE B. BOBINAS/MOBULODEARRANQUE
C. LJNEASDECOMBUSTIBLE 4) SISTEMADEINYECCIONDEAIRE
B. LJNEASDEVENTEOEVAPORATIVO A. VALVULADEINDUCCIONBEAIREPORIMPULSOS
E. REGULADOR(COMBUSTIBLESGASEOSOS) 5) SISTEMADEESCAPE
2) SISTEMADEINDUCCIONDEAIRE A. CATALIZADOR
A. MULTIPLEDEADMISION B, CANODEESCAPE
B. FILTRODEAIRE
Parte2 de 2
NOde parteOJ3335ARev.A 11/11
41
Page 44

EM/S/ONBELAGARAflTJAPARALOSEQU/POSCERT/F/CABOSCARB
CALiFORNiA Y LA EPA DE EE,UU. DECLARACION DE CONTROL DE ENiISIONES DE
GARANTiA SUS DERECHOS Y OBLIGACIONES
LaJuntade RecursosAereosdeCalifornia(CaliforniaAir ResourceBoard,CARB)ylaAgenciade Proteccbn Ambientalde los EstadosUnidos(UnitedStates
EnvironmentalProtectionAgency,EPA),junto con Generac PowerSystems, Inc. (Generac)se complacen en explicarla garantiadel sistema de control
de emisiones (garantiaECS)en su nuevoequipo de 2012. Los equipos nuevosqueutilizanpequefiosmotores encendidoscon chispa se deben disefiar,
construir,y equipardetalforma quecumplan con las estrictasnormas contra el smog del gobiernofederaly el estado deCalifornia.Generacgarantizael
sistemadecontrol de emisionesensu equipoper el per|odequese enumeraa continuacbn siempreque no hayahabido abuse,negligencia,modificacbn
no aprobadao mantenimientoincorrecto de su equipo.
El sistemade control deemisiones deeste equipo incluyetodos los componentescuya falla aumentariala emision detodo contaminanteregulado.Estos
componentesseenumeranenla seccion Informacbn sobre Emisionesdeeste manual.
COBERTURA DE LA GARANTiA DEL FABRICANTE:
EstaGarantiaECSesva_lidaperdosaries,o per elmismo per|odequese especifiqueenlaGarantiaLimitadaGenerac,el queseama_slargo.Paralos equipos
quetienen medidorde horas, elper|odede garantiaes un numerode horasigual a la mitadde lavida util parala que estacertificado el equipo,o el per|ode
de garantiaespecificado en aries, el que sea menor. La vida util se puedeencontrar en la etiquetade Control de Emisionesdel motor. Si durantedicho
9eriododegarantiase identifica que cualquierparte desu equiporelacionadacon lasemisionesesta.defectuosaencuanto a sus mater|alesofabricacion,
un Centrede Serviciode GarantiaAutorizadode Generacrealizara,lasreparacioneso remplazos.
RESPONSABILIDADES DEL DUEI_IO EN LA GARANTiA:
Comeduefiodelequipo, usted es responsabledela realizaciondetodo el mantenimientorequeridocome se indica ensu Manualdel Usuariosuministrado
defabrica. Paralos propositos delagarantia,Generacrecomiendaqueguardetodos los recibos demantenimientode su generador,peroGeneracnopuede
invalidarla garantiasolamentedebido ala falta de recibos.
Usteddebesaberque Generacpuedenegarcualquiery/o toda garantiade coberturao responsabilidadsi suequipo,o unaparte o componentedelmismo,
ha fallado debido al abuse,mantenimiento inapropiado,o modificaciones no autorizadas.
UstedesresponsabledeponerseencontactoconunCentrede GarantiaAutorizadodeGeneractanprontocomeocurraunproblema.Lasreparaciones
pergarantia deben terminarseen un per|odede tiemporazenabie,que noexceda de 30 dias.
El servicio per garantiapuede ser coordinado poniendoseen contacto con su distribuidor autorizadoo con un Centrede Serviciode GarantiaAutorizado
de Generac. Paraubicar al Distribuidorde Servicio de GarantiaAutorizado de Generacma.scercano, Ilame al numero gratuito que aparecedebajo, o
conta.ctenosa traves delcorreo electron|co:emissions@generac.com.
1-800-333-1322
NOTAIMPORTANTE:Estadeclaracionde garantiaexplicasus derechosy obligacionessegun la Garantiadel Sistemade Controlde Emisiones(Garantia
ECS),quelees proporcionadaper Generac conforme a la ley federal. Vea tambien las "GarantiasLimitadasde GeneracparaGeneracPowerSystems,
Inc.", que se incluyen en otra hoja en estedocumento, y que tambien le son proporcionadasper Generac.Observeque esta garantiano seaplicaraa los
dafios incidentales,consecuenteso indirectos ocasionadosper defectosen mater|alesofabricacion o a algun retrasoen la reparacbn o el reemplazode
las partes defectuosas.Estagarantiaremplazaalas otrasgarantias,expresadasoimplicitas. Especificamente,Generacno ofreceninguna otragarantiaen
cuantoa la comerciabilidado |done|dadpara algunproposito en particular.Cualquiergarantiaimplicita permitidaper ley, seralimitadaen su duracbn a los
terminosde la garantiaexpresaproporcionadaen el presente.Algunosestados no permitenlimitacionesen cuantoa la duracbn de una garantiaimplicita,
as|que la limitacbn anteriorpuedeno aplicarsea usted.
La Garantiadel ECSse aplicasolamenteal sistema decontrol deemisiones de sunuevo equipo. La Garantiadel ECSy la Garantiade Generacdescriben
derechosy obligaciones importantesrelacionadascon su nuevo motor.
El servicio de garantiapuederealizarsesolamenteper un Centrede Serviciode GarantiaAutorizadode Generac.AIpedir el servicio de garantia,sedeben
presentarpruebas enlasque seindique la fechade la ventaal comprador/duefio original.
Si tiene algunapreguntasobre susderechosy responsabilidadesde la garantia,debecontactarsecon Generac,en la direccion siguiente:
A LA ATENC|ON DEL DEPARTAMENTO DE GARANTIAS
Parte 1de 2
42
GENERAC POWER SYSTEMS, iNC.
Re. BOX 297 * WHJTEWATER, W| 53190
No de parte 0J8147C Rev.A 01/12
Page 45

EM/S/Ofl#ELAGARAflflAPARALOSEQU/POSCERT/F/CA#OSCARB
GARANTIA DEL SISTEMA DE CONTROL DE EMiSiONES
Garantiadel SistemadeControlde Emisiones[ECS,por sus siglaseningles](garantiadel ECS)paraequiposqueusanpequehosmotoresencendidoscon
chispa:
(a) Aplicaci6n:Estagarantiase aplicaraa los equiposqueutilizanpeque_osmotoresno paravehiculos.Elperiododegarantiadel ECScomenzaraen la
fecha en queel equiponuevoes compradoo entregadoa su comprador/duehooriginaly usuafiofinal, y continuarapor24 mesesconsecutivosdespues
deesafecha.
(1) El periodoespecificadoenla presenteGarantiaLimitada de Generac,perono menosde24 meses,o
(2) Paramotoresequipadoscon medidorde horas,unnumerode horasdeoperaci6niguala la mitad dela vida util demotor.Lavidautil se puede
encontrarenla etiquetadeControlde Emisionesdelmotor.
CoberturaGeneralde laGarantiadeEmisiones:Generacgarantizaalcomprador/duehooriginaly usuafiofinal delnuevomotoro equipoy a cada
(b)
comprador/duehosubsiguientequeel ECScuandose instal6:
(1) Estabadisehado,construidoy equipadoparacumplircontodas las normasaplicables;y
(2) Estabafibre dedefectosenlos matefialesy fabficaci6nquepudieranocasionarfallasdeuna piezacon garantiaen cualquiermomentoduranteel
PeriododeGarantiadel ECS.
(c) Lagarantiaparalas piezasrelacionadascon emisionesserainterpretadacomosigue:
(1) Cualquierpiezacongarantiaque noeste programadaparareemplazocomoparte delmantenimientonecesafioindicadoen elManualdel Usuario
seragarantizadaporel PeriododeGarantiadelECS.Si cualquieradeestaspiezasfalladuranteel Pefiodode Garantiadel ECS,serareparadao
remplazadapot GeneracsegOnlasubsecci6n(4) siguiente.Dichaparte reparadao remplazadabajo la GarantiadelECSseragarantizadapor elresto
delPefiodode GarantiadelECS.
(2) Cualquierparte garantizadaque esteprogramadasolamenteparalas inspeccionesregulatessegunse especifiqueenel Manualdel Usuariosera
garantizadaporelPeriododeGarantiadelECS.Unenunciadoenel ManualdelUsuarioqueindique"repareo remplacecuantosea necesario"no
reducirael PefiododeGarantiadelECS.Dichapartereparadao remplazadabajola Garantiadel ECSseragarantizadaporel restodel Pefiodode
GarantiadelECS.
(3) Cualquierpiezacongarantiaqueesteprogramadapararemplazocomopartedel mantenimientonecesarioenel Manualdel Usuafioseragarantizada
pot el periododetiempoprevioalprimerremplazoprogramadoparadichapieza.Silapiezafallaantesdelprimerreemplazoprogramado,la piezasera
reparadaoremplazadapotGeneracsegunla subsecci6n(4)siguiente.Dichapiezarelacionadaconlasemisionesquehayasidoreparadao remplazada
bajola garantiadelECSseragarantizadapor el restodel periodoprevioal primerremplazoprogramadoparaesapieza.
(4) Lareparaci6no el reemplazodecualquierpiezagarantizadarelacionadaconlas emisionesbajoestaGarantiadel ECSserasin cargoparael dueho
enun CentrodeServicio deGarantiaAutodzadode Generac.
(5) A pesardelas disposicionesdela subseccBn (4) anterior,losservicios degarantiao de reparacionessedebenproporcionarenun Centrode
ServicioAutofizadodeGenerac.
(6) Cuandoel motor esexaminadopor unCentrode ServiciodeGarantiaAutofizadodeGenerac,el comprador/duehonoseraresponsabledelcosto de
diagn6sticosi la reparaci6nestacubiertaporla garantia.
(7) DuranteelPeriodode GarantiadelECS,Generactendrael inventafiodepiezasrelacionadascon las emisionesbajogarantiasuficienteparacubfir la
demandaprevistaparatales piezas.
(8) Laspiezasde recambiorelacionadasconlas emisionesque hayansido autofizadasyaprobadasporGeneracsepuedenutilizardurantecualquier
mantenimientoo reparaci6nde Garantiadel ECSy seranproporcionadassin cargo al comprador/dueho.Dichouso noreduciralasobligacionesde
la GarantiadelECSdeGenerac.
(9) No se puedenrealizarotrasmodificacionesal generador,exceptoaquellasexplicitamenteaprobadasporGenerac.Las modificacionesnoaprobadas
anulanla GarantiaECSy sonmotivo suficienteparainvalidarun reclamoaesta.
(10) Generacno seraresponsableporfallas de repuestosno autofizados,ofallas depiezasautofizadascausadaspor el usode repuestosno
autofizados.
LAS PiEZAS RELACIONADA$ CON EiVlISIONES PUEDEN INCLU|R LAS $1GUIENTE$
1) SISTEMADEDOSIFICACIONDELCOMBUSTIBLE 3) SISTEMADEIGNICION
A. CARBURADORY PIEZASINTERNAS A. BUJiAS
B. TANQUE/TAPONDECOMBUSTIBLE B. BOBINAS/MODULODEARRANQUE
C. LiNEASDECOMBUSTIBLE 4) SISTEMADEINYECCIONDEAIRE
D. LiNEASDEVENTEOEVAPORATIVO A. VALVULADEINDUCCIONDEAIREPORIMPULSOS
E. REGULADOR(COMBUSTIBLESGASEOSOS) 5) SISTEMADE ESCAPE
E CARBONACTIVO A. CATALIZADOR
2) SISTEMADEINDUCCIONDEAIRE B, CAIRODEESCAPE
A. MULTIPLEDEADMISION
B. FILTRODEAIRE
Parte2 de 2
(SI ESTAN INSTALADAS):
NOde parte0J8147C Rev.A 01/12
43
Page 46

GARANTiA LIMITADA DE "DOS AltOS" DE SISTEMAS DE POTENCIA GENERAC
PARA GENERADORES PORTATILES SERIE XG
Porunperiododedos afios (2) desdela fechadelaventaoriginal,GeneracPowerSystems,Inc.(Generac)garantizasusgeneradoresserieXGcomolibresdedefectosenmateriales
y manode obraporlositemsy periodosindicadosabajo.Generac,a su discrecion,repararaoreemplazaracuatquierparteque,luegodeunexamen,inspecciony pruebasrealizadas
por unconcesionariodeserviciodegarantiaautorizadodeGenerac,seencuentrequeestadefectuosa.Lareparaciono reemptazoconformea lo indicadoen estagarantialimitadano
renovaraniextendera,el periododegarantiaoriginal.Cualquierproductoreparadodeberaestarbajogarantiasoloporelperiododegarantiaoriginalquereste.Cuatquierequipoqueel
comprador/propietarioreclamecomodefectuosodebeserregresadoa y examinadoporel concesionariodeservicio degarantiaautorizadoporGeneracmascercano.Todoslos costos
detransportebajolagarantia,incluyendoelretornoa lafa.brica,sera.nporcuentay prepagadosporel propietario/comprador.Estagarantiaseaplicasolo a losgeneradoresporta.tites
serieXGdeGeneracy noes transferibledel propietariooriginal.Guardesu comprobantedecompra.Si ustedno proporcionaunapruebadela fechadela comprainiciat,seusarala
fechadeembarquedelproductodelfabricanteparadeterminarelperiododegarantia.
PROGRAIVlACION DE GARANTiA
Las apticacionesparaconsumidorestangarantizadaspor(2) afios. Lasaplicacionescomercialesyde alquileresta.ngarantizadasporun (1) ahoo 1000 horascomomaximo,lo que
Negueprimero.
APLICACleN PARA CONSUMIDOR
ANO UNO - Coberturacompletade100% limitadaen mano de obra y repuestos(se requiere comprobantede compra y demantenimiento):
• Todosloscomponentes
ANODOS- Coberturacompletade100%,limitadaenrepuestoslistados(serequierecomprobantedecompray mantenimiento):
• Todosloscomponentes
APLICACleN COMERCIAL / DE ALQUILER
ANO UNO - Coberturacompletade100% limitadaen mano de obra y repuestos(se requiere comprobantede compra y demantenimiento):
• Todosloscomponentes
NOTA: Parael proposito de esta garantia "uso de consumidor" significa uso personal en casa residenciato recreacionalpor et comprador original.La garantia no
aplica a unidades usadas para FuentePrimaria de Energia en lugar del servicio poblico donde el servicio poblico se encuentre presenteo donde el servicio
publico de energiano exista normatmente.Unavezqueelgeneradorhaexperimentadousocomercialo de atquiter,se le considerara,enadelanteungeneradornoparauso
delconsumidorparapropositosdeestagarantia.
Lineamientos;
1. Todaslasreparacionesporgarantiadebenserrealizadasy/oatendidaspor un concesionariodeGeneracPowerSystemsautorizadoy/o certificadoo susfinales.
2. Unidadesquehayansidorevendidasno esta.ncubiertasporla garantiade Generac,yaque estagarantianoestransferible.
3. Eluso de repuestosqueno sonde Generacinvalidala garantiaensutotatidad.
4. Generacpuedeelegirreparar,reemplazaro reembolsarunequipo.
5. Loscostosdemanodeobracubiertosporgarantiasebasanenhorasnormatesdetrabajo.Costosadicionalesporsobretiempos,feriadoso trabajosde emergenciafuerade horas
normalesdetrabajosera.nresponsabilidaddelcliente.
6. Elcosto del embarquederepuestoscubiertospor garantiaes reembolsadoa unatarifade embarqueportierra.Loscostosrelacionadosporunasolicitudde embarqueexpedito
sera.nresponsabilidaddelcliente.
7. Talvezserequieraverificarel mantenimientoparaque lacoberturadegarantiaaplique.
ESTA GARANTiA NO SE APLICARA A LO SIGUIENTE:
1. Costosdemantenimientonormaly ajustes.
2. Fattascausadasporcombustibleso aceitescontaminados,o la fattadenivelesapropiados.
3. Reparacioneso diagn6sticosrealizadosporindividuosdiferentesalos concesionariosautorizadosporGeneracquenoestenautorizadosporescritopor Generac.
4. Fattasdebido a, peronolimitandosea, eluso y desgastenormal,accidente,matuso,abuso,negligenciao uso inapropiado.
5. Comotodo dispositivomecanico,los motoresGeneracnecesitanservicioy repuestosperiodicamenteparafuncionarcomoestandisehados.Estagarantianocubrereparaciones
cuandoel uso normalhaagotadolavidautil deuna parteo motor.
6. Las fattas causadas por cuatquiercausa extema o acto de Dios, como colisiOn,robo, vandalismo, disturbios o guerra, evento nuclear,incendio, congelamiento,
electricidad atmosferica, terremoto, tormentas,granizo, erupcion volcanica, agua o inundaciones,tornados o huracanes.
7. El daho relacionadoa roedores y/o plaga de insectos.
8. Los productos que son modificados o alterados de manera no autorizada pot Generacpor escrito.
9. Cualquierda_ioincidental,consecuencialo indirecto causado por defectos en los materialesy mano de obra, o cualquierretraso en repararo reemplazar
las partes defectuosas.
10. Falla debido a una mata apticaciOn.
11. Gastos relacionadosa "instrucciones del cliente" o deteccion de problemasdonde no se encuentre defecto de fabrica.
12. Equipo de atquiterusado mientrasse realiza las reparacionesde garantia.
13. Bateriasde arranque,fusibles, bombillos de luz y fluidos de motor.
ESTAGARANTfAREEMPLAZACUALQUIEROTRAGARANTiA,EXPRESAO IMPLfCITA,ESPECfFICAMENTE,GENERACNOOTORGAOTRASGARANTfASCOMODEMERCANTIBILIDAD
0 ADECUACIONPARAUNPROPOSITOPARTICULAR.Cuatquiergarantiaimplicitaqueseapermitidaporley,estaralimitadaen duracionalosterminos de lagarantiaexpresadispuesta
aqui.AIgunosestadosnopermitenlimitacionesencuantoduraunagarantiaimplicita,de modoque la limitacionexpresadaarribapuedeno aplicarseatcomprador/propietario.
LAONICARESPONSABILIDADDEGENERACSERALA REPARACIONOREEMPLAZODELASPARTESTALCOMOSEESPECIFICAARRIBA.ENNINGONCASOGENERACSERA
RESPONSABLEPORCUALQUIERDANOINCIDENTAL0 CONSECUENCIAL,AUNSITALESDANOSSEANUNRESULTADODIRECTODEUNANEGLIGENCIADEGENERAC.Algunos
estadosno permitenlaexclusionolimitaciondedafios accidentateso resultantes,demodoquelastimitacionesmencionadasmas arribapodriannoapticarseatcomprador/propietario.
Elcomprador/propietarioesta.deacuerdoenno hacerreclamoscontraGeneracbasadosennegligencia.Estagarantialedaat comprador/propietarioderechoslegalesespecificos.
Elcomprador/propietariotambienpuedetenerotrosderechosquevariandeestadoaestado.
GENERAC POWER SYSTEMS, iNC.
RO. BOX 8 = Waukesha, WI 53187 = Tel: (888) GENERAC (436=3722) = Fax: (262) 544=4851
Para ubicar al concesionario autorizado rnas cercano visite nuestro sitio web: www.generac.corn
No. de parte 0H5472 RevisionE (03/12)
NOde parte delManual.0J3092 RevisionC (24/05/12) ImpresoenEE.UU.
Page 47

GENERAC _
[] m
iut=J=sateur
_neratriceportabledeS6rieXG
45
Page 48

introduction............................................................................47
Life attentivementce manuel................................................47
Reglesdesecurit6.................................................................47
Indexdesnormes..................................................................49
Informationsgen6rale............................................................50
1.1 Deballage...............................................................................50
1.1.1 BoRed'accessoires....................................................50
1.2 Assemblage...........................................................................50
1.2.1 AssemblagedeI'ensemblederouesetdu
pieddebD.ti..................................................................50
Fonctionnement.....................................................................51
2.1 ConnaRrela gen6ratrice..........................................................51
2.2 Horometre- sans remise ;_zero.............................................52
2.3 Horometre- avec remise;_zero.............................................52
2.4 Cordons etprises de connexion.............................................52
2.4.1 Prisedoubledu disjoncteurGFOIde 120 Volts OA,
20 Amp..................................................................... 52
2.4.2 Prisede 120/240 Volts CA,20 Amp ..........................53
2.5 Commentutiliser la gen6ratrice..............................................53
2.5.1 Misea la terre de la gen6ratriceIorsqu'utilisee
comme portable........................................................ 53
2.5.2 Brancherla gen6ratriceau systeme
@ctrique d'unb_timent.............................................54
2.5.3 Misea la terre du conducteur neutreaub_ti ..............54
2.5.4 Brancherles charges @ctriques ...............................54
2.6 Nepas surchargerla gen6ratrice............................................54
2.7 Guidede referencedewattage...............................................55
2.8 Avantde demarrerlageneratrice............................................55
2.8.1 AjouterI'huilea_moteur..............................................55
2.8.2 Ajouterde I'essence...................................................56
2.9 Pourdemarrerlemoteur........................................................56
2.10 Arr_ter le moteur.................................................................... 57
2.11 Systemed'arr_t de basse pression d'huile..............................57
2.11.1 Redemarrer............................................................... 57
Entretien................................................................................ 57
3.1 Effectuerle programmed'entretien.........................................57
3.2 Programmed'entretien........................................................... 57
3.3 Specificationsdu produit........................................................57
3.3.1 Specificationsde la gen6ratrice..................................57
3.3.2 Specificationsdu moteur............................................57
3.3.3 Informationapropos des emissions...........................58
3.4 Recommandationsgenerales.................................................58
3.4.1 Entretiende la generatrice...........................................58
3.4.2 Nettoyerlagen6ratrice................................................58
3.4.3 Entretiendu moteur.................................................... 58
3.4.4 Verifierle niveaud'huile.............................................. 58
3.4.5 ChangementdeI'huile etdu filtre d'huile.....................58
3.4.6 Remplacerla bougied'allumage..................................59
3.5 Entretenirle filtre a air............................................................ 59
3.6 Entretiende I'ecranpare-etincelles.......................................... 59
3.7 Gen6ralit6s............................................................................. 60
3.8 Entreposagealong terme ...................................................... 60
3.9 Autres conseilsd'entreposage................................................60
Depannage.............................................................................61
4.1 Guideded@annage..............................................................61
Garantie.................................................................................62
46
Page 49

iNTRODUCTiON
Merci d'avoirachetece modelefabrique parGeneracPowerSystems,Inc.
Ce modele est une generatriceentraine par moteur compacte, a haute
performance, refroidiea I'air,conguepour fournir I'alimentationelectrique
afin de faire fonctionner les charges electriques Iorsqu'aucun reseau
electriquen'estdisponibleoua.laplacedu reseauenraisond'unecoupure
de courant.
LIREATTENTIVEiVIENTCEMANUEL
En cas d'incomprehension d'une partie de ce manuel, contacter le
depositaire agree le plus proche pour connakre les procedures de
demarrage,de fonctionnementet d'entretien.
L'operateurestresponsabledeI'utilisationcorrecteets_rede I'equipement.
Nous recommandons fortement a I'operateur de lire ce manuel et
de comprendre completement toutes les instructions avant d'utiliser
I'equipement.Nous recommandons egalementfortement d'apprendre
d'autresutilisateurscomment correctementdemarrer et faire fonctionner
I'unite.Celales prepare aucas ou ils auraientbesoin de faire fonctionner
I'equipementpourune urgence.
La gen6ratricepeut fonctionner en toute securit6, de fagon efficace et
de fa9on fiableuniquement si elleest correctement installee,utilisee et
entretenue.Avantd'utiliserou entretenirlagen6ratrice:
• Se familiariser avec et respecter strictement tons les codes et
reglementationsIocaux,d'Etatet nationaux.
• Lire attentivementtons les avertissementsdes6curitefigurant dartsce
manuelet sur le produit.
• Sefamiliariser avec ce manuel etI'uniteavant de I'utiliser.
Le fabricant ne peut pas anticiper toutes les situations possibles qui
peuventimpliquer undanger.Lesavertissementsdece manueletfigurant
sur les etiquetteset les autocollantsapposessur I'unitenesont, toutefois,
pas exhaustifs.Si vous suivezune procedure,unemethode detravail ou
unetechnique defonctionnementquelefabricant ne recommandepas en
particulier,assurez-vousqu'elleestsansdangerpourles autres.S'assurer
quelaprocedure,lamethodedetravail ou latechniquedefonctionnement
choisie nerende pas la generatricedangereuse.
LES INFORMATIONSCONTENUESBANS LE PRI_SENTMANUEL SE
BASENTSUR LES MACHINESEN PRODUCTIONAU MOMENT BE LA
PUBLICATION.GENERACSE RESERVELE DROIT DE MODIFIERCE
MANUELATOUTMOMENT.
REGLESDESI :CURiT(:
Banstout ce manuel,et sur les etiquetteset sur les autocollantsapposes
sur la generatrice,les blocs DANGER,AVERTISSEMENT,ATTENTIONet
REMARQUEserventa alerterle personneld'instructions specialesausujet
d'uneoperationspecifique qui peut s'avererdangereusesi elle n'est pas
effectueecorrectementou avec precaution. Lesrespecter attentivement.
Leurs definitionssont les suivantes:
INDIQUEUNE SITUATIONOU UNE ACTION DANGEREUSE QUI,
SiELLEN'ESTPAS EVITEE,ENTRAINERALA MORT OU DES
BLESSURES GRAVES,
Indiqueune situation onuneaction dangereuse qui,si elle n'est pas
evitee, pourraitentrainer la mort on des biessures graves.
,A ATTENTION
Indiqueunesituation ouune action dangereusequi, si elle n'est pas
evitee, entrainera desblessures legereson moderees.
REiVIARQUE:
Lesremarques contiennent desinformations supplementaires
importantes relatives aune procedure et se trouventdarts le corps
de texte regulier de ce manuel
Cesavertissementsdesecuritene peuventpaseliminerlesdangersqu'ils
signalent. Lesens commun etlerespect strict desinstructions speciales
Iorsde I'actionou I'entretiensent essentiels pour eviter lesaccidents.
Quatre symboles de securite couramment utilises accompagnent les
blocs DANGER,AVERTISSEIVIENTet ATTENTION.Chacunindiqueletype
d'informationssuivant :
,d_Ce symbole indiquedesinformationsimportantesrelatives a la
securite qui, si elles ne sent pas suivies, pourraientmettre en
danger la securite personnelleet/ou lesbiens.
Ce symbole indiqueunrisquepotentield'explosion.
//_Ce symbole indiqueunrisquepotentield'incendie.
Ce symbole indiqueunrisquepotentield'electrocution.
DANGERSGI NI RAUX
• NEJAMAISfaire fonctionner dartsun espace clos, darts un vehicule,
ou a I'interieurm_me si les portes et les fenetressont ouvertes.
• Pour des raisons de securite, le fabricant recommande que la
maintenance de cet equipement soit effectuee par un depositaire
agree.Inspecterregulierementlageneratriceetcontacterle depositaire
agreele plus proche pourles pieces quinecessitentune reparationou
un remplacement.
• Fairefonctionnerla generatriceuniquementsurdes surfaces deniveau
etou ellene serapas exposeea_I'humidite,auxsaletes,a la poussiere
ou auxvapeurs corrosives excessives.
• Tenirles mains,les pieds,les v_tements,etc., a distancedes courroies
detransmission,desventilateursetd'autrespiecesmobiles. Nejamais
retirertout protege-ventilateurpendant queI'unitefonctionne.
• Certaines pieces de la generatricedeviennentextremementchaudes
pendant le fonctionnement. Restera_distancede la generatricetant
qu'ellen'a pas refroidieafin d'eviterdes brQluresgraves.
• Ne PASfairefonctionnerla generatricesons la pluie.
• Ne pas modifier la construction de la generatriceni les commandes,
ce quipourrait creer une conditionde fonctionnementdangereuse.
• Ne jamais demarrer ou arreter I'unite avec les charges electriques
brancheesaux prises ETavec des dispositifs branchessonstension.
Demarrerle moteur et le laisser se stabiliser avant de brancherles
chargeselectriques.Debranchertoutes les chargeselectriques avant
d'arr_terla generatrice.
• Ne pasinserer d'objet dans les fentesde refroidissementde I'unite.
• Lors du travail sur cet equipement,conserver I'alertea tout moment.
Ne jamais travailler sur I'equipementen cas de fatigue physique ou
mentale.
4'7
Page 50

Ne jamais utiliser la gencratriceou n'importe laquellede ses pieces
comme marche.Monter sur I'unitepeut ecraser et casser les pieces,
et peut entrainerdes conditions defonctionnement dangereusessuite
une fuite de gaz d'echappement,une fuite de carburant, une fuite
d'huile,etc.
REIVlARQUE:
Cette geueratrice est equipee d'uuport d'echappemeut pare-
etiucelles. Le proprietaire / I'operateur de la geueratrice devra
garder le pare-etiucelles eu ben etat de fouctiouuemeut. Bans
I'Etat de Califomie, uu pare-etiucelles est requis par la Ioi (Article
4442 du California Public Resources Code).O'autres Etatspeuveut
avoir des lois similaires. Les lois federales s'appliqueut sur le
territoire federal
DANGERSD'i'CHAPPEIVlENTET
D'EIVlPLACEIVlENT
Ne jamais faire fonctionner dans unespace tics ouaI'interieur.NE
JAIVlAISfaire fonctionner dans un espace clcs, dans un vehicule,
ou a I'interieurm_me si los portes et los fen_tres sent ouvertes
! Utiliser UNIQUEIMIENTa I'exterieur et loin des fen_tres, portes
ouvertes, ventilations, et dans un espace dans lequel le gaz
d'echappementne s'accumulera pasde fa_on mortelle.
L'utilisation d'une generatrice a rinterieur PEUT VOUS TUER
EN QUELQUES MINUTES.
Los generatrices rejettent du mono×yde de carbone. II s'agit
d'un gaz toxique invisible et inodore.
RISQUESELECTRIC __E__S_
• La generatrice produit une tension dangereusementhaute pendant
son fonctionnement. Eviter le contact avec les fils nus, les bornes,
les branchements,etc., pendant le fonctionnement de I'unite, meme
sur I'equipement branche a. la generatrice.S'assurer que tousles
couvercles,les dispositifs de protection et les barrieres sent en place
avantdefaire fonctionner la generatrice.
• Ne jamais manipuler tout type de cordon ou de dispositif dectrique
qui est dans I'eau, alors que vous _tes pieds nus ou que vos
mains ou vos pieds sent mouilles. CELAENTRA|NERAUN RISQUE
D'ELECTROCUTION.
• Le NationalElectric Code (NEC,Code electrique national)exige que
le b_ti et que les pieces externeselectriquementconductrices de la
generatricesoientcorrectement relies a une mise aterre approuvee.
Les codes electriquesIocauxpeuventegalementexigerune mise ala
terre appropriede la generatrice. Consulterun electricien local pour
connaitreles exigencesdemise a laterre dans la region.
• Utiliser un disjoncteur de fuite a la terre dans toute zone humide ou
tresconductrice (telle que le carterprotecteur metalliqueou I'acierie).
• N'employez pas des cordons amovibles electriques uses, nus,
effilochesou autrementendommagesavecla generatrice.
• Avant d'effectuertoute maintenancesur la generatrice,debrancherla
batteriededemarrage du moteur (lecas echeant) afind'emp_cher un
demarrageaccidentel.Debrancherle c_blede la borne de la batterie
signaleepar I'inscription NEGATIVE(Negatif),NEGou (-) en premier.
Reconnecterle c_blea lafin.
• En cas d'accident cause par electrocution, couper immediatementla
source d'alimentationelectrique. Si cela est impossible, essayer de
libererlavictime du conducteursoustension. EVITERTOUTCONTACT
DIRECTAVECLA VICTI_E. Utiliser un objet non conducteur,comme
unecorde ou une planche,pour libererla victime duconducteursous
tension. Si la victime est inconsciente, assurer les premiers secours
etdemanderune aide medicaleimmediate.
NEJAMAISutiliser la generatrice
rinterieur d'une residenceeu
d'un garageMEMESiles portes
etlesfen_tres sent ouvertes.
• Les gaz d'echappement du moteur contiennent du monoxyde de
carbone,qui est invisibleet inodore.Ce gaz toxique,s'il est respireen
concentrationssuffisantes,peut entra;nerune perte deconscienceou
m_me la mort.
• Un debit approprie, non obstrue d'air de refroidissement et de
ventilationest important pour corriger le fonctionnement de la
generatrice.Nepas modifier I'installationou ne pas laisser m_me un
blocage partiel de I'alimentationde ventilation, etant donne que cela
peutserieusementaffecter le fonctionnementsQrdela generatrice.La
generatriceDOITfonctionnera I'exterieur.
• Ce systeme d'echappementdolt _tre correctemententretenu. Nerien
faire qui pourrait rendrele systemed'echappementdangereuxou non
conformeaux codes Iocauxet!ou normes locales.
• Toujours utiliser un detecteurd'oxydede carbone a alimentation par
batteriea I'interieur,conformementauxinstructions du fabricant.
• Sivous commencezavous sentir malade,a avoirdes etourdissements
ou a vous sentir faible apres le fonctionnement de la generatrice,
respirezdeI'airfrais IMMEDIATEMENT.Consultezun medecincarvous
pourriezavoir eteempoisonneau monoxydedecarbone.
Utiliser uniquement
L'EXTERIEURet loindes
fen_tres, portes et events.
RISQUESD'INCENDIE
• L'essenceestires iNFLAMMABLEetses vapeurssentEXPLOSIVES.
Ne pas produirede fumee, flammes hues, etincellesou chaleur
proximitede I'endroit cu I'essence est manipulee.
• NejamaisajouterdecarburantIorsqueI'unitefonctionneouestchaude.
Laisserlemoteurcompletementrefroidiravantd'ajouterdu carburant.
• Ne jamais remplir le reservoir de carburanta I'interieur. Respecter
toutesleslois reglementantI'entreposageetlamanipulationdeI'essence.
• Ne pastrop rernplir le reservoir de carburant.Toujourslaisser de la
placepour I'expansion du carburant.Sile reservoir est trop rempli,
I'essencepeutdebordersur unmoteurchaudet entrainerun INCENDtE
ou une EXPLOSION.Ne jamais entreposer la generatrice avec le
reservoir rempli de carburantetant donne que les vapeurs d'essence
pourraient atteindre une flamme ouverte, des etincelles ou une
veilleuse(comme il yen a sur une chaudiere,un chauffe-eauou sur
un seche-linge).Celapeutentrainerun INCENDtEou uneEXPLOSION.
LaisserI'unitecompletementrefroidir avantI'entreposage.
• Nettoyer immediatementtoute eclaboussurede carburantou d'huile.
S'assurerqu'aucune matierecombustible ne reste sur ou a proximite
dela generatrice.GarderI'espaceenvironnantdela generatricepropre
etsansdebris etgarderunjeude cinq (5) plodssur tousles cCtesafin
de permettreune aerationadapteedela generatrice.
48
Page 51

• Ne pasinserer d'objet dans les fentesde refroidissementde I'unite.
• Ne pas faire fonctionner la gen6ratricesi des dispositifs electriques
branches surchauffent ; si la puissanceelectriqueest perdue ; si le
moteur ou la generatricefait des etincelles; si des flammes ou de la
fumee sont detect6esalors que I'unitefonctionne.
• Garderun extincteur a.proximitede la gen6ratricea.tout moment.
/NDEZDESflORMES
1. National Fire ProtectionAssociation (Association nationale pour la
protection contre les incendies)70 : Le NATIONALELECTRICCODE
(Codeelectriquenational) disponibleaupresde www.nfpa.org
2. National Fire ProtectionAssociation (Association nationale pour la
protectioncontrelesincendies)5000 : Le BUILDINGCONSTRUCTION
ANDSAFETYCODEdisponibleaupresdewww.nfpa.org
3. InternationalBuildingCodedisponibleaupresdewww.iccsafe.org
4. Agricultural Wiring Handbook disponible aupres de www.rerc.org
, Rural Electricity ResourceCouncil RO. Box 309 Wilmington, OH
45177-0309
5. ASAE EP-364.2 Installation and Maintenance of Farm Standby
Electric Power(Installationet maintenancedes systemeselectriques
de secours pour les fermes), disponible aupres de www.asabe.org,
AmericanSociety of Agricultural & Biological Engineers,2950 Niles
Road,St. Joseph, MI 49085
Cette liste n'est pas exhaustive. Verifier avec I'autorite locale ayant
juridiction pour lescodes et normes Iocaux qui peuvent _treappliquesa.
votrejuridiction.
N° DEMOD! LE:
N° DES¢:RIE:
AVERTISSEIVlENTPROPOSITION65 CAUFORNIE
L'6chappementdu moteuret certainsde sesconstituantssont
susceptibtesselonI'!_tatdeCalifomied'entrafnerdes cancers,
desmalformations congenitatesou pouvant_tre nocifs pour le
systemereproductif.
AVERTISSEMENTPROPOSITION65 CAUFORNIE
Ceproduit contientouemetdesproduitschimiquessusceptibles
selonI'l_tatde Californiedtentrafnerdes cancers,desmalforma-
tions congenitalesouautresmaladiespouvant_trenocivespour
lesystemereproductif.
I'identificationde I'unite
Emplacementsde
49
Page 52

1.1 DI BALLAGE
• Retireztout le materield'emballage.
• Enlevezlaboite d'accessoiress@aree.
• Enlevezlabdte de la g6neratrice.
1.1.1 BOiTED'ACCESSOIRES
Verifierlecontenude la bdte (Figure1). Si des pieces sont absentesou
endommagees,mercideIocaliserun d@ositaireagre6au1-888-436-3722.
Lecontenuinclut '
• 2- Goupillesaxiales • Filtrea huile
• 2- Espaceursderoue • Filtrea air
• 2- Goupilles • Bougied'allumage
• 2-Roues • Clea.bougie
• 1 - Pieddu bD.ti • Serviette
• 1 - Boulondu b_ti • 1 Quartbouteilled'huileSAE30
• 1 - Rondelleplatedu bD.ti • Entonnoir
• 3 - Bridesd'ecrous • 2- Montantscontrelesvibrations
Figure 1 - Boite d'accessoires
REIVIARQUE•
Lesrouesn'ontpasere con(_uespourle transportsur la route.
ConsulterlaFigure2 et installer I'ensemblede roueset le pied du bD.tide
lafagon suivante:
1. Glissezla goupilleaxialesur laroue,I'espaceurde roue (rondelle)et
le b_ti.
2. Installerlagoupillea la goupilleaxialeetfixer la roue. R@@r pour le
c6te oppose.
3. Fixerlesmontantscontre lesvibration aupieddu b_.tiaveclesecrous
deblocagefournis.
4. Pourinstallerlepied dub_ti,enleverI'ecroudeblocagedu poteaudes
montantscontre les vibrations.
5. Placerle pieddub_.tisurle poteaudes montantscontre lesvibrations
etrdnstaller Ncrou deblocage. SerrezI'ecrou compl@ment.
6. Installerle boulondu b_tia traversla rondelledu b_.ti,leb_.tiet lepied
du b_.ti.Fixeravec unebride d'ecrou.
Figure 2 - Assemblage du pied et de la mue
SERRERLA
ROUEET L'AXE
AVEC LA GOUPILLE
1.2 ASSEMBLAGE
Life tout le Manuel du propridaire avant d'essayer d'assembler ou
d'utiliser la generatrice. L'assemblageest necessaireavant d'utiliser la
generatrice.Si des problemesse presentent Iors de I'assemblagede la
gen6ratrice,merci d'appelerlaligne d'assistancepour les gen6ratricesau
1-888-436-3722
1.2.1 ASSEMBLAGEDEL'ENSEMBLEDEROUESETDU
PIEDDEBAil
Les roues sont con(}uespour amdiorer considerablementla portabilite
de la gen6ratrice.Vous aurez besoin des outils suivants pour installer
I'ensemblederoues '
• Pinces
• CI6sde 1/2 po. (13 mm)
• Clea douilleavecunedouillede 1/2 po. (13 mm)
REUTILISERCET
ECROUDU IVIONTANT-_
CONTRELES VIBRATIONS
INSTALLERLE PIEDDE BATI
//- ESPACEURDE
"h ROUE(RONDELLE)
BOULON
BATI
RONDELLE
DE BATI
BRIDES D'ECROUS
/
GLISSERL'AXEBUR
LA ROUEET
L'ESPACEURDEROUE
50
Page 53

2.1 CONNAiTRELAGI Ni RATRICE
Lisezce IVlanueJd'instructions et JesRegJesde securite avant d'utiJiser
cettegeneratrice.
Comparerla generatricea la Figure3 afin de vous familiariser avec les
emplacementsdes differentscontr61esetajustements.Gardezce manuel
pour consultationfuture.
1. InterrupteurRun/Stop(IVlarche/Arr_t)- Contr61elefonctionnement
de la generatrice.
2. Soupape d'arr_t de carburant- Soupape entre le reservoir de
carburant et le carburateur. Arr_ter et enlever le carburant du
carburateurpourun entreposageprolonge.
3. PanneauDEL- Foumitun eclairagedu panneaude contr61eIorsque
la gen6ratriceest enfonctionnement.
4. Prise a verrouillage de 120/240 Volts CA, 20 Amp - Fournit
de I'alimentationelectrique pour le fonctionnement d'un eclairage
electrique,d'appareils,d'outils et de chargesde moteura.120 et!ou
240VoltsCA, 20 Amp,monophase,60 Hz.
5. Prise double du disjoncteur GFCI de 120 Volts CA, 20 Amp-
Fournit de I'alimentation electrique pour le fonctionnement d'un
eclairageelectrique,d'appareils,d'outils et de charges de moteur
120Volts CA,20 Amp, monophase,60 Hz.Ellefoumit egalementde
la protection avec un disjoncteurintegral defuite a la terre, complet
avecun bouton a appuyerpour ,<Tester, et ,<Reinitialiser,.
6. Disjoncteurs (CA) -Les disjoncteurs a poussoir (modele de 49
etats) ou le disjoncteur de 2 p61es(modeles CSA!CARB) sont
calibres D,20 amperes ; ceci protege la gen6ratrice contre les
surchargesdectriques.
7. Horometre - Offre les heuresde fonctionnementpour les intervalles
d'entretien.
8. PowerBar - Indique la quantite d'energie qui est utilisee par la
generatrice; chaquesectionest d'environ20%.
g. Reservoir de carburant- Lereservoir contient4,5 gallons I_.-U.de
carburant.
10. Jauge de carburant - Indique le niveau de carburant darts le
reservoir.
11. Poignees - Pivoter et retracter pour I'entreposage.Appuyezsur le
boutona,ressort pour deplacerles poignees.
12. Remplissage d'lluile -Wrifier le niveaud'huileet remplir I'huile ici.
13. Borne de raise a la terre- Relie la gen6ratricea_unemise a_terre
approuveeici. Voir lasection ,, Misea,laterre dela gen6ratrice, pour
plus d'informations.
14. Pot d'echappement- Comprendle pare-etincelleset rendsilencieux
le moteur.
15. Bougie d'allumage - Enflamme le melange de carburant!air (le
panneaulateraldolt _treenleve).
15. Filtre d'huile a moteur- Filtre I'huilea moteur ;voir Section3.1 pour
les intervallesd'entretiencorrects.
17. Etrangleur- Utilise audemarraged'un moteurfroid.
18. Fiitre a air - FiltreI'air aspirepar le moteur.
lg. Purgeur d'huile - Purgerla valve pour enlever I'huile utilisee du
carter du moteur.
20. Lanceur a rappel - Utiliser pour demarrerle moteurmanuellement.
*21.Reservoir a charbonactif - Absorbe les vapeurs du reservoir de
carburant.
22. Valve d'inversion - Passe les vapeurs du carburantau reservoira,
charbonactif.
23. Tuyaude recuperation- Installe entre la prise d'air du moteur,la
bo;tea,carboneetle Roll OverValve.
* modele de la Californieseulement.
Figure 3 - Contr#/es et emplacement de la generatrice
Etat 49°
1 4 5 8
J \
2 3 6 7 3
CSA/CARB
1 4 5 8
2 3 6 7 3
11
12
13
23
21
15
16 20
22
17
18
Page 54

2.2 HOBOMI:TBE-SANSREMISEAZI BO
L'horometre releve les heures de fonctionnement pour la maintenance
programmee:
IIy auraune paused'une fois dans le message<<CHGOIL>>qui clignote
avecletemps 6couleenheureset dixiemesapresles 30 premieresheures
defonctionnement.
Cemessagecommenceraa clignoter ala 29 emeheureet se desactivera
la 31eme heure, laissant une marge de deux heures pour effectuer
I'entretien.
II y aura une message <<CHG OIL >>ulterieurtoutes les 100 heures. Le
messageclignotera une heureavant etune heure apreschaque intervalle
de 100 heures, laissant D.nouveau une marge de deux heures pour
effectuerI'entretien.
Toutesles 200 heures,I'icCne<<SVC>>situee enbas a gauchede I'ecran
clignotera. Le message clignotera une heure avant et une heure apres
chaque intervallede 200 heures, laissantD.nouveauune marge de deux
heurespour effectuer I'entretien.
Lorsque I'horometre est en mode Flash Alert (Alerte clignotante), le
messagedemaintenances'afficheratoujoursen alternanceavecletemps
6couleen heureset en dixiemes.Les heuresferont clignoter quatrefois,
puis s'afficheront en alternanceavec le message de maintenance quatre
fois jusqu'a ce que I'horometrese reinitialise.
• 100 heures- OHGOIL-- Intervalledechangementd'huile(Toutesles
100 heures)
• 200 heures- SVC-- Intervalledu filtre a.air (Toutesles 200 heures)
2.3 HOROMETRE- AVECBEMISEA ZI BO
L'horometre releve les heures de fonctionnement pour la maintenance
programmee(voirle tableau)(Figure4).
Fonctionnement : Appuyer et reBcher le bouton de reinitialisationpour
alterner entre les ecrans. L'horlogeva en arriere a.partir de I'intervalle
etabli comme illustre dans letableau.
Lorsquele compteur atteint5 heures,le texte<<CHGOIL>>(ou<<SVCAIR
FILTER>>ou<<CHGPLUG>>)vaclignotersans arrCtpendantdeuxminutes.
Apres ce moment, le compteur va afficher le nombre total d'heures de
I'unite (pendant2 minutes). Cecycle vase r@eterpendantles 5 heures.
LorsqueI'intervalleentre les service atteint I'heurezero, le texte <<NOW>>
remplaceles heuresrestantes.
Parexemple,pour unenouvellegencratrice,le messagesera<<CHGOIL>>
puis clignotera <<dans30 >>.Celaveut direquedans 30 heures,on devra
changer I'huile. Appuyer le bouton D.quelques reprises va ramenerle
compteura.I'ecranqui montrelehombretotal d'heuresdefonctionnement.
Reinitialiser : ChangeraI'alerte quevous souhaitezpour reinitialiserpuis
tenir le bouton pendant9 secondes. Les heures de maintenancesent
reinitialiscesIorsque I'afficheurmontre <<0000.0 >>.
Rematque :
Le graphique de sablier clignoteraet s'eteindra lersque le moteur
est en marche. Cecisignifie que le compteursurveilleles heuresde
fonctionnement.
Figure4 - Horometre
iC
0000.0 8
TABLEAUDE
SABLIER
2.4 CORDONSETPRISESDECONNEXION
2.4.1 PRISEDOUBLEDUDiSJONCTEURGFC/DE
120VOLTSCA,20AMP
II s'agit d'une prise de 120 volts protcgee centre la surcharge par un
disjoncteur a poussoir de 20 A (Figure 5). Utiliserchaque douille pour
alimenter les charges electrique a 120 volts CA, monophase, 60 Hz
necessitantjusqu'a 2400 watts combines (2,4 kW) ou 20 A de courant.
Utiliser uniquement des cordons a trois ills avec mise a.la terre, bien
isoles,dehautequaliteconguspour 125Voltsa.20 A (ouplus). Uncordon
de 15 pieds ou moins est prcferable.
Garderles rallonges aussi courtes quepossible pour emp_cherla chute
detension et unesurchauffe possibledesills.
BOUTONDE
RI_INITIALISATION
(S'IL Y A UN)
Frequence de message
OHGOIL (changerI'huile)
OHGOIL (changerI'huile)
SVCAIR FILTER(entretenirlefiltre
D.air)
CHGPLUG(changerla bougie)
52
Premiereperiode d'initiation
TableaudeI'horometre (avecremisea zero)
Intervalle
Premieres30heures
Reapparition
Reapparition
Reapparition
100heures
200heures
200heures
Ouree de messageMessage
ON/OFF(marche/arr@ pour
2 minutes durantune periode de5
heures.
Page 55

Figure 5 - Prise doub/e du disjoncteur GFC/ de 120 Vo/ts
CA, 20 Amp
2.4.2 PRISEBE 120/240 VOLTSCA,20AMP
Utiliser une bougie NEMA L14-20 avec cette prise (tourner pour
verrouiller/deverrouiller).Brancherun cordon a4 ills avecmise alaterre
adaptea la prise eta la chargesouhaitee. Lecordon dolt _tre congu pour
250Volts CAa 20 A (ou plus) (Figure6).
,_Les fum6es d'6chappement du moteur contiennent
du monoxyde de carbone, un gaz toxique invisible
et inodore. Ce gaz toxique, s'il est respir6 en
concentrations suffisantes, peut entraP'net une perte
de conscience ou m6me la mort.
,j_jL Un d6bit obstru6 d'air de
refroidissement et de ventilation est important
approprie,
non
pour corriger le fonctionnement du g6n6rateur. Ne
pas modifier I'installation ou ne pas laisser m_me
un blocage partiel de I'alimentation de ventilation,
6tant donn6 que cela peut s6rieusement affecter
le fonctionnement sQr du g6n6rateur. II FAUT faire
fonctionner le g6n6rateur & I'ext6rieur.
,_Ce doit 6tre correctement
syst_me d'6chappement
entretenu. Ne rien faire qui pourrait rendre le
syst_me d'6chappement dangereux ou non conforme
aux codes Iocaux et/ou normes locales.
,_ Toujours utiliser un d6tecteur d'oxyde de carbone
alimentation par batterie _ Hnt6rieur, conform6ment
aux instructions du fabricant.
Figure 6 - Prisede 120/240 Volts CA,20 Amp
Utiliser cette prise pour alimenter les charges monophasees de
120 volts OA, 60 Hz, necessitant jusqu'a 2400 watts (2,4 kW) de
puissancea 20 A ou les charges monophaseesde 240 volts CA, 60 Hz,
necessitantjusqu'a4000 watts (4,0 kW) depuissancea 16,6 A. Laprise
est protegeeparun disjoncteur.
2.5 COMMENTUTILISERLAGENI RATRICE
Voir la section "Demarrerle moteur" pour connaitre la fagon de demarrer
et d'arr_ter de maniere securitairela generatriceet la fa£on de brancher
et debrancherles charges. Si des problemes se presentent Iors du
fonctionnement de la generatrice,merci d'appelerla ligne d'assistance
pour les generatricesau 1-888-436-3722.
,_Ne jamais faire fonctionner dans un espace clos ou
I'int_rieur. NE JAMAIS faire fonctionner darts un
espace clos, darts un v_hicule, ou _ I'int_rieur m_me
si les portes et les fen6tres sont ouvertes ! Utiliser
UNIQUEMENT & I'ext6rieur et loin des fen6tres,
portes ouvertes, ventilations, et dans un espace
dans lequel le gaz d'6chappement ne s'accumulera
pas de fa£on mortelle.
L'utiiisation d'une generatrice a I'interieur PEUT VOUS TUER
EN QUELQUES MINUTES.
Les generatrices rejettent du monoxyde de carbone. II s'agit
d'un gaz toxique invisible et inodore.
NE JAMAIS utiliser la generatrice
ia i'interieurd'uneresidence ou
id'ungarageM_:ME Sl lesportes
i ^
iet les fenetres sent ouvertes.
Utiliser uniquement
L'EXTERIEURet Joindes
fen6tres, portes et events.
2.5.1 M/SEA LA TERREDELA G£-N£-RATR/CE
LORSQU'UT/L/S£-ECOMMEPORTABLE
Oettegeneratricea une raisea la terre de I'equipementqui branche les
composantsde la structure dela generatriceauxbornes deterre dans les
prisesde sortie CA (voir NEC250.34 (A)pour I'explication).Oecipermet
la generatriced'etreutiliseecomme portablesansmettrea laterrele b_.ti
de la generatricetel qu'etabliedartsla norme NEO250.34.
Exigencesparticulieres
II peut y avoir des reglements federaux ou du OccupationalSafety and
HealthAdministration(OSHA),des codes Iocaux,ou des reglementations
qui s'appliquentD.I'utilisationprevuedela generatrice.
Veuillezconsulter un electricienqualifie, un inspecteur des installations
electriques,ou I'agencelocalecompetente :
* Bans certaines regions, les generatrices doivent _tre enregistrees
aupresdes entreprisesde services publics Iocaux.
* Si la generatriceest utilisee dans un chantier de construction, il peut
y avoir des reglementssupplementairesquidoivent _trerespectes.
_3
Page 56

2.5.2 BRANCHERLAGE-NE-RATR/CEAUSYSTt-ME
_LECTRIQUED'UNBAT/MENT
Les branchementspour I'alimentationde secours au systeme electrique
d'un b_timent doivent _tre faits par un electricien qualifie et en tout
conformite avec les codes et lois electriques Iocaux et nationaux. Le
branchementdolt isoler I'alimentationde la generatricede I'alimentation
utilitaire,ou d'autressources d'alimentationalternatives.
REIVlARQUE:
Puisquela raiseala torte deI'equipementdela generatriceest
attacheeauxills neutreCAdartslageneratrice(volt Figure8),un
commutateurdetransferta3 pClesouuncommutateurdetransfert
2 p_lesavecunkit decommutationneutreestexigepourbrancher
cettegeneratricea unechargedub_timent.Dartscetteapplication,
la generatricedevientunsystemederivesepare(voltNEC250.20
(D)),etdolt_treraisea la terreselonlos exigencesducode
electriquelocaletnational.
Misealaterredelageneratricedansuneapplicationde
secoursd'unb_timent
LeNationalElectricCode(NEC,Codeelectriquenational)exigeque
le cadre et los piecesexterneselectriquementconductricesde la
generatricesoientcorrectementretiesa unepriseatorte approuvee
(Figure7).
Lescodes dectriques Iocauxpeuventegalementexigerunemisea laterre
appropriedeI'appareil.A cettefin, brancherunfil toronne en cuivre de10
AWG (calibre americain des ills) a.la borne de mise a la terre eta une
tige en cuivre conduitea.laterre ou unetige a.la terre (electrode)en laiton
fournit une protection appropriee contre les electrocutions. Cependant,
les codesIocauxpeuventfortement varier.Consulterunelectricien local
pourconnaitrelos exigences de raise a la terre dartsla region.
Une raise a la terre appropriee de la generatrice va aider a prevenir
los decharges electrique en cas d'un defaut de mise a_la terre dans
la generatrice ou dans les dispositifs electriques branches. Une mise
la terre approprieeaide egalementa dissiper I'dectricite statique, qui
s'accumulesouventdans des dispositifs sans mise a,la terre.
Figure 7 - Mise a la torte de la generatrice
BRANCHERLA MISE_,LATERREDELAGENIeRATRICEICl
2.5.3 MISEA LA TERREDUCONDUCTEURNEUTRE
AUBAT/
Lors de I'entretiende I'alternateur,NEPASjeter les ills blancs de liaison
entre le bloc de jonction et I'alternateurde masse, situes au niveau
du boitier de roulement arriere. Toujours s'assurer que les ills sont
correctementreliesavantI'utilisationde lageneratriceapresqueI'entretien
de I'alternateursoit effectue(Figure8).
54
Figure 8 - Mise a la torte du cenducteur neutre au bati
NEPASJETER
CESFILS!
MISEALA TERRE
DUCONDUCTEUR
NEUTREAU BATI
Nopasrebranchercosills poutpresenterunrisquedechoc
potentielpendantle fonctionnementdelageneratrice!
2.5.4 BRANCHERLESCHARGES_LECTR/OUES
NEPASbrancherles charges de240 volts aux prisesde 120 volts.
NEPASbrancherles charges a_3 phasesa,la generatrice.
NEPASbrancherles charges de50 Hza la generatrice.
* Laisser le moteur se stabiliser et chauffer pendantquelques minutes
apresle demarrage.
* Brancheret mettresous tensionles charges electriquesmonophasees
souhaiteesde 120 ou 240 volts CA.,60 Hz.
, Ajouter les watts (ou amperes) nominaux de toutes les charges a_
brancherenm_metemps. Cetotal nedolt pasdepasser(a) lacapacite
nominale de wattage/amperage de la generatrice ou (b) la valeur
nominaledu disjoncteurde la prise fournissant I'alimentation.Voir la
section<,Nepas surchargerla generatrice>>.
2.6 NEPASSURCHARGERLA61 NERATRICE
Surcharger une generatrice au-dessus de sa capacite nominale de
wattage peut endommager la generatrice et les dispositifs electriques
branches.Respecterlesconsignessuivantespouremp_cherla surcharge
de I'unite:
* Calculerle wattagetotal de tous les dispositifs electriquesa brancher
enm_me temps. Cetotal nedolt PASdepasserla capacitedewattage
de la generatrice.
. Lewattage nominal des lumieres peut _tre indiquesur les ampoules.
Lewattagenominal des outils,des appareilsetdes moteurs setrouve
generalementsur une etiquette ou un autocollant appose(e) sur le
dispositif.
. SiI'appareil,I'outil ou le moteur n'indiquepas le wattage, multiplier la
valeurnominaledes volts fois la valeurnominaledes amperesafin de
determinerleswatts (volts x amperes= watts).
. Certains moteurs electriques, tels que ceux a induction, necessitent
environ trois fois plus de watts d'alimentation pour le demarrage
que pour le fonctionnement. Cette surtension d'alimentation dure
seulement quelques secondes Iors du demarrage des moteurs en
question.S'assurerde laisser un wattagede demarrageeleveIorsdu
choixdes dispositifs electriquespour brancherla generatrice:
1. Calculerleswatts necessairespour demarrerlemoteurle plus grand.
2. Ajouter ace chiffre les watts defonctionnementdetoutes les autres
chargesbranchees.
Le Guide de referencede wattage sert a determinercombien d'elements
la generatricepeutfaire fonctionner enm_me temps.
Page 57

2.7 GUIDEDERe:FlORENCEDEWATTAGE
REMARQUE•
Tousles chiffressontarrondis. Voir lesetiquettessur I'appareilpour
couuaitreles exigeuces de wattage.
Dispositif.................................. Wattaged'exploitation
*Climatiseur (12.000 BTU)................................... 1700
*Climatiseur (24.000 BTU)................................... 3800
*Climatiseur (40.000 BTU)................................... 6000
ChargeurdeBatterie (20 Amperes).............................. 500
Ponceusea courroie (3 po.).................................. 1000
Sciea chafne............................................. 1200
Sciecirculaire (6-1/2 po.)............................... 800 a 1000
*Seche-linge (Bectrique) .................................... 5750
*Seche-linge (Gaz).......................................... 700
*Laveuse ................................................ 1150
Cafetiere................................................. 1750
*Compresseur (1 HP) ...................................... 2000
*Compresseur (3/4 HP)..................................... 1800
*Compresseur (1/2 HP)..................................... 1400
Fer a friser ................................................ 700
*Deshumidificateur.......................................... 650
Ponceusea disque (9 po.) ................................... 1200
Coupe-bordures............................................ 500
Couverturechauffante ....................................... 400
Cloueusedectrique ........................................ 1200
Cuisinieredectrique (par element) ............................. 1500
Po_leelectrique ........................................... 1250
*Congdateur .............................................. 700
*Ventilateur dechaudiere (3/5 HP).............................. 875
*Ouvre-porte de garage................................. 500 a 750
Sechoir a cheveux ......................................... 1200
Perceusea main...................................... 250 a 1100
Taille-haie................................................. 450
Cle a Chocs............................................... 500
Fer..................................................... 1200
*Pompe a jet .............................................. 800
Tondeusea gazon ......................................... 1200
Ampoule.................................................. 100
Four a micro-ondes ................................... 700 a 1000
*Refroidisseur de lait ....................................... 1100
BrGleura mazoutsur le four ................................... 300
Chaufferettea mazout(140.000 BTU) ........................... 400
Chaufferettea mazout(85.000 BTU) ............................ 225
Chaufferettea mazout(30.000 BTU) ............................ 150
*Pistolet apeinture, sansair (1/3 HP) ........................... 600
Pistolet a peinture,sans air (portable) ........................... 150
Radio ................................................ 50 a200
*Rdrigerateur.............................................. 700
Cocotte mijoteuse .......................................... 200
*Pompe immergee (1-1/2 HP) ................................ 2800
*Pompe immergee (1 HP) ................................... 2000
*Pompe immergee (1/2 HP).................................. 1500
*Pompe de vidange ................................... 800 a 1050
*Scie circulairedetable (10 po.) ........................ 1750 a 2000
Television............................................ 200 a500
Grille-pain.......................................... 1000 a 1650
Coupebordures ............................................ 500
* Laisser3 lois les watts indiquespour le demarragede ces dispositifs.
2.8 AVANTDEDEMARRERLAGFtNI::RATRICE
Avant de faire fonctionner la generatrice, de I'huile de moteur et de
I'essence devront _tre ajoutes, de la fagon suivante '
2.8.1 AJOUTERL't'IUILEA MOTEUR
L'huile devrait repondre a_la classe de service SJ, SL ou mieux de
I'American Petroleum Institute (API). N'utiliser aucun additif special.
Choisissezla viscosite de I'huile selon la temperaturede fonctionnement
prevue(voir egalementle tableau).
• Au-dessusde 40 °F,utiliser SAE30
• Au-dessous de40 °Fetjusqu'a 10°F,utiliser le 10W-30
• Au-dessusde 10 °F,utiliser 5W-30 synthetique
°F -20 -10 0 I0 20 32 40 60 80 100
_c-_o -;;o -lo o lo 2'0 3'o 4;
Intervalle de temperature d'utilisation prevue
A ATTENTION
,_1 Toutetentativede faire tourner de demarrer le moteur avant
qu'il air ere correctemententretenu avec I'huile recommaudee
peutentrainerunepaunedu moteur.
* Installer le generateur sur une surface de niveau (he pasdepasser
15 ° dans aucunedirection).
, Nettoyer le secteur situe autour du reservoir d'huile et enlever le
capuchondu reservoir d'huile.
, Remplirlentementle moteur avecdeI'huile parI'orificede remplissage
d'huilejusqug_cequ'elleatteignelamarquederemplissage.Interrompre
regulierementle remplissagepour verifier le niveau d'huile. L'huilede
moteur est pleine Iorsque le niveau se situe au niveau des filets de
I'orifice deremplissaged'huile. (Figure9)
, Installerlecapuchon du reservoird'huileet serrerfermement a lamain.
, Verifierle niveau d'huilede moteur avant le demarragea,chaquefois
par la suite.
Figure9 - Niveau d'huile
m
ou
REMPLIR LE CARTER
JUSQU'AU-DESSOUS DE
- - CES FILS AVEC L'HUILE
A MOTEUR RECOMMANDEE
Page 58

2.8.2 AJOUTERDE/='ESSENCE
2.9 POURDI MARRERLEMOTEUR
z_Ne jamaisremplir le reservoirde carburanta I'interieur.Ne
jamaisremplir le reservoirde carburantquandle moteur est
en fonctionnementouchaud.Evitezderenverserde I'essence
sur un moteur chaud.Permettezau moteur de se refroidir
completementavant de remplir le reservoirde carburant.
z_Ne remplissezpastrople reservoirde carburaflt. Toujours
laisserde la placepour I'expansiondu carburaflt.Si le
reservoirdeest trop rempii,I'essencepeutdebordersur un
moteur chaudet entrainer un INCENDiEouune EXPLOSION.
Nettoyer routeeclaboussurede carburafltimmediatement.
z_Ne pasallumer une cigaretteou ne pasfumeren remplissafltle
reservoirde carburant.L'essenceest ires iNFLAMMABLEet ses
vapeurssent EXPLOSIVES.
* Utiliser de I'essence SANS PLOMBreguliere avec le moteur de la
generatrice.Nepasutiliser un supercarburant.Nepas melangerI'huile
avecI'essence.
* Ne pas d'utiliser d'essence avec plus de 10 % d'alcool telle que
I'essenceE85 ou le methanol.
* Nettoyer le secteur situe autour du capuchon de remplissage de
carburant,enleverlecapuchon.
* Ajouterlentementde I'essencesans plomb au reservoir de carburant.
Remplirjusqu'aufond dunitre a.tamis.Attentiona nepastropremplir
(Figure10).
* Mettre le bouchon du reservoir de carburant et nettoyer toute
eclaboussured'essence.
Figure 10 - fliveau deremplissagedecarburant
NEPAS
DEPASSER
LA LEVRE!
Nojamaisdemarrerouarreterle moteuraveclesdispositifs
electriquesbranchesdansles prisesETlesdispositifssous
tension.
* Debranchertoutes les chargeselectriquesdes prises de I'unite avant
de demarrerle moteur.
* Installer le generateur sur une surface de niveau (ne pasd@asser
15 °dans aucunedirection).
* Ouvrirla soupaped'arret (Figures11).
Figure 11 - Soupape d'arr_t
I
Glisser le bouton CHOKE(E_trangleur)du moteur a I'exterieursur la
position ,, Full Choke,_(Etrangleurplein) (Figure12).
Figure 12 - FenctionnementdeI'etrang/eur
x
iMPORTANT: II est important d'empecher la formation des dep6ts de
gommedans lespieces ducircuit d'alimentation,commele carburateur,le
tuyaudecarburantou lereservoirpendantI'entreposage.Lescombustibles
composesd'alcool(appelesessence-alcool,alcool ethylique,oumethanol)
peuventattirer I'humidite,ce qui conduit ala separationet a la formation
d'acidespendantI'entreposage.Ungazacide peutendommagerle circuit
de carburant d'un moteur pendantI'entreposagede celui-ci. Afin d'eviter
tout probleme avecle moteur,le circuit de carburant dolt etre vide avant
I'entreposagedumoteursi celui-ci estd'aumoins30 jours. (Voir lasection
<,Entreposage,_.)Ne jamais utiliser de produitnettoyant pour moteurou
carburateurdartsle reservoirde carburantetant donne que cela pourrait
causerdes dommages permanents.
56
REMARQUE•
L'interrupteurdumoteurdoltetrea la positionON(Marche).
Pour demarrer de fagon manuelle,attraperfermement la poignee de
rappel ettirer jusqu'a ce qu'une resistancese fasse sentir.Remonter
rapidementet demarrer le moteur.Ensuite,suivre la meme sequence
de demarrageindiqueeci-dessus.
Lorsque le moteur demarre,glisser le levier Choke(l_trangleur)sur la
position <<1/2 Choke ,_(Etrangleura.moitie)jusqu'a_ce que le moteur
fonctionnedoucementet ensuitesur la position <,Run,>(Marche).Si
le moteur vibre, glisser lelevier Choke (Etrangleur)sur la position,
1/2 Choke,>(Etrangleur;_moitie) jusqu'a ce quele moteurfonctionne
doucementet ensuitesur la position <,Run>>(Marche).
Page 59

REMARQUE'
Si le mnteur chauffe,mais ne continuepasa fonctionner, mettre
le boutonde I'etrangieursur la position,, FujiChoke, (Etrangieur
complet)et repeterles instructionsdedemarrage.
_. ATTENTION
,_Ne pas surcharger la generatrice. €-galement,ne pas
surcharger les prisesdutableau individuel.Cesprisessont
protegeescontrela surchargepar desdisjoncteursdu type
poussuir.Si la valeur d'intensite d'un disjoncteur est depassee,
le disjoncteurs'ouvre et la puissanceelectrique a cette
prise est perdue.Life ,, Ne passurcharger la generatrice,
soigneusement.
^
2.10ARRETERLElVlOTEUR
1. Arr_tertoutes les charges, puis debrancherles chargeselectriques
des prises du tableau de la generatrice. Ne jamais demarrer ou
arreterle moteur avec les dispositifs electriques branches et sous
tension.
2. Laisser le moteur fonctionner a_circuit ouvert pendant plusieurs
minutes pour stabiliser les temperaturesinternesdu moteur et de la
gen6ratrice.
3. MettreI'interrupteurRun/Stop(Marche/Arr_t)sur la position <,OFF>,
(Arret).
4. Fermerla so@ape de combustible.
2.11SYSTEMED'ARRI TDEBASSEPRESSION
D'HUILE
Lemoteurest 6quiped'un detecteurde bassepressiond'huilequi arr_tele
moteur automatiquementIorsquela pressiond'huile chute endessous de
5 livres par pouce carre. Untemps mort integr6 dans le systeme d'arr_t
de basse pression d'huilepermet a_la pression d'huilede se reconstituer
pendantledemarrage. Letemps mort permet au moteur defonctionner
pendant environ 10 secondes avant de detecter la pression d'huile.Si
le moteur s'arr_te tout seul et que le reservoir de carburant a assez
d'essence,verifier leniveau d'huiledu moteur.
2.11.1 REO[-MARRER
Si vous essayezde rdnitialiser le moteur avanties 10 secondesapres
i'arretpour bassepression deI'huile,le moteurpeutNEPASdemarrer. Le
systemea besoin de 5 a.10 secondes pour reinitialiser.
Si ie moteur est demarreapresun tel arr_t et la basse pression de i'huiie
n'a pas ete corrigee (par exemple, en ajoutant de I'huile), le moteur
fonctionnera a peu pres pendant 10 secondes comme decrit ci-dessus
puis s'arr_tera.
3.1 EFFECTUERLEPROGRAMMED'ENTRETIEN
IIest important d'effectuerI'entretiencommeindique dans ie Programme
d'entretien pour le fonctionnement approprie de la generatrice, et afin
d'assurer que la gen6ratrice est conforme aux normes d'emission
applicables pour la duree de sa vie utile. L'entretienet les reparations
peuvent etre effectues par une personne competenteou un atelier de
reparation. En outre, i'entretien critique des emissions dolt _tre effectue
comme prevu pour que la Garantie d'emissions soit valide. L'entretien
critique des emissions inclut I'entretien du filtre a air et les bougies
d'allumageconformementau Programmed'entretien.
3.2 PROGRAIVIiVIED'ENTRETIEN
Suivre les intervalles du calendrier. Un entretien plus frequent est
necessaireiorsqueI'appareilfonctionne dartsdesconditions defavorables
indiqueesci-dessous.
Verifierle niveaud'huile
ChangerI'huile etle filtre d'huile:l:
EntretiendeI'ecran pare-etincelles
Entretiendufiltre a air
Remplacerla bougie d'allumage
:i: ChangerI'huile apres les30 premieresheuresdefonctionnementpuisa chaque
saison.
* ChangerI'huile et les filtre d'huile tousles mois Iors du fonctionnement sous
unecharge Iourdeou a destemperatures elev6es.
** Nettoyer plus souvent dans des conditions de fonctionnement sales ou
poussiereuses.Remplacerles piecesdu filtre a air s'il est tres sale.
*A chaque saison/Toutesles 100 heures
A chaque saison/Toutesles 100 heures
**A chaquesaison/Toutes les200 heures
A chaque saison/Toutes les200 heures
Lors de chaqueutilisation
3.3 SPI CIFICATIONSDUPRODUIT
3.3.1 SPECIFICATIONSDE LAGENERATRICE
Puissancenominalemax.Puissance.......................................3,6 kW**
Puissancedesurtension............................................................. 4,5 kW
TensionCAnominale................................................................ 120/240
Courantnominal CAMax
Couranta 240V ................................................................ 15,0 Amp**
Couranta 120V ................................................................ 30,0 Amp**
Frequencenominale................................................. 60 Hza 3600 RPM
Phase.................................................................................. Monophase
** Le wattage et le courantmaximum sont soumis a, et limites par, ces facteurs
tels que lecontenu en Btu de carburant,latemperature ambiante,I'altitude,
I'etatdumoteur, etc. La puissancemaximalediminue d'environ3,5 %pour
chaquetranche de1000 piedsau-dessus du niveaude lamer ; et diminuera
egalementd'environ 1% pour chaquetranche de 6 °C (10 °F) au-dessus de
16 °C (60 °F) detemperatureambiante.
3.3.2 SP#uCIFICATiONSDU MOTEUR
Cheval-vapeurnominal a 3600 RPM.................................................... 6
Deplacement............................................................................ 216,5 cc
Typede bougied'allumage.................. Champion RC14YCouequivalent
Ecartementdebougie d'allumage....................... 0,03 pc. ou (0,76 mm)
Capacited'essence...................................................... 4,5 gallons E.-U.
Typed'huile..................................................Voir tableaudanslasection
,,Ajouter de I'huilea moteur,
Capacited'huile........................... avecchangementdefiltre = 0,8 Pinte
Tempsd'execution/Oonsommationde carburant- 1/2 charge
3,6 kW ..........................................14 heures/ 0,35 gallonsparheure
Certified'emissionsClasseI
_7
Page 60

3.3.3 INFORMAtiONSUfl LES¢LMiSSlONS
L'EnvironmentalProtectionAgency (et CaliforniaAir ResourceBoardpour
les g6neratricescertifiees aux normes CA) exigentque cette generatrice
respectelesnormesd'emissionsd'evaporationetd'echappement.Localiser
I'autocollantdu respect des emissions sur le moteur pour determinerles
normesrespecteespar la generatrice. Oetteg6neratriceest certifieepour
operera I'essence.Le systeme de contr61ed'emissioncomprend:
• Systemed'admissiond'air
- Collecteur/tubulured'admission
- Filtrea air
• Systemed'alimentationencarburant
- Oarburateur
- Bouchon/reservoirde carburant
- Canalisationsd'essence
- Oanalisationsd'air d'evaporation
- Reservoira charbonactive (pour les moteurs CAuniquement)
• Systemede demarrage
- Bougied'allumage
- Module d'allumage
• Systemed'echappement
- Collecteur/Potd'echappement
3.4 BEOOIVIIVIANDATIONSGi NI RALES
La garantiesur lagen6ratricene couvrepas les articles qui ont ete sujets
unemauvaiseutilisationou unenegligence.Pourrecevoirla contrepartie
totale de la garantie, I'utilisateur dolt entretenir la gen6ratrice comme
demontredans cemanuel.
Certains reglages devront _tre faits periodiquement pour entretenir
correctementla gen6ratrice.
Tous les ajustementsdabs la section Entretiende ce manuel devraient
_treeffectues au moins unefois parsaison. Suivreles exigencesdabsle
tableau<<Programmed'entretien7>.
REMARQUE :
Unelois par an, remplacer la bougie d'allumage et le filtre a air.
Une nouvelle bougie et filtre a air propreassurent UBbOBmelaBge
d'air-carburant et aident au moteur a mieux fonctionner et a durer
plusIongtemps.
3.4.1 ENTRET/ENDELA GENCLflATR/CE
Utilisez et entreposez I'unite dans un environnement sec et propre ou
eriene sera exposeeala poussiere excessive,ala salete,a I'humiditeou
aucune vapeurcorrosive. Les fentes d'air de refroidissementdans la
g6neratricene doivent pas _tre obstruees avec de la neige, desfeuilles,
ou aucuneautre matiereetrang6re.
Verifiezla proprete de la gen6ratricefrequemment et nettoyezquand la
poussiere,la salete,le petrole,I'humiditeou d'autrescorps etrangerssont
evidentssur sa surface exterieure.
_, ATTENTION
,_Ne jamais passeraUCUBobjet ou outil dabs les fentes
de refroidissement m6me si le moteur n'est pas en
fonctionnement.
REIMIARQUE:
NEPASutiliseruntuyau d'arrosage pournettoyerla generatrice.
L'eaupeutentrer dabsle circuitd'alimentationdu moteur et entrainer
des problemes.EBButte, si I'eau entre dabs la generatrice a partir les
fentes d'air de refroidissement,une certainequantite d'eaurestera
dabsles espaces videset les intersticesd'isolationde I'enreulement
rotorique et statorique. L'accumulationde I'eau et de salete sur les
enroulements internesde la generatrice diminuera eventuellement la
resistance d'isolationdeces enroulements.
3.4.2 NETTOYERLAGENERATRICE
• Employezun tissu humide pour essuyerles surfaces exterieures.
• Un brosse a soles, doux peut _tre employe pour se degager
I'accumulationde salete, le petrole,et.
• Un aspirateurpeut _tre employe pour ramasser la saletesuperficielle
etles debris.
• L'air de basse pression (ne pas depasser25 livres par pouce carre)
peut _tre employe pour enlever la salete. Verifiez les fentes et les
ouverturesd'air de refroidissementsur la g6neratrice.Ces ouvertures
doivent_tremaintenuespropres etsans obstructions.
3.4.3 ENTRET/ENDUMOTEUR
//_Lorsque voustravaillez avec la generatrice, debrancheztoujours
le fil de bougiede la bougied'allumageet restera distancede
celui-ci.
3.4.4 VC_RIFIERLENIVEAUD'HU/LE
Sereportera.lasection<<AVANTDEDI_MARRERLA GE_Nt_RATRICE>>pour
plus d'informations sur la verificationdu niveaud'huile. Le niveau d'huile
dolt _tre verifie avant chaque utilisation, ou au minimum toutes les huit
heuresde fonctionnement.Carderleniveaud'huilemaintenu.
3.4.5 CHANGEMENTDEL'HUILEETDUFILTRED'HUILE
Changer I'huile et le filtre apres les trente (30) premieres heures de
fonctionnement.ChangerI'huiletoutes les 100 heuresou a.chaquesaison.
Si vous utilisez cet appareildans des conditions sales ou poussiereuses,
ou dans desconditions climatiquesextr_mementchaudes,changezI'huile
plus souvent.
_, ATTENTION
causer
,t_lk L'huilechaude des brOlures.Laisserle moteur
refreidir avant de vidangerI'huile. f:vitez des expositions de
peauprolongeesourepetees avec de I'huile usagee.Lavez
completementlesendroits exposes avec du savon.
Respecter les instructionssuivantes pourchangerI'huile apres que le
moteur est refroidi :
1. Nettoyerla zoneautour du capuchon devidange d'huile.
2. Retirer le capuchon de vidange d'huile du moteur et le capuchon
de remplissage d'huile pour vider toute I'huile dans un recipient
appropri&
3. Lorsque I'huile est totalement vidangee, revisser le bouchon de
vidanged'huileet le resserrersolidement.
4. Placer un recipient appropriesous le filtre d'huile ettourner le filtre
dans le sens inverse des aiguilles pour le retirer. Jeter selon les
reglementsIocaux.
peut
_8
Page 61

5. Enduirelejoint d'etanch6it6du nouveaufiltre avec deI'huile a_moteur
propre.Tournerle filtre dans le sens des aiguillesjusqu'a ce quele
joint d'etanch6it6touchelegerementI'adaptateurdufiltre. Puis,serrer
d'un 3/4 detour supplementaire.
6. Remplirle moteur avecI'huilerecommandee.(Voirla section ,, Avant
de demarrerla generatrice>>pour les recommandationssur I'huile).
7. Nettoyertouteeclaboussured'huile.
8. EliminerI'huileusageedartsun centre decollecte appropri&
3.4.6 REMPLACERLABOUGIEB'ALLUMAGE
Utiliserla bougied'allumageChampionRO14YCou equivalent.Remplaoer
la beagle tobies les 200 heures. Celapermettraun demurrageplus facile
et un meilleurfonctionnementdu moteur.
1. Arreter le moteur et debrancher le fil de bougie de la bougie
d'allumage.
2. Pourfaciliter I'acces,retirer les quatre(4) viset le panneaulateral.
3. Nettoyer la zone autour de la bougie d'allumage et la retirer de la
culasse.
4. Definir I'ecartementde la bougie d'allumagea 0,76 mm (0,030 pc.).
Installer la bougie d'allumage correctementecart6e dartsla culasse
(Figure13).
5. Pousserfermementla protectionsurla bougied'allumageet installer
le c6te lateral.
Figure 13 - E-cartementde la bougie d'aflumage
3.5 ENTRETENIRLEFILTREAAIR
Le moteur ne fonctionnera pas correctementet pourra etre endommage
en cas d'utilisationd'unfiltre a air sale.Nettoyerou remplacerlepapier du
filtre a air toutes les 200 heuresou une fois par an (Figure14). Nettoyer
ou remplacerplus souventencas de fonctionnementdans des conditions
de salete.
Pour nettoyerOUremplacer lefiltre a air en papier:
1. Retirerle couvercledu filtre aair ; puisretirer lefiltre de papier.
2. Nettoyer le filtre en papier en le tapantdoucement sur une surface
sonde.Sile filtre esttrop sale,remplacez-lapar un nouveau.Jeterle
vieuxfiltre correctement.
3. Nettoyerle couvercle du filtre a air, puis inserer lenouveau filtre en
papier dartsla base du filtre D.air.Reinstallerle couvercle du filtre a.
air.
REIVlARQUE:
Pourcommanderannouveaufiltre a air,veuillezcontacterle centre
deserviceautorisele pluspresaU1-888-436-3722.
Figure 14- Fi/trea air
Filtre
I
Base
Couvercle
3.6 NETTOYERL'I CRANPARE-I TINCELLES
Le silencieux du pot d'echappementdu moteur est equipe d'un ecran
pare-etincelles.Inspecteret nettoyer I'ecrantoutes les 100 heures ou au
minimum une fois par an (Figure 15). Si I'unitefonctionne reguli6rement,
inspecteret nettoyerI'ecranplus souvent.
,/_Si la generatrice est utiliseeset un terrain bruI couvert
d'arbres,de buissonsOBd'herbe,elle devra etre equipee d'un
pare-etincelles.Leproprietaire/ I'operateur de la generatrice
devra garder le pare-etincellesen bon etat.
Nettoyer et inspecter le pare-etincelles Iorsque le moteur est D.la
temperatureambiantede la manieresuivante :
1. Inserer un tournevis a lame plate dans la fente sur le c6te du
protecteurthermique du pot d'echappementpour acceder au serre-
joint du pare-etincelles.Desserrerleserre-joint et retirerI'ecranpare-
etincellesdu pot d'echappement.
2. InspecterI'ecranet le remplacers'il est tordu, perforeou endommage
d'unequelconqueautrefagon.NEPASUTILISERunecrandefectueux.
Si I'ecran n'est pas endommage, le nettoyer avec un solvant
commercial.
3. Remplacerle pare4tincelles et serrerle serre-joint.
Figure 15 -- E-cranpare-etincelles
SERRE-JOINTDU
PARE-ETINOELLES INSERERLETOURNEVlSA
ECRAN PROTECTEURTHERMIQUEPOUR
PARE-ETINCELLES ACCEDERAUSERRE-JOINT
TRAVERSLA FENTEDANSLE
DU PARE-ETINCELLES
59
Page 62

3.7 Gi NI RALITI S ATTENTION
Lagen6ratricedolt _tre demarreeau moins unefois tousles 30 jours et
_tre autorisesa.executer au moins 30 minutes. Si cela est impossible
et que I'unite n'est pas utilisee pendant plus de 30 jours, utiliser les
informations suivantesen tant que guidepour preparerson stockage.
NEJAIVlAISranger le moteur avec unreservoir rempli
d'essencea I'interieur ou dansdeszonesfermees et faiblement
aereesou desfumees peuventatteindre uneflamme hue,
desetincelleseuune veilleusetelle qu'il y en a surune
chaudiere,unchauffe-eau,unseche-lingeou d'autresappareils
fonctionnantau gaz.
_IL LaisserI'unitecompletementrefroidiravant I'entreposage.
3.8 ENTREPOSAGEALONGTERME
II est important d'emp_cher la formation des dep6ts de gomme darts
les pieces essentielles du circuit d'alimentation, comme le carburateur,
le tuyau de carburant ou le reservoir pendant I'entreposage.En outre,
I'experienceindique que les combustibles composes d'alcool (appeles
essence-alcool,alcool ethylique, ou methanol) peuventattirer I'humidite,
ce qui conduit a. la separation et a la formation d'acides pendant
I'entreposage.Ungazacidepeut endommagerlecircuit de carburant d'un
moteur pendantI'entreposagede celui-ci.
Afin d'evitertout problemeavecle moteur,le circuit decarburantdolt _tre
vide avant I'entreposagedu moteur si celui-ci est d'au moins 30 jours.
Pourcela :
1. Enleveztoute le carburantdu reservoirde carburant.
,_ f:viter d'aspergera partir destrousdes bougiesd'allumage
Iorsque le moteur tourne.
5. Installezet serrez la bougied'allumage. Ne pas brancher le fil de la
bougied'allumage.
6. Nettoyezles surfaces exterieuresde la generatrice.Verifiezque les
fentes et les ouvertures d'air de refroidissementsur la generatrice
soientouverteset degagees.
7. ConserverI'unitedartsun endroitpropre etsec.
3.9 AUTRESCONSEILSD'ENTFIEPOSAGE
• Ne conservezpas du carburantd'unesaison a I'autre.
• Remplacerle reservoird'essences'ilcommence arouiller.De la rouille
et!ou de la saletedans I'essenceentraTnerontdes problemes dans le
carburateuret le systeme de carburant.
• Si cela est possible, entreposerI'unite a I'interieur,dans un garage
ou un hangar,et la recouvrir afin de la.proteger de la saleteet de la
poussiere.S'ASSURERDEVIDERLERESERVOIRDE CARBURANT.
• S'il n'estpas possible devider lereservoir de carburant et que I'unite
est rangee pendant une Iongue periode, ajouter un stabilisateur de
carburantdisponible dans le commerce a.I'essenceafin d'augmenter
la dureede vie de I'essence.
• Couvrir I'appareilavec une couverture de protection adequatequi ne
retientpas I'humidit&
/_NE JAIViAIScouvrirla generatrice alors quele moteur et la
zonedu pot d'echappementsent chauds.LaisserefroidirI'unite
completement.
ViderI'essencedans desconteneursadaptes situesa i'exterieur,
loinderouteflammehue.S'assurerquele moteur estfroid. He
pasallumer unecigaretteoune pasruiner aproximit&
2. Demarreretfairefonctionner le moteurjusqu'a,ce qu'il s'arr_te suite
unepanned'essence.
3. Vidangerle carterapresquele moteurestfrais autoucher.Recharger
avec le degrerecommande.
4. Enlevezlabougie d'allumageet verseza peupres 1/2 once (15 ml)
d'huile a moteur dans le cylindre. Couvrir le trou de la bougie
d'allumageavec un chiffon. Tirer plusieursfois le lanceur b.rappel
pour lubrifier les segmentsde piston et I'alesagedu cylindre.
60
Page 63

4.1 GUIDEDEDI PANNAGE
Le moteur tourne, mais aucun
courantaiternatif n'estproduit.
Le moteur fonctionne bien mais 1. Court-circuit dartsI'unedes chargesbranchees. 1. Debrancherla charge electriquecourt-circuitee.
connaitdes defaillances Iorsque 2. Surchargedela generatrice. 2. Voirlasection<<Nepas surchargerla generatrice>>.
des chargessent branchees. 3. Vitessedu moteurtrop faible. 3. Contacterun Centredeservice autoris&
Le moteur ne demarre pas;
ondemarre mais fonctionne
irregulierement.
1. Ledisjoncteur de est ouvert.
2. Cordon mal brancheou defectueux.
3. Dispositifbranchedefectueux.
4. Erreurau niveau dela gen6ratrice.
5. Ledisjoncteur GFCIdeclencheles prises de
20 amp.
4. Court-circuit de la generatrice. 4. Contacterun Centredeservice autoris&
1. Soupaped'arr_ten arr_t (OFF).
2. Filtrea_air sale.
3. Plusd'essence.
4. Essenceviciee.
5. Lefil de la bougie n'est pas branchea.la bougie
d'allumage.
6. Bougied'allumagedefectueuse.
7. EaudansI'essence.
8. Sur-etranglementdes gaz.
9. Niveaubasd'huile.
10. Melangede carburanttrop fiche.
11. Soupaped'admission bloqueeen position ouverte 11. Contacterun Centrede service autorise.
oufermee.
12. Pertede compression du moteur. 12. Contacterun Centrede service autorise.
1. Rearmerle disjoncteur.
2. Verifieret r@arer.
3. Brancherun autre dispositif en ben etat.
4. Contacterun Centredeservice autoris&
5. Corrigerle <<court-circuit >>et reinitialiserle
disjoncteurGFCI.
1. Ouvrirla soupaped'arr_t(ON).
2. Nettoyerou remplacer lefiltre a air.
3. Remplir le reservoirde carburant.
4. Viderle reservoir decarburantet remplir avecdu
carburantneuf.
5. Brancherlefil a.la bougie d'allumage.
6. Remplacezla bougied'allumage.
7. Viderle reservoir decarburant; rempliravec du
carburantneuf.
8. Placerle levierd'etrangleursur la positionNo
Choke(Aucunetrangleur).
9. Remplir le carter du moteurau niveauappropri&
10. Contacterun Centrede service autorise.
Le moteur s'arr_te inopinement. 1. Plusd'essence. 1. Remplir le reservoirde carburant.
2. Niveaubasd'huile. 2. Remplirlecarter du moteurau niveauappropri&
3. Erreurau niveau du moteur. 3. Contacterun Centredeservice autoris&
Manque de puissance. 1. Chargetrop devee. 1. Voir la section<<Nepas surchargerlageneratrice>>.
2. Filtrea air sale. 2. Remplacezle filtre a air.
3. Reparationnecessairedu moteur. 3. Contacterun Centredeservice autoris&
A-coupsondeolin du moteur. 1. Etrangleurouvert trop t6t. 1. Placer I'etrangleura mi-cheminjusqu'a,ce que le
2. Melangetrop fiche ou trop pauvredans le 2. Contacterun Centredeservice autoris&
carburateur.
moteurfonctionne doucement.
61
Page 64

GARANT/ED'£-M/SSION$POURL'£-QU/PEMENTCERT/F/£=EPA
ENONCI_ DE LA GABANTIE EPA AiVir:BICAINE DU CONTBOLE DES EMISSIONS
VOS DBOITS ET OBLiGATiONS DE GARANTIE
L'AgencepourlaProtectionde I'EnvJronnementamedcaine(ci-apresdenomm6eEPA)etla societ6GeneracPowerSystems,Inc.(ci-apresdenomm6eGenerac)
sontheureuxdevousexpliquercequ'estla garantiedevotre nouvelequipement2011 etulterieur.Lenouvelequipementutilisedes petitsmoteursa.ailumage
commandedoiventetre conqus,construitsetequip6sdanslerespectdesnormesnationaiesrigoureusesen matieredepollutionpourlegouvernementfed6rai.
Generacgarantiralesystemedecontr01edesemissionsdevotreappareilpourlesperiodesindiqueesci-apres,enI'absenced'acteabusif,denegligence,de
modificationnonapprouveeou demaintenanceinadapteedevotreequipement.Lesystemedecontr61edesemissionssur cet appareilcomprendtousles
composantsdontla ddaillancepourraitaugmenterlesemissionsdespolluantsreglement6s.Cescomposantssontlistesdansla sectionInformationssurles
emissionsdece manuel.
COUVEBTURE DE GARANTIE DU FABRICANT :
CettegarantieappreilsSCEestvaiidepourdeuxans,ou pourla memeperiodecommeindiquedanslagarantielimiteede Generac,selonla plusIongue.Pourles
appareilavecuncompteurhoraire,laperiodedela garantieestunnombred'heuresegaia.lamoitiedeladureedevie utilecertifieede I'appareil,ou laperiodede
garantiespecifi6eci-dessusenannees,selonlapossibiliteinferieure.La dureedevieutile peutetretrouveesurI'etiquettedecontrOledesemissionssur le moteur.
Si uncomposantou systemedevotreequipementrelatifauxemissionscomporteunepieceddectueuseoupresenteun ddaut defabricationpendantla dureede
la garantie,lesr@arationsouremplacementsdepiecesseronteffectuesparun d@ositaired'entretiendegarantieagre6parGenerac.
RESPONSABILITi_S DE GARANTIE DU PBOPRIETAIRE •
Entant queproprietairedeI'appareil,vousetesresponsabledelarealisationdetoute la maintenancenecessairetellequelisteedansle manueld'entretienquivous
aet6remisparI'usine.Auxfins dela garantie,Generacvousrecommandedeconservertousles requsrelatifsa.la maintenanceeffectu@survotregen6ratrice,
maisGeneracnepeutpasrefuserla garantieuniquementen raisondela non-presentationdesrequs.
VousdevezcependantsavoirqueGeneracpourrarefusertoutet / ou partiedelacouverturede lagarantieou de la responsabilitesi votreappareilet/ outoute
3iecede celle-cJnefonctionneplusdufaitd'unusageabusif,d'unen%lJgence,d'unemauvaisemaintenanceoudemodificationsnonapprouvees.
Veus_tes chargedecentacterundepasitairede garantieagre6parGeneracdesqu'unprebJernesepresente.Lesreparationseffectueesdanslecadrede
Jagarantiedevrant_tre faitesdansuneperi0deraisonnable,inf6rieurea 30jours,
Leservicedegarantiepeutetreorganiseencontactantvotred@ositaireou und@ositairedeservicedegarantieagreeparGenerac.Pourconnaitreled@ositaire
deservicedegarantieagreeparGeneracsituele plus pres,appelernotrenumeroci-dessous,ouenvoyeruncourriera.emissions@generac.com.
1-800-333-1322
REiVlARQUEllVIPORTANTE: Cetenoncede garantieexpliquevos droitset obligationsdansle cadredela garantieduSystemedeContr61edesf_missionsqui
vousestfournie parGeneracconformementaudroitde I't_tatfederal.Consulter%aiementles,_GarantieslimiteesdeGeneracpourGeneracPowerSystems,
Inc._>jointesaupresentdocumentsurunfeuillets@are,quivousest%aiementremisparGenerac.Veuilleznoterquelapresentegarantienes'appliquepasaux
dommagesaccessoires,importantsouindirectscausespardesddaillancesmateriellesou defabrication,ou partoutretardde r@arationouderemplacementde
la oudespiece(s)ddectueuses.Lapresentegarantieremplacetouteslesautresgaranties,implJcJtesouexplicites.EnparticulJer,Generacn'emetaucunegarantie
deconformiteou d'usagepourunobjectifparticulier.Certainsl_tatset provincesnepermettentpaslalimitationdela dureedesgarantiesimplicites.Toutesles
garantiesimplicitesquisontautoriseespar Ioi,serontlimiteesdansladureeselonlestermesde lapresentegarantie.Lalimitationmentionneeci-dessuspourrait
doncne pass'appliquera.votrecas.
Lagarantiedu SCEnes'appliquequ'ausystemedecontr61edesemissionsdevotrenouvelequipement.Les garantiesduSCEetdeGeneracdecriventles droitset
obligationsimportantesrelativesa.votrenouvel%uipement.
Leservicedegarantienepeutetrerealisequeparuneentreprisede serviceagreeeparGenerac.Encas dedemandedu servicedegarantie,despreuves
mentionnantla datedeventea.I'acquereur/ auproprietaired'originedoiventetrepresentees.
Pourtoutequestionconcernantvos droitsetresponsabilitesdegarantie,mercidecontacterGeneraca.I'adressesuivante:
P.O. BOX (boite posta|e) 297 • WHITEWATER, Wi 53190
Partie1 de 2
62
ATTENTION WARRANTY DEPARTMENT
GENERAC POWER SYSTEMS, INC.
N° de piece 0J3335A Rev.A 11/11
Page 65

GARANT/EO'BV//SSlONSPOURL'EQU/PEIV/ENTCERT/F/EEPA
GARANTiE DU SYSTEME DE CONTROLE DES EMiSSiONS
GarantieduSystemedeContr61edesEmissions(garantieduSCE)pourI'equipementutflisantdepetitsmoteursa.allumagecommande:
(a) Applicabilite:la presentegarantJes'appliquea.I'equipementquiutilisedepetitsmoteurshors route.Laperiodedela garantieduSCEcommenceraa.la date
d'achat/ delivraisondu nouvelequipementa.sonacquereur/ proprietaired'origine,final,et durerapourmoinsde:
(1) Laperiodedetemps specifi6edansla presenteGarantielimiteedeGenerac,maispasmoinsde24 moJs,ou
(2) Pourlesmoteursequip6sd'uncompteurhoraire,uncertainnombred'heuresdefonctionnementegalea.lamoitiedeladureedevieutiledumoteur.La
dureedevieutile peutest indiqueesur I'etiquettedecontr01edesemissionssurle moteur.
(b) Couverturegen6raledegarantied'emissions: Generacgarantita.I'acquereur/ auproprietaired'origine,final,du nouveaumoteurouequipementeta.chacun
desacquereurs/ proprietairessuivantqueIorsqullest installele SCE:
(1) Estcongu,construitet equip6danslerespectdetouteslesreglementationsapplicables; et
(2) NecomporteaucunepieceddectueusenJnepresenteaucunddautdefabricationa.tout momentdela periodedegarantieduSCE.
(c) La garantiesur lespiecesrelativesauxemissionsserainterpret6edela fagonsuivante:
(1) Toutepiecegarantie,dontleremplacementn'estpasprwu au coursdesmaintenancesobligatoiresmentionneesdansleManueld'entretiensera
garantiepourtouteladureedelaGarantieduSCE.SiI'unedecespiecesdevientddectueusependantla dureedelaGarantJedu SCE,erieserar@aree
ou remplaceeparGeneracconformementau paragraphe(4)quisuit.Cespiecesr@areesou remplaceesdanslecadredela GarantieduSCEseront
garantiespourle restedela dureedela GarantJeduSCE.
(2) Toutepiecegarantiedont il estprwu uneinspectionregulieredansle Manueld'entretienseragarantiependanttoutela dureedelaGarantieduSCE.Toute
declarationauniveauduManueld'entretienetrelativea.I'effetde,, r@arationouremplacementsi necessaire_ nereduirapasladureedela Garantiedu
SCE.Cespiecesr@areesou remplaceesdansle cadredela GarantieduSCEserontgarantiespourle restedela dureedela Garantiedu SCE.
(3) ToutepiecegarantJe,dontle remplacementestpasprwu aucoursdesmaintenancesobligatoiresmentionneesdansle Manueld'entretienseragarantie
pourla periodeprec6dantladatedu premierremplacementprwu. Sila piecedevientddectueuseavantle premierremplacementprevu,erieserar@aree
ou remplaceeparGenerac,conformementauparagraphe(4) quisuit. Cespiecesrelativesauxemissionsr@areesou remplaceesdansle cadrede la
Garantiedu SCEserontgarantJespourlerestede ladureeprec6dantla datedeleurpremierremplacementprwu.
(4) Lar@arationoule remplacementdetoutepiecerelativeauxemissionsetgarantiedansle cadrede la Garantiedu SCEserarealis6sansfrais pourle
proprietairedansunservicedegarantieagreeparGenerac.
(5) Nonobstantlesdispositionsdela sous-section(4) ci-dessus,les servicesour@arationssousgarantiedoiventetreeffectuesauxcentresd'entretien
agreesparGenerac.
(6) Si le moteurestinspecteparunservicedegarantieagreeparGenerac,lesfrais dediagnosticne serontpasa.la chargede I'acquereur/ duproprietairesi
la r@arationentredansle cadredela garantJe.
(7) Generacesttenu, pendantladureedelaGarantieduSCE,deconserverunstockde piecesrelativesauxemissionsetgarantiessuffisantafin der@ondre
a.lademandedesditespieces.
(8) Toutepiecederechangerelativeauxemissionsagreeeetapprouveepar Generacpourraetreutiliseepourla reaiisationde toutemaintenanceou
r@arationeffectueedanslecadredelagarantieduSCEetserafournJesansfraisa.lachargedeI'acquereur/ duproprietaire.Cetteutilisationnereduira
pasles obligationsdeGeneracdartsle cadrede la GarantieduSCE.
(9) Aucunemodification,autresquecellesexplicJtementapprouveesparGenerac,nepeuventetreapporteesa.lageneratrice.Lesmodificationsnon
approuveesannulentlaGarantiedu SCEetconstitueraunmotif suffisantpourrejetertoutedemandedebendice dela GarantieduSCE.
(10) Generacneserapasresponsabledesddaillancesdespiecesderechangenonautorisees,ou ddaillancedes piecesautoriseescauseesparI'utilisation
depiecesderechangenonautorisees.
LES PIECES RELATIVES AUX EMISSIONS PEUVENT INCLURE CE QUI SUIT
(LE CAS ECHEANT) =
1) DISPOSITIFMESUREURDECARBURANT 3) SYSTI_MED'ALLUMAGE
A. CARBURATEURETPIt_CESINTERNES A. BOUGIESD'ALLUMAGE
B. CAPUCHON/Rt_SERVOIRDECARBURANT B. MODULE/BOBINESD'ALLUMAGE
C. CANALISATIONSDECARBURANT 4) SYSTEMED'ADMISSIOND'AIR
D. CANALISATIONDETUYAUXD'EVACUATION A. SOUPAPEA IMPULSIOND'AIR
E. Rt_GULATEUR(CARBURANTSGAZEUX) 5) SYSTI_MED't_CHAPPEMENT
2) SYSTI_MED'ADMISSIOND'AIR A. CATALYSEUR
A. COLLECTEURD'ADMISSION B. COLLECTEURD'I_CHAPPEMENT
B. FILTREA AIR
Partie2 de2
N° de piece OJ3335ARev.A 11/11
63
Page 66

GARANT/ED' M/88/ONPOURL' QU/PEMENTCERT/F/£-CARB
CAUFORNIE ET DES EMISSIONS EPA AMERICAINE! DECLARATION DE GARANTIE DE
CONTROLE VOS DROITS ET OBLIGATIONS DE GARANTIE
Le conseil California Air ResourceBoard (ci-apresCARB)et I'Agencepour la Protectionde I'Environnementamericaine(ci-apres denommeeEPA)et la
societ6GeneracPowerSystems, Inc. (ci-apresdenommeeGenerac)sont heureux de vous expliquerla Garantiedu Systeme de Contr61edes l_missions
(ci-apres Garantie SCE)de votre nouvel appareil2012. Le nouvel equipement utilise des petits moteurs a allumagecommande doivent _tre con(_us,
construits et equipes dans le respect des normes nationalesrigoureusesen matierede pollution pour le gouvernementfed6ral et I'Etatde la Califomie.
Generacgarantiralesysteme decontr61edes emissions devotregen6ratricepour lesperiodesindiqueesci-apres,en I'absenced'acte abusif,de negligence,
demodification nonapprouveeou de maintenanceinadapteedevotre equipement.
Le systeme de contr61edesemissions sur cet equipementinclut tous les composants dont la defaillanceaugmenteraitles emissions de tout polluant
reglement6.Cescomposants sont indiquesa.la liste de la section Informationsur les emissions dece manuel.
COUVERTURE DE GARANTIE DU FABRICANT :
LagarantieSCEestvalidepour deux ans,ou pour la m_meperiodeque celle indiqueea la garantielimitee Generac,la periodela plus Iongues'appliquant.
PourI'equipementmuni d'horometres, la periodede garantieestun hombred'heuresegal a la moitiede la vieutile pourlaquelleI'equipementestcertifie, ou
laperiodedegarantieindiqueeci-dessus enannees,laperiode la pluscourte s'appliquant. Lavie utile estindiqueesur I'etiquettede contr61edes emissions
surle moteur.Si uncomposant ou systeme devotreequipementrelatif auxemissions comporte unepiecedefectueuseou presenteundefautdefabrication
pendantla dureede la garantie,les reparationsou remplacementsde pieces seront effectuespar un depositaired'entretiendegarantieagre6par Generac.
RESPONSABILITES DE GARANTIE DU PROPRIETAIRE :
Entant que proprietaire de la generatrice,vous _tes responsablede la realisation de toute la maintenance necessairetelle que listee darts le manuel
d'entretienquivous a et6remis parI'usine.Auxfins delagarantie,Generacvousrecommandedeconservertousles re£usrelatifsa.lamaintenanceeffectuee
survotre gen6ratrice,mais Generacnepeutpas refuserla garantieuniquementen raisonde la non-presentationdes re£us.
Vous devezcependantsavoir que Generacpourra refusertout et/ ou partie dela couverturede la garantieou de la responsabilitesi votre appareilet/ ou
toute piece decelle-ci nefonctionne plus dufait d'unusageabusif,d'une negligence,d'une mauvaisemaintenanceou demodifications non approuvees.
Vous_tes charge de contacterun depositaire de garantie agree par Genera¢des qu'un problemese presente.Les reparationseffecluees darts le
cadre de la garanlie devrnnt _tre faites darts uneperioderaisonnable,inferieurea 30 jours.
Le service de garantiepeut _tre organiseen contactant votre d@ositaire ou un d@ositaire de service de garantieagre6 par Generac.Pourconna_trele
d@ositairede service de garantieagre6 parGeneracsitue le plus pres, appeler notre numero ci-dessous,ou envoyerun courtier a.emissions@generac.
com.
REMARI:IUEIMPORTANTE: Cetenonce de garantieexpliquevos droits etobligationsdansle cadrede la garantiedu Systemede Contr61edes l_missions
quivous estfournie par Generacconformement audroit de I'l_tatfederal.Consulter egalementles <_Garantieslimiteesde Generacpour GeneracPower
Systems,Inc. ,>jointes aupresentdocument sur un feuillets@are, qui vous estegalementremispar Generac.Veuilleznoterque la presentegarantie
nes'applique pas aux dommagesaccessoires,importants ou indirectscauses par des defaillancesmateriellesou defabrication, ou par tout retardde
reparationou de remplacementde la ou des piece(s) defectueuses.La presentegarantieremplacetoutes les autres garanties,implicites ou explicites.
Enparticulier,Generacn'emet aucunegarantiede conformite ou d'usagepour un objectif particulier.Certainsl_tatset provincesne permettentpas la
limitationdela dureedes garantiesimplicites.Touteslesgarantiesimplicites qui sont autoriseespar Ioi, seront limiteesdans la dureeselon les termes de
la presentegarantie. Lalimitationmentionneeci-dessus pourrait donc ne pas s'appliquer a.votrecas.
Lagarantiedu SCEne s'applique qu'ausysteme de contr61edesemissions devotre nouvel equipement.Les garantiesdu SCEet de Generacdecriventles
droitset obligationsimportantes relatives avotre nouvelequipement.
Leservice de garantiene peutetre realiseque par une entreprisede service agreeeparGenerac.Encas de demandedu service de garantie,des preuves
mentionnantla datede ventea I'acquereur/ auproprietaired'originedoivent _trepresentees.
Pourtoute question concemantvos droits et responsabilitesde garantie,mercide contacterGeneraca.I'adressesuivante:
RO. BOX (bo_te postaie) 297 * WHITEWATER, WI 53190
Pattie1 de 2
64
1-800-333-1322
ATTENTION WARRANTY DEPARTMENT
GENERAC POWER SYSTEMS, INC.
N° de piece 0J8147C Rev.A 01/12
Page 67

GARANT/ED'£-MiSS/ONPOURL'£-QU/PEMENTCERTIF/£=CARB
GARANTIE DU SYSTEME DE LUTTE ANTli_iVlISSION
Garantiedu Systemede Oontr61edes Emissions(garantiedu SOE)pourI'equipementutilisantde petits moteurs a allumagecommande :
(a) Applicabilite:la presentegaranties'appliquea I'equipementqui utilise de petits moteurshors route. La periodede la garantie du SOEcommenceraa.
la dated'achat/ de livraison du nouvelequipementa son acquereur/ proprietaired'origine,final, et durerapendantles 24 mois suivantladitedate.
(1) Laperiodedetemps specifi6edartslapresenteGarantielimiteede Generac,mais pas moins de 24 mois, ou
(2) Pourlesmoteurs munis d'horometres,un hombre d'heures defonctionnementegala.lamoitiede la vie utile du moteur.Lavie utile est indiquee
sur I'etiquettede contr61edes emissionssur le moteur.
(b) Oouverturegen6ralede garantied'emissions : Generacgarantit a I'acquereur/au proprietaired'origine,final, du nouveaumoteurou equipementeta.
chacundes acquereurs/ proprietairessuivantque Iorsqu'il est installe le SOE:
(1) Estcongu, construit etequip6dartsle respect detoutes les reglementationsapplicables; et
(2) Ne comporte aucunepiece defectueusenine presenteaucundefaut defabrication a tout moment de la periodede garantiedu SCE.
(c) La garantiesur lespiecesrelativesauxemissions serainterpret6ede la fagonsuivante :
(1) Toutepiecegarantie,dont le remplacementn'estpas prevuau cours des maintenancesobligatoires mentionneesdartsle Manueld'entretiensera
garantiepourtoute la duree de la GarantieduSCE.Si I'unedeces piecesdevientdefectueusependantla dureede la Garantiedu SOE,ellesera
r@areeou remplaceepar Generacconformement auparagraphe(4) qui suit.Oes piecesr@areesou remplaceesdartsle cadrede la Garantie
du SOEseront garantiespour le reste dela dureede la Garantiedu SOE.
(2) Toutepiece garantiedont il estprevu une inspectionregulieredartsle Manueld'entretienseragarantiependanttoute la duree de la Garantiedu
SOE.Toutedeclarationauniveau du Manueld'entretienetrelative aI'effetde <,reparationou remplacementsi necessaire>>ne reduirapasla
dureede la GarantieduSOE.Oespiecesr@areesou remplaceesdartsle cadre de la Garantiedu SOEserontgarantiespourle restede la duree
de la Garantiedu SCE.
(3) Toutepiece garantie,dont le remplacementest pas prevuau coursdes maintenancesobligatoiresmentionneesdartsle Manueld'entretien
seragarantiepour la periodeprecedantla datedu premierremplacementprevu. Si la piecedevient defectueuseavantle premierremplacement
prevu, ellesera r@areeou remplaceeparGenerac,conformementau paragraphe(4) qui suit. Oespiecesrelatives auxemissions r@arees
ou remplaceesdanslecadre de la Garantiedu SCEseront garantiespour le restede la dureeprecedantla date deleur premier remplacement
prevu.
(4) La reparationou le remplacementdetoute piecerelative aux emissions etgarantiedans le cadre dela GarantieduSCEsera realisesansfrais
pour le proprietairedartsun service de garantie agreepar Generac.
(5) Nonobstantles dispositionsde la sous-section (4) ci-dessus, les services ou reparationssous garantiedoivent _tre effectuesaux centres
d'entretienagreespar Generac.
(6) Si le moteurest inspectepar un service de garantieagree parGenerac,les frais de diagnostic neseront pas a.la chargede I'acquereur/ du
proprietairesi la reparationentre darts le cadrede la garantie.
(7) Generacesttenu, pendantla dureede la Garantiedu SCE,de conserverun stock de piecesrelativesauxemissions etgarantiessuffisant afin de
r@ondre ala demandedesditespieces.
(8) Toutepiece derechangerelative auxemissionsagreee etapprouveepar Generacpourra etreutilisee pour la realisationdetoute maintenanceou
reparationeffectueedartsle cadre de la garantiedu SCEet serafournie sansfrais a.la charge deI'acquereur/ du proprietaire.Cetteutilisation ne
reduirapas les obligations deGeneracdartsle cadre dela Garantiedu SCE.
(9) Aucunemodification, autre quecelles specifiquementapprouveesparGenerac,ne peut@e apportee a cette generatrice.Les modificationsnon
approuveesannulentcette garantieSCEetrepresententune raison suffisantepour declinertoute reclamationenvertu dela garantieSCE.
(10) Envertu des presentes,Generacnesera pas tenu pour responsabledes defaillancesde pieces de rechangenon autorisees,ou desdefaillances
des pieces autoriseescausees parI'utilisation de piecesde rechangenon autorisees.
LES PIECES RELATIVES AUX EMISSIONS PEUVENT INCLURE CE QUI SUIT
(LE CAS ECHEANT) :
1) DtSPOSITIFMESUREURDECARBURANT 3) SYSTEMED'ALLUMAGE
A. CARBURATEURETPtI_CESINTERNES A. BOUGIESD'ALLUMAGE
B. CAPUCHON/RESERVOIRDECARBURANT B. MODULE/BOBINESD'ALLUMAGE
C. CANALISATIONSDECARBURANT 4) SYSTEMED'ADMISSIOND'AIR
D. CANALISATIONDETUYAUXD'EVACUATION A. SOUPAPEA IMPULSIOND'AIR
E. REGULATEUR(CARBURANTSGAZEUX) 5) SYSTEMED't!CHAPPEMENT
E RESERVOIRDECARBONE A. CATALYSEUR
2) SYSTEMED'ADMISSIOND'AIR B. COLLECTEURD'ECHAPPEMENT
A. COLLECTEURD'ADMISSION
B. FILTREAAIR
Partie2 de2
N° de piece 0J8147C Rev.A 01/12
65
Page 68

GARANTIE LIMITI'=-'E DE DEUX ANS DE GENERAC POWER SYSTEMS POUR
LES GI_NC:RATEURS PORTABLES SERIE XG
La societeGeneracPower Systems, Inc. (Generac)garantitque, pendantuneperiode dedeux (2) anneesa compter de la date d'achat d'origine,ses generateursserieXG
ne presenterontaucun ddaut materielni de fabrication pourles elementset la periodementionneeci-apres. Generacr@areraou remplacera, comme il le jugera necessaire,
toutepiece jugee ddectueuse apres un examen,une inspectionet un test realisespar Generacou un d@ositaire deservice de garantieagreepar Generac.Tout(e)reparation
ou remplacementdans le cadrede la presentegarantielimiteene renouvellepas ou ne prolonge pas laduree de garantieinitiale.Toutproduit r@areest uniquementgaranti
pendantla dureerestante de garantieinitiale.Toutequipementdeclaredefectueuxpar I'acquereur/le proprietairedoit _tre retourneet examinepar le d@ositaire de service
de garantieagreepar Generacle plus proche. Touslesfrais d'envoia payerdans le cadre dela garantie,dont le retour aI'usine, seront supportes etpayes a I'avancepar
I'acquereur/le proprietaire.Oettegarantienes'appliquequ'auxgenerateursportablesde la serieXGet n'est pastransferableparI'acquereurd'origine. IIest conseillede
conserverles preuves d'achat.Si vous ne fournissez pas depreuve dela dated'achat d'origine,la dated'envoidu produit par sonfabricant serviraa d@rminer laperiode de
garantie.
PROGRAMME DE GARANTIE
Les applications des clients sont garanties pendantdeux (2) ans. Les applications commerciales et de location sont garantiespendant un (1) anou 1 000 heures maximum,
la premieredes deux dates.
APPLICATION DES CLIENTS
ANNEEUNE- Oouverturecomplete limitee a 100 % pour la main d'eeuvreet la (les) piece(s) (ilest necessairede presenterune preuve d'achat et de maintenance) :
• Tousles composants
ANNEEDEUX- Couverturecomplete limiteea 100 % pour la (les) piece(s) (il est necessairede presenterunepreuve d'achat et de maintenance) :
• Tousles composants
APPLICATIONS COMMERClALES / DE LOCATION
ANNEEUNE- Oouverturecomplete limitee a 100 % pour la main d'eeuvreet la (les) piece(s) (ilest necessairede presenterune preuve d'achat et de maintenance) :
• Tousles composants
REMARQUE : Auxfins dela presentegarantie,<<utilisation du consommateur _ designe une utilisation menagerepersonnelleou recreativede la part de I'acquereur
1. Toute reparationsous garantie doit _treeffectuee et/ou traitee parun d@ositaireautorise / agree par Generac,ou une filiale de Generac.
2. Lesunites qui ont ete revenduesne sont pas couvertes par la garantiede Generacetant donne quela presentegarantien'estpas transferable.
3. L'utilisationde piece(s) de rechangeautre(s) que Generacannuleraentierementla garantie.
4. Generacpeutchoisir de r@arer,deremplacer ou de rembourser une piece deI'equipement.
5. Letaux demain-d'eeuvresous garantieestbase sur les heuresnormales detravail. Les autres frais relatifs aux heuressupplementaires,aux vacances ouaux coots
salariauxpour les reparations d'urgence en dehors des heures normalesde travail seront a la charge du client.
6. Lesfrais de transport des piecessous garantiesontremboursesa destarifs de transport terrestre.Lesfrais associes auxdemandesdetransport seronta la chargedu client.
7. La verification de la maintenancenecessairepeut 6treexigee pour la couverture dela garantie.
1. Les co8ts de maintenanceet des modifications normales.
2. Les ddaillances entrainees parde I'essenceou de I'huilecontaminee,ou par I'utilisation de niveauxd'huile nonappropries.
3. Les reparationsou diagnostics realises pardes d@ositaires non agreesparGenerac etnon autorises par ecrit par Generac.
4. Les ddaillances dues, sans s'y limiter, a I'usurenormale, a des accidents, mauvaises utilisations, usagesabusifs, negligence ou utilisation inadaptee.
5. Oommepour tous les dispositifs mecaniques,lesmoteurs Generacnecessitentune reparationet un remplacement periodiquesde leurs piecespour fonctionner comme
prevu. La presentegarantiene couvre pas les reparationsIorsquele problemede la ou les piece(s) ou du moteur decoule d'une utilisation normale.
6. Les ddaillances causees partoute cause exterieureoutout cas de force majeure, tel qu'un choc, un vol, un acte devandalisme, une emeuteou une guerre, un
evenementnucleaire,un incendie, un gel, la foudre, un seisme, unetempete, la grele, uneeruption volcanique, I'eauou une inondation, unetornade ou un ouragan.
7. Les dommages dus _,des rongeurs et/ou insectes.
8. Les produits modifies ou alteres d'unefagon n'ayant pas ete autorisee par ecrit par Generac.
9. Les dommagesaccessoires, importants ou indirects causes par des defaillancesmateriellesou defabrication, ou partout retardde reparationou de remplacementde
la ou despiece(s) ddectueuses.
10. Lesddaillances dues a une mauvaiseapplication.
11. Lesd@enses lieesa I'instruction du client ou au d@annageIorsqu'aucunddaut n'est detecte.
12. LesequipementsIoues utilises pendantla realisationdes reparationsdans le cadre de la garantie.
13. Lesbatteries dedemarrage,fusibles, ampoules et fluides du moteur.
LAPRESENTEGARANTIEREMPLAOETOUTESLESAUTRESGARANTIES,IMPLIOITESOUEXPLIOITES,ENPARTIOULIER,GENERACN'EMETAUOUNEGARANTIEDEOONFORMITE
OUD'USAGEPOURUNOBJEOTIFPARTIOULIER.Toutegarantieimplicitequiestautoriseeparla Ioidoit6trelimiteeen dureeconformementauxconditionsdegarantieexplicite
stipuleesdansla presente.Oertainsetatsnepermettentpas deposerunelimiteala dureedela garantieimplicite,lalimite susmentionneenes'appliquedonc pasa I'acheteur/ au
proprietaire.
GENERACNE SERARESPONSABLEQUEDE LAREPARATIONOUDU REMPLACEMENTDELA OUDES PIECESTELQUESUSMENTIONNE.ENAUCUNCASGENERACNE
POURRAETRETENURESPONSABLEDETOUTDOMMAGEDIRECTEOUINDIRECTE,MEME SI CE DOMMAGEDECOULEDIRECTEMENTD'UNENEGLIGENCEDEGENERAC.
Oertains etats ne permettent pas d'exclure ou de poserune limite aux dommages accessoires ouimportants, la limite susmentionneene s'applique donc pas a I'acheteur/
au proprietaire.L'acheteur/le proprietaireaccepte de nefaire aucunereclamation a I'encontrede Generac,ense basant sur la negligence.La presente garantieconfere
I'acheteur/au proprietaire des droits juridiques specifiques. L'acheteur/le proprietairepeutegalementavoir d'autresdroits qui varientd'Etat en Etat.
Reference0H5472 RevisionE (03/12)
N° depiece du manuel0J3092 RevisionC (24/05/12) Imprimeaux Etats-Unis
d'origine. Lapresentegarantie nes'applique pas aux unitesutilisees pour de I'energieprimaire au lieudu reseauIorsque le reseau @ctrique principal est
present ou n'existenormalementpas. Unefois quele generateura ete utilisede manierecommerciale ou locative, il seraconsidere par la suite comme un
generateura utilisation non personnelledansle cadre dela presentegarantie.
Directives :
LA PRI_SENTE GARANTIE NE S'APPLIQUE PAS AUX €:LC:MENTS SUIVANTS :
GENERAC POWER SYSTEMS, INC.
P.O. BOX 8 • Waukesha, Wl 53187 • T_I. : (888) GENERAC (438-3722) • Fax : (262) 544-4851
Pour Iocaliser le d_positaire le plus proche, visitez notre site Internet www.generac.com
 Loading...