

Power Washer
Operator’s Manual
000263
MODEL:________________________
SERIAL:________________________
DATE PURCHASED:______________
Register your Generac product at:
register.generac.com
1-888-922-8482
Operator’s Manual for Power Washer i
SAVE THIS MANUAL FOR FUTURE REFERENCE

Table of Contents
(000393a)
WARNING
CANCER AND REPRODUCTIVE HARM
www.P65Warnings.ca.gov.
Section 1 Introduction and Safety 1
Introduction .....................................1
Safety Rules .................................... 1
Safety Symbols and Meanings ........ 2
Section 2 General Information and
Setup ..............................................3
Know Your Power Washer .............. 3
Emissions Information ..................... 3
Remove Contents from Carton .......4
Assembly ......................................... 4
Add Engine Oil ................................ 4
Check Pump Oil .............................. 5
Fuel .................................................5
Water Supply ................................... 5
Connect Water Supply .................... 6
Connect Lance and High-Pressure
Hose to Spray Gun ..........................6
Spray Gun ....................................... 6
How to Use Nozzles ........................ 6
Section 3 Operation .......................8
Operation and Use Questions .........8
Before Starting Engine ....................8
Prepare Power Washer for Use .......8
Apply Detergent .............................10
Rinsing ...........................................10
Clean Detergent Siphoning Tube ..10
Automatic Cool Down System
(Thermal Relief) .............................11
Section 4 Maintenance and
Troubleshooting ..........................12
Maintenance ..................................12
Maintenance Schedule ..................12
Preventive Maintenance ................12
Engine Maintenance ......................14
Service Spark Plug ........................15
Storage ..........................................16
Troubleshooting .............................18
Notes .............................................19
Section 1 Introduction and Safety
(000100a)
WARNING
Consult Manual. Read and understand manual
completely before using product. Failure to
completely understand manual and product
could result in death or serious injury.
(000001)
DANGER
Indicates a hazardous situation which, if not avoided,
will result in death or serious injury.
(000002)
WARNING
Indicates a hazardous situation which, if not avoided,
could result in death or serious injury.
(000003)
CAUTION
Indicates a hazardous situation which, if not avoided,
could result in minor or moderate injury.
Introduction and Safety
Introduction
Thank you for purchasing a Generac Power
Systems Inc. product. This unit has been
designed to provide high performance,
efficient operation, and years of use when
maintained properly.
If any section of the manual is not understood,
contact your nearest Independent Authorized
Service Dealer (IASD), or contact Generac
Customer Service at 1-888-GENERAC (1888-436-3722), or http://www.generac.com/
with any questions or concerns.
The owner is responsible for proper
maintenance and safe use of the equipment.
Before operating, servicing or storing this
power washer:
• Study all warnings in this manual and on
the product carefully.
• Become familiar with this manual and the
unit before use.
• Refer to the Assembly section of the
manual for instructions on final assembly
procedures. Follow the instructions
completely.
Save these instructions for future reference.
ALWAYS supply this manual to any individual
that will use this machine.
The information in this manual is accurate
based on products produced at the time of
publication. The manufacturer reserves the
right to make technical updates, corrections,
and product revisions at any time without
notice.
Safety Rules
The manufacturer cannot anticipate every
possible circumstance that might involve a
hazard. The warnings in this manual, and on
tags and decals affixed to the unit are, therefore, not all inclusive. If using a procedure,
work method or operating technique that the
manufacturer does not specifically recommend, verify that it is safe for others. Also
make sure the procedure, work method or
operating technique utilized does not render
the equipment unsafe.
Throughout this publication, and on tags and
decals affixed to the generator, DANGER,
WARNING, CAUTION and NOTE blocks are
used to alert personnel to special instructions
about a particular operation that may be hazardous if performed incorrectly or carelessly.
Observe them carefully. Their definitions are
as follows:
Owner’s Manual for Power Washer 1
NOTE: Notes contain additional information
important to a procedure and will be found
within the regular text of this manual.
These safety warnings cannot eliminate the
hazards that they indicate. Common sense
and strict compliance with the special instructions while performing the action or service
are essential to preventing accidents.
Introduction and Safety
Asphyxiation. Running engines produce
carbon monoxide, a colorless, odorless,
poisonous gas. Carbon monoxide, if not
avoided, will result in death or serious injury.
(000103)
DANGER
(000104)
DANGER
Electrocution. Water contact with a power
source, if not avoided, will result in death
or serious injury.
(000105)
DANGER
Explosion and Fire. Fuel and vapors are
extremely flammable and explosive. Add fuel
in a well ventilated area. Keep fire and spark
away. Failure to do so will result in death
or serious injury.
(000106b)
Fluid Injection. This machine produces
high-pressure fluid streams that can pierce
skin. Fluid injection could result in death or
serious injury.
WARNING
(000110)
WARNING
Risk of Fire. Hot surfaces could ignite
combustibles, resulting in fire. Fire could
result in death or serious injury.
(000101)
WARNING
Vision Loss. Eye goggles are required to be
worn when using this machine. Failure to wear
eye goggles could result in permanent
vision loss.
(000107)
WARNING
Hearing Loss. Hearing protection is
recommended when using this machine.
Failure to wear hearing protection could
result in permanant hearing loss.
(000108)
WARNING
Hot Surfaces. When operating machine, do not
touch hot surfaces. Keep machine away from
combustibles during use. Hot surfaces could
result in severe burns or fire.
(000109)
WARNING
Risk of Fire. Verify machine has properly
cooled before installing cover and storing
machine. Hot surfaces could result in fire.
(000111)
WARNING
Moving Parts. Keep clothing, hair, and
appendages away from moving parts. Failure
to do so could result in death or serious injury.
(000112)
WARNING
Risk of Falling. Use of machine creates wet
areas and trip hazards. Be aware of work area
conditions. A fall could result in death
or serious injury.
(000114)
WARNING
Risk of Falling. Do not use this machine or
any components on elevated surfaces.
Doing so can result in a fall, serious injury,
or death.
(000113)
WARNING
Recoil Hazard. Recoil could retract unexpectedly
if water pressure is not properly relieved from
pump, creating kickback. Kickback could result
in death or serious injury.
(000100a)
WARNING
Consult Manual. Read and understand manual
completely before using product. Failure to
completely understand manual and product
could result in death or serious injury.
(000115)
WARNING
Moving Parts. Do not wear jewelry when
starting or operating this product. Wearing
jewelry while starting or operating this product
could result in death or serious injury.
(000117c)
Personal injury. Risk of fluid injection.
Do not aim spray gun at people, animals,
electrical devices, or fragile items. Keep out
of reach of children. Failure to do so
could cause death or serious injury.
WARNING
WARNING
Environmental Hazard. Always recycle batteries at an
official recycling center in accordance with all local
laws and regulations. Failure to do so could result in
environmental damage, death or serious injury.
(000228)
(000244)
WARNING
Personal Injury / Equipment Damage. Place wand in
holster and verify that handle is locked into place
before moving. Failure to do so could result in death,
serious injury, or equipment damage.
Safety Symbols and Meanings
2 Owner’s Manual for Power Washer

Section 2 General Information and Setup
000264
A
B
C
D
E
F
G
I
J
L
M
N
O
P
R
S
T
U
U
H
K
(000100a)
WARNING
Consult Manual. Read and understand manual
completely before using product. Failure to
completely understand manual and product
could result in death or serious injury.
Table 2-1. Power Washer Components
A Spray Gun
B Lance with Quick Connect
C High-Pressure Hose
D Recoil Starter
E Oil Fill
F Air Filter
G High-Pressure Pump
H Thermal Relief Valve
I Engine On/Off Switch
J Unloader Valve
K High-pressure Outlet
L Water Inlet
M Fuel Tank
N Fuel On/Off Valve
O Choke
PBelt Guard
R Nozzles
S Adjustable Side Handle
T Oil Drain Plug
U Serial Number Location.
Identification Label (not shown) – located
*
*
Owner’s Manual for Power Washer 3
on engine blower housing
Detergent Siphoning Tube/Filter (not
shown)
Figure 2-1.Features and Controls
Know Your Power Washer
Read this manual thoroughly before
assembling and operating this unit. Save this
manual for future and immediate reference.
Replacement owner’s manuals are available
at www.generac.com.
Emissions Information
The U.S. Environmental Protection Agency
(and California Air Resource Board for
equipment certified to CA standards) requires
that this engine comply with exhaust and
evaporative emission standards. Locate the
emissions compliance decal on the engine to
determine what standards the engine meets,
and to determine which emissions warranty
applies. The engine is certified to meet the
applicable emission standards on gasoline. It
is important to follow the maintenance
specifications in the Maintenance section to
verify that the engine complies with the
applicable emission standards for the duration
of the product’s life. This engine utilizes lean
carburetion settings and other systems to
reduce emissions. Tampering with or altering
the emission control system may increase
emissions and may be a violation of Federal
or California Law. Acts that constitute
tampering include but are not limited to:
• Removal or alteration of any part of the
intake, fuel, or exhaust systems.
• Altering or defeating the governor linkage
or speed-adjusting mechanism to cause
the engine to operate outside its design
parameters.

Have the engine inspected and repaired by a
(000100a)
WARNING
Consult Manual. Read and understand manual
completely before using product. Failure to
completely understand manual and product
could result in death or serious injury.
000265
000266
000115
servicing dealer if these symptoms develop:
• Hard starting or stalling after starting
• Rough idle
• Misfiring or backfiring under load
• Afterburning (backfiring)
• Black exhaust smoke or high fuel
consumption
NOTE: Maintenance, replacement, or repair of
emissions control devices and systems may
be performed by a small engine repair
establishment or individual. To be covered by
warranty, all emissions control service work
must be performed by a factory authorized
dealer. See emissions warranty for further
details.
Remove Contents from Carton
1. Open carton completely by cutting each
corner from top to bottom.
2. Remove and verify carton contents prior to
assembly. Carton contents should contain
one each of the following:
• Main Unit
• High-pressure Hose
• Siphon Hose & Filter
• Spray Gun
• Lance with Quick Connect Fitting
• Oil Bottle
• Parts Bag (includes):
– Owner’s Manual
– Owner’s Registration Card
– Bag of Colored Nozzles
3. Call Generac Customer Service 1-888-
436-3722 with the unit model and serial
number for any missing carton contents.
4. Record model, serial number, and date of
purchase on front cover of this manual.
Figure 2-2.Insert Nozzles (number may
2. Place spray gun and nozzle extension into
spray gun holder.
vary)
3. See Figure 2-3 Attach siphon tube.
Figure 2-3.Siphon Tube Location
Add Engine Oil
1. Place power washer on a flat, level
surface.
2. Clean area around oil fill and remove
orange oil fill cap/dipstick (Figure 2-4).
Assembly
Call Generac Customer Service at 1-888-4363722 for any assembly issues or concerns.
Please have model and serial number
available.
1. Insert color-coded nozzles in spaces
provided (Figure 2-2).
3. Using oil funnel (optional), slowly pour oil
NOTE: On some units there is more than one
oil fill location. In these instances it is only
necessary to use one of the oil fill points.
4. Check periodically until the oil level is
4 Owner’s Manual for Power Washer
Figure 2-4.Fill Engine Oil
into oil fill opening. See Engine Oil
Recommendations.
between "L" and "H" on the dipstick
(Figure 2-5). DO NOT OVERFILL.

NOTE: Any attempt to crank or start the
000116
000267
000268
(000105)
DANGER
Explosion and Fire. Fuel and vapors are
extremely flammable and explosive. Add fuel
in a well ventilated area. Keep fire and spark
away. Failure to do so will result in death
or serious injury.
000117
engine before it has been properly serviced
with the recommend oil may result in engine
failure.
5. Replace oil fill cap/dipstick and fully
tighten.
Figure 2-5.Safe Operating Range
Check Pump Oil
1. Place power washer on a flat, level
surface.
2. Clean area around oil fill and remove
vented cap/dipstick (Figure 2-1).
Fuel
Fuel requirements are as follows:
• Clean, fresh, unleaded gasoline.
• Minimum rating of 87 octane/87 AKI (91
RON).
• Up to 10% ethanol (gasohol) is acceptable.
• DO NOT use E85.
• DO NOT use a gas oil mix.
• DO NOT modify engine to run on alternate
fuels.Stabilize fuel prior to storage.
1. Verify unit is OFF and cooled for a
minimum of two minutes prior to fueling.
2. Place unit on level ground in a well
ventilated area.
3. Clean area around fuel cap and remove
cap slowly.
4. Slowly add recommended fuel. Do not
overfill.
Figure 2-6.Check Pump Oil
3. Check to confirm oil level is within the
markings on the dipstick (Figure 2-5). If oil
is required, see Maintenance section. DO
NOT OVERFILL.
4. See Preventive Maintenance for additional
information.
5. Install oil dipstick until finger tight.
6. Clean up any spilled oil.
Figure 2-7.Pump Oil Dipstick
Owner’s Manual for Power Washer 5
5. Install fuel cap.
NOTE: Allow spilled fuel to evaporate before
starting unit.
Water Supply
NOTE: DO NOT run unit without sufficient
water supply. Failure to follow water supply
requirements will void unit warranty.
Water supply must meet the following requirements:
• DO NOT siphon standing water for the
water supply.
• Water temperature must be less than 100
°F (38 ºC).
• Water supply hose length must not exceed
50 ft (15.2 m).
• Water must be greater than 3.8 gallons per
minute (17.3 liters per minute) and no less
than 30 psi (206.8 kPa).
• DO NOT use a one-way valve, vacuum
breaker, or check valve in any part of the
water supply.
Figure 2-8.Add Recommended Fuel

Connect Water Supply
000270
A
B
000120
000269
000123
000125
1. Remove and discard shipping cap from
the pump water inlet.
2. Run water supply for 30 seconds prior to
connection to eliminate debris.
3. See Figure 2-9. Inspect inlet screen (A) for
debris. Clean screen or replace as
necessary. DO NOT run power washer if
inlet screen is damaged or missing.
Figure 2-9.Connect Water Supply
4. Connect water supply hose to pump water
inlet (A) and hand-tighten.
5. Connect high-pressure hose to pump (B).
Connect Lance and HighPressure Hose to Spray Gun
1. See Figure 2-10. Connect lance to spray
gun and hand-tighten.
Spray Gun
Become familiar with spray gun trigger and
locking system prior to use.
See Figure 2-12. With unit OFF, hold spray
gun and squeeze trigger to learn how trigger
mechanism and locking system can be
activated and deactivated.
Figure 2-12.Spray Gun (Typical)
3. Turn ON the water, squeeze the trigger to
purge the pump system of air.
4. Verify spray gun is OFF with lock engaged
before starting power washer.
How to Use Nozzles
1. See nozzle selection guide and select
correct nozzle for task.
2. See Figure 2-13. Pull back quick–connect
collar and install nozzle.
Figure 2-10.Connect Lance
2. See Figure 2-11. Connect high-pressure
hose to base of spray gun.
Figure 2-11.Connect High-Pressure Hose
6 Owner’s Manual for Power Washer
to Spray Gun
3. Release quick-connect collar to secure
4. Verify nozzle is locked in place.
Figure 2-13.Insert Nozzle
nozzle.
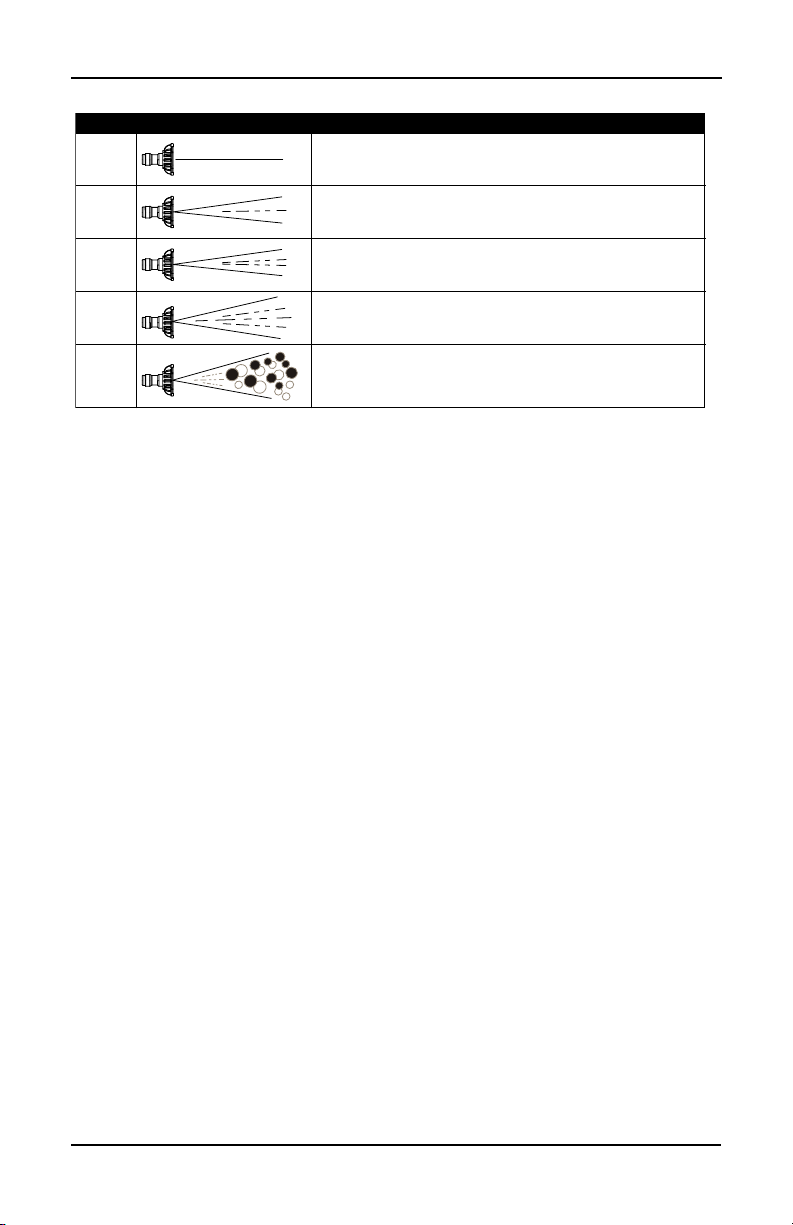
Blast
Pressure
Nozzle
(Red)
Strip
Pressure
Nozzle
(Yellow)
Clean
Pressure
Nozzle
(Green)
Wash
Pressure
Nozzle
(White)
Detergent
Nozzle
(Black)
Nozzle Selection Guide
MAXIMUM - Higher pressure and lower flow for stubborn or hard to reach
surface such as second story surfaces, paint removal, oil stains, rust removal
or other stubborn substances (tar, gum, grease, wax, etc.).
MEDIUM - Higher pressure and medium flow for removing stains on hard
porous surfaces such as concrete driveways, garage floors and brick patios.
GENERAL - Medium pressure and medium flow for most all purpose cleaning
such as home siding, brick patios, wood decks, driveways and
sidewalks, garage floors, etc.
DELICATE - Lower pressure and higher flow for gentle cleaning of cars/trucks,
boats, RV’s, patio furniture, lawn equipment, etc.
DETERGENT ONLY (BLACK), Only use power washer safe detergents/soaps
to help break down stubborn dirt and grime on a variety of surfaces.
000245
Owner’s Manual for Power Washer 7
Operation
Asphyxiation. Running engines produce
carbon monoxide, a colorless, odorless,
poisonous gas. Carbon monoxide, if not
avoided, will result in death or serious injury.
(000103)
DANGER
(000110)
WARNING
Risk of Fire. Hot surfaces could ignite
combustibles, resulting in fire. Fire could
result in death or serious injury.
(000108)
WARNING
Hot Surfaces. When operating machine, do not
touch hot surfaces. Keep machine away from
combustibles during use. Hot surfaces could
result in severe burns or fire.
000271
A
B
OFF
ON
000128
Section 3 Operation
Operation and Use Questions
Call Generac customer service at 1-888-4363722 with questions or concerns about unit
operation and maintenance.
Before Starting Engine
1. Verify engine oil level is correct.
2. Verify fresh fuel level is correct.
3. Verify all fittings and couplers are properly
secured.
4. Verify sufficient water supply is properly
connected.
5. Verify unit is secure on level ground, with
proper clearance and is in a well ventilated
area.
Prepare Power Washer for Use
1. Place unit on level ground, within the
specified clearance required.
2. Connect appropriate water supply.
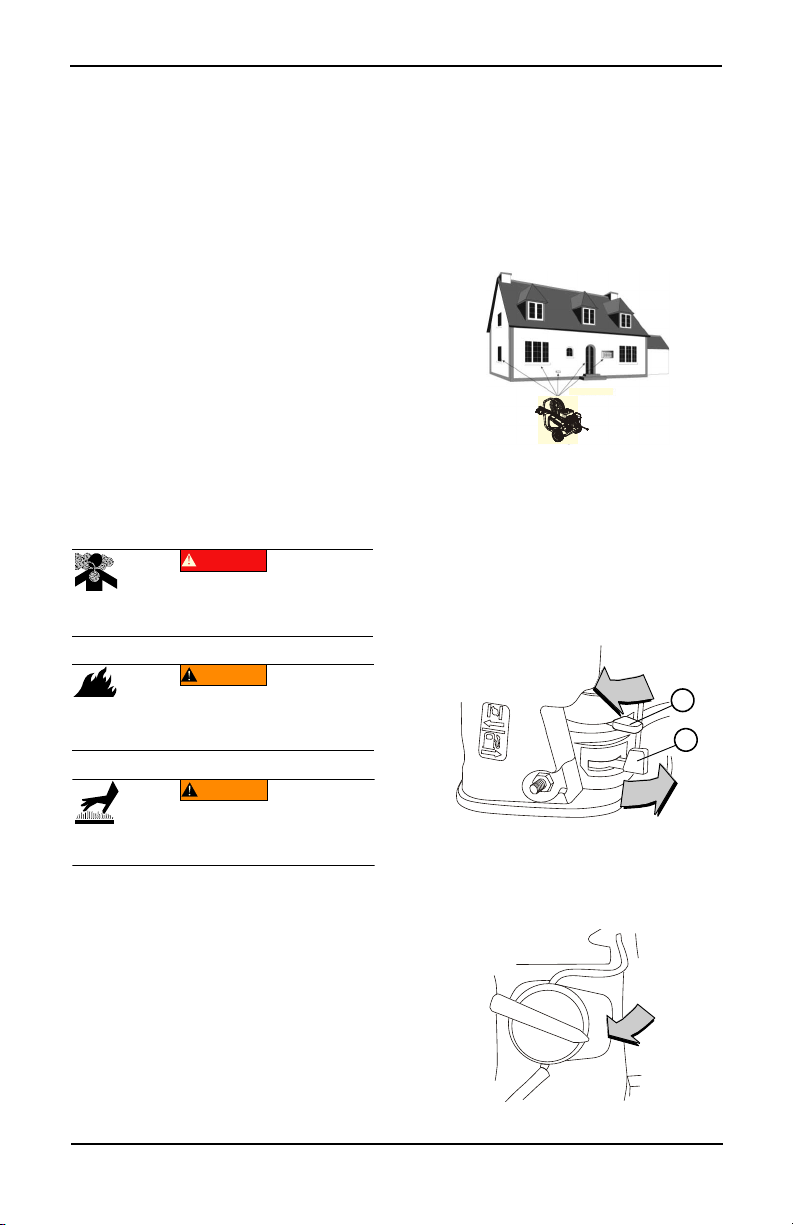
Power Washer Placement for Use
• Only use the unit outdoors. Verify exhaust
gas does not enter a confined area through
windows, doors, ventilation intakes.
•See Figure 3-1 Keep at least 5 ft (1.5 m) of
clearance on all sides of power washer
including overhead from dwellings and
combustibles, when in use.
Figure 3-1.Five Feet of Minimum Clearance
Power Washer Start-Up
NOTE: DO NOT run power washer without a
sufficient water supply turned ON. Damage to
equipment resulting from failure to follow this
instruction will void warranty.
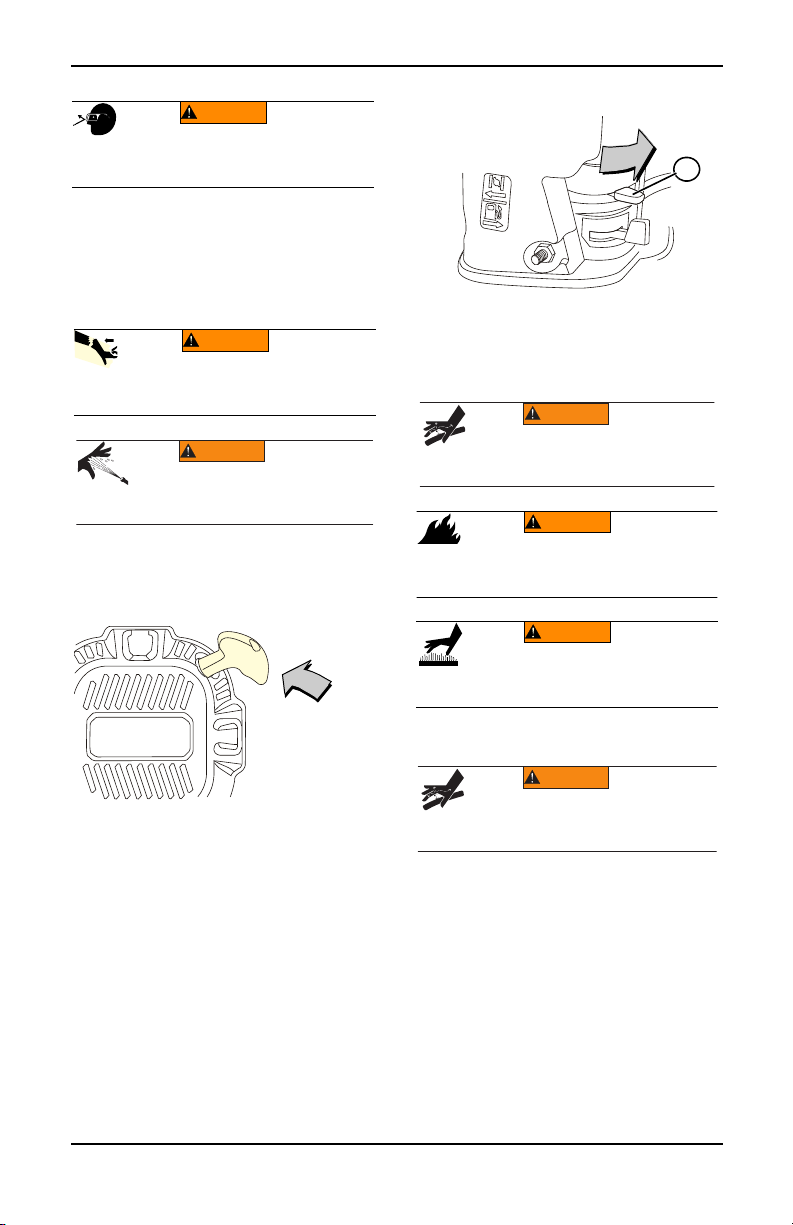
1. Connect a sufficient water supply.
2. See Figure 3-2. Move fuel valve (B) to ON.
3. Move choke lever (A) to CLOSE.
Figure 3-2.Fuel Valve and Choke
NOTE: For warm engine, verify choke lever is
It is a violation of California Public Resource
Code, Section 4442, to use or operate the
engine on any forest-covered, brush-covered,
or grass-covered land unless the exhaust
system is equipped with a spark arrester, as
defined in Section 4442, maintained in
effective working order. Other states or federal
jurisdictions may have similar laws.
Only operate power washer outdoors in a well
ventilated area. Never operate power washer
indoors, or in a confined space. Be aware of
building openings and ventilation systems
where exhaust may enter during use.
• Verify power washer is placed on level
ground to avoid tipping during operation.
8 Owner’s Manual for Power Washer
in OPEN position.
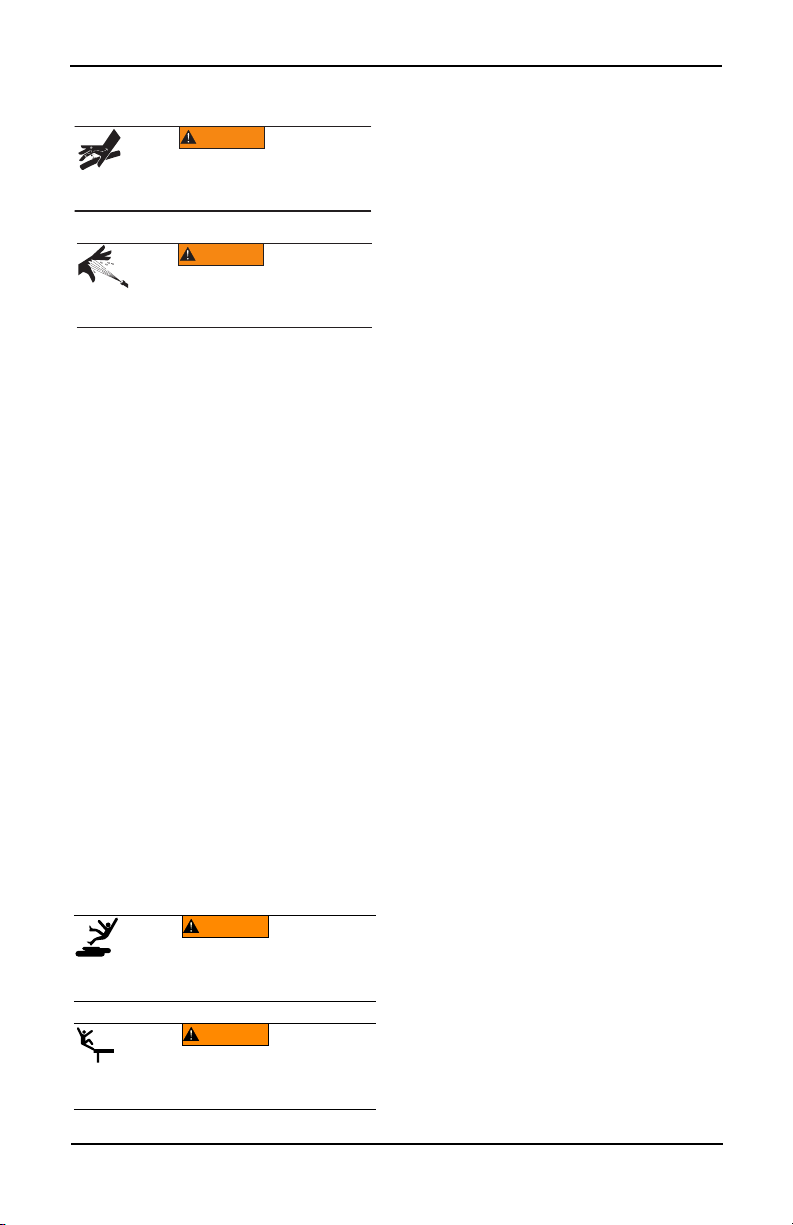
4. See Figure 3-3. Turn engine switch ON.
Figure 3-3.Engine Switch
000127
5. Relieve spray gun pressure.
(000101)
WARNING
Vision Loss. Eye goggles are required to be
worn when using this machine. Failure to wear
eye goggles could result in permanent
vision loss.
(000113)
WARNING
Recoil Hazard. Recoil could retract unexpectedly
if water pressure is not properly relieved from
pump, creating kickback. Kickback could result
in death or serious injury.
(000117c)
Personal injury. Risk of fluid injection.
Do not aim spray gun at people, animals,
electrical devices, or fragile items. Keep out
of reach of children. Failure to do so
could cause death or serious injury.
WARNING
000129
000127
A
(000106b)
Fluid Injection. This machine produces
high-pressure fluid streams that can pierce
skin. Fluid injection could result in death or
serious injury.
WARNING
(000110)
WARNING
Risk of Fire. Hot surfaces could ignite
combustibles, resulting in fire. Fire could
result in death or serious injury.
(000108)
WARNING
Hot Surfaces. When operating machine, do not
touch hot surfaces. Keep machine away from
combustibles during use. Hot surfaces could
result in severe burns or fire.
(000106b)
Fluid Injection. This machine produces
high-pressure fluid streams that can pierce
skin. Fluid injection could result in death or
serious injury.
WARNING
6. Secure unit from movement when pulling
recoil.
7. See Figure 3-4. Firmly grasp the recoil
handle. Pull slowly until resistance is felt.
Then pull rapidly to start engine.
After engine-start attempt, if engine fails to
run, always point spray gun in safe direction,
and squeeze spray gun trigger to release
high-pressure.
Operation
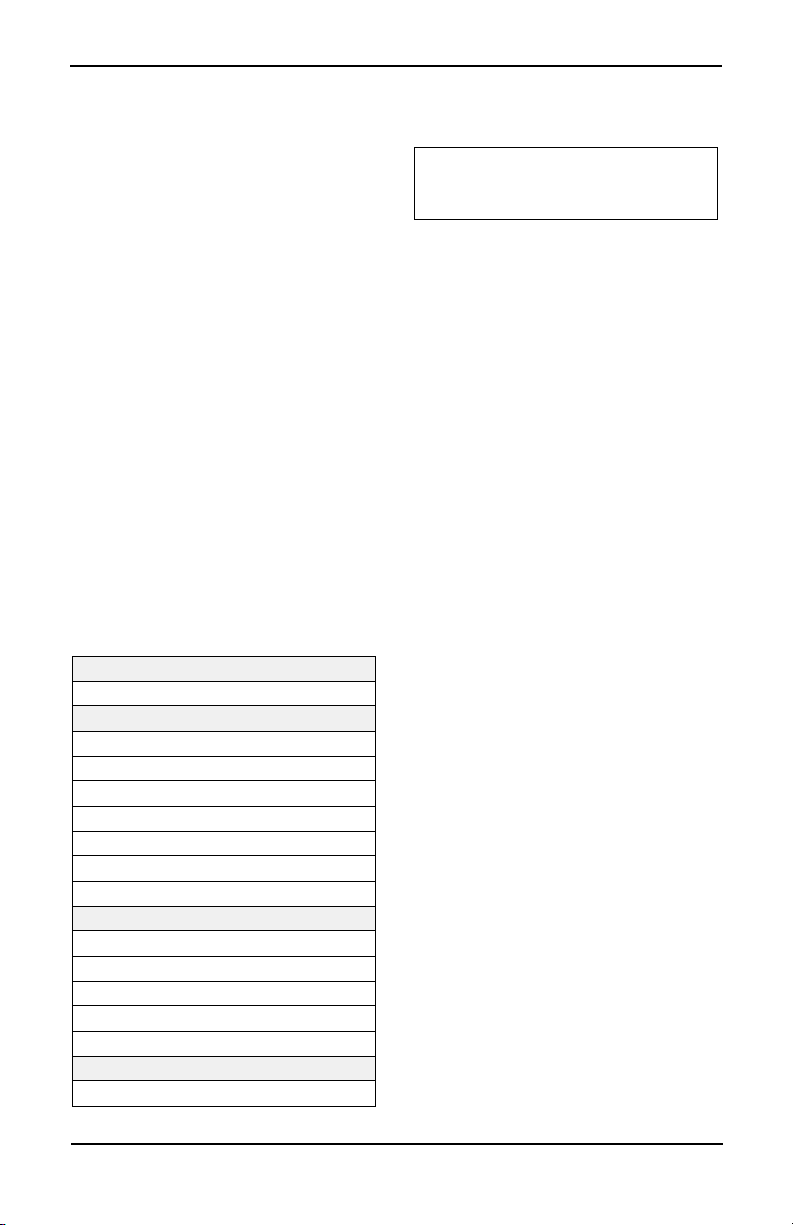
Figure 3-5.Fuel Valve and Choke
• If engine fails to start after six pulls, move
choke lever to OPEN position, and repeat
steps 6 through 9.
Power Washer Shut Down
Figure 3-4.Engine Recoil
8. Return recoil handle slowly. DO NOT let
recoil snap back against recoil housing.
9. See Figure 3-5. When engine starts, slowly
move choke lever to OPEN position (A) as
engine warms. If engine falters, move
choke lever to CLOSE position, then to
OPEN position.
Owner’s Manual for Power Washer 9
IMPORTANT: Spray gun traps high-pressure
water, even when engine is stopped and water
is disconnected. Always point spray gun in
safe direction, and squeeze spray gun trigger
to release high-pressure. Engage trigger lock
when not in use.
1. Release spray gun trigger.
2. Turn engine switch OFF.
3. Squeeze spray gun trigger and release
high-pressure water.
4. Engage trigger lock.
5. Turn water supply OFF.
NOTE: Keep high-pressure hose connected to
pump and spray gun while system is
pressurized.
Operation
(000106b)
Fluid Injection. This machine produces
high-pressure fluid streams that can pierce
skin. Fluid injection could result in death or
serious injury.
WARNING
(000117c)
Personal injury. Risk of fluid injection.
Do not aim spray gun at people, animals,
electrical devices, or fragile items. Keep out
of reach of children. Failure to do so
could cause death or serious injury.
WARNING
(000112)
WARNING
Risk of Falling. Use of machine creates wet
areas and trip hazards. Be aware of work area
conditions. A fall could result in death
or serious injury.
(000114)
WARNING
Risk of Falling. Do not use this machine or
any components on elevated surfaces.
Doing so can result in a fall, serious injury,
or death.
Apply Detergent
NOTE: DO NOT use caustic liquid with power
washer. Use ONLY power washer safe
detergents. Follow manufacturer instructions
on detergent label.
Apply detergent as follows:
1. Prepare detergent solution as required by
job.
2. Make sure siphoning tube remains fully
submerged into the detergent.
3. When inserting the siphon into a detergent
solution bottle, route the tube so as to
keep it from inadvertently contacting the
hot muffler.
4. Verify black detergent nozzle is installed.
NOTE: Detergent cannot be applied with highpressure nozzle (Yellow, White, Green or
Red). Only use black nozzle with detergent.
5. Start engine.
6. Firmly grasp spray gun with both hands
when using high-pressure spray to avoid
injury when spray gun kicks back.
7. Apply a high-pressure spray to a small
area and then inspect surface for damage.
If no damage is found, continue to apply
detergent.
8. Apply detergent to a dry surface, start at
lower portion of area to be washed and
work upward using long, even,
overlapping strokes.
IMPORTANT: Flush the detergent siphoning
system after each use. Contact an authorized
dealer or qualified service center with
questions.
Rinsing
1. Remove black detergent nozzle from
lance.
2. Select and install desired high-pressure
nozzle.
3. Point spray gun in safe direction and
squeeze trigger to flush remaining
detergent from system.
4. Keep spray gun a safe distance from area
you plan to spray.
5. Firmly grasp spray gun with both hands
when using high-pressure spray to avoid
injury when spray gun kicks back.
6. Apply a high-pressure spray to a small
area and then inspect surface for damage.
If no damage is found, continue rinsing.
7. Start at top of area to be rinsed, working
down with same overlapping strokes as
used for cleaning.
Clean Detergent Siphoning Tube
Flush detergent siphoning tube after each
use, before stopping the engine.
1. Place detergent siphoning tube/filter in
bucket of clean water.
2. Remove high-pressure nozzle from nozzle
extension.
3. Select and install black detergent nozzle.
4. Flush for 1-2 minutes.
5. Shut engine OFF.
6. Point spray gun in a safe direction,
squeeze spray gun trigger to release
retained high water pressure. Engage
trigger lock.
After Each Use
DO NOT allow water to remain in unit for long
periods of time. Sediments or minerals can
deposit on pump parts and freeze pump.
Follow these procedures after every use:
1. Shut engine OFF.
2. Turn water supply OFF.
3. Point spray gun in a safe direction, and
squeeze trigger to relieve trapped
pressure.
4. Let engine cool.
5. Disconnect hoses from spray gun and
high-pressure outlet on pump. Drain water
from hoses, spray gun, and lance. Use a
rag to wipe off components.
6. Verify engine start switch and fuel valve is
OFF.
7. Pull recoil handle approximately six times
to remove remaining liquid from pump.
8. Store unit in a clean, dry area.
NOTE: If storing for more than 30 days, see
Storage section.
10 Owner’s Manual for Power Washer

Automatic Cool Down System (Thermal Relief)
When power washer runs for 3-5 minutes
without spray gun activation, circulating water
in pump can reach temperatures above 133°F
(56.1 ºC). Thermal relief system engages to
cool pump by discharging warm water onto
ground.
Operation
Owner’s Manual for Power Washer 11
Maintenance and Troubleshooting
Section 4 Maintenance and Troubleshooting
Maintenance
Regular maintenance will improve performance and extend engine/equipment life.
Generac Power Systems, Inc. recommends
that all maintenance work be performed by an
Independent Authorized Service Dealer
(IASD). Regular maintenance, replacement,
or repair of the emissions control devices and
systems may be performed by any repair shop
or person of the owner’s choosing. To obtain
emissions control warranty service free of
charge, the work must be performed by an
IASD. See the emissions warranty.
Power washer warranty does not cover items
subjected to operator abuse or negligence. To
receive full warranty value, operator must
maintain power washer as instructed in this
manual, including proper storage as detailed
in Storage.
NOTE: Call 1-888-GENERAC (1-888-436-
3722) with questions about component
replacement.
NOTE: All required service and adjustments
should be each season, as detailed in
Maintenance Schedule.
Maintenance Schedule
Follow maintenance schedule intervals,
whichever occurs first according to use.
NOTE: Adverse conditions will require more
frequent service.
First 5 Hours
Change engine oil
Every 8 Hours or Daily
Inspect/clean water inlet screen*
Inspect high-pressure hose
Inspect detergent siphoning hose/filter
Inspect spray gun and assembly for leaks
Clean debris
Inspect engine oil level
Inspect pump oil level
Every 50 Hours or Every Season
Check/clean water inlet screen**
Check/clean air filter**
Change pump oil**
Change engine oil**
Inspect muffler and spark arrester*
Every 100 Hours or Every Season
Service spark plug
* Clean if clogged. Replace if perforated or
torn.
** Service more often under dirty or dusty
conditions.
Preventive Maintenance
Dirt or debris can cause improper operation
and equipment damage. Clean power washer
daily or before each use. Keep area around
and behind muffler free from combustible
debris. Inspect all cooling air openings on
power washer.
• Use a damp cloth to wipe exterior surfaces
clean.
• DO NOT insert any objects through cooling
air openings.
• Use a soft bristle brush to loosen caked on
dirt, oil, etc.
• Use a vacuum to pick up loose dirt and
debris.
Inspect and Clean Inlet Screen
Inspect inlet screen on pump water inlet.
Clean clogged screen and replace screen if
damaged.
Inspect High-Pressure Hoses
High-pressure hoses can develop leaks from
wear, kinking, or abuse. Inspect hoses before
each use. Inspect for cuts, leaks, abrasions,
bulging, and damage or movement of
couplings. If these conditions exist, replace
hose immediately.
NOTE: DO NOT repair high-pressure hose.
Replace with hose that meets or exceeds
maximum pressure rating of unit.
Inspect Detergent Siphoning Tube
Inspect filter on detergent tube and clean if
clogged. Tube should fit tightly on barbed
fitting. Examine tube for leaks or tears.
Replace filter or tube if either is damaged.
Inspect Spray Gun
See Figure 4-1.
NOTE: Replace spray gun immediately if it
fails any test steps.
1. Verify spray gun hose connection is
secure.
2. Squeeze and release trigger.
NOTE: Trigger should spring back into place
and lock when released.
12 Owner’s Manual for Power Washer
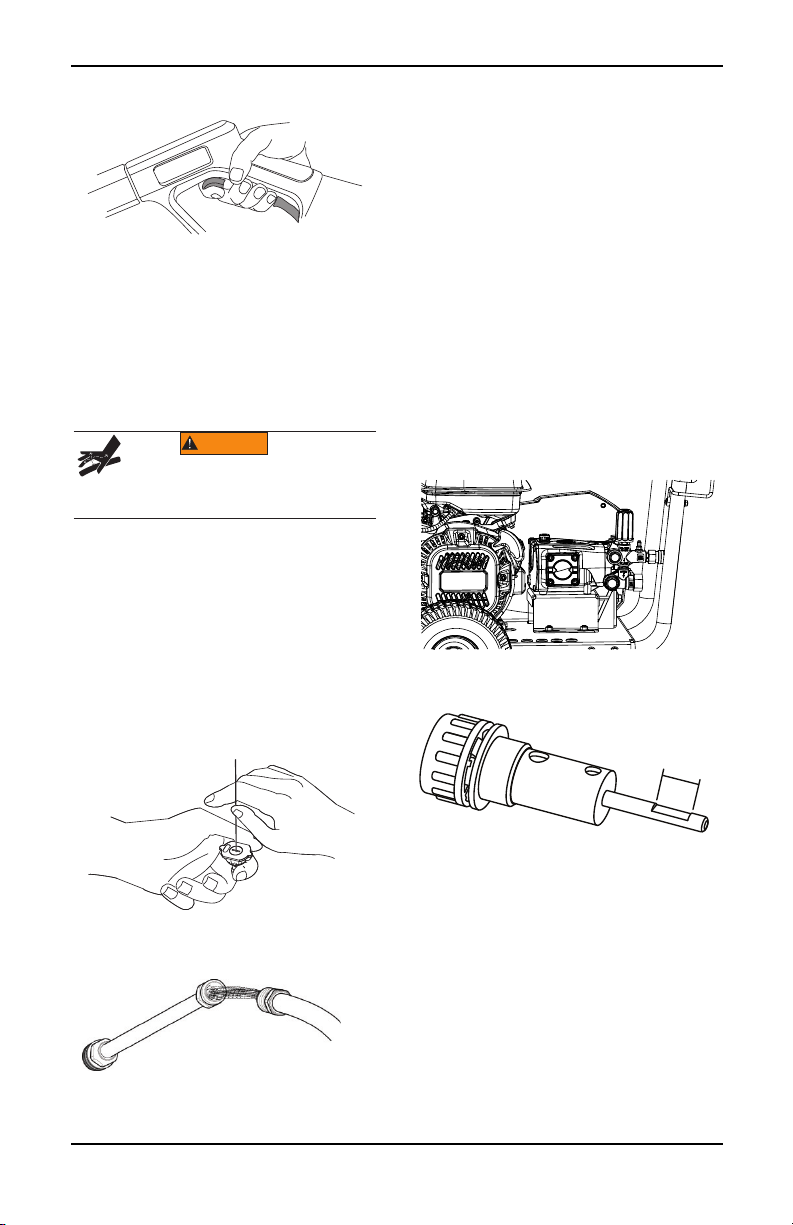
Figure 4-1.Test Spray Gun (typical)
000123
(000106b)
Fluid Injection. This machine produces
high-pressure fluid streams that can pierce
skin. Fluid injection could result in death or
serious injury.
WARNING
000109
000131
000275
000268
Nozzle Maintenance
A pulsing sensation felt when squeezing spray
gun trigger may be caused by excessive
pump pressure. Typical causes of excessive
pump pressure are nozzle clog or restriction.
Immediately clean nozzle as follows:
1. Turn engine and water supply OFF.
NOTE: Keep high-pressure hose connected
to pump and spray gun while system is
pressurized.
2. Relieve spray gun water pressure.
3. Remove nozzle from lance.
4. See Figure 4-2. Use a paper clip to remove
debris.
5. See Figure 4-3. Remove lance from spray
gun and back flush thoroughly.
6. Install nozzle on lance.
7. Install lance on spray gun.
Maintenance and Troubleshooting
8. Verify hose is connected to pump water
inlet, and high-pressure hose is connected
to spray gun and pump.
9. Turn water ON.
10. Start engine.
11. Test power washer by operating with each
quick connect nozzle.
Change Pump Oil
1. Clean area around oil drain plug (Figure 2-
1).
2. Place a small pan under oil drain plug to
catch oil.
3. Remove oil drain plug. Drain oil
completely.
4. Install oil drain plug. Do not over tighten.
5. Clean area around pump oil dipstick.
6. Fill pump with SAE 15W40 non-detergent
oil. Oil level must be within markings on
dipstick (Figure 2-5). Do not overfill.
7. Install oil dipstick until finger tight.
8. Clean up any spilled oil.
Figure 4-4.Drain Pump Oil
Figure 4-5.Pump Oil Dipstick
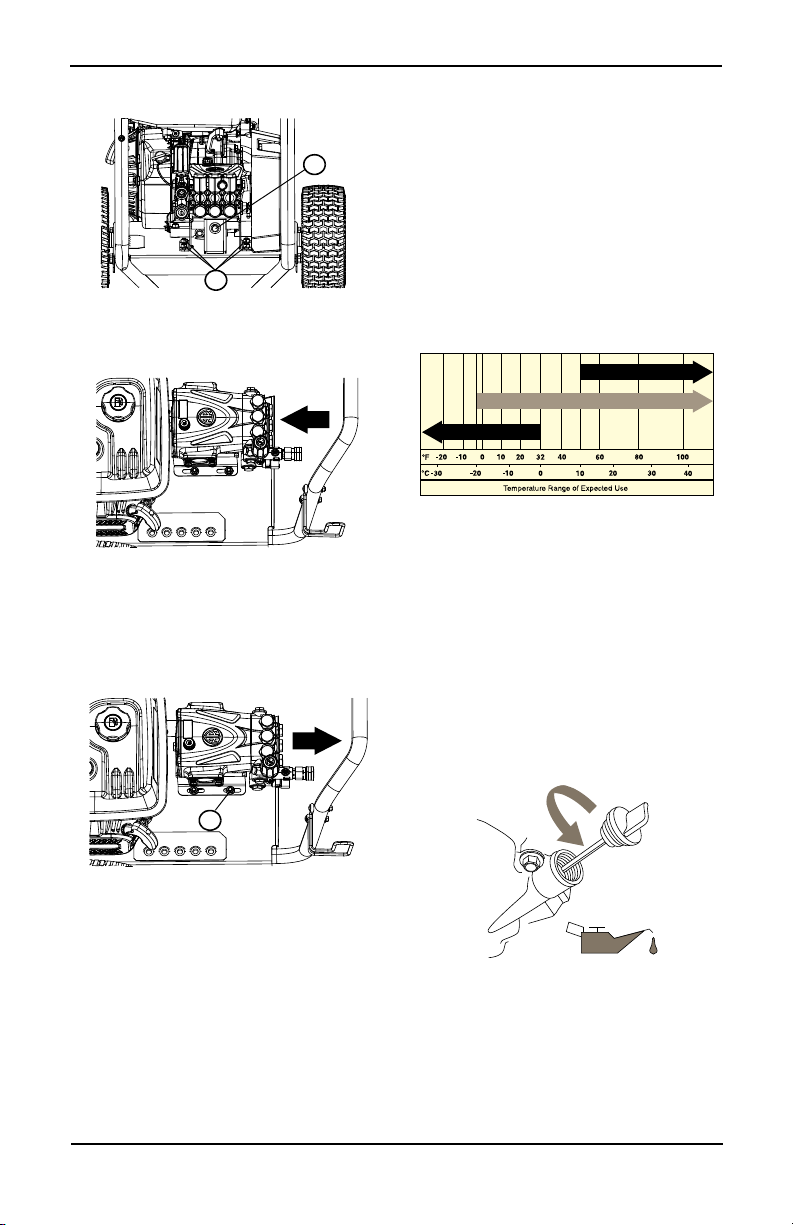
Belt Replacement
Figure 4-2.Remove Debris
Figure 4-3.Back Flush Lance
Owner’s Manual for Power Washer 13
It may be necessary to replace belt if it breaks
or if there is a sudden loss of pressure:
1. Remove belt guard
2. See Figure 4-6. Loosen nuts (A) and
tensioning bolt (B).
Maintenance and Troubleshooting
000272
A
B
000273
000274
A
000130
SAE 30*
5W-30
10W-30**
000115
Figure 4-6.Loosen Nuts
3. Push pump toward engine (Figure 4-7).
Figure 4-7.Push Pump Toward Engine
4. Remove old belt and install new belt.
5. See Figure 4-8 Pull pump away from
engine so bolt is approximately 2/3 of the
way through the pump bracket slot (A).
Tighten bolt.
Engine Maintenance
Engine Oil Recommendations
To maintain the product warranty, the engine
oil should be serviced in accordance with the
recommendations of this manual. For your
convenience, maintenance kits designed and
intended for use on this product are available
from the manufacturer that include engine oil,
oil filter, air filter, spark plug(s), a shop towel
and funnel. These kits can be obtained from
an Independent Authorized Service Dealer
(IASD).
Climate determines proper engine oil
viscosity. See chart to select correct viscosity.
Figure 4-9. Oil Viscosity
* Below 50°F (10°C) use of SAE 30 will result
in hard start.
** Above 80°F (27°C) use of 10W30 may
cause increased oil consumption. Inspect
oil level more frequently.
Inspect Engine Oil Level
Inspect engine oil level prior to each use, or
every 8 hours of operation.
1. Place power washer on a level surface.
2. Clean area around oil fill.
3. See Figure 4-10. Remove oil fill cap and
wipe dipstick clean.
Figure 4-8.Pull Pump Away From Engine
6. Tighten tensioning bolt (B) (page 14). The
pulleys should be aligned within 1° of each
other and the new belt should be
tensioned to ~90.5 lbs. (1/8” deflection
under 8.3 lbs. with a tension gauge).
7. Tighten all four nuts (A) (page 14).
8. Replace belt guard before running unit.
14 Owner’s Manual for Power Washer
Figure 4-10. Engine Oil Fill
4. See Figure 4-11. Screw dipstick into filler
neck.Verify proper oil level on dipstick.
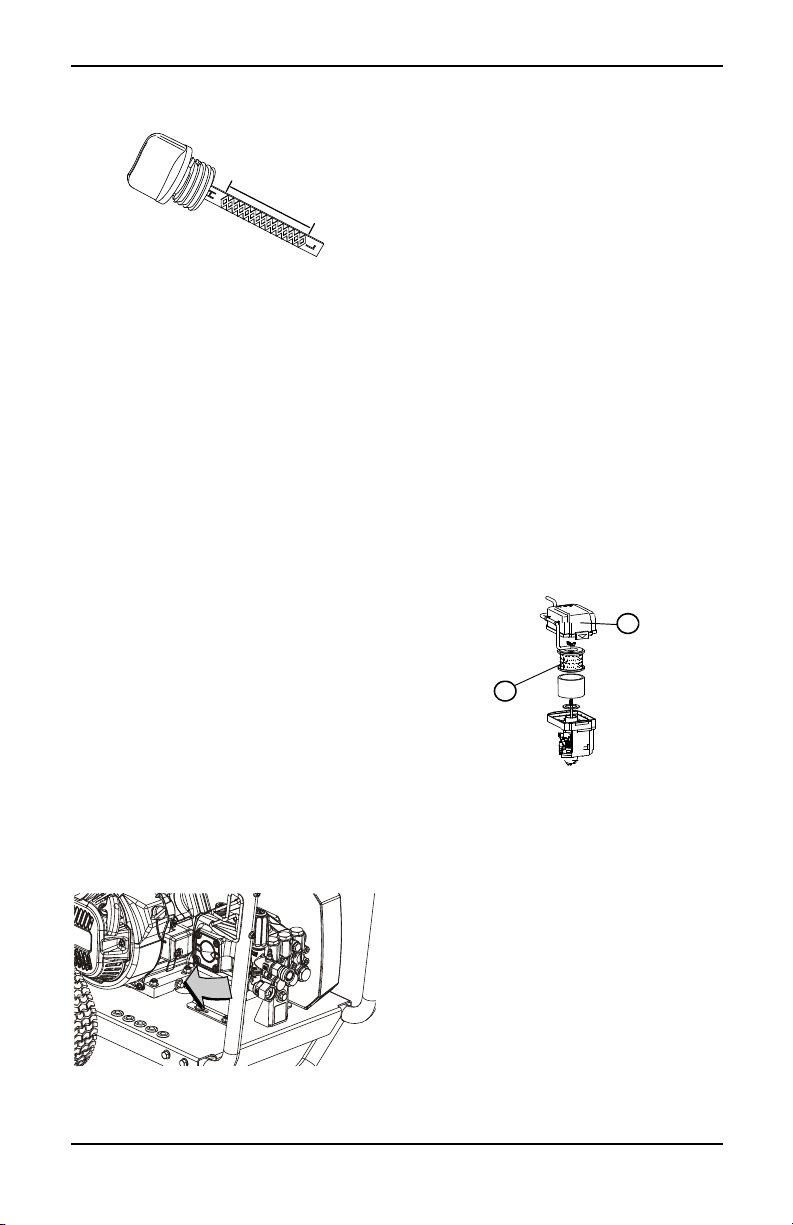
Figure 4-11. Safe Operating Range
000116
000276
000277
A
B
5. Add recommended engine oil as
necessary.
6. Replace oil fill cap and hand-tighten.
NOTE: Some units have more than one oil fill
location. It is only necessary to use one oil fill
point.
Change Engine Oil
When using power washer under extreme,
dirty, dusty conditions, or in extremely hot
weather, change oil more frequently.
NOTE: Don’t pollute. Conserve resources.
Return used oil to collection centers.
Change oil while engine is still warm from
running, as follows:
1. Place power washer on a level surface.
2. Disconnect the spark plug wire from the
spark plug and place the wire where it
cannot contact spark plug.
3. Clean area around oil fill, and oil drain
plug.
4. Remove oil fill cap.
5. See Figure 4-12. Remove oil drain plug (A)
and drain oil completely into a suitable
container.
6. Install oil drain plug and tighten securely.
7. See Figure 4-11. Slowly pour oil into oil fill
opening until oil level is between L and H
marks on dipstick. DO NOT overfill.
8. Install oil fill cap, and finger tighten.
9. Wipe up any spilled oil.
10. Properly dispose of oil in accordance with
all applicable regulations.
Maintenance and Troubleshooting
Air Filter
Engine will not run properly and may be
damaged if run with a dirty air cleaner. Service
air cleaner more frequently in dirty or dusty
conditions.
To service air cleaner:
1. See Figure 4-13. Remove air cleaner cover
(A).
2. Remove filter element(s) (B).
3. Inspect filter element(s) and replace if
damaged. To order replacements, contact
Generac Customer Service at 1-888GENERAC (888-436-3722) for the name
of your nearest IASD.
4. Clean foam filter element in warm soapy
water. Rinse, and allow to dry thoroughly.
Dip in clean engine oil and squeeze out
excess oil.
5. Tap paper filter element several times on
hard surface to remove dirt. Compressed
air (not exceeding 30 psi (207 kPa) can
also be used to blow through filter element
from the inside.
6. Use a clean, damp cloth to wipe dirt from
inside air cleaner cover.
7. Put cleaned or new filter element(s) in
place. Verify gasket is in place (if
equipped).
8. Install air cleaner cover. Tighten air
cleaner screws or fasteners securely.
Figure 4-13.Air Filter Assembly
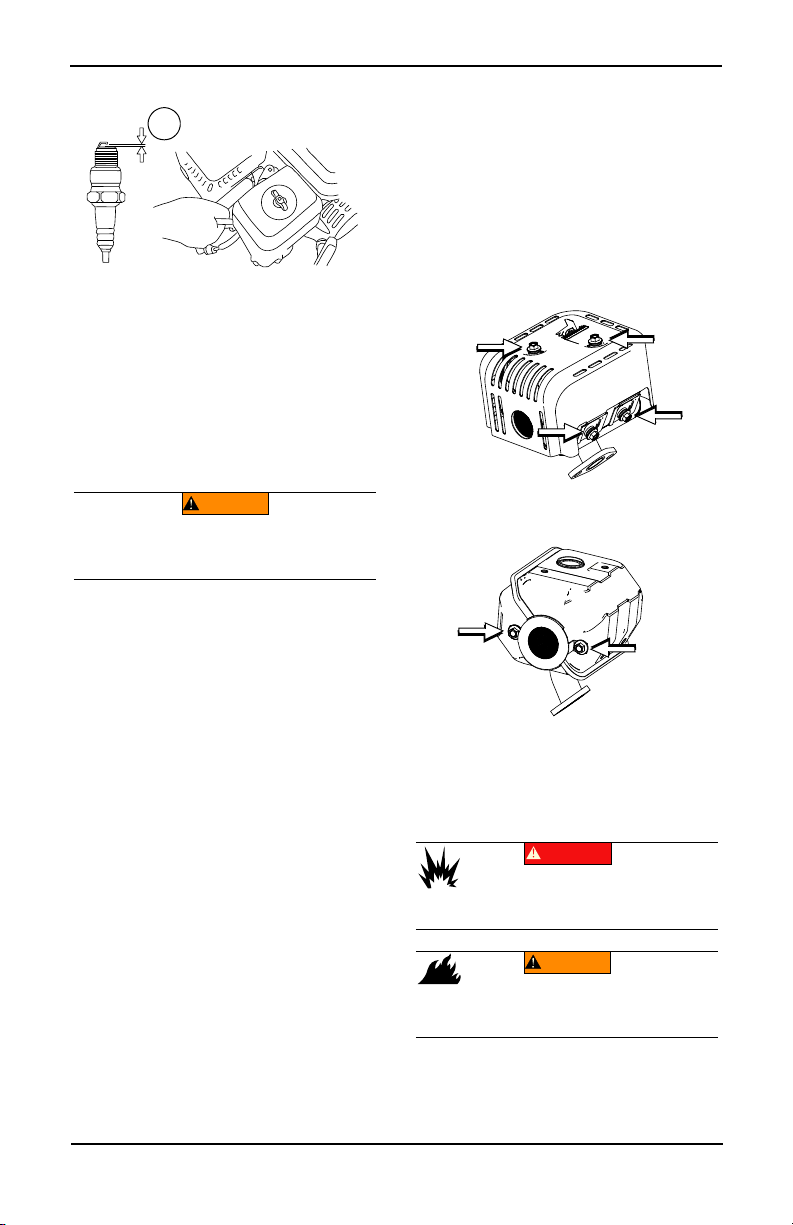
Service Spark Plug
To service spark plug:
1. Clean area around spark plug.
2. Remove and inspect spark plug.
3. See Figure 4-14. Inspect electrode gap
with wire feeler gauge and replace spark
plug if gap (A) is not within specification
listed on Product Specifications Sheet.
Figure 4-12.Oil Drain Plug
Owner’s Manual for Power Washer 15
Maintenance and Troubleshooting
000134a
A
(000102)
WARNING
Accidental Start-up. Disconnect spark plug wire when
working on unit. Failure to do so could result in death
or serious injury.
000135
000136
(000105)
DANGER
Explosion and Fire. Fuel and vapors are
extremely flammable and explosive. Add fuel
in a well ventilated area. Keep fire and spark
away. Failure to do so will result in death
or serious injury.
(000109)
WARNING
Risk of Fire. Verify machine has properly
cooled before installing cover and storing
machine. Hot surfaces could result in fire.
Figure 4-14. Spark Plug
NOTE: Replace spark plug if electrodes are
pitted, burned or porcelain is cracked. Use
ONLY recommended replacement plug. See
Product Specifications Sheet.
4. Install spark plug finger tight, and tighten
an additional 3/8 to 1/2 turn using spark
plug wrench.
Inspect Engine Spark
1. Disconnect spark plug wire from spark
plug.
2. Secure spark plug wire where it cannot
contact spark plug.
3. Test spark plug with approved spark plug
tester.
NOTE: DO NOT inspect for spark with spark
plug removed.
Inspect Muffler And Spark Arrestor
NOTE:
It is a violation of California Public
Resource Code, Section 4442, to use or
operate the engine on any forest-covered,
brush-covered, or grass-covered land unless
the exhaust system is equipped with a spark
arrestor, as defined in Section 4442, maintained
in effective working order. Other states or
federal jurisdictions may have similar laws.
NOTE: Call 1-888-GENERAC (1-888-436-
3722) with questions about component
replacement.
NOTE: Use ONLY original equipment
replacement parts.
Inspect muffler for cracks, corrosion, or other
damage. Remove spark arrestor, if equipped,
inspect for damage or carbon blockage. If
replacement parts are required.
16 Owner’s Manual for Power Washer
Inspect Spark Arrestor Screen
(if equipped)
1. Loosen fasteners and remove heat shield
from muffler. See Figure 4-15.
2. Loosen fasteners and remove spark
arrester from muffler. See Figure 4-16.
3. Inspect spark arrester. Replace if torn,
perforated or otherwise damaged (part
number 0K1851).
4. If screen is not damaged, clean it with a
commercial solvent and replace.
Figure 4-15.Heat Shield Fasteners
Figure 4-16.Spark Arrestor Fasteners
Storage
General
• DO NOT place a storage cover on a hot
power washer. Allow unit to cool to room
temperature before storage.
• DO NOT store fuel from one season to
another unless properly treated.

Maintenance and Troubleshooting
• Replace fuel container if rust is present.
Rust in fuel will cause fuel system
problems.
• Cover unit with a suitable protective,
moisture resistant cover.
• Store unit in a clean and dry area.
• Always store power washers and fuel away
from heat and ignition sources.
Winter Storage
NOTE: If pump saver is not available, connect
a 3-foot section of garden hose to water inlet
adapter. Pour RV-antifreeze (antifreeze
without alcohol) into hose. Pull recoil handle
twice. Disconnect 3-foot hose.
• Store unit in a clean and dry area.
NOTE: If not using power washer for more
than 30 days, prepare engine and pump for
storage.
Prepare Fuel System for Storage
Fuel stored over 30 days can go bad and
damage fuel system components. Keep fuel
fresh, use fuel stabilizer.
If fuel stabilizer is added to fuel system,
prepare and run engine according to Power
Washer Start-Up. Run engine for 2 minutes to
circulate stabilizer throughout fuel system.
Adequately prepared fuel can be stored up to
24 months.
NOTE: If fuel has not been treated with fuel
stabilizer, it must be drained into an approved
container. Run engine until it stops from lack
of fuel. Use of fuel stabilizer in fuel storage
container is recommended to keep fuel fresh.
Protect unit from freezing temperatures as
follows:
1. Shut engine OFF.
2. Turn fuel valve to OFF.
3. Turn water supply OFF.
4. Point spray gun in a safe direction, and
squeeze trigger to relieve trapped
pressure.
5. Let engine cool.
6. Disconnect hoses from spray gun and
high-pressure outlet on pump. Drain water
from hoses, spray gun, and lance. Use a
rag to wipe off components.
7. Empty pump of all remaining liquids.
8. Pull recoil handle approximately six times
to remove remaining liquid from pump.
9. Winterize pump with Generac Pump
Shield™ (P/N 0L2414). This minimizes
freeze damage and lubricates pistons and
seals.
NOTE: If Generac Pump Shield™ is not
available, connect a 3 ft (1 m) section of
garden hose to water inlet adapter. Pour RVantifreeze (alcohol free antifreeze) into hose.
Pull recoil handle twice. Disconnect hose.
10. Store unit in a clean and dry area.
Prepare Engine for Storage
1. Change engine oil.
2. Remove spark plug.
3. Pour a tablespoon (5-10cc) of clean
engine oil or spray a suitable fogging
agent into cylinder.
4. Pull starter recoil several times to
distribute oil in cylinder.
5. Install spark plug.
6. Pull recoil slowly until resistance is felt.
This will close valves so moisture cannot
enter engine cylinder. Gently release
recoil.
Change Oil
Change engine oil before storage. See
Change Engine Oil.
Prepare Pump for Storage
NOTE: If not using power washer for more
than 30 days, prepare engine and pump for
storage.
Protect unit from freezing temperatures.
Failure to do so will permanently damage
pump and render unit inoperable. Freeze
damage is not covered under warranty.
Owner’s Manual for Power Washer 17

Maintenance and Troubleshooting
Troubleshooting
PROBLEM CAUSE CORRECTION
Pump fails to produce
pressure, has erratic pressure,
chattering, loss of pressure,
low water volume.
Detergent fails to mix with
spray.
Engine runs well at no-load,
but bogs when load is applied.
Engine will not start, or starts
and runs rough.
Engine shuts down during
operation/
Engine lacks power. 1. Dirty air filter. 1. Replace air filter.
1. Low pressure nozzle
installed.
2. Water inlet is obstructed.
3. Inadequate water supply.
4. Inlet hose kinked or
leaking.
5. Clogged hose inlet screen.
6. Water supply is over 100 ºF
(37.8 ºC).
7. High-pressure hose is
obstructed, or leaks.
8. Spray gun leaks.
9. Nozzle is obstructed.
10. Pump is faulty.
11. B elt is wor n
1. Detergent siphoning tube is
not submerged.
2. Detergent siphoning tube/
filter is obstructed or
cracked.
3. High-pressure nozzle
installed.
1. Engine speed too low. 1. Contact authorized
1. Low oil level, “Oil Alert
System”.
2. Dirty air filter.
3. Out of fuel
4. Stale fuel.
5. Spark plug wire not
connected to plug.
6. Bad spark plug.
7. Water in fuel.
8. Excessively rich fuel
mixture.
9. Engine switch OFF.
1. Out of fuel. 1. Fill fuel tank.
1. Replace with high-pressure
nozzle.
2. Clean inlet.
3. Provide adequate water
flow.
4. Straighten inlet hose, patch
leak.
5. Inspect and clean inlet
hose screen.
6. Provide cooler water
supply.
7. Clear obstructions or
replace hose.
8. Replace spray gun.
9. Clean nozzle.
10. Contact authorized
servicing dealer.
11. Contact local service
facility to replace belt
1. 1. Insert detergent
siphoning tube into
detergent.
2. Clean or replace filter/
detergent siphoning tube.
3. Install low-pressure nozzle.
servicing dealer.
1. Fill crankcase to proper
level.
2. Clean or replace air filter.
3. Fill fuel tank.
4. Replace with fresh fuel.
5. Connect wire to spark plug.
6. Replace spark plug.
7. Drain fuel tank, replace
with fresh fuel.
8. Contact authorized
servicing dealer.
9. Turn engine switch ON.
18 Owner’s Manual for Power Washer

Notes
Owner’s Manual for Power Washer 19

20 Owner’s Manual for Power Washer


Part No. 0L1528 Rev. C 09/20/2018 ©2018 Generac Power Systems, Inc. All rights reserved Specifications are subject to change without notice. No reproduction allowed in any form without prior written consent from Generac Power Systems, Inc.
Generac Power Systems, Inc.
S45 W29290 Hwy. 59
1-888-GENERAC (1-888-436-3722)
Waukesha, WI 53189
www.generac.com/pro

Lavadora a presión
Manual del operador
000263
MODELO: ________________________
SERIE: __________________________
FECHA DE COMPRA: ______________
Registre su producto Generac en:
register.generac.com
1-888-922-8482
Operator’s Manual for Power Washer i
GUARDE ESTE MANUAL PARA REFERENCIA EN EL FUTURO

Índice de contenidos
Ñ
Sección 1 Introducción y seguridad
1
Introducción .................................... 1
Reglas de seguridad ....................... 1
Símbolos de seguridad y significado 2
Sección 2 Información general y
configuración ................................3
Conozca su lavadora a presión ....... 3
Información sobre emisiones ..........3
Retiro del contenido de la caja ........ 4
Armado ........................................... 4
Añadir aceite de motor .................... 5
Comprobar el aceite de la bomba ... 5
Combustible .................................... 6
Suministro de agua ......................... 6
Conexión del suministro
de agua ........................................... 6
Conexión de la manguera y la lanza de
alta presión ..................................... 7
Pistola de pulverización .................. 7
Cómo usar las boquillas .................. 7
Sección 3 Funcionamiento ...........9
Preguntas sobre uso y funcionamiento
9
Antes de poner en marcha
el motor ............................................9
Preparación de la lavadora a presión
para el uso .......................................9
Aplicación de detergente ...............11
Enjuague .......................................12
Limpieza del tubo de sifón para deter-
gente ..............................................12
Sistema de enfriamiento automático
(Alivio térmico) ...............................12
Sección 4 Mantenimiento y solución
de problemas ...............................13
Mantenimiento ...............................13
Programa de mantenimiento .........13
Mantenimiento preventivo .............13
Mantenimiento del motor ...............16
Mantenimiento de la bujía .............17
Almacenamiento ............................18
Resolución de problemas ..............20
ADVERTENCIA
PRODUCE CÁNCER Y
OS REPRODUCTIVOS
DA
www.P65Warnings.ca.gov.
(000393a)

Sección 1 Introducción y seguridad
(000100a)
ADVERTENCIA
Consulte el manual. Lea y comprenda
completamente el manual antes de usar el
producto. No comprender completamente el
manual puede provocar la muerte o lesiones
graves.
(000001)
PELIGRO
Indica una situación peligrosa que, si no se evita, ocasionará la
muerte o lesiones graves.
(000002)
ADVERTENCIA
Indica una situación peligrosa que, si no se evita, podría
ocasionar la muerte o lesiones graves.
PRECAUCIÓN
Indica una situación de riesgo que, si no se evita, puede
producir lesiones leves o moderadas.
(000003)
Introducción y seguridad
Introducción
Muchas gracias por comprar un producto de
Generac Power Systems Inc. Esta unidad ha
sido diseñada para brindar alto rendimiento,
funcionamiento eficiente, y años de uso si se
mantiene apropiadamente.
Si no se comprende alguna parte de este
manual, comuníquese con el concesionario
autorizado independiente (IASD) más cercano
o comuníquese con Servicio al cliente de
Generac llamando al 1-888-GENERAC (1-888436-3722), o visite http://www.generac.com/
para todas las preguntas o inquietudes que
puedan surgir.
El propietario es responsable del mantenimiento apropiado y del uso seguro del equipo.
Antes de operar, poner en funcionamiento o
almacenar esta lavadora a presión:
• Estudie atentamente todas las
advertencias indicadas en este manual y
en el producto.
• Familiarícese con este manual y la unidad
antes del uso.
• Consulte la sección Armado del manual
para obtener las instrucciones sobre los
procedimientos de armado finales. Siga las
instrucciones completamente.
Guarde estas instrucciones para referencia en
el futuro. SIEMPRE suministre este manual a
la persona que va a usar esta máquina.
La información que aparece en este manual
es precisa y está basada en productos fabricados en el momento en el que se editó esta
publicación. El fabricante se reserva el
derecho de hacer las actualizaciones
técnicas, las correcciones y las revisiones de
los productos que considere necesarias sin
previo aviso.
Reglas de seguridad
El fabricante no puede prever todas las
circunstancias probables que podrían
involucrar un peligro. Las advertencias de
este manual y los rótulos y etiquetas
adhesivas fijados en la unidad, por lo tanto, no
incluye todas las reglas de seguridad. Si usa
un procedimiento, método de trabajo o técnica
de funcionamiento que el fabricante no
recomienda específicamente, verifique que
sea seguro para los demás. Asegúrese
también de que el procedimiento, método de
trabajo o técnica de funcionamiento utilizado
no convierta el funcionamiento del equipo en
inseguro.
En toda esta publicación, en los rótulos y en
las etiquetas adhesivas fijadas en la lavadora
a presión, los bloques de PELIGRO, ADVERTENCIA, PRECAUCIÓN y NOTA se usan
para alertar al personal sobre instrucciones
especiales acerca de una determinada
operación que puede ser peligrosa si se
efectúa de manera incorrecta o imprudente.
Respételos cuidadosamente. Sus definiciones
son las siguientes:
Manual del propietario de la lavadora a presión 1
NOTA: Las Notas contienen información adicional importante para un procedimiento y se
encuentran dentro del texto de este manual.
Estas advertencias de seguridad no pueden
eliminar los peligros que indican. El sentido
común y el cumplimiento estricto de las
instrucciones especiales mientras se
desarrolla la acción o el mantenimiento son
esenciales para la prevención de accidentes.

Introducción y seguridad
Asfixia. Los motores funcionando producen
monóxido de carbono, un gas incoloro, inodoro, y
venenoso. El monóxido de carbono, si no se evita,
ocasionará la muerte o lesiones graves.
(000103)
PELIGRO
(000104)
PELIGRO
Electrocución. Si no se evita el contacto del
agua con una fuente de alimentación,
ocasionará la muerte o lesiones graves.
(000105)
PELIGRO
Explosión e incendio. El combustible y los vapores son
extremadamente inflamables y explosivos. Añada
combustible en una zona bien ventilada. Mantenga
alejados el fuego y las chispas. No hacerlo puede
ocasionar la muerte o lesiones graves.
ADVERTENCIA
Inyección de líquido a presión. Esta máquina genera
flujos de líquido a alta presión que pueden penetrar
en la piel. El líquido a presión, si penetra en la piel,
puede ocasionar la muerte o lesiones graves.
(000106b)
(000110)
ADVERTENCIA
Riesgo de incendio. Las superfcies calientes
pueden encender combustibles, produciendo un
incendio. El incendio puede ocasionar la muerte
o lesiones graves.
(000101)
ADVERTENCIA
Pérdida de visión. Se requiere el uso de gafas de
seguridad al usar esta máquina. No usar gafas de
seguridad puede ocasionar pérdida de visión
permanente.
(000107)
ADVERTENCIA
Pérdida auditiva. Recomendamos protectores de
oído al usar esta máquina. No usar protectores de
oído puede ocasionar pérdida auditiva permanente.
(000108)
ADVERTENCIA
Superfcies calientes. Al usar la máquina, no toque
las superfcies calientes. Mantenga la máquina
alejada de los combustibles durante el uso. Las
superfcies calientes pueden ocasionar quemaduras
graves o incendio.
(000109)
ADVERTENCIA
Riesgo de incendio. Verifque que la máquina se
haya enfriado apropiadamente antes de instalar una
cubierta y almacenar la máquina. Las superfcies
calientes pueden ocasionar un incendio.
Piezas en movimiento. Mantenga la ropa, cabello,
y extremidades alejados de las piezas en
movimiento. No hacerlo puede ocasionar la
muerte o lesiones graves.
(000111)
ADVERTENCIA
(000112)
ADVERTENCIA
Riesgo de caídas. El uso de la máquina crea zonas
mojadas y riesgos de disparo. Esté atento a las
condiciones de la zona de trabajo. Una caída
puede ocasionar la muerte o lesiones graves.
(000114)
ADVERTENCIA
Riesgo de caídas. No use esta máquina o
cualquiera de sus componentes en superficies
elevadas. Hacerlo puede ocasionar una caída,
lesiones graves o la muerte.
(000113)
ADVERTENCIA
Riesgo de la cuerda de arranque. La cuerda de
arranque se puede retraer inesperadamente si la presión
de agua no se alivió de la bomba apropiadamente,
creando un contragolpe. El contragolpe puede
ocasionar la muerte o lesiones graves.
(000100a)
ADVERTENCIA
Consulte el manual. Lea y comprenda
completamente el manual antes de usar el
producto. No comprender completamente el
manual puede provocar la muerte o lesiones
graves.
(000115)
ADVERTENCIA
Piezas en movimiento. No use alhajas cuando ponga
en marcha o trabaje con este producto. Usar alhajas
al poner en marcha o trabajar con este producto
puede ocasionar la muerte o lesiones graves.
ADVERTENCIA
Peligro ambiental. Siempre recicle las baterías en un
centro de reciclado oficial de acuerdo con todas las leyes
y reglamentos locales. No hacerlo puede ocasionar daños
ambientales, la muerte o lesiones graves.
(000228)
(000244)
ADVERTENCIA
Lesiones/Daños al equipo. Coloque la varilla en el
portador y verifique que el asa esté trabada en su
lugar antes de mover. No hacerlo puede ocasionar la
muerte, lesiones graves y daños al equipo.
Símbolos de seguridad y significado
2 Manual del propietario de la lavadora a presión
ADVERTENCIA
Lesiones personales. Riesgo de penetración de líquidos.
No apunte con la pistola pulverizadora a personas,
animales, dispositivos eléctricos o artículos frágiles.
Mantenga la máquina fuera del alcance de los niños.
En caso de no hacerlo, podría causar la muerte o
lesiones graves.
(000117c)

Sección 2 Información general y configuración
000264
Å
B
C
D
E
F
G
I
J
L
M
N
O
P
R
S
T
U
U
H
K
(000100a)
ADVERTENCIA
Consulte el manual. Lea y comprenda
completamente el manual antes de usar el
producto. No comprender completamente el
manual puede provocar la muerte o lesiones
graves.
Tabla 2-1. Componentes de la lavadora a
presión
Å Pistola de pulverización
B Lanza con conector rápido
C Manguera de alta presión
D Cuerda de arranque
E Llenado de aceite
F Filtro de aire
G Bomba de alta presión
H Válvula de alivio térmico
I Interruptor encendido/apagado del motor
J Válvula del descargador
K Salida de alta presión
L Entrada de agua
M Tanque de combustible
Válvula de encendido/apagado del
N
combustible
O Cebador
PCorrea
R Boquillas
S Asa lateral ajustable
T Tapón por vaciado de aceite
U Ubicación del número de serie
*
*
Manual del propietario de la lavadora a presión 3
Etiqueta de identificación (no se muestra) -
ubicada en la carcasa del ventilador del
motor
Filtro/Tubo del sifón del detergente (no se
muestra)
Figura 2-1. Controles y funciones
Conozca su lavadora a presión
Lea este manual detenidamente antes de
armar y poner en funcionamiento esta unidad.
Guarde este manual para referencia
inmediata y en el futuro. Los manuales del
propietario de repuesto están disponibles en
www.generac.com.
Información sobre emisiones
La Agencia de Protección Ambiental (EPA) de
los EE. UU. (y la Junta de Recursos del Aire
de California [CARB] para los equipos
certificados conforme a las normas de
California) requiere(n) que este motor cumpla
las normativas sobre el escape de gases y
emisiones por evaporación. Ubique en el
motor la etiqueta adhesiva sobre
cumplimiento de las normas referidas a
emisiones para determinar las normativas que
cumple el motor, y para determinar las
emisiones que incluye la garantía. El motor
está certificado de acuerdo con las normas de
emisiones de gasolina aplicables. Es
importante seguir las especificaciones sobre
mantenimiento en la sección Mantenimiento
para asegurarse de que el motor cumple con
las normas de emisiones aplicables durante la
vida útil del producto. Este motor utiliza un
ajuste de carburación pobre y otros sistemas
para reducir las emisiones. Manipular o alterar
el sistema de control de emisiones puede
aumentar el nivel de emisiones y podría
constituir una infracción de la Ley Federal o
de California. Los actos que constituyen
manipulación incluyen, aunque no se limitan
a, los que se especifican a continuación:

• Supresión o alteración de cualquiera de las
(000100a)
ADVERTENCIA
Consulte el manual. Lea y comprenda
completamente el manual antes de usar el
producto. No comprender completamente el
manual puede provocar la muerte o lesiones
graves.
000265
000266
piezas de los sistemas de entrada de aire,
combustible o sistema de escape de
gases.
• Alterar o interferir en el acoplamiento del
regulador o el mecanismo de ajuste de
velocidad para hacer que el motor funcione
fuera de los parámetros de diseño.
El motor debe ser inspeccionado o reparado
por un distribuidor de servicio si se presentan
los siguientes síntomas:
• Problemas de arranque o atasco tras el
arranque
• Ralentí brusco
• Fallos de encendido o detonaciones bajo
carga
• Postcombustión (detonaciones)
• Formación de humo de escape negro o
alto consumo de combustible
NOTA: El mantenimiento, la sustitución o
reparación de los dispositivos y sistemas de
control de emisiones puede ser llevada a
cabo por una persona o por un
establecimiento pequeño de reparación de
motores. Para que puedan ser cubiertos por
la garantía, todos los trabajos de
mantenimiento de control de emisiones deben
ser llevados a cabo por un distribuidor
autorizado por fábrica. Consulte la garantía de
emisiones para obtener información más
detallada.
Retiro del contenido de la caja
1. Abra la caja completamente cortando
cada esquina de arriba abajo.
2. Retire y verifique el contenido de la caja
antes del armado. La caja debe contener
uno de cada uno de los siguientes
componentes:
• Unidad principal
• Manguera de alta presión
• Manguera y filtro del sifón
• Pistola de pulverización
• Lanza con conector rápido
• Botella de aceite
• Bolsa de piezas
– Manual del propietario
– Tarjeta de registro del cliente
– Bolsa con boquillas de colores
3. Llame al Servicio al cliente de Generac al
1-888-436-3722 con el número de modelo
y número de serie de la unidad para
cualquier artículo que falte en la caja.
4. Registre el modelo, el número de serie y la
fecha de compra en la tapa de este
manual.
Armado
Llame al servicio al cliente de Generac al 1888-436-3722 para comunicar cualquier
problema o duda referente el armado. Tenga
disponible a mano el modelo y el número de
serie.
1. Inserte las boquillas de colores en los
espacios que se proporcionan (Figura 2-2).
Figura 2-2. Insertar boquillas (el número
2. Coloque la pistola de pulverización y la
extensión de la boquilla en el soporte de la
pistola de pulverización.
3. Consulte la Figura 2-3. Conecte el tubo de
sifón.
Figura 2-3. Ubicación del tubo de sifón
puede variar)
4 Manual del propietario de la lavadora a presión

Añadir aceite de motor
000115
000116
000267
000268
1. Coloque la lavadora a presión en una
superficie plana y nivelada.
2. Limpie la zona de llenado y retire el tapón/
varilla de medición de llenado de aceite de
color naranja (Figura 2-4).
Comprobar el aceite de la bomba
1. Coloque la lavadora a presión en una
superficie plana y nivelada.
2. Limpie la zona de llenado de aceite y retire
la varilla/tapón venteado (Figura 2-1).
Figura 2-4. Añadir aceite de motor
3. Con un embudo (opcional), eche el aceite
en la abertura de llenado de aceite.
Consulte Recomendaciones sobre el
aceite de motor.
NOTA: Algunas unidades tienen más de una
ubicación de llenado de aceite. En estos
casos, solo es necesario usar uno de los
puntos de llenado de aceite.
4. Compruebe de vez en cuando hasta que
el nivel de aceite esté ente la “L” y la “H”
de la varilla (Figura 2-5). No lo llene en
exceso.
NOTA: Cualquier intento de arrancar o girar el
motor antes de que se haya puesto a punto
con el aceite recomendado puede causar una
falla en el motor.
5. Instale la tapa de llenado/varilla de
medición y apriete con la mano.
Figura 2-5. Rango de funcionamiento
seguro
Figura 2-6. Comprobar el aceite de la
3. Compruebe que el nivel de aceite se
encuentra dentro de las marcas de la
varilla de medición (Figura 2-5). Si es
necesario añadir aceite, consulte la
sección Mantenimiento. NO LO LLENE
EN EXCESO.
4. Consulte Mantenimiento preventivo para
obtener información adicional.
5. Coloque la varilla de medición de aceite
hasta que quede bien apretada.
6. Limpie el aceite que haya podido quedar
derramada.
Figura 2-7. Va rilla d e medici ón de aceite d e
bomba
la bomba
Manual del propietario de la lavadora a presión 5

Combustible
(000105)
PELIGRO
Explosión e incendio. El combustible y los vapores son
extremadamente inflamables y explosivos. Añada
combustible en una zona bien ventilada. Mantenga
alejados el fuego y las chispas. No hacerlo puede
ocasionar la muerte o lesiones graves.
000117
000270
Å
B
Los requisitos para el combustible son los
siguientes:
• Gasolina limpia, fresca y sin plomo.
• Calificación mínima de 87 octanos/87 AKI
(91 RON).
• Es aceptable hasta un 10 % de etanol
(gasohol).
• NO use E85.
• NO use una mezcla de gasóleo.
• NO modifique el motor para que funcione
con combustibles alternativos. Añada un
estabilizador de combustible antes de
almacenarlo.
1. Verifique que la unidad esté APAGADA y
que se enfríe durante un mínimo de dos
minutos antes de volver a echar
combustible.
2. Coloque la unidad en terreno nivelado en
una zona bien ventilada.
3. Limpie la zona alrededor de la tapa de
combustible y retire la tapa lentamente.
4. Añada lentamente el combustible
recomendado. No lo llene en exceso.
Suministro de agua
NOTA: NO haga funcionar la unidad sin un
suministro de agua suficiente. No respetar los
requisitos de suministro de agua anulará la
garantía de la unidad.
El suministro de agua debe cumplir los
siguientes requisitos:
• NO haga sifón con agua estancada para el
suministro de agua.
• La temperatura del agua debe ser inferior a
100 ºF (38 ºC).
• El largo de la manguera de suministro de
agua no debe superar los 50 pies (15,2 m).
• El agua debe superar 3,8 galones por
minuto (17,3 litros por minuto) y no estar
por debajo de 30 psi (206,8 kPa).
• NO use una válvula de una vía, rompedor
de vacío, o válvula de retención en ninguna
parte del suministro de agua.
Conexión del suministro de agua
1. Retire y deseche la tapa de transporte de
la entrada de agua a la bomba.
2. Haga correr agua durante 30 segundos
antes de la conexión para eliminar
residuos.
3. Consulte la Figura 2-9. Inspeccione el
tamiz de entrada (A) para comprobar si
hay residuos. Limpie o sustituya el tamiz
según sea necesario. NO haga funcionar
la lavadora a presión si falta el tamiz de
entrada o está dañado.
Figura 2-8. Añadir el combustible
5. Instale la tapa de combustible.
NOTA: Permita que el combustible derramado
se evapore antes de poner en marcha la
unidad.
6 Manual del propietario de la lavadora a presión
recomendado
Figura 2-9. Conexión del suministro
4. Conecte la manguera de suministro de
agua a la entrada de agua de la bomba
(A) y apriete con la mano.
5. Conecte la manguera de alta presión a la
bomba (B).
de agua

Conexión de la manguera y la
000120
000269
000123
000125
lanza de alta presión
1. Consulte la Figura 2-10. Conecte la lanza
en la pistola de pulverización y apriete con
la mano.
Figura 2-10. Conexión de la lanza
2. Consulte la Figura 2-11. Conecte la lanza
en la pistola de pulverización y apriete con
la mano.
3. Conecte el agua y apriete el gatillo para
purgar de aire el sistema de la bomba.
4. Verifique que la pistola de pulverización
esté en OFF con el seguro enganchado
antes de poner en marcha la lavadora a
presión.
Cómo usar las boquillas
1. Consulte la guía de selección de boquillas
y seleccione la boquilla correcta para cada
tarea.
2. Consulte la Figura 2-13. Tire hacia atrás
del collar de conexión rápida e instale la
boquilla.
Figura 2-13. Insertar boquilla
3. Libere el collar de conexión rápida para
fijar la boquilla.
4. Verifique que la boquilla esté bloqueada
en su lugar.
Figura 2-11. Conexión de la manguera y la
lanza de alta presión
Pistola de pulverización
Familiarícese con el disparador y el sistema
de seguro de la pistola de pulverización antes
del uso.
Consulte la Figura 2-12. Con la unidad
apagada sostenga la pistola de pulverización
y apriete el gatillo para aprender como se
puede activar y desactivar el mecanismo del
gatillo y el sistema de seguro.
Figura 2-12. Pistola de pulverización
Manual del propietario de la lavadora a presión 7
(típica)

Guía para selección de la boquilla
Boquilla de
presión de
chorro fuerte
(Roja)
Boquilla de
presión para
franjas
(Amarilla)
Boquilla de
presión para
limpieza
(Verde)
Boquilla de
presión para
lavado
(Blanca)
Boquilla para
detergente
(Negra)
MÁXIMA - Presión más alta y caudal más bajo para superficies resistentes o difíciles de alcanzar
como las de segundo piso, remoción de pintura, manchas de aceite, remoción de óxido, y otras
sustancias resistentes (alquitrán, caucho, grasa, cera, etc.).
MEDIA - Presión más alta y caudal medio para quitar manchas en superficies duras porosas como
aceras de concreto, pisos de garaje y patios de ladrillo.
GENERAL - Presión y caudal medios para la mayor parte de la limpieza de propósitos múltiples como
los revestimientos de casas, patios de ladrillo, plataformas de madera, aceras y veredas, pisos de
garaje, etc.
DELICADO - Presión más baja y caudal más alto para limpieza suave de automóviles/camionetas,
botes, vehículos recreativos, muebles de patio, equipos de jardinería, etc.
ÚNICAMENTE DETERGENTE (NEGRA) - Use detergentes/jabones seguros para la hidrolavadora para
ayudar a disgregar suciedad o mugre resistente sobre diferentes superficies.
000245
Manual del propietario de la lavadora a presión 8

Funcionamiento
Asfixia. Los motores funcionando producen
monóxido de carbono, un gas incoloro, inodoro, y
venenoso. El monóxido de carbono, si no se evita,
ocasionará la muerte o lesiones graves.
(000103)
PELIGRO
(000110)
ADVERTENCIA
Riesgo de incendio. Las superfcies calientes
pueden encender combustibles, produciendo un
incendio. El incendio puede ocasionar la muerte
o lesiones graves.
(000108)
ADVERTENCIA
Superfcies calientes. Al usar la máquina, no toque
las superfcies calientes. Mantenga la máquina
alejada de los combustibles durante el uso. Las
superfcies calientes pueden ocasionar quemaduras
graves o incendio.
000271
Sección 3 Funcionamiento
Preguntas sobre uso y funcionamiento
Llame al Servicio al cliente de Generac al
1-888-436-3722 con las preguntas o dudas
acerca del funcionamiento y mantenimiento
de la unidad.
Antes de poner en marcha el motor
1. Verifique si el nivel de aceite de motor es
correcto.
2. Verifique si el nivel de combustible nuevo
es correcto.
3. Verifique que todos los adaptadores de
conexión y acopladores estén fijados con
seguridad.
4. Verifique que hay suficiente suministro de
agua y que está conectado
correctamente.
5. Verifique si la unidad está fija sobre
terreno nivelado, con separación
adecuada y en una zona bien ventilada.
Preparación de la lavadora a presión para el uso
1. Coloque la unidad sobre terreno nivelado,
dentro de la separación especificada
requerida.
2. Conecte el suministro de agua apropiado.
Emplazamiento de la lavadora a
presión para el uso
Es una violación del California Public
Resources Code (Código de recursos
públicos de California), Sección 4442, usar u
operar el motor en tierras cubiertas de
bosque, maleza o pasto excepto si el sistema
de escape tiene un supresor de chispas,
como se define en la Sección 4442, y éste
está mantenido en condiciones de trabajo
eficaces. Otros estados o jurisdicciones
federales pueden tener leyes similares.
Accione la lavadora a presión únicamente en
exteriores en una zona bien ventilada. Nunca
accione la lavadora a presión en interiores, o
en un espacio cerrado. Esté atento a las
aberturas y sistemas de ventilación de
edificios donde el escape puede entrar
durante el uso.
• Verifique que la lavadora a presión esté
colocada sobre terreno nivelado para evitar
volcar durante el funcionamiento.
• Use la unidad exclusivamente en
exteriores. Verifique que los gases de
escape no entren a una zona cerrada a
través de ventanas, puertas, entradas de
ventilación.
• Consulte la Figura 3-1. Mantenga por lo
menos 5 pies (1,5 m) de separación en
todos los costados de la lavadora a
presión, incluso hacia arriba, de viviendas y
combustibles.
Figura 3-1. Cinco pies (1,5 m) de
separación mínima
Puesta en marcha de la lavadora a
presión
NOTA: NO haga funcionar la lavadora a
presión sin que haya un suministro de agua
suficiente conectado. El daño al equipo por no
seguir esta instrucción anulará la garantía.
1. Conecte el suministro de agua apropiado.
2. Consulte la Figura 3-2. Mueva la válvula
de combustible (B) a la posición ON.
3. Mueva la palanca del cebador (A) a la
posición CERRADO.
9 Manual del propietario de la lavadora a presión

Funcionamiento
000127
Å
B
OFF
ON
000128
(000101)
ADVERTENCIA
Pérdida de visión. Se requiere el uso de gafas de
seguridad al usar esta máquina. No usar gafas de
seguridad puede ocasionar pérdida de visión
permanente.
(000113)
ADVERTENCIA
Riesgo de la cuerda de arranque. La cuerda de
arranque se puede retraer inesperadamente si la presión
de agua no se alivió de la bomba apropiadamente,
creando un contragolpe. El contragolpe puede
ocasionar la muerte o lesiones graves.
ADVERTENCIA
Lesiones personales. Riesgo de penetración de líquidos.
No apunte con la pistola pulverizadora a personas,
animales, dispositivos eléctricos o artículos frágiles.
Mantenga la máquina fuera del alcance de los niños.
En caso de no hacerlo, podría causar la muerte o
lesiones graves.
(000117c)
000129
000127
Å
Después del intento de arranque, si el motor
falla al arrancar, apunte con la pistola hacia
una dirección segura y apriete el gatillo de la
pistola de pulverización para liberar alta
presión.
Figura 3-2. Válvula de combustible y
NOTA: Para un motor caliente, verifique que
la palanca del cebador esté en la posición de
ABIERTO.
4. Consulte la Figura 3-3. Gire el interruptor
del motor a ON.
cebador
Figura 3-3. Interruptor del motor
5. Alivie la presión de la pistola de
pulverización.
6. Sujete la unidad para que no se mueva al
tirar de la cuerda de arranque.
7. Consulte la Figura 3-4. Sujete firmemente
el tirador de la cuerda. Tire lentamente
hasta que sienta resistencia. Luego tire
rápidamente para poner en marcha al
motor.
Figura 3-4. Arranque del motor con tirador
8. Devuelva lentamente el tirador de la
cuerda de arranque. NO deje que el
tirador golpee contra la carcasa.
9. Consulte la Figura 3-5. Cuando el motor se
ponga en marcha, empuje lentamente la
palanca del cebador a la posición
ABIERTO (A) a medida que el motor se
calienta. Si el motor falla
intermitentemente, mueva la palanca del
cebador a la posición de CERRADO,
luego a la ABIERTO.
Figura 3-5. Válvula de combustible y
• Si el motor falla en el arranque después de
seis tirones, mueva la palanca del cebador
hacia la posición OPEN (Abierto) y repita
los pasos 6 a 9.
y cuerda
cebador
Manual del propietario de la lavadora a presión 10

Funcionamiento
ADVERTENCIA
Inyección de líquido a presión. Esta máquina genera
flujos de líquido a alta presión que pueden penetrar
en la piel. El líquido a presión, si penetra en la piel,
puede ocasionar la muerte o lesiones graves.
(000106b)
(000110)
ADVERTENCIA
Riesgo de incendio. Las superfcies calientes
pueden encender combustibles, produciendo un
incendio. El incendio puede ocasionar la muerte
o lesiones graves.
(000108)
ADVERTENCIA
Superfcies calientes. Al usar la máquina, no toque
las superfcies calientes. Mantenga la máquina
alejada de los combustibles durante el uso. Las
superfcies calientes pueden ocasionar quemaduras
graves o incendio.
Parada de la lavadora a presión
ADVERTENCIA
Inyección de líquido a presión. Esta máquina genera
flujos de líquido a alta presión que pueden penetrar
en la piel. El líquido a presión, si penetra en la piel,
puede ocasionar la muerte o lesiones graves.
IMPORTANTE: La pistola de pulverización
atrapa agua a alta presión, aunque el motor
esté parado y el agua desconectada. Siempre
apunte la pistola de pulverización hacia una
dirección segura y apriete el gatillo de la
pistola de pulverización para liberar la alta
presión. Enganche el seguro del gatillo
cuando no esté en uso.
1. Suelte el gatillo de la pistola de
pulverización.
2. Gire el interruptor del motor a la posición
OFF.
3. Apriete el gatillo de la pistola de
pulverización y libere el agua a alta
presión.
4. Enganche el seguro de gatillo.
5. Cierre el suministro de agua.
NOTA: Mantenga la manguera de alta presión
conectada a la la bomba y a la pistola
pulverizadora mientras el sistema está
presurizado.
(000106b)
Aplicación de detergente
ADVERTENCIA
Inyección de líquido a presión. Esta máquina genera
flujos de líquido a alta presión que pueden penetrar
en la piel. El líquido a presión, si penetra en la piel,
puede ocasionar la muerte o lesiones graves.
ADVERTENCIA
Lesiones personales. Riesgo de penetración de líquidos.
No apunte con la pistola pulverizadora a personas,
animales, dispositivos eléctricos o artículos frágiles.
Mantenga la máquina fuera del alcance de los niños.
En caso de no hacerlo, podría causar la muerte o
lesiones graves.
NOTA: NO use líquidos cáusticos con la
lavadora a presión. Use SOLO detergentes
seguros para lavadoras a presión. Siga toda
las instrucciones del fabricante que aparecen
en la etiqueta del detergente.
Aplique el detergente tal y como se especifica
a continuación.
1. Prepare la solución de detergente según
lo requiera la tarea.
2. Verifique que el tubo de sifón quede
totalmente sumergido en detergente.
3. Al insertar el tubo de sifón en la botella de
solución de detergente, tienda el tubo
para evitar que entre en contacto con el
silenciador.
4. Verifique que esté instalada la boquilla
negra para detergente.
NOTA: El detergente no se puede aplicar con
una boquilla de alta presión (amarilla, blanca,
verde o roja). Use solo la boquilla negra con el
detergente.
5. Ponga en marcha el motor.
6. Sujete con firmeza la pistola de
pulverización con ambas manos cuando
use un chorro de alta presión para evitar
que se produzcan lesiones cuando la
pistola de pulverización retroceda.
7. Aplique un chorro de alta presión a un
área pequeña y, a continuación,
inspeccione la superficie para comprobar
si se han producido daños. Si observa que
no se han producido daños, continúe
aplicando detergente.
8. Aplique detergente a una superficie seca.
Comience en la porción inferior de la zona
que va a ser lavada y trabaje hacia arriba
usando pasadas largas, uniformes y
superpuestas.
IMPORTANTE: Lave con agua abundante el
sistema de sifón detergente después de cada
uso. Comuníquese con un concesionario
autorizado o centro de servicio calificado si
tiene alguna duda.
(000106b)
(000117c)
11 Manual del propietario de la lavadora a presión

Funcionamiento
(000112)
ADVERTENCIA
Riesgo de caídas. El uso de la máquina crea zonas
mojadas y riesgos de disparo. Esté atento a las
condiciones de la zona de trabajo. Una caída
puede ocasionar la muerte o lesiones graves.
(000114)
ADVERTENCIA
Riesgo de caídas. No use esta máquina o
cualquiera de sus componentes en superficies
elevadas. Hacerlo puede ocasionar una caída,
lesiones graves o la muerte.
Enjuague
1. Retire la boquilla negra para detergente
de la lanza.
2. Seleccione e instale la boquilla de alta
presión que desee.
3. Apunte la pistola de pulverización hacia
una dirección segura y apriete el gatillo
para evacuar el detergente restante del
sistema.
4. Mantenga la pistola de pulverización a una
distancia segura de la zona que planifica
pulverizar.
5. Sujete con firmeza la pistola de
pulverización con ambas manos cuando
use un chorro de alta presión para evitar
que se produzcan lesiones cuando la
pistola de pulverización retroceda.
6. Aplique un chorro de alta presión a un
área pequeña y, a continuación,
inspeccione la superficie para comprobar
si se han producido daños. Si observa que
no se han producido daños, continúe
enjuagando.
7. Comience en la parte superior de la zona
que va a ser enjuagada, trabajando hacia
abajo con la misma superposición de
pasadas que la usada para limpiar.
Limpieza del tubo de sifón para detergente
Lave con agua abundante el tubo de sifón
para detergente después de cada uso antes
de parar el motor.
1. Coloque el tubo/filtro de sifón para
detergente en un cubo de agua limpia.
2. Retire la boquilla de alta presión de la
extensión de la boquilla.
3. Seleccione e instale la boquilla negra para
detergente.
4. Lave durante 1-2 minutos.
5. Apague el motor.
6. Siempre apunte la pistola de pulverización
hacia una dirección segura y apriete el
gatillo de la pistola de pulverización para
liberar el agua retenida a alta presión.
Enganche el seguro de gatillo.
Después de cada uso
NO permita que el agua quede en la unidad
durante períodos prolongados. Los
sedimentos o minerales se pueden depositar
sobre piezas de la bomba y congelar la acción
de la bomba. Siga estos procedimientos
después de cada uso:
1. Apague el motor.
2. Cierre el suministro de agua.
3. Apunte la pistola de pulverización hacia
una dirección segura y apriete el gatillo
para aliviar la presión atrapada.
4. Deje que el motor se enfríe.
5. Desconecte las mangueras de la pistola
de pulverización y la salida de alta presión
de la bomba. Vacíe el agua de las
mangueras, pistola de pulverización y
lanza. Use un trapo para limpiar los
componentes.
6. Verifique que el interruptor de arranque
del motor y la válvula de combustible
están apagados.
7. Tire del tirador de la cuerda de arranque
seis veces aproximadamente para quitar
el líquido remanente de la bomba.
8. Almacene la unidad en una zona limpia y
seca.
NOTA: Si va a almacenar durante más de 30
días, consulte la sección Almacenamiento.
Sistema de enfriamiento automático (Alivio térmico)
Cuando la lavadora a presión funciona
durante 3 a 5 minutos sin activación de la
pistola de pulverización, el agua circulando en
la bomba puede alcanzar temperaturas por
encima de 133 °F (56,1 ºC). El sistema de
alivio térmico se engrana para enfriar la
bomba descargando el agua caliente en el
suelo.
Manual del propietario de la lavadora a presión 12

Mantenimiento y solución de problemas
Sección 4 Mantenimiento y solución de problemas
Mantenimiento
El mantenimiento regular mejorará el
rendimiento y prolongará la vida útil del motor/
equipo. Generac Power Systems, Inc.
recomienda que todo el trabajo de
mantenimiento sea efectuado por un
Concesionario de servicio autorizado
independiente (IASD). El mantenimiento
regular, sustitución o reparación de los
dispositivos y sistemas de control de
emisiones puede ser efectuado por cualquier
taller de reparaciones o mecánico elegido por
el propietario. Sin embargo, para obtener
servicio de garantía gratuito, el trabajo debe
ser efectuado por un Concesionario de
servicio autorizado independiente (IASD). Vea
la garantía de emisiones.
La garantía de la lavadora a presión no cubre
elementos sometidos a abuso o negligencia
por parte del operador. Para recibir el valor
completo de la garantía, el operador debe
mantener la lavadora a presión según las
instrucciones de este manual, y también
almacenar la unidad de la manera adecuada
tal y como se detalla en Almacenamiento.
NOTA: Llame al 1-888-GENERAC (1-888436-3722) con las preguntas que tenga
acerca de la sustitución de componentes.
NOTA: Todo el mantenimiento y los ajustes
requeridos deben efectuarse en cada estación
tal y como se detalla en Programa de
mantenimiento.
Programa de mantenimiento
Respete los intervalos de mantenimiento
programado, lo que ocurra primero acorde al uso.
NOTA: Las condiciones adversas pueden
requerir mantenimiento más frecuente.
Cada 5 horas
Cambio de aceite de motor
Cada 8 horas o diariamente
Inspección/limpieza del tamiz de entrada
de agua*
Inspección de la manguera de alta presión
Inspección de la manguera/filtro de sifón
para detergente
Inspección de la pistola de pulverización y
el conjunto para comprobar si hay fugas
Limpieza de residuos
Inspección del nivel de aceite de motor
Inspección del nivel de aceite de la bomba
Cada 50 horas o cada estación
Inspección/limpieza del tamiz de entrada
de agua*
13 Manual del propietario de la lavadora a presión
Inspección/limpieza del filtro de aire**
Cambio de aceite de la bomba**
Cambio de aceite de motor**
Inspección del silenciador y supresor
de chispas*
Cada 100 horas o cada estación
Mantenimiento de la bujía
* Limpiar si está obstruido. Sustituir si
está perforado o roto.
** Efectuar el mantenimiento
más frecuentemente en condiciones
de suciedad o polvo.
Mantenimiento preventivo
La suciedad o los residuos pueden causar
funcionamiento incorrecto y daños en el
equipo. Limpie la lavadora a presión
diariamente o antes de cada uso. Mantenga la
zona alrededor y detrás del silenciador sin
residuos de combustible. Inspeccione todas
las aberturas de aire de enfriamiento en la
lavadora a presión.
• Use un paño húmedo para limpiar las
superficies exteriores.
• NO inserte ningún objeto a través de las
aberturas de aire de enfriamiento.
• Use un cepillo de cerdas suaves para
aflojar la suciedad, aceite, etc.
compactada.
• Use una aspiradora para recoger la
suciedad y residuos sueltos.
Inspección y limpieza del tamiz de
entrada
Inspeccione el tamiz en la entrada de agua de
la bomba. Limpie el tamiz obstruido y
sustitúyalo si está dañado.
Inspección de las mangueras de
alta presión
Las mangueras de alta presión pueden
desarrollar fugas como producto del
desgaste, dobleces o mal uso. Inspeccione
las mangueras antes de cada uso.
Inspeccione en busca de cortes, fugas,
abrasiones, protuberancias, y daños o
desplazamiento de los acoplamientos. Si
existen estas condiciones, sustituya la
manguera de inmediato.
NOTA: NO repare una manguera de alta
presión. Sustituya con una manguera que
cumpla o exceda la presión nominal máxima
de la unidad.

Mantenimiento y solución de problemas
000123
ADVERTENCIA
Inyección de líquido a presión. Esta máquina genera
flujos de líquido a alta presión que pueden penetrar
en la piel. El líquido a presión, si penetra en la piel,
puede ocasionar la muerte o lesiones graves.
(000106b)
000109
000131
Inspección del tubo de sifón para
detergente
Inspeccione el filtro en el tubo para detergente
y límpielo si está obstruido. El tubo debe
ajustar apretadamente en el adaptador
dentado para conexión. Examine el tubo en
busca de fugas o desgarros. Sustituya el filtro
o el tubo si alguno está dañado.
Inspección de la pistola de
pulverización
Consulte la Figura 4-1.
NOTA: Sustituya la pistola de pulverización
de inmediato si falla en cualquiera de los
pasos de la prueba.
1. Verifique que la conexión de la manguera
de la pistola de pulverización sea correcta.
2. Apriete y suelte el gatillo.
NOTA: Al soltarlo, el gatillo debe volver a su
lugar y quedar trabado por la fuerza del
resorte.
Figura 4-1. Prueba de la pistola de
pulverización (típica)
Mantenimiento de la boquilla
Una sensación de pulsación sentida al apretar
el gatillo de la pistola de pulverización puede
ser causada por presión excesiva de la
bomba. Las causas típicas de presión
excesiva de la bomba son la obstrucción o
restricción de la boquilla. Limpie la boquilla
inmediatamente como sigue:
1. Apague el motor y cierre el suministro de
agua.
NOTA: Mantenga la manguera de alta presión
conectada a la la bomba y a la pistola de
pulverización mientras el sistema está
presurizado.
2. Alivie la presión de agua de la pistola de
pulverización.
3. Retire la boquilla de la lanza.
4. Consulte la Figura 4-2. Use un
sujetapapeles para retirar los residuos.
5. Consulte la Figura 4-3. Retire la lanza de
la pistola de pulverización y lave
completamente en sentido inverso.
6. Coloque la boquilla en la lanza.
7. Instale la lanza en la pistola de
pulverización.
Figura 4-2. Retiro de residuos
Figura 4-3. Lavado de la lanza en sentido
8. Verifique que la manguera esté conectada
a la entrada de agua de la bomba y que la
manguera de alta presión esté conectada
a la pistola de pulverización y a la bomba.
inverso
9. Abra el agua.
10. Ponga en marcha el motor.
11. Pruebe la lavadora a presión para que
funcione con cada boquilla de conexión
rápida.
Cambio de aceite de la bomba
1. Limpie la zona alrededor del tapón de
vaciado de aceite (Figura 2-1).
2. Coloque un recipiente pequeño debajo del
tapón de vaciado de aceite para atrapar el
aceite.
3. Retire el tapón de vaciado de aceite.
Drene completamente.
4. Coloque el tapón de vaciado de aceite. No
lo apriete en exceso.
5. Limpie el área alrededor de la varilla de
medición de aceite de la bomba.
6. Rellene la bomba con aceite SAE 15W40
sin detergente. El nivel de aceite debe
estar entre las marcas de la varilla de
medición (Figura 2-5). No lo llene en
exceso.
7. Coloque la varilla de medición de aceite
hasta que quede bien apretada.
8. Limpie el aceite que haya podido quedar
derramada.
Manual del propietario de la lavadora a presión 14

Mantenimiento y solución de problemas
000275
000268
000272
Å
B
000273
000274
Å
Figura 4-4. Vaciado del ac eite de la bomba
Figura 4-5. Varilla de medición de acei te de
la bomba
Sustitución de la correa
Si fuera necesario sustituir la correa en el
caso de que se rompiera o si se produce una
pérdida repentina de presión:
1. Quite la correa.
2. Consulte la Figura 4-6. Afloje las tuercas
(A) y el tornillo tensor (B).
Figura 4-7. Empuje de la bomba hacia el
motor
4. Retire la correa antigua e instale la nueva.
5. Consulte la Figura 4-8. Separe la bomba
del motor de manera que la correa quede
aproximadamente 2/3 de la ranura del
soporte de la bomba (A). Apriete la correa.
Figura 4-8. Separación de la bomba del
6. Apriete el tornillo tensor (B) (página 15).
Las poleas deberían estar alineadas a 1°
de distancia una de la otra y la correa
nueva debería estar tensionada a ~90,5
lbs. (desviación de 1/8” bajo 8,3 lbs. con
un indicador de tensión).
motor
7. Apriete los cuatro tornillos (A) (página 15).
8. Cambie la correa antes de poner en
marcha la unidad.
Figura 4-6. Aflojar tuercas
3. Empuje la bomba hacia el motor (Figura
4-7).
15 Manual del propietario de la lavadora a presión

Mantenimiento y solución de problemas
00013
SAE 30*
5W-30
10W-30**
Intervalo de temperatura de uso esperado
000115
000116
Mantenimiento del motor
Recomendaciones sobre el aceite
4. Consulte la Figura 4-11. Enrosque la varilla
de medición dentro de la boca de llenado.
Verifique que el nivel de aceite en la varilla
de medición es correcto.
de motor
Para mantener la garantía del producto,el
aceite de motor se debe mantener conforme a
las recomendaciones de este manual. Para su
comodidad, hay disponibles kits de
mantenimiento para usar en este producto
que incluyen aceite de motor, filtro de aceite,
bujía(s), una toalla de taller y embudo. Estos
kits se pueden obtener de un Concesionario
de servicio autorizado independiente (IASD).
El clima determina la viscosidad apropiada del
aceite de motor. Vea el cuadro para
seleccionar la viscosidad correcta.
Figura 4-9. Viscosidad del aceite
* Por debajo de 50 °F (10 °C) el uso de SAE
30 dará como resultado un arranque
irregular.
** Por encima de 80 °F (27 °C), el uso de
10W30 puede causar incremento en el
consumo de aceite. Inspeccione el nivel de
aceite más frecuentemente.
Inspección del nivel de aceite de
motor
Inspeccione el nivel de aceite de motor antes
de cada uso, o cada 8 horas de
funcionamiento.
1. Coloque la lavadora a presión en una
superficie nivelada.
2. Limpie la zona alrededor de la abertura de
llenado aceite.
3. Consulte la Figura 4-10. Retire el tapón de
llenado de aceite y limpie la varilla de
medición.
Figura 4-10. Llenado de aceite de motor
Manual del propietario de la lavadora a presión 16
Figura 4-11. Rango de funcionamiento
5. Añada el aceite de motor recomendado
según sea necesario.
6. Cambie el tapón de llenado y apriete con
la mano.
seguro
NOTA: Algunas unidades tienen más de una
ubicación de llenado de aceite. En estos
casos, solo es necesario usar uno de los
puntos de llenado de aceite.
Cambio de aceite de motor
Cuando use la lavadora a presión en
condiciones extremas de suciedad o polvo, o
en clima extremadamente caluroso, cambie el
aceite más frecuentemente.
NOTA: No contamine. Conserve los recursos.
Devuelva el aceite usado a los centros de
recolección.
Cambie el aceite mientras el motor aún está
caliente del funcionamiento, como sigue:
1. Coloque la lavadora a presión en una
superficie nivelada.
2. Desconecte el cable de bujía de la bujía y
coloque el cable donde no pueda hacer
contacto con la bujía.
3. Limpie la zona alrededor de la abertura de
punto de llenado de aceite y del tapón de
vaciado de aceite.
4. Retire la tapa de llenado de aceite.
5. Consulte la Figura 4-12. Retire el tapón de
vaciado de aceite (A) y vacíe el aceite
completamente en un recipiente
adecuado.
6. Instale el tapón de vaciado de aceite y
apriételo con seguridad.
7. Consulte la Figura 4-11. Vierta el aceite
lentamente en la abertura de llenado de
aceite hasta que el nivel de aceite esté
entre las marcas L y H en la varilla de
medición. NO lo llene en exceso.
8. Coloque el tapón de llenado y apriete con
la mano.
9. Limpie el aceite que haya podido quedar
derramada.

Mantenimiento y solución de problemas
000276
000277
Å
B
A
(000102)
ADVERTENCIA
Arranque accidental. Desconecte el cable de la
bujía cuando trabaje en la unidad. No hacerlo
puede provocar la muerte o lesiones graves.
10. Deseche apropiadamente el aceite
conforme a todos los reglamentos
correspondientes.
Figura 4-13. Conjunto del filtro de aire
Mantenimiento de la bujía
Figura 4-12. Tapón de vaciado de aceite
Filtro de aire
El motor no funcionará correctamente y se
puede dañar si lo usa con un depurador de
aire sucio. Realice el mantenimiento del
depurador de aire más frecuentemente en
condiciones de suciedad o polvo.
Para efectuar el mantenimiento del depurador
de aire:
1. Consulte la Figura 4-13. Quite la cubierta
del depurador de aire (A).
2. Retire el o los elemento(s) de filtro (B).
3. Inspeccione el o los elemento(s) del filtro y
sustituya si es necesario. Para pedir
repuestos, comuníquese con Servicio al
cliente de Generar llamando al 1-888GENERAC (888-436-3722) para obtener
el nombre del concesionario de servicio
autorizado independiente más cercano.
4. Limpie el elemento de espuma del filtro
con agua jabonosa tibia. Enjuague y deje
secar completamente. Sumerja en aceite
limpio y escurra el aceite que sobre.
5. Golpee levemente el elemento del filtro de
papel varias veces sobre una superficie
dura para quitar la suciedad. También se
puede usar aire comprimido (que no
exceda 30 psi [207 kPa]) para soplar a
través del elemento del filtro desde el
interior.
6. Use un trapo limpio húmedo para quitar la
suciedad del interior de la cubierta del
depurador de aire.
7. Coloque el o los elemento(s) del filtro de
aire limpiado o nuevo en su lugar.
Verifique que la junta esté en su lugar (si
tiene).
8. Instale la cubierta del depurador de aire.
Apriete con seguridad los tornillos o
fijaciones del depurador de aire.
17 Manual del propietario de la lavadora a presión
Para efectuar el mantenimiento de la bujía:
1. Limpie la zona alrededor de la bujía.
2. Retire e inspeccione la bujía.
3. Consulte la Figura 4-14. Inspeccione la
separación de electrodos con un calibre
de espesores de alambre y sustituya la
bujía si la separación (A) no está dentro
de las especificaciones listadas en la Hoja
de especificaciones del producto.
Figura 4-14. Bujía
NOTA: Sustituya la bujía si los electrodos
están picados, quemados o la porcelana está
rajada. Use SOLAMENTE la bujía de
repuesto recomendada. Vea la Hoja de
especificaciones del producto.
4. Instale la bujía apretando con la mano y
apriete 3/8 a 1/2 vuelta adicional usando
una llave para bujías.
Inspección de la chispa del motor
1. Desconecte el cable de la bujía de la
bujía.
2. Fije el cable de bujía donde no pueda
hacer contacto con la bujía.
3. Pruebe la bujía con el probador de bujías
aprobado.
NOTA: NO inspeccione la chispa con la bujía
retirada.
000134a

Inspección del silenciador y
000135
000136
(000105)
PELIGRO
Explosión e incendio. El combustible y los vapores son
extremadamente inflamables y explosivos. Añada
combustible en una zona bien ventilada. Mantenga
alejados el fuego y las chispas. No hacerlo puede
ocasionar la muerte o lesiones graves.
(000109)
ADVERTENCIA
Riesgo de incendio. Verifque que la máquina se
haya enfriado apropiadamente antes de instalar una
cubierta y almacenar la máquina. Las superfcies
calientes pueden ocasionar un incendio.
supresor de chispas
NOTA:
Es una violación del California Public
Resources Code (Código de recursos públicos
de California), Sección 4442, usar u operar el
motor en tierras cubiertas de bosque, maleza o
pasto excepto si el sistema de escape cuenta
con un supresor de chispas, tal y como se
define en la Sección 4442, y éste se mantiene
en condiciones de trabajo eficaces. Otros
estados o jurisdicciones federales pueden tener
leyes similares.
NOTA: Llame al 1-888-GENERAC (1-888436-3722) con las preguntas que tenga
acerca de la sustitución de componentes.
NOTA: Use ÚNICAMENTE piezas de
repuesto de equipo original.
Inspeccione el silenciador en busca de
rajaduras, corrosión u otros daños. Retire el
supresor de chispas, si tiene, e inspecciónelo
para comprobar si hay dañoso bloqueo con
carbón. O si se requieren piezas de repuesto.
Inspección del tamiz del supresor
de chispas (si tiene)
1. Suelte las fijaciones y retire el protector
de calor del silenciador. Consulte la
Figura 4-15.
2. Suelte las fijaciones y retire el supresor
de chispas del silenciador. Consulte la
Figura 4-16.
3. Inspeccione el supresor de chispas.
Sustitúyalo si está desgarrado, perforado
o dañado de alguna otra forma (Nº de
pieza 0K1851).
4. Si el tamiz no se encuentra dañado,
límpielo con algún disolvente comercial y
vuelva acolocarlo.
Figura 4-15. Fijaciones del protector
de calor
Mantenimiento y solución de problemas
Figura 4-16. Fijaciones del supresor de
chispas
Almacenamiento
Normas generales
• NO coloque una cubierta para
almacenamiento sobre una lavadora a
presión caliente. Permita que la unidad se
enfríe a temperatura ambiente antes de
almacenarla.
• NO almacene combustible de una estación
a otra excepto que esté tratado
apropiadamente.
• Sustituya el recipiente de combustible si
hay oxidación. El óxido en el combustible
causa problemas en el sistema de
combustible.
• Cubra la unidad con una cubierta
protectora adecuada resistente a la
humedad.
• Almacene la unidad en una zona limpia y
seca.
• Siempre almacene la lavadora a presión y
el combustible alejados del calor y las
fuentes de encendido.
Almacenamiento durante el
invierno
NOTA: Si no tiene disponible un protector de
bomba, conecte una parte de manguera de
jardín de 3 pies (1 m) en el adaptador de
entrada de agua. Vierta RV-antifreeze
(anticongelante sin alcohol) en la manguera.
Tire del tirador de la cuerda de arranque dos
veces. Desconecte la manguera de 3 pies.
Manual del propietario de la lavadora a presión 18

Mantenimiento y solución de problemas
• Almacene la unidad en una zona limpia y
seca.
NOTA: Si no se usa la lavadora a presión
durante más de 30 días, prepare el motor y la
bomba para su almacenamiento.
Preparación del sistema de
combustible para almacenamiento
El combustible almacenado más de 30 días
puede deteriorarse y dañar los componentes
del sistema de combustible. Mantenga fresco
el combustible, use estabilizador de
combustible.
Si se añade estabilizador de combustible al
sistema de combustible, prepare y haga
funcionar el motor conforme a las
especificaciones de la sección Puesta en
marcha de la lavadora a presión. Haga
funcionar el motor durante 2 minutos para
hacer circular el estabilizador a través del
sistema de combustible. El combustible
preparado adecuadamente se puede
almacenar hasta 24 meses.
NOTA: Si el combustible no ha sido tratado
con estabilizador de combustible, debe
vaciarse en un recipiente aprobado. Haga
funcionar el motor hasta que pare por falta de
combustible. Se recomienda el uso de un
estabilizador de combustible en el recipiente
de almacenamiento para mantener el
combustible fresco.
Preparación del motor para el
almacenamiento
1. Cambie el aceite de motor.
2. Retire la bujía.
3. Vierta una cuchara sopera (5-10 cc) de
aceite de motor limpio o pulverice un
agente protector adecuado en el cilindro.
4. Tire de la cuerda de arranque manual
varias veces para distribuir el aceite en el
cilindro.
5. Instale la bujía.
6. Tire lentamente hasta que sienta
resistencia. Esto cerrará las válvulas de
manera que la humedad no pueda
ingresar en el cilindro del motor. Suelte
lentamente la cuerda de arranque manual.
Preparación de la bomba para el
almacenamiento
NOTA: Si no se usa la lavadora a presión
durante más de 30 días, prepare el motor y la
bomba para su almacenamiento.
Proteja la unidad de las temperaturas de
congelamiento. No hacerlo dañará
permanentemente la bomba y la unidad se
volverá inoperable. El daño por
congelamiento no está cubierto por la
garantía.
Proteja la unidad de las temperaturas de
congelamiento de la manera siguiente:
1. Apague el motor.
2. Cierre la válvula de combustible.
3. Cierre el suministro de agua.
4. Apunte la pistola de pulverización hacia
una dirección segura y apriete el gatillo
para aliviar la presión atrapada.
5. Deje que el motor se enfríe.
6. Desconecte las mangueras de la pistola
de pulverización y la salida de alta presión
de la bomba. Vacíe el agua de las
mangueras, pistola de pulverización y
lanza. Use un trapo para limpiar los
componentes.
7. Vacíe la bomba de todos los líquidos
restantes.
8. Tire del tirador de la cuerda de arranque
seis veces aproximadamente para quitar
el líquido remanente de la bomba.
9. Prepare la bomba para el invierno con
Generac Pump Shield™ (N/P 0L2414).
Esto minimiza los daños por congelación y
lubrica los pistones y juntas.
NOTA: Si no hay disponible Generac Pump
Shield™, conecte una parte de manguera
dejardín de 3 pies (1 m) en el adaptador de
entrada de agua. Vierta RV-antifreeze
(anticongelante sin alcohol) en la manguera.
Tire del tirador de la cuerda de arranque dos
veces. Desconecte la manguera.
10. Almacene la unidad en una zona limpia y
seca.
Cambio de aceite
Cambie el aceite de motor antes de
almacenarlo. Consulte Cambio de aceite de
motor.
19 Manual del propietario de la lavadora a presión

Mantenimiento y solución de problemas
Resolución de problemas
PROBLEMA CAUSA CORRECCIÓN
La bomba falla en la
producción de presión, presión
errática, vibración, pérdida de
presión, bajo volumen de
agua.
El detergente no se mezcla
con la pulverización.
El motor funciona bien sin
carga, pero tiende a pararse
cuando se aplica carga.
El motor no se pone en
marcha, o se pone en marcha
y funciona en forma irregular.
El motor se para durante el
funcionamiento.
Falta de potencia del motor. 1. Filtro de aire sucio. 1. Sustituya el filtro de aire.
1. Está instalada la boquilla
de baja presión
2. La entrada de agua está
obstruida.
3. Suministro de agua
inadecuado.
4. Manguera de entrada
doblada o con fugas.
5. Tamiz de entrada de la
manguera obstruido.
6. El suministro de agua
supera los100 ºF (37,8 ºC).
7. La manguera de alta
presión está obstruida o
tiene fugas.
8. Fugas de la pistola de
pulverización.
9. La boquilla está obstruida.
10. La bomba falla.
11. La correa está desgastada.
1. El tubo para sifón de
detergente no está
sumergido.
2. El tubo/filtro para sifón de
detergente está obstruido
o rajado.
3. Está instalada la boquilla
de alta presión.
1. Velocidad del motor muy
lenta.
1. Nivel de aceite bajo,
“Sistema de alerta de
aceite”.
2. Filtro de aire sucio.
3. Combustible agotado.
4. Combustible vencido.
5. Cable de bujía no
conectado a la bujía.
6. Bujía averiada.
7. Agua en el combustible.
8. Mezcla de combustible
excesivamente rica.
9. Motor en la posición OFF.
1. Sin combustible. 1. Llene el tanque de
1. Sustituya con una boquilla
de alta presión.
2. Limpie la entrada.
3. Provea un flujo de agua
adecuado.
4. Enderece la manguera de
entrada, emparche las
fugas.
5. Inspeccione y limpie el
tamiz de la manguera de
entrada.
6. Provea un flujo de agua
más frío.
7. Libere las obstrucciones o
sustituya la manguera.
8. Sustituya la pistola de
pulverización.
9. Limpie la boquilla.
10. Comuníquese con un
concesionario de servicio
autorizado independiente.
11. Comuníquese con un
centro de mantenimiento
local para cambiar la
correa.
1. 1. Inserte el tubo para sifón
de detergente en
detergente.
2. Limpie o sustituya el filtro/
tubo para sifón de
detergente.
3. Instale la boquilla de baja
presión.
1. Comuníquese con un
concesionario de servicio
autorizado independiente.
1. Llene el cárter hasta el
nivel adecuado.
2. Limpie o sustituya el filtro
de aire.
3. Llene el tanque de
combustible.
4. Sustituya con combustible
nuevo.
5. Conecte el cable a la bujía.
6. Cambie la bujía.
7. Vacíe el tanque de
combustible, sustituya con
combustible nuevo.
8. Comuníquese con un
concesionario de servicio
autorizado independiente.
9. Gire el interruptor del motor
a ON.
combustible.
Manual del propietario de la lavadora a presión 20


Pieza Nº 0L1528 Rev. C 09/20/2018 ©2018 Generac Power Systems, Inc. Reservados todos los derechos.
Las especificaciones están sujetas a cambios sin
previo aviso.
No se permite la reproducción en ningún formato sin
el consentimiento previo por escrito de Generac
Power System, Inc.
Generac Power Systems, Inc.
S45 W29290 Hwy. 59
1-888-GENERAC (1-888-436-3722)
Waukesha, WI 53189
www.generac.com/pro

Laveuse à pression
Manuel d'utilisation
000263
MODÈLE : ___________________________
N° DE SÉRIE : ________________________
DATE D’ACHAT : ______________________
Enregistrez votre produit Generac sur
notre site Internet ou par téléphone :
register.generac.com
1-888-922-8482
Operator’s Manual for Power Washer i
CONSERVER CE MANUEL POUR RÉFÉRENCE ULTÉRIEURE

Table des matières
(000393a)
AVERTISSEMENT
CANCER ET EFFET NOCIF SUR
LA REPRODUCTION
www.P65Warnings.ca.gov.
Section 1 Introduction et règles
de sécurité .....................................1
Introduction .....................................1
Consignes de sécurité .....................1
Signification des symboles
de sécurité ...................................... 2
Section 2 Informations
générales et installation ............... 3
Familiarisation avec votre
laveuse à pression .......................... 3
Informations relatives aux
émissions ........................................ 3
Retrait des pièces du colis .............. 4
Assemblage ....................................4
Ajout d’huile moteur ........................4
Vérification de l'huile de la pompe .. 5
Carburant ........................................ 5
Alimentation en eau ........................6
Raccordement de l'alimentation
en eau .............................................6
Raccordement de la lance et du
tuyau à haute pression au pistolet
pulvérisateur .................................... 6
Pistolet pulvérisateur ....................... 7
Mode d'emploi des buses ............... 7
Section 3 Fonctionnement ............8
Questions relatives au
fonctionnement ................................8
Avant de démarrer le moteur ...........8
Préparation à l'emploi de la
laveuse à pression ...........................8
Application de détergent ................10
Rinçage .........................................11
Nettoyage du tube de siphonnage
de détergent ..................................11
Système de refroidissement
automatique
(décharge thermique) ....................11
Section 4 Maintenance et
dépannage ....................................12
Entretien ........................................12
Calendrier de maintenance ...........12
Maintenance préventive ................12
Maintenance du moteur .................15
Entretien de la bougie d’allumage .16
Entreposage ..................................17
Dépannage ....................................19
Remarques ....................................20

Introduction et règles de sécurité
(000001)
DANGER
Indique une situation dangereuse qui, si elle n’est pas évitée,
entraînera la mort ou des blessures graves.
(000002)
AVERTISSEMENT
Indique une situation dangereuse qui, si elle n’est pas évitée,
pourrait entraîner la mort ou des blessures graves.
MISE EN GARDE
Indique une situation dangereuse qui, si elle n’est pas
évitée, pourrait entraîner des blessures légères ou
moyennement graves.
(000003)
Section 1 Introduction et règles de sécurité
Introduction
AVERTISSEMENT
Consultez le manuel. Lisez complètement le manuel
et assurez-vous d’en comprendre le contenu avant
d’utiliser l’appareil. Une mauvaise compréhension
du manuel ou des consignes de l’appareil pourrait
entraîner la mort ou des blessures graves.
Merci d’avoir acheté ce produit Generac
Power Systems, Inc. Cet appareil a été conçu
pour offrir des performances élevées et un
fonctionnement fiable pendant de
nombreuses années, sous réserve d’un bon
entretien.
Si vous n’avez pas la certitude d’avoir bien
compris une quelconque partie de ce manuel,
communiquez avec le concessionnaire
réparateur indépendant agréé (CRIA) le plus
proche, ou bien le Service client de Generac
au 1-888-GENERAC (1-888-436-3722) ou sur
http://www.generac.com/, qui seront ravis de
vous aider.
Il relève de la responsabilité du propriétaire
d’utiliser et d’entretenir cet équipement de
façon sûre et adéquate. Avant d’utiliser, de
réparer ou d’entreposer cette laveuse à
pression :
• Lisez attentivement toutes les mises en
garde fournies dans ce manuel et sur les
étiquettes apposées sur l’appareil.
• Se familiariser avec l’appareil et avec ce
manuel.
• Consultez les instructions relatives aux
procédures d’assemblage dans la
section Assemblage du manuel. Respectez
strictement les instructions.
Conservez ces instructions pour référence
ultérieure. Fournissez SYSTÉMATIQUEMENT ce manuel à toute personne qui
sera amenée à utiliser l’appareil.
Les informations contenues dans ce manuel
décrivent avec exactitude les produits
fabriqués au moment de la publication du
manuel. Le fabricant se réserve le droit de
procéder à des mises à jour techniques, à des
corrections et à des révisions des produits à
tout moment et sans préavis.
(000100a)
Consignes de sécurité
Il est impossible pour le fabricant d’anticiper
toutes les circonstances susceptibles
d’impliquer un danger. Les avertissements
figurant dans ce manuel, ainsi que sur les
étiquettes et les autocollants apposés sur
l’appareil, ne sont pas exhaustifs. Si une
procédure, une méthode de travail ou une
technique d'utilisation non recommandée par
le fabricant, est employée, s'assurer qu'elle ne
présente aucun danger pour le personnel.
Assurez-vous également que la procédure, la
méthode de travail ou la technique d'utilisation
employée n'entraîne aucun danger potentiellement causé par l'équipement.
Tout au long de ce manuel, ainsi que sur les
étiquettes et autocollants apposés sur le
générateur, des encadrés DANGER, AVERTISSEMENT, ATTENTION et REMARQUE sont
utilisés pour attirer l’attention du personnel sur
des instructions concernant certaines opérations
pouvant s’avérer dangereuses si réalisées de
manière incorrecte ou inattentive. Respectez
scrupuleusement ces instructions. Les différentes mentions d’alerte sont ainsi définies :
REMARQUE : Les remarques fournissent des
informations complémentaires importantes sur
une opération ou une procédure. Elles sont
intégrées au texte ordinaire du manuel.
Ces alertes de sécurité ne sauraient à elles
seules éliminer les dangers qu’elles signalent.
Pour éviter les accidents, il est impératif de
faire preuve de bon sens et d’appliquer à la
lettre les instructions spéciales concernant
une action ou une opération donnée.
Manuel du propriétaire de la laveuse à pression 1

Introduction et règles de sécurité
AVERTISSEMENT
Injection de liquide. Cette machine produit des flux de
liquide à haute pression qui peuvent percer la peau.
L’injection de liquide peut provoquer des blessures
graves, voire mortelles.
(000106b)
(000111)
AVERTISSEMENT
Pièces mobiles. Gardez les vêtements, les cheveux
et les accessoires loin des pièces mobiles. Le
non-respect de cette consigne pourrait
entraîner la mort ou des blessures graves.
(000112)
AVERTISSEMENT
Risque de chute. L’utilisation de l’appareil crée des
zones humides, ce qui augmente les risques de
chute. Soyez conscient de la condition de la zone
de travail. Une chute pourrait entraîner des
blessures graves ou la mort.
(000114)
AVERTISSEMENT
Risque de chute. N’utilisez pas cet appareil ni
aucun de ses composants sur des surfaces
élevées. Le non-respect de cette consigne
pourrait entraîner une chute, des blessures
graves ou la mort.
(000113)
Risque lié au lanceur à rappel. Le cordon du lanceur à
rappel pourrait se rétracter de façon inattendue si la
pression de l’eau n’est pas relâchée correctement, créant
ainsi un effet de rebond. Un effet de rebond pourrait
entraîner la mort ou des blessures graves.
AVERTISSEMENT
(000100a)
AVERTISSEMENT
Consultez le manuel. Lisez complètement le manuel
et assurez-vous d’en comprendre le contenu avant
d’utiliser l’appareil. Une mauvaise compréhension
du manuel ou des consignes de l’appareil pourrait
entraîner la mort ou des blessures graves.
(000115)
AVERTISSEMENT
Pièces mobiles. Ne portez pas de bijoux lorsque
vous mettez en marche ou utilisez ce produit. Le
non-respect de cette consigne pourrait entraîner
la mort ou des blessures graves.
AVERTISSEMENT
Risques de blessure. Risque d’injection de liquide. Ne dirigez
pas le pistolet pulvérisateur sur des personnes, des animaux,
des appareils électriques ou des objets fragiles. Tenir hors de
portée des enfants. Le non-respect de cette consigne peut
provoquer des blessures graves, voire mortelles.
(000117c)
AVERTISSEMENT
Risque environnemental. Recyclez toujours les batteries dans
un centre de recyclage officiel, conformément aux lois et aux
réglementations locales. Le non-respect de cette consigne
pourrait causer des dommages à l’environnement,
la mort ou des blessures graves.
(000228)
(000244)
Blessures corporelles/Dommages à l'équipement. Placez le
tube-rallonge dans l' étui et vérifiez si la poignée est bien en
place avant tout déplacement. Le non-respect de cette
consigne pourrait entraîner la mort, des blessures graves,
ainsi que des dommages à l’équipement.
Signification des symboles de sécurité
Asphyxie. Le moteur en marche produit du monoxyde
de carbone, un gaz inodore, incolore et toxique.
Le monoxyde de carbone, s’il n’est pas évité,
entraînera la mort ou des blessures graves.
(000103)
DANGER
DANGER
Décharge électrique. Le contact de l’eau avec une
source d’alimentation, s’il n’est pas évité, entraînera la
mort ou des blessures graves.
(000104)
DANGER
Explosion et incendie. Le carburant et ses vapeurs sont
extrêmement inflammables et explosifs. Ajoutez du
carburant dans un endroit bien aéré. Gardez l’appareil loin
du feu et des étincelles. Le non-respect de cette consigne
entraînera la mort ou des blessures graves.
(000105)
AVERTISSEMENT
Risque d’incendie. Les surfaces chaudes peuvent
enflammer des matériaux combustibles, ce qui
pourrait causer un incendie. Un incendie pourrait
entraîner la mort ou des blessures graves.
(000110)
AVERTISSEMENT
Perte de vision. Portez toujours des lunettes de
sécurité lorsque vous utilisez cet appareil. Le
non-respect de cette consigne pourrait entraîner
une perte de vision permanente.
(000101)
AVERTISSEMENT
Perte d’audition. Il est recommandé de porter des
protections auditives lorsque vous utilisez cet
appareil. Le non-respect de cette consigne pourrait
entraîner une perte d’audition permanente.
AVERTISSEMENT
Surfaces chaudes. Lorsque vous utilisez l’appareil, ne
touchez pas aux surfaces chaudes. Gardez l’appareil
loin des matériaux combustibles lorsqu’il fonctionne.
Le contact avec des surfaces chaudes pourrait entraîner
des brûlures graves ou un incendie.
AVERTISSEMENT
Risque d’incendie. Vérifiez que l’appareil a bien refroidi
avant d’installer une protection de rangement et
d’entreposer l’appareil. Le contact avec des surfaces
chaudes pourrait entraîner un incendie.
2 Manuel du propriétaire de la laveuse à pression
(000107)
(000108)
(000109)
AVERTISSEMENT

Section 2 Informations générales et installation
000264
A
B
C
D
E
F
G
I
J
L
M
N
O
P
R
S
T
U
U
H
K
(000100a)
AVERTISSEMENT
Consultez le manuel. Lisez complètement le manuel
et assurez-vous d’en comprendre le contenu avant
d’utiliser l’appareil. Une mauvaise compréhension
du manuel ou des consignes de l’appareil pourrait
entraîner la mort ou des blessures graves.
Table 2-1. Composants de la laveuse à
pression
A Pistolet pulvérisateur
B Lance avec raccord rapide
C Tuyau à haute pression
D Lanceur à rappel
E Bouchon de remplissage d'huile
F Filtre à air
G Pompe à haute pression
H Soupape de décharge thermique
I Interrupteur Marche/Arrêt du moteur
J Soupape de décharge
K Sortie haute pression
L Arrivée d'eau
M Réservoir de carburant
N Robinet d’arrêt/de marche du carburant
O Étrangleur
P Garde-courroie
R Buses
S Poignée latérale réglable
T Bouchon de vidange d'huile
U Emplacement du numéro de série.
*
* Siphon/filtre pour détergent (non illustré)
Manuel du propriétaire de la laveuse à pression 3
Étiquette d'identification (non illustrée) située sur le boîtier du ventilateur du
moteur
Figure 2-1. Fonctions et commandes
Familiarisation avec votre laveuse à pression
Lisez ce manuel avec attention avant
d’assembler et d’utiliser cette unité.
Conservez ce manuel pour référence
ultérieure. Vous pouvez vous procurer des
exemplaires de remplacement du manuel du
propriétaire sur www.generac.com.
Informations relatives aux émissions
L’Agence américaine de protection de
l’environnement, ainsi que l’Agence pour la
qualité de l’air de l’État de Californie, exigent
que ce moteur soit conforme aux normes
relatives aux émissions d'échappement et de
vapeurs. Repérez l'autocollant de conformité
relative aux émissions sur le moteur afin de
déterminer les normes respectées par le
moteur, et pour déterminer quelle garantie
relative aux émissions s'applique. Ce moteur
est certifié conforme aux normes en vigueur
relatives aux émissions des moteurs à
essence. Il est important de respecter les
directives d’entretien contenues dans la
rubrique Maintenance pour garantir la
conformité du moteur aux normes applicables
en matière d’émissions pendant toute la durée
de vie du produit. Ce moteur utilise des
réglages de carburation pauvre ainsi que
d'autres systèmes pour réduire les émissions.
Altérer ou modifier le système de régulation
des émissions peut faire augmenter le niveau
d'émission et constituer une violation de la loi
californienne ou fédérale. Actions constituant
une altération, entre autres :

• Retrait ou modification de n'importe quelle
(000100a)
AVERTISSEMENT
Consultez le manuel. Lisez complètement le manuel
et assurez-vous d’en comprendre le contenu avant
d’utiliser l’appareil. Une mauvaise compréhension
du manuel ou des consignes de l’appareil pourrait
entraîner la mort ou des blessures graves.
000265
000266
pièce des circuits d'admission, de
carburant, ou d'échappement.
• Altération de la tringlerie de régulation ou
du mécanisme du régulateur de vitesse
afin de faire fonctionner le moteur en
dehors des points de consigne d'origine.
Faites inspecter et réparer le moteur par un
technicien de maintenance si ces symptômes
apparaissent :
• Démarrage difficile ou arrêt suite au
démarrage
• Fonctionnement au ralenti difficile
• Raté d'allumage ou retour de flamme en
présence d'une charge
• Postcombustion (retour de flamme)
• Fumée d'échappement noire ou forte
consommation de carburant
REMARQUE : L'entretien, le remplacement
ou la réparation des dispositifs et des circuits
de régulation des émissions doivent être
effectués par un technicien individuel ou par
une structure spécialisée dans la réparation
des moteurs de faible cylindrée. Pour être
couvert par la garantie, tous les travaux
d'entretien du système antipollution doivent
être effectués par un concessionnaire agrée
par l'usine. Voir la garantie relative aux
émissions pour plus de détails.
Retrait des pièces du colis
1. Ouvrez complètement le carton en
découpant chaque coin de haut en bas.
2. Retirez les pièces du carton et inspectez-
les avant de procéder à l’assemblage. Le
colis doit contenir chacune des pièces
suivantes :
• Unité principale
• Tuyau à haute pression
• Tuyau de siphon et filtre
• Pistolet pulvérisateur
• Lance avec raccordement rapide
• Flacon d'huile
• Sachet de pièces (comprenant) :
– Manuel du propriétaire
– Carte d’enregistrement du proprié-
taire;
– Sachet de buses colorées
3. Si certaines pièces sont absentes du colis,
contactez le Service client de Generac au
1-888-436-3722 en vous munissant du
nom du modèle et du numéro de série de
l’appareil.
4. Consignez le nom du modèle, le numéro
de série et la date d’achat sur la page de
garde de ce manuel.
Assemblage
Si vous rencontrez des problèmes lors de
l’assemblage, contactez le Service client de
Generac au 1-888-436-3722. Veillez à vous
munir du nom du modèle et du numéro de
série.
1. Insérez les buses à code de couleur dans
les espaces prévus à cet effet (Figure 2-2).
Figure 2-2. Insérez les buses (le nombre
2. Placez le pistolet pulvérisateur et
l'extension de buse dans le support du
pistolet.
peut varier)
3. Voir Figure 2-3. Fixer le tube de siphon.
Figure 2-3. Emplacement du tube de
siphon
Ajout d’huile moteur
1. Placez la laveuse à pression sur une
surface horizontale plane.
2. Nettoyez autour de la zone de
remplissage d'huile et retirez le bouchon
orange de remplissage d'huile/jauge
(Figure 2-4).
4 Manuel du propriétaire de la laveuse à pression

Figure 2-4. Plein d’huile mo t e u r
000115
000116
000267
000268
(000105)
DANGER
Explosion et incendie. Le carburant et ses vapeurs sont
extrêmement inflammables et explosifs. Ajoutez du
carburant dans un endroit bien aéré. Gardez l’appareil loin
du feu et des étincelles. Le non-respect de cette consigne
entraînera la mort ou des blessures graves.
3. À l'aide d'un entonnoir à huile (en option),
versez lentement l'huile dans l'orifice de
remplissage d'huile. Voir Recommanda-
tions relatives à l'huile moteur.
REMARQUE : Certains appareils possèdent
plusieurs orifices de remplissage d’huile.
Dans ce cas n’utilisez qu'un point de
remplissage d'huile.
4. Vérifiez périodiquement jusqu'à ce que le
niveau d'huile se situe entre « L » et « H »
sur la jauge (Figure 2-5). NE
REMPLISSEZ PAS À RAS BORD.
REMARQUE : Toute tentative de lancement
ou de démarrage du moteur avant qu'il n'ait
été correctement entretenu avec l'huile
recommandée risque d'entraîner une panne
du moteur.
5. Remettez le bouchon de remplissage
d’huile/jauge et serrez à fond.
Figure 2-5. Plage de fonctionnement sûr
Vérification de l'huile de la pompe
1. Placez la laveuse à pression sur une
surface horizontale plane.
2. Nettoyez autour de la zone de
remplissage d'huile et retirez le capuchon
d'huile/jauge aéré (Figure 2-1).
Figure 2-6. Vérification de l'huile
3. Vérifiez que le niveau d'huile se trouve
dans les limites des repères sur la jauge
(Figure 2-5). Si de l'huile est nécessaire,
voir la section Maintenance. NE
REMPLISSEZ PAS À RAS BORD.
4. Voir Maintenance préventive pour plus
d'informations.
5.Insérez la jauge d'huile et serrez
fermement à la main.
6. Nettoyez toute trace d’huile déversée hors
du réservoir.
de la pompe
Figure 2-7. Jauge d'huile de la pompe
Carburant
Les spécifications relatives au carburant sont
les suivantes :
• Essence propre sans plomb.
• Indice d’octane minimum de 87 / 87 AKI
(91 RON).
• Teneur en éthanol (essence-alcool)
admissible jusqu’à 10 %.
• N’UTILISEZ PAS de carburant E85.
• N’UTILISEZ PAS de mélange d’huile et
d’essence.
• NE MODIFIEZ PAS le moteur pour le faire
fonctionner avec d’autres carburants.
Stabiliser le carburant avant l'entreposage.
Manuel du propriétaire de la laveuse à pression 5

1. Vérifiez que l’appareil est en
000117
000270
A
B
000120
000269
position ARRÊT et laissez-le refroidir
pendant au moins deux minutes avant de
faire le plein de carburant.
2. Placez l’appareil de niveau dans une zone
bien ventilée.
3. Nettoyez la zone environnant le bouchon
du réservoir de carburant et retirez-le
lentement.
4. Ajoutez lentement le carburant recommandé. Ne remplissez pas à ras bord.
Nettoyez ou remplacez la crépine si
nécessaire. NE FAITES PAS fonctionner
la laveuse à pression si la crépine
d'alimentation est endommagée ou
manquante.
Figure 2-8. Ajout du carburant
5. Remettez le bouchon du réservoir de
carburant en place.
REMARQUE : Laissez s’évaporer le
carburant déversé hors du réservoir avant de
démarrer l’appareil.
recommandé
Alimentation en eau
REMARQUE : NE FAITES PAS fonctionner
l'unité avec une alimentation en eau insuffisante. Le non-respect des exigences d'alimentation en eau annulera la garantie de
l'unité.
L'alimentation en eau doit répondre aux exigences suivantes :
• NE siphonnez PAS d'eau stagnante pour
l'utiliser en tant qu'eau d'alimentation.
• La température de l'eau doit être inférieure
à 100 °F (38 ºC).
• Le tuyau d'alimentation en eau doit
mesurer au maximum 50 pieds (15,2 m) de
longueur.
• Le débit d'eau doit dépasser les 3,8 gallons
par minute (17,3 litres par minute) à une
pression minimale de 30 psi (206,8 kPa).
• N'UTILISEZ PAS de valve de retenue, de
reniflard ou de clapet antiretour dans le
circuit d'alimentation d'eau.
Figure 2-9. Raccordement de l'alimentation
4. Raccordez le tuyau d'alimentation en eau
à l'admission d'eau de la pompe (A), puis
serrez à la main.
5. Raccordement du tuyau à haute pression
à la pompe (B).
en eau
Raccordement de la lance et du tuyau à haute pression au pistolet pulvérisateur
1. Voir Figure 2-10. Raccordez la lance au
pistolet pulvérisateur et serrez à la main.
Figure 2-10. Raccordement de la lance
2. Voir Figure 2-11. Raccordez le tuyau à
haute pression à la base du pistolet
pulvérisateur.
Raccordement de l'alimentation en eau
1. Retirez et jetez le bouchon d'expédition de
l'admission d'eau de la pompe.
2. Activez l'alimentation en eau pendant
30 secondes avant de procéder au
raccordement, afin d'éliminer les débris.
3. Voir Figure 2-9. Inspectez la crépine
d'admission (A) à la recherche de débris.
6 Manuel du propriétaire de la laveuse à pression
Figure 2-11. Raccordement du tuyau à
haute pression au pistolet pulvérisateur

Pistolet pulvérisateur
000123
000125
Guide de sélection de buses
Buse de
soufflage
(rouge)
Buse de
décapage
(jaune)
Buse de
nettoyage
à pression
(verte)
Buse de
lavage à
pression
(blanche)
Buse à
détergent
(noire)
0$;,0$/(¬²3UHVVLRQpOHYpHHWGpELWIDLEOHSRXUQHWWR\HUOHVVXUIDFHVGLIILFLOHVj
atteindre, comme les surfaces du deuxième étage, ou les éléments tenaces,
comme la peinture, les taches d’huile, la rouille, le goudron, les impuretés, la
graisse, la cire, etc.
02<(11(¬²3UHVVLRQpOHYpHHWGpELWPR\HQSRXUHQOHYHUOHVWDFKHVVXUOHV
surfaces poreuses dures, comme les entrées, les planchers de garage ou les patios
de brique.
*e1e5$/(¬²3UHVVLRQPR\HQQHHWGpELWPR\HQSRXUOHQHWWR\DJHJpQpUDO
comme le bardage, les patios en brique, les terrasses en bois, les entrées et les
trottoirs, les planchers de garage, etc.
'e/,&$7(¬²)DLEOHSUHVVLRQHWGpELWpOHYpSRXUQHWWR\HUGpOLFDWHPHQWOHVYRLWXUHV
les camions, les bateaux, les véhicules de plaisance, l’ameublement de patio,
l’équipement de jardin, etc.
'e7(5*(176(8/(0(1712,5(¬²1·XWLOLVH]TXHGHVGpWHUJHQWVRXGHVVDYRQV
pouvant être utilisés de manière sécuritaire avec la laveuse à pression afin d’aider à
dissoudre la crasse ou les taches tenaces sur une grande variété de surfaces.
000245
Familiarisez-vous avec la gâchette du pistolet
pulvérisateur et avec son système de verrouillage avant de l'utiliser.
Voir Figure 2-12. Lorsque l'unité est à l'arrêt,
saisissez le pistolet pulvérisateur et appuyez
sur la gâchette pour comprendre comment le
mécanisme de déclenchement et le système
de verrouillage peuvent s'activer et se
désactiver.
Mode d'emploi des buses
1. Consultez le guide de sélection des buses
et choisissez la buse appropriée à la
tâche.
2. Voir Figure 2-13. Tirez le collier à
raccordement rapide vers l’arrière et
insérez la buse.
Figure 2-12. Pistolet pulvérisateur
3. Activez l'arrivée d'eau, appuyez sur la
gâchette pour purger l'air du circuit de la
pompe.
4. Vérifiez que le pistolet pulvérisateur est
désactivé et que son dispositif de
verrouillage est enclenché avant de
démarrer la laveuse à pression.
Manuel du propriétaire de la laveuse à pression 7
(standard)
Figure 2-13. Insertion de la buse
3. Relâchez le collier à raccordement rapide
pour fixer la buse.
4. Vérifiez que la buse est bien fixée en
place.

Fonctionnement
DANGER
Asphyxie. Le moteur en marche produit du monoxyde
de carbone, un gaz inodore, incolore et toxique.
Le monoxyde de carbone, s’il n’est pas évité,
entraînera la mort ou des blessures graves.
(000103)
(000110)
AVERTISSEMENT
Risque d’incendie. Les surfaces chaudes peuvent
enflammer des matériaux combustibles, ce qui
pourrait causer un incendie. Un incendie pourrait
entraîner la mort ou des blessures graves.
AVERTISSEMENT
(000108)
Surfaces chaudes. Lorsque vous utilisez l’appareil, ne
touchez pas aux surfaces chaudes. Gardez l’appareil
loin des matériaux combustibles lorsqu’il fonctionne.
Le contact avec des surfaces chaudes pourrait entraîner
des brûlures graves ou un incendie.
000271
Section 3 Fonctionnement
Questions relatives au fonctionnement
Si vous avez des questions concernant
l’utilisation et l’entretien de l’unité, contactez le
Service client de Generac 1-888-436-3722.
Avant de démarrer le moteur
1. Vérifiez que le niveau d’huile moteur est
correct.
2. Vérifiez que le niveau de carburant frais
est correct.
3. Vérifiez que l’ensemble des fixations et
des raccords sont bien en place.
4. Vérifiez que l'alimentation en eau est
suffisante, et bien raccordée.
5. Vérifiez que l’appareil est installé à niveau
dans une zone bien ventilée, et que
l’accès à l’appareil est correctement
dégagé.
Préparation à l'emploi de la laveuse à pression
1. Placez l'unité sur un sol plat en respectant
les dégagements indiqués.
2. Raccordez une alimentation en eau
adaptée.
Positionnement de la laveuse à
pression en vue de son utilisation
fonctionnement, comme défini dans ledit
article. Des lois similaires peuvent s’appliquer
dans d’autres juridictions.
La laveuse à pression ne doit être utilisée
qu’en extérieur dans une zone bien ventilée.
Ne l’utilisez jamais en intérieur ni dans un
espace confiné. Tenez compte des ouvertures
de bâtiment et systèmes de ventilation par
lesquels les gaz d’échappement pourraient
pénétrer lorsque la pompe fonctionne.
• Vérifiez que la laveuse à pression est
placée sur une surface plane afin d’éviter
qu’elle ne se renverse en cours de
fonctionnement.
• N'utilisez l'appareil qu'en extérieur. Vérifiez
que le gaz d'échappement n'entre pas dans
une zone confinée par les fenêtres, les
portes ou les bouches d'aération.
•Voir Figure 3-1. Laissez un dégagement
d'au moins 5 pieds (1,5 m) de chaque côté
de la laveuse à pression, y compris en
hauteur, par rapport aux habitations et aux
surfaces combustibles lors de son
utilisation.
Figure 3-1. Dégagement minimal de cinq
pieds
Démarrage de la laveuse à pression
REMARQUE : NE FAITES PAS
FONCTIONNER la laveuse à pression si
l'alimentation en eau n'est pas suffisante. Le
non-respect de cette consigne endommagera
l'équipement et annulera la garantie.
1. Raccordez une alimentation en eau
adaptée.
2. Voir Figure 3-2. Placez le levier du robinet
de carburant (B) sur MARCHE.
3. Placez le levier d’étrangleur (A) en
position FERMÉ.
L’utilisation du moteur sur un terrain recouvert
de forêt, de broussailles ou d’herbe constitue
une violation de l’Article 4442 du California
Public Resource Code, à moins que le
système d’échappement ne soit équipé d’un
pare-étincelles entretenu en bon état de
8 Manuel du propriétaire de la laveuse à pression

Fonctionnement
000127
A
B
Perte de vision. Portez toujours des lunettes de
sécurité lorsque vous utilisez cet appareil. Le
non-respect de cette consigne pourrait entraîner
une perte de vision permanente.
(000101)
AVERTISSEMENT
(000113)
Risque lié au lanceur à rappel. Le cordon du lanceur à
rappel pourrait se rétracter de façon inattendue si la
pression de l’eau n’est pas relâchée correctement, créant
ainsi un effet de rebond. Un effet de rebond pourrait
entraîner la mort ou des blessures graves.
AVERTISSEMENT
AVERTISSEMENT
Risques de blessure. Risque d’injection de liquide. Ne dirigez
pas le pistolet pulvérisateur sur des personnes, des animaux,
des appareils électriques ou des objets fragiles. Tenir hors de
portée des enfants. Le non-respect de cette consigne peut
provoquer des blessures graves, voire mortelles.
(000117c)
000129
000127
A
Une fois la tentative de démarrage du moteur
effectuée, si le moteur ne démarre pas,
orientez toujours le pistolet dans une direction
ne présentant aucun danger, et appuyez sur la
gâchette pour le dépressuriser.
Figure 3-2. Robinet de carburant et
REMARQUE : Si le moteur est chaud, vérifiez
que le levier d’étrangleur se trouve en
position OUVERT.
4. Voir Figure 3-3. Tournez le bouton de
commande du moteur en position MARCHE.
Figure 3-3.Bouton de commande
étrangleur
OFF
ON
000128
du moteur
5. Dépressurisez le pistolet pulvérisateur.
6. Empêchez l'appareil de bouger en tirant
sur le lanceur à rappel.
7. Voir Figure 3-4. Saisissez fermement la
poignée du lanceur à rappel. Tirez
lentement jusqu’à ressentir une
résistance. Tirez-la ensuite rapidement
pour démarrer le moteur.
Figure 3-4. Lanceur à rappel du moteur
8. Remettez la poignée du lanceur à rappel
en place lentement. NE laissez PAS le
lanceur à rappel se rabattre brusquement
contre son logement.
9. Voir Figure 3-5. Une fois le moteur
démarré, placez lentement le levier
d’étrangleur en position OUVERT (A)
pendant que le moteur se réchauffe. Si le
moteur hésite, replacez le bouton de
l’étrangleur en position FERMÉ, puis de
nouveau en position OUVERT.
Figure 3-5. Robinet de carburant et
• Si le moteur n’est pas parvenu à démarrer
après six tentatives, placez le levier
d’étrangleur en position OUVERT, puis
répétez les étapes 6 à 9.
étrangleur
Manuel du propriétaire de la laveuse à pression 9

Fonctionnement
AVERTISSEMENT
Injection de liquide. Cette machine produit des flux de
liquide à haute pression qui peuvent percer la peau.
L’injection de liquide peut provoquer des blessures
graves, voire mortelles.
(000106b)
(000110)
AVERTISSEMENT
Risque d’incendie. Les surfaces chaudes peuvent
enflammer des matériaux combustibles, ce qui
pourrait causer un incendie. Un incendie pourrait
entraîner la mort ou des blessures graves.
AVERTISSEMENT
(000108)
Surfaces chaudes. Lorsque vous utilisez l’appareil, ne
touchez pas aux surfaces chaudes. Gardez l’appareil
loin des matériaux combustibles lorsqu’il fonctionne.
Le contact avec des surfaces chaudes pourrait entraîner
des brûlures graves ou un incendie.
Arrêt de la laveuse à pression
AVERTISSEMENT
Injection de liquide. Cette machine produit des flux de
liquide à haute pression qui peuvent percer la peau.
L’injection de liquide peut provoquer des blessures
graves, voire mortelles.
IMPORTANT : Le pistolet pulvérisateur
contient de l'eau sous haute pression, même
lorsque le moteur est à l'arrêt et que
l'alimentation en eau est débranchée. Pointez
toujours le pistolet pulvérisateur dans une
direction n'entraînent aucun danger, et
appuyez sur la gâchette pour évacuez la
pression. Activez le verrouillage de la
gâchette lorsque vous ne l'utilisez pas.
1. Relâchez la gâchette du pistolet
pulvérisateur.
2. Tournez le bouton de commande du
moteur en position ARRÊT.
3. Appuyez sur la gâchette du pistolet
pulvérisateur et évacuez l'eau sous haute
pression.
4. Activez le verrouillage de la gâchette.
5. Coupez l'alimentation en eau.
REMARQUE : Maintenez le tuyau à haute
pression raccordé à la pompe et au pistolet
pulvérisateur lorsque le système est sous
pression.
(000106b)
Application de détergent
AVERTISSEMENT
Injection de liquide. Cette machine produit des flux de
liquide à haute pression qui peuvent percer la peau.
L’injection de liquide peut provoquer des blessures
graves, voire mortelles.
AVERTISSEMENT
Risques de blessure. Risque d’injection de liquide. Ne dirigez
pas le pistolet pulvérisateur sur des personnes, des animaux,
des appareils électriques ou des objets fragiles. Tenir hors de
portée des enfants. Le non-respect de cette consigne peut
provoquer des blessures graves, voire mortelles.
REMARQUE : N'UTILISEZ PAS de liquide
caustique avec la laveuse à pression. Utilisez
UNIQUEMENT des détergents sécurisés avec
la laveuse à pression. Respectez les
instructions du fabricant figurant sur l'étiquette
du détergent.
Appliquez le détergent de la manière
suivante :
1. Préparez une solution détergente adaptée
à la tâche à effectuer.
2. Assurez-vous que le tube de siphonnage
reste complètement immergé dans le
détergent.
3. Lorsque vous insérez le siphon dans un
flacon de solution détergente, acheminez
le tube de manière à éviter qu'il ne touche
par inadvertance le silencieux chaud.
4. Vérifiez que la buse à détergent noire est
installée.
REMARQUE : Le détergent ne peut pas être
appliqué à l'aide d'une buse à haute pression
(jaune, blanche, verte, ou rouge). Utilisez
uniquement la buse noire lors de l'application
de détergent.
5. Démarrez le moteur.
6. Tenez fermement le pistolet des deux
mains lors de l'utilisation d'un
pulvérisateur haute pression pour éviter
les accidents lorsque le pistolet se
rétracte.
7. Effectuez une pulvérisation à haute
pression sur une surface restreinte, puis
inspectez-la pour repérer d'éventuels
dommages. Si aucun dommage n'est
visible, continuez l'application de
détergent.
8. Appliquez du détergent sur une surface
sèche, commencez sur la partie inférieure
de la surface à nettoyer, puis remontez en
effectuant des va-et-vient longs,
homogènes et superposés.
IMPORTANT : Rincez le circuit de
siphonnage de détergent après chaque
utilisation. Contactez un revendeur agréé ou
un centre de maintenance qualifié en cas de
questions.
(000106b)
(000117c)
10 Manuel du propriétaire de la laveuse à pression

Fonctionnement
Rinçage
AVERTISSEMENT
Risque de chute. L’utilisation de l’appareil crée des
zones humides, ce qui augmente les risques de
chute. Soyez conscient de la condition de la zone
de travail. Une chute pourrait entraîner des
blessures graves ou la mort.
AVERTISSEMENT
Risque de chute. N’utilisez pas cet appareil ni
aucun de ses composants sur des surfaces
élevées. Le non-respect de cette consigne
pourrait entraîner une chute, des blessures
graves ou la mort.
1. Retirez la buse à détergent noire de la
lance.
2. Choisissez et installez une buse à haute
pression adaptée.
3. Pointez le pistolet pulvérisateur dans une
direction ne représentant aucun danger, et
appuyez sur la détente pour purger le
détergent restant dans le circuit.
4. Maintenez le pistolet pulvérisateur à une
distance sécurisée de la surface sur
laquelle vous comptez intervenir.
5. Tenez fermement le pistolet des deux
mains lors de l'utilisation d'un
pulvérisateur haute pression pour éviter
les accidents lorsque le pistolet se
rétracte.
6. Effectuez une pulvérisation à haute
pression sur une surface restreinte, puis
inspectez-la pour repérer d'éventuels
dommages. Si aucun dommage n'est
visible, continuez le rinçage.
7. Commencez par le haut de la surface à
rincer, puis descendez en effectuant les
mêmes mouvements que lors du
nettoyage.
(000112)
(000114)
Nettoyage du tube de siphonnage de détergent
Rincez le tube de siphonnage de détergent
après chaque utilisation avant d'arrêter le
moteur.
1. Placez le tube/filtre de siphonnage de
détergent dans un seau d'eau propre.
2. Retirez la buse à haute pression de
l'extension de lance.
3. Choisissez et installez la buse à détergent
noire.
4. Procédez au rinçage pendant 1 à 2
minutes.
5. Arrêtez le moteur.
6. Pointez le pistolet dans une direction ne
représentant aucun danger, et appuyez
sur la gâchette pour évacuer l'eau sous
haute pression contenue à l'intérieur.
Activez le verrouillage de la gâchette.
Après chaque utilisation
NE LAISSEZ PAS l'eau à l'intérieur de
l'appareil pendant une période prolongée. Des
sédiments et des minéraux peuvent
s'accumuler sur des pièces de la pompe et la
bloquer. Après chaque utilisation, observez la
procédure suivante :
1. Arrêtez le moteur.
2. Coupez l'alimentation en eau.
3. Pointez le pistolet de pulvérisation dans
une direction ne présentant aucun danger
pour évacuer la pression accumulée.
4. Laissez le moteur refroidir.
5. Débranchez les tuyaux du pistolet de
pulvérisation et de la sortie haute pression
de la pompe. Évacuez l'eau des tuyaux,
du pistolet et de la lance. Essuyez les
composants à l'aide d'un chiffon.
6. Vérifiez que l'interrupteur de démarrage
du moteur et le robinet de carburant sont
en position ARRÊT.
7. Tirez sur la poignée du lanceur à rappel
environ six fois pour évacuer le liquide
restant dans la pompe.
8. Entreposez l’appareil dans un lieu propre
et sec.
REMARQUE : En cas d’entreposage
supérieur à 30 jours, reportez-vous à la
section Entreposage.
Système de refroidissement automatique (décharge thermique)
Si la laveuse à pression fonctionne pendant 3
à 5 minutes sans que le pistolet de
pulvérisation ne soit activé, l'eau circulant
dans la pompe peut atteindre des
températures supérieures à 133 °F (56,1 ºC).
Le système de décharge thermique
s'enclenche pour refroidir la pompe en
déversant l'eau chaude sur le sol.
Manuel du propriétaire de la laveuse à pression 11

Maintenance et dépannage
Section 4 Maintenance et dépannage
Entretien
Un entretien régulier permet d'améliorer les
performances et de prolonger la durée de vie
du moteur/de l'équipement. Generac Power
Systems, Inc. préconise que tous les travaux
d'entretien soient menés par un fournisseur de
services d'entretien agréé. Pour l'entretien
régulier, le remplacement ou la réparation des
appareils et des systèmes de contrôle des
émissions, le propriétaire peut faire appel à la
personne ou à l'atelier de réparation de son
choix. Toutefois, pour obtenir un service de
garantie relatif au contrôle des émissions sans
frais, cette tâche doit être confiée à un
fournisseur de services d'entretien agréé.
Consultez la garantie en matière d'émissions.
La garantie de la laveuse à pression ne
couvre pas les articles ayant fait l’objet d’une
utilisation abusive ou d’une négligence de la
part d’un opérateur. Pour bénéficier
pleinement de la garantie, les opérateurs
doivent entretenir la laveuse à pression
conformément aux instructions du manuel, en
respectant notamment les procédures
d’entreposage exposées dans la section
Entreposage.
REMARQUE : Pour toute question relative au
remplacement des composants, contactez le
Service client de Generac au 1-888GENERAC (1-888-436-3722).
REMARQUE : Les différents réglages et
réparations requis doivent être effectués
chaque saison comme indiqué dans la section
Calendrier de maintenance.
Calendrier de maintenance
Respectez les intervalles de maintenance, en
tenant toujours compte de la première
occurrence selon l’utilisation.
REMARQUE : Des conditions difficiles
imposent des opérations de maintenance plus
fréquentes.
Les 5 premières heures
Vidange de l’huile moteur
Toutes les 8 heures ou tous les jours
Inspection/nettoyage de la crépine
d'admission d'eau*
Inspection du tuyau à haute pression
Inspection du tuyau/filtre de siphonnage
de détergent
Inspection du pistolet pulvérisateur et de
l'ensemble pour repérer d'éventuelles fuites
Nettoyage des débris
Vérifiez le niveau d’huile moteur
Vérifiez le niveau d’huile de la pompe
Toutes les 50 heures ou à chaque saison
Vérification/nettoyage de la crépine
d'admission d'eau**
Vérification/nettoyage du filtre à air**
Vidange de l’huile de la pompe**
Vidange de l’huile moteur**
Inspection du silencieux et du
pare-étincelles*
Toutes les 100 heures ou à chaque saison
Entretien de la bougie
* Nettoyez en cas d'obstruction. Remplacez
en cas de perforation ou de déchirure.
** Entretenez le filtre à air plus souvent
si l'environnement est sale ou poussiéreux.
Maintenance préventive
Des saletés ou des débris peuvent provoquer
des dysfonctionnements et endommager
l’équipement. Nettoyez la laveuse à pression
quotidiennement ou avant chaque utilisation.
Maintenez la zone environnant le silencieux
libre de tout débris combustible. Inspectez
toutes les ouvertures de refroidissement de le
laveuse à pression.
• Nettoyez les surfaces externes à l’aide d’un
chiffon humide.
• N'INSÉREZ AUCUN objet dans les
ouvertures de refroidissement.
• Éliminez la crasse, les résidus d’huile, etc.,
à l’aide d’une brosse douce.
• Éliminez les saletés et les débris à l’aide
d’un aspirateur.
Inspection et nettoyage de la
crépine d'admission
Inspectez la crépine au niveau de l'admission
d'eau de la pompe. Nettoyez la crépine si elle
est obstruée, et remplacez-la si elle est
endommagée.
Inspection des tuyaux à haute
pression
Les tuyaux à haute pression peuvent fuir à
cause de l'usure, des pliures ou d'utilisations
abusives. Inspectez les tuyaux avant chaque
utilisation. Essayez de repérer d'éventuelles
traces de coupure, de fuite, d'abrasion, de
gonflement, de dommages ou de
déplacement des raccords. Si vous en
repérez, remplacez immédiatement le tuyau.
REMARQUE : NE RÉPAREZ PAS le tuyau à
haute pression. Remplacez-le par un tuyau
respectant ou dépassant la pression nominale
maximale de l'appareil.
12 Manuel du propriétaire de la laveuse à pression

Maintenance et dépannage
000123
AVERTISSEMENT
Injection de liquide. Cette machine produit des flux de
liquide à haute pression qui peuvent percer la peau.
L’injection de liquide peut provoquer des blessures
graves, voire mortelles.
(000106b)
000109
000131
Inspection du tube de siphonnage
du détergent
Inspectez le filtre du tube de détergent et
nettoyez-le s'il est obstrué. Le tube doit être
fermement fixé sur le raccord cannelé.
Examinez le tube pour repérer d'éventuelles
fuites ou déchirures. Remplacez le filtre ou le
tube si l'un des deux est endommagé.
7. Installez la lance sur le pistolet
pulvérisateur.
Inspection du pistolet pulvérisateur
Voir Figure 4-1.
REMARQUE : Remplacez le pistolet
pulvérisateur immédiatement si l'un des
essais montre une défaillance.
1. Vérifiez que le tuyau est fermement
raccordé au pistolet pulvérisateur.
Figure 4-2. Retrait des débris
2. Appuyez sur la gâchette et relâchez-la.
REMARQUE : La gâchette doit revenir à sa
position d'origine et se verrouiller une fois
relâchée.
Figure 4-3. Rinçage de la lance par
circulation inversée
8. Vérifiez que le tuyau est raccordé à
l'admission d'eau de la pompe, et que le
tuyau à haute pression est raccordé au
pistolet pulvérisateur et à la pompe.
9. Activez l'arrivée d'eau.
10. Démarrez le moteur.
11. Testez la laveuse à pression en l'utilisant
Figure 4-1. Essais à effectuer sur le pistolet
pulvérisateur (standard)
avec chaque buse à raccordement rapide.
Vidange de l’huile de la pompe
Entretien des buses
Une impulsion peut se faire ressentir en cas
de surpression dans la pompe, lorsque vous
appuyez sur la gâchette du pistolet
pulvérisateur. La surpression dans la pompe
est généralement causée par une obstruction
de la buse. Nettoyez immédiatement la buse
de la manière suivante :
1. Coupez le moteur et l'alimentation en eau.
REMARQUE : Maintenez le tuyau à haute
pression raccordé à la pompe et au pistolet
pulvérisateur lorsque le système est sous
pression.
2. Libérez la pression de l'eau du pistolet
pulvérisateur.
3. Retirez la buse de la lance.
4. Voir Figure 4-2. Utilisez un trombone pour
retirer les débris.
5. Voir Figure 4-3. Retirez la lance du pistolet
pulvérisateur puis rincez à fond.
6. Installez la buse sur la lance.
Manuel du propriétaire de la laveuse à pression 13
1. Nettoyez soigneusement la zone au tour du
bouchon de vidange d'huile (Figure 2-1).
2. Placez une petite cuvette sous le bouchon
de vidange d'huile pour recueillir l'huile.
3. Retirez le bouchon de vidange d'huile.
Vidangez la totalité de l’huile.
4. Retirez le bouchon de vidange d'huile.
Évitez de serrer excessivement.
5. Nettoyez la zone autour de la jauge d’huile
de la pompe.
6. Remplissez la pompe avec de l'huile nondétergente SAE 15W40. Le niveau d'huile
doit se situer entre les repères de la jauge
(Figure 2-5). Ne remplissez pas à ras bord.
7.Insérez la jauge d'huile et serrez
fermement à la main.
8. Nettoyez toute trace d’huile déversée hors
du réservoir.

Maintenance et dépannage
000268
000272
A
B
000273
000274
A
000275
Figure 4-4. Vidange de l'huile de la pompe
Figure 4-5. Jauge d'huile de la pompe
Remplacement de la courroie
Il peut être nécessaire de remplacer la
courroie en cas de rupture de perte soudaine
de pression :
1. Retrait du garde-courroie
2. Voir Figure 4-6. Desserrez les écrous (A)
et le boulon de serrage (B).
Figure 4-7. Poussée de la pompe vers
4. Retirez l'ancienne courroie et en installer
une nouvelle.
5. Voir Figure 4-8. Sortez la pompe du moteur
de façon à ce que le boulon se trouve à
environ 2/3 du chemin à travers la fente du
support de la pompe (A). Serrez le boulon.
Figure 4-8. Détachement de la pompe
6. Serrez le boulon de serrage (B) (page 14).
Les poulies doivent être alignées à moins
de 1° l'une de l'autre et la nouvelle
courroie doit être tendue à environ 90,5 lb.
(déflexion de 1/8 po sous 8,3 lb avec un
tensiomètre).
le moteur
du moteur
7. Serrez les quatre écrous (A) (page 14).
8. Remplacez le garde-courroie avant de
faire fonctionner l'appareil.
Figure 4-6. Desserrage des écrous
3. Poussez la pompe vers le moteur (Figure
4-7).
14 Manuel du propriétaire de la laveuse à pression

Maintenance et dépannage
00013
SAE 30*
5W-30
10W-30**
Plage de température de l’utilisation prévue
000115
000116
Maintenance du moteur
Recommandations relatives à
4. Voir Figure 4-11. Vissez la jauge dans le
col de remplissage. Vérifiez sur la jauge
que le niveau d'huile est correct.
l'huile moteur
Afin que la garantie du produit reste en
vigueur, l’entretien de l’huile à moteur doit être
fait conformément aux recommandations du
présent manuel. Pour un entretien facile, des
trousses d’entretien conçues pour cet appareil
sont offertes par le fabricant. Elles
comprennent de l’huile à moteur, un filtre à
huile, un filtre à air, des bougies d’allumage,
un chiffon et un entonnoir. Ces trousses sont
disponibles auprès d’un fournisseur
indépendant de services d’entretien agréé.
La viscosité appropriée de l’huile dépend du
climat dans lequel opère l'appareil. Consultez
le tableau pour sélectionner la bonne
viscosité.
Figure 4-11. Plage de fonctionnement sûr
5. Ajoutez la quantité requise d’huile moteur
recommandée.
6. Remettez le bouchon de remplissage
d’huile en place et serrez-le
manuellement.
REMARQUE : Certains appareils possèdent
plusieurs orifices de remplissage d’huile. Il
n’est pas nécessaire d’utiliser plus d’un point
de remplissage.
Remplacement de l’huile moteur
Si vous utilisez la laveuse à pression dans un
environnement extrêmement contraignant,
sale, poussiéreux ou chaud, remplacez l’huile
Figure 4-9. Viscosité de l'huile
* En dessous de 50 °F (10 °C), l'utilisation de
SAE 30 entraînera un démarrage difficile.
** Au-dessus de 80 °F (27 °C), l'utilisation de
10W30 entraînera une plus grande
consommation d'huile. Inspectez le niveau
d'huile plus fréquemment.
Inspection du niveau d’huile moteur
Inspectez le niveau d’huile moteur avant
chaque utilisation ou toutes les 8 heures de
fonctionnement.
1. Placez la laveuse à pression sur une
surface plane.
2. Nettoyez la zone de remplissage d’huile.
3. Voir Figure 4-10. Retirez le bouchon de
remplissage d’huile et essuyez la jauge.
Figure 4-10. Remplissage d’huile moteur
Manuel du propriétaire de la laveuse à pression 15
plus fréquemment.
REMARQUE : Évitez de polluer. Conservez
les ressources. Jetez l’huile usagée dans un
centre de collecte des déchets approprié.
Assurez-vous que le moteur est toujours
chaud, puis changez l’huile selon la procédure
suivante :
1. Placez la laveuse à pression sur une
surface plane.
2. Débranchez le fil de la bougie d’allumage
et placez-le à l’écart de celle-ci pour éviter
tout contact.
3. Nettoyez la zone de remplissage d’huile et
le bouchon de vidange d’huile.
4. Retirez le bouchon de remplissage d’huile.
5. Voir Figure 4-12. Retirez le bouchon du
tuyau de vidange d’huile (A) et purgez la
totalité de l’huile dans un bac adapté.
6. Remettez le bouchon de vidange d’huile
en place et serrez-le fermement.
7. Voir Figure 4-11. Versez lentement l’huile
dans l’orifice de remplissage jusqu’à ce
que le niveau d’huile se situe entre les
repères L et H sur la jauge. NE
REMPLISSEZ PAS à ras-bord.
8. Remettez le bouchon de remplissage
d’huile en place et serrez-le
manuellement.
9. Nettoyez toute trace d’huile déversée hors
du réservoir.
10. Mettez l’huile au rebut conformément à
toutes les réglementations applicables.

Maintenance et dépannage
000276
A
B
A
Démarrage accidentel. Débranchez le câble de la
bougie lorsque vous effectuez l’entretien de l’appareil.
Le non-respect de cette consigne pourrait entraîner la
mort ou des blessures graves.
(000102)
AVERTISSEMENT
Entretien de la bougie d’allumage
Pour effectuer la maintenance de la bougie
d’allumage :
1. Nettoyez soigneusement la zone
environnant la bougie d’allumage.
2. Retirez et inspectez la bougie d’allumage.
3. Voir Figure 4-14. Inspectez l’écartement
(A) des électrodes à l’aide d’une jauge
d'épaisseur et remplacez la bougie si
l'écartement (A) n'est pas conforme aux
spécifications figurant sur la fiche
technique du produit.
Figure 4-12. Bouchon de vidange d'huile
Filtre à air
Si le filtre à air est sale, le moteur ne
fonctionne pas correctement et risque d’être
endommagé. Réduisez son intervalle de
maintenance dans un environnement sale ou
poussiéreux.
Pour effectuer la maintenance du filtre à air :
1. Voir Figure 4-13. Retirez le couvercle du
filtre à air (A).
2. Retirez la (les) cartouche(s) du filtre.
3. Inspectez la (les) cartouche(s) et
remplacez-les si nécessaire. Pour
commander des pièces de rechange,
contactez le Service client de Generac au
1-888-GENERAC (888-436-3722) afin de
connaître le CRIA le plus proche de chez
vous.
4. Nettoyez la cartouche en mousse à l’eau
chaude savonneuse. Rincez-le et laissezle bien sécher. Plongez-le dans de l’huile
moteur propre et éliminez l’excès d’huile
en pressant.
5. Tapotez plusieurs fois la cartouche en
papier sur une surface dure pour en
éliminer la poussière. Vous pouvez
également utiliser de l’air comprimé (sans
dépasser 30 psi [207 kPa]) pour souffler la
poussière hors du filtre depuis l’intérieur.
6. Essuyez la poussière à l’intérieur du
couvercle du filtre à air à l’aide d’un chiffon
propre humide.
7. Mettez la (les) cartouche(s) nettoyée(s) ou
neuve(s) en place. Vérifiez que le joint est
bien en place (le cas échéant).
8. Remettez le couvercle du filtre à air en
place. Serrez fermement les vis ou les
fixations du filtre à air.
000277
Figure 4-13. Filtre à air
16 Manuel du propriétaire de la laveuse à pression
Figure 4-14. Bougie d’allumage
REMARQUE : Ne remplacez la bougie
d’allumage que si les électrodes sont trouées
ou brûlées, ou si la porcelaine est fissurée.
Utilisez EXCLUSIVEMENT la bougie de
rechange recommandée. Reportez-vous à la
Fiche technique du produit.
4. Serrez manuellement bougie, puis serrez
de 3/8 à 1/2 tour supplémentaire à l’aide
d’une clé à bougies.
Inspection de la bougie
1. Débranchez le fil de la bougie.
2. Maintenez le fil de la bougie à un endroit
où il ne pourra pas entrer en contact avec
la bougie.
3. Testez la bougie à l'aide d'un testeur de
bougie homologué.
REMARQUE : N'essayez PAS de vérifier la
présence d'étincelles si la bougie n'est pas
installée.
Inspection du silencieux et du
pare-étincelles
REMARQUE :
terrain recouvert de forêt, de broussailles ou
d’herbe constitue une violation de l’Article 4442
du California Public Resource Code, à moins
que le système d’échappement ne soit équipé
d’un pare-étincelles entretenu en bon état de
L’utilisation du moteur sur un
000134a

Maintenance et dépannage
000135
000136
(000105)
DANGER
Explosion et incendie. Le carburant et ses vapeurs sont
extrêmement inflammables et explosifs. Ajoutez du
carburant dans un endroit bien aéré. Gardez l’appareil loin
du feu et des étincelles. Le non-respect de cette consigne
entraînera la mort ou des blessures graves.
(000109)
AVERTISSEMENT
Risque d’incendie. Vérifiez que l’appareil a bien refroidi
avant d’installer une protection de rangement et
d’entreposer l’appareil. Le contact avec des surfaces
chaudes pourrait entraîner un incendie.
fonctionnement, comme défini dans ledit article.
Des lois similaires peuvent s’appliquer dans
d’autres juridictions.
REMARQUE : Pour toute question relative au
remplacement des composants, contactez le
Service client de Generac au 1-888GENERAC (1-888-436-3722).
REMARQUE : Utilisez EXCLUSIVEMENT
des pièces de rechange d’origine.
Inspectez le silencieux pour vérifier l’absence
de fissures, de signes de corrosion ou
d’autres dommages. Retirez le pare-étincelles
(le cas échéant) et inspectez-le pour vérifiez
qu’il n’est pas endommagé, ni obstrué par es
dépôts de calamine. Si des pièces de
rechange sont nécessaires.
Inspection de l’écran du
pare-étincelles (si équipé)
1. Desserrez les attaches et retirez la
protection thermique du silencieux. Voir
Figure 4-15.
2. Desserrez les attaches et retirez le pareétincelles du silencieux. Voir Figure 4-16.
3. Inspectez le pare-étincelles. Remplacez-le
s'il est déchiré, perforé ou endommagé de
quelque façon que ce soit. (réf. 0K1851).
4. Si l'écran semble en bon état, nettoyez-le
à l’aide d’un solvant disponible dans le
commerce et réinstallez-le.
Entreposage
Généralités
• Ne placez JAMAIS un couvercle
d’entreposage sur la laveuse à pression si
elle est chaude. Laissez l’appareil refroidir
à température ambiante avant de
l’entreposer.
• N’entreposez JAMAIS de carburant d’une
saison à une autre à moins de l’avoir traité
de façon appropriée.
• Remplacez le conteneur de carburant s’il
présente des traces de rouille. La présence
de rouille dans le carburant provoque des
dysfonctionnements du circuit de
carburant.
• Recouvrez l’appareil d’un couvercle de
protection adapté résistant à l’humidité.
• Entreposez l’appareil dans un lieu propre et
sec.
• Veillez à toujours entreposer la laveuse à
pression et le carburant à l’écart des
sources de chaleur et d’inflammation.
Entreposage hivernal
REMARQUE : Si l'économiseur de pompe
n'est pas disponible, branchez une section de
tuyau d'arrosage de 3 pieds (1 m) à
l'adaptateur d'arrivée d'eau. Versez de
l'antigel pour véhicule de plaisance (antigel
Figure 4-15. Attaches de la protection
thermique
sans alcool) dans le tuyau. Tirez deux fois sur
la poignée du lanceur à rappel. Débranchez le
tuyau de 3 pieds (1 m).
• Entreposez l’appareil dans un endroit
propre et sec.
REMARQUE : Si vous ne comptez pas utiliser
la laveuse à pression pendant plus de
30 jours, préparez le moteur et la pompe en
vue de leur entreposage.
Préparation du circuit de carburant
à l'entreposage
Tout carburant entreposé pendant plus de
30 jours risque de se dégrader et
d’endommager les composants du circuit de
Figure 4-16. Attaches du pare-étincelles
Manuel du propriétaire de la laveuse à pression 17
carburant. Veillez à ce que le carburant reste
frais et utilisez un stabilisateur de carburant.
Si vous ajoutez du stabilisateur dans le circuit
de carburant, préparez le moteur et faites-le
tourner conformément à la section

Maintenance et dépannage
Démarrage de la laveuse à pression. Faites
tourner le moteur pendant 2 minutes pour
faire circuler le stabilisateur dans l’ensemble
du circuit de carburant. Un carburant préparé
de façon appropriée peut être entreposé
pendant un maximum de 24 mois.
REMARQUE : Si le carburant n’a pas été
traité avec un stabilisateur, il doit être purgé
dans un conteneur adapté. Faites tourner le
moteur jusqu’à ce qu’il s’arrête par manque de
carburant. Il est recommandé d’utiliser un
stabilisateur dans le conteneur d’entreposage
afin de conserver le carburant frais.
Préparation du moteur pour
l'entreposage
1. Vidangez l’huile moteur.
2. Retirez la bougie d’allumage.
3. Versez une cuillère à table (5-10 cm3)
d’huile moteur propre ou vaporisez un
agent anti-buée adapté dans le cylindre.
4. Tirez plusieurs fois la poignée du lanceur à
rappel pour distribuer l’huile dans le
cylindre.
5. Remettez la bougie d’allumage en place.
6. Tirez lentement la poignée du lanceur à
rappel jusqu’à ressentir une résistance.
Cela a pour effet de fermer les soupapes
afin d’empêcher la pénétration d’humidité
dans le cylindre. Relâchez délicatement la
poignée du lanceur à rappel.
Remplacement de l’huile
Remplacez l’huile moteur avant d’entreposer
le générateur. Voir Remplacement de l’huile
moteur.
7. Purgez la pompe de tout liquide restant à
l'intérieur.
8. Tirez sur la poignée du lanceur à rappel
environ six fois pour évacuer le liquide
restant dans la pompe.
9. Frigélisez la pompe avec du Generac
Pump Shield™ (Réf. 0L2414). Ce produit
réduira au maximum les dommages liés
au gel, et lubrifiera les pistons et les joints.
REMARQUE : Si vous ne disposez pas de
Generac Pump Shield™, raccordez un tuyau
d'arrosage de 3 pieds (1 m) à un adaptateur
d'admission d'eau. Versez de l'antigel pour
véhicule de plaisance (sans alcool) dans le
tuyau. Tirez deux fois sur la poignée du
lanceur à rappel. Débranchez le tuyau.
10. Entreposez l’appareil dans un lieu propre
et sec.
Préparation de la pompe pour
l’entreposage
REMARQUE : Si vous ne comptez pas utiliser
la laveuse à pression pendant plus de
30 jours, préparez le moteur et la pompe en
vue de leur entreposage.
Protégez l’appareil du gel. Le non-respect de
cette consigne endommagera la pompe de
façon permanente, la rendant inutilisable. Les
dommages dus au gel ne sont pas couverts
par la garantie.
Pour protéger l’appareil du gel :
1. Arrêtez le moteur.
2. Fermez le robinet de carburant.
3. Coupez l'alimentation en eau.
4. Pointez le pistolet de pulvérisation dans
une direction ne présentant aucun danger
pour évacuer la pression accumulée.
5. Laissez le moteur refroidir.
6. Débranchez les tuyaux du pistolet de
pulvérisation et de la sortie haute pression
de la pompe. Évacuez l'eau des tuyaux,
du pistolet et de la lance. Essuyez les
composants à l'aide d'un chiffon.
18 Manuel du propriétaire de la laveuse à pression

Maintenance et dépannage
Dépannage
PROBLÈME CAUSE CORRECTION
La pompe ne génère aucune
pression, une pression
erratique, un broutage, des
pertes de pression, ou
n'achemine qu'un faible
volume d'eau.
Le détergent ne se mélange
pas dans le pulvérisateur.
Le moteur tourne bien sans
charge, mais stagne lorsque la
charge est appliquée.
Le moteur ne démarre pas, ou
démarre mais tourne de
manière saccadée.
Le moteur s’arrête en cours de
fonctionnement.
Le moteur manque de
puissance.
Manuel du propriétaire de la laveuse à pression 19
1. Une buse à faible pression
est installée.
2. L'admission d'eau est
obstruée.
3. L'alimentation en eau est
inadaptée.
4. Le tuyau d'admission est
plié ou fuit.
5. La crépine d'admission du
tuyau est bouchée.
6. La température de
l'alimentation en eau
dépasse 100 ºF (37,8 ºC).
7. Obstruction ou fuite au
niveau du tuyau à haute
pression.
8. Le pistolet pulvérisateur
fuit.
9. La buse est obstruée.
10. La pompe est défaillante.
11. Usure de la courroie.
1. Le tube de siphonnage de
détergent n'est pas
immergé.
2. Le tube/filtre de
siphonnage de détergent
est obstrué ou fissuré.
3. Une buse à haute pression
est installée.
1. La vitesse du moteur est
trop faible.
1. Niveau d'huile bas,
« Système d'alerte
d'huile ».
2. Filtre à air encrassé.
3. Panne de carburant.
4. Carburant éventé.
5. Fil de la bougie d’allumage
non raccordé à la bougie.
6. Bougie d’allumage
défectueuse.
7. Présence d’eau dans le
carburant.
8. Mélange de carburant
excessivement riche.
9. Tournez le bouton de
commande du moteur en
position ARRÊT.
1. Panne de carburant. 1. Remplissez le réservoir de
1. Filtre à air sale. 1. Remplacez le filtre à air.
1. Remplacez par une buse à
haute pression.
2. Nettoyez l'admission.
3. Rectifiez le débit d'eau.
4. Redressez le tuyau
d'admission, colmatez la
fuite.
5. Inspectez et nettoyez la
crépine du tuyau
d'admission.
6. Réduisez la température
de l'alimentation en eau.
7. Nettoyez les sources
d'obstruction ou remplacez
le tuyau.
8. Remplacez le pistolet
pulvérisateur.
9. Nettoyez la buse.
10. Contactez un
concessionnaire
réparateur agréé.
11. Contactez le service après-
vente local pour remplacer
la courroie.
1. Insérez le tube de
siphonnage de détergent
dans le détergent.
2. Nettoyez ou remplacez le
filtre/tube de siphonnage
de détergent.
3. Installez une buse à basse
pression.
1. Contactez un
concessionnaire réparateur
agréé.
1. Remplissez le carter d'huile
au niveau approprié.
2. Nettoyez ou remplacez le
filtre à air.
3. Remplissez le réservoir de
carburant.
4. Remplacez le carburant
par du carburant frais.
5. Raccordez le fil à la bougie
d’allumage.
6. Remplacez la bougie
d’allumage.
7. Purgez le réservoir de
carburant et faites le plein
de carburant frais.
8. Contactez un
concessionnaire
réparateur agréé.
9. Tournez le bouton de
commande du moteur en
position MARCHE.
carburant.

Remarques
20 Manuel du propriétaire de la laveuse à pression


Réf. 0L1528 Rév. C 20/09/2018 ©2018 Generac Power Systems, Inc. Tous droits réservés.
Les spécifications sont sujettes à modification sans
préavis. Aucune forme de reproduction n’est
autorisée sans le consentement écrit préalable de
Generac Power Systems Inc.
Generac Power Systems, Inc.
S45 W29290 Hwy. 59
1-888-GENERAC (1-888-436-3722)
Waukesha, WI 53189
www.generac.com/pro
 Loading...