

Page 1

Owner’s Manual
003986
Light Tower
PLT240 LINK Tower
For technical assistance contact:
www.generacmobileproducts.com
Technical Support
1-800-926-9768
SAVE THIS MANUAL FOR FUTURE REFERENCE
Page 2

Use this page to record important information about your Light Tower
(000005)
WARNING
California Proposition 65. This product contains or
emits chemicals known to the state of California to
cause cancer, birth defects, and other reproductive
harm.
Record the information found on your unit data label on
Unit Model Number
Unit Serial Number
this page. See unit serial number location (Unit Serial
Number Locations). The data plate is affixed to the
mast inside the cabinet.
When contacting an Generac Mobile Products
Authorized Dealer about parts and service, always
supply the complete model number and serial number of
the unit.
Operation and Maintenance: Proper maintenance and
care of the Light Tower ensures a minimum number of
problems and keeps operating expenses at a minimum. It
is the operator’s responsibility to perform all safety
checks, to verify that all maintenance for safe operation is
performed promptly, and to have the equipment checked
periodically by a Generac Mobile Products Authorized
Dealer. Normal maintenance, service and replacement of
parts are the responsibility of the owner/operator and, as
such, are not considered defects in materials or
workmanship within the terms of the warranty. Individual
operating habits and usage may contribute to the need
for additional maintenance or service.
ii Owner’s Manual for PLT240 Light Tower
Page 3

Table of Contents
Section 1: Introduction and Safety
Introduction ..........................................................1
Read This Manual Thoroughly ....................................1
How to Obtain Service .................................................1
Safety Rules .........................................................1
General Hazards ..................................................2
Fire Hazards .........................................................2
Electrical Hazards ................................................2
Operating Safety ..................................................2
Positioning the Unit .....................................................2
Starting the Unit ...........................................................3
Raising and Lowering the Mast ...................................3
Service Safety ......................................................3
Safety and Operating Decals ..............................3
Section 2: General Information
Specifications ......................................................5
Section 4:Maintenance
Daily Walk-Around Inspection ......................... 17
General Maintenance ........................................ 17
Preparing for Service .................................................17
Cleaning the Unit .......................................................17
Inspecting the Unit ..................................................... 17
Basic Maintenance Schedule ........................... 17
Winch Use, Operation and Maintenance ......... 18
Prior to Use ............................................................... 18
Operation ................................................................... 18
Maintenance .............................................................. 18
Winch Mechanical Brake ........................................... 18
Jack Maintenance .............................................. 18
Wheel Maintenance ........................................... 18
Section 5:Troubleshooting
Troubleshooting the Lights .............................. 19
Unit Serial Number Locations ............................6
Unit Dimensions ..................................................7
Component Locations .........................................8
Control Panel .......................................................9
Control Panel Components and Functions ..................9
Internal Storage .................................................10
Lifting and Transporting ...................................10
Lifting the Unit ...........................................................10
Transporting the Unit .................................................10
Tying the Unit Down ..........................................11
Section 3:Operation
Operation Configuration ...................................13
LED Lights Only ........................................................13
LED Lights and Auxiliary Power ................................13
Light Tower Setup .............................................13
Raising the Mast ................................................14
Section 6:Wiring Diagrams
AC Wiring ........................................................... 21
Prestart Checklist ..............................................15
Turn Unit ON ......................................................15
Turn Unit OFF .....................................................15
Lowering the Mast .............................................15
Long-Term Storage ............................................16
Owner’s Manual for PLT240 Light Tower iii
Page 4

Table of Contents
This page intentionally left blank.
iv Owner’s Manual for PLT240 Light Tower
Page 5
Section 1: Introduction and Safety
(000100a)
WARNING
Consult Manual. Read and understand manual
completely before using product. Failure to
completely understand manual and product
could result in death or serious injury.
(000001)
DANGER
Indicates a hazardous situation which, if not avoided,
will result in death or serious injury.
(000002)
WARNING
Indicates a hazardous situation which, if not avoided,
could result in death or serious injury.
(000003)
CAUTION
Indicates a hazardous situation which, if not avoided,
could result in minor or moderate injury.
Introduction and Safety
Introduction
Thank you for purchasing a Generac Mobile Products LLC
product. This unit has been designed to provide high
performance, efficient operation, and years of use when
maintained properly.
The information in this manual is accurate based on
products produced at the time of publication. The
manufacturer reserves the right to make technical updates,
corrections, and product revisions at any time without
notice.
Read This Manual Thoroughly
If any section of the manual is not understood, contact your
nearest Generac Mobile Products Authorized Dealer, or
contact Generac Mobile Products Technical Service at 1800-926-9768 or
any questions or concerns.
www.generacmobileproducts.com
with
Safety Rules
The manufacturer cannot anticipate every possible
circumstance that might involve a hazard. The warnings in
this manual, and on tags and decals affixed to the unit are,
therefore, not all inclusive. If using a procedure, work
method or operating technique that the manufacturer does
not specifically recommend, verify that it is safe for others.
Also make sure the procedure, work method or operating
technique utilized does not render the equipment unsafe.
Throughout this publication, and on tags and decals affixed
to the unit, DANGER, WARNING, CAUTION and NOTE
blocks are used to alert personnel to special instructions
about a particular operation that may be hazardous if
performed incorrectly or carelessly. Observe them
carefully. Their definitions are as follows:
The owner is responsible for proper maintenance and safe
use of the equipment. Comply with regulations the
Occupational Safety and Health Administration (OSHA)
has established, or with equivalent standards. Also, verify
that the unit is applied, used, and maintained in accordance
with the manufacturer's instructions and recommendations.
Do nothing that might alter safe application/usage and
render the unit in noncompliance with the aforementioned
codes, standards, laws, and regulations
Save these instructions for future reference. This manual
contains important instructions for the unit that should be
followed during setup, operation and maintenance of the
unit and battery. ALWAYS supply this manual to any
individual that will use this machine.
.
How to Obtain Service
When the unit requires servicing or repairs, contact a
Generac Mobile Products Authorized Dealer for assistance.
Service technicians are factory-trained and are capable of
handling all service needs. For assistance locating a dealer,
www.generacmobleproducts.com/parts-service/
go to
.
find-service
Products Authorized Dealer about parts and service,
always supply the complete model number and serial
number of the unit as given on its data decal located on
the unit. Record the model number and serial numbers in
the spaces provided on the inside front cover of this
manual.
Owner’s Manual for PLT240 Light Tower 1
When contacting an Generac Mobile
NOTE: Notes contain additional information important to
a procedure and will be found within the regular text of
this manual.
These safety alerts cannot eliminate the hazards that they
indicate. Common sense and strict compliance with the
special instructions while performing the action or service
are essential to preventing accidents.
Page 6
Introduction and Safety
(000111)
WARNING
Moving Parts. Keep clothing, hair, and
appendages away from moving parts. Failure
to do so could result in death or serious injury.
(000108)
WARNING
Hot Surfaces. When operating machine, do not
touch hot surfaces. Keep machine away from
combustibles during use. Hot surfaces could
result in severe burns or fire.
WARNING
Risk of injury. Do not operate or service this machine
if not fully alert. Fatigue can impair the ability to service
this equipment and could result in death or serious
injury.
(000215)
WARNING
Do not operate this unit while transporting. Doing so
could result in death or serious injury.
(000231)
(000234a)
WARNING
Crushing hazard. Verify unit is properly secured and
on level ground. An unsecured unit can suddenly roll
or move, causing death or serious injury.
CAUTION
(000306)
Equipment Damage. Failure to perform a daily
inspection could result in damage to the unit.
(000110)
WARNING
Risk of Fire. Hot surfaces could ignite
combustibles, resulting in fire. Fire could
result in death or serious injury.
(000354)
DANGER
Electrocution. In the event of electrical accident,
immediately shut power OFF and disconnect unit
from source. Use non-conductive implements to free
victim from live conductor. Apply first aid and get medical help.
Failure to do so will result in death or serious injury.
(000104)
DANGER
Electrocution. Water contact with a power
source, if not avoided, will result in death
or serious injury.
(000152)
DANGER
Electrocution. Verify electrical system is
properly grounded before applying power.
Failure to do so will result in death or serious
injury.
(000188)
DANGER
Electrocution. Do not wear jewelry while
working on this equipment. Doing so will
result in death or serious injury.
DANGER
Electrocution. DO NOT use the unit if
electrical cord is cut or worn through. Doing
so will result in death or serious injury.
(000263a)
(000260a)
High Voltage. Verify area above unit is clear
of overhead wires and obstructions. Contact
with high-voltage power lines will result in
death or serious injury.
DANGER
General Hazards
Electrical Hazards
Fire Hazards
2 Owner’s Manual for PLT240 Light Tower
Operating Safety
Positioning the Unit
•
The area immediately surrounding the unit should be
dry, clean, and free of debris.
•
Position and operate the unit on a firm, level surface.
•
If the unit requires external grounding (using the
grounding stud on the control panel), follow any
local, state, and National Electrical Code (NEC)
guidelines when connecting.
Page 7
Introduction and Safety
DANGER
Electrocution. DO NOT use the unit if
electrical cord is cut or worn through. Doing
so will result in death or serious injury.
(000263a)
WARNING
Electrocution. Do not set up or operate
this unit if severe weather is expected.
Lightning strikes can kill or cause severe injury
even if you are not touching the unit.
(000296)
WARNING
(000345)
Personal Injury. Do not set-up or operate unit
in high winds. Doing so could result in death,
serious injury, property, or unit damage.
WARNING
Personal Injury. Stop immediately if the mast hangs
up or the winch cable develops slack. Excess slack
could cause the mast to collapse, resulting in personal
injury or equipment damage.
(000265)
WARNING
Personal injury. Use caution when winding
winch cable. Failure to do so could result
in serious injury.
(000391)
Starting the Unit
DO NOT start a unit in need of repair.
•
Raising and Lowering the Mast
IMPORTANT NOTE: Unit wind rating is 45 mph.
DO NOT
all electrical components are shut down.
•
ALWAYS
in damp conditions. Do not service the unit if your
skin or clothing is wet. Do not allow water to collect
around the base of the unit.
•
DO NOT
power washers, or steam cleaners. Water may
collect in the unit, causing damage to electrical parts.
•
Replace all missing and hard to read decals. Decals
provide important operating instructions and warn of
dangers and hazards.
•
Wear heavy leather gloves when handling winch
cables. Never let cables slip through bare hands.
•
Only use mild soap and water to clean the lens covers.
Other chemicals may damage the lens covers.
perform even routine maintenance unless
use extreme care when servicing this unit
wash the unit with high pressure hoses,
Safety and Operating Decals
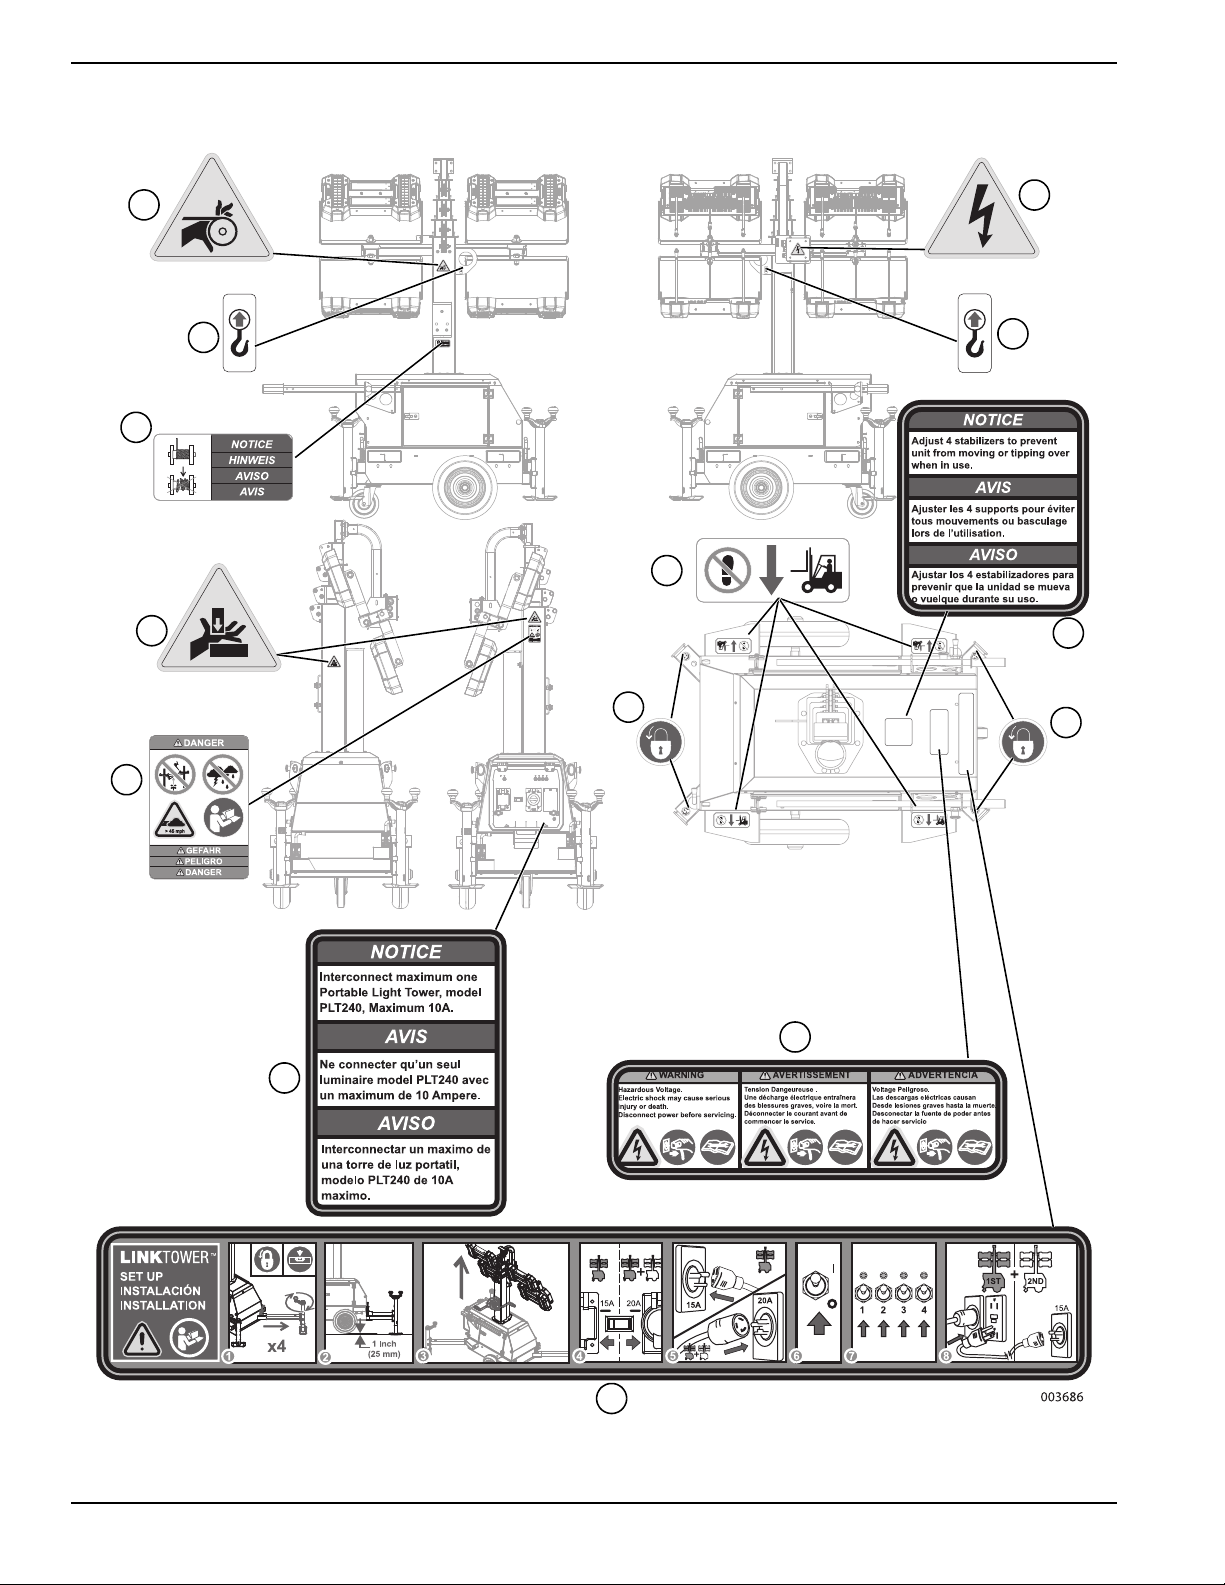
See Table 1-1 and Figure 1-1. This unit features numerous
safety and operating decals. These decals provide
important operating instructions and warn of dangers and
hazards. The following diagrams illustrate decal locations
and descriptions.
Replace any missing or hard-to-read decals and use care
when washing or cleaning the unit. Decal part numbers
can be found in the parts manual at
www.generacmobileproducts.com.
• ALWAYS extend the outriggers and level the unit
before raising the mast. DO NOT retract the
outriggers while the mast is up.
• Keep area around the unit clear of people while
raising and lowering the mast.
• ALWAYS lower the mast when not in use.
Service Safety
This unit uses high voltage circuits capable of causing
serious injury or death. Only a qualified and licensed
electrician should troubleshoot or repair problems
occurring in this equipment.
Table 1-1. Decal Descriptions
ID Description
1 Warning—Entanglement Hazard
2 Lifting Point
3 Notice—Correctly Wind Winch
4 Warning—Crushing Hazard
Danger—Electrical Storms, High Wind and Overhead
5
Wires
6 Notice—Interconnect (located on flat beneath right
side receptacles)
7 Quick Start Guide
Warning—Hazardous Voltage: Disconnect Before
8
Servicing
9 Lock Stabilizing Feet
10 Forklift Pocket: Not a Step
11 Notice—Adjust Four Stabilizers
12 Warning—Electric Shock Hazard
•
Before servicing the unit, verify the main breaker
switch and circuit breakers are in the OFF (O)
position, and the shore power cord is disconnected.
Owner’s Manual for PLT240 Light Tower 3
Page 8
Introduction and Safety
7
9
9
5
4
3
2
1
12
2
10
8
6
11
Figure 1-1. Decal Locations
4 Owner’s Manual for PLT240 Light Tower
Page 9

Section 2: General Information
Specifications
DESCRIPTION PLT240-LED
Dimensions
See Unit Dimensions.
Weights
Operating Weight 558 lbs (252.6 kg)
Lighting
Lighting Type Light-Emitting Diode (LED)
LED Driver (4) Mean Well HLG-320H-30A
Lumens 88,000
AC Distribution
Circuit Breaker Size 15A / 20A Main Breaker
Amperage Selection 15A / 20A
120V-20 Amp GFCI Receptacle 1
Power Selection Switch 1
120V-20 Amp Twist Lock Inlet 1
120V-15 Amp Inlet 1
Chassis
Number of Axles 1
Tire Size 3.5 x 8 in. (89 x 203 mm)
Locking Caster Size 6 in. (152 mm)
Maximum Cargo Capacity 180 in. (81.7 mm)
Specifications are subject to change without notice.
General Information
Owner’s Manual for PLT240 Light Tower 5
Page 10

General Information
003622
Unit ID Tag
(Located on mast inside cabinet)
xxxxx
Unit Serial Number Locations
See Figure 2-1 to locate the unit ID tag on the unit. Important information, such as the unit serial number, model
number, and tire loading information are found on these tags. Record the information from these tags so it is available
if the tags are lost or damaged. When ordering parts or requesting assistance, you may be asked to provide this
information.
Figure 2-1. Unit Serial Number Locations
6 Owner’s Manual for PLT240 Light Tower
Page 11

Unit Dimensions
003440
C
B
A
D
E
F
General Information
Figure 2-2. Unit Dimensions
ABCDEF
PLT240
(1.37 m)
54 in.
77.5 in.
(1.96 m)
Specifications are subject to change without notice.
16 ft.
(4.88 m)
31.5 in.
(0.80 m)
57 in.
(1.45 m)
74 in.
(1.88 m)
Owner’s Manual for PLT240 Light Tower 7
Page 12

General Information
003443
F
E
C
D
B
A
H
I
J
K
L
G
Component Locations
Figure 2-3. Component Locations—Front and Left Side
A. Forklift pockets / tie-down locations G. LED Drivers (inside cabinet)
B. Swiveling caster (lockable) H. Lockable storage access door (2)
C. Control panel I. Outrigger and jack (4)
D. Water protection shield J. Handle (2)
E. Quick start guide K. Winch
F. LED fixtures (4) L. Lifting eye
8 Owner’s Manual for PLT240 Light Tower
Page 13

General Information
ON
15A
20A
OFF
ON
OFF
20A OUT15A IN 20A IN
1 2 3 4
003389
G
F
E
DC
B
A
Control Panel
IMPORTANT NOTE: If the control panel is ever removed, replace the gasket behind control panel and the gasket
between the water ingress cover and control panel.
Control Panel Components and Functions
(A) Main circuit breaker
Resettable main circuit breaker for the LED lights and
120V/20A GFCI receptacle.
(B) Input power selector switch
Allows the operator to select the input (shore power)
source.
• Choose the 15A setting if the unit will be operated
as a stand-alone light source.
• Choose the 20A setting if auxiliary equipment or a
second PLT240 will be connected to the unit.
See (C) and (G) for more information.
(C) 120VAC-20A plug (shore power input)
Provides a connection point for 120VAC-20A shore power
input to the LED lamps and GFCI receptacle. Requires
NEMA L5-20P connection.
(D) Mast light circuit breakers
Individual circuit breakers for the LED light fixtures.
Figure 2-4. Control Panel
(E) 120VAC/20A GFCI convenience receptacle (5-20R)
Customer convenience receptacle for use in connecting
auxiliary equipment. Includes a Ground Fault Circuit
Interrupter (GFCI) test and reset button. Requires NEMA
5-20P or 5-15P connection.
(F) Electrical ground connection (Optional)
An electrical grounding stud for connecting an earth
ground to the unit if required. Follow local, state, or
National Electrical Code (NEC) guidelines.
(G) 120VAC-15A plug (shore power input)
Provides a connection point for 120V-15A input power for
the LED lamps only. NEMA 5-15 plug. Requires NEMA 515P connection.
Owner’s Manual for PLT240 Light Tower 9
Page 14

General Information
003545
A
(000108)
WARNING
Hot Surfaces. When operating machine, do not
touch hot surfaces. Keep machine away from
combustibles during use. Hot surfaces could
result in severe burns or fire.
003542
B
A
C
D
Internal Storage
See Figure 2-5. The interior of the cabinet can be used
for storing nonflammable items such as shore power
cords, small equipment, or tools when the unit is not in
operation. Locking doors (A) on each side of the cabinet
provide access to the cabinet interior.
NOTE: Cabinet is not waterproof.
Figure 2-5. Internal Storage
4. Close and lock both access doors and the control
panel.
5. See Figure 2-6. To lift the unit, use one of the
following methods:
• Attach slings, chains or hooks directly to the central
lift point (A). Verify the LED fixtures will not be
damaged when lifting.
• Use a forklift. Approach the forklift pockets (B) only
from the side as shown. Avoid approaching the unit
at an angle, as this can permanently damage the
forklift pockets, wheels, or cabinet. Make sure any
obstructions are clear of the forklift tines before
lifting.
The LED drivers are mounted inside the cabinet behind a
heat guard at the back of the unit (control panel end). The
drivers become very hot during operation. Use care when
adding or removing items from internal storage, and
avoid touching the heat guard. Verify heat guard vents
are clear of obstructions.
Transporting the Unit
See Figure 2-7. Wheelbarrow-style handles (C) are
Figure 2-6. Lifting The Unit
provided for maneuvering the unit at the work site. Pull
the spring-loaded knobs (D) and fully extend each
Lifting and Transporting
This unit is equipped with a lifting eye and forklift pockets
handle. Then release the spring-loaded knobs to lock the
handles in place.
for lifting the unit on and off a transporting vehicle.
Wheels and handles are provided for manually
maneuvering the unit at the work site.
IMPORTANT NOTE: This unit is not designed to be
towed. Never attempt to tow this unit behind a
vehicle.
Lifting the Unit
NOTE: Always remain aware of people and objects
around the unit while preparing, maneuvering, and lifting
the unit.
1. Verify the equipment being used to lift the unit is in
good condition and has sufficient capacity. For
Figure 2-7. Extending the Handles
approximate weights, refer to Specifications.
2. Verify the mast is completely lowered.
3. Verify the outriggers and jacks are fully retracted.
10 Owner’s Manual for PLT240 Light Tower
003541
Page 15

See Figure 2-8. The chassis is equipped with a
003515
E
swiveling caster at the rear. Step on the brake (E) to lock
the caster and prevent the wheel from rotating. Raise the
brake to unlock the caster.
Figure 2-8. Swiveling Caster
Tying the Unit Down
When securing the unit for transportation, verify the
equipment being used to fasten the unit is in good
condition and has sufficient strength to hold the unit in
place during transport.
See Figure 2-6. Tie-down straps, ropes, or chains may
be passed through the forklift pockets (B). The holes in
the forklift pockets may also be used to secure the unit
for transport.
General Information
Owner’s Manual for PLT240 Light Tower 11
Page 16

General Information
This page intentionally left blank.
12 Owner’s Manual for PLT240 Light Tower
Page 17

Section 3: Operation
Asphyxiation. Do not connect any enginepowered equipment or fired air heaters to the
convenience receptacle(s), even with proper
ventilation. Carbon monoxide, if not avoided,
will result in death or serious injury.
(000353)
DANGER
(000260a)
High Voltage. Verify area above unit is clear
of overhead wires and obstructions. Contact
with high-voltage power lines will result in
death or serious injury.
DANGER
WARNING
(000345)
Personal Injury. Do not set-up or operate unit
in high winds. Doing so could result in death,
serious injury, property, or unit damage.
WARNING
Electrocution. Do not set up or operate
this unit if severe weather is expected.
Lightning strikes can kill or cause severe injury
even if you are not touching the unit.
(000296)
Operation Configuration
Before setting up the unit, determine if the unit will
operate as a standalone light tower, or if export power will
be required.
If the unit will be operated as a standalone light tower,
either the 120V-15A or 120V-20A input power plugs can
be used.
If export power is required, or a second link tower will be
connected (via the 120V GFCI receptacle), 120V-20A
input power is required.
NOTE: Shore power cords are not included with this unit
and must be supplied by the end user. See Table 1 for
recommended cable size and length.
Table 1 - Recommended Shore Power Cable
Size and Length
Operation
Light Tower Setup
Suggested Power Cables and Lengths
50 ft. (15.2 m) 10/3—(L5-20P – L5-20R)
100 ft. (30.5 m) 12/3—(5-15P – 5-15R)
Maximum Distance - One LINK Tower
400 ft. (121.9 m) cable size 10/3—(L5-20P – L5-20R)
OR
300 ft. (91.4 m) cable size 12/3—(5-15P – 5-15R)
Maximum Distance - Two LINK Towers
300 ft. (91.4 m) cable size 10/3—(L5-20P –L5-20R)
to first LINK Tower
(first LINK Tower must be powered by 20A circuit)
AND
200 ft. (61 m) cable size 12/3—(5-15P–5-15R)
to second LINK Tower
LED Lights Only
Connect the unit to either a 120VAC-15A supply or
120VAC-20A supply using either input power plug.
LED Lights and Auxiliary Power
1. Connect the unit to a 120VAC-20A supply using
the NEMA L5-20 plug.
2. Connect auxiliary equipment to the 120VAC GFCI
convenience receptacle.
IMPORTANT NOTE: Unit wind rating is 45 mph.
1. For maximum light coverage, position the unit at
ground level or in a spot higher than the area being
illuminated by the lamps.
NOTE: The mast extends up to 16 ft (4.88m).
2. Place the unit on firm ground that is relatively flat
(less than 5° grade). Use the handles to rotate the
unit until the lights face the desired direction.
3. Lock the swiveling caster.
4. Return the handles to the stored position.
5. A grounding stud is located on the control panel.
For grounding requirements, follow local, state, oil
and gas or petrochemical plant grounding, MSHA,
OSHA, CSA, IEC, IEEE, NFPA, ABS Marine and
Maritime guidelines as applicable.
Owner’s Manual for PLT240 Light Tower 13
Page 18

Operation
003544
B
A
WARNING
Tipping hazard. Extend the outriggers and level the unit
before raising the mast. Keep the outriggers extended
while the mast is up. Failure to do so could cause the unit
to tip and fall and could result in death or serious injury.
(000266)
002994
DETAIL C
STOP
B
C
A
WARNING
Personal Injury. Stop immediately if the mast hangs
up or the winch cable develops slack. Excess slack
could cause the mast to collapse, resulting in personal
injury or equipment damage.
(000265)
6. See Figure 3-1. Pull the locking pins (A) on the
four outriggers (B) and pull each outrigger out until
the spring loaded locking pin snaps back into
place.
Figure 3-1. Set Up Outriggers and Jacks
7. Rotate each jack handle clockwise to start leveling
the unit. Adjust all four jacks by rotating their
handles clockwise until the wheels and caster are
not touching the ground.
8. Before raising the mast, it may be necessary to
adjust the LED fixtures. The LED fixtures may be
adjusted up, down, left or right by simply aiming
them in the desired direction.
Raising the Mast
IMPORTANT NOTE: The mast is intended for use
ONLY to support the LED fixtures. Do not use the
mast as a hoist or for any other purpose.
1. Set up and level the unit. See Light Tower Setup.
x
Figure 3-2. Pulley Locations
2. See Figure 3-2. Check the mast cables for
excessive wear or damage. Verify the cables are
properly centered in each pulley (A). Check the
electrical cord for damage.
Stand, facing the winch, at the location indicated
3.
with the black “X” in
4.
Use the winch (B) to slowly extend the mast, making
sure that the coiled electrical cord is extending at
the top sections of the mast. STOP extending the
mast when the colored mark (C) on the second mast
section is visible as seen in Detail C.
Figure 3-2.
14 Owner’s Manual for PLT240 Light Tower
IMPORTANT NOTE: Contact a Generac Mobile
Products Authorized Dealer immediately if the mast
hangs up or the winch cable develops slack.
Page 19

5. See Figure 3-3. Verify cable winds evenly around
WARNING
(000372)
Machine damage. Do not extend the mast beyond
the colored mark. Overextension can stretch or
break electrical cables or winch cables, and may
damage mast hardware.
WARNING
Personal injury. Use caution when winding
winch cable. Failure to do so could result
in serious injury.
(000391)
004887
A
(000100a)
WARNING
Consult Manual. Read and understand manual
completely before using product. Failure to
completely understand manual and product
could result in death or serious injury.
winch drum as shown (A) to prevent cable
damage.
Operation
Prestart Checklist
Before starting the unit, all items in the prestart checklist
must be completed.
Verify all maintenance procedures are up to date. For
more information, refer to General Maintenance and
Basic Maintenance Schedule.
Verify the unit is level.
Verify the unit is dry. Look for water inside or near the
unit; dry if needed.
For grounding requirements, follow any local, state,
oil and gas or petrochemical plant grounding, MSHA,
OSHA, CSA, IEC, IEEE, NFPA, ABS Marine and
Maritime guidelines as applicable.
Verify the main breaker switch is OFF (O).
Verify all circuit breakers are OFF (O).
Figure 3-3. Winch Cable Alignment
Inspect all electrical cords; repair or replace any that
are cut, worn, or bare.
Verify all winch cables are in good condition and
centered on each pulley. Do not use if cables are
kinked or beginning to unravel.
Verify all covers and guards are in place and properly
secured.
Verify cords are routed properly through the water
protection shield.
If using 20A shore power, verify convenience
receptacle is functional.
Owner’s Manual for PLT240 Light Tower 15
Page 20

Operation
DANGER
Electrocution. DO NOT use the unit if
electrical cord is cut or worn through. Doing
so will result in death or serious injury.
(000263a)
WARNING
Personal Injury. Stop immediately if the mast hangs
up or the winch cable develops slack. Excess slack
could cause the mast to collapse, resulting in personal
injury or equipment damage.
(000265)
Turn Unit ON
1. Plug in any equipment or another LINK tower.
2. Press the plug power selection switch to select
either 15A or 20A power source. Switch position
MUST match the connected input source.
3. Connect a 20A or 15A shore power cord,
depending on plug power selection switch position
and input source from previous step.
4. Turn the main breaker switch ON.
5. Turn each mast light circuit breaker ON. The LED
lamps will illuminate.
6. Start auxiliary equipment (if powered by the 20A
inlet).
NOTE: It may be necessary to leave some lights off if the
export current exceeds 12A.
Long-Term Storage
Perform the following steps if the machine is to be stored
for an extended period (for example, more than one
year).
1. Verify all circuit breakers are OFF (O).
2. Verify the unit is unplugged.
3. Lower the mast.
4. Retract the outriggers and handles.
5. Clean the unit inside and out.
6. Close and lock the storage access panels.
7. Store the unit indoors, if possible, in a secure, dry
location.
Perform a visual inspection of all electrical connections,
LED lights, winch cables, and mast before returning the
unit to service.
Turn Unit OFF
Check with personnel using lights and auxiliary power
supplied by the unit and let them know the power is going
to be turned off. Verify the power shutdown will not create
hazards by turning off equipment that may be in use
(lights, tools, etc.).
1. Turn off and disconnect any auxiliary equipment.
2. Switch lights OFF using the individual mast light
breakers.
3. Switch main breaker OFF (O).
4. After the unit shuts down, disconnect the shore
power cord.
Lowering the Mast
1. Shut down the lights. See Turn Unit OFF.
2. Lower the mast.
3. Use the winch handles to lower the mast to its
lowest position. Verify the electrical cord does not
get caught in, or pinched by, the mast while it is
being lowered.
IMPORTANT NOTE: Contact an Generac Mobile
Products Authorized Dealer immediately if the mast
hangs up or the winch cable develops slack.
16 Owner’s Manual for PLT240 Light Tower
Page 21

Section 4: Maintenance
CAUTION
(000306)
Equipment Damage. Failure to perform a daily
inspection could result in damage to the unit.
Maintenance
Daily Walk-Around Inspection
Perform a walk-around inspection of the unit every day
before starting the unit. Look for conditions that could
hinder performance or safety, such as (but not limited to)
damaged or missing parts and hardware, and loose or
broken electrical connections.
General Maintenance
Poorly maintained equipment can become a safety
hazard. In order for the equipment to operate safely and
properly over a long period of time, periodic maintenance
and occasional repairs are necessary. DO NOT perform
routine service unless all electrical components are OFF.
Regular maintenance will improve performance and
extend engine/equipment life. Generac Mobile Products
LLC recommends all maintenance work be performed by
an Generac Mobile Products Authorized Dealer.
Inspecting the Unit
•
If the unit is stored outside, check for water inside
the cabinet and control panel cover before each
use. If wet, dry the unit thoroughly before starting.
• Inspect condition of electrical cords. DO NOT use
the unit if insulation is cut or worn through.
• Verify winch cables are in good condition and
centered on each pulley. DO NOT use a cable that
is kinked or starting to unravel.
• Verify the wheels and locking caster are present
and in serviceable condition.
Basic Maintenance Schedule
Use Table 4-1 and Table 4-2 as guides for regular
maintenance intervals. For additional guidance, contact a
Generac Mobile Products Authorized Dealer.
Table 4-1. Basic Maintenance Guide
Item
Check Tires for Wear
Check All Electrical Connections
Daily
Preparing for Service
Before servicing the unit, always follow the instructions
listed below.
1. Verify the main breaker switch and lamp switches
are OFF.
2. Disconnect shore power from the unit.
3. Disconnect linked units.
4. Attach a DO NOT USE sign to the control panel.
This will notify everyone that the unit is being
serviced and will reduce the chance of someone
inadvertently trying to start the unit.
Cleaning the Unit
Always clean the unit after each use to remove dust,
grease, mud, or spilled fuel or oil. Use soft, clean rags to
wipe the cabinet exterior and control panel. Low-pressure
compressed air (less than 40 PSI [276 kPa]) can also be
used to remove dust and debris from the cabinet interior.
This unit contains sensitive electronic components that
can be damaged by high pressure, heat and moisture.
Do not wash the unit with a high pressure hose or power
washer. Water may enter the cabinet and collect in the
control panel or other electrical parts, causing damage.
Inspect Light Tower Winch For Proper Operation
Owner’s Manual for PLT240 Light Tower 17
Page 22

Maintenance
Winch Use, Operation and
Maintenance
Prior to Use
Inspect winch cable and replace if damaged.
•
• Check mounting hardware for proper tightness and
tighten if necessary.
• Gears, ratchet pivot point and shaft bushings must
be kept lubricated with a thin film of oil or grease.
Operation
Raising the Mast:
1. The cable must be securely fastened to the winch
drum.
2. Always be sure the cable is undamaged. Contact
Generac Mobile Products to order a replacement
cable if necessary.
3. Referring to the LIFT/LET DOWN decal on the
winch, rotate handle according to the specified
direction to lift. The ratchet MUST make a loud
clicking sound while winding the cable.
Lowering the Mast:
Referring to the LIFT/LET DOWN decal on the winch,
rotate handle according to the specified direction to
lower. No clicking will be heard while lowering the mast
because the automatic brake system is activated.
Maintenance
The following procedures should be performed at least
annually:
1. Lubricate winch gears and bushings. Apply a thin
film of grease to the gear teeth, and oil the
bushings as needed.
2. Lubricate the ratchet pawl pivot point with a thin oil.
Winch Mechanical Brake
The mechanical brake generates heat when loads are
lowered and the wire cable is powered out. Care must be
taken to avoid overheating the mechanical brake.
Whine or chatter associated with a new mechanical
brake is normal and typically disappears with use.
Overheating the mechanical brake may result in
permanent damage to, or failure of, the brake. Replace
any damaged brake components before resuming use of
the winch.
Table 4-2. Winch Preventative Maintenance Schedule
Maintenance
Activity
Check Fasteners
Clean And Grease
Brake Assembly
Visually Check
Winch And Control
After First
Operation
Before
Each Use
Semi-
Annually
Jack Maintenance
Before each use, check each jack foot for damage and
remove any mud or debris. The jacks must be clean and
in good operating condition to properly support the unit.
Wheel Maintenance
Before each use, check each wheel for cuts, damage,
cracks, or embedded objects. Verify all fasteners are
present and tight.
NOTE: Do not get oil or grease on the brake mechanism.
18 Owner’s Manual for PLT240 Light Tower
Page 23

Section 5: Troubleshooting
(000343)
Electrocution. Potentially lethal voltages are present
in this equipment. Render the equipment safe before
attempting repairs or maintenance. Failure to do so
will result in death or serious injury.
DANGER
Troubleshooting the Lights
Problem Possible Cause Solution
Troubleshooting
IMPORTANT NOTE: Only a qualified electrician should
troubleshoot or repair electrical problems occurring in this
equipment. Contact Generac Mobile Products Technical
Service at 1-800-926-9768 for assistance if you have any
questions, or if problems persist.
LED Mast Lights
Do Not Turn On
Extension cord too long
Faulty electrical
connection
Faulty main breaker
switch
Faulty mast light circuit
breaker(s)
Faulty LED driver
Supply power breaker
tripped
Extension cord gauge
too small
Reduce length or increase gauge of extension cord. See
Section 3.
Verify connectors within following sections are properly seated and there
are no loose connections:
• Mast junction box
• 12 pin connector
• LED drivers (4)
• Mast light circuit breakers (4)
• Input power selector switch
• Main breaker switch
Replace main breaker switch
Replace mast light circuit breaker(s)
Verify driver input voltage from light switch is 120VAC ±10VDC. If output
voltage from LED Driver (at 12 pin connector) is less than 24VDC, replace
LED driver.
Reset supply power breaker.
Use larger extension cord.
Table 1 in
Leave light off for a few minutes to reset protection; then restart lights.
LED Mast Lights
are Flashing
Main Breaker
Switch Trips when
Applying Load
LED driver overheated
Voltage is too low Raise voltage to 90VAC
Connected load (through
GFCI) too large
Verify nothing is obstructing airflow to driver. Check for accumulated dust
or dirt on driver; remove using clean, dry cloth.
Reduce size of connected load or reduce the number of lights in use.
Owner’s Manual for PLT240 Light Tower 19
Page 24

Troubleshooting
This page intentionally left blank.
20 Owner’s Manual for PLT240 Light Tower
Page 25

Section 6: Wiring Diagrams
BK/OR
14
RD/OR
14
14
BK/BL
14
14
14
14
14
RD/BL
BK/WT
RD/WT
BK/YL
RD/YL
12
12
12
12
GN/YL
GN/YL
GN/YL
GN/YL
RD
BK
14
14
DRIVER 4
BN
BL
12
12
DRIVER 3
RD
BK
14
14
BN
BL
12
12
GN/YL
12
RD
BK
14
14
DRIVER 2
BN
BL
12
12
GN/YL
12
RD
BK
14
14
DRIVER 2
BN
BL
12
12
GN/YL
12
TB B4
12
YL BK
12
5A
LIGHT #4
TB B3
12
BK BK
12
5A
LIGHT #3
TB B2
12
BL BK
12
5A
LIGHT #2
TB B1
12
OR BK
12
5A
LIGHT #1
NEUTRAL GND
L1
12
BL
12
BL
12
BL
12
BL
TB A4
TB A3
TB A2
TB A1
75018_A_06.28.16
VIEW FACING MAST BOX
12
34
N
N
N
N
NEUTRAL BAR
ISOLATED
12
12
12
12
12
12
120V/20A Edison Inlet
L1
NEUTRAL
GND
N WT
L2
BK
GN/YL
NWT
120V/20A Edison Inlet
GN/YL
GND
NEUTRAL
L1
BK
L1
2-POLE
CIRCUIT
BREAKER
15A
20A
L1.1
BK
L2.1
BK
12
12
DPDT
SELECT
SWITCH
BK
BK
12
12
L3
DPDT
SELECT
SWITCH
BK
12
L4
BK
12
GFCI
120V/20A 5-20R
12 POSITION
CONNECTOR
B
A
1 234
56 7 89101112
MAST COIL CORD
MAST JUNCTION BOX
BK/OR
RD/OR
BK/BL
RD/BL
14
14
14
14
14
14
141414
BK
WT
BK
WT
BK/WT
RD/WT
BK/YL
RD/YL
BK
WT
BK
WT
LIGHT #1
LIGHT #2
LIGHT #3
LIGHT #4
GN/YL
12
GROUND BAR
GN/YL 12
AC Wiring
Wiring Diagrams
Owner’s Manual for PLT240 Light Tower 21
Page 26

Wiring Diagrams
This page intentionally left blank.
22 Owner’s Manual for PLT240 Light Tower
Page 27

Page 28

Part No. 54800 Rev. C 06/01/17
©2017 Generac Mobile Products
All rights reserved.
Specifications are subject to change without notice.
No reproduction allowed in any form without prior written
consent from Generac Mobile Products.
Generac Mobile Products
215 Power Drive, Berlin, WI 54923
GeneracMobileProducts.com │800-926-9768 │920-361-4442
 Loading...