

Page 1
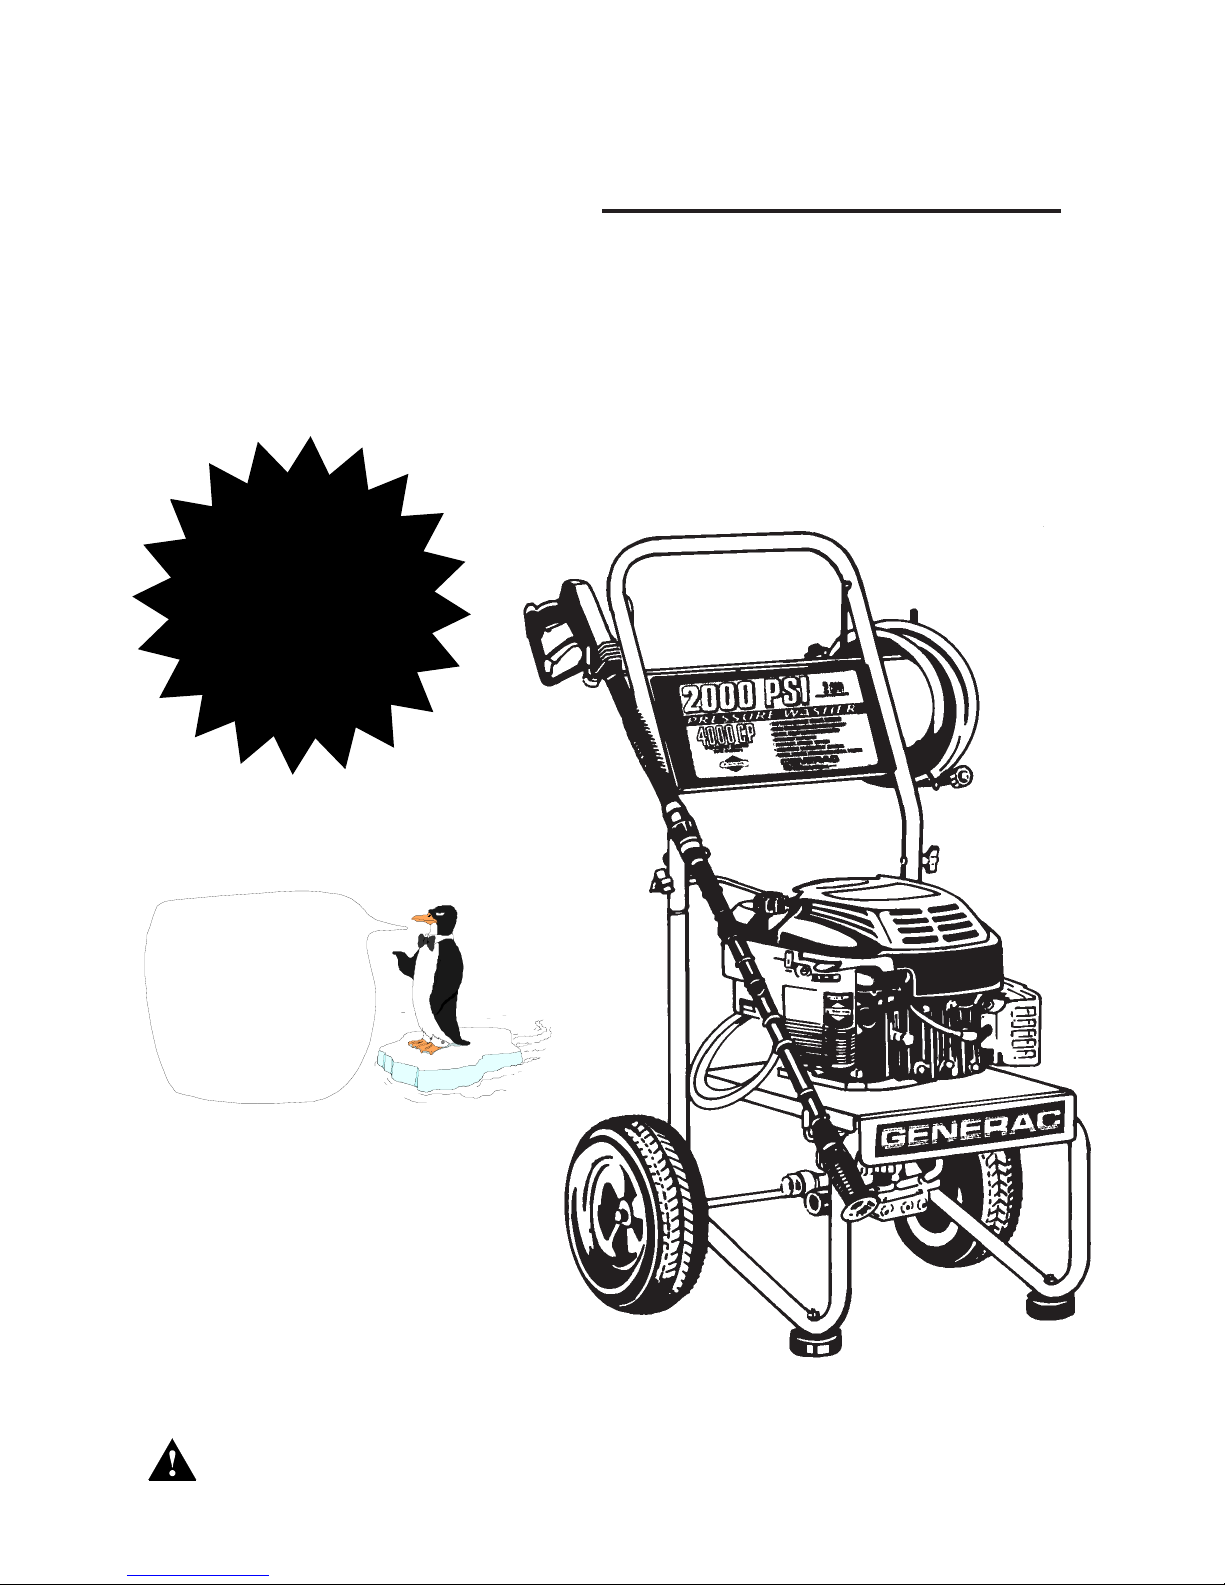
This pressure
washer is
equipped with an
Automatic Cool
Down System.
See page 12 for
details
This symbol points out important safety instructions, which, if not followed, could endanger the personal safety and/or property of yourself and others. Read and follow all
instructions in the manual before attempting to operate this unit.
Model No. 10402 (2000 PSI High Pressure Washer) Manual No. B3408 Revision 0 (12/28/98)
2000PSI
Owner’s Manual
Problems?
Questions?
Before taking your unit
back to the store,
call the pressure washer
helpline at
1-800-270-1408
M-F 8-5 CST
GENERAC
The Reliable Ones
Page 2
Generac 2000PSI High Pressure Washer
GENERAC
The Reliable Ones
2
SAFETY RULES
DANGER! Always disconnect spark plug
wire and place wire where it cannot
contact spark plug to prevent accidental
starting when setting up, transporting,
adjusting or making repairs to your high
pressure washer.
Engine exhaust gases contain DEADLY carbon
monoxide gas. This dangerous gas, if breathed
in sufficient concentrations, can cause
unconsciousness or even death. Operate this
equipment only in the open air where adequate
ventilation is available.
Gasoline is highly FLAMMABLE and its vapors
are EXPLOSIVE. Do not permit smoking, open
flames, sparks or heat in the vicinity while
handling gasoline. Avoid spilling gasoline on a
hot engine. Allow unit to cool for 2 minutes
before refueling. Comply with all laws
regulating storage and handling of gasoline.
Locate this pressure washer in areas away
from combustible materials, combustible fumes
or dust.
The high pressure equipment is designed to be
used with Generac authorized parts only. If you
use this equipment with parts that do not
comply with minimum specifications, the user
assumes all risks and liabilities.
Some chemicals or detergents may be harmful
if inhaled or ingested, causing severe nausea,
fainting or poisoning. The harmful elements
may cause property damage or severe injury.
Do not allow CHILDREN to operate the
Pressure Washer at any time.
Operate engine only at governed speed.
Running the engine at excessive speeds
increases the hazard of personal injury. Do not
tamper with parts which may increase or
decrease the governed speed.
Do not wear loose clothing, jewelry or anything
that may be caught in the starter or other
rotating parts.
Before starting the Pressure Washer in cold
weather, check all parts of the equipment and
be sure ice has not formed there.
Units with broken or missing parts, or without
protective housing or covers should NEVER be
operated.
The muffler and air cleaner must be installed
and in good condition before operating the
Pressure Washer. These components act as
spark arrestors if the engine backfires.
Check the fuel system for leaks or signs of
deterioration such as chafed or spongy hose,
loose or missing clamps or damaged tank or
cap. Correct all defects before operating the
Pressure Washer.
Do not spray flammable liquids.
Never aim the gun at people, animals or
plants.
High pressure spray can cause paint chips or
other particles to become airborne and fly at
high speeds.
The engine exhaust from this product
contains chemicals known to the State
of California to cause cancer, birth
defects, or other reproductive harm.
WARNING:
IMPORTANT! SAFETY RULES IMPORTANT!
Page 3

Generac 2000PSI High Pressure Washer
GENERAC
The Reliable Ones
3
Never allow any part of the body to come in
contact with the fluid stream. DO NOT come in
contact with a fluid stream created by a leak in
the high pressure hose.
The high pressure stream of water that this
equipment produces can pierce skin and its
underlying tissues, leading to serious injury
and possible amputation.
Always wear eye protection when you use this
equipment or when you are in the vicinity
where the equipment is in use.
Never move the machine by pulling on the high
pressure hose. Use the handle provided on the
top of the unit.
Always be certain the spray gun, nozzles and
accessories are correctly attached.
Never use a spray gun which does not have a
trigger lock or trigger guard in place and in
working order.
Use a respirator or mask whenever there is a
chance that vapors may be inhaled. Read all
instructions with mask so you are certain the
mask will provide the necessary protection
against inhaling harmful vapors.
High pressure spray may damage fragile items
including glass. Do not point spray gun at glass
when in the jet spray mode.
Keep the hose connected to machine or the
spray gun while the system is pressurized.
Disconnecting the hose while the unit is
pressurized is dangerous.
Hold the spray gun firmly in your hand before
you start the unit. Failure to do so could result
in an injury from a whipping spray gun. Do not
leave the spray gun unattended while the
machine is running.
The cleaning area should have adequate
slopes and drainage to reduce the possibility of
a fall due to slippery surfaces.
Keep water spray away from electric wiring or
fatal electric shock may result.
Do not secure trigger gun in the pullback
(open) position.
Do not bypass any safety device on this
machine.
The muffler and engine heat up during
operation and remain hot immediately after
shutting it down. Avoid contact with a hot
muffler or engine or you could be severely
burned.
Operate and store this unit on a stable surface.
High pressure hose can develop leaks from
wear, kinking, abuse, etc. Water spraying from
a leak is capable of injecting material into
skin. Inspect hose each time before using it.
Check all hoses for cuts, leaks, abrasions or
bulging of cover, or damage or movement of
couplings. If any of these conditions exist,
replace hose immediately. Never repair high
pressure hose. Replace it with another hose
that meets minimum pressure rating of your
pressure washer.
IMPORTANT! SAFETY RULES IMPORTANT!
Page 4
Generac 2000PSI High Pressure Washer
GENERAC
The Reliable Ones
4
ASSEMBLY
CONGRATULATIONS on your purchase of a
GENERAC high pressure washer. It has been
designed, engineered and manufactured to give you
the best possible dependability and performance.
Should you experience any problem you cannot
easily remedy, please contact your nearest
GENERAC Authorized Service facility, or call the
1800 number listed on the front of this manual. We
have competent, welltrained technicians and the
proper tools to service or repair this unit.
Please read and retain this manual. The instructions
will enable you to assemble and maintain your high
pressure washer properly.
CUSTOMER
RESPONSIBILITIES
Read and observe the safety rules.
Follow regular schedule in maintaining, caring for
and using your high pressure washer.
Follow the instructions under Customer
Responsibilities and Storage sections of this
Owner's Manual.
PRODUCT
SPECIFICATIONS
Pressure Washer Specifications
Outlet Pressure . . . . 2000 psi
Flow Rate . . . . . . . . . 2.0 gallons per minute (gpm)
Detergent Mix . . . . . . Use undiluted detergent
approved for pressure
washers
Water Supply . . . . . . Not to Exceed 140°F
Temperature
Automatic Cool . . . . Will cycle when water
Down System reaches 140°-145°F
Engine Specifications
Engine Model . . . . . . Briggs & Stratton Quantum
Rated Horsepower . . 6.0
Displacement . . . . . . 190cc
Spark Plug
Type . . . . . . . . RJ19LM
Set Gap To: . . 0.030 inch (0.76mm)
Gasoline Capacity . . 1.6 U.S. quarts
Oil . . . . . . . . . . . . . . . SAE 30
In the State of California a spark arrestor is required
by law (Section 4442 of the California Public
Resources Code). Other states may have similar
laws. Federal laws apply on federal lands.
NOTE: If you equip the engine of your pressure
washer with a spark arrestor muffler, the spark
arrestor must be maintained in effective working order
by the owner/operator.
You can order a spark arrestor through your
authorized Briggs & Stratton service facility. See
Engine Owners Manual for part number.
Model Number 10402
Serial Number
Date of Purchase
The model and serial numbers will be found on a
decal attached to the pressure washer. Record
both serial number and date of purchase and
keep in a safe place for future reference.
Page 5
Generac 2000PSI High Pressure Washer
GENERAC
The Reliable Ones
5
ASSEMBLY
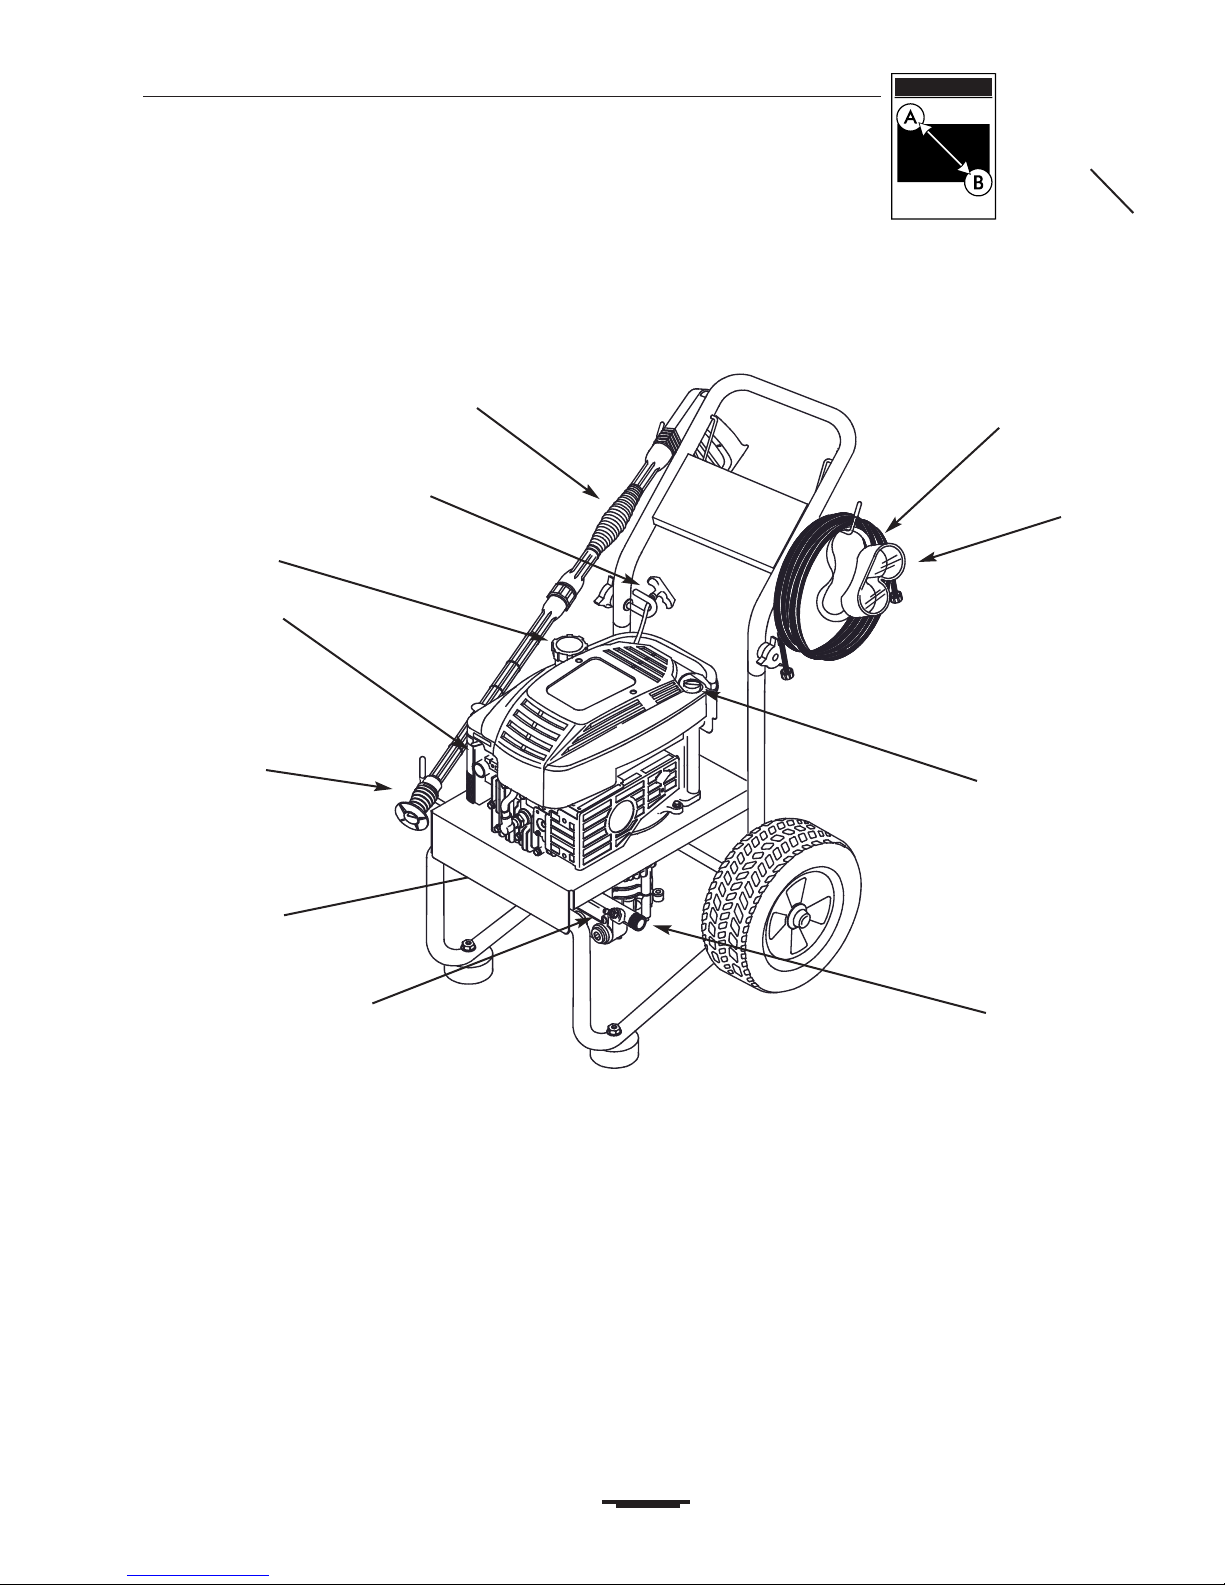
KNOW YOUR PRESSURE WASHER
Read this owners manual and safety rules before operating your high pressure washer.
Compare the illustrations with your high pressure washer to familiarize yourself with the locations of various
controls and adjustments. Save this manual for future reference.
Adjustable Nozzle Extension You must attach this
to the spray gun to provide high pressure stream. The
adjustable nozzle allows you to adjust the spray pattern
which, in turn, adjusts the force of spray.
Air Cleaner Dry type filter element limits the amount
of dirt and dust that gets in the engine.
Automatic Cool Down System Cycles water
through pump when water reaches 140°-145°F. Warm
water will discharge from pump onto ground. This
system prevents internal pump damage.
Gas Tank Fill with regular unleaded gasoline only.
Goggles Always use the enclosed goggles or other
eye protection when running your pressure washer.
High Pressure Hose Connect one end to water
pump and the other end to spray wand.
High Pressure Outlet Connection for high pressure
hose.
Oil Fill Tube Fill engine with oil here. See page 7 for
oil recommendations.
Pump Develops high pressure.
Recoil Starter Used for starting the engine
manually.
Spray Gun Controls the application of water onto
cleaning surface with trigger device. Includes safety
latch.
Water Inlet Connection for garden hose.
Spray Gun
Adjustable Nozzle
Extension
High Pressure Hose
Goggles
Air Cleaner
Gas Tank
Water Inlet
Pump equipped with
Automatic Cool Down System
Recoil Starter
High Pressure Outlet
Oil Fill Tube
Page 6
Generac 2000PSI High Pressure Washer
GENERAC
The Reliable Ones
6
ASSEMBLY
Read entire owners manual before you attempt to
assemble or operate your new pressure washer.
Your new pressure washer has been assembled at
the factory with the exception of those parts left
unassembled for shipping purposes.
REMOVE PRESSURE
WASHER FROM CARTON
Remove parts box included with pressure washer.
Slice two corners at guide handle end of carton
from top to bottom so the panel can be folded down
flat, then remove all packing material.
Roll pressure washer out of carton.
CARTON CONTENTS
Items in the carton include:
Main Unit
Parts Box (which includes the following):
Wireform
ORing Maintenance Kit.
Video
Goggles
Nozzle Cleaning Kit
Owners Manual
Engine Manual
Spray Gun
Nozzle Extension
High Pressure Hose
Handle
Parts Bag (which includes the following):
1 carriage bolt
1 carriage hook
2 knobs
If any of the above parts are missing or damaged, call
the pressure washer helpline at 18002701408.
PREPARING THE
PRESSURE WASHER
FOR USE
If you have any problems with the assembly of your
pressure washer or if parts are missing or damaged,
call the Pressure Washer Helpline at 1-800-270-1408.
To prepare your pressure washer for operation you
will need to perform these tasks:
Attach the handle and attach the wire form that
holds high pressure hose and spray gun.
Connect high pressure hose to the spray gun and
the pump and connect water supply to the pump.
Add oil to engine crankcase.
Add fuel to fuel tank.
Attach the Handle
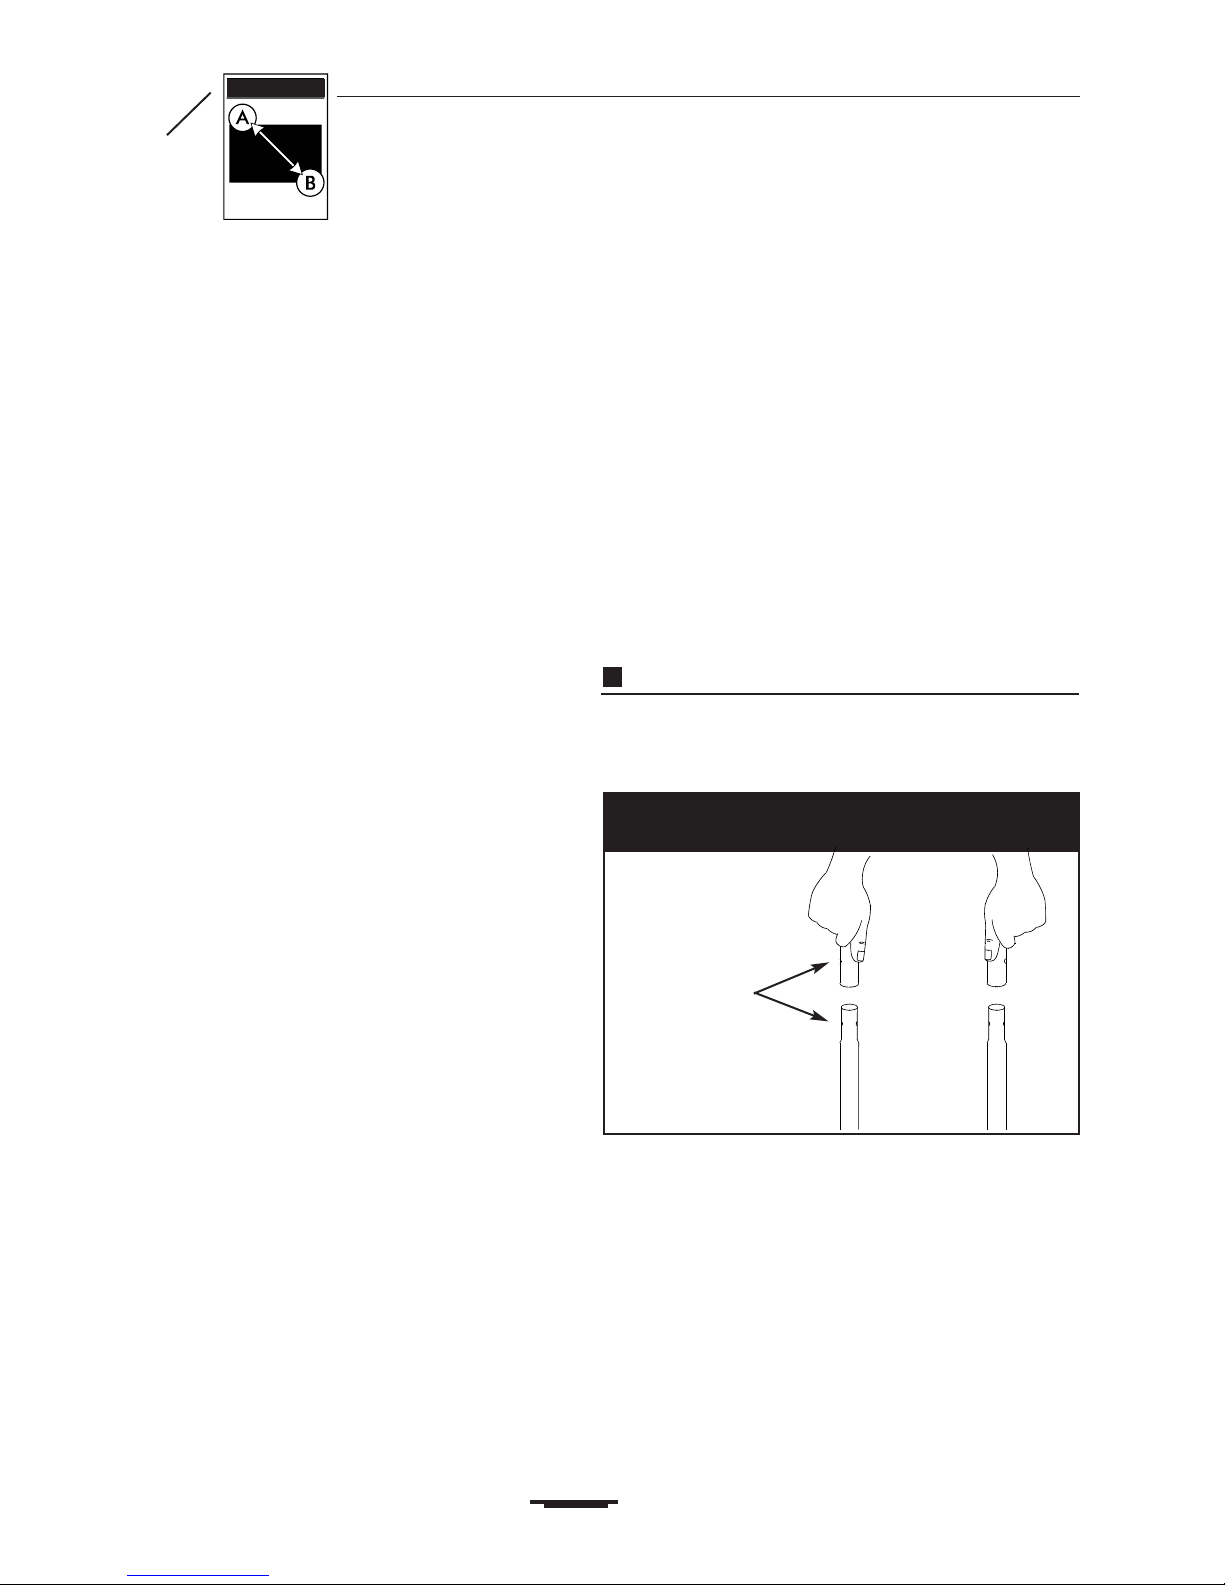
Place the top of the handle onto the bottom of the
handle already connected to the main unit making
sure the holes in the top align with the holes on the
bottom (Figure 1).
Figure 1 Attach the top of the handle to
the bottom of the handle.
Make sure the
holes on the
top of the
handle are
aligned with the
holes in the
bottom of the
handle
Page 7
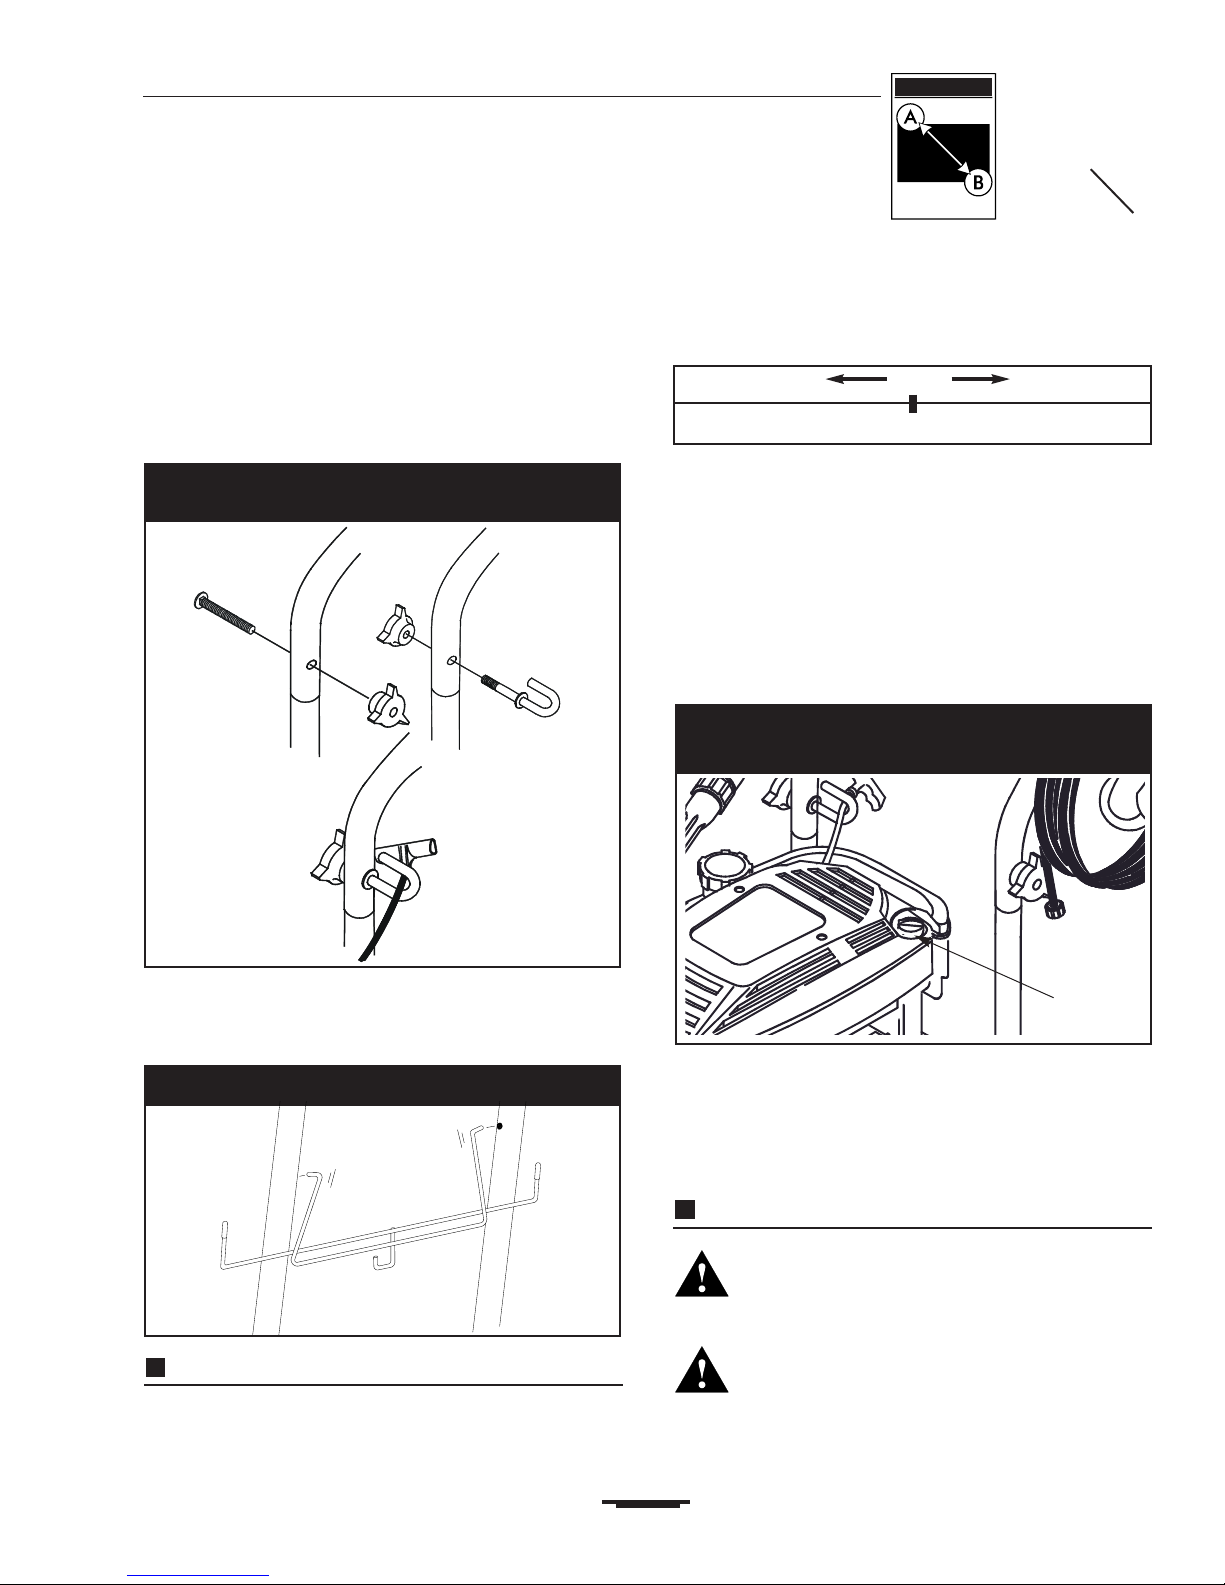
Insert the carriage bolt through the right hole
(looking at the front of the pressure washer) and
attach a plastic knob. Tighten the knob by hand
(Figure 2).
Insert the carriage hook through the left hole
(looking at the front of the pressure washer). Pull
the recoil handle out slowly. Place the recoil string
through the hook and attach the plastic knob.
Tighten the knob by hand (Figure 2).
Insert the wire form with the longer arm positioned on
the left. From this view (from rear of unit) the hook
should resemble a J
(Figure 3)
.
Add Engine Oil
IMPORTANT: Any attempt to crank or start the
engine before it has been properly serviced with the
recommended oil may result in an engine failure.
Note: When adding oil to the engine crankcase, use
only high quality detergent oil rated with API service
classification SF,SG, SH or SH/CD rated SAE 30
weight. Select the oils viscosity grade according to
your expected operating temperature:
Do Not Use SAE 10W40 Oil.
Although multiviscosity oils (5W30, 10W30, etc.)
improve starting in cold weather, these multiviscosity
oils will result in increased oil consumption when used
above 32°F. Check your engine oil level more
frequently to avoid possible damage from running
low on oil.
Place pressure washer on a level surface.
Clean area around oil fill and remove oil dipstick
(Figure 4).
Wipe dipstick clean. Pour oil into oil fill opening until
oil reaches FULL mark on the dipstick. Stop
occasionally to check oil level. DO NOT OVERFILL.
Install oil dipstick, hand tighten securely.
Note: Check Oil Often During Engine Breakin.
Add Gasoline
DANGER! Never fill fuel tank indoors. Never
fill fuel tank when engine is running or hot. Do
not smoke when filling fuel tank.
WARNING! Never fill fuel tank completely full.
Fill tank to about 1/2" below the bottom of the
filler neck to provide space for fuel expansion.
Wipe away any fuel spillage from engine and
equipment before starting.
Generac 2000PSI High Pressure Washer
GENERAC
The Reliable Ones
7
ASSEMBLY
Figure 3 Fit wire form on handle.
Figure 4 Add oil to engine crankcase. Do not
attempt to start engine without adding
oil.
Oil Fill Cap
Figure 2 Insert the carriage bolt and hook and
attach the knobs.
colder 32°F warmer
5W30 SAE 30
Page 8
Generac 2000PSI High Pressure Washer
GENERAC
The Reliable Ones
8
ASSEMBLY
The manufacturer recommends fresh, clean unleaded
automotive gasoline.
Use clean fuel and store in approved, clean,
covered containers. Use clean fill funnels. Never
use stale gasoline left over from last season or
gasoline stored for long periods.
Clean area around fuel fill cap, remove cap.
(Figure 5).
Add UNLEADED regular gasoline, slowly, to fuel
tank. Use a funnel to prevent spillage.
Install fuel cap and wipe up any spilled gasoline.
Connect Hose and Water
Supply to Pump
IMPORTANT: You must assemble wand and attach
all hoses before you start engine. Starting engine
without all hoses connected and water supplied will
damage pump.
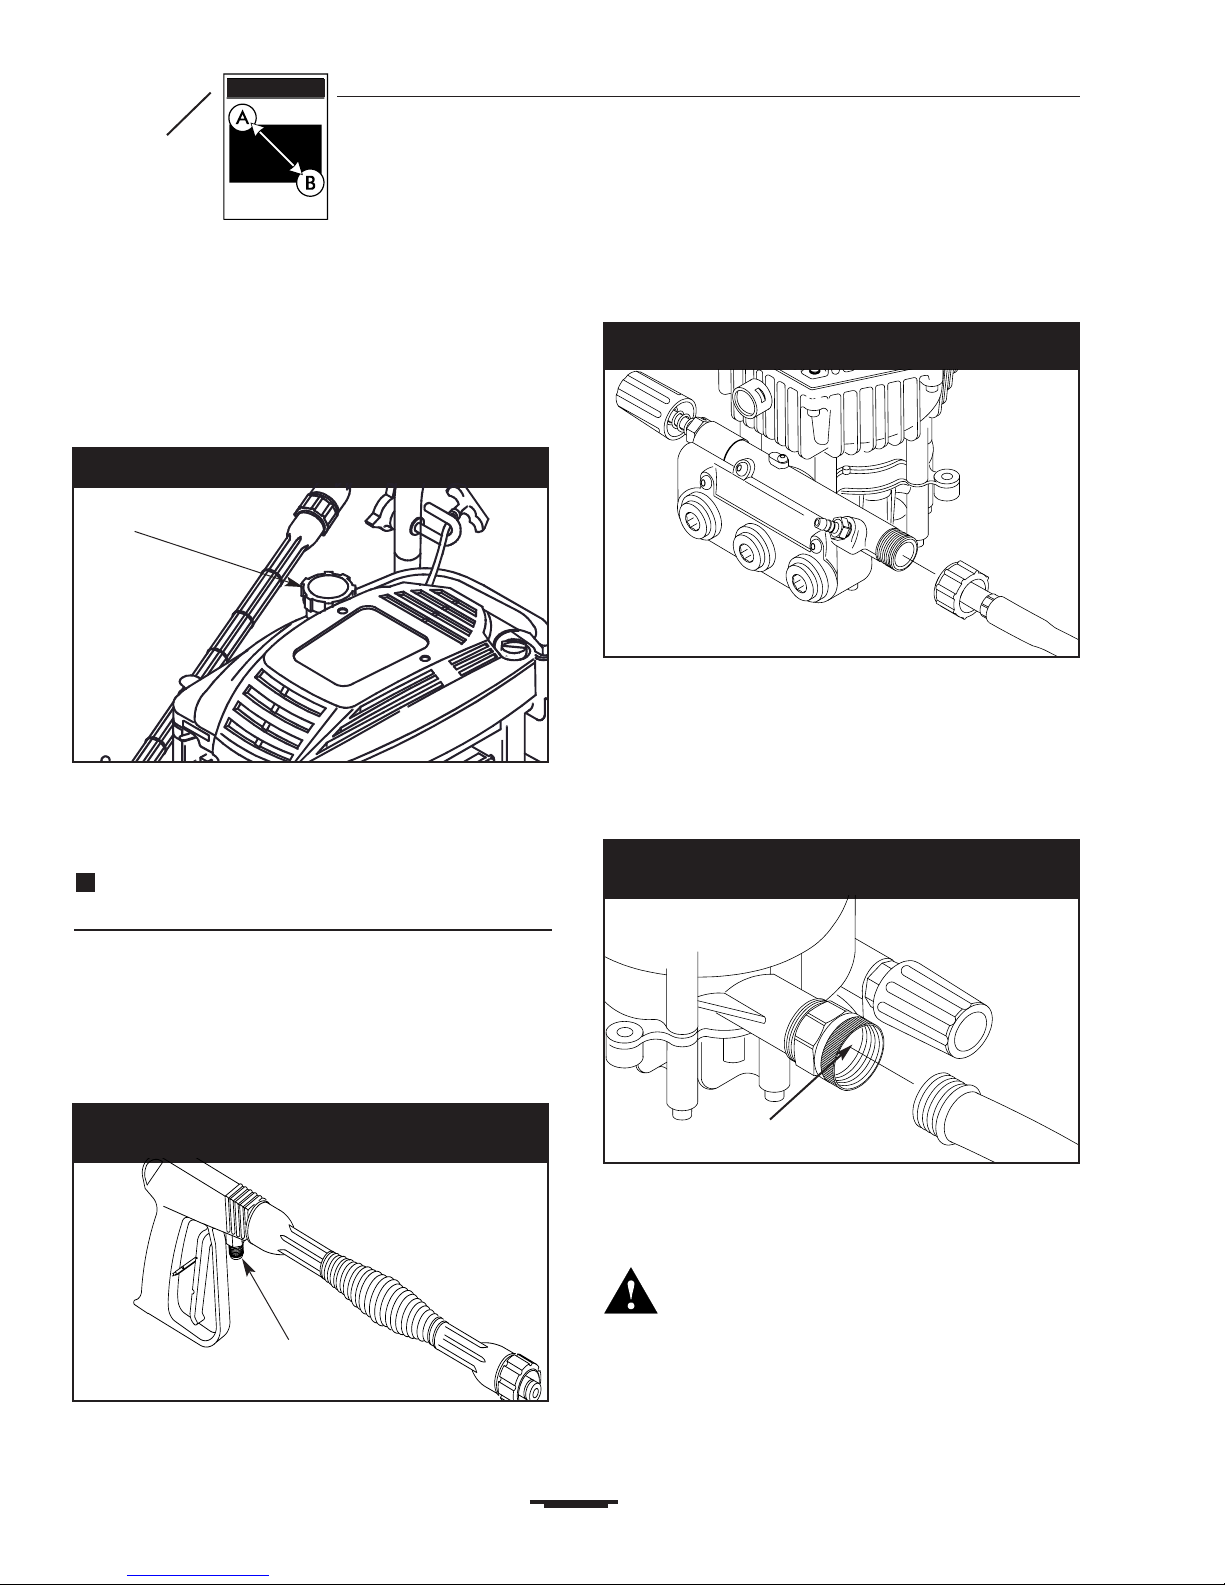
Uncoil high pressure hose and attach one end of
hose to the base of the spray gun (Figure 6).
Tighten by hand.
Attach other end of high pressure hose to the high
pressure outlet on the pump (Figure 7). Tighten by
hand.
Before you connect your garden hose to the water
inlet, inspect the Inlet Screen (Figure 8). Clean the
screen if it contains debris or have it replaced if
damaged. Do not run the pressure washer if the
inlet screen is damaged.
Connect garden hose to water inlet. Tighten by
hand (Figure 8).
Turn ON the water (open valve completely).
Squeeze trigger on gun to purge pump system of
air and impurities.
CAUTION! Before starting the pressure
washer, be sure you are wearing adequate
eye protection.
Figure 7 Connect high pressure hose to pump.
Figure 6 Connect high pressure hose
to spray gun.
Figure 8 Connect the garden hose to water inlet
and turn ON the water.
Figure 5 Add gasoline to fuel tank.
Fuel Cap
Connect High Pressure
Hose Here
Check Screen for Damage
Page 9

Generac 2000PSI High Pressure Washer
GENERAC
The Reliable Ones
9
ASSEMBLY
Attach nozzle extension to spray gun. Tighten by
hand (Figure 9).
CHECKLIST BEFORE
STARTING ENGINE
If you have reached this point, look back over the
assembly to see if you have performed all of the
following.
Check for properly tightened hose connections
(high pressure and water supply) and for tight
connections and that there are no kinks, cuts, or
damage to the high pressure hose.
Check that oil has been added to proper level in
engine crankcase before trying to start the pressure
washer.
Add proper gasoline to fuel tank.
Provide proper water supply (not to exceed 140°F).
Be sure to read Safety Rules and Operation
sections before using the pressure washer.
Figure 9 Connect nozzle extension to spray gun.
Page 10

Generac 2000PSI High Pressure Washer
GENERAC
The Reliable Ones
10
HOW TO USE YOUR
PRESSURE WASHER
If you have any problems operating your pressure
washer, please call the pressure washer helpline at
18002701408.
You have assembled your high pressure washer and
have prepared the engine for starting. You are now
ready to clean your car, boat or the outside of a
building or whatever you plan to clean.
How to Start Your Engine
The best way to start your enginepowered pressure
washer for the first time is to follow these instructions
stepbystep. This starting information also applies
whenever you start the engine after you have let the
pressure washer sit idle for at least a day.
This pressure washer requires a water source that
flows at least 2 gallons per minute. Do not attempt
to siphon water from a nonpressurized
container. Place the pressure washer close
enough to an outside water source so that no more
than 50' of garden hose is needed.
Check that the high pressure hose is tightly
connected to the spray gun and to the pump. See
ASSEMBLY section for illustrations.
Connect the garden hose to water inlet on the
pressure washer pump and turn the water on all
the way.
IMPORTANT: Do not run pump without the water
supply connected and turned on. You must follow this
caution or the pump will be damaged.
Move the Throttle Control Lever to the Fast
position
Set Choke Lever to Choke position.
Note: This is a multiposition choke.
Note: For a warm engine, be sure the Throttle
Control Lever is in the Fast position and the Choke
Lever is in the Run position.
Squeeze the trigger on the spray gun to relieve air
pressure caused by turning ON the water. Water
will spew out the gun in a thin stream. Continue to
hold trigger until you have a steady stream of water
and no air remains.This will make it easier to pull
start the engine. Release the trigger.
Apply the safety latch to the spray gun trigger
(Figure 10).
Grasp rope handle and pull slowly until you feel
some resistance. Then pull cord rapidly to
overcome compression, prevent kickback and start
the engine. Let rope return to starter slowly.
Note: Always keep the Throttle Control Lever in the
Fast position when operating the pressure washer.
When the engine starts, gradually move the Choke
Lever from one position to the next until it is in the
Run position.
If after 3 pulls the engine fails to start, disengage the
spray gun safety latch, squeeze the trigger to relive
water pressure, reengage the spray gun safety latch,
move the Choke Lever to the Run position and pull
the recoil starter handle rapidly (Max. 3 pulls).
How to Stop Your Pressure
Washer
Move the Throttle Control Lever to the Slow position.
Wait for the engine to idle down.
Move the Throttle Lever Lever to the Stop position.
Simply shutting off the engine will not release
pressure in the system. Squeeze trigger on the
spray gun to relieve pressure in the hose.
Note: A small amount of water will squirt out when
you release the pressure.
Figure 10 Squeeze trigger to relieve water
pressure, release trigger and turn
the safety latch ON.
Safety Latch ON
Page 11

Generac 2000PSI High Pressure Washer
GENERAC
The Reliable Ones
11
How to Use the Adjustable
Nozzle and Adjust Pressure
You now should know how to START your pressure
washer and how to STOP it. The information in this
section will tell you how to adjust the spray pattern
and apply detergent or any other cleaning chemicals.
DANGER! Never adjust spray pattern when spraying.
Never put hands in front of nozzle to adjust spray
pattern.
On the end of your spray gun is a nozzle that you can
slide forward and backward and that you can also
twist from side to side. With the adjustable nozzle you
can adjust the spray pattern to be either high
pressure or low pressure. You can also adjust the
spray so it is concentrated in a stream pattern or
expanded into a fan pattern.
Slide the nozzle forward when you wish to adjust
the spray to low pressure mode (Figure 11). Slide
the nozzle backward to achieve high pressure.
Located on the side of the pump is a pressure
control knob. You can increase and decrease the
pressure of the spray by turning the knob clockwise
or counterclockwise respectively (Figure 12).
Point the nozzle toward the ground and press the
trigger to test the pattern.
Twisting the nozzle adjusts the spray pattern from a
narrow pattern to a fan pattern.
For most effective cleaning, keep spray nozzle
between 8 to 24 inches away from cleaning
surface.
If you get spray nozzle too close, especially using
high pressure mode, you may damage the cleaning
surface.
Do not get closer than 6 inches when cleaning
automobile tires.
Figure 11 Using the adjustable nozzle.
Slide Nozzle Backward
for High Pressure
Mode
Slide Nozzle Forward
for low pressure
mode and detergent
application
Twist nozzle
counterclockwise for
fan spray pattern
Twist nozzle
clockwise for narrow
spray pattern
Figure 12 Pressure control knob.
Pressure Control Knob
Page 12

Generac 2000PSI High Pressure Washer
GENERAC
The Reliable Ones
12
Applying Detergent with the
Adjustable Nozzle
IMPORTANT: Use soaps designed specifically for
pressure washers. Household detergents could
damage the pump.
IMPORTANT: You must attach all hoses before you
start the engine. Starting the engine without all the
hoses connected and without the water turned ON will
damage the pump.
To apply detergent follow these steps:
Review the use of adjustable nozzles on Page 10.
Prepare the detergent solution as required by the
job.
Hang the detergent solution on hook of the
wireform on the handle as shown (Figure 13).
Place small filter end of the chemical injecting tube
into the detergent container (Figure 13).
Slide the adjustable nozzle forward to low pressure
mode. Detergent cannot be applied with nozzle in
high pressure position.
IMPORTANT: Detergent cannot be applied without
the water source turned on.
Make sure garden hose is connected to water inlet.
Check that high pressure hose is connected to
spray gun and pump (see ASSEMBLY starting on
Page 6 ), and start engine.
Apply detergent to a dry surface, starting from the
bottom and working up to avoid streaking.
Allow the detergent to soak in for 35 minutes
before washing and rinsing. Reapply if necessary to
prevent drying.
For washing, start at lower portion of area to be
washed and work upward, using long, even,
overlapping strokes.
CAUTION! Keep the plastic injector tube
from coming in contact with the hot muffler.
This will damage the plastic tube. When
inserting the filter into a cleaning agent bottle,
route the tube so as to keep it from
inadvertently contacting the hot muffler.
Note: After using chemical injection, you must flush
the hose and the pump with clear water to prevent
chemicals from drying and clogging the chemical
injection system. See Cleaning Chemical Injector
System on page 14.
Pressure Washer Rinsing
WARNING! Be extremely careful if you must
use the pressure washer from a ladder,
scaffolding or any other relatively unstable
location. Pressure in a running washer builds
as you climb. When you press the trigger, the
recoil from the initial spray could force you to
fall. The high pressure spray could also force
you to fall if you are too close to the cleaning
surface.
For Rinsing:
Slide nozzle backward to high pressure, squeeze
trigger and wait for detergent to clear.
Keep the spray gun a safe distance from the area
you plan to spray.
Apply a high pressure spray to an small area and
then check the surface for damage. If no damage
is found, you can assume it is okay to continue
cleaning.
Start at top of area to be rinsed, working down with
same overlapping strokes as you used for cleaning.
Note: You can also stop detergent from flowing by
simply removing siphon from bottle.
Automatic Cool Down System
(also known as Thermal Relief)
If you run the engine on your pressure washer for 35
minutes without pressing the trigger on the spray gun,
circulating water in the pump can reach a temperature
between 140145°F. When the water reaches this
temperature, the automatic cool down system
engages and cools the pump by discharging the
warm water onto the ground. This system prevents
internal damage to the pump.
Figure 13 Insert the small filter into container of
cleaning solution.
Page 13

Generac 2000PSI High Pressure Washer
GENERAC
The Reliable Ones
13
GENERAL MAINTENANCE
RECOMMENDATIONS
The warranty of the high pressure washer does not
cover items that have been subjected to operator
abuse or negligence. To receive full value from the
warranty, operator must maintain high pressure
washer as instructed in this manual.
Some adjustments will need to be made
periodically to properly maintain your high pressure
washer.
All adjustments in the Service and Adjustments
section of the engine owners manual should be
made at least once each season.
Once a year you should clean or replace the spark
plug and clean or replace the air filter and check the
gun and wand assembly for wear. A new spark plug
and clean air filter assure proper fuelair mixture
and help your engine run better and last longer.
Before Each Use
Check engine oil level.
Check water inlet screen for damage.
Check high pressure hose for leaks.
Check detergent inlet hose and filter for damage.
Check gun and wand assembly for leaks.
PRESSURE WASHER
MAINTENANCE
Check and Clean Inlet Screen
Examine screen on the water inlet. Clean if the
screen is clogged or replace if screen is damaged.
Check High Pressure Hose
High pressure hose can develop leaks from wear,
kinking, or abuse. Inspect hose each time before
using it. Check for cuts, leaks, abrasions or bulging of
cover, damage or movement of couplings. If any of
these conditions exist, replace hose immediately.
DANGER! Water spraying from a leak is
capable of injecting material into skin. Inspect
hose each time before using it. Never repair a
high pressure hose. Replace it with another
hose that meets the maximum pressure rating
of your pressure washer.
Check Detergent Hose
Examine the filter on the detergent hose and clean if
clogged. Hose should fit tightly on barbed fitting.
Examine hose for leaks or tears. Replace the filter or
hose if either is damaged.
Check Gun and Wand
Examine hose connection to gun and make sure it is
secure. Test trigger by pressing it and making sure it
springs back into place when you release it. Put
safety latch in ON position and test trigger. You
should not be able to press trigger.
Purge Pump of Air and
Contaminants
To remove the air from the pump, follow these steps:
Set up the pressure washer as described in the
ASSEMBLY section (starting on page 5) and
connect the water supply.
Remove the wand extension from the gun.
Squeeze the trigger on the gun and hold.
To remove any contaminants from the pump, follow
these steps:
Set up the pressure washer as described in the
ASSEMBLY section, and connect the water supply.
Remove the nozzle extension from the spray gun.
Start the engine according to instructions in
OPERATION section.
Squeeze the trigger on the spray gun and hold.
When the water supply is steady and constant,
engage the safety latch and refasten the nozzle
extension.
Page 14

Cleaning Chemical Injector
System
If you have used the chemical injector system you
must flush it with clean water before stopping the
engine.
Place the small filter end of the chemical injection
tube in a bucket of clean water.
Slide the adjustable nozzle forward.
Squeeze the spray gun trigger for 12 minutes to
flush the chemical injection tube.
Shut off the engine.
Important: Simply shutting OFF engine will not release
pressure in the system. When engine has shut down,
squeeze the trigger on the gun to relieve the
pressure in the hose.
Nozzle Maintenance
If the adjustable nozzle becomes restricted or
clogged with foreign materials, such as dirt, excessive
pump pressure may develop. If this nozzle becomes
partially clogged, it can cause a pulsing sensation
during use. This generally is not a pump related
problem, but rather a clogged or partially restricted
adjustable nozzle.
If the adjustable nozzle becomes clogged or partially
restricted, immediately clean the nozzle with the kit
included with your pressure washer by following
these instructions:
Shut off the engine and turn off the water supply.
Separate the nozzle extension from the gun.
Adjust the nozzle extension to the stream position.
Remove nozzle from the end of the wand extension
(Figure 14) using a 2mm or 5/64 allen wrench (like
the one included in the kit).
Use the wire included in the kit (Figure 14) or a
small paper clip to free the foreign materials
clogging or restricting the nozzle.
Remove additional debris by back flushing water
supply through wand extension (Figure 15). Back
flush between 30 to 60 seconds. Turn nozzle
extension to stream spray and move nozzle forward
and backward while flushing.
Reinstall nozzle into the wand extension. Do not
overtighten.
Reconnect the nozzle extension to the spray gun.
Reconnect the water supply, turn on the water, and
start the engine.
Test the pressure washer by operating with nozzle
in the high and in the low position.
ENGINE MAINTENANCE
See the engine Owners Manual for instructions on
how to properly maintain the engine.
SERVICE AND
ADJUSTMENTS
See the engine Owners Manual for instructions on
how to properly service and adjust the engine
Generac 2000PSI High Pressure Washer
GENERAC
The Reliable Ones
14
Figure 14 Removing and cleaning the nozzle.
Figure 15 Removing and cleaning the nozzle.
Page 15

Generac 2000PSI High Pressure Washer
GENERAC
The Reliable Ones
15
PREPARING THE UNIT FOR
STORAGE
Water should not remain in the unit for long periods of
time. Sediments of minerals can deposit on pump
parts and freeze pump action. If you do not plan to
use the pressure washer for more than 30 days,
follow this procedure:
1.Flush chemical injection tube by placing the injector
filter into a pail of clean water while running
pressure washer and squeezing the spray gun
trigger with the adjustable nozzle in low pressure
mode. Flush for 12 minutes.
2.Shut off the engine and let it cool, then remove all
hoses.
3.Place throttle lever in STOP position.
CAUTION! Be sure lever is in STOP
position before you continue. If you start
engine without proper water supply connected,
you can damage pump.
4.Empty the pump of all pumped liquids by pulling
recoil handle about 6 times. This should remove
most of the liquid in the pump.
NOTE: To protect unit from freezing temperatures,
draw windshield washer fluid into pump by pouring
RV antifreeze (antifreeze without alcohol) into a
3foot section of garden hose connected to inlet
adapter and pulling recoil handle twice.
5.Store in a clean, dry area.
STORING THE ENGINE
See the Engine Owners Manual for instructions on
how to properly store the engine.
Page 16

Troubleshooting Points
Generac 2000PSI High Pressure Washer
GENERAC
The Reliable Ones
16
Problem Cause Correction
Pump has following problems: 1. Nozzle in low pressure mode. 1. Pull nozzle backward for high
failure to produce pressure, erratic pressure mode.
pressure, chattering, loss of pressure, 2. Water inlet is blocked. 2. Clear inlet
low water volume. 3. Inadequate water supply 3. Provide adequate water flow.
4. Inlet hose is kinked or leaking 4. Straighten inlet hose, patch leak.
5. Clogged inlet hose strainer. 5. Check and clean inlet hose
strainer.
6. Water supply is over 140°F. 6. Provide cooler water supply.
7. Outlet hose is blocked or leaks. 7. Clear blocks in outlet hose.
8. Gun leaks. 8. Replace gun.
9. Nozzle is obstructed. 9. Clear nozzle.
10. Pump is faulty. 10. Contact Generac service facility.
Detergent fails to mix with spray. 1. Detergent line is not submerged. 1. Insert chemical line into deter
gent.
2. Chemical filter is clogged. 2. Clean or replace filter/detergent
line.
3. Nozzle is in high pressure mode. 3. Push nozzle forward for
low pressure mode.
Engine runs good at noload but bogs Engine speed is too slow. Move throttle control to FAST .
when load is added. position. If engine still bogs down
contact Generac service facility.
Page 17

Troubleshooting Points
Generac 2000PSI High Pressure Washer
GENERAC
The Reliable Ones
17
PROBLEM CAUSE CORRECTION
Engine will not start; or starts 1. Low oil level 1. Fill crankcase to proper level.
and runs rough 2. Dirty air cleaner 2. Clean or replace air cleaner.
3. Out of gasoline. 3. Fill fuel tank.
4. Stale gasoline. 4. Drain gas tank; fill with fresh fuel.
5. Spark plug wire not connected 5. Connect wire to spark plug.
to spark plug
6. Bad spark plug. 6. Replace spark plug.
7. Water in gasoline. 7. Drain gas tank; fill with fresh fuel.
8. Overchoking. 8. Open choke fully and crank
engine.
9. Excessively rich fuel mixture. 9. Contact Generac service facility.
10. Intake valve stuck open or closed. 10. Contact Generac service facility.
11. Engine has lost compression. 11. Contact Generac service facility.
Engine shuts down during operation 1. Out of gasoline. 1. Fill fuel tank.
2. Low oil level. 2. Fill crankcase to proper level.
Engine lacks power. Dirty air filter. Replace air filter.
Engine hunts or falters. Choke is opened too soon. Move choke to halfway position
until engine runs smoothly.
Page 18

18
Generac 2000PSI High Pressure Washer
GENERAC
The Reliable Ones
EXPLODED VIEW PUMP
Drawing No. B3361A
Page 19

19
Generac 2000PSI High Pressure Washer
GENERAC
The Reliable OnesThe Reliable Ones
REPAIR PARTS PUMP
Item Part # Qty Description
1 B3287 1 O-RING, 1.625" x 0.103
2 B2260 1 ADAPTER, Engine
3 96542 2 BEARING, Eng. Adptr. Roller
Thrust 4 x 4
4 B3329 1 CAM, Axial 6.0 Lift Assembly
6 B2261B 4 SCREW, Button Hd 5/16 - 24 x
3/4" Lg
7 B2217 4 O-RING, 0.239 ID x 0.070
8 94944 3 SHOE, Piston Pivot
9 99427 3 ASSEMBLY, Ceramic Piston &
Cap
10 96400 3 SPRING, Piston Return
11 99735 1 ASSEMBLY, Breather
12 93790 1 O RING, Crankcase 113.97 x
119.21 x 2.62
13 B2016 1 CRANKCASE ASSEMBLY
14 93668 3 SPACER, Pilot
15 40945 6 SCREW, SHC M6 x 1.0 x 20
mm Lg
16 93652 1 SPRING, Thermal Relief Actua-
tor
17 95416 1 PISTON, Thermal Relief Actua-
tor
18 93876 1 O RING, Thermal Relief 2.9 x
6.5 x 1.78
19 B2015 1 SPACER ASSEMBLY
20 A2069 1 GASKET, Head
21 97934 6 O - RING, Check Valve
22 B1449 6 CHECK VALVE, Inlet and Outlet
23 93644 1 ACTUATOR, Thermal Relief
24 96053 3 SEAL, High Pressure
25 96015 3 RING, Bearing
26 95380 1 SPRING, Chemical Injector
27 95379 1 BALL, 5.5 dia. Chemical Injector
28 A1575 1 BARB HOSE, Brass with Nylon
Insert
Item Part # Qty Description
29 B2151 1 VENTURI ASSEMBLY
30 89138 1 SPRING, Check Valve
31 B1879 1 SHUTTLE PISTON ASSEMBLY
32 A2503 1 SEAT, Trapped Line Pressure
33 A2015 1 BALL, Stainless Steel 9/32 Dia.
34 B2152 1 BALL SEAT ASSEMBLY
35 97840 3 O RING, Chk Valve Cap15.6 x
19.16 x 1.78
36 97841 3 CAP, Outlet Port
37 A2013 6 BOLT, Head M8 x 1.25 x 70mm
Lg
38 B2665 6 WASHER, Steel Special
39 B3148 1 HEAD ASSEMBLY
40 B3185 1 UNLOADER SPINDLE ASSEM-
BLY
41 A1716 1 SPRING, Unloader
42 B3117 1 HANDLE, Unloader
43 A2014 1 SET SCREW, M6 - 1.0 x 8mm
44 B2241 1 CAP, Plastic
Service Kits
45 B3519 0 CAM ASSEMBLY, 6.0 LIFT
46 B3507 0 HEAD ASSEMBLY
47 B3508 0 CRANKCASE ASSEMBLY
48 B3509 0 SPACER PLATE ASSEMBLY
49 B3480 0 COMPLETE HEAD ASSEMBLY
50 B3510 0 HIGH PRESSURE OUTLET
ASSEMBLY
51 B3513 0 CHECK VALVE ASSEMBLY, 6
pkg.
52 B3479 0 UNLOADER SPINDLE ASSEM-
BLY
53 B3478 0 PISTON/SHOE ASSEMBLY
54 B3514 0 O-RING/SEAL KIT
Page 20

20
Generac 2000PSI High Pressure Washer
GENERAC
The Reliable OnesThe Reliable Ones
Drawing No. B3409
EXPLODED VIEW MAIN UNIT
Page 21

21
Generac 2000PSI High Pressure Washer
GENERAC
The Reliable OnesThe Reliable Ones
REPAIR PARTS MAIN UNIT
Item Part # Description Qty.
1 AB2058 BASE, VSPW 1
2 B1932 DECAL, Instructions 1
3 20566 DECAL, 1-800 Number 1
4 48031G CLAMP, Hose 3/16 1
5 B2192 DECAL, GENERAC 1
6 B1730 BOLT, Eye 1
7 50190 WASHER, M8 Flat 2
8 B2060 DECAL, Logo 2000 PSI 1
9 22145 WASHER, M8 Flat 3
10 B1232 CLAMP, Hose 1
11 30809 GROMMET, Chem Hose 1
12 97054 TAG, Pressure Adjust 1
13 B1631B BILLBOARD, Plastic 1
14 B1760 TIRE, 3.5 X 10 Black Mag 2
15 75402 PUSHNUT, 1/2 2
16 52858 NUT, M8 Locking Flange 5
17 A1408 CAP, Garden Hose Inlet 1
18 21424 CONNECTOR, Garden Hose 1
19 B1288 TAG, Pump Breather Cap 1
20 27007 MOUNT, Rubber Foot 2
21 B1214 HHCS, M8 X 1.25 X 45 Long 2
22 39414 HHCS, M8 x 35 2
23 52265 HHCS, M8 x 65 1
Item Part # Description Qty.
24 A1040C HOSE, Chemical 1
25 A1041 FILTER, Chemical Hose 1
26 NSP ENGINE, B & S 6HP, #12H812-2-
681-E1, Spec B2216A 1
27 B3356 MANUAL, B & S Engine 1
28 B3408 MANUAL, Owners 1
29 B3057 KIT, O-Ring Maintenance 1
30 NSP PUMP, GPW-FH Assembly,
B3358A 1
31 97100 CAP, High Pressure 1
32 88056 DECAL, Data 1
33 79552 OVERLAMINATE 1
34 AB1945 HANDLE, VS PW 1
35 97178 KNOB, PW Handle 2
36 B2163 KIT, Nozzle Cleaning 1
37 B2430 VIDEO 1
38 31669 BOLT, 1/4-20 X 1.75 Carriage 1
39 B1969 HOSE, 1/4 X 25 1
40 97566 HANG TAG, Nozzle 1
41 B1867E WAND, Adjustable Nozzle 1
42 B3263 GUN, High Pressure 1
43 B1460 CAP, Vinyl Black 3
44 B1953A WIREFORM 1
Page 22

NOTES
Generac 2000PSI High Pressure Washer
GENERAC
The Reliable Ones
22
Page 23

NOTES
Generac 2000PSI High Pressure Washer
GENERAC
The Reliable Ones
23
Page 24

Generac 2000PSI High Pressure Washer
GENERAC
The Reliable Ones
Limited Pressure Washer Warranty
(includes Master Contractor)
Generac Portable Products warrants to the original retail purchaser, the pressure washer manufactured by
Generac Portable Products to be free from defects in material and workmanship for the period(s) set forth
below from the date of original purchase. This warranty is not transferable. The term original purchaser
means the person for whom the pressure washer is originally purchased.
Warranty Schedules
Electric Power Washer 1 year (does not apply to commercial or rental applications)
CONSUMER* COMMERCIAL*
All Other Engine-driven Engine: Warranted solely by Warranted solely by
Engine Manufacturer Engine Manufacturer
Pump: 1 year 90 days
* NOTE: For the purpose of this warranty consumer use means personal residential household use
by original purchaser. Commercial Use means all other uses, including rental, construction,
commercial and income producing purposes. Once a pressure washer has experienced commercial
use, it shall thereafter be considered a commercial use pressure washer for the purposes of this
warranty.
During said warranty period, Generac Portable Products will, at its option, repair or replace any part which,
upon examination by Generac Portable Products or Generac Portable Products Authorized Dealers, is found
to be defective under normal use and service**. All transportation costs under warranty, including return to
the factory if necessary, are to be borne by the purchaser and prepaid by the purchaser.
** NORMAL WEAR: As with all mechanical devices, pressure washers need periodic parts service and
replacement to perform well. This warranty will not cover repair when normal use has exhausted the
life of a part or pressure washer pump.
THIS WARRANTY DOES NOT INCLUDE: Used products and demonstration equipment. Parts such as
GUNS, HOSES, WANDS, NOZZLES or other wear items such as quick couplers, oil, gauges, belts, O-rings,
filters, pump packing, etc. Pumps which have been run without water supplied. Damage or malfunctions
resulting from: accidents, abuse, modifications, alterations, or improper servicing. Freezing or chemical
deterioration. Normal maintenance such as adjustments, fuel system cleaning and obstruction (due to
chemical, dirt, carbon or lime, etc.).
THIS WARRANTY IS IN PLACE OF ALL OTHER WARRANTIES, EXPRESS OR IMPLIED, SPECIFICALLY,
GENERAC PORTABLE PRODUCTS MAKES NO OTHER WARRANTIES AS TO MERCHANTABILITY OR
FITNESS FOR A PARTICULAR PURPOSE. THE DURATION OF ANY IMPLIED WARRANTIES WHICH
CANNOT BE DISCLAIMED IS LIMITED TO THE TIME PERIOD AS SPECIFIED IN THE EXPRESS
WARRANTY. LIABILITY FOR CONSEQUENTIAL, INCIDENTAL, OR SPECIAL DAMAGES UNDER ANY
AND ALL WARRANTIES IS EXCLUDED, EVEN IF SUCH DAMAGES ARE A DIRECT RESULT OF
GENERAC PORTABLE PRODUCTS' NEGLIGENCE. GENERAC ALSO DISCLAIMS ANY RESPONSIBILITY
FOR INCIDENTAL OR CONSEQUENTIAL DAMAGES SUCH AS THE LOSS OF TIME OR THE USE OF
THE POWER EQUIPMENT, OR ANY COMMERCIAL LOSS DUE TO THE FAILURE OF THE EQUIPMENT:
AND ANY IMPLIED WARRANTIES ARE LIMITED TO THE DURATION OF THIS WRITTEN WARRANTY.
Some states do not allow limitations on how long an implied warranty lasts, or the exclusion or limitation of
incidental or consequential damages, so the above limitations or exclusions may not apply to you. This
warranty gives you specific legal rights and you may also have other rights, which vary from state to state.
For service, see your nearest Generac Portable Products authorized warranty service facility or call 1-877544-0982. Warranty service can be performed only by a Generac Portable Products authorized service
facility. This warranty will not apply to service at any other facility. At the time of requesting warranty service,
evidence of original purchase date must be presented.
The Reliable Ones
 Loading...