

Page 1

Diagnostic
Repair Manual
Diagnostic
Repair Manual
For more information
www.guardiangenerators.com
QUIETPACT
®
55/65/75
Model 4702, 4703, 4707, 4705, 4706, 4707
RECREATIONAL VEHICLE GENERATOR
Page 2
SAFETY
Throughout this publication, "DANGER!" and "CAUTION!" blocks are used to alert the mechanic to special
instructions concerning a particular service or operation that might be hazardous if performed incorrectly or
carelessly. PAY CLOSE ATTENTION TO THEM.
DDAANNGGEERR!! UUNNDDEERR TTHHIISS HHEEAADDIINNGG WWIILLLL BBEE FFOOUUNNDD SSPPEECCIIAALL IINNSSTTRRUUCCTTIIOONNSS WWHHIICCHH,, IIFF NNOOTT CCOOMMPPLLIIEEDD
WWIITTHH,, CCOOUULLDD RREESSUULLTT IINN PPEERRSSOONNAALL IINNJJUURRYY OORR DDEEAATTHH..
CCAAUUTTIIOONN!! UUnnddeerr tthhiiss hheeaaddiinngg wwiillll bbee ffoouunndd ssppeecciiaall iinnssttrruuccttiioonnss wwhhiicchh,, iiff nnoott ccoommpplliieedd wwiitthh,, ccoouulldd rreessuulltt iinn ddaamm--
aaggee ttoo eeqquuiippmmeenntt aanndd//oorr pprrooppeerrttyy..
These "Safety Alerts" alone cannot eliminate the hazards that they signal. Strict compliance with these special Instructions plus "common sense" are major accident prevention measures.
NOTICE TO USERS OF THIS MANUAL
This SERVICE MANUAL has been written and published by Generac to aid our dealers' mechanics and company service personnel when servicing the products described herein.
It is assumed that these personnel are familiar with the servicing procedures for these products, or like or
similar products manufactured and marketed by Generac. That they have been trained in the recommended
servicing procedures for these products, including the use of common hand tools and any special Generac
tools or tools from other suppliers.
Generac could not possibly know of and advise the service trade of all conceivable procedures by which a
service might be performed and of the possible hazards and/or results of each method. We have not undertaken any such wide evaluation. Therefore, anyone who uses a procedure or tool not recommended by
Generac must first satisfy himself that neither his nor the products safety will be endangered by the service
procedure selected.
All information, illustrations and specifications in this manual are based on the latest product information
available at the time of publication.
When working on these products, remember that the electrical system and engine ignition system are capable of violent and damaging short circuits or severe electrical shocks. If you intend to perform work where
electrical terminals could be grounded or touched, the battery cables should be disconnected at the battery.
Any time the intake or exhaust openings of the engine are exposed during service, they should be covered to
prevent accidental entry of foreign material. Entry of such materials will result in extensive damage when the
engine Is started.
During any maintenance procedure, replacement fasteners must have the same measurements and strength
as the fasteners that were removed. Metric bolts and nuts have numbers that indicate their strength.
Customary bolts use radial lines to indicate strength while most customary nuts do not have strength markings. Mismatched or incorrect fasteners can cause damage, malfunction and possible injury.
REPLACEMENT PARTS
Components on Generac recreational vehicle generators are designed and manufactured to comply with
Recreational Vehicle Industry Association (RVIA) Rules and Regulations to minimize the risk of fire or explosion. The use of replacement parts that are not in compliance with such Rules and Regulations could result
in a fire or explosion hazard. When servicing this equipment, It is extremely important that all components be
properly installed and tightened. If Improperly Installed and tightened, sparks could Ignite fuel vapors from
fuel system leaks.
Page 3

TTaabbllee ooff CCoonntteennttss
Page 1
SSAAFFEETTYY ........................................................ IINNSSIIDDEE FFRROONNTT CCOOVVEERR
SSEECCTTIIOONN 11::
GGEENNEERRAATTOORR FFUUNNDDAAMMEENNTTAALLSS ............................................ 33--77
MAGNETISM ................................................................ 3
ELECTROMAGNETIC FIELDS .................................... 3
ELECTROMAGNETIC INDUCTION .............................. 3
A SIMPLE AC GENERATOR ........................................ 4
A MORE SOPHISTICATED AC GENERATOR ............ 4
FIELD BOOST .............................................................. 6
GENERATOR AC CONNECTION SYSTEM ................ 6
SSEECCTTIIOONN 22::
MMAAJJOORR GGEENNEERRAATTOORR CCOOMMPPOONNEENNTTSS ........................ 88--1111
ROTOR ASSEMBLY ...................................................... 8
STATOR ASSEMBLY .................................................... 8
BRUSH HOLDER .......................................................... 9
BATTERY CHARGE COMPONENTS .......................... 9
EXCITATION CIRCUIT COMPONENTS ...................... 9
CRANKCASE BREATHER .......................................... 10
SSEECCTTIIOONN 33::
IINNSSUULLAATTIIOONN RREESSIISSTTAANNCCEE TTEESSTTSS ............................ 1122--1144
EFFECTS OF DIRT AND MOISTURE ........................ 12
INSULATION RESISTANCE TESTERS ...................... 12
DRYING THE GENERATOR ...................................... 12
CLEANING THE GENERATOR .................................. 12
STATOR INSULATION RESISTANCE ........................ 13
TESTING ROTOR INSULATION ................................ 14
THE MEGOHMMETER .............................................. 14
SSEECCTTIIOONN 44::
MMEEAASSUURRIINNGG EELLEECCTTRRIICCIITTYY .................................................... 1155--1177
METERS ...................................................................... 15
THE VOM .................................................................... 15
MEASURING AC VOLTAGE ...................................... 15
MEASURING DC VOLTAGE ...................................... 15
MEASURING AC FREQUENCY ................................ 16
MEASURING CURRENT ............................................ 16
MEASURING RESISTANCE ...................................... 16
ELECTRICAL UNITS .................................................. 17
OHM’S LAW ................................................................ 17
SSEECCTTIIOONN 55::
EENNGGIINNEE DDCC CCOONNTTRROOLL SSYYSSTTEEMM ................................ 1188--2266
INTRODUCTION ........................................................ 18
OPERATIONAL ANALYSIS .................................. 18-23
ENGINE CONTROLLER CIRCUIT BOARD ................ 24
BATTERY .................................................................... 24
7.5 AMP FUSE ............................................................ 25
FUEL PRIMER SWITCH ............................................ 25
START-STOP SWITCH .............................................. 25
STARTER CONTACTOR RELAY
& STARTER MOTOR ................................................ 26
SSEECCTTIIOONN 66::
TTRROOUUBBLLEESSHHOOOOTTIINNGG FFLLOOWWCCHHAARRTTSS ........................................ 2277--3377
IF PROBLEM INVOLVES AC OUTPUT ...................... 27
PROBLEM 1 VOLTAGE & FREQUENCY ARE BOTH
HIGH OR LOW ............................................................ 27
PROBLEM 2 GENERATOR PRODUCES ZERO VOLTAGE OR
RESIDUAL VOLTAGE (5-12 VAC) ........................ 28-29
PROBLEM 3 -
NO BATTERY CHARGE OUTPUT .............................. 29
PROBLEM 4 EXCESSIVE VOLTAGE/FREQUENCY DROOP
WHEN LOAD IS APPLIED .......................................... 30
PROBLEM 5 PRIMING FUNCTION DOES NOT WORK
(GASOLINE MODELS) ................................................ 30
PROBLEM 6 -
ENGINE WILL NOT CRANK ...................................... 31
PROBLEM 7 ENGINE CRANKS BUT WILL NOT START
(GASOLINE UNITS) .................................................... 32
PROBLEM 7 ENGINE CRANKS BUT WILL NOT START
(LP UNITS) .................................................................. 33
PROBLEM 8 ENGINE STARTS HARD AND RUNS ROUGH
(GASOLINE UNITS) .................................................... 34
PROBLEM 8 ENGINE STARTS HARD AND RUNS ROUGH
(LP UNITS) .................................................................. 34
PROBLEM 9 -
ENGINE STARTS THEN SHUTS DOWN .................. 36
PROBLEM 10 -
7.5 AMP (F1) FUSE BLOWING .................................. 37
SSEECCTTIIOONN 77::
DDIIAAGGNNOOSSTTIICC TTEESSTTSS ............................................................................ 3388--6677
INTRODUCTION ........................................................ 38
TEST 1 -
Check No-Load Voltage And Frequency ...................... 38
TEST 2 -
Check Engine Governor .............................................. 38
TEST 3 -
Test Excitation Circuit Breaker .................................... 39
TEST 4 -
Fixed Excitation Test/Rotor Amp Draw ........................ 39
TEST 5 -
Wire Continuity ............................................................ 40
TEST 6 -
Check Field Boost ........................................................ 41
TEST 7 -
Test Stator DPE Winding.............................................. 41
TEST 8 -
Check Sensing Leads/Power Windings ...................... 42
Page 4

TEST 9 -
Check Brush Leads ...................................................... 43
TEST 10 -
Check Brushes & Slip Rings ........................................ 43
TEST 11 -
Check Rotor Assembly ................................................ 44
TEST 12 -
Check Main Circuit Breaker .......................................... 44
TEST 13 -
Check Load Voltage & Frequency ................................ 45
TEST 14 -
Check Load Watts & Amperage .................................. 45
TEST 15 -
Check Battery Charge Output ...................................... 45
TEST 16 -
Check Battery Charge Rectifier .................................... 45
TEST 17 Check Battery Charge Windings/
Battery Charge Resistor .............................................. 46
TEST 18 -
Try Cranking the Engine .............................................. 47
TEST 19 -
Test Primer Switch........................................................ 47
TEST 20 -
Check Fuel Pump ........................................................ 48
TEST 21 -
Check 7.5 Amp Fuse .................................................... 49
TEST 22 -
Check Battery & Cables................................................ 49
TEST 23 -
Check Power Supply to Circuit Board .......................... 49
TEST 24 -
Check Start-Stop Switch .............................................. 50
TEST 25 -
Check Power Supply to Wire 56 .................................. 51
TEST 26 -
Check Starter Contactor Relay .................................... 51
TEST 26A -
Check Starter Contactor .............................................. 52
TEST 27 -
Check Starter Motor .................................................... 52
TEST 28 -
Check Fuel Supply........................................................ 54
TEST 29 -
Check Wire 14 Power Supply ...................................... 56
TEST 30 -
Check Wire 18 .............................................................. 56
TEST 31 Check Fuel Solenoid
(Gasoline Models) ........................................................ 57
TEST 32 -
Check Ignition Spark .................................................... 57
TEST 33 -
Check Spark Plugs ...................................................... 59
TEST 34 -
Check and Adjust Ignition Magnetos .......................... 59
TEST 35 -
Check Valve Adjustment .............................................. 61
TEST 36 -
Check Carburetion ...................................................... 62
TEST 37 -
Check Choke Solenoid ................................................ 62
TEST 38 Check Engine / Cylinder Leak Down Test /
Compression Test ........................................................ 64
TEST 39 -
Check Oil Pressure Switch .......................................... 65
TEST 40 -
Test Oil Temperature Switch ........................................ 65
TEST 41 -
Test Choke Heater ...................................................... 66
TEST 42 -
Check LPG Fuel Solenoid ............................................ 66
SSEECCTTIIOONN 88::
AASSSSEEMMBBLLYY ........................................................................................................ 6688--7700
MAJOR DISASSEMBLY .............................................. 68
Enclosure/Panel Removal ........................................68
Stator Removal ........................................................ 68
Rotor Removal ........................................................ 68
Belt Tensioning ........................................................ 69
Engine Removal ...................................................... 69
Startor Removal ...................................................... 69
Flywheel/Magneto Removal .................................... 70
SSEECCTTIIOONN 99::
EEXXPPLLOODDEEDD VVIIEEWWSS // PPAARRTT NNUUMMBBEERRSS ................ 7722--8833
BASE & PULLEY DRAWING ............................................ 72
ENCLOSURE DRAWING ................................................ 74
SHEET METAL DRAWING .......................................... 76
CONTROL PANEL DRAWING .................................... 78
760 V-TWIN ENGINE DRAWING ................................ 80
LP REGULATOR DRAWING ...................................... 82
SSEECCTTIIOONN 1100::
SSPPEECCIIFFIICCAATTIIOONNSS && CCHHAARRTTSS................................................ 8844--8866
MAJOR FEATURES AND DIMENSIONS .................... 84
GENERATOR SPECIFICATIONS .............................. 85
NOMINAL RESISTANCES OF
GENERATOR WINDINGS AT 68°F ............................ 85
ENGINE SPEEDS AND
VOLTAGE SPECIFICATIONS .................................... 86
TORQUE SPECIFICATIONS ...................................... 86
SSEECCTTIIOONN 1111::
EELLEECCTTRRIICCAALL DDAATTAA ................................................................................ 8888--8899
ELECTRICAL SCHEMATIC AND
WIRING DIAGRAM ...................................................... 88
Page 2
TTaabbllee ooff CCoonntteennttss
Page 5
SSeeccttiioonn 11
GGEENNEERRAATTOORR FFUUNNDDAAMMEENNTTAALLSS
MAGNETISM
Magnetism can be used to produce electricity and
electricity can be used to produce magnetism.
Much about magnetism cannot be explained by our
present knowledge. However, there are certain patterns of behavior that are known. Application of these
behavior patterns has led to the development of generators, motors and numerous other devices that utilize magnetism to produce and use electrical energy.
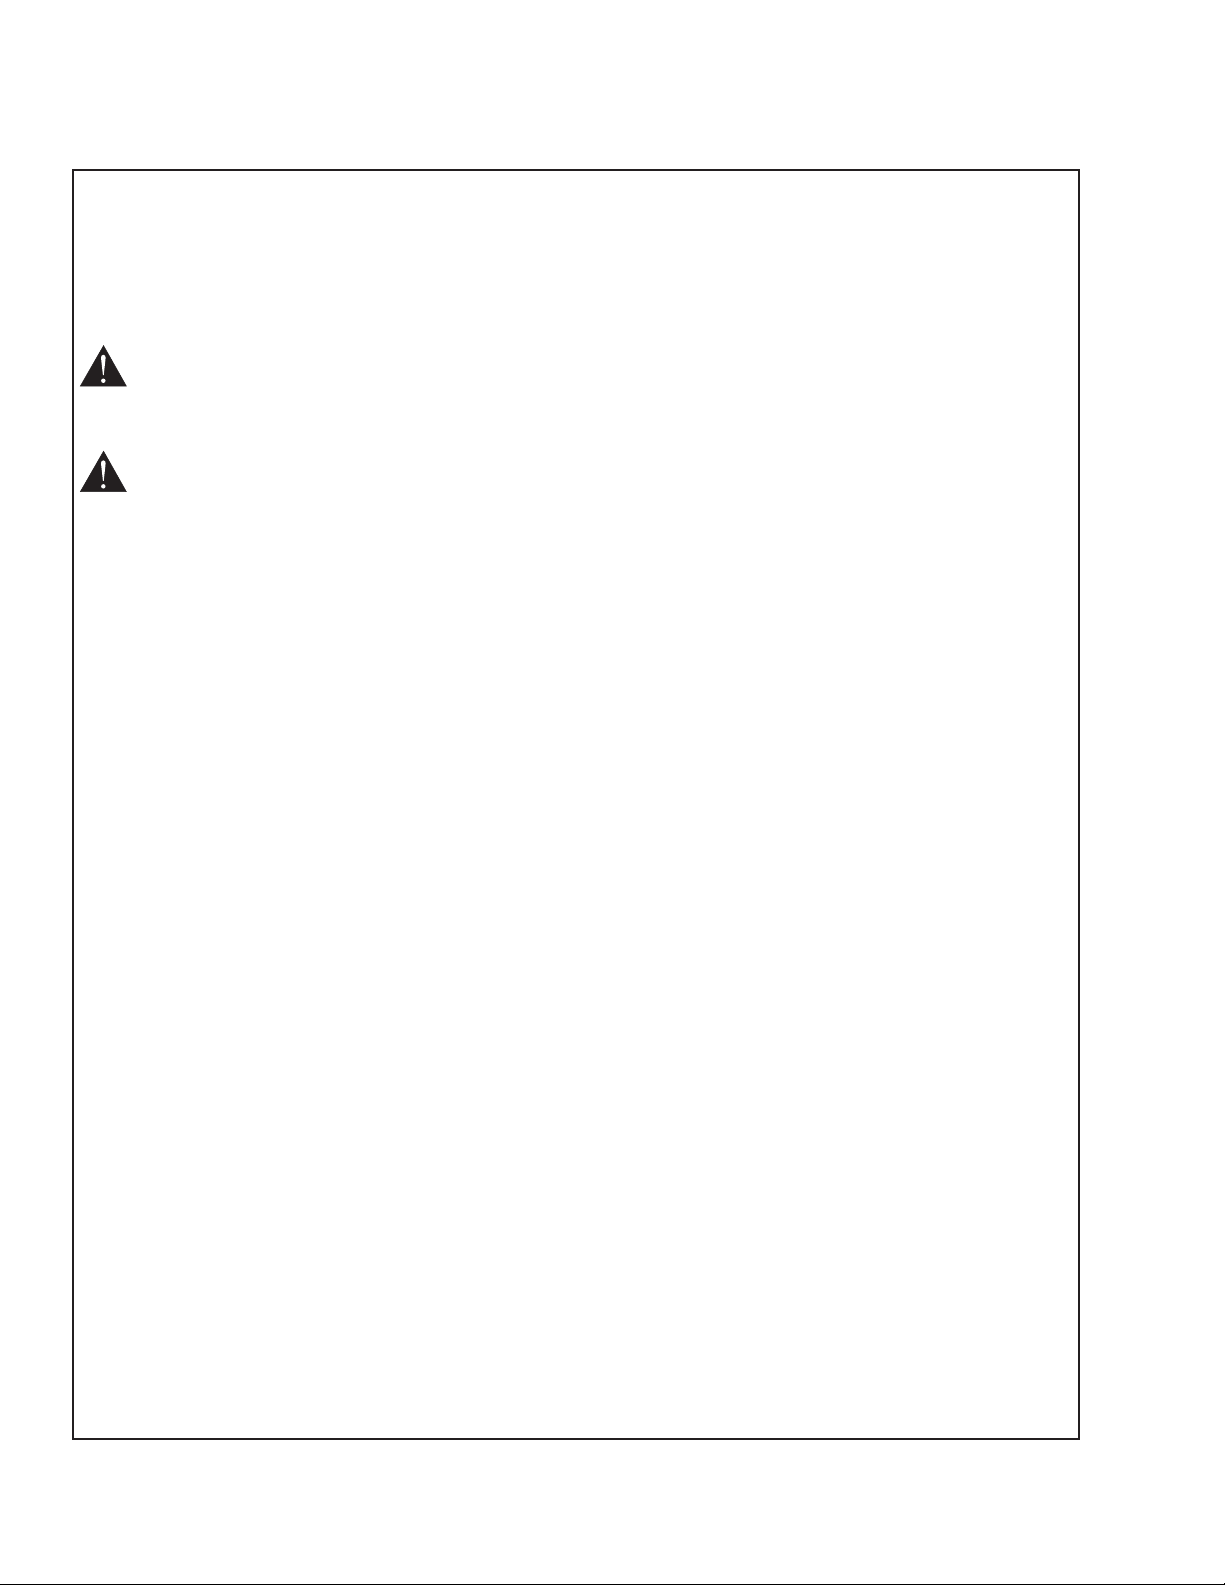
See Figure 1-1. The space surrounding a magnet is
permeated by magnetic lines of force called “flux”.
These lines of force are concentrated at the magnet's
north and south poles. They are directed away from
the magnet at its north pole, travel in a loop and reenter the magnet at its south pole. The lines of force
form definite patterns which vary in intensity depending on the strength of the magnet. The lines of force
never cross one another. The area surrounding a
magnet in which its lines of force are effective is
called a “magnetic field”.
Like poles of a magnet repel each other, while unlike
poles attract each other.
Figure 1-1. – Magnetic Lines of Force
ELECTROMAGNETIC FIELDS
All conductors through which an electric current Is
flowing have a magnetic field surrounding them. This
field is always at right angles to the conductor. If a
compass is placed near the conductor, the compass
needle will move to a right angle with the conductor.
The following rules apply:
• The greater the current flow through the conductor,
the stronger the magnetic field around the conductor.
• The increase in the number of lines of force is
directly proportional to the increase in current flow
and the field is distributed along the full length of
the conductor.
• The direction of the lines of force around a conductor can be determined by what is called the “right
hand rule”. To apply this rule, place your right hand
around the conductor with the thumb pointing in the
direction of current flow. The fingers will then be
pointing in the direction of the lines of force.
NOTE: The “right hand rule” is based on the “current flow” theory which assumes that current
flows from positive to negative. This is opposite
the “electron” theory, which states that current
flows from negative to positive.
Figure 1-2. – The Right Hand Rule
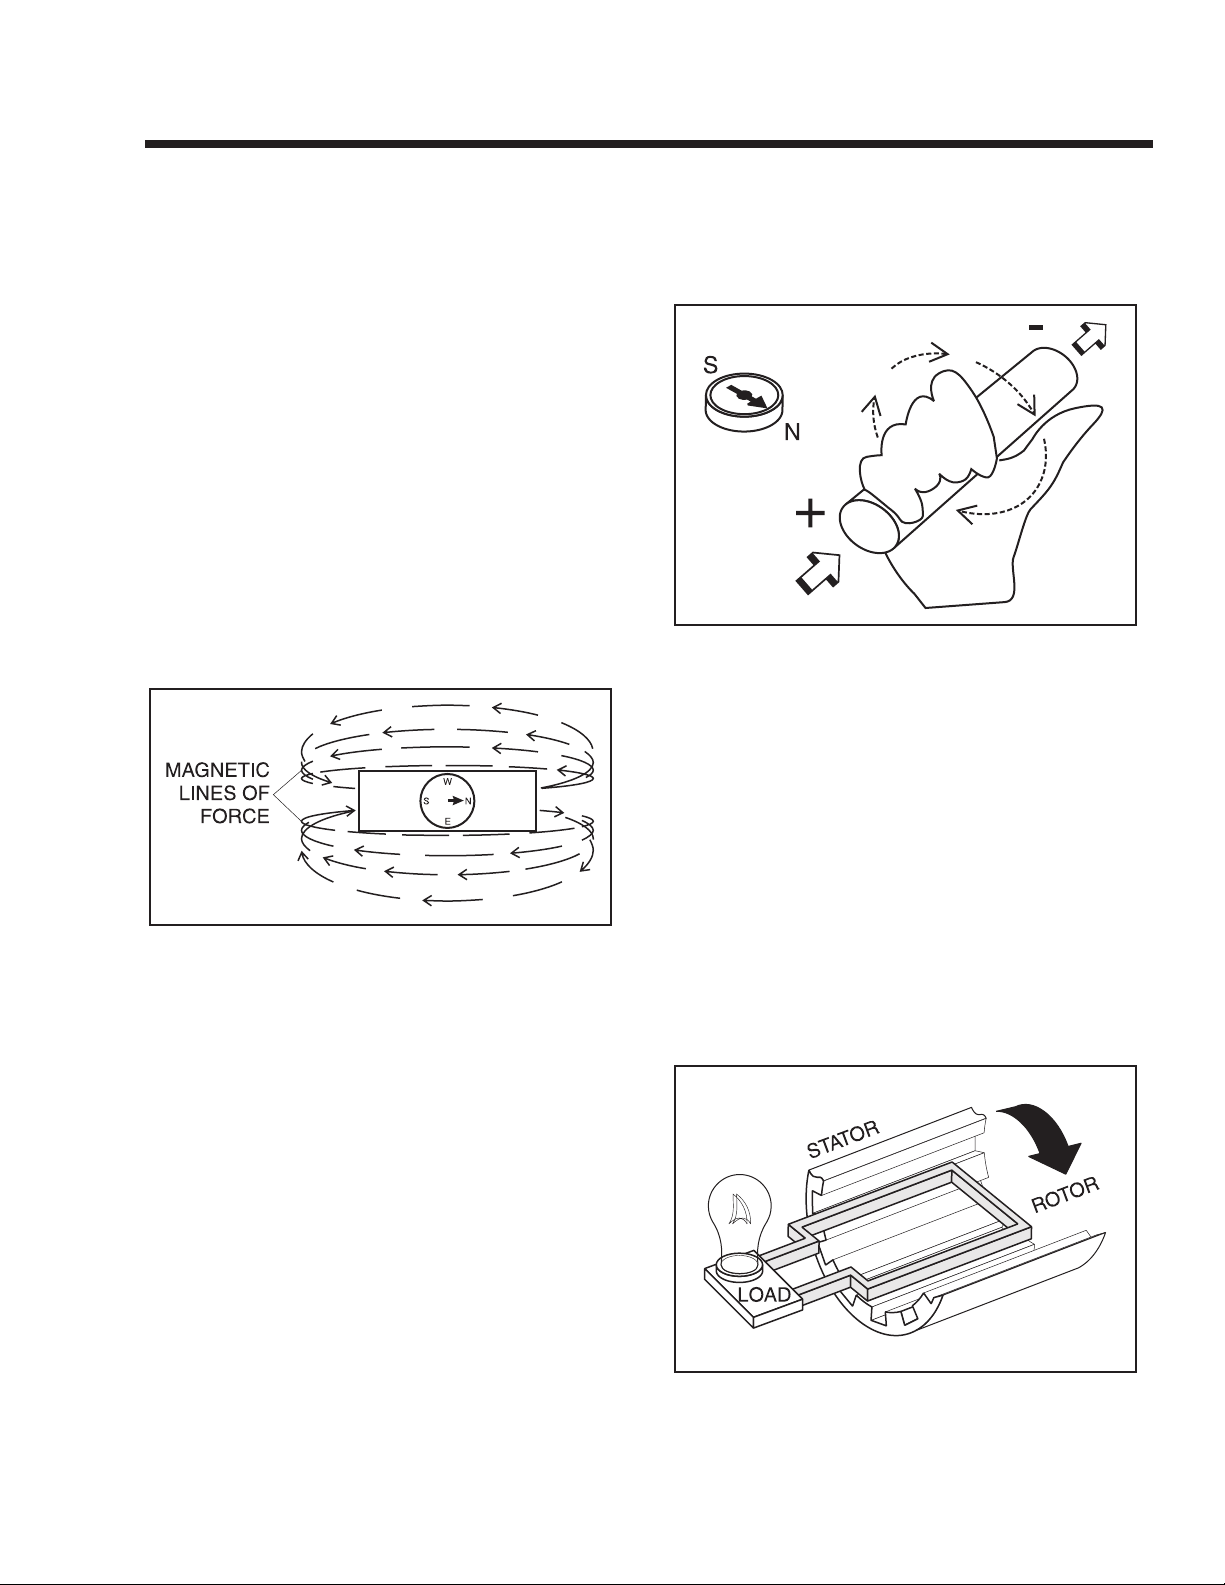
ELECTROMAGNETIC INDUCTION
An electromotive force (EMF) or voltage can be produced in a conductor by moving the conductor so that
it cuts across the lines of force of a magnetic field.
Similarly, if the magnetic lines of force are moved so
that they cut across a conductor, an EMF (voltage)
will be produced in the conductor. This is the basic
principal of the revolving field generator.
Figure 1-3, below, illustrates a simple revolving field
generator. The permanent magnet (Rotor) is rotated
so that its lines of magnetic force cut across a coil of
wires called a Stator. A voltage is then induced into
the Stator windings. If the Stator circuit is completed
by connecting a load (such as a light bulb), current
will flow in the circuit and the bulb will light.
Figure 1-3. – A Simple Revolving Field Generator
Page 3
Page 6
SSeeccttiioonn 11
GGEENNEERRAATTOORR FFUUNNDDAAMMEENNTTAALLSS
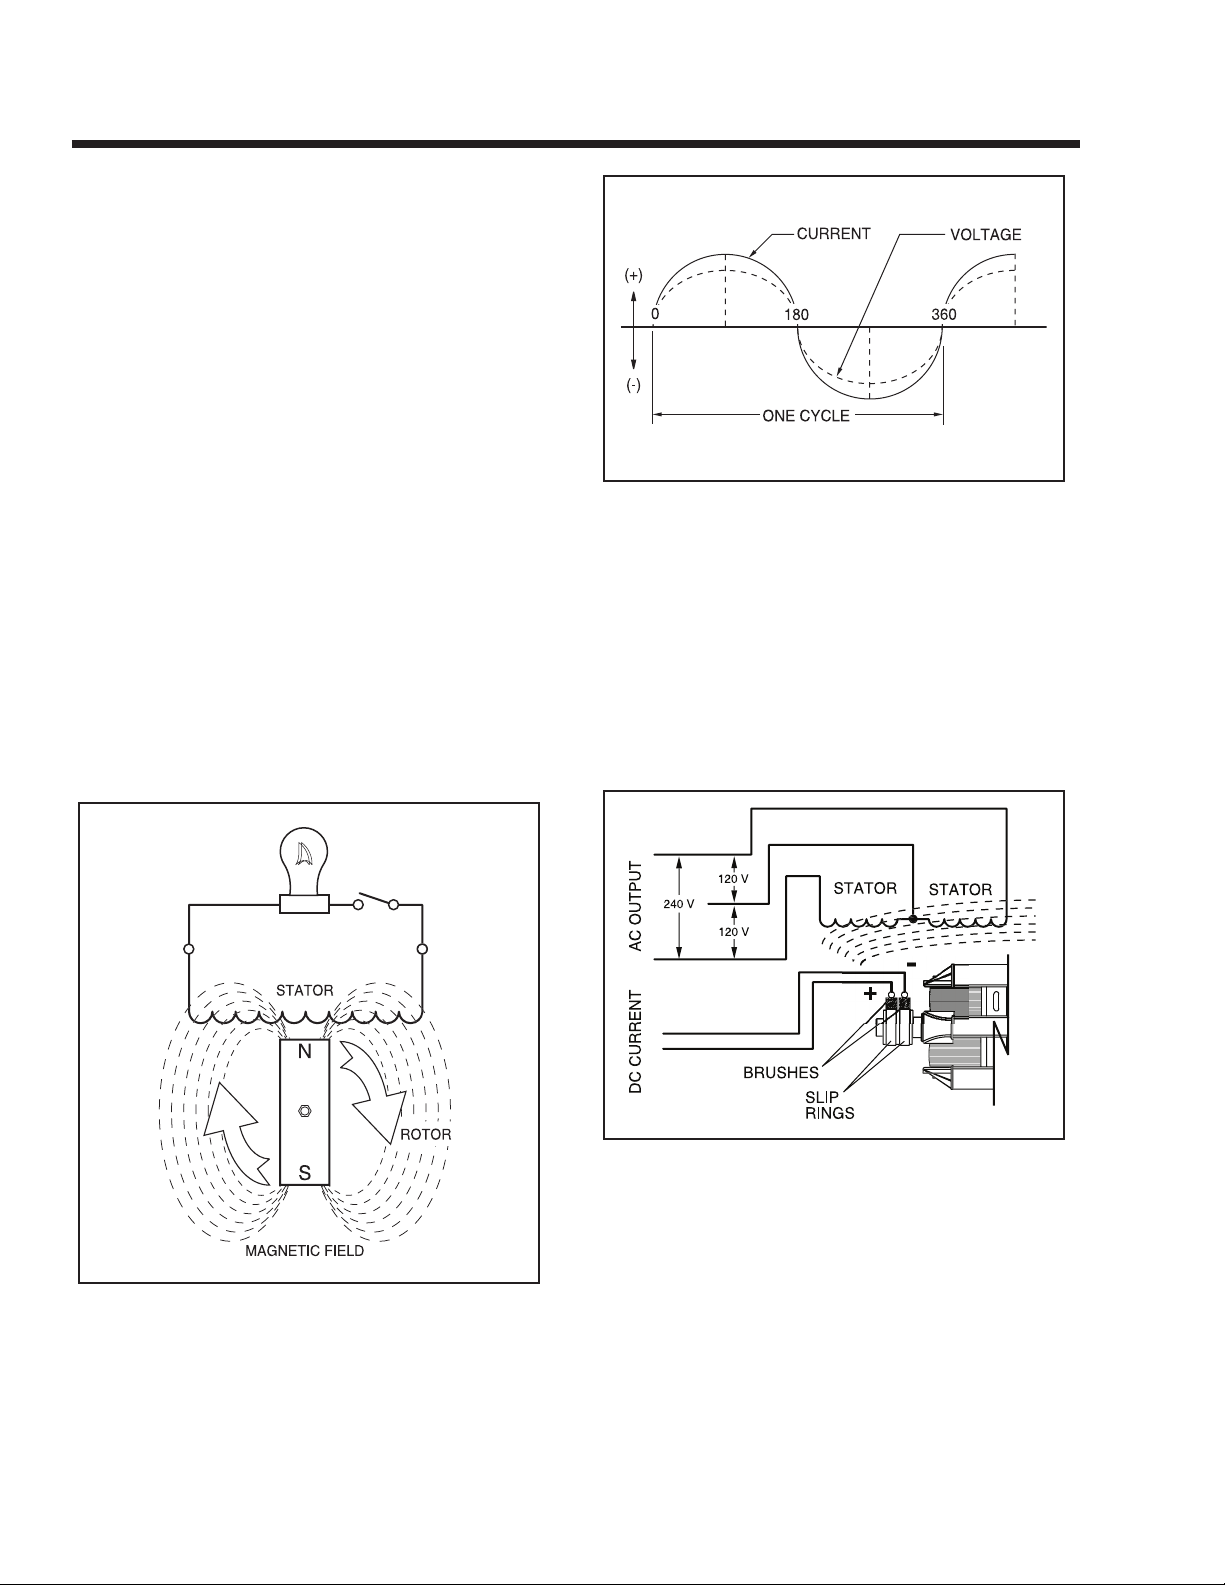
A SIMPLE AC GENERATOR
Figure 1-4 shows a very simple AC Generator. The
generator consists of a rotating magnetic field called
a ROTOR and a stationary coil of wire called a STATOR. The ROTOR is a permanent magnet which consists of a SOUTH magnetic pole and a NORTH magnetic pole.
As the MOTOR turns, its magnetic field cuts across
the stationary STATOR. A voltage is induced Into the
STATOR windings. When the magnet's NORTH pole
passes the STATOR, current flows in one direction.
Current flows in the opposite direction when the magnet's SOUTH pole passes the STATOR. This constant reversal of current flow results in an alternating
current (AC) waveform that can be diagrammed as
shown in Figure 1-5.
The ROTOR may be a 2-pole type having a single
NORTH and a single SOUTH magnetic pole. Some
ROTORS are 4-pole type with two SOUTH and two
NORTH magnetic poles. The following apply:
1. The 2-pole ROTOR must be turned at 3600 rpm to produce an
AC frequency of 60 Hertz, or at 3000 rpm to deliver an AC frequency of 50 Hertz.
2. The 4-pole ROTOR must operate at 1800 rpm to deliver a 60
Hertz AC frequency or at 1500 rpm to deliver a 50 Hertz AC
frequency.
Figure 1-4. – A Simple AC Generator
Figure 1-5. – Alternating Current Sine Wave
A MORE SOPHISTICATED AC GENERATOR
Figure 1-6 represents a more sophisticated generator. A regulated direct current is delivered into the
ROTOR windings via carbon BRUSHES AND SLIP
RINGS. This results in the creation of a regulated
magnetic field around the ROTOR. As a result, a regulated voltage is induced into the STATOR.
Regulated current delivered to the ROTOR is called
“EXCITATION” current.
Figure 1-6. – A More Sophisticated Generator
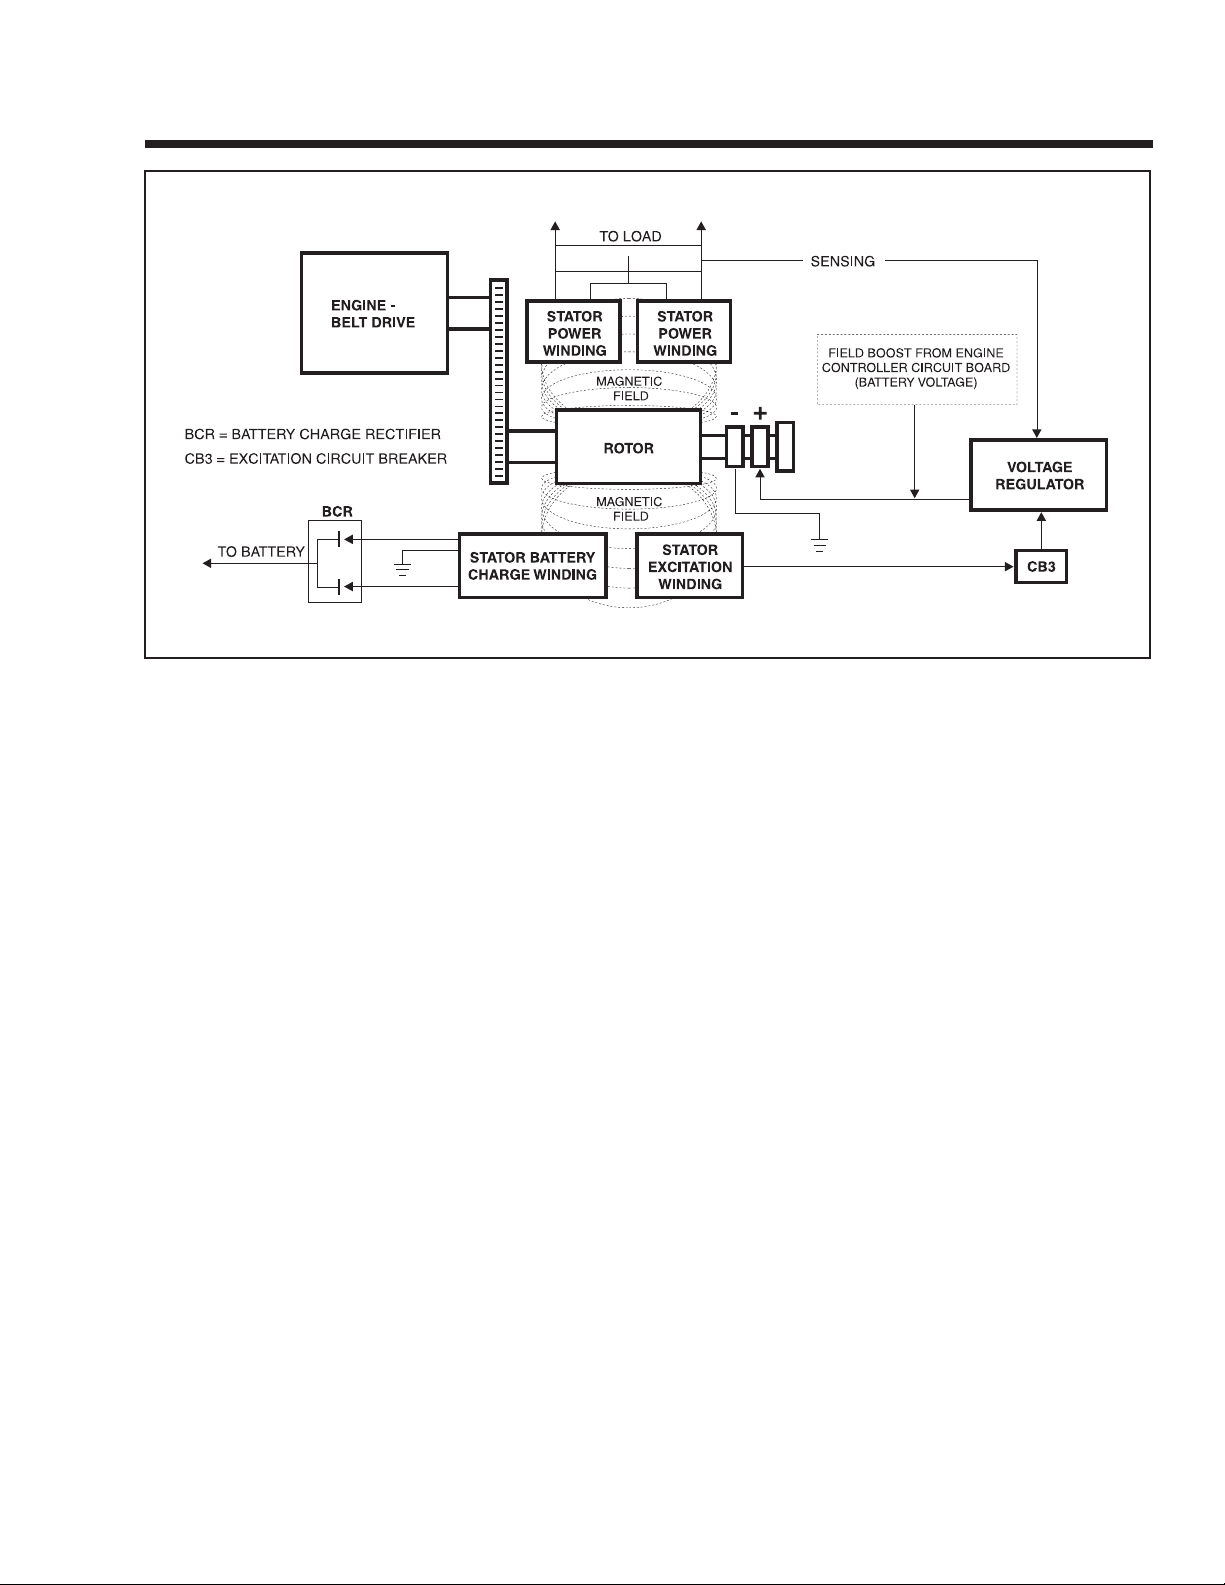
See Figure 1-7 (next page). The revolving magnetic
field (ROTOR) is driven by the engine at a constant
speed. This constant speed is maintained by a
mechanical engine governor. Units with a 2-pole rotor
require an operating speed of 3600 rpm to deliver a
60 Hertz AC output. Engine governors are set to
maintain approximately 3720 rpm when no electrical
loads are connected to the generator.
Page 4
Page 7
SSeeccttiioonn 11
GGEENNEERRAATTOORR FFUUNNDDAAMMEENNTTAALLSS
NOTE: AC output frequency at 3720 rpm will be
about 62 Hertz. The “No-Load” is set slightly high
to prevent excessive rpm, frequency and voltage
droop under heavy electrical loading.
Generator operation may be described briefly as follows:
1. Some “residual” magnetism is normally present in the Rotor
and is sufficient to induce approximately 7 to 12 volts AC Into
the STATOR's AC power windings.
2. During startup, an engine controller circuit board delivers battery voltage to the ROTOR, via the brushes and slip rings.
a. The battery voltage is called “Field Boost”.
b. Flow of direct current through the ROTOR
increases the strength of the magnetic field
above that of “residual” magnetism alone.
3. “Residual” plus “Field Boost” magnetism induces a voltage into
the Stator excitation (DPE), battery charge and AC Power
windings.
4. Excitation winding unregulated AC output is delivered to an
electronic voltage regulator, via an excitation circuit breaker.
a. A “Reference” voltage has been preset into
the Voltage Regulator.
b. An “Actual” (“sensing”) voltage is delivered
to the Voltage Regulator via sensing leads
from the Stator AC power windings.
c. The Regulator “compares” the actual (sens-
ing) voltage to its pre-set reference voltage.
(1) If the actual (sensing) voltage is greater
than the pre-set reference voltage, the
Regulator will decrease the regulated current flow to the Rotor.
(2) If the actual (sensing) voltage is less
than the pre-set reference voltage, the
Regulator will increase the regulated current flow to the Rotor.
(3) In the manner described, the Regulator
maintains an actual (sensing) voltage that is
equal to the pre-set reference voltage.
NOTE: The Voltage Regulator also changes the
Stator excitation windings alternating current
(AC) output to direct current (DC).
5. When an electrical load is connected across the Stator power
windings, the circuit is completed and an electrical current will
flow.
6. The Rotor's magnetic field also induces a voltage Into the
Stator battery charge windings.
a. Battery charge winding AC output is deliv-
ered to a battery charge rectifier (BCR)
which changes the AC to direct current
(DC).
b. The rectified DC is then delivered to the unit
battery, to maintain the battery in a charged
state.
c. A 1 ohm, 25 watt Resistor is installed in
series with the grounded side of the battery
charge circuit.
Page 5
Figure 1-7. – Generator Operating Diagram
Page 8
SSeeccttiioonn 11
GGEENNEERRAATTOORR FFUUNNDDAAMMEENNTTAALLSS
FIELD BOOST
When the engine is cranked during startup, the
engine's starter contactor is energized closed. Battery
current is then delivered to the starter motor and the
engine cranks.
Closure of the starter contactor contacts also delivers
battery voltage to Pin 13 of an Engine Controller circuit board. The battery current flows through a 47
ohm, 2 watt resistor and a field boost diode, then to
the Rotor via brushes and slip rings. This is called
“Field Boost” current.
Field boost current is delivered to the Rotor only while
the engine is cranking. The effect is to “flash the field”
every time the engine is cranked. Field boost current
helps ensure that sufficient “pickup” voltage is available on every startup to turn the Voltage Regulator on
and build AC output voltage.
NOTE: Loss of the Field Boost function may or
may not result in loss of AC power winding output. If Rotor residual magnetism alone is sufficient to turn the Regulator on loss of Field Boost
may go unnoticed. However, If residual magnetism alone Is not enough to turn the Regulator on,
loss of the Field Boost function will result In loss
of AC power winding output to the load. The AC
output voltage will then drop to a value commensurate with the Rotor's residual magnetism (about
7-12 VAC).
GENERATOR AC CONNECTION SYSTEM
These air-cooled generator sets are equipped with
dual stator AC power windings. These two stator windings supply electrical power to customer electrical
loads by means of a dual 2-wire connection system.
Generators may be installed to provide the following
outputs:
1. 120 VAC loads only — one load with a maximum total wattage
requirement equal to the generator’s rated power output (in
watts), and 120V across the generator output terminals. Figure
1.8, page 7, shows the generator lead wire connections for
120VAC ONLY.
2. 120/240 VAC loads — one load with a maximum total wattage
requirement equal to the generator’s rated power output, and
240V across the generator output terminals; or two separate
loads, each with a maximum total wattage requirement equal to
half of the generator’s rated power output (in watts), and 120V
across the generator output terminals. Figure 1.9 on page 7,
shows the generator lead wire connections for 120/240 VAC
loads.
You can use your generator set to supply electrical
power for operating one of the following electrical
loads:
• QUIETPACT 55G & LP: 120 and/or 240 volts, single phase, 60 Hz electrical loads. These loads can
require up to 5500 watts (5.5 kW) of total power,
but cannot exceed 45.8 AC amperes of current at
120 volts or exceed 22.9 AC amperes at 240 volts.
• QUIETPACT 65G & LP: 120 and/or 240 volts, single phase, 60 Hz electrical loads. These loads can
require up to 6500 watts (6.5 kW) of total power,
but cannot exceed 54.1 AC amperes of current at
120 volts or exceed 27 AC amperes at 240 volts.
• QUIETPACT 75G & LP: 120 and/or 240 volts, single phase, 60 Hz electrical loads. These loads can
require up to 7500 watts (7.5 kW) of total power,
but cannot exceed 62.5 AC amperes of current at
120 volts or exceed 31.2 AC amperes at 240 volts.
CCAAUUTTIIOONN!! DDoo nnoott oovveerrllooaadd tthhee ggeenneerraattoorr.. SSoommee
iinnssttaallllaattiioonnss mmaayy rreeqquuiirree tthhaatt eelleeccttrriiccaall llooaaddss bbee
aalltteerrnnaatteedd ttoo aavvooiidd oovveerrllooaaddiinngg.. AAppppllyyiinngg eexxcceess--
ssiivveellyy hhiigghh eelleeccttrriiccaall llooaaddss mmaayy ddaammaaggee tthhee ggeenn--
eerraattoorr aanndd mmaayy sshhoorrtteenn iittss lliiffee.. AAdddd uupp tthhee rraatteedd
wwaattttss ooff aallll eelleeccttrriiccaall lliigghhttiinngg,, aapppplliiaannccee,, ttooooll aanndd
mmoottoorr llooaaddss tthhee ggeenneerraattoorr wwiillll ppoowweerr aatt oonnee ttiimmee..
TThhiiss ttoottaall sshhoouulldd nnoott bbee ggrreeaatteerr tthhaann tthhee wwaattttaaggee
ccaappaacciittyy ooff tthhee ggeenneerraattoorr.. IIff aann eelleeccttrriiccaall ddeevviiccee
nnaammeeppllaattee ggiivveess oonnllyy vvoollttss aanndd aammppss,, mmuullttiippllyy
vvoollttss ttiimmeess aammppss ttoo oobbttaaiinn wwaattttss ((vvoollttss xx aammppss ==
wwaattttss)).. SSoommee eelleeccttrriicc mmoottoorrss rreeqquuiirree mmoorree wwaattttss
ooff ppoowweerr ((oorr aammppss ooff ccuurrrreenntt)) ffoorr ssttaarrttiinngg tthhaann ffoorr
ccoonnttiinnuuoouuss ooppeerraattiioonn..
LINE BREAKERS (120 VOLTS ONLY):
Protects generator’s AC output circuit against
overload, i.e., prevents unit from exceeding
wattage/amperage capacity. The circuit breaker ratings are as follows:
Page 6
MMooddeell CCiirrccuuiitt BBrreeaakkeerr 11 CCiirrccuuiitt BBrreeaakkeerr 22
QuietPact 55 30A 20A
QuietPact 65 30A 30A
QuietPact 75 35A 35A
Page 9
SSeeccttiioonn 11
GGEENNEERRAATTOORR FFUUNNDDAAMMEENNTTAALLSS
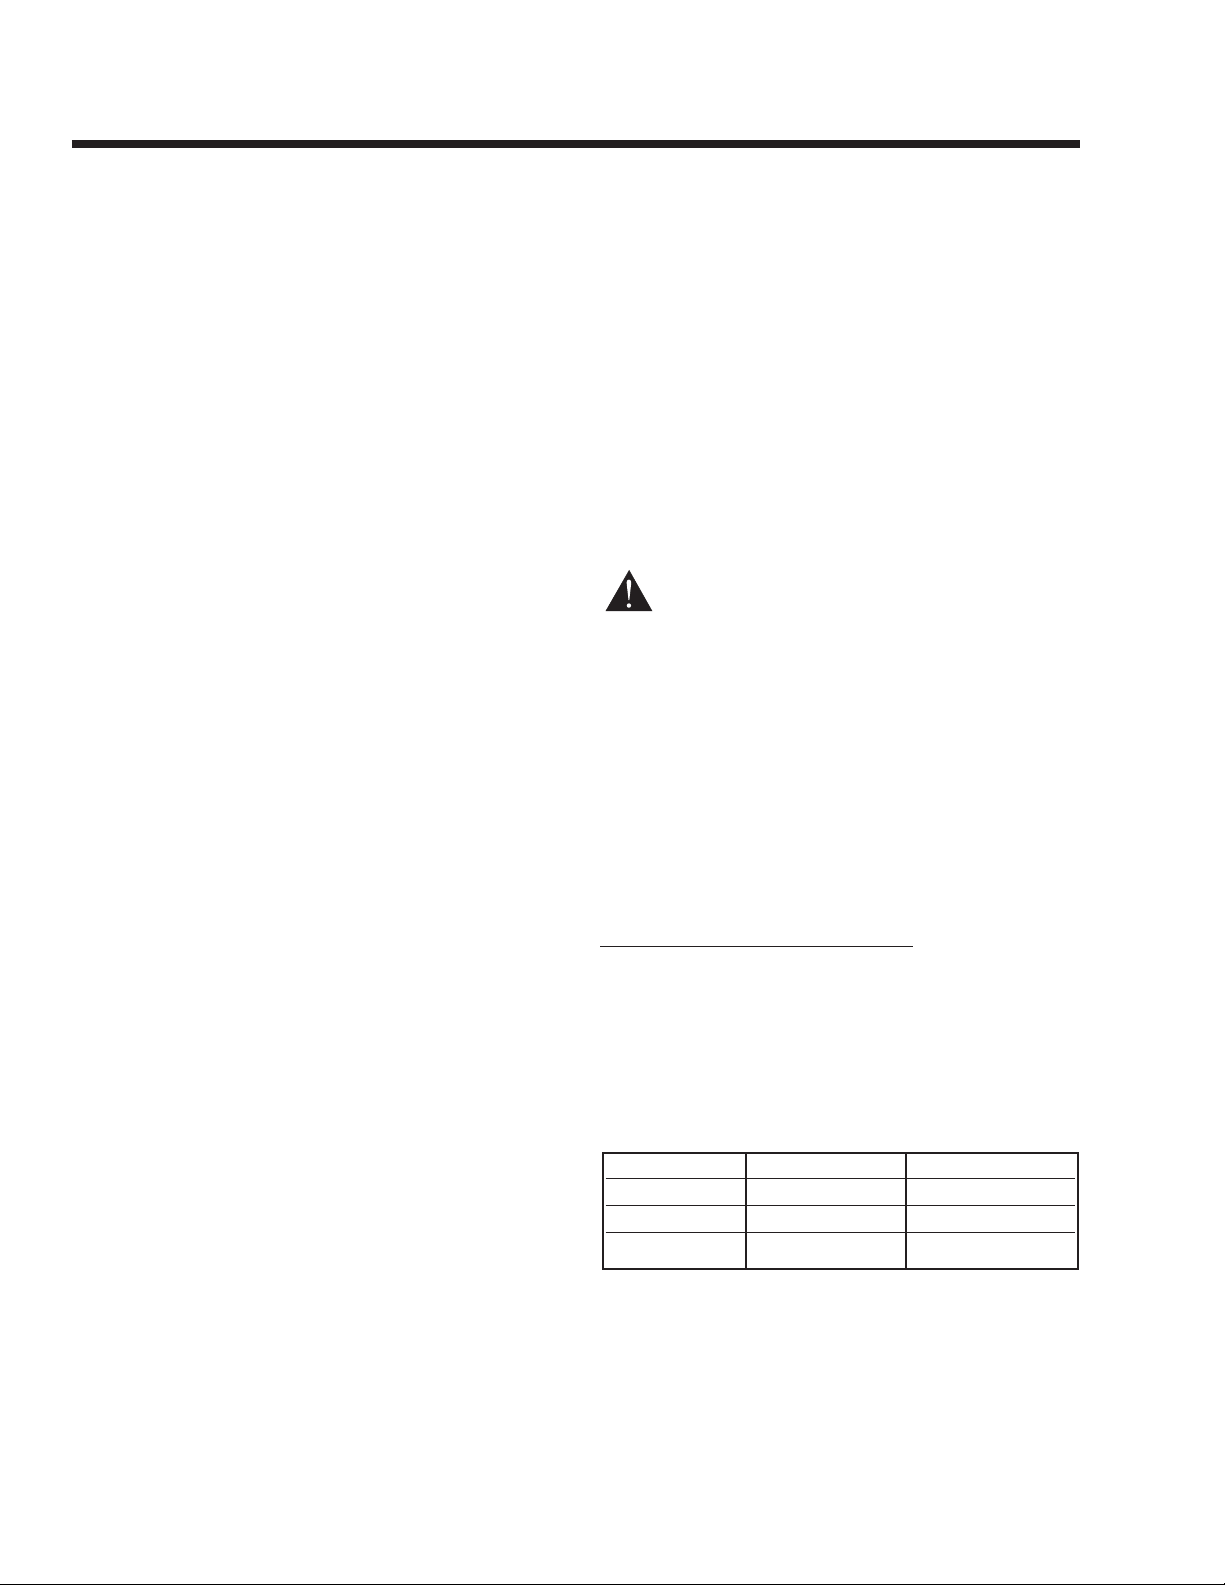
Figure 1-8. – Connection for 120 Volts Only
RECONNECTION FOR DUAL VOLTAGE OUTPUT:
When connected for dual voltage output, Stator out-
put leads 11P and 44 form two “hot” leads (T1- Red
and T3- Black). The junction of leads 22P and 33
form the “Neutral” line (T2- White).
For dual voltage output, the “Neutral” line remains
grounded.
NOTE: For units with two 30 amp or two 35 amp
main breakers, the existing breakers may be reused when reconnecting for dual voltage output.
However, on units with a 30 amp and a 20 amp
main breaker, you may wish to install a 2-pole
breaker that is rated closer to the unit’s rated
capacity (use two 25 amp main breakers).
Figure 1-9 - Connection for 120/240 Volts
NOTE: If this generator has been reconnected for
dual voltage AC output (120/240 volts), the
replacement line breakers should consist of two
separate breakers with a connecting piece
between the breaker handles (so that both breakers operate at the same time). If the unit is reconnected for dual voltage, it is no longer RVIA listed.
Page 7
Page 10
SSeeccttiioonn 22
MMAAJJOORR GGEENNEERRAATTOORR CCOOMMPPOONNEENNTTSS
ROTOR ASSEMBLY
The Rotor is sometimes called the “revolving field”,
since it provides the magnetic field that induces a
voltage into the stationary Stator windings. Slip rings
on the Rotor shaft allow excitation current from the
voltage regulator to be delivered to the Rotor windings. The Rotor is driven by the engine at a constant
speed through a pulley and belt arrangement.
All generator models in this manual utilize a 2-pole
Rotor, i.e., one having a single north and a single
south pole. This type of Rotor must be driven at 3600
rpm for a 60 Hertz AC output, or at 3000 rpm for a 50
Hertz output.
Slip rings may be cleaned. If dull or tarnished, clean
them with fine sandpaper (a 400 grit wet sandpaper is
recommended). DO NOT USE ANY METALLIC GRIT
OR ABRASIVE TO CLEAN SLIP RINGS.
STATOR ASSEMBLY
The Stator is “sandwiched” between the upper and
lower bearing carriers and retained in that position by
four Stator studs. Windings Included in the Stator
assembly are (a) dual AC power windings, (b) an
excitation or DPE winding, and (c) a battery charge
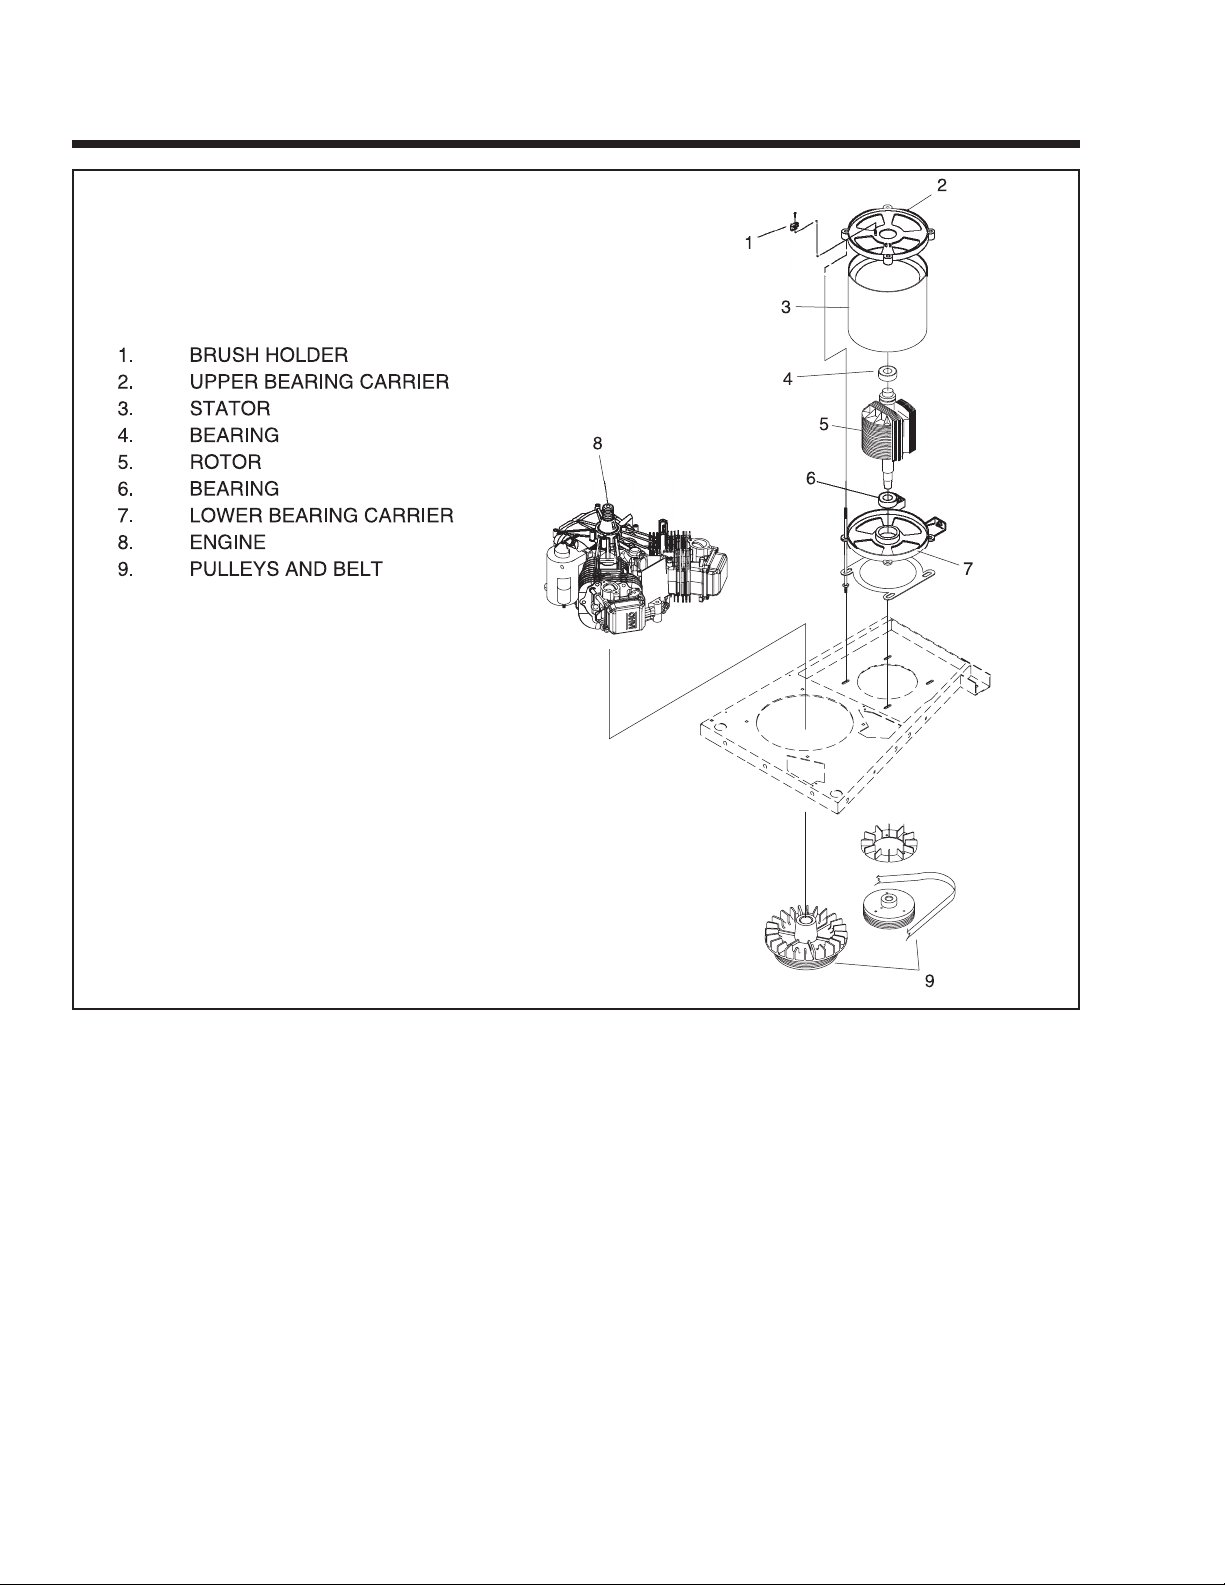
winding. A total of eleven (11) leads are brought out
of the Stator as follows:
1. Four (4) Stator power winding output leads (Wires No. 11P,
22P, 33 and 44). These leads deliver power to connected electrical loads.
2. Stator Power winding “sensing” leads (11S and 22S). These
leads deliver an “actual voltage signal to the electronic Voltage
Regulator.
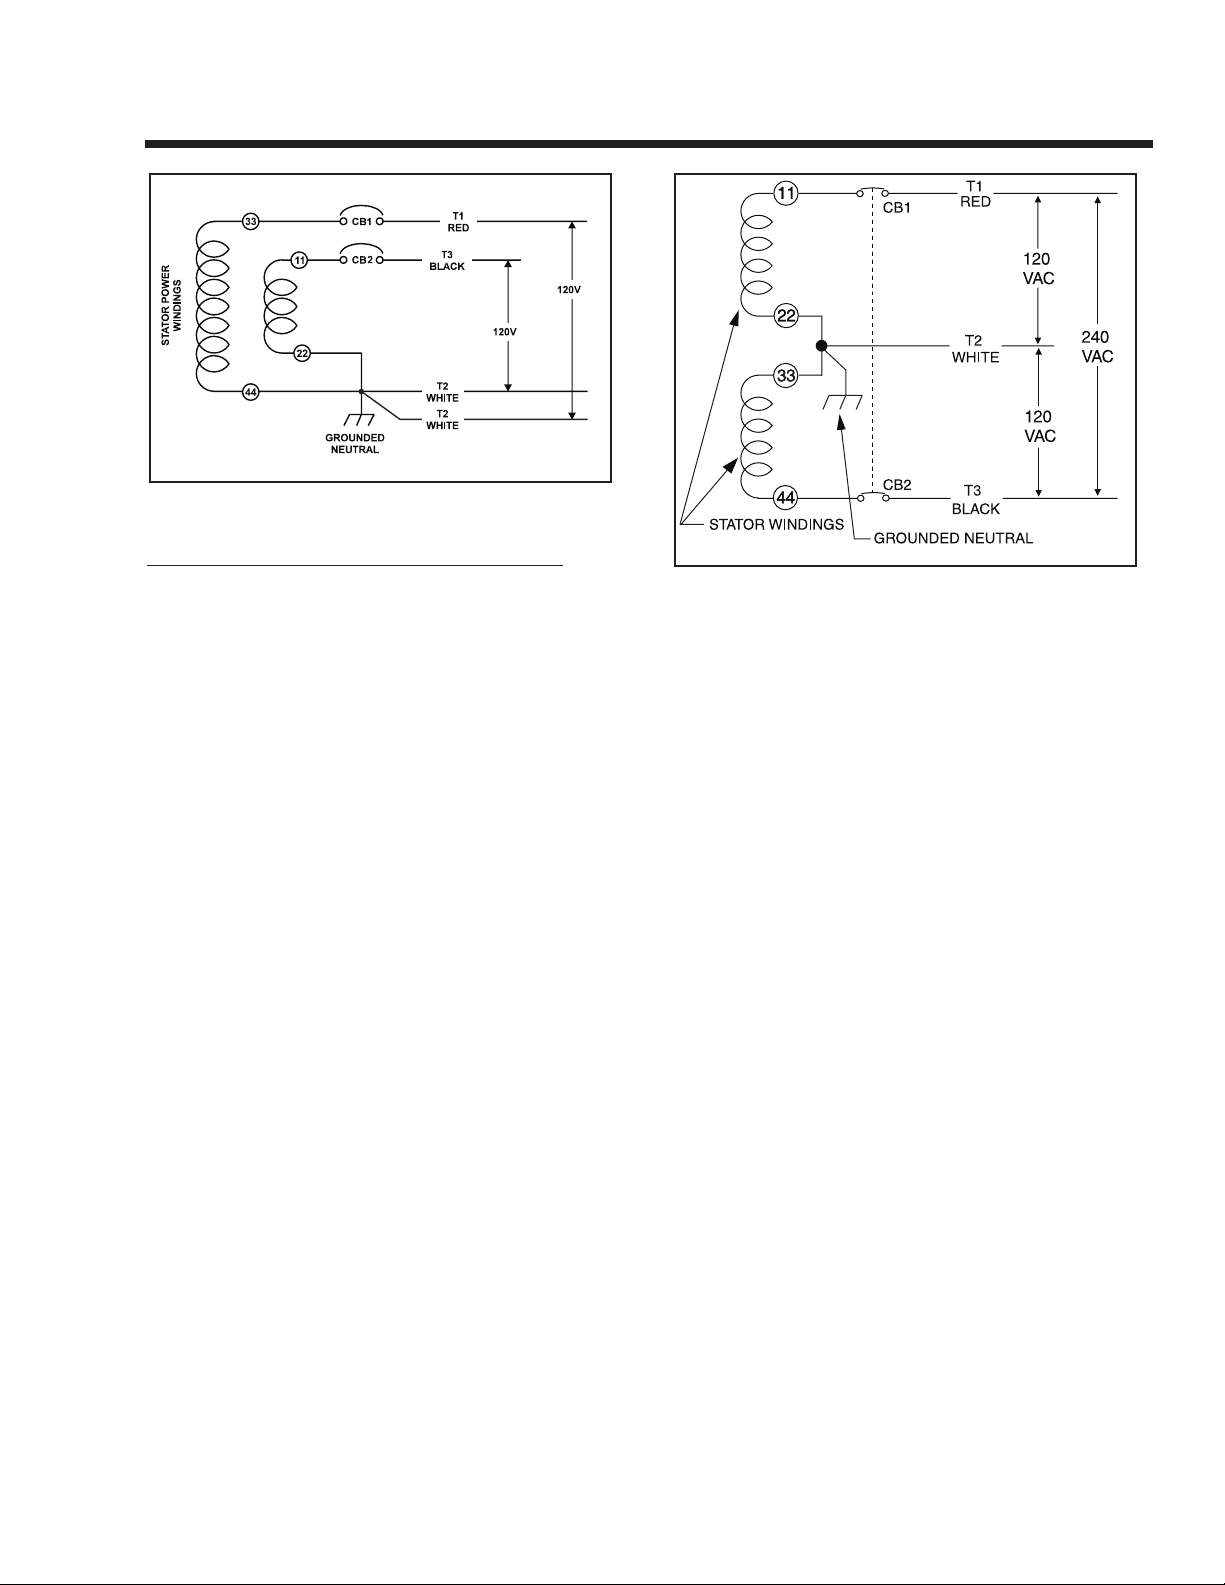
Page 8
Figure 2-1. Exploded View of Generator
Page 11
SSeeccttiioonn 22
MMAAJJOORR GGEENNEERRAATTOORR CCOOMMPPOONNEENNTTSS
3. Two excitation winding output leads (No. 2 and 6). These leads
deliver unregulated excitation current to the voltage regulator.
4. Three (3) battery charge output leads (No. 55, 66 and 77).
Figure 2-2. – Stator Output Leads
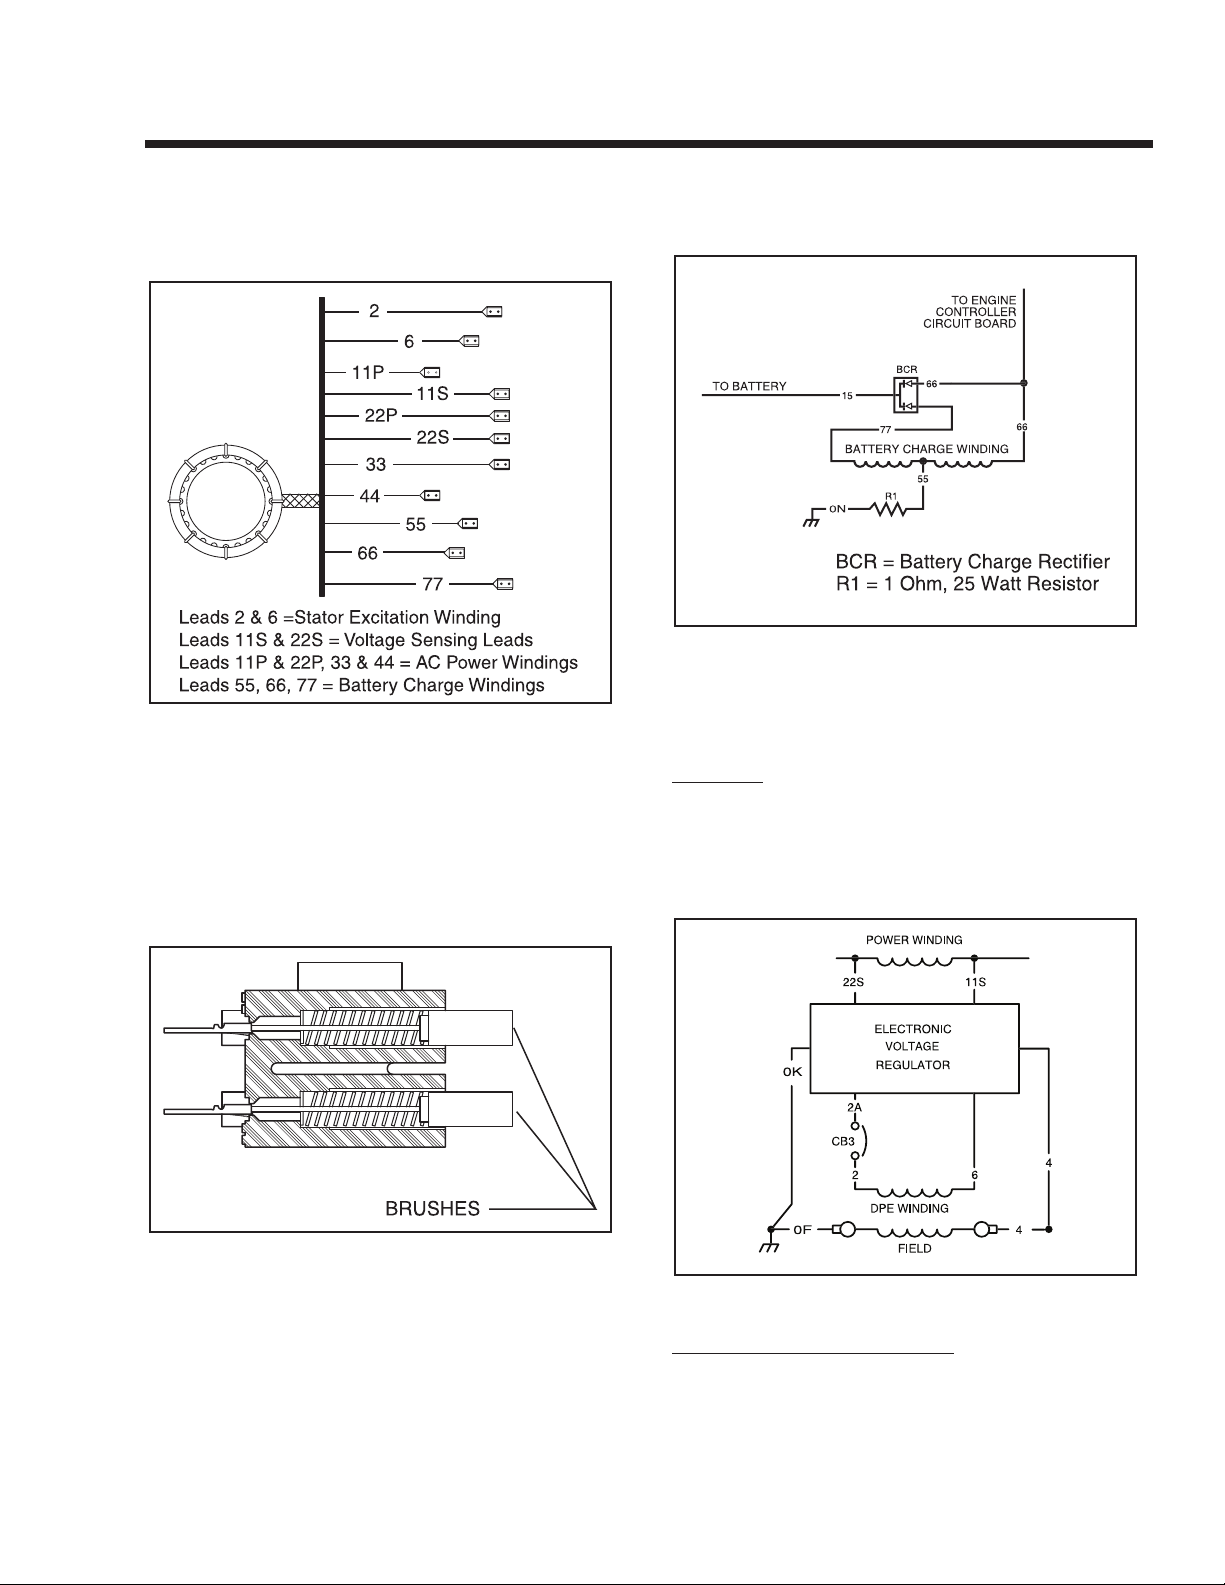
BRUSH HOLDER
The brush holder is retained in the rear bearing carrier by two M5 screws. It retains two brushes, which
contact the Rotor slip rings and allow current flow
from stationary parts to the revolving Rotor. The positive (+) brush is located nearest the Rotor bearing.
Figure 2-3. – Brush Holder
BATTERY CHARGE COMPONENTS
The Stator incorporates dual battery charge windings.
A battery charge rectifier (BCR) changes the AC output of these windings to direct current (DC). Battery
charge winding output is delivered to the unit battery
via the rectifier, a 7.5 amp fuse and Wire No. 13. A 1
ohm, 25 watt resistor is connected in series with the
grounded side of the circuit.
Figure 2-4. – Battery Charge Circuit
EXCITATION CIRCUIT COMPONENTS
GENERAL:
During operation, the Rotor's magnetic field induces a
voltage and current flow into the Stator excitation
winding. The resultant AC output is delivered to a
voltage regulator via an excitation circuit breaker
(CB3).
Figure 2-5. – Schematic: Excitation Circuit
EXCITATION CIRCUIT BREAKER:
The excitation circuit breaker (CB3) is self-resetting
and cannot be reset manually. Should the breaker
open for any reason, excitation current flow to the
Page 9
Page 12
SSeeccttiioonn 22
MMAAJJOORR GGEENNEERRAATTOORR CCOOMMPPOONNEENNTTSS
Rotor will be lost. The unit’s AC output voltage will
then drop to a value commensurate with the Rotor's
residual magnetism (about 7-12 VAC).
Figure 2-6. – Excitation Circuit Breaker
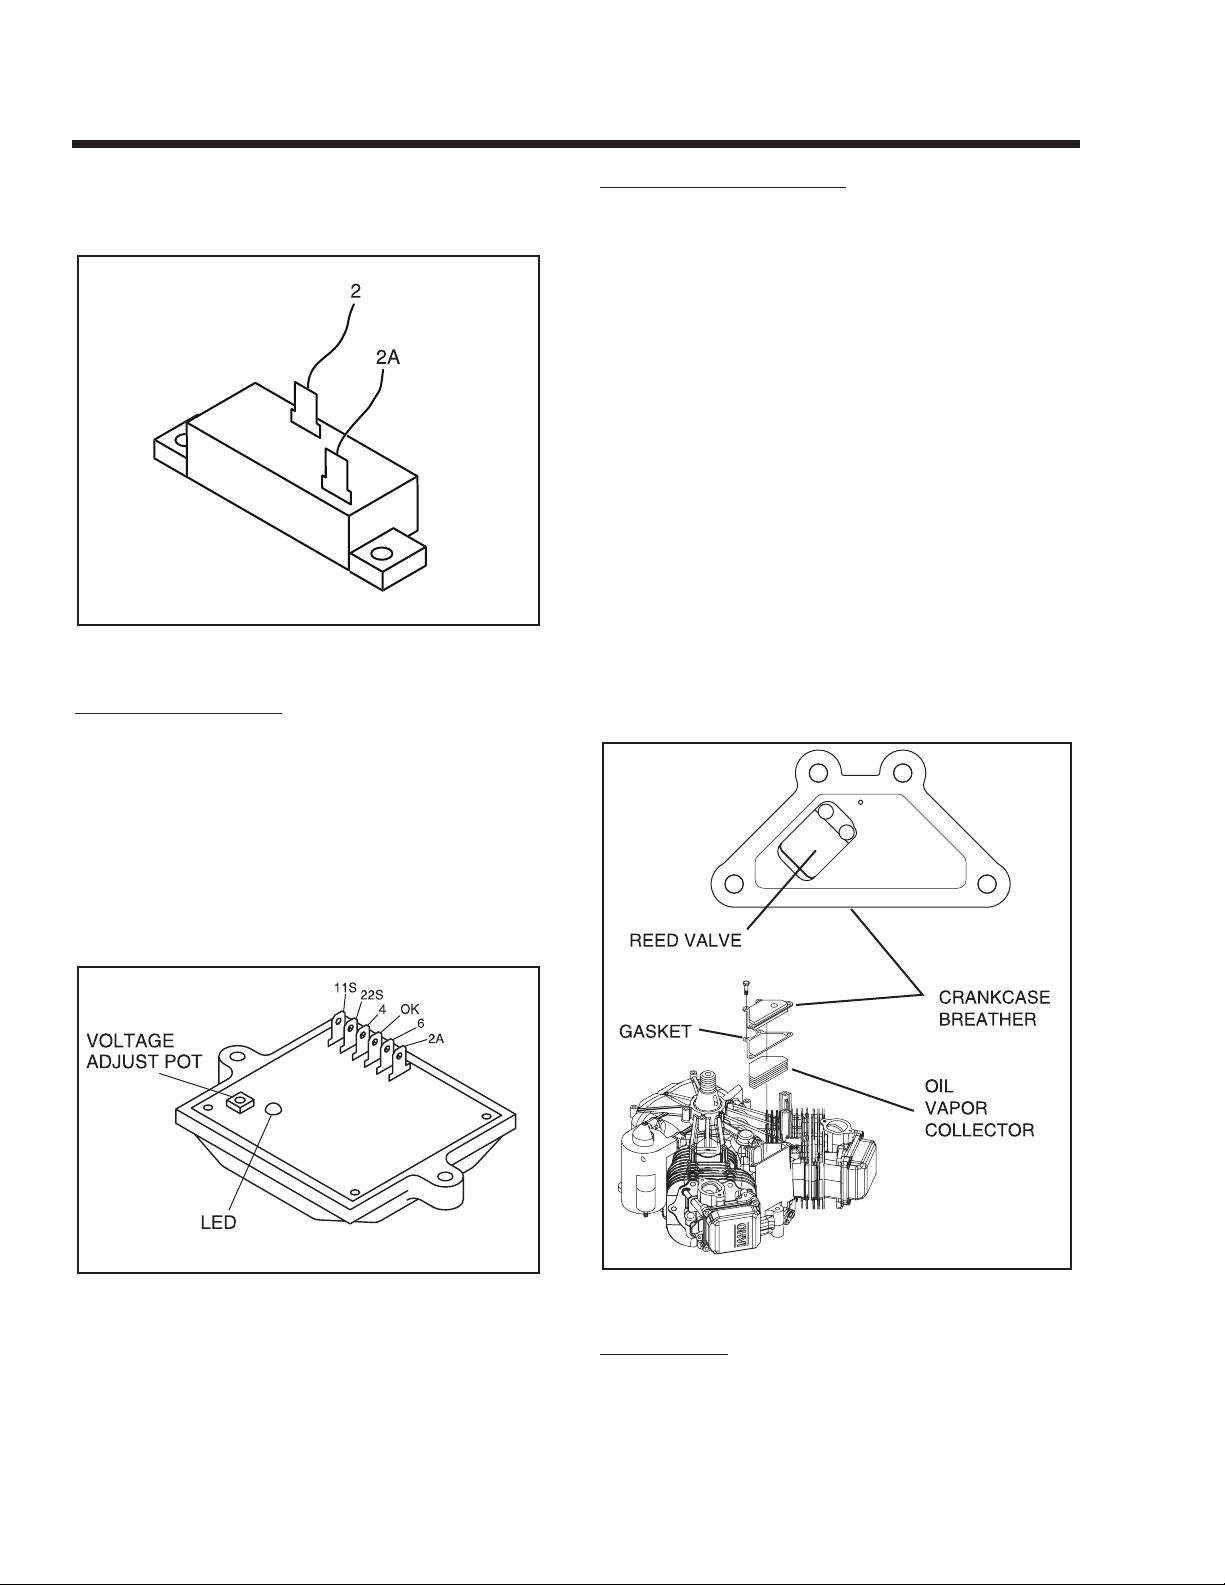
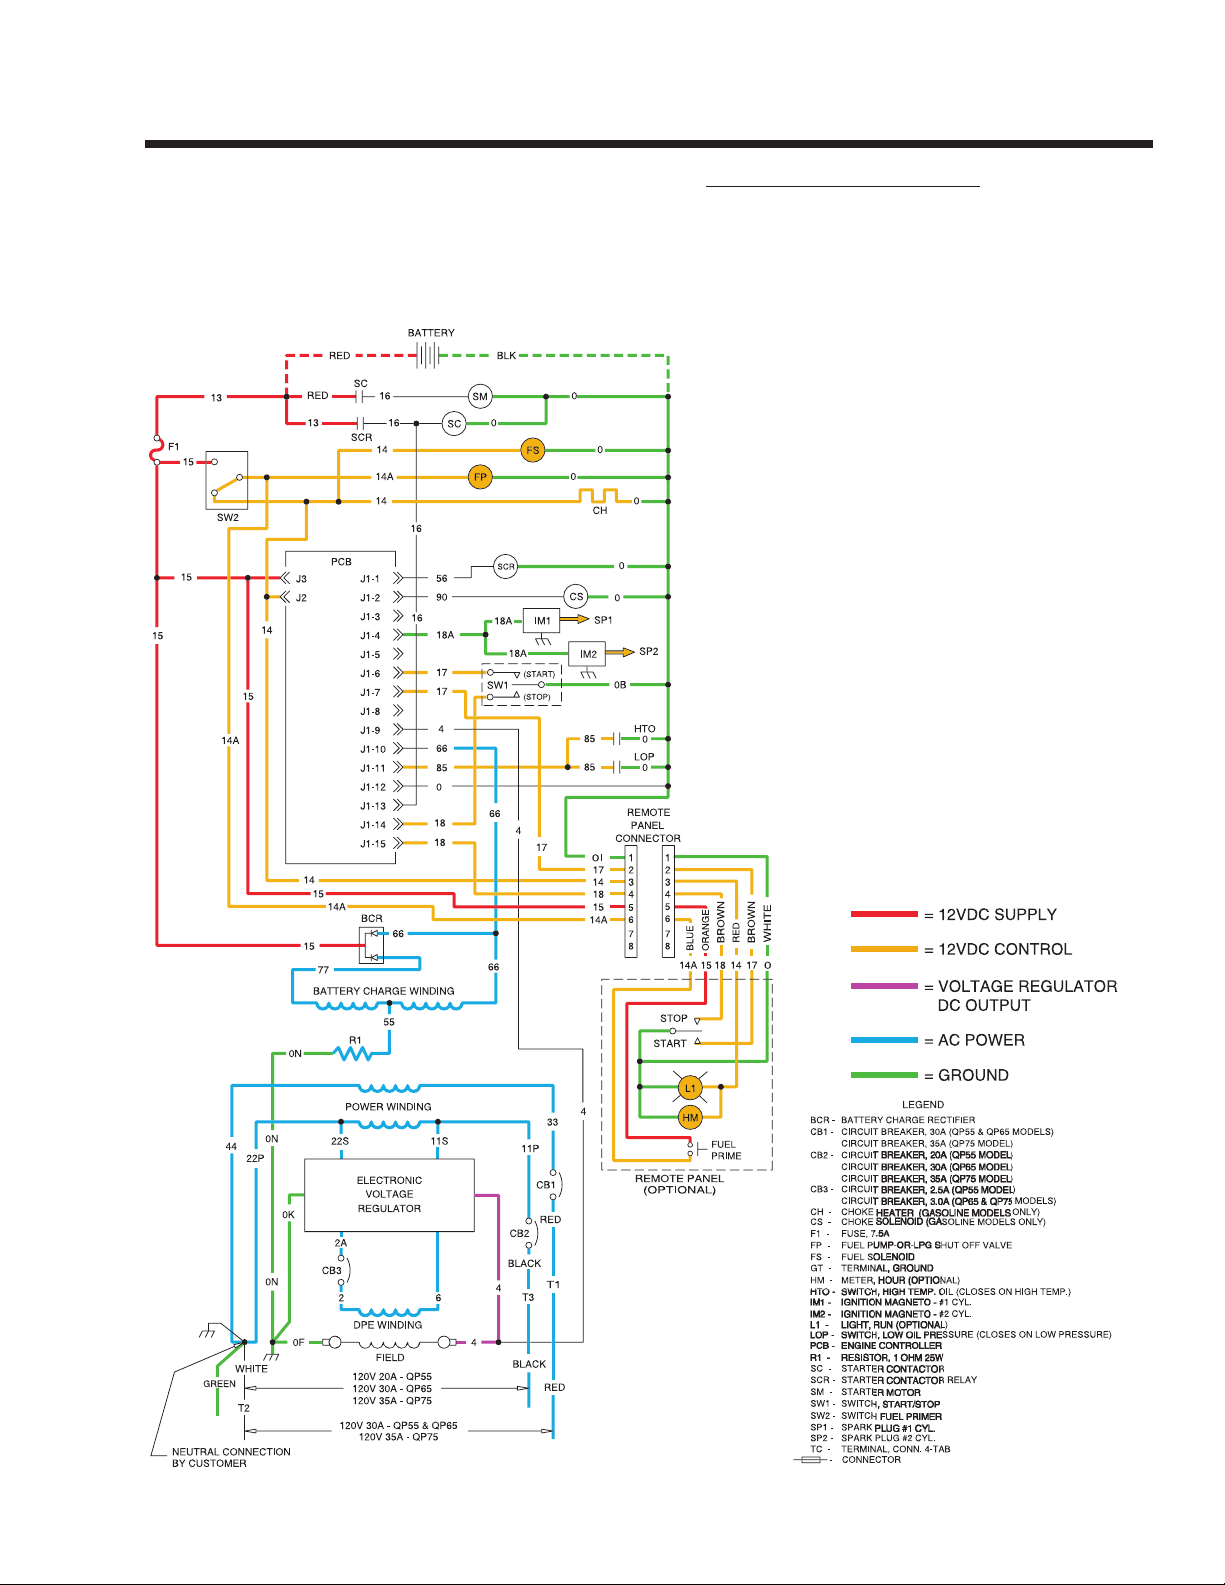
VOLTAGE REGULATOR:
Six (6) leads are connected to the voltage regulator
as follows:
• Two (2) SENSING leads deliver ACTUAL AC output voltage signals to the regulator. These are
Wires No. 11S and 22S.
• Two (2) leads (4 and 0K) deliver the regulated
direct current to the Rotor, via brushes and slip
rings.
• Two (2) leads (No. 6 and 2A) deliver Stator excitation winding AC output to the regulator.
Figure 2-7. – Voltage Regulator
The regulator mounts a “VOLTAGE ADJUST” potentiometer, used for adjustment of the pre-set REFERENCE voltage. A lamp (LED) will turn on to indicate
that SENSING voltage is available to the regulator
and the regulator is turned on.
ADJUSTMENT PROCEDURE:
With the frequency set at 62.5 Hertz and no load on
the generator, slowly turn the voltage adjust pot on
the voltage regulator until 124 VAC is measured. If
voltage is not adjustable, proceed to Section 6 Troubleshooting; Problem 2.
NOTE: If, for any reason, sensing voltage to the
regulator is lost, the regulator will shut down and
excitation output to the Rotor will be lost. The AC
output voltage will then drop to a value that is
commensurate with Rotor residual magnetism
(about 7-12 VAC). Without this automatic shutdown feature, loss of sensing (actual) voltage to
the regulator would result in a “full field” or “full
excitation” condition and an extremely high AC
output voltage.
NOTE: Adjustment of the regulator's “VOLTAGE
ADJUST” potentiometer must be done only when
the unit is running at its correct governed no-load
speed. Speed is correct when the unit's no-load
AC output frequency is about 62.5 Hertz. At the
stated frequency, AC output voltage should be
about 124 volts.
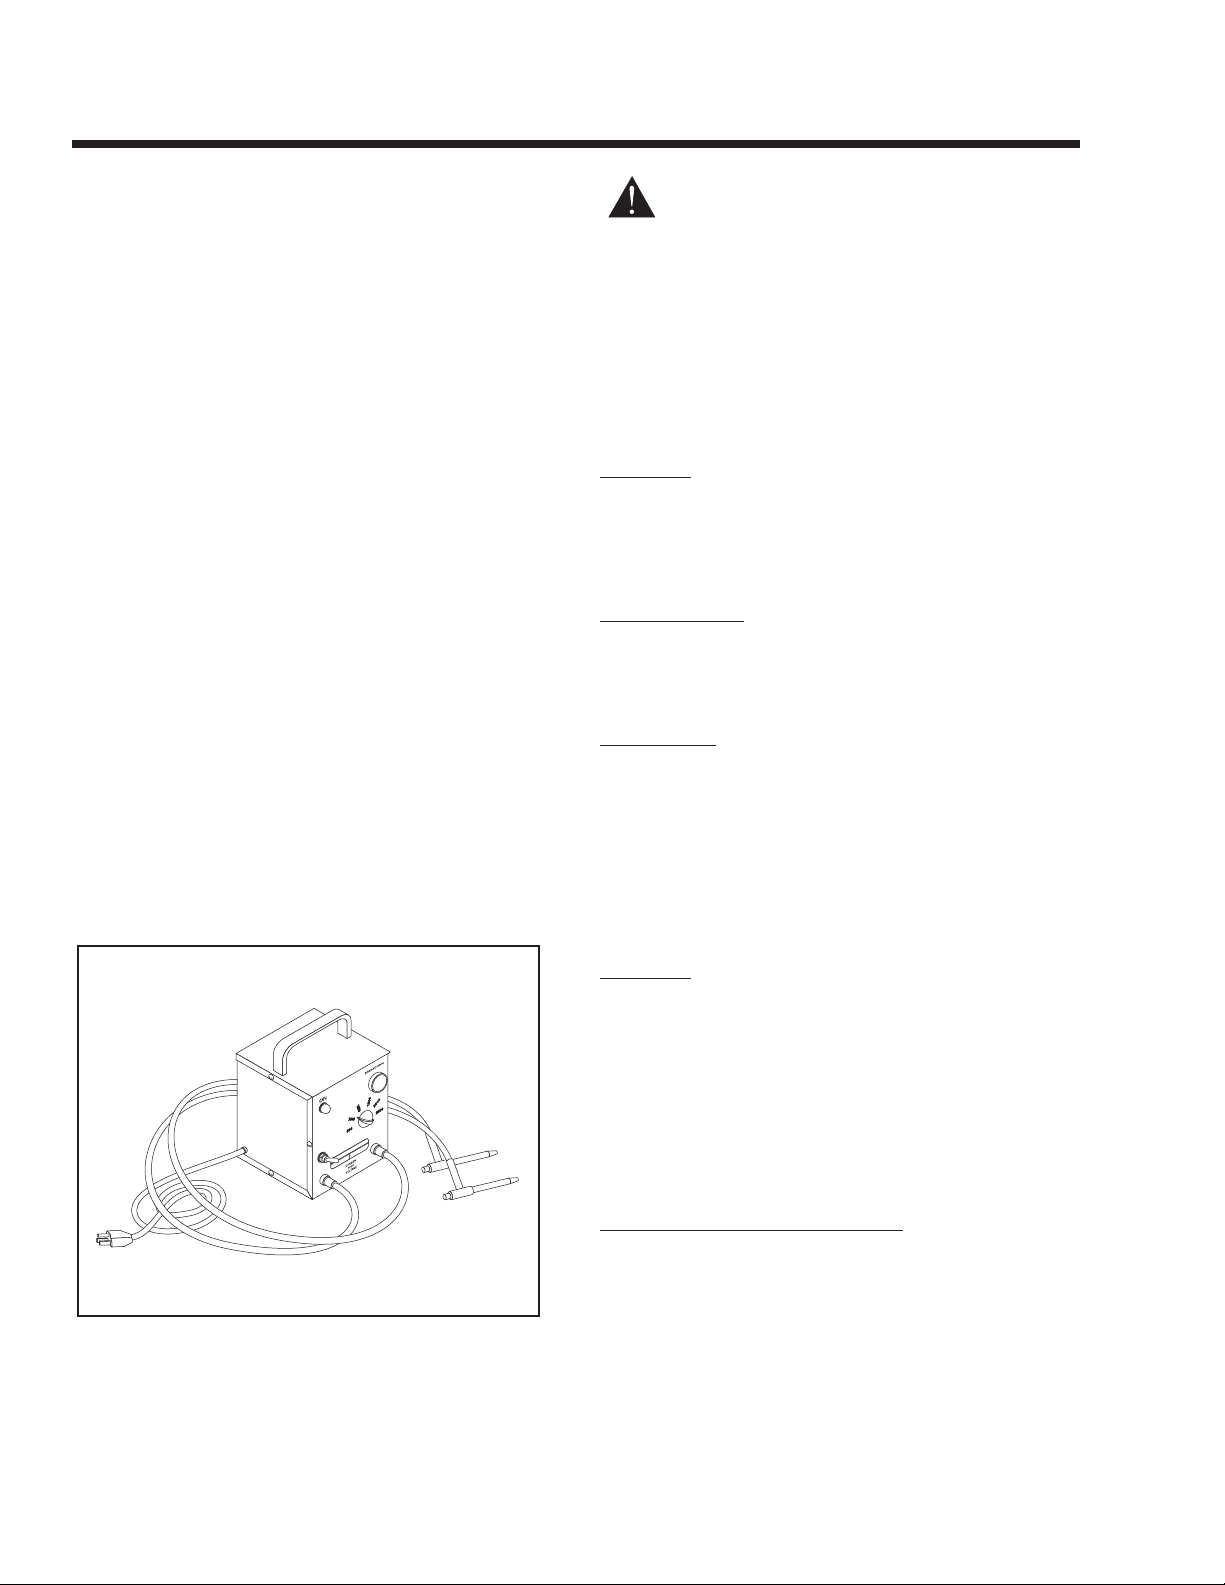
CRANKCASE BREATHER
Figure 2-8. – Crankcase Breather
DESCRIPTION:
The crankcase breather is equipped with a reed valve
to control and maintain a partial vacuum in the
crankcase. The breather is vented to the intake
Page 10
Page 13

SSeeccttiioonn 22
MMAAJJOORR GGEENNEERRAATTOORR CCOOMMPPOONNEENNTTSS
elbow. The breather chamber contains a removable
oil vapor collector. Oil vapor is condensed on the collector material and drains back into the crankcase,
which minimizes the amount of oil vapor entering the
breather.
CHECK BREATHER:
1. Disconnect breather tube and remove four screws and
breather. Discard gasket.
2. Check to see that reed valve is not deformed (Figure 2-8).
Note: Reed valve must form a complete seal
around vent hole.
3. Remove oil vapor collector and retainer.
4. Check collector for deterioration and replace if necessary.
INSTALL BREATHER:
1. Install oil vapor collector and retainer.
Note: Push oil vapor collector and retainer in until
it bottoms.
2. Install breather with new gasket (Figure 2-8).
a. Torque screws to 5-8 ft-lbs.
3. Assemble breather tube to intake elbow.
Page 11
CONTROL PANEL COMPONENT IDENTIFICATION
Figure 2-9. – Control Panel Components
Page 14
SSeeccttiioonn 33
IINNSSUULLAATTIIOONN RREESSIISSTTAANNCCEE TTEESSTTSS
EFFECTS OF DIRT AND MOISTURE
Moisture and dirt are detrimental to the continued
good operation of any generator set.
If moisture is allowed to remain in contact with the
Stator and Rotor windings, some of the moisture will
be retained in voids and cracks of the winding
Insulation. This will result in a reduced Insulation
resistance and, eventually, the unit's AC output will be
affected.
Insulation used in the generator is moisture resistant.
However, prolonged exposure to moisture will gradually reduce the resistance of the winding insulation.
Dirt can make the problem worse, since it tends to
hold moisture Into contact with the windings. Salt, as
from sea air, contributes to the problem since salt can
absorb moisture from the air. When salt and moisture
combine, they make a good electrical conductor.
Because of the detrimental affects of dirt and moisture, the generator should be kept as clean and as
dry as possible. Rotor and Stator windings should be
tested periodically with an insulation resistance tester
(such as a megohmmeter or hi-pot tester).
If the Insulation resistance is excessively low, drying
may be required to remove accumulated moisture.
After drying, perform a second insulation resistance
test. If resistance is still low after drying, replacement
of the defective Rotor or Stator may be required.
INSULATION RESISTANCE TESTERS
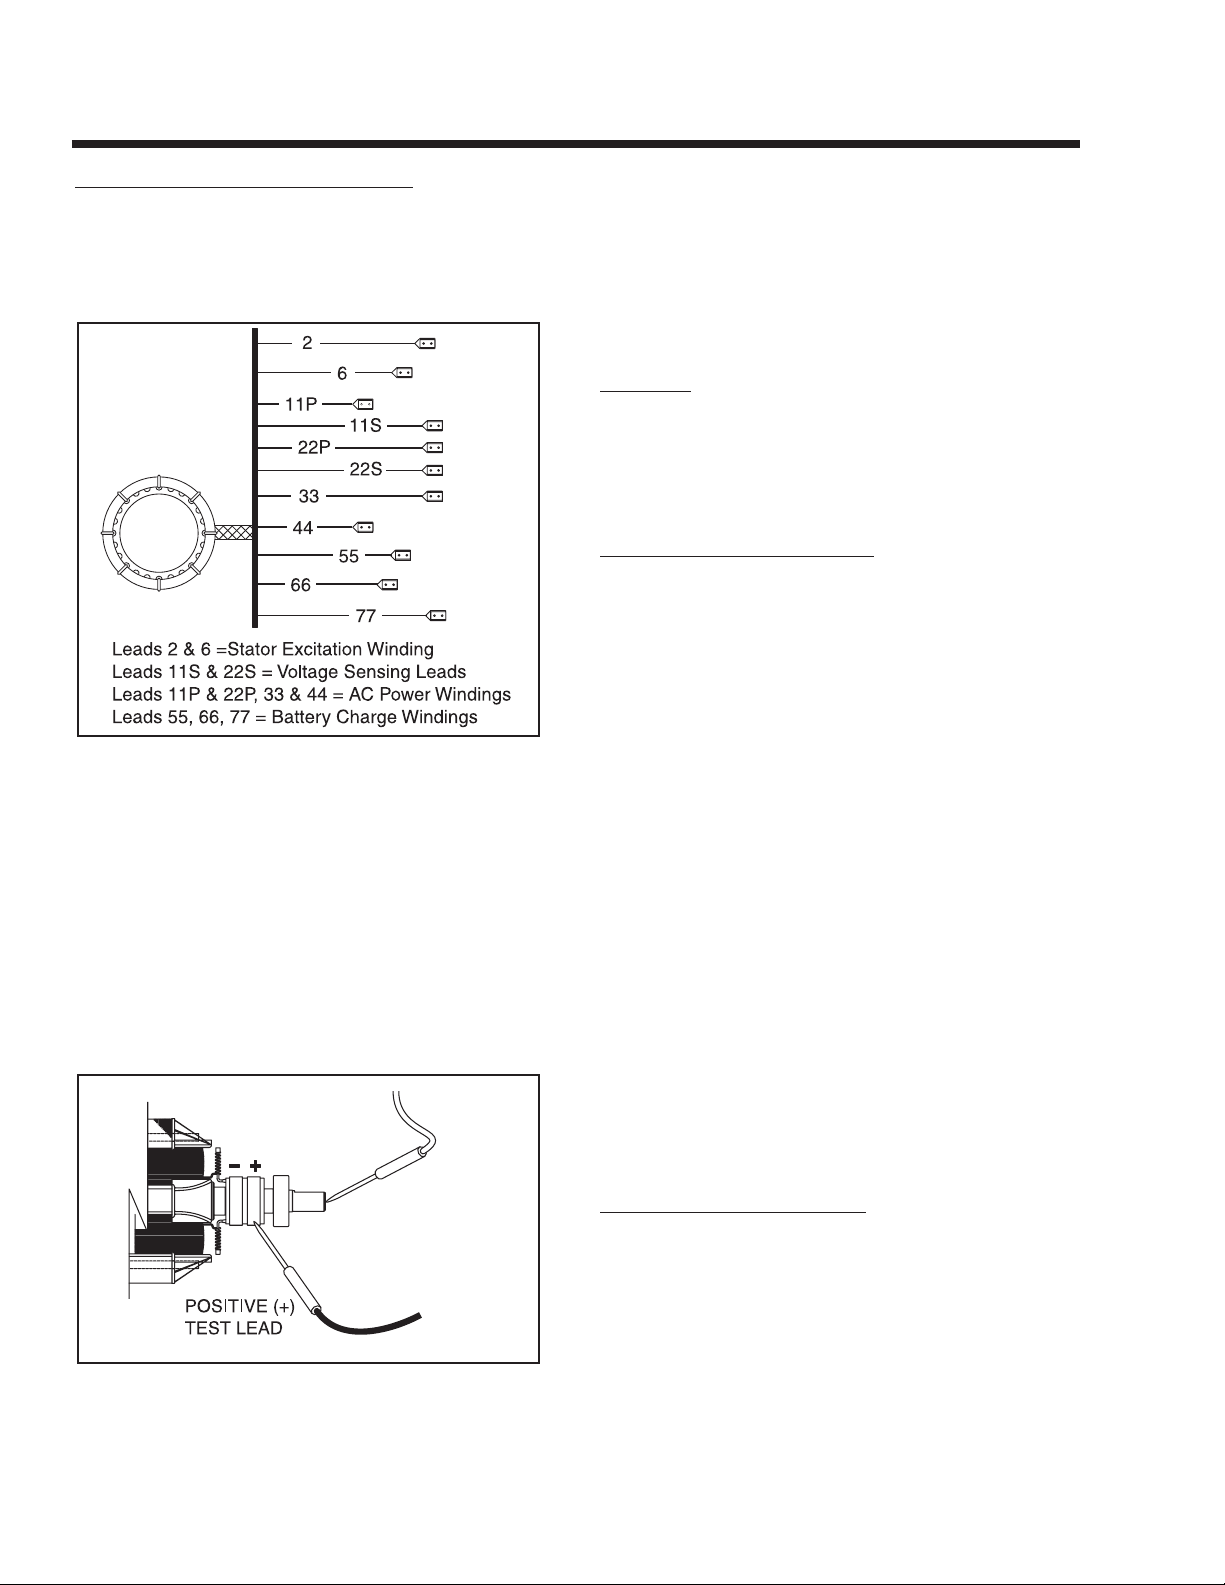
Figure 3-1 shows one kind of hi-pot tester. The tester
shown has a “Breakdown” lamp that will glow during
the test procedure to indicate an insulation breakdown in the winding being tested.
Figure 3-1. – One Type of Hi-Pot Tester
DDAANNGGEERR!! IINNSSUULLAATTIIOONN RREESSIISSTTAANNCCEE
TTEESSTTEERRSS SSUUCCHH AASS HHII--PPOOTT TTEESSTTEERRSS AANNDD
MMEEGGOOHHMMMMEETTEERRSS AARREE AA SSOOUURRCCEE OOFF HHIIGGHH
AANNDD DDAANNGGEERROOUUSS EELLEECCTTRRIICCAALL VVOOLLTTAAGGEE..
FFOOLLLLOOWW TTHHEE TTEESSTTEERR MMAANNUUFFAACCTTUURREERR''SS
IINNSSTTRRUUCCTTIIOONNSS CCAARREEFFUULLLLYY.. UUSSEE CCOOMMMMOONN
SSEENNSSEE TTOO AAVVOOIIDD DDAANNGGEERROOUUSS EELLEECCTTRRII--
CCAALL SSHHOOCCKK
DRYING THE GENERATOR
GENERAL:
If tests indicate the insulation resistance of a winding
is below a safe value, the winding should be dried
before operating the generator. Some recommended
drying procedures Include (a) heating units and (b)
forced air.
HEATING UNITS:
If drying is needed, the generator can be enclosed in
a covering. Heating units can then be installed to
raise the temperature about 15°-18° F. (8°-10° C.)
above ambient temperature.
FORCED AIR:
Portable forced air heaters can be used to dry the
generator. Direct the heated air into the generator’s
air intake openings. Remove the voltage regulator
and run the unit at no-load. Air temperature at the
point of entry into the generator should not exceed
150° F. (66° C.).
CLEANING THE GENERATOR
GENERAL:
The generator can be cleaned properly only while it is
disassembled. The cleaning method used should be
determined by the type of dirt to be removed. Be sure
to dry the unit after it has been cleaned.
NOTE: A shop that repairs electric motors may be
able to assist you with the proper cleaning of generator windings. Such shops are often experienced In special problems such as a sea coast
environment, marine or wetland applications,
mining, etc.
USING SOLVENTS FOR CLEANING:
If dirt contains oil or grease a solvent is generally
required. Only petroleum distillates should be used to
clean electrical components. Recommended are
safety type petroleum solvents having a flash point
greater than 100° F. (38° C.).
Page 12
Page 15

SSeeccttiioonn 33
IINNSSUULLAATTIIOONN RREESSIISSTTAANNCCEE TTEESSTTSS
CCAAUUTTIIOONN!!:: SSoommee ggeenneerraattoorrss mmaayy uussee eeppooxxyy oorr
ppoollyyeesstteerr bbaassee wwiinnddiinngg vvaarrnniisshheess.. UUssee ssoollvveennttss
tthhaatt wwiillll nnoott aattttaacckk ssuucchh mmaatteerriiaallss..
Use a soft brush or cloth to apply the solvent. Be careful to avoid damage to wire or winding insulation. After
cleaning, dry all components thoroughly using moisture-free, low-pressure compressed air.
DDAANNGGEERR!!:: DDOO NNOOTT AATTTTEEMMPPTT TTOO WWOORRKK WWIITTHH
SSOOLLVVEENNTTSS IINN AANNYY EENNCCLLOOSSEEDD AARREEAA.. PPRROO--
VVIIDDEE AADDEEQQUUAATTEE VVEENNTTIILLAATTIIOONN WWHHEENN
WWOORRKKIINNGG WWIITTHH SSOOLLVVEENNTTSS.. WWIITTHHOOUUTT AADDEE--
QQUUAATTEE VVEENNTTIILLAATTIIOONN,, FFIIRREE,, EEXXPPLLOOSSIIOONN OORR
HHEEAALLTTHH HHAAZZAARRDDSS MMAAYY EEXXIISSTT .. WWEEAARR EEYYEE
PPRROOTTEECCTTIIOONN.. WWEEAARR RRUUBBBBEERR GGLLOOVVEESS TTOO
PPRROOTTEECCTT TTHHEE HHAANNDDSS..
CLOTH OR COMPRESSED AIR:
For small parts or when dry dirt is to be removed, a
dry cloth may be satisfactory. Wipe the parts clean,
then use low pressure air at 30 psi (206 Kpa) to blow
dust away.
BRUSHING AND VACUUM CLEANING:
Brushing with a soft bristle brush followed by vacuum
cleaning is a good method of removing dust and dirt.
Use the soft brush to loosen the dirt, then remove it
with the vacuum.
STATOR INSULATION RESISTANCE
GENERAL:
Insulation resistance is a measure of the Integrity of
the insulating materials that separate electrical windings from the generator's steel core. This resistance
can degrade over time due to the presence of contaminants, dust, dirt, grease and especially moisture).
The normal Insulation resistance for generator windings is on the order of “millions of ohms” or
“megohms”.
When checking the insulation resistance, follow the
tester manufacturer's Instructions carefully. Do NOT
exceed the applied voltages recommended in this
manual. Do NOT apply the voltage longer than one
(1) second.
CCAAUUTTIIOONN!!:: DDOO NNOOTT ccoonnnneecctt tthhee HHii--PPoott TTeesstteerr
oorr MMeeggoohhmmmmeetteerr tteesstt lleeaaddss ttoo aannyy lleeaaddss tthhaatt aarree
rroouutteedd iinnttoo tthhee ggeenneerraattoorr ccoonnttrrooll ppaanneell.. CCoonnnneecctt
tthhee tteesstteerr lleeaaddss ttoo tthhee SSttaattoorr oorr RRoottoorr lleeaaddss oonnllyy..
STATOR SHORT-TO-GROUND TESTS:
See Figure 3-2. To test the Stator for a short-to-
ground condition, proceed as follows:
1. Disconnect and Isolate all Stator leads as follows:
a. Disconnect sensing leads 11S and 22S
from the voltage regulator.
b. Disconnect excitation winding lead No. 6
from the voltage regulator.
c. Disconnect excitation lead No. 2 from the
excitation circuit breaker (CB3).
d. Disconnect battery charge winding leads
No. 66 and 77 from the battery charge rectifier (BCR).
e. Disconnect battery charge winding lead No.
55 from the battery charge resistor (R1).
f. At the main circuit breakers, disconnect AC
power leads No. 11P and 33.
g. At the 4-tab ground terminal (GT), discon-
nect Stator power leads No. 22P and 44.
2. When all leads have been disconnected as outlined in Step 1
above, test for a short-to-ground condition as follows:
a. Connect the terminal ends of all Stator
leads together (11S, 22S, 11P, 22P, 33, 44,
2,6, 55, 66, 77).
b. Follow the tester manufacturer's instructions
carefully. Connect the tester leads across
all Stator leads and to frame ground on the
Stator can. Apply a voltage of 1500 volts.
Do NOT apply voltage longer than one (1)
second.
If the test Indicates a breakdown in Insulation, the
Stator should be cleaned, dried and re-tested. If the
winding fails the second test (after cleaning and drying), replace the Stator assembly.
TEST BETWEEN ISOLATED WINDINGS:
1. Follow the tester manufacturer's instructions carefully. Connect
the tester test leads across Stator leads No. 11P and 2. Apply
a voltage of 1500 volts- DO NOT EXCEED 1 SECOND.
2. Repeat Step 1 with the tester leads connected across the following Stator leads:
a. Across Wires No. 33 and 2.
b. Across Wires No. 11P and 66.
c. Across Wires No. 33 and 66.
d. Across Wires No. 2 and 66.
If a breakdown in the insulation between isolated
windings is indicated, clean and dry the Stator. Then,
repeat the test. If the Stator fails the second test,
replace the Stator assembly.
Page 13
Page 16
SSeeccttiioonn 33
IINNSSUULLAATTIIOONN RREESSIISSTTAANNCCEE TTEESSTTSS
TEST BETWEEN PARALLEL WINDINGS:
Connect the tester leads across Stator leads No. 11P
and 33. Apply a voltage of 1500 volts. If an insulation
breakdown is indicated, clean and dry the Stator.
Then, repeat the test between parallel windings. If the
Stator fails the second test, replace it.
Figure 3-2. – Stator Leads
TESTING ROTOR INSULATION
To test the Rotor for insulation breakdown, proceed
as follows:
1. Disconnect wires from the Rotor brushes or remove the brush
holders with brushes.
2. Connect the tester positive (+) test lead to the positive (+) slip
ring (nearest the Rotor bearing). Connect the tester negative (-)
test lead to a clean frame ground (like the Rotor shaft).
Figure 3-3. – Rotor Test Points
3. Apply 1000 volts. DO NOT APPLY VOLTAGE LONGER THAN
1 SECOND.
If an insulation breakdown is indicated, clean and dry
the Rotor then repeat the test. Replace the Rotor if it
fails the second test (after cleaning and drying).
THE MEGOHMMETER
GENERAL:
A megohmmeter, often called a “megger”, consists of
a meter calibrated in megohms and a power supply.
Use a power supply of 1500 volts when testing
Stators; or 1000 volts when testing the Rotor. DO
NOT APPLY VOLTAGE LONGER THAN ONE (1)
SECOND.
TESTING STATOR INSULATION:
All parts that might be damaged by the high megger
voltages must be disconnected before testing. Isolate
all Stator leads (Figure 3-2) and connect all of the
Stator leads together. FOLLOW THE MEGGER
MANUFACTURER'S INSTRUCTIONS CAREFULLY.
Use a megger power setting of 1500 volts. Connect
one megger test lead to the junction of all Stator
leads, the other test lead to frame ground on the
Stator can. Read the number of megohms on the
meter.
MINIMUM INSULATION
GENERATOR RATED VOLTS
RESISTANCE =
__________________________
+1
(in “Megohms”)
1000
The MINIMUM acceptable megger reading for Stators
may be calculated using the following formula:
EXAMPLE: Generator is rated at 120 volts AC.
Divide “120” by “1000” to obtain “0.12”. Then add
“1” to obtain “1.12” megohms. Minimum
Insulation resistance for a 120 VAC Stator Is 1.12
megohms.
If the Stator insulation resistance is less than the calculated minimum resistance, clean and dry the Stator.
Then, repeat the test. If resistance is still low, replace
the Stator.
Use the Megger to test for shorts between isolated
windings as outlined “Stator Insulation Resistance”.
Also test between parallel windings. See “Test
Between Parallel Windings”on this page.
TESTING ROTOR INSULATION:
Apply a voltage of 1000 volts across the Rotor posi-
tive (+) slip ring (nearest the rotor bearing), and a
clean frame ground (i.e. the Rotor Shaft). DO NOT
EXCEED 1000 VOLTS AND DO NOT APPLY VOLTAGE LONGER THAN 1 SECOND. FOLLOW THE
MEGGER MANUFACTURER'S INSTRUCTIONS
CAREFULLY.
RROOTTOORR MMIINNIIMMUUMM IINNSSUULLAATTIIOONN RREESSIISSTTAANNCCEE::
11..55 mmeeggoohhmmss
Page 14
Page 17
SSeeccttiioonn 44
MMEEAASSUURRIINNGG EELLEECCTTRRIICCIITTYY
METERS
Devices used to measure electrical properties are
called meters. Meters are available that allow one to
measure (a) AC voltage, (b) DC voltage, (c) AC frequency, and (d) resistance In ohms. The following
apply:
❏ To measure AC voltage, use an AC voltmeter.
❏ To measure DC voltage, use a DC voltmeter.
❏ Use a frequency meter to measure AC frequency In
“Hertz” or “cycles per second”..
❏ Use an ohmmeter to read circuit resistance, in
“ohms”.
THE VOM
A meter that will permit both voltage and resistance to
be read is the “volt-ohm-milliammeter” or “VOM”.
Some VOM's are of the “analog” type (not shown).
These meters display the value being measured by
physically deflecting a needle across a graduated
scale. The scale used must be Interpreted by the
user.
“Digital” VOM's (Figure 4-1) are also available and
are generally very accurate. Digital meters display the
measured values directly by converting the values to
numbers.
NOTE: Standard AC voltmeters react to the AVERAGE value of alternating current. When working
with AC, the effective value is used. For that reason a different scale is used on an AC voltmeter.
The scale is marked with the effective or “rms”
value even though the meter actually reacts to the
average value. That is why the AC voltmeter will
give an Incorrect reading if used to measure
direct current (DC).
Figure 4-1. – Digital VOM
MEASURING AC VOLTAGE
An accurate AC voltmeter or a VOM may be used to
read the generator's AC output voltage. The following
apply:
1. Always read the generator's AC output voltage only at the
unit's rated operating speed and AC frequency.
2. The generator's voltage regulator can be adjusted for correct
output voltage only while the unit is operating at its correct
rated speed and frequency.
3. Only an AC voltmeter may be used to measure AC voltage. DO
NOT USE A DC VOLTMETER FOR THIS PURPOSE.
DDAANNGGEERR!!:: RRVV GGEENNEERRAATTOORRSS PPRROODDUUCCEE HHIIGGHH
AANNDD DDAANNGGEERROOUUSS VVOOLLTTAAGGEESS.. CCOONNTTAACCTT
WWIITTHH HHIIGGHH VVOOLLTTAAGGEE TTEERRMMIINNAALLSS WWIILLLL
RREESSUULLTT IINN DDAANNGGEERROOUUSS AANNDD PPOOSSSSIIBBLLYY
LLEETTHHAALL EELLEECCTTRRIICCAALL SSHHOOCCKK..
MEASURING DC VOLTAGE
A DC voltmeter or a VOM may be used to measure
DC voltages. Always observe the following rules:
1. Always observe correct DC polarity.
a. Some VOM's may be equipped with a polar-
ity switch.
b. On meters that do not have a polarity
switch, DC polarity must be reversed by
reversing the test leads.
2. Before reading a DC voltage, always set the meter to a higher
voltage scale than the anticipated reading. if in doubt, start at
the highest scale and adjust the scale downward until correct
readings are obtained.
3. The design of some meters is based on the “current flow” theory while others are based on the “electron flow” theory.
a. The “current flow” theory assumes that
direct current flows from the positive (+) to
the negative (-).
b. The “electron flow” theory assumes that
current flows from negative (-) to positive
(+).
NOTE: When testing generators, the “current
flow” theory is applied. That is, current is
assumed to flow from positive (+) to negative (-).
Page 15
Page 18
SSeeccttiioonn 44
MMEEAASSUURRIINNGG EELLEECCTTRRIICCIITTYY
MEASURING AC FREQUENCY
The generator's AC output frequency is proportional
to Rotor speed. Generators equipped with a 2-pole
Rotor must operate at 3600 rpm to supply a frequency of 60 Hertz. Units with 4-pole Rotor must run at
1800 rpm to deliver 60 Hertz.
Correct engine and Rotor speed is maintained by an
engine speed governor. For models rated 60 Hertz,
the governor is generally set to maintain a no-load
frequency of about 62 Hertz with a corresponding output voltage of about 124 volts AC line-to-neutral.
Engine speed and frequency at no-load are set slightly high to prevent excessive rpm and frequency droop
under heavy electrical loading.
MEASURING CURRENT
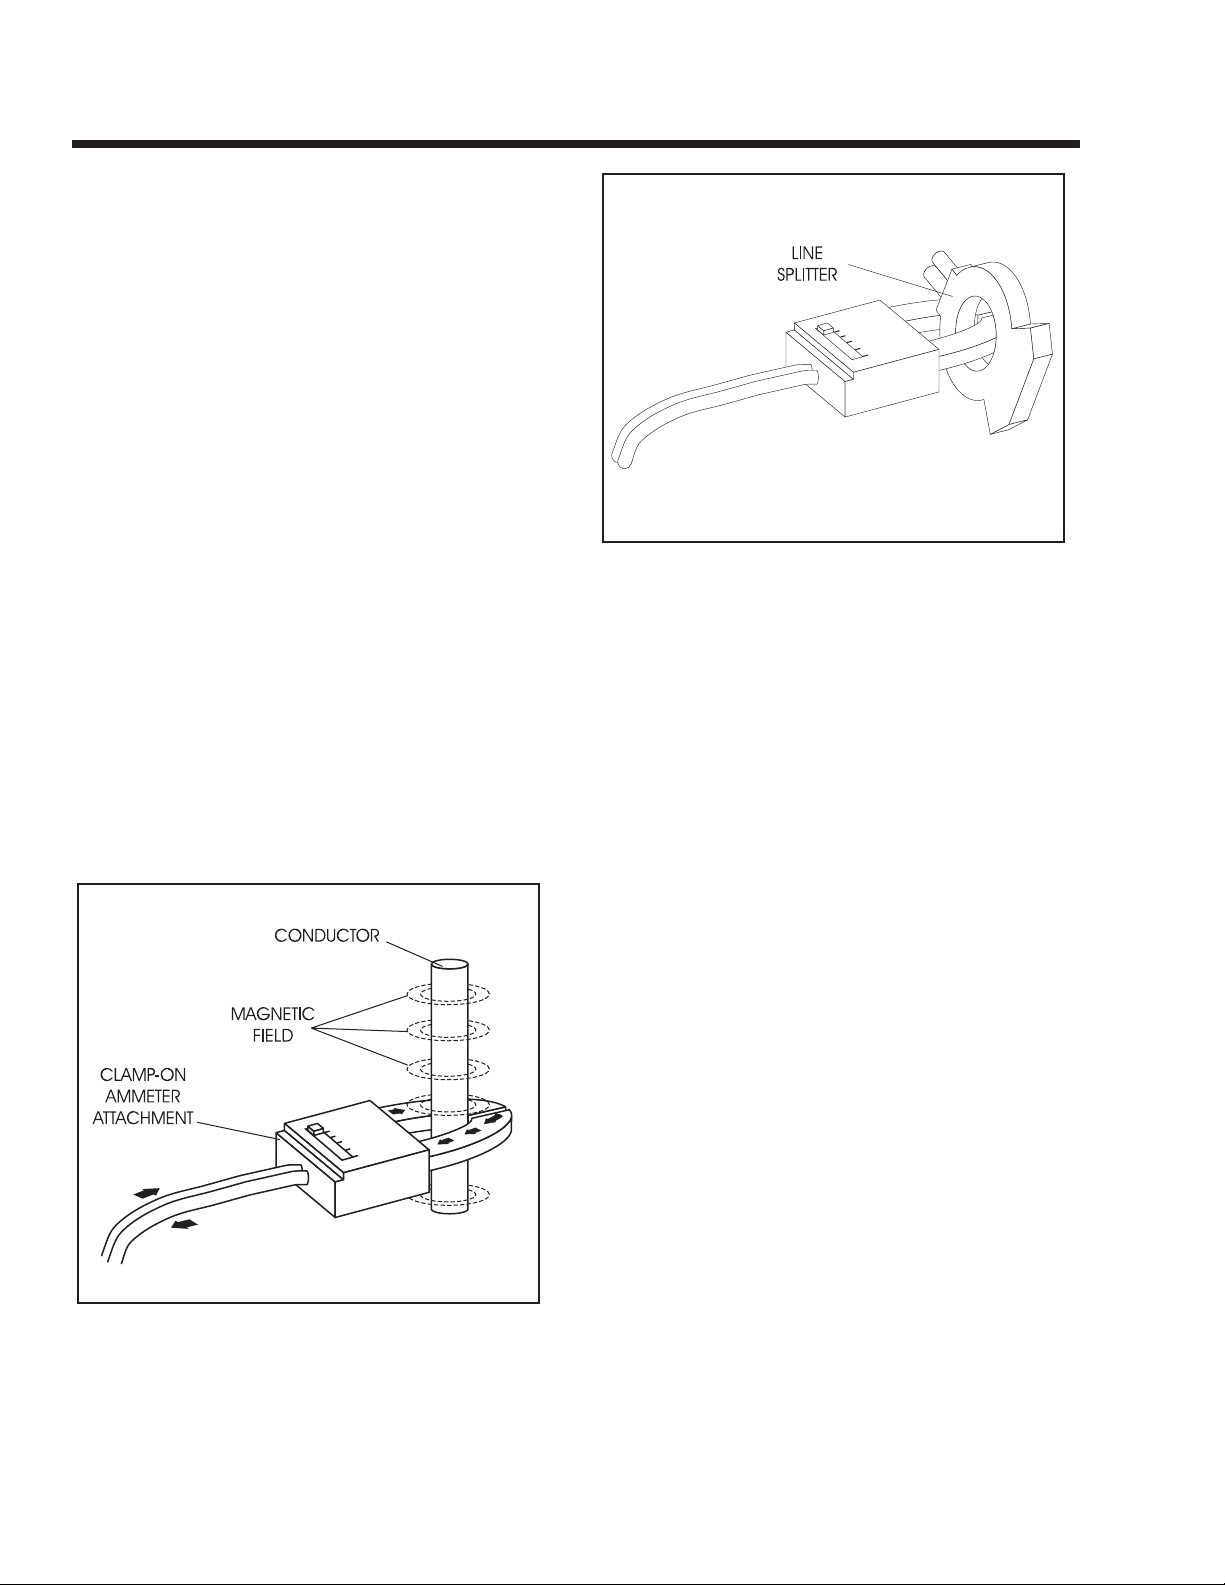
To read the current flow, in AMPERES, a clamp-on
ammeter may be used. This type of meter indicates
current flow through a conductor by measuring the
strength of the magnetic field around that conductor.
The meter consists essentially of a current transformer with a split core and a rectifier type instrument
connected to the secondary. The primary of the current transformer is the conductor through which the
current to be measured flows. The split core allows
the Instrument to be clamped around the conductor
without disconnecting it.
Current flowing through a conductor may be measured safely and easily. A line-splitter can be used to
measure current in a cord without separating the conductors.
Figure 4-2. – Clamp-On Ammeter
Figure 4-3. – A Line-Splitter
NOTE: If the physical size of the conductor or
ammeter capacity does not permit all lines to be
measured simultaneously, measure current flow
in each individual line. Then, add the Individual
readings.
MEASURING RESISTANCE
The volt-ohm-milliammeter may be used to measure
the resistance in a circuit. Resistance values can be
very valuable when testing coils or windings, such as
the Stator and Rotor windings.
When testing Stator windings, keep in mind that the
resistance of these windings is very low. Some
meters are not capable of reading such a low resistance and will simply read “continuity”.
If proper procedures are used, the following conditions can be detected using a VOM:
❏ A “short-to-ground” condition in any Stator or Rotor
winding.
❏ Shorting together of any two parallel Stator wind-
ings.
❏ Shorting together of any two isolated Stator wind-
ings.
❏ An open condition in any Stator or Rotor winding.
Component testing may require a specific resistance
value or a test for “infinity” or “continuity.” Infinity is an
OPEN condition between two electrical points, which
would read as no resistance on a VOM. Continuity is
a closed condition between two electrical points,
which would be indicated as very low resistance or
“ZERO” on a VOM.
Page 16
Page 19
SSeeccttiioonn 44
MMEEAASSUURRIINNGG EELLEECCTTRRIICCIITTYY
ELECTRICAL UNITS
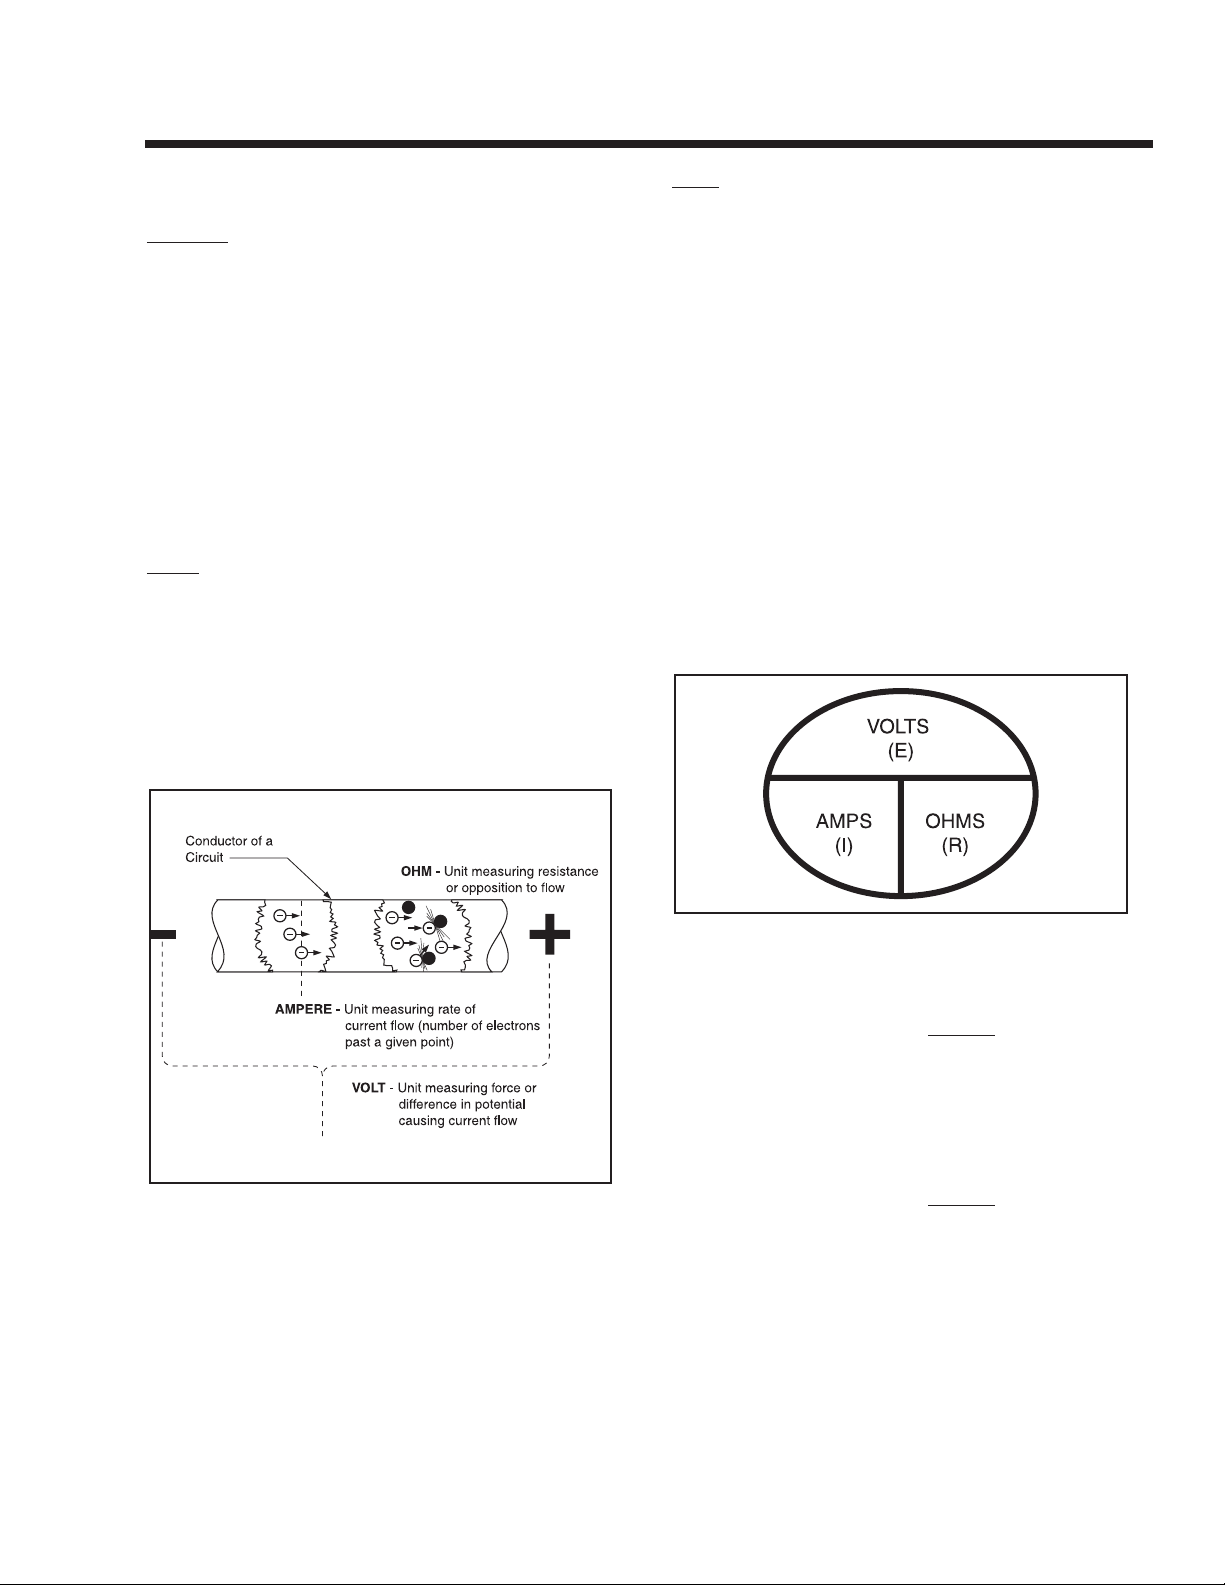
AMPERE:
The rate of electron flow in a circuit is represented by
the AMPERE. The ampere is the number of electrons
flowing past a given point at a given time. One
AMPERE is equal to just slightly more than six thousand million billion electrons per second.
With alternating current (AC), the electrons flow first
in one direction, then reverse and move in the opposite direction. They will repeat this cycle at regular
intervals. A wave diagram, called a “sine wave”
shows that current goes from zero to maximum positive value, then reverses and goes from zero to maximum negative value. Two reversals of current flow is
called a cycle. The number of cycles per second is
called frequency and is usually stated in “Hertz”.
VOLT:
The VOLT is the unit used to measure electrical
PRESSURE, or the difference in electrical potential
that causes electrons to flow. Very few electrons will
flow when voltage is weak. More electrons will flow as
voltage becomes stronger. VOLTAGE may be considered to be a state of unbalance and current flow as an
attempt to regain balance. One volt is the amount of
EMF that will cause a current of 1 ampere to flow
through 1 ohm of resistance.
Figure 4-4. – Electrical Units
OHM:
The OHM is the unit of RESISTANCE. In every circuit
there is a natural resistance or opposition to the flow
of electrons. When an EMF is applied to a complete
circuit, the electrons are forced to flow in a single
direction rather than their free or orbiting pattern. The
resistance of a conductor depends on (a) its physical
makeup, (b) its cross-sectional area, (c) its length,
and (d) its temperature. As the conductor's temperature increases, its resistance increases in direct proportion. One (1) ohm of resistance will permit one (1)
ampere of current to flow when one (1) volt of electromotive force (EMF) is applied.
OHM'S LAW
A definite and exact relationship exists between
VOLTS, OHMS and AMPERES. The value of one can
be calculated when the value of the other two are
known. Ohm's Law states that in any circuit the current
will increase when voltage increases but resistance
remains the same, and current will decrease when
resistance Increases and voltage remains the same.
Figure 4-5.
If AMPERES is unknown while VOLTS and OHMS
are known, use the following formula:
AMPERES =
VOLTS
OHMS
If VOLTS is unknown while AMPERES and OHMS
are known, use the following formula:
VOLTS = AMPERES x OHMS
If OHMS is unknown but VOLTS and AMPERES are
known, use the following:
OHMS
=
VOLTS
AMPERES
Page 17
Page 20
SSeeccttiioonn 55
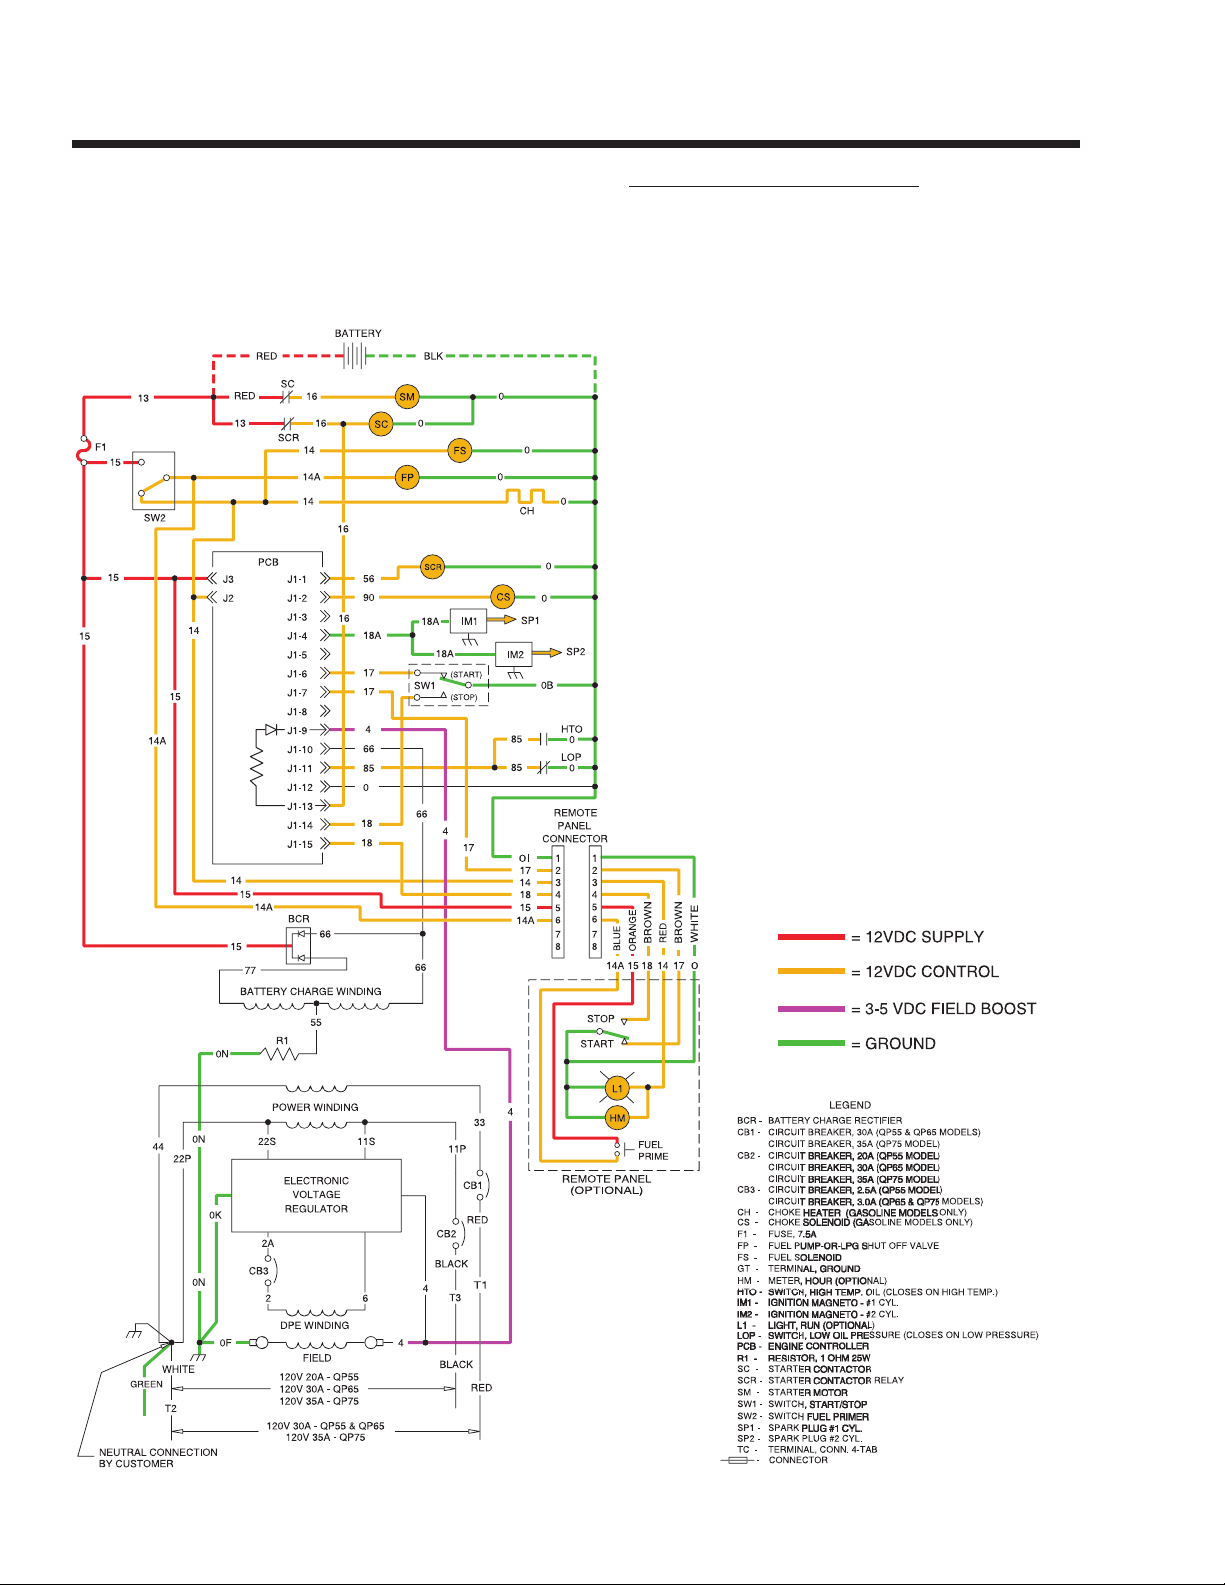
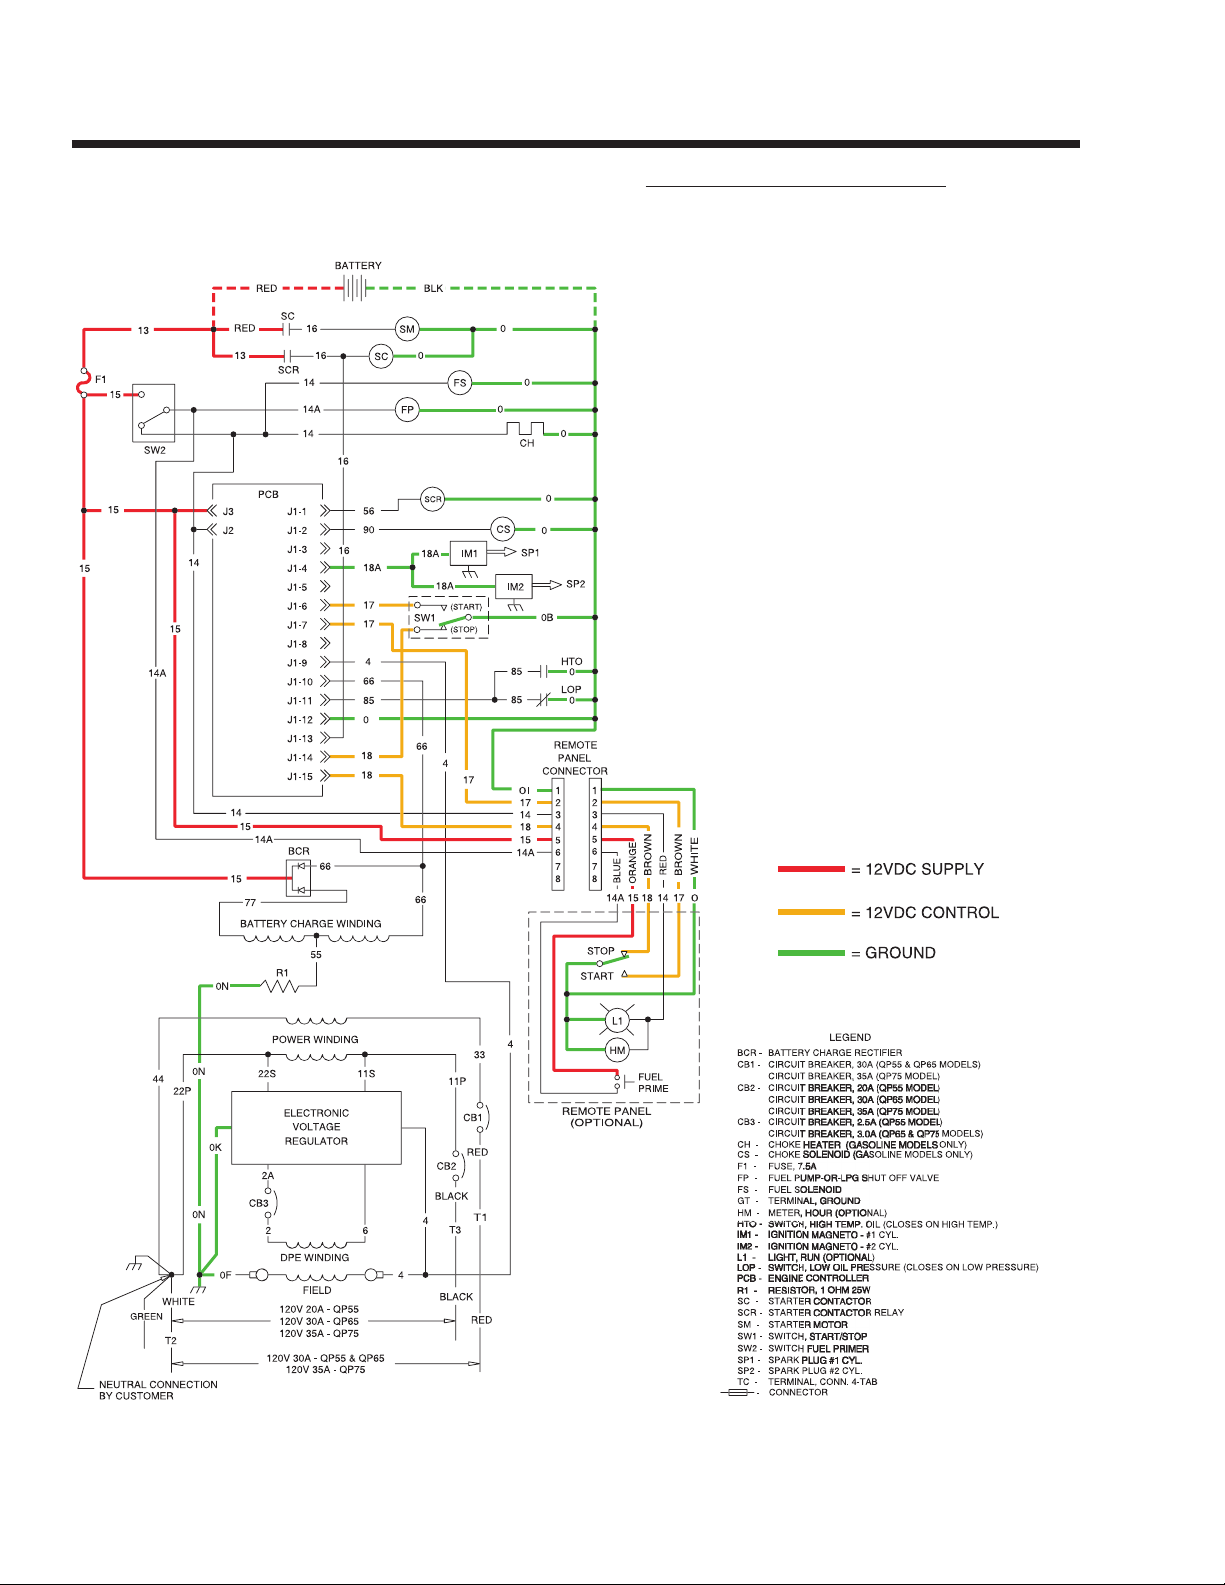
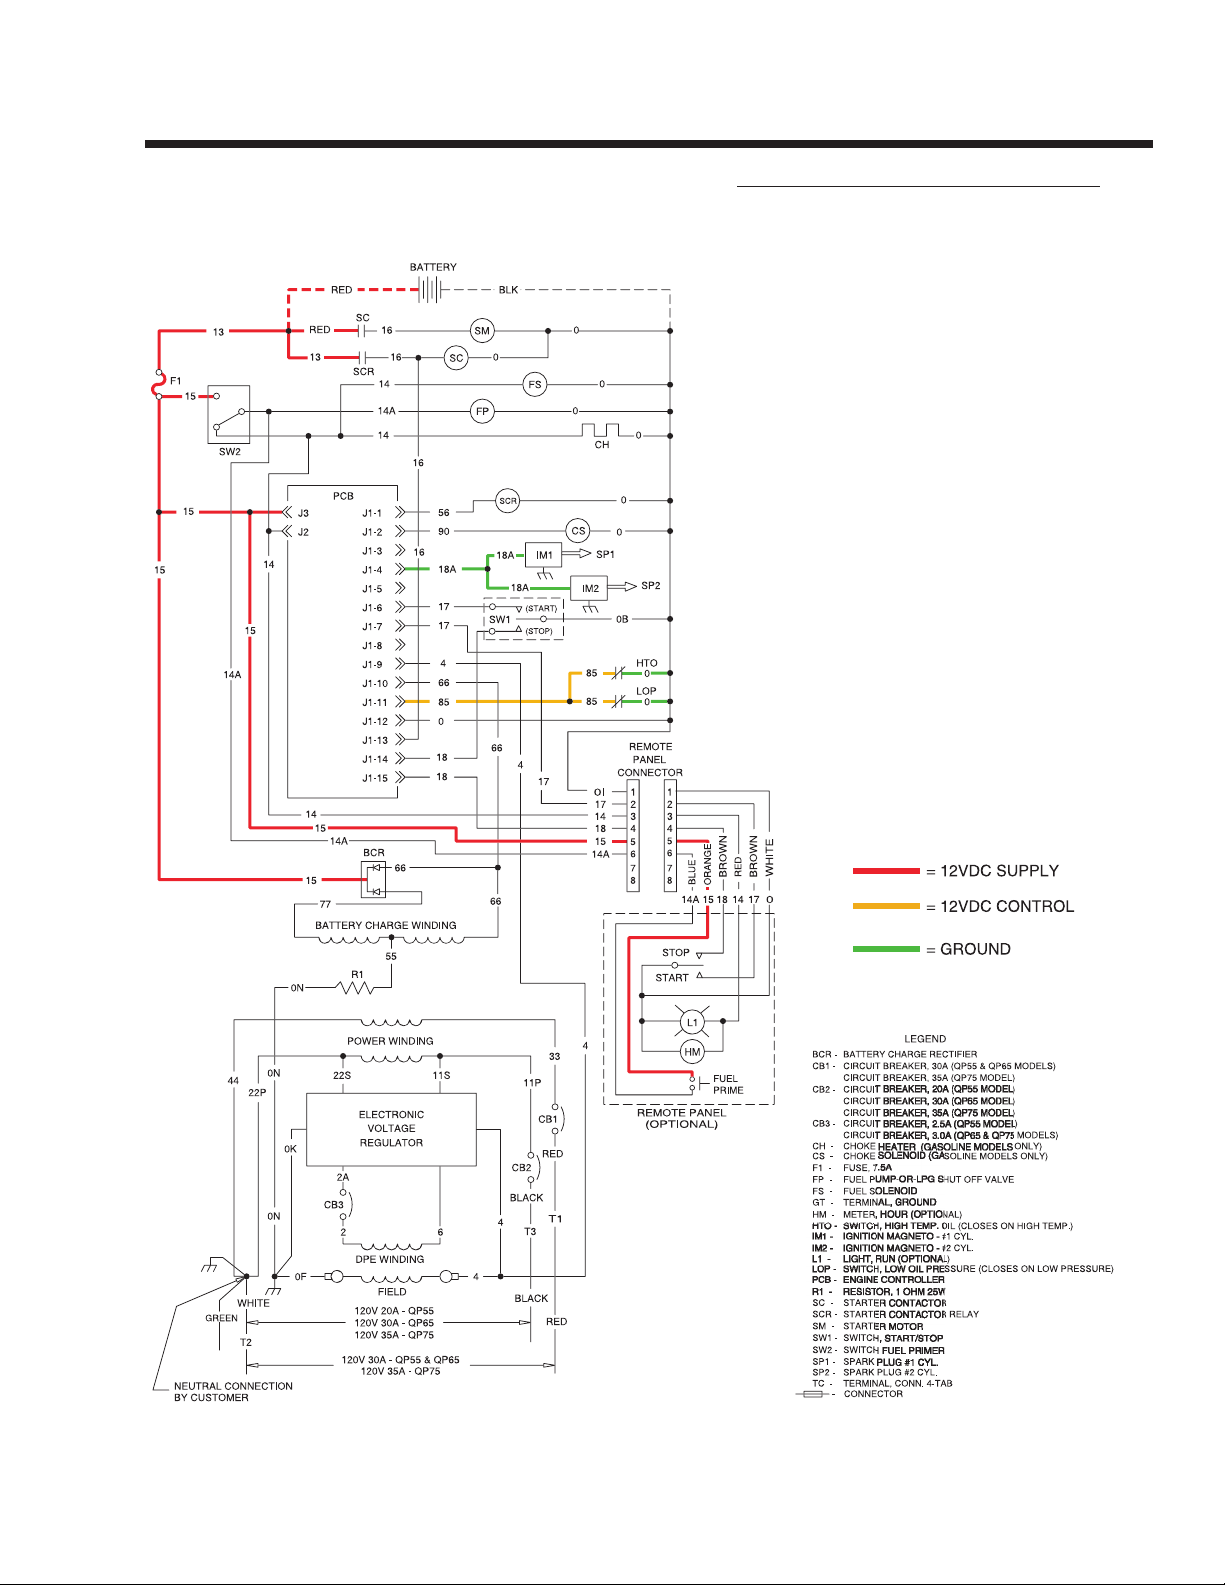
EENNGGIINNEE DDCC CCOONNTTRROOLL SSYYSSTTEEMM
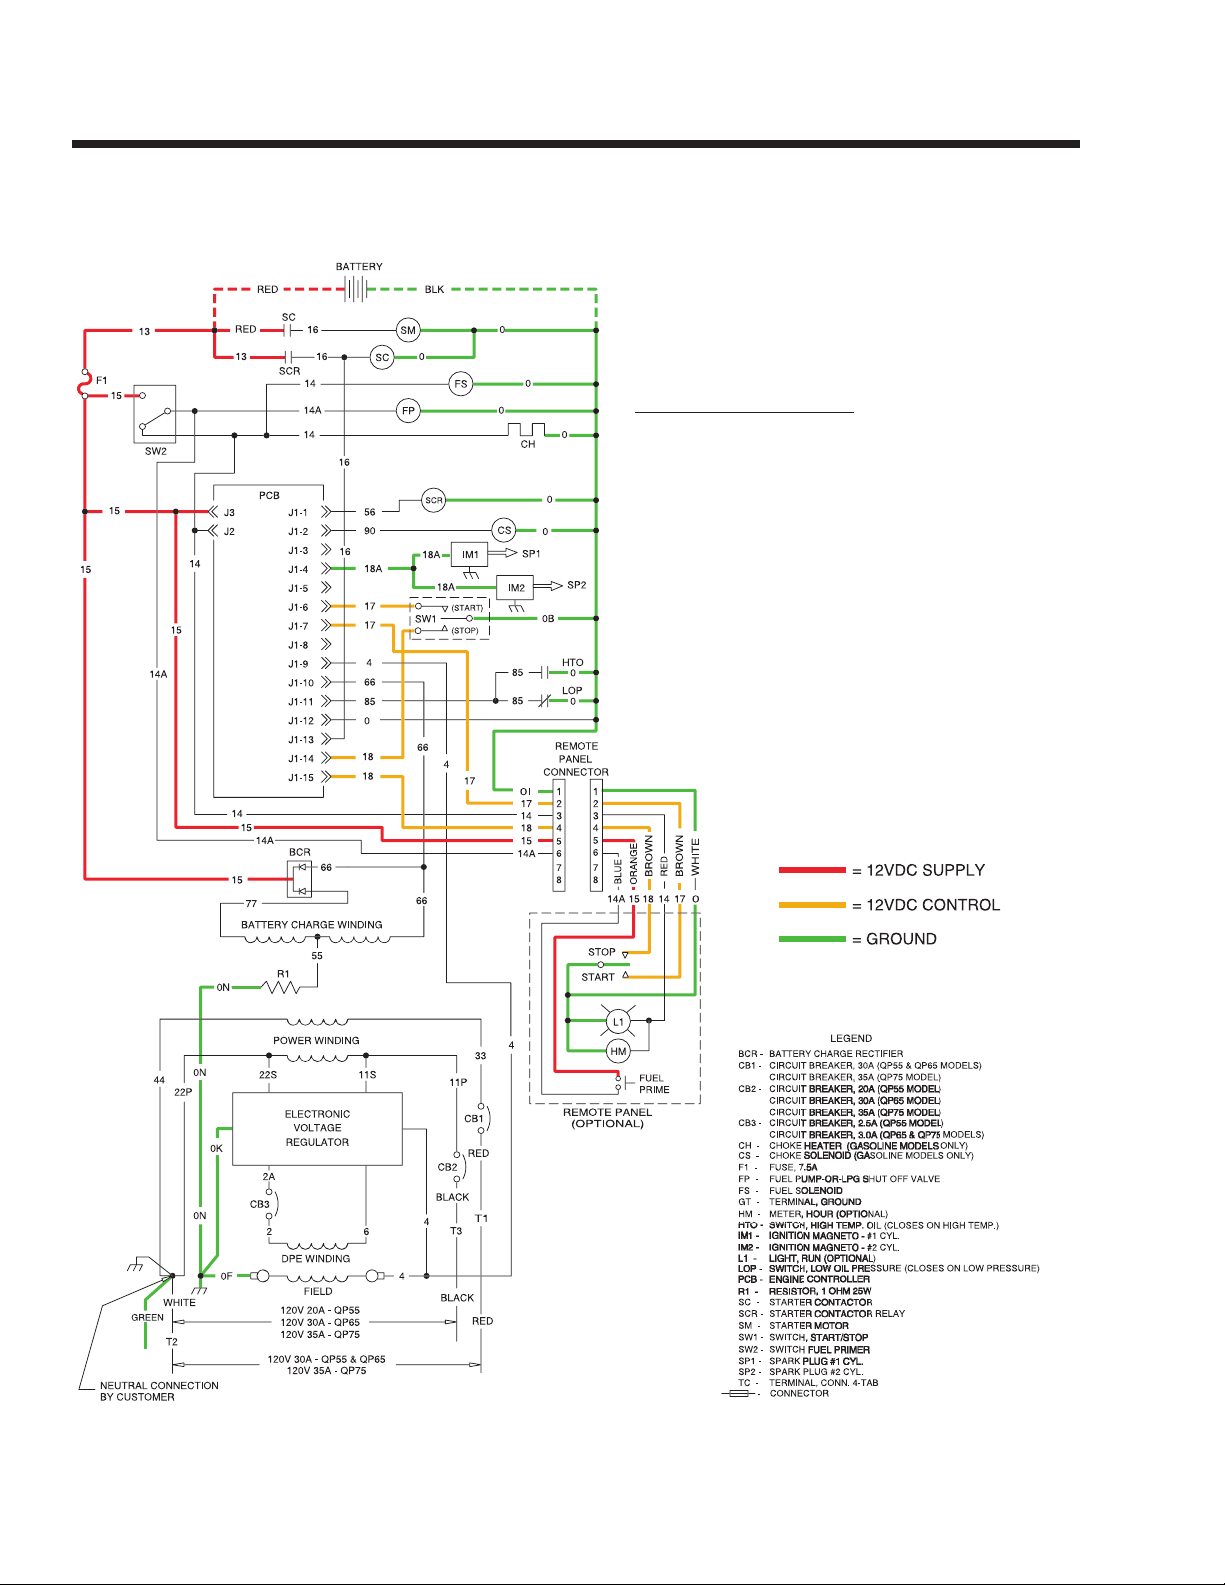
INTRODUCTION
The engine DC control system includes all components necessary for the operation of the
engine. Operation includes rest, priming, cranking, starting, running and shutdown. The system
is shown schematically.
OPERATIONAL ANALYSIS
CIRCUIT CONDITION- REST:
Battery voltage is available to the engine controller circuit board (PCB) from the unit BATTERY and via (a)
the RED battery cable, Wire 13, a 7.5 amp FUSE (F1),
Wire 15 and circuit board Terminal J3. However, circuit
board action is holding the circuit open and no action
can occur.
Battery output is available to the contacts of a
STARTER CONTACTOR (SC) and STARTER CONTACTOR RELAY (SCR), but the contacts are open.
Battery voltage is also delivered to the FUEL PRIMER
SWITCH (SW2). The switch is open and the circuit is
incomplete.
Battery voltage is also available to the REMOTE FUEL
PRIMER SWITCH. The switch is open and the circuit is
incomplete.
Page 18
Page 21
SSeeccttiioonn 55
EENNGGIINNEE DDCC CCOONNTTRROOLL SSYYSSTTEEMM
Page 19
CIRCUIT CONDITION- PRIMING:
When the FUEL PRIMER SWITCH (SW2) or the
REMOTE PANEL FUEL PRIMER is closed by the operator, battery voltage is delivered across the closed
switch contacts and to the FUEL PUMP (FP) via Wire
14A. The FUEL SOLENOID (FS) will be energized via
Wire 14 during cranking and running.
Page 22
SSeeccttiioonn 55
EENNGGIINNEE DDCC CCOONNTTRROOLL SSYYSSTTEEMM
Page 20
CIRCUIT CONDITION- CRANKING:
When the START-STOP-SWITCH (SW1)or REMOTE
PANEL START SWITCH is held at “START” position,
Wire 17 from the Engine controller circuit board is connected to frame Ground. Circuit board action will then
deliver battery voltage to a STARTER CONTACTOR
RELAY (SCR) via wire 56, and to a automatic CHOKE
SOLENOID (CS) via Wire 90.
When battery voltage energizes the STARTER CONTACTOR RELAY (SCR), Its contacts close and battery
output is delivered to the STARTER CONTACTOR (SC)
via Wire 16. The STARTER CONTACTOR (SC) energizes and its contacts close, battery output is delivered
to the STARTER MOTOR (SM) via Wire 16.The
STARTER MOTOR energizes and the engine cranks.
When the STARTER CONTACTOR RELAY (SCR)
closes, Battery voltage is also delivered to the circuit
board pin location J1-13 via Wire 16. This voltage is
reduced and used for field boost and is outputted from
pin location J1-9.
While cranking, the CHOKE SOLENOID (CS) is energized cyclically by circuit board action (two seconds on,
two seconds off).
Also while cranking, circuit board action energizes
CIRCUIT BOARD TERMINAL J2 and delivers battery
voltage to the Wire 14/14A circuit. This energizes the
FUEL PUMP (FP) ,FUEL SOLENOID (FS) and CHOKE
HEATER (CH) and optional light or hourmeter in
remote panel.
Circuit board action holds open Wire 18A to common
ground. The Magneto will induce a spark during cranking.
Page 23
SSeeccttiioonn 55
EENNGGIINNEE DDCC CCOONNTTRROOLL SSYYSSTTEEMM
Page 21
CIRCUIT CONDITION-RUNNING:
With the FUEL PUMP (FP) and FUEL SOLENOID (FS)
operating and ignition occurring, the engine should
start, and the START-STOP SWITCH (SW1) is
released.
A voltage is induced into the Stator's BATTERY
CHARGE WINDING. This voltage is delivered to the
ENGINE CONTROLLER BOARD (PCB) via Wire 66 to
prevent STARTER MOTOR engagement above a certain rpm.
Circuit board action terminates DC output to the
STARTER CONTACTOR RELAY (SCR), which then
de-energizes to end cranking. Circuit board action terminates DC output to the CHOKE SOLENOID (CS).
The choke will go to a position determined by the
CHOKE HEATER (CH).
The LOW OIL PRESSURE SWITCH (LOP) is normally closed. After start-up, engine oil pressure
will open the LOP.
Page 24
SSeeccttiioonn 55
EENNGGIINNEE DDCC CCOONNTTRROOLL SSYYSSTTEEMM
Page 22
CIRCUIT CONDITION- SHUTDOWN:
Setting the START-STOP SWITCH (SW1) or the
REMOTE PANEL START-STOP SWITCH to its
“STOP” position connects the Wire 18 circuit to frame
ground. Circuit board action then closes the circuit to
Wire 18A, grounding the ignition magneto. Circuit
board action de-energizes DC output to Terminal J2.
The FUEL PUMP (FP), FUEL SOLENOID (FS) and
CHOKE HEATER (CH) are de-energized by the loss
of DC to Wire 14. Ignition and fuel flow terminate and
the engine shuts down.
Page 25
SSeeccttiioonn 55
EENNGGIINNEE DDCC CCOONNTTRROOLL SSYYSSTTEEMM
Page 23
CIRCUIT CONDITION- FAULT SHUTDOWN:
The engine mounts a HIGH OIL TEMPERA-
TURE SWITCH (HTO) and a LOW OIL PRESSURE SWITCH (LOP).
Should engine oil temperature exceed a preset value, the switch contacts will close. Wire
85 from the circuit board will connect to frame
ground. Circuit board action will then initiate a
shutdown.
Should engine oil pressure drop below a safe
pre-set value, the switch contacts will close.
On contact closure, Wire 85 will be connected
to frame ground and circuit board action will
initiate an engine shutdown.
The circuit board has a time delay built into it
for the Wire 85 fault shutdowns. At STARTUP
ONLY the circuit board will wait approximately
6 seconds before looking at the Wire 85 fault
shutdowns. Once running after the 6 second
time delay, grounding Wire 85 thru either
switch will cause an immediate shutdown.
Page 26
SSeeccttiioonn 55
EENNGGIINNEE DDCC CCOONNTTRROOLL SSYYSSTTEEMM
ENGINE CONTROLLER CIRCUIT BOARD
GENERAL:
The engine controller board is responsible for crank-
ing, startup, running and shutdown operations. The
board interconnects with other components of the DC
control system to turn them on and off at the proper
times. It is powered by fused 12 VDC power from the
unit battery.
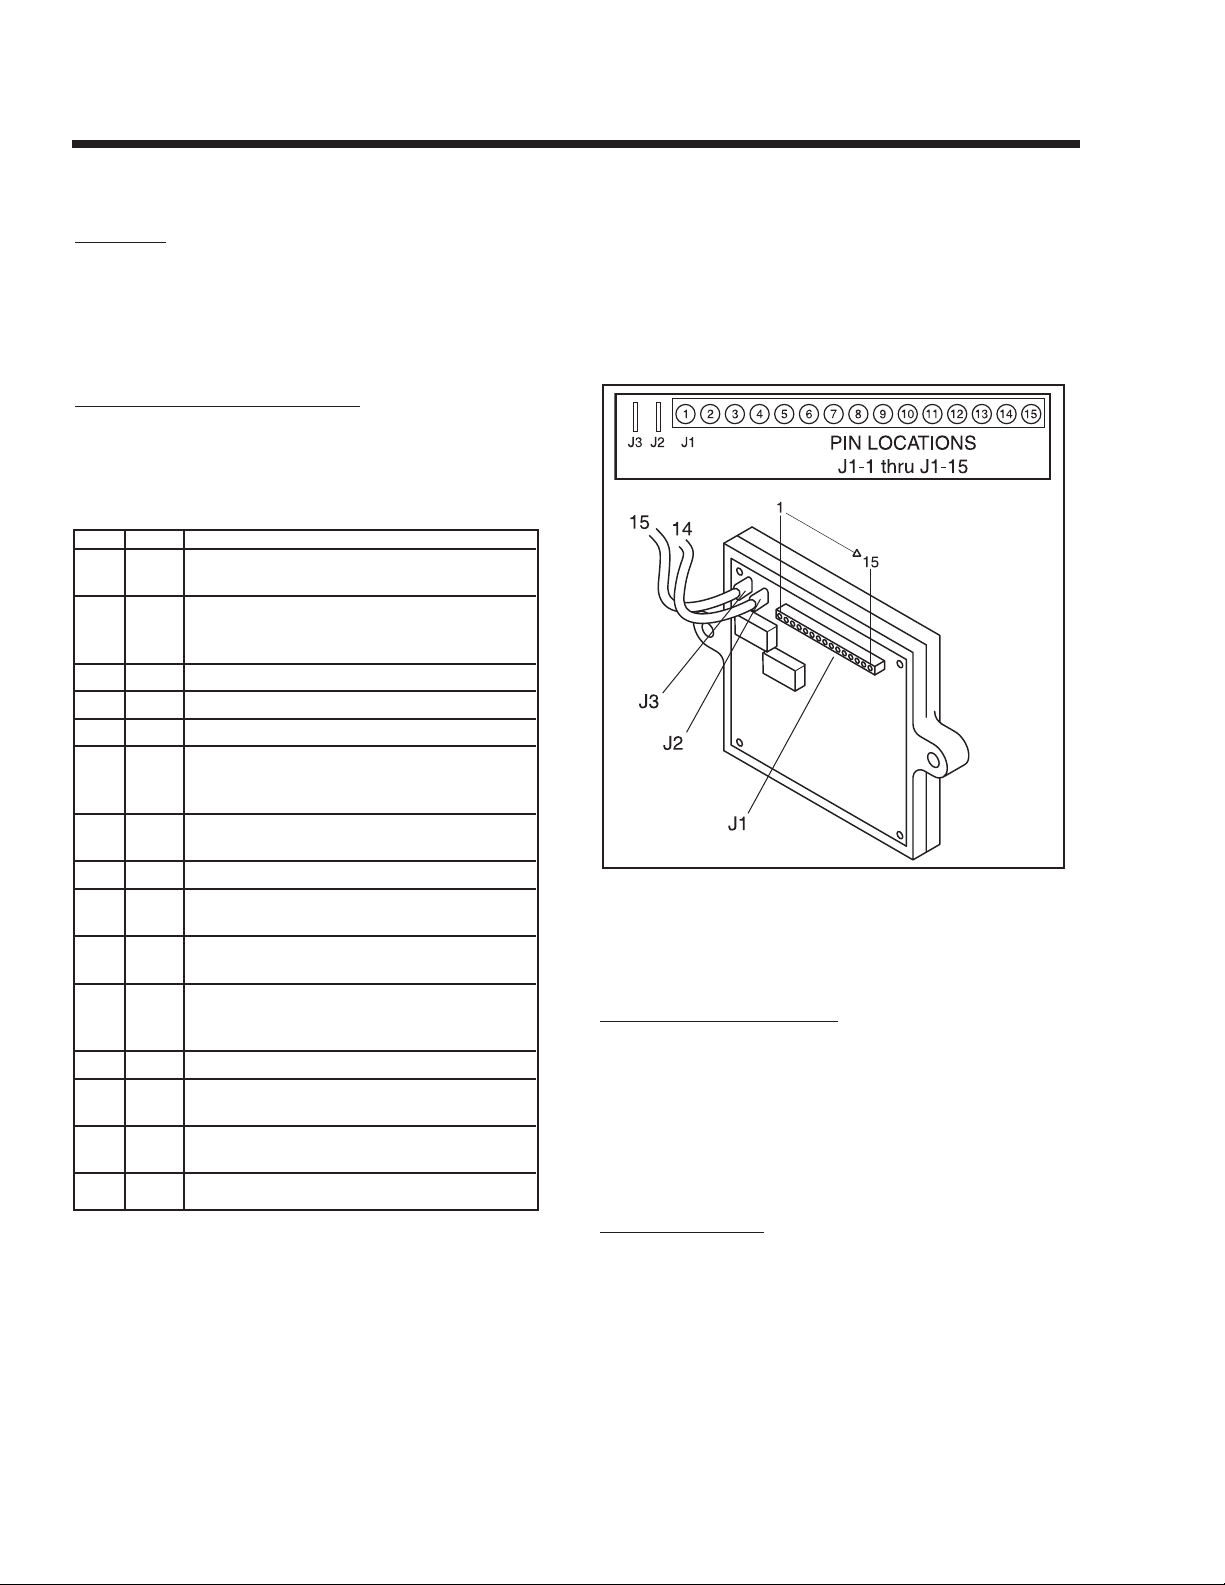
CIRCUIT BOARD CONNECTIONS:
The circuit board mounts a 15-pin receptacle (J1) and
two single pin terminals (J2 and J3, see Figure 5.3).
Figure 5-2 shows the 15-pin receptacle (J1), the associated wires and the function(s) of each pin and wire.
PPIINN WWIIRREE FFUUNNCCTTIIOONN
1 56 Delivers 12 VDC to Starter Contactor (SC)
while cranking only.
290
Delivers 12 VDC to Choke Solenoid coil
while cranking only. (Two seconds ON, Two
seconds OFF)
3 — Not used.
4 18A Grounds Magneto for Shutdown.
5 — Not used.
6 17 To Start-Stop switch. When wire is grounded
by setting Start-Stop switch to “START”,
engine will crank.
7 17 To Start-Stop switch on optional Remote
Panel.
8 — Not used.
9 4 Field Boost DC to Voltage Regulator and to
Rotor windings.
10 66 Starter Lockout. Prevents cranking while
engine is running.
11 85 Fault shutdown circuit. When grounded by clo-
sure of High Oil Temperature or Low Oil
Pressure Switch engine will shut down.
12 0 Common Ground.
13 16 12 VDC Input to Field Boost circuit while
cranking only.
14 18 To Start-Stop switch. When grounded by set-
ting Switch to “STOP” engine shuts down.
15 18
To Start-Stop Switch on optional Remote Panel.
Figure 5-2. – Receptacle J1
In addition to the 15-pin receptacle (J1), the circuit
board is equipped with two single pin terminals (J2
and J3). These terminals may be identified as follows:
1. Wire 14 connects to Terminal J2. During cranking and running,
the circuit board delivers battery voltage to the Wire 14 circuit
for the following functions:
a. To operate the electric Fuel Pump (FP).
b. To energize the Fuel Solenoid.
c. To operate the Choke Heater.
d. To the Remote Wire Harness to operate an
hourmeter or a light.
2. Wire 15 connects to Terminal J3. This is the power supply (12
VDC) for the circuit board and the DC control system.
Figure 5-3. – Engine Controller Circuit Board
BATTERY
RECOMMENDED BATTERY:
When anticipated ambient temperatures will be con-
sistently above 32° F. (0° C.), use a 12 volts automotive type storage battery rated 70 amp-hours and
capable of delivering at least 400 cold cranking
amperes.
If ambient temperatures will be below 32° (0° C.), use
a 12 volt battery rated 95 amp-hours and having a
cold cranking capacity of 400 amperes.
BATTERY CABLES:
Use of battery cables that are too long or too small in
diameter will result in excessive voltage drop. For
best cold weather starting, voltage drop between the
battery and starter should not exceed 0.12 volt per
100 amperes of cranking current.
Select the battery cables based on total cable length
and prevailing ambient temperature. Generally, the
longer the cable and the colder the weather, the larger the required cable diameter.
Page 24
Page 27
SSeeccttiioonn 55
EENNGGIINNEE DDCC CCOONNTTRROOLL SSYYSSTTEEMM
The following chart applies:
CCAABBLLEE LLEENNGGTTHH ((IINN FFEEEETT)) RREECCOOMMMMEENNDDEEDD CCAABBLLEE SSIIZZEE
0-10 No. 2
11-15 No. 0
16-20 No. 000
EFFECTS OF TEMPERATURE:
Battery efficiency is greatly reduced by a decreased
electrolyte temperature. Such low temperatures have
a decided numbing effect on the electrochemical
action. Under high discharge rates (such as cranking), battery voltage will drop to much lower values in
cold temperatures than in warmer temperatures. The
freezing point of battery electrolyte fluid is affected by
the state of charge of the electrolyte as indicated
below:
SSPPEECCIIFFIICC GGRRAAVVIITTYY FFRREEEEZZIINNGG PPOOIINNTT
1.220 -35° F. (-37° C.)
1.200 --20° F. (-29° C.)
1.160 0° F. (-18° C.)
ADDING WATER:
Water is lost from a battery as a result of charging
and discharging and must be replaced. If the water is
not replaced and the plates become exposed, they
may become permanently sulfated. In addition, the
plates cannot take full part in the battery action unless
they are completely immersed in electrolyte. Add only
DISTILLED WATER to the battery. DO NOT USE
TAP WATER.
NOTE: Water cannot be added to some “maintenance-free” batteries.
CHECKING BATTERY STATE OF CHARGE:
Use an automotive type battery hydrometer to test the
battery state of charge. Follow the hydrometer manufacturer's instructions carefully. Generally, a battery
may be considered fully charged when the specific
gravity of its electrolyte is 1.260. If the hydrometer
used does not have a “Percentage of Charge” scale,
compare the readings obtained with the following:
SSPPEECCIIFFIICC GGRRAAVVIITTYY PPEERRCCEENNTTAAGGEE OOFF CCHHAARRGGEE
1.260 100%
1.230 75%
1.200 50%
1.170 25%
CHARGING A BATTERY:
Use an automotive type battery charger to recharge a
battery. Battery fluid is an extremely corrosive, sulfuric acid solution that can cause severe burns. For that
reason, the following precautions must be observed:
❏ The area in which the battery is being charged must
be well ventilated. When charging a battery, an
explosive gas mixture forms in each cell.
❏ Do not smoke or break a live circuit near the top of
the battery. Sparking could cause an explosion.
❏ Avoid spillage of battery fluid. If spillage occurs,
flush the affected area with clear water immediately.
❏ Wear eye protection when handling a battery.
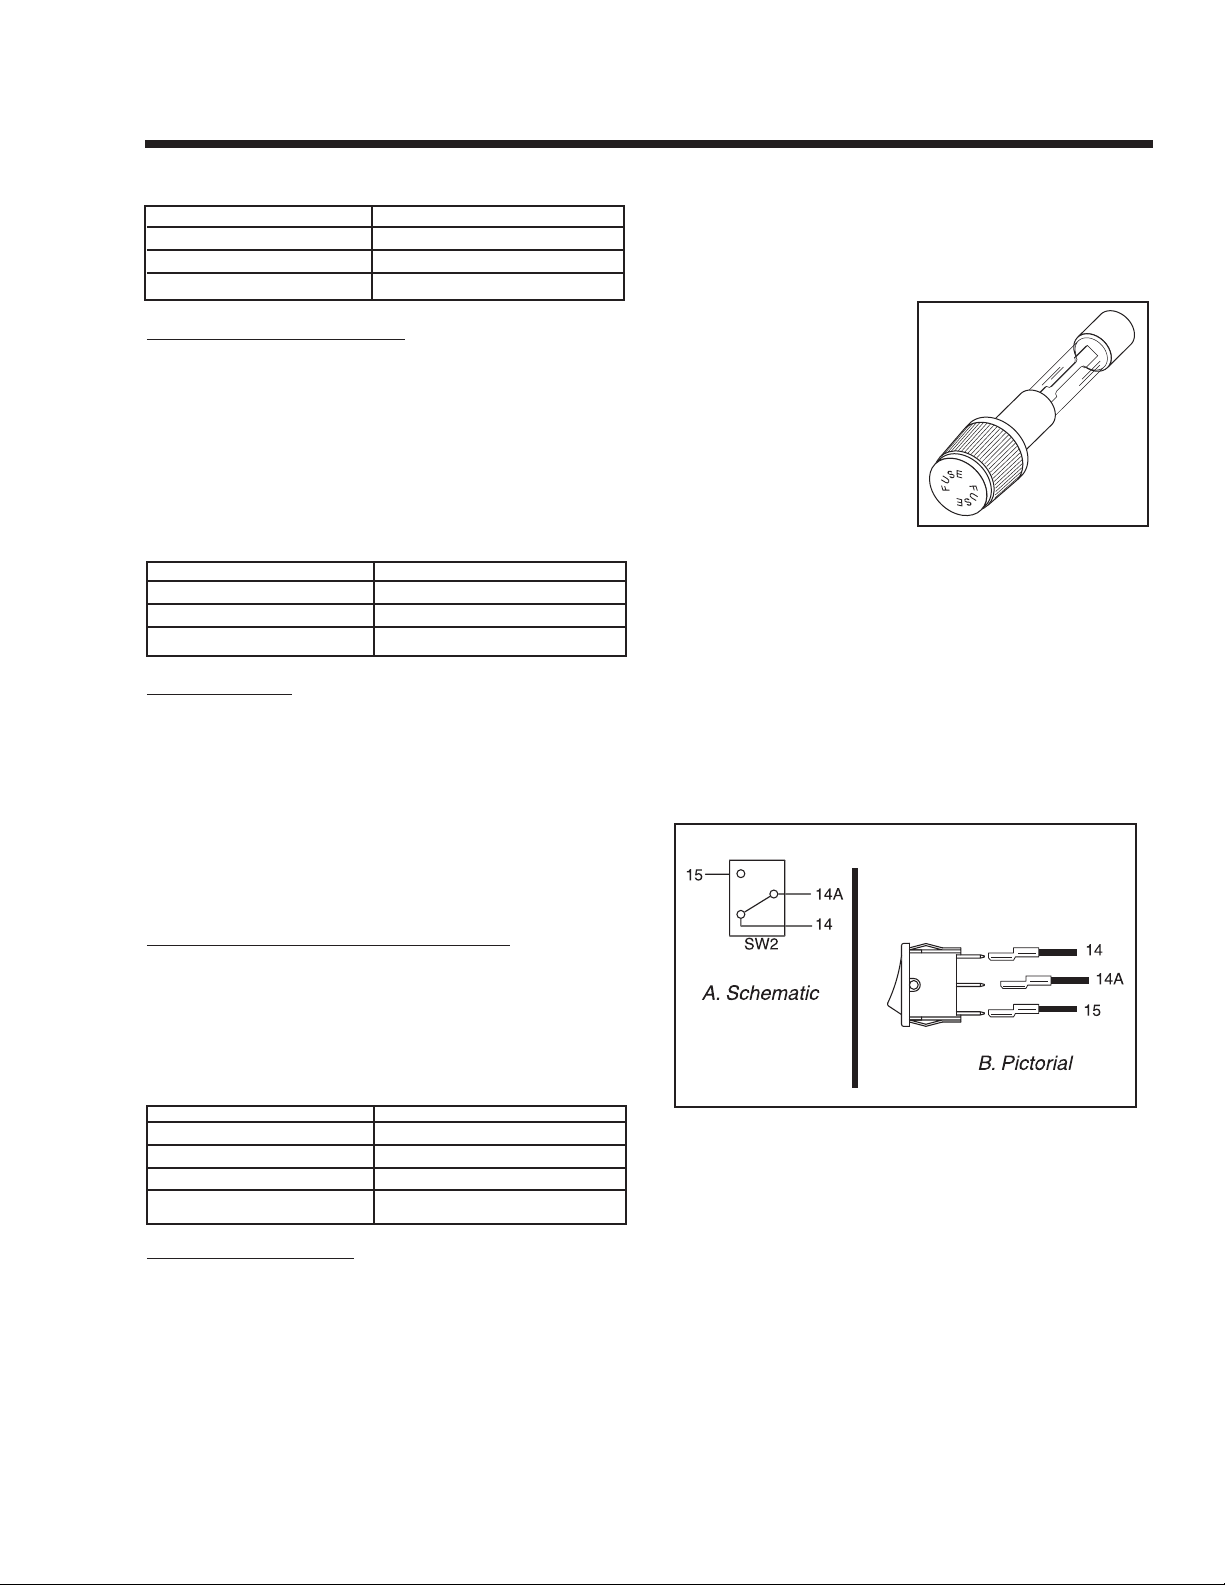
7.5 AMP FUSE
This panel-mounted Fuse
protects the DC control
circuit against overload
and possible damage. If
the Fuse has melted open
due to an overload, neither the priming function
nor the cranking function
will be available.
FUEL PRIMER SWITCH
Following generator installation and after the unit has
been idle for some time, the fuel supply line may be
empty. This condition will require a long cranking period before fuel can reach the carburetor. The Fuel
Primer Switch, when actuated to its “PRIME” position
will deliver battery voltage across the closed switch
contacts to the Fuel Pump (FP) to turn the Pump on.
Pump action will then draw fuel from the supply tank
to prime the fuel lines and carburetor.
Figure 5-5. – Primer Switch
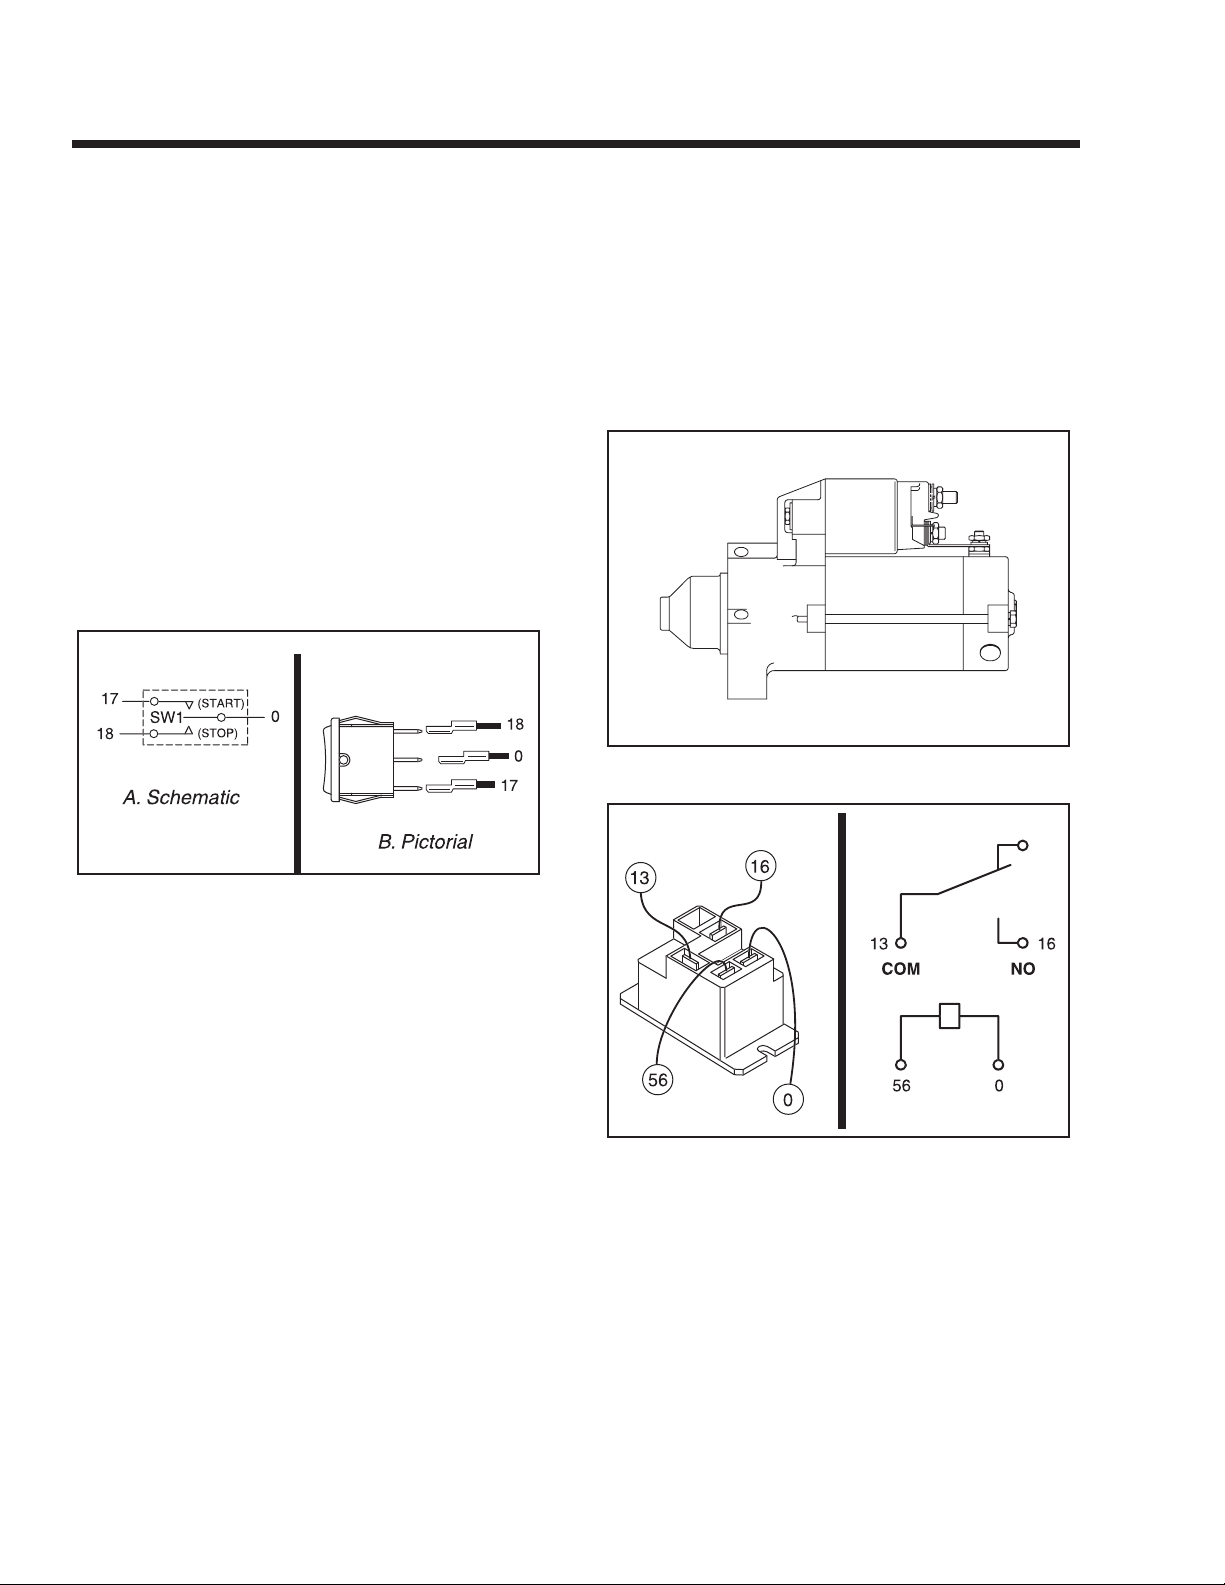
START-STOP SWITCH
The Start-Stop Switch allows the operator to control
cranking, startup and shutdown. The following wires
connect to the Start-Stop Switch:
1. Wire No. 17 from the Engine Controller circuit board. This Is
the CRANK and START circuit. When the Switch is set to
'START”, Wire 17 is connected to frame ground via Wire OB.
a. With wire 17 grounded, a Crank Relay on
the circuit board energizes and battery volt-
Page 25
Figure5-4
Page 28
SSeeccttiioonn 55
EENNGGIINNEE DDCC CCOONNTTRROOLL SSYYSSTTEEMM
age is delivered to the Starter Contactor
Relay via Wire 56.The Starter Contactor
Relay energizes, its contacts close and the
Starter Contactor is energized via wire 16.
Its contacts close and the engine cranks.
b. With Wire 17 grounded, a Run Relay on the
circuit board energizes and battery voltage
is delivered to the Wire 14 circuit. Battery
voltage is delivered to the Fuel Pump, Fuel
Solenoid, Choke Heater and the Remote
Harness.
2.Wire 18 from the Engine Controller board. This Is the
ENGINE STOP circuit. When the Start-Stop Switch is set to
“STOP”, Wire 18 is connected to frame ground via Wire No.
0B. Circuit board action then opens the circuit to Wire 14,
and grounds Wire 18A. Fuel flow to the carburetor and ignition are terminated.
3. Wire 0B connects the Switch to frame ground.
Figure 5-6. – Start-Stop Switch
STARTER CONTACTOR RELAY
& STARTER MOTOR
The positive (+) battery cable attaches to the large lug
on the STARTER CONTACTOR. Wire 13 then
attaches to one side of the STARTER CONTACTOR
RELAY contact, from this point Wire 13 attaches to
the fuse F1 to supply battery voltage to the DC control system. The opposite side of the starter contactor
relay contact is connected to Wire 16.
Wire 16 will supply battery power to the starter contactor and to the engine controller board for field flash
when the starter contactor relay is energized.
Attached to the starter contactor relay coil is wire 56
(positive supply during cranking) and wire 0 (ground).
When the Start-Stop switch is set to “START”, the circuit board delivers battery voltage to the Starter
Contactor Relay via Wire 56.The Starter Contactor
Relay energizes, its contacts close and the Starter
Contactor is energized via wire 16. Its contacts close
and battery voltage is available to the starter motor,
and the engine cranks.
Figure 5-7. – Starter Motor
Figure 5-8. – Starter Contactor Relay
Page 26
Page 29

SSeeccttiioonn 66
TTRROOUUBBLLEESSHHOOOOTTIINNGG FFLLOOWWCCHHAARRTTSS
The “Flow Charts” in this section may be used in conjunction with the “Diagnostic Tests” of Section 7.
Numbered tests in the Flow Charts correspond to
identically numbered tests of Section 7.
Problems 1 through 4 apply to the AC generator only.
Beginning with Problem 5, the engine DC control sys-
tem is dealt with.
Page 27
INTRODUCTION
Page 30

SSeeccttiioonn 66
TTRROOUUBBLLEESSHHOOOOTTIINNGG FFLLOOWWCCHHAARRTTSS
Page 28
Page 31

SSeeccttiioonn 66
TTRROOUUBBLLEESSHHOOOOTTIINNGG FFLLOOWWCCHHAARRTTSS
Page 29
Page 32

SSeeccttiioonn 66
TTRROOUUBBLLEESSHHOOOOTTIINNGG FFLLOOWWCCHHAARRTTSS
Page 30
Page 33

SSeeccttiioonn 66
TTRROOUUBBLLEESSHHOOOOTTIINNGG FFLLOOWWCCHHAARRTTSS
Page 31
Page 34

SSeeccttiioonn 66
TTRROOUUBBLLEESSHHOOOOTTIINNGG FFLLOOWWCCHHAARRTTSS
Page 32
Page 35

SSeeccttiioonn 66
TTRROOUUBBLLEESSHHOOOOTTIINNGG FFLLOOWWCCHHAARRTTSS
Page 33
Page 36

SSeeccttiioonn 66
TTRROOUUBBLLEESSHHOOOOTTIINNGG FFLLOOWWCCHHAARRTTSS
Page 34
Page 37

SSeeccttiioonn 66
TTRROOUUBBLLEESSHHOOOOTTIINNGG FFLLOOWWCCHHAARRTTSS
Page 35
Page 38

SSeeccttiioonn 66
TTRROOUUBBLLEESSHHOOOOTTIINNGG FFLLOOWWCCHHAARRTTSS
Page 36
Page 39

SSeeccttiioonn 66
TTRROOUUBBLLEESSHHOOOOTTIINNGG FFLLOOWWCCHHAARRTTSS
Page 37
Page 40

SSeeccttiioonn 77
DDIIAAGGNNOOSSTTIICC TTEESSTTSS
INTRODUCTION
The “Diagnostic Tests” in this chapter may be performed in conjunction with the “Flow Charts” of
Section 6. Test numbers in this chapter correspond to
the numbered tests in the “Flow Charts”.
Tests 1 through 17 are procedures Involving problems with the generator's AC output voltage and frequency (Problems 1 through 4 in the “Flow Charts”).
Tests 18 through 42 are procedures involving problems with engine operation (Problems 5 through 9 in
the “Troubleshooting Flow Charts”).
You may wish to read Section 4, “Measuring
Electricity”.
NOTE: Test procedures in this Manual are not
necessarily the only acceptable methods for diagnosing the condition of components and circuits.
All possible methods that might be used for system diagnosis have not been evaluated. If you use
any diagnostic method other than the method
presented in this Manual, you must ensure that
neither your safety nor the product's safety will
be endangered by the procedure or method you
have selected.
TEST 1- CHECK NO-LOAD VOLTAGE AND
FREQUENCY
DISCUSSION:
The first step in analyzing any problem with the AC
generator is to determine the unit's AC output voltage
and frequency. Once that has been done, you will
know how to proceed with specific diagnostic tests.
PROCEDURE:
1. Set a volt-ohm-milliammeter (VOM) to read AC voltage.
Connect the meter test leads across customer connection
leads T1 (Red) and T2 (White).
2. Disconnect or turn OFF all electrical loads. Initial checks and
adjustments are accomplished at no-load.
3. Start the engine, let it stabilize and warm up.
4. Read the AC voltage.
5. Connect an AC frequency meter across AC output leads T1
(Red) and T2 (White). Repeat the above procedure.
RESULTS:
For units rated 60 Hertz, no-load voltage and frequen-
cy should be approximately 122-126 VAC and 61-63
Hertz respectively.
1. If AC voltage and frequency are BOTH correspondingly high or
low, go to Test 2.
2. If AC frequency is good but low or residual voltage is indicated,
go to Test 3.
3. If AC output voltage and frequency are both “zero”, go to Test 12.
4. If the no-load voltage and frequency are within the stated limits,
go to Test 13.
NOTE: The term “low voltage” refers to any voltage reading that is lower than the unit's rated
voltage. The term “residual voltage” refers to the
output voltage supplied as a result of Rotor residual magnetism (approximately 5-12 VAC).
TEST 2- CHECK ENGINE GOVERNOR
DISCUSSION:
Rotor operating speed and AC output frequency are
proportional. The generator will deliver a frequency of
60 Hertz at 3600 Rotor rpm or 62 Hertz at 3720
Rotor rpm.
The Voltage Regulator should be adjusted to deliver
120 VAC (line-to-neutral) at a frequency of 60 Hertz
or 124 VAC (line-to-neutral at 62 Hertz. It is apparent
that, if governed speed is high or low, AC frequency
and voltage will be correspondingly high or low.
Governed speed at no-load is usually set slightly
above the rated speed of 60 Hertz (to 62 Hertz), to
prevent excessive rpm, frequency and voltage droop
under heavy electrical loading.
Figure 7-1. – Governor Adjustment Points
Page 38
Page 41

SSeeccttiioonn 77
DDIIAAGGNNOOSSTTIICC TTEESSTTSS
GOVERNOR ADJUSTMENT
1. Loosen the GOVERNOR CLAMP BOLT.
2. Push Spring end of GOVERNOR LEVER clockwise to wide
open throttle position of lever.
a.Hold the GOVERNOR LEVER at wide open
throttle and, with a pair of pliers, rotate the
GOVERNOR SHAFT fully clockwise (CW). Use
a minimum amount of force against the governor shaft.
b.While holding the GOVERNOR SHAFT fully
clockwise and the GOVERNOR LEVER at wide
open throttle, tighten the GOVERNOR CLAMP
BOLT to 70 inch-pounds (8 N-m).
3. Start engine, let it stabilize and warm up at no-load.
4. Turn the ADJUSTER NUT to obtain a frequency reading of 62
Hertz.
5. Determine if the GOVERNOR SPRING is properly located in
the slot of the GOVERNOR LEVER as follows:
a.If droop is excessive, move the GOVERNOR
SPRING down one slot on LEVER.
b. For greater stability, move the GOVERNOR SPRING up one
slot on LEVER.
6. After repositioning the SPRING on a LEVER slot, recheck frequency reading and, if necessary, readjust ADJUSTER NUT to
obtain 62 Hertz at no-load.
7. When frequency is correct at no-load, check the AC voltage
reading. If voltage is incorrect, the voltage regulator may
require adjustment. See “VOLTAGE ADJUSTMENT,” Page 10.
TEST 3- TEST EXCITATION CIRCUIT
BREAKER
DISCUSSION:
This circuit breaker (CB3) is normally closed and self-
resetting. It will open in the event of excessive current
from the Stator excitation (DPE) winding. The circuit
breaker should re-close or reset automatically after it
cools down (takes approximately two minutes).
When the breaker (CB3) is open, excitation current to
the Regulator (and to the Rotor) will be lost. The unit's
AC output voltage will then drop to a value that is
commensurate with the Rotor's residual magnetism
(about 5-12 volts AC). This test will determine if the
breaker has failed in its open position.
PROCEDURE:
Note: After running the unit, allow two minutes for
the breaker to reset.
1. Set a volt-ohm-milliammeter (VOM) to its “Rx1” scale and zero
the meter.
Figure 7-2. – Excitation “DPE” Circuit Breaker
2. In the generator panel, locate the excitation circuit breaker.
Disconnect Wire 2 and Wire 2A from the breaker terminals.
3. Connect the meter test leads across the two circuit breaker
(CB3) terminals. The meter should indicate “continuity”.
RESULTS:
1. If the meter did NOT read “continuity”, replace the excitation
(DPE) circuit breaker (CB3), and go to Test 4.
2. If “continuity” was indicated, go to Test 4.
TEST 4- FIXED EXCITATION TEST/ROTOR
AMP DRAW
DISCUSSION:
The fixed excitation test consists of applying battery
voltage (12 VDC) to the Rotor windings. This allows
that portion of the excitation circuit between the
Voltage Regulator and the Rotor (including the Rotor
itself) to be checked as a possible cause of the problem. When battery voltage is applied to the Rotor, the
resulting magnetic field around the Rotor should
induce a Stator power winding voltage equal to about
one-half the unit's rated output voltage.
Figure 7-3. – Fixed Excitation Test
Page 39
Page 42

SSeeccttiioonn 77
DDIIAAGGNNOOSSTTIICC TTEESSTTSS
PROCEDURE:
1. Disconnect Wire 4 from the Voltage Regulator (VR). (Third terminal from the top of VR).
2. Connect a jumper wire to Wire 4 and to the 12 volt fused battery
positive supply Wire 15 (Wire 15 located at fuse (F1) holder).
3. Set the VOM to measure AC voltage.
4. Disconnect Wire 2 from the DPE breaker (CB3) and connect
one test lead to that wire. Disconnect Wire 6 from the Voltage
Regulator and connect the other test lead to that wire. Start the
generator and measure the AC voltage. It should be above 60
volts. Record the results and stop the generator.
5. Re-connect Wire 2 to the DPE Circuit Breaker (CB3) and reconnect Wire 6 to the Voltage Regulator.
6. Disconnect Wire 11 from the Voltage Regulator (VR) and connect one test lead to that wire. Disconnect Wire 22 from the
Voltage Regulator and connect the other test lead to that wire.
Start the generator and measure the AC voltage. It should be
above 60 volts. Record the results and stop the generator.
7. Re-connect Wire 11 and Wire 22 to the Voltage Regulator.
8. Remove the jumper wire between Wire 4 and 12 volt supply.
9. Set the VOM to measure DC amps.
10. Connect one test lead to the 12 volt fused battery supply Wire
15, and connect the other test lead to Wire 4 (should still be
disconnected from the VR).
11. Start the generator. Measure the DC current. Record the rotor
amp draw.
12. Stop the generator. Re-connect Wire 4 to the Voltage
Regulator.
RESULTS:
Proceed to “TEST 4 RESULTS” (top of page 40).
Match all results to corresponding column in the
chart. The column letter refers to the Problem 4 flow
charts on pages 28 and 29.
TEST 5- WIRE CONTINUITY
DISCUSSION:
The Voltage Regulator receives unregulated alternat-
ing current from the Stator Excitation Winding via
Wires 2, 6 and 2A. It also receives voltage sensing
from the Stator AC Power Windings via Wires 11 and
22. The regulator rectifies the AC from the Excitation
Winding and, based on the sensing signals, regulates
that DC current flow to the Rotor. The rectified and
regulated current flow is delivered to the Rotor
Brushes via Wires 4 (+) and 0 (-). This test will verify
the integrity of Wires 0 and 2A.
PROCEDURE:
1. Set a VOM to its “Rx1” scale.
2. Remove Wire 0 from the Voltage Regulator, fourth terminal from
the top (identified by a negative (-) sign next to terminal).
3. Connect one test lead to Wire 0 and the other test lead to a
clean frame ground. The meter should read continuity.
4. Disconnect Wire 2A from the Voltage Regulator, sixth terminal
from the top. Disconnect the other end of this wire from the
Page 40
TTEESSTT 44 RREESSUULLTTSS
AA BB CC DD EE FF GG
VOLTAGE RESULTS ABOVE ABOVE BELOW ZERO OR BELOW BELOW ABOVE
WIRE 2 & 6 60 VAC 60 VAC 60 VAC RESIDUAL 60 VAC 60 VAC 60 VAC
EXCITATION WINDING VOLTAGE
(5-12 VAC)
VOLTAGE RESULTS ABOVE BELOW ABOVE ZERO OR BELOW BELOW ABOVE
WIRE 11 & 22 60 VAC 60 VAC 60 VAC RESIDUAL 60 VAC 60 VAC 60 VAC
POWER WINDING VOLTAGE
SENSE LEADS (5-12 VAC)
ROTOR AMP DRAW .85 A .85 A .85 A ZERO ≥1.2 A .85 A ZERO
QP55 ± 20% ± 20% ± 20% CURRENT ± 20% CURRENT
(MODEL 4702/4703) DRAW DRAW
ROTOR AMP DRAW 1.2 A 1.2 A 1.2 A ZERO ≥1.5 A 1.2 A ZERO
QP65 ± 20% ± 20% ± 20% CURRENT ± 20% CURRENT
(MODEL 4704/4705) DRAW DRAW
ROTOR AMP DRAW .87-.79 A .87-.79 A .87-.79 A ZERO ≥1.2 A .87-.79 A ZERO
QP75 ± 20% ± 20% ± 20% CURRENT ± 20% CURRENT
(MODEL 4706/4707) DRAW DRAW
((MMAATTCCHH RREESSUULLTTSS WWIITTHH LLEETTTTEERR AANNDD RREEFFEERR TTOO FFLLOOWW CCHHAARRTT –– PPrroobblleemm 22 oonn PPaaggeess 2288 && 2299))
Page 43

SSeeccttiioonn 77
DDIIAAGGNNOOSSTTIICC TTEESSTTSS
Excitation Circuit Breaker (CB3). Connect one test lead to one
end of Wire 2A and the other test lead to the other end of the
same wire. The meter should read continuity.
RESULTS:
If continuity was NOT measured across each wire,
repair or replace the wires as needed.
If continuity WAS measured, proceed to Test 6.
TEST 6- CHECK FIELD BOOST
DISCUSSION:
Field boost current is delivered to the Rotor only while
the engine is being cranked. This current helps
ensure that adequate “pickup” voltage is available to
turn the Voltage Regulator on and build AC output
voltage.
Loss of the field boost function may or may not result
in a problem with AC output voltage. If the Rotor's
residual magnetism is sufficient to turn the Regulator
on, loss of the function may go unnoticed. However, if
the Rotor's residual magnetism is not enough to turn
the Regulator on, loss of field boost can result in failure of the unit to generate an output voltage.
PROCEDURE:
1. Set VOM to measure DC voltage.
2. Disconnect Wire 4 from the Voltage Regulator and connect the
positive (+) test lead to it. Connect the negative (-) test lead to
a clean frame ground.
3. Set the Start-Stop Switch to “START.” During cranking only,
measure DC voltage. It should read 3-5 VDC. Reconnect Wire
4 to the Voltage Regulator. If voltage is measured, it can be
assumed that the Field Boost is working. Stop testing. If voltage is not measured, proceed to Step 4.
4. Connect the positive (+) test lead to Wire 16 at pin location J113 on the PCB (see Figure 7-4) (J1, J2 & J3 connectors remain
connected to PCB). Connect the negative(-) test lead to a
clean frame ground.
5. Set the Start-Stop Switch to “START.” During cranking only,
battery voltage should measure 11-12 VDC.
6. Connect the positive (+) test lead to Wire 4 at pin location J1-9
on the PCB (see Figure 7-4) (J1, J2 & J3 connectors remain
connected to PCB). Connect the negative(-) test lead to a
clean frame ground.
7. Set the Start-Stop Switch to “START.” During cranking only
measure the DC voltage. It should measure 3-5 VDC.
RESULTS:
1. If battery voltage was not measured in Step 5, repair or replace
Wire 16 between the Starter Contactor Relay and PCB.
2. If field boost voltage was measured in Step 7 but not measured
in Step 3, repair or replace Wire 4 between PCB and Voltage
Regulator.
3. If battery voltage was measured in Step 5 but field boost voltage was not measured in Step 7, replace PCB.
4. If field boost checks good, replace the Voltage Regulator.
Figure 7-4. – The Field Boost Circuit
TEST 7 - TEST STATOR DPE WINDING
DISCUSSION:
An open circuit in the Stator excitation windings will
result in a loss of unregulated excitation current to the
Voltage Regulator. The flow of regulated excitation current to the Rotor will then terminate and the unit's AC
output voltage will drop to a value that is commensurate
with the rotor’s residual magnetism (about 5 - 12 VAC).
Figure 7-5. – Stator Excitation Winding
Page 41
Page 44

SSeeccttiioonn 77
DDIIAAGGNNOOSSTTIICC TTEESSTTSS
PROCEDURE:
1. Disconnect Wire 2 from the Excitation Circuit Breaker.
2. Disconnect Wire 6 from the Voltage Regulator.
3. Set a VOM to its “Rx1” scale and zero the meter.
4. Connect the VOM test leads across the terminal ends of Wires
2 and 6. The VOM should indicate the resistance of the Stator
Excitation (DPE) Windings.
EXCITATION “DPE” WINDING RESISTANCE *
(Measured Across Wires 2 & 6)
MMOODDEELL OOHHMMSS
QP55 (4702/4703) 1.41Ω − 1.63Ω
QP65 (4704/4705) 1.59Ω − 1.84Ω
QP75 (4706/4707) 1.12Ω − 1.30Ω
* Resistance values In ohms at 20° C. (68° F.). Actual readings
may vary depending on ambient temperature. A tolerance of
plus or minus 5% is allowed.
5. Now, set the meter to its “Rx1 K” or “Rx10,000” scale and zero
the meter. Test for a “short-to-ground” condition as follows:
a.Connect one meter test lead to Stator lead No.
2, the other test lead to a clean frame ground.
b.The meter should read “Infinity”. Any other read-
ing indicates a “short-to-ground” condition and
the Stator should be replaced.
6. Test for a short between windings as follows:
a.Meter should be set to its “Rx1 K” or “Rx10,000”
scale.
b.Connect one meter test lead to Stator Wire 2,
the other test lead to Stator lead No. 11. The
meter should read “Infinity”.
c. Connect one VOM test lead to Stator lead No. 2
the other test lead to Stator lead No. 33.
“Infinity” should be indicated.
d.Connect one VOM test lead to Stator lead No. 2
and connect the other test lead to Stator lead
No. 66. “Infinity” should be indicated.
RESULTS:
1. If the Stator excitation (DPE) windings are open or shorted,
replace the Stator assembly.
2. If the excitation windings are good, perform “Insulation
Resistance Test”, page 13.
TEST 8- CHECK SENSING LEADS / POWER
WINDINGS
DISCUSSION:
The Voltage Regulator “regulates” excitation current
flow to the Rotor by electronically comparing sensing
voltage to a pre-set reference voltage. The sensing
voltage is delivered to the Voltage Regulator via
Wires 11S and 22S.
If an open circuit exists in sensing leads 11S or 22S,
the normal reaction of an unprotected Regulator
would be to increase the excitation current to the
Rotor in an effort to increase the actual AC output
voltage. This would result in a “full field” condition and
an extremely high AC output voltage.
To protect the system against such a high AC output
voltage, the Voltage Regulator will shut down if sensing voltage signals are lost.
If the regulator shuts down, the generator's AC output
voltage will decrease to a value that is commensurate
with the Rotor's residual magnetism (about 5-12 VAC).
PROCEDURE:
Gain access to the generator control panel interior.
Test the Stator power windings, as follows:
1. From main breaker, disconnect Wires 11 P and 33.
2. Also disconnect Wires 22P and 44 from the ground terminal.
3. Disconnect Wires 11S and 22S from the Voltage Regulator.
4. Set a VOM to its “Rx1” scale and zero the meter.
5. Connect the meter test leads across Stator leads 11P and 22P.
Normal power winding resistance should be read.
6. Connect the meter test leads across Stator leads 33 and 44.
Normal power winding resistance should be read.
7. Connect the meter test leads across Stator leads 11S and 22S.
Normal Power Winding resistance should be read.
AC POWER WINDING RESISTANCE * QP55 (Model 4702/4703)
AACCRROOSSSS WWIIRREESS:: OOHHMMSS
11P & 22P 0.28Ω − 0.32Ω
11S & 22S 0.28Ω − 0.32Ω
33 & 44 0.28Ω − 0.32Ω
AC POWER WINDING RESISTANCE * QP65 (Model 4704/4705)
AACCRROOSSSS WWIIRREESS:: OOHHMMSS
11P & 22P 0.209Ω − 0.242Ω
11S & 22S 0.209Ω − 0.242Ω
33 & 44 0.209Ω − 0.242Ω
AC POWER WINDING RESISTANCE * QP75 (Model 4706/4707)
AACCRROOSSSS WWIIRREESS:: OOHHMMSS
11P & 22P 0.157Ω − 0.182Ω
11S & 22S
0.157
Ω − 0.182Ω
33 & 44 0.157Ω − 0.182Ω
* Resistance values In ohms at 20° C. (68° F.). Actual readings
may vary depending on ambient temperature. A tolerance of
plus or minus 5% is allowed.
8. Now, set the VOM to its “Rx1 K” or “Rx10,000” scale and zero
the meter.
Page 42
Page 45

SSeeccttiioonn 77
DDIIAAGGNNOOSSTTIICC TTEESSTTSS
9. Connect the meter test leads across Stator lead 11P and frame
ground. “Infinity” should be read.
10. Connect the meter test leads across Stator lead 33 and frame
ground. The reading should be “Infinity”.
11. Connect the meter test leads across Stator leads Wire 11P
and Wire 33. The reading should be “Infinity”.
12. Connect the meter test leads across Stator leads Wire 11P
and Wire 66. The reading should be “Infinity”.
13. Connect the meter test leads across Stator leads Wire 33 and
Wire 66. The reading should be “Infinity”.
14. Connect the meter test leads across Stator leads Wire 11P
and Wire 2. The reading should be “Infinity”.
15. Connect the meter test leads across Stator leads Wire 33 and
Wire 2. The reading should be “Infinity”.
RESULTS:
1. If the Stator passes all steps except Step 7, repair, re-connect
or replace Sensing leads 11S and 22S.
2. Replace the Stator if it’s power windings fail the test. (Note
Result No. 1).
3. If the Power Windings test good, perform the “Insulation
Resistance Test” on Page 13.
Figure 7-6. – Stator Power Winding Leads
TEST 9- CHECK BRUSH LEADS
DISCUSSION:
In Test 4, if application of battery voltage to the Rotor
did NOT result in an output of about one-half rated
voltage, the brush leads could be one possible cause
of the problem. This test will check Wires 4 and OK
for an open circuit condition.
PROCEDURE:
1. Set a VOM to its “Rx1” scale and zero the meter.
2. Disconnect Wire 4 from the Voltage Regulator and from the
Rotor brush terminal.
3. Connect the VOM test leads across each end of the wire. The
meter should read “Continuity”.
4. Disconnect Wire OF from the Rotor Brush Terminal. Connect
one meter test lead to Wire OF. Connect the other test lead to
a clean frame ground. The meter should read “Continuity”.
RESULTS:
1. Repair, reconnect or replace any defective wire(s).
2. If wires check good, go to Test 10.
Figure 7-7. – Brush Leads
TEST 10 - CHECK BRUSHES & SLIP RINGS
DISCUSSION:
Brushes and slip rings are made of special materials
that will provide hundreds of hours of service with little
wear. However, when the generator has been idle for
some time, an oxide film can develop on the slip
rings. This film acts as an insulator and impedes the
flow of excitation current to the Rotor.
If Test 4 resulted in less than one-half rated output
voltage, it is possible that the brushes and slip rings
are at fault.
PROCEDURE:
1. Gain access to the brushes and slip rings.
2. Remove Wire 4 from the positive (+) brush terminal.
3. Remove the ground wire (0F) from the negative (-) brush.
4. Remove the brush holder, with brushes.
5. Inspect the brushes for excessive wear, damage, cracks, chipping, etc.
6. Inspect the brush holder, replace if damaged.
Page 43
Page 46

SSeeccttiioonn 77
DDIIAAGGNNOOSSTTIICC TTEESSTTSS
7. Inspect the slip rings.
a.If slip rings appear dull or tarnished they may be
cleaned and polished with fine sandpaper. DO
NOT USE ANY METALLIC GRIT TO CLEAN
SLIP RINGS. (A 400 grit wet sandpaper is recommended).
b.After cleaning slip rings, blow away any sandpa-
per residue.
RESULTS:
1. Replace bad brushes. Clean slip rings, if necessary.
2. If brushes and rings are good, go to Test 11.
TEST 11- CHECK ROTOR ASSEMBLY
DISCUSSION:
During the “Fixed Excitation Test” (Test 4), if AC out-
put voltage did not come up to about one-half rated
volts, one possible cause might be a defective Rotor.
The Rotor can be tested for an open or shorted condition using a volt-ohm-milliammeter (VOM).
Also see Chapter Three, “INSULATION RESISTANCE TESTS”.
PROCEDURE:
Gain access to the brushes and slip rings. Disconnect
Wire 4 and Wire OF from their respective brushes
and remove the brush holder. Then, test the Rotor as
follows:
1. Set a VOM to its “Rx1” scale and zero the meter.
2. Connect the positive (+) meter test lead to the positive (+) slip
ring (nearest the Rotor bearing). Connect the common (-) test
lead to the negative (-) slip ring. Read the resistance of the
Rotor windings, in OHMS.
ROTOR RESISTANCE *
MMOODDEELL:: OOHHMMSS
QP55 4702/4703 14.88Ω
QP65 4704/4705 10.81Ω
QP75 4706/4707 14.50Ω − 16.0Ω
* Resistance values In ohms at 20° C. (68° F.). Actual readings
may vary depending on ambient temperature. A tolerance of
plus or minus 5% is allowed.
3. Set the VOM to its “Rx1 K” or “Rx10,000” scale and zero the
meter.
4. Connect the positive (+) meter test lead to the positive (+) slip
ring, the common (-) test lead to a clean frame ground (such as
the Rotor shaft). The meter should read “Infinity”.
RESULTS:
1. Replace the Rotor if it fails the test.
2. If Rotor checks good, perform “Insulation Resistance Test,” on
Page 14.
Figure 7-8. – Rotor Assembly
TEST 12 - CHECK MAIN CIRCUIT BREAKER
DISCUSSION:
The main circuit breaker on the generator panel must
be closed or no output to the load will be available. A
defective breaker may not be able to pass current
even though it is in the “ON” position.
Figure 7-9. – Main Breaker (Typical)
PROCEDURE:
Set the coach main breaker to it’s “OFF” position.
Check that the appropriate main breaker on the generator panel is set to its “ON” (closed) position. Set a
VOM to measure resistance and use it to check for
continuity across the breaker terminals.
Page 44
Page 47

SSeeccttiioonn 77
DDIIAAGGNNOOSSTTIICC TTEESSTTSS
RESULTS:
1. If breaker is “ON” and “Continuity” is measured, go to Test 3.
2. If breaker is “OFF”, reset to the “ON” position and check for AC
output.
3. If breaker is “ON” and “Continuity” is not measured, replace the
defective circuit breaker.
TEST 13- CHECK LOAD VOLTAGE &
FREQUENCY
DISCUSSION:
If engine speed appears to drop off excessively when
electrical loads are applied to the generator, the load
voltage and frequency should be checked.
PROCEDURE:
Perform this test in the same manner as Test 1, but
apply a load to the generator equal to its rated capacity. With load applied check voltage and frequency.
Frequency should not drop below about 58 Hertz with
the load applied.
Voltage should not drop below about 115 VAC with
load applied.
RESULTS:
1. If voltage and/or frequency drop excessively when the load is
applied, go to Test 14.
2. If load voltage and frequency are within limits, end tests.
TEST 14- CHECK LOAD WATTS & AMPERAGE
DISCUSSION:
This test will determine if the generator's rated
wattage/amperage capacity has been exceeded.
Continuous electrical loading should not be greater
than the unit's rated capacity.
PROCEDURE:
Add up the wattages or amperages of all loads pow-
ered by the generator at one time. If desired, a clampon ammeter may be used to measure current flow.
See “Measuring Current” on Page 16.
RESULTS:
1. If the unit is overloaded, reduce the load.
2. If load is within limits, but frequency and voltage still drop
excessively, complete Test 2, “Check/Adjust Engine Governor”.
If governor adjustment does not correct the problem, go to
Problem 8 (Flow Chart, Pages 34 and 35).
TEST 15 - CHECK BATTERY CHARGE
OUTPUT
DISCUSSION:
The Battery Charge system consists of a center tap
Battery Charge Winding, a Battery Charge Rectifier,
and a Battery Charge Resistor. During normal operation the battery charge output will vary between 1 to 2
amps, depending on the load applied to the generator. Battery Charge Winding Stator Lead Wire 66 is
tapped at the Battery Charge Rectifier and connected
to the Engine Control Circuit Board at Pin location J110, and is used as a signal for Starter lockout.
PROCEDURE:
1. Disconnect Wire 15 from the Battery Charge Rectifier (center
terminal). Wire 15 is the fused battery supply.
2. Set a VOM to measure DC Amps. Connect the positive (+) test
lead to the center terminal of the Battery Charge Rectifier.
Connect the negative (-) test lead to Wire 15 previously disconnected.
3. Start the generator. The amp reading on the VOM should be
approximately 0.8 Amps. Apply full load to the generator. The
amp reading should increase to approximately 2 Amps.
RESULTS:
1. If amperage was measured between 0.8 to 2 Amps in Step 2
and Step 3, the charging system is working.
2. If no amperage was measured, check the VOM fuses and verify the functioning of the Amp Meter. If DC Amp Meter is good
and no current is measured, go to Test 16
TEST 16 - CHECK BATTERY CHARGE
RECTIFIER
DISCUSSION:
The Battery Charge Rectifier (
BCR)
is a full wave rectifier.
PROCEDURE:
1. Disconnect Wire 66, Wire 15 and Wire 77 from the Battery
Charge Rectifier.
2. Set the VOM to the Diode Test range. Connect the negative (-)
test lead to the center terminal of the BCR. Connect the positive (+) test lead to an outer terminal. The meter should measure approximately 0.5 volts. Now connect the positive test
lead to the other outer terminal. Again, the meter should measure approximately 0.5 volts.
3. Connect the positive (+) test lead to the center terminal of the BCR.
Connect the negative (-) test lead to to an outer terminal. The
meter should measure “Infinity.” Connect the negative test lead to
the other outer terminal. “Infinity” should once again be measured.
Page 45
Page 48

SSeeccttiioonn 77
DDIIAAGGNNOOSSTTIICC TTEESSTTSS
Short to Ground:
4. Set the VOM to measure resistance. Connect the positive (+)
test lead to the case housing of the BCR. Connect the negative
(-) test lead to an outer terminal. “Infinity” should be measured.
Now connect the negative test lead to the BCR center terminal.
“Infinity” should be measured. Next, connect the negative test
lead to the remaining outer BCR terminal. Once again “Infinity”
should be measured.
Figure 7-10. – Battery Charge Rectifier
RESULTS:
1. If any of the previous steps has failed, replace the Battery
Charge Rectifier.
2. If the BCR tests good, go to Test 17.
TEST 17 - CHECK BATTERY CHARGE
WINDINGS / BATTERY CHARGE RESISTOR
DISCUSSION:
The Battery Charge Winding (BCW) produces AC
voltage that is delivered to the Battery Charge
Rectifier. The Battery Charge Winding is a center
tapped winding consisting of the following Stator
Leads: Wire 66, Wire 77 and Wire 55. The Battery
Charge Resistor is used as a current limiting resistor.
PROCEDURE:
1. Disconnect the Stator Leads (Wire 66 and Wire 77) from the
Battery Charge Rectifier. (Be sure to disconnect Stator Lead
Wire 66 “Black” from Wire 66 “Blue” connector for this test).
Disconnect the Stator Lead Wire 55 from the Battery Charge
Resistor.
2. Set the VOM to measure resistance at the “R x 1” scale.
Connect one test lead to Stator Lead Wire 66. Connect the
other test lead to Stator Lead Wire 55. Normal Battery Charge
Winding resistance should be measured.
3. Connect one test lead to Stator Lead Wire 77. Connect the
other test lead to Stator Lead Wire 55. Normal Battery Charge
Winding resistance should be measured.
4. Connect one test lead to Stator Lead Wire 55. Connect the
other test lead to Stator Leads Wire 11 & 33 at the back of
CB1. “Infinity” should be measured.
5. Connect one test lead to Stator Lead Wire 55. Disconnect
Stator Lead Wire 2 from the DPE circuit breaker (CB3) and
connect the other test lead to Wire 2. “Infinity” should be measured.
6 Connect one test lead to Stator Lead Wire 55. Connect the
other test lead to frame ground. “Infinity” should be measured.
7. Connect one test lead to the Battery Charge Resistor terminal
that Wire 55 was removed from. Connect the other test lead to
frame ground. One (1) ohm should be measured. If 1 ohm was
not measured, remove Wire 0 from the Battery Charge
Resistor. Connect one test lead to Wire 0 and the other test
lead to frame ground.
“
Continuity” should be measured. Repair
or replace Wire 0 if defective and retest the Battery Charge
Resistor.
BATTERY CHARGE WINDING RESISTANCE *
QP55 (Model 4702/4703)
AACCRROOSSSS WWIIRREESS:: OOHHMMSS
55 & 66 0.100Ω − 0.116Ω
55 & 77 0.100Ω − 0.116Ω
BATTERY CHARGE WINDING RESISTANCE *
QP65 (Model 4704/4705)
AACCRROOSSSS WWIIRREESS:: OOHHMMSS
55 & 66 0.104Ω − 0.120Ω
55 & 77 0.087Ω − 0.101Ω
BATTERY CHARGE WINDING RESISTANCE *
QP75 (Model 4706/4707)
AACCRROOSSSS WWIIRREESS:: OOHHMMSS
55 & 66 0.092Ω − 0.107Ω
55 & 77 0.076Ω − 0.088Ω
* Resistance values In ohms at 20° C. (68° F.). Actual readings
may vary depending on ambient temperature. A tolerance of plus
or minus 5% is allowed.
RESULTS:
1. For Steps 2 & 3, keep in mind that the resistance values are
very low. Depending upon the quality of the VOM, it may read
“
Continuity” across these windings. Exercise good judgement
with these values.
2. If Steps 2, 3, 4, 5 & 6 fail any test, replace the Stator.
Page 46
Page 49

Page 47
SSeeccttiioonn 77
DDIIAAGGNNOOSSTTIICC TTEESSTTSS
3. In Step 7, if Wire 0 reads “Continuity”, but resistor does not
measure 1 ohm, replace the Battery Charge Resistor.
4. If all of the Steps in this test pass, perform “Insulation
Resistance Test” on page 13.
TEST 18 - TRY CRANKING THE ENGINE
DISCUSSION:
If the Fuel Primer Switch on the generator panel is
actuated, but the Fuel Pump does not run (priming
function doesn't work), perhaps battery voltage is not
available.
PROCEDURE:
Hold the Start-Stop Switch at “START”. The engine
should crank and start.
RESULTS:
1. If the engine cranks normally, but the priming function still
doesn't work, go to Test 19.
2. If engine will not crank, go to Test 21. Refer to Problem 6 of
Section 6.
3. If engine cranks but won't start, go to Problem 7 of Section 6.
4. If engine starts hard and runs rough, go to Problem 8 of
Section 6.
TEST 19- TEST PRIMER SWITCH
DISCUSSION:
A defective primer switch can prevent the priming
function from occurring.
Switch failure can also prevent the engine from start-
ing, since the switch is in series with the Wire14 circuit.
(Also see “Fuel Primer Switch,” page 25).
Figure 7-11. – Primer Switch
PROCEDURE:
1. Set a VOM to read battery voltage (12 VDC).
2. Connect the positive (+) meter test lead to the Wire 15 terminal
of the Primer Switch (leave Wire 15 connected to the switch).
Connect the negative (-) meter test lead to frame ground. The
meter should indicate battery voltage.
3. Connect the positive (+) meter test lead to the Wire 14 terminal
of the Primer Switch (leave Wire 14 connected to the switch).
Connect the negative (-) meter test lead to a clean frame
ground. Set the Start-Stop switch to “START”. The engine
should crank and battery voltage should be measured.
4. Connect the positive (+) meter test lead to the Wire 14A terminal of the Primer Switch, the negative (-) meter test lead to
frame ground.
a. With the Primer Switch NOT actuated, no
voltage should be indicated.
b. Actuate the switch to its “PRIME” position
and the meter should read battery voltage.
5. For gasoline models, disconnect Connector 2 at the Fuel
Pump. Connect the VOM positive (+) test lead to Wire 14A,
(Pin 2 of Connector 2) going up to the Control Panel (see
Figure 7-12). Connect the VOM negative(-) test lead to frame
ground. Repeat Steps 4a and 4b. Battery Voltage should be
measured when the Primer Switch is activated.
Figure 7-12. – Harness End of Connector 2
6. For LPG models, disconnect Wire 14A from the LPG Fuel
Solenoid (FS)(see Figure 7-13). Connect the VOM positive (+)
test lead to Wire 14A. Connect the VOM negative(-) test lead to
frame ground. Repeat Steps 4a and 4b. Battery Voltage
should be measured when the Primer Switch is activated.
7. Set the VOM to measure resistance at the “Rx1” scale and
zero the meter.
a. Disconnect Wire 14 from the Primer Switch.
b. Connect the meter test leads across the
Wires 14 and 14A terminals of the switch.
c. With the switch NOT actuated, the meter
should read “Continuity”
.
Page 50

SSeeccttiioonn 77
DDIIAAGGNNOOSSTTIICC TTEESSTTSS
Figure 7-13. – The LPG Fuel Solenoid (FS)
RESULTS:
1. If battery voltage is not indicated in Step 2, check Wire 15 between
the Primer Switch and the 7.5 amp fuse for an open condition.
2. If battery voltage is indicated in Step 2 but not in Step 4,
replace the Primer Switch. If battery voltage is NOT indicated
in Step 3 repair or replace Wire 14 between the 4-tab Terminal
Connector (TC) and the Fuel Primer Switch (SW2).
3. If battery voltage was indicated in Step 4 but not in Step 5:
a. For gasoline models repair or replace Wire
14A between the Primer Switch (SW2) and
Fuel Pump Connector 2.
b. For LPG models repair or replace Wire 14A
between the Fuel Prime Switch (SW2) and
the LPG Fuel Solenoid (FS).
4. If the meter reads anything other than
“
Continuity” in Step 7,
replace the Primer Switch.
5. If the Primer Switch checks good, go to Test 20 for Gasoline
models. For LPG models, go to Test 42.
TEST 20- CHECK FUEL PUMP
DISCUSSION:
An inoperative Fuel Pump will (a) prevent the priming
function from working and (b) prevent the engine from
starting.
PROCEDURE:
1. Remove Fuel Filter and verify that filter is not clogged. Replace
filter if necessary.
2. Verify that fuel is available to Fuel Filter inlet. Use an alternative fuel supply if questionable.
3. Remove air filter access panel and air filter. Remove fuel hose
from pump. Place a suitable container to catch fuel from fuel
pump line. Activate fuel primer switch. Pump should operate
and fuel should flow. If pump does not operate, proceed to
Step 4.
4. In Test 19, Battery Voltage was checked at Connector 2. This
step will test the ground wire. Disconnect Connector 2 at the
Fuel Pump. Set the VOM to measure resistance. Connect one
test lead to Wire 0, (Pin 1 of Connector 2) that goes to the
Control Panel (see Figure 7-12). Connect the other test lead to
a clean frame ground .
“
Continuity” should be measured.
5. To test for an open fuel pump coil, connect one test lead to the
Red Wire (Pin 2 of Connector 2) going to the fuel pump.
Connect the other test lead to the Black Wire (Pin 1 of
Connector 2) going to the Fuel Pump (see Figure 7-15). The
VOM should indicate Fuel Pump coil resistance of about 29.5
kW. (Current draw of the pump at nominal voltage is approximately 1.4 amperes MAXIMUM).
Short to Ground:
6. To test for a shorted fuel pump coil, connect one test lead to
the Red Wire
(Pin 2 of Connector 2, see Figure 7-15)
. Connect
the other test lead to the fuel pump housing. “Infinity” should be
measured.
Figure 7-14. – Electric Fuel Pump
RESULTS:
1. If “Continuity” was not measured in Step 4, repair or replace
Wire 0 between Connector 2 and the ground terminal.
2. If “Continuity” is measured in Step 4, but pump does not operate in Step 3, replace the Fuel Pump.
Page 48
Page 51

SSeeccttiioonn 77
DDIIAAGGNNOOSSTTIICC TTEESSTTSS
3. If the pump fails Step 5 or Step 6, replace the Fuel Pump.
Note: If desired, a pressure gauge can be
attached to the pumps outlet side. Pump outlet
pressure should be 2.0 to 3.5 psi.
4. If the pump operates normally, go to Test 31.
Figure 7-15. – Harness to Fuel Pump
TEST 21- CHECK 7.5 AMP FUSE
DISCUSSION:
If the panel-mounted 7.5 amp fuse (F1) has blown,
engine cranking will not be possible.
Figure 7-16. – 7.5 Amp Fuse
PROCEDURE:
Push In on fuse holder cap and turn counterclock-
wise. Then, remove the cap with fuse. Inspect the
Fuse.
RESULTS:
If the Fuse element has melted open, replace the
Fuse with an identical size fuse. If Fuse is good, go to
Test 22.
TEST 22- CHECK BATTERY & CABLES
DISCUSSION:
If the engine won't crank or cranks too slowly, the bat-
tery may be weak or discharged. See “Battery” on
Page 24.
PROCEDURE:
1. Inspect the battery cables and battery posts or terminals for
corrosion or tightness. Measure the voltage at the terminal of
the starter contactor and verify 11-12 volts DC is available to
the generator during cranking. If voltage is below 11 volts DC,
measure at the battery terminals during cranking. If battery
voltage is below 11 volts DC, recharge/replace battery. If battery voltage is above 11 volts DC, check for proper battery
cable sizing (see “BATTERY CABLES” on Page 24). If battery
or cables are still suspected, connect an alternate battery and
cables to the generator and retest.
2. Use a battery hydrometer to test the battery for (a) state of
charge and (b) condition. Follow the hydrometer manufacturer's instructions carefully.
RESULTS:
1. Clean battery posts and cables as necessary. Make sure battery cables are tight.
2. Recharge the battery, if necessary.
3. Replace the battery, if necessary.
4. If battery is good, but engine will not crank, go to Test 23.
TEST 23- CHECK POWER SUPPLY TO
CIRCUIT BOARD
DISCUSSION:
If battery voltage is not available to the circuit board,
engine cranking and running will not be possible.
If battery voltage is available to the board, but no DC
output is delivered to the board's Wire 56 terminal
while attempting to crank, either the circuit board is
defective or the Start-Stop Switch has failed.
This test will determine if battery voltage is available
to the Engine Controller circuit board. Test 24 will
check the Start-Stop Switch. Test 25 will check the
DC power supply to the circuit board's Wire 56 terminal (Receptacle J1, Pin 1).
PROCEDURE:
1. On the Engine Controller Circuit Board, locate Terminal J3 to
which Wire 15 connects (see Figure 5-3 on Page 24).
2. Set a VOM to read battery voltage. Connect the meter test
leads across circuit board Terminal J3 and frame ground. The
meter should read battery voltage.
3. Set the VOM to measure resistance (“Rx1” scale). Connect
one meter test lead to Wire 0, Pin location J1-12 on the Engine
Controller Circuit Board. Connect the other test lead to a clean
frame ground. “Continuity” should be measured.
Page 49
Page 52

SSeeccttiioonn 77
DDIIAAGGNNOOSSTTIICC TTEESSTTSS
RESULTS:
1.If battery voltage is NOT indicated in Step 1, check
continuity of:
a. Wire 13 between Starter Contactor and
Starter Contactor Relay.
b. Wire 13 between Starter Contactor Relay
and 7.5 Amp Fuse (F1).
c. Wire 15 between the 7.5 Amp fuse (F1) and
the Battery Charge Rectifier.
d. Wire 15 between the Battery Charge
Rectifier and the Engine Controller Board.
Repair, reconnect or Replace bad wiring as necessary.
2. If battery voltage is indicated but engine will not crank, go to
Test 24.
3. If “Continuity” was not measured in Step 3, repair or replace
Wire 0 between the Engine Controller Circuit Board and the
Ground Terminal.
TEST 24 - CHECK START-STOP SWITCH
DISCUSSION:
Engine cranking and startup is initiated when Wire 17
from the Engine Controller board is connected to
frame ground by setting the Start-Stop Switch to
“START”.
Engine shutdown occurs when circuit board Wire 18
is connected to frame ground by the Start-Stop
Switch.
Figure 7-17. – Start-Stop Switch
A defective Start-Stop Switch can result in (a) failure
to crank when the switch is set to “START”, and/or (b)
failure to shut down when the switch is set to “STOP”.
PROCEDURE:
For Problem 6 (Section 6), perform all steps. For
Problem 9, perform Step 1 and Step 5 ONLY.
1. Set a VOM to its “Rx1” scale and zero the meter.
2. Inspect the ground Wire 0B, between the Start-Stop Switch
and the grounding terminal. Connect one meter test lead to
Wire 0B on SW1. Connect the other test lead to a clean frame
ground. “Continuity” should be measured.
3. Disconnect Wire 17 from its Switch terminal and connect it to
frame ground. The engine should crank.
4. Remove the 7.5 amp fuse. Disconnect Wire 18, Wire 0B and
Wire 17 from the Start-Stop Switch (SW1).
5. Connect one test lead to the center terminal of SW1. Connect
the other test lead to an outer terminal of SW1. “Infinity” should
be measured. Remove the test lead from the outer terminal of
SW1 and connect it to the opposite outer terminal. “Infinity”
should be measured.
6. Leave the test lead connected to the center terminal of SW1
from Step 5. Connect the other test lead to an outer terminal.
Depress the switch away from the terminal being tested (see
Figure 7-18). “Continuity” should be measured. Repeat the procedure with the test lead connected to the other outer terminal.
“Continuity” should be measured.
Figure 7-18. – Test 24, Step 6
RESULTS:
1. If “Continuity” is not measured in Step 2, repair, reconnect or
replace Wire 0B (between Start-Stop Switch and ground terminal) as necessary.
Page 50
Page 53

SSeeccttiioonn 77
DDIIAAGGNNOOSSTTIICC TTEESSTTSS
2. If engine cranks in Step 3 when Wire 17 is grounded, but will
not crank when the Switch is set to “START”, replace the StartStop Switch.
3. If the Start-Stop Switch (SW1) failed any part of Steps 5 or 6,
replace the switch.
4. If engine will not crank when Wire 17 is grounded, proceed as
follows:
a.Use a jumper wire to connect the circuit board's
Wire 17 (pin location J1-6) to ground. If engine
does NOT crank, proceed to Test 25.
b.If engine cranks now, but would not crank in
Step 3 of the procedure, check Wire 17 for continuity between the circuit board and Start-Stop
Switch. If “Continuity” is not measured, repair or
replace Wire 17 between the engine control
board and the Start-Stop Switch.
5. For Problem 9 (Section 6), if switch tests GOOD, go to Test 30.
TEST 25 - CHECK POWER SUPPLY TO WIRE 56
DISCUSSION:
If battery voltage is available to the Engine Controller
board in Test 23, then DC voltage should be delivered
to Wire 56 when the Start-Stop Switch is set to
“START” (Test 24). This test will check to see if the
circuit board is delivering battery voltage to the Wire
56 terminal.
PROCEDURE:
1. Set a VOM to measure DC voltage (12 VDC).
2. Disconnect Wire 56 from its Starter Contactor Relay terminal.
3. Connect the meter positive (+) test lead to Wire 56, just disconnected. Connect the other test lead to frame ground. No voltage should be indicated.
4. Actuate the Start-Stop Switch to its “START” position. The
meter should indicate battery voltage. If battery voltage is present, stop the procedure.
5. Connect the VOM positive (+) test lead to Wire 56 (Pin
Location J1-1) at the Engine Controller Circuit Board. Connect
the other test lead to frame ground.
6. Actuate the Start-Stop Switch to the “START” position. The
meter should indicate battery voltage.
RESULTS:
1. If battery voltage was measured in Step 6, but not in Step 4,
repair or replace Wire 56 between the Engine Controller Circuit
Board and Starter Contactor Relay.
2. If battery voltage was not available in Step 6, replace the
Engine Controller Circuit Board.
3. If battery voltage is available in Step 4 but engine does not
crank, go to Test 26.
TEST 26- CHECK STARTER CONTACTOR
RELAY
DISCUSSION:
If battery voltage is available to Wire 56 but the
engine won't crank, the possible cause could be a
failed Starter Contactor Relay.
PROCEDURE:
1. Set the VOM to measure resistance (“R x 1” scale). Remove
Wire 0 from the Starter Contactor Relay (SCR). Connect one
meter test lead to Wire 0, and connect the other meter test lead
to frame ground. “Continuity” should be measured. Reconnect
Wire 0.
2. Set the VOM to measure resistance (“R x 1” scale). Disconnect
Wire 16 and Wire 13 (Wire 13 is 12VDC isolate from ground)
from the Starter Contactor Relay (SCR). Connect one meter
test lead to an SCR terminal, and connect the other meter test
lead to the remaining SCR terminal. “Infinity” should be measured. Set the Start-Stop Switch to “START”. The meter should
now read “Continuity”.
Short to Ground:
3. Set the VOM to measure resistance (“R x 1” scale). Disconnect
Wire 56 from the Starter Contactor Relay (SCR). Connect one
meter test lead to the SCR terminal from which Wire 56 was
just removed. Connect the other meter test lead to a clean
frame ground. Starter Contactor Relay coil resistance of 155
ohms should be measured. If
“
Continuity” is measured a short
to ground exists.
Note: Current draw of the Starter Contactor Relay
coil at nominal voltage is approximately 80ma.
Figure 7-19. – Starter Contactor Relay
Page 51
Page 54

SSeeccttiioonn 77
DDIIAAGGNNOOSSTTIICC TTEESSTTSS
RESULTS:
1. If “Continuity” is not measured in Step 1, repair or replace Wire
0 between the Starter Contactor Relay and the ground terminal.
2. If “Continuity” was not measured in Step 2 when the Start-Stop
switch was activated to “START”, replace the Starter Contactor
Relay.
3. If
“
Continuity” is measured in Step 2, go to Test 26A.
TEST 26A - CHECK STARTER CONTACTOR
DISCUSSION:
The Starter Contactor (SC) must energize and it's
heavy duty contacts must close or the engine will not
crank. This test will determine if the Starter Contactor
is in working order. The Starter Contactor is connected to the Starter Motor (see Figure 7-20).
Figure 7-20. – The Starter Contactor (SC)
PROCEDURE:
1. Carefully inspect the starter motor cable that runs from the
Battery to the Starter Motor. Cable connections should be
clean and tight. If connections are dirty or corroded, remove
cable and clean cable terminals and studs. Replace any cable
that is defective or badly corroded. Set the VOM to measure
DC voltage. Connect the positive (+) meter test lead to the
Starter Contactor stud that the battery cable is connected to.
Connect the negative (-) meter test lead to a clean frame
ground. Battery voltage should be measured (see Figure 7-20,
STEP 1 TEST POINT).
2. Set the VOM to measure DC voltage. Disconnect Wire 16 from
the Starter Contactor. Connect the positive (+) meter test lead
to Wire 16. Connect the negative (-) meter test lead to a clean
frame ground. Set the Start-Stop Switch to “START”. Battery
voltage should be indicated. Reconnect Wire 16 to the Starter
Contactor.
3. Set the VOM to measure DC voltage. Connect the positive (+)
meter test lead to the Starter Contactor stud that has the small
jumper wire connected to the Starter. Connect the negative (-)
meter test lead to a clean frame ground. Set the Start-Stop
Switch to “START”. Battery voltage should be measured (see
Figure 7-20, STEP 2 TEST POINT).
RESULTS:
1. If battery voltage was not measured in Step 1, repeat Test 22.
2. If battery voltage was not measured in Step 2, repair or
replace Wire 16 between the Starter Contactor Relay (SCR)
and the Starter Contactor (SC).
3 If battery voltage was measured in Step 1, but not in Step 3,
replace the Starter Contactor.
4. If battery voltage was measured in Step 3 but the engine still
does not crank, go to test 27.
TEST 27 - CHECK STARTER MOTOR
CONDITIONS AFFECTING STARTER MOTOR
PERFORMANCE:
1. A binding or seizing condition in the Starter Motor bearings.
2. A shorted, open or grounded armature.
a.Shorted, armature (wire insulation worn and
wires touching one another). Will be indicated
by low or no RPM.
b.Open armature (wire broken) will be indicated
by low or no RPM and excessive current draw.
c. Grounded armature (wire insulation worn and
wire touching armature lamination or shaft). Will
be indicated by excessive current draw or no
RPM.
3. A defective Starter Motor switch.
4. Broken, damaged or weak magnets.
5. Starter drive dirty or binding.
DISCUSSION:
Test 25 verified that circuit board action is delivering
DC voltage to the Starter Contactor Relay (SCR).
Test 26 verified the operation of the SCR. Test 26A
verified the operation of the Starter Contactor (SC).
Another possible cause of an "engine won't crank"
problem is a failure of the Starter Motor.
Page 52
Page 55

SSeeccttiioonn 77
DDIIAAGGNNOOSSTTIICC TTEESSTTSS
PROCEDURE:
The battery should have been checked prior to this
test and should be fully charged.
Set a VOM to measure DC voltage (12 VDC).
Connect the meter positive (+) test lead to the Starter
Contactor stud which has the small jumper wire connected to the Starter. Connect the common (-) test
lead to the Starter Motor frame.
Set the Start-Stop Switch to its "START" position and
observe the meter. Meter should Indicate battery voltage, Starter Motor should operate and engine should
crank.
RESULTS:
1. If battery voltage is indicated on the meter but Starter Motor did
not operate, remove and bench test the Starter Motor (see following test).
2. If battery voltage was indicated and the Starter Motor tried to
engage (pinion engaged), but engine did not crank, check for
mechanical binding of the engine or rotor.
If engine turns over slightly, go to Test 35 “Check and
Adjust Valves.”
NOTE: If a starting problem is encountered, the
engine itself should be thoroughly checked to
eliminate it as the cause of starting difficulty. It is
a good practice to check the engine for freedom
of rotation by removing the spark plugs and turning the crankshaft over slowly by hand, to be sure
it rotates freely.
WWAARRNNIINNGG!!:: DDOO NNOOTT RROOTTAATTEE EENNGGIINNEE WWIITTHH
EELLEECCTTRRIICC SSTTAARRTTEERR WWIITTHH SSPPAARRKK PPLLUUGGSS
RREEMMOOVVEEDD.. AARRCCIINNGG AATT TTHHEE SSPPAARRKK PPLLUUGG
EENNDDSS MMAAYY IIGGNNIITTEE TTHHEE GGAASSOOLLIINNEE VVAAPPOORR
EEXXIITTIINNGG TTHHEE SSPPAARRKK PPLLUUGG HHOOLLEE..
Figure 7-21. – Starter Motor (SM)
CHECKING THE PINION:
When the Starter Motor is activated, the pinion gear
should move and engage the flywheel ring gear. If the
pinion does not move normally, inspect the pinion for
binding or sticking.
Figure 7-22. – Check Pinion Gear Operation
TOOLS FOR STARTER PERFORMANCE TEST:
The following equipment may be used to complete a
performance test of the Starter Motor:
❏ A clamp-on ammeter.
❏ A tachometer capable of reading up to 10,000 rpm.
❏ A fully charged 12-volt battery.
MEASURING CURRENT:
To read the current flow, in AMPERES, a clamp-on
ammeter may be used. This type of meter indicates
current flow through a conductor by measuring the
strength of the magnetic field around that conductor.
Figure 7-23. – Clamp-On Ammeter
TACHOMETER:
A tachometer is available from your Generac Power
Systems source of supply. Order as P/N 042223. The
tachometer measures from 800 to 50,000 RPM (see
Figure 7-24).
Page 53
Page 56

SSeeccttiioonn 77
DDIIAAGGNNOOSSTTIICC TTEESSTTSS
Figure 7-24. – Tachometer
TEST BRACKET:
A starter motor test bracket may be made as shown
in Figure 7-25.
Figure 7-25. – Test Bracket
REMOVE STARTER MOTOR:
It is recommended that the Starter Motor be removed
from the engine when testing Starter Motor performance. Assemble starter to test bracket and clamp
test bracket in vise (Figure 7-26).
TESTING STARTER MOTOR:
1. A fully charged 12 volt battery is required.
2. Connect jumper cables and clamp-on ammeter as shown in
Figure 7-26.
3. With the Starter Motor activated (jump the terminal on the
Starter Contactor to battery voltage), note the reading on the
clamp-on ammeter and on the tachometer (rpm).
Note: Take the reading after the ammeter
and tachometer are stabilized, approximately
2-4 seconds.
4. A starter motor in good condition will be within the following
specifications:
MMiinniimmuumm rrppmm 44550000
MMaaxxiimmuumm AAmmppss 5500
Note: Nominal amp draw of starter in generator is
60 amps.
Figure 7-26. – Testing Starter Motor Performance
TEST 28- CHECK FUEL SUPPLY
DISCUSSION (GASOLINE MODELS):
If the engine cranks but won't start, don't overlook the
obvious. The fuel supply may be low. Many RV generator installations “share” the fuel tank with the vehicle engine. When such is the case, the Installer may
have used a generator fuel pickup tube that is shorter
than the vehicle engine's pickup tube. Thus, the generator will run out of gas before the vehicle engine.
PROCEDURE:
Check fuel level in the supply tank. Attach a fresh fuel
supply if necessary and restart. Fuel may be stale,
causing a hard start.
RESULTS:
1. If necessary, replenish fuel supply.
2. If fuel is good, go to Test 29 (for Problem 7, Section 6).
Go to Test 32 for Problem 8 (Section 6).
Page 54
Page 57

SSeeccttiioonn 77
DDIIAAGGNNOOSSTTIICC TTEESSTTSS
DISCUSSION (LPG MODELS):
LP gas is stored in pressure tanks as a liquid. The
gas systems used with these generators were
designed only for vapor withdrawal type systems.
Vapor withdrawal systems use the gas vapors that
form above the liquid fuel in the tank. Do NOT attempt
to use the generator with any liquid withdrawal type
system.
Gas pressure delivered to the solenoid valve must be
properly regulated by means of a primary gas regulator. Mount the primary regulator at the gas tank outlet
or in the supply line from the gas tank. The following
rules apply:
• For best results, the primary regulator supplies
gaseous fuel to the secondary regulator at 11 inches water column. Do NOT exceed 14 inches water
column.
• The installer must be sure the primary regulator is
rated at sufficient gas flow to operate the generator
plus all other gas appliances in the circuit.
Figure 7-27 – Typical Propane Gas Fuel System
NOTE: Recommended MINIMUM gas flow rate for
all air-cooled QUIETPACT series generators is 67
cubic feet per hour.
If an existing primary gas regulator does not have
a sufficient flow capacity for the generator and
other gas appliances in the circuit, (a) install a primary regulator with adequate flow rate, or (b)
install a separate regulator only and rated at least
67 cubic feet per hour. The inlet side of any primary regulator that supplies the generator must connect directly to a gas pressure tank. Do NOT tee
the generator line into a gas circuit feeding other
areas.
CCAAUUTTIIOONN!!:: UUssee oonnllyy aapppprroovveedd ccoommppoonneennttss iinn
tthhee ffuueell ssuuppppllyy ssyysstteemm.. AAllll ccoommppoonneennttss mmuusstt bbee
pprrooppeerrllyy iinnssttaalllleedd iinn aaccccoorrddaannccee wwiitthh aapppplliiccaabbllee
ccooddeess.. IImmpprrooppeerr iinnssttaallllaattiioonn oorr uussee ooff uunnaauutthhoo--
rriizzeedd ccoommppoonneennttss mmaayy rreessuulltt iinn ffiirree oorr aann eexxpplloo--
ssiioonn.. FFoollllooww aapppprroovveedd mmeetthhooddss ttoo tteesstt tthhee ssyyss--
tteemm ffoorr lleeaakkss.. NNoo lleeaakkaaggee iiss ppeerrmmiitttteedd.. DDoo nnoott
aallllooww ffuueell vvaappoorrss ttoo eenntteerr tthhee vveehhiiccllee iinntteerriioorr..
LP gas vapors should be supplied to the secondary
regulator inlet at about 11 inches water column (positive pressure). The engine pistons draw air in during
the intake stroke (Figure 7-28). This air passes
through a carburetor venturi, which creates a low
pressure that is proportional to the quantity of air
being pumped. The low pressure from the carburetor
venturi acts on the regulator diaphragm to pull the
diaphragm toward the source of low pressure. A lever
attached to the diaphragm opens a valve to permit
gas glow through the carburetor.
Figure 7-28 – LP Gas Carburetion Diagram
The greater the airflow through the carburetor venturi,
the lower the pressure at the venturi throat. The
lower the pressure at the venturi throat, the greater
the diaphragm movement, and the greater the movement of the regulator valve. The more the regulator
valve opens, the greater the gas flow that is proportional to airflow through the generator.
The following facts about the secondary regulator
must be emphasized:
• The regulator must be sensitive to venturi throat
pressure changes throughout the operating range.
• The regulator must be properly adjusted so it will
stop the flow of gas when the engine is not running
(no air flow through the carburetor).
• The slightest airflow (and vacuum in the venturi
throat) should move the regulator valve off its seat
and permit gas to flow.
PROCEDURE:
A water manometer or a gauge that is calibrated in
“ounces per square inch” may be used to measure
the fuel pressure. Fuel pressure at the inlet side of the
LPG Shut Off Valve should be between 11-14 inches
Page 55
Page 58

SSeeccttiioonn 77
DDIIAAGGNNOOSSTTIICC TTEESSTTSS
water column as measured with a manometer. The
LP system must be able to maintain 11-14 inches
water column under all load requirements.
1. Turn LP supply to generator off.
2. Remove the Gas Pressure Tap from the fuel regulator and
install manometer to this port.
3. Turn LP supply to generator on, the gauge should read 11-14
inches water column.
4. For Problem 8 only (Section 6), start the engine and the gauge
should read 11-14 inches water column.
RESULTS:
1. If the LP gas pressure is less than 11-14 inches water column
the fuel supply system must be corrected in order to maintain
11-14 inches water column.
2. If the LP gas pressure is between 11-14 inches water Column,
proceed to Test 29 for Problem 7 (Section 6). Proceed to Test
32 for Problem 8 (Section 6).
Figure 7-29. – Fuel Regulator
TEST 29 - CHECK WIRE 14 POWER SUPPLY
DISCUSSION:
When the engine is cranked, Engine Controller Circuit
Board action must deliver battery voltage to the Wire
14 circuit, or the engine will not start. This is because
the Wire 14 circuit will operate the Fuel Pump and
Fuel Solenoid on Gasoline models. On LP models it
operates the LPG Shut-off valve.
PROCEDURE:
Inside the generator panel, locate the 4-tab terminal
connector (Figure 7-30). Then, proceed as follows:
1. Set a VOM to read battery voltage (12 VDC).
2. Connect the meter positive (+) test lead to the 4-tab terminal
connector, the common (-) test lead to frame ground.
3. Crank the engine and the meter should read battery voltage. If
battery voltage is not measured, proceed to Step 4.
4. Connect the positive (+) meter test lead to Terminal J2 on the
Engine Controller Circuit Board. Connect the negative (-) test
lead to a clean frame ground (see Figure 5-3, Page 24).
5. Crank the engine. The meter should indicate battery voltage.
Figure 7-30. – The 4-tab Connector
RESULTS:
1. If the meter indicated battery voltage, go to Test 19.
2. If battery voltage was NOT indicated in Step 3 but is indicated
in Step 5, check Wire 14 between the 4-tab connector and the
Engine Controller circuit board.
a.Repair, reconnect or replace Wire 14 as neces-
sary.
3. If battery voltage was not indicated in Step 5, replace the
Engine Controller Circuit Board.
TEST 30 - CHECK WIRE 18
DISCUSSION:
Wire 18 controls sending the STOP signal to the
Engine Controller Circuit Board. If Wire 18 contacts
ground it will initiate a shutdown. Coach manufacturers sometimes install a 15 to 30 foot remote harness.
A ground on Wire 18 in a remote harness can also
cause a shutdown.
PROCEDURE:
1. Remove the remote harness connector from the generator and
re-test. If generator continues to run, a short is present in the
remote harness. Repair or replace the remote harness.
2. Remove the J1 connector from the Engine Controller Circuit
Board. Set the VOM to measure resistance. Connect one test
lead to Pin Location J1-14. Connect the other test lead to a
clean frame ground. “Infinity” should be measured.
Page 56
Page 59

SSeeccttiioonn 77
DDIIAAGGNNOOSSTTIICC TTEESSTTSS
Figure 7-31. – Remote Harness Connector
3. Connect one test lead to Pin Location J1-15. Connect the other
test lead to a clean frame ground. “Infinity” should be measured.
RESULTS:
1. If “Continuity” is measured in Step 2, repair or replace shorted
Wire 18 between J1 Connector and Start-Stop Switch.
2. If “Continuity” was measured in Step 3, repair or replace shorted Wire 18 between J1 Connector and remote panel connector.
3. If Wire 18 checks GOOD, proceed to Problem 8 (Section 6).
TEST 31 - CHECK FUEL SOLENOID
(GASOLINE MODELS)
DISCUSSION:
If the Fuel Solenoid fails to open, the engine will not
start.
PROCEDURE:
1. Remove Control Panel cover. Remove Wire 56 from the Starter
Contactor Relay. This will prevent the unit from cranking during
test (see Figure 7-19, Page 51).
2. Remove air filter cover. Disconnect Connector 2 which connects to the fuel pump.
3. Activate the Start-Stop Switch (SW1) to the START position
and hold. This will activate the fuel solenoid. The fuel solenoid
should energize and produce an audible click. If the fuel solenoid does not operate, proceed to Step 4. Reconnect
Connector 2 back to the fuel pump.
4. Set the VOM to measure DC voltage. Disconnect Wire 14 from
the Fuel Solenoid. Connect the positive (+) meter test lead to
Wire 14 that goes to the control panel.Connect the negative (-)
test lead to a clean frame ground. Activate the Start-Stop
Switch (SW1) to the START position and hold. Battery voltage
should be measured.
5. Set the VOM to measure resistance. Disconnect Wire 0 from
the Carburetor at the bullet connector. Connect one test lead to
Wire 0 that goes to the control panel. Connect the other test
lead to a clean frame ground.
“
Continuity” should be measured.
6. Connect one test lead to the Green Wire going to the carburetor. Connect the other test lead to the carburetor body.
“
Continuity” should be measured.
Short to Ground:
7. Set the VOM to measure resistance. Disconnect the bullet connector going to the Fuel Solenoid. Connect one meter test lead
to the Red Wire going to the Fuel Solenoid. Connect the other
meter test lead to the Fuel Solenoid housing. A reading of 38.0
ohms should be measured. If
very low resistance
is measured, a short to ground exists. (Fuel Solenoid coil resistance
is approximately 38.0 ohms. Current draw of the Fuel Solenoid
at nominal voltage is approximately 331 milliamps or 0.331
amps).
RESULTS:
1. If the Fuel Solenoid passes Steps 4 & 5 but does NOT operate
in Step 3, replace or repair Fuel Solenoid.
2. If battery voltage is not measured in Step 4, repair or replace
Wire 14 between the 4-Tab Terminal Connector (TC) and the
Fuel Solenoid.
3. If
“
Continuity” is not measured in Step 5, repair or replace Wire
0 between the Fuel Solenoid and ground terminal.
4. If
“
Continuity” is not measured in Step 6, repair or replace
Carburetor ground wire.
5. If the Fuel Solenoid operates, proceed to Test 32.
TEST 32 - CHECK IGNITION SPARK
DISCUSSION:
A problem in the engine ignition system can cause
any of the following:
• Engine will not start.
• Engine starts hard, runs rough.
A commercially available spark tester may be used to
test the engine ignition system. One can also be purchased from Generac Power Systems (Part No.
0C5969).
PROCEDURE:
1. Disconnect a high tension lead from a spark plug.
2. Attach the high tension lead to the spark tester terminal.
3. Ground the spark tester clamp by attaching to the cylinder
head (see Figure 7-32).
Page 57
Page 60

SSeeccttiioonn 77
DDIIAAGGNNOOSSTTIICC TTEESSTTSS
4. Crank the engine rapidly. Engine must be cranking at 350 rpm
or more. If spark jumps the tester gap, you may assume the
ignition system is working properly. Repeat on remaining cylinder spark plug.
5. To determine if an engine miss is ignition related, connect the
spark tester in series with the high tension lead and the spark
plug. Then, start the engine. If spark jumps the tester gap at
regular Intervals, but the engine miss continues, the problem
may be in the spark plug or fuel system. Repeat on remaining
cylinder spark plug. Proceed to Test 33.
6. If spark jumps the tester gap intermittently, the problem may be
in the Ignition Magneto. Proceed to Test 34.
Figure 7-32. – Testing Ignition System
Figure 7-33. – Checking Engine Miss
RESULTS:
1. If no spark or if engine miss is apparent, go to Test 34.
2. If ignition spark is good, go to Test 33.
CYLINDER BALANCE TEST:
If the engine is hard starting, runs rough, misses or
lacks power, perform a cylinder balance test to determine whether both cylinders are operating to their full
potential.
Tools Required:
1. Two Ignition Testers (Generac P/N OC5969)
Attach an ignition tester between the spark plug lead
and each spark plug (Figure 7-33).
Start and run engine running at top no load speed
and note spark at ignition testers. If the spark is equal
at both ignition testers, the problem is not ignition
related. A spark miss will be readily apparent. Now
note RPM of engine. Ground out one cylinder by contacting ignition tester and a good ground on engine
(Figure 7-34). Note RPM loss. Then ground out the
other spark plug and note the RPM loss. If the difference between the two cylinders does not exceed 75
RPM, the amount of work the two cylinders are doing
should be considered equal.
If the RPM loss is greater than 75 RPM this indicates
that the grounded cylinder with the least RPM loss is
the weakest of the two cylinders. Look to that cylinder
for a problem.
Example:
Engine RPM - Both Cylinders = 2570 RPM
Engine RPM - No. 1 Cylinder Grounded = 2500 RPM
Engine RPM - No. 2 Cylinder Grounded = 2300 RPM
Conclusion: No. 1 cylinder is weakest of the two cylinders.
Figure 7-34. – Cylinder Balance Test
The cylinder balance test will also detect a cylinder
that is not functioning. When grounding out one cylinder there will be no RPM loss. When the other cylinder is grounded out the engine will stop.
Page 58
Page 61

SSeeccttiioonn 77
DDIIAAGGNNOOSSTTIICC TTEESSTTSS
TEST 33 - CHECK SPARK PLUGS
DISCUSSION:
During Test 32, if spark jumped the tester gap, the
ignition system must be functioning properly.
However, if the engine misses the spark plug itself
may be fouled.
PROCEDURE:
Remove spark plugs. Clean with a commercial sol-
vent. DO NOT BLAST CLEAN SPARK PLUGS.
Replace spark plugs if badly fouled, if ceramic is
cracked, or if badly worn or damaged. Set gap to
0.030 inch (0.76mm). Use a Champion RC12YC (or
equivalent) replacement spark plug.
Figure 7-35 – Setting Spark Plug Gap
RESULTS:
1. Clean and regap or replace sparks plug as necessary.
2. If spark plugs are good for gasoline models, go to Test 36. For
LPG models, go to Test 35.
TEST 34 - CHECK AND ADJUST IGNITION
MAGNETOS
DISCUSSION:
The ignition system used on GTV-760 engines is a
solid-state (breakerless) type. The system utilizes a
magnet on the engine flywheel to induce a relatively
low voltage into an ignition magneto assembly.
Ignition magneto internal components increase the
voltage and deliver the resulting high voltage across
the spark plug gap.
The ignition magneto houses a solid state-circuit
board that controls ignition timing. Timing is fixed and
spark advance is automatic.
Major components of the ignition system include (a)
two ignition magneto assemblies, (b) the spark plugs,
(c) the engine control board and (d) the engine flywheel.
Solid-state components encapsulated in the ignition
magneto are not accessible and cannot be serviced.
If the magneto is defective, the entire assembly must
be replaced. The air gap between the magneto and
the flywheel magnet is between 0.012” to 0.015”.
The ignition magneto assembly (Figure 7-36) consists
of (a) ignition magneto, (b) spark plug high tension
lead and (c) spark plug boot.
Figure 7-36. – Ignition Magneto Assembly
In Test 32, a spark tester was used to check for
engine ignition. If sparking or weak spark occurred,
one possible cause might be the ignition magneto(s).
This test consists of adjusting the air gap between the
ignition magneto(s) and the flywheel. The flywheel
and flywheel key will also be checked during this test.
If no sparking occurs, the ground harness may be at
fault.
PROCEDURE:
1. Disconnect the J1 connector from the Engine Control Board.
Carefully remove Wire 18A from Pin Location J1-4. Connect
the J1 connector back to the engine control board. Repeat Test
32 “Check Ignition Spark”. If the unit now produces spark go to
Step 2. If the unit does not produce spark or has weak spark
go to Step 4.
2. Do the following:
a. Set a VOM to measure resistance. Connect
the positive (+) meter test lead to Wire
No.18A (Wire 18A still removed from the J1
connector) Connect the negative (-) meter
test lead to a clean frame ground. “Infinity”
should be measured, or 0.5 to 1M ohms,
depending upon the type of VOM used. If
“Continuity” is measured proceed to
Step12.
b. Set a VOM to the diode test range. Attach
the negative (-) meter test lead to Pin
Location J1-4 on the Engine Control Board.
(Wire 18A still removed from the J1 connector) Attach the positive (+) meter test lead
to frame ground. Set the Start-Stop Switch
to START. “Infinity” should be measure during cranking and running. If the VOM does
not have a diode test range, set VOM to
measure resistance again. “Infinity” should
be measured.
Page 59
Page 62

SSeeccttiioonn 77
DDIIAAGGNNOOSSTTIICC TTEESSTTSS
Page 60
3. If Step 1 produced spark and Step 2 tested good, set the VOM
to measure DC voltage. Connect one test lead to Wire 15 (J3
Terminal) on ECB. Connect the other test lead to frame
ground. Battery voltage should be measured. Verify that Wire
15 is connected to J3 and that Wire 14 is connected to J2; if
reversed the unit will produce no spark.
4. Rotate the flywheel until the magnet is under the module
(armature) laminations (see Figure 7-37).
5. Place a 0.012-0.015 inch thickness gauge between the flywheel magnet and the module laminations.
6. Loosen the mounting screws and let the magnet pull the magneto down against the thickness gauge.
7. Tighten both mounting screws.
8. To remove the thickness gauge, rotate the flywheel.
9. Repeat the above procedure for the second magneto.
Figure 7-37. – Setting Ignition Magneto
(Armature) Air Gap
10. Repeat Test 55 and check for spark across the spark tester
gap.
11. If air gap was not out of adjustment, test ground wires.
12. Set the VOM to the diode test position. The meter will display
forward voltage drop across the diode. If the voltage drop is
less than 0.7 volts, the meter will “Beep” once as well as display the voltage drop. A continuous tone indicates
“
Continuity”
(shorted diode). An incomplete circuit (open diode) will be displayed as “OL.”
13. Disconnect the engine ground harness from the ignition magnetos and stud connector (see Figure 7-38).
Figure 7-38. – Engine Ground Harness
Figure 7-39. – Diode Failure Diagnosis
14. Connect the positive (+) test lead to Connector ”A” (as shown in
Figure 7-40). Connect the negative (-) test lead to Connector “B.”
a.If meter “Beeps” once and displays voltage
drop, then the diode is good.
b.If the meter makes a continuous tone, the diode
is bad (shorted) and the harness must be
replaced.
c. If the meter displays “OL,” the diode is defective
(open) and the harness must be replaced.
d.Now repeat Steps 14a through 14c with the
negative meter test lead connected to
Connector “C” (Figure
7-40
).
15. If the ground harness tested good, check Wire 18A between
the insulated terminal stud and the J1 Connector for a short to
ground. Set a VOM to measure resistance The ground harness
should still be disconnected from the ignition magnetos.
Connect one meter test lead to Wire 18A which is still removed
from the J1 Connector. Connect the other meter test lead to
frame ground. “Infinity” should be measured.
RESULTS:
1. If “Infinity” was not measured in Step 2b, replace the Engine
Control Board.
Note: If VOM was set to Diode test, a reading of
0.5 volts would be observed when the Start-Stop
Switch is set to STOP. If the VOM was set to resistance, a reading of 0.5 to 1.5M ohms would be
Page 63

SSeeccttiioonn 77
DDIIAAGGNNOOSSTTIICC TTEESSTTSS
measured. During cranking and running this reading should go to “Infinity”. Verify that the meter
leads were properly connected as per Step 2
instructions.
2. If battery voltage was not measured in Step 3, reconnect Wire
15 and Wire 14 to their correct terminal locations.
Figure 7-40. – Engine Ground Harness Test Points
3. If “Infinity” was not measured in Step 15, repair or replace
grounded Wire 18A between the J1 Connector and the insulated terminal stud or defective insulated terminal stud.
4. If sparking still does not occur after adjusting the armature air
gap, testing the ground wires and performing the basic flywheel
test, replace the ignition magneto(s).
Note: Before replacing the Ignition Magneto,
check the Flywheel Magnet.
CHECKING FLYWHEEL MAGNET:
The flywheel magnet rarely loses its magnetism. If
you suspect a magnet might be defective, a rough
test can be performed as follows:
1. Place the flywheel on a wooden surface.
2. Hold a screwdriver at the extreme end of its handle and with its
point down.
3. Move the tip of the screwdriver to about 3/4 inch (19mm) from
the magnet. The screwdriver blade should be pulled in against
the magnet.
FLYWHEEL KEY:
In all cases, the flywheel taper is locked on the crank-
shaft taper by the torque of the flywheel nut. A key-
way is provided for alignment only and theoretically
carries no load.
If the flywheel key becomes sheared or even partially
sheared, ignition timing can change. Incorrect timing
can result in hard starting or failure to start.
Remove and inspect flywheel key for damage.
TEST 35 - CHECK VALVE ADJUSTMENT
DISCUSSION:
The valve lash must be adjusted correctly in order to pro-
vide the proper air/fuel mixture to the combustion chamber.
ADJUSTING VALVE CLEARANCE:
Adjust valve clearance with the engine at room tem-
perature. The piston should be at top dead center
(TDC) of its compression stroke (both valves closed).
An alternative method is to turn the engine over and
position the intake valve fully open (intake valve
spring compressed) and adjust the exhaust valve
clearance. Turn the engine over and position the
exhaust valve fully open (exhaust valve spring compressed) and adjust the intake valve clearance.
Correct valve clearance is given below, in INCHES
(MILLIMETERS).
IInnttaakkee VVaallvvee 00..000022--00..000044 ((00..0055--00..11))
EExxhhaauusstt VVaallvvee 00..000022--00..000044 ((00..0055--00..11))
1. Loosen the rocker arm jam nut. Use a 10mm allen wrench to turn
the pivot ball stud while checking the clearance between the
rocker arm and valve stem with a feeler gauge (see Figure 7-41).
Figure 7-41 – Adjusting Valve Clearance
2. When clearance is correct, hold the pivot ball stud with the
allen wrench and tighten the rocker arm jam nut to the specified torque with a crow's foot. After tightening the jam nut,
recheck valve clearance to make sure it did not change.
TORQUE SPECIFICATION
ROCKER ARM JAM NUT
174 inch-pounds
Page 61
Page 64

SSeeccttiioonn 77
DDIIAAGGNNOOSSTTIICC TTEESSTTSS
Figure 7-42 – Tightening the Jam Nut
INSTALL ROCKER ARM COVER
1. Use a new rocker arm cover gasket. Install the rocker arm
cover and retain with four screws.
RESULTS:
Adjust valves to specification and retest. If problem
continues, go to Test 38.
TEST 36 - CHECK CARBURETION
DISCUSSION:
If the engine cranks but will not start, one possible
cause of the problem might be the carburetion system.
PROCEDURE:
Before making a carburetion check, be sure the fuel sup-
ply tank has an ample supply of fresh, clean gasoline.
Check that all shutoff valves are open and fuel flows
freely through the fuel line.
Make sure the automatic choke operates properly.
If the engine will not start, remove and inspect the spark
plug. If the spark plug is wet, look for the following:
❏ Overchoking.
❏ Excessively rich fuel mixture.
❏ Water in fuel.
❏ Intake valve stuck open.
❏ Needle/float stuck open.
If the spark plug is dry look for the following:
❏ Leaking carburetor mounting gaskets.
❏ Intake valve stuck closed.
❏ Inoperative fuel pump.
❏ Plugged fuel filter(s).
❏ Varnished carburetor
If the engine starts hard or will not start, look for the
following:
❏ Physical damage to the AC generator. Check the
Rotor for contact with the Stator.
❏ Starting under load. Make sure all loads are discon-
nected or turned off before attempting to crank and
start the engine.
❏ Check that the automatic choke is working properly.
RESULTS:
If problem has not been solved, go to Test 37. If car-
buretor is varnished, clean or replace.
1. Remove fuel line at carburetor and ensure that there is an adequate amount of fuel entering the carburetor.
2. Remove the float bowl and check to see if there is any foreign
matter in bottom of carburetor bowl.
3. The float is plastic and can be removed for access to the needle so it can be cleaned.
4. With all of this removed carburetor cleaner can be used to
clean the rest of the carburetor before reassembly.
5. After cleaning carburetor with an approved carburetor cleaner,
blow dry with compressed air and reassemble.
Shelf life on gasoline is 30 days. Proper procedures
need to be taken for carburetors so that the fuel doesn’t
varnish over time. A fuel stabilizer must be used at all
times in order to ensure that the fuel is fresh at all times.
TEST 37 - CHECK CHOKE SOLENOID
DISCUSSION:
The automatic choke is active only during cranking.
When the Start-Stop Switch is held at “START”, a
crank relay on the Engine Controller circuit board is
energized closed to (a) crank the engine and (b)
deliver a cyclic voltage to the Choke Solenoid via
Wire 90. The Choke Solenoid will be pulled in for
about two seconds, then deactivate for about two
seconds. This cyclic choking action will continue as
long as the engine is being cranked.
PROCEDURE:
1. Operational Check: Crank the engine. While cranking, the
choke solenoid should pull in about every 2 seconds (2 seconds ON, 2 seconds OFF). If the choke solenoid does not pull
in, try adjusting the choke as follows.
2. Pre-Choke Adjustment: With the CHOKE SOLENOID not actuated, the carburetor CHOKE PLATE should be approximately
1/8 Inch from its full open position. Verify choke is completely
open once engine is warmed up. If not, power will be down and
emissions will be up. Adjust position of BI-METAL HEATER
ASSEMBLY by loosening screws until unit starts when cold and
the choke closes when engine is up to temperature. Tighten the
screws to complete the adjustment.
3. Choke Solenoid Adjustment: Loosen the screws that retain the
CHOKE SOLENOID to its bracket. Slide the CHOKE SOLENOID in the slotted holes of the bracket to adjust axial move-
Page 62
Page 65

SSeeccttiioonn 77
DDIIAAGGNNOOSSTTIICC TTEESSTTSS
ment of the SOLENOID PLUNGER. Adjust SOLENOID
PLUNGER movement until, with the carburetor CHOKE PLATE
closed, the CHOKE SOLENOID is bottomed in its coil (plunger
at full actuated position). With the CHOKE PLATE closed and
the plunger bottomed in its coil, tighten the two screws.
4. Disconnect Connector 1: Set the VOM to measure DC voltage.
Connect the positive (+) test lead to Wire 90 (Pin 2) of
Connector 1 going to the control panel. Connect the negative (-)
test lead to frame ground. Activate the Start-Stop Switch to
“START.” During cranking, battery voltage should be measured
cyclically every two seconds.
Figure 7-43. – Connector 1
5. If battery voltage was not measured in Step 4, check at J1
Connector: Connect positive (+) test lead to Pin Location J1-2
at the engine control board. Connect the negative (-) test lead
to frame ground. Activate the Start-Stop Switch to “START.”
During cranking, battery voltage should be measured cyclically
every two seconds.
6. Set the VOM to measure resistance.
Disconnect Connector 1
from the Choke Solenoid.
Connect one test lead to Wire 0 (Pin
1) of Connector 1, going to the control panel. Connect the other
test lead to frame ground.
“
Continuity” should be measured.
7. Set the VOM to measure resistance. Disconnect Connector 1.
Connect one meter test lead to Wire 90 (Connector 1, Pin 2)
going to the Choke Solenoid. Connect the other meter test lead
to Wire 0 (Connector 1, Pin 1). Approximately 3.7 ohms should
be measured. (Current draw of Choke Solenoid at nominal voltage is 3.4 amps).
Short to Ground:
8. Set the VOM to measure resistance. Disconnect Connector 1.
Connect one meter test lead to Wire 90 (Connector 1, Pin 2).
Connect the other meter test lead to the metal Choke Solenoid
housing. “Infinity” should be measured. If “Continuity” is measured, a short to ground exists.
RESULTS:
1. If Choke operation is good, go to Test 35 for Problem 7,
“Engine Cranks but Won’t Start” (Section 6). Go to Test 41 for
Problem 8, “Engine Starts Hard and Runs Rough”.
2. If battery voltage was measured in Step 5 but not measured in
Step 4, repair or replace Wire 90 between Engine Control
Board (ECB) and Connector 1.
3. If battery voltage is not measured in Step 5 during engine
cranking, replace Engine Control Board.
4. If
“
Continuity” is not measured in Step 6, repair or replace Wire
0 between the ground terminal and Connector 1.
5. If Choke Solenoid coil resistance is not measured or is incorrect in Step 7, replace the Choke Solenoid.
Figure 7-44. – Exploded View of Choke Assembly
Figure 7-45. – Automatic Choke Assembly
Page 63
Page 66

SSeeccttiioonn 77
DDIIAAGGNNOOSSTTIICC TTEESSTTSS
TEST 38 - CHECK ENGINE / CYLINDER LEAK
DOWN TEST / COMPRESSION TEST
GENERAL:
Most engine problems may be classified as one or a
combination of the following:
❏ Will not start.
❏ Starts hard.
❏ Lack of power.
❏ Runs rough.
❏ Vibration.
❏ Overheating.
❏ High oil consumption.
DISCUSSION:
The Cylinder Leak Down Tester checks the sealing
(compression) ability of the engine by measuring air
leakage from the combustion chamber. Compression
loss can present many different symptoms. This test
is designed to detect the section of the engine where
the fault lies before disassembling the engine.
PROCEDURE:
1. Remove a spark plug.
2. Gain access to the flywheel. Remove the valve cover.
3. Rotate the engine crankshaft until the piston reaches top dead
center (TDC). Both valves should be closed.
4. Lock the flywheel at top dead center.
5. Attach cylinder leak down tester adapter to spark plug hole.
6. Connect an air source of at least 90 psi to the leak down tester.
7. Adjust the regulated pressure on the gauge to 80 psi.
8. Read the right hand gauge on the tester for cylinder pressure. 20
percent leakage is normally acceptable. Use good judgement,
and listen for air escaping at the carburetor, the exhaust, and the
crankcase breather. This will determine where the fault lies.
9. Repeat Steps 1 through 8 on remaining cylinder.
RESULTS:
❏ Air escapes at the carburetor – check intake valve.
❏ Air escapes through the exhaust – check exhaust
valve.
❏ Air escapes through the breather – check piston
rings.
❏ Air escapes from the cylinder head – the head gas-
ket should be replaced.
CHECK COMPRESSION:
Lost or reduced engine compression can result in (a)
failure of the engine to start, or (b) rough operation.
One or more of the following will usually cause loss of
compression:
❏ Blown or leaking cylinder head gasket.
❏ Improperly seated or sticking-valves.
❏ Worn Piston rings or cylinder. (This will also result
in high oil consumption).
NOTE: It is extremely difficult to obtain an accurate compression reading without special equipment. For that reason, compression values are
not published for the V-Twin engine. Testing has
proven that an accurate compression indication
can be obtained using the following method.
PROCEDURE:
1. Remove both spark plugs.
2. Insert a compression gauge into either cylinder.
3. Crank the engine until there is no further increase in pressure.
4. Record the highest reading obtained.
5. Repeat the procedure for the remaining cylinder and record the
highest reading.
RESULTS:
The difference in pressure between the two cylinders
should not exceed 25 percent. If the difference is
greater than 25 percent, loss of compression in the
lowest reading cylinder is indicated.
Example 1: If the pressure reading of cylinder #1 is
165 psi and of cylinder #2, 160 psi, the difference is 5
psi. Divide "5" by the highest reading (165) to obtain
the percentage of 3.0 percent.
Example 2: No. 1 cylinder reads 160 psi; No. 2 cylinder reads 100 psi. The difference is 60 psi. Divide "60"
by "160" to obtain "37.5" percent. Loss of compression
in No. 2 cylinder is indicated.
If compression is poor, look for one or more of the following causes:
❏ Loose cylinder head bolts.
❏ Failed cylinder head gasket.
❏ Burned valves or valve seats.
❏ Insufficient valve clearance.
❏ Warped cylinder head.
❏ Warped valve stem.
❏ Worn or broken piston ring(s).
❏ Worn or damaged cylinder bore.
❏ Broken connecting rod.
❏ Worn valve seats or valves.
❏ Worn valve guides.
NOTE: Refer to Engine Service manual No.
0E2081 for further engine service information.
Page 64
Page 67

SSeeccttiioonn 77
DDIIAAGGNNOOSSTTIICC TTEESSTTSS
TEST 39 - CHECK OIL PRESSURE SWITCH
DISCUSSION:
Also see “Operational Analysis” on Pages 18-23. The
Low Oil Pressure Switch is normally-closed, but is
held open by engine oil pressure during cranking and
startup. Should oil pressure drop below a safe level,
the switch contacts will close to ground the Wire 85
circuit. Engine controller board action will then initiate
an automatic shutdown.
If the switch fails CLOSED, the engine will crank and
start, but will then shut down after a few seconds.
If the switch fails OPEN, low oil pressure will not
result in automatic shutdown.
Figure 7-46. – Oil Pressure Switch
PROCEDURE:
1. Check engine oil level. If necessary, replenish oil level to the
dipstick “FULL” mark.
2. Set a VOM to its “Rx1” scale and zero the meter.
3. Connect the meter test leads across the switch terminals, with
engine shut down. The meter should read
“
Continuity”. A small
amount of resistance is acceptable.
4. Crank the engine. Oil pressure should open the switch contacts
at some point while cranking and starting. Meter should then
indicate “Infinity”.
5. If the contacts did not open in Step 5, remove the low oil pressure switch and connect an oil pressure gauge in it’s place.
Start the engine and measure oil pressure. Pressure should be
above 10 psi.
RESULTS:
1. In Step 3, if “Continuity” is not indicated, replace the switch.
2. If oil pressure checked good in Step 5, but Step 4 measured
“Infinity,” replace the low oil pressure switch.
3. If oil pressure is below 10 psi, determine cause of low oil pressure. Refer to Engine Service manual No. 0E2081 for further
engine service information. Verify that the oil is the proper viscosity for the climate and season.
4. If all steps check GOOD, go to Test 40.
TEST 40 - TEST OIL TEMPERATURE SWITCH
DISCUSSION:
If the engine cranks, starts and then shuts down, one
possible cause of the problem may be a high oil temperature condition. Protective shutdown is a normal
occurrence if the oil temperature switch exceeds
approximately 270°F for gasoline units, or 284°F for
LP units.
Figure 7-47. – Oil Temperature Switch
PROCEDURE:
1. Remove Wire 85 from Oil Temperature Switch terminal and
start the generator. If engine starts and runs now, but shuts
down when Wire 85 is connected to the switch terminal, the following possibilities exist:
a.Oil temperature is too high.
b.The oil temperature switch has failed closed or
is shorted to ground.
2. Remove the switch and place its sensing tip into oil (Figure 7-
48). Place a thermometer into the oil.
3. Connect the test leads of a VOM across the switch terminals.
The meter should read “Infinity”.
4. Heat the oil. When oil temperature reaches approximately 270284°F., the switch contacts should close and the meter should
read “Continuity”.
Page 65
Page 68

SSeeccttiioonn 77
DDIIAAGGNNOOSSTTIICC TTEESSTTSS
Figure 7-48. – Testing Oil Temperature Switch
RESULTS:
1. If the Oil Temperature Switch fails Step 3 or Step 4, replace the
Oil Temperature Switch.
2. If the Oil Temperature Switch is good, an overheat condition
may be occurring. Verify that the installation of the generator is
within specified tolerances. The generator must receive the
proper amount of incoming air, and also be able to exhaust the
cooling air with NO RESTRICTIONS. Check to be sure that the
exhaust pipe is not under the air intake. Refer to the Owner’s
and Installation Manual for proper installation specifications. If
installation is correct, go to Test 24.
TEST 41 - TEST CHOKE HEATER
DISCUSSION:
The Choke Heater is a sensitive heating element
wrapped around a temperature sensitive Bi-Metal
strip. The BI-METAL HEATER ASSEMBLY positions
the Choke Plate during startup. Once running, the BiMetal Heater Assembly will also allow the Choke
Plate to fully open. Power for the heater element is
supplied from Wire 14 to assist the Bi-Metal Heater
Assembly in opening the Choke Plate after starting.
Failure of the Choke Plate to open will cause an
excessively rich fuel-air mixture and engine performance will suffer.
PROCEDURE:
1. Verify that the Choke Plate on the carburetor is mechanically
free to move and is not binding. If the engine runs rough, check
the operation of the BI-METAL HEATER ASSEMBLY. Allow
the engine to run for five minutes, then inspect the choke position. The Bi-Metal strip should have been heated by the Choke
Heater and should have expanded to allow the Choke Plate to
open fully.
2. If the Choke Plate did not open in Step 1, check the Choke
Heater. Set the VOM to measure DC voltage. Disconnect
Connector 1 at the Choke Assembly. Connect the positive (+)
meter test lead to Wire 14 (Connector 1, Pin 3) going to the
control panel. Connect the negative (-) meter test lead to a
clean frame ground. Set the Start-Stop Switch to “START.”
Battery voltage should be measured (see Figure 7-43 on
Page 63).
3. If battery voltage was not measured in Step 2, set the VOM to
measure resistance. Disconnect Connector 1 at the Choke
Assembly. Connect one meter test lead to Wire 14 (Connector
1, Pin 3) going to the control panel. Connect the other meter
test lead to the 4-tab Terminal for Wire 14 in the control panel.
“Continuity” should be measured.
SHORT TO GROUND:
Set the VOM to measure resistance. Connect one
meter test lead to Wire 14 (Connector 1, Pin 3) going to
the Bi-Metal Heater Assembly. Connect the other meter
test lead to the exposed steel portion of the Bi-Metal
Heater Assembly. Approximately 37 ohms (±20%)
should be measured. (Current draw of the Bi-Metal
Heater Assembly at nominal voltage is approximately
340 milliamps or 0.340 amps). If “Continuity” is present
the Bi-Metal Heater Assembly has a short to ground.
RESULTS:
1. If Choke Plate is binding in Step 1, repair or replace binding
Choke Plate. If Bi-Metal Heater Assembly tests good, go to
Test 35.
2. If continuity was not measured in Step 3, repair or replace Wire
14 between the 4-tab Terminal and Connector 1.
3. If the resistance value is incorrect in the Short to Ground step,
or the Bi-Metal Heater Assembly does not function with voltage
present, replace the Bi-Metal Heater Assembly.
TEST 42 - CHECK LPG FUEL SOLENOID
DISCUSSION:
If the LPG Fuel Solenoid (FS) fails to open, fuel will
not be available to the engine and it will not start.
PROCEDURE:
1. Place one hand on the top of the LPG Fuel Solenoid. Activate
the Fuel Prime Switch. You should be able to feel as well as
hear the solenoid energize. If solenoid energizes discontinue
testing.
2. Set VOM to measure resistance. Disconnect Wire 0 from the
LPG Fuel Solenoid. Connect one meter test lead to Wire 0.
Connect the other test lead to a clean frame ground.
“Continuity” should be measured. Reconnect Wire 0 to LPG
shut off valve.
Page 66
Page 69

SSeeccttiioonn 77
DDIIAAGGNNOOSSTTIICC TTEESSTTSS
SHORT TO GROUND:
Set VOM to measure resistance. Disconnect Wire
14A from the LPG Fuel Solenoid. Connect one meter
test lead to LPG Fuel Solenoid. terminal that Wire
14A was just removed from. Connect the other meter
test lead to a clean frame ground. LPG Fuel Solenoid.
coil resistance of approximately 30-32 ohms Should
be measured. Current draw of the LPG Fuel Solenoid
at nominal voltage Is approximately 380 milliamps or
0.380 amps.
RESULTS:
1. If the solenoid energized in Step 1, proceed to Test 32.
2. If “Continuity” was not measured in Step 2 repair or replace
Wire 0 between the LPG Fuel Solenoid (FS) and the Ground
Terminal (GT) in the control panel.
3. If “Continuity” was measured in Step 2, repair or replace the
Fuel Solenoid (FS).
Figure 7-49. – Fuel Solenoid
Page 67
Page 70

SSeeccttiioonn 88
AASSSSEEMMBBLLYY
MAJOR DISASSEMBLY
ENCLOSURE/PANEL REMOVAL:
1. Remove enclosure door.
2. Remove the nine (9) enclosure roof bolts from the perimeter of
the enclosure roof (a 10mm socket is required).
3. Remove six (6) enclosure side panel bolts from the outside
perimeter Remove two (2) front & side enclosure panel bolts
from the outside perimeter. Remove three (3) enclosure side
panel bolts, located on the inside. Remove three (3) enclosure
side panel nuts, two (2) on the top and one (1) on the side.
Remove enclosure side panel (a 10mm socket is required).
4. Remove one (1) front & side panel enclosure nut located in the
inside corner. Remove front & side enclosure panel (a 10mm
socket is required).
5. Remove four (4) muffler bolts (a 13mm socket is required).
6. Loosen muffler clamp. Remove muffler (a 15mm wrench is
required).
7. Remove three (3) side mounted muffler shield bolts. Remove
two (2) muffler shield nuts located on the inside. Remove muffler shield (a 10mm socket is required).
8. Remove five (5) side and back enclosure panel bolts. Remove
wing nut for control panel access. Remove three (3) upper control panel bolts. Remove one (1) upper control panel nut (a
10mm socket is required). Move control panel down-cut tie
wraps on red and black wires to the circuit breaker.
9. Remove red and black wires from the circuit breaker. Remove
two (2) white and one (1) green wire from the ground lug (using
a 10mm deep well socket).
10. Remove customer-wiring conduit.
11. Remove one (1) upper control panel nut. Remove one (1)
lower panel nut in corner. Remove two (2) nuts behind upper
control panel.
12. Remove six (6) air in duct base bolts from top of stator.
Remove air in duct base (a 10mm socket is required).
STATOR REMOVAL:
1. Perform enclosure/panel removal steps 1-12.
2. Remove six (6) air in duct base panel bolts from top of stator.
Remove air in duct base (using a 10mm socket).
3. Remove four (4) standoff bolts from top of stator (a 13mm
wrench is required).
4. Disconnect Wire 4 and Wire 0 from the brush holder assembly.
5. Remove two (2) brush holder assembly screws. Remove the
brush holder assembly (a 7mm socket is required).
6. Remove Wire 11 and Wire 33 from the circuit breaker.
7. Remove Wire 66 and Wire 77 from the Battery Charge Rectifier
(BCR).
8. Remove Wire 55 from the R1 resistor.
9. Remove Wire 11, Wire 22, and Wire 6 from the Voltage
Regulator (VR).
10. Remove Wire 2 from the DPE circuit breaker (CB2).
11. Remove Wire 22 and Wire 44 from the ground lug.
12. Remove upper bearing carrier.
13. Remove stator.
ROTOR REMOVAL:
1. Perform Stator removal procedure steps 1-13.
2. Remove carburetor air tube.
3. Remove fuel line.
4. Remove two (2) lower control panel nuts (a 10mm socket is
required).
5. Unplug choke solenoid connector.
6. Disconnect Wire 0 and Wire 14 from bullet connectors to fuel
solenoid. Disconnect Wire 0 and Wire 85 from Low Oil
Pressure (LOS) and High Temperature (HT) switches. Remove
positive and negative battery cables from remote box. Unplug
Wires 13,16 & 18 from bullet connectors. Remove control
panel.
7. Remove four (4) vibration mount nuts (using a 13mm socket).
8. Remove two safety nuts (using a 15 mm socket).
9. Lift generator out of bottom tray.
10. Remove seven (7) blower housing screws. Remove blower
housing (using a 1/4” socket).
11. Remove two (2) side belt tensioner bolts. Remove belt (a
13mm socket is required).
12. Remove rotor pulley bolt. (14 mm socket) Use steering wheel
puller to remove pulley (use M6 x 1 bolts for puller).
13. Lift rotor and bottom bearing carrier out. Press rotor/bearing
from bottom bearing carrier.
Page 68
Page 71

SSeeccttiioonn 88
AASSSSEEMMBBLLYY
BELT TENSIONING:
Tighten all four stator stud nuts to compress the
spring to one half inch (1/2”) between the washer and
support slide.
Tighten the two side bolts to compress the spring to
5/8 of an inch between the washer and bearing carrier
(see Figure 8-1).
ENGINE REMOVAL:
1. Perform rotor removal steps 1-17.
2. Drain engine oil.
3. Remove engine pulley bolt (using a 14mm socket).
4. Remove engine pulley using steering wheel puller (using 5/16"18 bolts for puller).
5. Remove 5 of 6 screws holding exhaust gaskets to tray (an
8mm socket is required).
6. Remove four (4) exhaust manifold bolts (using a 6mm allen
wrench).
7. Remove last screw holding exhaust gasket to tray (an 8mm
socket is required).
8. Remove four (4) engine mounting bolts (using a 14mm socket).
9. Remove oil fill line mounting clamp.
10. Remove two (2) oil lines to oil filter adapter.
11. Remove engine.
STARTER REMOVAL:
1. Perform enclosure/panel removal steps 1-7.
2. Remove spark plug boot from spark plug left side/cylinder 1.
3. Remove nine (9) bolts from cylinder 1 wrap. Remove cylinder
1wrap (using an 8mm socket).
4. Remove five (5) bolts from crankcase wrap (using an 8mm
socket).
5. Remove four (4) bolts from oil cooler oil duct. Remove oil duct
(both a 10mm socket and an 8mm socket are required).
6. Remove crankcase wrap.
7. Remove five (5) bolts holding blower housing (using an 8mm
socket).
Page 69
Figure 8-1. – Drive Belt Tension
Page 72

SSeeccttiioonn 88
AASSSSEEMMBBLLYY
8. Remove two (2) bolts holding blower housing on each cylinder
head (a 10mm socket is required).
9. Loosen four (4) allen head bolts for intake manifold. Tilt manifold forward to gain clearance (using a 6mm allen wrench).
10. Remove blower housing.
11. Remove negative cable from starter motor (using 13mm
socket).
12. Remove positive cable and Wire 13 from starter contactor on
starter motor
(using 13mm socket).
13. Remove Wire 16 from spade terminal on starter contactor.
14. Remove two (2) starter bolts
(using 13mm socket).
15. Remove starter motor, watch for possible shim washer on
right side mounting bolt.
FLYWHEEL/MAGNETO REMOVAL:
1. Perform enclosure/panel removal steps 1-7.
2. Remove spark plug boot from spark plug on left side
(Cylinder 1).
3. Remove nine (9) bolts from cylinder 1 wrap. Remove Cylinder
1 wrap (using an 8mm socket).
4. Remove five (5) bolts from crankcase wrap (using an 8mm
socket).
5. Remove four (4) bolts from oil cooler oil duct. Remove oil duct
(both a 10mm socket and an 8mm socket are required).
6. Remove crankcase wrap.
7. Remove five (5) bolts holding blower housing (using an 8mm
socket).
8. Remove two (2) bolts holding blower housing on each cylinder
head (a 10mm socket is required).
9. Loosen four (4) allen head bolts for intake manifold. Tilt manifold forward to gain clearance (using a6mm allen wrench).
10. Remove blower housing. Adjust or replace magnetos as
needed.
11. Remove two (2) bolts from plastic fan on flywheel (using a
13mm socket).
12.Remove flywheel nut.(36mm socket) Use steering wheel
puller to remove flywheel (using M8 x 1.25 bolts for puller).
Page 70
Page 73

NNOOTTEESS
Page 71
Page 74

SSeeccttiioonn 99
EExxppllooddeedd VViieewwss // PPaarrtt NNuummbbeerrss
Page 72
Base & Pulley – Drawing No. 0E1323-A
Page 75

SSeeccttiioonn 99
EExxppllooddeedd VViieewwss // PPaarrtt NNuummbbeerrss
Page 73
IITTEEMM PPAARRTT NNOO.. QQTTYY.. DDEESSCCRRIIPPTTIIOONN
1 0E0196 1 FRAME, 760 ENGINE
2 022129 12 WASHER LOCK M8-5/16
3 022145 15 WASHER FLAT 5/16-M8 ZINC
4 022259 6 NUT HEX 5/16-18 STEEL
5 0C7758 4 VIB MNT 1.5 X 1.38 X 5/16-18
6 0C3168 1 WASHER LOCK SPECIAL 5/16
7 0C2417 1 EARTH STRAP
8 077603 2 SCREW HHC 5/16-18 X 3.5 SPC
9 0E0588 1 SPACER, SAFETY BOLT .375 I.D.
10 029451 1.5 FT. TAPE ELEC UL FOAM 1/8 X ½
11 0D8912 1 DUCT, AIR OUT
12 0E0571 2 GASKET,AIR OUT DUCT
13 0D8911 1 BRACKET, MUFFLER SUPPORT
14 043107 7 SCREW HHC M8-1.25 X 25 G8.8
15 0D9021 1 MUFFLER, GTV760 RV
16 096289 1 CLAMP, EXHAUST 1.25"
17 0D8940 1 MANIFOLD, EXHAUST
18 070006 4 WASHER LOCK M8 SS
19 070008 4 WASHER FLAT M8 SS
20 040976 4 SCREW SHC M8-1.25 X 20 G12.9
21 056893 6 SCREW CRIMPTITE 10-24 X ½
22 023897 6 WASHER FLAT #10 ZINC
23 0E1078 2 GASKET, EXH BASE, GTV760 RV
24 0C4138 2 GASKET,EXHAUST PORT
25 043116 3 SCREW HHC M6-1.0 X 12 G8.8 (5.5
KW ONLY)
26 022097 4 WASHER LOCK M6-1/4 (5.5 KW
ONLY)
022097 1 WASHER LOCK M6-1/4 (6.5 & 7.5 KW
ONLY)
27 022473 3 WASHER FLAT 1/4-M6 ZINC (5.5 KW
ONLY)
28 0C1751 1 FAN NYLON 7" DIA (5.5 KW ONLY)
29 0C1753B 1 PULLEY, ALTERNATOR 2200 RPM
(5.5 KW ONLY)
073106B 1 PULLEY, ALTERNATOR 2500 RPM
(6.5 & 7.5 KW ONLY)
30 075224A 1 PULLEY, ENGINE 2100 RPM (5.5 KW
ONLY)
075224B 1 PULLEY, ENGINE 2500 RPM (6.5 &
7.5 KW ONLY)
31 0E0586 1 GASKET, BOTTOM AIR OUT QPRV
IITTEEMM PPAARRTT NNOO.. QQTTYY.. DDEESSCCRRIIPPTTIIOONN
32 0D7176 4 WASHER SELF LOCKING 1"DIA
12GA
33 0E1334 1 SCREEN, BOTTOM AIR OUT
34 0D8824 1 TRAY, V-TWIN RV
35 081105 2 NUT FLG 5/16-18 LOCK
36 073118 1 SCREW HHC 3/8-24 X 2-1/4 G8
37 046526 1 WASHER LOCK M10
38 022131 1 WASHER FLAT 3/8-M10 ZINC
39 0C2824 7 SCREW TAP-R #10-32 X 9/1
40 0E1077 1 BLOWER HOUSING GTV760 RV
41 042633 1 SCREW HHC 3/8-24 X 1 G5
42 022237 1 WASHER LOCK 3/8
43 049451 1 WASHER FLAT .406ID X 1.62OD
44 0C1441 1 SET,BLOWER HOUSING GASKET
45 0C1112 1 BELT,V-RIB 4LX42.5"
46 023484E 1 BUSHING SNAP (GASOLINE ONLY)
0E1534 1 PLUG PLASTIC 0.687" (LP ONLY)
47 0D7530 1 STUD, M6-1.0 OFFSET
48 0D9723 1 ELEMENT AIR FILTER
49 0D4511 1 PRECLEANER,AIR GTH990 GASO-
LINE
50 0D8981 2 FILTER GASKET RV (GASOLINE
ONLY)
0D8981 1 FILTER GASKET RV (LP ONLY)
51 0D8451 1 WASHER FLAT .281"ID X 1.25"OD
52 087680 2 NUT WING M6-1.0
53 0D3700 3 NUT FLANGE M6-1.0 NYLOK (GASO-
LINE ONLY)
0D3700 1 NUT FLANGE M6-1.0 NYLOK (LP
ONLY)
54 087769 1 FILTER FUEL 1/8P-5/16H (GASOLINE
ONLY)
55 0E0570 1 ASSEMBLY,NON SHTOFF FUEL
PUMP (GASOLINE ONLY)
56 0D9919 1 ASSEMBLY, RV V-TWIN FUEL LINE
(GASOLINE ONLY)
57 0E1330 1 GROMMET, 38.1 DIA. CROSS SLIT
(GASOLINE ONLY)
0E1534A 1 PLUG PLASTIC 1.50" (LP ONLY)
58 0A1658 1 WASHER LOCK SPECIAL 1/4"
59 0D5133 1 SCREEN, SPARK ARRESTOR
60 0D5133A 1 RETAINER, SPARK ARREST
SCREEN
61 045764 1 SCREW HHTT M4-0.7 X 8 BP
Page 76

SSeeccttiioonn 99
EExxppllooddeedd VViieewwss // PPaarrtt NNuummbbeerrss
Page 74
Enclosure – Drawing No. 0E1011-B
Page 77

SSeeccttiioonn 99
EExxppllooddeedd VViieewwss // PPaarrtt NNuummbbeerrss
Page 75
IITTEEMM PPAARRTT NNOO.. QQTTYY.. DDEESSCCRRIIPPTTIIOONN
1 0D8827 1 PANEL, ENCLOSURE ROOF
2 0A7215 22 SCREW SW 1/4-20X5/8 N WA JS500
3 029451 11.5 FT. TAPE ELEC UL FOAM 1/8 X 1/2"
4 0D8825 1 PANEL, SIDE AND BACK ENCLOSURE
5 0D3700 14 NUT FLANGE M6-1.0 NYLOK (GASOLINE ONLY)
0D3700 17 NUT FLANGE M6-1.0 NYLOK (LP ONLY)
6 090388 8 SCREW HHTT M6-1.0 X 12 YC
7 0D8979 1 PANEL, AIR IN DUCT BASE
8 0D8960 1 PANEL, CUSTOMER CONNECTION
9 023484D 1 BUSHING SNAP SB-875-11
10 0E0594 1 COVER, RV AIR CLEANER BOX
11 064113 1 STUD WINGNUT M6-1.0 X 20MM NY
12 0E0575 1 FOAM SEALING STRIP 1" X 12FT
13 0D8980 1 PANEL, AIR IN DUCT BACK
14 0E1376 1 BAFFLE, V-TWIN RV SHORT
15 0E1377 1 BAFFLE, V-TWIN RV LONG
16 0D8628 3.5 FOAM, AIR OUT COMPARTMENT
17 0D8910 1 PANEL, MUFFLER SHIELD
18 0D8826 1 PANEL, ENCLOSURE SIDE
19 0D9162 1 PANEL, FRONT & SIDE ENCLOSURE
20 0C5644 2 SLIDE LATCH,FLUSH
21 0D8828 1 PANEL, ENCLOSURE DOOR
22 0E0585 1 FOAM PANEL, DOOR 1/2"THK QP RV
23 0E1486 1 HARNESS, AC OUTPUT (5.5, 6.5, & 7.5 KW ONLY)
0E1774 1 HARNESS, AC OUTPUT (5.0 & 7.0 KW-50 Hz ONLY)
24 0D9099 1 CUST. CONN. 4KW RV REMOTE
25 074908 4 SCREW HHTT M5-0.8 X 10 BP
26 022473 1 WASHER FLAT 1/4-M6 ZINC
27 022097 1 WASHER LOCK M6-1/4
28 022507 1 SCREW HHC 1/4-20 X 1/2 G5
29 0742600149 1 WIRE ASM. BATT. (NEG.) QP RV
30 0C7968 4 NUT HEX JAM 3/8-16 BRASS
31 022237 2 WASHER LOCK 3/8
32 0C7423 1 STUD 3/8-16 X 2-1/4 BRASS
33 0742600151 1 GND WIRE C/PNL TO STUD V-T RV
34 0A4456 1 WASHER LOCK SPECIAL 3/8
35 0D8502 1 NEUTRAL CONNETCTOR UL
36 0E0593 1 STUD, 1/4-20 TO 5/16-18
37 0742600148 1 WIRE ASM BATT. (POS.) QP RV
38 022129 2 WASHER LOCK M8-5/16 (GASOLINE ONLY)
022129 4 WASHER LOCK M8-5/16 (LP ONLY)
39 022259 2 NUT HEX 5/16-18 STEEL
40 045756 8 SCREW HHTT M6-1.0 X 10 YC
41 0A2115 1 WASHER NYLON .250
42 029451A 6.5 FT. TAPE, 1/2" X 1/16" CLOSED CELL
43 0E1534A 1 PLUG PLASTIC 1.50" (GASOLINE ONLY)
44 0A5606 1 ELBOW 90DEG 3/8X3/4 (LP ONLY)
45 0E1528 1 BRACKET, LP REGULATOR MOUNTING (LP ONLY)
46 0A1495 2 SCREW HHTT M4-0.7 X 10 BP (LP ONLY)
47 042907 2 SCREW HHC M8-1.25 X 16 G8.8 (LP ONLY)
48 022145 1 WASHER FLAT 5/16-M8 ZINC (GASOLINE ONLY)
022145 3 WASHER FLAT 5/16-M8 ZINC (LP ONLY)
49 0D8979A 1 PANEL, AIR IN DUCT
Page 78

SSeeccttiioonn 99
EExxppllooddeedd VViieewwss // PPaarrtt NNuummbbeerrss
Page 76
Sheet Metal – Drawing No. 0E1012-E
Page 79

SSeeccttiioonn 99
EExxppllooddeedd VViieewwss // PPaarrtt NNuummbbeerrss
Page 77
IITTEEMM PPAARRTT NNOO.. QQTTYY.. DDEESSCCRRIIPPTTIIOONN
1 045756 15 SCREW HHTT M6-1.0 X 10 YC
2 0D1131 1 GUARD,FAN 12KW HSB
3 0C3022G 1 HOUSING, BLOWER V-TWIN RV
4 0C9763 4 NUT,GROMMET 1/4 PLUG
5 0D9782 1 HOSE, BREATHER
6 0C3034 1 NUT HEX M24-2.0 G8 YEL CHR
7 0C3033 1 WASHER,BELLEVILLE 25MM BOLT
8 051754 2 SCREW HHC M8-1.25 X 12 G8.8
9 0A5992 2 WASHER SHAKEPROOF INT M8 SS
10 0C3032 1 PLATE, FAN GTV-990
11 0C3031 1 FAN NYLON GTV-990
12 0C3725A 1 FLYWHEEL ASSY GT-990
13 0C3016A 1 PLATE,BACKING GT990 W/OIL COOL
14 023484S 1 BUSHING SNAP
15 0D9679A 1 WRAP, CRANKCASE GTV760 RV SPCC
16 0D9708 1 GT760 VERTICAL SHAFT RV ENGINE
17 0D9681A 1 WRAP, CYL 1 GTV760 RV SPCC
18 056893 13 SCREW CRIMPTITE 10-24 X ½
19 072347 2 SPARK PLUG
20 0E0998 1 CLAMP VINYL 9.5 O.D. TUBE
21 0D8384 1 TUBE, OIL DRAIN & CHECK
22 043790A 1 BARBED EL 90 3/8NPT X 3/8 VS
23 0D3083 1 ASSEMBLY, OIL DRAIN HOSE
24 0E0361A 1 OIL DRAIN / DIPSTICK TUBE VTW
25 0E0393 1 ASSEMBLY, CAP & DIP STICK
26 0C2824 2 SCREW TAP-R #10-32 X 9/16 (GASO-
LINE ONLY)
0C2824 1 SCREW TAP-R #10-32 X 9/16 (LP ONLY)
27 065852 1 SPRING CLIP HOLDER .37-.62
28 075246 4 SCREW HHTT 3/8-16 X 1-1/4 CZ
29 0A4456 1 WASHER LOCK SPECIAL 3/8
30 0A2311 2 SCREW SWAGE 1/4-20 X 1 Z/YC
31 070185 1 FILTER, OIL D 69X64 LG
32 0A8584 1 SWITCH OIL PRESSURE HOBBS
33 0A5360 1 SUPPORT OIL FLTR,FLARE
34 043182 2 WASHER LOCK M3
35 0C1085 2 SCREW PPHM M3-0.5 X 8
36 0E1497 1 SWITCH, OIL HIGH TEMP (GASOLINE
ONLY)
075281 1 SWITCH, OIL HIGH TEMP (LP ONLY)
37 0D9399 1 ASSEMBLY, GOVERNOR LEVER
38 0D9513 1 SPRING, GOV.(5.5 KW & 5.0 KW-50HZ
ONLY)
0E1498 1 SPRING, GOV.(6.5/7.5 KW & 7.0 KW-
50HZ ONLY)
39 0D1366 2 BUSHING, GOVERNOR ROD
40 0D9395 1 ROD, GOVERNOR
41 077075 1 BOOT CHOKE SOLENOID (GASOLINE
ONLY)
42 0A7094 2 RHMS 4-40 X 1/4 SEMS (GASOLINE
ONLY)
43 0D8590 1 ASSY, BI-METAL/HEATER (GASOLINE
ONLY)
44 0D8591 1 SOLENOID, CHOKE (GASOLINE ONLY)
45 045770 1 SCREW HHC M5-0.8 X 10 G8.8
46 049226 1 WASHER LOCK M5
47 051713 1 WASHER FLAT M5
48 0D9402 1 LINKAGE, CHOKE (GASOLINE ONLY)
49 077091 1 COTTER PIN (GASOLINE ONLY)
50 082025 1 NUT LOCK HEX M5-0.8 SS NYL INS
51 0E1247 1 ASSEMBLY, GOV. ADJUSTMENT
52 055173 2 SCREW HHC M8-1.25 X 20 G10.9
53 022129 2 WASHER LOCK M8-5/16
54 022145 2 WASHER FLAT 5/16-M8 ZINC
55 0D9403 1 LINKAGE CHOKE BELLCRANK/CARB
56 0E1246 1 ASSEM., CHOKE BRACKET (GASOLINE
ONLY)
0D9400 1 BRACKET, CHOKE (LP ONLY)
IITTEEMM PPAARRTT NNOO.. QQTTYY.. DDEESSCCRRIIPPTTIIOONN
57 0A7095 2 RHMS 4-40 X 5/16SEMS
58 0D9404 1 SPRING, CHOKE RETURN
59 0D9801A 1 WRAP, VALLEY UPPER SPCC
60 0C3018A 1 WRAPPER,UPR #1 W/ M8 WELD NUT
61 0D9680A 1 WRAP, VALLEY GTV760 RV SPCC
62 0D1143A 1 WRAPPER,UPR #2 W/ M8 WELD NUT
63 0C3053 1 ASSY GROUND WIRE GTV990
64 085011 1 INSULATOR ASM IGN
65 0D9852 2 ASSY,IGNITION COIL GT760 RV
66 022097 8 WASHER LOCK M6-1/4
67 092079 4 SCREW HHTT M6-1.0 X 25 BP
68 0C1546 1 O-RING 59.92 X 66.98 X 3.53MM
69 0C1547 1 O-RING 21.89 X 27.13 X 2.62MM
70 082774 1 KEY, WOODRFF 4 X 19D
71 0A5358 1 ADPTR OIL PAD, FLARE
72 0D9312 1 TUBE, ENGINE OIL RETURN
73 0D9314 1 TUBE, ENGINE OIL OUT
74 0C1557 1 O-RING 20.35 X 23.91 X 1.78MM
75 0A9028 1 BOLT, OIL ADAPTOR
76 0D9682A 1 WRAP, CYL 2 GTV760 RV SPCC
77 0D9270 1 INTAKE TUBE 1.25" X 20 GA
78 048031A 2 HOSE CLMP-BAND 1 5/8
79 0D9269 1 BOOT, INTAKE AIRBOX
80 0E0142 1 BOOT, CARB ADAPTOR
81 078643B 2 BOLT,CARB MOUNT M6 X 1.0 -85LG
82 0D9219 1 ADAPTER, AIR INTAKE CARB
83 0E0573 1 GASKET,CARB TO ADAPTOR
84 0D8807 1 CARBURETOR, GT-760 (GASOLINE
ONLY)
0E1217 1 CARBURETOR, GT-760 (LP ONLY)
85 0E0572 1 GASKET,CARB TO INTAKE MANIFOLD
86 0C3043 2 GASKET INTAKE PORT GT990
87 0D8836 1 MANIFOLD, INTAKE 760 RV
88 049821 4 SCREW SHC M8-1.25 X 30 G12.9
89 070008 4 WASHER FLAT M8 SS
90 070006 4 WASHER LOCK M8 SS
91 035461A 2 BARBED STR 1/4NPT X 3/8 W/VS
92 0C7649 4 CLAMP HOSE 0.38" - 0.87"
93 0C9806 2 HOSE,3/8"IDX6"L 300F
94 0C3026 1 COOLER, OIL GTV-990
95 0D9683A 1 DUCT, OIL CLR GTV760 RV SPCC
96 0C9764 4 PLASTITE,1/4-15 X ¾
97 036933 1 SCREW PPHM #10-32 X 3/8
98 0E0246 1 SCREW HHTT #4-40 X ¼
99 0D9394 1 PLATE, THROTTLE
100 022152 1 WASHER LOCK #10
101 022158 1 NUT HEX #10-32 STEEL
102 043116 2 SCREW HHC M6-1.0 X 12 G8.8
103 049811 4 WASHER FLAT M6
104 047411 2 SCREW HHC M6-1.0 X 16 G8.8
105 066849B 2 SCREW HHTT M5-0.8 X 8 BP
106 057822 2 CLAMP HOSE #8 .53 - 1.00 (LP ONLY)
107 074994 2.25 FT. HOSE 1\2 ID (LP ONLY)
108 075476 1 SCREW PPHM M4-0.7 X 16 (GASOLINE
ONLY)
109 082121A 1 CLIP-J VINYL COAT .375 ID (GASOLINE
ONLY)
110 038150 1 WASHER FLAT #8 (GASOLINE ONLY)
111 022264 1 WASHER LOCK #8 (GASOLINE ONLY)
112 051715 1 NUT HEX M4-0.7 G8 YC (GASOLINE
ONLY)
113 0D6029 2 SCREW HHTT M6-1.0 X 16 YC
114 055934D 1 CLAMP VINYL 1.06 X .406 (LP
ONLY)
115 022473 1 WASHER FLAT 1/4-M6 (LP ONLY)
116 090388 1 SCREW HHTT M6-1.0 X 12 (LP
ONLY)
117 0E3200 1 CLAMP VINYL .437" X .281"
Page 80

SSeeccttiioonn 99
EExxppllooddeedd VViieewwss // PPaarrtt NNuummbbeerrss
Page 78
Control Panel – Drawing No. 0E1013-A
Page 81

SSeeccttiioonn 99
EExxppllooddeedd VViieewwss // PPaarrtt NNuummbbeerrss
Page 79
IITTEEMM PPAARRTT NNOO.. QQTTYY.. DDEESSCCRRIIPPTTIIOONN
1 0C2375 2 SCREW HHC M8-1.25 X 90 G8.8
2 022145 2 WASHER FLAT 5/16-M8 ZINC
3 029459 2 TENSION SPRING
4 075215 2 WASHER, SPRING CENTER
5 052858 6 NUT LOCK FL M8-1.25
6 047411 7 SCREW HHC M6-1.0 X 16 G8.8
7 022097 13 WASHER LOCK M6-1/4
8 022473 10 WASHER FLAT 1/4-M6 ZINC
9 080925 8 WASHER NYLON .404
10 0D9921 4 STANDOFF, 1/2" HEX
11 066849 2 SCREW HHTT M5-0.8 X 16
12 066386 1 ASSY, BRUSH HOLDER
13 0C9674 1 BEARING CARRIER, UP
14 0E0363H 1 STATOR ASSEMBLY (5.5 KW ONLY)
0E0364H 1 STATOR ASSEMBLY (6.5 KW ONLY)
0E0362H 1 STATOR ASSEMBLY (7.5 KW ONLY)
15 073159 1 BEARING BALL
16 077005H 1 ROTOR ASSEMBLY (5.5 KW ONLY)
077004H 1 ROTOR ASSEMBLY (6.5 KW ONLY)
073163H 1 ROTOR ASSEMBLY (7.5 KW ONLY)
17 031971 1 BEARING
18 077006 4 STUD,RV STATOR D/C
19 0C9675 1 BEARING CARRIER, LOW
20 0A5351 1 NYLON SLIDE
21 073146 2 SLIDE, NYLON
22 0C1878 2 SUPPORT, SLIDE
23 075242 4 SPRING, GEN. MOUNT
24 075237 4 WASHER, SPRING CENTER
25 090145 1 CIRCUIT BREAKER 30 X 1 (5.5 & 6.5
KW ONLY)
0E1529 1 CIRCUIT BREAKER 35 X 1 (7.5 KW
ONLY)
26 090144 1 CIRCUIT BREAKER 20 X 1 (5.5 KW
ONLY)
090145 1 CIRCUIT BREAKER 30 X 1 (6.5 KW
ONLY)
0E1529 1 CIRCUIT BREAKER 35 X 1 (7.5 KW
ONLY)
27 025105 4 SCREW RHM 6-32 X 1/4 SIMS
28 0A9611 1 FUSE 7.5 AMP
29 032300 1 HOLDER FUSE
30 092113 1 SWITCH SPDT ON-MOM-ON
31 087798 1 SWITCH 6A SPDT
IITTEEMM PPAARRTT NNOO.. QQTTYY.. DDEESSCCRRIIPPTTIIOONN
32 055440 2 SCREW HHC M5-0.8 X 25 G8.8
33 0D9377 1 PANEL, TOP CONTROL
34 054502 1 CIRCUIT BREAKER 3 X 1
35 031879 4 WASHER FLAT #4 ZINC
36 043182 4 WASHER LOCK M3
37 051714 4 NUT HEX M3-0.5 G8 YEL CHR
38 092234 1 ASSY POTTED RV CNTL
39 049226 5 WASHER LOCK M5
40 051716 3 NUT HEX M5-0.8 G8 YEL CHR
41 023484R 2 BUSHING SNAP
42 0D3700 1 NUT FLANGE M6-1.0 NYLOK
43 0D9378 1 PANEL, BOTTOM CONTROL
44 052619 1 SCREW HHC M5-0.8 X 20 G8.8
45 075476 2 SCREW PPHM M4-0.7 X 16
46 065795 1 RECTIFIER-BATTERY CHARGE
47 0C2174 1 RELAY 12V 25A SPST
48 092120 4 NUT LOCK TRIC M6 X 1.0 Y/ZNC
49 049721 2 SCREW HHC M6-1.0 X 35 G8.8 BLK
50 0A1658 2 WASHER LOCK SPECIAL 1/4"
51 0742600146 1 WIRE ASM GRD STD CONN.
52 049813 4 NUT HEX M6 X 1.0 G8 YEL CHR
53 023484D 1 BUSHING SNAP
54 0742600151 1 GROUND WIRE C/PNL TO STUD V-T
RV
55 084867 1 RUBBER U-CHANNEL
56 043181 2 SCREW PHM M3-0.5 X 10MM
57 075210A 1 BLOCK 1 POSITION
58 022264 2 WASHER LOCK #8-M4
59 051715 2 NUT HEX M4-0.7 G8 YEL CHR
60 0C7605 2 SCREW HHC M5-0.8 X 60 G8.8
61 083049 1 ASY POTTED REG W/FIN
62 089047 2 SPACER .25 X .43 X .55 ST/ZNC
63 075234 1 RESISTOR WW LUG 1R 5% 25W
64 0A2053 1 SCREW HHC M6-1.0 X 65 G8.8
65 058000K 2 NUT TRIC M5 X .8
66 0D8941 1 COMPARTMENT, AIR BOX
67 029451A 2.3 FT. TAPE, 1/2" X 1/16" CLOSED CELL
68 0E0583 1 WIRE HARNESS, QP RV (GASOLINE
ONLY)(NOT SHOWN)
0E1812 1 WIRE HARNESS, QP RV (LP ONLY)
(NOT SHOWN)
69 0E1375 1 WIRE ASS'Y STARTER TO C/PNL
(NOT SHOWN)
Page 82

SSeeccttiioonn 99
EExxppllooddeedd VViieewwss // PPaarrtt NNuummbbeerrss
Page 80
760 V-Twin Engine – Drawing No. 0E1014-B
Page 83

SSeeccttiioonn 99
EExxppllooddeedd VViieewwss // PPaarrtt NNuummbbeerrss
IITTEEMM PPAARRTT NNOO.. QQTTYY.. DDEESSCCRRIIPPTTIIOONN
1 0C5730A 1 ASSEMBLY, CRANKCASE RV
2 0C3008 1 SEAL, 38 I.D. CRANKCASE
3 090388 6 SCREW, HHTT M6-1.0 X 12mm
4 0C5372 1 ASSEMBLY, BREATHER
5 0C3005 1 GASKET, BREATHER COVER
6 0C3003 3 SEPARATOR, OIL BREATHER
7 0D8067A 1 ASSEMBLY, HEAD #1
8 0C2981C 1 COVER, ROCKER
9 071983 4 RETAINER, PISTON PIN 20
10 0C5848 2 PISTON, HC
11 021533 2 SET, PISTON RING 90mm
12 071980 2 PIN , PISTON D20
13 0D4041 1 ASSEMBLY, CAMSHAFT & GEAR
14 0C2983 1 SHAFT, GOVERNOR
15A 0C2985A 2 ROLLER BEARING, GOVERNOR
PLATE
15B 0C2985B 1 ROLLER BEARING, GOVERNOR
16 0D4042 1 ASSEMBLY, GOVERNOR GEAR
17 0A7811 1 SPOOL, GOVERNOR MACHINED
18 0C2977 1 GASKET, CRANK CASE
19 0C5943 1 SEAL, OIL PASSAGE
20 0D4122A 1 ASSEMBLY, CRANKSHAFT
21 0D3961 2 ASSEMBLY, CONNECTING ROD
22 0C2978 2 GASKET, HEAD
23 093873 3 WASHER, LOCK RIB M6
24 021374 3 SCREW, SHC M6-1.0 X 30mm
25 0C2994 1 SCREEN, OIL PICKUP
26 0C2997 1 COVER, GEROTOR
27 0C2995 1 GEROTOR, INNER
28 0C2996 1 GEROTOR, OUTER
29 0C3011 2 COVER, OIL RELIEF
30 0C3009 2 SPRING, OIL RELIEF
31 0C3010 2 BALL, 1/2D OIL RELIEF
32 050873A 1 1/4" NPT PIPE PLUG
IITTEEMM PPAARRTT NNOO.. QQTTYY.. DDEESSCCRRIIPPTTIIOONN
33 0C2991 2 E-RING, GOVERNOR ARM
34 0D1667A 1 ARM, GOVERNOR
35 0C2988 1 THRUST WASHER, GOVERNOR
36 0C2992 1 BUSHING, GOVERNOR LOWER
37 0C5732 1 ASSEMBLY, SUMP WITH SLEEVE
38 0C2993 1 SEAL, GOVERNOR SHAFT
39 0C3007 1 SEAL, 42 I.D. CRANKSHAFT
40 0D9756 1 CONNECTOR, 3/8NPT TO INVTD
FLR 3/8OD
41 0C3006 10 SCREW, HHFC M10-1.5 X 55mm
42 0C8566 8 SCREW HHFC M6-1.0 X 20mm
43 0C2982 1 COVER, ROCKER WITH OIL FILL
44 093064 1 ASSEMBLY, OIL FILL CAP
45 0C2979 2 GASKET, VALVE COVER
46 086515 8 KEEPER, VALVE SPRING
47 0D2274 4 RETAINER, VALVE SPRING
48 0D3867 4 SPRING, VALVE
49 078672 2 SEAL, VALVE STEM D7
50 0C5371 4 WASHER, VALVE SPRING
51 0D5326 4 NUT, JAM ROCKER ARM
52 0D5354 4 PIVOT, ROCKER ARM
53 0D5313 4 ROCKER ARM
54 0D6023 4 STUD, ROCKER ARM M8-1.0 x
57mm
55 0D6024 2 PLATE, PUSH ROD GUIDE
56 0C2976 12 SCREW HHFC M8-1.25 X 65mm
57 0D8067B 1 ASSEMBLY, HEAD #2
58 0C2229 2 VALVE, INTAKE
59 086516 2 VALVE, EXHAUST
60 0D9853D 4 PUSHROD 147
61 083897 4 TAPPET, SOLID
62 0C3017 1 STARTER, V-TWIN ENGINE
63 022129 2 WASHER LOCK M8
64 061906 2 SCREW, HHC M8-1.25 X 85mm
Page 81
Page 84

SSeeccttiioonn 99
EExxppllooddeedd VViieewwss // PPaarrtt NNuummbbeerrss
Page 82
LP Regulator – Drawing No. 0E1530
Page 85

SSeeccttiioonn 99
EExxppllooddeedd VViieewwss // PPaarrtt NNuummbbeerrss
Page 83
IITTEEMM PPAARRTT NNOO.. QQTTYY.. DDEESSCCRRIIPPTTIIOONN
1 0D5694 1 CASTING, TWIN REGULATOR HOUSING
2 075475 4 SCREW PPHM M4-0.7 X 10
3 022264 4 WASHER LOCK #8-M4
4 043180 4 WASHER FLAT M4
5 0C5765 1 SOLENOID, TWIN REGULATOR
6 0C6070* 1 SPRING-SOLENOID PLUNGER
7 0C4680* 1 PLUNGER LP REG. ASSY
8 0C4647 1 GASKET, SOLENOID
9 0C4643 1 INLET, TWIN REGULATOR NO HOLE
10 0D3973 1 PLUG, EXPANSION 16MM TWINREG
11 0C6606 1 BARBED STR 1/2 X 1/2NPT W/VS
12 026073 2 PLUG STD PIPE 1/8 STEEL SQ HD
13 0D3308 2 WASHER FLAT 3.2MM ID X 10MM OD
14 070728 2 SCREW PFILHM M3-0.5 X 5
15 0C5764 1 SPRING, REGULATOR 45N/M 32MM
16 0C4643A 1 INLET, TWIN REG 11.11 DIA.
17 0C6066 1 SEAL, INLET REGULATOR
18 0C5968 1 SUPPORT, INLET SEAL
19 0C5759 1 PIN, PIVOT ARM
20 0C5761 1 LEVER, REGULATOR
21 0C6069 1 GASKET, DIAPHRAGM
22 0C6731 1 RIVET .118 X .125 ALUMINUM
23 0C6067 1 SUPPORT, DIAPHRAGM
24 0C4706 1 DIAPHRAGM, TWIN REGULATOR
25 0C6068 1 CAP, DIAPHRAGM SUPPORT
26 0C5762 1 COVER,TWIN REGULATOR
27 045764 8 SCREW HHTT M4-0.7 X 8 BP
* ITEMS 6 AND 7 NOT SOLD SEPARATELY. ORDER KIT P/N 0D4166
Page 86

SSeeccttiioonn 1100
SSPPEECCIIFFIICCAATTIIOONNSS && CCHHAARRTTSS
Page 84
Major Features and Dimensions – Drawing No. 0E1058-C
Page 87

SSeeccttiioonn 1100
SSPPEECCIIFFIICCAATTIIOONNSS && CCHHAARRTTSS
Page 85
TYPE QUIETPACT 55 QUIETPACT 65 QUIETPACT 75
MODEL 4702/4703 4704/4705 4706/4707
WEIGHT 326/329 pounds 328/331 pounds 330/333 pounds
TYPE OF ROTOR Two-pole Two-pole Two-pole
RATED WATTS 5500 6500 7500
RATED VOLTS 120 120 120
PHASE 1-Phase 1-Phase 1-Phase
RATED MAXIMUM 45.8 54.2 62.5
LOAD AMPERES
RATED FREQUENCY 60 Hz 60 Hz 60 Hz
OPERATING SPEED 2200 rpm 2571 rpm 2571 rpm
ENGINE MODEL GTV-760 GTV-760 GTV-760
TYPE OF ENGINE Vertical Shaft Vertical Shaft Vertical Shaft
FUEL SYSTEM Gasoline/LP Gasoline/LP Gasoline/LP
COOLING SYSTEM Air-Cooled Air-Cooled Air-Cooled
OIL SYSTEM Pressurized with Filter Pressurized with Filter Pressurized with Filter
OIL PUMP Trochoid Type Trochoid Type Trochoid Type
AIR CLEANER Paper element Paper element Paper element
w/foam pre-cleaner w/foam pre-cleaner w/foam pre-cleaner
STARTER 12 VDC electric 12 VDC electric 12 VDC electric
IGNITION SYSTEM Solid State Solid State Solid State
SPARK PLUG Champion RC12YC Champion RC12YC Champion RC12YC
(or equivalent) (or equivalent) (or equivalent)
SPARK PLUG GAP 0.030 inch 0.030 inch 0.030 inch
(0.76mm) (0.76mm) (0.76mm)
NOMINAL RESISTANCES OF GENERATOR WINDINGS AT 68°F
GENERATOR SPECIFICATIONS
TYPE QUIETPACT 55 QUIETPACT 65 QUIETPACT 75
MODEL 4702/4703 4704/4705 4706/4707
Power Windings
Lead 11 to 22 0.280 - 0.320 ohms 0.209 - 0.242 ohms 0.157 - 0.182 ohms
Lead 11S to 22S
Lead 33 to 44
Excitation "DPE" Winding
Lead 2 to 6 1.41 - 1.63 ohms 1.59 - 1.84 ohms 1.12 - 1.30 ohms
Battery Charge Windings
Lead 55 to 66 0.100 - 0.116 ohms 0.104 - 0.107 ohms 0.092 - 0.107 ohms
Lead 55 to 77 0.100 - 0.116 ohms 0.087 - 0.101 ohms 0.076 - 0.088 ohms
Rotor Winding
Slip Ring to Slip Ring 14.88 ohms 10.81ohms 14.50 - 16.0 ohms
Page 88

SSeeccttiioonn 1100
SSPPEECCIIFFIICCAATTIIOONNSS && CCHHAARRTTSS
Page 86
TORQUE SPECIFICATIONS
LONG BLOCK TORQUE REQUIREMENTS
HEAD BOLTS 22 ft-lbs (±5%)
SUMP COVER BOLTS 36 ft-lbs
CONNECTING ROD CAP BOLTS 16.2 - 19.8 ft-lbs
VALVE COVER BOLTS 4.8 - 5.5 ft-lbs
ROCKER ARM JAM NUTS 156.6 - 191.4 in-lbs
OIL PRESSURE RELIEF COVER BOLT 7.4 ft-lbs
OIL FILTER ADAPTER 9 ft-lbs
IGNITION COILS 6.7 - 8.1 ft-lbs
INTAKE MANIFOLD 12.6 - 15.4 ft-lbs
FAN RETAINER 16 - 20 ft-lbs
LARGE AND SMALL PULLEY 34.2 - 41.8 ft-lbs
TRIM TORQUE REQUIREMENTS
M3-.5 PHILLIPS PAN HEAD SCREW INTO ALUMINUM 50 in-lbs
M6-1 TAPTITE SCREW INTO ALUMINUM 96 in-lbs
M6-1 TAPTITE SCREW INTO WELDNUT 96 in-lbs
M8-1.25 TAPTITE SCREW INTO ALUMINUM 18 ft-lbs
STARTER BRACKET TO BLOCK 18 ft-lbs
GOVERNOR LEVER PINCH BOLT 120 in-lbs
FLYWHEEL NUT 135 - 165 ft-lbs
SPARK PLUG 15 ft-lbs
RV TORQUE REQUIREMENTS
EXHAUST OUTLET BOLTS 18 ft-lbs
STATOR BOLTS 7.2 - 8.8 ft-lbs
M6-1 TAPTITE SCREW INTO PIERCED HOLE 96 in-lbs
ENGINE SPEEDS AND VOLTAGE SPECIFICATIONS
LLOOAADD %% VVOOLLTTAAGGEE ((VVAACC)) FFRREEQQUUEENNCCYY ((HHzz))
0 123-126 62-63
50 118-122 62-59
100 112-118 57-61
Listed below are normal running voltages, load voltages and frequency ranges.
Refer to Engine Service Manual No. 0E2081 for complete GTV-760/990 V-Twin OHVI engine service information.
Page 89

NNOOTTEESS
Page 87
Page 90

SSeeccttiioonn 1111
EELLEECCTTRRIICCAALL DDAATTAA
Page 88
Electrical Schematic and Wiring Diagram – Drawing No. 0E1057-D
Page 91

SSeeccttiioonn 1111
EELLEECCTTRRIICCAALL DDAATTAA
Page 89
Electrical Schematic and Wiring Diagram – Drawing No. 0E1057-D
Page 92

PO BOX 297 WHITEWATER, WI 53190
www.guardiangenerators.com
P/N OE7225 REV O PRINTED IN THE USA/9.03
 Loading...