

Generac 005993-0 Owner’s Manual
GENERAC _
0
erator'sIVianual
introduction.............................................................1
Safety Rules...........................................................1
SafetySymbols and Meanings.......................................1
Generalinformation................................................4
KnowYourPowerWasher.........................................................4
ProductSpecifications..............................................................5
Unpacking.................................................................................5
Set-up.....................................................................5
Assembly..................................................................................5
Add EngineOil..........................................................................6
CheckPumpOil........................................................................6
Add Fuel...................................................................................7
ConnectHoseand WaterSupplyto Pump.................................7
How to Use Nozzles..................................................................9
CleaningandApplying Detergent..................................10
PowerWasherRinsing.................................................10
CleaningDetergentSiphoningTube...............................10
Operation..............................................................11
Operation................................................................................11
PowerWasherLocation..........................................................11
ChecklistBefore StartingEngine..............................................11
How to Start YourPowerWasher............................................11
AutomaticCoolDown System (ThermalRelief).......................13
AdjustabelPressureSetting.....................................................13
How to Stop YourPowerWasher.............................................13
Maintenance.........................................................14
MaintenanceRecommendations..............................................14
MaintenanceSchedule............................................................14
EmissionsControl...................................................................14
PowerWasherMaintenance....................................................14
Checkand CleanInletScreen..................................................14
CheckHigh PressureHoses....................................................14
CheckDetergentSiphoningTube.............................................14
CheckSpray Gun....................................................................15
NozzleMaintenance................................................................15
PumpOilMaintenance............................................................15
EngineMaintenance................................................................15
EngineOil Recommendations..................................................16
CheckingOilLevel........................................................16
AddingEngineOil.........................................................16
ChangingEngineOil.....................................................16
ServiceAir Cleaner.................................................................17
ServiceSparkPlug..................................................................17
InspectMufflerand SparkArrestor..........................................17
After EachUse........................................................................17
WinterStorage........................................................................18
LongTermStorage..................................................................18
ProtectFuelSystem.....................................................18
ChangeOil...................................................................18
Protectingthe Pump.....................................................18
OtherStorageInstructions.......................................................18
Troubleshooting....................................................lg
TroubleshootingGuide.............................................................19
Warranty...............................................................20
MANUALDELPROPIETARIO.............................23
MANUELDEL'OPI_RATEUR...............................47
INTRODUCTION
Thank you for purchasing this power washer manufactured by
GeneracPower Systems, Inc.This modelis a high performance,
air-cooled, engine-driven power washer that operatesbetween
3000 and 4000 psi dependingon which model you purchased.
Theseunitsfeaturepowerful Generacengines,atriplex pumpwith
ceramic coated pistons, a pressure control valve, an automatic
thermal relief system, a professional grade spray gun with
vibrationisolationfor reducedfatigue,astainlesssteellance,quick
connect nozzles, steel reinforcedhigh pressure rubber hose for
long life andmaximumflexibility and a detergentsiphoning hose.
Commonsenseandstrictcompliancewiththespecialinstructions
are essentialto preventing accidents. The operatormust read
this manual and thoroughly understand all of the instructions
and warnings before usingthe equipment. If any portion of the
manualis not understood, contact the nearestAuthorizedDealer
for starting, operating and servicing procedures.The owner is
responsiblefor properandsafe use of the equipment.
Thepower washer can operatesafely,efficientlyand reliably only
if it is properlylocated,operatedandmaintained.Beforeoperating,
servicingor storing:
• Studyall warnings in this manualand on the productcarefully.
• Becomefamiliar with this manual andthe unit beforeuse.
• Referto theAssemblysection of the manualfor instructionson
final assembly procedures.Followthe instructions completely.
Themanufacturercannot anticipateevery possible circumstance
that might involvea hazard.The warnings in this manual,and on
tags and decals affixedto the unit are,therefore,not all inclusive.
If usingaprocedure,workmethodoroperatingtechniquethat the
manufacturerdoes not specifically recommend,ensurethat it is
safe for others. Also make sure the procedure,work method or
operatingtechnique utilized does not render the power washer
unsafe.
THE INFORMATIONCONTAINEDHEREIN WAS BASED ON
MACHINESIN PRODUCTIONAT THE TIME OF PUBLICATION.
GENERACRESERVESTHERIGHTTO MODIFYTHIS MANUALAT
ANYTIME.
Save these instructionsfor future reference. If you loan this
device to someone,ALWAYSloanALL instructionalmaterialsto
theindividualas well.
SAFETYRULES
Throughoutthis publication,and on tags and decalsaffixedto the
generator,DANGER,WARNING,CAUTIONand NOTEblocks are
usedto alert personnelto special instructionsabout a particular
operation that may be hazardous if performed incorrectly or
carelessly. Observe them carefully. Their definitions are as
follows:
Indicatesa hazardoussituationor action which,if notavoided,
will resultin death or seriousinjury.
Indicatesa hazardoussituationor actionwhich,if notavoided,
couldresultin deathor seriousinjury.
ACAUTION!
Indicatesa hazardoussituationor actionwhich,if notavoided,
couldresultin minoror moderateinjury.
NOTE:
Notescontainadditional informationimportanttoa procedure
and will be found withinthe regulartextbody of thismanual.
These safety warnings cannot eliminate the hazards that they
indicate. Common sense and strict compliancewith the special
instructionswhile performingtheaction or serviceareessentialto
preventingaccidents.
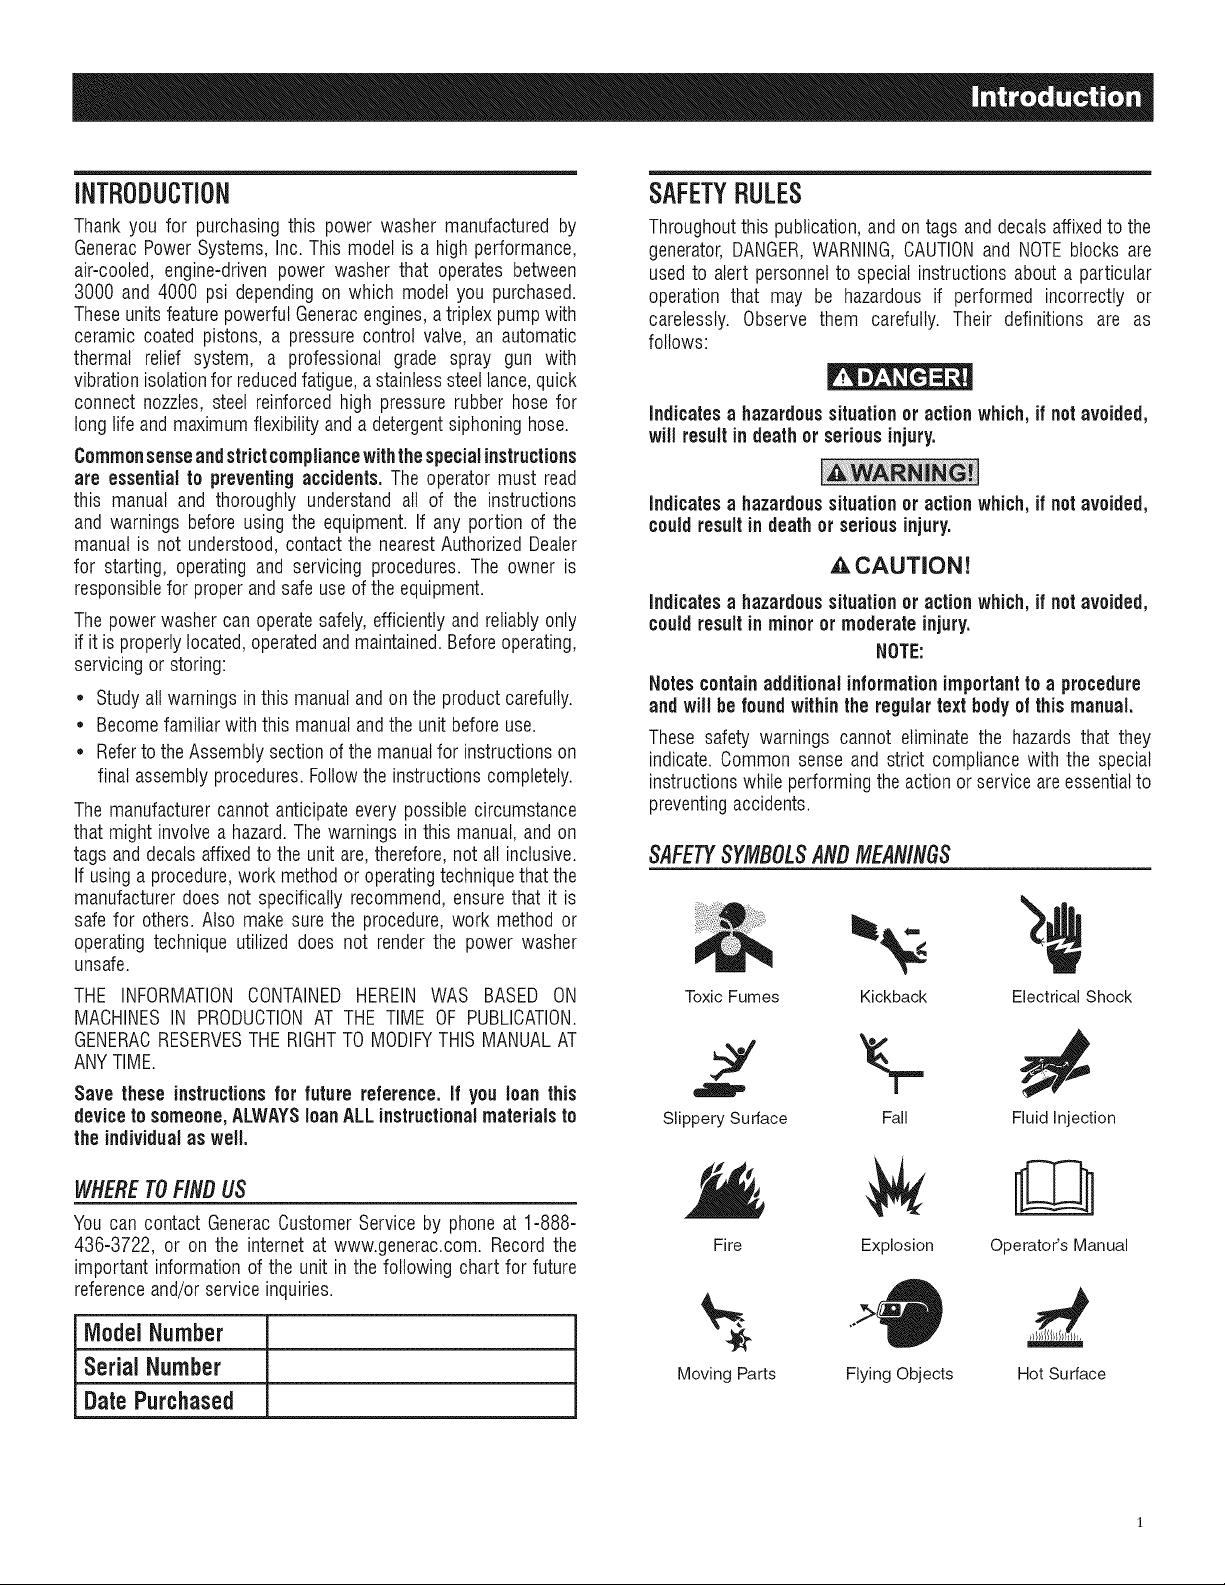
SAFETYSYMBOLSANDMEAN/NGS
ToxicFumes Kickback ElectricalShock
Slippery Surface Fall Fluid injection
WHERETOFINDUS
You can contact GeneracCustomerService by phone at 1-888-
436-3722, or on the internet at www.generac.com. Record the
important information of the unit in the following chart for future
referenceand/orservice inquiries.
ModelNumber
Serial Number
DatePurchased
Fire
MovingParts
D
Explosion Operator's Manual
Flying Objects Hot Surface
,_ DANGER:CarbonmonoxideproducedduringuseCANKiLL
inminutes.NEVERuseindoorsorinothershelteredareas,
EVENiFdoorsandwindowsare open.DrilyuseOUTSIDEand
farawayfromwindows,doorsandvents.
Somechemicalsor detergents may be harmfulif inhaled
oringested,causingseverenausea, fainting, or poisoning.
• Operatepowerwasher ONLYoutdoors.
• A running enginegivesoff carbon monoxide.
• Carbonmonoxide is an odorless, colorless, poisonousgas.
Breathingcarbonmonoxidecan causeheadache,fatigue,
dizziness,vomiting, confusion,seizures,nausea,fainting
or death.If you start experiencingany of these symptoms,
IMMEDIATELYmoveto fresh air. Seekmedicalattention.
• Keepexhaustgasfrom enteringa confined areathrough
windows, doors, ventilationintakes,or other openings.Warnany
occupantsinside aboutthe symptoms of carbon monoxideso
they know to move to fresh air if they beginto feel ill.
• Theuse of a carbon monoxidedetector insideany occupied
premisesbetweenthe powerwasher andthe occupant is
recommended.
• NEVERstart or run engineindoors or inan enclosedarea,EVEN
IFwindows and doors areopen.
• Usea respiratoror maskwheneverthere is achance that
harmful gas or vapors may beinhaled.
• Readall instructions with respiratoror mask so you arecertain
the respiratoror mask will providethe necessaryprotection
againstinhalingharmful gasor vapors. Ifyou beginto
experienceany ofthe COsymptoms listedabove,IMMEDIATELY
moveto fresh air.
,_DANGER: spray gun people, or
electrical devices.Serious injuryor deathwill result.
ALWAYSpointspraygunin safedirection, squeezespraygun
trigger to release highpressure,every time you stopengine.
Engagetrigger lockwhen not in use.
• NEVERallow CHILDRENto operatepowerwasher or playnearby.
This is NOTa toy.
• NEVERrepairhigh pressure hose. Replaceit.
• NEVERrepairleaking connectionswith sealantof any kind.
Replaceo-ring or seal.
• NEVERconnecthigh pressurehoseto nozzleextension.
• Keephigh pressurehoseconnectedto pump and spraygun
while system is pressurized.
• NEVERsecurespray gun in openposition.
• NEVERleavespraygun unattendedwhile machineis running.
• NEVERusea spraygun which does not haveatrigger lock or
triggerguard in placeandin working order.
• ALWAYSbe certain spraygun, nozzlesandaccessories are
correctly attached.
NEVERaim at
• Thehigh pressurestream ofwater that this equipment
produces cancut through skin andits underlyingtissues,leadingto serious injury,possible amputationor death.
Spray guntraps high water pressure,EVENWHENengine
is stoppedandwater is disconnected,which can cause
injury.
animals,
,_WARNING: Riskofelectrocution.
burn.
'_ Contactwithpowersourcecancauseelectricshockor
• NEVERspraynearpower source.
,_WARNING: Contactwith muffler area canresult in serious
burns. Exhaustheat/gasescanignitecombustibles,
structuresor damage thefuel tank causinga fire.
• DONOTtouch hot parts and AVOIDhot exhaustgases.
• Allowequipmentto cool beforetouching.
• Keepat leastfive (5) feet (152 cm) of clearance on all
sidesof powerwasherincluding overhead.
• Itis aviolation of California PublicResourceCode,Section
4442, to use or operatethe engineon anyforest-covered,
brush-covered,or grass-coveredland unlessthe exhaust
systemis equippedwith a sparkarrester,as definedin
Section4442, maintainedin effectiveworking order.Other
statesor federaljurisdictions may havesimilar laws.
Contactthe original equipmentmanufacturer,retailer,or dealerto
obtaina sparkarrester designedfor the exhaustsystem installed
onthis engine.
• Replacementparts must bethe sameand installedinthe same
position as the originalparts.
,_ WARNING:Fueland its vaporsare extremelyflammable and
explosive. Fire or explosion cancausesevere burns or death.
WHENADDINGDR DRAININGFUEL
• Turnpower washer OFFandlet it cool at leasttwo (2)
minutes beforeremovingfuel cap. Loosencap slowly to
relievepressurein tank.
• Fillor drainfuel tank outdoors.
• DONOToverfill tank.Allow spacefor fuel expansion.
• Iffuel spills, wait until it evaporatesbeforestarting
engine.
• Keepfuel awayfrom sparks, openflames,pilot lights, heat, and
other ignitionsources.
• DONOTfighta cigaretteor smoke.
WHENSTARTINGEQUIPMENT
• Ensurespark plug, muffler,fuel cap, andair cleanerare in place.
• DONOTcrankenginewith spark plug removed.
WHENOPERATINGEQUIPMENT
• DONOTtip engineor equipment at anglewhich causesfuel to
spill.
• DONOTsprayflammable liquids.
WHENTRANSPORTINGORREPAIRINGEQUIPMENT
• Transport/repairwithfuel tank EMPTYor with fuel shutoff valve
OFF.
• Disconnectsparkplug wire.
WHENSTORINGFUELDREQUIPMENTWITH FUELiN TANK
• Storeaway from furnaces, stoves, waterheaters,clothes dryers,
or otherappliancesthat havepilot light or otherignition source
becausetheycan ignitefuel vapors.
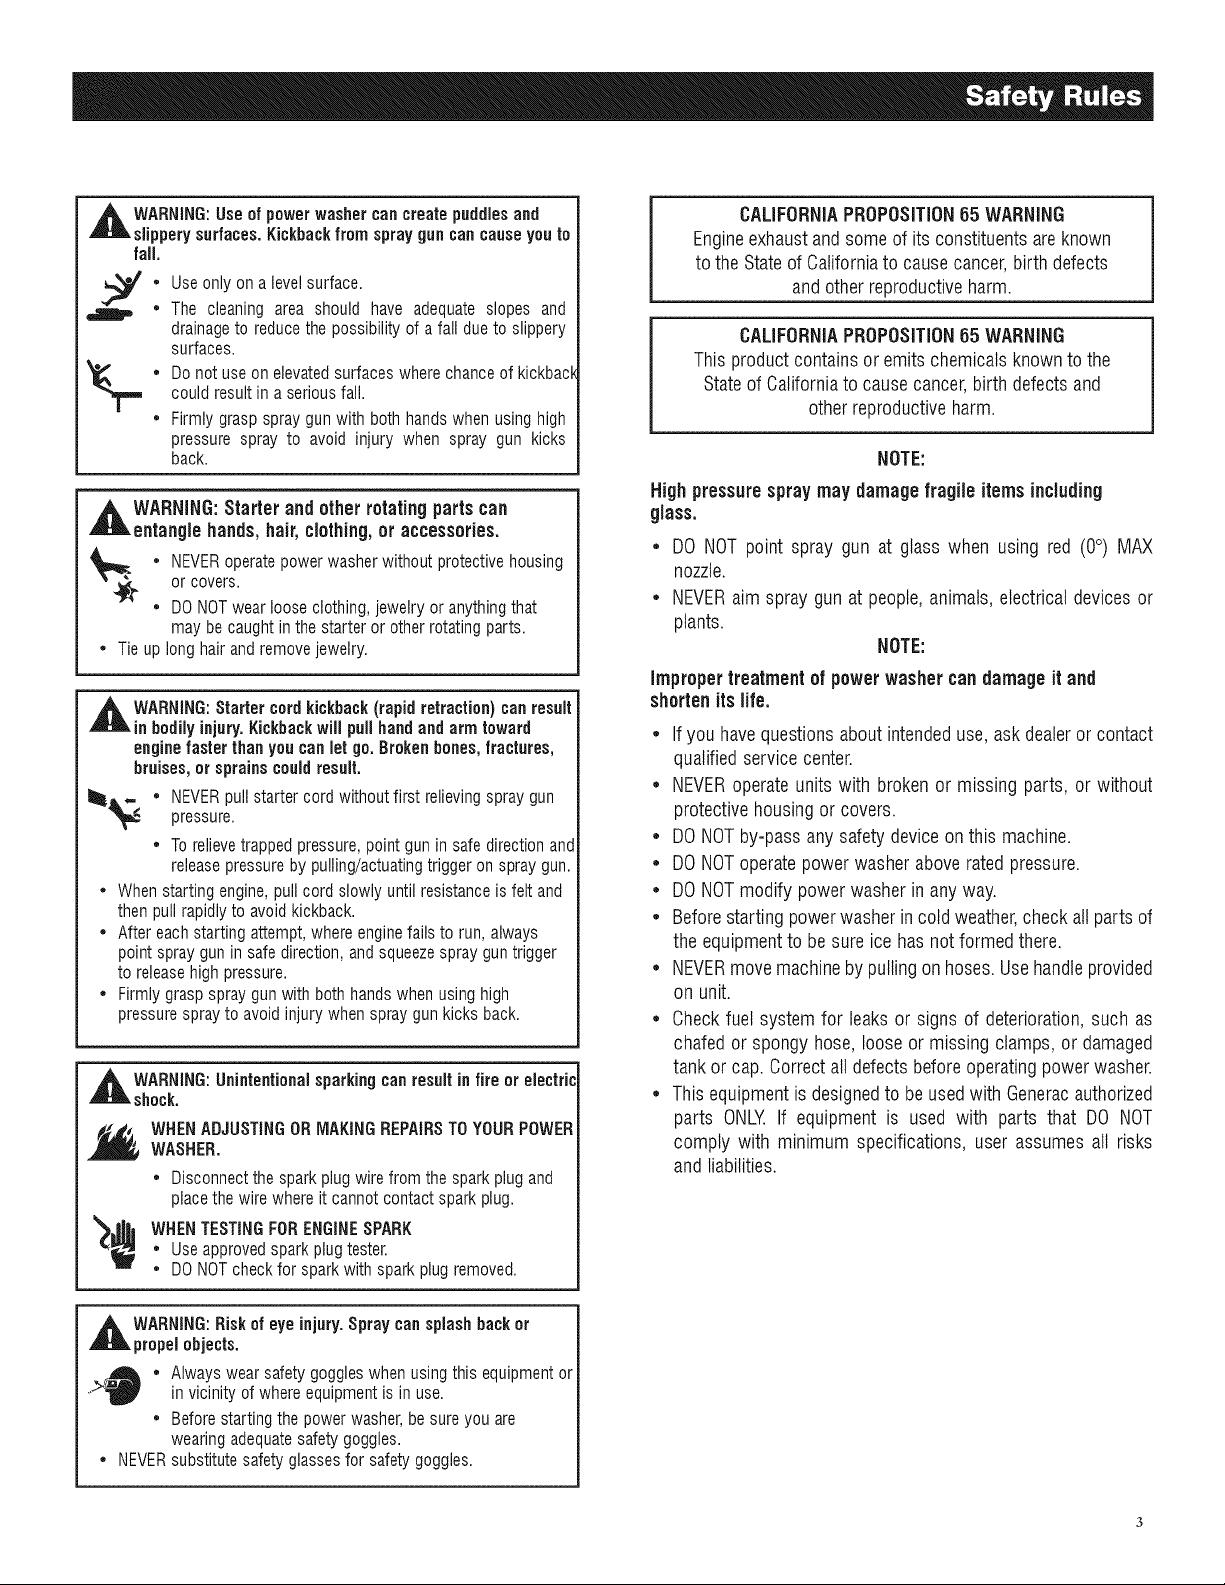
,_ll WARNING:Useofpowerwashercancreatepuddlesand
slipperysurfaces.Kickbackfromsprayguncancauseyouto
fail.
Useonly on a levelsurface.
The cleaning area should have adequate slopes and
drainageto reducethe possibility of afall due to slippery
surfaces.
Donot useon elevatedsurfaceswhere chanceof kickback
could resultin a seriousfall.
®
Firmlygrasp spraygun with both handswhen using high
pressure spray to avoid injury when spray gun kicks
back.
,_WARNING: Starter and otherrotatingpartscan
entangle hands,hair,clothing,or accessories.
or covers.
* NEVERoperatepowerwasherwithoutprotectivehousing
* DONOTwearlooseclothing,jewelryoranythingthat
maybecaughtinthestarterorotherrotatingparts.
* Tieuplonghairandremovejewelry.
,_ WARNING:Starter cordkickback(rapid retraction) canresult
in bodilyinjury.Kickbackwill puffhandand arm toward
engine faster than you can let go. Brokenbones,fractures,
bruises,or sprains couldresult.
• NEVERpullstarter cord without first relieving spraygun
pressure.
• Torelievetrappedpressure,point gun in safe directionand
releasepressureby pulling/actuatingtrigger on spraygun.
• Whenstartingengine, pull cord slowly until resistanceis felt and
then pull rapidlyto avoidkickback.
• After eachstarting attempt,where enginefails to run, always
pointspray gun in safedirection, and squeezespray gun trigger
to releasehigh pressure.
• Firmlygrasp spraygun with both hands whenusing high
pressuresprayto avoid injurywhen spraygun kicks back.
,_ WARNING:Unintentionalsparking canresult in fire or electric
shock.
WHENADJUSTINGORMAKINGREPAIRSTO YOURPOWER
WASHER.
* Disconnectthe sparkplug wire from the spark plug and
place the wire whereit cannotcontact sparkplug.
CALIFORNIAPROPOSITION65 WARNING
Engineexhaustandsome of its constituentsareknown
to the Stateof Californiato causecancer,birth defects
andotherreproductiveharm.
CAUFORNIAPROPOSITION65 WARNING
This productcontainsor emits chemicalsknownto the
Stateof Californiato causecancer,birth defectsand
otherreproductiveharm.
NOTE:
Highpressurespraymay damage fragile itemsincluding
glass.
DO NOTpoint spray gun at glass when using red (0°) MAX
nozzle.
NEVERaim spray gun at people,animals,electricaldevicesor
plants.
NOTE:
Impropertreatmentof powerwashercandamageit and
shortenits life.
* If you havequestionsabout intendeduse,ask dealeror contact
qualifiedservice center.
* NEVERoperateunits with brokenor missing parts, or without
protectivehousingor covers.
* DONOTby-pass anysafety deviceon this machine.
* DONOToperate powerwasher above ratedpressure.
* DONOTmodify power washerinanyway.
* Beforestarting powerwasher incold weather,checkallparts of
the equipmentto be sure icehas notformed there.
* NEVERmovemachineby pullingon hoses.Usehandleprovided
on unit.
* Checkfuel system for leaks or signs of deterioration,such as
chafed or spongy hose, looseormissing clamps, or damaged
tank or cap. Correctall defectsbefore operatingpowerwasher.
* Thisequipmentisdesignedto be usedwith Generacauthorized
parts ONLY.If equipment is used with parts that DO NOT
comply with minimum specifications, user assumesall risks
and liabilities.
* Useapprovedsparkplug tester.
_ WHENTESTINGFORENGINESPARK
* DONOTcheckfor spark with spark plug removed.
,_ WARNING:Risk of eye injury.Spray cansplashback or
propelobjects.
•. in vicinity of where equipmentis in use.
* Always wear safetygoggleswhen using this equipmentor
• Beforestarting the power washer,be sure you are
wearing adequatesafetygoggles.
• NEVERsubstitutesafety glassesfor safetygoggles.
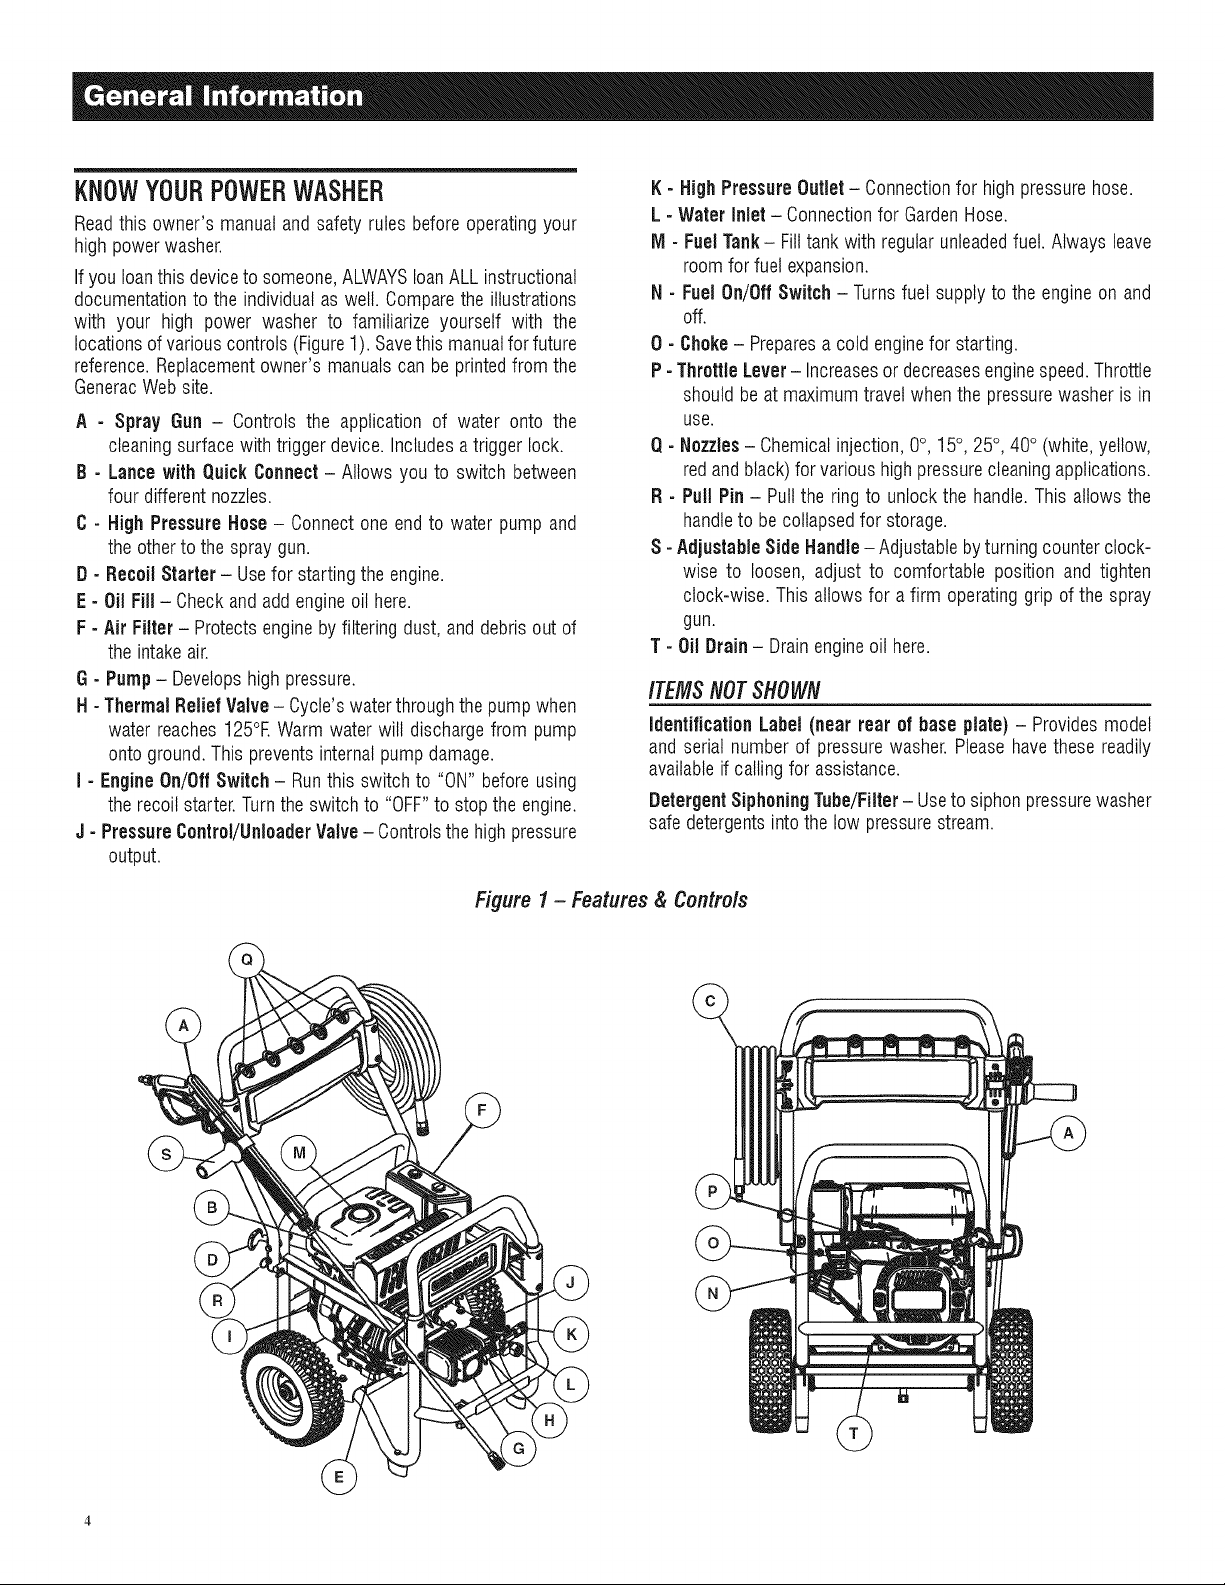
KNOWYOURPOWERWASHER
Readthis owner's manual and safety rules before operatingyour
high powerwasher.
If you loanthis deviceto someone,ALWAYSloanALL instructional
documentationto the individualas well. Comparethe illustrations
with your high power washer to familiarize yourself with the
locationsof variouscontrols(Figure1). Savethis manualfor future
reference.Replacementowner'smanualscan be printedfrom the
GeneracWebsite.
A = Spray Gun - Controls the application of water onto the
cleaningsurface with triggerdevice.Includesa trigger lock.
B - Lancewith QuickConnect- Allows you to switch between
four different nozzles.
C - High PressureHose- Connect one end to water pump and
theother to the spraygun.
D - Recoil Starter - Usefor starting the engine.
E - Oil Fill- Checkand add engineoil here.
F - Air Filter- Protectsenginebyfiltering dust, anddebrisout of
the intakeair.
G - Pump- Developshigh pressure.
H - ThermalRelief Valve- Cycle'swaterthroughthepumpwhen
water reaches 125°EWarm water will dischargefrom pump
ontoground. This preventsinternalpumpdamage.
I - Engine On/OffSwitch - Runthis switch to "ON" beforeusing
therecoil starter.Turnthe switch to "OFF"to stop the engine.
J - PressureControl/UnloaderValve- Controlsthe highpressure
output.
K- HighPressureOutlet - Connectionfor high pressurehose.
L - Water Inlet - Connectionfor GardenHose.
M - FuelTank- Filltank with regularunleadedfuel. Always leave
roomfor fuel expansion.
N - FuelOn/Off Switch - Turnsfuel supply to the engineon and
off.
0 - Choke- Preparesa cold enginefor starting.
P - ThrottleLever- Increasesor decreasesenginespeed.Throttle
shouldbe at maximumtravel whenthe pressurewasher is in
use.
Q - Nozzles- Chemicalinjection,0°, 15°, 25°, 40° (white,yellow,
redand black)forvarious highpressurecleaningapplications.
R - Pull Pin - Pullthe ring to unlock the handle.This allows the
handleto be collapsedfor storage.
S - Adjustable Side Handle- Adjustablebyturning counterclock-
wise to loosen, adjust to comfortable position and tighten
clock-wise. This allowsfor a firm operatinggrip of the spray
gun.
T - OilDrain- Drain engineoil here.
ITEMSNOTSHOWN
IdentificationLabel (near rear of base plate) - Providesmodel
and serial number of pressurewasher.Pleasehavethese readily
availableif callingfor assistance.
DetergentSiphoningTube/Filter- Useto siphonpressurewasher
safe detergentsintothe low pressurestream.
Figure 1 - Features & Controls
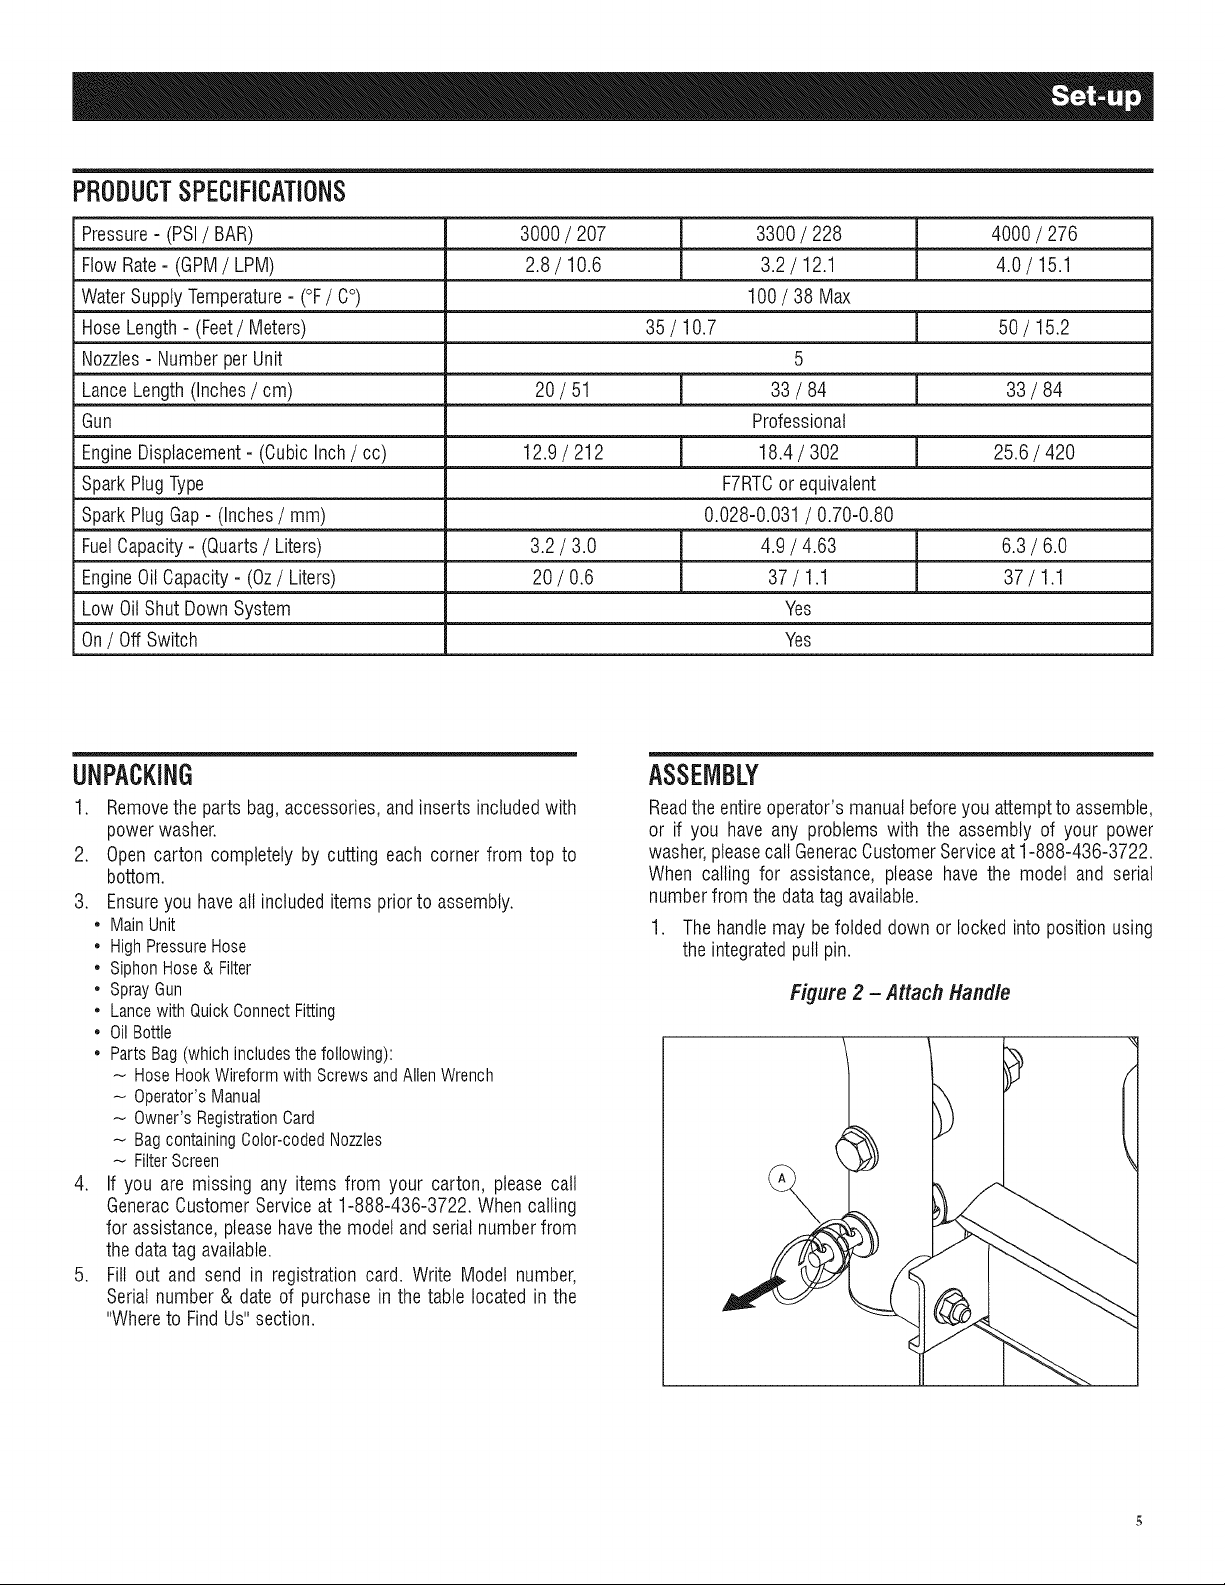
PRODUCTSPECiFiCATiONS
Pressure- (PSI/ BAR) 3000 / 207 3300/ 228 4000 / 276
FlowRate- (GPM/LPM) 2.8/10.6 3.2/12.1 4.0/15.1
WaterSupplyTemperature- (°F/ C°) 100 / 38 Max
HoseLength- (Feet/ Meters) 35 / 10.7 50 / 15.2
Nozzles- NumberperUnit 5
LanceLength (Inches/ cm) 20 / 51 33 / 84 33 / 84
Gun Professional
EngineDisplacement- (Cubic Inch/ cc) 12.9/ 212 18.4/ 302 25.6 / 420
SparkPlugType F7RTCor equivalent
SparkPlugGap- (Inches/ mm) 0.028-0.031 / 0.70-0.80
FuelCapacity- (Quarts/ Liters) 3.2/ 3.0 4.9/ 4.63 6.3 / 6.0
EngineOilCapacity- (Oz/ Liters) 20 / 0.6 37 / 1.1 37 / 1.1
Low OilShut Down System Yes
On/ Off Switch Yes
UNPACKING
1. Removethe parts bag,accessories,andinserts includedwith
powerwasher.
2. Open carton completely by cutting each corner from top to
bottom.
3. Ensureyou haveall includeditemspriorto assembly.
• MainUnit
• HighPressureHose
• SiphonHose& Filter
• SprayGun
• LancewithQuickConnectFitting
• OilBottle
• PartsBag(whichincludesthefollowing):
HoseHookWireformwithScrewsandAllenWrench
Operator'sManual
Owner'sRegistrationCard
BagcontainingColor-codedNozzles
FilterScreen
4. If you are missing any items from your carton, please call
GeneracCustomerService at 1-888-436-3722. Whencalling
for assistance,pleasehavethe modeland serial numberfrom
thedata tag available.
5. Fill out and send in registrationcard. Write Model number,
Serial number& dateof purchase in the table locatedin the
"Whereto FindUs"section.
ASSEMBLY
Readthe entireoperator'smanualbeforeyou attemptto assemble,
or if you have any problems with the assembly of your power
washer,pleasecallGeneracCustomerServiceat 1-888-436-3722.
When calling for assistance, please have the model and serial
numberfrom thedata tag available.
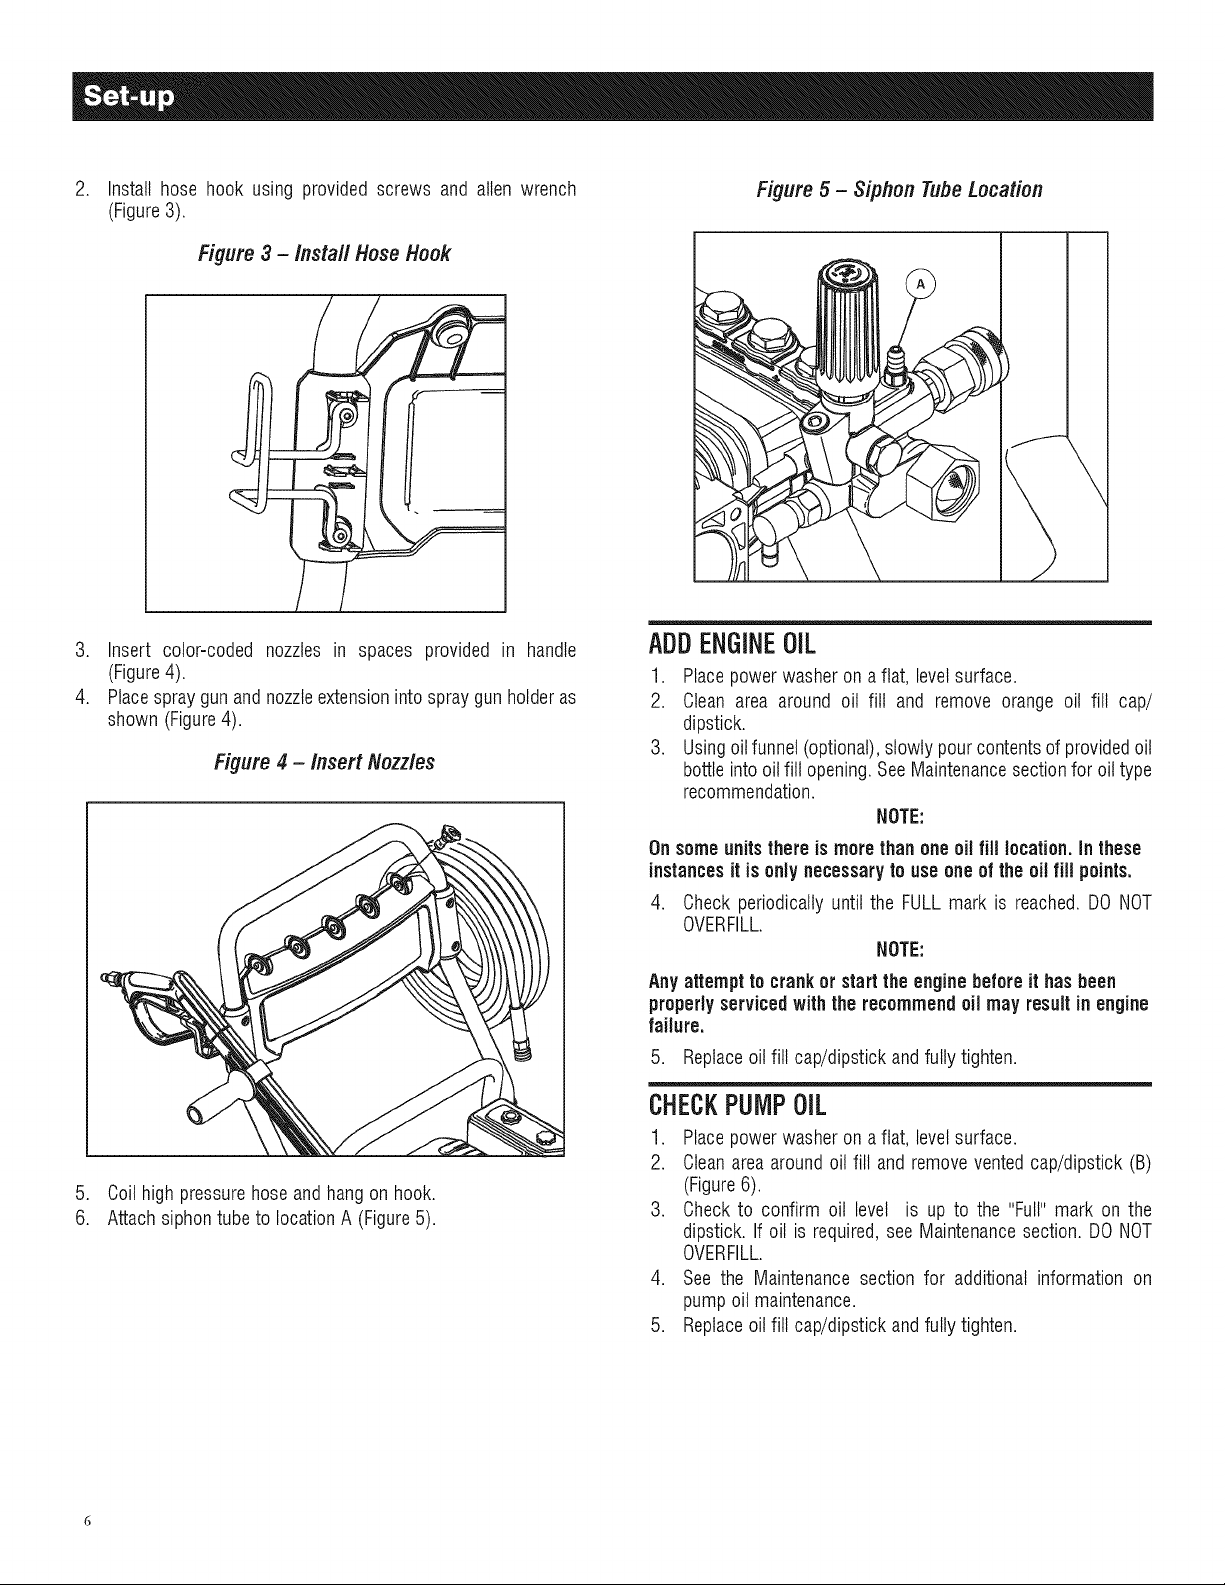
1. Thehandlemay be folded down or locked into position using
theintegratedpull pin.
Figure 2 - Attach Handle
.
Install hose hook using provided screws and allen wrench
(Figure3).
Figure 3 - Instal/Hose Hook
Figure5 - Siphon TubeLocation
3. Insert color-coded nozzles in spaces provided in handle
(Figure4).
4. Placespraygunand nozzleextensionintospray gunholderas
shown (Figure4).
Figure4 - InsertNozzles
5. Coilhigh pressurehoseand hangon hook.
6. Attachsiphon tubeto locationA (Figure5).
ADDENGINEOIL
1. Placepowerwasher on a flat, level surface.
2. Clean area around oil fill and remove orange oil fill cap/
dipstick.
3. Usingoilfunnel(optional),slowly pour contentsof providedoil
bottle intooilfill opening.SeeMaintenancesectionfor oil type
recommendation.
NOTE:
Onsomeunitsthere ismore than one oil fill location.Inthese
instancesitis only necessaryto use one of the oil fill points.
4. Check periodicallyuntil the FULL mark is reached. DONOT
OVERFILL.
NOTE:
Any attemptto crankor startthe engine before it hasbeen
properlyservicedwith the recommendoil may resultin engine
failure.
5. Replaceoil fill cap/dipstickand fully tighten.
CHECKPUMPOIL
1. Placepowerwasher on a flat, level surface.
2. Cleanarea aroundoil fill and removevented cap/dipstick (B)
(Figure6).
3. Checkto confirm oil level is up to the "Full" mark on the
dipstick. If oil is required,seeMaintenancesection.DO NOT
OVERFILL.
4. See the Maintenancesection for additional information on
pumpoil maintenance.
5. Replaceoil fill cap/dipstickand fully tighten.
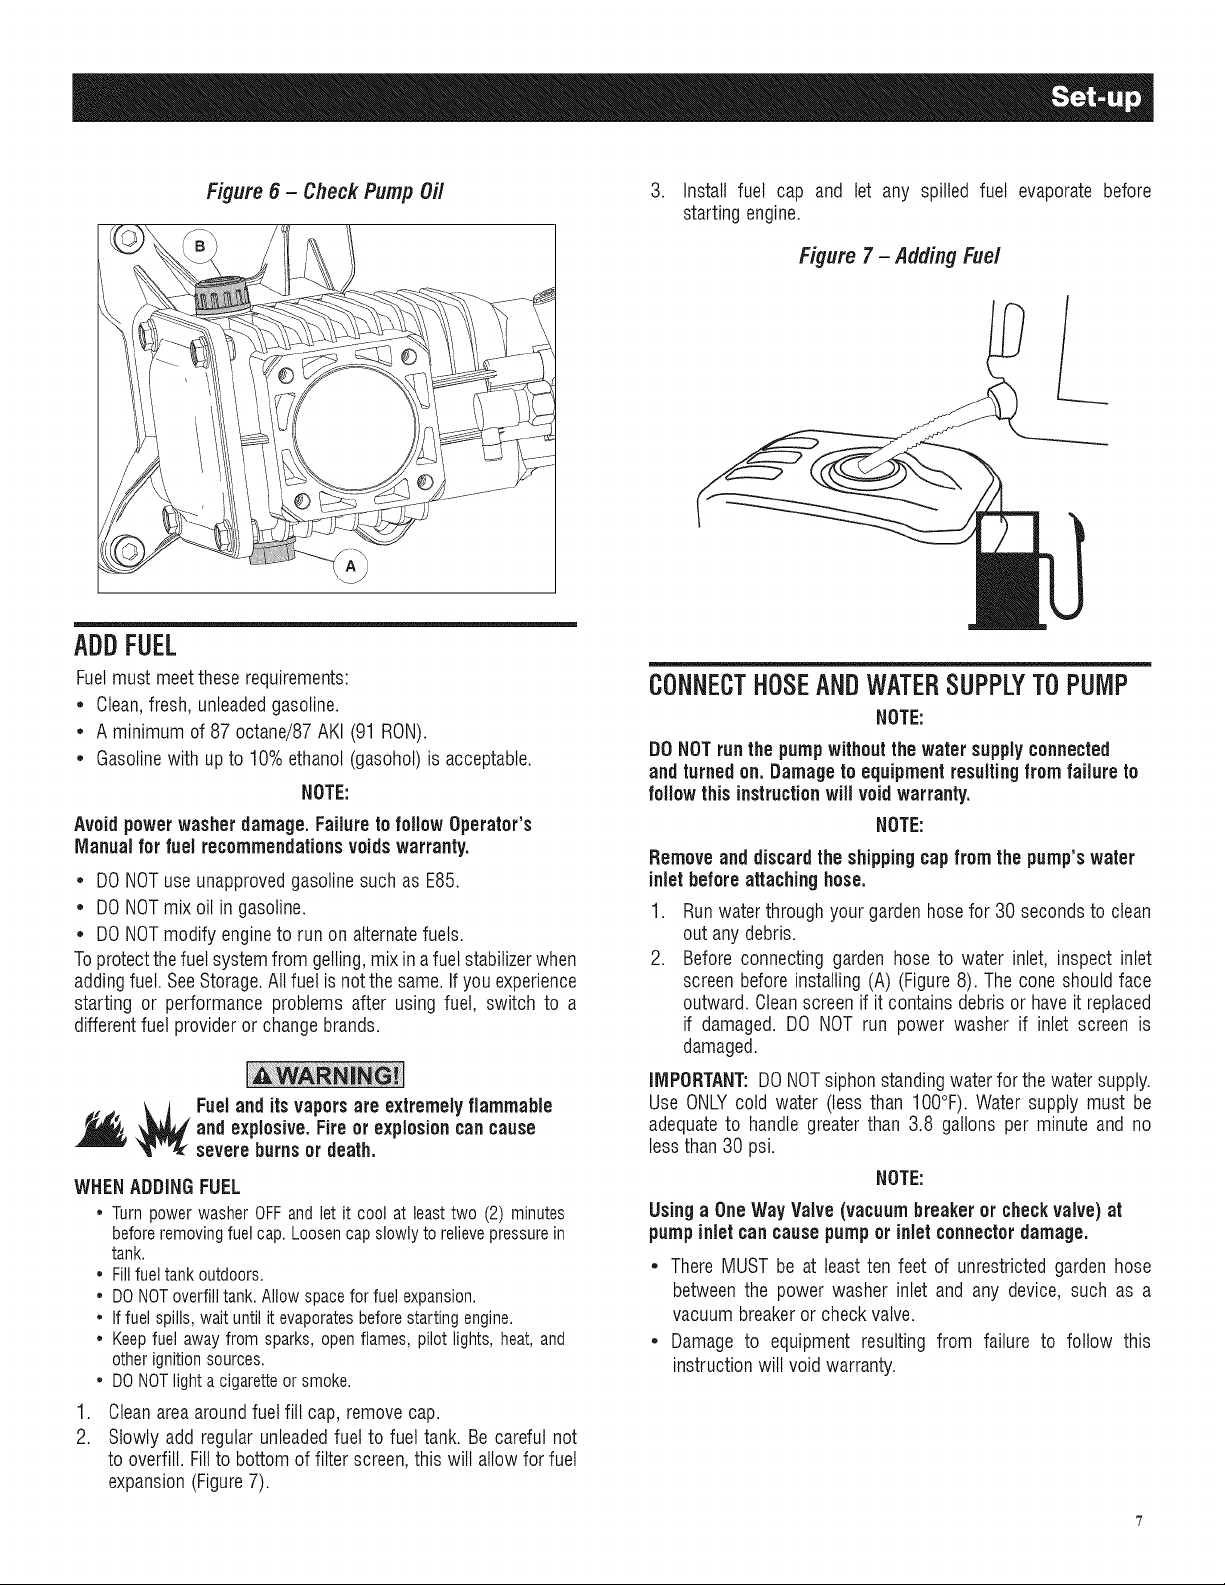
Figure 6 - Check Pump Oi/ 3. Install fuel cap and let any spilled fuel evaporate before
ADDFUEL
Fuelmust meetthese requirements:
* Clean,fresh, unleadedgasoline.
* A minimum of 87 octane/87AKI (91 RON).
* Gasolinewith up to 10%ethanol (gasohol)is acceptable.
NOTE:
Avoid powerwasherdamage.FailuretofollowOperator's
Manualfor fuel recommendationsvoidswarranty.
* DONOTuse unapprovedgasolinesuch as E85.
* DONOTmix oil in gasoline.
* DONOTmodify engineto run on alternatefuels.
Toprotectthefuel systemfrom gelling,mix in afuel stabilizerwhen
addingfuel. SeeStorage.All fuel isnotthesame.If youexperience
starting or performance problems after using fuel, switch to a
differentfuel provideror changebrands.
and explosive. Fire or explosion cancause
Fueland itsvaporsare extremely flammable
severeburns or death.
WHEN ADDING FUEL
* Turn power washer OFFand let it cool at least two (2) minutes
beforeremovingfuel cap. Loosen capslowly to relievepressurein
tank.
* Fillfuel tank outdoors.
* DONOToverfill tank. Allow spacefor fuel expansion.
* If fuel spills, wait until it evaporatesbeforestarting engine.
* Keepfuel awayfrom sparks, open flames, pilot lights, heat, and
other ignitionsources.
* DONOTlight acigarette or smoke.
1. Clean area around fuel fill cap, remove cap.
2. Slowly add regular unleaded fuel to fuel tank. Be careful not
to overfill. Fillto bottom of filter screen, this will allow for fuel
expansion (Figure 7).
starting engine.
Figure 7- Adding rue/
/
CONNECTHOSEANDWATERSUPPLYTOPUMP
NOTE:
DONOTrunthe pumpwithoutthewater supplyconnected
and turnedon. Damage to equipment resultingfrom failure to
follow this instructionwiil voidwarranty.
NOTE:
Removeand discard the shippingcapfrom the pump'swater
inletbefore attachinghose.
1. Runwaterthrough your gardenhose for 30 secondsto clean
out any debris.
2. Before connecting garden hose to water inlet, inspect inlet
screen beforeinstalling (A) (Figure8). The coneshouldface
outward.Cleanscreenif it containsdebrisor have it replaced
if damaged. DO NOT run power washer if inlet screen is
damaged.
iMPORTANT:DONOTsiphon standingwater forthe watersupply.
Use ONLYcold water (tessthan IO0°F).Water supply must be
adequateto handle greater than 3.8 gallons per minute and no
less than30 psi.
NOTE:
Using a OneWayValve (vacuumbreaker or checkvalve)at
pumpinlet cancausepumpor inletconnectordamage.
* ThereMUST be at least ten feet of unrestricted garden hose
between the power washer inlet and any device, such as a
vacuumbreakeror checkvalve.
* Damage to equipment resulting from failure to follow this
instructionwill voidwarranty.
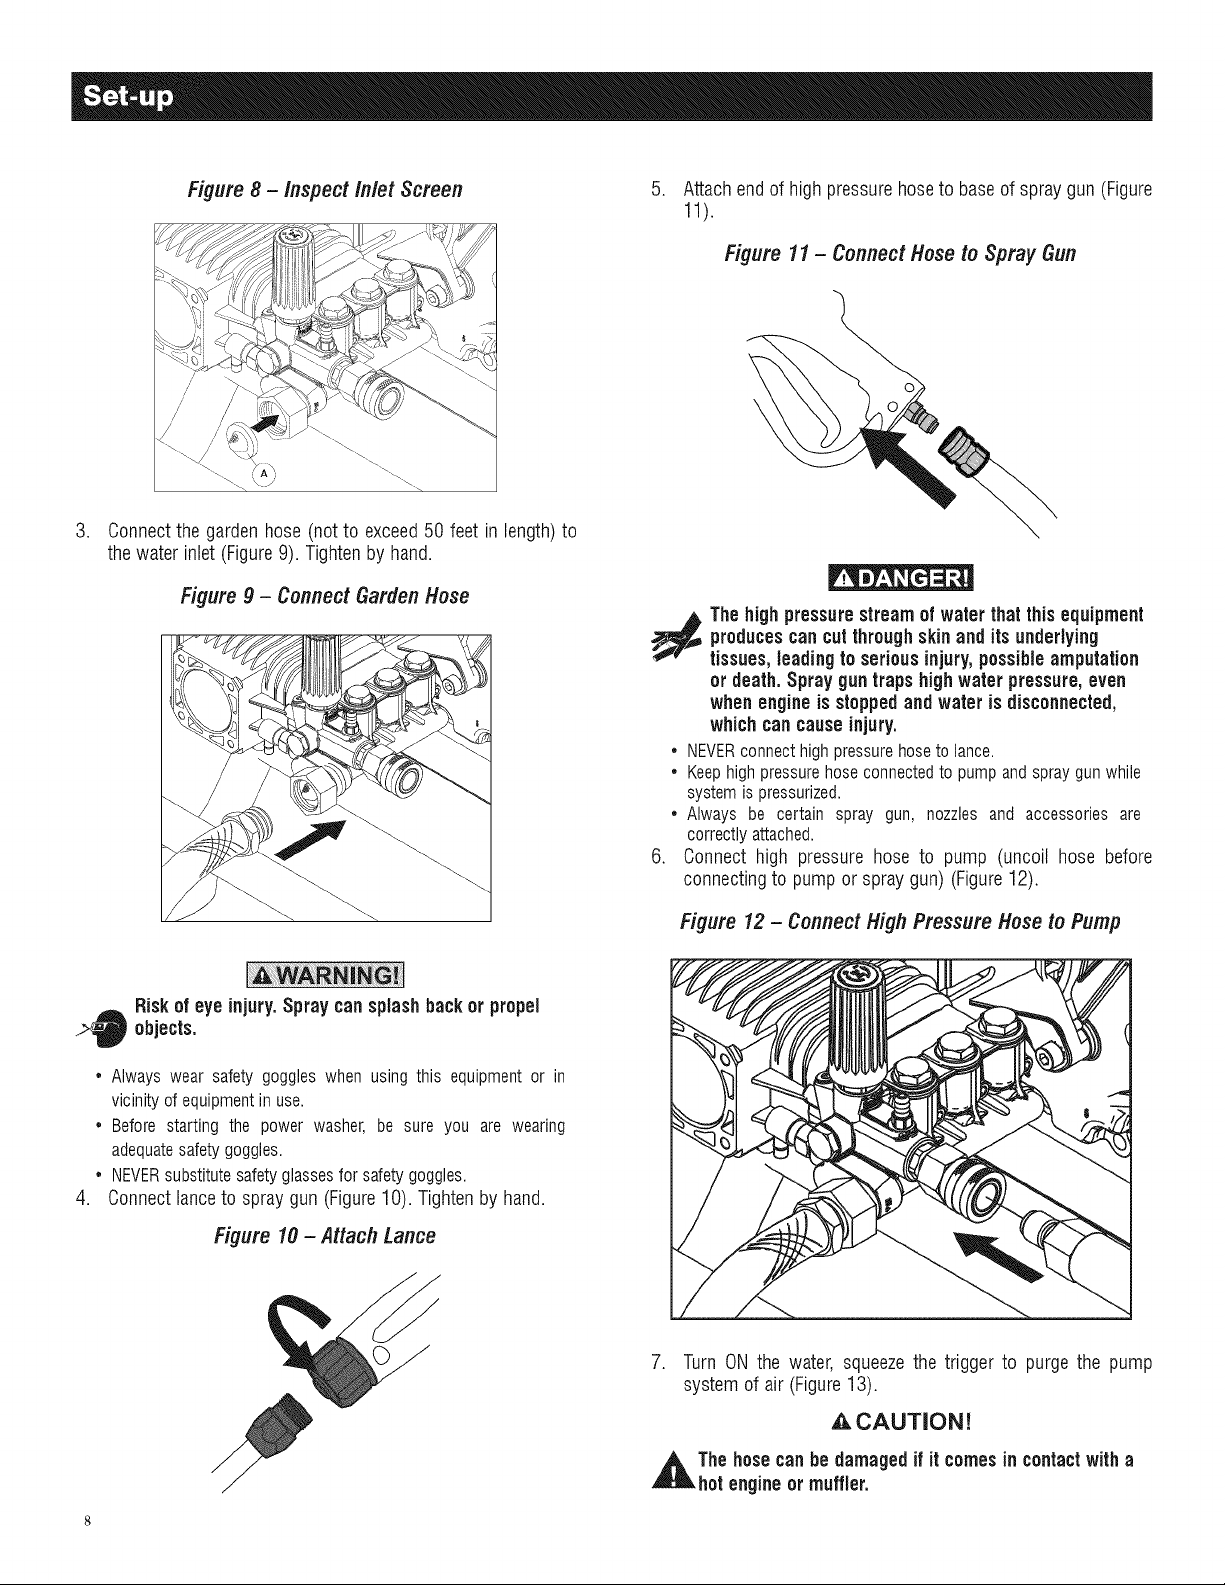
Figure 8 - Inspect Inlet Screen
.
Connectthe gardenhose (not to exceed50 feet in length)to
the water inlet (Figure9). Tightenby hand.
Figure 9 - Connect Garden Hose
.
Attachendof high pressurehoseto baseof spray gun (Figure
11).
Figure 11 - Connect Hose to Spray Gun
producescancut throughskinand itsunderlying
The highpressurestreamof water thatthisequipment
tissues,leadingto seriousinjury,possibleamputation
or death.Spray guntrapshighwater pressure,even
whenengineisstoppedandwater is disconnected,
whichcan causeinjury.
• NEVERconnecthighpressurehosetolance.
• Keephighpressurehoseconnectedtopumpandspraygunwhile
systemispressurized.
• Always be certain spray gun, nozzlesand accessoriesare
correctlyattached.
6. Connect high pressure hose to pump (uncoil hose before
connectingto pump or spraygun) (Figure12).
Riskof eye injury.Spray cansplashbackor propel
..>40 objects.
• Always wear safety goggles when using this equipment or in
vicinity of equipmentin use.
• Before starting the power washer, be sure you are wearing
adequatesafetygoggles.
• NEVERsubstitute safety glassesfor safetygoggles.
.
Connect lance to spray gun (Figure 10). Tighten by hand.
Figure10- Attach Lance
Figure 12- Connect High PressureHoseto Pump
7. Turn ON the water, squeezethe trigger to purge the pump
system of air (Figure13).
,A CAUTION!
,iA The hosecanbe damagedif it comesin contactwitha
hotengineor muffler.
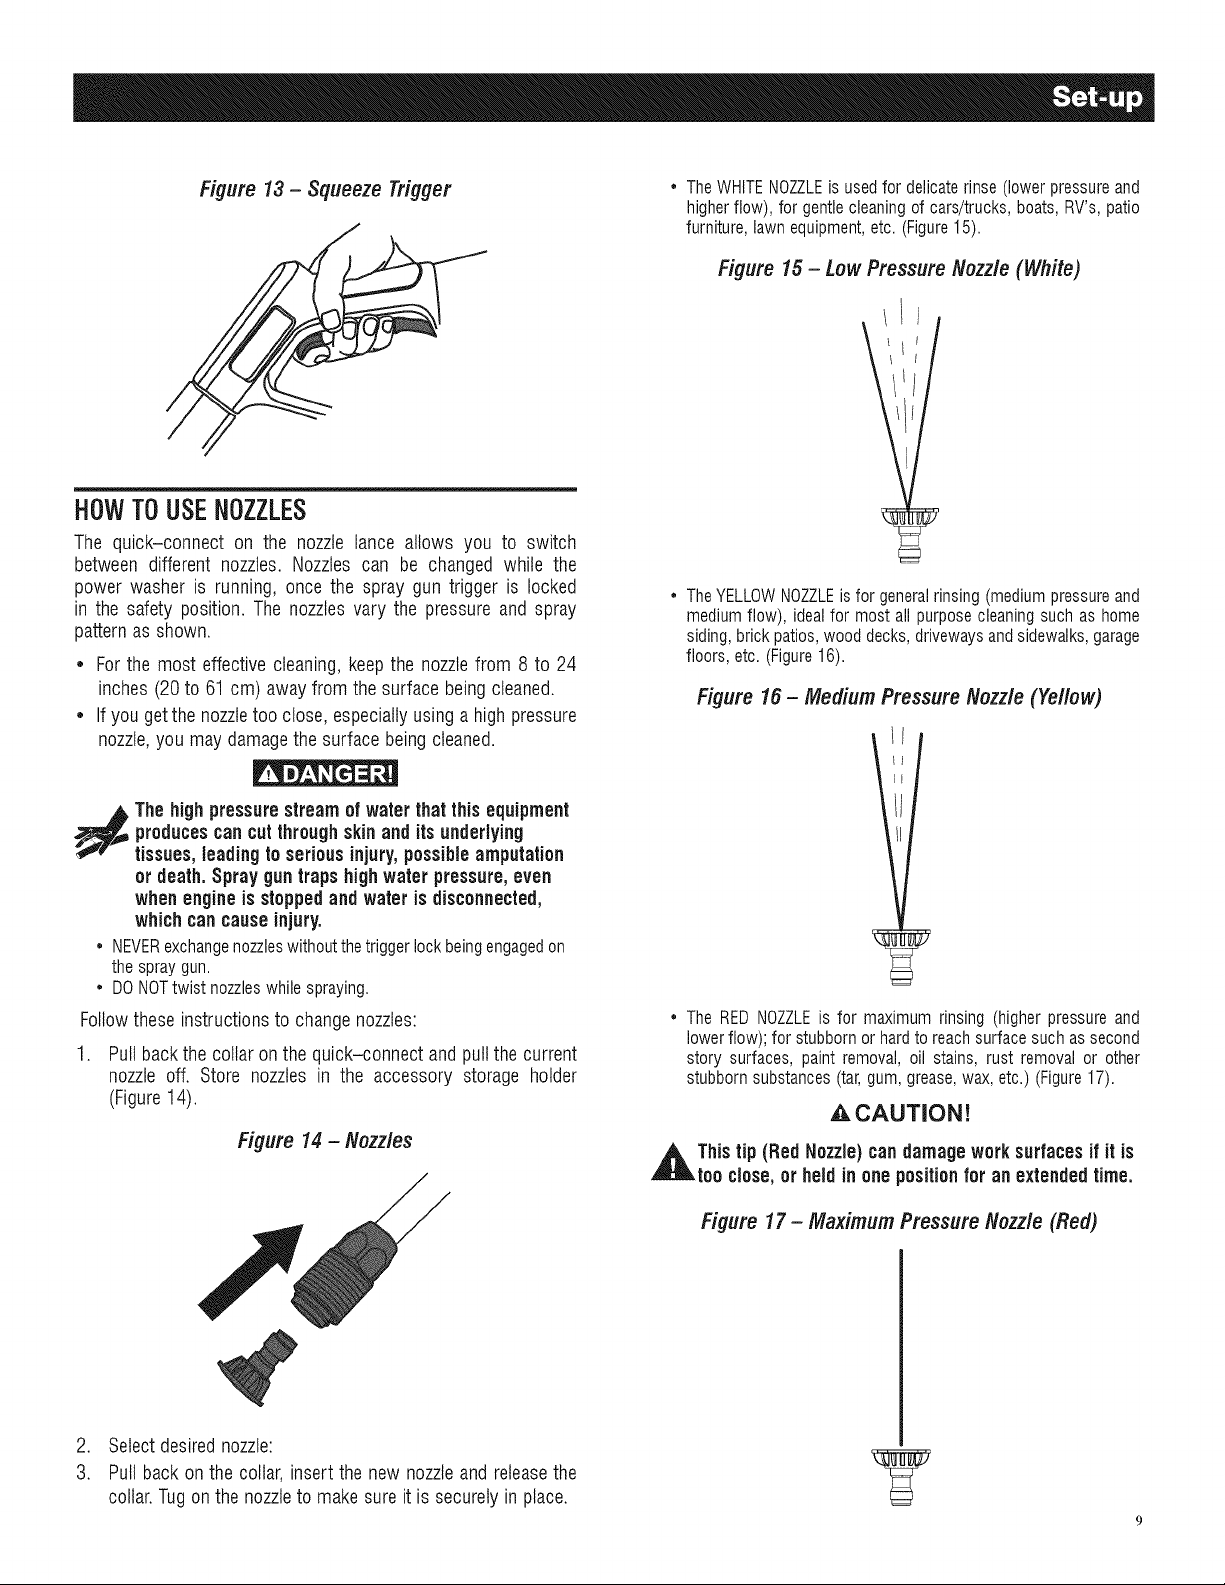
Figure 13- Squeeze Trigger
HOW TOUSENOZZLES
The quick-connect on the nozzle lance allows you to switch
between different nozzles. Nozzles can be changed while the
power washer is running, once the spray gun trigger is locked
in the safety position. The nozzles vary the pressure and spray
patternas shown.
* Forthe most effectivecleaning,keepthe nozzlefrom 8 to 24
inches (20 to 61 cm) awayfrom the surfacebeing cleaned.
* If you getthe nozzletoo close,especiallyusinga highpressure
nozzle,you may damagethe surfacebeingcleaned.
* TheWHITENOZZLEis usedfor delicaterinse (lower pressure and
higherflow), for gentlecleaningof cars/trucks, boats, RV's,patio
furniture, lawn equipment,etc. (Figure15).
Figure 15 - Low Pressure Nozzle (White)
• TheYELLOWNOZZLEis for generalrinsing (medium pressureand
mediumflow), idealfor most all purposecleaning such as home
siding, brickpatios,wood decks, drivewaysandsidewalks,garage
floors, etc. (Figure16).
Figure 16 - Medium Pressure Nozzle (Yellow)
producescancutthroughskinand its underlying
The highpressurestreamof waterthat this equipment
tissues,leadingto seriousinjury,possibleamputation
or death. Spray gun trapshighwaterpressure,even
whenengine is stoppedandwater is disconnected,
whichcan causeinjury.
* NEVERexchangenozzleswithoutthetriggerlockbeingengagedon
thespraygun.
* DONOTtwistnozzleswhilespraying.
Followthese instructionsto changenozzles:
1. Pull backthe collar on the quick-connect and pullthe current
nozzle off. Store nozzles in the accessory storage holder
(Figure14).
Figure 14- Nozzles
* The REDNOZZLEis for maximum rinsing (higher pressure and
lowerflow); for stubborn or hardto reachsurface such as second
story surfaces, paint removal, oil stains, rust removal or other
stubborn substances(tar,gum, grease,wax, etc.) (Figure17).
,&CAUTION!
,l_ Thistip (Red Nozzle)can damageworksurfacesif it is
too close,or heldin one positionfor an extendedtime.
Figure17- MaximumPressureNozzle(Red)
2. Selectdesirednozzle:
3. Pull back on the collar, insert the new nozzleand releasethe
collar.Tugon the nozzleto makesureit is securely in place.
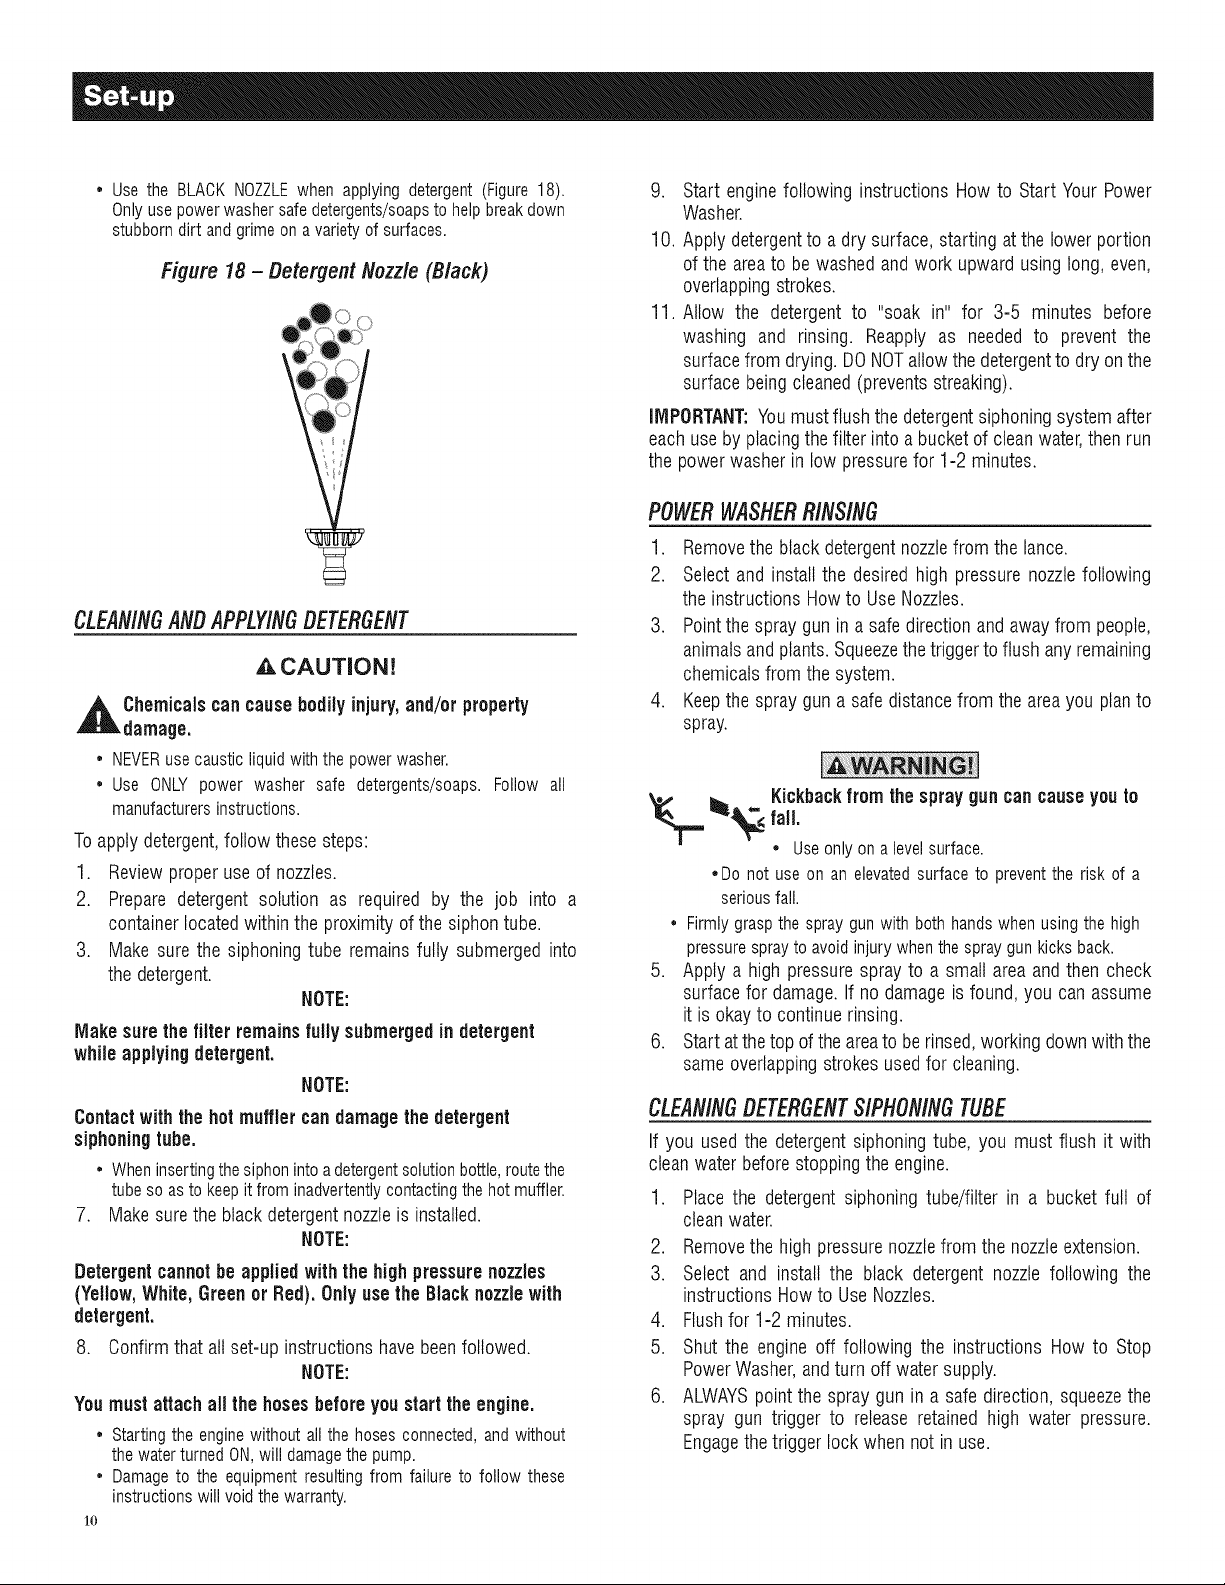
• Use the BLACKNOZZLEwhen applying detergent (Figure 18).
Onlyusepower washer safe detergents/soapsto helpbreakdown
stubborn dirt andgrime on avariety of surfaces.
Figure 18- Detergent Nozzle(Black)
CLEANINGANDAPPLYINGDETERGENT
,A CAUTION!
,_ Chemicals cancause bodily injury,and/or property
damage.
• NEVERusecausticliquidwiththepowerwasher.
• Use ONLYpower washer safe detergents/soaps.Follow all
manufacturersinstructions.
9. Start enginefollowing instructions How to Start Your Power
Washer.
10. Applydetergentto a dry surface,starting atthe lowerportion
of the areato bewashed andwork upward usinglong, even,
overlappingstrokes.
11. Allow the detergent to "soak in" for 3-5 minutes before
washing and rinsing. Reapply as needed to prevent the
surfacefrom drying. DONOTallowthe detergentto dry onthe
surface beingcleaned(preventsstreaking).
IMPORTANT:Youmustflush the detergentsiphoningsystem after
eachuse byplacing thefilter into a bucketof cleanwater,then run
the powerwasher in low pressurefor 1-2 minutes.
POWERWASHERRINS/NG
1. Removethe black detergentnozzlefrom the lance.
2. Select and install the desiredhigh pressure nozzlefollowing
theinstructions Howto UseNozzles.
3. Pointthe spray gun in a safedirection andaway from people,
animalsandplants.Squeezethe triggerto flush anyremaining
chemicalsfrom the system.
4. Keepthe spray gun a safe distancefrom the areayou planto
spray.
Kickback from thespray guncancauseyouto
Toapply detergent,followthese steps:
1. Reviewproper use of nozzles.
2. Prepare detergent solution as required by the job into a
containerlocatedwithin the proximityof the siphontube.
3. Make sure the siphoning tube remains fully submergedinto
thedetergent.
NOTE:
Makesurethe filter remainsfully submergedin detergent
while applying detergent.
NOTE:
Contactwith the hotmuffler can damage the detergent
siphoningtube.
• Wheninsertingthesiphonintoadetergentsolutionbottle,routethe
tubeso asto keepitfrominadvertentlycontactingthehotmuffler.
7. Makesurethe blackdetergentnozzleis installed.
NOTE:
Detergentcannotbe applied withthe highpressurenozzles
(Yellow, White,Greenor Red). Only usethe Black nozzlewith
detergent.
8. Confirmthat all set-up instructions havebeenfollowed.
NOTE:
Youmustattachall the hosesbefore youstart the engine.
• Startingtheenginewithoutallthe hosesconnected,andwithout
thewaterturnedON,willdamagethepump.
• Damageto the equipmentresultingfrom failureto followthese
instructionswillvoidthewarranty.
1o
• Useonlyonalevelsurface.
•Donotuseon anelevatedsurfacetopreventthe riskof a
seriousfall.
• Firmlygraspthespraygunwith bothhandswhenusingthehigh
pressurespraytoavoidinjurywhenthespraygunkicksback.
5. Apply a high pressurespray to a small area andthen check
surfacefor damage.If no damageis found,you can assume
it is okay to continuerinsing.
6. Start atthe top of theareato be rinsed,workingdownwiththe
same overlappingstrokesusedfor cleaning.
CLEAN/NGDETERGENTS/PHON/NGTUBE
If you used the detergentsiphoningtube, you must flush it with
cleanwater beforestoppingthe engine.
1. Place the detergent siphoning tube/filter in a bucket full of
cleanwater.
2. Removethe high pressurenozzlefrom the nozzleextension.
3. Select and install the black detergent nozzle following the
instructions Howto UseNozzles.
4. Flushfor 1-2 minutes.
5. Shut the engine off following the instructions How to Stop
PowerWasher,andturn off water supply.
6. ALWAYSpointthe spray gun in a safe direction, squeezethe
spray gun trigger to release retained high water pressure.
Engagethe trigger lock when notin use.

IMPORTANT:Sprayguntraps highwater pressure,evenwhenthe
engineis stoppedandwater is disconnected.
Figure19 - Building Clearances
:_ The highpressurestreamof water thatthisequipment
producescancutthroughskinand its underlying
tissues,leadingto seriousinjury,possibleamputation
or death.Spray guntrapshighwaterpressure,even
whenengineis stoppedandwater is disconnected,
whichcan causeinjury.
• Keepthehighpressurehoseconnectedtothepumpandspraygun
whilethesystemis pressurized.
• ALWAYSpointthespraygunin a safedirection,andsqueezethe
sprayguntriggerto releasehighpressureeverytimeyoustopthe
engine.Engagethetriggerlockwhennotinuse.
OPERATION
If youhaveany problemsoperatingyourpower washer,pleasecall
Generaccustomerservice at 1-888-436-3722.
POWERWASHERLOCATION
ClearancesandAir Movement
_ ANGER:Carbonmonoxide producedduringuse CAN
For moreinformation,reference the CarbonMonoxide
warningsinthe Safety Rules section.
Place the power washer outdoors, in an area that wilt not
accumulatedeadly exhaustgas. NEVERplacethe power washer
where exhaust gas could accumulate and enter inside, or be
drawn into a potentially occupied building. Ensurethe exhaust
gas is kept away from any windows, doors, ventilation intakes,
or other openingsthat can allow the exhaustgas to collect in a
confined area. Prevailingwinds and air currents should be taken
into considerationwhenpositioningthe powerwasher (Figure19).
KILLin minutes.NEVERuseindoorsor in other
shelteredareas, EVENIFdoorsand windowsare open.
Onlyuse OUTSIDEand far awayfromwindows,doors
andvents.
NOTE:
• OperatethepowerwasheroutdoorsONLY.
• Keepthe exhaustgasfrom enteringa confinedareathrough
windows,doors,ventilationintakes,or otheropenings.
• NEVERstartor run theengineindoors,or in an enclosedarea,
EVENIFwindowsanddoorsareopen.
5 Foot Minimum
CHECKLISTBEFORESTARTINGENGINE
1. Be sure to read and understandthe OperatorSafety section
andthe Operationsectionbefore usingthe power washer.
2. Checkthat oil is at the proper level in the enginecrankcase
andthat fuel has beenaddedto the fueltank.
3. Reviewtheunit'sassemblyandensurethefittings areproperly
secured.Also make surethere areno kinks, cuts, or damage
to high pressurehose.
4. Provide a proper water supply at an adequateflow, clear
screensof debris,andconfirmthat the systemis purgedof air.
5. Confirm that the unit is on secure, level ground and the
surroundingwork areais clear.
HOW TOSTARTYOURPOWERWASHER
NOTE:
DONOTrun the pumpwithoutthe water supplyconnectedand
turnedon. Damageto the equipment resultingfrom failure to
follow theseinstructionswill voidwarranty.
1. Movethefuel valve leverto theONposition (Figure20).
Figure20- Fue/Va/ve
Off
structuresor damagethe fuel tankcausinga
_1_ Exhaustheat/gasescan ignitecombustibles,
fire.
• Keepat least 5 ft. (152 cm) clearanceon all sides of the power
washerincludingoverhead.
11

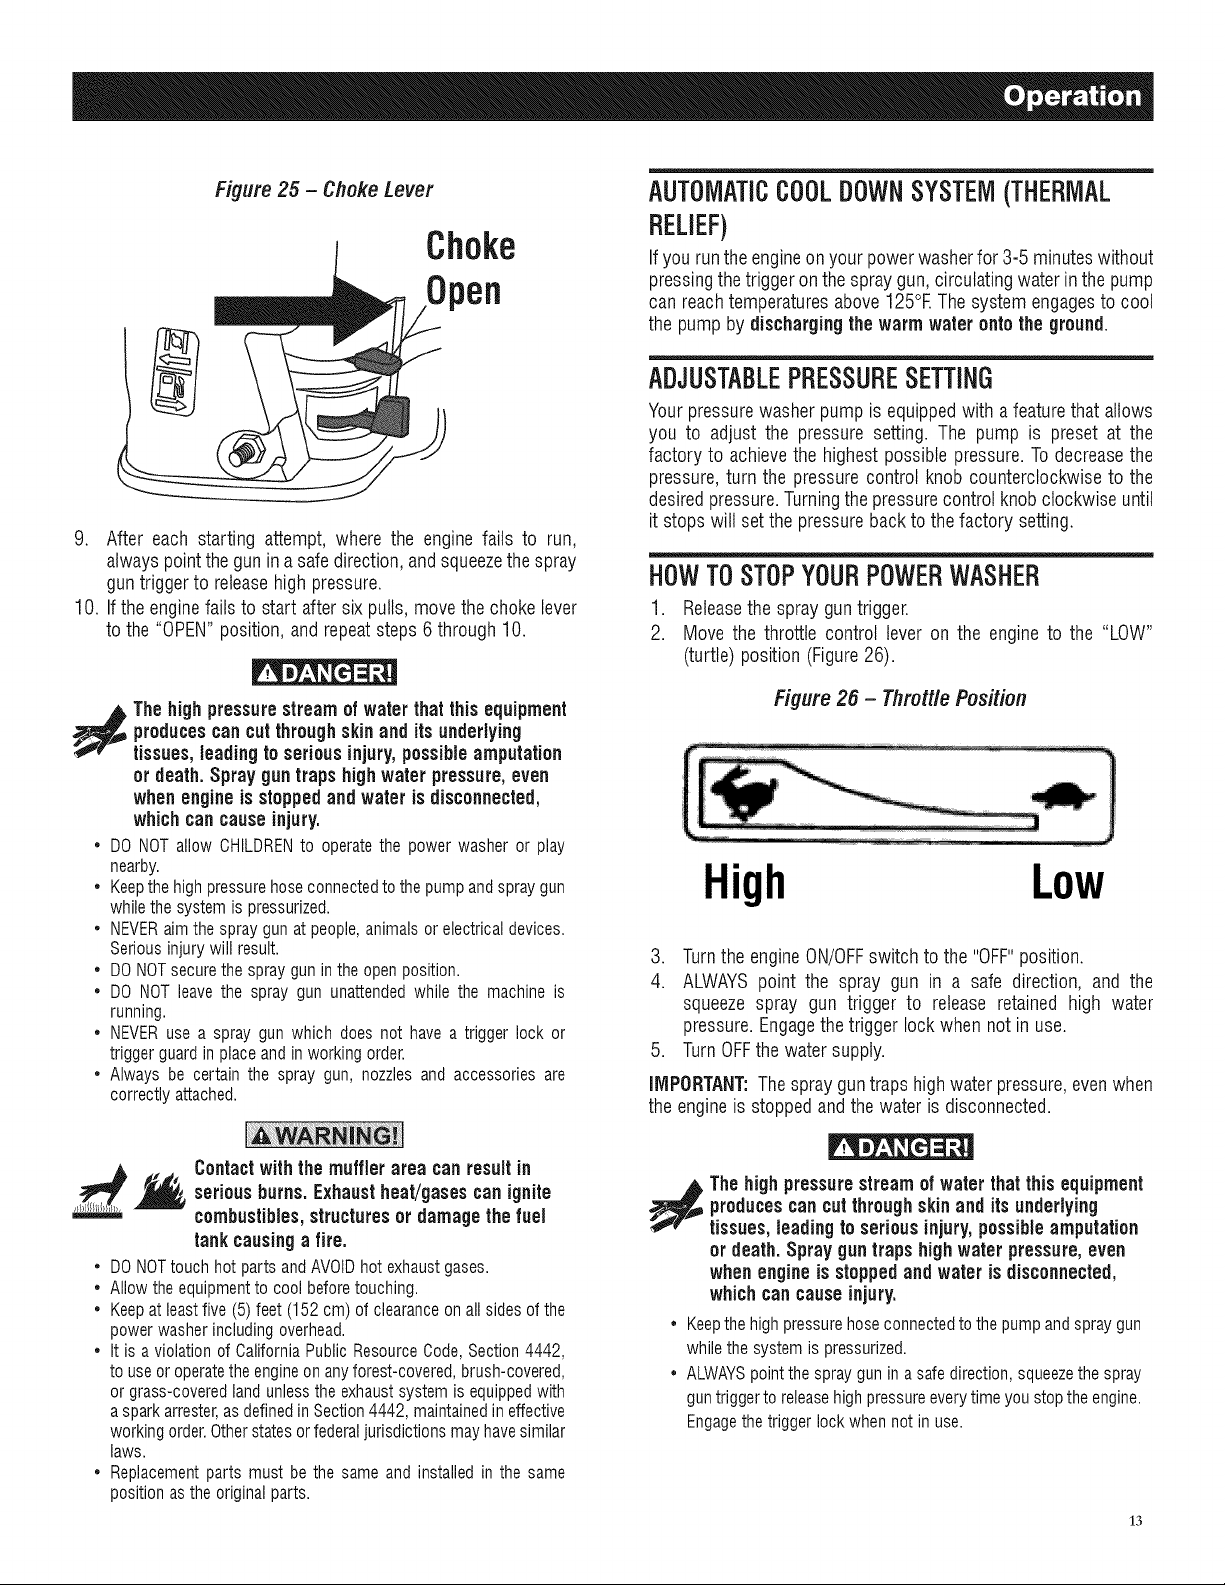
2. Movethechokeleverto the "CLOSE"position (Figure21).
NOTE:
Fora warm engine, be surethe chokeleveris inthe "OPEN"
position.
Figure21 - ChokeLever
Open
Close
.
Move thethrottle control lever to the"HIGH" position, shown
on theengineas a rabbit(Figure22).
Figure 22 - Throttle Centre/
High Low
IMPORTANT:Beforestarting the power washer,be sure you are
wearingadequatesafetygoggles.
Risk of eye injury.Spraycansplashbackor propel
'>_0 objects.
Alwayswearsafetygoggleswhenusingthisequipmentor inthe
vicinityof equipmentin use.
Beforestarting the powerwasher,be sure you are wearing
adequatesafetygoggles.
NEVERsubstitutesafetyglassesfor safetygoggles.
.
Place foot on footpad or otherwise secure the unit from
movementwhenpullingthe recoil.
6.
Whenstarting the engine,graspthe startergrip handle(Figure
24) and pull slowly until you feel some resistance.Then pull
rapidlyto start engine.
Starter cordkickback (rapidretraction)canresult in
bodily injury.Kickback will pullhandand arm toward
enginefaster thanyoucan let go. Brokenbones,
fractures, bruises, or sprainscouldresult.
* NEVERpullthe startercordwithoutfirst relievingthespraygun
pressure.
* Whenstartingthe engine,pullthecord slowlyuntilresistanceis
felt,thenpullrapidlyto avoidkickback.
* Aftereachstartingattempt,whereenginefailstorun,alwayspoint
thesprayguninasafedirectionandsqueezethesprayguntrigger
to releasehighpressure.
®
Firmlygraspthe spraygun with both handswhenusing high
pressurespraytoavoidinjurywhenthespraygunkicksback.
7.
Return the starter grip handle slowly. DO NOTlet the rope
"snap back" againstthe starter.
.
Turnthe engineswitch to the "ON"position (Figure23).
Figure 23- The ON Position
12
Figure24 - StartingtheEngine
StarterHandle
.
Whenthe engine starts, slowly the move choke leverto the
"OPEN" position as the engine warms. If the enginefalters,
move the choke leverto the "CLOSE"position, then to the
"OPEN"position (Figure25).
9. After each starting attempt, where the engine fails to run,
alwayspointthegun in asafe direction,andsqueezethe spray
guntriggerto releasehigh pressure.
10. If the enginefails to start after six pulls, movethe chokelever
to the "OPEN"position,andrepeatsteps6through 10.
producescancutthroughskinand its underlying
The highpressurestreamof waterthat this equipment
tissues,leadingto seriousinjury,possibleamputation
or death.Spray guntraps highwater pressure,even
whenengineisstoppedandwater is disconnected,
whichcan causeinjury.
, DONOTallow CHILDRENto operatethe powerwasheror play
nearby.
* Keepthehighpressurehoseconnectedtothepumpandspraygun
whilethesystemis pressurized.
* NEVERaimthespraygunatpeople,animalsorelectricaldevices.
Seriousinjurywill result.
* DONOTsecurethe spraygunintheopenposition.
* DONOTleavethe spraygun unattendedwhilethe machineis
running.
* NEVERuse a spraygunwhich doesnot havea triggerlockor
triggerguardinplaceandinworkingorder.
* Alwaysbe certainthe spray gun,nozzlesand accessoriesare
correctlyattached.
AUTOMATICCOOLDOWNSYSTEM(THERMAL
RELIEF)
If yourunthe engineon yourpowerwasherfor 3-5 minuteswithout
pressingthetrigger onthe spraygun, circulatingwater inthe pump
can reachtemperaturesabove125°EThesystemengagesto cool
the pump by discharging thewarm waterontotheground.
ADJUSTABLEPRESSURESETTING
Yourpressurewasher pumpis equippedwith a featurethat allows
you to adjust the pressure setting. The pump is preset at the
factory to achievethe highest possible pressure.Todecreasethe
pressure,turn the pressurecontrol knob counterclockwiseto the
desiredpressure.Turningthe pressurecontrolknobclockwise until
it stops will setthe pressureback to thefactory setting.
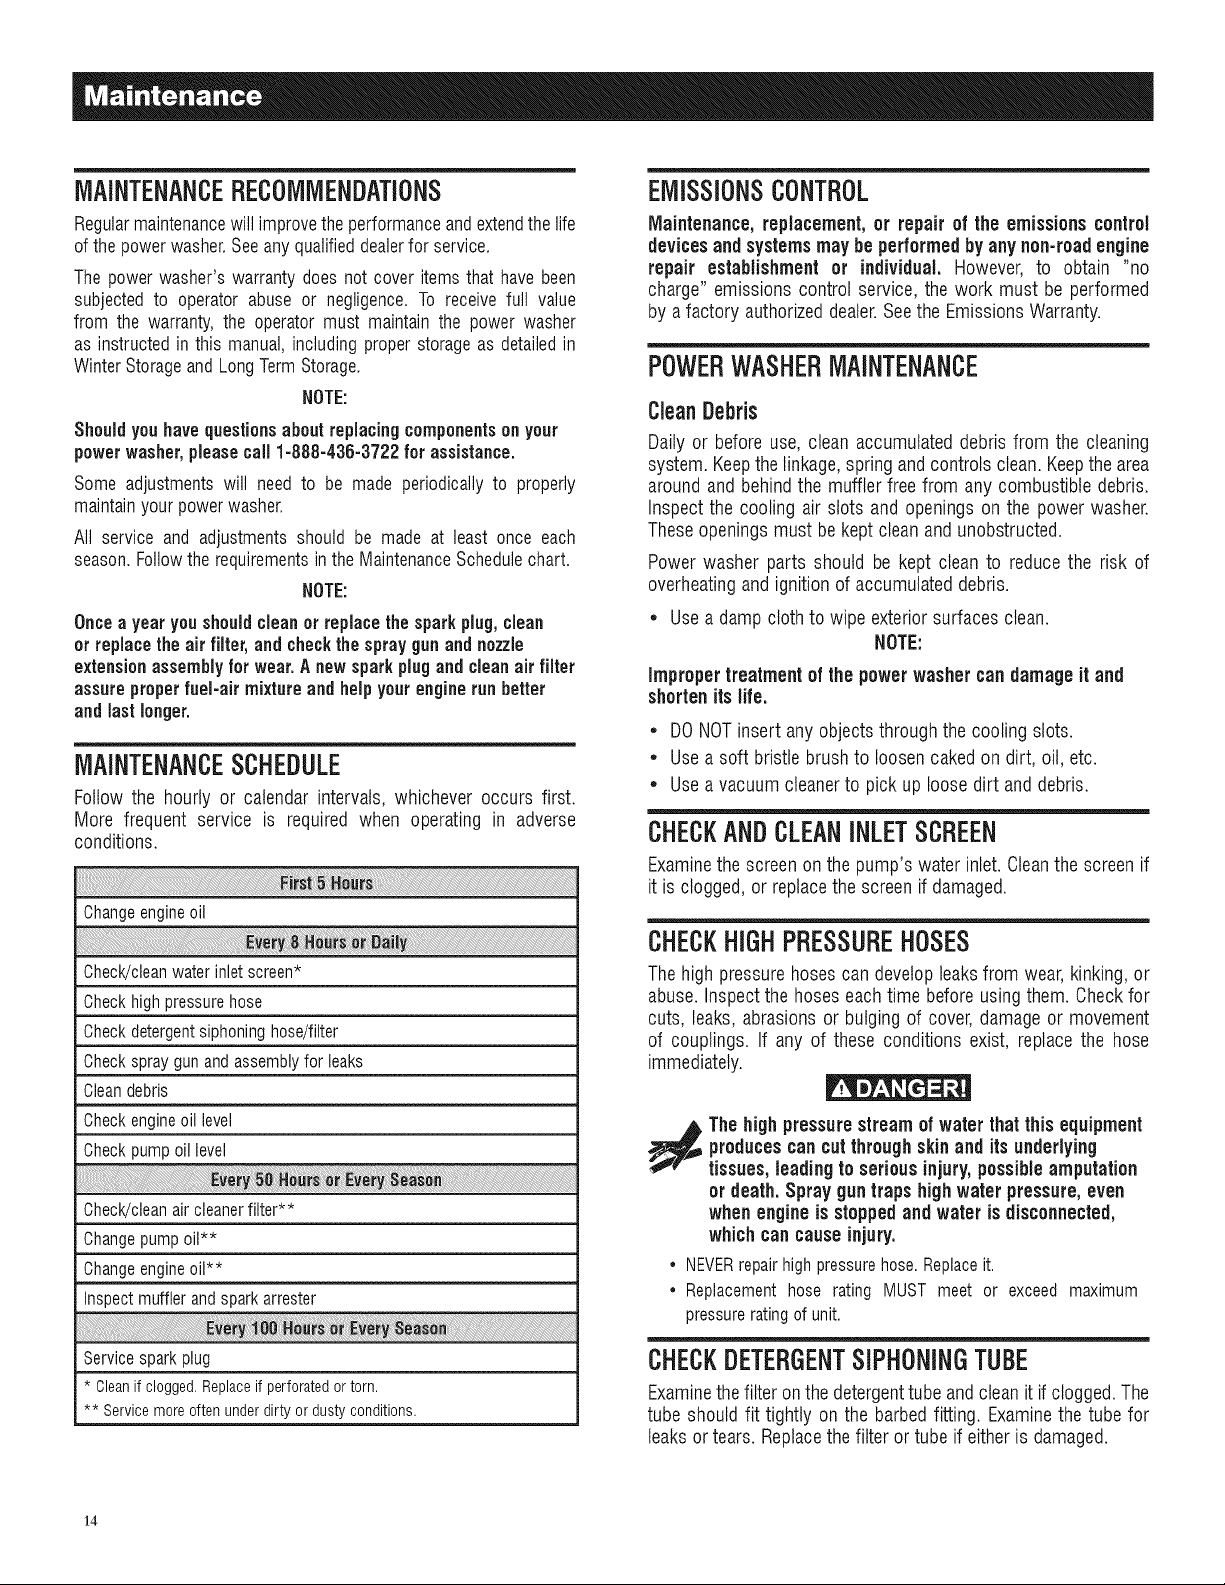
HOWTOSTOPYOURPOWERWASHER
1. Releasethe spray guntrigger.
2. Move the throttle control lever on the engine to the "LOW"
(turtle) position (Figure26).
Figure 26 - Throttle Position
High Low
3. Turnthe engineON/OFFswitch to the "OFF"position.
4. ALWAYSpoint the spray gun in a safe direction, and the
squeeze spray gun trigger to release retained high water
pressure.Engagethe triggerlock when not inuse.
5. TurnOFFthe watersupply.
iMPORTANT:Thesprayguntraps highwater pressure,evenwhen
theengineis stoppedand thewater is disconnected.
serious burns, Exhaust heat/gasescanignite
Contact with the muffler area can result in
combustibles,structures or damagethe fuel
tank causinga fire,
• DONOTtouch hot parts and AVOIDhot exhaustgases.
• Allowthe equipmentto cool beforetouching.
• Keepat leastfive (5)feet (152 cm) of clearance on allsides ofthe
powerwasher including overhead.
• It is a violation of CaliforniaPublic ResourceCode,Section 4442,
to useor operatethe engineon anyforest-covered,brush-covered,
or grass-coveredland unlessthe exhaustsystemis equippedwith
aspark arrester,asdefinedin Section4442, maintainedin effective
workingorder.Otherstatesorfederaljurisdictions mayhavesimilar
laws.
• Replacementparts must be the same and installed in the same
positionas the originalparts.
producescancutthroughskinand its underlying
The highpressurestreamof waterthat this equipment
tissues,leading to seriousinjury,possibleamputation
or death,Spray guntraps highwater pressure,even
whenengineisstoppedandwater is disconnected,
whichcan causeinjury,
* Keepthehigh pressurehoseconnectedtothe pump andspray gun
while thesystemis pressurized.
* ALWAYSpointthe spray gunin a safedirection,squeezethe spray
guntrigger to releasehigh pressureeverytime youstop the engine.
Engagethetrigger lock when not in use.
13
MAINTENANCERECOMMENDATIONS
Regularmaintenancewillimprovetheperformanceandextendthe life
ofthe powerwasher.Seeanyqualifieddealerforservice.
Thepowerwasher'swarrantydoesnotcover itemsthathavebeen
subjectedto operator abuseor negligence.To receivefull value
from the warranty,the operatormust maintainthe power washer
as instructedin this manual,includingproperstorageas detailedin
WinterStorageandLongTermStorage.
NOTE:
Shouldyouhavequestionsaboutreplacingcomponentson your
powerwasher,pleasecall1-888-436-3722for assistance.
Some adjustmentswill need to be made periodicallyto properly
maintainyour powerwasher.
All service and adjustmentsshould be made at least once each
season.Followtherequirementsinthe MaintenanceSchedulechart.
NOTE:
Oncea yearyoushouldcleanor replacethesparkplug,clean
or replacetheair filter, andcheckthespraygun andnozzle
extensionassemblyfor wear.Anewsparkplugandcleanair filter
assureproperfuel-air mixture and helpyourenginerunbetter
and lastlonger.
MAINTENANCESCHEDULE
Follow the hourly or calendar intervals, whichever occurs first.
More frequent service is required when operating in adverse
conditions.
Changeengineoil
Check!cleanwaterinletscreen*
Checkhighpressurehose
Checkdetergentsiphoninghose/filter
Checkspraygunandassemblyfor leaks
Cleandebris
Checkengineoil level
Checkpumpoillevel
Check/cleanaircleanerfilter**
Changepumpoil**
Changeengineoil**
Inspectmufflerandsparkarrester
EMISSIONSCONTROL
Maintenance,replacement,or repair of the emissions control
devicesand systemsmaybe performedbyany non-roadengine
repair establishment or individual, However, to obtain "no
charge" emissions control service, the work must be performed
by afactory authorizeddealer.Seethe EmissionsWarranty.
POWERWASHERMAINTENANCE
CleanDebris
Daily or beforeuse, cleanaccumulateddebris from the cleaning
system.Keepthelinkage,spring and controlsclean.Keepthe area
aroundand behindthe muffler freefrom anycombustible debris.
Inspectthe cooling air slots and openings on the power washer.
Theseopeningsmust be kept cleanandunobstructed.
Powerwasher parts should be kept clean to reducethe risk of
overheatingand ignition of accumulateddebris.
• Usea dampclothto wipe exteriorsurfaces clean.
NOTE:
Improper treatmentof the powerwasher candamageit and
shortenits life.
• DONOTinsert anyobjects throughthe cooling slots.
• Usea soft bristlebrushto loosen cakedon dirt, oil, etc.
• Usea vacuumcleanerto pick up loosedirt anddebris.
CHECKAND CLEANINLETSCREEN
Examinethe screen on thepump's water inlet. Cleanthe screen if
it is clogged,or replacethe screen if damaged.
CHECKHIGHPRESSUREHOSES
Thehigh pressurehosescan developleaksfrom wear,kinking, or
abuse.Inspectthehoses each time beforeusingthem. Checkfor
cuts, leaks,abrasionsor bulgingof cover,damageor movement
of couplings. If any of these conditions exist, replace the hose
immediately.
producescancut throughskinand its underlying
Thehighpressurestream of water thatthisequipment
tissues,leadingto seriousinjury,possibleamputation
or death.Spray gun trapshighwaterpressure,even
whenengine is stoppedand water is disconnected,
whichcan causeinjury.
• NEVERrepairhigh pressurehose.Replaceit.
• Replacement hose rating MUST meet or exceed maximum
pressure ratingof unit.
Servicesparkplug
* Cleanif clogged.Replaceif perforated ortorn.
** Service moreoften under dirty or dusty conditions.
14
CHECKDETERGENTSIPHONINGTUBE
Examinethe filter on thedetergenttube andcleanit if clogged.The
tube should fit tightly on the barbedfitting. Examinethe tube for
leaksor tears.Replacethe filter or tube if eitheris damaged.
CHECKSPRAYGUN
Examinethe hoseconnectionto thespray gun andmakesure itis
secure.Test the trigger by pressingthe trigger,it "springs back"
into placewhenyou releaseit. Replacethe spraygun immediately
if itfails to "springback".
NOZZLEMAINTENANCE
A pulsing sensation felt while squeezingthe spray gun trigger
may becaused by excessivepumppressure.Theprincipalcause
of excessive pump pressure is a nozzle clogged or restricted
with foreign materials,such as dirt, etc. Tocorrect the problem,
immediatelycleanthe nozzlefollowing these instructions:
1. Shutoff the engineandturn off thewater supply.
2. ALWAYSpointthe spray gun in a safe direction, squeezethe
spray guntriggerto releaseretainedhighwater pressure.
producescancutthroughskinand itsunderlying
The highpressurestream of water thatthis equipment
tissues,leadingto seriousinjury,possibleamputation
or death.Spray gun trapshighwaterpressure,even
whenengine isstoppedandwater is disconnected,
whichcan causeinjury.
* Keepthehighpressurehoseconnectedtothepumpandspraygun
whilethesystemispressurized.
* ALWAYSpointthespraygunin a safedirection,andsqueezethe
sprayguntriggerto releasehighpressureeverytimeyoustopthe
engine.Engagethetriggerlockwhennotinuse.
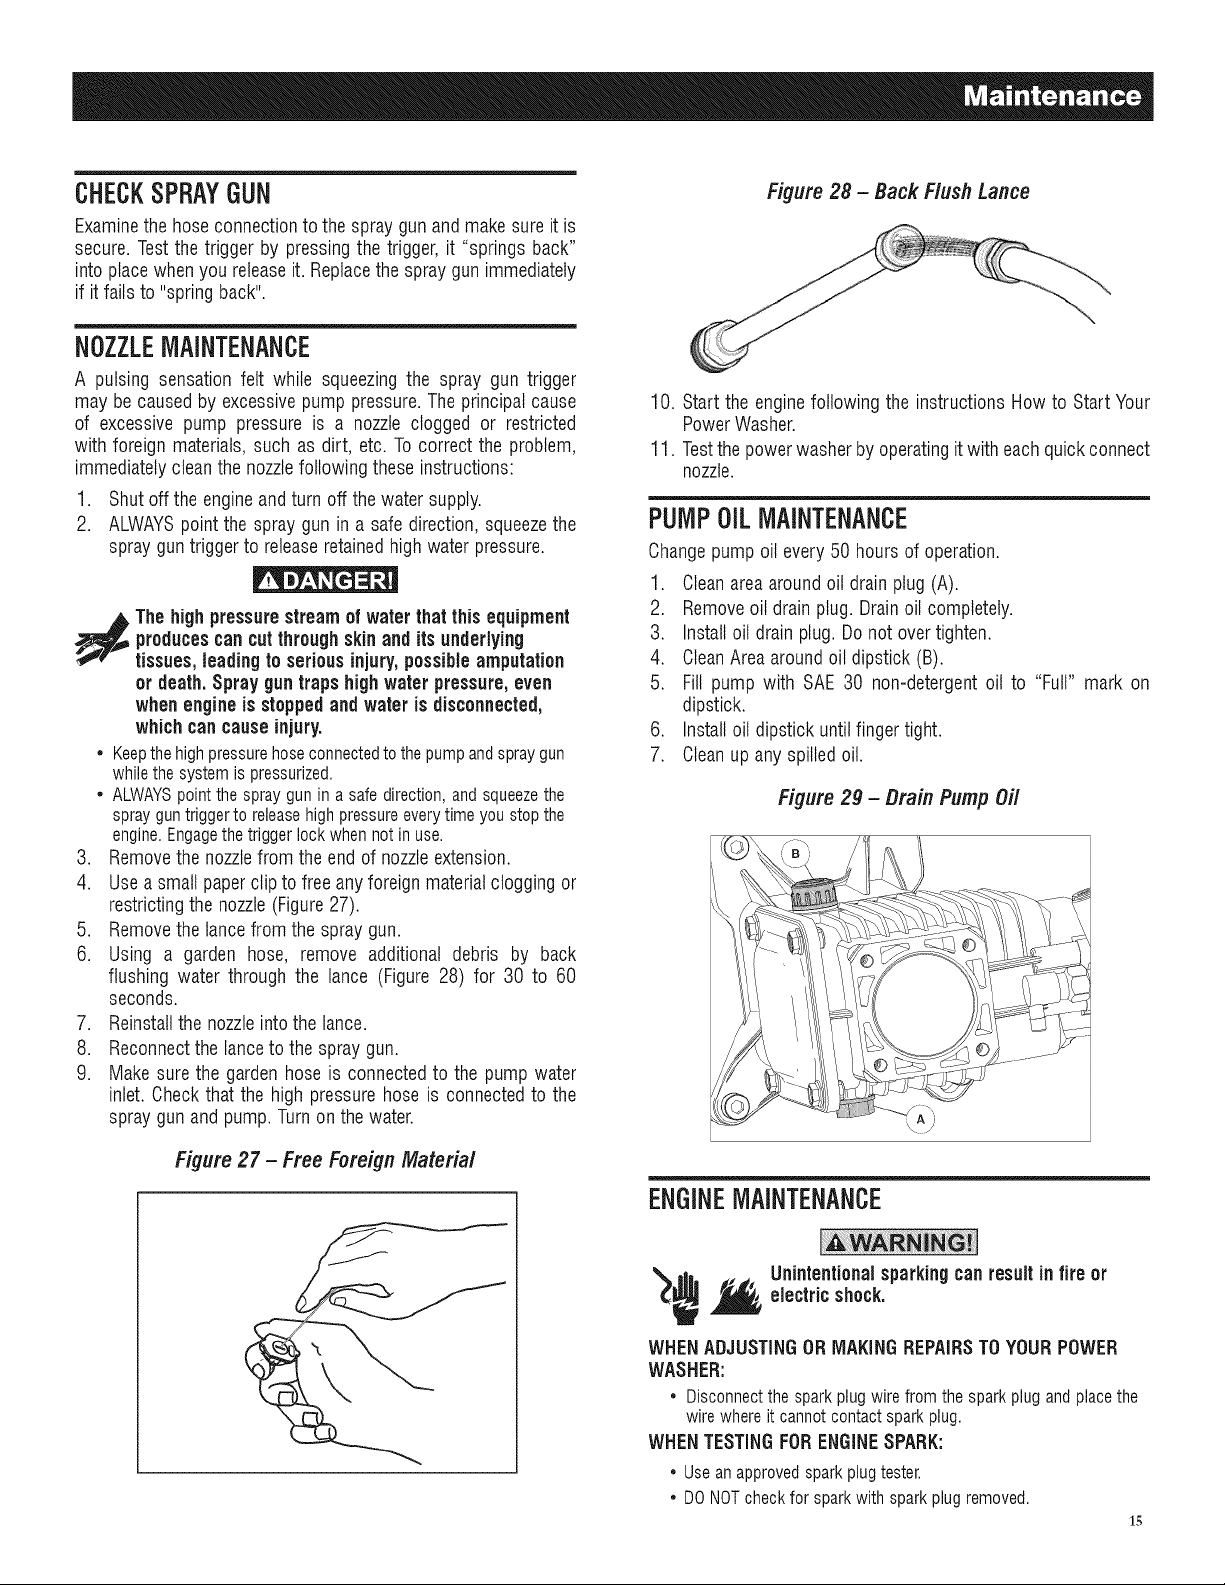
3. Removethe nozzlefrom theendof nozzleextension.
4. Use asmall paperclipto free anyforeignmaterialcloggingor
restrictingthe nozzle(Figure27).
5. Removethe lancefrom the spray gun.
6. Using a garden hose, remove additional debris by back
flushing water through the lance (Figure28) for 30 to 60
seconds.
7. Reinstallthe nozzleintothe lance.
8. Reconnectthe lanceto the spray gun.
9. Make surethe gardenhose is connectedto the pump water
inlet. Checkthat the high pressurehose is connectedto the
spray gun and pump.Turnon the water.
Figure28 - BackFlushLance
10. Start the enginefollowing the instructions Howto Start Your
PowerWasher.
11. Testthepowerwasher by operatingit with eachquickconnect
nozzle.
PUMPOILMAINTENANCE
Changepump oil every 50 hours of operation.
1. Cleanareaaroundoil drain plug (A).
2. Removeoil drain plug. Drainoil completely.
3. Installoil drain plug. Do not overtighten.
4. CleanAreaaroundoil dipstick (B).
5. Fill pump with SAE 30 non-detergentoil to "Full" mark on
dipstick.
6. Installoil dipstick until fingertight.
7. Cleanup any spilledoil.
Figure2g - Drain PumpOil
Figure 27 - Free Foreign Material
ENGINEMAINTENANCE
'_f Unintentionalsparkingcanresultin fire or
WHENADJUSTINGORMAKINGREPAIRSTOYOURPOWER
WASHER:
* Disconnectthesparkplugwirefromthesparkplugandplacethe
wirewhereitcannotcontactsparkplug.
WHENTESTINGFORENGINESPARK:
* Useanapprovedsparkplugtester.
* DONOTcheckforsparkwithsparkplugremoved.
electric shock.
15
ENGINEOiLBECOIVlIVIENDATIONS
Werecommendthe use of high=qualitydetergentoils acceptableif
classifiedfor service SF,SG,SH,SJor higher.DONOTusespecial
additives.
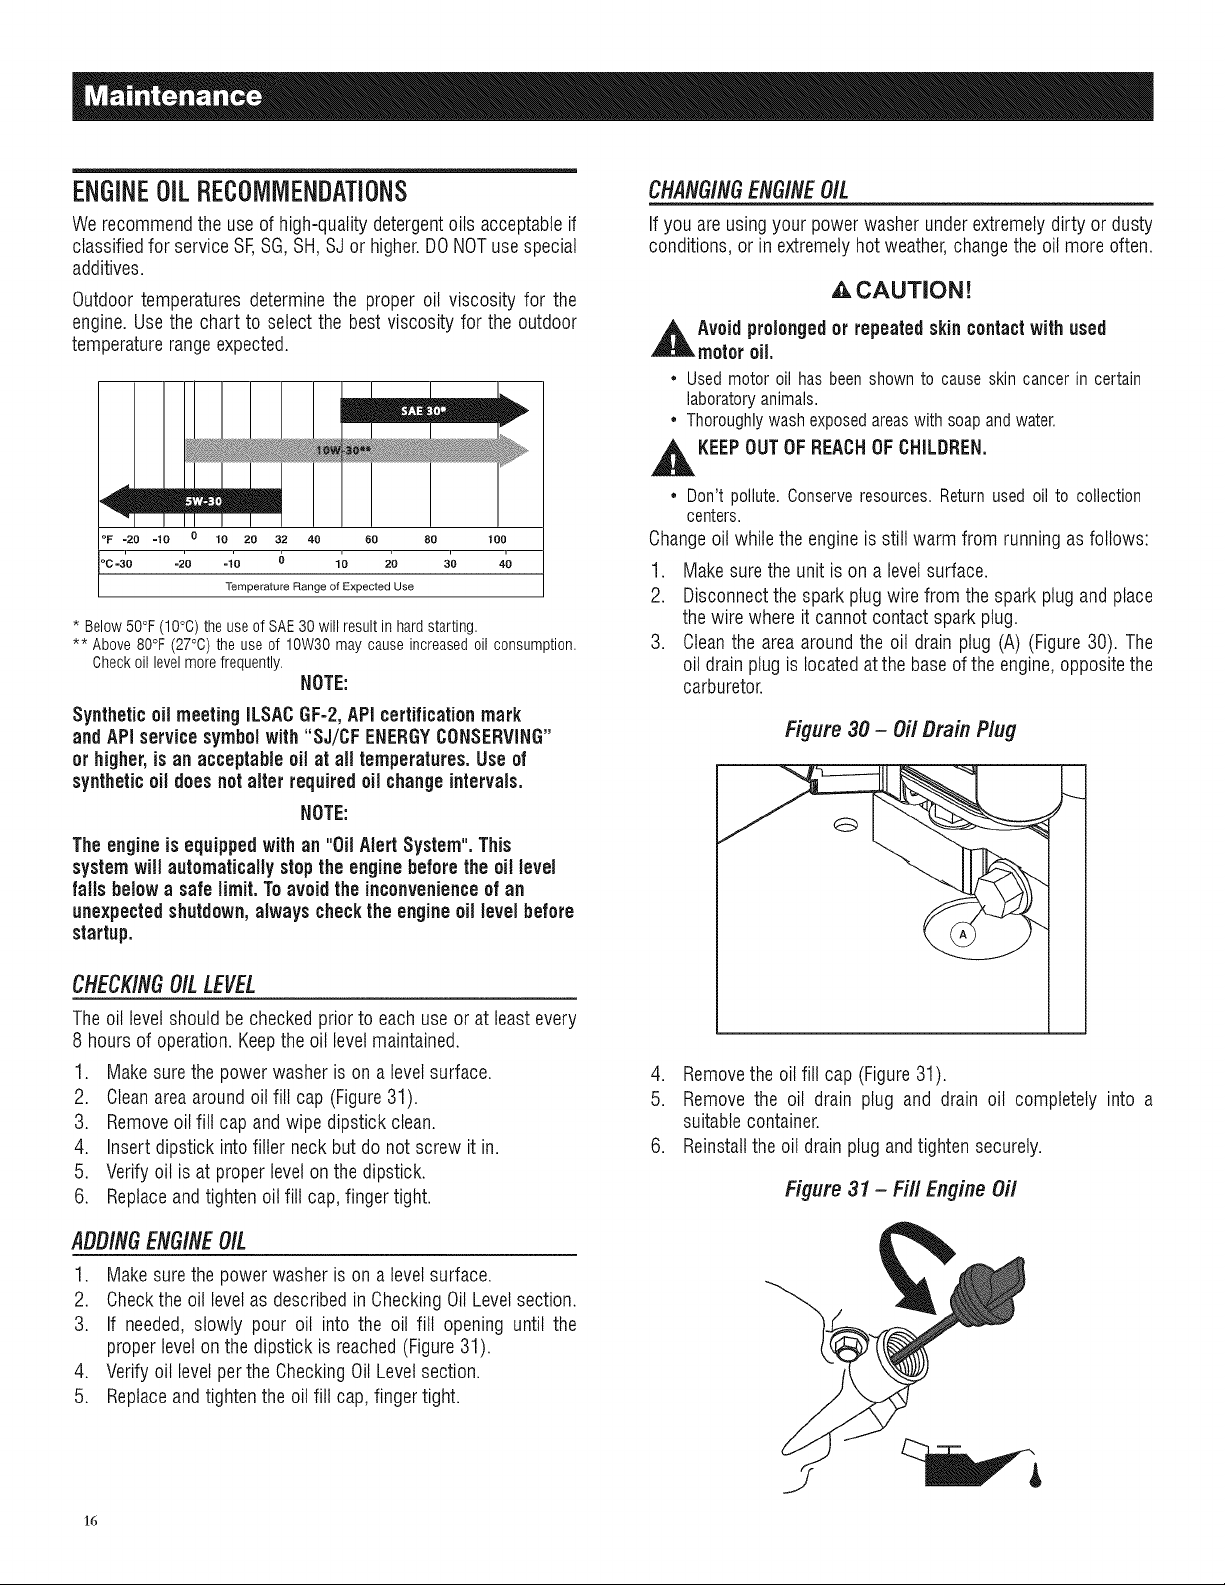
Outdoortemperatures determinethe proper oil viscosity for the
engine.Usethe chart to select the best viscosity for the outdoor
temperaturerangeexpected.
, lm| zmm
°F =20 -10 0 10 20 32 40 60 80 100
oc-3'o -2'o -I'o 6 1'o 2'0 3'o 40
Temperature Range of Expected Use
* Below 50°F (10°C) the use of SAE 30 will result in hard starting.
** Above 80°F (27°C) the use of 10W30 may causeincreased oil consumption.
Checkoil levelmore frequently.
NOTE:
Synthetic oil meetingILSACGF-2,API certificationmark
and API servicesymbolwith "SJ/CFENERGYCONSERVING"
or higher,is an acceptableoil at all temperatures.Useof
syntheticoil doesnotalter requiredoil changeintervals.
NOTE:
CHANG/NGENG/NEOIL
If you are usingyour power washer underextremelydirty or dusty
conditions,or in extremelyhot weather,changethe oil moreoften.
,_ CAUTION!
,_ Avoid prolongedor repeatedskincontactwith used
motoroil.
* Usedmotoroil hasbeenshownto causeskincancerin certain
laboratoryanimals.
* Thoroughlywashexposedareaswithsoapandwater.
,_ KEEP OUT OF REACH OF CHILDREN,
* Don'tpollute.Conserveresources.Returnusedoil to collection
centers.
Changeoil while the engineis still warm from running as follows:
1. Makesurethe unitis on a levelsurface.
2. Disconnectthe sparkplug wirefrom the spark plugand place
thewire whereit cannot contactspark plug.
3. Cleanthe area aroundthe oil drain plug (A) (Figure30). The
oil drain plugis locatedat the baseof the engine,oppositethe
carburetor.
Figure30 - OilDrain Plug
Theengineis equipped withan "OilAlert System". This
systemwill automaticallystopthe engine beforethe oil level
fails below a safe limit.Toavoidtheinconvenienceof an
unexpectedshutdown,alwayscheckthe engine oil levelbefore
startup.
CHECK/NGO/LLEVEL
Theoil levelshould be checkedprior to eachuse or at leastevery
8 hoursof operation.Keepthe oillevelmaintained.
1. Makesurethe powerwasherison a levelsurface.
2. Cleanareaaroundoil fill cap (Figure31).
3. Removeoil fill cap andwipedipstick clean.
4. Insert dipstick into filler neck but do notscrew it in.
5. Verifyoil is at properlevelonthe dipstick.
6. Replaceandtighten oil fill cap,fingertight.
ADDINGENG/NEOIL
1. Makesurethe powerwasherison a levelsurface.
2. Checkthe oil levelasdescribedin CheckingOilLevelsection.
3. If needed, slowly pour oil into the oil fill opening until the
proper levelon the dipstick is reached(Figure31).
4. Verifyoil levelperthe CheckingOilLevelsection.
5. Replaceandtightenthe oil fill cap,finger tight.
4. Removethe oil fill cap (Figure31).
5. Removethe oil drain plug and drain oil completely into a
suitablecontainer.
6. Reinstallthe oil drainplug andtighten securely.
Figure 31 - Fi// Engine Oil
16
7. Slowly pour oil (about 20 oz.) into the oil fill openingto the
proper levelon the dipstick. DO NOToverfill.
8. Reinstallthe oil fill cap. Fingertightencap securely.
9. Wipeup any spilledoil.
10. Properly dispose of oil in an accordance with all local
regulations.
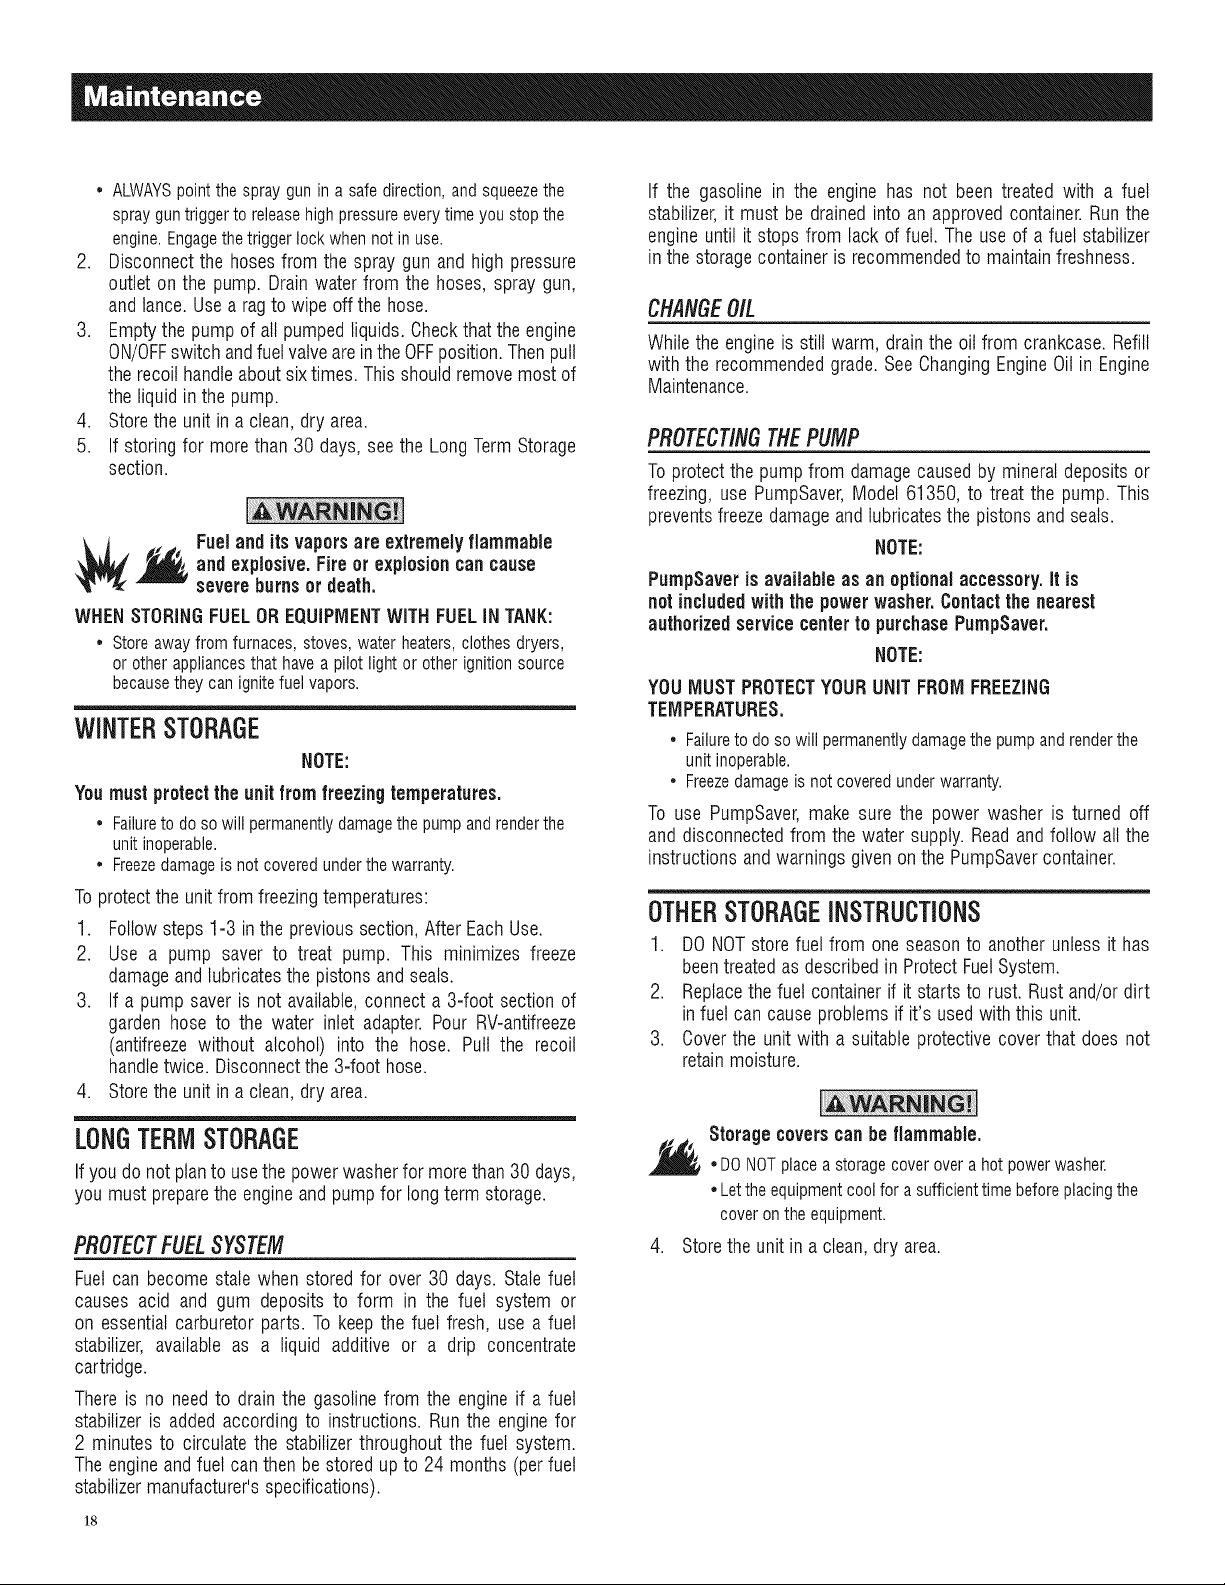
SERVICEAIRCLEANER
Yourenginewill notrun properly andmay bedamagedif you runit
with a dirty air cleaner.Servicemoreoftenif operatingunderdirty
or dustyconditions.
Toservicethe air cleaner,follow these steps:
1. Loosenthe screw andremovecover (Figure32).
2. Carefullyremovethe filter assembly.
3. Removethe foam filter.
4. Tocleanthe cartridge, gentlytap it on a flat surface.
5. Reinstallthe foam filter.
6. Reinstalla clean or newcartridgeassembly.
7. Installthe cover andtighten screwsecurely.
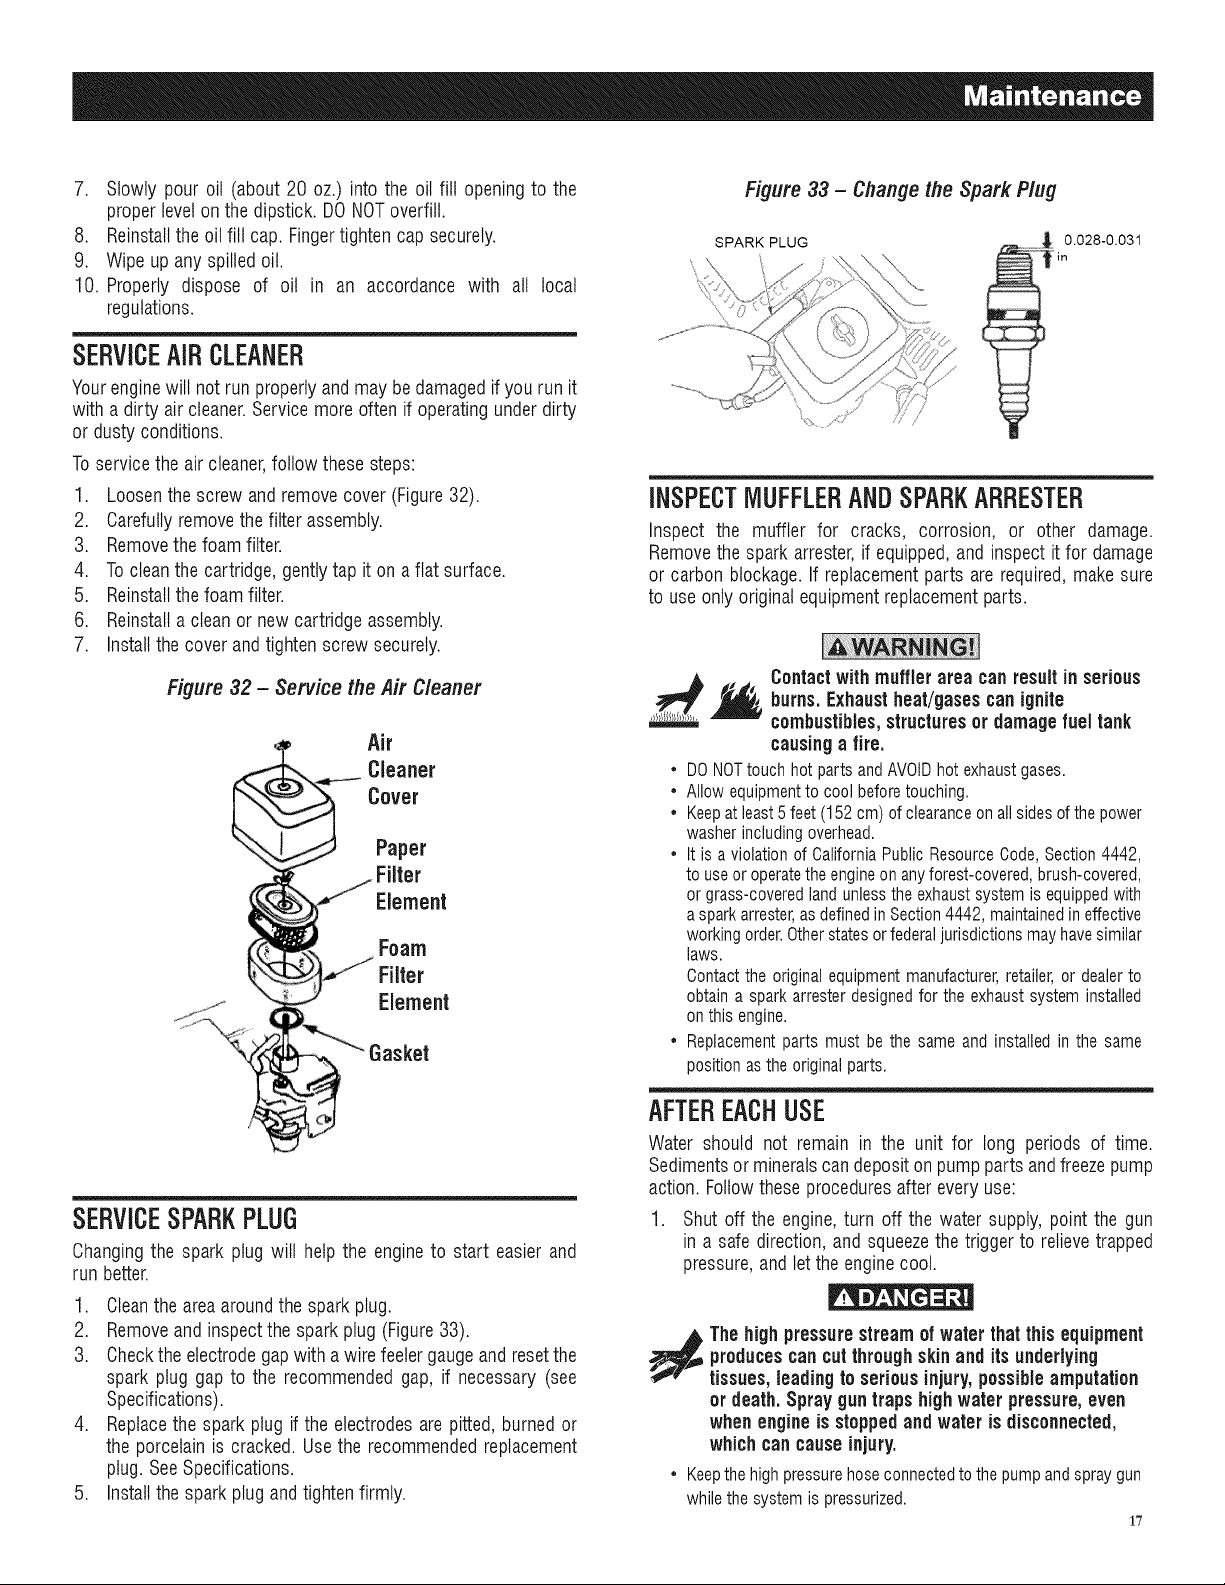
Figure 33 - Change the Spark Plug
SPARKPLUG
0.028-0.031
INSPECTMUFFLERANDSPARKARRESTER
Inspect the muffler for cracks, corrosion, or other damage.
Removethe spark arrester,if equipped,and inspectit for damage
or carbon blockage.If replacementparts are required,makesure
to use only originalequipmentreplacementparts.
Figure 32 - Service the Air Cleaner
Air
Cleaner
Cover
Paper
Filter
Element
Foam
SERVICESPARKPLUG
Changingthe spark plug will help the engineto start easier and
run better.
burns.Exhaustheat/gasescan ignite
Contactwith muffler area can result in serious
combustibles,structuresor damagefuel tank
causinga fire.
* DONOTtouchhotpartsandAVOIDhotexhaustgases.
* Allowequipmenttocoolbeforetouching.
* Keepatleast5feet(152cm)ofclearanceonallsidesofthepower
washerincludingoverhead.
* It isa violationof CaliforniaPublicResourceCode,Section4442,
to useoroperatetheengineonanyforest-covered,brush-covered,
orgrass-coveredlandunlesstheexhaustsystemis equippedwith
asparkarrester,asdefinedinSection4442,maintainedineffective
workingorder.Otherstatesorfederaljurisdictionsmayhavesimilar
laws.
Contactthe originalequipmentmanufacturer,retailer,or dealerto
obtainasparkarresterdesignedforthe exhaustsysteminstalled
onthisengine.
* Replacementpartsmust bethesameand installedin the same
positionastheoriginalparts.
AFTEREACHUSE
Water should not remain in the unit for long periods of time.
Sedimentsormineralscan depositon pumpparts andfreezepump
action. Followthese proceduresafter every use:
1. Shut off the engine,turn off the water supply, point the gun
in a safe direction,andsqueezethe triggerto relievetrapped
pressure,and let the enginecool.
1. Cleanthe areaaroundthe sparkplug.
2. Removeandinspect the spark plug (Figure33).
3. Checkthe electrodegapwith a wirefeelergaugeandresetthe
spark plug gap to the recommendedgap, if necessary (see
Specifications).
4. Replacethe spark plug if the electrodesarepitted, burnedor
the porcelain is cracked. Usethe recommendedreplacement
plug.SeeSpecifications.
5. Installthe spark plug andtightenfirmly.
producescancutthroughskinand its underlying
The highpressurestreamof waterthat this equipment
tissues,leadingto seriousinjury,possibleamputation
or death.Sprayguntrapshighwater pressure,even
whenengineisstoppedandwater is disconnected,
whichcan causeinjury.
* Keepthehigh pressurehoseconnectedtothe pump andspray gun
while thesystemis pressurized.
17
* ALWAYSpointthespraygunin a safedirection,andsqueezethe
sprayguntriggerto releasehighpressureeverytimeyoustopthe
engine.Engagethetriggerlockwhennotinuse.
2. Disconnectthe hosesfrom the spray gun and high pressure
outlet on the pump. Drainwaterfrom the hoses, spray gun,
and lance.Use a ragto wipe off the hose.
3. Emptythe pump of all pumped liquids. Checkthat the engine
ON/OFFswitch andfuel valveareintheOFFposition.Thenpull
therecoil handleaboutsixtimes. This should removemost of
the liquidin the pump.
4. Storethe unit inaclean,dry area.
5. If storing for morethan 30 days,seethe LongTermStorage
section.
Fueland itsvaporsare extremelyflammable
and explosive.Fireor explosioncan cause
severeburnsor death.
WHENSTORINGFUELOREQUIPMENTWiTH FUELiNTANK:
* Storeawayfromfurnaces,stoves,waterheaters,clothesdryers,
or otherappliancesthathaveapilotlightor otherignitionsource
becausetheycanignitefuelvapors.
WINTERSTORAGE
NOTE:
Youmustprotectthe unitfrom freezing temperatures.
* Failuretodosowillpermanentlydamagethepumpandrenderthe
unitinoperable.
* Freezedamageisnotcoveredunderthewarranty.
Toprotectthe unit from freezingtemperatures:
1. Followsteps 1-3 inthe previoussection, After EachUse.
2. Use a pump saver to treat pump. This minimizes freeze
damageand lubricatesthe pistons andseals.
3. If a pump saver is not available,connect a 3-foot sectionof
garden hose to the water inlet adapter. Pour RV-antifreeze
(antifreeze without alcohol) into the hose. Pull the recoil
handletwice. Disconnectthe 3-foot hose.
4. Storethe unit inaclean,dry area.
If the gasoline in the engine has not been treated with a fuel
stabilizer,it must be drainedinto an approvedcontainer.Runthe
engineuntil it stops from lack of fuel. Theuse of a fuel stabilizer
in thestoragecontaineris recommendedto maintainfreshness.
CHANGEO/L
Whilethe engineis still warm, drain the oil from crankcase. Refill
with the recommendedgrade.SeeChangingEngineOil in Engine
Maintenance.
PROTECT/NGTHEPUMP
Toprotect the pump from damagecausedby mineral depositsor
freezing, use PumpSaver,Model 61350, to treat the pump. This
preventsfreezedamageand lubricatesthe pistonsandseals.
NOTE:
PumpSaveris available as anoptional accessory,it is
notincludedwiththe powerwasher.Contactthenearest
authorizedservicecenterto purchasePumpSaver.
NOTE:
YOUMUSTPROTECTYOURUNiT FROMFREEZING
TEMPERATURES.
• Failureto dosowill permanentlydamagethe pumpandrenderthe
unitinoperable.
• Freezedamageis notcoveredunderwarranty.
To use PumpSaver,make sure the power washer is turned off
and disconnectedfrom the water supply.Read andfollow all the
instructionsandwarnings given on the PumpSavercontainer.
OTHERSTORAGEINSTRUCTIONS
1. DONOTstore fuel from one seasonto anotherunlessit has
beentreatedas describedin Protect FuelSystem.
2. Replacethe fuel containerif it starts to rust. Rustand/ordirt
infuel can causeproblems if it's usedwiththis unit.
3. Coverthe unit with a suitable protectivecover that does not
retainmoisture.
LONGTERM STORAGE
If you do not planto use thepower washerfor morethan 30 days,
you must preparetheengineandpump for longtermstorage.
PROTECTFUELSYSTEM
Fuelcan become stale when stored for over 30 days. Stalefuel
causes acid and gum deposits to form in the fuel system or
on essentialcarburetor parts. To keepthe fuel fresh, use afuel
stabilizer, available as a liquid additive or a drip concentrate
cartridge.
Thereis no needto drain the gasoline from the engineif a fuel
stabilizeris added according to instructions. Run the enginefor
2 minutes to circulatethe stabilizerthroughout the fuel system.
Theengineandfuel canthen bestored up to 24 months (perfuel
stabilizermanufacturer'sspecifications).
18
Storage coverscan beflammable.
*DONOTplaceastoragecoveroverahotpowerwasher.
*Lettheequipmentcoolforasufficienttimebeforeplacingthe
coveronthe equipment.
.
Storethe unitin a clean,dry area.
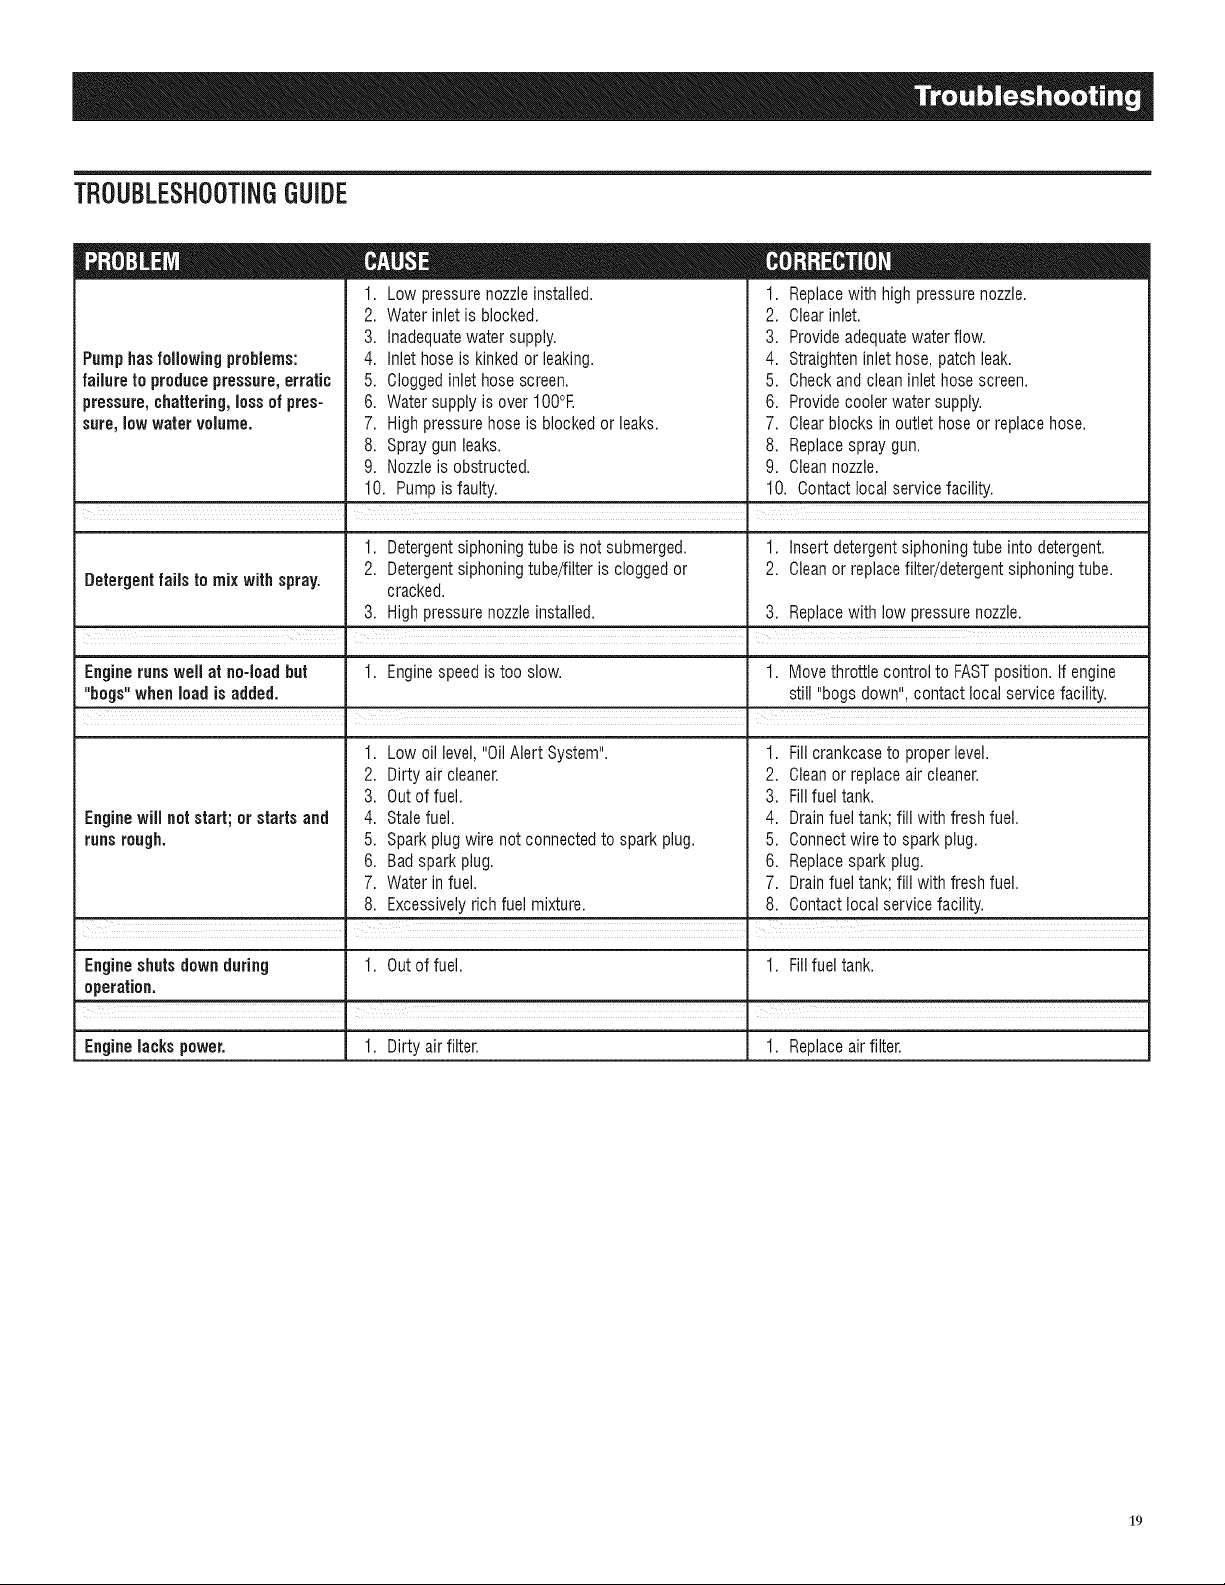
TBOUBLESHOOTiNGGUIDE
1. Low pressurenozzleinstalled. 1. Replacewith high pressurenozzle.
2. Waterinlet is blocked. 2. Clearinlet.
3. Inadequatewatersupply.
Pumphasfollowingproblems:
failuretoproducepressure,erratic
pressure,chattering,lossofpres-
sure,lowwatervolume.
Detergent fails to mix with spray, cracked.
Engineruns well at no-load but 1. Enginespeedistoo slow. 1. Movethrottle control to FASTposition.If engine
"bogs" when load isadded, still "bogs down", contact local servicefacility.
4. Inlet hoseis kinked or leaking.
5. Cloggedinlethose screen.
6. Watersupplyis overlO0°E
7. Highpressurehose is blocked orleaks.
8. Spray gunleaks.
9. Nozzleis obstructed.
10. Pumpis faulty.
1. Detergentsiphoningtube is not submerged. 1. Insert detergentsiphoning tubeinto detergent.
2. Detergentsiphoningtube/filteris cloggedor 2. Cleanor replacefilter/detergentsiphoningtube.
3. Highpressurenozzleinstalled. 3. Replacewith low pressurenozzle.
! I
3. Provideadequatewaterflow.
4. Straighteninlethose,patch leak.
5. Checkand cleaninlet hose screen.
6. Providecoolerwater supply.
7. Clearblocks in outlethose or replacehose.
8. Replacespray gun.
9. Cleannozzle.
10. Contact local servicefacility.
1. Low oil level,"OilAlert System".
2. Dirty air cleaner.
3. Outof fuel.
Enginewill notstart;orstartsand
runsrough.
Engineshutsdownduring 1. Outof fuel. 1. Fillfuel tank.
operation.
Enginelacks power. 1. Dirty air filter. 1. Replaceairfilter.
4. Stalefuel.
5. Sparkplug wire not connectedto spark plug.
6. Badspark plug.
7. Waterinfuel.
8. Excessivelyrich fuel mixture.
1. Fillcrankcaseto proper level.
2. Cleanor replaceair cleaner.
3. Fillfuel tank.
4. Drainfuel tank;fill with fresh fuel.
5. Connectwire to spark plug.
6. Replacespark plug.
7. Drainfuel tank;fill with fresh fuel.
8. Contactlocal servicefacility.
19

U,S, EPA EMiSSiON CONTROL WARRANTY STATEMENT
YOUR WARRANTY RIGHTS AND OBLiGATiONS
The UnitedStatesEnvironmentalProtectionAgency (EPA)and GeneracPowerSystems, Inc. (Generac)are pleasedto explainthe Emission Control
SystemWarranty(ECSWarranty)on your new 2011 and laterequipment.New equipmentthat use smallspark-ignited enginesmust be designed,built,
andequippedto meet stringentanti-smogstandardsfor the federal government.Generacwill warrant the emissioncontrol system on your equipment
for the periodof time listed below providedtherehas been no abuse,neglect,unapprovedmodificationor impropermaintenanceofyour equipment.
The emissioncontrolsystemon this equipmentincludesall components whose failurewould increasethe emissions of anyregulatedpollutant. These
componentsare listedin the EmissionsInformation section ofthis manual.
MANUFACTURER'S WARRANTY COVERAGE:
This ECSWarrantyis valid fortwo years,or for the same periodas specified inthe GeneracLimitedWarranty,whicheveris longer.Forequipmentwith
hour meters,the warranty period is a number of hours equalto halfthe Useful Lifeto which the equipmentis certified, or thewarranty period specified
abovein years,whicheveris less. TheUseful Life can befound onthe EmissionControl Labelon theengine.If, during suchwarranty period, any
emission-relatedpart on your equipmentis foundto be defectivein materialsor workmanship, repairsor replacementwill be performedby a Generac
AuthorizedWarrantyServiceDealer.
OWNER'S WARRANTY RESPONSiBiLiTiES:
As the equipmentowner,you are responsiblefor thecompletion of all requiredmaintenanceas listedin your factory suppliedOwner'sManual. For
warranty purposes,Generacrecommendsthat you retainall receiptscovering maintenanceon your generator,butGeneraccannot denywarranty
solelydueto the lack of receipts.
Youshould be awarethat Generacmaydeny anyand/or all warrantycoverageor responsibility if your equipment,or apart/component thereof,has
failed dueto abuse,neglect, impropermaintenance,or unapprovedmodifications.
Youare responsible for contactinga GeneracAuthorizedWarrantyDealeras soonas a problemoccurs.The warranty repairsshouldbe
completed in a reasonable amount of time, not to exceed30 days.
Warrantyservice can bearrangedby contacting eitheryour sellingdealeror a GeneracAuthorizedWarrantyService Dealer.Tolocate the Generac
AuthorizedWarrantyServiceDealernearestyou, call our toll free numberbelow, oremail emissions@generac.com.
1-800-333-1322
IMPORTANTNOTE:Thiswarranty statementexplainsyour rightsand obligations underthe Emission ControlSystemWarranty,which is providedto
you by Generacpursuantto federal law. Seealso the "GeneracLimitedWarrantiesfor GeneracPowerSystems, Inc.,"which is enclosed herewithon a
separatesheet,also providedto you by Generac.Notethat this warranty shallnot apply to any incidental,consequentialor indirect damagescaused
bydefects in materialsor workmanship or any delayin repairor replacementof the defectivepart(s). This warranty is in place of all other warranties,
expressedor implied. Specifically,Generacmakes no other warrantiesasto the merchantabilityor fitness for a particularpurpose. Anyimplied
warrantieswhich areallowedby law, shallbe limited indurationto the terms of the expresswarranty providedherein.Somestatesdo not allow
limitationson how long an implied warrantylasts, so the abovelimitation maynotapply to you.
The ECSWarrantyappliesonly to the emissioncontrol system of your newequipment. Boththe ECSWarrantyand the GeneracWarrantydescribe
importantrights and obligationswith respectto your new engine.
Warrantyservice can beperformed only by a GeneracAuthorizedWarrantyServiceFacility.Whenrequestingwarrantyservice, evidencemust be
presentedshowing the dateof the saleto the originalpurchaser/owner.
Ifyou haveany questionsregardingyour warranty rights andresponsibilities,you shouldcontact Generacatthe following address:
ATTENTION WARRANTY DEPARTMENT
GENERAC POWER SYSTEMS, INC.
RO. BOX 297 * WHITEWATER, Wi 53190
Part1 of 2
Part No.0J3335 Rev.C 11/11
20
 Loading...