

Page 1
SSL-50
50 IN. SOFT STRIP LED
USER MANUAL
Page 2

SSL-50
INTRODUCTION
SSL-50 50 in. Soft Strip LED - USER MANUAL
2
THANK YOU FOR CHOOSING GENARAY
The Genaray SSL-50 is a daylight-balance strip LED that
provides continuous, even illumination along its entire
50-inch length. In the studio, it’s perfect for lighting fulllength portraits, headshots, and product photography. It
also excels as a background or accent light and is perfect
as a hair light for individuals or group shots. The bright
400-bulb LED array has an integrated diffuser for a soft
wraparound beam that eliminates the multiple shadows
of most LED lights. Stepless dimming from 100% to
1% provides precise control for a full 6-stop range. The
SSL-50's integrated full-length barndoors can cut the
beam to a very narrow strip, which gives precise control
over light and shadow on subjects or backgrounds.
Page 3

PRECAUTIONS
· Please read and follow these
instructions, and keep this manual in
a safe place.
· Keep this unit away from water and
any flammable gases or liquids.
· Make sure the unit is powered off
when plugging it into a power source.
· Use only the correct, recommended
voltage.
· Do not attempt to disassemble or
repair the equipment—doing so will
void the warranty, and Genaray will not
be responsible for any damage.
· Handle the unit with care.
· Do not stare directly at the lights when
they are powered on.
· Clean the unit with only a soft, dry
cloth.
· Keep this unit away from children.
· Use only parts provided by the
manufacturer.
· Make sure the item is intact and that
there are no missing parts.
· All images are for illustrative purposes
only.
SSL-50 50 in. Soft Strip LED - USER MANUAL
Precautions
3
Page 4
PRODUCT
OVERVIEW
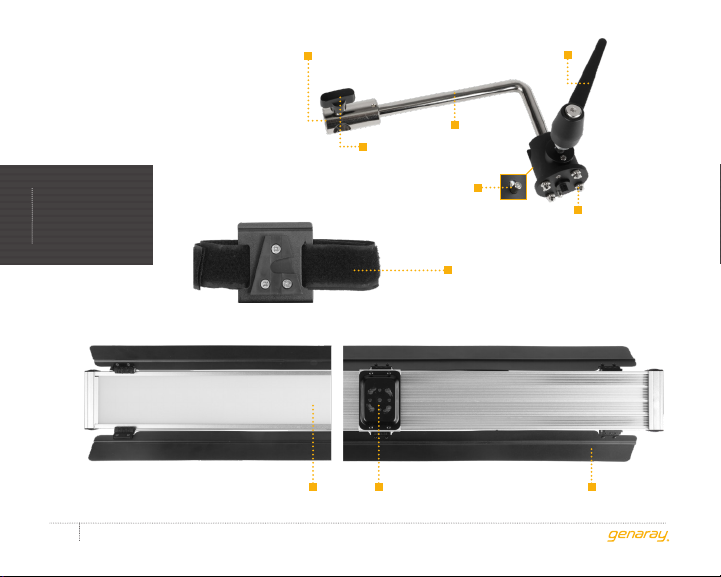
Front Back
SSL-50 50 in. Soft Strip LED - USER MANUAL
4
5/8 in. baby
receiver
Locking knob
Mounting plate BarndoorsDiffuser
Ratchet handle
Lollipop
Release
lever
V-mount adapter with
touch-connect strap
Mounting
studs
Page 5
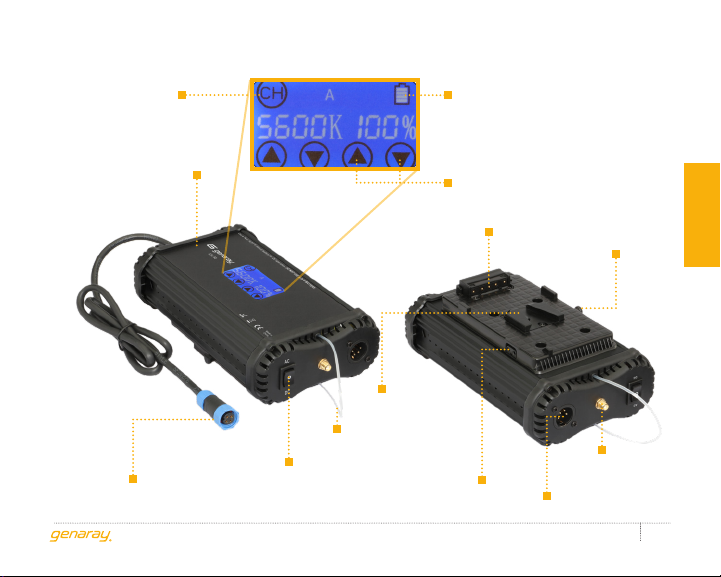
Battery power indicatorChannel selector
Dimmer control box
Power output
cable
Hanger
loop
3-way power
switch
Brightness up/down controls
Battery
contacts
Battery
release button
V-mount
battery slot
D-tap power
socket
SSL-50 50 in. Soft Strip LED - USER MANUAL
Product overview
Antenna
port
4-pin XLR input
5
Page 6

MOUNTING
THE SSL-50CONTENTS INCLUDE
· Light fixture
· Dimmer control box with V-mount
instructions
· Power supply
· Lollipop mount
· Power cable
· V-mount strap
· Antenna
· Carry case with shoulder strap
SSL-50 50 in. Soft Strip LED - USER MANUAL
6
ATTACHING THE LOLLIPOP MOUNT
1. Close the barndoors, and place the
light facedown on a flat surface.
2. Align the lollipop mount with the
mounting plate, and insert the studs
into the mounting plate holes.
3. Make sure the lollipop mount is flush
with the mounting plate, and rotate
the lollipop mount a quarter-turn
clockwise until it clicks into place.
To remove the lollipop mount, pull
the release lever, and rotate the
mount counterclockwise.
2 3
Page 7
POWERING
THE SSL-50
MOUNTING THE SSL-50
TO A LIGHT STAND
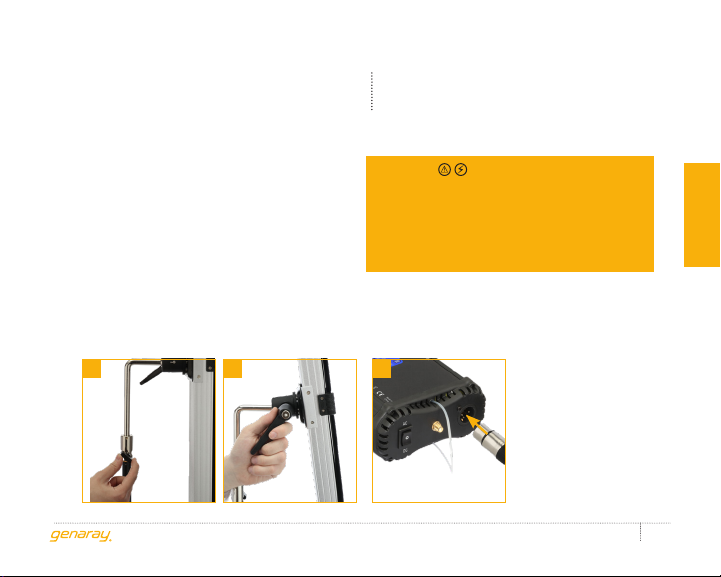
1. Make sure the ratchet handle is
tightened before mounting the SSL-50.
2. Loosen the locking knob, and place
the 5/8-inch receiver on a light stand.
3. Tighten the locking knob until secure.
4. Loosen the ratchet handle to adjust the
light’s tilt and swivel. Once the light is
aimed, retighten the ratchet handle,
and make sure the fixture is secure.
3 4 1
USING THE SSL-50 WITH AC POWER
Important
The SSL-50 is a multivoltage fixture capable
of running on 100 to 240 V, 50/60 Hz. The
included cable has a 120 V, 60 Hz plug. To
use this fixture with other voltages, you
must use a plug adapter (sold separately).
1. Connect the AC power adapter to
the control box with the 4-pin XLR
cable, and then use the power
cable to plug it into an outlet.
SSL-50 50 in. Soft Strip LED - USER MANUAL
instructions
7
Page 8
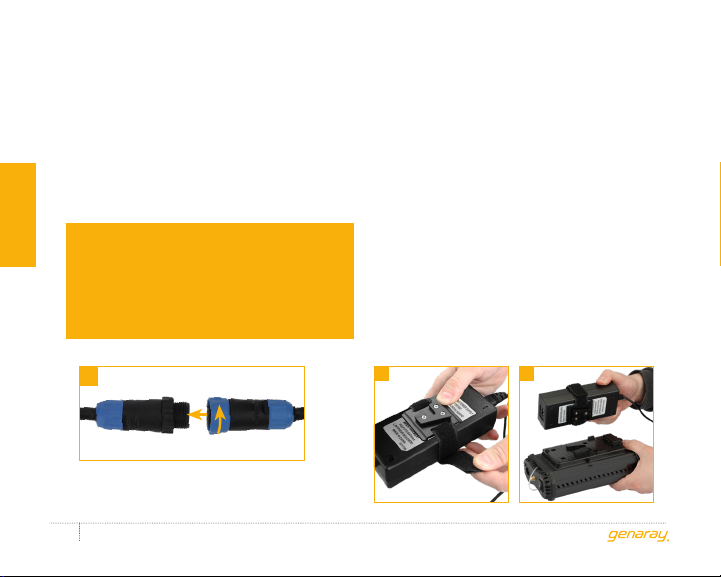
2. To connect the power output cable
to the SSL-50’s 4-pin connector,
instructions
align the two connectors, and
press them together. Then tighten
the locking collar until secure.
Important!
The connectors should easily attach.
Don’t use force to join them together. Hold
one connector still and rotate the other
while gently pushing them together until
it seats in place, then tighten the collar.
3. Set the power switch to AC.
2
SSL-50 50 in. Soft Strip LED - USER MANUAL
8
TO MOVE THE AC ADAPTER
SAFELY OUT OF THE WAY
1. Wrap the touch-connect strap
around the AC adapter.
2. Insert the V-mount adapter into
the V-mount slot of the control
box until it clicks into place.
3. Once the AC adapter is secured
to the control box, use the hanger
loop to hang the control box on a
hook or on your light stand.
1 2
Page 9
USING THE SSL-50
WITH BATTERY POWER
Note:
Make sure to use batteries
rated for 120 W or greater.
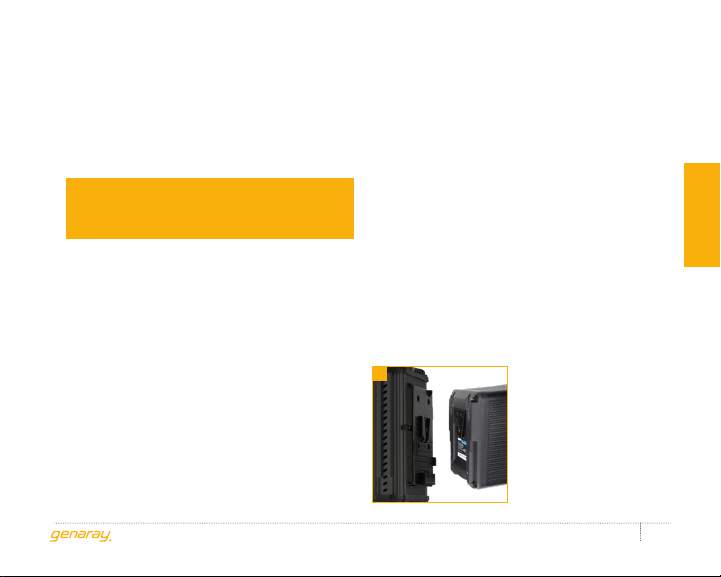
1. When attaching a V-mount battery,
make sure the power switch is in
the off position, and disconnect the
AC adapter so the control box is
not plugged into a wall outlet.
2. Align the battery terminals with the
contacts in the battery mount.
3. Place the battery down into the mount,
and push the battery toward the
contacts until it clicks into place.
4. Set the power switch to DC.
To connect a Gold Mount battery
to the control box, use a D-tap
power cable (not included).
2
instructions
SSL-50 50 in. Soft Strip LED - USER MANUAL
9
Page 10

ADJUSTING
THE LIGHT
WIRELESS
OPERATION
The brightness control buttons
on the control box can adjust the
output from 0% to 100%.
instructions
Touch the up/down buttons to adjust
the brightness in 1% increments, or
touch and hold to adjust rapidly.
Adjust the barndoor flaps to aim or
shape the beam and contain light spill.
SSL-50 50 in. Soft Strip LED - USER MANUAL
10
The SSL-50’s control box has an
integrated transmitter and receiver.
The Genaray SSL-RC remote (sold
separately) can control multiple SSL-50
lights. Refer to the SSL-RC user manual
for setup and operation instructions.
You can also control multiple lights
from the control box of the SSL-50.
First screw the antenna into the
antenna port on each control box.
Mutual Control
(multiple lights set to the same channel)
· Any control box will set the
brightness level for all the lights.
Individual Control
(multiple lights set to different channels)
· Use the channel selector buttons on
one control box to adjust the brightness
of lights set to each channel.
Page 11

PRODUCT
SPECIFICATIONS
LED Count: 400
Color Temperature: 5600 K
Dimming: 1% to 100%
Luminance: 1693.6 @ 3 ft., 1415.9 @ 1 m
Coverage: 75°
CRI: 96
TLCI: 98.3
Electrical Consumption: 80 W
AC Operating Voltage: 100 to 240 V, 50/60 Hz
DC Operating Voltage: 15 V, 5 A
Bulb Life: 50,000 hr.
Battery: V-mount
Material: Metal chassis and barndoors
Power Cord Length:
AC cord: 114 in. (2.9 m)
AC adapter cord: 44 in. (111.8 cm)
Adapter DC cord: 37.5 in. (95.2 cm)
DC cord: 43 in. (109.2 cm)
Weight :
Light: 8.5 lb. (3.9 kg)
Control box: 1.9 lb. (862 g)
AC adapter: 0.9 lb. (443 g)
Carry case: 6 lb. (2.7 kg)
Dimensions (H × W × D):
Light: 50 × 4.2 × 1.9 in. (127 × 10.7 × 4.9 cm)
Control box: 2.5 × 4.7 × 8 in. (6.3 × 12 × 20.3 cm)
AC adapter: 1.5 × 2.4 × 6 in. (3.8 × 6.1 × 15.2 cm)
Carry case: 51 × 8.5 × 5.5 in. (129.5 × 21.6 × 14 cm)
SSL-50 50 in. Soft Strip LED - USER MANUAL
sPecifications
11
Page 12

ONE-YEAR LIMITED WARRANTY
This Genaray product is warranted to the original purchaser to be free from defects in materials and
workmanship under normal consumer use for a period of one (1) year from the original purchase date
or thirty (30) days after replacement, whichever occurs later. Genaray’s responsibility with respect
to this limited warranty shall be limited solely to repair or replacement, at Genaray’s discretion, of
any product that fails during normal use of this product in its intended manner and in its intended
environment. Inoperability of the product or part(s) shall be determined by Genaray. If the product
has been discontinued, Genaray reserves the right to replace it with a model of equivalent quality and
function.
This warranty does not cover damage or defect caused by misuse, neglect, accident, alteration, abuse,
improper installation or maintenance. EXCEPT AS PROVIDED HEREIN, GENARAY MAKES NEITHER
ANY EXPRESS WARRANTIES NOR ANY IMPLIED WARRANTIES, INCLUDING BUT NOT LIMITED TO
ANY IMPLIED WARRANTY OF MERCHANTABILITY OR FITNESS FOR A PARTICULAR PURPOSE. This
warranty provides you with specific legal rights, and you may also have additional rights that vary from
state to state.
To obtain warranty coverage, contact the Genaray Customer Service Department to obtain a return
merchandise authorization (“RMA”) number, and return the defective product to Genaray along with
the RMA number and proof of purchase. Shipment of the defective product is at the purchaser’s own
risk and expense.
For more information, or to arrange service, visit www.genaray.com or contact us at [email protected].
© 2019 Genaray. All Rights Reserved.
GG1
 Loading...