

Page 1

SRL-10
SpectroLED
USER MANUAL
SpectroLED - USER MANUAL
1
Page 2

SpectroLED
INTRODUCTION
SpectroLED - USER MANUAL
2
THANK YOU FOR
CHOOSING GENARAY.
The Genaray Soft Ring Light LED provides photographers and
videographers with ultrabright yet soft continuous light. This 120LED fixture can operate on AC or battery power, and it features
flicker-free light from 100% to 10% with an even 75° beam angle.
The built-in diffuser and the recessed placement of the LEDs
within the fixture contribute to a bright and punchy light that also
has a soft wraparound quality. This design eliminates the multiple
shadows that are often associated with LED lighting.
Perfect for location or studio shoots, the SRL fixture comes with
a rail-mounting bracket that’s compatible with most 15- and
19-millimeter rail support systems. To use the SRL as a
stand-alone light, the removable yoke is equipped with
a combination 5/8-inch baby-pin and 1⅛-inch junior-pin mount
that will fit most light stands.
Page 3

PRECAUTIONS
· Please read and follow these
instructions, and keep this manual in
a safe place.
· Keep this unit away from water and
any flammable gases or liquids.
· Make sure the unit is powered off
when plugging it into a power source.
· Use only the correct, recommended
voltage.
· Do not attempt to disassemble or
repair the equipment—doing so will
void the warranty, and Genaray will
not be responsible for any damage.
· Handle the unit with care.
· Do not stare directly at the lights
when they are powered on.
· Clean the unit with only a soft,
dry cloth.
· All images are for illustrative
purposes only.
SpectroLED - USER MANUAL
PRECAUTIONS
3
Page 4
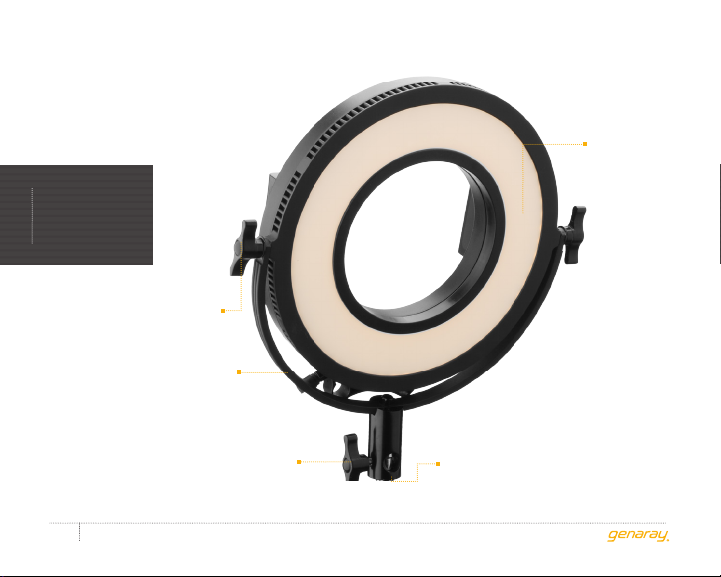
PRODUCT
OVERVIEW
Front diffuser
(not removable)
Tilt locking knob
Yok e
SpectroLED - USER MANUAL
4
Locking knob
5/8 in. mounting receiver
Page 5
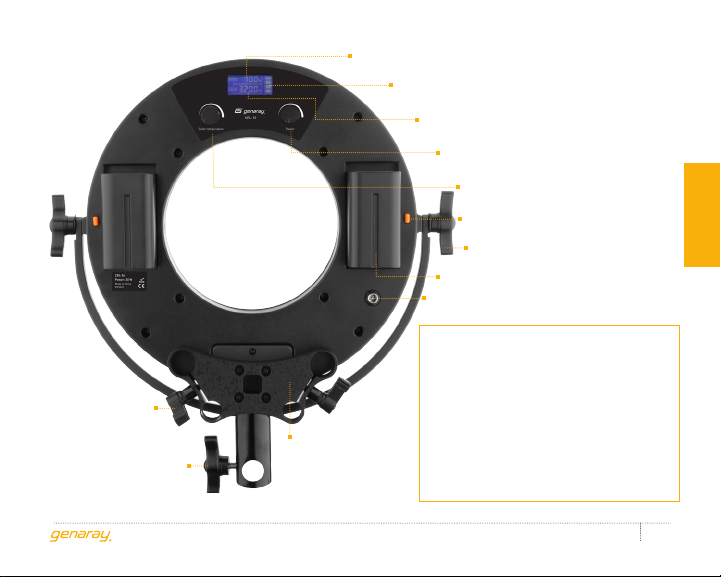
Ratchet handles
Locking knob
Rail mounting
bracket
Dimmer indicator
Battery indicator
Color temperature indicator
Power/dimmer knob
Battery
DC input
Also included:
• Dual charger
• Charger power cord
• Cigarette lighter charging cable
• AC adapter
• AC power cord
• Carry case and shoulder strap
Color temperature knob
Battery release button
Yoke locking knob
PRODUCT OVERVIEW
SpectroLED - USER MANUAL
5
Page 6

MOUNTING TO A
ROD SYSTEM
The mounting bracket that comes with the
SRL-10 is compatible with 15 and 19 mm
rod support systems.
To mount the SRL-10 to a rod system,
INSTRUCTIONS
follow these steps:
1. Align the mounting bracket with the four
holes at the base of the fixture. Make sure
that the solid side of the bracket is facing
away from the fixture, and that the correct
rail size extends below the bottom of the
light fixture.
2. Attach the mounting bracket to the light
fixture with the four included Phillips
screws.
SpectroLED - USER MANUAL
6
3. Slide the light and bracket onto the rods,
and turn the ratchet handles until secure.
Page 7
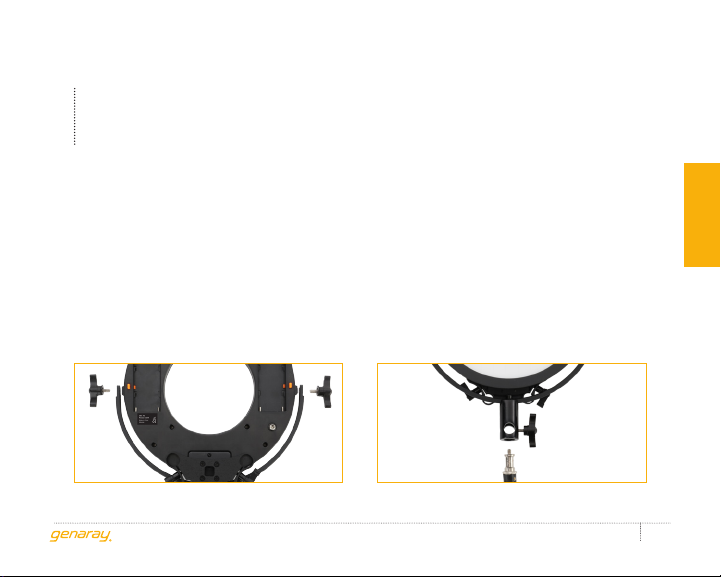
MOUNTING TO A
LIGHT STAND OR
TRIPOD
The SRL-10 includes a removable yoke for
easy light stand attachment.
1. Attach the yoke to the threaded side
sockets with the included washers and
attachment screws.
2. Loosen the yoke’s locking knob, and fit
the mount over the light stand’s 5/8-inch
baby-pin stud. Turn the tightening screw
until secure.
Alternate method: The yoke can also be
mounted onto a light stand with a 1-inch
junior-pin receiver. Remove the locking
knob, and insert the mount into the
receiver. Secure the yoke with the light
stand’s locking knob.
3. Once it’s mounted, adjust the fixture’s tilt
angle as necessary.
INSTRUCTIONS
SpectroLED - USER MANUAL
7
Page 8

POWERING THE
SRL-10
The SRL-10 can be powered directly from
an AC outlet or by one or two NP-F
style batteries (included).
Using the SRL_10 with AC Power
INSTRUCTIONS
Important! The SRL-10 is a multivoltage
fixture capable of running on 100–240 V,
50/60 Hz. The included cable has a 120 V,
50 Hz (North American) plug. To use this
fixture with other voltages, you must use a
plug adapter (sold separately).
Connect the AC power adapter to the
SRL-10, and then use the power cable to
connect it to an outlet.
SpectroLED - USER MANUAL
8
Using the SRL_10 with Battery Power
The SRL-10 can be powered by one or two
NP-F style batteries.
First, make sure the batteries are fully
charged. Place them in the dual charger,
and plug it into a wall outlet. The indicator
lights will blink sequentially to indicate that
charging is in progress. When the lights
stop blinking and are all constant, the
batteries are fully charged.
The dual charger will also work
with the cigarette lighter charging
Note
cable. Plug the cable into a car’s
cigarette lighter socket and the
dual charger to charge
the batteries.
Page 9

OPERATING THE
SRL-10
1. Make sure the power switch is in the Off
position, and the fixture is not plugged into
a wall outlet.
2. Place the battery down into the battery
compartment. Make sure the battery
contacts face the contacts in the battery
compartment.
3. Slide the battery toward the contacts until
it clicks into place.
To remove the battery, press the battery
release button.
The battery level indicator shows the
remaining charge in your batteries.
If the batteries are low, run the SRL-10
with one battery while the other charges.
Power the SRL-10 on by turning the power
knob. The LCD screen will show the last
color temperature setting that was used.
After powering on the SRL-10, set the
brightness and color temperature using the
knobs on the back of the fixture.
· Color temperature can be adjusted
from 3200 to 5600 K in 100 K
increments.
· Brightness can be adjusted from
100% to 10% in 1% increments.
Turn the SRL-10 off by turning the
brightness knob all the way down until it
clicks off.
SpectroLED - USER MANUAL
INSTRUCTIONS
9
Page 10

PRODUCT
SPECIFICATIONS
LED count: 120
Color temperature: 3200 (±200) to 5600 K (±300 K)
Luminance: 900 lx @ 0.5 m
SPECIFICATIONS
Coverage: 75°
CRI: 93
TLCI: 93
Output power: 30 W
SpectroLED - USER MANUAL
10
Working voltage: AC: 100 to 240 V
DC: 7.4 to 14 V
Battery type: NP-F style rechargeable
lithium-ion battery
Mount: Bracket for 19 and 15 mm rail systems
1/4 in. sockets, 5/8 in baby receiver
and 1⅛ junior pin
Dimensions: Diameter: 10 in. (25.4 cm)
Depth: 1.25 in. (3.2 cm)
Weight: 2.15 lb. (1 kg)
Page 11

ONE-YEAR LIMITED WARRANTY
This GENARAY product is warranted to the original purchaser to be free from defects in materials and
workmanship under normal consumer use for a period of one (1) year from the original purchase date
or thirty (30) days after replacement, whichever occurs later. Genaray’s responsibility with respect to this
limited warranty shall be limited solely to repair or replacement, at Genaray’s discretion, of any product
that fails during normal use of this product in its intended manner and in its intended environment.
Inoperability of the product or part(s) shall be determined by Genaray. If the product has been
discontinued, Genaray reserves the right to replace it with a model of equivalent quality and function.
This warranty does not cover damage or defect caused by misuse, neglect, accident, alteration, abuse,
improper installation or maintenance. EXCEPT AS PROVIDED HEREIN, GENARAY MAKES NEITHER
ANY EXPRESS WARRANTIES NOR ANY IMPLIED WARRANTIES, INCLUDING BUT NOT LIMITED TO ANY
IMPLIED WARRANTY OF MERCHANTABILITY OR FITNESS FOR A PARTICULAR PURPOSE. This warranty
provides you with specific legal rights, and you may also have additional rights that vary from state to
state.
To obtain warranty coverage, contact the Genaray Customer Service Department to obtain a return
merchandise authorization (“RMA”) number, and return the defective product to Genaray along with the
RMA number and proof of purchase. Shipment of the defective product is at the purchaser’s own risk
and expense.
For more information, or to arrange service, visit www.genaray.com or contact us at [email protected].
© 2017 Genaray LLC. All Rights Reserved
Other product and corporate names mentioned herein
are trademarks of their respective holders.
GG1
SpectroLED - USER MANUAL
WARRANTY
11
Page 12

SpectroLED - USER MANUAL
12
GG1
 Loading...