

Page 1

OLED-55
OCTALUX LED
USER MANUAL
OctaLux LED - USER MANUAL
1
Page 2

OctaLux LED
INTRODUCTION
OctaLux LED - USER MANUAL
2
Thank you for choosing Genaray.
The OctaLux LED Light Softbox produces bright, soft, and
consistent light that’s designed for use in the studio or on
location when shooting portraits, beauty/fashion, tabletop
products, and interviews. 240 individual LEDs generate a
5500 K daylight-balanced light that creates warmth and
glow on your subject. This continuous light emits very
little heat, so it can be used for extended periods without
overheating, and it allows you to get up close for intimate
shots. A dimmer control affords the ability to change the
light output from 10% to 100%.This is a great feature when
environment conditions alter the amount of light needed
for proper exposure.
Page 3

The housing is sturdy, and the LEDs are not prone to
breakage like fluorescent fixtures, making the Genaray
OLED-55 ideal for everyday usage. The OctaLux LED Light
Softbox is 31.5˝ (80 cm) in diameter, and it attaches with
tension rods to the integrated speed ring, making setup a
snap. Additionally, you have the option of three diffusion
attachments. The diffusers help soften the light output,
which is more flattering and minimizes harsh shadows.
OctaLux LED - USER MANUAL
TABLE OF
CONTENTS
Introduction ................................ 2-3
Precautions ................................4-5
Overview ......................................6-9
Assembling the Softbox ........10-11
Attaching the Diffusers .........12-13
Mounting the OctaLux .................14
Powering the OctaLux ................. 15
Disassembling the Softbox ...........16
Specifications ...............................17
Warranty .......................................19
Page 4

PRECAUTIONS
· Please read and follow these
PRECAUTIONS
instructions, and keep this
manual in a safe place.
· Keep this product away from water
and any flammable gases or liquids.
· Do not leave the device in a
closed vehicle under the sun
or in other areas subject to
very high temperatures.
· Make sure this product is powered off
when plugging it into a power source.
OctaLux LED - USER MANUAL
4
· Always remove the power cord by
holding the plug; do not pull the cord.
· Disconnect the power cord from
the power supply when not in use.
· Use only the correct,
recommended voltage.
· Do not attempt to disassemble
or repair this product. There are
components inside that can produce
a hazardous electric shock.
Page 5

· Do not stare at the light
when it is powered on.
· Do not point directly towards the
naked eye (especially those of
infants and small children)—it
may lead to visual impairment.
· Avoid any unnecessary impact to the
unit, as this can damage the LEDs.
· Handle this product with care.
· Do not touch the LEDs or
expose them to moisture.
· If necessary, clean the LEDs
with only a lint-free, cotton
cloth. Do not smudge.
· Keep this product away from children.
· Make sure that this product is intact
and that there are no missing parts.
· All images are for illustrative
purposes only.
PRECAUTIONS
OctaLux LED - USER MANUAL
5
Page 6
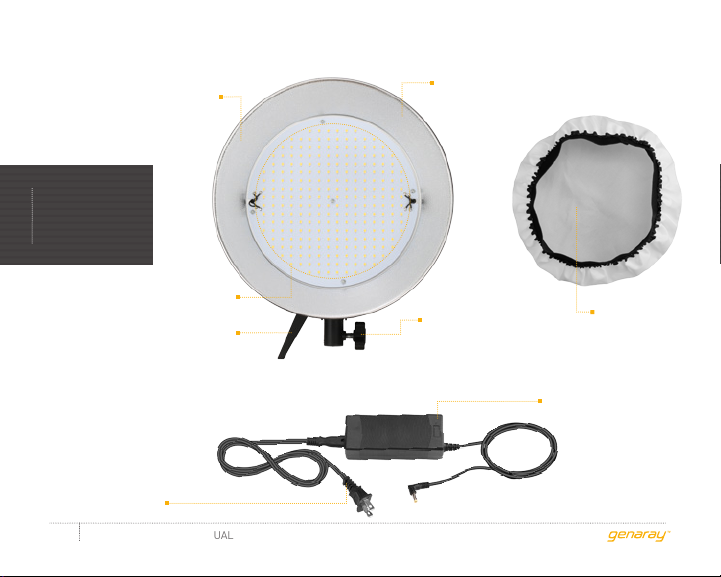
PRODUCT
OVERVIEW
Reflector dish
OctaLux light head
Tilt-adjustment knob
AC power
cable
OctaLux LED - USER MANUAL
6
LEDs
Locking knob
Diffuser cap
120 V AC/DC
power adapter
Page 7
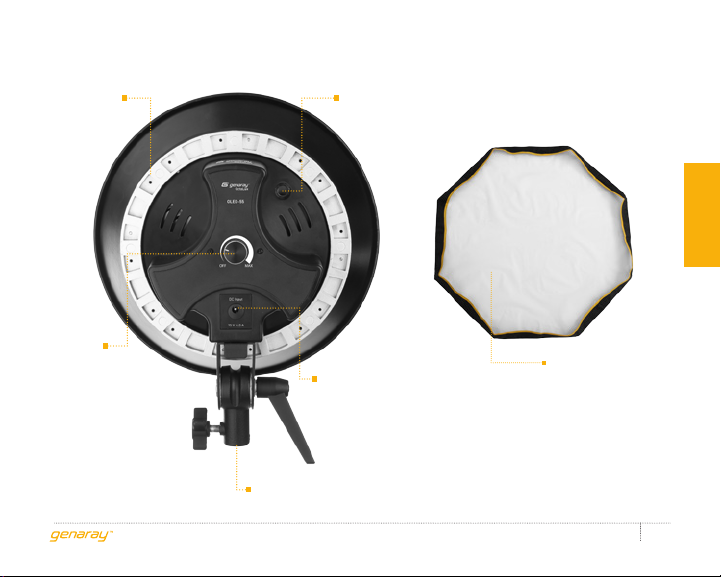
Integrated
speed ring
Handle socket
PRODUCT OVERVIEW
On/off
dimmer knob
DC power input
socket
Mounting socket
Front
diffuser
OctaLux LED - USER MANUAL
7
Page 8
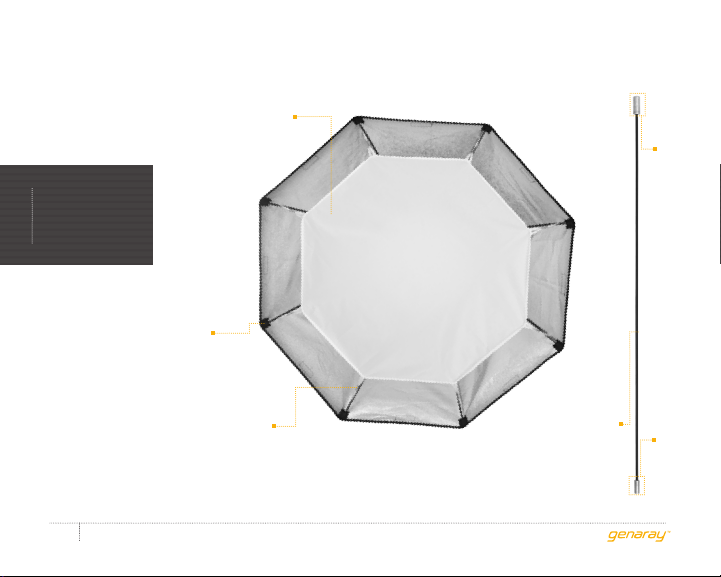
PRODUCT
OVERVIEW
Softbox
tension-rod
pockets
Inner diffuser
Side A
Internal diffuser ringlets
OctaLux LED - USER MANUAL
8
8 × tension rods
Side B
Page 9
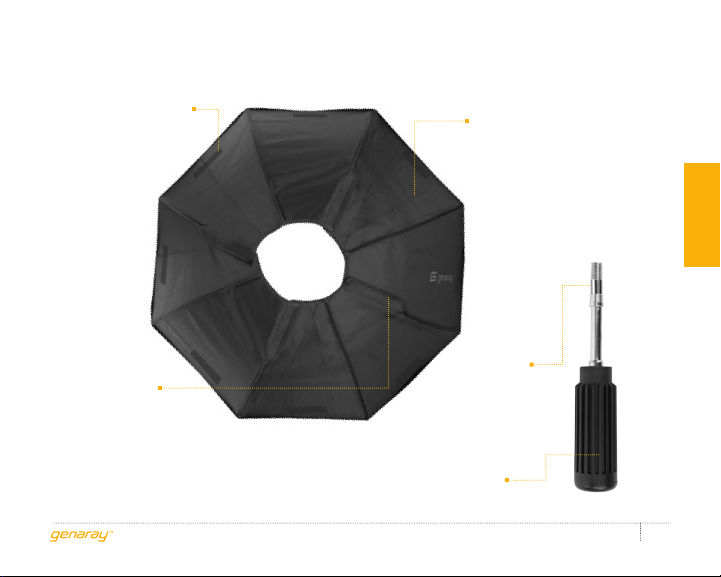
Touch-fastener strips
Access flaps
OctaLux light-head handle
31.5˝ (80 cm)
OctaLux softbox
Spacer
PRODUCT OVERVIEW
OctaLux LED - USER MANUAL
9
Page 10

ASSEMBLING
THE SOFTBOX
1. Place the OctaLux light head
INSTRUCTIONS
faceup on a flat surface
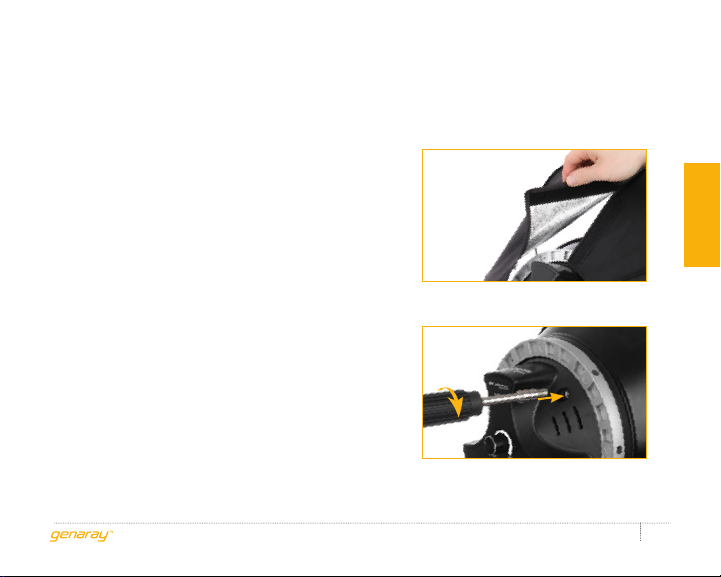
2. Open the access flaps on the back
of the OctaLux softbox, place the
softbox around the light head. It will
take shape with the following steps.
3. Insert the first tension rod (side B)
in any of the eight pockets at the
outer edge of the OctaLux softbox.
4. Insert the other end of the tension rod
(side A) into the speed-ring socket
on the side of the light head.
5. Insert the next rod at the opposite side
(180°) of the first rod. Insert one end
into the correct pocket on the softbox,
and then insert the other end into the
corresponding speed-ring socket.
OctaLux LED - USER MANUAL
10
Page 11
6. Insert the next two rods at a 90° angle
from the first two rods that were
inserted. This time insert each additional
rod into a socket on the speed ring,
and then into a pocket on the softbox.
7. Insert the remaining rods, one opposite
the next. Once all rods are in place, the
softbox will firm up and take shape.
8. Close the access flaps on the back of
the OctaLux softbox to ensure that it fits
tightly. This will prevent any light leaks.
9. Insert the OctaLux light-head handle
into the handle socket. Rotate clockwise
until the handle is fully tightened.
INSTRUCTIONS
OctaLux LED - USER MANUAL
11
Page 12
ATTACHING
THE DIFFUSERS
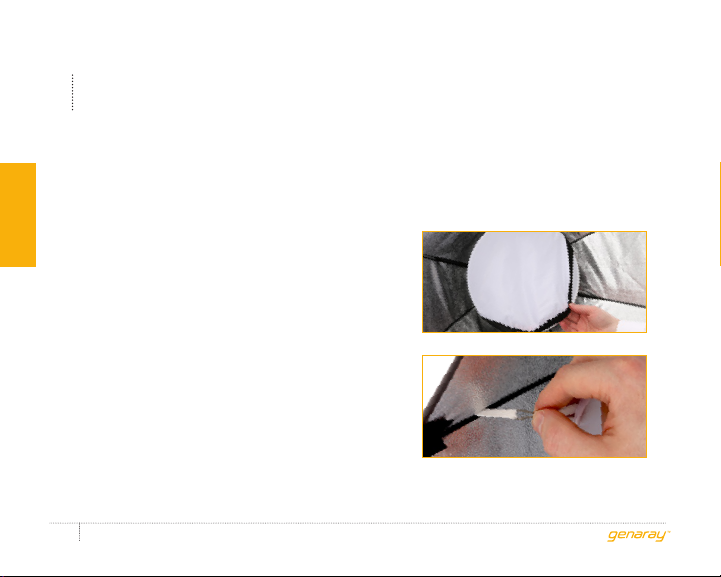
The diffusers soften the light output and can be used
separately or in combination for varying results.
INSTRUCTIONS
1. Stretch the diffuser cap over the LED
light head’s built-in reflector dish.
2. Attach the inner diffuser to the ringlets
hanging on the inside of the softbox.
OctaLux LED - USER MANUAL
12
Page 13
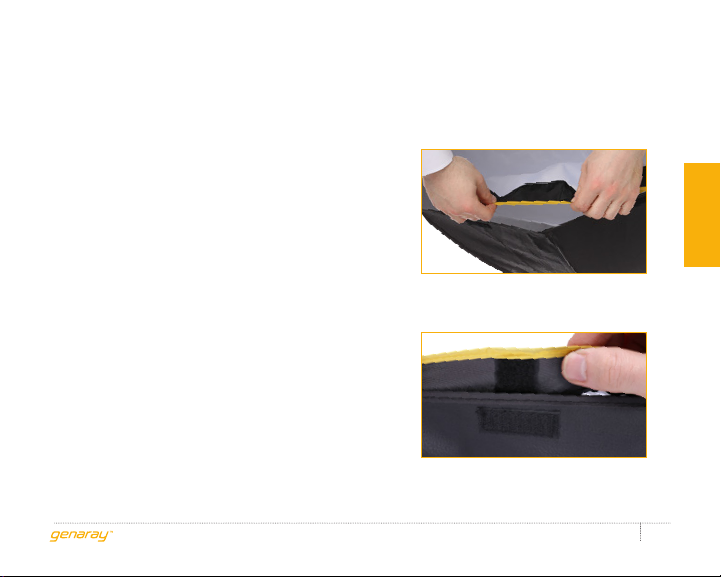
3. Stretch the front diffuser over the
outside edge of the softbox, aligning
the touch-fastener strips.
4. Press the touch-fastener strips
together, and make certain that the
diffuser fits tightly on all sides.
INSTRUCTIONS
OctaLux LED - USER MANUAL
13
Page 14
MOUNTING
THE OCTALUX
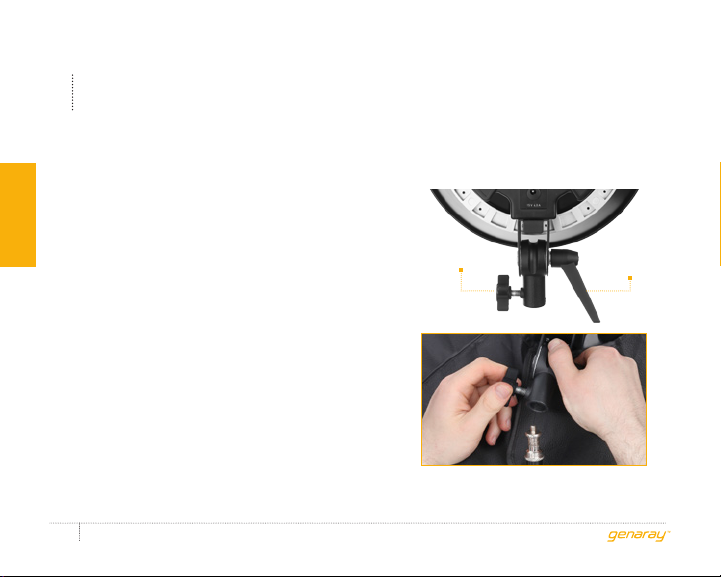
The OctaLux mounts to most light
stands that have a standard 5/8˝ stud.
INSTRUCTIONS
1. Make sure the tilt adjustment
knob is fully tightened.
2. Loosen the locking knob on the
mounting socket, and mount the
OctaLux LED Light on your light stand.
3. Tighten the locking knob until secure.
You can adjust the tilt of the OctaLux LED
Light by loosening the tilt adjustment knob.
Keep one hand on the light to hold it steady.
OctaLux LED - USER MANUAL
14
Locking Knob
Tilt Adjustment
Knob
Page 15
POWERING
THE OCTALUX
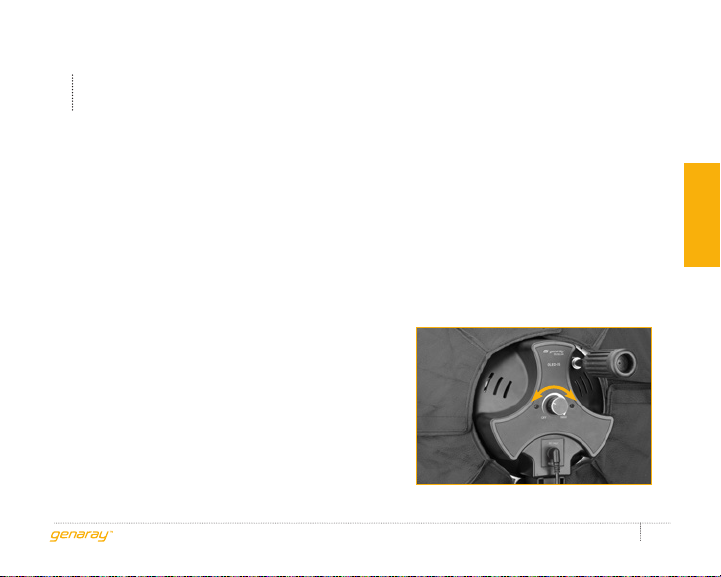
Make sure the unit is turned off. Connect
the AC power cable to the AC/DC adapter
and a wall outlet. Connect the adapter’s
DC connector to the OctaLux light.
To turn on the OctaLux light,
turn the On/off dimmer control
clockwise until you hear a click.
ADJUSTING THE POWER OUTPUT
You can adjust the OctaLux’s power
output from 10%–100%.
To adjust power output via the On/off
dimmer knob, rotate the knob clockwise.
INSTRUCTIONS
OctaLux LED - USER MANUAL
15
Page 16

DISASSEMBLING
THE SOFTBOX
1. Ensure that the power control on
INSTRUCTIONS
the back of the light head is turned
to the Off position. Unplug the
power cord from the wall outlet.
2. Unplug the power cord from
the back of the light head.
3. Release the light-stand locking
knob, and remove the light
head from the light stand.
4. Remove the front diffuser.
5. Detach the inner diffuser
from the ringlets hanging on
the inside of the softbox.
OctaLux LED - USER MANUAL
16
6. Remove the diffuser cap if attached.
7. Remove the OctaLux light-head handle
by rotating it counterclockwise until you
can separate it from the light head.
8. Open the access flaps on
the back of the softbox.
9. Remove a tension rod from the
speed ring, and then from the
pocket on the opposite end.
10. Remove the rod at the opposite
side, and then repeat this process
until all rods are removed.
Page 17

PRODUCT
SPECIFICATIONS
OctaLux LED
Light source: 240 LEDs
Lamp life: 50,000 hr.
Luminance @ 3´ 1 m: 2000 lx – no diffusers
1500 lx – with front diffuser only
1800 lx – with inner diffuser only
1700 lx – with diffuser cap only
Power consumption: 55 W
Color temperature: 5500 K (±200 K)
CRI: 89
Dimming: 10%–100%
Softbox diameter: 31.5˝ (80 cm)
AC operating voltage: 100–240 V, 50/60 Hz
Weight: 2.85 lb. (1.3 kg)
Dimensions (H × W × D): 10.75˝ × 10.75˝ × 7˝
(27.3 × 27.3 × 17.8 cm)
SPECIFICATIONS
OctaLux LED - USER MANUAL
17
Page 18

Page 19

ONE-YEAR LIMITED WARRANTY
This Genaray product is warranted to the original purchaser to be free from defects in materials and
workmanship under normal consumer use for a period of one (1) year from the original purchase date
or thirty (30) days after replacement, whichever occurs later. Genaray’s responsibility with respect
to this limited warranty shall be limited solely to repair or replacement, at Genaray’s discretion, of
any product that fails during normal use of this product in its intended manner and in its intended
environment. Inoperability of the product or part(s) shall be determined by Genaray. If the product
has been discontinued, Genaray reserves the right to replace it with a model of equivalent quality and
function.
This warranty does not cover damage or defect caused by misuse, neglect, accident, alteration, abuse,
improper installation or maintenance. EXCEPT AS PROVIDED HEREIN, GENARAY MAKES NEITHER
ANY EXPRESS WARRANTIES NOR ANY IMPLIED WARRANTIES, INCLUDING BUT NOT LIMITED TO
ANY IMPLIED WARRANTY OF MERCHANTABILITY OR FITNESS FOR A PARTICULAR PURPOSE. This
warranty provides you with specific legal rights, and you may also have additional rights that vary from
state to state.
To obtain warranty coverage, contact the Genaray Customer Service Department to obtain a return
merchandise authorization (“RMA”) number, and return the defective product to Genaray along with
the RMA number and proof of purchase. Shipment of the defective product is at the purchaser’s own
risk and expense.
For more information, or to arrange service, visit www.genaray.com or contact us at [email protected].
© 2016 Genaray LLC. All Rights Reserved.
Page 20

OctaLux LED - USER MANUAL
20
GG1
 Loading...