

Page 1
LED-6800
256 LED ON-CAMERA LIGHT
USER MANUAL
Page 2

LED-6800
INTRODUCTION
LED-6800 - USER MANUAL
2
Thank you for choosing the Genaray LED-6800
On-Camera Light. This product will provide you with
powerful, portable and dependable illumination that
can be used in a variety of settings. Featuring a superbright 256 LED lamp count, 5800K color temperature,
flicker-free, dimmable features and two removable
filters with advanced light dispersion capabilities,
the Genaray LED-6800 On-Camera Light is the
perfect choice for professional photographers and
videographers alike.
Page 3

KEY
FEATURES
PRODUCT
CONTENTS
· Lightweight Design With
Powerful 256 Lamp Count
· Long Profile Provides Wider
Angle Of Coverage
· Removable Diffuser & 3200K
Warming Filter
· Low Battery Power Warning Light
· Vertically Stackable
LED-6800 - USER MANUAL
3
· 256 LED Light
· Slide-In Diffuser
· Slide-In Warming Filter
· NP-F750 Battery
· AC/DC Battery Charger
· AC Adapter
· Ball Head Mount
· Manual
Features
Page 4

SAFETY
WARNINGS
· Do not attempt to disassemble,
repair or perform any unauthorized
modifications on device
· Do not handle with wet hands,
saFety Warnings
immerse in liquids or expose to water
and rain; electric shock or fire may
result
· Device contains small parts which
may pose a choking hazard; keep out
reach of children
· Do not operate device in presence of
flammable gas or vapors
LED-6800 - USER MANUAL
4
· Do not use product if it emits smoke
or a strange odor; disconnect power
source immediately to avoid personal
injury and contact place of purchase
· Observe caution when handling
batteries; only use batteries approved
by the manufacturer of this product
· Batteries are prone to leakage when
fully discharged; to avoid damaging
product be sure to remove batteries
when leaving product unattended
· Do not intentionally stare or gaze at
Page 5

LED light panel for prolonged periods
while device is on
· Do not cover the ventilation grille
found at the rear of device when in
operation and ensure light is cool
before storing
· Do not use or leave device in
conditions of extreme heat, severe
cold or high humidity
· Unit will display a decrease in
brightness when the battery runs
LED-6800 - USER MANUAL
5
low; be sure to replace battery when
necessary to avoid affecting recording
quality
· When cleaning the device, use only a
mild detergent solution and quickly
wipe dry with a soft cloth
· Please dispose of used batteries,
packaging and old devices in
accordance with appropriate
environmental regulations
saFety Warnings
Page 6
PRODUCT
OVERVIEW
LED-6800 - USER MANUAL
6
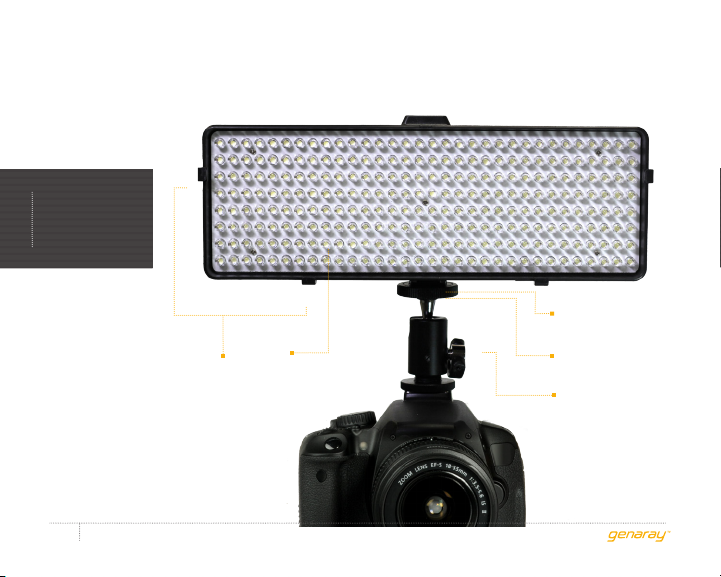
Filter
Clasps
LED
Array
Cold Shoe Mount
1/4 20
Threading Mount
Included
Ball Head
Mount
Page 7
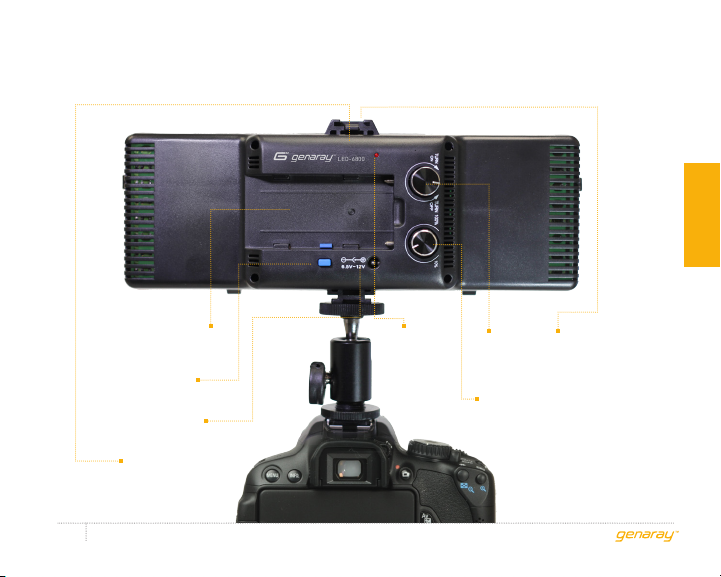
Battery
Mounting
Area
Battery
Release
Button
DC Input
Expansion
Slot Release
Tab
LED-6800 - USER MANUAL
7
Low
Battery
Level
Warning
Light
Power
Knob
Dimming
Knob
PrODuCt OvervieW
Interlocking
Expansion Slot
Page 8

MOUNTING LIGHT
UNIT DIRECTLY ON
CAMERA OR TRIPOD
MOUNTING LIGHT
UNIT ON BALL HEAD
MOUNT
· Begin by positioning light directly atop
camera or video camera
· Slide cold shoe mounting into shoe of
instruCtiOns
camera
· For tripod installation, simply insert 1/4 20
screw found on tripod head into the 1/4 20
threading mount found on bottom of unit;
then tighten securely
Light can also be fastened
to included ball head mount,
which can then be installed on
Note
cold shoe found on cameras
or similar devices; see ball
head mounting instructions
LED-6800 - USER MANUAL
8
· Included ball head mount is designed to
provide user with a 180° tilt/360° rotating
angle feature that can be used on both
cameras and other devices featuring a cold
shoe
· Begin by inserting 1/4 20 screw found atop ball
head mount into the 1/4 20 threading found on
bottom of LED light unit and fasten securely
· Tighten adjustment locking knob so light
unit does not wobble during remainder of
mounting process
· Ensure cold shoe foot is firmly secured to ball
head mount device and loosen locking collar
found on base of ball head device
· Slide entire male cold shoe into female cold
shoe of camera or other mounting device; then
fasten locking collar securely
Page 9

INTERLOCKING
WITH OTHER
LED DEVICES
· Loosen adjustment locking knob by
twisting counterclockwise and rotate ball
head mount to position light at desired
angle; twist locking knob clockwise to hold
light unit firmly in position
Cold shoe mount can also
be removed to reveal an
Note
integrated1/4 20 threading
mount
· To reveal ball head mount's integrated 1/4
20 threading mount for fastening to tripod,
twist locking ring resting above cold shoe
counterclockwise until entire shoe comes
out; insert 1/4 20 screw found on tripod
head into the 1/4 20 threading mount; then
tighten securely
LED-6800 - USER MANUAL
9
· Slide cold shoe mounting into interlocking
expansion slot of another compatible
Genaray LED light device
· To separate stacked units, press down on
the release tab found at the bottom of the
expansion slot to allow the cold shoe of the
other unit to slide out
· Compatible Genaray LED light devices can
be mounted atop one another in a stacked
vertical format for increased illumination
instruCtiOns
Page 10

POWERING
DEVICE
ADJUSTING
FEATURES
· Begin by holding fully-charged battery in
position over mounting area, leaving only
a small gap between conductor contacts
found on battery and metal prongs found
instruCtiOns
on unit
· Push battery down and lock into place by
sliding it inwards along grooves until an
audible click is heard
· The power port found on rear of monitor
connects directly to the AC/DC power
adapter and can provide continuous power
in the event that the battery is low
· Turn the power dial to the right until it
clicks into the on position
· Rechargeable battery can be removed
by firmly pushing down on the battery
release button and sliding the battery to
the side until it disengages
LED-6800 - USER MANUAL
10
· To adjust the flicker-free dimmable
features, simply rotate the dimming
wheel until desired effect is achieved
· To install the 3200K warming or the soft
diffusion filter, align filter with clasps
found on edge of LED panel; ensure that
filter tab is facing downwards and slide
filter alongside clasps; gently snap filter
in place
Page 11

CUSTOMER
SUPPORT
PRODUCT
SPECIFICATIONS
· For more information about this
product or to contact the Genaray
Customer Support Center with
any questions, please send your
email correspondence to:
[email protected].
LED-6800 - USER MANUAL
11
Bulb Type: 256 Daylight LEDs
Brightness: 1900 lux @ 3'
Color Temperature: 5800K
Voltage: 6.5-12V
Weight: 0.71 lbs
Dimension: 10" x 4" x 2.25"
sPeCiFiCatOns
Page 12

ONE-YEAR LIMITED WARRANTY
Genaray provides a limited warranty that this product is free from defects in
materials and workmanship to the original purchaser under normal use for a period
of one (1) year from the original purchase date or thirty (30) days after replacement,
whichever occurs later (the “Warranty Period”). Our responsibility with respect
to this limited warranty shall be limited solely to repair or replacement, at its
option, of any product which fails during normal consumer use. To obtain warranty
coverage during the Warranty Period, contact your place of purchase (“Seller”) to
obtain a return merchandise authorization (“RMA”) number, and return to Seller the
defective product along with proof of purchase and the RMA number. This warranty
does not extend to damage or failure which results from misuse, neglect, accident,
alteration, abuse, improper installation or maintenance. EXCEPT AS PROVIDED
HEREIN, GENARAY MAKES NEITHER ANY EXPRESS WARRANTIES NOR ANY
IMPLIED WARRANTIES, INCLUDING BUT NOT LIMITED TO ANY IMPLIED WARRANTY
OF MERCHANTABILITY OR FITNESS FOR A PARTICULAR PURPOSE. This warranty
provides you with specific legal rights, and you may also have additional rights which
vary from state to state. © Copyright 2013 Genaray
www.genaray.com
 Loading...