

Page 1

Escort
LED LIGHTS
™
USER MANUAL
Page 2

Escort™
INTRODUCTION
Escort LED Lights - USER MANUAL
2
THANK YOU FOR CHOOSING GENARAY
The Escort series of LED light fixtures provides
photographers and videographers with flicker-free
continuous light. They draw only 40 W to deliver the
equivalent output of a 300–400 W tungsten bulb for
outstanding brightness and precise color accuracy.
The Escort fixtures are designed with an integrated
2.4 GHz receiver with 99 channels. The lights can be
controlled individually or globally with the Genaray
MB-WRT remote. Advanced features include an
adjustable dimmer from 10% to full brightness and
built-in barndoors with a hammered reflective silver
finish. The 680-LED array generates minimal heat, and
it allows you to place these fixtures close to a heatsensitive subject without causing discomfort or damage.
Page 3

TABLE OF
CONTENTS
Precautions .....................................................4
Contents Include ............................................6
Product Overview ...........................................8
Mounting the Light .......................................12
Powering the Light .......................................15
Operating the Escort ....................................17
Storing the Light ...........................................21
FCC Declaration of Conformity ................... 21
Product Specifications .................................22
Escort LED Lights - USER MANUAL
3
Page 4

PRECAUTIONS
Precautions
· Please read and follow these
instructions, and keep this
manual in a safe place.
· Keep this unit away from water and
any flammable gases or liquids.
· Make sure the unit is powered off
when plugging it into a power source.
· Use only the correct,
recommended voltage.
Escort LED Lights - USER MANUAL
4
· Do not attempt to disassemble or
repair the equipment—doing so will
void the warranty, and Genaray will
not be responsible for any damage.
· Handle the unit with care.
· Do not stare directly at the lights
when they are powered on.
· Clean the unit with only
a soft, dry cloth.
Page 5

· Keep this unit away from children.
· Use only parts provided
by the manufacturer.
· Make sure the item is intact and
that there are no missing parts.
· All images are for illustrative
purposes only.
Precautions
Escort LED Lights - USER MANUAL
5
Page 6

CONTENTS
INCLUDE
ESDS-25
contents
· Genaray ESDS-25 Escort
Daylight LED Spot Light
· Diffusion filter
· Tungsten filter
· Stand mount
· Handle mount
· AC adapter
· Power cable with U.S. plug
· NP-F750 battery (×2)
· Battery charger
· 12 V cigarette lighter adapter cable
· Carry case
Escort LED Lights - USER MANUAL
6
ESDF-75
· Genaray ESDF-75 Escort
Daylight LED Flood Light
· Diffusion filter
· Tungsten filter
· Stand mount
· Handle mount
· AC adapter
· Power cable with U.S. plug
· NP-F750 battery (×2)
· Battery charger
· 12 V cigarette lighter adapter cable
· Carry case
Page 7

ESDFS-KIT
· ESDS-25
· ESDF-75 (×2)
· Diffusion filters (×3)
· Tungsten filters (×3)
· Stand mounts (×3)
· Handle mounts (×3)
· AC adapters (×3)
· Power cables for the USA (×3)
· NP-F750 batteries (×6)
· Battery chargers (×3)
· 12 V cigarette lighter adapter cables (×3)
· Remote control
· Carry case
ESBF-75
· Genaray ESBF-75 Escort
Bi-Color LED Flood Light
· Diffusion filter
· Stand mount
· Handle mount
· AC adapter
· Power cable with U.S. plug
· NP-F750 battery (×2)
· Battery charger
· 12 V cigarette lighter adapter cable
· Carry case
contents
Escort LED Lights - USER MANUAL
7
Page 8
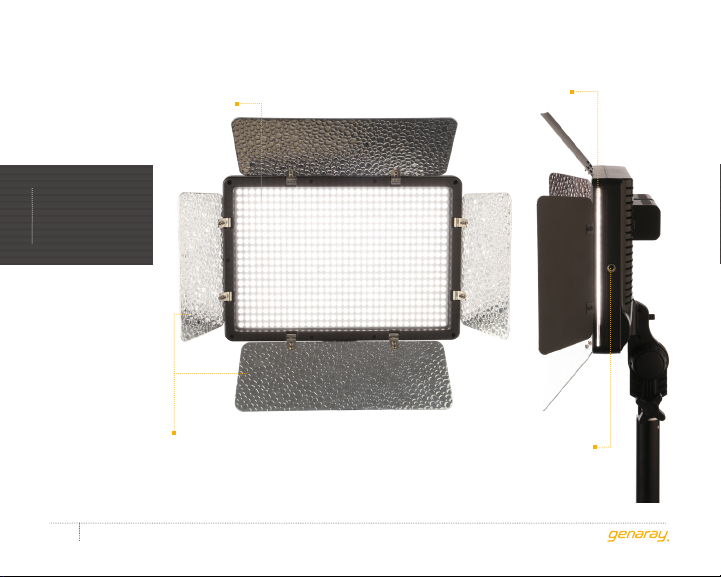
PRODUCT
OVERVIEW
LED array
Diffuser/filter slot
Barndoors
Escort LED Lights - USER MANUAL
8
1/4˝-20 mounting socket
Page 9
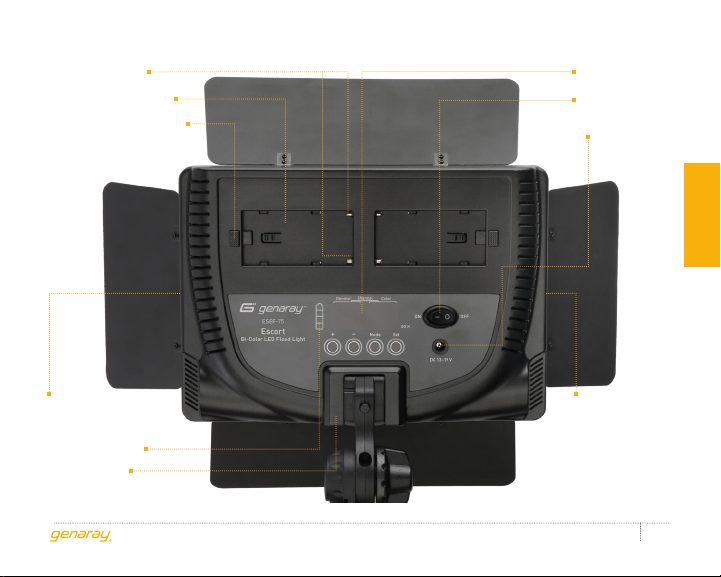
Battery contacts
Battery compartment
Battery release buttons
LED display
Power switch
Power socket
Product overview
1/4˝-20 mounting
socket
Battery indicator
Mounting slot
1/4˝-20 mounting
socket
Escort LED Lights - USER MANUAL
9
Page 10
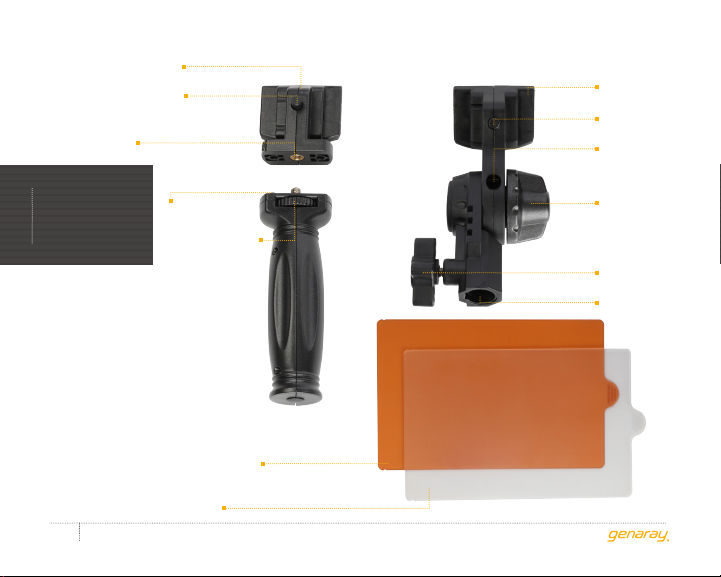
Mounting plate
Release button
1/4˝-20 threaded
mount
Handle mount
Stand mount
Mounting plate
Release button
Umbrella mount
PRODUCT
OVERVIEW
Escort LED Lights - USER MANUAL
10
Guide pin
Locking wheel
Tungsten filter
(Daylight models only)
Diffuser
Tilt adjustment
knob
Locking knob
5/8˝ socket
Page 11
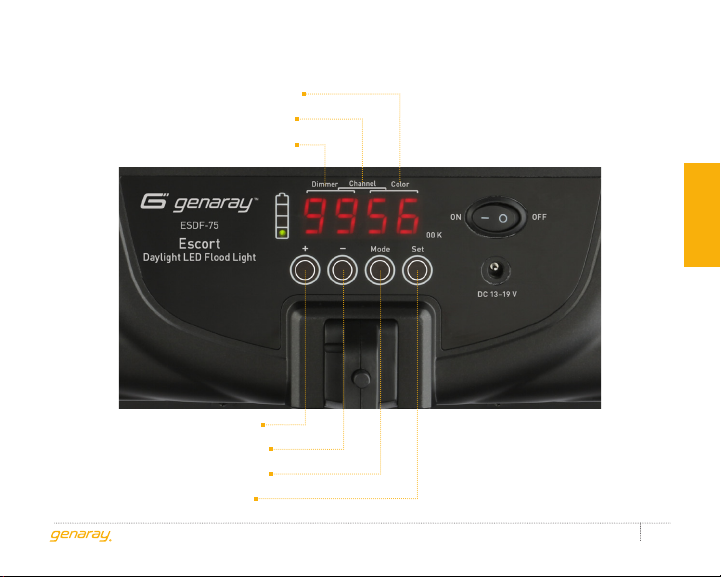
Color temperature
Channel number
Dimmer number
Plus button
Minus button
Mode button
Set button
Product overview
Escort LED Lights - USER MANUAL
11
Page 12
MOUNTING THE
LIGHT
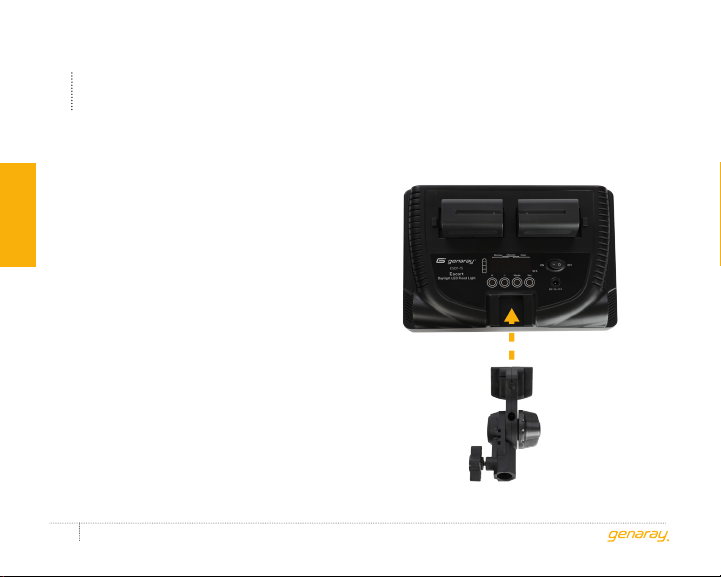
MOUNTING THE ESCORT
TO A LIGHT STAND
instructions
1. Slide the stand mount’s mounting
plate into the mounting slot of the
fixture until it clicks into place.
Note: Make sure the tilt adjustment
knob is locked before you mount
the fixture onto a light stand.
2. Loosen the locking knob, and
fit the stand mount to the light
stand’s 5/8˝ spigot. Then tighten
the locking knob until secure.
3. Hold the fixture while you loosen the tilt
adjustment knob. Adjust the fixture’s tilt,
and re-tighten the knob until secure.
To remove the stand mount, press the
release button, and slide the mounting
plate out of the mounting slot.
Escort LED Lights - USER MANUAL
12
Page 13

ALTERNATE METHOD (WITHOUT
THE STAND MOUNT)
To mount the fixture vertically:
· Attach a ball or photo head to your tripod,
and align either of the 1/4˝ mounting
sockets with the mounting post of the
head. Screw in the fixture until secure.
To mount the fixture horizontally:
1. Detach the mounting plate
from the handle mount by
loosening the locking wheel.
2. Screw the 1/4˝-20 socket into the
1/4˝mounting fixture on your light
stand or tripod until secure.
3. Attach the fixture to the mounting plate.
instructions
Escort LED Lights - USER MANUAL
13
Page 14
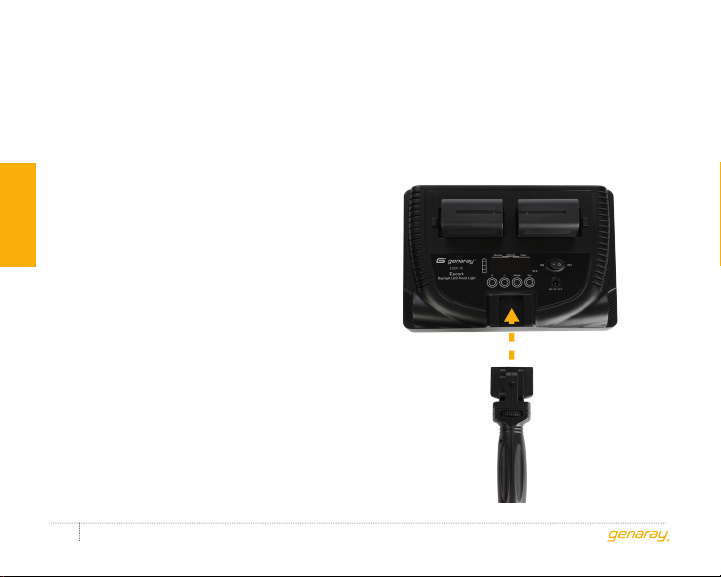
MOUNTING THE ESCORT TO
THE HANDLE MOUNT
instructions
1. Align the 1/4˝ threaded mount and guide
pin with the socket on the mounting
plate. Turn the locking wheel until
the mounting plate is securely flush
with the top of the handle mount.
2. Insert the mounting plate into
the mounting slot on the fixture
until it clicks into place.
To remove the handle mount, press the
release button, and slide the mounting
plate out of the mounting slot.
Escort LED Lights - USER MANUAL
14
Page 15
POWERING THE
LIGHT
The Escort can be powered directly from
an AC outlet or the two included batteries.
Important
The Escort is a multi-voltage fixture
capable of running on 100–240 V,
50/60 Hz. The included cable has a 120V,
50 Hz (North American) plug. To use this
fixture with other voltages, you must
use a plug adapter (sold separately).
USING THE FIXTURE WITH AC POWER
1. Plug the cord from the AC adapter
into the fixture’s power socket.
2. Plug the 2-pin end of the AC cord into the
adapter and the other into an AC outlet.
The light on the adapter will glow green
to indicate that it’s receiving power.
USING THE FIXTURE WITH
BATTERY POWER
Important
The Escort will work only when
both batteries are installed.
Installing the batteries:
1. Make sure the power switch is in
the Off position and the fixture is
not plugged into a wall outlet.
2. Place the batteries into the battery
compartments so that their contacts
are facing the battery contacts.
3. Slide the batteries toward the center of
the fixture until they lock into place.
To remove the batteries, press down
on the release buttons at the side of
each battery compartment. Slide the
batteries toward the release buttons,
and lift them out of the compartment.
Escort LED Lights - USER MANUAL
instructions
15
Page 16

Charging the batteries:
The four battery indicator lights each
instructions
represent 25% charge. When the
remaining charge is less than 25%, the
bottom light will blink to indicate that
you need to recharge the battery.
1. Place the battery plate onto the
charger by aligning the guide posts
with the slots. Slide the plate onto the
charger in the direction of the arrow.
2. Slide the battery onto the plate so that
the battery and plate contacts touch.
3. Plug the 2-pin plug into the charger
and the other end into an AC outlet. The
indicator will glow red to show that the
battery is charging. It will turn green
when the battery is fully charged.
Escort LED Lights - USER MANUAL
16
Using the cigarette lighter cable:
1. Attach the battery to the charger as
described in the previous section.
2. Plug the cigarette lighter adapter cable
into your car’s cigarette lighter, and
attach the 1-pin plug to the charger.
Note
The battery indicator lights may continue
to glow even after the batteries have been
removed from the unit. This is normal and
will not affect the performance of your
Escort LED, the charger, or the batteries.
Page 17

OPERATING THE
ESCORT
Open the barndoors and press the
power switch to On. The LED array will
turn on, and the LED display will show
the last settings that were used.
SETTING THE CHANNEL
The Escort features a 2.4 GHz receiver
that enables it to be operated by the
Genaray MB-WRT wireless remote
(sold separately) from up to 98´ (30 m)
away. The Escort offers 99 channels
for controlling setups with multiple
lights and preventing interference from
other remote devices in your area.
To set the channel, follow these steps:
1. Press and hold the Mode ( ) button
until the two-digit channel number
appears on the display.
2. Touch and hold the Plus ( ) or Minus ( )
buttons to increase or decrease the value.
Tap either button to raise or lower
the value by one-unit increments.
3. Press the Set ( ) button to select the
channel and return to the main display.
The Escort and the remote must be set to
the same channel. To set the channel on the
remote, refer to the user manual included
with the Genaray MB-WRT wireless remote.
Escort LED Lights - USER MANUAL
instructions
17
Page 18
MODIFYING THE LIGHT OUTPUT
The brightness of the Escort ranges
instructions
from 10 (10% brightness) to 99 (full
brightness). To set the brightness of
the fixture, follow these steps:
1. Turn on the power. The dimmer value
will show the last brightness setting.
2. Touch and hold the Plus ( ) or Minus ( )
buttons to increase or decrease the value.
Tap either button to raise or lower
the value by one-unit increments.
Since the ESDS-25 and ESDF-75 are
daylight balanced, the color temperature
stays at a constant 5600 K.
Escort LED Lights - USER MANUAL
18
ADJUSTING THE COLOR
TEMPERATURE (ESBF-75 ONLY)
To change the color temperature of
the ESBF-75, follow these steps:
1. Tap once on the Mode ( ) button. The
color temperature value will blink.
2. Use the Plus ( ) and Minus ( ) buttons to
adjust the color temperature from 5600 K
(daylight balance) to 3200 K (tungsten
balance). Tap the buttons to change
the temperature by 100 K increments,
or press and hold to change rapidly.
3. The color temperature setting will stop
blinking, and the color temperature will
be selected after 5 seconds.
You can tap the Set ( ) button to
select the color temperature in case
you want to immediately proceed
to another setting adjustment.
Page 19

Tip: Adjusting the color temperature
between 3200 K and 5600 K will have
an effect on the white balance of your
photographs. Try using AWB (auto white
balance) on your camera when adjusting
the color temperature of the ESBF-75.
To adjust the color temperature with the
remote, and for more information about
using the remote with a multi-light setup,
refer to the user manual included with
the Genaray MB-WRT wireless remote.
Full-Power Mode
Full-power mode represents the
fixture’s highest power output.
To enter full-power mode, tap the Set ( )
button twice. FL will appear on the display.
Both daylight and tungsten LEDs will be
fully illuminated and automatically set to a
color temperature of approximately 4000 K.
The dimmer value can be adjusted, but the
color temperature cannot be changed.
To return to adjustable temperature
mode, tap the Set ( ) button twice. The
color temperature reading will return
to the previously set temperature.
Note: Full-power mode can only be set
from the back panel of the ESBF-75.
When in full-power mode, the brightness
can be adjusted from the back panel and
with the MB-WRT wireless remote.
instructions
Escort LED Lights - USER MANUAL
19
Page 20
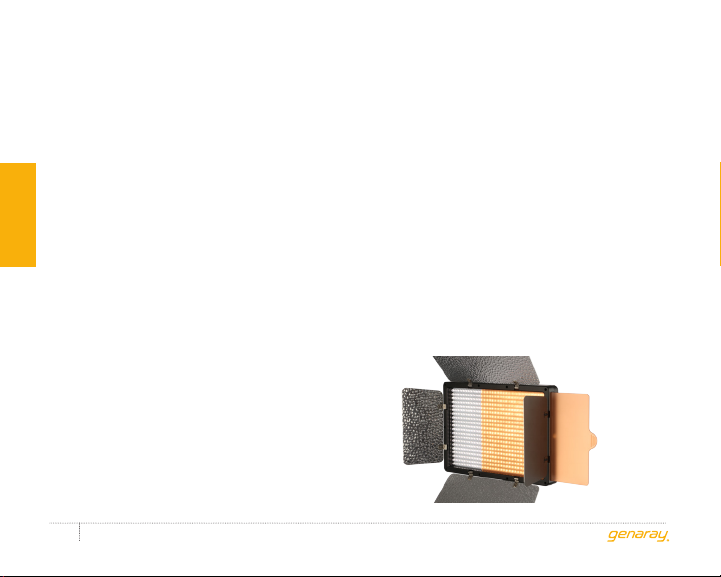
SHAPING AND DIFFUSING THE LIGHT
Barndoors and the included diffuser
instructions
can shape or modify the light.
BARNDOORS
The barndoors can be opened and
closed independently to prevent light
from spreading to unwanted areas, or to
precisely control where the light strikes.
DIFFUSER
The diffuser softens your light to
make it less angular and punchy.
To install the diffuser, close the barndoors
and slide it into the slot on the side
of the fixture until it clicks into place.
Then reopen the barndoors. To remove
the diffuser, close the barndoors and
pull it out of the slot by the pull tab.
Escort LED Lights - USER MANUAL
20
TUNGSTEN FILTER (ESDF-75
AND ESDS-25 ONLY)
The orange tungsten filter changes the
color temperature of your light from 5600 K
(daylight) to 3200 K (warm tungsten light).
To install the tungsten filter, close the
barndoors and slide it into the slot on
the side of the fixture until it clicks into
place. Then reopen the barndoors. To
remove the filter, close the barndoors
and pull it out of the slot by the pull tab.
Page 21
STORING
THE LIGHT
FCC DECLARATION OF
CONFORMITY
When you're finished using the light, push
the power switch to the Off position.
Remove the power cord or the batteries
from the fixture, and close the barndoors
to protect the fixture during transport
and storage. If the fixture is warm, allow
a few minutes for it to cool down.
Important
Always keep the barndoors closed
when the light is not in use.
This device complies with Part 15 of
the FCC rules. Operation is subject
to the following two conditions:
1. This device may not cause
harmful interference, and
2. This device must accept any interference
received, including interference that
may cause undesired operation.
Escort LED Lights - USER MANUAL
instructions
21
Page 22

PRODUCT
SPECIFICATIONS
All Models
LED count: 680
sPecifications
Dimming: 10% to full brightness
Electrical consumption: 40 W
Tungsten output equivalent: 300–400 W
AC operating voltage: 100–240 V, 50/60 Hz
DC operating voltage: 13–19 V
Bulb life: 50,000 hr.
Wireless receiver: Built-in 2.4 GHz receiver,
Battery: NP-F750 7.4 V, 4400 mAh, 32.66 Wh
AC Cable length: 4.9´ (1.5 m)
Escort LED Lights - USER MANUAL
22
99 channels
DC cable length: 12.6´ (3.8 m)
Car charger cable length: 3.9´ (1.2 m)
Dimensions (W × H × D): 10.35˝ × 7.2˝ × 2˝
(26.3 × 18.3 × 5 cm)
Weight: 2.2 lb. (1 kg)
Page 23
ESDS-25 (Daylight Spot Light)
Color temperature: 5600 K
(3200 K with tungsten filter)
Luminance: 6790 lx @ 1 m
Coverage: 25°
CRI: 91.5
ESBF-75 (Bi-Color Flood Light)
Color temperature: 3200–5600 K
Luminance: 3020 lx @ 1 m
Coverage: 75°
CRI: 91.7
ESDF-75 (Daylight Flood Light)
Color temperature: 5600 K
(3200 K with tungsten filter)
Luminance: 3330 lx @ 1 m
Coverage: 75°
CRI: 96
sPecifications
Escort LED Lights - USER MANUAL
23
Page 24

ONE-YEAR LIMITED WARRANTY
This Genaray product is warranted to the original purchaser to be free from defects in materials and
workmanship under normal consumer use for a period of one (1) year from the original purchase date
or thirty (30) days after replacement, whichever occurs later. Genaray’s responsibility with respect
to this limited warranty shall be limited solely to repair or replacement, at Genaray’s discretion, of
any product that fails during normal use of this product in its intended manner and in its intended
environment. Inoperability of the product or part(s) shall be determined by Genaray. If the product
has been discontinued, Genaray reserves the right to replace it with a model of equivalent quality and
function.
This warranty does not cover damage or defect caused by misuse, neglect, accident, alteration, abuse,
improper installation or maintenance. EXCEPT AS PROVIDED HEREIN, GENARAY MAKES NEITHER
ANY EXPRESS WARRANTIES NOR ANY IMPLIED WARRANTIES, INCLUDING BUT NOT LIMITED TO
ANY IMPLIED WARRANTY OF MERCHANTABILITY OR FITNESS FOR A PARTICULAR PURPOSE. This
warranty provides you with specific legal rights, and you may also have additional rights that vary from
state to state.
To obtain warranty coverage, contact the Genaray Customer Service Department to obtain a return
merchandise authorization (“RMA”) number, and return the defective product to Genaray along with
the RMA number and proof of purchase. Shipment of the defective product is at the purchaser’s own
risk and expense.
For more information, or to arrange service, visit www.genaray.com or contact us at [email protected].
© 2017 Genaray LLC. All Rights Reserved.
GG4
 Loading...