

Page 1
Genano® 5250
LUCHTZUIVERINGSSYSTEEM
APPAREIL DE PURIFICATION D’AIR
AIR PURIFICATION DEVICE
Handleiding (Nederlands)
Manuel d’utilisation (Français)
Manual (English)
Page 2

Inhoud
Sommaire
Contents
Nederlands
Inhoud van de verpakking
Technische kenmerken
Vóór gebruik
Installatie
Basisbediening
Geavanceerd gebruik
Garantievoorwaarden
Veiligheidsinstructies
Français
Contenu de la livraison
Caractéristiques techniques
Avant l’utilisation
Installation
Fonctionnement de base
Fonctions avancées
Conditions de garantie
Règles de sécurité
English
Contents of delivery
Technical features
Before use
Installation
Basic operation
Advanced operation
Warranty conditions
Safety instructions
3
4
4
5
7
8
11
13
15
17
18
18
19
21
22
25
27
29
30
31
31
32
34
35
38
40
42
Contacteer ons / Nous contacter / Contact us
2
43
Manual revised 23.11.2016.
Page 3
Genano® 5250
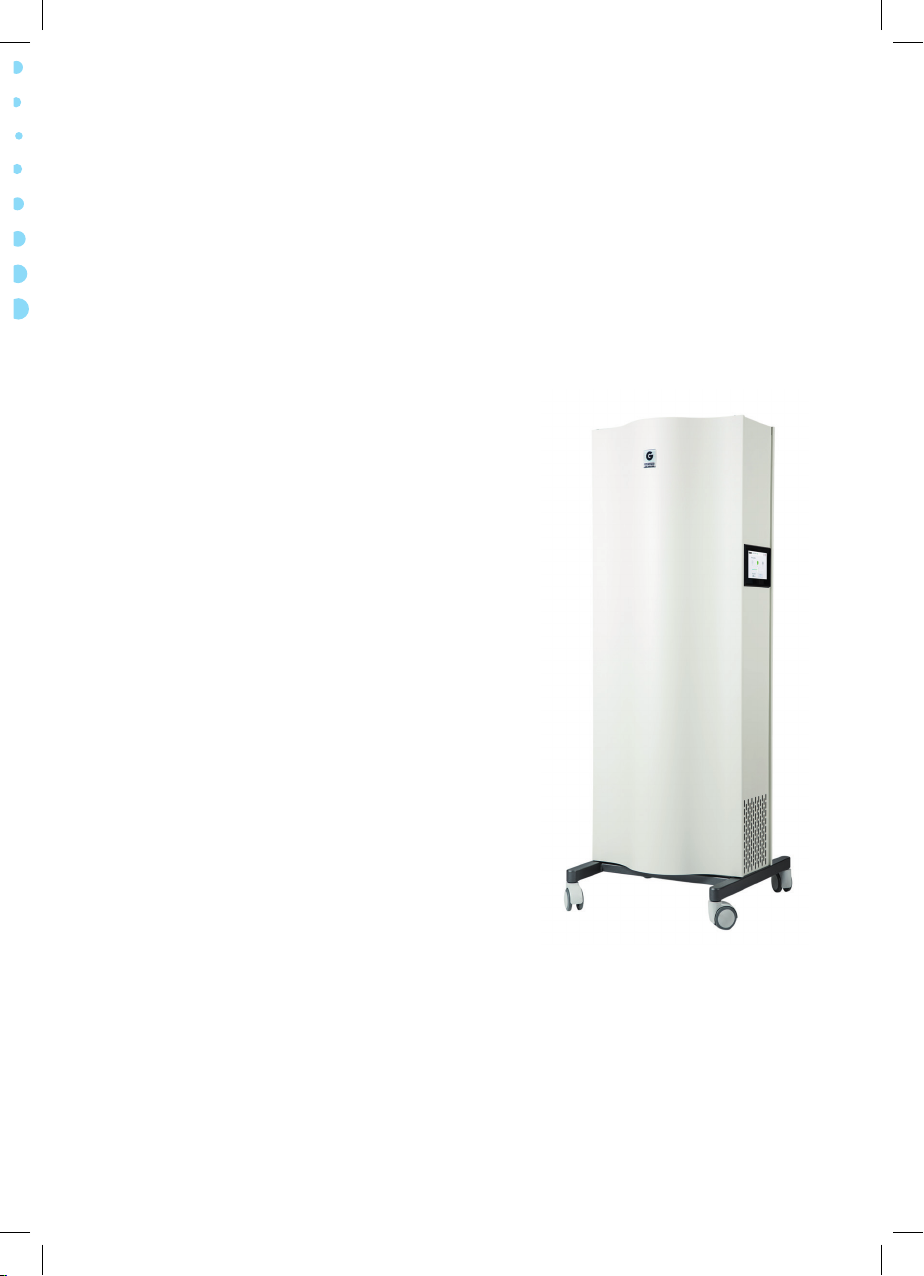
Luchtzuiveringssysteem
Nederlands
De Genano 5250 is een op
Genano Technology
luchtzuiveringssysteem. Deze unieke
technologie verwijdert zelfs de kleinste
onzuiverheden uit de binnenlucht. Die
kunnen zowel uit virussen, bacteriën en
schimmelsporen bestaan als uit van verkeer
afkomstige roetdeeltjes.
De Genano 5250 is niet uitgerust met
traditionele vezelfilters, dus is er ook
geen risico dat er binnenin de unit een
voedingsbodem voor microben ontstaat,
zelfs niet onder vochtige omstandigheden.
In plaats daarvan maakt Genano Technology
gebruik van een gasabsorbeerder om
schadelijke gassen en ozon uit de lucht te
halen.
Bovendien is een Genano-unit erg
gebruiksvriendelijk en eenvoudig te
onderhouden. De Genano 5250 is immers
zelfreinigend en vergt geen tussenkomst van
de gebruiker.
®
gebaseerd
3
Page 4
Inhoud van de verpakking
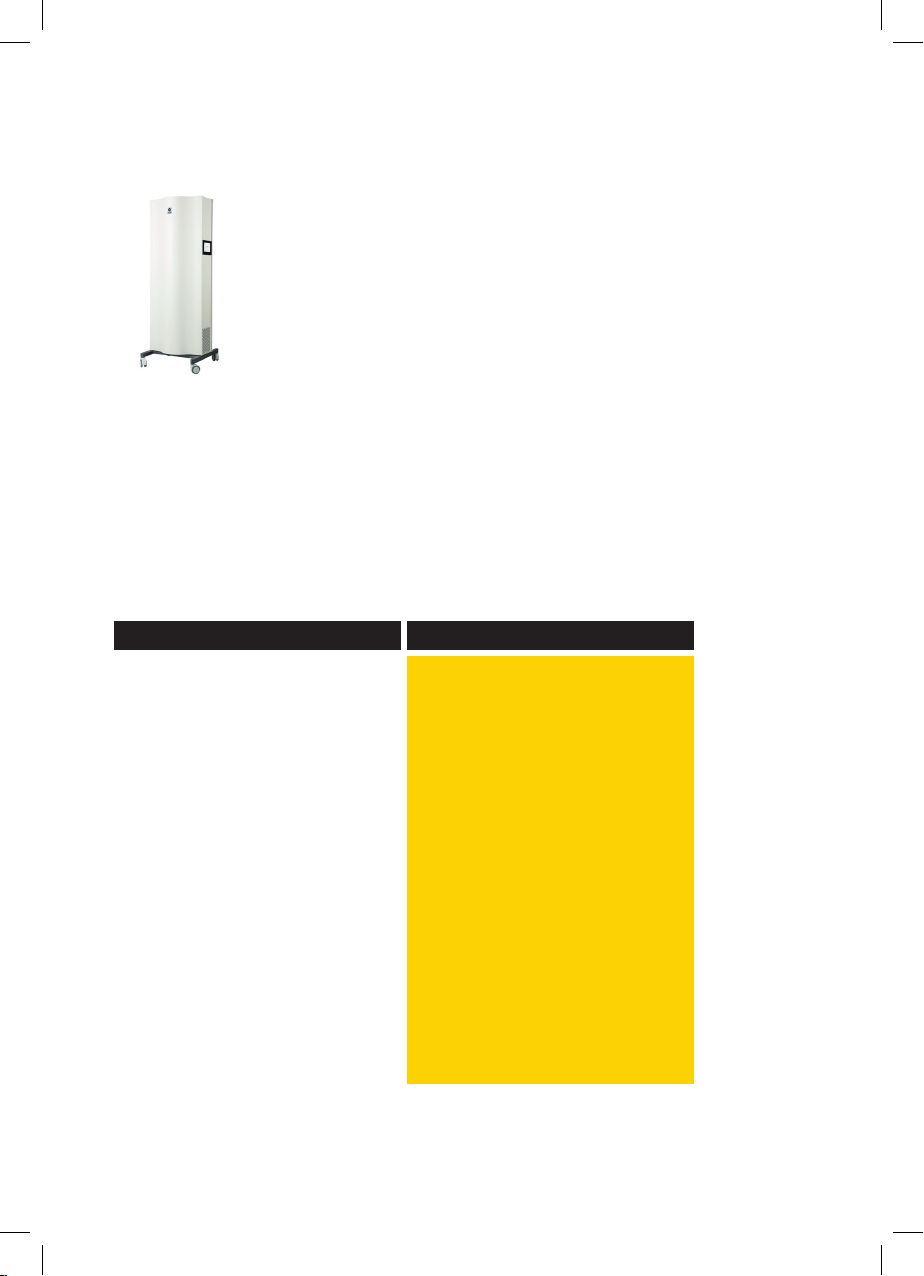
1 Genano 5250-unit met stroomkabel
Bevat 1 gasabsorptieplaat om gasemissies te verwerken. Zorg
ervoor dat de absorptieplaat jaarlijks vervangen wordt. Het
vervangen van de absorptieplaat en andere onderhoudsmaatregelen zijn inbegrepen in het onderhoudscontract.
Reinigingsvloeistof (Genonex)
Gebruik alleen door Genano goedgekeurde reinigingsvloeistoffen
in de Genano-units. Opmerking: Het reinigingsvloeistofreservoir
van de eenheid bevat max. 10 liter en kan voorgevuld zijn met een
bepaalde hoeveelheid reinigingsmiddel.
Technische kenmerken
Technische kenmerken
Reinigend vermogen
Grootte van tegengehouden deeltjes
Reinigingsdoeltreffendheid
Eliminatie van gassen
Installatie
Reiniging
Ventilatorsnelheid
Afmetingen (b x d x h mm)
Gewicht
Behuizing
Geluidsniveau
Bedrijfsspanning
Stroomverbruik
Omgevingstemperatuur
* De Genano 5250 kan uitgerust worden met een negatieve en/of positieve
drukaanpassingskit om isolatieruimten of beschermde omgevingen met
een negatieve/positieve luchtdruk te creëren.
4
Genano® 5250
max. 500 m3/u
> 0.003 µm
99.5 %
Inbegrepen: 800 g actieve kool, 60 mm
Mobiel *
Automatisch
Traploze snelheidsregeling
600 x 600 x 1680
91 kg
Gelakt staal
30–42 LpA (dBa)
200–240 V, 50/60 Hz
90–260 W
+5...+60 °C
Page 5

Vóór gebruik
OM REKENING MEE TE HOUDEN BIJ HET PLA ATSEN VAN DE UNIT IN EEN KAMER
De Genano 5250 moet verticaal op een effen ondergrond geplaatst worden.
De unit werd onderaan van wieltjes voorzien om de eenheid gemakkelijker te
kunnen verplaatsen. De 5250 telt vier van deze wieltjes, waarvan er twee vergrendeld kunnen worden.
Over drempels en andere obstakels moet de eenheid voorzichtig heen gedragen
worden.
De Genano 5250 zuigt de vervuilde lucht langs onderen aan. De gezuiverde lucht
verlaat de unit langs boven.
OPGELET! Vervoer de eenheid, indien mogelijk, altijd verticaal. Blijkt dat niet te
kunnen en moet u de unit horizontaal transporteren, maak het reservoir van de
reinigingsvloeistof dan leeg en vergewis u ervan dat de voorkant van de eenheid
tijdens het vervoer naar boven wijst. Laat het toestel in verticale positie drogen
gedurende minstens 8 uur, alvorens het opnieuw aan te schakelen. Het apparaat
moet altijd verticaal gebruikt worden. Gebruik de unit alleen binnen en sla de
eenheid ook alleen binnen op.
WAARSCHUWING! Gebruik de unit nooit op een plaats waar bijvoorbeeld
ontvlambare gassen en vloeistoffen of grote hoeveelheden stof in de lucht een
explosief mengsel kunnen vormen, dat door een vonk tot ontploffing gebracht
kan worden.
Gebruik de eenheid niet in ruimten zonder een normale ventilatie. Zorg altijd
voor voldoende verluchting!
5
Page 6
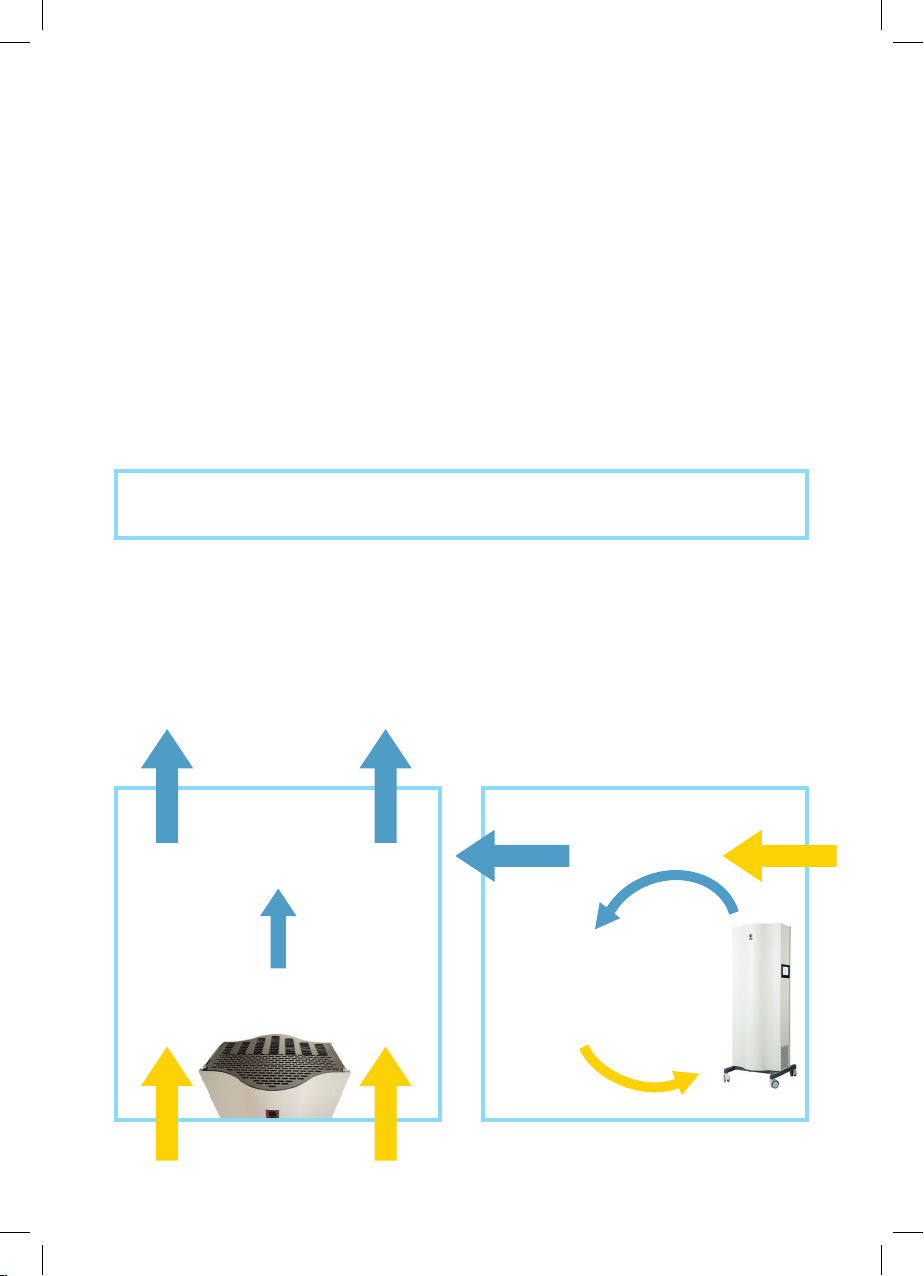
Stel de unit zodanig op dat het meubilair in het vertrek het traject van de luchtstroom zo weinig mogelijk beïnvloedt. De eenheid moet zodanig gepositioneerd
worden, dat het de lucht op dezelfde manier laat circuleren in de kamer als wanneer
er zich geen unit in het vertrek zou bevinden. Het beste resultaat wordt gewoonlijk
behaald, wanneer de unit nabij de luchttoevoeropening geplaatst wordt.
De beste luchtzuiverheidsgraad wordt in de onmiddellijke omgeving van de
eenheid behaald. Daarom is de beste plek om de eenheid in een groot vertrek op te
stellen, vlakbij een werkstation. Verder kan de eenheid ook in de buurt van bronnen
van problematische partikels voorzien worden om te vermijden dat de deeltjes in
kwestie zich zouden kunnen verspreiden.
Door de ventilatorsnelheid aan te passen, kan de productie van gezuiverde lucht
vergroot worden.
OPGELET! We raden aan om de eenheid altijd aangeschakeld te laten, ook
wanneer er zich niemand in de kamer bevindt, 's nachts en tijdens het weekend.
Met uw eventuele vragen over binnenluchtkwaliteit, de opstelling van de eenheid
en de ventilatorinstellingen kunt u altijd bij onze Genano-experts terecht. Volg de
instructies die u van hen krijgt om u van het best mogelijke eindresultaat te vergewissen.
BOVENAANZICHT ZIJAANZICHT
Afvoerlucht
Afvoerlucht
Inkomende lucht
Inkomende lucht
6
Page 7
Installatie
OPGELET! We raden u aan om de 5250-eenheid alleen door een erkende
Genano-dienstverlener te laten installeren.
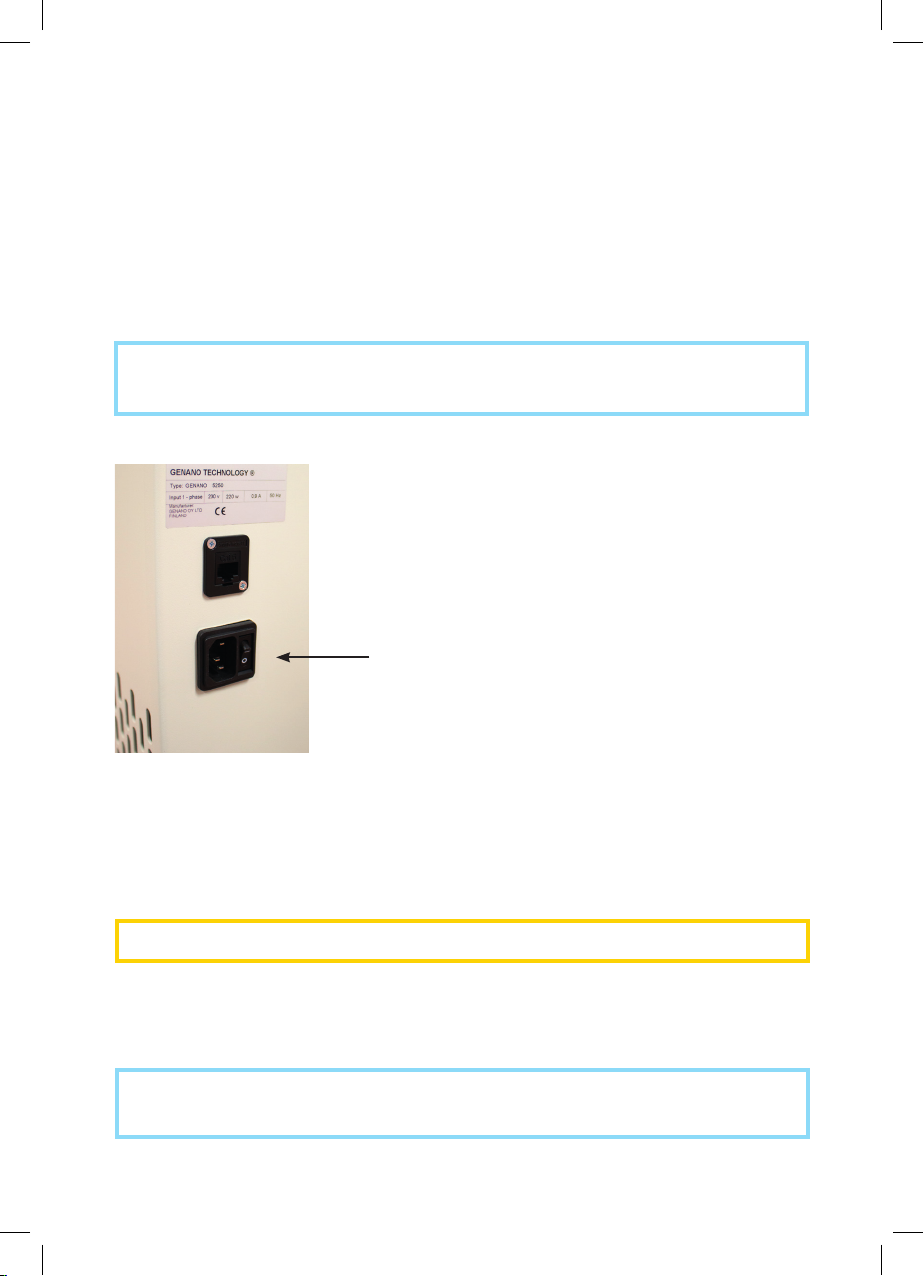
Manuele hoofdschakelaar
Vergewis u ervan dat de manuele hoofdschakelaar (zie afbeelding) zich in de
1.
‘0‘-positie bevindt. Steek de geaarde stroomkabel die bij de unit werd meegeleverd,
eerst in de Genano 5250, voordat u de kabel in een geaard stopcontact steekt (230
V/50 Hz).
WAARSCHUWING! Sluit de eenheid alleen aan op een geaard stopcontact.
2. Zet de manuele hoofdschakelaar in de ‘1‘-positie. De unit zal daarop beginnen
werken.
OPGELET! Doe de achterdeur op slot bij gebruik van de unit in de buurt van
kinderen of dieren.
7
Page 8

Basisbediening
De Genano 5250 wordt bediend via een aanraakscherm.
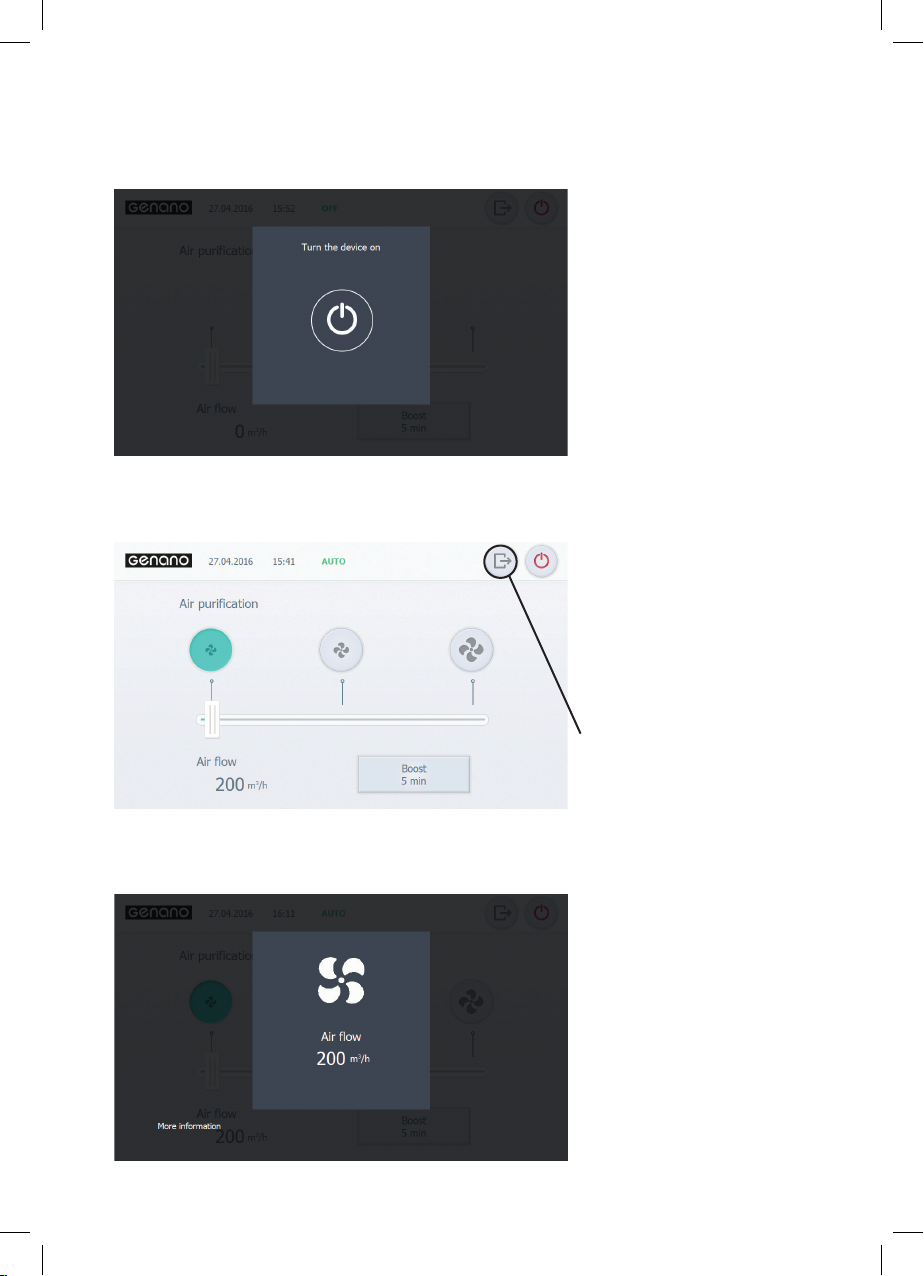
Wanneer de unit voor het eerst op het elektriciteitsnet wordt aangesloten, krijgt u
op het aanraakscherm het opstartvenster te zien (afbeelding A). Druk op de stroomknop op het scherm om de luchtzuivering te starten.
In het bedieningsvenster (afbeelding B) kunt u het luchtdebiet traploos regelen met
behulp van een schuifknop. Daarnaast zijn er ook de ventilatorknoppen waarmee
u het debiet naar vooraf ingestelde waarden kunt wijzigen. En met de ‘Boost‘-knop
kunt u de luchtcirculatie in de ruimte tijdelijk vergroten.
OPGELET! Als u het aanraakscherm niet kunt gebruiken zonder een pincode in
te geven, dan werd de eenheid vergrendeld uit beveiligingsoverwegingen. Neem
in dat geval contact op met uw onderhoudsdienst voor meer informatie.
Als het aanraakscherm gedurende bepaalde tijd niet gebruikt wordt, verschijnt er
een screensaver op het scherm (afbeelding C). Als die op het scherm weergegeven
wordt, dan werkt de eenheid normaal en zuivert deze de lucht zoals voorzien.
AUTOMATISCHE SPOELING
De eenheid houdt deeltjes in de lucht doeltreffend vast op de hiertoe voorziene
oppervlakken binnenin de eenheid. Een keer per week worden deze verzameloppervlakken automatisch gespoeld.
Na de spoelcyclus moet de unit ook kunnen drogen. Het spoelen en drogen duren
samen minder dan een minuut. Na het einde van de droogtijd zal de unit automatisch opnieuw beginnen werken.
OPGELET! We raden aan om de unit continu aangeschakeld te laten ter verzekering van de wekelijkse spoeling en een goede luchtkwaliteit. Als de eenheid
niet is aangeschakeld, dan kan het gebeuren dat er een automatische spoeling
overgeslagen wordt.
OPGELET! In kritieke situaties, zoals in isolatieruimten in ziekenhuizen, kan de
automatische spoelfunctie uitgeschakeld worden. In dat geval moet het spoelen
een keer per week manueel gestart worden. Neem contact op met uw erkende
Genano-dienstverlener om uw instellingen bij gebruik van de eenheid in kritieke
omstandigheden te laten aanpassen.
8
Page 9
A
Opstartscherm
B
Bedieningsscherm
Inloggen
C
Screensaver
9
Page 10

WEKELIJKS PROGRAMMA
Als er een wekelijks programma ingeschakeld wordt, dan zal de unit het luchtdebiet automatisch aanpassen op de voorgedefinieerde tijdstippen. Dat wordt aangegeven door het woord ‘AUTO‘ (automatisch) bovenaan het scherm (zie afbeelding
B, pagina 9).
Als u het luchtdebiet handmatig aanpast met behulp van de schuifknop, dan zal het
woord ‘MANUAL‘ (manueel) bovenaan het aanraakscherm verschijnen. De eenheid
zal dan verder blijven werken tegen de door u gekozen ventilatorsnelheid, totdat de
volgende aanpassing conform het wekelijkse programma wordt doorgevoerd. Op
dat moment zal het ‘AUTO‘-programma dan opnieuw in gebruik genomen worden.
Als u de wekelijkse programma-instellingen wilt wijzigen of uitschakelen, gelieve
dan contact op te nemen met uw onderhoudsdienst.
FOUT/ONDERHOUD
De Genano 5250 is uitgerust met een intern monitoringsysteem. In de volgende
situaties krijgt u een bericht op uw aanraakscherm te zien:
• laag peil van reinigingsvloeistof gedetecteerd;
• reinigingsvloeistof in eenheid is op;
• deur vooraan staat open;
• of er heeft een bepaalde functie een foutmelding gegenereerd.
Gelieve bij dergelijken meldingen de instructies op het scherm te volgen.
OVERIGE HANDELINGEN
De Genano 5250 is erg gebruiksvriendelijk. U bedient de unit normaal gezien alleen
via het aanraakscherm en u hoeft de deur aan de voorzijde bij een normaal gebruik
ook nooit te openen.
Een erkende Genano-dienstverlener zal het bekken onderaan schoonmaken en zal
ook reinigingsvloeistof bijvullen.
10
Page 11

Geavanceerd gebruik
Voor uw onderhoudsteam zijn er geavanceerde instellingen voorzien.
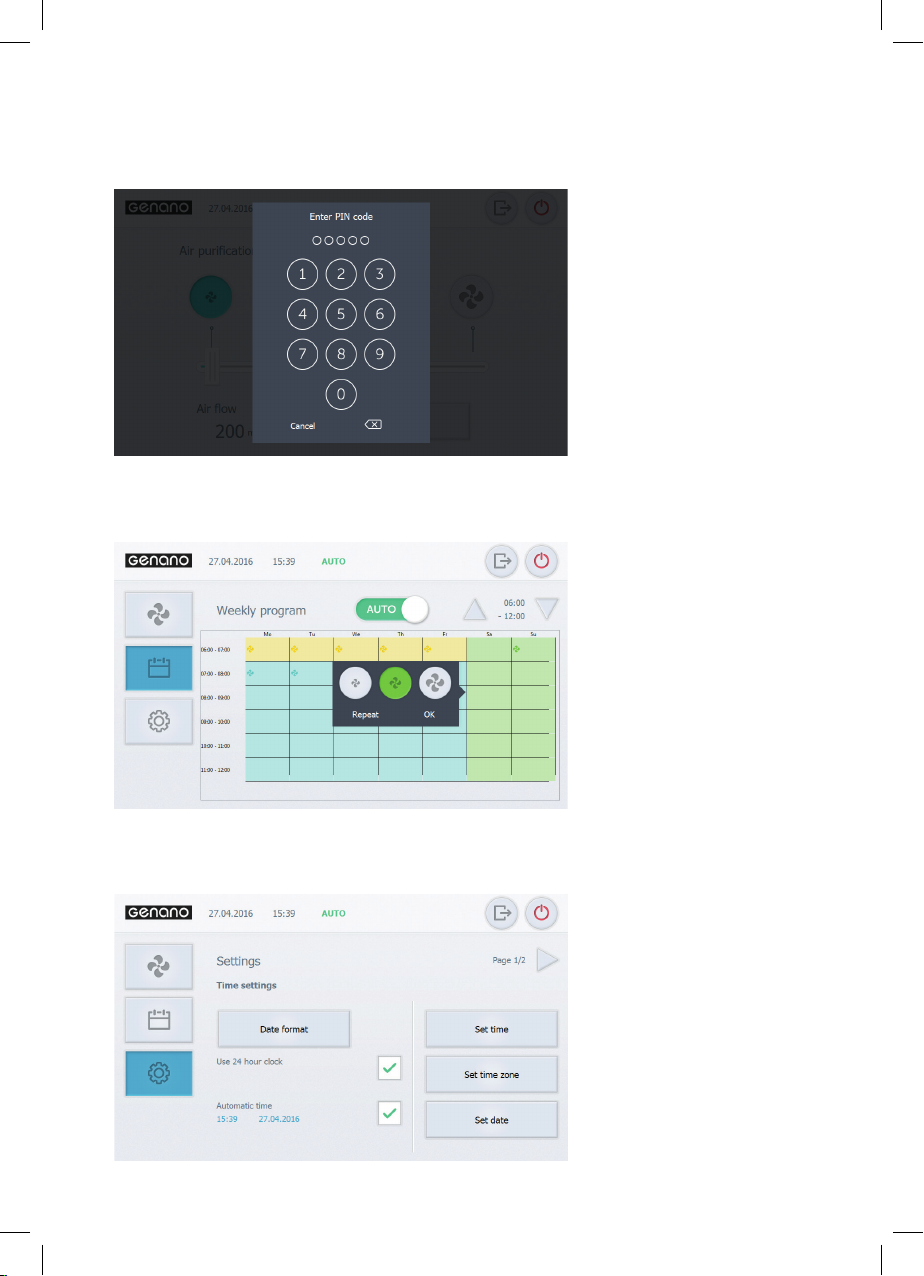
Inloggen doet u hier met uw pincode voor niveau 2 na op de respectieve inlogknop
gedrukt te hebben (zie afbeelding B op pagina 9 en D op pagina 12).
Daarna krijgt u aan de linkerkant van het venster bijkomende snelkoppelingen te
zien.
WEKELIJKS PROGRAMMA
Met het wekelijkse programma (zie afbeelding E, pagina 12) kunt u een automatisch
programma voor de week ingeven. Daarbij kunt u kiezen uit drie voorgedefinieerde
ventilatorinstellingen. Gebruik de pijlen in de rechter bovenhoek om van ochtend
naar nacht te gaan.
Verder kunt u het wekelijkse programma ook uitschakelen door de schuifknop van
‘AUTO‘ naar ‘MANUAL‘ te verplaatsen.
INSTELLINGEN
Via de tandwielknop links hebt u toegang tot tijd-, datum-, taal- en pincode-instellingen.
Op pagina 1/2 kunt u kiezen tussen manuele of automatische instelling van datum
en tijd en de manier waarop beide weergegeven worden.
Op pagina 2/2 kunt u de taal van de eenheid en de pincodes voor niveau 1 en 2
wijzigen. De pincode voor niveau 2 is degene die u gebruikte om in te loggen op
deze instellingen.
• De pincode voor niveau 1 wordt alleen in kritieke contexten gebruikt. Het belet
de gebruiker om iets te doen zonder de pincode voor niveau 1 in te geven. Het
gebruik ervan kan alleen door het serviceteam van Genano geactiveerd worden.
• De pincode voor niveau 2 is bedoeld voor het lokale onderhoud van de unit. Het
is de pincode waarmee u zelf inlogde.
UITLOGGEN
Vergeet na het veranderen van de instellingen niet om uit te loggen via de in-/uitlogknop op het bovenpaneel.
11
Page 12
D
Pincode ingeven
E
Wekelijks programma
12
F
Instellingen
Page 13

GAS ABSORPTION PLATE
Besides particles, the Genano unit can also remove gases. Using a gas absorp-
tion plate, different kinds of gases can be removed from indoor air. The typical
exchange period of the gas absorption plate is 12 months.
Garantievoorwaarden
1. ALGEMEEN
De garantievoorwaarden van Genano Ltd stemmen overeen met de NL 09 (artikel
21-35) contractvoorwaarden met de volgende wijzigingen en aanpassingen.
2. GARANTIETERMIJN
De garantietermijn bedraagt 24 maanden na leveringsdatum, tenzij er ter zake iets
anders bepaald werd in de productspecifieke garantie, het aanbod of het contract.
3. INHOUD VAN DE GARANTIE
Het repareren van een defect onderdeel of toestel of, indien nodig, het vervangen
van het defecte onderdeel of de defecte unit door een nieuw onderdeel of nieuwe
eenheid al naargelang het oordeel van de koper, is inbegrepen in de garantie.
Mogelijke reis- en vervoerskosten die door de reparatie onder garantie veroorzaakt
worden, vallen niet onder de garantie.
4. AANVULLEND
Aanvullende garanties, verbintenissen of beloftes die eventueel door de verdeler
of de wederverkoper gegeven, aangegaan of gedaan werden, zijn alleen voor hen
bindend. Genano Ltd is uitsluitend verantwoordelijk voor de hier vermelde garantie.
5. GARANTIEBEPERKINGEN
Deze garantie wordt gegeven in de veronderstelling dat het product onder normale
kantoor- of vergelijkbare omstandigheden gebruikt wordt en dat de gebruiksinstructies zorgvuldig worden nageleefd. Onder deze voorwaarden is de garantie
geldig in Finland. De verantwoordelijkheid van de garantiegever beperkt zich tot
deze garantievoorwaarden en dekt geen schade die een verkocht product aan een
ander voorwerp of een persoon zou berokkenen. Op basis van deze garantie kan
de klant alleen iets eisen van de garantiegever. De garantiegever is niet gebonden
door mondelinge bepalingen die niet opgenomen werden in deze garantievoorwaarden. Opdat de garantie geldig zou zijn, mogen de gegevens en serienummers
op het product of op de garantiekaarten niet gewijzigd of beschadigd geraakt zijn.
De garantie dekt geen schade veroorzaakt:
• tijdens het vervoer;
13
Page 14

• door verzuim vanwege de gebruiker van het product of door overbelasting van
het product;
• door de gebruiker als gevolg van het niet naleven van de gebruiksinstructies, een
gebrek aan zorg of onderhoud, het laten vallen van het product of vloeistofschade;
• door omstandigheden waar de garantiegever geen controle over heeft, zoals
schommelingen in de voedingsspanning (kunnen tot 10% gaan), onweersbuien,
brand of ongevallen;
• door een onderhoud, reparatie of verandering van structuur, uitgevoerd door
een andere partij dan de hiertoe gemachtigde dienst;
• of door het plaatsen van de unit op een manier die indruist tegen de gebruiksinstructies of die op een andere manier niet klopt.
De garantie dekt geen reparaties van schade die geen impact heeft op de werking
van het product.
Onderdelen die stuk kunnen gaan bij hantering of als gevolg van natuurlijke slijtage,
zoals zekeringen, plastic onderdelen die handmatig bewogen kunnen worden of
andere onderdelen die verslijten, zijn niet opgenomen in de garantie.
6. STAPPEN DIE ONDERNOMEN MOETEN WORDEN, WANNEER ER EEN FOUT
ONTDEKT WORDT
Als er tijdens de garantieperiode een fout ontdekt wordt, dan moet de klant meteen
contact opnemen met de erkende dienstverlener of verdeler. Hij dient daarbij mee
te delen om welk product het precies gaat (de typenaam en het serienummer kan
hij op de garantiekaart of het identificatieplaatje vinden), alsook wat er precies mis
mee is, waarbij hij zo specifiek mogelijk moet proberen te zijn, en in welke omstandigheden de fout zich heeft voorgedaan. Een andere voorwaarde om aanspraak
te kunnen maken op de garantie, is dat de klant op een betrouwbare wijze kan
aantonen dat de garantie nog steeds van kracht is (door het voorleggen van de
aankoopfactuur waarop het serienummer van het product vermeld wordt.
14
Page 15

Veiligheidsinstructies
1. Gebruik de unit alleen binnen.
2. Stel of berg de eenheid nergens op, waar de unit nat kan worden. Laat
de eenheid niet in de regen staan en giet er ook geen water overheen.
Gebruik geen natte unit.
3. Stel de eenheid nooit bloot aan direct, warm zonlicht en sla de unit ook
niet op bij een temperatuur van meer dan 60 °C (140 °F).
4. Stel of berg de eenheid niet op een plek op, waar de unit kan omvallen.
5. Gebruik de eenheid niet in ruimten zonder een normale ventilatie. Zorg
voor voldoende verluchting.
6. Gebruik de unit niet, als die op een of andere manier beschadigd is.
7. Gebruik de eenheid niet, als de stroomkabel of stekker beschadigd blijkt.
Bezorg de unit terug aan een erkende Genano onderhoudsdienst voor
onderzoek en reparatie.
8. Om eventuele schade aan de stroomkabel te voorkomen, mag u de kabel
niet rond de unit heen draaien en moet u de kabel uit de buurt van warme
oppervlakken houden.
9. Steek de stekker van eenheid alleen in een geaard stopcontact.
10. Sluit de stroomkabel altijd eerst aan op de unit, voordat u de stekker aan
het andere uiteinde van de kabel in het stopcontact steekt (muur). Vergewis
u ervan dat de respectieve plug naar behoren in de eenheid steekt. Om
los te koppelen, schakelt u het apparaat eerst uit en trekt u daarna pas de
stekker uit het stopcontact.
11. Koppel de unit ook eerst los, vooraleer u deze verplaatst of naar een andere
locatie vervoert.
12. Bedek de luchttoevoeropeningen niet en plaats niets direct bovenop de
eenheid.
13. Laat nooit iets vallen of steek ook nooit iets in eender welke opening.
14. Vergrendel het bekken onderaan bij gebruik ervan in de buurt van kinderen
of dieren.
15. Tussenkomsten op de unit mogen alleen uitgevoerd worden door een
erkende reparatiedienst.
15
Page 16

16. Verwijder de gasabsorptieplaat niet uit de unit.
17. WAARSCHUWING! Door zijn manier van werken kan de elektronische
eenheid soms vonken veroorzaken. Gebruik de unit daarom nooit op een
plaats waar ontvlambare gassen of vloeistoffen of grote hoeveelheden
stof samen met lucht een explosief mengsel kunnen vormen.
Volg altijd de instructies, wanneer u deze Genano-eenheid gebruikt. Maak
geen gebruik van uitbreidingen of accessoires die niet door Genano Ltd
werden aanbevolen of ingezet.
Fabrikant: Genano Ltd
16
Page 17
Genano® 5250
Appareil de purification d’air
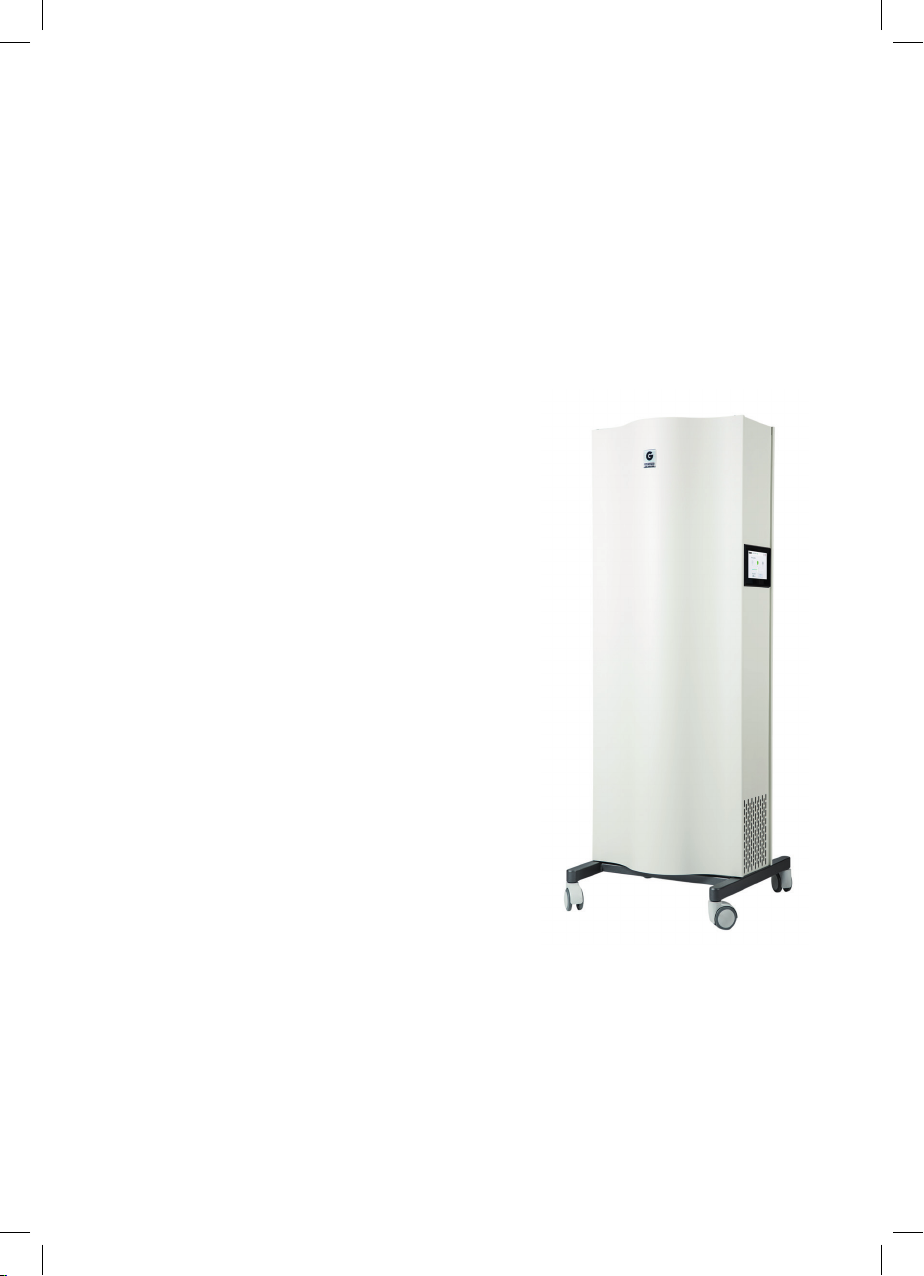
Le Genano 5250 est un appareil de
purification d’air basé sur la Genano
Technology
exceptionnelle élimine même les plus petites
impuretés de l’air intérieur, qu’il s’agisse de
virus, de bactéries, de spores de moisissures
ou de particules de suie provenant de la
circulation automobile.
Le Genano 5250 n’étant pas équipé de filtres
traditionnels à fibres, il n’y a aucun milieu
fertile favorisant la prolifération de microorganismes à l’intérieur de l’appareil, même
dans des conditions humides. La technologie
de Genano met en œuvre un absorbeur de
gaz pour l’élimination des gaz nocifs et de
l’ozone.
®
. Cette technologie
Français
L’utilisation et l’entretien de l’appareil Genano
sont d’une grande facilité. Le Genano
5250 est autonettoyant et ne nécessite pas
d’actions spécifiques de la part de l’utilisateur.
17
Page 18
Contenu de la livraison
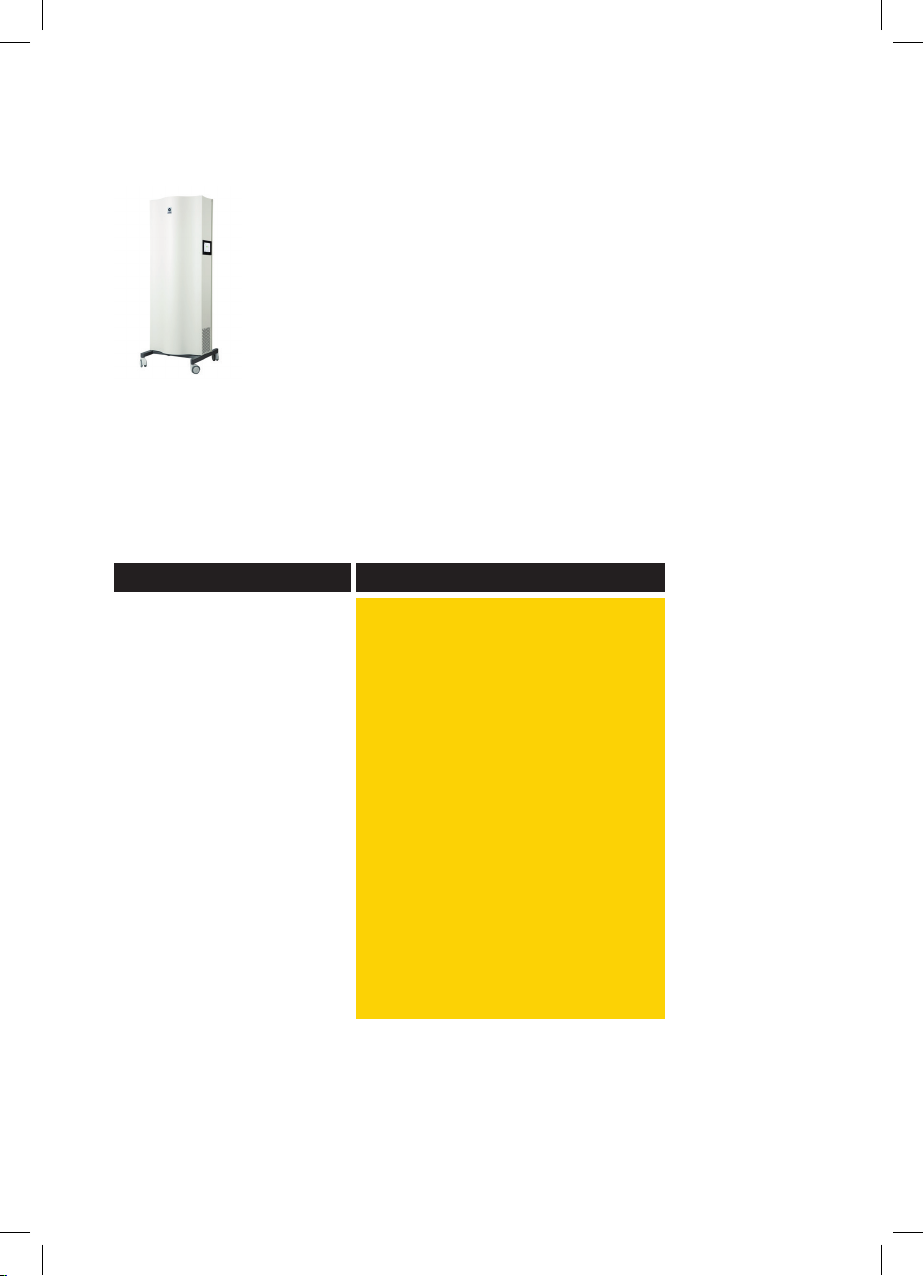
1 appareil Genano 5250 avec câble d’alimentation secteur
L’appareil contient une plaque d’absorption de gaz pour traiter les
émissions de gaz. Veillez à ce que celle-ci soit remplacée tous
les ans. Le remplacement de la plaque d’absorption et les autres
actions d’entretien sont inclus dans le contrat de maintenance.
Liquide de lavage (Genonex)
Utilisez uniquement les liquides de lavage agréés dans les appareils Genano. Remarque : le réservoir de liquide de lavage de l’appareil a une capacité de 10 L maximum et peut avoir été pré-rempli
d’un peu de liquide de lavage.
Caractéristiques techniques
Caractéristiques techniques
Capacité de nettoyage
Taille des particules filtrées
Efficacité de nettoyage
Neutralisation des gaz
Installation
Lavage
Vitesse du ventilateur
Dimensions
Poids
Châssis
Niveau sonore
Tension de fonctionnement
Puissance absorbée
Température d’utilisation
Genano® 5250
max. 500 m3/h
> 0.003 µm
99.5 %
Inclus: 800 g de charbon actif, 60 mm
Mobile *
Automatique
Commande de vitesse réglable en continu
600 x 600 x 1680 mm
91 kg
Acier peint
30–42 LpA (dBa)
200–240 V, 50/60 Hz
90–260 W
+5...+60 °C
* Il est possible d’équiper le Genano 5250 d’un kit d’adaptateur de
pression négative et/ou positive pour créer des salles isolées ou des
environnements de protection avec une pression d’air négative/
positive.
18
Page 19

GAS ABSORPTION PLATE
Besides particles, the Genano unit can also remove gases. Using a gas absorp-
tion plate, different kinds of gases can be removed from indoor air. The typical
exchange period of the gas absorption plate is 12 months.
Avant l’utilisation
ÉLÉMENTS À PRENDRE EN COMPTE QUAND VOUS PLACEZ L’APPAREIL DANS
UNE SALLE
Le Genano 5250 doit être positionné à la verticale sur une base de niveau.
Le dessous de l’appareil est doté de roues pour une meilleure portabilité. Le 5250
est équipé notamment de quatre roues, dont deux sont verrouillables.
Déplacez l’appareil avec précaution au-dessus des seuils de portes et des autres
obstacles en l’inclinant.
Le Genano 5250 aspire l’air contaminé au niveau de sa base. L’air purifié ressort par
la partie supérieure de l’appareil.
ATTENTION ! Si possible, transportez toujours l’appareil à la verticale. Si cela n’est
pas possible et si vous devez le transporter horizontalement, videz le réservoir de
liquide de lavage et veillez à ce que la façade de l’appareil soit dirigée vers le haut
lors du transport. Laissez l’appareil sécher en position verticale pendant au moins
8 heures avant de le rallumer. L’appareil doit toujours fonctionner en position
verticale. L’appareil doit être utilisé et stocké uniquement à l’intérieur.
AVERTISSEMENT ! N’utilisez jamais l’appareil dans un lieu où, par exemple,
des gaz ou des liquides inflammables, ou de grandes quantités de poussières
dans l’air sont susceptibles de créer un mélange détonant pouvant exploser en
présence d’une étincelle.
De même, n’utilisez pas l’appareil dans des espaces non dotés d’une ventilation
normale. Veillez à toujours avoir une ventilation suffisante !
19
Page 20
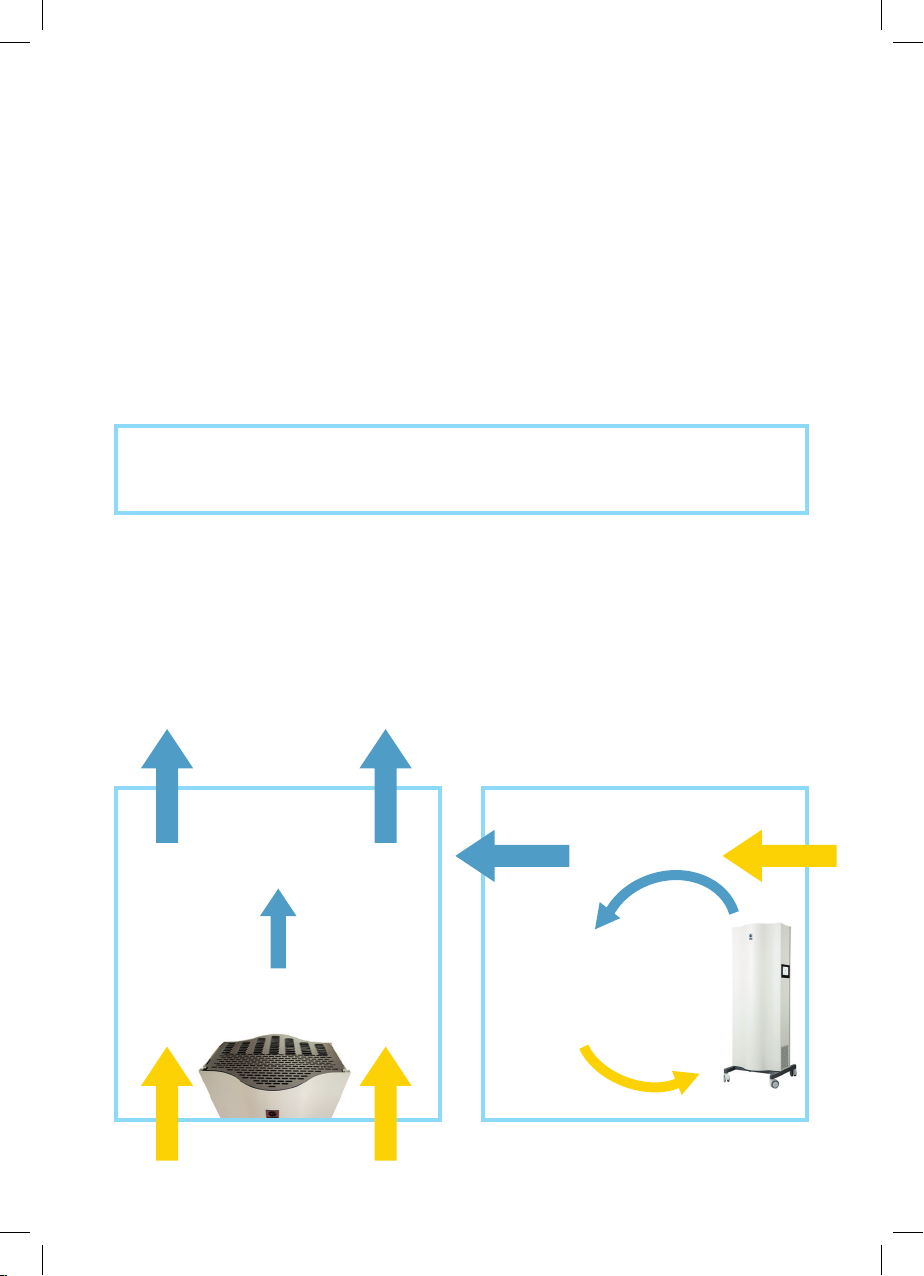
Positionnez l’appareil dans la pièce de sorte que le mobilier présent entrave les
flux d’air aussi peu que possible. Placez l’appareil de sorte que l’air puisse circuler
de façon normale et habituelle dans la pièce. Le meilleur effet est habituellement
obtenu quand l’appareil est placé près de l’arrivée d’air.
Le meilleur niveau de purification d’air est atteint à proximité de l’appareil. Par
conséquent, le meilleur emplacement pour l’appareil dans une grande pièce est
à côté d’un poste de travail. Il est aussi possible de la placer près des sources des
particules problématiques pour empêcher leur dispersion.
Il est possible d’augmenter la production d’air purifié en ajustant les réglages du
ventilateur.
ATTENTION ! Il est recommandé de laisser l’appareil fonctionner à tout
moment, même quand personne ne se trouve dans la pièce, durant la nuit et
pendant les week-ends.
Les experts Genano répondront à toutes vos questions concernant la qualité de
l’air intérieur, le positionnement de l’appareil et les réglages du ventilateur. Suivez
les instructions fournies par votre expert Genano pour profiter des meilleures
performances possibles.
VUE DU DESSUS VUE LATÉRALE
20
Évacuation d’air
Entrée d’air
Évacuation d’air
Entrée d’air
Page 21
Installation
IMPORTANT ! Il est recommandé de confier l’installation de l’appareil 5250
uniquement à un installateur Genano agréé.
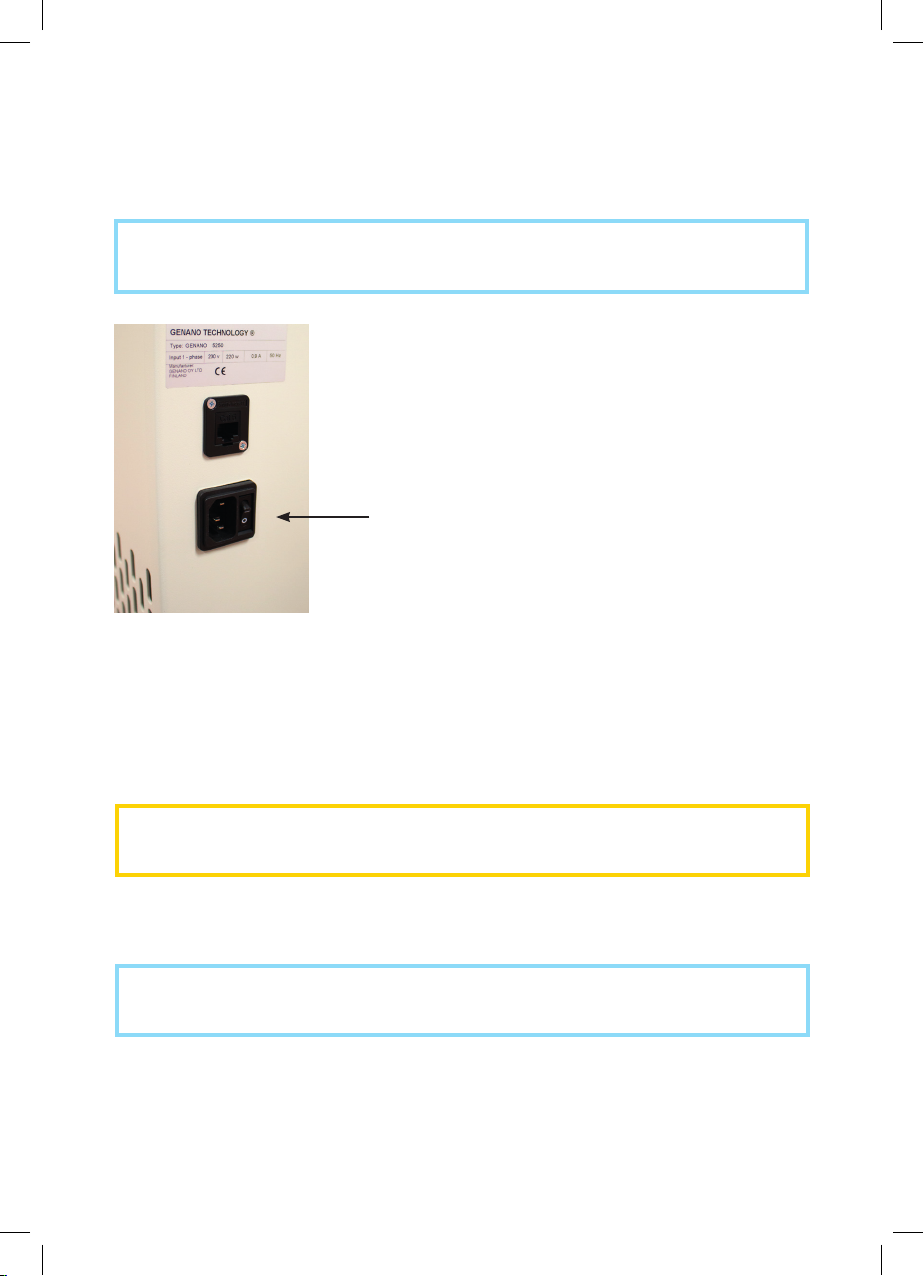
Interrupteur principal manuel
1.
Vérifiez que l’interrupteur principal manuel (voir illustration) est en position 0.
Branchez d’abord au Genano 5250 le câble d’alimentation avec prise de terre livré
avec l’appareil, puis le même câble à une prise secteur avec connexion à la terre
(230 V/50 Hz).
AVERTISSEMENT ! Branchez uniquement l’appareil à une prise de courant
reliée à la terre.
2. Mettez l’interrupteur principal manuel sur la position 1. L’appareil démarre.
ATTENTION ! Verrouillez la porte arrière si vous utilisez l’appareil en présence
d’enfants ou d’animaux de compagnie.
21
Page 22
Fonctionnement de base
Le Genano 5250 se contrôle au moyen d’un écran tactile.
La première fois que l’appareil est branché dans une prise de courant, l’écran
tactile affiche l’écran de démarrage (image A). Touchez le bouton Marche/Arrêt
sur l’écran pour démarrer la purification d’air.
L’écran de fonctionnement (image B) vous permet de régler le débit d’air en
continu au moyen d’un curseur. Vous pouvez aussi toucher les boutons des ventilateurs pour régler le flux d’air sur des valeurs prédéfinies. Il est possible d’activer le
bouton Boost pour augmenter provisoirement le débit d’air dans la pièce.
ATTENTION ! Si vous ne pouvez pas accéder aux commandes de l’écran tactile
sans code PIN, c’est que l’appareil a été verrouillé pour une protection supplémentaire. Contacter le service maintenance de votre entreprise pour obtenir
plus d’informations.
Un économiseur d’écran (image C) s’affiche automatiquement si l’écran tactile
n’est pas utilisé pendant un certain temps. Durant ce temps, l’appareil fonctionne
et purifie l’air normalement.
LAVAGE AUTOMATIQUE
L’appareil capture efficacement les particules présentes dans l’air sur les surfaces
de collecte intérieures. Le lavage des surfaces de collecte s’effectue automatiquement une fois par semaine.
Après ce cycle de lavage, l’appareil sèche. Le lavage et le séchage durent moins
d’une minute au total. L’appareil reprend automatiquement son fonctionnement
quand la période de séchage est terminée.
ATTENTION ! Il est recommandé de laisser l’appareil fonctionner en permanence pour garantir ce lavage hebdomadaire et une bonne qualité de l’air. Si
l’appareil ne fonctionne pas en continu, le lavage automatique risque de ne pas
être assuré.
ATTENTION ! Dans des conditions critiques comme les salles d’isolement en
hôpital, il est possible de désactiver la fonction de lavage automatique. Dans
ce cas, il convient de lancer manuellement le lavage une fois par semaine.
Contactez votre service Genano agréé pour modifier les réglages de votre
appareil dans des situations critiques.
22
Page 23
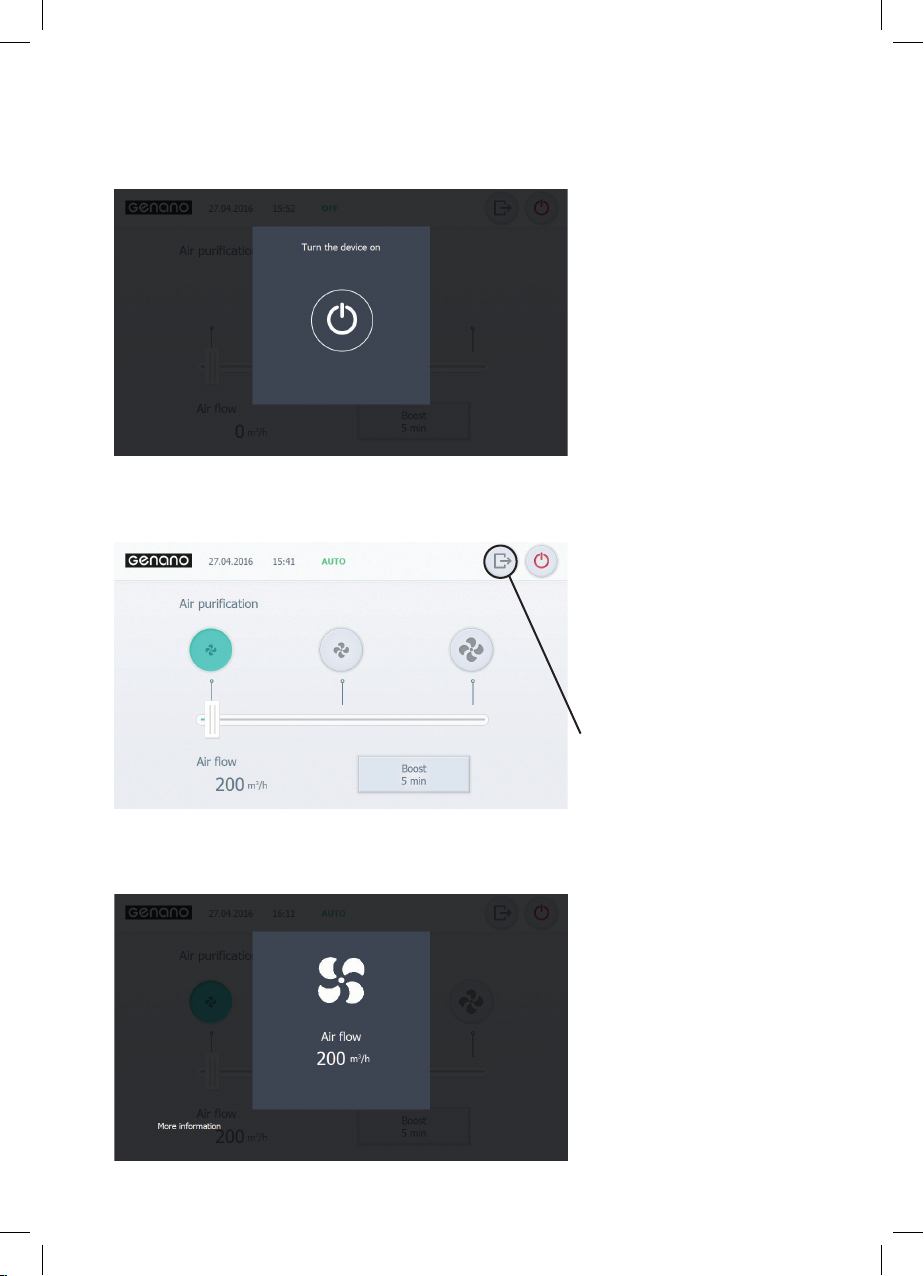
A
Écran de démarrage
B
Écran de fonctionnement
Connexion
C
Économiseur d’écran
23
Page 24

PROGRAMME HEBDOMADAIRE
Si un programme hebdomadaire est activé, l’appareil changera automatiquement
le débit d’air à des moments prédéfinis. Cela est indiqué par l’affichage du mot «
AUTO » dans la partie supérieure de l’écran tactile (voir l’image B, page 23).
Si vous réglez manuellement le débit d’air au moyen du curseur, le mot « MANUEL
» s’affichera dans la partie supérieure de l’écran tactile. L’appareil continuera de
fonctionner avec la même vitesse de ventilateur jusqu’au prochain changement
prévu dans le programme hebdomadaire. À ce moment, le programme « AUTO »
se réactivera.
Si vous souhaitez modifier les réglages du programme hebdomadaire ou désactiver ce dernier, veuillez contacter le service maintenance de votre entreprise.
ERREUR/DÉPANNAGE
Le Genano 5250 est doté d’un système de contrôle interne. Un message s’affiche
sur l’écran tactile quand :
• Le système détecte un niveau bas de liquide de lavage.
• L’appareil est à court de liquide de lavage.
• La porte avant est ouverte.
• Une défaillance exige un dépannage.
Veuillez alors suivre les instructions affichées à l’écran.
AUTRES ACTIONS
L’utilisation du Genano 5250 est très facile pour vous. L’appareil a été conçu pour
une seule utilisation à partir de l’écran tactile. Vous n’avez jamais à ouvrir la porte
avant de l’appareil dans des conditions normales d’utilisation.
Un service de maintenance agréé par Genano se chargera du nettoyage de la
cuve inférieure et d’ajouter du liquide de lavage dans l’appareil.
24
Page 25

Fonctions avancées
Des réglages avancés existent pour l’équipe de maintenance de votre entreprise.
Connectez-vous avec un code PIN de niveau 2 avec le bouton de connexion (voir
les images B, page 23 et D, page 26).
Ensuite, des raccourcis supplémentaires menant à des réglages s’afficheront sur le
côté gauche du panneau (voir l’image E, page 26).
PROGRAMME HEBDOMADAIRE
Le programme hebdomadaire (voir image E, page 26) vous permet de définir
une programmation automatique pour la semaine. Vous avez le choix parmi trois
vitesses de ventilation prédéfinies. Utilisez les flèches en haut à droite pour naviguer entre les heures du matin et du soir.
Vous pouvez désactiver le programme hebdomadaire en déplaçant le curseur de
« AUTO » à « MANUEL ».
PARAMÉTRAGE
Il est possible d’accéder aux paramètres d’heure, de date, de langue et de code
PIN à partir du bouton de l’engrenage.
Sur la page 1/2, vous pouvez choisir entre le réglage manuel ou automatique de la
date, de l’heure et de leurs formats.
Sur la page 2/2, vous pouvez changer la langue de l’appareil ainsi que les codes
PIN de niveau 1 et 2. Le code PIN de niveau 2 est celui que vous utilisez pour vous
connecter à cette page de paramétrage.
• Le code PIN de niveau 1 est utilisé uniquement dans des environnements
critiques. Il empêche l’utilisateur dépourvu de ce code de tout dérégler. Il peut être
activé uniquement par une équipe de maintenance Genano agréée.
• Le code PIN de niveau 2 est destiné à l’équipe locale de maintenance. C’est le
code avec lequel vous vous êtes connecté.
DÉCONNEXION
Après avoir changé les paramètres, n’oubliez pas de vous déconnecter avec le
bouton connexion/déconnexion situé sur le panneau supérieur.
25
Page 26
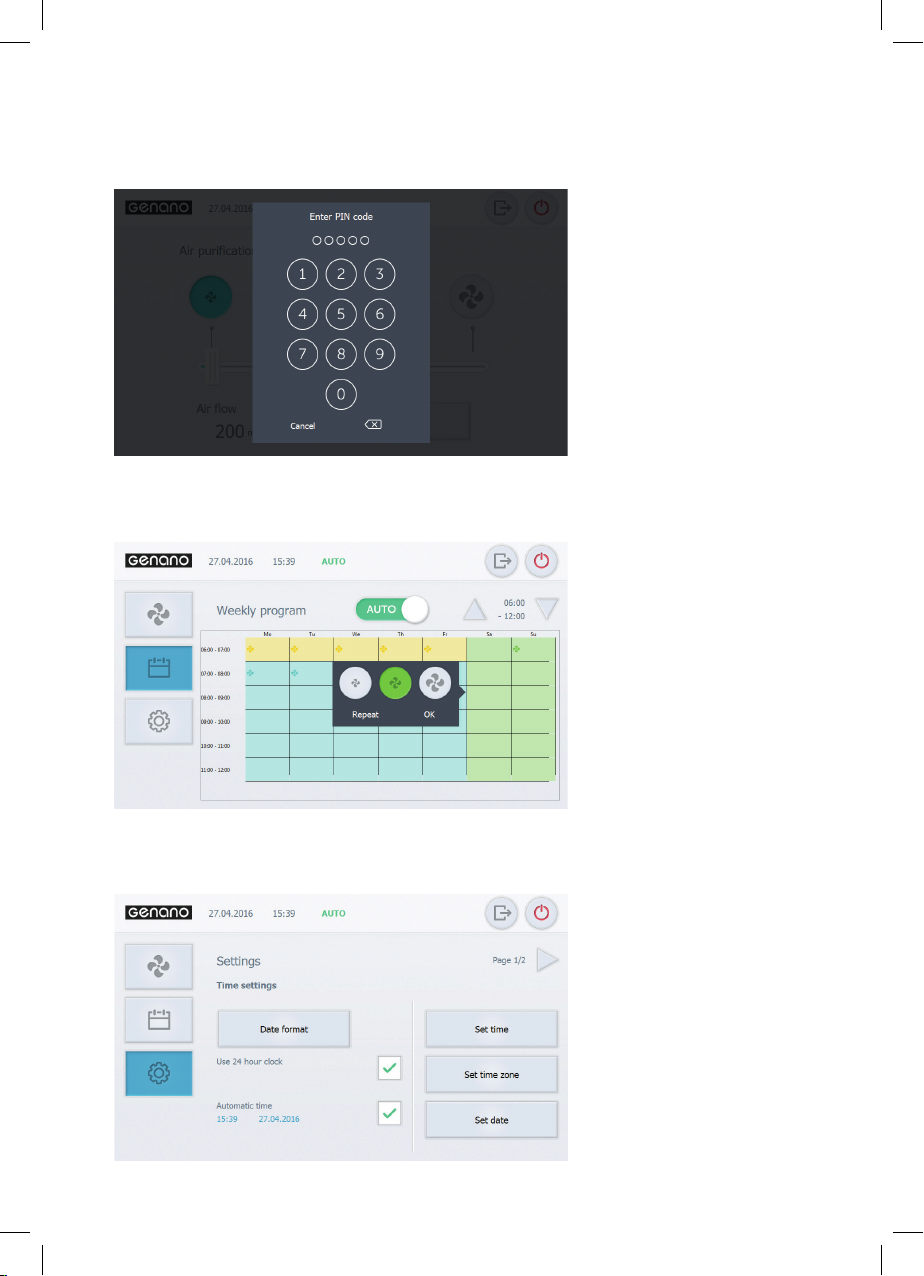
D
Saisie du code PIN
E
Programme
hebdomadaire
26
F
Paramètres
Page 27

Conditions de garantie
1. GÉNÉRALITÉS
Les conditions de garantie de Genano Ltd respectent les conditions du contrat NL
09 (articles 21-35) avec les modifications et les amendements ci-après.
2. PÉRIODE DE GARANTIE
La période de garantie est de 24 mois à compter de la date de livraison, sauf
indication contraire figurant dans la garantie, l’offre ou le contrat spécifiques du
produit.
3. PORTÉE DE LA GARANTIE
La garantie inclut la réparation d’une pièce défectueuse ou de l’appareil, ou, si
nécessaire, le remplacement par une pièce neuve ou un appareil neuf selon l’avis
du revendeur. Les frais de transport ou d’expédition occasionnés par la réparation
sous garantie ne sont pas couverts par celle-ci.
4. GARANTIE SUPPLÉMENTAIRE
Les garanties, engagements ou assurances supplémentaires accordés éventuellement par le distributeur ou le revendeur n’engagent que ces derniers. Genano Ltd
est responsable uniquement de la garantie énoncée ici.
5. LIMITATIONS DE GARANTIE
Cette garantie est valable en supposant que le produit est utilisé dans des conditions normales de bureau, ou des conditions équivalentes, et que les instructions
sont respectées avec le plus grand soin. La garantie est valable en Finlande dans
ces conditions. La responsabilité du fabricant est limitée à ces seules conditions de
garantie et ne couvre pas les dommages provoqués par le produit vendu à d’autres
objets ou à une personne. Sur la base de la présente garantie, le client n’est pas
en droit d’exiger d’autres garanties à une personne différente du fabricant. Les
clauses verbales ne figurant pas dans les présentes conditions de garantie ne lient
pas le fabricant. Pour que la garantie soit valide, il convient de ne pas modifier ou
endommager les informations et les numéros de série figurant sur le produit ou
les cartes de garantie.
La présente garantie ne couvre pas les dommages occasionnés :
• Au cours de l’expédition
• Par négligence de l’utilisateur du produit ou par surcharge du produit
• Par une utilisation contraire aux instructions, par un manque de soin ou de
maintenance, par une chute du produit ou un dommage occasionné par les
liquides
27
Page 28

• Par des circonstances ne dépendant pas du fabricant comme des fluctuations
de la tension d’alimentation (les fluctuations maximum de tension peuvent être de
+10 %), des orages, des incendies ou des accidents
• Par des interventions de maintenance, des réparations ou des altérations de
structure opérées par d’autres personnes que l’équipe de maintenance agréée
• Ou par le placement de l’appareil ne respectant pas les instructions de fonctionnement ou incorrect d’une autre manière.
La présente garantie ne couvre pas la réparation de dommages n’ayant aucune
influence sur la fonctionnalité du produit.
Les pièces risquant de se casser lors de la manutention ou de s’user naturellement
comme les fusibles, les pièces en plastique déplaçables à la main ou les autres
pièces d’usure ne sont pas incluses dans la garantie.
6. MESURE À PRENDRE EN CAS DE DÉFAILLANCE
Quand survient une défaillance durant la période de garantie, le client doit
contacter immédiatement le fournisseur des services de maintenance ou le
distributeur. Le client doit décrire le produit concerné (la désignation du type et
le numéro de série figurent sur la carte de garantie ou la plaque signalétique), la
défaillance de manière aussi détaillée que possible et dans quelles circonstances
elle est apparue. Une condition préalable pour le service de garantie est également que le client démontre que la garantie est toujours valide (en présentant la
facture d’achat avec le numéro de série du produit).
28
Page 29

Règles de sécurité
1. Utilisez l’appareil uniquement à l’intérieur.
2. Ne placez pas ou ne stockez pas l’appareil à un endroit où il risque d’être
mouillé. Ne placez pas l’appareil sous la pluie ou ne versez pas d’eau
dessus. N’utilisez pas l’appareil quand il est humide.
3. N’exposez pas l’appareil à la lumière directe et chaude du soleil, ou à une
température supérieure à 60 ºC (140 ºF).
4. Ne placez pas ou ne stockez pas l’appareil à un endroit où il risque de
tomber.
5. De même, n’utilisez pas l’appareil dans des espaces non dotés d’une
ventilation normale. Veillez à toujours avoir une ventilation suffisante.
6. N’utilisez pas l’appareil s’il est endommagé de quelque façon que ce soit.
7. N’utilisez pas l’appareil si son cordon d’alimentation ou la prise sont
endommagés. Renvoyez l’appareil à un centre de maintenance autorisé
Genano pour un contrôle et des réparations.
8. Pour éviter d’endommager éventuellement le cordon, ne l’enroulez pas
autour de l’appareil et éloignez-le des surfaces chaudes.
9. Branchez l’appareil uniquement à une prise de courant reliée à la terre.
10. Branchez toujours le cordon d’alimentation d’abord à l’appareil, puis
à la prise (murale). Veillez à ce que la fiche soit bien enfoncée dans le
connecteur de l’appareil. Pour débrancher l’appareil, éteignez-le, puis
retirez la fiche de la prise.
11. Débranchez l’appareil avant de le déplacer ou de le transporter dans un
autre lieu.
12. Ne couvrez pas les entrées d’air de l’appareil. Ne placez rien directement
sur le dessus de l’appareil.
13. Ne faites pas tomber d’objets ou n’insérez aucun objet dans les ouvertures.
14. Verrouillez l’espace inférieur si vous utilisez l’appareil en présence d’enfants ou d’animaux de compagnie.
15. Seules des opérations de maintenance effectuées par un service de réparation agréé sont autorisées.
16. Ne sortez pas la plaque d’absorption de gaz de l’appareil.
17. AVERTISSEMENT! En raison de son mode de fonctionnement, l’appareil
peut émettre des étincelles de temps à autre. N’utilisez jamais l’appareil
dans un lieu où des gaz ou des liquides inflammables, ou de grandes
quantités de poussières dans l’air sont susceptibles de créer un mélange
détonant.
Respectez toujours les instructions quand vous utilisez l’appareil Genano.
N’utilisez jamais des accessoires ou des fournitures non recommandées par
Genano Ltd.
Fabricant : Genano Ltd
29
Page 30
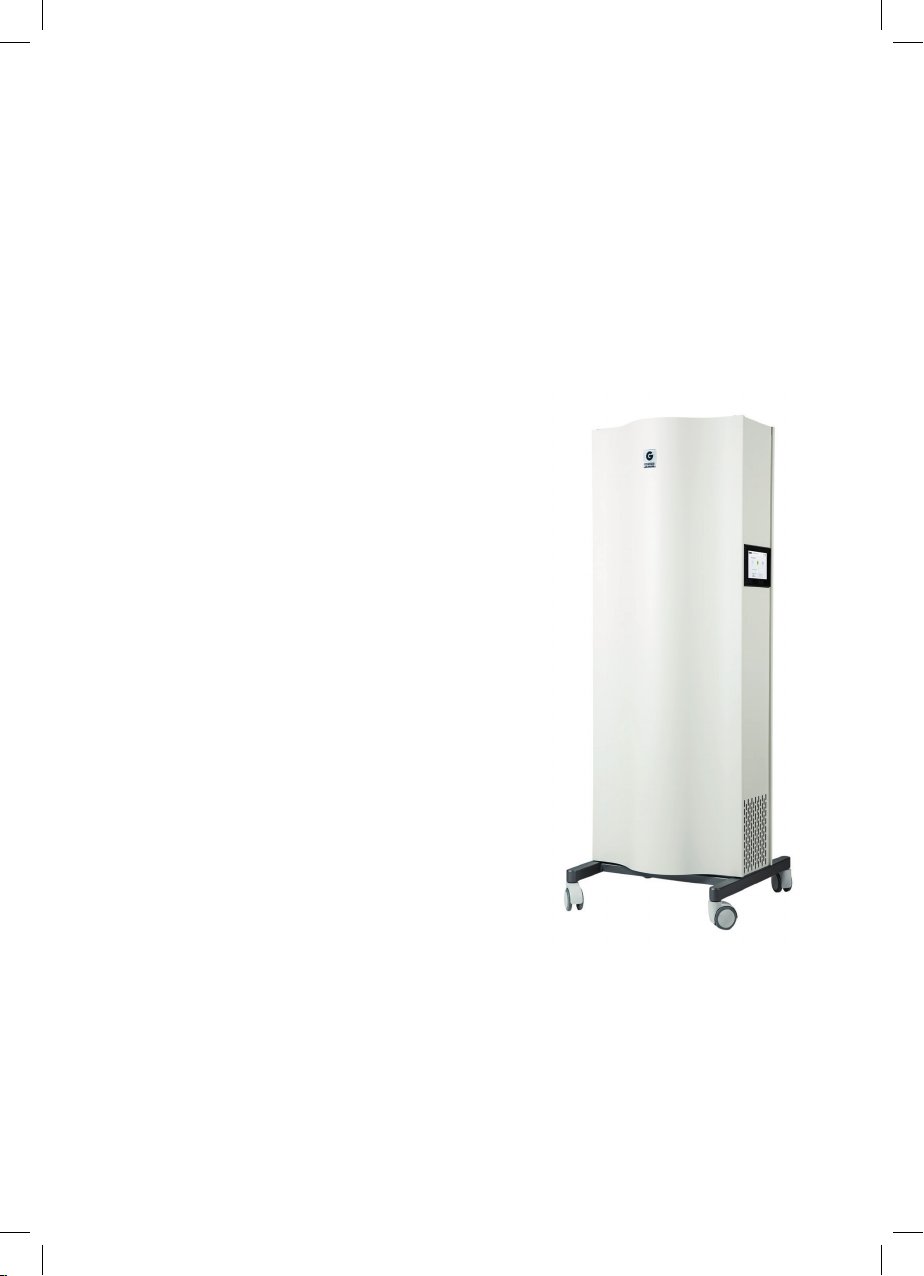
Genano® 5250
Air Purification Device
English
Genano 5250 is an air purification device
based on Genano Technology
technology removes even the smallest
impurities from indoor air. These impurities
can consist of viruses, bacteria, mould spores
as well as traffic originated soot.
Genano 5250 doesn’t have traditional fiber
filters, so there is no risk for a breeding
ground for microbes forming inside the
unit even in humid conditions. In Genano
technology, a gas absorber is used for the
removal of harmful gases and ozone.
Using and taking care of the Genano unit is
easy. Genano 5250 is self-cleaning and does
not require measures from the user.
®
. The unique
30
Page 31
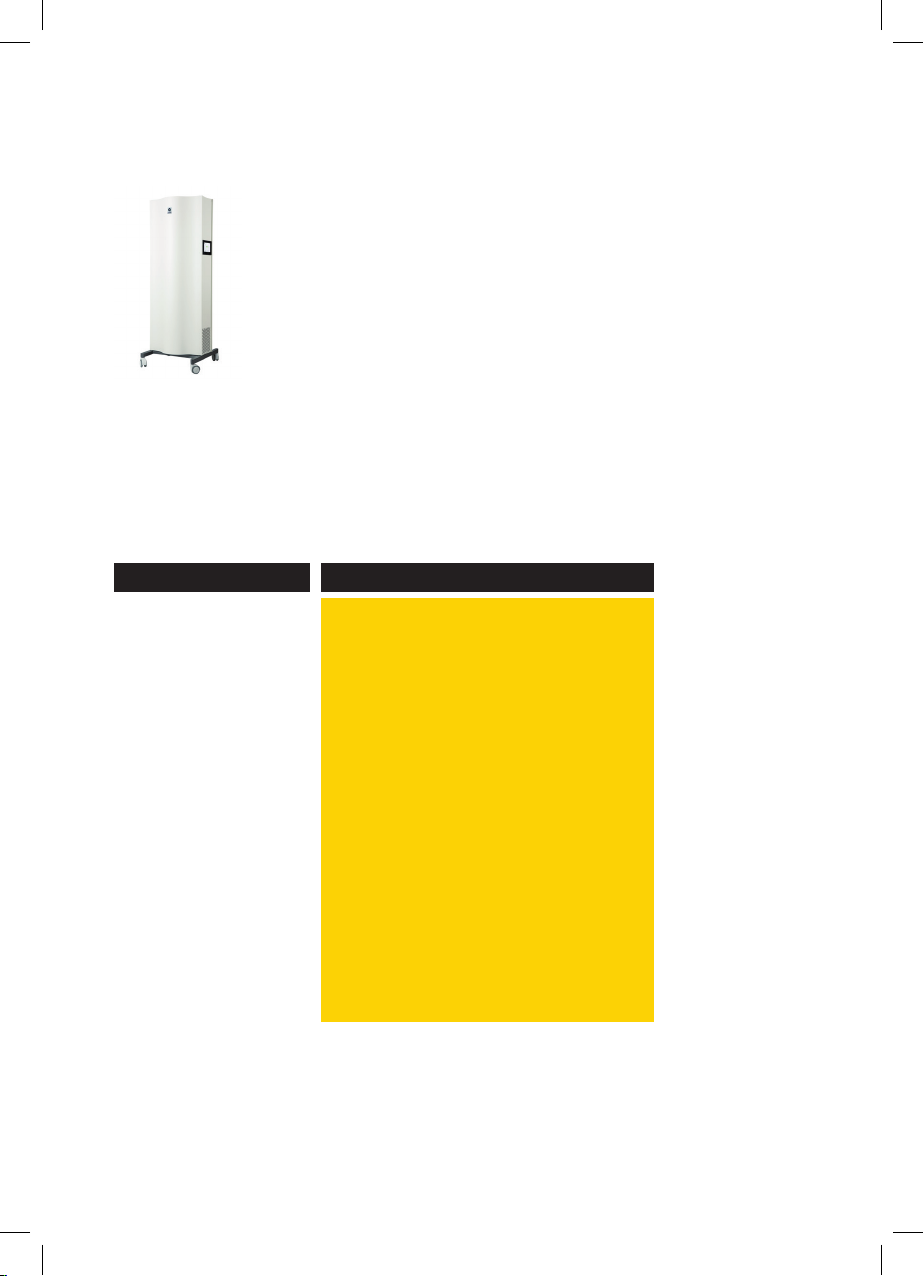
Contents of delivery
1 Genano 5250 unit with mains power cable
Contains 1 gas absorption plate to handle gas emissions. Make
sure absorption plate is changed annually. The absorption plate
change and other service measures are included in the service
agreement.
Washing liquid (Genonex)
Only use approved Genano washing liquids in Genano units.
Note: The washing liquid reservoir of the unit holds max. 10 ltr and
may have been pre-filled with some amount of washing liquid.
Technical features
Technical features
Cleaning capacity
Particle size arrestance
Cleaning efficiency
Gas removal
Installation
Cleaning
Fan speed
Size (w x d x h mm)
Weight
Construction
Sound level
Operating voltage
Power consumption
Usage temperature
Genano® 5250
max. 500 m3/h
> 0.003 µm
99.5 %
Included: 800 g activated carbon, 60 mm
Mobile *
Automatic
Stepless speed control
600 x 600 x 1680 mm
91 kg
Painted steel
30–42 LpA (dBa)
200–240 V, 50/60 Hz
90–260 W
+5...+60 °C
* Can be equipped with a negative and/or positive pressure adaptor
kit to create spaces with negative / positive air pressure.
31
Page 32

Before use
TO TAKE INTO CONSIDERATION WHEN PLACING THE UNIT IN A ROOM
Genano 5250 is to be positioned to stand vertically on an even base.
The units have wheels on the bottom for portability. 5250 is equipped with four
wheels, of which two can be locked.
Move the unit carefully over doorsteps and other obstacles by tilting.
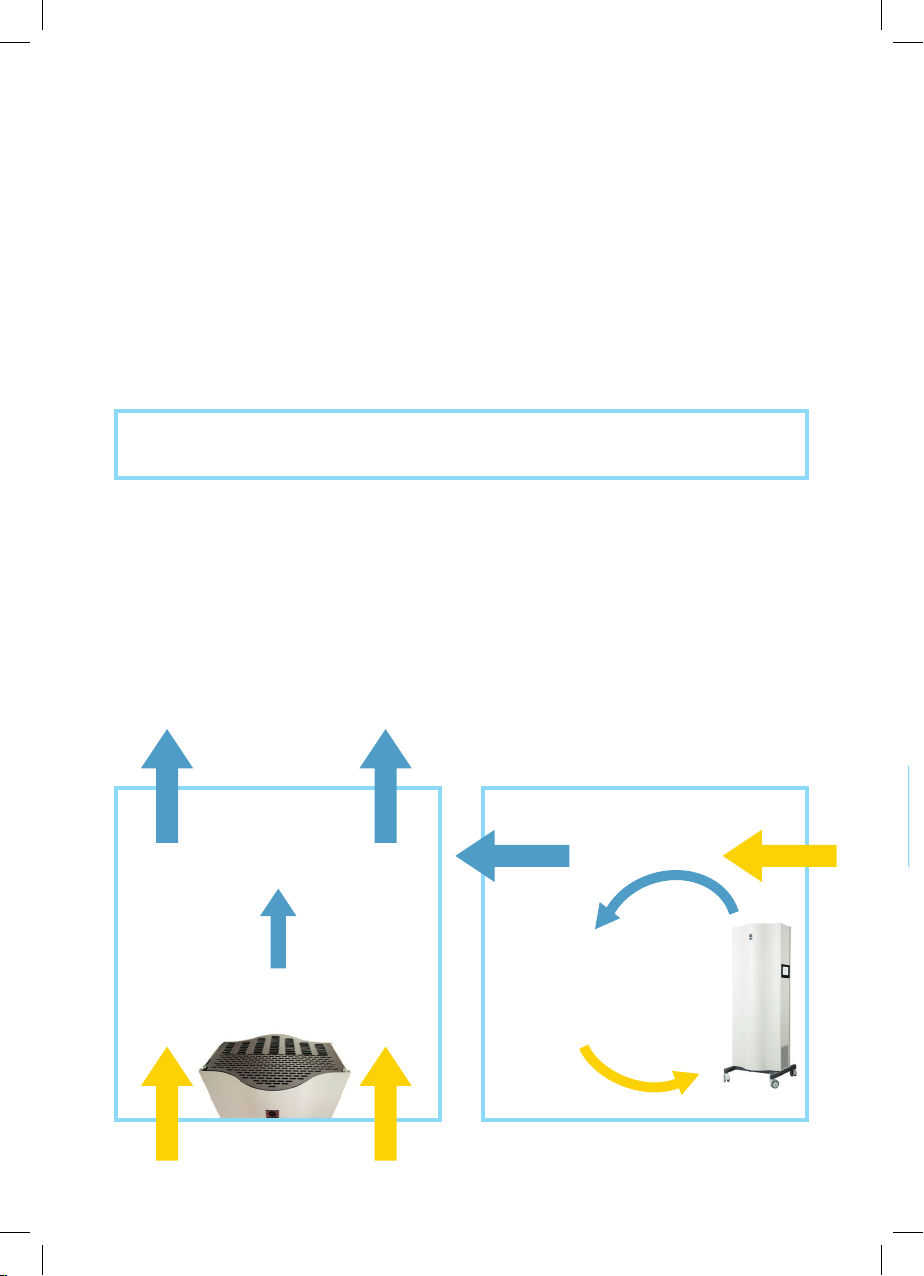
Genano 5250 takes in the contaminated air from the bottom. The purified air is let
out through the upper part of the unit.
NOTE! If possible, always transport the unit vertically. If this is not possible, and
you need to transport the unit horizontally, empty the washing fluid container
and make sure the front of the unit is facing upwards during transport. Let the
device dry in a vertical position for at least 8 hours before turning it back on. The
device is always to be used vertically. Only use and store the unit indoors.
WARNING! Never use the unit in a place where for example flammable gases
and liquids or large amounts of dust in the air may form an explosive mixture
ignited by a spark.
Do not use the unit in spaces without normal ventilation. Make sure you have
sufficient ventilation!
32
Page 33
GAS ABSORPTION PLATE
Besides particles, the Genano unit can also remove gases. Using a gas absorp-
tion plate, different kinds of gases can be removed from indoor air. The typical
exchange period of the gas absorption plate is 12 months.
Place the unit so that the furniture in the room influences the course of the
air flow as little as possible. The unit is to be placed so that it circulates the air
the same way the air normally circulates in the room. The best effect is usually
achieved when the unit is placed near the air income.
The best level of air purification is reached near the unit. Therefore, the best place
for the unit in a big room is near a workstation. The unit can also be placed near
sources of problematic particles to prevent the particles from spreading.
By adjusting the fan settings the production of purified air can be increased.
NOTE! It is recommended to leave the unit on at all times, including times
when no one is in the room, nights and weekends.
Genano experts will help you with questions regarding indoor air quality and
placement of the unit and fan settings. Follow the instructions given by your
Genano expert to ensure the best possible outcome.
ABOVE VIEW SIDE VIEW
Exhaust air
Exhaust air
Incoming air
Incoming air
33
Page 34
Installation
NOTE! We recommend that only authorized Genano service installs the 5250
unit.
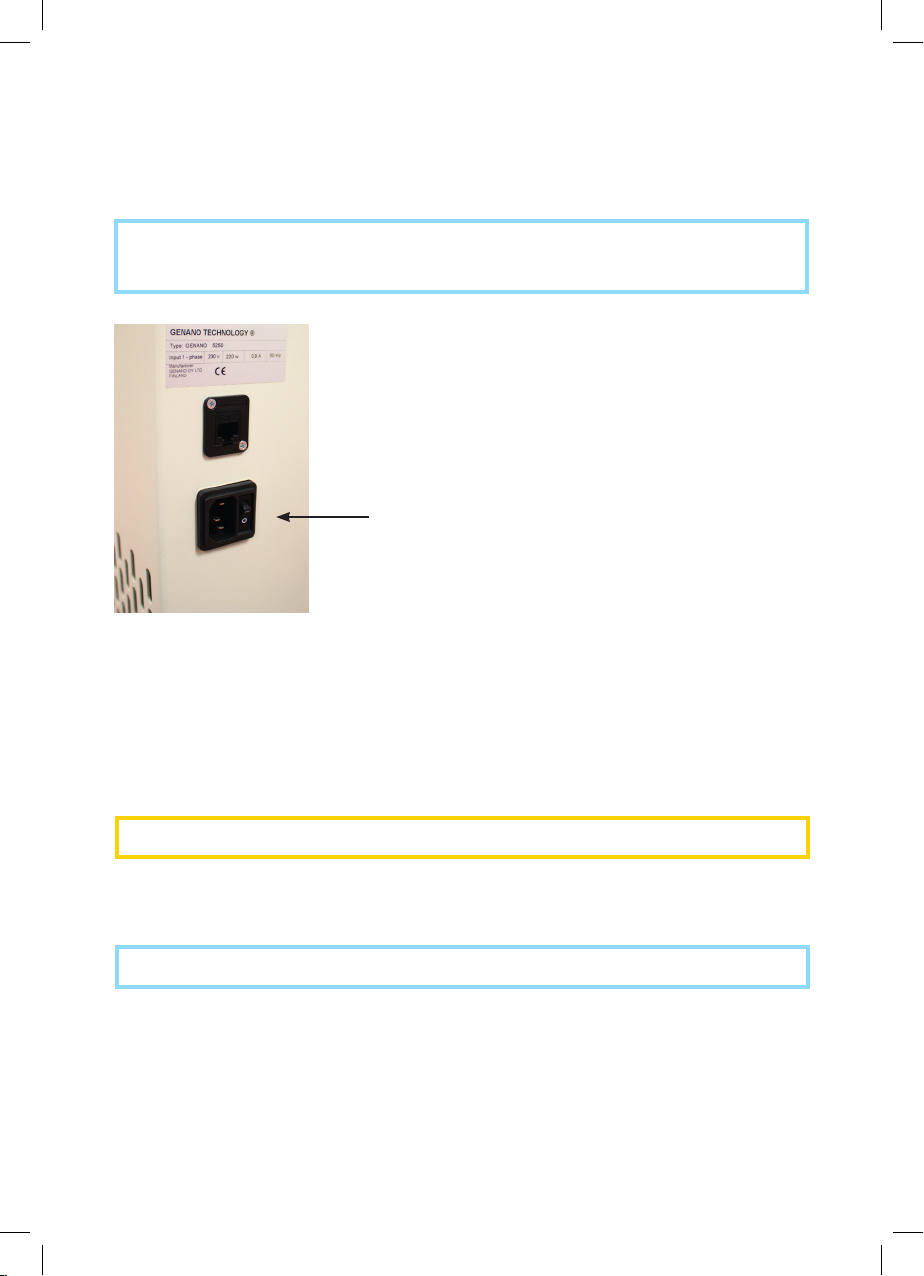
Manual main switch
Make sure that the manual main switch (see picture) is in the 0-position. Plug
1.
the grounded main power cable that came with the unit first into the Genano
5250 before you plug in the main cable into a grounded power socket (230V /
50Hz).
WARNING! Only plug the unit into a grounded power socket.
2. Switch the manual main switch to the 1-position. The unit starts up.
NOTE! Lock the front door of the unit when operated near children or pets.
34
Page 35

Basic operation
Genano 5250 is controlled by a touch screen.
When the unit is plugged in a power outlet for the first time, the touch screen
shows the start-up view (image A, page 36). Push the power button on the screen
to start air purification.
The operation view (image B, page 36) allows you to adjust air flow steplessly,
using a slider. You can also push the fan buttons to change the air flow to predefined values. The boost button can be used to temporarily boost the air flow in the
room.
NOTE! If you cannot access the touch screen controls without a pin code, the
unit has been locked for extra protection. Contact the maintenance of your
property for more information.
A screen saver (image C, page 36) is automatically shown if the touch screen is
not used for some time. The unit is functioning and purifying air normally when
the screen saver is shown.
AUTOMATIC WASHING
The unit efficiently collects atmospheric particles on the collection surfaces inside
the unit. Washing of the collection surfaces takes place automatically once a
week.
After the washing cycle the unit is drying. The washing and drying lasts together
less than a minute. The unit continues operation automatically when the drying
period is over.
NOTE! It is recommended to let the unit be continuously ON to ensure the
weekly washing and good air quality. If the unit is not ON the automatic wash
may be missed.
NOTE! In critical conditions, such as hospital isolation rooms, the automatic
washing function can be turned off. In this case, washing must be started
manually once a week. Contact authorized Genano service to change your unit
settings in critical conditions.
35
Page 36
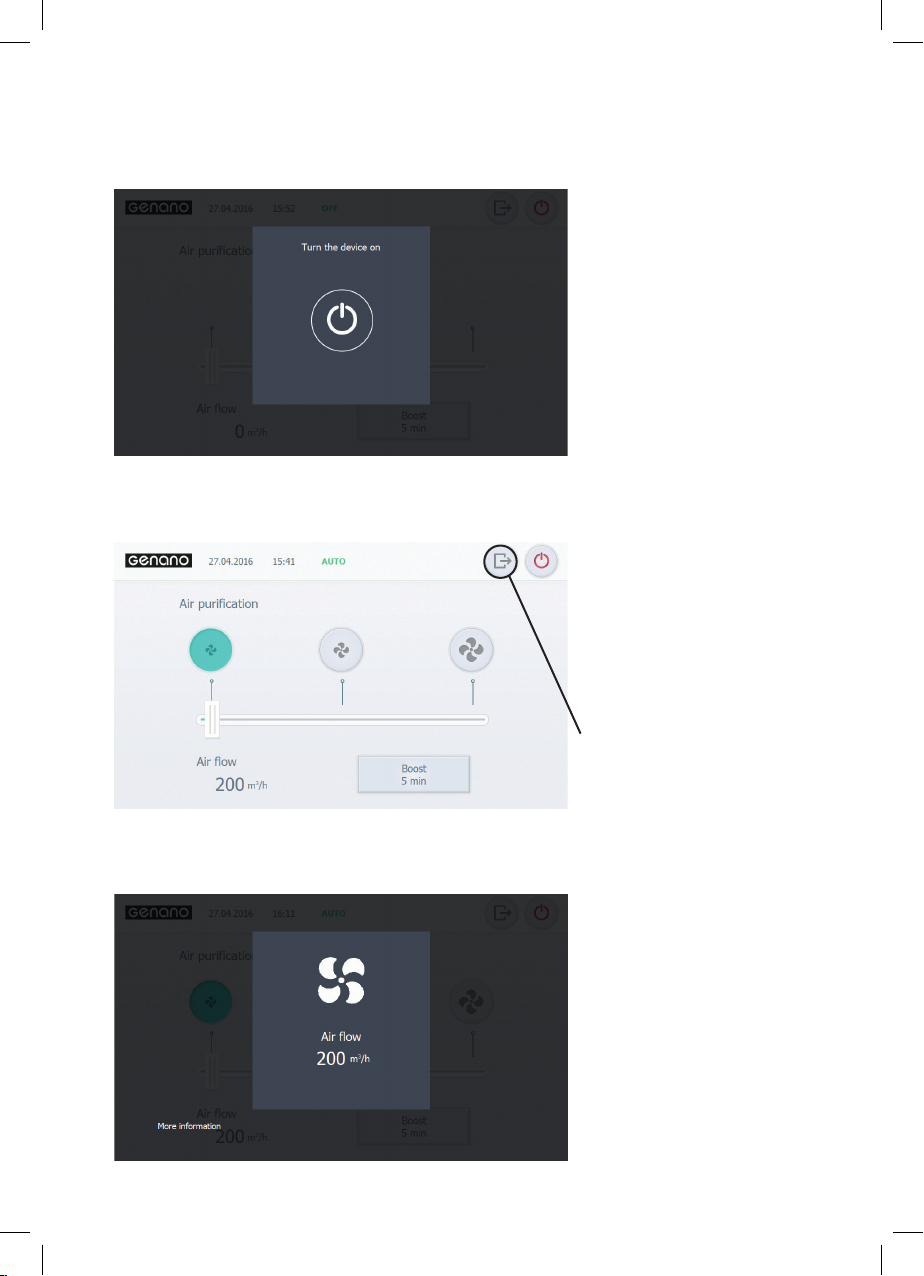
A
Start-up view
B
Operation view
Login
36
C
Screen saver
Page 37

WEEKLY PROGRAM
If a weekly program is turned on, the unit will automatically change air flow at
predefined times. This is indicated by the word “AUTO” in the top part of the touch
screen (see image B, page 36).
If you adjust the air flow manually, using the slider, the word “MANUAL” will appear
in the top part of the touch screen. The unit will continue at your chosen fan
speed until the next change in the weekly program takes place. At this moment,
the “AUTO” program is taken into use again.
If you wish to change the weekly program settings or disable it, please contact the
maintenance of your property.
ERROR/SERVICE
Genano 5250 has an internal monitoring system. A message is shown on the
touch screen when:
• low level of washing liquid is detected,
• unit has ran out of washing liquid,
• front door is open,
• or there is a malfunction which requires service.
Please act according to the instructions given on the screen.
OTHER ACTIONS
Using the Genano 5250 is easy for you. You are only meant to use the unit from
the touch screen. You never need to open the front door of the unit in normal use.
An authorized Genano service will take care of the cleaning of the bottom basin,
as well as adding the washing liquid in the unit.
37
Page 38

Advanced operation
Advanced settings are available for the maintenance team in your property.
Log in with level 2 pin code from the login button (see images B, page 36 and D,
page 39).
After this, additional shortcuts to settings are shown on the left side of the panel
(see image E, page 39).
WEEKLY PROGRAM
The weekly program (see image E, page 39) allows you to set an automatic
program for the week. You can choose between three predefined fan settings.
Use the arrows on the top right to move between morning and night times.
You can also disable the weekly program by moving the slider from “AUTO” to
“MANUAL”.
SETTINGS
Time, date, language and pin code settings are accessed from the wheel button
on the left.
On page 1/2, you can choose between manual and automatic setting of date and
time, and their format.
On page 2/2, you can change the language of the unit and 1st and 2nd level pin
codes. (2nd level pin code is the one you used to login to these settings.
• 1st level pin code is used in critical surroundings only. It prevents the user from
doing anything without the 1. level pin code. It can only be activated by an authorized Genano service team.
• 2nd level pin code is for local maintenance of the property. It is the pin code
you logged in with.
LOGOUT
After changing the settings, remember to log out from the login/logout button on
the top panel.
38
Page 39
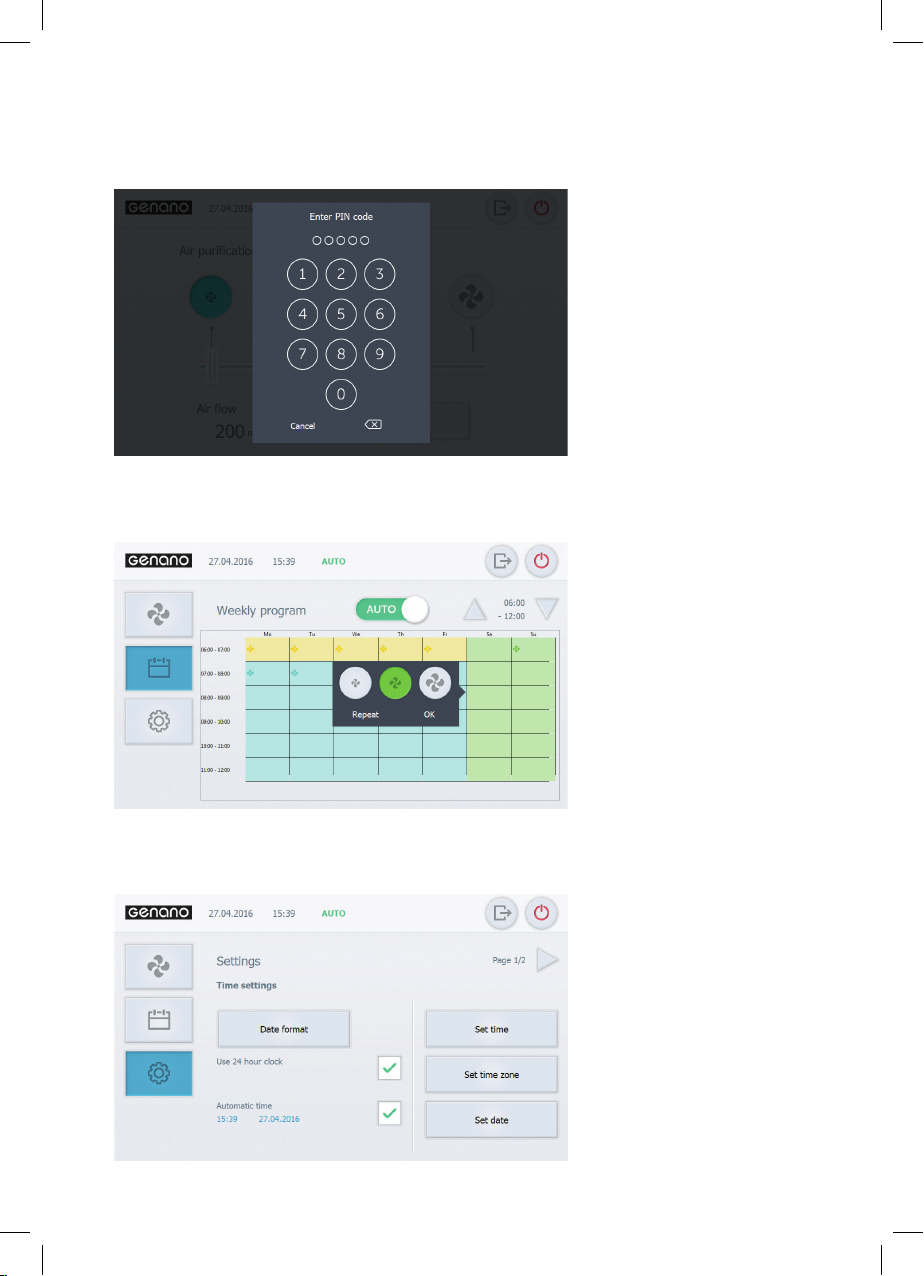
D
Enter PIN code
E
Weekly program
F
Settings
39
Page 40

Warranty conditions
1. GENERAL
Genano Ltd warranty conditions follow the NL 09 (articles 21-35) contract terms
with the following modifications and amendments.
2. WARRANTY PERIOD
The warranty period is 24 months from the date of delivery, unless otherwise
stated in the product-specific warranty, offer or contract.
3. CONTENTS OF WARRANTY
Repairing a defective part or device or if needed replacing the faulty part or unit
with a new one according to the consideration of the salesperson is included in
the warranty. Possible travel expenses and freight costs that are caused by the
warranty repair are not included in the warranty.
4. ADDITIONAL
Additional warranties, commitments or assurances potentially given by the distributor or reseller bind only them. Genano Ltd is responsible only for the warranty
stated here.
5. LIMITATIONS OF WARRANTY
This warranty is given with the assumption that the product is used in normal
office conditions or comparable conditions and that the operating instructions
are followed carefully. The warranty is valid in Finland under these conditions. The
responsibility of the guarantor is limited to these warranty conditions and does
not cover damages a sold product causes another object or a person. On the
basis of this warranty the client is not entitled to demand anything from anyone
other than the guarantor. Verbal clauses not included in these warranty conditions do not bind the guarantor. For the warranty to be valid, the information and
serial numbers on the product or in the warranty cards are not to be changed or
damaged.
The warranty does not include damage that has been caused:
• during shipment
• by negligence of the user of the product or overload of the product
• by use that is against the operating instructions, lack of care or service,
the product falling or liquid damage
• by circumstances not dependent on the guarantor such as fluctuations
in power supply voltage, (fluctuations in voltage can be at maximum level
+10 %), thunderstorms, fires or accidents
40
Page 41

• by service, repairs or alterations in structure performed by other than
authorized repair service
• or by placement of the unit against operating instructions or otherwise incorrectly.
The warranty does not include repairing damage that has no effect on the functionality of the product.
Parts that have a risk of break up from handling or natural wear and tear like fuses,
plastic parts movable by hand or other parts that wear are not included in the
warranty.
6. ACTIONS TO BE TAKEN WHEN A FAULT IS DISCOVERED
When a fault appears during the warranty period the client is to contact the
authorized service provider or distributor without delay. The client is to tell what
product is in question (the designation of type and serial number on the warranty
card or the data plate), what the fault is as specifically as possible and in what kind
of circumstances the fault has appeared. A precondition for the warranty service is
also that the customer reliably shows that the warranty is valid (by presenting the
purchase invoice with the serial number of the product).
41
Page 42

Safety instructions
1. Only use the unit indoors.
2. Do not place or store the unit where it can get wet. Do not keep the unit
in the rain or pour water on it. Do not use a wet unit.
3. Never put the unit in direct, hot sunlight or store at a temperature above
140°F (60°C).
4. Do not place or store the unit in a place where it can fall over.
5. Do not use the unit in spaces without normal ventilation. Make sure you
have sufficient ventilation.
6. Do not use the unit if it is damaged in any way.
7. Do not use the unit if it has a damaged cord or plug. Return the unit to an
authorized Genano service location for examination and repair.
8. To prevent possible damage to the cord, do not wrap the cord around
the unit and keep the cord away from heated surfaces.
9. Only plug the unit to a grounded outlet.
10. Always attach the power cable first to the unit, then to the outlet (wall).
Be certain that the plug is inserted firmly into the unit. To disconnect, turn
off the device, then remove the plug from the outlet.
11. Unplug the unit before moving or transporting it to another location.
12. Do not cover the air intakes of the unit. Do not place anything directly on
top of the unit.
13. Never drop or insert any object into any opening.
14. Lock the bottom basin when the unit is operated near children or pets.
15. The unit is only allowed to be serviced by an authorized repair service.
16. Do not take the gas absorption plate out of the unit.
17. WARNING! Due to its mode of operation the electronic unit may occasionally emit sparks. Never use the unit in a place where flammable gases
or liquids or large amounts of dust may combine with air to form an
explosive mixture.
Always follow the operational instructions when using this Genano unit. Do
not use expansions or supplies not recommended or used by Genano Ltd.
Manufacturer: Genano Ltd
42
Page 43

Contacteer ons
Nous contacter
Contact us
www.genano.com
Genano Ltd
Metsänneidonkuja 6
02130 Espoo
Finland
Tel. +358 (0) 9 774 3870
[email protected]
43
Page 44
www.genano.com
 Loading...