

Page 1

//AE Cymbal System
Advanced User Guide
A Supplement to the AE Cymbal Quick Start Guide
Page 2

●
●
●
●
●
●
●
●
Table of Contents:
Introduction 3
Controls and Connectors 4
System Set Up 8
System Operation 15
Troubleshooting 24
Specifications 28
Midi Specifications 29
Contact Us 32
Page
Page 3

Introduction:
Congratulations on your purchase of the Gen16 AE Cymbal System! The AE Cymbal System is more than
just another set of cymbals - it’s a bold new technology that combines timeless acoustics with cutting-edge
digital electronics to create a completely new instrument that will inspire your musical creativity in ways
you’ve never imagined.
Unlike most existing electronic percussion systems, the AE Cymbal is not a sample trigger device - it’s the
real thing.
It starts with a unique new design, inspired by nature, with thousands of holes that create a cymbal that
looks, feels and plays like a traditional cymbal, but at less than a quarter of the volume. Utilizing a unique,
patent-pending, dual-microphone pickup system, the sound from each cymbal is sent through the AE Digital
Cymbal Processor, adding powerful DSP and tone shaping. This enables the AE Cymbal to deliver a wide
range of sounds, from classic to cutting-edge.
Like the birth of the electric guitar, the Fender Rhodes™ piano, or the electric bass, the AE Cymbal is more
than just a new twist on the same old game. It’s a whole new game - a new instrument that will inspire and
impact our creativity in ways you never imagined!
Although you’ll find the AE Cymbal System to be intuitive and easy to use, please take a few minutes
to look through this user’s guide to help you get the most out of your new system.
3
Page 4
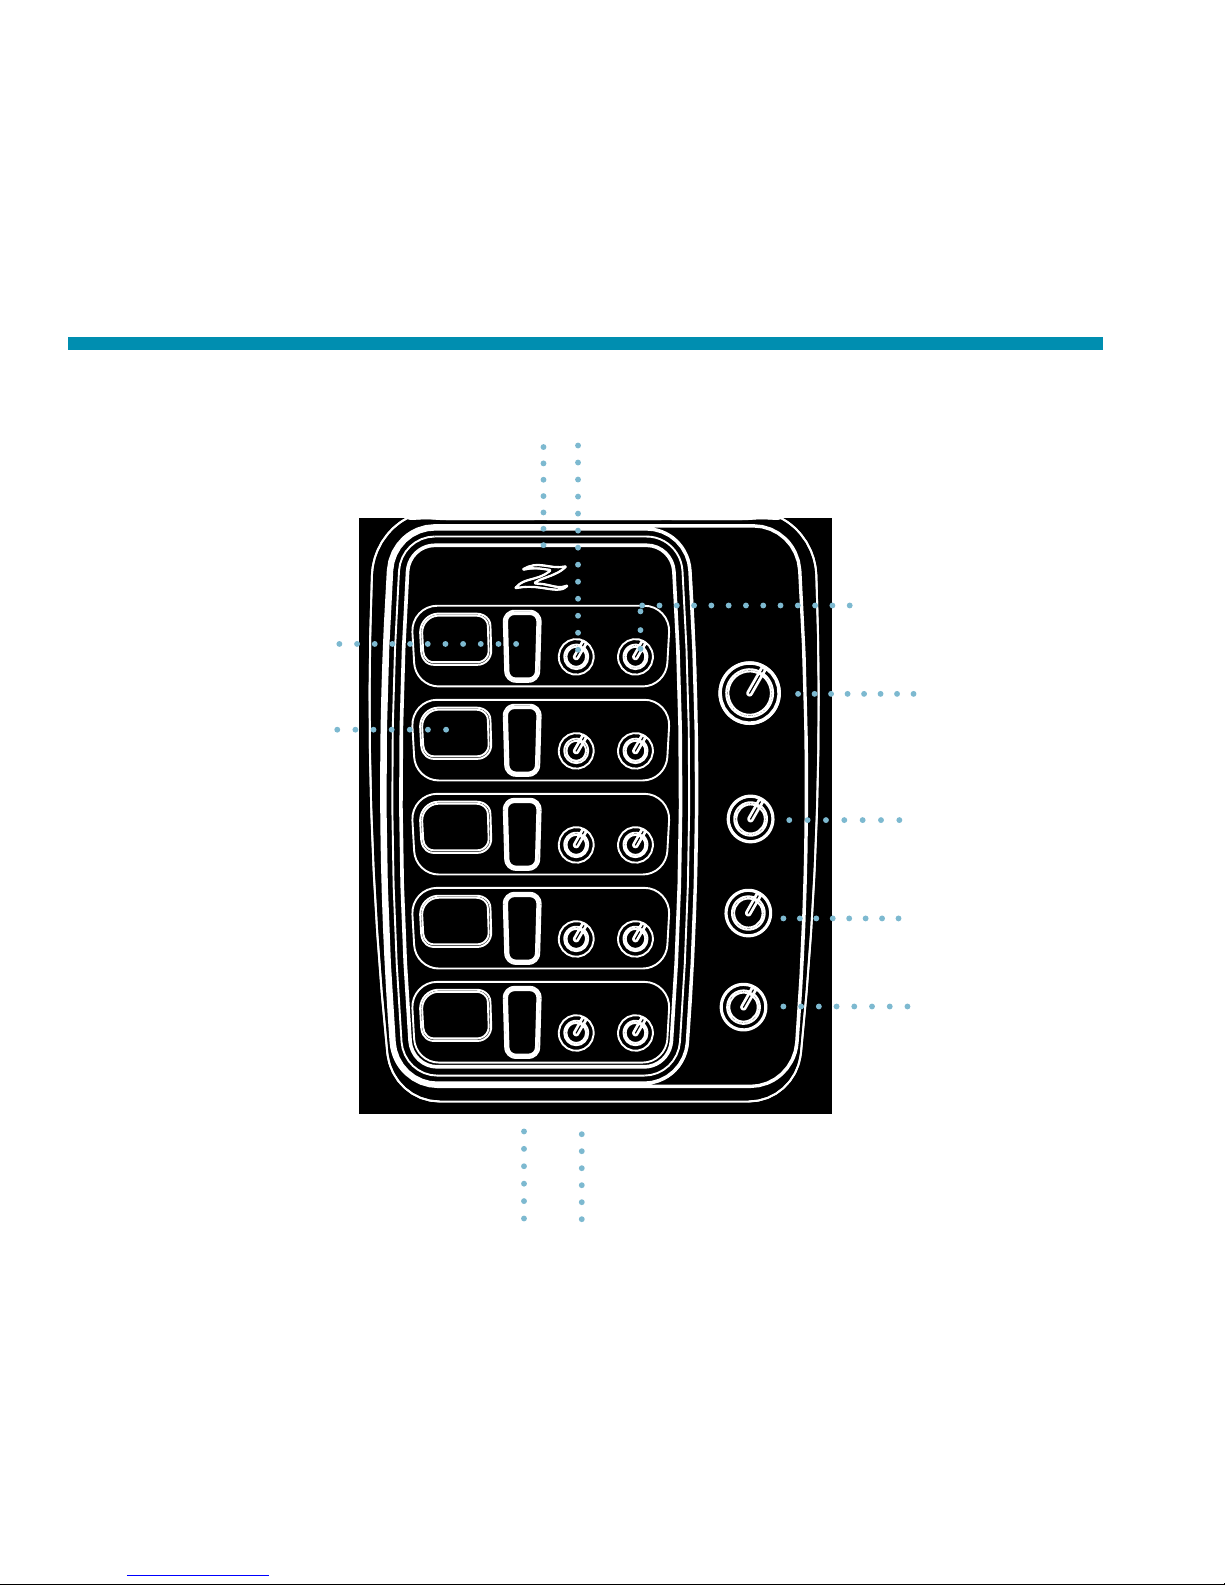
Master Volume Level (5)
Channel Preset Display (11)
Channel Preset Control (1)
Illuminated Logo (2) Cymbal Channel Pan (3)
Front Panel
Cymbal Channel Volume (4)
Phones Volume (8)
Reverb Return Level (7)
Edrum/Cymbal Mix (6)
Headphone Output (9)MP3 Player / Aux Input (10)
● ●
●
●
●
●●
●
●
●
●
●
●
●
●
●
●
●
●
●
●
●
Controls & Connectors:
4
Page 5

Front Panel
Controls & Connectors Descriptions:
1. Channel Preset Control: Selects a tone-shaping preset for each of the five AE Cymbal input channels.
2. Illuminated Logo: The “Z” logo lights steadily while the DCP is operating. While the Standby/Power
switch (14) is in standby (“sleep”) mode it pulsates.
3. Cymbal Channel Pan: Pans the selected channel’s AE Cymbal output Left or Right.
4. Cymbal Channel Volume: Controls the mix level of the selected AE Cymbal channel.
5. Master Volume: Controls the volume of the Line Outputs (12) independently of the Headphone
Output (9) level.
6. Drum / Cym Mix: Controls the relative balance between AE Cymbals and Drum Inputs (13).
7. Reverb: Controls the level of reverb return for all AE Cymbals.
8. Phones Volume: Controls the level of headphone output (9) independently of Line Outputs (12).
9. Headphone Output: 3.5 mm Stereo connector. (Use 8 - 64 Ohm Headphones for best performance.)
Output level controlled by Phones Volume (8).
10. Aux Input: Connect an MP3 player or other audio source to play along with pre-recorded music.
The connected source will be mixed with the cymbal and Drum inputs in both the Line and
headphone outputs.
11. Channel Preset Display: Displays the currently selected preset for each of the five cymbals.
5
Page 6
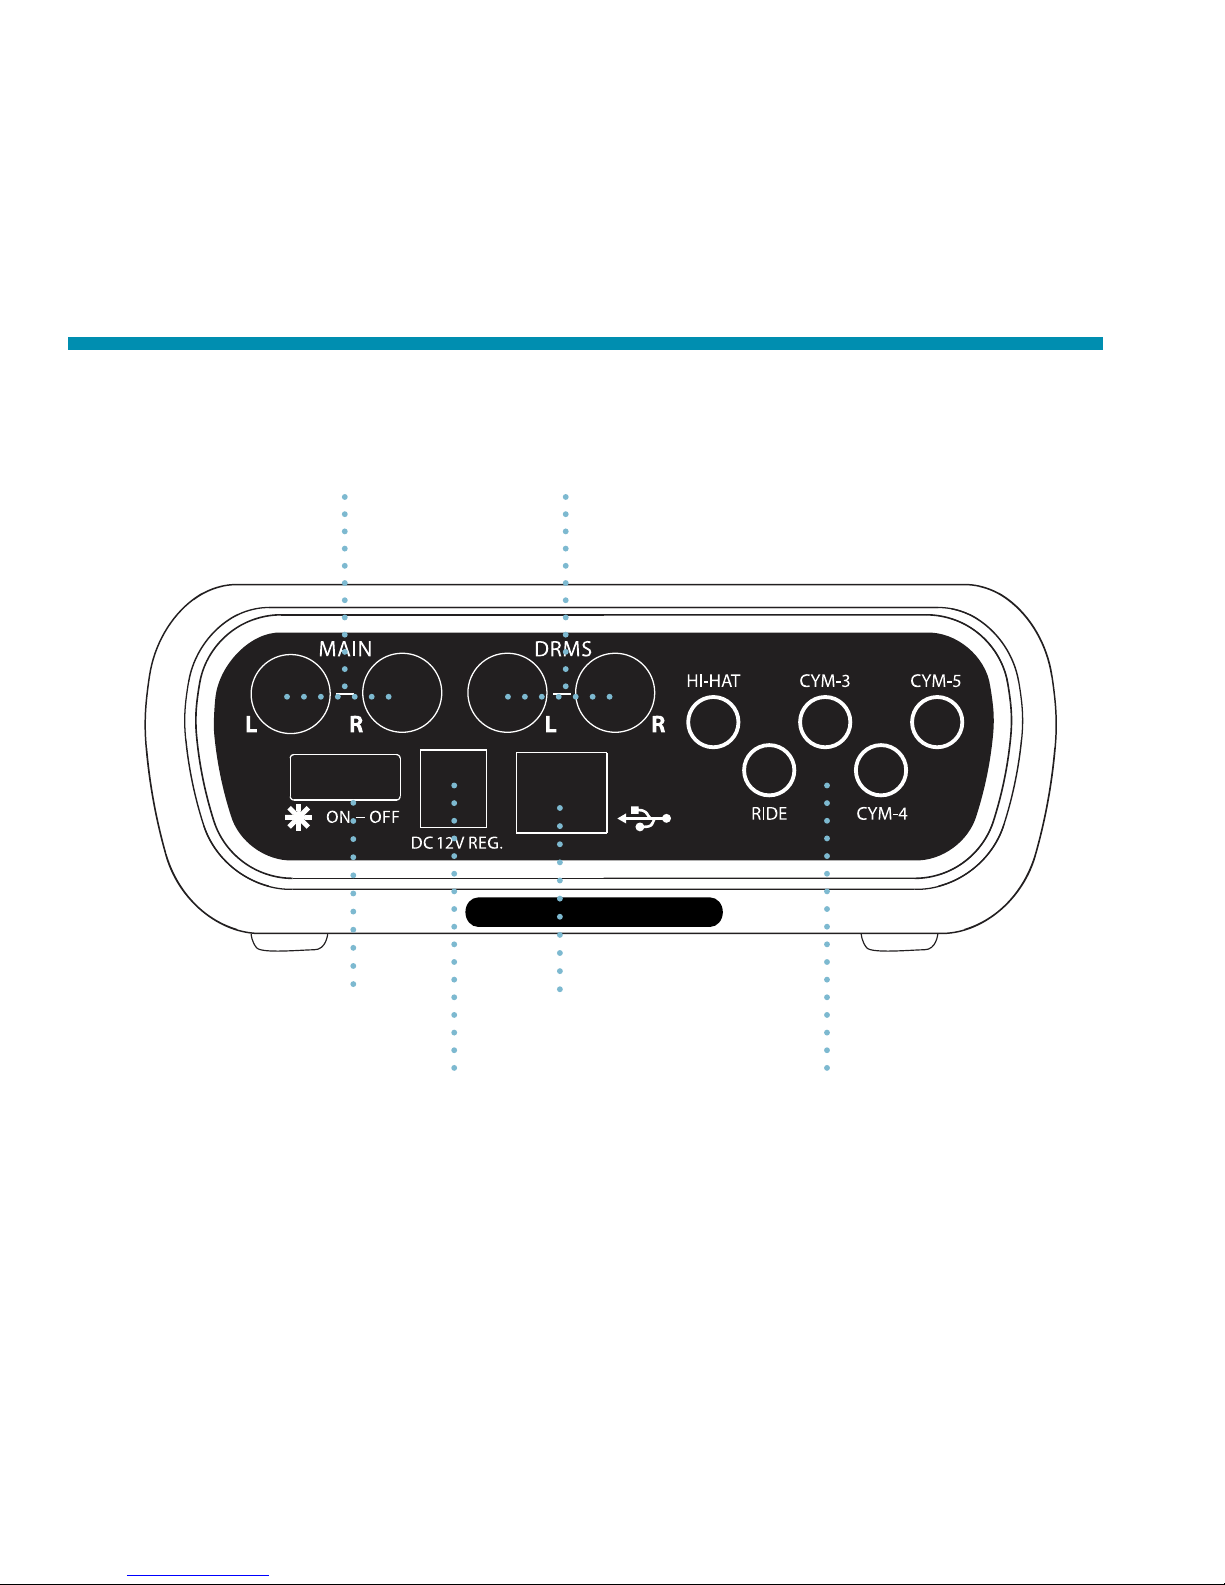
Rear Panel
Controls & Connectors:
DIGITAL CYMBAL PROCESSOR
Line Outputs (12) Drum Inputs (13)
Power Input (15) AE Cymbal Pickup Inputs (17)
USB Connector (16)
Power / Lights Switch (14)
●
●
●
●
●
●
●
●
● ●
●
● ●
●
6
Page 7

Rear Panel
Controls & Connectors Descriptions:
12. Line Outputs: L&R 1/4-inch mono unbalanced outputs. Connect these to the inputs of your PA system,
DAW, amplifier, etc. These outputs are a mix of the cymbal microphone, Drum, and Aux inputs.
13. Drum Inputs: L&R 1/4-inch mono unbalanced inputs. Connect the outputs of your e-drum module,
sampler, etc. to these inputs to mix them with your AE cymbals.
14. Standby / Power Switch: Switches between Standby, Power On and Lights On modes. To operate
the AE Cymbal System without illuminating the blue LED rings in the cymbal microphones,
select the middle (On) position. NOTE: In the Standby position the controller is actually “sleeping”
and draws a small amount of current. It can be safely left in this position indefinitely. In order to
completely shut the unit off the power adapter must be unplugged from the controller or disconnected
from its AC supply. In order to ensure that your user settings and customized Kit Presets are safely
stored in memory, it is recommended that you always switch the DCP to Standby mode before
physically disconnecting its power supply or switching off AC power on a plug strip.
15. Power Input: Connect the supplied power supply here. Use only the power supply provided with your
AE Digital Cymbal Processor.
16. USB Connector: Connect to a computer for firmware and presets updates.
17. AE Cymbal Pickup Inputs: Connect the color-coded cable ends of the AE Cymbal Pickup cable
snake to these inputs.
7
Page 8
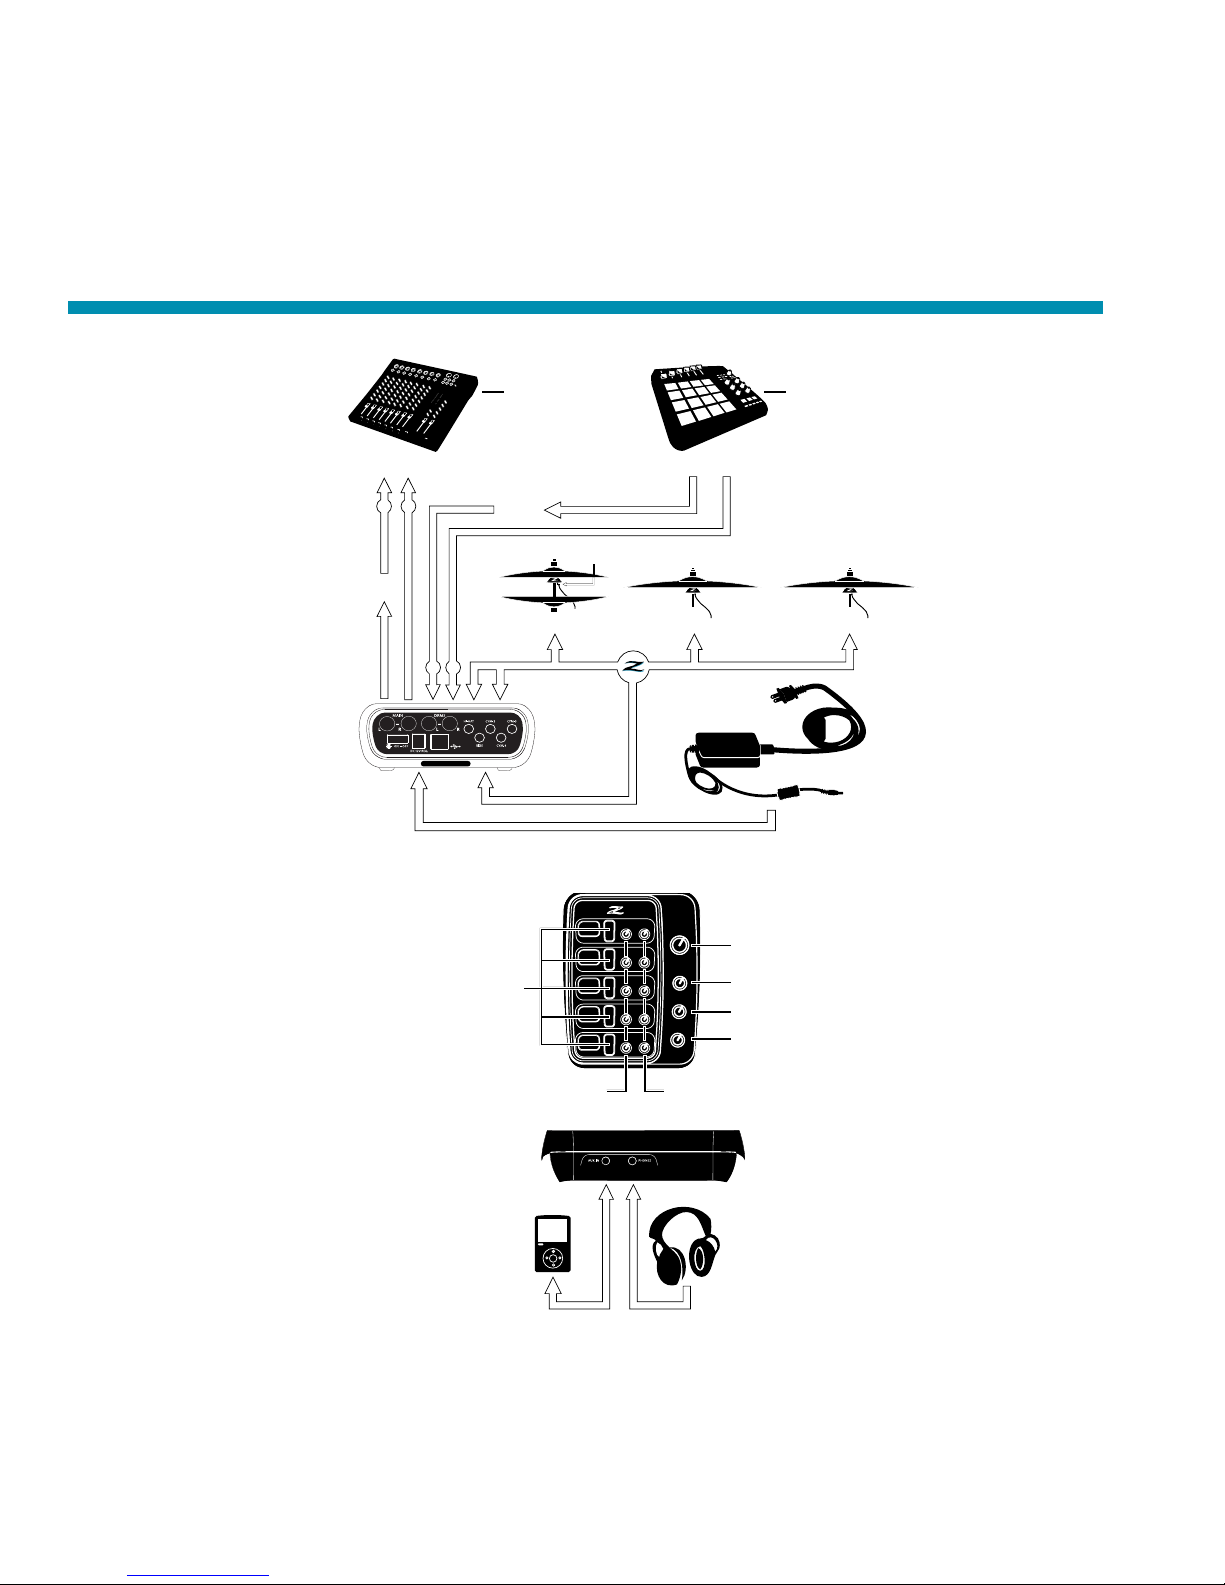
System Setup:
Hi-Hat Ride
MP3 Player Input
(MP3 Player Sold Separately)
Headphone Output
(Headphones Sold Separately)
AC Power
Audio Output to Mixer
Audio Output to DCP
(Mono)
Cymbal
Edrum Controller
(Sold Separately)
(Mono)
L
R
L
R
Master Audio Level
Tone Shape
Preset Control
Edrum/AE Cymbal Blend Level
Master Reverb Level
Headphone Level
Channel R/L Pan Channel Volume
Audio System
(Sold Separately)
Digital Cymbal Processor (DCP)
(DCP)
DIGITAL CYMBAL PROCESSOR
Note: connect cable
with right angle end here
Note: shape / style / specification of power
supply may vary per country / region
Page 9
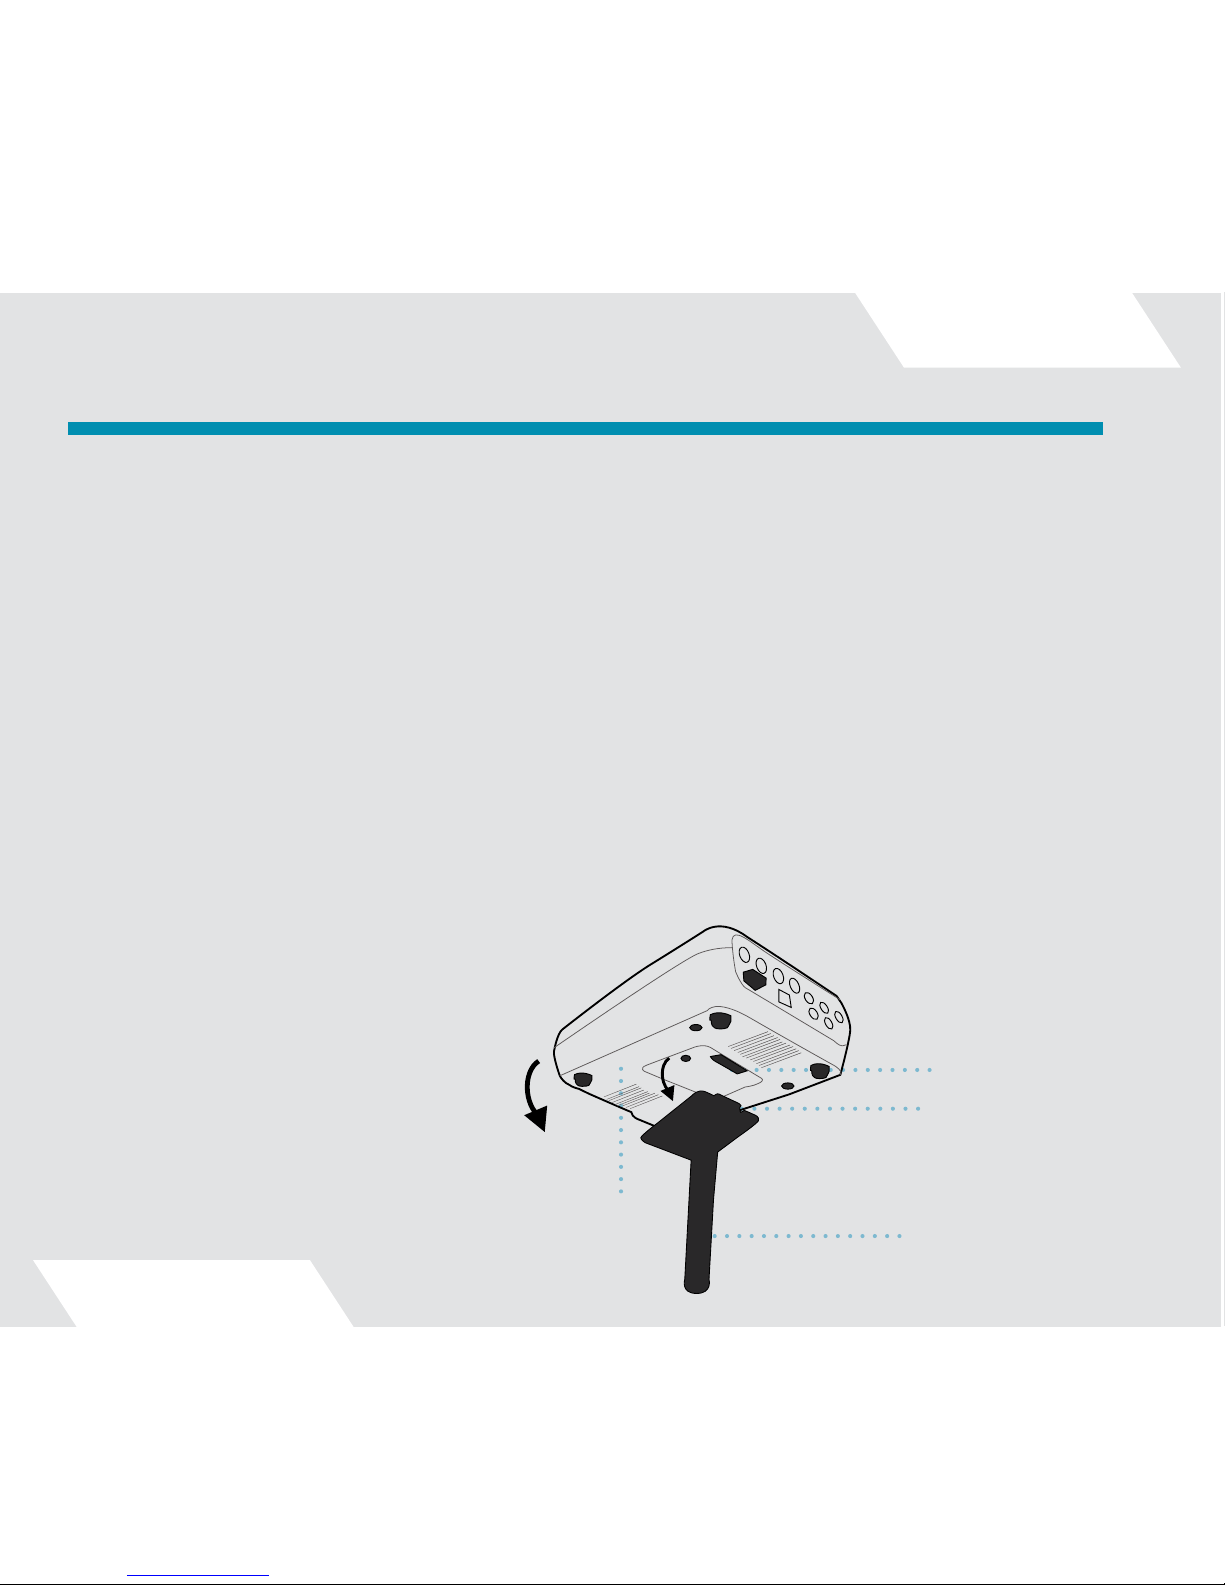
System Setup (cont.):
Mounting the DCP:
Secure the DCP Mounting Bracket to your existing drum hardware. The bracket has an embedded magnet that
makes mounting the DCP quick and easy. Slide the lip of the mount into the tab on the underside of the DCP.
The DCP will snap into place, locking with the mounting bracket.
Note that it is normal for the bottom surface of the DCP to become quite warm while in operation. It is recommended that you not place the DCP on a soft surface such as carpet or upholstery that could prevent the flow
of air around the unit. Use the mounting stand or place the unit on a hard surface, on its rubber feet.
Connect the supplied 12VDC regulated power adapter to the power input of the controller. Use only the power
supply provided. Make sure it’s switched to the “Standby” position (blue “Z” logo pulsating) while you connect
your cymbal pickups in the following steps.
Important: Always switch the DCP to “Standby” mode before connecting or disconnecting cymbal pickup
cables. Connecting or disconnecting cymbal pickups with the unit fully powered on may result in a DCP crash,
loss of user settings data, or speaker damage. Note that even with the DCP switched to Standby, the pickup
lights will flash briefly during plug insertion; this is normal.
Setting Up Your Digital Cymbal Processor:
Alignment Channel
●
Bottom of DCP
●
Alignment Tab
●
DCP Mounting Bracket
●
9
Page 10

System Setup (cont.):
The AE cymbal pickups are “universal” and completely interchangeable with one another. The only difference
is that the stand mounting sleeve is omitted when mounting a pickup in a Hi-Hat.
On the other hand, the tone-shaping presets in each channel have been optimized for use with specific
cymbals. While the snake cable branches are interchangeable and any pickup will work in any channel, we do
recommend that you connect your Hi-Hat to the “Hi-Hat” channel and your Ride cymbal to the “Ride” channel.
Connect the short ends of the included cable snake to the matching color-coded AE Cymbal Pickup Input jacks
(17) on the rear panel of the controller. While snake connectors are interchangeable, the system color coding
has been designed as follows:
Blue: Hi-Hat (you must use this one for your Hi-Hat because it’s the only one with a right-angle plug).
Red: Ride
Orange: Cym3 (typically a crash or splash)
Yellow: Cym4 (typically a crash or splash)
Green: Cym5 (typically a China or other “effects” cymbal)
Important: Use only Gen16 four-conductor pickup cables to connect the pickups to the controller. Use of
any other cables may result in damage to your DCP, pickup(s), or both.
Important: The connectors are designed for a very snug fit to prevent their coming loose during playing.
Make sure they are fully inserted into the pickups and DCP rear panel inputs.
10
Page 11

System Setup (cont.):
Line Outputs:
Connect the L and R Line Outputs (12) to the inputs of your PA mixer, amplifier or DAW
Drum Inputs:
Connect the L and R Drum Inputs (13) to the outputs of your e-drum module or sample player. The Mix control
(6) is used to regulate the balance between the input signal from the Drum Inputs (13) and the AE Cymbal
Inputs (17).
Headphone Output:
Connect a 3.5 mm Stereo headphone connector to this output. (Use 8 - 64 Ohm Headphones for best
performance.) The headphone output level is controlled by the Phones Volume control (8).
CAUTION: The Digital Cymbal Processor’s headphone amplifier is capable of driving many headphones
to very high sound levels. Use care in setting the headphone volume level control to avoid potential
hearing damage.
Aux Input:
Connect an MP3 player or other audio playback source to this input using 3.5 mm stereo connector.
The connected source will be mixed with the cymbal and Drum inputs in both the Line and headphone outputs.
USB:
For firmware or preset updates, connect a computer to this input using a standard USB cable.
11
Page 12
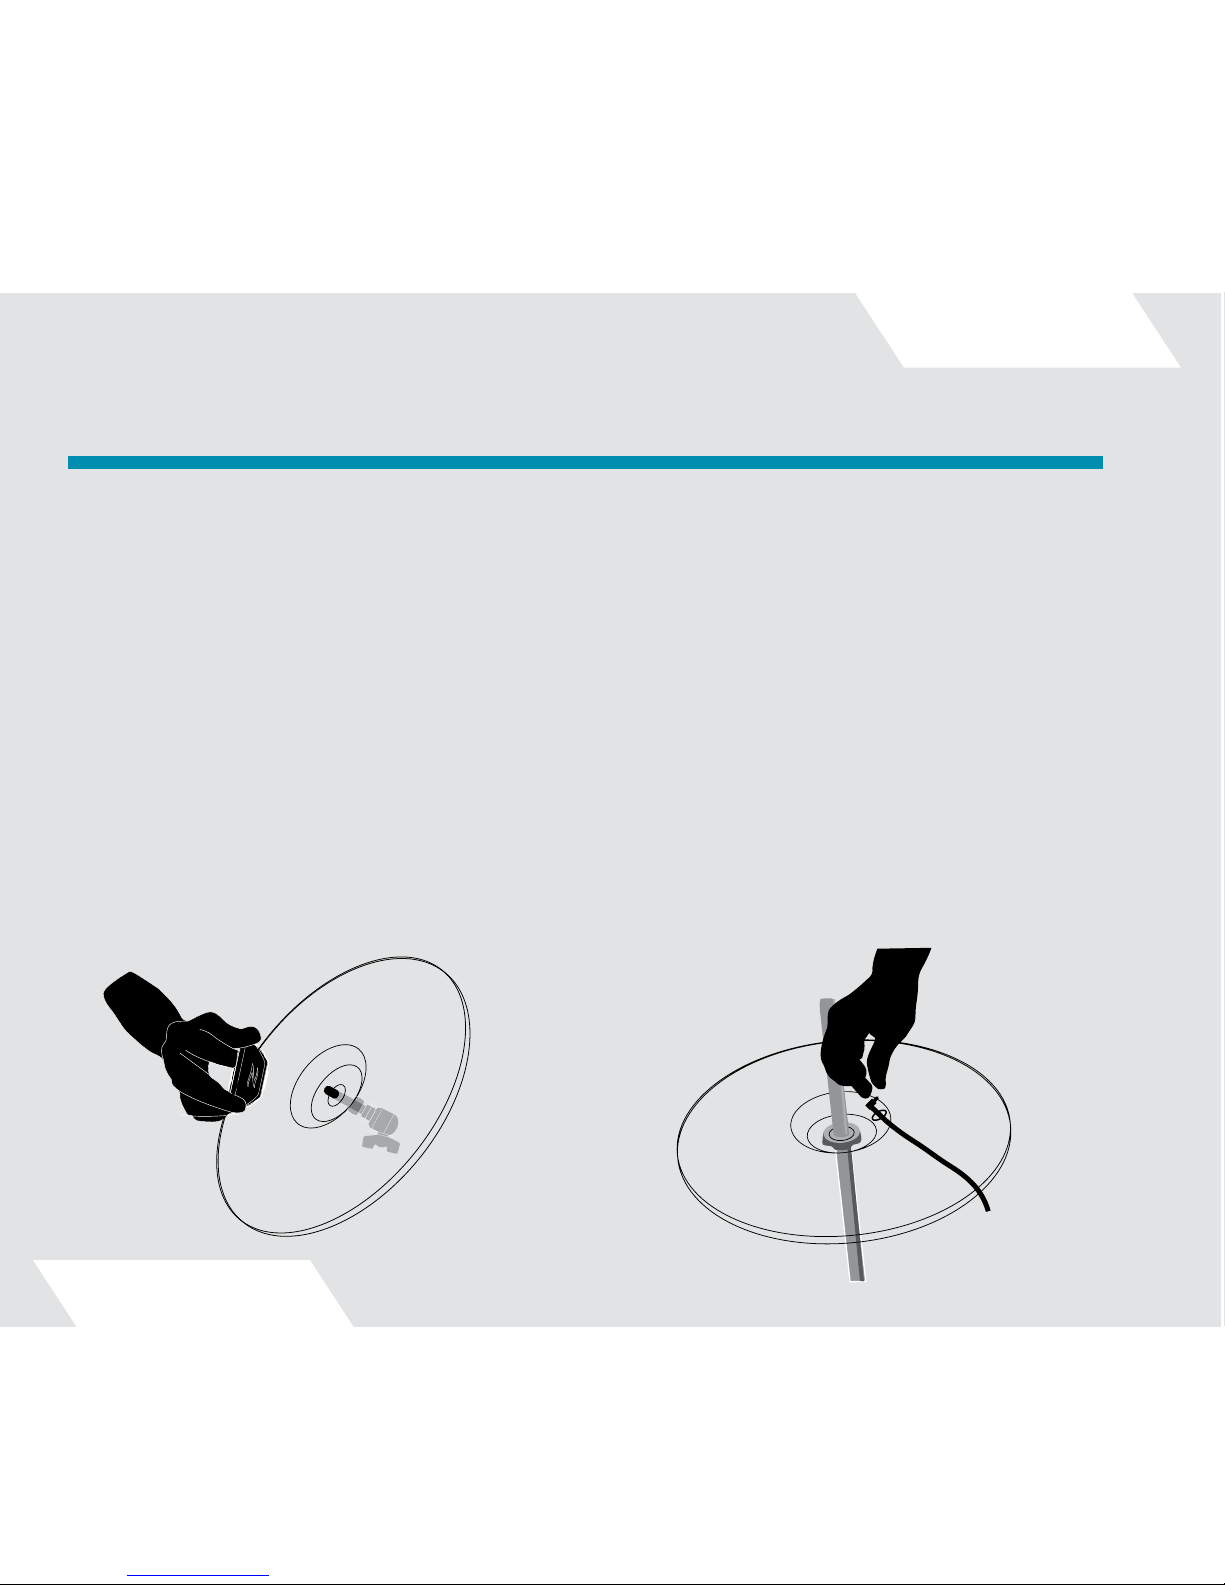
System Setup (cont.):
HiHats:
To mount the Hi-Hat pickup, slide a foam washer over the shaft of the supplied clutch. Slide the shaft through
the top Hi-Hat cymbal and slide on another foam washer, then an AE pickup without a cymbal sleeve. (Note: the
top Hi-Hat fits very snugly onto the clutch shaft.) Finally, screw on the bottom clutch nut. The Gen16 clutch nut
has a special hex top, which engages a mating hex recess in the inner surface of the pickup, making it easy to
screw the nut on by rotating the pickup.
Place the included bottom Hi-Hat foam washer on your Hi-Hat stand. Next, place the bottom AE Hi-Hat cymbal
(the one with the hole and rubber grommet) on your Hi-Hat stand. Insert the cable snake’s blue-coded rightangle plug through the grommet and into the jack on the bottom of the pickup. Place the assembled top Hi-Hat
cymbal onto the Hi-Hat stand, leaving a gentle curve of cable about 3 inches long between the pickup and the
exit hole in the bottom cymbal. The cable is not designed to exit directly out of the hole.
Setting Up Your AE Cymbals:
12
Page 13
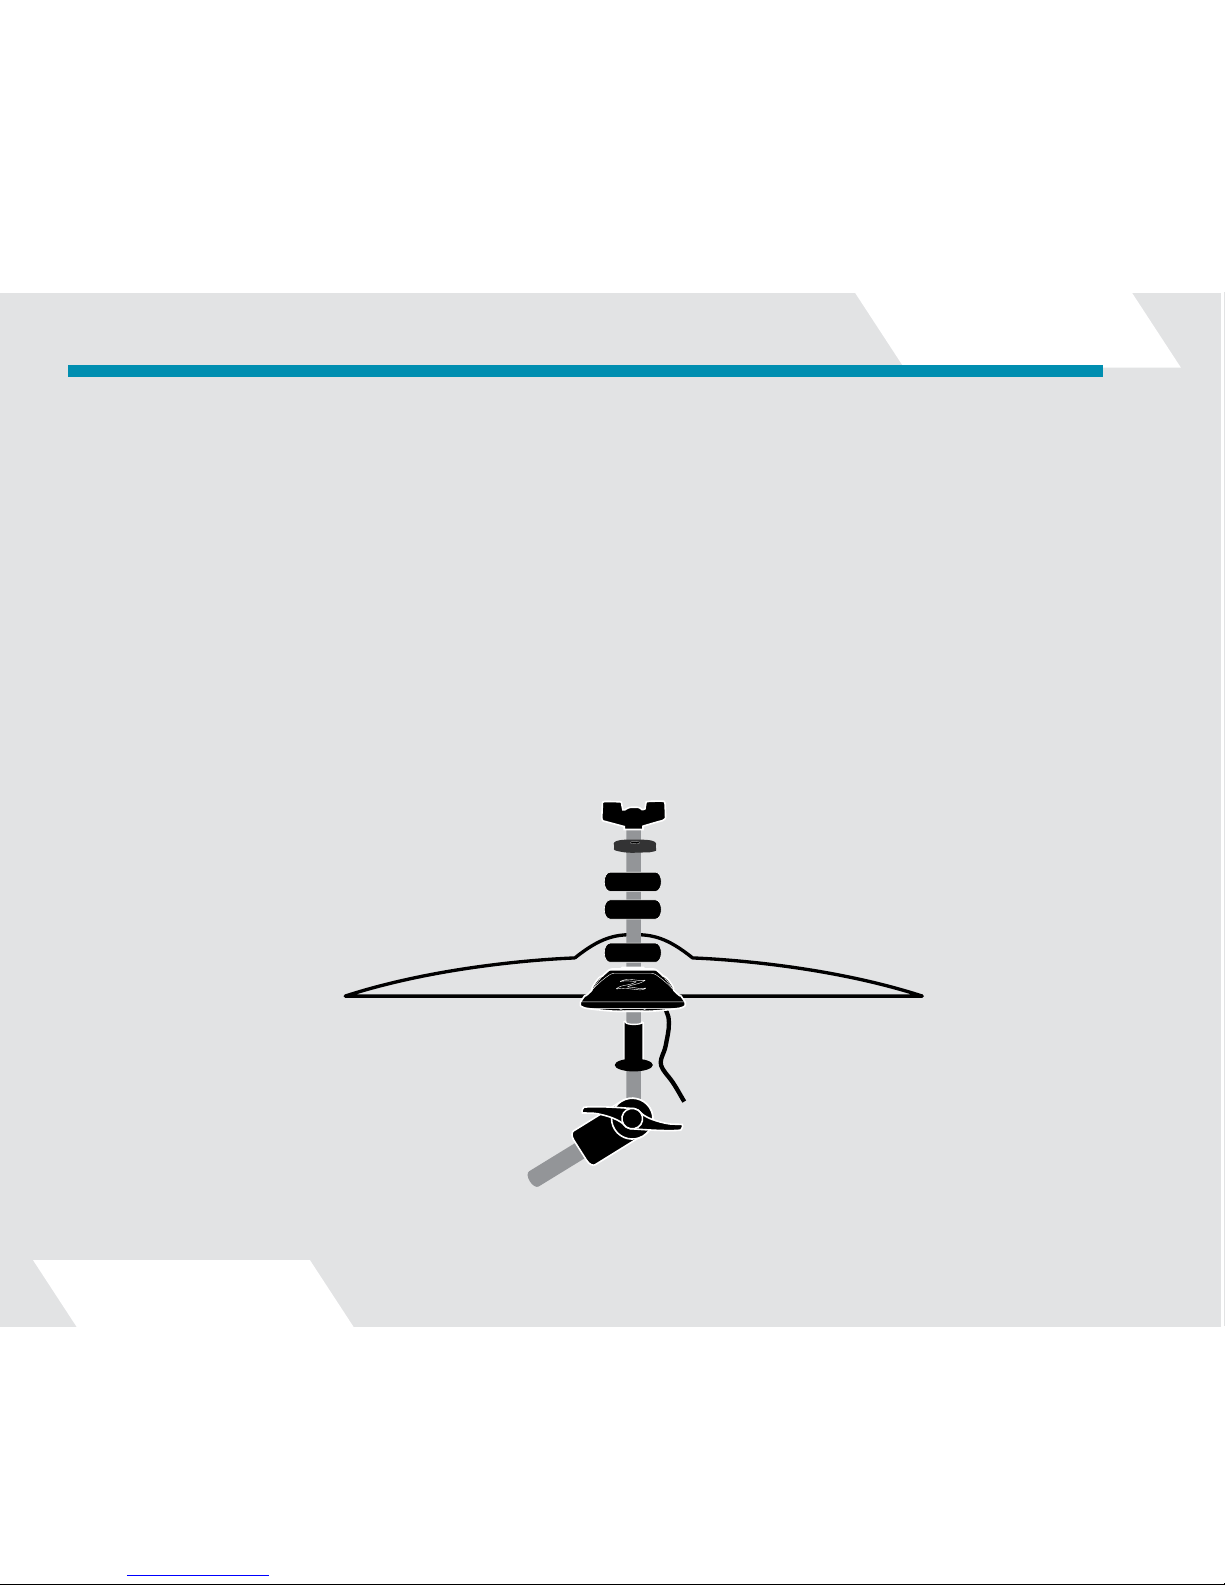
System Setup (cont.):
Other Cymbals:
Remove your existing cymbal felts and cymbal sleeve. Slide a Gen16 cymbal sleeve onto your cymbal
stand and place the pickup over the sleeve. Place a Gen16 foam washer over the pickup, place your
AE Cymbal on the washer, place another Gen16 foam washer over the cymbal, and secure with the supplied
stabilizing washer.
Note: Gen16 cymbal sleeves and foam washers have been specially designed and made from special
materials to provide optimum results with your AE Cymbals. We strongly encourage you to use only Gen16
mounting accessories; use of generic sleeves and washers can result in undesirable stand vibration bleedthrough and excessive cymbal “ringing” overtones.
13
Page 14
System Setup (cont.):
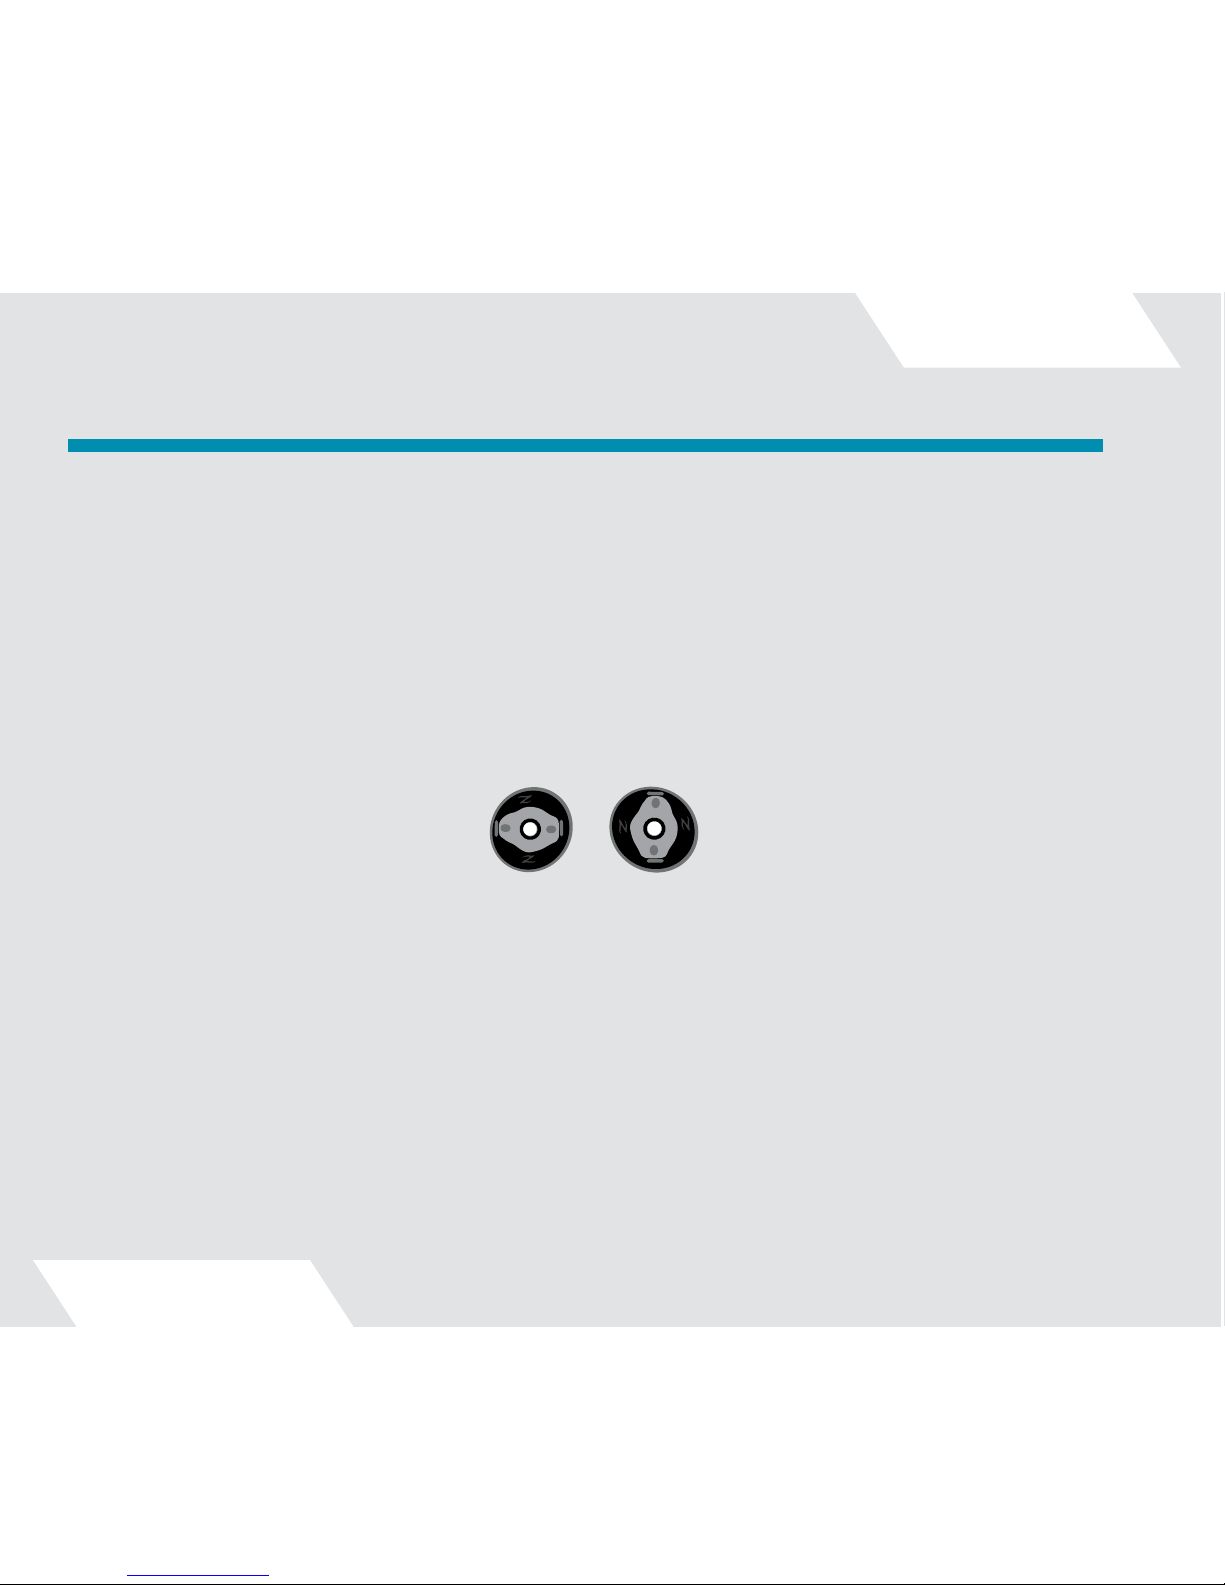
About Pickup Orientation:
The AE Cymbal System’s dual microphone pickups are specially designed to capture the best sound possible
from the AE Cymbals. It’s important to consider the dynamics of different types of cymbals in positioning the
pickups.
Crash Cymbal: Typically, the crash cymbal is hit harder than other cymbals, and tends to swing front-to-back
when hit. For best results, orient the mic capsules horizontally, at 9 o’clock and 3 o’clock positions. This
minimizes the differences in distance to the mic when the cymbal moves.
Ride Cymbal: Orient the mic capsules vertically, at 12 o’clock and 6 o’clock positions, so that they are not
directly under the area where you strike the bell.
Adjusting the Tone of Your AE Cymbals With Dampeners:
The AE Cymbal System’s Digital Cymbal Processor is capable of a lot of tonal variation, but you may want
to customize the sound of your cymbals further by using the included Dampening Pins and accompanying
rubber pads. Simply slide a rubber pad onto the threaded pin, insert it through a perforation in the cymbal,
slide on another rubber pad, and thread the nut onto the pin. Typically, locations near the bell provide good
results. Both the location of the pin and how hard you tighten the nut onto the pin will have a big effect on the
sound, so experiment!
You can also vary the overtone characteristics of your AE cymbals by trying different sizes of foam washer
beneath and above the cymbals. Larger washer will provide more dampening action.
Cymbals Ride Cymbal
14
Page 15

System Operation:
CAUTION: The Digital Cymbal Processor’s headphone amplifier is capable of driving many headphones
to very high sound levels. Use care in setting the headphone volume level control to avoid potential
hearing damage.
After connecting the system, begin by setting headphone and Master Volume levels to minimum before powering on the Digital Cymbal Processor. For best noise performance, cymbal volume controls should generally be
around the “12:00” position or higher. Turn your PA volume down, then switch the DCP into its “On” or “On with
Pickup Lights” position. Gradually raise output volumes to a comfortable level, first the DCP, then the PA.
Basic Functions:
Changing Cymbal Presets:
To change a channel’s preset, press its or button. Preset values range from 1 to the number of stored
presets for each cymbal.
Changing the Reverb Preset:
To change the reverb preset, press and hold Ride and simultaneously to enter reverb preset selection
mode. The top two display digits will show the current reverb preset. Press Hi-Hat or to scroll through
the reverb presets. Press Ride and simultaneously again to exit reverb selection mode.
15
PRESET
PRESET
PRESET
PRESET
PRESET
PRESET
PRESET
PRESET
Page 16
System Operation (cont.):
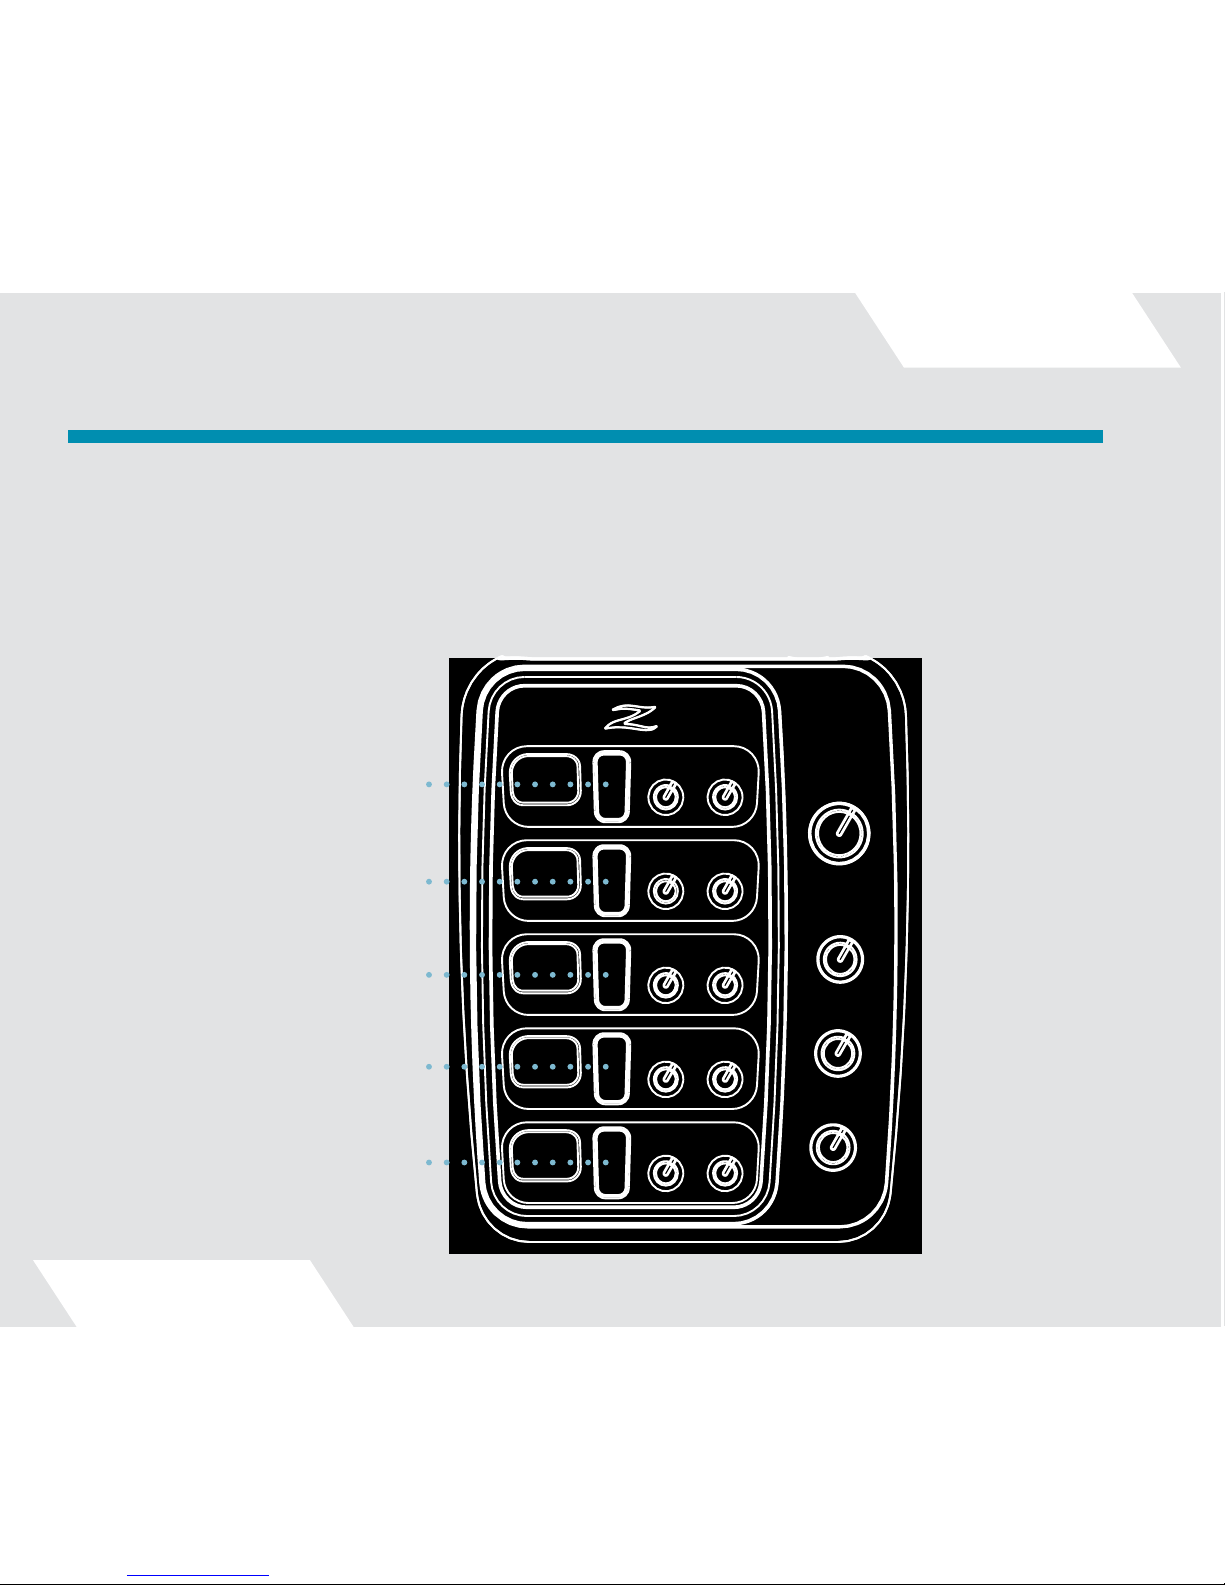
Advanced Functions
Your DCP includes five “second-level” functions which are accessed by pressing and holding both the up and
down buttons of a channel for about a second. There’s no need to use two hands or fingers, though – just press
and hold the center of the button firmly until the second level mode is indicated on the display. The illustration
below shows all the second-level functions:
Enter/Exit Settings Menu
● ●
Enter/Exit Reverb Preset
Select Mode
● ●
Enter/Exit Channel Solo Mode
● ●
Enter/Exit Cymbal Finder Mode
● ●
Enter/Exit Kit Preset Mode
● ●
Page 17

System Operation (cont.):
Channel Solo Mode:
Channel solo mode provides a quick way to listen to only one cymbal channel while muting all the others. This
can be useful for tracking down which cymbal might be feeding back or for just “zoning in” on one cymbal to adjust its sound. Channel Solo can also be used as a “Panic Button” to mute all channels in the event of feedback.
To enter Channel Solo mode, press and hold Cym3. When Channel Solo mode is first entered, all five cymbal
channels will be muted - each channel’s preset number display will show “- -“ to indicate its muted status. (The
volume control knob for muted channels is also disabled in solo mode.) To solo a channel, press its or
button. Its preset number will be displayed, flashing, to indicate that it is being soloed, and its volume control
will be enabled. While soloed, a channel’s preset may be changed if desired. To solo another channel, simply
press its or button.
To exit Solo mode, press and hold Cym3.
Note: Even though the Volume controls of muted channels are disabled in Solo Mode, once Solo Mode is
exited they will immediately become active again, and all channel volumes will return to the levels set by their
Volume controls. For this reason, it is not advisable to change the Volume position of a muted channel.
17
PRESET
PRESET
PRESET
PRESET
Page 18

System Operation (cont.):
Cymbal Finder Mode:
In Cymbal Finder mode, the DCP automatically senses that a cymbal has been struck and flashes its preset
number display. This is handy for quickly identifying which cymbal in your kit is connected to which channel
of the Digital Cymbal Processor, without having to trace your cables.
To enter Cymbal Finder mode, press and hold the Cym4 button. The DCP display will initially show “Cym
Finder”. When a cymbal attack is sensed, that cymbal’s preset display will be shown flashing and the other
cymbals’ displays will show “—“.
A medium-velocity tap on the bell of the cymbal you wish to identify, while choking the cymbal with your other
hand will yield the best results. The objective is to tap on the bell hard enough to trigger the Digital Cymbal
Processor’s detection. Hitting too hard may trigger adjacent AE Cymbal mics.
Press any key to exit Cymbal Finder mode.
Note: In DCP firmware versions lower than 1.2.2, Cymbal Finder mode was not available as a separate func-
tion; it was combined with Solo Mode. We recommend all users upgrade to the latest firmware version for the
most up-to-date features. Visit www.Gen-16.com to download the Gen16 DCP Access Tool application program
and updates.
18
Page 19

System Operation (cont.):
Kit Preset Mode:
Kit Presets allow you to create and save custom “kits” of cymbal presets that you can recall instantly. To enter
Kit Preset Mode, press and hold the Cym5 tone-shape button until the top four cymbal channels dim to show
that they are part of a kit preset.
The kit preset number is shown on the Cym5 LED display, at normal brightness. You can cycle through the kit
presets by pressing Cym5 up or down.
Initially the default preset kits will have all their cymbal presets set equal to the kit preset number.
In order to prevent accidentally messing up your kit presets, cymbal presets in a preset kit cannot be changed
while they’re dimmed. To change a cymbal preset within a kit preset you need to put that channel into Edit
Mode as follows:
• To edit a cymbal’s preset within a Kit Preset, press and hold the tone-shape button of the cymbal
whose preset you want to change, until its LED brightens and flashes to show that it’s being edited. Then
use its up or down button to select the preset you want that cymbal to have in that kit.
• When you’ve got the one you want, save the change by pressing and holding the key of the
cymbal you just changed until it stops flashing and goes back to being dimmed. Now it’s been saved.
• Repeat for the other cymbals of the kit.
Note that since in Kit Preset mode Cym5 acts as the “kit selector”, the number displayed on Cym5’s preset
display indicates both the kit number and the Cym5 preset for the kit. This has two ramifications:
1. When in Kit Preset mode, Cym5’s cymbal preset is always the same as the kit number and cannot be
assigned as with the other cymbals.
2. The number of available kits is equal to the number of Cym5 presets.
To exit Kit Preset Mode, press and hold the Cym5 tone-shape button until all LED’s return to normal brightness.
19
Page 20
System Operation (cont.):
Settings Menu:
To access the Settings menu, press and hold the Hi-Hat button. The Hi-Hat preset display identifies the specific
setting to be adjusted, and the Cym5 display shows the current value of that setting.
Press Cym5 or to change the value of the current setting.
Press Hi-Hat or to scroll to the next setting.
To exit the Settings menu press and hold the Hi-Hat button. For most settings, the DCP will exit the Settings
menu automatically if no keys are pressed for several seconds.
Available Settings:
• Display Brightness (“br”) – Adjust the display brightness by pressing Cym5 or .
• Aux Input Volume (“Au”) – Adjust the level of signals mixed in via the Aux Input jack by pressing Cym5
or .
• MIDI Channel (“ch”) – Sets the base MIDI channel (1-8). The DCP requires 9 MIDI channels, starting with
the base channel. For example, if channel 1 is selected (the default value) then communication will take place
over channels 1- 9. The base channel selected in the DCP must match the base channel set in the DCP
Access Tool program. Both programs default to channel 1, and you should not need to change these settings
unless you are using other MIDI devices on the same MIDI bus at the same time.
• MIDI Device ID (“id”) – Sets the MIDI sysex device ID of the DCP when using the companion desktop DCP
Access Tool program to edit presets or upload firmware upgrades to the DCP. It defaults to 1, and the desktop
program’s device ID defaults to 0. You should not have to change this setting unless you have multiple DCPs on
the same MIDI bus, in which case each DCP should have a different device ID.
20
PRESET
PRESET
PRESET
PRESET
PRESET
PRESET
PRESET
PRESET
Page 21

System Operation (cont.):
Settings / System Info Menu:
The following selections of the Settings menu are not really “settings” per se; they are informational displays of
the version numbers of various components of your Digital Cymbal Processor. They cannot be changed except
by firmware updates. They may be required in the event that you need technical support for your DCP.
• Cymbal Processor Firmware Version Number (“Ctlr”) – Displays the currently installed DCP firmware
version number.
• Cymbal Processor Bootloader Version Number (“boot”) – Displays the currently installed DCP bootloader
version number.
• DSP Firmware Version Number (“dSP”) – Displays the currently installed DSP firmware version number.
• Hardware Version Number (“hdwr”) – Displays the hardware version number of your DCP.
Note that the System Info can also be read via USB using the AE Cymbals Gen16 DCP Access Tool
application Program for Macintosh® or Windows®, available as a free download from www.gen-16.com.
21
Page 22

System Operation (cont.):
Remote Control of the DCP Via MIDI:
Your DCP can be controlled via MIDI Continuous Controller (CC) and/or Program Change messages.
Using these you can change cymbal, reverb, or kit presets, channel volume and pan settings, Master Volume,
Cymbal / Drum Mix, Reverb Return level, and even the cymbal pickup blue lights, all from your e-drum “brain”
or any MIDI sequencer or controller. In this way your DCP can be “slaved” to your e-drum brain so that when
you make a change to your drum kit, the DCP’s configuration changes at the same time.
Conversely, the DCP also sends CC and/or Program Change messages whenever any of its controls are
operated, so if you prefer you can configure your system so that the DCP is the “Master” and your e-drum
brain or other MIDI gear is “slaved” to it.
A list of all supported Controller and Program Change messages can be found in the MIDI Implementation
Chart at the end of this Guide.
Note: Some Program Change messages are only supported in DCP firmware version 1.2.3 and above. Please
make sure you have the latest firmware version installed by using the AE Cymbals DCP Access Tool program
to check the Gen16 update server.
A Note About How and When the DCP Stores User Settings:
All of your user settings (kit presets, display brightness, aux input volume, MIDI channel, etc.) are stored in
“Flash Memory” within the DCP. In order to maximize the life of your flash memory, settings are not saved each
time they are changed, rather they are saved only when the DCP is switched to Standby mode or when power
loss is detected. The saving of your settings when the power switch is switched to Standby is very reliable,
however when power is removed unexpectedlty by unplugging the AC adapter or switching off a plug strip,
there is a chance that some user settings could be lost. Therefore we recommend that you always switch
the DCP to Standby via its own switch prior to disconnecting its power supply.
22
Page 23

System Operation (cont.):
Updating and Customizing your DCP:
The Gen16 team is continually working on improvements and enhancements to the AE system. We encourage
you to visit www.gen-16.com often to check for free firmware updates and new cymbal tone-shaping preset
packages. These are easily installed via USB using the AE Cymbals Gen16 DCP Access Tool Application
Program, which can be downloaded for both Macintosh™ OS X and Windows™ XP/7.
Tips & Tricks:
• When mounting the DCP, align the mounting arm tab flush to the DCP.
• To achieve best performance and minimize cymbal stand noise, tighten the wing nuts securely but do
not force.
• To minimize the potential for feedback, try not to position your drum kit too near your PA speakers or
stage monitors.
• To prevent the AE pickups from rotating from their optimum orientations, you can use cable ties
(not included) to secure the snake cable to your cymbal stand(s).
23
Page 24

Troubleshooting:
Your AE Cymbal System is designed to deliver many years of trouble-free operation. However, should something seem “not quite right,” it’s best to begin by checking your signal chain. Below are some suggestions for
troubleshooting a few common issues:
No sound from any cymbals:
• Make sure that the Drum / Cym Mix control is not set fully to Drums. In that position there is no cymbal
signal in the output mix!
• Make certain each channel’s volume control, as well as the master volume are set to an
operational level.
• Check the power supply connection and the cable snake connections to the DCP and to each
AE Cymbal Pickup.
• Check the connections between the Line Output and your PA, amplifier or DAW input, and make certain
your PA is powered on etc. Make sure you’ve connected the Line Outputs and not the Drum Inputs
to your PA!
• Connect headphones to the Headphone output to verify that signal is getting from the input(s) and passing
it through the DSP. If you get sound from the ‘phones then the problem is in the connection to your PA
(or the Master Volume knob is turned down).
No sound from one or more individual cymbals:
• Check that the plugs are fully inserted in both the pickup and DCP jacks. In order to prevent accidental
disconnection they have been engineered for a snug fit.
• Make certain each channel’s volume control is set to an operational level.
24
Page 25

Troubleshooting (cont.):
Pickup lights don’t work:
• Check that the plugs are fully inserted in both the pickup and DCP jacks.
• Ensure that the power switch is in the “Lights On” position.
No signal through the Aux input:
• Check the Aux input volume level via the Settings menu.
Feedback:
• Aim your speakers away from the cymbal pickups.
• Use Channel Solo mode to set the volume of each cymbal individually to where it doesn’t feed back.
• Try different presets; some presets accentuate frequencies that may cause feedback in your particular
acoustic environment.
• Use the channel Pan controls to pan each cymbal to the speaker farthest from it.
• In live performance situations consider monitoring with headphones rather than floor monitors.
My cymbal has an overtone that I don’t like:
• You can vary the overtones of your AE cymbals by changing the foam damping washers beneath and
above it. Larger washers will help dampen ringing; smaller washers will let the cymbal ring more. The
included dampening pins and accompanying rubber pads can also be inserted through the perforations
in your AE cymbals at various locations (typically near the bell) to control overtones.
25
Page 26

Troubleshooting (cont.):
Excessive noise in outputs:
• For optimal signal to noise ratio, set individual cymbal channel volume controls (4) and the Master (5) or
Phones (8) volume controls at 12:00 or higher. Set your levels accordingly and then adjust your PA,
DAW, etc. levels based on this output level.
My band sounds out of tune:
• Some of the cymbal tone-shaping presets use a “detune” or “pitch shift” process to alter the pitch of some
frequencies. Since the AE cymbal pickups are acoustic microphones, some “bleed” from other instruments
is unavoidable. In live situations you may want to avoid the use of detuned tone-shaping presets. Similarly,
a cymbal using a detuned preset may also alter the sound of nearby cymbals. If you’re hearing some “out
of tune” or “muddiness” in your setup, you might want to try different presets.
I’m getting low-frequency bleed in my cymbals:
• Use only Gen16 sleeves and washers.
• Aim any on-stage amps, monitors, and PA speakers away from the drum kit.
• Some drum racks can be quite resonant. If that’s true in your case you can try filling the tubes of your rack
with spray-in foam insulation to damp the vibrations. The Gen16 AE Drum Rack has been specially designed to minimize any kind of resonance or vibration; visit the Gen16 website for details.
• In especially difficult situations with flimsy stage risers it may be necessary to use some sort of
vibration-isolating pads under you cymbal stands.
One preset display is flashing and I don’t hear the other cymbals:
• The DCP is in Channel Solo mode. Press and hold Cym3 Up and Down to exit Channel Solo mode.
26
Page 27

Troubleshooting (cont.):
The Cym5 display is bright but the other cymbal displays are dim:
• The DCP is in Kit Preset mode. Press Cym5 Up and Down at the same time to exit Kit Preset mode.
The display is too bright or too dim:
• Adjust the display brightness via the Settings menu.
If you are experiencing other functionality issues, chances are your problem may already have been addressed
in a firmware update issued since purchasing your unit. Visit www.gen-16.com/support for information on the
latest firmware updates.
If you have checked your full signal path and things are still not functioning correctly, contact Gen16 Tech
Support for assistance. See the Contact Us section for contact information.
27
Page 28

Specifications:
Dimensions:
6.8 x 5.27 x 2.7 in
172 x 134 x 68 mm
Weight 632 g (1lb 6.3 oz) excluding power supply
Power Requirements:
AC Adaptor 100-240VAC 50-60Hz
Power Consumption:
Operating 18W
Sleep Mode < 1W
DC Input 12VDC, regulated, 1200 mA max
Cymbal Inputs (5 mono):
Type Balanced-impedance, proprietary
4-conductor power-carrying cable
Frequency Response 400Hz - 20 kHz ±3dB maximum bandwidth.
Actual response depends on selected preset
Drum Inputs (L/R):
Type Single-ended 1/4-in T-S
Frequency Response 35Hz - 20kHz ±3dB
Input Impedance 47KΩ
Gain 0 to -2dB, dep on control settings
Max input level before clipping +7.5 dBu
Aux Input (Stereo):
Type Standard 3.5 mm TRS stereo
Frequency Response 35Hz - 20kHz ±3dB
Input Impedance 47KΩ
Gain 0 to -2dB, dep on control settings
Max input level before clipping +7.5 dBu
Line Outputs (L/R):
Type Single-ended 1/4-in T-S
Max Output Level +7.5 dBu
Headphone Output (Stereo):
Type 3.5 mm TRS Stereo
Output Power 1.5W @8Ω, .75W @16Ω, 0.4W @32Ω (all wattages RMS)
Frequency Response 55Hz - 20kHz ±3dB into 32Ω
80Hz - 20kHz ±3dB into 8Ω
Note: All specifications are for reference only and subject to change without notice.
Page 29
MIDI Specifications:
The AE Digital Cymbal Processor incorporates a class-compliant MIDI-over-USB device port. No special device
drivers are required for either Mac OS or Windows. The USB port is used in conjunction with the AE Cymbals
DCP Access Tool application Program (available via download from the Gen16 tech support website) for uploading
firmware updates to the DCP.
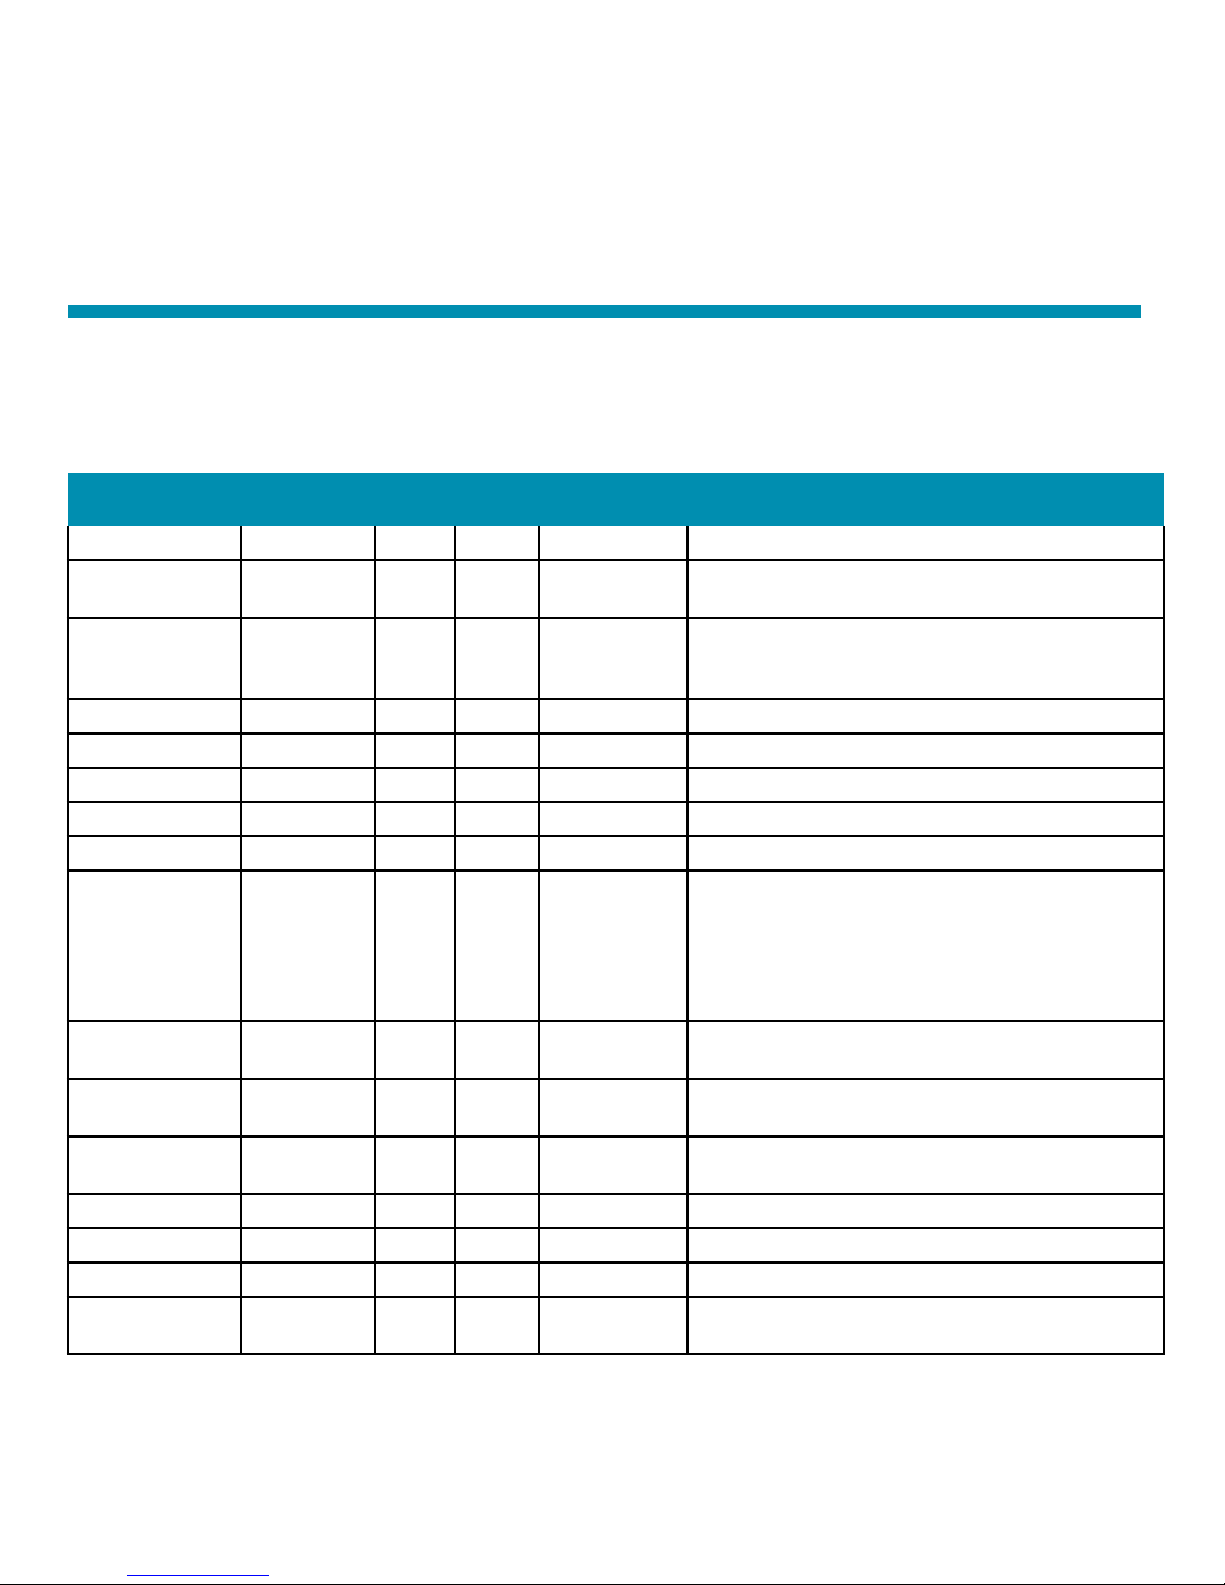
Gen16 AE Digital Cymbal Processor MIDI Implementation Chart
Transmitted
Recognized
Description Remarks
Basic Channel 1 The base channel can be set to 1-8 via the Settings
Menu. The AE DCP uses 9 consecutive channels,
starting with the base channel.
Mode 4 no no
Note Number no no
Velocity no no
Aftertouch no no
Pitch Bend no no
Controller 0, 2-9, 11,
13-17, 1933,42-56,
61-62, 68-72,
76, 78-79,
81-84, 100
yes yes Proprietary
control
functions
Messages are sent on these controllers when presets
are changed and at other times. Used also by DCP
Access Tool program in controlling DCP parameters
remotely. Channels base channel - base channel+5
are used.
40 yes yes Cymbal
Channel Volume
Target cymbal = msg channel-base channel+1
(1=Hi-Hat, 2=Ride, etc.)
41 yes yes Cymbal
Channel Pan
Target cymbal = msg channel-base channel+1
(1=Hi-Hat, 2=Ride, etc.)
65 yes yes Headphone
Volume
TX on base channel, RX channel is ignored
66 yes yes Mix TX on base channel, RX channel is ignored
67 yes yes Reverb Return TX on base channel, RX channel is ignored
73 yes yes Master Volume TX on base channel, RX channel is ignored
74 yes yes Aux Input
volume
TX on base channel, RX channel is ignored
Page 30
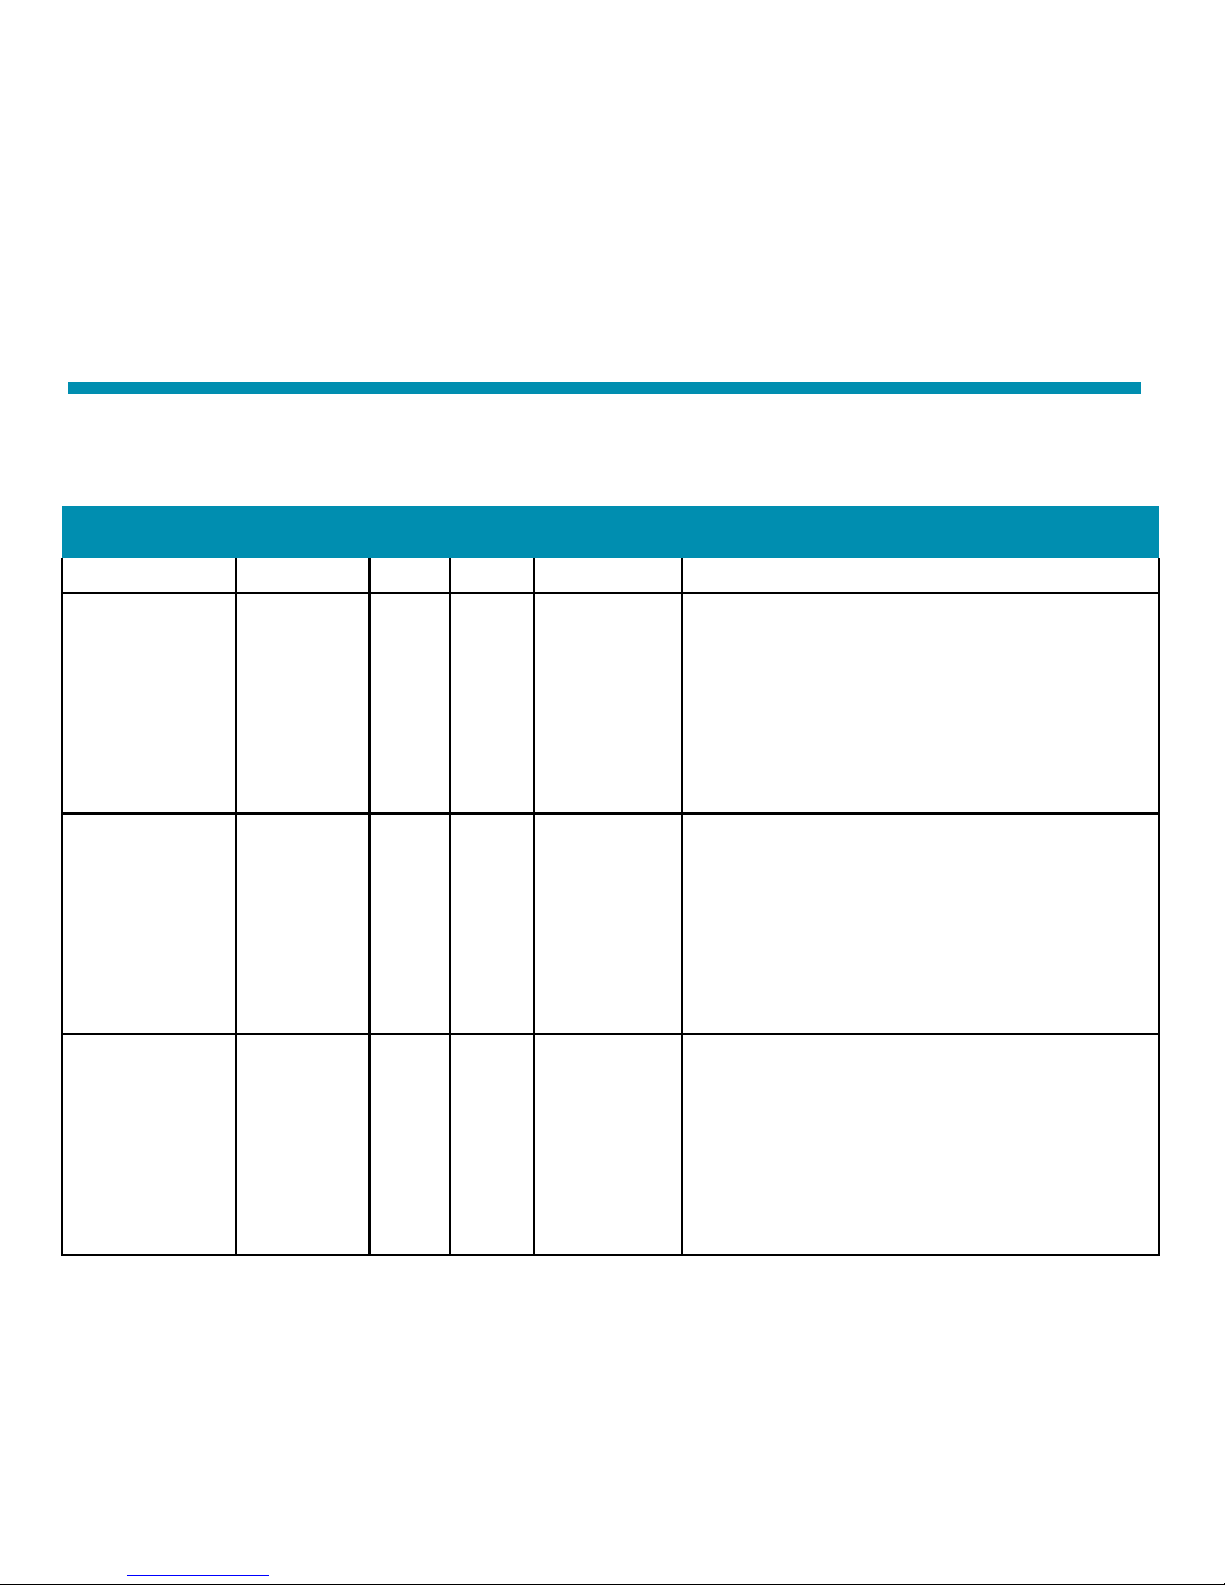
Gen16 AE Digital Cymbal Processor MIDI Implementation Chart
Program Change On Channel
(base channel
+ target cymbal[1-5] -1)
yes yes Cymbal Preset
Change
Transmit to DCP to change a preset, DCP transmits
when preset is changed via onboard buttons. Channel
determines target cymbal. For example, if Base Channel = 1, sending a Program Change message of value
4 on channel 2 sets the Ride preset to #4.
Max Value = Number of presets stored in the target
channel. Program change messages whose channel or
data is out of range are ignored.”
On Channel
(base channel
+ 5)
yes yes Reverb Preset
Change
Transmit to DCP to change a preset, DCP transmits
when preset is changed via onboard buttons. For
example, if Base Channel = 1, sending a Program
Change message of value 8 on channel 6 sets the
Reverb preset to #8.
Max Value = Number of reverb presets stored in the
DCP. Program change messages whose data is out of
range are ignored.
On Channel
(base channel
+ 6)
yes yes Recall Kit
Preset
Transmit to DCP to change a preset, DCP transmits
when preset is changed via onboard buttons. For example, if Base Channel = 1, sending a program change
message on channel 7 with value 3 recalls Kit Preset
#3.
If value is 0 or greater than the highest Cym5 preset
number (i.e. the number of Kit Presets) the message is
ignored.”
MIDI Specifications (cont.):
30
Page 31
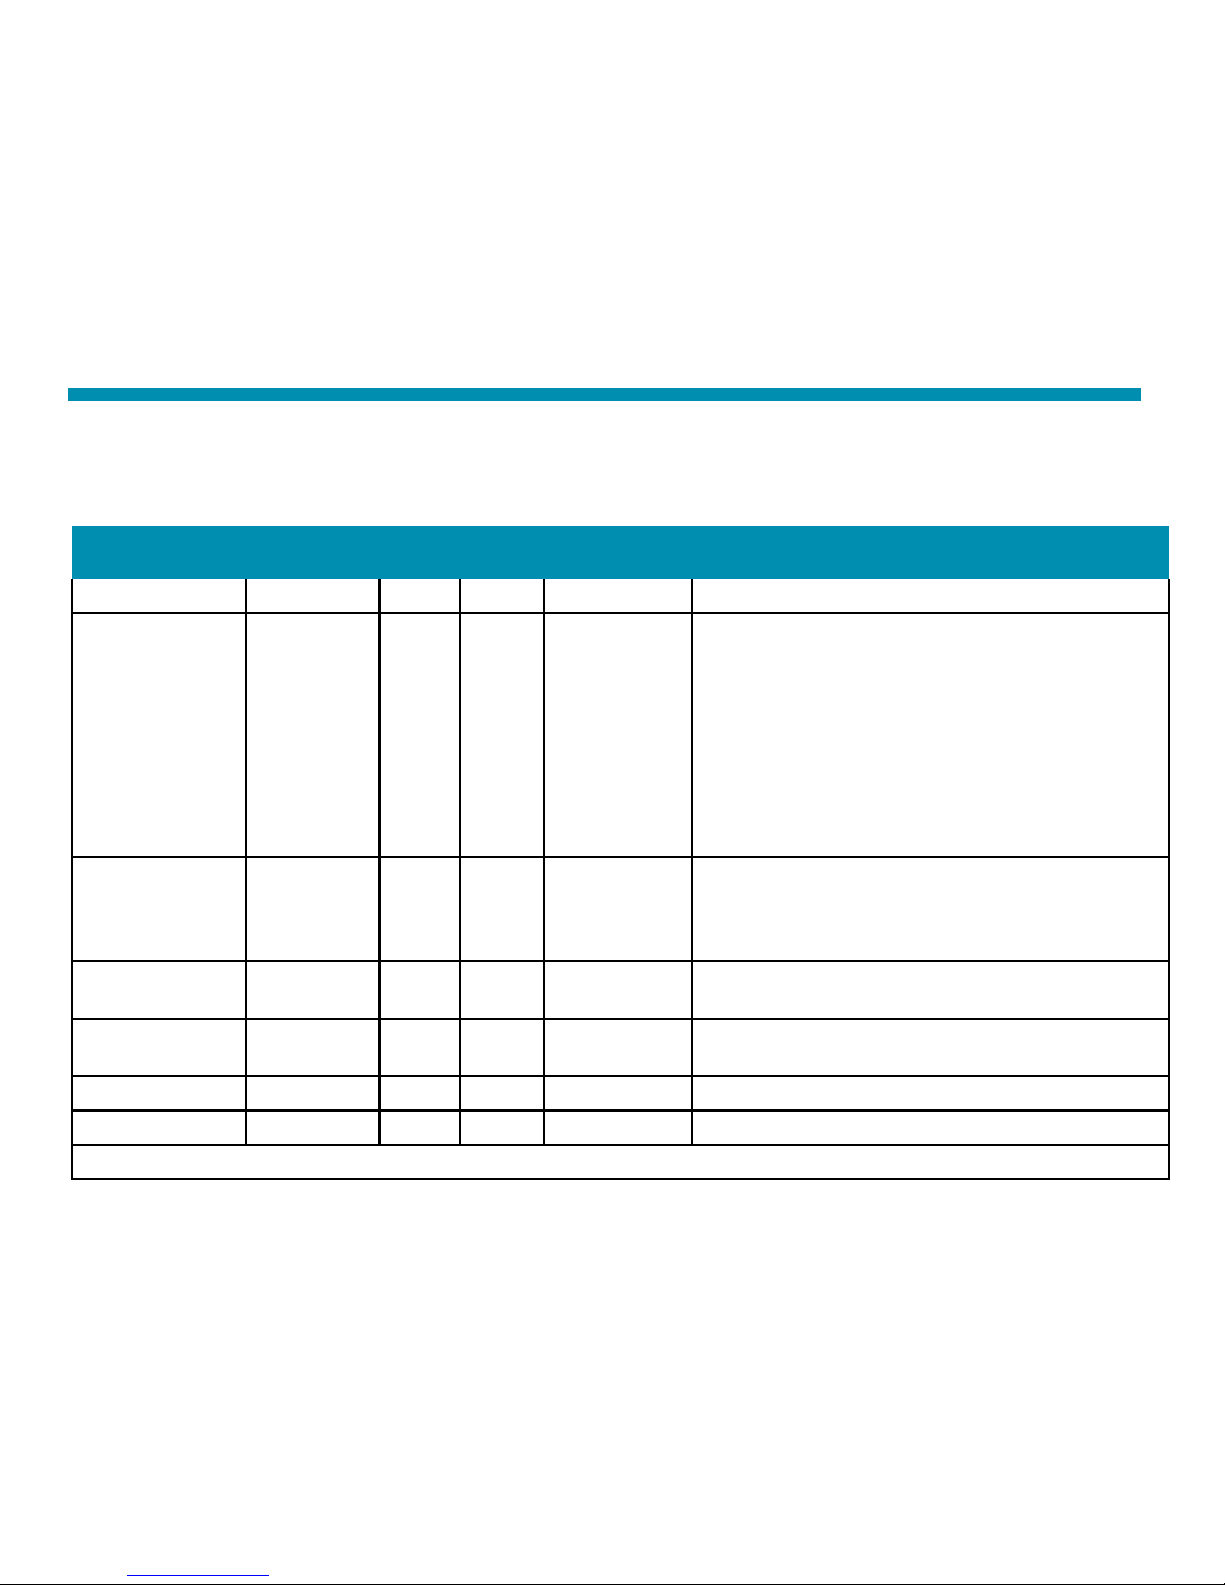
Gen16 AE Digital Cymbal Processor MIDI Implementation Chart
On Channel
(base channel
+ 7)
no yes Store Kit Preset The currently-displayed cymbal presets are saved
to the Kit Preset indicated by the Program Change
Message’s value. For example, if Base Channel = 1,
sending a program change message on channel 8 with
value 2 stores the currently-displayed cymbal presets
to Kit Preset #2.
If value is 0 or greater than the highest Cym5 preset
number (i.e. the number of Kit Presets) the message is
ignored.
On Channel
(base channel
+ 8)
no yes Pickup Light
Control
Send an odd number to turn the pickup lights on or
an even number to turn them off. For example, if Base
Channel = 1, sending a program change message on
channel 9 with value 3 turns the pickup lights on.
Sysex yes yes Proprietary
Internal Control
Used for firmware updates and production test.
System Common Real-time
Tune
no yes Proprietary
Internal Control
Used for firmware updates and production test.
Aux Messages no no
All MIDI messages not listed are unimplemented.
MIDI Specifications (cont.):
31
Page 32

Contact Us:
Gen16 Support:
The Zildjian Company continues to build on its legacy of listening to drummer’s needs. If you have
something to tell us then we want to know what it is. Please send all correspondence to
Attn: Customer Service
AVEDIS ZILDJIAN COMPANY
International Headquarters
22 Longwater Drive
Norwell, MA 02061
Tel +1 781 871 2200
Fax +1 781 871 9652
32
Z-Store & Log In Issues:
If you have a Zildjian Store question, or are having trouble logging into Zildjian.com, please
call 800-229-1623 M-F, 8:30a to 5:00p EST, or email us at [email protected].
Page 33

© 2012 Avedis Zildjian Company
 Loading...