

Page 1

LaCie Wireless Space • DESIGN BY NEIL POULTON Table of Contents
User Manual page 1
Table of Contents
1. Introduction................................................................................................................. 6
1.1. How to use this manual ................................................................................................................. 7
1.2. Minimum Computer and Network Requirements .............................................................................. 8
1.2.1. Computer ........................................................................................................................ 8
1.2.2. Network ........................................................................................................................... 8
1.3. Box Content ................................................................................................................................. 9
1.4. Views of the Drive ....................................................................................................................... 10
1.4.1. Front View ..................................................................................................................... 10
1.4.2. Rear View ...................................................................................................................... 10
1.5. Power Button Functions ...............................................................................................................11
1.6. Gigabit Ethernet Cables And Connectors ...................................................................................... 12
1.7. Wireless Signal - 802.11b/g/n ..................................................................................................... 12
1.8. Light Behavior............................................................................................................................. 13
1.9. Default Settings ........................................................................................................................... 14
2. What is the best configuration for my network? ........................................................ 15
2.1. Configuration 1: Ethernet NAS - Wired Only ................................................................................ 16
2.2. Configuration 2: NAS Wireless Client ........................................................................................... 17
2.3. Configuration 3: NAS Wireless Access Point ................................................................................. 18
2.4. Configuration 4: NAS Router - Wired Only ................................................................................... 19
2.5. Configuration 5: NAS Router - Wireless Access Point ..................................................................... 20
3. Basic Installation ....................................................................................................... 21
3.1. Connect the Power Supply ........................................................................................................... 21
3.2. Configuration 1: NAS Ethernet - Wired Only ................................................................................ 22
3.2.1. Wireless Space Setup Wizard ........................................................................................... 22
3.3. Configuration 2: NAS Wireless Client ........................................................................................... 24
3.3.1. Wireless Space Setup Wizard ........................................................................................... 24
3.4. LaCie Network Assistant .............................................................................................................. 28
3.4.1. Connect to the LaCie Wireless Space Dashboard using LaCie Network Assistant .................. 29
3.4.2. Connect to the LaCie Wireless Space Dashboard directly from the browser .......................... 30
3.5. Accessing and Transferring Files ................................................................................................... 31
3.5.1. About Shares ................................................................................................................. 31
3.5.2. Accessing Shares Using LaCie Network Assistant ............................................................... 32
3.5.3. Map Shared Folders ....................................................................................................... 35
3.5.4. LaCie Network Assistant Auto Mount ................................................................................ 37
3.5.5. Accessing Shares Using File Browser ................................................................................ 38
3.5.5.1. About the File Browser 38
3.5.6. Accessing Shares via FTP ................................................................................................. 39
3.5.7. Multimedia Server ........................................................................................................... 40
3.5.8. iTunes Music Server ........................................................................................................ 40
3.6. Administering Your LaCie Wireless Space ...................................................................................... 42
3.6.1. Dashboard: Accessing .................................................................................................... 43
3.6.1.1. Use LaCie Network Assistant.......................................................................................43
3.6.1.2. Use a Browser...........................................................................................................43
3.6.2. Dashboard: Welcome Page ............................................................................................. 44
3.6.3. Dashboard: Navigation................................................................................................... 44
3.6.4. Dashboard: Shut Down or Restart the Wireless Space ........................................................ 44
3.6.5. Dashboard: General Settings ........................................................................................... 45
3.6.5.1. Names, Date & Time, iTunes & Media Server, and Login & Password............................45
3.6.5.2. Time Machine™.........................................................................................................46
Page 2

LaCie Wireless Space • DESIGN BY NEIL POULTON Table of Contents
User Manual page 2
3.6.6. Dashboard: Network LAN .............................................................................................. 47
3.6.6.1. IP Address and Remote Access....................................................................................47
3.6.7. Dashboard: Drives .......................................................................................................... 49
3.6.8. Dashboard: Support ....................................................................................................... 50
3.6.8.1. Firmware, Resetting the device, and Light.....................................................................50
3.6.9. Dashboard: Download.................................................................................................... 53
3.6.9.1. Upload .torrent files...................................................................................................53
3.6.10. Dashboard: Mode .......................................................................................................... 55
3.6.10.1. Configuration Basics..................................................................................................56
3.6.10.2. Changing the Configuration Example: Wired Only to Wireless Client.............................58
3.6.11. Dashboard: Wireless Client ............................................................................................. 62
3.7. INTERNET Port: NAS+Switch ....................................................................................................... 63
3.8. Basic Endnote ............................................................................................................................. 65
4. Beyond Basic Install ................................................................................................... 66
4.1. Before the Installation .................................................................................................................. 67
4.2. Configuration 3: Wireless Access Point (Switch) ............................................................................. 68
4.2.1. Wireless Space Setup Wizard ........................................................................................... 68
4.3. Configuration 4: Router - Wired Only ........................................................................................... 72
4.3.1. Wireless Space Setup Wizard ........................................................................................... 72
4.4. Configuration 5: Router Wireless Access Point .............................................................................. 75
4.4.1. Wireless Space Setup Wizard ........................................................................................... 75
4.5. Administering Your LaCie Wireless Space - Beyond Basic ............................................................... 80
4.5.1. Dashboard: Wireless AP .................................................................................................. 81
4.5.1.1. Wireless AP - Standard Settings...................................................................................81
4.5.1.2. Wireless AP - Security.................................................................................................82
4.5.1.3. Wireless AP - MAC address filter.................................................................................84
4.5.1.4. Wireless AP - Associated stations.................................................................................84
4.5.2. Dashboard: Router Pages ................................................................................................ 85
4.5.2.1. Dashboard Pages: Router - Wired Only.......................................................................85
4.5.2.2. Dashboard Pages: Router - Wireless Access Point.........................................................85
4.5.3. Dashboard: Network WAN .............................................................................................. 86
4.5.4. Dashboard: Network LAN ............................................................................................... 88
4.5.4.1. Avoiding Router IP Address Conflicts: Example..............................................................89
4.5.5. Dashboard: Firewall ....................................................................................................... 90
4.5.5.1. Firewall Basic Settings - Internet Access........................................................................90
4.6. INTERNET Port: NAS+Router ....................................................................................................... 91
4.6.5.1. NAS+Router Recovery................................................................................................91
4.7. Beyond Basic Endnote ................................................................................................................. 92
5. Glossary .................................................................................................................... 93
6. Troubleshooting ........................................................................................................ 98
6.1. System Log ................................................................................................................................. 98
6.2. Manual Updates ......................................................................................................................... 98
6.3. Troubleshooting the USB Connection(s) and Share Files ................................................................. 99
6.3.1. Mac Users ..................................................................................................................... 99
6.3.2. Windows Users ............................................................................................................. 100
6.4. Troubleshooting the Network Connection ................................................................................... 102
6.5. Light Indications ........................................................................................................................ 105
7. Contacting Customer Support ................................................................................. 106
7.1. LaCie Technical Support Contacts .............................................................................................. 107
8. Warranty Information ............................................................................................. 108
Page 3

LaCie Wireless Space • DESIGN BY NEIL POULTON Foreword
User Manual page 3
Copyrights
Copyright © 2010 LaCie. All rights reserved. No part of this publication may
be reproduced, stored in a retrieval system, or transmitted in any form or by any
means, electronic, mechanical, photocopying, recording or otherwise, without
the prior written consent of LaCie.
Licences and free software
The LaCie Wireless Space ships with copyrighted software that are licensed under
the GPL, AFL, Apache, Apple, BSD, GNU
LGPL, MIT, OpenLDAP, OpenSSL, PHP,
Python, and Creative Common. It also
includes free software, the source code for
which can be downloaded from the LaCie
web site: www.lacie.com/support/
© 2007-2008, Thomas BERNARD.
© 2006 Allan Saddi allan@saddi.com
© 2004, Jan Kneschke, incremental.
© 2001-2006, Patrick K. O’Brien and
Contributors.
© 2003-2009 Stuart Bishop stuart@stuartbishop.net.
© 2006 Kirill Simonov.
© 1996-2006 Julian R Seward.
© 2004, 2005 Darren Tucker. All rights
reserved.
© 1997-2008 University of Cambridge.
All rights reserved.
© 2007-2008, Google Inc. All rights reserved.
© 1990-2003 Sleepycat Software. All
rights reserved.
© 1995-2004 Jean-loup Gailly and Mark
Adler.
© 2004 Micah Dowty.
® 1997-2006 by Secret Labs AB
® 1995-2006 by Fredrik Lundh.
© 1988,1990,1993,1994 by Paul Vixie.
© 2007-2009 Charles du Jeu.
This list of licenses can evolve over time
and can be found on the user interface
under the heading “Credits.”
Trademarks
Apple, Mac, Time Machine, and Macintosh are registered trademarks of Apple
Computer, Inc. Microsoft, Windows XP,
Windows Vista, and Windows 7 are registered trademarks of Microsoft Corporation. Other trademarks mentioned in this
manual are the property of their respective
owners.
Changes
The material in this document is for information only and subject to change
without notice. While reasonable efforts
have been made in the preparation of this
document to assure its accuracy, LaCie
assumes no liability resulting from errors
or omissions in this document, or from the
use of the information contained herein.
LaCie reserves the right to make changes
or revisions in the product design or the
product manual without reservation and
without obligation to notify any person of
such revisions and changes.
Canada Compliance Statement
This Class A digital apparatus meets all
requirements of the Canadian Interference-Causing Equipment Regulations.
ROHS Compliance
This product is ROHS compliant (European Directive 2002/95/EC on the Restriction of Hazardous Substances).
Manufacturer’s Declaration
for CE Certification
We, LaCie, solemnly declare that this
product conforms to the following European standards: Class B EN60950,
EN55022, EN50082-1, EN61000-3-2
With reference to the following conditions: 73/23/EEC Low Voltage Directive;
89/336/EEC EMC Directive
FCC Statement
LaCie Wireless Space
Tested to comply with FCC
standards for home or office
use
NOTE: This equipment has been tested
and found to comply with the limits for
a Class B digital device, pursuant to Part
15 of the FCC Rules. These limits are designed to provide reasonable protection
against harmful interference in a residential installation. This equipment generates,
uses and can radiate radio frequency energy and, if not installed and used in accordance with the instructions, may cause
harmful interference to radio communications. However, there is no guarantee that
interference will not occur in a particular
installation. If this equipment does cause
harmful interference to radio or television
reception, which can be determined by
turning the equipment off and on, the user
is encouraged to try and correct the interference by one or more of the following
measures:
✦ Reorient or relocate the receiving
antenna.
✦ Increase the separation between the
equipment and receiver.
✦ Connect the equipment into an out-
let on a circuit different from that to
which the receiver is connected.
✦ Consult the dealer or an experi-
enced radio/TV technician for help.
✦ Modifications to this product not
authorized by LaCie could void the
FCC & Industry Canada regulations
and negate your authority to operate the product.
100331 v1.0
continued on the next page>>
Page 4

LaCie Wireless Space • DESIGN BY NEIL POULTON Foreword
User Manual page 4
FCC Caution: Any changes or modifications not expressly approved by the party
responsible for compliance could void the
user’s authority to operate this equipment.
This device complies with Part 15 of the
FCC Rules. Operation is subject to the following two conditions: (1) This device may
not cause harmful interference, and (2)
this device must accept any interference
received, including interference that may
cause undesired operation.
IMPORTANT NOTE:
Radiation Exposure Statement:
This equipment complies with FCC radiation exposure limits set forth for an uncontrolled environment. This equipment
should be installed and operated with
minimum distance 20 cm between the radiator & your body.
This transmitter must not be co-located or
operating in conjunction with any other
antenna or transmitter.
The availability of some specific channels and/or operational frequency bands
are country dependent and are firmware
programmed at the factory to match the
intended destination. The firmware setting
is not accessible by the end user.
This symbol on the product
or on its packaging indicates
that this product must not be
disposed of with your other
household waste. Instead, it
is your responsibility to dispose of your
waste equipment by handing it over to a
designed collection point for the recycling
of waste electrical and electronic equipment. The separate collection and recycling of your waste equipment at the time
of disposal will help to conserve natural
resources and ensure that it is recycled in
a manner that protects human health and
the environment. For more information
about where you can drop off your waste
equipment for recycling, please contact
your local city office, your household
waste disposal service, or the shop where
you purchased the product.
Health and Safety
Precautions
✦ Only qualified persons are autho-
rized to carry out maintenance on
this device.
✦ Read this User Manual carefully and
follow the correct procedure when
setting up the device.
✦ Do not open your LaCie Wireless
Space or attempt to disassemble or
modify it. Never insert any metallic
object into the drive to avoid any
risk of electrical shock, fire, shortcircuiting or dangerous emissions.
Your LaCie Wireless Space contains
no user-serviceable parts. If it appears to be malfunctioning, have
it inspected by a qualified LaCie
Technical Support representative.
✦ Never expose your device to rain,
or use it near water, or in damp or
wet conditions. Never place objects
containing liquids on the LaCie
Wireless Space, as they may spill
into its openings. Doing so increases the risk of electrical shock, shortcircuiting, fire, or personal injury.
✦ Power requirements 100-240 V~,
0.9 A, 50-60 Hz, (Supply voltage
fluctuations not exceeding ± 10%
of the nominal, transient overvoltages according to over-voltage
category II).
General Use Precautions
✦ Do not expose the LaCie Wireless
Space to temperatures outside the
range of 5° C to 35° C (41° F to
95° F); or to operational humidity
beyond 5-80%, non-condensing,
or non-operating humidity beyond
10-90%, non-condensing. Doing
so may damage the LaCie Wireless
Space or disfigure its casing. Avoid
placing your LaCie Wireless Space
near a source of heat or exposing it
to sunlight (even through a window).
Inversely, placing your LaCie Wireless Space in an environment that is
too cold or humid may damage the
unit. Because of heat issues, LaCie
recommends that users do not stack
multiple Wireless Space together.
✦ Always unplug the LaCie Wireless
Space from the electrical outlet if
there is a risk of lightning or if it will
be unused for an extended period
of time. Otherwise, there is an increased risk of electrical shock,
short-circuiting or fire.
✦ Use only the power supply shipped
with the device.
✦ Do not use the LaCie Wireless
Space near other electrical appliances such as televisions or radios.
Doing so may cause interference
which will adversely affect the operation of the other products.
✦ Do not place the LaCie Wireless
Space near sources of magnetic
interference, such as computer
displays, televisions or speakers. Magnetic interference can
affect the operation and stability of your LaCie Wireless Space.
Do not place heavy objects on top
of the LaCie Wireless Space.
✦ Never use excessive force on your
LaCie Wireless Space. If you detect
a problem, see the Troubleshooting
section in this manual.
Page 5

LaCie Wireless Space • DESIGN BY NEIL POULTON Foreword
User Manual page 5
IMPORTANT INFO: Any loss, corruption or destruction of data
while using a LaCie drive is the sole responsibility of the user, and
under no circumstances will LaCie be held liable for the recovery or
restoration of this data. To help prevent the loss of your data, LaCie
highly recommends that you keep TWO copies of your data; one
copy on your external hard disk, for instance, and a second copy
either on your internal hard disk, another external hard disk or some
other form of removable storage media. LaCie offers a complete
line of CD and DVD drives. If you would like more information on
backup, please refer to our web site.
IMPORTANT INFO: 1GB = 1,000,000,000 bytes. 1TB =
1,000,000,000,000 bytes. Once formatted, the actual available
storage capacity varies depending on operating environment (typically 10% less).
IMPORTANT INFO: Some enhancements brought to the product
during its lifetime may cause discrepancies between the information
and screenshots in the manual and the actual user experience.
CAUTION: Modifications not authorized by the manufacturer may
void the user’s authority to operate this device.
CAUTION: A shielded-type power cord is required in order to meet
FCC emission limits and also to prevent interference to the nearby
radio and television reception. It is essential that only the supplied
power cord be used.
Page 6
LaCie Wireless Space • DESIGN BY NEIL POULTON Introduction
User Manual page 6
1. Introduction
Congratulations on your purchase of a LaCie Wireless Space, Design by Neil Poulton. Built to enhance an existing network or to create a new one, the LaCie Wireless Space offers expansive shared
storage and superior performance. Best of all, the Wireless Space
lives up to its name, giving you the freedom to connect to your
network using Wi-Fi. With its large capacity hard drive for storing
important data and backups, as well as a rich set of configurations
and features to satisfy the home networking novice and enthusiast
alike, the LaCie Wireless Space is the perfect choice for any home
or business.
Distinctive Design
The LaCie Wireless Space has a bold exterior, strengthened by fine
edges and a warm blue and green glow. As an attractive addition
to any environment, the Wireless Space is welcome in the home or
office. With convenience and storage expansion in mind, the Wireless Space has three USB 2.0 host ports, two in the back and one on
the front for easy access. Of course, as a wired and wireless network
expander, the Wireless Space also includes four Ethernet ports and
a Wi-Fi access point. Cooling vents on the underside ensure proper
air flow and quiet operation.
Media Server
Your LaCie Wireless Space can share media files with compatible
UPnP AV adapters and players as well as computers using iTunes.
Once on the network, the Wireless Space can store movies, music,
and photos on its OpenShare partition for all to enjoy.
Network Management Made Easy
The LaCie Wireless Space is compatible with Mac®, Windows®,
and Linux, allowing for an inclusive network. To complement strong
performance, the Wireless Space is bundled with LaCie Network
Assistant, a convenient application that provides important device
details for all LaCie network drives. Administration takes place in
the Dashboard, a web-based administration tool that is available
on any system connected to the network or from a remote location.
Quick Links
Click a topic:
✦ What is the best configuration for my network?
✦ Basic Installation
✦ Administering Your LaCie Wireless Space
✦ Beyond Basic Install
Page 7

LaCie Wireless Space • DESIGN BY NEIL POULTON Introduction
User Manual page 7
1.1. How to use this manual
Unlike many standard network attached storage (NAS) devices, the
LaCie Wireless Space can be integrated into a network in several
ways. While it is, above all, a network drive with a large capacity
for data and media, the Wireless Space is also a router, a server, a
Wi-Fi access point, and much more. The Wireless Space has easyto-use features that allow for the networking novice to dive in immediately, as well as advanced features for those who want to move
their home or small business networks to the next level.
LaCie wants you to have fun with your new Wireless Space, taking
advantage of its expansive set of features. This User Manual will help
you determine the configuration that best suits the demands of your
network as well as offer ideas on how to grow in the future.
To start, LaCie recommends that you pay close attention to the five
primary configurations listed in 2. What is the best configuration for
my network?. It is very important that you decide upon a single setup
before commencing with the installation of your Wireless Space. You
should not feel locked into a choice, however, as the option to adjust the configuration never goes away. For example, if you begin to
use the Wireless Space as a simple switch without Wi-Fi, the option
to turn it on is always available.
Since the levels of networking interest and expertise vary, this User
Manual has sections for Basic installation and operation as well as
Beyond Basic. Two of the five configurations are fairly close to plug
and play, allowing for a relatively fast setup. They are included in
the Basic section. For those looking to add a new Wi-Fi or create a
separate network, please take a look at the Beyond Basic configurations.
There is another level, Advanced, that is not included in this User
Manual. Many of the advanced features of the Wireless Space and
other LaCie network devices may not have direct application to the
general use of a NAS. Of course, if you are interested in learning
more on how to use your Wireless Space, please refer to the expansive glossary in this User Manual if certain terms or abbreviations are
not easily understood.
Page 8
LaCie Wireless Space • DESIGN BY NEIL POULTON Introduction
User Manual page 8
1.2. Minimum Computer and Network Requirements
1.2.1. Computer
Operating System Network Interface Optical Drive Media Sharing Web Browser
The latest versions of Windows
XP, Windows Vista, or Windows
7
The latest versions of Mac OS
10.5.x, or 10.6.x
The latest version of Linux 2.6 Ethernet 100/1000
1.2.2. Network
The connection that you currently use for a home or business can be called the “Internet provider”. This User Manual considers the Internet provider to be the hardware connection to the Internet and the network within the home and/or business. The Internet provider is generally supplied
by a local cable and broadband company.
Ethernet 100/1000*
and/or Wi-Fi b/g/n
Ethernet 100/1000*
and/or Wi-Fi b/g/n
*and/or Wi-Fi b/g/n
CD-ROM drive UPnP/DLNA compliant
software
CD-ROM drive UPnP/DLNA compliant
software
CD-ROM drive UPnP/DLNA compliant
software
Internet Explorer®, Chrome®,
Safari™, Firefox™, Opera
Safari™, Firefox™, Chrome®
Opera
Firefox™, Opera, Chrome®,
Konqueror
Access to the Internet is considered communication with a larger, external network, often referred to as a Wide Area Network (WAN). The network
within a home or business is called a Land Area Network (LAN), since it is limited to a specific region.
LAN/WAN Device User* Network Interface - Wired and Wi-Fi
Internet Provider ✦ Home
✦ Home Office
✦ Small Business
Router ✦ Home (advanced user)
✦ Home Office
✦ Small to large Business
Server (used with a router or
switch to connect multiple systems to the network)
*Please see 2. What is the best configuration for my network? for more information on the optimal configuration for your Wireless Space.
**Ethernet 100/1000 indicates network transfer rates of 100 Megabits (Mb) per second or 1000 Mb per second; 1000 Mb is equal to 1 Gigabit
(Gb). LaCie recommends using Ethernet 1000 Mb/s connections for better performance. Please see 1.6. Gigabit Ethernet Cables And Connectors
for more information.
IMPORTANT INFO: The LaCie Wireless Space’s performance
can be affected by such external forces as network activity, hardware, distance, and setup.
✦ Home (advanced user)
✦ Home Office
✦ Small to large Business
Ethernet 100/1000** and/or Wi-Fi
802.11b/g/n
Ethernet 100/1000** and/or Wi-Fi
802.11b/g/n
Ethernet 100/1000** and/or Wi-Fi
802.11b/g/n
TECHNICAL NOTE: For optimal performance, use a Fast Ethernet
device to connect the Wireless Space to the Internet and a Fast Ethernet board in your host computer(s).
Page 9
LaCie Wireless Space • DESIGN BY NEIL POULTON Introduction
User Manual page 9
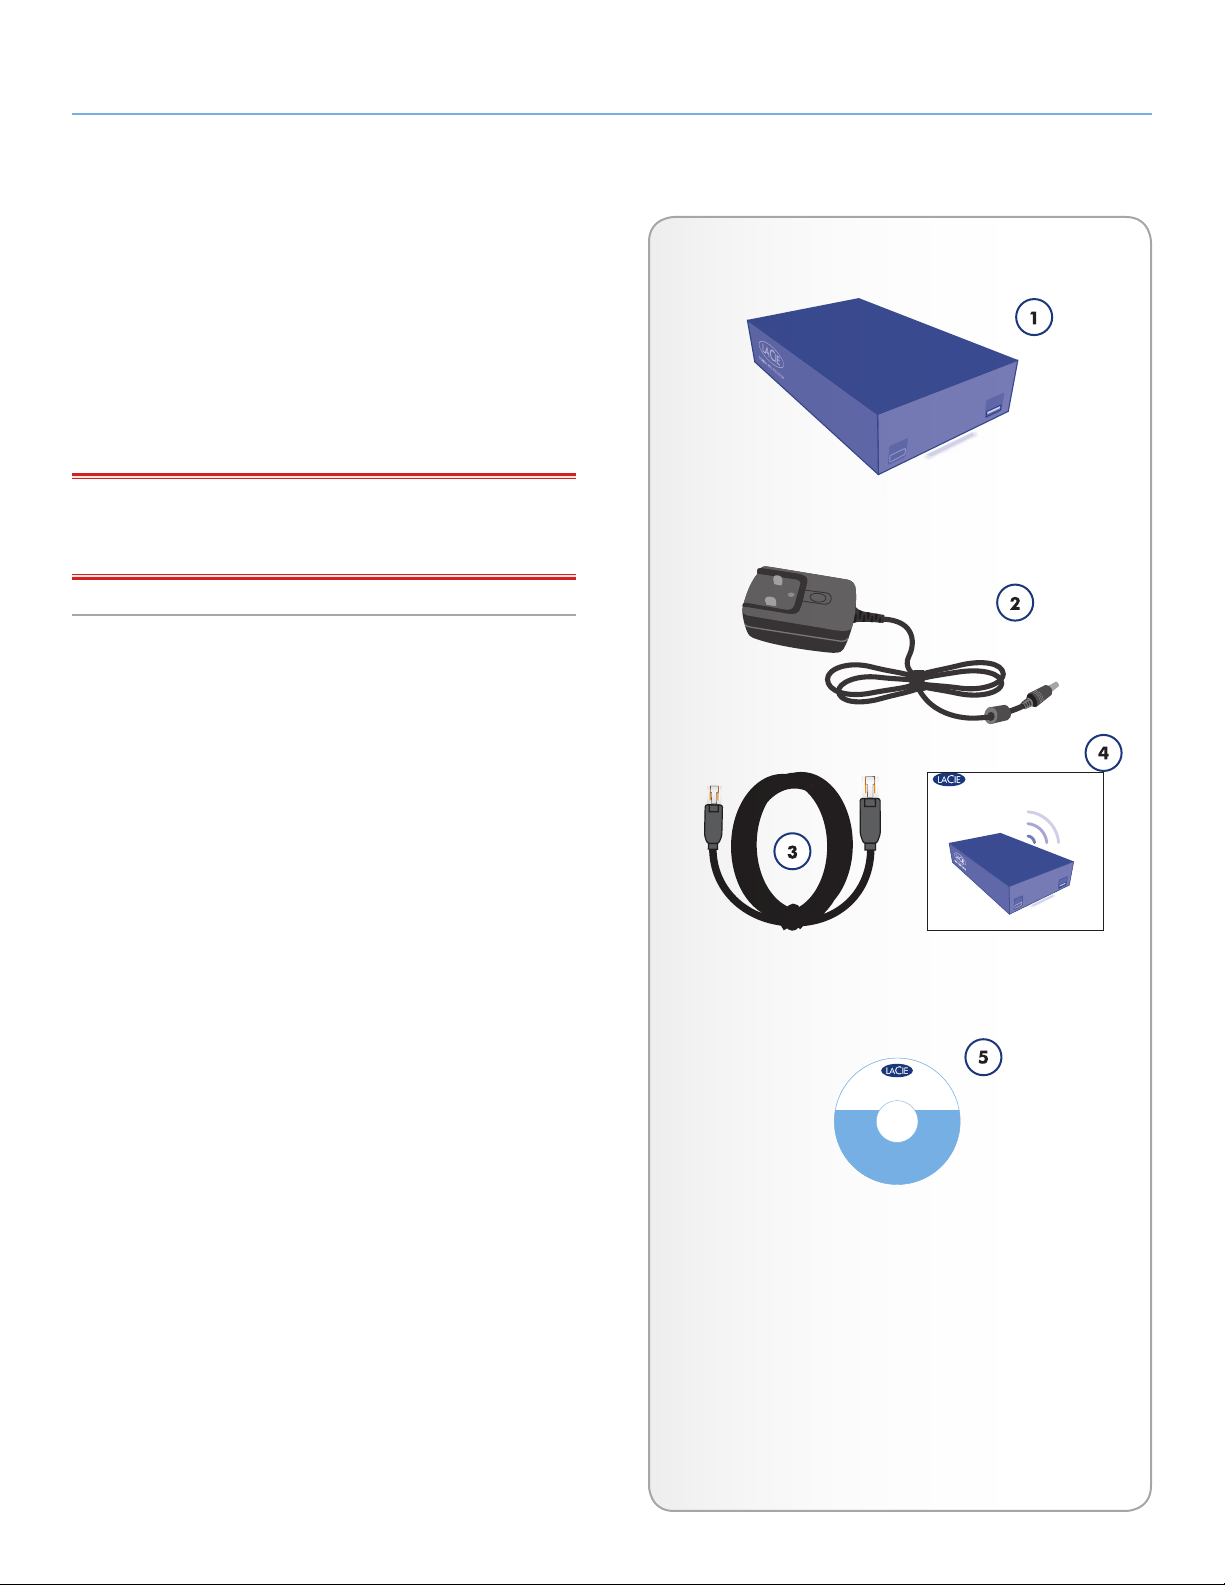
1.3. Box Content
1. LaCie Wireless Space
2. External power supply
3. Gigabit Ethernet cable
4. Quick Install Guide
5. CD-ROM with software utilities and the User Manual
IMPORTANT INFO: Please save your packaging. In the event that
the drive should need to be repaired or serviced, it must be returned
in its original packaging.
Windows
LaCie Network Assistant
LaCie Backup Assistant
wireless space
DESIG N B Y NE IL POU LTON
®
Wireless Space Setup
and LaCie Utilities
V
e
r
s
i
o
n
1
.
0
©
2
0
1
0
L
a
C
i
e
,
a
l
l
r
h
i
g
wireless space
DES IGN B Y N EIL P OULT ON
Gigabit Ethernet | Wi-Fi b/g/n
®
Mac
LaCie Network Assistant
LaCie Backup Assistant
2
2
2
0
0
1
4
0
4
4
1
7
.
d
e
v
r
e
s
e
r
s
t
Quick Install Guide
Page 10
LaCie Wireless Space • DESIGN BY NEIL POULTON Introduction
USBLAN1 LAN2 LAN3
INTERNET
User Manual page 10
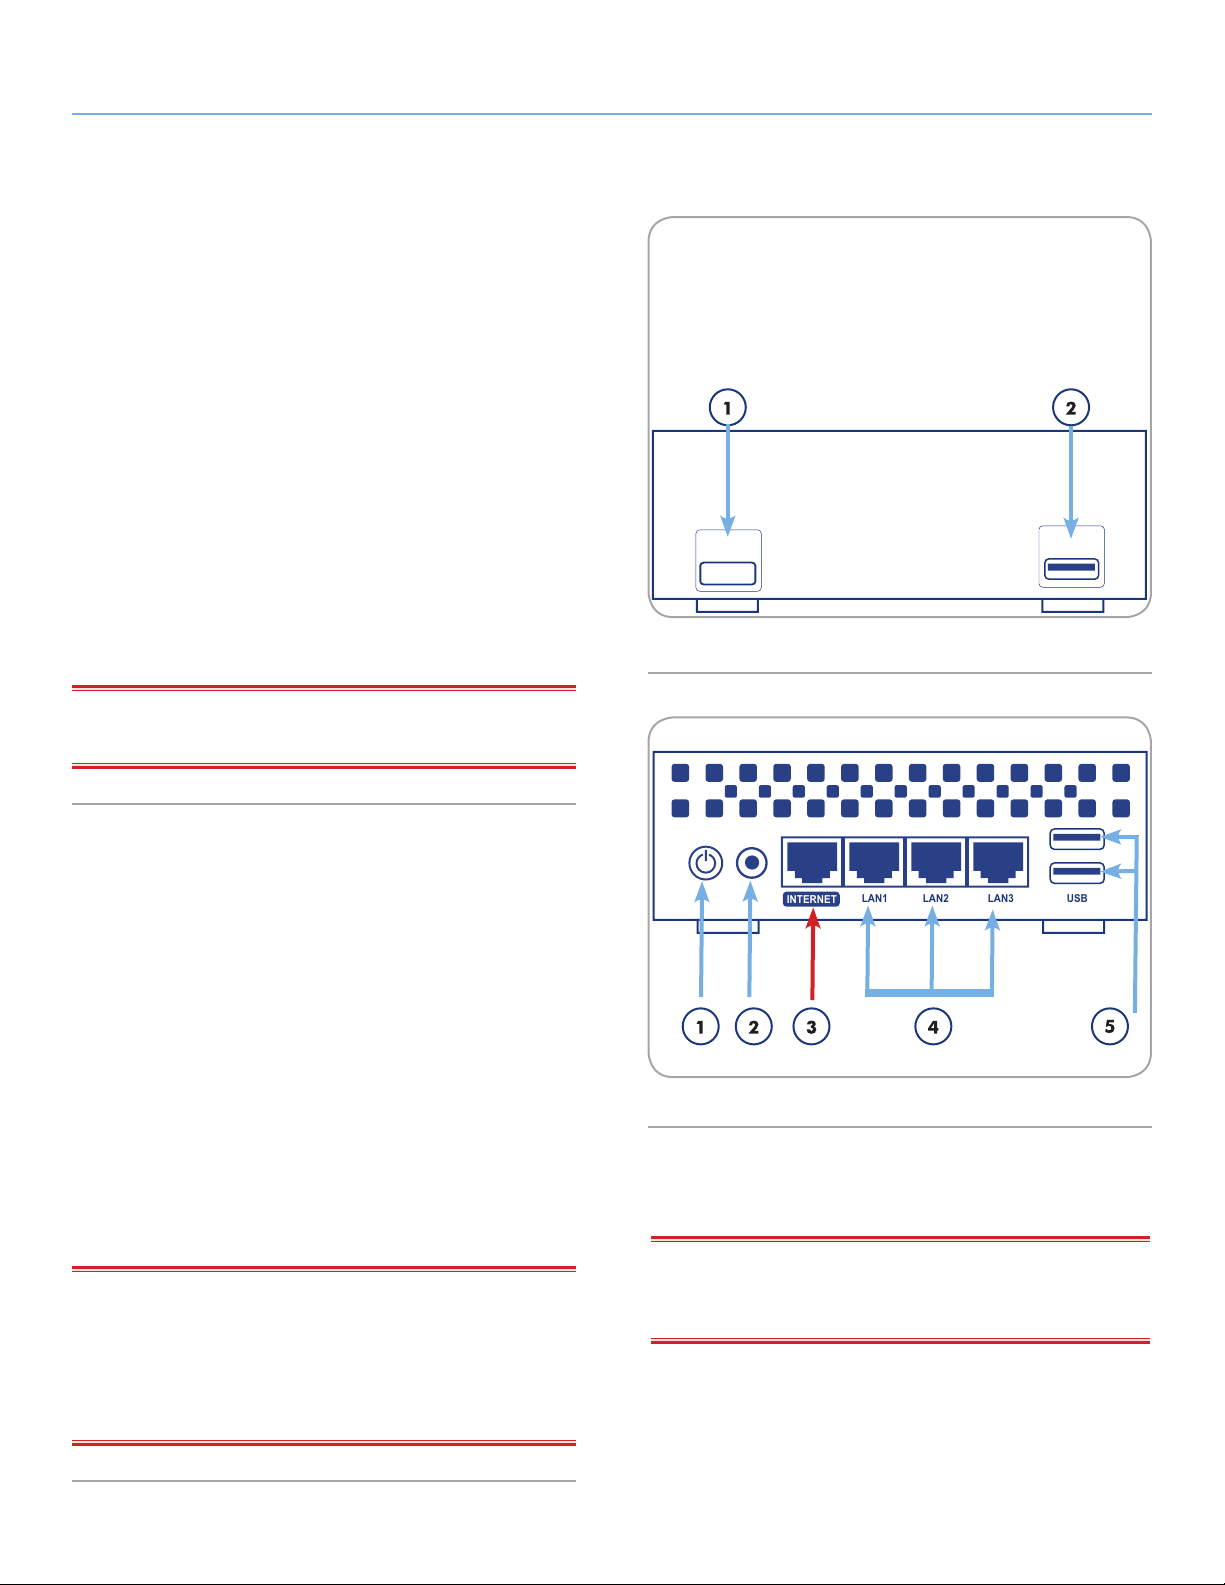
1.4. Views of the Drive
1.4.1. Front View
1. WPS Button: Join Wi-Fi networks that support WPS (Wi-Fi Pro-
tected Setup) or turn the Wi-Fi on/off:
✦ Quick touch: the Wireless Space searches for a WPS network
to join while the light flashes blue and green. See the user
manual of your WPS device for details on joining its network.
✦ Long touch: the Wi-Fi access point is turned on (blue light) or
off (green light).
2. USB 2.0 External Mass Storage: The USB 2.0 host port on
the front of the LaCie Wireless Space may be used to connect
an external USB hard drive, USB key, digital camera, or any
other USB mass storage device. Most popular disk formats are
supported (see 3.5. Accessing and Transferring Files), including Mac HFS+ Extended non-journaled. Volumes formatted
HFS+ journaled are not supported.
Fig. 01
IMPORTANT INFO: The Wireless Space supports external USB
storage with volumes up to 2 TB.
1.4.2. Rear View
1. Power button
2. Power supply
3. INTERNET Fast Ethernet port. This port is reserved for Recov-
ery (NAS+Switch modes) or WAN (NAS+Router modes)*
4. LAN1, LAN2, and LAN3 - Gigabit (Gb) Ethernet switch ports
to connect the Wireless Space to the network and expansion
ports for other devices (computers, gaming systems, etc.).
5. Two USB 2.0 host ports for External Mass Storage. See note
above regarding disk 3.5. Accessing and Transferring Files
*Please see sections 3.7. INTERNET Port: NAS+Switch and 4.6. IN-
TERNET Port: NAS+Router for more information on how to use this
port.
IMPORTANT INFO: All USB 2.0 ports are host only, which means
they are intended for storage expansion using USB 2.0 storage devices. To access the storage on the Wireless Space, please use the
network, LaCie Network Assistant, or the Wireless Space Dashboard
(3.5.1. About Shares). Do not connect the Wireless Space directly to
your computer using any of the USB ports.
Fig. 02
IMPORTANT INFO: DO NOT use the INTERNET port for the
Wireless Space Setup. Connect an Ethernet cable from your computer to any of the LAN ports.
Page 11

LaCie Wireless Space • DESIGN BY NEIL POULTON Introduction
User Manual page 11
1.5. Power Button Functions
The multi-function power button (1.4.2. Rear View) allows you to
turn the device on/off, reboot, or revert the system to its default
configuration.
✦ Turn on the drive: Press and hold the power button for five
seconds. The front light will turn on and then begin blinking.
IMPORTANT INFO: The light may not offer a sign that the device
is powering on while pressing the power button. It is recommended
to release the power button after five seconds, even if the light has
not turned on.
✦ Turn off the drive: Press and hold the power button for ap-
proximately five seconds. When the light turns red, release the
button. The Wireless Space will shut down.
✦ Reboot the device when it is on:
1. Press and hold the power button for five to ten seconds.
2. The light will turn off. Continue to hold the button.
3. Release the button when the light turns blue.
✦ Reset to default when the Wireless Space is on:
1. Press and hold the power button for ten to twenty seconds.
2. Continue to hold the button as the Wireless Space reboots.
3. Continue to hold the button as the light turns blue.
4. Release the button when the light becomes solid red.
5. The light will blink red. Immediately press the button again.
6. It will only blink red for five seconds. If you don’t press the
button while the red light is blinking, the drive will reboot
normally.
IMPORTANT INFO: Use of the power button to reset the Wireless
Space should not delete files on the shares. For example, media files
stored on OpenShare will be accessible after a reset.
IMPORTANT INFO: A power button reset will restore the Wireless
Space to its factory settings, including the version of firmware.
Page 12

LaCie Wireless Space • DESIGN BY NEIL POULTON Introduction
User Manual page 12
1.6. Gigabit Ethernet Cables And
Connectors
Your LaCie Wireless Space is shipped with an Ethernet cable (Fig.
03 - Gigabit Ethernet Cable) that is compatible with transfer rates up
to 1000 Mb/s, or 1 Gb/s. Often referred to as “Gigabit Ethernet”
or “Gig-E”, this level of Ethernet connection is superior to older,
100 Mb/s connections.
The Gigabit Ethernet cable should be used to connect your LaCie
Wireless Space to your network router, switch, or Internet provider
for all configurations. The ends of the cable are the same, making
it simple to connect the LaCie Wireless Space to your router, switch,
or Internet provider.
The Ethernet ports on the back of the Wireless Space are compatible
with Gigabit Ethernet. No matter the configuration, each port will
provide transfer rates up to Gigabit Ethernet, depending upon the
speed of the network.
TECHNICAL INFO: When using the Wireless Space as a Wireless
Client (see 2.2. Configuration 2: NAS Wireless Client), the device
maintains support for Gigabit Ethernet ports. However, Ethernet
transfer rates may vary depending upon the level of Wi-Fi (b/g/n) on
the original Wi-Fi access point.
Fig. 03 - Gigabit Ethernet Cable
IMPORTANT INFO: While the ports on the Wireless Space are
compatible with Gigabit Ethernet, there is no guaranty that transfer
rates will reach 1 Gb/s. Further, the communication between computers and devices connected to the Wireless Space have the potential to reach up to 1 Gb/s but LaCie cannot assure the same level
of speed with networks, LANs, or WANs outside the Wireless Space
network. This includes, but is not limited to, access to the Internet.
1.7. Wireless Signal - 802.11b/g/n
The number 802.11 is the IEEE (Institute of Electrical and Electronics Engineers) term for the wireless signal on a land area network
(also known as “WLAN”). The letters that follow indicate the levels
of speed.
Signal Strength
b 11 Mb/s
g 54 Mb/s
n Greater than 50 Mb/s
Page 13

LaCie Wireless Space • DESIGN BY NEIL POULTON Introduction
User Manual page 13
1.8. Light Behavior
The front light changes color and status to indicate drive, Wi-Fi, and
operational behavior (Fig. 04).
Light Behavior Indication
Off ✦ Device is turned off
✦ Light has been turned
off using the Dashboard
(see 3.6.8.1. Firmware,
Resetting the device,
and Light)
Blue: Fast blinking ✦ Drive is initializing
Blue: Static ✦ Device is ready
✦ Device has been turned
on using the power button
✦ Wi-Fi is enabled
Fig. 04
Blue: Flickering ✦ Disk access
✦ Wi-Fi is enabled
✦ USB Backup
Green: Static ✦ Drive is ready
✦ Wi-Fi is disabled
Green: Flickering ✦ Disk access
✦ Wi-Fi is disabled
✦ USB Backup
Blue/Green: Flickering ✦ Wireless Protected Set-
up (WPS) active
Blue/Green: Fast blinking ✦ Sense cap has been
pushed
Red: Static ✦ Disk Failure
✦ Shutting down using the
Dashboard
✦ Resetting to default
Red: blinking ✦ The Wireless Space is
ready for a reset (see
1.5. Power Button Functions)
TECHNICAL NOTE: The standard blue and green light activity can
be turned off in the Dashboard (see 3.6.8.1. Firmware, Resetting the
device, and Light). Light activity cannot be turned off for notification
of booting, restarting, updating, or failure.
Blue/Green/Red: blinking ✦ Software upgrade
✦ Wireless Space reset
Page 14

LaCie Wireless Space • DESIGN BY NEIL POULTON Introduction
User Manual page 14
1.9. Default Settings
IMPORTANT INFO: DO NOT attempt to access the Wireless
Space via the web-enabled Dashboard (see 3.6.1. Dashboard: Ac-
cessing) before running the Setup Wizard. During the initial con-
figuration, the Setup Wizard must find the Wireless Space on the
network. If the Dashboard has made contact with the device, the
Setup Wizard will not run since it believes the choice of configuration
has already been made. This could be problematic when attaching
the Wireless Space to a network with a router, server, or Internet
provider that assigns IP addresses using DHCP. Most DHCP servers or devices use the same default settings as the Wireless Space
when it is set to a Router configuration, which can create IP address
conflicts on a network.
The Wireless Space is shipped with the following default settings:
Setting Default
Host/Server name WirelessSpace
Domain name local
Workgroup WORKGROUP
IP Mode for WAN Interface DHCP
LAN Interface IP address (Router
configurations only; see 4.1. Be-
fore the Installation)
Internet port IP address (Switch
configurations only; see 3.7. IN-
TERNET Port: NAS+Switch)
Time zone Greenwich Mean Time
Configuration NAS+Router - Wired Only**
Light Blue when powering on,
Login admin
Password admin
192.168.1.1/24*
172.20.0.1
(GMT) + 1
followed by green since the
Wi-Fi has been disabled
*The number “24” following the slash represents the bits used to find
a subnetwork. In most cases, this is not important to the standard
user.
**Using the Wireless Space as a router may be suitable for many
users but LaCie highly recommends running the Setup Wizard since
there are additional settings to consider.
Page 15

LaCie Wireless Space • DESIGN BY NEIL POULTON Wireless Space Configuration
User Manual page 15
2. What is the best configuration for my network?
The Wireless Space is flexible, offering five configurations. to work
with most networks. No matter how it is used, the Wireless Space
disk drive is always available to share files or backup on the network.
Please see the table below for a brief summary of each configuration.
Base Mode Configuration Ethernet Wi-Fi Access
Networks Installation
Point*
NAS + Switch NAS Ethernet - Wired
Only
NAS + Switch NAS Wireless Client Up to 1
NAS + Switch NAS Wireless Access
Point
NAS + Router NAS Router - Wired Only Up to 1 Gb/s No ✦ Joins existing wired network
NAS + Router NAS Router - Wireless
Access Point
*A network router or switch that broadcasts Wi-Fi 802.11b/g/n is called a Wi-Fi access point. In the home, many Internet providers are Wi-Fi
access points since they offer both wired (Ethernet) and Wi-Fi networks.
**The Ethernet LAN ports are available for devices that want to connect to the network from a distance.
***Though the Wireless Client is using Wi-Fi to connect to an access point, this configuration does not offer a Wi-Fi network for devices to join.
The Wireless Client can join Wi-Fi access points using b, g, or n protocols.
Up to 1 Gb/s No ✦ Joins existing wired network by connecting
to the router, server, or Internet provider
No*** ✦ Joins existing Wi-Fi network Basic
Gb/s**
Up to 1 Gb/s Yes
802.11b/g/n
Up to 1 Gb/s Yes
802.11b/g/n
✦ Joins existing wired network
✦ Manages its own Wi-Fi network
✦ Manages its own wired network
✦ Joins existing wired network
✦ Manages its own wired network
✦ Manages its own Wi-Fi network
Basic
Beyond
Basic
Beyond
Basic
Beyond
Basic
For greater detail and case uses for each configuration:
2.1. Configuration 1: Ethernet NAS - Wired Only (Basic)
2.2. Configuration 2: NAS Wireless Client (Basic)
2.3. Configuration 3: NAS Wireless Access Point (Beyond Basic)
2.4. Configuration 4: NAS Router - Wired Only (Beyond Basic)
2.5. Configuration 5: NAS Router - Wireless Access Point (Be-
yond Basic)
Page 16

LaCie Wireless Space • DESIGN BY NEIL POULTON Wireless Space Configuration
User Manual page 16
2.1. Configuration 1: Ethernet NAS Wired Only
The Wireless Space acts as network attached storage and a switch,
providing additional ports to expand the devices on the network.
Case Example
Networks with a router, server, or Internet provider that manages the
network may not require an additional router to manage a separate
network. Further, the Wi-Fi access point feature is kept off on the
Wireless Space if it is not required.
See 3.2. Configuration 1: NAS Ethernet - Wired Only for more infor-
mation on how to set up this configuration.
Fig. 05
Configuration Installation and
Management
Ethernet NAS Wired Only
Basic Easy install
Why?
Very little network
management
No Wi-Fi access
point to manage
Page 17

LaCie Wireless Space • DESIGN BY NEIL POULTON Wireless Space Configuration
User Manual page 17
2.2. Configuration 2: NAS Wireless
Client
The Wireless Space joins an existing Wi-Fi network to:
✦ Provide wireless network attached storage
✦ Extend Ethernet connectivity
Case Example
The router, switch, or Internet provider offers sufficient management
and Wi-Fi features for the network. However, there is a need for
network attached storage. Additionally, devices that are not Wi-Fi
compatible and located at a distance require Ethernet connectivity
to join the network.
The Wireless Space connects to the network as a Wi-Fi client, making the storage available to devices on the network. Further, the
computers and devices that require wired connectivity may use the
Wireless Space’s Ethernet ports to reach the network.
See 3.3. Configuration 2: NAS Wireless Client for more information
on how to set up this configuration.
Fig. 06
Configuration Installation and
Why?
Management
NAS Wireless Client Basic Wireless Space joins
an existing Wi-Fi
network
No need to change
the settings on the
existing Internet provider
No Wi-Fi access
point to manage
Page 18

LaCie Wireless Space • DESIGN BY NEIL POULTON Wireless Space Configuration
User Manual page 18
2.3. Configuration 3: NAS Wireless
Access Point
The Wireless Space joins an existing wired network via an Ethernet
cable. The Wireless Space adds network storage, switch connectivity, and a Wi-Fi access point for wireless clients.
Case Examples
✦ An existing network is managed by a server, router, or Inter-
net provider that does not offer a Wi-Fi signal. The Wireless
Space connects to the network device in order to add network
attached storage and a Wi-Fi access point. Ethernet LAN ports
on the Wireless Space are available for devices that require a
wired connection to the network.
✦ An existing network is managed by a server, router, or Internet
provider with a Wi-Fi 802.11b/g signal. The Wireless Space
connects to the network device in order to add a stronger WiFi 802.11n access point. Ethernet LAN ports on the Wireless
Space are available for devices that require a wired connection.
See 4.2. Configuration 3: Wireless Access Point (Switch) for more
information on how to set up this configuration.
Fig. 07
Configuration Installation and
Management
NAS Wireless Access Point
Beyond Basic Management is not
difficult but requires
planning
Why?
Wireless Space joins
an existing network
May require changes to the settings on
the existing Internet
provider
Wireless Space
Wi-Fi access point
to manage and secure
Important understanding of previously existing
Wi-Fi network (if applicable) and how
to manage it
Page 19

LaCie Wireless Space • DESIGN BY NEIL POULTON Wireless Space Configuration
User Manual page 19
2.4. Configuration 4: NAS Router Wired Only
The Wireless Space creates its own network and connects directly
to the existing wide area network (WAN) for access to the Internet.
The Wireless Space connects to the WAN using an Ethernet cable.
Devices connected to the Wireless Space LAN ports have access to
its shared storage.
Case Examples
✦ A second network is created for security or to separate devices
on an existing network. The Wi-Fi access point is not enabled.
✦ A router, switch, or Internet provider does not offer network
management capabilities. The Wireless Space creates a network for a home or business in order to connect multiple clients to the WAN. The Wi-Fi access point is not enabled.
✦ A router, switch, or Internet provider offers limited network
management capabilities. The Wireless Space creates a more
advanced network for a home or business. The Wi-Fi access
point is not enabled.
See 4.3. Configuration 4: Router - Wired Only for more information
on how to set up this configuration.
Fig. 08
Configuration Installation and
Management
NAS Router - Wired
Only
Beyond Basic Management is not
difficult but requires
planning
Why?
Manage IP addressing and conflicts between the new Wireless Space network
and the existing network (i.e. WAN)
Manage the Wireless Space network
May require changes to the settings on
the existing router,
switch, or Internet
provider
Important understanding of previously existing
Wi-Fi network (if
applicable) and
how to manage it
in conjunction with
the Wireless Space
network
Page 20

LaCie Wireless Space • DESIGN BY NEIL POULTON Wireless Space Configuration
User Manual page 20
2.5. Configuration 5: NAS Router Wireless Access Point
The Wireless Space creates its own network and connects directly to
the existing wide area network (WAN) for access to the Internet. The
Wireless Space connects to the WAN using an Ethernet cable and
offers a Wi-Fi access point for wireless devices. Devices connected
to the Wireless Space LAN ports and its Wi-Fi access point have access to the shared storage.
Case Examples
✦ A second network is created for security or to separate devices
in an existing network. A Wi-Fi access point is added to enhance connectivity.
✦ A router, switch, or Internet provider does not offer network
management capabilities. The Wireless Space creates a network for a home or business in order to connect multiple clients to the WAN. A Wi-Fi access point is added to enhance
connectivity.
✦ A router, switch, or Internet provider offers limited network
management capabilities. The Wireless Space creates a more
advanced network for a home or business. A Wi-Fi access
point is added to enhance connectivity.
Fig. 09
Configuration Installation and
Management
Router (Wi-Fi access
point enabled)
Beyond Basic Management is not
difficult but requires
planning
Why?
Manage IP addressing and conflicts between the new Wireless Space network
and the WAN
Manage the Wireless Space network
See 4.4. Configuration 5: Router Wireless Access Point for more information on how to set up this configuration.
May require changes to the settings on
the existing router,
switch, or Internet
provider
Important understanding of previously existing
Wi-Fi network (if
applicable) and
how to manage it
in conjunction with
the Wireless Space
network and Wi-Fi
access point
Wireless Space
Wi-Fi access point
to manage and secure
Page 21

LaCie Wireless Space • DESIGN BY NEIL POULTON Basic Install: Setup Wizard
User Manual page 21
3. Basic Installation
Topics covered:
3.1. Connect the Power Supply
3.2. Configuration 1: NAS Ethernet - Wired Only
3.3. Configuration 2: NAS Wireless Client
3.4. LaCie Network Assistant
3.5. Accessing and Transferring Files
3.6. Administering Your LaCie Wireless Space
It is important to determine in advance which configuration works
best for your network. Please review 2. What is the best configuration
for my network? to find the optimal mode for your Wireless Space.
With a configuration in mind, you may run the Setup Wizard and
connect to your network.
Fig. 10
3.1. Connect the Power Supply
1. Connect the power supply to a wall outlet and to the LaCie
Wireless Space (Fig. 10).
2. Push the rear power button for five seconds to turn it on (Fig.
11). The front light will indicate that the device is booting by
turning green (Wi-Fi disabled) or blue (Wi-Fi enabled). The light
will turn a solid color once the device is ready for use.
For more information on the power button, please see 1.5. Power
Button Functions
CAUTION: Only use the AC adapter supplied with your specific
LaCie device. Do not use a power supply from another LaCie device
or manufacturer. Using any other power cable or power supply may
cause damage to the device and void your warranty. Always remove
the AC adapter before transporting your LaCie network drive. Failure to remove the adapter may result in damage to your drive and
will void your warranty.
TECHNICAL NOTE: You may use your LaCie network drive when
in a foreign country thanks to its 100-240 Volt power supply. To be
able to use this feature, you may need to purchase an appropriate
adapter or cord. LaCie accepts no responsibility for any damage to
the drive resulting from the use of an inappropriate adapter. Using
an adapter other than one authorized by LaCie will void your warranty.
Fig. 11
IMPORTANT INFO: The light may not offer a sign that the device
is powering on while pressing the power button. It is recommended
to release the power button after five seconds, even if the light has
not turned on.
Page 22

LaCie Wireless Space • DESIGN BY NEIL POULTON Basic Install: Setup Wizard
User Manual page 22
3.2. Configuration 1: NAS Ethernet Wired Only
IMPORTANT INFO: DO NOT attempt to access the Wireless
Space via the web-enabled Dashboard (see 3.6.1. Dashboard: Ac-
cessing) before running the Setup Wizard. During the initial con-
figuration, the Setup Wizard must find the Wireless Space on the
network. If the Dashboard has made contact with the device, the
Setup Wizard will not run since it believes the choice of configuration
has already been made. This could be problematic when attaching
the Wireless Space to a network with a router, server, or Internet
provider that assigns IP addresses using DHCP. Most DHCP servers or devices use the same default settings as the Wireless Space
when it is set to a Router configuration, which can create IP address
conflicts on a network.
Fig. 12
Please see 2. What is the best configuration for my network? before
preparing your Wireless Space.
3.2.1. Wireless Space Setup Wizard
Preparing for the Setup:
✦ Do not connect the Wireless Space to your router, switch, or
Internet provider before running the Setup Wizard.
✦ Quit the applications running on your computer.
✦ If your computer is connected to the router, switch, or Inter-
net provider via Ethernet, please disconnect the end from the
router, switch, or Internet provider.
1. Connect the power cable to the Wireless Space (see 3.1. Con-
nect the Power Supply) and turn the device on (1.5. Power Button Functions). In most instances, the light will become solid
green and turn red during the setup.
2. Run the Utilities CD from the computer’s optical disk drive.
When prompted, launch the Wireless Space Setup. DO NOT
install LaCie Network Assistant before running the Wireless
Space Setup.
3. Choose your language then select OK. After reading the welcome screen text, click Continue.
4. Select Do not enable Wi-Fi. Click Continue. (Fig. 12)
5. Select NAS. Click Continue. (Fig. 13)
Fig. 13
continued on the next page>>
Page 23

LaCie Wireless Space • DESIGN BY NEIL POULTON Basic Install: Setup Wizard
User Manual page 23
6. You will be prompted to connect your computer to the Wireless
Space. Please use one of the three ports marked LAN1, LAN2,
or LAN3 on the back of the Wireless Space (1.4.2. Rear View).
DO NOT connect the cable to the port named INTERNET (Fig.
14). LaCie recommends a Gigabit Ethernet cable for optimal
performance (1.6. Gigabit Ethernet Cables And Connectors).
7. Once the Wireless Space has been connected to the computer,
click Continue.
8. The Setup will search for your Wireless Space. Move to the next
step if the device is found. If not, please reinsert the Ethernet
connections on the Wireless Space and the computer before
trying again.
9. You must select and confirm a password that contains at least
eight alphanumeric characters (Fig. 15). While not mandatory,
LaCie recommends that you change the Login and Device name
as well. Make certain to note your entries for future reference.
Do not attach the
computer to the
INTERNET port.
Fig. 14
Attach the computer to
LAN1, LAN2, or LAN3.
10. Click Commit when you are ready for the Wireless Space Setup
to configure the device.
11. The Wireless Space will reboot for the changes to take effect. If
you received an error, please try again.
IMPORTANT INFO: Frequent errors during the Setup may occur
if too much time is taken to click Continue or Commit. If you experience such errors, please consider your responses before starting the
Setup Wizard.
12. Once the Wireless Space has restarted, the device light will turn
solid green, indicating that the wireless access point has not
been enabled.
13. You may connect the Wireless Space to the router, switch, or
Internet provider via the included Gigabit Ethernet cable. Please
use one of the three ports marked LAN1, LAN2, or LAN3 on
the back of the Wireless Space (1.4.2. Rear View). DO NOT
connect the cable to the port named INTERNET (Fig. 16). LaCie
recommends a Gigabit Ethernet cable for optimal performance
(1.6. Gigabit Ethernet Cables And Connectors). Other devices
on your network, such as computers or gaming systems, may
use the available LAN ports to connect to the network. See 3.7.
INTERNET Port: NAS+Switch for further information on the IN-
TERNET port.
Fig. 15
Attach the router and
the computer to LAN1,
LAN2, or LAN3.
14. Go to 3.4. LaCie Network Assistant to install LaCie Network
Assistant.
Do not attach
the router to
the INTERNET
port.
Fig. 16
Page 24

LaCie Wireless Space • DESIGN BY NEIL POULTON Basic Install: Setup Wizard
User Manual page 24
3.3. Configuration 2: NAS Wireless
Client
IMPORTANT INFO: DO NOT attempt to access the Wireless
Space via the web-enabled Dashboard (see 3.6.1. Dashboard: Ac-
cessing) before running the Setup Wizard. During the initial con-
figuration, the Setup Wizard must find the Wireless Space on the
network. If the Dashboard has made contact with the device, the
Setup Wizard will not run since it believes the choice of configuration
has already been made. This could be problematic when attaching
the Wireless Space to a network with a router, server, or Internet
provider that assigns IP addresses using DHCP. Most DHCP servers or devices use the same default settings as the Wireless Space
when it is set to a Router configuration, which can create IP address
conflicts on a network.
Please see 2. What is the best configuration for my network? before
preparing your Wireless Space.
3.3.1. Wireless Space Setup Wizard
Preparing for the setup:
✦ Do not connect the Wireless Space to your router, switch, or
Internet provider via Ethernet.
✦ Quit the applications running on your computer, especially
those having to do with Internet connectivity (web browsers,
email, etc.)
✦ If your computer is connected to the router, switch, or Inter-
net provider via Ethernet, please disconnect the end from the
router, switch, or Internet provider.
✦ LaCie recommends that you disconnect from Wi-Fi networks
while running the Wireless Space Setup Wizard. You may reconnect to a Wi-Fi once the setup is finished.
✦ While the Wireless Space will extend a Wi-Fi signal to another
room, LaCie recommends running the Setup Wizard close to
the access point. It is far easier to manage the installation
within proximity of both devices.
1. Connect the power cable to the Wireless Space (see 3.1. Con-
nect the Power Supply) and turn the device on (1.5. Power Button Functions). In most instances, the light will become solid
green and turn red during the setup.
2. Run the Utilities CD from the computer’s optical disk drive.
When prompted, launch the Wireless Space Setup. DO NOT
install LaCie Network Assistant before running the Wireless
Space Setup.
continued on the next page>>
Page 25

LaCie Wireless Space • DESIGN BY NEIL POULTON Basic Install: Setup Wizard
User Manual page 25
3. Choose your language then select OK. After reading the welcome screen text, click Continue.
4. Select Enable Wi-Fi. Click Continue. (Fig. 17)
5. Select NAS Extender Ethernet. Click Continue. (Fig. 18)
6. You will be prompted to connect your computer to the Wireless
Space. Please use one of the three ports marked LAN1, LAN2,
or LAN3 on the back of the Wireless Space (1.4.2. Rear View).
DO NOT connect the cable to the port named INTERNET (Fig.
19). LaCie recommends a Gigabit Ethernet cable for optimal
performance (1.6. Gigabit Ethernet Cables And Connectors).
7. Once the Wireless Space has been connected to the computer,
click Continue.
8. The Setup will search for your Wireless Space. Move to the next
step if the device is found. If not, please reinsert the Ethernet
connections on the Wireless Space and the computer before
trying again.
Fig. 17
continued on the next page>>
Fig. 18
Attach the computer to
LAN1, LAN2, or LAN3.
Do not attach the
computer to the
INTERNET port.
Fig. 19
Page 26

LaCie Wireless Space • DESIGN BY NEIL POULTON Basic Install: Setup Wizard
User Manual page 26
9. Choose between Connect using WPS to an existing Wi-Fi or
Connect manually to an existing Wi-Fi. Click Continue. The
Wireless Space Setup will search for available Wi-Fi networks.
IMPORTANT INFO: Each Wi-Fi access point is listed by its name,
or SSID. The Wireless Space can join an access point with an SSID
that includes letters (uppercase and lowercase), whole numbers, and
the following symbols: . _ % + - = @ #
IMPORTANT INFO: In Wireless Client mode, the Wireless Space
can join a network that has letters (uppercase and lowercase) and
whole numbers in the password or security key. Please note that
symbols are unsupported for a password in this mode.
10. From the list of available networks, choose the Wi-Fi that the
Wireless Space will join. Enter the password at the bottom of the
screen (Fig. 21). (Consult the user manual for your access point
to determine how best to join its Wi-Fi network.) Once the Wi-Fi
access point is ready for a new device to join, click Continue.
Fig. 20
11. You must select and confirm a password that contains at least
eight alphanumeric characters (Fig. 22). While not mandatory,
LaCie recommends that you change the Login and Device name
as well. Make certain to note your entries for future reference.
12. Click Commit when you are ready for the Wireless Space Setup
to configure the device.
13. The Wireless Space will reboot for the changes to take effect. If
you received an error, please try again.
IMPORTANT INFO: Frequent errors during the Wireless Space
Setup may occur if too much time is taken to click Continue or Commit. If you experience such errors, please consider your responses
before starting the Setup Wizard.
14. Once the Wireless Space has restarted, the device light will be
solid blue, indicating that the Wireless Space is communicating
with a Wi-Fi network.
continued on the next page>>
Fig. 21
Fig. 22
Page 27

LaCie Wireless Space • DESIGN BY NEIL POULTON Basic Install: Setup Wizard
User Manual page 27
15. Disconnect the Wireless Space from the computer and, if necessary, move the device to its new location.
16. You may connect devices such as computers or game systems to
the Wireless Space similar to a router or switch. Please use one
of the three ports marked LAN1, LAN2, or LAN3 on the back
of the Wireless Space (1.4.2. Rear View). DO NOT connect the
cable to the port named INTERNET (1.4.2. Rear View). LaCie
recommends a Gigabit Ethernet cable for optimal performance
(1.6. Gigabit Ethernet Cables And Connectors). Other devices
on your network, such as computers or gaming systems, may use
the available LAN ports. See 3.7. INTERNET Port: NAS+Switch
for further information on the INTERNET port.
17. Go to 3.4. LaCie Network Assistant to install LaCie Network
Assistant.
TECHNICAL INFO: As a Wireless Client, the Wireless Space re-
quires a strong signal from the Wi-Fi access point for optimal performance.
Page 28

LaCie Wireless Space • DESIGN BY NEIL POULTON LaCie Network Assistant
User Manual page 28
3.4. LaCie Network Assistant
IMPORTANT INFO: You must run the Wireless Space Setup Wiz-
ard before installing LaCie Network Assistant.
LaCie Network Assistant is a convenient software that detects all
LaCie network attached storage on your home or business network.
Once installed and running, LaCie Network Assistant will appear in
the system tray (Windows, Fig. 23) or the menu bar (Mac, Fig. 24).
LaCie Network Assistant automatically searches for LaCie network
storage devices and the icon will blink if a new device is found,.
Fig. 23
When LaCie Network Assistant finds your Wireless Space, you can
view information about the device (i.e. network addressing) or connect to any of its Shares (volumes) (Fig. 25).
Install LaCie Network Assistant:
1. Insert the LaCie Wireless Space CD-ROM into your computer’s
CD-ROM drive.
2. Launch the LaCie Network Assistant Setup when prompted.
3. Follow the Wizard to complete installation.
Fig. 24
Fig. 25
Page 29

LaCie Wireless Space • DESIGN BY NEIL POULTON LaCie Network Assistant
User Manual page 29
3.4.1. Connect to the LaCie Wireless Space
Dashboard using LaCie Network
Assistant
1. Launch LaCie Network Assistant.
Windows Users
a. Select LaCie Network Assistant in Start/Programs. A LaCie
Network Assistant icon will appear in the system tray (Fig.
26). LaCie Network Assistant automatically detects the Wire-
less Space as well as other LaCie network devices. (Fig. 27)
b. Click on the icon in the system tray and select Configuration
Window... from the LaCie Wireless Space sub-menu (Fig.
28). LaCie Network Assistant will open (Fig. 29), presenting
all the details of the Wireless Space. Click the hyperlink for
the name of your device (default is WirelessSpace). The web-
based Dashboard will open in your default browser. See 3.6.
Administering Your LaCie Wireless Space for more informa-
tion on the Dashboard.
Fig. 26
Fig. 27
Mac Users
a. Select LaCie Network Assistant in your Applications folder. A
LaCie Network Assistant icon will appear in the menu bar.
LaCie Network Assistant automatically detects the Wireless
Space as well as other LaCie devices on your network..
b. Click on the icon in the system tray and select Configuration
Window... from the LaCie Wireless Space sub-menu (Fig.
28). LaCie Network Assistant will open (Fig. 29), presenting
all the details of the Wireless Space. Click the hyperlink for
the name of your device (default is WirelessSpace). The web-
based Dashboard will open in your default browser. See 3.6.
Administering Your LaCie Wireless Space for more informa-
tion on the Dashboard.
2. Your Wireless Space is configured and ready to use. For further
information on the Basic Dashboard features, see 3.6. Adminis-
tering Your LaCie Wireless Space.
Fig. 28
Fig. 29
Page 30

LaCie Wireless Space • DESIGN BY NEIL POULTON LaCie Network Assistant
User Manual page 30
3.4.2. Connect to the LaCie Wireless Space
Dashboard directly from the browser
LaCie Network Assistant offers a simple way to connect to your LaCie network attached device (3.4.1. Connect to the LaCie Wireless
Space Dashboard using LaCie Network Assistant). However, there
are other options. To access the Dashboard using a web browser
address window (URL), simply enter the device IP address or name.
IP Address
If you know the IP address, type it in the URL bar, then select Enter
(Windows) or Return (Mac). (Fig. 30)
Device Name
The name of the Wireless Space may have been changed while
running the Setup Wizard. Enter the new name or the default, Wire-
lessSpace, in the URL bar. Select Enter (Windows) or Return (Mac) to
launch the Dashboard (Fig. 31). If the device name does not launch
the Dashboard, use the IP address.
Fig. 30
Fig. 31
TECHNICAL INFO: To easily find the IP address or the name of
the device, open LaCie Network Assistant>Configuration Window
(Fig. 32). The information required to reach the Dashboard appears
in the Configuration Window (Fig. 33).
For further information on the Basic Dashboard features, see 3.6.
Administering Your LaCie Wireless Space.
Fig. 32
Fig. 33
Page 31

LaCie Wireless Space • DESIGN BY NEIL POULTON Accessing & Transferring Files
User Manual page 31
3.5. Accessing and Transferring Files
IMPORTANT INFO: As noted in the chart below, the Wireless
There are several ways to access and transfer files located on the
Wireless Space. Follow the links below for more details.
3.5.2. Accessing Shares Using LaCie Network Assistant
3.5.3. Map Shared Folders
Space accepts many formats for external storage attached to one of
its three USB 2.0 ports. However, the Mac format HFS+ Journaled
is not supported. The Wireless Space will see a volume partitioned
in HFS+ Journaled in the Dashboard but cannot copy files to it or
mount it on a computer.
3.5.5. Accessing Shares Using File Browser
3.5.6. Accessing Shares via FTP
IMPORTANT INFO: On a Mac, the icon marked “Wireless Space
(Time Machine)” under Shared is a virtual representation for a Time
Machine compatible disk. It is not a volume for use on the desktop.
MyShare, OpenShare, and USB volumes connected to the Wireless
Space may be used on the desktop. You may also choose MyShare
or OpenShare for Time Machine backups.
3.5.1. About Shares
The LaCie Wireless Space has two permanent shares (similar to drive
partitions or volumes): OpenShare and MyShare. A USB disk drive
may be connected to any of the three USB 2.0 host ports to copy
data or expand the network storage. The following table sums up the
differences between the shares:
IMPORTANT INFO: The Wireless supports external USB storage
with volumes up to 2 TB.
Name Accessibility Login Availability
OpenShare ✦ Public
✦ Accessible to any user on
the network
MyShare ✦ Private
✦ Accessible using a login
and password
✦ None ✦ Computers on the network
✦ UPnP®/DLNA®- certified players/adapters on
the network
✦ Required
✦ Login and password
created in the Setup
Wizard
✦ Computers on the network
✦ Administrator login and password
External USB
Hard Drive(s)
✦ Public
✦ Accessible to any user on
the network
✦ Partitions keep their previ-
ously assigned names
✦ Supported file systems
include EXT2/3 (Linux),
FAT32 (Mac and Windows), HFS+ non-journaled only (Mac), NTFS
(Windows), and XFS
(Linux)
✦ Volumes up to 2 TB only
✦ None ✦ Computers on the network
✦ UPnP/DLNA-certified players/adapters on the
network
✦ Not for use as Time Machine disks when at-
tached to the Wireless Space
Page 32

LaCie Wireless Space • DESIGN BY NEIL POULTON Accessing & Transferring Files
User Manual page 32
3.5.2. Accessing Shares Using LaCie
Network Assistant
LaCie Network Assistant will help you quickly connect to the Wireless
Space shares (MyShare and OpenShare) and the USB storage that
is connected to one of its three ports. Further, the shares can be set
to mount each time you log on to your computer (see section 3.5.3.
Map Shared Folders).
By default, you will be logged in as a guest, providing access only
to OpenShare and the USB hard drive(s) attached to the Wireless
Space. In order to access MyShare, you will have to use the login
and password created during the Setup.
To access shared folders open to the public:
1. Launch LaCie Network Assistant.
Windows Users
a. If it is not available in the system tray, launch LaCie Network
Assistant from Start>Programs. LaCie Network Assistant automatically detects the Wireless Space and any other LaCie
network storage (Fig. 34).
b. Select LaCie Network Assistant from the system tray. Choose
OpenShare (Fig. 35 - LaCie Network Assistant: No External
USB Storage) or a volume from an attached USB storage
drive (Fig. 36 - LaCie Network Assistant: External USB Stor-
age). The drive window will open, allowing for standard
desktop actions such as dragging, dropping, copying, pasting, etc.
Mac Users
a. If it is not available in the menu bar, launch LaCie Network
Assistant from your Applications folder. LaCie Network Assistant automatically detects the Wireless Space and other
LaCie network storage.
Fig. 34
Fig. 35 - LaCie Network Assistant: No External USB Storage
b. Select LaCie Network Assistant from the menu bar. Choose
OpenShare (Fig. 35 - LaCie Network Assistant: No External
USB Storage) or a volume from an attached USB storage
drive (Fig. 36 - LaCie Network Assistant: External USB Stor-
age). The drive window will open, allowing for standard
desktop actions such as dragging, dropping, copying, pasting, etc.
continued on the next page >>
Fig. 36 - LaCie Network Assistant: External USB Storage
Page 33

LaCie Wireless Space • DESIGN BY NEIL POULTON Accessing & Transferring Files
User Manual page 33
To access all shares and volumes, including MyShare :
1. Launch LaCie Network Assistant and click on its icon in the system tray (Windows) or menu bar (Mac).
2. Choose Configuration Window... to launch the configuration
page (Fig. 37).
3. Choose the Volumes tab to view OpenShare and all USB volumes currently attached to the Wireless Space (Fig. 38).
4. To add MyShare to the list, select Authentication (Fig. 38) then
enter the login and password created during the Setup (Fig. 39).
TECHNICAL NOTE: Windows and Mac users will be prompted to
choose Registered User or Guest. A Guest will have immediate access to OpenShare and USB storage attached to the Wireless Space.
To see files in MyShare, select Registered User to enter the login and
password
Fig. 37
continued on the next page>>
Fig. 38
Fig. 39
Page 34

LaCie Wireless Space • DESIGN BY NEIL POULTON Accessing & Transferring Files
User Manual page 34
5. All shares and USB volumes (if applicable) are now available in
the Volumes tab (Fig. 40).
6. Right-click on a share or USB volume for options on mounting
(Fig. 41) or double-click to open it immediately.
7. LaCie Network Assistant provides a green icon to let you know
that the share or USB volume is mounted (Fig. 42). You may
search Network (Windows) or Shared (Mac) to access the shares
and volumes.
8. Transfer files normally from your computer to the Wireless
Space share.
TECHNICAL INFO: To automatically copy data from USB hard
disks when they are first connected to the Wireless Space, use Auto
import (see 3.6.7. Dashboard: Drives). It is not recommended to
transfer large quantities of files to or from Wireless Space shares and
USB volumes using SMB (i.e. using the Finder for Mac or an Explorer
window for Windows - Fig. 41).
Fig. 40
Fig. 41
Fig. 42
Page 35

LaCie Wireless Space • DESIGN BY NEIL POULTON Accessing & Transferring Files
User Manual page 35
3.5.3. Map Shared Folders
If you would like a shortcut to accessing Wireless Space shares, follow the procedures below. Before starting, you must mount the share
or USB volume that is targeted for mapping.
Windows Users
1. Open My Computer/Computer and select Tools>Map
Network Drive (Windows XP) or Map Network Drive (Win-
dows Vista and Windows 7 - Fig. 43)
2. From Fig. 44
✦ Select a letter for the drive.
✦ Check the box for Reconnect at logon to mount the shares
or volumes each time you log on to the computer. See
3.5.4. LaCie Network Assistant Auto Mount for informa-
tion on how to mount Wireless Space Shares using LaCie
Network Assistant.
✦ Click Browse to search the network for your share or USB
volume connected to the Wireless Space.
Fig. 43
3. Select the share or volume you want to mount and click
OK. Click Finish for the share to open. It is now listed with
Network drives in My Computer/Computer.
4. Repeat steps 1-3 for other shares. Note that MyShare will
require the login and password entered during the setup.
Alternatively, you may search for the shares in the list of drives in
Network (Windows Vista and Windows 7).
TECHNICAL NOTE: LaCie recommends that Windows users map
MyShare first when selecting multiple Wireless Space shares and at-
tached USB volumes.
continued on the next page>>
Fig. 44
Fig. 45
Page 36

LaCie Wireless Space • DESIGN BY NEIL POULTON Accessing & Transferring Files
User Manual page 36
Mac Users
To access a share:
1. Open a new Finder window. On the left of the window,
search for Shared>WirelessSpace (or, the new name of
your device)>OpenShare. While the default is Guest, you
must log in as a Registered User to open MyShare. The
name and password were created during the Setup.
To mount the shares each time you log on to your computer:
1. From the Apple icon in the menu bar, select System
Preferences>Accounts>Login Items. Choose your account
name on the left of the window.
Fig. 46
2. Click on the + sign (Fig. 46) to add a new item to the list
and browse for the shares (Fig. 47). Please note that the
shares must be mounted before attempting to add them to
the list. Click Add.
3. When you log on to the Mac OS, the share(s) will automatically mount on your desktop.
See 3.5.4. LaCie Network Assistant Auto Mount for information
on how to mount Wireless Space shares using LaCie Network
Assistant.
Fig. 47
Fig. 48
 Loading...