

Page 1

User Manual
USB Wireless 802.11 b/g Adaptor
V 2.0
Page 2

Information in this document is subject to change without notice.
Microsoft, Encarta, MSN, and Windows are either registered trademarks or trademarks of
Microsoft Corporation in the United States and/or other countries.
Copyright 2006 Gemtek Technology Corporation. All rights reserved.
©
Other trademarks and trade names may be used in this document to refer to either the entities
claiming the marks and names or their products.
MODE
L NUMBER: WUBR-177G
2 USB Wireless 802.11 b/g Adaptor
Page 3

Table of Contents
1 Introduction.................................................................................5
1.1 Inventory Checklist.............................................................................................5
1.2 Supported Security...........................................................................................6
2 Antenna Attachment............................................................................................7
3 Security Setting...............................................................................................8
4 WindowsXP Wireless Zero Configuration........................................................9
4.1 Launching MicrosoftWindowsXP Wireless Network Configuration........................9
4.2 Setting the Network Key Automatically............................................................10
4.3 Setting the Network Key Manually............................................................12
4.3.1 WEP: Setting the Network Key (Network Security)..............................................15
4.3.2 WPA: Setting the Network Key (Network Security)..............................................18
Glossary........................................................................................31
Appendix A: Troubleshooting............................................................................23
Appendix B: Regulatory Notices..........................................................................24
Appendix C: Product Specifications.........................................................................28
Index..........................................................................................30
3 USB Wireless 802.11 b/g Adaptor
Page 4

Table of Figures
Figure 1: Antenna Attachment.......................................................... 7
Figure 2: Wireless Network Icon............................................................ 9
Figure 3: Wireless Network Connection dialog box ...........................................10
Figure 4: Wireless Network Connection dialog box............................................11
Figure 5: Connecting to Wireless.........................................................11
Figure 6: Wireless Network Connection dialog box............................................12
Figure 7: Wireless Network Connection dialog box ...........................................13
Figure 8: Wireless Network Connection Properties dialog box........................................14
Figure 9: Internet Protocol (TCP/IP) Properties dialog box...........................................14
Figure 10: Manually adding a Wireless Network..............................................16
Figure 11: Wireless Network Properties dialog box................................................... 17
Figure 12: Wireless Network Connection Properties dialog box......................................18
Figure 13: Wireless Network Properties dialog box.............................................19
4 USB Wireless 802.11 b/g Adaptor
Page 5

1. Introduction
Your PC comes with a built-in USB Wireless 802.11 b/g adaptor which allows it to function as
a Wireless Local Area Network (WLAN) connecting with other wireless product(s). This
product is an IEEE 802.11g Compliant device. It features automatic rate selection and
advanced security features like WEP, 802.1x, WPA/WPA2 with TKIP and AES for stronger
data encryption.
1.1 Inventory Checklist
Included with your HP PC should be the following items for your Wireless USB Adaptor:
Η Documentation CD (Contains Quick Installation Guide and full User Manual)
Η A high gain omni directional antenna as well as an attachment pad ( See Chapter 2 for
installation instructions)
Note: Not all PC Configurations ship with this external omni-directional
antenna. If your PC did not come with an antenna in a plastic packet
then there is a built-in internal antenna already installed in your PC. In
such case please skip chapter 2 of this manual as your PC does not need
an external antenna.
5 USB Wireless 802.11 b/g Adaptor
Introduction
Page 6

1.2 Supported Security
In order to secure your network from passive or active intrusion, key features are enabled on
WindowsXP Wireless Zero Configuration:
Η WPA personal security
Η WEP encryption
Please see Chapter 3 for information on security settings for your USB Wireless adaptor.
Note: In order to have the WPA encryption method, you must upgrade your
Windows XP to Service Pack 2.
6 USB Wireless 802.11 b/g Adaptor
Introduction
Page 7
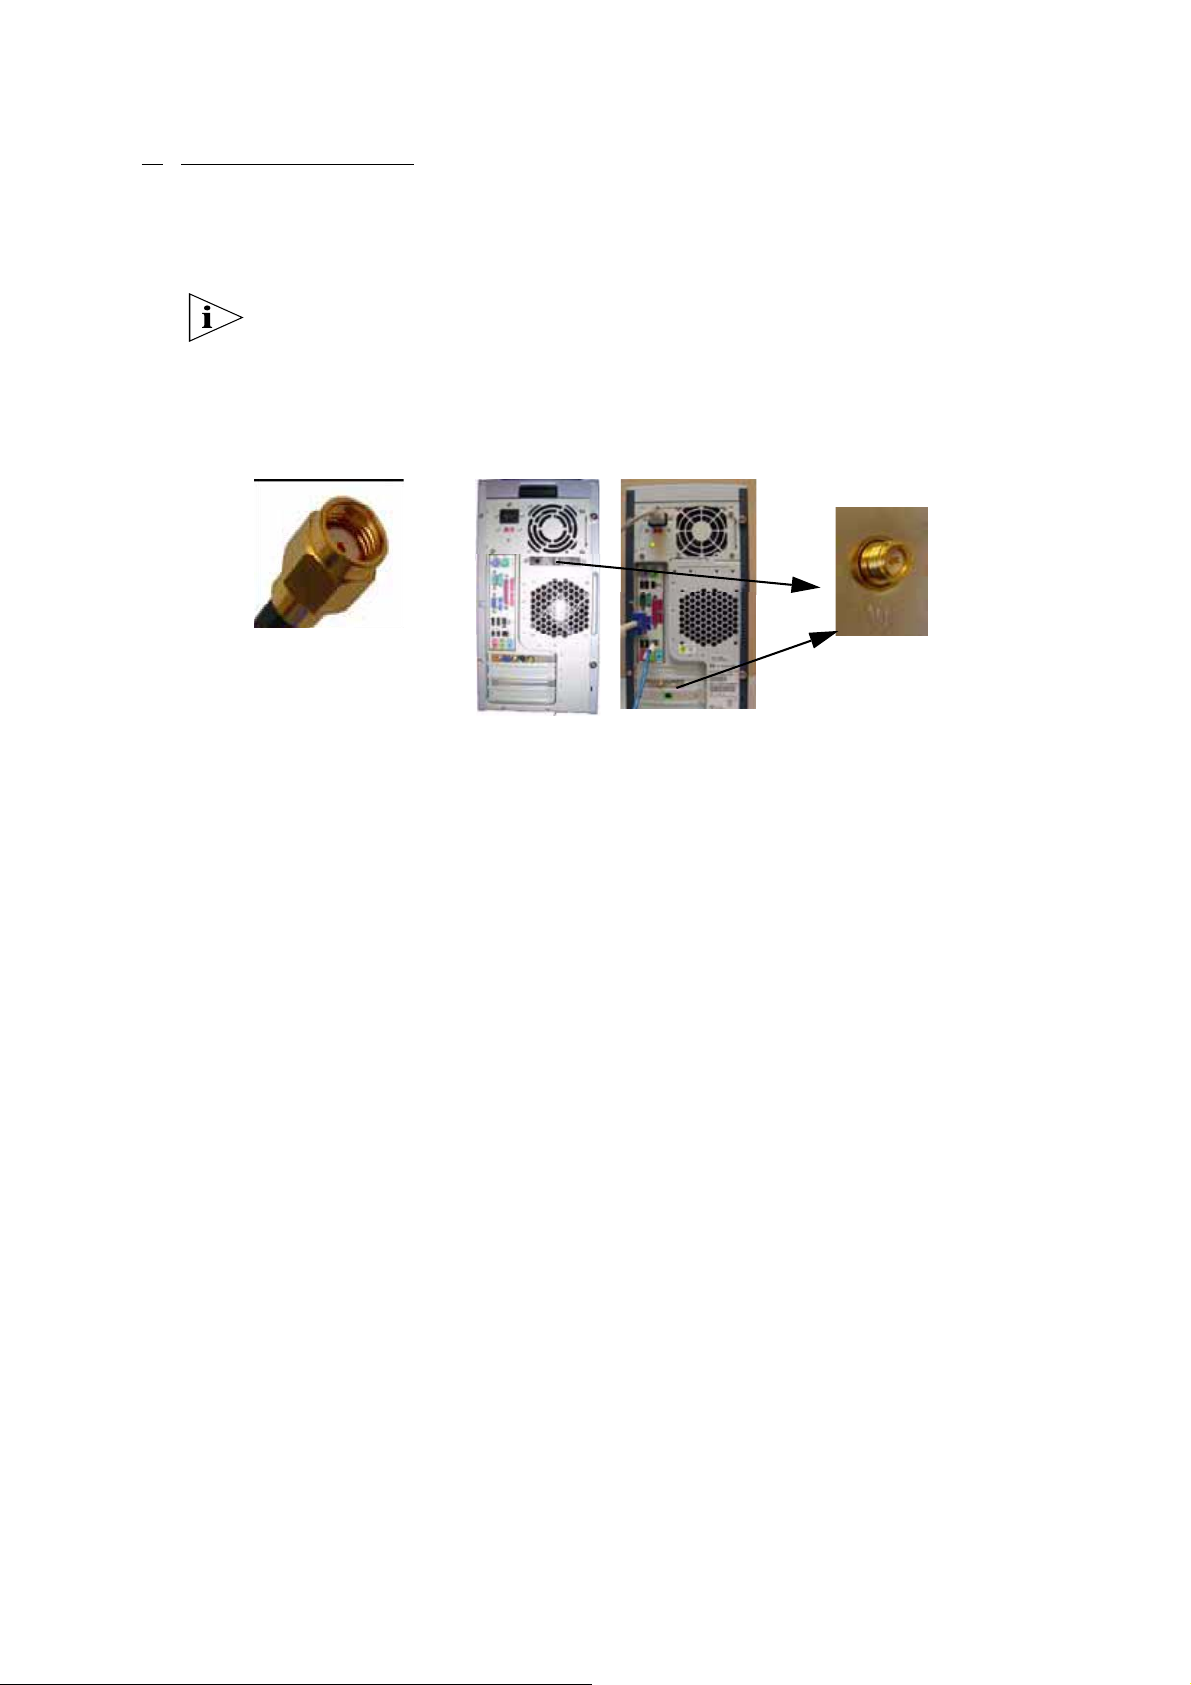
2. Antenna Attachment
This chapter contains instructions for antenna installation.
Note: If you have already attached the antenna to your PC, please skip to
Chapter 3.
1. Please find a connector at one end of the antenna cable. Screw this connector (A) to the
matching antenna receptable (B) located at the back of the computer chassis.
)C*
)B*
Figureȱ1:ȱAntennaȱAttachment
2. Place the antenna in an elevated and open area for optimal wireless performance.
3. You can optionally use the 'attachment pad' which comes with the accessory kit to make
your antenna base stick to any flat surface. Avoid using the front panel of your computer to
stick the antenna
7 USB Wireless 802.11 b/g Adaptor
Antenna Attachment
Page 8

3. Security Setting
Security can be set up using WEP (Wired Equivalency Protocol) or WPA (Wi-Fi Protected
!
Access). It is important to set up matching security types between devices. Be!certain to check
the type of security on your other wireless device(s) in order to decide which type of security
needs to be set up on your PC.
WEP security was the original security standard provided for wireless 802.11 devices. WPA
!
security which offers more advanced encryption technology!is a more recent standard of security available.
8 USB Wireless 802.11 b/g Adaptor
Security Setting
Page 9
4. WindowsXP Wireless Zero Configuration
It is necessary to complete the steps in Chapter 2, Antenna Attachment prior to using WindowsXP Wireless Network Configuration.
If you have already established a wireless network with access to the internet and you would
like to wirelessly connect this HP PC to your wireless network, use WindowsXP Zero Configuration (WindowsXP Wireless Auto Configuration).
4.1. Launching MicrosoftWindowsXP Wireless Network Configuration
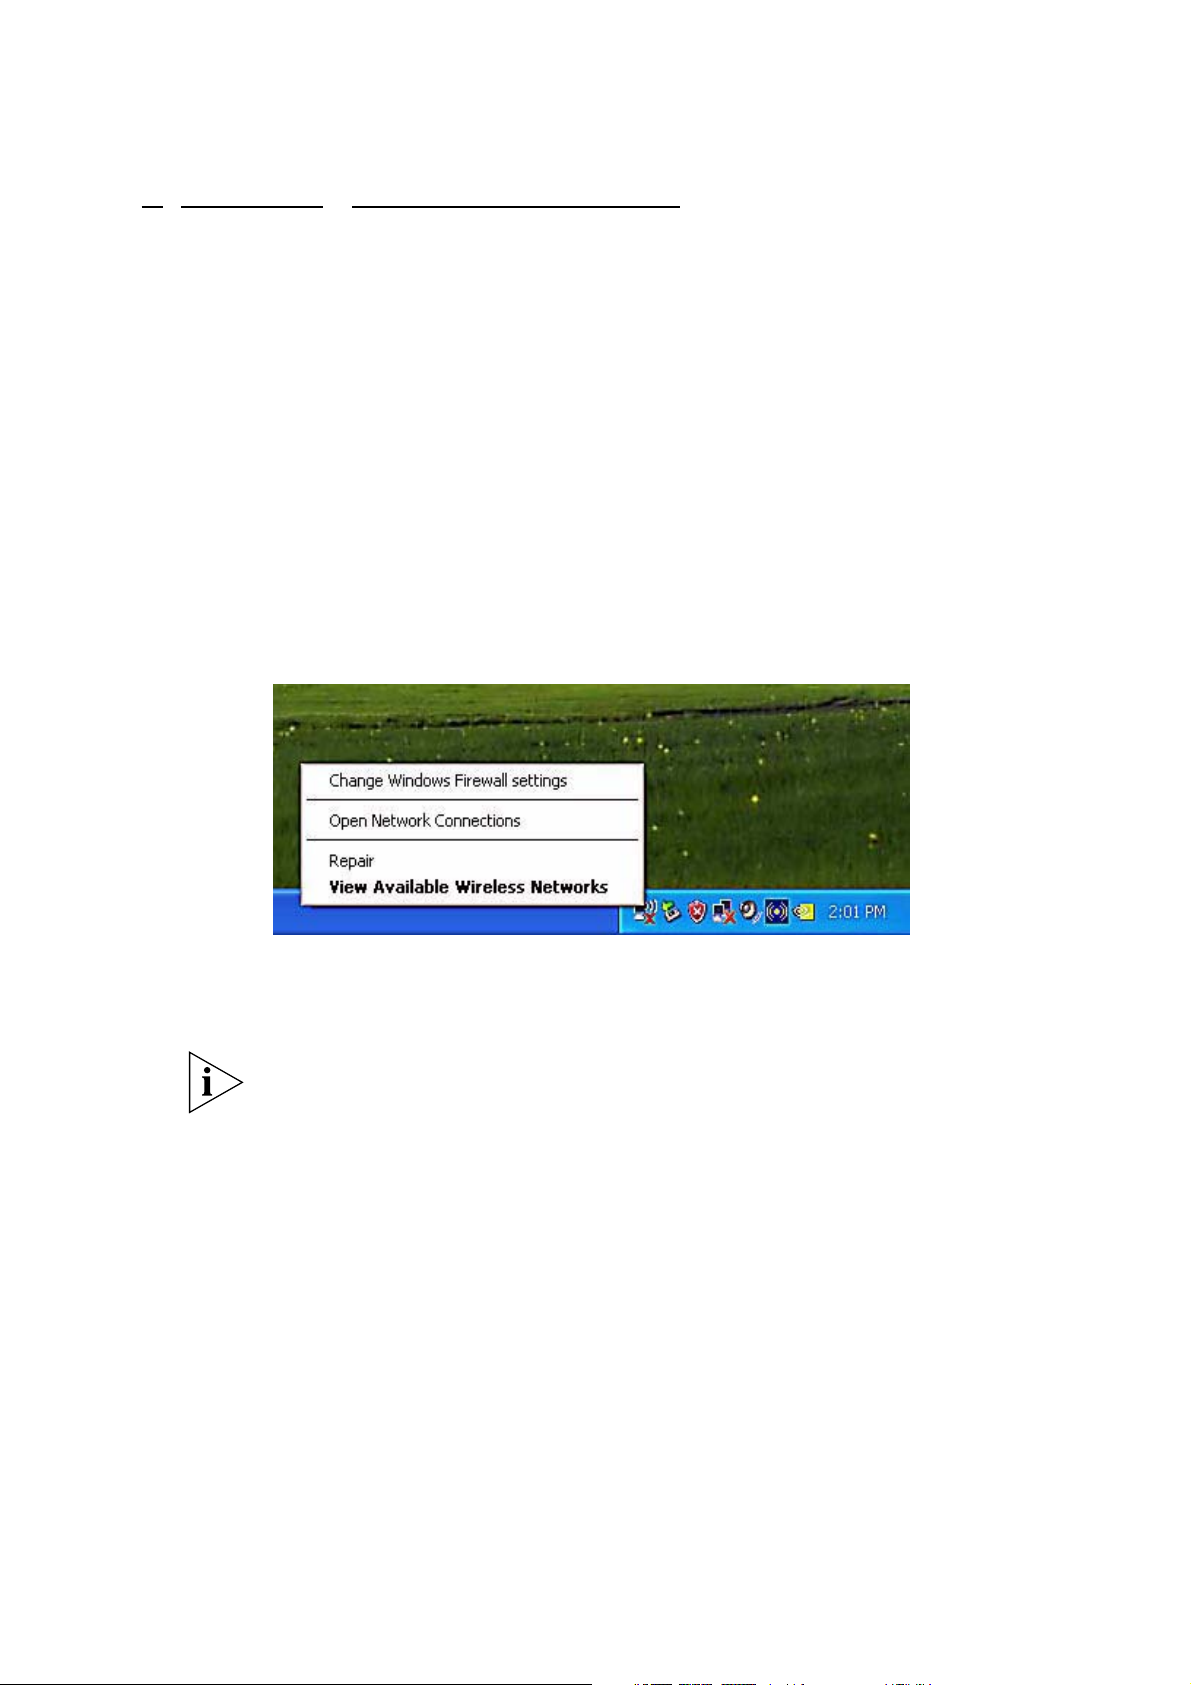
To launch WindowsXP Wireless Network Configuration:
1. In the Systems Tray find the Wireless Networking icon.
Figureȱ2:ȱWirelessȱNetworkȱIcon
Note: There may be multiple Network icons in the system tray. Choose the
one for Wireless Network Connection as shown above.
2. Select View Available Wireless Networks and the Wireless Network Connection dialog
box will appear.
9 USB Wireless 802.11 b/g Adaptor
WindowsXPWireless Zero Configuration
Page 10

4.2. Setting the Network Key Automatically
The PC will begin functioning in Station Mode (as a Client) with your Wireless LAN Network
as soon as the Network Key is set-up.
Note: If you do not have an existing wireless network you will need to set up
your Gateway prior to using your PC in Station Mode.
1. Find the Network Key (WEP Key or WPA Key) for your Wireless Network.
2. Select View Available Wireless Networks from the Wireless Network icon menu.
The Wireless Network Connection dialog box will appear.
Figureȱ3:ȱWirelessȱNetworkȱConnectionȱdialogȱbox
3. Select the Wireless Network of your choice by clicking on its name and the entire block
will become highlighted.
4. Select Connect in the lower right corner.
10 USB Wireless 802.11 b/g Adaptor
WindowsXPWireless Zero Configuration
Page 11

The Wireless Network Connection dialog box will appear as shown below.
Figureȱ4:ȱWirelessȱNetworkȱConnectionȱdialogȱbox
5. Enter your Network Key (WEP Key or WPA Key) for your Wireless Network.
6. Input the Network Key a second time into the “Confirm network key” field.
Note: If your network is using WEP encryption, then a HEX or an ASCII
format is necessary when entering your Network Key:
Η HEX: 10 characters in HEX notation for 40 bit or 26 characters for 128
bit encryption.
Η ASCII: 5 characters for 40 bit or 13 characters for 128 bit encryption.
If your network is using WPA it is necessary to enter an 8 – 63 character
alphanumeric key-phrase.
The Network Key will accept any of these as it supports both WEP and
WPA.
7. Select Connect.
The Wireless Network Connection dialog box appears as you are being connected.
Figureȱ5:ȱConnectingȱtoȱWireless
11 USB Wireless 802.11 b/g Adaptor
WindowsXPWireless Zero Configuration
Page 12

After connection to a wireless network is established, a Wireless Network Connection dialog
box, as shown below will appear/
Figureȱ6:ȱWirelessȱNetworkȱConnectionȱdialogȱbox
4.3. Setting the Network Key Manually
After launching the application (See Section 4.1, Launching the application) you will need to
input the Network name and Network Key. The Network name and Network Key must both be
set up for your HP PC to function with your current network in Station Mode.
Before manually setting up the Network name and Network Key on your HP PC you must
identify this information on your current wireless network:
Η Network name (SSID)
Η Security WPA-PSK Key OR Security WEP Key
The Wireless Network Connection dialog box appears when you have launched
WindowsXP Wireless Zero Configuration:
12 USB Wireless 802.11 b/g Adaptor
WindowsXPWireless Zero Configuration
Page 13

Figureȱ7:ȱWirelessȱNetworkȱConnectionȱdialogȱbox
Note: Your Network name will appear in the Wireless Network Connection
window. Any other listed available wireless networks represent the
wireless networks established within range of your PC. These will vary
and may not provide secured access to the internet.
1. Choose your Wireless Network in the Available Wireless Networks selection box.
Your network will become highlighted as shown in figure 7.
2. Select Change advanced settings found on the left side of the dialog box.
13 USB Wireless 802.11 b/g Adaptor
WindowsXPWireless Zero Configuration
Page 14

The Wireless Network Connection Properties dialog box appears.
Figureȱ8:ȱWirelessȱNetworkȱConnectionȱPropertiesȱdialogȱbox
3. Select the General tab in the Wireless Network Connection Properties dialog box.
4. Highlight Internet Protocol (TCP/IP) in the “This connection uses the following!items:”
selection box.
5. Select Properties.
The Internet Protocol (TCP/IP) Properties dialog box appears with the General tab displayed.
Figureȱ9:ȱInternetȱProtocolȱ(TC P/IP)ȱPropertiesȱdialogȱbox
14 USB Wireless 802.11 b/g Adaptor
WindowsXPWireless Zero Configuration
Page 15

6. Verify that the following choices are selected:
Η Obtain an IP address automatically
Η Obtain DNS server address automatically
7. Select OK.
You are returned to the Wireless Network Connection Properties dialog box.
For instructions on how to set WEP security refer to Section 4.3.1. For instructions on how to
set WPA security refer to Section 4.3.2.
4.3.1 WEP: Setting the Network Key (Network Security)
This section gives instruction on how to correctly set up WEP security on your HP PC. If you
are currently running a WPA enabled device, skip to Section 4.3.2, WPA: Setting the Network
Key (Network Security).
In order to set up your Network Key (WEP security feature) you will need to do the following:
1. Open the Wireless Network Connection Properties dialog box:
Η Right click on the Wireless Networks icon in the system tray.
Η Select View Available Wireless Networks from the Wireless Networks Icon menu.
The Wireless Network Connection dialog box appears.
Η Select Change advanced settings on the left side of the dialog box.
The Wireless Network Connection Properties dialog box appears.
15 USB Wireless 802.11 b/g Adaptor
WindowsXPWireless Zero Configuration
Page 16

Η Select the Wireless Networks tab as shown in figure 10 below.
Figureȱ10:ȱManuallyȱaddingȱaȱWirelessȱNetwork
2. Select Add under the Preferred networks selection box.
The Wireless Network Properties dialog box appears.
16 USB Wireless 802.11 b/g Adaptor
WindowsXPWireless Zero Configuration
Page 17

Figureȱ11:ȱWirelessȱNetworkȱPropertiesȱdialogȱbox
3. Input your Network name (SSID).
4. Uncheck the box “The key is provided for me automatically”.
5. Verify that the Network Authentication is set to Open.
6. Verify that the Data Encryption is set to WEP.
7. Input the Network Key of your Access Point, Wireless Broadband Router or Wireless
Gateway.
Note: Either a HEX or ASCII format is necessary when using the WEP
interface. Your WEP enabled device should already have either HEX or
ASCII format pass-phrase associated. Consult the information asked for in
section 4.2.
Η
HEX: 10 characters in HEX notation for 40 bit, or 26 characters for 128 bit.
Η
ASCII: 5 characters for 40 bit, 13 characters for 128 bit.
8. Input the Network Key a second time into the #Confirm network key# box.
9. Select OK.
You are returned to the Wireless Network Connection Properties dialog box and are able
to verify your connection.
17 USB Wireless 802.11 b/g Adaptor
WindowsXPWireless Zero Configuration
Page 18

4.3.2 WPA: Setting the Network Key (Network Security)
This section gives instruction on how to correctly set up WPA security on your HP PC. If you
are currently running a WEP enabled device, return to Section 4.3.1, WEP: Setting the Network Key (Network Security).
In order to set up your Network Key (WPA security feature) you will need to do the!following:
1. Open the Wireless Network Connection Properties dialog box:
Η Right click on the Wireless Networks icon in the system tray.
Η Select View Available Wireless Networks from the Wireless Networks icon menu.
The Wireless Network Connection dialog box appears.
Η Select Change advanced settings on the left side of the dialog box.
The Wireless Network Connection Properties dialog box appears.
Η Select the Wireless Networks tab as shown in figure 12 below.
Figureȱ12:ȱWirelessȱNetworkȱConnectionȱPropertiesȱdialogȱbox
18 USB Wireless 802.11 b/g Adaptor
WindowsXPWireless Zero Configuration
Page 19

2. Select Add under the Preferred networks selection box.
The Wireless Network Properties dialog box appears as shown in figure 14/
Figureȱ13:ȱWirelessȱNetworkȱPropertiesȱdialogȱbox
3. Uncheck the box “The key is provided for me automatically”.
4. Verify that the Network Authentication is set to WPA-PSK.
5. Verify that the Data Encryption is set to TKIP or AES.
6. Input the Network Key of your Access Point, Wireless Broadband Router or Wireless
Gateway.
Note: A 8 – 63 character alphanumeric key-phrase is necessary when using
the WPA interface. WPA does not require HEX or ASCII notation which
is common with WEP keys. Your WPA enabled device should already
have a 8 – 63 character alphanumeric key-phrase. Consult the information asked for in Section 4.2.
7. Input the Network Key a second time into the “Confirm network key” box.
8. Select OK.
You are returned to the Wireless Network Connection Properties dialog box and are able
to verify your connection.
19 USB Wireless 802.11 b/g Adaptor
WindowsXPWireless Zero Configuration
Page 20

Glossary
x Access Point (AP)
x MAC Address
x Network Name
Terms
Terms
Continued
A hardware device (possibly a PC) that
Media Access Control Address. On an
can act as a communication hub for
802.11 network the MAC address is used to
identify each node of the network.
wireless devices enabling them to connect
to a wired LAN (Local Area Network) or to
See SSID.
one another.
x Network Key
x ASCII (American Standard Code for
Information Interchange)
x SSID (Service Set Identifier)
x Broadband Router
x Station
x Client
x WEP
x DNS Server
x Wireless LAN
x Encryption
x Wireless Network
x WPA
x Gateway
x WPA Personal AES
Network password.
A code used for encryption that represents
letters with numbers.
The unique identifier attached to the
header of packets sent over a Wireless
A device which lets multiple client devices
Local Area Network (WLAN). The SSID
share a single internet connection (like DSL,
differentiates Wireless LANs from one
Cable modem or T1). Generally
another. For this reason an SSID must be
Broadband Routers offer rudimentary
entered on each wireless device
network address translations and firewall
attempting to connect on the WLAN.
features.
See Client.
A device that acquires networking services
Wired Equivalency Protocol. WEP is an
from another device like another PC or
802.11 encryption standard that provides
access point.
security for wireless LANs.
Domain Name System / Service / Server is
A wireless version of Ethernet, the Wireless
a service available on the internet that
Local Area Network enables wireless
translates domain names into IP addresses.
internet access through your SoftAP™ or
broadband router.
The most efficient way to achieve data
security online. Encryption is a method of
See Wireless LAN.
coding data. Generally it is necessary to
provide a secret key or password in order
Wi-Fi Protected Access. WPA is an addition
to receive decoded information when
to the security in the 802.11 standard. It is
encrypted.
an enhancement to the original security
implementation for 802.11 devices.
A gate or entrance into a network. The ISP
(Advanced Encryption Standard). See
connecting a home to the internet is
WPA.
generally the gateway in a residence.
(Temporal Key Integrity Protocol). See
x WPA Personal TKIP
x HEX
A numbering system used in encryption.
WPA.
HEX is a 16 symbol system consisting of the
numbers 0 – 9 and A – F.
x IP Address
An address that identifies devices on a
TCP/IP network (eg; 192.168.0.2).
x ISP (Internet Service Provider)
Wireless LAN 802.11a/b/g Device
20 USB Wireless 802.11 b/g Adaptor
Glossary
A company that provides access to the
internet.
20
Page 21

Continued
x MAC Address
x Network Name
x Network Key
x SSID (Service Set Identifier)
x Station
x WEP
x Wireless LAN
Media Access Control Address. On an
802.11 network the MAC address is used to
identify each node of the network.
See SSID.
Network password.
The unique identifier attached to the
header of packets sent over a Wireless
Local Area Network (WLAN). The SSID
differentiates Wireless LANs from one
another. For this reason an SSID must be
entered on each wireless device
attempting to connect on the WLAN.
See Client.
Wired Equivalency Protocol. WEP is an
802.11 encryption standard that provides
security for wireless LANs.
A wireless version of Ethernet, the Wireless
Local Area Network enables wireless
internet access through your SoftAP™ or
broadband router.
x Wireless Network
x WPA
x WPA Personal AES
x WPA Personal TKIP
See Wireless LAN.
Wi-Fi Protected Access. WPA is an addition
to the security in the 802.11 standard. It is
an enhancement to the original security
implementation for 802.11 devices.
(Advanced Encryption Standard). See
WPA.
(Temporal Key Integrity Protocol). See
WPA.
21 USB Wireless 802.11 b/g Adaptor
Glossary
Page 22

22 USB Wireless 802.11 b/g Adaptor
Glossary
Page 23

Appendix A: Troubleshooting
Table 1:
Problems Recommended Solutions
My WPA security settings are not
working properly.
I am unable to see my Network
name in the Available wireless
networks section of the Wireless
Network Connection dialog box
on my HP PC.
I am having difficulty with my
VPN connection.
Verify that your Network Keys are
entered correctly.
If the problem persists/////////
Reconfigure your wireless network
setting to WEP security.
Verify your Network name and Security settings.
If the problem persists.............
Consult the users manual for your
Wireless Gateway or Access Point.
Check your VPN server administrator/
IT Department for wireless connection support and requirements.
Internet Gaming issues
23 USB Wireless 802.11 b/g Adaptor
Appendix A: Troubleshooting
For assistance with internet gaming
issues please refer to Microsoft inter-
net gaming site.
Page 24

Appendix B: Regulatory Notices
Regulatory Notices
Federal Communication Commission Notices
Federal Communication Commission Interference Statement
This equipment has been tested and found to comply with the limits for a Class B digital
device, pursuant to Part 15 of the FCC Rules. These limits are designed to provide reasonable
protection against harmful interference in a residential installation. This equipment generates,
uses and can radiate radio frequency energy and, if not installed and used in accordance with
the instructions, may cause harmful interference to radio communications. However, there is
no guarantee that interference will not occur in a particular installation. If this equipment does
cause harmful interference to radio or television reception, which can be determined by turning
the equipment off and on, the user is encouraged to try to correct the interference by one of the
following measures:
- Reorient or relocate the receiving antenna.
- Increase the separation between the equipment and receiver.
- Connect the equipment into an outlet on a circuit different from that to which the receiver is
connected.
- Consult the dealer or an experienced radio/TV technician for help.
This device complies with Part 15 of the FCC Rules. Operation is subject to the following two
conditions: (1) This device may not cause harmful interference, and (2) this device must accept
any interference received, including interference that may cause undesired operation.
FCC Caution: Any changes or modifications not expressly approved by the party responsible
for compliance could void the user's authority to operate this equipment.
IMPORTANT NOTE:
FCC Radiation Exposure Statement:
This equipment complies with FCC radiation exposure limits set forth for an uncontrolled
environment. This equipment should be installed and operated with minimum distance 20cm
between the radiator & your body.
This transmitter must not be co-located or operating in conjunction with any other antenna or
transmitter.
This device is intended only for OEM integrators under the following conditions:
1) The antenna must be installed such that 20 cm is maintained between the antenna and users, and
2) The transmitter module may not be co-located with any other transmitter or antenna.
As long as 2 conditions above are met, further transmitter test will not be required. However, the
OEM integrator is still responsible for testing their end-product for any additional compliance
requirements required with this module installed (for example, digital device emissions, PC
peripheral requirements, etc.).
IMPORTANT NOTE:
In the event that these conditions can not be met (for example certain laptop
configurations or co-location with another transmitter), then the FCC authorization is no longer
considered valid and the FCC ID can not be used on the final product. In these circumstances,
the OEM integrator will be responsible for re-evaluating the end product (including the transmitter)
and obtaining a separate FCC authorization.
End Product Labeling
This transmitter module is authorized only for use in device where the antenna may be installed
such that 20 cm may be maintained between the antenna and users (for example : PC, desktop,
mobile device.). The final end product must be labeled in a visible area with the following:
Contains TX FCC ID: MXF-U950529G
Manual Information That Must be Included
The OEM integrator has to be aware not to provide information to the end user regarding how to
install or remove this RF module in the users manual of the end product which integrate this module.
The users manual for OEM integrators must include the following information in a prominent location
" IMPORTANT NOTE: To comply with FCC RF exposure compliance requirements, the antenna
used for this transmitter must be installed to provide a separation distance of at least 20 cm from all
persons and must not be co-located or operating in conjunction with any other antenna or transmitter.
Gemtek declares that US model of WUBR-177G (FCC ID: MXF-U950529G) is limited in CH1-CH11
for 2.4G band by specific firmware controlled by the manufacturer and is not user changeable.
24 USB Wireless 802.11 b/g Adaptor
Appendix B: Regulatory Notices
Page 25

European Notices
EC Conformance Declaration
This device compliance with the Essential Requirements of the R&TTE Directive of
the European Union (1999/5/EC). This equipment meets the following conformance
standards:
EN 60950 (IEC 60950) - Product Safety
EN 300 328 - Technical requirements for 2.4 GHz radio equipment
EN 301 893 – Technical requirements for 5GHz radio equipment
EN 301 489-1 / EN 301 489-17 - EMC requirements for radio equipment
Declaration of Conformity in Languages of the European Community
English Hereby, Gemtek Technology Corp, declares that this Radio LAN
device is in compliance with the essential requirements and other
relevant provisions of Directive 1999/5/EC.
Finnish Valmistaja Gemtek Technology Corp vakuuttaa täten että Radio LAN
device tyyppinen laite on direktiivin 1999/5/EY oleellisten vaatimusten
ja sitä koskevien direktiivin muiden ehtojen mukainen.
Dutch Hierbij verklaart Gemtek Technology Corp dat het toestel Radio LAN
device in overeenstemming is met de essentiële eisen en de andere
relevante bepalingen van richtlijn 1999/5/EG.
Bij deze Gemtek Technology Corp dat deze Radio LAN device
voldoet aan de essentiële eisen en aan de overige
relevante bepalingen van Richtlijn 1999/5/EC.
French Par la présente Gemtek Technology Corp déclare que
l'appareil Radio LAN device est conforme aux
exigences essentielles et aux autres dispositions
pertinentes de la directive 1999/5/CE.
Swedish Härmed intygar Gemtek Technology Corp att denna Radio
LAN device står I överensstämmelse med de
väsentliga egenskapskrav och övriga relevanta
bestämmelser som framgår av direktiv 1999/5/EG.
Danish Undertegnede Gemtek Technology Corp erklærer herved, at
følgende udstyr Radio LAN device overholder de
væsentlige krav og øvrige relevante krav i direktiv
1999/5/EF.
25 USB Wireless 802.11 b/g Adaptor
Appendix B: Regulatory Notices
Page 26

European Notices
Continued
German Hiermit erklärt Gemtek Technology Corp, dass sich dieser/diese/diese
Greek ƮƧ ƵƩƯ ƲƣƳƱƶƴƣ LITE-ON Technology Corp ƦƩƭƺƯƧƫ ƱƵƫ RLAN device
Italian Con la presente Gemtek Technology Corp dichiara che questo
Spanish Por medio de la presente Gemtek Technology Corp declara
Portuguese Gemtek Technology Corp declara que este Radio LAN device
Malti Hawnhekk, Gemtek Technology Corp, jiddikjara li dan RLAN device jikkonforma
Managed Accces Point in Übereinstimmung mit den grundlegenden
Anforderungen und den anderen relevanten Vorschriften der Richtlinie
1999/5/EG befindet". (BMWi)
Hiermit erklärt Gemtek Technology Corp die Übereinstimmung des Gerätes
RLAN device mit den grundlegenden Anforderungen und den anderen
relevanten Festlegungen der Richtlinie 1999/5/EG. (Wien)
ƴƶƮƮƱƳƷƺƯƧƵƣƫ ƲƳƱƴ Ƶƫƴ ƱƶƴƫƺƦƧƫƴ ƣƲƣƫƵƩƴƧƫƴ Ƭƣƫ Ƶƫƴ ƭƱƫƲƧƴ ƴƸƧƵƫƬƧƴ
ƦƫƣƵƣưƧƫƴ ƵƩƴ ƱƦƩƥƫƣƴ 1999/5/ƧƬ
Radio LAN device è conforme ai requisiti essenziali
ed alle altre disposizioni pertinenti stabilite dalla
direttiva 1999/5/CE.
que el Radio LAN device cumple con los requisitos
esenciales y cualesquiera otras disposiciones
aplicables o exigibles de la Directiva 1999/5/CE.
está conforme com os requisitos essenciais e
outras disposições da Directiva 1999/5/CE.
mal-ŧtišijiet essenzjali u ma provvedimenti oŧrajn relevanti li hemm fid-Dirrettiva
1999/5/EC
Estonian Käesolevaga kinnitab Gemtek Technology Corp seadme RLAN device
Hungarian Alulírott, Gemtek Technology Corp nyilatkozom, hogy a RLAN device megfelel a
Slovak Gemtek Technology Corp týmto vyhlasuje, že RLAN device spēěa základné
Czech Gemtek Technology Corp tímto prohlašuje, že tento RLAN device je ve shodď se
Slovene Šiuo Gemtek Technology Corp deklaruoja, kad šis RLAN device atitinka esminius
Lithuanian Šiuo Gemtek technology Corp deklaruoja, kad šis RLAN device atitinka esminius
vastavust direktiivi 1999/5/EÜ põhinõuetele ja nimetatud direktiivist tulenevatele
teistele asjakohastele sätetele.
vonatkozó alapvetõ követelményeknek és az 1999/5/EC irányelv egyéb
elõírásainak.
požiadavky a všetky príslušné ustanovenia Smernice 1999/5/ES.
základními požadavky a dalšími pĢíslušnými ustanoveními smďrnice 1999/5/ES.
reikalavimus ir kitas 1999/5/EB Direktyvos nuostatas.
reikalavimus ir kitas 1999/5/EB Direktyvos nuostatas.
26 USB Wireless 802.11 b/g Adaptor
Appendix B: Regulatory Notices
Page 27

Latvian Ar šo Gemtek Technology Corp deklarř, ka RLAN device atbilst Direktūvas
1999/5/EK bƈtiskajœm prasūbœm un citiem ar to saistūtajiem noteikumiem.
IC CAUTION
IC statement: Operation is subject to the following two conditions : (1) this device may not cause
interference, and (2) this device must accept any interference, including interference
that may cause undesired operation of the device.
This device has been designed to operate with an antenna having a maximum gain
of 0 dBi. Antenna having a higher gain is strictly prohibited per regulations of Industry
Canada. The required antenna impedance is 50 ohms.
IMPORTANT NOTE:
IC Radiation Exposure Statement:
This equipment complies with IC radiation exposure limits set forth for an uncontrolled
environment. End users must follow the specific operating instructions for satisfying RF
exposure compliance. This equipment should be installed and operated with minimum
distance 20cm between the radiator & your body.
This transmitter must not be co-located or operating in conjunction with any other
antenna or transmitter.
27 USB Wireless 802.11 b/g Adaptor
Appendix B: Regulatory Notices
Page 28

Appendix C: Product Specifications
Model Number WUBR177G
Functional Criteria
Data Rate Up to 54 Mbps
Operating Range 802.11b/g: 30m (indoor), 200 m (outdoor)
Radio Signal
Modulation
Operating Frequency
Operating Channel
Physical Characteristics
Power Consumption TX: 350/305mA Max in 802.11b/g mode
Orthogonal Frequency Division
Multiplexing (OFDM)
USA (FCC), Canada (IC):
802.11b/g: 2412~2462 MHz (Ch1~Ch11)
Europe (ETSI):
802.11b/g : 2412~2472 MHz (Ch1~Ch13)
USA, Canada: 11 Channels (802.11b/g)
Europe: 13 Channels (802.11b/g)
RX: 145 mA Max in 802.11b/g mode
Dimensions 4.5x 1.25 x1.25 in.
Antenna External Antenna
LED Indicator No LED Indicator
Host Interface USB specification v.2.0
Standards Conformance
Wireless Standard IEEE 802.11 b/g, Wi-Fi, WPA
28 USB Wireless 802.11 b/g Adaptor
Appendix C: Product Specifications
Page 29

Model Number WUBR177G
Environmental
Temperature
Humidity 5 to 90% (non-condensing)
Certification
Emissions
Safety EN60950
ETSI EN300328, EN301893, EN301489
Software Drivers
Operating: 0 to 55 C (32 to 131 F)
Storage: -20 to 75 C (-4 to 167 F)
EN 55022 Class B
EN 61000-4-2/3/4/6/11
FCC Part 15 (B)
NDIS Drivers Windows XP Professional SP2
Antenna Specification
Antenna Type External Antenna
Frequency Band
Polarization Vertical
Connector Reverse SMA Connector
Gain
Radiation Omni-directional
2.4 ~ 2.4835GHz
802.11b/g: 0dBi
29 USB Wireless 802.11 b/g Adaptor
Appendix C: Product Specifications
Page 30

Index
802.11 1, 5, 8, 28, 29
A
Access Point 19, 23
AES 5, 19
Antenna 3, 4, 5,,7, 9, 24, 28, 29
ASCII 11, 17, 19
B
Broadband Router 17, 19
C
Client 10
E
Encryption 5, 6, 8, 11,17, 19
G
Gateway 10, 17, 19, 23
H
HEX 11, 17, 19
I
Installation 5, 7, 24
K
Key 15
key 6, 17, 19
N
Network 5, 6, 9, 10, 11, 12, 13, 14, 15, 17, 18, 19, 23
Network Key 10, 11, 12, 15, 17, 18, 19, 21
Network Name 12, 13, 17, 21
Network Security 15, 18
S
security 5, 6
W
Wireless Network 9, 10, 11, 13, 14, 15, 16, 17, 18, 19, 21, 23
WLAN 5
WPA 5, 6, 8, 10, 11, 12, 15, 18, 19, 23, 28
WPA2 5
WPA-PSK 12, 19
30 USB Wireless 802.11 b/g Adaptor
Index
 Loading...