

Page 1

en_pd10.book Page 0 Monday, September 12, 2005 12:43 PM
For Your Safety
To prevent damage to your Nikon product or injury to yourself or to others, read the following safety precautions in their entirety
before using this equipment. Keep these safety instructions where all those who use the product will read them.
En
The consequences that could result from failure to observe the precautions listed in this section are indicated by the following symbol:
This icon marks warnings, information that should be read before using this product to prevent possible injury.
WARNINGS
Turn off immediately in the event of malfunction
Should you notice smoke or an unusual smell coming from the
PD-10, unplug th e USB connector fr om printer and remove the
battery immediately, taking care to avoid burns. Then take the
equipment to a Nikon-authorized service representative for inspection. Continued operation could resu lt in injury.
Do not disassemble
Touching the interna l parts of the product cou ld result in injury.
Repairs should be p erformed only by qualified technic ians.
Should the product break open as the result of a fall or other accident, take the product to a Nikon-authorized service representative for inspectio n after unplugging the product and/or
removing the ba tteries.
Do not use in the presence of flammable gas
Do not use electronic equipment in the presence of flammable
gas, as this could result in explosion or fire.
Keep dry
Do not immerse in or expose to water. Continuing to use the product under such circumstances may cause fire or an electric shock.
Keep out of reach of children
Failure to observe this p recaution could resul t in injury.
Remove the batteries if the product will not be used for
long periods
Failure to observe this precaution could result in leakage, which
may cause fire, injury, or contamination of surroundings.
Follow the instructions of hospital and airline personnel
This device emits radio fr equency radiation that co uld interfere
with medical or nav igational equipme nt. Do not use this de vice
in a hospital or on board an airplane without first obtaining the
permission of hospital or airline staff.
Follow the warnings on the batteries
Failure to observe this pr ecaution could result in leakage, ruptu re,
or fire.
Page 2

en_pd10.book Page i Monday, September 12, 2005 12:43 PM
Notices
• No part of the manuals incl uded with this produc t may be reproduced ,
transmitted, transcrib ed, stored in a retrie val system, or trans lated into
any language in any form, by any means, without Nikon’s prior written
permission.
• Nikon reserves the right to change the specifications of the hardware
and software described in these manuals at any time and without prior
notice.
Notice for customers in the U.S.A.
Federal Communications Commission (FCC)
Declaration of Conformity
This device complies with Part 15 of the FCC rules. Operation of the device is subject to the following two conditions: (1) this device may not
cause harmful int erference, and ( 2) this device mus t accept any inte rference received, including interference that may cause undesired operation.
Products that contain a radio transmitter are labeled with FCC ID and may
also carry the FCC logo.
Federal Communication Commission Interference Statement
This equipment ha s been tested and fo und to comply wi th the limits for
a Class B digital device, pursuant to Part 15 of the FCC Rules. These limits
are designed to provide reasonable protection against harmful interference in a residential installation. This equipment generates, uses and can
radiate radio frequency energy and, if not installed and used in accordance with the instru ctions, may cause harmful interference to radio communications. However, there is no guarantee that interference will not
occur in a parti cular installation. If this equipment d oes cause harm ful interference to radio or television receptio n, which can be determ ined by
• Nikon will not be held liable for any damages resulting from the use of
this product.
• While every effort has been made to ensure that the information in
these manuals is accurate and complete, we would appreciate it were
you to bring any errors or omissions to the atten tion of the Nikon representative in your area (address provided separately).
turning the equipment off and on, the user is encouraged to try to correct
the interference by one of the following measures:
• Reorient or relocate the re ceiving antenna.
• Increase the separation between the equipment and receiver.
• Connect the equipment into an outlet on a circuit different from that to
which the receiver is connected.
• Consult the dealer or an experienced radio/TV technician for help.
En
i
Page 3

en00_pd10_7.fm Page ii Monday, September 12, 2005 2:35 PM
This device complies with Part 15 of the FCC Rules. Operation is subject
to the following two conditions: (1) This device may not cause harmful interference, and (2) this device must accept any interference received, including interference that may cause undesired operation.
En
FCC Caution: Any ch anges or modifications not expressl y approved by the
party responsible for compliance could void the user's authority to operate this equipment.
IMPORTANT NOTE:
FCC Radiation Exposure Statement:
This equipment c omplies with FC C radiation expos ure limits set forth for
an uncontrolled environment. This equipment should be installed and operated with minimum distance 20cm between the radiator & your body.
This transmitter must not be co-located or operating in conjunction with
any other antenna or tr ansmitter.
Nikon Corporation declares that the Wireless Printer Adapter
PD-10 ( FCC ID: MXF-U940829G) is limited in CH1~CH11 for 2.4 GHz
by specified firmware controlled in U.S.A.
Notice for customers in the State of California
WARNING: Handling the cord on this produc t will expose you to lead, a
chemical known to the State of California to cause birth defects or other
reproductive harm. Wash hands aft er handling.
Nikon Inc.,
1300 Walt Whitman Road, Melville, New Y ork
11747-3064, U.S. A.
Tel.: 631-547- 4200
ii
Notice for customers in Canada
CAUTION
This class B digital apparatus meets all requirements of the Canadian Interference Causing Equipment Regulations.
RSS-210 14. Exposure of Humans to RF Fields
The installer of this radio equipment must ensure that the antenna is located or pointed such that it does n ot emit RF field in excess of Health
Canada limits for the general population; consult Safety Code 6, obtainable from Health Canada’s website:
www.hc-sc.gc.ca/rpb
ATTENTION
Cet appareil numé ique de la classe B respect e toutes les exigences du R èglement sur le matériel brouilleur du Canada.
IC statem ent
Operation is subject to the following two conditions:
1) This device may not cause interference and
2) This devic e must accept any interfe rence, including inte rference that
may cause undesired operation of the device.
Page 4

en_pd10.book Page iii Monday, September 12, 2005 12:43 PM
Notice for customers in Europe
Hereby, Nikon C orporation, decla res that this wirele ss printer adapte r is
in compliance with t he essential requirem ents and other releva nt provisions of Directive 199 9/5/EC.
Symbol for separate collection applicable
in European countries
This symbol indicates that this product is to be collected
separately.
The following apply only to users in European countries.
• This product is designated fo r separate collection at a n appropriate collectio n point. Do not dispose of as househ old
waste.
• For more information, contact the retailer or the local authorities in charge of waste managemen t.
Caring for the Adapter
Keep dry
The device will be damaged if immersed in water or subjected to
high levels of moisture.
Do not drop
The product may malfunction if subjected to strong shocks or vibration.
Keep away from strong magnetic fields
Do not use or store this device in the vicinity of equipment that generates strong electromagnetic radiation or magnetic fields. Stro ng
static charges or the magnetic fields produced by equipment such as
radio transmitters could affect the product’s int ernal circuitry.
Avoid sudden changes in temperature
Sudden changes in temperature, such as occur when entering or
leaving a heated building on a cold day, can cause c ondensation inside the device. To prevent condensation, place the device in a carrying case or a plastic bag before exposing it to s udden changes in
temperature.
En
iii
Page 5

en_pd10.book Page iv Monday, September 12, 2005 12:43 PM
Table of Contents
For Your Safety
Notices ...............................................................................................................................................................i
En
Caring for the Adapter ..................................................................................................................................... iii
Introduction ..................................................................................................................................................... 1
Before You Begin ............................................................................................................................................. 2
Parts of the Adapter ......................................................................................................................................... 3
Inserting the Batteries....................................................................................................................................... 4
Connecting the PD-10 to a Printer .................................................................................................................... 5
Setting Profile Information on the Camera ........................................................................................................ 6
Wireless Printing............................................................................................................................................... 8
LED Lamp Display ............................................................................................................................................. 9
Troubleshooting ............................................................................................................................................. 10
Specifications ................................................................................................................................................. 11
iv
©2005 FotoNation
Page 6

en_pd10.book Page 1 Monday, September 12, 2005 12:43 PM
Introduction
Thank you for purchasing the Nikon PD-10 wireless printer adapter.
The PD-10 is an accessory for use with Nikon COOLPIX digital cameras* equipped with Wireless transfer mode.
By connecting the PD-10 to a PictBridge-compatible printer, you can wirelessly print camera images without a computer.
Read this manual and the camera manual thoroughly before use, and keep them handy when using these products.
* Check the camera manual to make sure that the camera is compatible with the PD-10.
P
O
W
E
R
LINK
S
T
A
R
T
B
U
S
Y
Note
• Connect the PD-10 directly to a printer. Do not connect to a USB hub.
• The PD-10 must be connected to a printer that pro vides a 5 V, 100 mA power supply throu gh the PictBridge interface (USB connector).
En
1
Page 7

en_pd10.book Page 2 Monday, September 12, 2005 12:43 PM
Before You Begin
Package
En
Contents
Life-Long Lea rning
As part of Nikon’s “Life-Long L earning” commitment to ongoing
product support and education, continually-updated infor mation is
available on-line at the following sites:
• For users in the U.S.A.:
http://www.nikonusa.com/
• For users in Europe and Africa :
http://www.europe-nikon.com/support/
• For users in Asia, Oceania and the Middle East:
http://www.nikon-asia.com/
Visit these sites to keep up-to-date with the latest product information, tips, answers to frequently-asked questions (FAQs), and general advice on digital imaging and photography. Add itional
information may be available from the Nikon representative in your
area. See the URL below for contact information:
2
PD-10 wireless printer adapter
Instruction Manual (this manual)
Declaration of Co nformity (Europe only)
Two LR6 (AA) Alkaline batteries (for testin g)
Warranty
http://nikonimaging.co m/
Page 8

en_pd10.book Page 3 Monday, September 12, 2005 12:43 PM
Parts of the Adapter
POWER lamp
(c5, 9)
Reset button (c10)
P
O
W
E
R
LINK
LINK lamp
(yellow green/orange)
(c9)
USB connector (c5)
En
Battery-chamber cover (c4)
S
T
A
R
T
BUSY
START button (c5)
BUSY lamp
(yellow green/orange)
(c7, 9)
Battery chamber (c4)
3
Page 9

en_pd10.book Page 4 Monday, September 12, 2005 12:43 PM
Inserting the Batteries
En
1
Press down and slide the batterychamber cover in the direction of
the arrow and open the cover.
4
2
Insert two AA batteries into the
battery chamber matching the (+)
and (–) polarities as shown in the
diagram.
3
Close the battery-chamber cover
and slide it until it latches.
Page 10

en_pd10.book Page 5 Monday, September 12, 2005 12:43 PM
Connecting the PD-10 to a Printer
S
T
A
R
3
T
O
Y
S
W
U
E
B
R
LINK
2
Turn the printer on and check that
it is ready to print.
• Do not perform any operations with the
PD-10 until the printer is ready to print.
1
Connect the USB cable of the
PD-10 to the PictBridge connector
on the printer.
P
En
22
P
O
W
E
R
1
3
Press the START button on the
PD-10 to turn it on.
• The POWER lamp on the PD-10 lights,
and the LINK lamp change s from orange
to yellow green. The PD-10 is ready for
wireless connection.
Once a connection is established:
• If this is the first time the PD-10 is used
with the camera:
Proceed to p.6.
• To perform wireless printing:
Proceed to p.8.
5
Page 11
CHOOSE PROFILE 1/3
Confirm
Info
Cancel
Cancel
en_pd10.book Page 6 Monday, September 12, 2005 12:43 PM
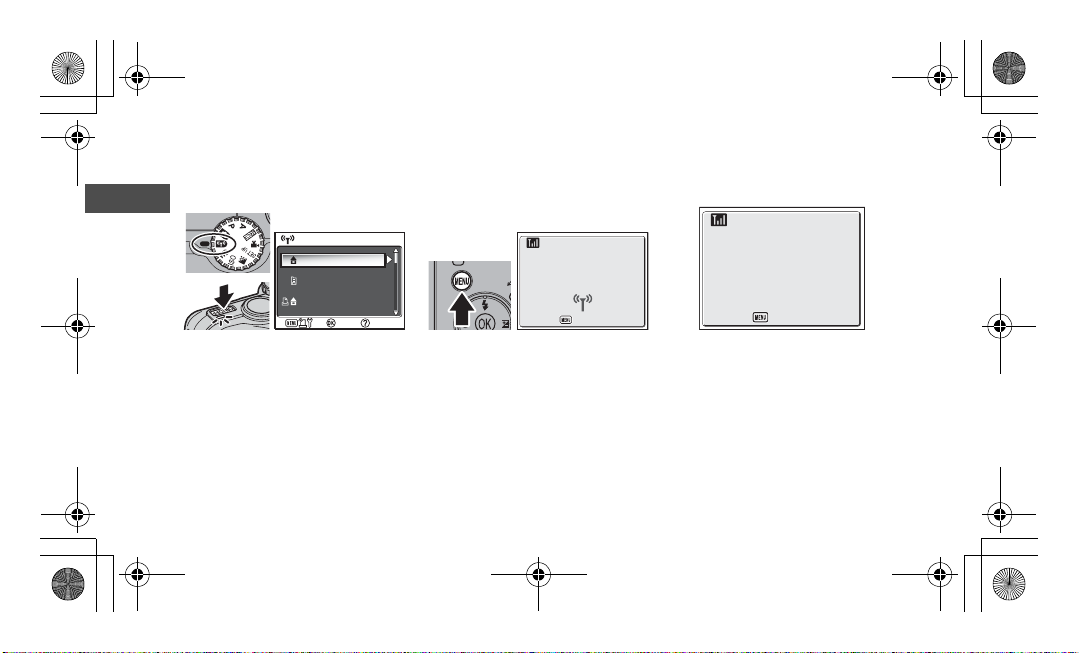
Setting Profile Information on the Camera
If this is the first time the PD-10 is being used with a particular camera, follow the steps below to set up Profile Information on the
camera and PD-10.
En
1
Rotate the mode dial on the camera to Y (Wireless transfer
mode), and turn the camera on.
• The CHOOSE PROFILE screen is displayed
on the camera monitor.
• If no Profile Information is currently s et, a
message is displaye d prompting you to
add Profile Information.
6
CHOOSE PROFILE 1/3
Profile-A
Profile-B
Profile-C
Confirm
Info
Connecting to
wireless printer adapter
Cancel
2
Press the m button on the cam-
era.
• The message “Connecting to wireless
printer adapter” will be displayed on the
camera monitor.
Press the button on
Wireless Printer Adapter
Cancel
3
The message “Press the button on
Wireless Printer Adapter” will be
displayed on the camera monitor.
Page 12

Confirm
en_pd10.book Page 7 Monday, September 12, 2005 12:43 PM
S
T
A
R
P
O
1
4
As soon as the message is displayed, press the START button on
the PD-10 for one to two seconds.
• Press the START button while the message is displaye d.
• The BUSY lamp on the PD-10 will blink
slowly in orange 1. After a while, the
BUSY lamp will light in ora nge for about
one second when setup is complete 2.
Note
If setup fails, the BUSY lamp on the PD-10 will blink rapidly in ora nge, and a message will be displayed on the camera monitor. If this occurs, press the d button on the camera, and perform settings again.
T
Y
S
W
U
E
B
R
LINK
2
5
Ready to connect toReady to connect to
Printer1
Do you want to connect now?
Do you want to connect now?
No
Yes
Confirm
After setup is complete, the message “Ready to connect to
Printer1 Do you want to connect
now?” will be displayed on the
camera monitor.
•
Select
Yes
to cont inue operations and
c
print (step 3 on
to the CHOOSE PROFILE screen (
•
After Profile Information is set up, the
camera and PD-10 can be connected any
number of times by choosing the Profile Information from the camera CHOOSE PROFILE screen. Profile Information must be set
up again when Reset (
8). Select No to return
c
c
10) is perfo rmed.
6).
Number of Devices That Can Be Set
• The PD-10 can store the Profile Information
of up to 50 cameras. If 50 profiles have already been created, the oldest profile will
be deleted when storing a new profile.
• The c amera can store the Profile Information of up to 9 devices, such as the PD-10,
computers, and printers connected to computers. If 9 profiles have already been created and the Profile Information of the
PD-10 is stored, delete an unneeded profile
first using the Wireless Camera Setup Utility provided with the camera. If an unneeded profile is not deleted, the oldest profile
will be overwritten. See the camera manual
for more information on deleting profiles.
Profile names
• When the Profile Information of the
PD-10 is stored in the camera, the profile name is automatically set to “Printer
x” (where x is a digit from 1 to 9).
• The profile name “Printer x” can be
changed later using the Wireless Camera
Setup Utility provided with the camera. See
the camera manual for more information.
Turning the PD-10 Off
• The PD-10 will turn off when disconnected from the printer.
En
7
Page 13

En
CHOOSE PROFILE 1/3
Confirm
Info
CHOOSE PROFILE 2/3
Confirm
Info
WIRELESS PRINTING
Confirm
Info
en_pd10.book Page 8 Monday, September 12, 2005 12:43 PM
Wireless Printing
Use the PD-10 and a camera with PD-10 Profile Information to wirelessly print camera images.
CHOOSE PROFILE 2/3
CHOOSE PROFILE 1/3
Profile-A
Profile-B
Profile-C
Confirm
Info
1
Rotate the mode dial on the camera to Y (Wireless transfer
mode), and turn the camera on.
• The CHOOSE PROFILE screen is displayed
on the camera monitor.
Note
• Use fully-powered batteries when performing wireless printing.
• See the camera manual for direct printing operations.
• If printing is canceled before completing, printing stops and the camera monitor returns to the CHOOSE PROFILE screen.
2
8
Profile-D
Profile-E
Printer1
Confirm
Info
Select the profile name of the
PD-10 using the multi selector on
the camera and press d button.
• Screen s showing the connection sta tus of
the PD-10 are displayed on the camera
monitor.
3
The WIRELESS PRINTING screen is
displayed on the camera monitor.
• Print using the same procedure as “Dire ct
• After printing is complete, the camera
WIRELESS PRINTING
Print selection
Print all images
DPOF printing
Paper size
Confirm
Print” in the camera manual to directly
print from the camera to a PictBridgecompatib le printer.
monitor returns to the CHOOSE PROFILE
screen.
Page 14
en_pd10.book Page 9 Monday, September 12, 2005 12:43 PM
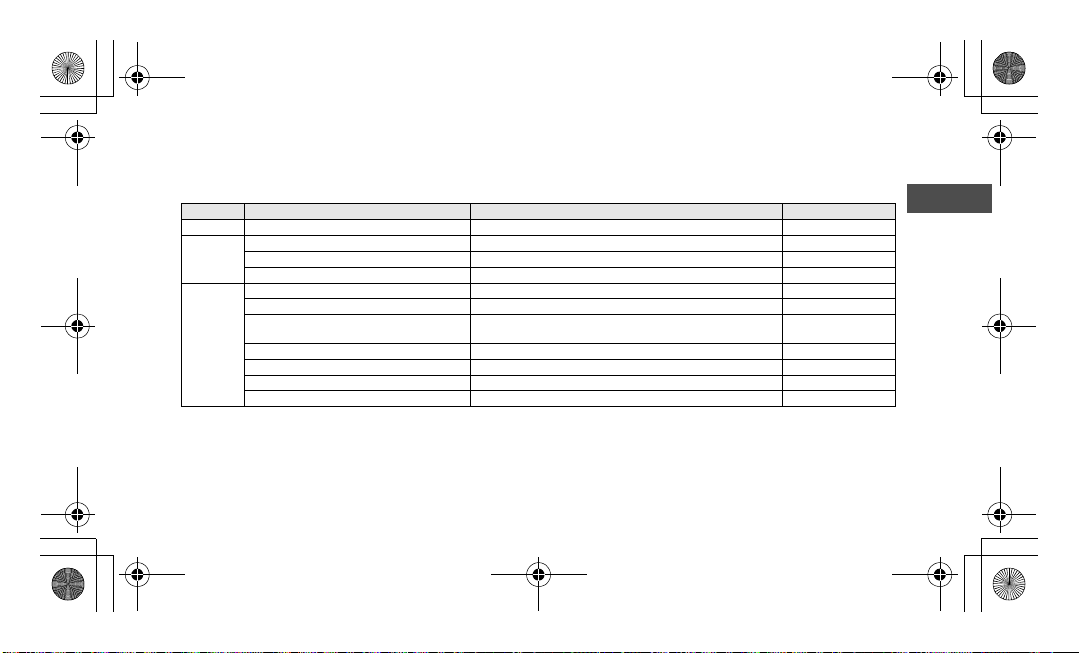
LED Lamp Display
The POWER, LINK and BUSY lamps (c3) indicate the following after the printer and camera are set up.
During printing standby, each lamp displays the color corresponding to the check mark (9).
Lamp Display Status Printing standby
POWER Lights Power is on 9
LINK Lights in yellow green Ready for wireless connection 9
BUSY Lights in yellow g reen Printing standby 9
Note
Lights in orange Not ready for wireless connection
Blinks rapidly in or ange for about 1 se cond There is a problem w ith the wireless connection.
Blinks in yellow green Printing
Blinks rapidly in y ellow green for abo ut 3 sec-
onds
Blinks in orange Setting Profile Information on the camera
Lights in orange fo r about 1 second Profile Information setup on the camera complete
Blinks rapidly in or ange for about 3 se conds There is a problem s etting Profile Infor mation on the camera.
Blinks alt ernately i n orange and yellow gree n Resetting (c10)
• If the connection with the camer a is not established (when the BUSY lamp i s not lit) and no operations are performe d for about three minutes,
the PD-10 automatically turns off in order to reduce power consumption.
• If in printing standby (indicated by the check marks in the chart above) for 10 minutes, the PD-10 automatically turns off.
There is a problem receiving data for prin ting.
En
9
Page 15

en_pd10.book Page 10 Monday, September 12, 2005 12:43 PM
Troubleshooting
If the camera cannot establish a strong connection to the PD-10 or if printing suddenly stops, check the following items.
Problem Possible cause/Solution
En
The POWER lamp on the PD-10 does not light. • Use fully-powered batteries.
Unable to successfully set up the Profile Information on the
camera and PD-10./T he camera cannot estab lish a strong
connection to the PD-10 (overall).
The camera cannot e stablish a strong connection to the
PD-10./The connecti on is interrupted.
There is a problem with the wireless connection./The connection is interrupted.
Unable to successfully set up the Profile Information on the
camera and PD-10. (BUSY lamp blinks ra pidly in orange.)
Resetting
• If the Reset button is pressed for about one second while the PD-10 is on and connect-
S
T
A
R
T
P
ed to the printer, all of the Profile Information set in the PD-10 will be deleted.
• Press the Reset button with a small, thin object.
10
• Check that the PD-10 is connected to the printer.
• Check that the printer is on and ready to print.
The wireless signal may be affected by something nearby. Move the camera and printer closer t ogether.
The wireless signal may be affected by something nearby. Move the camera and printer closer together. Perform a Reset, and then set up the Profile Information on the
camera again (c6).
Perform Steps 3 and 4 in “Setting Profile Information on the Camera” (c6 - 7) in rap-
id succession. In Step 4, the START button must be pressed for one to two seco nds.
Page 16

en01_pd10_7.fm Page 11 Monday, September 12, 2005 12:54 PM
Specifications
Interface USB
Wireless LAN interface
Power sources
Dimensions (W × H × D)
Approximate weight 73 g without batter ies
Operation Environ ment
IEEE 802.11g Wireless LAN (OFDM, 5 4 Mbps in 2.4 GHz band)
IEEE 802.11b Wireless LAN (DSSS , 11 Mbps in 2.4 GHz ba nd)
Wireless mode Ad-hoc mode
Security WEP 128 bit
Batteries Two LR6 (AA) Alkaline batteries (two rechargeable Nikon EN-MH1 batteries, two ZR6 (AA)
USB connector on printer 5 V, 100 mA
Battery life Approximately 90 minutes (this m ay differ depe nding on the type of printer, fil e size of
Body: Approximately 117 × 45.5 × 29.5 mm/4.6 in. × 1.8 in. × 1.2 in. including cabl e boot (not including c able)
USB cable: Approx imately 500 mm/19. 7 in.
Temperature: 0 to 40°C
Humidity: 10 to 90 %
The distance to communicate: 0 - 25 m Condition of the distance: Line of sight
The distance to communicate: 0 - 40 m Condition of the distance: Line of sight
nickel manganese b atteries and two FR6/L91 (AA) lithium batteries also can be used)
pictures to be print ed, and wireless connection conditions)
En
11
 Loading...