

Page 1

WIXFMM-109 802.16-2005
2.5GHz Personal Hot Spot
User Guide
Version 1.0
Gemtek Technology Co., Ltd.
www.gemtek.com.tw
No.1 Jen-Ai Road, HsinChu
Industrial Park, HuKou Hsiang,
HsinChu Hsien,Taiwan, R.O.C.
Page 2

WIXFMM
-
109 User Guide
V1.0
Copyright
This DOCUMENT is copyrighted with all rights reserved. No part of this
publication may be reproduced, transmitted, transcribed, stored in a retrieval
system, or translated into any language in any form by any means without the
written permission of Gemtek Technology Co. Ltd.
Notice
Gemtek reserves the right to change specifications without prior notice.
While the information in this document has been compiled with great care, it
may not be deemed an assurance of product characteristics. Gemtek shall be
liable only to the degree specified in the terms of sale and delivery.
The reproduction and distribution of the documentation and software supplied
with this product and the use of its contents is subject to written authorization
from Gemtek.
2
Page 3

WIXFMM
-
109 User Guide
V1.0
Contents
Copyright ............................................................................................................................... 2
Notice .................................................................................................................................... 2
Contents .................................................................................................................................... 3
About this Guide ........................................................................................................................ 7
Purpose .................................................................................................................................. 7
Conventions Used in this Document ..................................................................................... 7
Chapter 1 – Introduction ........................................................................................................... 7
Product Overview .................................................................................................................. 8
Product Package .................................................................................................................... 8
Connector and Buttons ......................................................................................................... 8
LED Indicators ........................................................................................................................ 9
Chapter 2 – Installation ........................................................................................................... 10
Chapter 3 – Web Interface ...................................................................................................... 12
Chapter 4 – Reference Manual ................................................................................................ 13
Personalize .......................................................................................................................... 15
Personalize | Password ................................................................................................... 23
Personalize | Device Time ............................................................................................... 24
Personalize | Device Name ............................................................................................. 25
Personalize | Restore To Factory .................................................................................... 26
Internet ................................................................................................................................ 15
Internet | WiMAX Security .............................................................................................. 15
Internet | Internet Protocol ............................................................................................ 16
Internet | Firewall ........................................................................................................... 17
Internet | Dynamic DNS .................................................................................................. 19
Internet | WiFi ................................................................................................................. 20
3
Page 4

WIXFMM
-
109 User Guide
V1.0
Local Address ....................................................................................................................... 27
Local Address | DHCP Server ........................................................................................... 27
Local Address | Lease Status ........................................................................................... 28
Local Address | Lease Reservation .................................................................................. 29
Port Forwarding ................................................................................................................... 30
Port Forwarding | Basic ................................................................................................... 30
Port Forwarding | Forwarding ......................................................................................... 31
Control Panel ....................................................................................................................... 32
Control Panel | Software ................................................................................................. 32
Control Panel | System .................................................................................................... 33
Control Panel | Power manage ....................................................................................... 34
Control Panel | About ..................................................................................................... 35
Status ................................................................................................................................... 36
Status | WiMAX Status .................................................................................................... 36
Status | Device Status ..................................................................................................... 37
Status | Syslog ................................................................................................................. 38
Reboot /Log out/ Reconnect ............................................................................................... 39
關於這份使用手冊 ................................................................................................................. 39
目的: .................................................................................................................................... 40
如何閱讀這份文件 ............................................................................................................. 40
第一章 – 簡介 ....................................................................................................................... 40
產品介紹: ............................................................................................................................ 41
Product Package .................................................................................................................. 41
連結孔/按鈕介紹 ............................................................................................................... 41
燈號定義 ............................................................................................................................. 43
第二章 – 安裝 ....................................................................................................................... 44
第三章 – 網頁介面 ............................................................................................................... 46
4
Page 5

WIXFMM
-
109 User Guide
V1.0
第四章 – 使用者介面說明 ................................................................................................... 46
個人化 ............................................................................................................................. 48
個人化| 密碼 ................................................................................................................. 54
個人化| 設備時間 ......................................................................................................... 55
個人化|當前設備名稱 ................................................................................................... 56
個人化|恢復原廠設定 ................................................................................................... 57
網際網路設定| WiMAX 設定 ......................................................................................... 48
網際網路設定|網際網路 ............................................................................................... 49
網際網路設定|防火牆 ................................................................................................... 50
網際網路設定|動態 DNS ............................................................................................... 51
網際網路設定|WiFi ........................................................................................................ 52
區域網路設定 ..................................................................................................................... 58
區域網路設定 | DHCP 伺服器 ......................................................................................... 58
區域網路設定| 租約狀態 ............................................................................................. 59
區域網路設定|租約保留 ............................................................................................... 60
虛擬伺服器設定 ................................................................................................................. 61
虛擬伺服器設定 |基本 ..................................................................................................... 61
虛擬伺服器設定 |轉發 ..................................................................................................... 62
系統管理 ............................................................................................................................. 63
系統管理 | 軟 ............................................................................................................... 63
系統管理 | 語言切換 ................................................................................................... 64
系統管理 | 電源管理 ................................................................................................... 65
系統管理 | 關於 ........................................................................................................... 66
狀態 ..................................................................................................................................... 67
狀態 | WiMAX 狀態 ...................................................................................................... 67
狀態 | 設備狀態 ........................................................................................................... 68
狀態 | 系統紀錄 ........................................................................................................... 69
5
Page 6

WIXFMM
-
109 User Guide
V1.0
重新啟動/登出/重新連結 .................................................................................................. 70
6
Page 7
WIXFMM
-
109 User Guide
V1.0
to observe this may result in
Additional information that may be helpful but which is not
About this Guide
Purpose
This document provides information and procedures on installation and
configuration of WIXFMM-109 802.16-2005 2.5GHz Personal Hotspot. You
could utilize the theoretical information in this guide to setup your device
Conventions Used in this Document
The following typographic conventions and symbols are used throughout this
document:
bold
Very important information. Failure
damage.
Important information that should be observed.
required.
Menu commands, buttons and input fields are displayed in bold
Chapter 1 – Introduction
7
Page 8
WIXFMM
-
109 User Guide
V1.0
Product Overview
Thank you for choosing GlobalMobile 802.16-2005 2.5GHz Personal Hotspot.
Compliant with 802.16-2005 WiMAX standard, WIXFMM-109 is a
comprehensive device which can connects to WiMAX network and also
provides Wi-Fi connectivity for multiple users.
Product Package
Item Qty
WIXFMM-109 802.16-2005 2.5GHz Personal Hotspot 1
1
User Manual
2
Power Adapter 1
3
USB cable 1
4
Battery 1
5
If any of the items mentioned above are missing or damaged,
please contact our customer support immediately.
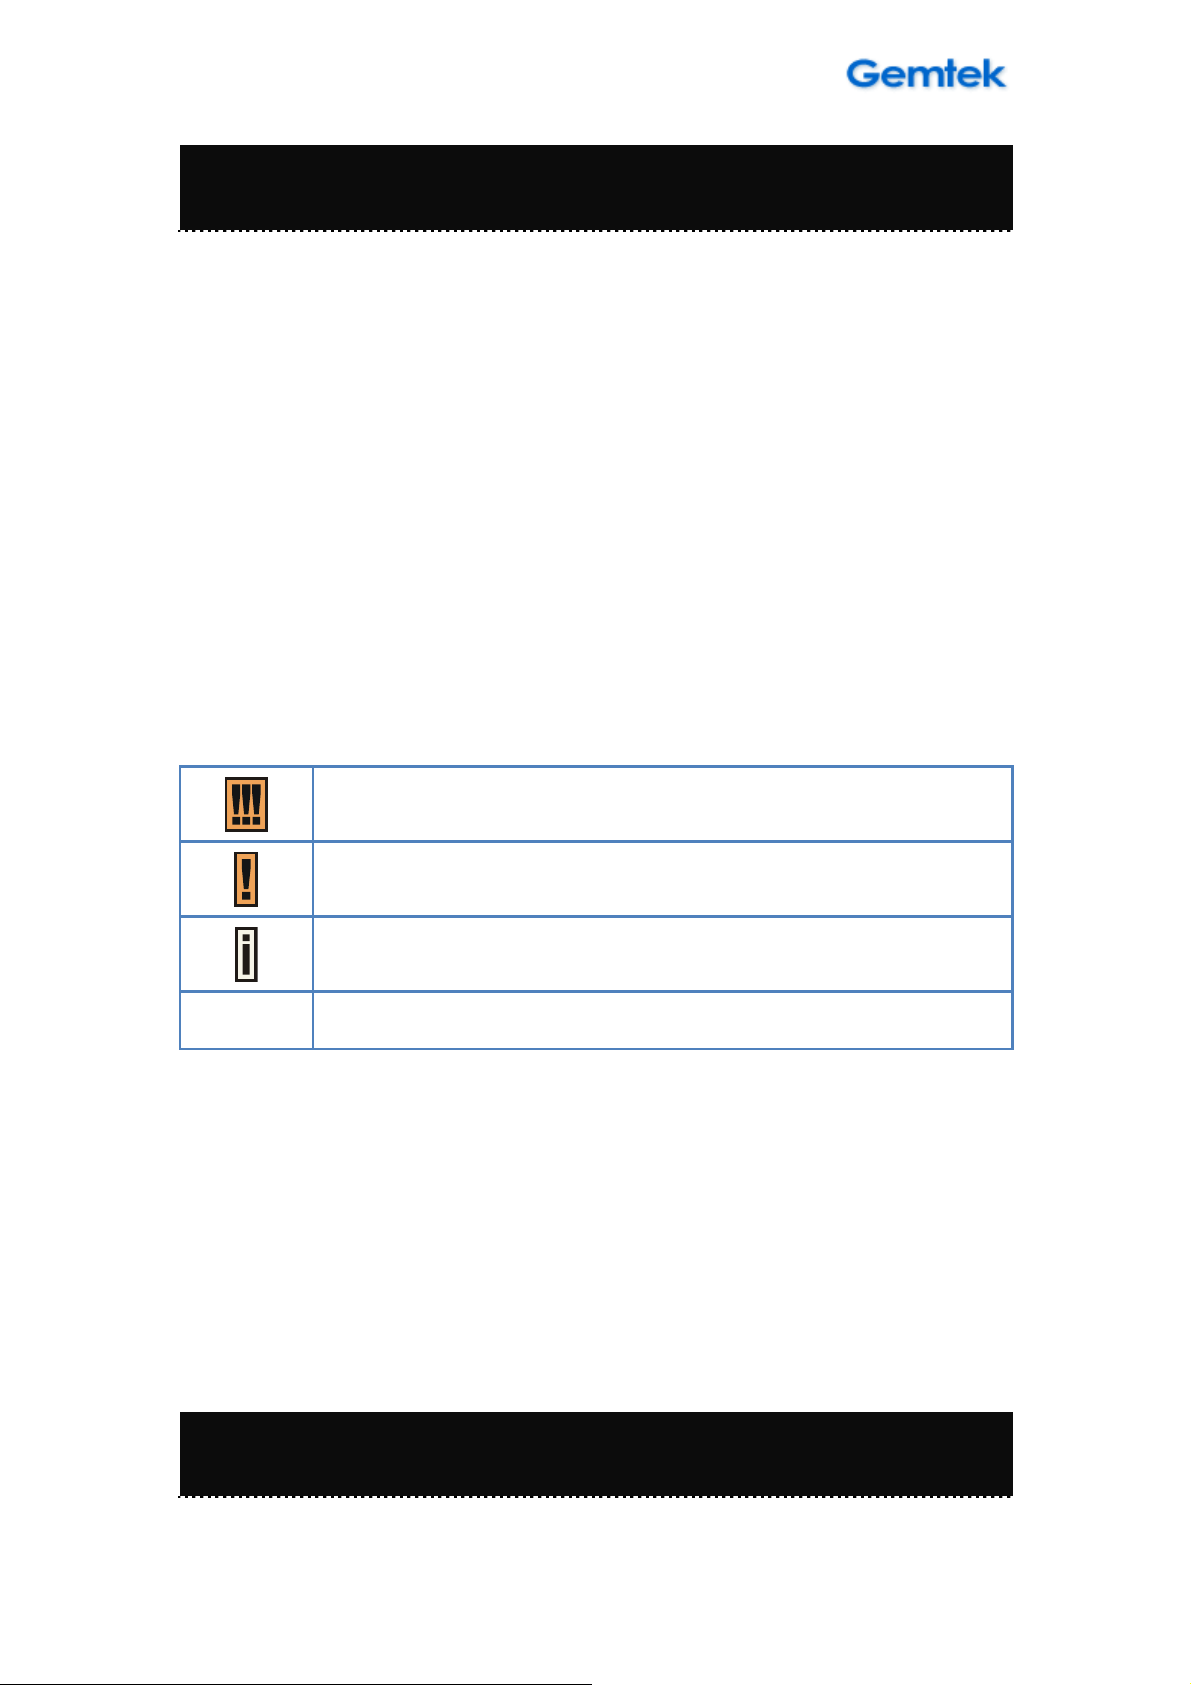
Connector and Buttons
1
1. Power Button: Press and hold the Power button for 5 seconds to power
on or power off the device.
8
Page 9

WIXFMM
-
109 User Guide
V1.0
2. Reboot/Reset Button: Press and hold the Reboot/Reset button for less
than 5 seconds to reboot the device. Or press and hold the Reboot/Reset
button for more than 5 seconds to reset the device to factory default.
3. USB Port: This port is to connect your WIXFMM-109 with a PC or charge
the built-in battery.
LED Indicators
WIXFMM-109 LED Indicators
Blue Steady ON CINR < 14dB
WiMAX
1.
Blue Steady ON 14dB < CINR < 23dB
Signal Strength
Blue Steady ON 23dB < CINR
ON Power ON
2 Power Blue
OFF Power OFF
Flashing Booting
3 Wi-Fi Blue ON Wi-Fi ON
9
Page 10
WIXFMM
-
109 User Guide
V1.0
OFF Wi-Fi OFF
Flashing Wi-Fi Traffic
Green Steady ON Battery > 66%
Amber Steady ON 33% < Battery < 66%
4.
Battery
Red Steady ON Battery < 33%
Flashing Charging
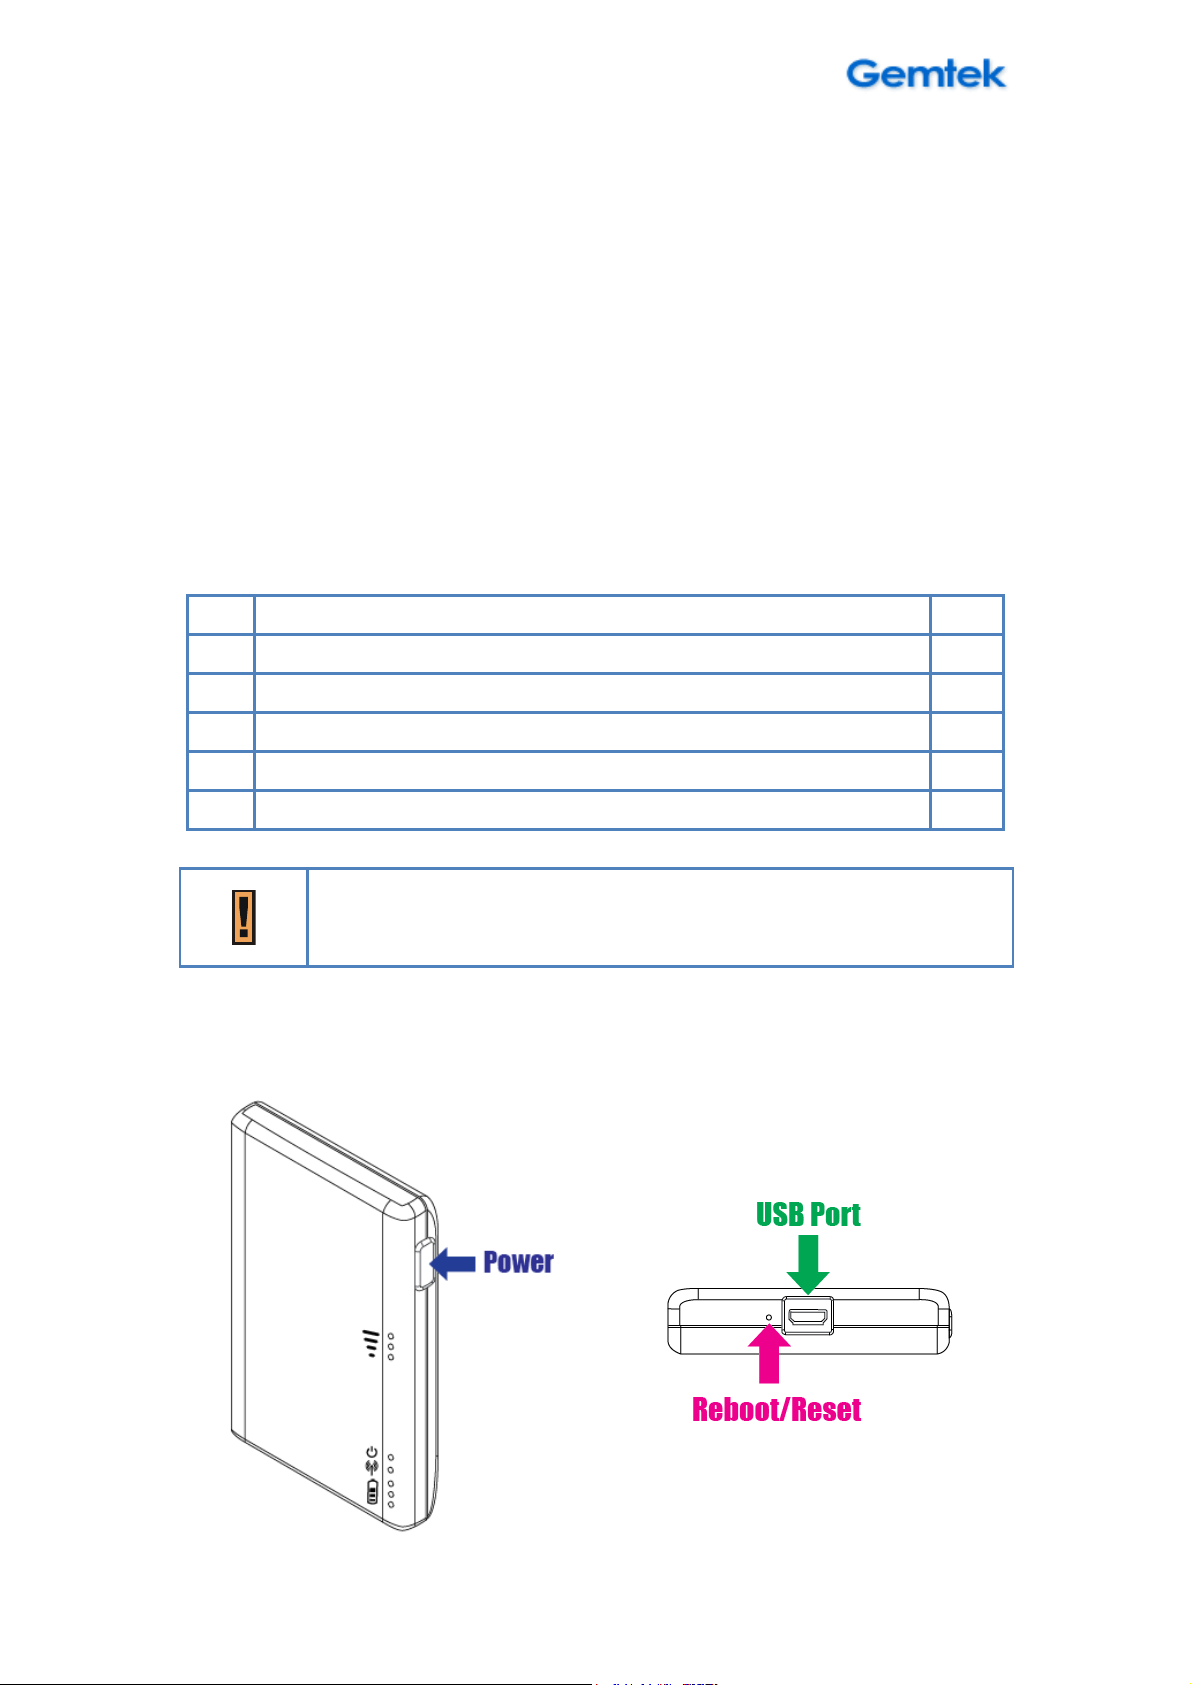
Chapter 2 – Installation
Please follow the steps below to install the device:
WIXFMM-109 Installation
Step1: Connect the device to your PC with a USB cable provided.
Step2: The device will start the boot process. Please wait for about 60
seconds to let the boot process complete.
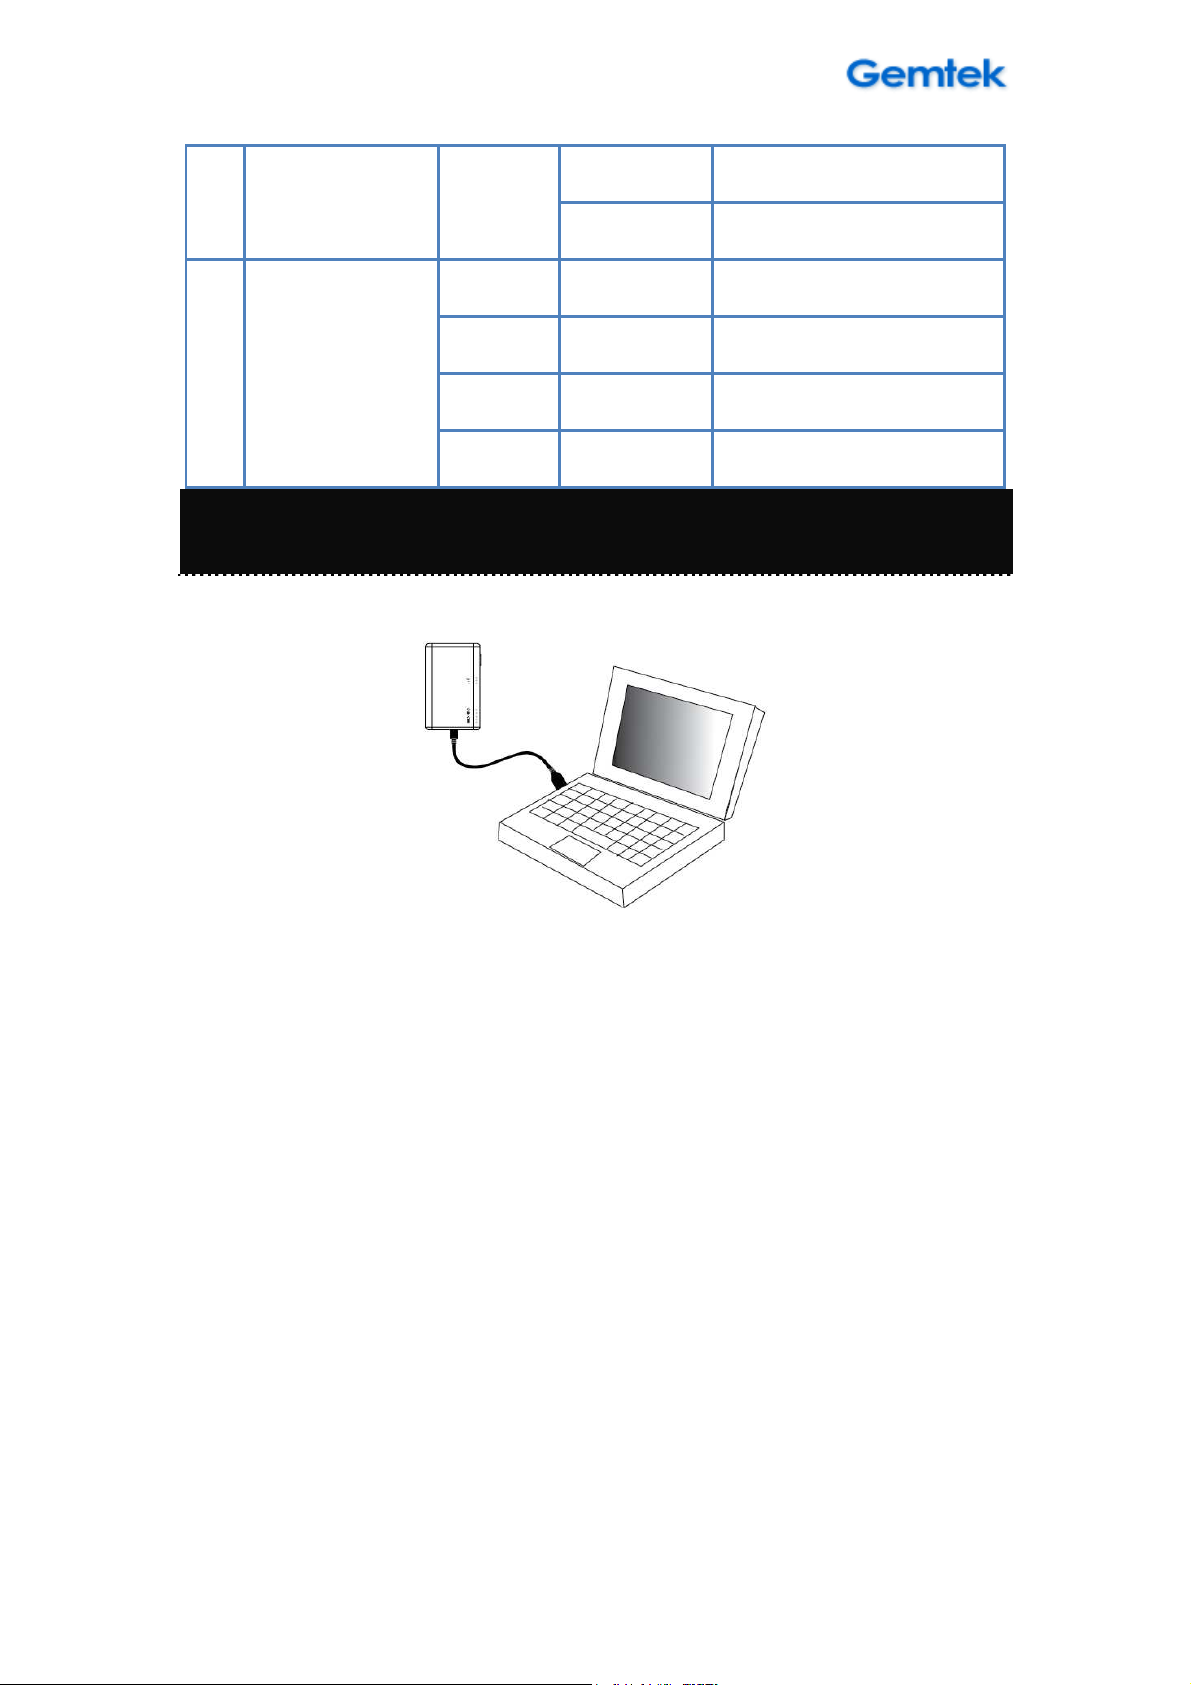
Step3: New Hardware Wizard will pop-up.
10
Page 11
WIXFMM
-
109 User Guide
V1.0
Found New Hardware Wizard – 1
Step4: Select Cancel and not use Wizard for install.
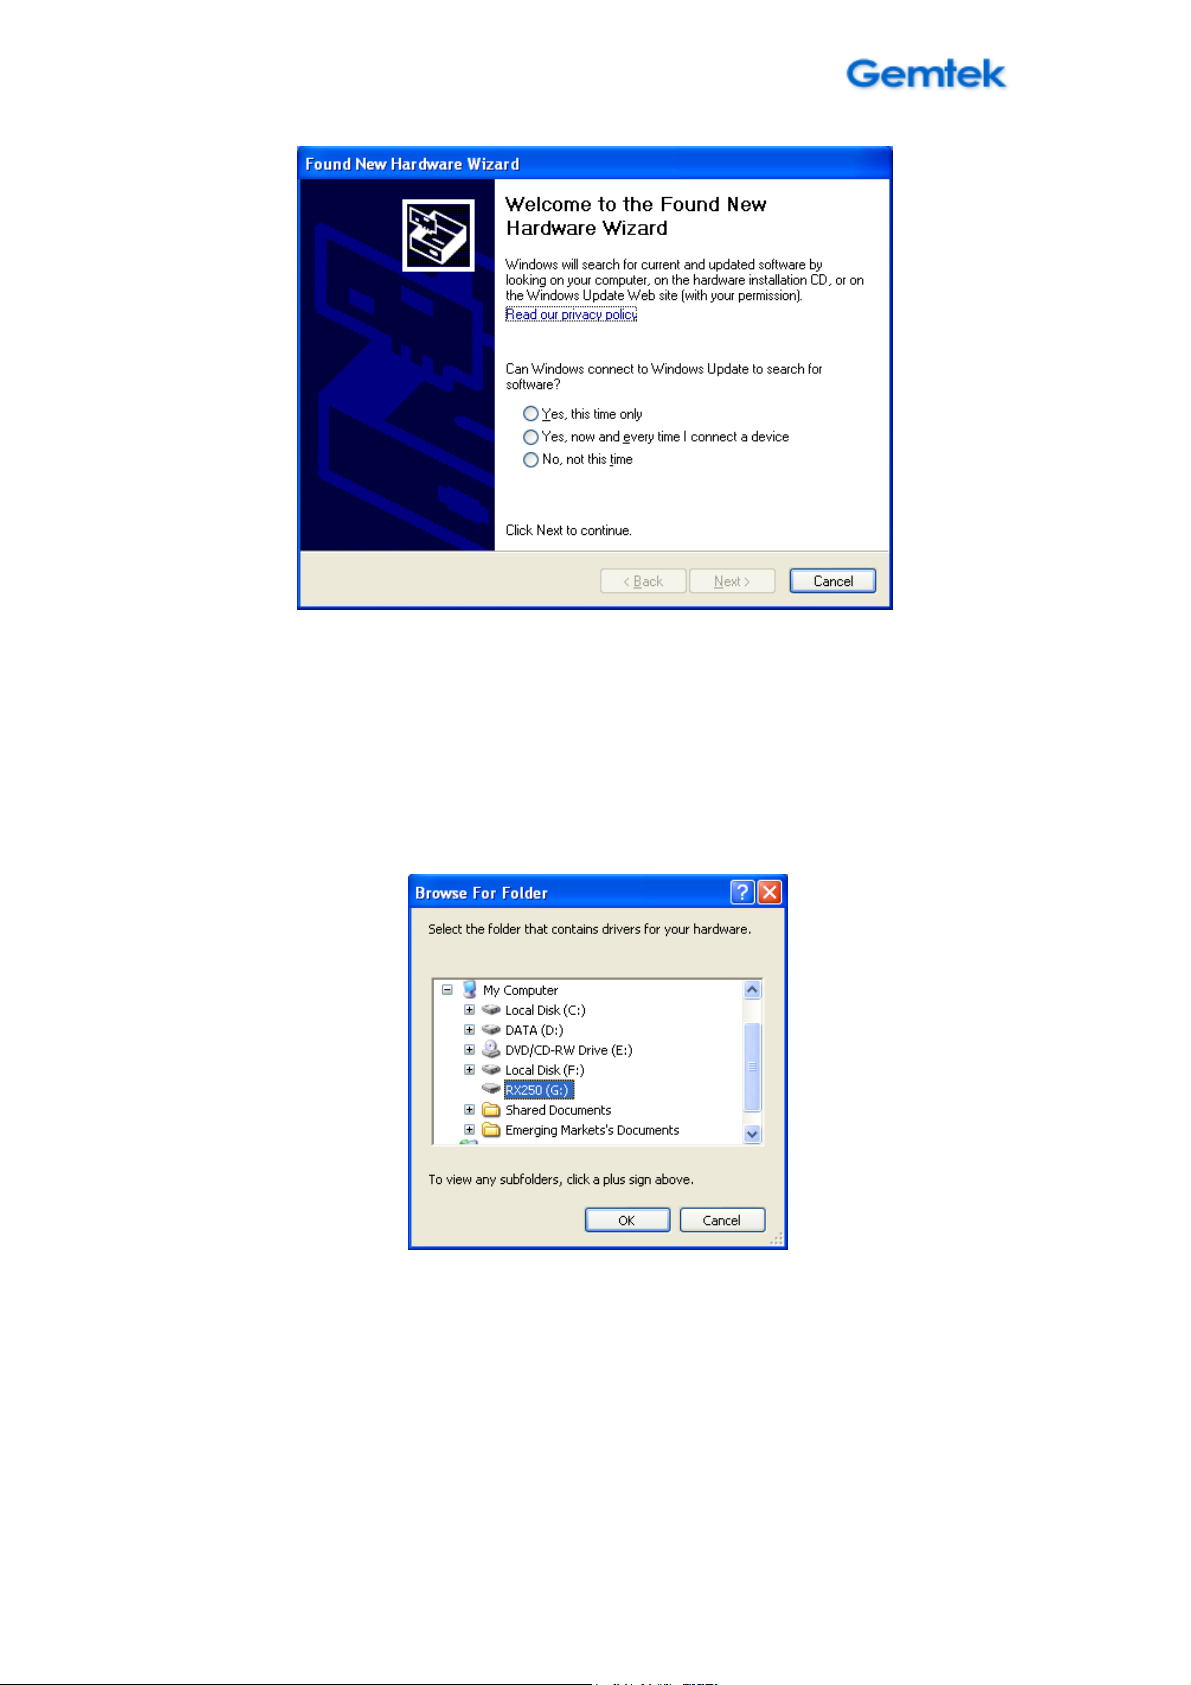
Step5: Select the connected drive and click.
Select driver path
Step6: You will see the “Setup.exe” file, click it and proceed set up process.
11
Page 12

WIXFMM
-
109 User Guide
V1.0
Step7: Now you can start browsing the Internet or configure your device
using web interface
Chapter 3 – Web Interface
How can you configure your device through the web interface?
Step1: Open the Web browser and enter the default IP address of the
WIXFMM-109, which is : http://192.168.15.1/
Step2: Your default password is : gmcadmin
Step3: The page shown here will be displayed on your browser. You can now
configure the device settings.
12
Page 13
WIXFMM
-
109 User Guide
V1.0
WIXFMM-109 User Interface
Chapter 4 – Reference Manual
The main menu is located at the left side of the screen and each main menu
item contains sub-items on the top right of the screen. You can refer to the
menu structure is given below:
Menu Items Sub Items Menu Items Sub Items
Personalize Password
Device Time
Status WiMAX Status
Device Status
Device Name
Restore To Factory
Internet WiMAX Security
Internet Protocol
Firewall
Dynamic DNS
Syslog
Reboot -
13
Page 14
WIXFMM
-
109 User Guide
V1.0
WiFi
Local Address DHCP Server
Lease Status
Lease Reservation
Port forwarding Basic
Forwarding
Control Panel Software
System
Power Management
About
Please click Apply button every time whenever the settings are
changed.
Reconnect -
Menu Structure Table
14
Page 15
WIXFMM
-
109 User Guide
V1.0
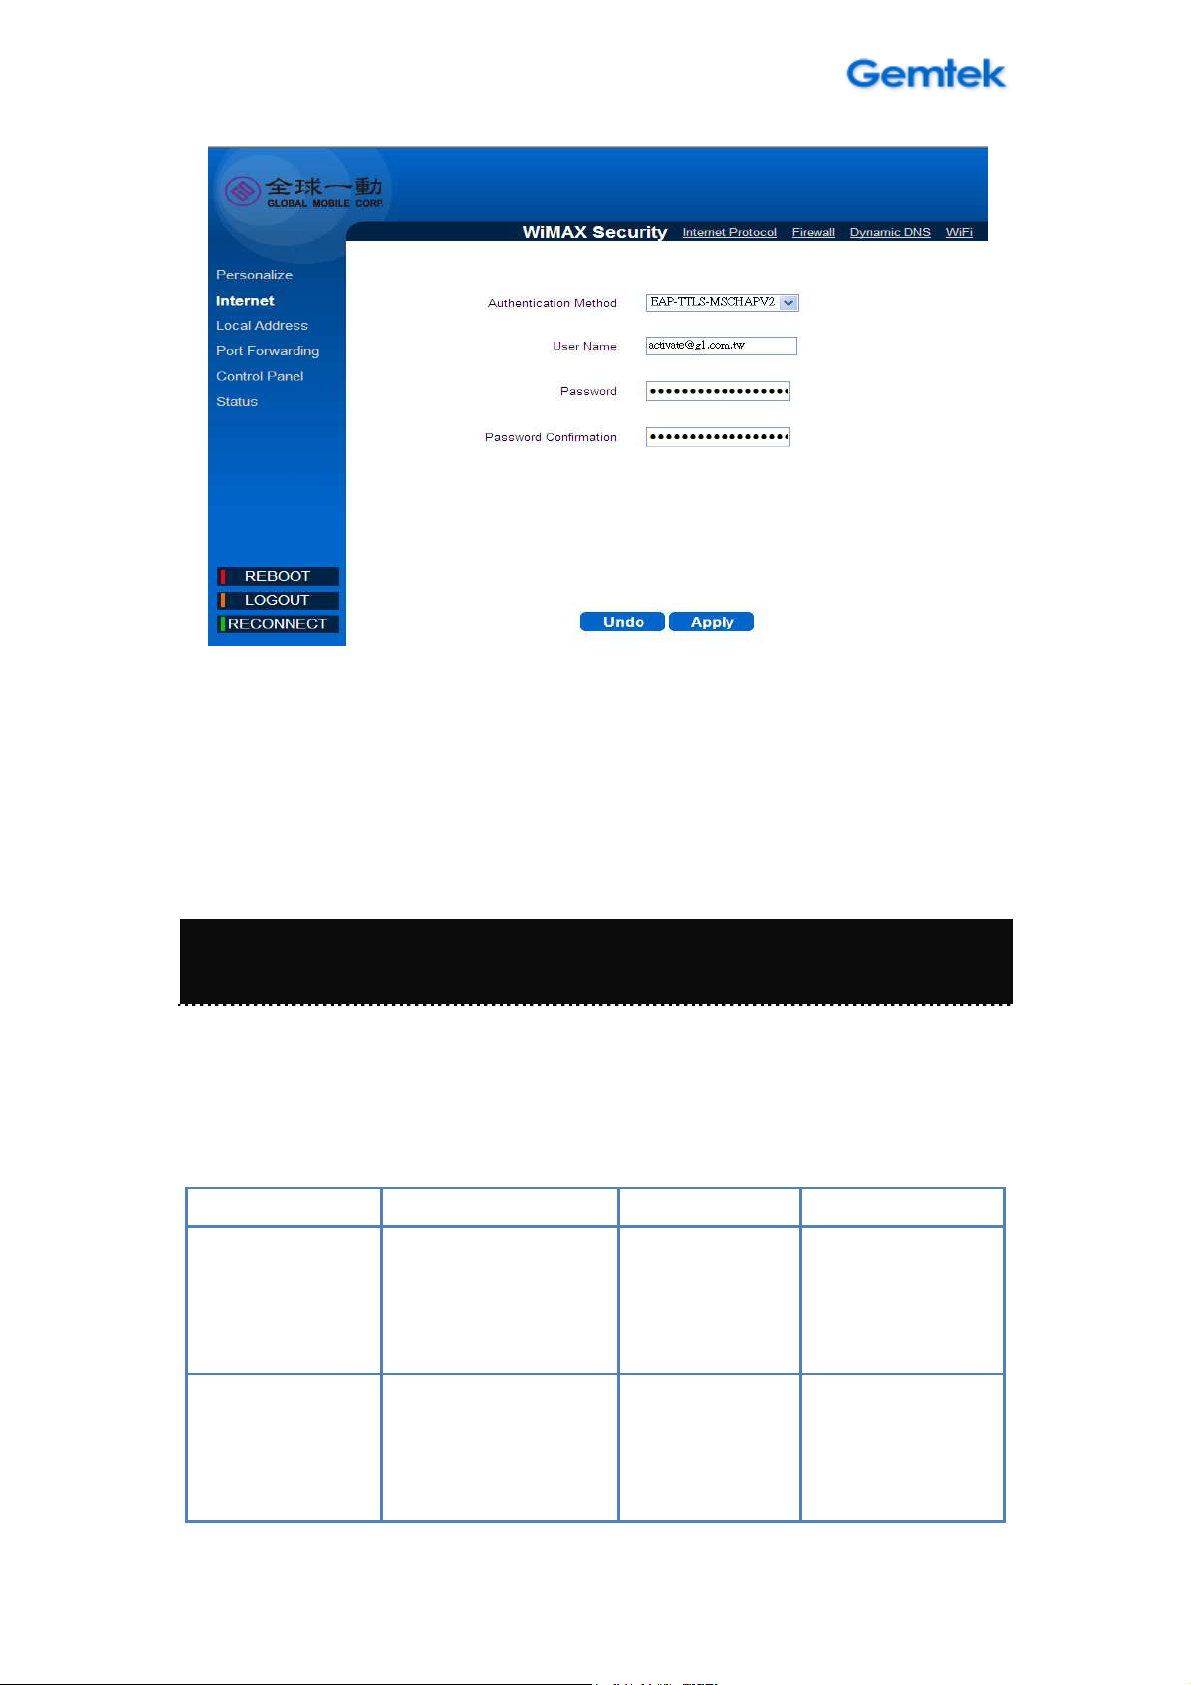
Internet
Internet | WiMAX Security
WiMAX Security - EAP-TTLS-MACHAPV2
Select Internet > WiMAX Security to setup the security method.
Authentication Method: You should always fix EAP-TTLS-MACHAPV2
selection when you connecting Global Mobile network.
User Name: Enter the username provided by Global Mobile (It allows 64
bytes ASCII code)
Password: Enter the password provided by your Global Mobile. (It allows
64 bytes ASCII code)
Password Confirmation: Re-enter the password again for confirmation.
Undo: Click Undo to clear the changes you have made on this window.
Apply button: The changes that you have made on this window can be
saved in the device by clicking the Apply button.
15
Page 16
WIXFMM
-
109 User Guide
V1.0
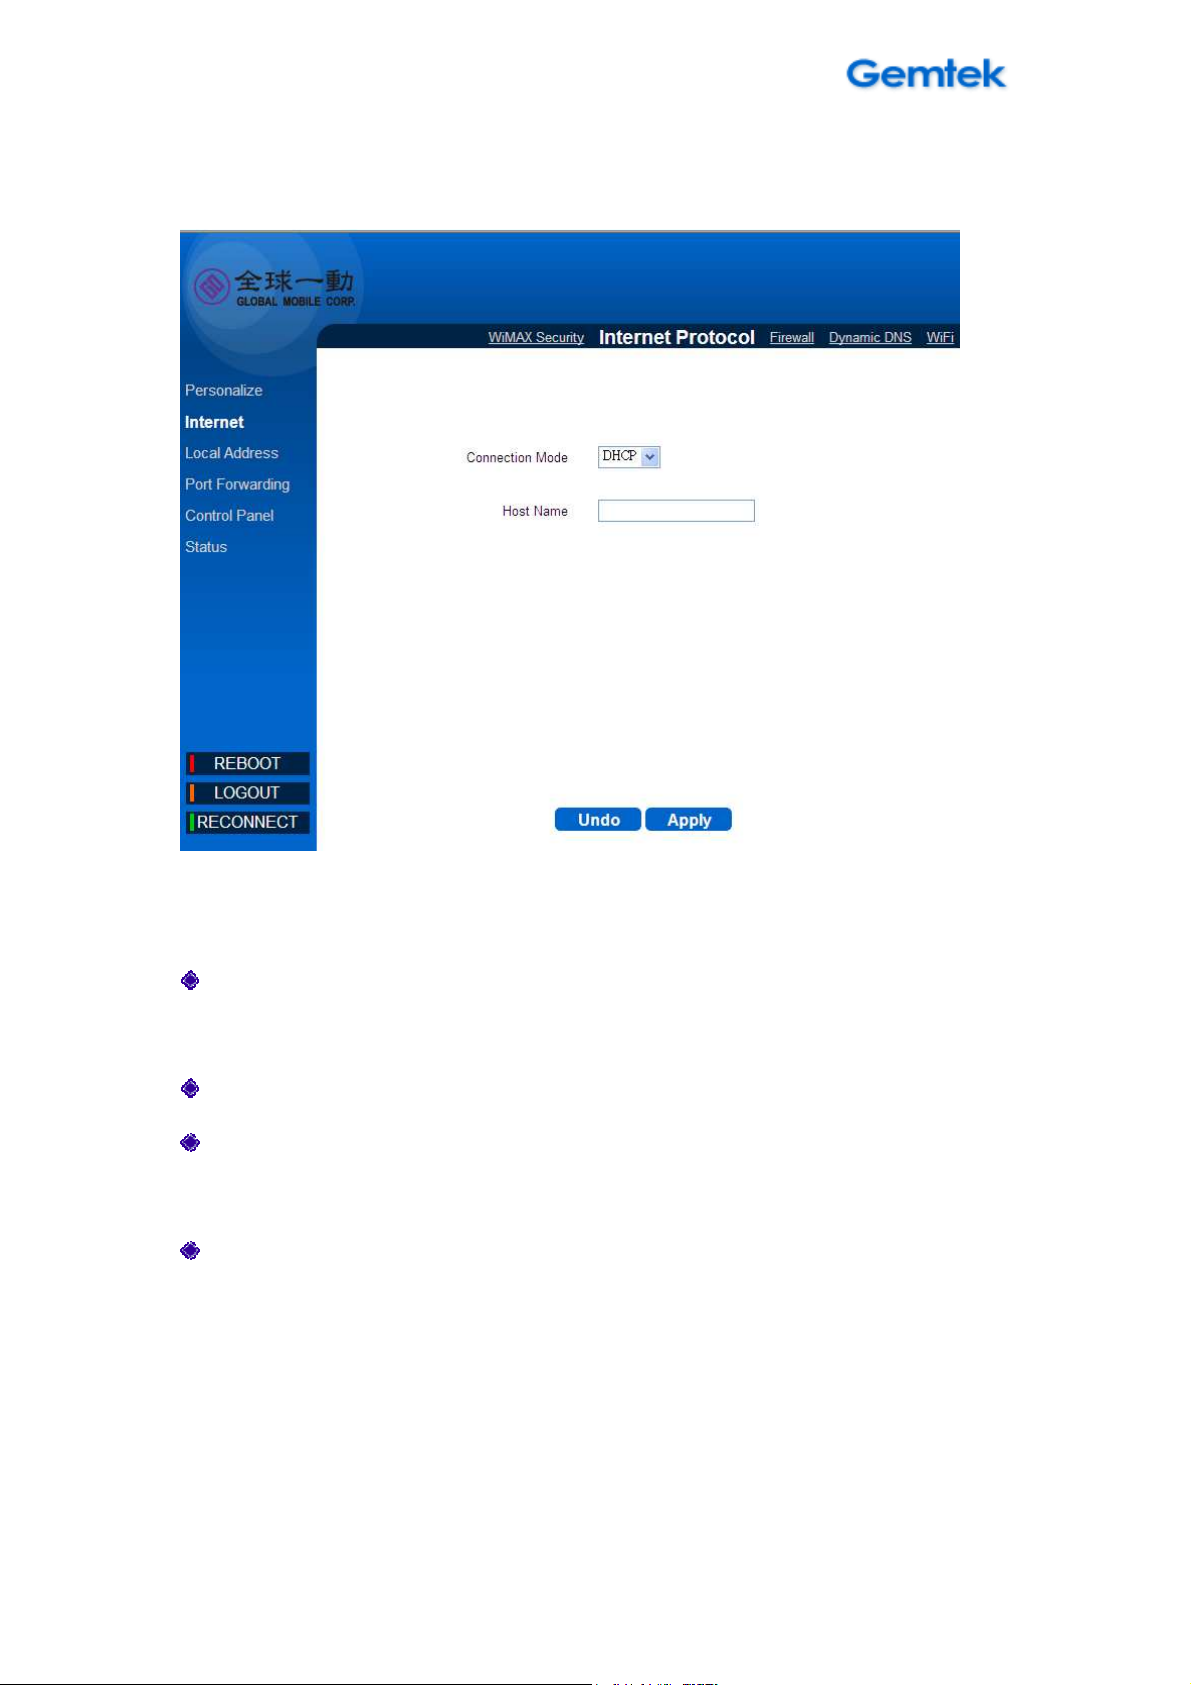
Internet | Internet Protocol
Internet Protocol
Select Internet > Internet Protocol to configure the internet protocol.
Connection Mode: Display the current connection mode of device with
the WiMAX network.
Host Name: Enter the host name for DHCP server to identify your device.
Undo: Click the Undo button to clear the changes that you have made on
this window.
Apply: The changes that you have made on this window can be saved in
the device by clicking the Apply button.
16
Page 17
WIXFMM
-
109 User Guide
V1.0
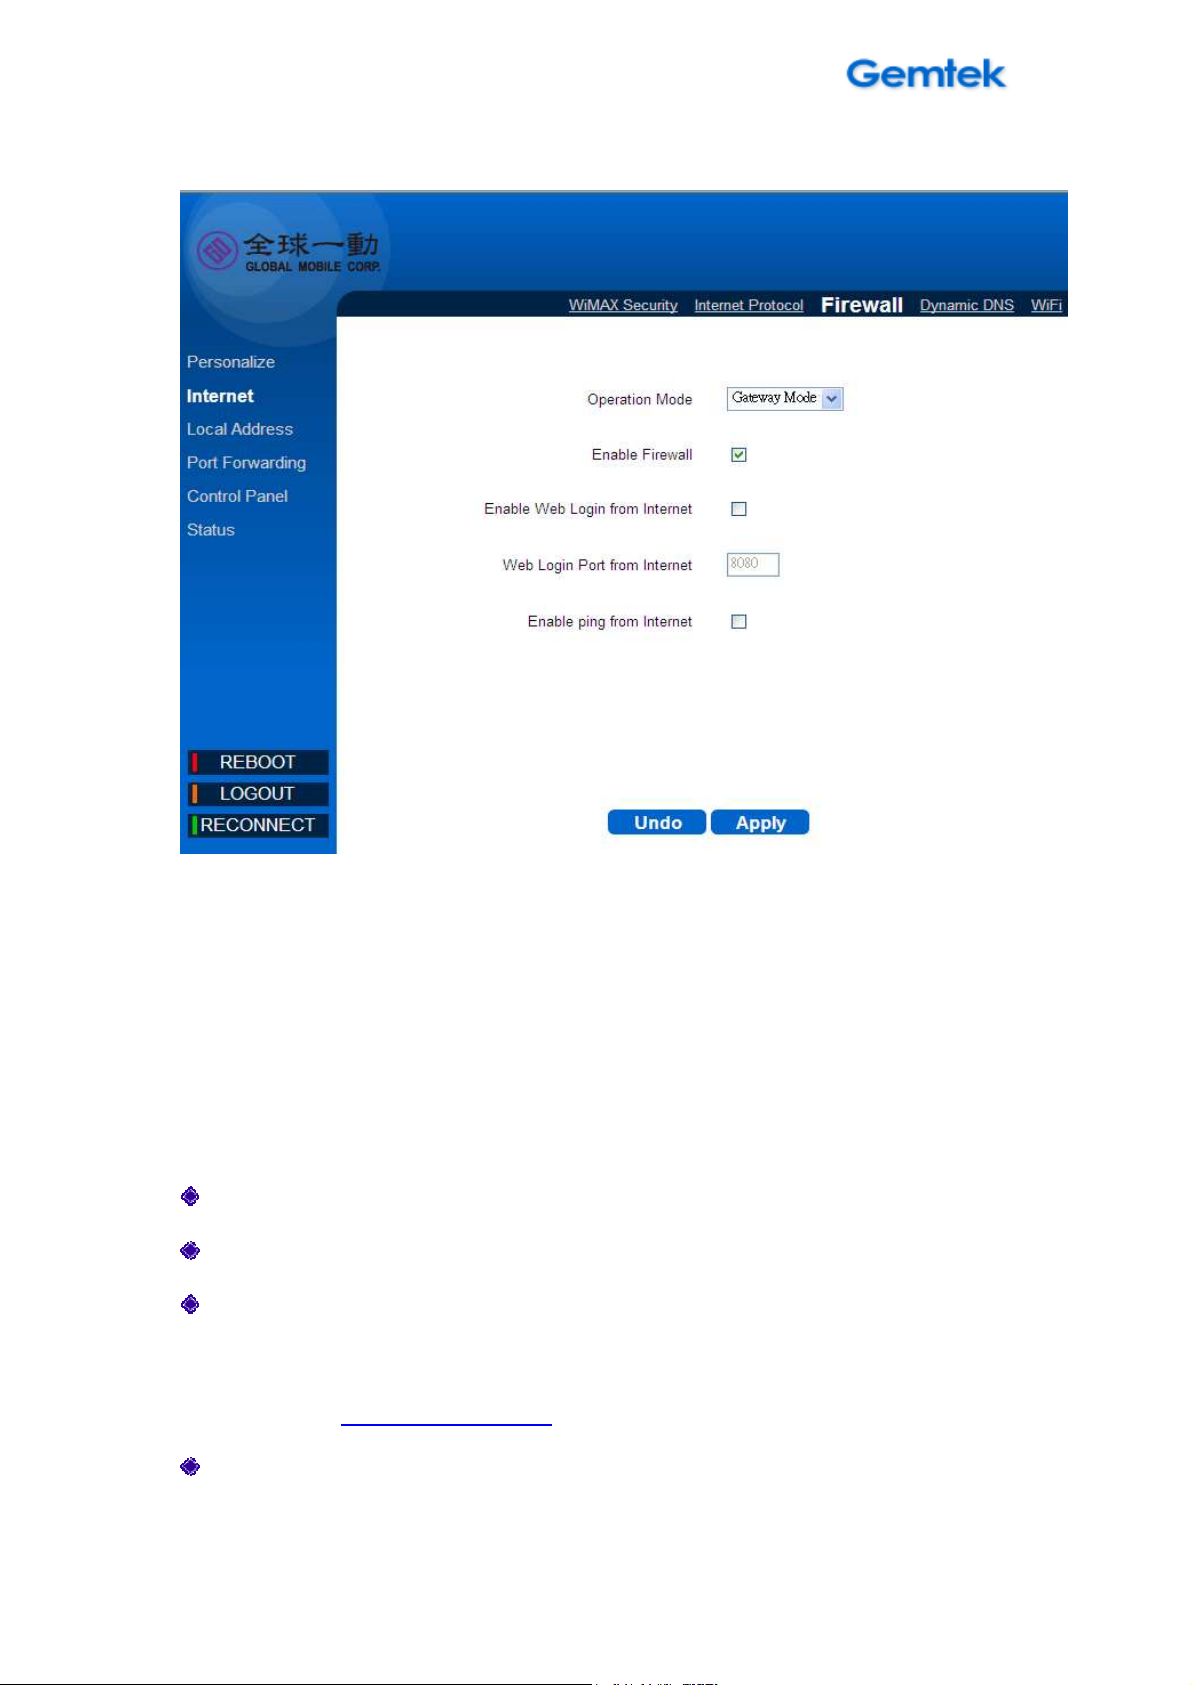
Internet | Firewall
Firewall
Select Internet > Firewall to configure the firewall feature that is built-in to the
device. The firewall feature can be used to block unauthorized access while
allowing only the authorized communications from the Internet. This feature
also allows the device to be managed over the Internet by authorized
personnel.
Operation Mode: Display the operation mode of firewall.
Enable Firewall: Click the checkbox to enable device firewall.
Enable Web Login from Internet: Enabling this option will allow you to
access the device from other networks.( You can access this device via
WAN side https://192.168.15.1 )
Web Login Port from Internet: Define a specific port number for security
access control (Matches numbers in range of 0 through 65536).
17
Page 18

WIXFMM
-
109 User Guide
V1.0
Enable ping from internet: The device will respond to a ping request
from the internet if this option is enabled.
Undo: Click the Undo button to clear the changes that you have made on
this window.
Apply: The changes that you have made on this window can be saved in
the device by clicking the Apply button.
18
Page 19
WIXFMM
-
109 User Guide
V1.0
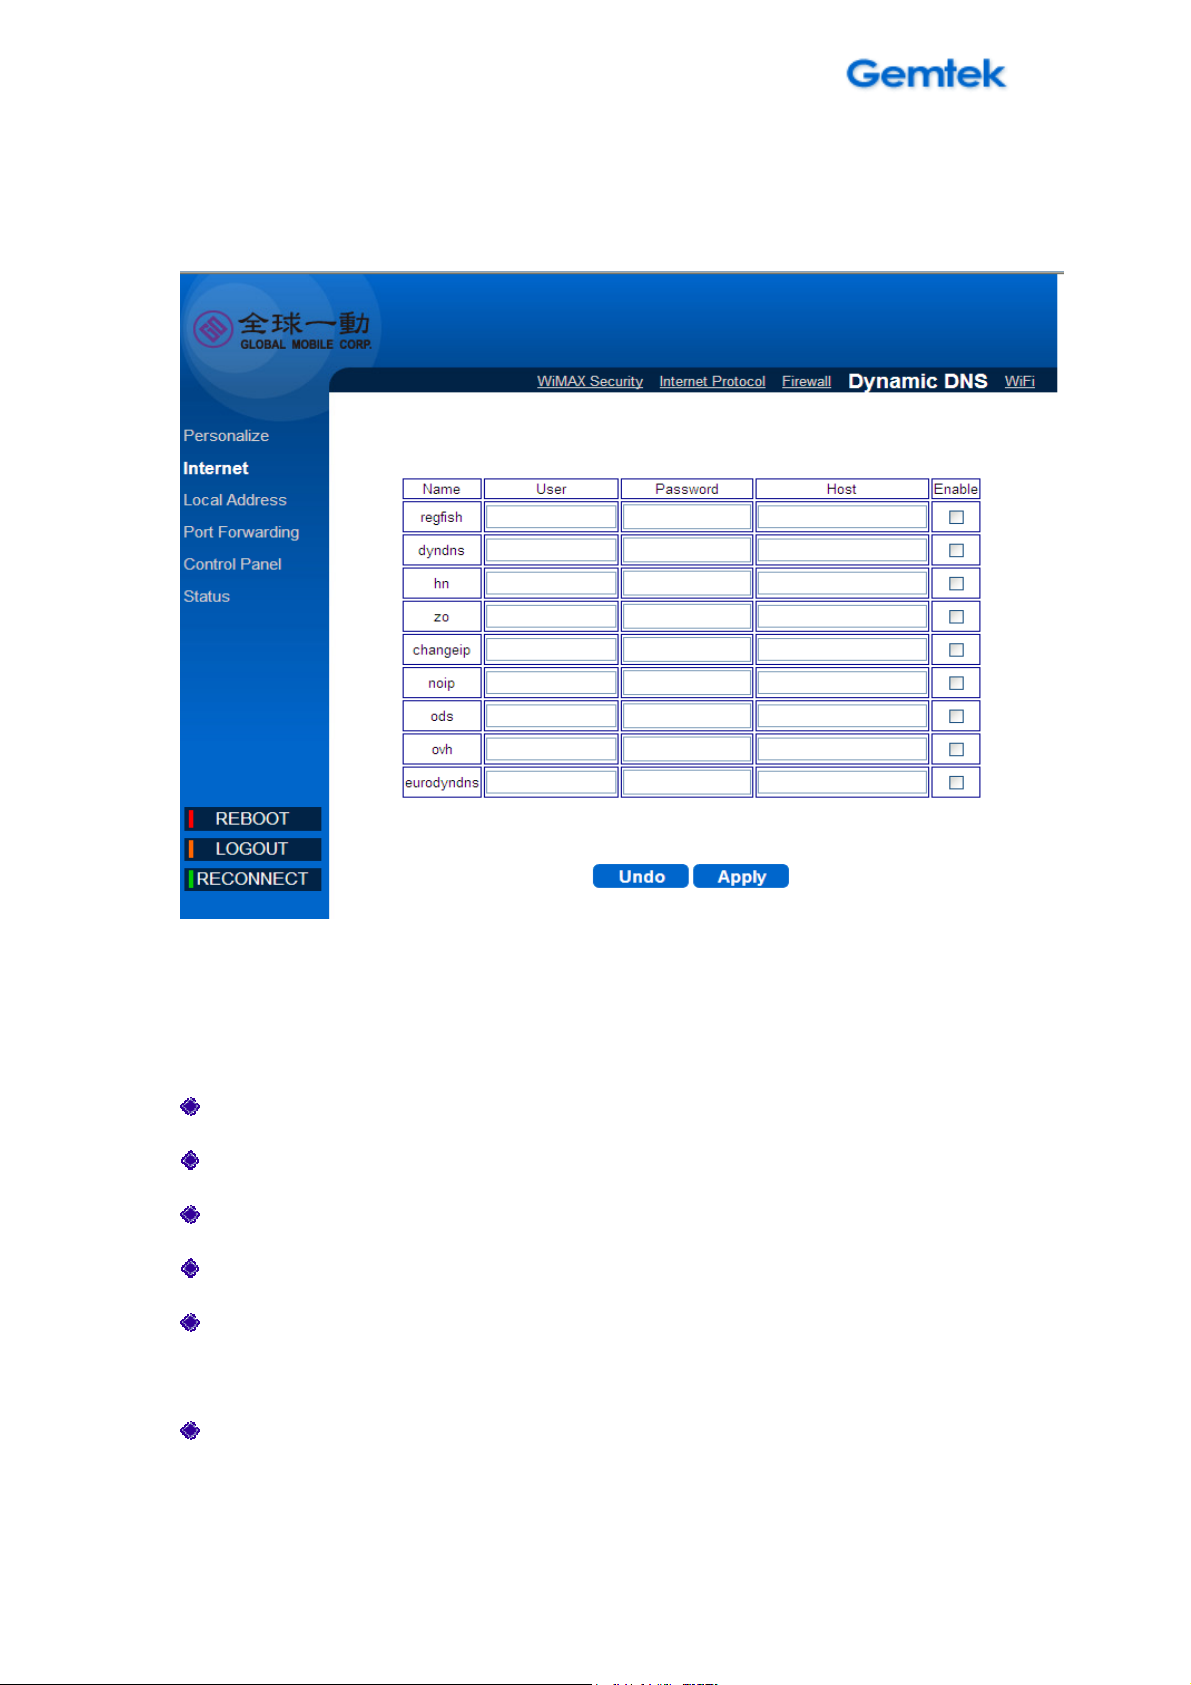
Internet | Dynamic DNS
Dynamic DNS
Select Internet > Dynamic DNS to configure the DDNS settings. (The device
only provides the listed DNS service providers.)
User: Enter the username provided by your DNS service provider.
Password: Enter the password provided by your DNS service provider.
Host: Enter the host provided by your DNS service provider.
Enable: Enable the DNS service provider by checking this checkbox.
Undo: Click the Undo button to clear the changes that you have made on
this window.
Apply: The changes that you have made on this window can be saved in
the device by pressing the Apply button.
19
Page 20
WIXFMM
-
109 User Guide
V1.0
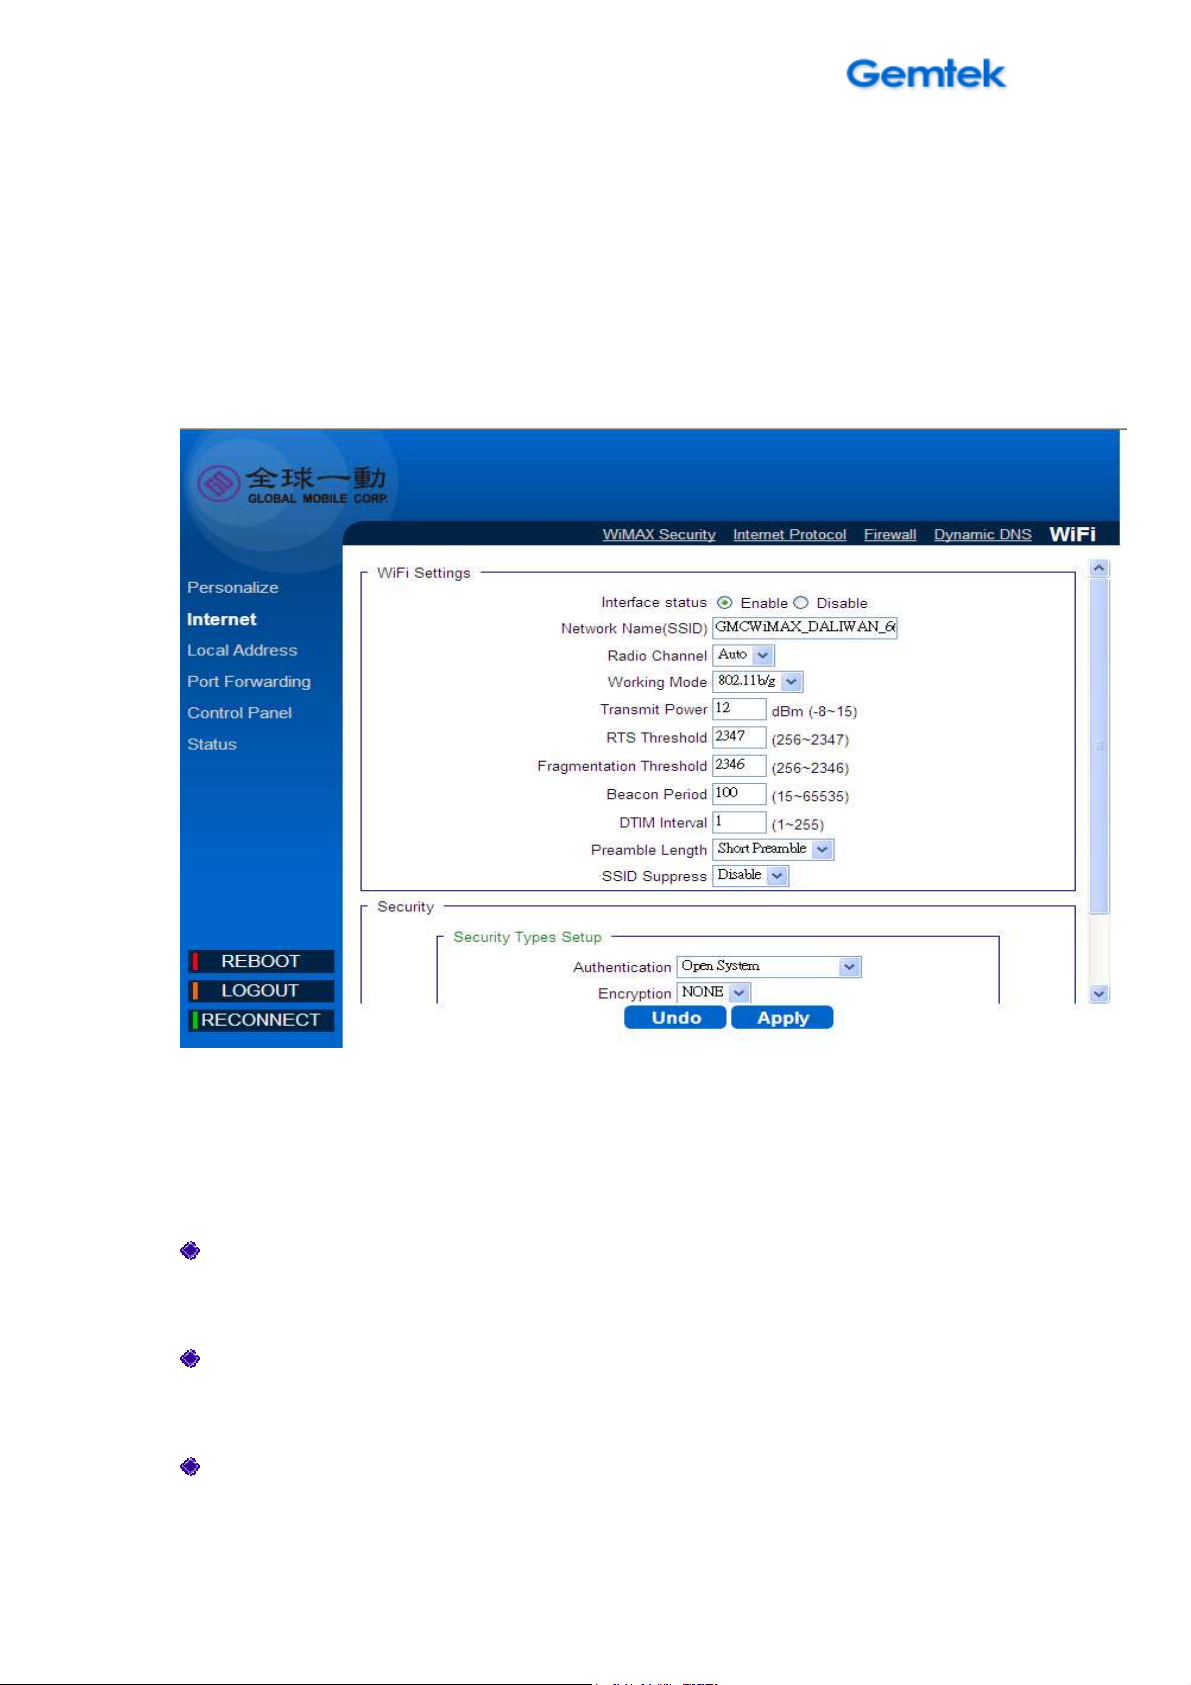
Internet | WiFi
WiFi
Select Internet > WiFi to enable/disable and configure the Wi-Fi interface.
WiFi Settings:
Interface status: Enable or disable the Wi-Fi interface by clicking this
radio button.
Network Name (SSID): Define the service set identifier for your Wi-Fi
network access. (Maximum 32 bytes string)
Radio Channel: Select the appropriate channel for your Wi-Fi network.
20
Page 21
WIXFMM
-
109 User Guide
V1.0
Working Mode: Select the wireless operation mode for your Wi-Fi
network. (The selection contains 802.11b/g, 802.11b only and 802.11g
only)
RTS Threshold: Specify the packet size threshold of the device by
changing the request-to-send (RTS) value. (Range : 256 to 2432)
Fragmentation Threshold: Specify the size of the fragmented packets.
(The default maximum value 2346 is recommended.)
Beacon Period: Enter the amount of time between beacons in
kilomicroseconds.
DTIM Interval: Specify the time interval between each DTIM (Delivery
Traffic Indication Message) contained in Beacon.
Preamble Length: Define the length of preamble, either short or long.
SSID Suppress: Enable or disabling suppression of SSID broadcasting.
Security:
Authentication: Select the Wi-Fi security method.
Encryption: Select the Wi-Fi encryption algorithm.
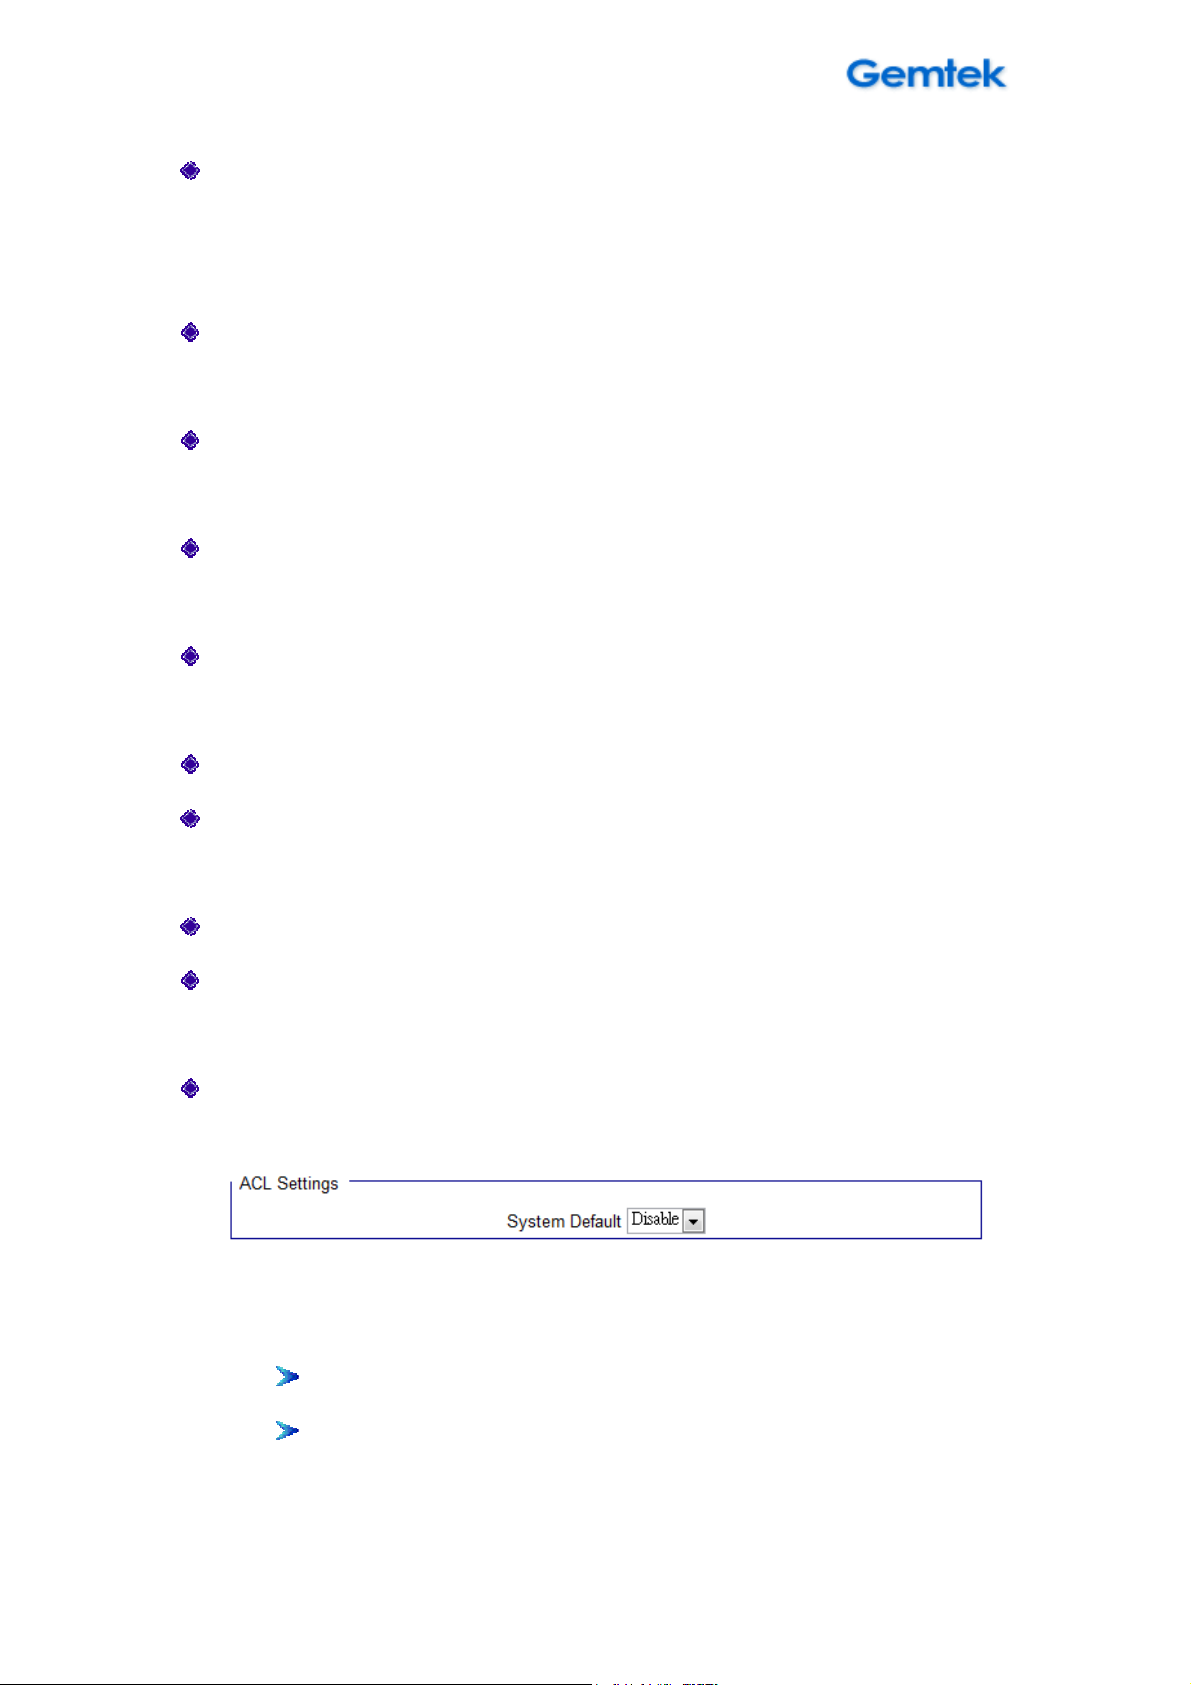
ACL Setting:
System Default: Select the filter action for the device access control.
1. Disable: Select disable to disable access control (ACL) feature.
2. Allow: To create a MAC filter list that allows the specific clients to
have access to the wireless network.
Insert: Click Insert to add MAC address (up to 10) to the list.
Del: Click Del to remove MAC address from the list.
21
Page 22

WIXFMM
-
109 User Guide
V1.0
3. Deny: To create a MAC filter list that will block the specific clients to
have access to the wireless network.
Insert: Click Insert to add MAC address (up to 10) to the list.
Del: Click Del to remove MAC address from the list.
Undo: Click the Undo button to clear the changes that you have made on
this window.
Apply: The changes that you have made on this window can be saved in
the device by clicking the Apply button.
22
Page 23

WIXFMM
-
109 User Guide
V1.0
Personalize
Personalize | Password
Password
Select Personalize > Password to enable or disable the password protection
for the device. You can also change the existing password on this sub-menu.
Enable Login Password Protection: If this option is enabled, then you
have to enter the password whenever you try to connect the device.
23
Page 24

WIXFMM
-
109 User Guide
V1.0
New Login Password: Enter a new password. (The new password can
contain 64 bytes ASCII code and it is case sensitive.)
Confirm New Login Password: Re-enter the new password to confirm.
Undo button: Click the Undo button to clear the data on this window.
Apply button: The changes that you have made to this window can be
saved in the device by clicking the Apply button.
Personalize | Device Time
Device Time
Select Personalize > Device Time to set the time zone.
Current Local Time: Display current local time.
Time Zone: Select the proper time zone for your location on the drop
down menu.
Auto Adjust for Daylight Saving Time: Please enable this option if your
location observes Daylight Savings Time.
24
Page 25

WIXFMM
-
109 User Guide
V1.0
Undo button: Click the Undo button to clear the data on this window.
Apply button: The changes that you have made to this window can be
saved in the device by clicking the Apply button.
Personalize | Device Name
Device Name
Select Personalize > Device Name to define a specific name for your device,
so that you can login to this device from any PC on your internal network by
entering the device name on the address bar. The default, the device name is
WiMaxCPE.
Device Name: Display the current device name.
New Device Name: Enter a new name for your device (Maximum 20
25
Page 26

WIXFMM
-
109 User Guide
V1.0
ASCII Printable Characters allowed).
Undo button: Click the Undo button to clear the changes that you have
made on this window.
Apply button: The changes that you have made on this window can be
saved in the device by clicking the Apply button.
Personalize | Restore To Factory
Restore To Factory
Select Personalize > Restore To Factory to clear all users’ configuration and
restore to factory default settings.
Apply: Click the Apply button to reset the device settings to factory
default.
26
Page 27

WIXFMM
-
109 User Guide
V1.0
Local Address
Local Address | DHCP Server
DHCP Server
Select Local Address > DHCP Server to configure the internal DHCP server
settings. This device has a built-in DHCP server that can be used for managing
the allotment of IP address for the devices connected to the LAN Port of the
device.
Enable DHCP Server: Enable DHCP Server by clicking on the checkbox.
DHCP Server IP address: Enter the DHCP server IP address.
DHCP Starting IP address/ DHCP Ending IP address: Define the IP
address range shall be supported by the DHCP server.
DHCP Lease Time: Specify the IP address renewal time.
Undo: Click the Undo button to clear the changes that you have made on
this window.
Apply: The changes that you have made on this window can be saved in
the device by clicking the Apply button.
27
Page 28

WIXFMM
-
109 User Guide
V1.0
Local Address | Lease Status
Lease Status
Select Local Address > Lease Status to view the current status of client host
PC such as host name, host PC’s MAC address, IP address, and remaining
lease time
Refresh: Click the Refresh button to display the updated information of
the client host PC.
Auto: Click the Auto button to refresh the information automatically.
28
Page 29

WIXFMM
-
109 User Guide
V1.0
Local Address | Lease Reservation
Lease Reservation
Select Local Address > Lease Reservation to assign the specific IP
addresses to the specific client device connected to the LAN port.
Add button: Click the Add button to insert lease reservation information.
Del button: Click the Del button to delete the selected lease reservation
information. Before clicking Del, one or more of information items must be
selected by enabling the checkbox on the Select column of the table.
Undo: Click the Undo button to clear the changes that you have made on
this window.
Apply: The changes that you have made on this window can be saved in
the device by clicking the Apply button.
29
Page 30

WIXFMM
-
109 User Guide
V1.0
Port Forwarding
Port Forwarding | Basic
Basic
Select Port Forwarding > Basic to forward the network traffic to specific hosts
based on the protocol and port number. It is used to play Internet games or
provide local services (such as web hosting) for a LAN group.
Enable UPnP IGD: When this option is enabled, certain Windows
applications would setup the port forwarding rule dynamically.
DMZ IP Address: The IP address of DMZ should be entered here.
Undo: Click the Undo button to clear the changes that you have made on
this window.
Apply: The changes that you have made on this window can be saved in
the device by clicking the Apply button.
30
Page 31

WIXFMM
-
109 User Guide
V1.0
Port Forwarding | Forwarding
Forwarding
Select Port Forwarding > Forwarding to manage the additional port
forwarding rules.
Add: Click the Add button to insert new port forwarding rule. When
adding a new port forwarding rule, please select TCP or UDP, and then
enter port and IP information such as WAN port range, LAN IP address,
and LAN port range.
Del: Click the Del button to delete the selected port forwarding rule.
Undo: Click the Undo button to clear the changes that you have made on
this window.
Apply: The changes that you have made on this window can be saved in
the device by clicking the Apply button.
31
Page 32

WIXFMM
-
109 User Guide
V1.0
Control Panel
Control Panel | Software
Software
Select Control Panel > Software to manage the software of your device. Click
Browse to select the IPKG file, and then click Upgrade to install the selected
IPKG. Or click the Remove button to delete the IPKG file.
32
Page 33

WIXFMM
-
109 User Guide
V1.0
Control Panel | System
System
Select Control Panel >System to select your GUI language.(You can choose
English or Chinese.)
33
Page 34

WIXFMM
-
109 User Guide
V1.0
Control Panel | Power manage
Power Management
Select Control Panel >Power management to manage your power saving
table.
Power saving enable: Enable power saving mode can help you save
your device power.
Standby mode: When you disconnect usb port and no WiFi traffic and
connection after setting period, your device will enter standby mode. In
stand by mode ,WiMAX interface will be disable and WiFi remain on.
Stand by mode Wake up: You can wake up device via below method:
1. re-connect usb port ,
2. connect device via WiFi interface
3. push power button 1sec
34
Page 35

WIXFMM
-
109 User Guide
V1.0
will make
Hibernate mode: When you in standby mode after the setting period,
your device will enter Hibernate mode. In Hibernate mode, both
WiMAX/WiFi interface will be disable.
Hibernate mode Wake up: You can wake up device via push power
button 1sec.
You can charge your device on Hibernate mode that
the charging much more efficient
Control Panel | About
About
Select Control Panel > About to display the basic information about the
device: Service Provider, Product Name, WAN port MAC address, LAN Port
MAC address, Model ID, Device hardware version and Serial ID.
35
Page 36

WIXFMM
-
109 User Guide
V1.0
Status
Status | WiMAX Status
WiMAX Status
Select Status > WiMAX Status to display the WiMAX connection status.
Refresh: Click the Refresh button to refresh the current WiMAX
connection status.
Auto: Click the Auto button to update the status information periodically.
36
Page 37

WIXFMM
-
109 User Guide
V1.0
Status | Device Status
Device Status
Select Status > Device Status to display the status of device system uptime
and WAN information.
Refresh: Click the Refresh button to update the current device status.
Auto: Click the
Auto
button to update the status information periodically.
37
Page 38

WIXFMM
-
109 User Guide
V1.0
Status | Syslog
Select Status >Syslog to let your GlobalMobile customer service
engineers understand your device current status that is help solve your
problem.
38
Page 39

WIXFMM
-
109 User Guide
V1.0
Reboot /Log out/ Reconnect
Reboot / Reconnect
There are 3 function buttons on the lower left corner
Reboot: Clicking Reboot button will restart your device
Log out: Clicking Log out button device will log out from current UI and
back to log in page
Reconnect:. Clicking Reconnect button the device will attempt
reconnection to the Base Station
關於這份使用手冊
關於這份使用手冊
關於這份使用手冊關於這份使用手冊
39
Page 40

WIXFMM
-
109 User Guide
V1.0
目的
目的:
目的目的
這份文件將提供你使用這台 WIXFMM-109 802.16-2005 2.5GHz Personal
Hotspot 所需要的資訊跟設定程序,並幫助你設定本機。
如何閱讀這份文件
如何閱讀這份文件
如何閱讀這份文件如何閱讀這份文件
以下圖案跟說明可以幫助你閱讀這份文件:
非常重要的資訊,需要詳細遵守否則會導致機器損害。
重要資訊。
附加的有用資訊。
粗體
粗體 選單指令,按鈕,重要文字等將會以粗體顯示。
粗體粗體
第一章
第一章 – 簡介
第一章第一章
簡介
簡介簡介
40
Page 41

WIXFMM
-
109 User Guide
V1.0
產品介紹
產品介紹:
產品介紹產品介紹
WIXFMM-109
產品示意圖
感謝你購買全球一動 WIXFMM-109 802.16-2005 2.5GHz Personal Hotspot,此
產品符合 802.16-2005 WiMAX 標準規範,也是一台提供 WiMAX 4G 暢網和
Wi-Fi 分享的多工產品.
Product Package
項目
項目 數量
WIXFMM-109 802.16-2005 2.5GHz Personal Hotspot
1
快速安裝手冊
2
充電器 1 個
3
連接線 1 條
4
電池 1 個
5
購買時,請確認以上內容物。
項目項目
數量
數量數量
1 台
1 本
連結孔
連結孔/按鈕介紹
連結孔連結孔
按鈕介紹
按鈕介紹按鈕介紹
41
Page 42

WIXFMM
-
109 User Guide
V1.0
1. 開機
開機: 請長按約 5秒左右開啟電源(燈號全部亮起後熄滅表示本機進入開機流
開機開機
程,開機流程需要大約 1 分鐘請耐心等待),當電源燈恆亮即代表開機完成.
2. 重新啟動
重新啟動/重置
重新啟動重新啟動
重置按鈕 1~5 秒.重置
重置 按鈕
重置重置
按鈕: 重新啟動
按鈕按鈕
重置(恢復出廠設定
重置重置
重新啟動/重置按鈕 5~10 秒.
3. Micro USB 連接孔
連接孔: USB 連接孔用於連結 PC 與本機或是暫時充電。
連接孔連接孔
重新啟動:開機後如欲重新啟動本機請按壓重新啟動/
重新啟動重新啟動
恢復出廠設定值
恢復出廠設定恢復出廠設定
值):開機後如欲恢復出廠設定值請長壓
值值
42
Page 43

WIXFMM
-
109 User Guide
V1.0
燈號定義
燈號定義
燈號定義燈號定義
1.
2
3
WiMAX
訊號強度顯示
訊號強度顯示
訊號強度顯示訊號強度顯示
電源
電源 藍
電源電源
Wi-Fi
無線網路
無線網路
無線網路無線網路
WIXFMM-109
燈號定義
藍 恆亮
藍 恆亮
藍 恆亮
ON
OFF
閃爍 正在執行開機程序
ON Wi-Fi ON
藍
OFF Wi-Fi OFF
閃爍 Wi-Fi 資料傳輸中
CINR < 14dB
14dB < CINR < 23dB
23dB < CINR
開機
關機
綠 恆亮 電池容量 > 66%
橘 恆亮 33% < 電池容量 < 66%
電池電量
電池電量
4.
電池電量電池電量
紅 恆亮 電池容量 < 33%
閃爍 充電中
43
Page 44

WIXFMM
-
109 User Guide
V1.0
第二章
第二章 – 安裝
第二章第二章
請遵照以下步驟安裝這台機器的驅動程式:
步驟
步驟1:
步驟步驟
請使用附件之 USB 連接線連結 PC.
安裝
安裝安裝
WIXFMM-109
安裝示意圖
步驟
步驟2:
步驟步驟
步驟
步驟3:
步驟步驟
連結完成後產品會自動開機,開機時間約為 60 秒請耐心等待。
此時會跳出新增硬體安裝精靈如下圖所示:
新增安裝精靈
– 1
步驟
步驟4: 請先選擇”取消” ,不要選擇新增安裝精靈安裝。
步驟步驟
44
Page 45

WIXFMM
-
109 User Guide
V1.0
步驟
步驟5: 請直接進入”我的電腦”,選擇本機的磁碟機並點選進入。
步驟步驟
選擇本機磁碟
步驟
步驟6: 你將會看到“Setup.exe”點選並執行安裝此檔案。
步驟步驟
步驟
步驟7: 恭喜你!現在你可以使用 usb 介面,連結並使用本機。
步驟步驟
45
Page 46

WIXFMM
-
109 User Guide
V1.0
第三章
第三章 – 網頁介面
第三章第三章
如何利用網頁介面設定你的機器
如何利用網頁介面設定你的機器?
如何利用網頁介面設定你的機器如何利用網頁介面設定你的機器
步驟
步驟1: 開啟網頁介面,在你的 IE 或是瀏覽器輸入以下路徑:
步驟步驟
http://192.168.15.1/
步驟
步驟2: 進入網頁後,輸入你的預設密碼: gmcadmin
步驟步驟
步驟
步驟3: 進入設定網頁,開始設定:
步驟步驟
網頁介面
網頁介面網頁介面
WIXFMM-109
第四章
第四章 – 使用者介面說明
第四章第四章
使用者介面說明
使用者介面說明使用者介面說明
使用者介面
46
Page 47

WIXFMM
-
109 User Guide
V1.0
以下為你可以設定的清單,主要的設定項目未於使用者介面左側;而子目錄位於
畫面的上側順序由左至右。詳細目錄清單為以下:
主項目
主項目 子目錄
主項目主項目
子目錄 主項目
子目錄子目錄
主項目 子目錄
主項目主項目
子目錄
子目錄子目錄
個人化 密碼
設備時間
設備名稱
恢復原廠設定
網際網路設定 WiMAX 設定
網際網路協定
防火牆
動態 DNS
WiFi
區域網路設定 DHCP 伺服器
租約狀態
租約保留
虛擬伺服器設定 基本
轉換
系統管理 軟體更新
認證
狀態 WiMAX 狀態
設備狀態
系統紀錄
重新啟動
重新連接
-
-
電源管理
關於
Menu Structure Table
每次當你完成設定修改時請務必點選套用
套用按鍵,以確認修改成功。
套用套用
47
Page 48

WIXFMM
-
109 User Guide
V1.0
網際網路設定
網際網路設定| WiMAX 設定
網際網路設定網際網路設定
設定
設定設定
WiMAX
選擇網際網路設定
網際網路設定> WiMAX 設定
網際網路設定網際網路設定
認證方法
認證方法:全球一動提供 EAP-TTLS-MACHAPV2 認證方式,請不要更動。
認證方法認證方法
使用者名稱
使用者名稱: 請輸入你開通的全球一動帳號
使用者名稱使用者名稱
密碼
密碼: 請輸入你開通的全球一動密碼
密碼密碼
密碼確認
密碼確認: 再次輸入你開通的全球一動密碼
密碼確認密碼確認
取
取消
消: 點選取消可清除畫面中輸入的資料。
取取
消消
套用
套用: 套用並儲存更改的設定。
套用套用
設定
- EAP-TTLS-MACHAPV2
設定 來設定你的連線。
設定設定
48
Page 49

WIXFMM
-
109 User Guide
V1.0
網際網路設定
網際網路設定|網際網路協定
網際網路設定網際網路設定
網際網路協定
網際網路協定網際網路協定
網際網路協定
選擇網際網路設定
網際網路設定>網際網路協定
網際網路設定網際網路設定
連接模式
連接模式: 顯示目前 WiMAX 網路的連接模式
連接模式連接模式
主機名
主機名: 輸入你的主機名,讓 DCHP 伺服器辨別的的設備.
主機名主機名
取消
取消: 點選取消可清除畫面中輸入的資料
取消取消
套用
套用: 套用並儲存更改的設定
套用套用
網際網路協定 來設定你的網路設定
網際網路協定網際網路協定
49
Page 50

WIXFMM
-
109 User Guide
V1.0
網際網路設定
網際網路設定|防火牆
網際網路設定網際網路設定
防火牆
防火牆防火牆
選擇網
擇網際網路設定
際網路設定|防火牆
擇網擇網
際網路設定際網路設定
防火牆
防火牆 來設定本機的防火牆設定,防火牆功能可以防止未經
防火牆防火牆
認證過的遠端連線需求.
操作模式
操作模式: 顯示當前的防火牆操作模式
操作模式操作模式
啟用防火牆
啟用防火牆: 勾選此欄位來啟用本機的防火牆.
啟用防火牆啟用防火牆
允許網際網路登入此設備
允許網際網路登入此設備: 勾選此欄位來允許遠端連連線 ( 遠端連線請用
允許網際網路登入此設備允許網際網路登入此設備
https://192.168.15.1 位址來登入此設備)
網際網路
網際網路 web 頁面登入埠口
網際網路網際網路
頁面登入埠口: 建立特定的埠口來建立安全的連線 (設定埠
頁面登入埠口頁面登入埠口
口範圍為: 0 ~ 65536).
允許網際網路
允許網際網路 ping 此設備
允許網際網路允許網際網路
此設備: 勾選此欄位將會允許遠端網際網路連結的要求.
此設備此設備
取消
取消: 點選取消可清除畫面中輸入的資料
取消取消
套用
套用: 套用並儲存更改的設定
套用套用
50
Page 51

WIXFMM
-
109 User Guide
V1.0
網際網路設定
網際網路設定|動態
網際網路設定網際網路設定
動態 DNS
動態動態
動態
選擇網際網路設定
網際網路設定>動態
網際網路設定網際網路設定
動態 DNS 來設定你的 DNS 設定 (注意!本機只支援所列的
動態動態
DNS 伺服器清單)
使用者
使用者:輸入 DNS 伺服器的使用者名稱
使用者使用者
密碼
密碼: 輸入 DNS 使用者密碼
密碼密碼
主機
主機: 輸入 DNS 註冊主機名稱
主機主機
啟用
啟用: 請勾選你想要指定的 DNS 名稱
啟用啟用
取消
取消: 點選取消可清除畫面中輸入的資料。
取消取消
套用
套用: 套用並儲存更改的設定。
套用套用
DNS
51
Page 52

WIXFMM
-
109 User Guide
V1.0
網際網路設定
網際網路設定|WiFi
網際網路設定網際網路設定
WiFi
選擇網際
網際網路設定
網路設定>WiFi
網際網際
網路設定網路設定
無線網路設定
無線網路設定:
無線網路設定無線網路設定
介面狀態
介面狀態: 啟用或停用你的 WiFi 無線網路
介面狀態介面狀態
網路名稱
網路名稱(SSID): 設定你的網路名稱 (最多 32 字元)
網路名稱網路名稱
無線電頻道
無線電頻道: 選擇你欲使用的無線網路頻道
無線電頻道無線電頻道
工作模式
工作模式:選擇你欲使用的無線網路工作模式 (802.11b/g, 802.11 或是
工作模式工作模式
來設定無線網路
來設定無線網路
來設定無線網路來設定無線網路
..
802.11g )
傳輸功率
傳輸功率:設定你無限網路的傳輸功率
傳輸功率傳輸功率
RTS 門檻值
設定你無限網路的傳輸功率(-8~15dBm)
設定你無限網路的傳輸功率設定你無限網路的傳輸功率
門檻值:修改 RTS 門檻值的定義來指定設備封包傳送機制 (範圍 : 256
門檻值門檻值
to 2432)
分裂門檻值
分裂門檻值:定義封包分割的大小(建議維持原廠設定值: 2346)
分裂門檻值分裂門檻值
52
Page 53

WIXFMM
-
109 User Guide
V1.0
訊標期
訊標期:設定 Beacon 傳輸的時間間距(單位為千分秒)
訊標期訊標期
睡眠模式
睡眠模式封包間隔
睡眠模式睡眠模式
封包間隔: 設定 DTIM (Delivery Traffic Indication Message) 時間
封包間隔封包間隔
間隔.
前置碼長度
前置碼長度:設定前置碼長度短前置碼或是長前置碼
前置碼長度前置碼長度
網路名稱
網路名稱(SSID)隱藏
網路名稱網路名稱
安全類型設定
安全類型設定:
安全類型設定安全類型設定
認證
認證:選擇你欲採用的無線網路認證方法
認證認證
加密
加密: 選擇你欲採用的無線網路加密演算法
加密加密
隱藏: 隱藏或是顯示網路名稱(SSID).
隱藏隱藏
ACL 設定
設定:
設定設定
系統預設值
系統預設值: 用下拉選單選擇設備網路連線控制
系統預設值系統預設值
關閉
關閉: 關閉 ACL 設定
關閉關閉
4. 允許
允許: 請建立 MAC 位址篩選清單來允許特定的用戶端可連線至無線
允許允許
網路
插入
插入: 點選插入來新增一個 MAC 位址(最多建立 10 組)
插入插入
刪除
刪除: 點選移除移除你編輯清單中的 MAC 位址
刪除刪除
5. 拒絕
拒絕: 請建立 MAC 位址篩選清單拒絕特定的用戶端可連線至無線網
拒絕拒絕
路
6. 插入
插入: 點選插入來新增一個 MAC 位址(最多建立 10 組)
插入插入
7. 刪除
刪除: 點選移除移除你編輯清單中的 MAC 位址
刪除刪除
53
Page 54

WIXFMM
-
109 User Guide
V1.0
取消
取消: 點選取消可清除畫面中輸入的資料。
取消取消
套用
套用: 套用並儲存更改的設定。。。。
套用套用
個人化
個人化
個人化個人化
個人化
個人化| 密碼
個人化個人化
密碼
密碼密碼
密碼
選擇個人化
個人化>密碼
個人化個人化
以在此頁面更新密碼。
啟用登入密碼保護
啟用登入密碼保護: 勾選這個選項時,進入設定頁面時將會要求你輸入密碼.
啟用登入密碼保護啟用登入密碼保護
新登入密碼
新登入密碼:輸入一個新的密碼(64 位元為限)
新登入密碼新登入密碼
確認新登入密碼
確認新登入密碼: 再次輸入你的新密碼
確認新登入密碼確認新登入密碼
取消
取消: 點選取消可清除畫面中輸入的資料
取消取消
密碼 在這個頁面你可以設定開啟或是關閉密碼保護.另外,你也可
密碼密碼
54
Page 55

WIXFMM
-
109 User Guide
V1.0
套用
套用: 套用並儲存更改的設定
套用套用
個人化
個人化| 設備時間
個人化個人化
設備時間
設備時間設備時間
設備時間
選擇個人化
個人化>設備時間設定時區
個人化個人化
當前本地時間
當前本地時間: 顯示目前的時間。
當前本地時間當前本地時間
時區
時區: 請在下拉選單選擇你所在地區之時區
時區時區
自動調整為夏令時間
自動調整為夏令時間: 如果你所在地區有日光節約時間,請點選以利正確設
自動調整為夏令時間自動調整為夏令時間
設備時間設定時區
設備時間設定時區設備時間設定時區
定。
取消
取消: 點選取消可清除畫面中輸入的資料
取消取消
套用
套用: 套用並儲存更改的設定
套用套用
55
Page 56

WIXFMM
-
109 User Guide
V1.0
個人化
個人化|當前設備名稱
個人化個人化
當前設備名稱
當前設備名稱當前設備名稱
選擇個人化
個人化>當前設備名稱修改設備名稱
個人化個人化
當前設備名稱修改設備名稱(你可以在網路芳鄰裡面看到這台設備
當前設備名稱修改設備名稱當前設備名稱修改設備名稱
當前設備名稱
的名稱,出廠值為: WiMaxCPE)
當前設備名稱
當前設備名稱: 顯示目前本機的設備名稱.
當前設備名稱當前設備名稱
新設備名稱
新設備名稱: 輸入你想更改的設備名稱(最高支援 20 ASCII位元).
新設備名稱新設備名稱
取消
取消: 點選取消可清除畫面中輸入的資料
取消取消
套用
套用: 套用並儲存更改的設定
套用套用
56
Page 57

WIXFMM
-
109 User Guide
V1.0
個人化
個人化|恢復原廠設定
個人化個人化
恢復原廠設定
恢復原廠設定恢復原廠設定
恢復原廠設定
選擇個人化
個人化>恢復原廠設定
個人化個人化
恢復原廠設定
恢復原廠設定: 勾選恢復原廠設定,然後點選套用
恢復原廠設定恢復原廠設定
恢復原廠設定 可清除你做的所有設定,恢復到原廠出廠狀態。
恢復原廠設定恢復原廠設定
套用即可恢復到出場狀態。
套用套用
57
Page 58

WIXFMM
-
109 User Guide
V1.0
區域網路設定
區域網路設定
區域網路設定區域網路設定
區域網
區域網路設定
區域網區域網
路設定 | DHCP 伺服器
路設定路設定
伺服器
伺服器伺服器
DHCP
伺服器
選擇區區區區域網路設定
與本設備連結之區域網路端機器的 IP 位址)
域網路設定>DHCP 伺服器
域網路設定域網路設定
啟用
啟用 DHCP 伺服器
啟用啟用
DHCP 伺服器
DHCP 起始
位址範圍.
DHCP 租約時間
取消
取消: 點選取消可清除畫面中輸入的資料。
取消取消
套用
套用: 套用並儲存更改的設定。
套用套用
伺服器:勾選欄位來啟用
伺服器伺服器
伺服器 IP 位址
伺服器伺服器
起始 IP 位址
起始起始
租約時間: 定義 DHCP server IP 位址更新時間
租約時間租約時間
位址/ DHCP 結束
位址位址
伺服器 來設定內建的 DHCP 伺服器(DHCP 伺服器管理
伺服器伺服器
勾選欄位來啟用 DHCP 伺服器
勾選欄位來啟用勾選欄位來啟用
位址: 你可以在此修改 DHCP 伺服器的 IP 位址
位址位址
結束 IP 位址
結束結束
位址: 定義 DHCP 伺服器所支援的 IP
位址位址
58
Page 59

WIXFMM
-
109 User Guide
V1.0
區域網路設定
區域網路設定| 租約狀態
區域網路設定區域網路設定
租約狀態
租約狀態租約狀態
租約狀態
選擇區區區區域網路設定
域網路設定>租約狀態
域網路設定域網路設定
更新
更新: 點選更新可顯示最新的用戶端主機的狀態
更新更新
自動
自動: 點選自動可讓頁面自動更新用戶端主機的狀態
自動自動
租約狀態來檢視目前狀態用戶端主的的狀態
租約狀態租約狀態
59
Page 60

WIXFMM
-
109 User Guide
V1.0
區域網路設定
區域網路設定|租約保留
區域網路設定區域網路設定
租約保留
租約保留租約保留
租約保留
選擇區區區區域網路設定
域網路設定>租約保留
域網路設定域網路設定
增加
增加: 點選增加來插入一個新的租約保留資料
增加增加
刪除
刪除: 選擇你欲刪除的租約保留資料然後點選刪除鍵來執行刪除
刪除刪除
取消
取消: 點選取消可清除畫面中輸入的資料。
取消取消
套用
套用: 套用並儲存更改的設定。
套用套用
租約保留 來指定某用戶端取得指定的 IP 位址而不會更改
租約保留租約保留
60
Page 61

WIXFMM
-
109 User Guide
V1.0
虛擬伺服器設定
虛擬伺服器設定
虛擬伺服器設定虛擬伺服器設定
虛擬伺服器設定
虛擬伺服器設定 |基本
虛擬伺服器設定虛擬伺服器設定
基本
基本基本
基本
選擇 虛擬
虛擬伺服器設定
伺服器設定 >基本
虛擬虛擬
伺服器設定伺服器設定
啟用
啟用 UPnP: 當此功能啟用時可以自動建立任何 UPnP 設備通訊埠 (port)
啟用啟用
的連結
DMZ IP 位置
位址。
取消
取消: 點選取消可清除畫面中輸入的資料。
取消取消
套用
套用: 套用並儲存更改的設定.
套用套用
位置: 設備會將所有的埠口 (port) ,皆會對應到內部您所設定的 IP
位置位置
基本 來
基本基本
來建立網路封包傳送規則
來來
建立網路封包傳送規則
建立網路封包傳送規則建立網路封包傳送規則
61
Page 62

WIXFMM
-
109 User Guide
V1.0
虛擬伺服器設定
虛擬伺服器設定 |轉發
虛擬伺服器設定虛擬伺服器設定
轉發
轉發轉發
轉發
選擇 虛擬
虛擬伺服器設定
伺服器設定 >基本
虛擬虛擬
伺服器設定伺服器設定
新增
新增:點選新增來插入一個新的埠口 (port)轉發規則,當增加一個新個規則你
新增新增
基本 來建立更新的網路封包傳送規則
基本基本
來建立更新的網路封包傳送規則
來建立更新的網路封包傳送規則來建立更新的網路封包傳送規則
必須先選擇 TCP or UDP 協定以及其他資訊.
刪除
刪除: 點選刪除鍵來移除你選定的埠口 (port)轉發規則
刪除刪除
取消
取消: 點選取消可清除畫面中輸入的資料。
取消取消
套用
套用: 套用並儲存更改的設定。
套用套用
62
Page 63

WIXFMM
-
109 User Guide
V1.0
系統管理
系統管理
系統管理系統管理
系統管理
系統管理 | 軟體
系統管理系統管理
軟體
軟體軟體
軟體
選擇系系系系統管理
點選瀏覽
此更新的軟體。
統管理 > 軟體
統管理統管理
瀏覽並選擇愈更新的軟體檔案(必須是.IPKG 的格式),接著點選升級
瀏覽瀏覽
軟體 來確認你的軟體版本以及更新軟體.
軟體軟體
升級 來安裝
升級升級
63
Page 64

WIXFMM
-
109 User Guide
V1.0
系統管理
系統管理 | 語言切換
系統管理系統管理
語言切換
語言切換語言切換
選擇系系系系統管理
統管理 >語言切換
統管理統管理
語言切換來切換
語言切換語言切換
來切換擬使用者介面的語言
來切換來切換
語言切換
擬使用者介面的語言(英文以及繁體中文
擬使用者介面的語言擬使用者介面的語言
英文以及繁體中文)
英文以及繁體中文英文以及繁體中文
64
Page 65

WIXFMM
-
109 User Guide
V1.0
系統管理
系統管理 | 電源管理
系統管理系統管理
電源管理
電源管理電源管理
電源管理
選擇系系系系統管理
統管理 >電源管理
統管理統管理
開啟省電模式
開啟省電模式::::點選開啟省電模式可節省你設備的耗電
開啟省電模式開啟省電模式
模式以及休眠模式機制
模式以及休眠模式機制
模式以及休眠模式機制模式以及休眠模式機制
(幾秒後
幾秒後))))進入待機模式
幾秒後幾秒後
電源管理 來設定以及管理你的省電模式
電源管理電源管理
點選開啟省電模式可節省你設備的耗電,,,,你可以接續設定待機
點選開啟省電模式可節省你設備的耗電點選開啟省電模式可節省你設備的耗電
進入待機模式: 當你移除 USB 端口連結以及沒有無線網路連結的
進入待機模式進入待機模式
來設定以及管理你的省電模式
來設定以及管理你的省電模式來設定以及管理你的省電模式
你可以接續設定待機
你可以接續設定待機你可以接續設定待機
狀態下,設備會進入待機模式,你可以設定幾秒之後進入待機模式。
(在
在待機
待機模式下
在在
名稱
名稱(SSID)
名稱名稱
從待機模式甦醒
從待機模式甦醒::::當你做以下之ㄧ的動作時設備將會從待機模式中甦醒回到
從待機模式甦醒從待機模式甦醒
模式下,4G WiMAX 網路連結會被關閉
待機待機
模式下模式下
(SSID))
(SSID)(SSID)
網路連結會被關閉,你仍然可以看到本機的網路
網路連結會被關閉網路連結會被關閉
你仍然可以看到本機的網路
你仍然可以看到本機的網路你仍然可以看到本機的網路
正常模式 :
1111....
重新連結USB端口
65
Page 66

WIXFMM
-
109 User Guide
V1.0
2222....
重新連結無線網路
3333....
短按電源開關1秒
(
(幾秒後
幾秒後))))進入休眠模式
((
幾秒後幾秒後
進入休眠模式::::你可以在這裡設定在進入待機模式幾秒後進入休
進入休眠模式進入休眠模式
眠模式(在休眠模式下 4G WiMAX 網路以及無線網路都會被關閉)
從休眠模式甦醒
從休眠模式甦醒::::當你短按電源開關1秒時設備將會從休眠模式中甦醒回到
從休眠模式甦醒從休眠模式甦醒
正常模式
你可以利用待機模式來充電,將會使充電更有效率
系統管理
系統管理 | 關於
系統管理系統管理
關於
關於關於
選擇系統管理
系統管理 >>>> 關於
系統管理系統管理
產品名稱、
WAN MAC 位址等等
關於
關於可以幫助你讀取到本設備的一些基本資訊:服務供應商、
關於關於
66
Page 67

WIXFMM
-
109 User Guide
V1.0
狀態
狀態
狀態狀態
狀態
狀態 | WiMAX 狀態
狀態狀態
狀態
狀態狀態
WiMAX
選擇狀態 | WiMAX 狀態 顯示 WiMAX 連線狀態
更新
更新: 點選更新可顯示最新的 WiMAX 連線狀態
更新更新
自動
自動: 點選自動可讓頁面自動更新 WiMAX 連線狀態
自動自動
狀態
67
Page 68

WIXFMM
-
109 User Guide
V1.0
狀態
狀態 | 設備狀態
狀態狀態
設備狀態
設備狀態設備狀態
設備狀態
選擇狀態
狀態>設備狀態
狀態狀態
更新
更新: 點選更新可顯示最新的設備狀態狀態
更新更新
自動
自動: 點選自動可讓頁面自動更新設備狀態
自動自動
設備狀態 顯示設備狀態
設備狀態設備狀態
.
68
Page 69

WIXFMM
-
109 User Guide
V1.0
狀態
狀態 | 系統紀錄
狀態狀態
系統紀錄
系統紀錄系統紀錄
選擇狀態
狀態>系統紀錄
狀態狀態
系統紀錄 可以讓你以及全球一動的客服人員了解你的系統狀態,以利
系統紀錄系統紀錄
解決你的連線問題
系統紀錄
69
Page 70

WIXFMM
-
109 User Guide
V1.0
重新啟動
重新啟動/登出
重新啟動重新啟動
登出/重新連結
登出登出
重新連結
重新連結重新連結
使用者介面左下方有 3 個功能鍵:
重新啟動
重新啟動:
重新啟動重新啟動
: 點選後設備會重新開機
: :
重新連結/重新啟動
登出
登出:
: 點選後設備會登出當前的使用者介面
登出登出
::
重新連結
重新連結: 點選後設備會重新連結 4G WiMAX 網路
重新連結重新連結
70
 Loading...