

Page 1
SUREgauge
USER MANUAL
™
Page 2

MAINTENANCE INSTRUCTIONS
1. Gently wipe down the gauge with a dry, clean cloth
before using.
2. The gauge is a precision instrument and must treated
with care. Do not allow the gauge to fall or be handled in
a rough way as it may damage it, impact its precision and
void the warranty.
3. Keep the gauge clean, dry and away from liquids.
4. In order to save power, turn off the gauge when it is not
in use. There is no auto shut-off with this gauge. Your unit
will continue to run until you power it off.
SCHEMATIC
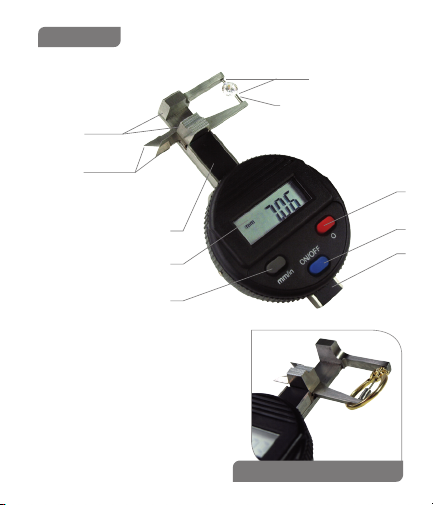
1. Protective Slider Cover
2. LCD Display
3. Millimeter/Inch Mode Button
(mm/inch)
4. Slider
5. Power Button (ON/OFF)
6. Zero Adjustment Setting Button (O)
HIGH SETTING ATTACHMENT
To measure the depth of certain mounted stones, place the
high setting attachment on the lower pin as shown on the
schematic Measuring Surface A. Press the zero adjustment
setting prior to measuring the stone’s depth.
Page 3
SCHEMATIC
Measuring Surface / B
Measuring Surface / A
High Setting
Attachment Goes Here
Measuring Surface / C
6
1
2
3
5
4
HIGH SETTING ATTACHMENT
Page 4

TECHNICAL SPECIFICATIONS
Measuring Range: 0-25mm/0-1”
Precision Accuracy: 0.01mm/0.0005”
Power: LR44 Alkaline Battery (Or 357 Silver Oxide)
Environmental Conditions
Temperature: 0ºC-40ºC
Relatively Humidity: ≤80%
Storage Temperature: -10ºC– +60ºC
FUNCTIONS
1. Power ON/OFF – Press the ON/OFF button to activate or
deactivate the gauge.
2. Zero Adjustment Setting – Press the “O” button while the
unit is on.
3. Millimeter/Inch Conversion – Press the “mm/in” button to
switch between measuring modes.
BATTERY REPLACEMENT
If the LCD display flashes its digits on and off this is an
indication that the batteries are weak and in need of
immediate replacement. On the backside of the gauge
nearest the LCD display, locate the small screw and carefully
unscrew it to remove the battery compartment cover and
replace the battery (positive side facing up). Replace the
battery compartment cover.
Page 5

OPERATION
1. Push the ON/OFF power button to activate the gauge.
2. Push the mm/inch button until the desired unit of measure
has been selected.
3. Apply only a slight pressure to move the slider down in
order to open steel jaws of the measuring surface as
needed. Only allow the jaws to close slowly to avoid
damage to the gauge.
4. Measure stones or items within the jaws and read the
measurement on its LCD display.
5. To determine the depth of a stone in a setting that has
its culet exposed through a hole in the setting, you must
use the High Setting Attachment. Move the slider down
to open the steel jaws all of the way. Locate the High
Setting Attachment and place the female end over the
bottom pin on the right side of the jaws and close the
slider. Then press the zero (O) button so that the LCD
display will then read 0.00mm or 0.000 inches. Now
move the slider down to open the jaws and insert the
ring so that the stones culet is touching the end of the
High Setting Attachment and the stones table is touching
the jaws pin on top. The display will then show you the
measurement.
6. Push the ON/OFF power button to deactivate the gauge.
Page 6
TROUBLE SHOOTING
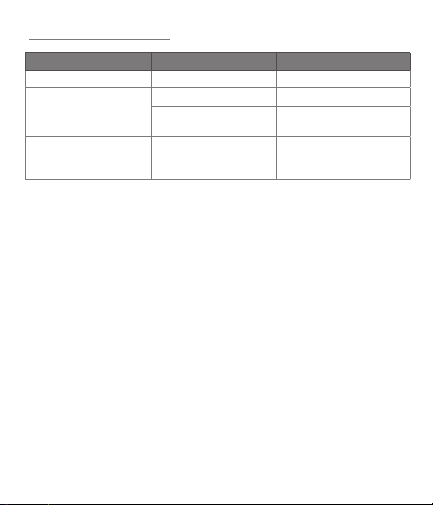
FAILURE CAUSE MEASURE
Flashing digits Low battery voltage Replace the battery
No display on LCD
Display doesn’t change
when the slider is
moved
1. Low battery voltage 1. Replace the battery
2. Poor battery contact 2. Adjust and clean the
Potential circuit problem Take out battery and
battery compartment
reinsert it after 1 minute
Page 7

WARRANTY
Congratulations on your purchase of the GemOro
Suregauge! Your gauge features a ONE YEAR LIMITED
WARRANTY from the date of its purchase assuming the
purchaser fills out the WARRANTY REGISTRATION FORM
at www.gemoroproducts.com/warrantyregistration. If this
criteria is not followed, the Suregauge will automatically
be covered by a 90 DAY LIMITED WARRANTY from the
date of your steamer purchase, as noted on the bill of
sale (if supplied). In the event the Suregauge is no longer
available or has been discontinued and warranty coverage
is applicable, at the factory’s sole discretion, an equivalent
gauge may be substituted in place of the defective
Suregauge. The purchaser shall incur the cost for return
postage, insurance and handling for all warranty and nonwarranty repairs and/or replacements. Warranty repairs
and/or replacements will be shipped back to the customer
FOB Destination to the location of the customer’s choosing
if within the Continental United States (U.S.). Non-warranty
repairs will be shipped back to the customer FOB Factory.
Should the customer require the repair and/or replacement
unit(s) to be shipped outside the Continental U.S., the
customer will be required to pay any related shipping
charges and any related taxes/duties for the respective
destination country, regardless of whether it is a warranty or
non-warranty claim.
Page 8

10455 Olympic Drive
Dallas, Texas 75220 USA
Tel 800.527.0719 or 214.351.0380
Fax 800.832.9871 or 214.351.1903
www.gemoroproducts.com
 Loading...