

Page 1
DIAMOND &
WHITE SAPPHIRE
TESTER
Page 2

GEMORO PRO-D 3 2
The new generation tester for diamond
fraud protection, the GemOro PRO-D 3,
features enhanced testing abilities, sleek
ergonomics and more!
OPERATING PROCEDURE
& OWNERS MANUAL
Congratulations on your purchase of
the PRO-D 3 from GemOro Superior
Instruments, the most trusted name
in gemological instrumentation for the
jewelry industry. You’ve made a great
choice. Built upon the foundation of the
second generation and most popular
diamond tester to date, the PRO-D
3 offers even more. Separate true
diamonds from white sapphire, CZ, and
other known diamond simulants with
confidence.
IMPORTANT: PLEASE BE CERTAIN
TO READ THE FOLLOWING
COMPLETELY BEFORE USING.
THERMAL CONDUCTIVITY &
ELECTRICAL CONDUCTIVITY
TESTING METHODS
The recognized method for separating
diamond from all known diamond
simulants (except moissanite and
synthetic diamond) is the thermal
conductivity test. The thermal
conductivity test works consistently well
since a diamond’s heat conductivity
property is significantly greater than all
other gemstones (except moissanite
and synthetic diamond). White sapphire
is also thermally conductive, yet not as
conductive as diamond and moissanite,
therefore, it can be separated from those
two types of stones.
The GemOro Superior Instruments
PRO-D 3 utilizes the thermal conductivity
test and it will quickly help in identifying
and separating the stone in question.
Page 3

3
The PRO-D 3 is an advanced,
technologically based tool.
IMPORTANT DISCLAIMER: The PRO-D
3 is a helpful screening tool that by
design is to be used as a quick method
for helping to identify diamonds. The
PRO-D 3 should not be used as the final
method for determining the authenticity
or identity of the gemstone being tested.
The final determination of the identity
of any gemstone, whether genuine or
not, should only be made by a trained
gemologist. Neither GemOro nor any
of its affiliates, dealers, or distributors
shall be held liable for any loss and/
or damages associated with the use
of the PRO-D 3. No warranties exist
with respect to the PRO-D 3 or its use
other than those expressly contained
herein. All other warranties of any kind or
character whatsoever, whether expressed
or implied, including warranties of
merchantability or fitness for a particular
purpose, are hereby disclaimed and are
excluded from the warranties hereunder.
In the event that a claim is made with
respect to the PRO-D 3 or its use, the
maximum liability of GemOro, and its
affiliates, dealers, and distributors shall
be the amount paid for the PRO-D 3.
PLEASE READ BEFORE USING THE
PROVIDED NiMH RECHARGEABLE
BATTERIES: Before using the NiMH
rechargeable batteries that have been
provided with your tester, the batteries
should be fully charged as indicated by
the small round LED indicator next to
the power button glowing green when
the PRO-D 3 is plugged in. While the
batteries are being charged, the tester
may be used as desired while powered
by the AC current.
Page 4

GEMORO PRO-D 3 4
CONDITIONS FOR IDEAL OPERATION
1. The PRO-D 3 should be used in the
following environmental conditions.
Both the tester and the stone being
tested must be the same temperature.
By not following these instructions you
risk compromising the accuracy of the
test.
a. Temperature: 65°F-80°F (18°C-27°C)
b. Air Relative Humidity: 45%-75%
2. The stone being tested must be dry. If
the surface of the stone is wet or has
any type of surface moisture it may not
test correctly.
3. The stone being tested must be
clean. Aside from obvious visible dirt
that may be present on the stone,
there may also be hand oil or other
contaminates on the stones surface
that may not be visible and which
could impact the accuracy of the test.
Always be certain to clean the stone
being tested with an ultrasonic or
steamer or other appropriate means,
and thoroughly dry it and/or remove
any cleaning chemicals remaining on
the stone prior to testing.
4. It is imperative that the probe tip be
cleaned regularly or ideally prior to
performing a test. Please be aware
that there may be hand oil or other
contaminates that may not be visible
on the probe tip, which could impact
the accuracy of the test. To clean the
tip, take a piece of uncoated white
printer or copy paper and place the
probe tip of the tester at a 90 degree
angle against the paper while gently
rubbing it in a forward motion a few
times. Repeat this process routinely or
prior to testing each time to ensure the
cleanliness of the probe tip.
Page 5

5
5. Always allow the stone being tested
to cool off for 5-10 seconds prior to
retesting. Blowing on the stone is
recommended and will speed up this
process. Please be aware that if while
testing a stone the Pro-D 3 light pipe
turns pink, unless it is a white sapphire
or sapphire watch crystal, odds are
that the stone has been overheated
from prolonged exposure to the probe
tip and, therefore, you must wait for
the stone to cool off prior to retesting.
PRO-D 3 FEATURES
1. Helps to identify diamond and white
sapphire, including genuine sapphire
watch crystals. The test results are
shown via its PATENTED color-coded
light pipe and unique sounding beep
tones.
2. Quickly assists with testing most any
size diamond, whether mounted or
loose.
3. The sleek and ergonomic shape
comfortably rests in and on your
hand when held, and the tester has
PATENT PENDING intuitive finger grip
pads for increased user-friendliness
and ease of use.
4. The LED illuminator is positioned
under the probe tip. The LED
Illuminator is a super bright white
LED that illuminates the stone being
tested.
5. The tester is equipped with a
spring-loaded probe tip designed
to protect the probe tip if excessive
force is used while testing or if it is
accidentally dropped.
Page 6

GEMORO PRO-D 3 6
6. The tester housing is made from
durable ABS and is covered with
GemOro’s exclusive rubberized paint
that provides an even greater grip.
7. Powered by (3) supplied 1.5V AAA
NiMH rechargeable batteries and
conveniently charged by a micro-USB
adapter. The rechargeable batteries
may be substituted with AAA alkaline
batteries if a suitable power outlet
is unavailable to recharge the NiMH
batteries.
8. The tester is also designed to have its
batteries charged with the optional
GemOro UltraDock 3 charging station
accessory (Item #0772).
9. Includes a GemOro rubberized
protective carrying/storage case,
aluminum loose stone holder, as well
as (3) user-replaceable AAA NiMH
rechargeable batteries, a universal
multi-voltage 100V-240V AC adaptor/
charger cube with micro-USB cord.
10. The tester is also designed to be
used with the optional handy PATENT
PENDING GemOro Test Stone
Magnifier attachment, which when
clipped onto the tester’s tip area
allows the user to more easily see
and test small diamonds without
accidentally touching the setting or
prongs (Item # 0780).
11. The tester has an auto-off function
to preserve the battery life and it will
automatically turn itself off after a
period of 5 minutes of non-use. After
powering down, if you wish to resume
using the PRO-D 3, simply touch
the tester’s power button and within
seconds the tester will turn itself back
on again.
Page 7
7
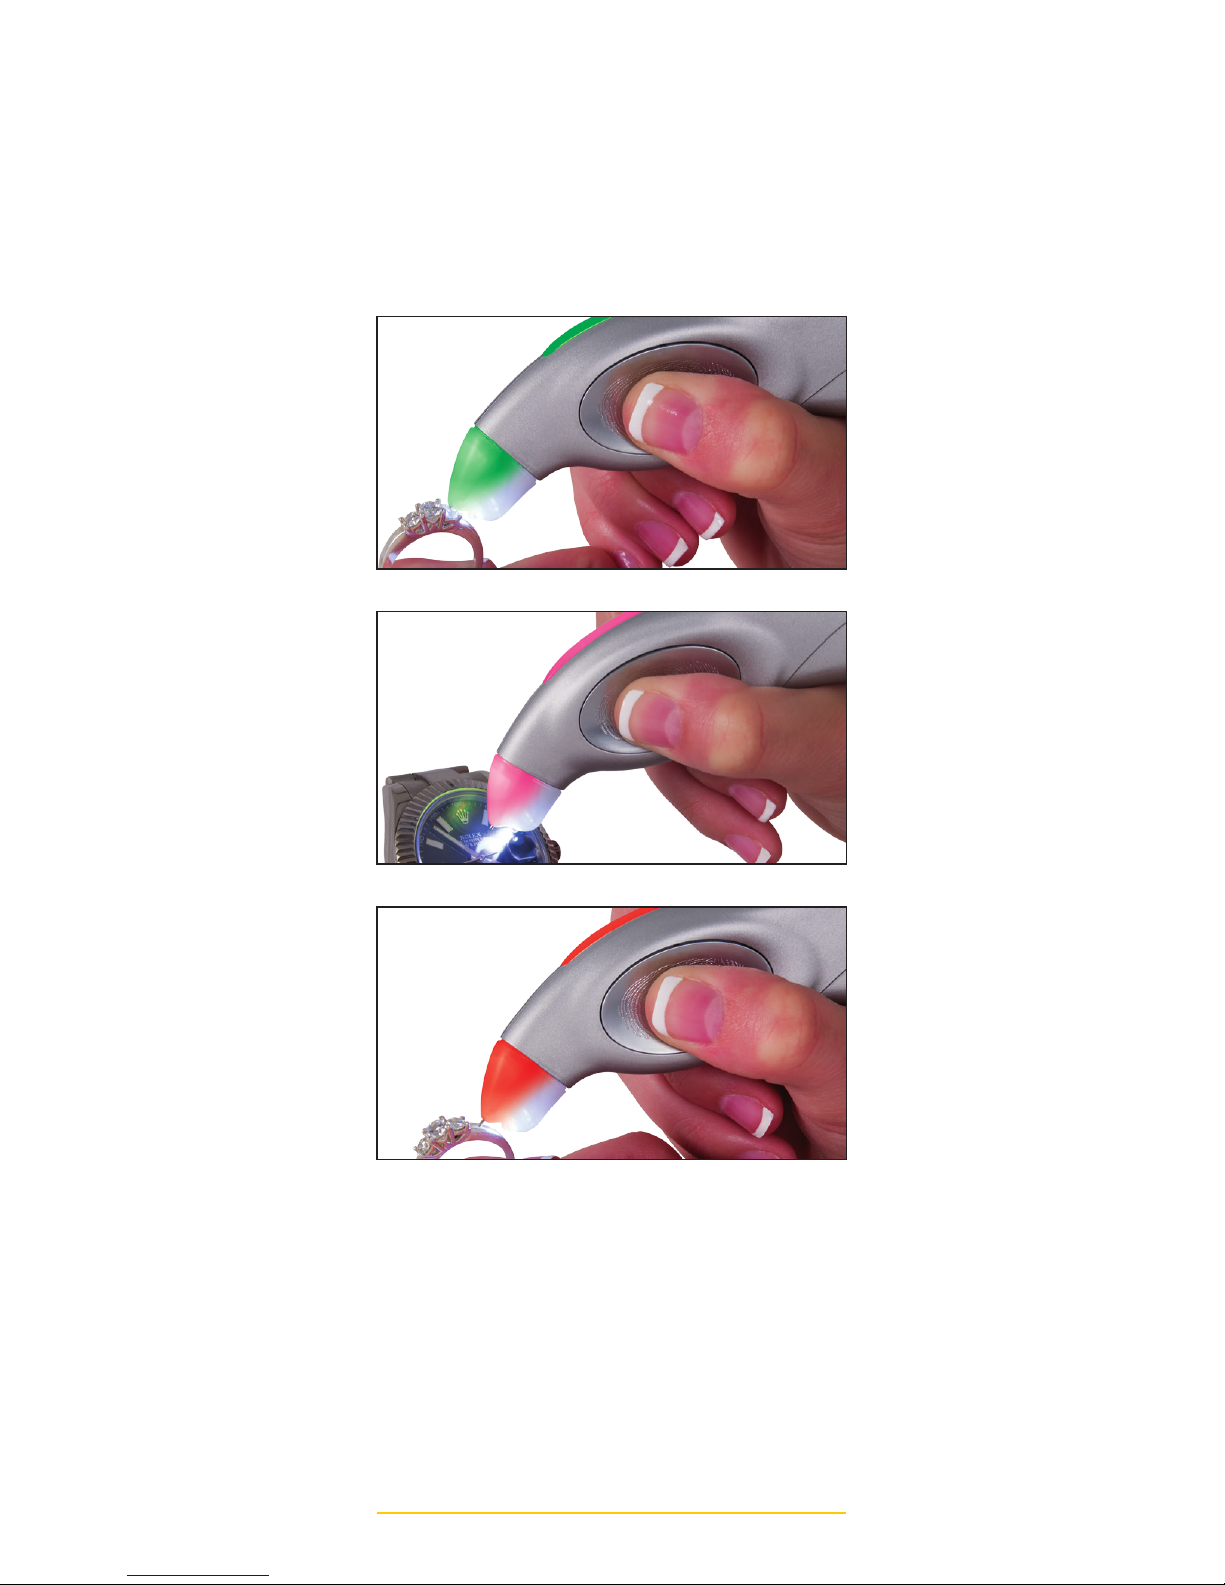
12. Glowing LED Light Pipe and Probe
Tip Indicator. Innovative PATENTED
colored LEDs visually indicate (see
images):
GREEN = Diamond
PINK = Sapphire
RED = Metal Alert
DIAMOND
SAPPHIRE
METAL ALERT
Page 8
GEMORO PRO-D 3 8
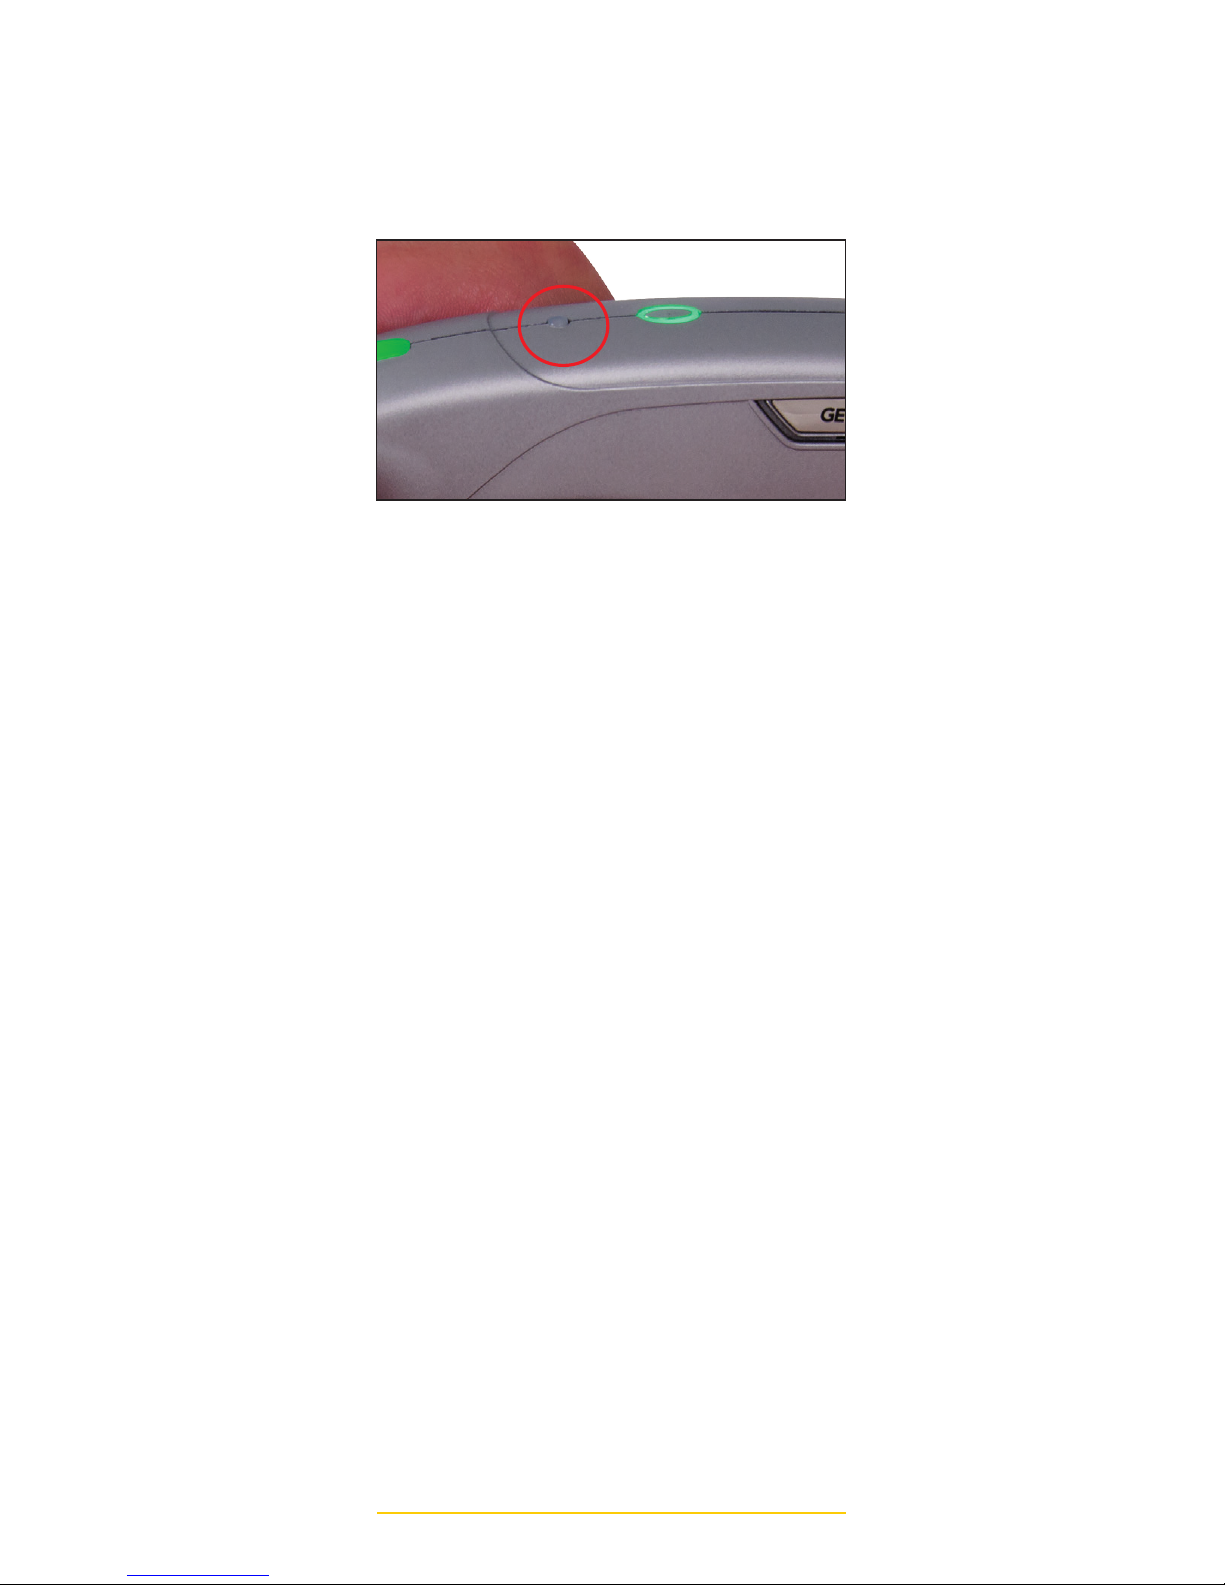
13. LED Indicators. The round LED
indicator is located next to the oval
shaped power button:
GREEN = Fully Charged Batteries
YELLOW = Charging Batteries
RED = Low Batteries
14. Bright green LED illuminated power
button.
15. Pocket-sized and portable.
16. Simple to operate.
SPECIFICATIONS
• Working Voltage: DC 1.2V (3) × AAA
NiMH, DC 1.5V, (3) x AAA alkaline
batteries or its universal voltage
100V-240V AC adapter cube.
• Probe Tip Warm-Up Time:
Approximately 25 seconds.
• NiMH and Alkaline Battery Working
Time: Approximately two hours of
continuous use.
• Working Temperature: 65°F-80°F
(18°C-27°C).
• Air Relative Humidity: 45%-75%.
• Net Weight: Approximately 100g
(including batteries).
CAUTION
DO NOT disassemble the PRO-D 3
other than to replace the batteries or the
warranty will become void.
BATTERY LED INDICATOR
Page 9
9
OPERATION
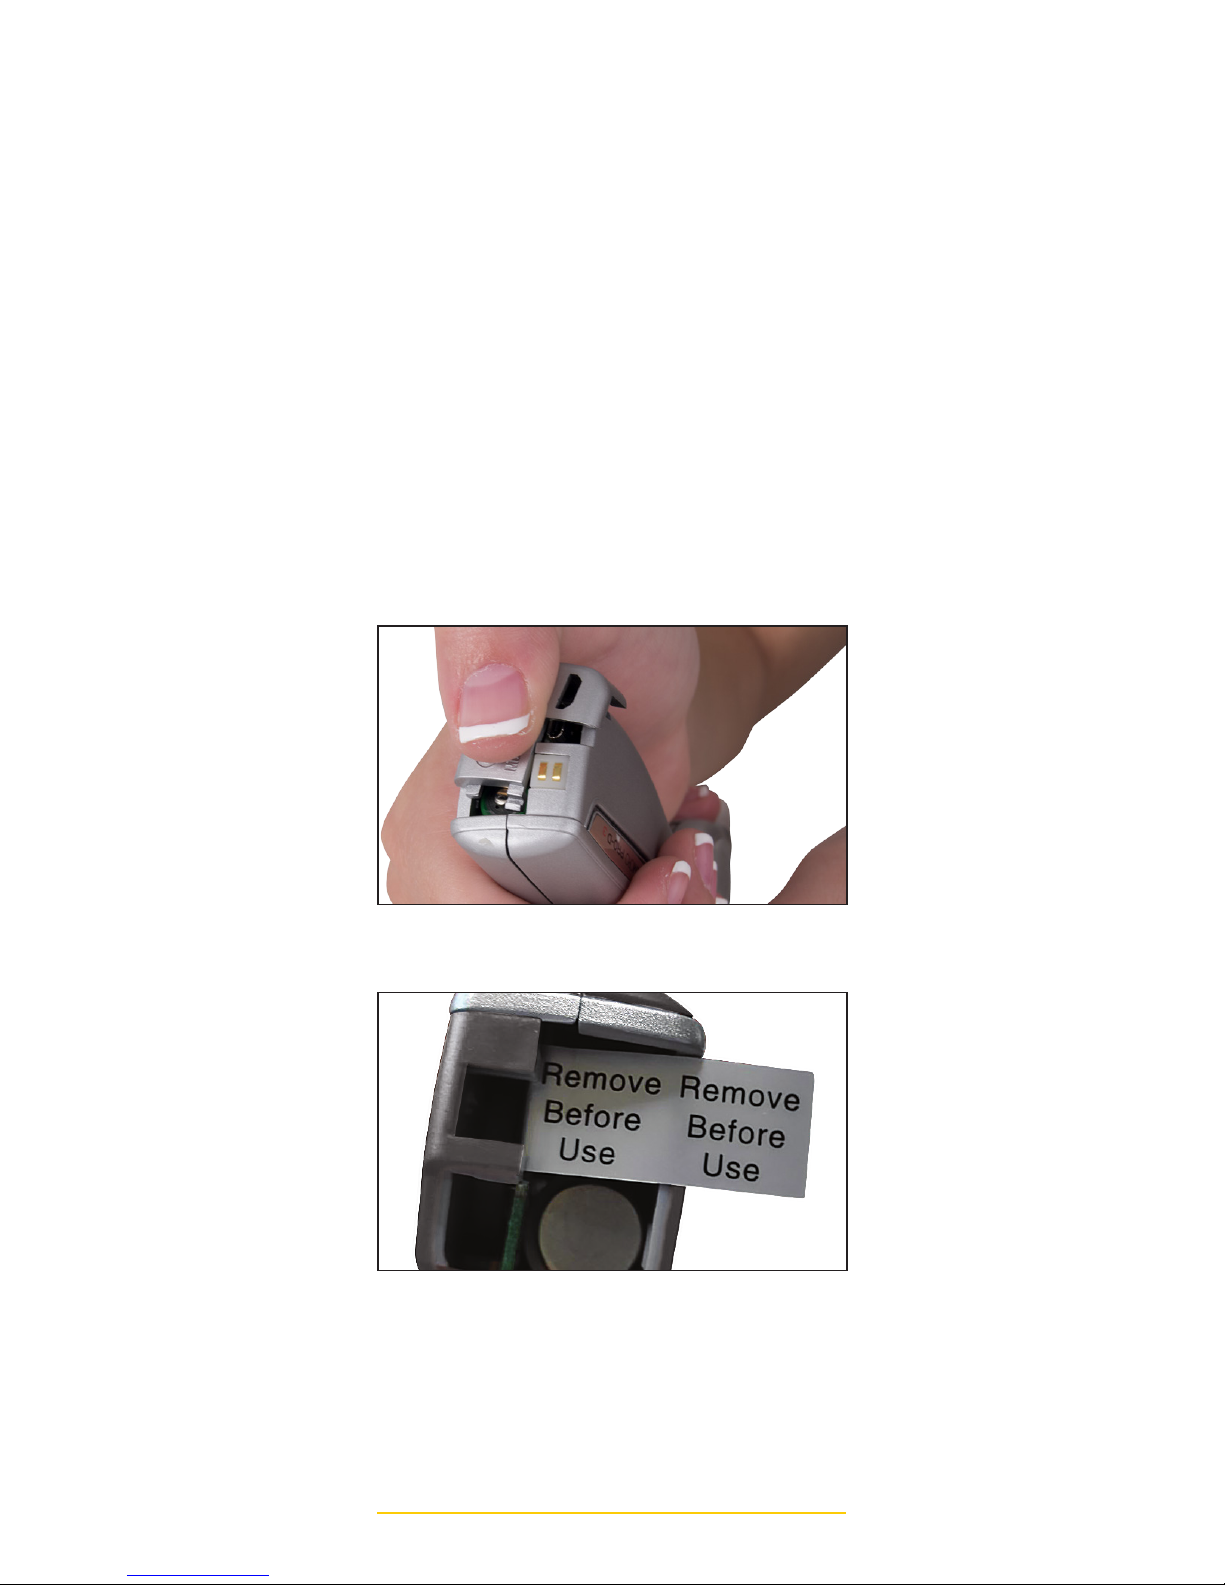
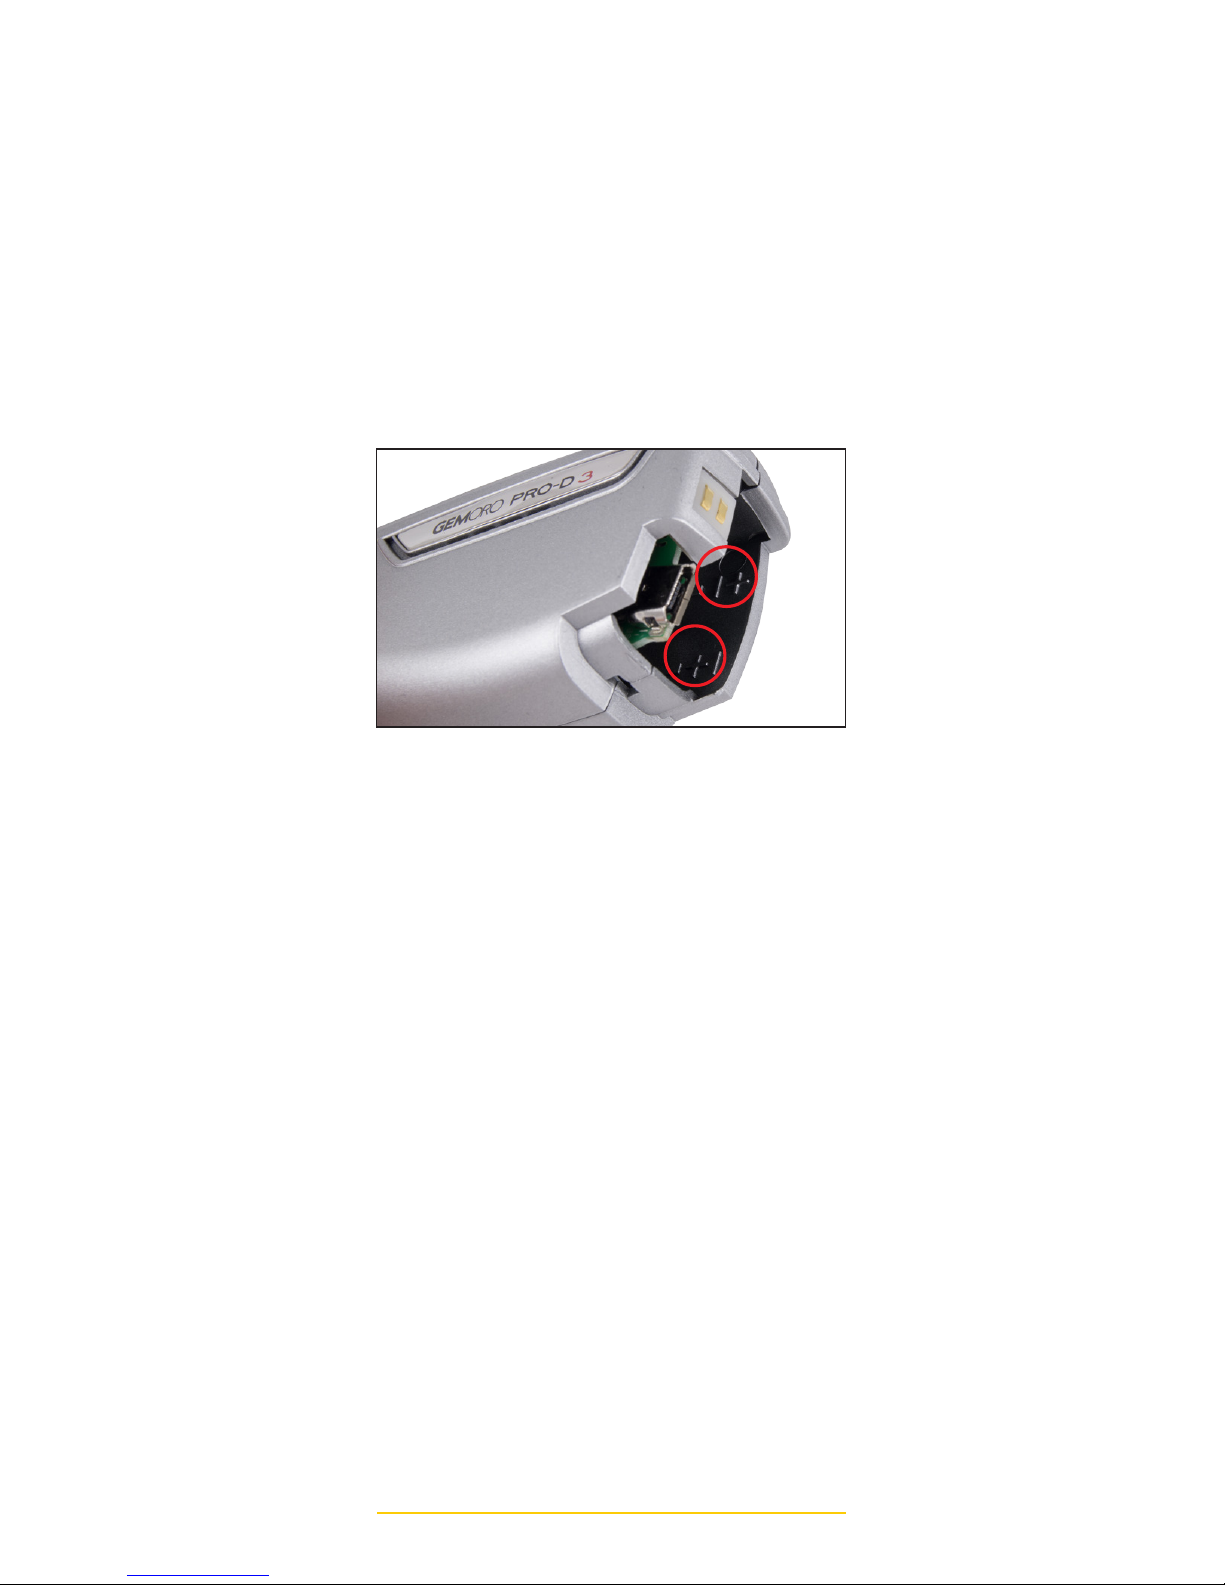
1. NiMH Battery Usage and Alkaline
Battery Installation: Remove the
battery compartment door located on
the end of the PRO-D 3 by using your
thumb to slide the textured area down
and in the direction of the arrow. To
activate the (3) NiMH rechargeable
batteries, REMOVE THE (2) BLACK
BATTERY DISCHARGE INSULATOR
TABS located at the end of each
battery and then carefully replace
the battery compartment door
(see image). To increase the life of
the NiMH rechargeable batteries,
after removing the discharge insulator
tabs in the battery compartment, fully
charge the batteries prior to use.
TESTER BATTERY COMPARTMENT
BATTERY DISCHARGE INSULATOR TAB
Page 10
GEMORO PRO-D 3 10
If you wish to replace the NiMH
batteries with alkaline batteries, after
removing the battery compartment
door as described above, insert (3)
high-quality AAA 1.5V alkaline batteries
into the battery compartment. The
proper polarity positioning is indicated
on the side of the battery compartment
wall showing the direction of positive
(+) and negative (-) polarity so that it
is correctly positioned in the battery
holder. Carefully replace the battery
compartment door.
2. The PRO-D 3 batteries may be charged
by placing it in the optional UltraDock
3 battery charging station with the
micro-USB power cord plugged into
the rear of the charging station or by
plugging its supplied micro-USB power
cord into the rear of the tester and the
USB adapter cube directly into a wall
outlet. Once the tester is connected to
the AC adapter or the charging station,
the tester will switch to its DC power
mode. The tester’s built-in Intelligent
Charging Circuit ICC will automatically
identify the type of batteries installed
(NiMH rechargeable batteries
or alkaline batteries). If alkaline
batteries are installed, the circuit will
automatically cut off the power supply
to the batteries so that the alkaline
batteries will not be recharged. If NiMH
rechargeable batteries are installed, the
BATTERY POLARITY
Page 11
11
batteries will be recharged and at the
same time the tester may be used with
the AC adapter.
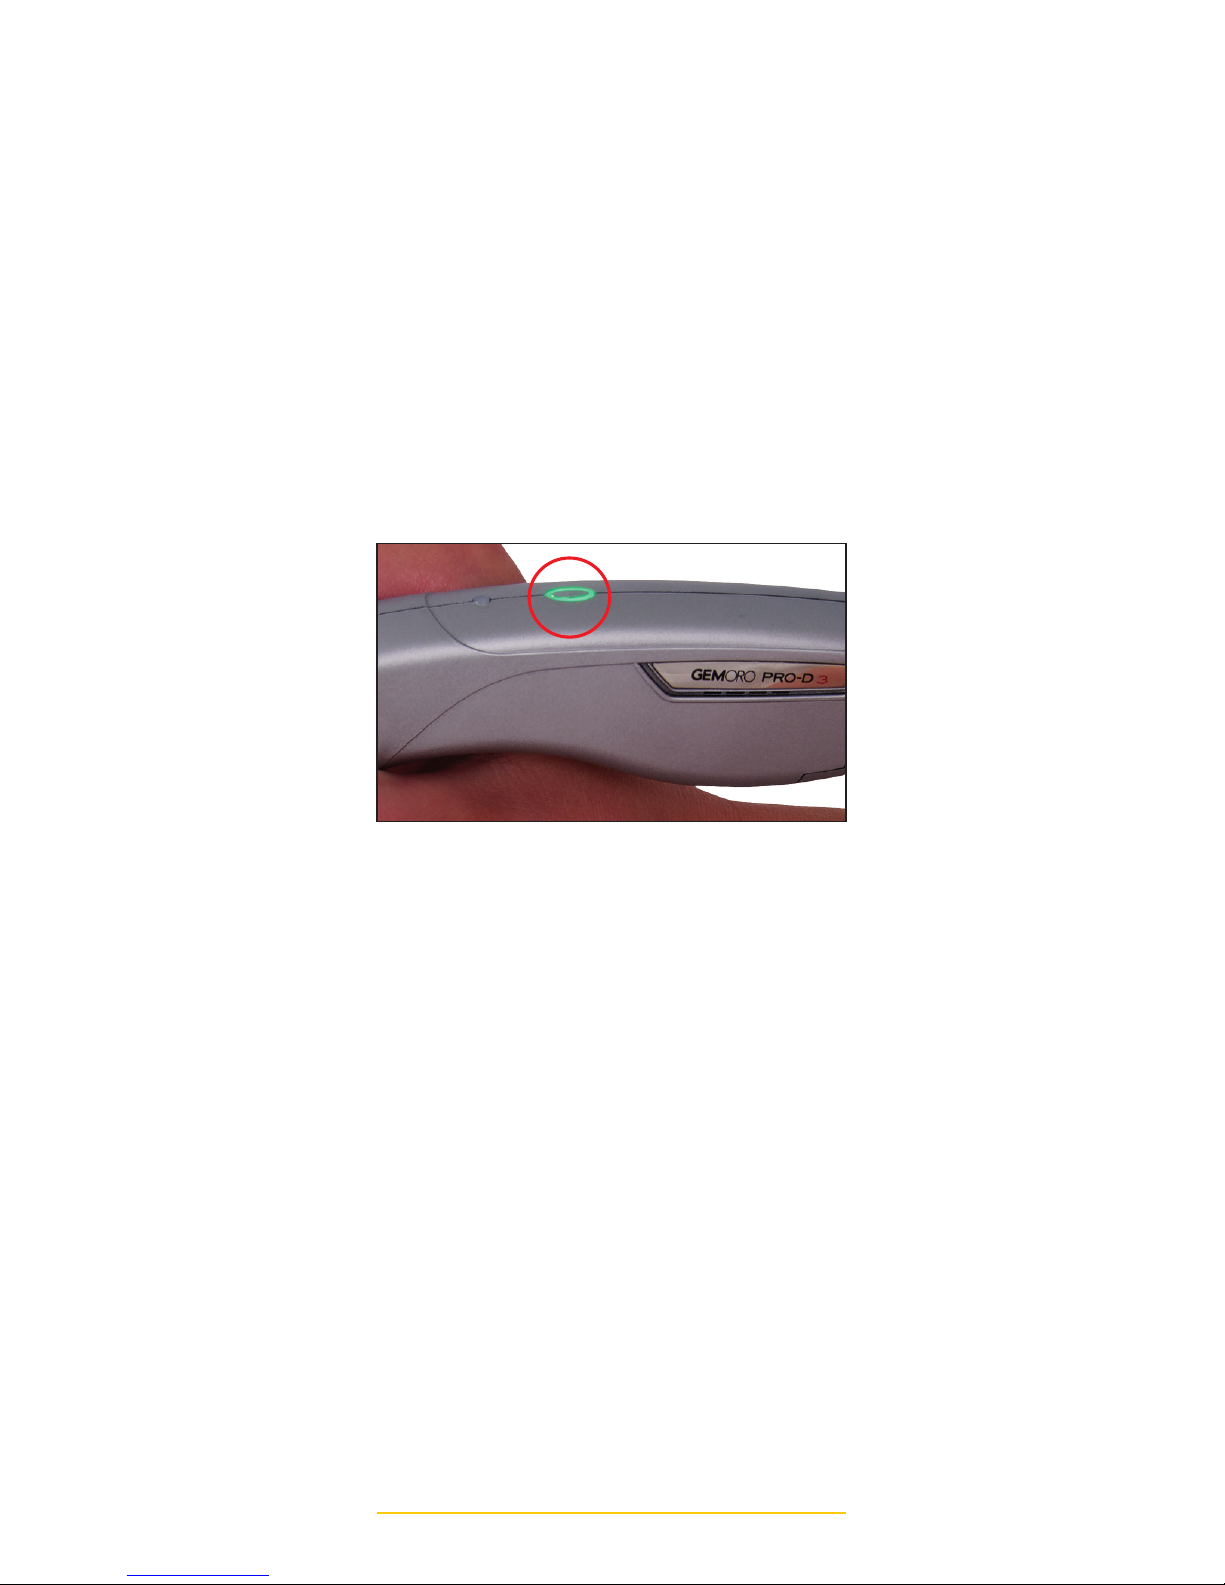
3. To turn the PRO-D 3 ON press the
oval shaped power button, located on
the top center edge of the tester and
hold it down for approximately one
second, then release the button. The
power button’s green LED indicator
will begin flashing. The warm-up time
is approximately 25 seconds. When it
has fully warmed up, the flashing green
LED light will become solid and a beep
tone will be sounded. You may now
begin using the tester.
4. The PRO-D 3 is also equipped with
a PATENTED color-coded light pipe
and probe tip cone indicator. This line
of sight colored indicator allows the
user to easily see the test results while
keeping their eyes on the stone being
tested.
GREEN = Diamond
PINK = Sapphire
RED = Metal Alert
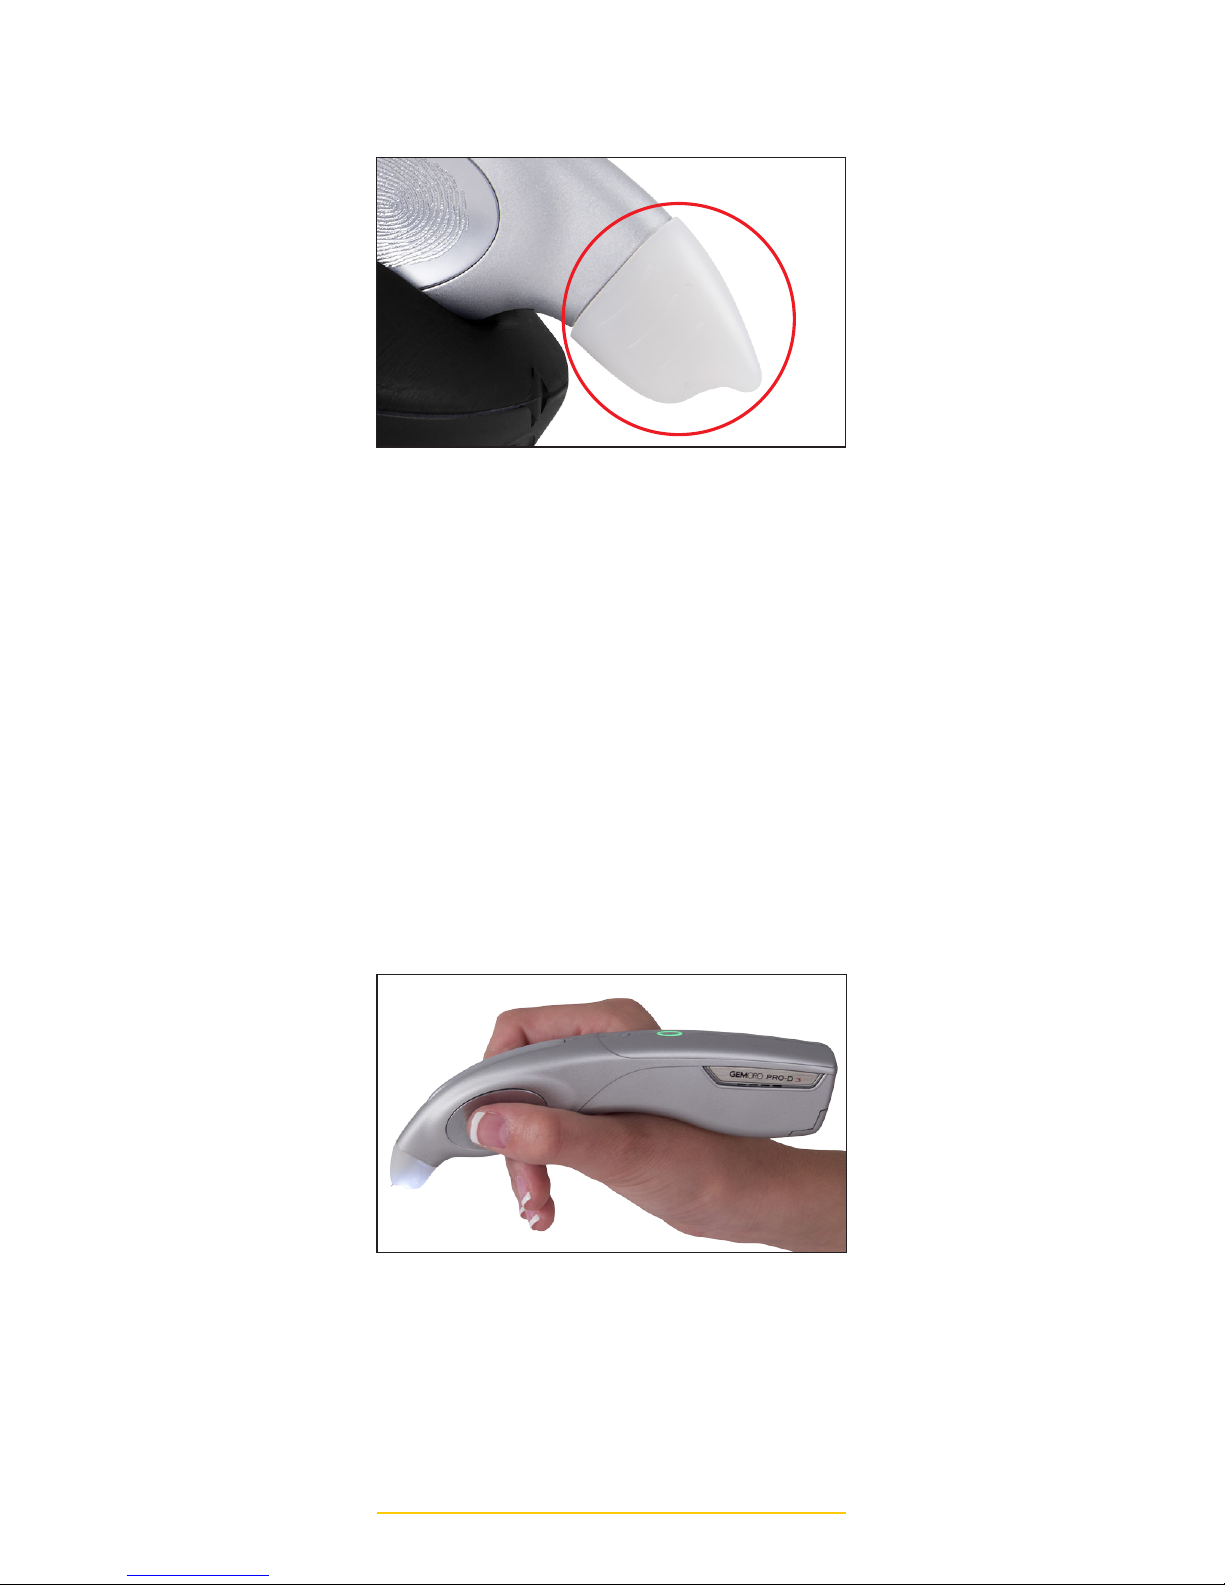
5. Prior to using the PRO-D 3, be certain
to REMOVE THE WHITE CAP at the
front end of the tester that serves to
protect the probe tip from accidentally
being bent or broken. The cap may
be easily removed by simply applying
a minimal amount of pressure to
the sides of the cap, as you hold it
between your thumb and forefinger.
POWER BUTTON
Page 12
GEMORO PRO-D 3 12
Then gently pull it out and off. Always
replace the cap when the PRO-D 3 is
not in use.
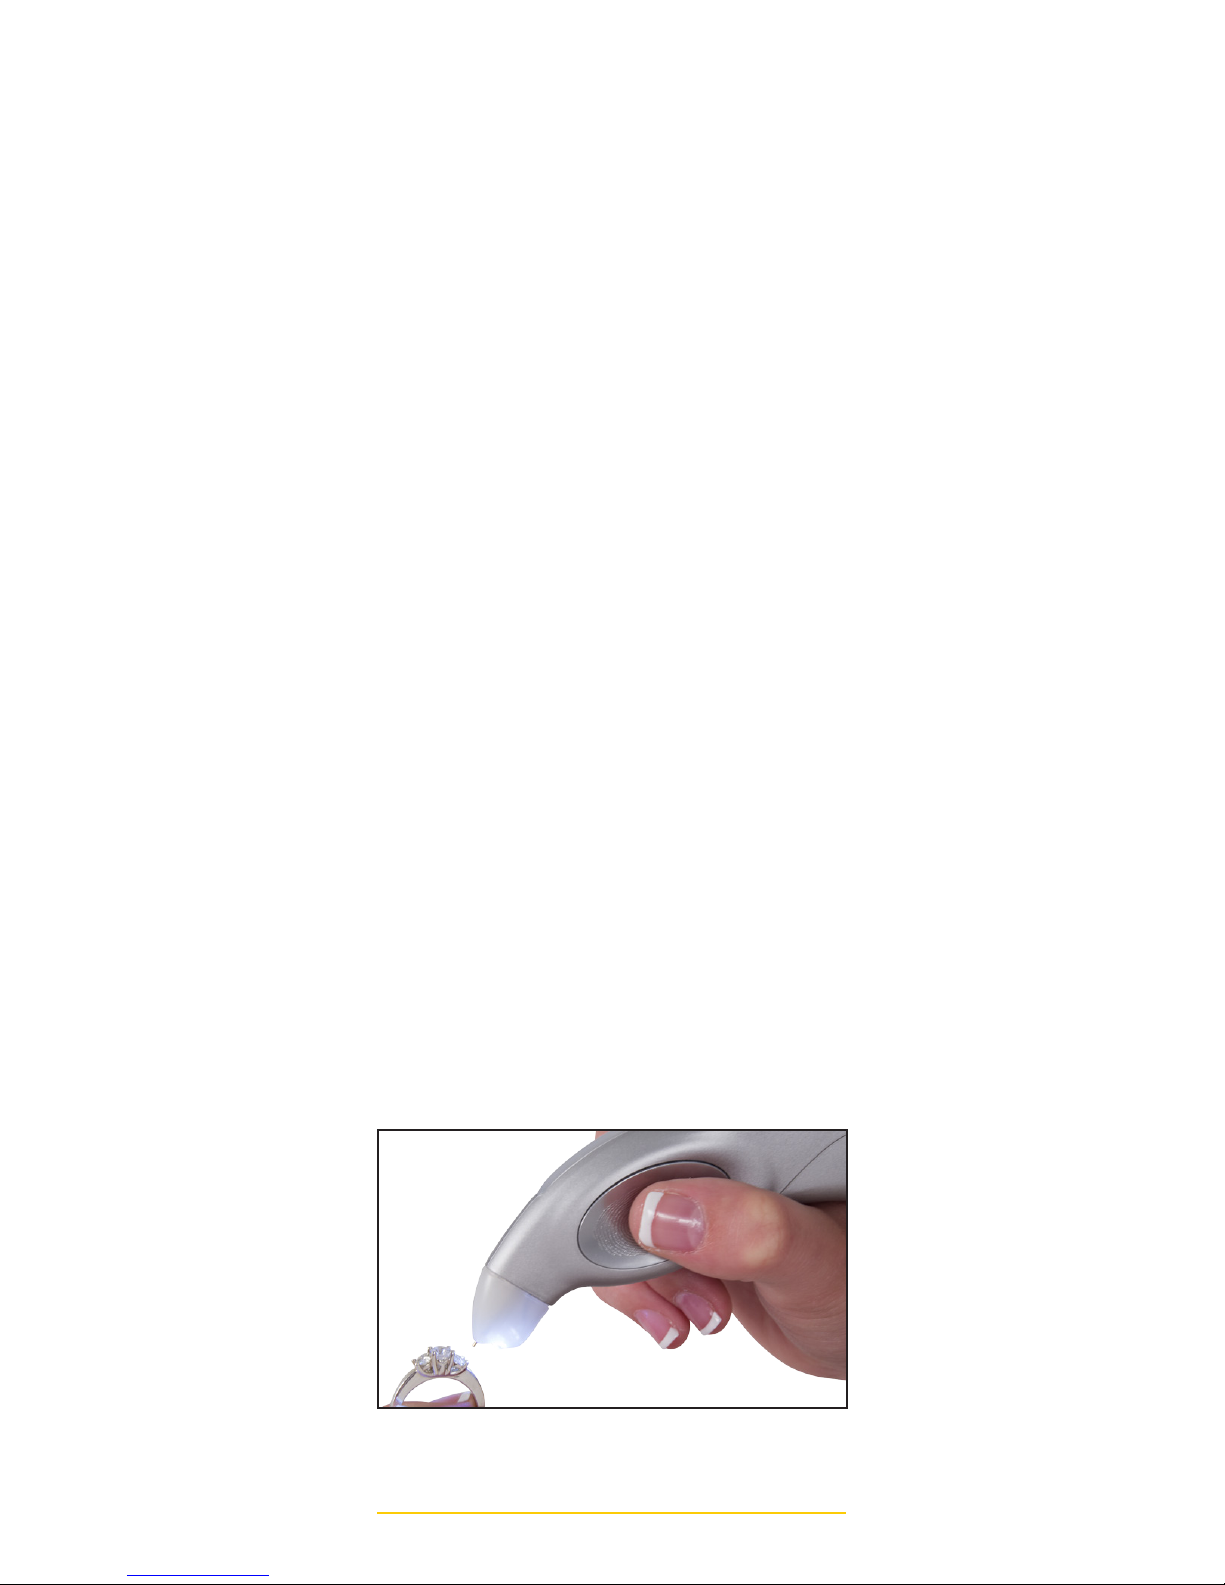
6. To properly hold the PRO-D 3, it is
important to grasp the tester with your
thumb and forefinger while touching
them to the PATENT PENDING finger
pads located on either side of the
tester. This will allow you to easily
manipulate the tester and make the
best contact with the stone being
tested. While holding the tester,
its ergonomic shape allows it to
comfortably rest on the top of your
hand. If you hold the tester without
touching the finger pads, the metal
alert feature will not function.
7. The LED Illuminator allows the user
to easily see the stone being tested
to confirm that only the stone is being
tested and that the setting or prongs
are not accidentally being touched.
HOW TO PROPERLY HOLD THE TESTER
PROBE TIP CAP
Page 13
13
You may also attach the optional
GemOro Test Stone Magnifier to the
Pro-D 3 by clipping it onto the end of
the tester’s probe tip cone. This will
allow you to see a magnified view of
the stone being tested and help ensure
proper contact with the stone while
not accidentally touching the setting
or prongs.
8. Testing Mounted Stones: With one
hand, hold the ring (or setting) that
contains the stone you wish to test and
in your other hand hold the PRO-D 3
(see image). Quickly, yet firmly touch
the testers probe tip to the stone’s
“table”, while being certain not to allow
the probe tip to make contact with the
metal setting or prongs. While firmly
depressing the spring-loaded probe
tip all of the way in until you hear a
click sound, touch the stone just long
enough to allow the tester to indicate
a reading (1 or 2 seconds) and then
take the probe tip away from the stone.
Be aware that a stone that has been
overheated by prolonged exposure to
the probe, or from body heat due to
wearing or the environment, may not
test accurately. Always allow the stone
and setting a few seconds to cool off
to room temperature before testing.
Blowing on the stone will speed up this
process.
TESTING A MOUNTED STONE
Page 14
GEMORO PRO-D 3 14
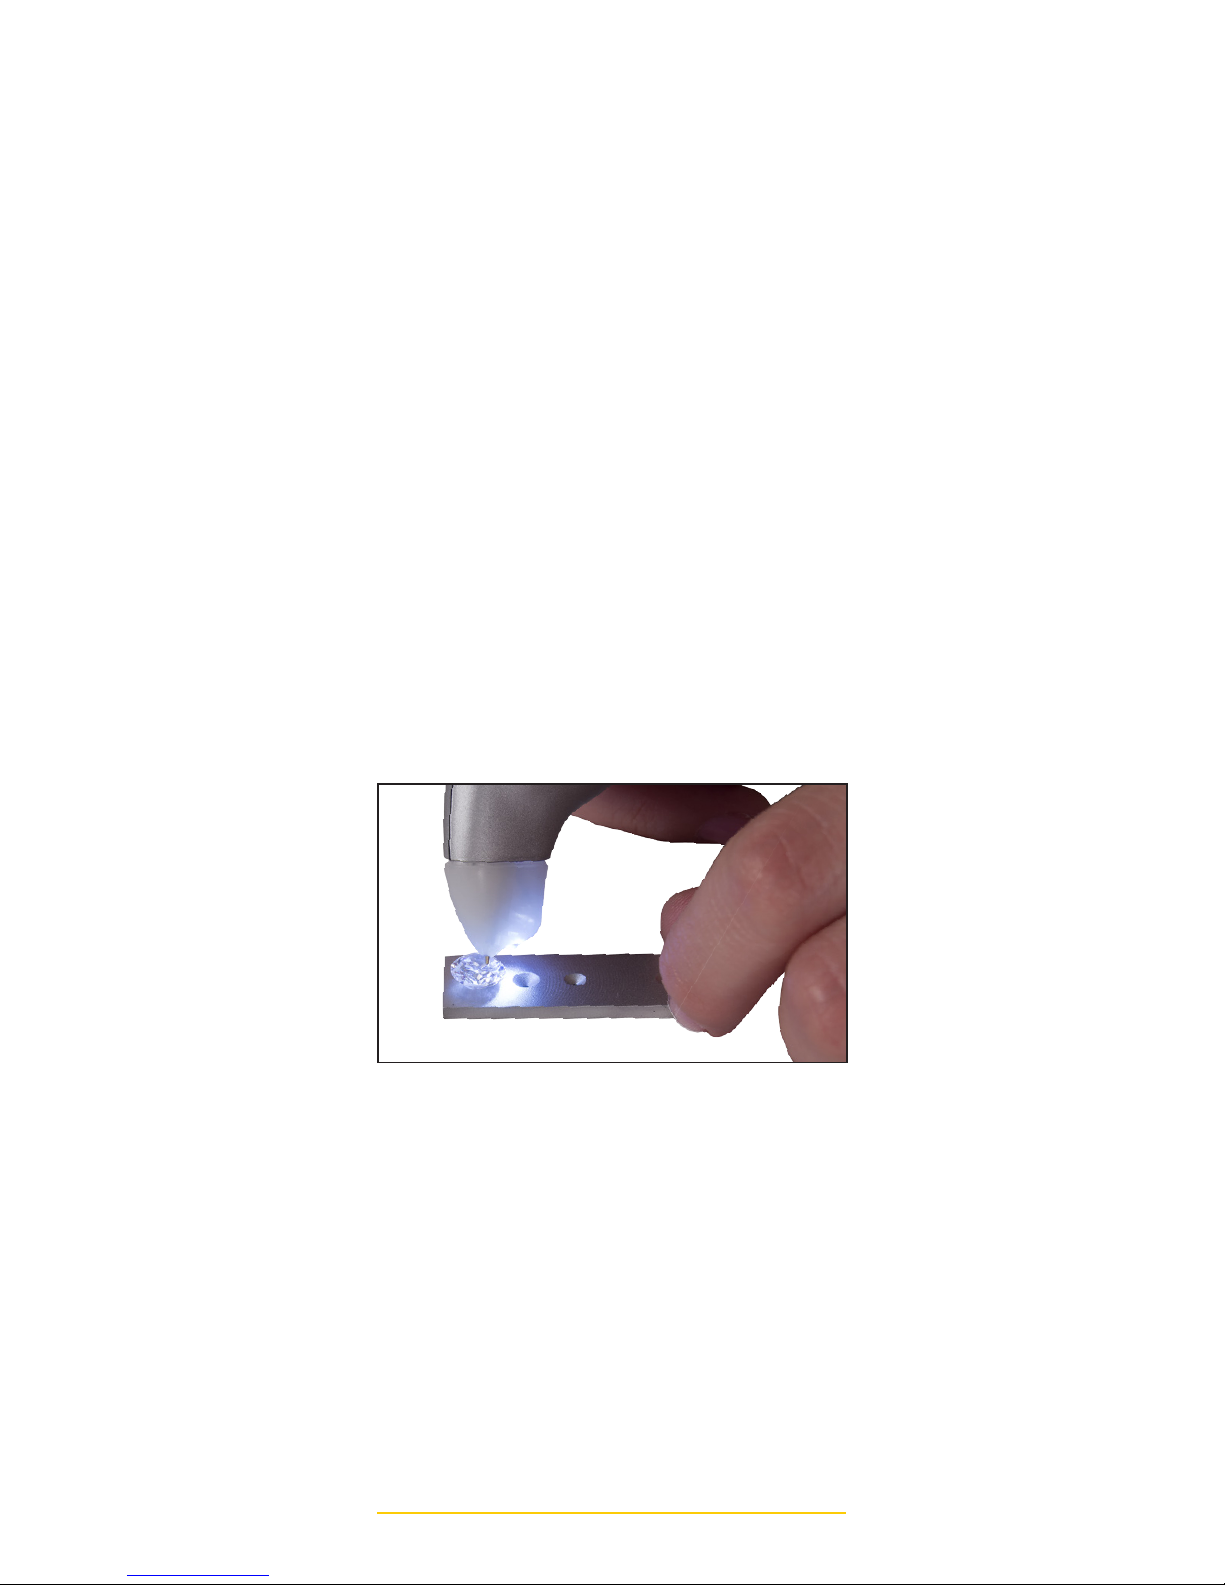
9. Testing Loose Stones: Place the
loose stone in the supplied aluminum
loose stone testing plate positioned
with the “culet” facing down into
the recessed hole part of the testing
plate. Then hold the testing plate
steady with one hand, as this will
also allow the electrical current to
pass through your body, permitting
the tester to function as designed
and test properly. While holding the
PRO-D 3 in your other hand, firmly
touch the probe tip to the loose
stone’s “table” (see image) until the
test result it indicated. YOU MUST
FOLLOW THIS PROCEDURE
WHEN TESTING LOOSE STONES
OR THE TESTER MAY NOT TEST
CORRECTLY. DO NOT ATTEMPT
TO TEST LOOSE STONES
WHILE HOLDING THEM IN YOUR
FINGERS OR THE TESTER MAY
NOT TEST CORRECTLY.
10. The probe tip must be cleaned
routinely to ensure proper contact
with the stone being tested. To
clean the probe tip, take a piece
of uncoated white copy or printing
paper and lay it on a table or counter
or other flat surface. Place the tester
in a 90-degree angle to the paper
with the probe tip lightly touching
the paper. Apply enough pressure
TESTING LOOSE STONES WITH
TESTING PLATE
Page 15
15
to gently depress the spring loaded
probe tip slightly inside the housing.
Then carefully rub the probe tip in
one direction on the paper to clean it.
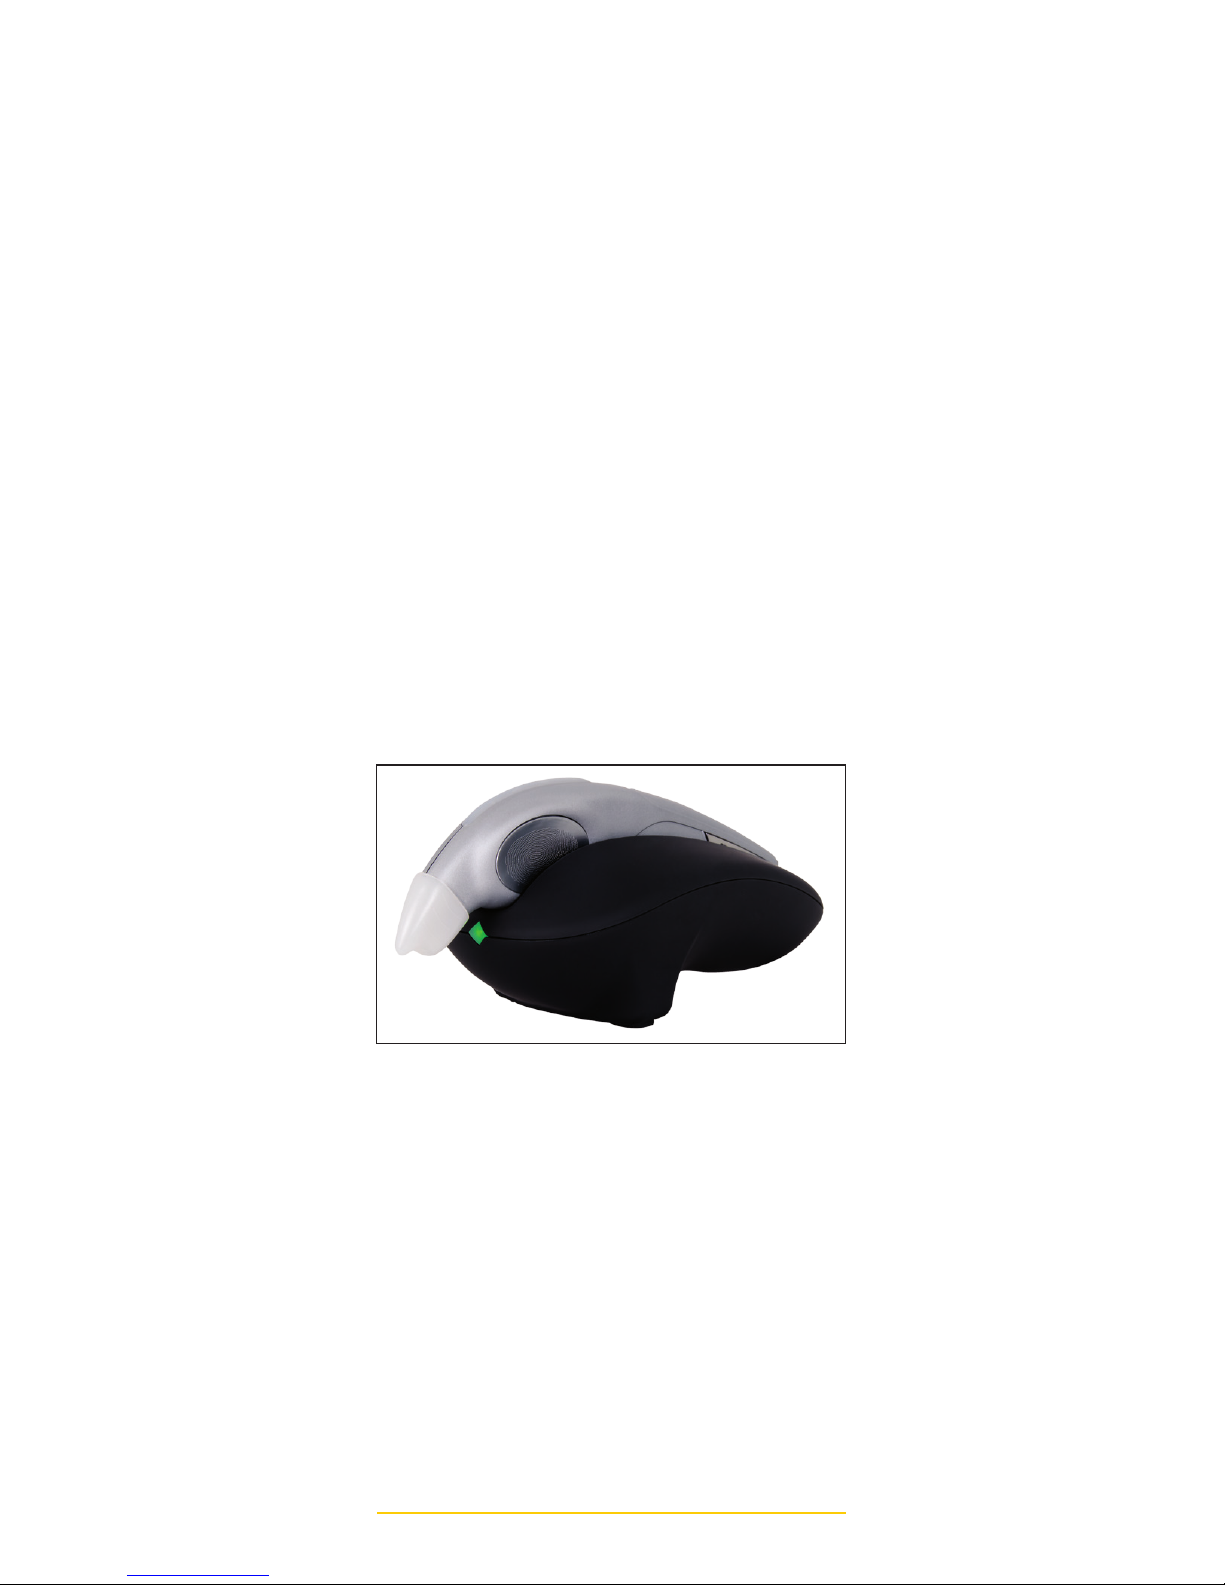
11. Using the Optional UltraDock 3: Place
the charging station in a convenient
location near where it will be used
such as on a desk, showcase or
repair area. Take the testers microUSB power cord and plug it into
the rear of the UltraDock 3, while
plugging the USB into its AC power
cube adapter. Plug the adapter into
a convenient wall outlet. You may
now simply place the PRO-D 3 in the
charging stations cradle with its on
bottom edge facing down, and the
rear of the PRO-D 3 facing the back
end of the cradle. The PRO-D 3 will
automatically have its NiMH batteries
charged while in the UltraDock 3.
(see image)
TESTER IN OPTIONAL ULTRADOCK 3
Page 16
GEMORO PRO-D 3 16
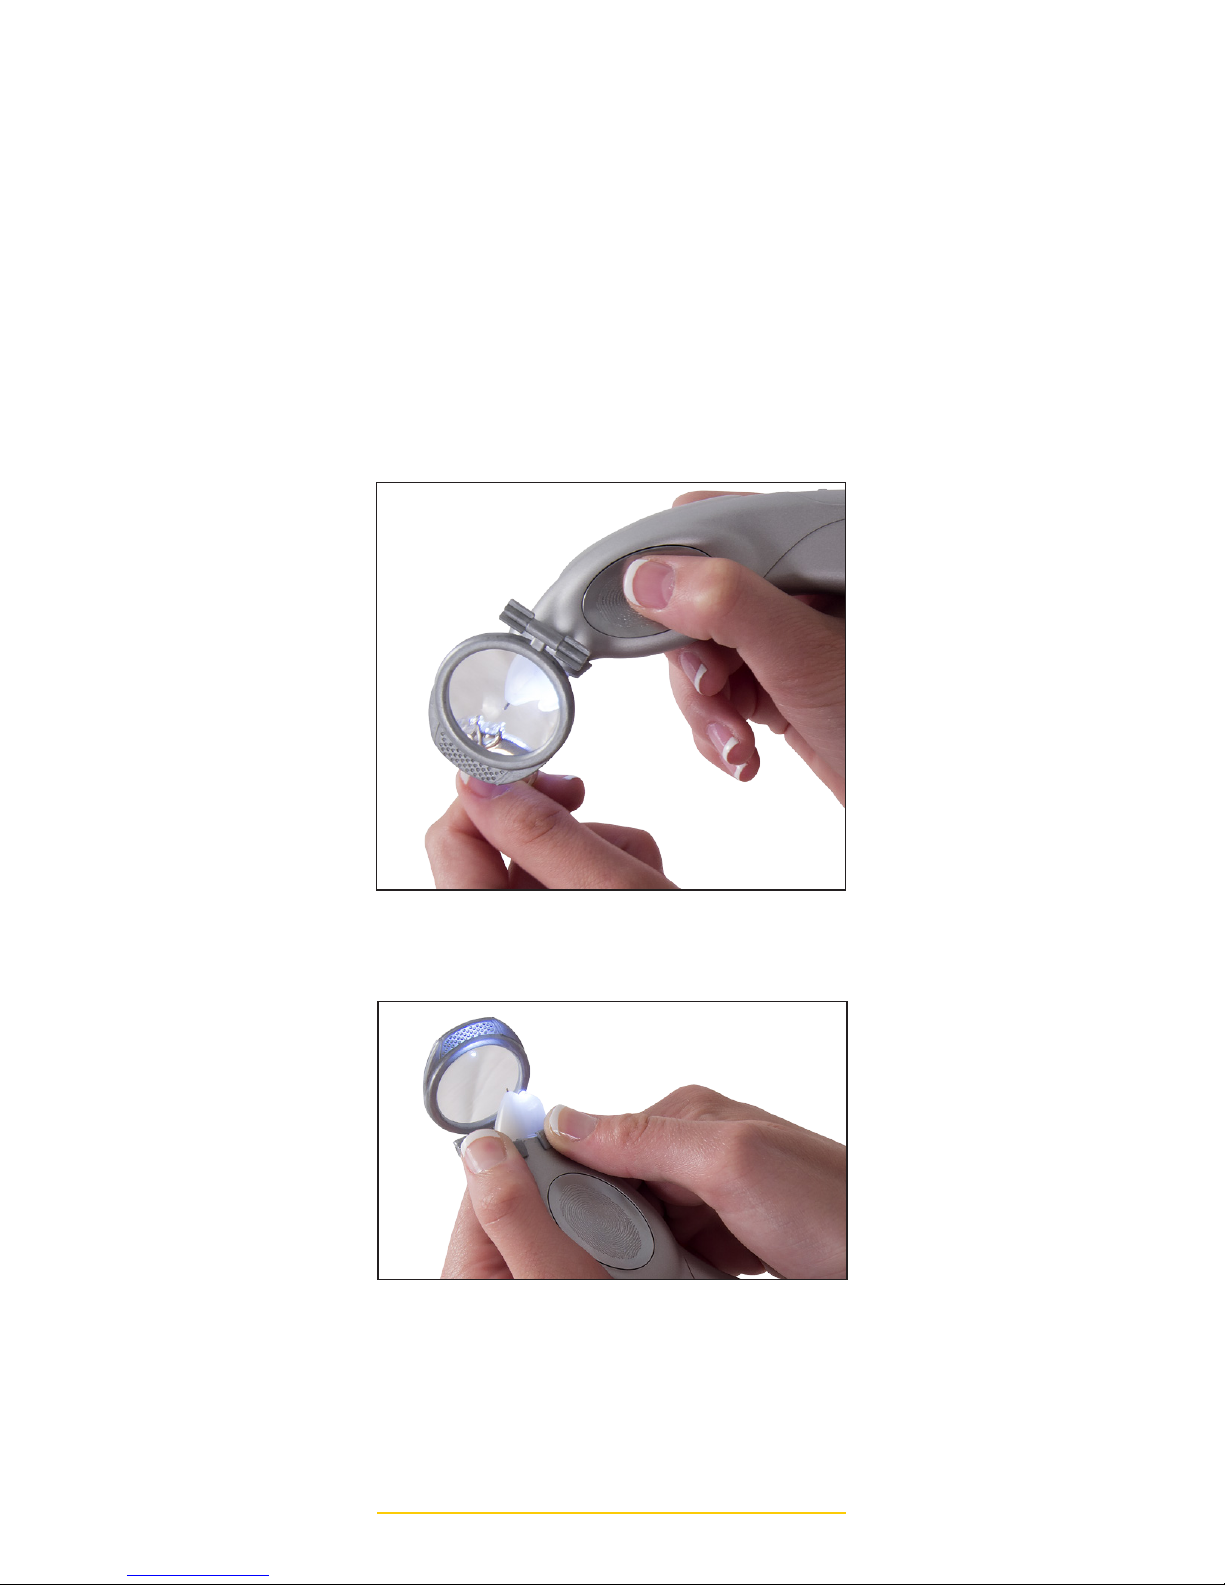
12. Using the Optional Test Stone
Magnifier: Insert the PRO-D 3’s probe
tip cone through the wider opening of
the magnifiers oval shaped bracket
and clip it into place. Depending on
whether you are right or left handed,
you may conveniently position it
on either side of the tester. Pivot
the hinged magnifier so that it is
positioned in front of the testers
probe tip. You may now view
the stones you are testing under
magnification. (see image)
HOW TO REMOVE THE MAGNIFIER
HOW TO USE THE MAGNIFIER
Page 17

17
MAINTENANCE:
1. The PRO-D 3 is a professional
instrument and proper care should
always be used when using it. You
should always protect it when it is not
in use.
2. Always replace the protective probe
tip cap to keep the probe tip from
becoming damaged.
3. If using alkaline batteries, always
replace the batteries after long periods
of time to prevent premature corrosion
or battery leakage, which is common
with old or spent alkaline batteries
after a period of time. Be aware that
damage to the PRO-D 3 may occur if
there is battery leakage and it will void
the warranty.
4. In the event the PRO-D 3 is not used
for an extended period of time, the
batteries should be removed.
5. Routinely clean the probe tip.
6. The PRO-D 3 is not user serviceable
other than battery replacement,
probe tip cleaning, and recalibration.
If service is required, please contact
your supplier or the factory. Any other
attempt to repair the tester by a user
will void the warranty.
HELPFUL SUGGESTIONS
1. If substituting alkaline batteries for the
NiMH rechargeable batteries, only use
high-quality AAA alkaline batteries.
2. The PRO-D 3 is designed to be able
to easily test faceted or rough stones
of virtually all sizes. However, please
keep in mind that small stones will
naturally heat up much faster after
Page 18

GEMORO PRO-D 3 18
being touched by the probe tip. After
each test be certain to cool off the
stone by blowing on it or waiting a
few seconds until it cools if a retest
is required. If testing diamonds in a
pave setting, please note it is easy to
accidentally overheat the stones next
to the one being tested. Therefore, it is
very important that you test the stones
while alternating testing one area of the
ring and then another, while regularly
blowing on the stones to cool them off.
3. The PRO-D 3 has been calibrated at
the factory and should not require
further calibration. If after using
the PRO-D 3 it is determined that
recalibration is required, please contact
the factory for calibration instructions,
which can be easily accomplished by
any user.
Page 19

19
WARRANTY
Congratulations on your purchase of
the GemOro® PRO-D 3! Your PRO-D
3 features a 2-YEAR PROBE TIP AND
BATTERY WARRANTY and LIFETIME
LIMITED WARRANTY on the rest of the
tester. Damage caused by abuse will void
the warranty. These warranties become
effective from the date of the original
purchase assuming the purchaser fills
out the WARRANTY REGISTRATION
FORM at www.gemoroproducts.com/
warrantyregistration or the purchaser
provides a copy of their invoice (bill of
sale) when making a warranty claim.
In the event the tester’s owner has not
registered their tester or provided a copy
of their invoice for when they purchased
the PRO-D 3, warranty service will be
determined by the serial number tracking
system as interpreted by the factory.
In the event the PRO-D 3 is no longer
available or has been discontinued and
warranty coverage is applicable, at the
factory’s sole discretion, an equivalent
tester may be substituted for the
defective PRO-D 3. The purchaser shall
incur the cost for postage, insurance,
and handling for all warranty and nonwarranty repairs. Warranty repairs and/
or replacements will be shipped back
to the customer FOB Destination to the
location of the customer’s choosing if
within the continental United States.
Non-warranty repairs will be shipped
back to the customer FOB Factory.
Should the customer require the repair
and/or replacement unit(s) to be shipped
outside the continental United States,
the customer will be required to pay
any related shipping charges and any
related taxes / duties for the respective
destination country, regardless of whether
it is a warranty or non-warranty claim.
Page 20

GemOro Superior Instruments
Attention: PRO-D 3 Warranty Registration
10455 Olympic Drive
Dallas, Texas 75220
214.351.0380 or 800.527.0719
214.351.1903 or 800.832.9871 FAX
[email protected]
www.gemoroproducts.com/
warrantyregistration
www.gemoroproducts.com
 Loading...