

Page 1

IN THE USA: IF YOU ARE EXPERIENCING PROBLEMS WITH THIS UNIT
CALL 1-732-346-0061 FOR GCI TECHNOLOGIES CUSTOMER SERVICE.
DO NO ATTEMPT TO RETURN THIS EQUIPMENT TO YOUR DEALER.
Parts of the design of this product may be protected by worldwide patents. Information in this manual is
subject to changes without notice and does not represent a commitment on the part of the vendor.
GCI Technologies Corp. shall not be liable for any loss or damage whatsoever arising from the use of information or any error contained in this manual.
No part of this manual may be reproduced, stored in a retrieval system or transmitted, in any form or by
any means, electronic, electrical, mechanical, optical, chemical, including photocopying and recording, for
any purpose without the express written permission of GCI Technologies Corp.
It is recommended that all maintenance and service on this product is performed by GCI Technologies.
Corp or its authorized agents. GCI Technologies will not accept liability for loss or damage caused by
maintenance or repair performed by unauthorized personnel.
Worldwide Headquarters • 280 Raritan Center Dr. Edison, NJ 08837 • USA
Tel: (732) 346-0061 • Fax: (732) 346-0065
Gemini Sound Products
Unit 44
Brambles Enterprise Centre
Waterlooville P07 7TH, UK
Tel: 087 087 00880
Fax: 087 087 00990
© GCI Technologies Corp. 2011 All Rights Reserved .
GCI Technologies S.A.
Caspe, 172 - 5º A
08013 Barcelona, Spain
Tel: 34 93 436 37 00
Fax: 34 93 347 69 61
WWW.GEMINIDJ.COM
GCI TECHNOLOGIES
2 bis, rue Léon Blum
91120 Palaiseau, France
Tél: + 33 1 69 79 97 70
Fax: + 33 1 69 79 97 80
GCI Technologies GmbH
Lerchenstraße 14
80995 München, Germany
Tel: 089 - 319 019 8 - 0
Fax: 089 - 319 019 8 - 18
Page 2

WWW.GEMINIDJ.COM
Page 3

english
Warning
Introduction
Player Overview
Mixer Overview
Connections Overview
Displays
Loading discs and memory devices
Playback Controls
Effects Controls
Jogwheel Controls
Display Controls
Midi Controls
Mixer Controls
Troubleshooting
Specifications
Warranty Information
Product Registration
español
Advertencias
Introducción
Vision General del Reproductor
Vision General del Mixer
Vision General del Conexiones
Pantallas
Carga de Discos y Dispositivos de Memoria
Controles de Reproducción
Controles de Efectos
Controles de Rueda Jog
Controles de Pantella
Controles MIDI
Controles Mixer
Resolución de Problemas
Especificaciones Téchinas
Información de la Garantía
Registro del Product
4
5
7
8
9
10
11
12
15
16
17
18
20
22
24
91
93
26
27
29
30
31
32
33
34
37
38
39
40
42
44
46
91
93
français
Mises en Garde
Introduction
Vue d’Ensemble des Lectures
Vue d’Ensemble du Mixer
Vue d’Ensemble des Connexions
Écran et Zones d’Affichage
Chargement de Disques et Périphériques Mémoire
Réglages de Lecture
Réglages des Effets
Réglages de la Molette
Gestion de l’Affichage
Gestion MIDI
Fonctions Console de Mixage
Assistance Technique
Caractéristiques
L’information de Garantie
Carte D’enregistrement de Garantie
deutsch
Warnung
Einleitung
Player-Übersicht
Mixer-Übersicht
Anschlüsse-Übersicht
Displays
Discs und Speichermedium Laden
Playback-Regler
Effekt-Regler
Jogwheel-Regler
Display-Regler
MIDI-Regler
Mixer-Regler
Fehlersuche
Technische Daten
Garantie-Informationen
Registrierung
48
49
51
52
53
54
55
56
59
60
61
62
64
66
68
91
93
70
71
73
74
75
76
77
78
81
82
83
84
87
88
90
91
93
3
cdmp- 7000 manual • geminidj. com
Page 4
cdmp- 7000 manual • geminidj. com
4
Page 5

introduction
Thank you for purchasing our Gemini CDMP-7000. We are confident that the Gemini platform of products
will not only make your life easier through the use of the latest technological advancements in cross-platform connectivity and sound reproduction but will raise the bar for DJ and pro audio products. With the
proper care & maintenance, your unit will likely provide years of reliable, uninterrupted service. All Gemini
products are backed by a 1-year limited warranty*.
preparing for
first use
Please ensure that you find these accessories included with
the CDMP-7000:
(1) Power cord
(1) Operating instructions
(1) Warranty Card
precautions
1 Do not use this CD player at temperatures below 41°F/5°C
or higher than 95°F/35°C.
2 The apparatus should not be exposed to dripping or
splashing, and no objects filled with liquids such as vases
should be placed on the apparatus.
3 Place the unit in a clean and dry location.
4 Do not place the unit in an unstable location.
5 When disconnecting the power cord from the AC outlet,
always grasp by the plug. Never pull the power cord.
6 To prevent electric shock, do not remove the cover or the
bottom screws.
7 There are NO USER SERVICEABLE PARTS INSIDE. Please
refer to a qualified technician.•
8 Do not use chemical solvents to clean the unit.
9 Keep the laser pickup clean by keeping the tray closed.
10 Keep this manual in a safe place for future reference.
safety specfications
Laser Diode Properties
Material: Ga - Al - As
Wavelength: 755 - 815 nm (25° C)
Laser Output: Continuous Wave, max. 0.5 mW
• In the USA- if you experience problems with this unit call Gemini
customer service at 1 (732) 346-0061. Do not attempt to return
this equipment to your dealer
we want you listening
for a lifetime
Selecting fine audio equipment such as the unit you have just
purchased is only the start of your musical enjoyment. Now it’s
time to consider how you can maximize the fun and excitement
your equipment offers. This Manufacturer and the Electronic
Industries Association’s Consumer Electronics Group want you
to get the most out of your equipment by playing it at a safe
level. One that lets the sound come through loud and clear
without annoying blaring or distortion-and, most importantly,
without affecting your sensitive hearing. Sound can be deceiving. Over time your hearing “comfort level” adapts to higher
volumes of sound. So what sounds “normal” can actually be
loud and harmful to your hearing. Guard against this by setting
your equipment at a safe level BEFORE your hearing adapts.
To establish a safe level, start your volume control at a low
setting. Slowly increase the sound until you can hear it comfortably and clearly, and without distortion. Once you have
established a comfortable sound level, set the dial and leave
it there. Taking a minute to do this now will help to prevent
hearing damage or loss in the future. After all, we want you
listening for a lifetime.
Used wisely, your new sound equipment will provide a lifetime
of fun and enjoyment. Since hearing damage from loud noise is
often undetectable until it is too late, this Manufacturer and the
Electronic Industries Association’s Consumer Electronics Group
recommend you avoid prolonged exposure to excessive noise.
This list of sound levels is included for your protection.
30 dB - Quiet library, soft whispers
40 dB - Living room, refrigerator, bedroom away from traffic
50 dB - Light traffic, normal conversation, quiet office
60 dB - Air conditioner at 20 feet, sewing machine
70 dB - Vacuum cleaner, hair dryer, noisy restaurant
80 dB - Average city traffic, garbage disposals, alarm clock
at two feet
The following noises can be dangerous at extended exposure:
90 dB - Subway, motorcycle, truck traffic, lawn mower
100 dB - Garbage truck, chain saw, pneumatic drill
120 dB - Rock band concert in front of speakers,
thunderclap
140 dB - Gunshot blast, jet plane
180 dB - Rocket launch pad
Information courtesy of the Deafness Research Foundation.
5
cdmp- 7000 manual • geminidj. com
Page 6

introduction
cleaning the
unit
To clean the CDMP-7000, use only a dry soft cloth and/or compressed air. If the unit is soiled with stubborn dirt, we suggest
using a 2:1 solution of distilled water and 30% isopropyl alcohol.
Avoid using harsh cleaning chemicals such as benzene, paint
thinner, bleach, or hydrochloric acid, which will damage the unit.
operating
conditions
For optimum performance, the temperature of the operating
environment should be between +5º C to +35º C (+41º F - +95º
F). Failure to maintain proper operating temperature may result
in difficulty reading the display, thermal overload, or systemwide instability. Avoid exposing the unit to direct sunlight.
When placing the unit in an installation, make sure that it is
placed on a stable surface, as far away from vibrations as possible. Even though the unit is impervious to vibration, the storage
devices (specifically hard drive based ones) that are designed
to be used in conjunction with it are typically not. Also be sure
not to place or use the player on heat generating sources, such
as amplifiers or near spotlights.
playable formats
and discs
The CDMP-7000 plays discs (CD compatible) as well as music
files on USB memory devices. All of the following file formats
are supported:
using midi
control
The CDMP-7000 can also send MIDI data from the buttons and
dials to a computer to control the parameters and playback
controls of DJ software. The audio playback from the computer
can also be output from the CDMP-7000.
Before using the CDMP-7000 as an audio device, connect
the CDMP-7000 with a USB cable and allow your PC/MAC to
detect it. Open your DJ software and select the CDMP-7000’s
output device in the DJ software’s settings. For instructions on
how to do this, see your DJ software’s operating instructions.
connecting to
a
computer
The CDMP-7000 is a plug and play device that requires no software installation. The CDMP-7000’s audio and MIDI drivers are
compatible with PC and MAC.
• To use the CDMP-7000 with a computer using Windows,
connect the CDMP-7000 to your PC after starting up the
computer. The CDMP-7000 will configure standard WDM
drivers. Select the CDMP-7000 as your device to use it as
your audio device. ASIO drivers can also be configured for
use with the CDMP-7000, such as ASIO4ALL.
• To use the CDMP-7000 with a computer using a MAC operating system, connect the CDMP-7000 to your MAC after
starting up the computer. Use the system’s standard CORE
Audio drivers and select the CDMP-7000 as the device.
• WAV (16-bit PCM, sample rates of 8 kHz, 11.025 kHz, 12
kHz, 16 kHz, 22.50 kHz, 24 kHz, 32 kHz, 44.1 kHz, 48 kHz)
• MP3 (16 bit, 44.1 kHz, MPEG-I, Layer III)
• AAC (16 bit, 44.1 kHz, stereo, AAC Core, AAC Plus, AAC
Plus v2)
• AIFF (16 bit, 44.1 kHz, stereo)
Supported file systems on Memory Stick Devices include:
• FAT
• FAT32
• HFS+
• NTFS
cdmp- 7000 manual • geminidj. com
6
Page 7
player overview
top view
25
30
11 12 13 14 15
10
9
8
7
6
5
4
3
2
16 17 18 19 20
21
22
23
24
26
27
28
29
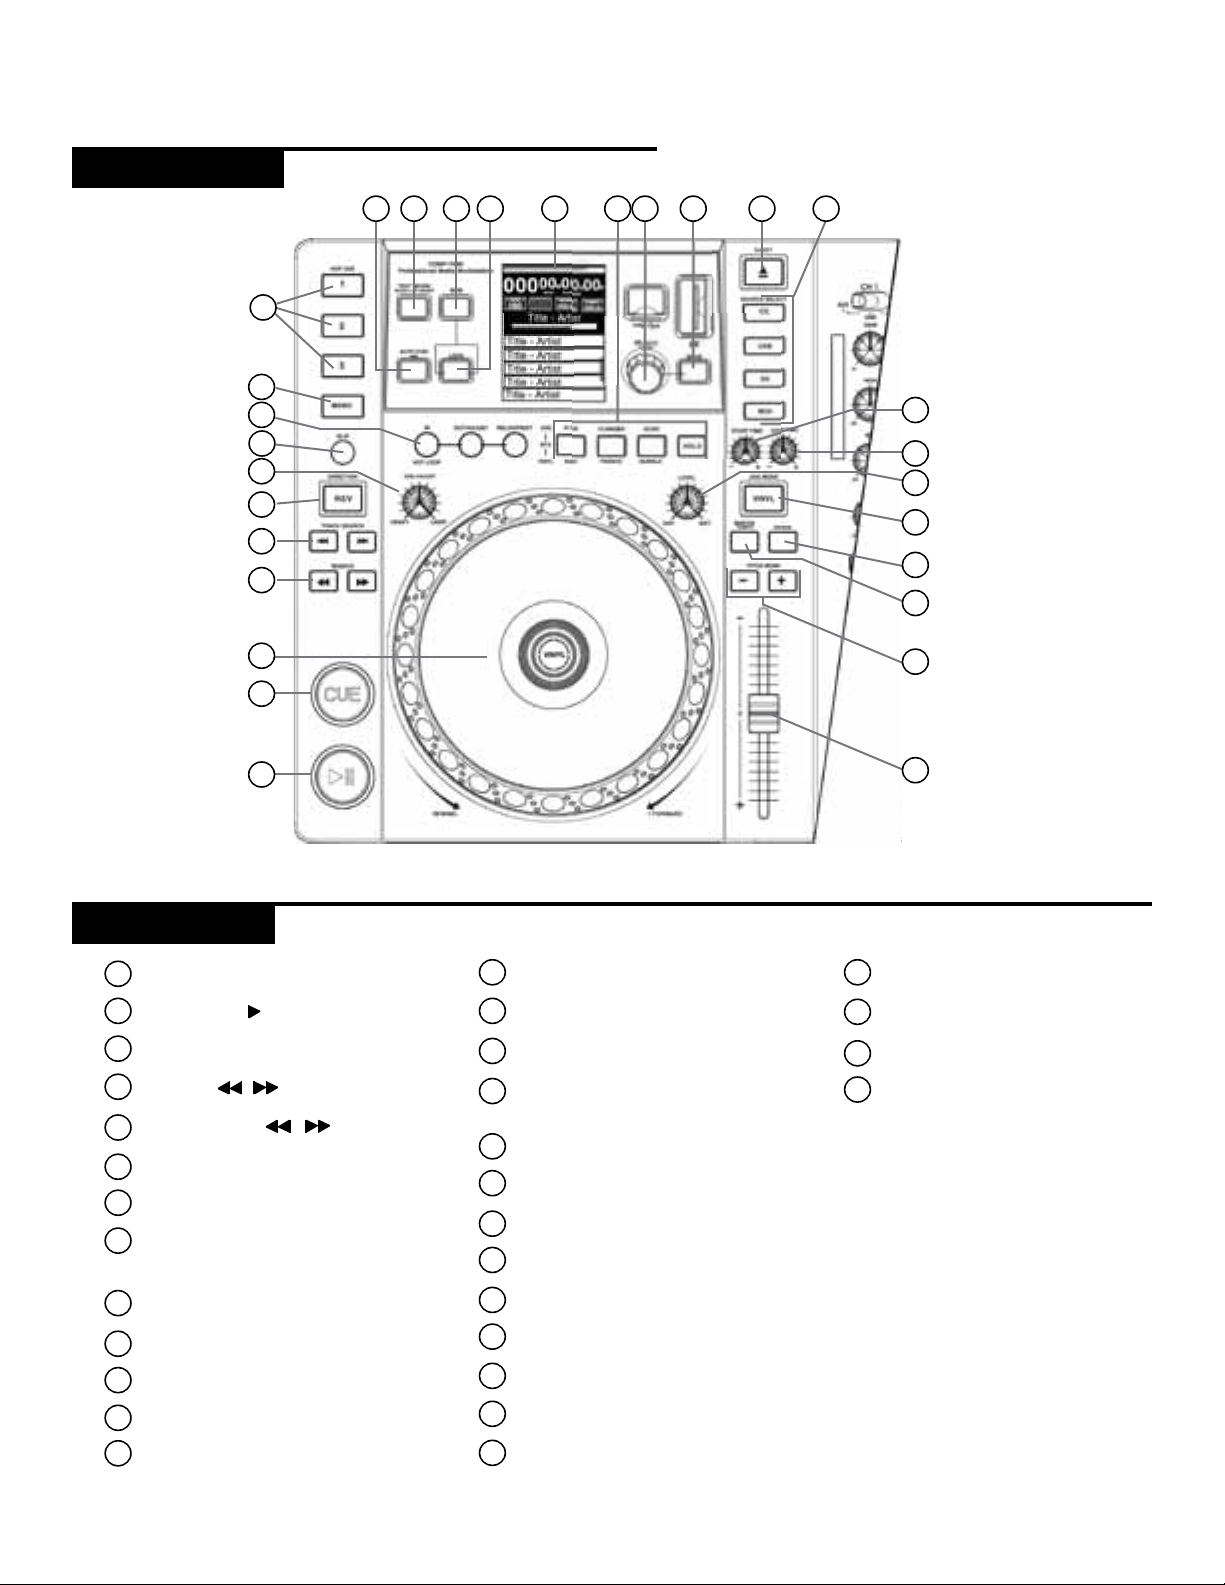
controls
Power
1
2
Play/Pause / II
3
Cue
4
Search /
Track search | / |
5
Reverse
6
7
Jog adjust
8
Loop in / loop out/adjust / reloop/exit
Memo
9
Hot cues
10
Auto cue / time
11
Text mode / touch on/off
12
BPM
13
14
Lock
15
Lcd touch display
Effects
16
Rotary encoder / select / con-
17
trast
Back
18
19
Eject
Source select
20
21
Jog start time
Jog stop time
22
23
Effect dry/wet
24
Vinyl
25
Slip mode
Range
26
27
Master tempo
Pitch bend [+] [-]
28
Pitch control fader
29
Jogwheel
30
7
cdmp- 7000 manual • geminidj. com
Page 8
top view
45
44
43
31 31 31
32
33
34
35
36
37
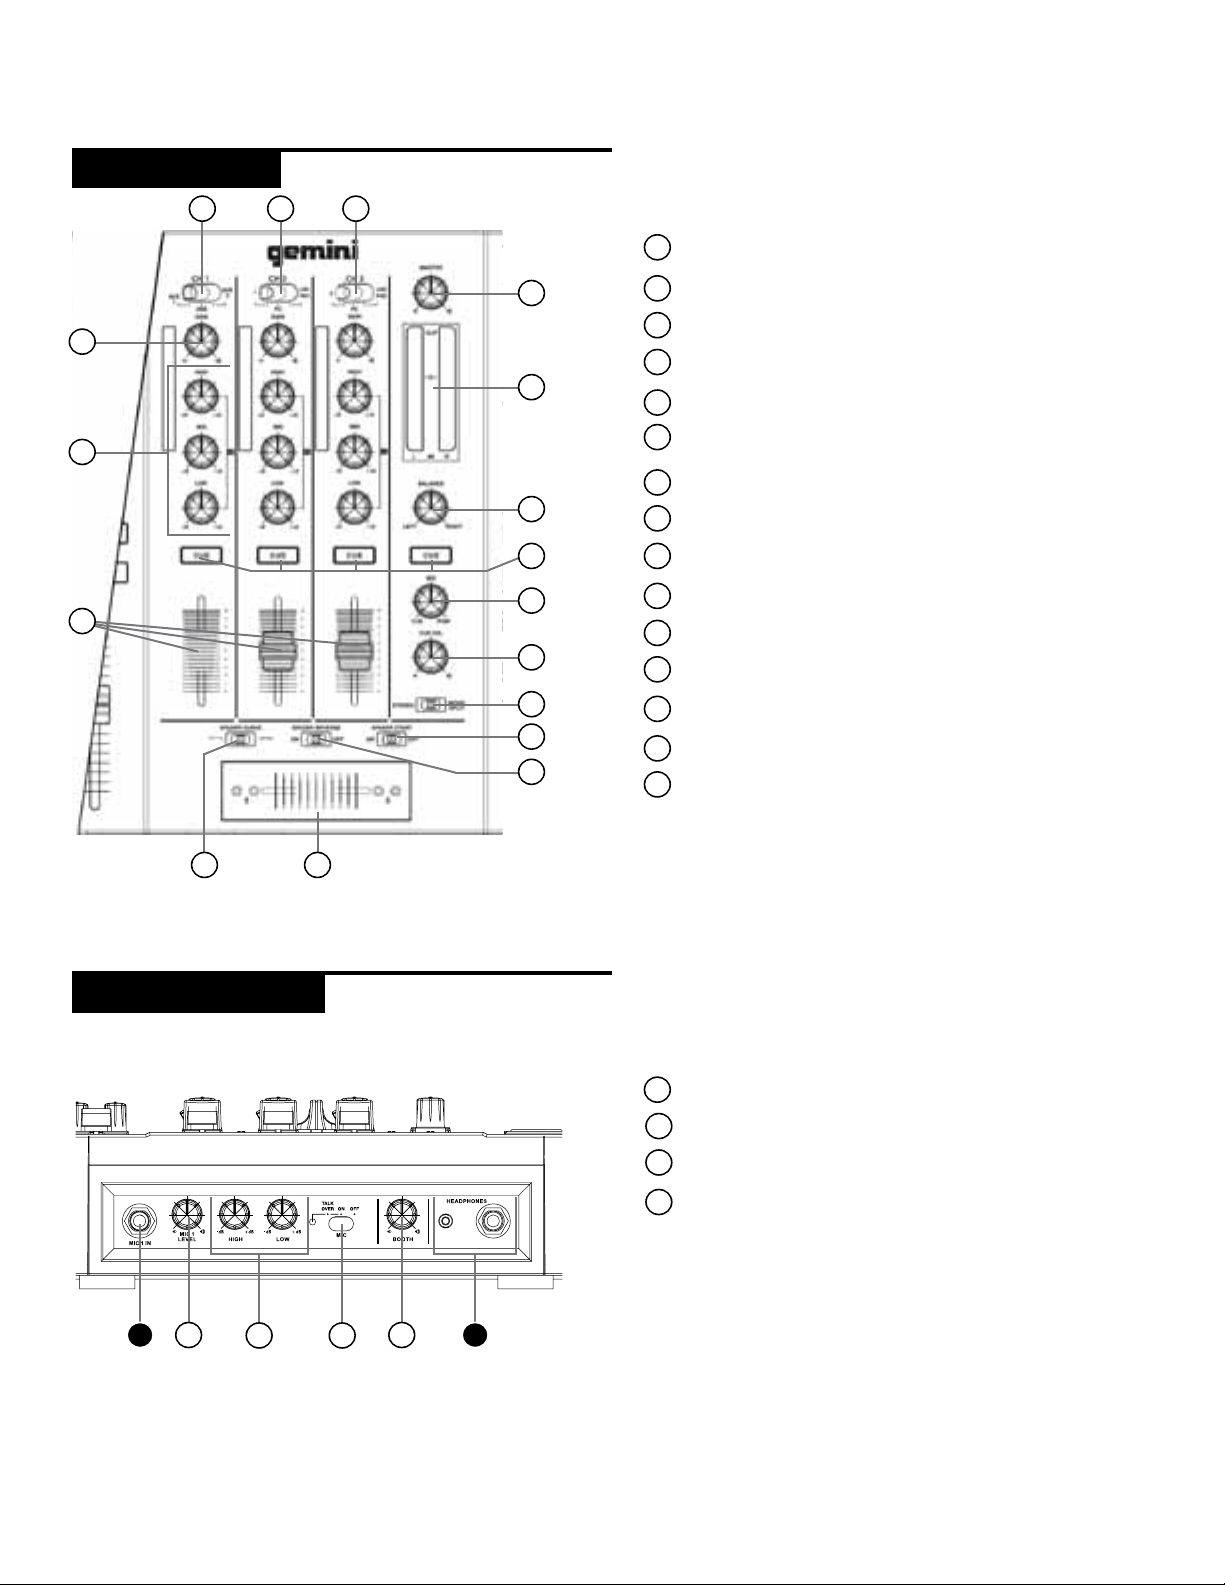
mixer overview
Channel Input Selector
31
Master Volume
32
VU Meter
33
34
Master Balance Control
Headphone Cue Toggle/indicator
35
36
Headphone Mix Control
Headphone Volume Control
37
Headphone Output Switch
38
Cross Fader Start
39
Cross Fader Reverse
40
Cross Fader
41
42
Cross Fader Curve Adjust
front view
38
39
40
4142
Channel Fader
43
3-Band Channel Equalizer
44
45
Channel Gain Control
Mic Volume Control
46
47
2-Band Mic Equalizer
48
Mic Talkover Switch
49
Booth Volume Control
46 49
L O
cdmp- 7000 manual • geminidj. com
47
48
8
Page 9
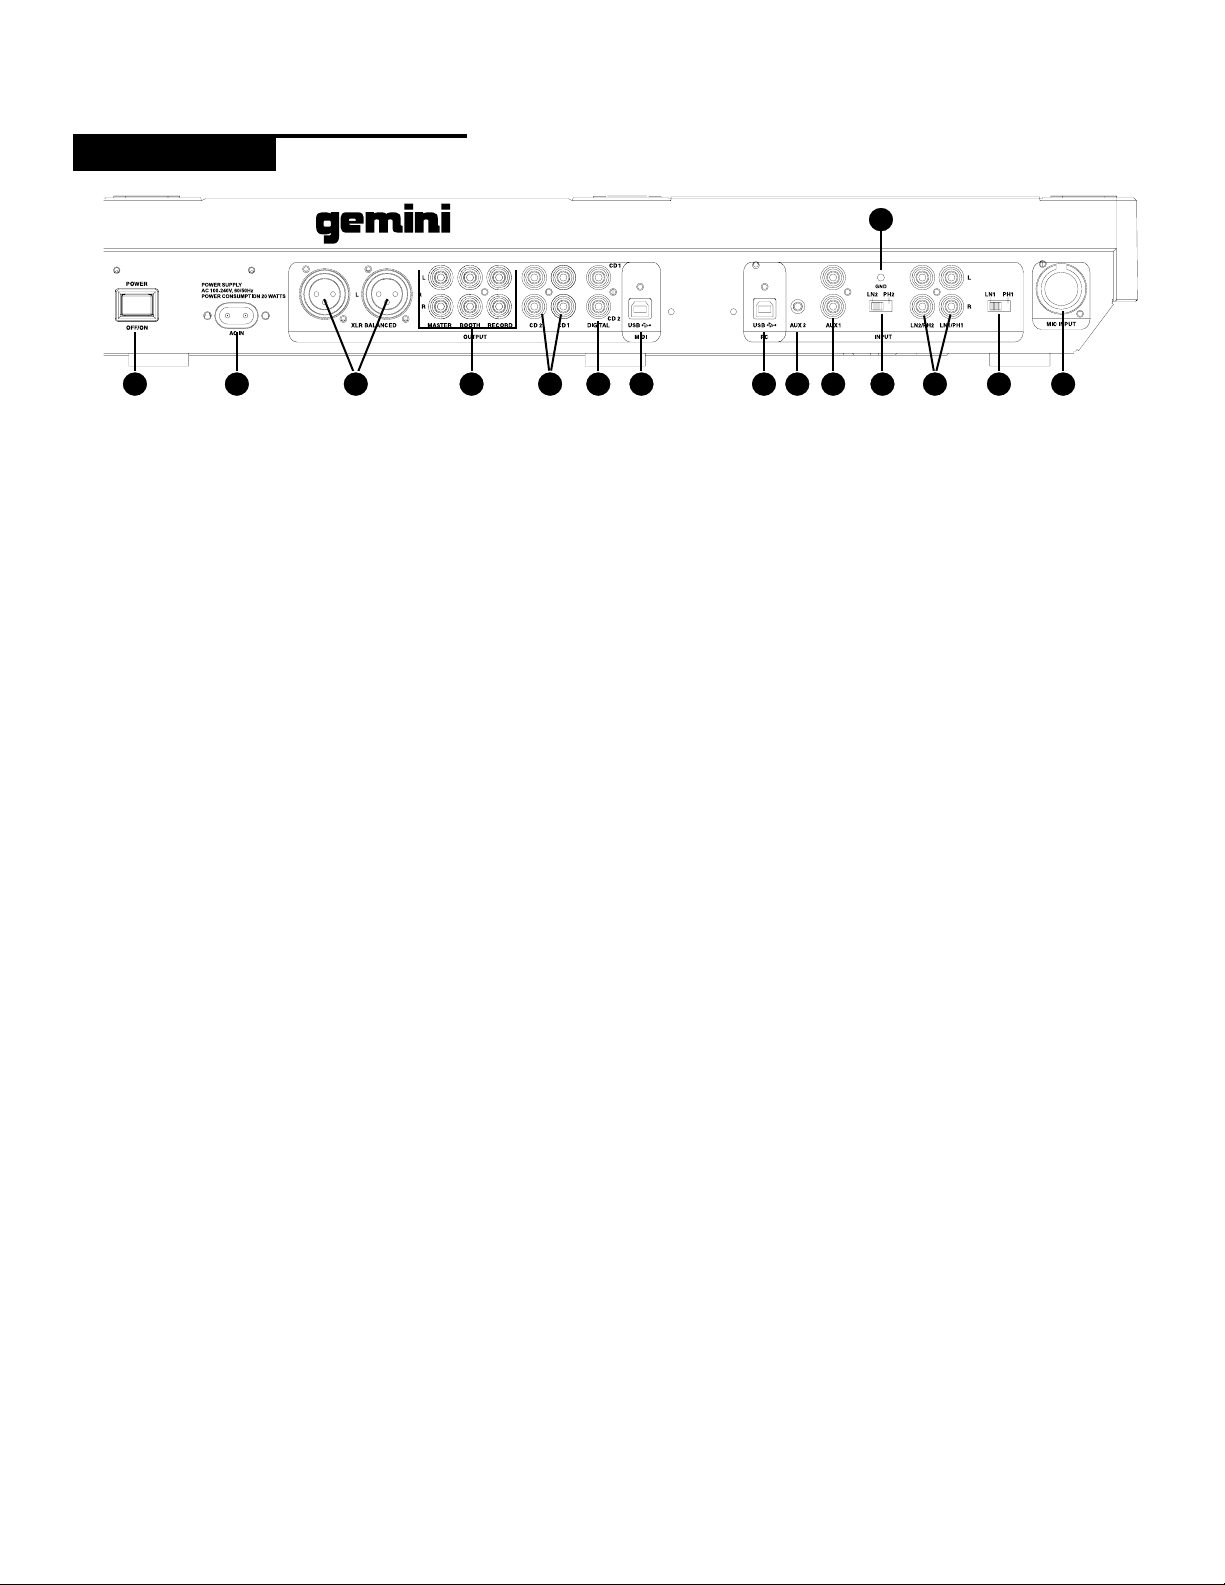
connections overview
rear view
M
AN C D E F G H I
POWER
Plug in the power cord of the CDMP-7000 into the AC IN
(A). Press the POWER OFF/ON (N) switch to power the
unit on.
RCA PHONO / LINE INPUTS
The CDMP-7000 comes with two (2) stereo convertible
LINE/PHONO RCA INPUTS (K) that accept standard stereo RCA connections. The two PHONO/LINE SWITCHES
(J) allow you to convert the RCA input connection between a PHONO (turntable) input or a LINE level (MP3,
CD, cassette deck, etc.) input. When switched to the PHONO position, you may use any turntable with a magnetic
cartridge. Remember to connect your ground wire to the
GROUNDING SCREW (M) or there may be a system hum.
AUX INPUTS
The CDMP-7000 comes with two (2) stereo aux inputs.
AUX1 (I) is a stereo line-level RCA input and AUX2 (H) is a
stereo 1/8” input. Any line-level device (MP3, CD, cassette
deck, etc.) can be plugged into AUX1 and AUX2.
J J LB K
RCA LINE OUTPUTS
The CDMP-7000 contains three different stereo RCA outputs: REC, MASTER and BOOTH (C). The MASTER output
connects the unit to your main amplifier. The RECORD output can be used to connect the mixer to the record input
of a recording unit, thus enabling recording of a mix. The
BOOTH output can be used as an output source for monitors or booth playback.
If connecting the CDMP-7000 through a receiver, the
RCA connection can be insterted into the CD AUX INPUT
JACKS on a receiver. If there are no CD nor AUX INPUTS
use any line level (not phono) inputs.
BALANCED XLR OUTPUT
The XLR BALANCED OUTPUT (B) section has LEFT and
RIGHT XLR outputs for balanced operation of stereo outputs.
CD1/CD2 O UTPUT
The CD1/CD2 stereo RCA outputs (D) allow the two media
players to be feed directly to an external mixer individually,
bypassing the mixer section of the CDMP-7000.
MIC INPUTS
The CDMP-7000 comes with two (2) mic inputs: one 1/4”
mic input and one XLR / 1/4” combo jack. The 1/4” mic input accepts balanced or unbalanced connections. The XLR
/ 1/4” combo jack (L) accepts balanced XLR connections
or balanced/unbalanced 1/4” connections. The MIC VOLUME (46) control on the front panel controls the volume
of the mics connected.
*NOTE: It is advised to use a balanced 1/4” cable for less
noise and a stronger signal.
USB INPUT
The CDMP-7000 has a USB INPUT (G) designed to receive
audio from a computer (Mac/PC). Connect a USB cable
(not included) from one of your computer’s USB ports to
the CDMP-7000’s USB INPUT (G). To use the CDMP-7000
as your computer’s audio device, select the device on your
computer’s audio settings.
9
USB OUTPUT
Plug in the included USB cable into the USB OUT (F) on
the rear panel. Plug the other end of the USB cable into
any available USB port on your computer. This will enable
use of the CDMP-7000 in MIDI mode.
DIGITAL OUTPUTS
Plug a S/PDIF cable (not included) into the DIGITAL OUT
on the CDMP-7000 (E) and into any DIGITAL IN port on
any device. This will send the digital audio to that input.
Possible applications include using the DIGITAL OUT to
record or to feed to a DAW (Digital Audio Workstation).
HEADPHONE OUTPUTS
The CDMP-7000 contains two headphone outputs: one
1/4” headphone input and one 1/8” headphone input. The
HEADPHONE OUTPUTS (O) allow cueing of music before
playback through the master outputs.
cdmp- 7000 manual • geminidj. com
Page 10
lcd touch displays
VINYL
HOLD
CD
USB
SD
MIDI
1
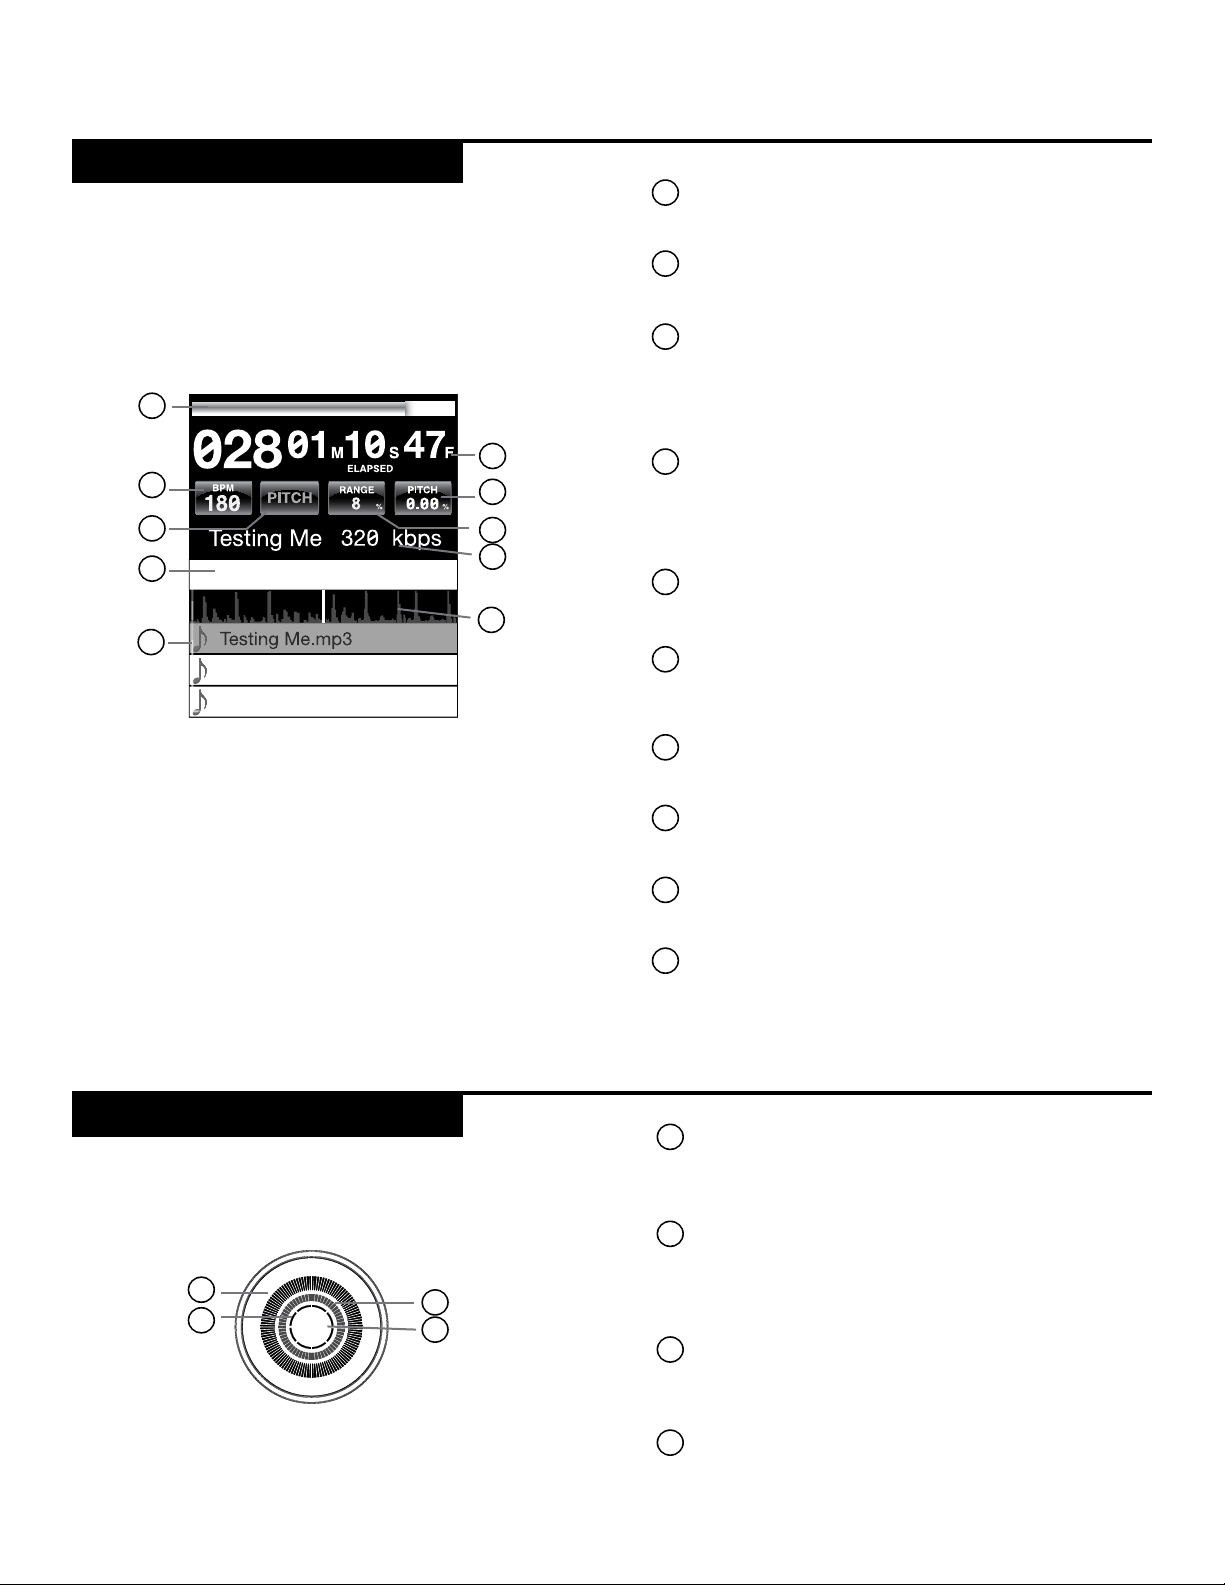
displays
TIME PROGRESS BAR
1
Shows the current position in the track.
TIME DISPLAY
2
Shows the current time value of the track.
BPM
3
Displays current BPM value in auto and manual
BPM mode or displays the tempo information
from the ID3 tag.
2
3
4
7
5
6
8
TEMPO
4
When MASTER TEMPO is OFF, PITCH is displayed in this field. When MASTER TEMPO is
ON, TEMPO is displayed in this field.
PITCH/MT VALUE
5
Shows current PITCH/TEMPO value.
10
9
RANGE
6
Displays the current PITCH/TEMPO range
selected.
EFFECTS PARAMETER BAR
7
Displays effect parameter value
TRACK INFORMATION DISPLAY
8
Displays track information.
LIBRARY BROWSER
9
Displays playable tracks and folders
TRACK WAVEFORM
10
Displays a visual representation the loaded
track’s audio. Pressing the waveform changes
the magnification. The values are: 3.2 seconds,
6.5 seconds, 12 seconds, and 24 seconds.
jogwheel displays
1
3
cdmp- 7000 manual • geminidj. com
VINYL
TRACK DISPLAY
1
Simulates a turntable playing at 33 1/3 RPM and
displays the current track position.
CUE POINT/SL IP DISPLAY
2
Displays the CUE point assigned to the track. In
SLIP mode, it displays the normal playback posi-
2
4
tion (page 14).
JOGWHEEL TOUCH DISPLAY
3
The jogwheel touch display illuminates when the
jogwheel is pressed.
4
VINYL
The VINYL display illuminates when VINYL
mode is activated.
10
Page 11
loading discs and memory devices
Once you have connected all your cables, you can turn
the CDMP-7000’s POWER on by pressing the POWER (1)
button, pressing the button a second time will turn off the
unit.
source select
The SOURCE SELECT (20) allows you to choose the media from which you will play music:
CD Pressing the CD source button allows you to play
music from the CD drives.
USB Pressing the USB source button allows you to play
music from a USB device.
SD Pressing the SD source button allows you to play
music from a SD/SDHC card.
MIDI Pressing the MIDI source button switches the unit
to MIDI mode with bi-directorial support. In this mode,
all controls (button pressings, pitch potentiometers
moving and wheel rotations) are registered on the unit
and transferred to PC via USB MIDI. This can be used in
conjunction with DJ software to contrhol the software’s
parameters. (For more information, see page 9).
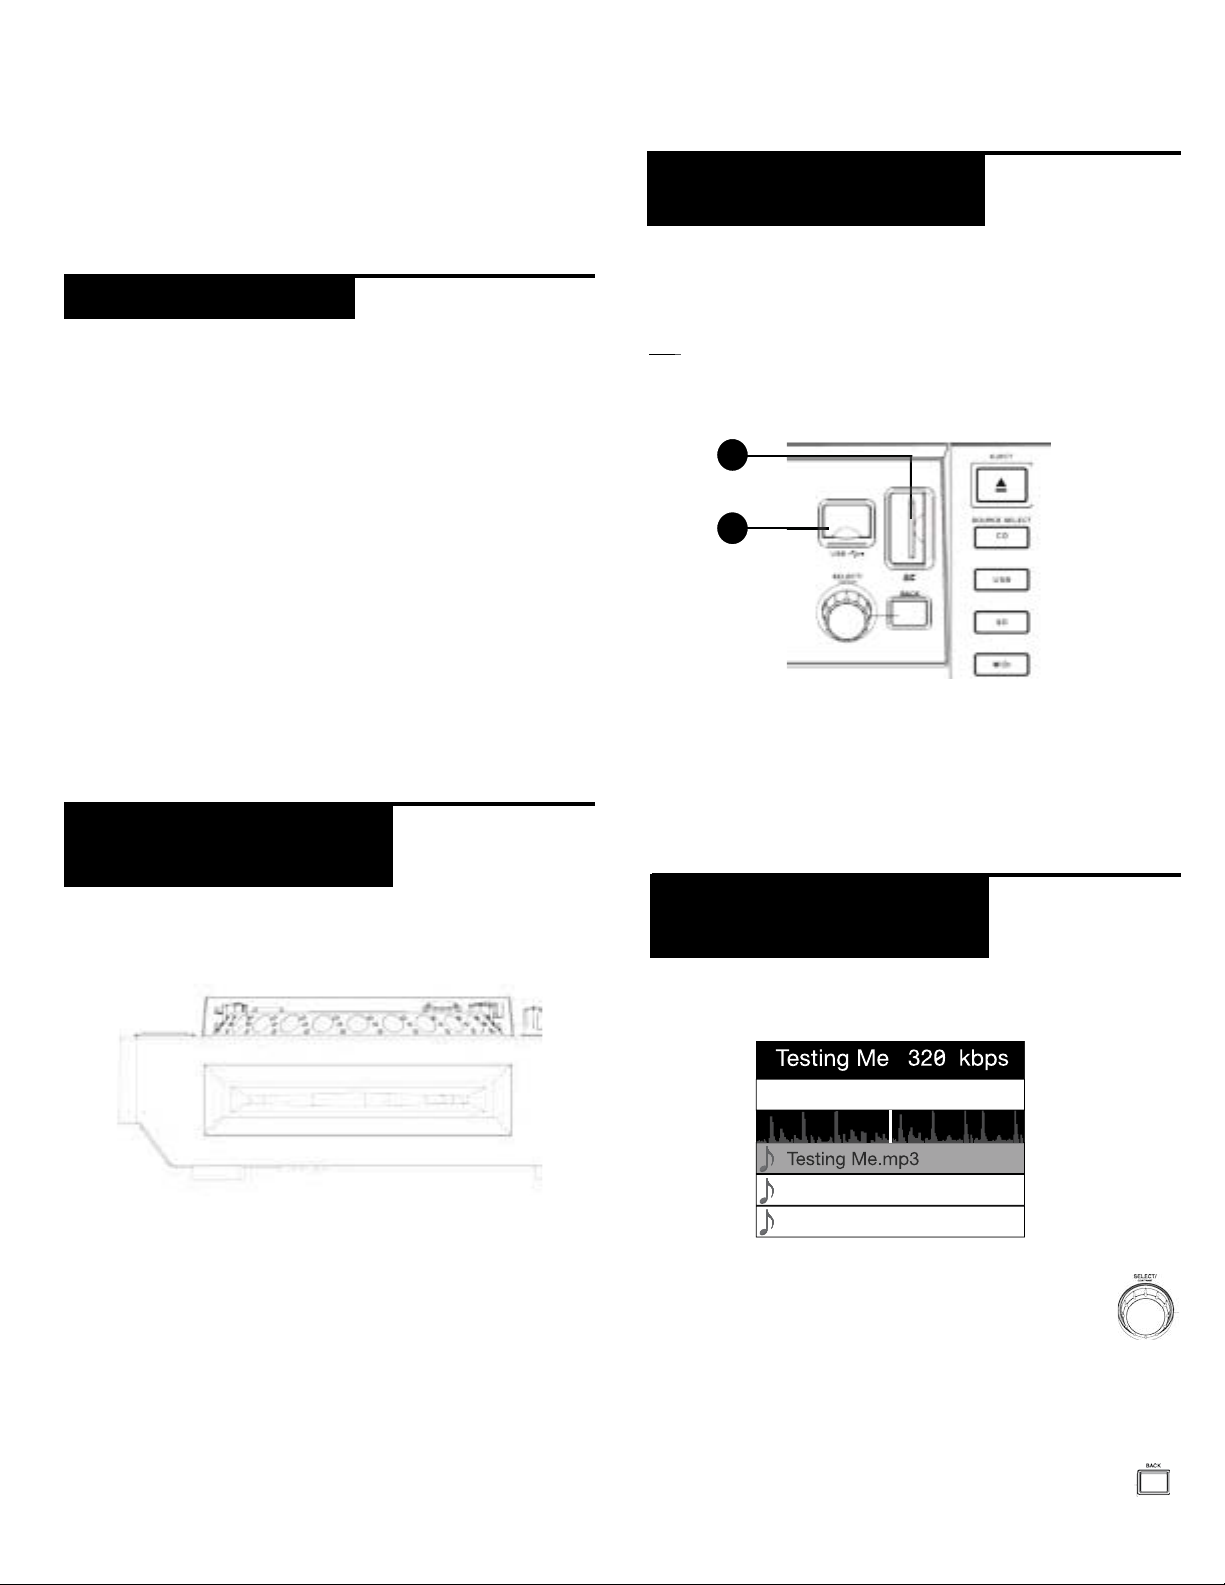
loading/ ejecting
/ sd devices
usb
USB Insert the USB memory device into the USB input (E)
on the top of the CDMP-7000. Upon loading the device,
the LCD Touch Display will show the folders and tracks on
the USB memory device.
SD Insert the SD card into the SD card slot (F) on the
top of the CDMP-7000. Upon loading the device, the LCD
Touch Display will show the folders and tracks on the SD
memory device.
E
F
To eject the USB and SD card, change the SOURCE SELECT (20) to another selection and remove the USB memory device or SD card. To eject the SD card, press the SD
card in. When it pops up, pull the SD card out vertically.
loading/ ejecting
discs
The SLOT-IN CD-ROM (pictured below) is where the CD
is held during loading, unloading and playback, and holds
both 12 cm and 8cm CD’s.
Pressing the EJECT (19) button will eject the disc from the
SLOT-IN CDROM. The disc will not eject in PLAY mode.
*NOTE: Before powering off the CDMP-7000, remove any
USB memory device or SD card to ensure that no corruption of data occurs.
browsing tracks/
folders
The browsing display shows the playable files and folders
on the CD, USB memory device, or SD card.
Rotating the rotary ENCODER(17) allows searching through the browser. This can also be done
via touching the screen in the browsing display
area.
To open a folder, highlight a folder and press in the ENCODER (17) to select. To load a track, highlight a track to
load and press the ENCODER(17) again.
To return to the previous folder, press the BACK
(18) button.
11
cdmp- 7000 manual • geminidj. com
Page 12
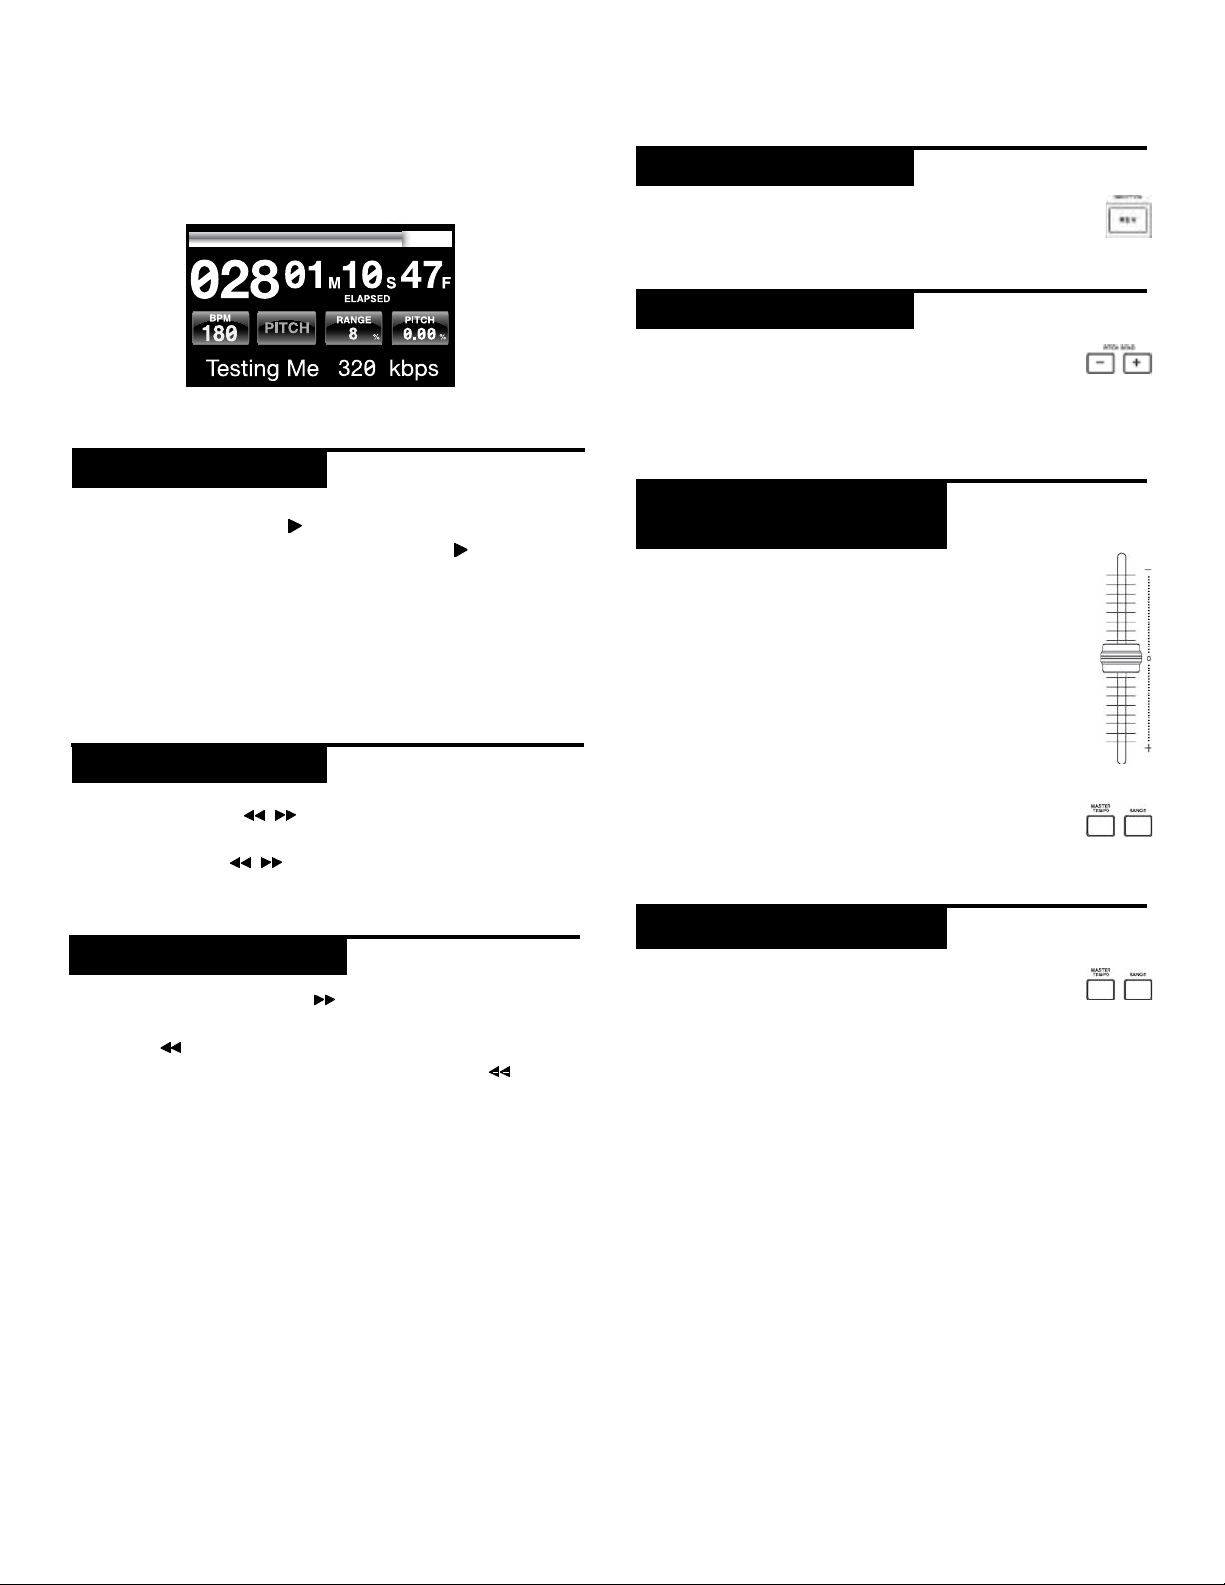
playback controls
Once you have loaded a track, the TRACK TITLE on the
LCD Touch Screen will display the loaded track.
play/ pause
Pressing PLAY/PAUSE
the selected track. Pressing PLAY/PAUSE
will pause playback and hold the track at the current
position.
• Pausing playback before the disc is ejected:
-Before ejecting a disc, the unit must be PAUSED.
The disc will not eject while the unit is playing.
/ ll (2) will begin playback of
/ ll (2) again
reverse
Pressing REVERSE (6) will begin playback in the
reverse direction.
pitch bend
Pressing the PITCH BEND [+] [-] (28) will raise
the pitch up to +100% or lower the pitch down
to -100% from the existing pitch setting. Releasing the
buttons will return the pitch to the original pitch setting.
adjusting pitch/
tempo
Moving the PITCH CONTROL FADER (29) will
accelerate the pitch/tempo when moved towards
[+] and deaccellerate the pitch/tempo when it is
moved towards [-].
The current PITCH/TEMPO value is displayed on
the LCD Touch Display.
search
Pressing SEARCH / (4) will search through the
track in the direction (forward/reverse). Pressing and
holding SEARCH / (4) will fast-search through the
track in the direction (forward/reverse).
track search
Pressing TRACK SEARCH l (5) will advance to the
beginning position of the next track. Pressing TRACK
SEARCH l (5) will return the current track to the
beginning position. Pressing TRACK SEARCH l (5)
twice consecutively returns to the beginning point of the
previous track.
• When searching through folders:
-When files are organized in folders, only tracks
within the same folder are searched.
• Autocue function:
-When autocue is enabled, the player will pause at
the beginning of the track.
Pressing the RANGE (26) button adjusts the
range of the PITCH CONTROL FADER between
+/- 4%, 8%, 16%, 24% ,50% and 100%
master tempo
MASTER TEMPO (27) allows tempo adjustment
without changing the original pitch.
The current mode, either PITCH or TEMPO, is displayed
on the LCD Touch Display.
• RANGE in MASTER TEMPO:
-In MASTER TEMPO mode, the range is +/- 4%, 8%,
16%, 24% ,50% and 100%
• Sound quality:
-The sound is digitally processed in MASTER
TEMPO mode, so a loss in sound quality may occur
if drastic tempo adjustments are employed.
cdmp- 7000 manual • geminidj. com
12
Page 13

playback controls
bpm
Press and hold the BPM (13) button to toggle between
different BPM modes: BPM ID3 / AUTO BPM / MANUAL
BPM.
ID3 when BPM mode is set to ID3, the BPM information
from the ID3 will be displayed.
AUTO BPM When BPM mode is set to AUTO BPM, the
beats per meter is calculated automatically and corresponding info is displayed on LCD in BPM field.
MANUAL BPM When BPM mode is set to MANUAL, the
BPM (13) button can be used to set the beats per minute
of playback by a series of TAPS at the desired tempo.
NOTE If a BPM value is present in file info ID3 tag, the
value is loaded into the unit and displayed.
bpm lock
The BPM LOCK feature allows the user to set the desired
value of the BPM by rotating the rotary knob and pushing down to set BPM. After the mode is activated the
pitch/master tempo value will be automatically adjusted
to match desired BPM level.
To enable the LOCK feature, set the desired BPM and
press the LOCK (14) button.
To turn OFF the LOCK feature, press the LOCK (14) button again.
NOTE: Valid BPM range for setting is restricted to the
following: 80 – 196 BPM.
cue controls
SETTING A CUE POINT
While the unit is in playback, press PLAY/
PAUSE / ll (2) to pause the track. While the
track is paused, press CUE (3) to set the cue
point at the current position. The CUE indicator illuminates when the CUE point is set as well as the marking
the CUE point on the Jogwheel display.
ADJUSTING THE CUE POINT
After the cue point has been programmed, press PLAY/
PAUSE / ll (2) to pause the track at the cue point.
Press SEARCH / (4) or rotate the jogwheel to
adjust the cue position. Press CUE (3) to set the cue
point at the current position.
RETURNING TO THE CUE POINT
While the unit is playing and after the cue point has
been programmed, pressing CUE (3) will cause the
unit to enter the PAUSE mode (PLAY/PAUSE BUTTON
blinks) at the programmed cue point (the CUE LED is
lit). Holding down the CUE button changes the function
to preview, and allows you to stutter start or play from
the programmed CUE POINT. Releasing the CUE button
will return the CD to the preset CUE point.
AUTO CUE
The AUTO CUE (11) function sets the cue at the
point immediately before sound starts, skipping
the beginning silent section of tracks. Press AUTO CUE
(11) to enable auto cue.
13
cdmp- 7000 manual • geminidj. com
Page 14

playback controls
cue controls continued loop controls
SETTING HOT CUES
Pictured LOOP IN / LOOP OUT/ADJUST / RELOOP/EXIT (8)
During playback or in pause mode, press HOT CUE
1, 2 or 3 (10) at the point in the track where the
HOT CUE is to be set.
Once pressed, the programmed HOT CUE (1, 2, or
3) should now be illuiminated.
SETTING A LOOP
During playback, press LOOP IN (8) at the
desired starting position for the loop (loop in
point).
To delete a hot cue, press MEMO (9) to enable deleting and select the hot cue for deletion.
PLAYING HOT CUES
Before playing hot cues, make sure MEMO (9) is not
enabled.
During playback or in the pause mode, press HOT CUE 1,
2 or 3 (10) and playback starts instantaneously from the
point recorded on that HOT CUE.
Press LOOP OUT / ADJUST (8) at the desired
ending position for the loop (loop out position).
The loop out point is now set and loop playback
starts from the loop in point.
ADJUSTING A LOOP
To adjust the loop once the loop is set, press the
OUT/ADJUST (8) button. The LOOP IN (8) button
will stop blinking.
• The length of the loop can be adjusted by rotating the jogwheel (30) clockwise to extend the loop.
Rotate the jogwheel counterclockwise to shorten the
loop.
CANCELING A LOOP
While the loop is engaged, press RELOOP/EXIT
(8) to disengage the loop. Playback continues
after the loop out point.
cdmp- 7000 manual • geminidj. com
RETURNING TO A LOOP
After canceling a set loop, press RELOOP/EXIT
(8) during playback to reengage the last set loop.
Loop playback begins at the loop in point.
14
Page 15

effects controls
effects section
The CDMP-7000 has six built-in effects: FLTR, FLANGER, ECHO, WAH, TRANCE, and BUBBLE.
FLTR The FLTR effect is a band-pass filter and will filter
out either the high frequencies or the low frequencies
depending on the position of the EFFECT PARAMETER
BAR. In the center position, there is no effect on the
sound. Adjusting the effect towards the left will gradually remove high frequencies until there is just lowend
(bass). Adjusting the effect towards the right will gradually remove the low frequencies until only high frequencies (treble) remain.
FLANGER The FLANGER effect is a time-based audio
effect that occurs when two identical signals are mixed
together, but with one signal time-delayed by a small
and gradually changing amount. Varying the time delay
causes these to sweep up and down the frequency
spectrum. By sliding the EFFECTS PARAMETER BAR to
the left the flanger gets slower and when you slide the
parameter bar to the right the flanger gets faster.
ECHO The ECHO effect repeats the audio several times,
softer each time. Adjusting the EFFECTS PARAMETER
BAR towards the left will shorten the time between the
repeats and decrease the volume of the repeats, while
adjusting the EFFECTS PARAMETER BAR towards the
right will lengthen the time between the repeats and
increase the volume of the repeats.
WAH The WAH effect is an autowah effect that uses a
variable cutoff frequency lowpass filter that exhibits a
resonant peak just at its lowpass rolloff frequency to
emulating the human voice making a “waaaah” tone, or
its tonal inverse, “aaaooow”.
ENABLING AN EFFECT
During playback, the EFFECT (16) section
allows you to enable/disable effects.
When VINYL (24) mode is disabled, the FLTR /
FLANGER / ECHO effect set are the effects that
can be used. When VINYL (24) mode is enabled, the
WAH / TRANCE / BUBBLE effect set are the effects
that can be used.
ADJUSTING THE EFFECTS
The EFFECTS DRY/WET (23) control adjusts the
mix of the non-affected signal and the affected
signal. Turn clockwise to increase the amount of
the affected signal. Turn counter-clockwise to increase the amount of the non-affected signal.
The EFFECTS PARAMETER BAR located on the LCD
shows the value of the effects parameter for the FLTR
/ FLANGER / ECHO effect set. The WAH / TRANCE
/ BUBBLE effect set does not have any adjustable
parameters.
To adjust the parameter of the FLTR / FLANGER /
ECHO effect set, touch the EFFECTS PARAMETER
BAR on the LCD touch display and adjust the parameter position to the desired spot. The effect parameter can also be adjusted by using the jogwheel (30).
Rotating the jogwheel (30) clockwise will increase the
value of the parameter, rotating the jogwheel counterclockwise will decrease the parameter.
NOTE: When the effect is selected the name of the
effect should appear at this place of the screen for
about 5 seconds.
BUBBLE The BUBBLE effect is a preset effect that com-
bines the WAH and ECHO effects.
TRANCE The TRANCE effect uses amplitude modulation
in order to cut the audio’s volume in and out.
15
HOLD MODE
Pressing HOLD will enable/disable effect HOLD
mode. This will apply effect with selected parameters
to music.
When an effect is enabled, but HOLD mode is disabled, you can change the effect’s parameters and
listen to it by rotating the jogwheel (30) or moving
the finger along effect bar on the LCD touch screen.
When the jogwheel (30) stops rotating, the effect will
disengage. To keep the effect engaged, apply HOLD
mode.
It is possible to change the effect parameters in HOLD
mode as well which will preserve the parameter value
and keep the effect enabled.
cdmp- 7000 manual • geminidj. com
Page 16

jogwheel controls
jogwheel controls
JOGWHEEL ADJUST
The JOG ADJUST (7) rotary allows adjustment to
the feel of the jogwheel. For a stiffer and heavier
feel, rotate the JOG ADJUST (7) rotary to the
left. For a looser and lighter feel, rotate the JOG ADJUST
(7) rotary to the right.
VINYL MODE
Pressing the VINYL (24) button enables VINYL
mode and illuminates the Vinyl indicator on the
joghwheel display.
Enabling VINYL mode allows scratch-like effects when
the JOGWHEEL (30) is depressed and rotated. When
VINYL mode is disabled, the JOGWHEEL (30) will be
in SEARCH MODE and will allow searching through the
track.
The VINYL button also activates WAH / TRANCE /
BUBBLE effects set instead of FLTR / FLANGER / ECHO
set. In this mode rotating the JOG WHEEL will produce
scratch sound and change the parameters of the effects.
START TIME / STOP TIME
SLIP MODE
When SLIP (25) is enabled, normal playback continues inaudibly underneath SCRATCH, LOOP, and
REVERSE effects. When SCRATCH, LOOP, or REVERSE
mode is exited, normal playback resumes from the inaudible playback spot as indicated on the JOGWHEEL
(30) display.
SLIP WITH SCRATCH
To use SLIP while scratching, enable VINYL mode by
pressing the VINYL (24) button. Enable SLIP mode by
pressing the SLIP (25) button.
Using the jogwheel will now create scratch effects while
normal track playback continues inaudibly undeneath.
The position playing underneath is shown on the jogwheel display.
Once the jogwheel is released, track playback will continue from the playback position playing underneath.
NOTE: When using SLIP mode with scratch, SLIP reverse
operations will not be performed.
Adjusting the START TIME (21) jog mode adjustment adjusts the speed at which playback
returns to normal when the top of the jogwheel is released and when the unit resumes playback
from pause mode. The start time increases when turned
clockwise and decreases when turned counterclockwise.
The STOP TIME (22) jog mode adjustment adjusts the
speed at which playback slows when the top of the jogwheel is touched and when pause is enabled. The stop
time increases when turned clockwise and decreases
when turned counterclockwise.
SLIP WITH LOOP
To use SLIP with loop playback, enable SLIP mode by
pressing the SLIP (25) button.
Set a loop (page 12) using the IN/OUT controls and loop
playback will begin. The SLIP (25) button will begin
flashing indicating SLIP mode is active and the position
playing underneath is shown on the jogwheel display.
Upon exiting the loop, track playback will continue from
the playback position playing underneath.
SLIP WITH REVERSE
To use SLIP with reverse playback, enable SLIP mode by
pressing the SLIP (25) button.
Press REVERSE (6) to begin playback in the reverse direction. The SLIP (25) button will begin flashing indicating SLIP mode is active and the position playing underneath is shown on the jogwheel display.
Press REVERSE (6) again to exit reverse playback. Upon
exiting reverse playback, track playback will continue
from the playback position playing underneath.
cdmp- 7000 manual • geminidj. com
16
Page 17
display controls
display options
ADJUSTING CONTRAST
Pressing and holding the ENCODER (17) and rotating the rotary will adjust the contrast of the
240x320 display. To increase the contrast ratio,
rotate clockwise. To decrease the contrast ratio rotate
the counter-clockwise.
TRACK TE XT DISPLAY MODE
Press the TEXT MODE / TOUCH ON/OFF (12)
to alter the displayed information on the LCD
TOUCH DISPLAY (15) between title/artist/
album/genre info for files.
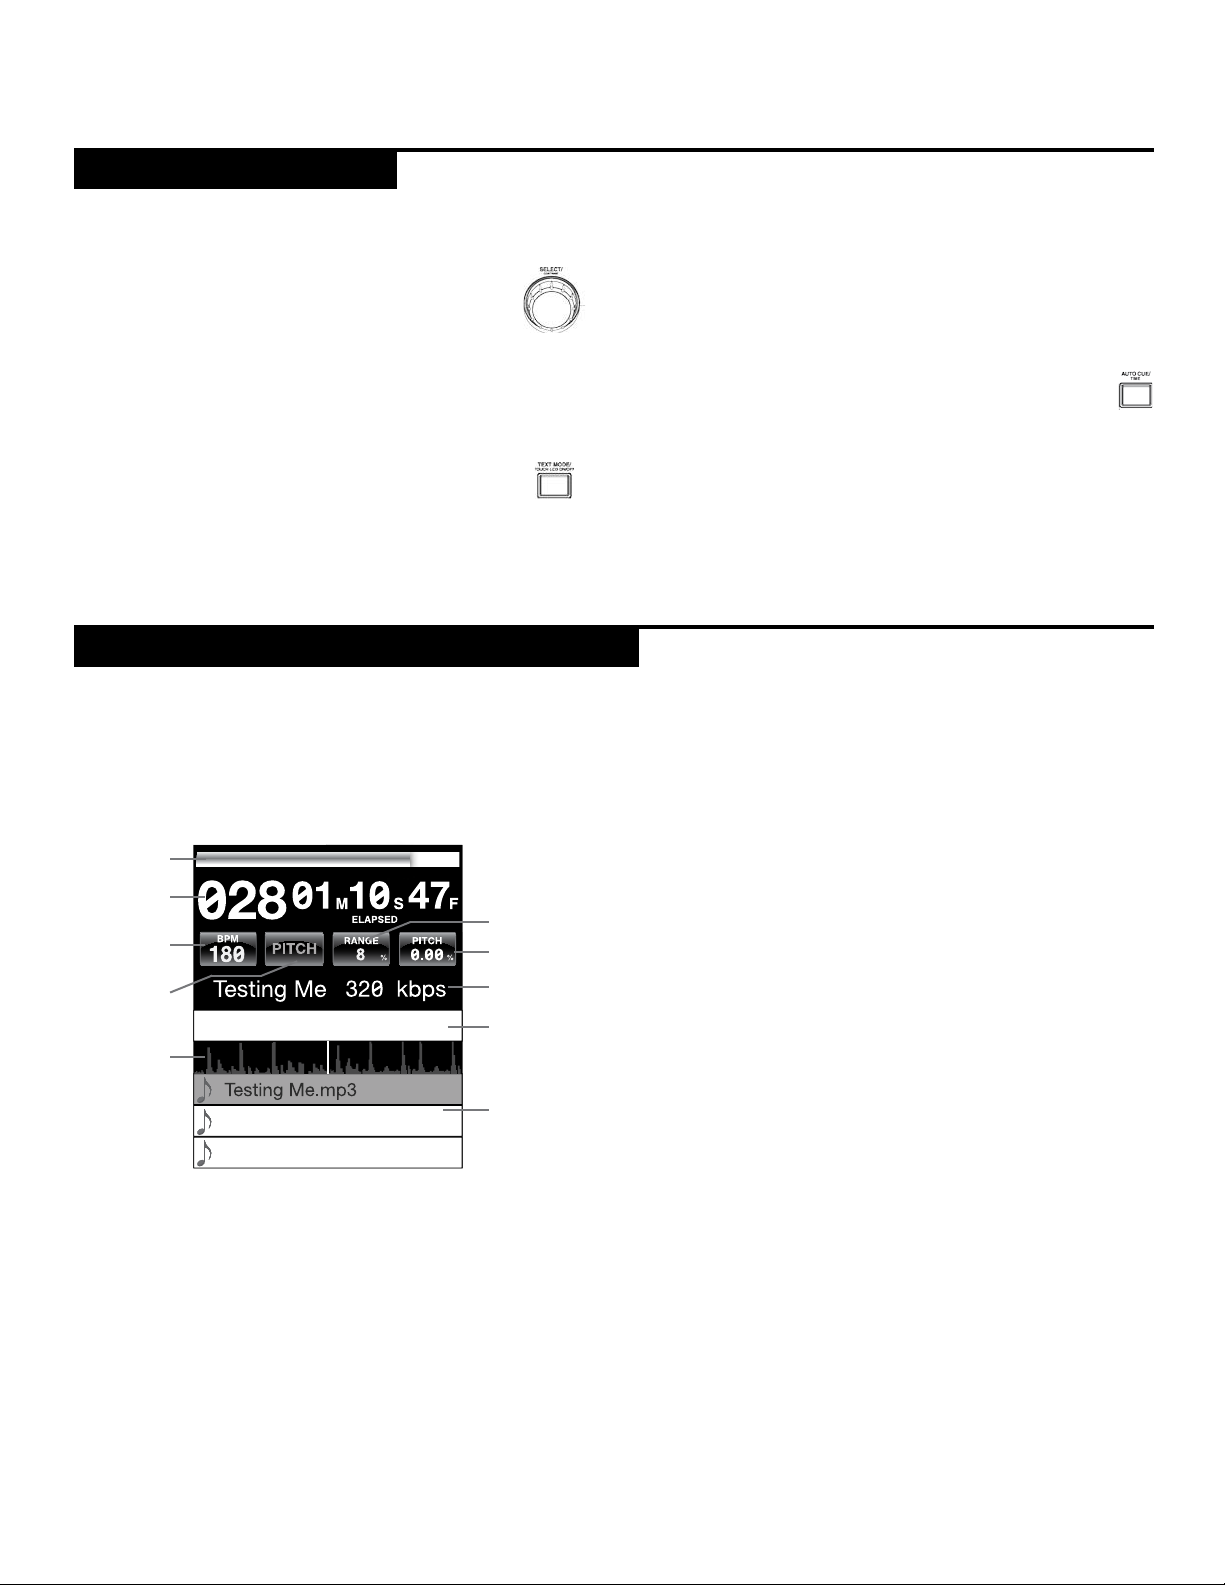
lcd touch screen functions
PRESS and HOLD the TEXT MODE / TOUCH ON/OFF
(12) to enable/disable touch screen functionality.
TIME ELAPSED/REMAIN DISPLAY
Press and hold the TIME/AUTOCUE (11) button to
switch track time display modes between time
elapsed and time remain.
The CDMP-7000’s LCD display also has touch functionality. The following features can used by touching the
LCD TOUCH DISPLAY (15)
1
2
5
3
4
9
1
TIME PROGRESS BAR Touching the TIME PROGRESS
6
7
8
10
BAR will skip to the selected position of the track.
2
TIME Toggles between time elapsed and time remain
display modes.
4
TEMPO/PITCH Has the same functionality as MASTER
TEMPO button (page 10). When MASTER TEMPO is OFF,
PITCH is displayed in this field. When MASTER TEMPO is
ON, TEMPO is displayed in this field .
5
RANGE Has the same functionality as RANGE button
(page 10).
6
PITCH/MT VALUE Allows you to enable/disable PITCH/
MT (page 10). Additionally it shows current PITCH/MT
value.
TRACK TITLE Allows you to select title/artist/album/
7
genre text displaying. Touch on this area will switch between display modes.
EFFECTS PARAMETER BAR Allows you to set effect
8
values by touching the desired position.
TRACK WAVEFORM Displays a visual representation the
9
loaded track’s audio. Pressing the waveform changes the
magnification. The values are: 3.2 seconds, 6.5 seconds,
12 seconds, and 25 seconds.
TRACK SELECT Allows you to select a track or enter a
10
folder. Touching this area will enter a folder.
BPM Displays current BPM value in auto and manual
3
BPM mode or displays the BPM information from the ID3
tag when BPM mode is set to ID3.
17
cdmp- 7000 manual • geminidj. com
Page 18

midi controls
midi controls
MIDI MODE
The CDMP-7000 has MIDI mode, which allows the data
from the buttons and dials of the CDMP-7000 to be encoded into MIDI format. If the unit is connected via a USB
cable to a computer with MIDI-compatible DJ software,
the DJ software can be operated from the unit. The computer audio can also be played from the CDMP-7000’s
outputs.
It may not be possible to use some buttons to operate the
DJ sofware. For a list of MIDI messages refer the the MIDI
Device Messages Table.
NOTE For instructions for your specific DJ software’s
settings refer to your DJ software’s operating manual.
HID MODE
In addition to MIDI, the CDMP-7000 also uses HID protocol
which allows greater speeds.
If your software supports HID devices, disable MIDI devices
in your software, and search for HID devices. This should
locate the CDMP-7000 and allow you to use it as a HID
device.
CONF IGURING MIDI MODE
Connect the USB cable from the unit’s rear USB port (D)
to the computer. Press the MIDI source selection on the
CDMP-7000 (20). This will terminate playback of the CD/
USB/SD sources.
The CDMP-7000 will then display an audio configuration
prompt for audio bit rate and sampling rate on the touch
screen with the following audio settings:
• 24-bit/192kHz
• 24-bit/96 kHz
• 24-bit/48 kHz
• 16-bit/44.1 kHz
Press and hold the MIDI source select button to swtich between audio settings. Press MIDI to toggle between audio
settings and press the ENCODER (14) to apply the setting.
Press BACK (15) to exit.
NOTE Higher bit depth and sampling rates will create
greater latency and may impact performance.
After configuring the audio settings on the CDMP-7000,
start the DJ software:
• Select the CDMP-7000 as your MIDI device*
• Select the CDMP-7000 as your AUDIO device*
*Refer to DJ software’s instructions
cdmp- 7000 manual • geminidj. com
18
Page 19
midi controls
midi device messages table hid device messages table
Controller
Parameter
Cue Cue 1 0 127
Play/Pause Play/Pause 2 0 127
+ (pitch bend) Pitch + 3 0 127
- (pitch bend) Pitch - 4 0 127
HotCue 1 Cue 1 5 0 127
HotCue 2 Cue 2 6 0 127
HotCue 3 Cue 3 7 0 127
Memo Memo 8 0 127
Track Search << Track reverse 9 0 127
Track Seach >> Track forward 10 0 127
Browse Left Up in tracklist 11 0 127
Browse Right Down in tracklist 12 0 127
Master Tempo Master Tempo 13 0 127
Vinyl Scratch 14 0 127
Select Load Track 15 0 127
Loop In Loop In 16 0 127
Loop Out/Adjust Loop Out 17 0 127
Reloop/Exit Reloop 18 0 127
BPM BPM 19 0 127
Effect1 (wah) Effect1 (select) 20 0 127
Effect2 (flanger) Effect2 (select) 21 0 127
Effect3 (echo) Effect3 (select) 22 0 127
Back Folder Out 23 0 127
Wheel Touch Wheel Touch 24 0 127
Effect Param Effect Param 25 0 127
Time Elapsed/Remain 26 0 127
Autocue Autocue 27 0 127
LOCK LOCK 28 0 127
Range Range 29 0 127
Reverse Reverse 30 0 127
Slip Slip 31 0 127
Jogwheel Jogwheel 32 0, 63 63, 128
Pitch Slider PitchSlider 33 0 127
Track Skip << Prev. track 34 0 127
Track Skip >> Next track 35 0 127
Hold Effect On/Off 36 0 127
Eject Deck Select 37 0 127
Effect4 (wah) Effect4 (select) 38 0 127
Effect5 (trance) Effect5 (select) 39 0 127
Effect6 (bubble) Effect6 (select) 40 0 127
Dry/Wet Dry/Wet Effect 41 0 127
Start time Parameter 42 0 127
Stop time Parameter 43 0 127
Pitch Slider (14bit) Pitch Slider 44 0 127
*NOTE: 14-bit pitch slider allows for greater accuracy when transmitting pitch
information but may not be compatible with all DJ Software.
Software
Parameter
Send
Number
Min
Value
Max
Value
19
Controller
Parameter
Cue Cue 1 1 1- on, 0 - off
Play/Pause Play/Pause 2 1 1- on, 0 - off
+ (pitch bend) Pitch + 3 1 1- on, 0 - off
- (pitch bend) Pitch - 4 1 1- on, 0 - off
HotCue 1 Cue 1 5 1 1- on, 0 - off
HotCue 2 Cue 2 6 1 1- on, 0 - off
HotCue 3 Cue 3 7 1 1- on, 0 - off
Memo Memo 8 1 1- on, 0 - off
Track Search << Track reverse 9 1 1- on, 0 - off
Track Seach >> Track forward 10 1 1- on, 0 - off
Browse Left Up in tracklist 11 1 1- on, 0 - off
Browse Right Down in tracklist 12 1 1- on, 0 - off
Master Tempo Master Tempo 13 1 1- on, 0 - off
Vinyl Scratch 14 1 1- on, 0 - off
Select Load Track 15 1 1- on, 0 - off
Loop In Loop In 16 2 1- on, 0 - off
Loop Out/Adjust Loop Out 17 2 1- on, 0 - off
Reloop/Exit Reloop 18 2 1- on, 0 - off
BPM BPM 19 2 1- on, 0 - off
Effect1 (wah) Effect1 (select) 20 2 1- on, 0 - off
Effect2 (flanger) Effect2 (select) 21 2 1- on, 0 - off
Effect3 (echo) Effect3 (select) 22 2 1- on, 0 - off
Back Folder Out 23 2 1- on, 0 - off
Wheel Touch Wheel Touch 24 3 1- on, 0 - off
Time Elapsed/Remain 26 3 1- on, 0 - off
Autocue Autocue 27 3 1- on, 0 - off
LOCK LOCK 28 3 1- on, 0 - off
Range Range 29 3 1- on, 0 - off
Reverse Reverse 30 3 1- on, 0 - off
Slip Slip 31 3 1- on, 0 - off
Track Skip << Prev. track 34 4 1- on, 0 - off
Track Skip >> Next track 35 4 1- on, 0 - off
Hold Effect On/Off 36 4 1- on, 0 - off
Eject Deck Select 37 4 1- on, 0 - off
Effect4 (wah) Effect4 (select) 38 4 1- on, 0 - off
Effect5 (trance) Effect5 (select) 39 4 1- on, 0 - off
Effect6 (bubble) Effect6 (select) 40 5 1- on, 0 - off
Jog wheel Jog wheel 64-71 8 Min = 0, Max= 180
Effect Parameter Effect Parameter 72-79 9 Min = 0, Max= 255
Dry/Wet Dry/Wet Effect 80-87 10 Min = 0, Max= 255
Start time Parameter 88-95 11 Min = 0, Max= 255
Stop time Parameter 96-103 12 Min = 0, Max= 255
Pitch Slider Pitch Slider 104-117 13, 14 Min = 0, Max= 800
Software
Parameter
Bit Byte Value
cdmp- 7000 manual • geminidj. com
Page 20

mixer controls
mixer controls
CHANNEL INPUT SELECTION
The CDMP-7000 has three mixing channels: CH1, CH2,
CH3. Each channel has three inputs that can be selected
via the CHANNEL INPUT SELECTOR SWITCH (31) located at the top of each channel.
• CH1 can be toggled to either use the USB INPUT,
AUX1, or AUX2.
• CH2 toggles between the left deck of the CDMP7000, computer audio in MIDI mode, and the LN1/
PH1 input.
• CH3 toggles between the right deck of the CDMP7000, computer audio in MIDI mode, and the LN2/
PH2 input.
CHANNEL CONTROLS
Each channel of the CDMP-7000 has a rotary GAIN
CONTROL (45), a 3-BAND EQUALIZER (44), and a
VOLUME FADER (43) to make tonal and volume adjustments to each channel.
The GAIN CONTROL (45) adjusts the gain of the incoming signal on each channel.
The 3-BAND EQUALIZER (44) adjusts the tone of the
incoming signal on each channel across 3 bands: LOW,
MID, and HIGH.
• Use the HIGH control to adjust the treble frequencies.
• Use the MID control to adjust the middle frequencies.
• Use the LOW control to adjust the bass frequencies.
The CHANNEL VOLUME FADERS (43) are 60mm faders
that adjust the sound volume for each channel (adjustable from -∞ to 0 dB).
BOOTH O UTPUT
The CDMP-7000 has a BOOTH VOLUME (49) control
that adjusts the BOOTH OUTPUT (C) level. This can
be used for many purposes including feeding a set of
speakers for monitoring or to send the signal to a different area or feed.
headphone controls
HEADPHONE CU E ASSIGN
Each channel on the CDMP-7000 has a CUE TOGGLE/
INDICATOR (35) allowing the creation of a headphone
cue mix with any combination of channels, including the
master output. By pressing the CUE TOGGLE/INDICATOR (35), that channel will be assigned to the cue mix
and the indicator LED will illuminate.
HEADPHONE MIX CONTROL
The HEADPHONE MIX CONTROL (36) controls the mix
of the headphone output between the CUE mix and
PGM (master output) mix.
The HEADPHONE VOLUME CONTROL (37) controls the
volume of the heaphone signal.
The HEADPHONE OUTPUT SWITCH (38) allows toggling between a full stereo mix of the CUE/PGM blend
or a mono split signal, which will put the CUE mix in the
LEFT channel of the headphone out and the PGM mix in
the RIGHT channel of the headphone out.
MASTER OUTPUT
The CDMP-7000 has a MASTER VOLUME (32) control
that adjusts the summed output of the 3 channels.
The VU METER (33) displays the the left and right output levels of the MASTER OUTPUT.
*NOTE: Going above 0dB (into the red indicators) should
be avoided as the signal will distort and could damage
other equipment.
The MASTER BALANCE CONTROL (34) adjusts the L/R
channel panning on the master output.
cdmp- 7000 manual • geminidj. com
20
Page 21

mixer controls
cross fader controls
CROSS FADER
The CROSS FADER (41) allows mixing and cutting from
CHANNEL 2 to CHANNEL 3. The CROSS FADER (41) in
the CDMP-7000 is removable and if the need arises can
be replaced easily.
CROSS FADER CONTROLS
The CROSS FADER (41) has three sets of controls associated with it: CROSS FADER START (39), CROSS
FADER REVERSE (40) CROSS FADER CURVE ADJUST
(42).
The CROSS FADER START (39) when enabled will allowplayback simply by moving the CROSS FADER (41) from
side to side. Moving the cross fader in the direction of
the cued deck will begin playback of that deck. When
the cross fader is moved all the way to the opposite side
of the currently playing disc, the unit will pause playback
of that deck.
The CROSS FADER REVERSE (40) when enabled inverts
the cross fader so that the left side of the cross fader
becomes channel 3 and the right of the cross fader becomes channel 2.
The CROSS FADER CURVE ADJUST (42) allows for two
different cross fader slopes for entering/cutting tracks:
gradual and steep.
microphone controls
MIC CONTROLS
The CDMP-7000 has two mic inputs (front and rear
panel) that are controlled via the MIC VOLUME CONTROL (46).
The 2-BAND MIC EQ (47) allows for tonal adjustments
of the mic signal across the LOW and HIGH bands.
The 3-position MIC TALKOVER SWITCH (48) turns the
mic signal ON or OFF as well as enabling the talkover
setting, which attenuates the PGM mix so the mic signal
can be clearly heard.
21
cdmp- 7000 manual • geminidj. com
Page 22

playback
troubleshooting
troubleshooting
CD ERRORS
- If a disc will not play, check to see if the disc was
loaded correctly (label side up). Also check the disc for
excessive dirt, scratches, etc.
- If a disc contains a non-compliant file format causing a
playback error, press and hold the EJECT (19) button for
4 seconds. The unit will eject the disc and reboot.
- If the disc turns but there is no sound, check the cable
connections, if they are ok, check your amplifier or
receiver.
-If the CD skips, check the CD for dirt or scratches. Do
not assume that the CD layer is defective. Many CD’s
are recorded out of spec and will skip on most or all CD
players. Before sending the unit for repair, try playing a
CD that you are sure plays properly.
USB MEMORY DEVICE ERRORS
Some USB devices may not operate properly with the
CDMP-7000. Gemini accepts no resposibility for any
possible data loss that may occur. To ensure that data is
not permanently lost, please make sure to backup any
data prior to connecting the USB device to the the unit.
SD CARD E RRO RS
- If the unit does not read the SD memory card, check
to see if the memory card was inserted correctly and
inserted completely.
- If a ”Media err. Please Check Media Format and Try
Again” message appears, this signifies that your SD
memory device is formatted incorrectly.
MIDI ERRORS
-If the computer does not recognize the device, try powering the unit off and rebooting the computer.
-If the DJ software does not list the device, ensure that
you are using the latest version by downloading any updates to your DJ software. If the CDMP-7000 mapping
does not appear in your DJ software’s list, go to geminidj.com for downloads and support.
- USB hubs cannot be used with the CDMP-7000.
- If the unit does not read the USB memory device,
check to see if the memory device was inserted
completely.
- If a “Too many devices” message appears, it is because
a USB hub is in use. The CDMP-7000 does not work with
USB hubs. Disconnect the USB hub and connect the
USB memory device directly into the CDMP-7000.
-If a ”Media err. Please Check Media Format and Try
Again” message appears, this signifies that your USB
memory device is formatted incorrectly.
cdmp- 7000 manual • geminidj. com
22
Page 23

troubleshooting
mixer
troubleshooting
LOW/NO OUTPUT
If the CDMP-7000 is not sending a loud signal or sending no signal, check for the following possible reasons:
- Input selector is set incorrectly.
- The connections are set up improperly on the back
panel.
- Bad cable(s), improperly inserted cables, or loose connection.
- Jacks or plugs are dirty, making a poor contact.
DISTORTED OUTPUT
If the CDMP-7000 is sending a distorted signal, check
for the following possible reasons:
- Master output level is too high.
- Input level (gain control) is too high.
DIGITAL OUTPUT ERROR
If the CDMP-7000’s digital output is not performing,
check for the following possible reasons:
- The digital output sampling frequency of the CDMP7000 does not match the specifications of the connected device.
- The digital output is being connected to an analog
input.
- The cable used to connect the digital output is not an
Optical S/PDIF cable.
23
cdmp- 7000 manual • geminidj. com
Page 24

specifications
GENERAL
Type................CD/USB/SD media workstation w/ MIDI/HID
USB output type.....................................................................Type B
Disc Type..............Standard Compact discs (12 cm & 8 cm)
Power Supply.............................................. 100/240V, 60/50 Hz
Power consumption.................................................................. 25W
Dimensions........................................... 26.3 x 12.4 x 3.93 inches
(720 x 315 x 100 mm)
Weight.................................................................. 16.97 lbs. (7.7 kg)
ANALOG AUDIO
Quantization....................1 Bit Linear/Channel, 3 Beam Laser
Oversampling Rate..............................................................8 Times
Frequency response:
LINE ................................................................... 20 Hz to 20 kHz
PHONO ..........................20 Hz to 20 kHz (RIAA +/-0.5dB)
MIC .................................................................... 20 Hz to 20 kHz
S/N ratio (at rated output):
LINE ....................................................................................... >80dB
PHONO ................................................................................ >70dB
MIC ......................................................................................... >70dB
THD+N
LINE ....................................................................................... <0.01%
PHONO .................................................................................<0.05%
MIC ............................................................................................ <0.1%
Standard input level/Input impedance:
AUX................................................................................ 0dBV/10kΩ
PHONO/LINE........................... -40dBV/47kΩ, 0dBu/1 47kΩ
MIC.......................................................-50dBV/>1kΩ (balanced)
Standard output level/Minimum Load Impedance:
MASTER (Bal)........................................................... +6 dBv/1kΩ
MASTER (Unbal)......................................................... 0dBv/1kΩ
BOOTH ............................................................................0dBv/ 1kΩ
REC ...................................................................................0dBv/1kΩ
PHONES ......................................... 200mW/200Ω THD 0.3%
specifications
DIGITAL AUDIO
Output type............................................Coaxial digital (S/PDIF)
Output format.........................................................44.1 kHz, 16-bit
USB AUDIO
Bit Depth........................................................................24-bit, 16-bit
Sampling rate..........................192kHz, 96kHz, 48kHz, 44.1kHz
SPECIFICATIONS AND DESIGN ARE SUBJECT
TO CHANGE WITHO UT NOTICE FOR PURPOS E
OF IMPROVEMENT.
cdmp- 7000 manual • geminidj. com
24
Page 25

español
MANUAL DE INSTRUCCIONES
Page 26
cdmp- 7000 manual • geminidj. com
26
Page 27

introducción
Felicidades y gracias por comprar el Gemini CDMP-7000. Estamos seguros de que nuestra gama de productos
Gemini no solo le facilitará la vida por medio del uso de los últimos avances tecnológicos en cuanto a
conectividad inter-plataformas y reproducción de sonido sino que subirá el listón en lo referente a productos
audio profesionales y para DJ. Con unos cuidados básicos, su unidad le ofrecerá años de un funcionamiento
fiable y sin problemas. Todos los productos Gemini incluyen una garantía limitada de 1 año*.
pasos previos
Asegúrese de que los siguientes elementos estén incluidos junto
con su CDMP-7000:
(1) Cable de alimentación
(1) Manual de instrucciones (este documento)
(1) Tarjeta de garantía
precauciones
1 No use este reproductor de CD a temperaturas inferiores a
los 41° F/5° C o superiores a los 95° F/35° C.
2 No permita que este aparato quede expuesto a salpicaduras
ni coloque objetos que contengan líquidos (como jarrones)
encima de él.
3 Coloque esta unidad en un lugar limpio y seco.
4 No coloque esta unidad en lugares inestables.
5 Cuando desconecte el cable de alimentación de la salida,
siempre tire del enchufe y no del cable.
6 Para evitar el riesgo de descargas eléctricas, nunca quite la
tapa ni los tornillos de sujeción de la misma.
7 DENTRO DE ESTE APARATO NO HAY PIEZAS
SUSCEPTIBLES DE SER REPARADAS POR EL PROPIO
USUARIO. Dirija cualquier posible reparación al servicio
técnico oficial.•
8 No use disolventes para limpiar esta unidad.
9 Para evitar que se ensucie el cabezal láser, deje siempre la
bandeja cerrada.
10 Conserve este manual a mano para cualquier consulta futura.
datos de seguridad
Propiedades del diodo láser
Material: Ga - Al - As
Longitud de onda: 755 - 815 nm (25° C)
Salida láser: Onda continua, máximo 0.5 mW
• Para los Estados Unidos - Si observa cualquier problema con
esta unidad, póngase en contacto con el departamento de
atención al usuario de Gemini en el 1 (732) 346-0061. No intente
devolver este aparato al distribuidor directamente
queremos que sus oídos
le duren toda la vida
La selección de una unidad audio de calidad como esta que
acaba de adquirir es solo el principio de su disfrute musical.
Ahora debe plantearse cómo sacar todas las posibilidades que
le ofrece este aparato. Tanto nosotros como fabricante como
el Electronic Industries Association’s Consumer Electronics
Group queremos que disfrute de este aparato usándolo a un
nivel seguro. Uno con el que obtenga un sonido potente y
limpio sin distorsiones ni molestias y, lo que es más importante,
sin que afecte a su capacidad de audición. El sonido puede
ser algo engañoso. A lo largo del tiempo su “nivel cómodo” de
escucha se adapta a niveles cada vez superiores. Y por eso,
lo que puede considerar como “normal” puede llegar a ser
realmente potente y dañino para sus oídos. Protéjase contra
esto ajustando su equipo a un nivel seguro ANTES de que sus
oídos se adapten.
Para fijar un nivel seguro, empiece con el control de volumen a
un nivel muy bajo. Suba lentamente el sonido hasta que pueda
escucharlo cómoda y limpiamente, y sin distorsión. Llegados a
ese punto, deje el dial allí. El dedicar un minuto a este proceso
evitará daños o pérdidas de audición en el futuro. Porque al
final, ¡queremos que sus oídos le duren toda la vida!.
Si lo usa con inteligencia, este nuevo aparato le dará años
de diversión. Dado que los daños auditivos provocados
por ruidos potentes suelen ser indetectables hasta que es
demasiado tarde, tanto nosotros como el Electronic Industries
Association’s Consumer Electronics Group le recomendamos
que evite una exposición prolongada a niveles de ruido
excesivos. La siguiente lista de ejemplos se incluyen para su
protección.
30 dB - Biblioteca en silencio, susurros
40 dB - Frigorífico, habitación lejos del tráfico
50 dB 60 dB - Aire acondicionado a 7 m, máquina de coser
70 dB - Aspirador, secador, restaurante ruidoso
80 dB - Nivel de tráfico medio, despertador a 1 m
Los niveles siguientes son peligrosos con una exposición larga:
90 dB - Metro, moto, camiones, cortacésped
100 dB - Camión de la basura, motosierra, taladradora
120 dB - Concierto de rock delante de los altavoces,
trueno
140 dB - Disparo, avión despegando
180 dB - Despegue de un cohete
Tráfico suave, conversación normal, oficina silenciosa
27
Información suministrada por cortesía de Deafness Research Foundation.
cdmp- 7000 manual • geminidj. com
Page 28

introducción
limpieza de la
unidad
Para limpiar el CDMP-7000 use solo un trapo suave y seco y/o
aire comprimido. Si la unidad está muy sucia, le recomendamos
que use una disolución 2:1 de agua destilada y alcohol isopropil
al 30%. No use limpiadores químicos ni disolventes ya que eso
puede dañar la unidad.
condiciones
operativas
Para un máximo rendimiento, la temperatura del entorno debe
estar entre los +5º y +35º C (+41º - +95º F). Si la temperatura
está fuera de ese margen se pueden producir errores de lectura
en pantalla, recalentamientos o inestabilidad del sistema. Evite
exponer este aparato a la luz del sol directa.
Cuando vaya a instalar esta unidad, asegúrese de colocarla en
un lugar estable y lo más lejos posible de posibles vibraciones.
Incluso aunque esta unidad pueda soportar vibraciones, los
dispositivos de almacenamiento (especialmente discos duros)
con los que la usará no suelen poder. Asegúrese también de no
colocar o usar este aparato muy cerca de unidades que generen
calor como etapas de potencia o proyectores.
formatos y discos
admitidos
uso del control
midi
El CDMP-7000 también puede enviar a un ordenador datos
MIDI de sus botones y controles para controlar con ello los
parámetros y la reproducción de un software de DJ. También
puede dar salida a la reproducción audio del ordenador desde
el CDMP-7000.
Antes de usar el CDMP-7000 como un dispositivo audio,
conecte el CDMP-7000 con un cable USB y deje que su PC/
MAC lo detecte. Ejecute su software DJ y elija el CDMP-7000
como dispositivo de salida en la configuración del software DJ.
Para saber cómo hacer esto, lea el manual de instrucciones del
software.
conexión a un
ordenador
El CDMP-7000 es un dispositivo de tipo “plug and play” que no
requiere ningún software de instalación. Los drivers de control
audio y MIDI del CDMP-7000 son compatible con PC y MAC.
• Para usar el CDMP-7000 con un ordenador Windows,
conecte el CDMP-7000 a su PC después de poner en
marcha el ordenador. El CDMP-7000 configurará los drivers
WDM standard. Elija el CDMP-7000 como su dispositivo
para usarlo como dispositivo audio. También puede
configurar drivers ASIO para usarlos con el CDMP-7000,
como el ASIO4ALL.
El CDMP-7000 reproduce discos (compatible con CD) así como
ficheros musicales contenidos en dispositivos de memoria USB.
Los siguientes formatos de ficheros son admitidos:
• WAV (PCM a 16 bits, frecuencias de muestreo de 8, 11.025,
12, 16, 22.50, 24, 32, 44.1 y 48 kHz)
• MP3 (16 bits, 44.1 kHz, MPEG1 Layer 3)
• AAC (16 bits, 44.1 kHz, stereo, AAC Core, AAC Plus, AAC
Plus v2)
• AIFF (16 bits, 44.1 kHz, stereo)
Los sistemas de ficheros admitidos en pendrives de memoria
incluyen:
• FAT
• FAT32
• HFS+
• NTFS
• Para usar el CDMP-7000 con un ordenador con sistema
operativo MAC, conecte el CDMP-7000 a su MAC después
de poner en marcha el ordenador. Use los drivers audio
CORE standard del sistema y elija el CDMP-7000 como su
dispositivo.
cdmp- 7000 manual • geminidj. com
28
Page 29

vision general del reproductor
vista superior
25
30
11 12 13 14 15
10
9
8
7
6
5
4
3
2
16 17 18 19 20
21
22
23
24
26
27
28
29
controles
1
Encendido/apagado
2
Reproducción/pausa / II
3
Escucha (cue)
4
Búsqueda /
5
Buscar pista | / |
Inversión
6
7
Ajuste jog
8
Entrada/salida de bucle/ajuste/
re-bucle/salida
Memo
9
Escuchas directas
10
Auto-escucha / tiempo
11
Modo texto / on/off táctil
12
BPM
13
14
Bloqueo
15
Pantalla táctil LCD
16
Efectos
Mando giratorio (encoder) /
17
selección / contraste
Atrás
18
Expulsión
19
Selección de fuente
20
Tiempo inicio jog
21
Tiempo parada jog
22
Efecto seco/húmedo
23
Vinyl
24
Modo Slip
25
Rango
26
27
Tempo master
28
Inflexión tonal [+] [-]
Fader de control de tono
29
30
Rueda jog
29
cdmp- 7000 manual • geminidj. com
Page 30

top view
45
44
43
31 31 31
vision general del mixer
Selector del Canal de Entrada
31
Volumen Master
32
33
34
35
36
37
32
VU Meter
33
34
Control del Balance del Master
Conmutador/indicador Cue de Auriculares
35
36
Control de la Mezcla por Auriculares
Control del Volumen de Auriculares
37
Interruptor de Salida de Auriculares
38
Crossfader Start
39
Crossfader Reverse
40
Crossfader
41
42
Ajuste de la Curva del Crossfader
front view
38
39
40
4142
Fader de Canal
43
Ecualizador de Canal de 3 Bandas
44
45
Control de Ganancia de Canal
Control del Volumen de Micrófono
46
47
Ecualizador de Micrófono de 2 Bandas
48
Botón de micrófono Talkover
49
Control de Volumen de Booth
46 49
L O
cdmp- 7000 manual • geminidj. com
47
48
30
Page 31

vision general de las conexiones
rear view
M
AN C D E F G H I
PUESTA EN MARCHA
Conecte el enchufe del CDMP-7000 en el AC IN (A). Pulse
el botón POWER OFF/ON (N) para poner en marcha la
unidad.
ENTRADAS RCA PHONO / LINEA
El CDMP-7000 viene con dos (2) ENTRADAS DE RCA
LINEA/PHONO (K) estéreo convertibles que acepta conexiones RCA estándar y estéreo. Los dos CONMUTADORES PHONO/LINEA (J) te permiten convertir la conexión
de entrada RCA entre una entrada PHONO (tocadiscos)
o una entrada de LINEA (MP3, CD, casete, etc.). Cuando
conmutas a la posición PHONO, debes usar cualquier tocadiscos con un cartucho magnético. Recuerda de conectar la toma de tierra al TORNILLO DE TOMA DE TIERRA
(M) o puede haber zumbidos en el sistema.
ENTRADAS AUXILIARES
El CDMP-7000 viene con dos (2) entradas estéreo auxiliares. AUX1 (I) es una entrada RCA estéreo línea-nivel y
AUX2 (H) es una entrada estéreo de jack 1/8”. Cualquier
aparato línea-nivel (MP3, CD, casete, etc.) pueden ser conectados en el AUX1 y AUX2.
J J LB K
SALIDAS RCA LINEA
El CDMP-7000 posee tres salidas RCA estéreo distintas:
REC, MASTER y BOOTH (C). La salida MASTER conecta
la unidad con el amplificador principal. La salida RECORD
puede ser usada para conectar la mesa de mezclas con la
entrada de grabación de un aparato para grabar audio, lo
que permite la grabación de una mezcla. La salida BOOTH
se puede usa como una fuente de salida para monitores o
reproducción de cabina.
Si se conecta el CDMP-7000 a través de un receptor, la
conexión RCA se puede insertar en las ENTRADAS CD
AUX JACKS en un receptor. Si no hay ENTRADAS CD o
AUX use cualquier entrada de línea (no de phono).
SALIDA XLR BALANCEADA
La sección de SALIDA XLR BALANCEADA (B) tiene salidas
XLR IZQUIERDA y DERECHA para balancear las salidas estéreo.
SALIDA CD1/CD2
Las salidas RCA estéreo balanceadas CD1/CD2 (D) permiten a los dos reproductores multimedia ser alimentados
de manera individual directamente por un mezclador externo, sin pasar por la sección mezclador del CDMP-7000..
ENTRADAS DE MICRÓFONO
El CDMP-7000 viene con dos (2) entradas de micrófono:
una entrada jack 1/4” y una entrada combo XLR / jack 1/4”
. La entrada de micrófono jack 1/4” acepta conexiones balanceadas y no balanceadas. La entrada combo XLR / jack
1/4” (L) acepta conexiones XLR balanceadas o conexiones
de jack 1/4” balanceadas/no balanceadas. El control de
VOLUMEN DE MICROFONO (46) en el panel frontal controla el volumen de los micrófonos conectados.
*NOTA: Se aconseja usar un cable jack de 1/4” balanceado
para menor ruido y una señal más fuerte.
ENTRADAS USB
El CDMP-7000 tiene una ENTRADA USB (G) designada
para recibir audio desde un ordenador (Mac/PC). Conecte
un cable USB (no incluido) desde uno de los puertos USB
de su ordenador a ENTRADA USB (G) del CDMP-7000.
Para utilizar el CDMP-7000 como su reproductor de audio
de su ordenador, seleccione el aparato en la configuración
de audio de su ordenador.
31
SALIDA USB
Conecta el cable USB incluido en la SALIDA USB (F) en el
panel posterior. Conecta el otro extremo del cable USB en
cualquier entrada USB disponible de tu ordenador. Esto
permitirá usar el CDMP-7000 en modo MIDI.
SALIDAS DIGITALE S
Conecta un cable S/PDIF (no incluido) en la SALIDA DIGITAL del CDMP-7000 (E) y en cualquier puerto de ENTRADA DIGITAL de cualquier aparato. Esto enviará la señal de
audio digital a esa entrada. Las posibles aplicaciones incluyen la SALIDA DIGITAL para grabación o para alimentación de un DAW (Digital Audio Workstation).
SALIDAS DE AURICULARES
El CDMP-7000 contiene dos salidas de auriculares: uno
con conector jack de 1/4” y otro con un conector jack de
1/8”. Las SALIDAS DE AURICULARES (O) permiten la preescucha de la música antes de reproducirla a través de las
salidas de master.
cdmp- 7000 manual • geminidj. com
Page 32

pantalla táctil lcd
VINYL
HOLD
CD
USB
SD
MIDI
1
pantallas
BARRA DE AVANCE DE TIEMPO
1
Le muestra la posición activa de la pista.
INDICACIÓN DE TIEMPO
2
Muestra el valor de tiempo activo de la pista.
BPM
3
Muestra el valor BPM activo en el modo BPM
auto y manual BPM o la información de tempo
de la etiqueta ID3.
2
3
4
7
5
6
8
TEMPO
4
Si MASTER TEMPO está en OFF, es mostrado el
TONO en este campo. Si MASTER TEMPO está
en ON, en este campo es mostrado el TEMPO.
VALOR DE TONO/MT
5
Muestra el valor de TONO/TEMPO activo.
10
9
RANGO
6
Muestra el rango de TONO/TEMPO elegido en
ese momento.
BARRA DE PARÁMETRO DE EFECTOS
7
Muestra el valor de parámetro de efecto
INDICACIÓN DE INFORMACIÓN DE PISTA
8
Muestra información de la pista.
BUSCADOR
9
Muestra las pistas y carpetas reproducibles.
FORMA DE ONDA DE PISTA
10
Muestra una representación visual del audio
de la pista cargada. Pulse sobre la onda para
cambiar el zoom. Los valores posibles son: 3.2,
6.5, 12 y 24 segundos.
pantallas de rueda jog
1
3
cdmp- 7000 manual • geminidj. com
VINYL
PANTALLA DE PISTA
1
Simula un giradiscos a una velocidad de 33 1/3
RPM y muestra la posición activa de la pista.
PANTALLA DE PUNTO CUE/SLIP
2
Muestra el punto de escucha o CUE asignado a
2
4
la pista. En el modo SLIP muestra la posición de
reproducción activa (pág. 31).
PANTALLA TÁCTIL DE RUEDA JOG
3
La pantalla táctil de la rueda jog se ilumina
cuando pulse la rueda jog.
4
VINYL
Esta pantalla se ilumina cuando el modo VINYL
esté activado.
32
Page 33

carga de discos y dispositivos de memoria
Una vez que haya conectado todos los cables, encienda
el CDMP-7000 pulsando el botón POWER (1); púlselo una
segunda vez para apagar la unidad.
selección de fuente
El botón SOURCE SELECT (20) le permite elegir la unidad
desde la que reproducirá la música:
CD Pulse el botón fuente CD para reproducir música
desde la unidad CD.
USB Pulse el botón fuente USB para reproducir música
desde una memoria USB.
SD Pulse el botón fuente SD para reproducir música
desde una tarjeta SD/SDHC.
MIDI Pulse el botón fuente MIDI para activar esta
unidad en el modo MIDI bidireccional. En él, todos los
controles (pulsaciones de botón, giros de controles
y potenciómetros) son registrados en la unidad y
transferidos al PC vía MIDI USB. Puede usar esto junto
con un software DJ para controlar los parámetros de
dicho programa. (Para más información, vea pág. 9).
carga/expulsión
unidades usb/sd
de
USB Inserte la memoria USB en la toma USB (E) de la
parte superior del CDMP-7000. Tras cargar la memoria
aparecerá en la pantalla táctil LCD las carpetas y pistas
que contiene.
SD Inserte la tarjeta SD en la ranura de tarjetas SD (F) de
la parte superior del CDMP-7000. Tras cargar la tarjeta
aparecerá en la pantalla táctil LCD las carpetas y pistas
que contiene.
E
F
Para expulsar la memoria USB y la tarjeta SD, cambie
la selección de fuente (20) a otra distinta y extraiga la
memoria USB o la tarjeta SD. Para expulsar la tarjeta SD,
empújela un poco hacia dentro. Cuando salga un poco
hacia fuera, extraígala completamente en vertical.
carga/ expulsión
de discos
La ranura CD-ROM (imagen de abajo) es donde quedará
su CD durante la carga, descarga y reproducción y admite
CD tanto de 12 como de 8 cm.
Pulse el botón EJECT (19) para expulsar el disco de la
ranura CDROM. Aunque pulse este botón, el disco no será
expulsado si está en el modo de reproducción.
*NOTA: Antes de apagar el CDMP-7000, extraiga cualquier
memoria USB o tarjeta SD para asegurarse de que no se
produzca ninguna pérdida de datos.
búsqueda de
pistas/ carpetas
La pantalla de búsqueda le muestra los ficheros y carpetas
reproducibles que hay en un CD, unidad USB o tarjeta SD.
El giro del mando ENCODER(17) le permite
buscar pistas en esta pantalla. También puede
hacer esto con la pantalla táctil en la zona del
buscador.
Para abrir una carpeta, haga que quede en video inverso
y pulse el mando ENCODER (17) para elegirlo. Para cargar
una pista, resáltela para cargarla y vuelva a pulsar de
nuevo el mando ENCODER(17).
33
Para volver a la carpeta anterior, pulse el botón
BACK (18).
cdmp- 7000 manual • geminidj. com
Page 34

controles de reproducción
Una vez que haya cargado una pista, la zona de título de
pista de la pantalla LCD le mostrará la pista cargada.
reproducción/ pausa
Pulse PLAY/PAUSE
reproducción de la pista elegida. Púlselo de nuevo para
activar la pausa y que la pista quede en la posición activa.
• Active la pausa antes de expulsar el disco:
- Antes de expulsar un disco, la unidad tiene que
estar en PAUSA. El disco no será expulsado mientras
la unidad esté en el modo de reproducción.
/ ll (2) para que comience la
búsqueda
reproducción inversa
Pulse REVERSE (6) para hacer que comience la
reproducción en sentido inverso.
inflexión tonal
Pulse PITCH BEND [+] [-] (28) para aumentar
el tono en hasta +100% o disminuirlo hasta
-100% con respecto al valor activo. Deje de pulsar los
botones para volver al valor original.
ajuste del tono/
tempo
Mueva el fader PITCH CONTROL (29) para
acelerar el tempo/subir el tono si lo sube hacia
arriba [+] o reducirlo/bajarlo cuando lo mueva
hacia abajo [-].
El valor de TONO/TEMPO activo aparecerá en la
pantalla táctil LCD.
Pulse SEARCH / (4) para hacer una búsqueda
en la pista en la dirección que quiera (delante/atrás).
Mantenga pulsado este botón para hacer un avance
rápido o rebobinado.
búsqueda de pista
Pulse TRACK SEARCH l (5) para pasar al punto inicial
de la pista siguiente y TRACK SEARCH l (5) para
volver al punto inicial de la pista activa. El pulsar dos
veces consecutivas este botón le hará volver al punto
inicial de la pista anterior.
• Búsqueda en distintas carpetas:
- Si los ficheros están organizados en carpetas, solo
podrá buscar las pistas de la carpeta activa.
• Función Autocue:
- Cuando esta función esté activa, la unidad
quedará en pausa al principio de cada pista.
Pulse el botón RANGE (26) para ajustar el
rango de control de este fader entre +/- 4, 8,
16, 24, 50 y 100 %
tempo master
Los botones MASTER TEMPO (27) le permiten
cambiar el tempo sin modificar el tono original.
El modo de ajuste activo, PITCH o TEMPO, será
mostrado en la pantalla táctil LCD.
• RANGE en MASTER TEMPO:
- En el modo MASTER TEMPO, el rango disponible
es +/- 4, 8, 16, 24, 50 y 100%
• Calidad del sonido:
- El sonido es procesado digitalmente en el modo
MASTER TEMPO, por lo que no se produce pérdida
de calidad de sonido aunque realice un ajuste
drástico del tempo.
cdmp- 7000 manual • geminidj. com
34
Page 35

controles de reproducción
bpm
Mantenga pulsado el botón BPM (13) para cambiar entre
estos modos: BPM ID3 / AUTO BPM / MANUAL BPM.
ID3 Cuando ajuste el modo BPM a ID3, aparecerá la
información BPM del ID3.
AUTO BPM Cuando ajuste el modo BPM a AUTO BPM,
los tiempos musicales por minuto serán calculados de
forma automática y la información correspondiente será
mostrada en la LCD en el campo BPM.
MANUAL BPM En este caso, use el botón BPM (13)
para ajustar el tempo de la reproducción pulsándolo
rítmicamente al tempo que quiera.
NOTA Si hay un valor BPM presente en la etiqueta ID3
de un fichero, dicho valor será cargado y visualizado.
sincronización bpm
La función BPM LOCK permite al usuario ajustar el
valor BPM que quiera girando y pulsando el mando.
Una vez que haya activado este modo, el valor de tono/
tempo master será ajustado automáticamente para que
coincida con el BPM elegido.
controles cue o de escucha
AJUSTE DEL PUNTO CUE
Con la reproducción en marcha, pulse PLAY/
PAUSE / ll (2) para activar la pausa. Con la
pista en pausa, pulse CUE (3) para configurar el
punto cue en la posición activa. El piloto CUE
se iluminará cuando el punto CUE haya sido configurado
así como la marca en la pantalla de la rueda jog.
RECOLOCACIÓ N DEL PUNTO CUE
Una vez que haya programado el punto, pulse PLAY/
PAUSE / ll (2) para que la pista quede en pausa en el
punto CUE. Pulse SEARCH / (4) o gire la rueda
jog para recolocar la posición cue. Pulse CUE (3) para
fijar la posición del punto cue en la posición activa.
RETO RNO AL PUNTO C UE
Con la reproducción en marcha y tras haber programado
el punto cue, el pulsar CUE (3) hará que la unidad active
el modo de pausa (el botón PLAY/PAUSE parpadea)
en el punto cue programado (piloto CUE encendido).
Mantenga pulsado el botón CUE para activar el ensayo
que le permitirá iniciar la reproducción desde el punto
CUE programado. Deje de pulsar el punto CUE para que
el CD vuelva al punto CUE prefijado.
Para activar esta función de sincronización, ajuste el
BPM que quiera y pulse el botón LOCK (14).
Para desactivar esta sincronización, pulse de nuevo el
botón LOCK (14).
NOTA El rango de BPM que puede elegir queda limitado
a esta gama de valores: 80 – 196 BPM.
ESCUCHA O CUE AUTOMÁTICA
La función AUTO CUE (11) ajusta el punto cue
justo antes de que comience el sonido, para de
esta manera saltar directamente la sección sin
sonido de las pistas. Pulse AUTO CUE (11) para activar
esta función de escucha automática.
35
cdmp- 7000 manual • geminidj. com
Page 36

controles de reproducción
controles cue continuación controles de bucle
CONF IGURACIÓN DE C U E S DIRECTOS
Durante la reproducción o en el modo de pausa,
pulse HOT CUE 1, 2 ó 3 (10) en el punto de la pista
en el que quiera fijar ese HOT CUE.
Una vez pulsado, la escucha directa programada (1,
2 ó 3) debería iluminarse.
Para borrar un HOT CUE, pulse MEMO (9) para
permitir la eliminación y seleccione el Hot Cue para
su borrado.
REPRODUCCIÓN DE ESCU C HAS
DIRECTAS
Antes de ejecutar una de estas escuchas directas,
asegúrese de que MEMO (9) no esté activo.
Durante la reproducción o en el modo de pausa, pulse
HOT CUE 1, 2 ó 3 (10) tras lo que comenzará la reproducción de forma instantánea desde el punto registrado
en ese HOT CUE.
Imagen LOOP IN / LOOP OUT/ADJUST / RELOOP/EXIT (8)
AJUSTE DE UN BUCLE
Durante la reproducción, pulse LOOP IN (8) en la
posición que quiera que sea el comienzo del bucle
(punto de inicio del bucle).
Pulse LOOP OUT / ADJUST (8) en el punto que
quiera que sea el final del bucle (posición de
salida de bucle). El punto de salida de bucle quedará
registrado y comenzará la reproducción del bucle desde
el punto inicial.
EDICIÓN DE UN BUC L E
Para editar el bucle una vez ajustado, pulse el
botón OUT/ADJUST (8). El botón LOOP IN (8)
dejará de parpadear.
• Puede ajustar la longitud del bucle girando la rueda
jog (30) hacia la derecha si quiere alargar el bucle o a
la izquierda para acortarlo.
CANCELACIÓ N DE UN BUCLE
Con un bucle activo, pulse RELOOP/EXIT (8) para
desactivarlo. La reproducción continuará más allá
del punto de salida de bucle.
RETO RNO A UN BUCLE
Tras cancelar un bucle ajustado, pulse RELOOP/
EXIT (8) durante la reproducción para volver
al último bucle creado. La reproducción en bucle
comenzará desde el punto de inicio del bucle.
cdmp- 7000 manual • geminidj. com
36
Page 37

controles de efectos
sección de efectos
El CDMP-7000 le ofrece seis efectos internos: FLTR,
FLANGER, ECHO, WAH, TRANCE y BUBBLE.
FLTR Este efecto es un filtro pasabandas que eliminará
las frecuencias agudas o graves dependiendo de la
posición de la BARRA DE PARÁMETRO DE EFECTOS.
En la posición central no habrá efecto sobre el sonido.
El ajuste de este efecto hacia la izquierda irá eliminando
gradualmente las frecuencias agudas hasta que solo
queden los súper graves, mientras que el ajuste hacia la
derecha eliminará las bajas frecuencias hasta que solo
queden las frecuencias más altas (agudas).
FLANGER Esto es un efecto audio basado en el
tiempo que se produce cuando dos señales idénticas
son mezcladas juntas, pero con un retardo pequeño y
gradualmente variable de una sobre la otra. La variación
de este retardo produce un barrido hacia arriba y
abajo en el espectro de frecuencias. El deslizamiento
de la BARRA DE PARÁMETRO DE EFECTOS hacia la
izquierda produce un flanger más lento, mientras que el
movimiento hacia la derecha un efecto más rápido.
AC T I VACIÓN DEL E F ECTO
Durante la reproducción, la sección
EFFECT (16) le permite activar/desactivar
los efectos.
Cuando el modo VINYL (24) esté desactivado,
podrá usar el grupo de efectos FLTR / FLANGER
/ ECHO. Cuando el modo VINYL (24) esté activo,
podrá usar los efectos WAH / TRANCE / BUBBLE.
AJUSTE DE LOS EFECTOS
El control EFFECTS DRY/WET (23) ajusta la
mezcla entre señal sin efectos (seca) y con
efectos (húmeda). Gírelo a la derecha para
aumentar la cantidad de señal húmeda (con efectos)
o a la izquierda para aumentar la cantidad de señal
sin efectos (seca).
La BARRA DE PARÁMETRO DE EFECTOS de la
LCD le muestra el valor del parámetro de efectos
del grupo de efectos FLTR / FLANGER / ECHO. Los
efectos WAH / TRANCE / BUBBLE no disponen de
parámetros ajustables.
ECHO Este efecto repite la señal audio varias veces,
cada vez más débilmente. El ajuste de la BARRA DE
PARÁMETRO DE EFECTOS hacia la izquierda acorta el
tiempo entre las repeticiones y reduce el volumen de
las repeticiones, mientras que el ajuste hacia la derecha
hará que el tiempo entre las repeticiones sea mayor y
aumentará el volumen de las repeticiones.
WAH Esto es un efecto autowah que usa un filtro
pasabajos de frecuencia de corte variable que da lugar
a un pico resonante justo en su frecuencia de supresión
pasabajos para simular la voz humana al producir un
sonido “waaaah” o su inverso tonal, “aaaooow”.
BUBBLE Este es un efecto prefijado que combina los
efectos WAH y ECHO.
TRANCE Este efecto usa una modulación de la amplitud
para cortar el volumen del audio arriba o abajo.
Para ajustar el parámetro del grupo de efectos FLTR /
FLANGER / ECHO, toque la BARRA DE PARÁMETRO
DE EFECTOS de la pantalla táctil y ajuste la posición
del parámetro al punto que quiera. También puede
ajustar el parámetro del efecto usando la rueda jog
(30). Gírela a la derecha para aumentar el valor del
parámetro o a la izquierda para reducirlo.
NOTA: Cuando haya elegido un efecto, su nombre
debería aparece en la pantalla durante 5 segundos.
MODO HOLD O DE BLOQUEO
El pulsar HOLD activará o desactivará este modo
para el efecto. Esto seguirá aplicando el cambio
del parámetro de efecto a la música.
Cuando tenga un efecto activo, pero el modo HOLD
no lo esté, podrá cambiar el parámetro del efecto
y escuchar el cambio al girar la rueda jog (30) o
mover el dedo sobre la BARRA DE PARÁMETRO DE
EFECTOS de la pantalla táctil LCD. Cuando deje de
girar la rueda jog (30) el efecto quedará desactivado.
Para mantener el efecto activo, active el modo HOLD.
37
Puede seguir cambiando el parámetro del efecto en
este modo HOLD, dado que el efecto seguirá activo
con su nuevo valor de parámetro.
cdmp- 7000 manual • geminidj. com
Page 38

controles de rueda jog
controles de rueda jog
AJUSTE DE RUEDA JOG
El mando giratorio JOG ADJUST (7) le permite el
ajuste del tacto de la rueda jog. Para un tacto más
duro, gire el control JOG ADJUST (7) a la izquierda.
Para un tacto más suave, gírelo a la derecha.
MODO VINYL
Pulse el botón VINYL (24) para activar ese modo
y que se ilumine el piloto Vinyl en la pantalla de la
rueda jog.
La activación del modo Vinyl le permite conseguir
efectos de tipo scratch cuando pulse y gire la rueda jog
(30). Cuando el modo VINYL esté desactivado, la rueda
jog (30) quedará en el modo SEARCH y le permitirá
realizar búsquedas dentro de la pista.
El botón VINYL activa también los efectos WAH /
TRANCE / BUBBLE en lugar de los FLTR / FLANGER /
ECHO. En ese caso el giro de la rueda jog producirá un
sonido scratch y cambiará los parámetros de los efectos.
TIEMPO INICIO / TIEMP O PARADA
La elección del valor START TIME (21) de la
configuración del modo jog ajusta la velocidad
a la que volverá la reproducción a ser normal
una vez que haya dejado de pulsar sobre la rueda jog
y cuando la unidad vuelva a la reproducción desde
el modo de pausa. Este tiempo de inicio aumentará
cuando gire el control a la derecha y disminuirá si lo gira
a la izquierda.
El valor del modo jog STOP TIME (22) ajusta la velocidad
de ralentización de la reproducción cuando pulse sobre
la rueda jog y cuando active la pausa. Este tiempo de
parada aumenta cuando gire el control a la derecha y
disminuye cuando lo gire a la izquierda.
MODO SLIP
Cuando esté activado SLIP (25), la reproducción
normal continuará de forma inaudible por debajo
de los efectos SCRATCH, LOOP y REVERSE. Cuando
salga del modo SCRATCH, LOOP o REVERSE será
recuperada la reproducción normal, tal como será
indicado en la pantalla de la rueda jog (30).
SLIP CON SCRATCH
Para usar el modo SLIP con scratching, active el modo
VINYL pulsando el botón VINYL (24) y el modo SLIP
pulsando el botón SLIP (25).
El uso de la rueda jog creará ahora efectos scratch
pero la reproducción normal seguirá por debajo de ello
de forma inaudible. La posición de reproducción es
mostrada en la pantalla de la rueda jog.
Una vez que deje de pulsar la rueda jog, la reproducción
normal continuará desde la posición activa.
NOTA: Al usar el modo SLIP con scratch no podrá
realizar operaciones de SLIP inverso.
SLIP CON BUCLE
Para usar el modo SLIP con la reproducción en bucle,
active el modo SLIP pulsando el botón SLIP (25).
Configure un bucle (pág. 29) con los controles IN/OUT
y el bucle comenzará. El botón SLIP (25) empezará a
parpadear para indicarle que el modo SLIP está activo y
la posición de reproducción aparecerá en la pantalla de
la rueda jog.
Cuando salga del bucle, la reproducción normal
continuará desde la posición activa.
cdmp- 7000 manual • geminidj. com
SLIP CON INVERSIÓN
Para usar SLIP con la reproducción inversa, active el
modo SLIP pulsando el botón SLIP (25).
Pulse REVERSE (6) para activar la reproducción
inversa. El botón SLIP (25) empezará a parpadear para
indicarle que el modo SLIP está activo y la posición de
reproducción aparecerá en la pantalla de la rueda jog.
Pulse REVERSE (6) de nuevo para salir de la
reproducción al revés. Tras eso, la reproducción normal
continuará desde la posición activa.
38
Page 39

controles de pantalla
opciones de pantalla
AJUSTE DEL CONTRASTE
Mantenga pulsado TEXT MODE / TOUCH ON/OFF (12)
para activar/desactivar la funcionalidad de la pantalla
Mantenga pulsado el ENCODER (17) y gire
táctil.
el mando giratorio para ajustar el contraste
de la pantalla de 240x320. Para aumentar el
contraste, gire el mando a la derecha y para disminuirlo
INDICACIÓ N DE TIEMPO RESTA NTE/
TRANSCURRIDO DE PISTA
a la izquierda.
Mantenga pulsado el botón TIME/AUTOCUE (11)
MODO DE INDICACIÓ N DE TEXTO
para cambiar el modo de indicación de tiempo de
pista entre el tiempo transcurrido y el tiempo restante
Pulse TEXT MODE / TOUCH ON/OFF (12)
de la misma.
para cambiar la información visualizada en la
PANTALLA TÁCTIL LCD (15) entre la información de
título/artista/álbum/género de los ficheros.
funciones de la pantalla táctil lcd
La pantalla LCD del CDMP-7000 también tiene
4
funciones como pantalla táctil. Puede usar las siguientes
funciones con solo pulsar en esta LCD (15)
TEMPO/TONO Realiza la misma función que el botón
MASTER TEMPO (pág. 27). Cuando MASTER TEMPO
esté en OFF, aparecerá PITCH en este campo. Cuando
esté en ON, aparecerá TEMPO.
1
2
5
3
4
9
1
BARRA DE TIEMPO Toque en esta barra para pasar
6
7
8
10
directamente a un punto determinado de la pista.
2
TIEMPO Le permite cambiar entre los modos de
indicación de tiempo transcurrido y tiempo restante.
BPM Indica el valor BPM activo en el modo BPM auto y
3
manual o muestra la información BPM de la etiqueta ID3
cuando el modo BPM esté ajustado a ID3.
5
RANGO Tiene la misma función que el botón RANGE
(pág. 10).
6
VALOR TONO/MT Le permite activar o desactivar
PITCH/MT (pág. 27). De forma adicional, le muestra el
valor PITCH/MT.
TITULO DE PISTA Le permite elegir la indicación de
7
título/artista/álbum/género. Toque en esta zona para ir
cambiando entre los distintos modos.
BARRA DE PARÁMETROS DE EFECTOS Le permite ajustar
8
valores de efectos tocando en la posición deseada.
FORMA DE ONDA DE PISTA Muestra una
9
representación visual del audio de la pista cargado.
Pulse sobre esta onda para realizar un zoom. Los valores
posibles de zoom son: 3.2, 6.5, 12 y 25 segundos.
SELECCIÓN DE PISTA Le permite elegir una pista o
10
entrar en una carpeta. Toque en esta zona para acceder
a una carpeta.
39
cdmp- 7000 manual • geminidj. com
Page 40

controles midi
controles midi
MODO MIDI
El CDMP-7000 le ofrece el MIDI que le permite codificar los
botones y mandos giratorios del CDMP-7000 al formato MIDI. Si
esta unidad está conectada a un ordenador a través de un cable
USB con un software DJ compatible MIDI, podrá usar este software
DJ desde la unidad y podrá reproducir el audio del ordenador
desde las salidas del CDMP-7000.
Puede que no sea posible usar algunos botones para controlar
su programa DJ. Para ver un listado de todos los mensajes MIDI
admitidos consulte la tabla de mensajes de unidad MIDI.
NOTA Para saber cómo configurar y usar su programa DJ
concreto, consulte el manual de instrucciones del mismo.
MODO HID
Además del MIDI, el CDMP-7000 usa también el protocolo HID que
permite mayores velocidades y transmisión de datos.
Si su programa admite dispositivos HID, desactive los dispositivos
MIDI en su software y realice una búsqueda de dispositivos HID.
Esto debería encontrar el CDMP-7000 y permitirle usarlo como un
dispositivo HID.
tabla de mensajes de unidad midi
CONF IGURACIÓN DEL MODO MIDI
Conecte el cable USB entre el puerto USB del panel trasero de
esta unidad (D) y uno del ordenador. Pulse la selección de fuente
MIDI en el CDMP-7000 (20). Esto terminará la reproducción en
las fuentes CD/USB/SD.
El CDMP-7000 le mostrará entonces en la pantalla táctil una
ventana de configuración audio de la velocidad de bits audio y
frecuencia de muestreo con las siguientes opciones:
• 24 bits/192 kHz
• 24 bits/96 kHz
• 24 bits/48 kHz
• 16 bits/44.1 kHz
Mantenga pulsado el botón de selección de fuente MIDI para
ir pasando entre las distintas opciones. Pulse MIDI para elegir
una de las opciones concreta y pulse el mando ENCODER (14)
para aplicar dichos ajustes. Pulse BACK (15) para salir de esa
configuración.
NOTA Las frecuencias de muestreo y valor de bits superiores
darán lugar a una mayor latencia, lo que puede incidir
negativamente en el rendimiento.
Tras configurar esto en el CDMP-7000, ponga en marcha el
software DJ:
• Elija el CDMP-7000 como su dispositivo MIDI*
• Elija el CDMP-7000 como su dispositivo AUDIO*
*Consulte el manual de instrucciones del software de DJ
cdmp- 7000 manual • geminidj. com
40
Page 41

controles midi
tabla de mensajes de unidad midi tabla de mensajes de unidad hid
Parámetro de
controlador
Cue Cue 1 0 127
Play/Pause Ply/Pause 2 0 127
+ (inflex. tonal) Pitch + 3 0 127
- (inflex. tonal) Pitch - 4 0 127
HotCue 1 Cue 1 5 0 127
HotCue 2 Cue 2 6 0 127
HotCue 3 Cue 3 7 0 127
Memo Memo 8 0 127
Track Search << Track reverse 9 0 127
Track Seach >> Track forward 10 0 127
Browse Left Up in tracklist 11 0 127
Browse Right Down in tracklist 12 0 127
Master Tempo Master Tempo 13 0 127
Vinyl Scratch 14 0 127
Select Load Track 15 0 127
Loop In Loop In 16 0 127
Loop Out/Adjust Loop Out 17 0 127
Reloop/Exit Reloop 18 0 127
BPM BPM 19 0 127
Effect1 (wah) Effect1 (select) 20 0 127
Effect2 (flanger) Effect2 (select) 21 0 127
Effect3 (echo) Effect3 (select) 22 0 127
Back Folder Out 23 0 127
Wheel Touch Wheel Touch 24 0 127
Effect Param Effect Param 25 0 127
Time Elapsed/Remain 26 0 127
Autocue Autocue 27 0 127
LOCK LOCK 28 0 127
Range Range 29 0 127
Reverse Reverse 30 0 127
Slip Slip 31 0 127
Jogwheel Jogwheel 32 0, 63 63, 128
Pitch Slider PitchSlider 33 0 127
Track Skip << Prev. track 34 0 127
Track Skip >> Next track 35 0 127
Hold Effect On/Odd 36 0 127
Eject Deck Select 37 0 127
Effect4 (wah) Effect4 (select) 38 0 127
Effect5 (trance) Effect5 (select) 39 0 127
Effect6 (bubble) Effect6 (select) 40 0 127
Dry/Wet Dry/Wet Effect 41 0 127
Start time Parameter 42 0 127
Stop time Parameter 43 0 127
Pitch Slider (14-bit) Pitch Slider 44 0 127
Parámetro de
software
Número
envío
Valor
mín.
Valor
máx.
Parámetro de
controlador
Cue Cue 1 0 1- on, 0 - off
Play/Pause Ply/Pause 2 0 1- on, 0 - off
+ (inflex. tonal) Pitch + 3 0 1- on, 0 - off
- (inflex. tonal) Pitch - 4 0 1- on, 0 - off
HotCue 1 Cue 1 5 0 1- on, 0 - off
HotCue 2 Cue 2 6 0 1- on, 0 - off
HotCue 3 Cue 3 7 0 1- on, 0 - off
Memo Memo 8 1 1- on, 0 - off
Track Search << Track reverse 9 1 1- on, 0 - off
Track Seach >> Track forward 10 1 1- on, 0 - off
Browse Left Up in tracklist 11 1 1- on, 0 - off
Browse Right Down in tracklist 12 1 1- on, 0 - off
Master Tempo Master Tempo 13 1 1- on, 0 - off
Vinyl Scratch 14 1 1- on, 0 - off
Select Load Track 15 1 1- on, 0 - off
Loop In Loop In 16 2 1- on, 0 - off
Loop Out/Adjust Loop Out 17 2 1- on, 0 - off
Reloop/Exit Reloop 18 2 1- on, 0 - off
BPM BPM 19 2 1- on, 0 - off
Effect1 (wah) Effect1 (select) 20 2 1- on, 0 - off
Effect2 (flanger) Effect2 (select) 21 2 1- on, 0 - off
Effect3 (echo) Effect3 (select) 22 2 1- on, 0 - off
Back Folder Out 23 2 1- on, 0 - off
Wheel Touch Wheel Touch 24 3 1- on, 0 - off
Time Elapsed/Remain 26 3 1- on, 0 - off
Autocue Autocue 27 3 1- on, 0 - off
LOCK LOCK 28 3 1- on, 0 - off
Range Range 29 3 1- on, 0 - off
Reverse Reverse 30 3 1- on, 0 - off
Slip Slip 31 3 1- on, 0 - off
Track Skip << Prev. track 34 4 1- on, 0 - off
Track Skip >> Next track 35 4 1- on, 0 - off
Hold Effect On/Odd 36 4 1- on, 0 - off
Eject Deck Select 37 4 1- on, 0 - off
Effect4 (wah) Effect4 (select) 38 4 1- on, 0 - off
Effect5 (trance) Effect5 (select) 39 4 1- on, 0 - off
Effect6 (bubble) Effect6 (select) 40 5 1- on, 0 - off
Jogwheel Jogwheel 64-71 8 Min=0, Max=180
Effect Parameter Effect Parameter 72-79 9 Min=0, Max=255
Dry/Wet Dry/Wet Effect 80-87 10 Min=0, Max=255
Start time Parameter 88-95 11 Min=0, Max=255
Stop time Parameter 96-103 12 Min=0, Max=255
Pitch Slider Pitch Slider 104-117 13, 14 Min=0, Max=800
Parámetro de
software
Bit Byte Valor
41
cdmp- 7000 manual • geminidj. com
Page 42

controles mixer
controles mixer
SELECCIÓN DEL CANAL DE ENTRADA
El CDMP-7000 tiene tres canales de mezclas: CH1, CH2,
CH3. Cada canal tiene tres entradas que pueden ser
seleccionadas a través del BOTON DE SELECCIÓN DEL
CANAL DE ENTRADA (31) situado en la parte superior
de cada canal.
• CH1 se puede alternar para usar la ENTRADA USB,
AUX1 ó AUX2.
• CH2 se alterna entre la platina izquierda del CDMP7000, modo MIDI para audio de ordenador y la
entrada LN1/PH1.
• CH3 alterna entre la platina derecha del CDMP7000, modo MIDI para audio de ordenador y la
entrada LN2/PH2
CONTRO LES DE CANAL
Cada canal del CDMP-7000 tiene un CONTROL DE GANANCIA rotatorio (45), un ECUALIZADOR DE 3 BANDAS (44) y un VOLUMEN FADER (43) para hacer los
ajustes tonales y de volumen para cada canal.
El CONTROL DE GANANCIA (45) ajusta la ganancia de
la señal entrante en cada canal.
El ECUALIZADOR DE 3 BANDAS (44) ajusta el tono de
la señal entrante en cada canal a través de 3 bandas:
GRAVES, MEDIAS y AGUDAS.
• Usar el control HIGH para ajustar las frecuencias agudas.
• Usar el control MID para ajustar las frecuencias medias.
• Usar el control LOW para ajustar las frecuencias graves.
El CANAL DE VOLUMEN FADERS (43) son faders de
60mm que permiten ajustar el volumen del sonido de
cada canal (ajustable desde -∞ a 0 dB).
SALIDA BOOTH
El CDMP-7000 tiene un control de VOLUMEN BOOTH
(49) que ajusta el nivel de SALIDA BOOTH (C). Esto
puede ser usado para diferentes propósitos incluyendo
la alimentación de un conjunto de altavoces para monitorización o para enviar la señal a diferentes áreas.
control de auriculares
ASSIGNACIÓN DE CUE DE AURICULARES
Cada canal en el CDMP-7000 tiene un CONMUTADOR/
INDICADOR CUE (35) permitiendo la pre-escucha de
la mezcla en los auriculares con cualquier combinación
de canales, incluido la salida master. Presionando el
CONMUTADOR/INDICADOR CUE (35), este canal será
asignado a la pre-escucha de mezcla y el indicador de
luz LED se iluminará.
CONTROL DE MEZCLA DE AURICULARES
El CONTROL DE MEZCLA DE AURICULARES (36)
controla la mezcla de la salida de los auriculares entre la
mezcla CUE y la mezcla PGM (salida master).
El CONTROL DE VOLUMEN DE AURICULARES (37)
controla el volumen de la señal de los auriculares.
El BOTON DE SALIDA DE AURICULARES (38) permite
alternar entre la mezcla estéreo de la combinación CUE/
PGM o una señal mono, que pondrá la mezcla CUE en el
canal IZQUIERDO de salida de los auriculares y la mezcla
PGM en el canal DERECHO de la salida de los auriculares.
SALIDA MASTER
El CDMP-7000 tiene un control de VOLUMEN MASTER
(32) que ajusta la salida del total de los 3 canales.
El VU METER (33) muestra los niveles izquierda y derecha de salida de la SALIDA MASTER.
*NOTA: Se debe evitar pasar de 0dB (en los indicadores rojos) la señal se distorsionará y puede dañar otros
equipos.
El CONTROL DE BALANCE MASTER (34) ajusta el canal
L/R panorámico en la salida master.
cdmp- 7000 manual • geminidj. com
42
Page 43

controles mixer
controles crossfader
CROSS FADER
El CROSSFADER (41) permite mezclar y cortar desde
el CANAL 2 al CANAL 3 . El CROSSFADER (41) en el
CDMP-7000 es desmontable y fácilmente reemplazable
en caso de necesidad.
CONTRO LES CROSS FADER
El CROSSFADER (41) tiene tres ajustes de control:
CROSSFADER START (39), CROSSFADER REVERSE
(40) AJUSTE DE CURVA DEL CROSSFADER (42).
Cuando está activa el CROSSFADER START (39) se permite la reproducción simplemente moviendo el CROSSFADER (41) de un lado al otro. Moviendo el crossfader
en la dirección de la platina marcada empezará a reproducir esa platina. Cuando el crossfader se mueve en
la dirección opuesta a la del disco reproducido en ese
momento, la unidad dejará de reproducir esa pletina.
Cuando está activado el CROSSFADER REVERSE (40)
invierte el crossfader así el lado izquierdo del crossfader
empieza en el canal 3 y el lado derecho de crossfader
empieza en el canal 2.
El AJUSTE DE CURVA DEL CROSSFADER (42) permite
dos tipos de pendientes de crossfader diferentes de
entrada/corte de pistas: gradual y abrupto.
controles de microfono
CONTRO LES DE MICROFONO
El CDMP-7000 tiene dos entradas de micrófono (frontal
y panel trasero) que son controladas vía el CONTROL
VOLUMEN MICRÓFONO (46).
El EQUALIZADOR DE 2-BANDAS DEL MICROFONO
(47) permite los ajustes tonales del la señal de micro a
través de las bandas GRAVES y AGUDAS.
El BOTON MIC TALKOVER de 3 posiciones (48) cambia
la señal de micrófono ON o OFF así como permite el
ajuste del talkover, lo que atenúa la mezcla PGM para
que la señal de micrófono se pueda escuchar claramente.
=
43
cdmp- 7000 manual • geminidj. com
Page 44

solución de problemas
de la reproduccion
ERRORES DE CD
- Si un disco no se reproduce, compruebe que ha
cargado correctamente el disco (con la etiqueta hacia
arriba). Compruebe también que no esté excesivamente
sucio o que tenga rayas, etc.
- Si un disco contiene algún fichero en un formato
no compatible causando un error en la reproducción,
mantenga pulsado el botón EJECT (19) durante 4
segundos. La unidad expulsará el disco y se reiniciará.
RES O LUCIÓ N DE PRO BLEMAS
ERRORES DE TARJETAS SD
- Si esta unidad no lee su tarjeta de memoria
SD, compruebe que la ha insertado completa y
correctamente.
- Si aparece el mensaje ”Media err. Please Check Media
Format and Try Again”, eso implicará que su tarjeta de
memoria SD ha sido formateada incorrectamente.
ERRORES MIDI
- Si el disco gira pero no suena, compruebe los cables
de conexión y si todo está correcto, compruebe su
amplificador o receptor.
- Si se producen saltos, compruebe que el disco no
esté sucio o rayado. Si no es así, no piense que el
reproductor está averiado. Muchos CD son grabados
con especificaciones distintas a las standard y saltan
en casi todos los reproductores de CD. Antes de enviar
esta unidad para su reparación, pruebe a reproducir
ese mismo CD en otra unidad para asegurarse de que
funcione.
ERRORES DE DISPO S ITIVO S DE
MEMORIA USB
Algunos dispositivos USB puede que no funcionen
correctamente con el CDMP-7000. Gemini no acepta
ninguna responsabilidad por las posibles pérdidas de
datos que se puedan producir. Para asegurarse de
que no se produzca una pérdida de datos irreparable,
asegúrese de hacer una copia de seguridad de los
mismos antes de conectar el dispositivo USB a esta
unidad.
- No puede usar hubs USB con el CDMP-7000.
- Si el ordenador no reconoce este dispositivo, pruebe a
apagar la unidad y reiniciar el ordenador.
- Si en el software DJ no aparece esta unidad, asegúrese
de que esté usando la última versión descargándose las
actualizaciones necesarias de este software. Si el mapa
del CDMP-7000 no aparece en el listado de su software
DJ, vaya a la web geminidj.com en busca de posibles
descargas y soporte técnico.
- Si esta unidad no lee un dispositivo de memoria
USB, compruebe que ha insertado completamente ese
dispositivo de memoria.
- Si aparece el mensaje “Too many devices” eso será
debido a que está usando un hub USB. El CDMP-7000
no admite hubs USB. Desconecte ese hub y conecte
el dispositivo de memoria USB directamente al CDMP-
7000.
- Si aparece el mensaje ”Media err. Please Check Media
Format and Try Again”, eso implicará que su dispositivo
de memoria USB ha sido formateado incorrectamente.
cdmp- 7000 manual • geminidj. com
44
Page 45

RES O LUCIÓ N DE PRO BLEMAS
resolución de problemas
del
mixer
NIVEL BAJO/NO SALIDA
Si el CDMP-7000 no está enviado una señal fuerte o no
envía señal, comprueba las siguientes razones:
- El selector de entrada no está bien seleccionado.
- Las conexiones en el panel trasero no están bien
seleccionadas.
- Cable(s) erróneo, cables insertados incorrectamente o
conexión perdida.
- Cables jacks o enchufes están sucios, hacen un mal
contacto.
SALIDA DISTORSIONA DA
Si el CDMP-7000 está enviando una señal distorsionada,
comprueba las siguientes posibles razones:
- El nivel de salida Master está demasiado alto.
- El nivel de entrada (control de ganancia) está
demasiado alto.
ERROR EN LA SALIDA DIGITAL
Si la salida digital del CDMP-7000 no funciona,
comprueba las siguientes posibles razones:
- La frecuencia de muestreo de la salida digital del
CDMP-7000 no coincide con las especificaciones del
dispositivo conectado.
- La salida digital ha sido conectada a una entrada
analógica.
- El cable usado para conectar la salida digital no es un
cable S/PDIF óptico.
45
cdmp- 7000 manual • geminidj. com
Page 46

especificaciones
GENERAL
Tipo ...............................Reproductor CD/USB/SD con MIDI y HID
Tipo de salida USB .........................................................................Tipo B
Tipo de disco ................ Compact disc standard (12 cm & 8 cm)
Fuente de alimentación..........................CA 100/240 V, 60/50 Hz
Consumo ................................................................................................10 W
Dimensiones ............................................... 13 1/8 x 12 x 4.5 pulgadas
(333 3/8 x 304 x 114.3 mm)
Peso .................................................................................... 7.2 lbs. (3.3 kg)
AUDIO ANALÓGICO
Cuantización ..............................1 bit lineal/canal, láser de 3 haces
Sobremuestreo .........................................................................................8X
Respuesta en frecuencia:
LINEA ..................................................................... 20 Hz to 20 kHz
PHONO ...............................20 Hz to 20 kHz (RIAA +/-0.5dB)
MIC .......................................................................... 20 Hz to 20 kHz
Relación señal/ruido (salida):
LINEA ......................................................................................... >80dB
PHONO ...................................................................................... >70dB
MIC ............................................................................................... >70dB
THD+N
LINEA ......................................................................................... <0.01%
PHONO PHONO…...................................................................<0.05%
MIC .................................................................................................. <0.1%
Entrada estándar de nivel/Impedancia de entrada:
AUX..................................................................................... 0dBV/10kΩ
PHONO/LINEA............................ -40dBV/47kΩ, 0dBu/1 47kΩ
MIC............................................................-50dBV/>1kΩ (balanced)
Salida estándar de nivel/Impedancia de Carga Mínima:
MASTER (Balanceada)............................................... +6 dBv/1kΩ
MASTER (No balanceada)........................................... 0dBv/1kΩ
BOOTH ..................................................................................0dBv/1kΩ
REC ..........................................................................................0dBv/1kΩ
PHONOS .............................................. 200mW/200Ω THD 0.3%
E SPECIF ICACIONES TÉCNICAS
AUDIO DIGITAL
Tipo de salida ................................................ Digital coaxial (S/PDIF)
Formato de salida ........................................................44.1 kHz, 16 bits
AUDIO USB
Profundidad de bits ................................................................24, 16 bits
Frecuencia de muestreo .................................. 192, 96, 48, 44.1 kHz
DE C ARA A FUTURAS MEJORAS, ESTAS
ESPECIFICACIONES TÉCNICAS Y E L DISE ÑO EXTER IOR
ESTÁN SUJETOS A CAM BIOS SIN PRE VIO AVI SO.
cdmp- 7000 manual • geminidj. com
46
Page 47

français
MANUEL D’ INSTRUCTIONS
Page 48

cdmp- 7000 manual • geminidj. com
48
Page 49

introduction
Merci d’avoir choisi le Gemini CDMP-7000. Nous savons que les produits Gemini vous simplifieront la vie
grâce aux dernières avancées technologiques auxquelles ils font appel pour la connectivité inter platesformes et la reproduction sonore, mais nous savons également que ces équipements sont devenus la
norme en terme de produits DJ et audio professionnels. Avec un entretien approprié, cet appareil fonctionnera sans souci pendant de très nombreuses années. Tous les produits Gemini sont garantis 1 an*.
première
utilisation
Vérifiez la présence des accessoires suivants, livrés avec le
CDMP-7000 :
(1) Cordon secteur
(1) Mode d’emploi
(1) Carte de garantie
précautions
1 N’utilisez pas ce lecteur de CD à des températures inférieures
à 5° C
ou supérieures à 35° C.
2 Cet appareil ne doit être exposé à aucune projection liquide.
Évitez toute projection liquide ou d’objet dans l’appareil.
Ne posez jamais un objet contenant un liquide (vase, verre,
etc.) sur l’appareil.
3 Placez l’appareil dans un environnement propre et sec.
4 Veillez à la stabilité de l’appareil.
5 Pour déconnectez le cordon secteur de la prise,
tirez sur la fiche, et non sur le cordon.
6 Pour éviter tout risque d’électrocution, ne retirez pas le
couvercle, ou les vis inférieures.
7 Cet appareil ne contient aucune pièce remplaçable par
l’utilisateur. Consultez un technicien qualifié.•
8 N’utilisez pas de solvants pour nettoyer l’appareil.
9 Fermez le tiroir pour garder la lentille laser propre.
10 Conservez le mode d’emploi pour référence future.
pour votre sécurité
Cet appareil utilise une diode au laser
Matériaux : Ga - Al - As
Longueur d’onde : 755 - 815 nm (25° C)
Puissance laser : Onde continue, 0,5 mW max.
• Aux USA - Si vous avez des problèmes avec ce produit, appelez
le service clientèle de Gemini au 1 (732) 346-0061. Ne renvoyez
pas ce produit à votre revendeur.
conservez votre audition
toute votre vie
La sélection d’un équipement de haute qualité comme celui-ci
n’est que le début de votre démarche musicale. Vous devez
maintenant penser à optimiser la joie musicale offerte par cet
équipement. La société Gemini et l’association de consommateurs de produits électroniques vous invitent à apprécier
ce produit le plus longtemps possible en veillant aux niveaux
d’écoute. Vous pourrez profiter de ce produit pendant de
longues années, avec une musique claire, puissante, exempte
de sifflements et de toute distorsion — bref, en prenant soin
de votre audition. Le son peut être trompeur. Avec le temps, le
“niveau de confort de votre audition” s’adapte à des niveaux
sonores de plus en plus élevés. Un son qui vous semble “normal”, peut en fait être très fort et nuisible à votre audition. Évitez ce problème en gardant les volumes sonores à des niveaux
raisonnables AVANT que votre audition s’adapte.
Pour établir une limite d’écoute sécuritaire, commencez par un
réglage de volume bas. Montez progressivement jusqu’à ce que
l’écoute soit confortable et claire, sans distorsion. Une fois que
vous avez établi un niveau d’écoute confortable, ne touchez
plus au volume. Ce simple geste vous évitera toute perte auditive future. Nous voulons que vous conserviez votre audition
toute votre vie.
Utilisé avec sagesse, cet équipement vous apportera de la joie
toute votre vie. Étant donné que les dommages auditifs ne
sont détectés que lorsqu’il est trop tard, la société Gemini et
l’association de consommateurs de produits électroniques vous
conseillent d’éviter les écoutes prolongées à un niveau excessif.
La liste suivante vous est donnée pour votre protection :
30 dB - Bibliothèque, chuchotements
40 dB - Salon, réfrigérateur, chambre sans trafic
50 dB - Trafic léger, conversation normale, bureau calme
60 dB - Air conditionneur à 6 mètres, machine à coudre
70 dB - Aspirateur, sèche-cheveux, restaurant bruyant
80 dB - Trafic en ville, réveil à 50 cm
Les cas suivants peuvent être dangereux dans le cas d’une
exposition longue :
90 dB - Métro, moto, trafic de camions, tondeuse à gazon
100 dB - Camion poubelle, tronçonneuse, marteau piqueur
120 dB - Concert de Rock en face des enceintes, orage
140 dB - Coup de fusil, avion à réaction
180 dB - Site de lancement de fusée
Informations données par la Fondation pour la Recherche sur la Surdité
.
49
cdmp- 7000 manual • geminidj. com
Page 50

introduction
nettoyage du
produit
Pour nettoyer le CDMP-7000, utilisez uniquement un tissu doux
et sec et/ou de l’air compressé. Si la saleté est difficile à enlever,
utilisez une solution d’eau distillée et d’alcool isopropyle dilué
à 2:1. Évitez les produits de nettoyage comme le benzène, les
diluants peinture, le chlore, ou l’acide hydrochlorique — ceux-ci
feront des dommages irréversibles au produit.
conditions
d
’ utilisation
Pour obtenir les meilleurs résultats possibles, la température
ambiante doit être comprise entre +5º C et +35º C. Hors de ces
limites vous risquez d’avoir du mal à lire l’écran, de créer des
surchauffes, ou des instabilités de fonctionnement. Évitez toute
exposition aux rayons directs du soleil.
Lorsque vous intégrez le produit à une installation, placez-le sur
une surface stable, aussi loin que possible de toute source de
vibrations. Même si le produit ne réagit pas aux vibrations, les
périphériques de stockage (notamment les disques durs) y sont
sensibles. Ne placez pas le lecteur sur une source génératrice
de chaleur, comme un amplificateur ou à côté de projecteurs.
formats et disques
compatibles
Le CDMP-7000 lit les disques (CD compatibles) ainsi que les
fichiers de musique sur support USB. Tous les formats suivants
sont compatibles :
gestion par
midi
Le CDMP-7000 peu également transmettre des données MIDI
par ses boutons et molettes à un ordinateur pour contrôler les
paramètres d’un logiciel DJ. La lecture audio de l’ordinateur
peut également être restituée par le CDMP-7000.
Avant d’utiliser le CDMP-7000 comme périphérique audio,
connectez-le avec un câble USB et laissez votre PC/MAC le
détecter. Ouvrez votre logiciel DJ et sélectionnez le périphérique de sortie du CDMP-7000 dans les réglages du logiciel DJ.
À cette fin, consultez le mode d’emploi du logiciel DJ.
connexion à un
ordinateur
Le CDMP-7000 est un périphérique Plug and Play ne nécessitant
aucune installation logicielle. Les pilotes audio et MIDI du CDMP7000 sont compatibles PC et MAC.
• Pour utiliser le CDMP-7000 avec un ordinateur utilisant
Windows, connectez le CDMP-7000 au PC après avoir lancé l’ordinateur. Le CDMP-7000 configure les pilotes WDM
standard. Sélectionnez le CDMP-7000 comme périphérique
audio. Vous pouvez également configurer les pilotes ASIO
pour fonctionner avec le CDMP-7000, comme l’ASIO4ALL.
• Pour utiliser le CDMP-7000 avec un ordinateur MAC,
connectez le CDMP-7000 au MAC après avoir lancé l’ordinateur. Utilisez les pilotes audio système CORE et sélectionnez le CDMP-7000 comme périphérique.
• WAV (PCM 16 bits, fréquence de 8 kHz, 11,025 kHz, 12 kHz,
16 kHz, 22,5 kHz, 24 kHz, 32 kHz, 44,1 kHz et 48 kHz)
• MP3 (16 bits, 44,1 kHz, MPEG1 Layer III)
• AAC (16 bits, 44,1 kHz, stéréo, AAC Core, AAC Plus, AAC
Plus v2)
• AIFF (16 bits, 44,1 kHz, stéréo)
Systèmes de fichiers (sur clef USB) compatibles :
• FAT
• FAT32
• HFS+
• NTFS
cdmp- 7000 manual • geminidj. com
50
Page 51

vue d ’ ensemble des lecteurs
vue de dessus
25
30
11 12 13 14 15
10
9
8
7
6
5
4
3
2
16 17 18 19 20
21
22
23
24
26
27
28
29
réglages
1
Power
2
Play/Pause / II
3
Cue
4
Search /
5
Track search | / |
6
Reverse
7
Jog adjust
8
Loop in / loop out/adjust /
reloop/exit
Memo
9
Hot cues
10
Auto cue / time
11
Text mode / touch on/off
12
BPM
13
Lock
14
Écran tactile LCD
15
16
Effets
Codeur rotatif/sélection/
17
contraste
Back
18
Eject
19
Sélection de source
20
Jog start time
21
Jog stop time
22
Effet dry/wet
23
Vinyl
24
Slip mode
25
Range
26
Master tempo
27
Pitch bend [+] [-]
28
Fader de hauteur (Pitch)
29
Molette
30
51
cdmp- 7000 manual • geminidj. com
Page 52

top view
45
44
43
31 31 31
32
33
34
35
36
37
vue d ’ ensemble du mixer
Sélecteur de Source en Entrée
31
Volume Master
32
VU-mètre
33
34
Réglage de Balance Sortie Master
Sélection Pré-écoute/Indicateur
35
36
Contrôle de Mix Pré-écoute Casque
Volume Casque
37
Sélection Sortie Casque
38
Démarrage de Lecture via Crossfader
39
Inversion Crossfader
40
Crossfader
41
42
Réglage Courbe Crossfader
front view
38
39
40
4142
Fader de Voie
43
Correction Paramétrique 3 Bandes
44
45
Réglage de Gain
Volume Micro
46
47
Corrections 2 Bandes Micro
48
Commutateur Talkover Micro
49
Volume Sortie Auxiliaire (Booth)
46 49
L O
cdmp- 7000 manual • geminidj. com
47
48
52
Page 53

vue d ’ ensemble des connexions
vue arrière
M
AN C D E F G H I
MISE SOUS TENSION
Reliez le cordon d’alimentation à l’embase AC IN (A) du
CDMP-7000. Appuyez sur la touche POWER OFF/ON (N)
afin de mettre l’appareil sous tension.
ENTREES RCA PHONO / LIGNE
Le CDMP-7000 comprend 2 voies stéréo commutables
LIGNE/PHONO (RCA) (K). Les 2 SELECTEURS PHONO/
LIGNE (J) permettre de sélectionner une source de niveau
PHONO (Platine Vinyle) ou une source de niveau LIGNE
(MP3, CD, K7, Tuner…). En position PHONO, vous devez
utiliser une platine vinyle équipée d’une cellule de lecture
magnétique. N’oubliez pas de relier le fils de masse à la
BORNE DE MISE A LA TERRE (M) afin d’éviter tout bruit
de ronronnement.
ENTREES AUXILAI R E S
Le CDMP-7000 comprend 2 entrées stéréo auxiliaires.
AUX1 (I) est équipé d’une paire de connecteurs RCA. AUX2
(H) est équipé d’un Mini-Jack Stéréo 3.5mm. Toute source
de niveau ligne (MP3, CD, K7, Tuner…) peut être connectée
aux entrées AUX1 & AUX2.
ENTREES MICROPHONE
Le CDMP-7000 est équipé de deux (2) entrées micro: une
sur Jack 6.35mm & un seconde sur Combo (XLR/Jack
6.35mm). L’entrée Jack 6.35mm accepte les connections
symétriques & asymétriques. L’entrée Combo accepte les
connections symétriques via XLR & les connections symétriques & asymétriques via Jack 6.35mm. Le potentiomètre
MIC VOLUME (46) - situé en face avant - permet le réglage
de l’ensemble des micros connectés.
J J LB K
SORTIES LIGNE RCA
Le CDMP-7000 possède 3 sorties asymétriques RCA: ENREGISTREMENT (REC), MASTER (PRINCIPALE) & AUXILIAIRE (BOOTH) (C). La sortie MASTER permet de relier
l’appareil à votre système d’amplification principal. La sortie ENREGISTREMENT (RECORD) permet de procéder à
l’enregistrement de votre mix (Relier cette sortie à l’entrée
de votre enregistreur). La sortie AUXILIAIRE (BOOTH)
permet l’utilisation d’un second système de diffusion ou
d’un système de monitoring (Retour).
Si vous utilisez le CDMP-7000 avec un récepteur, utilisez
les ENTREES CD ou AUX (RCA). Si le récepteur ne possède aucune de ces entrées, veuillez utiliser toute entrée
de niveau LIGNE. Ne reliez en aucun cas le CDMP-7000 à
l’entrée PHONO.
SORTIE SYMETRIQUE XLR
La sortie SYMETRIQUE XLR (B) possède une sortie GAUCHE
& une sortie DROITE.
SORTIES CD1/CD2
Les sorties stéréo CD1/CD2 (RCA) (D) permettent
l’utilisation des deux lecteurs avec une console de mixage
externe.
SORTIE USB
Veuillez relier le cordon USB (Non livré avec l’appareil) à
la sortie USB OUT (F) située en face arrière. Veuillez relier
l’autre extrémité du cordon USB à un port USB disponible
de votre ordinateur. Ceci permettra d’utiliser le CDMP7000 en mode MIDI.
SORTIES NUMERI QUE S
*NOTE: Dans le cadre de l’utilisation des connecteurs Jack
6.35mm, Il est recommandé d’utiliser un cordon symétrique afin de bénéficier d’un signal de meilleure qualité.
ENTRÉE USB
Le CDMP-7000 possède une ENTRÉE USB (G) prévue
pour y relier un ordinateur (Mac/PC) & recevoir les données audio qui y sont stockées. Veuillez connecter un
cordon USB (Non livré avec l’appareil) entre votre ordinateur & l’ENTRÉE USB (G) du CDMP-7000. Pour utiliser le
CDMP-7000, veuillez sélectionner ce dernier dans le menu
de configuration de votre ordinateur.
53
Veuillez connecter un cordon S/PDIF (Non livré) à la sortie
numérique DIGITAL OUT du CDMP-7000 (E) & à l’entrée
numérique DIGITAL IN de votre appareil. Les informations
transiteront ainsi de façon strictement numérique. Certaines applications nécessitent ce type de signal pour enregistrer ou alimenter une station de mixage numérique.
SORTIES CASQUE
Le CDMP-7000 possède deux sorties casque: l’une sur
Jack 6.35mm & la seconde sur Mini-Jack 3.5mm. La SORTIE CASQUE (O) permet de pré-écouter la musique avant
de la mixer.
cdmp- 7000 manual • geminidj. com
Page 54

écran lcd tactile
VINYL
HOLD
CD
USB
SD
MIDI
1
écran et zones d ’ affichage
BARRE DE PROGRESSION TEMPORELLE
1
Indique la position dans la piste.
TEMPS
2
Valeur temporelle de la piste.
BPM
3
Valeur du tempo actuel en BPM des modes BPM
auto et manuel. La zone affiche également les
informations de tempo des données ID3.
2
3
4
7
5
6
8
TEMPO
4
Lorsque le MASTER TEMPO est sur OFF, la
hauteur PITCH est affichée. Lorsque le MASTER
TEMPO est actif, le TEMPO est affiché.
PITCH/MT VALUE
5
Affiche la hauteur PITCH ou le TEMPO.
10
9
RANGE
6
Affiche la plage PITCH/TEMPO actuellement
sélectionnée.
PARAMÈTRES D’EFFETS
7
Affiche la valeur des paramètres d’effets.
INFORMATION DE PISTES
8
Donne les informations sur la piste.
NAVIGATEUR DE BIBLIOTHÈQUE
9
Affiche les pistes et les dossiers.
FORME D’ONDE DE LA PISTE
10
Affiche une représentation graphique de la piste
audio chargée. Appuyez sur la forme d’onde
pour modifier l’échelle. Valeurs : 3,2 secondes,
6,5 secondes, 12 secondes et 24 secondes.
affichage de molette
1
3
cdmp- 7000 manual • geminidj. com
VINYL
AFFICHAGE DE LA PISTE
1
Simule un disque 33 tours et affiche la position
courante dans la piste.
POINT DE CUE/SLIP
2
Donne le point de CUE affecté à la piste. En
2
4
mode SLIP, la position normale de lecture est
affichée (voir page 14).
ÉCRAN TACTILE DE LA MOLETTE
3
Cette zone s’allume lorsque vous appuyez sur la
molette.
4
VINYL
VINYL s’allume lorsque le mode VINYL est
activé.
54
Page 55

chargement de disques et périphériques mémoire
Une fois tous les câbles connectés, placez le CDMP-7000
sous tension en appuyant sur POWER (1). Appuyez à nouveau pour le placer hors tension.
source
Les touches SOURCE SELECT (20) vous permettent de
sélectionner la source musicale :
CD : Sélectionnez un lecteur de CD en appuyant sur la
touche CD.
USB : Sélectionnez un périphérique USB en appuyant sur
la touche USB.
SD : Sélectionnez une carte mémoire SD/SDHC en
appuyant sur la touche SD.
MIDI : Appuyez sur cette touche pour placer le produit
en mode MIDI bi-directionnel. Dans ce mode, tous les
réglages (pressions sur les touches, mouvements sur les
boutons de Pitch et rotations de la molette) sont enregistrés et transférés au PC par la liaison USB MIDI. Cette
fonction est utilisée avec le logiciel DJ pour contrôler ses
paramètres (voir page 9).
charger/ éjecter les
périphériques usb/ sd
USB : Insérez la clef USB dans le port USB (E), sur le
CDMP-7000. Lors du chargement, l’écran LCD affiche les
dossiers et les pistes de la clef USB.
SD : Insérez la carte SD dans le port SD (F), sur le CDMP-
7000. Lors du chargement, l’écran LCD affiche les dossiers
et les pistes de la carte SD.
E
F
Pour éjecter les périphériques USB et SD, sélectionnez
une autre source avec la touche SOURCE SELECT (20) et
retirez le périphérique USB ou la carte SD. Pour éjecter la
carte SD, appuyez sur la carte SD. Retirez-la ensuite verticalement.
charger/ éjecter
cd
les
Les CD-ROM (illustration ci-dessous) de 12 cm et de 8 cm
sont chargés, lus et éjectés par cette zone.
Appuyez sur EJECT (19) pour éjecter le CD du lecteur. Les
CD ne peuvent pas être éjectés en mode de lecture PLAY.
*REMARQUE : Avant de placer le CDMP-7000 hors tension, retirez la clef USB ou la carte SD pour éviter toute
corruption des données.
défilement des
pistes/ dossiers
L’écran affiche les fichiers lisibles et les dossiers du CD, de
la clef USB, ou de la carte SD.
Utilisez le CODEUR (17) pour effectuer les recherches. Vous pouvez également appuyer sur
l’écran tactile, dans la zone de défilement.
55
Pour ouvrir un dossier, sélectionnez-le et appuyez sur le
CODEUR (17). Pour charger une piste, sélectionnez-la et
appuyez à nouveau sur le CODEUR (17).
Pour revenir au dossier précédent, appuyez sur la
touche BACK (18).
cdmp- 7000 manual • geminidj. com
Page 56

réglages de lecture
Lorsque vous avez chargé une piste, la zone TRACK
TITLE de l’écran LCD affiche la piste chargée.
play/ pause
Appuyez sur PLAY/PAUSE / ll (2) pour lire la piste sélectionnée. Appuyez sur PLAY/PAUSE
une fois pour passer en pause sur la position courante.
• Mise en pause avant l’éjection du disque :
- Vous devez passer en PAUSE avant d’éjecter un
disque.
Le disque ne s’éjecte pas tant qu’il est en lecture.
/ ll (2) encore
search
reverse
Appuyez sur REVERSE (6) pour lancer la lecture
inversée.
pitch bend
Appuyez sur PITCH BEND [+] [-] (28) pour
monter la hauteur jusqu’à +100 % ou la diminuer jusqu’à -100 % par rapport à la hauteur de départ.
Relâchez les touches pour revenir au réglage de hauteur
initial.
réglage pitch/
tempo
Déplacez le Fader PITCH CONTROL (29) pour
augmenter la valeur de Pitch/tempo vers la position [+]. Pour diminuer le Pitch/tempo descendez vers la position [-].
La valeur PITCH/TEMPO courante est affichée à
l’écran LCD.
Appuyez sur SEARCH / (4) pour faire une recherche dans le sens de la flèche (avant/arrière). Maintenez la touche SEARCH / (4) enfoncée pour accélérer la recherche dans le sens de la flèche.
track search
Appuyez sur la touche TRACK SEARCH l (5) pour
avancer jusqu’au point de départ de la piste suivante.
Appuyez sur TRACK SEARCH l (5) pour revenir au
début de la piste courante. Appuyez deux fois sur
TRACK SEARCH l (5) pour revenir au début de la
piste précédente.
• Lors de la recherche dans les dossiers :
- Lorsque les fichiers sont organisés en dossiers,
la recherche s’effectue parmi les pistes d’un même
dossier.
• Fonction Autocue :
- Lorsque la fonction Autocue est activée, le lecteur
se met en pause au début de la piste.
Les touches RANGE (26) déterminent la plage
d’action du Fader PITCH CONTROL entre +/- 4
%, 8 %, 16 %, 24 % ,50 % et 100 %.
master tempo
La touche MASTER TEMPO (27) vous permet
de modifier le tempo sans modifier la hauteur
initiale.
Le mode courant PITCH ou TEMPO est affiché à l’écran.
• Valeurs RANGE en mode MASTER TEMPO :
- En mode MASTER TEMPO, la plage de réglage est
de +/- 4 %, 8 %, 16 %, 24 % ,50 % et 100 %.
• Qualité sonore :
- Le son subit un traitement important en mode
MASTER TEMPO, qui peut détériorer la qualité du
signal audio lorsque vous poussez les réglages de
tempo.
cdmp- 7000 manual • geminidj. com
56
Page 57

réglages de lecture
bpm
Maintenez la touche BPM (13) enfoncée pour sélectionner le mode BPM : BPM ID3 / AUTO BPM / MANUAL
BPM.
ID3 : Lorsque le mode BPM est ID3, les informations de
tempo des données ID3 sont affichées.
AUTO BPM : Lorsque le mode BPM est AUTO BPM, les
battements par minute sont calculés automatiquement
et les informations correspondantes sont affichées à
l’écran LCD, dans le champ BPM.
MANUAL BPM : Lorsque le mode BPM est sur MANUAL,
la touche BPM (13) vous permet de définir le nombre de
battements par minute de la lecture en appuyant sur la
touche TAPS en tempo avec la musique.
REMARQUE : Si la valeur de tempo BPM est présente
dans les données ID3, la valeur est chargée et affichée.
bpm lock
La fonction BPM LOCK vous permet de définir la valeur
de tempo BPM souhaitée en faisant tourner le bouton
et en poussant pour définir le tempo. Une fois le mode
activé, la valeur de tempo Pitch/Master est automatiquement modifiée pour correspondre au tempo souhaité.
réglages cue
POINT DE REPÈR E S CUE
Lors de la lecture, appuyez sur
PLAY/PAUSE / ll (2) pour placer la piste en
pause. Avec la piste en pause, appuyez sur la
touche CUE (3) pour affecter le point de Cue à la position courante. Le témoin CUE s’allume lorsque le point
de CUE est défini. Il en va de même sur la molette.
RÉGLAGE D U POINT DE REPÈRE CU E
Une fois le point de repère Cue programmé, appuyez sur
PLAY/PAUSE / ll (2) pour mettre en pause la piste sur
le point de Cue. Appuyez sur SEARCH / (4) ou
utilisez la molette pour régler la position du point de
repère. Appuyez sur la touche CUE (3) pour placer un
point de repère sur la position courante.
RETO UR SUR LE POINT DE REPÈR E
Pendant la lecture, avec un point de repère Cue programmé, appuyez sur la touche CUE (3) pour passer en
PAUSE (la touche PLAY/PAUSE clignote) sur le point
de Cue (la Led CUE s’allume). Maintenez la touche CUE
enfoncée pour revenir un peu en arrière et faire un effet
de Stutter sur le point CUE. Relâchez la touche CUE et le
CD revient au point CUE.
Pour activer la fonction LOCK, réglez le tempo souhaité
et appuyez sur la touche LOCK (14).
Pour désactiver la fonction LOCK, appuyez une fois de
plus sur la touche LOCK (14).
REMARQUE : La plage de tempo BPM est restreinte aux
valeurs suivantes : 80 – 196 BPM.
AUTO CUE
La fonction AUTO CUE (11) place le repère Cue
sur le point immédiatement avant que le son ne
commence, en sautant la section silencieuse au début
des pistes. Appuyez sur AUTO CUE (11) pour activer la
fonction Auto Cue.
57
cdmp- 7000 manual • geminidj. com
Page 58

réglages de lecture
réglages cue suite réglages de boucle
REPÈRES HOT CUE
Lors de la lecture ou en pause, appuyez sur les
touches HOT CUE 1, 2 ou 3 (10) sur les points souhaités du morceau.
Lorsque vous appuyez sur les touches HOT CUE
(1, 2, ou 3) elles doivent s’allumer.
Pour effacer un point hot cue, appuyer sur la
touche MEMO (9) & sélectionner le point hot cue
à effacer.
LECTURE DES POINTS HOT CUE
Illustré : Touches LOOP IN / LOOP OUT/ADJUST / RELOOP/EXIT (8)
CRÉATION D’UNE BOUCL E
Pendant la lecture, appuyez sur la touche
LOOP IN (8) lorsque vous êtes sur le point de
début de la boucle (point de début de boucle Loop In).
Appuyez sur la touche LOOP OUT / ADJUST (8)
sur le point de fin de la boucle. Le point de fin de
boucle est maintenant défini et la boucle commence sa
lecture.
Avant de lire les points Hot Cue, vérifiez que la touche
MEMO (9) ne soit pas active.
Lors de la lecture ou lors des pauses, appuyez sur les
touches HOT CUE 1, 2 ou 3 (10) pour lancer la lecture
directement depuis le point de repère correspondant à
la touche HOT CUE.
RÉGLAGE DE LA BOUCLE
Pour régler une boucle existante, appuyez sur la
touche OUT/ADJUST (8). La touche LOOP IN (8)
cesse de clignoter.
• La longueur de la boucle est réglable avec la molette
de données (30). Tournez vers la droite pour allonger
la boucle et vers la gauche pour la raccourcir.
ANNULER LA BOUC L E
Activez la boucle et appuyez sur
RELOOP/EXIT (8) pour la désactiver. La lecture
continue après le point de fin de boucle Out.
RETO UR À LA BOUCLE
Après avoir annulé une boucle, appuyez sur la
touche RELOOP/EXIT (8) pendant la lecture
pour réactiver la dernière boucle. La lecture de la
boucle commence sur le point de début In.
cdmp- 7000 manual • geminidj. com
58
Page 59

réglage des effets
section des effets
Le CDMP-7000 dispose de six effets intégrés : FLTR,
FLANGER, ECHO, WAH, TRANCE, et BUBBLE.
FLTR : L’effet FLTR est un filtre passe-bande et atténue
les basses ou hautes-fréquences, selon la position de la
BARRE DE PARAMÈTRES. Au centre, aucun effet n’est
appliqué au son. Le déplacement vers la gauche atténue
progressivement les hautes-fréquences pour ne laisser
passer que les basses-fréquences. Le déplacement vers
la droite atténue progressivement les basses-fréquences
pour ne laisser passer que les hautes-fréquences.
FLANGER : Le FLANGER est un effet à base temporelle
qui se produit en mélangeant deux signaux identiques,
et en retardant l’un des deux signaux d’un retard variant
dans le temps. Le fait de faire varier le temps de retard
crée des balayages en fréquences. En déplaçant la
BARRE DES PARAMÈTRES D’EFFETS vers la gauche, le
Flanger ralentit. Déplacez-la vers la droite pour l’accélére r.
ECHO : L’effet ECHO répète le signal audio plusieurs
fois, atténué à chaque fois. En déplaçant la BARRE DES
PARAMÈTRES D’EFFETS vers la gauche, vous raccourcissez l’écart entre les répétitions et réduisez le niveau
de chaque répétition. Déplacez-la vers la droite pour
augmenter le temps entre les répétitions et augmenter
le volume des répétitions.
WAH : L’effet WAH est un effet de Wah-Wah auto-
matique qui utilise un filtre passe-bas à fréquence de
coupure variable avec une pointe résonnante sur la
fréquence de coupure pour simuler la voix humaine
avec un son de “waaaah”, ou à l‘inverse avec un son de
“aaaooow”.
AC T I VER UN EFFET
Pendant la lecture, la section EFFECT (16)
vous permet d’activer/désactiver les effets.
Lorsque le mode VINYL (24) est désactivé, vous
pouvez utiliser les effets FLTR / FLANGER /
ECHO. Lorsque le mode VINYL (24) est activé,
vous pouvez utiliser les effets WAH / TRANCE /
BUBBLE.
RÉGLAGE DES E FFETS
Le bouton EFFECTS DRY/WET (23) mélange le
signal traité avec le signal non traité. Tournez vers
la droite pour augmenter la proportion de signal
traité. Tournez vers la gauche pour augmenter la proportion de signal non traité.
La BARRE DE PARAMÈTRES de l’écran LCD affiche la
valeur des paramètres des effets FLTR / FLANGER /
ECHO. Les effets WAH / TRANCE / BUBBLE ne sont
pas paramétrables.
Pour modifier les paramètres des effets FLTR / FLANGER / ECHO, touchez la BARRE DE PARAMÈTRES de
l’écran LCD. Vous pouvez également régler le paramètre d’effet avec la molette (30). Tournez la molette
(30) vers la droite pour augmenter la valeur du paramètre, et vers la gauche pour la diminuer.
REMARQUE : Lorsque l’effet est sélectionné, son nom
doit s’afficher à l’écran pendant environ 5 secondes.
MODE HOLD
BUBBLE : L’effet BUBBLE combine la WAH et l’ECHO.
TRANCE : L’effet TRANCE utilise la modulation d’ampli-
tude pour faire varier le volume audio.
59
Appuyez sur la touche HOLD pour activer/désactiver le mode HOLD. Ceci applique l’effet avec les
paramètres sélectionnés à la musique.
Lorsqu’un effet est activé avec le mode HOLD désactivé, vous pouvez modifier les paramètres de l’effet
et écouter le résultat en tournant la molette (30) ou
en déplaçant votre doigt sur la barre tactile de l’écran
LCD. Lorsque vous arrêtez de faire tourner la molette
(30), l’effet cesse. Pour que l’effet reste audible, appliquez le mode HOLD.
Il est également possible de modifier les paramètres
d’effet en mode HOLD : dans ce cas, la valeur du
paramètre est préservée et l’effet reste activé.
cdmp- 7000 manual • geminidj. com
Page 60

réglages de la molette
réglages de la molette
JOGWHEEL ADJUST
Le bouton JOG ADJUST (7) détermine la réponse
de la molette à la rotation. Pour une utilisation
plus dure et plus lourde, tournez le bouton JOG
ADJUST (7) vers la gauche. Pour que la molette réponde
plus rapidement, tournez le bouton JOG ADJUST (7)
vers la droite.
MODE VINYL
Appuyez sur la touche VINYL (24) pour activer
le mode VINYL et allumer le témoin Vinyl de la
molette.
Le mode VINYL vous permet de réaliser des effets de
Scratch lorsque vous appuyez et tournez la molette JOGWHEEL (30). Lorsque le mode VINYL est désactivé, la
molette JOGWHEEL (30) et en mode de RECHERCHE
sur la piste en cours.
La touche VINYL active également les effets WAH /
TRANCE / BUBBLE à la place des effets FLTR / FLANGER / ECHO. Dans ce mode, lorsque vous faites tourner
la MOLETTE, vous produisez des sons de Scratch et
modifiez les paramètres d’effets.
MODE SLIP
Lorsque la fonction SLIP (25) est activée, la lecture
normale continue sans pour autant être audible
lors des effets SCRATCH, LOOP, et REVERSE. Lorsque
vous quittez le mode SCRATCH, LOOP, ou REVERSE, la
lecture normale reprend à partir du point où le signal est
devenu silencieux, comme indiqué par l’afficheur de la
MOLETTE (30).
SLIP et SCRATCH
Pour utiliser la fonction SLIP pendant que vous faites un
Scratch, vous pouvez activer le mode VINYL en appuyant sur la touche VINYL (24). Activez le mode SLIP
en appuyant sur la touche SLIP (25).
Utilisez la molette pour créer des Scratch pendant que
la lecture continue de façon silencieuse. La position de la
lecture est indiquée par l’afficheur de la MOLETTE.
Lorsque vous relâchez la molette, la lecture reprend.
REMARQUE : Lorsque vous utilisez le mode SLIP avec
les Scratch, les opérations inversées du mode SLIP ne
sont pas réalisées.
START TIME / STOP TIME
Le bouton START TIME (21) détermine le
temps mis par la lecture pour revenir à la
vitesse normale lorsque vous relâchez le dessus de la
molette et lorsque vous repassez en lecture après une
pause. Tournez le bouton vers la droite pour augmenter
la durée, et vers la gauche pour la réduire.
Le bouton STOP TIME (22) détermine le temps mis pour
que la lecture ralentisse après avoir touché le dessus de
la molette et lorsque vous passez en pause. Le temps
d’arrêt augmente lorsque vous tournez le bouton vers la
droite, et diminue lorsque vous le tournez vers la gauche.
SLIP et LOOP
Pour utiliser la fonction SLIP avec la lecture d’une
boucle, appuyez sur la touche SLIP (25).
Définissez une boucle (page 45) avec les points IN/OUT
et la lecture de la boucle commence. La touche SLIP
(25) clignote, indiquant que le mode SLIP est actif et la
position de la lecture en arrière plan s’affiche.
Lorsque vous quittez la boucle, la lecture continue
depuis la position de la lecture en arrière plan.
SLIP et REVERSE
Pour utiliser la fonction SLIP avec la lecture inversée,
appuyez sur la touche SLIP (25).
Appuyez sur la touche REV (6) pour lancer la lecture
inversée. La touche SLIP (25) clignote, indiquant que le
mode SLIP est actif et la position de la lecture en arrière
plan est indiquée sur l’afficheur de la molette.
Appuyez à nouveau sur REVERSE (6) pour arrêter la
lecture inversée. La lecture de la piste continue depuis la
positon de lecture en arrière plan.
cdmp- 7000 manual • geminidj. com
60
Page 61

gestion de l ’ affichage
options d ’ affichage
RÉGLAGE D U CONTRASTE
Maintenez le bouton SELECT (17) enfoncé
pendant que vous le tournez pour régler le
contraste de l’écran 240 x 320. Pour augmenter
le contraste, tournez le bouton vers la droite. Pour le
réduire, tournez vers la gauche.
MODE D’AFFICHAGE DU TEXTE DE PISTE
Appuyez sur la touche TEXT MODE / TOUCH ON/
OFF (12) pour modifier les informations affichées
à l’écran LCD (15) pour sélectionner les informations de
titre/artiste/album/genre du fichier.
fonctions de l ’écran tactile
L’écran LCD du CDMP-7000 est de type tactile. Vous
pouvez réaliser les opérations suivantes en appuyant sur
l’écran LCD (15)
Maintenez la touche TEXT MODE / TOUCH ON/OFF (12)
pour activer/désactiver l’écran tactile.
TEMPS ÉCOULÉ/RESTAN T
Maintenez la touche TIME/AUTOCUE (11) pour
changer de mode d’affichage des durées de la
piste (temps écoulé ou temps restant).
4
TEMPO/PITCH : Offre la même fonction que la touche
MASTER TEMPO (page 43). Lorsque le MASTER TEMPO
est désactivé, le PITCH est affiché. Lorsque le MASTER
TEMPO est activé, le TEMPO est affiché dans ce champ.
1
2
5
3
4
9
BARRE DE PROGRESSION TEMPORELLE : Appuyez sur
1
6
7
8
10
cette zone pour sauter directement à la position sélectionnée de la piste.
2
TIME : Affiche soit le temps écoulé de la lecture de la
piste, soit le temps restant.
3
BPM : Affiche la valeur BPM courante en modes BMP
auto et manuel ou affiche les informations de BPM des
données ID3 lorsque le mode BPM est réglé sur ID3.
5
RANGE : Offre la même fonction que la touche RANGE
(page 43).
6
PITCH/MT VALUE : Vous permet d’activer/désactiver
la fonction PITCH/MT (page 43). De plus, il indique la
valeur PITCH/MT.
TITRE DE LA PISTE : Vous permet d‘afficher le titre/ar-
7
tiste/album/genre. Appuyez sur cette zone, pour modifier le mode d’affichage.
BARRE DES PARAMÈTRES D’EFFETS : Vous permet de
8
définir des valeurs d’effet en appuyant sur cette zone.
FORME D’ONDE : Affiche une représentation visuelle
9
de la piste audio chargée. Appuyez sur la forme d’onde
pour modifier le taux de zoom. Les valeurs sont :
3,2 secondes, 6,5 secondes, 12 secondes et 25 secondes.
SÉLECTION DE LA PISTE : Vous permet de sélectionner
10
une piste ou d’accéder à un dossier. Appuyez pour accéder à un dossier.
61
cdmp- 7000 manual • geminidj. com
Page 62

réglages midi
gestion midi
MODE MIDI
Le CDMP-7000 est équipé d’un mode MIDI, qui transmet sous forme
de données MIDI l’utilisation des touches et boutons du CDMP-
7000. Si l’appareil est connecté par USB à un ordinateur avec un
logiciel DJ compatible MIDI, vous pouvez contrôler le logiciel DJ
depuis l’appareil. Les signaux audio de l’ordinateur sont retransmis
par les sorties du CDMP-7000.
Il se peut que certains boutons ou certaines touches soient sans
incidence sur le logiciel DJ. Pour obtenir la liste des messages MIDI
transmis, consultez le tableau des messages MIDI.
REMARQUE: Pour en savoir plus sur les réglages spécifiques du
logiciel DJ, consultez son mode d’emploi.
MODE HID
En plus du mode MIDI, le CDMP-7000 utilise le protocole HID plus
rapide et à plus grand débit de transmission.
Si votre logiciel est compatible avec les équipements HID, désactivez les périphériques MIDI dans votre logiciel, et recherchez les
périphériques HID. Vous devriez ainsi trouver le CDMP-7000 et
l‘utiliser comme périphérique HID.
CONF IGURATION D U MODE MIDI
Connectez le câble USB entre le port USB (D) situé à l’arrière et
l’ordinateur. Appuyez sur la touche de sélection de source MIDI du
CDMP-7000 (20). Ceci arrête la lecture des sources CD/USB/SD.
Le CDMP-7000 vous demande alors de saisir la résolution et la
fréquence d’échantillonnage audio à l’écran, avec les possibilités
audio suivantes :
• 24-bits/192 kHz
• 24-bits/96 kHz
• 24-bits/48 kHz
• 16-bits/44,1 kHz
Maintenez la touche de sélection de source MIDI enfoncée pour
passer d’un réglage audio à un autre. Appuyez sur MIDI pour faire
défiler les réglages et appuyez sur le CODEUR (14) pour valider le
choix. Appuyez sur BACK (15) pour quitter.
REMARQUE: Une résolution et une fréquence d’échantillonnage
plus élevées créent plus de latence et peuvent avoir un impact
négatif sur le jeu.
Après avoir configuré les paramètres audio du CDMP-7000, lancez le logiciel DJ :
• Sélectionnez le CDMP-7000 comme périphérique MIDI*
• Sélectionnez le CDMP-7000 comme périphérique AUDIO*
*Consultez le mode d’emploi du logiciel DJ pour de plus amples informations.
cdmp- 7000 manual • geminidj. com
62
Page 63

gestion midi
tableau des messages midi tableau des messages hid
Paramètre du
CDMP-7000
Cue Cue 1 0 127
Play/Pause Lecture/Pause 2 0 127
+ (Pitch Bend) Pitch + 3 0 127
- (Pitch Bend) Pitch - 4 0 127
HotCue 1 Cue 1 5 0 127
HotCue 2 Cue 2 6 0 127
HotCue 3 Cue 3 7 0 127
Memo Memo 8 0 127
Track Search << Track reverse 9 0 127
Track Seach >> Track forward 10 0 127
Browse Left Sup. dans liste 11 0 127
Browse Right Inf. dans liste 12 0 127
Master Tempo Master Tempo 13 0 127
Vinyl Scratch 14 0 127
Select Chargement piste 15 0 127
Loop In Loop In 16 0 127
Loop Out/Adjust Loop Out 17 0 127
Reloop/Exit Reloop 18 0 127
BPM BPM 19 0 127
Effe t1 (Wah) Effet 1 (sélection) 20 0 127
Effet 2 (Flanger)
Effet 3 (Echo)
Back Folder Out 23 0 127
Wheel Touch Toucher molette 24 0 127
Effect Param Param d’effet 25 0 127
Temps Écoulé/Restant 26 0 127
Autocue Autocue 27 0 127
LOCK LOCK 28 0 127
Range Plage 29 0 127
Reverse Inversé 30 0 127
Slip Slip 31 0 127
Molette Molette 32 0, 63 63, 128
Curseur Pitch Curseur Pitch 33 0 127
Saut piste << Piste précédente 34 0 127
Saut piste >> Piste suivante 35 0 127
Hold Effet On/Off 36 0 127
Eject Deck Select 37 0 127
Effet 4 (Wah)
Effet 5 (Trance)
Effet 6 (Bubble)
Dry/Wet Effet Dry/Wet 41 0 127
Start time Paramètre 42 0 127
Stop time Paramètre 43 0 127
Curseur Pitch (14-bit) Curseur Pitch 44 0 127
Paramètre logiciel N°
Effet 2 (sélection)
Effe t3 (sélection)
Effet 4 (sélection)
Effet 5 (sélection)
Effet 6 (sélection)
transmis
22 0 127
38 0 127
39 0 127
40 0 127
Valeur
21 0 127
min.
Valeur
max.
Paramètre du
CDMP-7000
Cue Cue 1 1 1 - on, 0 = off
Play/Pause Lecture/Pause 2 1 1 - on, 0 = off
+ (Pitch Bend) Pitch + 3 1 1 - on, 0 = off
- (Pitch Bend) Pitch - 4 1 1 - on, 0 = off
HotCue 1 Cue 1 5 1 1 - on, 0 = off
HotCue 2 Cue 2 6 1 1 - on, 0 = off
HotCue 3 Cue 3 7 1 1 - on, 0 = off
Memo Memo 8 2 1 - on, 0 = off
Track Search << Track reverse 9 2 1 - on, 0 = off
Track Seach >> Track forward 10 2 1 - on, 0 = off
Browse Left Sup. dans liste 11 2 1 - on, 0 = off
Browse Right Inf. dans liste 12 2 1 - on, 0 = off
Master Tempo Master Tempo 13 2 1 - on, 0 = off
Vinyl Scratch 14 2 1 - on, 0 = off
Select Chargement piste 15 2 1 - on, 0 = off
Loop In Loop In 16 2 1 - on, 0 = off
Loop Out/Adjust Loop Out 17 2 1 - on, 0 = off
Reloop/Exit Reloop 18 2 1 - on, 0 = off
BPM BPM 19 2 1 - on, 0 = off
Effe t1 (Wah) Effet 1 (sélection) 20 2 1 - on, 0 = off
Effet 2 (Flanger)
Effet 3 (Echo)
Back Folder Out 23 2 1 - on, 0 = off
Wheel Touch Toucher molette 24 3 1 - on, 0 = off
Temps Écoulé/Restant 26 3 1 - on, 0 = off
Autocue Autocue 27 3 1 - on, 0 = off
LOCK LOCK 28 3 1 - on, 0 = off
Range Plage 29 3 1 - on, 0 = off
Reverse Inversé 30 3 1 - on, 0 = off
Slip Slip 31 3 1 - on, 0 = off
Saut piste << Piste précédente 34 4 1 - on, 0 = off
Saut piste >> Piste suivante 35 4 1 - on, 0 = off
Hold Effet On/Off 36 4 1 - on, 0 = off
Eject Deck Select 37 4 1 - on, 0 = off
Effet 4 (Wah)
Effet 5 (Trance)
Effet 6 (Bubble)
Molette Molette 64-71 8 Min = 0, Max = 225
Effect Param Param d’effet 72-79 9 Min = 0, Max = 255
Dry/Wet Effet Dry/Wet 80-87 10 Min = 0, Max = 255
Start time Paramètre 88-95 11 Min = 0, Max = 255
Stop time Paramètre 96-103 12 Min = 0, Max = 255
Curseur Pitch Curseur Pitch 104-117 13, 14 Min = 0, Max = 800
Paramètre logiciel Bit Byte Valeur
Effet 2 (sélection)
Effe t3 (sélection)
Effet 4 (sélection)
Effet 5 (sélection)
Effet 6 (sélection)
21 2 1 - on, 0 = off
22 2 1 - on, 0 = off
38 4 1 - on, 0 = off
39 4 1 - on, 0 = off
40 5 1 - on, 0 = off
63
cdmp- 7000 manual • geminidj. com
Page 64

fonctions console de mixage
fonctions console de mixage
SELECTION DE LA SO URCE D’ENTREE
Le CDMP-7000 possède 3 voies: CH1, CH2, CH3. Chaque
voie comprend 3 entrées qui peuvent être sélectionnées
via le SELECTEUR DE SOURCE EN ENTREE (31) situé en
haut de chaque voie.
• CH1: ENTRÉE USB – AUX1 – AUX2.
• CH2: Lecteur gauche CDMP-7000 – Audio ordinateur (En mode MIDI) – Ligne 1/Phono 1 (LN1/PH1).
• CH3: Lecteur droit CDMP-7000 – Audio ordinateur
(En mode MIDI) – Ligne 2/Phono 2 (LN2/PH2)..
REGLAGES PAR VOIE
Chaque voie du CDMP-7000 possède un REGLAGE
DE GAIN (45), une CORRECTION PARAMETRIQUE 3
BANDES (44) & un FADER DE VOLUME (43) afin de
procéder à tout réglage utile de volume & de tonalité sur
la voie.
Le REGLAGE DE GAIN (45) permet de régler le signal en
entrée.
La CORRECTION PARAMETRIQUE 3 BANDES (44)
permet un réglage précis de la tonalité sur les 3 gammes
de fréquences: BASSE (LOW), MEDIUM (MID) & AIGU
(HIGH).
• Utilisez le réglage HIGH pour ajuster les fréquences
aigues.
• Utilisez le réglage MEDIUM pour ajuster les fréquences médiums.
• Utilisez le réglage LOW pour ajuster les fréquences
basses.
Le potentiomètre FADER DE VOLUME (43) mesure
60mm & permet de régler le volume de chaque voie
(Réglable de -∞ à 0 dB).
SORTIE MASTER (PRINCIPALE)
SORTIE AUXILIAIRE (BOOTH)
Le CDMP-7000 possède un potentiomètre SORTIE AUXILIAIRE (BOOTH) (49) permettant le réglage du niveau
de la SORTIE AUXILIAIRE (C). Cette dernière permet
l’utilisation d’un second système de diffusion ou d’un
système de monitoring (Retour).
reglages casque
ASSIGNATION DE LA PREECOUTE
CASQUE
Chaque voie du CDMP-7000 possède une touche SELECTEUR PREECOUTE/INDICATEUR (35) permettant
de sélectionner la voie en pré-écoute seule ou associée
à la SORTIE MASTER. En appuyant sur cette touche, la
voie sera assignée à la pré-écoute & l’indicateur à LED
s’illuminera.
CONTRO LE DU MIX DANS LE CASQUE
Le potentiomètre CONTROLE DU MIX DANS LE
CASQUE (36) permet de mélanger la sortie casque
(CUE) avec le programme en cours de diffusion (PGM)
via la SORTIE MASTER.
Le potentiomètre VOLUME CASQUE (37) permet
d’ajuster le volume du casque.
Le sélecteur SELECTION SORTIE CASQUE (38) permet
de choisir entre une écoute stéréo via le potentiomètre
CUE/PGM ou une écoute mono diffusant la pré-écoute
(CUE) sur la voie GAUCHE & en diffusant le programme
en cours de diffusion (PGM) sur la voie DROITE de la
sortie casque.
Le CDMP-7000 possède un potentiomètre de réglage
de volume de la SORTIE MASTER (32).
Le VU-mètre (33) affiche les niveaux Gauche & Droit
(Stéréo) de la SORTIE MASTER.
*NOTE: Veillez à ne pas dépasser le 0dB (Leds rouge sur
l’indicateur de niveau). Ceci afin d’éviter toute distorsion
& risque d’endommagement des équipements inhérent.
Le potentiomètre REGLAGE DE BALANCE VOLUME
MASTER (34) permet d’ajuster les niveaux Gauche &
Droit de la SORTIE MASTER.
cdmp- 7000 manual • geminidj. com
64
Page 65

fonctions console de mixage
reglages crossfader
CROSSFADER
Le potentiomètre CROSS FADER (41) permet le passage
de la VOIE 2 à la VOIE 3. Ce dernier est facilement remplaçable par l’utilisateur (Un tournevis cruciforme suffit).
REGLAGES C R OSSFADER
Le CROSS FADER (41) possède 3 réglages: CROSS FADER START (39), CROSS FADER REVERSE (40) CROSS
FADER CURVE ADJUST (42).
La fonction CROSS FADER START (39) permet de
démarrer la lecture via l’utilisation unique du CROSSFADER (41). Déplacer le CROSSFADER vers le lecteur
en pré-écoute afin de démarrer la lecture sur ce dernier.
Lorsque le CROSSFADER est positionné à l’extrémité de
sa position, la lecture du lecteur opposé s’arrêtera alors
instantanément.
La touche CROSS FADER REVERSE (40) permet
d’inverser l’assignation des voies 2 & 3 au crossfader. La
voie 2 se retrouve ainsi assignée au côté droit & la voie 3
au côté gauche.
Le sélecteur REGLAGE COURBE CROSSFADER (42)
permet la sélection de deux types de courbe de
réponse: progressive & rapide.
.
reglages microphone
REGLAGES MICR O PHONE
Le CDMP-7000 possède deux entrées micro (Face avant
& face arrière) dont le réglage de volume s’effectue par
le potentiomètre REGLAGE VOLUME MICRO (46).
La CORRECTION 2 BANDES MICRO (47) permet de
modifier la tonalité du signal micro sur les bandes de
fréquences BASSES (LOW) & AIGUES (HIGH).
Le sélecteur à trois positions TALKOVER MICRO (48)
permet d’éteindre (OFF) ou d’allumer (ON) le signal
micro, ainsi que d’activer la fonction talkover qui permet d’atténuer de plusieurs dB le programme principal
(PGM) afin de donner priorité au signal micro.
65
cdmp- 7000 manual • geminidj. com
Page 66

dysfonctionnement
assistance technique
durant
la lecture
ERREURS CD
- Si un CD ne se lit pas, vérifiez que le CD soit chargé
correctement (sérigraphie vers le haut). Vérifiez la propreté du CD, l’absence de rayures, etc.
- Si un disque contient un fichier non compatible causant un problème de lecture ou l’absence de lecture,
maintenir enfoncée la touche EJECT (19) durant 4
secondes. L’appareil éjectera le disque & redémarrera
automatiquement le programme de fonctionnement de
l’appareil.
- Si le CD tourne, mais sans le son, vérifiez les câbles. Si
les connexions sont correctes, vérifiez l’amplificateur.
- Si le CD saccade, vérifiez sa propreté, l’absence de
rayures, etc. La couche optique du CD n’est pas forcément défectueuse. De nombreux CD sont créés hors
normes et provoquent des saccades sur de nombreux
lecteurs. Avant de renvoyer le produit en réparation,
essayez de lire un CD dont vous êtes sûr de la qualité.
ERREURS DE CARTE S D
- Si le produit ne lit pas la carte mémoire SD, vérifiez son
insertion correcte dans le port du CDMP-7000.
-Si un message ”Media err. Please Check Media Format
and Try Again” (”Erreur de périphérique — vérifiez son
format et essayez à nouveau”) s’affiche, cela signifie que
la carte USB n’est pas formatée correctement.
ERREURS MIDI
- Si l’ordinateur ne reconnaît pas le CDMP-7000, placezle hors tension et rebootez l’ordinateur.
- Si le logiciel DJ ne détecte pas le CDMP-7000, vérifiez
que vous utilisez la version la plus récente en téléchargeant les dernières mises à jour. Si les contrôles MIDI du
CDMP-7000 n’apparaissent pas dans le logiciel DJ, allez
sur le site geminidj.com pour y trouver téléchargements
et assistance technique.
ERREURS DE LECTEUR USB
Certains périphériques USB risquent de ne pas fonctionner correctement avec le CDMP-7000. Gemini n’accepte
aucune responsabilité pour toute perte de données.
Pour éviter la perte permanente de données, faites des
sauvegardes de vos données avant de connecter le périphérique USB au produit.
- Vous ne pouvez pas utiliser de Hubs USB (concentrateurs) avec le CDMP-7000.
- Si le produit ne lit pas la mémoire USB, vérifiez que la
clef soit complètement enfoncée dans le port USB.
- Si le message “Too many devices” s’affiche (“Trop de
périphériques”), vous utilisez un Hub USB (concentrateur). Vous ne pouvez pas utiliser de Hubs USB (concentrateurs) avec le CDMP-7000. Déconnectez le Hub USB
et connectez la clef USB directement au CDMP-7000.
- Si un message ”Media err. Please Check Media Format
and Try Again” (”Erreur de périphérique — vérifiez son
format et essayez à nouveau”) s’affiche, cela signifie que
le périphérique USB n’est pas formaté correctement.
cdmp- 7000 manual • geminidj. com
66
Page 67

assistance technique
dysfonctionnement
durant
la lecture
FAIBLE/ABSENCE DE SIGNAL
Si le CDMP-7000 ne diffuse pas un son normal ou n’envoie aucun signal, merci de vérifier les raisons possibles
qui suivent:
- Sélecteur de source positionné incorrectement.
- Connexions effectuées de façon incorrecte.
- Défaut(s) dans le(s) cordon(s) audio utilisé(s).
- Problème(s) de contact avec les connecteurs (Sales
ou/et défectueux).
DISTORSION EN SO RTIE
Si le signal du CDMP-7000 comprend de la distorsion
merci de vérifier les raisons possibles qui suivent:
- Niveau de SORTIE MASTER trop important.
- Gain en entrée trop élevé au niveau des sources reliées
à l’appareil.
SORTIE NUMERI QUE & ABSENCE DE
SIGNAL
En cas d’absence de signal sur la sortie numérique du
CDMP-7000, merci de vérifier les raisons possibles qui
suivent:
- Incompatibilité de la fréquence d’échantillonnage entre
le CDMP-7000 & l’appareil connecté.
- La sortie numérique connectée à une entrée analogique.
- Le cordon utilisé n’est pas un cordon optique S/PDIF
(Problème de compatibilité).
67
cdmp- 7000 manual • geminidj. com
Page 68

caractéristiques techniques
DONNÉES GÉNÉRALE S
Type.................................... Lecteur CD/USB/SD avec MIDI et HID
Type USB...........................................................................................Type B
Type de CD..........................................CD standard (12 cm et 8 cm)
Alimentation....................................................100/240 Vca, 60/50 Hz
Consommation électrique..............................................................10 W
Dimensions.......................................................... 333 x 304 x 114 mm
Poids......................................................................................................3,3 kg
AUDIO ANALOGIQUE
Quantisation........................1 Bit linéaire/canal, Laser 3 faisceaux
Suréchantillonnage..........................................................................8 fois
Bande passante:
LIGNE ....................................................................... 20 Hz - 20 kHz
PHONO ..................................20 Hz - 20 kHz (RIAA +/-0.5dB)
MICRO .................................................................... 20 Hz to 20 kHz
Rapport Signal/Bruit (A la puissance nominale):
LIGNE .......................................................................................... >80dB
PHONO ....................................................................................... >70dB
MICRO ......................................................................................... >70dB
Distorsion Harmonique Totale:
LIGNE ........................................................................................... <0.01%
PHONO……… ................................................................................<0.05%
MICRO ............................................................................................ <0.1%
Impédance standard en entrée/Impédance entrée:
AUX....................................................................................... 0dBV/10kΩ
PHONO/LIGNE……......................... -40dBV/47kΩ, 0dBu/1 47kΩ
MICRO...................................................-50dBV/>1kΩ (Symétrique)
Impédance standard en sortie/Charge impédance minimum:
MASTER (Symétrique).................................................. +6 dBv/1kΩ
MASTER (Asymétrique)................................................... 0dBv/1kΩ
AUXILIAIRE (BOOTH) (Asymétrique)........................0dBv/1kΩ
ENREGISTREMENT..............................................................0dBv/1kΩ
CASQUE ............................................. 200mW/200Ω / THD 0.3%
caractéristiques
AUDIO NUM ÉRIQUE
Type de sortie...................................Numérique coaxiale (S/PDIF)
Format de sortie..........................................................44,1 kHz, 16-Bits
USB AUDIO
Résolution........................................................................24-Bits, 16-Bits
Fréquence d’échantillonnage........................192, 96, 48, 44,1 kHz
CARAC TÉRISTIQUES ET APPARENCE SUJETTES
À MODIFICAT IONS SANS PRÉAVIS, DA NS UN BUT
D’AM ÉLIORATION DE NOS PRODUI TS.
cdmp- 7000 manual • geminidj. com
68
Page 69

deutsch
BEDIENUNGSHANDBUCH
Page 70

cdmp- 7000 manual • geminidj. com
70
Page 71

einleitung
Herzlichen Dank für den Kauf unseres Gemini CDMP-7000. Mit ihren fortschrittlichen und modernen Technologien auf dem Gebiet plattformübergreifender Konnektivität und Soundreproduktion erleichtert Ihnen
die Gemini Produktlinie nicht nur die Arbeit, sondern setzt auch neue Maßstäbe für DJ- und Pro AudioGeräte. Bei entsprechender Pflege und Wartung leistet Ihr CDMP-7000 über Jahre hinaus zuverlässige
und störungsfreie Dienste. Auf alle Gemini Produkte erhalten Sie eine 1-jährige beschränkte Garantie*.
vorbereitung für
den einsatz
Ihr CDMP-7000 wurde mit folgendem Zubehör ausgeliefert:
(1) Netzkabel
(1) Bedienungshandbuch
(1) Garantiekarte
vorsichtsmassnahmen
1 Betreiben Sie diesen CD-Player nicht bei Temperaturen unter
5°C/41°F oder über 35°C/95°F.
2 Setzen Sie dieses Gerät keinen tropf enden oder spritzenden
Flüssig kei ten aus und stellen Sie keine mit Flüssigkeit gefüllten Objekte, z. B. Vasen, auf das Gerät.
3 Stellen Sie das Gerät an einem sauberen und trockenen Stan-
dort auf.
4 Stellen Sie das Gerät nicht auf instabilen Oberflächen auf.
5 Ziehen Sie das Netzkabel immer an seinem Stecker und nicht
am Kabel aus der Netzsteckdose.
6 Entfernen Sie nicht die Abdeckung oder die Bodenschrauben
des Geräts, um Stromschläge zu verhindern.
7 Im Innern des Geräts befinden sich KEINE VOM ANWENDER
WARTBAREN BAUTEILE. Überlassen Sie die Wartung qualifi-
zierten Technikern.
lebenslanger hörgenuss
Der Kauf eines hochwertigen Audiogeräts ist erst der Anfang
des Hörgenusses. Planen Sie jetzt, wie Sie die Freude und
Begeisterung, die dieses Produkt für Sie bereithält, maximieren
können. Wir als Hersteller und die Consumer Electronics Group
der Electronic Industries Association möchten, dass Sie das
Gerät optimal nutzen, indem Sie es mit sicherer Lautstärke betreiben. Laut und deutlich hörbar, aber ohne lästiges Geplärre
und Verzerrungen und vor allem ohne Gehörschäden. Schall
ist trügerisch. Mit der Zeit gewöhnt man sich an immer höhere
Lautstärken und empfindet sie als angenehm. Und was dann
“normal” klingt, kann schon zu laut und gehörschädigend sein.
Schützen Sie sich vor diesem Irrtum, indem Sie Ihre Anlage auf
einen sicheren Pegel einstellen, BEVOR sich Ihr Gehör anpasst.
Um eine sichere Lautstärke festzulegen, beginnen Sie mit einer
niedrigen Einstellung des Pegelreglers. Erhöhen Sie die Lautstärke langsam, bis Sie den Sound als angenehm, klar und ohne
Verzerrungen wahrnehmen. Wenn Sie die passende Lautstärke
gefunden haben, lassen Sie den Regler auf dieser Position stehen. Die jetzt investierte Zeit wird zukünftige Hörschäden oder
Hörverlust verhindern helfen. Dies ist die Basis für lebenslangen
Hörgenuss.
Vernünftig eingesetzt, wird Ihnen Ihre neue Soundanlage
jahrelang Spaß und Freude bereiten. Da Gehörschäden durch
lauten Lärm häufig erst bemerkt werden, wenn es zu spät ist,
empfehlen wir als Hersteller gemeinsam mit der Consumer
Electronics Group der Electronic Industries Association, dass
Sie sich nicht über längere Zeit exzessivem Lärm aussetzen.
Beachten Sie die folgende Liste von Schallpegeln zu Ihrem
eigenen Schutz.
8 Reinigen Sie das Gerät nicht mit chemischen Lösungsmitteln.
9 Halten Sie die Laser-Einheit sauber, indem Sie den Schacht
geschlossen halten.
10 Bewahren Sie das Handbuch vorsorglich auf.
sicherheitsspezifikationen
Eigenschaften der Laser-Diode
Material: Ga - Al - As
Wellenlänge: 755 - 815 nm (25° C)
Laser-Ausgabe: Dauerstrichlaser, max. 0,5 mW
• Wenn in den USA mit diesem Gerät Probleme auftreten, rufen
Sie bitte den Gemini Kundenservice unter 1 (732) 346-0061 an.
Versuchen Sie nicht, das Gerät Ihrem Händler zurückzugeben.
71
30 dB - ruhige Bibliothek, leises Flüstern
40 dB - Wohnzimmer, Kühlschrank, Schlafzimmer ohne
Verkehrslärm
50 dB - geringer Verkehrslärm, normale Unterhaltung,
ruhiges Büro
60 dB - Klimaanlage in 6 Meter Entfernung, Nähmaschine
70 dB - Staubsauger, Haartrockner, belebtes Restaurant
80 dB - durchschnittlicher Verkehrslärm, Müllabfuhr, Wecker
einen halben Meter entfernt
Folgender Lärm kann über längere Zeit gefährlich werden:
90 dB - U-Bahn, Motorrad, LKW-Verkehrslärm, Rasenmäher
100 dB - Müllwagen, Kettensäge, Presslufthammer
120 dB - Rock-Konzert direkt vor den Boxen, Donner
140 dB - Gewehrschuss, Düsenflugzeug
180 dB - Raketenstartrampe
Informationen mit freundlicher Genehmigung der Deafness Research Foundation.
cdmp- 7000 manual • geminidj. com
Page 72

einleitung
gerät reinigen
Reinigen Sie den CDMP-7000 nur mit einem trockenen, weichen
Tuch und/oder Druckluft. Bei hartnäckigen Verschmutzungen
verwenden Sie eine 2:1 Lösung aus destilliertem Wasser und
30% Isopropylalkohol. Verwenden Sie keine chemischen Reinigungsmittel, wie Benzin, Farbverdünner, Bleichmittel oder Chlorwasserstoff, um das Gerät nicht zu beschädigen.
betriebsbedingungen
Für optimale Betriebsbedingungen sollte die Umgebungstemperatur zwischen +5º C und +35º C (+41º F - +95º F) liegen.
Abweichende Betriebstemperaturen können zu schlechter
Lesbarkeit des Displays, Überhitzung oder systemweiter Instabilität des Geräts führen. Setzen Sie den Player keinem direkten
Sonnenlicht aus.
In einer Festinstallation sollte das Gerät auf einer stabilen Oberfläche und möglichst weit entfernt von Vibrationen platziert
werden. Obwohl das Gerät immun gegenüber Vibrationen ist,
sind es die mit ihm verwendeten Speichergeräte (besonders
Festplatten) meistens nicht. Platzieren oder betreiben Sie den
Player auch nicht auf oder in der Nähe von wärmeerzeugenden
Quellen, wie Verstärkern oder Spotlights.
abspielbare formate
und discs
Der CDMP-7000 spielt Discs (CD kompatibel) sowie Musikdateien von USB-Speichermedien ab. Folgende Dateiformate werden
unterstützt:
• WAV (16-Bit PCM, Sampleraten von 8 kHz, 11,025 kHz, 12
kHz, 16 kHz, 22,50 kHz, 24 kHz, 32 kHz, 44,1 kHz, 48 kHz)
• MP3 (44,1 kHz, MPEG 1 stereo, Layer III)
• AAC (44,1 kHz, stereo, AAC Core, AAC Plus, AAC Plus v2)
• AIFF (44,1 kHz, stereo)
midi- steuerung
verwenden
Der CDMP-7000 kann über seine Tasten und Wahlräder auch
MIDI-Daten an einen Computer übertragen und dort die Parameter und Playback-Regler von DJ Softwares steuern. Das
Audiomaterial des Computers kann auch über den CDMP-7000
wiedergegeben werden.
Bevor Sie den CDMP-7000 als Audiogerät betreiben, verbinden
Sie ihn über ein USB-Kabel mit Ihrem PC/MAC, damit dieser den
Player erkennen kann. Öffnen Sie Ihre DJ Software und wählen
Sie den CDMP-7000 in deren Einstellungen als Ausgabegerät.
Detaillierte Anleitungen finden Sie im Bedienungs handbuch
Ihrer DJ Software.
anschluss an
den
Der CDMP-7000 ist ein Plug & Play-Gerät, das keine SoftwareInstallation benötigt. Die Audio- und MIDI-Treiber des CDMP-7000
sind PC- und MAC-kompatibel.
• Um den CDMP-7000 mit einem Computer unter Windows
zu verwenden, starten Sie zuerst Ihren PC und schließen
dann den CDMP-7000 an. Der CDMP-7000 konfiguriert die
standard WDM-Treiber. Wählen Sie den CDMP-7000 als Audiogerät. Man kann auch die ASIO-Treiber, z. B. ASIO4ALL,
für die Verwendung mit dem CDMP-7000 konfigurieren.
• Um den CDMP-7000 mit einem Computer unter einem
MAC-Betriebssystem zu verwenden, starten Sie zuerst Ihren
MAC und schließen dann den CDMP-7000 an. Verwenden
Sie die standard CORE Audiotreiber des Systems und
wählen Sie den CDMP-7000 als Gerät.
computer
Folgende Dateisysteme auf Memory Sticks werden unterstützt:
• FAT
• FAT32
• HFS+
• NTFS
cdmp- 7000 manual • geminidj. com
72
Page 73

player- übersicht
oberseite
25
30
11 12 13 14 15
10
9
8
7
6
5
4
3
2
16 17 18 19 20
21
22
23
24
26
27
28
29
regler
1
Power-Taste
2
Play/Pause / II
3
Cue
4
Search /
5
Track Search | / |
6
Reverse
7
Jog Adjust
8
Loop in / Loop out/Adjust
/ Reloop/Exit
9
Memo
Hot Cues
10
11
Auto Cue / Time
12
Text Mode / Touch on/off
BPM
13
Lock
14
15
LCD Touchdisplay
16
Effekte
17
Wählrad / Select /
Contrast
18
Back
19
Eject
20
Source Select
21
Jog Start Time
22
Jog Stop Time
23
Effekt dry/wet
24
Vinyl
25
Slip-Modus
26
Range
27
Master Tempo
28
Pitch bend [+] [-]
29
Pitch Control Fader
30
Jogwheel
73
cdmp- 7000 manual • geminidj. com
Page 74

top view
45
44
43
31 31 31
32
33
34
35
36
37
mixer- übersicht
Kanal-Eingangs-Wahlschalter
31
Master-Volume
32
Pegelanzeige
33
34
Master-Balance-Regler
Kophörer-Cue-Schalter/-Anzeige
35
36
Kopfhörer-Mix-Regler
Kopfhörer-Pegel-Regler
37
Kopfhörer-Ausgangs-Schalter
38
Crossfader-Start
39
Crossfader-Reverse
40
Crossfader
41
42
Crossfader-Curve-Einstellung
front view
38
39
40
4142
Kanal-Fader
43
3-Band-Kanal-Equalizer
44
45
Kanal-Gain-Regler
Mikrofon-Pegel-Regler
46
47
2-Band-Mikrofon-Equalizer
48
Mikrofon-Talkover-Schalter
49
Booth-Pegel-Regler
46 49
L O
cdmp- 7000 manual • geminidj. com
47
48
74
Page 75

anschlüsse- übersicht
rückseite
M
AN C D E F G H I
STROMVERSORGUNG
Schließen Sie das Netzkabel des CDMP-7000 an die AC
IN (A) Buchse an. Drücken Sie den POWER OFF/ON (N)
Schalter, um das Gerät zu starten.
CINCH-PHONO / LINE-EINGÄNGE
Der CDMP-7000 bietet zwei (2) umschaltbare Stereo LINE/
PHONO-CINCH-EINGÄNGE (K) für den Anschluss von
Standard-Stereo-Cinch-Kabeln. Mit den beiden PHONO/
LINE-SCHALTERN (J) legen Sie fest, ob der Eingang als
PHONO-Eingang (für Plattenspieler) oder als LINE-Eingang
(für MP3-/CD-Player, Cassetten-Decks, etc.) arbeitet. In der
PHONO-Position sollten Sie einen Plattenspieler mit einem
magnetischen System verwenden. Vergessen Sie nicht, eine
Masseverbindung über die ERDUNGSSCHRAUBE (M) herzustellen, da es sonst zu einem Brummen kommen kann.
AUX-EINGAN
Der CDMP-7000 verfügt über zwei (2) Stereo-AuxEingänge. AUX1 (I) ist ein Stereo-Line-Cinch-Eingang und
AUX2 (H) ist ein Stereo-Line-Eingang mit 3,5-mm-Klinke.
Sie können an beide Eingänge jedes Line-Signal (MP3, CD,
Cassetten-Deck, etc.) anschließen.
MIKROFON-EINGANG
Der CDMP-7000 bietet zwei (2) Mikrofon-Eingänge: Eine ist
mit einer 6,3-mm-Klinkenbuchse ausgestattet, der zweite
verfügt über eine XLR-/6,3-mm-Klinke-Kombibuchse. Der
6,3-mm-Klinkeneingang akzeptiert sowohl symmetrische
als auch unsymmetrische Mikrofonsignale. Der XLR-/KlinkeKombieingang (L) verarbeitet über XLR symmetrische Mikrofonsignale, bei Nutzung der 6,3-mm-Klinkenbuchse können sowohl symmetrische als auch unsymmetrische Signale
angeschlossen werden. Mit dem MIC-VOLUME-Regler (46)
auf der Vorderseite stellen Sie den gewünschten Pegel der
angeschlossenen Mikrofone ein.
USB-EINGANG
Über den USB EINGANG (G) des CDMP-7000 können
Audio-Daten von einem Computer (PC/MAC) empfangen
werden. Schließen Sie dazu ein USB-Kabel an einen USBAnschluss Ihres Computers und den USB-EINGANG (G)
des CDMP-7000 an. Um den CDMP-7000 als Audio-Gerät
für Ihren Computer zu verwenden, wählen Sie den CDMP7000 in den Audio-Einstellungen des Computers aus.
CINCH-LINE-AUSGANG
J J LB K
Der CDMP-7000 bietet insgesamt drei verschiedene Stereo-Cinch-Ausgänge: REC, MASTER und BOOTH (C). Über
den MASTER-Ausgang stellen Sie die Verbindung zu Ihrem
Hauptverstärker oder Ihrer Beschallungsanlage her. An
den RECORD-Ausgang können Sie ein Aufnahmegerät anschließen, um die am Mixer des CDMP-7000 anliegenden Signale aufzunehmen. Der BOOTH-Ausgang kann sowohl zum
Anschluss von Monitor-Boxen oder auch für die Verbindung
mit einer weiteren Beschallungsanlage genutzt werden.
Wenn Sie den CDMP-7000 an einen Receiver anschließen
wollen, nutzen Sie ein Cinch-Kabel und einen CD- oder AUXEINGANG am Reciever. Sollte dieser keine CD- oder AUXEINGÄNGE haben, können Sie auch jeden anderen LINEEingang nutzen (auf keinen Fall aber die Phono-Eingänge).
SYMMETRISCHE XLR-AUSGÄNGE
Im AUSGANGS-BEREICH (B) steht ein separater SYMMETRISCHER-XLR-Ausgang jeweils für LINKEN und RECHTEN
Kanal des symmetrischen Stereo-Signals bereit.
CD1-/CD2-AUSGANG
Über die CD1-/CD2-Stereo-Cinch-Ausgänge (D) können
die Signale der beiden Media-Player direkt zu einem externen Mischer geschickt werden. Dabei wird die interne
Mixer-Sektion des CDMP-7000 vollständig umgangen.
USB-AUSGANG
Schließen Sie ein USB-Kabel an die USB-OUT-BUCHSE (F)
auf der Rückseite an und verbinden es mit einem freien
USB-Anschluss an Ihrem Computer. Danach können Sie
den CDMP-7000 im MIDI-Modus verwenden.
DIGITAL-AUSGANG
Schließen Sie ein S/P-DIF-Kabel (nicht im Lieferumfang
enthalten) an den DIGITAL-OUT des CDMP-7000 (E) an
und verbinden es mit dem DIGITAL-IN-Anschluss eines anderen Geräts. Jetzt kann ein digitales Signal vom CDMP7000 an das andere Gerät gelangen. Der DIGITAL-OUT
eignet sich zum Beispiel sehr gut, um einzelne Signale
oder einen kompletten Mix mit einer DAW aufzunehmen..
KO PFHÖRE R-AUSGÄNGE
Der CDMP-7000 bietet zwei Kopfhörer-Ausgänge: Einer
ist mit einer 6,3-mm-Klinkenbuchse ausgestattet, der andere verfügt über eine 3,5-mm-Miniklinken-Buchse. Über
die KOPFHÖRER-AUSGÄNGE (O) können Sie Musik vor
der Wiedergabe über die Master-Ausgänge vorhören.
75
cdmp- 7000 manual • geminidj. com
Page 76

lcd touchdisplays
VINYL
HOLD
CD
USB
SD
MIDI
1
3
4
7
9
displays
1
ZEITLEISTE
Zeigt die aktuelle Position des Tracks.
2
ZEITDISPLAY
Zeigt den aktuellen Zeitwert des Tracks an.
3
BPM
Zeigt im Auto und Manual BPM-Modus den
aktuellen BPM-Wert an. Oder zeigt die TempoInformation des ID3 Tags an.
4
2
5
6
8
10
TEMPO
Wenn MASTER TEMPO auf OFF gesetzt ist, wird
in diesem Feld PITCH angezeigt. Wenn MASTER
TEMPO auf ON gesetzt ist, wird in diesem Feld
TEMPO angezeigt.
5
PITCH/MT VALUE
Zeigt den aktuellen PITCH/TEMPO-Wert an.
6
RANGE
Zeigt den aktuell gewählten PITCH/TEMPOBereich an.
jogwheel displays
1
3
VINYL
7
EFFEKTPARAMETER-LEISTE
Zeigt den Effektparameterwert an.
8
TRACK-INFO-DISPLAY
Zeigt Track-Informationen an.
9
LIBRARY BROWSER
Zeigt abspielbare Tracks und Ordner an.
10
TRACK-WELLENFORM
Visuelle Darstellung des Audiomaterials des
geladenen Tracks. Ein Druck auf die Wellenform
ändert die Vergrößerung. Verfügbare Werte: 3,2
Sekunden, 6,5 Sekunden, 12 Sekunden und 24
Sekunden.
1
TRACK DISPLAY
Simuliert einen mit 33 1/3 RPM laufenden Plattenspieler und zeigt die aktuelle Track-Position an.
2
CUE-PUNKT/S LIP DISPLAY
Zeigt den CUE-Punkt an, der dem Track zugewie sen ist. Im SLIP-Modus wird die normale
Playback-Position angezeigt (Seite 14).
2
4
3
JOGWHEEL TOUCHDISPLAY
Das Jogwheel Touchdisplay leuchtet, wenn man
auf das Jogwheel drückt.
cdmp- 7000 manual • geminidj. com
4
VINYL
Das VINYL-Display leuchtet, wenn der VINYLModus aktiviert ist.
76
Page 77
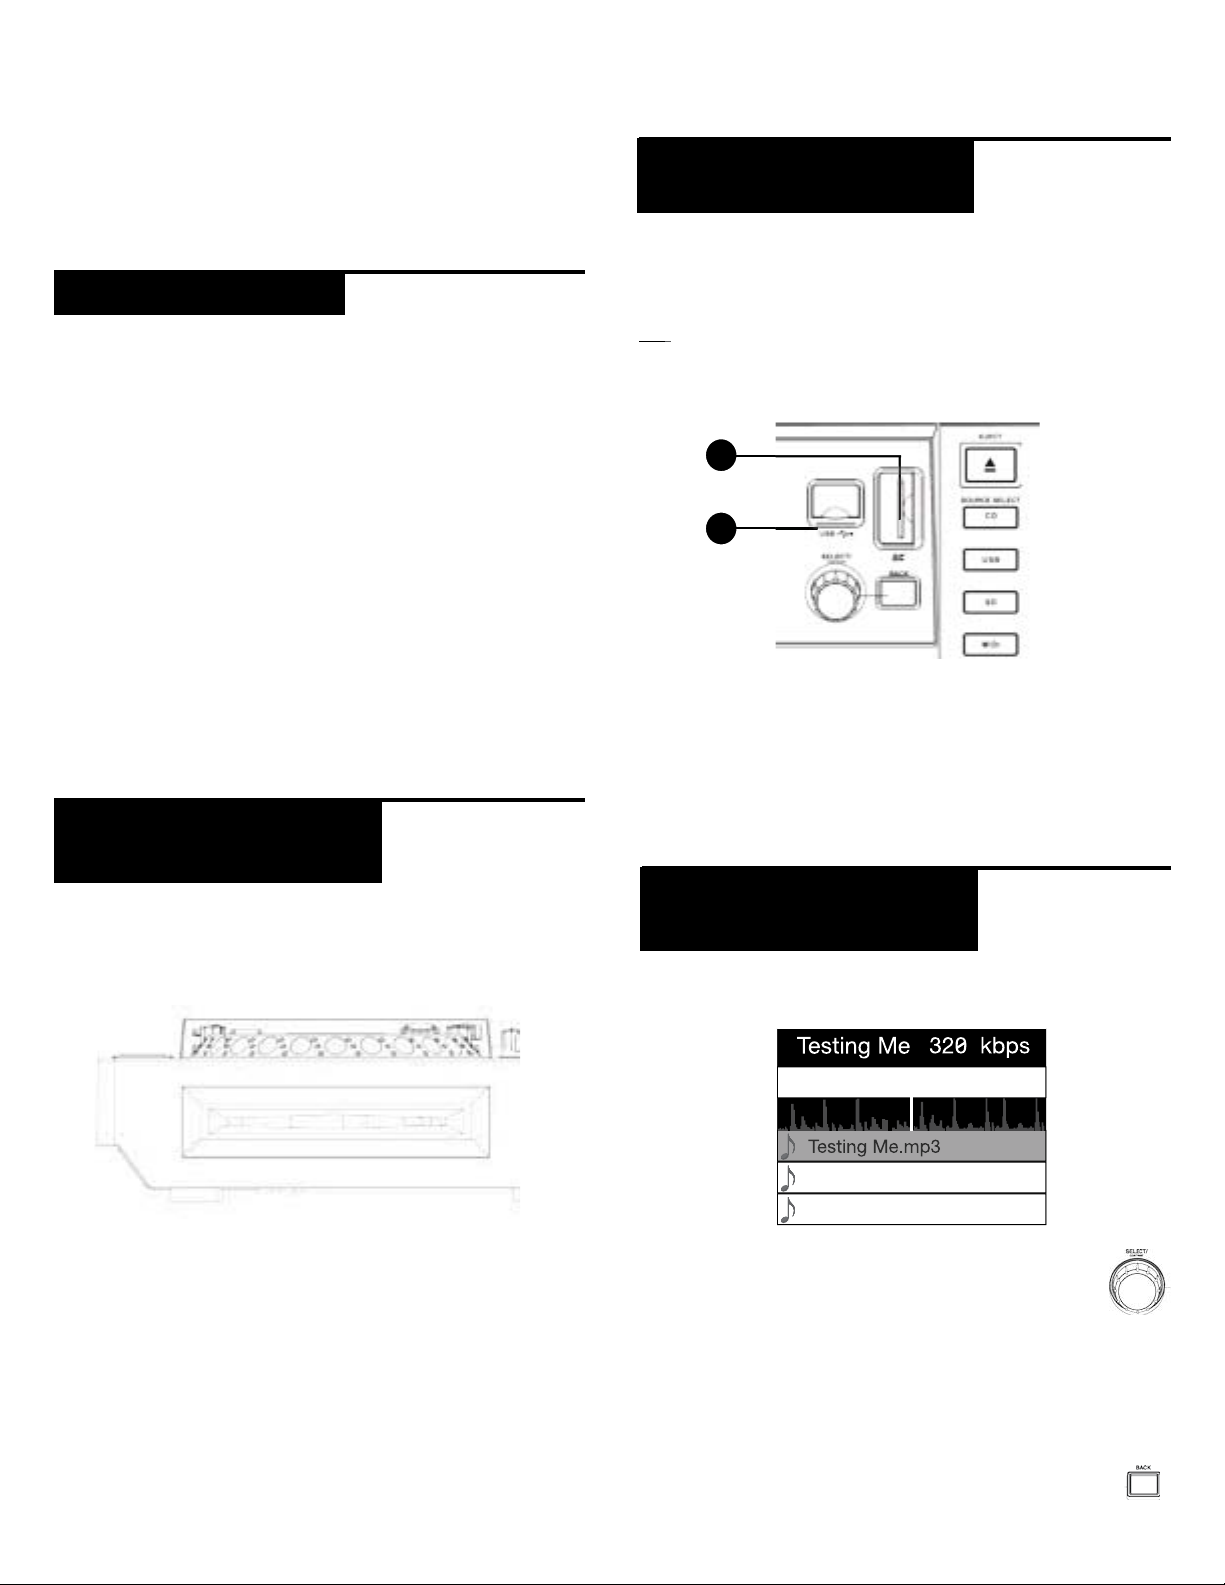
discs und speichermedium laden
Nachdem Sie alle Kabel angeschlossen haben, können Sie
den CDMP-7000 mit einem Druck auf die POWER-Taste
(1) einschalten. Nochmaliges Drücken schaltet das Gerät
wieder aus.
source select
Mit SOURCE SELECT (20) können Sie das Medium wählen,
von dem Sie Musik abspielen möchten:
CD Drücken Sie die CD-Taste, um Musik vom CD-Lauf-
werk abzuspielen.
USB Drücken Sie die USB-Taste, um Musik von einem
USB-Gerät abzuspielen.
SD Drücken Sie die SD-Taste, um Musik von einer SD/
SDHC Card abzuspielen.
MIDI Ein Druck auf die MIDI-Taste schaltet das Gerät
in den MIDI-Modus mit bidirektionaler Unterstützung.
In diesem Modus werden alle Regleraktionen (Tastendrücke, Bewegungen der Pitch-Potis und Drehungen
am Wählrad) vom CDMP-7000 registriert und via USB
MIDI zum PC übertragen. So kann man beispielsweise
die Parame ter einer DJ Software steuern (weitere Infos
finden Sie auf Seite 9).
discs
laden/ auswerfen
usb/ sd- medien
laden/ auswerfen
USB Stecken Sie den USB Memory Stick in den USB-An-
schluss (E) auf der Oberseite des CDMP-7000. Nach dem
Laden des Sticks werden die darauf gespeicherten Ordner
und Tracks auf dem LCD Touchdisplay angezeigt.
SD Stecken Sie die SD Card in den SD-Kartenschacht (F)
auf der Oberseite des CDMP-7000. Nach dem Laden der
Card werden die darauf gespeicherten Ordner und Tracks
auf dem LCD Touchdisplay angezeigt.
E
F
Um den USB Stick und die SD Card auszuwerfen, wählen
Sie mit SOURCE SELECT (20) eine andere Option und entfernen das USB-Speichermedium oder die SD Card. Um die
SD Card auszuwerfen, drücken Sie sie nach unten. Wenn
die SD Card hochspringt, ziehen Sie sie vertikal heraus.
*HINWEIS: Vor dem Ausschalten des CDMP-7000 sollten
Sie alle USB Memory Sticks oder SD Cards entfernen, um
eine Beschädigung der Daten zu vermeiden.
Das SLOT-IN CD-ROM Laufwerk (siehe unten) dient zum
Laden, Auswerfen und Abspielen von CDs und kann Discs
der Größe 12 cm und 8 cm aufnehmen.
Drücken Sie die EJECT-Taste (19), um die Disc aus dem
SLOT-IN CD-ROM auszuwerfen. Im PLAY-Modus wird die
Disc nicht ausgeworfen.
tracks/ ordner
durchsuchen
Auf dem Browser Display werden alle abspielbaren Dateien und Ordner auf CD, USB Memory Stick oder SD Card
angezeigt.
Drehen Sie das WÄHLRAD (17), um den Browser
zu durchsuchen. Alternativ können Sie für die
Suche auch den Bildschirm im Browser DisplayBereich berühren.
Um einen Ordner zu öffnen, markieren Sie ihn und drücken
auf das WÄHLRAD (17), um den Ordner zu wählen. Um
einen Track zu laden, markieren Sie ihn und drücken nochmals auf das WÄHLRAD (17).
Um zum vorherigen Ordner zurückzukehren, drücken Sie die BACK-Taste (18).
77
cdmp- 7000 manual • geminidj. com
Page 78

playback- regler
Nachdem Sie einen Track geladen haben, wird der
TRACK TITEL auf dem LCD Touchscreen angezeigt.
play/ pause
Ein Druck auf PLAY/PAUSE / ll (2) startet die Wiedergabe des gewählten Tracks. Ein erneuter Druck auf
PLAY/PAUSE
aktuellen Position auf Pause.
• Wiedergabe vor dem Auswerfen der Disc auf Pause
schalten:
-Bevor Sie eine Disc auswerfen können, müssen Sie
den Player auf PAUSE schalten.
Im Play-Modus wird die Disc nicht ausgeworfen.
/ ll (2) schaltet die Wiedergabe an der
search
reverse
Ein Druck auf REVERSE (6) spielt den Track rückwärts ab.
pitch bend
Ein Druck auf PITCH BEND [+] [-] (28) erhöht
die Tonhöhe um bis zu +100% oder verringert
sie um bis zu -100% der ursprünglich eingestellten Tonhöhe. Wenn man die Tasten loslässt, wird die Tonhöhe
auf die ursprüngliche Einstellung zurückgesetzt.
pitch/tempo
einstellen
Durch Bewegen des PITCH CONTROL FADERs
(29) in Richtung [+] können Sie die Tonhöhe/das
Tempo erhöhen bzw. in Richtung [-] verringern.
Der aktuelle PITCH/TEMPO-Wert wird auf dem
LCD Touchdisplay angezeigt.
Ein Druck auf SEARCH
in der gewählten Richtung (vorwärts/rückwärts). Indem
Sie SEARCH
Track im Schnelllauf in der gewählten Richtung durchsuchen (vorwärts/rückwärts).
/ (4) gedrückt halten, können Sie den
/ (4) durchsucht den Track
track search
Ein Druck auf TRACK SEARCH
Anfang des nächsten Tracks. Ein Druck auf TRACK
SEARCH l
Tracks zurück. Ein zweifacher Druck auf TRACK SEARCH
l
(5) kehrt zum Anfang des vorherigen Tracks zurück.
• Ordner durchsuchen:
-Wenn Dateien in Ordnern untergebracht sind,
werden nur Tracks innerhalb des gleichen Ordners
durchsucht.
• Autocue-Funktion:
-Bei aktivierter Autocue-Funktion hält der Player
am Track-Anfang an.
(5) springt an den Anfang des aktuellen
l (5) springt an den
Ein Druck auf die RANGE-Taste (26) legt den
Bereich des PITCH CONTROL FADERs auf +/4%, 8%, 16%, 24%, 50% und 100% fest.
master tempo
Mit MASTER TEMPO (27) kann man das Tempo
variieren, ohne die Originaltonhöhe zu verändern.
Der aktuelle Modus, entweder PITCH oder TEMPO, wird
auf dem LCD Touchdisplay angezeigt.
• BEREICH im MASTER TEMPO-Modus:
-Im MASTER TEMPO-Modus sind die Bereiche +/4%, 8%, 16%, 24% ,50% und 100% wählbar.
• Klangqualität:
-Da das Soundmaterial im MASTER TEMPO-Modus
digital bearbeitet wird, können bei drastischen Tempoeinstellungen Klangqualitätsverluste auftreten.
cdmp- 7000 manual • geminidj. com
78
Page 79

playback- regler
bpm
Halten Sie die BPM-Taste (13) gedrückt, um zwischen
verschiedenen BPM-Modi umzuschalten: BPM ID3 /
AUTO BPM / MANUAL BPM.
ID3 Wenn der BPM-Modus auf ID3 eingestellt ist, wird
die BPM-Information des ID3 angezeigt.
AUTO BPM Wenn der BPM-Modus auf AUTO BPM ein-
gestellt ist, werden die Taktschläge pro Minute (BPM)
automatisch berechnet und eine entsprechende Info
wird auf dem LCD im BPM-Feld angezeigt.
MANUAL BPM Wenn der BPM-Modus auf MANUAL
eingestellt ist, kann man mit der BPM-Taste (13) die
Taktschläge pro Minute (BPM) des abgespielten Audiomaterials einstellen, indem man mehrmals im gewünschten Tempo die Taste betätigt.
HINWEIS Wenn ein BPM-Wert in der Datei-Info des ID3
Tags vorhanden ist, wird der Wert ins Gerät geladen und
angezeigt.
bpm lock
Mittels BPM LOCK-Funktion kann der Anwender den
gewünschten BPM-Wert durch Drehen des Wählrads
einstellen und durch einen Druck auf das Wählrad festlegen. Nach der Aktivierung des Modus wird der Pitch/
Master Tempo-Wert automatisch dem gewünschten
BPM-Wert angepasst.
cue- regler
CUE-PUNKT SE TZEN
Während die Wiedergabe läuft, drücken Sie
PLAY/PAUSE
zu schalten. Drücken Sie dann CUE (3), um an
der aktuellen Position den Cue-Punkt zu setzen. Ist der
CUE-Punkt gesetzt, leuchtet die CUE-Anzeige und die
Markierung des CUE-Punkts auf dem Jogwheel-Display.
/ ll (2), um den Track auf Pause
CUE-PUNKT NEU EINSTELLEN
Nachdem der Cue-Punkt programmiert wurde, drücken
Sie PLAY/PAUSE
auf Pause zu schalten. Drücken Sie SEARCH
oder drehen Sie das Jogwheel, um die Cue-Position
einzustellen. Drücken Sie CUE (3), um den Cue-Punkt
auf die aktuelle Position zu setzen.
/ ll (2), um den Track am Cue-Punkt
/ (4)
ZUM CUE-PUNKT ZURÜCKKEHREN
Während die Wiedergabe läuft und nachdem der CuePunkt programmiert wurde, können Sie das Gerät durch
Drücken von CUE (3) am programmierten Cue-Punkt auf
PAUSE schalten (die PLAY/PAUSE-TASTE blinkt und die
CUE LED leuchtet). Wenn Sie die CUE-Taste gedrückt
halten, wird die Preview-Funktion aktiviert, mit der Sie
einen Stutter Start oder eine normale Wiedergabe ab
dem programmierten CUE-PUNKT auslösen können.
Wenn Sie die CUE-Taste loslassen, kehrt die CD zum
voreingestellten CUE-Punkt zurück.
Um die LOCK-Funktion zu aktivieren, stellen Sie den
gewünschten BPM-Wert ein und drücken die LOCKTaste (14).
Um die LOCK-Funktion zu deaktivieren, drücken Sie
noch mals die LOCK-Taste (14).
HINWEIS: Der Bereich gültiger BPM-Werte beträgt 80 –
196 BPM.
79
AUTO CUE
Die AUTO CUE-Funktion (11) setzt den Cue-Punkt
direkt vor den Beginn des Sounds und überspringt somit den anfänglichen lautlosen Abschnitt des
Tracks. Drücken Sie AUTO CUE (11), um diese Funktion
zu aktivieren.
cdmp- 7000 manual • geminidj. com
Page 80

playback- regler
cue- regler fortsetzung loop-regler
HOT C UES SETZEN
Drücken Sie im Playback- oder Pause-Modus die
HOT CUE-Tasten 1, 2 oder 3 (10) an der Stelle im
Track, an der das HOT CUE gesetzt werden soll.
Nach dem Tastendruck sollte das programmierte
HOT CUE (1, 2 oder 3) leuchten.
Um einen Hot Cue zu löschen, drücken Sie MEMO
(9) und wählen den zu löschenden Hot Cue aus.
HOT C UES ABSPIELEN
Stellen Sie vor der Wiedergabe von Hot Cues sicher,
dass MEMO (9) nicht aktiviert ist.
Drücken Sie im Playback- oder Pause-Modus die HOT
CUE-Taste 1, 2 oder 3 (10), um die Wiedergabe sofort an
der im HOT CUE programmierten Position zu starten.
Abb. LOOP IN / LOOP OUT/ADJUST / RELOOP/EXIT (8)
LOOP SE TZEN
Drücken Sie während der Wiedergabe die LOOP
IN-Taste (8) an der gewünschten Startposition des
Loops (Loop in Punkt).
Drücken Sie LOOP OUT / ADJUST (8) an der
gewünschten Endposition des Loops (Loop out
Position). Nachdem der Loop out-Punkt gesetzt
ist, beginnt die Loop-Wiedergabe am Loop in-Punkt.
LOOP NEU EINSTE LLEN
Um einen bereits gesetzten Loop neu einzustellen,
drücken Sie die OUT/ADJUST-Taste (8). Die LOOP
IN-Taste (8) blinkt jetzt nicht mehr.
• Zum Verändern der Loop-Länge drehen Sie das Jogwheel (30) nach rechts, um den Loop zu verlängern,
und nach links, um den Loop zu verkürzen.
LOOP DEAKTIVIER EN
Drücken Sie bei aktiviertem Loop die RELOOP/
EXIT-Taste (8), um den Loop zu deaktivieren. Die
Wiedergabe wird nach dem Loop out-Punkt fortgesetzt.
ZU EINEM LOOP ZURÜC KKEHREN
Nach der Deaktivierung eines gesetzten Loops
können Sie während der Wiedergabe die
RELOOP/EXIT-Taste (8) drücken, um den zuletzt
gesetzten Loop zu reaktivieren. Die Wiedergabe beginnt
am Loop in-Punkt.
cdmp- 7000 manual • geminidj. com
80
Page 81

effekt- regler
effekt- sektion
Der CDMP-7000 verfügt über sechs integrierte Effekte:
FLTR, FLANGER, ECHO, WAH, TRANCE und BUBBLE.
FLTR Der FLTR-Effekt ist ein Bandpass-Filter, das je nach
Position der EFFEKTPARAMETER-LEISTE entweder die
hohen oder tiefen Frequenzen herausfiltert. In der Mitteposition wird der Sound nicht verändert. Je weiter man
den Effekt nach links einstellt, desto mehr Höhen werden
entfernt, bis nur noch Bässe übrigbleiben. Je weiter
man den Effekt nach rechts einstellt, desto mehr Bässe
werden entfernt, bis nur noch Höhen übrigbleiben.
FLANGER
Audio effekt. Er entsteht, wenn man zwei identische
Signale zusammenmischt und dabei ein Signal um einen
kleinen und sich langsam ändernden Betrag zeitlich verzögert. Durch Variieren der Zeitverzögerung entstehen
Frequenzauslöschungen, die sich im Frequenzspektrum
nach oben und unten bewegen. Schieben Sie die EFFEKTPARAMETER-LEISTE nach links, um den Flanger zu verlangsamen, und nach rechts, um ihn zu beschleunigen.
ECHO Der ECHO-Effekt wiederholt das Audiosignal
mehrmals und wird dabei immer leiser. Schieben Sie
die EFFEKTPARAMETER-LEISTE nach links, um die
Abstände der Wiederholungen zu verkürzen und deren
Signalpegel zu verringern, oder nach rechts, um die
Abstände der Wiederholungen zu verlängern und deren
Signalpegel zu erhöhen.
Der FLANGER-Effekt ist ein zeitbasierter
EFFEKT AKTIV IER EN
Während der Wiedergabe können Sie in
der EFFECT-Sektion (16) die gewünschten
Effekte aktivieren/deaktivieren.
Bei deaktiviertem VINYL-Modus (24) kann man
das FLTR / FLANGER / ECHO-Effektset verwenden. Bei aktiviertem VINYL-Effekt (24) kann man
das WAH / TRANCE / BUBBLE-Effektset verwenden.
EFFEKTE NEU EINSTELLEN
Mit dem EFFECTS DRY/WET-Regler (23) steuern
Sie die Mischung der unbearbeiteten und bearbeiteten Signale. Eine Rechtsdrehung erhöht den
Effektsignal-Anteil. Eine Linksdrehung erhöht den
Direktsignal-Anteil.
Die EFFEKTPARAMETER-LEISTE des LCD zeigt den
Wert des Effektparameters für das FLTR / FLANGER
/ ECHO-Effektset an. Das WAH / TRANCE / BUBBLE
Effektset besitzt keine einstellbaren Parameter.
Um den Parameter des FLTR / FLANGER / ECHO
Effektsets einzustellen, berühren Sie die EFFEKTPARAMETER-LEISTE auf dem LCD Touchdisplay und
setzen die Parameterposition an die gewünschte
Stelle. Man kann den Effektparameter auch mit dem
Jogwheel (30) einstellen. Eine Rechtsdrehung des
Jogwheels (30) erhöht den Parameterwert und eine
Linksdrehung verringert den Wert.
WAH Dieser AUTOWAH-Effekt arbeitet mit einem
Tiefpass-Filter mit variabler Cutoff-Frequenz, das eine
Resonanzspitze bei der Tiefpass-Eckfrequenz aufweist,
um eine menschliche Stimme zu emulieren, die ein lautmalerisches “Waaaah” oder die klangliche Umkehrung
“Aaaooow” erzeugt.
BUBBLE Der voreingestellte BUBBLE-Effekt kombiniert
die WAH- und ECHO-Effekte.
TRANCE Der TRANCE-Effekt arbeitet mit Amplituden-
modulationen, um den Audiopegel anzuheben oder
abzusenken.
HINWEIS: Wenn der Effekt gewählt wird, sollte dessen Name etwa 5 Sekunden lang an dieser Stelle des
Bildschirms angezeigt werden.
HOLD-MODUS
Ein Druck auf HOLD aktiviert/deaktiviert den Effekt HOLD-Modus. Dadurch wird der Effekt mit
den gewählten Parametern auf die Musik angewandt.
Wenn Sie einen Effekt bei deaktiviertem HOLD-Modus
aktivieren, können Sie dessen Effektparameter ändern
und die Wirkung hören, indem Sie das Jogwheel (30)
drehen oder den Finger entlang der Effektleiste des
LCD Touchscreens bewegen. Wenn die Rotation des
Jogwheels (30) aufhört, wird der Effekt deaktiviert.
Schalten Sie in den HOLD-Modus, um den Effekt
weiter hin zu aktivieren.
Man kann die Effekparameter auch im HOLD-Modus
ändern, wobei der Parameterwert erhalten und der
Effekt aktiviert bleibt.
81
cdmp- 7000 manual • geminidj. com
Page 82

jogwheel- regler
jogwheel- regler
JOGWHEEL EINSTELLEN
Mit dem JOG ADJUST-Drehregler (7) kann man
das Bediengefühl des Jogwheels einstellen.
Durch eine Linksdrehung des JOG ADJUSTReglers (7) erzeugen Sie ein trägeres, schwereres
Bedien gefühl. Durch eine Rechtsdrehung erzeugen Sie
ein lockereres, leichteres Bediengefühl.
VINYL-MODUS
Ein Druck auf die VINYL-Taste (24) aktiviert
den VINYL-Modus. Die Vinyl-Anzeige auf dem
Jogwheel-Display leuchtet.
Bei aktiviertem VINYL-Modus kann man ScratchingEffekte erzeugen, indem man auf das JOGWHEEL (30)
drückt und es dreht. Das JOGWHEEL (30) befindet sich
im SEARCH-MODUS, damit Sie den Track durchsuchen
können.
Die VINYL-Taste aktiviert auch das WAH / TRANCE /
BUBBLE Effektset an Stelle des FLTR / FLANGER /
ECHO Sets. In diesem Modus können Sie durch Drehen
des JOG WHEELs Scratchsounds erzeugen und Effektparameter ändern.
SLIP MIT SCRATCHING
Um die SLIP-Funktion beim Scratching einzusetzen,
aktivieren Sie den VINYL-Modus mit einem Druck
auf die VINYL-Taste (24). Aktivieren Sie den SLIP-Modus
mit einem Druck auf die SLIP-Taste (25).
Jetzt können Sie mit dem Jogwheel Scratch-Effekte
erzeugen, während darunter die normale Track-Wiedergabe unhörbar fortgesetzt wird. Die aktuelle Wiedergabeposition wird auf dem Jogwheel-Display angezeigt.
Sobald Sie das Jogwheel loslassen, wird die Track-Wiedergabe ab der mitlaufenden Playback-Position wieder
hörbar.
HINWEIS: Wenn Sie den SLIP-Modus mit Scratching
verwenden, werden keine SLIP Reverse-Verfahren ausgeführt.
SLIP MIT LOOPING
Um SLIP bei der Loop-Wiedergabe einzusetzen, aktivieren Sie den SLIP-Modus mit einem Druck auf die SLIPTaste (25).
START TIME / STOP TIME
Mit START TIME (21) des Jog-Modus regeln
Sie die Geschwindigkeit, mit der die Wiedergabe in den Normalzustand zurückkehrt,
nachdem die Oberseite des Jogwheels losgelassen
wurde, sowie die Geschwindigkeit, mit der das Gerät aus
dem Pause-Modus in den Playback-Modus schaltet. Bei
einer Rechtsdrehung verlängert sich die Startzeit, bei
einer Linksdrehung verkürzt sich die Startzeit.
Mit STOP TIME (22) des Jog-Modus regeln Sie die Geschwindigkeit, mit der sich die Wiedergabe verlangsamt,
wenn man die Oberseite des Jogwheels berührt, sowie
die Geschwindigkeit, mit der in den Pause-Modus geschaltet wird. Bei einer Rechtsdrehung verlängert sich
die Stoppzeit, bei einer Linksdrehung verkürzt sich die
Stoppzeit.
SLIP-MODUS
Bei aktivierter SLIP-Taste (25) wird die normale Wiedergabe unhörbar unter den SCRATCH-, LOOP- und REVERSE-Effekten fortgesetzt. Wenn Sie den SCRATCH-,
LOOP- oder REVERSE-Modus verlassen, wird die normale Wiedergabe ab dem Wiedergabepunkt hörbar, der
auf dem JOGWHEEL-Display (30) angezeigt wird.
Setzen Sie einen Loop (Seite 12) mit den IN/OUTReglern. Die Loop-Wiedergabe beginnt. Der aktivierte
SLIP-Modus wird durch die blinkende SLIP-Taste (25)
angezeigt und die darunter weiterlaufende Wiedergabeposition wird auf dem Jogwheel-Display angegeben.
Wenn Sie den Loop beenden, wird die Track-Wiedergabe
ab der mitlaufenden Playback-Position wieder hörbar.
SLIP MIT REVERSE
Um SLIP mit Reverse Playback zu verwenden, aktivieren
Sie den SLIP-Modus mit einem Druck auf die SLIP-Taste
(25).
Drücken Sie REVERSE (6), um die rückwärts laufende
Wiedergabe zu starten. Der aktivierte SLIP-Modus wird
durch die blinkende SLIP-Taste (25) angezeigt und die
darunter weiterlaufende Wiedergabeposition wird auf
dem Jogwheel-Display angegeben.
Drücken Sie nochmals REVERSE (6), um das Reverse
Playback zu beenden. Wenn Sie das Reverse Playback
beenden, wird die Track-Wiedergabe ab der mitlaufenden Playback-Position wieder hörbar.
cdmp- 7000 manual • geminidj. com
82
Page 83

display- regler
display- optionen
KONTRAST EINSTELLEN
Indem Sie auf das Wählrad (17) drücken und es
drehen, können Sie den Kontrast des 240x320
Displays einstellen. Eine Rechtsdrehung erhöht das Kontrastverhältnis. Eine Linksdrehung verringert das Kontrastverhältnis.
TRACK TE XT DISPLAY MODUS
Drücken Sie TEXT MODE / TOUCH ON/OFF (12),
um die auf dem LCD TOUCHDISPLAY (15) angezeigten
Informationen zwischen Title/Artist/Album/Genre umzuschalten.
lcd touchscreen-funktionen
Das LC-Display des CDMP-7000 besitzt auch TouchFunktionalität. Durch Berühren des LCD TOUCHDISPLAYs (15) können Sie folgende Funktionen nutzen.
1
2
5
3
4
9
6
7
8
10
HALTEN Sie TEXT MODE / TOUCH ON/OFF (12) GEDRÜCKT, um die Touchscreen-Funktionalität zu aktivieren/deaktivieren.
TRACK E LAPSED/REMAIN DISPLAY
Halten Sie die TIME/AUTOCUE-Taste (11) gedrückt,
um die Zeitanzeige-Modi des Tracks zwischen
abgelaufener Zeit (elapsed) und verbleibender Zeit (remain) umzuschalten.
TEMPO/PITCH Besitzt die gleiche Funktionalität wie die
4
MASTER TEMPO-Taste (Seite 10). Ist MASTER TEMPO
auf OFF gesetzt, wird in diesem Feld PITCH angezeigt.
Ist MASTER TEMPO auf ON gesetzt, wird in diesem Feld
TEMPO angezeigt.
5
RANGE Besitzt die gleiche Funktionalität wie die
RANGE-Taste (Seite 10).
6
PITCH/MT VALUE Damit können Sie PITCH/MT aktivie-
ren/deaktivieren (Seite 10). Zusätzlich wird der aktuelle
PITCH/MT-Wert angezeigt.
7
TRACK TITLE Damit können Sie die Textanzeige von
Title/Artist/Album/Genre wählen. Durch Berühren dieses
Bereichs schalten Sie zwischen den Anzeige-Modi um.
1
ZEITLEISTE Durch Berühren der ZEITLEISTE springen
Sie zur gewählten Track-Position.
2
ZEIT Wechselt zwischen der Anzeige für die abge-
laufene und die verbleibende Zeit.
3
BPM Zeigt im Auto und Manual BPM-Modus den aktuel-
len BPM-Wert an oder zeigt die BPM Informationen des
ID3 Tags an, wenn BPM-Modus auf ID3 gesetzt ist.
83
EFFEKTPARAMETER-LEISTE Indem Sie die gewünschte
8
Position berühren, können Sie Effektwerte einstellen.
TRACK-WELLENFORM Visuelle Darstellung des Audio-
9
materials des geladenen Tracks. Ein Druck auf die
Wellenform ändert die Vergrößerung. Verfügbare Werte:
3,2 Sekunden, 6,5 Sekunden, 12 Sekunden und 24 Sekunden.
10
TRACK-WAHL
Damit können Sie einen Track wählen
oder einen Ordner öffnen. Berühren Sie diesen Bereich,
einen Ordner anzuzeigen
.
cdmp- 7000 manual • geminidj. com
Page 84

midi- regler
midi- regler
MIDI-MODUS
Im MIDI-Modus des CDMP-7000 können die Daten seiner Tasten
und Wahlräder ins MIDI-Format kodiert werden. Wenn das Gerät
via USB-Kabel mit einem Computer und MIDI-kompatibler DJ Software verbunden ist, kann man die DJ Software mit dem Gerät bedienen. Man kann auch das Audiomaterial des Computers über die
Ausgänge des CDMP-7000 ausgeben.
Manche Tasten können möglicherweise nicht zur Bedienung der
DJ Sofware verwendet werden. Eine Liste der MIDI-Meldungen finden Sie in der Tabelle mit MIDI-Gerätemeldungen.
HINWEIS Anleitungen zum Einstellen Ihrer spezifischen DJ Soft-
ware finden Sie in deren Bedienungshandbuch.
HID-MODUS
Zusätzlich zu MIDI verwendet der CDMP-7000 auch das HID-Protokoll, das höhere Geschwindigkeiten und einen höheren Datendurchsatz ermöglicht.
Wenn Ihre Software HID-Geräte unterstützt, sollten Sie MIDIGeräte in der Software deaktivieren und nach HID-Geräten suchen.
Die Software sollte den CDMP-7000 finden und seine Verwendung
als HID-Gerät erlauben.
MIDI-MODUS KONFIGURIEREN
Verbinden Sie ein USB-Kabel mit dem rückseitigen USB-Port des
Geräts (D) und Ihrem Computer. Drücken Sie die MIDI Source Select-Taste des CDMP-7000 (20). Dadurch wird die Wiedergabe
aller CD/USB/SD-Quellen beendet.
Auf dem Touchscreen des CDMP-7000 wird eine Audiokonfigurations-Aufforderung für die Audio Bit-Rate und Samplingrate mit
folgenden Audioeinstellungen angezeigt:
• 24-Bit/192kHz
• 24-Bit/96 kHz
• 24-Bit/48 kHz
• 16-Bit/44,1 kHz
Halten Sie die MIDI Source Select-Taste gedrückt, um die Audioeinstellungen umzuschalten. Drücken Sie MIDI, um zwischen den
Audioeinstellungen zu wechseln, und drücken Sie das WÄHLRAD
(14), um die Einstellung anzuwenden. Drücken Sie BACK (15), um
den Modus zu verlassen.
HINWEIS Höhere Bit-Tiefen und Samplingraten resultieren in
höherer Latenz und eventuell fehlerhafter Performance.
Nachdem Sie die Audioeinstellungen des CDMP-7000 konfiguriert
haben, starten Sie die DJ Software:
• Wählen Sie den CDMP-7000 als Ihr MIDI-Gerät*
• Wählen Sie den CDMP-7000 als Ihr AUDIO-Gerät *
*Beziehen Sie sich auf die Bedienungsanleitung der DJ Software
cdmp- 7000 manual • geminidj. com
84
Page 85

midi- regler
midi- gerätemeldungen hid-gerätemeldungen
ControllerParameter
Cue Cue 1 0 127
Play/Pause Ply/Pause 2 0 127
+ (pitch bend) Pitch + 3 0 127
- (pitch bend) Pitch - 4 0 127
HotCue 1 Cue 1 5 0 127
HotCue 2 Cue 2 6 0 127
HotCue 3 Cue 3 7 0 127
Memo Memo 8 0 127
Track Search << Track reverse 9 0 127
Track Seach >> Track forward 10 0 127
Browse Left Up in tracklist 11 0 127
Browse Right Down in tracklist 12 0 127
Master Tempo Master Tempo 13 0 127
Vinyl Scratch 14 0 127
Select Load Track 15 0 127
Loop In Loop In 16 0 127
Loop Out/Adjust Loop Out 17 0 127
Reloop/Exit Reloop 18 0 127
BPM BPM 19 0 127
Effect1 (Wah) Effect1 (Wahl) 20 0 127
Effect2 (Flanger) Effect2 (Wahl) 21 0 127
Effect3 (Echo) Effect3 (Wahl) 22 0 127
Back Folder Out 23 0 127
Wheel Touch Wheel Touch 24 0 127
Effect Param Effect Param 25 0 127
Time Elapsed/Remain 26 0 127
Autocue Autocue 27 0 127
LOCK LOCK 28 0 127
Range Range 29 0 127
Reverse Reverse 30 0 127
Slip Slip 31 0 127
Jogwheel Jogwheel 32 0, 63 63, 128
Pitch Slider PitchSlider 33 0 127
Track Skip << Prev. track 34 0 127
Track Skip >> Next track 35 0 127
Hold Effect On/Odd 36 0 127
Eject Deck Select 37 0 127
Effect4 (Wah) Effect4 (Wahl) 38 0 127
Effect5 (Trance) Effect5 (Wahl) 39 0 127
Effect6 (Bubble) Effect6 (Wahl) 40 0 127
Dry/Wet Dry/Wet Effect 41 0 127
Start time Parameter 42 0 127
Stop time Parameter 43 0 127
Pitch Slider (14-bit) PitchSlider 44 0 127
SoftwareParameter
SendNummer
Min.
Wert
Max.
Wert
ControllerParameter
Cue Cue 1 1 1 - on, 0 - off
Play/Pause Ply/Pause 2 1 1 - on, 0 - off
+ (pitch bend) Pitch + 3 1 1 - on, 0 - off
- (pitch bend) Pitch - 4 1 1 - on, 0 - off
HotCue 1 Cue 1 5 1 1 - on, 0 - off
HotCue 2 Cue 2 6 1 1 - on, 0 - off
HotCue 3 Cue 3 7 1 1 - on, 0 - off
Memo Memo 8 1 1 - on, 0 - off
Track Search << Track reverse 9 1 1 - on, 0 - off
Track Seach >> Track forward 10 1 1 - on, 0 - off
Browse Left Up in tracklist 11 1 1 - on, 0 - off
Browse Right Down in tracklist 12 1 1 - on, 0 - off
Master Tempo Master Tempo 13 1 1 - on, 0 - off
Vinyl Scratch 14 1 1 - on, 0 - off
Select Load Track 15 1 1 - on, 0 - off
Loop In Loop In 16 2 1 - on, 0 - off
Loop Out/Adjust Loop Out 17 2 1 - on, 0 - off
Reloop/Exit Reloop 18 2 1 - on, 0 - off
BPM BPM 19 2 1 - on, 0 - off
Effect1 (Wah) Effect1 (Wahl) 20 2 1 - on, 0 - off
Effect2 (Flanger) Effect2 (Wahl) 21 2 1 - on, 0 - off
Effect3 (Echo) Effect3 (Wahl) 22 2 1 - on, 0 - off
Back Folder Out 23 2 1 - on, 0 - off
Wheel Touch Wheel Touch 24 3 1 - on, 0 - off
Time Elapsed/Remain 26 3 1 - on, 0 - off
Autocue Autocue 27 3 1 - on, 0 - off
LOCK LOCK 28 3 1 - on, 0 - off
Range Range 29 3 1 - on, 0 - off
Reverse Reverse 30 3 1 - on, 0 - off
Slip Slip 31 3 1 - on, 0 - off
Track Skip << Prev. track 34 4 1 - on, 0 - off
Track Skip >> Next track 35 4 1 - on, 0 - off
Hold Effect On/Odd 36 4 1 - on, 0 - off
Eject Deck Select 37 4 1 - on, 0 - off
Effect4 (Wah) Effect4 (Wahl) 38 4 1 - on, 0 - off
Effect5 (Trance) Effect5 (Wahl) 39 4 1 - on, 0 - off
Effect6 (Bubble) Effect6 (Wahl) 40 5 1 - on, 0 - off
Jogwheel Joghweel 64-71 8 Min = 0, Max = 225
Effect Param Effect Param 72-79 9 Min = 0, Max = 255
Dry/Wet Dry/Wet Effect 41 10 Min = 0, Max = 225
Start time Parameter 42 11 Min = 0, Max = 225
Stop time Parameter 43 12 Min = 0, Max = 225
Pitch Slider PitchSlider 104-117 13, 14 Min = 0, Max = 800
SoftwareParameter
Bit Byte Wert
85
cdmp- 7000 manual • geminidj. com
Page 86

mixer- regler
mixer- regler
KANAL-EINGANGS-WAHLSC HALTE
Der CDMP-7000 bietet drei Mixer-Kanäle: CH1, CH2,
CH3. Jeder Kanal verfügt über drei Eingänge, die mit
dem KANAL-EINGANGS-WAHLSCHALTER (31) am Anfang jedes Kanalzugs ausgewählt werden können.
• An CH1 kann der USB-EINGANG, AUX1 oder AUX2
genutzt werden.
• An CH2 kann entweder der linke Player des CDMP7000, Audiosignale vom Computer im MIDI-Modus
oder der LN1/PH1-Eingang genutzt werden.
• An CH3 kann entweder der rechte Player des CDMP7000, Audiosignale vom Computer im MIDI-Modus
oder der LN2/PH2-Eingang genutzt werden.
KANAL-REGLER
Jeder Kanal des CDMP-7000 verfügt über einen GAINREGLER (45), einen 3-BAND-EQUALIZER (44) sowie
einen KANAL-FADER (43), um Pegel und Klang jedes
Kanals individuell verändern zu können.
Mit dem GAIN-REGLER (45) stellen Sie die Vorverstärkung (Gain) für das eingehende Signal im jeweiligen
Kanal ein.
Der 3-BAND-EQUALIZER (44) eignet sich, um am jeweiligen Kanal anliegende Signale klanglich zu verändern.
Dazu stehen die drei Frequenzbänder LOW, MID und
HIGH zur Verfügung.
• Nutzen Sie den HIGH-Regler, um die hohen Frequenzen zu verändern.
• Nutzen Sie den MID-Regler, um die mittleren Frequenzen zu verändern.
• Nutzen Sie den LOW-Regler, um die tiefen Frequenzen zu verändern.
Die KANAL-FADER (43) haben eine Länge von 60 mm.
Damit können Sie den Pegel für jeden Kanal einstellen
(von -∞ bis 0 dB).
MASTER-AUSGANG
Mit dem MASTER-VOLUME-REGLER (32) des CDMP7000 legen Sie den Gesamtpegel der drei zusammengemischten Kanäle fest.
weiteren Geräten führen.
Mit dem MASTER-BALANCE-REGLER (34) stellen Sie
das Panning von linkem und rechtem Kanal im MasterAusgang ein.
BOOTH-AUSGANG
Mit dem BOOTH-VOLUME-REGLER (49) des CDMP7000 stellen Sie den Pegel des BOOTH-AUSGANGS (C)
ein. Das ist nützlich, um zum Beispiel ein Paar MonitorLautsprecher oder eine weitere Beschallungsanlage für
einen anderen Raum anzusteuern.
kopfhörer- regler
KO PFHÖRE R-CUE-ZUWEISUNG
In jedem Kanal des CDMP-7000 finden Sie einen
CUE-SCHALTER /-ANZEIGE (35), mit dessen Hilfe Sie
einen Kopfhörer-Mix aus jedem der Kanäle und dem
Master-Ausgang erstellen können. Sobald Sie den CUESCHALTER/-ANZEIGE (35) drücken, wird der zugehörige Kanal dem Cue-Mix hinzugefügt und die AnzeigeLED beginnt zu leuchten.
KO PFHÖRE R-MIX-STE U ERUNG
Mit dem HEADPHONE-MIX-REGLER (36) steuern Sie
den Mix am Kopfhörer-Ausgang. Damit können Sie
zwischen CUE-Signalen und dem PGM-Signal (MasterAusgang) überblenden.
Mit dem HEADPHONE-VOLUME-REGLER (37) bestimmen Sie den Pegel des Kopfhörer-Signals.
Der HEADPHONE-OUTPUT-SCHALTER (38) erlaubt es,
zwischen einem Stereo-Mix aus CUE/PGM und einem
Mono-Split-Signal umzuschalten. Beim Split-Signal hören
Sie auf dem linken Kopfhörer-Kanal den CUE-Mix und
auf dem rechten den PGM-Mix.
Auf der PEGEL-ANZEIGE (33) sehen Sie die Pegel von
rechtem und linkem Kanal des MASTER-AUSGANGS.
*WICHTIG: Wenn Sie einen Pegel von 0 dB (Pegel-Anzeige geht in den roten Bereich) überschreiten, kann das
zu einem verzerrten Signal und zu Beschädigungen an
cdmp- 7000 manual • geminidj. com
86
Page 87

mixer- regler
crossfader- steurung
CROSSFADER
Mit dem CROSSFADER (41) können Sie von KANAL 2 zu
KANAL 3 überblenden oder cutten. Der CROSSFADER
(41) des CDMP-7000 lässt sich bei Bedarf einfach austauschen.
CROSSFADER-STEUE RUNG
Für den CROSSFADER (41) gibt es drei zugehörige
Einstellmöglichkeiten: CROSSFADER-START (39),
CROSSFADER-REVERSE (40) CROSSFADER-KURVENEINSTELLUNG (42).
Wenn CROSSFADER-START (39) aktiviert ist, startet
die Wiedergabe der jeweiligen Player-Seite, sobald Sie
den CROSSFADER (41) von der einen zur anderen Seite
bewegen. Eine Bewegung des Crossfaders in Richtung
des im Cue-Modus befindlichen Players startet dessen Wiedergabe. Sobald der Crossfader am Ende des
Regelwegs angekommen ist, stoppt die Wiedergabe des
bisherigen Players.
Mit CROSSFADER REVERSE (40) wechseln Sie die
Zuordnung der Crossfader-Seiten. Ist der Crossfader
invertiert, liegt Kanal 3 auf der linken Seite und Kanal 2
auf der rechten.
Mit CROSSFADER CURVE ADJUST (42) können Sie zwei
unterschiedliche Regelkurven (Linear oder Steil) für den
Crossfader festlegen und diesen so für sanfte Übergänge
oder harte Cuts nutzen.
mikrofon- regler
MIC CONTROLS
Der CDMP-7000 bietet zwei Mikrofon-Eingänge (auf der
Vorder- und der Rückseite), die mit dem MIC-VOLUMEREGLER (46) gesteuert werden.
Mit dem 2-BAND-MIC-EQ (47) können Sie das MikrofonSignal in den HÖHEN und den BÄSSEN verändern.
Mit dem 3-Weg MIC-TALKOVER-SCHALTER (48)
schalten Sie das Mikrofon-Signal EIN oder AUS oder
aktivieren die Talkover-Funktion. Dabei wird das Programm-Material gedämpft, damit das Mikrofon-Signal
besser zu hören ist.
87
cdmp- 7000 manual • geminidj. com
Page 88

wiedergabe
problemlösungen
fehlersuche
CD-FEHLER
- Wenn eine Disc nicht abgespielt wird, prüfen Sie, ob sie
korrekt geladen wurde (Label-Seite oben). Untersuchen
Sie die Disc auch auf übermäßige Verschmutz ung,
Kratzer usw.
- Wenn ein Speichermedium Daten in einem nicht
kompatiblen Format enthalten sollte und eine Fehlermeldung bei der Wiedergabe angezeigt wird, halten Sie die
EJECT-Taste (19) für 4 Sekunden gedrückt. Das Speichermedium wird ausgeworfen und das Gerät wird neu
gestartet.
- Wenn sich die Disc dreht, aber kein Sound hörbar ist,
überprüfen Sie die Kabelverbindungen sowie den Verstärker oder Receiver.
- Wenn die CD springt, untersuchen Sie die Disc auf
Verschmutzung und Kratzer. Gehen Sie nicht davon aus,
dass die CD-Beschichtung defekt ist. Viele CDs entsprechen nicht den Spezifikationen und springen auf den
meisten oder allen CD-Playern. Bevor Sie das Gerät zur
Reparatur einschicken, spielen Sie probeweise eine CD
ab, die nachweislich korrekt funktioniert.
SD CARD-FEHLE R
- Wenn der Player die SD Memory Card nicht liest,
prüfen Sie, ob die Memory Card korrekt und vollständig
eingesteckt ist.
- Wenn die Meldung ”Media err. Please Check Media Format and Try Again” erscheint, ist Ihr SD-Speichergerät
falsch formatiert.
MIDI-FEHLER
- Wenn der Computer das Gerät nicht erkennt, schalten
Sie das Gerät probeweise aus und starten Sie den Computer neu.
- Wenn das Gerät in der DJ Software nicht aufgeführt ist,
aktualisieren Sie Ihre Version, indem Sie alle Updates für
die DJ Software herunterladen. Wenn das CDMP-7000
Mapping nicht in der Liste Ihrer DJ Software erscheint,
finden Sie unter geminidj.com neue Downloads und Support.
USB MEMORY STICK-FE HLER
Manche USB-Geräte funktionieren eventuell nicht korrekt
mit dem CDMP-7000. Gemini übernimmt keine Verantwortung für eventuell auftretende Datenverluste. Um
einen endgültigen Datenverlust zu verhindern, erstellen
Sie eine Sicherheitskopie, bevor Sie das USB-Gerät an
den Player anschließen.
- USB Hubs sind nicht mit dem CDMP-7000 verwendbar.
- Wenn der Player das USB-Gerät nicht liest, prüfen Sie,
ob es vollständig eingesteckt ist.
- Wenn die Meldung “Too many devices” erscheint, wird
ein USB Hub eingesetzt. Der CDMP-7000 funktioniert
nicht mit USB-Hubs. Entfernen Sie den USB-Hub und
schließen Sie das USB-Speichergerät direkt an den
CDMP-7000 an.
- Wenn die Meldung ”Media err. Please Check Media Format and Try Again” erscheint, ist Ihr USB-Speichergerät
falsch formatiert.
cdmp- 7000 manual • geminidj. com
88
Page 89

fehlersuche
mixer problemlösungen
LEISES / KEIN AUSGANGSSIGNAL
Falls der CDMP-7000 nur ein sehr leises oder gar kein
Ausgangssignal liefert, kann das folgende Gründe haben:
- Falscher Eingang am Wahlschalter ausgewählt.
- Die Anschlüsse auf der Rückseite sind nicht richtig
verbunden.
- Defekte(s) Kabel, falsch angeschlossene Kabel,
lockere Verbindung.
- Verschmutze Steckerkontakte verursachen schlechte
Kontaktverbindungen.
AUSG A NG VERZERRT
Falls der CDMP-7000 ein verzerrtes Signal liefert, kann
das folgende Gründe haben:
- Master-Ausgangs-Pegel ist zu hoch.
- Eingangs-Pegel (Gain-Regler) ist zu hoch.
FEHLER IM DIGITAL-AUSGANG
Falls der Digital-Ausgang des CDMP-7000 nicht funktioniert, kann das folgende Gründe haben:
- Die Sampling-Frequenz des CDMP-7000-DigitalAusgangs passt nicht zu der des angeschlossenen
Geräts.
- Der Digital-Ausgang ist mit einem Analog-Eingang
verbunden.
- Das verwendete Verbindungskabel ist kein optisches
S/P-DIF-Kabel.
89
cdmp- 7000 manual • geminidj. com
Page 90

technische daten
ALLGEMEIN
Typ.................................... CD/USB/SD Mediaplayer mit MIDI und HID
USB-Ausgabetyp...................................................................................Type B
Disc-Typ.......................................................standard CDs (12 cm & 8 cm)
Spannungsversorgung......................................AC 115/230V, 60/50 Hz
Leistungsaufnahme................................................................................. 10 W
Abmessungen............................................... 333 3/8 x 304 x 114,3 mm
(13 1/8 x 12 x 4,5”)
Gewicht..................................................................................... 3,3 kg (7,2 lbs)
ANALOGAUDIO
Quantisierung......................................1-Bit linear/Kanal, 3-Strahl Laser
Oversampling-Rate................................................................................8-fach
Frequenzgang:
LINE ............................................................................... 20 Hz bis 20 kHz
PHONO ...................................20 Hz bis 20 kHz (RIAA +/- 0,5 dB)
MIC ................................................................................. 20 Hz bis 20 kHz
Signal-Rausch-Abstand (bei Nennleistung):
LINE ................................................................................................... >80 dB
PHONO ............................................................................................. >70 dB
MIC ..................................................................................................... >70 dB
THD+N
LINE ................................................................................................... <0,01 %
PHONO ............................................................................................<0,05 %
MIC ........................................................................................................ <0,1 %
Standard-Eingangspegel / Eingangs-Impedanz:
AUX.......................................................................................... 0 dBV/10 kΩ
PHONO/LINE....................................-40 dBV/47 kΩ, 0 dBu/1 47 kΩ
MIC..........................................................-50 dBV/>1 kΩ (symmetrisch)
Standard-Ausgangspegel / Minimale Lastimpedanz:
MASTER (symmetrisch)................................................... +6 dBv/1 kΩ
MASTER (unsymmetrisch)................................................ 0 dBv/1 kΩ
BOOTH .......................................................................................0 dBv/1 kΩ
REC ..............................................................................................0 dBv/1 kΩ
KOPFHÖRER ......................................... 200 mW/200 Ω THD 0,3 %
technische daten
DIGITALAUDIO
Ausgangstyp.........................................................koaxial digital (S/PDIF)
Ausgabeformat......................................................................44,1 kHz, 16-Bit
USB AUDIO
Bit-Tiefe.........................................................................................24-Bit, 16-Bit
Samplingrate....................................192 kHz, 96 kHz, 48 kHz, 44,1 kHz
UNA NGEKÜNDIGTE ÄNDERUNGEN DER TECHNISC HEN
DAT EN UND DES E RSCHEINU NGSBI LDS BLEIBEN IM
SINNE STÄNDIGER PRODUKTVERBESSERUNGEN VOR BEHALTEN.
cdmp- 7000 manual • geminidj. com
90
Page 91

Warranty and Repair:
All GCI products are designed and manufactured to the highest standards in the industry. With proper care and maintenance, your product will
provide years of reliable service.
LIMITED WARRANTY
A. GCI warrants its products to be free from defects in materials and workmanship for One (1) year from the original purchase date. Exceptions:
Laser assemblies on CD Players, cartridges, and crossfaders are covered for 90 days.
B. This limited warranty does not cover damage or failure caused by abuse, misuse, abnormal use, faulty installation, improper maintenance or any
repairs other than those provided by an authorized GCI Service Center.
C. There are no obligations of liability on the part of GCI for consequential damages arising out of or in connection with the use or performance
of the product or other indirect damages with respect to loss of property, revenues, of prot, or costs of removal, installation, or reinstallation. All
implied warranties for GCI, including implied warranties for tness, are limited in duration to One (1) year from the original date of purchase, un-
less otherwise mandated by local statutes.
RETURN/REPAIR
A. In the U.S.A., please call our helpful Customer Service Representatives at (732)738-9003, and they will be happy to give you a Return Authorization Number (RA#) and the address of an authorized service center closest to you.
B. After receiving an RA#, include a copy of the original sales receipt, with defective product and a description of the defect. Send by insured freight
to: GCI Sound Products Corp, and use the address provided by your customer service representative. Your RA# must be written on the outside
of the package, or processing will be delayed indenitely!
C. Service covered under warranty will be paid for by GCI and returned to you. For non-warrantied products, GCI will repair your unit after payment is received. Repair charges do not include return freight. Freight charges will be added to the repair charges.
D. On warranty service, you pay for shipping to GCI, we pay for return shipping within the continental United States. Alaska, Hawaii, Puerto Rico,
Canada, Bahamas, and the Virgin Islands will be charged for freight.
E. Please allow 2-4 weeks for return of your product. Under normal circumstances your product will spend no more than 10 working days at Gemini.
We are not responsible for shipping times.
GCI Technologies Corp.
Worldwide Headquarters
280 Raritan Center Dr
Edison, NJ 08837 USA
Tel: (732) 346-0061
Fax: (732) 346-0065
IN THE UNITED KINGDOM
In the event that you need service on your GCI product under warranty, simply write a letter describing the problem, along with your contact information. Make sure to enclose a copy of your receipt for proof of warranty information. A return number is not required. You will be responsible
for shipping charges to Gemini UK, and Gemini UK will pay to return the unit to you if it is considered under warranty.
GCI Technologies Ltd
Unit 44 Brambles Enterprise Centre
Waterberry Drive
Waterlooville
Hampshire, P07, 7TH, UK
Tel: +44 (0) 87 087 00880
Fax: +44 (0) 87 087 00990
-
EN ESPAÑA
En caso de mal funcionamiento de esta unidad, por favor contacte con el Servicio de Atención al Cliente en el teléfono 93 436 37 00 que le asesorará sobre el procedimiento correcto para solucionarlo. En caso de ser necesario enviar la unidad para su reparación, el Servicio de Atención al
Cliente le proveerá de un número de incidencia, así como de la dirección del Servicio de Asistencia Técnica más cercano a su residencia.
GCI Technologies S.A.
Caspe, 172 - 5º A
08013 Barcelona, Spain
Tel: 34 93 436 37 00
Fax: 34 93 347 69 61
91
cdmp- 7000 manual • geminidj. com
Page 92

EN FRANCE
En cas de panne, merci de contacter votre revendeur. Tout appareil en panne doit y être retourné, accompagné de sa facture d’achat, de son emballage d’origine et d’un descriptif de panne. L’appareil sera expédié au SAV de GCI Technologies France. Tout produit reçu sans facture sera réparé
hors garantie. L’appareil sera ensuite ré-expédié au revendeur.
GCI TECHNOLOGIES
2 bis, rue Léon Blum
91120 Palaiseau, France
Tél: + 33 1 69 79 97 70
Fax: + 33 1 69 79 97 80
IN DEUTSCHLAND
Die allgemeinen gesetzlichen Gewährleistungen bleiben von den Herstellergarantien unberührt. Der Garantieanspruch erlischt bei Eingriffen
durch den Käufer oder durch Dritte sowie bei unsachgemässer Behandlung. Gewährleistungsansprüche sind ausschließlich gegenüber Ihrem
Fachhändler geltend zu machen.
GCI Technologies GmbH
Lerchenstrasse 14
80995 München, Munich, Germany
T: +49 (0) 89 319 019 80
F: +49 (0) 89 319 019 819
cdmp- 7000 manual • geminidj. com
92
Page 93

Register your product online at www.geminidj.com to be eligible for great prize giveaways! If you do not have
Internet access, fill out the form included and mail it to the appropriate address listed previously.
------------------------------------------------------------------------------------------------------------------------------
First and Last Name
Address (Number and Street) Apartment Number
City and State or Province
Country
Zip Code or Postal Code
Email Address Telephone Number
Date of Birth Date of Purchase
Purchase Price (Excluding Tax) City of Purchase
Model Number (Example: CDT-05)
Serial Number (back of unit)
 Loading...