

Page 1
OPERAOPERA
OPERA
OPERAOPERA
BedienungsanleltungBedienungsanleltung
Bedienungsanleltung
BedienungsanleltungBedienungsanleltung
Manual de FuncionamientoManual de Funcionamiento
Manual de Funcionamiento
Manual de FuncionamientoManual de Funcionamiento
Manuel de FonctionnementManuel de Fonctionnement
Manuel de Fonctionnement
Manuel de FonctionnementManuel de Fonctionnement
Manual del UtenteManual del Utente
Manual del Utente
Manual del UtenteManual del Utente
TIONS MANUTIONS MANU
TIONS MANU
TIONS MANUTIONS MANU
ALAL
AL
ALAL
PMX
P
ROFESSIONAL
PrPr
ofof
essionneller Stereo essionneller Stereo
Pr
of
essionneller Stereo
PrPr
ofof
essionneller Stereo essionneller Stereo
Mezclador-Preamplificador Estereofónico Para el ProfesionalMezclador-Preamplificador Estereofónico Para el Profesional
Mezclador-Preamplificador Estereofónico Para el Profesional
Mezclador-Preamplificador Estereofónico Para el ProfesionalMezclador-Preamplificador Estereofónico Para el Profesional
Mélangeur-Préamplificateur Stéréophonique pour le ProfessionnelMélangeur-Préamplificateur Stéréophonique pour le Professionnel
Mélangeur-Préamplificateur Stéréophonique pour le Professionnel
Mélangeur-Préamplificateur Stéréophonique pour le ProfessionnelMélangeur-Préamplificateur Stéréophonique pour le Professionnel
Miscelatore-PreamplificatorMiscelatore-Preamplificator
Miscelatore-Preamplificator
Miscelatore-PreamplificatorMiscelatore-Preamplificator
2
S
TEREO
VV
oror
verver
V
VV
stärkermiscstärkermisc
or
ver
stärkermisc
oror
verver
stärkermiscstärkermisc
e Stereofonico per il Professionalee Stereofonico per il Professionale
e Stereofonico per il Professionale
e Stereofonico per il Professionalee Stereofonico per il Professionale
P
5
REAMP
hpulthpult
hpult
hpulthpult
M
0
IXER
MM
M
MM
EnglishEnglish
English
EnglishEnglish
DeutschDeutsch
Deutsch
DeutschDeutsch
EspañolEspañol
Español
EspañolEspañol
FrancaisFrancais
Francais
FrancaisFrancais
ItalianoItaliano
Italiano
ItalianoItaliano
s
ULUL
UL
ULUL
TITI
TI
TITI
-L-L
-L
-L-L
ANGUANGU
ANGU
ANGUANGU
Page 1
AA
A
AA
GEGE
GE
GEGE
I I
NSTRNSTR
I
NSTR
NSTRNSTR
I I
UCTIONSUCTIONS
UCTIONS
UCTIONSUCTIONS
Page 3Page 3
Page 3
Page 3Page 3
Page 4Page 4
Page 4
Page 4Page 4
Page 5Page 5
Page 5
Page 5Page 5
Page 6Page 6
Page 6
Page 6Page 6
Page 7Page 7
Page 7
Page 7Page 7
Page 2
2
2
2
2
2
2
2
2
k
123456789
123456789
123456789
123456789
123456789
123456789
123456789
123456789
123456789
12345678
12345678
12345678
12345678
12345678
12345678
12345678
12345678
12345678
12
12
l
m
OUTPUT LINE 2 PHONO 2 LINE 1 PHONO 1
2345678901
2345678901
2345678901
2345678901
2345678901
2345678901
2345678901
2345678901
GND
r
j
15
14
13
8
6
10
7
12
11
n
PMX-
16
n
250
Page 2
Page 3

INTRODUCTIONINTRODUCTION
INTRODUCTION
INTRODUCTIONINTRODUCTION
OPERAOPERA
OPERA
OPERAOPERA
TIONTION
TION
TIONTION
Congratulations on your purchase of a
MixMix
erer
Mix
er
MixMix
advances and is backed by a three year warranty, excluding crossfader
and channel slides.
CACA
CA
CACA
1. All instructions should be read before using this equipment.
2. To reduce the risk of electrical shock, do not open the unit. THERE
3. Do not expose this unit to direct sunlight or a heat source such as
4. This unit should be cleaned only with a damp cloth. Avoid solvents
5. When moving this equipment it should be placed in its original carton
6. DO NOT EXPOSE THIS UNIT TO RAIN OR MOISTURE.
7. DO NOT USE SPRAY CLEANERS OR LUBRICANTS ON CONTROLS,
CONNECTIONSCONNECTIONS
CONNECTIONS
CONNECTIONSCONNECTIONS
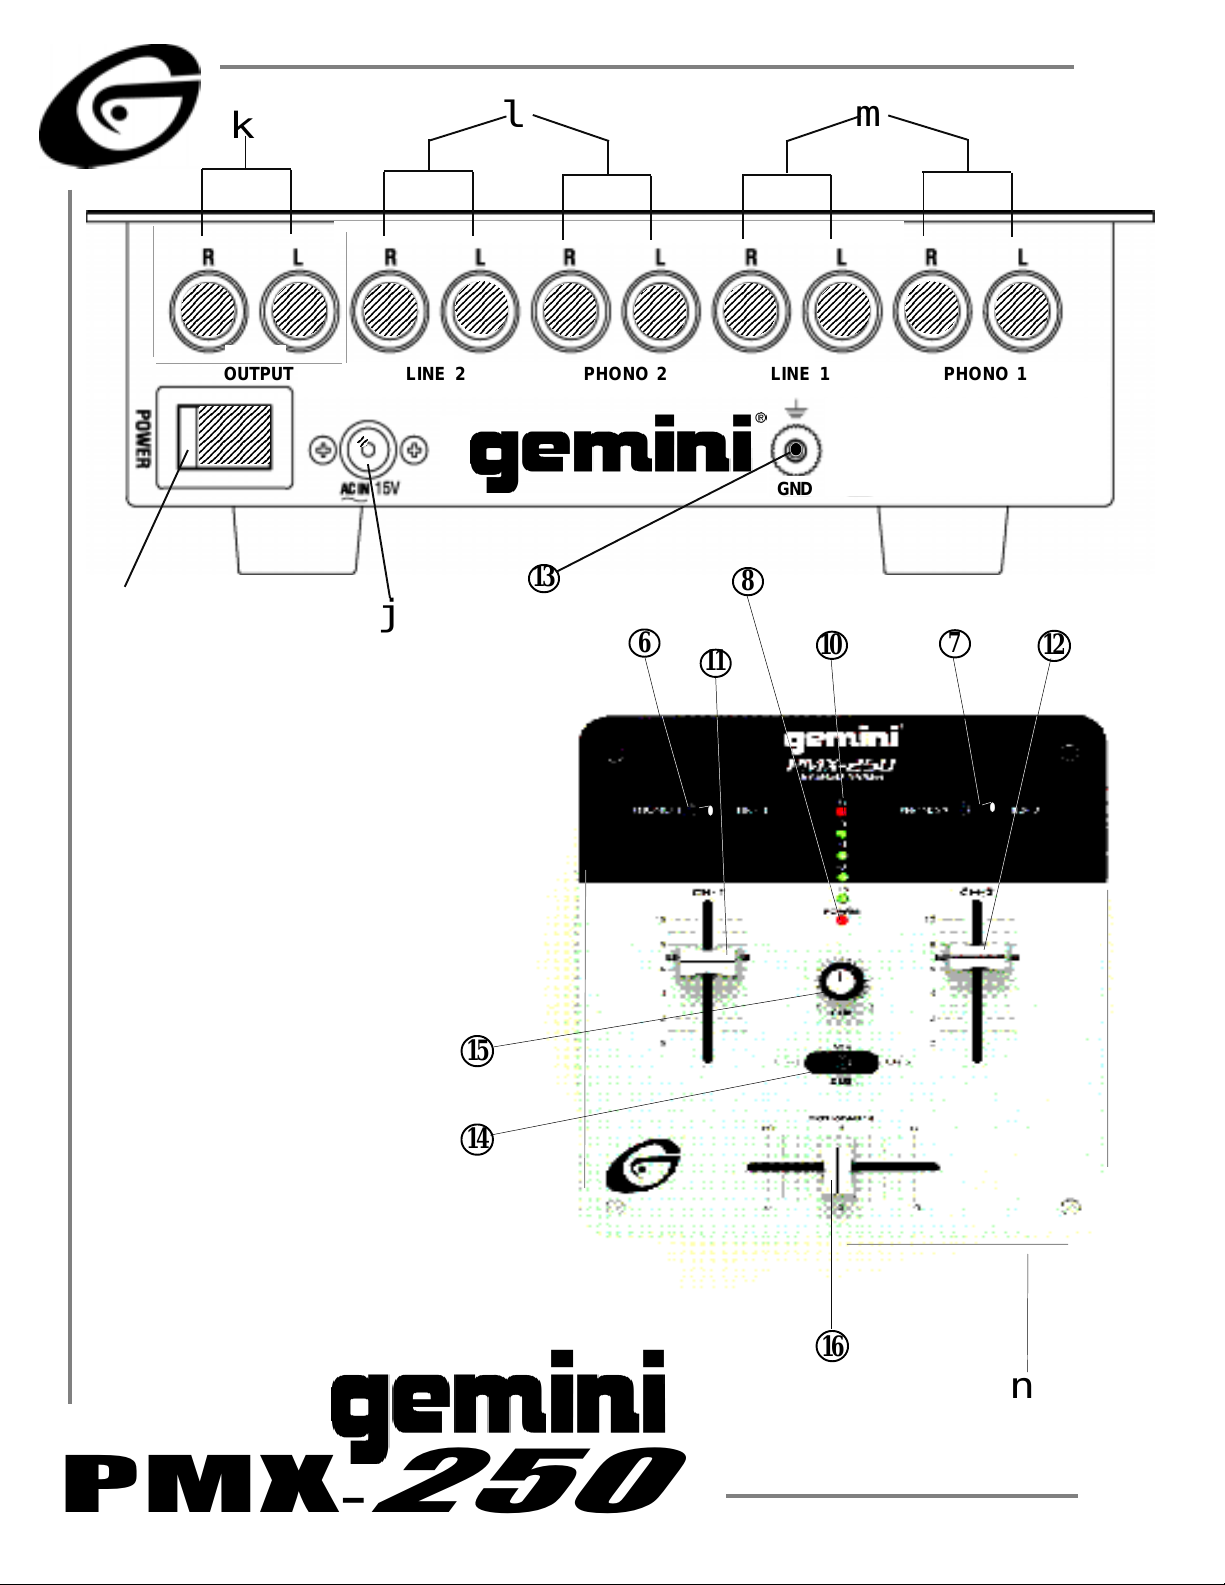
1. Ensure that the POWER (9) switch is in the OFF position prior to
2. MASTER OUTPUT (2) connects this unit to the main amplifier using
3. Headphones may be plugged into the front panel-mounted
F
4. Attach a phono ground line to the GROUN D THUMB SCREW (13).
. This state-of-the-art mixer features the latest technological
erer
UTIONSUTIONS
UTIONS
UTIONSUTIONS
ARE NO USER REPLACEABLE PARTS INSIDE. Please refer all
servicing needs to a Gemini-qualified service technician.
In the USA ~ if you experience problems with this unit
call Gemini Customer Service at: 1 (732) 738-9003.
Do not attempt to return this equipment to your dealer .
a radiator or stove.
or other cleaning detergents.
and packaging. This will reduce the risk of damage during transit.
SURFACES OR SWITCHES.
making any connections. This unit comes with a 15 volt AC adaptor.
Plug the adaptor into the rear panel POWER JACK (1) before
plugging it into a proper power source.
standard audio cables with RCA-type connectors.
HEADPHONES (5) jack.
PHONO inputs accept
cartridges. Additional units, such as CD players, utilize `
the LINE inputs and require the proper switch setting.
NONO
TE:TE:
NotNot
Not
NotNot
attac attac
attac
attac attac
NO
TE:
NONO
TE:TE:
(
hing a grhing a gr
hing a gr
hing a grhing a gr
Gemini Gemini
Gemini
Gemini Gemini
only
turntables with magnetic
ound maound ma
ound ma
ound maound ma
y cause a system y cause a system
y cause a system
y cause a system y cause a system
PMXPMX
PMX
PMXPMX
-250-250
-250
-250-250
“hum.“hum.
“hum.
“hum.“hum.
””
”
””
1. POWER ON: Once all equipment connections have been made,
press POWER (9) switch. Power is ON when POWER LED (8)
is illuminated.
2. CHANNEL 1: The PH-1/LN-1 (6) switch allows you to select
PHONO 1 or LINE 1. CHANNEL SLIDE (11) controls the input
level of this channel.
3. CHANNEL 2: The PH-2/LN-2 (7) switch allows you to select
PHONO 2 or LINE 2. CHANNEL SLIDE (12) controls the input
level of this channel.
4. CROSSFADER: The CROSSF ADER (16) allows the mixing of
one source into another. The left side of the CROSSFADER
is Channel 1 while the right belongs to Channel 2.
Note: Do not apply pressure while using the Crossfader.
I
I
5. CUE: Connecting a set of headphones to the HEADPHONES jack
6. DISPLAY: DISPLAY (10) indicates the MASTER output.
SPECIFICASPECIFICA
SPECIFICA
SPECIFICASPECIFICA
Phono...................................................................................3 mV, 47 kOhm
Line...................................................................................250 mV, 27 kOhm
Amp...................................................................................0 dB 1 V, 400 Ohm
Max......................................................................................18 V Peak to Peak
Frequency Response......................................................20Hz - 20 kHz +/- 2 dB
Distortion........................................................................................0.02%
S/N Ratio.............................................................................better than 80 dB
Headphone Impedance...........................................................................16 Ohm
Power Source......................................115V/15V AC 7.5W (or 230V/15V AC 7.5W)
Dimensions...................................................10" x 6.5" x 2" (254 x 165 x 51 mm)
Weight........................................................................................3 lbs. (1.3 kg)
Specifications and designs are subject to change without notice for the purpose of improvement.
Lightly glide the crossfader back and forth. Pressing down
on the controls can bend contacts and cause a loss of sound.
allows you to monitor either Channel 1 or Channel 2. Select
Channel 1 by moving CUE SWITCH (14) to the left. Listen to
Channel 2 by moving CUE SWITCH to the right. Use CUE LEVEL
(15) to adjust headphone volume without affecting the speakerdriven mix. Cue facilitates the seamless blending of one recorded
track into another.
TIONSTIONS
TIONS
TIONSTIONS
INPUTS:INPUTS:
INPUTS:
INPUTS:INPUTS:
OUTPUTS:OUTPUTS:
OUTPUTS:
OUTPUTS:OUTPUTS:
GENERAL:GENERAL:
GENERAL:
GENERAL:GENERAL:
CACA
CA
CACA
UTIONUTION
UTION
UTIONUTION
ELECTRICAL HAZARD
DO NOT OPEN
Record and save the serial
number from the back of
your Gemini Mixer here for
future reference:
Purchase Date:
Model #: Gemini PMX-250 Mixer
Serial Number:
Page 3
Page 4

EINLEITUNGEINLEITUNG
EINLEITUNG
EINLEITUNGEINLEITUNG
BEDIENUNGBEDIENUNG
BEDIENUNG
BEDIENUNGBEDIENUNG
Wir gratulieren Ihnen zum Kauf eines
MischpultsMischpults
Mischpults
MischpultsMischpults
Garantie, ausgenommen Crossfader und Kanalfader. Vor Anwendung
dieses Mischpults bitte alle Anweisungen sorgfältig durchlesen.
VORSICHTSMAßNAHMENVORSICHTSMAßNAHMEN
VORSICHTSMAßNAHMEN
VORSICHTSMAßNAHMENVORSICHTSMAßNAHMEN
1. Vor Anwendung dieses Geräts bitte alle Anweisungen
sorgfältig durchlesen.
2. Das Gerät nicht öffnen, um das Risiko elektrischen Schocks zu
vermeiden. ES ENTHAL T KEINE VOM ANWENDER ERSETZBAREN
TEILE. Die Wartung darf nur von Gemini authorisierten
Wartungstechnikern durchgeführt werden.
3. Das Gerät keinem direktem Sonnenlicht oder einer Wärmequelle
wie Heizkörper oder Ofen aussetzen.
4. Dieses Gerät darf nur mit einem feuchten Tuch gesäubert
werden. Keine Lösungs-oder Reinigungsmittel benutzen.
5. Bei Umzügen sollte das Gerät in seinem ursprünglichen
Versandkarton und Verpackungsmaterial verpackt werden.
Dadurch verhindert man, daß das Gerät während des
Transportes beschädigt wird.
6. DIESES GERÄT NICHT REGEN ODER FEUCHTIGKEIT AUSSETZEN.
7. AN DEN REGLERN ODER SCHALTERN KEIN SPRAYREINIGUNGSMITTEL ODER SCHMIERMITTEL BENUTZEN.
. Dieses moderne Mischpult enthält eine dreijährige
Gemini PMXGemini PMX
Gemini PMX
Gemini PMXGemini PMX
-250-250
-250
-250-250
1. NETZ EINSCHAL TEN: Nachdem Sie alle T onquellen am Mischpult
angeschlossen haben, drücken Sie auf die Taste POWER (9). Der
Strom wird eingeschaltet und die POWER LED (8) leuchtet auf.
2. KANAL 1: Der Schalter PH-1/LN-1 (6) ermöglicht PHONO 1 oder LINE 1
auszuwählen. CHANNEL SLIDE (11) regelt den Ausgangspegel
dieses Kanals.
3. KANAL 2: Der Schalter PH-2/LN-2 (7) ermöglicht PHONO 2 oder LINE 2
auszuwählen. CHANNEL SLIDE (12) regelt den Ausgangspegel
dieses Kanals.
4. CROSSFADER: Der Überblender CROSSFADER (16) ermöglicht
das Mischen von T onquellen. Die linke Seite des CROSSFADER
ist KANAL 1 und die rechte ist KANAL 2.
Hinweis: Beim Überblenden keinen Druck ausüben. Den
Überblender sanft hin und her schieben. Druck auf den
I
5. CUE: Indem Sie die Kopfhörer an der Buchse KOPFHÖRER -
6. ANZEIGE: Die ANZEIGE (10) zeigt den MASTER an.
TECHNISCHE DATECHNISCHE DA
TECHNISCHE DA
TECHNISCHE DATECHNISCHE DA
Überblender kann die Kontakte verbiegen, welches zu
Klangverlust führen kann.
PHONES anschließen, können Sie Kanal 1 oder Kanal 2
überwachen. Wählen die Kanal 1 aus, indem Sie den Regler
CUE SWITCH (14) nach links schieben, oder Kanals 2 auswählen,
indem Sie den Regler CUE SWITCH (14) nach rechts schieben.
Betätigen Sie die Taste CUE LEVEL (15), um die Tonstärke des
Kopfhörers zu regulieren ohne Einfluß auf die Mischung.
TENTEN
TEN
TENTEN
ANSCHLÜSSEANSCHLÜSSE
ANSCHLÜSSE
ANSCHLÜSSEANSCHLÜSSE
1. Darauf achten, daß der Netzschalter POWER (9) in OFF Position
geschaltet ist. Dieses Gerät wird mit einem 15-V Wechselstromadapter
geliefert. Den Adapter in die Leistungsbuchse-POWER JACK (1) an der
Rückwand stecken. Dann den Adapter an der vorschriftsmässigen
Stromquelle anschliessen.
2. Die Buchsen MASTER OUTPUT (2) dienen zum Anschluß an
den Hauptverstärker, wofür Standard Kabel mit RCA Stecker
benutzt werden.
3. Ein Kopfhörer kann an der Kopfhörer-Buchse HEADPHONES (5)
auf der Vorderseite eingesteckt werden.
Die Phono-Eingänge werden nur Plattenspieler mit einem
magnetischem Tonabnehmer aufnehmen. Die Stereo-
F
5. Eine Erdungschraube GROUND (13) zur Erdung des Plattenspielers
Leitungseingängen nehmen Geräte wie CD- oder
Kassettenspieler auf.
ist an der Rückwand angebracht.
EINGÄNGE:EINGÄNGE:
EINGÄNGE:
EINGÄNGE:EINGÄNGE:
Phono (Plattenspieler)..................................................3 mV, 47 kOhm
Leitung (CD, MD, Kassette).................................................250 mV, 27 kOhm
AA
USGÄNGE:USGÄNGE:
A
USGÄNGE:
AA
USGÄNGE:USGÄNGE:
Master...........................................................................0 dB 1V, 400 Ohm
Max..........................................................................................10 V Spitze-Spitze
ALLGEMEINES:ALLGEMEINES:
ALLGEMEINES:
ALLGEMEINES:ALLGEMEINES:
Frequenzgang.................................................................20Hz - 20KHz +/- 2 dB
Klirrfaktor..............................................................................................0.02%
Störabstand...........................................................................better than 80 dB
Kopfhörerimpedanz.......................................................................16 Ohm
Netzspannung.................................115V/15V AC 7.5W oder 230V/15V AC 7.5W
Abmessungen......................................................................254 x 165 x 51 mm
Gewicht..................................................................................................1.3 kg
Die technischen Daten und die Konstruktion können zu
Verbesserungszwecken ohne vorherige Bekanntgabe geändert werden.
Page 4
Page 5

INTRODUCCIÓNINTRODUCCIÓN
INTRODUCCIÓN
INTRODUCCIÓNINTRODUCCIÓN
Felicitaciones por su compra de un
modelo modelo
modelo
modelo modelo
tecnología está respaldado por una garantía de tres años, salvo el
crossfader y los mandos deslizantes de canal. Antes de usarlo, le
recomendamos leer cuidadosamente todas las instrucciones.
PRECAPRECA
PRECA
PRECAPRECA
1. Deberán leerse todas las instrucciones de operación antes
de usar el equipo.
2. Para reducir el riesgo de shock eléctrico, no abra esta unidad.
NO CONTIENE PIEZAS REEMPLAZABLES POR EL USUARIO.
Por favor, refiera el servicio a un técnico de servicio calificado.
3. No exponga la unidad a la luz solar directa ni a una fuente
de calor, por ejemplo, un radiador o estufa.
4. Esta unidad sólo deberá limpiarse con un paño húmedo. Evite
el uso de disolventes u otros detergentes de limpieza.
5. Para mover este equipo, colóquelo en la caja y empaque original,
a fin de reducir el riesgo de daños durante el transporte.
6. NO DEJE ESTA UNIDAD EXPUEST A A LLUVIA O HUMEDAD.
7. NO USE LIMPIADORES DE ROCÍO O LUBRICANTES EN
CUALESQUIER CONTROLES O INTERRUPTORES.
PMXPMX
-250-250
PMX
-250
PMXPMX
-250-250
UCIONESUCIONES
UCIONES
UCIONESUCIONES
mezclador Geminimezclador Gemini
mezclador Gemini
mezclador Geminimezclador Gemini
. Este mezclador de la más avanzada
FUNCIONAMIENTFUNCIONAMIENT
FUNCIONAMIENT
FUNCIONAMIENTFUNCIONAMIENT
1. ENCENDIDO: Una vez que haya efectuado todas las conexiones
de los equipos a su mezclador, oprima el POWER (9) (INTERRUPT OR
DE ENERGÍA). Se encenderá la unidad así como el POWER LED (8).
2. CANAL 1: El conmutador PH-1/LN-1 (6) le permite seleccionar
PHONO 1 o LINE 1. El CHANNEL SLIDE (11) (cursor deslizante
de canal) controla el volumen de entrada de este canal.
3. CANAL 2: El conmutador PH-2/LN-2 (7) le permite seleccionar
PHONO 2 o LINE 2. El CHANNEL SLIDE (12) (cursor deslizante
de canal) controla el volumen de entrada de este canal.
4. SECCIÓN DE A TENUADOR DE TRANSFERENCIA: El ATENUADOR
DE TRANSFERENCIA - CROSSFADER (16) le permite mezclar una
fuente en otra. El lado izquierdo del CROSSF ADER corresponde al
CANAL 1 y el lado derecho corresponde al CANAL 2.
Nota: No aplique presión durante el accionamiento del
crossfader. Deslice el crossf ader liger amente adelante
I
5. SECCION DE REFERENCIA: Al conectar audífonos al jack de
7. PRESENTACIÓN: La PRESENTACIÓN (10) indica los niveles
ESPECIFICAESPECIFICA
ESPECIFICA
ESPECIFICAESPECIFICA
y atrás. Si Ud apoya demasiado en el crossfader , s e
curvarán los contactos y se perderá el sonido.
HEADPHONES, se puede monitorear sea el Canal 1 sea el Canal 2.
Seleccione el canal I al deslizar el mando CUE SWITCH (14) a la
izquierda o el canal II al deslizar el mando CUE SWITCH a la
derecha. Haga uso del mando CUE LEVEL (15) para ajustar el
volumen del audífono sin afectar la mezcla global.
de salida del control MASTER.
CIONES CIONES
CIONES
CIONES CIONES
OO
O
OO
TÉCNICASTÉCNICAS
TÉCNICAS
TÉCNICASTÉCNICAS
CONEXIONESCONEXIONES
CONEXIONES
CONEXIONESCONEXIONES
1. Cerciórese de que el interruptor de POWER (9) (ENERGÍA) esté
en la posición off (apagada). Esta unidad se suministra con un
adaptador AC de 15 voltios. Enchufe el adaptador en el jack de
energía - POWER JACK (1) del panel trasero. Luego enchufe el
adaptador en una fuente de energía apropiada.
2. Los jacks MASTER OUTPUT (2) (salida de amplificador) se usan
para la conexión al amplificador principal con la ayuda de cables
estándares con conector de RCA.
3. Los audífonos se enchufan en el jack de AUDÍFONOS - PHONES
(5) montado en el panel delantero.
Las entradas fonográficas solamente aceptarán giradiscos
con cartucha magnética. Las entradas de línea
F
4. Un GROUND SCREW (13) para poner el giradiscos a tierra se
estereofónicas aceptarán cualquier entrada de nivel de línea
tal como tocadisco de discos compactos o casetera, etc.
encuentra en el panel trasero.
ENTRADAS:ENTRADAS:
ENTRADAS:
ENTRADAS:ENTRADAS:
Fono...................................................................................3 mV, 47 kOhmios
Línea..................................................................................250 mV, 27 kOhmios
SALIDAS:
Master (balanceada)............................................................0 dB 1 V, 400 Ohmio
Máx.....................................................................................18 V pico-pico
GENERALES:GENERALES:
GENERALES:
GENERALES:GENERALES:
Respuesta de frecuencia..................................................20 Hz - 20 kHz +/- 2dB
Distorsión....................................................................................................0.02%
Relación señal/ruido..................................................................superior a 80 dB
Impedancia del auricular....................................................................16 Ohmios
Fuente de Alimentación...........................115V/15V AC 7.5W o 230V/15V AC 7.5W
Dimensiones........................................................................254 x 165 x 51 mm
Peso......................................................................................................1.3 kg
Las especificaciones y el diseño están sujetos a cambio sin previo aviso con fines de perfeccionamiento.
Page 5
Page 6

INTRODUCTIONINTRODUCTION
INTRODUCTION
INTRODUCTIONINTRODUCTION
FONCTIONNEMENTFONCTIONNEMENT
FONCTIONNEMENT
FONCTIONNEMENTFONCTIONNEMENT
Nos félicitations à l’occasion de votre achat du
modèle
moderne est accompagné d’une garantie de trois ans, à l’exceptio n
du crossfader et fader de chaque canal. Avant de vous en servir,
lisez attentivement toutes les instructions ci-après.
MISES EN GARDEMISES EN GARDE
MISES EN GARDE
MISES EN GARDEMISES EN GARDE
1. Toutes les instructions de fonctionnement doivent être lues avant
de vous servir de cet appareil.
2. Pour réduire le risque de commotion électrique, n’ouvrez pas
l’appareil. IL NE CONTIENT AUCUNE PIÈCE À REMPLACER
PAR L’UTILISATEUR. La solution de problèmes doit être confiée
à un technicien qualifié.
3. N’exposez pas cet appareil aux rayons directs du soleil; ne l’exposez
pas non plus à une source de chaleur (p.e. radiateur, poêle).
4. Cet appareil ne doit être nettoyé qu’avec un chiffon humide.
N’utilisez pas de solvants ou d’autre produits de nettoyage.
5. Lorsque vous déplacez cet appareil, il doit être placé dans
son emballage et carton d’origine. Ceci réduira le risque
d’endommagement lors de tout transport.
6. PROTÉGEZ CET APPAREIL CONTRE LA PLUIE OU L’HUMIDITÉ.
7. N’APPLIQUEZ AUCUN PRODUIT DE NETTOYAGE OU DE
LUBRIFICATION PUL VERISÉ SUR LES COMMANDES OU LES
INTERRUPTEURS ET COMMUTA TEURS.
PMX-250,
de Gemini.
mélangeur
Ce mélangeur très
1. POWER ON (MISE SOUS TENSION): Dès que tous les
branchements sont effectués à votre mélangeur, appuyez
sur le POWER (9) (touche de mise sous tension). L’appareil
se mettra sous tension et la POWER LED (8) s’allumera.
2. CANAL 1 - CHANNEL 1: Le commutateur PH-1/LN-1 (6) vous
permet de choisir PHONO 1 ou LINE 1. Le CHANNEL SLIDE (11)
(curseur de canal) commande le volume d’entrée de ce canal.
3. CANAL 2 - CHANNEL 2: Le commutateur PH-2/LN-2 (7) vous
permet de choisir PHONO 2 ou LINE 2. Le CHANNEL SLIDE (12)
(curseur de canal) commande le volume d’entrée de ce canal.
4. SECTION CROSSFADER: Le CROSSF ADER (16) (l’atténuateur
croisé) permet le mélange d’une source avec une autre. Le côté
gauche du CROSSFADER est le CANAL 1 et le côté droit est le
CANAL 2.
REMARQUE: N’appliquez aucune pression durant l’action du
crossfader. Glissez le crossf ader légèrement en avant et en
I
5. SECTION “CUE”: En connectant des écouteurs au jack PHONES
6. DISPLAY (Affichage): L’AFFICHAGE - DISPLAY (10) indique les
CARACARA
CARA
CARACARA
arr ière . S i vous appuye z trop for t sur le crossf ader, vous
courbez les contacts ce qui cause la perte du son.
(18), vous pouvez suivre le canal 1 ou le canal 2. Choisissez le
canal 1 en glissant la commande CUE SWITCH (14) à gauche ou le
canal 2 en glissant la commande CUE SWITCH à droite. Servezvous de la commande CUE LEVEL (15) pour ajuster le volume des
écouteurs sans affecter le mélange global.
volumes de sortie du MASTER.
CTÉRISTIQCTÉRISTIQ
CTÉRISTIQ
CTÉRISTIQCTÉRISTIQ
UES UES
UES
UES UES
TECHNIQTECHNIQ
TECHNIQ
TECHNIQTECHNIQ
UESUES
UES
UESUES
CONNEXIONSCONNEXIONS
CONNEXIONS
CONNEXIONSCONNEXIONS
1. Le commutateur POWER (9) (puissance) doit occuper la position
OFF (hors tension). Cet appareil est doté d’un adaptateur de 15
Vca. Raccordez l’adaptateur à la prise - POWER JACK (1) sur le
panneau arrière. Puis, raccordez l’adaptateur à une source
électrique appropriée.
2. Les jacks MASTER OUTPUT (2) (amplificateur à sortie) sont utilisés
pour le branchement à l’amplificateur principal à l’aide de câbles
courants avec connecteurs de RCA.
3. Des écouteurs peuvent être raccordés au jack ECOUTEURS -
PHONES (5) se trouvant sur le panneau avant.
Les entrées phono n’acceptent que des tables tournantes
avec cartouche magnétique. Les entrées de ligne stéréo
F
4. Une GROUND SCREW (13) (vis de terre) pour la mise à la masse
accepteront n’importe quelle entrée de ligne telle que CD
player, cassette player, etc.
des tables tournantes est située sur le panneau arrière.
””
”
””
ENTRÉES:ENTRÉES:
ENTRÉES:
ENTRÉES:ENTRÉES:
Phono..........................................................................................3 mV, 47 kOhm
Ligne.........................................................................................250 mV, 27 kOhm
SORTIES:SORTIES:
SORTIES:
SORTIES:SORTIES:
Master................................................................................0 dB 1V , 400 Ohm
Max..................................................................................10 V, crête-crête
GENERALITES:GENERALITES:
GENERALITES:
GENERALITES:GENERALITES:
Réponse en fréquence.....................................................20Hz - 20KHz +/- 2 dB
Distortion.........................................................................................0.02%
Rapport signal/bruit...............................................................supérieur à 80 dB
Impédance écouteur................................................................................16 Ohm
Alimentation...........................................115V/15V AC 7.5W ou 230V/15V AC 7.5W
Dimensions..........................................................................254 x 165 x 51 mm
Poids..........................................................................................1.3 kg
Les caractéristiques de l’apppareil sont sujets à des modifications sans aucuns préavis.
Page 6
Page 7

INTRODUZIONEINTRODUZIONE
INTRODUZIONE
INTRODUZIONEINTRODUZIONE
FUNZIONAMENTFUNZIONAMENT
FUNZIONAMENT
FUNZIONAMENTFUNZIONAMENT
OO
O
OO
Complimenti per l’acquisto di questo
PMX-250PMX-250
PMX-250
PMX-250PMX-250
di tre anni, escl
leggere attentamente queste istruzioni.
ATTENZIONEATTENZIONE
ATTENZIONE
ATTENZIONEATTENZIONE
1. Leggere attentamente queste istruzioni prima di usare il miscelatore.
2. Per evitare scosse elettriche non aprire l’apparecchio.
INTERNAMENTE NON CI SONO COMPONENTI SOSTITUIBILI
DALL’UTENTE. Per le riparazioni rivolgersi solo a personale
qualificato.
3. Non esporre l’apparecchio alla luce diretta del sole o metterlo
vicino a fonti di calore come caloriferi o stufe.
4. Pulire questo mixer solo con un panno inumidito. Evitare di
usare solventi o altri detergenti.
5. Per trasportare questo apparecchio, si consiglia di rimetterlo
nella scatola e usare l’imballaggio originale. Questo eviterà di
danneggiarlo durante il trasporto.
6. NON ESPONETE QUESTO APPARECCHIO ALLA PIOGGIA O
ALL’UMIDIT A ’.
7. NON USATE DETERGENTI A SPRUZZO O LUBRIFICANTI SUI
CONTROLLI E SUGLI INTERRUTTORI.
. Questo miscelatore d’avanguardia offre una garanzia
uso il crossfader ed i cursori canale. Prima dell’uso
miscelatoremiscelatore
miscelatore
miscelatoremiscelatore
GeminiGemini
Gemini
GeminiGemini
1. ACCENSIONE: Dopo che sono stati eseguiti tutti i collegamenti degli
apparecchi con il miscelatore, premere POWER (9). Verrà attivata
l’alimentazione e il POWER LED (8) diventerà.
2. CANALE 1: CANALE 1: L’interruttore PH-1/LN-1 (6) permette di
selezionare il PHONO 1 o LINE 1. Il CURSORE CANALE - CHANNEL
SLIDE (11) controlla il livello d’uscita di questo canale.
3. CANALE 2: CANALE 2: L’interruttore PH-2/LN-2 (7) permette di
selezionare il PHONO 2 o LINE 2. Il CURSORE CANALE - CHANNEL
SLIDE (12) controlla il livello d’uscita di questo canale.
4. SEZIONE CROSSFADER (Dissolvenza incrociata): Il CROSSF ADER
(16) permette di miscelare una sorgente con un’altra. La parte
sinistra del CROSSFADER (16) corrisponde al CANALE 1 e quella
destra corrisponde al CANALE 2.
Nota: Non esercite pressione durante l’azione del crossfader.
Fa scorrere eggermente il crossfader avanti e indietro. Premen
I
5. COMMANDO MICROFONO: Il MIC (13) controlla il livello del microfono.
6. SEZIONE PREASCOL T O: Collegando un set di cuf fie al jack
7. DISPLAY (10): Indica i livelli di uscita di destra di sinistra del MASTER (2).
CARACARA
CARA
CARACARA
do il crossfader con forza può curvare i contatti e causare il
suono di perdersi.
PHONES (18) è possibile monitorare il canale 1 o il canale 2. Per
selezionare il Canale 1 far scorrere il controllo CUE SWITCH (14)
sulla sinistra o farlo scorrere invece sulla destra per il Canale 2.
Usare il controllo CUE LEVEL (15) per regolare il volume della
cuffia senza influenzare la miscelazione globale.
TTERISTICHETTERISTICHE
TTERISTICHE
TTERISTICHETTERISTICHE
COLLEGAMENTICOLLEGAMENTI
COLLEGAMENTI
COLLEGAMENTICOLLEGAMENTI
1. Assicurarsi che il POWER (9) sia su off. L’indicatore POWER
LED (8) sarà spento. Questo apparecchio viene fornito con un
adattatore di 15 volt CA. Inserire l’adattatore nel POWER JACK
(1) posto sul pannello posteriore. Inserire poi l’adattatore
nell’appropriata presa di corrente.
2. I jacks MASTER OUTPUT (2) sono usati per collegare l’amplificatore
principale con un cavo standard con connettori da RCA.
3. Le cuffie devono essere inserite nel jack PHONES (5)
che si trova sul pannello anteriore.
Gli ingressi phono accetteranno solamente i giradischi con la
cartuccia magnetica. Gli ingressi della linea stereo accettano
F
4. Sul pannello posteriore si trova una vite di MESSA A TERRA (13)
qualsiasi ingresso di livello di linea come ad esempio un lettore
di CD, registratori a cassette ecc.
per la messa a terra dei giradischi.
ENTRAENTRA
TT
A:A:
A:
A:A:
AA
T
A:
TT
AA
ENTRA
ENTRAENTRA
Phono...................................................................................3 mV, 47 kOhm
Linea..............................................................................250 mV, 27 kOhm
USCITUSCIT
USCIT
USCITUSCIT
Master.............................................................................0 dB 1V, 400 Ohm
Max.............................................................................10V da picco a picco
GENERALE:GENERALE:
GENERALE:
GENERALE:GENERALE:
Risposta in frequenza.......................................................20Hz - 20 kHz +/- 2 dB
Distorsione..................................................................................0.02%
Rapporto segnale/rumore (S/N)................................................migliore di 80 dB
Impedenza cuffia.....................................................................................16 Ohm
Alimentazione...........................115V/15V AC 7.5W oppure 230V/15V AC 7.5W
Dimensioni...........................................................................254 x 165 x 51 mm
Peso.....................................................................................................1.3 kg
Le caratteristiche e il disegno sono soggetti a cambiare senza avviso per motivi di miglioramento.
Page 7
Page 8

In the USA: If you experience problems with this unit,
call 1-732-738-9003 for Gemini Customer Service.
Do not attempt to return this equipment to your dealer.
Parts of the design of this product may be protected by worldwide patents.
Information in this manual is subject to change without notice and does
not represent a commitment on the part of the vendor. Gemini Sound
Products Corp. shall not be liable for any loss or damage whatsoever
arising from the use of information or any error contained in this manual.
No part of this manual may be reproduced, stored in a retrieval system or
transmitted, in any form or by any means, electronic, electrical, mechanical,
optical, chemical, including photocopying and recording, for any purpose
without the express written permission of Gemini Sound Products Corp.
It is recommended that all maintenance and service on this product is
performed by Gemini Sound Products Corp. or its authorized agents.
Gemini Sound Products Corp. will not accept liability for loss or damage
caused by maintenance or repair performed by unauthorized personnel.
Worldwide Headquarters • 120 Clover Place, Edison, NJ 08837 • USA
Tel: (732) 738-9003 • Fax: (732) 738-9006
France • G.S.L. France • 11, Avenue Leon Harmel, Z.I. Antony, 92160 Antony, France
Germany • Gemini Sound Products GmbH • Ottostrasse 6, 85757 Karlsfeld, Germany
UK • Gemini Sound Products • Unit C4 Hazleton Industrial Estate, Waterlooville, UK P08 9JU
Spain • Gemini Sound Products S.A. • Rosello, 516, Barcelona, Spain, 08026
© Gemini Sound Products Corp. 2002 All Rights Reserved
Tel: + 33 (0) 1 55 59 04 70 • Fax: + 33 (0) 1 55 59 04 80
Tel: 08131 - 39171-0 • Fax: 08131 - 39171-9
Tel: 087 087 00880 • Fax: 087 087 00990
Tel: 349-3435-0814 • Fax: 3493-347-6961
 Loading...