

Page 1

ES - MANUAL DE INSTRUCCIONES
PT - MANUAL DE INSTRUÇÕES
EN - INSTRUCTIONS FOR USE
FR - MANUEL D’UTILISATION
DE - GEBRAUCHSANWEISUNG
IT - MANUALE DI ISTRUZIONI
EL - ENTYРП ПДЗГЙЩN
HU - HASZNÁLATI ÚTMUTATÓ
CZ - NÁVOD K POUŽITÍ
SK - NÁVOD NA POUŽITIE
PL - INSTRUKCJA OBSŁUGI
BG - ИНСТРУКЦИЯ ЗА УПОТРЕБА
ИНСТРУКЦИЯ ПО ЭКСПЛУАТАЦИИ
RU -
Fig. 2
Abb. 2
Eik. 2
2. Ábra
Obr. 2
Rys 2
Фиг. 2
Рис. 2
Fig. 3
Abb. 3
Eik. 3
3. Ábra
Obr. 3
Rys 3
Фиг. 3
Рис. 3
El fabricante se reserva los derechos de modificar los modelos descritos en este Manual de Instrucciones.
O fabricante, reserva-se os direitos de modificar os modelos descritos neste Manual de Instruções.
The manufacturer reserves the right to modify the models described in this User’s Manual.
Le fabricant se réserve le droit de modifier les modèles décrit dans le présente notice.
Der Hersteller behält sich das Recht vor, die in dieser Gebrauchsanweisung beschrieben Modelle zu verändern.
Il fabbricante si riserva il diritto a modificare i modelli descritti in questo Manuale d’Istruzioni.
O kбtбуkеvбуфЮт дйбфзсеЯ брпклейуфйкЬ фп дйкбЯщмб нб фспрпрпйЮуей фб мпнфЭлб рпх ресйгсЬцпнфбй уфп рбсьн Енфхрп Пдзгйюн
A gyártó fenntartja magának a jogot a használati útmutatóban közölt műszaki adatok megváltoztatására.
Výrobce si vyhrazuje právo modifikovat modely popsané v tomto uživatelském návodu.
Výrobca si vyhradzuje právo modifikovať modely opísané v tomto užívateľskom návode.
Producent zastrzega sobie prawo do modyfikowania modeli opisanych w niniejszej instrukcji obsługi.
Производителя си запазва правото променя моделите описани в този наръчник.
Производитель оставляет за собой право замены модели, описанные в данном Руководстве пользователя.
Fig. 4
Abb. 4
Eik. 4
Fig. 6
Abb. 6
Eik. 6
4. Ábra
Obr. 4
Rys 4
6. Ábra
Obr. 6
Rys 6
Фиг. 4
Рис. 4
Фиг. 6
Рис. 6
Fig. 5
Abb. 5
Eik. 5
Fig. 7
Abb. 7
Eik. 7
5. Ábra
Obr. 5
Rys 5
7. Ábra
Obr. 7
Rys 7
Фиг. 5
Рис. 5
Фиг. 7
Рис. 7
PLANCHA ELECTRÓNICA / FEERO DE ENGOMAR ELECTRÓNICO / ELECTRIC IRON /
FER À REPASSER ÉLECTRONIQUE/ ELEKTRISCHES BÜGELEISEN /
.
FERRO DA STIRO ELETTRONICO / HЛЕКФСПНЙКП УЙДЕСП / ELEKTROMOS VASALУ /
ELEKTRONICKÁ ŽEHLIČKA / ELEKTRONICKÁ ŽEHLIČKA /
ŻELAZKO ELEKTRYCZNE / ЕЛЕКТРОННА ЮТИЯ / ЭЛЕКТРОННЫЙ УТЮГ
MOD.: PL-2410 E PL-2450 E
N.I.F. F-20.020.517 - B. San Andrés, n. 18 • Apartado 49 - 20500 MONDRAGON (Guipúzcoa) ESPAÑA
Fig. 8
Abb. 8
Eik. 8
8. Ábra
Obr. 8
Rys 8
Фиг. 8
Рис. 8
Fig. 9
Abb. 9
Eik. 9
9. Ábra
Obr. 9
Rys 9
Фиг. 9
Рис. 9
N.I.F. F-20.020.517 - Bº. San Andrés, nº 18 •
Apartado 49 - 20500 MONDRAGON (Guipúzcoa) ESPAÑA
Diciembre 2006
Page 2
ES
Fig. 1
Abb. 1
Eik. 1
1. Ábra
Obr. 1
Rys 1
Фиг. 1
Рис. 1
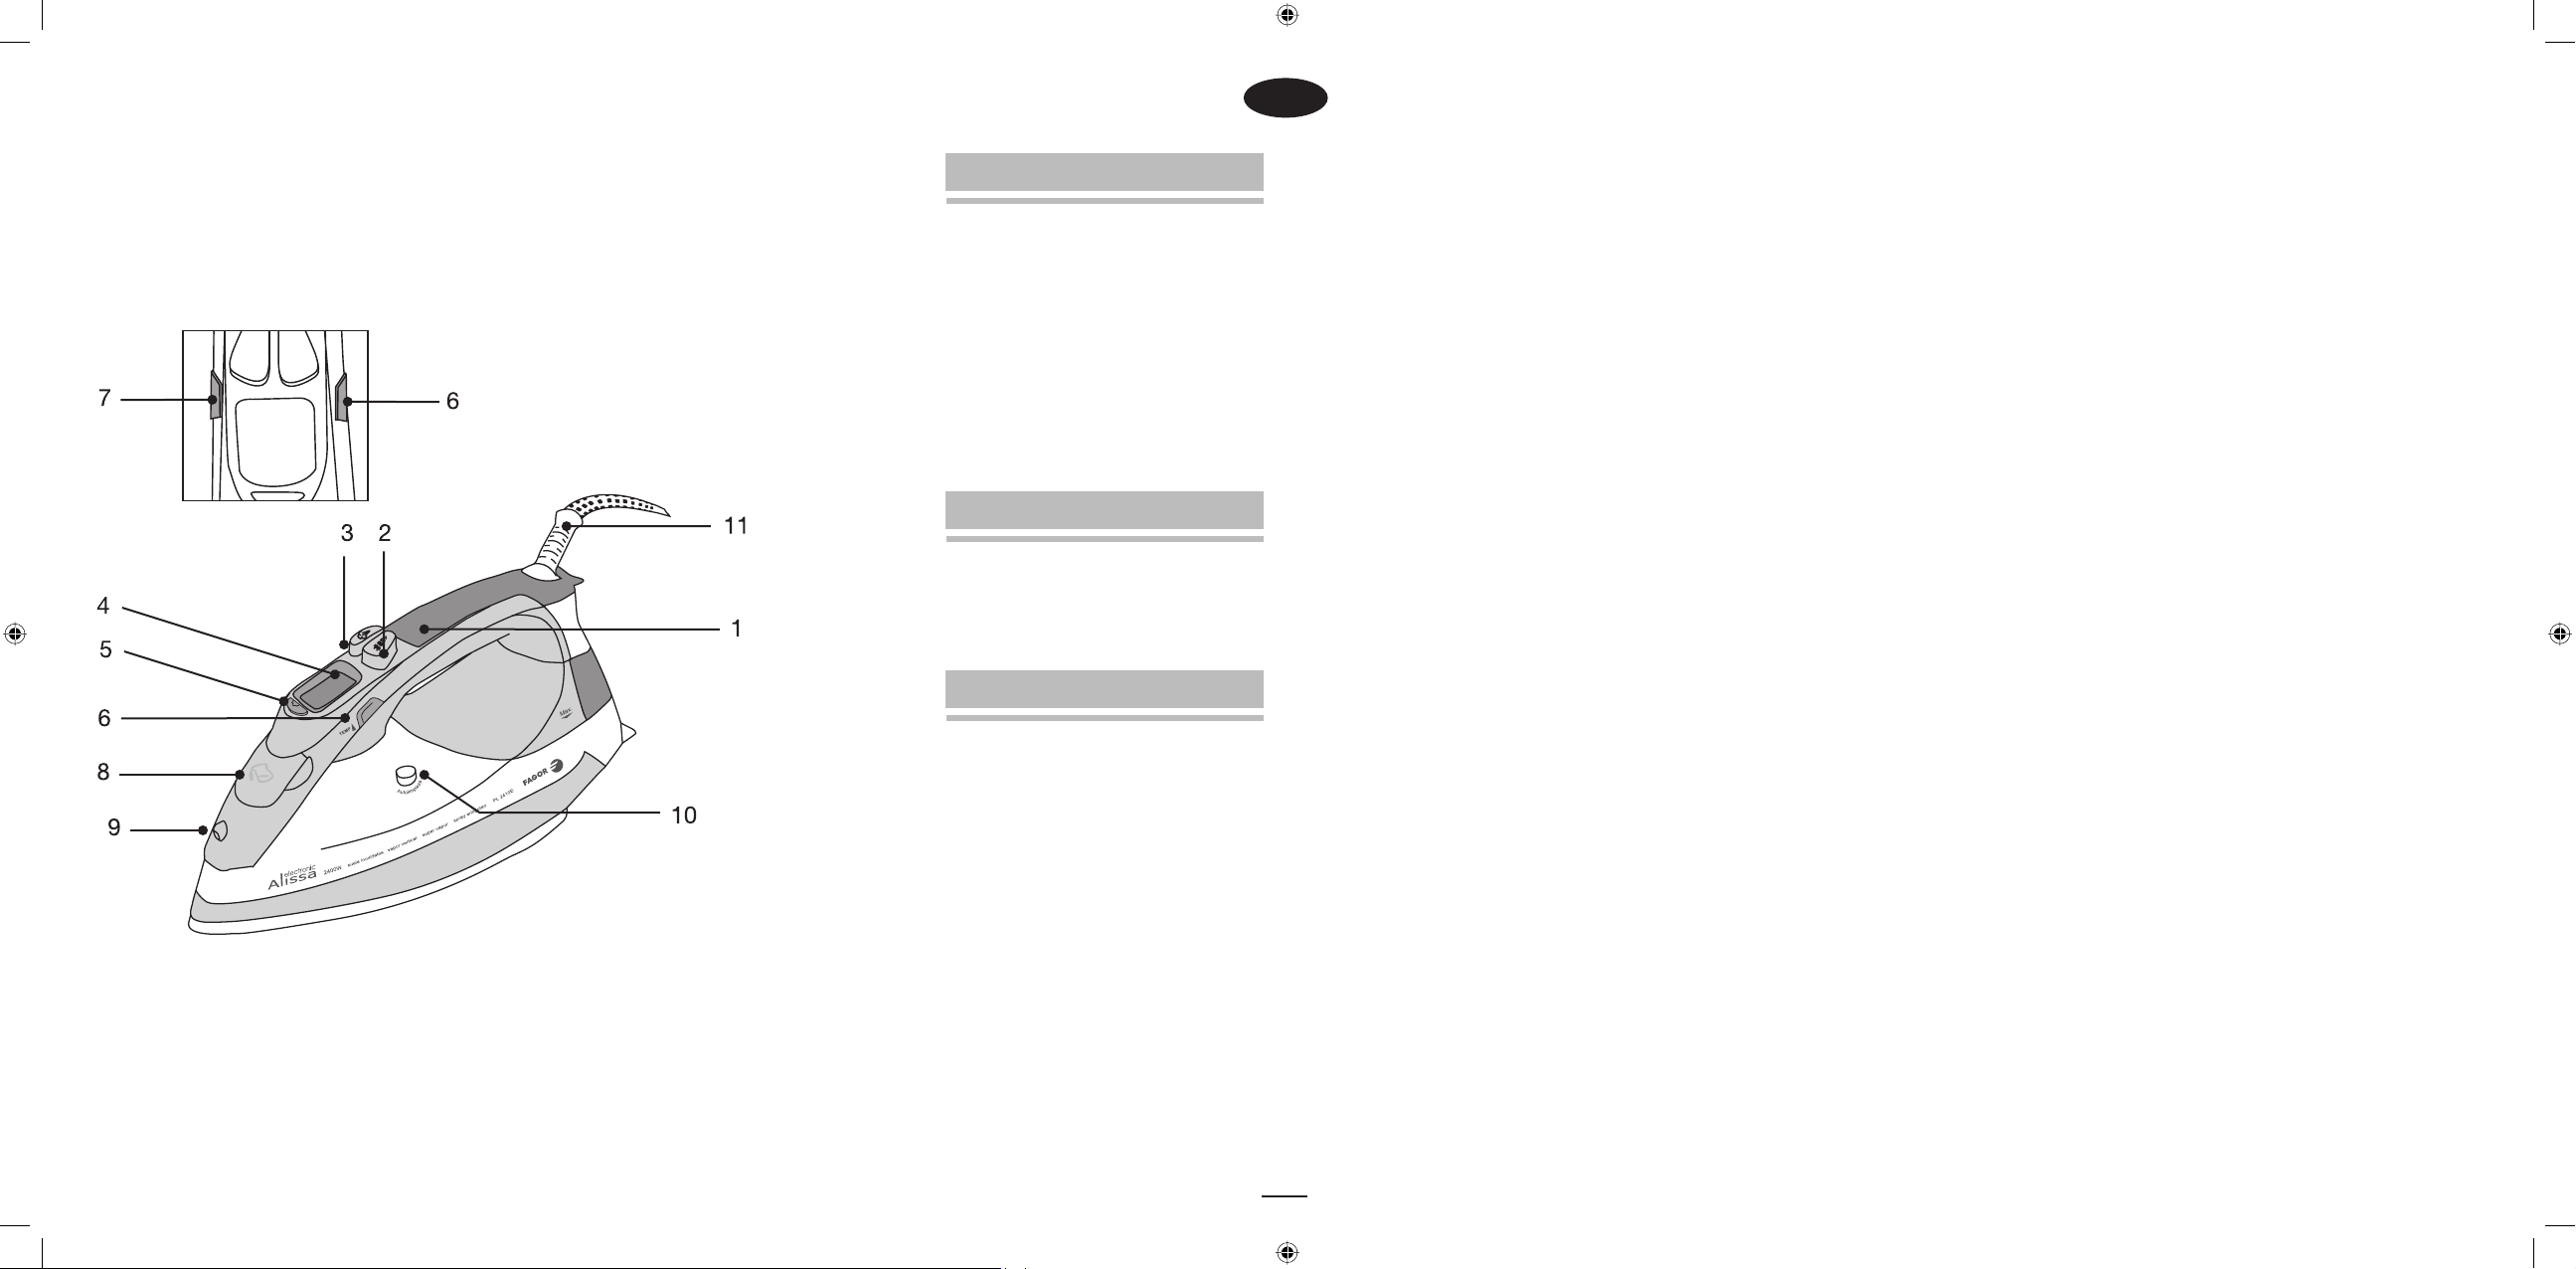
1. DESCRIPCIÓN (FIG. 1)
1. Asa
2. Botón de spray
3. Botón de vapor extra
4. Pantalla LCD
5. Botón de vapor ON/OFF
6. Regulador de pantalla LCD
“Aumentar temperatura”
7. Regulador de pantalla LCD
“Disminuir temperatura”
8. Tapa de entrada de agua
9. Boquilla spray
10. Botón de autolimpieza
11. Cable
2. CARACTERÍSTICAS TÉCNICAS
Vea placa de características.
Este producto cumple con las
Directivas Europeas de Compatibilidad
Electromagnética y Baja Tensión.
3. ADVERTENCIAS DE SEGURIDAD
• Antes de utilizar este aparato por
primera vez, lea detenidamente este
manual de instrucciones y guárdelo para
posteriores consultas.
• Verifique que la tensión de la red
doméstica y la potencia de la toma
correspondan con las indicadas en el
aparato.
• En caso de incompatibilidad entre la
toma de corriente y el enchufe del
aparato, sustituya la toma por otra
adecuada sirviéndose de personal
profesionalmente cualificado.
• La seguridad eléctrica del aparato se
garantiza solamente en caso de que esté
conectado a una toma de tierra eficaz
tal como prevén las vigentes normas de
seguridad eléctrica. En caso de dudas
diríjase a personal profesionalmente
cualificado.
• Se desaconseja el uso de adaptadores,
tomas múltiples y/o cables de extensión.
En caso de que fuera indispensable
usarlos, hay que utilizar únicamente
adaptadores y prolongaciones que sean
conformes a las normas de seguridad
vigentes, prestando atención a no
superar el límite de potencia indicado en
el adaptador.
• Después de quitar el embalaje, verifique que
el aparato esté en perfectas condiciones,
en caso de duda, diríjase al Servicio de
Asistencia Técnica más cercano.
• Los elementos del embalaje (bolsas de
plástico, espuma de poliestireno, etc.),
no deben dejarse al alcance de los niños
porque son fuentes de peligro.
• Este aparato debe utilizarse solo para
uso doméstico. Cualquier otro uso se
considerará inadecuado o peligroso.
• El fabricante no será responsable de
los daños que puedan derivarse del
uso inapropiado equivocado o poco
adecuado o bien de reparaciones
efectuadas por personal no cualificado.
• No toque el aparato con manos o pies
mojados o húmedos.
• Mantenga el aparato lejos del agua u
otros líquidos para evitar una descarga
eléctrica; No enchufe el producto si está
sobre una superficie húmeda.
• Coloque el aparato sobre una superficie
seca, firme y estable.
• No deje que los niños o discapacitados
manipulen el aparato sin vigilancia.
• No abandonar el aparato encendido
porque puede ser una fuente de peligro.
• Al desenchufar la clavija nunca tire del
cable.
• Desenchufe el aparato antes de efectuar
cualquier operación de limpieza o
mantenimiento.
• En caso de avería o mal funcionamiento
del aparato y siempre que no vaya a
utilizar, apáguelo y no trate de arreglarlo.
En caso de necesitar reparación diríjase
únicamente a un Servicio de Asistencia
Técnica autorizado por el fabricante y
solicitar el uso de recambios originales.
• Si el cable de este aparato resulta
dañado, diríjase a un Centro de
Asistencia técnico autorizado para que
lo sustituyan.
1
Page 3

EN
1. DESCRIPTION (FIG. 1)
1. Handle
2. Spray button
3. Extra spray button
4. LCD screen
5. ON/OFF steam button
6. LCD screen “Increase temperature”
setting
7. LCD screen “Lower temperature”
setting
8. Water reservoir cover
9. Spray nozzle
10. Self-clean button
11. Cord
2. TECHNICAL CHARACTERISTICS
See characteristics plate.
This product complies with the European
Directives on Electromagnetic Compatibility
and Low Voltage.
3. SAFETY PRECAUTIONS
• Before using this appliance for the first
time, read the following instructions
carefully and keep them for future
reference.
• Make sure that the mains voltage in your
home corresponds to that indicated on the
appliance.
• In the event of incompatibility between
the mains socket and the appliance plug,
replace the socket with a suitable one,
using a qualified professional.
• The electrical safety of the appliance is only
guaranteed if it is connected to an efficient
earth installation, as foreseen in applicable
electrical safety regulations. If in doubt,
contact a qualified professional.
• The use of adaptors, multiple sockets and
or extension cables is not recommended.
Where it is not possible to avoid their use,
only adaptors or extensions that comply
with applicable safety regulations should
be used, and ensuring that the indicated
voltage limit is not exceeded.
• After removing the packaging, check that
the appliance is in perfect condition, if
in doubt, contact the nearest Technical
Support Service.
• Packaging elements (plastic bags,
polystyrene foam, etc.), should not be left
within the reach of children because they
can be dangerous.
• The appliance is for domestic use only.
Any other use is considered unsuitable or
dangerous.
• The manufacturer shall not be responsible
for any damages that may arise from
improper or inadequate use, or for repairs
conducted by non-qualified personnel.
• Do not touch the appliance with wet or
damp hands or feet.
• Keep the appliance separate from water or
other liquids, to avoid electric shock; do not
connect the appliance to the mains if it is
on a damp surface.
• Place the appliance on a dry, firm and
stable surface.
• Do not allow children or the disabled to
handle the appliance unsupervised.
• Do not leave the appliance unattended
when it is turned on because it can be
dangerous.
• When removing the plug never pull on the
cable.
• Unplug the appliance before cleaning or
maintenance.
• In the event of fault or malfunction where
the appliance is not to be used, turn off
the appliance and do not attempt to repair.
If a repair is required, contact a Technical
Assistance Service authorised by the
manufacturer and request the use of
original spare parts.
• If the cable for this appliance is damaged,
contact an authorised Technical Assistance
Service for it to be replaced.
• Do not leave the appliance exposed to the
elements (rain, sun, ice, etc.).
• Do not use or let any part of the appliance
come into contact or near hot surfaces
(kitchen gas or electric hobs or ovens).
• Do not use detergents or abrasive sponges
to clean the appliance.
• Do not touch the hot surfaces. Use the
handles.
• Do not let the cable come into contact with
11
Page 4

the hot parts of the appliance.
• Do not direct the steam jet towards people.
• Do not use the iron on excessively wet
fabrics.
• Do not leave the iron supported on its base
while it is hot; leave it to cool down.
• Do not use stain-removing mixes or similar
products on fabrics to be ironed.
4. FILLING THE WATER RESERVOIR
• Place the unplugged iron on a stable
surface.
• Lift the water inlet cover. (8)
• Pour the water into the reservoir hole
using a glass (Fig. B).
• Do not put any cleaning products or
solvents into the water reservoir.
• Check that the water does not exceed
the maximum level and replace the
cover (8).
N.B.: If the water in the area where you live
is too hard (>27
o
F), we recommend that
you use distilled water. Do not use battery
water or water with added starch, perfume,
conditioner, etc.
5. SETTING THE TEMPERATURE
1. Place the iron on a stable surface
and plug it in. Press the “increase
temperature” regulator (6) to turn on
the unit.
2. The LCD screen (4) will light up for a
second and you will hear a beep when it
when it goes off.
3. Change the temperature with the
screen settings: press the “increase
temperature” regulator (6) to raise
the temperature from 1 to 3 and
to Maximum. Press the “lower
temperature” setting (7) to lower the
temperature setting (Fig C).
4. To select the right temperature for each
item to be ironed, select the correct
point and the correct item, which will
appear on the LCD screen while you
move from one point to the next. Use
this table as a guide:
LCD SCREEN
ACRYL
NYLON
POLYE
BLEND
WOOL
COTTO
LINEN
APPROX. TEMP.
•
••
••
•••
•••
•••
MAX
70 - 90ºC
110 - 130ºC
115 - 135ºC
145 - 165ºC
160 - 180ºC
180 - 200ºC
185 - 205ºC
FABRIC
Acrylic
Nylon
Polyester
Cotton and
blends
Wool
Cotton
Linen
5. The symbol will appear and
the “▲” symbol will flash when the
temperature changes from lower to
higher and the “▼” symbol will flash
when you change from higher to lower.
6. When the sole reaches the right
temperature, you will hear a beeping
sound and the “ ” symbol will come
on. The “▲” and “▼” symbols will
disappear.
7. The iron is ready for use.
6. DRY IRONING
1. Place the iron on a stable, heat-resistant
surface and plug it in. Press the
“increase temperature” regulator (6)
to turn on the unit.
2. The LCD screen (4) will show all the
symbols at once and you will hear a
beep. The screen will then show Point 1
and the iron will begin to heat up.
3. Select the right temperature. See
Section 4. “Setting the temperature”
4. When you hear the beep and the “ ”
symbol appears, the iron is hot and
ready to use.
5. If you want to disconnect the iron, hold
the “increase temperature” setting (6)
down for 2 seconds (Fig. D). The screen
will go off with a beep.
6. Unplug the iron and let it cool down
before storing it away.
12
Page 5

7. STEAM IRONING
1. Fill the iron as described in Section 3 “Filling the
water reservoir” and plug in the iron. Press the
“increase temperature” regulator (6) to turn on
the unit.
2. The LCD screen (4) will show all the symbols at
once and you will hear a beep. Then the screen will
show Point 1 and the iron will start to heat up.
3. Select the right temperature. See Section 4
“Setting the temperature”.
4. Select the steam option by pressing the steam
button (5). The iron will give a whistle and
the symbol will start flashing. Wait until the
symbol appears on the screen indicating that the
steam is ready
5. When you want to disconnect the steam, again
press the steam button (5). The symbol will
stop flashing.
6. If you wish to disconnect the iron, hold the
“increase temperature” setting (6) down for 2
seconds (Fig. D). The screen will go off with a
beep.
7. Unplug the iron and let it cool down before storing
it away.
steam button so as to allow the iron to heat
up again and thereby obtain the maximum
amount of extra steam.
Upright steam: The extra steam function
also works when the iron is in an upright
position. To use this function, hold the iron
upright around 15-30 cm away from the item,
press the extra steam button (3), and the
steam will come out of the holes in the sole
(Fig. G).
CAUTION: Do not direct the iron towards
people as the temperature of the steam is
very high.
The shut-off function will work automatically
when the iron is left unattended whilst
connected to the mains.
• Automatic shut-off while the iron is
If the iron remains immobile for 30
8. SPRAY
To use this function there must be water in
the reservoir. If you wish to obtain a spray
of water to dampen dry or difficult-to-iron
fabrics, press the spray button (2). The
spray function is also useful to dampen
creases created by accident while ironing.
The spray of water will come through the
spray nozzle (9) (Fig. E).
N.B.: It may be necessary to press the
spray button several times to activate this
function.
• Automatic shut-off in the upright
If the iron remains immobile for 8 minutes
10. AUTOMATIC SHUT-OFF
horizontal position or lying on its side:
seconds in an ironing position (horizontal
or on its side), the iron will disconnect
automatically. The " " pause symbol on
the LCD screen and the light will go off. To
reconnect, simply move the iron.
position:
on its support base (upright), the iron will
disconnect automatically. “AUTOMATIC
SHUT-OFF” will appear on the LCD screen
and the light will go off. To reconnect,
simply move the iron. N.B: the iron will
take 60 seconds to reach its previous
temperature.
11. LANGUAGE SELECTION
9. EXTRA STEAM
Switch the iron on, as indicated in Section 6
“Steam ironing”. When the iron has reached
the temperature selected, press the extra
steam button (3) while ironing and the
steam will come through the holes in the
sole (Fig. F) onto the fabric, smoothing out
the most difficult creases. Wait for at least
5 seconds between each use of the extra
13
Hold the “lower temperature” setting down
for 2 seconds (7) (Fig. H). EN will appear
on the LCD screen (4). Press the “lower
temperature” setting (7) again to change the
language. The language will change from EN
(English ) to DE (German), and from DE to
FR (French). To select the desired language,
press the “increase temperature” setting (6)
and the language selected will be set.. N.B.:
The default language is English.
Page 6

12. CLEANING AND MAINTENANCE
Cleaning the water reservoir
Unplug the iron. To empty the water
reservoir, open the water inlet cover (8)
and hold the iron with the hole facing
downwards until all the water has run out
(Fig. I). Shake the iron gently to remove any
drops left inside.
Storage
Leave the iron to cool down before storing
it away. If you do not use the iron on a
daily basis, it is a good idea to empty the
water reservoir after each use to extend the
useful life of the iron. Wind the cord around
the support base (do not wind tightly) and
store the iron away on its base.
Cleaning
Unplug the iron and wait until it has cooled
down before cleaning it. Clean the outside
and the sole with a damp cloth. Do not use
detergent or abrasive products. Do not
immerse the iron in water or run it under
the tap.
Self-clean
This function will remove limescale and
minerals accumulating in the steam
chamber. The sole will need to be selfcleaned once you have used the steam
function for 5 hours. When this is needed,
the symbol will appear on the LCD
screen (4).
7. Move the iron carefully forward until
the water reservoir is empty and let
go of the self-clean button.
8. Place the iron on its support base
and leave it to cool down completely.
9. Wipe the sole with a damp cloth.
13. INFORMATION FOR THE
CORRECT DISPOSAL OF ELECTRICAL
AND ELECTRONIC APPLIANCES
At the end of its working
life, the product must not be
disposed of as urban waste.
It must be taken to a special
local authority differentiated
waste collection centre or
to a dealer providing this service. Disposing
of a household appliance separately avoids
possible negative consequences for the
environment and health deriving from
inappropriate disposal and enables the
constituent materials to be recovered to
obtain significant savings in energy and
resources.
To remind you that you must collaborate with
a selective collection scheme, the symbol
shown appears on the product warning
you not to dispose of it in traditional refuse
containers.
For further information, contact your local
authority or the shop where you bought the
product.
1. Half-fill the water reservoir, as described
in Section 3 “Filling the water reservoir”.
2. Place the iron upright and plug it in.
Press the “increase temperature”
regulator (6) to turn on the unit.
3. Set the maximum temperature. See
Section 4 “Setting the temperature”.
4. Hold the “increase temperature”
setting (6) down for 2 seconds to
switch the iron off and then unplug it.
5. Place the iron upright in the sink and
hold the self-clean button (10) down.
6. The steam and hot water will remove
the limescale and minerals created in
the steam chamber.
14
 Loading...